
1. 簡介
本程式碼研究室以「網頁專用的 Google 登入按鈕」程式碼研究室為基礎,因此請務必先完成該程式碼研究室。
在本程式碼研究室中,您將使用 Google Identity 服務 JavaScript 程式庫和 One Tap 提示,透過 HTML 和 JavaScript API 在靜態和動態網頁中加入使用者登入功能。
我們也會設定伺服器端登入端點,以驗證 JWT ID 權杖。
課程內容
- 如何設定伺服器端登入端點來驗證 ID 權杖
- 如何在網頁中加入 Google One Tap 提示
- 做為靜態 HTML 元素,以及
- 使用 JavaScript 動態設定。
- One Tap 提示的行為
軟硬體需求
- 具備 HTML、CSS、JavaScript 和 Chrome 開發人員工具 (或同等工具) 的基本知識。
- 可編輯及代管 HTML 和 JavaScript 檔案。
- 在上一個程式碼研究室中取得的用戶端 ID。
- 可執行基本 Python 應用程式的環境。
開始吧!
2. 設定登入端點
首先,我們會建立做為基本網路伺服器的 Python 指令碼,並設定執行該指令碼所需的 Python 環境。
在本地執行時,指令碼會將到達網頁、靜態 HTML 和動態「一鍵登入」網頁提供給瀏覽器。這個端點會接受 POST 要求、解碼憑證參數中包含的 JWT,並驗證 JWT 是否由 Google Identity 的 OAuth 平台核發。
指令碼解碼及驗證 JWT 後,會重新導向至 index.html 到達網頁,並顯示結果。
將這段程式碼複製到名為 simple-server.py 的檔案:
"""Very basic web server to handle GET and POST requests."""
from http.server import SimpleHTTPRequestHandler
import json
import socketserver
from typing import Dict, Optional, Tuple
import urllib.parse
from urllib.parse import parse_qs

from google.auth.transport import requests as google_auth_requests
from google.oauth2 import id_token


""" NOTE: You'll need to change this """
CLIENT_ID = (
    "PUT_YOUR_WEB_CLIENT_ID_HERE"
)

""" these may change for a Cloud IDE, but good as-is for local termainals """
SERVER_ADDRESS = "0.0.0.0"
PORT = 3000
TARGET_HTML_PAGE_URL = f"http://localhost:{PORT}/"
""" and this is the end of constants you might need to change """

HTTP_STATUS_OK = 200
HTTP_STATUS_BAD_REQUEST = 400
HTTP_STATUS_UNAUTHORIZED = 401
HTTP_STATUS_INTERNAL_SERVER_ERROR = 500
HTTP_STATUS_FOUND = 303  # For redirection after decode and verify
OIDC_SERVER = "accounts.google.com"


class OIDCJWTReceiver(SimpleHTTPRequestHandler):
  """Request handler to securely process a Google ID token response."""

  def _validate_csrf(self, request_parameters: Dict) -> Tuple[bool, str]:
    """Validates the g_csrf_token to protect against CSRF attacks."""
    csrf_token_body = request_parameters.get("g_csrf_token")
    if not csrf_token_body:
      return False, "g_csrf_token not found in POST body."

    csrf_token_cookie = None
    cookie_header = self.headers.get("Cookie")
    if cookie_header:
      cookie_pairs = (c.split("=", 1) for c in cookie_header.split(";"))
      cookies = {k.strip(): v.strip() for k, v in cookie_pairs}
      csrf_token_cookie = cookies.get("g_csrf_token")
    if not csrf_token_cookie:
      return False, "g_csrf_token not found in cookie."

    if csrf_token_body != csrf_token_cookie:
      return False, "CSRF token mismatch."

    return True, "CSRF token validated successfully."

  def _parse_and_validate_credential(
      self, request_parameters: Dict
  ) -> Optional[Tuple[Optional[Dict], str]]:
    """Parse POST data, extract, decode and validate user credential."""
    credential = request_parameters.get("credential")
    if not credential:
      return None, "Credential not provided"

    try:
      id_info = id_token.verify_oauth2_token(
          credential, google_auth_requests.Request(), CLIENT_ID
      )
      return id_info, ""
    except ValueError as e:
      return None, f"Error during JWT decode: {e}"
    except Exception as e:
      return None, f"Unexpected error during credential validation: {e}"

  def _redirect_to_html(self, response_data: Dict) -> None:
    """Redirect to the target HTML page with data in the URL fragment."""
    try:
      json_data = json.dumps(response_data)
      encoded_data = urllib.parse.quote(json_data)
      redirect_url = f"http://localhost:{PORT}/#data={encoded_data}"
      self.send_response(HTTP_STATUS_FOUND)
      self.send_header("Location", redirect_url)
      self.send_header("Connection", "close")
      self.end_headers()
    except Exception as e:
      print(f"An error occurred during redirection: {e}")
      self.send_response(HTTP_STATUS_INTERNAL_SERVER_ERROR)
      self.send_header("Content-type", "text/plain")
      self.send_header("Connection", "close")
      self.end_headers()
      self.wfile.write(f"A redirect error occurred: {e}".encode("utf-8"))

  def _send_bad_request(self, message: str) -> None:
    """Sends a 400 Bad Request response."""
    self.send_response(HTTP_STATUS_BAD_REQUEST)
    self.send_header("Content-type", "text/plain")
    self.send_header("Connection", "close")
    self.end_headers()
    self.wfile.write(message.encode("utf-8"))

  def do_POST(self):
    """Handle POST requests for the /user-login path."""
    if self.path != "/user-login":
      self.send_error(404, "File not found")
      return

    try:
      content_length = int(self.headers.get("Content-Length", 0))
      post_data_bytes = self.rfile.read(content_length)
      post_data_str = post_data_bytes.decode("utf-8")
      request_parameters = {
          key: val[0]
          for key, val in parse_qs(post_data_str).items()
          if len(val) == 1
      }

      csrf_valid, csrf_message = self._validate_csrf(request_parameters)
      if not csrf_valid:
        print(f"CSRF verify failure: {csrf_message}")
        self._send_bad_request(f"CSRF verify failure: {csrf_message}")
        return

      decoded_id_token, error_message = self._parse_and_validate_credential(
          request_parameters
      )

      response_data = {}
      if decoded_id_token:
        response_data["status"] = "success"
        response_data["message"] = decoded_id_token
      elif error_message:
        response_data["status"] = "error"
        response_data["message"] = error_message
      else:
        response_data["status"] = "error"
        response_data["message"] = "Unknown error during JWT validation"

      self._redirect_to_html(response_data)

    except Exception as e:
      self._redirect_to_html(
          {"status": "error", "error_message": f"Internal server error: {e}"}
      )


with socketserver.TCPServer(("", PORT), OIDCJWTReceiver) as httpd:
  print(
      f"Serving HTTP on {SERVER_ADDRESS} port"
      f" {PORT} (http://{SERVER_ADDRESS}:{PORT}/)"
  )
  httpd.serve_forever()
由於我們將使用 ID 權杖的對象 (aud) 欄位,驗證 JWT 是否發給您的用戶端,因此 Python 應用程式必須知道目前使用的用戶端 ID。如要這麼做,請將 PUT_YOUR_WEB_CLIENT_ID_HERE 替換為您在先前的「使用 Google 帳戶登入」按鈕程式碼研究室中使用的用戶端 ID。
Python 環境
接下來,請設定執行網路伺服器指令碼的環境。
您需要 Python 3.8 以上版本,以及幾個有助於 JWT 驗證和解碼的套件。
$ python3 --version
如果 python3 版本低於 3.8,您可能需要變更 Shell PATH,以便找到預期版本,或在系統上安裝較新版本的 Python。
接著,建立名為 requirements.txt 的檔案,列出 JWT 解碼和驗證所需的套件:
google-auth
在與 simple-server.py 和 requirements.txt 相同的目錄中執行下列指令,建立虛擬環境並安裝僅適用於這個應用程式的套件:
$ python3 -m venv env
$ source env/bin/activate
(env) $ pip install -r requirements.txt
現在啟動伺服器,如果一切運作正常,您會看到以下內容:
(env) $ python3 ./simple-server.py
Serving HTTP on 0.0.0.0 port 3000 (http://0.0.0.0:3000/) ...
雲端式 IDE
本程式碼研究室的設計是在本機終端機和 localhost 上執行,但經過一些變更後,或許也能在 Replit 或 Glitch 等平台上使用。每個平台都有自己的設定需求和 Python 環境預設值,因此您可能需要變更一些項目,例如 TARGET_HTML_PAGE_URL 和 Python 設定。
舉例來說,在 Glitch 上,您仍會新增 requirements.txt,但也會建立名為 start.sh 的檔案,自動啟動 Python 伺服器:
python3 ./simple-server.py
Python 指令碼和 HTML 檔案使用的網址也必須更新為 Cloud IDE 的外部網址。因此我們會得到類似這樣的內容:TARGET_HTML_PAGE_URL = f"https://your-project-name.glitch.me/",由於本程式碼研究室中的 HTML 檔案預設也會使用 localhost,因此您需要使用外部 Cloud IDE 網址更新這些檔案:data-login_uri="https://your-project-name.glitch.me/user-login"。
3. 建立到達網頁
接著,我們會建立到達網頁,顯示使用「一鍵登入」登入的結果。這個頁面會顯示已解碼的 JWT ID 權杖或錯誤。您也可以使用頁面上的表單,將 JWT 傳送至 Python HTTP 伺服器上的登入端點,以便解碼及驗證。這個範例會使用 CSRF 雙重提交 Cookie 和 POST 要求參數,因此可以重複使用與程式碼研究室中 gsi/client HTML 和 JavaScript API 範例相同的 user-login 伺服器端點。
在終端機中,將這段程式碼儲存到名為 index.html 的檔案:
<!doctype html>
<html lang="en">
  <head>
    <meta charset="UTF-8" />
    <meta name="viewport" content="width=device-width, initial-scale=1.0" />
    <title>JWT Verification</title>
    <style>
      body { font-family: sans-serif; margin: 0; }
      .top-nav {
        text-align: center; padding: 15px 0; background-color: #f8f9fa;
        border-bottom: 1px solid #dee2e6; width: 100%;
      }
      .top-nav a {
        margin: 0 15px; text-decoration: none; font-weight: bold;
        color: #007bff; font-size: 1.1em;
      }
      .top-nav a:hover { text-decoration: underline; }
      .page-container { padding: 20px; }
      pre {
        background-color: #f9f9f9; padding: 10px; overflow-x: auto;
        white-space: pre-wrap; word-break: break-all;
      }
      .error { color: red; }
      .success { color: green; }
      #jwt-form { margin-bottom: 20px; flex: 1; }
      fieldset {
        border: 1px solid #ddd; padding: 10px; margin: 0;
        min-width: 0; flex: 1; }
      legend { font-weight: bold; margin-bottom: 5px; }
      textarea { width: 100%; box-sizing: border-box; vertical-align: top; }
      button[type="submit"] { padding: 8px 15px; margin-top: 10px; }
      @media (min-width: 1024px) {
        .main-content { display: flex; gap: 20px; }
        .main-content > #jwt-form,
        .main-content > .result-container {
          flex-basis: 50%; /* Each item takes up 50% of the width */
          margin-bottom: 0; /* Remove bottom margin when side-by-side */
          display: flex; /* Make the result container a flex container */
          flex-direction: column; /* Stack children vertically */
          flex: 1; /* Allows the result container to grow and shrink */
        }
      }
    </style>
  </head>
  <body>
    <nav class="top-nav">
      <a href="static-page.html">One Tap Static Page</a>
      <a href="dynamic-page.html">One Tap Dynamic Page</a>
      <a href="prompt-outcomes.html">Prompt behaviors</a>
    </nav>
    <div class="page-container">
      <h1>JWT Verification</h1>

      <div class="main-content">
        <form id="jwt-form" action="/user-login" method="post">
          <fieldset>
            <legend>Encoded JWT ID Token</legend>
            <textarea id="credential" name="credential" rows="5"
                      cols="50"></textarea>
            <button type="submit">Verify JWT</button>
          </fieldset>
        </form>

        <section class="result-container">
          <fieldset>
            <legend>Decode and verify result</legend>
            <p id="status"></p>
            <pre id="result"></pre>
          </fieldset>
        </section>
      </div>
    </div>
    <script>
      const statusElement = document.getElementById("status");
      const resultElement = document.getElementById("result");

      const handleResponse = (responseData) => {
        const { status, message } = responseData;
        const result = message
          ? status === "success"
            ? JSON.stringify(message, null, 2)
            : message
          : "";

        statusElement.textContent = status;
        resultElement.textContent = result;
        statusElement.className = "";
        if (status === "success") {
          statusElement.classList.add("success");
        } else if (status === "error") {
          statusElement.classList.add("error");
        }
      };

      const getEncodedDataFromHash = (hash) => {
        const urlParams = new URLSearchParams(hash.substring(1));
        return urlParams.get("data");
      };

      const processHashData = (hash) => {
        const encodedData = getEncodedDataFromHash(hash);
        if (encodedData) {
          try {
            const jsonData = JSON.parse(decodeURIComponent(encodedData));
            handleResponse(jsonData);
            history.pushState(
              "",
              document.title,
              window.location.pathname + window.location.search,
            );
          } catch (error) {
            handleResponse({
              status: "error",
              message: "Error parsing data from URL: " + error,
            });
          }
        }
      };

      window.addEventListener("load",
                              () => processHashData(window.location.hash));
      window.addEventListener("hashchange",
                              () => processHashData(window.location.hash));
    </script>

    <script>
      document.addEventListener("DOMContentLoaded", () => {

        const generateRandomString = (length) => {
        const chars = "ABCDEFGHIJKLMNOPQRSTUVWXYZ" +
                      "abcdefghijklmnopqrstuvwxyz" +
                      "0123456789";
          let result = "";
          for (let i = 0; i < length; i++) {
            result += chars.charAt(Math.floor(Math.random() * chars.length));
          }
          return result;
        };

        const csrfToken = generateRandomString(12);
        document.cookie = `g_csrf_token=${csrfToken};path=/;SameSite=Lax`;
        const form = document.getElementById("jwt-form");
        const hiddenInput = document.createElement("input");
        hiddenInput.setAttribute("type", "hidden");
        hiddenInput.setAttribute("name", "g_csrf_token");
        hiddenInput.setAttribute("value", csrfToken);
        form.appendChild(hiddenInput);
      });
    </script>
  </body>
</html>
測試網頁伺服器和 JWT 解碼
在嘗試使用「一鍵登入」前,請先確認伺服器端點環境已設定完成並正常運作。
瀏覽至到達網頁 http://localhost:3000/,然後按下「Verify JWT」按鈕。
您應該會看到這個畫面
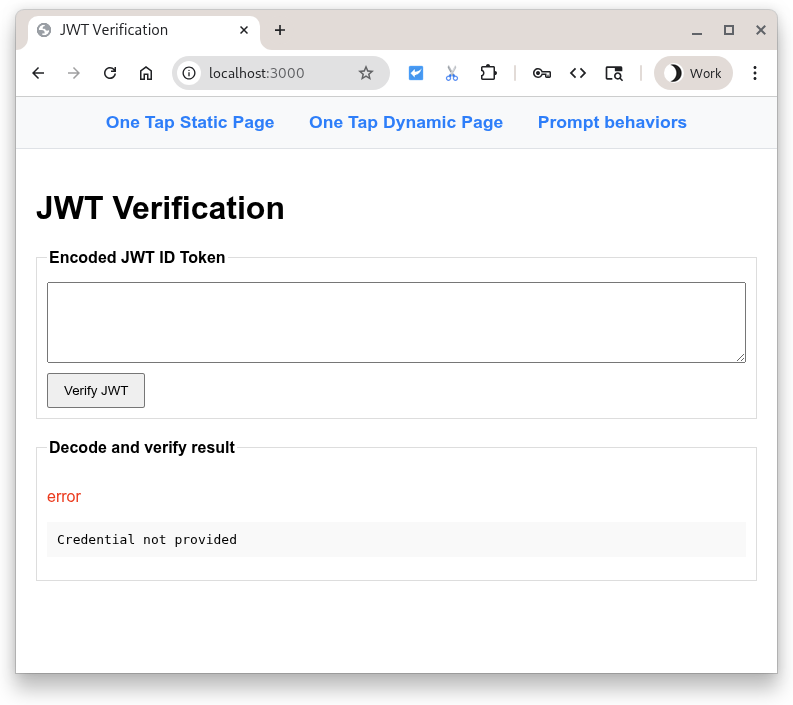
按下按鈕會將含有輸入欄位內容的 POST 傳送至 Python 指令碼。指令碼預期在輸入欄位中找到已編碼的 JWT,因此會嘗試解碼及驗證酬載。然後重新導向回到達網頁,顯示結果。
等等,沒有 JWT... 這樣不是會失敗嗎?可以,但請優雅地離開!
由於欄位空白,系統會顯示錯誤。現在請嘗試在 entryfield 中輸入一些文字 (任何文字都可以),然後再次按下按鈕。作業失敗,發生不同的解碼錯誤。
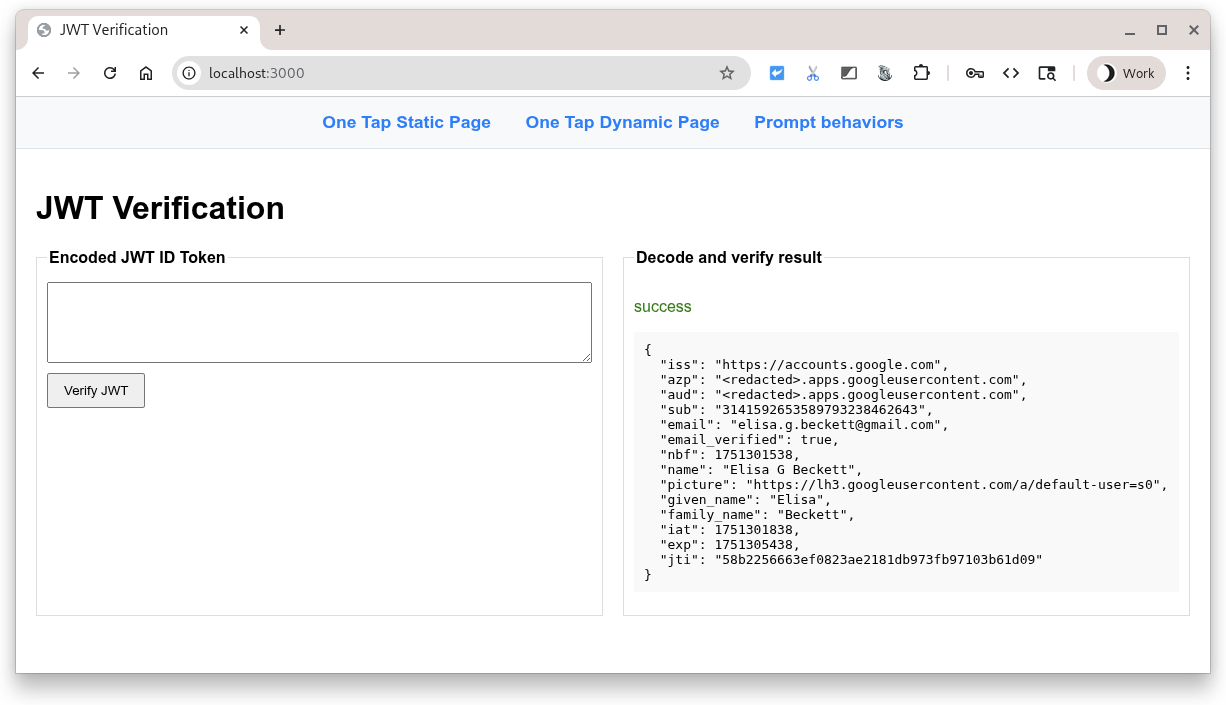
您可以將 Google 發出的編碼 JWT ID 權杖貼到輸入欄位,然後讓 Python 指令碼解碼、驗證及顯示該權杖,也可以使用 https://jwt.io 檢查任何編碼的 JWT。
4. 靜態 HTML 網頁
現在,我們將設定 One Tap,讓它在 HTML 網頁上運作,而不使用任何 JavaScript。這項功能適用於靜態網站,或快取系統和 CDN。
首先,請將下列程式碼範例新增至名為 static-page.html 的檔案:
<!DOCTYPE html>
<html lang="en">
  <head>
    <script src="https://accounts.google.com/gsi/client" async></script>
    <link rel="icon" href="data:," />
  </head>
  <body>
    <h1>Google One Tap static HTML page</h1>
    <div
      id="g_id_onload"
      data-client_id="PUT_YOUR_WEB_CLIENT_ID_HERE"
      data-ux_mode="redirect"
      data-login_uri="http://localhost:3000/user-login"
    ></div>
  </body>
</html>
接著開啟 static-page.html,並將 PUT_YOUR_WEB_CLIENT_ID_HERE 替換為您在先前的「使用 Google 帳戶登入」按鈕程式碼研究室中使用的用戶端 ID。
這有什麼作用?
凡是 id 為 g_id_onload 的 HTML 元素及其資料屬性,都會用於設定 Google Identity Services 程式庫 (gsi/client)。此外,當文件載入瀏覽器時,系統也會顯示「一鍵登入」提示。
data-login_uri 屬性是 URI,使用者登入後,瀏覽器會向該 URI 發出 POST 要求。這項要求包含 Google 發出的編碼 JWT。
如需一鍵登入選項的完整清單,請參閱 HTML 程式碼產生器和 HTML API 參考資料。
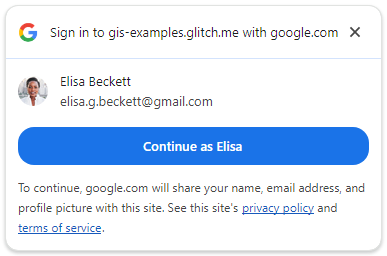
登入
按一下「http://localhost:3000/static-page.html」http://localhost:3000/static-page.html。
瀏覽器中應會顯示「一鍵登入」提示。
按下「以『<使用者名稱>』身分繼續」即可登入。
登入後,Google 會向 Python 伺服器的登入端點傳送 POST 要求。要求包含 Google 簽署的編碼 JWT。
接著,伺服器會使用 Google 的其中一個公開簽署金鑰,驗證 JWT 是由 Google 建立及簽署。然後解碼並驗證目標對象是否與您的用戶端 ID 相符。接著,系統會執行 CSRF 檢查,確保 POST 內容中的 Cookie 值和要求參數值相等。如果不是,就表示有問題。
最後,到達網頁會以 JSON 格式的 ID 權杖使用者憑證,顯示成功驗證的 JWT。
常見錯誤
登入流程可能會因多種原因而失敗。常見原因包括:
data-client_id遺失或不正確,在這種情況下,您會在開發人員工具控制台中看到錯誤,且「一鍵登入」提示不會運作。data-login_uri無法使用,因為輸入的 URI 有誤、網路伺服器未啟動,或正在錯誤的連接埠上接聽。如果發生這種情況,單一輕觸提示看起來會正常運作,但當系統傳回憑證時,您會在開發人員工具的「網路」分頁中看到錯誤。- 您使用的主機名稱或通訊埠,未列在 OAuth 用戶端 ID 的「已授權的 JavaScript 來源」中。您會看到以下控制台訊息:「When fetching the ID assertion endpoint, a 400 HTTP response code was received.」(擷取 ID 聲明端點時,收到 400 HTTP 回應代碼)。如果在程式碼研究室中看到這個畫面,請確認
http://localhost/和http://localhost:3000都已列出。
5. 動態頁面
現在我們將使用 JavaScript 呼叫顯示「一鍵登入」。在本範例中,網頁載入時一律會顯示「一鍵登入」,但您也可以選擇只在需要時顯示提示。舉例來說,您可以檢查使用者工作階段是否已超過 28 天,並再次顯示登入提示。
將這個程式碼範例新增至名為 dynamic-page.html 的檔案。
<!DOCTYPE html>
<html lang="en">
<head>
<script src="https://accounts.google.com/gsi/client" async></script>
<link rel="icon" href="data:," />
</head>
<body>
<h1>Google One Tap dynamic page</h1>
<script>
const generateRandomString = (length) => {
const array = new Uint8Array(length / 2);
window.crypto.getRandomValues(array);
return Array.from(array, (byte) =>
byte.toString(16).padStart(2, "0")
).join("");
};
const setCookie = (name, value) => {
document.cookie = '${name}=${value};path=/;SameSite=Lax';
};
const getCookie = (name) => {
const nameEQ = name + "=";
const ca = document.cookie.split(";");
for (let i = 0; i < ca.length; i++) {
let c = ca[i];
while (c.charAt(0) == " ") c = c.substring(1, c.length);
if (c.indexOf(nameEQ) == 0)
return c.substring(nameEQ.length, c.length);
}
return null;
};
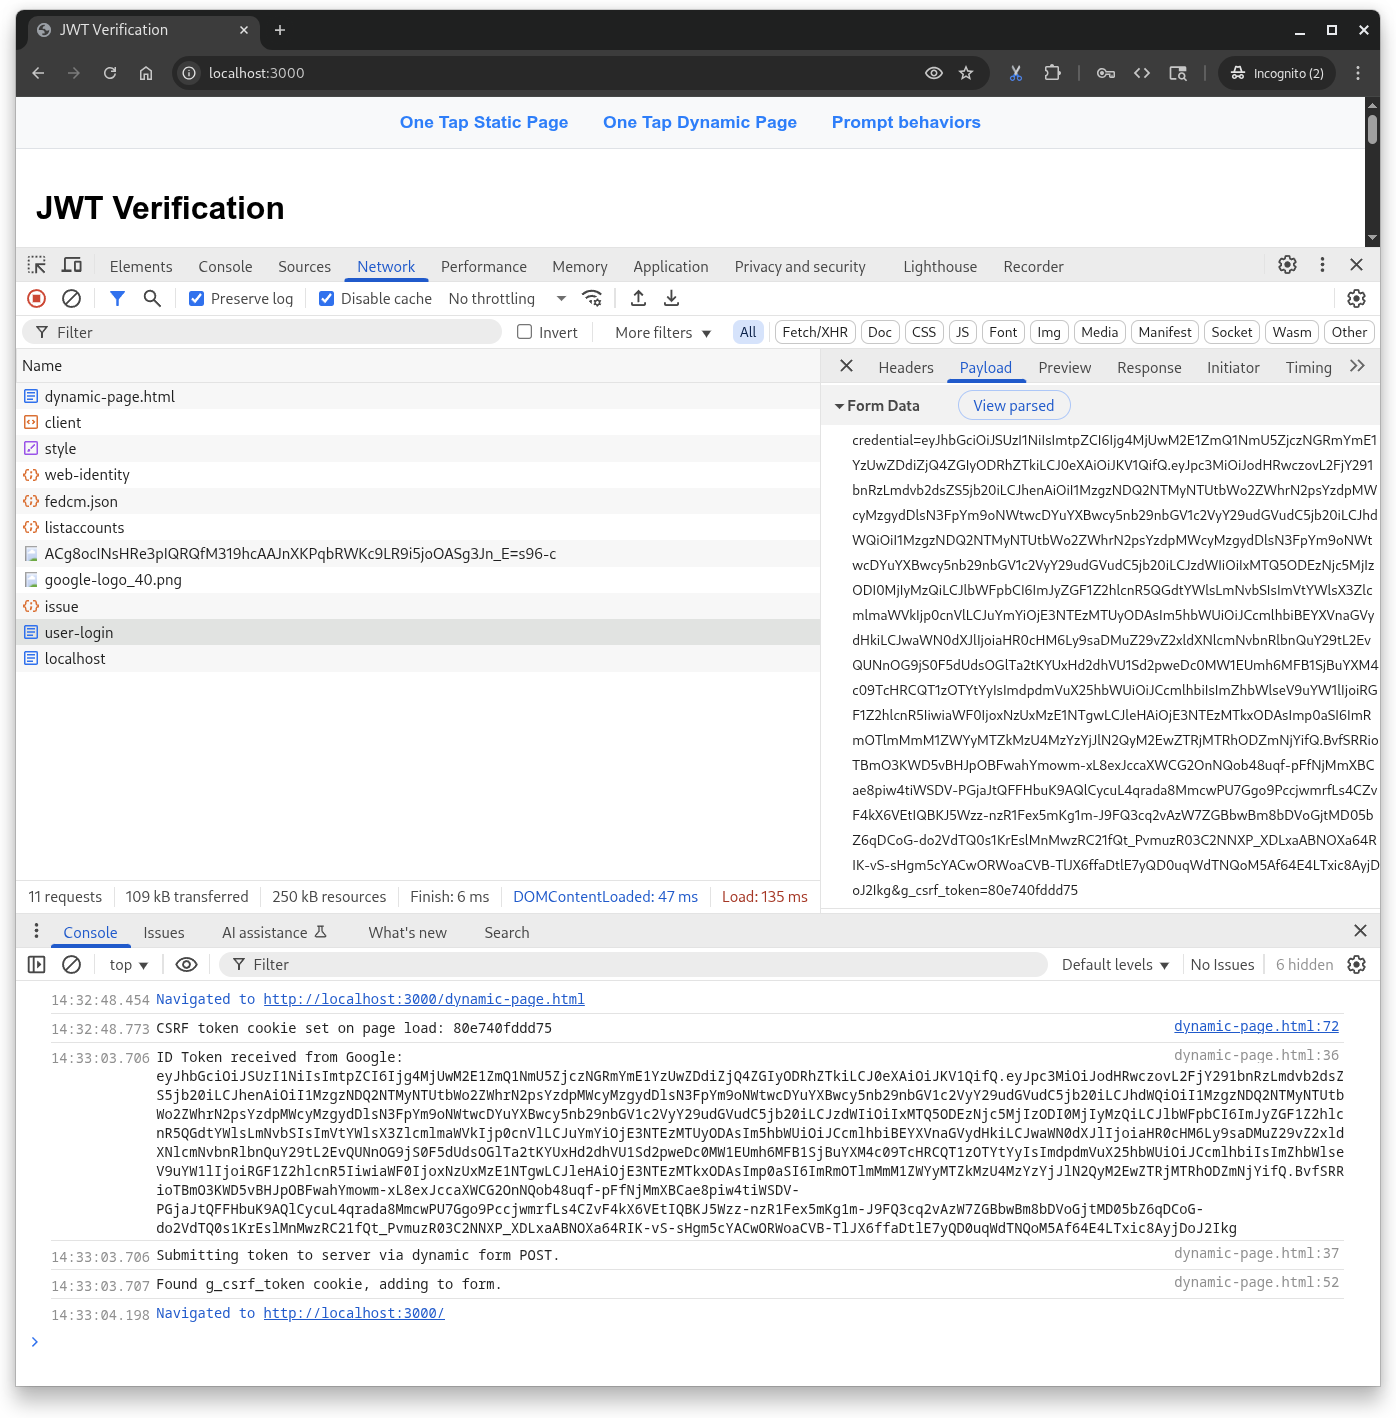
function handleResponse(rsp) {
console.log("ID Token received from Google: ", rsp.credential);
console.log("Submitting token to server via dynamic form POST.");
const form = document.createElement("form");
form.method = "POST";
form.action = "http://" + window.location.host + "/user-login";
// Add the credential and CSRF cookie value asa hidden fields
const hiddenField = document.createElement("input");
hiddenField.type = "hidden";
hiddenField.name = "credential";
hiddenField.value = rsp.credential;
form.appendChild(hiddenField);
const csrfToken = getCookie("g_csrf_token");
if (csrfToken) {
console.log("Found g_csrf_token cookie, adding to form.");
const csrfField = document.createElement("input");
csrfField.type = "hidden";
csrfField.name = "g_csrf_token";
csrfField.value = csrfToken;
form.appendChild(csrfField);
} else {
console.warn(
"Warning: g_csrf_token cookie not found. POSTing without it."
);
}
document.body.appendChild(form);
form.submit();
}
window.onload = function () {
const csrfToken = generateRandomString(12);
setCookie("g_csrf_token", csrfToken);
console.log("CSRF token cookie set on page load:", csrfToken);
google.accounts.id.initialize({
client_id: "PUT_YOUR_WEB_CLIENT_ID_HERE",
ux_mode: "popup",
callback: handleResponse,
});
google.accounts.id.prompt(); // Display the One Tap prompt
};
</script>
</body>
</html>
開啟 dynamic-page.html,然後將 PUT_YOUR_WEB_CLIENT_ID_HERE 替換為您在先前的「使用 Google 帳戶登入」按鈕程式碼研究室中使用的用戶端 ID。
這段程式碼混合了 HTML 和 JavaScript,會執行下列幾項動作:
- 呼叫
google.accounts.id.initialize(),設定 Google Identity Services 程式庫 (gsi/client), - 產生跨網站偽造要求 (CSRF) Cookie,
- 新增回呼處理常式,從 Google 接收編碼的 JWT,並使用表單 POST 將其提交至我們的 Python 指令碼
/user-login端點,以及 - 使用
google.accounts.id.prompt()顯示 One Tap 提示。
如需「一鍵登入」設定的完整清單,請參閱 JavaScript API 參考資料。
讓我們登入吧!
在瀏覽器中開啟 http://localhost:3000/dynamic-page.html。
單一輕觸提示的行為與靜態 HTML 情況相同,但這個網頁會定義 JavaScript 回呼處理常式,用來建立 CSRF Cookie、接收 Google 傳送的 JWT,並將其 POST 至 Python 伺服器的 user-login 端點。HTML API 會自動為您執行這些步驟。
6. 提示行為
因此,我們來試試單一輕觸,因為提示不像按鈕一樣會一直顯示。瀏覽器和使用者可以關閉、停用或關閉通知。
首先,請將這項內容儲存到名為 prompt-outcomes.html 的檔案:
<!doctype html>
<html lang="en">
  <head>
    <meta charset="UTF-8" />
    <meta name="viewport" content="width=device-width, initial-scale=1.0" />
    <title>Google One Tap Prompt behaviors</title>
    <style>
      body { font-family: sans-serif; padding: 20px; }
      #log {
        border: 1px solid #ccc; background-color: #f0f0f0;
        padding: 15px; margin-top: 20px;
        white-space: pre-wrap; font-family: monospace;
      }
      .success { color: green; }
      .error { color: red; }
      .info { color: blue; }
      .warning { color: orange; }
    </style>
  </head>
  <body>
    <h1>One Tap behaviors</h1>
    <p>Open the developer console to see detailed logs.</p>
    <div id="log">Awaiting events...</div>

    <script src="https://accounts.google.com/gsi/client" async defer></script>

    <script>
      // logging utility to display event and notification info
      const logElement = document.getElementById("log");
      function log(message, type = "info") {
        const timestamp = new Date().toLocaleTimeString();
        logElement.innerHTML +=
          `\n<span class="${type}">[${timestamp}] ${message}</span>`;
        console.log(`[${type.toUpperCase()}] ${message}`);
      }

      function decodeJwt(jwt) {
        try {
          const parts = jwt.split(".");
          if (parts.length !== 3) {
            throw new Error("Invalid JWT structure");
          }
          const base64Url = parts[1];
          const base64 = base64Url.replace(/-/g, "+").replace(/_/g, "/");
          const jsonPayload = decodeURIComponent(
            atob(base64)
              .split("")
              .map(function (c) {
                return "%" + ("00" + c.charCodeAt(0).toString(16)).slice(-2);
              })
              .join(""),
          );
          return JSON.parse(jsonPayload);
        } catch (e) {
          log(`Error decoding JWT: ${e.message}`, "error");
          return null;
        }
      }

      /* Handles the credential response after a user signs in. */
      function handleCredentialResponse(credentialResponse) {
        log("Credential Response received.", "success");

        const credential = credentialResponse.credential;
        log(`Credential JWT: ${credential.substring(0, 30)}...`);

        // For demonstration, we decode the JWT on the client side.
        // REMEMBER: Always verify the token on your backend server!
        const payload = decodeJwt(credential);
        if (payload) {
          log(`Welcome, ${payload.name}! (Email: ${payload.email})`);
          log("Decoded JWT Payload: " + JSON.stringify(payload, null, 2));
        }
      }

      /* Handles notifications about the One-Tap prompt's UI status. */
      function handlePromptMomentNotification(notification) {
        log(`Prompt Moment Notification received.`, "info");

        if (notification.isNotDisplayed()) {
          const reason = notification.getNotDisplayedReason();
          log(`Prompt not displayed. Reason: <strong>${reason}</strong>`,
              "error");
        }
        if (notification.isSkippedMoment()) {
          const reason = notification.getSkippedReason();
          log(`Prompt was skipped. Reason: <strong>${reason}</strong>`,
              "warning");
          if (reason === "auto_cancel") {
            log("may have called prompt() multiple times in a row.");
          } else if (reason === "user_cancel") {
            log("The user manually closed the prompt.");
          }
        }
        if (notification.isDismissedMoment()) {
          const reason = notification.getDismissedReason();
          log(`Prompt dismissed. Reason: <strong>${reason}</strong>`, "info");
          if (reason === "credential_returned") {
            log("Expected, credential sent to the JS handler.");
          } else if (reason === "cancel_called") {
            log("programmatic call to google.accounts.id.cancel().");
          }
        }
      }

      window.onload = function () {
        try {
          google.accounts.id.initialize({
            client_id: "PUT_YOUR_WEB_CLIENT_ID_HERE",
            callback: handleCredentialResponse,
            ux_mode: "popup",
          });

          google.accounts.id.prompt(handlePromptMomentNotification);
          log("One Tap initialized. Waiting for prompt...");
        } catch (e) {
          log(`Initialization Error: ${e.message}`, "error");
        }
      };
    </script>
  </body>
</html>
接著開啟 prompt-outcomes.html,將 PUT_YOUR_WEB_CLIENT_ID_HERE 替換成您的用戶端 ID,然後儲存檔案。
在瀏覽器中開啟 http://localhost:3000/prompt-outcomes.html
頁面點擊
首先,請點按「一鍵登入」提示以外的任何位置。您應該會在頁面和控制台中看到「The request has been aborted」(要求已中止) 的記錄。
登入
接著照常登入即可。您會看到記錄和通知更新,可用於觸發建立或重新整理使用者工作階段等動作。
關閉提示
現在重新載入頁面,在顯示「一鍵登入」後,按下標題列中的「X」。這則訊息應記錄到控制台:
- 「使用者拒絕或關閉提示。API 指數冷卻已觸發。」
測試期間,你會觸發冷卻程序。在等待期間,系統不會顯示「一鍵登入」提示。在測試期間,您可能想重設裝置,而不是等待裝置自動重設,除非您真的想去喝杯咖啡或回家睡覺。如要重設冷卻時間:
- 按一下瀏覽器網址列左側的「網站資訊」圖示,
- 按下「重設權限」按鈕,然後
- 重新載入頁面。
重設冷卻時間並重新載入頁面後,系統就會顯示「一鍵登入」提示。
7. 結語
因此在本程式碼研究室中,您學到了幾件事,例如如何只使用靜態 HTML 或透過 JavaScript 動態顯示「一鍵登入」。
您設定了非常基本的 Python 網路伺服器進行本機測試,並瞭解解碼及驗證 ID 權杖的必要步驟。
您已試過使用者與「一鍵登入」提示互動及關閉提示的最常見方式,並有可用於偵錯提示行為的網頁。
恭喜!
如要獲得額外積分,請返回並在支援的瀏覽器中使用「一鍵登入」。
這些連結或許有助於採取後續行動:
- Google Identity 服務 HTML API
- Google Identity Services JavaScript API
- 如何設定網頁版「使用 Google 帳戶登入」
- 驗證 Google ID 權杖
- 進一步瞭解 Google Cloud 專案
- Google Identity 驗證方式