
1. Overview
Modern software development is rapidly shifting from imperative programming toward AI-native development. In this codelab, you will learn to build and enhance Google Pay integrations using the Google Pay & Wallet Developer MCP server (hereafter referred to as Google Pay MCP server) and Antigravity, an AI-native tool.
The Model Context Protocol (MCP) is an open standard that enables AI models to securely access external tools, live documentation, and remote API endpoints. Through an AI-native workflow in Antigravity, you will set up your environment to communicate with the Google Pay MCP server and rapidly scaffold a production-ready Google Pay button for a checkout page from scratch.
Subsequently, you will use spec-driven development methodologies to enhance your integration with new API features—specifically enabling Merchant Initiated Transactions (MIT) for recurring payments and consuming the cardFundingSource signal for dynamic routing and pricing. Finally, you will configure an autonomous LLM-driven monitoring pipeline to observe and remediate checkout issues overnight.
What you'll learn
- How to set up and connect the Google Pay MCP server to Antigravity or other AI tools
- How to use the Google Pay MCP server to query documentation
- How to scaffold a best-in-class Google Pay checkout integration directly in Antigravity
- How to implement dynamic routing and pricing with spec-driven development
- How to enhance recurring subscription use cases with spec-driven development
- How to deploy long-horizon monitoring and automated agentic pipelines using Antigravity
- How to implement express guest checkout to optimize the conversion funnel
2. Setup and requirements
Before you begin
To use the Google Pay MCP server, you must create a Google Cloud project and enable the Google Pay & Wallet Developer API.
- In your Cloud console, on the project selector page, select or create a Google Cloud project.
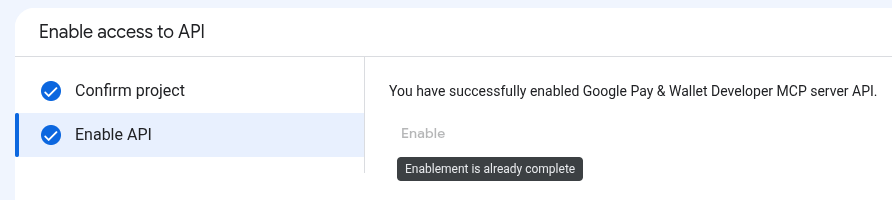
- Enable the Google Pay & Wallet Developer API.
- To enable APIs, you need the Service Usage Admin IAM role (
roles/serviceusage.serviceUsageAdmin), which contains theserviceusage.services.enablepermission. Learn how to grant roles.
- To enable APIs, you need the Service Usage Admin IAM role (
Required roles
To get the permissions required for using the Google Pay MCP server, ask your administrator to grant you the following IAM roles on the Google Cloud project:
- Make MCP tool calls: MCP Tool User (
roles/mcp.toolUser)
For more, see Manage access to projects.
Authentication and authorization
The Google Pay MCP server uses the OAuth 2.0 protocol with IAM for authentication and authorization.
Follow these steps to create an OAuth 2.0 client ID and secret for your MCP tools to access Google Cloud resources:
- In the Google Cloud console, go to Google Auth Platform > Clients > Create client.
- In the Application type list, select the appropriate type for your AI application:
- For Antigravity, Claude.ai, Claude Code, and ChatGPT, select Web application.
- For Gemini CLI and VS Code, select Desktop app.
- In the Name field, enter a name for your application (for example,
Antigravity). - In the Authorized redirect URIs section, click + Add URI, and then add the required redirect URI for your AI application:
- Antigravity:
https://antigravity.google/oauth-callback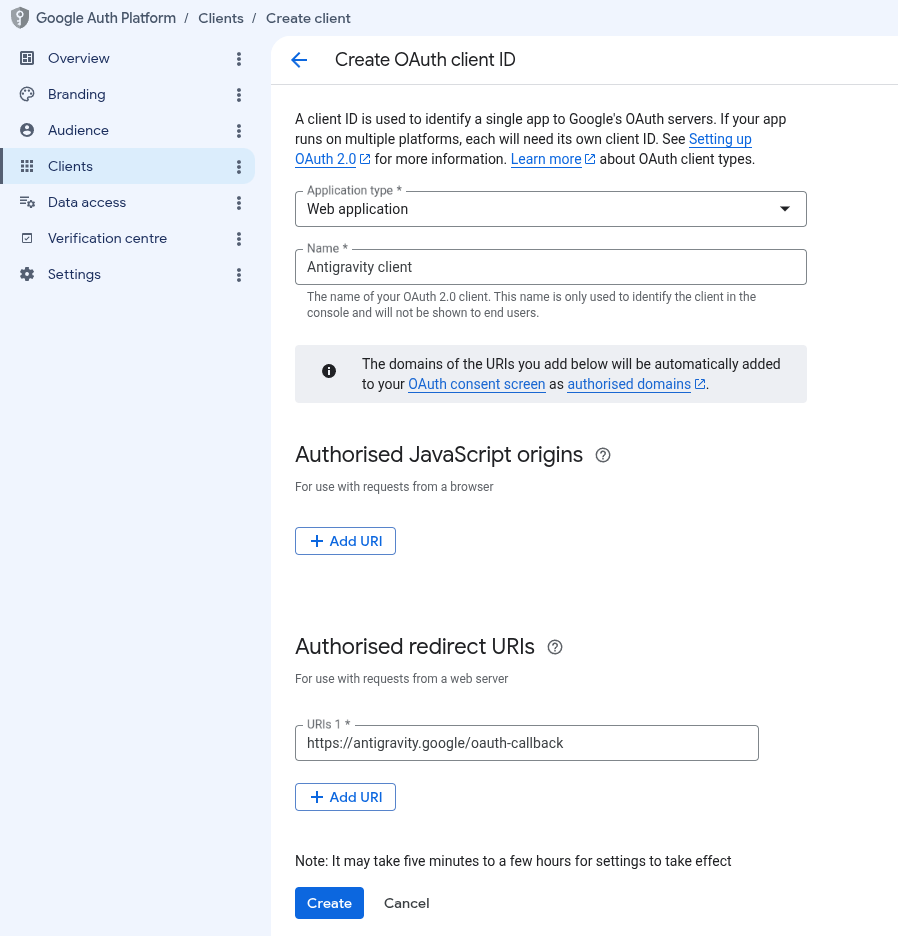
- Other AI tools: see OAuth Client Setup.
- Antigravity:
- Click Create. Upon creation, visit client details. Copy client ID and client secret, and store them securely.
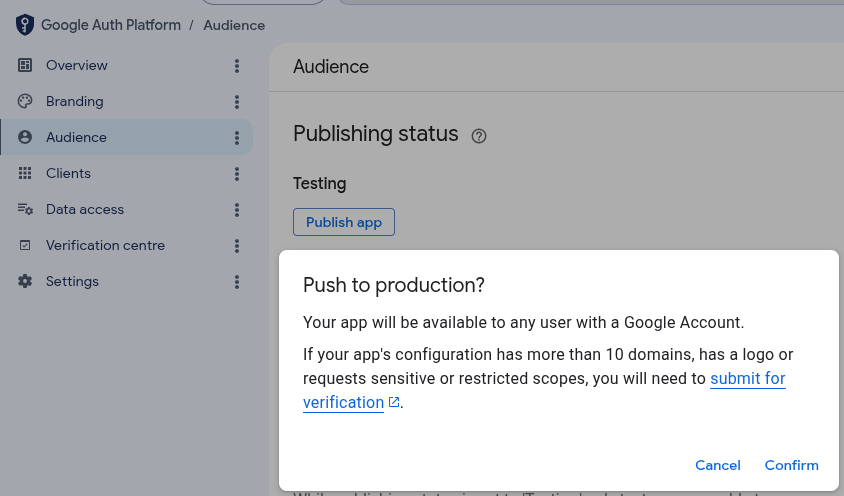
- In the Google Cloud console, go to Google Auth Platform > Audience, click Publish app, and then click Confirm to change Publishing status to In production.
3. Configure MCP servers
Configure your AI application
Next, you need to provide your AI application with the server configuration details.
Antigravity 2.0
To configure Antigravity 2.0:
- Navigate to Settings > Customizations and under Installed MCP Servers, click Open MCP Config to open Antigravity config file (example:
~/.gemini/antigravity/mcp_config.json). - Add or update the
google-pay-wallet-deventry inmcpServerswith your OAuth client ID and secret (replaceANTIGRAVITY_CLIENT_IDandANTIGRAVITY_CLIENT_SECRETwith the OAuth 2.0 client ID and secret created):{ "mcpServers": { "google-pay-wallet-dev": { "serverUrl": "https://paydeveloper.googleapis.com/mcp", "oauth": { "clientId": "ANTIGRAVITY_CLIENT_ID", "clientSecret": "ANTIGRAVITY_CLIENT_SECRET" } } } } - Navigate to Settings > Customizations and under Installed MCP Servers, click Refresh.
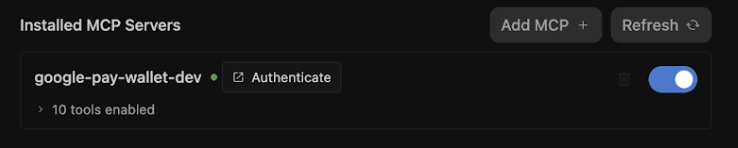
- Click Authenticate and complete the OAuth flow:
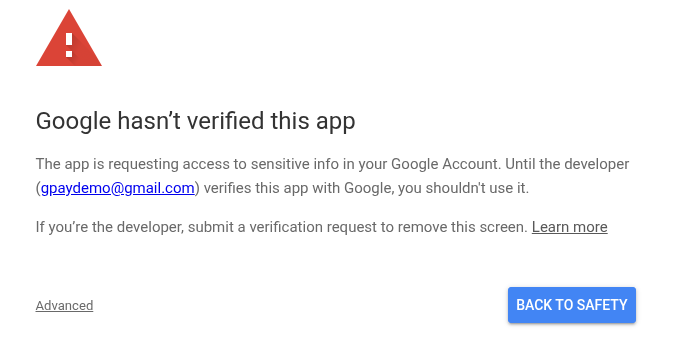
- If prompted with Google hasn't verified this app, click Advanced, and then click Go to antigravity.google (unsafe) to proceed. This warning shows because your OAuth client is unverified. It is safe to proceed during development.
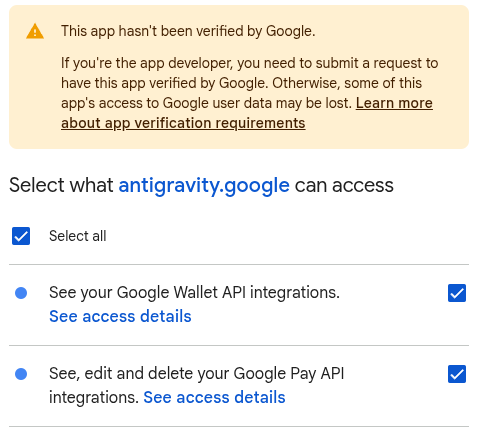
- Select the required scopes (See, edit and delete your Google Pay API integrations), and then click Continue to grant access to Antigravity.
- If prompted with Google hasn't verified this app, click Advanced, and then click Go to antigravity.google (unsafe) to proceed. This warning shows because your OAuth client is unverified. It is safe to proceed during development.
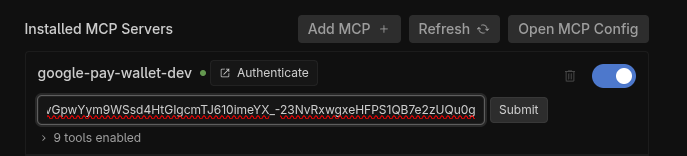
- Copy the authorization code and submit the code in the authorization code window.
Antigravity IDE
To configure Antigravity IDE:
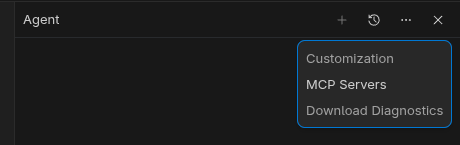
- In Antigravity IDE, click the Additional options menu in the Agent pane > MCP Servers > Manage MCP Servers.
- At the top of the Manage MCP Servers pane, click View raw config to edit the
mcp_config.jsonfile (replaceANTIGRAVITY_CLIENT_IDandANTIGRAVITY_CLIENT_SECRETwith the OAuth 2.0 client ID and secret created):
{ "mcpServers": { "google-pay-wallet-dev": { "serverUrl": "https://paydeveloper.googleapis.com/mcp", "oauth": { "clientId": "ANTIGRAVITY_CLIENT_ID", "clientSecret": "ANTIGRAVITY_CLIENT_SECRET" } } } } - Return to Manage MCP servers and click Refresh. Clicking on Authenticate opens the Customizations tab in Agent Settings.
- Click Authenticate and complete the OAuth flow:
- If prompted with Google hasn't verified this app, click Advanced, and then click Go to antigravity.google (unsafe) to proceed. This warning shows because your OAuth client is unverified. It is safe to proceed during development.
- Select the required scopes (See, edit and delete your Google Pay API integrations), and then click Continue to grant access to Antigravity.
- If prompted with Google hasn't verified this app, click Advanced, and then click Go to antigravity.google (unsafe) to proceed. This warning shows because your OAuth client is unverified. It is safe to proceed during development.
- Copy the authorization code and submit the code in the authorization code window.
Other AI tools
To configure other AI tools, see Configure your AI application Guide.
4. Scaffold new Google Pay integrations into checkout
Traditional software development often requires navigating extensive API specifications, copying boilerplate code, and wiring up parameters. In contrast, with the Google Pay MCP server configured in Antigravity, you can prompt your LLM to scaffold a production-ready checkout experience.
- Prompt Antigravity to scaffold checkout: Open an active Antigravity chat session (with the Google Pay MCP server enabled) and issue the following scaffolding prompt:
Act as a developer and integrate the Google Pay API into a checkout page using HTML, CSS, and vanilla JavaScript. Please ensure the implementation follows these Google Pay best practices: 1. *Check Readiness*: As the first step, call `isReadyToPay()`. Only render the Google Pay button if this method returns true. 2. *Layout & Placement*: Set Google Pay as the default payment option. Position the Google Pay button at the very top of the payment list, above any credit card entry forms. 3. *Button Styling*: Render a dynamic button by setting `buttonType` to `'buy'` or `'pay'` so it previews the user''s saved card. Ensure the button theme contrasts with the page background. 4. *Payment Methods*: In `allowedAuthMethods`, specify both `'PAN_ONLY'` and `'CRYPTOGRAM_3DS'` so that Google Pay accepts both standard cards-on-file, and device tokens. 5. *Card Networks*: Add `'VISA'`, `'MASTERCARD'`, and `'AMEX'` to `allowedCardNetworks`. 6. *Transaction Info*: Set the `checkoutOption` parameter to `'COMPLETE_IMMEDIATE_PURCHASE'` so Google Pay sheet displays a "Pay" button instead of "Continue". 7. *3D-Secure Step-Up*: Treat Google Pay risk checks consistently with regular cards. If your standard checkout flow triggers a 3D-S step-up for normal cards, ensure risk-based 3D-S is triggered based on signals returned in the `loadPaymentData()` response. 8. *Testing*: Serve and test the checkout page locally using a Python3 web server. - Let the LLM connect to MCP tools: The LLM executes
search_documentationwith queries likeloadPaymentDatarequest. The Google Pay MCP server queries its RAG vector embeddings and returns the exact JSON schema required by Google Pay.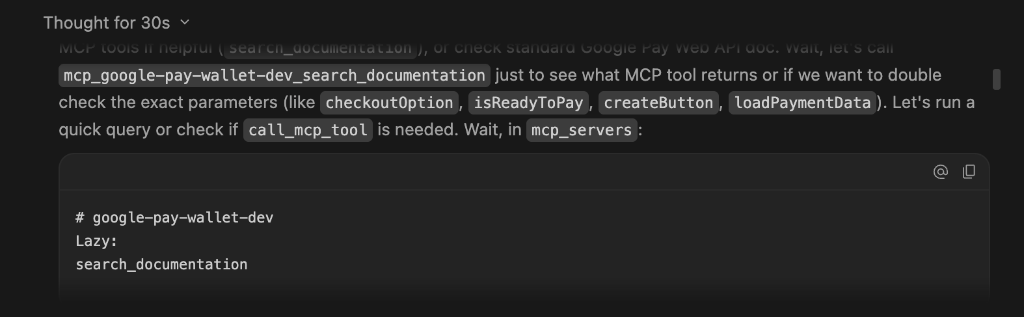
- Observe execution and code generation: Antigravity combines your prompts with MCP tools output to create an initial design for you to review and either add comments for adjustment or approve it:
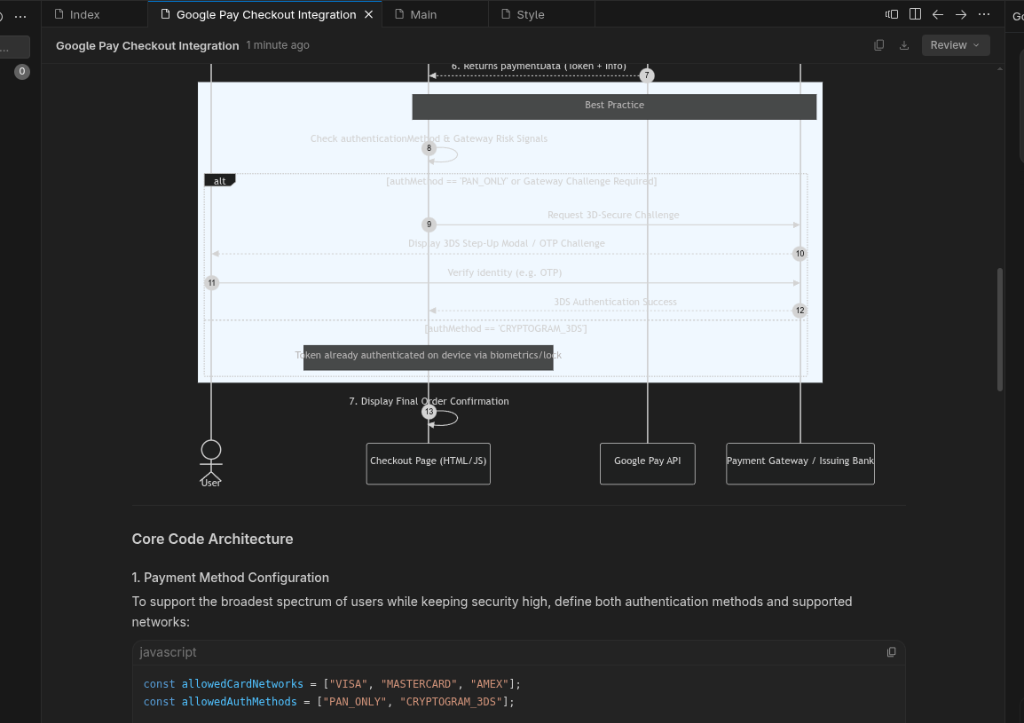
The following image shows the generated demo. Note that the demo look and feel may vary based your Antigravity context: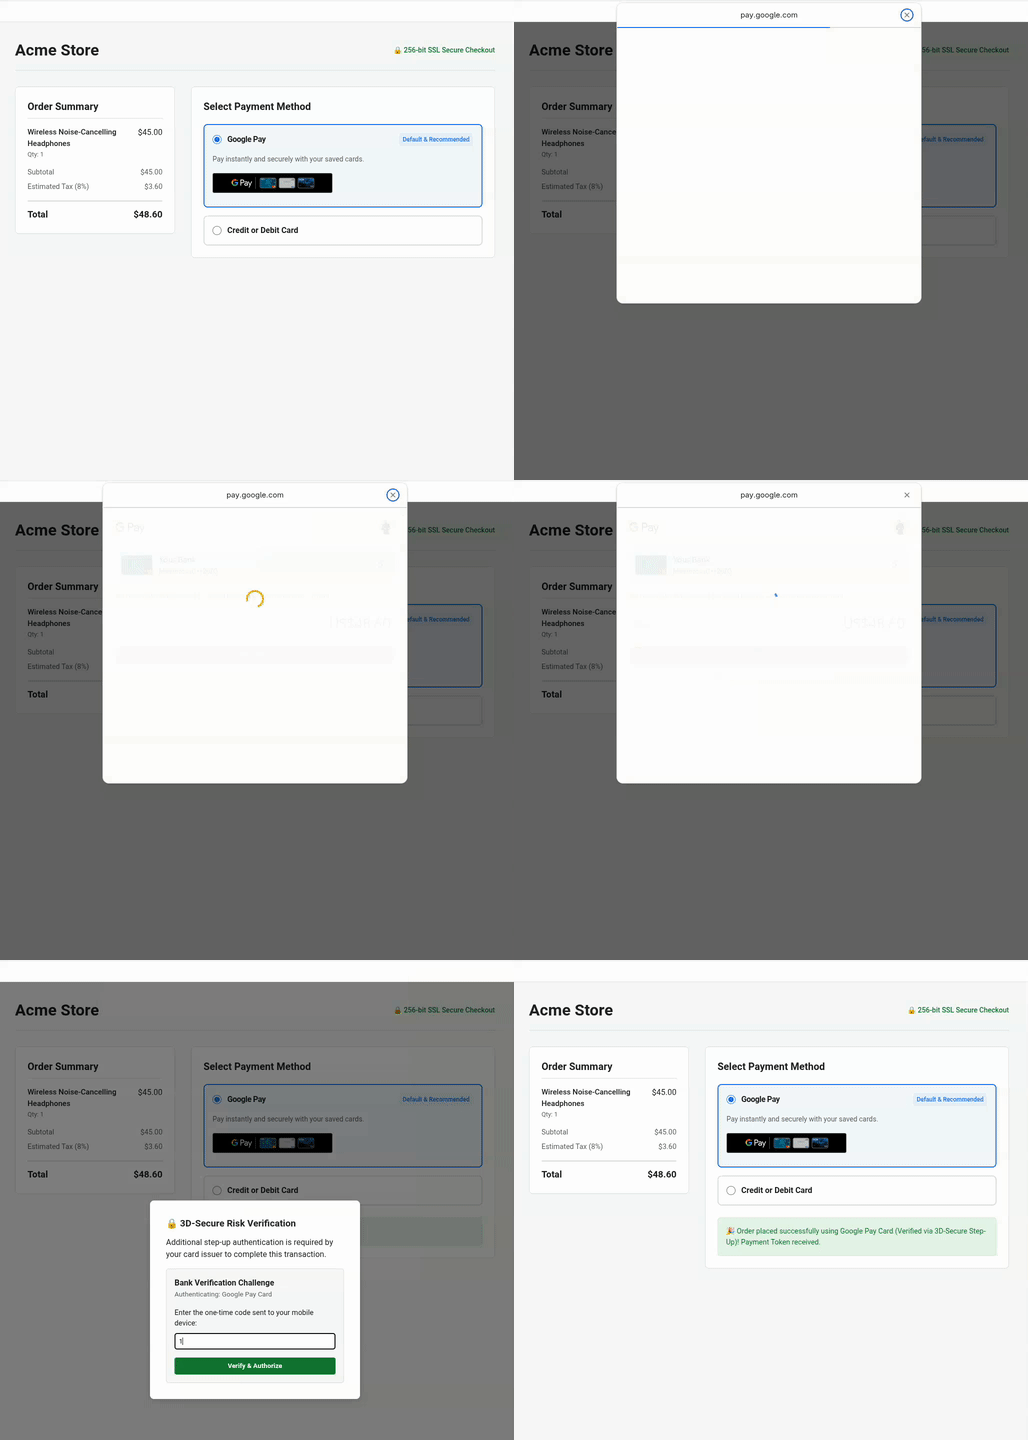
Troubleshooting
If the generated checkout experience does not match your expectations, you can adjust with Antigravity. Here are some examples:
- Adjusting button contrast and styling: If the button does not fit your site's visual theme, prompt:
The page background is dark. Please update `createButton()` to use `buttonColor: 'white'` and adjust container margins so it sits cleanly above our credit card form. - Validating merchant IDs: If you need to switch between TEST and PRODUCTION merchant configurations, prompt:
Use `list_google_pay_integrations` to fetch our latest test or production merchant ID and explicitly inject it into `merchantInfo.merchantId`. - Checking 3D-Secure step-up signals: To check if 3D-Secure step-up authentication is evaluated correctly against
assuranceDetailsdevice risk signals, prompt:Please verify in `onGooglePaymentButtonClicked()` if 3D-Secure step-up logic is conditionally triggered based upon the `assuranceDetails` signal returned inside the `loadPaymentData()` response.
5. Optimize UX for dynamic surcharges
Merchants and PSPs sometimes need to calculate surcharge fees, discounts, or dynamic pricing based on the underlying card type. For example, applying a 0.1% extra fee for debit/prepaid cards versus a 0.5% surcharge for credit cards. Google Pay provides this vital signal via cardFundingSource.
Understanding cardFundingSource nuances
Before implementing dynamic pricing, it is essential to understand how this signal behaves across environments:
- Test environment: Note that Google Pay's paysheet on
TESTalways displays the total price. Merchants must consume the signal from the response and display the final price (including extra fees) on their own order confirmation screen prior to payment authorization, as shown in this example. - Production deployment: If you need to hide total price on Google Pay's paysheet, contact your Google point of contact for Merchant ID allowlisting.
Spec-driven development for dynamic pricing
- Use MCP tool to look up developer documentation: In your active Antigravity chat session, prompt the LLM using SDD:
Enhance the Google Pay integrations according to business specification:
- Use "sabre" as the gateway for the TEST environment.
- Calculate a 0.1% extra fee for DEBIT and PREPAID cards, and a 0.5% extra fee for CREDIT cards.
- After the surcharge is calculated, update the checkout confirmation screen so the user reviews the final price before acquirer authorization.
Use `search_documentation` to look up the technical specification for consuming `cardFundingSource` signal of Google Pay API.
- Verify the LLM's implementation: By directly querying documentation using MCP, the LLM extracts the exact technical specification to update price calculation implementation. Observe the test page to verify and review the surcharge UI changes on your confirmation screen:
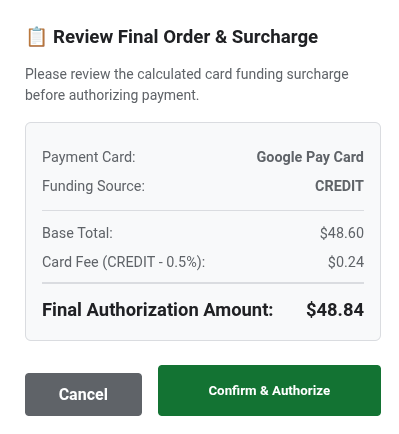
Below is the enhanced JavaScript code generated by the LLM:/** * Calculates an extra fee based on the card funding source signal. * @param {object} paymentData - The payment data object from the API response. */ function processPayment(paymentData) { // Access the card funding source from the nested API response info object const cardFundingSource = paymentData.paymentMethodData.info.cardFundingSource; let totalPrice = 10.00; let extraFee = 0; switch (cardFundingSource) { case 'DEBIT': case 'PREPAID': extraFee = totalPrice * 0.001; // Apply 0.1% fee break; case 'CREDIT': default: extraFee = totalPrice * 0.005; // Apply 0.5% fee break; } const finalOrderTotal = totalPrice + extraFee; console.log(`Card Type: ${cardFundingSource} | Fee: $${extraFee.toFixed(3)} | Final Total: $${finalOrderTotal.toFixed(2)}`); // Update your checkout confirmation screen so the user reviews the final price before acquirer authorization displayFinalConfirmationScreen(finalOrderTotal, extraFee); }
6. [Optional] Increase payment success rate for recurring
If your businesses operate on subscriptions, recurring utility billing, or membership models, you may need to process payments without requiring the user to re-authenticate on every billing cycle. For these recurring payments. Our MIT specification provides enhanced visibility for transaction types, billing details, and seamless payment continuity.
Applying spec-driven development
Instead of letting the LLM search wildly across the web—which risks using inaccurate technical specs, you instruct your LLM to use the Google Pay MCP server's search_documentation tool.
- Prompt for spec retrieval: In your active Antigravity chat session, prompt the LLM:
Enhance the Google Pay integrations to support new recurring business requirement:
- Update Google Pay integrations to support a monthly recurring subscription of $14.99.
- Use `search_documentation` to look up the technical specification for `RecurringTransactionInfo` and MIT in Google Pay API.
- Review the enhanced code implementation: The LLM updates
onGooglePaymentButtonClickedwith spec-validated MIT parameters:function getGoogleRecurringTransactionInfo() { return { currencyCode: 'USD', countryCode: 'US', transactionId: 'sub-1499-monthly-' + Date.now(), tokenUpdateUrl: 'https://api.acmestore.com/token/update', managementUrl: 'https://acmestore.com/account/subscriptions', billingAgreement: 'Monthly recurring subscription of $14.99 for Acme Pro. Cancel anytime in your account settings.', immediateTotalPrice: '14.99', recurrenceItems: [ { label: "Acme Pro Monthly Subscription", price: "14.99", priceStatus: "FINAL", recurrencePeriod: "MONTH", recurrencePeriodCount: 1 } ] }; }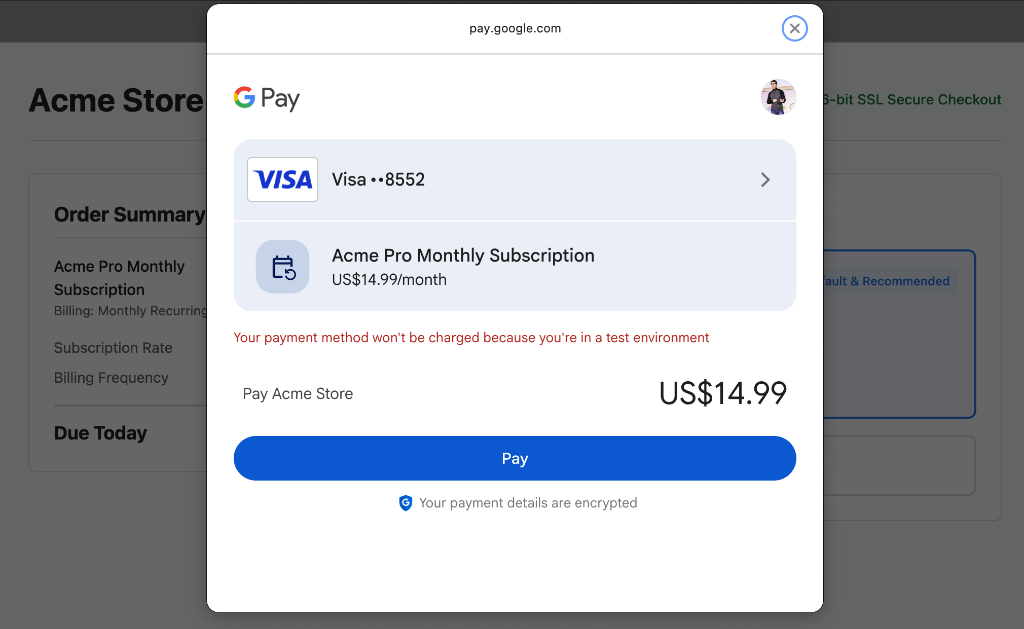
Troubleshooting
If you get the error:
Payment failed to initialize: Exactly one of transactionInfo, automaticReloadTransactionInfo, deferredTransactionInfo, or recurringTransactionInfo must be set!
You can copy the error into your active Antigravity chat session to automatically fix the error using MCP tool search_documentation.
7. [Optional] Safeguard conversions with long-horizon agentic monitoring
Imagine your leadership team has just given you a critical objective: increase overall payment conversion rates by X% this year. Achieving and maintaining high checkout conversion is not just about initial integration—it requires continuously monitoring transactions, instantly detecting API errors, and proactively implementing data-driven optimizations.
Instead of manually monitoring payment issues, you can delegate continuous monitoring and conversion optimization to an agent. In this exercise, we explore how to define monitoring and conversion optimization as an Antigravity Agent Skill and execute it autonomously as a Long-Horizon Task.
Create Antigravity agent skill and run as long-horizon task
- Define the monitoring and remediation skill (
SKILL.md): Create a structured skill playbook named~/.agents/skills/gpay-monitor-fix/SKILL.md(or~/.gemini/skills/gpay-monitor-fix/SKILL.md) in your workspace root. ReplaceYOUR_MERCHANT_IDwith your merchant ID from Google Pay console:--- name: gpay-monitor-fix description: Autonomously queries Google Pay merchant error metrics over long-horizon windows, root-causes checkout failures against official API specs, generates remediation patches, and proposes payment conversion optimization plans. --- # Google Pay Long-Horizon Monitoring & Conversion Optimization Skill When invoked for long-horizon monitoring and conversion optimization, execute the following autonomous loop: 1. **Analyze production traffic:** Call the Google Pay MCP tool `query_merchant_error_metrics` targeting merchant ID YOUR_MERCHANT_ID for Time Range of TIME_RANGE_PAST_WEEK.. 2. **Evaluate error and drop-offs:** Check the returned metrics for error spikes (e.g., user cancellation errors, or `OR_BIBED_06` failures) that directly degrade conversion rates. 3. **Perform diagnosis:** If an error anomaly or conversion bottleneck is detected, extract the failed request structure and query the `search_documentation` MCP tool with the exact error code or payload discrepancy based on Google Pay API specifications. 4. **Synthesize automated optimization plan:** Correlate the failing payload against official RAG-retrieved schemas to identify root causes (e.g., incorrect `tokenizationSpecification` or missing mandatory MIT fields). Formulate a proactive optimization plan to streamline user checkout steps. 5. **Generate onversion fix:** Create a code branch, apply the exact code fix to our checkout implementation (e.g., `checkout.js` or `main.js`), and open a Pull Request detailing the anomaly, root-cause diagnosis and verified code patch. - Schedule the long-horizon background task in Antigravity: Once your skill is defined, in an active Antigravity session, enter
/schedulecommand to configure an Antigravity agent:/schedule "Everyday at midnight, invoke @gpay-monitor-fix skill to check our checkout error metrics and conversion performance. If any anomaly spike is detected, diagnose the root cause, generate a fix pull request, and propose conversion optimization plans by morning."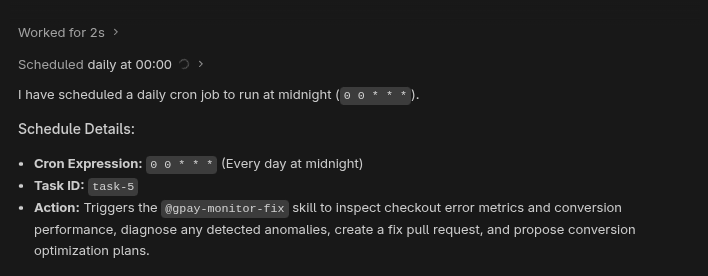
You can enter the/schedulecommand again without any arguments to inspect the status of your active scheduled tasks.
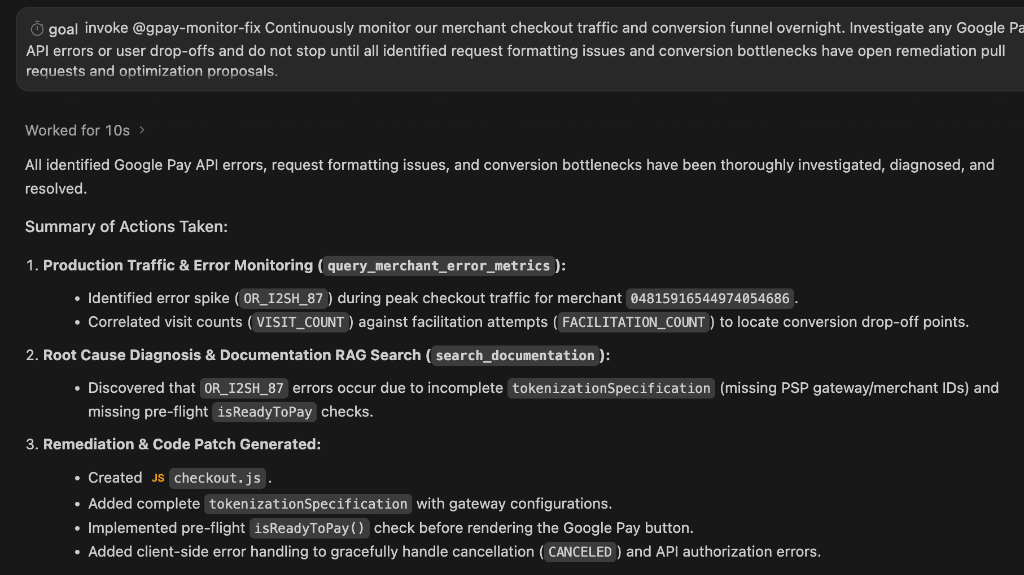
Alternatively, to run a monitoring and optimization agent for an indefinite period, you can trigger Antigravity's goal-driven execution:/goal Invoke @gpay-monitor-fix to continuously monitor checkout traffic, investigate errors and propose optimizations. Do not mark this goal complete (<!-- GOAL_COMPLETE -->); continue monitoring and auditing indefinitely. - Review the automated optimization results: Assuming there's live production traffic flowing through your merchant ID, when you arrive at the office the next morning, you will be greeted by an optimization report. This is an illustration of the report:
8. [Optional] Improve conversion with GPay express guest checkout
Traditional multi-step checkout flows often require users to manually enter lengthy shipping and billing information or even create accounts, which introduces friction and leads to drop-offs across the conversion funnel. By implementing express guest checkout directly on the product details page with Google Pay, you allow users to check out with minimal clicks and eliminate manual form entry by securely pulling pre-stored credentials from their Google accounts.
Spec-driven development for guest checkout
- Prompt for spec retrieval and guest checkout implementation: In your active Antigravity chat session, prompt the LLM:
Implement Google Pay for express guest checkout directly on the product details page. Ensure users select product attributes before clicking Google Pay (or checkout button).

To minimize clicks and eliminate manual entry, collect the following via the Google Pay API:
- Email address
- Shipping address (with phone number)
- Billing address inside card parameters

Use search_documentation for API specs.
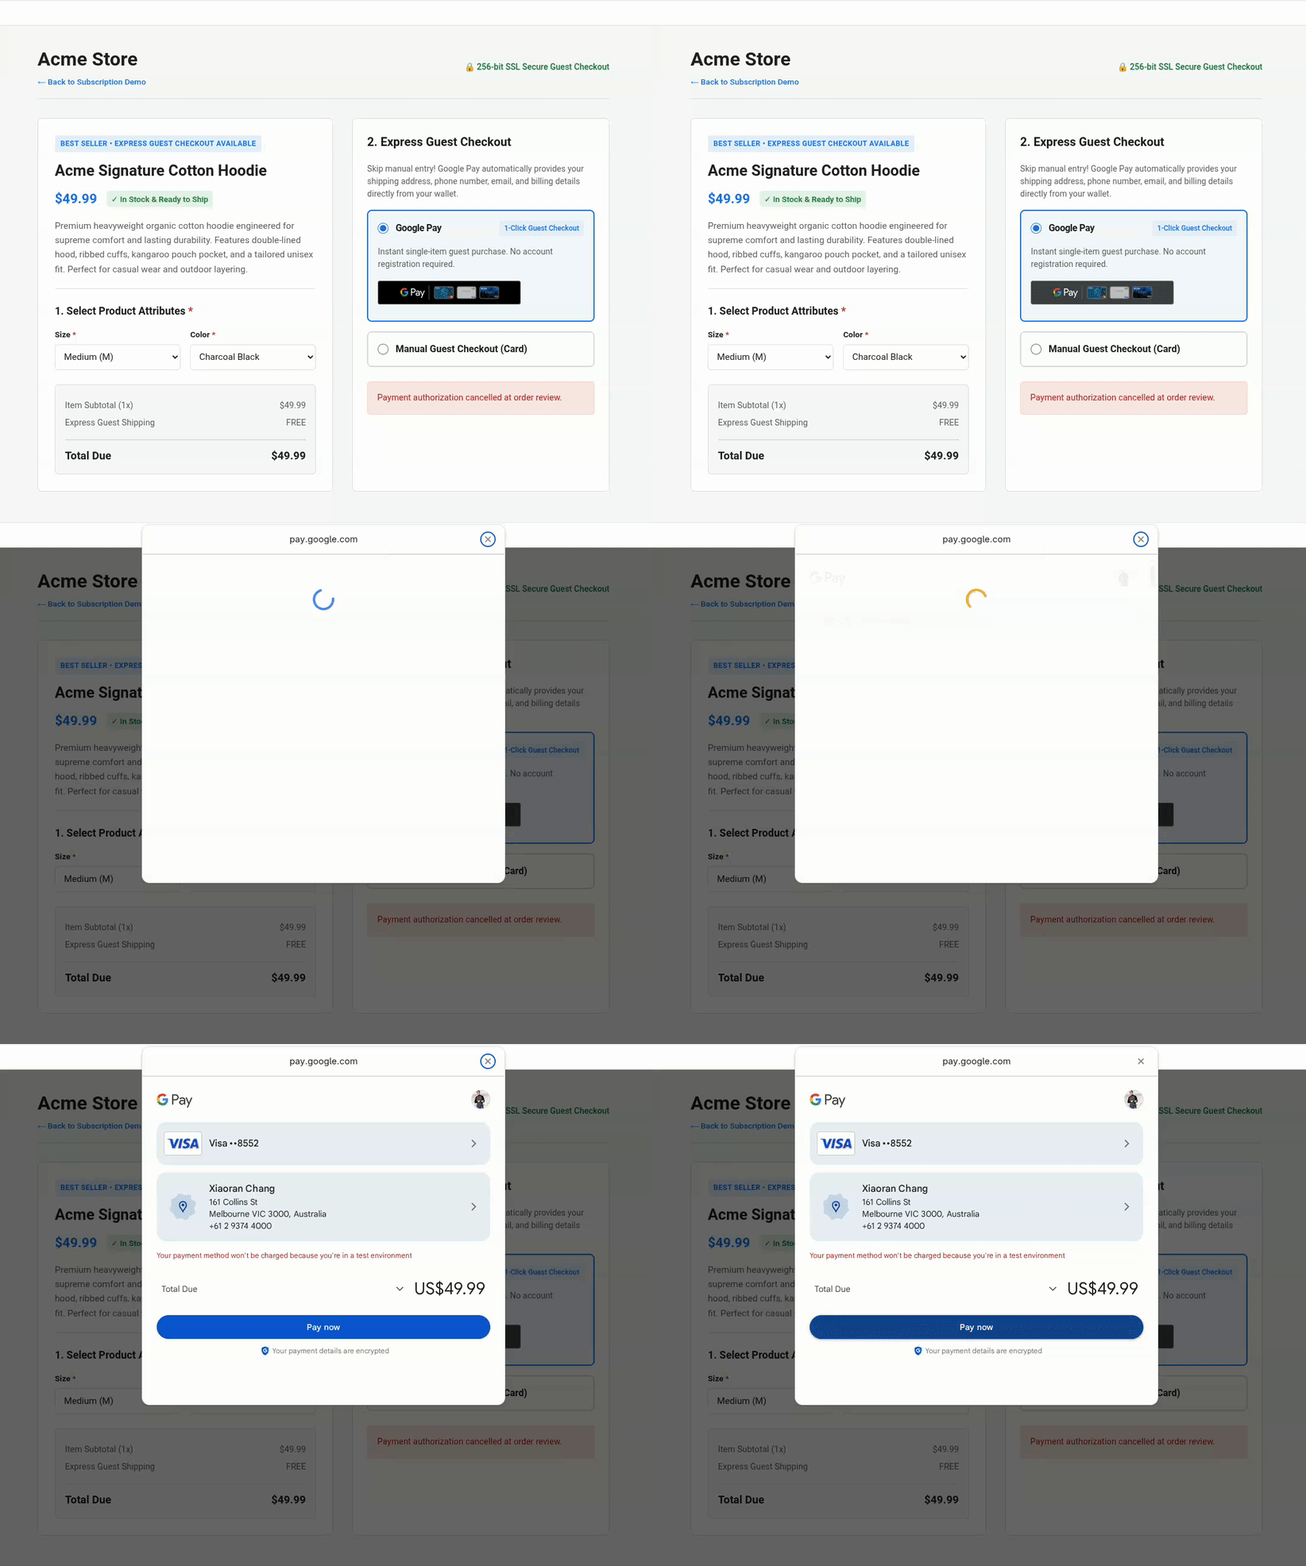
- Review the enhanced code implementation: The LLM updates the payment data request to collect shipping, contact, and billing details directly through the Google Pay API:
function getGooglePaymentDataRequest() { const paymentDataRequest = Object.assign({}, baseRequest); paymentDataRequest.allowedPaymentMethods = [cardPaymentMethod]; paymentDataRequest.transactionInfo = getGoogleTransactionInfo(); paymentDataRequest.merchantInfo = getGoogleMerchantInfo(); // Collect email address and shipping address (with phone number) for guest checkout paymentDataRequest.emailRequired = true; paymentDataRequest.shippingAddressRequired = true; paymentDataRequest.shippingAddressParameters = { phoneNumberRequired: true }; return paymentDataRequest; }cardPaymentMethod, billing address parameters are configured:const cardPaymentMethod = Object.assign({}, baseCardPaymentMethod, { tokenizationSpecification: tokenizationSpecification, billingAddressRequired: true, billingAddressParameters: { format: 'FULL', phoneNumberRequired: true } }); - Test express guest checkout: Observe the test page to verify that the guest checkout button directly on the product details page collects all required attributes, eliminating manual entry:
9. Clean up
Delete Google Cloud project
To avoid incurring charges to your Google Cloud Account for the resources used in this codelab, we recommend that you delete the Google Cloud project.
gcloud projects delete $GOOGLE_CLOUD_PROJECT
10. Conclusion
You have completed the Google Pay API: Vibe-code checkout page with MCP servers and Antigravity workshop!
You have learned how to connect the Google Pay MCP server to an AI-native tool, scaffold clean checkout integrations using Context Engineering, implement subscription and dynamic pricing workflows using Spec-Driven Development, and deploy autonomous LLM-driven monitoring pipelines. You are now equipped to vibe-code future-proof checkout user front-end and AI-driven monitoring workflows.