

1. 概要
最新のソフトウェア開発は、命令型プログラミングから AI ネイティブ開発へと急速に移行しています。この Codelab では、Google Pay とウォレットのデベロッパー MCP サーバー(以下、Google Pay MCP サーバー)と、AI ネイティブ ツールである Antigravity を使用して、Google Pay の統合を構築、強化する方法を学びます。
Model Context Protocol(MCP)は、AI モデルが外部ツール、ライブ ドキュメント、リモート API エンドポイントに安全にアクセスできるようにするオープン スタンダードです。Antigravity の AI ネイティブ ワークフローを使用して、Google Pay MCP サーバーと通信するように環境を設定し、購入手続きページの本番環境対応の Google Pay ボタンをスクラッチから迅速にスキャフォールディングします。
次に、仕様駆動開発手法を使用して、新しい API 機能との統合を強化します。具体的には、定期的なお支払いの Merchant Initiated Transactions(MIT)を有効にし、動的ルーティングと料金設定に cardFundingSource シグナルを使用します。最後に、自律型 LLM 駆動モニタリング パイプラインを構成して、購入手続きの問題を夜間に監視して修正します。
学習内容
- Google Pay MCP サーバーを Antigravity やその他の AI ツールに設定して接続する方法
- Google Pay MCP サーバーを使用してドキュメントにクエリを実行する方法
- Antigravity で最高水準の Google Pay 購入手続き統合を直接スキャフォールディングする方法
- 仕様駆動開発で動的ルーティングと料金設定を実装する方法
- 仕様駆動開発で定期購入のユースケースを強化する方法
- Antigravity を使用して長期モニタリングと自動エージェント パイプラインをデプロイする方法
- エクスプレス ログインせずに決済を実装してコンバージョン プロセスを最適化する方法
2. 設定と要件
始める前に
Google Pay MCP サーバーを使用するには、Google Cloud プロジェクトを作成し、Google Pay とウォレットのデベロッパー API を有効にする必要があります。
- Cloud コンソールのプロジェクト セレクタ ページで、Google Cloud プロジェクトを選択または作成します。
- Google Pay とウォレットのデベロッパー API を有効にします。
- API を有効にするには、
serviceusage.services.enable権限を含む Service Usage 管理者 IAM ロール(roles/serviceusage.serviceUsageAdmin)が必要です。詳しくは、ロールを付与する方法をご覧ください。
![Google Cloud コンソールで [API を有効にする] を選択する](https://codelabs.developers.google.com/static/codelabs/gpay-api-vibe-code-mcp-servers/images/setup-enable-api.png?hl=ja)
- API を有効にするには、
必要なロール
Google Pay MCP サーバーの使用に必要な権限を取得するには、Google Cloud プロジェクトに対する次の IAM ロールの付与を管理者に依頼してください。
- MCP ツール呼び出しを行う: MCP ツールユーザー(
roles/mcp.toolUser)
詳しくは、プロジェクトへのアクセスを管理するをご覧ください。
認証と認可
Google Pay MCP サーバーは、認証と認可に IAM と OAuth 2.0 プロトコルを使用します。
MCP ツールが Google Cloud リソースにアクセスするための OAuth 2.0 クライアント ID とシークレットを作成する手順は次のとおりです。
- Google Cloud コンソールで、[Google Auth Platform] > [クライアント] > [クライアントの作成] に移動します。
- [アプリケーションの種類] リストで、AI アプリケーションに適したタイプを選択します。
- [Antigravity] 、[Claude.ai] 、[Claude Code] 、[ChatGPT] の場合は、[ウェブ アプリケーション] を選択します。
- [Gemini CLI] と [VS Code] の場合は、[デスクトップ アプリ] を選択します。
- [名前] フィールドに、アプリケーションの名前を入力します(例:
Antigravity)。 -
[**承認済みのリダイレクト URI**] セクションで、[**\+ URI を追加**] をクリックし、AI アプリケーションに必要なリダイレクト URI を追加します。
- [Antigravity]:
https://antigravity.google/oauth-callback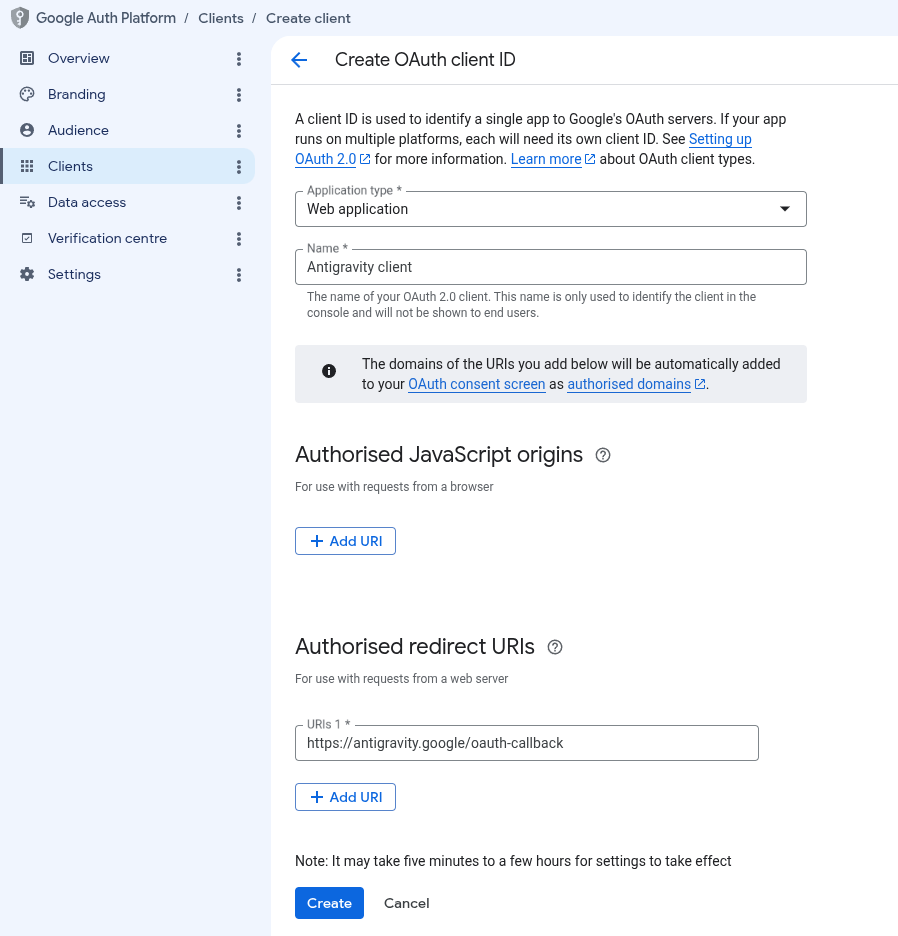
- その他の AI ツール: OAuth クライアントの設定をご覧ください。
- [Antigravity]:
- [作成] をクリックします。作成したら、クライアントの詳細に移動します。クライアント ID とクライアント シークレットをコピーして安全に保管します。
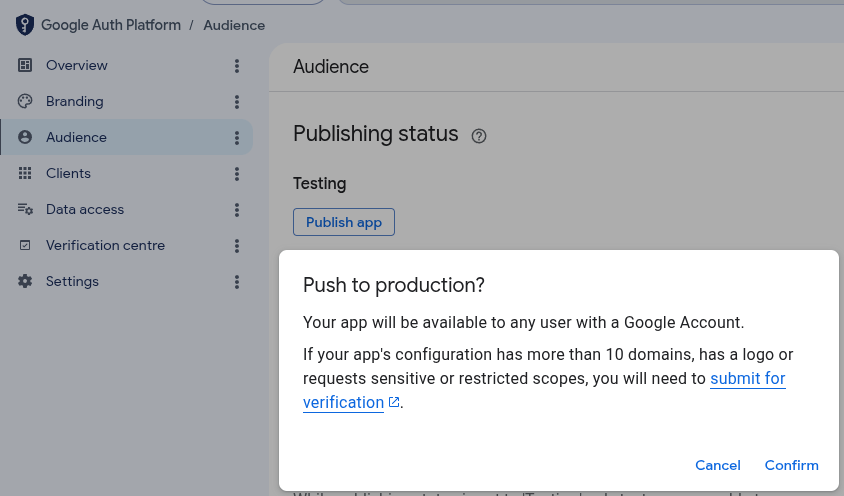
- Google Cloud コンソールで、[Google Auth Platform] > [視聴者] に移動し、[アプリを公開] をクリックして [確認] をクリックし、[公開ステータス] を [本番環境] に変更します。
3. MCP サーバーを構成する
AI アプリケーションを構成する
次に、AI アプリケーションにサーバー構成の詳細を指定する必要があります。
Antigravity 2.0
Antigravity 2.0 を構成する手順は次のとおりです。
- [設定] > [カスタマイズ] に移動し、[インストール済み MCP サーバー] で [MCP 構成を開く] をクリックして Antigravity 構成ファイル(例:
~/.gemini/antigravity/mcp_config.json)を開きます。 mcpServersのgoogle-pay-wallet-devエントリに OAuth クライアント ID とシークレットを追加または更新します(ANTIGRAVITY_CLIENT_IDとANTIGRAVITY_CLIENT_SECRETは、作成した OAuth 2.0 クライアント ID とシークレットに置き換えます)。{ "mcpServers": { "google-pay-wallet-dev": { "serverUrl": "https://paydeveloper.googleapis.com/mcp", "oauth": { "clientId": "ANTIGRAVITY_CLIENT_ID", "clientSecret": "ANTIGRAVITY_CLIENT_SECRET" } } } }- [設定] > [カスタマイズ] に移動し、[インストール済み MCP サーバー] で [更新] をクリックします。
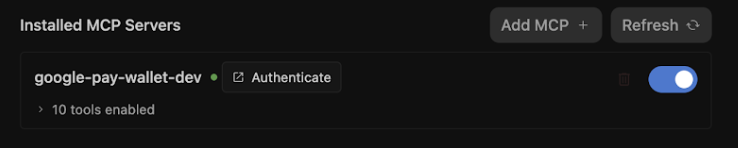
- [認証] をクリックして OAuth フローを完了します。
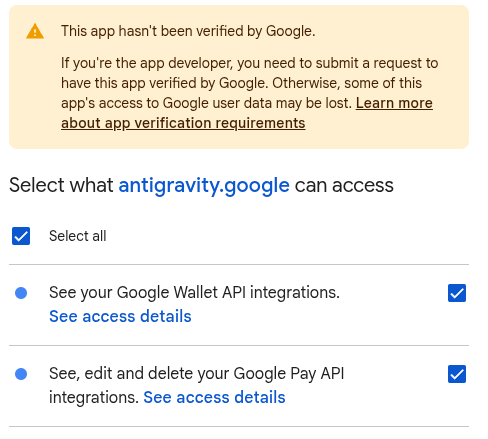
- [Google はこのアプリを確認していません] というメッセージが表示されたら、[詳細設定] をクリックし、[antigravity.google に移動(安全ではありません)] をクリックして続行します。この警告は、OAuth クライアントが確認されていないために表示されます。開発中は続行しても問題ありません。
![Google OAuth の警告が表示されたら、[詳細] をクリックして続行します](https://codelabs.developers.google.com/static/codelabs/gpay-api-vibe-code-mcp-servers/images/configure-oauth-unverified-warning.png?hl=ja)
- 必要なスコープ(Google Pay API の統合の参照、編集、削除)を選択し、[続行] をクリックして Antigravity へのアクセス権を付与します。
- [Google はこのアプリを確認していません] というメッセージが表示されたら、[詳細設定] をクリックし、[antigravity.google に移動(安全ではありません)] をクリックして続行します。この警告は、OAuth クライアントが確認されていないために表示されます。開発中は続行しても問題ありません。
- 認証コードをコピーし、認証コード ウィンドウにコードを送信します。
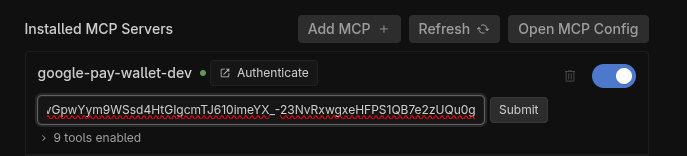
Antigravity IDE
Antigravity IDE を構成する手順は次のとおりです。
- Antigravity IDE で、[エージェント] ペイン > [MCP サーバー] > [MCP サーバーを管理] の [その他のオプション] メニューをクリックします。
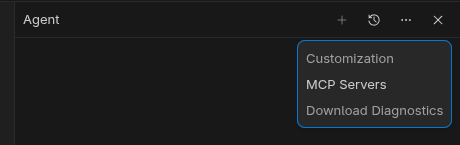
- [MCP サーバーを管理] ペインの上部にある [生の構成を表示] をクリックして
mcp_config.jsonファイルを編集します(ANTIGRAVITY_CLIENT_IDとANTIGRAVITY_CLIENT_SECRETは、作成した OAuth 2.0 クライアント ID とシークレットに置き換えます)。
{ "mcpServers": { "google-pay-wallet-dev": { "serverUrl": "https://paydeveloper.googleapis.com/mcp", "oauth": { "clientId": "ANTIGRAVITY_CLIENT_ID", "clientSecret": "ANTIGRAVITY_CLIENT_SECRET" } } } } - [MCP サーバーを管理] に戻り、[更新] をクリックします。[認証] をクリックすると、[エージェント設定] の [カスタマイズ] タブが開きます。
- [認証] をクリックして OAuth フローを完了します。
- [Google はこのアプリを確認していません] というメッセージが表示されたら、[詳細設定] をクリックし、[antigravity.google に移動(安全ではありません)] をクリックして続行します。この警告は、OAuth クライアントが確認されていないために表示されます。開発中は続行しても問題ありません。
- 必要なスコープ(Google Pay API の統合の参照、編集、削除)を選択し、[続行] をクリックして Antigravity へのアクセス権を付与します。
- [Google はこのアプリを確認していません] というメッセージが表示されたら、[詳細設定] をクリックし、[antigravity.google に移動(安全ではありません)] をクリックして続行します。この警告は、OAuth クライアントが確認されていないために表示されます。開発中は続行しても問題ありません。
- 認証コードをコピーし、認証コード ウィンドウにコードを送信します。
その他の AI ツール
その他の AI ツールを構成するには、AI アプリケーションを構成するガイドをご覧ください。
4. 新しい Google Pay 統合を購入手続きにスキャフォールディングする
従来のソフトウェア開発では、多くの場合、広範な API 仕様の確認、ボイラープレート コードのコピー、パラメータの接続が必要になります。一方、Antigravity で Google Pay MCP サーバー を構成すると、LLM にプロンプトを表示して、プロダクション レディな購入手続きエクスペリエンスをスキャフォールディングできます。
- Antigravity に購入手続きのスキャフォールディングを促す: アクティブな Antigravity チャット セッション(Google Pay MCP サーバーが有効になっている)を開き、次のスキャフォールディング プロンプトを発行します。
Act as a developer and integrate the Google Pay API into a checkout page using HTML, CSS, and vanilla JavaScript. Please ensure the implementation follows these Google Pay best practices: 1. *Check Readiness*: As the first step, call `isReadyToPay()`. Only render the Google Pay button if this method returns true. 2. *Layout & Placement*: Set Google Pay as the default payment option. Position the Google Pay button at the very top of the payment list, above any credit card entry forms. 3. *Button Styling*: Render a dynamic button by setting `buttonType` to `'buy'` or `'pay'` so it previews the user''s saved card. Ensure the button theme contrasts with the page background. 4. *Payment Methods*: In `allowedAuthMethods`, specify both `'PAN_ONLY'` and `'CRYPTOGRAM_3DS'` so that Google Pay accepts both standard cards-on-file, and device tokens. 5. *Card Networks*: Add `'VISA'`, `'MASTERCARD'`, and `'AMEX'` to `allowedCardNetworks`. 6. *Transaction Info*: Set the `checkoutOption` parameter to `'COMPLETE_IMMEDIATE_PURCHASE'` so Google Pay sheet displays a "Pay" button instead of "Continue". 7. *3D-Secure Step-Up*: Treat Google Pay risk checks consistently with regular cards. If your standard checkout flow triggers a 3D-S step-up for normal cards, ensure risk-based 3D-S is triggered based on signals returned in the `loadPaymentData()` response. 8. *Testing*: Serve and test the checkout page locally using a Python3 web server. - LLM を MCP ツールに接続する: LLM は、
loadPaymentDataリクエストなどのクエリでsearch_documentationを実行します。Google Pay MCP サーバーは RAG ベクトル埋め込みにクエリを実行し、Google Pay で必要な正確な JSON スキーマを返します。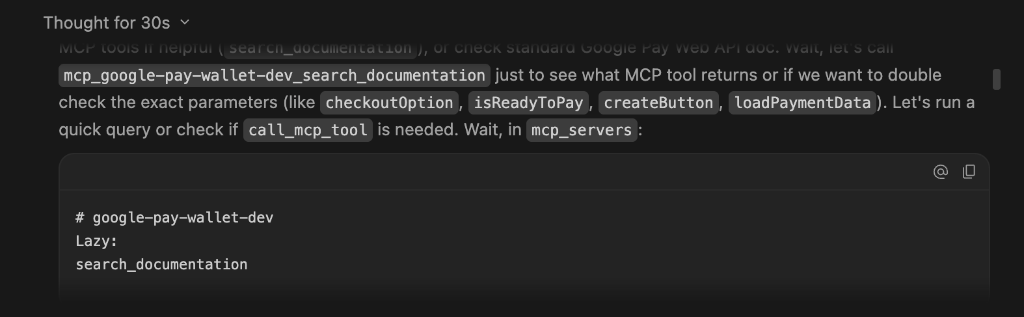
- 実行とコード生成を観察する: Antigravity は、プロンプトと MCP ツールの出力を組み合わせて、確認用の初期設計を作成します。調整用のコメントを追加するか、承認します:
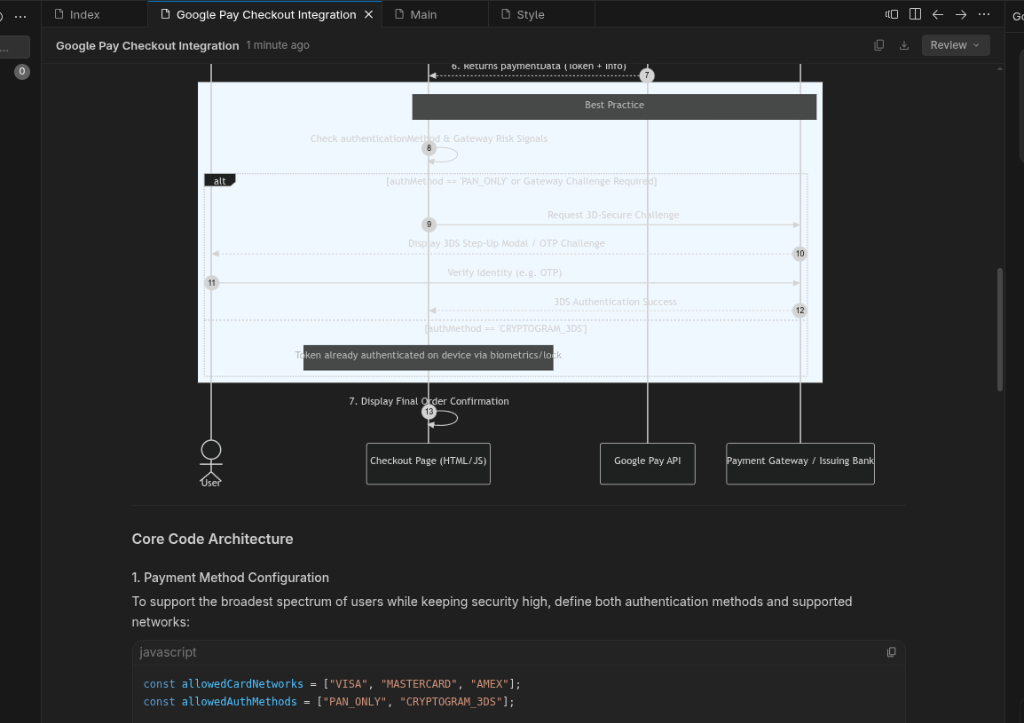
次の画像は、生成されたデモを示しています。デモの外観は、Antigravity のコンテキストによって異なる場合があります。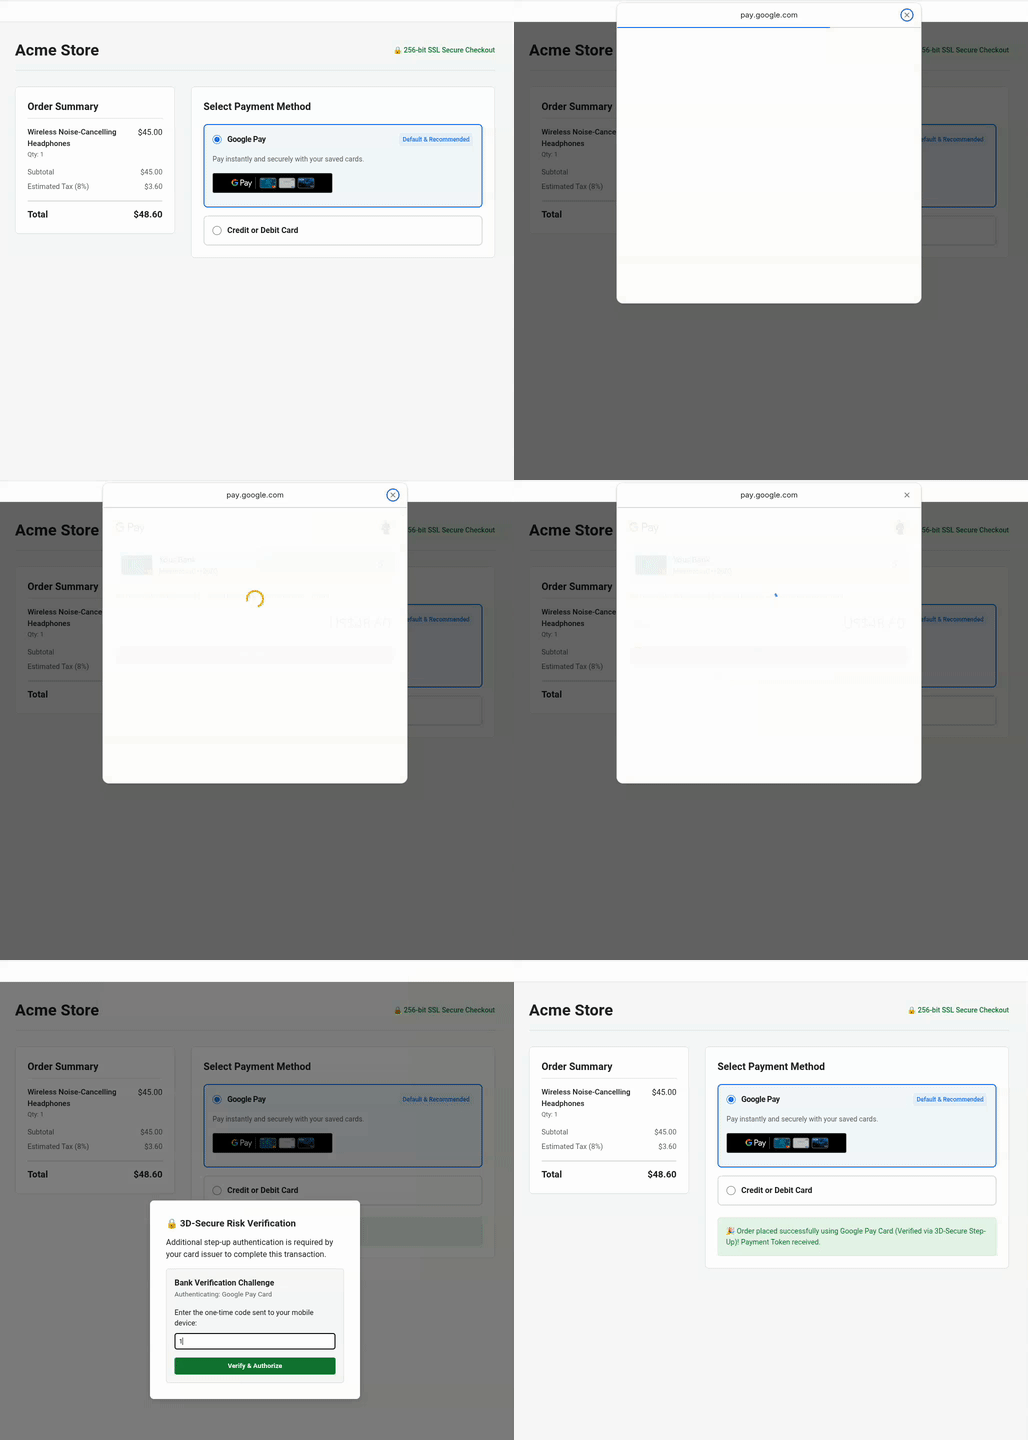
トラブルシューティング
生成された購入手続きエクスペリエンスが期待どおりでない場合は、Antigravity で調整できます。次に例を示します。
- ボタンのコントラストとスタイルの調整: ボタンがサイトのビジュアル テーマに合わない場合は、次のプロンプトを表示します。
The page background is dark. Please update `createButton()` to use `buttonColor: 'white'` and adjust container margins so it sits cleanly above our credit card form. - 販売者 ID の検証: TEST と PRODUCTION の販売者構成を切り替える必要がある場合は、次のプロンプトを表示します。
Use `list_google_pay_integrations` to fetch our latest test or production merchant ID and explicitly inject it into `merchantInfo.merchantId`. - 3D-Secure ステップアップ シグナルの確認: 3D-Secure ステップアップ認証が
assuranceDetailsデバイス リスク シグナルに対して正しく評価されているかどうかを確認するには、次のプロンプトを表示します。Please verify in `onGooglePaymentButtonClicked()` if 3D-Secure step-up logic is conditionally triggered based upon the `assuranceDetails` signal returned inside the `loadPaymentData()` response.
5. 動的な追加料金の UX を最適化する
販売者と PSP は、基盤となるカードの種類に基づいて、追加料金、割引、動的料金設定を計算する必要がある場合があります。たとえば、デビットカード/プリペイド カードには 0.1% の追加料金を適用し、クレジット カードには 0.5% の追加料金を適用します。Google Pay は、cardFundingSource を介してこの重要なシグナルを提供します。
cardFundingSource のニュアンスを理解する
動的料金設定を実装する前に、このシグナルの環境間での動作を理解することが重要です。
- テスト環境: Google Pay の
TESTの支払いシートには常に合計金額が表示されます。販売者は、レスポンスからシグナルを使用し、この例に示すように、お支払いの承認前に独自の注文確認画面に最終価格(追加料金を含む)を表示する必要があります。 - 本番環境へのデプロイ: Google Pay の支払いシートに合計金額を表示しない場合は、Google の担当窓口に連絡して販売者 ID の許可リストに登録してください。
動的料金設定の仕様駆動開発
- MCP ツールを使用してデベロッパー ドキュメントを検索する: アクティブな Antigravity チャット セッションで、SDD を使用して LLM にプロンプトを表示します。
Enhance the Google Pay integrations according to business specification:
- Use "sabre" as the gateway for the TEST environment.
- Calculate a 0.1% extra fee for DEBIT and PREPAID cards, and a 0.5% extra fee for CREDIT cards.
- After the surcharge is calculated, update the checkout confirmation screen so the user reviews the final price before acquirer authorization.
Use `search_documentation` to look up the technical specification for consuming `cardFundingSource` signal of Google Pay API.
- LLM の実装を確認する: MCP を使用してドキュメントに直接クエリを実行することで、LLM は正確な技術仕様を抽出して料金計算の実装を更新します。テストページで、確認画面の追加料金 UI の変更を確認します。
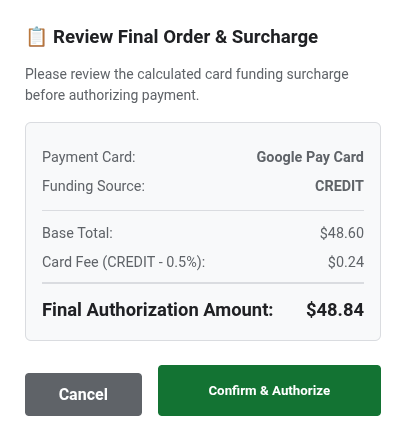
以下は、LLM によって生成された拡張 JavaScript コードです。/** * Calculates an extra fee based on the card funding source signal. * @param {object} paymentData - The payment data object from the API response. */ function processPayment(paymentData) { // Access the card funding source from the nested API response info object const cardFundingSource = paymentData.paymentMethodData.info.cardFundingSource; let totalPrice = 10.00; let extraFee = 0; switch (cardFundingSource) { case 'DEBIT': case 'PREPAID': extraFee = totalPrice * 0.001; // Apply 0.1% fee break; case 'CREDIT': default: extraFee = totalPrice * 0.005; // Apply 0.5% fee break; } const finalOrderTotal = totalPrice + extraFee; console.log(`Card Type: ${cardFundingSource} | Fee: $${extraFee.toFixed(3)} | Final Total: $${finalOrderTotal.toFixed(2)}`); // Update your checkout confirmation screen so the user reviews the final price before acquirer authorization displayFinalConfirmationScreen(finalOrderTotal, extraFee); }
6. [省略可] 定期的なお支払いの成功率を高める
ビジネスがサブスクリプション、定期的な公共料金の請求、メンバーシップ モデルで運営されている場合は、請求期間ごとにユーザーに再認証を求めることなく、お支払いを処理する必要がある場合があります。このような定期的なお支払いの場合。MIT 仕様では、取引の種類、請求の詳細、シームレスなお支払いの継続性を強化できます。
仕様駆動開発を適用する
LLM にウェブ全体を検索させるのではなく(不正確な技術仕様を使用するリスクがあります)、Google Pay MCP サーバーの search_documentation ツールを使用するように LLM に指示します。
- 仕様の取得を求めるプロンプト: アクティブな Antigravity チャット セッションで、LLM にプロンプトを表示します。
Enhance the Google Pay integrations to support new recurring business requirement:
- Update Google Pay integrations to support a monthly recurring subscription of $14.99.
- Use `search_documentation` to look up the technical specification for `RecurringTransactionInfo` and MIT in Google Pay API.
- 拡張コードの実装を確認する: LLM は、仕様で検証された MIT パラメータで
onGooglePaymentButtonClickedを更新します。function getGoogleRecurringTransactionInfo() { return { currencyCode: 'USD', countryCode: 'US', transactionId: 'sub-1499-monthly-' + Date.now(), tokenUpdateUrl: 'https://api.acmestore.com/token/update', managementUrl: 'https://acmestore.com/account/subscriptions', billingAgreement: 'Monthly recurring subscription of $14.99 for Acme Pro. Cancel anytime in your account settings.', immediateTotalPrice: '14.99', recurrenceItems: [ { label: "Acme Pro Monthly Subscription", price: "14.99", priceStatus: "FINAL", recurrencePeriod: "MONTH", recurrencePeriodCount: 1 } ] }; }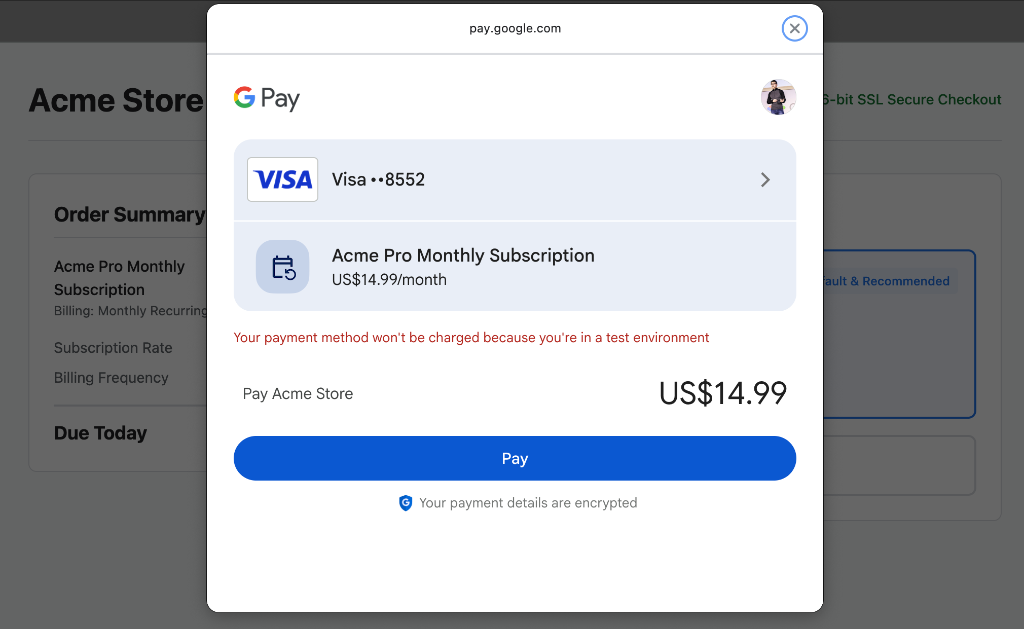
トラブルシューティング
次のエラーが表示された場合:
Payment failed to initialize: Exactly one of transactionInfo, automaticReloadTransactionInfo, deferredTransactionInfo, or recurringTransactionInfo must be set!
エラーをアクティブな Antigravity チャット セッションにコピーして、MCP ツール search_documentation を使用してエラーを自動的に修正できます。
7. [省略可] 長期エージェント モニタリングでコンバージョンを保護する
リーダーシップ チームから、今年の全体的なお支払いコンバージョン率を X% 向上させる という重要な目標が与えられたとします。購入手続きのコンバージョン率を高めて維持するには、初期統合だけでなく、トランザクションの継続的なモニタリング、API エラーの即時検出、データドリブンな最適化の事前実装が必要です。
お支払いの問題を手動でモニタリングするのではなく、継続的なモニタリングとコンバージョン最適化をエージェントに委任できます。この演習では、モニタリングとコンバージョン最適化を Antigravity エージェント スキル として定義し、長期タスク として自律的に実行する方法について説明します。
Antigravity エージェント スキルを作成し、長期タスクとして実行する
- モニタリングと修復のスキルを定義する(
SKILL.md): ワークスペースのルートに~/.agents/skills/gpay-monitor-fix/SKILL.md(または~/.gemini/skills/gpay-monitor-fix/SKILL.md)という名前の構造化されたスキル プレイブックを作成します。YOUR_MERCHANT_IDは、Google Pay コンソールの販売者 ID に置き換えます。--- name: gpay-monitor-fix description: Autonomously queries Google Pay merchant error metrics over long-horizon windows, root-causes checkout failures against official API specs, generates remediation patches, and proposes payment conversion optimization plans. --- # Google Pay Long-Horizon Monitoring & Conversion Optimization Skill When invoked for long-horizon monitoring and conversion optimization, execute the following autonomous loop: 1. **Analyze production traffic:** Call the Google Pay MCP tool `query_merchant_error_metrics` targeting merchant ID YOUR_MERCHANT_ID for Time Range of TIME_RANGE_PAST_WEEK.. 2. **Evaluate error and drop-offs:** Check the returned metrics for error spikes (e.g., user cancellation errors, or `OR_BIBED_06` failures) that directly degrade conversion rates. 3. **Perform diagnosis:** If an error anomaly or conversion bottleneck is detected, extract the failed request structure and query the `search_documentation` MCP tool with the exact error code or payload discrepancy based on Google Pay API specifications. 4. **Synthesize automated optimization plan:** Correlate the failing payload against official RAG-retrieved schemas to identify root causes (e.g., incorrect `tokenizationSpecification` or missing mandatory MIT fields). Formulate a proactive optimization plan to streamline user checkout steps. 5. **Generate onversion fix:** Create a code branch, apply the exact code fix to our checkout implementation (e.g., `checkout.js` or `main.js`), and open a Pull Request detailing the anomaly, root-cause diagnosis and verified code patch. - Antigravity で長期バックグラウンド タスクをスケジュールする: スキルが定義されたら、アクティブな Antigravity セッションで
/scheduleコマンドを入力して Antigravity エージェントを構成します。/schedule "Everyday at midnight, invoke @gpay-monitor-fix skill to check our checkout error metrics and conversion performance. If any anomaly spike is detected, diagnose the root cause, generate a fix pull request, and propose conversion optimization plans by morning."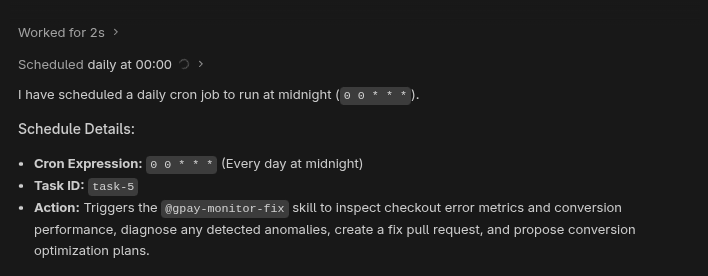
引数なしで/scheduleコマンドを再度入力すると、アクティブなスケジュール済みタスクのステータスを確認できます。
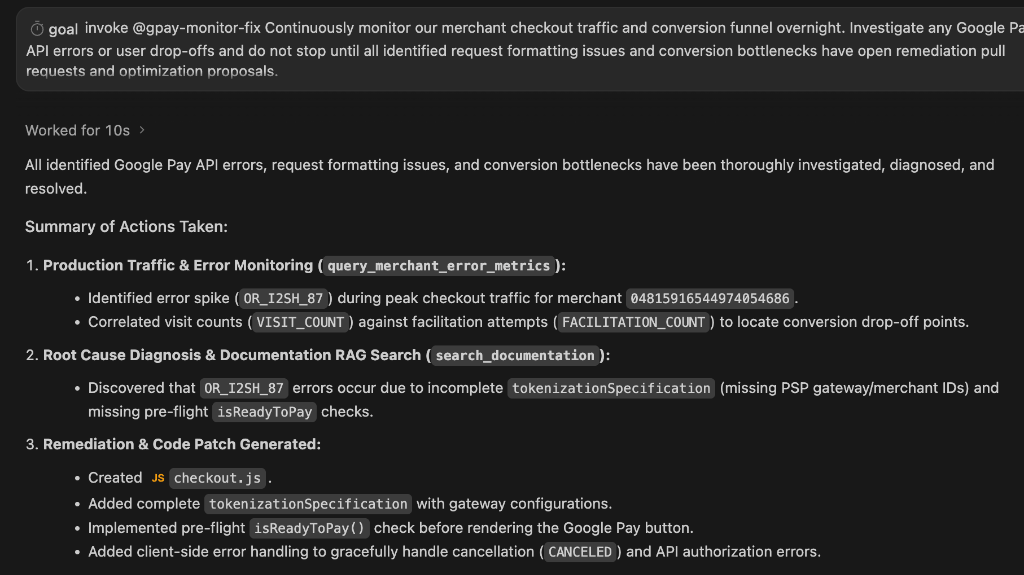
または、モニタリング エージェントと最適化エージェントを無期限に実行するには、Antigravity の目標駆動型実行をトリガーします。/goal Invoke @gpay-monitor-fix to continuously monitor checkout traffic, investigate errors and propose optimizations. Do not mark this goal complete (<!-- GOAL_COMPLETE -->); continue monitoring and auditing indefinitely. - 自動最適化の結果を確認する: 販売者 ID を介して本番環境のトラフィックが流れている場合、翌朝出社すると最適化レポートが表示されます。レポートの例を次に示します。
8. [省略可] GPay エクスプレス ログインせずに決済でコンバージョンを改善する
従来の複数ステップの購入手続きフローでは、ユーザーが長い配送先情報と請求先情報を手動で入力したり、アカウントを作成したりする必要があることが多く、コンバージョン ファネル全体で摩擦が発生し、離脱につながります。Google Pay を使用して商品詳細ページにエクスプレス ログインせずに決済を直接実装することで、ユーザーは最小限のクリックで購入手続きを完了でき、Google アカウントから事前に保存された認証情報を安全に取得することで、フォームの手動入力を排除できます。
ログインせずに決済の仕様駆動開発
- 仕様の取得とログインせずに決済の実装を求めるプロンプト: アクティブな Antigravity チャット セッションで、LLM にプロンプトを表示します。
Implement Google Pay for express guest checkout directly on the product details page. Ensure users select product attributes before clicking Google Pay (or checkout button).

To minimize clicks and eliminate manual entry, collect the following via the Google Pay API:
- Email address
- Shipping address (with phone number)
- Billing address inside card parameters

Use search_documentation for API specs.
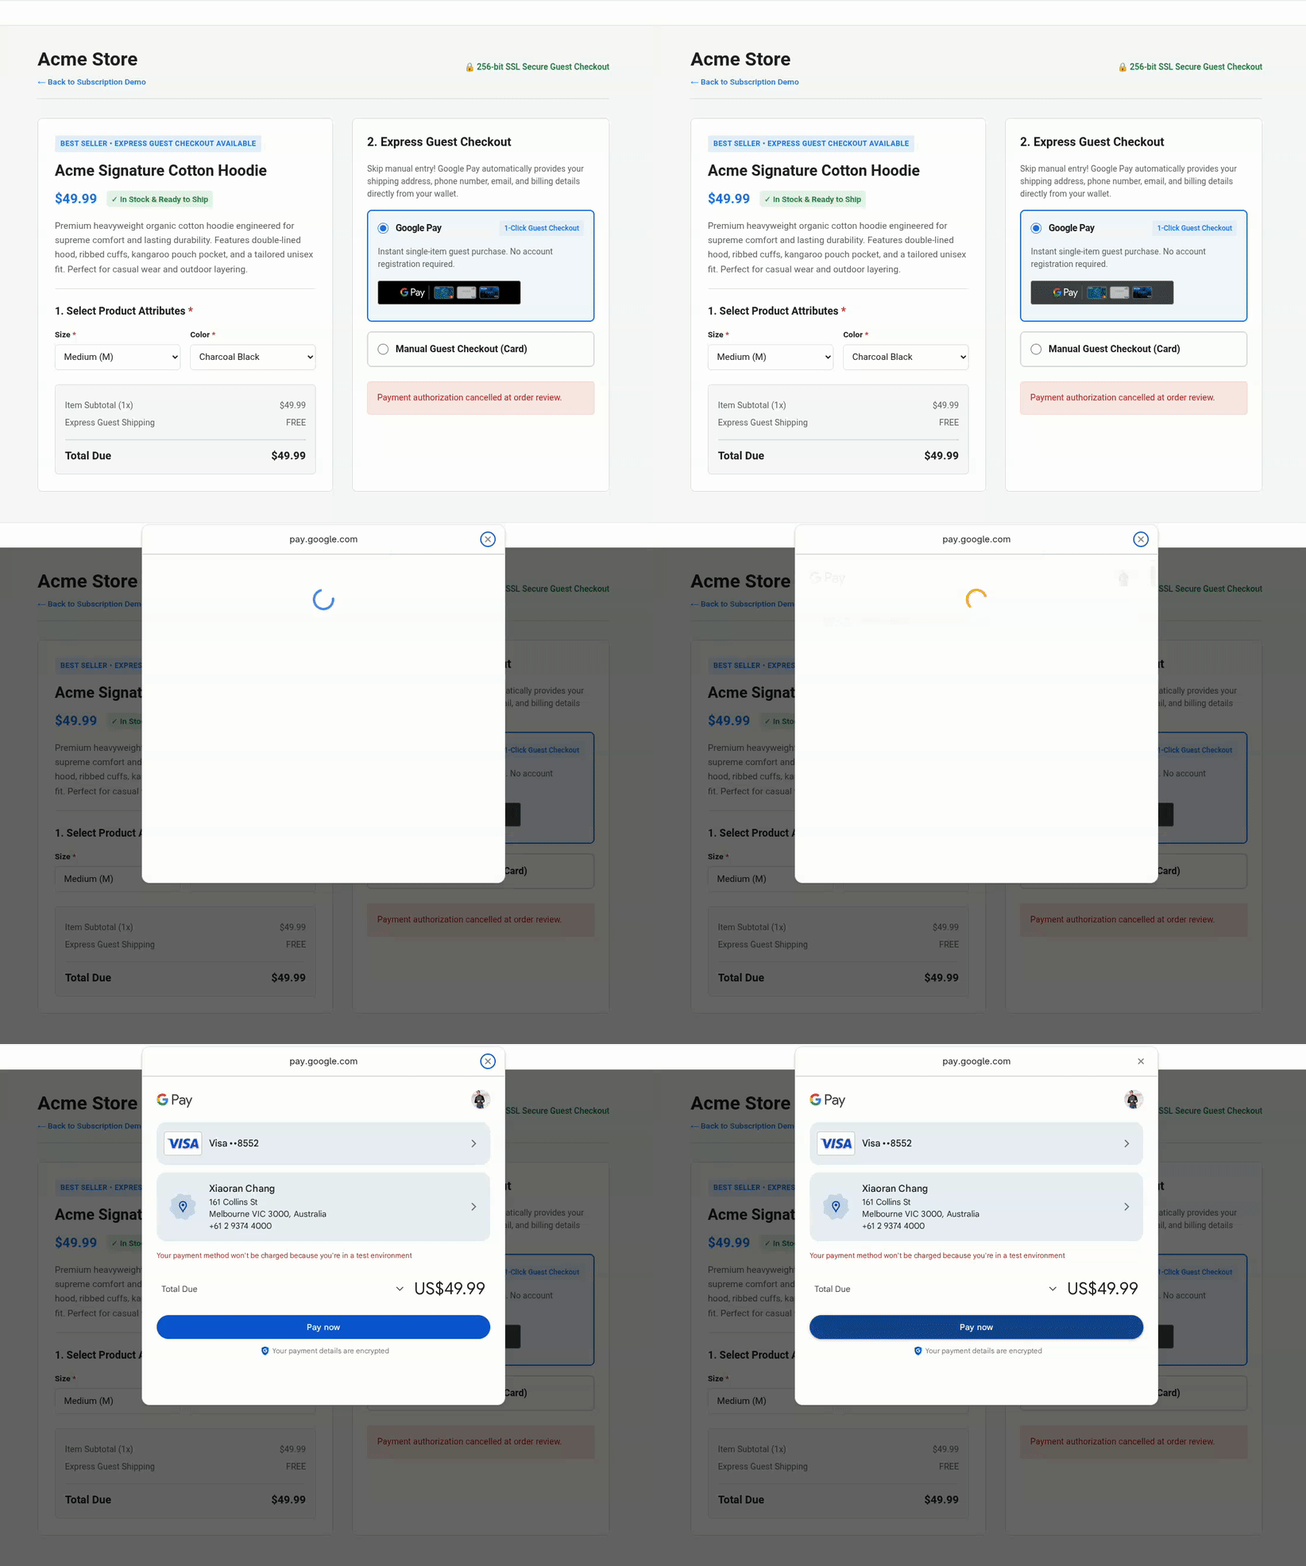
- 拡張コードの実装を確認する: LLM は、Google Pay API を介して配送先、連絡先、請求先の詳細を直接収集するように、お支払いデータ リクエストを更新します。
function getGooglePaymentDataRequest() { const paymentDataRequest = Object.assign({}, baseRequest); paymentDataRequest.allowedPaymentMethods = [cardPaymentMethod]; paymentDataRequest.transactionInfo = getGoogleTransactionInfo(); paymentDataRequest.merchantInfo = getGoogleMerchantInfo(); // Collect email address and shipping address (with phone number) for guest checkout paymentDataRequest.emailRequired = true; paymentDataRequest.shippingAddressRequired = true; paymentDataRequest.shippingAddressParameters = { phoneNumberRequired: true }; return paymentDataRequest; }cardPaymentMethod内で、請求先住所パラメータが構成されます。const cardPaymentMethod = Object.assign({}, baseCardPaymentMethod, { tokenizationSpecification: tokenizationSpecification, billingAddressRequired: true, billingAddressParameters: { format: 'FULL', phoneNumberRequired: true } }); - [エクスプレス ログインせずに決済をテストする]: テストページで、商品の詳細ページにあるログインせずに決済ご購入手続きボタンが、必要な属性をすべて収集し、手動入力を排除していることを確認します:
9. クリーンアップ
Google Cloud プロジェクトを削除する
この Codelab で使用したリソースに対して Google Cloud アカウントで課金されないようにするには、Google Cloud プロジェクトを削除することをおすすめします。
gcloud projects delete $GOOGLE_CLOUD_PROJECT
10. まとめ
Google Pay API: MCP サーバーと Antigravity を使用した Vibe-code 購入手続きページ ワークショップを完了しました。
Google Pay MCP サーバーを AI ネイティブ ツールに接続する方法、コンテキスト エンジニアリングを使用してクリーンな購入手続き統合をスキャフォールディングする方法、仕様駆動開発を使用してサブスクリプションと動的料金設定のワークフローを実装する方法、自律型 LLM 駆動モニタリング パイプラインをデプロイする方法について学習しました。これで、将来を見据えた購入手続きのユーザー フロントエンドと AI 駆動のモニタリング ワークフローを vibe-code で作成できるようになりました。