
1. Using the Google Workspace APIs
This codelab introduces you to using Google Workspace (formerly G Suite) HTTP-based RESTful APIs. The example will be done in Python for brevity and availability, but you can also choose to use your favorite development language. You'll be exposed to introductory topics such as how to use the developer console to create/manage projects, obtaining authorization credentials, and installing the API client libraries. With the formalities taken care of, you'll write an app to display the first 100 files & folders in your Google Drive by using its API.
What you'll learn
- Create a project using the Google/Cloud Developers Console
- Obtain & use OAuth2 application credentials in your app
- Learn about using the Google APIs Client Libraries
- Write applications using Google & Google Workspace APIs
- Obtain file and folder information with the Google Drive API
What you'll need
- Access to the internet and a web browser
- A Google account (Google Workspace accounts may require administrator approval)
- Familiarity to POSIX-compliant systems like Linux & Mac OS X
- Ability to create source files with either a code editor or shell commands.
- Basic skills in Python (2 or 3), but you can use any supported language
- Some files and/or folders in your Google Drive
2. Survey
How will you use this codelab tutorial?
How would rate your experience with Google Workspace developer tools & APIs?
3. Overview
In this codelab, you will learn how to:
- Download the Google APIs client library for Python
- Create a new project in the Google/Cloud Developers Console
- Obtain the necessary credentials for your app
- Use those credentials to access the Google Drive API
If you prefer not to use Python, you're welcome to implement the codelab in your favorite development tool (supported languages' client libraries are available here) and simply refer to the Python examples as (executable) pseudocode.
4. Confirm Python environment
This codelab requires you to use the Python language (although many languages are supported by the Google APIs client libraries, so feel free to build something equivalent in your favorite development tool and simply use the Python as pseudocode). In particular, this codelab supports Python 2 and 3, but we recommend moving to 3.x as soon as possible.
The Cloud Shell is a convenience available for users directly from the Cloud Console and doesn't require a local development environment, so this tutorial can be done completely in the cloud with a web browser. The Cloud Shell is especially useful if you're developing or plan to continue developing with GCP products & APIs. More specifically for this codelab, the Cloud Shell has already pre-installed both versions of Python.
The Cloud Shell also has IPython installed... it is a higher-level interactive Python interpreter which we recommend, especially if you are part of the data science or machine learning community. If you are, IPython is the default interpreter for Jupyter Notebooks as well as Colab, Jupyter Notebooks hosted by Google Research.
IPython favors a Python 3 interpreter first but falls back to Python 2 if 3.x isn't available. IPython can be accessed from the Cloud Shell but can also be installed in a local development environment. Exit with ^D (Ctrl-d) and accept the offer to exit. Example output of starting ipython will look like this:
$ ipython
Python 3.7.3 (default, Mar 4 2020, 23:11:43)
Type 'copyright', 'credits' or 'license' for more information
IPython 7.13.0 -- An enhanced Interactive Python. Type '?' for help.

In [1]:
If IPython isn't your preference, use of a standard Python interactive interpreter (either the Cloud Shell or your local development environment) is perfectly acceptable (also exit with ^D):
$ python
Python 2.7.13 (default, Sep 26 2018, 18:42:22)
[GCC 6.3.0 20170516] on linux2
Type "help", "copyright", "credits" or "license" for more information.
>>>
$ python3
Python 3.7.3 (default, Mar 10 2020, 02:33:39)
[GCC 6.3.0 20170516] on linux
Type "help", "copyright", "credits" or "license" for more information.
>>>
The codelab also assumes you have the pip installation tool (Python package manager and dependency resolver). It comes bundled with versions 2.7.9+ or 3.4+. If you have an older Python version, see this guide for installation instructions. Depending on your permissions you may need to have sudo or superuser access, but generally this isn't the case. You can also explicitly use pip2 or pip3 to execute pip for specific Python versions.
The remainder of the codelab assumes you're using Python 3—specific instructions will be provided for Python 2 if they differ significantly from 3.x.
*Create and use virtual environments
This section is optional and only really required for those who must use a virtual environment for this codelab (per the warning sidebar above). If you only have Python 3 on your computer, you can simply issue this command to create a virtualenv called my_env (you can choose another name if desired):
virtualenv my_env
However, if you have both Python 2 & 3 on your computer, we recommend you install a Python 3 virtualenv which you can do with the -p flag like this:
virtualenv -p python3 my_env
Enter your newly created virtualenv by "activating" it like this:
source my_env/bin/activate
Confirm you're in the environment by observing your shell prompt is now preceded with your environment name, i.e.,
(my_env) $
Now you should be able to pip install any required packages, execute code within this eivonment, etc. Another benefit is that if you completely mess it up, get into a situation where your Python installation is corrupted, etc., you can blow away this entire environment without affecting the rest of your system.
5. Install the Google APIs client library for Python
This codelab requires the use of the Google APIs client library for Python, so either it's a simple install process, or, you may not have to do anything at all.
We earlier recommended you consider using Cloud Shell for convenience. You can complete the entire tutorial from a web browser in the cloud. Another reason to use Cloud Shell is that many popular development tools and necessary libraries are already pre-installed.
*Install client libraries
(optional) This can be skipped if you're using Cloud Shell or a local environment where you've already installed the client libraries. You only need to do this if you're developing locally and haven't (or unsure you've) installed them. The easiest way is to use pip (or pip3) to do the install (including updating pip itself if necessary):
pip install -U pip google-api-python-client oauth2client
Confirm installation
This command installs the client library as well as any packages it depends on. Whether you're using Cloud Shell or your own environment, verify the client library is installed by importing the necessary packages and confirm there are no import errors (nor output):
python3 -c "import googleapiclient, httplib2, oauth2client"
If you use Python 2 instead (from Cloud Shell), you'll get a warning that support for it has been deprecated:
*******************************************************************************
Python 2 is deprecated. Upgrade to Python 3 as soon as possible.
See https://cloud.google.com/python/docs/python2-sunset

To suppress this warning, create an empty ~/.cloudshell/no-python-warning file.
The command will automatically proceed in seconds or on any key.
*******************************************************************************
Once you can run that import "test" command successfully (no errors/output), you're ready to start talking to Google APIs!
Summary
As this is an introductory codelab, the assumption is that you're new to using Google and Google Workspace APIs. If you already have experience creating projects and creating user authorization "OAuth client IDs." If so, create or reuse an existing project, create or reuse an existing OAuth client ID and skip the next two modules and go straight to, "Displaying your Drive files & folders application" or jump all the way down to, "Advanced devconsole usage", to review those steps with less guidance.
6. Specify project in Cloud console
An application using Google APIs requires a project. Those are managed in the Google Cloud Developers Console or simply, "devconsole." In this codelab, we're only going to use the Google Drive API, so we have a magic link (below in Step 1) that:
- Takes you to the devconsole
- Walks you through creating a new project (or choosing an existing one), and
- Automagically enables the Drive API
Let do it!
- Navigate to console.developers.google.com/start/api?id=drive and login to your Google account.
- If you don't have any projects yet, you'll see this screen to accept the Google APIs Terms of Service:
 Once you accept the terms, a new project named "My Project" will be created, and the Drive API automatically enabled. 3. If instead, you've already created a project (perhaps your previous codelab?), you'll get this screen instead:
  When you click the Create a project pulldown, choose an existing project or really create a new project.
  Once you've made your selection (new or existing project), the Drive API will be automatically enabled for you. 4. You'll know the Drive API has been enabled with this confirmation:
  5. Click Go to credentials to move to the next step.
7. *Authorize API requests (user authorization)
This section can be skipped if you've already created user account authorization credentials and familiar with the process. It is different from service account authorization whose technique differs, so please continue below.
Intro to authorization (plus some authentication)
In order to make requests to the APIs, your application needs to have the proper authorization. Authentication, a similar word, describes login credentials—you authenticate yourself when logging into your Google account with a login & password. Once authenticated, the next step is whether you are—or rather, your code, is—authorized to access data, such as blob files on Cloud Storage or a user's personal files on Google Drive.
Google APIs support several types of authorization, but the one most common for Google Workspace API users is user authorization since the example application in this codelab accesses data belonging to end-users. Those end-users must grant permission for your app to access their data. This means your code must obtain user account OAuth2 credentials.
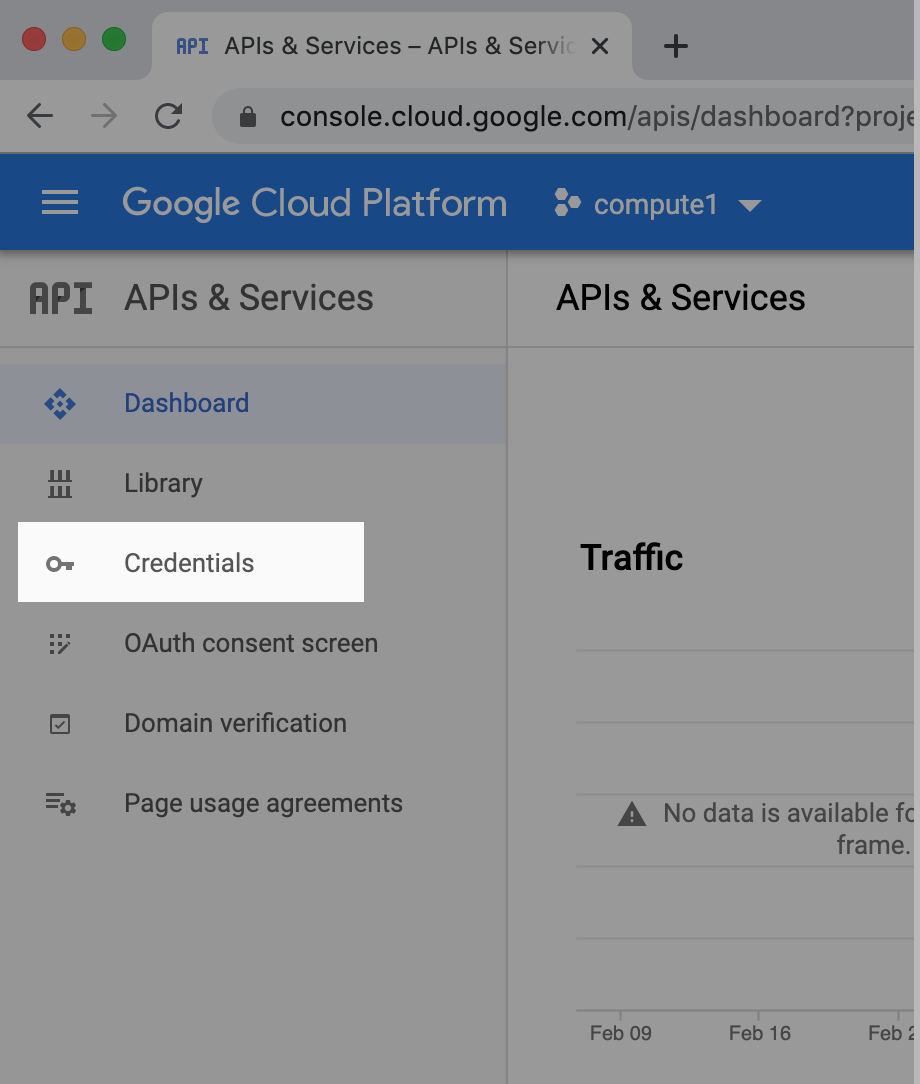
To get OAuth2 credentials for user authorization, go back to the API manager and select the "Credentials" tab on the left-nav:
When you get there, you'll see all your credentials in three separate sections:
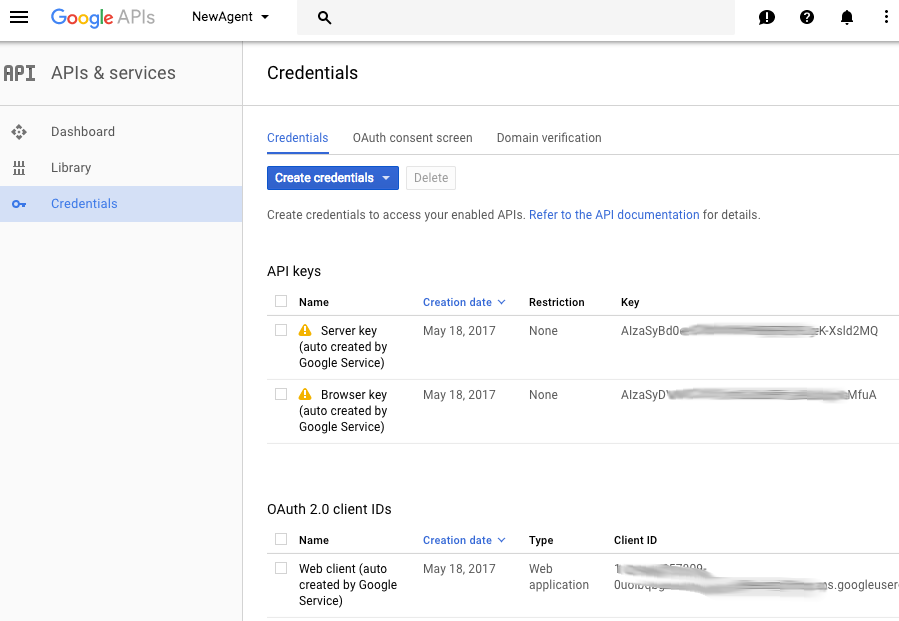
The first is for API keys, the second OAuth 2.0 client IDs, and the last OAuth2 service accts—we're using the one in the middle.
Creating credentials
From the Credentials page, click on the + Create Credentials button at the top, which then gives you a dialog where you'd choose "OAuth client ID:"

On the next screen, you have 2 actions: configuring your app's authorization "consent screen" and choosing the application type:

If you have not set a consent screen, you will see the warning in the console and would need to do so now. (Skip this these next steps if your consent screen has already been setup.)
OAuth consent screen
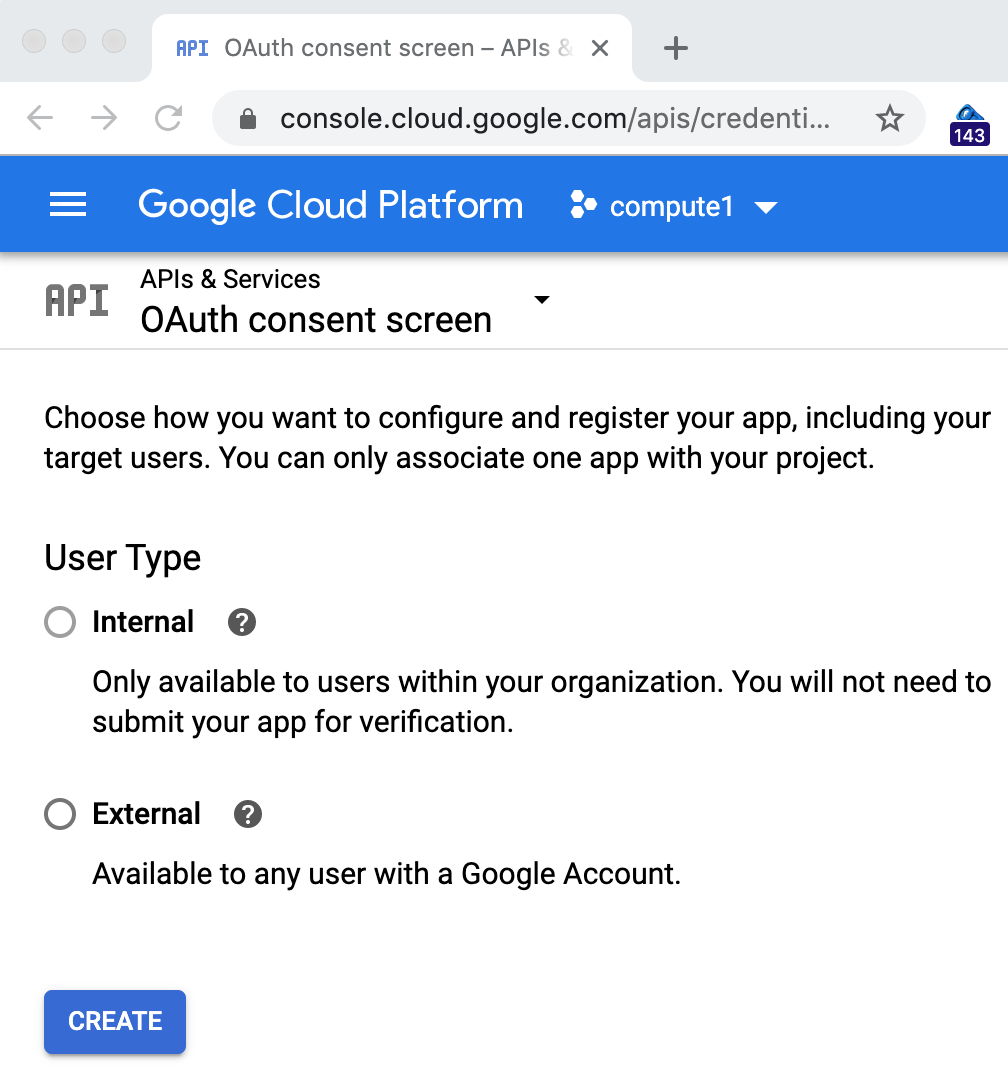
Click on "Configure consent screen" where you select an "External" app (or "Internal" if you're a Google Workspace [formerly "Google Workspace"] customer):
Note that for the purposes of this exercise, it doesn't matter which you pick because you're not publishing your codelab sample. Most people will select "External" to be taken to a more complex screen, but you really only need to complete the "Application name" field at the top:
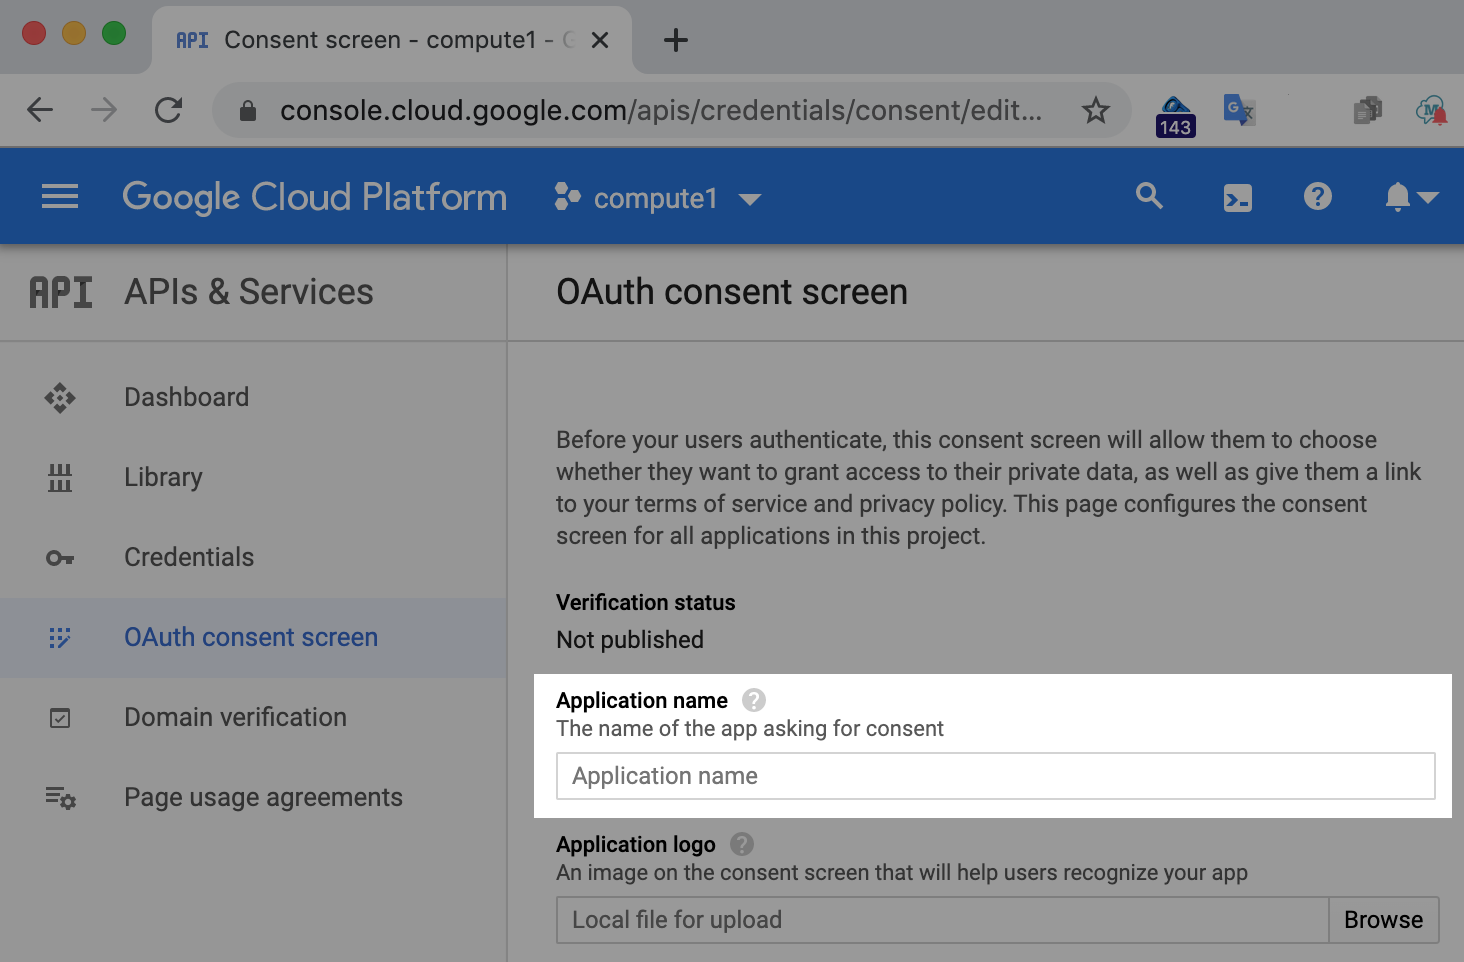
The only thing you need at this time is just an application name so pick someone that reflects the codelab you're doing then click Save.
Creating OAuth client ID (user acct auth)
Now go back to the Credentials tab to create an OAuth2 client ID. Here you'll see a variety of OAuth client IDs you can create:
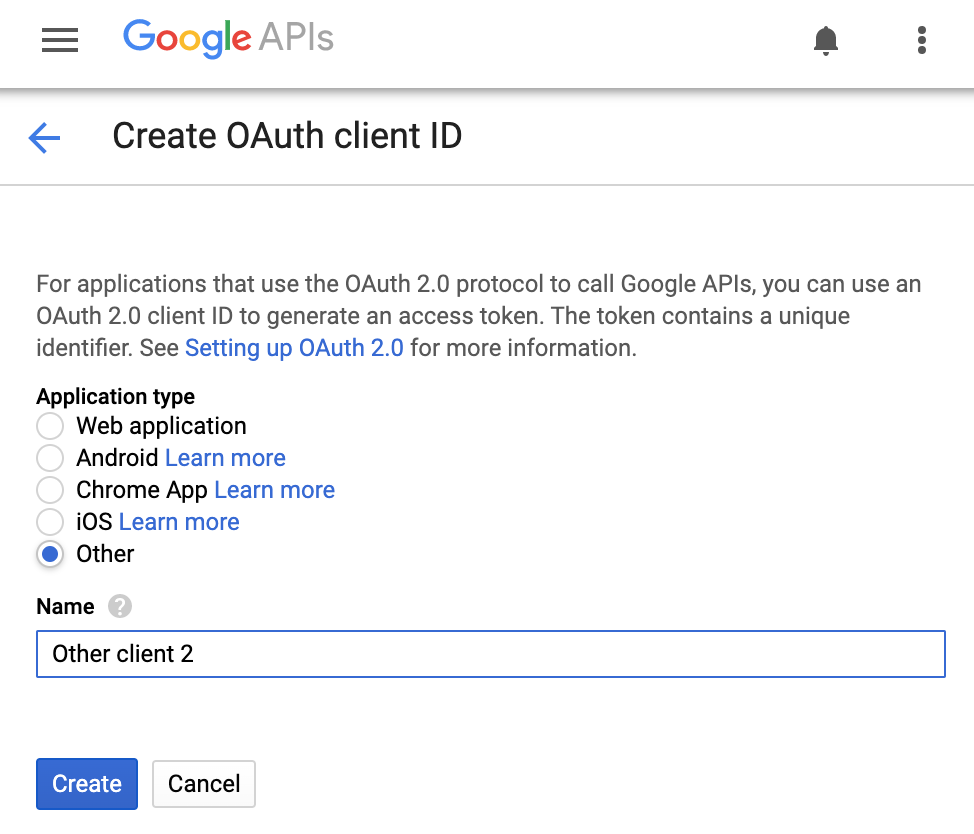
We're developing a command-line tool, which is Other, so choose that then click the Create button. Choose a client ID name reflecting the app you're creating or simply take the default name, which is usually, "Other client N".
Saving your credentials
- A dialog with the new credentials appears; click OK to close

- Back on the Credentials page, scroll down to the "OAuth2 Client IDs" section find and click the download icon
to the far right bottom of your newly-created client ID.
- This open a dialog to save a file named
client_secret-LONG-HASH-STRING.apps.googleusercontent.com.json, likely to your Downloads folder. We recommend shortening to an easier name likeclient_secret.json(which is what the sample app uses), then save it to the directory/folder where you'll be creating the sample app in this codelab.

Summary
With credentials in-hand you're now ready to access the Drive API from your app, keeping in mind the purpose of the OAuth client ID is that your users must grant your app permission to access their data in Google Drive.
NOTE: More details about creating projects, enabling APIs, and obtaining credentials, manually, i.e., without the use of the "wizard" above, is available after the conclusion of this codelab for further study.
8. Displaying your Drive files & folders application
Whether in your local development environment or in Cloud Shell, in the same directory where your client_id.json credentials file is located, create a new Python file named drive_list.py and add the lines of code below:
from __future__ import print_function

from googleapiclient import discovery
from httplib2 import Http
from oauth2client import file, client, tools

SCOPES = 'https://www.googleapis.com/auth/drive.readonly.metadata'
store = file.Storage('storage.json')
creds = store.get()
if not creds or creds.invalid:
    flow = client.flow_from_clientsecrets('client_id.json', SCOPES)
    creds = tools.run_flow(flow, store)
DRIVE = discovery.build('drive', 'v3', http=creds.authorize(Http()))

files = DRIVE.files().list().execute().get('files', [])
for f in files:
    print(f['name'], f['mimeType'])
Application structure
There are three main sections to this application:
- Python imports to bring in library functionality
- Obtaining application credentials
- Fetch file & folder names & MIMEtypes in user's Google Drive & display
NOTE: A deeper dive into the code and review a line-by-line explanation is available after the conclusion of this codelab for further study.
Running the application
Name this file something like drive_list.py. The first time you execute the script, it won't have the authorization to access the user's files on Drive (yours). The output looks like this with execution paused:
$ python3 ./drive_list.py
/usr/local/lib/python3.6/site-packages/oauth2client/_helpers.py:255: UserWarning: Cannot access storage.json: No such file or directory
 warnings.warn(_MISSING_FILE_MESSAGE.format(filename))

Your browser has been opened to visit:
  https://accounts.google.com/o/oauth2/auth?client_id=LONG-STRING.apps.googleusercontent.com&redirect_uri=http%3A%2F%2Flocalhost%3A8080%2F&scope=https%3A%2F%2Fwww.googleapis.com%2Fauth%2Fdrive.readonly.metadata&access_type=offline&response_type=code

If your browser is on a different machine then exit and re-run this
application with the command-line parameter

 --noauth_local_webserver
From local development environment
The command-line script is paused as a browser window opens and presents you with the OAuth2 permissions dialog:

This is where the application asks the user for the permissions the code is requesting (via the SCOPES variable). In this case, it's the ability to view the file metadata from the user's Google Drive. Yes, in your code, these permission scopes appear as URIs, but they're translated into the language specified by your locale in the OAuth2 flow dialog window. The user must give explicit authorization for the requested permission(s) requested, else the "run flow" part of the code will throw an exception, and the script does not proceed further.
NOTE: Some users have multiple browsers, and the authorization request may be popping up on a non-preferred browser. If that's the case, just copy the entire URL from the browser window you don't want to use and paste into the address bar of a browser you do wish to use.
From Cloud Shell
If you weren't paying attention and ran the program in the Cloud Shell, no browser window popped open, leaving you stuck. Realize the diagnostic message at the bottom was meant for you... this one:
If your browser is on a different machine then exit and re-run this
application with the command-line parameter

 --noauth_local_webserver
When you run it this way, you'll get the following output instead:
$ python3 drive_list.py --noauth_local_webserver
/usr/local/lib/python3.7/site-packages/oauth2client/_helpers.py:255: UserWarning: Cannot access storage.json: No such file or directory
 warnings.warn(_MISSING_FILE_MESSAGE.format(filename))

Go to the following link in your browser:

  https://accounts.google.com/o/oauth2/auth?client_id=xxx.apps.googleusercontent.com&redirect_uri=urn%3Aietf%3Awg%3Aoauth%3A2.0%3Aoob&scope=https%3A%2F%2Fwww.googleapis.com%2Fauth%2Fdrive.readonly.metadata&access_type=offline&response_type=code

Enter verification code:
Following the instructions and going to a different browser tab with that URL, you'll get an experience nearly identical to what was described above for local development environments. The key difference is at the end where you get one more screen with the verification code to enter in the Cloud Shell:

Cut and paste this code into the terminal window.
Summary
Once the user clicks allow and/or the verification code is pasted into the prompt, the app will (continue to) run so expect to see output consisting of Drive files/folders and their MIMEtypes. Here's an example from one of our test accounts:
$ python3 ./drive_list.py
Travel expenses application/vnd.google-apps.spreadsheet
Gmail Add-ons codelab application/vnd.google-apps.script
Google Workspace Developer Intro application/vnd.google-apps.presentation
Baseball Sheets application/vnd.google-apps.folder
My Resume application/vnd.google-apps.document
  . . .
Notice in successive executions that you're no longer prompted for authorization (as it's been cached by the auth libraries), and you go straight to output. Isn't it exciting to see your documents in a terminal for the first time? We think so!
9. Conclusion
Now you're ready to learn more features about the Drive API or explore other Google Workspace (Gmail, Google Docs, Sheets, Slides, Calendar) and other Google APIs (Maps, Analytics, YouTube, etc.). Congrats for making it all the way to the end!
The code featured in this codelab is also available at its GitHub repo at github.com/googlecodelabs/gsuite-apis-intro. (We aim to keep this codelab in-sync with the repo.) Ready to move on? Below are various resources you can access to help you dig into the material covered in this codelab more, or if you want to stretch your mind and explore other ways of accessing Google technologies programmatically.
As hinted earlier, if you're not a regular Python developer, we invite you to redo this codelab example in your favorite development language. Client libraries for supported languages are available here.
Additional Study
Now that you have some experience with the Drive API under your belt, below are some recommended exercises to further develop your skills:
- ZIP files: Write an application which backs up multiple ZIP archives to Drive, uncompressing them on the fly so each ZIP filename is the name of the folder those files go into. EXTRA CREDIT: support recursive ZIP archives within other ZIP files with Drive folders embedded inside other folders. If you give up, see this Node.js sample app.
- Photo albums: Write the beginning of a photo album generation tool which uploads multiple images to Google Drive, organizing them into separate folders by timestamp & geolocation. EXTRA CREDIT: find an open source image manipulation library and stitch all photos in each folder to represent events you may have experienced (a trip, a dinner, etc.).
- Explore GCP: Write an app that connects Google Workspace and Google Cloud Platform (GCP) together. Write a tool which backsup image files from Google Drive to Google Cloud Storage (GCS), another "file storage in the cloud" solution. Believe it or not, using GCS will be simpler than Drive because of its advanced client libraries.
- Analyze & record: Extend your solution to #3 by analyzing each image backed up by passing it to the Google Cloud Vision API and getting the top (3, 5, 10) "labels" of what the API sees in those images. For each image, write a row in a Google Sheet containing the analysis from Cloud Vision as well as its backed up location on GCS. If you give up, see this Python codelab.
10. Additional Resources
Documentation
- Google Drive API documentation (REST API & Android native SDK/API)
- Other Google Workspace APIs documentation
- Other Google APIs documentation
- Google APIs client libraries
- OAuth2 documentation
Related and general videos
- Creating new Google API projects ( blog post & video)
- Python authorization boilerplate code review ( video)
- Listing your files in Google Drive ( video, blog post)
- Google Drive API video library
- Launchpad Online video series (predecessor to...)
- Google Workspace Dev Show video series
News & updates
- Google Workspace developers blog
- Google Workspace developers Twitter (@GSuiteDevs)
- Google Workspace developers monthly newsletter
Other codelabs
Introductory
- [Apps Script] Google Apps Script intro
Intermediate
- [Apps Script] CLASP Apps Script command-line tool
- [Apps Script] Gmail Add-ons
- [Apps Script] Docs Add-on & GCP Natural Language API
- [Apps Script] Hangouts Chat bot framework
- [REST APIs] Custom reporting tool (Sheets API)
- [REST APIs] Custom slide generator for Github license BigQuery analyzer (Slides+BigQuery APIs)
Advanced
- [REST APIs] Cloud image processing workflow (Drive, Cloud Storage, Cloud Vision, Sheets APIs)
Reference apps
- Markdown-to-Google Slides converter (Slides REST API)
11. *Application detailed explanation
This optional section is to be used as self-study after the session concludes to fill-in any gaps which may have arose or for further research.
Python imports to bring in library functionality
from __future__ import print_function

from googleapiclient import discovery
from httplib2 import Http
from oauth2client import file, client, tools
- The first
importstatement enables this code to run on Python 2—it can be dropped completely if you're solely using Python 3. - One Python style guideline is to separate standard library and 3rd-party module imports—that's what the blank line is for.
- The next three imports bring in the necessary classes & functions from the Google APIs client library... all are needed for us to write this app. In brief, here are what they do:
googleapiclientfocuses on connecting to Google APIshttplib2provides an HTTP client for the app to useoauth2clienthelps us manage OAuth2 credentials
Authorization and obtaining application credentials
SCOPES = 'https://www.googleapis.com/auth/drive.readonly.metadata'
store = file.Storage('storage.json')
creds = store.get()
if not creds or creds.invalid:
    flow = client.flow_from_clientsecrets('client_id.json', SCOPES)
    creds = tools.run_flow(flow, store)
DRIVE = discovery.build('drive', 'v3', http=creds.authorize(Http()))
- Application
SCOPESare the permissions an app will ask of the user running it. To keep user data secure, apps can't run without being granted permission - A best practice is to use the most restrictive permissions your app needs to function. Why?
- Isn't it annoying when an app asks for a large set of permissions when you install or run it? Guess what? You're on the other side of the coin now, asking your users for all these permissions. Using more restrictive scopes make users feel better about installing your app because you're asking for less access.
- Most all scopes look like long URLs, and the Drive metadata scope is no exception.
SCOPES = 'https://www.googleapis.com/auth/drive.readonly.metadata'
- A token is required for apps to communicate with Google servers. Valid tokens coming back from Google will be saved in the token storage file,
storage.json. If you don't save these tokens, you'll have to re-authorize your app each time you run it.
store = file.Storage('storage.json')
- This app first checks whether we have valid credentials already in storage (see the
ifstatement conditional).
creds = store.get()
if not creds or creds.invalid:
- If you have no or expired credentials, a new authorization flow must be built [via
oauth2client.client.flow_from_clientsecrets()] from your OAuth client ID & secret inclient_id.jsonfile that you downloaded].
if not creds or creds.invalid:
    flow = client.flow_from_clientsecrets('client_id.json', SCOPES)
- Once your app has a flow, it needs to execute in order to present the OAuth2 permissions screen to the user [via
oauth2client.tools.run_flow()] described and illustrated above.
creds = tools.run_flow(flow, store)
- By clicking Allow, users consent to your app accessing their Google Drive file metadata, and Google servers return tokens to access the API. They're returned as
credsand cached in thestorage.jsonfile. - At this point, your app now has valid credentials to make API calls. Calling
googleapiclient.discovery.build()creates a service endpoint to the API you're using. - To use
build(), pass in the API name ('drive') & version desired (currently'v3'). - The final parameter is an HTTP client to use for encrypted API calls.
DRIVE = discovery.build('drive', 'v3', http=creds.authorize(Http()))
Fetch & display first 100 Drive files/folders & MIMEtypes)
files = DRIVE.files().list().execute().get('files', [])
for f in files:
    print(f['name'], f['mimeType'])
- The next line of code calls the
list()method in thefiles()collection for the Drive API to build the request, which is immediately called withexecute(). A Pythondictis returned from which we ask for the'files'key to get the 100 file & folder names from the user's Google Drive (or less if you have fewer files). - Why 100? That's the default from
DRIVE.files().list(). If you want to change this number, say to only 10 files or 1000, add thepageSizeparameter to your request:DRIVE.files().list(pageSize=10). Here's the documentation for more options. - The final part of the script loops through each file and displays their names & file MIMEtypes.
You've now written your first application that uses a Google REST API... congratulations! Aside from the imports and authorization code, this script really is just a couple of lines of code (what you see above). Most Google APIs work in a similar manner and you would only need to create service endpoints for each one you want to use.
Using more than one Google API in an app
Yes, you can certainly use more than one API in the same app! Here's a Python code snippet for an app that reuses the same HTTP client and creates service endpoints to three Google APIs (yes, also with 3 different SCOPES):
SCOPES = (
    'https://www.googleapis.com/auth/drive',
    'https://www.googleapis.com/auth/spreadsheets.readonly',
    'https://www.googleapis.com/auth/presentations',
)

    . . .

HTTP   = creds.authorize(Http())
DRIVE  = discovery.build('drive',  'v3', http=HTTP)
SHEETS = discovery.build('sheets', 'v4', http=HTTP)
SLIDES = discovery.build('slides', 'v1', http=HTTP)
We imagine this code can be part of an app that generates multiple slide decks (Slides API) based upon spreadsheet data (Sheets API) and uses a slide template which is copied (Drive API) for each deck generated. While such an app doesn't exist, you should be able to build something similar by using two existing samples that Google Workspace team has created as building blocks:
- Replacing text & images in slides ( blog post & video) — uses the Drive API to copy a slide template deck then employs the Slides API to change the text & image placeholders
- Generating slides from spreadsheet data ( blog post & video) — reads data from a spreadsheet (Sheets API) and creates slides (Slides API) based on that data
Your challenge: build that app!
12. *Advanced devconsole usage
In this optional section, we describe how to create projects in the devconsole, enable APIs, and obtain credentials, all without using the wizard as above in the codelab. This is for intermediate users comfortable enough to do it manually or wish to learn how to do so.
Specify project in the Cloud console
Any time you write an application using Google APIs, you need to have a project. You can either reuse an existing project or create a new one. That happens in the Cloud Console. Some codelabs provide a magic link (i.e., like a setup wizard) that gets you going quickly, skipping many of the required steps. But not all of them do, so these are intended to be general instructions on how to create projects.
You can create projects from most screens in the Cloud console, as long as you've logged in with your Google credentials and see a project pulldown at the top of the console. Note that most screenshots here are taken from the API Manager a.k.a. the Developers Console (easily reachable by clicking "API manager" in the left-nav or directly pointing your browser to console.developers.google.com.
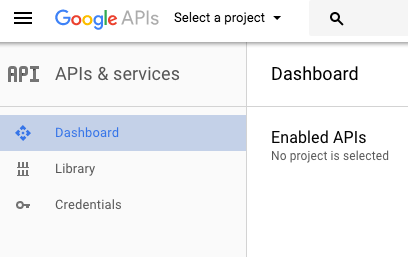
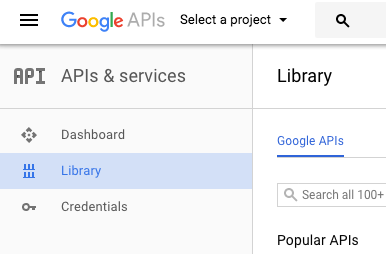
- If you don't have any projects yet, you may be taken to...
- the Dashboard page:
- the Library page:
- or a completely blank page:
If this 3rd one happens to you, just refresh the browser to be taken to the Library page.
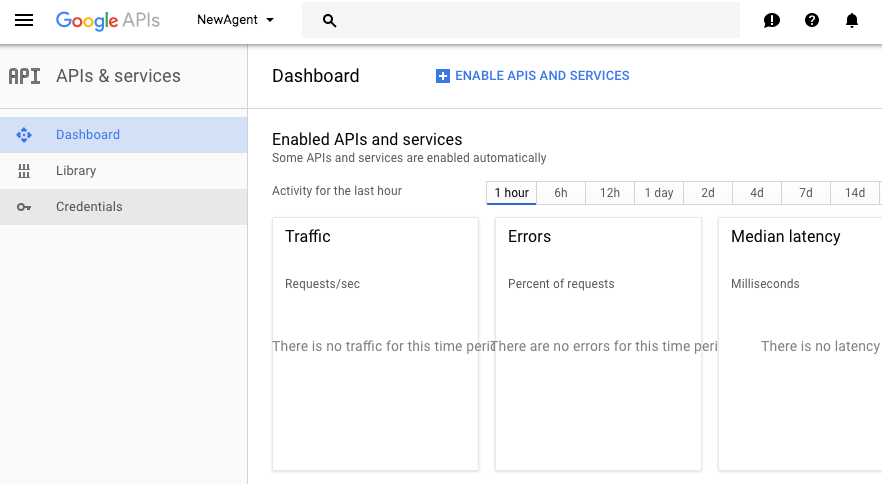
- Whether you're on the Dashboard or Library pages, click the project selector at the top of the page:
- Next, you'll get the selector dialog. Click on the "+" on the right-hand side to create a new project:
- After you click the "+", a New Project page will appear. All consumer accounts get 12 projects by default. Before creating your first project, you'll have to accept the Google APIs Terms of Service:


After you've done this, the email solicitation and Terms of Service questions go away when creating future projects:

You've now created a project successfully and are ready to move on by choosing the APIs you wish to use for your project.
Enable Google APIs
Before you can begin using Google APIs, you must enable them. The example below shows what you would do to enable the Cloud Vision API. In this codelab, you may be using one or more APIs, and should follow similar steps to enable them before usage.
From Cloud Shell
Using Cloud Shell, you can enable the API by using the following command:
gcloud services enable vision.googleapis.com
From the Cloud Console
You may also enable the Vision API in the API Manager. From the Cloud Console, go to API Manager and select, "Library."

In the search bar, start typing, "vision," then select Vision API when it appears. It may look something like this as you're typing:
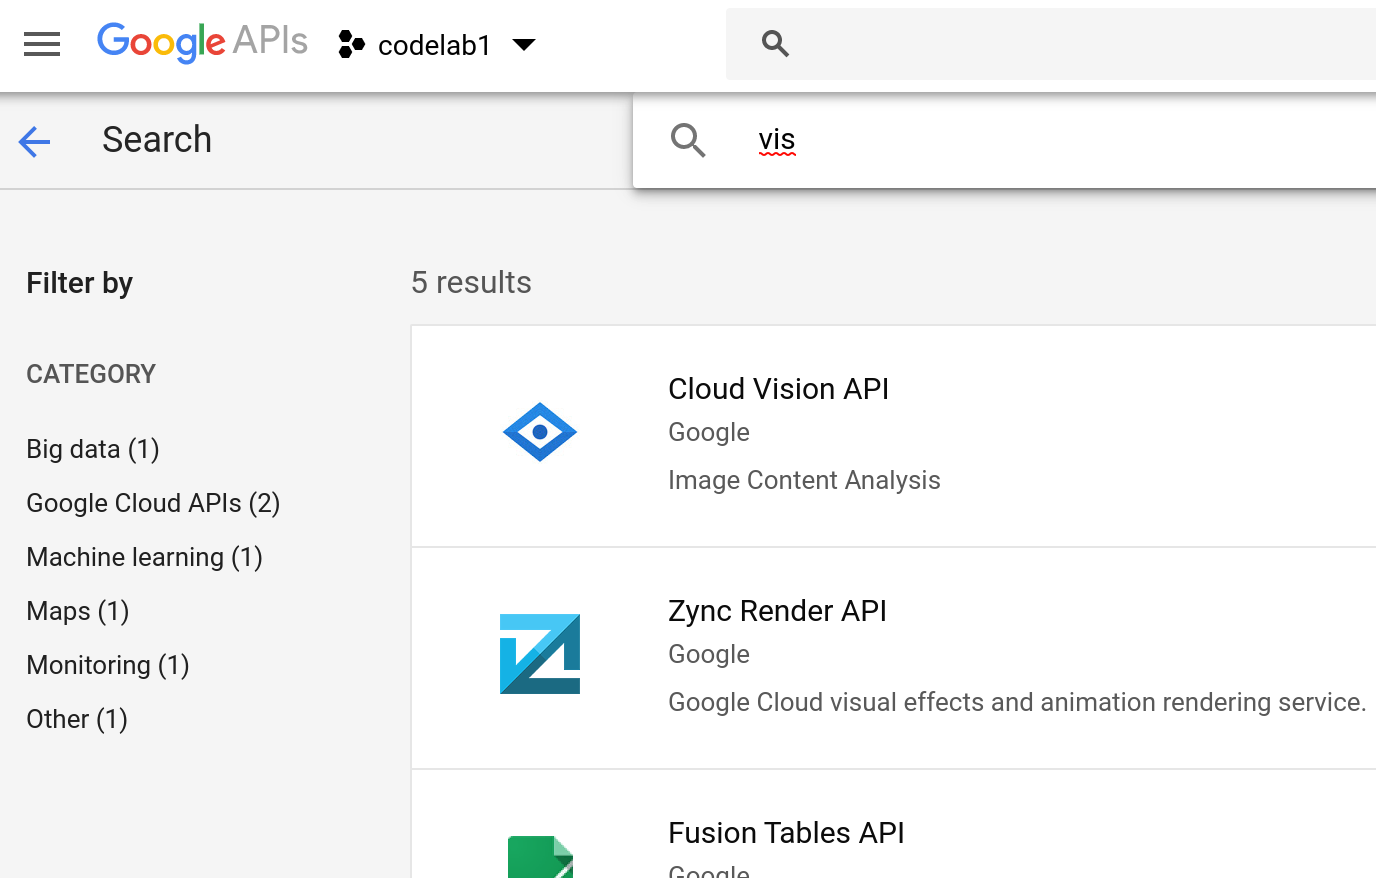
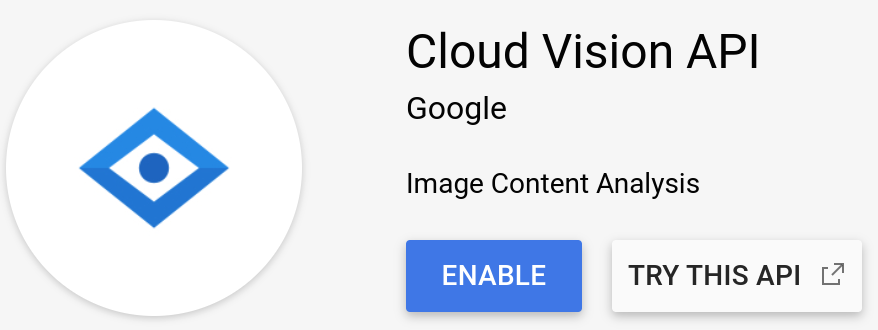
Select the Cloud Vision API to get the dialog you see below, then click the "Enable" button:
Cost
While many Google APIs can be used without fees, use of GCP (products & APIs) is not free. When enabling the Vision API (as described above), you may be asked for an active billing account. The Vision API's pricing information should be referenced by the user before enabling. Keep in mind that certain Google Cloud Platform (GCP) products feature an "Always Free" tier for which you have to exceed in order to incur billing. For the purposes of the codelab, each call to the Vision API counts against that free tier, and so long as you stay within its limits in aggregate (within each month), you should not incur any charges.
Some Google APIs, i.e., Google Workspace, has usage covered by a monthly subscription, so there's no direct billing for use of the Gmail, Google Drive, Calendar, Docs, Sheets, and Slides APIs, for example. Different Google products are billed differently, so be sure to reference your API's documentation for that information.
Summary
In this codelab, you only need to turn on the Google Drive API, so follow the instructions above and search for "Drive". Proceed forward once it's enabled.
Authorize API requests (user authorization)
Intro to authorization (plus some authentication)
In order to make requests to the APIs, your application needs to have the proper authorization. Authentication, a similar word, describes login credentials—you authenticate yourself when logging into your Google account with a login & password. Once authenticated, the next step is whether you are—or rather, your code, is—authorized to access data, such as blob files on Cloud Storage or a user's personal files on Google Drive.
Google APIs support several types of authorization, but the one most common for Google Workspace API users is user authorization since the example application in this codelab accesses data belonging to end-users. Those end-users must grant permission for your app to access their data. This means your code must obtain user account OAuth2 credentials.
To get OAuth2 credentials for user authorization, go back to the API manager and select the "Credentials" tab on the left-nav:
When you get there, you'll see all your credentials in three separate sections:
The first is for API keys, the second OAuth 2.0 client IDs, and the last OAuth2 service accts—we're using the one in the middle.
Creating credentials
From the Credentials page, click on the + Create Credentials button at the top, which then gives you a dialog where you'd choose "OAuth client ID:"
On the next screen, you have 2 actions: configuring your app's authorization "consent screen" and choosing the application type:
If you have not set a consent screen, you will see the warning in the console and would need to do so now. (Skip this these next steps if your consent screen has already been setup.)
OAuth consent screen
Click on "Configure consent screen" where you select an "External" app (or "Internal" if you're a Google Workspace customer):
Note that for the purposes of this exercise, it doesn't matter which you pick because you're not publishing your codelab sample. Most people will select "External" to be taken to a more complex screen, but you really only need to complete the "Application name" field at the top:
The only thing you need at this time is just an application name so pick someone that reflects the codelab you're doing then click Save.
Creating OAuth client ID (user acct auth)
Now go back to the Credentials tab to create an OAuth2 client ID. Here you'll see a variety of OAuth client IDs you can create:
We're developing a command-line tool, which is Other, so choose that then click the Create button. Choose a client ID name reflecting the app you're creating or simply take the default name, which is usually, "Other client N".
Saving your credentials
- A dialog with the new credentials appears; click OK to close
- Back on the Credentials page, scroll down to the "OAuth2 Client IDs" section find and click the download icon
- This open a dialog to save a file named
client_secret-LONG-HASH-STRING.apps.googleusercontent.com.json, likely to your Downloads folder. We recommend shortening to an easier name likeclient_secret.json(which is what the sample app uses), then save it to the directory/folder where you'll be creating the sample app in this codelab.