1. はじめに
概要
この Codelab では、ソースコードの変更を GitHub リポジトリに push するたびにアプリケーションの新しいバージョンを自動的にビルドしてデプロイするように Cloud Run を構成します。
このデモ アプリケーションはユーザーデータを Firestore に保存しますが、適切に保存されるのはごく一部のデータのみです。継続的デプロイは、バグ修正を GitHub リポジトリに push したときに自動的に新しいリビジョンで修正が利用可能になるように構成します。
学習内容
- Cloud Shell エディタを使用して Express ウェブ アプリケーションを作成する
- 継続的デプロイのために GitHub アカウントを Google Cloud に接続する
- アプリケーションを Cloud Run に自動的にデプロイする
- HTMX と TailwindCSS の使用方法
2. 設定と要件
前提条件
- GitHub アカウントを持っており、コードの作成とリポジトリへの push に精通している。
- Cloud コンソールにログインしています。
- 以前に Cloud Run サービスをデプロイしました。たとえば、「ソースコードからウェブサービスをデプロイする」クイックスタートの手順に沿って開始できます。
Cloud Shell をアクティブにする
- Cloud Console で、[Cloud Shell をアクティブにする]
 をクリックします。

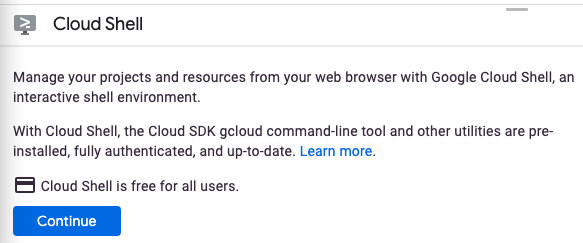
Cloud Shell を初めて起動する場合は、内容を説明する中間画面が表示されます。中間画面が表示されたら、[続行] をクリックします。

Cloud Shell のプロビジョニングと接続に少し時間がかかる程度です。

この仮想マシンには、必要なすべての開発ツールが読み込まれます。5 GB の永続的なホーム ディレクトリが用意されており、Google Cloud で稼働するため、ネットワークのパフォーマンスと認証が大幅に向上しています。この Codelab での作業のほとんどはブラウザを使って行うことができます。
Cloud Shell に接続すると、認証が完了し、プロジェクトに各自のプロジェクト ID が設定されていることがわかります。
- Cloud Shell で次のコマンドを実行して、認証されたことを確認します。
gcloud auth list
コマンド出力
 Credentialed Accounts
ACTIVE  ACCOUNT
*       <my_account>@<my_domain.com>

To set the active account, run:
    $ gcloud config set account `ACCOUNT`
- Cloud Shell で次のコマンドを実行して、gcloud コマンドがプロジェクトを認識していることを確認します。
gcloud config list project
コマンド出力
[core]
project = <PROJECT_ID>
上記のようになっていない場合は、次のコマンドで設定できます。
gcloud config set project <PROJECT_ID>
コマンド出力
Updated property [core/project].
3. API を有効にして環境変数を設定する
API を有効にする
この Codelab では、次の API を使用する必要があります。これらの API を有効にするには、次のコマンドを実行します。
gcloud services enable run.googleapis.com \
    cloudbuild.googleapis.com \
    firestore.googleapis.com \
    iamcredentials.googleapis.com
環境変数を設定する
この Codelab 全体で使用する環境変数を設定できます。
REGION=<YOUR-REGION>
PROJECT_ID=<YOUR-PROJECT-ID>
PROJECT_NUMBER=$(gcloud projects describe $PROJECT_ID --format='value(projectNumber)')
SERVICE_ACCOUNT="firestore-accessor"
SERVICE_ACCOUNT_ADDRESS=$SERVICE_ACCOUNT@$PROJECT_ID.iam.gserviceaccount.com
4. サービス アカウントを作成する
このサービス アカウントは、Cloud Run が Vertex AI Gemini API を呼び出すために使用します。このサービス アカウントには、Firestore に対する読み取り / 書き込み権限と、Secret Manager からのシークレットの読み取り権限も付与されます。
まず、次のコマンドを実行してサービス アカウントを作成します。
gcloud iam service-accounts create $SERVICE_ACCOUNT \
  --display-name="Cloud Run access to Firestore"
次に、Firestore に対する読み取り / 書き込みアクセス権をサービス アカウントに付与します。
gcloud projects add-iam-policy-binding $PROJECT_ID \
  --member serviceAccount:$SERVICE_ACCOUNT_ADDRESS \
  --role=roles/datastore.user
5. Firebase プロジェクトを作成して構成する
- Firebase コンソールで [プロジェクトを追加] をクリックします。
- <YOUR_PROJECT_ID> を入力します既存の Google Cloud プロジェクトのいずれかに Firebase を追加する
- Firebase の利用規約が表示されたら、内容を確認して同意します。
- [続行] をクリックします。
- [プランを確認] をクリックして Firebase 料金プランを確認します。
- この Codelab では、Google アナリティクスを有効にするかどうかは任意です。
- [Firebase を追加] をクリックします。
- プロジェクトが作成されたら、[続行] をクリックします。
- [構築] メニューから [Firestore データベース] をクリックします。
- [データベースを作成] をクリックします。
- [ロケーション] プルダウンからリージョンを選択し、[次へ] をクリックします。
- デフォルトの [本番環境モードで開始] を使用し、[作成] をクリックします。
6. アプリケーションを作成する
まず、ソースコード用のディレクトリを作成し、そのディレクトリに移動します。
mkdir cloud-run-github-cd-demo && cd $_
次に、次の内容の package.json ファイルを作成します。
{
  "name": "cloud-run-github-cd-demo",
  "version": "1.0.0",
  "description": "",
  "main": "index.js",
  "scripts": {
    "start": "node app.js",
    "nodemon": "nodemon app.js",
    "tailwind-dev": "npx tailwindcss -i ./input.css -o ./public/output.css --watch",
    "tailwind": "npx tailwindcss -i ./input.css -o ./public/output.css",
    "dev": "npm run tailwind && npm run nodemon"
  },
  "keywords": [],
  "author": "",
  "license": "ISC",
  "dependencies": {
    "@google-cloud/firestore": "^7.3.1",
    "axios": "^1.6.7",
    "express": "^4.18.2",
    "htmx.org": "^1.9.10"
  },
  "devDependencies": {
    "nodemon": "^3.1.0",
    "tailwindcss": "^3.4.1"
  }
}
まず、以下の内容で app.js ソースファイルを作成します。このファイルには、サービスのエントリ ポイントと、アプリのメインロジックが含まれています。
const express = require("express");
const app = express();
app.use(express.urlencoded({ extended: true }));
app.use(express.json());
const path = require("path");
const { get } = require("axios");

const { Firestore } = require("@google-cloud/firestore");
const firestoreDb = new Firestore();

const fs = require("fs");
const util = require("util");
const { spinnerSvg } = require("./spinnerSvg.js");

const service = process.env.K_SERVICE;
const revision = process.env.K_REVISION;

app.use(express.static("public"));

app.get("/edit", async (req, res) => {
    res.send(`<form hx-post="/update" hx-target="this" hx-swap="outerHTML">
                <div>
  <p>
    <label>Name</label>
    <input class="border-2" type="text" name="name" value="Cloud">
    </p><p>
    <label>Town</label>
    <input class="border-2" type="text" name="town" value="Nibelheim">
    </p>
  </div>
  <div class="flex items-center mr-[10px] mt-[10px]">
  <button class="btn bg-blue-500 text-white px-4 py-2 rounded-lg text-center text-sm font-medium mr-[10px]">Submit</button>
  <button class="btn bg-gray-200 text-gray-800 px-4 py-2 rounded-lg text-center text-sm font-medium mr-[10px]" hx-get="cancel">Cancel</button>
                ${spinnerSvg}
                </div>
  </form>`);
});

app.post("/update", async function (req, res) {
    let name = req.body.name;
    let town = req.body.town;
    const doc = firestoreDb.doc(`demo/${name}`);

    //TODO: fix this bug
    await doc.set({
        name: name
        /* town: town */
    });

    res.send(`<div hx-target="this" hx-swap="outerHTML" hx-indicator="spinner">
                <p>
                <div><label>Name</label>: ${name}</div>
                </p><p>
                <div><label>Town</label>: ${town}</div>
                </p>
                <button
                    hx-get="/edit"
                    class="bg-blue-500 text-white px-4 py-2 rounded-lg text-sm font-medium mt-[10px]"
                >
                    Click to update
                </button>
            </div>`);
});

app.get("/cancel", (req, res) => {
    res.send(`<div hx-target="this" hx-swap="outerHTML">
                <p>
                <div><label>Name</label>: Cloud</div>
                </p><p>
                <div><label>Town</label>: Nibelheim</div>
                </p>
                <div>
                <button
                    hx-get="/edit"
                    class="bg-blue-500 text-white px-4 py-2 rounded-lg text-sm font-medium mt-[10px]"
                >
                    Click to update
                </button>
                </div>
            </div>`);
});

const port = parseInt(process.env.PORT) || 8080;
app.listen(port, async () => {
    console.log(`booth demo: listening on port ${port}`);

    //serviceMetadata = helper();
});

app.get("/helper", async (req, res) => {
    let region = "";
    let projectId = "";
    let div = "";

    try {
        // Fetch the token to make a GCF to GCF call
        const response1 = await get(
            "http://metadata.google.internal/computeMetadata/v1/project/project-id",
            {
                headers: {
                    "Metadata-Flavor": "Google"
                }
            }
        );

        // Fetch the token to make a GCF to GCF call
        const response2 = await get(
            "http://metadata.google.internal/computeMetadata/v1/instance/region",
            {
                headers: {
                    "Metadata-Flavor": "Google"
                }
            }
        );

        projectId = response1.data;
        let regionFull = response2.data;
        const index = regionFull.lastIndexOf("/");
        region = regionFull.substring(index + 1);

        div = `
        <div>
        This created the revision <code>${revision}</code> of the
        Cloud Run service <code>${service}</code> in <code>${region}</code>
        for project <code>${projectId}</code>.
        </div>`;
    } catch (ex) {
        // running locally
        div = `<div> This is running locally.</div>`;
    }

    res.send(div);
});
spinnerSvg.js というファイルを作成します。
module.exports.spinnerSvg = `<svg id="spinner" alt="Loading..."
                    class="htmx-indicator animate-spin -ml-1 mr-3 h-5 w-5 text-blue-500"
                    xmlns="http://www.w3.org/2000/svg"
                    fill="none"
                    viewBox="0 0 24 24"
                >
                    <circle
                        class="opacity-25"
                        cx="12"
                        cy="12"
                        r="10"
                        stroke="currentColor"
                        stroke-width="4"
                    ></circle>
                    <path
                        class="opacity-75"
                        fill="currentColor"
                        d="M4 12a8 8 0 018-8V0C5.373 0 0 5.373 0 12h4zm2 5.291A7.962 7.962 0 014 12H0c0 3.042 1.135 5.824 3 7.938l3-2.647z"
                    ></path>
                </svg>`;
tailwindCSS の input.css ファイルを作成する
@tailwind base;
@tailwind components;
@tailwind utilities;
tailwindCSS の tailwind.config.js ファイルを作成します。
/** @type {import('tailwindcss').Config} */
module.exports = {
    content: ["./**/*.{html,js}"],
    theme: {
        extend: {}
    },
    plugins: []
};
.gitignore ファイルを作成します。
node_modules/

npm-debug.log
coverage/

package-lock.json

.DS_Store
次に、新しい public ディレクトリを作成します。
mkdir public
cd public
そのパブリック ディレクトリ内に、htmx を使用するフロントエンド用の index.html ファイルを作成します。
<!DOCTYPE html>
<html lang="en">
    <head>
        <meta charset="UTF-8" />
        <meta
            name="viewport"
            content="width=device-width, initial-scale=1.0"
        />
        <script
            src="https://unpkg.com/htmx.org@1.9.10"
            integrity="sha384-D1Kt99CQMDuVetoL1lrYwg5t+9QdHe7NLX/SoJYkXDFfX37iInKRy5xLSi8nO7UC"
            crossorigin="anonymous"
        ></script>

        <link href="./output.css" rel="stylesheet" />
        <title>Demo 1</title>
    </head>
    <body
        class="font-sans bg-body-image bg-cover bg-center leading-relaxed"
    >
        <div class="container max-w-[700px] mt-[50px] ml-auto mr-auto">
            <div class="hero flex items-center">
                <div class="message text-base text-center mb-[24px]">
                    <h1 class="text-2xl font-bold mb-[10px]">
                        It's running!
                    </h1>
                    <div class="congrats text-base font-normal">
                        Congratulations, you successfully deployed your
                        service to Cloud Run.
                    </div>
                </div>
            </div>

            <div class="details mb-[20px]">
                <p>
                    <div hx-trigger="load" hx-get="/helper" hx-swap="innerHTML" hx-target="this">Hello</div>
                </p>
            </div>

            <p
                class="callout text-sm text-blue-700 font-bold pt-4 pr-6 pb-4 pl-10 leading-tight"
            >
                You can deploy any container to Cloud Run that listens for
                HTTP requests on the port defined by the
                <code>PORT</code> environment variable. Cloud Run will
                scale automatically based on requests and you never have to
                worry about infrastructure.
            </p>

            <h1 class="text-2xl font-bold mt-[40px] mb-[20px]">
                Persistent Storage Example using Firestore
            </h1>
            <div hx-target="this" hx-swap="outerHTML">
                <p>
                <div><label>Name</label>: Cloud</div>
                </p><p>
                <div><label>Town</label>: Nibelheim</div>
                </p>
                <div>
                <button
                    hx-get="/edit"
                    class="bg-blue-500 text-white px-4 py-2 rounded-lg text-sm font-medium mt-[10px]"
                >
                    Click to update
                </button>
                </div>
            </div>

            <h1 class="text-2xl font-bold mt-[40px] mb-[20px]">
                What's next
            </h1>
            <p class="next text-base mt-4 mb-[20px]">
                You can build this demo yourself!
            </p>
            <p class="cta">
                <button
                    class="bg-blue-500 text-white px-4 py-2 rounded-lg text-center text-sm font-medium"
                >
                    VIEW CODELAB
                </button>
            </p>
        </div>
   </body>
</html>
7. アプリケーションをローカルで実行する
このセクションでは、アプリケーションをローカルで実行し、ユーザーがデータを保存しようとしたときにアプリケーションにバグがあることを確認します。
まず、Firestore にアクセスするには Datastore ユーザーのロールが必要です(認証に ID を使用している場合、Cloud Shell で実行する場合など)。以前に作成したユーザー アカウントの権限を借用することもできます。
ローカル実行時の ADC の使用
Cloud Shell で実行している場合は、すでに Google Compute Engine 仮想マシンで実行されています。この仮想マシンに関連付けられている認証情報(gcloud auth list を実行することで表示)は、アプリケーションのデフォルト認証情報(ADC)によって自動的に使用されるため、gcloud auth application-default login コマンドを使用する必要はありません。ただし、Datastore ユーザーのロールが必要です。アプリをローカルで実行するセクションまでスキップできます。
ただし、Cloud Shell ではなく、ローカル ターミナルで実行している場合は、アプリケーションのデフォルト認証情報を使用して Google API に対する認証を行う必要があります。1)認証情報を使用してログインするか(Datastore ユーザーのロールがある場合)、2)この Codelab で使用するサービス アカウントの権限を借用してログインできます。
オプション 1)ADC にお客様の認証情報を使用する
認証情報を使用する場合は、まず gcloud auth list を実行して、gcloud での認証方法を確認します。次に、ID に Vertex AI ユーザーロールを付与する必要があります。ID にオーナーのロールが付与されている場合は、この Datastore ユーザー ユーザーロールがすでに付与されています。権限がない場合は、次のコマンドを実行して、Vertex AI ユーザーロールと Datastore ユーザーロールを自分の ID に付与できます。
USER=<YOUR_PRINCIPAL_EMAIL>

gcloud projects add-iam-policy-binding $PROJECT_ID \
  --member user:$USER \
  --role=roles/datastore.user
次のコマンドを実行します。
gcloud auth application-default login
オプション 2)ADC 用のサービス アカウントの権限借用
この Codelab で作成したサービス アカウントを使用するには、ユーザー アカウントにサービス アカウント トークン作成者のロールが必要です。このロールを取得するには、次のコマンドを実行します。
gcloud projects add-iam-policy-binding $PROJECT_ID \
  --member user:$USER \
  --role=roles/iam.serviceAccountTokenCreator
次に、以下のコマンドを実行して、サービス アカウントで ADC を使用します。
gcloud auth application-default login --impersonate-service-account=$SERVICE_ACCOUNT_ADDRESS
アプリをローカルで実行する
次に、Codelab のルート ディレクトリ cloud-run-github-cd-demo にいることを確認します。
cd .. && pwd
次に、依存関係をインストールします。
npm install
最後に、次のスクリプトを実行してアプリを起動できます。このスクリプトは、tailwindCSS から output.css ファイルを生成します。
npm run dev
ウェブブラウザで http://localhost:8080 を開きます。Cloud Shell からウェブサイトを開くには、[ウェブでプレビュー] ボタンを開いて [ポート 8080 をプレビュー] を選択します。
![[ウェブでプレビュー] - [ポート 8080 でプレビュー] ボタン](https://codelabs.developers.google.com/static/codelabs/how-to-deploy-github-cloud-run-using-cloud-build/img/PreviewPort8080.png?authuser=3&hl=ja)
[名前] と [町] の入力フィールドにテキストを入力し、[保存] をクリックします。その後、ページを更新してください。町フィールドが変わっていないことがわかります。このバグは次のセクションで修正します。
Express アプリのローカル実行を停止します(例: MacOS の場合は Ctrl^c)。
8. GitHub リポジトリを作成する
ローカル ディレクトリに、main をデフォルトのブランチ名とする新しいリポジトリを作成します。
git init
git branch -M main
バグを含む現在のコードベースを commit します。バグは継続的デプロイを構成した後に修正します。
git add .
git commit -m "first commit for express application"
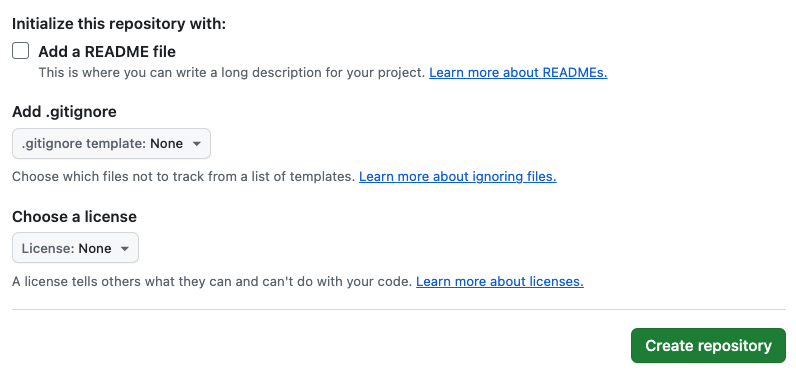
GitHub に移動し、非公開または一般公開の空のリポジトリを作成します。この Codelab では、リポジトリに cloud-run-auto-deploy-codelab という名前を付けることをおすすめします。空のリポジトリを作成するには、デフォルトの設定をすべてオフのままにするか、なしに設定します。これにより、リポジトリの作成時にデフォルトでコンテンツが何もなくなります。次に例を示します。

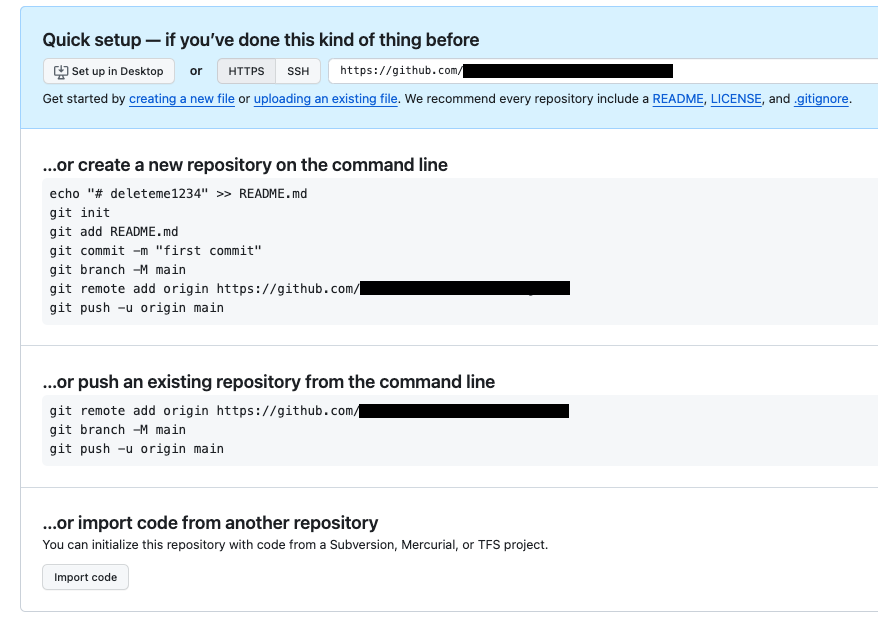
この手順を正しく完了すると、空のリポジトリ ページに次の手順が表示されます。

コマンドラインから既存のリポジトリを push する手順に沿って、次のコマンドを実行します。
まず、次のコマンドを実行してリモート リポジトリを追加します。
git remote add origin <YOUR-REPO-URL-PER-GITHUB-INSTRUCTIONS>
次に、main ブランチをアップストリーム リポジトリに push します。
git push -u origin main
9. 継続的デプロイの設定
GitHub にコードが配置されたので、継続的デプロイを設定できます。Cloud Run の Cloud コンソールに移動します。
- [サービスを作成] をクリックします。
- [リポジトリから継続的にデプロイする] をクリックします。
- [Cloud Build を設定] をクリックします。
- [ソース リポジトリ]
- リポジトリ プロバイダとして GitHub を選択
- [接続リポジトリの管理] をクリックして、リポジトリへの Cloud Build アクセスを構成します。
- リポジトリを選択して [次へ] をクリックします。
- [ビルド構成] の
- ブランチを ^main$ のままにする
- [Build Type] で、[Go、Node.js, Python, Java, .NET Core, Ruby or PHP via Google Cloud's buildpacks] を選択します。
- ビルド コンテキスト ディレクトリを
/のままにする - [保存] をクリックします。
- 認証下
- [未認証の呼び出しを許可] をクリックします。
- [コンテナ]、[ボリューム]、[ネットワーキング]、[セキュリティ] で、
- [Security] タブで、前の手順で作成したサービス アカウントを選択します。
Cloud Run access to Firestore
- [Security] タブで、前の手順で作成したサービス アカウントを選択します。
- [作成] をクリックします。
これにより、次のセクションで修正するバグを含む Cloud Run サービスがデプロイされます。
10. バグを修正する
コードのバグを修正する
Cloud Shell エディタで app.js ファイルに ppen を入力し、//TODO: fix this bug というコメントに移動します。
次の行を
 //TODO: fix this bug
    await doc.set({
        name: name
    });
たとえば
//fixed town bug
    await doc.set({
        name: name,
        town: town
    });
次のコマンドを実行して修正を確認します。
npm run start
ウェブブラウザを開きます。町のデータを保存し直して、更新してください。更新時に、新しく入力した町のデータが正しく保持されていることがわかります。
修正の検証が完了したので、修正をデプロイする準備は完了です。まず、修正を commit します。
git add .
git commit -m "fixed town bug"
GitHub のアップストリームリポジトリに push します
git push origin main
Cloud Build が自動的に変更をデプロイします。Cloud Run サービスの Cloud コンソールに移動して、デプロイの変更をモニタリングできます。
本番環境で修正を確認する
Cloud Run サービスの Cloud コンソールで、2 番目のリビジョンが 100% のトラフィックを処理していることがhttps://console.cloud.google.com/run/detail/<YOUR_REGION>/<YOUR_SERVICE_NAME>/revisions にアクセスします。ブラウザで Cloud Run サービスの URL を開き、ページを更新した後、新しく入力した町データが保持されていることを確認します。
11. 完了
これでこの Codelab は完了です。
ドキュメント Cloud Run と git からの継続的デプロイを確認することをおすすめします。
学習した内容
- Cloud Shell エディタを使用して Express ウェブ アプリケーションを作成する
- 継続的デプロイのために GitHub アカウントを Google Cloud に接続する
- アプリケーションを Cloud Run に自動的にデプロイする
- HTMX と TailwindCSS の使用方法
12. クリーンアップ
不注意による料金の発生(たとえば、Cloud Run サービスが誤って無料枠の毎月の Cloud Run 呼び出し割り当てよりも多く呼び出された場合)を回避するには、Cloud Run を削除するか、手順 2 で作成したプロジェクトを削除します。
Cloud Run サービスを削除するには、Cloud Run Cloud コンソール(https://console.cloud.google.com/run)に移動し、この Codelab で作成した Cloud Run サービスを削除します。次に例を示します。cloud-run-auto-deploy-codelab サービスを削除します。
プロジェクト全体を削除する場合は、https://console.cloud.google.com/cloud-resource-manager に移動し、手順 2 で作成したプロジェクトを選択して [削除] を選択します。プロジェクトを削除する場合は、Cloud SDK でプロジェクトを変更する必要があります。使用可能なすべてのプロジェクトのリストを表示するには、gcloud projects list を実行します。

