
1. 歡迎
感謝您參加 Google 的 Istio 多雲端爆發程式碼研究室。本程式碼研究室需要具備 Kubernetes、Node 和 Go 的入門實作經驗。 需要準備的事項
|
|

學習目標
- 如何在 GKE 上建立 Kubernetes 叢集
- 如何使用 Helm 在 Kubernetes 叢集上安裝 Istio
- 如何使用 Helm 安裝 Istio 多叢集
- 將來源中的網頁應用程式部署至 Kubernetes
- 為 Istio 編寫及套用流量轉送規則
- Prometheus 指標
- 在 Kubernetes 叢集內建構及推送容器映像檔
2. 開始設定
您可以透過下列任一方式完成本程式碼研究室:
- Google Cloud Shell (建議):瀏覽器內建的 Shell,已安裝工具
- 筆電 (請按照下方說明操作)
開始使用 Google Cloud Platform
- 如果你沒有 GCP 帳戶,請向講師索取免費使用者帳戶卡。
- 前往 Google Cloud 控制台,然後按一下「選取專案」:

- 記下專案的「ID」,然後按一下專案進行選擇:

方法 1:使用 Google Cloud Shell (建議做法)
Cloud Shell 會在瀏覽器中提供指令列殼層,並安裝您需要的工具,自動驗證您的 Google Cloud Platform 帳戶。(如不想在 Cloud Shell 中執行這項練習,請跳至下一節)。
前往 Cloud Shell,然後點選右上工具列中的「啟用 Cloud Shell」:

在 Cloud Shell 中新增工具
或者,執行下列指令,將兩者都安裝至 ~/.bin,並新增至 $PATH:
mkdir -p ~/.bin && \
cd ~/.bin && \
curl -LO https://raw.githubusercontent.com/ahmetb/kubectx/master/kubectx && \
chmod +x kubectx && \
curl -LO https://raw.githubusercontent.com/ahmetb/kubectx/master/kubens && \
chmod +x kubens && \
curl -LO  https://storage.googleapis.com/kubernetes-helm/helm-v2.12.0-linux-amd64.tar.gz && \
tar xzf helm-v2.12.0-linux-amd64.tar.gz && \
rm helm-v2.12.0-linux-amd64.tar.gz && \
mv linux-amd64/helm ./helm && \
rm -r linux-amd64 && \
export PATH=${HOME}/.bin:${PATH}
以下提供一些快速提示,讓您更輕鬆使用 Cloud Shell:
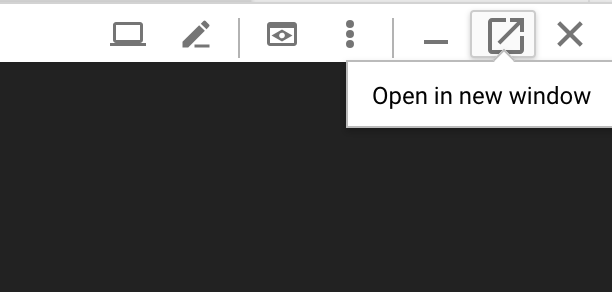
1. 將殼層分離到新視窗: |
|
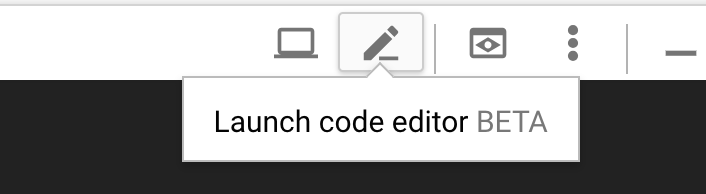
2. 使用檔案編輯器: 按一下右上方的鉛筆圖示,即可啟動瀏覽器內建的檔案編輯器。我們會在檔案中複製程式碼片段,因此這項功能非常實用。 |
|
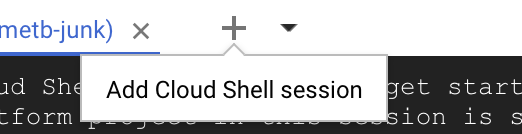
3. 啟動新分頁:如果需要多個終端機提示。 |
|
4. 放大文字: Cloud Shell 的預設字型大小可能太小,不易閱讀。 | Linux/Windows 上的 Ctrl-+ 鍵,macOS 上的 ⌘-+ 鍵。 |
方法 2:設定筆電 (不建議)
如果您覺得使用自己的工作站環境比 Cloud Shell 更方便,請設定下列工具:
- 安裝
gcloud:(已預先安裝在 Cloud Shell 中)。按照操作說明在所用平台上安裝gcloud。我們會使用這項資訊建立 Kubernetes 叢集。 - 安裝
kubectl:(已預先安裝在 Cloud Shell 中)。執行下列指令進行安裝:
gcloud components install kubectl
執行下列指令,驗證 gcloud。系統會要求你登入 Google 帳戶。然後選擇預先建立的專案 (如上所示) 做為預設專案。(您可以略過設定運算可用區):
gcloud init
3. 設定 GCP 專案
在專案中啟用 GKE (Google Kubernetes Engine)、GCR (Google Container Registry) 和 GCB (Google Cloud Build) API:
gcloud services enable \
  cloudapis.googleapis.com \
  container.googleapis.com \
  containerregistry.googleapis.com \
  cloudbuild.googleapis.com
設定環境變數
設定期間我們會大量使用 Google Cloud 專案,因此請設定環境變數以供快速參照
export GCLOUD_PROJECT=$(gcloud config get-value project)
在本次研討會中,我們會建立一些程式碼和設定檔,因此請建立專案目錄並切換至該目錄
mkdir -p src/istio-burst && \
cd src/istio-burst && \
export proj=$(pwd)
4. 建立「主要」Kubernetes 叢集
您可以使用 Google Kubernetes Engine (GKE) 輕鬆建立代管 Kubernetes 叢集。
下列指令會建立 Kubernetes 叢集:
- 名為「primary」,
- 位於 us-west1-a 區域,
- 可用的最新 Kubernetes 版本
- 4 個初始節點
export cluster=primary
export zone=us-west1-a
gcloud container clusters create $cluster --zone $zone --username "admin" \
--cluster-version latest --machine-type "n1-standard-2" \
--image-type "COS" --disk-size "100" \
--scopes "https://www.googleapis.com/auth/compute",\
"https://www.googleapis.com/auth/devstorage.read_only",\
"https://www.googleapis.com/auth/logging.write",\
"https://www.googleapis.com/auth/monitoring",\
"https://www.googleapis.com/auth/servicecontrol",\
"https://www.googleapis.com/auth/service.management.readonly",\
"https://www.googleapis.com/auth/trace.append" \
--num-nodes "4" --network "default" \
--enable-cloud-logging --enable-cloud-monitoring --enable-ip-alias
(這項作業可能需要 5 分鐘才能完成。您可以在 Cloud 控制台中,觀看叢集建立過程。)
建立 Kubernetes 叢集後,gcloud 會使用指向叢集的憑證設定 kubectl。
gcloud container clusters get-credentials $cluster --zone=$zone
現在應該可以使用新叢集中的 kubectl 了。
執行下列指令,列出叢集的 Kubernetes 節點 (應會顯示「Ready」狀態):
kubectl get nodes
修改 Kubeconfig 名稱,方便使用
我們會經常切換環境,因此叢集的簡短別名非常實用。
這項指令會將您剛建立的 kubeconfig 項目重新命名為 primary
kubectx ${cluster}=gke_${GCLOUD_PROJECT}_${zone}_${cluster}
設定權限:
如要部署 Istio,您必須是叢集管理員。這項指令會將與 Google Cloud 帳戶相關聯的電子郵件地址設為叢集管理員
kubectl create clusterrolebinding cluster-admin-binding \
    --clusterrole=cluster-admin \
    --user=$(gcloud config get-value core/account)
5. 建立「爆量」叢集
下列指令會建立 Kubernetes 叢集:
- 名為「burst」
- 位於 us-west1-a 區域,
- 可用的最新 Kubernetes 版本
- 1 個初始節點
- 最多可自動調度資源 5 個節點
export cluster=burst
export zone=us-west1-a
gcloud container clusters create $cluster --zone $zone --username "admin" \
--cluster-version latest --machine-type "n1-standard-2" \
--image-type "COS" --disk-size "100" \
--scopes "https://www.googleapis.com/auth/compute",\
"https://www.googleapis.com/auth/devstorage.read_only",\
"https://www.googleapis.com/auth/logging.write",\
"https://www.googleapis.com/auth/monitoring",\
"https://www.googleapis.com/auth/servicecontrol",\
"https://www.googleapis.com/auth/service.management.readonly",\
"https://www.googleapis.com/auth/trace.append" \
--num-nodes "1" --enable-autoscaling --min-nodes=1 --max-nodes=5 \
--network "default" \
--enable-cloud-logging --enable-cloud-monitoring --enable-ip-alias
(這項作業可能需要 5 分鐘才能完成。您可以在 Cloud 控制台中,觀看叢集建立過程。)
建立 Kubernetes 叢集後,gcloud 會使用指向叢集的憑證設定 kubectl。
gcloud container clusters get-credentials $cluster --zone=$zone
現在應該可以使用新叢集中的 kubectl 了。
執行下列指令,列出叢集的 Kubernetes 節點 (應會顯示「Ready」狀態):
kubectl get nodes
修改 Kubeconfig 名稱,方便使用
這個指令會將您剛才建立的 kubeconfig 項目修改為 burst
kubectx ${cluster}=gke_${GCLOUD_PROJECT}_${zone}_${cluster}
設定權限:
您必須是叢集管理員,才能部署 Istio Remote。這項指令會將與 Google Cloud 帳戶相關聯的電子郵件地址設為叢集管理員
kubectl create clusterrolebinding cluster-admin-binding \
    --clusterrole=cluster-admin \
    --user=$(gcloud config get-value core/account)
6. 套用防火牆規則
如要讓這兩個叢集彼此通訊,我們需要建立防火牆規則。
在 Google Cloud Platform 中執行下列指令,建立防火牆規則,允許叢集通訊
function join_by { local IFS="$1"; shift; echo "$*"; }
ALL_CLUSTER_CIDRS=$(gcloud container clusters list \
--filter="(name=burst OR name=primary) AND zone=$zone" \
--format='value(clusterIpv4Cidr)' | sort | uniq)
ALL_CLUSTER_CIDRS=$(join_by , $(echo "${ALL_CLUSTER_CIDRS}"))
ALL_CLUSTER_NETTAGS=$(gcloud compute instances list \
--filter="(metadata.cluster-name=burst OR metadata.cluster-name=primary) AND metadata.cluster-location=us-west1-a" \
--format='value(tags.items.[0])' | sort | uniq)
ALL_CLUSTER_NETTAGS=$(join_by , $(echo "${ALL_CLUSTER_NETTAGS}"))
gcloud compute firewall-rules create istio-multicluster-test-pods \
  --allow=tcp,udp,icmp,esp,ah,sctp \
  --direction=INGRESS \
  --priority=900 \
  --source-ranges="${ALL_CLUSTER_CIDRS}" \
  --target-tags="${ALL_CLUSTER_NETTAGS}" --quiet
我們已設定好兩個叢集,準備在當中部署應用程式和 Istio!
7. Istio 簡介
什麼是 Istio?
Istio 是服務網格控制層,目標是「連結、保護、控制及觀察服務」。Istio 會透過各種方式達成這個目標,但主要是將 Proxy 容器 ( Envoy) 側載到每個已部署的 Kubernetes Pod 中。Proxy 容器會與一般用途的政策和遙測中樞 ( Mixer) 搭配運作,控管微服務之間的所有網路通訊。
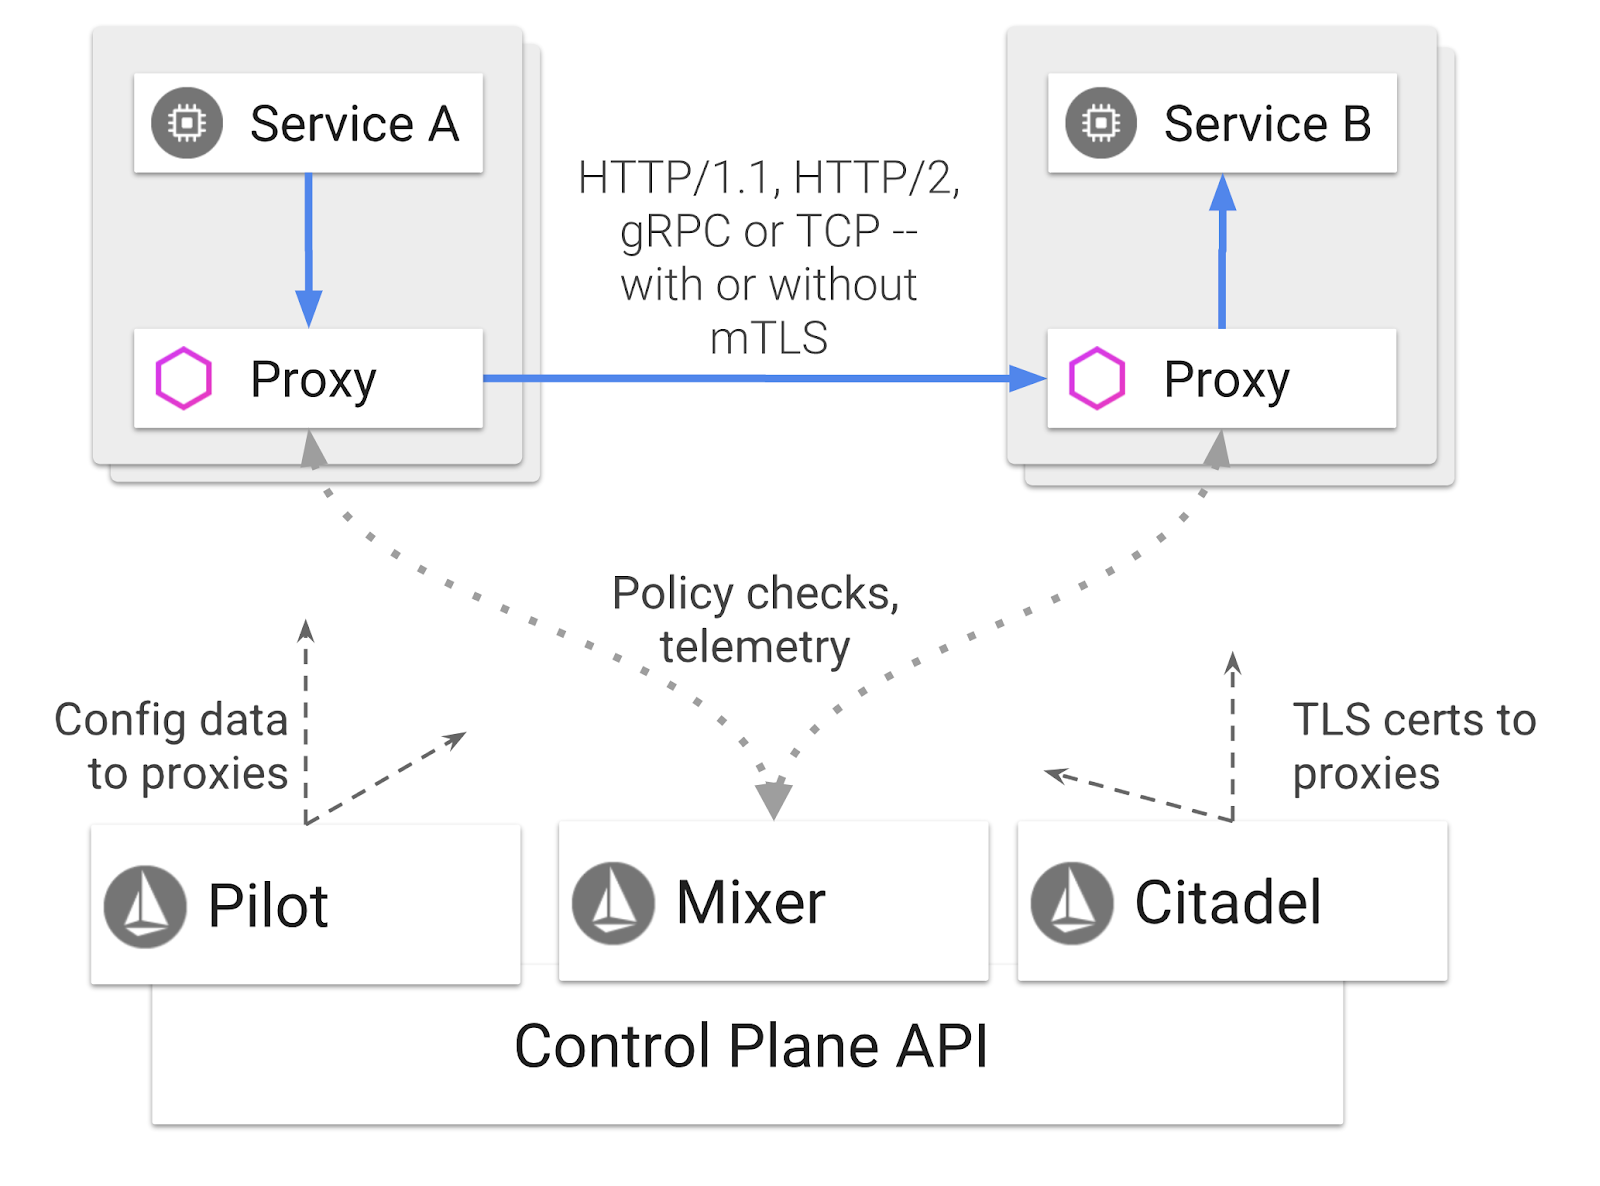
這些政策可獨立於 Kubernetes 部署作業和服務套用,也就是說,網路營運人員可以觀察網路活動、限制、重新導向或重新編寫網路政策,不必重新部署相關聯的應用程式。
Istio 支援的部分流量管理功能包括:
- 斷路器
- 以百分比為準的流量拆分
- 網址重寫
- 傳輸層安全標準 (TLS) 終止
- 健康狀態檢查
- 負載平衡
在本研討會中,我們將著重於以百分比為基礎的流量分配。
我們將使用的 Istio 術語
VirtualService
VirtualService 會定義一組流量路由規則,在處理主機時套用。
閘道
閘道是網格邊緣運作的負載平衡器,負責接收傳入或傳出的 HTTP/TCP 連線。閘道可以指定通訊埠、SNI 設定等。
DestinationRule
DestinationRule 會定義適用於服務的流量政策,在轉送發生後生效。這些設定會指定負載平衡的設定、來自 Sidecar 的連線集區大小,以及離群值偵測設定。
Istio 多叢集
您可能已注意到,我們建立的兩個叢集,primary 叢集有 4 個節點,沒有自動調度資源功能,而 burst 叢集有 1 個節點,自動調度資源功能最多可調度 5 個節點。
這項設定有兩個原因。
首先,我們要模擬「地端部署」到雲端的案例。在地端部署環境中,您無法存取自動調度資源叢集,因為基礎架構是固定的。
其次,如上所述,執行 Istio 的最低要求是 4 個節點。這引發了一個問題:如果 Istio 至少需要 4 個節點,我們的 burst 叢集如何以 1 個節點執行 Istio?答案是 Istio 多叢集安裝的 Istio 服務集小得多,而且會與主要叢集中的 Istio 安裝項目通訊,以擷取政策規則並發布遙測資訊。
8. 應用程式架構總覽
元件總覽
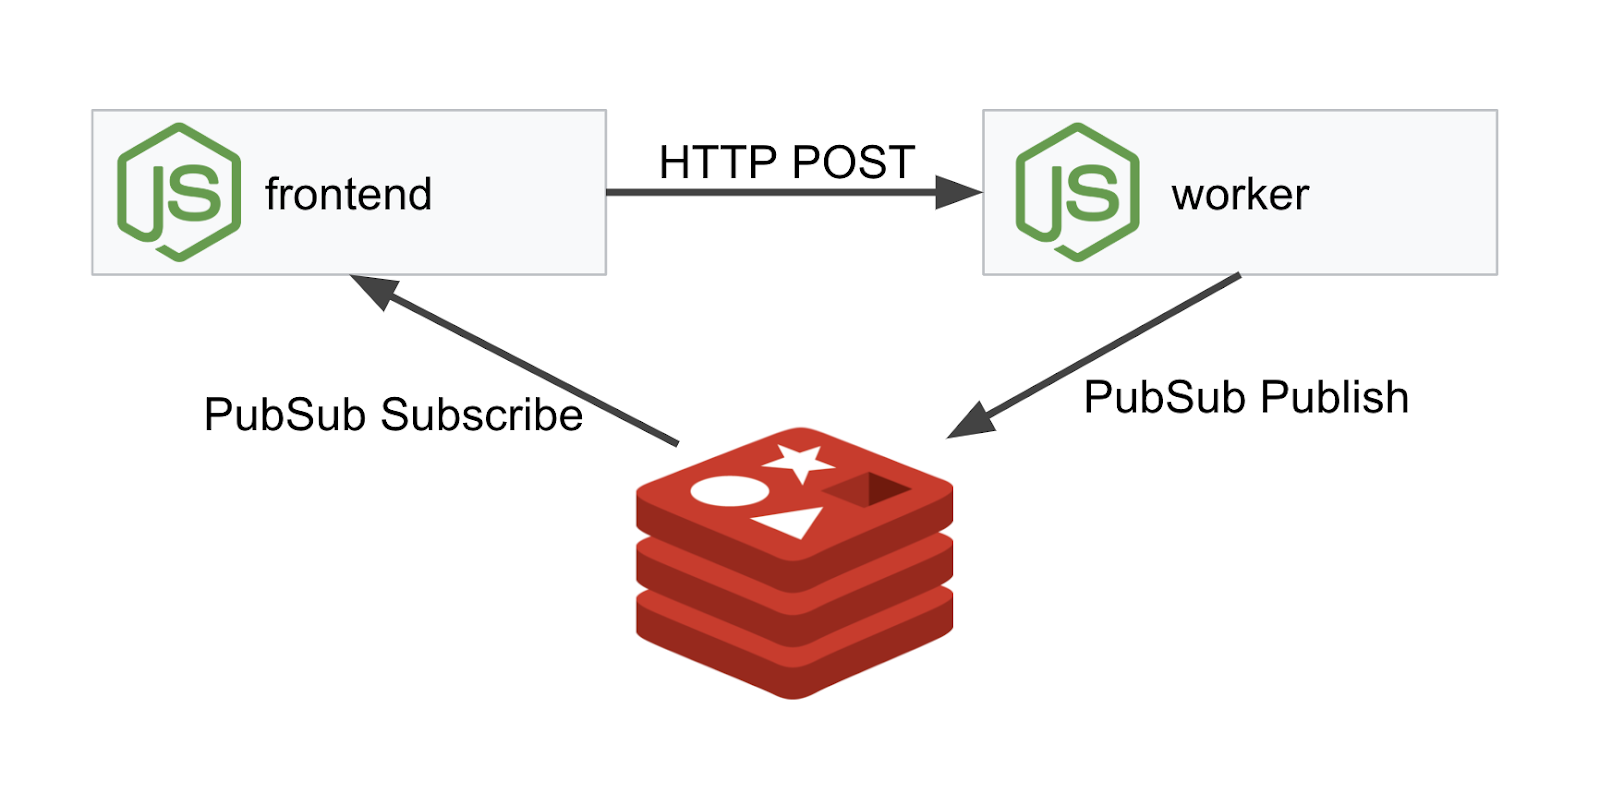
我們將使用 NodeJS 和 Redis 部署三層式應用程式。
工作人員
這個工作人員應用程式是以 NodeJS 編寫,會監聽傳入的 POST HTTP 要求、對要求執行雜湊作業,並在定義名為 PREFIX 的環境變數時,將該值加到雜湊值的前面。計算完雜湊後,應用程式會透過指定 Redis 伺服器上的「calculation」管道傳送結果。
稍後我們會使用 PREFIX 環境變數,示範多叢集功能。
以供參考:這是應用程式使用的套件。
body-parser:允許我們剖析 HTTP 要求cors:允許使用跨源資源共享dotenv:輕鬆剖析環境變數express:輕鬆託管網站ioredis:用戶端程式庫,用於與 Redis 資料庫通訊morgan:提供結構良好的記錄
前端
前端也是 NodeJS 應用程式,使用 express 代管網頁。這項工具會根據使用者輸入的頻率,以該頻率向 worker 應用程式傳送要求。這個應用程式也會訂閱名為「calculation」的 Redis 管道訊息,並在網頁中顯示結果。
應用程式會使用下列依附元件。
body-parser:允許我們剖析 HTTP 要求dotenv:輕鬆剖析環境變數express:輕鬆託管網站ioredis:用戶端程式庫,用於與 Redis 資料庫通訊morgan:提供結構良好的記錄request:允許發出 HTTP 要求socket.io:允許網頁與伺服器進行雙向通訊
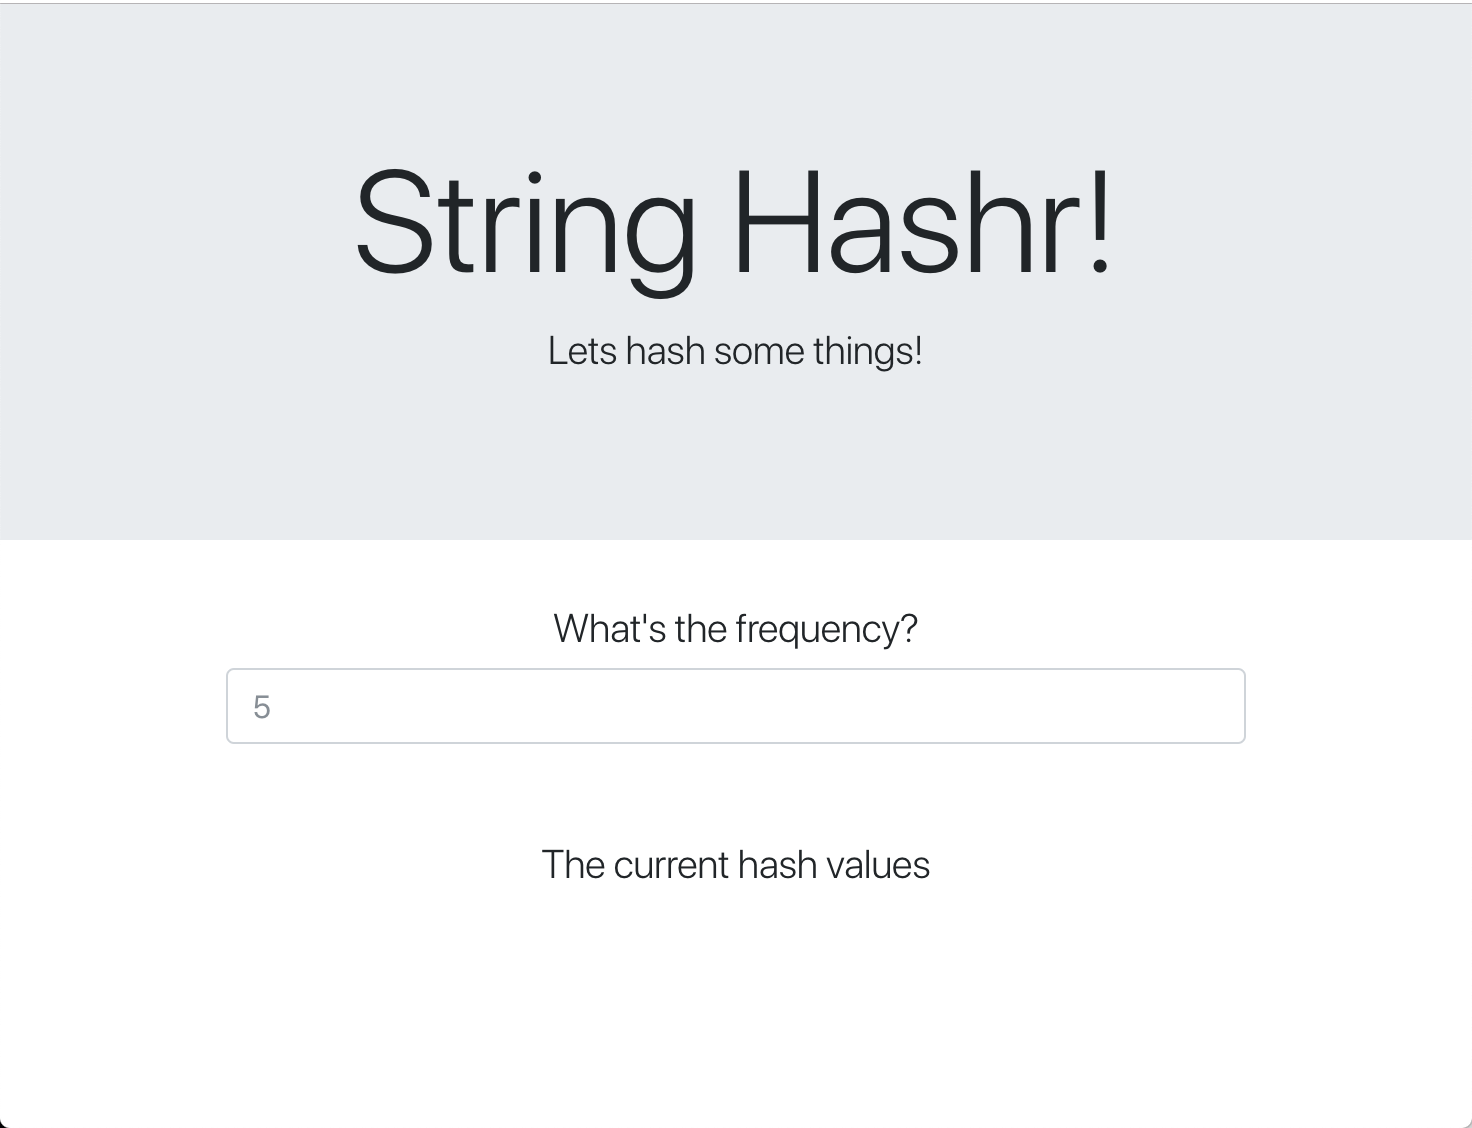
這個網頁使用 Bootstrap 設定樣式,執行時會如下所示
架構圖
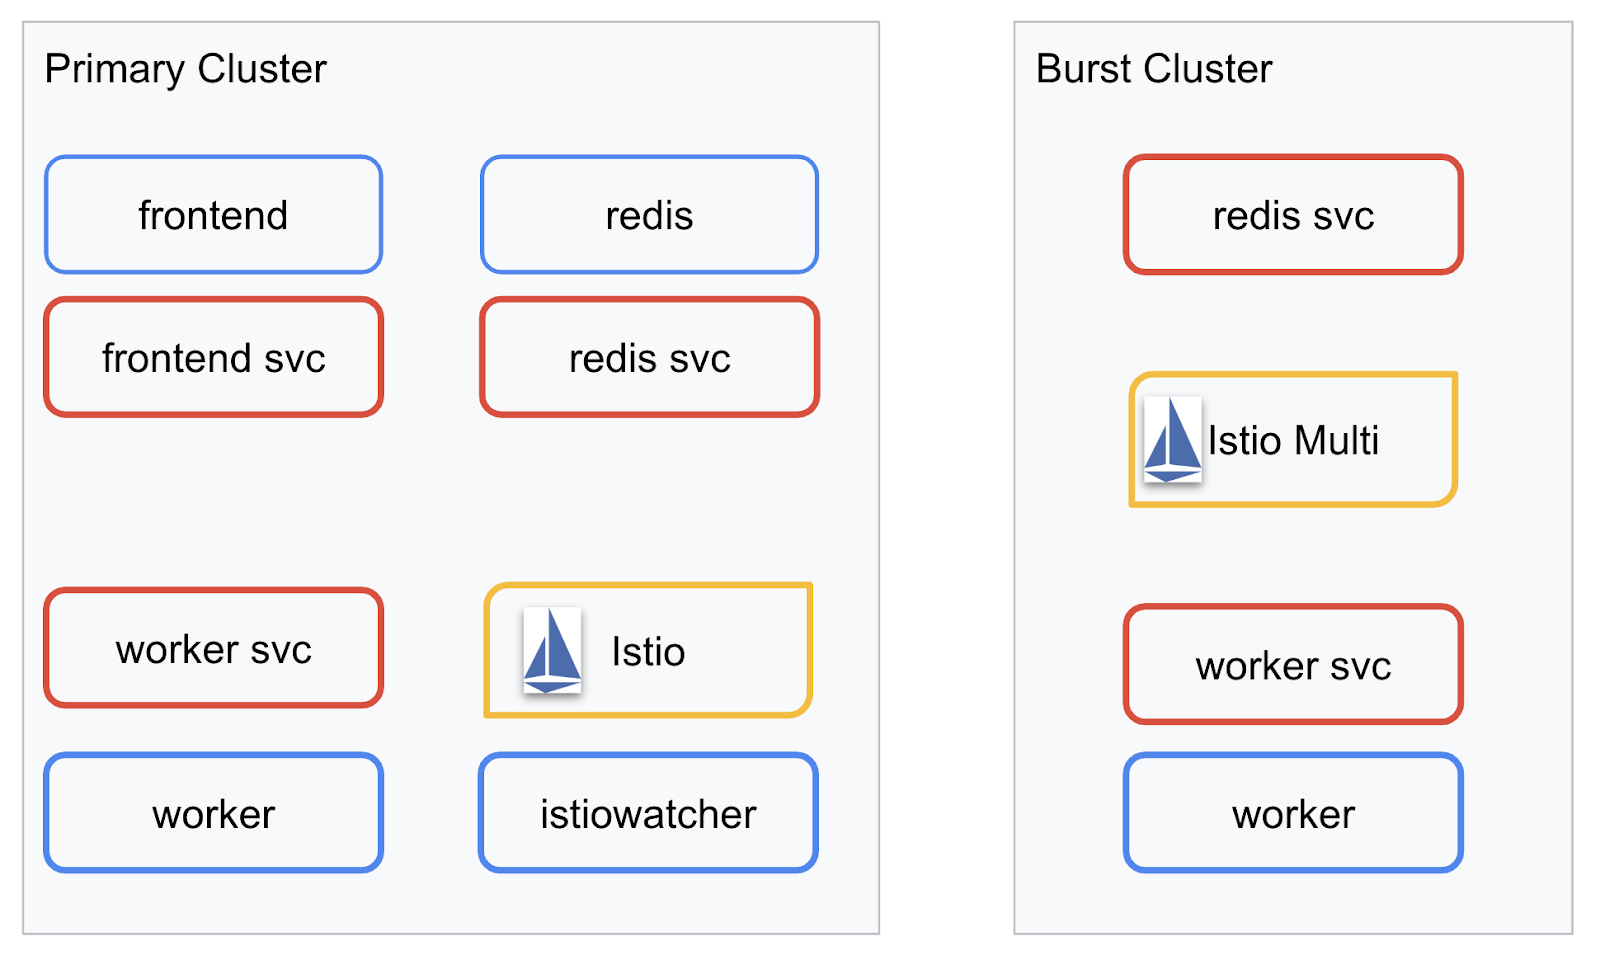
部署圖表
我們會將最終應用程式部署到我們建立的兩個叢集。primary 叢集會部署所有元件 (frontend、worker 和 Redis),但 burst 叢集只會部署 worker 應用程式。
下方圖表說明瞭這兩個叢集。紅色外框是 Kubernetes Service,藍色外框則是 Kubernetes Deployment。黃色方塊代表我們安裝的 Istio。
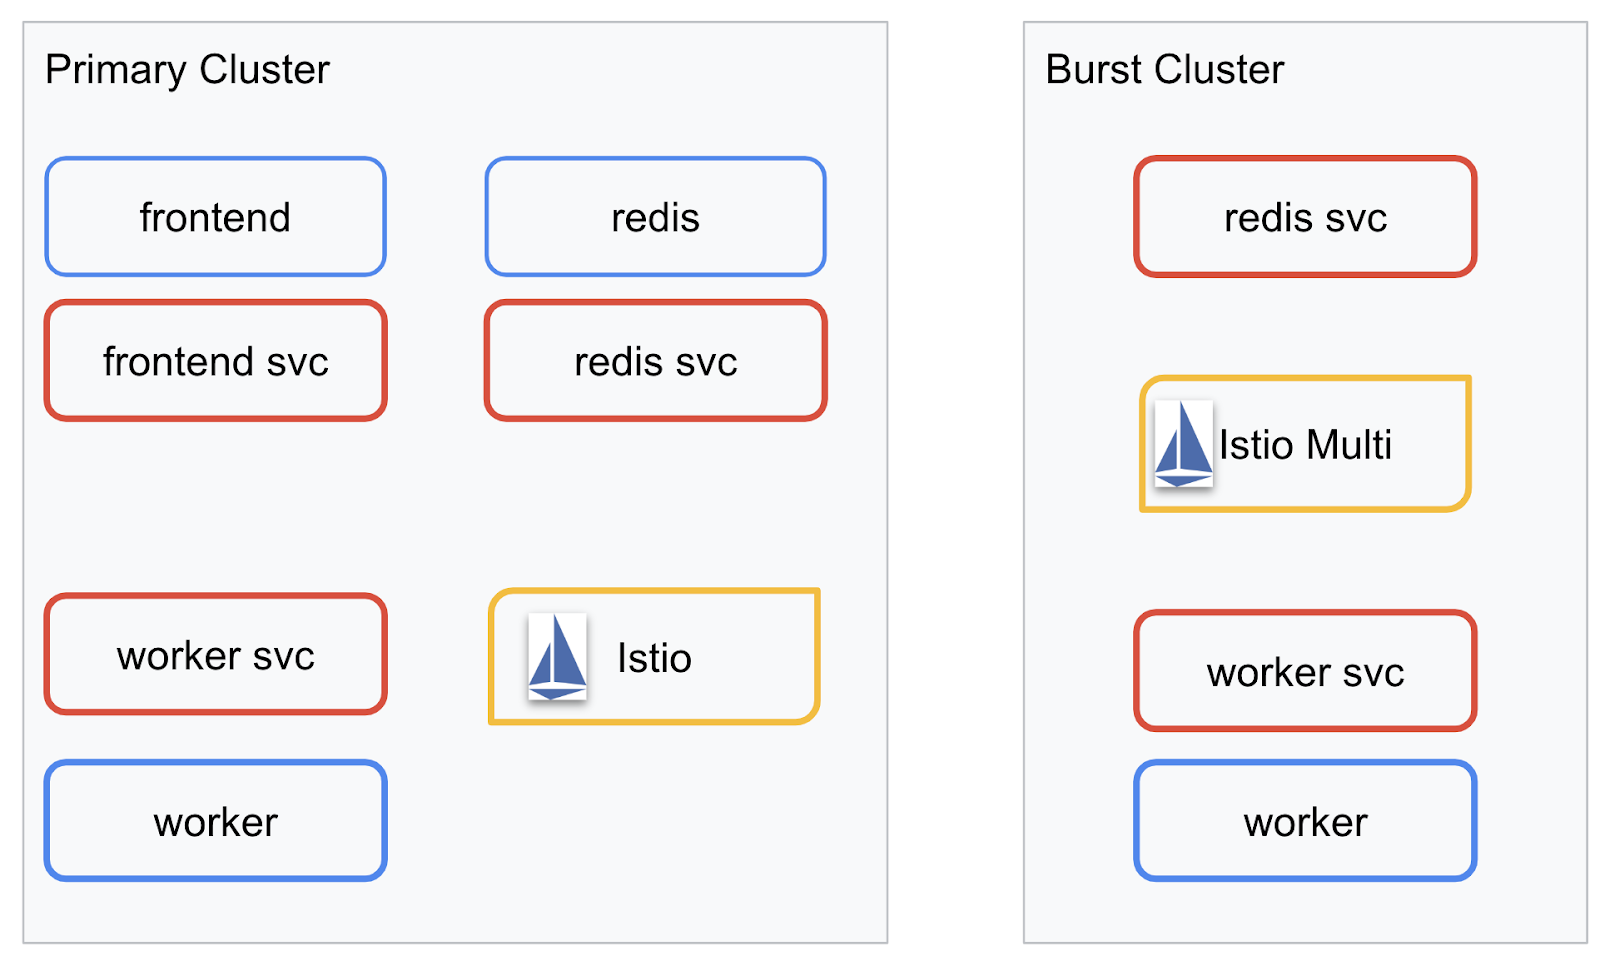
請注意,即使叢集中沒有 Redis 的 Deployment,burst 叢集仍有 Redis 的服務部署。我們需要在叢集中提供這項服務,Kubernetes DNS 才能解析要求,但實際提出要求時,Istio Proxy 會將要求重新導向至 primary 叢集中的 Redis 部署作業。
最終應用程式會在 primary 叢集中執行名為 istiowatcher. 的額外部署。當流量超過特定門檻時,這項部署會自動將流量動態重新導向至 burst。
9. 建立應用程式部署檔案
我們需要建立一組 Kubernetes 資訊清單,才能部署應用程式
切換至專案的根目錄,並建立名為 kubernetes 的新資料夾
mkdir ${proj}/kubernetes && cd ${proj}/kubernetes
撰寫 frontend.yaml
這會建立 Kubernetes Deployment 和 Service,以存取前端映像檔。
將下列內容插入 frontend.yaml。
apiVersion: extensions/v1beta1
kind: Deployment
metadata:
  name: frontend-deployment
  labels:
    app: frontend
spec:
  replicas: 1
  selector:
    matchLabels:
      app: frontend
  template:
    metadata:
      labels:
        app: frontend
    spec:
      containers:
      - name: frontend
        image: gcr.io/istio-burst-workshop/frontend
        ports:
        - containerPort: 8080
        readinessProbe:
            initialDelaySeconds: 10
            httpGet:
              path: "/_healthz"
              port: 8080
              httpHeaders:
              - name: "Cookie"
                value: "istio_session-id=x-readiness-probe"
        livenessProbe:
          initialDelaySeconds: 10
          httpGet:
            path: "/"
            port: 8080
            httpHeaders:
            - name: "Cookie"
              value: "istio_session-id=x-liveness-probe"
        env:
        - name: PORT
          value: "8080"
        - name: PROCESSOR_URL
          value: "http://worker-service"
        - name: REDIS_URL
          value: "redis-cache-service:6379"
---
apiVersion: v1
kind: Service
metadata:
  name: frontend-service
spec:
  type: ClusterIP
  selector:
    app: frontend
  ports:
  - name: http
    port: 80
    targetPort: 8080
Deployment中的重要事項
- 我們已指定應用程式要執行的通訊埠為
8080 - 我們已將工作站的位址設為「
http://worker-service」,並將使用 Kubernetes 內建的 DNS 功能來解析產生的服務 - 我們已將
REDIS_URL的位址設為「redis-cache-service:6379」,並使用 Kubernetes 內建的 DNS 功能解析產生的 IP 位址。 - 我們也為容器設定了
liveness和readiness探測,以便在容器啟動並執行時通知 Kubernetes。
編寫 worker-service.yaml
我們會在與 Deployment 定義不同的檔案中編寫 Kubernetes 服務定義,因為我們會在多個叢集中重複使用這項服務,但會為每個叢集編寫不同的 Deployment。
在 worker-service.yaml 中插入下列內容
apiVersion: v1
kind: Service
metadata:
 name: worker-service
spec:
 type: ClusterIP
 selector:
   app: worker
 ports:
 - name: http
   port: 80
   targetPort: 8081
編寫 worker-primary.yaml
這會是worker我們將推送至主要叢集的部署作業。
將下列內容插入 worker-primary.yaml。
apiVersion: extensions/v1beta1
kind: Deployment
metadata:
 name: worker-deployment
 labels:
   app: worker
spec:
 replicas: 1
 selector:
   matchLabels:
     app: worker
 template:
   metadata:
     labels:
       app: worker
       cluster-type: primary-cluster
   spec:
     containers:
     - name: worker
       image: gcr.io/istio-burst-workshop/worker
       imagePullPolicy: Always
       ports:
       - containerPort: 8081
       readinessProbe:
           initialDelaySeconds: 10
           httpGet:
             path: "/_healthz"
             port: 8081
             httpHeaders:
             - name: "Cookie"
               value: "istio_session-id=x-readiness-probe"
       livenessProbe:
         initialDelaySeconds: 10
         httpGet:
           path: "/"
           port: 8081
           httpHeaders:
           - name: "Cookie"
             value: "istio_session-id=x-liveness-probe"
       env:
       - name: PORT
         value: "8081"
       - name: REDIS_URL
         value: "redis-cache-service:6379"
請注意,我們遵循相同的模式,提供 liveness 和 readiness 探測,並為應用程式指定 PORT 和 REDIS_URL 環境變數。
此外,請注意這次部署作業缺少 PREFIX 環境變數。也就是說,我們的計算結果會是原始雜湊 (沒有任何前置字元)。
這項部署作業的最後一個重點是 cluster-type: primary-cluster 標籤。稍後在 Istio 多叢集上執行流量路徑時,我們會用到這個名稱
撰寫 redis.yaml
工作站與前端之間的通訊是透過 Redis 管道進行,因此我們需要在叢集中部署 Redis 應用程式。
將下列內容插入 redis.yaml
apiVersion: extensions/v1beta1
kind: Deployment
metadata:
 name: redis-cache
spec:
 template:
   metadata:
     labels:
       app: redis-cache
   spec:
     containers:
     - name: redis
       image: redis:alpine
       ports:
       - containerPort: 6379
       readinessProbe:
         periodSeconds: 5
         tcpSocket:
           port: 6379
       livenessProbe:
         periodSeconds: 5
         tcpSocket:
           port: 6379
       volumeMounts:
       - mountPath: /data
         name: redis-data
       resources:
         limits:
           memory: 256Mi
           cpu: 125m
         requests:
           cpu: 70m
           memory: 200Mi
     volumes:
     - name: redis-data
       emptyDir: {}
這是 Redis 應用程式的半標準部署作業。這個指令會根據 redis:alpine 映像檔啟動容器、公開適當的連接埠,並設定合理的資源限制。
撰寫 redis-service.yaml
我們需要 Kubernetes 服務與 Redis 應用程式通訊
將下列內容插入 redis-service.yaml
apiVersion: v1
kind: Service
metadata:
 name: redis-cache-service
spec:
 type: ClusterIP
 selector:
   app: redis-cache
 ports:
 - port: 6379
   targetPort: 6379
這項服務名為 redis-cache-service,可存取 Redis 部署作業。
10. 部署應用程式
將映像檔推送至 GCR 並編寫 Kubernetes 資訊清單後,現在可以部署應用程式,看看運作情形!
執行下列指令來部署應用程式
- 確認我們位於正確的叢集
kubectx primary
- 部署 Redis 快取
kubectl apply -f redis.yaml
- 部署 Redis 服務
kubectl apply -f redis-service.yaml
- 部署前端
kubectl apply -f frontend.yaml
- 部署工作站
kubectl apply -f worker-primary.yaml
- 部署 Worker Service
kubectl apply -f worker-service.yaml
我們已將應用程式部署至 GKE。恭喜!
測試
等待 Pod 上線
kubectl get pods -w
所有 Pod 都「正在執行」後,請按下 Ctrl + C 鍵
NAME                                   READY     STATUS    RESTARTS   AGE
frontend-deployment-695d95fbf7-76sd8   1/1       Running   0          2m
redis-cache-7475999bf5-nxj8x           1/1       Running   0          2m
worker-deployment-5b9cf9956d-g975p     1/1       Running   0          2m
您會發現我們並未透過 LoadBalancer 公開前端。這是因為稍後我們會透過 Istio 存取應用程式。如要測試一切是否正常運作,請使用 kubectl port-forward. 執行下列指令,將本機 (或 Cloud Shell) 電腦上的通訊埠 8080 轉送至執行 frontend Deployment 的通訊埠 8080。
kubectl port-forward \
$(kubectl get pods -l app=frontend -o jsonpath='{.items[0].metadata.name}') \
8080:8080
如果您在本機執行:開啟網路瀏覽器並前往 http://localhost:8080
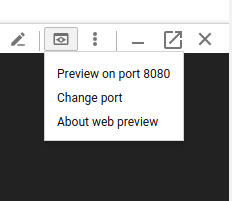
如果您在 Cloud Shell 中執行:按一下「Web Preview」(網頁預覽) 按鈕,然後選取「Preview on port 8080」(透過以下通訊埠預覽:8080)。
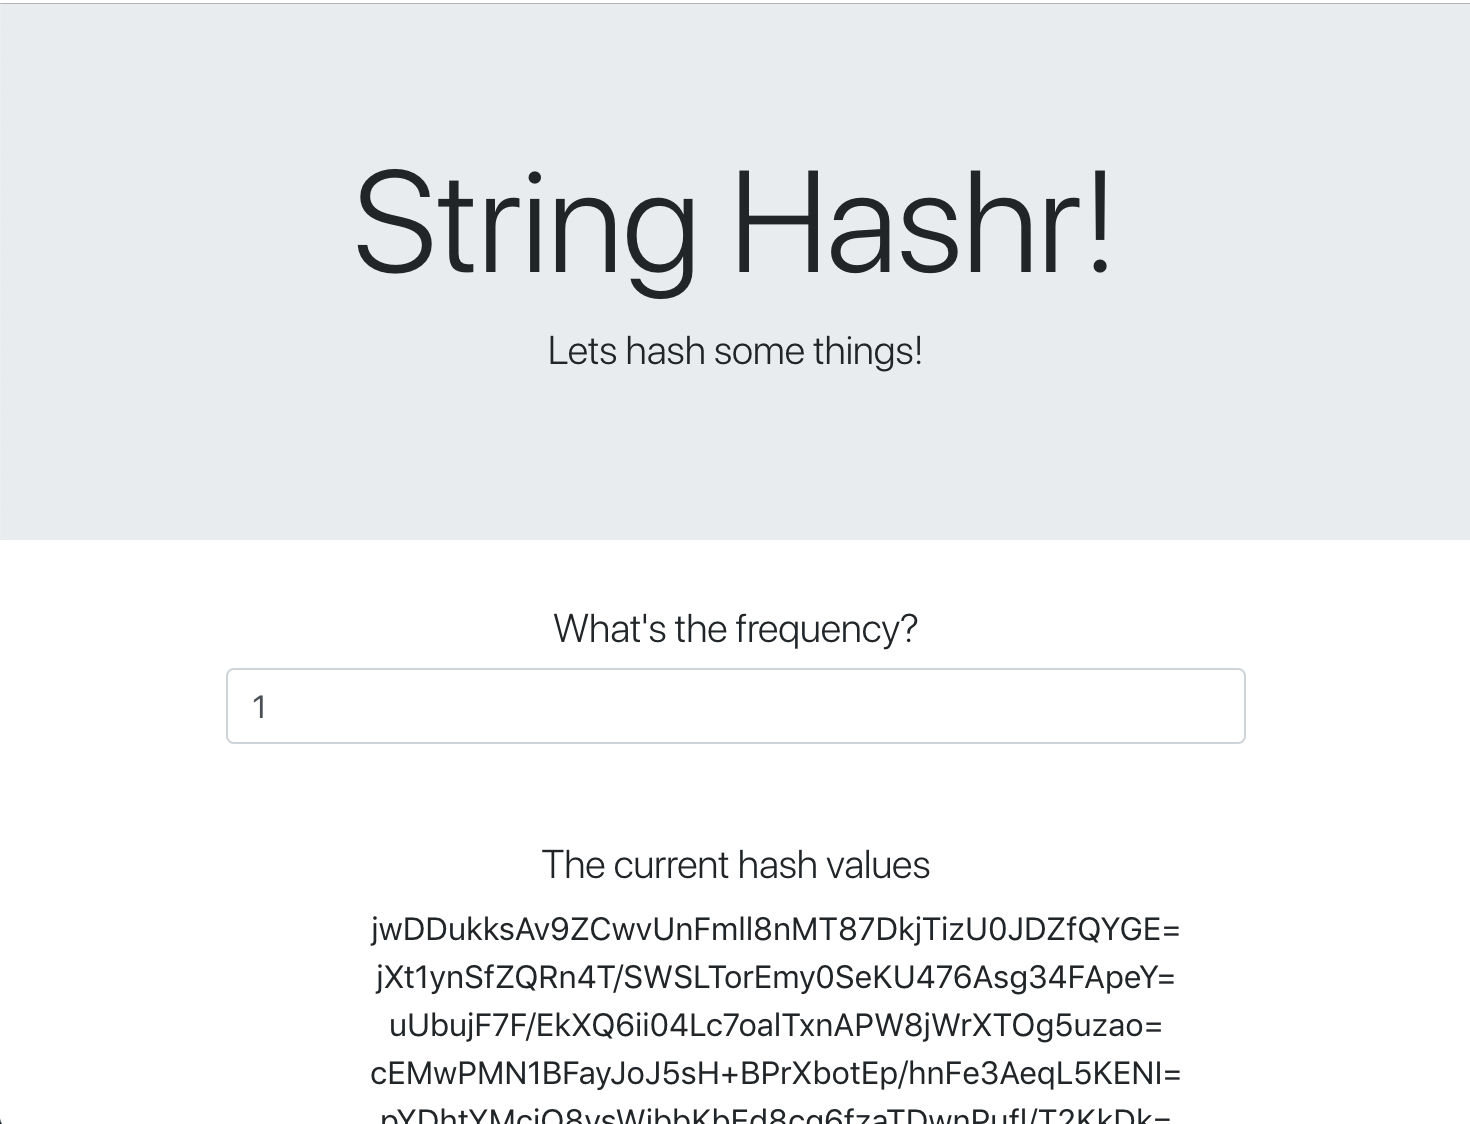
您應該會看到前端!如果您在「頻率」方塊中輸入數字,應該會開始看到雜湊
恭喜,一切都已設定完成!
按下 Ctrl+C 即可停止轉送通訊埠。
11. 清除已部署的應用程式
我們將對叢集套用 Istio,然後重新部署應用程式,因此請先清理目前的應用程式。
執行下列指令,刪除您剛建立的所有 Deployment 和服務
- 刪除「
redis-cache-service」
kubectl delete -f redis-service.yaml
- 刪除「
redis」
kubectl delete -f redis.yaml
- 刪除「
frontend」
kubectl delete -f frontend.yaml
- 刪除「
worker」
kubectl delete -f worker-primary.yaml
- 刪除「
worker-service」
kubectl delete -f worker-service.yaml
12. 在主要叢集上安裝 Istio
取得 Istio
Istio 的版本託管在 GitHub 上。下列指令會下載並解壓縮 Istio 1.0.0 版。
- 切換至專案根目錄
cd ${proj}
- 下載封存檔
curl -LO https://github.com/istio/istio/releases/download/1.0.0/istio-1.0.0-linux.tar.gz
- 擷取並移除封存檔
tar xzf istio-1.0.0-linux.tar.gz && rm istio-1.0.0-linux.tar.gz
建立 Istio 範本
執行下列 Helm 指令,即可建立範本,將 Istio 安裝至叢集。
helm template istio-1.0.0/install/kubernetes/helm/istio \
--name istio --namespace istio-system \
--set prometheus.enabled=true \
--set servicegraph.enabled=true  > istio-primary.yaml
這會在目前目錄中建立名為 istio-primary.yaml 的檔案,其中包含部署及執行 Istio 所需的所有定義和規格。
請注意這兩個 --set 參數。這些外掛程式會為 Istio 系統新增 Prometheus 和 ServiceGraph 支援功能。我們稍後會在實驗室中使用 Prometheus 服務。
部署 Istio
如要部署 Istio,我們首先需要建立名為 istio-system 的命名空間,供 Istio 部署作業和服務執行。
kubectl create namespace istio-system
最後,使用 Helm 套用我們建立的 istio-primary.yaml 檔案
kubectl apply -f istio-primary.yaml
標籤預設命名空間
Istio 的運作方式是將 Sidecar Proxy 服務插入每個 Deployment。這項作業是選擇加入性質,因此我們需要使用 istio-injection=enabled 標記 default 命名空間,Istio 才能自動為我們注入補充資訊。
kubectl label namespace default istio-injection=enabled
恭喜!我們已啟動叢集並執行 Istio,現在可以部署應用程式了!
13. 使用 Istio 流量管理功能部署應用程式
建立 Istio 流量管理設定檔
Istio 的運作方式與 Kubernetes 類似,都是使用 yaml 檔案進行設定。因此,我們需要建立一組檔案,告訴 Istio 如何公開及轉送流量。
建立名為 istio-manifests 的目錄,然後切換至該目錄
mkdir ${proj}/istio-manifests && cd ${proj}/istio-manifests
撰寫 frontend-gateway.yaml
這個檔案會以類似 GKE LoadBalancer 的方式公開 Kubernetes 叢集,並將所有連入流量轉送至前端服務。
建立名為 frontend-gateway.yaml 的檔案,並插入下列內容。
apiVersion: networking.istio.io/v1alpha3
kind: Gateway
metadata:
 name: frontend-gateway
spec:
 selector:
   istio: ingressgateway # use Istio default gateway implementation
 servers:
 - port:
     number: 80
     name: http
     protocol: HTTP
   hosts:
   - "*"
---
apiVersion: networking.istio.io/v1alpha3
kind: VirtualService
metadata:
 name: frontend-ingress-virtual-service
spec:
 hosts:
 - "*"
 gateways:
 - frontend-gateway
 http:
 - route:
   - destination:
       host: frontend-service
       port:
         number: 80
編寫 redis-virtualservice.yaml
建立名為 redis-virtualservice.yaml 的檔案,並插入下列內容:
apiVersion: networking.istio.io/v1alpha3
kind: VirtualService
metadata:
 name: redis-virtual-service
spec:
 hosts:
 - redis-cache-service
 gateways:
 - mesh
 tcp:
 - route:
   - destination:
       host: redis-cache-service.default.svc.cluster.local
編寫 worker-virtualservice.yaml
建立名為 worker-virtualservice.yaml 的檔案,並插入下列內容:
apiVersion: networking.istio.io/v1alpha3
kind: VirtualService
metadata:
 name: worker-virtual-service
spec:
 hosts:
 - worker-service
 gateways:
 - mesh
 http:
 - route:
   - destination:
       host: worker-service.default.svc.cluster.local
       port:
         number: 80
部署 Istio 流量管理政策
部署 Istio 政策的方式與其他 Kubernetes 資源相同,都是使用 kubectl apply
- 套用我們的閘道
kubectl apply -f frontend-gateway.yaml
- 套用 Redis VirtualService
kubectl apply -f redis-virtualservice.yaml
- 套用 Worker VirtualService
kubectl apply -f worker-virtualservice.yaml
部署應用程式
- 切換回
kubernetes目錄
cd ${proj}/kubernetes
- 部署 Redis 快取
kubectl apply -f redis.yaml
- 部署 Redis 服務
kubectl apply -f redis-service.yaml
- 部署前端
kubectl apply -f frontend.yaml
- 部署工作站
kubectl apply -f worker-primary.yaml
- 部署 Worker Service
kubectl apply -f worker-service.yaml
驗證
此時,我們已在叢集上重新部署應用程式,並採用 Istio 和流量管理政策。
請等待所有工作負載上線
全部上線後,請取得在 frontend-ingressgateway.yaml 中設定的 IngressGateway
$ kubectl -n istio-system get svc istio-ingressgateway
NAME                   TYPE           CLUSTER-IP    EXTERNAL-IP     PORT(S)                                                                                                     AGE
istio-ingressgateway   LoadBalancer   10.36.3.112   35.199.158.10   80:31380/TCP,
瀏覽 <EXTERNAL-IP> 位址,或使用 curl 執行該位址,您應該會看到前端!
$ curl 35.199.158.10
<!doctype html>
<html>

<head>
    <title>String Hashr</title>
    <!-- Bootstrap -->
...
14. 在「爆發」叢集上安裝 Istio
我們花費許多時間在 primary 叢集上設定及部署,但還有另一個叢集要部署!
在本節中,我們需要擷取兩個叢集的設定變數,因此請密切注意每個指令指向的叢集。
建立 Istio Remote 資訊清單
就像將 Istio 部署到 primary 叢集時一樣,我們將使用 Helm 範本,將 Istio 遠端部署到 burst 叢集。不過,我們需要先取得 primary 叢集的一些資訊
收集主要叢集資訊
變更為 primary 叢集
kubectx primary
下列指令會擷取主要叢集中各種 Pod 的 IP 位址。Istio Remote 會使用這些位址與主要叢集通訊。
export PILOT_POD_IP=$(kubectl -n istio-system get pod -l istio=pilot -o jsonpath='{.items[0].status.podIP}')
export POLICY_POD_IP=$(kubectl -n istio-system get pod -l istio-mixer-type=policy -o jsonpath='{.items[0].status.podIP}')
export STATSD_POD_IP=$(kubectl -n istio-system get pod -l istio=statsd-prom-bridge -o jsonpath='{.items[0].status.podIP}')
export TELEMETRY_POD_IP=$(kubectl -n istio-system get pod -l istio-mixer-type=telemetry -o jsonpath='{.items[0].status.podIP}')
export ZIPKIN_POD_IP=$(kubectl -n istio-system get pod -l app=jaeger -o jsonpath='{range .items[*]}{.status.podIP}{end}')
建立遠端範本
現在我們將使用 helm 建立名為 istio-remote-burst.yaml 的檔案,然後部署至 burst 叢集。
變更為專案根目錄
cd $proj
helm template istio-1.0.0/install/kubernetes/helm/istio-remote --namespace istio-system \
--name istio-remote \
--set global.remotePilotAddress=${PILOT_POD_IP} \
--set global.remotePolicyAddress=${POLICY_POD_IP} \
--set global.remoteTelemetryAddress=${TELEMETRY_POD_IP} \
--set global.proxy.envoyStatsd.enabled=true \
--set global.proxy.envoyStatsd.host=${STATSD_POD_IP} \
--set global.remoteZipkinAddress=${ZIPKIN_POD_IP} > istio-remote-burst.yaml
在爆量叢集上安裝 Istio Remote
如要在 burst 叢集上安裝 Istio,請按照在 primary 叢集上安裝時的步驟操作,但請改用 istio-remote-burst.yaml 檔案。
將 kubecontext 變更為 burst
kubectx burst
建立 istio-system 命名空間
kubectl create ns istio-system
套用 istio-burst.yaml
kubectl apply -f istio-remote-burst.yaml
標籤預設命名空間
再次標記 default 命名空間,以便自動插入 Proxy。
kubectl label namespace default istio-injection=enabled
恭喜!此時,我們已在 burst 叢集上設定 Istio Remote。不過,此時叢集仍無法通訊。我們需要為 burst 叢集產生 kubeconfig 檔案,並部署至 primary 叢集,將兩者連結在一起。
為「burst」叢集建立 kubeconfig
變更為叢集連拍
kubectx burst
設定環境
我們需要收集叢集的一些資訊,才能為其建立 kubeconfig 檔案。
- 取得叢集名稱
CLUSTER_NAME=$(kubectl config view --minify=true -o "jsonpath={.clusters[].name}")
- 取得叢集伺服器名稱
SERVER=$(kubectl config view --minify=true -o "jsonpath={.clusters[].cluster.server}")
- 取得
istio-multi服務帳戶憑證授權單位的密碼名稱
SECRET_NAME=$(kubectl get sa istio-multi -n istio-system -o jsonpath='{.secrets[].name}')
- 取得先前密碼中儲存的憑證授權單位資料
CA_DATA=$(kubectl get secret ${SECRET_NAME} -n istio-system -o "jsonpath={.data['ca\.crt']}")
- 取得儲存在先前密鑰中的權杖
TOKEN=$(kubectl get secret ${SECRET_NAME} -n istio-system -o "jsonpath={.data['token']}" | base64 --decode)
建立 kubeconfig 檔案
設定所有環境變數後,我們需要建立 kubeconfig 檔案
cat <<EOF > burst-kubeconfig
apiVersion: v1
clusters:
   - cluster:
       certificate-authority-data: ${CA_DATA}
       server: ${SERVER}
     name: ${CLUSTER_NAME}
contexts:
   - context:
       cluster: ${CLUSTER_NAME}
       user: ${CLUSTER_NAME}
     name: ${CLUSTER_NAME}
current-context: ${CLUSTER_NAME}
kind: Config
preferences: {}
users:
   - name: ${CLUSTER_NAME}
     user:
       token: ${TOKEN}
EOF
這會在目前目錄中建立名為 burst-kubeconfig 的新檔案,primary 叢集可用於驗證及管理 burst 叢集。
切換回主要叢集
kubectx primary
建立密鑰並加上標籤,套用「burst」的 kubeconfig
kubectl create secret generic burst-kubeconfig --from-file burst-kubeconfig -n istio-system
為密鑰加上標籤,讓 Istio 知道要使用該密鑰進行多叢集驗證
kubectl label secret burst-kubeconfig istio/multiCluster=true -n istio-system
恭喜!我們已驗證這兩個叢集,並透過 Istio Multicluster 讓兩者相互通訊。讓我們跨叢集部署應用程式
15. 部署跨叢集應用程式
建立 Deployment
切換至 kubernetes 目錄
cd ${proj}/kubernetes
為「burst」叢集建立工作站部署作業:worker-burst.yaml
建立名為 worker-burst.yaml 的檔案,並在其中插入下列內容:
apiVersion: extensions/v1beta1
kind: Deployment
metadata:
  name: worker-deployment
  labels:
    app: worker
spec:
  replicas: 1
  selector:
    matchLabels:
      app: worker
  template:
    metadata:
      labels:
        app: worker
        cluster-type: burst-cluster
    spec:
      containers:
      - name: worker
        image: gcr.io/istio-burst-workshop/worker
        imagePullPolicy: Always
        ports:
        - containerPort: 8081
        readinessProbe:
            initialDelaySeconds: 10
            httpGet:
              path: "/_healthz"
              port: 8081
              httpHeaders:
              - name: "Cookie"
                value: "istio_session-id=x-readiness-probe"
        livenessProbe:
          initialDelaySeconds: 10
          httpGet:
            path: "/"
            port: 8081
            httpHeaders:
            - name: "Cookie"
              value: "istio_session-id=x-liveness-probe"
        env:
        - name: PORT
          value: "8081"
        - name: REDIS_URL
          value: "redis-cache-service:6379"
        - name: PREFIX
          value: "bursty-"
請注意,這與我們稍早建立的 worker-primary.yaml 幾乎完全相同。主要有兩項差異。
第一個主要差異是我們新增了 PREFIX 環境變數,值為「bursty-」
env:
- name: PORT
  value: "8081"
- name: REDIS_URL
  value: "redis-cache-service:6379"
- name: PREFIX
  value: "bursty-"
這表示 burst 叢集中的 worker 會在傳送的所有雜湊值加上「bursty-」前置字串,我們可以藉此判斷應用程式是否確實跨叢集。
第二個主要差異是,我們已將這個部署作業的 cluster-type 標籤從 primary-cluster 變更為 burst-cluster
labels:
  app: worker
  cluster-type: burst-cluster
我們稍後更新 VirtualService 時會使用這個標籤。
修改 Istio 服務
目前 Istio 服務並未充分運用這兩項部署作業。我們 100% 的流量都轉送至「主要」叢集。我們來調整一下吧!
切換至 istio-manifests 目錄
cd ${proj}/istio-manifests
編輯 worker-virtualservice.yaml,加入 DestinationRules
apiVersion: networking.istio.io/v1alpha3
kind: VirtualService
metadata:
  name: worker-virtual-service
spec:
  hosts:
  - worker-service
  gateways:
  - mesh
  http:
  - route:
    - destination:
        host: worker-service.default.svc.cluster.local
        subset: primary
        port:
          number: 80
      weight: 50
    - destination:
        host: worker-service.default.svc.cluster.local
        subset: burst
        port:
          number: 80
      weight: 50
---
apiVersion: networking.istio.io/v1alpha3
kind: DestinationRule
metadata:
  name: worker-destination-rule
spec:
  host: worker-service
  trafficPolicy:
    loadBalancer:
      simple: RANDOM
  subsets:
  - name: primary
    labels:
      cluster-type: primary-cluster
  - name: burst
    labels:
     cluster-type: burst-cluster
如您所見,我們已在 VirtualService 中新增第二個目的地。它仍會參照相同主機 (worker-service.default.svc.cluster.local)),但 50% 的流量會轉送至 primary 子集,其餘 50% 則會轉送至 burst 子集。
我們已將 primary 子集定義為具有 cluster-type: primary-cluster 標籤的部署作業,並將 burst 子集定義為具有 cluster-type: burst-cluster 標籤的部署作業。
這樣一來,流量就會平均分配到兩個叢集。
部署至叢集
將 redis-service.yaml 部署至爆發叢集
變更為 burst kubeconfig
kubectx burst
變更為專案根目錄
cd ${proj}
然後部署
將 redis-service.yaml 部署至爆量叢集
kubectl apply -f kubernetes/redis-service.yaml
將 worker-burst.yaml 部署至爆量叢集
kubectl apply -f kubernetes/worker-burst.yaml
將 worker-service.yaml 部署至爆量叢集
kubectl apply -f kubernetes/worker-service.yaml
套用 Istio VirtualService
變更為 primary kubeconfig
kubectx primary
然後部署
kubectl apply -f istio-manifests/worker-virtualservice.yaml
確認運作正常
如要確認是否正常運作,請瀏覽 Istio Ingress 點,並注意大約 50% 的雜湊值是否以「burst-」為前置字元。
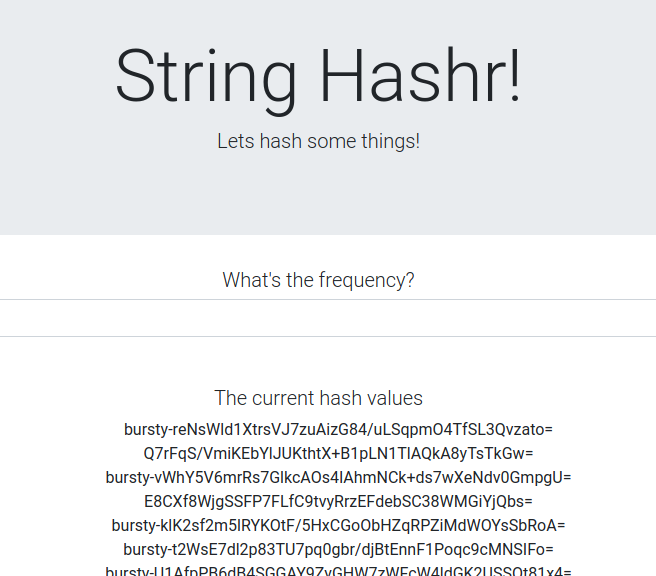
這表示我們已成功跨叢集通訊!嘗試變更不同服務的權重,然後套用 worker-virtualservice.yaml 檔案。這是平衡叢集之間流量的好方法,但如果可以自動執行,不是更好嗎?
16. 運用 Prometheus 指標
Prometheus 簡介
Prometheus 是開放原始碼系統監控與快訊工具包,最初是在 SoundCloud 上打造的。並維護多維度資料模型,其中包含以指標名稱和鍵/值組合識別的時間序列資料。
以下是 Prometheus 架構圖,供您參考:

與 Prometheus 一併部署時,Istio 會自動向 Prometheus 伺服器回報各種指標。我們可以運用這些指標,即時管理叢集。
探索 Prometheus 指標
首先,我們需要公開 Prometheus 部署作業。
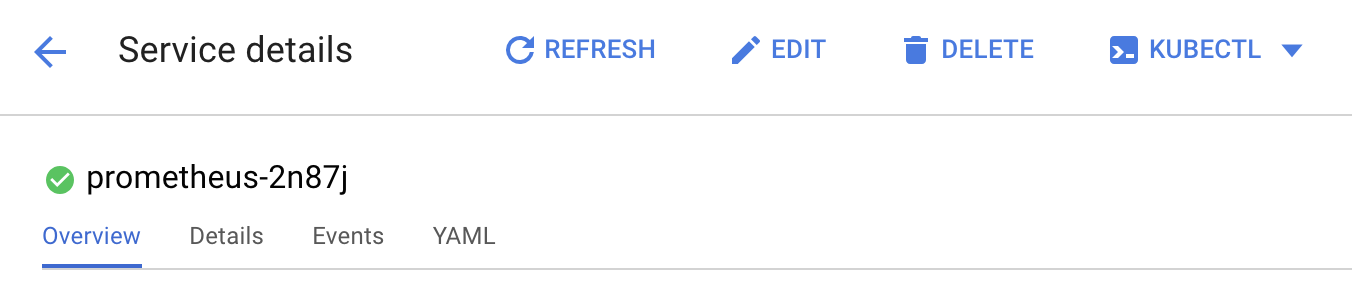
前往 GKE 的「Workloads」(工作負載) 分頁,然後向下鑽研至「prometheus」工作負載。

查看部署作業的詳細資料後,請依序前往「Actions」(動作) ->「Expose」(公開)。
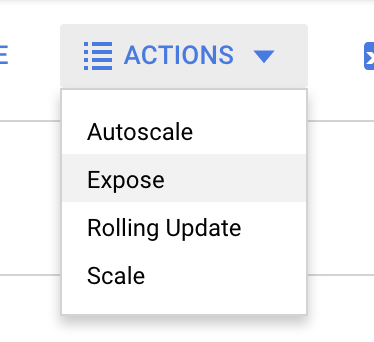
選擇轉送至通訊埠 9090,然後輸入「負載平衡器」
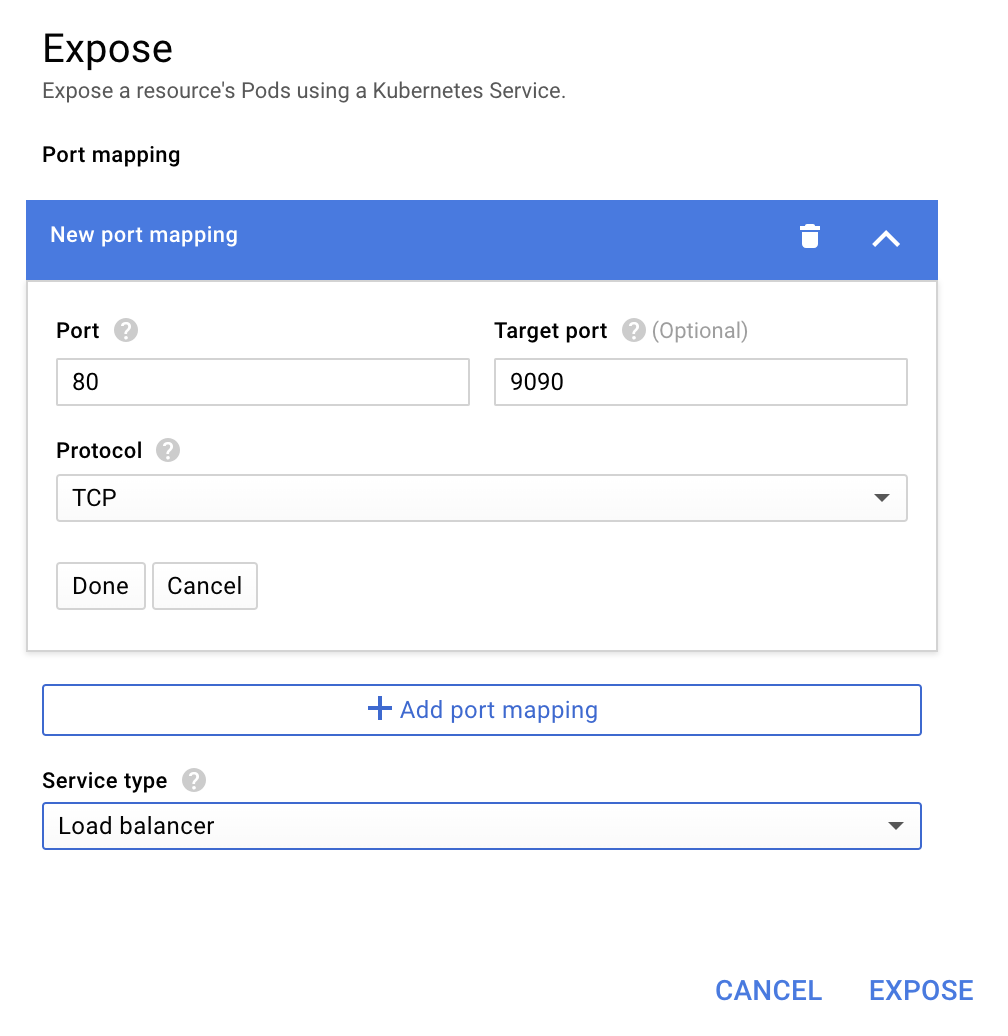
然後選擇「公開」
這會在可公開存取的 IP 位址上建立服務,供我們探索 Prometheus 指標
等待端點開始運作,然後按一下「外部端點」旁的 IP 位址 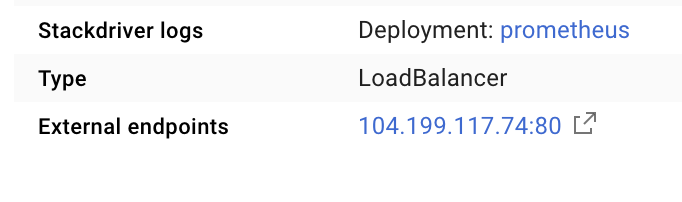
現在應該會看到 Prometheus UI。
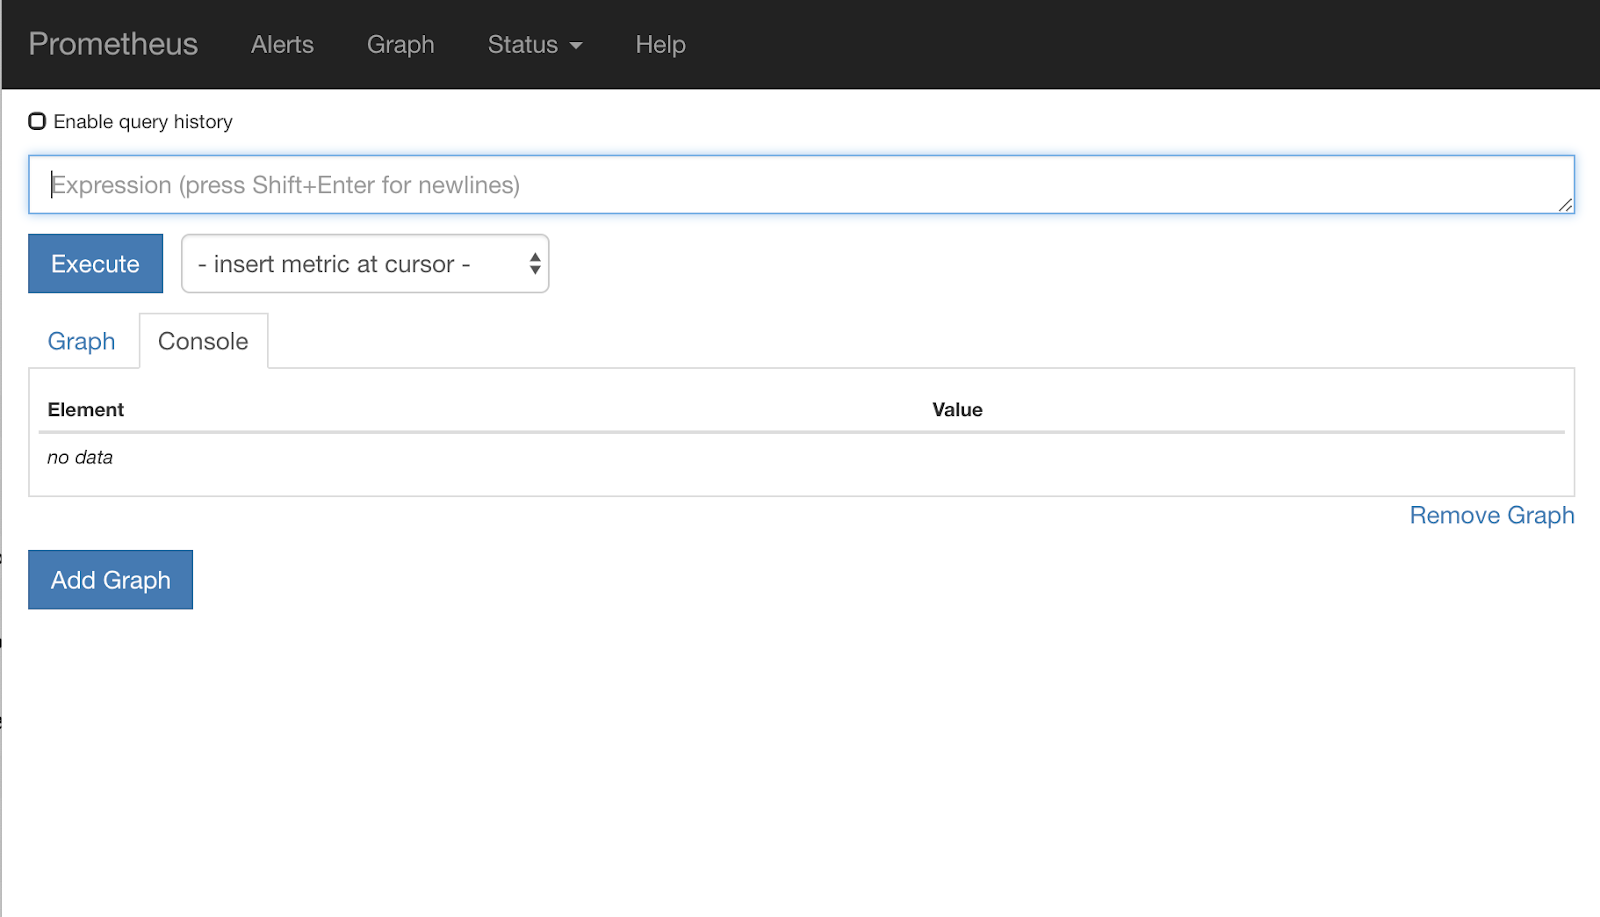
Prometheus 提供足夠的指標,可做為自己的研討會。不過,我們現在會先探討 istio_requests_total 指標。
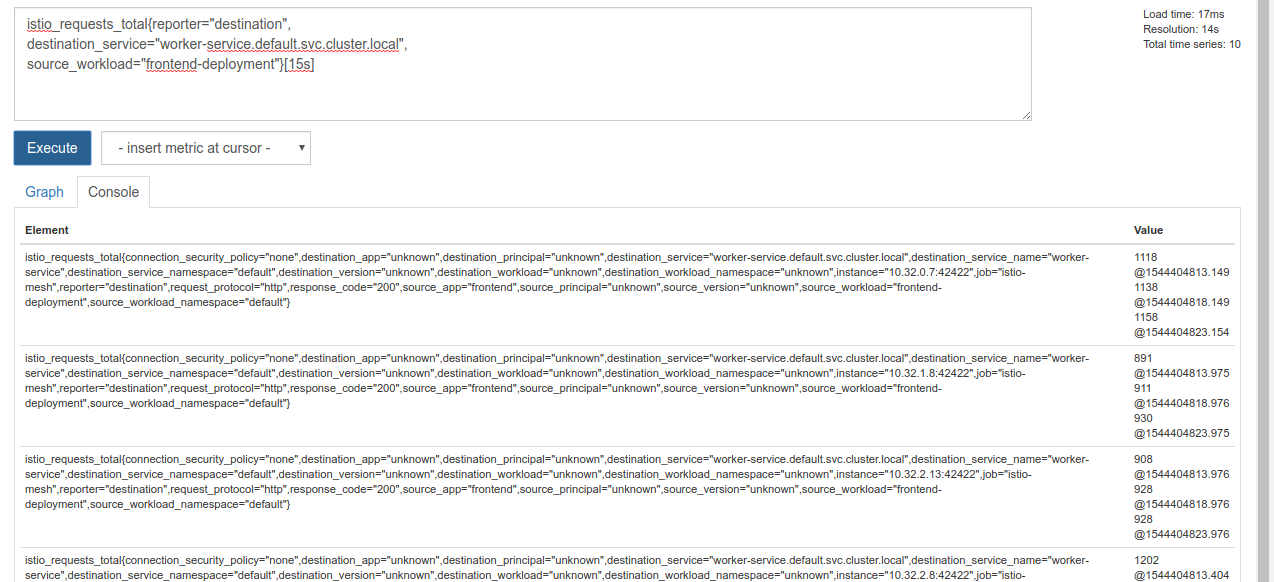
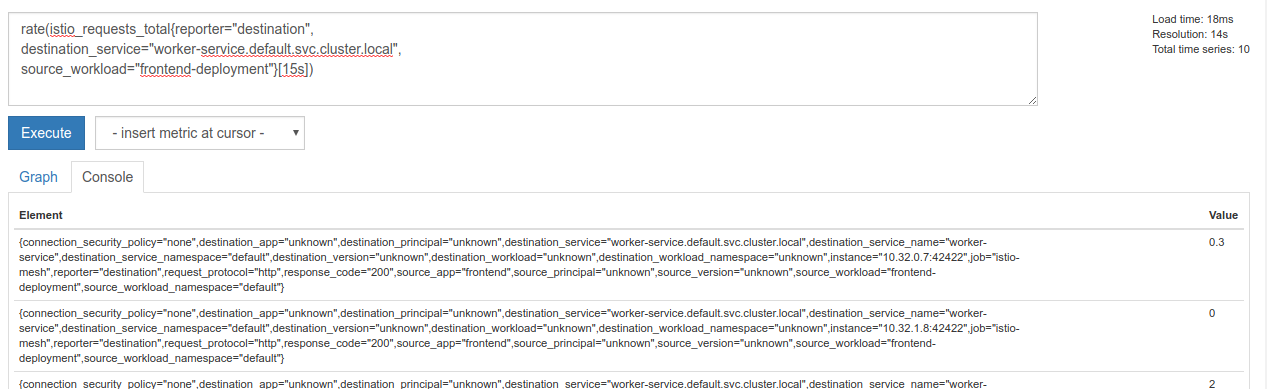
執行該查詢會傳回大量資料。這是指通過 Istio 服務網格的所有要求指標,數量非常龐大!我們會變更運算式,篩選出真正感興趣的內容:
目的地服務為 worker-service.default.svc.cluster.local,且來源為 frontend-deployment 的要求 (僅限過去 15 秒)
查詢內容如下所示:
istio_requests_total{reporter="destination",
destination_service="worker-service.default.svc.cluster.local",
source_workload="frontend-deployment"}[15s]
並提供更容易管理的一組資料
但仍有點密集。我們想知道每秒的要求數,而不是所有要求。
如要取得該值,可以使用內建的 rate 函式
rate(istio_requests_total{reporter="destination",
destination_service="worker-service.default.svc.cluster.local",
source_workload="frontend-deployment"}[15s])
這樣做更接近目標,但我們需要將這些指標進一步歸入邏輯群組。
為此,我們可以使用 sum 和 by 關鍵字,將結果分組並加總
sum(rate(istio_requests_total{reporter="destination",
destination_service="worker-service.default.svc.cluster.local",
source_workload="frontend-deployment"}[15s])) by (source_workload,
source_app, destination_service)
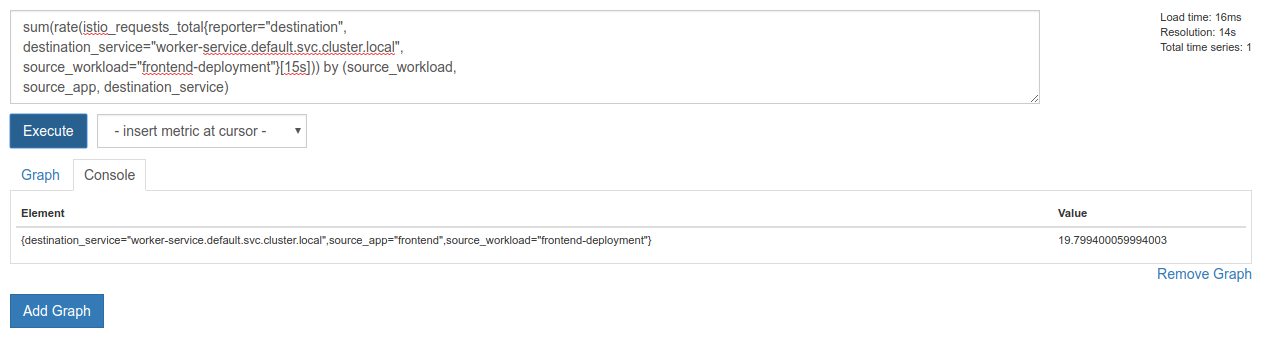
太棒了!我們可以從 Prometheus 取得所需的確切指標。
最終的 Prometheus 查詢
根據我們所學,我們需要向 Prometheus 提出的最終查詢是
sum(rate(istio_requests_total{reporter="destination",
destination_service="worker-service.default.svc.cluster.local",
source_workload="frontend-deployment"}[15s])) by (source_workload,
source_app, destination_service)
現在我們可以使用他們的 HTTP API 取得指標。
我們可以發出類似這樣的 HTTP GET 要求,使用查詢條件查詢他們的 API。請將 <prometheus-ip-here>
curl http://<prometheus-ip-here>/api/v1/query?query=sum\(rate\(istio_requests_total%7Breporter%3D%22destination%22%2C%0Adestination_service%3D%22worker-service.default.svc.cluster.local%22%2C%0Asource_workload%3D%22frontend-deployment%22%7D%5B15s%5D\)\)%20by%20\(source_workload%2C%0Asource_app%2C%20destination_service\)
回覆範例如下:
{
    "status": "success",
    "data": {
        "resultType": "vector",
        "result": [
            {
                "metric": {
                    "destination_service": "worker-service.default.svc.cluster.local",
                    "source_app": "frontend",
                    "source_workload": "frontend-deployment"
                },
                "value": [
                    1544404907.503,
                    "18.892886390062788"
                ]
            }
        ]
    }
}
現在,我們可以從 JSON 擷取指標值
清除
我們需要刪除剛才用來公開 Prometheus 的服務。在 Google Cloud 控制台中,前往剛才建立的服務頂端,然後按一下「刪除」
後續步驟:
我們已找出流量在叢集中的流動方式和速率,接下來要編寫一個小型二進位檔,定期查詢 Prometheus,如果每秒對 worker 的要求數超過特定門檻,就對 worker 虛擬服務套用不同的目的地權重,將所有流量傳送至 burst 叢集。一旦每秒要求數低於下限,請將所有流量傳回 primary。
17. 建立跨叢集爆量
設定方式
將工作站服務的所有流量設為主要叢集
我們會將所有導向 worker-service 的流量都路由至 primary 叢集,視為應用程式的「預設」狀態
將 $proj/istio-manifests/worker-virtualservice.yaml 編輯成如下所示:
apiVersion: networking.istio.io/v1alpha3
kind: VirtualService
metadata:
  name: worker-virtual-service
spec:
  hosts:
  - worker-service
  gateways:
  - mesh
  http:
  - route:
    - destination:
        host: worker-service.default.svc.cluster.local
        subset: primary
        port:
          number: 80
      weight: 100
    - destination:
        host: worker-service.default.svc.cluster.local
        subset: burst
        port:
          number: 80
      weight: 0
---
apiVersion: networking.istio.io/v1alpha3
kind: DestinationRule
metadata:
  name: worker-destination-rule
spec:
  host: worker-service
  trafficPolicy:
    loadBalancer:
      simple: RANDOM
  subsets:
  - name: primary
    labels:
      cluster-type: primary-cluster
  - name: burst
    labels:
     cluster-type: burst-cluster
確認你已連線至 primary 叢集
kubectx primary
套用 istio-manifests/worker-virtualservice.yaml
kubectl apply -f istio-manifests/worker-virtualservice.yaml
編寫 istiowatcher daemon
我們會使用 Go 撰寫這項服務,因為它速度快且可攜性高。應用程式的整體流程為啟動,然後每秒查詢 Prometheus,
在 src 中建立名為 istiowatcher 的新目錄
mkdir -p ${proj}/src/istiowatcher && cd ${proj}/src/istiowatcher
我們會從容器內呼叫 istioctl,以便從叢集內操控 Istio 控制層。
編寫 istiowatcher.go
在該目錄中建立名為 istiowatcher.go 的檔案,並插入下列內容
package main

import (
        "github.com/tidwall/gjson"
        "io/ioutil"
        "log"
        "net/http"
        "os/exec"
        "time"
)

func main() {
        //These are in requests per second
        var targetLow float64 = 10
        var targetHigh float64 = 15
        // This is for the ticker in milliseconds
        ticker := time.NewTicker(1000 * time.Millisecond)

        isBurst := false

        // Our prometheus query
        reqQuery := `/api/v1/query?query=sum(rate(istio_requests_total{reporter="destination",destination_service="worker-service.default.svc.cluster.local",source_workload="frontend-deployment"}[15s]))by(source_workload,source_app,destination_service)`

        for t := range ticker.C {
                log.Printf("Checking Prometheus at %v", t)

                // Check prometheus
                // Note that b/c we are querying over the past 5 minutes, we are getting a very SLOW ramp of our reqs/second
                // If we wanted this to be a little "snappier" we can scale it down to say 30s
                resp, err := http.Get("http://prometheus.istio-system.svc.cluster.local:9090" + reqQuery)
                if err != nil {
                        log.Printf("Error: %v", err)
                        continue
                }
                defer resp.Body.Close()
                body, _ := ioutil.ReadAll(resp.Body)

                val := gjson.Get(string(body), "data.result.0.value.1")
                log.Printf("Value: %v", val)

                currentReqPerSecond := val.Float()
                log.Printf("Reqs per second %f", currentReqPerSecond)

                if currentReqPerSecond > targetHigh && !isBurst {
                        applyIstio("burst.yaml")
                        log.Println("Entering burst mode")
                        isBurst = true
                } else if currentReqPerSecond < targetLow && isBurst {
                        applyIstio("natural.yaml")
                        log.Println("Returning to natural state.")
                        isBurst = false
                }
        }
}

func applyIstio(filename string) {
        cmd := exec.Command("istioctl", "replace", "-f", filename)
        if err := cmd.Run(); err != nil {
                log.Printf("Error hit applying istio manifests: %v", err)
        }
}
編寫 Dockerfile
建立名為 Dockerfile 的新檔案,並在其中插入下列內容。
FROM golang:1.11.2-stretch as base

FROM base as builder

WORKDIR /workdir
RUN curl -LO https://github.com/istio/istio/releases/download/1.0.0/istio-1.0.0-linux.tar.gz
RUN tar xzf istio-1.0.0-linux.tar.gz
RUN cp istio-1.0.0/bin/istioctl ./istioctl

FROM base

WORKDIR /go/src/istiowatcher
COPY . .
COPY --from=builder /workdir/istioctl /usr/local/bin/istioctl

RUN go get -d -v ./...
RUN go install -v ./...

CMD ["istiowatcher"]
這個多級式 Dockerfile 會在第一個階段下載並擷取 Istio 1.0.0 版。第二階段會將目錄中的所有內容複製到映像檔,然後將建構階段的 istioctl 複製到 /usr/local/bin (以便應用程式呼叫),取得依附元件、編譯程式碼,並將 CMD 設為「istiowatcher」
撰寫 burst.yaml
如果從 frontend 到 worker 的每秒要求數超過 15,系統就會套用這個檔案 istiowatcher。
建立名為 burst.yaml 的新檔案,並在其中插入下列內容。
apiVersion: networking.istio.io/v1alpha3
kind: VirtualService
metadata:
 name: worker-virtual-service
spec:
 hosts:
 - worker-service
 gateways:
 - mesh
 http:
 - route:
   - destination:
       host: worker-service.default.svc.cluster.local
       subset: primary
       port:
         number: 80
     weight: 0
   - destination:
       host: worker-service.default.svc.cluster.local
       subset: burst
       port:
         number: 80
     weight:  100
撰寫 natural.yaml
當每秒的請求數從 frontend 降至 worker 低於 10 時,我們會將此視為「自然」狀態。在這個狀態下,100% 的流量會轉送至 primary 叢集。
建立名為 natural.yaml 的新檔案,並在其中插入下列內容
apiVersion: networking.istio.io/v1alpha3
kind: VirtualService
metadata:
 name: worker-virtual-service
spec:
 hosts:
 - worker-service
 gateways:
 - mesh
 http:
 - route:
   - destination:
       host: worker-service.default.svc.cluster.local
       subset: primary
       port:
         number: 80
     weight: 100
   - destination:
       host: worker-service.default.svc.cluster.local
       subset: burst
       port:
         number: 80
     weight: 0
建構並推送 istiowatcher
執行下列指令,將目前目錄傳送至 Google Cloud Build (GCB),後者會在 GCR 中建構及標記映像檔。
gcloud builds submit -t gcr.io/${GCLOUD_PROJECT}/istiowatcher
部署 istiowatcher
切換至 kubernetes 目錄
cd ${proj}/kubernetes/
編寫部署檔案:istiowatcher.yaml
建立名為 istiowatcher.yaml 的檔案,並插入下列內容 (請將 <your-project-id> 替換為您的專案 ID)。
apiVersion: extensions/v1beta1
kind: Deployment
metadata:
  name: istiowatcher-deployment
  labels:
    app: istiowatcher
spec:
  replicas: 1
  selector:
    matchLabels:
      app: istiowatcher
  template:
    metadata:
      labels:
        app: istiowatcher
    spec:
      serviceAccountName: istio-pilot-service-account
      automountServiceAccountToken: true
      containers:
      - name: istiowatcher
        image: gcr.io/<your-project-id>/istiowatcher
        imagePullPolicy: Always
部署
確認我們在主要叢集中執行
kubectx primary
在 istio-system 命名空間中部署 istiowatcher.yaml
kubectl apply -n istio-system -f istiowatcher.yaml
請注意 yaml 中的 serviceAccountName 和 automountServiceAccountToken 指令。這樣我們就能取得在叢集中執行 istioctl 時所需的憑證。
我們也需要在 istio-system 命名空間中部署這項服務,確保我們擁有 istio-pilot-service-account 的憑證。(不存在於 default 命名空間中)。
觀察流量自動切換!
現在,神奇時刻來臨!前往前端,將每秒要求數提高至 20
請注意,這需要幾秒鐘的時間,但我們已加速處理,所有雜湊都加上了「bursty-」前置字元!
這是因為我們在 15s 範圍內對 Prometheus 進行取樣,導致回應時間稍微延遲。如果我們想要更窄的頻帶,可以將查詢變更為 prometheus,即 5s.
18. 接下來要做什麼?
清除
如果您使用為本研討會提供的臨時帳戶,則不需要清理。
您可以刪除 Kubernetes 叢集、防火牆規則和 GCR 中的映像檔
gcloud container clusters delete primary --zone=us-west1-a
gcloud container clusters delete burst --zone=us-west1-a
gcloud compute firewall-rules delete istio-multicluster-test-pods
gcloud container images delete gcr.io/$GCLOUD_PROJECT/istiowatcher
後續
- 參加幾場 Istio Talks!
- 取得認證:使用 Kubernetes + Istio 建構下一個應用程式
- 主題演講:Kubernetes、Istio、Knative:全新開放雲端堆疊 - Google Kubernetes 產品群經理 Aparna Sinha
- 教學課程:使用 Istio - Lee Calcote 和 Girish Ranganathan (SolarWinds)
- Istio - The Packet's-Eye View - Matt Turner, Tetrate
- Is Istio the Most Next Gen Next Gen Firewall Ever Created? - John Morello,Twistlock
- 參閱 Istio 說明文件
- 加入 Istio 工作群組
- 在 Twitter 上追蹤 @IstioMesh