
Sobre este codelab
1. Antes de começar
Este codelab explica os principais conceitos relacionados ao uso do estado no Jetpack Compose. Ele mostra como o estado do app determina o que é mostrado na interface, como o Compose atualiza a interface quando o estado muda ao trabalhar com diferentes APIs, como otimizar a estrutura das funções combináveis e como usar ViewModels em um ambiente do Compose.
Pré-requisitos
- Conhecimento da sintaxe do Kotlin.
- Conhecimentos básicos do Compose. Comece com o tutorial do Jetpack Compose.
- Conhecimentos básicos do
ViewModeldo Componente de Arquitetura.
O que você vai aprender
- Como analisar o estado e os eventos em uma interface do Jetpack Compose.
- Como o Compose usa o estado para determinar quais elementos vão ser mostrados na tela.
- O que é a elevação de estado.
- Como as funções combináveis com e sem estado funcionam.
- Como o Compose monitora automaticamente o estado com a API
State<T>. - Como a memória e o estado interno funcionam em uma função combináveis usando as APIs
remembererememberSaveable. - Como trabalhar com listas e estados: uso das APIs
mutableStateListOfetoMutableStateList. - Como usar o
ViewModelno Compose.
O que é necessário
Recomendado/opcional
- Leia Como trabalhar com o Compose.
- Siga o codelab de Noções básicas do Jetpack Compose antes deste. Neste codelab, vamos resumir o conceito de estado.
O que você vai criar
Você vai implementar um app de bem-estar simples:

O app tem duas funcionalidades principais:
- Um contador para monitorar seu consumo de água.
- Uma lista de tarefas de bem-estar para seguir ao longo do dia.
Para receber mais suporte durante este codelab, confira as orientações neste vídeo (em inglês):
2. Começar a configuração
Iniciar um novo projeto do Compose
- Para iniciar um novo projeto do Compose, abra o Android Studio.
- Se estiver na janela Welcome to Android Studio, clique em Start a new Android Studio project. Caso você já tenha um projeto aberto no Android Studio, selecione File > New > New Project na barra de menus.
- Ao criar um novo projeto, selecione a opção Empty Activity nos modelos disponíveis.
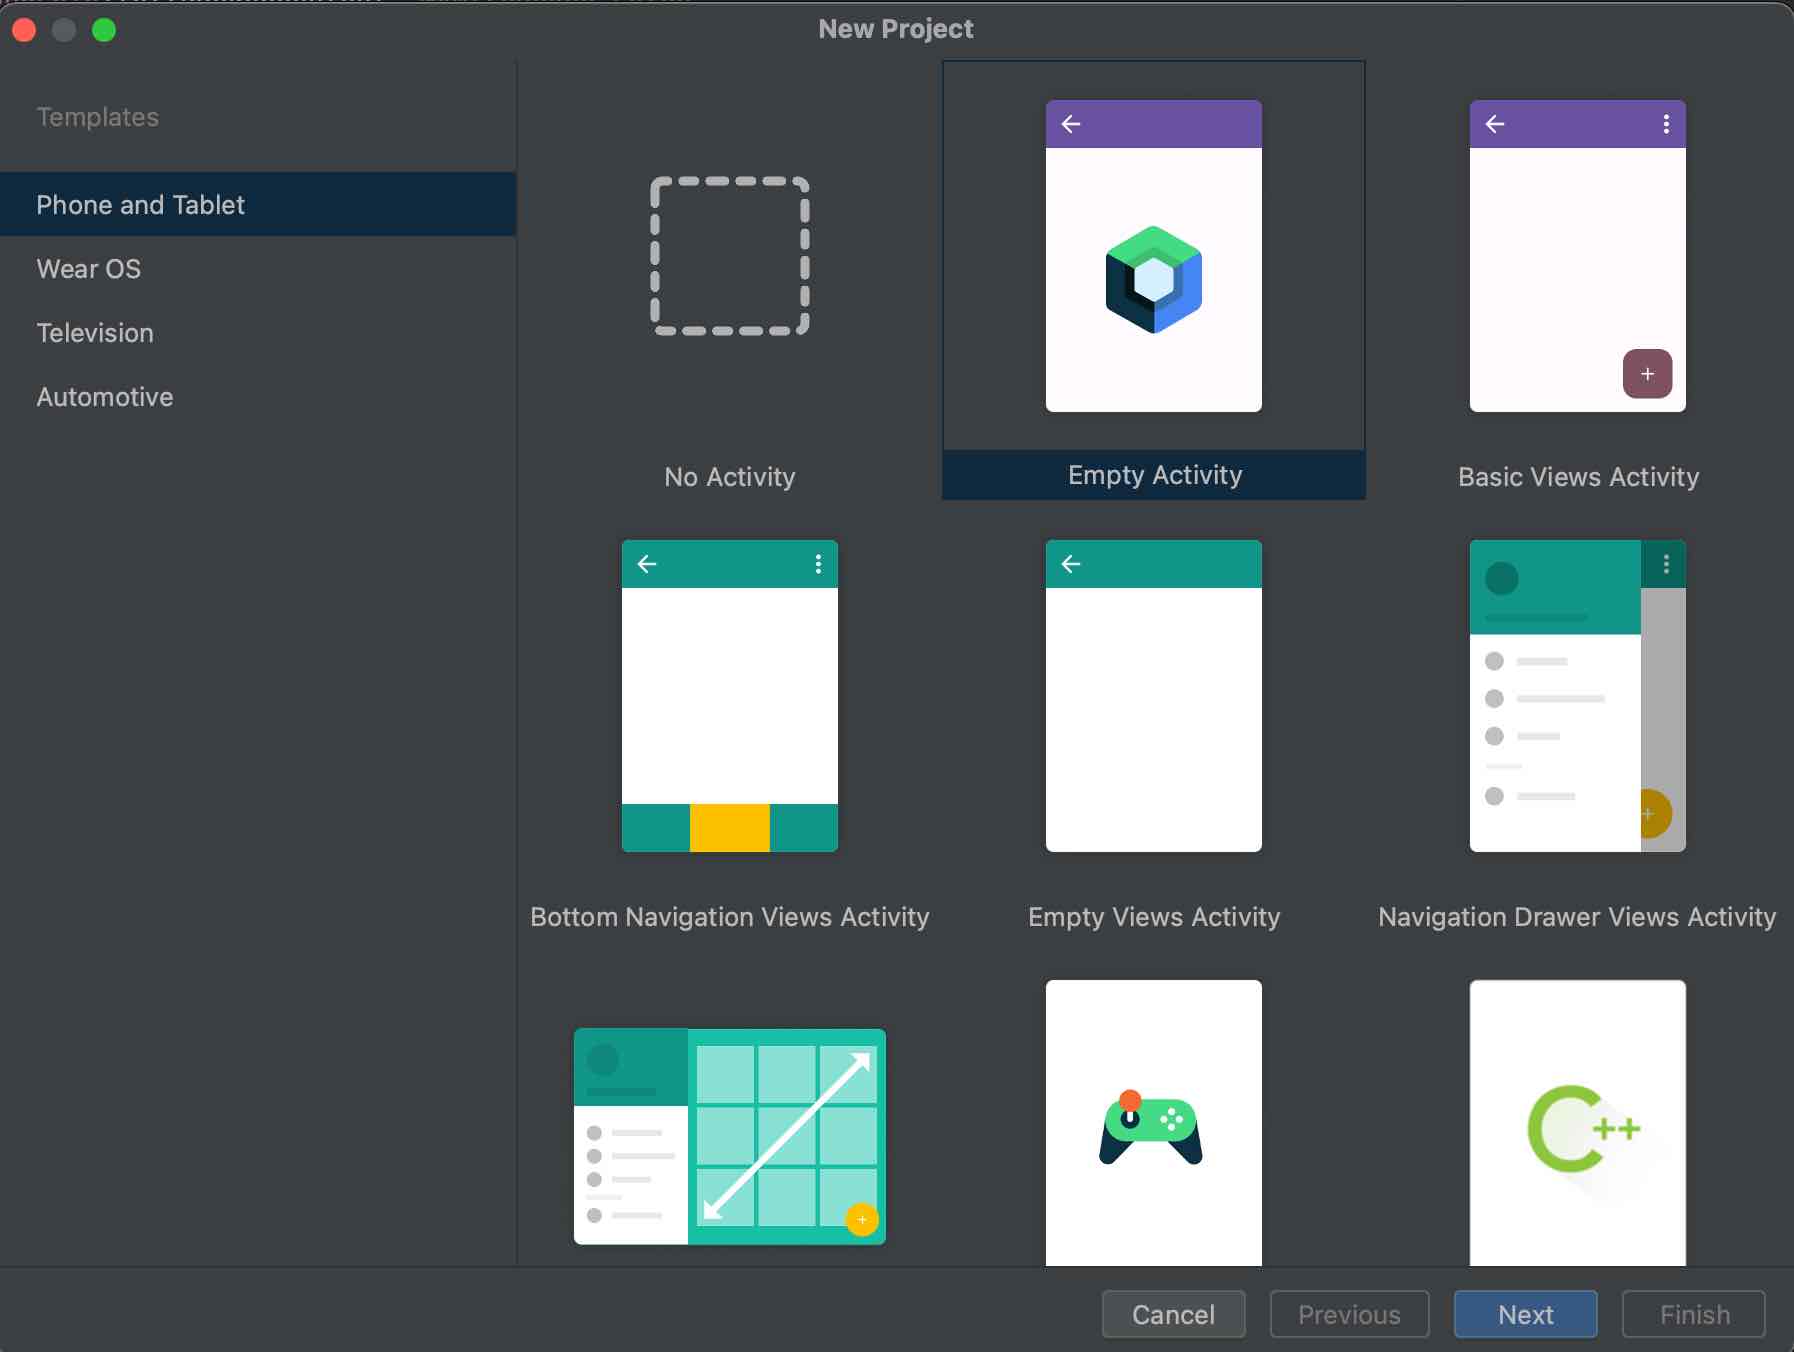
- Clique em Next e configure o projeto com o nome "BasicStateCodelab".
Defina a minimumSdkVersion como a API de nível 21 ou mais recente. Esse é o nível mínimo de API com suporte no Compose.
Quando você escolhe o modelo Empty Compose Activity, o Android Studio define os elementos abaixo no projeto:
- Uma classe
MainActivityconfigurada com uma função combinável que mostra texto na tela. - O arquivo
AndroidManifest.xml, que define as permissões, componentes e recursos personalizados do app. - Os arquivos
build.gradle.ktseapp/build.gradle.kts, que contêm opções e dependências necessárias para o Compose.
Solução do codelab
O código da solução para o BasicStateCodelab está disponível no GitHub:
$ git clone https://github.com/android/codelab-android-compose
Se preferir, faça o download do repositório como um arquivo ZIP (link em inglês).
O código da solução está disponível no projeto BasicStateCodelab. Recomendamos que você siga as etapas do codelab no seu próprio ritmo e, caso precise de ajude, consulte a solução. Durante o codelab, você vai encontrar snippets de código que precisam ser adicionados ao projeto.
3. Estado no Compose
O "estado" em um app é qualquer valor que pode mudar ao longo do tempo. Essa é uma definição ampla que abrange tudo, desde um banco de dados do Room até uma variável em uma classe.
Todos os apps Android mostram o estado para o usuário. Confira alguns exemplos de estado em apps Android:
- As mensagens mais recentes recebidas em um app de chat.
- A foto do perfil do usuário.
- A posição de rolagem em uma lista de itens.
Vamos começar a programar o app Wellness.
Para simplificar, durante o codelab:
- Você pode adicionar todos os arquivos Kotlin no pacote raiz
com.codelabs.basicstatecodelabdo móduloapp. No entanto, em um app de produção, os arquivos precisam ser estruturados logicamente em subpacotes. - Vamos fixar no código todas as strings in-line em snippets. Em um app real, elas precisam ser adicionadas como recursos de string no arquivo
strings.xmle referenciadas usando a APIstringResourcedo Compose.
A primeira funcionalidade que você precisa criar é um contador para medir o número de copos de água consumidos durante o dia.
Crie uma função combinável chamada WaterCounter, contendo um elemento combinável Text para mostrar o número de copos. O número de copos vai ser armazenado em um valor com o nome count, que você pode fixar no código por enquanto.
Crie um novo arquivo WaterCounter.kt com a função combinável WaterCounter, desta forma:
import androidx.compose.foundation.layout.padding
import androidx.compose.material3.Text
import androidx.compose.runtime.Composable
import androidx.compose.ui.Modifier
import androidx.compose.ui.unit.dp

@Composable
fun WaterCounter(modifier: Modifier = Modifier) {
   val count = 0
   Text(
       text = "You've had $count glasses.",
       modifier = modifier.padding(16.dp)
   )
}
Vamos criar uma função combinável que representa a tela inteira. Ela vai ter duas seções: o contador de água e a lista de tarefas de bem-estar. Por enquanto, vamos adicionar apenas o contador.
- Crie um arquivo
WellnessScreen.kt, que representa a tela principal, e chame nossa funçãoWaterCounter:
import androidx.compose.runtime.Composable
import androidx.compose.ui.Modifier

@Composable
fun WellnessScreen(modifier: Modifier = Modifier) {
   WaterCounter(modifier)
}
- Abra o arquivo
MainActivity.kt. Remova os elementos combináveisGreetingeDefaultPreview. Chame o elementoWellnessScreenrecém-criado dentro do blocosetContentda atividade, desta forma:
class MainActivity : ComponentActivity() {
   override fun onCreate(savedInstanceState: Bundle?) {
       super.onCreate(savedInstanceState)
       setContent {
           BasicStateCodelabTheme {
               // A surface container using the 'background' color from the theme
               Surface(
                   modifier = Modifier.fillMaxSize(),
                   color = MaterialTheme.colorScheme.background
               ) {
                   WellnessScreen()
               }
           }
       }
   }
}
- Se você executar o app agora, vai encontrar nossa tela básica do contador com a contagem de copos de água fixada no código.

O estado da função combinável WaterCounter é a variável count. Mas ter um estado estático não é muito útil porque ele não pode ser modificado. Para resolver isso, adicione um Button para aumentar a contagem e acompanhar quantos copos de água bebeu ao longo do dia.
Qualquer ação que causa uma modificação do estado é chamada de "evento", e vamos aprender mais sobre isso na próxima seção.
4. Eventos no Compose
Falamos do estado como qualquer valor que mude ao longo do tempo, como as últimas mensagens recebidas em um app de chat. Mas o que faz com que o estado seja atualizado? Nos apps Android, o estado é atualizado em resposta aos eventos.
Eventos são entradas geradas de fora ou de dentro de um aplicativo, como:
- A interação do usuário com a interface, por exemplo, pressionando um botão.
- Outros fatores, como sensores que enviam um novo valor ou respostas de rede.
Embora o estado do app ofereça uma descrição do que vai ser mostrado na interface, os eventos são o mecanismo que altera o estado, resultando em mudanças na interface.
Os eventos notificam uma parte do programa sobre o acontecimento de algo. Todos os apps Android têm uma repetição de atualização de interface principal que funciona assim:
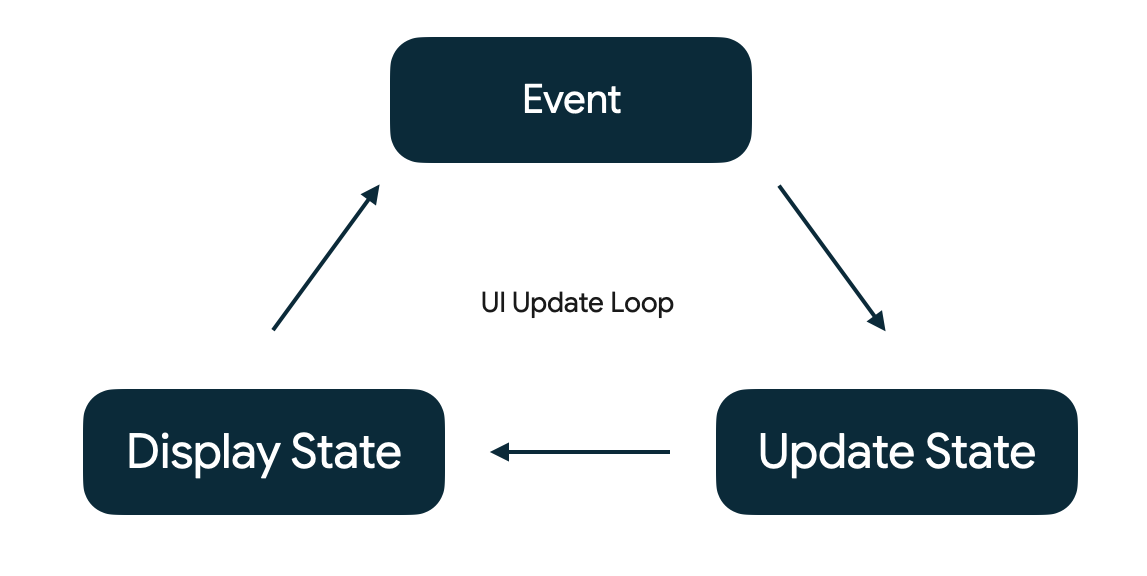
- Evento: um evento é gerado pelo usuário ou por outra parte do programa.
- Estado de atualização: um manipulador de eventos muda o estado usado pela interface.
- Estado de exibição: a interface é atualizada para mostrar o novo estado.
O gerenciamento de estado no Compose tem como objetivo entender como o estado e os eventos interagem entre si.
Agora, adicione o botão para que os usuários possam modificar o estado adicionando mais copos de água.
Acesse a função combinável WaterCounter para adicionar o Button abaixo do rótulo Text. Uma Column vai ajudar a alinhar verticalmente o Text com os elementos combináveis do Button. É possível mover o padding externo para o elemento combinável Column e adicionar mais padding à parte de cima do Button, de forma que ele seja separado do texto.
A função combinável Button recebe uma função lambda (link em inglês) onClick. Esse é o evento que acontece quando o botão é clicado. Você vai encontrar mais exemplos de funções lambda mais tarde.
Para que a contagem possa ser modificada, mude a count para ser var em vez de val.
import androidx.compose.material3.Button
import androidx.compose.foundation.layout.Column

@Composable
fun WaterCounter(modifier: Modifier = Modifier) {
   Column(modifier = modifier.padding(16.dp)) {
       var count = 0
       Text("You've had $count glasses.")
       Button(onClick = { count++ }, Modifier.padding(top = 8.dp)) {
           Text("Add one")
       }
   }
}
Quando você executar o app e clicar no botão, nada vai acontecer. Definir um valor diferente para a variável count não vai fazer com que o Compose a detecte como uma mudança de estado. Nada vai acontecer nesse caso. Isso ocorre porque você não informou ao Compose que ele precisa renderizar a tela novamente, ou seja, "recompor" a função combinável, com a mudança do estado. Isso vai ser corrigido na próxima etapa.

5. Memória em uma função combinável
Os apps do Compose chamam funções combináveis para transformar dados em interface. Uma composição é a descrição da interface criada pelo Compose ao executar elementos combináveis. Se uma mudança de estado ocorrer, o Compose vai executar novamente as funções combináveis afetadas usando o novo estado para criar uma interface atualizada. Isso é conhecido como recomposição. Ele também analisa quais dados são necessários para uma composição individual. O Compose só recompõe os componentes cujos dados mudaram, ignorando aqueles que não são afetados.
Para fazer isso, o Compose precisa saber qual estado acompanhar para que, ao receber uma atualização, ele possa programar a recomposição.
O Compose tem um sistema especial de monitoramento do estado em vigor que programa as recomposições para qualquer função que consiga ler um estado específico. Isso permite que o Compose seja granular e recomponha apenas as funções combináveis que precisam mudar, não toda a interface. Isso é feito monitorando não apenas "gravações", ou seja, mudanças de estado, mas também "leituras" do estado.
Use os tipos State e MutableState do Compose para tornar o estado observável.
O Compose monitora cada elemento combinável que lê propriedades de estado value e aciona uma recomposição quando o value muda. Você pode usar a função mutableStateOf para criar um MutableState observável. Ela recebe um valor inicial como um parâmetro unido a um objeto State, que torna o value dele observável.
Atualize o elemento combinável WaterCounter para que count use a API mutableStateOf com 0 como valor inicial. Como mutableStateOf retorna um tipo MutableState, você pode atualizar o value para atualizar o estado. Depois, o Compose vai acionar uma recomposição para as funções em que o value é lido.
import androidx.compose.runtime.MutableState
import androidx.compose.runtime.mutableStateOf

@Composable
fun WaterCounter(modifier: Modifier = Modifier) {
   Column(modifier = modifier.padding(16.dp)) {
       // Changes to count are now tracked by Compose
       val count: MutableState<Int> = mutableStateOf(0)

       Text("You've had ${count.value} glasses.")
        Button(onClick = { count.value++ }, Modifier.padding(top = 8.dp)) {
           Text("Add one")
       }
   }
}
Como mencionado anteriormente, qualquer mudança em count agenda a recomposição das funções combináveis que leem o value da count automaticamente. Nesse caso, o WaterCounter é recomposto sempre que o botão é clicado.
Se você executar o app agora, vai perceber mais uma vez que nada acontece ainda.
O agendamento de recomposições está funcionando. No entanto, quando uma recomposição acontece, a variável count é reinicializada novamente como 0. Portanto, precisamos de uma maneira para preservar o valor nas recomposições.
Para isso, podemos usar a função combinável remember inline. Um valor calculado por remember é armazenado durante a composição inicial, e o valor armazenado é mantido nas recomposições.
Normalmente, remember e mutableStateOf são usados em conjunto nas funções combináveis.
Existem algumas maneiras equivalentes de programar isso, conforme mostrado na documentação sobre estados no Compose.
Modifique o WaterCounter, envolvendo a chamada para mutableStateOf com a função combinável remember inline:
import androidx.compose.runtime.remember

@Composable
fun WaterCounter(modifier: Modifier = Modifier) {
    Column(modifier = modifier.padding(16.dp)) {
        val count: MutableState<Int> = remember { mutableStateOf(0) }
        Text("You've had ${count.value} glasses.")
        Button(onClick = { count.value++ }, Modifier.padding(top = 8.dp)) {
            Text("Add one")
        }
    }
}
Também podemos simplificar o uso da count com as propriedades delegadas (link em inglês) do Kotlin.
Você pode usar a palavra-chave by para definir a count como uma variável. Adicionar as importações getter e setter do delegado permite ler e modificar a count indiretamente sem referenciar de forma explícita a propriedade value de MutableState todas as vezes.
Agora, o WaterCounter vai ficar assim:
import androidx.compose.runtime.getValue
import androidx.compose.runtime.setValue

@Composable
fun WaterCounter(modifier: Modifier = Modifier) {
   Column(modifier = modifier.padding(16.dp)) {
       var count by remember { mutableStateOf(0) }

       Text("You've had $count glasses.")
       Button(onClick = { count++ }, Modifier.padding(top = 8.dp)) {
           Text("Add one")
       }
   }
}
Escolha a sintaxe que produz o código mais fácil de ler no elemento combinável que você está criando.
Vamos conferir o que fizemos até agora:
- Definimos uma variável com o nome
countpara ser lembrada ao longo do tempo. - Criamos uma exibição de texto em que informamos ao usuário o número lembrado.
- Adicionamos um botão que incrementa o número lembrado sempre que recebe um clique.
Este modelo forma um loop de feedback do fluxo de dados do usuário:
- A interface apresenta o estado ao usuário (a contagem atual é mostrada como texto).
- O usuário produz eventos que são combinados com o estado atual para produzir um novo estado (clicar no botão incrementa a contagem atual em um).
O contador está pronto e funcionando.
6. UI orientada por estado
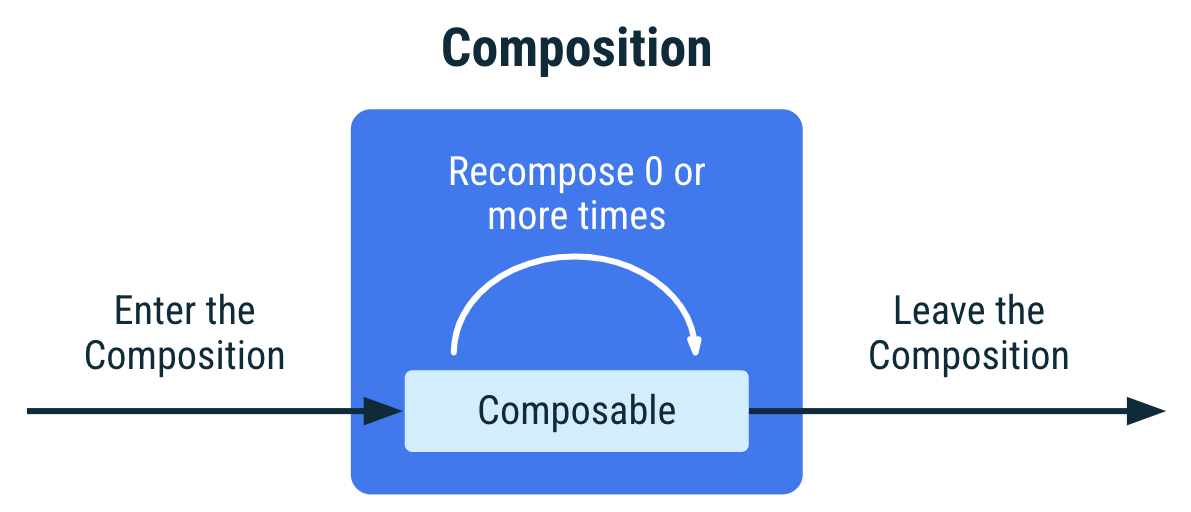
O Compose é um framework de interface declarativo. Em vez de remover os componentes da interface ou mudar a visibilidade deles com a mudança do estado, descrevemos como a interface está em condições específicas de estado. Após uma chamada de recomposição e a atualização da interface, os elementos combináveis podem acabar entrando ou saindo da composição.
Essa abordagem evita a complexidade de atualizar visualizações manualmente, como você faria com o sistema de visualização. Isso também diminui a probabilidade de erros, já que, como ela acontece automaticamente, não é possível esquecer a atualização de uma visualização com base em um novo estado.
Se uma função combinável for chamada durante a composição inicial ou em recomposições, dizemos que ela está presente na composição. Se uma função combinável não é chamada (por exemplo, porque a chamada dela ocorre dentro de uma instrução if, e a condição não é atendida) dizemos que ela está ausente na composição.
Saiba mais sobre o ciclo de vida dos elementos combináveis na documentação.
O resultado da composição é uma estrutura de árvore que descreve a interface.
Você pode inspecionar o layout do app gerado pelo Compose usando a ferramenta Layout Inspector do Android Studio, que é a próxima etapa.
Para demonstrar isso, modifique seu código para mostrar a interface com base no estado. Abra o WaterCounter e mostre o Text se a count for maior que 0:
@Composable
fun WaterCounter(modifier: Modifier = Modifier) {
   Column(modifier = modifier.padding(16.dp)) {
       var count by remember { mutableStateOf(0) }

       if (count > 0) {
           // This text is present if the button has been clicked
           // at least once; absent otherwise
           Text("You've had $count glasses.")
       }
       Button(onClick = { count++ }, Modifier.padding(top = 8.dp)) {
           Text("Add one")
       }
   }
}
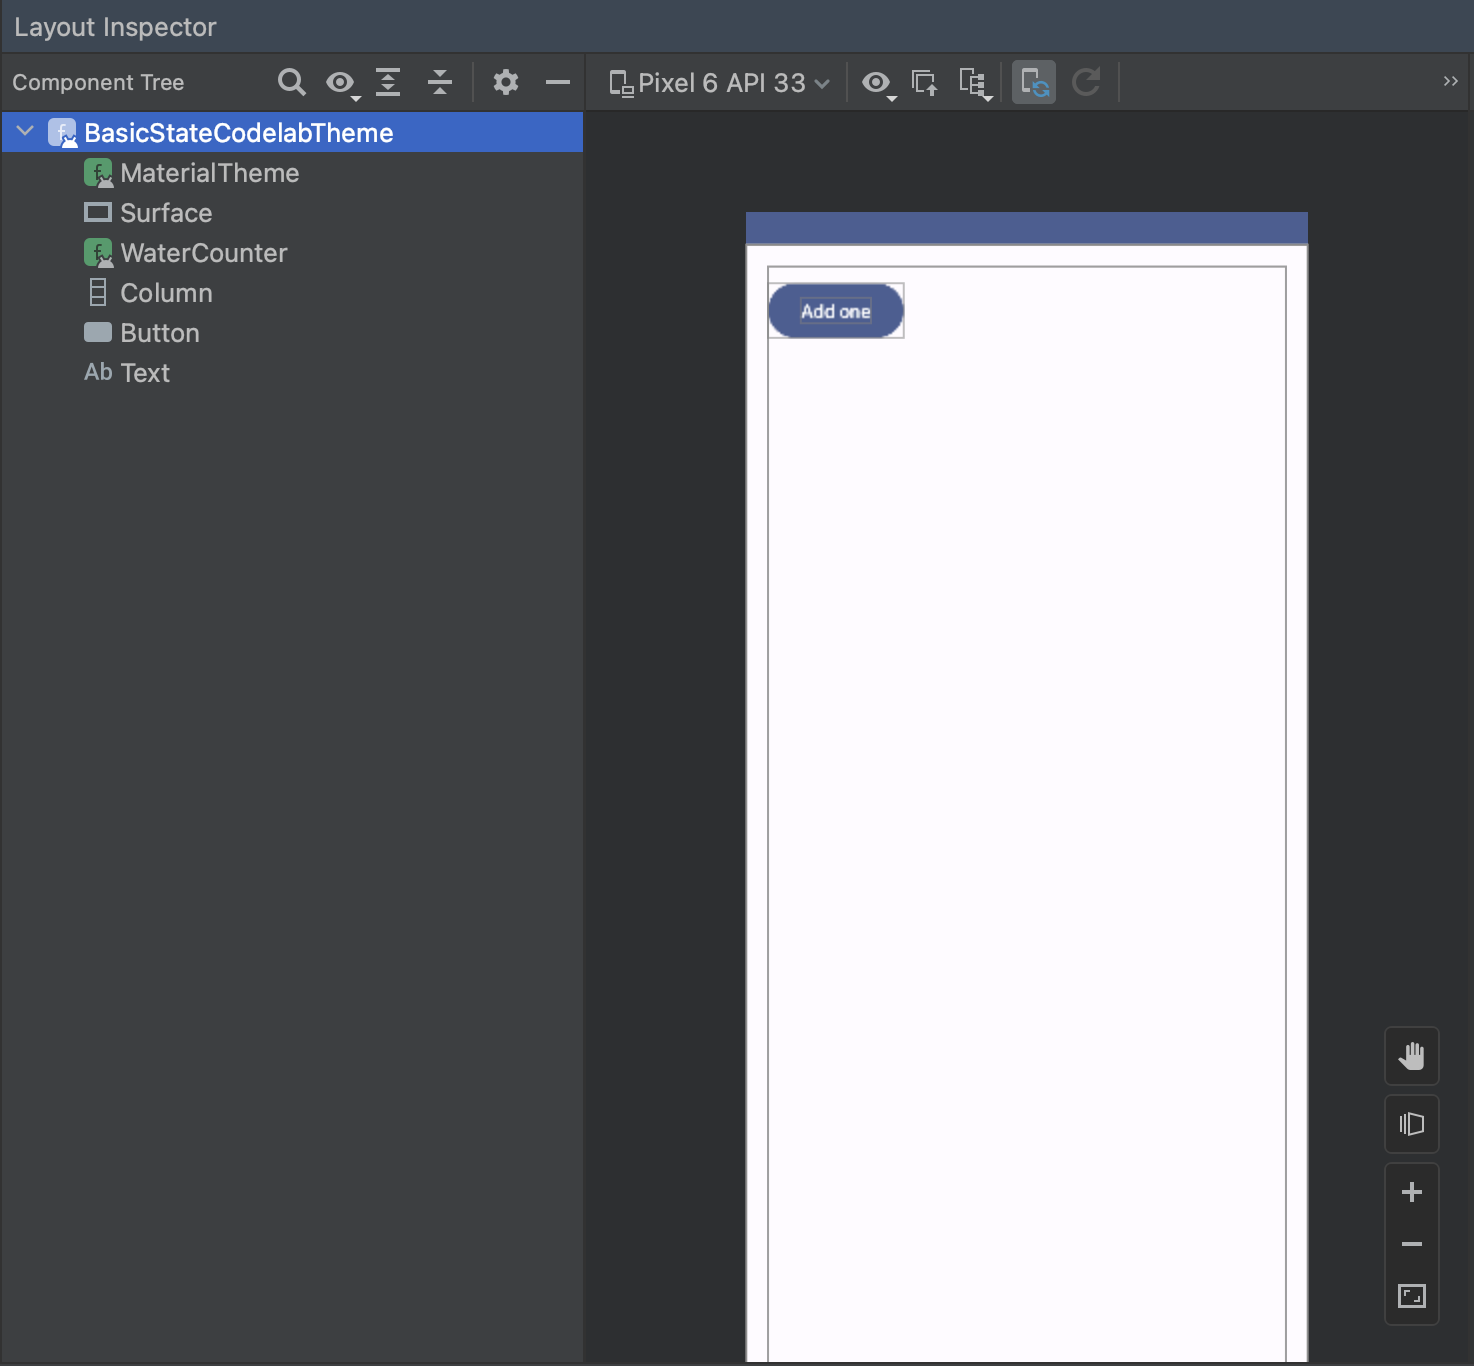
Execute o app e abra a ferramenta Layout Inspector do Android Studio em Tools > Layout Inspector.
Você vai encontrar uma tela dividida: a árvore de componentes à esquerda e uma visualização do app à direita.
Navegue pela árvore tocando no elemento raiz BasicStateCodelabTheme à esquerda da tela. Abra toda a árvore de componentes clicando no botão Expand all (abrir tudo).
Clique em um elemento na tela à direita para acessar o elemento correspondente na árvore.
Se você pressionar o botão Add one (adicionar copo) no app:
- A contagem vai aumentar para 1 e o estado vai mudar.
- Uma recomposição vai ser chamada.
- A tela vai ser recomposta com os novos elementos.
Ao examinar a árvore de componentes com a ferramenta Layout Inspector do Android Studio, você também vai notar o elemento combinável Text:
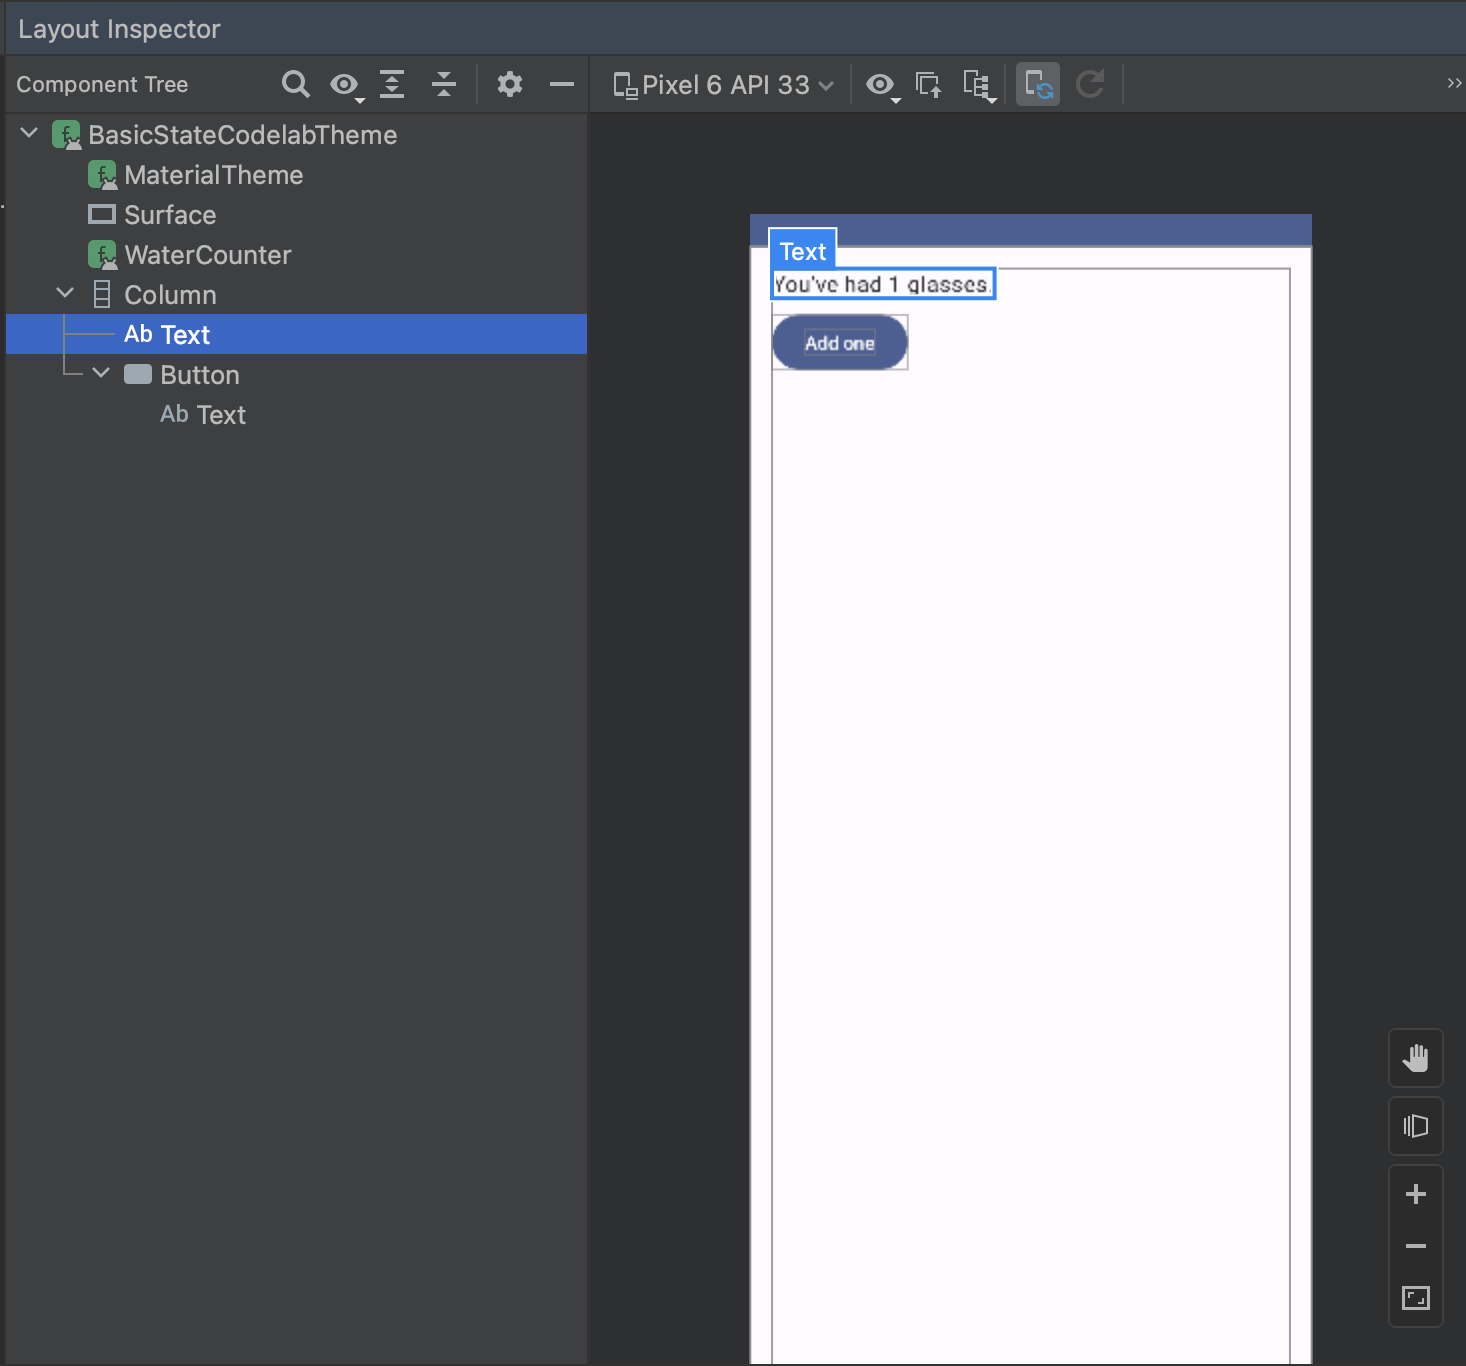
O estado determina quais elementos estão presentes na interface em um determinado momento.
Diferentes partes da interface podem depender do mesmo estado. Modifique o Button para que ele fique ativado até que a count seja 10. Depois disso, ele vai ser desativado (e você vai ter atingido sua meta do dia). Para isso, use o parâmetro enabled do Button.
@Composable
fun WaterCounter(modifier: Modifier = Modifier) {
    ...
        Button(onClick = { count++ }, Modifier.padding(top = 8.dp), enabled = count < 10) {
    ...
}
Execute o app. As mudanças no estado da count determinam se o Text vai ser mostrado e se o Button está ativado ou não.

7. A função remember na composição
remember armazena objetos na composição e esquece o objeto quando o local de origem em que remember é chamado não é invocado novamente em uma recomposição.
Para visualizar esse comportamento, implemente esta funcionalidade no app: quando o usuário tiver bebido pelo menos um copo de água, mostre uma tarefa de bem-estar que ele pode fazer ou dispensar. Como os elementos combináveis precisam ser pequenos e reutilizáveis, crie um novo com o nome WellnessTaskItem para mostrar a tarefa de bem-estar com base em uma string recebida como parâmetro e um botão de ícone Fechar.
Crie um novo arquivo WellnessTaskItem.kt e adicione o código abaixo. Você vai usar essa função combinável mais tarde no codelab.
import androidx.compose.foundation.layout.Row
import androidx.compose.material3.Icon
import androidx.compose.material3.IconButton
import androidx.compose.material3.Text
import androidx.compose.material.icons.Icons
import androidx.compose.material.icons.filled.Close
import androidx.compose.runtime.Composable
import androidx.compose.ui.Alignment
import androidx.compose.ui.Modifier
import androidx.compose.ui.unit.dp
import androidx.compose.foundation.layout.padding

@Composable
fun WellnessTaskItem(
    taskName: String,
    onClose: () -> Unit,
    modifier: Modifier = Modifier
) {
    Row(
        modifier = modifier, verticalAlignment = Alignment.CenterVertically
    ) {
        Text(
            modifier = Modifier.weight(1f).padding(start = 16.dp),
            text = taskName
        )
        IconButton(onClick = onClose) {
            Icon(Icons.Filled.Close, contentDescription = "Close")
        }
    }
}
A função WellnessTaskItem recebe uma descrição de tarefa e uma função lambda onClose, assim como o elemento combinável Button integrado recebe um onClick.
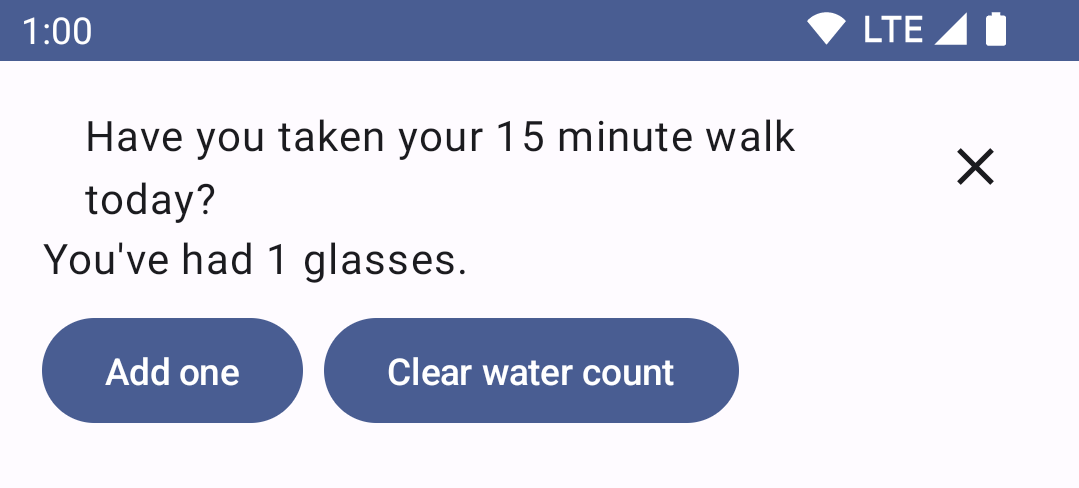
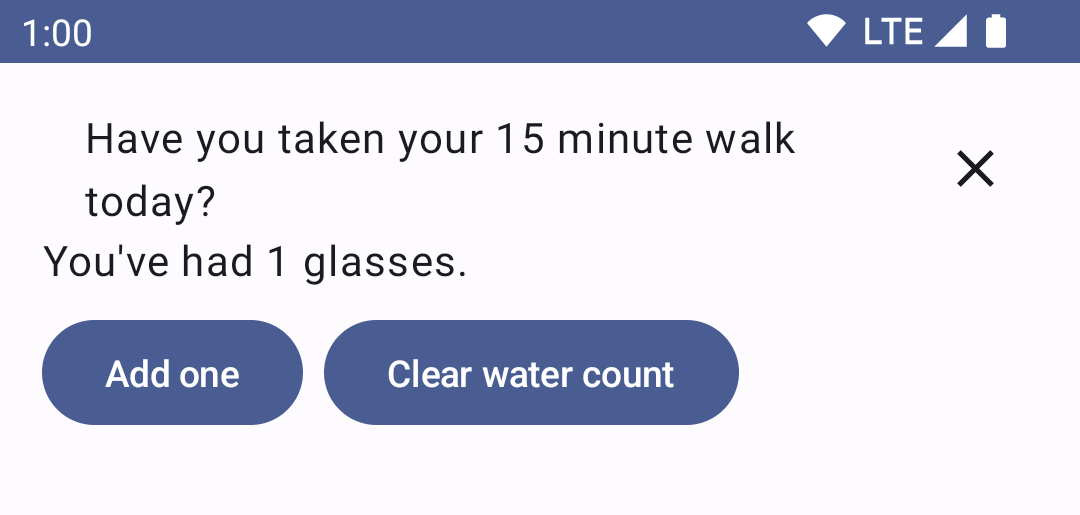
WellnessTaskItem tem esta aparência:

Para melhorar nosso app com mais recursos, atualize o WaterCounter para mostrar o WellnessTaskItem quando a count for maior que 0.
Quando a count for maior que 0, defina uma variável showTask para determinar se o WellnessTaskItem vai ser mostrado ou não e fazer a inicialização dele como "true" (verdadeiro).
Adicione uma nova instrução if para mostrar WellnessTaskItem quando showTask for true. Use as APIs que você aprendeu nas seções anteriores para garantir que o valor showTask sobreviva às recomposições.
@Composable
fun WaterCounter() {
   Column(modifier = Modifier.padding(16.dp)) {
       var count by remember { mutableStateOf(0) }
       if (count > 0) {
           var showTask by remember { mutableStateOf(true) }
           if (showTask) {
               WellnessTaskItem(
                   onClose = { },
                   taskName = "Have you taken your 15 minute walk today?"
               )
           }
           Text("You've had $count glasses.")
       }

       Button(onClick = { count++ }, enabled = count < 10) {
           Text("Add one")
       }
   }
}
Use a função lambda onClose do WellnessTaskItem para que, quando o usuário pressionar o botão "X" para dispensar o item, a variável showTask mude para false e a tarefa não seja mais mostrada.
   ...
   WellnessTaskItem(
      onClose = { showTask = false },
      taskName = "Have you taken your 15 minute walk today?"
   )
   ...
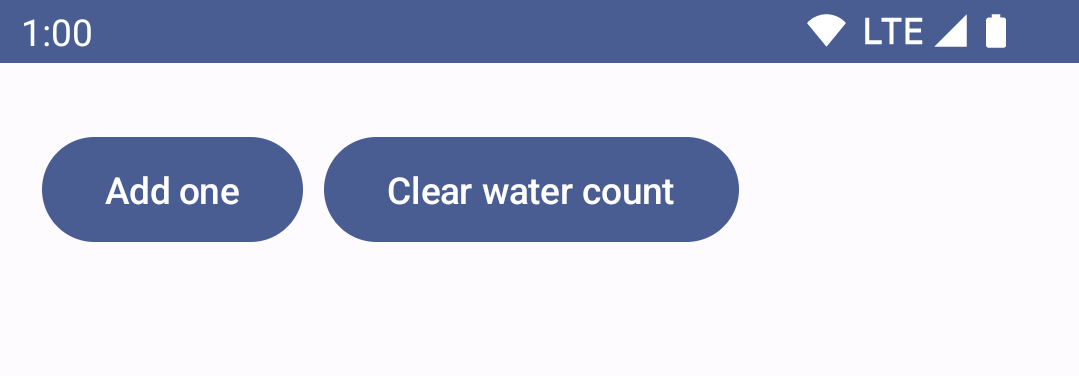
Em seguida, adicione um novo Button com o texto "Clear water count" (excluir contagem de copos de água) e o coloque ao lado do Button "Add one" (adicionar um copo). Uma Row pode ajudar a alinhar os dois botões. Também é possível adicionar padding à Row. Quando o botão "Clear water count" é pressionado, a variável count é redefinida como 0.
A função combinável WaterCounter vai ficar assim:
import androidx.compose.foundation.layout.Row


@Composable
fun WaterCounter(modifier: Modifier = Modifier) {
   Column(modifier = modifier.padding(16.dp)) {
       var count by remember { mutableStateOf(0) }
       if (count > 0) {
           var showTask by remember { mutableStateOf(true) }
           if (showTask) {
               WellnessTaskItem(
                   onClose = { showTask = false },
                   taskName = "Have you taken your 15 minute walk today?"
               )
           }
           Text("You've had $count glasses.")
       }

       Row(Modifier.padding(top = 8.dp)) {
           Button(onClick = { count++ }, enabled = count < 10) {
               Text("Add one")
           }
           Button(
               onClick = { count = 0 },
               Modifier.padding(start = 8.dp)) {
                   Text("Clear water count")
           }
       }
   }
}
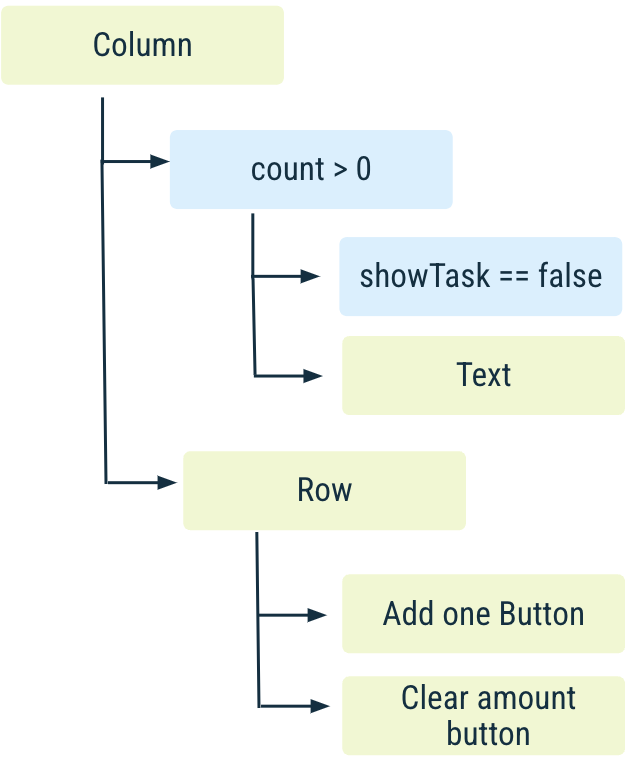
Quando você executa o app, a tela mostra o estado inicial:
|
|

À direita, temos uma versão simplificada da árvore de componentes, que vai ajudar a analisar o que acontece à medida que o estado muda. count e showTask são os valores lembrados.
Agora, você pode seguir estas etapas no app:
- Pressione o botão Add one. Essa ação vai incrementar a
count, causando uma recomposição, e oWellnessTaskIteme oTextdo contador vão ser mostrados.
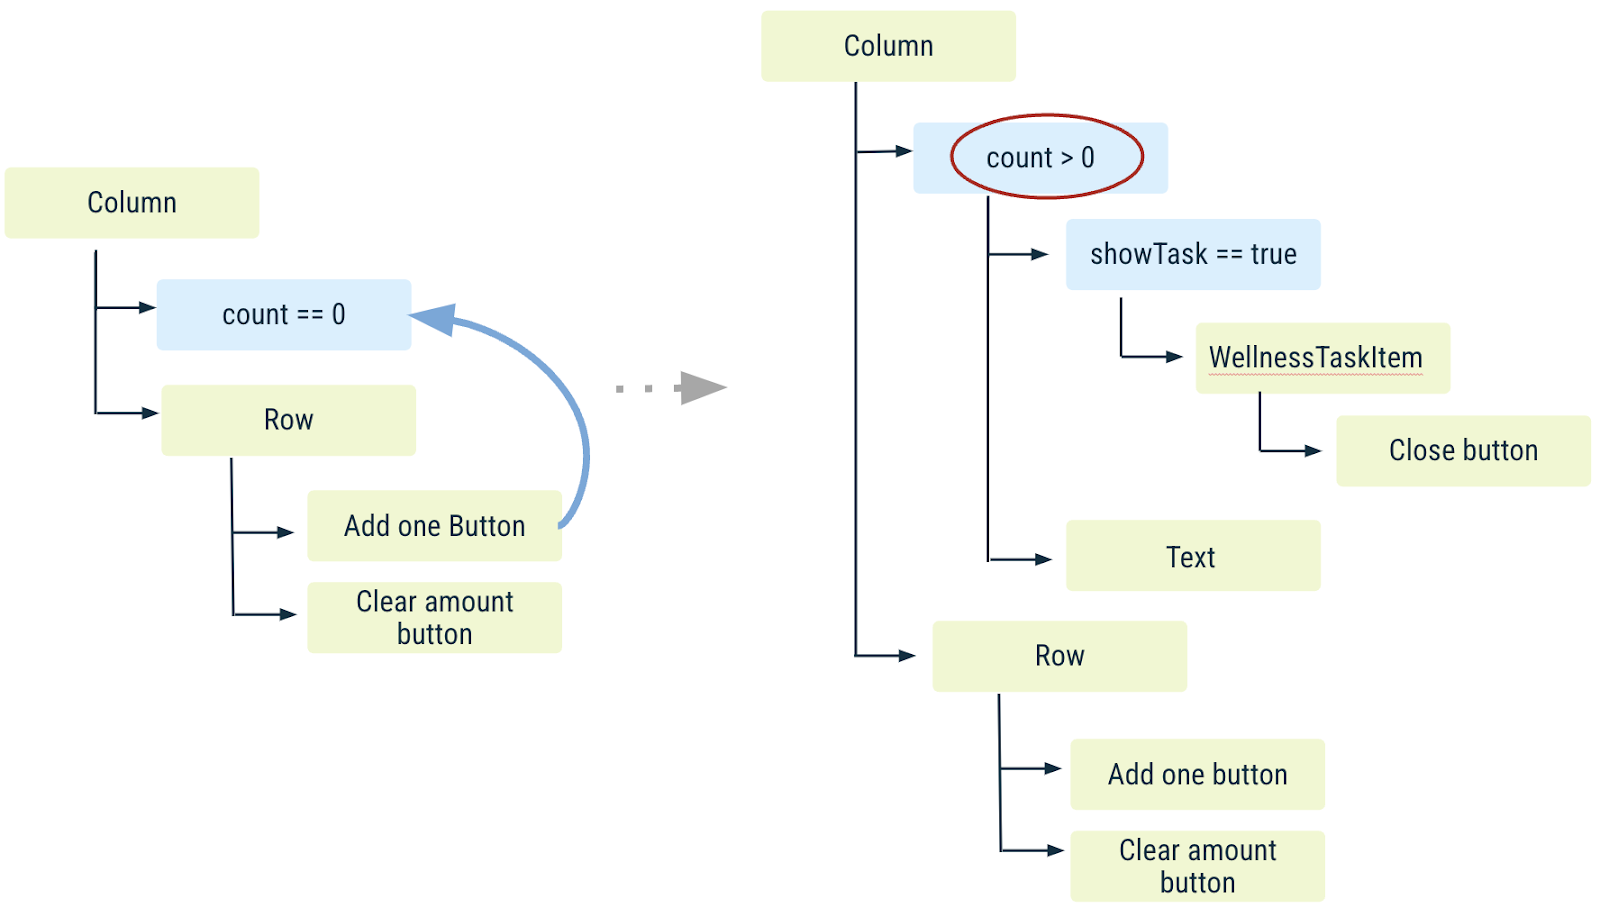
- Pressione o "X" do componente
WellnessTaskItem. Isso causa outra recomposição.showTaskagora é "false" (falso), ou seja,WellnessTaskItemnão é mais exibido.
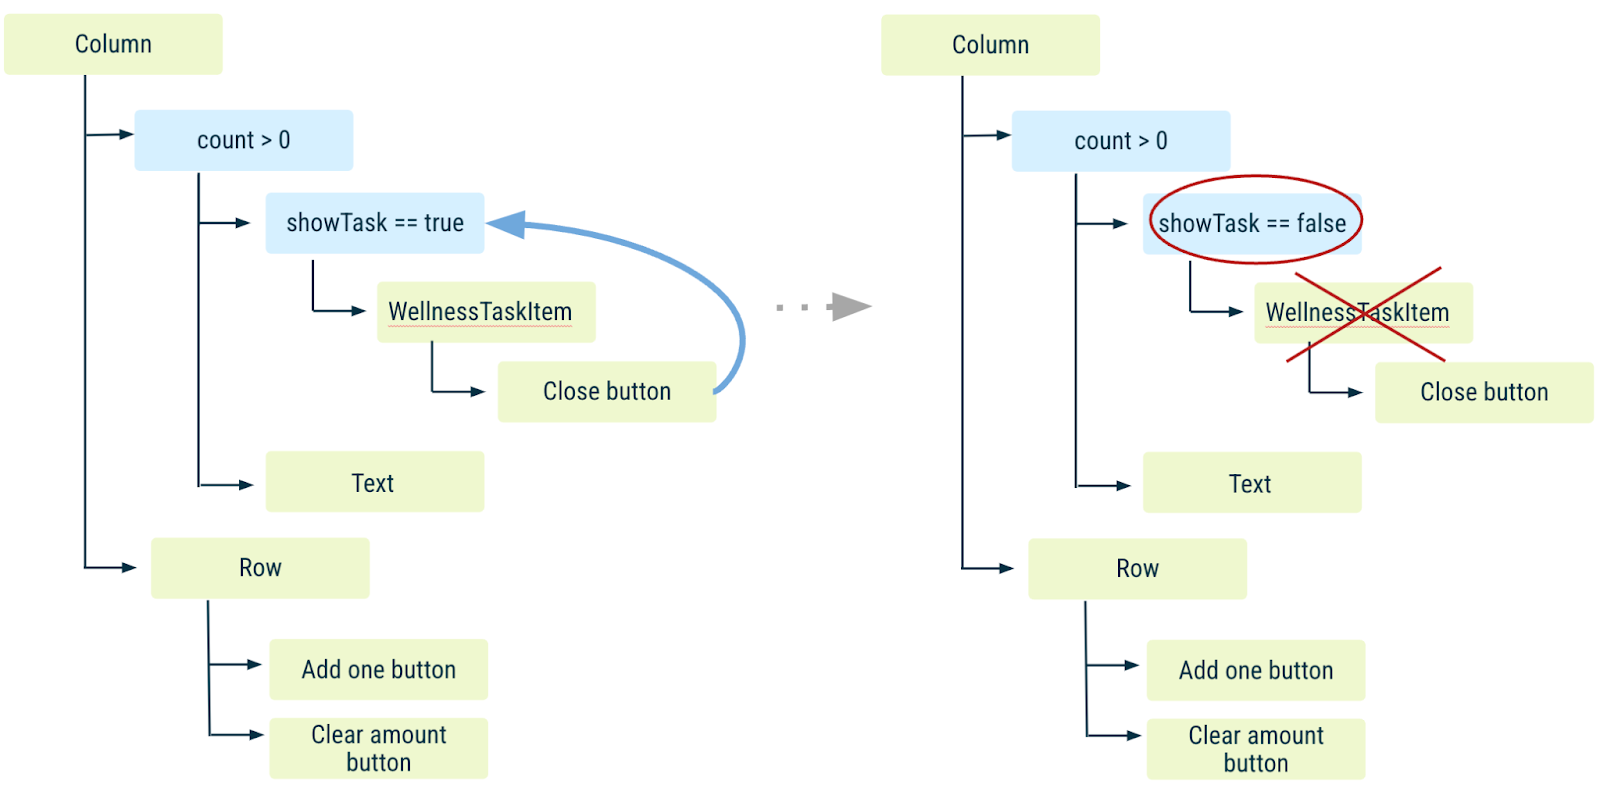
- Pressione o botão Add one (outra recomposição). Se você continuar adicionando copos,
showTaskvai lembrar nas próximas composições que você fechou oWellnessTaskItem.
|
|
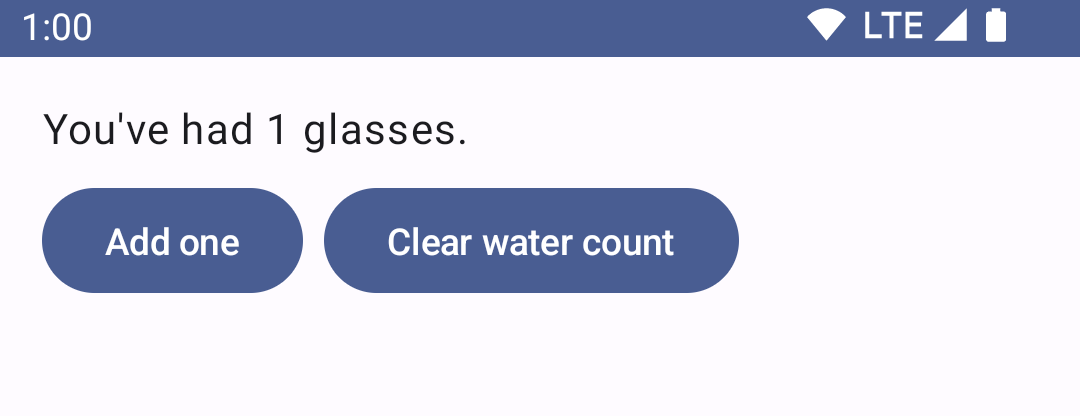
- Pressione o botão Clear water count para redefinir a
countcomo 0 e causar uma recomposição. OTextque mostra acounte todo o código relacionado aoWellnessTaskItemnão são invocados e saem da composição.
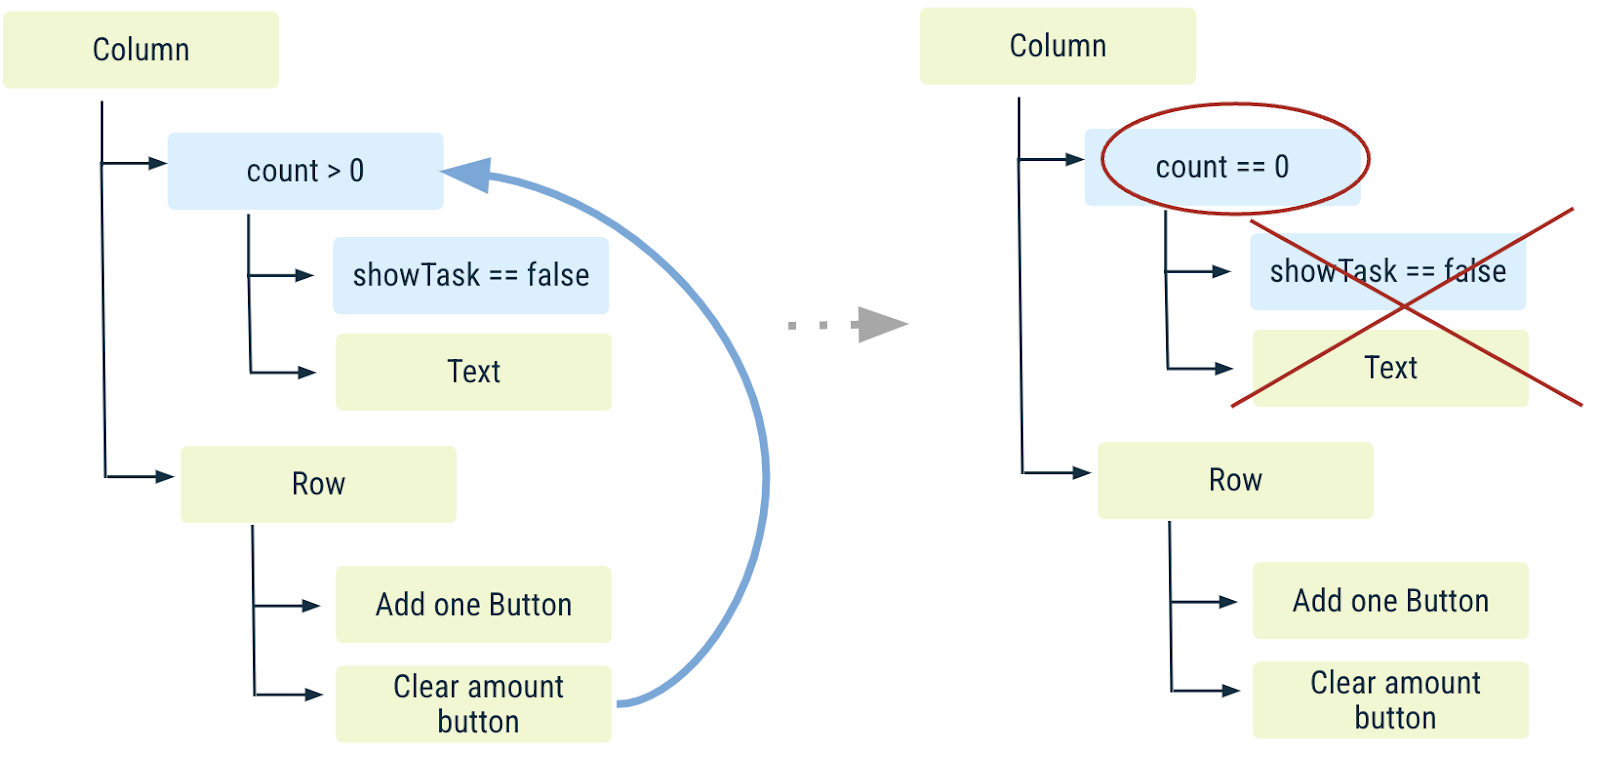
showTaské esquecido porque o local do código em que oshowTasklembrado é chamado não foi invocado. Você voltou para a primeira etapa.
|
|

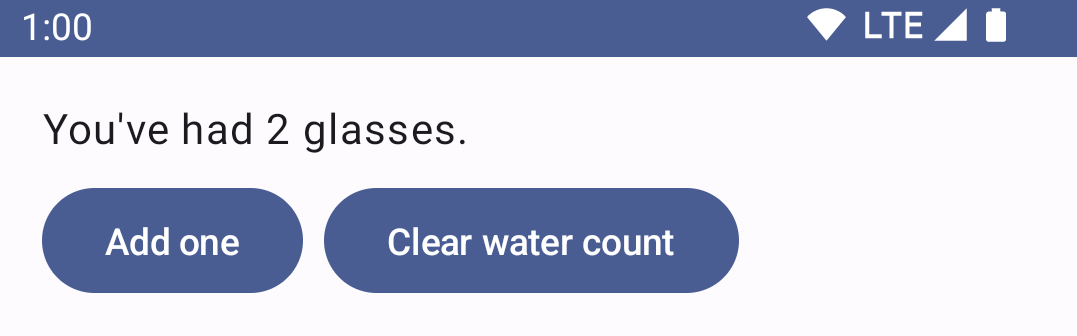
- Pressione o botão Add one para tornar a
countmaior que 0 (recomposição).
- O elemento combinável
WellnessTaskItemé mostrado novamente porque o valor anterior deshowTaskfoi esquecido quando saiu da composição acima.
E se for necessário que showTask persista por mais tempo do que a função remember permite depois que a count voltar a 0, ou seja, mesmo que o local do código em que remember é chamado não seja invocado durante uma recomposição? Vamos aprender como corrigir esses cenários e outros exemplos nas próximas seções.
Agora que você sabe como a interface e o estado são redefinidos quando saem da composição, limpe o código e volte para o WaterCounter do início da seção:
@Composable
fun WaterCounter(modifier: Modifier = Modifier) {
    Column(modifier = modifier.padding(16.dp)) {
        var count by remember { mutableStateOf(0) }
        if (count > 0) {
            Text("You've had $count glasses.")
        }
        Button(onClick = { count++ }, Modifier.padding(top = 8.dp), enabled = count < 10) {
            Text("Add one")
        }
    }
}
8. Restaurar o estado no Compose
Execute o app, adicione alguns copos de água ao contador e gire o dispositivo. Confira se a configuração de giro automático do dispositivo está ativada.
Como a atividade é recriada após uma mudança de configuração (neste caso, orientação), o estado que foi salvo é esquecido, e o contador desaparece e volta para 0.

O mesmo acontece quando você muda o idioma, alterna entre os modos claro e escuro ou qualquer outra mudança de configuração que faça o Android recriar a atividade em execução.
Embora o método remember ajude a manter o estado em recomposições, ele não é retido após mudanças de configuração. Para isso, use rememberSaveable em vez de remember.
rememberSaveable salva automaticamente qualquer valor que possa ser salvo em um Bundle. Para outros valores, é possível transmitir um objeto de armazenamento personalizado. Para mais informações sobre Como restaurar o estado no Compose, consulte a documentação.
No WaterCounter, substitua remember por rememberSaveable:
import androidx.compose.runtime.saveable.rememberSaveable

@Composable
fun WaterCounter(modifier: Modifier = Modifier) {
        ...
        var count by rememberSaveable { mutableStateOf(0) }
        ...
}
Execute o app e teste algumas mudanças de configuração. Agora, o contador vai ser salvo corretamente.
A recriação de atividades é apenas um dos casos de uso de rememberSaveable. Vamos analisar outro caso de uso mais tarde ao trabalhar com listas.
Use remember ou rememberSaveable dependendo do estado do app e das necessidades de UX.
9. Elevação de estado
Um elemento combinável que usa remember para armazenar um objeto contém um estado interno, o que transforma o elemento em com estado. Isso é útil em situações em que um autor de chamada não precisa controlar o estado e pode usá-lo sem ter que gerenciar o estado por conta própria. No entanto, os elementos que têm estado interno tendem a ser menos reutilizáveis e mais difíceis de testar.
Os elementos combináveis que não contêm um estado são conhecidos como elementos sem estado. Uma maneira fácil de criar um elemento combinável sem estado é usando a elevação de estado.
A elevação de estado no Compose é um padrão que move um estado para o autor da chamada para criar um elemento combinável sem estado. O padrão geral para elevação de estado no Jetpack Compose é substituir a variável por dois parâmetros:
- value: T: o valor atual a ser mostrado.
- onValueChange: (T) -> Unit: um evento que solicita a mudança do valor para um novo valor T.
Esse valor representa qualquer estado que pode ser modificado.
O estado elevado dessa maneira tem algumas propriedades importantes:
- Única fonte da verdade: ao mover o estado em vez de o duplicar, garantimos que exista apenas uma fonte da verdade. Isso ajuda a evitar bugs.
- Compartilhável: o estado elevado pode ser compartilhado com vários elementos combináveis.
- Interceptável: os autores de chamada para elementos combináveis sem estado podem decidir ignorar ou modificar eventos antes de mudar o estado.
- Desacoplado: o estado de uma função combinável sem estado pode ser armazenado em qualquer lugar. Por exemplo, em um ViewModel.
Tente implementar essa configuração no WaterCounter para que ele se beneficie de todas as opções acima.
Com e sem estado
Quando todo o estado pode ser extraído de uma função combinável, a função resultante é chamada de sem estado.
Refatore o combinável WaterCounter dividindo em duas partes: um contador com e sem estado.
O papel do StatelessCounter é mostrar a count e chamar uma função quando você incrementa a count. Para fazer isso, siga o padrão descrito acima e transmita o estado, a count (como parâmetro para a função combinável) e uma lambda (onIncrement), que é chamada quando o estado precisa ser incrementado. O StatelessCounter é semelhante a este exemplo:
@Composable
fun StatelessCounter(count: Int, onIncrement: () -> Unit, modifier: Modifier = Modifier) {
   Column(modifier = modifier.padding(16.dp)) {
       if (count > 0) {
           Text("You've had $count glasses.")
       }
       Button(onClick = onIncrement, Modifier.padding(top = 8.dp), enabled = count < 10) {
           Text("Add one")
       }
   }
}
O estado pertence ao StatefulCounter. Isso significa que ele armazena o estado da count e o modifica ao chamar a função StatelessCounter.
@Composable
fun StatefulCounter(modifier: Modifier = Modifier) {
   var count by rememberSaveable { mutableStateOf(0) }
   StatelessCounter(count, { count++ }, modifier)
}
Bom trabalho! Você elevou a count do StatelessCounter para o StatefulCounter.
Implemente a elevação no app e atualize a WellnessScreen com o StatefulCounter:
@Composable
fun WellnessScreen(modifier: Modifier = Modifier) {
   StatefulCounter(modifier)
}
Conforme mencionado, a elevação de estado tem alguns benefícios. Vamos explorar variações desse código para explicar algumas delas. Não é necessário copiar os snippets abaixo para o app.
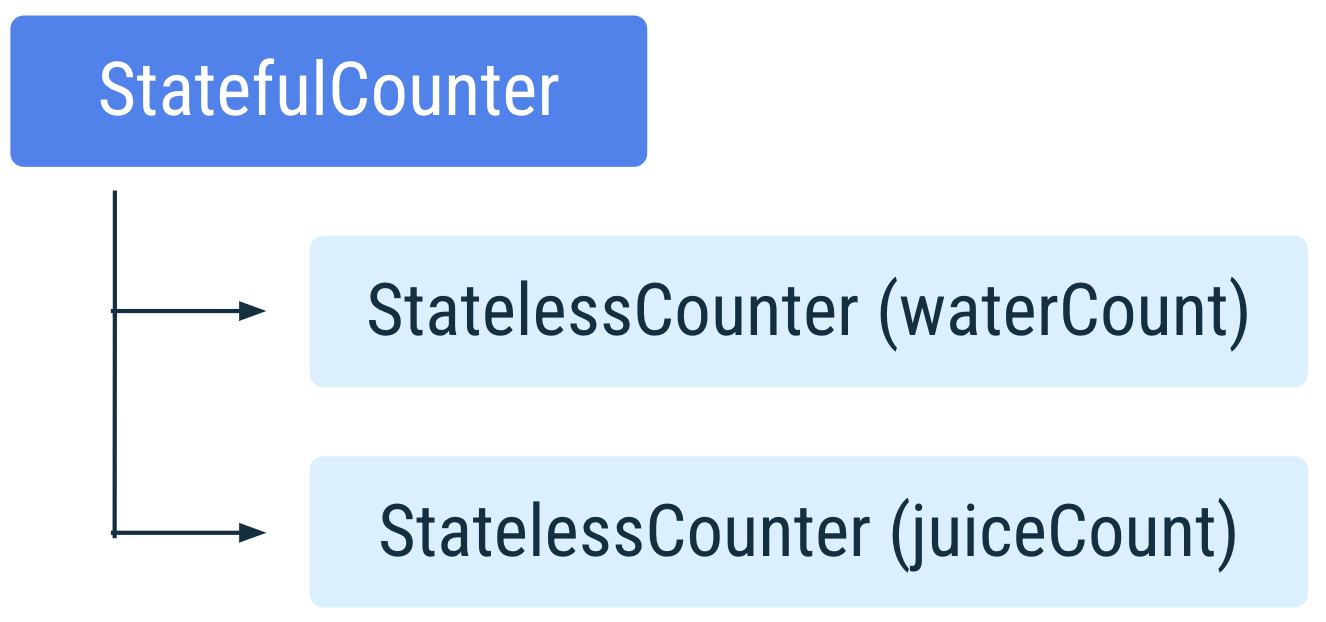
- Agora, os elementos combináveis sem estado podem ser reutilizados. Confira o exemplo abaixo.
Para contar copos de água e suco, é necessário se lembrar de waterCount e juiceCount, mas você pode usar a mesma função combinável StatelessCounter para mostrar dois estados independentes diferentes.
@Composable
fun StatefulCounter() {
    var waterCount by remember { mutableStateOf(0) }

    var juiceCount by remember { mutableStateOf(0) }

    StatelessCounter(waterCount, { waterCount++ })
    StatelessCounter(juiceCount, { juiceCount++ })
}
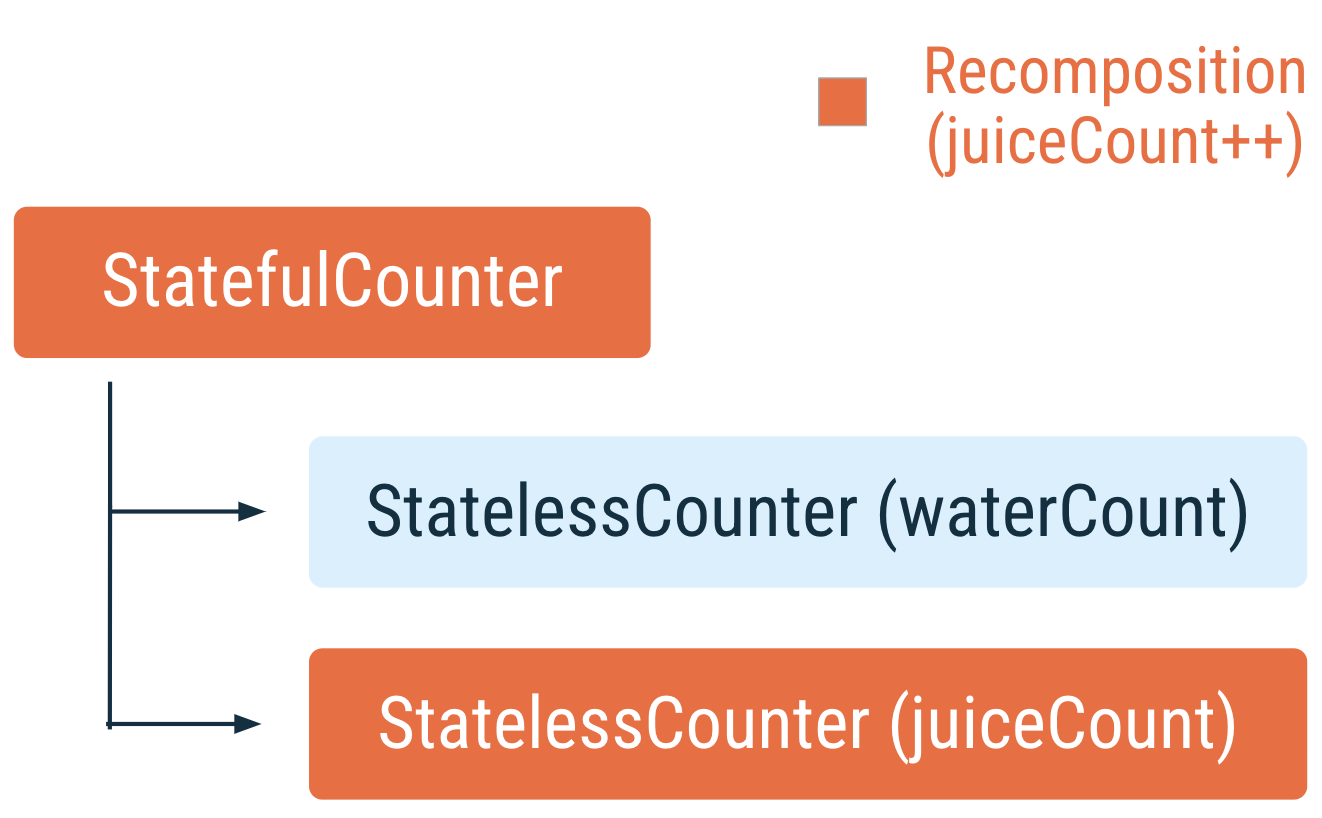
Se a juiceCount mudar, o StatefulCounter vai ser recomposto. Durante a recomposição, o Compose identifica quais funções leem a juiceCount e aciona a recomposição apenas delas.
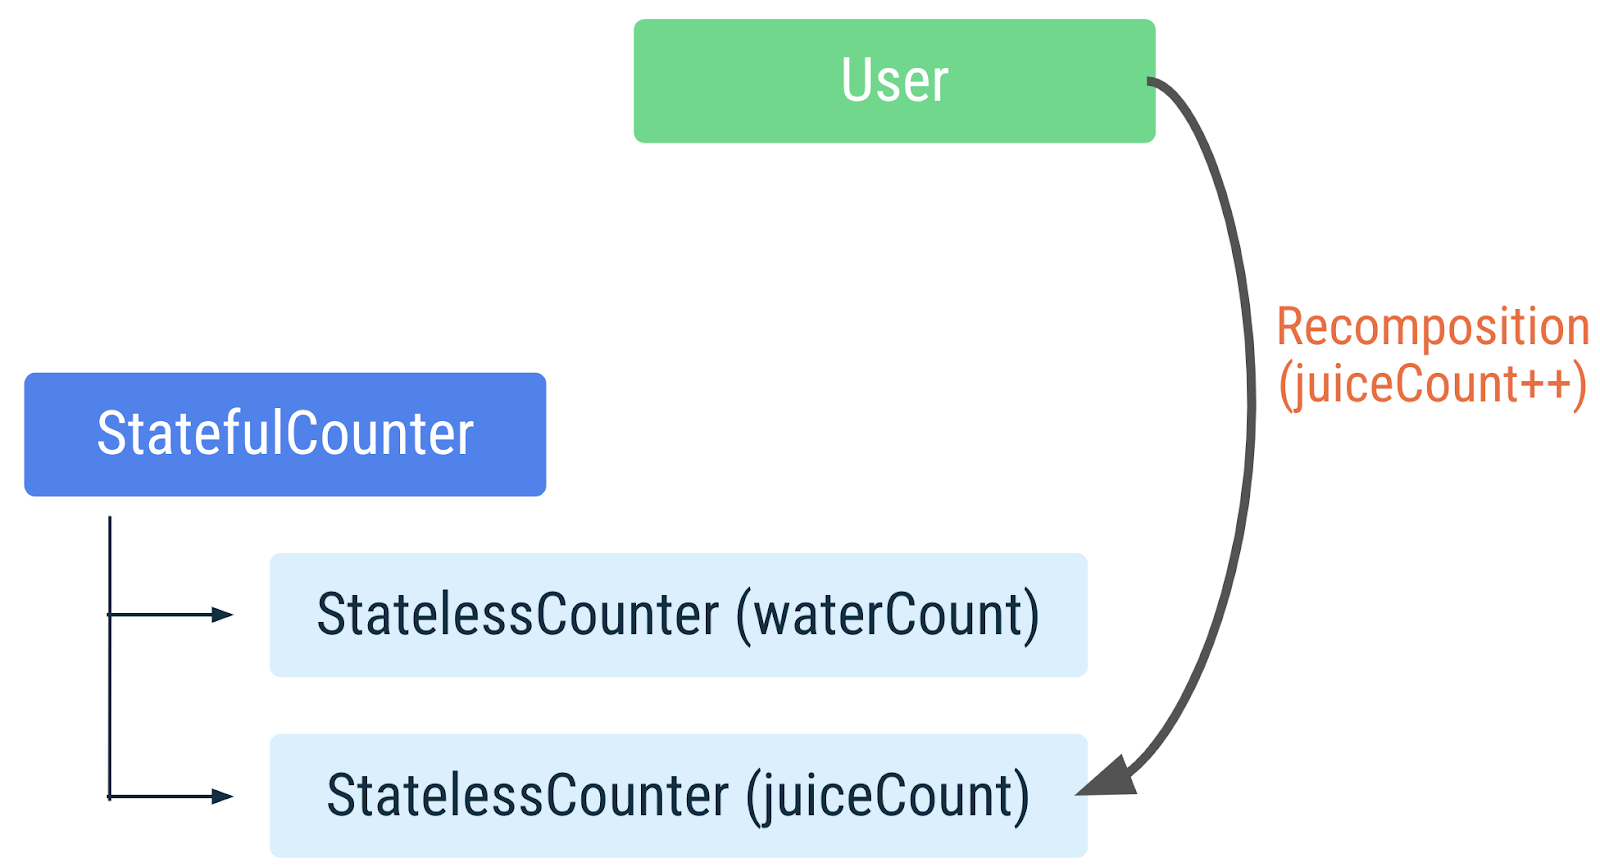
Quando o usuário toca o botão para incrementar a juiceCount, o StatefulCounter é recomposto, assim como o StatelessCounter que lê a juiceCount. Mas o StatelessCounter que lê a waterCount não é recomposto.
- Uma função combinável e com estado pode fornecer o mesmo estado a várias funções combináveis.
@Composable
fun StatefulCounter() {
   var count by remember { mutableStateOf(0) }

   StatelessCounter(count, { count++ })
   AnotherStatelessMethod(count, { count *= 2 })
}
Nesse caso, se a contagem for atualizada por StatelessCounter ou AnotherStatelessMethod, tudo vai ser recomposto, o que é esperado.
Como o estado elevado pode ser compartilhado, transmita apenas o estado necessário aos elementos combináveis para evitar recomposições desnecessárias e aumentar a reutilização.
Para mais informações sobre estado e a elevação dele, consulte a documentação sobre estados no Compose.
10. Trabalhar com listas
Em seguida, adicione o segundo recurso do app, a lista de tarefas de bem-estar. Você pode realizar duas ações com itens da lista:
- Marcar a tarefa como concluída.
- Remover da lista as tarefas que você não quer fazer.
Configuração
- Primeiro, modifique o item da lista. Você pode reutilizar o
WellnessTaskItemda seção "A função remember na composição" e o atualizar para conter oCheckbox. Não esqueça de elevar o estadochecked(marcado) e o callbackonCheckedChangepara tornar a função sem estado.

A função combinável WellnessTaskItem desta seção precisa ficar assim:
import androidx.compose.material3.Checkbox

@Composable
fun WellnessTaskItem(
    taskName: String,
    checked: Boolean,
    onCheckedChange: (Boolean) -> Unit,
    onClose: () -> Unit,
    modifier: Modifier = Modifier
) {
    Row(
        modifier = modifier, verticalAlignment = Alignment.CenterVertically
    ) {
        Text(
            modifier = Modifier
                .weight(1f)
                .padding(start = 16.dp),
            text = taskName
        )
        Checkbox(
            checked = checked,
            onCheckedChange = onCheckedChange
        )
        IconButton(onClick = onClose) {
            Icon(Icons.Filled.Close, contentDescription = "Close")
        }
    }
}
- No mesmo arquivo, adicione uma função combinável
WellnessTaskItemcom estado definindo uma variável de estadocheckedStatee a transmita para o método sem estado de mesmo nome. Por enquanto, não se preocupe com a funçãoonClose. Você pode transmitir uma função lambda vazia.
import androidx.compose.runtime.getValue
import androidx.compose.runtime.setValue
import androidx.compose.runtime.mutableStateOf
import androidx.compose.runtime.remember

@Composable
fun WellnessTaskItem(taskName: String, modifier: Modifier = Modifier) {
   var checkedState by remember { mutableStateOf(false) }

   WellnessTaskItem(
       taskName = taskName,
       checked = checkedState,
       onCheckedChange = { newValue -> checkedState = newValue },
       onClose = {}, // we will implement this later!
       modifier = modifier,
   )
}
- Crie um arquivo
WellnessTask.ktpara modelar uma tarefa que contenha um ID e um rótulo, e a defina como uma classe de dados (link em inglês).
data class WellnessTask(val id: Int, val label: String)
- Para a lista de tarefas, crie um novo arquivo com o nome
WellnessTasksList.kte adicione um método que gere dados simulados:
fun getWellnessTasks() = List(30) { i -> WellnessTask(i, "Task # $i") }
Em um app real, eles são gerados da sua camada de dados.
- Em
WellnessTasksList.kt, adicione uma função combinável para criar a lista. Defina umaLazyColumne itens do método de lista que você criou. Consulte a documentação de listas se você precisar de ajuda.
import androidx.compose.foundation.lazy.LazyColumn
import androidx.compose.foundation.lazy.items
import androidx.compose.runtime.Composable
import androidx.compose.ui.Modifier
import androidx.compose.runtime.remember

@Composable
fun WellnessTasksList(
    modifier: Modifier = Modifier,
    list: List<WellnessTask> = remember { getWellnessTasks() }
) {
    LazyColumn(
        modifier = modifier
    ) {
        items(list) { task ->
            WellnessTaskItem(taskName = task.label)
        }
    }
}
- Adicione a lista à
WellnessScreen. Use umaColumnpara ajudar a alinhar verticalmente a lista com o contador que você já tem.
import androidx.compose.foundation.layout.Column

@Composable
fun WellnessScreen(modifier: Modifier = Modifier) {
   Column(modifier = modifier) {
       StatefulCounter()
       WellnessTasksList()
   }
}
- Execute o app e faça um teste. Por enquanto, você pode marcar as tarefas como concluídas, mas elas ainda não podem ser excluídas. Isso vai ser implementado em uma próxima seção.

Restaurar o estado do item em uma LazyList
Confira mais detalhes sobre os elementos combináveis WellnessTaskItem.
Cada elemento WellnessTaskItem é proprietário de um checkedState de forma independente, como uma variável particular. Quando o checkedState muda, apenas a instância do WellnessTaskItem é recomposta, e não todas as instâncias de WellnessTaskItem na LazyColumn.
Para testar, siga estas etapas:
- Marque um elemento no topo da lista como concluído, como os elementos 1 e 2.
- Role até o fim da lista para que eles fiquem fora da tela.
- Volte para os elementos marcados.
- Observe que eles não estão mais marcados como concluídos.
Como abordado em uma seção anterior, há um problema: quando um item sai da composição, o estado lembrado é esquecido. Os itens em uma LazyColumn saem totalmente da composição quando você rola a tela, e eles não ficam mais visíveis.

Como resolver o problema? Mais uma vez, use o rememberSaveable. Seu estado sobrevive à recriação da atividade ou do processo usando o mecanismo de estado da instância salvo. Graças à forma como o rememberSaveable funciona com a LazyList, seus itens também conseguem sobreviver ao sair da composição.
Basta substituir remember por rememberSaveable no WellnessTaskItem com estado:
import androidx.compose.runtime.saveable.rememberSaveable

var checkedState by rememberSaveable { mutableStateOf(false) }
Padrões comuns no Compose
Confira a implementação de LazyColumn:
@Composable
fun LazyColumn(
...
    state: LazyListState = rememberLazyListState(),
...
A função combinável rememberLazyListState cria um estado inicial para a lista usando rememberSaveable. Quando a atividade é recriada, o estado de rolagem é mantido sem que seja necessário programar nada.
Muitos apps precisam reagir e detectar a posição de rolagem, as mudanças no layout do item e outros eventos relacionados ao estado da lista. Componentes lentos, como LazyColumn ou LazyRow, oferecem suporte a esse caso de uso ao elevar o LazyListState. Saiba mais sobre esse padrão na documentação sobre estados em listas.
Ter um parâmetro de estado com um valor padrão fornecido por uma função pública rememberX é comum em funções combináveis integradas. Outro exemplo pode ser encontrado no BottomSheetScaffold, que eleva o estado usando rememberBottomSheetScaffoldState.
11. MutableList observável
Nesta etapa, para que seja possível remover uma tarefa da lista, a primeira etapa é fazer com que a lista seja mutável.
Para isso, o uso de objetos mutáveis como ArrayList<T> ou mutableListOf, não vai funcionar. Esses tipos não notificam o Compose sobre a mudança nos itens da lista, e não agendam a recomposição da IU. Você precisa de uma API diferente.
Crie uma instância de MutableList que possa ser observada pelo Compose. Essa estrutura permite que o Compose acompanhe as mudanças para recompor a IU quando itens são adicionados ou removidos da lista.
Comece definindo uma MutableList observável. A função de extensão toMutableStateList() é usada para criar uma MutableList observável de uma Collection inicial mutável ou imutável, como uma List.
Você também pode usar o método de fábrica mutableStateListOf para criar a MutableList observável e, em seguida, adicionar os elementos ao estado inicial.
- Abra
WellnessScreen.kt. Mova o métodogetWellnessTaskspara esse arquivo. Crie a lista chamandogetWellnessTasks()e usando a função de extensãotoMutableStateListque já apresentamos.
import androidx.compose.runtime.remember
import androidx.compose.runtime.toMutableStateList

@Composable
fun WellnessScreen(modifier: Modifier = Modifier) {
   Column(modifier = modifier) {
       StatefulCounter()

       val list = remember { getWellnessTasks().toMutableStateList() }
       WellnessTasksList(list = list, onCloseTask = { task -> list.remove(task) })
   }
}

private fun getWellnessTasks() = List(30) { i -> WellnessTask(i, "Task # $i") }
- Modifique a função combinável
WellnessTasksListremovendo o valor padrão da lista, já que ela é elevada para o nível da tela. Adicione um novo parâmetro de função lambdaonCloseTask(recebendo umWellnessTaskpara excluir). TransmitaonCloseTaskaoWellnessTaskItem.
Você precisa fazer mais uma mudança. O método items recebe um parâmetro key. Por padrão, o estado de cada item é vinculado à posição do item na lista.
Em uma lista mutável, isso causa problemas quando o conjunto de dados muda, já que os itens que mudam de posição perdem qualquer estado lembrado.
Para corrigir isso facilmente, use o id de cada WellnessTaskItem como a chave de cada item.
Para saber mais sobre as chaves de item em uma lista, leia a documentação.
A WellnessTasksList vai ficar assim:
@Composable
fun WellnessTasksList(
   list: List<WellnessTask>,
   onCloseTask: (WellnessTask) -> Unit,
   modifier: Modifier = Modifier
) {
   LazyColumn(modifier = modifier) {
       items(
           items = list,
           key = { task -> task.id }
       ) { task ->
           WellnessTaskItem(taskName = task.label, onClose = { onCloseTask(task) })
       }
   }
}
- Modifique o
WellnessTaskItem: adicione a função lambdaonClosecomo um parâmetro aoWellnessTaskItemcom estado e chame a função.
@Composable
fun WellnessTaskItem(
   taskName: String, onClose: () -> Unit, modifier: Modifier = Modifier
) {
   var checkedState by rememberSaveable { mutableStateOf(false) }

   WellnessTaskItem(
       taskName = taskName,
       checked = checkedState,
       onCheckedChange = { newValue -> checkedState = newValue },
       onClose = onClose,
       modifier = modifier,
   )
}
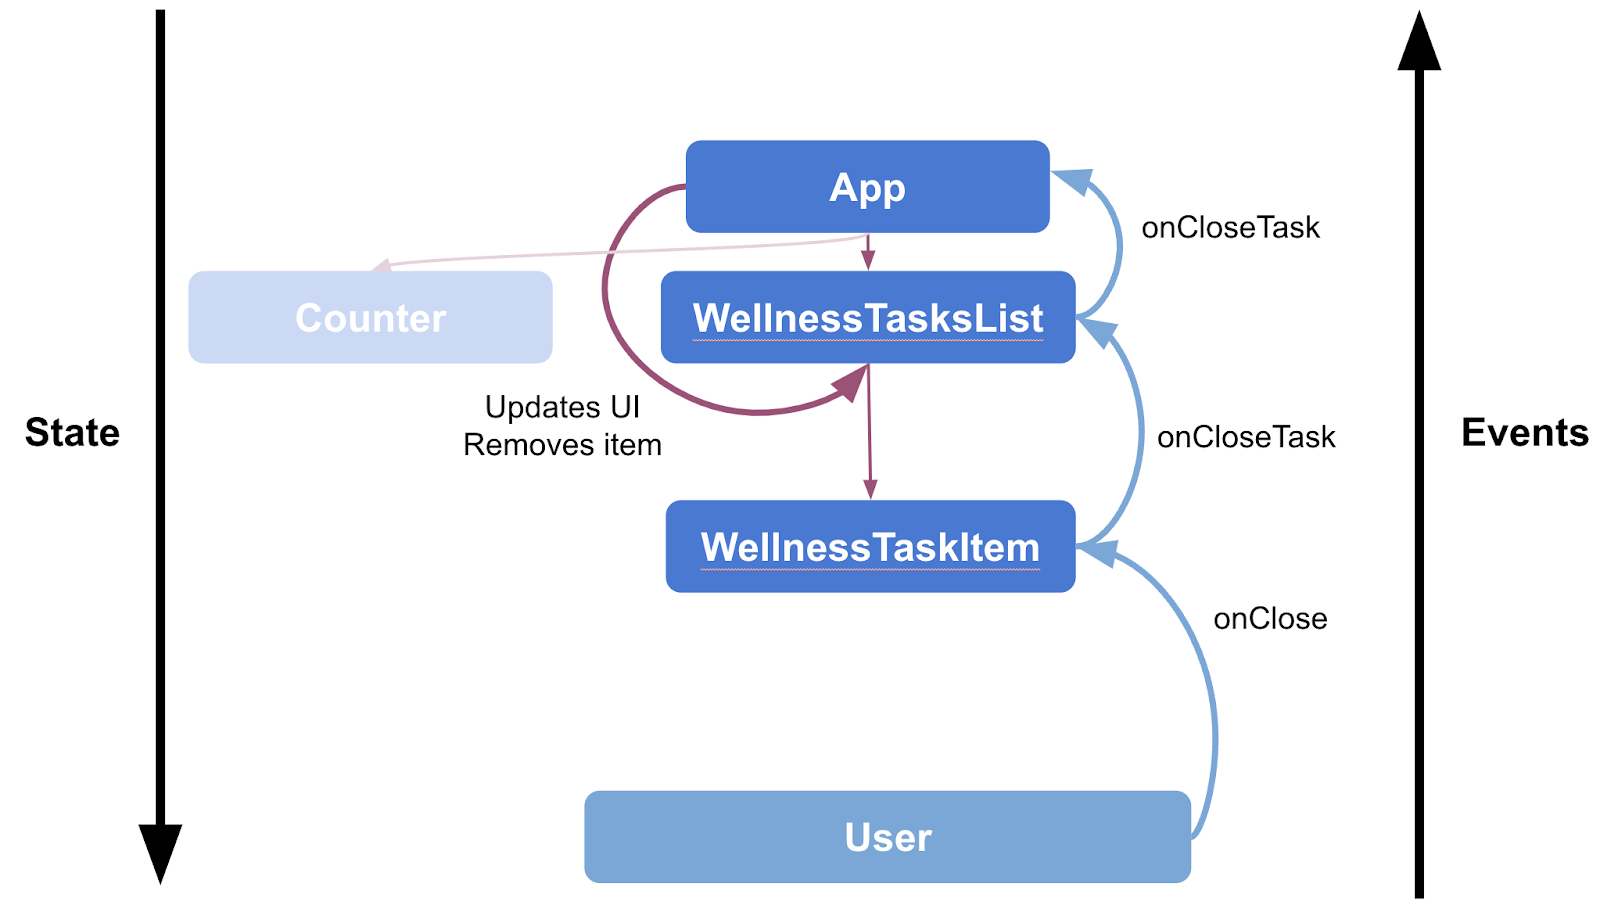
Bom trabalho! A funcionalidade foi concluída, e agora você pode excluir um item da lista.
Se você clicar no X em cada linha, os eventos vão subir até a lista que contém o estado, removendo o item e fazendo com que o Compose recomponha a tela.
Se você tentar usar rememberSaveable() para armazenar a lista na WellnessScreen, vai encontrar uma exceção de execução:
Esse erro informa que você precisa fornecer um saver personalizado. No entanto, não use rememberSaveable para armazenar grandes quantidades de dados ou estruturas de dados complexas que exigem serialização ou desserialização demoradas.
Regras semelhantes se aplicam ao trabalhar com o onSaveInstanceState da atividade. Confira mais informações na documentação sobre o salvamento de estados da IU. Se quiser fazer isso, use um mecanismo de armazenamento alternativo. Saiba mais sobre as diferentes opções para preservar o estado da IU na documentação.
Em seguida, analisaremos o papel do ViewModel como detentor do estado do app.
12. Estado no ViewModel
A tela, ou o estado da IU, indica o que vai ser mostrado (por exemplo, a lista de tarefas). Esse estado geralmente está conectado a outras camadas da hierarquia, já que contém dados do aplicativo.
Enquanto o estado da IU descreve o que é mostrado na tela, a lógica de um app descreve como o aplicativo se comporta e precisa reagir às mudanças de estado. Existem dois tipos de lógica: o comportamento ou lógica da UI e a lógica de negócios.
- A lógica da UI está relacionada a como mostrar mudanças de estado na tela. Por exemplo, a lógica de navegação ou exibição de snackbars.
- A lógica de negócios é o que fazer com as mudanças de estado. Por exemplo, fazer um pagamento ou armazenar preferências de usuários. Essa lógica geralmente é colocada nas camadas de negócios ou de dados, nunca na camada da IU.
Os ViewModels fornecem o estado da IU e acesso à lógica de negócios localizada em outras camadas do app. Além disso, eles sobrevivem a mudanças de configuração, tendo como resultado um ciclo de vida mais longo que o da composição. Eles podem seguir o ciclo de vida do host do conteúdo do Compose, ou seja, atividades, fragmentos ou o destino de um gráfico de navegação, se você estiver usando a navegação do Compose.
Para saber mais sobre a arquitetura e a camada da IU, consulte a documentação da camada da IU.
Migrar a lista e remover o método
As etapas anteriores mostraram como gerenciar o estado diretamente nas funções combináveis, mas é recomendável manter a lógica da interface e de negócios separadas do estado da interface e migrá-las para um ViewModel.
Vamos migrar o estado da interface, a lista, para o ViewModel e começar a extrair a lógica de negócios.
- Crie um arquivo
WellnessViewModel.ktpara adicionar sua classe do ViewModel.
Mova a "fonte de dados" getWellnessTasks() para o WellnessViewModel.
Defina uma variável _tasks interna usando toMutableStateList, como antes, e exponha tasks como uma lista. Isso vai fazer com que ela não possa ser modificada de fora do ViewModel.
Implemente uma função remove simples para ser delegada à função de remoção integrada da lista.
import androidx.compose.runtime.toMutableStateList
import androidx.lifecycle.ViewModel

class WellnessViewModel : ViewModel() {
    private val _tasks = getWellnessTasks().toMutableStateList()
    val tasks: List<WellnessTask>
        get() = _tasks


   fun remove(item: WellnessTask) {
       _tasks.remove(item)
   }
}

private fun getWellnessTasks() = List(30) { i -> WellnessTask(i, "Task # $i") }
- Podemos acessar esse ViewModel de qualquer elemento combinável chamando a função
viewModel().
Para usar essa função, abra o arquivo app/build.gradle.kts, adicione a biblioteca abaixo e sincronize as novas dependências no Android Studio:
implementation("androidx.lifecycle:lifecycle-viewmodel-compose:{latest_version}")
Use a versão 2.6.2 ao trabalhar com o Android Studio Giraffe. Acesse a versão mais recente da biblioteca neste link.
- Abra o arquivo
WellnessScreen. Instancie o ViewModel dowellnessViewModelchamandoviewModel()como parâmetro do elemento combinável da tela para que ele possa ser substituído ao testar esse elemento e elevado, se necessário. Forneça aWellnessTasksListcom a lista de tarefas e remova a função para a lambdaonCloseTask.
import androidx.lifecycle.viewmodel.compose.viewModel

@Composable
fun WellnessScreen(
    modifier: Modifier = Modifier,
    wellnessViewModel: WellnessViewModel = viewModel()
) {
   Column(modifier = modifier) {
       StatefulCounter()

       WellnessTasksList(
           list = wellnessViewModel.tasks,
           onCloseTask = { task -> wellnessViewModel.remove(task) })
   }
}
O viewModel() retorna um ViewModel já existente ou cria um novo no escopo especificado. A instância de ViewModel vai ser preservada enquanto o escopo estiver ativo. Por exemplo, se o elemento combinável for usado em uma atividade, a função viewModel() vai retornar a mesma instância até que a atividade seja concluída ou o processo seja encerrado.
Pronto. Você integrou o ViewModel com parte do estado e da lógica de negócios à tela. Como o estado é mantido fora da composição e armazenado pelo ViewModel, as mutações da lista sobrevivem às mudanças de configuração.
O ViewModel não vai manter o estado do app automaticamente em nenhum cenário (por exemplo, para o encerramento do processo iniciado pelo sistema). Para informações detalhadas sobre como manter o estado da IU no app, consulte a documentação.
Migrar o estado marcado
A última refatoração a ser feita é a migração da lógica e do estado marcado para o ViewModel. Dessa forma, o código vai ficar mais simples e testável, com todo o estado gerenciado pelo ViewModel.
- Primeiro, modifique a classe do modelo
WellnessTaskpara que ela possa armazenar o estado marcado e definir "false" como o valor padrão.
data class WellnessTask(val id: Int, val label: String, var checked: Boolean = false)
- No ViewModel, implemente um método
changeTaskCheckedque recebe uma tarefa a ser modificada com um novo valor para o estado.
class WellnessViewModel : ViewModel() {
   ...
   fun changeTaskChecked(item: WellnessTask, checked: Boolean) =
       _tasks.find { it.id == item.id }?.let { task ->
           task.checked = checked
       }
}
- Na
WellnessScreen, forneça o comportamento para aonCheckedTaskda lista chamando o métodochangeTaskCheckeddo ViewModel. Agora, as funções vão ficar assim:
@Composable
fun WellnessScreen(
    modifier: Modifier = Modifier,
    wellnessViewModel: WellnessViewModel = viewModel()
) {
   Column(modifier = modifier) {
       StatefulCounter()

       WellnessTasksList(
           list = wellnessViewModel.tasks,
           onCheckedTask = { task, checked ->
               wellnessViewModel.changeTaskChecked(task, checked)
           },
           onCloseTask = { task ->
               wellnessViewModel.remove(task)
           }
       )
   }
}
- Abra a
WellnessTasksListe adicione o parâmetro de função lambdaonCheckedTaskpara que ela possa ser transmitida aoWellnessTaskItem.
@Composable
fun WellnessTasksList(
   list: List<WellnessTask>,
   onCheckedTask: (WellnessTask, Boolean) -> Unit,
   onCloseTask: (WellnessTask) -> Unit,
   modifier: Modifier = Modifier
) {
   LazyColumn(
       modifier = modifier
   ) {
       items(
           items = list,
           key = { task -> task.id }
       ) { task ->
           WellnessTaskItem(
               taskName = task.label,
               checked = task.checked,
               onCheckedChange = { checked -> onCheckedTask(task, checked) },
               onClose = { onCloseTask(task) }
           )
       }
   }
}
- Limpe o arquivo
WellnessTaskItem.kt. Não precisamos mais de um método com estado, já que o estado da caixa de seleção vai ser elevado para o nível da lista. O arquivo tem apenas esta função combinável:
@Composable
fun WellnessTaskItem(
   taskName: String,
   checked: Boolean,
   onCheckedChange: (Boolean) -> Unit,
   onClose: () -> Unit,
   modifier: Modifier = Modifier
) {
   Row(
       modifier = modifier, verticalAlignment = Alignment.CenterVertically
   ) {
       Text(
           modifier = Modifier
               .weight(1f)
               .padding(start = 16.dp),
           text = taskName
       )
       Checkbox(
           checked = checked,
           onCheckedChange = onCheckedChange
       )
       IconButton(onClick = onClose) {
           Icon(Icons.Filled.Close, contentDescription = "Close")
       }
   }
}
- Execute o app e tente marcar qualquer tarefa como concluída. Observe que isso ainda não funciona.

Isso ocorre porque o Compose está monitorando as mudanças relacionadas à adição e remoção de elementos na MutableList. É por isso que a exclusão funciona. Mas o Compose não sabe quais são os valores dos itens de linha (neste caso, checkedState), a menos que você peça para que eles também sejam monitorados.
Existem duas opções para corrigir isso:
- Mude nossa classe de dados
WellnessTaskpara que ocheckedStatese torneMutableState<Boolean>em vez deBoolean. Isso faz com que o Compose monitore mudanças no item. - Copie o item que você está prestes a modificar, remova-o da lista e o adicione novamente a ela, fazendo com que o Compose monitore a mudança.
Há vantagens e desvantagens nas duas abordagens. Por exemplo, dependendo da implementação de lista que você está usando, remover e ler o elemento pode ter um alto custo computacional.
Vamos supor que você queira evitar operações de lista com um custo tão alto assim e tornar o elemento checkedState observável, já que ele é mais eficiente e idiomático para o Compose.
Seu novo WellnessTask pode ser parecido com este exemplo:
import androidx.compose.runtime.MutableState
import androidx.compose.runtime.mutableStateOf

data class WellnessTask(val id: Int, val label: String, val checked: MutableState<Boolean> = mutableStateOf(false))
Como abordado anteriormente, é possível usar propriedades delegadas, resultando em um uso mais simples da variável checked.
Mude a WellnessTask para ser uma classe simples em vez de uma classe de dados. Faça a WellnessTask receber uma variável initialChecked com valor padrão false no construtor. Em seguida, podemos inicializar a variável checked com o método de fábrica mutableStateOf e initialChecked como valor padrão.
import androidx.compose.runtime.getValue
import androidx.compose.runtime.mutableStateOf
import androidx.compose.runtime.setValue

class WellnessTask(
    val id: Int,
    val label: String,
    initialChecked: Boolean = false
) {
    var checked by mutableStateOf(initialChecked)
}
Pronto! Essa solução funciona e sobrevive às mudanças de recomposição e configuração.

Teste
Agora que a lógica de negócios foi refatorada no ViewModel em vez de acoplada dentro de funções combináveis, o teste de unidade é muito mais simples.
Você pode usar testes instrumentados para verificar o comportamento correto do código do Compose e se o estado da IU está funcionando adequadamente. Consulte o codelab Como fazer testes no Compose para aprender a testar a UI do Compose.
13. Parabéns
Bom trabalho! Você concluiu este codelab e aprendeu sobre todas as APIs básicas para trabalhar com estados em um app do Jetpack Compose.
Você aprendeu a pensar sobre estados e eventos para extrair elementos combináveis e sem estado no Compose, além de usar as atualizações de estado para fazer mudanças na interface.
Qual é a próxima etapa?
Confira os outros codelabs no programa de treinamentos do Compose.
Apps de exemplo
- O JetNews demonstra as práticas recomendadas explicadas neste codelab.
Mais documentação
- Como trabalhar com o Compose
- Estado e Jetpack Compose
- Fluxo de dados unidirecional no Jetpack Compose
- Como restaurar o estado no Compose
- Visão geral do ViewModel
- Compose e outras bibliotecas