
1. Giới thiệu
Nhóm thiết bị đầu cuối của mạng (NEG) Private Service Connect (PSC) hỗ trợ liên kết Trình cân bằng tải HTTPS nội bộ với Trình cân bằng tải HTTPS bên ngoài. Điều này cung cấp tính năng Kiểm tra tình trạng phân tán và lưu lượng truy cập của tầng dữ liệu đến Tại chỗ bằng cách sử dụng các dải do khách hàng xác định. Ngoài ra, cấu trúc liên kết này cũng hỗ trợ nhiều VPC kết nối với Tại chỗ thông qua nhiều InterConnect khu vực.
Trong lớp học lập trình này, chúng ta sẽ trình bày cách định cấu hình cấu trúc liên kết đầu cuối này dựa trên cấu trúc liên kết bên dưới. Từ trái sang phải, khách hàng tại chỗ có một máy ảo để mô phỏng các dịch vụ HTTP, tận dụng khả năng kết nối kết hợp (HA-VPN hoặc InterConnect) và NEG kết hợp để hiển thị thông qua trình cân bằng tải HTTPS nội bộ. PSC sử dụng LB HTTPS nội bộ làm tệp đính kèm dịch vụ. PSC NEG sử dụng các tệp đính kèm làm dịch vụ phụ trợ, được hiển thị cho LB HTTPS bên ngoài. Người dùng Internet có thể sử dụng mạng toàn cầu của Google để tăng tốc độ truy cập vào các dịch vụ HTTP tại chỗ.
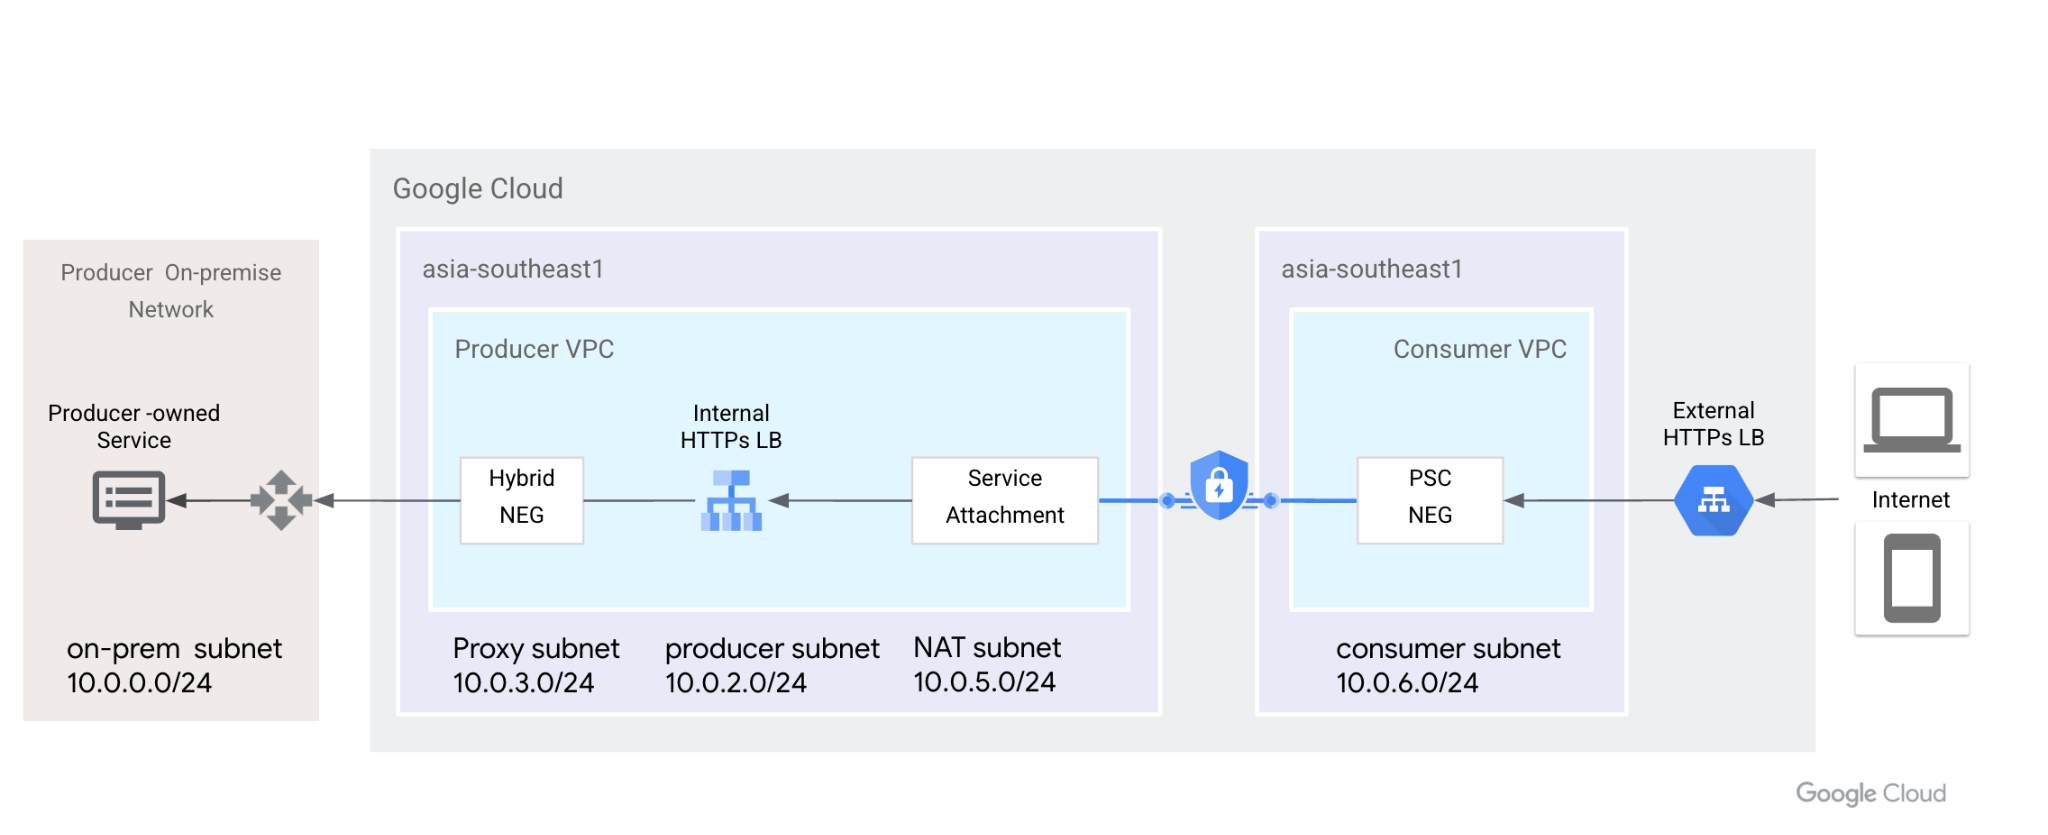
Hình 1. Private Service Connect sử dụng Nhóm thiết bị đầu cuối của mạng và các tệp đính kèm dịch vụ để kết nối Trình cân bằng tải HTTPS bên ngoài với Trình cân bằng tải HTTPS nội bộ và mở rộng phần phụ trợ đến Tại chỗ.
Kiến thức bạn sẽ học được
- Trình cân bằng tải HTTPS nội bộ với NEG kết hợp và Kiểm tra tình trạng phân tán
- Tệp đính kèm dịch vụ PSC với Trình cân bằng tải HTTPS nội bộ
- Thiết lập Nhóm thiết bị đầu cuối của mạng PSC
- Hiển thị NEG PSC bằng Trình cân bằng tải HTTPS bên ngoài
Bạn cần có
- Kiến thức về Khả năng kết nối kết hợp, chẳng hạn như HA-VPN
- Kiến thức về Cân bằng tải HTTPS nội bộ/bên ngoài
- Kiến thức về Private Service Connect
2. Trước khi bắt đầu
Lưu ý: Lớp học lập trình cung cấp các bước định cấu hình và xác thực dựa trên cấu trúc liên kết được minh hoạ, hãy sửa đổi quy trình nếu cần để đáp ứng các yêu cầu của tổ chức. Quyền IAM không nằm trong phạm vi của lớp học lập trình.
Lớp học lập trình sẽ sử dụng một dự án để mô phỏng toàn bộ quy trình. Nhiều dự án cũng được hỗ trợ.
Dự án đơn lẻ – Cập nhật dự án để hỗ trợ mạng nhà sản xuất và người tiêu dùng
Trong Cloud Shell, hãy đảm bảo rằng bạn đã thiết lập mã dự án
gcloud config list project
gcloud config set project [YOUR-PROJECT-NAME]
prodproject=YOUR-PROJECT-NAME
echo $prodproject
3. Tạo tài nguyên tại chỗ
Trong phần sau, chúng ta sẽ thiết lập một VPC tại chỗ và các máy ảo để mô phỏng các dịch vụ tại chỗ của khách hàng.
Mạng VPC
Từ Cloud Shell
gcloud compute networks create vpc-demo-onprem --project=$prodproject --subnet-mode=custom
Tạo mạng con
Từ Cloud Shell
gcloud compute networks subnets create vpc-demo-onprem-asia-southeast1 --project=$prodproject --range=10.0.0.0/24 --network=vpc-demo-onprem --region=asia-southeast1
Tạo quy tắc tường lửa.
Trình cân bằng tải HTTPS nội bộ hỗ trợ kiểm tra tình trạng phân tán, các quy tắc tường lửa chỉ cần cho phép dải IP mạng con proxy. Hãy làm theo tài liệu này để đưa các dự án của bạn vào danh sách cho phép.
Từ Cloud Shell, hãy tạo một quy tắc tường lửa để bật tính năng kiểm tra tình trạng phần phụ trợ và lưu lượng truy cập của tầng dữ liệu từ các mạng con proxy.
gcloud compute firewall-rules create vpc-demo-health-checks --allow tcp:80,tcp:443 --network vpc-demo-onprem --source-ranges 10.0.3.0/24 --enable-logging
Từ Cloud Shell, hãy tạo một quy tắc tường lửa để cho phép IAP kết nối với các thực thể máy ảo,
gcloud compute firewall-rules create psclab-iap-prod --network vpc-demo-onprem --allow tcp:22 --source-ranges=35.235.240.0/20 --enable-logging
4. Tạo thực thể máy ảo tại chỗ
Máy ảo này mô phỏng các dịch vụ tại chỗ và cần được hiển thị bằng Trình cân bằng tải HTTPS nội bộ bằng cách sử dụng NEG kết hợp.
Từ Cloud Shell, hãy tạo thực thể www01
gcloud compute instances create www01 \
    --zone=asia-southeast1-b \
    --image-family=debian-11 \
    --image-project=debian-cloud \
    --network-interface=network-tier=PREMIUM,nic-type=GVNIC,stack-type=IPV4_ONLY,subnet=vpc-demo-onprem-asia-southeast1 \
    --shielded-secure-boot \
    --shielded-vtpm \
    --shielded-integrity-monitoring \
    --metadata=startup-script='#! /bin/bash
sudo apt-get update
sudo apt-get install nginx -y
vm_hostname="$(curl -H "Metadata-Flavor:Google" \
http://169.254.169.254/computeMetadata/v1/instance/name)"
filter="{print \$NF}"
vm_zone="$(curl -H "Metadata-Flavor:Google" \
http://169.254.169.254/computeMetadata/v1/instance/zone \
| awk -F/ "${filter}")"
echo "Page on $vm_hostname in $vm_zone" | \
tee /var/www/html/index.nginx-debian.html
sudo systemctl restart nginx'
Trong phần sau, chúng ta sẽ sử dụng letsencrypt để tạo chứng chỉ và cài đặt trên Nginx. Tải tệp khoá công khai và khoá riêng tư xuống cho bước tiếp theo. Bạn cần tạm thời mở cổng TCP 80 cho Internet để tạo chứng chỉ.
Đảm bảo máy ảo này có tên miền được phân giải công khai. Ví dụ: trong Cloud DNS, hãy thêm bản ghi A [www01.yinghli.demo.altostrat.com](http://www01.yinghli.demo.altostrat.com) và trỏ đến địa chỉ IP công khai của máy ảo.
gcloud dns --project=$prodproject record-sets create www01.yinghli.demo.altostrat.com. --zone="yinghli-demo" --type="A" --ttl="300" --rrdatas="34.87.77.186"
Từ bảng điều khiển máy ảo www01, hãy làm theo hướng dẫn để cài đặt chứng chỉ trên Nginx và tạo một bản sao của fullchain.pem và private.pem cho các bước sau.
sudo apt install snapd
sudo snap install core; sudo snap refresh core
sudo snap install --classic certbot
sudo ln -s /snap/bin/certbot /usr/bin/certbot
sudo certbot --nginx
5. Tạo mạng VPC của nhà sản xuất
Lưu ý: Cấu hình mạng kết hợp KHÔNG có trong cấu hình này.
Mạng VPC
Từ Cloud Shell
gcloud compute networks create vpc-demo-producer --project=$prodproject --subnet-mode=custom
Tạo mạng con
Từ Cloud Shell
gcloud compute networks subnets create vpc-demo-asia-southeast1 --project=$prodproject --range=10.0.2.0/24 --network=vpc-demo-producer --region=asia-southeast1
Tạo mạng con proxy
Từ Cloud Shell
gcloud compute networks subnets create proxy-subnet-asia-southeast1 \
  --purpose=REGIONAL_MANAGED_PROXY \
  --role=ACTIVE \
  --region=asia-southeast1 \
  --network=vpc-demo-producer \
  --range=10.0.3.0/24
Hybrid Connectivity
Hãy làm theo tài liệu về Cloud VPN để triển khai khả năng kết nối HA-VPN giữa VPC Tại chỗ và VPC của nhà sản xuất. Giữ nguyên cấu hình mặc định trên Cloud Router, chúng ta không cần thêm 130.211.0.0/22, 35.191.0.0/16 vào quảng cáo BGP.
6. Tạo NEG kết hợp của nhà sản xuất
Tạo một nhóm thiết bị đầu cuối của mạng kết hợp và thêm IP:PORT máy ảo tại chỗ vào NEG.
Từ Cloud Shell
gcloud compute network-endpoint-groups create on-prem-service-neg \
    --network-endpoint-type=NON_GCP_PRIVATE_IP_PORT \
    --zone=asia-southeast1-b \
    --network=vpc-demo-producer

gcloud compute network-endpoint-groups update on-prem-service-neg \
    --zone=asia-southeast1-b \
    --add-endpoint="ip=10.0.0.2,port=443"
7. Tạo Trình cân bằng tải HTTPS nội bộ của nhà sản xuất
Hiện tại, Trình cân bằng tải HTTPS bên ngoài chỉ hỗ trợ giao thức HTTPS cho NEG PSC( tài liệu). Khi xuất bản các dịch vụ, chúng ta cần sử dụng Trình cân bằng tải HTTPS nội bộ và bật quyền truy cập toàn cầu vào các quy tắc chuyển tiếp.
Từ Cloud Shell, hãy tạo tính năng kiểm tra tình trạng theo khu vực.
gcloud compute health-checks create https on-prem-service-hc \
    --region=asia-southeast1 \
    --use-serving-port
Từ Cloud Shell, hãy tạo dịch vụ phụ trợ và thêm NEG kết hợp.
gcloud compute backend-services create on-premise-service-backend \
   --load-balancing-scheme=INTERNAL_MANAGED \
   --protocol=HTTPS \
   --region=asia-southeast1 \
   --health-checks=on-prem-service-hc \
   --health-checks-region=asia-southeast1

gcloud compute backend-services add-backend on-premise-service-backend \
   --network-endpoint-group=on-prem-service-neg \
   --network-endpoint-group-zone=asia-southeast1-b \
   --region=asia-southeast1 \
   --balancing-mode=RATE \
   --max-rate-per-endpoint=100
Từ Cloud Shell, hãy tạo bản đồ URL
gcloud compute url-maps create on-premise-url \
    --default-service on-premise-service-backend \
    --region=asia-southeast1
Từ Cloud Shell, hãy tạo chứng chỉ SSL theo khu vực. Hai tệp chứng chỉ được tải xuống từ máy ảo.
gcloud compute ssl-certificates create www01 \
    --certificate=fullchain.pem \
    --private-key=private.pem \
    --region=asia-southeast1
Từ Cloud Shell, hãy tạo https-target-proxy
gcloud compute target-https-proxies create on-premise-httpsproxy \
    --ssl-certificates=www01 \
    --url-map=on-premise-url \
    --url-map-region=asia-southeast1 \
    --region=asia-southeast1
Từ Cloud Shell, hãy đặt trước một IP tĩnh nội bộ và tạo quy tắc chuyển tiếp
gcloud compute addresses create ilbaddress \
  --region=asia-southeast1 \
  --subnet=vpc-demo-asia-southeast1  \
  --addresses=10.0.2.100

gcloud compute forwarding-rules create https-ilb-psc \
      --load-balancing-scheme=INTERNAL_MANAGED \
      --network=vpc-demo-producer \
      --subnet=vpc-demo-asia-southeast1  \
      --address=ilbaddress \
      --ports=443 \
      --region=asia-southeast1 \
      --target-https-proxy=on-premise-httpsproxy \
      --target-https-proxy-region=asia-southeast1
      --allow-global-access
8. Tạo thực thể máy ảo của nhà sản xuất
Tạo một máy ảo của nhà sản xuất để xác minh.
Từ Cloud Shell
gcloud compute instances create test01 \
    --zone=asia-southeast1-b \
    --image-family=debian-11 \
    --image-project=debian-cloud \
    --network-interface=network-tier=PREMIUM,nic-type=GVNIC,stack-type=IPV4_ONLY,subnet=vpc-demo-asia-southeast1 \
    --shielded-secure-boot \
    --shielded-vtpm \
    --shielded-integrity-monitoring
Để cho phép IAP kết nối với các thực thể máy ảo, hãy tạo một quy tắc tường lửa:
Từ Cloud Shell
gcloud compute firewall-rules create psclab-iap-prod --network vpc-demo-producer --allow tcp:22 --source-ranges=35.235.240.0/20 --enable-logging
Từ bảng điều khiển máy ảo của nhà sản xuất, hãy truy cập vào [www01.yinghli.demo.altostrat.com](https://www01.yinghli.demo.altostrat.com) và phân giải địa chỉ IP của trình cân bằng tải HTTPS nội bộ. HTTP 200 cho biết rằng cấu hình hoạt động như dự kiến.
curl -v --resolve www01.yinghli.demo.altostrat.com:443:10.0.2.100 https://www01.yinghli.demo.altostrat.com

* Added www01.yinghli.demo.altostrat.com:443:10.0.2.100 to DNS cache
* Hostname www01.yinghli.demo.altostrat.com was found in DNS cache
*   Trying 10.0.2.100:443...
* Connected to www01.yinghli.demo.altostrat.com (10.0.2.100) port 443 (#0)
* ALPN, offering h2
* ALPN, offering http/1.1
* successfully set certificate verify locations:
*  CAfile: /etc/ssl/certs/ca-certificates.crt
*  CApath: /etc/ssl/certs
* TLSv1.3 (OUT), TLS handshake, Client hello (1):
* TLSv1.3 (IN), TLS handshake, Server hello (2):
* TLSv1.3 (IN), TLS handshake, Encrypted Extensions (8):
* TLSv1.3 (IN), TLS handshake, Certificate (11):
* TLSv1.3 (IN), TLS handshake, CERT verify (15):
* TLSv1.3 (IN), TLS handshake, Finished (20):
* TLSv1.3 (OUT), TLS change cipher, Change cipher spec (1):
* TLSv1.3 (OUT), TLS handshake, Finished (20):
* SSL connection using TLSv1.3 / TLS_AES_256_GCM_SHA384
* ALPN, server accepted to use h2
* Server certificate:
*  subject: CN=www01.yinghli.demo.altostrat.com
*  start date: Jun  4 10:36:43 2023 GMT
*  expire date: Sep  2 10:36:42 2023 GMT
*  subjectAltName: host "www01.yinghli.demo.altostrat.com" matched cert's "www01.yinghli.demo.altostrat.com"
*  issuer: C=US; O=Let's Encrypt; CN=R3
*  SSL certificate verify ok.
* Using HTTP2, server supports multi-use
* Connection state changed (HTTP/2 confirmed)
* Copying HTTP/2 data in stream buffer to connection buffer after upgrade: len=0
* Using Stream ID: 1 (easy handle 0x55865ef982e0)
> GET / HTTP/2
> Host: www01.yinghli.demo.altostrat.com
> user-agent: curl/7.74.0
> accept: */*
>
* TLSv1.3 (IN), TLS handshake, Newsession Ticket (4):
* TLSv1.3 (IN), TLS handshake, Newsession Ticket (4):
* old SSL session ID is stale, removing
* Connection state changed (MAX_CONCURRENT_STREAMS == 100)!
< HTTP/2 200
< server: nginx/1.18.0
< date: Mon, 05 Jun 2023 02:29:38 GMT
< content-type: text/html
< content-length: 35
< last-modified: Sun, 04 Jun 2023 09:02:16 GMT
< etag: "647c5318-23"
< accept-ranges: bytes
< via: 1.1 google
<
Page on www01 in asia-southeast1-b
* Connection #0 to host www01.yinghli.demo.altostrat.com left intact
Lưu ý: Bạn không thể truy cập trực tiếp vào các dịch vụ HTTPS của máy ảo 10.0.0.2 vì tường lửa tại chỗ chỉ cho phép mạng con proxy 10.0.3.0/24 truy cập.
9. Tạo mạng con NAT PSC
Từ Cloud Shell
gcloud compute networks subnets create psc-nat-subnet \
--network=vpc-demo-producer \
--region=asia-southeast1 \
--range=10.0.5.0/24 \
--purpose=private-service-connect
10. Tạo tệp đính kèm dịch vụ HTTPs
Từ Cloud Shell, hãy tạo tệp đính kèm dịch vụ HTTPs
gcloud compute service-attachments create ilbserviceattach \
--region=asia-southeast1 \
--producer-forwarding-rule=https-ilb-psc \
--connection-preference=ACCEPT_AUTOMATIC \
--nat-subnets=psc-nat-subnet
Xác thực tệp đính kèm dịch vụ HTTPs
gcloud compute service-attachments describe ilbserviceattach --region asia-southeast1
Ghi lại tên tệp đính kèm dịch vụ:
projects/<project>/regions/asia-southeast1/serviceAttachments/ilbserviceattach
11. Tạo mạng VPC của người tiêu dùng
Trong phần sau, VPC của người tiêu dùng được định cấu hình trong cùng một dự án, nhưng các dự án khác nhau cũng được hỗ trợ. Việc giao tiếp giữa mạng của người tiêu dùng và nhà sản xuất được thực hiện thông qua tệp đính kèm dịch vụ được xác định trong mạng của nhà sản xuất.
Mạng VPC
Từ Cloud Shell
gcloud compute networks create vpc-demo-consumer --project=$prodproject --subnet-mode=custom
Tạo mạng con
Từ Cloud Shell
gcloud compute networks subnets create consumer-subnet --project=$prodproject --range=10.0.6.0/24 --network=vpc-demo-consumer --region=asia-southeast1
12. Tạo Nhóm thiết bị đầu cuối của mạng PSC
Tạo NEG PSC
Sao chép tên tệp đính kèm dịch vụ https trước đó và dán vào các tham số --psc-target-service
Từ Cloud Shell
gcloud beta compute network-endpoint-groups create consumerpscneg \
--project=$prodproject \
--region=asia-southeast1 \
--network-endpoint-type=PRIVATE_SERVICE_CONNECT \
--psc-target-service=projects/<project>/regions/asia-southeast1/serviceAttachments/ilbserviceattach \
--network=vpc-demo-consumer \
--subnet=consumer-subnet
Sau khi thiết lập NEG PSC thành công, từ giao diện người dùng, hãy làm theo Private Service Connect -> Published Services -> Lưu ý rằng kết nối ilbserviceattach đã xuất bản hiện cho biết 1 quy tắc chuyển tiếp.

13. Tạo Trình cân bằng tải HTTPS bên ngoài của người tiêu dùng
Tạo Trình cân bằng tải HTTPS bên ngoài và sử dụng NEG PSC làm dịch vụ phụ trợ( tài liệu).
Từ Cloud Shell
gcloud compute addresses create httpspsclb \
    --ip-version=IPV4 --global

gcloud compute backend-services create consumer-bs \
    --load-balancing-scheme=EXTERNAL_MANAGED \
    --protocol=HTTPS \
    --global

gcloud compute backend-services add-backend consumer-bs \
  --network-endpoint-group=consumerpscneg \
  --network-endpoint-group-region=asia-southeast1 \
  --global

gcloud compute url-maps create consumer-url \
  --default-service=consumer-backend-service \
  --global

gcloud compute ssl-certificates create wwwglobal \
    --certificate=fullchain.pem \
    --private-key=private.pem \
    --global

gcloud compute target-https-proxies create consumer-url-target-proxy \
  --url-map=consumer-url \
  --ssl-certificates=wwwglobal

gcloud compute forwarding-rules create consumer-url-forwarding-rule \
    --load-balancing-scheme=EXTERNAL_MANAGED \
    --network-tier=PREMIUM \
    --address=httpspsclb \
    --target-https-proxy=consumer-url-target-proxy \
    --ports=443 \
    --global
Cập nhật bản ghi DNS cho www01.yinghli.demo.altostrat.com và trỏ đến địa chỉ IP công khai của Trình cân bằng tải HTTPS bên ngoài
gcloud dns --project=$prodproject record-sets update www01.yinghli.demo.altostrat.com. --type="A" --zone="yinghli-demo" --rrdatas="34.102.178.214" --ttl="300"
14. Xác thực
Từ máy tính xách tay, hãy truy cập vào https://www01.yinghli.demo.altostrat.com bằng curl.
curl -v https://www01.yinghli.demo.altostrat.com
*   Trying 34.102.178.214:443...
* Connected to www01.yinghli.demo.altostrat.com (34.102.178.214) port 443 (#0)
* ALPN: offers h2,http/1.1
* TLSv1.3 (OUT), TLS handshake, Client hello (1):
* TLSv1.3 (IN), TLS handshake, Server hello (2):
* TLSv1.3 (IN), TLS handshake, Encrypted Extensions (8):
* TLSv1.3 (IN), TLS handshake, Certificate (11):
* TLSv1.3 (IN), TLS handshake, CERT verify (15):
* TLSv1.3 (IN), TLS handshake, Finished (20):
* TLSv1.3 (OUT), TLS change cipher, Change cipher spec (1):
* TLSv1.3 (OUT), TLS handshake, Finished (20):
* SSL connection using TLSv1.3 / TLS_AES_256_GCM_SHA384
* ALPN: server accepted h2
* Server certificate:
*  subject: CN=www01.yinghli.demo.altostrat.com
*  start date: Jun  4 10:36:43 2023 GMT
*  expire date: Sep  2 10:36:42 2023 GMT
*  subjectAltName: host "www01.yinghli.demo.altostrat.com" matched cert's "www01.yinghli.demo.altostrat.com"
*  issuer: C=US; O=Let's Encrypt; CN=R3
*  SSL certificate verify ok.
* using HTTP/2
* h2h3 [:method: GET]
* h2h3 [:path: /]
* h2h3 [:scheme: https]
* h2h3 [:authority: www01.yinghli.demo.altostrat.com]
* h2h3 [user-agent: curl/8.0.0]
* h2h3 [accept: */*]
* Using Stream ID: 1 (easy handle 0x149019a00)
> GET / HTTP/2
> Host: www01.yinghli.demo.altostrat.com
> user-agent: curl/8.0.0
> accept: */*
>
* TLSv1.3 (IN), TLS handshake, Newsession Ticket (4):
* TLSv1.3 (IN), TLS handshake, Newsession Ticket (4):
* old SSL session ID is stale, removing
< HTTP/2 200
< server: nginx/1.18.0
< date: Mon, 05 Jun 2023 02:48:43 GMT
< content-type: text/html
< content-length: 35
< last-modified: Sun, 04 Jun 2023 09:02:16 GMT
< etag: "647c5318-23"
< accept-ranges: bytes
< via: 1.1 google, 1.1 google
< alt-svc: h3=":443"; ma=2592000,h3-29=":443"; ma=2592000
<
Page on www01 in asia-southeast1-b
* Connection #0 to host www01.yinghli.demo.altostrat.com left intact
15. Các bước dọn dẹp
Các bước dọn dẹp mạng của nhà sản xuất
Lưu ý: Các bước dọn dẹp chỉ hiển thị cấu hình liên quan đến Trình cân bằng tải và PSC, không bao gồm VPC và Khả năng kết nối kết hợp.
Từ một Cloud Shell duy nhất trong thiết bị đầu cuối, hãy xoá các thành phần của phòng thí nghiệm
gcloud compute forwarding-rules delete consumer-url-forwarding-rule --global
gcloud compute target-https-proxies delete consumer-url-target-proxy
gcloud compute ssl-certificates delete wwwglobal --global
gcloud compute url-maps delete consumer-url
gcloud compute backend-services delete consumer-bs --global
gcloud compute addresses delete httpspsclb --global

gcloud beta compute network-endpoint-groups delete consumerpscneg --region=asia-southeast1

gcloud compute service-attachments delete ilbserviceattach --region=asia-southeast1
gcloud compute networks subnets delete psc-nat-subnet --region=asia-southeast1

gcloud compute forwarding-rules delete https-ilb-psc --region=asia-southeast1
gcloud compute addresses delete ilbaddress --region=asia-southeast1
gcloud compute target-https-proxies delete on-premise-httpsproxy --region=asia-southeast1
gcloud compute ssl-certificates delete www01 --region=asia-southeast1
gcloud compute url-maps delete on-premise-url --region=asia-southeast1
gcloud compute backend-services delete on-premise-service-backend --region=asia-southeast1
gcloud compute health-checks delete on-prem-service-hc --region=asia-southeast1

gcloud compute network-endpoint-groups delete on-prem-service-neg --zone=asia-southeast1-b
gcloud compute networks subnets delete proxy-subnet-asia-southeast1 --region=asia-southeast1
16. Xin chúc mừng!
Chúc mừng bạn đã hoàn thành lớp học lập trình.
Nội dung chúng ta đã đề cập
- Trình cân bằng tải HTTPS nội bộ với NEG kết hợp và Kiểm tra tình trạng phân tán
- Tệp đính kèm dịch vụ PSC với Trình cân bằng tải HTTPS nội bộ
- Thiết lập Nhóm thiết bị đầu cuối của mạng PSC
- Hiển thị NEG PSC bằng Trình cân bằng tải HTTPS bên ngoài