
1. 事前準備
瞭解如何使用 Google 地圖平台和 Places SDK for Android 向使用者顯示地點清單,以識別目前的位置。
必要條件
- Java 基本技能
執行步驟
- 在 Android 應用程式中加入地圖。
- 使用位置存取權來定位使用者。
- 擷取使用者目前位置附近的地點。
- 向使用者顯示可能的地點,找出目前所在位置。
建構項目
您從頭開始建立 Android 應用程式,但可以下載程式碼範例進行偵錯。從 GitHub 下載範例程式碼;如果您已設定使用指令列進行 Git,請輸入下列指令:
git clone https://github.com/googlecodelabs/current-place-picker-android.git
使用本程式碼研究室時,如果遇到任何問題 (程式碼錯誤、文法錯誤、措辭不明顯或其他問題),請透過程式碼研究室左下角的 [回報錯誤] 連結回報問題。
2. 開始使用
開始進行這個程式碼研究室之前,您必須設定下列項目:
Android Studio
前往 https://developer.android.com/studio 下載 Android Studio。
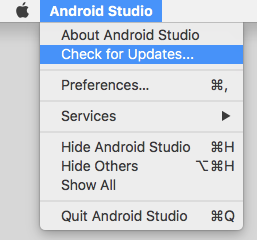
如果您已安裝 Android Studio,請按一下 [Android Studio] 檢查最新版本 (點選 [檢查更新...])。
這個研究室是以 Android Studio 3.4 撰寫而成。
Android SDK
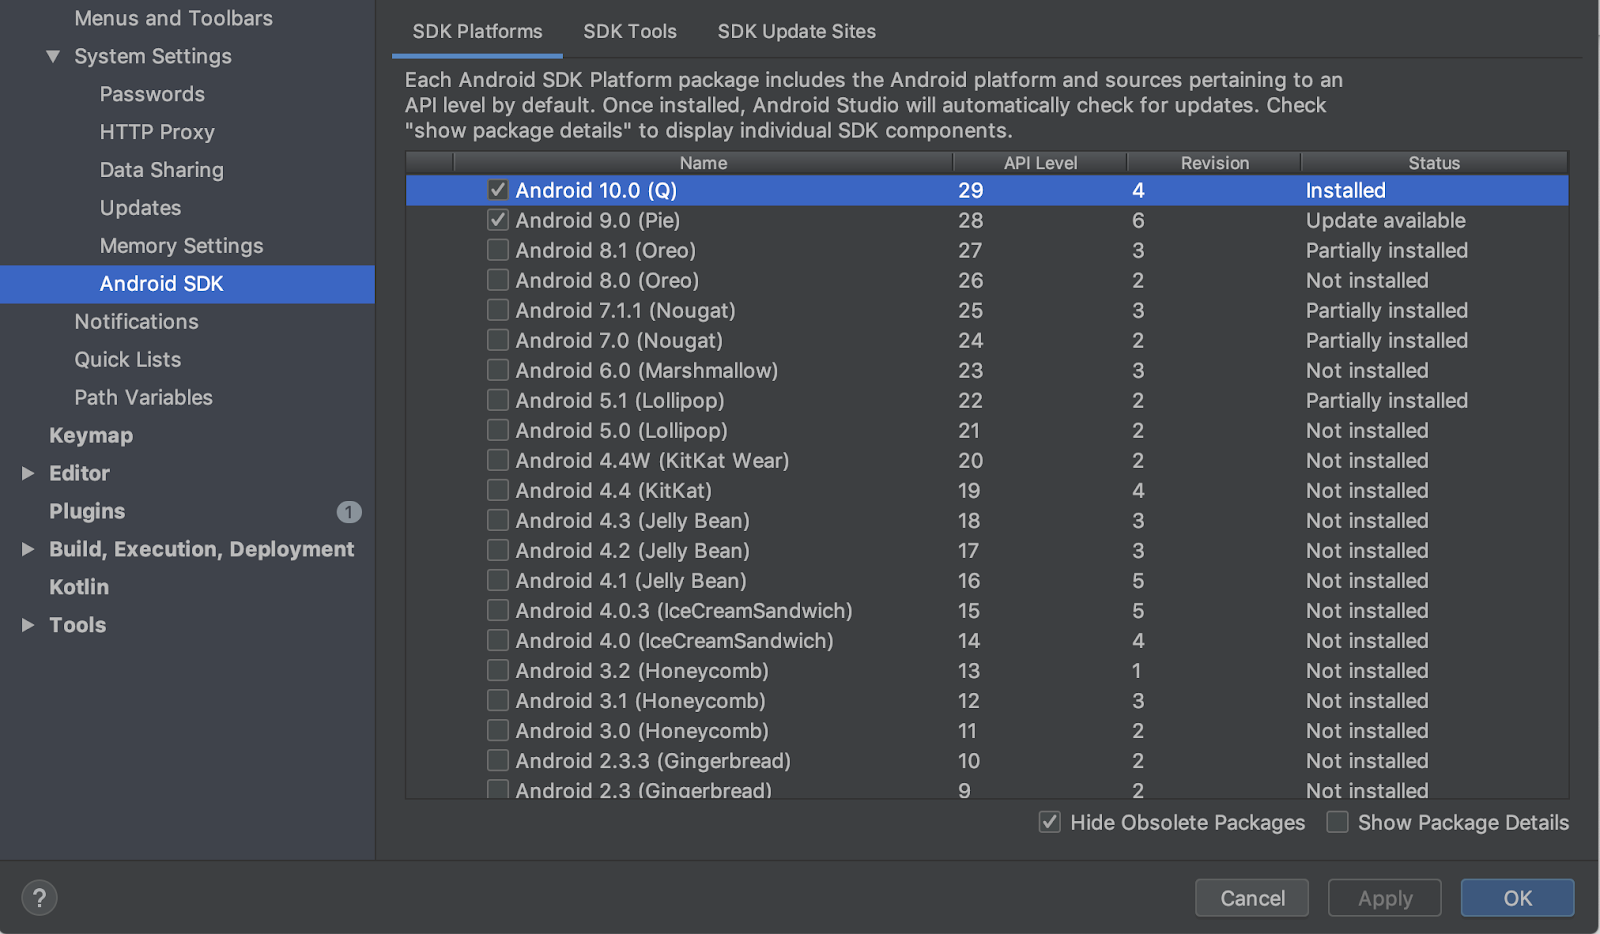
在 Android Studio 中,您可以使用 SDK Manager 設定所需的 SDK。這個研究室使用的是 Android Q SDK。
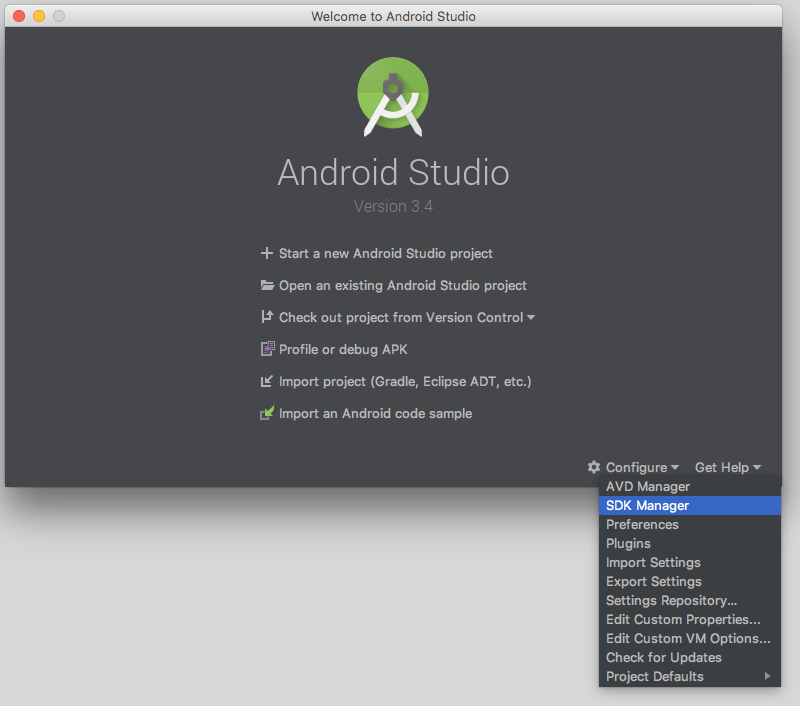
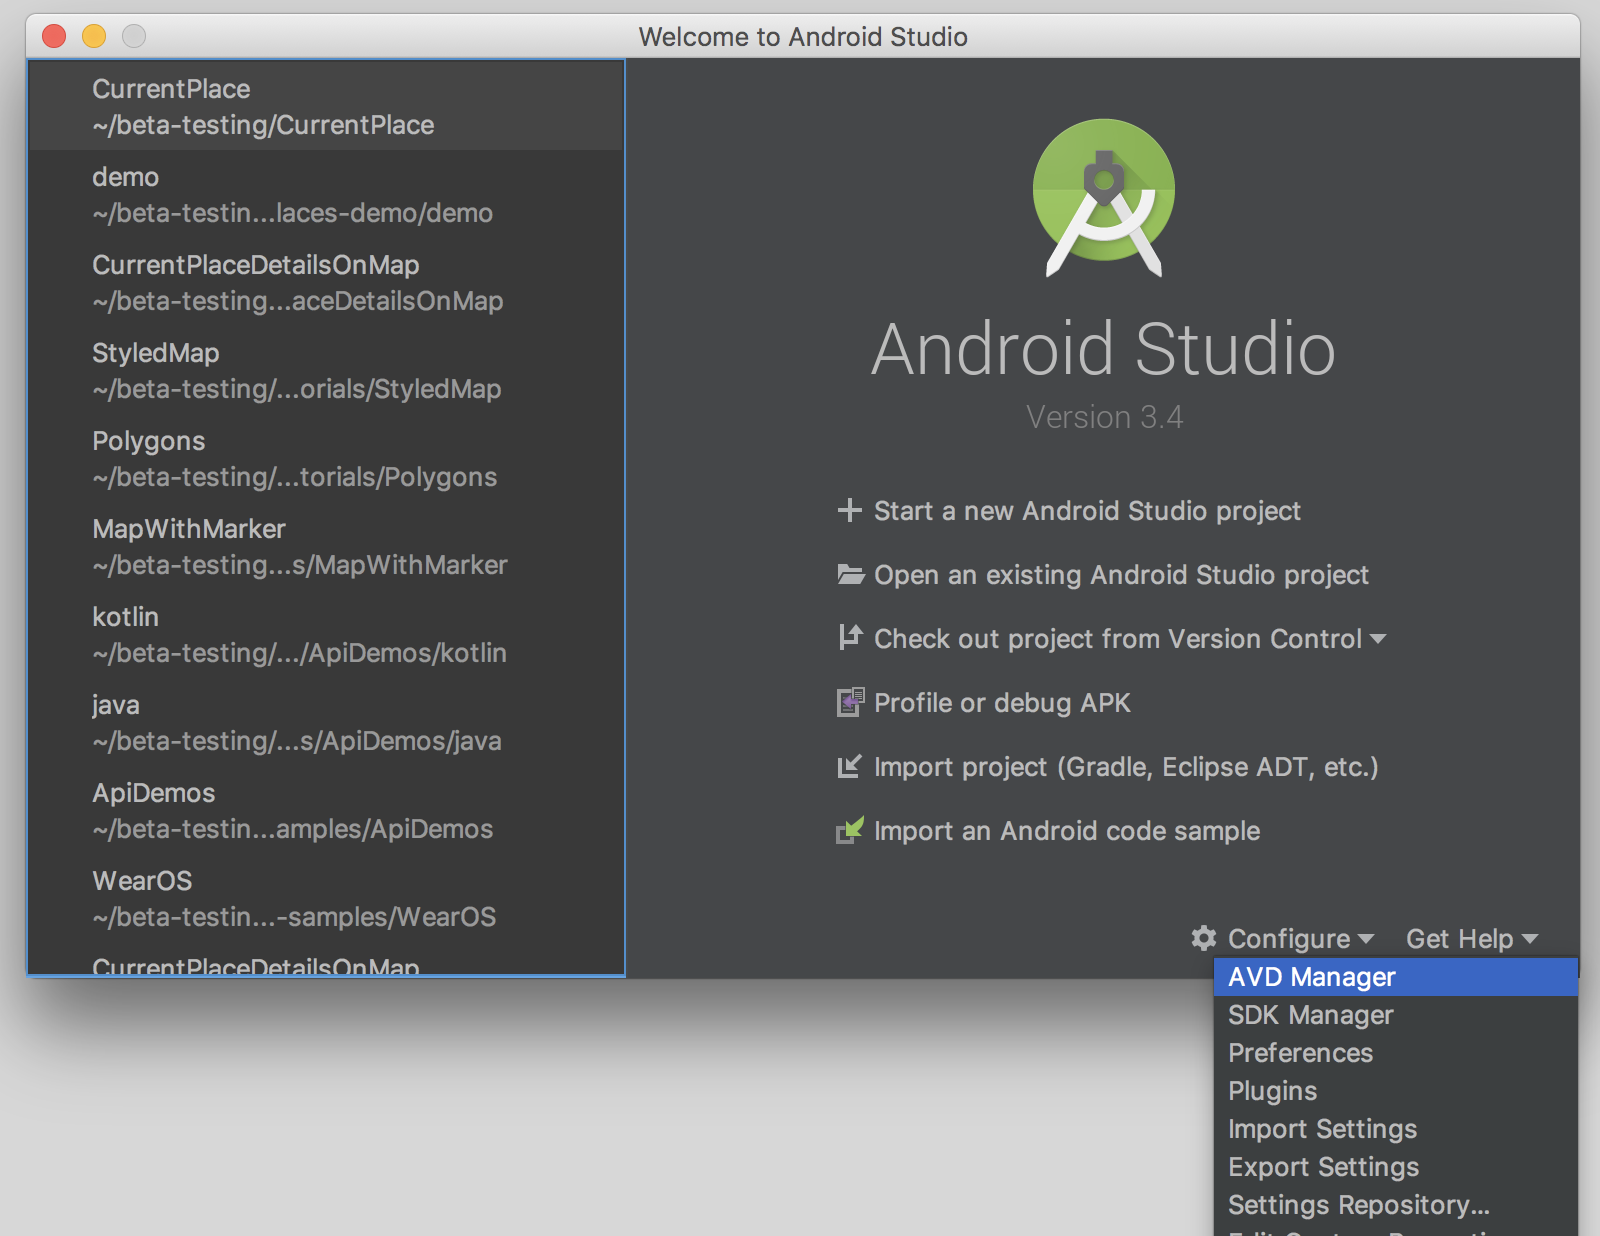
- 在 Android Studio 歡迎畫面中,按一下 [Configure] (設定) > [SDK Manager]。
- 選取所需的 SDK 核取方塊,然後按一下 [套用]。
如果您尚未安裝 SDK,系統會將 SDK 下載至您的電腦。
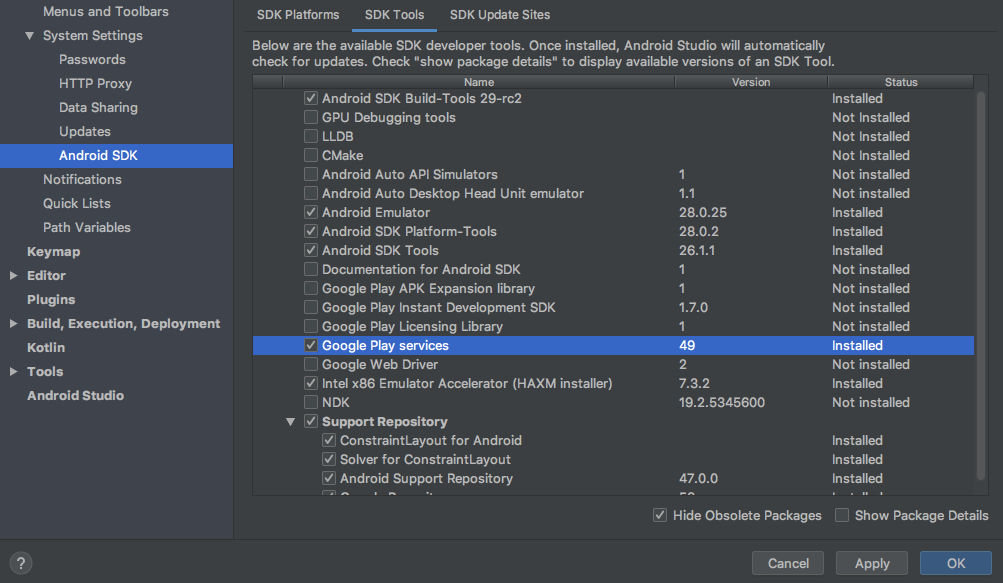
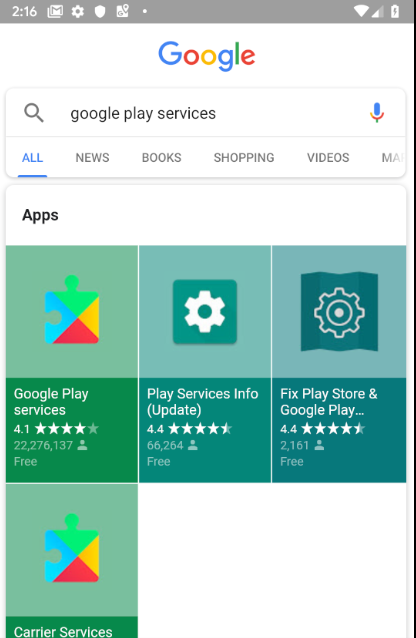
Google Play 服務
也必須透過 SDK 管理員安裝 Google Play 服務。
- 按一下 [SDK Tools] 分頁標籤,然後勾選 [Google Play services] 核取方塊。
如果狀態顯示為「有可用的更新」,請更新。
3. 準備模擬器
如要執行這個應用程式,您可以連結自己的裝置或使用 Android Emulator。
如果您使用的是自己的裝置,請跳至本頁結尾的 [真實裝置操作說明:更新 Google Play 服務]。
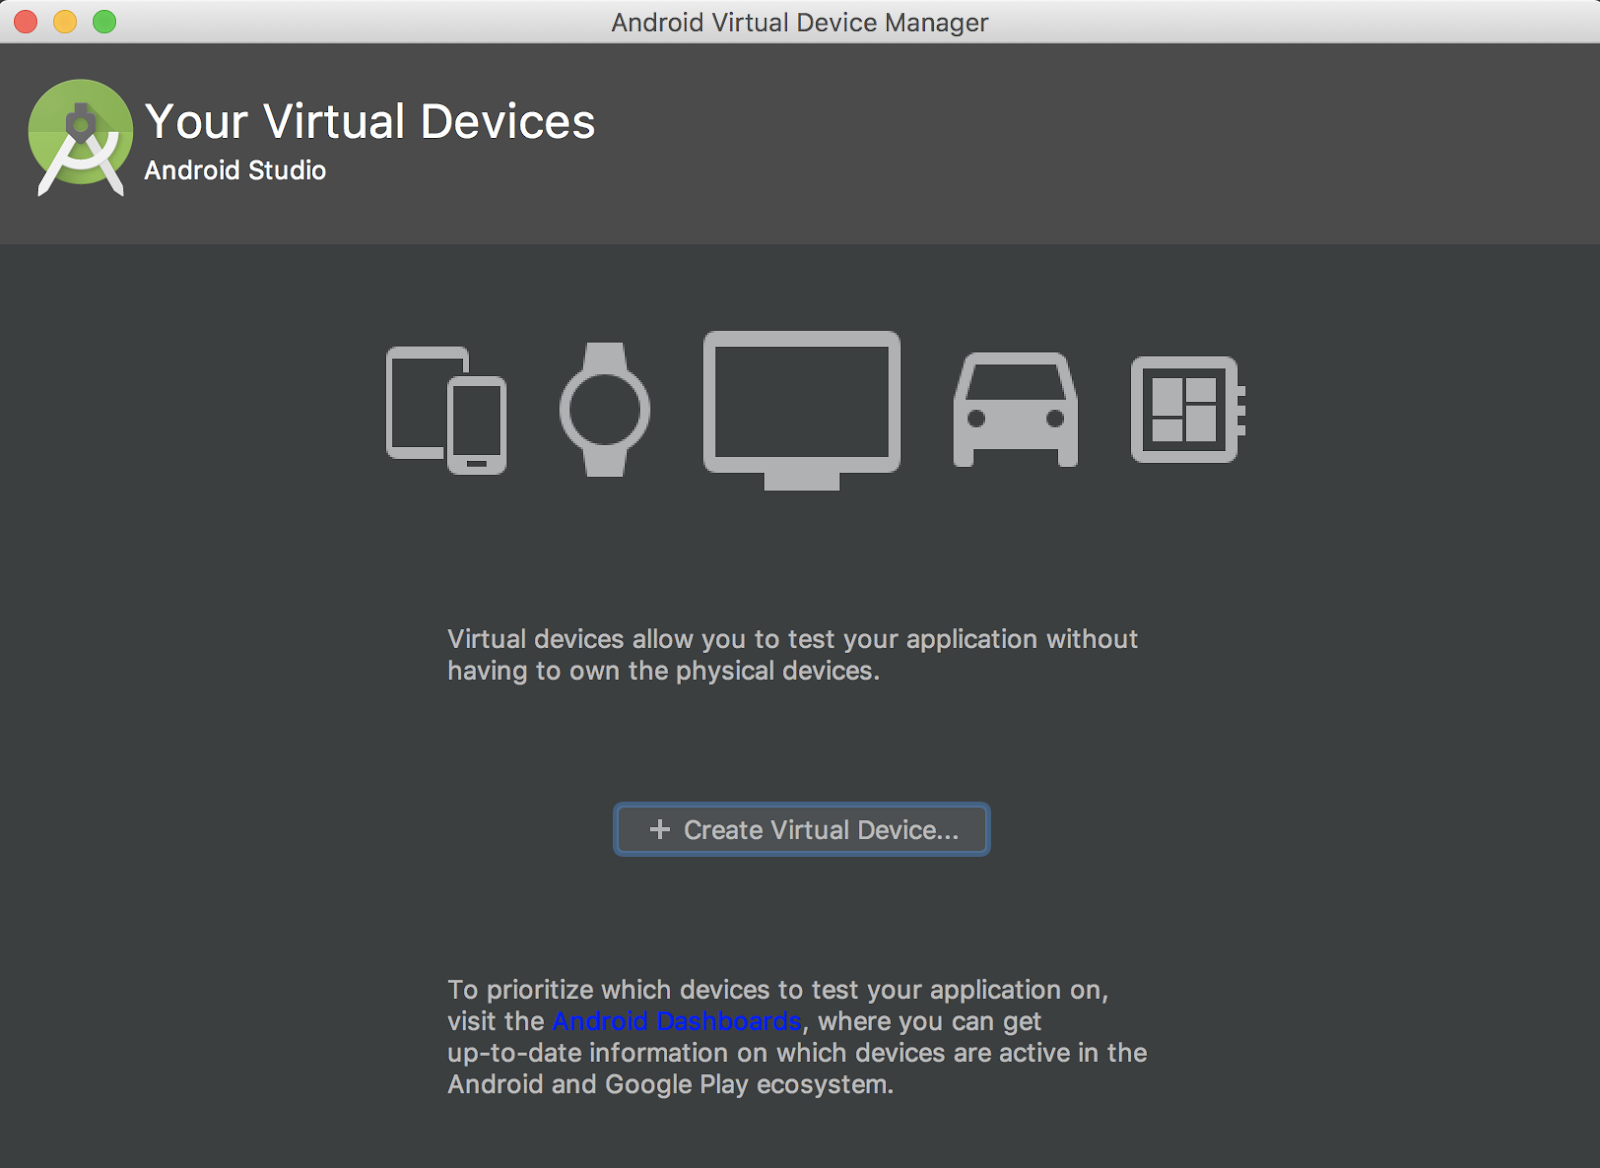
新增模擬器
- 在 Android Studio 歡迎畫面中,按一下 [Configure] (設定) > [AVD Manager]。
系統會隨即開啟「Android 虛擬裝置管理員」對話方塊。
- 按一下 [建立虛擬裝置...],開啟裝置清單。
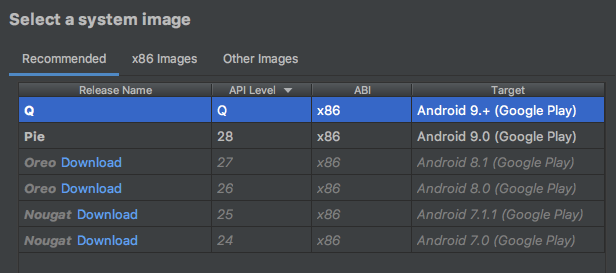
- 選擇「Play 商店」欄中顯示 Google Play
 圖示的裝置,然後點選 [下一步]。
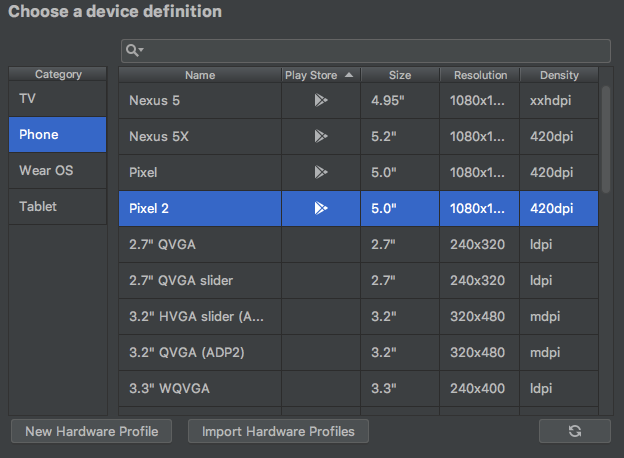
您會看到一組可以安裝的系統映像檔。如果 Q 鎖定 Android 9.+ (Google Play) 時,旁邊有「下載」字樣,請按一下 [下載]。
- 點選 [下一步],然後為虛擬裝置命名,然後按一下 [完成]。
您會返回「您的虛擬裝置」清單。
- 按一下新裝置旁邊的「開始」圖示
 :
:
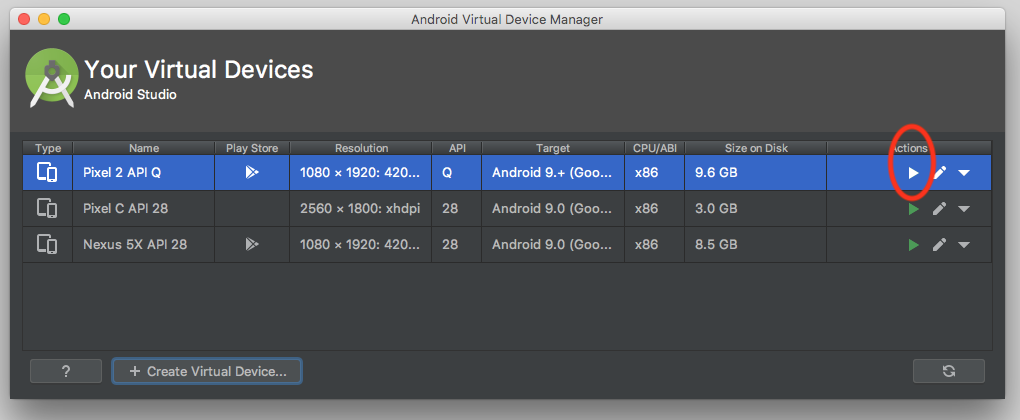
模擬器會在幾分鐘後開啟。
模擬器操作說明 - 更新 Google Play 服務
- 模擬器啟動後,在出現的導覽列中按一下 [...]。**
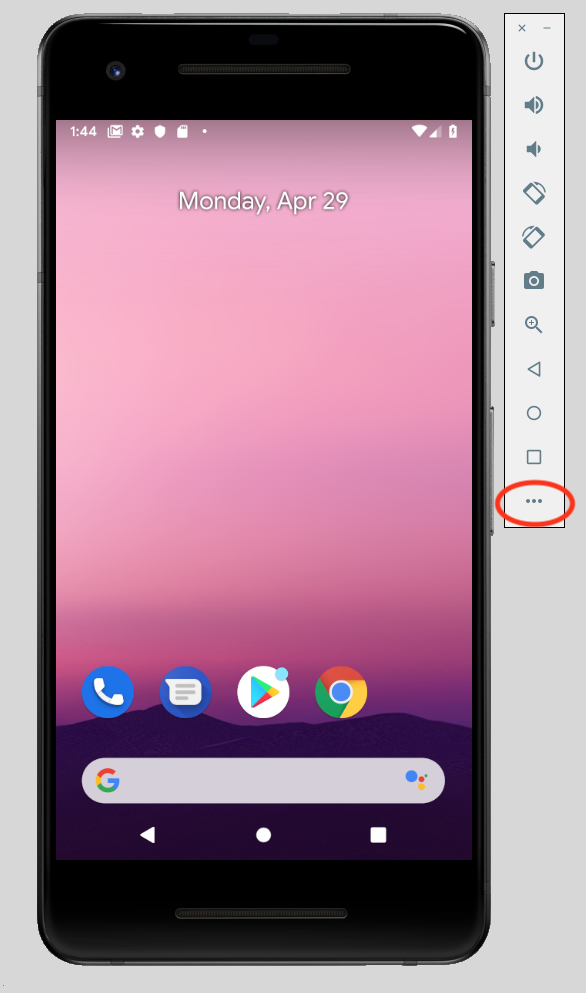
系統隨即會開啟「擴充控制項」對話方塊。
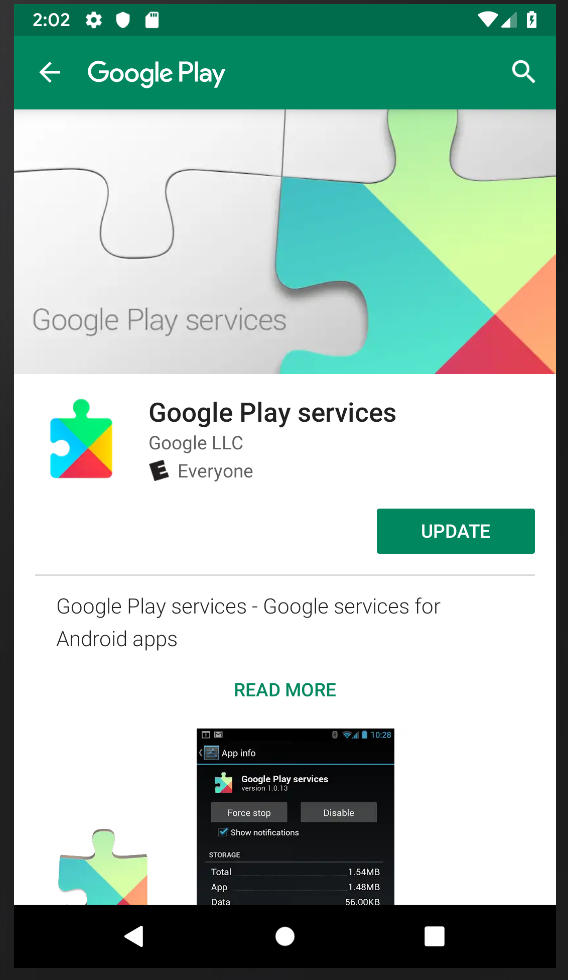
- 按一下選單中的 [Google Play]。
如果有可用的更新,請按一下 [更新]。

- 使用 Google 帳戶登入模擬器。
您可以使用您自己的帳戶,也可以免費建立新帳戶,讓您的測試與個人資訊分開。
Google Play 隨即會開啟 Google Play 服務。
- 按一下 [更新],即可取得最新版本的 Google Play 服務。
如果系統要求您完成帳戶設定並完成付款選項,請按一下 [略過]。
在模擬器中設定位置
- 模擬器啟動後,在主畫面的搜尋列中輸入「地圖」,即可開啟 Google 地圖應用程式圖示。

- 按一下圖示即可啟動。
您會看到預設地圖。
- 方法是按一下地圖右下角的 [我的位置]。

系統要求你授予手機使用位置資訊的權限。
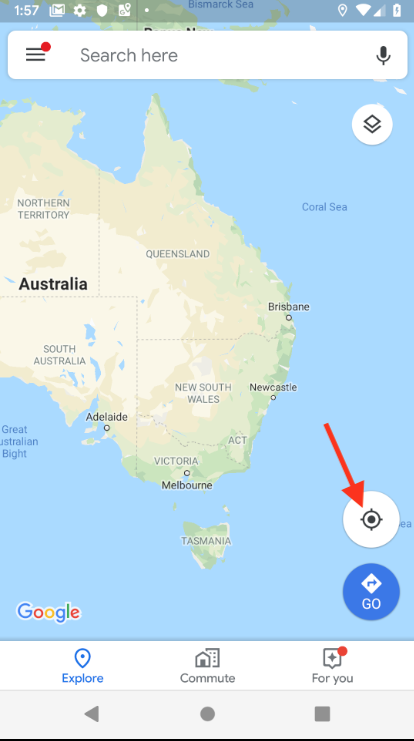
- 按一下 [...],開啟「擴充控制項」選單。
- 按一下 [地點] 標籤。
- 輸入緯度和經度。
請在這裡輸入任何您感興趣的內容,但務必確認它位於很多地方。
(在夏威夷毛伊庫伊市使用 Kihei 20.7818 和 Longitude -156.4624 重複此代碼實驗室的結果。)
- 按一下 [傳送],系統隨即會更新地圖。
你已準備好執行應用程式,並可透過位置資訊進行測試。
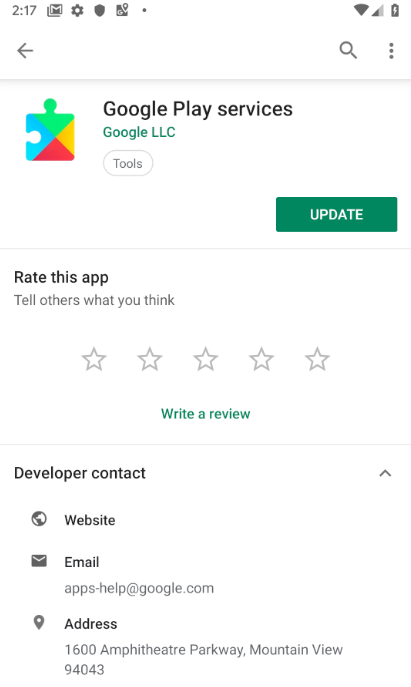
實際裝置操作說明:更新 Google Play 服務
如果您使用實際的 Android 裝置,請採取下列做法:
- 使用搜尋列的搜尋列搜尋及開啟 Google Play 服務。
- 按一下 [更多詳細資料]。
如果有,請按一下 [更新]。
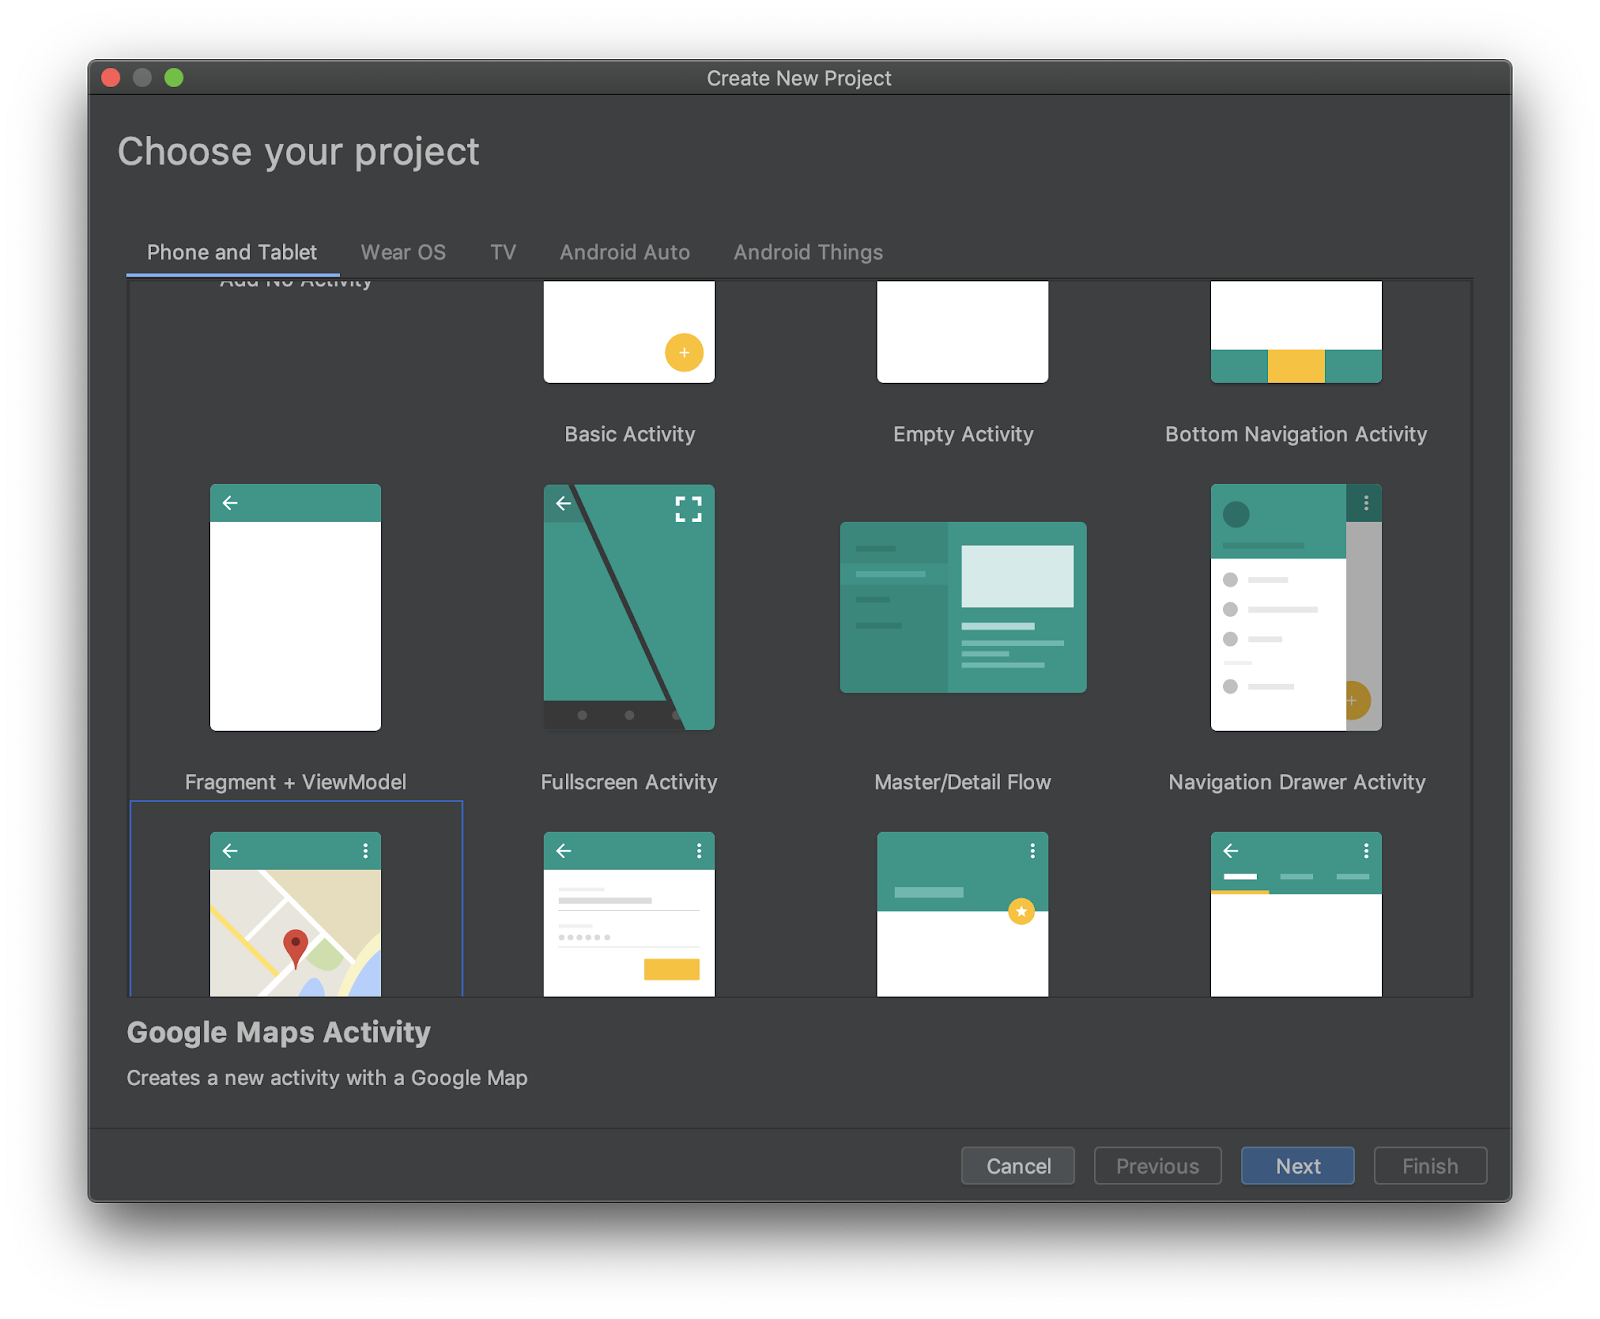
4. 建立包含 Google 地圖活動的應用程式殼層
- 在 Android Studio 歡迎畫面中,選取 [Start a new Android Studio project] (建立新的 Android Studio 專案)。
- 在「手機和平板電腦」分頁中,選取 [Google 地圖活動]。
「設定專案」對話方塊隨即開啟。您可以在這裡為應用程式命名,並根據您的網域建立套件。
以下是「目前所在地點」應用程式的設定,對應至 com.google.codelab.currentplace 套件。
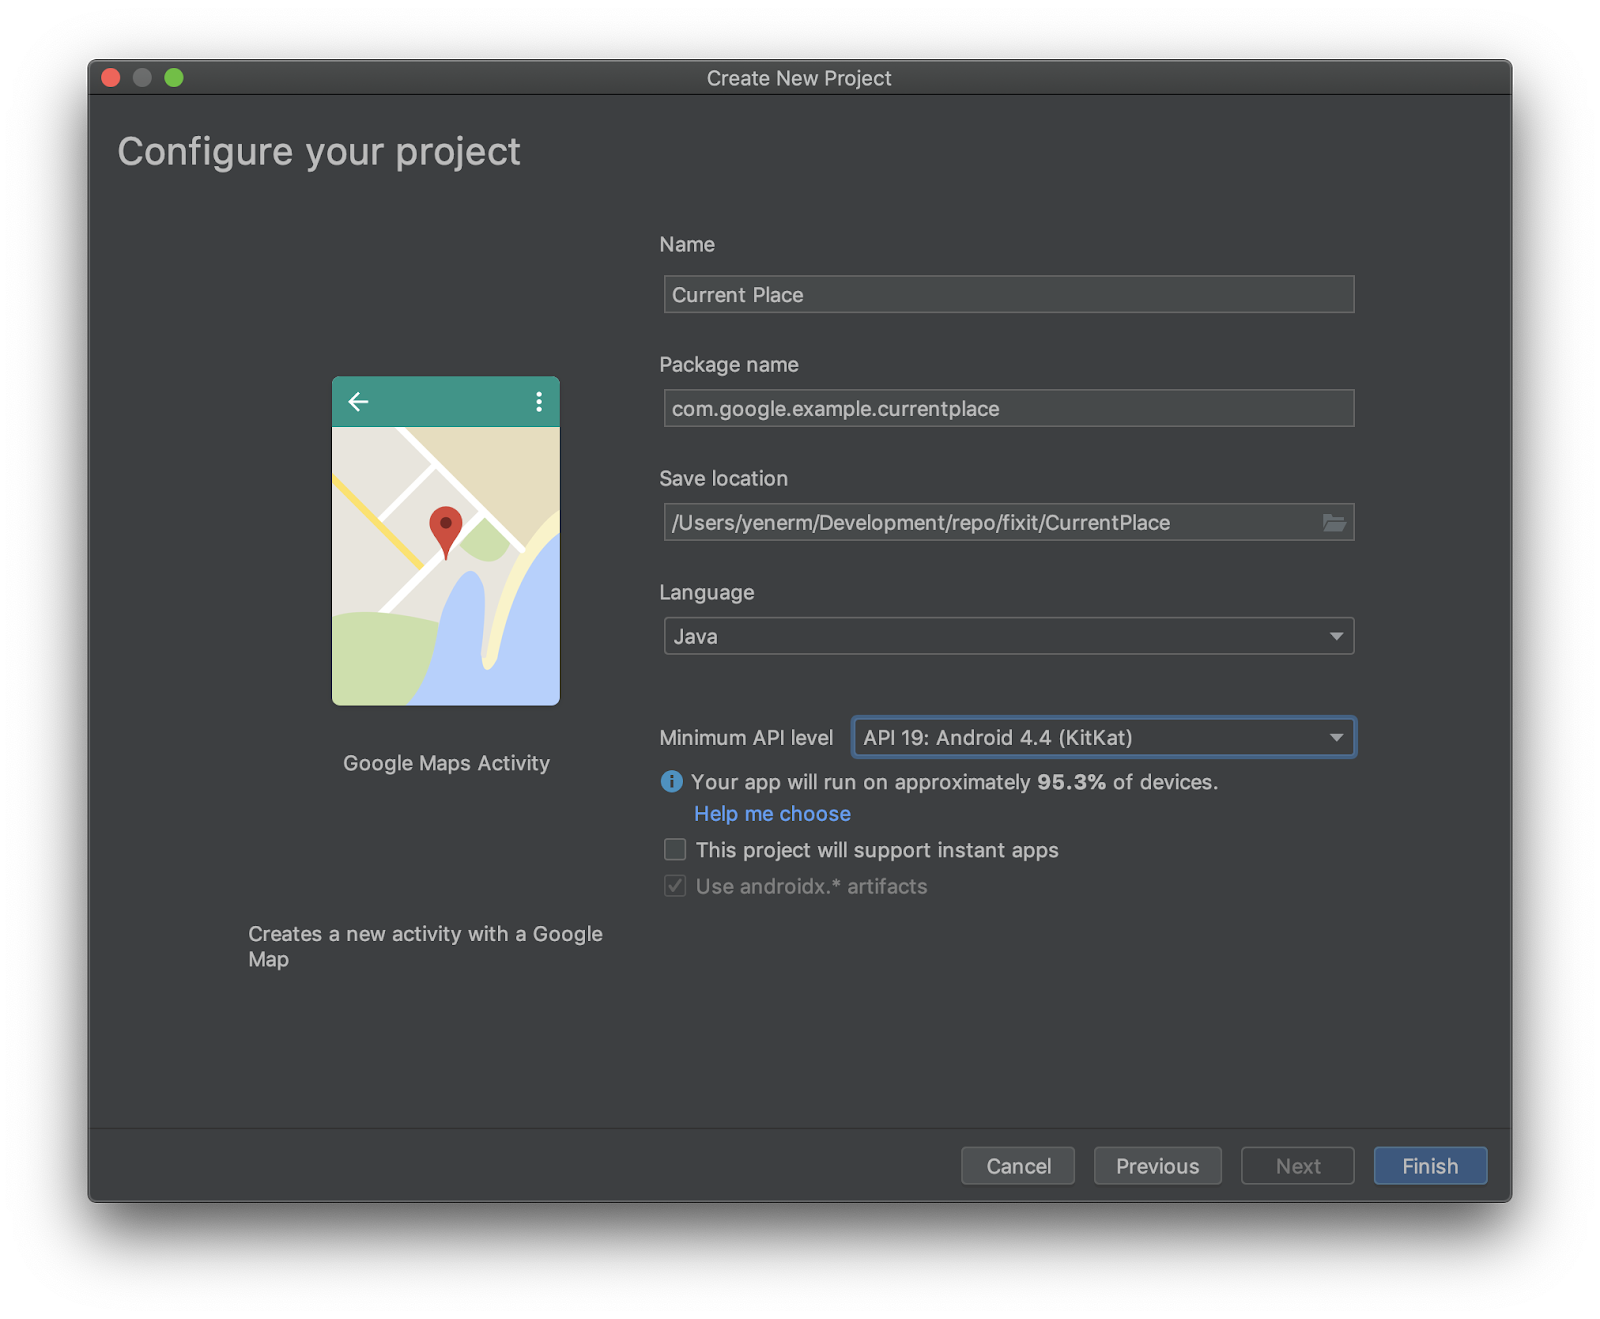
- 選擇 [Java] 做為語言,然後選取 [Use androidx.Artifact]*。
保留其餘設定的預設值。
- 按一下 [完成]。
5. 將 Google 服務依附元件新增至 Gradle 建構檔案
如要在 Android 應用程式中存取位置存取權,你必須透過 Google Play 服務使用 Google Location and Activity Recognition API。如要進一步瞭解如何新增這個 API 和其他 Google Play 服務 API,請參閱設定 Google Play 服務。
Android Studio 專案通常有兩個 build.gradle 檔案。一個是整體專案,另一個則是應用程式。如果您在「Android」檢視模式中使用 Android Studio Project Explorer,那麼「Gradle Scripts」資料夾內就會同時顯示這兩個專案。您必須編輯 build.gradle (Module: app) 檔案才能新增 Google 服務。
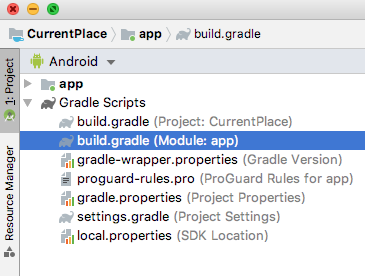
- 在「
dependencies」部分中加入兩行,即可新增位置的 Google 服務以及 Places API (範例程式碼中的背景資訊)。
build.gradle (模組:應用程式)
plugins {
  id 'com.android.application'
}

android {
    compileSdkVersion 28
    defaultConfig {
        applicationId "com.google.codelab.currentplace"
        minSdkVersion 19
        targetSdkVersion 28
        versionCode 1
        versionName "1.0"
        testInstrumentationRunner "androidx.test.runner.AndroidJUnitRunner"
    }
    buildTypes {
        release {
            minifyEnabled false
            proguardFiles getDefaultProguardFile('proguard-android-optimize.txt'), 'proguard-rules.pro'
        }
    }
}

dependencies {
    implementation fileTree(dir: 'libs', include: ['*.jar'])
    implementation 'androidx.appcompat:appcompat:1.0.2'
    implementation 'com.google.android.gms:play-services-maps:16.1.0'
    testImplementation 'junit:junit:4.12'
    androidTestImplementation 'androidx.test:runner:1.1.1'
    androidTestImplementation 'androidx.test.espresso:espresso-core:3.1.1'

    implementation 'com.google.android.gms:play-services-location:16.0.0'
    implementation 'com.google.android.libraries.places:places:1.1.0'
}
6. 啟用 Google 地圖平台 API 並取得 API 金鑰
您在以下啟用步驟中需要啟用 Maps SDK for Android 和 Places API。
設定 Google 地圖平台
如果您還沒有 Google Cloud Platform 帳戶和已啟用計費功能的專案,請參閱開始使用 Google 地圖平台指南,建立帳單帳戶和專案。
- 在 Cloud Console 中按一下專案下拉式選單,然後選取您要用於這個程式碼研究室的專案。

- 在 Google Cloud Marketplace 中啟用此程式碼研究室所需的 Google 地圖平台 API 和 SDK。詳細步驟請參閱這部影片或這份文件。
- 在 Cloud Console 的「憑證」頁面中產生 API 金鑰。你可以按照這部影片或這份說明文件中的步驟進行。傳送至 Google 地圖平台的所有要求都需要 API 金鑰。
複製您剛建立的 API 金鑰。切換回 Android Studio,然後在「Android」>「app」和「res」部分找到「google_maps_api.xml」檔案。
將 YOUR_KEY_HERE 替換成您複製的 API 金鑰。

您的應用程式現已設定完成。
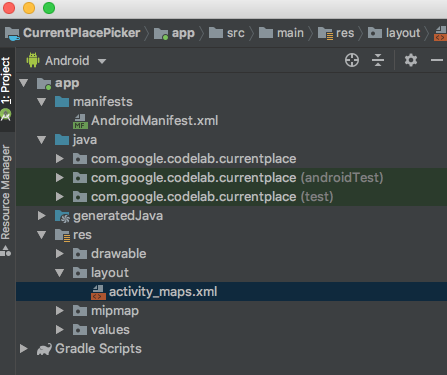
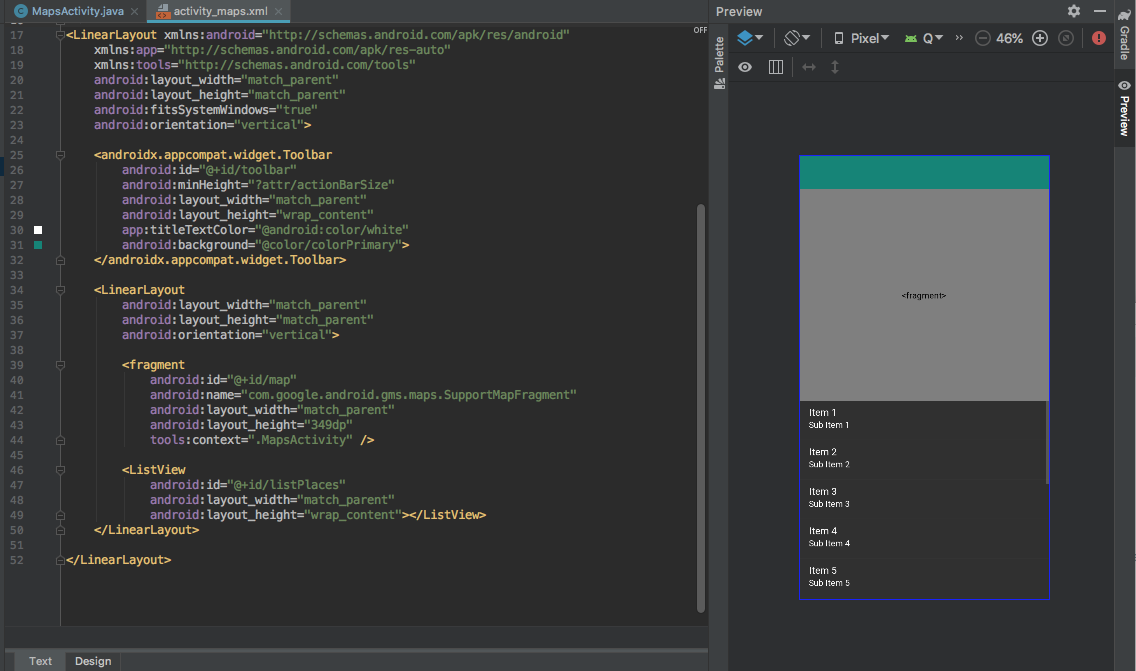
7. 編輯版面配置檔案
- 在專案多層檢視中,在 Android >
app>res>layout中開啟activity_maps.xml檔案。
- 畫面右側會開啟基本使用者介面,並利用底部的標籤選取版面配置設計或文字編輯器。選取 [文字],然後將版面配置檔案的所有內容替換為:
activity_maps.xml
<?xml version="1.0" encoding="utf-8"?>

<LinearLayout xmlns:android="http://schemas.android.com/apk/res/android"
    xmlns:app="http://schemas.android.com/apk/res-auto"
    xmlns:tools="http://schemas.android.com/tools"
    android:layout_width="match_parent"
    android:layout_height="match_parent"
    android:fitsSystemWindows="true"
    android:orientation="vertical">

    <androidx.appcompat.widget.Toolbar
        android:id="@+id/toolbar"
        android:minHeight="?attr/actionBarSize"
        android:layout_width="match_parent"
        android:layout_height="wrap_content"
        app:titleTextColor="@android:color/white"
        android:background="@color/colorPrimary" />

    <LinearLayout
        android:layout_width="match_parent"
        android:layout_height="match_parent"
        android:orientation="vertical">

        <fragment
            android:id="@+id/map"
            android:name="com.google.android.gms.maps.SupportMapFragment"
            android:layout_width="match_parent"
            android:layout_height="349dp"
            tools:context=".MapsActivity" />

        <ListView
            android:id="@+id/listPlaces"
            android:layout_width="match_parent"
            android:layout_height="wrap_content" />
    </LinearLayout>

</LinearLayout>
這樣就會看到使用者介面,如下所示:
8. 設定應用程式列
如要讓使用者在點選目前地點時點選按鈕,請新增應用程式圖示,在其中顯示使用者目前所在位置,並顯示附近可能的地點。介面外觀如下:

在手機上,系統只會顯示圖示。如果平板電腦空間較多,系統也會加入文字內容。
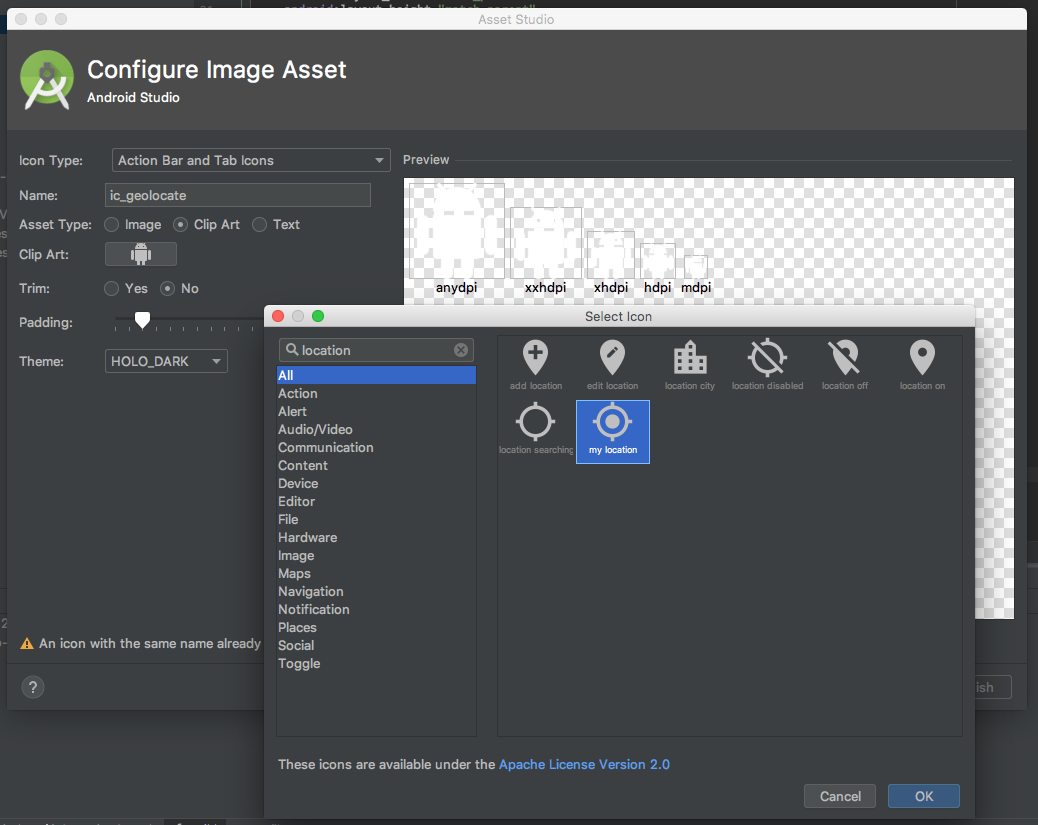
建立圖示
- 在專案多層檢視中,按一下 [Android] > [app],然後對 [res] 資料夾按一下滑鼠右鍵,然後選取 [New] > [g Asset]。
系統隨即會開啟「資產工作室」。
- 在「圖示類型」選單中,按一下 [動作列和 Tab 圖示]。
- 為您的素材資源命名:
ic_geolocate。 - 選取夾扣藝術做為資產類型**。**
- 按一下「插圖」旁的圖片。
系統隨即會開啟「選取圖示」視窗。
- 選擇一個圖示。
您可以使用搜尋列來尋找與意圖相關的圖示。
- 搜尋「
location」並選擇地點相關圖示。
當使用者將相機鏡頭對準目前所在位置時,「我的位置」圖示與 Google 地圖應用程式中的圖示相同。
- 按一下 [確定] > [下一步] & [完成],然後確認名為「
drawable」的新資料夾,其中含有您的新圖示檔案。
新增字串資源
- 在專案多層檢視中,按一下 [Android] > app > res > values,然後開啟
strings.xml檔案。 - 在
<string name="title_activity_maps">Map</string>之後加入下列幾行內容:
strings.xml
    <string name="action_geolocate">Pick Place</string>
    <string name="default_info_title">Default Location</string>
    <string name="default_info_snippet">No places found, because location permission is disabled.</string>
應用程式列的空白處會在圖示旁加上文字標籤,其他的則是用於您新增到地圖的標記。
現在,檔案中的程式碼如下所示:
<resources>
    <string name="app_name">Current Place</string>
    <string name="title_activity_maps">Map</string>
    <string name="action_geolocate">Pick Place</string>
    <string name="default_info_title">Default Location</string>
    <string name="default_info_snippet">No places found, because location permission is disabled.</string>
</resources>
新增應用程式列
- 在專案多層檢視中,依序按一下 [Android] > [app],接著在
res資料夾上按一下滑鼠右鍵,然後選取 [New] > [Directory] (目錄),在app/src/main/res下建立新的子目錄。 - 將目錄命名為
menu。 - 在
menu資料夾上按一下滑鼠右鍵,然後選取 [新增] > [檔案]。 - 命名檔案
menu.xml。 - 貼上以下程式碼:
menu.xml
<?xml version="1.0" encoding="utf-8"?>
<menu xmlns:android="http://schemas.android.com/apk/res/android"
    xmlns:app="http://schemas.android.com/apk/res-auto">

    <!-- "Locate me", should appear as action button if possible -->
    <item
        android:id="@+id/action_geolocate"
        android:icon="@drawable/ic_geolocate"
        android:title="@string/action_geolocate"
        app:showAsAction="always|withText" />

</menu>
更新應用程式列樣式
- 在專案總管中,展開 Android >
app>res>values,然後開啟styles.xml檔案。 - 在
<style>代碼中,將父項屬性修改為"Theme.AppCompat.NoActionBar"。 - 記下您在下一步使用的
name屬性。
styles.xml
<style name="AppTheme" parent="Theme.AppCompat.NoActionBar">
更新 AndroidManifest.xml 中的應用程式主題
- 點選 [Android] >
app>manifests,然後開啟AndroidManifest.xml檔案。 - 找到
android:theme行,然後編輯或確認值為@style/AppTheme。
AndroidManifest.xml
   <application
        android:allowBackup="true"
        android:icon="@mipmap/ic_launcher"
        android:label="@string/app_name"
        android:roundIcon="@mipmap/ic_launcher_round"
        android:supportsRtl="true"
        android:theme="@style/AppTheme">
您已經可以開始使用程式碼了!
9. 初始化應用程式
- 在專案多層檢視中,尋找
MapsActivity.java檔案。
這個編號會對應至您在步驟 1 為應用程式建立的套件。
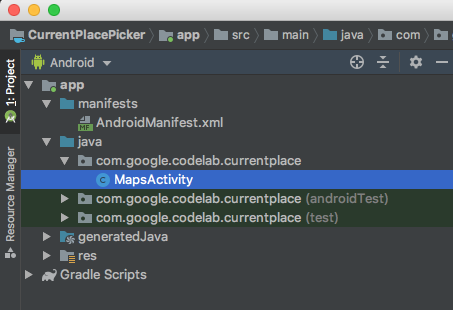
- 開啟檔案,然後進入 Java 程式碼編輯器中。
匯入 Places SDK 和其他依附元件
在 MapsActivity.java 頂端新增這一行,取代現有的匯入陳述式。
這些程式碼包含現有的匯入項目,以及這個程式碼研究室程式碼中的其他用途。
MapsActivity.java
import androidx.annotation.NonNull;
import androidx.appcompat.app.AppCompatActivity;
import androidx.appcompat.widget.Toolbar;
import androidx.core.app.ActivityCompat;
import androidx.core.content.ContextCompat;

import android.content.pm.PackageManager;
import android.location.Location;
import android.os.Bundle;
import android.text.TextUtils;
import android.util.Log;
import android.view.Menu;
import android.view.MenuItem;
import android.view.View;
import android.widget.AdapterView;
import android.widget.ArrayAdapter;
import android.widget.ListView;

import com.google.android.gms.common.api.ApiException;
import com.google.android.gms.location.FusedLocationProviderClient;
import com.google.android.gms.location.LocationServices;
import com.google.android.gms.maps.CameraUpdateFactory;
import com.google.android.gms.maps.GoogleMap;
import com.google.android.gms.maps.OnMapReadyCallback;
import com.google.android.gms.maps.SupportMapFragment;
import com.google.android.gms.maps.model.LatLng;
import com.google.android.gms.maps.model.MarkerOptions;

import com.google.android.gms.tasks.OnCompleteListener;
import com.google.android.gms.tasks.OnSuccessListener;
import com.google.android.gms.tasks.Task;
import com.google.android.libraries.places.api.Places;
import com.google.android.libraries.places.api.model.Place;
import com.google.android.libraries.places.api.model.PlaceLikelihood;
import com.google.android.libraries.places.api.net.FindCurrentPlaceRequest;
import com.google.android.libraries.places.api.net.FindCurrentPlaceResponse;
import com.google.android.libraries.places.api.net.PlacesClient;

import java.util.Arrays;
import java.util.List;
更新課程簽名
Places API 會使用 AndroidX 元件提供回溯相容性,因此您必須定義該元件才能擴充 AppCompatActivity。系統會取代地圖活動預設定義的 FragmentActivity 擴充功能。
public class MapsActivity extends AppCompatActivity implements OnMapReadyCallback {
新增類別變數
接著,宣告各類別方法中使用的各種類別變數。包括 UI 元素和狀態碼。這些變數應略低於 GoogleMap mMap 的變數宣告。
    // New variables for Current Place picker
    private static final String TAG = "MapsActivity";
    ListView lstPlaces;
    private PlacesClient mPlacesClient;
    private FusedLocationProviderClient mFusedLocationProviderClient;

    // The geographical location where the device is currently located. That is, the last-known
    // location retrieved by the Fused Location Provider.
    private Location mLastKnownLocation;

    // A default location (Sydney, Australia) and default zoom to use when location permission is
    // not granted.
    private final LatLng mDefaultLocation = new LatLng(-33.8523341, 151.2106085);
    private static final int DEFAULT_ZOOM = 15;
    private static final int PERMISSIONS_REQUEST_ACCESS_FINE_LOCATION = 1;
    private boolean mLocationPermissionGranted;

    // Used for selecting the Current Place.
    private static final int M_MAX_ENTRIES = 5;
    private String[] mLikelyPlaceNames;
    private String[] mLikelyPlaceAddresses;
    private String[] mLikelyPlaceAttributions;
    private LatLng[] mLikelyPlaceLatLngs;
更新 onCreate 方法
您必須更新 onCreate 方法,以處理定位服務的執行階段使用者權限、設定 UI 元素以及建立 Places API 用戶端。
在現有 onCreate() 方法的結尾,加入以下各行程式碼、資料檢視設定和 Places 用戶端程式碼。
MapsActivity.java onCreate()
   @Override
    protected void onCreate(Bundle savedInstanceState) {
        super.onCreate(savedInstanceState);
        setContentView(R.layout.activity_maps);
        // Obtain the SupportMapFragment and get notified when the map is ready to be used.
        SupportMapFragment mapFragment = (SupportMapFragment) getSupportFragmentManager()
                .findFragmentById(R.id.map);
        mapFragment.getMapAsync(this);

        //
        // PASTE THE LINES BELOW THIS COMMENT
        //

        // Set up the action toolbar
        Toolbar toolbar = (Toolbar) findViewById(R.id.toolbar);
        setSupportActionBar(toolbar);

        // Set up the views
        lstPlaces = (ListView) findViewById(R.id.listPlaces);

        // Initialize the Places client
        String apiKey = getString(R.string.google_maps_key);
        Places.initialize(getApplicationContext(), apiKey);
        mPlacesClient = Places.createClient(this);
        mFusedLocationProviderClient = LocationServices.getFusedLocationProviderClient(this);
    }
新增應用程式列選單的程式碼
這兩個方法會新增應用程式列選單 (包含單一項目、「挑選地點」圖示),並處理使用者的圖示。
在 onCreate 方法之後,將這兩個方法複製到您的檔案中。
MapsActivity.java onCreateOptionsMenu() 和 onOptionsItemSelected()
    @Override
    public boolean onCreateOptionsMenu(Menu menu) {
        getMenuInflater().inflate(R.menu.menu, menu);

        return super.onCreateOptionsMenu(menu);
    }

    @Override
    public boolean onOptionsItemSelected(MenuItem item) {
        switch (item.getItemId()) {
           case R.id.action_geolocate:

                // COMMENTED OUT UNTIL WE DEFINE THE METHOD
                // Present the current place picker
                // pickCurrentPlace();
                return true;

            default:
                // If we got here, the user's action was not recognized.
                // Invoke the superclass to handle it.
                return super.onOptionsItemSelected(item);

        }
    }
測試
- 在 Android Studio 中,按一下 [Run] 或 [Run 選單 > Run ‘app']。
- 系統要求您選取部署目標。執行中的模擬器會顯示在這份清單中。選取應用程式後,Android Studio 會為您將應用程式部署至模擬器。
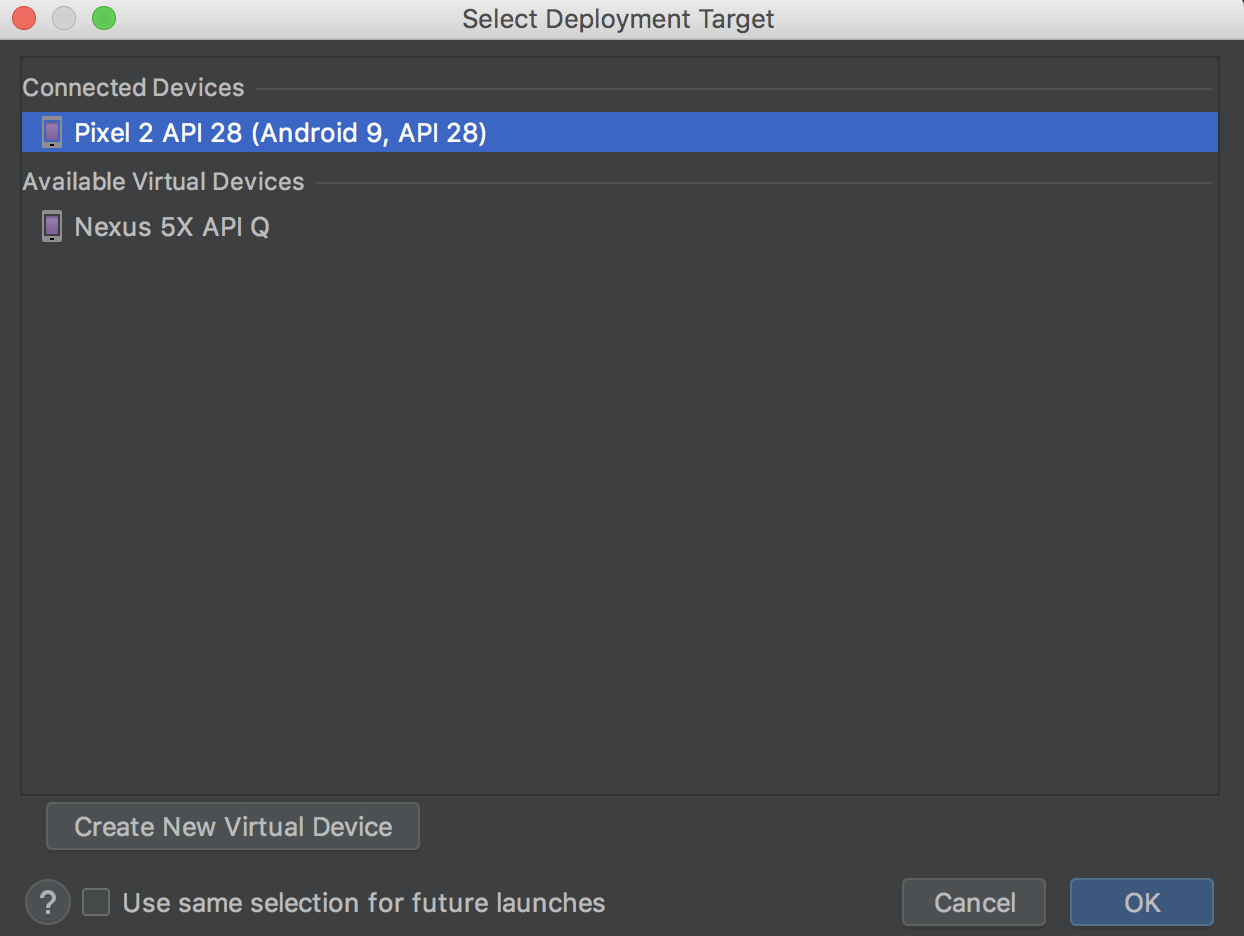
應用程式會在幾分鐘後啟動。您將看到地圖以澳洲雪梨為中心,其中有一個按鈕和未填入的地點清單。
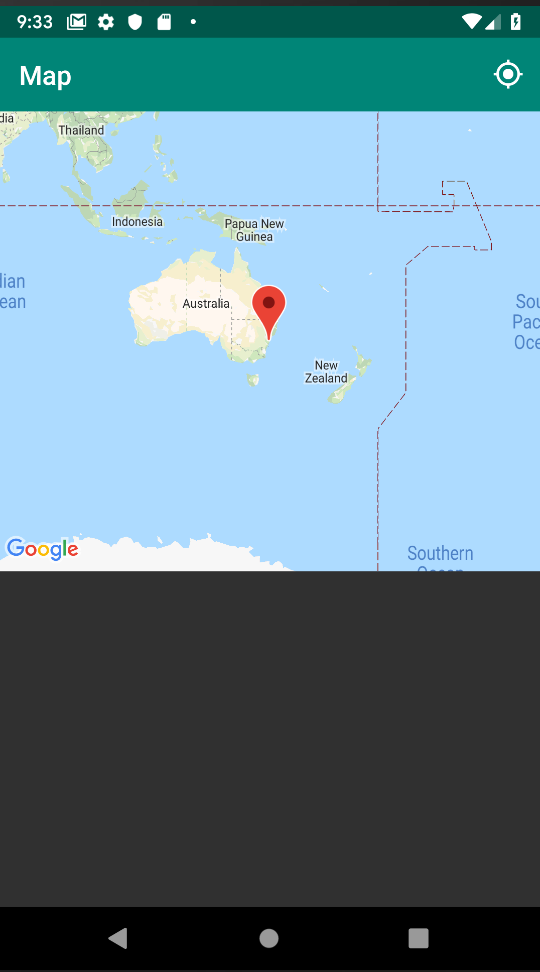
除非您要求存取裝置位置,否則地圖焦點不會移至使用者的位置。
10. 要求及處理位置存取權
地圖準備就緒後,要求取得位置存取權
- 定義稱為
getLocationPermission的方法來要求使用者權限。
請將這段程式碼貼到您剛建立的 onOptionsSelected 方法下方。
MapsActivity.java getLocationPermission()
    private void getLocationPermission() {
        /*
         * Request location permission, so that we can get the location of the
         * device. The result of the permission request is handled by a callback,
         * onRequestPermissionsResult.
         */
        mLocationPermissionGranted = false;
        if (ContextCompat.checkSelfPermission(this.getApplicationContext(),
                android.Manifest.permission.ACCESS_FINE_LOCATION)
                == PackageManager.PERMISSION_GRANTED) {
            mLocationPermissionGranted = true;
        } else {
            ActivityCompat.requestPermissions(this,
                    new String[]{android.Manifest.permission.ACCESS_FINE_LOCATION},
                    PERMISSIONS_REQUEST_ACCESS_FINE_LOCATION);
        }
    }
- 在現有
onMapReady方法的結尾加上兩行即可啟用縮放控制項,並要求使用者位置存取權。
MapsActivity.java onMapReady()
   @Override
    public void onMapReady(GoogleMap googleMap) {
        mMap = googleMap;

        // Add a marker in Sydney and move the camera
        LatLng sydney = new LatLng(-34, 151);
        mMap.addMarker(new MarkerOptions().position(sydney).title("Marker in Sydney"));
        mMap.moveCamera(CameraUpdateFactory.newLatLng(sydney));

        //
        // PASTE THE LINES BELOW THIS COMMENT
        //

        // Enable the zoom controls for the map
        mMap.getUiSettings().setZoomControlsEnabled(true);

        // Prompt the user for permission.
        getLocationPermission();

    }
處理要求權限的結果
當使用者回應要求權限對話方塊時,Android 會呼叫這個回呼。
在 getLocationPermission() 方法後方貼上這段程式碼:
MapsActivity.java onRequestPermissionsResult()
   /**
     * Handles the result of the request for location permissions
     */
    @Override
    public void onRequestPermissionsResult(int requestCode,
                                           @NonNull String permissions[],
                                           @NonNull int[] grantResults) {
        mLocationPermissionGranted = false;
        switch (requestCode) {
            case PERMISSIONS_REQUEST_ACCESS_FINE_LOCATION: {
                // If request is cancelled, the result arrays are empty.
                if (grantResults.length > 0
                        && grantResults[0] == PackageManager.PERMISSION_GRANTED) {
                    mLocationPermissionGranted = true;
                }
            }
        }
    }
11. 取得目前位置並擷取可能地點
使用者在應用程式列中按一下 [選擇地點] 時,應用程式會呼叫 pickCurrentPlace() 方法,該方法會呼叫您先前定義的 getDeviceLocation() 方法。在擷取最新裝置位置後,getDeviceLocation 方法會呼叫另一種方法 (getCurrentPlaceLikelihoods,)。
呼叫 FindCurrentPlace API 並處理回應
getCurrentPlaceLikelihoods 會建構 findCurrentPlaceRequest 並呼叫 Places API findCurrentPlace 工作。假如工作成功,系統會傳回 findCurrentPlaceResponse,其中包含 placeLikelihood 物件清單。每個屬性都具有多個屬性,包括地點的名稱和地址,以及您在該地點的可能性 (機率為 0 到 1)。這個方法會從 placeLikelihoods 建構地點詳細資料清單,以回應回應。
此程式碼會反覆執行最多五個可能的位置,並將可能低於 0 的位置加入清單,再進行轉譯。如果想要顯示多於 5 個,請編輯 M_MAX_ENTRIES 常數。
請將這段程式碼貼到 onMapReady 方法的後方。
MapsActivity.java getCurrentPlacelikelihoods()
   private void getCurrentPlaceLikelihoods() {
        // Use fields to define the data types to return.
        List<Place.Field> placeFields = Arrays.asList(Place.Field.NAME, Place.Field.ADDRESS,
                Place.Field.LAT_LNG);

        // Get the likely places - that is, the businesses and other points of interest that
        // are the best match for the device's current location.
        @SuppressWarnings("MissingPermission") final FindCurrentPlaceRequest request =
                FindCurrentPlaceRequest.builder(placeFields).build();
        Task<FindCurrentPlaceResponse> placeResponse = mPlacesClient.findCurrentPlace(request);
        placeResponse.addOnCompleteListener(this,
                new OnCompleteListener<FindCurrentPlaceResponse>() {
                    @Override
                    public void onComplete(@NonNull Task<FindCurrentPlaceResponse> task) {
                        if (task.isSuccessful()) {
                            FindCurrentPlaceResponse response = task.getResult();
                            // Set the count, handling cases where less than 5 entries are returned.
                            int count;
                            if (response.getPlaceLikelihoods().size() < M_MAX_ENTRIES) {
                                count = response.getPlaceLikelihoods().size();
                            } else {
                                count = M_MAX_ENTRIES;
                            }

                            int i = 0;
                            mLikelyPlaceNames = new String[count];
                            mLikelyPlaceAddresses = new String[count];
                            mLikelyPlaceAttributions = new String[count];
                            mLikelyPlaceLatLngs = new LatLng[count];

                            for (PlaceLikelihood placeLikelihood : response.getPlaceLikelihoods()) {
                                Place currPlace = placeLikelihood.getPlace();
                                mLikelyPlaceNames[i] = currPlace.getName();
                                mLikelyPlaceAddresses[i] = currPlace.getAddress();
                                mLikelyPlaceAttributions[i] = (currPlace.getAttributions() == null) ?
                                        null : TextUtils.join(" ", currPlace.getAttributions());
                                mLikelyPlaceLatLngs[i] = currPlace.getLatLng();

                                String currLatLng = (mLikelyPlaceLatLngs[i] == null) ?
                                        "" : mLikelyPlaceLatLngs[i].toString();

                                Log.i(TAG, String.format("Place " + currPlace.getName()
                                        + " has likelihood: " + placeLikelihood.getLikelihood()
                                        + " at " + currLatLng));

                                i++;
                                if (i > (count - 1)) {
                                    break;
                                }
                            }


                            // COMMENTED OUT UNTIL WE DEFINE THE METHOD
                            // Populate the ListView
                            // fillPlacesList();
                        } else {
                            Exception exception = task.getException();
                            if (exception instanceof ApiException) {
                                ApiException apiException = (ApiException) exception;
                                Log.e(TAG, "Place not found: " + apiException.getStatusCode());
                            }
                        }
                    }
                });
    }
將地圖相機移至裝置目前的位置
如果使用者授予權限,應用程式就會擷取使用者的最新位置資訊,並將相機移至該位置的中心位置。
如果使用者拒絕授權,應用程式只會將相機移至本頁開頭的常數中,定義為預設位置的位置 (範例程式碼中的澳洲是雪梨)。
在 getPlaceLikelihoods() 方法後方貼上這段程式碼:
MapsActivity.java getDeviceLocation()
    private void getDeviceLocation() {
        /*
         * Get the best and most recent location of the device, which may be null in rare
         * cases when a location is not available.
         */
        try {
            if (mLocationPermissionGranted) {
                Task<Location> locationResult = mFusedLocationProviderClient.getLastLocation();
                locationResult.addOnCompleteListener(this, new OnCompleteListener<Location>() {
                    @Override
                    public void onComplete(@NonNull Task<Location> task) {
                        if (task.isSuccessful()) {
                            // Set the map's camera position to the current location of the device.
                            mLastKnownLocation = task.getResult();
                            Log.d(TAG, "Latitude: " + mLastKnownLocation.getLatitude());
                            Log.d(TAG, "Longitude: " + mLastKnownLocation.getLongitude());
                            mMap.moveCamera(CameraUpdateFactory.newLatLngZoom(
                                    new LatLng(mLastKnownLocation.getLatitude(),
                                            mLastKnownLocation.getLongitude()), DEFAULT_ZOOM));
                        } else {
                            Log.d(TAG, "Current location is null. Using defaults.");
                            Log.e(TAG, "Exception: %s", task.getException());
                            mMap.moveCamera(CameraUpdateFactory
                                    .newLatLngZoom(mDefaultLocation, DEFAULT_ZOOM));
                        }

                       getCurrentPlaceLikelihoods();
                    }
                });
            }
        } catch (SecurityException e)  {
            Log.e("Exception: %s", e.getMessage());
        }
    }
檢查使用者點擊「挑選地點」時的位置存取權
當使用者輕觸 [選擇地點] 時,這個方法會檢查位置存取權,並提示使用者尚未授予相關權限。
如果使用者已取得授權,該方法會呼叫 getDeviceLocation,以啟動取得目前可能地點的程序。
- 在
getDeviceLocation()之後新增這個方法:
MapsActivity.java PickCurrentPlace()
   private void pickCurrentPlace() {
        if (mMap == null) {
            return;
        }

        if (mLocationPermissionGranted) {
            getDeviceLocation();
        } else {
            // The user has not granted permission.
            Log.i(TAG, "The user did not grant location permission.");

            // Add a default marker, because the user hasn't selected a place.
            mMap.addMarker(new MarkerOptions()
                    .title(getString(R.string.default_info_title))
                    .position(mDefaultLocation)
                    .snippet(getString(R.string.default_info_snippet)));

            // Prompt the user for permission.
            getLocationPermission();
        }
    }
pickCurrentPlace現已定義完成,請在onOptionsItemSelected()中找出呼叫pickCurrentPlace的行,然後取消註解。
MapsActivity.java onOptionItemSelected()
           case R.id.action_geolocate:

                // COMMENTED OUT UNTIL WE DEFINE THE METHOD
                // Present the Current Place picker
                pickCurrentPlace();
                return true;
測試
如果現在執行應用程式並輕觸 [選擇地點],系統應會提示你授予位置存取權。
- 如果您授予權限,系統就會儲存這項偏好設定,並且不會提示您。拒絕權限後,系統會在您下次輕觸按鈕時提示您進行這項操作。
- 雖然
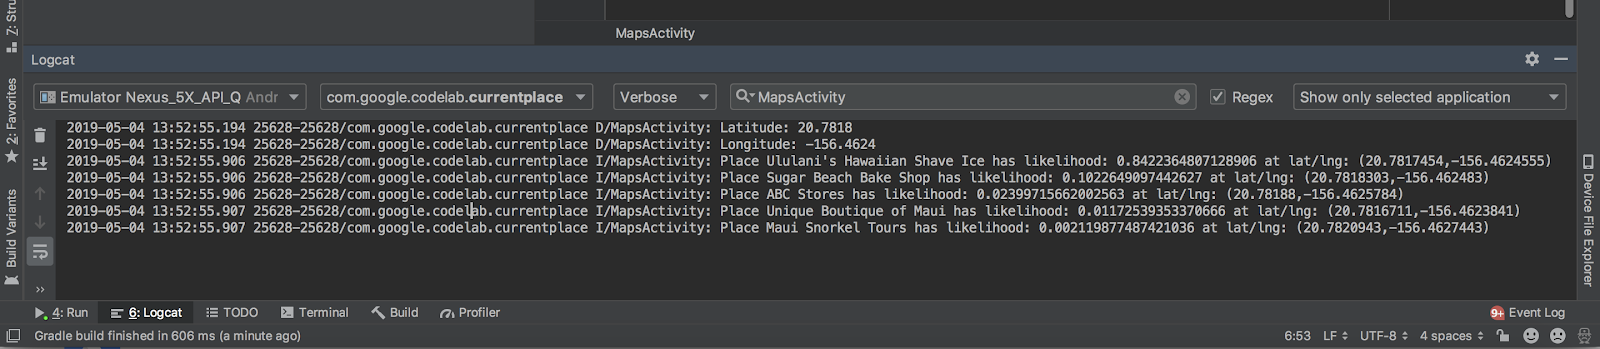
getPlaceLikelihoods已擷取到目前可能的位置,但ListView尚未顯示這些地點。在 Android Studio 中,您可以按一下 [⌘6] 查看 Logcat 紀錄中是否有標示為 MapsActivity 的紀錄,確認新方法是否正常運作。 - 如果您授予權限,記錄中會包含「
Latitude:」的對帳單和「Longitude:」的陳述式 (顯示裝置偵測到的位置)。如果您先前使用「Google 地圖」和模擬器的展開選單指定模擬器的位置,這些陳述式會顯示該位置。 - 如果呼叫
findCurrentPlace成功,記錄中會包含 5 份陳述式,其中列出五個最可能地點的名稱和位置。
12. 填入目前地點挑選器
為選取的地點設定處理常式
我們假設使用者在點擊 ListView 中的項目時,想要達成什麼目標。如要確認使用者目前的所在位置,你可以為該地點新增地圖標記。如果使用者按一下該標記,畫面上會出現彈出式視窗,顯示地點名稱和地址。
在 pickCurrentPlace 方法後方貼上這個點擊處理常式。
MapsActivity.java listClickedHandler
    private AdapterView.OnItemClickListener listClickedHandler = new AdapterView.OnItemClickListener() {
        public void onItemClick(AdapterView parent, View v, int position, long id) {
            // position will give us the index of which place was selected in the array
            LatLng markerLatLng = mLikelyPlaceLatLngs[position];
            String markerSnippet = mLikelyPlaceAddresses[position];
            if (mLikelyPlaceAttributions[position] != null) {
                markerSnippet = markerSnippet + "\n" + mLikelyPlaceAttributions[position];
            }

            // Add a marker for the selected place, with an info window
            // showing information about that place.
            mMap.addMarker(new MarkerOptions()
                    .title(mLikelyPlaceNames[position])
                    .position(markerLatLng)
                    .snippet(markerSnippet));

           // Position the map's camera at the location of the marker.
            mMap.moveCamera(CameraUpdateFactory.newLatLng(markerLatLng));
        }
    };
填入 ListView
建立使用者目前可能造訪的地點清單後,您就能透過 ListView 向使用者顯示這些選項。您也可以將 ListView 點擊接聽器設定為使用您剛剛定義的點擊處理常式。
將這種方法貼到點擊處理常式之後:
MapsActivity.javafillPlacesList()
    private void fillPlacesList() {
        // Set up an ArrayAdapter to convert likely places into TextViews to populate the ListView
        ArrayAdapter<String> placesAdapter =
                new ArrayAdapter<String>(this, android.R.layout.simple_list_item_1, mLikelyPlaceNames);
        lstPlaces.setAdapter(placesAdapter);
        lstPlaces.setOnItemClickListener(listClickedHandler);
    }
fillPlacesList 定義完成之後,請在 findPlaceLikelihoods 的結尾找到會呼叫 fillPlacesList 的那行,然後取消註解。
MapsActivity.javafillPlaceLikelihoods()
               // COMMENTED OUT UNTIL WE DEFINE THE METHOD
                // Populate the ListView
                fillPlacesList();
這是目前地點挑選器所需的所有程式碼!
13. 執行應用程式
測試挑選地點
- 再次執行應用程式。
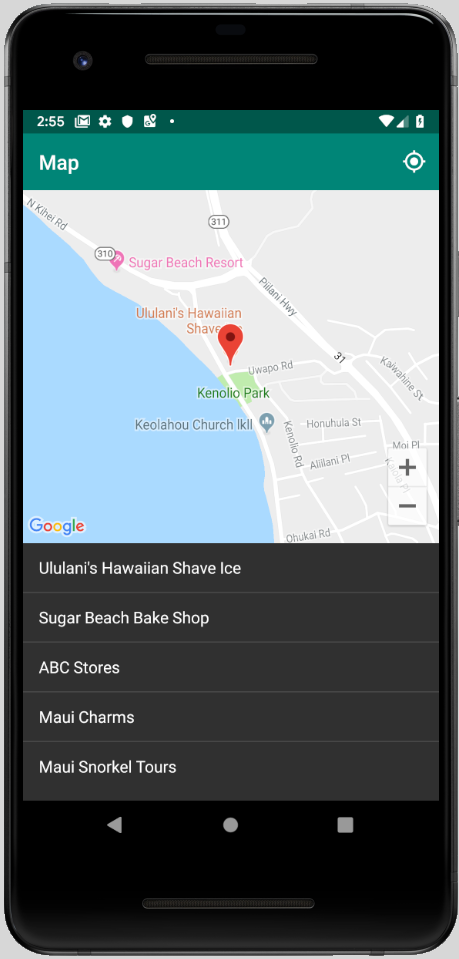
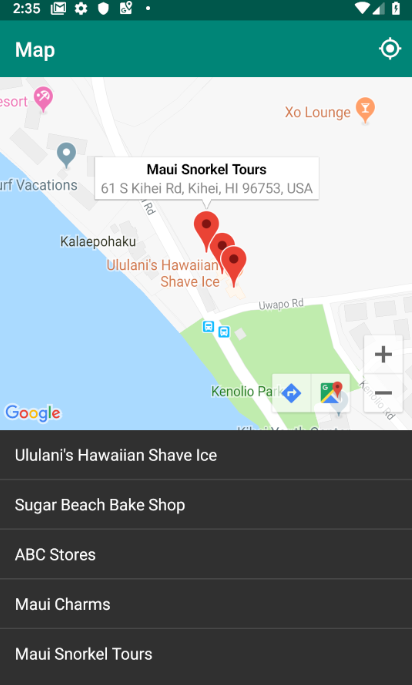
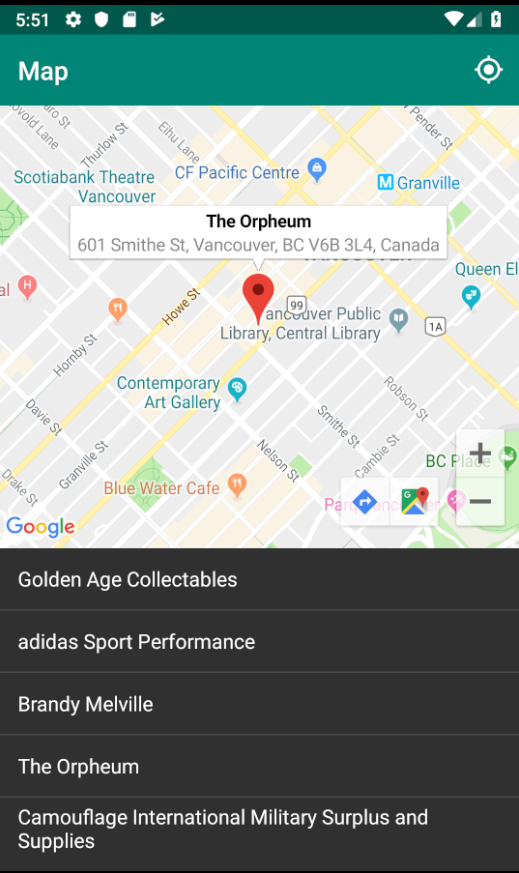
這次輕觸 [選擇地點] 時,應用程式會在清單中列出已命名的地點附近已命名的地點。鄰近茂宜市的位置就在附近,例如烏魯蘭人夏威夷冰淇淋和糖海灘烘焙坊等。由於好幾個地點非常接近位置座標,因此會列出您可能去過的地點。
- 按一下
ListView中的地點名稱。
您應該會在地圖上新增標記。
- 輕觸標記。
即可看到 Place Details。

測試其他位置
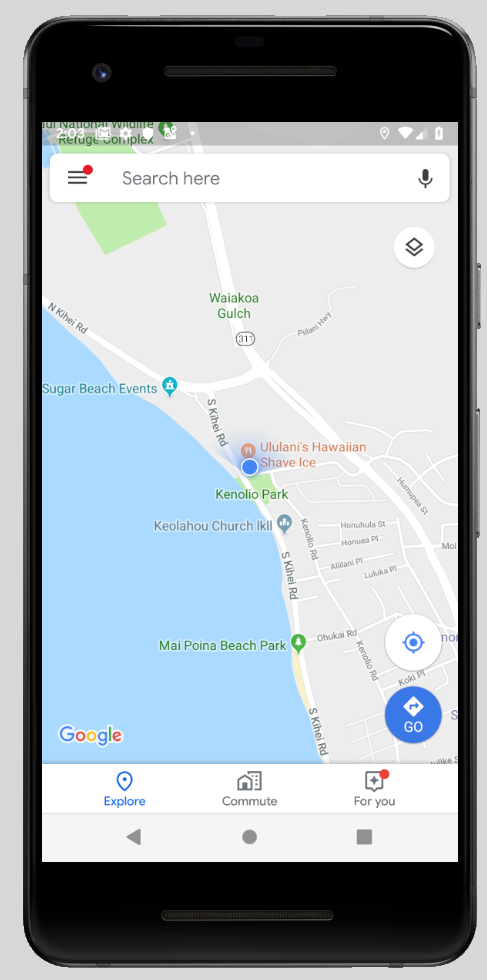
如果您想變更位置,且正在使用模擬器,當您更新模擬器的延伸選單中的位置座標時,裝置的位置並不會自動更新。
如要解決這個問題,請按照下列步驟使用原生的 Google 地圖應用程式,強制更新模擬器位置:
- 開啟 Google 地圖。
- 輕觸 [...] > [位置],將緯度和經度改成新座標,然後輕觸 [傳送]。
- 例如,您可以使用緯度:49.2768 和經度 -123.1142 將位置設定為加拿大溫哥華市中心。
- 確認 Google 地圖最近已更新到新座標。在 Google 地圖應用程式中,您可能需要輕觸 [我的位置] 按鈕,才能提出更新要求。
- 返回您的「目前地點」應用程式,然後輕觸 [選擇地點],在新座標上取得地圖,並查看新的可能位置清單。
這樣就完成了!您開發了一個簡單好用的應用程式,能夠檢查目前位置的地點,並讓您有機會判斷自己所在的地點。歡迎多加利用!
現在,執行您執行的應用程式並修改其內容,完成此額外步驟!
14. 後續步驟
為避免 API 金鑰遭竊,您必須妥善保護金鑰,確保只有您的 Android 應用程式可以使用這組金鑰。如未設定限制,任何擁有金鑰的人都能利用該金鑰呼叫 Google Maps Platform API,並向您收取相關費用。
取得 SHA-1 憑證
稍後當您限制 API 金鑰時,將需要使用這個金鑰。以下是取得偵錯憑證的一系列操作說明。
如果是 Linux 或 macOS,請開啟終端機視窗並輸入以下指令:
keytool -list -v -keystore ~/.android/debug.keystore -alias androiddebugkey -storepass android -keypass android
如果是 Windows Vista 或 Windows 7,請執行下列指令:
keytool -list -v -keystore "%USERPROFILE%\.android\debug.keystore" -alias androiddebugkey -storepass android -keypass android
畫面會顯示與以下內容類似的輸出結果:
Alias name: androiddebugkey
Creation date: Jan 01, 2013
Entry type: PrivateKeyEntry
Certificate chain length: 1
Certificate[1]:
Owner: CN=Android Debug, O=Android, C=US
Issuer: CN=Android Debug, O=Android, C=US
Serial number: 4aa9b300
Valid from: Mon Jan 01 08:04:04 UTC 2013 until: Mon Jan 01 18:04:04 PST 2033
Certificate fingerprints:
     MD5:  AE:9F:95:D0:A6:86:89:BC:A8:70:BA:34:FF:6A:AC:F9
     SHA1: BB:0D:AC:74:D3:21:E1:43:07:71:9B:62:90:AF:A1:66:6E:44:5D:75
     Signature algorithm name: SHA1withRSA
     Version: 3
起始 SHA1 的行包含憑證的 SHA-1 指紋。指紋為一系列 20 個雙位十六進位制數碼,以冒號分隔。
當您準備好要發布應用程式時,請按照這份說明文件中的操作說明取得發行憑證。
新增 API 金鑰限制
- 在 Cloud Console 中,前往「APIs & Services」>「Credentials」。
您用於這個應用程式的金鑰應列在「API 金鑰」之下。
- 按一下 [
 ] 即可編輯按鍵設定。
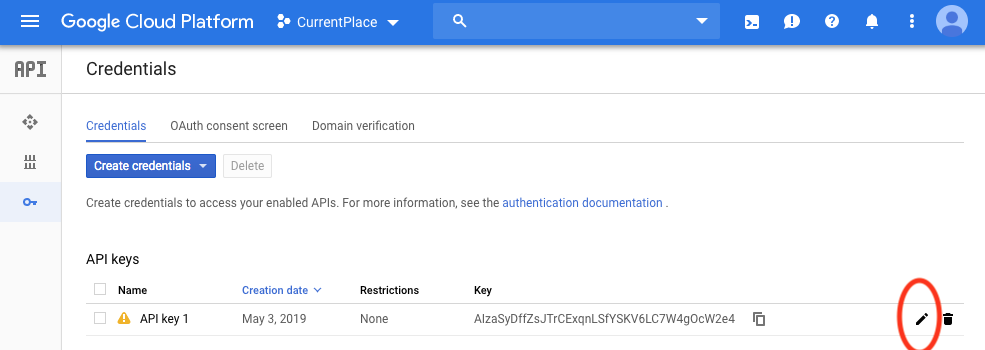
- 在「API 金鑰」頁面的 [金鑰限制] 下方,按照下列步驟設定應用程式限制:
- 選取 [Android 應用程式] 並按照指示操作。
- 按一下 [新增項目]。
- 輸入您的套件名稱和 SHA-1 憑證指紋 (擷取於上一節)。
例如:
com.google.codelab.currentplace
BB:0D:AC:74:D3:21:E1:43:07:71:9B:62:90:AF:A1:66:6E:44:5D:75s
- 如要進一步保護,請執行下列 API 限制。
- 使用 API 限制之後,選擇 [限制金鑰]。
- 選取 Maps SDK for Android 和 Places API。
- 依序按一下 [完成] 和 [儲存]。
15. 恭喜
您建構了一個簡單好用的應用程式,會檢查目前位置中最有可能獲得的地點,並為地圖使用者選擇的地點在地圖上新增標記。
瞭解詳情
- 如要加快開發速度,請使用 Maps SDK for Android 公用程式庫。這些公用程式針對在 Google 地圖平台執行的部分應用程式進行了大量操作。
- 如需示範 Google Maps SDK for Android 大部分功能的程式碼範例,請複製 Maps SDK for Android 範例和 Places SDK for Android 示範。
- 要瞭解如何在 Android Q 中處理第三方位置存取權,請完成透過 Kotlin 接收 Android 的位置資訊更新程式碼研究室。