

1. 简介
Material Components (MDC) 有助于开发者实现 Material Design。MDC 是由一组 Google 工程师和用户体验设计人员倾心打造的,提供数十种精美实用的界面组件,可用于 Android、iOS、Web 和 Flutter.material.io/develop |
Android Material 组件 (MDC Android) 并非需要您在应用中进行范式转变的新系统或框架。MDC Android 基于您在 Android 中已知的相同类和 API 构建,例如 AppCompat 按钮和文本字段。您可以根据需要使用 MDC Android 提供的组件,并立即改进现有应用的设计。
构建内容
在此 Codelab 中,您将使用 MDC 提供的新组件替换表单中的一些现有组件。
本 Codelab 中用到的 MDC-Android 组件
- 文本字段
- 按钮
- 菜单
所需条件
- 已掌握 Android 开发方面的基础知识
- Android Studio(如果尚未安装,请在此处下载)
- Android 模拟器或设备(可通过 Android Studio 获取)
- 示例代码(参见下一步)
您如何评价自己在构建 Android 应用方面的经验水平?
2. 设置您的开发环境
下载起始 Codelab 应用
起始应用位于 material-components-android-codelabs-111-starter/java 目录中。请务必先通过 cd 命令转到该目录,然后再开始操作。
…或从 GitHub 克隆
如需从 GitHub 克隆此 Codelab,请运行以下命令:
git clone https://github.com/material-components/material-components-android-codelabs
cd material-components-android-codelabs/
git checkout 111-starter
在 Android Studio 中加载起始代码
- 在设置向导已完成且系统显示 Welcome to Android Studio 窗口后,点击 Open an existing Android Studio project。转到您安装示例代码的目录,然后依次选择 java -> shipping(或在计算机上搜索 shipping),以打开 Shipping 项目。
- 等待 Android Studio 构建和同步项目,如 Android Studio 窗口底部的 activity 指示器所示。
- 此时,由于缺少 Android SDK 或构建工具,因此 Android Studio 可能会显示一些构建错误(如下所示)。按照 Android Studio 中的说明安装/更新这些内容,并同步您的项目。

导入 MDC-Android
转到 app 模块的 build.gradle 文件,并确保 dependencies 代码块包含 MDC Android 的依赖项:
api 'com.google.android.material:material:1.1.0-alpha06'
运行起始应用
|
|

大功告成!您应该会看到该应用及其表单。

3. 更新文本字段
与纯文本字段相比,Material Design 文本字段在易用性方面有很大优势。通过使用轮廓或背景填充来定义命中区域,用户更有可能与您的表单互动,或在更复杂的内容中识别文本字段。
替换文本字段样式
在 shipping_info_activity.xml 中,将以下样式添加到所有 TextInputLayout XML 组件:
shipping_info_activity.xml
style="@style/Widget.MaterialComponents.TextInputLayout.OutlinedBox"
每个 TextInputLayout 应如下所示:
shipping_info_activity.xml
<com.google.android.material.textfield.TextInputLayout
   android:id="@+id/name_text_input"
   style="@style/Widget.MaterialComponents.TextInputLayout.OutlinedBox"
   android:layout_width="match_parent"
   android:layout_height="wrap_content"
   app:errorEnabled="true">

   <com.google.android.material.textfield.TextInputLayout
       android:id="@+id/name_edit_text"
       android:layout_width="match_parent"
       android:layout_height="wrap_content"
       android:hint="@string/label_name" />
</com.google.android.material.textfield.TextInputLayout>
构建并运行:
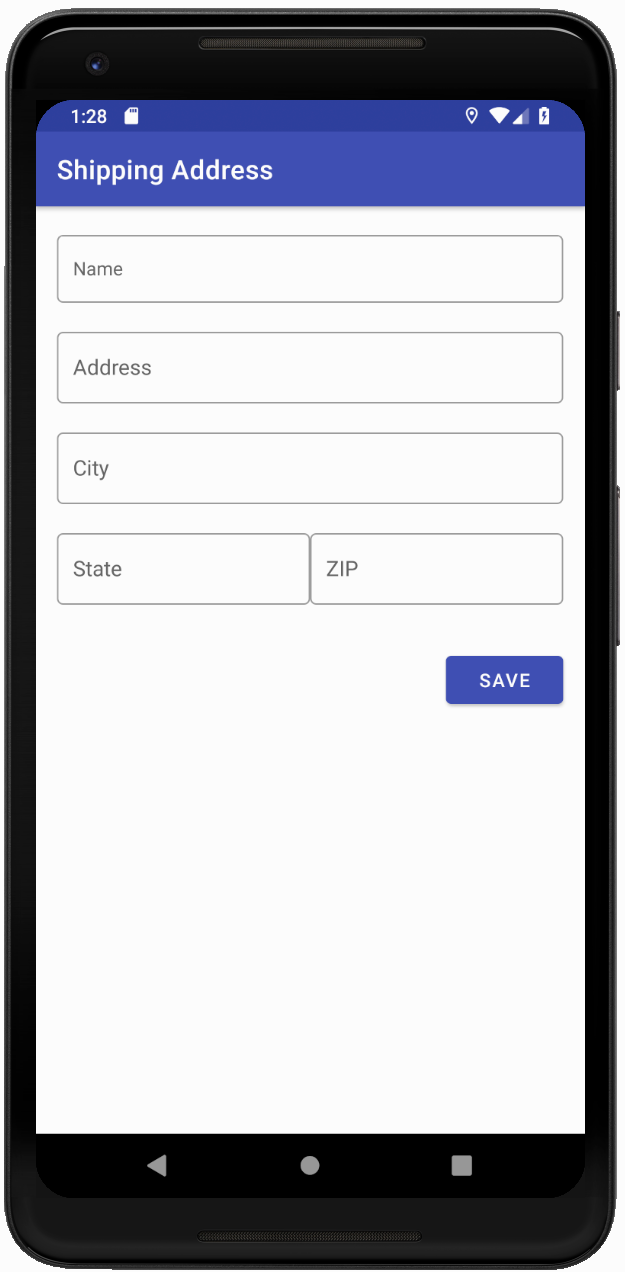
所有文本字段均已更新为使用 MDC 中的新设计。
添加错误
MDC 文本字段具有内置的错误呈现功能。MDC 会在文本字段下方添加红色文本,并将装饰更新为红色。
在 ShippingInfoActivity.java 中,将 onCreate() 方法更新为如下所示:
ShippingInfoActivity.java
@Override
protected void onCreate(Bundle savedInstanceState) {
   super.onCreate(savedInstanceState);
   setContentView(R.layout.shipping_info_activity);

   View rootView = findViewById(android.R.id.content);

   final List<TextInputLayout> textInputLayouts = Utils.findViewsWithType(
           rootView, TextInputLayout.class);

   Button button = findViewById(R.id.save_button);
   button.setOnClickListener(new View.OnClickListener() {
       @Override
       public void onClick(View view) {
           boolean noErrors = true;
           for (TextInputLayout textInputLayout : textInputLayouts) {
               String editTextString = textInputLayout.getEditText().getText().toString();
               if (editTextString.isEmpty()) {
                   textInputLayout.setError(getResources().getString(R.string.error_string));
                   noErrors = false;
               } else {
                   textInputLayout.setError(null);
               }
           }

           if (noErrors) {
               // All fields are valid!
           }
       }
   });
}
构建并运行。按“保存”,但至少将一个文本字段留空:
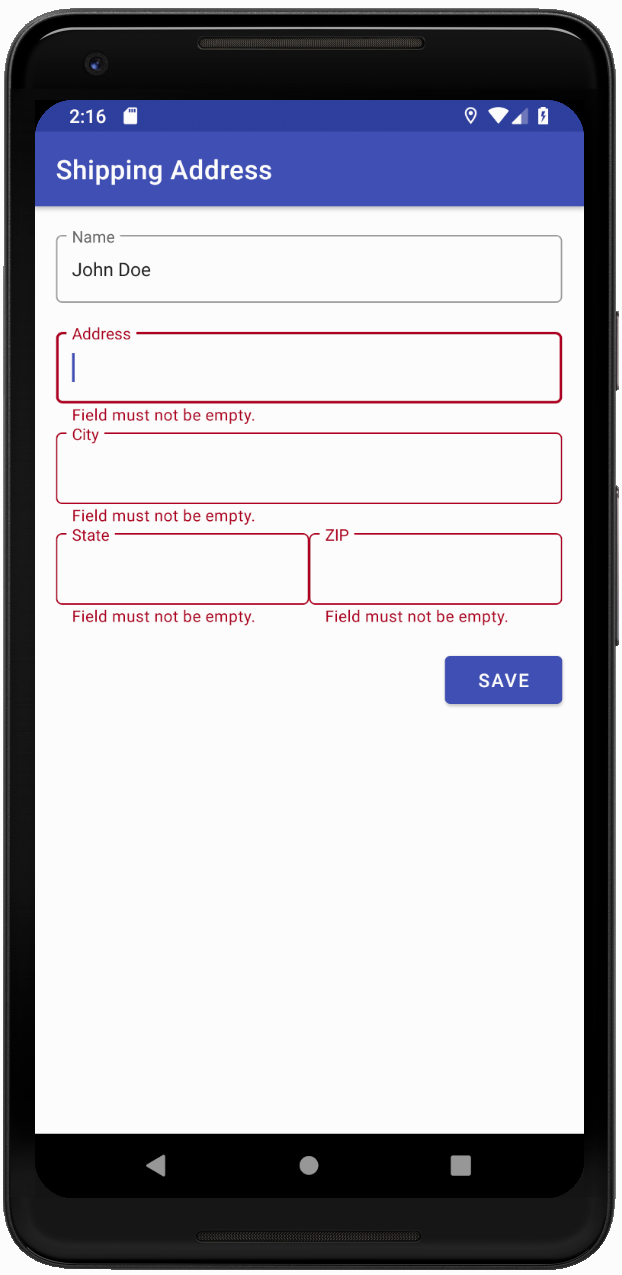
空白的文本字段会显示为红色,并在下方显示错误文本。
4. 更新按钮
MDC 具有以下按钮:
- 墨水波纹
- 圆角
- 主题支持
- 完美像素布局和排版
- 基于 AppCompatButton(标准 Android 按钮类)构建,因此您知道如何在代码中使用它们。
(可选)替换按钮类
默认情况下,Material 库会自动将常规按钮膨胀为 MDC 按钮。不过,您可以选择将对 Button 的所有引用替换为 MaterialButton,以便访问仅在 MaterialButton 中提供的其他方法,例如更改圆角半径。MDC 按钮是一种简单的即插即用型组件。您只需将 XML 组件名称 Button 替换为 MaterialButton,然后将默认的 MaterialButton 样式应用于 MaterialButton。
在 shipping_info_activity.xml 中,将按钮从以下内容更改为:
shipping_info_activity.xml
<Button
   android:id="@+id/save_button"
   android:layout_width="wrap_content"
   android:layout_height="wrap_content"
   android:layout_gravity="end"
   android:layout_marginTop="16dp"
   android:text="@string/label_save" />
收件人:
shipping_info_activity.xml
<com.google.android.material.button.MaterialButton
   android:id="@+id/save_button"
   style="@style/Widget.MaterialComponents.Button"
   android:layout_width="wrap_content"
   android:layout_height="wrap_content"
   android:layout_gravity="end"
   android:layout_marginTop="16dp"
   android:text="@string/label_save" />
构建并运行:
5. 添加卡
MaterialCardView 是基于 CardView 构建的组件,具有以下特点:
- 修正了高度和样式
- 描边宽度和颜色属性
将内容封装在卡片中
使用 MaterialCardView 组件将包含内容的 shipping_info_activity.xml 中的 LinearLayout 封装起来,如下所示:
shipping_info_activity.xml
<com.google.android.material.card.MaterialCardView
   android:layout_width="match_parent"
   android:layout_height="wrap_content"
   android:layout_margin="16dp"
   app:contentPadding="16dp">


   <!-- LinearLayout goes here -->


</com.google.android.material.card.MaterialCardView>
构建并运行。整个表单应封装在卡片中:
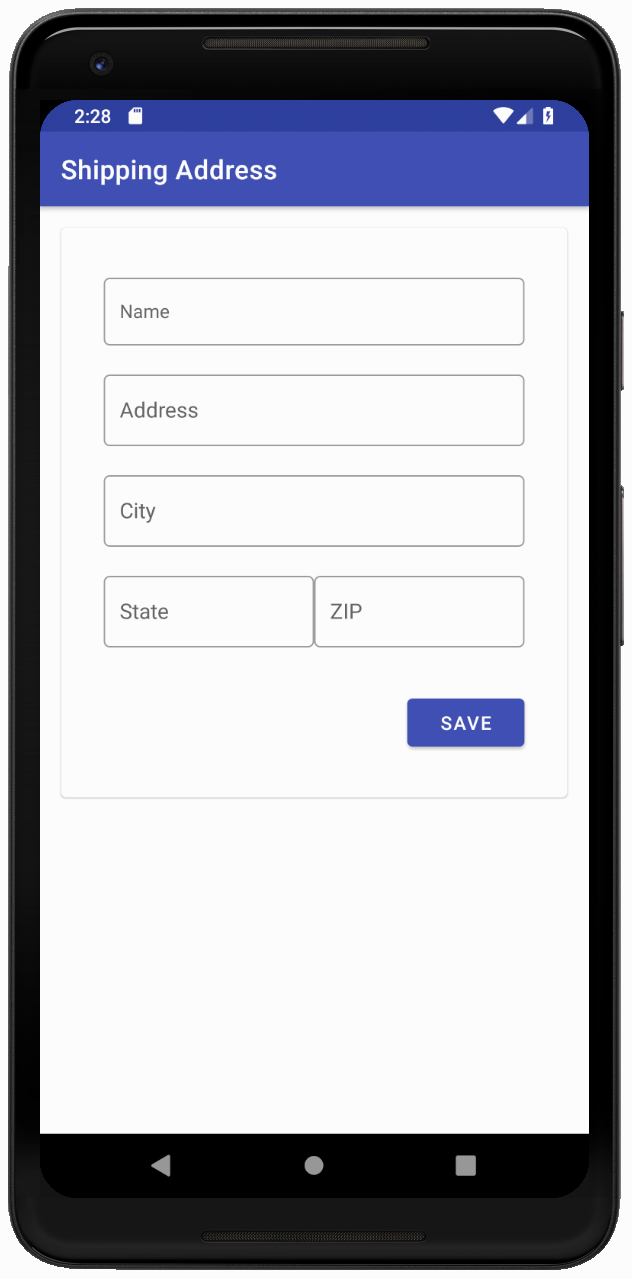
Material 卡片视图组件是一种熟悉而新颖的方式,可让您轻松将内容封装在卡片中。
6. 回顾
您已替换了一些常用组件,以立即显示价值:文本字段、按钮和卡片,并且无需对应用进行全面重新设计。其他组件(例如顶部应用栏和 TabLayout)也可以带来很大变化。
后续步骤
您可以访问 Android widget 目录,探索 MDC-Android 中的更多组件。