
1. Introduction
ML Kit is a mobile SDK that brings Google's machine learning expertise to Android and iOS apps in a powerful yet easy-to-use package. Whether you're new or experienced in machine learning, you can easily implement the functionality you need in just a few lines of code. There's no need to have deep knowledge of neural networks or model optimization to get started.
How does it work?
ML Kit makes it easy to apply ML techniques in your apps by bringing Google's ML technologies, such as Mobile Vision and TensorFlow Lite, together in a single SDK. Whether you need the power of the real-time capabilities of Mobile Vision's on-device models, or the flexibility of custom TensorFlow Lite image classification models, ML Kit makes it possible with just a few lines of code.
This codelab will walk you through creating your own iOS app that can automatically detect text and facial features in an image.
What you will build
In this codelab, you're going to build an iOS app with ML Kit. Your app will:
|
|


What you'll learn
- How to use the ML Kit SDK to easily add advanced Machine Learning capabilities such as text recognition, face feature detection to any iOS app
What you'll need
- A recent version of Xcode (v12.4+)
- iOS Simulator or a physical iOS device running iOS 10.0+
- ML Kit supports only these two 64-bit architectures:
x86_64andarm64 - The sample code
- Basic knowledge of iOS development in Swift
- Basic understanding of machine learning models
This codelab is focused on ML Kit. Non-relevant concepts and code blocks are glossed over and are provided for you to simply copy and paste.
2. Getting set up
Download the Code
Click the following link to download all the code for this codelab:
Unpack the downloaded zip file. This will create a root folder (mlkit-ios-codelab) with all of the resources you will need. For this codelab, you will only need the resources in the vision subdirectory.
The vision subdirectory in the mlkit-ios-codelab repository contains two directories:
 starter—Starting code that you build upon in this codelab.
- final—Completed code for the finished sample app.
Add the dependencies for ML Kit with CocoaPods
CocoaPods is used to add the ML Kit dependencies to your app. If you haven't got CocoaPods installed on your machine, find their installation instructions here. Once installed, open Podfile in your favourite editor and add ML Kit as dependencies:
Podfile
platform :ios, '10.0'
use_frameworks!

pod 'GoogleMLKit/FaceDetection'
pod 'GoogleMLKit/TextRecognition'

target 'MLKit-codelab' do
end
Install ML Kit Cocoa Pods
To be sure that all dependencies are available to your app, you should use the command line to install the ML Kit Cocoa Pods.
Command Line
# Make sure you are in the root of your app
pod install
xed .
3. Run the starter app
Now you are ready to run the app for the first time. Click  Run in Xcode to compile the app and run it on the iOS Simulator.
The app should launch on your simulator. At this point, you should see a basic layout that has a picker which allows you to select between 2 images. In the next section, you add text recognition to your app to identify text in the images.
4. Add on-device text recognition
In this step, we will add functionality to your app to recognize text in images.
Import the MLVision module
Confirm the following imports to your ViewController class exists.
ViewController.swift
import MLKit
Create a VisionTextRecognizer
Add the following lazy properties to your ViewController class.
ViewController.swift
private lazy var textRecognizer = TextRecognizer.textRecognizer()
Set up and run on-device text recognition on an image
Add the following to the runTextRecognition method of ViewController class:
ViewController.swift
func runTextRecognition(with image: UIImage) {
  let visionImage = VisionImage(image: image)
  textRecognizer.process(visionImage) { features, error in
    self.processResult(from: features, error: error)
  }
}
The code above configures the text recognition detector and calls the function processResult(from:, error:) with the response.
Process the text recognition response
Add the following code to processResult in the ViewController class to parse the results and display them in your app.
ViewController.swift
 func processResult(from text: Text?, error: Error?) {
    removeDetectionAnnotations()
    guard error == nil, let text = text else {
      let errorString = error?.localizedDescription ?? Constants.detectionNoResultsMessage
      print("Text recognizer failed with error: \(errorString)")
      return
    }

    let transform = self.transformMatrix()

    // Blocks.
    for block in text.blocks {
      drawFrame(block.frame, in: .purple, transform: transform)

      // Lines.
      for line in block.lines {
        drawFrame(line.frame, in: .orange, transform: transform)

        // Elements.
        for element in line.elements {
          drawFrame(element.frame, in: .green, transform: transform)

          let transformedRect = element.frame.applying(transform)
          let label = UILabel(frame: transformedRect)
          label.text = element.text
          label.adjustsFontSizeToFitWidth = true
          self.annotationOverlayView.addSubview(label)
        }
      }
    }
  }
Run the app on the simulator
Now click Run in Xcode. Once the app loads, make sure that Image 1 is selected in the picker and click on the Find Text button.
Your app should now look like the image below, showing the text recognition results and bounding boxes overlaid on top of the original image.
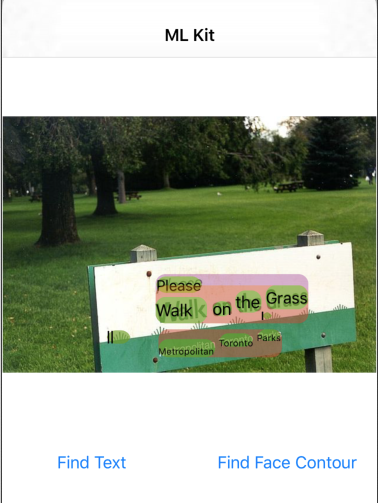
Photo: Kai Schreiber / Wikimedia Commons / CC BY-SA 2.0
Congratulations, you have just added on-device text recognition to your app using ML Kit! On-device text recognition is great for many use cases as it works even when your app doesn't have internet connectivity and is fast enough to use on still images as well as live video frames.
5. Add on-device face contour detection
In this step, we will add functionality to your app to detect the contours of faces in images.
Create a FaceDetector
Add the following lazy properties to your ViewController class.
ViewController.swift
private lazy var faceDetectorOption: FaceDetectorOptions = {
  let option = FaceDetectorOptions()
  option.contourMode = .all
  option.performanceMode = .fast
  return option
}()
private lazy var faceDetector = FaceDetector.faceDetector(options: faceDetectorOption)
Set up and run on-device face contour detection on an image
Add the following to the runFaceContourDetection method of ViewController class:
ViewController.swift
  func runFaceContourDetection(with image: UIImage) {
    let visionImage = VisionImage(image: image)
    faceDetector.process(visionImage) { features, error in
      self.processResult(from: features, error: error)
    }
  }
The code above configures the text recognition detector and calls the function processResult(from:, error:) with the response.
Process the face detector response
Add the following code to processResult in the ViewController class to parse the results and display them in your app.
ViewController.swift
  func processResult(from faces: [Face]?, error: Error?) {
    removeDetectionAnnotations()
    guard let faces = faces else {
      return
    }

    for feature in faces {
      let transform = self.transformMatrix()
      let transformedRect = feature.frame.applying(transform)
      UIUtilities.addRectangle(
        transformedRect,
        to: self.annotationOverlayView,
        color: UIColor.green
      )
      self.addContours(forFace: feature, transform: transform)
    }
  }
Finally add the helper method addContours in the ViewController class to draw the contour points.
ViewController.swift
 private func addContours(forFace face: Face, transform: CGAffineTransform) {
    // Face
    if let faceContour = face.contour(ofType: .face) {
      for point in faceContour.points {
        drawPoint(point, in: .blue, transform: transform)
      }
    }

    // Eyebrows
    if let topLeftEyebrowContour = face.contour(ofType: .leftEyebrowTop) {
      for point in topLeftEyebrowContour.points {
        drawPoint(point, in: .orange, transform: transform)
      }
    }
    if let bottomLeftEyebrowContour = face.contour(ofType: .leftEyebrowBottom) {
      for point in bottomLeftEyebrowContour.points {
        drawPoint(point, in: .orange, transform: transform)
      }
    }
    if let topRightEyebrowContour = face.contour(ofType: .rightEyebrowTop) {
      for point in topRightEyebrowContour.points {
        drawPoint(point, in: .orange, transform: transform)
      }
    }
    if let bottomRightEyebrowContour = face.contour(ofType: .rightEyebrowBottom) {
      for point in bottomRightEyebrowContour.points {
        drawPoint(point, in: .orange, transform: transform)
      }
    }

    // Eyes
    if let leftEyeContour = face.contour(ofType: .leftEye) {
      for point in leftEyeContour.points {
        drawPoint(point, in: .cyan, transform: transform)
      }
    }
    if let rightEyeContour = face.contour(ofType: .rightEye) {
      for point in rightEyeContour.points {
        drawPoint(point, in: .cyan, transform: transform)
      }
    }

    // Lips
    if let topUpperLipContour = face.contour(ofType: .upperLipTop) {
      for point in topUpperLipContour.points {
        drawPoint(point, in: .red, transform: transform)
      }
    }
    if let bottomUpperLipContour = face.contour(ofType: .upperLipBottom) {
      for point in bottomUpperLipContour.points {
        drawPoint(point, in: .red, transform: transform)
      }
    }
    if let topLowerLipContour = face.contour(ofType: .lowerLipTop) {
      for point in topLowerLipContour.points {
        drawPoint(point, in: .red, transform: transform)
      }
    }
    if let bottomLowerLipContour = face.contour(ofType: .lowerLipBottom) {
      for point in bottomLowerLipContour.points {
        drawPoint(point, in: .red, transform: transform)
      }
    }

    // Nose
    if let noseBridgeContour = face.contour(ofType: .noseBridge) {
      for point in noseBridgeContour.points {
        drawPoint(point, in: .yellow, transform: transform)
      }
    }
    if let noseBottomContour = face.contour(ofType: .noseBottom) {
      for point in noseBottomContour.points {
        drawPoint(point, in: .yellow, transform: transform)
      }
    }
  }
Run the app on the simulator
Now click Run in Xcode. Once the app loads, make sure that Image 2 is selected in the picker and click on the Find Face Contour button. Your app should now look like the image below, showing the contours of Grace Hopper's face as points overlaid on top of the original image.
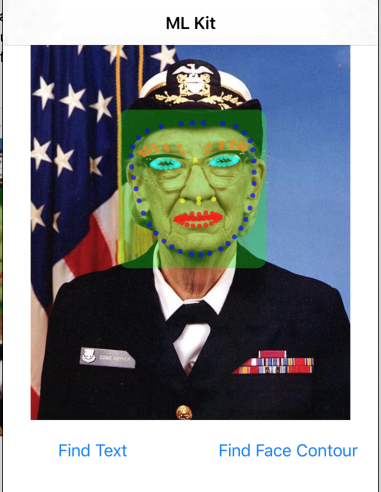
Congratulations, you have just added on-device face contour detection to your app using On-device ML Kit face contour detection is great for many use cases as it works even when your app doesn't have internet connectivity and is fast enough to use on still images as well as live video frames.
6. Congratulations!
You have used ML Kit to easily add advanced machine learning capabilities to your app.
What we've covered
- How to add ML Kit to your iOS app
- How to use on-device text recognition in ML Kit to find text in images
- How to use on-device face recognition in ML Kit to identify face features in images
Next Steps
- Use ML Kit in your own iOS app.
Learn More
- https://g.co/mlkit