
1. Introdução

O OpenThread lançado pelo Google é uma implementação de código aberto do protocolo de rede Thread. O Google Nest lançou o OpenThread para disponibilizar aos desenvolvedores a tecnologia usada nos produtos Nest para acelerar o desenvolvimento de produtos de casa conectada.
A especificação do Thread define um protocolo de comunicação entre dispositivos sem fio confiável, seguro e de baixo consumo de energia para aplicativos domésticos. O OpenThread implementa todas as camadas de rede Thread, incluindo IPv6, 6LoWPAN, IEEE 802.15.4 com segurança MAC, estabelecimento de link de malha e roteamento de malha.
Este codelab ajuda você a simular uma rede Thread em dispositivos simulados.
O que você vai aprender
- Como configurar o conjunto de ferramentas de build do OpenThread
- Como simular uma rede Thread
- Como autenticar nós do Thread
- Como gerenciar uma rede Thread com o Daemon do OpenThread
O que é necessário
- git
- Conhecimento básico de Linux e roteamento de rede
2. Configurar o sistema de build
Git
O Git é necessário para concluir este codelab. Faça o download e instale antes de continuar.
Depois da instalação, siga as instruções do seu SO específico para fazer o download e criar o OpenThread.
XCode para Mac OS X
O XCode é necessário para instalar e criar o OpenThread no Mac OS X.
Depois de instalar o XCode, instale as ferramentas de linha de comando do XCode:
$ xcode-select --install
Compilação no Linux / Mac OS X
Essas instruções de instalação foram testadas no Ubuntu Server 14.04 LTS e no Mac OS X Sierra 10.12.6.
Instale o OpenThread. Os comandos bootstrap garantem que o conjunto de ferramentas esteja instalado e que o ambiente esteja configurado corretamente:
$ mkdir -p ~/src
$ cd ~/src
$ git clone --recursive https://github.com/openthread/openthread.git
$ cd openthread
$ ./script/bootstrap
Como usar o Windows
Se você preferir o Windows, recomendamos testar a versão do Docker deste codelab.
3. Criar os aplicativos OpenThread
Quando a instalação estiver concluída, crie o aplicativo de exemplo do OpenThread. Neste codelab, usamos um exemplo de simulação.
$ cd ~/src/openthread
$ ./script/cmake-build simulation
Agora crie o daemon do OpenThread:
$ ./script/cmake-build posix -DOT_DAEMON=ON
4. Simular uma rede Thread
O aplicativo de exemplo que você usará neste codelab demonstra um aplicativo OpenThread mínimo que expõe as interfaces de configuração e gerenciamento do OpenThread por uma interface de linha de comando (CLI) básica.
Este exercício apresenta as etapas mínimas necessárias para dar um ping em um dispositivo Thread simulado a partir de outro dispositivo Thread simulado.
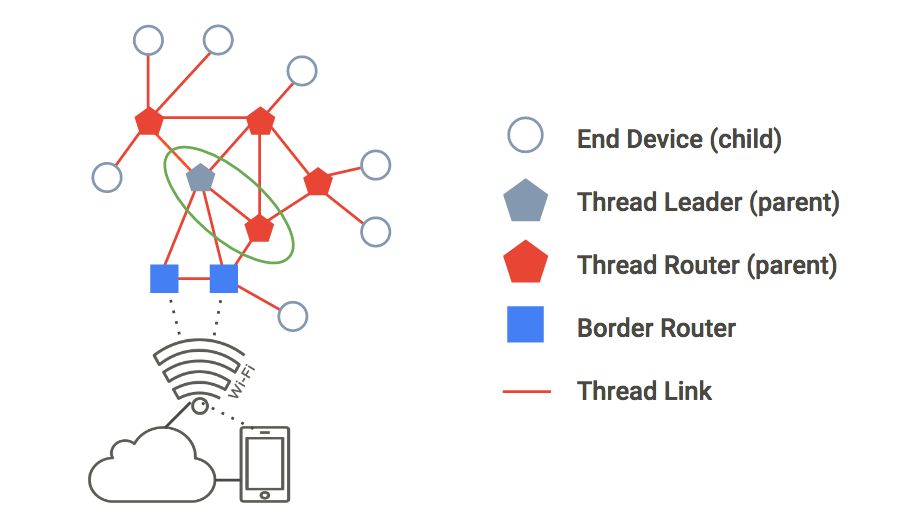
A figura abaixo descreve uma topologia básica de rede Thread. Neste exercício, vamos simular os dois nós dentro do círculo verde: um líder de linha e um roteador de linha de execução com uma única conexão entre eles.
Dar um ping em um nó
1. Nó inicial 1
Navegue até o diretório openthread e gere o processo da CLI para um dispositivo Thread simulado usando o binário ot-cli-ftd.
$ cd ~/src/openthread
$ ./build/simulation/examples/apps/cli/ot-cli-ftd 1
Observação:se o prompt > não aparecer depois de executar esse comando, pressione enter.
Esse binário implementa um dispositivo OpenThread simulado com base no POSIX. O driver de rádio IEEE 802.15.4 é implementado sobre o UDP (frames IEEE 802.15.4 são passados dentro de payloads de UDP).
O argumento de 1 é um descritor de arquivo que representa os bits menos significativos dos "atribuídos de fábrica". IEEE EUI-64 para o dispositivo simulado. Esse valor também é usado na vinculação a uma porta UDP para emulação de rádio IEEE 802.15.4 (porta = 9000 + descritor do arquivo). Cada instância de um dispositivo Thread simulado neste codelab vai usar um descritor de arquivo diferente.
Observação:use apenas descritores de arquivo de 1 ou mais recentes, conforme observado neste codelab ao gerar o processo para um dispositivo simulado. Um descritor de arquivo de 0 está reservado para outro uso.
Criar um novo conjunto de dados operacional e fazer commit dele como ativo. O conjunto de dados operacional é a configuração da rede Thread que você está criando.
> dataset init new
Done
> dataset
Active Timestamp: 1
Channel: 20
Channel Mask: 07fff800
Ext PAN ID: d6263b6d857647da
Mesh Local Prefix: fd61:2344:9a52:ede0/64
Network Key: e4344ca17d1dca2a33f064992f31f786
Network Name: OpenThread-c169
PAN ID: 0xc169
PSKc: ebb4f2f8a68026fc55bcf3d7be3e6fe4
Security Policy: 0, onrcb
Done
Confirme este conjunto de dados como o ativo:
> dataset commit active
Done
Abra a interface IPv6:
> ifconfig up
Done
Inicie a operação do protocolo Thread:
> thread start
Done
Aguarde alguns segundos e verifique se o dispositivo se tornou o líder de linha de execução. O líder é o dispositivo responsável por gerenciar a atribuição do ID do roteador.
> state
leader
Done
Confira os endereços IPv6 atribuídos à interface Thread do Nó 1 (sua saída será diferente):
> ipaddr
fd61:2344:9a52:ede0:0:ff:fe00:fc00
fd61:2344:9a52:ede0:0:ff:fe00:5000
fd61:2344:9a52:ede0:d041:c5ba:a7bc:5ce6
fe80:0:0:0:94da:92ea:1353:4f3b
Done
Observe os tipos de endereços IPv6 específicos:
- Começa com
fd= mesh-local - Começa com
fe80= link-local
Os tipos de endereço local de malha são classificados ainda mais:
- Contém
ff:fe00= Router Locator (RLOC) - Não contém
ff:fe00= identificador de endpoint (EID, na sigla em inglês)
Identifique o EID na saída do console e anote-o para uso posterior. No exemplo de saída acima, o EID é:
fd61:2344:9a52:ede0:d041:c5ba:a7bc:5ce6
2. Nó inicial 2
Abra um novo terminal, navegue até o diretório openthread e gere o processo da CLI. Este é o segundo dispositivo Thread simulado:
$ cd ~/src/openthread
$ ./build/simulation/examples/apps/cli/ot-cli-ftd 2
Observação:se o prompt > não aparecer depois de executar esse comando, pressione enter.
Configure a chave de rede de linha de execução e o ID do PAN usando os mesmos valores do conjunto de dados operacional do nó 1:
> dataset networkkey e4344ca17d1dca2a33f064992f31f786
Done
> dataset panid 0xc169
Done
Confirme este conjunto de dados como o ativo:
> dataset commit active
Done
Abra a interface IPv6:
> ifconfig up
Done
Inicie a operação do protocolo Thread:
> thread start
Done
O dispositivo será inicializado como um filho. Um Thread Child é equivalente a um dispositivo final, que é um dispositivo Thread que transmite e recebe tráfego unicast somente com um dispositivo pai.
> state
child
Done
Em até dois minutos, a mudança de estado de child para router será mostrada. Um roteador Thread é capaz de rotear o tráfego entre dispositivos Thread. Ele também é chamado de "Pai".
> state
router
Done
Verificar a rede
Uma maneira fácil de verificar a rede mesh é olhar a tabela do roteador.
1. Verificar a conectividade:
No Nó 2, acesse o RLOC16. O RLOC16 são os últimos 16 bits do endereço RLOC IPv6 do dispositivo.
> rloc16
5800
Done
No Nó 1, verifique na tabela do roteador o RLOC16 do Nó 2. Primeiro, verifique se o Nó 2 mudou para o estado do roteador.
> router table
| ID | RLOC16 | Next Hop | Path Cost | LQI In | LQI Out | Age | Extended MAC  |
+----+--------+----------+----------+-------+---------+-----+------------------+
| 20 | 0x5000 |       63 |         0 |     0 |      0 |   0 | 96da92ea13534f3b |
| 22 | 0x5800 |       63 |         0 |     3 |      3 |  23 | 5a4eb647eb6bc66c |
O RLOC do nó 1 de 0xa800 é encontrado na tabela, confirmando que ele está conectado à malha.
2. Dê um ping no nó 1 a partir do nó 2
Verificar a conectividade entre os dois dispositivos Thread simulados. No Nó 2, ping, o EID atribuído ao Nó 1:
> ping fd61:2344:9a52:ede0:d041:c5ba:a7bc:5ce6
> 16 bytes from fd61:2344:9a52:ede0:d041:c5ba:a7bc:5ce6: icmp_seq=1
hlim=64 time=12ms
Pressione enter para retornar ao comando da CLI >.
Testar a rede
Agora que é possível dar um ping entre dois dispositivos Thread simulados, teste a rede mesh colocando um nó off-line.
Volte para o nó 1 e pare a linha de execução:
> thread stop
Done
Alterne para o Nó 2 e verifique o estado. Em dois minutos, o Nó 2 detectará que o líder (Nó 1) está off-line, e a transição do Nó 2 deverá ser o leader da rede:
> state
router
Done
...
> state
leader
Done
Após a confirmação, pare o Thread e redefina o Nó 2 para a configuração original antes de sair. Uma redefinição de fábrica é feita para garantir que as credenciais da rede Thread que usamos neste exercício não sejam transferidas para o próximo.
> thread stop
Done
> factoryreset
>
> exit
Redefina também para a configuração original e saia do Nó 1:
> factoryreset
>
> exit
Consulte a Referência da CLI do OpenThread para explorar todos os comandos disponíveis da CLI.
5. Autenticar nós com Comissionamento
No exercício anterior, você configurou uma rede Thread com dois dispositivos simulados e conectividade verificada. No entanto, isso permite apenas que o tráfego link-local IPv6 não autenticado passe entre dispositivos. Para rotear o tráfego IPv6 global entre eles (e a Internet por meio de um roteador de borda Thread), os nós precisam ser autenticados.
Para autenticar um dispositivo, ele precisa atuar como Comissário. O comissário é o servidor de autenticação eleito para novos dispositivos Thread e o autorizador a fornecer as credenciais de rede necessárias para que os dispositivos entrem na rede.
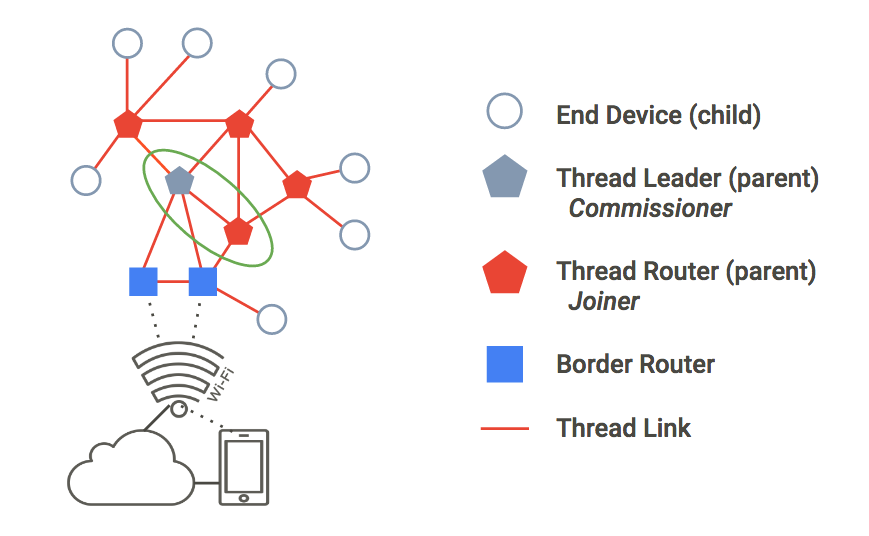
Neste exercício, usaremos a mesma topologia de dois nós de antes. Para autenticação, o líder do Thread vai atuar como o comissário, e o roteador do Thread como um Joiner.
1. Criar uma rede
Ao continuar do exercício anterior, você já deve ter duas janelas de terminal abertas. Caso contrário, certifique-se de que dois estejam abertos e prontos para uso. Um servirá como Nó 1, o outro como Nó 2.
No Nó 1, gere o processo da CLI:
$ cd ~/src/openthread
$ ./build/simulation/examples/apps/cli/ot-cli-ftd 1
Observação:se o prompt > não aparecer depois de executar esse comando, pressione enter.
Crie um novo conjunto de dados operacional, confirme-o como o ativo e inicie a linha de execução:
> dataset init new
Done
> dataset
Active Timestamp: 1
Channel: 12
Channel Mask: 07fff800
Ext PAN ID: e68d05794bf13052
Mesh Local Prefix: fd7d:ddf7:877b:8756/64
Network Key: a77fe1d03b0e8028a4e13213de38080e
Network Name: OpenThread-8f37
PAN ID: 0x8f37
PSKc: f9debbc1532487984b17f92cd55b21fc
Security Policy: 0, onrcb
Done
Confirme este conjunto de dados como o ativo:
> dataset commit active
Done
Abra a interface IPv6:
> ifconfig up
Done
Inicie a operação do protocolo Thread:
> thread start
Done
Aguarde alguns segundos e verifique se o dispositivo se tornou um líder de linha de execução:
> state
leader
Done
2. Começar a função de Comissário
Ainda no Nó 1, inicie a função de Comissário:
> commissioner start
Done
Permita que qualquer Joiner (usando o caractere curinga *) com a credencial J01NME seja comissionado na rede. Um Joiner é um dispositivo adicionado por um administrador humano a uma rede Thread comissionada.
> commissioner joiner add * J01NME
Done
3. Iniciar a função de Combinador
Em uma janela do segundo terminal, gere um novo processo da CLI. Este é o Nó 2.
$ cd ~/src/openthread
$ ./build/simulation/examples/apps/cli/ot-cli-ftd 2
No Nó 2, ative o papel de Joiner usando a credencial de Joiner J01NME.
> ifconfig up
Done
> joiner start J01NME
Done
Aguarde alguns segundos pela confirmação...
Join success
Como Joiner, o dispositivo (Nó 2) se autenticou com o Commissioner (Nó 1) e recebeu as credenciais da rede Thread.
Agora que o Node 2 está autenticado, inicie a Thread:
> thread start
Done
4. Validar a autenticação de rede
Verifique o state no nó 2 para confirmar que agora ele está conectado à rede. Em dois minutos, o nó 2 faz a transição de child para router:
> state
child
Done
...
> state
router
Done
5. Redefinir configuração
Para se preparar para o próximo exercício, redefina a configuração. Em cada nó, pare o Thread, faça uma redefinição para a configuração original e saia do dispositivo Thread simulado:
> thread stop
Done
> factoryreset
>
> exit
Talvez seja necessário pressionar enter algumas vezes para trazer o prompt > de volta após um comando factoryreset.
6. Gerenciar a rede com o OpenThread Daemon
Para este exercício, vamos simular uma instância de CLI (um único dispositivo de Thread SoC incorporado) e uma instância de coprocessador de rádio (RCP).
ot-daemon é um modo do app OpenThread Posix que usa um soquete UNIX como entrada e saída. Assim, o núcleo do OpenThread pode ser executado como um serviço. Um cliente pode se comunicar com esse serviço conectando-se ao soquete usando a CLI OpenThread como protocolo.
ot-ctl é uma CLI fornecida pelo ot-daemon para gerenciar e configurar o RCP. Com isso, vamos conectar o RCP à rede criada pelo dispositivo Thread.
Usar ot-daemon
Este exercício usará três janelas de terminal, correspondentes ao seguinte:
- Instância da CLI do dispositivo Thread simulado (nó 1)
- Processo
ot-daemon - Instância da CLI
ot-ctl
Ao continuar o exercício anterior, você já deve ter duas janelas de terminal abertas. Abra uma terceira para garantir que haja três janelas de terminal disponíveis para este exercício.
1. Nó inicial 1
Na primeira janela do terminal, gere o processo da CLI para o dispositivo Thread simulado:
$ cd ~/src/openthread
$ ./build/simulation/examples/apps/cli/ot-cli-ftd 1
Observação:se o prompt > não aparecer depois de executar esse comando, pressione enter.
Crie um novo conjunto de dados operacional, confirme-o como o ativo e inicie a linha de execução:
> dataset init new
Done
> dataset
Active Timestamp: 1
Channel: 13
Channel Mask: 07fff800
Ext PAN ID: 97d584bcd493b824
Mesh Local Prefix: fd55:cf34:dea5:7994/64
Network Key: ba6e886c7af50598df1115fa07658a83
Network Name: OpenThread-34e4
PAN ID: 0x34e4
PSKc: 38d6fd32c866927a4dfcc06d79ae1192
Security Policy: 0, onrcb
Done
Confirme este conjunto de dados como o ativo:
> dataset commit active
Done
Abra a interface IPv6:
> ifconfig up
Done
Inicie a operação do protocolo Thread:
> thread start
Done
Confira os endereços IPv6 atribuídos à interface da linha de execução do nó 1:
> ipaddr
fd55:cf34:dea5:7994:0:ff:fe00:fc00
fd55:cf34:dea5:7994:0:ff:fe00:d000
fd55:cf34:dea5:7994:460:872c:e807:c4ab
fe80:0:0:0:9cd8:aab6:482f:4cdc
Done
>
Conforme explicado na etapa Simular uma rede Thread, um endereço é link-local (fe80) e três são mesh-local (fd). O EID é o endereço local da malha que não contém ff:fe00 no endereço. Neste exemplo de saída, o EID é fd55:cf34:dea5:7994:460:872c:e807:c4ab.
Identifique o EID específico da saída do ipaddr, que será usado para se comunicar com o nó.
2. Iniciar ot-daemon
Na janela do segundo terminal, navegue até o diretório openthread e inicie ot-daemon para um nó do RCP, que chamaremos de Nó 2. Use a sinalização detalhada -v para ver a saída do registro e confirmar se ela está em execução. Use sudo:
$ cd ~/src/openthread
$ sudo ./build/posix/src/posix/ot-daemon -v \
    'spinel+hdlc+forkpty://build/simulation/examples/apps/ncp/ot-rcp?forkpty-arg=2'
Quando bem-sucedido, ot-daemon no modo detalhado gera uma saída semelhante a esta:
ot-daemon[12463]: Running OPENTHREAD/thread-reference-20200818-1938-g0f10480ed; POSIX; Aug 30 2022 10:55:05
ot-daemon[12463]: Thread version: 4
ot-daemon[12463]: Thread interface: wpan0
ot-daemon[12463]: RCP version: OPENTHREAD/thread-reference-20200818-1938-g0f10480ed; SIMULATION; Aug 30 2022 10:54:10
Deixe esse terminal aberto e em execução em segundo plano. Você não inserirá outros comandos nele.
3. Usar ot-ctl para fazer conexão com a rede
Ainda não comissionamos o nó 2 (o RCP ot-daemon) em nenhuma rede Thread. É aí que entra a ot-ctl. ot-ctl usa a mesma CLI que o app da CLI do OpenThread. Portanto, você pode controlar os nós ot-daemon da mesma forma que os outros dispositivos Thread simulados.
Em uma terceira janela do terminal, inicie ot-ctl:
$ sudo ./build/posix/src/posix/ot-ctl
>
Observação:se o prompt > não aparecer depois de executar esse comando, pressione enter.
Use o ot-ctl nesta janela do terceiro terminal para gerenciar o nó 2 (o nó do RCP) iniciado na janela do segundo terminal com ot-daemon. Verifique o state do nó 2:
> state
disabled
Done
Consiga o eui64 do nó 2 para restringir a mesclagem ao Joiner específico:
> eui64
18b4300000000001
Done
No nó 1 (primeira janela do terminal), inicie o Commissioner e restrinja a mesclagem apenas a esse eui64:
> commissioner start
Done
> commissioner joiner add 18b4300000000001 J01NME
Done
No Nó 2 (terceiro janela do terminal), abra a interface de rede e entre na rede:
> ifconfig up
Done
> joiner start J01NME
Done
Aguarde alguns segundos pela confirmação...
Join success
Como Joiner, o RCP (Nó 2) se autenticou com sucesso no Commissioner (Nó 1) e recebeu as credenciais da rede Thread.
Agora, junte o nó 2 à rede Thread:
> thread start
Done
4. Validar a autenticação de rede
Verifique o state no nó 2 para confirmar que agora ele está conectado à rede. Em dois minutos, o nó 2 faz a transição de child para router:
> state
child
Done
...
> state
router
Done
5. Validar a conectividade
Saia do ot-ctl usando o comando Ctrl+D ou exit e, na linha de comando da máquina host, dê um ping no nó 1 usando o EID com o comando ping6. Se a instância do RCP ot-daemon for associada e se comunicar com a rede Thread, o ping será bem-sucedido:
$ ping6 -c 4 fd55:cf34:dea5:7994:460:872c:e807:c4ab
PING fd55:cf34:dea5:7994:460:872c:e807:c4ab (fd55:cf34:dea5:7994:460:872c:e807:c4ab): 56 data bytes
64 bytes from fd55:cf34:dea5:7994:460:872c:e807:c4ab: icmp_seq=0 ttl=64 time=4.568 ms
64 bytes from fd55:cf34:dea5:7994:460:872c:e807:c4ab: icmp_seq=1 ttl=64 time=6.396 ms
64 bytes from fd55:cf34:dea5:7994:460:872c:e807:c4ab: icmp_seq=2 ttl=64 time=7.594 ms
64 bytes from fd55:cf34:dea5:7994:460:872c:e807:c4ab: icmp_seq=3 ttl=64 time=5.461 ms
--- fd55:cf34:dea5:7994:460:872c:e807:c4ab ping statistics ---
4 packets transmitted, 4 packets received, 0% packet loss
round-trip min/avg/max/stddev = 4.568/6.005/7.594/1.122 ms
7. Parabéns!
Você simulou sua primeira rede Thread usando o OpenThread. Incrível!
Neste codelab, você aprendeu a:
- Configurar o conjunto de ferramentas de build do OpenThread
- Simular uma rede Thread
- Autenticar nós do Thread
- Gerenciar uma rede Thread com o OpenThread Daemon
Para saber mais, consulte estas referências: