
1. Introducción

Google lanzó OpenThread una implementación de código abierto del protocolo de red Thread. Google Nest lanzó OpenThread para que la tecnología que se usa en sus productos esté ampliamente disponible para los desarrolladores con el objetivo de acelerar el desarrollo de productos para el hogar conectado.
La especificación de Thread define un protocolo de comunicación de dispositivo a dispositivo inalámbrico, seguro y de bajo consumo basado en IPv6 para aplicaciones domésticas. OpenThread implementa todas las capas de red de Thread, incluidas IPv6, 6LoWPAN, IEEE 802.15.4 con seguridad MAC, establecimiento de vínculos de malla y enrutamiento de malla.
En este codelab, aprenderás a simular una red Thread en dispositivos emulados con Docker.
Qué aprenderás
- Cómo configurar la cadena de herramientas de compilación de OpenThread
- Cómo simular una red Thread
- Cómo autenticar nodos de subprocesos
- Cómo administrar una red Thread con Daemon de OpenThread
Requisitos
- Docker
- Conocimientos básicos de Linux, enrutamiento de red
2. Configura Docker
Este codelab está diseñado para usar Docker en máquinas con Linux, Mac OS X o Windows. Linux es el entorno recomendado.
Instala Docker
Instala Docker en el SO que prefieras.
Extrae la imagen de Docker
Una vez que Docker esté instalado, abre una ventana de terminal y extrae la imagen de Docker openthread/environment. En esta imagen, se muestran OpenThread y OpenThread Daemon compilados previamente y listos para usar en este Codelab.
$ docker pull openthread/environment:latest
Ten en cuenta que la descarga completa puede tardar unos minutos.
En una ventana de terminal, inicia un contenedor de Docker desde la imagen y conéctate a su shell bash:
$ docker run --name codelab_otsim_ctnr -it --rm \
   --sysctl net.ipv6.conf.all.disable_ipv6=0 \
   --cap-add=net_admin openthread/environment bash
La opción --rm borra el contenedor cuando sales de él. No uses esta opción si no deseas que se borre el contenedor.
Ten en cuenta las marcas, que son necesarias para este codelab:
--sysctl net.ipv6.conf.all.disable_ipv6=0: Esto habilita IPv6 dentro del contenedor.--cap-add=net_admin: Habilita la función NET_ADMIN, que te permite ejecutar operaciones relacionadas con la red, como agregar rutas IP.
Una vez que estés en el contenedor, deberías ver un mensaje similar al siguiente:
root@c0f3912a74ff:/#
En el ejemplo anterior, c0f3912a74ff es el ID del contenedor. El ID del contenedor de tu instancia de Docker será distinto del que se muestra en las indicaciones de este Codelab.
Usa Docker
En este codelab, se supone que conoces los conceptos básicos del uso de Docker. Debes permanecer en el contenedor de Docker durante todo el codelab.
3. Cómo simular una red Thread
La aplicación de ejemplo que usarás para este codelab demuestra una aplicación mínima de OpenThread que expone las interfaces de configuración y administración de OpenThread a través de una interfaz de línea de comandos (CLI) básica.
Este ejercicio te guiará por los pasos mínimos necesarios para hacer ping a un dispositivo Thread emulado desde otro dispositivo Thread emulado.
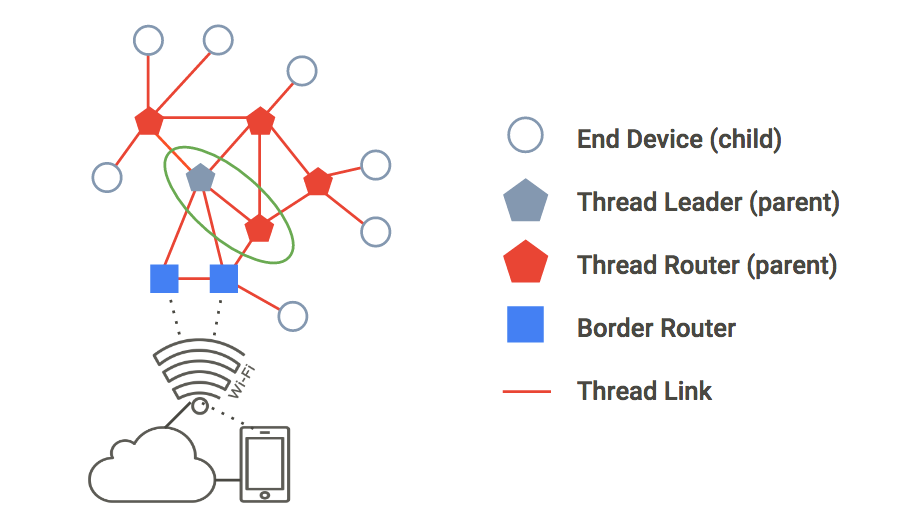
En la siguiente figura, se describe una topología de red de Thread básica. Para este ejercicio, emularemos los dos nodos dentro del círculo verde: un líder de subproceso y un router de subproceso con una sola conexión entre ellos.
Crea la red
1. Iniciar nodo 1
Si aún no lo hiciste, en una ventana de terminal, inicia el contenedor de Docker y conéctate a su shell bash:
$ docker run --name codelab_otsim_ctnr -it --rm \
   --sysctl net.ipv6.conf.all.disable_ipv6=0 \
   --cap-add=net_admin openthread/environment bash
En el contenedor de Docker, genera el proceso de la CLI para un dispositivo Thread emulado con el objeto binario ot-cli-ftd.
root@c0f3912a74ff:/# /openthread/build/examples/apps/cli/ot-cli-ftd 1
Nota: Si no ves el mensaje de > después de ejecutar este comando, presiona enter.
Este objeto binario implementa un dispositivo OpenThread. El controlador de radio IEEE 802.15.4 se implementa además del UDP (los tramas IEEE 802.15.4 se pasan dentro de las cargas útiles de UDP).
El argumento de 1 es un descriptor de archivo que representa los bits menos significativos de la configuración "asignada a la fábrica". IEEE EUI-64 para el dispositivo emulado. Este valor también se usa cuando se vincula a un puerto UDP para la emulación de radio IEEE 802.15.4 (puerto = 9000 + descriptor de archivo). Cada instancia de un dispositivo Thread emulado en este codelab usará un descriptor de archivo diferente.
Nota: Solo usa descriptores de archivo de 1 o más, como se indica en este Codelab cuando generes el proceso para un dispositivo emulado. Se reserva un descriptor de archivos de 0 para otro uso.
Crear un nuevo conjunto de datos operativo y confirmarlo como el activo El conjunto de datos operativo es la configuración de la red Thread que estás creando.
> dataset init new
Done
> dataset
Active Timestamp: 1
Channel: 20
Channel Mask: 07fff800
Ext PAN ID: d6263b6d857647da
Mesh Local Prefix: fd61:2344:9a52:ede0/64
Network Key: e4344ca17d1dca2a33f064992f31f786
Network Name: OpenThread-c169
PAN ID: 0xc169
PSKc: ebb4f2f8a68026fc55bcf3d7be3e6fe4
Security Policy: 0, onrcb
Done
Confirmar este conjunto de datos como el activo:
> dataset commit active
Done
Abre la interfaz IPv6:
> ifconfig up
Done
Inicia la operación del protocolo Thread:
> thread start
Done
Espera unos segundos y verifica que el dispositivo se haya convertido en líder de subprocesos. El líder es el dispositivo responsable de administrar la asignación del ID de router.
> state
leader
Done
Visualiza las direcciones IPv6 asignadas a la interfaz Thread del nodo 1 (tu resultado será diferente):
> ipaddr
fd61:2344:9a52:ede0:0:ff:fe00:fc00
fd61:2344:9a52:ede0:0:ff:fe00:5000
fd61:2344:9a52:ede0:d041:c5ba:a7bc:5ce6
fe80:0:0:0:94da:92ea:1353:4f3b
Done
Ten en cuenta los tipos de direcciones IPv6 específicos:
- Comienza con
fd= Mesh-local - Comienza con
fe80= link-local
Los tipos de direcciones locales de malla se clasifican aún más:
- Contiene
ff:fe00= Localizador de routers (RLOC) - No contiene
ff:fe00= Identificador de extremo (EID)
Identifica el EID en el resultado de la consola y anótalo para usarlo más adelante. En el resultado de muestra anterior, el EID es el siguiente:
fd61:2344:9a52:ede0:d041:c5ba:a7bc:5ce6
2. Iniciar nodo 2
Abre una terminal nueva y ejecuta una shell bash en el contenedor de Docker que se está ejecutando para usarla en Node 2.
$ docker exec -it codelab_otsim_ctnr bash
En la nueva instrucción de bash, genera el proceso de la CLI con el argumento 2. Este es tu segundo dispositivo Thread emulado:
root@c0f3912a74ff:/# /openthread/build/examples/apps/cli/ot-cli-ftd 2
Nota: Si no ves el mensaje de > después de ejecutar este comando, presiona enter.
Configura la clave de red de Thread y el ID PAN con los mismos valores que el conjunto de datos operativos del Nodo 1:
> dataset networkkey e4344ca17d1dca2a33f064992f31f786
Done
> dataset panid 0xc169
Done
Confirmar este conjunto de datos como el activo:
> dataset commit active
Done
Abre la interfaz IPv6:
> ifconfig up
Done
Inicia la operación del protocolo Thread:
> thread start
Done
El dispositivo se inicializará como un elemento secundario. Un elemento secundario de Thread es equivalente a un dispositivo final, que es un dispositivo Thread que transmite y recibe tráfico de unidifusión solo con un dispositivo principal.
> state
child
Done
En un plazo de 2 minutos, deberías ver el cambio de estado de child a router. Un router Thread es capaz de enrutar el tráfico entre dispositivos Thread. También se denomina elemento superior.
> state
router
Done
Verifica la red
Una forma sencilla de verificar la red en malla es observar la tabla del router.
1. Verifica la conectividad
En el nodo 2, obtén el RLOC16. RLOC16 son los últimos 16 bits de la dirección IPv6 de RLOC del dispositivo.
> rloc16
5800
Done
En el Nodo 1, revisa la tabla del router para el RLOC16 del Nodo 2. Asegúrate de que el Nodo 2 haya cambiado al estado de router primero.
> router table
| ID | RLOC16 | Next Hop | Path Cost | LQ In  | LQ Out  | Age | Extended MAC   |
+----+--------+----------+-----------+--------+-------+---+--------------------+
| 20 | 0x5000 |       63 |         0 |      0 |     0 |   0 | 96da92ea13534f3b |
| 22 | 0x5800 |       63 |         0 |      3 |     3 |  23 | 5a4eb647eb6bc66c |
El RLOC del nodo 2 de 0x5800 se encuentra en la tabla, lo que confirma que está conectado a la malla.
2. Haz ping al nodo 1 desde el nodo 2
Verifica la conectividad entre los dos dispositivos Thread emulados. En el Nodo 2, usa ping en el EID asignado al Nodo 1:
> ping fd61:2344:9a52:ede0:d041:c5ba:a7bc:5ce6
> 16 bytes from fd61:2344:9a52:ede0:d041:c5ba:a7bc:5ce6: icmp_seq=1 hlim=64 time=12ms
Presiona enter para volver a la ventana de la CLI de >.
Prueba la red
Ahora que puedes hacer ping correctamente entre dos dispositivos Thread emulados, desconecta un nodo para probar la red en malla.
Regresa al nodo 1 y detén el subproceso:
> thread stop
Done
Cambia al Nodo 2 y verifica el estado. Luego de dos minutos, el Nodo 2 detecta que el líder (Nodo 1) está sin conexión y deberías ver la transición del Nodo 2 para que sea el leader de la red:
> state
router
Done
...
> state
leader
Done
Una vez confirmado, detén el subproceso y restablece la configuración de fábrica del Nodo 2 antes de volver al mensaje bash de Docker. Se realiza un restablecimiento de la configuración de fábrica para garantizar que las credenciales de la red de Thread que usamos en este ejercicio no se transfieran al siguiente ejercicio.
> thread stop
Done
> factoryreset
>
> exit
root@c0f3912a74ff:/#
Es posible que debas presionar enter varias veces para que se muestre el mensaje de > después de un comando factoryreset. No salgas del contenedor de Docker.
También restablece la configuración de fábrica y sal del Nodo 1:
> factoryreset
>
> exit
root@c0f3912a74ff:/#
Consulta la Referencia de la CLI de OpenThread para explorar todos los comandos de la CLI disponibles.
4. Autentica nodos con Commissioning
En el ejercicio anterior, configuraste una red Thread con dos dispositivos simulados y conectividad verificada. Sin embargo, esto solo permite que el tráfico de vínculo local IPv6 no autenticado pase entre dispositivos. Para enrutar el tráfico IPv6 global entre ellos (y con Internet a través de un router de borde Thread), los nodos se deben autenticar.
Para realizar la autenticación, un dispositivo debe actuar como Comisionado. El Comisionado es el servidor de autenticación elegido actualmente para los dispositivos Thread nuevos y el autorizador para proporcionar las credenciales de red necesarias para que los dispositivos se unan a ella.
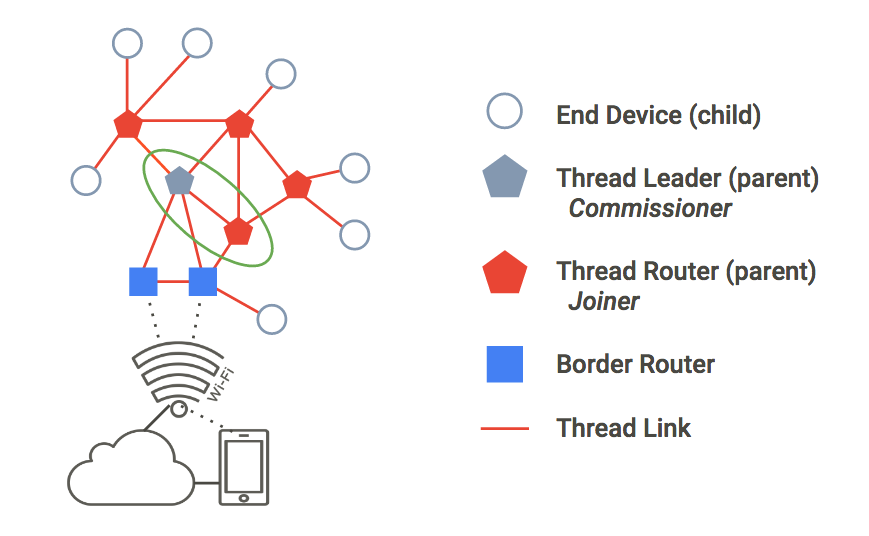
En este ejercicio, usaremos la misma topología de dos nodos que antes. Para la autenticación, el líder de subprocesos actuará como comisionado y el enrutador de subprocesos como un Unión.
Docker
Para cada nodo (ventana de terminal) de los ejercicios restantes, asegúrate de estar ejecutando el contenedor de Docker con la compilación de OpenThread. Si continúas desde el ejercicio anterior, deberías tener dos mensajes bash dentro del mismo contenedor de Docker ya abiertos. De lo contrario, consulta el paso Solución de problemas de Docker o simplemente vuelve a realizar el ejercicio Simular una red de Thread.
1. Crea una red
En el nodo 1, genera el proceso de la CLI:
root@c0f3912a74ff:/# /openthread/build/examples/apps/cli/ot-cli-ftd 1
Nota: Si no ves el mensaje de > después de ejecutar este comando, presiona enter.
Crea un nuevo conjunto de datos operativo, confírmalo como el activo y, luego, inicia el subproceso:
> dataset init new
Done
> dataset
Active Timestamp: 1
Channel: 12
Channel Mask: 07fff800
Ext PAN ID: e68d05794bf13052
Mesh Local Prefix: fd7d:ddf7:877b:8756/64
Network Key: a77fe1d03b0e8028a4e13213de38080e
Network Name: OpenThread-8f37
PAN ID: 0x8f37
PSKc: f9debbc1532487984b17f92cd55b21fc
Security Policy: 0, onrcb
Done
Confirmar este conjunto de datos como el activo:
> dataset commit active
Done
Abre la interfaz IPv6:
> ifconfig up
Done
Inicia la operación del protocolo Thread:
> thread start
Done
Espera unos segundos y verifica que el dispositivo se haya convertido en líder de subprocesos:
> state
leader
Done
2. Comienza el rol de comisionado
Mientras estés en el Nodo 1, inicia el rol Commissioner:
> commissioner start
Done
Permitir que cualquier Joiner (con el comodín *) que tenga la credencial de Unión de J01NME realice la comisión en la red. Un Unión es un dispositivo que agrega un administrador humano a una red de Thread encargada.
> commissioner joiner add * J01NME
Done
3. Iniciar el rol de Unión
En una segunda ventana de terminal, en el contenedor de Docker, genera un nuevo proceso de CLI. Este es el Nodo 2.
root@c0f3912a74ff:/# /openthread/build/examples/apps/cli/ot-cli-ftd 2
En el Nodo 2, habilita la función de Unión con la credencial de Unión J01NME.
> ifconfig up
Done
> joiner start J01NME
Done
Espera unos segundos para recibir la confirmación...
Join success
Como Unión, el dispositivo (Nodo 2) se autenticó correctamente con el Comisionado (Nodo 1) y recibió las credenciales de la red Thread.
Ahora que se autenticó el nodo 2, inicia Thread:
> thread start
Done
4. Valida la autenticación de la red
Verifica el state en el nodo 2 para validar que ahora se haya unido a la red. En dos minutos, el Nodo 2 pasa de child a router:
> state
child
Done
...
> state
router
Done
5. Restablecer configuración
Para prepararte para el siguiente ejercicio, restablece la configuración. En cada nodo, detén Thread, restablece la configuración de fábrica y sal del dispositivo Thread emulado:
> thread stop
Done
> factoryreset
>
> exit
root@c0f3912a74ff:/#
Es posible que debas presionar enter varias veces para que se muestre el mensaje de > después de un comando factoryreset.
5. Administra la red con OpenThread Daemon
Para este ejercicio, simularemos una instancia de CLI (un solo dispositivo Thread SoC incorporado) y una instancia de Radio Coprocesador (RCP).
ot-daemon es un modo de la app de OpenThread Posix que usa un socket UNIX como entrada y salida para que el núcleo de OpenThread pueda ejecutarse como un servicio. Un cliente puede comunicarse con este servicio a través de la conexión al socket usando la CLI de OpenThread como protocolo.
ot-ctl es una CLI que proporciona ot-daemon para administrar y configurar el RCP. Con esto, conectaremos el RCP a la red que creó el dispositivo Thread.
Docker
Para cada nodo (ventana de terminal) de este ejercicio, asegúrate de ejecutar el contenedor de Docker con la compilación de OpenThread. Si continúas desde el ejercicio anterior, deberías tener dos mensajes bash dentro del mismo contenedor de Docker ya abiertos. De lo contrario, consulta el paso Solución de problemas de Docker.
Cómo usar ot-daemon
En este ejercicio, se usarán tres ventanas de terminal, correspondientes a las siguientes opciones:
- Instancia de CLI del dispositivo Thread simulado (nodo 1)
- Proceso de
ot-daemon ot-ctlinstancia de CLI
1. Iniciar nodo 1
En la primera ventana de la terminal, genera el proceso de CLI para tu dispositivo Thread emulado:
root@c0f3912a74ff:/# /openthread/build/examples/apps/cli/ot-cli-ftd 1
Nota: Si no ves el mensaje de > después de ejecutar este comando, presiona enter.
Crea un nuevo conjunto de datos operativo, confírmalo como el activo y, luego, inicia el subproceso:
> dataset init new
Done
> dataset
Active Timestamp: 1
Channel: 13
Channel Mask: 07fff800
Ext PAN ID: 97d584bcd493b824
Mesh Local Prefix: fd55:cf34:dea5:7994/64
Network Key: ba6e886c7af50598df1115fa07658a83
Network Name: OpenThread-34e4
PAN ID: 0x34e4
PSKc: 38d6fd32c866927a4dfcc06d79ae1192
Security Policy: 0, onrcb
Done
Confirmar este conjunto de datos como el activo:
> dataset commit active
Done
Abre la interfaz IPv6:
> ifconfig up
Done
Inicia la operación del protocolo Thread:
> thread start
Done
Visualiza las direcciones IPv6 asignadas a la interfaz Thread del nodo 1:
> ipaddr
fd55:cf34:dea5:7994:0:ff:fe00:fc00
fd55:cf34:dea5:7994:0:ff:fe00:d000
fd55:cf34:dea5:7994:460:872c:e807:c4ab
fe80:0:0:0:9cd8:aab6:482f:4cdc
Done
>
Como se explicó en el paso Simula una red de Thread, una dirección es un vínculo local (fe80) y tres son locales de malla (fd). El EID es la dirección local de malla que no contiene ff:fe00 en la dirección. En este resultado de muestra, el EID es fd55:cf34:dea5:7994:460:872c:e807:c4ab.
Identifica el EID específico de la salida de ipaddr, que se usará para comunicarse con el nodo.
2. Iniciar OT-DAemon
En la segunda ventana de la terminal, crea un nodo de dispositivo tun y configura los permisos de lectura y escritura:
root@c0f3912a74ff:/# mkdir -p /dev/net && mknod /dev/net/tun c 10 200
root@c0f3912a74ff:/# chmod 600 /dev/net/tun
Este dispositivo se utiliza para la transmisión y recepción de paquetes en dispositivos virtuales. Es posible que aparezca un error si el dispositivo ya se creó. Esto es normal y se puede ignorar.
Inicia ot-daemon para un nodo de RCP, al que llamaremos Nodo 2. Usa la marca detallada -v para ver el resultado del registro y confirmar que se está ejecutando:
root@c0f3912a74ff:/# /openthread/build/posix/src/posix/ot-daemon -v \
'spinel+hdlc+forkpty:///openthread/build/examples/apps/ncp/ot-rcp?forkpty-arg=2'
Cuando se ejecuta de forma correcta, ot-daemon en el modo detallado genera un resultado similar al siguiente:
ot-daemon[31]: Running OPENTHREAD/297a880; POSIX; Feb  1 2022 04:43:39
ot-daemon[31]: Thread version: 3
ot-daemon[31]: Thread interface: wpan0
ot-daemon[31]: RCP version: OPENTHREAD/297a880; SIMULATION; Feb  1 2022 04:42:50
Deja esta terminal abierta y ejecutándose en segundo plano. No escribirás más comandos.
3. Usa ot-ctl para unirte a la red
Aún no encomendamos el nodo 2 (el RCP ot-daemon) a ninguna red Thread. Aquí es donde ot-ctl entra en juego. ot-ctl usa la misma CLI que la app de la CLI de OpenThread. Por lo tanto, puedes controlar los nodos ot-daemon de la misma manera que los otros dispositivos Thread simulados.
Abre una tercera ventana de terminal y ejecuta el contenedor existente:
$ docker exec -it codelab_otsim_ctnr bash
Una vez que estés en el contenedor, inicia ot-ctl:
root@c0f3912a74ff:/# /openthread/build/posix/src/posix/ot-ctl
>
Usarás ot-ctl en esta ventana de la tercera terminal para administrar el Nodo 2 (el nodo RCP) que iniciaste en la segunda ventana de la terminal con ot-daemon. Verifica el state del Nodo 2:
> state
disabled
Done
Obtén el eui64 del nodo 2 para restringir la unión a la unión específica:
> eui64
18b4300000000001
Done
En el Nodo 1 (primera ventana de terminal), inicia el Commissioner y restringe la unión solo a esa eui64:
> commissioner start
Done
> commissioner joiner add 18b4300000000001 J01NME
Done
En la tercera ventana de la terminal, abre la interfaz de red para el Nodo 2 y únete a la red:
> ifconfig up
Done
> joiner start J01NME
Done
Espera unos segundos para recibir la confirmación...
Join success
Como Unión, el RCP (Nodo 2) se autenticó correctamente con el Comisionado (Nodo 1) y recibió las credenciales de la red Thread.
Ahora, une el Nodo 2 a la red de Thread (nuevamente, en la tercera ventana de la terminal):
> thread start
Done
4. Valida la autenticación de la red
En la tercera terminal, verifica el state en el Nodo 2 para validar que ahora se haya unido a la red. En dos minutos, el Nodo 2 pasa de child a router:
> state
child
Done
...
> state
router
Done
5. Valida la conectividad
En la tercera ventana de terminal, sal de ot-ctl con el comando Ctrl+D o exit y regresa a la consola de bash del contenedor. Desde esta consola, haz ping al Nodo 1 mediante su EID con el comando ping6. Si la instancia de RCP ot-daemon se une correctamente a la red Thread y se comunica con ella, el ping se realizará correctamente:
root@c0f3912a74ff:/# ping6 -c 4 fd55:cf34:dea5:7994:460:872c:e807:c4ab
PING fd55:cf34:dea5:7994:460:872c:e807:c4ab (fd55:cf34:dea5:7994:460:872c:e807:c4ab): 56 data bytes
64 bytes from fd55:cf34:dea5:7994:460:872c:e807:c4ab: icmp_seq=0 ttl=64 time=4.568 ms
64 bytes from fd55:cf34:dea5:7994:460:872c:e807:c4ab: icmp_seq=1 ttl=64 time=6.396 ms
64 bytes from fd55:cf34:dea5:7994:460:872c:e807:c4ab: icmp_seq=2 ttl=64 time=7.594 ms
64 bytes from fd55:cf34:dea5:7994:460:872c:e807:c4ab: icmp_seq=3 ttl=64 time=5.461 ms
--- fd55:cf34:dea5:7994:460:872c:e807:c4ab ping statistics ---
4 packets transmitted, 4 packets received, 0% packet loss
round-trip min/avg/max/stddev = 4.568/6.005/7.594/1.122 ms
6. Solución de problemas de Docker
Si saliste del contenedor de Docker, haz lo siguiente:
bash mensajes, es posible que debas verificar si se están ejecutando y reiniciar o volver a ingresar según sea necesario. Los contenedores de Docker que creaste en los que no usaste la opción --rm deberían seguir existiendo.
Para mostrar qué contenedores de Docker se están ejecutando, sigue estos pasos:
$ docker ps
CONTAINER ID        IMAGE               COMMAND             CREATED             STATUS              PORTS               NAMES
505fc57ffc72        environment       "bash"              10 minutes ago      Up 10 minutes                           codelab_otsim_ctnr
Para mostrar todos los contenedores de Docker (en ejecución y detenidos), haz lo siguiente:
$ docker ps -a
CONTAINER ID        IMAGE               COMMAND             CREATED             STATUS              PORTS               NAMES
505fc57ffc72        environment       "bash"              10 minutes ago      Up 10 minutes                           codelab_otsim_ctnr
Si no ves el contenedor codelab_otsim_ctnr en el resultado de ninguno de los comandos docker ps, vuelve a ejecutarlo:
$ docker run --name codelab_otsim_ctnr -it --rm \
   --sysctl net.ipv6.conf.all.disable_ipv6=0 \
   --cap-add=net_admin openthread/environment bash
Usa la opción --rm solo si deseas que el contenedor se borre cuando salgas de él.
Si el contenedor está detenido (aparece en docker ps -a, pero no en docker ps), reinícialo:
$ docker start -i codelab_otsim_ctnr
Si el contenedor de Docker ya se está ejecutando (indicado en docker ps), vuelve a conectarte al contenedor en cada terminal:
$ docker exec -it codelab_otsim_ctnr bash
"No se permite la operación" errores
Si te encuentras con errores Operation not permitted cuando creas nuevos nodos de OpenThread (con el comando mknod), asegúrate de ejecutar Docker como el usuario raíz de acuerdo con los comandos que se proporcionan en este codelab. Este codelab no admite la ejecución de Docker en el modo sin raíz.
7. ¡Felicitaciones!
Simulaste correctamente tu primera red Thread con OpenThread. ¡Genial!
En este Codelab aprendiste a hacer lo siguiente:
- Inicia y administra el contenedor de Docker de simulación de OpenThread
- Cómo simular una red Thread
- Autentica nodos de subprocesos
- Cómo administrar una red Thread con OpenThread Daemon
Para obtener más información sobre Thread y OpenThread, explora estas referencias:
- Primer Thread en openthread.io
- Especificación del subproceso
- Repositorio de GitHub de OpenThread
- Referencia de la CLI de OpenThread
- Compatibilidad adicional con Docker de OpenThread
También puedes intentar usar el router de borde OpenThread en un contenedor de Docker.