
1. Overview
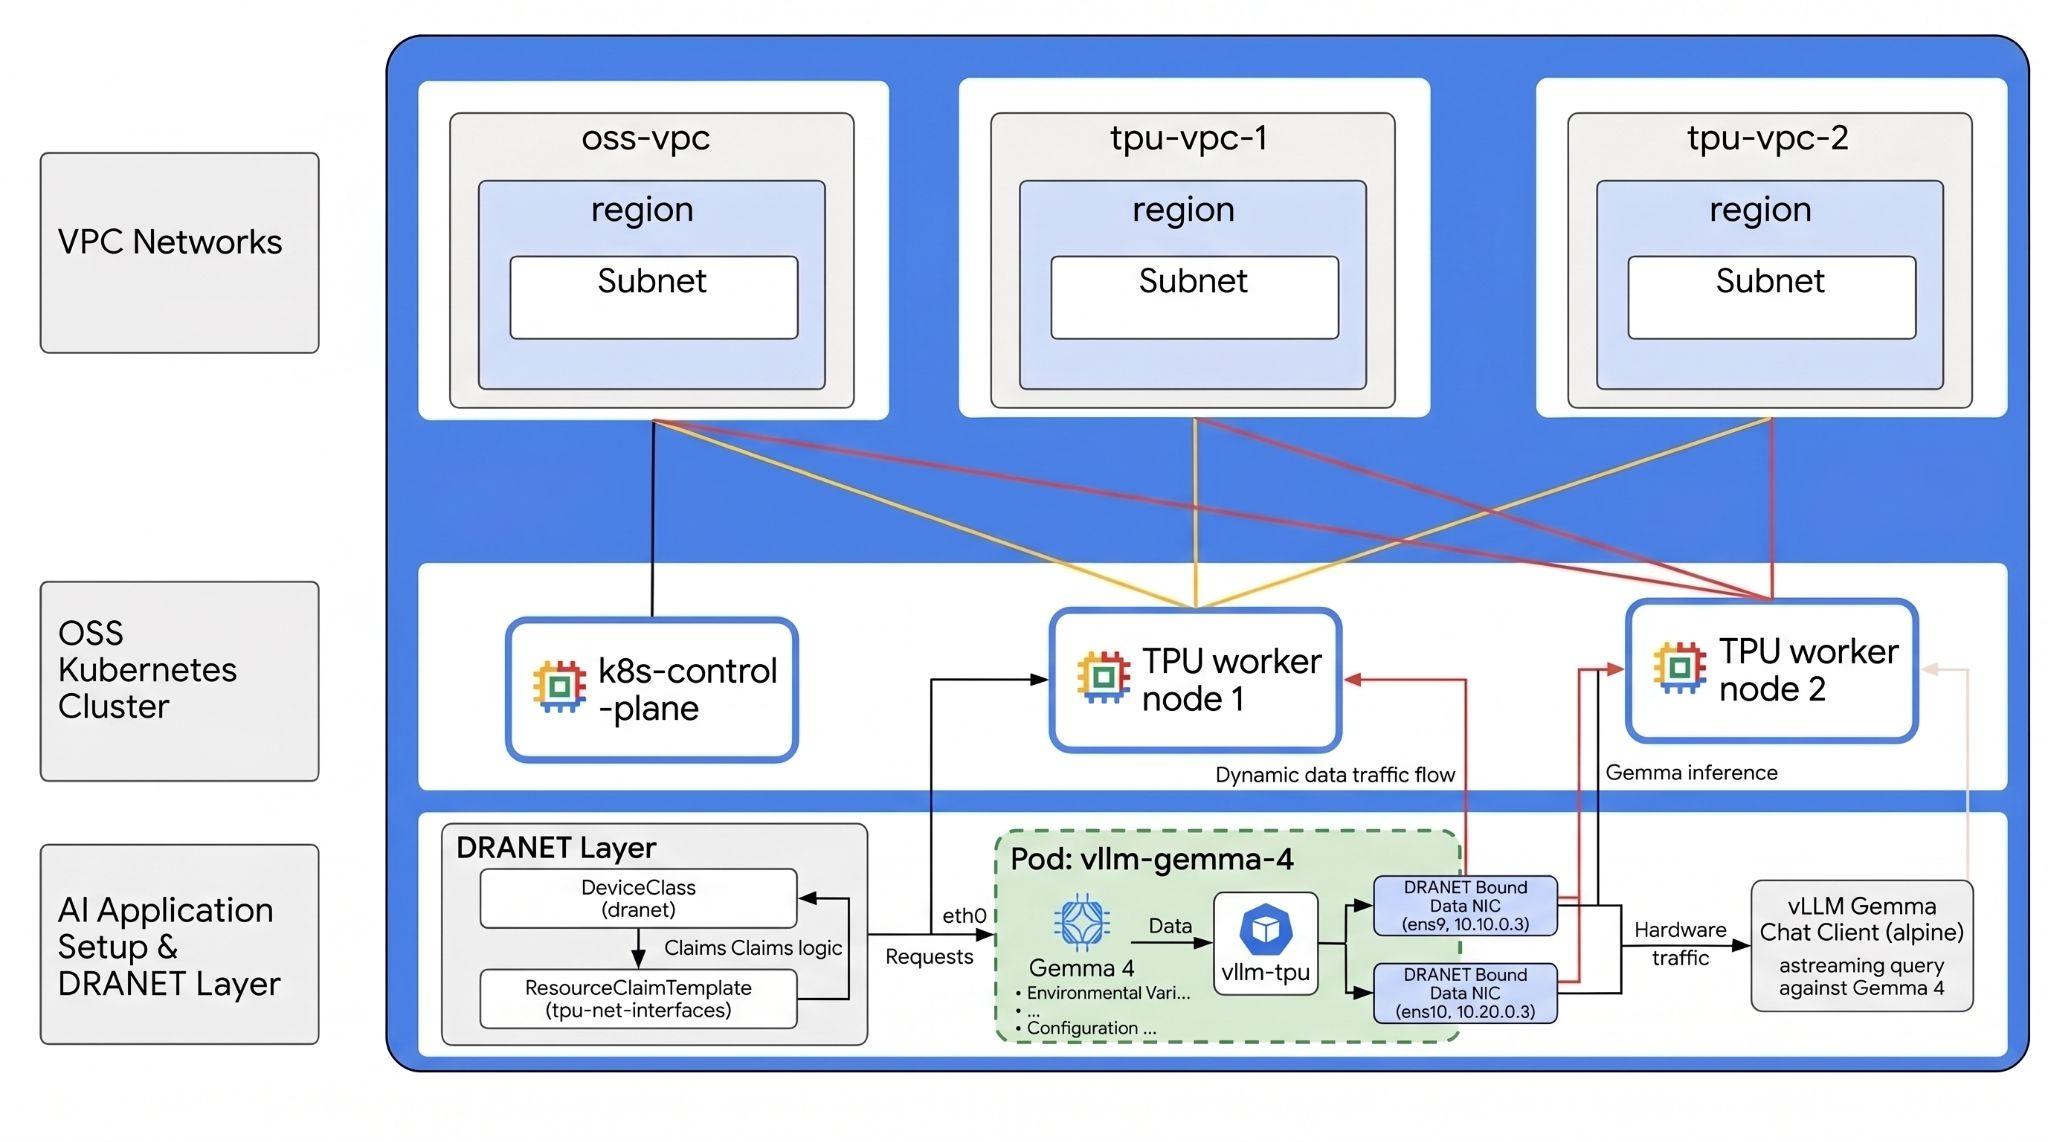
This lab introduces you to building a self-managed, AI infrastructure directly on Google Compute Engine (GCE). You will bootstrap an unmanaged Kubernetes cluster on virtual machines (some with TPUs) using Terraform, kubeadm, and configure Kubernetes Dynamic Resource Allocation (DRA) using the open-source driver. You will be working with the following:
- Google Compute Engine - This provides the compute resources to bootstrap your clusters
- TPUs - Google's custom-built accelerator chips.
- Kubernetes OSS - Software to install and set up Kubernetes manually
- OSS DRANET - DRA Networking driver
- OSS DRA for TPU - DRA drivers which support TPUs
To configure the environment, you will deploy multiple independent VPC networks each with its own subnet. This allows you to provision your VM instances with multiple network interfaces (multi-NIC), separating management traffic from high-speed TPU data traffic.
Next, to enable open-source Dynamic Resource Allocation (DRA), you will install both the DRA Google TPU hardware driver and the DRANET networking driver. You will then configure Kubernetes DeviceClasses and write ResourceClaimTemplates to handle the dynamic provisioning of these resources.
Finally, you will deploy a high-performance benchmarking workload using Neper to validate the Jumbo Frame network data paths between your worker nodes, followed by a Python JAX test to validate the underlying TPU silicon. You will then deploy vLLM to serve Google's cutting-edge Gemma 4 model via Hugging Face using fully isolated hardware and network DRA claims.
The configurations will use a combination of Terraform, gcloud, and kubectl.
In this lab you will learn how to perform the following task:
- Set up a VPC networks
- Deploy 3 nodes on GCE (1 Standard node and 2 TPU v6 nodes)
- Bootstrap Kubernetes
- Configure OSS DRANET and DRA for TPU
- Benchmark Performance
- Create DeviceClasses and ResourceClaimTemplates
- Benchmark network and hardware performance
- Deploy Gemma 4: Serve the model on TPU v6e hardware using vLLM and active DRA claims
- Test connectivity to the LLM
In this lab, you're going to be creating the following pattern.
Figure1.
2. Google Cloud services setup
Self-paced environment setup
- Sign-in to the Google Cloud Console and create a new project or reuse an existing one. If you don't already have a Gmail or Google Workspace account, you must create one.

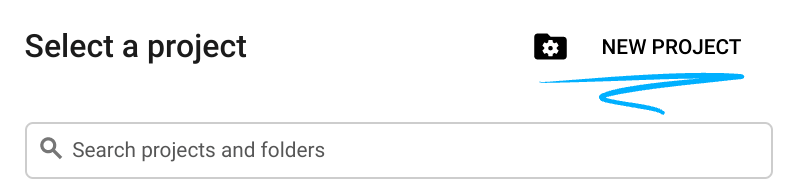
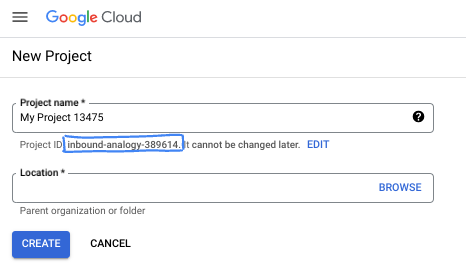
- The Project name is the display name for this project's participants. It is a character string not used by Google APIs. You can always update it.
- The Project ID is unique across all Google Cloud projects and is immutable (cannot be changed after it has been set). The Cloud Console auto-generates a unique string; usually you don't care what it is. In most codelabs, you'll need to reference your Project ID (typically identified as
PROJECT_ID). If you don't like the generated ID, you might generate another random one. Alternatively, you can try your own, and see if it's available. It can't be changed after this step and remains for the duration of the project. - For your information, there is a third value, a Project Number, which some APIs use. Learn more about all three of these values in the documentation.
- Next, you'll need to enable billing in the Cloud Console to use Cloud resources/APIs. Running through this codelab won't cost much, if anything at all. To shut down resources to avoid incurring billing beyond this tutorial, you can delete the resources you created or delete the project. New Google Cloud users are eligible for the $300 USD Free Trial program.
Start Cloud Shell
While Google Cloud can be operated remotely from your laptop, in this codelab you will be using Google Cloud Shell, a command line environment running in the Cloud.
From the Google Cloud Console, click the Cloud Shell icon on the top right toolbar:

It should only take a few moments to provision and connect to the environment. When it is finished, you should see something like this:

This virtual machine is loaded with all the development tools you'll need. It offers a persistent 5GB home directory, and runs on Google Cloud, greatly enhancing network performance and authentication. All of your work in this codelab can be done within a browser. You do not need to install anything.
3. Setup environment with Terraform
To do this lab you need access to TPUs. The exact version used is TPU v6e.
- You should follow the TPU plan doc and enable TPU quota to get access.
- Use a region that you have TPU quota in. For more info check this document " Validate TPU availability in GKE"
- We are using a small deployment requiring (2) 4 TPU v6e chips (
ct6e-standard-4t)which will be a 2x2 slice in a single region. - Hugging Face Token: An Access Token is needed to download the Gemma model weights
We will create three custom VPCs with firewall rules, subnets. Open the cloud console and select the project you will be using.
- Open Cloud Shell located at the top of your console on the right, ensure you see the correct project id in Cloud Shell, confirm any prompts to allow access.

- Create a folder called
oss-kube-dra,move to the folder and add some variables. p.s. Update the variable values for "REGION", and "ZONE" to your actual region and zone, the default region used is "europe-west4" and the default zone use is "europe-west4-a".
mkdir -p oss-kube-dra && cd oss-kube-dra
export PROJECT_ID=$(gcloud config get-value project)
export REGION="europe-west4"
export ZONE="europe-west4-a"
echo $PROJECT_ID
echo $REGION
echo $ZONE
- Now add some configuration files. These will create the following terraform.tfvars , variables.tf, vpc.tf file.
cat << EOF > terraform.tfvars
project_id = "${PROJECT_ID}"
region     = "${REGION}"
zone       = "${ZONE}"
EOF

cat << 'EOF' > variables.tf
variable "project_id" {
  type        = string
  description = "The Google Cloud Project ID"
}

variable "region" {
  type        = string
  description = "The region to deploy the resources"
}

variable "zone" {
  type        = string
  description = "The specific zone for the VMs"
}

variable "control_plane_machine_type" {
  type        = string
  default     = "e2-standard-8"
  description = "Machine type for the Kubernetes control plane node"
}

variable "tpu_worker_machine_type" {
  type        = string
  default     = "ct6e-standard-4t"
  description = "The machine type for TPU workers (TPU v6e Trillium VM)"
}
EOF


cat << 'EOF' > vpc.tf
terraform {
  required_version = ">= 1.5.0"
  required_providers {
    google = {
      source  = "hashicorp/google"
      version = "~> 7.32.0"
    }
  }
}

provider "google" {
  project = var.project_id
  region  = var.region
}

# 1. Primary Management VPC and Subnet
resource "google_compute_network" "primary_vpc" {
  name                    = "oss-k8s-primary-vpc"
  auto_create_subnetworks = false
  mtu                     = 1460
}

resource "google_compute_subnetwork" "primary_subnet" {
  name          = "oss-k8s-primary-subnet"
  ip_cidr_range = "10.0.0.0/24"
  region        = var.region
  network       = google_compute_network.primary_vpc.id
}

# 2. Cloud NAT Router and NAT Gateway for Primary VPC (Outbound Access)
resource "google_compute_router" "router" {
  name    = "oss-k8s-router"
  network = google_compute_network.primary_vpc.id
  region  = var.region
}

resource "google_compute_router_nat" "nat" {
  name                               = "oss-k8s-nat"
  router                             = google_compute_router.router.name
  region                             = var.region
  nat_ip_allocate_option             = "AUTO_ONLY"
  source_subnetwork_ip_ranges_to_nat = "ALL_SUBNETWORKS_ALL_IP_RANGES"
}

# 3. Firewalls for Primary VPC
resource "google_compute_firewall" "allow_internal" {
  name    = "oss-k8s-primary-allow-internal"
  network = google_compute_network.primary_vpc.id

  allow {
    protocol = "tcp"
  }
  allow {
    protocol = "udp"
  }
  allow {
    protocol = "icmp"
  }

  source_ranges = ["10.0.0.0/24"]
}

resource "google_compute_firewall" "allow_iap" {
  name    = "oss-k8s-allow-iap-ssh"
  network = google_compute_network.primary_vpc.id

  allow {
    protocol = "tcp"
    ports    = ["22"]
  }

  source_ranges = ["35.235.240.0/20"]
}

# 4. Multi-NIC TPU Networks and Subnets (With Jumbo Frames MTU 8896)
resource "google_compute_network" "tpu_vpc" {
  count                   = 2
  name                    = "oss-tpu-vpc-${count.index + 1}"
  auto_create_subnetworks = false
  mtu                     = 8896
}

resource "google_compute_subnetwork" "tpu_subnet" {
  count         = 2
  name          = "oss-tpu-vpc-${count.index + 1}-subnet"
  ip_cidr_range = "10.${count.index + 1}0.0.0/24"
  region        = var.region
  network       = google_compute_network.tpu_vpc[count.index].id
}

resource "google_compute_firewall" "tpu_allow_internal" {
  count   = 2
  name    = "oss-tpu${count.index + 1}-allow-internal"
  network = google_compute_network.tpu_vpc[count.index].id

  allow {
    protocol = "tcp"
  }
  allow {
    protocol = "udp"
  }
  allow {
    protocol = "icmp"
  }

  source_ranges = ["10.${count.index + 1}0.0.0/24"]
}
EOF
- Make sure you are in the
oss-kube-dradirectory and run the following commandsterraform initInitializes the working directory. This is the first step and it downloads the providers required for the given configuration.terraform plan -outgenerates an execution plan, showing what actions Terraform will take to deploy your infrastructure. The-outallows you to save the execution plan to a named binary. You can see what will happen without making any changes.terraform applyruns the updates.
terraform init
terraform plan -out=tfplan
- Now run the deployment after you run
terraform apply, since you are applying the saved execution plan, it will execute immediately without prompting for confirmation. (This may take between 5 -10 mins)
terraform apply tfplan
- Verify the set up.
echo -e "\n=== Verifying VPC Networks ==="
gcloud compute networks list --filter="name~oss-.*" --project=$PROJECT_ID

echo -e "\n=== Verifying Subnetworks ==="
gcloud compute networks subnets list --filter="name~oss-.*" --project=$PROJECT_ID

echo -e "\n=== Verifying Firewall Rules ==="
gcloud compute firewall-rules list --filter="name~oss-.*" --project=$PROJECT_ID

echo -e "\n=== Verifying Cloud NAT ==="
gcloud compute routers nats list --router=oss-k8s-router --router-region=$REGION --project=$PROJECT_ID
Create your VM nodes
Now, you will define the Compute Engine instances.
- Make sure you are in the
oss-kube-dradirectory and run the following command in Cloud Shell to write thenodes.tffile.
cat << 'EOF' > nodes.tf
# 1. K8s Control Plane VM (No TPU)
resource "google_compute_instance" "control_plane" {
  name         = "k8s-control-plane"
  machine_type = var.control_plane_machine_type
  zone         = var.zone

  boot_disk {
    initialize_params {
      image = "projects/ubuntu-os-cloud/global/images/family/ubuntu-2204-lts"
      size  = 100
    }
  }

  network_interface {
    network    = google_compute_network.primary_vpc.id
    subnetwork = google_compute_subnetwork.primary_subnet.id
    # No public IP block keeps this node private
  }

  service_account {
    scopes = ["cloud-platform"]
  }
}

# 2. TPU Worker VMs (Multi-NIC ct6e-standard-4t instances)
resource "google_compute_instance" "tpu_workers" {
  count        = 2
  name         = "k8s-tpu-worker-${count.index + 1}"
  machine_type = var.tpu_worker_machine_type
  zone         = var.zone

  boot_disk {
    initialize_params {
      image = "projects/ubuntu-os-accelerator-images/global/images/family/ubuntu-accel-2204-amd64-tpu-v5e-v5p-v6e"
      size  = 200
    }
  }

  scheduling {
    on_host_maintenance = "TERMINATE"
    provisioning_model  = "STANDARD"
  }

  # NIC 1: Management VPC Subnet
  network_interface {
    network    = google_compute_network.primary_vpc.id
    subnetwork = google_compute_subnetwork.primary_subnet.id
  }

  # NIC 2: TPU VPC 1 Subnet
  network_interface {
    network    = google_compute_network.tpu_vpc[0].id
    subnetwork = google_compute_subnetwork.tpu_subnet[0].id
  }

  # NIC 3: TPU VPC 2 Subnet
  network_interface {
    network    = google_compute_network.tpu_vpc[1].id
    subnetwork = google_compute_subnetwork.tpu_subnet[1].id
  }

  service_account {
    scopes = ["cloud-platform"]
  }


  lifecycle {
    ignore_changes = [
      boot_disk[0].initialize_params[0].image,
      guest_accelerator,
      metadata
    ]
  }
}
EOF
- With your new configuration written, generate a new plan and apply it to provision your instances.
terraform plan -out=tfplan

terraform apply tfplan
- Verify.
echo -e "\n=== Verifying Provisioned VM Instances ==="
gcloud compute instances list --filter="name~k8s-.*" --project=$PROJECT_ID


echo -e "\n=== Verifying Network Interfaces on Workers ==="
for i in 1 2; do
  echo -e "\n--- Interfaces for k8s-tpu-worker-${i} ---"
  gcloud compute instances describe k8s-tpu-worker-${i} \
      --zone=$ZONE \
      --project=$PROJECT_ID \
      --format="table(networkInterfaces[].network.basename(), networkInterfaces[].networkIP)"
done
4. Bootstrap your Kubernetes cluster control node
In this section, you will connect securely to your newly created control plane VM instance, configure the underlying operating system, install the container runtime and Kubernetes packages, initialize your cluster, and deploy Calico CNI with strict traffic isolation to the management network.
- Connect securely to the
k8s-control-planeinstance using GCE's Identity-Aware Proxy (IAP) tunnel. Run the following command in your Cloud Shell terminal:
gcloud compute ssh k8s-control-plane \
    --zone=$ZONE \
    --tunnel-through-iap
- On the
k8s-control-planeVM create a script calledinit-control-plane.shto automate the installation and configuration steps.
cat << 'CONTROL_PLANE_EOF' > init-control-plane.sh
#!/bin/bash
# Strict error handling: fail instantly if any command exits with a non-zero status
set -e

echo "=== 1. Neutralizing Background Updates & Preparing Base OS ==="
# Prevent unattended upgrades from locking apt or breaking network configuration mid-setup
sudo systemctl stop apt-daily.timer apt-daily-upgrade.timer || true
sudo systemctl disable apt-daily.timer apt-daily-upgrade.timer || true
sudo systemctl mask apt-daily.service apt-daily-upgrade.service || true

# Turn off swap (mandatory for Kubernetes)
sudo swapoff -a
sudo sed -i '/ swap / s/^\(.*\)$/#\1/g' /etc/fstab

# Load required kernel modules
cat << 'EOT' | sudo tee /etc/modules-load.d/k8s.conf
overlay
br_netfilter
EOT

sudo modprobe overlay
sudo modprobe br_netfilter

# Configure sysctl requirements for Kubernetes bridging
cat << 'EOT' | sudo tee /etc/sysctl.d/k8s.conf
net.bridge.bridge-nf-call-iptables  = 1
net.bridge.bridge-nf-call-ip6tables = 1
net.ipv4.ip_forward                 = 1
EOT
sudo sysctl --system

echo "=== 2. Installing Container Runtime (Containerd) ==="
sudo apt-get update
sudo apt-get install -y ca-certificates curl gnupg bash-completion

sudo install -m 0755 -d /etc/apt/keyrings
curl -fsSL https://download.docker.com/linux/ubuntu/gpg | sudo gpg --dearmor --yes -o /etc/apt/keyrings/docker.gpg
sudo chmod a+r /etc/apt/keyrings/docker.gpg
echo "deb [arch=$(dpkg --print-architecture) signed-by=/etc/apt/keyrings/docker.gpg] https://download.docker.com/linux/ubuntu $(. /etc/os-release && echo $VERSION_CODENAME) stable" | sudo tee /etc/apt/sources.list.d/docker.list > /dev/null

sudo apt-get update
sudo apt-get install -y docker-ce docker-ce-cli containerd.io

echo "=== 3. Configuring Containerd with Systemd Cgroups ==="
sudo mkdir -p /etc/containerd
containerd config default | sudo tee /etc/containerd/config.toml >/dev/null
sudo sed -i 's/SystemdCgroup = false/SystemdCgroup = true/' /etc/containerd/config.toml

sudo systemctl daemon-reload
sudo systemctl restart containerd
sudo systemctl enable containerd

# Validation Step: Verify runtime engine health
if ! systemctl is-active --quiet containerd; then
    echo "❌ ERROR: Containerd failed to start properly."
    exit 1
fi
echo "✅ Containerd runtime is active and healthy."

echo "=== 4. Installing Kubernetes 1.36 Binaries ==="
curl -fsSL https://pkgs.k8s.io/core:/stable:/v1.36/deb/Release.key | sudo gpg --dearmor --yes -o /etc/apt/keyrings/kubernetes-apt-keyring.gpg
echo 'deb [signed-by=/etc/apt/keyrings/kubernetes-apt-keyring.gpg] https://pkgs.k8s.io/core:/stable:/v1.36/deb/ /' | sudo tee /etc/apt/sources.list.d/kubernetes.list

sudo apt-get update
sudo apt-get install -y kubelet kubeadm kubectl
sudo apt-mark hold kubelet kubeadm kubectl

# Configure Autocomplete and Aliases system-wide
kubectl completion bash | sudo tee /etc/bash_completion.d/kubectl > /dev/null
kubeadm completion bash | sudo tee /etc/bash_completion.d/kubeadm > /dev/null
if ! grep -q 'alias k=kubectl' ~/.bashrc; then
  echo 'alias k=kubectl' >> ~/.bashrc
  echo 'complete -o default -F __start_kubectl k' >> ~/.bashrc
fi

echo "=== 5. Initializing Control Plane Engine ==="
sudo kubeadm init --pod-network-cidr=192.168.0.0/16

echo "=== 6. Configuring Administrative Cluster Credentials ==="
mkdir -p $HOME/.kube
sudo cp -i /etc/kubernetes/admin.conf $HOME/.kube/config
sudo chown $(id -u):$(id -g) $HOME/.kube/config

# Validation Step: Verify API Server local responsiveness
echo "Waiting for local API server context..."
until kubectl cluster-info &>/dev/null; do
    sleep 2
done
echo "✅ Kubernetes API server is responding locally."

echo "=== 7. Deploying Calico Network Operator ==="
kubectl create -f https://raw.githubusercontent.com/projectcalico/calico/v3.27.3/manifests/tigera-operator.yaml

# Validation Step: Ensure Tigera Operator CRD is fully available before applying configuration
echo "Waiting for Tigera Installation CRD to register on the API server..."
kubectl wait --for=condition=established crd/installations.operator.tigera.io --timeout=60s

echo "=== 8. Deploying Calico Custom Resources (Subnet Interlock Locked to 10.0.0.0/24) ==="
cat << 'CALICO_EOF' > custom-calico.yaml
apiVersion: operator.tigera.io/v1
kind: Installation
metadata:
  name: default
spec:
  calicoNetwork:
    nodeAddressAutodetectionV4:
      cidrs:
        - "10.0.0.0/24"
    ipPools:
    - blockSize: 26
      cidr: 192.168.0.0/16
      encapsulation: VXLANCrossSubnet
      natOutgoing: Enabled
      nodeSelector: all()
CALICO_EOF
kubectl apply -f custom-calico.yaml

# Validation Step: Confirm Calico daemon configurations are processing
echo "Waiting 10 seconds for Calico system namespaces to initialize..."
sleep 10
echo "Current Calico workload deployment status:"
kubectl get pods -n calico-system

echo "=== 9. Exporting Worker Cluster Join Token ==="
sudo kubeadm token create --print-join-command > ~/join.sh
chmod +x ~/join.sh

echo "--------------------------------------------------------"
echo "✅ CONTROL PLANE BOOTSTRAP COMPLETE!"
echo "Your cluster join command for the TPU workers is saved below:"
echo "--------------------------------------------------------"
cat ~/join.sh
CONTROL_PLANE_EOF
- Run the script.
chmod +x init-control-plane.sh
./init-control-plane.sh
- When complete, verify. It will take a few minutes for all to become active.
kubectl get nodes
kubectl get pods -A
You should see something similar to this
NAME                STATUS   ROLES           AGE     VERSION
k8s-control-plane   Ready    control-plane   6m50s   v1.36.2
NAMESPACE         NAME                                        READY   STATUS    RESTARTS   AGE
calico-system     calico-kube-controllers-5578ff64dd-87vp2    1/1     Running   0          6m33s
calico-system     calico-node-fxzpp                           1/1     Running   0          6m33s
calico-system     calico-typha-785cbc858-rv4nz                1/1     Running   0          6m33s
calico-system     csi-node-driver-wlrhx                       2/2     Running   0          6m33s
kube-system       coredns-589f44dc88-pqfrl                    1/1     Running   0          6m42s
kube-system       coredns-589f44dc88-sdwmj                    1/1     Running   0          6m42s
kube-system       etcd-k8s-control-plane                      1/1     Running   0          6m47s
kube-system       kube-apiserver-k8s-control-plane            1/1     Running   0          6m47s
kube-system       kube-controller-manager-k8s-control-plane   1/1     Running   0          6m47s
kube-system       kube-proxy-jnm2p                            1/1     Running   0          6m42s
kube-system       kube-scheduler-k8s-control-plane            1/1     Running   0          6m47s
tigera-operator   tigera-operator-6bc8d879b5-w5mrq            1/1     Running   0          6m42s
- Exit the
sshconnection to return to Cloud Shell
exit
5. Add the TPU worker nodes
You will run a script from Cloud Shell that securely connects to your control plane VM, retrieves the cluster join token, and concurrently configures and registers your TPU worker nodes into the cluster.
- Run the following command in Cloud Shell to write the orchestration script:
cat << 'WORKER_BOOTSTRAP_EOF' > bootstrap-workers.sh
#!/bin/bash
# Strict error handling: fail instantly if any command exits with a non-zero status
set -e

# Fetch the join command safely from the control plane
echo "Fetching join command from Control Plane..."
JOIN_CMD=$(gcloud compute ssh k8s-control-plane --zone=$ZONE --tunnel-through-iap --command="cat ~/join.sh" 2>/dev/null)

if [ -z "$JOIN_CMD" ]; then
    echo "❌ ERROR: Failed to retrieve the join command. Ensure the control plane is reachable."
    exit 1
fi

echo "✅ Successfully retrieved join command."

# Create the setup script locally to be copied to the workers
cat << 'WORKER_INIT_EOF' > init-worker.sh
#!/bin/bash
set -e

echo "=== 1. Neutralizing Background Updates & Setting Non-Interactive Mode ==="
export DEBIAN_FRONTEND=noninteractive
sudo sed -i "s/#\$nrconf{restart} = 'i';/\$nrconf{restart} = 'a';/g" /etc/needrestart/needrestart.conf 2>/dev/null || true

# Prevent unattended upgrades from tearing down network interfaces mid-setup
sudo systemctl stop apt-daily.timer apt-daily-upgrade.timer || true
sudo systemctl disable apt-daily.timer apt-daily-upgrade.timer || true
sudo systemctl mask apt-daily.service apt-daily-upgrade.service || true

echo "=== 2. Base OS Prep ==="
# Disable swap
sudo swapoff -a
sudo sed -i '/ swap / s/^\(.*\)$/#\1/g' /etc/fstab

# Load required kernel modules
cat << 'EOT' | sudo tee /etc/modules-load.d/k8s.conf
overlay
br_netfilter
EOT
sudo modprobe overlay
sudo modprobe br_netfilter

# Configure bridging and IP forwarding sysctls
cat << 'EOT' | sudo tee /etc/sysctl.d/k8s.conf
net.bridge.bridge-nf-call-iptables  = 1
net.bridge.bridge-nf-call-ip6tables = 1
net.ipv4.ip_forward                 = 1
EOT
sudo sysctl --system

echo "=== 3. Installing Containerd (CRI-Only) ==="
sudo apt-get update && sudo apt-get install -yq ca-certificates curl gnupg bash-completion
sudo install -m 0755 -d /etc/apt/keyrings
curl -fsSL https://download.docker.com/linux/ubuntu/gpg | sudo gpg --dearmor --yes -o /etc/apt/keyrings/docker.gpg
sudo chmod a+r /etc/apt/keyrings/docker.gpg
echo "deb [arch=$(dpkg --print-architecture) signed-by=/etc/apt/keyrings/docker.gpg] https://download.docker.com/linux/ubuntu $(. /etc/os-release && echo $VERSION_CODENAME) stable" | sudo tee /etc/apt/sources.list.d/docker.list > /dev/null

# Install only containerd to avoid unnecessary Docker CE overhead
sudo apt-get update && sudo apt-get install -yq containerd.io
sudo mkdir -p /etc/containerd
containerd config default | sudo tee /etc/containerd/config.toml >/dev/null
sudo sed -i 's/SystemdCgroup = false/SystemdCgroup = true/' /etc/containerd/config.toml
sudo systemctl daemon-reload
sudo systemctl restart containerd
sudo systemctl enable containerd

# Validation: Check containerd status
if ! systemctl is-active --quiet containerd; then
    echo "❌ ERROR: Containerd failed to start."
    exit 1
fi

echo "=== 4. Installing Kubernetes 1.36 Binaries ==="
curl -fsSL https://pkgs.k8s.io/core:/stable:/v1.36/deb/Release.key | sudo gpg --dearmor --yes -o /etc/apt/keyrings/kubernetes-apt-keyring.gpg
echo 'deb [signed-by=/etc/apt/keyrings/kubernetes-apt-keyring.gpg] https://pkgs.k8s.io/core:/stable:/v1.36/deb/ /' | sudo tee /etc/apt/sources.list.d/kubernetes.list
sudo apt-get update && sudo apt-get install -yq kubelet kubeadm kubectl
sudo apt-mark hold kubelet kubeadm kubectl
WORKER_INIT_EOF

# Append the actual join command to the script
echo "echo \"=== 5. Joining Cluster ===\"" >> init-worker.sh
echo "sudo $JOIN_CMD" >> init-worker.sh

# Push and run on both Workers concurrently
echo "Starting concurrent bootstrap on both workers..."

(
    echo "[Worker 1] Copying script..."
    gcloud compute scp init-worker.sh k8s-tpu-worker-1:~ --zone=$ZONE --tunnel-through-iap --quiet
    echo "[Worker 1] Executing script..."
    gcloud compute ssh k8s-tpu-worker-1 --zone=$ZONE --tunnel-through-iap --command="bash ~/init-worker.sh"
    echo "✅ [Worker 1] Bootstrap and Join complete!"
) &

(
    echo "[Worker 2] Copying script..."
    gcloud compute scp init-worker.sh k8s-tpu-worker-2:~ --zone=$ZONE --tunnel-through-iap --quiet
    echo "[Worker 2] Executing script..."
    gcloud compute ssh k8s-tpu-worker-2 --zone=$ZONE --tunnel-through-iap --command="bash ~/init-worker.sh"
    echo "✅ [Worker 2] Bootstrap and Join complete!"
) &

# Wait for both background processes to finish
wait

echo "--------------------------------------------------------"
echo "✅ BOTH WORKERS HAVE FINISHED PROCESSING"
echo "--------------------------------------------------------"

# Final Validation Check from Control Plane
echo "Verifying cluster node status..."
sleep 5 # Give kubelet a moment to register the nodes
gcloud compute ssh k8s-control-plane --zone=$ZONE --tunnel-through-iap --command="kubectl get nodes -o wide"
WORKER_BOOTSTRAP_EOF
- Execute the Worker Setup. (This process runs both installations simultaneously in the background and takes approximately 3 to 5 minutes to complete).
chmod +x bootstrap-workers.sh
./bootstrap-workers.sh
You should see something similiar when all nodes are added to the cluster
To increase the performance of the tunnel, consider installing NumPy. For instructions,
please see https://cloud.google.com/iap/docs/using-tcp-forwarding#increasing_the_tcp_upload_bandwidth

NAME                STATUS     ROLES           AGE   VERSION   INTERNAL-IP   EXTERNAL-IP   OS-IMAGE             KERNEL-VERSION           CONTAINER-RUNTIME
k8s-control-plane   Ready      control-plane   25m   v1.36.2   10.0.0.2      <none>        Ubuntu 22.04.5 LTS   6.8.0-1064-gcp (amd64)   containerd://2.2.6
k8s-tpu-worker-1    NotReady   <none>          10s   v1.36.2   10.0.0.3      <none>        Ubuntu 22.04.5 LTS   6.8.0-1064-gcp (amd64)   containerd://2.2.6
k8s-tpu-worker-2    Ready      <none>          27s   v1.36.2   10.0.0.4      <none>        Ubuntu 22.04.5 LTS   6.8.0-1064-gcp (amd64)   containerd://2.2.6
6. Deploying OSS DRA TPU Driver
In this section, you will return to the control plane, label your TPU worker nodes with their specific accelerator topology details, and install the open-source Google TPU DRA driver using Helm. This driver is responsible for discovering the physical TPU v6e chips and mapping them natively to the Kubernetes API.
- Reconnect securely to the
k8s-control-planeVM from Cloud Shell.
gcloud compute ssh k8s-control-plane \
    --zone=$ZONE \
    --tunnel-through-iap
- Run these commands inside your
k8s-control-planeSSH session. Label Nodes with the complete label set (including exact chip count keys)
kubectl label node k8s-tpu-worker-1 \
  cloud.google.com/gke-tpu-accelerator=tpu-v6e-slice \
  cloud.google.com/gke-tpu-topology=2x2 \
  cloud.google.com/gke-tpu-dra-driver=true \
  cloud.google.com/gke-accelerator-count=4 \
  cloud.google.com/gke-tpu-count=4 \
  --overwrite

kubectl label node k8s-tpu-worker-2 \
  cloud.google.com/gke-tpu-accelerator=tpu-v6e-slice \
  cloud.google.com/gke-tpu-topology=2x2 \
  cloud.google.com/gke-tpu-dra-driver=true \
  cloud.google.com/gke-accelerator-count=4 \
  cloud.google.com/gke-tpu-count=4 \
  --overwrite
- Clone and install DRA TPU driver with Helm
curl -fsSL https://raw.githubusercontent.com/helm/helm/main/scripts/get-helm-3 | bash

git clone https://github.com/kubernetes-sigs/dra-driver-google-tpu.git ~/dra-driver-google-tpu || true
cd ~/dra-driver-google-tpu
rm -f *.pack *.tgz

helm install dra-driver-google-tpu ./deployments/helm/dra-driver-google-tpu \
  -n dra-driver-google-tpu \
  --create-namespace \
  --set 'kubeletPlugin.env[0].name=NODE_NAME' \
  --set 'kubeletPlugin.env[0].valueFrom.fieldRef.fieldPath=spec.nodeName'

cd ~
- Validate DRA TPU driver setup
# Verify driver daemonset status (Pods should show as Running and Ready)
kubectl get pods -n dra-driver-google-tpu -o wide

# Verify TPU ResourceSlices are successfully published to the API server
kubectl get resourceslices

# Safely parse the ResourceSlices to show the Node Name and the number of TPU chips registered
kubectl get resourceslices -o json | jq -r '.items[] | select(.spec.driver=="tpu.google.com") | "Node: \(.spec.nodeName) | TPUs Registered: \(.spec.devices | length)"'

# Inspect driver logs to confirm the TPU hardware was initialized successfully
kubectl logs -n dra-driver-google-tpu -l app.kubernetes.io/name=dra-driver-google-tpu -c tpu-dra-plugin --tail=20
7. Deploying Open-Source DRANET & Device Classes
In this section, you will return to the control plane, install the open-source DRANET driver, apply a custom filter patch to exclude virtual interfaces, and establish your Kubernetes DeviceClass and ResourceClaimTemplate with the matching oss network prefixes.
- Reconnect securely to the
k8s-control-planeVM from Cloud Shell. If already connected, skip.
gcloud compute ssh k8s-control-plane \
    --zone=$ZONE \
    --tunnel-through-iap
- Run these commands inside your
k8s-control-planeSSH session
# Install the core components and patch
kubectl apply -f https://raw.githubusercontent.com/kubernetes-sigs/dranet/refs/heads/main/install.yaml


kubectl patch daemonset dranet -n kube-system --type='json' -p='[ { "op": "add", "path": "/spec/template/spec/containers/0/args/-", "value": "-filter=!(\"dra.net/type\" in attributes) || (attributes[\"dra.net/type\"].StringValue != \"veth\" && attributes[\"dra.net/type\"].StringValue != \"vxlan\" && attributes[\"dra.net/type\"].StringValue != \"bridge\")" } ]'

# Monitor rollout readiness
kubectl rollout status daemonset/dranet -n kube-system

# Verify running components and permissions
kubectl get pods -n kube-system -l app=dranet -o wide
kubectl get clusterrole,clusterrolebinding,sa dranet -n kube-system

# Interrogate logs for driver binding confirmation
kubectl logs -n kube-system -l app=dranet --tail=20
- Apply the DeviceClass and ResourceClaimTemplate
# Apply DRANET DeviceClass and BOTH ResourceClaimTemplates (Network + Hardware)
cat << 'EOF' | kubectl apply -f -
apiVersion: resource.k8s.io/v1
kind: DeviceClass
metadata:
  name: dranet
spec:
  selectors:
    - cel:
        expression: device.driver == "dra.net"
---
apiVersion: resource.k8s.io/v1
kind: ResourceClaimTemplate
metadata:
  name: tpu-net-interfaces
  namespace: default
spec:
  spec:
    devices:
      requests:
      - name: tpu-net-interface
        exactly:
          deviceClassName: dranet
          count: 2
          selectors:
          - cel:
              expression: device.attributes["gce.dra.net"].networkName.startsWith("oss-tpu-vpc")
      config:
      - opaque:
          driver: dra.net
          parameters:
            interface:
              mtu: 8896
              gsoMaxSize: 65536
              groMaxSize: 65536
              gsoIPv4MaxSize: 65536
              groIPv4MaxSize: 65536
              disableEbpfPrograms: true
---
apiVersion: resource.k8s.io/v1
kind: ResourceClaimTemplate
metadata:
  name: tpu-device-template
  namespace: default
spec:
  spec:
    devices:
      requests:
      - name: tpu-devices
        exactly:
          deviceClassName: tpu.google.com
          allocationMode: ExactCount
          count: 4
EOF
- Confirm that your templates and classes are registered correctly in the Kubernetes API.
# Verify ResourceSlices exist and are actively serving both drivers
kubectl get resourceslices -o custom-columns=NAME:.metadata.name,NODE:.spec.nodeName,DRIVER:.spec.driver | grep -E "dra.net|tpu.google.com"

# Verify the DRANET daemonset pods are Running across all nodes
kubectl get pods -n kube-system -l app=dranet -o wide
- Deploy the Parallel Neper StatefulSet.
cat << 'EOF' | kubectl apply -f -
---
apiVersion: v1
kind: Service
metadata:
  name: neper
spec:
  clusterIP: None
  selector:
    app: neper
---
apiVersion: apps/v1
kind: StatefulSet
metadata:
  name: neper
spec:
  selector:
    matchLabels:
      app: neper
  serviceName: neper
  replicas: 2
  template:
    metadata:
      labels:
        app: neper
    spec:
      initContainers:
      - name: "network-optimization-sysctls"
        image: "busybox"
        securityContext:
          privileged: true
        command:
        - sh
        - -c
        - |
          echo 5000 > /proc/sys/net/ipv4/tcp_rto_min_us
          echo 1 > /proc/sys/net/ipv4/tcp_no_metrics_save
          echo 0 > /proc/sys/net/ipv4/tcp_slow_start_after_idle
          echo 131072 > /proc/sys/net/core/optmem_max
          echo "4096 41943040 314572800" > /proc/sys/net/ipv4/tcp_rmem
      containers:
      - name: neper
        image: ubuntu:22.04
        command:
        - /bin/bash
        - -c
        - |
          apt-get update && apt-get install -y iproute2 build-essential git jq python3-pip &&
          git clone https://github.com/google/neper.git /tmp/neper &&
          cd /tmp/neper && make &&
          cp tcp_stream /usr/local/bin/ &&
          sleep infinity
        securityContext:
          privileged: true
        resources:
          requests:
            cpu: "170"
            memory: "650Gi"
          limits:
            cpu: "170"
            memory: "650Gi"
          claims:
          - name: tpu-net-claim
          - name: tpu-hardware-claim
      resourceClaims:
      - name: tpu-net-claim
        resourceClaimTemplateName: tpu-net-interfaces
      - name: tpu-hardware-claim
        resourceClaimTemplateName: tpu-device-template
EOF
- Validation check
echo -e "\n=== Verifying StatefulSet Pod Status ==="
kubectl get pods -l app=neper -o wide

echo -e "\n=== Verifying Dynamic Resource Claims (DRCs) ==="
kubectl get resourceclaims

echo -e "\n=== Inspecting Device Claim Allocation ==="
# Using a safer JSONPath query to extract the allocated drivers and devices
kubectl get resourceclaims -o json | jq -r '.items[] | "Claim: \(.metadata.name) | Driver: \(.status.allocation.devices.results[0].driver // "Pending")"'
8. Run test
Run dual-interface benchmarking and hardware validation suite.
Phase 1 (Network Benchmarking): It waits for both Neper pods (neper-0 and neper-1) to compile dependencies, extracts the non-default multi-NIC IP addresses bound via DRANET, launches concurrent tcp_stream servers on neper-1, generates high-throughput load from neper-0, and parses aggregate throughput in Gigabits per second (Gbps).
Phase 2 (Hardware Validation): It installs Google JAX inside neper-0 and executes matrix multiplication (5000x5000) directly on the mapped TPU chips via VFIO to confirm silicon operational status.
- Run the following command in your
k8s-control-planeto writerun_dual_neper_test.sh
cat << 'EOF' > run_dual_neper_test.sh
#!/bin/bash
set -e

SERVER_POD="neper-1"
CLIENT_POD="neper-0"

echo "================================================="
echo " PHASE 1: DUAL-INTERFACE HIGH-SPEED NETWORK TEST"
echo "================================================="
echo "=== Waiting for Pods to be Ready ==="
kubectl wait --for=condition=ready pod/$CLIENT_POD pod/$SERVER_POD --timeout=300s

echo "=== Waiting for neper compilation to finish inside Pods ==="
for POD in $SERVER_POD $CLIENT_POD; do
  until kubectl exec $POD -c neper -- sh -c 'command -v jq >/dev/null 2>&1 && command -v tcp_stream >/dev/null 2>&1'; do
    sleep 5
  done
done

echo ""
echo "=== Step 1: Extract Target IPs from $SERVER_POD ==="
# Using jq to parse the network interfaces directly from Linux JSON output
IFACE1=$(kubectl exec $SERVER_POD -c neper -- sh -c "ip -j -4 addr show | jq -r '.[] | select(.ifname != \"lo\" and .ifname != \"eth0\") | .ifname' | sed -n '1p'")
IFACE2=$(kubectl exec $SERVER_POD -c neper -- sh -c "ip -j -4 addr show | jq -r '.[] | select(.ifname != \"lo\" and .ifname != \"eth0\") | .ifname' | sed -n '2p'")

IP1=$(kubectl exec $SERVER_POD -c neper -- sh -c "ip -j -4 addr show | jq -r '.[] | select(.ifname != \"lo\" and .ifname != \"eth0\") | .addr_info[0].local' | sed -n '1p'")
IP2=$(kubectl exec $SERVER_POD -c neper -- sh -c "ip -j -4 addr show | jq -r '.[] | select(.ifname != \"lo\" and .ifname != \"eth0\") | .addr_info[0].local' | sed -n '2p'")

echo "   📍 Target IP 1 ($IFACE1): $IP1"
echo "   📍 Target IP 2 ($IFACE2): $IP2"

echo ""
echo "=== Step 2: Initialize TCP Servers on $SERVER_POD ==="
kubectl exec $SERVER_POD -c neper -- sh -c '
for i in 0 1; do
  nohup tcp_stream -C$((52279 + i)) --port=$((38339 + i)) --skip-rx-copy -rw -Z -B16384 \
    --test-length=60 --suicide-length=120 -F100 --num-threads=16 --num-flows=32 -D0 \
    --logtostderr > test${i}.log 2>&1 &
done
'
sleep 3

echo "=== Step 3: Generate Concurrent High-Throughput Load from $CLIENT_POD ==="
echo "Blasting Traffic via Interface 1 -> $IP1 ..."
kubectl exec $CLIENT_POD -c neper -- sh -c "nohup tcp_stream -C52279 --port=38339 --skip-rx-copy -rw -Z -B16384 \
  --test-length=60 --suicide-length=70 -F100 --num-threads=16 --num-flows=32 \
  --client -H $IP1 -D0 --logtostderr > test0.log 2>&1 &"

echo "Blasting Traffic via Interface 2 -> $IP2 ..."
kubectl exec $CLIENT_POD -c neper -- sh -c "nohup tcp_stream -C52280 --port=38340 --skip-rx-copy -rw -Z -B16384 \
  --test-length=60 --suicide-length=70 -F100 --num-threads=16 --num-flows=32 \
  --client -H $IP2 -D0 --logtostderr > test1.log 2>&1 &"

echo ""
echo "=== Testing in progress... Waiting 65 seconds for test completion ==="
sleep 65

echo ""
echo "=== Step 4: Evaluate Throughput Metrics ==="
RAW_BPS1=$(kubectl exec $CLIENT_POD -c neper -- grep -a "remote_throughput=" test0.log | cut -d= -f2 | tr -d '\r' || echo "0")
RAW_BPS2=$(kubectl exec $CLIENT_POD -c neper -- grep -a "remote_throughput=" test1.log | cut -d= -f2 | tr -d '\r' || echo "0")

GBPS1=$(awk -v bps="$RAW_BPS1" 'BEGIN { printf "%.2f", bps / 1000000000 }')
GBPS2=$(awk -v bps="$RAW_BPS2" 'BEGIN { printf "%.2f", bps / 1000000000 }')
TOTAL=$(awk -v b1="$RAW_BPS1" -v b2="$RAW_BPS2" 'BEGIN { printf "%.2f", (b1 + b2) / 1000000000 }')

echo "📊 --- NETWORK RESULTS ---"
echo "Interface 1 ($IFACE1) : ${GBPS1} Gbps"
echo "Interface 2 ($IFACE2) : ${GBPS2} Gbps"
echo "🔥 TOTAL AGGREGATE  : ${TOTAL} Gbps"
echo "--------------------------"


echo ""
echo "================================================="
echo " PHASE 2: TPU HARDWARE VALIDATION TEST"
echo "================================================="
echo "⏳ Installing Python and Google JAX on $CLIENT_POD (Takes ~1 minute)..."
kubectl exec $CLIENT_POD -c neper -- bash -c "apt-get update > /dev/null 2>&1 && apt-get install -y python3-pip > /dev/null 2>&1 && pip3 install jax[tpu] -f https://storage.googleapis.com/jax-releases/libtpu_releases.html > /dev/null 2>&1"

echo "🧠 Running matrix math directly on the TPU chips..."
kubectl exec $CLIENT_POD -c neper -- python3 -c "
import jax
import jax.numpy as jnp
print(f'✅ TPU Hardware Detected: {jax.device_count()} chips mapped via vfio')
print('🚀 Executing 5000x5000 Matrix Multiplication on TPU silicon...')
x = jnp.ones((5000, 5000))
y = jnp.dot(x, x)
print('✅ Success! The TPU driver is fully operational and executing math.')
"
EOF

chmod +x run_dual_neper_test.sh
- Execute the test. This will take 2 minutes to complete.
./run_dual_neper_test.sh
Upon completion, your terminal output will display the validated high-speed networking metrics and TPU matrix math execution
=== Step 4: Evaluate Throughput Metrics ===
📊 --- NETWORK RESULTS ---
Interface 1 (ens9)  : 157.51 Gbps
Interface 2 (ens10) : 167.04 Gbps
🔥 TOTAL AGGREGATE  : 324.55 Gbps
--------------------------

=================================================
 PHASE 2: TPU HARDWARE VALIDATION TEST
=================================================
⏳ Installing Python and Google JAX on neper-0 (Takes ~1 minute)...
🧠 Running matrix math directly on the TPU chips...
✅ TPU Hardware Detected: 4 chips mapped via vfio
🚀 Executing 5000x5000 Matrix Multiplication on TPU silicon...
✅ Success! The TPU driver is fully operational and executing math.
9. Deploy Gemma 4 on your cluster
In this section, you will configure your secure Hugging Face API credentials as a Kubernetes secret, deploy your vLLM inference engine utilizing both your Dynamic Resource Allocation (DRA) network and hardware claims, and run an end-to-end test query against Google's Gemma 4 model.
Make sure you are logged into your secure SSH session on k8s-control-plane:
- Reconnect securely to the control plane VM from Cloud Shell. If you are already connected, skip this.
gcloud compute ssh k8s-control-plane \
    --zone=$ZONE \
    --tunnel-through-iap
- Clean up previous deployments
# 1. Delete the StatefulSet to stop the benchmarking pods
kubectl delete statefulset neper

# 2. Wait for the pods to terminate fully and release the claims
kubectl wait --for=delete pod/neper-0 pod/neper-1 --timeout=60s
- Store your Hugging Face Access Token. Replace
<YOUR_ACTUAL_HUGGING_FACE_TOKEN>with your token.
export HF_TOKEN="<YOUR_ACTUAL_HUGGING_FACE_TOKEN>"
- Create a secret
kubectl create secret generic hf-token --from-literal=token="${HF_TOKEN}"
- This manifest schedules a single replica of vLLM running on a 4-chip raw TPU VM. It utilizes the Kubernetes DRA standard to mount both your custom network claims (tpu-net-claim) and your hardware claims (tpu-hardware-claim) to securely access the raw TPU hardware without requiring insecure host volume mounts. Finally, it exposes the OpenAI-compatible API server over port 8080. Run the following command to create the file:
cat << 'EOF' > gemma-inference.yaml
apiVersion: apps/v1
kind: Deployment
metadata:
  name: vllm-gemma-4
  labels:
    app: gemma-server
spec:
  replicas: 1
  selector:
    matchLabels:
      app: gemma-server
  template:
    metadata:
      labels:
        app: gemma-server
    spec:
      hostIPC: true
      containers:
      - name: vllm-tpu
        image: vllm/vllm-tpu:latest
        securityContext:
          privileged: true
        env:
        - name: HF_TOKEN
          valueFrom:
            secretKeyRef:
              name: hf-token
              key: token
        - name: JAX_PLATFORMS
          value: "tpu,cpu"
        - name: TPU_ACCELERATOR_TYPE
          value: "v6e-4"
        - name: TPU_WORKER_HOSTNAMES
          value: "127.0.0.1"
        - name: TPU_WORKER_ID
          value: "0"
        - name: LIBTPU_INIT_ARGS
          value: "--noenable_tpunetd_client"
        - name: BARE_METAL_MODE
          value: "true"
        - name: BYPASS_VBAR_CONTROL_SERVICE
          value: "1"
        - name: TPU_SKIP_MDS_QUERY
          value: "1"
        - name: TPU_DEFAULT_NETWORK_TYPE
          value: "loopback"
        - name: CHIPS_PER_HOST_BOUNDS
          value: "2,2,1"
        - name: HOST_BOUNDS
          value: "1,1,1"
        - name: ALT
          value: "false,false,false"
        - name: WRAP
          value: "false,false,false"
        command:
        - bash
        - -c
        - |
          export PYTHONUNBUFFERED=1
          sysctl -w net.ipv6.conf.all.disable_ipv6=0
          sysctl -w net.ipv6.conf.default.disable_ipv6=0
          sysctl -w net.ipv6.conf.lo.disable_ipv6=0
          ip link set lo up || true

          exec python3 -m vllm.entrypoints.openai.api_server \
            --model google/gemma-4-E4B-it \
            --tensor-parallel-size 4 \
            --trust-remote-code \
            --max-model-len 8192 \
            --max-num-batched-tokens 4096 \
            --host 0.0.0.0 \
            --port 8080
        ports:
        - containerPort: 8080
        resources:
          requests:
            cpu: "170"
            memory: "650Gi"
          limits:
            cpu: "170"
            memory: "650Gi"
          claims:
          - name: tpu-net-claim
          - name: tpu-hardware-claim
        volumeMounts:
        - name: dshm
          mountPath: /dev/shm
      volumes:
      - name: dshm
        emptyDir:
          medium: Memory
      resourceClaims:
      - name: tpu-net-claim
        resourceClaimTemplateName: tpu-net-interfaces
      - name: tpu-hardware-claim
        resourceClaimTemplateName: tpu-device-template
---
apiVersion: v1
kind: Service
metadata:
  name: vllm-gemma-service
spec:
  selector:
    app: gemma-server
  ports:
  - protocol: TCP
    port: 8080
    targetPort: 8080
  type: ClusterIP
EOF
- Deploy the Inference workload
kubectl apply -f gemma-inference.yaml
- Verify deployment status. This setup has to download the model and load
vLLM. Thiscan take between10 - 25 minutes.
kubectl get pods -l app=gemma-server

kubectl describe pods -l app=gemma-server
You can also watch the logs from the container to see the process. Press CTRL+C to exit the log view.
kubectl logs -l app=gemma-server -f
You will know the engine is completely initialized when you see the lines
(APIServer pid=1) INFO: Started server process [1]
(APIServer pid=1) INFO: Waiting for application startup.
(APIServer pid=1) INFO: Application startup complete.
Press CTRL+C to exit the log stream before moving on.
- Verify Interface Attachment. Check the network interfaces bound inside the container
kubectl exec deployment/vllm-gemma-4 -c vllm-tpu -- ls /sys/class/net
kubectl exec deployment/vllm-gemma-4 -c vllm-tpu -- cat /proc/net/fib_trie | grep -B 1 "32 host"
What to look for: You should see ens9 and ens10 (or similar ensX names) alongside your standard CNI interface (eth0) and loopback (lo). These represent the physical GCE host PCI network interfaces dynamically bound inside your pod by the open-source DRANET driver using systemd's predictable slot-naming convention..
kubectl exec deployment/vllm-gemma-4 -c vllm-tpu -- ls /sys/class/net
ens10
ens9
eth0
Lo

kubectl exec deployment/vllm-gemma-4 -c vllm-tpu -- cat /proc/net/fib_trie | grep -B 1 "32 host"

              |-- 10.10.0.3
                 /32 host LOCAL
--
              |-- 10.20.0.3
                 /32 host LOCAL
--
           |-- 127.0.0.1
              /32 host LOCAL
--
     |-- 192.168.238.67
        /32 host LOCAL
--
              |-- 10.10.0.3
                 /32 host LOCAL
--
              |-- 10.20.0.3
                 /32 host LOCAL
--
           |-- 127.0.0.1
              /32 host LOCAL
--
     |-- 192.168.238.67
        /32 host LOCAL
10. Test the LLM
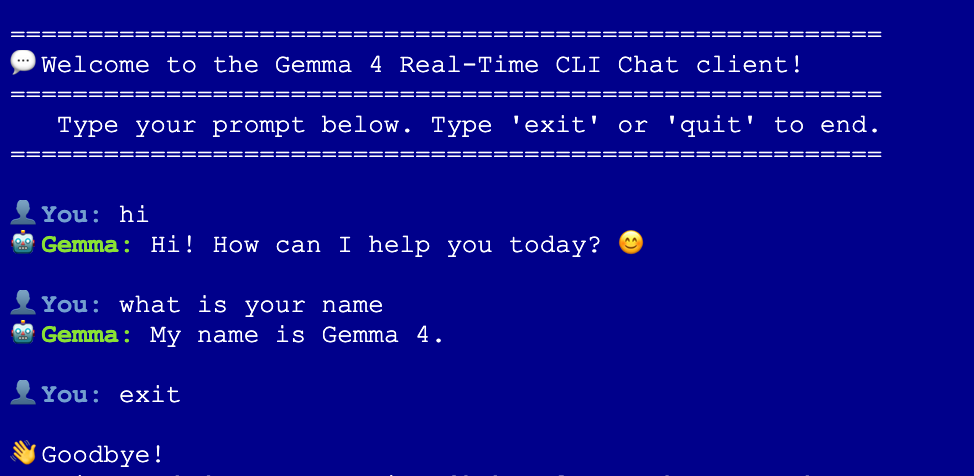
With your interfaces validated, launch a lightweight test container inside your cluster to dispatch a streaming inference request against Gemma 4.
- Run the following command on the
k8s-control-planesession to launch the interactive client:
kubectl run gemma-chat --rm -i --tty --image=alpine --restart=Never -- sh -c '
  # 1. Silently install curl and jq
  apk add --no-cache curl jq > /dev/null

  echo -e "\n========================================================"
  echo -e "💬 Welcome to the Gemma 4 Real-Time CLI Chat client!"
  echo -e "========================================================"
  echo -e "   Type your prompt below. Type '\''exit'\'' or '\''quit'\'' to end."
  echo -e "========================================================\n"

  while true; do
    # Read user input
    echo -n -e "👤 \033[1;34mYou:\033[0m "
    read -r USER_INPUT

    # Handle exit conditions
    if [ "$USER_INPUT" = "exit" ] || [ "$USER_INPUT" = "quit" ] || [ -z "$USER_INPUT" ]; then
      echo -e "\n👋 Goodbye!"
      break
    fi

    echo -n -e "🤖 \033[1;32mGemma:\033[0m "

    # Use jq to safely escape double quotes and special characters in user input
    JSON_PAYLOAD=$(jq -n --arg msg "$USER_INPUT" '\''{
      model: "google/gemma-4-E4B-it",
      messages: [{role: "user", content: $msg}],
      temperature: 0.7,
      stream: true
    }'\'')

    # Stream the tokens in real-time with a typewriter effect
    curl -s -X POST http://vllm-gemma-service:8080/v1/chat/completions \
      -H "Content-Type: application/json" \
      -d "$JSON_PAYLOAD" | while read -r line; do
        # Extract SSE data streams
        if echo "$line" | grep -q "data:"; then
          DATA_CLEAN=$(echo "$line" | sed "s/^data: //" | tr -d "\r")
          if [ "$DATA_CLEAN" != "[DONE]" ] && [ -n "$DATA_CLEAN" ]; then
            # Parse and print only the token content
            TOKEN=$(echo "$DATA_CLEAN" | jq -r ".choices[0].delta.content // empty" 2>/dev/null)
            echo -n "$TOKEN"
          fi
        fi
      done
    echo -e "\n"
  done
'
Interactive chat
11. Clean Up
First, delete all workloads, secrets, and configurations from your cluster.
If you are still logged into your k8s-control-plane secure SSH session, run the following command directly. (If you have already exited, SSH back in first):
- Reconnect securely to the control plane VM from Cloud Shell. If you are already connected to this VM skip this step.
gcloud compute ssh k8s-control-plane \
    --zone=$ZONE \
    --tunnel-through-iap
- Clean Up Kubernetes Resources
# 1. Delete the Gemma 4 deployment and service
kubectl delete -f gemma-inference.yaml --ignore-not-found=true

# 2. Delete the Hugging Face access secret
kubectl delete secret hf-token --ignore-not-found=true

# 3. Delete the open-source DRANET specs and drivers
kubectl delete deviceclass dranet --ignore-not-found=true
kubectl delete resourceclaimtemplate tpu-net-interfaces --ignore-not-found=true
kubectl delete -f https://raw.githubusercontent.com/kubernetes-sigs/dranet/refs/heads/main/install.yaml --ignore-not-found=true

# 4. Uninstall the OSS TPU Hardware Driver
helm uninstall dra-driver-google-tpu -n dra-driver-google-tpu --wait || true
- Now, type
exitand return to your active Cloud Shell directory where your Terraform files are stored and destroy all nodes, VPC networks, and firewall rules.
# 1. Create the teardown script
cat << 'EOF' > teardown.sh
#!/bin/bash

# The specific networks defined in your Terraform vpc.tf
NETWORKS=(
  "oss-k8s-primary-vpc"
  "oss-tpu-vpc-1"
  "oss-tpu-vpc-2"
)

echo "=== Hunting down and deleting ALL firewall rules for OSS networks ==="

for NETWORK in "${NETWORKS[@]}"; do
    echo "Searching for firewall rules attached to network: $NETWORK..."

    # Query GCP for any firewall rule tied to this specific network
    STUCK_RULES=$(gcloud compute firewall-rules list \
        --filter="network:($NETWORK)" \
        --format="value(name)" | tr '\n' ' ')

    # Check if the string is not empty and contains more than just whitespace
    if [ -n "$STUCK_RULES" ] && [ "$STUCK_RULES" != " " ]; then
        echo "🔥 Found rules holding $NETWORK hostage: $STUCK_RULES"
        echo "Deleting them now..."
        gcloud compute firewall-rules delete $STUCK_RULES --quiet
    else
        echo "✅ No firewall rules found for $NETWORK."
    fi
done

# Fallback: Explicitly delete the named rules from your Terraform file
# just in case the dynamic filter missed them due to caching delays
echo "=== Running fallback deletion for explicitly named Terraform rules ==="
gcloud compute firewall-rules delete \
    oss-k8s-primary-allow-internal \
    oss-k8s-allow-iap-ssh \
    oss-tpu1-allow-internal \
    oss-tpu2-allow-internal \
    --quiet 2>/dev/null || true

echo "--------------------------------------------------------"
echo "✅ Firewall cleanup complete!"
echo "Your networks are now stripped of firewalls and ready to be deleted."
echo "--------------------------------------------------------"

echo "=== Destroying Infrastructure ==="
cd ~/oss-kube-dra || exit
terraform destroy -auto-approve

echo "--------------------------------------------------------"
echo "✅ Infrastructure successfully destroyed!"
echo "--------------------------------------------------------"
EOF

# 2. Make the script executable and run it
chmod +x teardown.sh
./teardown.sh
- Delete the terraform folder
oss-kube-dra
cd
rm -r oss-kube-dra
12. Congratulations
You have successfully provisioned, bootstrapped, and validated a high-performance, self-managed Kubernetes AI infrastructure directly on Google Compute Engine (GCE) VM instances.
You now have a deep, system-level understanding of how Kubernetes uses Dynamic Resource Allocation (DRA) to orchestrate raw TPU accelerators, bind high-speed multi-NIC host topologies, and serve cutting-edge large language models.
Next steps / Learn more
You can read more about GKE networking
Take your next lab
Continue your quest with Google Cloud, and check out these other Google Cloud labs: