

1. Genel Bakış
Bu laboratuvarda, doğrudan Google Compute Engine (GCE) üzerinde kendi kendine yönetilen bir yapay zeka altyapısı oluşturma hakkında bilgi edineceksiniz. Terraform ve kubeadm kullanarak sanal makinelerde (bazıları TPU'lu) yönetilmeyen bir Kubernetes kümesi başlatacak ve açık kaynak sürücüyü kullanarak Kubernetes Dynamic Resource Allocation (DRA) özelliğini yapılandıracaksınız. Aşağıdakilerle çalışacaksınız:
- Google Compute Engine: Bu hizmet, kümelerinizi başlatmak için gereken bilgi işlem kaynaklarını sağlar.
- TPU'lar: Google'ın özel olarak ürettiği hızlandırıcı çiplerdir.
- Kubernetes OSS: Kubernetes'i manuel olarak yüklemek ve ayarlamak için kullanılan yazılım
- OSS DRANET - DRA Networking sürücüsü
- TPU için OSS DRA: TPU'ları destekleyen DRA sürücüleri
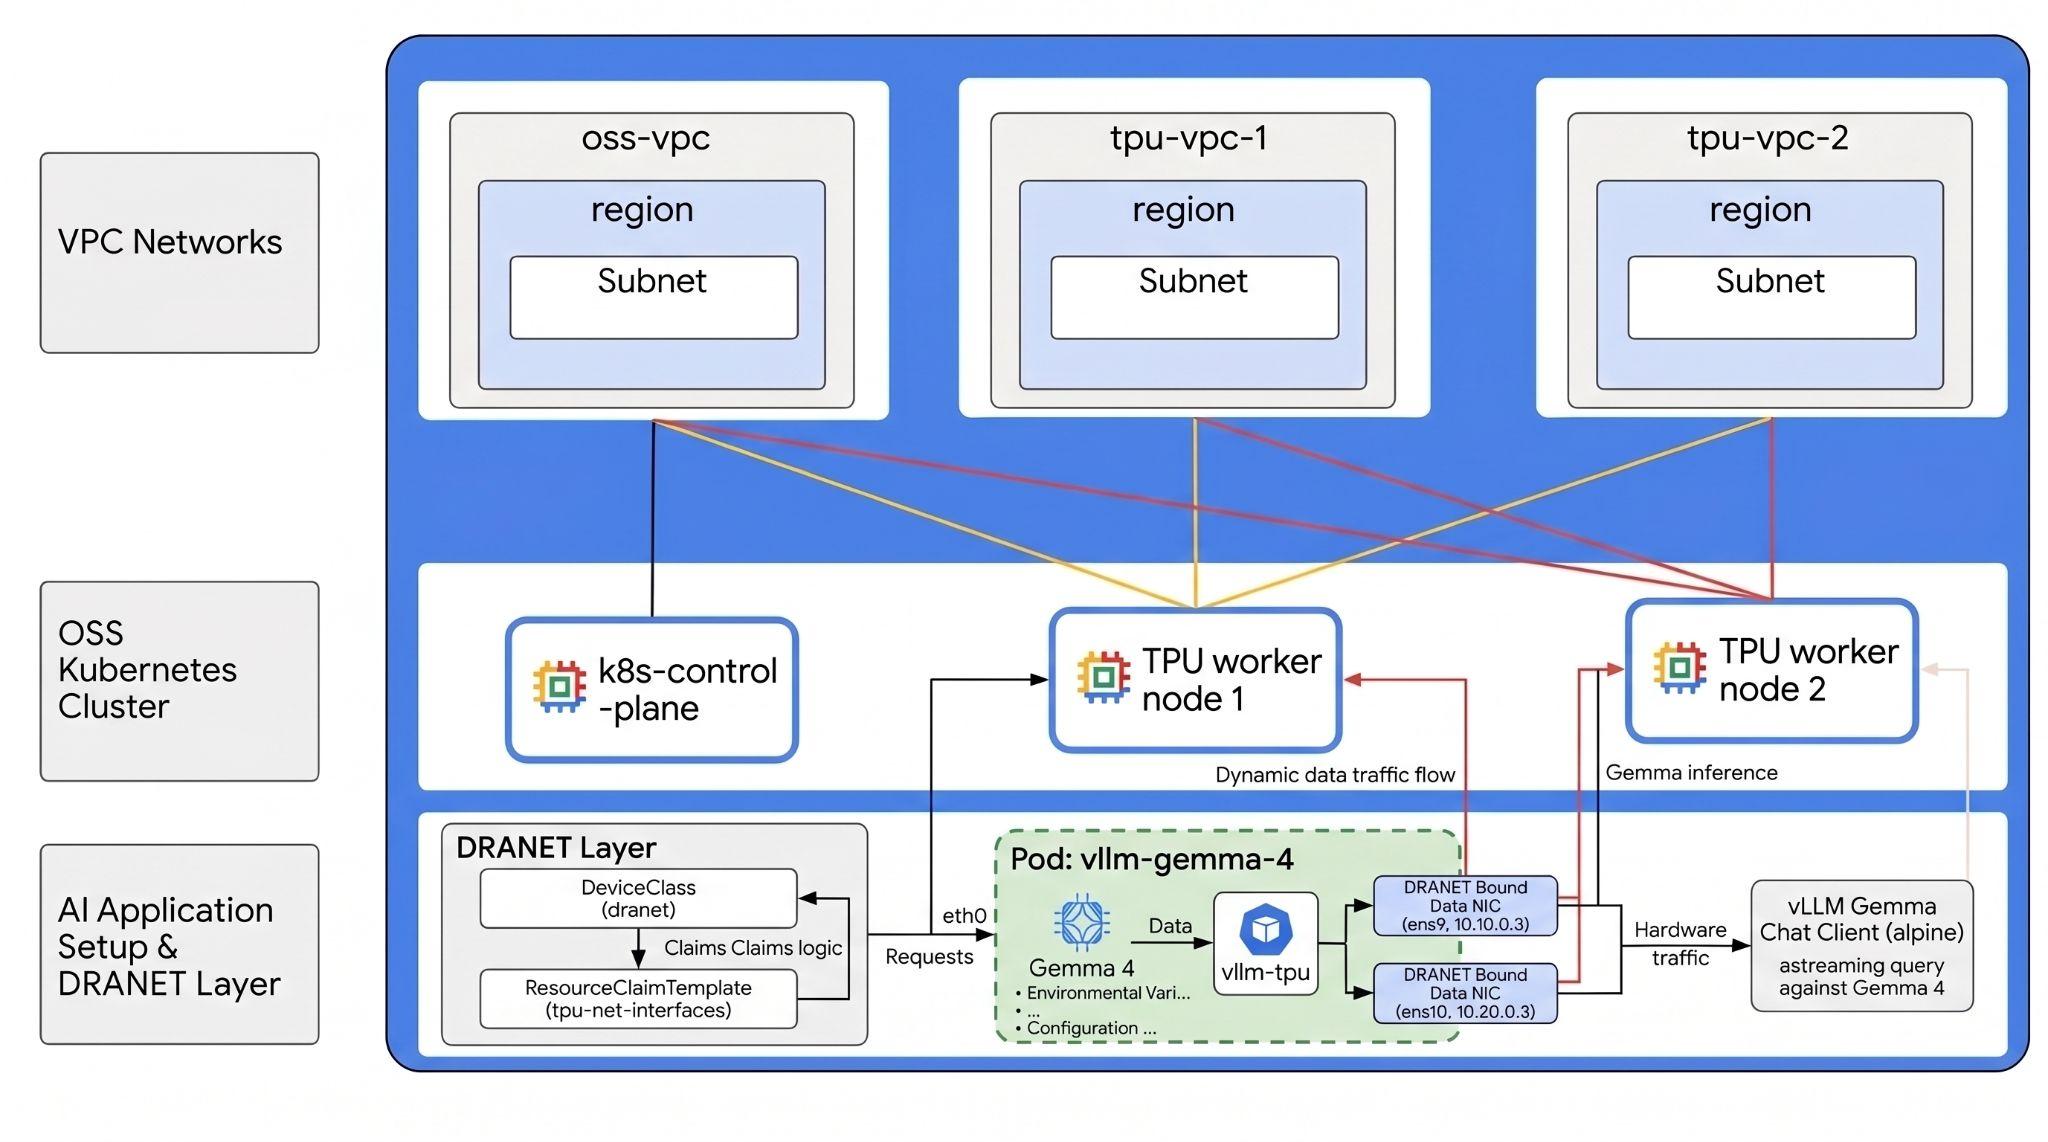
Ortamı yapılandırmak için her biri kendi alt ağına sahip birden fazla bağımsız VPC ağı dağıtırsınız. Bu sayede, yönetim trafiğini yüksek hızlı TPU veri trafiğinden ayırarak sanal makine örneklerinizi birden fazla ağ arayüzüyle (çoklu NIC) sağlayabilirsiniz.
Ardından, açık kaynaklı Dinamik Kaynak Ayırma (DRA) özelliğini etkinleştirmek için hem DRA Google TPU donanım sürücüsünü hem de DRANET ağ sürücüsünü yükleyeceksiniz. Ardından, bu kaynakların dinamik olarak sağlanmasını işlemek için Kubernetes DeviceClasses'i yapılandırır ve ResourceClaimTemplates yazar.
Son olarak, çalışan düğümleriniz arasındaki Jumbo Frame ağ veri yollarını doğrulamak için Neper kullanarak yüksek performanslı bir karşılaştırma iş yükü dağıtacak, ardından temel TPU silikonunu doğrulamak için bir Python JAX testi yapacaksınız. Ardından, tamamen yalıtılmış donanım ve ağ DRA taleplerini kullanarak Hugging Face üzerinden Google'ın en yeni Gemma 4 modelini sunmak için vLLM'yi dağıtacaksınız.
Yapılandırmalarda Terraform, gcloud ve kubectl kombinasyonu kullanılır.
Bu laboratuvarda, aşağıdaki görevi nasıl gerçekleştireceğinizi öğreneceksiniz:
- VPC ağları oluşturma
- GCE'de 3 düğüm dağıtın (1 standart düğüm ve 2 TPU v6 düğümü)
- Kubernetes'i başlatma
- TPU için OSS DRANET ve DRA'yı yapılandırma
- Performansı Karşılaştırma
- DeviceClass ve ResourceClaimTemplate oluşturma
- Ağ ve donanım performansını karşılaştırma
- Gemma 4'ü dağıtma: vLLM ve etkin DRA taleplerini kullanarak modeli TPU v6e donanımında sunma
- LLM'ye bağlantıyı test etme
Bu laboratuvarda aşağıdaki kalıbı oluşturacaksınız.
Şekil 1.
2. Google Cloud hizmetlerinin kurulumu
Yönlendirmesiz ortam kurulumu
- Google Cloud Console'da oturum açın ve yeni bir proje oluşturun veya mevcut bir projeyi yeniden kullanın. Gmail veya Google Workspace hesabınız yoksa hesap oluşturmanız gerekir.

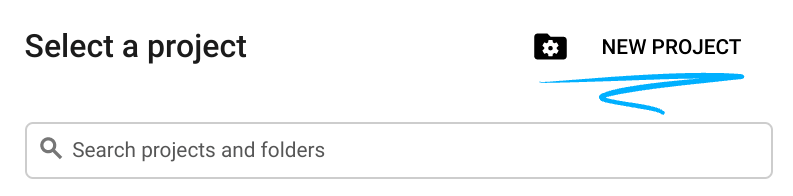
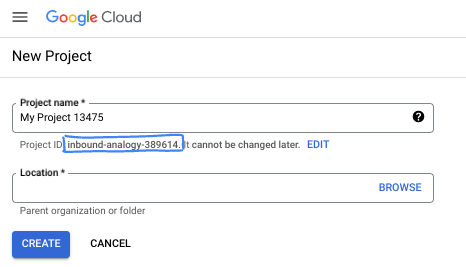
- Proje adı, bu projenin katılımcıları için görünen addır. Google API'leri tarafından kullanılmayan bir karakter dizesidir. Dilediğiniz zaman güncelleyebilirsiniz.
- Proje kimliği, tüm Google Cloud projelerinde benzersizdir ve sabittir (ayarlandıktan sonra değiştirilemez). Cloud Console, benzersiz bir dizeyi otomatik olarak oluşturur. Genellikle bu dizenin ne olduğuyla ilgilenmezsiniz. Çoğu codelab'de proje kimliğinize (genellikle
PROJECT_IDolarak tanımlanır) başvurmanız gerekir. Oluşturulan kimliği beğenmezseniz başka bir rastgele kimlik oluşturabilirsiniz. Dilerseniz kendi adınızı deneyerek kullanılabilir olup olmadığını kontrol edebilirsiniz. Bu adım tamamlandıktan sonra değiştirilemez ve proje süresince geçerli kalır. - Bazı API'lerin kullandığı üçüncü bir değer olan Proje Numarası da vardır. Bu üç değer hakkında daha fazla bilgiyi belgelerde bulabilirsiniz.
- Ardından, Cloud kaynaklarını/API'lerini kullanmak için Cloud Console'da faturalandırmayı etkinleştirmeniz gerekir. Bu codelab'i tamamlamak neredeyse hiç maliyetli değildir. Bu eğitimin ötesinde faturalandırılmayı önlemek için kaynakları kapatmak üzere oluşturduğunuz kaynakları veya projeyi silebilirsiniz. Yeni Google Cloud kullanıcıları 300 ABD doları değerinde ücretsiz deneme programından yararlanabilir.
Cloud Shell'i başlatma
Google Cloud, dizüstü bilgisayarınızdan uzaktan çalıştırılabilir ancak bu codelab'de Cloud'da çalışan bir komut satırı ortamı olan Google Cloud Shell'i kullanacaksınız.
Google Cloud Console'da sağ üstteki araç çubuğunda Cloud Shell simgesini tıklayın:
Ortamın temel hazırlığı ve bağlantı kurulması yalnızca birkaç dakikanızı alır. İşlem tamamlandığında aşağıdakine benzer bir ekranla karşılaşırsınız:

Bu sanal makine, ihtiyaç duyacağınız tüm geliştirme araçlarıyla birlikte gelir. 5 GB boyutunda kalıcı bir ana dizin sunar ve Google Cloud üzerinde çalışır. Bu sayede ağ performansı ve kimlik doğrulama önemli ölçüde güçlenir. Bu codelab'deki tüm çalışmalarınızı tarayıcıda yapabilirsiniz. Herhangi bir şey yüklemeniz gerekmez.
3. Terraform ile ortamı ayarlama
Bu laboratuvarı tamamlamak için TPU'lara erişmeniz gerekir. Kullanılan tam sürüm TPU v6e'dir.
- Erişim elde etmek için TPU planı dokümanını incelemeli ve TPU kotasını etkinleştirmelisiniz.
- TPU kotanızın olduğu bir bölge kullanın. Daha fazla bilgi için "GKE'de TPU kullanılabilirliğini doğrulama" başlıklı belgeye göz atın.
- (2) 4 TPU v6e çip gerektiren küçük bir dağıtım kullanıyoruz (
ct6e-standard-4t)bu, tek bir bölgede 2x2 dilim olacaktır). - Hugging Face jetonu: Gemma model ağırlıklarını indirmek için erişim jetonu gerekir.
Güvenlik duvarı kuralları ve alt ağlarla birlikte üç özel VPC oluşturacağız. Cloud Console'u açın ve kullanacağınız projeyi seçin.
- Konsolunuzun sağ üst kısmında bulunan Cloud Shell'i açın, Cloud Shell'de doğru proje kimliğini gördüğünüzden emin olun ve erişime izin verme istemlerini onaylayın.

oss-kube-dra,adlı bir klasör oluşturun, klasöre gidin ve bazı değişkenler ekleyin. Not: "REGION" ve "ZONE" değişken değerlerini gerçek bölgeniz ve alt bölgenizle güncelleyin. Varsayılan olarak kullanılan bölge "europe-west4", varsayılan olarak kullanılan alt bölge ise "europe-west4-a"dır.
mkdir -p oss-kube-dra && cd oss-kube-dra
export PROJECT_ID=$(gcloud config get-value project)
export REGION="europe-west4"
export ZONE="europe-west4-a"
echo $PROJECT_ID
echo $REGION
echo $ZONE
- Şimdi bazı yapılandırma dosyaları ekleyin. Bu komutlar aşağıdaki terraform.tfvars , variables.tf, vpc.tf dosyalarını oluşturur.
cat << EOF > terraform.tfvars
project_id = "${PROJECT_ID}"
region     = "${REGION}"
zone       = "${ZONE}"
EOF

cat << 'EOF' > variables.tf
variable "project_id" {
  type        = string
  description = "The Google Cloud Project ID"
}

variable "region" {
  type        = string
  description = "The region to deploy the resources"
}

variable "zone" {
  type        = string
  description = "The specific zone for the VMs"
}

variable "control_plane_machine_type" {
  type        = string
  default     = "e2-standard-8"
  description = "Machine type for the Kubernetes control plane node"
}

variable "tpu_worker_machine_type" {
  type        = string
  default     = "ct6e-standard-4t"
  description = "The machine type for TPU workers (TPU v6e Trillium VM)"
}
EOF


cat << 'EOF' > vpc.tf
terraform {
  required_version = ">= 1.5.0"
  required_providers {
    google = {
      source  = "hashicorp/google"
      version = "~> 7.32.0"
    }
  }
}

provider "google" {
  project = var.project_id
  region  = var.region
}

# 1. Primary Management VPC and Subnet
resource "google_compute_network" "primary_vpc" {
  name                    = "oss-k8s-primary-vpc"
  auto_create_subnetworks = false
  mtu                     = 1460
}

resource "google_compute_subnetwork" "primary_subnet" {
  name          = "oss-k8s-primary-subnet"
  ip_cidr_range = "10.0.0.0/24"
  region        = var.region
  network       = google_compute_network.primary_vpc.id
}

# 2. Cloud NAT Router and NAT Gateway for Primary VPC (Outbound Access)
resource "google_compute_router" "router" {
  name    = "oss-k8s-router"
  network = google_compute_network.primary_vpc.id
  region  = var.region
}

resource "google_compute_router_nat" "nat" {
  name                               = "oss-k8s-nat"
  router                             = google_compute_router.router.name
  region                             = var.region
  nat_ip_allocate_option             = "AUTO_ONLY"
  source_subnetwork_ip_ranges_to_nat = "ALL_SUBNETWORKS_ALL_IP_RANGES"
}

# 3. Firewalls for Primary VPC
resource "google_compute_firewall" "allow_internal" {
  name    = "oss-k8s-primary-allow-internal"
  network = google_compute_network.primary_vpc.id

  allow {
    protocol = "tcp"
  }
  allow {
    protocol = "udp"
  }
  allow {
    protocol = "icmp"
  }

  source_ranges = ["10.0.0.0/24"]
}

resource "google_compute_firewall" "allow_iap" {
  name    = "oss-k8s-allow-iap-ssh"
  network = google_compute_network.primary_vpc.id

  allow {
    protocol = "tcp"
    ports    = ["22"]
  }

  source_ranges = ["35.235.240.0/20"]
}

# 4. Multi-NIC TPU Networks and Subnets (With Jumbo Frames MTU 8896)
resource "google_compute_network" "tpu_vpc" {
  count                   = 2
  name                    = "oss-tpu-vpc-${count.index + 1}"
  auto_create_subnetworks = false
  mtu                     = 8896
}

resource "google_compute_subnetwork" "tpu_subnet" {
  count         = 2
  name          = "oss-tpu-vpc-${count.index + 1}-subnet"
  ip_cidr_range = "10.${count.index + 1}0.0.0/24"
  region        = var.region
  network       = google_compute_network.tpu_vpc[count.index].id
}

resource "google_compute_firewall" "tpu_allow_internal" {
  count   = 2
  name    = "oss-tpu${count.index + 1}-allow-internal"
  network = google_compute_network.tpu_vpc[count.index].id

  allow {
    protocol = "tcp"
  }
  allow {
    protocol = "udp"
  }
  allow {
    protocol = "icmp"
  }

  source_ranges = ["10.${count.index + 1}0.0.0/24"]
}
EOF
oss-kube-dradizininde olduğunuzdan emin olun ve aşağıdaki komutları çalıştırınterraform initÇalışma dizinini başlatır. Bu ilk adımdır ve belirli yapılandırma için gerekli sağlayıcıları indirir.terraform plan -out, Terraform'un altyapınızı dağıtmak için hangi işlemleri yapacağını gösteren bir yürütme planı oluşturur.-out, yürütme planını adlandırılmış bir ikili programa kaydetmenize olanak tanır. Herhangi bir değişiklik yapmadan ne olacağını görebilirsiniz.terraform applygüncellemeleri çalıştırır.
terraform init
terraform plan -out=tfplan
- Şimdi
terraform applykomutunu çalıştırdıktan sonra dağıtımı çalıştırın. Kaydedilen yürütme planını uyguladığınız için onay istemeden hemen yürütülür. (Bu işlem 5-10 dakika sürebilir)
terraform apply tfplan
- Kurulumu doğrulayın.
echo -e "\n=== Verifying VPC Networks ==="
gcloud compute networks list --filter="name~oss-.*" --project=$PROJECT_ID

echo -e "\n=== Verifying Subnetworks ==="
gcloud compute networks subnets list --filter="name~oss-.*" --project=$PROJECT_ID

echo -e "\n=== Verifying Firewall Rules ==="
gcloud compute firewall-rules list --filter="name~oss-.*" --project=$PROJECT_ID

echo -e "\n=== Verifying Cloud NAT ==="
gcloud compute routers nats list --router=oss-k8s-router --router-region=$REGION --project=$PROJECT_ID
Sanal makine düğümlerinizi oluşturma
Şimdi Compute Engine örneklerini tanımlayacaksınız.
oss-kube-dradizininde olduğunuzdan emin olun venodes.tfdosyasını yazmak için Cloud Shell'de aşağıdaki komutu çalıştırın.
cat << 'EOF' > nodes.tf
# 1. K8s Control Plane VM (No TPU)
resource "google_compute_instance" "control_plane" {
  name         = "k8s-control-plane"
  machine_type = var.control_plane_machine_type
  zone         = var.zone

  boot_disk {
    initialize_params {
      image = "projects/ubuntu-os-cloud/global/images/family/ubuntu-2204-lts"
      size  = 100
    }
  }

  network_interface {
    network    = google_compute_network.primary_vpc.id
    subnetwork = google_compute_subnetwork.primary_subnet.id
    # No public IP block keeps this node private
  }

  service_account {
    scopes = ["cloud-platform"]
  }
}

# 2. TPU Worker VMs (Multi-NIC ct6e-standard-4t instances)
resource "google_compute_instance" "tpu_workers" {
  count        = 2
  name         = "k8s-tpu-worker-${count.index + 1}"
  machine_type = var.tpu_worker_machine_type
  zone         = var.zone

  boot_disk {
    initialize_params {
      image = "projects/ubuntu-os-accelerator-images/global/images/family/ubuntu-accel-2204-amd64-tpu-v5e-v5p-v6e"
      size  = 200
    }
  }

  scheduling {
    on_host_maintenance = "TERMINATE"
    provisioning_model  = "STANDARD"
  }

  # NIC 1: Management VPC Subnet
  network_interface {
    network    = google_compute_network.primary_vpc.id
    subnetwork = google_compute_subnetwork.primary_subnet.id
  }

  # NIC 2: TPU VPC 1 Subnet
  network_interface {
    network    = google_compute_network.tpu_vpc[0].id
    subnetwork = google_compute_subnetwork.tpu_subnet[0].id
  }

  # NIC 3: TPU VPC 2 Subnet
  network_interface {
    network    = google_compute_network.tpu_vpc[1].id
    subnetwork = google_compute_subnetwork.tpu_subnet[1].id
  }

  service_account {
    scopes = ["cloud-platform"]
  }


  lifecycle {
    ignore_changes = [
      boot_disk[0].initialize_params[0].image,
      guest_accelerator,
      metadata
    ]
  }
}
EOF
- Yeni yapılandırmanız yazıldıktan sonra yeni bir plan oluşturun ve bunu örneklerinizi sağlamak için uygulayın.
terraform plan -out=tfplan

terraform apply tfplan
- Doğrulayın.
echo -e "\n=== Verifying Provisioned VM Instances ==="
gcloud compute instances list --filter="name~k8s-.*" --project=$PROJECT_ID


echo -e "\n=== Verifying Network Interfaces on Workers ==="
for i in 1 2; do
  echo -e "\n--- Interfaces for k8s-tpu-worker-${i} ---"
  gcloud compute instances describe k8s-tpu-worker-${i} \
      --zone=$ZONE \
      --project=$PROJECT_ID \
      --format="table(networkInterfaces[].network.basename(), networkInterfaces[].networkIP)"
done
4. Kubernetes kümesi kontrol düğümünüzü başlatma
Bu bölümde, yeni oluşturduğunuz kontrol düzlemi sanal makine örneğine güvenli bir şekilde bağlanacak, temel işletim sistemini yapılandıracak, kapsayıcı çalışma zamanını ve Kubernetes paketlerini yükleyecek, kümenizi başlatacak ve Calico CNI'yi yönetim ağına sıkı trafik izolasyonuyla dağıtacaksınız.
- GCE'nin Identity-Aware Proxy (IAP) tünelini kullanarak
k8s-control-planeörneğine güvenli bir şekilde bağlanın. Cloud Shell terminalinizde aşağıdaki komutu çalıştırın:
gcloud compute ssh k8s-control-plane \
    --zone=$ZONE \
    --tunnel-through-iap
k8s-control-planeVM'de, yükleme ve yapılandırma adımlarını otomatikleştirmek içininit-control-plane.shadlı bir komut dosyası oluşturun.
cat << 'CONTROL_PLANE_EOF' > init-control-plane.sh
#!/bin/bash
# Strict error handling: fail instantly if any command exits with a non-zero status
set -e

echo "=== 1. Neutralizing Background Updates & Preparing Base OS ==="
# Prevent unattended upgrades from locking apt or breaking network configuration mid-setup
sudo systemctl stop apt-daily.timer apt-daily-upgrade.timer || true
sudo systemctl disable apt-daily.timer apt-daily-upgrade.timer || true
sudo systemctl mask apt-daily.service apt-daily-upgrade.service || true

# Turn off swap (mandatory for Kubernetes)
sudo swapoff -a
sudo sed -i '/ swap / s/^\(.*\)$/#\1/g' /etc/fstab

# Load required kernel modules
cat << 'EOT' | sudo tee /etc/modules-load.d/k8s.conf
overlay
br_netfilter
EOT

sudo modprobe overlay
sudo modprobe br_netfilter

# Configure sysctl requirements for Kubernetes bridging
cat << 'EOT' | sudo tee /etc/sysctl.d/k8s.conf
net.bridge.bridge-nf-call-iptables  = 1
net.bridge.bridge-nf-call-ip6tables = 1
net.ipv4.ip_forward                 = 1
EOT
sudo sysctl --system

echo "=== 2. Installing Container Runtime (Containerd) ==="
sudo apt-get update
sudo apt-get install -y ca-certificates curl gnupg bash-completion

sudo install -m 0755 -d /etc/apt/keyrings
curl -fsSL https://download.docker.com/linux/ubuntu/gpg | sudo gpg --dearmor --yes -o /etc/apt/keyrings/docker.gpg
sudo chmod a+r /etc/apt/keyrings/docker.gpg
echo "deb [arch=$(dpkg --print-architecture) signed-by=/etc/apt/keyrings/docker.gpg] https://download.docker.com/linux/ubuntu $(. /etc/os-release && echo $VERSION_CODENAME) stable" | sudo tee /etc/apt/sources.list.d/docker.list > /dev/null

sudo apt-get update
sudo apt-get install -y docker-ce docker-ce-cli containerd.io

echo "=== 3. Configuring Containerd with Systemd Cgroups ==="
sudo mkdir -p /etc/containerd
containerd config default | sudo tee /etc/containerd/config.toml >/dev/null
sudo sed -i 's/SystemdCgroup = false/SystemdCgroup = true/' /etc/containerd/config.toml

sudo systemctl daemon-reload
sudo systemctl restart containerd
sudo systemctl enable containerd

# Validation Step: Verify runtime engine health
if ! systemctl is-active --quiet containerd; then
    echo "❌ ERROR: Containerd failed to start properly."
    exit 1
fi
echo "✅ Containerd runtime is active and healthy."

echo "=== 4. Installing Kubernetes 1.36 Binaries ==="
curl -fsSL https://pkgs.k8s.io/core:/stable:/v1.36/deb/Release.key | sudo gpg --dearmor --yes -o /etc/apt/keyrings/kubernetes-apt-keyring.gpg
echo 'deb [signed-by=/etc/apt/keyrings/kubernetes-apt-keyring.gpg] https://pkgs.k8s.io/core:/stable:/v1.36/deb/ /' | sudo tee /etc/apt/sources.list.d/kubernetes.list

sudo apt-get update
sudo apt-get install -y kubelet kubeadm kubectl
sudo apt-mark hold kubelet kubeadm kubectl

# Configure Autocomplete and Aliases system-wide
kubectl completion bash | sudo tee /etc/bash_completion.d/kubectl > /dev/null
kubeadm completion bash | sudo tee /etc/bash_completion.d/kubeadm > /dev/null
if ! grep -q 'alias k=kubectl' ~/.bashrc; then
  echo 'alias k=kubectl' >> ~/.bashrc
  echo 'complete -o default -F __start_kubectl k' >> ~/.bashrc
fi

echo "=== 5. Initializing Control Plane Engine ==="
sudo kubeadm init --pod-network-cidr=192.168.0.0/16

echo "=== 6. Configuring Administrative Cluster Credentials ==="
mkdir -p $HOME/.kube
sudo cp -i /etc/kubernetes/admin.conf $HOME/.kube/config
sudo chown $(id -u):$(id -g) $HOME/.kube/config

# Validation Step: Verify API Server local responsiveness
echo "Waiting for local API server context..."
until kubectl cluster-info &>/dev/null; do
    sleep 2
done
echo "✅ Kubernetes API server is responding locally."

echo "=== 7. Deploying Calico Network Operator ==="
kubectl create -f https://raw.githubusercontent.com/projectcalico/calico/v3.27.3/manifests/tigera-operator.yaml

# Validation Step: Ensure Tigera Operator CRD is fully available before applying configuration
echo "Waiting for Tigera Installation CRD to register on the API server..."
kubectl wait --for=condition=established crd/installations.operator.tigera.io --timeout=60s

echo "=== 8. Deploying Calico Custom Resources (Subnet Interlock Locked to 10.0.0.0/24) ==="
cat << 'CALICO_EOF' > custom-calico.yaml
apiVersion: operator.tigera.io/v1
kind: Installation
metadata:
  name: default
spec:
  calicoNetwork:
    nodeAddressAutodetectionV4:
      cidrs:
        - "10.0.0.0/24"
    ipPools:
    - blockSize: 26
      cidr: 192.168.0.0/16
      encapsulation: VXLANCrossSubnet
      natOutgoing: Enabled
      nodeSelector: all()
CALICO_EOF
kubectl apply -f custom-calico.yaml

# Validation Step: Confirm Calico daemon configurations are processing
echo "Waiting 10 seconds for Calico system namespaces to initialize..."
sleep 10
echo "Current Calico workload deployment status:"
kubectl get pods -n calico-system

echo "=== 9. Exporting Worker Cluster Join Token ==="
sudo kubeadm token create --print-join-command > ~/join.sh
chmod +x ~/join.sh

echo "--------------------------------------------------------"
echo "✅ CONTROL PLANE BOOTSTRAP COMPLETE!"
echo "Your cluster join command for the TPU workers is saved below:"
echo "--------------------------------------------------------"
cat ~/join.sh
CONTROL_PLANE_EOF
- Komut dosyasını çalıştırın.
chmod +x init-control-plane.sh
./init-control-plane.sh
- İşlem tamamlandığında doğrulayın. Tümünün etkinleşmesi birkaç dakika sürer.
kubectl get nodes
kubectl get pods -A
Aşağıdakine benzer bir şey görmelisiniz
NAME                STATUS   ROLES           AGE     VERSION
k8s-control-plane   Ready    control-plane   6m50s   v1.36.2
NAMESPACE         NAME                                        READY   STATUS    RESTARTS   AGE
calico-system     calico-kube-controllers-5578ff64dd-87vp2    1/1     Running   0          6m33s
calico-system     calico-node-fxzpp                           1/1     Running   0          6m33s
calico-system     calico-typha-785cbc858-rv4nz                1/1     Running   0          6m33s
calico-system     csi-node-driver-wlrhx                       2/2     Running   0          6m33s
kube-system       coredns-589f44dc88-pqfrl                    1/1     Running   0          6m42s
kube-system       coredns-589f44dc88-sdwmj                    1/1     Running   0          6m42s
kube-system       etcd-k8s-control-plane                      1/1     Running   0          6m47s
kube-system       kube-apiserver-k8s-control-plane            1/1     Running   0          6m47s
kube-system       kube-controller-manager-k8s-control-plane   1/1     Running   0          6m47s
kube-system       kube-proxy-jnm2p                            1/1     Running   0          6m42s
kube-system       kube-scheduler-k8s-control-plane            1/1     Running   0          6m47s
tigera-operator   tigera-operator-6bc8d879b5-w5mrq            1/1     Running   0          6m42s
- Cloud Shell'e dönmek için
sshbağlantısından çıkın.
exit
5. TPU çalışan düğümlerini ekleme
Cloud Shell'den bir komut dosyası çalıştırarak kontrol düzlemi sanal makinenize güvenli bir şekilde bağlanacak, kümeye katılma jetonunu alacak ve TPU çalışan düğümlerinizi eşzamanlı olarak yapılandırıp kümeye kaydedeceksiniz.
- Orkestrasyon komut dosyasını yazmak için Cloud Shell'de aşağıdaki komutu çalıştırın:
cat << 'WORKER_BOOTSTRAP_EOF' > bootstrap-workers.sh
#!/bin/bash
# Strict error handling: fail instantly if any command exits with a non-zero status
set -e

# Fetch the join command safely from the control plane
echo "Fetching join command from Control Plane..."
JOIN_CMD=$(gcloud compute ssh k8s-control-plane --zone=$ZONE --tunnel-through-iap --command="cat ~/join.sh" 2>/dev/null)

if [ -z "$JOIN_CMD" ]; then
    echo "❌ ERROR: Failed to retrieve the join command. Ensure the control plane is reachable."
    exit 1
fi

echo "✅ Successfully retrieved join command."

# Create the setup script locally to be copied to the workers
cat << 'WORKER_INIT_EOF' > init-worker.sh
#!/bin/bash
set -e

echo "=== 1. Neutralizing Background Updates & Setting Non-Interactive Mode ==="
export DEBIAN_FRONTEND=noninteractive
sudo sed -i "s/#\$nrconf{restart} = 'i';/\$nrconf{restart} = 'a';/g" /etc/needrestart/needrestart.conf 2>/dev/null || true

# Prevent unattended upgrades from tearing down network interfaces mid-setup
sudo systemctl stop apt-daily.timer apt-daily-upgrade.timer || true
sudo systemctl disable apt-daily.timer apt-daily-upgrade.timer || true
sudo systemctl mask apt-daily.service apt-daily-upgrade.service || true

echo "=== 2. Base OS Prep ==="
# Disable swap
sudo swapoff -a
sudo sed -i '/ swap / s/^\(.*\)$/#\1/g' /etc/fstab

# Load required kernel modules
cat << 'EOT' | sudo tee /etc/modules-load.d/k8s.conf
overlay
br_netfilter
EOT
sudo modprobe overlay
sudo modprobe br_netfilter

# Configure bridging and IP forwarding sysctls
cat << 'EOT' | sudo tee /etc/sysctl.d/k8s.conf
net.bridge.bridge-nf-call-iptables  = 1
net.bridge.bridge-nf-call-ip6tables = 1
net.ipv4.ip_forward                 = 1
EOT
sudo sysctl --system

echo "=== 3. Installing Containerd (CRI-Only) ==="
sudo apt-get update && sudo apt-get install -yq ca-certificates curl gnupg bash-completion
sudo install -m 0755 -d /etc/apt/keyrings
curl -fsSL https://download.docker.com/linux/ubuntu/gpg | sudo gpg --dearmor --yes -o /etc/apt/keyrings/docker.gpg
sudo chmod a+r /etc/apt/keyrings/docker.gpg
echo "deb [arch=$(dpkg --print-architecture) signed-by=/etc/apt/keyrings/docker.gpg] https://download.docker.com/linux/ubuntu $(. /etc/os-release && echo $VERSION_CODENAME) stable" | sudo tee /etc/apt/sources.list.d/docker.list > /dev/null

# Install only containerd to avoid unnecessary Docker CE overhead
sudo apt-get update && sudo apt-get install -yq containerd.io
sudo mkdir -p /etc/containerd
containerd config default | sudo tee /etc/containerd/config.toml >/dev/null
sudo sed -i 's/SystemdCgroup = false/SystemdCgroup = true/' /etc/containerd/config.toml
sudo systemctl daemon-reload
sudo systemctl restart containerd
sudo systemctl enable containerd

# Validation: Check containerd status
if ! systemctl is-active --quiet containerd; then
    echo "❌ ERROR: Containerd failed to start."
    exit 1
fi

echo "=== 4. Installing Kubernetes 1.36 Binaries ==="
curl -fsSL https://pkgs.k8s.io/core:/stable:/v1.36/deb/Release.key | sudo gpg --dearmor --yes -o /etc/apt/keyrings/kubernetes-apt-keyring.gpg
echo 'deb [signed-by=/etc/apt/keyrings/kubernetes-apt-keyring.gpg] https://pkgs.k8s.io/core:/stable:/v1.36/deb/ /' | sudo tee /etc/apt/sources.list.d/kubernetes.list
sudo apt-get update && sudo apt-get install -yq kubelet kubeadm kubectl
sudo apt-mark hold kubelet kubeadm kubectl
WORKER_INIT_EOF

# Append the actual join command to the script
echo "echo \"=== 5. Joining Cluster ===\"" >> init-worker.sh
echo "sudo $JOIN_CMD" >> init-worker.sh

# Push and run on both Workers concurrently
echo "Starting concurrent bootstrap on both workers..."

(
    echo "[Worker 1] Copying script..."
    gcloud compute scp init-worker.sh k8s-tpu-worker-1:~ --zone=$ZONE --tunnel-through-iap --quiet
    echo "[Worker 1] Executing script..."
    gcloud compute ssh k8s-tpu-worker-1 --zone=$ZONE --tunnel-through-iap --command="bash ~/init-worker.sh"
    echo "✅ [Worker 1] Bootstrap and Join complete!"
) &

(
    echo "[Worker 2] Copying script..."
    gcloud compute scp init-worker.sh k8s-tpu-worker-2:~ --zone=$ZONE --tunnel-through-iap --quiet
    echo "[Worker 2] Executing script..."
    gcloud compute ssh k8s-tpu-worker-2 --zone=$ZONE --tunnel-through-iap --command="bash ~/init-worker.sh"
    echo "✅ [Worker 2] Bootstrap and Join complete!"
) &

# Wait for both background processes to finish
wait

echo "--------------------------------------------------------"
echo "✅ BOTH WORKERS HAVE FINISHED PROCESSING"
echo "--------------------------------------------------------"

# Final Validation Check from Control Plane
echo "Verifying cluster node status..."
sleep 5 # Give kubelet a moment to register the nodes
gcloud compute ssh k8s-control-plane --zone=$ZONE --tunnel-through-iap --command="kubectl get nodes -o wide"
WORKER_BOOTSTRAP_EOF
- Çalışan kurulumunu gerçekleştirin. (Bu işlem, her iki yüklemeyi de aynı anda arka planda çalıştırır ve tamamlanması yaklaşık 3-5 dakika sürer.)
chmod +x bootstrap-workers.sh
./bootstrap-workers.sh
Tüm düğümler kümeye eklendiğinde benzer bir şey görmelisiniz
To increase the performance of the tunnel, consider installing NumPy. For instructions,
please see https://cloud.google.com/iap/docs/using-tcp-forwarding#increasing_the_tcp_upload_bandwidth

NAME                STATUS     ROLES           AGE   VERSION   INTERNAL-IP   EXTERNAL-IP   OS-IMAGE             KERNEL-VERSION           CONTAINER-RUNTIME
k8s-control-plane   Ready      control-plane   25m   v1.36.2   10.0.0.2      <none>        Ubuntu 22.04.5 LTS   6.8.0-1064-gcp (amd64)   containerd://2.2.6
k8s-tpu-worker-1    NotReady   <none>          10s   v1.36.2   10.0.0.3      <none>        Ubuntu 22.04.5 LTS   6.8.0-1064-gcp (amd64)   containerd://2.2.6
k8s-tpu-worker-2    Ready      <none>          27s   v1.36.2   10.0.0.4      <none>        Ubuntu 22.04.5 LTS   6.8.0-1064-gcp (amd64)   containerd://2.2.6
6. OSS DRA TPU sürücüsünü dağıtma
Bu bölümde, kontrol düzlemine dönecek, TPU çalışan düğümlerinizi belirli hızlandırıcı topolojisi ayrıntılarıyla etiketleyecek ve Helm'i kullanarak açık kaynaklı Google TPU DRA sürücüsünü yükleyeceksiniz. Bu sürücü, fiziksel TPU v6e çiplerini keşfetmekten ve bunları Kubernetes API'ye yerel olarak eşlemekten sorumludur.
- Cloud Shell'den
k8s-control-planeVM'sine güvenli bir şekilde yeniden bağlanın.
gcloud compute ssh k8s-control-plane \
    --zone=$ZONE \
    --tunnel-through-iap
- Bu komutları
k8s-control-planeSSH oturumunuzda çalıştırın. Düğümleri, tam etiket grubuyla (tam çip sayısı anahtarları dahil) etiketleyin.
kubectl label node k8s-tpu-worker-1 \
  cloud.google.com/gke-tpu-accelerator=tpu-v6e-slice \
  cloud.google.com/gke-tpu-topology=2x2 \
  cloud.google.com/gke-tpu-dra-driver=true \
  cloud.google.com/gke-accelerator-count=4 \
  cloud.google.com/gke-tpu-count=4 \
  --overwrite

kubectl label node k8s-tpu-worker-2 \
  cloud.google.com/gke-tpu-accelerator=tpu-v6e-slice \
  cloud.google.com/gke-tpu-topology=2x2 \
  cloud.google.com/gke-tpu-dra-driver=true \
  cloud.google.com/gke-accelerator-count=4 \
  cloud.google.com/gke-tpu-count=4 \
  --overwrite
- Helm ile DRA TPU sürücüsünü klonlama ve yükleme
curl -fsSL https://raw.githubusercontent.com/helm/helm/main/scripts/get-helm-3 | bash

git clone https://github.com/kubernetes-sigs/dra-driver-google-tpu.git ~/dra-driver-google-tpu || true
cd ~/dra-driver-google-tpu
rm -f *.pack *.tgz

helm install dra-driver-google-tpu ./deployments/helm/dra-driver-google-tpu \
  -n dra-driver-google-tpu \
  --create-namespace \
  --set 'kubeletPlugin.env[0].name=NODE_NAME' \
  --set 'kubeletPlugin.env[0].valueFrom.fieldRef.fieldPath=spec.nodeName'

cd ~
- DRA TPU sürücü kurulumunu doğrulama
# Verify driver daemonset status (Pods should show as Running and Ready)
kubectl get pods -n dra-driver-google-tpu -o wide

# Verify TPU ResourceSlices are successfully published to the API server
kubectl get resourceslices

# Safely parse the ResourceSlices to show the Node Name and the number of TPU chips registered
kubectl get resourceslices -o json | jq -r '.items[] | select(.spec.driver=="tpu.google.com") | "Node: \(.spec.nodeName) | TPUs Registered: \(.spec.devices | length)"'

# Inspect driver logs to confirm the TPU hardware was initialized successfully
kubectl logs -n dra-driver-google-tpu -l app.kubernetes.io/name=dra-driver-google-tpu -c tpu-dra-plugin --tail=20
7. Açık Kaynak DRANET ve Cihaz Sınıflarını Dağıtma
Bu bölümde, kontrol düzlemine dönecek, açık kaynaklı DRANET sürücüsünü yükleyecek, sanal arayüzleri hariç tutmak için özel bir filtre yaması uygulayacak ve Kubernetes DeviceClass ile ResourceClaimTemplate'inizi eşleşen oss ağ önekleriyle oluşturacaksınız.
- Cloud Shell'den
k8s-control-planeVM'sine güvenli bir şekilde yeniden bağlanın. Zaten bağlıysa bu adımı atlayın.
gcloud compute ssh k8s-control-plane \
    --zone=$ZONE \
    --tunnel-through-iap
- Bu komutları
k8s-control-planeSSH oturumunuzda çalıştırın.
# Install the core components and patch
kubectl apply -f https://raw.githubusercontent.com/kubernetes-sigs/dranet/refs/heads/main/install.yaml


kubectl patch daemonset dranet -n kube-system --type='json' -p='[ { "op": "add", "path": "/spec/template/spec/containers/0/args/-", "value": "-filter=!(\"dra.net/type\" in attributes) || (attributes[\"dra.net/type\"].StringValue != \"veth\" && attributes[\"dra.net/type\"].StringValue != \"vxlan\" && attributes[\"dra.net/type\"].StringValue != \"bridge\")" } ]'

# Monitor rollout readiness
kubectl rollout status daemonset/dranet -n kube-system

# Verify running components and permissions
kubectl get pods -n kube-system -l app=dranet -o wide
kubectl get clusterrole,clusterrolebinding,sa dranet -n kube-system

# Interrogate logs for driver binding confirmation
kubectl logs -n kube-system -l app=dranet --tail=20
- DeviceClass ve ResourceClaimTemplate'i uygulayın
# Apply DRANET DeviceClass and BOTH ResourceClaimTemplates (Network + Hardware)
cat << 'EOF' | kubectl apply -f -
apiVersion: resource.k8s.io/v1
kind: DeviceClass
metadata:
  name: dranet
spec:
  selectors:
    - cel:
        expression: device.driver == "dra.net"
---
apiVersion: resource.k8s.io/v1
kind: ResourceClaimTemplate
metadata:
  name: tpu-net-interfaces
  namespace: default
spec:
  spec:
    devices:
      requests:
      - name: tpu-net-interface
        exactly:
          deviceClassName: dranet
          count: 2
          selectors:
          - cel:
              expression: device.attributes["gce.dra.net"].networkName.startsWith("oss-tpu-vpc")
      config:
      - opaque:
          driver: dra.net
          parameters:
            interface:
              mtu: 8896
              gsoMaxSize: 65536
              groMaxSize: 65536
              gsoIPv4MaxSize: 65536
              groIPv4MaxSize: 65536
              disableEbpfPrograms: true
---
apiVersion: resource.k8s.io/v1
kind: ResourceClaimTemplate
metadata:
  name: tpu-device-template
  namespace: default
spec:
  spec:
    devices:
      requests:
      - name: tpu-devices
        exactly:
          deviceClassName: tpu.google.com
          allocationMode: ExactCount
          count: 4
EOF
- Şablonlarınızın ve sınıflarınızın Kubernetes API'ye doğru şekilde kaydedildiğini onaylayın.
# Verify ResourceSlices exist and are actively serving both drivers
kubectl get resourceslices -o custom-columns=NAME:.metadata.name,NODE:.spec.nodeName,DRIVER:.spec.driver | grep -E "dra.net|tpu.google.com"

# Verify the DRANET daemonset pods are Running across all nodes
kubectl get pods -n kube-system -l app=dranet -o wide
- Parallel Neper StatefulSet'i dağıtın.
cat << 'EOF' | kubectl apply -f -
---
apiVersion: v1
kind: Service
metadata:
  name: neper
spec:
  clusterIP: None
  selector:
    app: neper
---
apiVersion: apps/v1
kind: StatefulSet
metadata:
  name: neper
spec:
  selector:
    matchLabels:
      app: neper
  serviceName: neper
  replicas: 2
  template:
    metadata:
      labels:
        app: neper
    spec:
      initContainers:
      - name: "network-optimization-sysctls"
        image: "busybox"
        securityContext:
          privileged: true
        command:
        - sh
        - -c
        - |
          echo 5000 > /proc/sys/net/ipv4/tcp_rto_min_us
          echo 1 > /proc/sys/net/ipv4/tcp_no_metrics_save
          echo 0 > /proc/sys/net/ipv4/tcp_slow_start_after_idle
          echo 131072 > /proc/sys/net/core/optmem_max
          echo "4096 41943040 314572800" > /proc/sys/net/ipv4/tcp_rmem
      containers:
      - name: neper
        image: ubuntu:22.04
        command:
        - /bin/bash
        - -c
        - |
          apt-get update && apt-get install -y iproute2 build-essential git jq python3-pip &&
          git clone https://github.com/google/neper.git /tmp/neper &&
          cd /tmp/neper && make &&
          cp tcp_stream /usr/local/bin/ &&
          sleep infinity
        securityContext:
          privileged: true
        resources:
          requests:
            cpu: "170"
            memory: "650Gi"
          limits:
            cpu: "170"
            memory: "650Gi"
          claims:
          - name: tpu-net-claim
          - name: tpu-hardware-claim
      resourceClaims:
      - name: tpu-net-claim
        resourceClaimTemplateName: tpu-net-interfaces
      - name: tpu-hardware-claim
        resourceClaimTemplateName: tpu-device-template
EOF
- Doğrulama kontrolü
echo -e "\n=== Verifying StatefulSet Pod Status ==="
kubectl get pods -l app=neper -o wide

echo -e "\n=== Verifying Dynamic Resource Claims (DRCs) ==="
kubectl get resourceclaims

echo -e "\n=== Inspecting Device Claim Allocation ==="
# Using a safer JSONPath query to extract the allocated drivers and devices
kubectl get resourceclaims -o json | jq -r '.items[] | "Claim: \(.metadata.name) | Driver: \(.status.allocation.devices.results[0].driver // "Pending")"'
8. Testi çalıştır
Çift arayüzlü karşılaştırma ve donanım doğrulama paketini çalıştırın.
1. Aşama (Ağ Karşılaştırması): Neper kapsüllerinin (neper-0 ve neper-1) her ikisinin de bağımlılıkları derlemesini bekler, DRANET üzerinden bağlı olan varsayılan olmayan çoklu NIC IP adreslerini ayıklar, neper-1'de eşzamanlı tcp_stream sunucularını başlatır, neper-0'dan yüksek işleme hızı yükü oluşturur ve toplam işleme hızını saniyede gigabit (Gbps) cinsinden ayrıştırır.
2. Aşama (Donanım Doğrulaması): neper-0'ın içine Google JAX'i yükler ve silikonun çalışma durumunu onaylamak için VFIO aracılığıyla doğrudan eşlenmiş TPU çiplerinde matris çarpımı (5000x5000) gerçekleştirir.
k8s-control-planedosyanızarun_dual_neper_test.shyazmak için aşağıdaki komutu çalıştırın.
cat << 'EOF' > run_dual_neper_test.sh
#!/bin/bash
set -e

SERVER_POD="neper-1"
CLIENT_POD="neper-0"

echo "================================================="
echo " PHASE 1: DUAL-INTERFACE HIGH-SPEED NETWORK TEST"
echo "================================================="
echo "=== Waiting for Pods to be Ready ==="
kubectl wait --for=condition=ready pod/$CLIENT_POD pod/$SERVER_POD --timeout=300s

echo "=== Waiting for neper compilation to finish inside Pods ==="
for POD in $SERVER_POD $CLIENT_POD; do
  until kubectl exec $POD -c neper -- sh -c 'command -v jq >/dev/null 2>&1 && command -v tcp_stream >/dev/null 2>&1'; do
    sleep 5
  done
done

echo ""
echo "=== Step 1: Extract Target IPs from $SERVER_POD ==="
# Using jq to parse the network interfaces directly from Linux JSON output
IFACE1=$(kubectl exec $SERVER_POD -c neper -- sh -c "ip -j -4 addr show | jq -r '.[] | select(.ifname != \"lo\" and .ifname != \"eth0\") | .ifname' | sed -n '1p'")
IFACE2=$(kubectl exec $SERVER_POD -c neper -- sh -c "ip -j -4 addr show | jq -r '.[] | select(.ifname != \"lo\" and .ifname != \"eth0\") | .ifname' | sed -n '2p'")

IP1=$(kubectl exec $SERVER_POD -c neper -- sh -c "ip -j -4 addr show | jq -r '.[] | select(.ifname != \"lo\" and .ifname != \"eth0\") | .addr_info[0].local' | sed -n '1p'")
IP2=$(kubectl exec $SERVER_POD -c neper -- sh -c "ip -j -4 addr show | jq -r '.[] | select(.ifname != \"lo\" and .ifname != \"eth0\") | .addr_info[0].local' | sed -n '2p'")

echo "   📍 Target IP 1 ($IFACE1): $IP1"
echo "   📍 Target IP 2 ($IFACE2): $IP2"

echo ""
echo "=== Step 2: Initialize TCP Servers on $SERVER_POD ==="
kubectl exec $SERVER_POD -c neper -- sh -c '
for i in 0 1; do
  nohup tcp_stream -C$((52279 + i)) --port=$((38339 + i)) --skip-rx-copy -rw -Z -B16384 \
    --test-length=60 --suicide-length=120 -F100 --num-threads=16 --num-flows=32 -D0 \
    --logtostderr > test${i}.log 2>&1 &
done
'
sleep 3

echo "=== Step 3: Generate Concurrent High-Throughput Load from $CLIENT_POD ==="
echo "Blasting Traffic via Interface 1 -> $IP1 ..."
kubectl exec $CLIENT_POD -c neper -- sh -c "nohup tcp_stream -C52279 --port=38339 --skip-rx-copy -rw -Z -B16384 \
  --test-length=60 --suicide-length=70 -F100 --num-threads=16 --num-flows=32 \
  --client -H $IP1 -D0 --logtostderr > test0.log 2>&1 &"

echo "Blasting Traffic via Interface 2 -> $IP2 ..."
kubectl exec $CLIENT_POD -c neper -- sh -c "nohup tcp_stream -C52280 --port=38340 --skip-rx-copy -rw -Z -B16384 \
  --test-length=60 --suicide-length=70 -F100 --num-threads=16 --num-flows=32 \
  --client -H $IP2 -D0 --logtostderr > test1.log 2>&1 &"

echo ""
echo "=== Testing in progress... Waiting 65 seconds for test completion ==="
sleep 65

echo ""
echo "=== Step 4: Evaluate Throughput Metrics ==="
RAW_BPS1=$(kubectl exec $CLIENT_POD -c neper -- grep -a "remote_throughput=" test0.log | cut -d= -f2 | tr -d '\r' || echo "0")
RAW_BPS2=$(kubectl exec $CLIENT_POD -c neper -- grep -a "remote_throughput=" test1.log | cut -d= -f2 | tr -d '\r' || echo "0")

GBPS1=$(awk -v bps="$RAW_BPS1" 'BEGIN { printf "%.2f", bps / 1000000000 }')
GBPS2=$(awk -v bps="$RAW_BPS2" 'BEGIN { printf "%.2f", bps / 1000000000 }')
TOTAL=$(awk -v b1="$RAW_BPS1" -v b2="$RAW_BPS2" 'BEGIN { printf "%.2f", (b1 + b2) / 1000000000 }')

echo "📊 --- NETWORK RESULTS ---"
echo "Interface 1 ($IFACE1) : ${GBPS1} Gbps"
echo "Interface 2 ($IFACE2) : ${GBPS2} Gbps"
echo "🔥 TOTAL AGGREGATE  : ${TOTAL} Gbps"
echo "--------------------------"


echo ""
echo "================================================="
echo " PHASE 2: TPU HARDWARE VALIDATION TEST"
echo "================================================="
echo "⏳ Installing Python and Google JAX on $CLIENT_POD (Takes ~1 minute)..."
kubectl exec $CLIENT_POD -c neper -- bash -c "apt-get update > /dev/null 2>&1 && apt-get install -y python3-pip > /dev/null 2>&1 && pip3 install jax[tpu] -f https://storage.googleapis.com/jax-releases/libtpu_releases.html > /dev/null 2>&1"

echo "🧠 Running matrix math directly on the TPU chips..."
kubectl exec $CLIENT_POD -c neper -- python3 -c "
import jax
import jax.numpy as jnp
print(f'✅ TPU Hardware Detected: {jax.device_count()} chips mapped via vfio')
print('🚀 Executing 5000x5000 Matrix Multiplication on TPU silicon...')
x = jnp.ones((5000, 5000))
y = jnp.dot(x, x)
print('✅ Success! The TPU driver is fully operational and executing math.')
"
EOF

chmod +x run_dual_neper_test.sh
- Testi yürütün. Bu işlemin tamamlanması 2 dakika sürer.
./run_dual_neper_test.sh
Tamamlandığında, terminal çıkışınızda doğrulanmış yüksek hızlı ağ metrikleri ve TPU matris matematik yürütmesi gösterilir.
=== Step 4: Evaluate Throughput Metrics ===
📊 --- NETWORK RESULTS ---
Interface 1 (ens9)  : 157.51 Gbps
Interface 2 (ens10) : 167.04 Gbps
🔥 TOTAL AGGREGATE  : 324.55 Gbps
--------------------------

=================================================
 PHASE 2: TPU HARDWARE VALIDATION TEST
=================================================
⏳ Installing Python and Google JAX on neper-0 (Takes ~1 minute)...
🧠 Running matrix math directly on the TPU chips...
✅ TPU Hardware Detected: 4 chips mapped via vfio
🚀 Executing 5000x5000 Matrix Multiplication on TPU silicon...
✅ Success! The TPU driver is fully operational and executing math.
9. Kümenize Gemma 4'ü dağıtma
Bu bölümde, güvenli Hugging Face API kimlik bilgilerinizi Kubernetes sırrı olarak yapılandıracak, hem dinamik kaynak ayırma (DRA) ağınızı hem de donanım taleplerinizi kullanarak vLLM çıkarım motorunuzu dağıtacak ve Google'ın Gemma 4 modeline karşı uçtan uca bir test sorgusu çalıştıracaksınız.
k8s-control-plane üzerinde güvenli SSH oturumunuza giriş yaptığınızdan emin olun:
- Cloud Shell'den kontrol düzlemi sanal makinesine güvenli bir şekilde yeniden bağlanın. Zaten bağlıysanız bu adımı atlayın.
gcloud compute ssh k8s-control-plane \
    --zone=$ZONE \
    --tunnel-through-iap
- Önceki dağıtımları temizleme
# 1. Delete the StatefulSet to stop the benchmarking pods
kubectl delete statefulset neper

# 2. Wait for the pods to terminate fully and release the claims
kubectl wait --for=delete pod/neper-0 pod/neper-1 --timeout=60s
- Hugging Face erişim jetonunuzu saklayın.
<YOUR_ACTUAL_HUGGING_FACE_TOKEN>yerine jetonunuzu girin.
export HF_TOKEN="<YOUR_ACTUAL_HUGGING_FACE_TOKEN>"
- Gizli anahtar oluşturma
kubectl create secret generic hf-token --from-literal=token="${HF_TOKEN}"
- Bu manifest, 4 çipli ham TPU sanal makinesinde çalışan vLLM'nin tek bir replikasını planlar. Güvensiz ana makine birimi bağlamalarına gerek kalmadan ham TPU donanımına güvenli bir şekilde erişmek için hem özel ağ taleplerinizi (tpu-net-claim) hem de donanım taleplerinizi (tpu-hardware-claim) bağlamak üzere Kubernetes DRA standardını kullanır. Son olarak, OpenAI ile uyumlu API sunucusunu 8080 numaralı bağlantı noktası üzerinden kullanıma sunar. Dosyayı oluşturmak için aşağıdaki komutu çalıştırın:
cat << 'EOF' > gemma-inference.yaml
apiVersion: apps/v1
kind: Deployment
metadata:
  name: vllm-gemma-4
  labels:
    app: gemma-server
spec:
  replicas: 1
  selector:
    matchLabels:
      app: gemma-server
  template:
    metadata:
      labels:
        app: gemma-server
    spec:
      hostIPC: true
      containers:
      - name: vllm-tpu
        image: vllm/vllm-tpu:latest
        securityContext:
          privileged: true
        env:
        - name: HF_TOKEN
          valueFrom:
            secretKeyRef:
              name: hf-token
              key: token
        - name: JAX_PLATFORMS
          value: "tpu,cpu"
        - name: TPU_ACCELERATOR_TYPE
          value: "v6e-4"
        - name: TPU_WORKER_HOSTNAMES
          value: "127.0.0.1"
        - name: TPU_WORKER_ID
          value: "0"
        - name: LIBTPU_INIT_ARGS
          value: "--noenable_tpunetd_client"
        - name: BARE_METAL_MODE
          value: "true"
        - name: BYPASS_VBAR_CONTROL_SERVICE
          value: "1"
        - name: TPU_SKIP_MDS_QUERY
          value: "1"
        - name: TPU_DEFAULT_NETWORK_TYPE
          value: "loopback"
        - name: CHIPS_PER_HOST_BOUNDS
          value: "2,2,1"
        - name: HOST_BOUNDS
          value: "1,1,1"
        - name: ALT
          value: "false,false,false"
        - name: WRAP
          value: "false,false,false"
        command:
        - bash
        - -c
        - |
          export PYTHONUNBUFFERED=1
          sysctl -w net.ipv6.conf.all.disable_ipv6=0
          sysctl -w net.ipv6.conf.default.disable_ipv6=0
          sysctl -w net.ipv6.conf.lo.disable_ipv6=0
          ip link set lo up || true

          exec python3 -m vllm.entrypoints.openai.api_server \
            --model google/gemma-4-E4B-it \
            --tensor-parallel-size 4 \
            --trust-remote-code \
            --max-model-len 8192 \
            --max-num-batched-tokens 4096 \
            --host 0.0.0.0 \
            --port 8080
        ports:
        - containerPort: 8080
        resources:
          requests:
            cpu: "170"
            memory: "650Gi"
          limits:
            cpu: "170"
            memory: "650Gi"
          claims:
          - name: tpu-net-claim
          - name: tpu-hardware-claim
        volumeMounts:
        - name: dshm
          mountPath: /dev/shm
      volumes:
      - name: dshm
        emptyDir:
          medium: Memory
      resourceClaims:
      - name: tpu-net-claim
        resourceClaimTemplateName: tpu-net-interfaces
      - name: tpu-hardware-claim
        resourceClaimTemplateName: tpu-device-template
---
apiVersion: v1
kind: Service
metadata:
  name: vllm-gemma-service
spec:
  selector:
    app: gemma-server
  ports:
  - protocol: TCP
    port: 8080
    targetPort: 8080
  type: ClusterIP
EOF
- Çıkarım iş yükünü dağıtma
kubectl apply -f gemma-inference.yaml
- Dağıtım durumunu doğrulayın. Bu kurulumda modelin indirilmesi ve
vLLM. Thisyüklenmesi10 - 25 minutes.sürebilir.
kubectl get pods -l app=gemma-server

kubectl describe pods -l app=gemma-server
İşlemi görmek için kapsayıcının günlüklerini de izleyebilirsiniz. Günlük görünümünden çıkmak için CTRL+C tuşuna basın.
kubectl logs -l app=gemma-server -f
Aşağıdaki satırları gördüğünüzde motorun tamamen başlatıldığını anlarsınız:
(APIServer pid=1) INFO: Started server process [1]
(APIServer pid=1) INFO: Waiting for application startup.
(APIServer pid=1) INFO: Application startup complete.
Devam etmeden önce günlük akışından çıkmak için CTRL+C tuşuna basın.
- Arayüz ekini doğrulayın. Kapsayıcıya bağlı ağ arayüzlerini kontrol etme
kubectl exec deployment/vllm-gemma-4 -c vllm-tpu -- ls /sys/class/net
kubectl exec deployment/vllm-gemma-4 -c vllm-tpu -- cat /proc/net/fib_trie | grep -B 1 "32 host"
Nelere dikkat etmelisiniz?: Standart CNI arayüzünüzün (eth0) ve geri döngünüzün (lo) yanında ens9 ve ens10 (veya benzer ensX adlar) görmelisiniz. Bunlar, systemd'nin tahmin edilebilir yuva adlandırma kuralı kullanılarak açık kaynaklı DRANET sürücüsü tarafından pod'unuzda dinamik olarak bağlanan fiziksel GCE ana makine PCI ağ arayüzlerini temsil eder.
kubectl exec deployment/vllm-gemma-4 -c vllm-tpu -- ls /sys/class/net
ens10
ens9
eth0
Lo

kubectl exec deployment/vllm-gemma-4 -c vllm-tpu -- cat /proc/net/fib_trie | grep -B 1 "32 host"

              |-- 10.10.0.3
                 /32 host LOCAL
--
              |-- 10.20.0.3
                 /32 host LOCAL
--
           |-- 127.0.0.1
              /32 host LOCAL
--
     |-- 192.168.238.67
        /32 host LOCAL
--
              |-- 10.10.0.3
                 /32 host LOCAL
--
              |-- 10.20.0.3
                 /32 host LOCAL
--
           |-- 127.0.0.1
              /32 host LOCAL
--
     |-- 192.168.238.67
        /32 host LOCAL
10. LLM'yi test etme
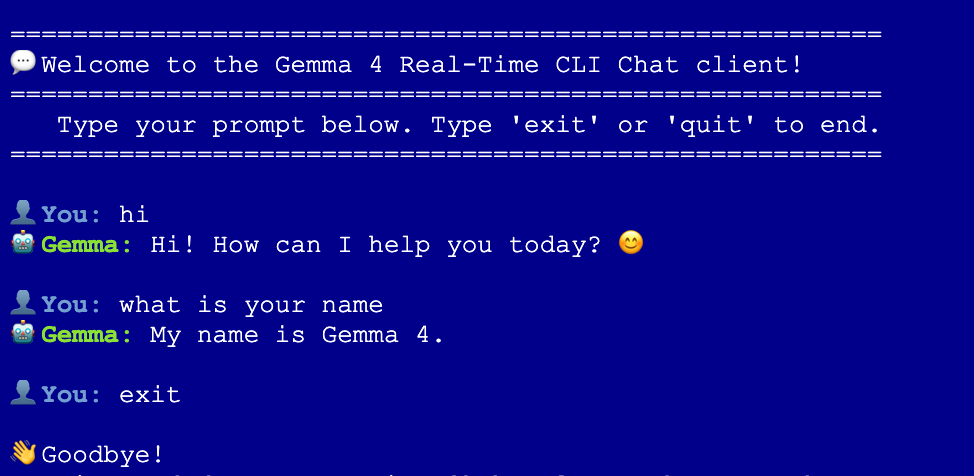
Arayüzleriniz doğrulandıktan sonra, Gemma 4'e karşı bir akış çıkarımı isteği göndermek için kümenizde hafif bir test kapsayıcısı başlatın.
- Etkileşimli istemciyi başlatmak için
k8s-control-planeoturumunda aşağıdaki komutu çalıştırın:
kubectl run gemma-chat --rm -i --tty --image=alpine --restart=Never -- sh -c '
  # 1. Silently install curl and jq
  apk add --no-cache curl jq > /dev/null

  echo -e "\n========================================================"
  echo -e "💬 Welcome to the Gemma 4 Real-Time CLI Chat client!"
  echo -e "========================================================"
  echo -e "   Type your prompt below. Type '\''exit'\'' or '\''quit'\'' to end."
  echo -e "========================================================\n"

  while true; do
    # Read user input
    echo -n -e "👤 \033[1;34mYou:\033[0m "
    read -r USER_INPUT

    # Handle exit conditions
    if [ "$USER_INPUT" = "exit" ] || [ "$USER_INPUT" = "quit" ] || [ -z "$USER_INPUT" ]; then
      echo -e "\n👋 Goodbye!"
      break
    fi

    echo -n -e "🤖 \033[1;32mGemma:\033[0m "

    # Use jq to safely escape double quotes and special characters in user input
    JSON_PAYLOAD=$(jq -n --arg msg "$USER_INPUT" '\''{
      model: "google/gemma-4-E4B-it",
      messages: [{role: "user", content: $msg}],
      temperature: 0.7,
      stream: true
    }'\'')

    # Stream the tokens in real-time with a typewriter effect
    curl -s -X POST http://vllm-gemma-service:8080/v1/chat/completions \
      -H "Content-Type: application/json" \
      -d "$JSON_PAYLOAD" | while read -r line; do
        # Extract SSE data streams
        if echo "$line" | grep -q "data:"; then
          DATA_CLEAN=$(echo "$line" | sed "s/^data: //" | tr -d "\r")
          if [ "$DATA_CLEAN" != "[DONE]" ] && [ -n "$DATA_CLEAN" ]; then
            # Parse and print only the token content
            TOKEN=$(echo "$DATA_CLEAN" | jq -r ".choices[0].delta.content // empty" 2>/dev/null)
            echo -n "$TOKEN"
          fi
        fi
      done
    echo -e "\n"
  done
'
Interactive chat
11. Temizleme
Öncelikle kümenizdeki tüm iş yüklerini, sırları ve yapılandırmaları silin.
k8s-control-plane güvenli SSH oturumunuza hâlâ giriş yapmış durumdaysanız aşağıdaki komutu doğrudan çalıştırın. (Zaten çıktıysanız önce SSH ile tekrar giriş yapın):
- Cloud Shell'den kontrol düzlemi sanal makinesine güvenli bir şekilde yeniden bağlanın. Bu sanal makineye zaten bağlıysanız bu adımı atlayın.
gcloud compute ssh k8s-control-plane \
    --zone=$ZONE \
    --tunnel-through-iap
- Kubernetes Kaynaklarını Temizleme
# 1. Delete the Gemma 4 deployment and service
kubectl delete -f gemma-inference.yaml --ignore-not-found=true

# 2. Delete the Hugging Face access secret
kubectl delete secret hf-token --ignore-not-found=true

# 3. Delete the open-source DRANET specs and drivers
kubectl delete deviceclass dranet --ignore-not-found=true
kubectl delete resourceclaimtemplate tpu-net-interfaces --ignore-not-found=true
kubectl delete -f https://raw.githubusercontent.com/kubernetes-sigs/dranet/refs/heads/main/install.yaml --ignore-not-found=true

# 4. Uninstall the OSS TPU Hardware Driver
helm uninstall dra-driver-google-tpu -n dra-driver-google-tpu --wait || true
- Şimdi
exityazın ve Terraform dosyalarınızın depolandığı etkin Cloud Shell dizininize dönerek tüm düğümleri, VPC ağlarını ve güvenlik duvarı kurallarını kaldırın.
# 1. Create the teardown script
cat << 'EOF' > teardown.sh
#!/bin/bash

# The specific networks defined in your Terraform vpc.tf
NETWORKS=(
  "oss-k8s-primary-vpc"
  "oss-tpu-vpc-1"
  "oss-tpu-vpc-2"
)

echo "=== Hunting down and deleting ALL firewall rules for OSS networks ==="

for NETWORK in "${NETWORKS[@]}"; do
    echo "Searching for firewall rules attached to network: $NETWORK..."

    # Query GCP for any firewall rule tied to this specific network
    STUCK_RULES=$(gcloud compute firewall-rules list \
        --filter="network:($NETWORK)" \
        --format="value(name)" | tr '\n' ' ')

    # Check if the string is not empty and contains more than just whitespace
    if [ -n "$STUCK_RULES" ] && [ "$STUCK_RULES" != " " ]; then
        echo "🔥 Found rules holding $NETWORK hostage: $STUCK_RULES"
        echo "Deleting them now..."
        gcloud compute firewall-rules delete $STUCK_RULES --quiet
    else
        echo "✅ No firewall rules found for $NETWORK."
    fi
done

# Fallback: Explicitly delete the named rules from your Terraform file
# just in case the dynamic filter missed them due to caching delays
echo "=== Running fallback deletion for explicitly named Terraform rules ==="
gcloud compute firewall-rules delete \
    oss-k8s-primary-allow-internal \
    oss-k8s-allow-iap-ssh \
    oss-tpu1-allow-internal \
    oss-tpu2-allow-internal \
    --quiet 2>/dev/null || true

echo "--------------------------------------------------------"
echo "✅ Firewall cleanup complete!"
echo "Your networks are now stripped of firewalls and ready to be deleted."
echo "--------------------------------------------------------"

echo "=== Destroying Infrastructure ==="
cd ~/oss-kube-dra || exit
terraform destroy -auto-approve

echo "--------------------------------------------------------"
echo "✅ Infrastructure successfully destroyed!"
echo "--------------------------------------------------------"
EOF

# 2. Make the script executable and run it
chmod +x teardown.sh
./teardown.sh
- terraform klasörünü silin
oss-kube-dra
cd
rm -r oss-kube-dra
12. Tebrikler
Doğrudan Google Compute Engine (GCE) sanal makine örneklerinde yüksek performanslı, kendi kendini yöneten bir Kubernetes yapay zeka altyapısını başarıyla sağladınız, başlattınız ve doğruladınız.
Artık Kubernetes'in, ham TPU hızlandırıcıları düzenlemek, yüksek hızlı çoklu NIC ana makine topolojilerini bağlamak ve en yeni büyük dil modellerini sunmak için dinamik kaynak ayırmayı (DRA) nasıl kullandığına dair sistem düzeyinde ayrıntılı bir anlayışa sahipsiniz.
Sonraki adımlar / Daha fazla bilgi
GKE ağ iletişimi hakkında daha fazla bilgi edinebilirsiniz.
Sonraki laboratuvarınıza katılın
Google Cloud ile görevinize devam edin ve aşağıdaki diğer Google Cloud laboratuvarlarına göz atın: