
1. Introduction
In this codelab you'll focus on creating a one-time product, define its purchase option, set region specific prices, and test the purchase flow of the one-time products.
Audience
This codelab is targeted for Android app developers who want to use Play Console to manage their one-time product catalog.
What you'll learn...
- The one-time product object model.
- How to navigate and use the Google Play Console to manage your one-time product catalog.
- How to translate one-time product details to various languages at zero cost.
- How to configure regional availability and pricing for one-time products.
- How to use the Play Billing Library APIs to query one-time product details.
- How to test one-time products using the Play Billing Lab.
What you'll need...
- Access to the Google Play Console with a developer account. If you don't have a developer account, you need to create an account.
- A sample app for this codelab which you can download from GitHub.
- Android Studio.
2. One-time product premier
The one-time product object model provides greater flexibility in how you can sell products, and reduce the complexity of managing them. The object model separates what is being sold from how it's being sold, allowing for the same entitlement to have multiple price points, and different ways to be marketed to users. The object model has three levels of hierarchy:
- One-time product - A product object defines what the user is buying.
- Purchase option - A purchase option defines how the entitlement is granted to the user, its price, and where (region) the product will be available. A single product can have multiple purchase options, which can represent different prices in different regions.
- Offer - Offers can affect the price of the purchase option they are linked to, and can be used to model discounts or a pre-order. A single purchase option can have multiple offers.
The following diagram shows the one-time product object model.
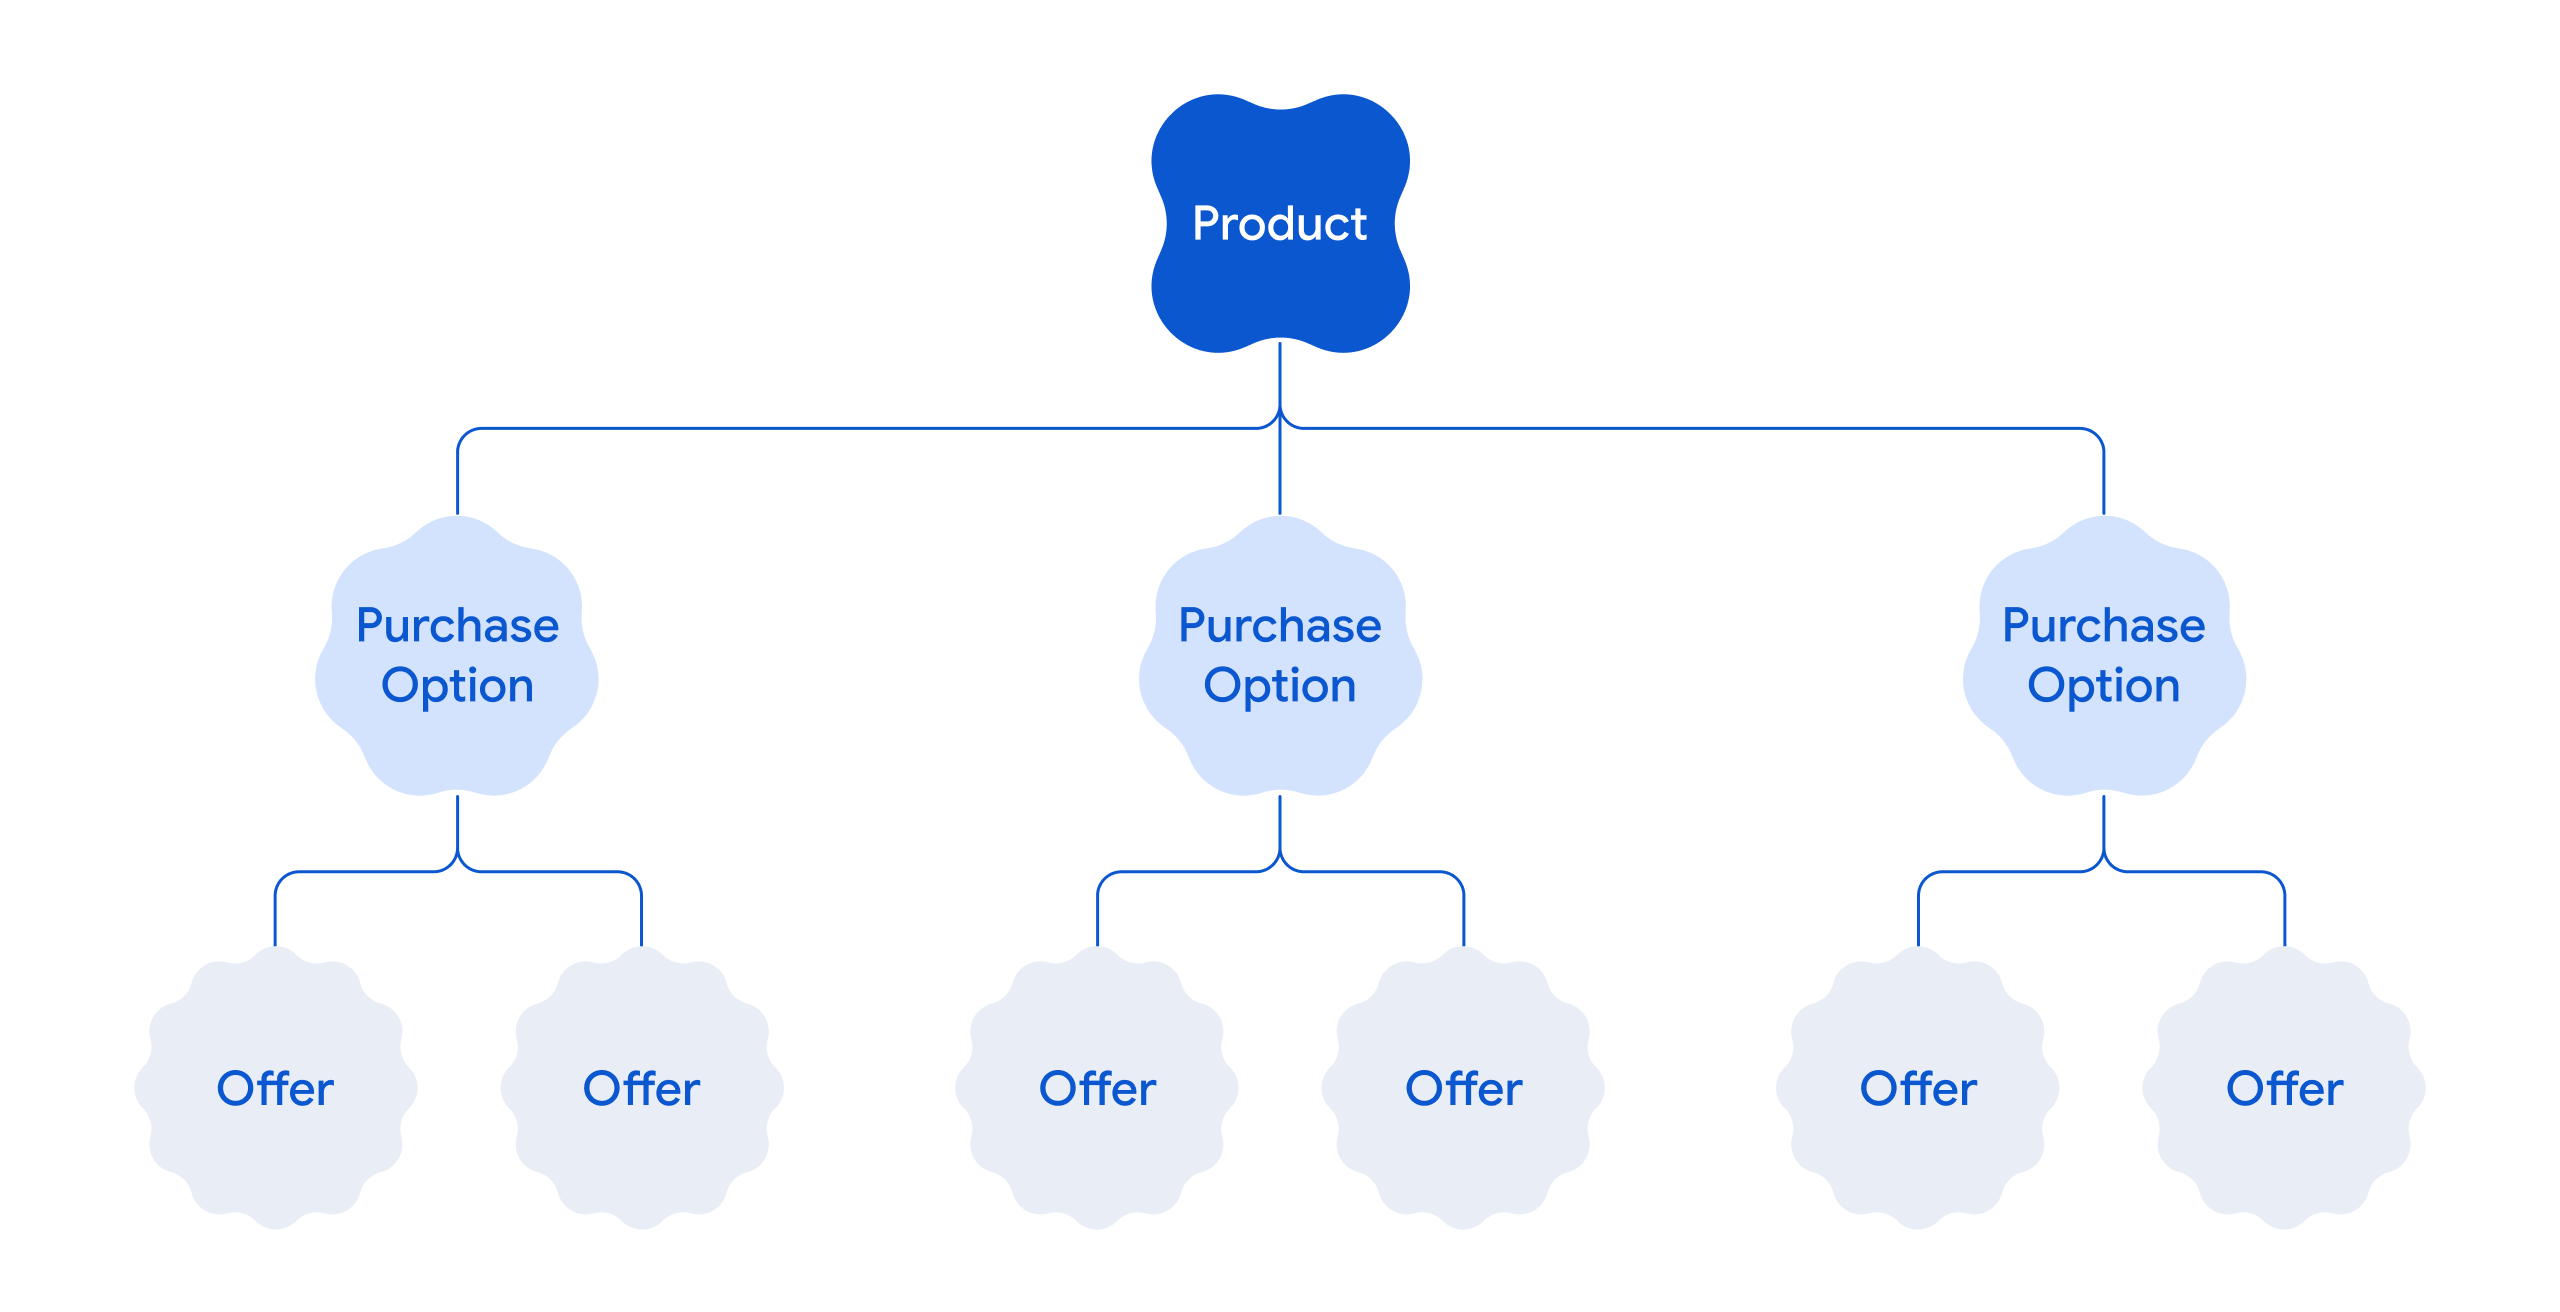 Figure 1: One-time object model.
For more information, see overview of one-time products.
3. Build the sample app
This codelab uses a sample Android app to show you how to manage one-time products. The sample app is designed to be a fully functional android app that has the complete source code which shows the following aspects:
- Integration the app with PBL
- Fetching of one-time products and the related purchase options
- Run purchase flows with regional pricing
The following demo video shows how the sample app will look and behave after it's deployed and run.
If you are already familiar with one-time products and Play Billing Library (PBL), you can download the sample app and play with it.
Pre-requisites
Before you build and deploy the sample app, do the following:
- Create a Google Play Console developer account. If you already have a developer account, skip this step.
- Create a new app in the Play Console. When creating an app, you can specify any app name for the sample app.
- Install Android Studio.
Build
The objective of this build step is to generate a signed Android app bundle file of the sample app.
To generate the Android app bundle, do the following steps:
- Download the sample app from GitHub.
- Build the sample app. Before you build, change the package name of the sample app and then build. If you have packages of other apps in your Play Console, ensure the package name you provide for the sample app is unique.
Note: Building the sample app creates only an APK file that you can use for local testing. However, running the app doesn't fetch products and prices because the products haven't been configured in the Play Console. - Generate a signed Android app bundle.
The next step is to upload the Android app bundle to Google Play Console.
4. Create one-time product in Play Console
To create one-time products in the Google Play Console, you need to have an app in the Play Console. Create an app in the Play Console, and then upload the previously created signed app bundle.
Create an app
To create an app:
- Log-in to the Google Play Console, using your developer account.
- Click Create app. This opens the Create app page.
- Enter an app name, select the default language, and other app related details.
- Click Create app. This creates an app in the Google Play Console.
Now you can upload the signed app bundle of the sample app.
Upload the signed app bundle
- Upload the signed app bundle to Google Play Console internal test track. Only after uploading, you can configure the monetization related features in the Play Console.
- Click Test and release > Testing > Internal release > Create new release.
- Enter a release name and upload the signed APK file.
- Click Next, and then click Save and publish.
Now, you can create your one-time products.
Create a one-time product
To create a one-time product:
- In the Google Play Console, from the left navigation menu, go to Monetize with Play > Products > One-time products.
- Click Create one-time product.
- Enter the following product details:
- Product ID: Enter a unique ID. For example,
trending_movie_1. - (Optional) Tags: Add relevant tags.
- Name: Enter a product name. For example,
Product Movie. - Description: Enter a product description. For example,
Product Description.
By default, the product name and description are in the English (United States) – en-US language. You can also manually enter the name and description in other languages. To enter the details, click Manage translations, select the languages for which you want to enter the translated text, and then click Apply. The following image shows the Manage translations option: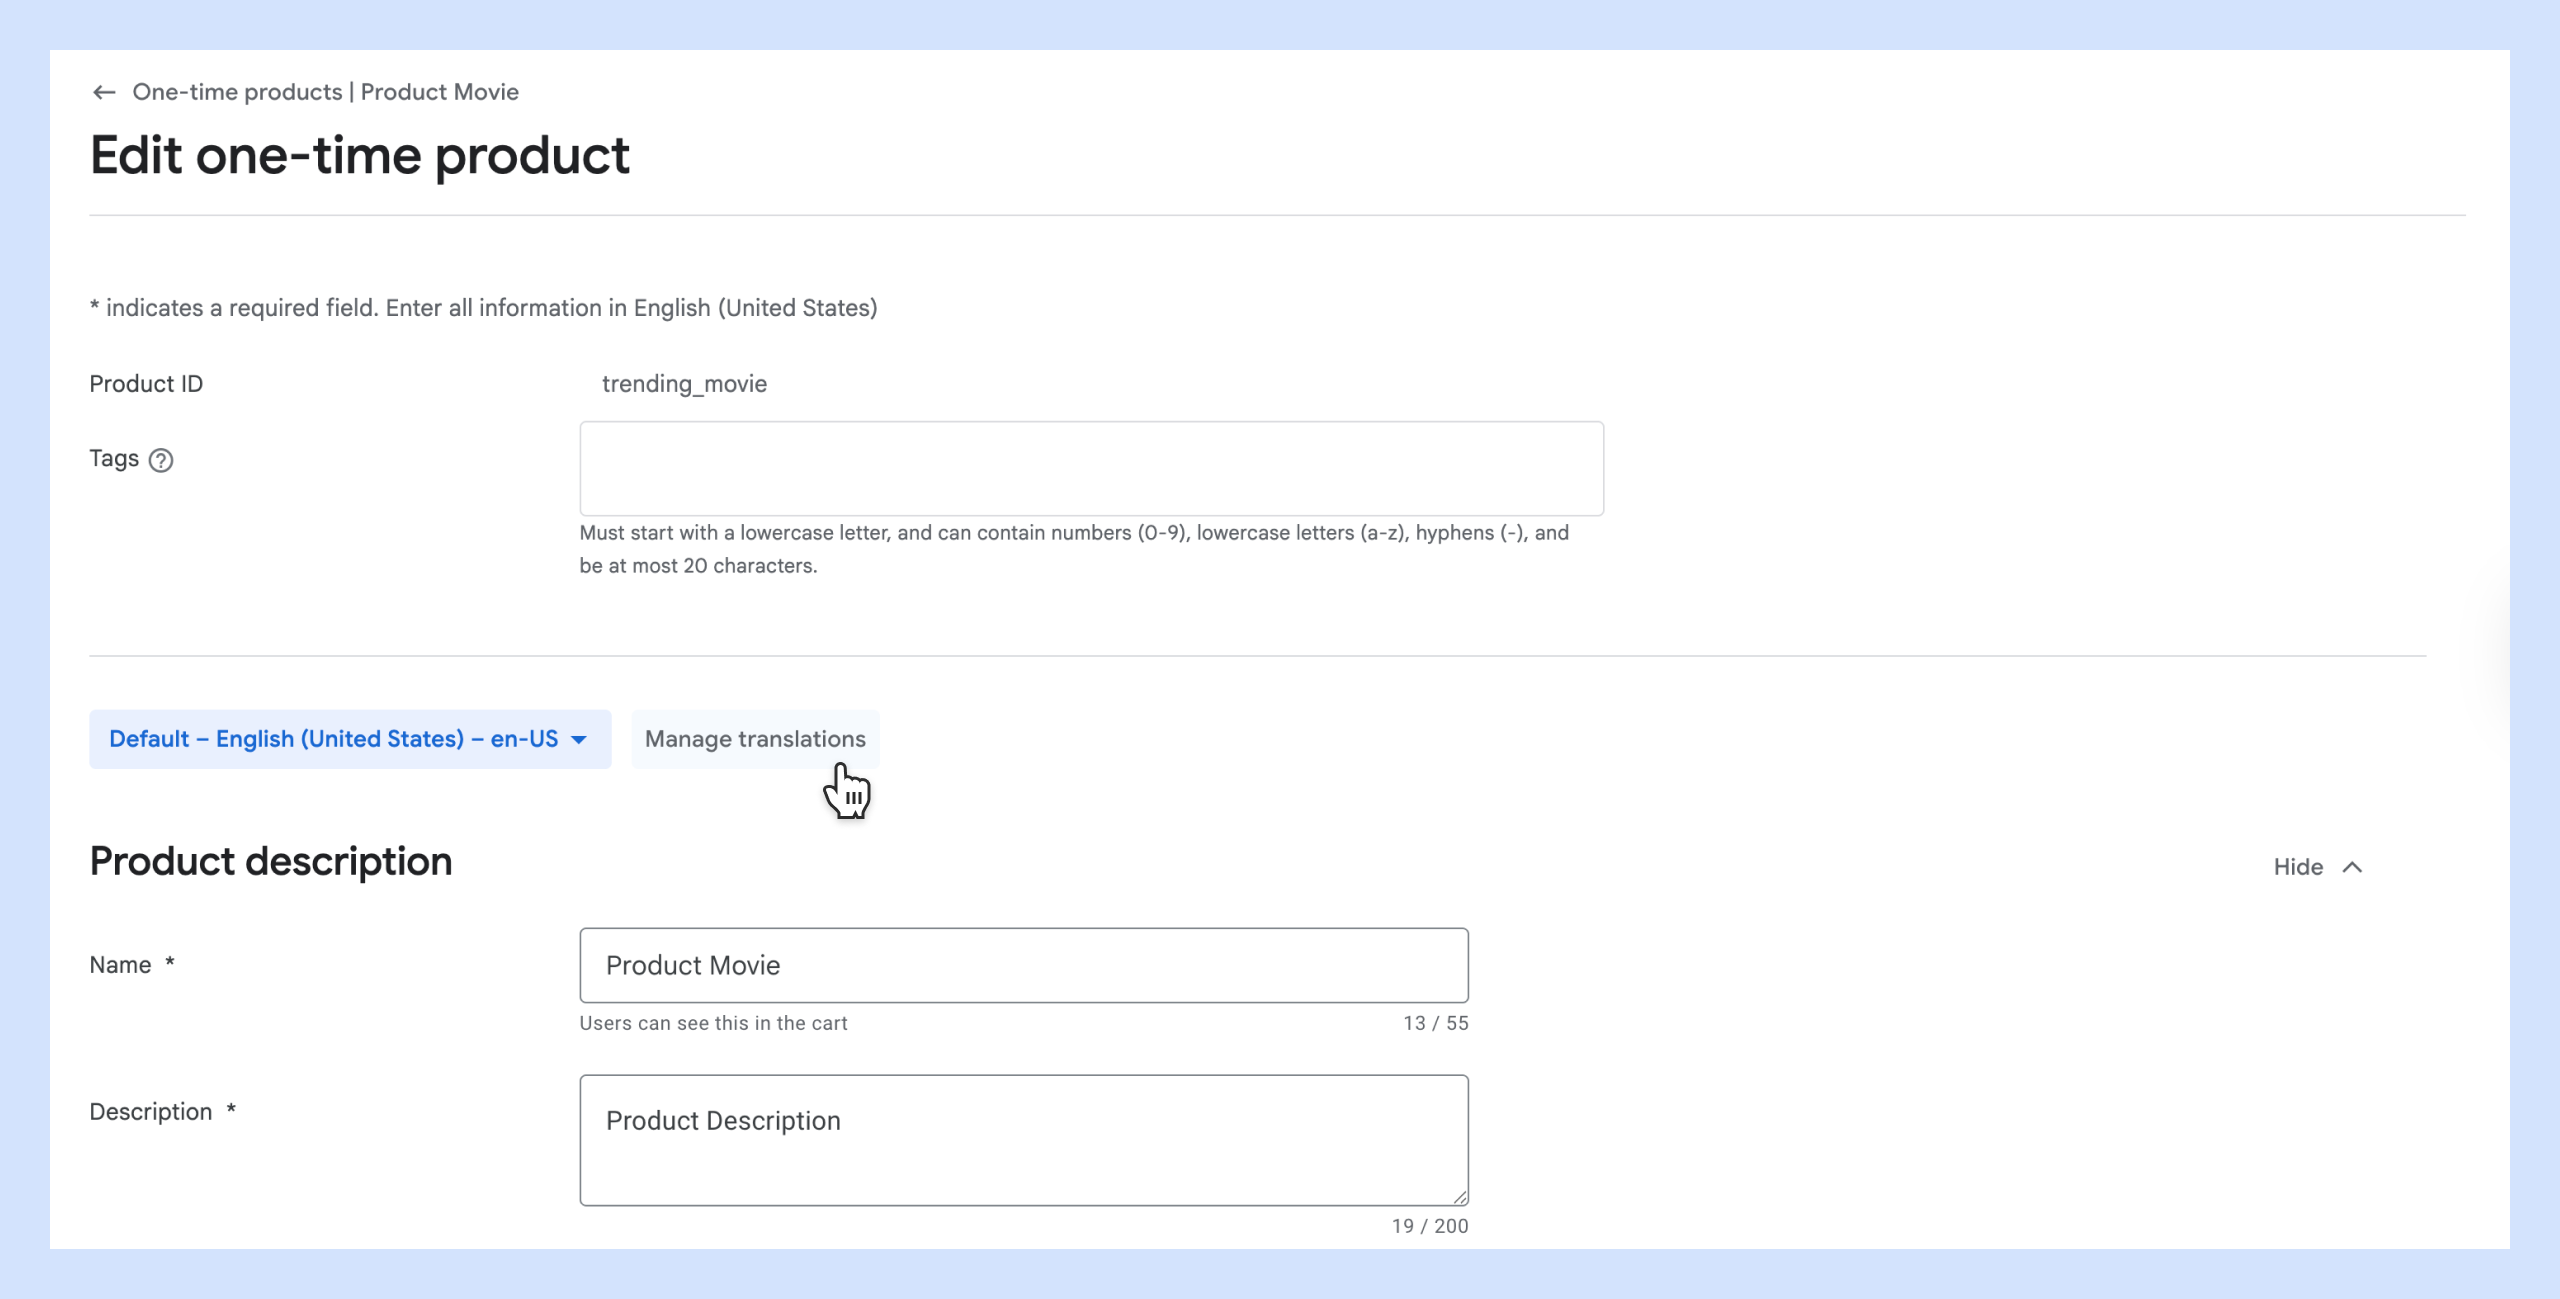 Figure 2: Manage translation.
The languages you have selected will appear in the language drop-down. Select each language and enter the corresponding name and description in the selected language. You can also translate the product name and description automatically free of cost. For more information, see the Translate one-time products section in this codelab.
Note: For the purpose of this codelab, you can skip configuring the Icon field and the Tax, compliance, and programs section. - Product ID: Enter a unique ID. For example,
- Click Next.
- Add a purchase option and configure its regional availability. A one-time product needs at least one purchase option, which defines how the entitlement is granted, its price, and regional availability. For this codelab, we will add the standard Buy option for the product.
In the Purchase option section, enter the following details:- Purchase Option ID: Enter a unique ID. For example
buy-movie. - Purchase type: Select Buy.
- (Optional) Tags: Add tags specific to this purchase option.
- (Optional) Click Advanced options to configure the advanced options. For the purpose of this codelab, you can skip the advanced options configuration.
- Purchase Option ID: Enter a unique ID. For example
- Next, you must configure the regional availability and price for the purchase option. In the regional availability, you will specify the regions where your product is available, including regions where your app is yet to be published. By default, a purchase option will be available in all regions.
In the Availability and pricing section, click Edit availability and access > Set to unavailable. Notice that all the regions are by default set to Available.- Select all countries except
France,Spain, and theUnited States, then click Set to unavailable. - From the All regions drop-down, select Available countries and regions. This shows only the countries that you selected in the previous step.
- For each of the available countries, click the edit icon in the Price column. This displays a dialog to edit the price. Enter and save the following prices:
- For
France, enter 10 EUR - For
Spain, enter 8 EUR - For
United States, enter 13 USD
- For
- Select all countries except
- Click Activate. This makes your one-time product available with the Buy purchase option.
Note: The regional price currency is visible based on the user's Play country setting. For example, if the user's Play country is set to France, the one-time product price is displayed in Euros.
One-time product creation video
The following video shows the one-time product creation steps that are previously described.
Add a rent purchase option
Now, add a rent purchase option to the previously created one-time product.
- In the Google Play Console, from the left navigation menu, go to Monetize with Play > Products > One-time products.
- Click the right-arrow for the product with the
trending_movie_1product ID that you created in the previous step. - Click Add purchase option.
- In the Purchase option section, enter the following details:
- Purchase Option ID: Enter
rent-movie. - Purchase type: Select Rent.
- Rental period: Select 48 hours.
- Rent initiation period: Select 24 hours.
- (Optional) Tags: Add tags specific to this purchase option.
- (Optional) Click Advanced options to configure the advanced options. For the purpose of this codelab, you can skip the advanced options configuration.
- Purchase Option ID: Enter
- Next, similar to the buy purchase option, configure the regional availability for the rental purchase option. See steps 6 and 7 in the previous section. When setting regional prices, set a different price for rentals. For example:
France- 5 EURSpain- 4 EURUnited States- 7 USD.
5. Translate one-time product details
You can translate your product name and description at no extra cost by using the machine translation feature available in Google Play Console.
To translate the title and description, do the following:
- In the Google Play Console, from the left navigation menu, go to Grow users > Translations > Store and in-app products.
- Click Create order.
- Select Machine translation at no cost, option, and then click Next.
- From the Translate to languages, select French - fr-FR and Spanish -es-ES, and then click Next.
- Select One-time products and subscriptions, and then click Translate and view translations. This displays a disclaimer banner. Acknowledge the disclaimer.
- You will now see the list of translated languages. Click Review and apply for a language. Review the text and then click Apply all translations. Repeat this step for all the languages that you have chosen to translate.
Post translation, you can edit the translated text in the Play Console. To edit the translated text:
- Open the One-time products > [your one-time product] > Edit one-time product > Edit one-time product details page.
- Select the required language from the language drop-down. This shows the text in the selected language. The following image shows the selection of a language to edit the translated text:
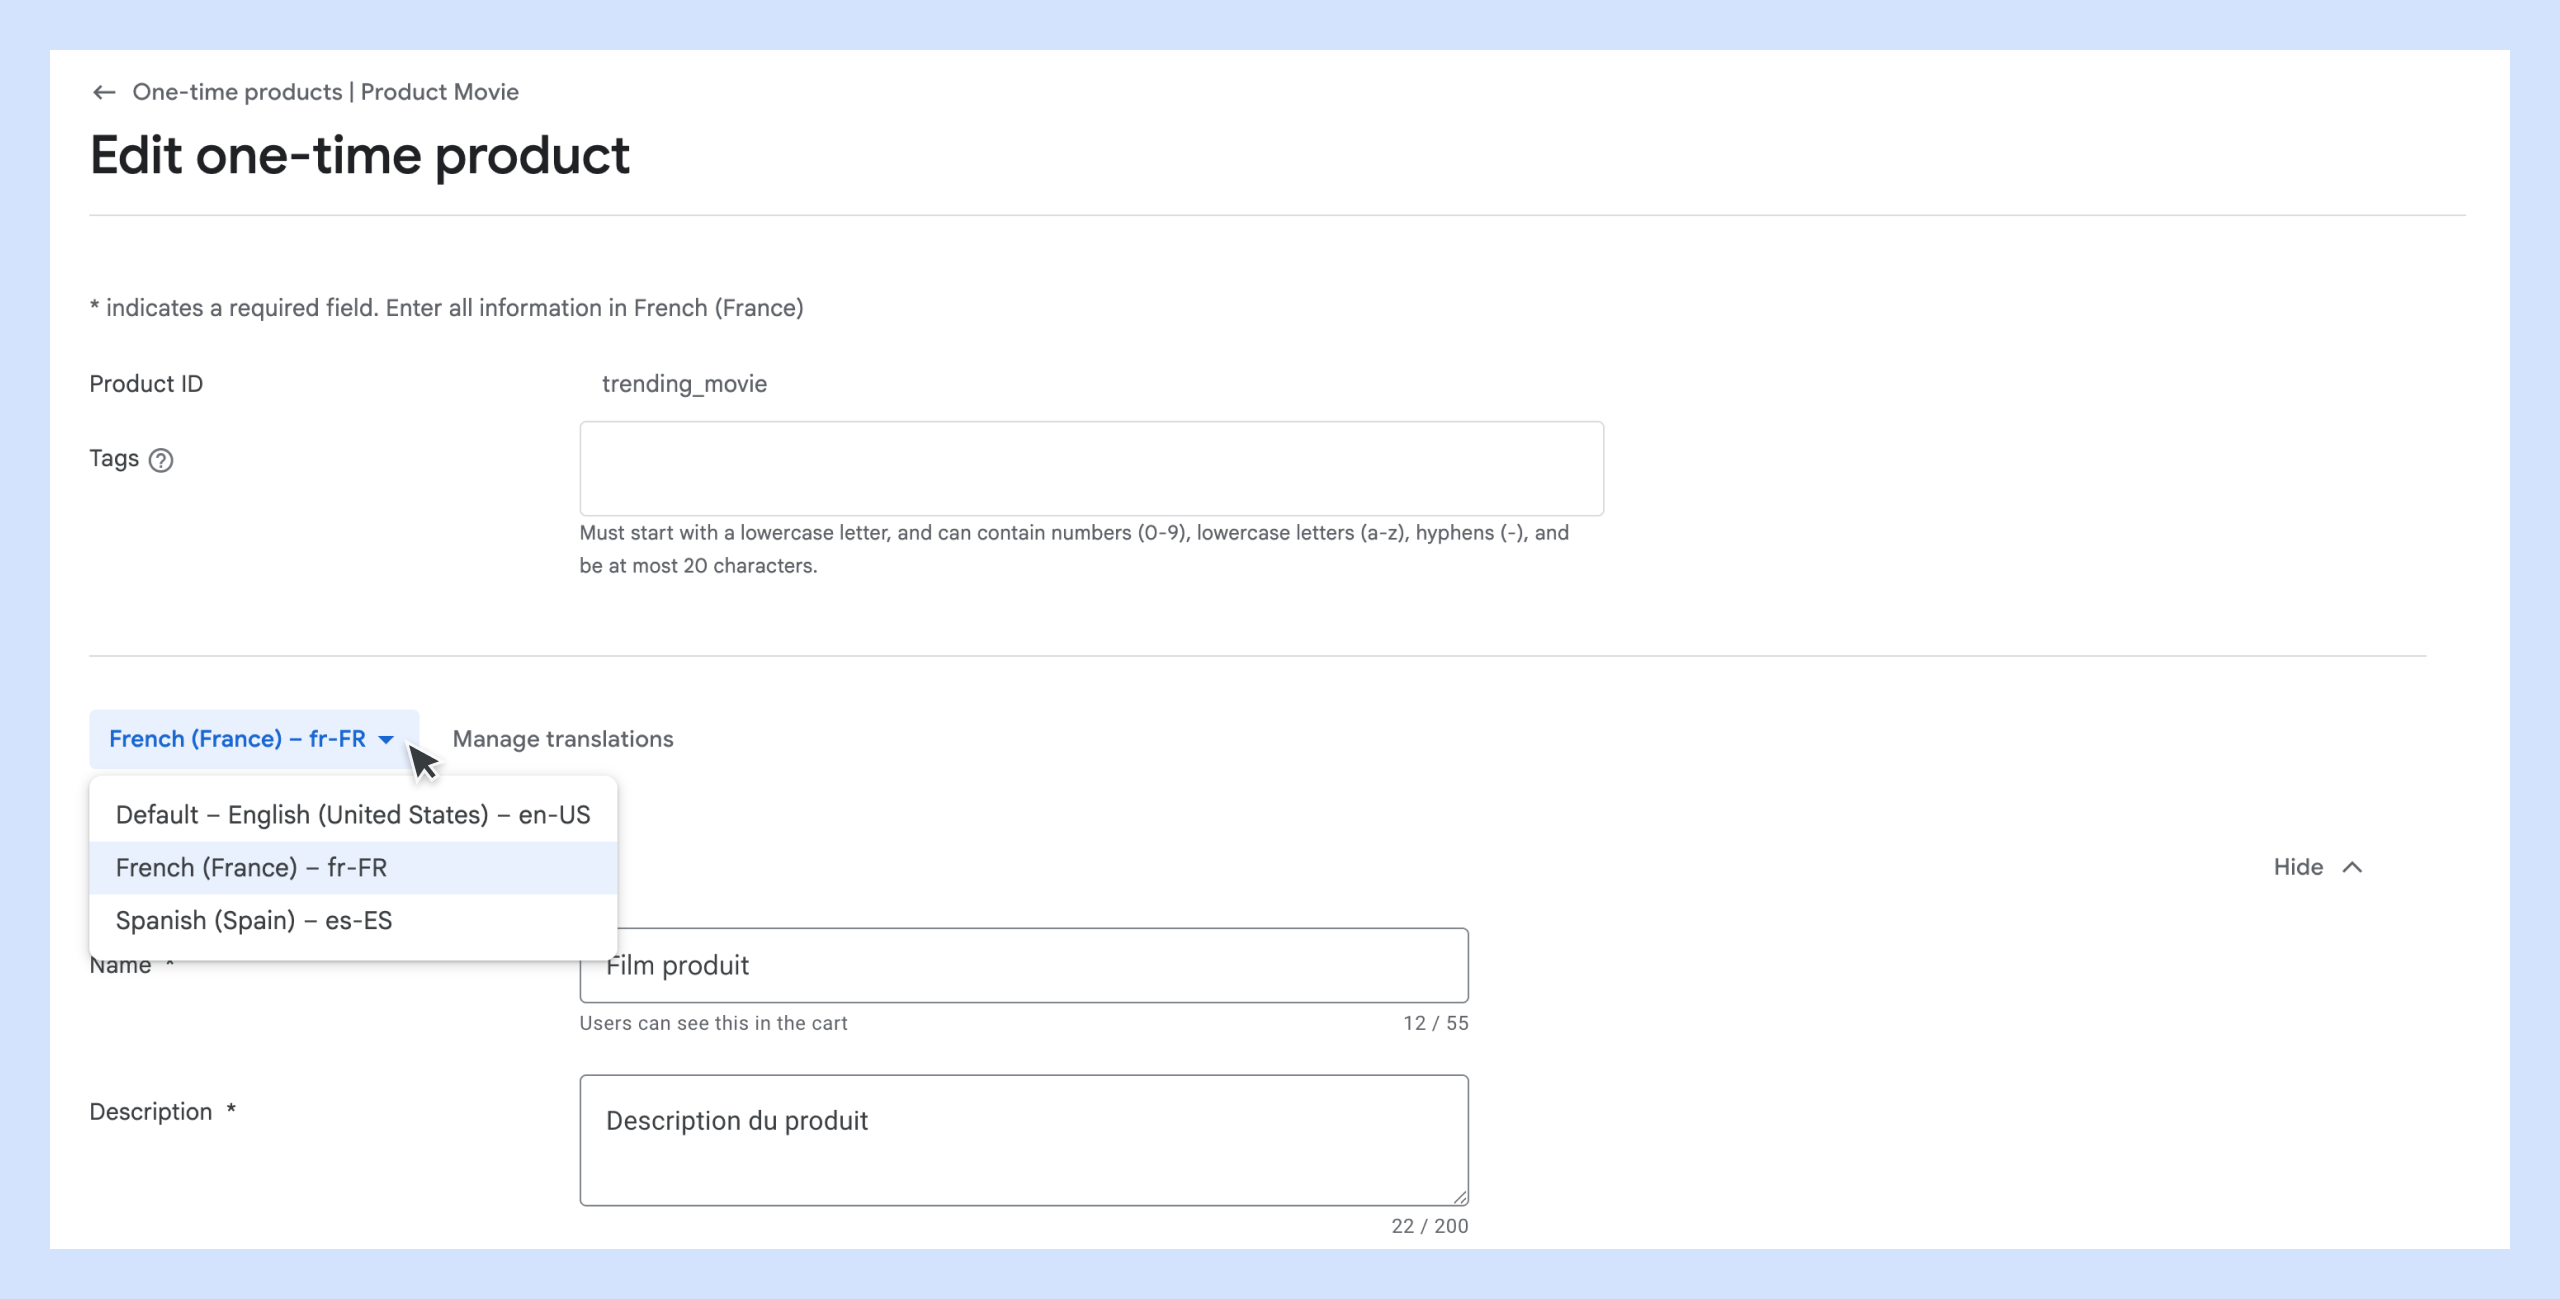 Figure 3: Edit translated text.
 - Edit the text as required, and then click Save changes.
The translated text is visible to the user based on the user's phone's language preferences. For example, if the user phone's language is set to France, the one-time product title and description are displayed in French. The following sample image shows how and where the translated text will appear in different languages.
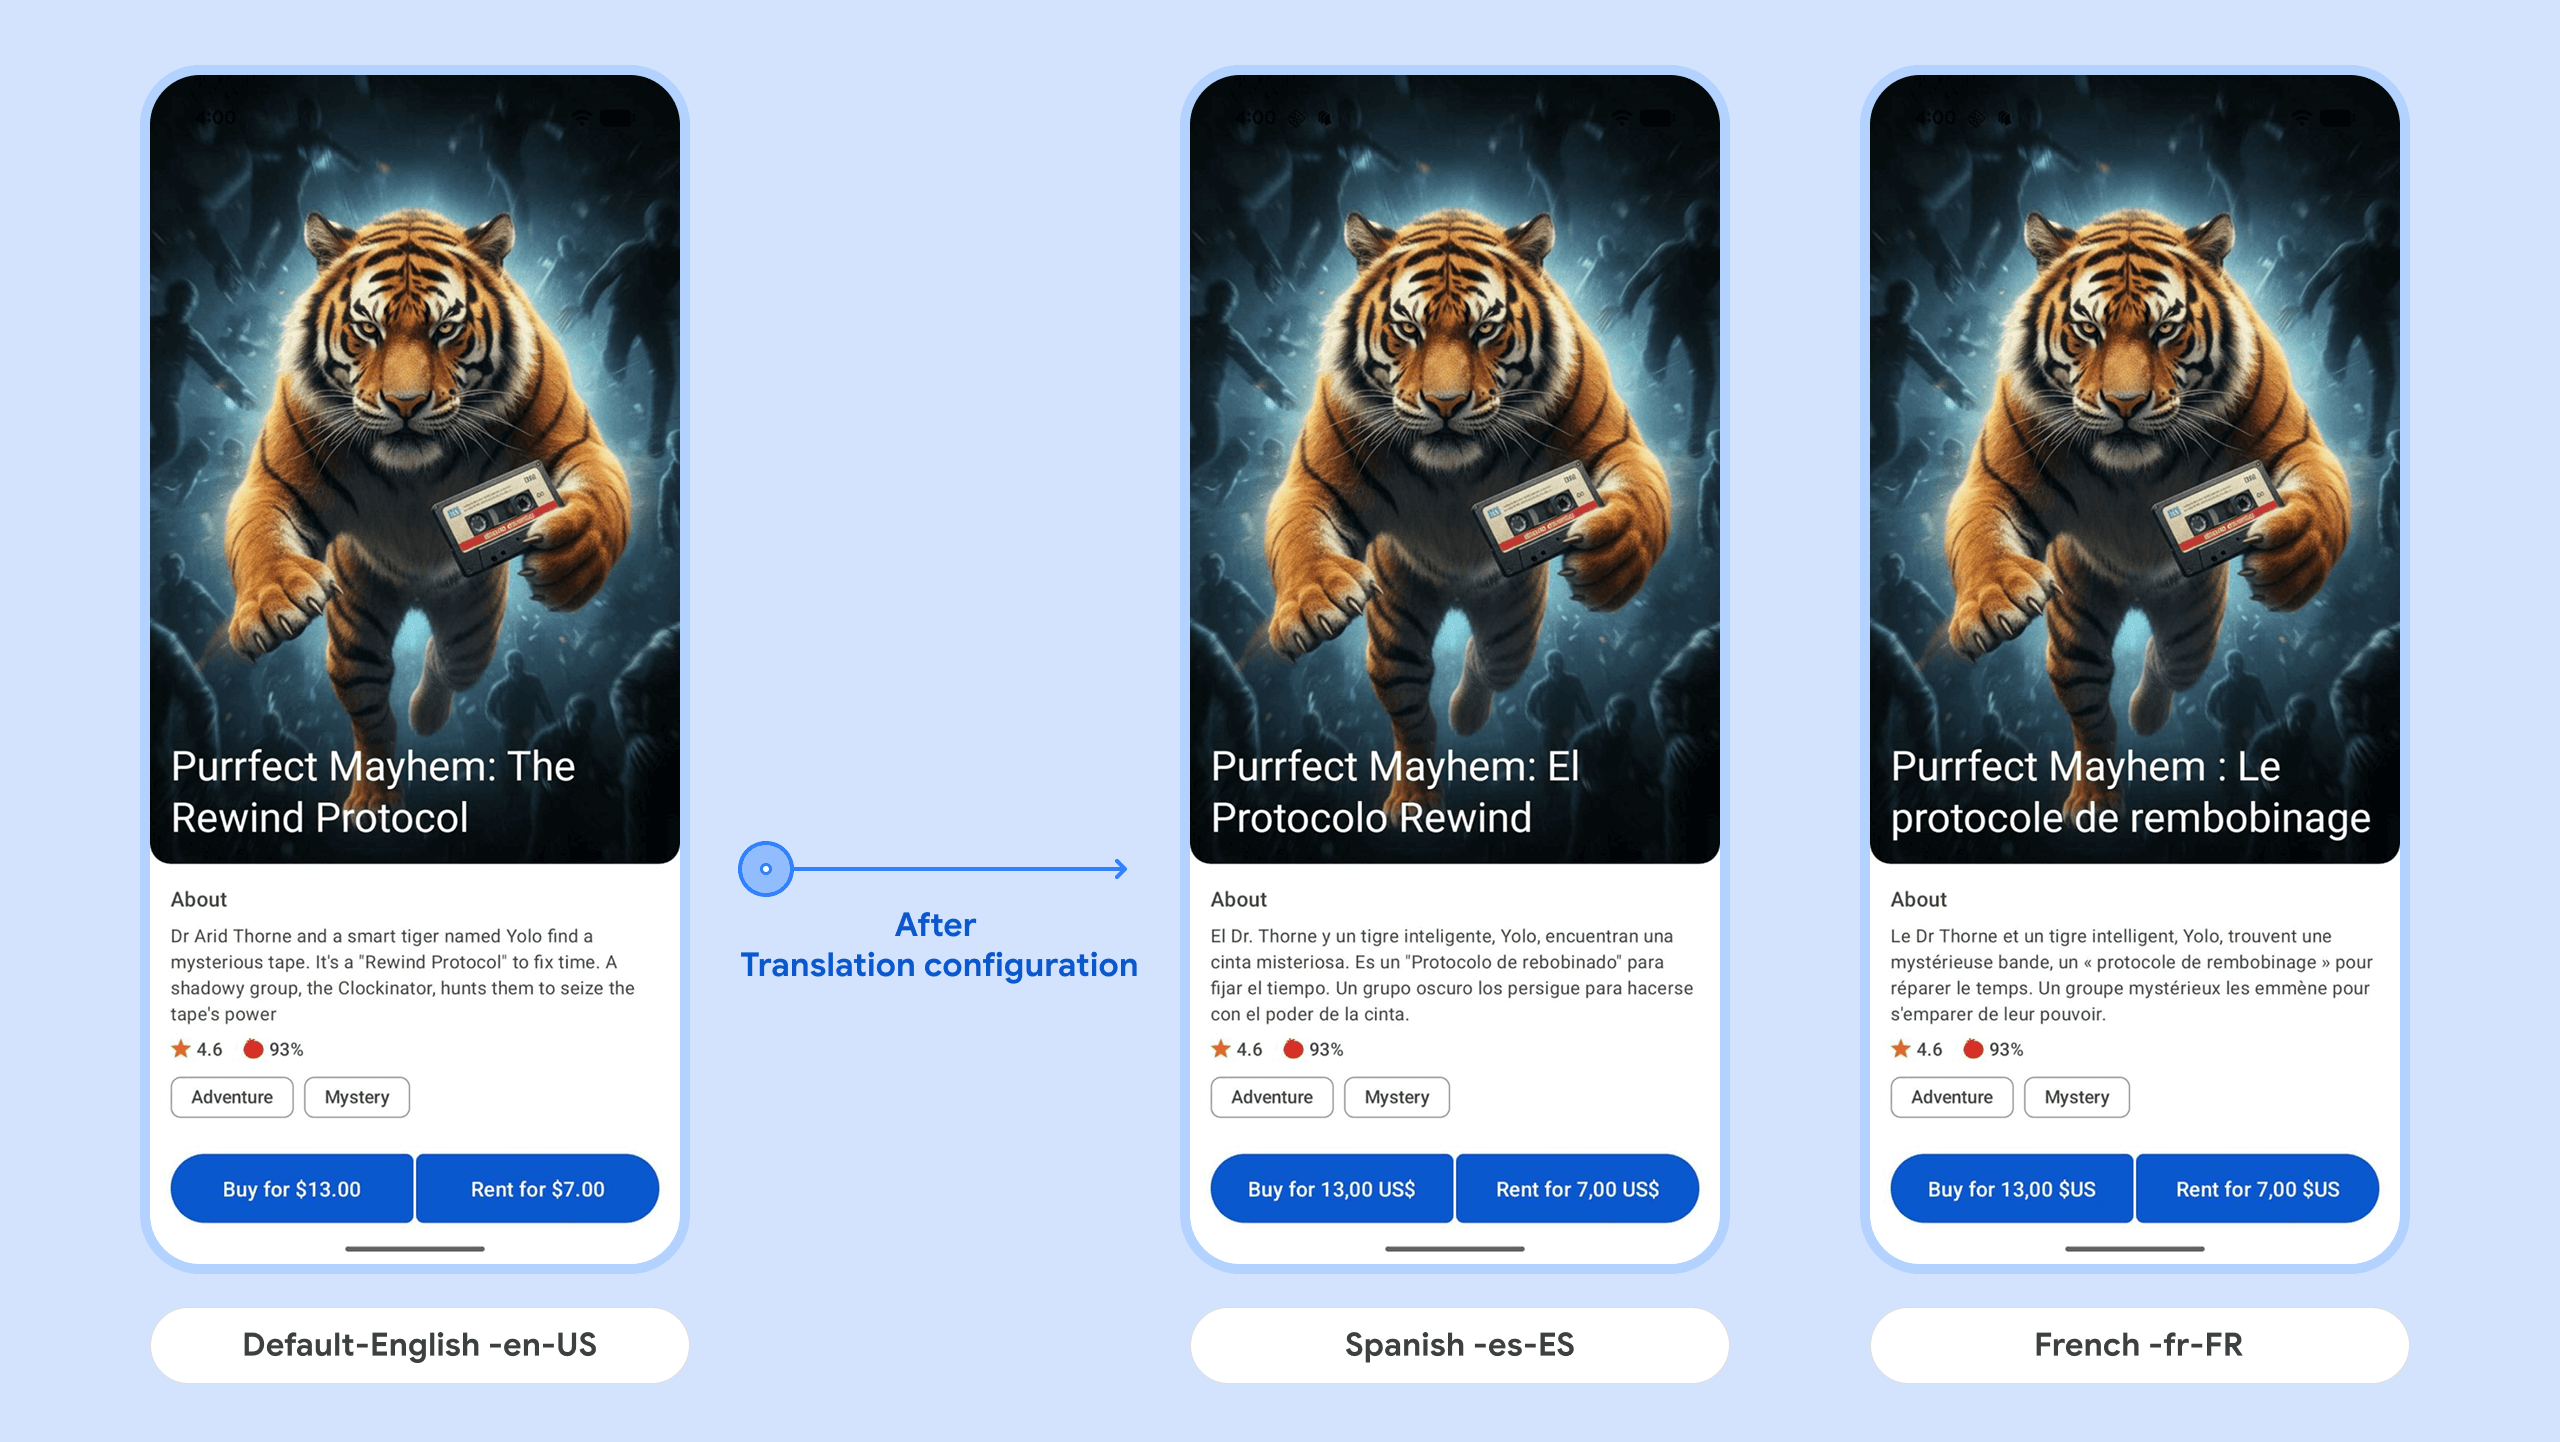 Figure 4: Translated text in your app.
Translation configuration video
The following video shows the translation configuration steps that are previously described.
6. Integrate with PBL
To integrate your app with Play Billing Library (PBL), do the following steps:
- Add the Play Billing Library dependency to the sample app.
dependencies { val billing_version = "8.0.0" implementation("com.android.billingclient:billing-ktx:$billing_version") } - Initialize the BillingClient. The BillingClient is the client SDK that resides on your app and communicates with the Play Billing Library. The following code snippet shows how to initialize the billing client.
private BillingClient createBillingClient() { return BillingClient.newBuilder(activity) .enablePendingPurchases(PendingPurchasesParams.newBuilder().enableOneTimeProducts().build()) // For one-time products, add a listener to process and acknowledge the purchases. This will notify // Google the purchase was processed. // For client-only apps, use billingClient.acknowledgePurchase(). // If you have a secure backend, you must acknowledge purchases on your server using the // server-side API. // See https://developer.android.com/google/play/billing/security#acknowledge // In this sample snippet purchases aren't processed. You must // implement your business logic to process and acknowledge the purchases. .setListener((billingResult, purchases) -> {}) .enableAutoServiceReconnection() .build(); } - Connect to Google Play.The following code snippet shows how to connect to Google Play.
/** * Starts the billing connection with Google Play. This method should be called exactly once * before any other methods in this class. * * @param productList The list of products to query for after the connection is established. */ public void startBillingConnection(List<Product> productList) { billingClient.startConnection( new BillingClientStateListener() { @Override public void onBillingSetupFinished(BillingResult billingResult) { if (billingResult.getResponseCode() == BillingResponseCode.OK) { Log.d(TAG, "Billing Client Connection Successful"); queryProductDetails(productList); } else { Log.e(TAG, "Billing Client Connection Failed: " + billingResult.getDebugMessage()); listener.onBillingSetupFailed(billingResult); // Propagate the error to the listener to show a message to the user. } } @Override public void onBillingServiceDisconnected() { Log.e(TAG, "Billing Client Connection Lost"); listener.onBillingError("Billing Connection Lost"); } }); } - Fetch the one-time product details.After integrating your app with PBL, you must fetch the one-time product details into your app. The following code snippet shows how to fetch the one-time product details in your app.
private void queryProductDetails(List<Product> productList) { QueryProductDetailsParams queryProductDetailsParams = QueryProductDetailsParams.newBuilder().setProductList(productList).build(); billingClient.queryProductDetailsAsync( queryProductDetailsParams, new ProductDetailsResponseListener() { @Override public void onProductDetailsResponse( BillingResult billingResult, QueryProductDetailsResult productDetailsResponse) { if (billingResult.getResponseCode() == BillingResponseCode.OK) { List<ProductDetails> productDetailsList = productDetailsResponse.getProductDetailsList(); listener.onProductDetailsResponse(productDetailsList); } else { Log.e(TAG, "QueryProductDetailsAsync Failed: " + billingResult.getDebugMessage()); listener.onBillingError("Query Products Failed: " + billingResult.getResponseCode()); } } }); }trending_movie_1in this example) inProductDetails, gives you a response similar to the following:{ "productId": "trending_movie_1", "type": "inapp", "title": "Purrfect Mayhem: The Rewind Protocol (Movies All Day | Play Samples)", "name": "Purrfect Mayhem: The Rewind Protocol", "description": "Dr. Arid Thorne and a smart tiger named Yolo find a mysterious tape. It's a \"Rewind Protocol\" to fix time. A shadowy group, the Clockinator, hunts them to seize the tape's power.", "skuDetailsToken": "<---skuDetailsToken--->", "oneTimePurchaseOfferDetails": {}, "oneTimePurchaseOfferDetailsList": [ { "priceAmountMicros": 13000000, "priceCurrencyCode": "USD", "formattedPrice": "$13.00", "offerIdToken": "<---buy offerIdToken --->", "purchaseOptionId": "buy-option", "offerTags": [ "adventure", "mystery" ] }, { "priceAmountMicros": 7000000, "priceCurrencyCode": "USD", "formattedPrice": "$7.00", "offerIdToken": "<---rent offerIdToken--->", "purchaseOptionId": "rent-option", "offerTags": [ "adventure", "mystery" ], "rentalDetails": { "rentalPeriod": "P30D", "rentalExpirationPeriod": "PT24H" } } ] }oneTimePurchaseOfferDetailsList. This list has 2 purchase options (buy-option and the rent-option) that were configured in the Play Console. You can identify each purchase option uniquely by its offerIdToken. - Fetch the offer tokens for the Rent and Buy offers. You need the offer tokens to launch the billing flow in step 6.
@Override public void onProductDetailsResponse(List<ProductDetails> productDetailsList) { if (productDetailsList != null && !productDetailsList.isEmpty()) { // Iterate over all details of the queried product in step 4. for (ProductDetails productDetails : productDetailsList) { // Get the list of all the offers associated with the product. List<ProductDetails.OneTimePurchaseOfferDetails> offerDetailsList = productDetails.getOneTimePurchaseOfferDetailsList(); // Iterate over the offer details for (ProductDetails.OneTimePurchaseOfferDetails offerDetails : offerDetailsList) { // For a Rent purchase option, the // offerDetails.getRentalDetails() method returns // the rent information. If this information is present, // the offer corresponds to a Rent purchsae option. if (offerDetails.getRentalDetails() != null) { rentFormattedPrice = offerDetails.getFormattedPrice(); // Get the offerIdToken for the Rent purchase option rentOfferToken = offerDetails.getOfferToken(); rentMovieTags = offerDetails.getOfferTags(); } // If the offerDetails.getRentalDetails() returns // null, the offer corresponds to a Buy purchsae option. else { buyFormattedPrice = offerDetails.getFormattedPrice(); // Get the offerIdToken for the Buy purchase option buyOfferToken = offerDetails.getOfferToken(); buyMovieTags = offerDetails.getOfferTags(); } } updateUIButtons(); return; } } else { Log.e(TAG, "No product details found for " + productId); } } - Launch the billing flow.
/**
 * Launches the billing flow for the product with the given offer token.
*
* @param activity The activity instance from which the billing flow will be launched.
* @param productDetails The product details of the product to purchase.
* @param offerToken The offer token of the product to purchase.
* @return The result of the billing flow.
*/
public void launchPurchase(Activity activity, ProductDetails productDetails, String offerToken) {
    ImmutableList<BillingFlowParams.ProductDetailsParams> productDetailsParamsList =
        ImmutableList.of(
            BillingFlowParams.ProductDetailsParams.newBuilder()
                .setProductDetails(productDetails)
                .setOfferToken(offerToken)
                .build());
    BillingFlowParams billingFlowParams = BillingFlowParams.newBuilder()
        .setProductDetailsParamsList(productDetailsParamsList)
        .build();
    billingClient.launchBillingFlow(activity, billingFlowParams);
}
Tip: You can also set up real-time developer notifications (RTDN) to implement win-back campaigns and other purchase lifecycle management strategies. To understand how to set up RTDN and handle notifications with accurate tracking and entitlement, it's recommended that you go through the Maximize Your Play Billing Integration codelab
7. Test purchase options
Before making your one-time products available in your live app, you can test your PBL integration using license testers and the Play Billing Lab.
You'll learn how to test price localization and availability in which the app is available only in some regions with a different price for each region.
Pre-requisites
- Add a license tester in the Google Play Console, and then enable the license tester for internal testing.
- Download and install the Play Billing Lab app on your phone or emulator.
- Run the sample app that you previously created on your phone or emulator.
Test regional pricing for the purchase options
To test the regional pricing for the purchase options, do the following:
- Open the Play Billing Lab app and then login as a license tester.
- In the Configuration Settings, click Edit, select the country
France, and then click Apply. Here we are selecting the Play country which determines the currency that will be shown in the app. - Close and re-open the sample app. Now it should show the buy and rent currency for
Francein Euros.
To test for a different country, select Spain in step 2 and then do step 3.
Play Billing Lab testing video
The following video shows the regional price testing steps using the sample app.
8. Next steps
- Learn how to maximize your play billing integration.
- Learn how to analyze product purchase drop-offs.
- Remember to follow the best practices for verifying and processing purchases on your secure backend once users start buying these products.
Reference docs
9. Congratulations!
Congratulations! You've successfully navigated the Google Play Console to create a new one-time product, configured a purchase option, and tested the purchase flow using the Play Billing Lab. You now have a deeper understanding of Google Play's flexible product catalog for one-time purchases.
Survey
Your feedback on this codelab is highly valued. Consider taking a few minutes to complete our survey.