
1. 簡介
在本程式碼研究室中,您將專注於建立單次產品、定義購買選項、設定特定區域的價格,以及測試單次產品的購買流程。
觀眾
本程式碼研究室適用於想使用 Play 管理中心管理單次產品目錄的 Android 應用程式開發人員。
課程內容...
- 單次產品物件模型。
- 瞭解如何瀏覽及使用 Google Play 管理中心,管理單次產品目錄。
- 如何免費將單次產品詳細資料翻譯成各種語言。
- 如何為單次產品設定區域供應情形和價格。
- 如何使用 Play Billing Library API 查詢單次產品詳細資料。
- 如何使用 Play Billing Lab 測試一次性產品。
事前準備
- 使用開發人員帳戶存取 Google Play 管理中心。如果沒有開發人員帳戶,請建立帳戶。
- 本程式碼研究室的範例應用程式,您可以從 GitHub 下載。
- Android Studio。
2. 單次產品首映
單次產品物件模型可讓您更有彈性地銷售產品,並降低管理這類產品的複雜度。物件模型會將銷售內容與銷售方式分開,因此同一項授權可有多個價位,並以不同方式向使用者行銷。物件模型有三個階層:
- 單次產品:產品物件是指使用者要購買的產品。
- 購買選項:用於定義向使用者授權的方式、授權價格,以及產品供應區域。一項產品可以有多個購買選項,在不同區域提供不同價格。
- 優惠 - 優惠會影響所連結購買選項的價格,可用於模擬折扣或預購。一個購買選項可有多項優惠。
下圖顯示單次產品物件模型。
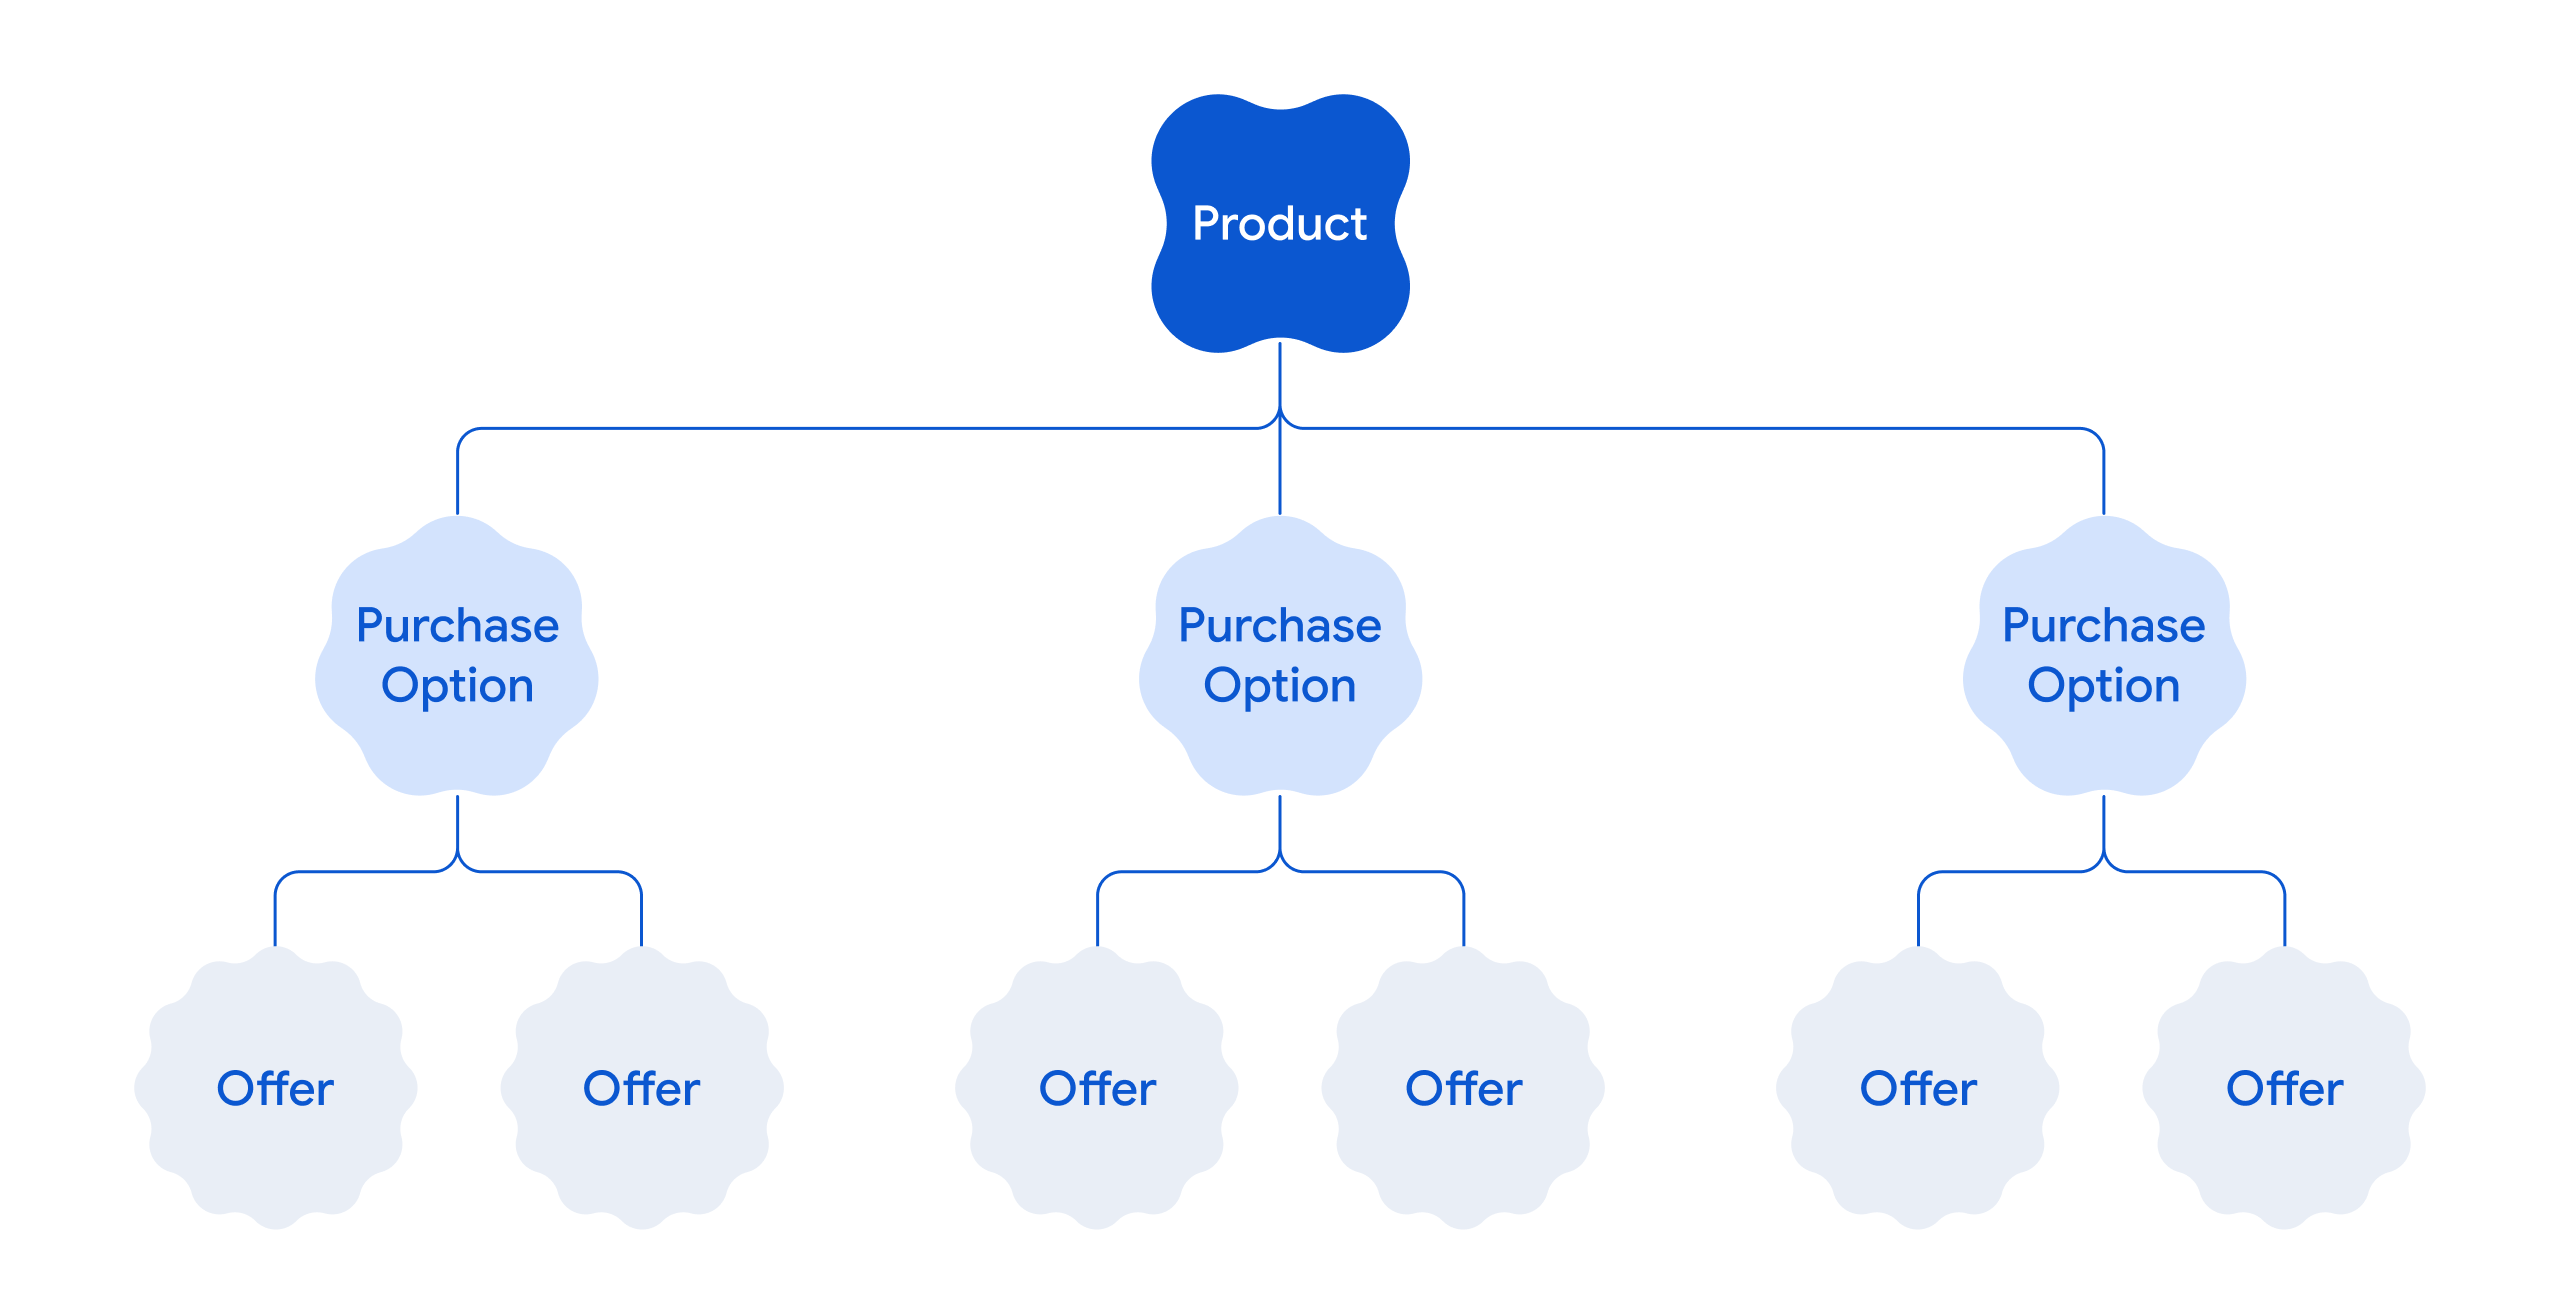 圖 1:單次物件模型。
詳情請參閱「單次產品總覽」。
3. 建構範例應用程式
本程式碼研究室會使用 Android 範例應用程式,說明如何管理單次產品。這個範例應用程式是功能齊全的 Android 應用程式,提供完整原始碼,可展示下列各方面:
- 將應用程式與 PBL 整合
- 擷取一次性產品和相關購買選項
- 使用區域價格執行購買流程
以下示範影片顯示範例應用程式部署及執行後的樣貌和行為。
如果您已熟悉單次產品和 Play 帳款服務程式庫 (PBL),可以下載範例應用程式並試用。
必備條件
建構及部署範例應用程式前,請先完成下列步驟:
- 建立 Google Play 管理中心開發人員帳戶。如果已有開發人員帳戶,請略過這個步驟。
- 在 Play 管理中心建立新應用程式。建立應用程式時,您可以為範例應用程式指定任何應用程式名稱。
- 安裝 Android Studio。
建構
這個建構步驟的目標是產生範例應用程式的已簽署 Android App Bundle 檔案。
如要產生 Android 應用程式套件,請按照下列步驟操作:
- 從 GitHub 下載範例應用程式。
- 建構範例應用程式。建構前,請先變更範例應用程式的套件名稱,然後再建構。如果 Play 管理中心中還有其他應用程式的套件,請確保您為範例應用程式提供的套件名稱是專屬的。
注意:建構範例應用程式只會建立 APK 檔案,可用於本機測試。不過,由於產品尚未在 Play 管理中心設定,因此執行應用程式不會擷取產品和價格。 - 產生已簽署的 Android App Bundle。
接下來,請將 Android 應用程式套件上傳至 Google Play 管理中心。
4. 在 Play 管理中心建立單次產品
如要在 Google Play 管理中心建立一次性產品,您必須在 Play 管理中心擁有應用程式。在 Play 管理中心建立應用程式,然後上傳先前建立的已簽署應用程式套件。
建立應用程式
如要建立應用程式,請按照下列步驟操作:
- 使用開發人員帳戶登入 Google Play 管理中心。
- 按一下「建立應用程式」,開啟「建立應用程式」頁面。
- 輸入應用程式名稱、選取預設語言,以及其他應用程式相關詳細資料。
- 按一下「建立應用程式」,即可在 Google Play 管理中心建立應用程式。
現在可以上傳範例應用程式的已簽署應用程式套件。
上傳已簽署的應用程式套件
- 將已簽署的應用程式套件上傳至 Google Play 管理中心的內部測試群組。上傳後,您才能在 Play 管理中心設定營利相關功能。
- 依序點選「測試及發布」>「測試」>「內部測試版本」>「建立新版本」。
- 輸入發布版本名稱,並上傳已簽署的 APK 檔案。
- 依序點選「下一步」和「儲存並發布」。
現在你可以建立單次性產品。
建立單次產品
如何建立單次產品:
- 在 Google Play 管理中心,依序點選左側導覽選單中的「透過 Google Play 營利」 >「產品」 >「單次產品」。
- 按一下「建立單次產品」。
- 輸入下列產品詳細資料:
- 產品 ID:輸入專屬 ID。例如:
trending_movie_1。 - (選用) 標記:新增相關標記。
- 名稱:輸入產品名稱。例如:
Product Movie。 - 說明:輸入產品說明。例如:
Product Description。
根據預設,產品名稱和說明會以英文 (美國) - en-US 顯示。你也可以手動輸入其他語言的名稱和說明。如要輸入詳細資料,請按一下「管理其他語言版本的翻譯內容」,選取要輸入翻譯文字的語言,然後按一下「套用」。下圖顯示「管理翻譯版本」選項: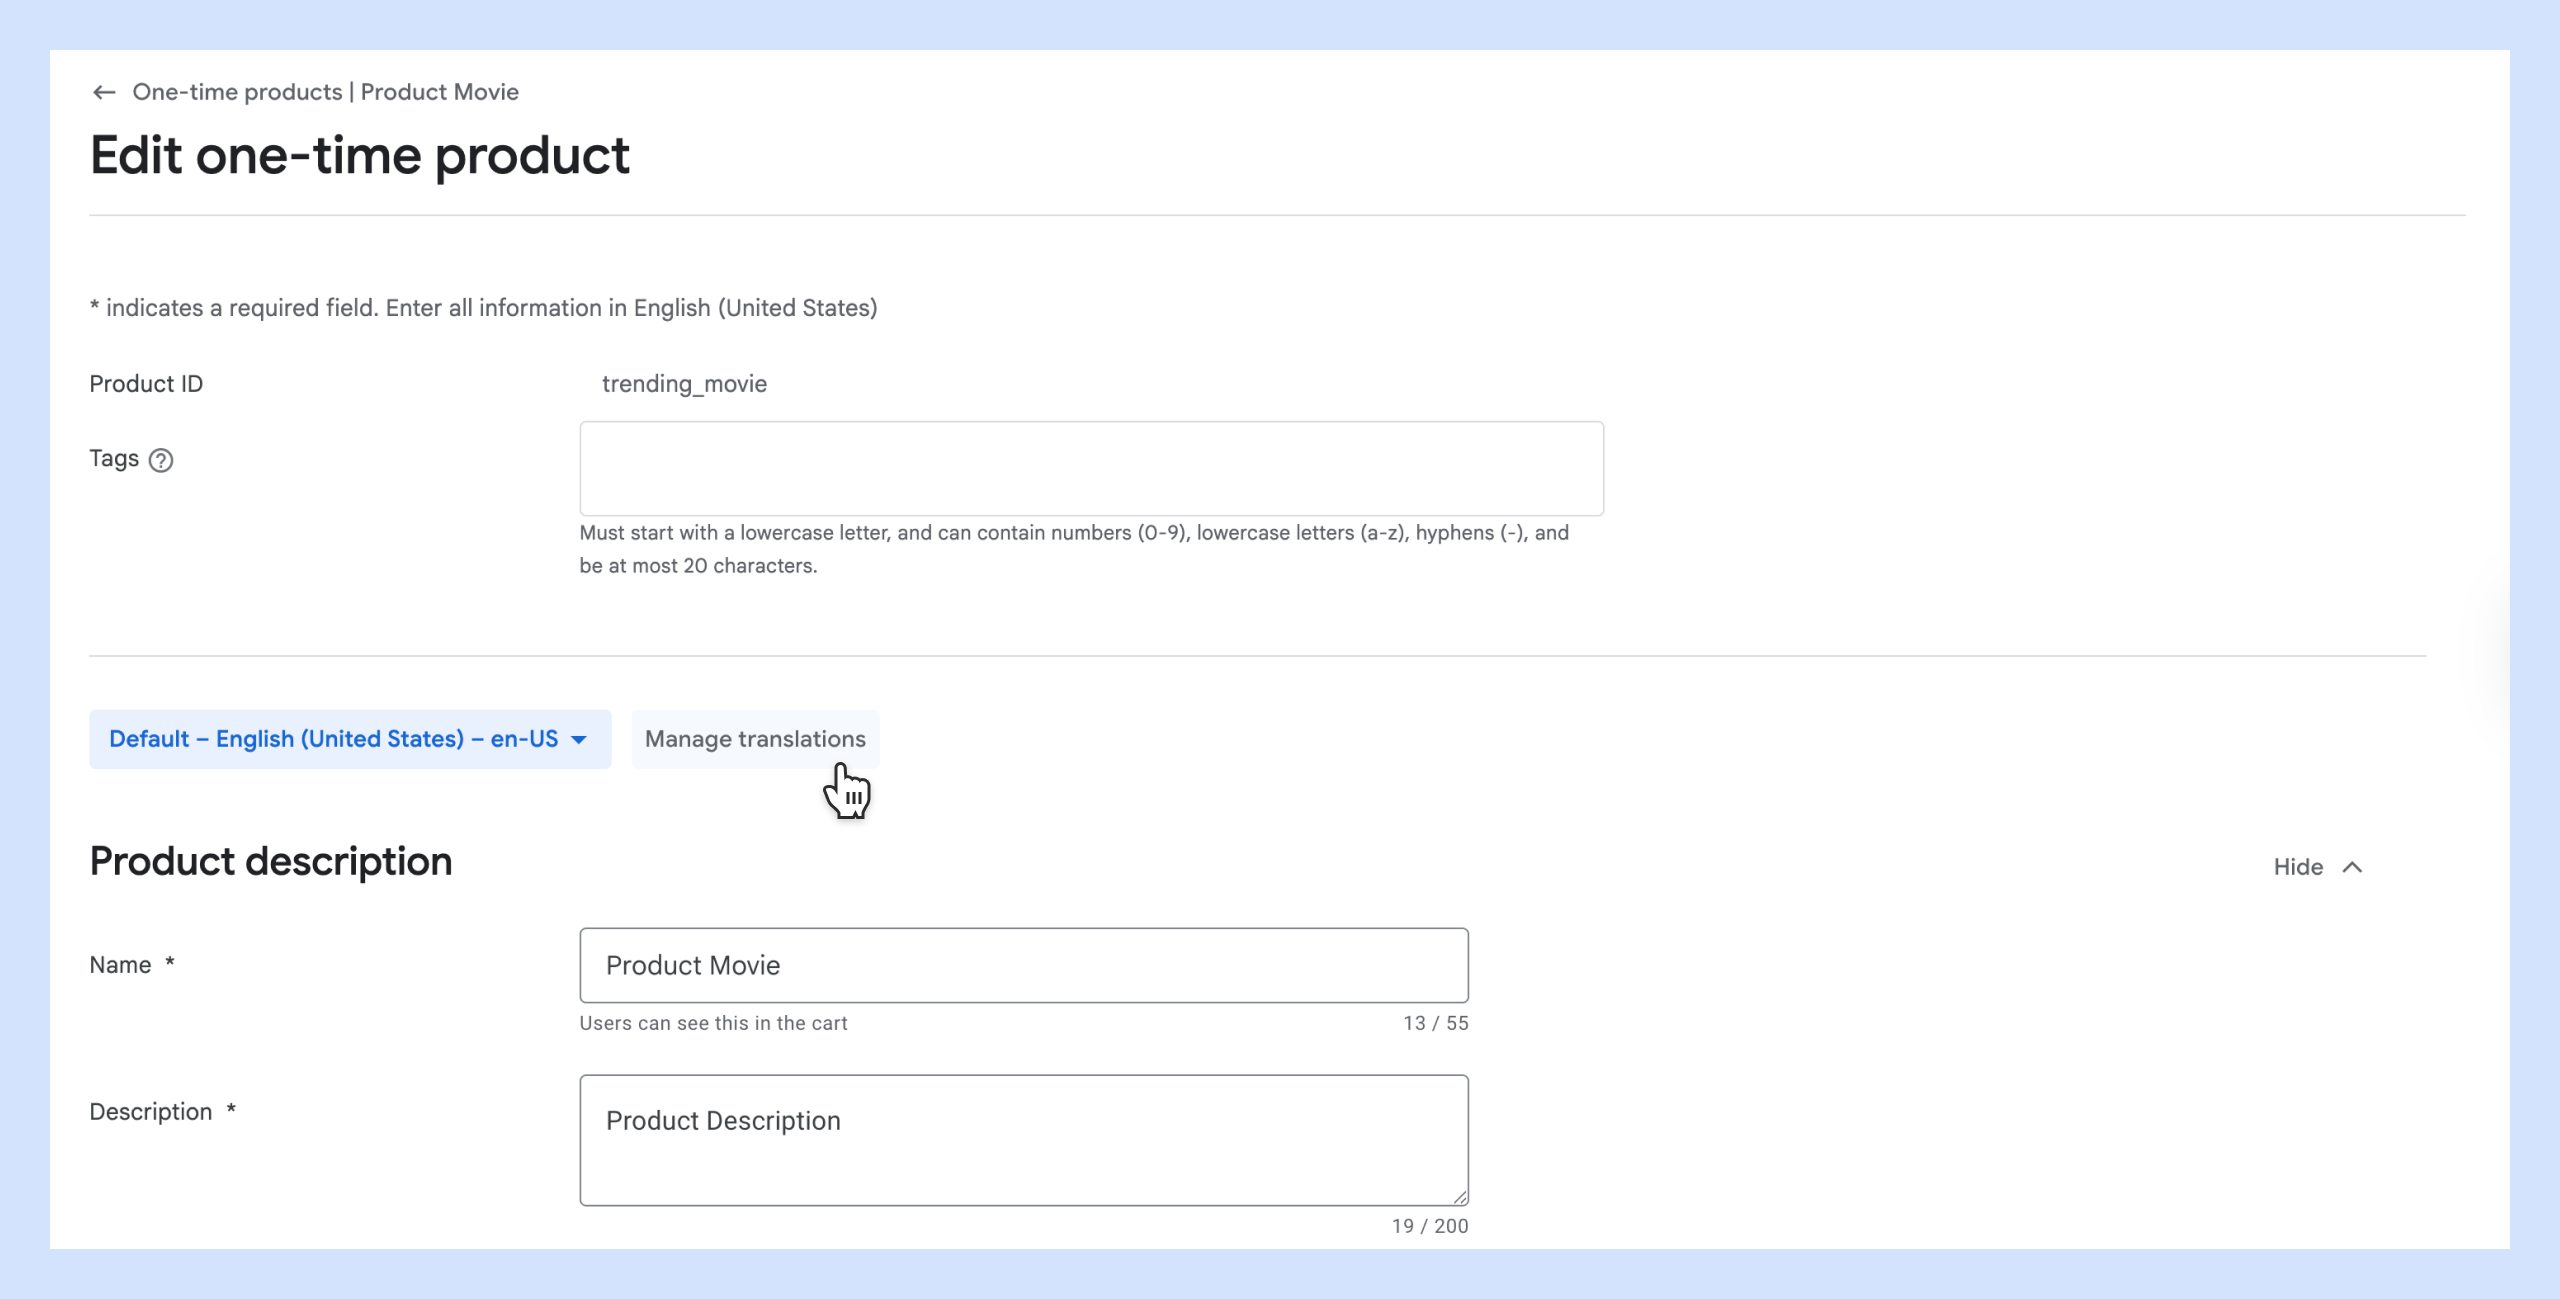 圖 2:管理翻譯版本。
你選取的語言會顯示在語言下拉式選單中。選取每種語言,然後以所選語言輸入相應名稱和說明。你也可以免費自動翻譯產品名稱和說明。詳情請參閱本程式碼研究室的「翻譯單次產品」一節。
注意:為配合本程式碼研究室,您可以略過設定「圖示」欄位和「稅金、法規遵循和計畫」部分。 - 產品 ID:輸入專屬 ID。例如:
- 點選 [下一步]。
- 新增購買選項並設定區域供應情形。單次產品至少需要一個購買選項,用於定義授權方式、價格和區域供應情形。在本程式碼研究室中,我們將為產品新增標準的「購買」選項。
在「購買選項」部分,輸入下列詳細資料:- 購買選項 ID:輸入專屬 ID。例如
buy-movie。 - 交易類型:選取「購買」。
- (選用) 標籤:新增這個購買選項專屬的標籤。
- (選用) 按一下「進階選項」,設定進階選項。在本程式碼研究室中,您可以略過進階選項設定。
- 購買選項 ID:輸入專屬 ID。例如
- 接著,你必須設定購買選項的區域供應情形和價格。在區域供應情形中,你會指定產品的供應區域,包括尚未發布應用程式的區域。根據預設,購買選項會在所有地區提供。
在「供應情形和價格」部分中,按一下「編輯供應情形和存取權」>「設為『不適用』」。請注意,所有區域預設都會設為「可供使用」。- 選取
France、Spain和United States以外的所有國家/地區,然後按一下「設為『不適用』」。 - 從「所有區域」下拉式選單中,選取「適用國家/地區和區域」。系統只會顯示您在上一步選取的國家/地區。
- 針對每個適用國家/地區,點選「價格」欄中的編輯圖示,系統會顯示對話方塊,供你編輯價格。輸入並儲存下列價格:
- 在「
France」中輸入 10 歐元 - 在「」
Spain中輸入 8 歐元 - 在「
United States」中輸入 13 美元
- 在「
- 選取
- 按一下「啟用」。這樣一來,單次產品就會提供「購買」購買選項。
注意:系統會根據使用者的 Play 國家/地區設定,顯示區域價格幣別。舉例來說,如果使用者的 Play 國家/地區設為法國,系統就會以歐元顯示單次產品價格。
單次產品建立影片
以下影片顯示先前所述的單次產品建立步驟。
新增租借購買選項
現在,請將租借購買選項新增至先前建立的單次產品。
- 在 Google Play 管理中心的左側導覽選單中,依序前往「透過 Google Play 營利」 >「產品」 >「單次產品」。
- 找出在先前步驟中建立的
trending_movie_1產品 ID,然後按一下該產品的向右箭頭。 - 按一下「新增購買選項」。
- 在「購買選項」部分,輸入下列詳細資料:
- 購買選項 ID:輸入
rent-movie。 - 交易類型:選取「租借」。
- 租期:選取 48 小時。
- 租借品啟用期限:選取 24 小時。
- (選用) 標籤:新增這個購買選項專屬的標籤。
- (選用) 按一下「進階選項」,設定進階選項。在本程式碼研究室中,您可以略過進階選項設定。
- 購買選項 ID:輸入
- 接著,與「購買」購買選項類似,設定「租借」購買選項的區域供應情形。請參閱上一節的步驟 6 和 7。設定區域價格時,請為租借設定不同價格。例如:
France- 5 歐元Spain- 4 歐元United States- 7 美元。
5. 翻譯單次產品詳細資料
您可以使用 Google Play 管理中心的機器翻譯功能,免費翻譯產品名稱和說明。
如要翻譯標題和說明,請按照下列步驟操作:
- 在 Google Play 管理中心,依序前往左側導覽選單的「拓展使用者」 >「翻譯」 >「商店和應用程式內產品」。
- 按一下「建立訂單」。
- 選取「免費機器翻譯」選項,然後按一下「下一步」。
- 從「Translate to」語言中,選取「French - fr-FR」和「Spanish -es-ES」,然後按一下「Next」。
- 選取「一次性產品和訂閱項目」,然後按一下「翻譯並查看譯文」。系統會顯示免責事項橫幅。確認免責事項。
- 畫面會顯示翻譯語言清單。按一下語言旁的「檢閱並套用」。檢查文字,然後按一下「套用所有翻譯」。針對所有要翻譯的語言重複這個步驟。
翻譯完成後,您可以在 Play 管理中心編輯譯文。如要編輯翻譯文字,請按照下列步驟操作:
- 開啟「單次產品」>「[您的單次產品]」>「編輯單次產品」>「編輯單次產品詳細資料」頁面。
- 從語言下拉式選單中選取所需語言。這會以所選語言顯示文字。下圖顯示如何選取語言來編輯翻譯文字:
 圖 3:編輯翻譯文字。
 - 視需要編輯文字,然後按一下「儲存變更」。
系統會根據手機的語言偏好設定,向使用者顯示翻譯文字。舉例來說,如果使用者手機的語言設為法文,單次產品的名稱和說明就會以法文顯示。下圖顯示翻譯文字在不同語言中的顯示方式和位置。
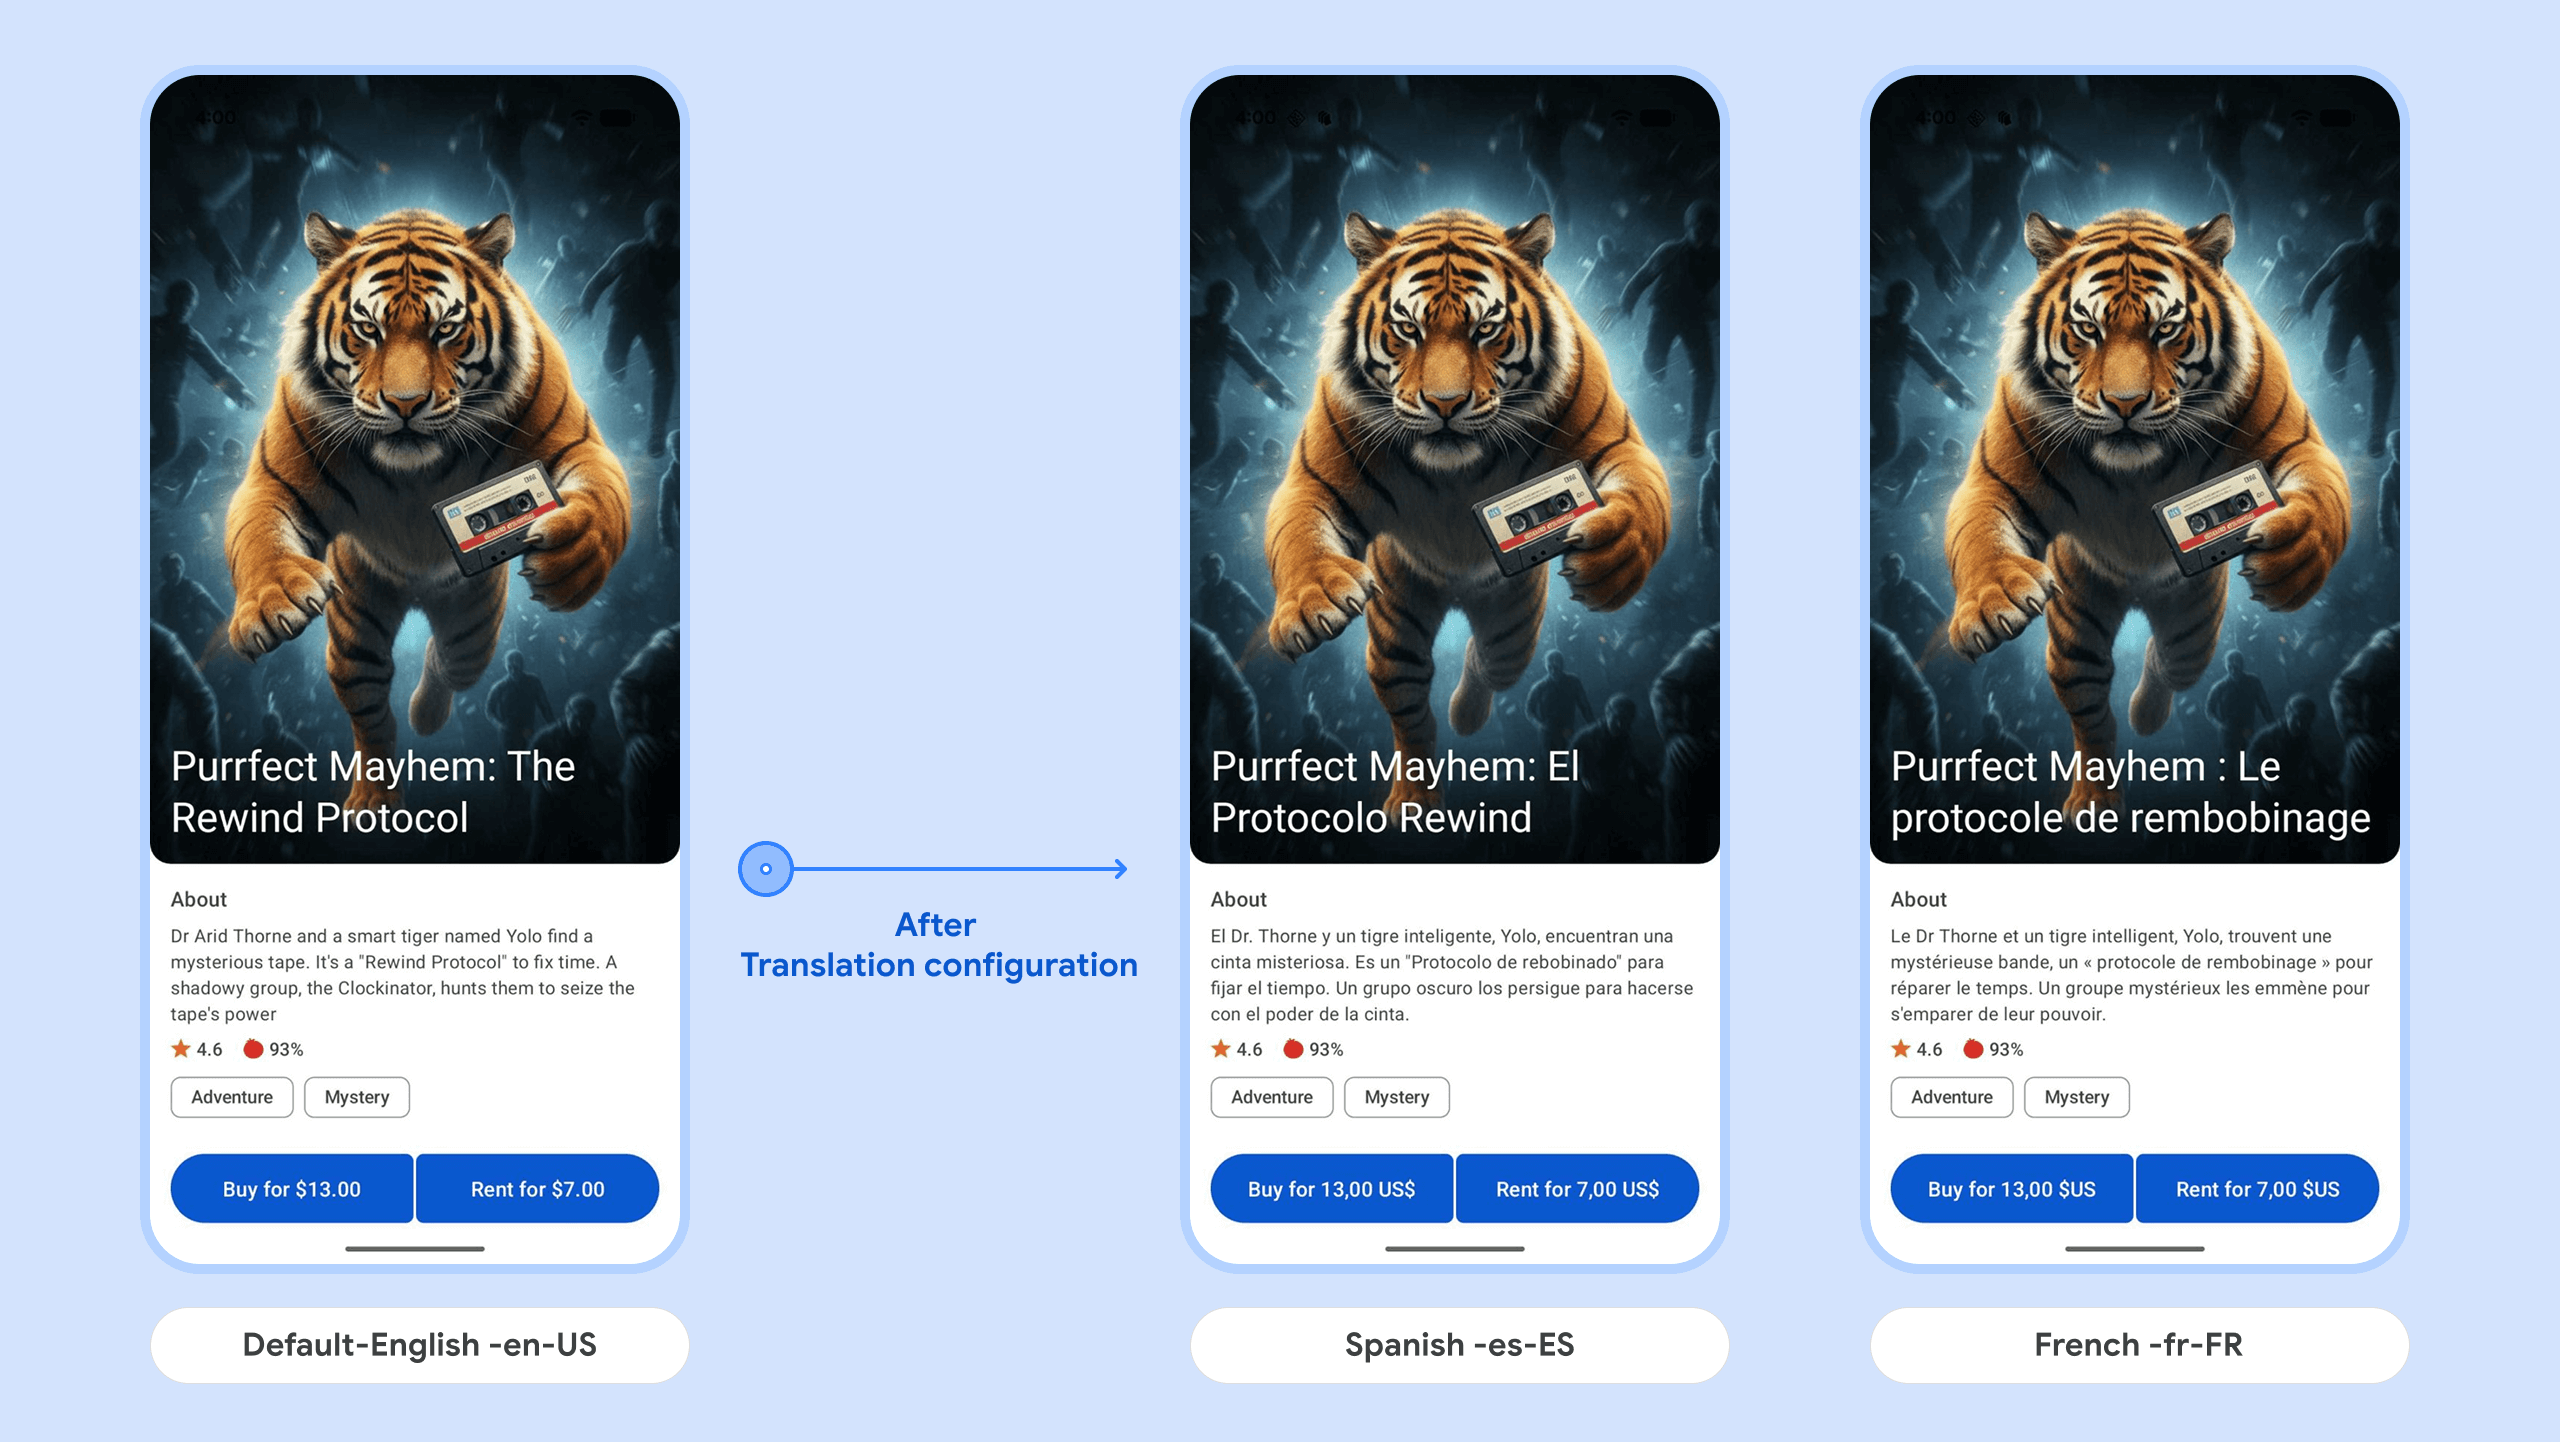 圖 4:應用程式中的翻譯文字。
翻譯設定影片
以下影片會展示先前所述的翻譯設定步驟。
6. 與 PBL 整合
如要將應用程式與 Play Billing Library (PBL) 整合,請按照下列步驟操作:
- 將 Play 帳款服務程式庫依附元件新增至範例應用程式。
dependencies { val billing_version = "8.0.0" implementation("com.android.billingclient:billing-ktx:$billing_version") } - 初始化 BillingClient。BillingClient 是位於應用程式的用戶端 SDK,可與 Play 帳款服務程式庫通訊。下列程式碼片段說明如何初始化帳單用戶端。
private BillingClient createBillingClient() { return BillingClient.newBuilder(activity) .enablePendingPurchases(PendingPurchasesParams.newBuilder().enableOneTimeProducts().build()) // For one-time products, add a listener to process and acknowledge the purchases. This will notify // Google the purchase was processed. // For client-only apps, use billingClient.acknowledgePurchase(). // If you have a secure backend, you must acknowledge purchases on your server using the // server-side API. // See https://developer.android.com/google/play/billing/security#acknowledge // In this sample snippet purchases aren't processed. You must // implement your business logic to process and acknowledge the purchases. .setListener((billingResult, purchases) -> {}) .enableAutoServiceReconnection() .build(); } - 連線至 Google Play。下列程式碼片段說明如何連線至 Google Play。
/** * Starts the billing connection with Google Play. This method should be called exactly once * before any other methods in this class. * * @param productList The list of products to query for after the connection is established. */ public void startBillingConnection(List<Product> productList) { billingClient.startConnection( new BillingClientStateListener() { @Override public void onBillingSetupFinished(BillingResult billingResult) { if (billingResult.getResponseCode() == BillingResponseCode.OK) { Log.d(TAG, "Billing Client Connection Successful"); queryProductDetails(productList); } else { Log.e(TAG, "Billing Client Connection Failed: " + billingResult.getDebugMessage()); listener.onBillingSetupFailed(billingResult); // Propagate the error to the listener to show a message to the user. } } @Override public void onBillingServiceDisconnected() { Log.e(TAG, "Billing Client Connection Lost"); listener.onBillingError("Billing Connection Lost"); } }); } - 擷取單次產品詳細資料。將應用程式與 PBL 整合後,您必須將單次產品詳細資料擷取到應用程式中。下列程式碼片段說明如何在應用程式中擷取單次產品詳細資料。
private void queryProductDetails(List<Product> productList) { QueryProductDetailsParams queryProductDetailsParams = QueryProductDetailsParams.newBuilder().setProductList(productList).build(); billingClient.queryProductDetailsAsync( queryProductDetailsParams, new ProductDetailsResponseListener() { @Override public void onProductDetailsResponse( BillingResult billingResult, QueryProductDetailsResult productDetailsResponse) { if (billingResult.getResponseCode() == BillingResponseCode.OK) { List<ProductDetails> productDetailsList = productDetailsResponse.getProductDetailsList(); listener.onProductDetailsResponse(productDetailsList); } else { Log.e(TAG, "QueryProductDetailsAsync Failed: " + billingResult.getDebugMessage()); listener.onBillingError("Query Products Failed: " + billingResult.getResponseCode()); } } }); }ProductDetails中擷取單次產品 (本例為trending_movie_1),會收到類似以下的回應:{ "productId": "trending_movie_1", "type": "inapp", "title": "Purrfect Mayhem: The Rewind Protocol (Movies All Day | Play Samples)", "name": "Purrfect Mayhem: The Rewind Protocol", "description": "Dr. Arid Thorne and a smart tiger named Yolo find a mysterious tape. It's a \"Rewind Protocol\" to fix time. A shadowy group, the Clockinator, hunts them to seize the tape's power.", "skuDetailsToken": "<---skuDetailsToken--->", "oneTimePurchaseOfferDetails": {}, "oneTimePurchaseOfferDetailsList": [ { "priceAmountMicros": 13000000, "priceCurrencyCode": "USD", "formattedPrice": "$13.00", "offerIdToken": "<---buy offerIdToken --->", "purchaseOptionId": "buy-option", "offerTags": [ "adventure", "mystery" ] }, { "priceAmountMicros": 7000000, "priceCurrencyCode": "USD", "formattedPrice": "$7.00", "offerIdToken": "<---rent offerIdToken--->", "purchaseOptionId": "rent-option", "offerTags": [ "adventure", "mystery" ], "rentalDetails": { "rentalPeriod": "P30D", "rentalExpirationPeriod": "PT24H" } } ] }oneTimePurchaseOfferDetailsList中。這個清單有 2 個購買選項 (buy-option 和 rent-option),都是在 Play 管理中心設定的。您可以透過 offerIdToken 識別每個購買選項。 - 擷取「租借」和「購買」優惠的優惠權杖。您需要優惠權杖,才能在步驟 6 中啟動結帳流程。
@Override public void onProductDetailsResponse(List<ProductDetails> productDetailsList) { if (productDetailsList != null && !productDetailsList.isEmpty()) { // Iterate over all details of the queried product in step 4. for (ProductDetails productDetails : productDetailsList) { // Get the list of all the offers associated with the product. List<ProductDetails.OneTimePurchaseOfferDetails> offerDetailsList = productDetails.getOneTimePurchaseOfferDetailsList(); // Iterate over the offer details for (ProductDetails.OneTimePurchaseOfferDetails offerDetails : offerDetailsList) { // For a Rent purchase option, the // offerDetails.getRentalDetails() method returns // the rent information. If this information is present, // the offer corresponds to a Rent purchsae option. if (offerDetails.getRentalDetails() != null) { rentFormattedPrice = offerDetails.getFormattedPrice(); // Get the offerIdToken for the Rent purchase option rentOfferToken = offerDetails.getOfferToken(); rentMovieTags = offerDetails.getOfferTags(); } // If the offerDetails.getRentalDetails() returns // null, the offer corresponds to a Buy purchsae option. else { buyFormattedPrice = offerDetails.getFormattedPrice(); // Get the offerIdToken for the Buy purchase option buyOfferToken = offerDetails.getOfferToken(); buyMovieTags = offerDetails.getOfferTags(); } } updateUIButtons(); return; } } else { Log.e(TAG, "No product details found for " + productId); } } - 啟動結帳流程。
/**
 * Launches the billing flow for the product with the given offer token.
*
* @param activity The activity instance from which the billing flow will be launched.
* @param productDetails The product details of the product to purchase.
* @param offerToken The offer token of the product to purchase.
* @return The result of the billing flow.
*/
public void launchPurchase(Activity activity, ProductDetails productDetails, String offerToken) {
    ImmutableList<BillingFlowParams.ProductDetailsParams> productDetailsParamsList =
        ImmutableList.of(
            BillingFlowParams.ProductDetailsParams.newBuilder()
                .setProductDetails(productDetails)
                .setOfferToken(offerToken)
                .build());
    BillingFlowParams billingFlowParams = BillingFlowParams.newBuilder()
        .setProductDetailsParamsList(productDetailsParamsList)
        .build();
    billingClient.launchBillingFlow(activity, billingFlowParams);
}
提示:您也可以設定即時開發人員通知 (RTDN),以便導入回購廣告活動和其他購買交易生命週期管理策略。如要瞭解如何設定 RTDN,以及如何處理通知以準確追蹤和授權,建議您完成「充分運用 Play 帳款服務整合功能」程式碼研究室。
7. 測試購買選項
在正式版應用程式中提供一次性產品前,您可以先使用授權測試人員和 Play Billing Lab 測試 PBL 整合服務。
您將瞭解如何測試價格本地化和供應情形,其中應用程式僅在部分區域提供,且各區域的價格不同。
必備條件
- 在 Google Play 管理中心新增授權測試人員,然後為內部測試啟用授權測試人員。
- 在手機或模擬器上,下載並安裝 Play Billing Lab 應用程式。
- 在手機或模擬器上執行先前建立的範例應用程式。
測試購買選項的區域價格
如要測試購買選項的區域價格,請按照下列步驟操作:
- 開啟 Play Billing Lab 應用程式,然後以授權測試人員身分登入。
- 在「設定」中,按一下「編輯」,選取國家/地區
France,然後按一下「套用」。在此選取 Play 國家/地區,決定應用程式中顯示的幣別。 - 關閉並重新開啟範例應用程式。現在應該會顯示
France的購買和租借幣別 (歐元)。
如要測試其他國家/地區,請在步驟 2 中選取 Spain,然後執行步驟 3。
Play Billing Lab 測試影片
以下影片使用範例應用程式,說明區域價格測試步驟。
8. 後續步驟
- 瞭解如何充分發揮 Play 帳款服務整合效益。
- 瞭解如何分析產品購買流程中的放棄率。
- 請務必在使用者開始購買這些產品後,遵循驗證及處理購買交易的最佳做法,在安全後端進行相關作業。
參考文件
9. 恭喜!
恭喜!您已成功在 Google Play 管理中心建立新的單次產品、設定購買選項,並使用 Play Billing Lab 測試購買流程。您現在已深入瞭解 Google Play 彈性產品目錄,可供一次性購買。
問卷調查
我們非常重視您對本程式碼研究室的意見。請考慮花幾分鐘填寫問卷調查。