
1. 简介
概览
在本实验中,您将超越简单的聊天机器人,构建一个分布式多智能体系统。
虽然单个 LLM 可以回答问题,但现实世界的复杂性通常需要专门的角色。您不会让后端工程师设计界面,也不会让设计师优化数据库查询。同样,我们可以创建专注于一项任务的专业 AI 智能体,并让它们相互协调来解决复杂问题。
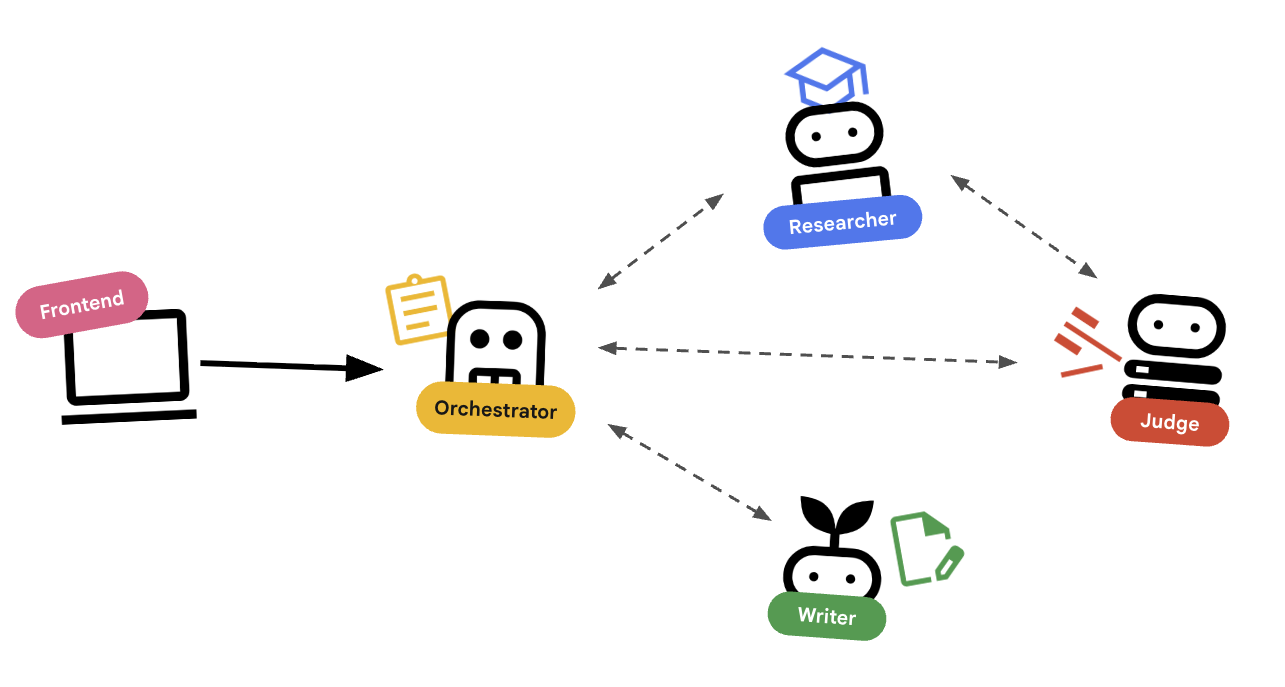
您将构建一个课程创建系统,其中包含:
- 研究员智能体:使用
google_search查找最新信息。 - Judge Agent:批判性地评估研究的质量和完整性。
- Content Builder Agent:将研究转化为结构化课程。
- Orchestrator Agent:管理这些专家之间的工作流和通信。
前提条件
- Python 基础知识。
- 熟悉 Google Cloud 控制台。
您将执行的操作
- 定义一个可以使用工具 (
researcher) 搜索网络的智能体。 - 使用 Pydantic 为
judge实现结构化输出。 - 使用 Agent-to-Agent (A2A) 协议连接到远程代理。
- 构建
LoopAgent以在研究人员和法官之间创建反馈环。 - 使用 ADK 在本地运行分布式系统。
- 将多智能体系统部署到 Google Cloud Run。
架构和编排原则
在编写代码之前,我们先来了解一下这些智能体如何协同工作。我们将构建一个课程创建流水线。
系统设计
使用代理进行编排
标准智能体(例如研究员)确实可以工作。编排器代理(例如 LoopAgent 或 SequentialAgent)管理其他代理。它们没有自己的工具;它们的“工具”是委托。
LoopAgent:此函数的作用类似于代码中的while循环。它会重复运行一系列代理,直到满足某个条件(或达到最大迭代次数)。我们使用此功能进行研究循环:- 研究人员查找信息。
- 裁判会提出批评意见。
- 如果 Judge 显示“失败”,EscalationChecker 会让循环继续。
- 如果 Judge 说“通过”,EscalationChecker 会中断循环。
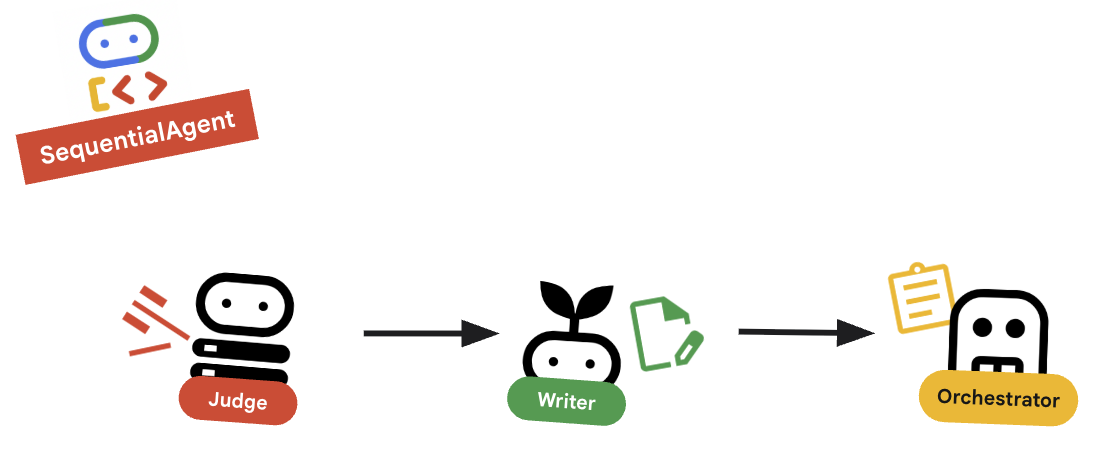
SequentialAgent:此操作类似于标准脚本执行。它会依次运行各个代理。我们将其用于高级流水线:- 首先,运行研究循环(直到它以良好的数据完成)。
- 然后,运行内容构建器(用于撰写课程)。
通过将这些方法相结合,我们创建了一个强大的系统,该系统可以在生成最终输出之前进行自我修正。
2. 设置
环境设置
- 打开 Cloud Shell:点击 Google Cloud 控制台右上角的激活 Cloud Shell 图标。
获取起始代码
- 将初始代码库克隆到您的主目录:
cd ~ git clone --depth 1 --filter=blob:none --sparse https://github.com/GoogleCloudPlatform/devrel-demos.git temp-repo && cd temp-repo && git sparse-checkout set agents/build-with-ai/production-ready-ai/prai-roadshow-lab-1-starter && cd .. && mv temp-repo/agents/build-with-ai/production-ready-ai/prai-roadshow-lab-1-starter . && rm -rf temp-repo cd prai-roadshow-lab-1-starter - 启用 API:运行以下命令以启用必要的 Google Cloud 服务:
gcloud services enable \ run.googleapis.com \ artifactregistry.googleapis.com \ cloudbuild.googleapis.com \ aiplatform.googleapis.com \ compute.googleapis.com - 在编辑器中打开此文件夹。
安装依赖项
我们使用 uv 来快速管理依赖项。
- 安装项目依赖项:
# Ensure you have uv installed: pip install uv uv sync - 设置环境变量。
- 提示:您可以在 Cloud 控制台的信息中心内找到项目 ID,也可以通过运行
gcloud config get-value project找到项目 ID。
.env文件来存储这些变量,以便您在会话断开连接时轻松重新加载它们。cat <<EOF > .env export GOOGLE_CLOUD_PROJECT=$(gcloud config get-value project) export GOOGLE_CLOUD_LOCATION=global export GOOGLE_GENAI_USE_VERTEXAI=true EOF - 提示:您可以在 Cloud 控制台的信息中心内找到项目 ID,也可以通过运行
- 加载环境变量:
source .envsource .env以恢复这些标签页。
3. 🕵️ 研究员代理
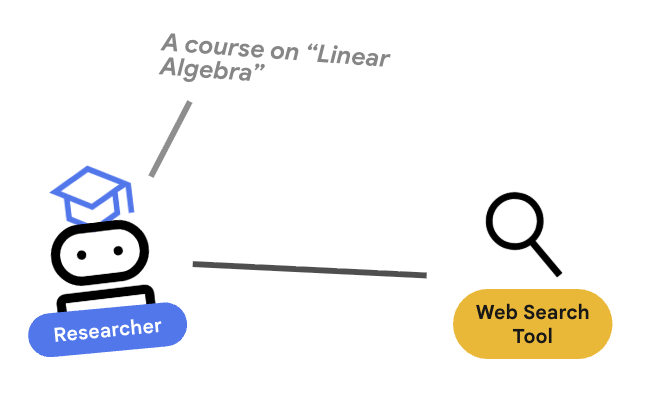
研究员是专家。它的唯一任务是查找信息。为此,它需要访问一个工具:Google 搜索。
为什么要将研究者分开?
深入探究:为什么不让一个代理完成所有任务?
小巧且专注的代理更易于评估和调试。如果研究结果不理想,您可以迭代研究人员提示。如果课程格式不佳,您可以在内容构建器中进行迭代。在“包罗万象”的单体提示中,修复一个问题往往会导致另一个问题。
- 如果您在 Cloud Shell 中工作,请运行以下命令以打开 Cloud Shell 编辑器:
cloudshell workspace . - 打开
agents/researcher/agent.py。 - 您会看到一个包含 TODO 的框架。
- 添加以下代码以定义
researcher代理:# ... existing imports ... # Define the Researcher Agent researcher = Agent( name="researcher", model=MODEL, description="Gathers information on a topic using Google Search.", instruction=""" You are an expert researcher. Your goal is to find comprehensive and accurate information on the user's topic. Summarize your findings clearly. If you receive feedback that your research is insufficient, use the feedback to refine your next search. DO NOT output any function calls. Provide your research directly as text. """, ) root_agent = researcher
主要概念:工具使用
使用 Gemini 3 时,Google 搜索工具会自动可用。如果您使用的是其他模型(例如 Gemini 2.5),则需要将 tools=[google_search] 作为额外的参数传递给 Agent() 构造函数。ADK 会处理向 LLM 描述此工具的复杂性。当模型确定需要信息时,它会生成结构化的工具调用,ADK 会执行 Python 函数 google_search,并将结果反馈给模型。
4. ⚖️ Judge 智能体
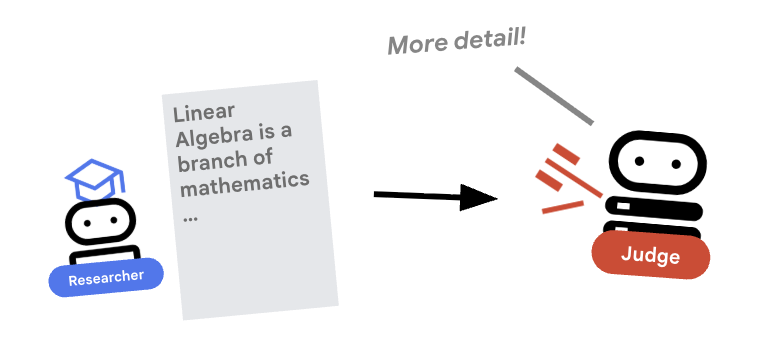
研究者很勤奋,但 LLM 可能很懒惰。我们需要评审员来审核作业。Judge 接受研究并返回结构化的通过/未通过评估结果。
结构化输出
深入探讨:为了实现工作流自动化,我们需要可预测的输出。杂乱无章的文字评价很难通过程序进行解析。通过强制执行 JSON 架构(使用 Pydantic),我们确保 Judge 返回布尔值 pass 或 fail,以便我们的代码能够可靠地采取行动。
- 打开
agents/judge/agent.py。 - 定义
JudgeFeedback架构和judge代理。# 1. Define the Schema class JudgeFeedback(BaseModel): """Structured feedback from the Judge agent.""" status: Literal["pass", "fail"] = Field( description="Whether the research is sufficient ('pass') or needs more work ('fail')." ) feedback: str = Field( description="Detailed feedback on what is missing. If 'pass', a brief confirmation." ) # 2. Define the Agent judge = Agent( name="judge", model=MODEL, description="Evaluates research findings for completeness and accuracy.", instruction=""" You are a strict editor. Evaluate the 'research_findings' against the user's original request. If the findings are missing key info, return status='fail'. If they are comprehensive, return status='pass'. """, output_schema=JudgeFeedback, # Disallow delegation because it should only output the schema disallow_transfer_to_parent=True, disallow_transfer_to_peers=True, ) root_agent = judge
核心概念:限制智能体行为
我们设置了 disallow_transfer_to_parent=True 和 disallow_transfer_to_peers=True。这会强制 Judge 仅返回结构化 JudgeFeedback。它无法决定是否与用户“聊天”,也无法委托给其他代理。这使其成为逻辑流程中的确定性组件。
5. 🧪 隔离测试
在连接它们之前,我们可以验证每个代理是否正常运行。借助 ADK,您可以单独运行智能体。
关键概念:互动式运行时
adk run 会启动一个轻量级环境,您是该环境中的“用户”。这样,您就可以单独测试代理的指令和工具使用情况。如果代理在此处失败(例如,无法使用 Google 搜索),则在编排中肯定会失败。
- 以交互方式运行研究者。请注意,我们指向的是特定的代理目录:
# This runs the researcher agent in interactive mode uv run adk run agents/researcher - 在聊天提示中,输入:
Find the population of Tokyo in 2020export GOOGLE_CLOUD_PROJECT=$(gcloud config get-value project) export GOOGLE_CLOUD_LOCATION=global export GOOGLE_GENAI_USE_VERTEXAI=true - 退出聊天 (Ctrl+C)。
- 以交互方式运行 Judge:
uv run adk run agents/judge - 在聊天提示中,模拟输入:
Topic: Tokyo. Findings: Tokyo is a city.status='fail',因为发现内容过于简短。
6. ✍️ 内容构建智能体
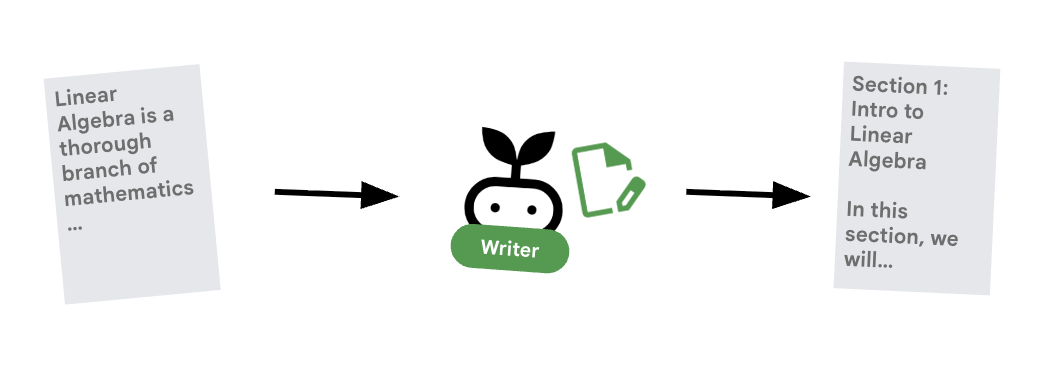
内容构建器是创意撰稿人。它会根据已获批准的研究成果制作课程。
- 打开
agents/content_builder/agent.py。 - 定义
content_builder代理。content_builder = Agent( name="content_builder", model=MODEL, description="Transforms research findings into a structured course.", instruction=""" You are an expert course creator. Take the approved 'research_findings' and transform them into a well-structured, engaging course module. **Formatting Rules:** 1. Start with a main title using a single `#` (H1). 2. Use `##` (H2) for main section headings. 3. Use bullet points and clear paragraphs. 4. Maintain a professional but engaging tone. Ensure the content directly addresses the user's original request. """, ) root_agent = content_builder
核心概念:上下文传播
您可能想知道:“内容构建器如何知道研究者找到了什么?”在 ADK 中,流水线中的代理共享一个 session.state。稍后,在 Orchestrator 中,我们将配置 Researcher 和 Judge,以将其输出保存到此共享状态。内容构建器的提示实际上可以访问此历史记录。
7. 🎻 编排器
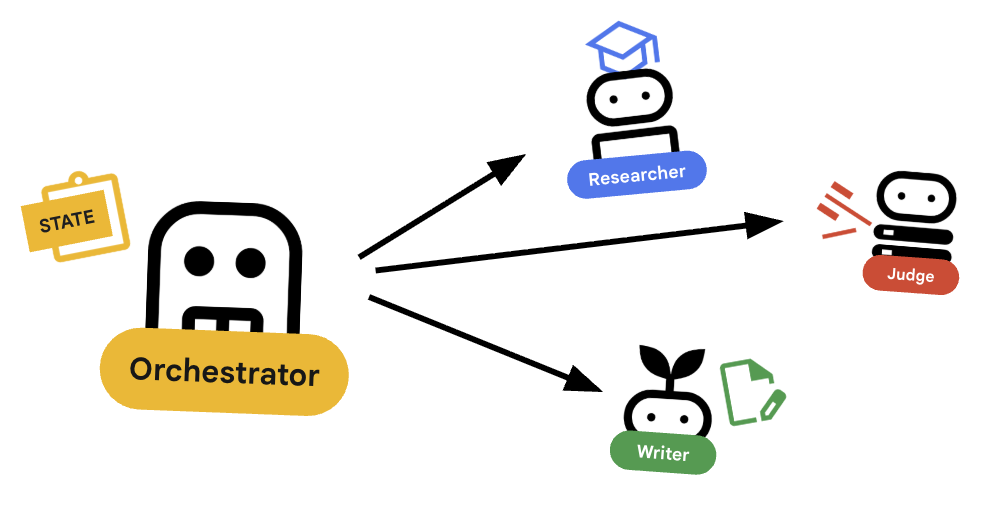
编排器是我们多智能体团队的管理器。与执行特定任务的专家代理(研究员、评判员、内容构建器)不同,编排器的任务是协调工作流并确保信息在它们之间正确流动。
🌐 架构:代理对代理 (A2A)
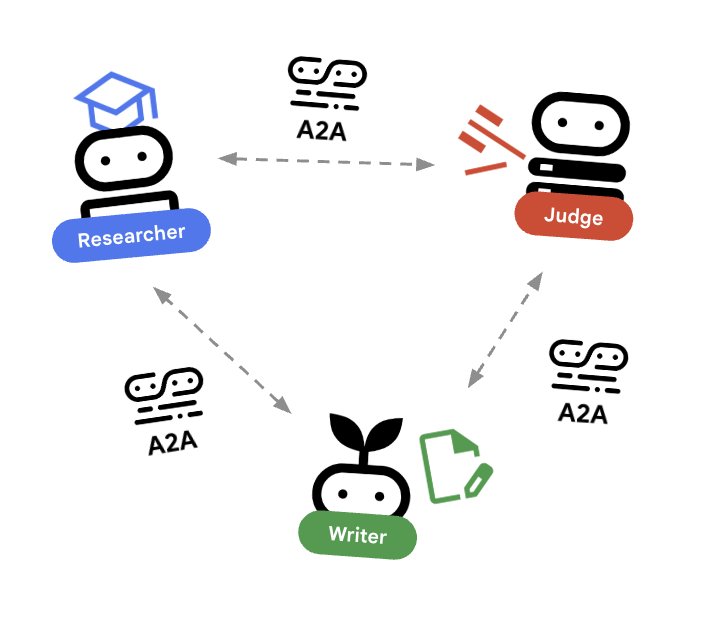
在本实验中,我们将构建一个分布式系统。我们没有在单个 Python 进程中运行所有代理,而是将它们部署为独立的微服务。这样一来,每个代理都可以独立扩缩,并且即使发生故障也不会导致整个系统崩溃。
为了实现这一点,我们使用了 Agent-to-Agent (A2A) 协议。
A2A 协议
深入探讨:在生产系统中,代理在不同的服务器(甚至不同的云)上运行。A2A protocol为它们提供了一种标准方式,以便通过 HTTP 发现彼此并进行通信。RemoteA2aAgent 是相应协议的 ADK 客户端。
- 打开
agents/orchestrator/agent.py。 - 找到注释
# TODO: Define connections to remote agents或远程代理定义部分。 - 添加以下代码以定义连接。请务必将此代码放在导入代码之后,并放在任何其他代理定义之前。
# ... existing code ...

# Connect to the Researcher (Localhost port 8001)
researcher_url = os.environ.get("RESEARCHER_AGENT_CARD_URL", "http://localhost:8001/a2a/agent/.well-known/agent-card.json")
researcher = RemoteA2aAgent(
    name="researcher",
    agent_card=researcher_url,
    description="Gathers information using Google Search.",
    # IMPORTANT: Save the output to state for the Judge to see
    after_agent_callback=create_save_output_callback("research_findings"),
    # IMPORTANT: Use authenticated client for communication
    httpx_client=create_authenticated_client(researcher_url)
)

# Connect to the Judge (Localhost port 8002)
judge_url = os.environ.get("JUDGE_AGENT_CARD_URL", "http://localhost:8002/a2a/agent/.well-known/agent-card.json")
judge = RemoteA2aAgent(
    name="judge",
    agent_card=judge_url,
    description="Evaluates research.",
    after_agent_callback=create_save_output_callback("judge_feedback"),
    httpx_client=create_authenticated_client(judge_url)
)

# Content Builder (Localhost port 8003)
content_builder_url = os.environ.get("CONTENT_BUILDER_AGENT_CARD_URL", "http://localhost:8003/a2a/agent/.well-known/agent-card.json")
content_builder = RemoteA2aAgent(
    name="content_builder",
    agent_card=content_builder_url,
    description="Builds the course.",
    httpx_client=create_authenticated_client(content_builder_url)
)
8. 🛑 升级检查工具
循环需要一种停止方式。如果 Judge 说“通过”,我们希望立即退出循环并转到内容构建器。
使用 BaseAgent 实现自定义逻辑
深入探究:并非所有智能体都使用 LLM。有时,您需要简单的 Python 逻辑。BaseAgent 可让您定义仅运行代码的代理。在这种情况下,我们会检查会话状态,并使用 EventActions(escalate=True) 向 LoopAgent 发出停止信号。
- 仍处于
agents/orchestrator/agent.py阶段。 - 找到
EscalationCheckerTODO 占位符。 - 将其替换为以下实现:
class EscalationChecker(BaseAgent):
    """Checks the judge's feedback and escalates (breaks the loop) if it passed."""

    async def _run_async_impl(
        self, ctx: InvocationContext
    ) -> AsyncGenerator[Event, None]:
        # Retrieve the feedback saved by the Judge
        feedback = ctx.session.state.get("judge_feedback")
        print(f"[EscalationChecker] Feedback: {feedback}")

        # Check for 'pass' status
        is_pass = False
        if isinstance(feedback, dict) and feedback.get("status") == "pass":
            is_pass = True
        # Handle string fallback if JSON parsing failed
        elif isinstance(feedback, str) and '"status": "pass"' in feedback:
            is_pass = True

        if is_pass:
            # 'escalate=True' tells the parent LoopAgent to stop looping
            yield Event(author=self.name, actions=EventActions(escalate=True))
        else:
            # Continue the loop
            yield Event(author=self.name)

escalation_checker = EscalationChecker(name="escalation_checker")
关键概念:通过事件控制流程
代理不仅通过文本进行通信,还通过事件进行通信。通过使用 escalate=True 生成事件,此代理会向上级(即 LoopAgent)发送信号。LoopAgent 已编程为捕获此信号并终止循环。
9. 🔁 研究循环
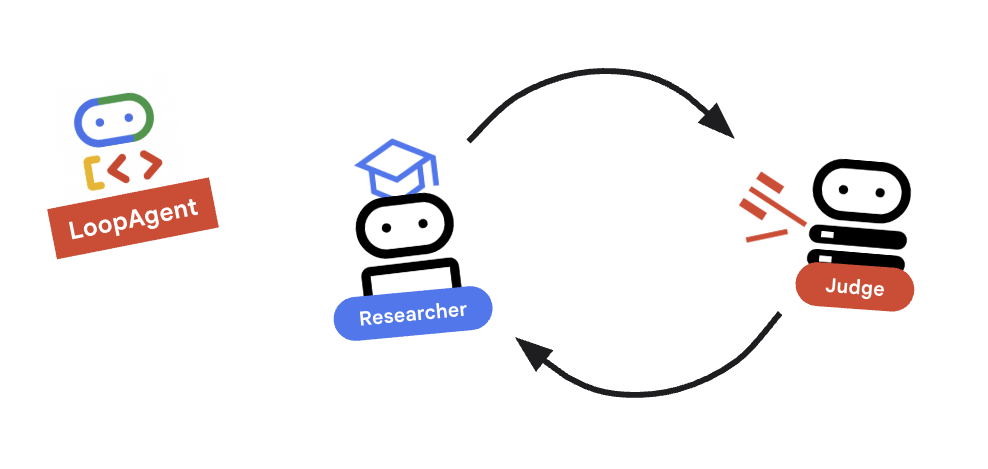
我们需要一个反馈环:研究 -> 判断 ->(失败)-> 研究 -> ...
- 仍处于
agents/orchestrator/agent.py阶段。 - 添加
research_loop定义。将此 放置在EscalationChecker类和escalation_checker实例之后。research_loop = LoopAgent( name="research_loop", description="Iteratively researches and judges until quality standards are met.", sub_agents=[researcher, judge, escalation_checker], max_iterations=3, )
主要概念:LoopAgent
LoopAgent 会按顺序循环遍历其 sub_agents。
researcher:查找数据。judge:评估数据。escalation_checker:决定是否要yield Event(escalate=True)。如果发生escalate=True,则循环会提前中断。否则,它会从研究员重新开始(最多max_iterations)。
10. 🔗 最终流水线
最后,将所有内容整合在一起。
- 仍处于
agents/orchestrator/agent.py阶段。 - 在文件底部定义
root_agent。确保此占位符替换任何现有的root_agent = None占位符。root_agent = SequentialAgent( name="course_creation_pipeline", description="A pipeline that researches a topic and then builds a course from it.", sub_agents=[research_loop, content_builder], )
主要概念:分层组合
请注意,research_loop 本身也是一个代理(一个 LoopAgent)。我们将其视为 SequentialAgent 中的任何其他分代理。这种可组合性让您可以通过嵌套简单模式(序列中的循环、路由器中的序列等)来构建复杂的逻辑。
11. 💻 在本地运行
在运行所有内容之前,我们先来看看 ADK 如何在本地模拟分布式环境。
深入了解:本地开发的工作原理
在微服务架构中,每个代理都以自己的服务器身份运行。部署后,您将拥有 4 项不同的 Cloud Run 服务。如果您必须打开 4 个终端标签页并运行 4 个命令,那么在本地模拟此操作可能会很麻烦。
此脚本会为 Researcher(端口 8001)、Judge(8002)和 Content Builder(8003)启动 uvicorn 进程。它会设置 RESEARCHER_AGENT_CARD_URL 等环境变量,并将这些变量传递给 Orchestrator(端口 8004)。这正是我们稍后在云端配置它的方式!
- 运行编排脚本:
perl -pi -e 's/us-central1/global/g' run_local.sh ./run_local.sh - 测试:
- 如果使用 Cloud Shell:点击网页预览按钮(位于终端的右上角)-> 在端口 8080 上预览 -> 将更改端口更改为
8000。 - 如果是在本地运行:在浏览器中打开
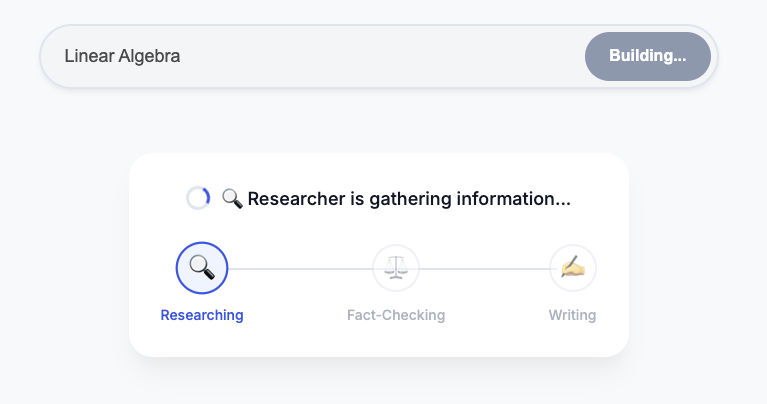
http://localhost:8000。 - 提示:“创建一个关于咖啡历史的课程。”
- 观察:Orchestrator 将调用 Researcher。输出会发送给评测系统。如果 Judge 失败,则循环继续!
- “Internal Server Error”(内部服务器错误)/ 身份验证错误:如果您看到身份验证错误(例如与
google-auth相关),请确保您已运行gcloud auth application-default login(如果在本地计算机上运行)。在 Cloud Shell 中,确保已正确设置GOOGLE_CLOUD_PROJECT环境变量。 - 终端错误:如果命令在新终端窗口中失败,请记得重新导出环境变量(
GOOGLE_CLOUD_PROJECT等)。
- 如果使用 Cloud Shell:点击网页预览按钮(位于终端的右上角)-> 在端口 8080 上预览 -> 将更改端口更改为
- 单独测试代理:即使整个系统都在运行,您也可以通过直接定位特定代理的端口来测试这些代理。这有助于调试特定组件,而无需触发整个链。注意:这些是 API 端点,而不是网页。您无法通过浏览器访问这些文件。而是使用
curl验证它们是否正在运行(例如,通过获取其代理卡)。- 仅限研究人员(端口 8001):
- 检查状态(并找到
url端点):curl http://localhost:8001/a2a/agent/.well-known/agent-card.json - 发送查询(使用 A2A JSON-RPC 协议):
curl -X POST http://localhost:8001/a2a/agent \
  -H "Content-Type: application/json" \
  -d '{
    "jsonrpc": "2.0",
    "method": "message/send",
    "id": 1,
    "params": {
      "message": {
        "message_id": "test-1",
        "role": "user",
        "parts": [
          {
            "text": "What is the capital of France?",
            "kind": "text"
          }
        ]
      }
    }
  }'
- 检查状态(并找到
- 仅评判(端口 8002):
- 检查状态:
curl http://localhost:8002/a2a/agent/.well-known/agent-card.json - 发送查询:
curl -X POST http://localhost:8002/a2a/agent \
  -H "Content-Type: application/json" \
  -d '{
    "jsonrpc": "2.0",
    "method": "message/send",
    "id": 1,
    "params": {
      "message": {
        "message_id": "test-2",
        "role": "user",
        "parts": [
          {
            "text": "Topic: Tokyo. Findings: Tokyo is the capital of Japan.",
            "kind": "text"
          }
        ]
      }
    }
  }'
- 检查状态:
- 仅限内容构建器(端口 8003):
curl http://localhost:8003/a2a/agent/.well-known/agent-card.json - 编排程序(端口 8004):
curl http://localhost:8004/a2a/agent/.well-known/agent-card.json
- 仅限研究人员(端口 8001):
12. 🚀 部署到 Cloud Run
最终验证在云端运行。我们将每个代理部署为单独的服务。
了解部署配置
将代理部署到 Cloud Run 时,我们会传递多个环境变量来配置其行为和连接:
GOOGLE_CLOUD_PROJECT:确保代理使用正确的 Google Cloud 项目进行日志记录和 Vertex AI 调用。GOOGLE_GENAI_USE_VERTEXAI:告知代理框架 (ADK) 使用 Vertex AI 进行模型推理,而不是直接调用 Gemini API。GOOGLE_CLOUD_LOCATION:告知代理框架 (ADK) 使用哪个端点。[AGENT]_AGENT_CARD_URL:这对编排程序至关重要。它会告知编排器在哪里可以找到远程代理。通过将此变量设置为已部署的 Cloud Run 网址(具体来说是代理卡路径),我们可以让 Orchestrator 通过互联网发现 Researcher、Judge 和 Content Builder 并与之通信。
- 部署子代理(并行):为节省时间,我们将同时部署 Researcher、Judge 和 Content Builder。打开三个新的终端标签页。在每个新标签页中,运行以下命令来设置环境:
cd ~/prai-roadshow-lab-1-starter source .envgcloud run deploy researcher \ --source agents/researcher/ \ --region us-west1 \ --allow-unauthenticated \ --labels dev-tutorial=prod-ready-1 \ --set-env-vars GOOGLE_CLOUD_PROJECT=$GOOGLE_CLOUD_PROJECT \ --set-env-vars GOOGLE_CLOUD_LOCATION=$GOOGLE_CLOUD_LOCATION \ --set-env-vars GOOGLE_GENAI_USE_VERTEXAI="true"gcloud run deploy judge \ --source agents/judge/ \ --region us-west1 \ --allow-unauthenticated \ --labels dev-tutorial=prod-ready-1 \ --set-env-vars GOOGLE_CLOUD_PROJECT=$GOOGLE_CLOUD_PROJECT \ --set-env-vars GOOGLE_CLOUD_LOCATION=$GOOGLE_CLOUD_LOCATION \ --set-env-vars GOOGLE_GENAI_USE_VERTEXAI="true"gcloud run deploy content-builder \ --source agents/content_builder/ \ --region us-west1 \ --allow-unauthenticated \ --labels dev-tutorial=prod-ready-1 \ --set-env-vars GOOGLE_CLOUD_PROJECT=$GOOGLE_CLOUD_PROJECT \ --set-env-vars GOOGLE_CLOUD_LOCATION=$GOOGLE_CLOUD_LOCATION \ --set-env-vars GOOGLE_GENAI_USE_VERTEXAI="true" - 捕获网址:所有三个部署完成后,返回到原始终端(您将在其中部署 Orchestrator)。运行以下命令以捕获服务网址:
RESEARCHER_URL=$(gcloud run services describe researcher --region us-west1 --format='value(status.url)') JUDGE_URL=$(gcloud run services describe judge --region us-west1 --format='value(status.url)') CONTENT_BUILDER_URL=$(gcloud run services describe content-builder --region us-west1 --format='value(status.url)') echo "Researcher: $RESEARCHER_URL" echo "Judge: $JUDGE_URL" echo "Content Builder: $CONTENT_BUILDER_URL" - 部署 Orchestrator:使用捕获的环境变量配置 Orchestrator。
gcloud run deploy orchestrator \ --source agents/orchestrator/ \ --region us-west1 \ --allow-unauthenticated \ --labels dev-tutorial=prod-ready-1 \ --set-env-vars RESEARCHER_AGENT_CARD_URL=$RESEARCHER_URL/a2a/agent/.well-known/agent-card.json \ --set-env-vars JUDGE_AGENT_CARD_URL=$JUDGE_URL/a2a/agent/.well-known/agent-card.json \ --set-env-vars CONTENT_BUILDER_AGENT_CARD_URL=$CONTENT_BUILDER_URL/a2a/agent/.well-known/agent-card.json \ --set-env-vars GOOGLE_CLOUD_PROJECT=$GOOGLE_CLOUD_PROJECT \ --set-env-vars GOOGLE_CLOUD_LOCATION=$GOOGLE_CLOUD_LOCATION \ --set-env-vars GOOGLE_GENAI_USE_VERTEXAI="true"ORCHESTRATOR_URL=$(gcloud run services describe orchestrator --region us-west1 --format='value(status.url)') echo $ORCHESTRATOR_URL - 部署前端:
gcloud run deploy course-creator \ --source app \ --region us-west1 \ --allow-unauthenticated \ --labels dev-tutorial=prod-ready-1 \ --set-env-vars AGENT_SERVER_URL=$ORCHESTRATOR_URL \ --set-env-vars GOOGLE_CLOUD_PROJECT=$GOOGLE_CLOUD_PROJECT - 测试远程部署:打开已部署的 Orchestrator 的网址。现在,它完全在云端运行,利用 Google 的无服务器基础架构来扩缩代理!提示:您可以在 Cloud Run 界面中找到所有微服务及其网址
13. 总结
恭喜!您已成功构建并部署了一个可用于生产用途的分布式多智能体系统。
我们取得的成就
- 分解复杂任务:我们没有使用一个庞大的提示,而是将工作拆分为专门的角色(研究员、评判员、内容构建者)。
- 实施质量控制:我们使用
LoopAgent和结构化Judge来确保只有高质量的信息才能进入最后一步。 - 专为生产环境而打造:通过使用智能体到智能体 (A2A) 协议和 Cloud Run,我们创建了一个系统,其中每个智能体都是一个独立的可扩缩微服务。这比在单个 Python 脚本中运行所有内容要可靠得多。
- 编排:我们使用
SequentialAgent和LoopAgent定义清晰的控制流模式。
后续步骤
现在,您已经掌握了基础知识,可以扩展此系统了:
- 添加更多工具:向研究员授予对内部文档或 API 的访问权限。
- 改进 Judge:添加更具体的标准,甚至添加“人机协同”步骤。
- 交换模型:尝试为不同的代理使用不同的模型(例如,为 Judge 使用更快的模型,为 Content Writer 使用更强大的模型)。
现在,您已准备好在 Google Cloud 上构建复杂且可靠的智能体工作流了!