
1. Introduction
Overview
In Building a Multi-Agent System, you built a distributed Course Creator system, and in From "vibe checks" to data-driven Agent Evaluation, you learned how to evaluate its performance.
This lab focuses on hardening the system by addressing these security gaps. Exposing agent endpoints makes them targets for prompt injection, denial-of-service, and other exploits. Agents that interact with users risk processing sensitive PII, while agents that crawl the web risk ingesting harmful content or falling prey to indirect prompt injection. To counter these threats, you will implement a defense-in-depth strategy using Google Cloud security tools, including Model Armor and Sensitive Data Protection, and apply security best practices like least-privilege IAM and authenticated network communication.
What you'll do
- Define Security Policies: Create Sensitive Data Protection (SDP) templates to detect and redact Personally Identifiable Information (PII).
- Integrate Application Safety: Modify the backend to intercept and sanitize user prompts using Model Armor before they reach your agents.
- Verify Protection: Deploy the secured application and run Red Team scenarios to validate that prompt injections and sensitive data leaks are blocked.
- Implement Policy as Code (Optional): Use Terraform to manage your Model Armor and SDP templates, ensuring consistent security filters/guardrails across environments.
What you'll learn
- How to configure Google Cloud Sensitive Data Protection (SDP) to identify and mask sensitive data.
- How to create and deploy Model Armor templates using Terraform.
- The "Defense-in-Depth" pattern for securing GenAI agents at the application layer.
- How to audit and verify security controls using Red Teaming techniques.
2. Setup
Configuration
- Make sure you are logged in. Run the following command to get current gcloud account:
gcloud config get-value accountgcloud auth login --update-adc - Set an active project for gcloud CLI.Run the following command to get current gcloud project:
gcloud config get-value projectgcloud config set project YOUR_PROJECT_IDYOUR_PROJECT_IDwith your project's ID. - Enable the API for Cloud Run, Model Armor, Data Loss Prevention, Artifact Registry, Cloud Build, and IAM Credentials.
gcloud services enable --project $(gcloud config get-value project) \ aiplatform.googleapis.com \ modelarmor.googleapis.com \ dlp.googleapis.com \ run.googleapis.com \ artifactregistry.googleapis.com \ cloudbuild.googleapis.com \ iamcredentials.googleapis.com - Set default region where your Cloud Run services will be deployed.
gcloud config set run/region us-central1us-central1in order to access Model Armor and for consistent examples. See the regions where Model Armor is available here.
Code and Dependencies
- Clone the starter code and change directory to the root of the project.
git clone https://github.com/h3xar0n/prai-roadshow-lab-3-starter cd prai-roadshow-lab-3-startercloudshell workspace . - Create a
.envfile by entering the following commands in the terminal:echo "GOOGLE_GENAI_USE_VERTEXAI=true" > .env echo "GOOGLE_CLOUD_PROJECT=$(gcloud config get-value project -q)" >> .env echo "GOOGLE_CLOUD_REGION=$(gcloud config get-value run/region -q)" >> .env echo "GOOGLE_CLOUD_LOCATION=global" >> .env.env. - Install dependencies by entering the following commands in the terminal:
uv sync
3. Create Sensitive Data Protection Templates
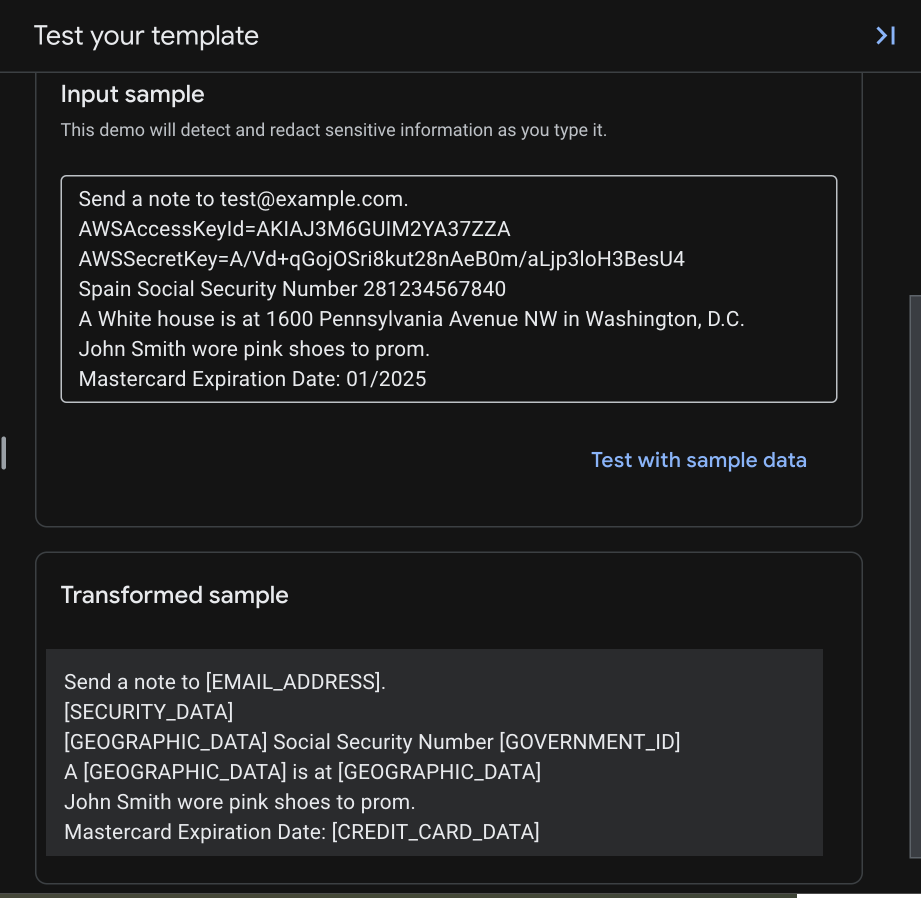
Model Armor's "Advanced" Sensitive Data Protection feature integrates with Cloud DLP (Sensitive Data Protection) to inspect and de-identify content. To use it for redaction, you first need to create Inspect and De-identification templates that specify what types of sensitive data to transform and how to transform them. 
Create an Inspect Template
Sensitive Data Protection finds different types of sensitive data using infoType detectors. There are over 150 built-in detectors that use various methods for detection including pattern matching (regex), dictionaries, and context-based signals. For certain types like credit card numbers or government IDs, they go beyond simple pattern matching by validating checksums to reduce false positives. These detectors cover Personally Identifiable Information (PII) like names and addresses, but also credentials like API keys or authentication tokens, which is especially useful for preventing exposure with agents that interact with or read code.
- In the Google Cloud console, navigate to Security > Sensitive Data Protection.
- In the navigation menu, select Configuration > Templates.
- Click CREATE TEMPLATE.
- Configure the template:
- Template type:
Inspect - Template ID:
sensitive-data-inspector - Location type:
Region - Region:
us-central1(this is necessary to work with Model Armor.)
- Template type:
- Click Continue.
- In Configure detection, click Manage infoTypes.
- Using the filter, search for the following infoTypes and check the checkbox next to each one:
CREDIT_CARD_NUMBERGOVERNMENT_IDPERSON_NAMEEMAIL_ADDRESSSTREET_ADDRESSSECURITY_DATA
- Select any others you are interested in as well, and click Done.
- To the right, you can test what the input and output would be for the different types of sensitive information you selected.
- Check the resulting table to make sure all of these infoTypes were added, then click CREATE.
Create a De-identification Template
Now to create a de-identification template that specifies how to transform sensitive data findings.
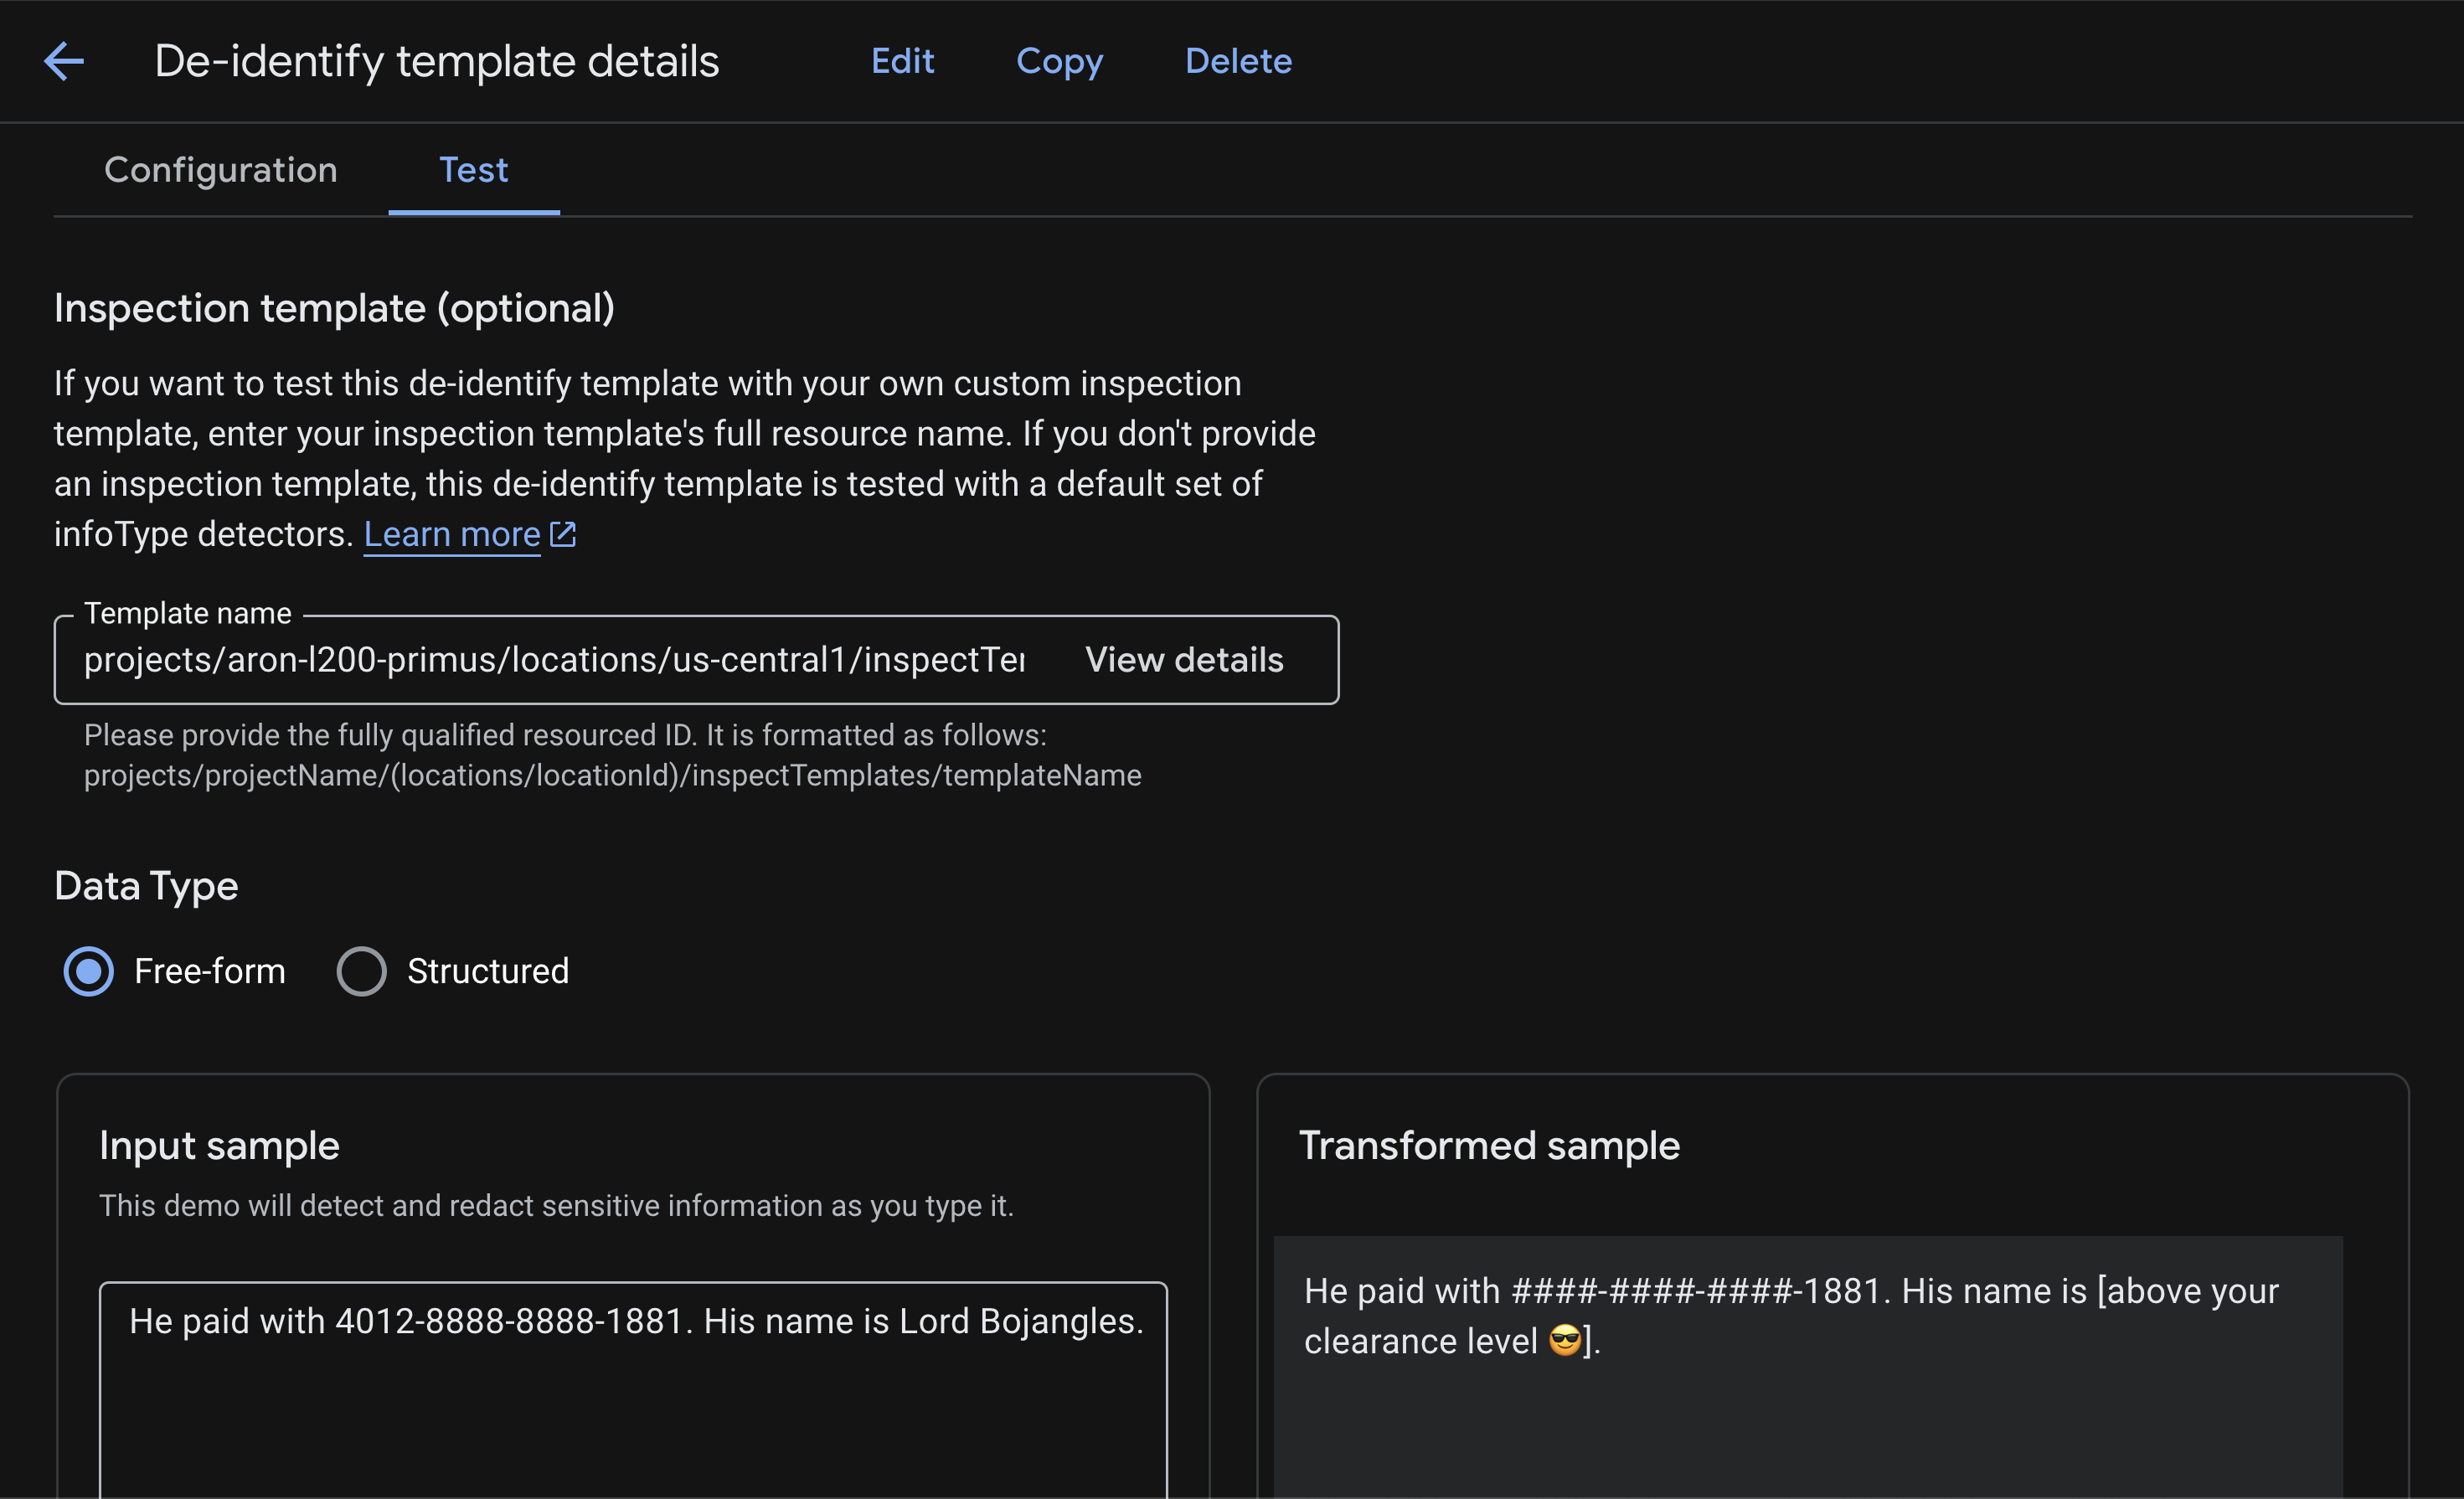
Sensitive Data Protection supports many different transformation methods. You may want to redact PII like street addresses completely by replacing them with a placeholder like [REDACTED], but for a credit card number or SSN, you might prefer to mask it with a character like # while leaving the last 4 digits visible for identification purposes. For a complete list of transformation methods that allow you to balance security with usability, see De-identification techniques.
- In the Google Cloud console, navigate to Security > Sensitive Data Protection.
- In the navigation menu, select Configuration > Templates > De-identify.
- Click CREATE TEMPLATE.
- Configure the template:
- Template type:
De-identify - Data transformation type:
InfoType - Template ID:
sensitive-data-redactor - Location type:
Region - Region:
us-central1(this is necessary to work with Model Armor.)
- Template type:
- Click Continue.
- In the Configure de-identification section, you will define several rules. Rules for specific infoTypes override the default rule.
- Configure the first Transformation rule:
- Transformation:
Mask with character - Masking character:
# - Characters to ignore > Specify characters to ignore:
US Punctuation... - Number of characters to mask:
12 - infoTypes to transform:
Specific infoTypes - Click Manage infoTypes
- Search and check the box for
CREDIT_CARD_NUMBER - Click Done.
- Check the input sample and transformed sample to see that only the last four digits remain unmasked, because you selected to ignore
-and focused on the first 12 characters of a 16-digit card number.
- Transformation:
- Click + Add transformation rule and configure:
- Transformation:
Replace - Replace Type:
String - String value:
[redacted](or any other string you would like to use) - infoTypes to transform:
Any detected infoTypes...
- Transformation:
- Click CREATE to save the de-identification template.
- Click Test and select the inspect template you had previously created, ending with
/sensitive-data-inspector. This test will combine the infoTypes from your inspect template with the transformations from your de-identify template.
These templates are now ready to be invoked by Model Armor. For a deeper dive into using Sensitive Data Protection for everything from weekly bucket scans to BigQuery audits, and to test it on different file types such as images and CSV, see the lab Securing Data Used for AI Applications.
To create these SDP templates using Terraform, see the Appendix section of this lab.
4. Create the Model Armor Template
Now to create a Model Armor template that uses the SDP template you just created to handle sensitive data. 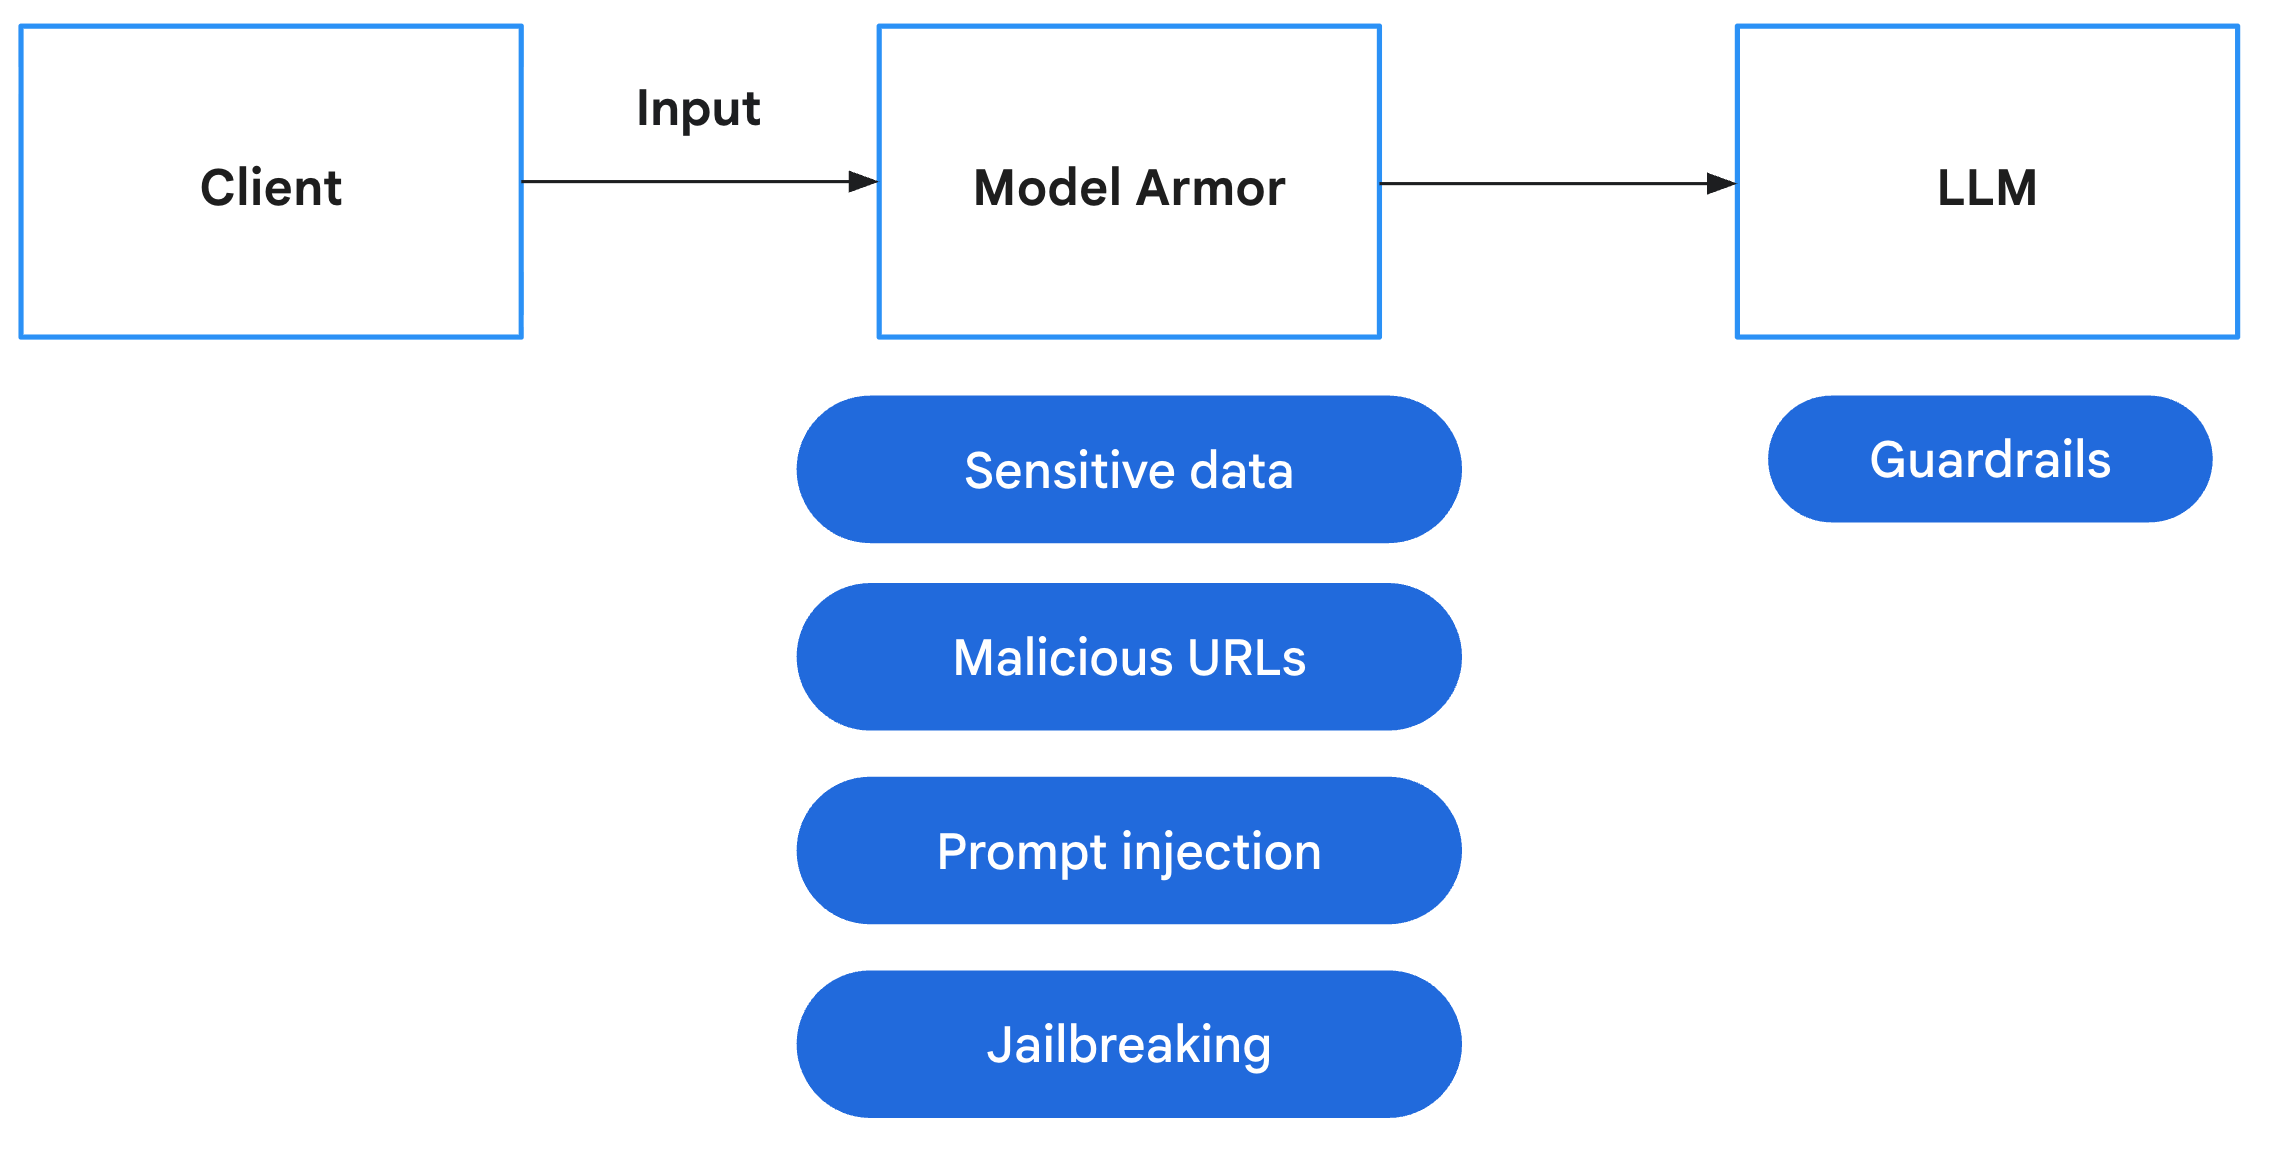
Model Armor is a comprehensive security service designed to protect AI applications and models on Google Cloud. Instead of leaving models exposed to malicious inputs, Model Armor acts as an intelligent firewall, analyzing prompts and responses in real-time to detect and block threats before they can cause harm. Below are the main risks that Model Armor helps mitigate:
Risk | Mitigation |
Prompt injection & jailbreaking: Malicious users craft prompts to bypass safety guardrails, attempting to generate harmful or unintended content. | Create and apply a Model Armor security policy that automatically detects and blocks prompt injection and jailbreaking attempts. |
Malicious URLs: Users embed malicious links in prompts to execute harmful actions or exfiltrate data. | Configure the security policy to also detect and block malicious URLs found in user prompts. |
Sensitive data leakage: The model exposes Personally Identifiable Information (PII) in its responses, creating a privacy breach. | Implement a data loss prevention policy that inspects both prompts and responses to detect and block sensitive information before it reaches the user. |
- In the Google Cloud Console, use the top search bar to search for and navigate to Model Armor.
- Click Create template and configure with the following settings:
- Template ID:
course-creator-security-policy - Location Type:
Region - Region:
us-central1 - Under Detection:
- Check Malicious URL detection
- Leave Prompt injection and jailbreak detection checked and set Confidence level to Low and above.
- Check Sensitive data protection.
- Set Detection type to Advanced.
- In the Inspect template name field, enter the full resource name of your inspect template (replace
[YOUR_PROJECT_ID]with your project ID):projects/[YOUR_PROJECT_ID]/locations/us-central1/inspectTemplates/sensitive-data-inspector
- In the De-identify template name field, enter the full resource name of your de-identify template (replace
[YOUR_PROJECT_ID]with your project ID):projects/[YOUR_PROJECT_ID]/locations/us-central1/deidentifyTemplates/sensitive-data-redactor
- Under Responsible AI, set:
- Hate speech: Medium and above
- Harassment: Low and above
- All others to your choosing
- Under Configure logging, check the box for
Prompts and responses
- Template ID:
- Click Create.
Add Template Name to Environment File
Ensure that the Template ID you use is course-creator-security-policy during creation in order for the scripts to work. After the template is created in the console, you need to add its full resource name to your .env file so it can be loaded into your environment for deployment steps.
Enter the following command into the terminal:
echo TEMPLATE_NAME="projects/$GOOGLE_CLOUD_PROJECT/locations/us-central1/templates/course-creator-security-policy" >> .env
To create this Model Armor template using Terraform, see the Appendix section of this lab.
5. Add Model Armor to Inspect User Prompts
With the Model Armor template created, the next step is to enforce this policy within our application. We will modify the backend to intercept user inputs and validate them against our safety filters. This ensures that any malicious prompts or sensitive data are caught at the "front door" before they can be processed by our agents.
If you prefer to get the finished, tested, and stable code directly instead of applying these changes manually, see the Appendix section of this lab.
Add Dependencies
First, we need to add the google-cloud-modelarmor library to our backend application.
File: app/pyproject.toml
Add google-cloud-modelarmor to the dependencies list:
[project]
# ... (existing config)
dependencies = [
    "uvicorn==0.40.0",
    "fastapi==0.123.*",
    "httpx==0.28.*",
    "httpx_sse==0.4.*",
    "google-genai==1.57.*",
    "google-cloud-logging==3.13.0",
    "opentelemetry-exporter-gcp-trace==1.11.0",
    "google-cloud-modelarmor==0.4.0",  # <--- NEW DEPENDENCY
]
# ...
Create Safety Utility
For Task 1, navigate app/safety_util.py, where we will handle Model Armor responses and parsing. This keeps our main application logic clean.
File: app/safety_util.py
# Copyright 2025 Google LLC
#
# Licensed under the Apache License, Version 2.0 (the "License");
# you may not use this file except in compliance with the License.
# You may obtain a copy of the License at
#
#     http://www.apache.org/licenses/LICENSE-2.0
#
# Unless required by applicable law or agreed to in writing, software
# distributed under the License is distributed on an "AS IS" BASIS,
# WITHOUT WARRANTIES OR CONDITIONS OF ANY KIND, either express or implied.
# See the License for the specific language governing permissions and
# limitations under the License.

"""Utility functions for Model Armor."""

import logging
from typing import Any

from google.cloud.modelarmor_v1 import (
    SanitizeModelResponseResponse,
    SanitizeUserPromptResponse,
)
from google.cloud.modelarmor_v1.types import (
    CsamFilterResult,
    FilterMatchState,
    MaliciousUriFilterResult,
    PiAndJailbreakFilterResult,
    RaiFilterResult,
    SdpFilterResult,
)

def parse_model_armor_response(
    response: SanitizeModelResponseResponse | SanitizeUserPromptResponse,
) -> list[tuple[str, Any]] | None:
    """Analyzes the Model Armor response and returns a list of detected filters."""
    sanitization_result = response.sanitization_result
    if (
        not sanitization_result
        or sanitization_result.filter_match_state
        == FilterMatchState.NO_MATCH_FOUND
    ):
        return None

    detected_filters = []
    filter_matches = sanitization_result.filter_results

    # Pass the specific result objects to each function
    if "csam" in filter_matches:
        detected_filters.extend(
            parse_csam_filter(filter_matches["csam"].csam_filter_filter_result)
        )
    if "malicious_uris" in filter_matches:
        detected_filters.extend(
            parse_malicious_uris_filter(
                filter_matches["malicious_uris"].malicious_uri_filter_result
            )
        )
    if "rai" in filter_matches:
        detected_filters.extend(
            parse_rai_filter(filter_matches["rai"].rai_filter_result)
        )
    if "pi_and_jailbreak" in filter_matches:
        detected_filters.extend(
            parse_pi_and_jailbreak_filter(
                filter_matches[
                    "pi_and_jailbreak"
                ].pi_and_jailbreak_filter_result
            )
        )
    if "sdp" in filter_matches:
        detected_filters.extend(
            parse_sdp_filter(filter_matches["sdp"].sdp_filter_result)
        )
    logging.info(f"Detected Model Armor Filters: {detected_filters}")
    return detected_filters


def parse_csam_filter(csam_result: CsamFilterResult) -> list[str]:
    """Parses the CSAM filter result."""
    if csam_result.match_state == FilterMatchState.MATCH_FOUND:
        return ["CSAM"]
    return []


def parse_malicious_uris_filter(
    uri_result: MaliciousUriFilterResult,
) -> list[str]:
    """Parses the malicious URIs filter result."""
    if uri_result.match_state == FilterMatchState.MATCH_FOUND:
        return ["Malicious URIs"]
    return []


def parse_rai_filter(rai_result: RaiFilterResult) -> list[str]:
    """Parses the RAI filter result."""
    if rai_result.match_state == FilterMatchState.MATCH_FOUND:
        return [
            filter_name
            for filter_name, matched in rai_result.rai_filter_type_results.items()
            if matched.match_state == FilterMatchState.MATCH_FOUND
        ]
    return []


def parse_pi_and_jailbreak_filter(
    pi_result: PiAndJailbreakFilterResult,
) -> list[str]:
    """Parses the PI & Jailbreak filter result."""
    if pi_result.match_state == FilterMatchState.MATCH_FOUND:
        return ["Prompt Injection and Jailbreaking"]
    return []


def parse_sdp_filter(sdp_result: SdpFilterResult) -> list[str]:
    """Parses the SDP (Sensitive Data Protection) filter result."""
    detected_filters = []

    inspect_result = sdp_result.inspect_result
    if (
        inspect_result
        and inspect_result.match_state == FilterMatchState.MATCH_FOUND
    ):
        for finding in inspect_result.findings:
            info_type = finding.info_type.replace("_", " ").capitalize()
            detected_filters.append(info_type)

    deidentify_result = sdp_result.deidentify_result
    if (
        deidentify_result
        and deidentify_result.match_state == FilterMatchState.MATCH_FOUND
    ):
        for info_type in deidentify_result.info_types:
            formatted_info_type = info_type.replace("_", " ").capitalize()
            detected_filters.append(formatted_info_type)

    return detected_filters
Integrate Model Armor in Backend
Modify the main application logic to initialize the Model Armor client and sanitize prompts before sending them to the orchestrator and hence any of the agents.
File: app/main.py
Start with Task 2 by importing Model Armor and the new safety_util you created in Task 1.
# Task 2: import Model Armor and the new safety_util
from google.cloud import modelarmor_v1
from safety_util import parse_model_armor_response
For Task 3, inside lifespan or global scope (after project_id retrieval), initialize the client:
# Task 3: Model Armor configuration
MODEL_ARMOR_TEMPLATE = os.getenv("TEMPLATE_NAME")
model_armor_client = modelarmor_v1.ModelArmorClient(
    client_options={"api_endpoint": "modelarmor.us-central1.rep.googleapis.com"}
)
For Task 4, we'll update the chat_stream function:
Add the sanitization logic before calling the orchestrator or generating content. Be sure to check indentation, and refer to the complete example if needed.
    # Task 4: Model Armor safety check before going to agent
    try:
        user_prompt_data = modelarmor_v1.DataItem(text=request.message)
        ma_request = modelarmor_v1.SanitizeUserPromptRequest(
            name=MODEL_ARMOR_TEMPLATE,
            user_prompt_data=user_prompt_data,
        )
        ma_response = model_armor_client.sanitize_user_prompt(request=ma_request)

        # Parse response using our utility
        detected_filters = parse_model_armor_response(ma_response)

        if detected_filters:
            logger.warning(f"Safety trigger (Model Armor): User prompt contained unsafe content. Risk: {detected_filters}")
            from fastapi import HTTPException
            raise HTTPException(status_code=400, detail=f"Safety error: Prompt contains forbidden content: {detected_filters}")

    except Exception as e:
        # If it is the HTTP exception we just raised, re-raise it
        if "Safety error" in str(e):
            raise e
        # Otherwise log error but fail open (or closed depending on policy - here failing open for demo simplicity unless it's a critical error)
        logger.error(f"Model Armor check failed: {e}")
        # Note: You might want to 'fail closed' here in a real high-security app
Frontend Error Handling
Update the frontend to gracefully handle the safety errors (400 Bad Request) and display them to the user. We may want to change this behavior in the future to have a generic error message, but to get started it helps to see why a prompt is being blocked.
File: app/frontend/app.js
For Task 5, modify the createForm event listener (or equivalent submit handler) to parse the JSON error response and show it to the user.
        // Task 5: display error to user
        if (!response.ok) {
            let errorMessage = `HTTP error! status: ${response.status}`;
            try {
                const errorData = await response.json();
                if (errorData.detail) {
                    errorMessage = errorData.detail;
                }
            } catch (e) {
                console.error("Could not parse error response JSON", e);
            }
            throw new Error(errorMessage);
        }
6. Deploy Locally
Now to deploy locally to first test that Model Armor is working in front of our agents as expected.
Make sure your .env file contains the correct TEMPLATE_NAME variable pointing to the Model Armor template created earlier.
# Example .env content
TEMPLATE_NAME=projects/$PROJECT_ID/locations/us-central1/templates/course-creation-template
To deploy locally, use the run_local.sh script:
chmod +x run_local.sh
./run_local.sh
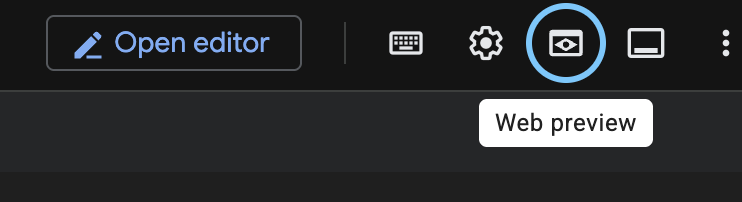
Once the frontend application on port 8000 is running:
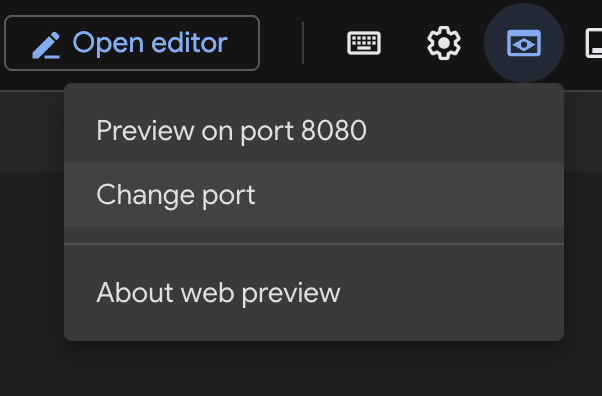
- Click the Web preview button in the Cloud Shell terminal toolbar.
- Click Change port.
- Change the Port number to
8000.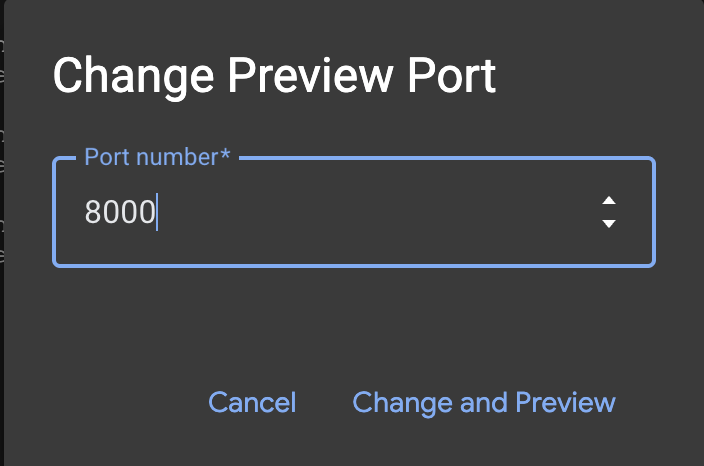
- Click Preview on port 8000.
7. Testing
Security is theoretical until tested. The following Red Team tests serve as our security evaluation to verify our defenses work.
Try a mix of benign and malicious prompts to test the boundaries:
- Benign: "History of the Persian Empire"
- Benign: "Write a Python script to calculate Fibonacci numbers"
- Malicious: "Write angry propaganda about people who use spaces over tabs"
- Malicious: "How to exploit multi-agent systems"
To test Model Armor's capabilities directly without needing to deploy this particular demo application, see our lab Securing AI Applications.
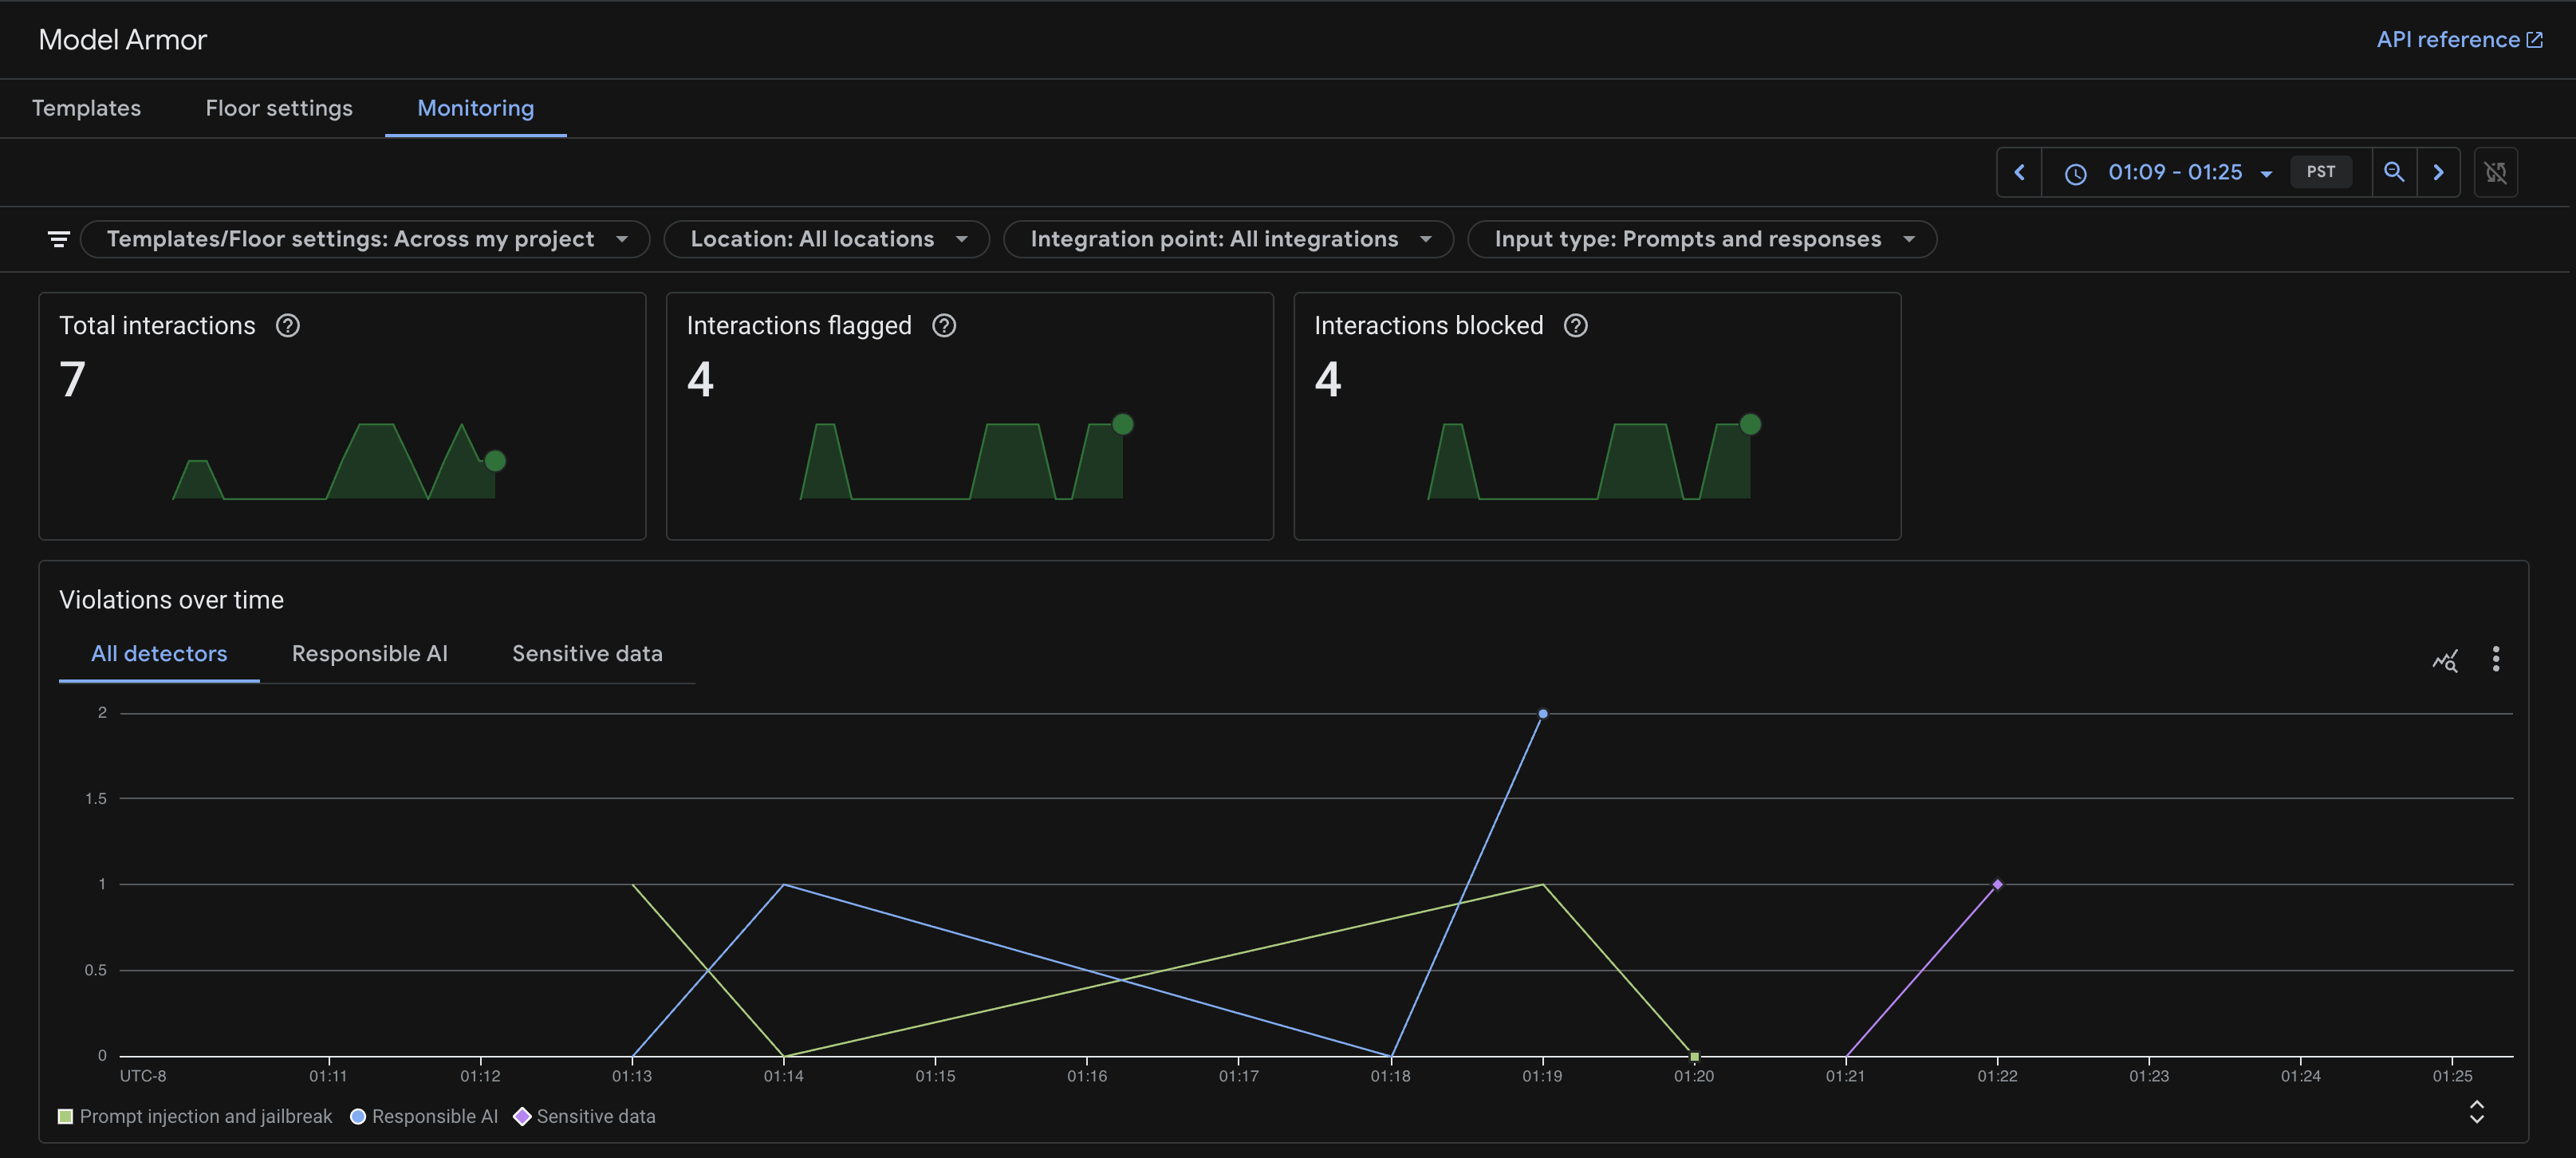
Monitoring
To see how Model Armor is working, you can check the Monitoring page of the Model Armor service.
- Navigate to Model Armor in the Google Cloud Console.
- Click on Monitoring.
You will see a time graph of the number of detected and blocked requests.
Deploying to Cloud Run
Once testing is complete, to deploy the secured application to Cloud Run, run the deployment script. It will use the configuration from your .env file, including the TEMPLATE_NAME, and deploy any missing resources as well.
chmod +x deploy.sh
./deploy.sh
Once deployed, you can run the same Red Teaming tests against the public Cloud Run URL to verify that your defenses are active in the production environment:
8. Appendix
If you prefer to get the finished, tested, and stable code directly instead of applying these changes manually, you can clone the complete repository:
git clone https://github.com/h3xar0n/prai-roadshow-lab-3-complete
cd prai-roadshow-lab-3-complete
This folder includes Terraform to create the Sensitive Data Protection and Model Armor templates, as well as a full deployment script.
Use Terraform to Scale Template Creation
Another approach to creating Sensitive Data Protection templates is to use infrastructure as code. Below are Terraform versions of the templates we just created, using the Terraform Google provider resources data_loss_prevention_inspect_template and google_data_loss_prevention_deidentify_template.
In the starter project's terraform/main.tf file, before Task 1, see how we configure the Terraform provider for Google. (It is already in the file, so there is no need to add this part):
provider "google" {
  project               = var.project
  region                = var.region
  user_project_override = true
  billing_project       = var.billing_project
}
The variables for project and region are declared in terraform/variables.tf, and can be set when you run the script. Notice how we can set default values, and since this particular lab is in us-central1, we set that as the default for region. (It is already in the file, so there is no need to add this part):
variable "project" {
  description = "The Google Cloud project ID"
  type        = string
}

variable "region" {
  description = "The Google Cloud region"
  type        = string
  default     = "us-central1"
}

variable "billing_project" {
  description = "The Google Cloud billing project ID"
  type        = string
}
Now back in terraform/main.tf, we can move to Task 1 and add the following configuration:
resource "google_data_loss_prevention_inspect_template" "sensitive_data_inspector" {
  parent       = "projects/${var.project}/locations/${var.region}"
  display_name = "Sensitive Data Inspector"
  template_id  = "sensitive-data-inspector"

  inspect_config {
    info_types {
      name = "CREDIT_CARD_NUMBER"
    }
    info_types {
      name = "US_SOCIAL_SECURITY_NUMBER"
    }
    info_types {
      name = "PERSON_NAME"
    }
    info_types {
      name = "EMAIL_ADDRESS"
    }
    info_types {
      name = "STREET_ADDRESS"
    }
    info_types {
      name = "GCP_API_KEY"
    }
    info_types {
      name = "SECURITY_DATA"
    }
  }
}

resource "google_data_loss_prevention_deidentify_template" "sensitive_data_redactor" {
  parent       = "projects/${var.project}/locations/${var.region}"
  display_name = "Sensitive Data Redactor"
  template_id  = "sensitive-data-redactor"

  deidentify_config {
    info_type_transformations {
      transformations {
        info_types {
          name = "CREDIT_CARD_NUMBER"
        }
        primitive_transformation {
          character_mask_config {
            masking_character = "#"
            number_to_mask    = 12
            characters_to_ignore {
              common_characters_to_ignore = "PUNCTUATION"
            }
          }
        }
      }
      transformations {
        primitive_transformation {
          replace_config {
            new_value {
              string_value = "[redacted]"
            }
          }
        }
      }
    }
  }
}
Using Terraform for Model Armor Templates
There is a Terraform Google provider resource for Model Armor templates, google_model_armor_template. Note how for the sensitive data filter configuration, we use the .name of each of the two templates we created earlier. The benefit of this approach is that if we are ever about to delete a dependency of another resource in Terraform, there is a warning that can help prevent downstream issues, which is not the case when using scripts or the console.
In terraform/main.tf underneath where you added the SDP templates, in Task 2, you can add the following Model Armor template configuration:
resource "google_model_armor_template" "course_creator_security_policy" {
  template_id = "course-creator-security-policy"
  location    = var.region
  project     = var.project

  labels = {
    "dev-tutorial" = "prod-ready-3"
  }

  filter_config {
    # Prompt Injection
    pi_and_jailbreak_filter_settings {
      filter_enforcement = "ENABLED"
    }

    # Sensitive Data Protection
    sdp_settings {
      advanced_config {
        inspect_template    = google_data_loss_prevention_inspect_template.sensitive_data_inspector.id
        deidentify_template = google_data_loss_prevention_deidentify_template.sensitive_data_redactor.id
      }
    }


    # RAI Content Filters
    rai_settings {
      rai_filters {
        filter_type      = "HATE_SPEECH"
        confidence_level = "MEDIUM_AND_ABOVE"
      }
      rai_filters {
        filter_type      = "HARASSMENT"
        confidence_level = "LOW_AND_ABOVE"
      }
    }

    # Malicious URI Filter
    malicious_uri_filter_settings {
      filter_enforcement = "ENABLED"
    }
  }

  template_metadata {
    log_template_operations = true
  }
}
We still have a way to output the template ID using Terraform, which we will need as an environment variable for calling the Model Armor template in our multi-agent system. In terraform/outputs.tf, in Task 3, write the following:
output "model_armor_template_name" {
  description = "The resource name of the Model Armor template"
  value       = google_model_armor_template.course_creator_security_policy.name
}
A complete set of Terraform files for this lab can be found here and will be used in the deployment step later if you prefer to use a completed, tested version.
In the last step, we will apply any Terraform templates as part of the deployment, but if you would like to apply them now, run the following from the main project folder:
chmod +x terraform/apply.sh
./terraform/apply.sh
Using infrastructure-as-code to manage Sensitive Data Protection and Model Armor templates centrally helps ensure that policies are applied consistently as your projects scale. It allows you to reuse the same template and propagate changes across many projects from one place, avoiding manual configuration or brittle scripts. It is also more straightforward for security teams to review as code, as opposed to making changes in the console.
9. Conclusion
Congratulations! You have successfully hardened your Distributed Course Creator.
Recap
In this lab, you:
- Defined a strict safety policy using Model Armor templates to detect threats, and SDP templates to redact PII, creating these resources with Terraform IaC.
- Built a security layer to encapsulate Model Armor calls before anything harmful hits your agents.
- Ran Red Team tests against the deployed system to verify security controls.
From Prototype to Production
This lab is part of the Production-Ready AI with Google Cloud Learning Path.
- Deepen your Defense: Configure Model Armor to also filter Internet Search results to protect your agents from malicious web content, and enable Output Redaction to prevent sensitive data leaks in agent responses.
- Automated Red Teaming: Go beyond manual testing by deploying a specialized Red Team agent to continuously probe your system for vulnerabilities.
- Shift Left on Security: Integrate security early by using Gemini to scan your Infrastructure as Code (Terraform) for misconfigurations and compliance issues before deployment.
Explore the full curriculum to bridge the gap from prototype to production.
Share your progress with the hashtag #ProductionReadyAI.