
1. Introduction
Overview
This lab teaches you how to orchestrate complex, multi-agent systems using the Google Agent Development Kit (Google ADK). You'll move from simple agent hierarchies to building automated, collaborative workflows.
What you'll build
You'll build two distinct multi-agent systems:
- A simple travel planning agent that learns to transfer conversations between a "brainstorming" agent and an "attraction planning" agent.
- A more advanced movie pitch generator that uses a "writer's room" of automated agents (like a researcher, screenwriter, and critic) to work together in a loop to create a full movie plot.
What you'll learn
- How to create parent and sub-agent relationships.
- How to write data to the session
statefrom a tool. - How to read from the
stateusing key templating (e.g.,{my_key?}). - How to use a
SequentialAgentfor step-by-step workflows. - How to use a
LoopAgentto create iterative refinement cycles. - How to use a
ParallelAgentto run independent tasks concurrently.
2. Multi-Agent Systems
The Agent Development Kit (ADK) empowers developers to get more reliable, sophisticated, multi-step behaviors from generative models. Instead of one complex prompt, ADK lets you build a flow of multiple, simpler agents that collaborate on a problem by dividing the work.
This approach has several advantages over using a single, monolithic prompt:
- Simpler Design: It's simpler to design and organize a flow of small, specialized agents than to engineer one large, complex prompt.
- Reliability: Specialized agents are more reliable at their specific tasks than one large, complex agent.
- Maintainability: It's easier to fix or improve a small, specialized agent without breaking other parts of the system.
- Modularity: Agents built for one workflow can be easily reused in others.
The Hierarchical Agent Tree
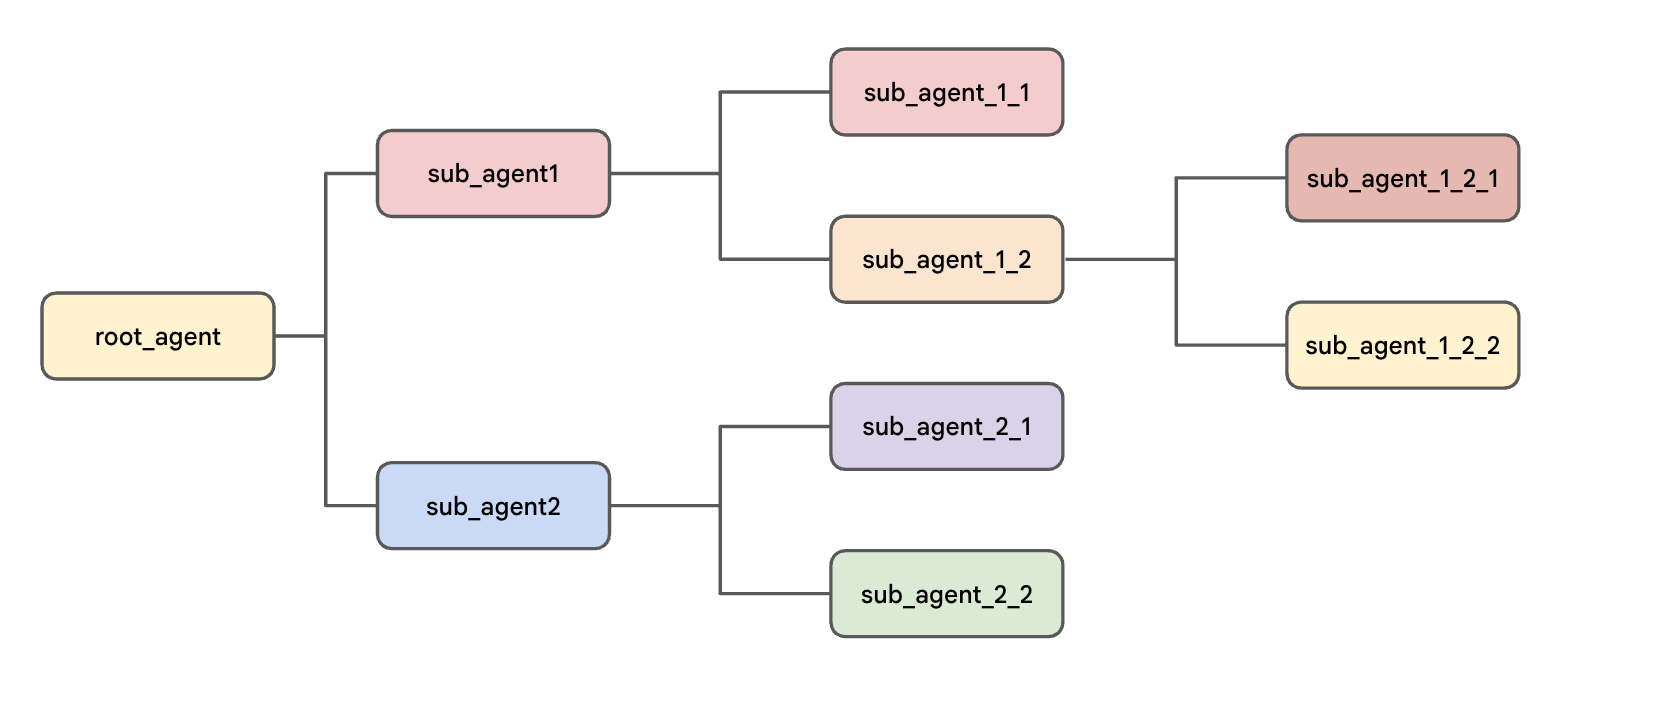
In ADK, you organize agents in a tree structure. This hierarchy is key to controlling the conversation's flow, as it limits which agent can "pass" the conversation to which other agent. This makes the system's behavior more predictable and easier to debug. Benefits include:
- Intuitive Design: The structure is inspired by real-world teams, making it easier to reason about.
- Controlled Flow: The hierarchy gives you precise control over task delegation, which helps in debugging. For example, the tree structure ensures the correct report-writing agent is called, even if you have two with similar descriptions.
The entire structure starts with the root_agent. This agent acts as a parent and can have one or more sub-agents, which in turn can also be parents to their own sub-agents, forming the tree.
3. Project setup
Google Account
If you don't already have a personal Google Account, you must create a Google Account.
Use a personal account instead of a work or school account.
Sign-in to the Google Cloud Console
Sign-in to the Google Cloud Console using a personal Google account.
Enable Billing
Redeem Google Cloud credits (optional)
To run this workshop, you need a billing account with some credit. Use the credits from the banner at the top of this codelab to get started. If you are already connected to a billing account, you can skip this step.
Set up a personal billing account
If you set up billing using Google Cloud credits, you can skip this step.
To set up a personal billing account, go here to enable billing in the Cloud Console.
Some Notes:
- Completing this lab should cost less than $1 USD in Cloud resources.
- You can follow the steps at the end of this lab to delete resources to avoid further charges.
- New users are eligible for the $300 USD Free Trial.
Create a project (optional)
If you do not have a current project you'd like to use for this lab, create a new project here.
4. Open Cloud Shell Editor
- Click this link to navigate directly to Cloud Shell Editor
- If prompted to authorize at any point today, click Authorize to continue.
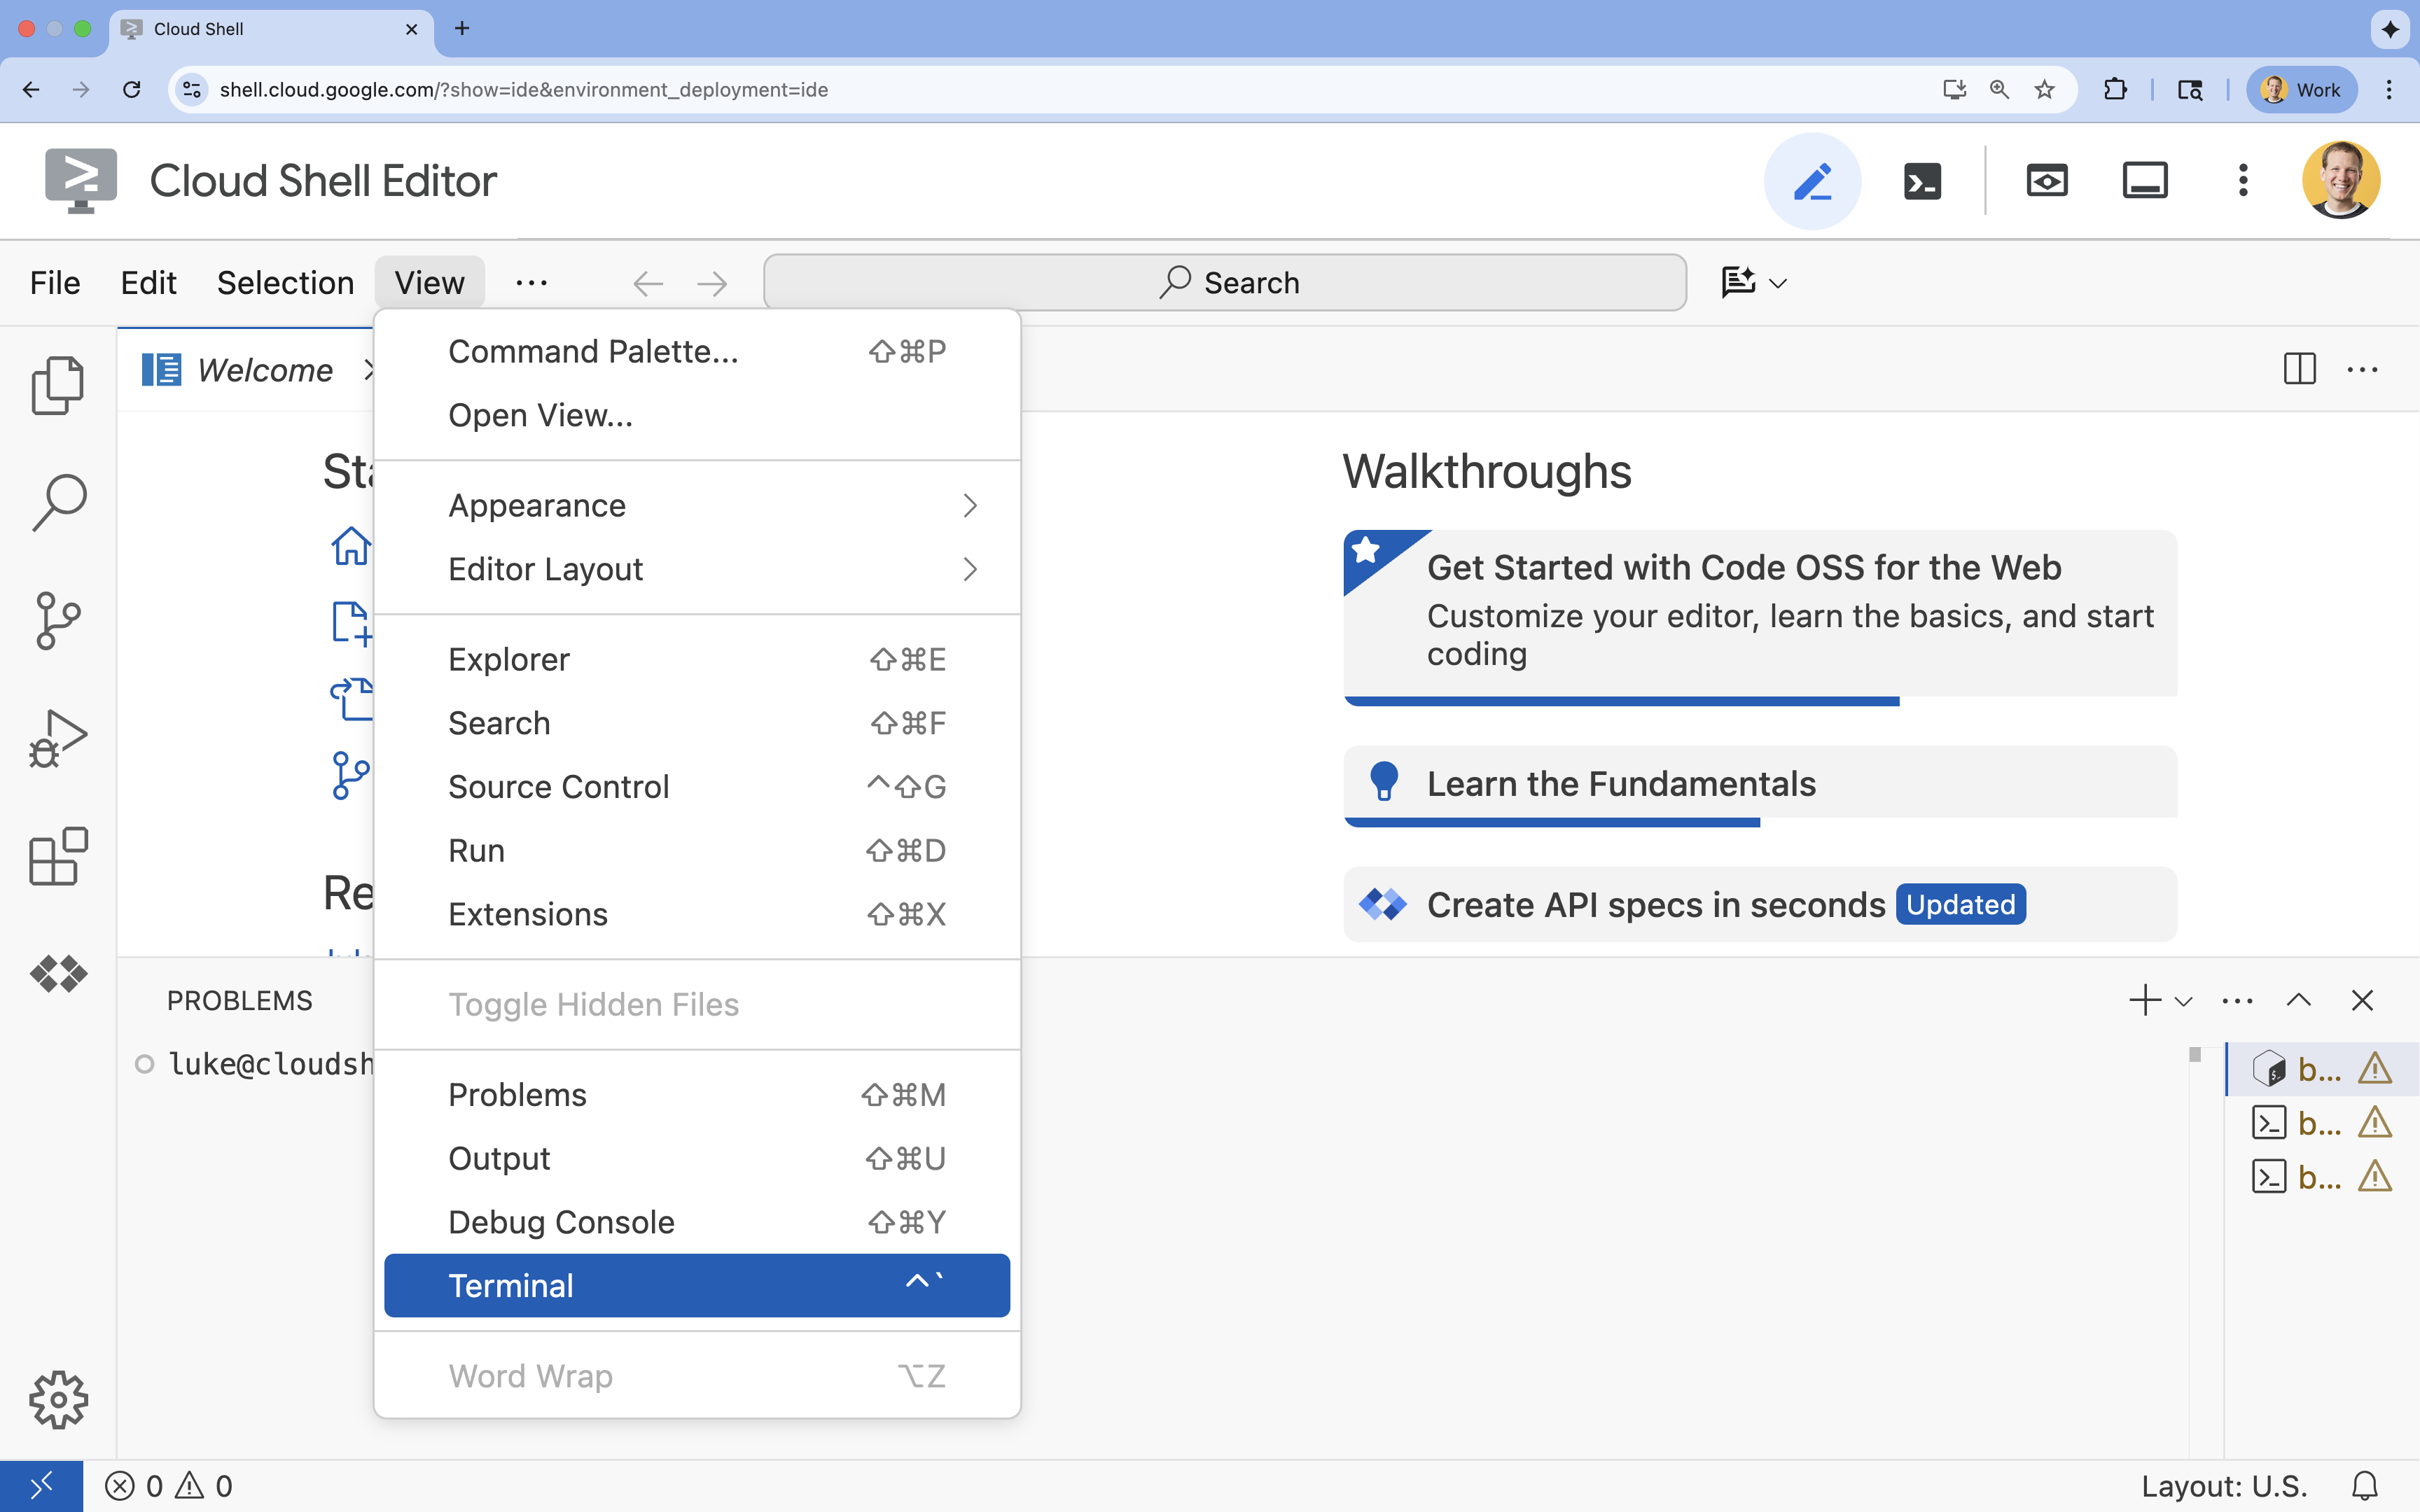
- If the terminal doesn't appear at the bottom of the screen, open it:
- Click View
- Click Terminal
- In the terminal, set your project with this command:
gcloud config set project [PROJECT_ID]- Example:
gcloud config set project lab-project-id-example - If you can't remember your project ID, you can list all your project IDs with:
gcloud projects list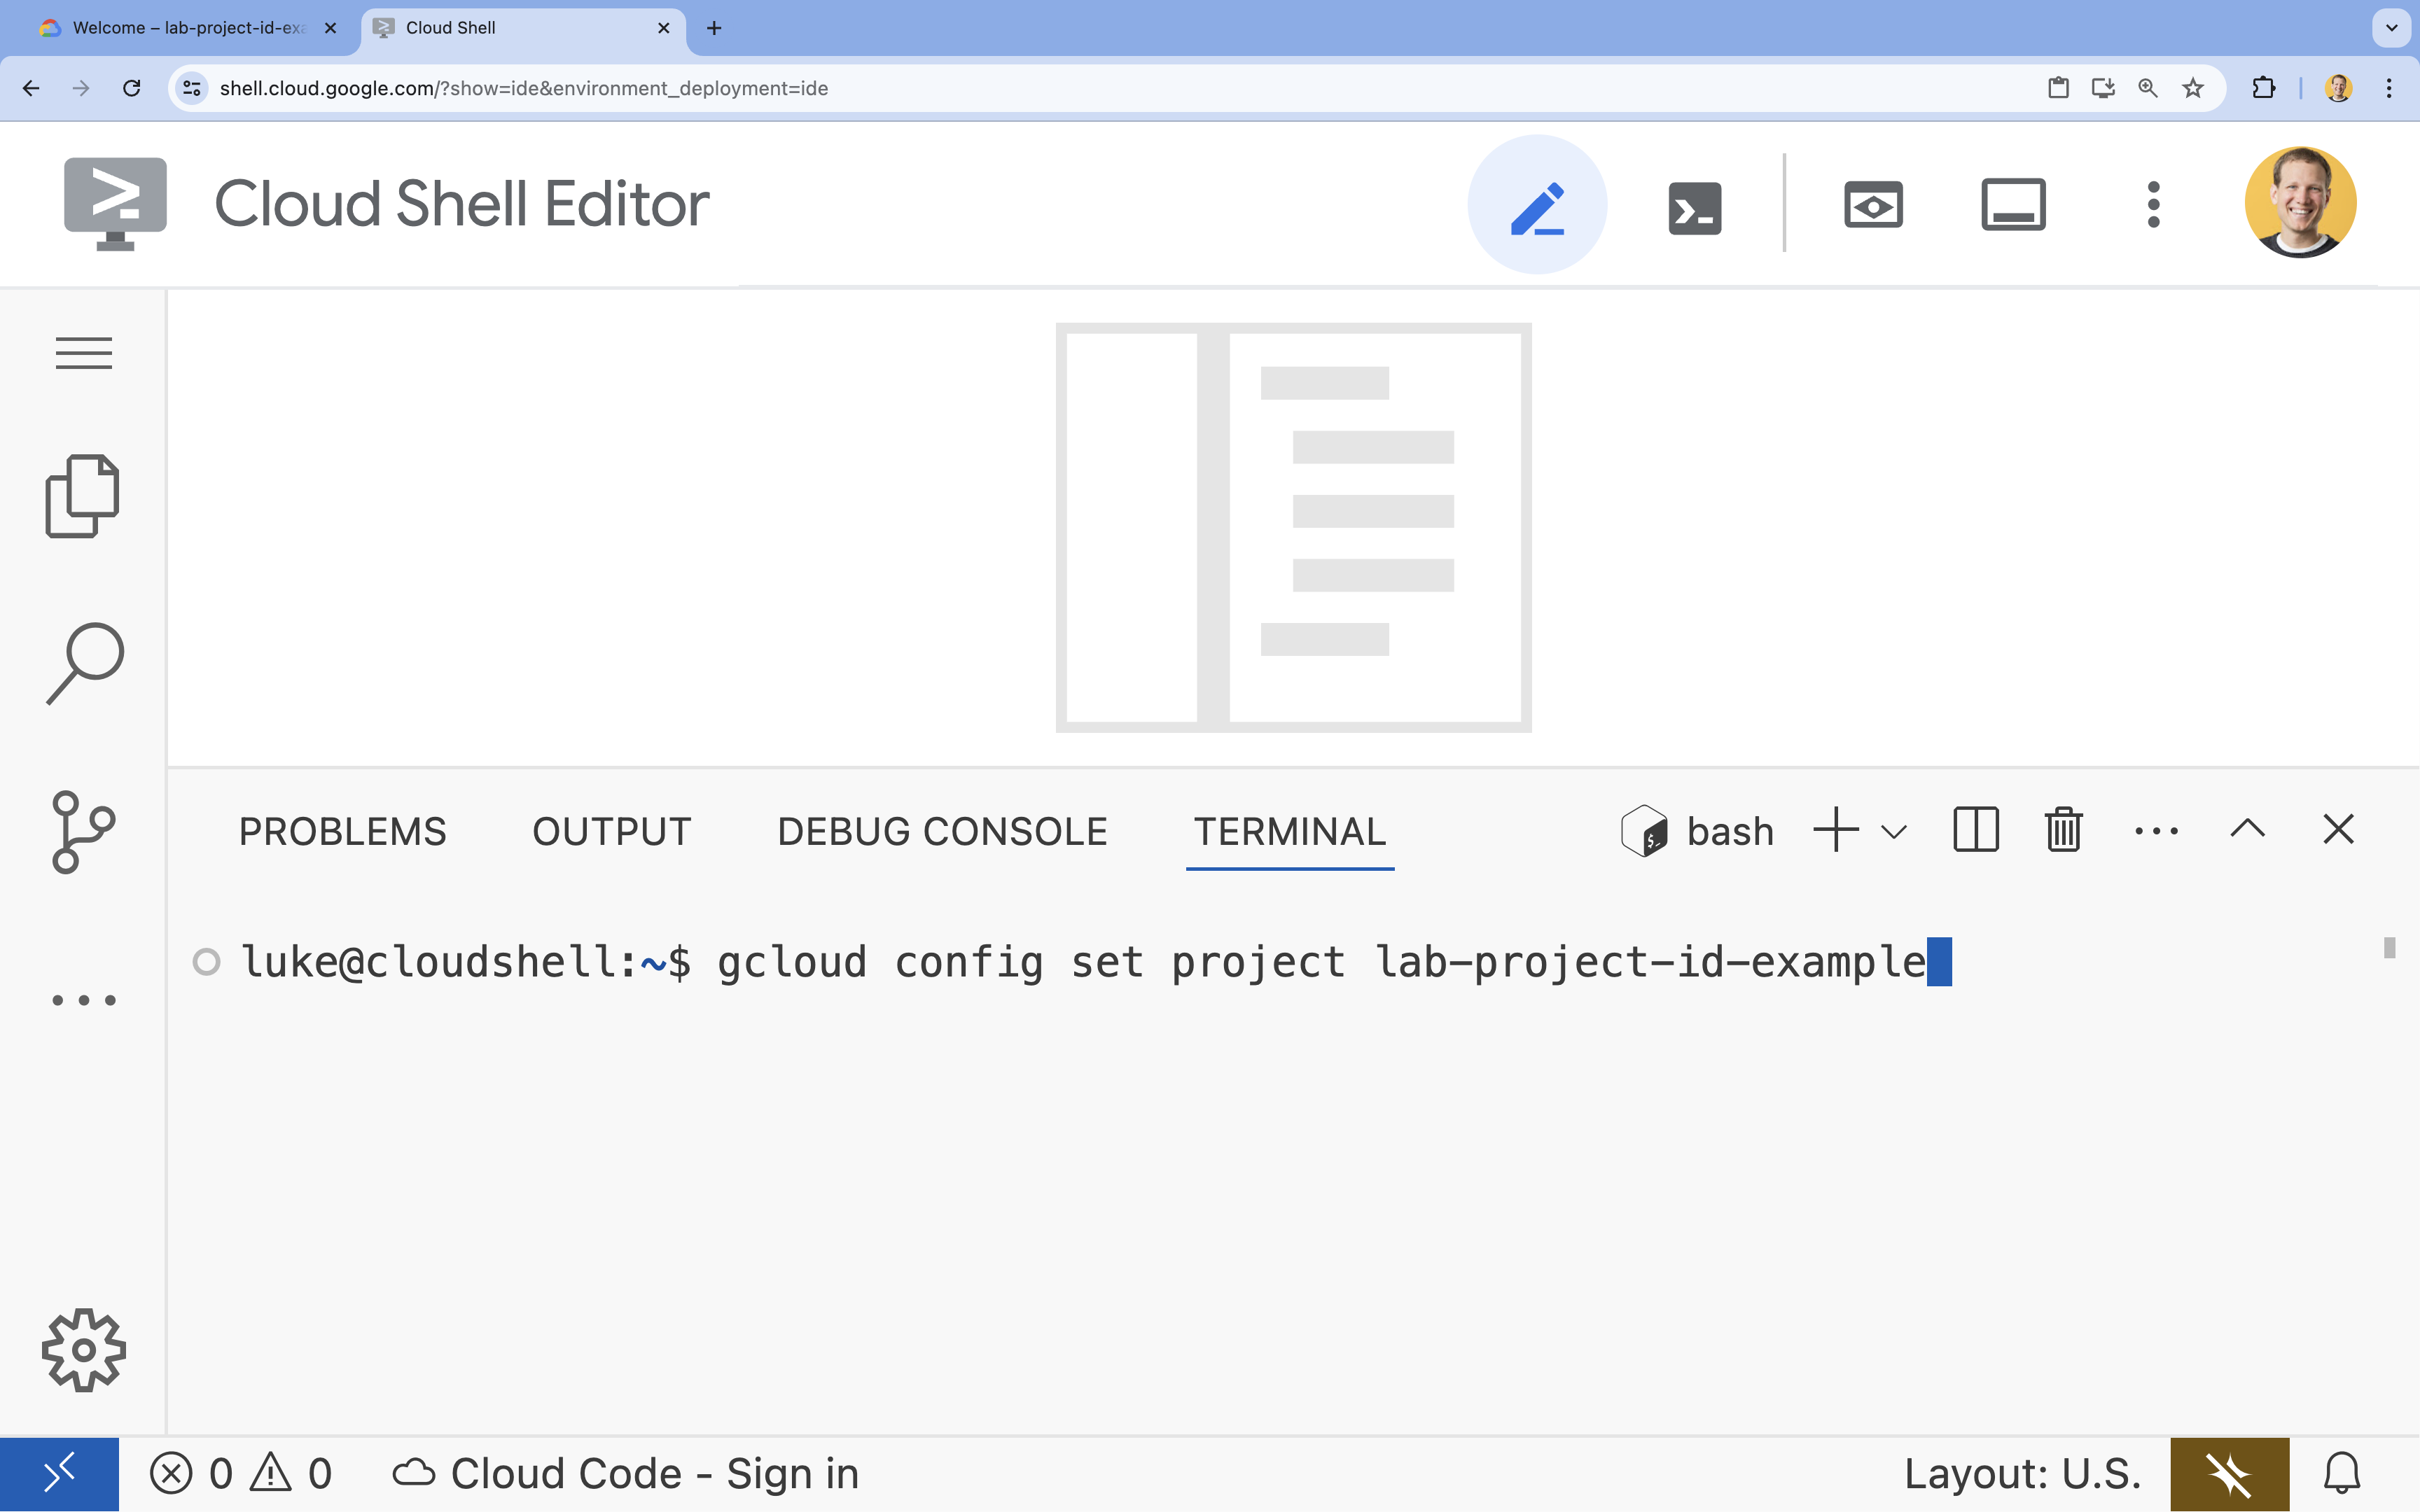
- Example:
- You should see this message:
Updated property [core/project].
5. Enable APIs
To use the Vertex AI API and interact with the Gemini model, you need to enable the Vertex AI API in your Google Cloud project.
- In the terminal, enable the API:
gcloud services enable aiplatform.googleapis.com
Introduction to the Vertex AI SDK for Python
To interact with models hosted on Vertex AI from your Python application, you'll use the Vertex AI SDK for Python. This SDK simplifies the process of sending prompts, specifying model parameters, and receiving responses without needing to handle the complexities of the underlying API calls directly.
You can find comprehensive documentation for the Vertex AI SDK for Python here: Introduction to the Vertex AI SDK for Python | Google Cloud.
6. Set up the project environment
Clone the repo
- In the terminal, clone the repository containing the starter files.
git clone --depth 1 https://github.com/GoogleCloudPlatform/devrel-demos.git devrel-demos-multiagent-lab--depth 1flag clones only the latest version, which is faster. - In the terminal, move the lab-specific folder to your home directory and rename it to match the lab's expected structure.
mv devrel-demos-multiagent-lab/ai-ml/build-multiagent-systems-with-adk/adk_multiagent_systems ~ - In the terminal, navigate to the correct working directory for this lab (
adk_multiagent_systems).cd ~/adk_multiagent_systems
Review your file structure
Now that all your files are created, open the adk_multiagent_systems folder in the explorer to see the full structure.
- In the Cloud Shell Editor menu, select File > Open Folder....
- In the box that pops up, add the following folder information after your username:
adk_multiagent_systems/. Click OK.
It should look something like this:
- The explorer panel on the left will refresh. You should now see your complete project structure, with the
parent_and_subagentsandworkflow_agentssub-directories, ready for the next steps.
Activate a virtual environment
- In the terminal, create and activate a virtual environment using
uv. This ensures your project dependencies don't conflict with the system Python or other projects.uv venv source .venv/bin/activate - In the terminal, install
google-adkand the other dependencies from therequirements.txtfile:uv pip install -r requirements.txt
Set up environment variables
- You are already in the
adk_multiagent_systemsdirectory. In the terminal, create a.envfile to store your environment variables:cloudshell edit .env - Paste the following into the
.envfile that opens in the editor:GOOGLE_GENAI_USE_VERTEXAI=TRUE GOOGLE_CLOUD_PROJECT="[YOUR-PROJECT-ID]" GOOGLE_CLOUD_LOCATION=global MODEL="gemini-2.5-flash" - Replace
[YOUR-PROJECT-ID]with your actual Google Cloud Project ID. (e.g.PROJECT_ID = "google-cloud-labs")
If you can't remember your project ID, run the following command in your terminal. It will show you a list of all your projects and their IDs.gcloud projects list - In the terminal, copy this
.envfile into the sub-agent directories so they can also access the variables:cp .env parent_and_subagents/.env cp .env workflow_agents/.env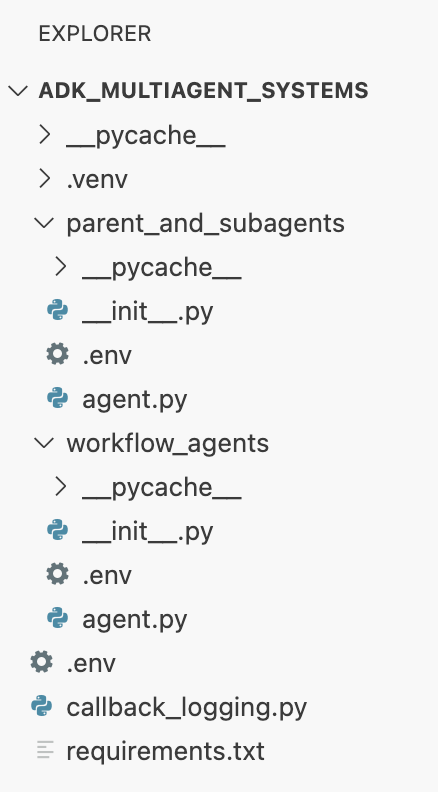
7. Explore transfers between parent, sub-agent, and peer agents
The conversation always starts with the root_agent. By default, a parent agent uses its sub-agents' description to decide when to transfer the conversation. You can also guide these transfers explicitly in the parent's instruction by using the sub-agents' name.
Let's test this.
- In the Cloud Shell Editor, open
adk_multiagent_systems/parent_and_subagents/agent.py. Notice the three agents in theagent.pyfile:root_agent(namedsteering): Asks the user a question to decide which sub-agent to transfer to. Initially, it relies only on its sub-agents'description.travel_brainstormer: Helps the user brainstorm destinations.attractions_planner: Helps the user list things to do in a specific country.
- Make
travel_brainstormerandattractions_plannersub-agents of theroot_agentby adding the following line to the creation of theroot_agent:sub_agents=[travel_brainstormer, attractions_planner] - In the terminal, chat with your agent:
cd ~/adk_multiagent_systems adk run parent_and_subagents - At the
[user]:prompt in the terminal, type:hello[steering]: Hi there! Do you already have a country in mind for your trip, or would you like some help deciding where to go?
- Now, tell the agent in the terminal:
I could use some help deciding.[travel_brainstormer]: Okay! To give you the best recommendations, I need to understand what you're looking for in a trip. ...
[travel_brainstormer]tag. Theroot_agenttransferred control based only on the sub-agent'sdescription. - At the
user:prompt in the terminal, typeexitand press ENTER to end the conversation. - Now let's be more explicit. In
agent.py, add the following to theroot_agent'sinstruction:If they need help deciding, send them to 'travel_brainstormer'. If they know what country they'd like to visit, send them to the 'attractions_planner'. - In the terminal, run the agent again:
adk run parent_and_subagents - At the
[user]:prompt in the terminal, type:hello - Reply with:
I would like to go to Japan.[attractions_planner]: Okay, I can help you with that! Here are some popular attractions in Japan: ...
attractions_planner, as guided by your new instructions. - Now reply with:
Actually I don't know what country to visit.[travel_brainstormer]: Okay! I can help you brainstorm some countries for travel...
travel_brainstormer, a peer ofattractions_planner. This is allowed by default. - At the user prompt, type
exitto end the session.
Recap
In this section, you learned the fundamentals of agent hierarchy and conversation flow:
- The conversation always starts with the
root_agent. - A parent agent can automatically transfer to a sub-agent based on its
description. - You can explicitly control this flow by giving the parent
instructionto transfer to a sub-agent by itsname. - By default, agents can transfer to their
peeragents (siblings in the hierarchy).
8. Use session state to store and retrieve information
Every ADK conversation has a Session, which includes a session state dictionary. This state is accessible to all agents, making it the perfect way to pass information between them or maintain data (like a list) throughout the conversation.
To explore adding to and reading from state:
- Return to the file
adk_multiagent_systems/parent_and_subagents/agent.py - Paste the following function definition after the
# Toolsheader:def save_attractions_to_state( tool_context: ToolContext, attractions: List[str] ) -> dict[str, str]: """Saves the list of attractions to state["attractions"]. Args: attractions [str]: a list of strings to add to the list of attractions Returns: None """ # Load existing attractions from state. If none exist, start an empty list existing_attractions = tool_context.state.get("attractions", []) # Update the 'attractions' key with a combo of old and new lists. # When the tool is run, ADK will create an event and make # corresponding updates in the session's state. tool_context.state["attractions"] = existing_attractions + attractions # A best practice for tools is to return a status message in a return dict return {"status": "success"}- The function receives
tool_context: ToolContext. This object is your gateway to the session. - The line
tool_context.state["attractions"] = ...directly reads from and writes to the session's state dictionary. The ADK handles the rest.
- The function receives
- Add the tool to the
attractions_planneragent by adding thetoolsparameter:tools=[save_attractions_to_state] - Add the following bullet points to the
attractions_planneragent's existinginstruction:- When they reply, use your tool to save their selected attraction and then provide more possible attractions. - If they ask to view the list, provide a bulleted list of { attractions? } and then suggest some more. - Launch the Agent Development Kit Web UI with the following command in the terminal:
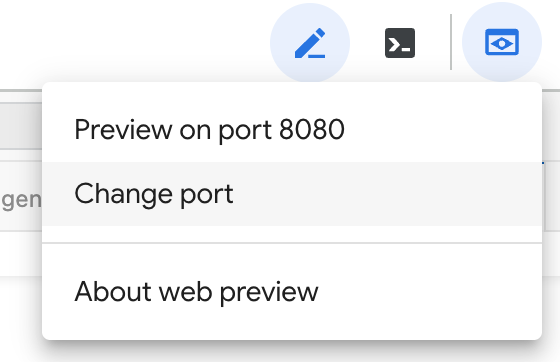
adk webINFO: Started server process [2434] INFO: Waiting for application startup. +-------------------------------------------------------+ | ADK Web Server started | | | | For local testing, access at http://localhost:8000. | +-------------------------------------------------------+ INFO: Application startup complete. INFO: Uvicorn running on http://127.0.0.1:8000 (Press CTRL+C to quit) - In the Cloud Shell terminal, click the To view the web interface in a new tab, click the Web Preview button and select Change Port.
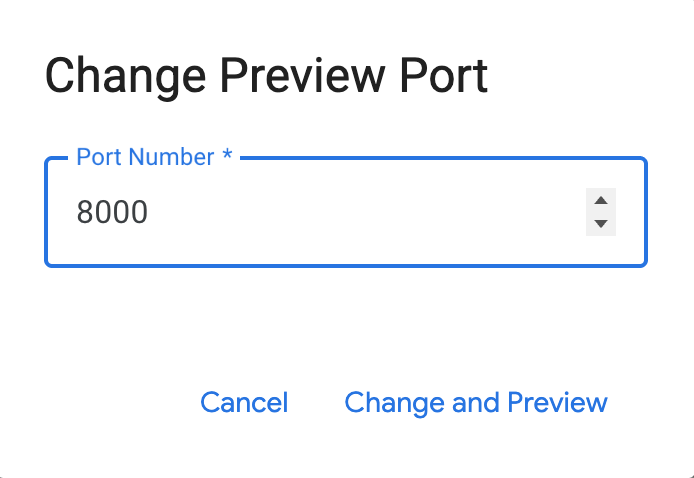
- Input port number 8000 and click Change and Preview. A new browser tab will open with the ADK Dev UI.
- From the Select an agent dropdown on the left, choose
parent_and_subagents. - Start the conversation with:
hello - After the agent greets you, reply with:
I'd like to go to Egypt.attractions_plannerand provided a list of attractions. - Choose an attraction, for example:
I'll go to the Sphinx - You should get a response like: Okay, I've saved The Sphinx to your list...
- Click the response tool box (marked with a check mark) to view the event created from the tool's response.
Notice that it includes an actions field which includesstateDeltadescribing the changes to the state. - Reply with another attraction from the agent's list.
- On the left-hand navigation menu, click the "X" to exit the focus on the event you inspected earlier.
- In the left-hand sidebar, click the State tab. You can now see the
attractionsarray in the session's state, which should contain both of your selected items.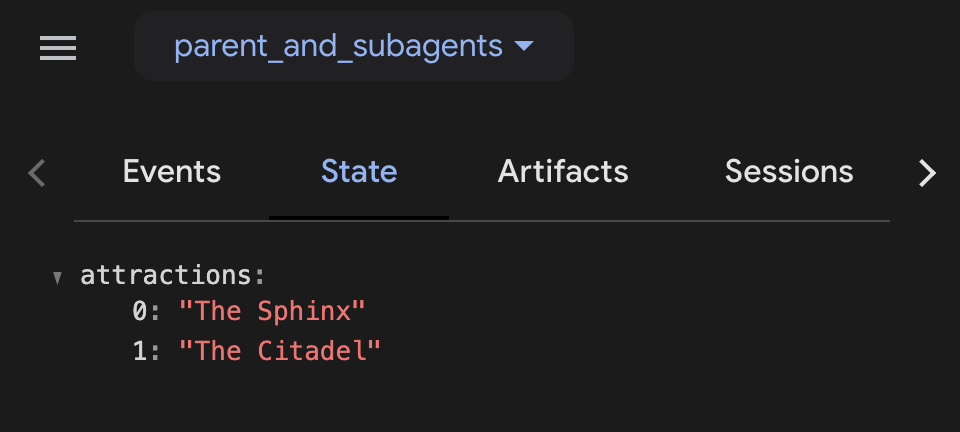
- Send this message to the agent:
What is on my list? - When you are finished experimenting with the agent, close the web browser tab and press CTRL + C in the Cloud Shell Terminal to stop the server.
Section Recap
In this section, you learned how to use the Session state to share data:
- To write state: You write to the state dictionary from within a tool, using the
tool_context.stateobject (e.g.,tool_context.state["my_list"] = [...]). - To read state: You inject state data directly into an agent's
instructionusing key templating (e.g.,Here is your list: {my_list?}). - To inspect state: You can monitor the session state live in the ADK Dev UI using the State tab.
9. Workflow Agents
So far, you've seen how a parent agent transfers to a sub-agent and then waits for the user. Workflow agents are different: they execute their sub-agents one after another in an automated flow, without waiting for user input.
This is perfect for automated, multi-step tasks like a "Plan and Execute" or "Draft and Revise" pipeline. ADK provides three built-in workflow agents to manage this:
SequentialAgentLoopAgentParallelAgent
The rest of this lab will focus on building a multi-agent system using these three workflow agents.
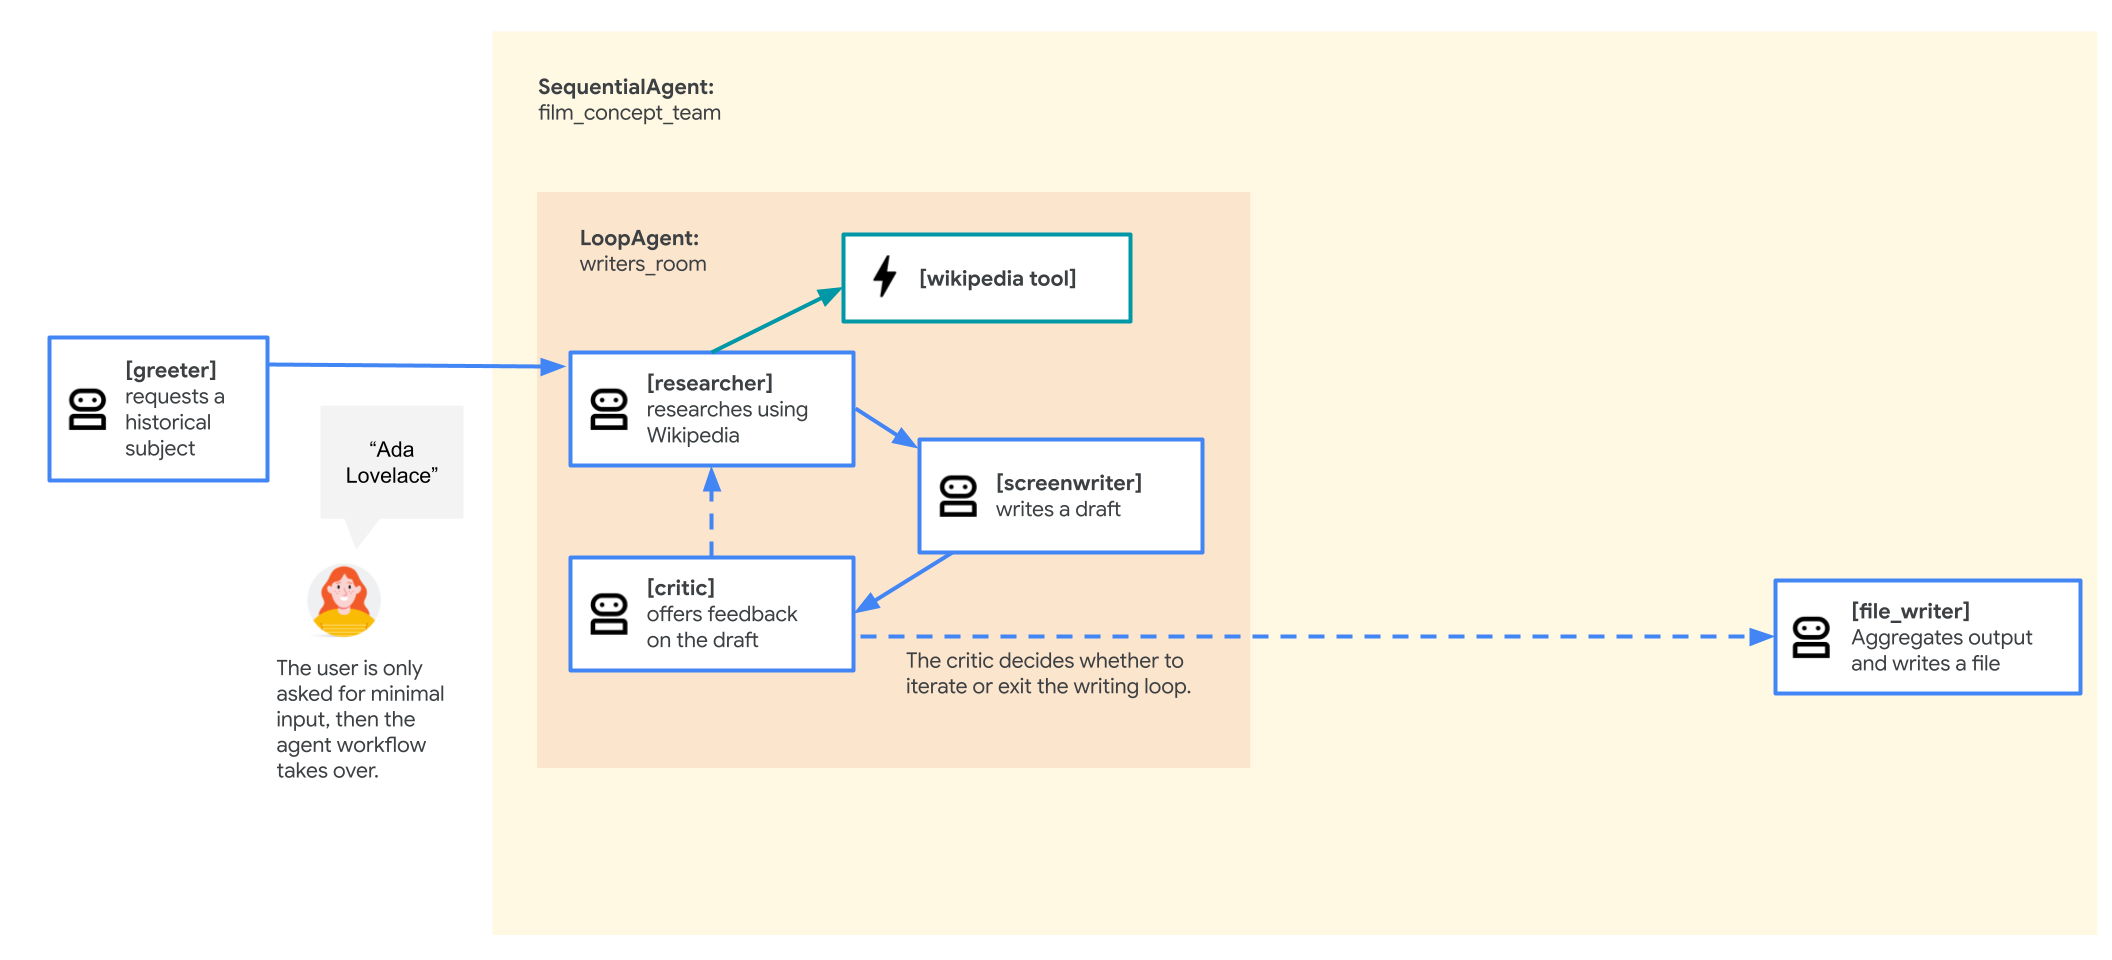
You will build an agent that develops a pitch document for a new movie about a historical character. Your agents will handle research, iterative writing, and report generation.
In the end, your system will look like this:
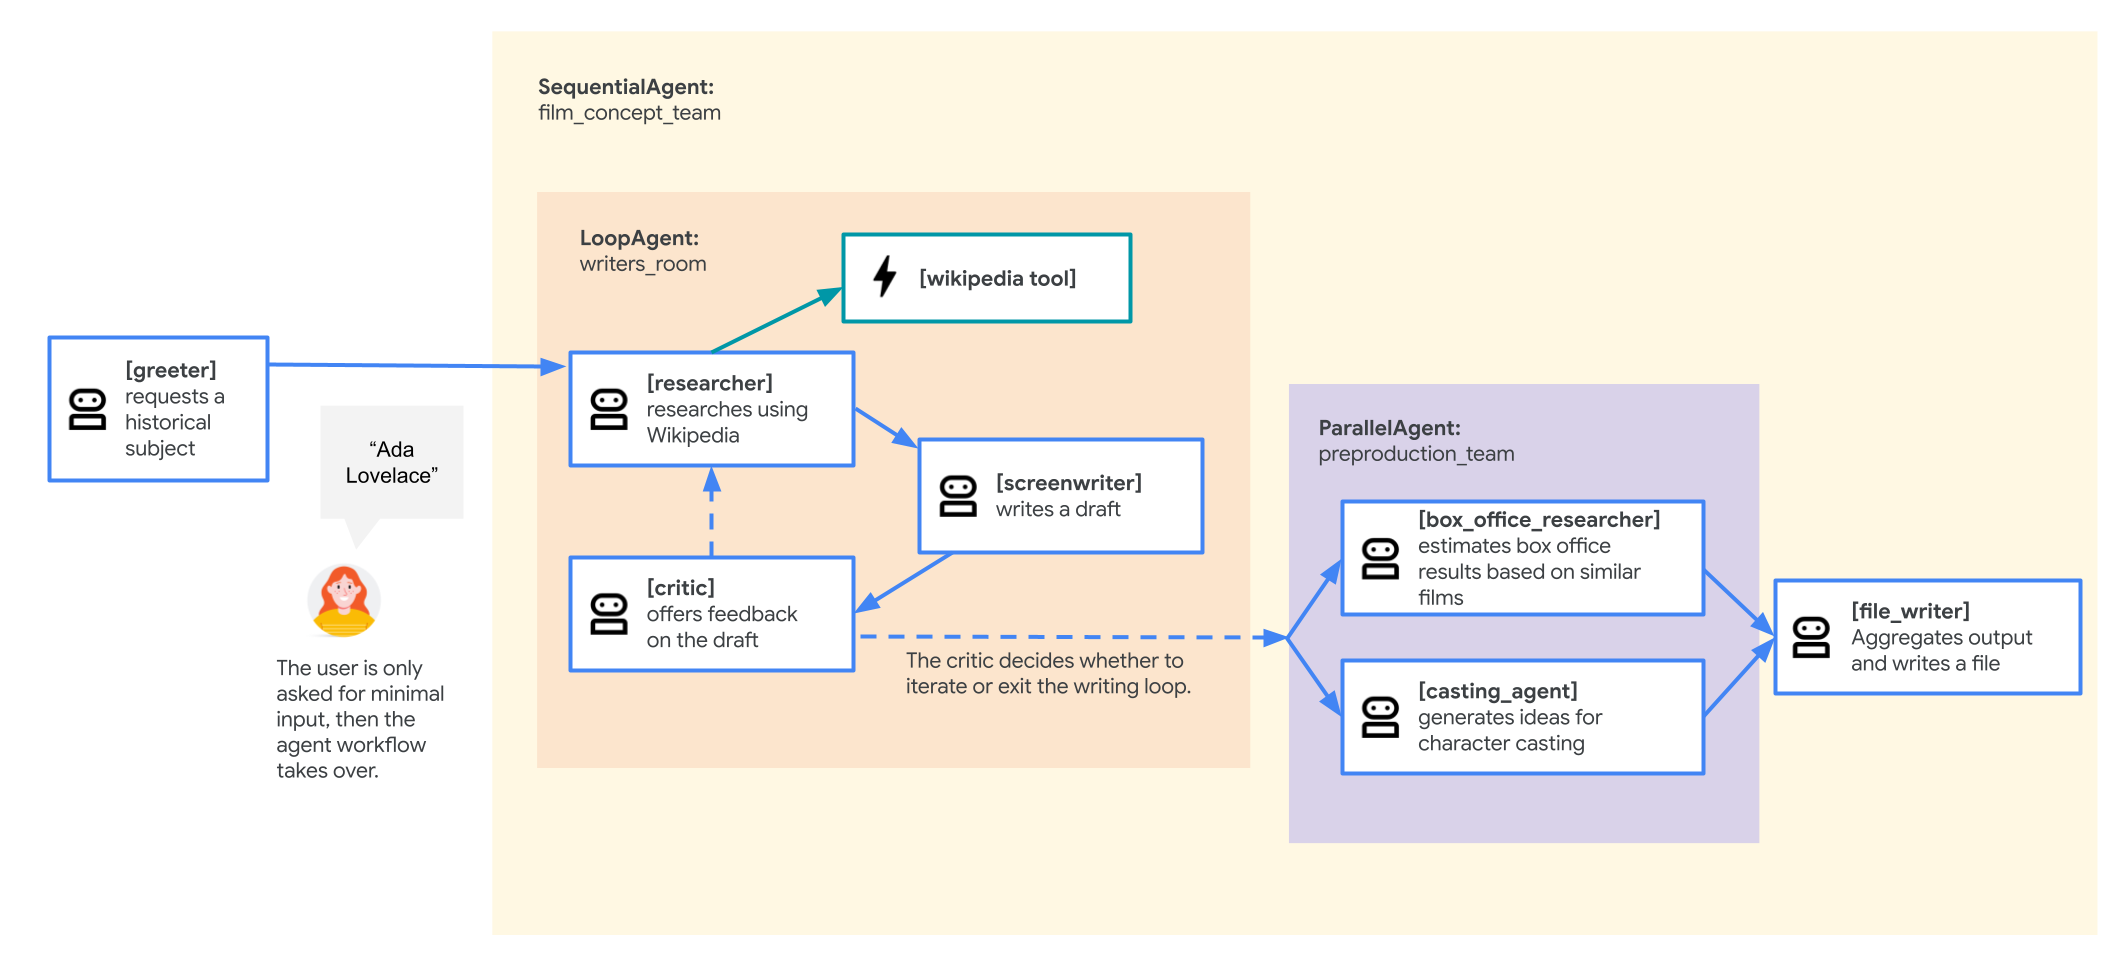
You will build this system one step at a time, starting with the simplest workflow.
10. Build a multi-agent system with a SequentialAgent
A SequentialAgent is a workflow agent that executes its sub-agents in a simple, linear sequence. Each agent in its sub_agents list is run one after the other, in order. This is perfect for pipelines where tasks must be performed in a specific order, like the movie-pitching agent you'll build now.
This first version will be structured like this:
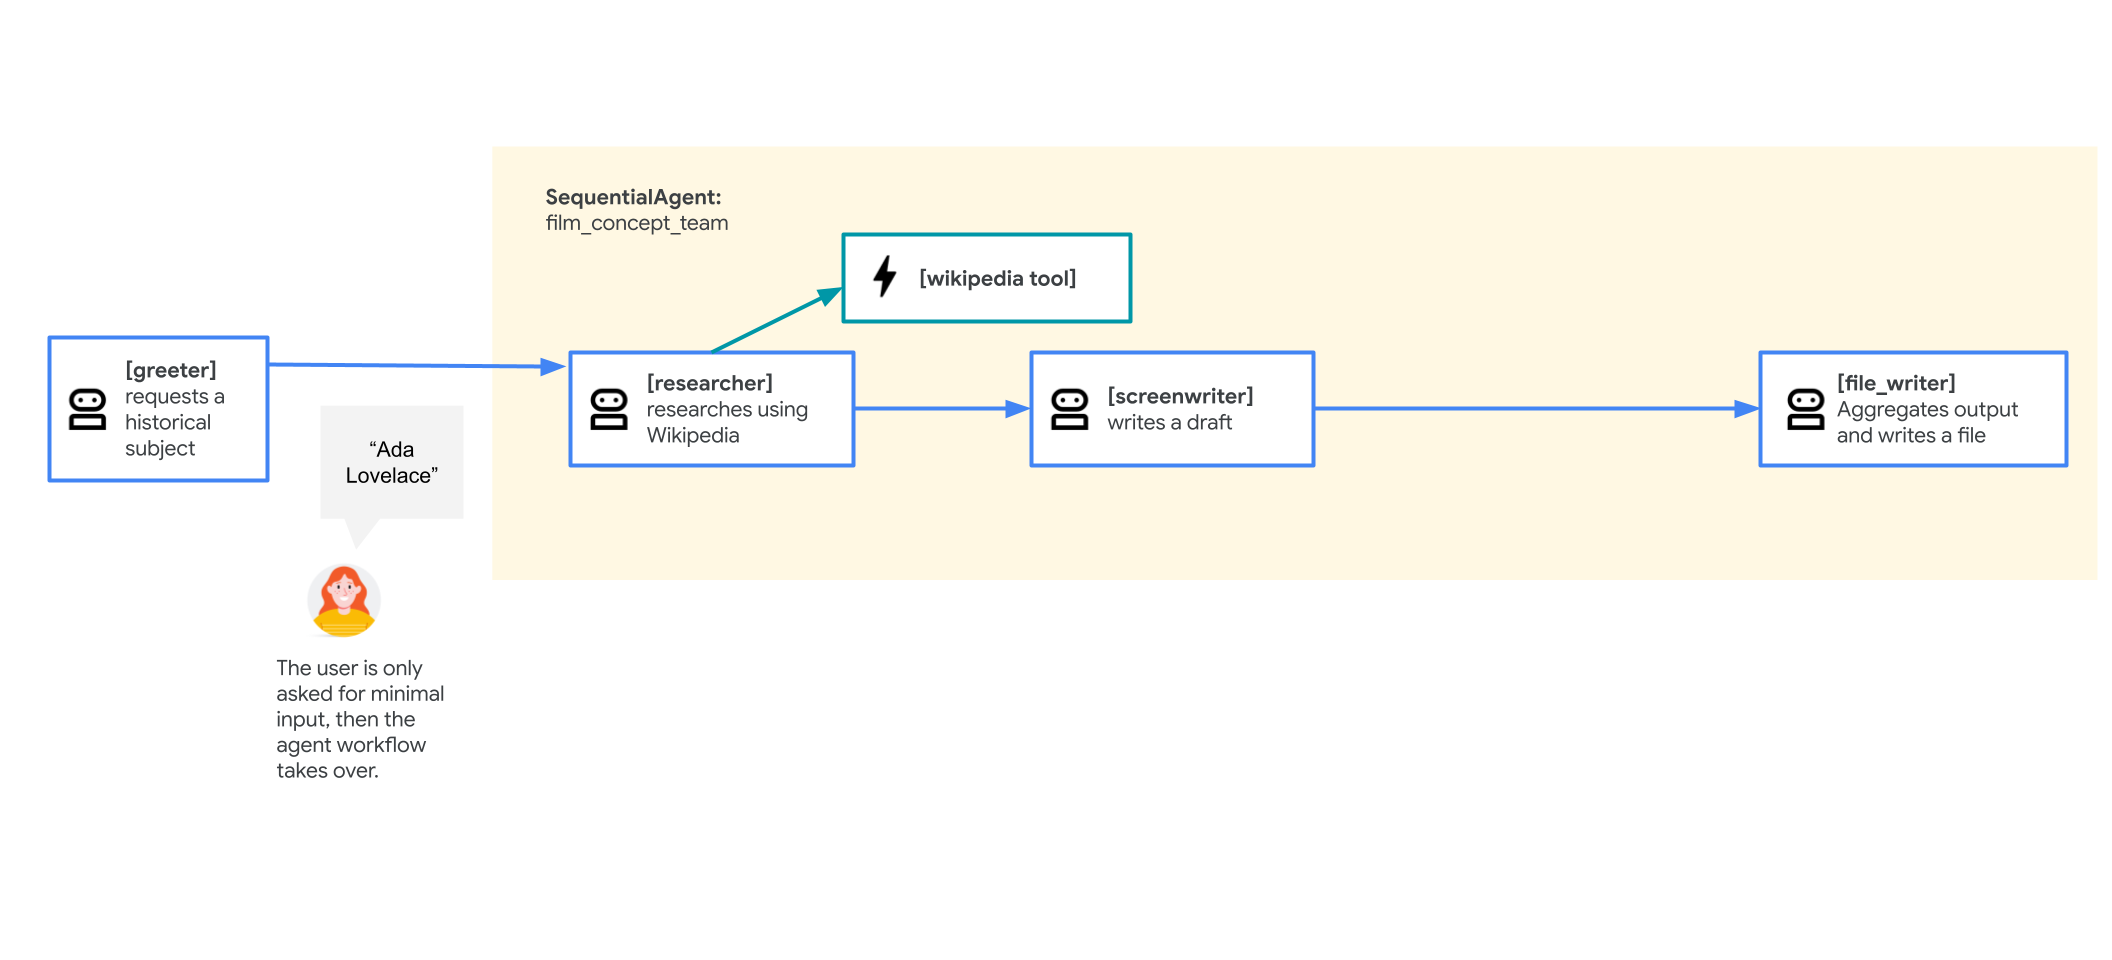
- A
root_agent(greeter) will welcome the user and get the movie subject. - It will then transfer to a
SequentialAgentnamedfilm_concept_team, which will:- Run a
researcheragent to get facts from Wikipedia. - Run a
screenwriteragent to use those facts to write a plot. - Run a
file_writeragent to save the final plot to a file.
- Run a
Let's run it.
- In the Cloud Shell Editor, open
adk_multiagent_systems/workflow_agents/agent.py.
Read through this agent definition file. Because sub-agents must be defined before they can be assigned to a parent, to read the file in the order of the conversational flow, you can read the agents from the bottom of the file to the top. - Notice the
append_to_statetool. This helper function lets agents append data to a list in the session state, which is how theresearcherandscreenwriterwill pass their work. - Try out the agent. In the terminal, launch the web interface with live-reloading enabled:
cd ~/adk_multiagent_systems adk web --reload_agents - In the Cloud Shell terminal, click the To view the web interface in a new tab, click the Web Preview button and select Change Port.
- Input port number 8000 and click Change and Preview. A new browser tab will open with the ADK Dev UI.
- From the Select an agent dropdown, select
workflow_agents. - Start the conversation with:
hello. Thegreeteragent will respond. - When prompted, enter a historical figure. You can use one of these or your own:
- Zhang Zhongjing
- Ada Lovelace
- Marcus Aurelius
- The
SequentialAgentwill now take over. You will not see any intermediate messages. Theresearcher,screenwriter, andfile_writerwill run one after another. The agent will only respond when the entire sequence is complete.
If it fails, you can click + New Session in the upper right and try again. - Once the agent confirms the file is written, find and open the new
.txtfile in themovie_pitchesdirectory in your Cloud Shell Editor to see the output. - In the ADK Dev UI, click on the last agent icon in the chat history to open the event view.
- The event view shows a visual graph of the agent tree. You can see how the
greetercalled thefilm_concept_team, which then called each of its sub-agents in order.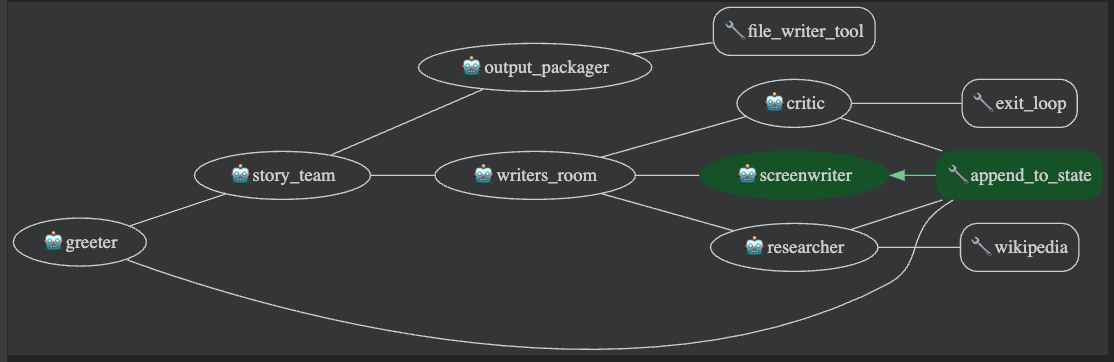
- You can click the Request and Response tabs for any agent in the graph to inspect the exact data that was passed, including the session state.
Section Recap
In this section, you learned how to use a workflow agent:
- A
SequentialAgentexecutes its sub-agents one by one, in order, without waiting for user input between steps. - This is a "workflow" because the user talks to the
root_agent, which then hands off the work to theSequentialAgentto complete. - Sub-agents in the sequence use the session state (e.g.,
{ PLOT_OUTLINE? }) to access the work of previous agents. - You can use the event graph in the Dev UI to visualize and debug the entire agent-to-agent workflow.
11. Add a LoopAgent for iterative work
The LoopAgent is a workflow agent that runs its sub-agents in a sequence and then repeats, starting from the beginning. This "loop" continues until a condition is met, like reaching a max_iterations count or a sub-agent calling the built-in exit_loop tool.
It's useful for tasks that require iterative refinement. You will add this LoopAgent to create a "writer's room" for your movie pitch agent. This allows a researcher, screenwriter, and a new critic agent to work in a loop, improving the plot with each pass until the critic decides it's ready. This also helps the agent handle vaguer user inputs (like "an ancient doctor") by letting it research and refine an idea.
To make these changes:
- In
adk_multiagent_systems/workflow_agents/agent.py, add the import forexit_loop(near the othergoogle.adkimports):from google.adk.tools import exit_loop - Add the new
criticagent. This agent will review the plot. If it's good, it callsexit_loop. If not, it adds feedback to the state for the next loop.
Paste the following agent definition under the# Agentssection:critic = Agent( name="critic", model=model_name, description="Reviews the outline so that it can be improved.", instruction=""" INSTRUCTIONS: Consider these questions about the PLOT_OUTLINE: - Does it meet a satisfying three-act cinematic structure? - Do the characters' struggles seem engaging? - Does it feel grounded in a real time period in history? - Does it sufficiently incorporate historical details from the RESEARCH? If the PLOT_OUTLINE does a good job with these questions, exit the writing loop with your 'exit_loop' tool. If significant improvements can be made, use the 'append_to_state' tool to add your feedback to the field 'CRITICAL_FEEDBACK'. Explain your decision and briefly summarize the feedback you have provided. PLOT_OUTLINE: { PLOT_OUTLINE? } RESEARCH: { research? } """, before_model_callback=log_query_to_model, after_model_callback=log_model_response, tools=[append_to_state, exit_loop] ) - Create the
writers_roomLoopAgent. This will contain the three agents that will work in the loop.
Paste the following code above thefilm_concept_teamagent definition:writers_room = LoopAgent( name="writers_room", description="Iterates through research and writing to improve a movie plot outline.", sub_agents=[ researcher, screenwriter, critic ], max_iterations=5, ) - Update the
film_concept_teamSequentialAgentto use the newwriters_roomloop. Replace theresearcherandscreenwriterwith the singlewriters_roomagent.Replace your existingfilm_concept_teamdefinition with this:film_concept_team = SequentialAgent( name="film_concept_team", description="Write a film plot outline and save it as a text file.", sub_agents=[ writers_room, file_writer ], ) - Return to the ADK Dev UI tab and click + New Session in the upper right.
- Begin a new conversation with:
hello - When prompted, give the agent a broader topic this time. Some ideas:
- an industrial designer who made products for the masses
- a cartographer (a map maker)
- that guy who made crops yield more food
- When the loop completes, the agent will write the file. Review the generated file in the
adk_multiagent_systems/movie_pitchesdirectory. - Inspect the event graph in the Dev UI to see the loop structure.
Section Recap
In this section, you learned how to use the LoopAgent:
- A
LoopAgentis a workflow agent that repeats its sequence of sub-agents, creating an "inner loop" for iterative tasks. - Agents inside the loop use the session state to pass work (e.g.,
PLOT_OUTLINE) and feedback (e.g.,CRITICAL_FEEDBACK) to each other on subsequent passes. - The loop can be stopped by hitting a
max_iterationslimit or by an agent calling theexit_looptool.
12. Use a ParallelAgent for "fan out and gather"
The ParallelAgent is a workflow agent that executes all its sub-agents at the same time (concurrently). This is valuable for tasks that can be divided into independent sub-tasks, like running two different research jobs.
You will use a ParallelAgent to create a "preproduction team" that works in parallel. One agent will research box office potential while another agent simultaneously brainstorms casting ideas. This is often called a "fan out and gather" pattern: the ParallelAgent "fans out" the work, and a later agent (our file_writer) "gathers" the results.
Your final agent flow will be:
- The
greeter(root) starts the chat. - It transfers to the
film_concept_team(SequentialAgent), which runs:- The
writers_room(LoopAgent) to create the plot. - The new
preproduction_team(ParallelAgent) to research box office and casting at the same time. - The
file_writerto gather all the results and save the file.
- The
To make these changes:
- In
adk_multiagent_systems/workflow_agents/agent.py, paste the newParallelAgentand its sub-agents under the# Agentsheader.box_office_researcher = Agent( name="box_office_researcher", model=model_name, description="Considers the box office potential of this film", instruction=""" PLOT_OUTLINE: { PLOT_OUTLINE? } INSTRUCTIONS: Write a report on the box office potential of a movie like that described in PLOT_OUTLINE based on the reported box office performance of other recent films. """, output_key="box_office_report" ) casting_agent = Agent( name="casting_agent", model=model_name, description="Generates casting ideas for this film", instruction=""" PLOT_OUTLINE: { PLOT_OUTLINE? } INSTRUCTIONS: Generate ideas for casting for the characters described in PLOT_OUTLINE by suggesting actors who have received positive feedback from critics and/or fans when they have played similar roles. """, output_key="casting_report" ) preproduction_team = ParallelAgent( name="preproduction_team", sub_agents=[ box_office_researcher, casting_agent ] ) - Update the
film_concept_teamSequentialAgent'ssub_agentslist to include the newpreproduction_team(betweenwriters_roomandfile_writer).Replace your existingfilm_concept_teamdefinition with this:film_concept_team = SequentialAgent( name="film_concept_team", description="Write a film plot outline and save it as a text file.", sub_agents=[ writers_room, preproduction_team, file_writer ], ) - Update the
file_writeragent'sinstructionso it "gathers" the new reports from the state and adds them to the file.
Replace theinstructionstring for thefile_writerwith this:instruction=""" INSTRUCTIONS: - Create a marketable, contemporary movie title suggestion for the movie described in the PLOT_OUTLINE. If a title has been suggested in PLOT_OUTLINE, you can use it, or replace it with a better one. - Use your 'write_file' tool to create a new txt file with the following arguments: - for a filename, use the movie title - Write to the 'movie_pitches' directory. - For the 'content' to write, include: - The PLOT_OUTLINE - The BOX_OFFICE_REPORT - The CASTING_REPORT PLOT_OUTLINE: { PLOT_OUTLINE? } BOX_OFFICE_REPORT: { box_office_report? } CASTING_REPORT: { casting_report? } """, - Return to the ADK Dev UI tab and click + New Session.
- Enter
helloto start the conversation. - When prompted, enter a new character idea. Some ideas:
- that actress who invented the technology for wifi
- an exciting chef
- key players in the worlds fair exhibitions
- When the agent completes its work, inspect the final file in the
adk_multiagent_systems/movie_pitchesdirectory. It should now contain the plot, the box office report, and the casting report all in one document.
Section Recap
In this section, you learned how to use the ParallelAgent:
- A
ParallelAgent"fans out" work, running all its sub-agents at the same time, rather than in a sequence. - This is highly efficient for tasks that don't depend on each other (like researching two different topics).
- The results of parallel agents are "gathered" by a later agent. This is done by having the parallel agents save their work to the session state (using
output_key), and having a final agent (likefile_writer) read those keys.
13. Custom workflow agents
When the pre-defined workflow agents of SequentialAgent, LoopAgent, and ParallelAgent are insufficient for your needs, CustomAgent provides the flexibility to implement new workflow logic.
You can define patterns for flow control, conditional execution, or state management between sub-agents. This is useful for complex workflows, stateful orchestrations, or integrating custom business logic into the framework's orchestration layer.
Creation of a CustomAgent is out of the scope of this lab, but it is good to know that it exists if you need it!
14. Congratulations!
You have successfully built a sophisticated multi-agent system using the Google Agent Development Kit (ADK). You've progressed from a simple parent-child agent relationship to orchestrating complex, automated workflows that can research, write, and refine a creative project.
Recap
In this lab, you did the following:
- Organized agents in a hierarchical tree with parent and sub-agent relationships.
- Controlled agent-to-agent transfers, both automatically (using
description) and explicitly (usinginstruction). - Used a tool to write data to the
tool_context.statedictionary. - Used key templating (e.g.,
{ PLOT_OUTLINE? }) to read from the session state and guide an agent's prompt. - Implemented a
SequentialAgentto create a simple, step-by-step workflow (research -> write -> save). - Used a
LoopAgentwith acriticagent and theexit_looptool to create an iterative refinement cycle. - Used a
ParallelAgentto "fan out" independent tasks (like casting and box office research) to run concurrently.
Continued experimentation
There are many ways to build on what you've learned. Here are some ideas:
- Add more agents: Try adding a new agent to your
preproduction_teamParallelAgent. For example, you could create amarketing_agentthat writes a tagline for the movie based on thePLOT_OUTLINE. - Add more tools: Give your
researcheragent more tools. You could create a tool that uses a Google Search API to find information that isn't on Wikipedia. - Explore
CustomAgent: The lab mentioned theCustomAgentfor workflows that don't fit the standard templates. Try building one that, for example, conditionally runs an agent only if a specific key exists in the session state.