
1. Introduction
Overview
In this lab, you build an automated data sanitization pipeline to protect sensitive information used in AI development. You use Google Cloud's Sensitive Data Protection (formerly Cloud DLP) to inspect, classify, and de-identify Personally Identifiable Information (PII) across a variety of data formats, including unstructured text, structured tables, and images.
Context
You are the security and privacy champion on your development team, and your goal is to establish a workflow that identifies sensitive information and de-identifies it before making it available to developers and models. Your team needs realistic, high-quality data to tune and test a new Generative AI application, but using raw customer data poses significant privacy challenges.
The following table lists the privacy risks you are most concerned with mitigating:
Risk | Mitigation |
Exposure of PII in unstructured text files (e.g., support chat logs, feedback forms). | Create a de-identification template that replaces sensitive values with their infoType, preserving context while removing the exposure. |
Loss of data utility in structured datasets (CSVs) when PII is removed. | Use record transformations to selectively redact identifiers (like names) and apply techniques like character masking to preserve other characters in the string, so developers can still test with the data. |
PII exposure from text embedded in images (e.g., scanned documents, user photos). | Create an image-specific de-identification template that redacts text found within images. |
Inconsistent or error-prone manual redaction across different data types. | Configure a single, automated Sensitive Data Protection job that consistently applies the correct de-identification template based on the file type it processes. |
What you'll learn
In this lab, you learn how to:
- Define an inspection template to detect specific sensitive information types (infoTypes).
- Build distinct de-identification rules for unstructured, structured, and image data.
- Configure and run a single job that automatically applies the correct redaction based on file type to the contents of an entire bucket.
- Verify the successful transformation of sensitive data in a secure output location.
2. Project setup
Google Account
If you don't already have a personal Google Account, you must create a Google Account.
Use a personal account instead of a work or school account.
Sign-in to the Google Cloud Console
Sign-in to the Google Cloud Console using a personal Google account.
Enable Billing
Redeem Google Cloud credits (optional)
To run this workshop, you need a billing account with some credit. Use the credits from the banner at the top of this codelab to get started. If you are already connected to a billing account, you can skip this step.
Set up a personal billing account
If you set up billing using Google Cloud credits, you can skip this step.
To set up a personal billing account, go here to enable billing in the Cloud Console.
Some Notes:
- Completing this lab should cost less than $1 USD in Cloud resources.
- You can follow the steps at the end of this lab to delete resources to avoid further charges.
- New users are eligible for the $300 USD Free Trial.
Create a project (optional)
If you do not have a current project you'd like to use for this lab, create a new project here.
3. Enable the APIs
Configure Cloud Shell
Once your project is created successfully, do the following steps to set up Cloud Shell.
Launch Cloud Shell
Navigate to shell.cloud.google.com and if you see a popup asking you to authorize, click on Authorize.
Set Project ID
Execute the following command in the Cloud Shell terminal to set the correct Project ID. Replace <your-project-id> with your actual Project ID copied from the project creation step above.
gcloud config set project <your-project-id>
You should now see that the correct project is selected within the Cloud Shell terminal.
Enable Sensitive Data Protection
To use the Sensitive Data Protection service and Cloud Storage, you need to ensure these APIs are enabled in your Google Cloud project.
- In the terminal, enable the APIs:
gcloud services enable dlp.googleapis.com storage.googleapis.com
Alternatively, you can enable these APIs by navigating to Security > Sensitive Data Protection and Cloud Storage in the console and clicking the Enable button if prompted for each service.
4. Create buckets with sensitive data
Create an input and output bucket
In this step, you create two buckets: one to hold sensitive data that needs to be inspected, and another where Sensitive Data Protection will store the de-identified output files. You also download sample data files and upload them to your input bucket.
- In the terminal, run the following commands to create one bucket for input data and one for output, then populate the input bucket with sample data from
gs://dlp-codelab-data:PROJECT_ID=$(gcloud config get-value project) gsutil mb gs://input-$PROJECT_ID gsutil mb gs://output-$PROJECT_ID
Add sensitive data to the input bucket
In this step, you download sample data files containing test PII from GitHub and upload them to your input bucket.
- In Cloud Shell, run the following command to clone the
devrel-demosrepository, which contains sample data required for this lab.REPO_URL="https://github.com/GoogleCloudPlatform/devrel-demos.git" TARGET_PATH="security/sample-data" OUTPUT_FOLDER="sample-data" git clone --quiet --depth 1 --filter=blob:none --sparse "$REPO_URL" temp_loader cd temp_loader git sparse-checkout set "$TARGET_PATH" cd .. mv "temp_loader/$TARGET_PATH" "$OUTPUT_FOLDER" rm -rf temp_loader - Next, copy the sample data to the input bucket you created earlier:
gsutil -m cp -r sample-data/* gs://input-$PROJECT_ID/ - Navigate to Cloud Storage > Buckets and click the input bucket to see the data you imported.
5. Create an inspect template
In this task, you create a template that tells Sensitive Data Protection what to look for. This allows you to focus the inspection on infoTypes that are relevant to your data and geography, improving performance and accuracy.
Create an inspect template
In this step, you define the rules for what constitutes sensitive data that needs to be inspected. This template will be reused by your de-identification jobs to ensure consistency.
- From the navigation menu, go to Sensitive Data Protection > Configuration > Templates.
- Click Create Template.
- For Template type, select Inspect (find sensitive data).
- Set the Template ID to
pii-finder. - Continue on to Configure detection.
- Click Manage infoTypes.
- Using the filter, search for the following infoTypes and check the checkbox next to each one:
CREDIT_CARD_EXPIRATION_DATECREDIT_CARD_NUMBERDATE_OF_BIRTHDRIVERS_LICENSE_NUMBEREMAIL_ADDRESSGCP_API_KEYGCP_CREDENTIALSORGANIZATION_NAMEPASSWORDPERSON_NAMEPHONE_NUMBERUS_SOCIAL_SECURITY_NUMBER
- Select any others you are interested in as well, and click Done.
- Check the resulting table to make sure all of these infoTypes were added.
- Click Create.
6. Create de-identification templates
Next, you create three separate de-identification templates to handle different data formats. This gives you granular control over the transformation process, applying the most appropriate method for each file type. These templates work in conjunction with the inspect template you just created.
Create a template for unstructured data
This template will define how sensitive data found in free-form text, like chat logs or feedback forms, is de-identified. The chosen method replaces the sensitive value with its infoType name, preserving context.
- On the Templates page, click Create Template.
- Define the de-identification template:
Property
Value (type or select)
Template type
De-identify (remove sensitive data)
Data transformation type
InfoType
Template ID
de-identify-unstructured - Continue on to Configure de-identification.
- Under Transformation method, select the Transformation: Replace with infoType name.
- Click Create.
- Click Test.
- Test a message containing PII to see how it will be transformed:
Hi, my name is Alex and my SSN is 555-11-5555. You can reach me at +1-555-555-5555.
Create a template for structured data
This template specifically targets sensitive information within structured datasets, such as CSV files. You will configure it to mask data in a way that preserves data utility for testing while still de-identifying sensitive fields.
- Navigate back to the Templates page, and click Create Template.
- Define the de-identification template:
Property
Value (type or select)
Template type
De-identify (remove sensitive data)
Data transformation type
Record
Template ID
de-identify-structured - Continue on to Configure de-identification.Since this template applies to structured data, we can often predict the fields or columns that will contain certain types of sensitive data. You know that the CSV your application uses has user emails under
user_idand thatmessageoften contains PII from customer interactions. You are not concerned with maskingagent_idsince those are employees and the conversations should be attributable. Fill out this section as follows:- Field(s) or column(s) to transform:
user_id,message. - Transformation type: Match on infoType
- Transformation method: click Add Transformation
- Transformation: Mask with character.
- Characters to ignore: US Punctuation.
- Field(s) or column(s) to transform:
- Click Create.
Create a template for image data
This template is designed to de-identify sensitive text found embedded within images, such as scanned documents or user-submitted photos. It leverages optical character recognition (OCR) to detect and redact the PII.
- Navigate back to the Templates page, and click Create Template.
- Define the de-identification template:
Property
Value (type or select)
Template type
De-identify (remove sensitive data)
Data transformation type
Image
Template ID
de-identify-image - Continue on to Configure de-identification.
- InfoTypes to transform: Any detected infoTypes defined in an inspection template or inspect config that are not specified in other rules.
- Click Create.
7. Create and run a de-identification job
With your templates defined, you now create a single job that applies the correct de-identification template based on the file type it detects and inspects. This automates the sensitive data protection process for data stored in Cloud Storage.
Configure input data
In this step, you specify the source of the data that needs de-identification, which is a Cloud Storage bucket containing various file types with sensitive information.
- Navigate to Security > Sensitive Data Protection via the search bar.
- Click Inspection in the menu.
- Click Create job and job triggers.
- Configure the job:
Property
Value (type or select)
Job ID
pii-removerStorage type
Google Cloud Storage
Location type
Scan a bucket with optional include/exclude rules
Bucket name
input-[your-project-id]
Configure detection and actions
Now you link your previously created templates to this job, telling Sensitive Data Protection how to inspect for PII and which de-identification method to apply based on the content type.
- Inspection template:
projects/[your-project-id]/locations/global/inspectTemplates/pii-finder - Under Add actions, select Make a de-identified copy and configure the transformation templates to be the ones you created.
- A pop-up opens for you to
Confirm whether you want to de-identify the findings, click DISABLE SAMPLING.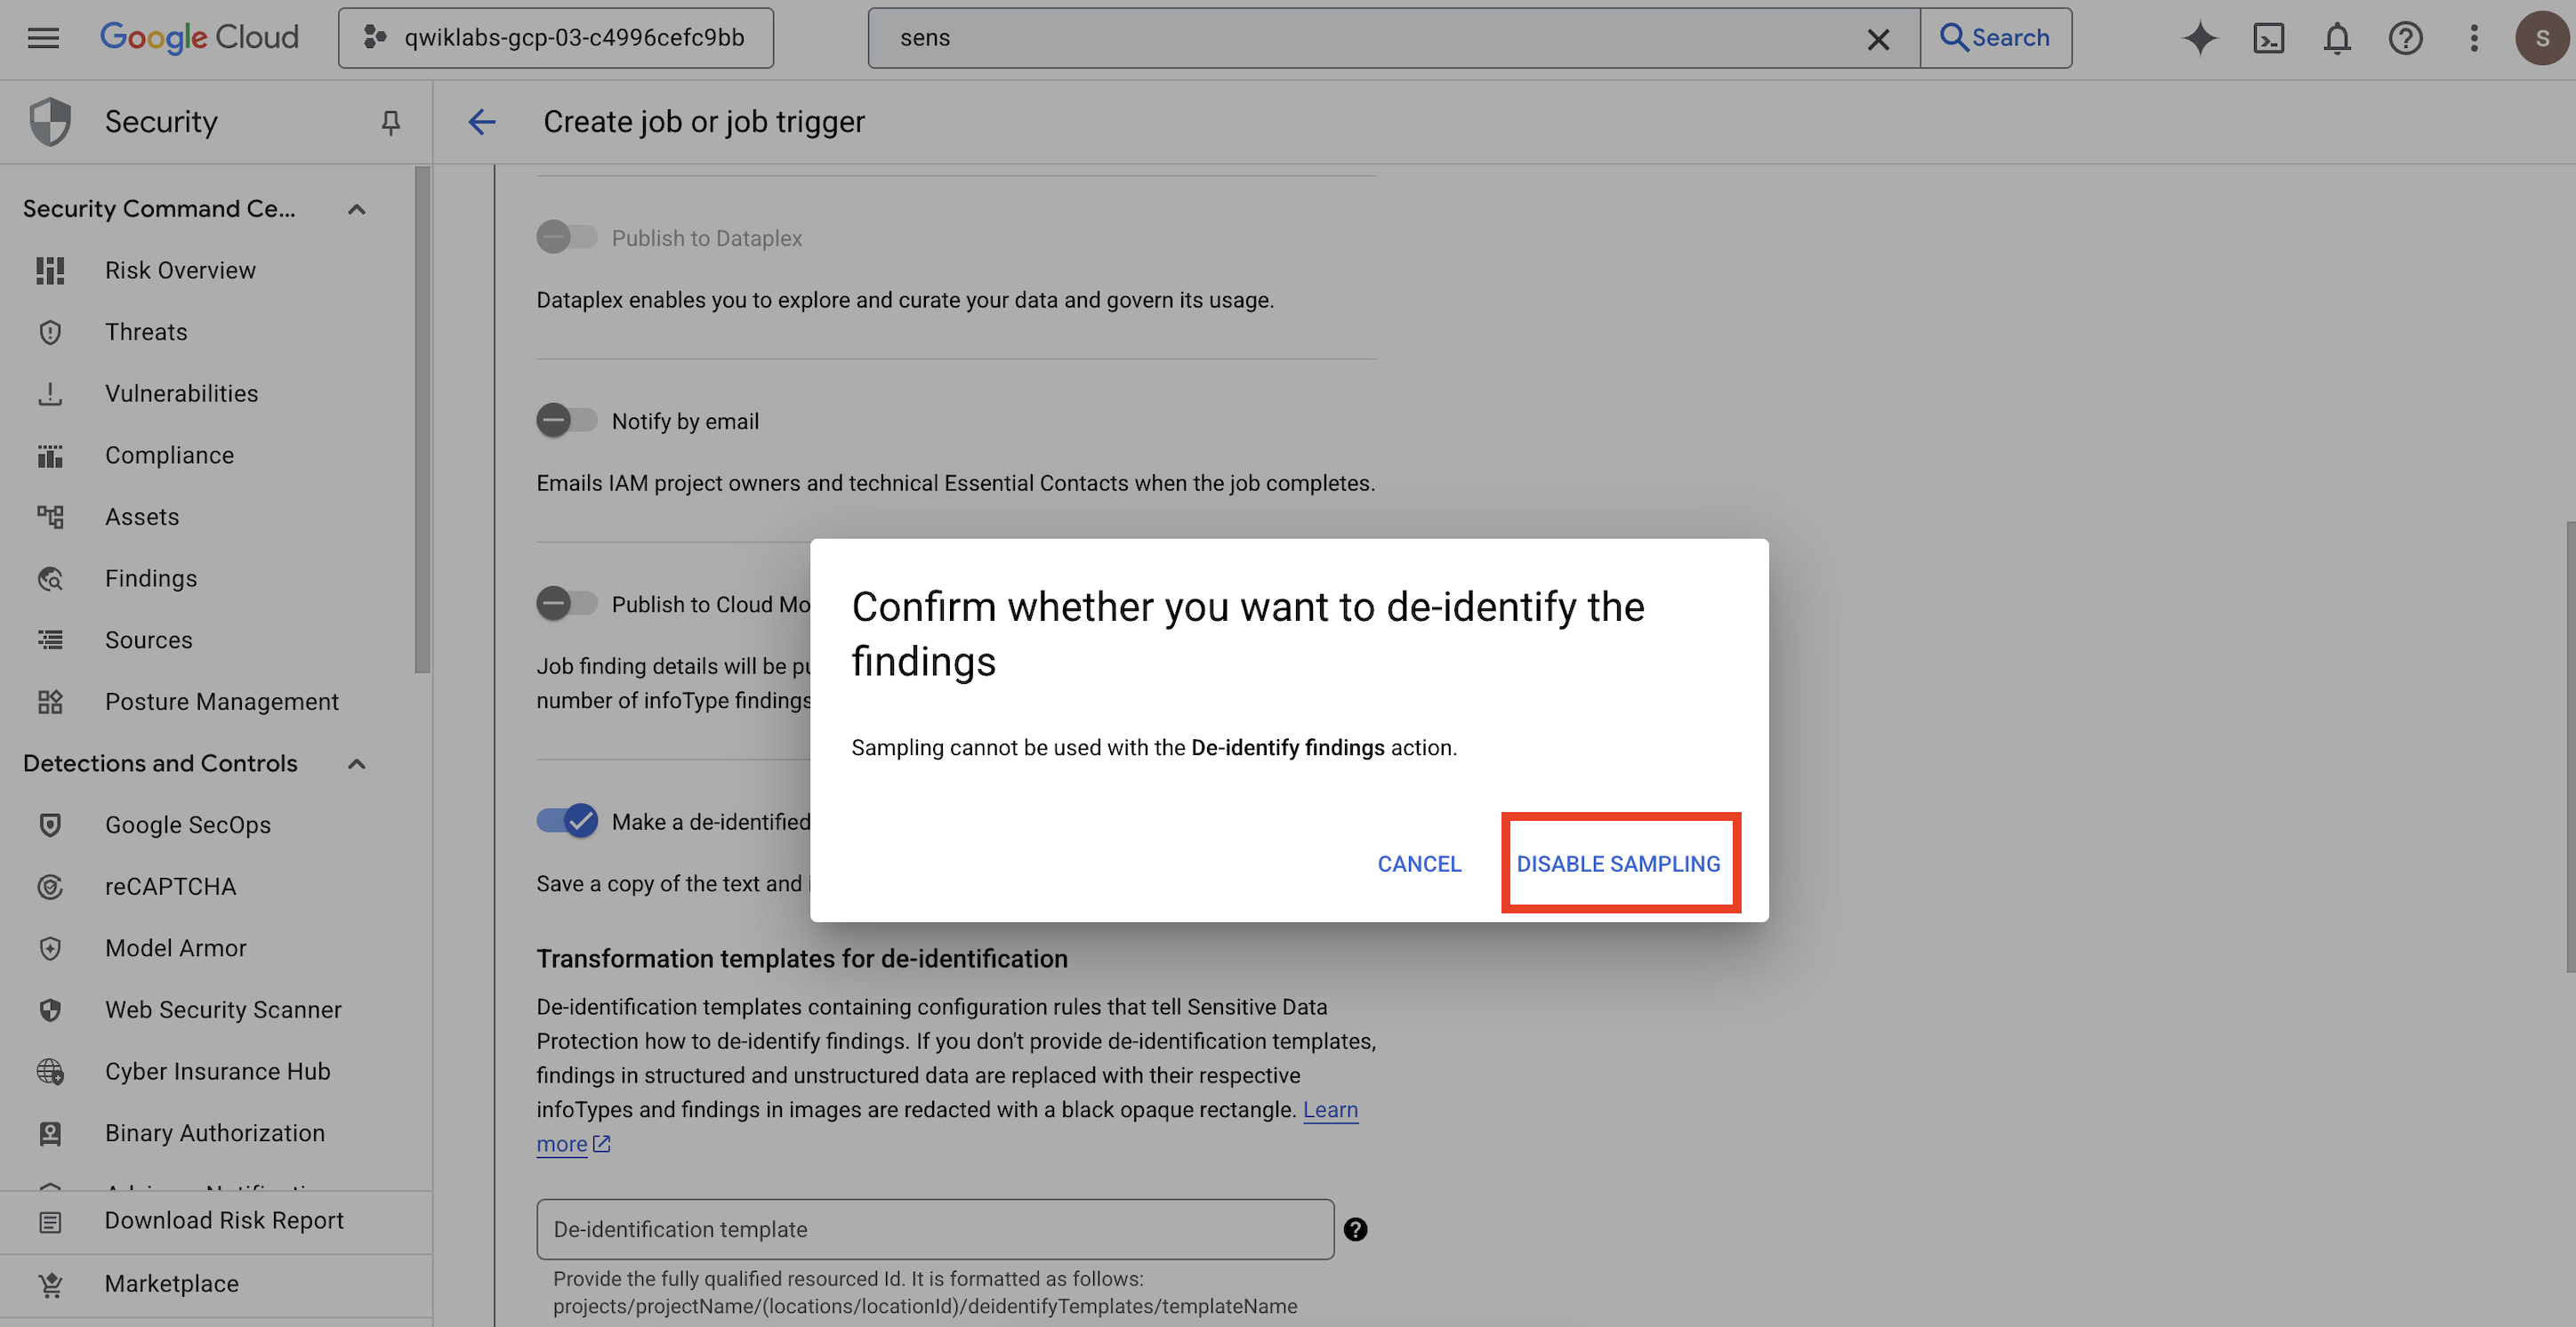
Property
Value (type or select)
De-identification template
projects/[your-project-id]/locations/global/deidentifyTemplates/de-identify-unstructuredStructured de-identification template
projects/[your-project-id]/locations/global/deidentifyTemplates/de-identify-structuredImage Redaction template
projects/[your-project-id]/locations/global/deidentifyTemplates/de-identify-image - Configure the Cloud Storage output location:
- URL:
gs://output-[your-project-id]
- URL:
- Under Schedule, leave the selection as None to run the job immediately.
- Click Create.
- A pop-up opens to
Confirm job or job trigger create, click CONFIRM CREATE.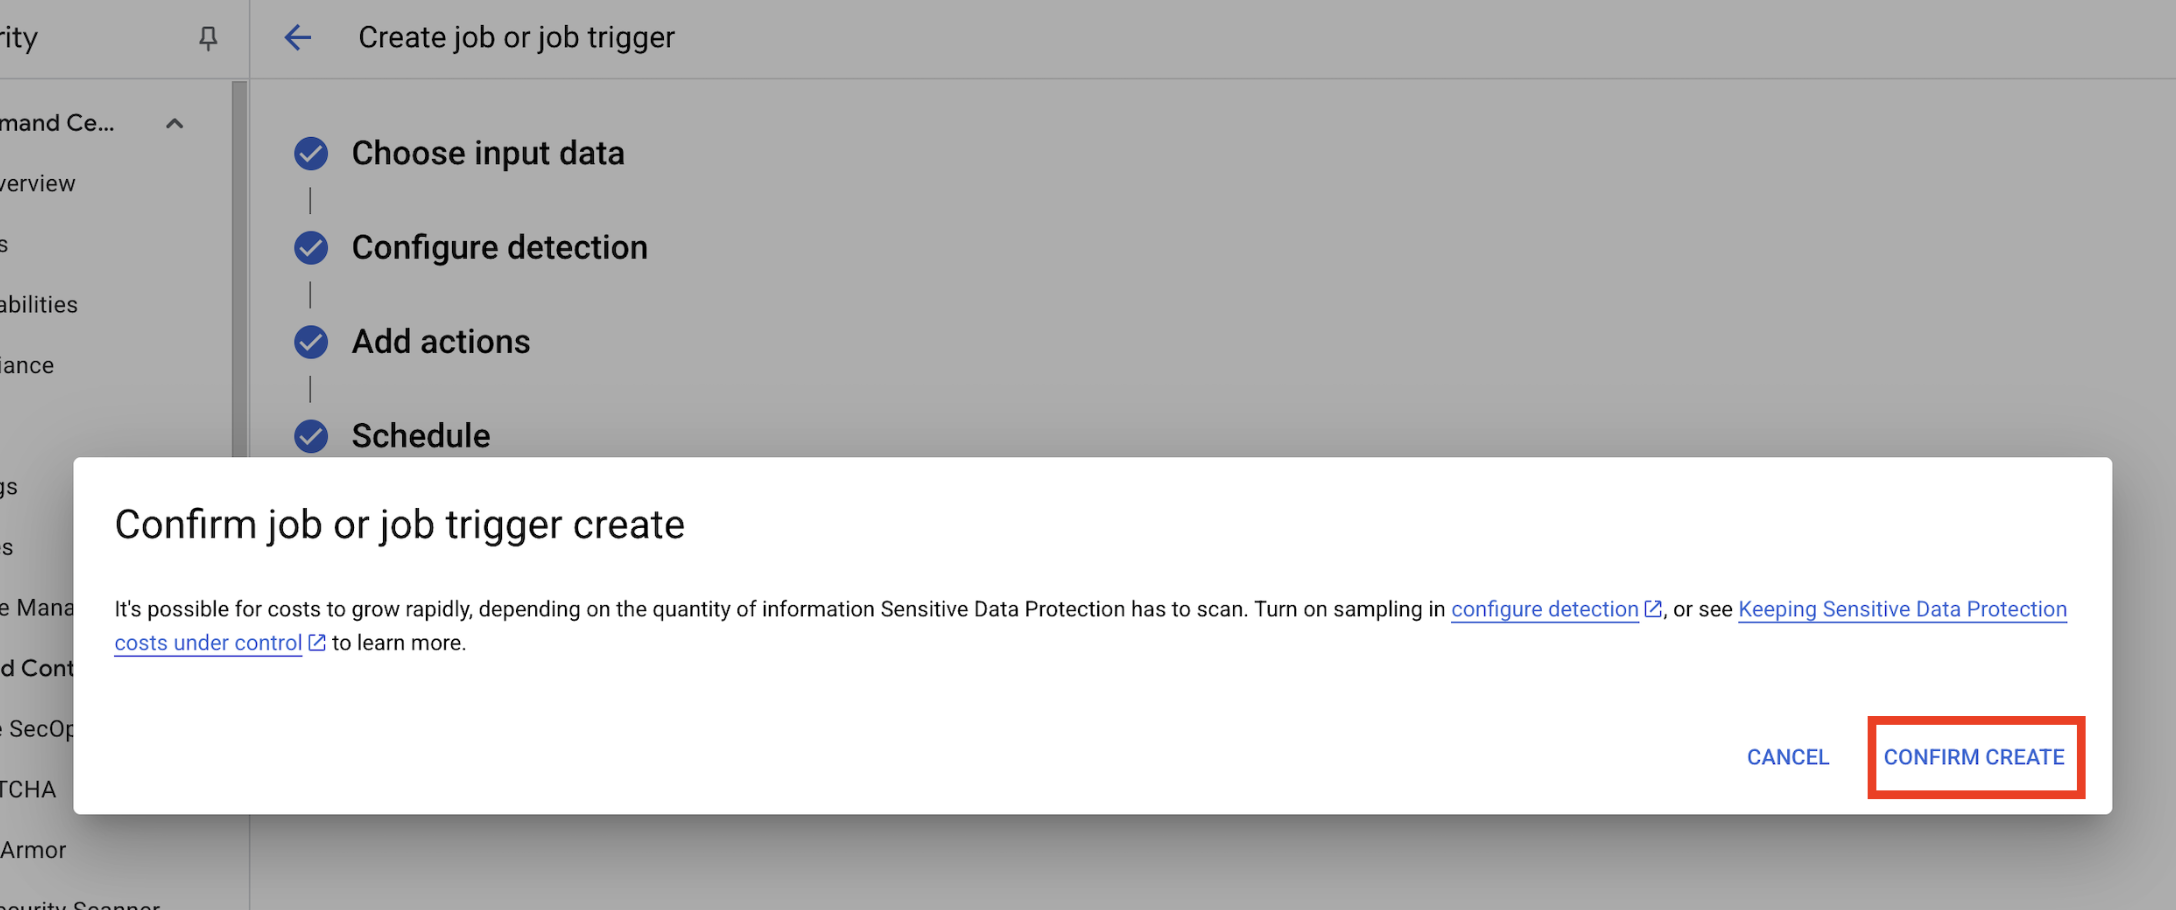
8. Verify the results
The final step is to confirm that the sensitive data was successfully and correctly redacted across all file types in the output bucket. This ensures your de-identification pipeline works as expected.
Review the job status
Monitor the job to ensure it completes successfully and review the summary of findings before checking the output files.
- In the Jobs details tab, wait for the job to show a status of Done.
- Under Overview, review the number of findings and the percentages of each infoType detected.
- Click Configuration.
- Scroll down to Actions and click the output bucket to see the de-identified data:
gs://output-[your-project-id].
Compare input and output files
In this step, you manually inspect the de-identified files to confirm that the data sanitization was applied correctly according to your templates.
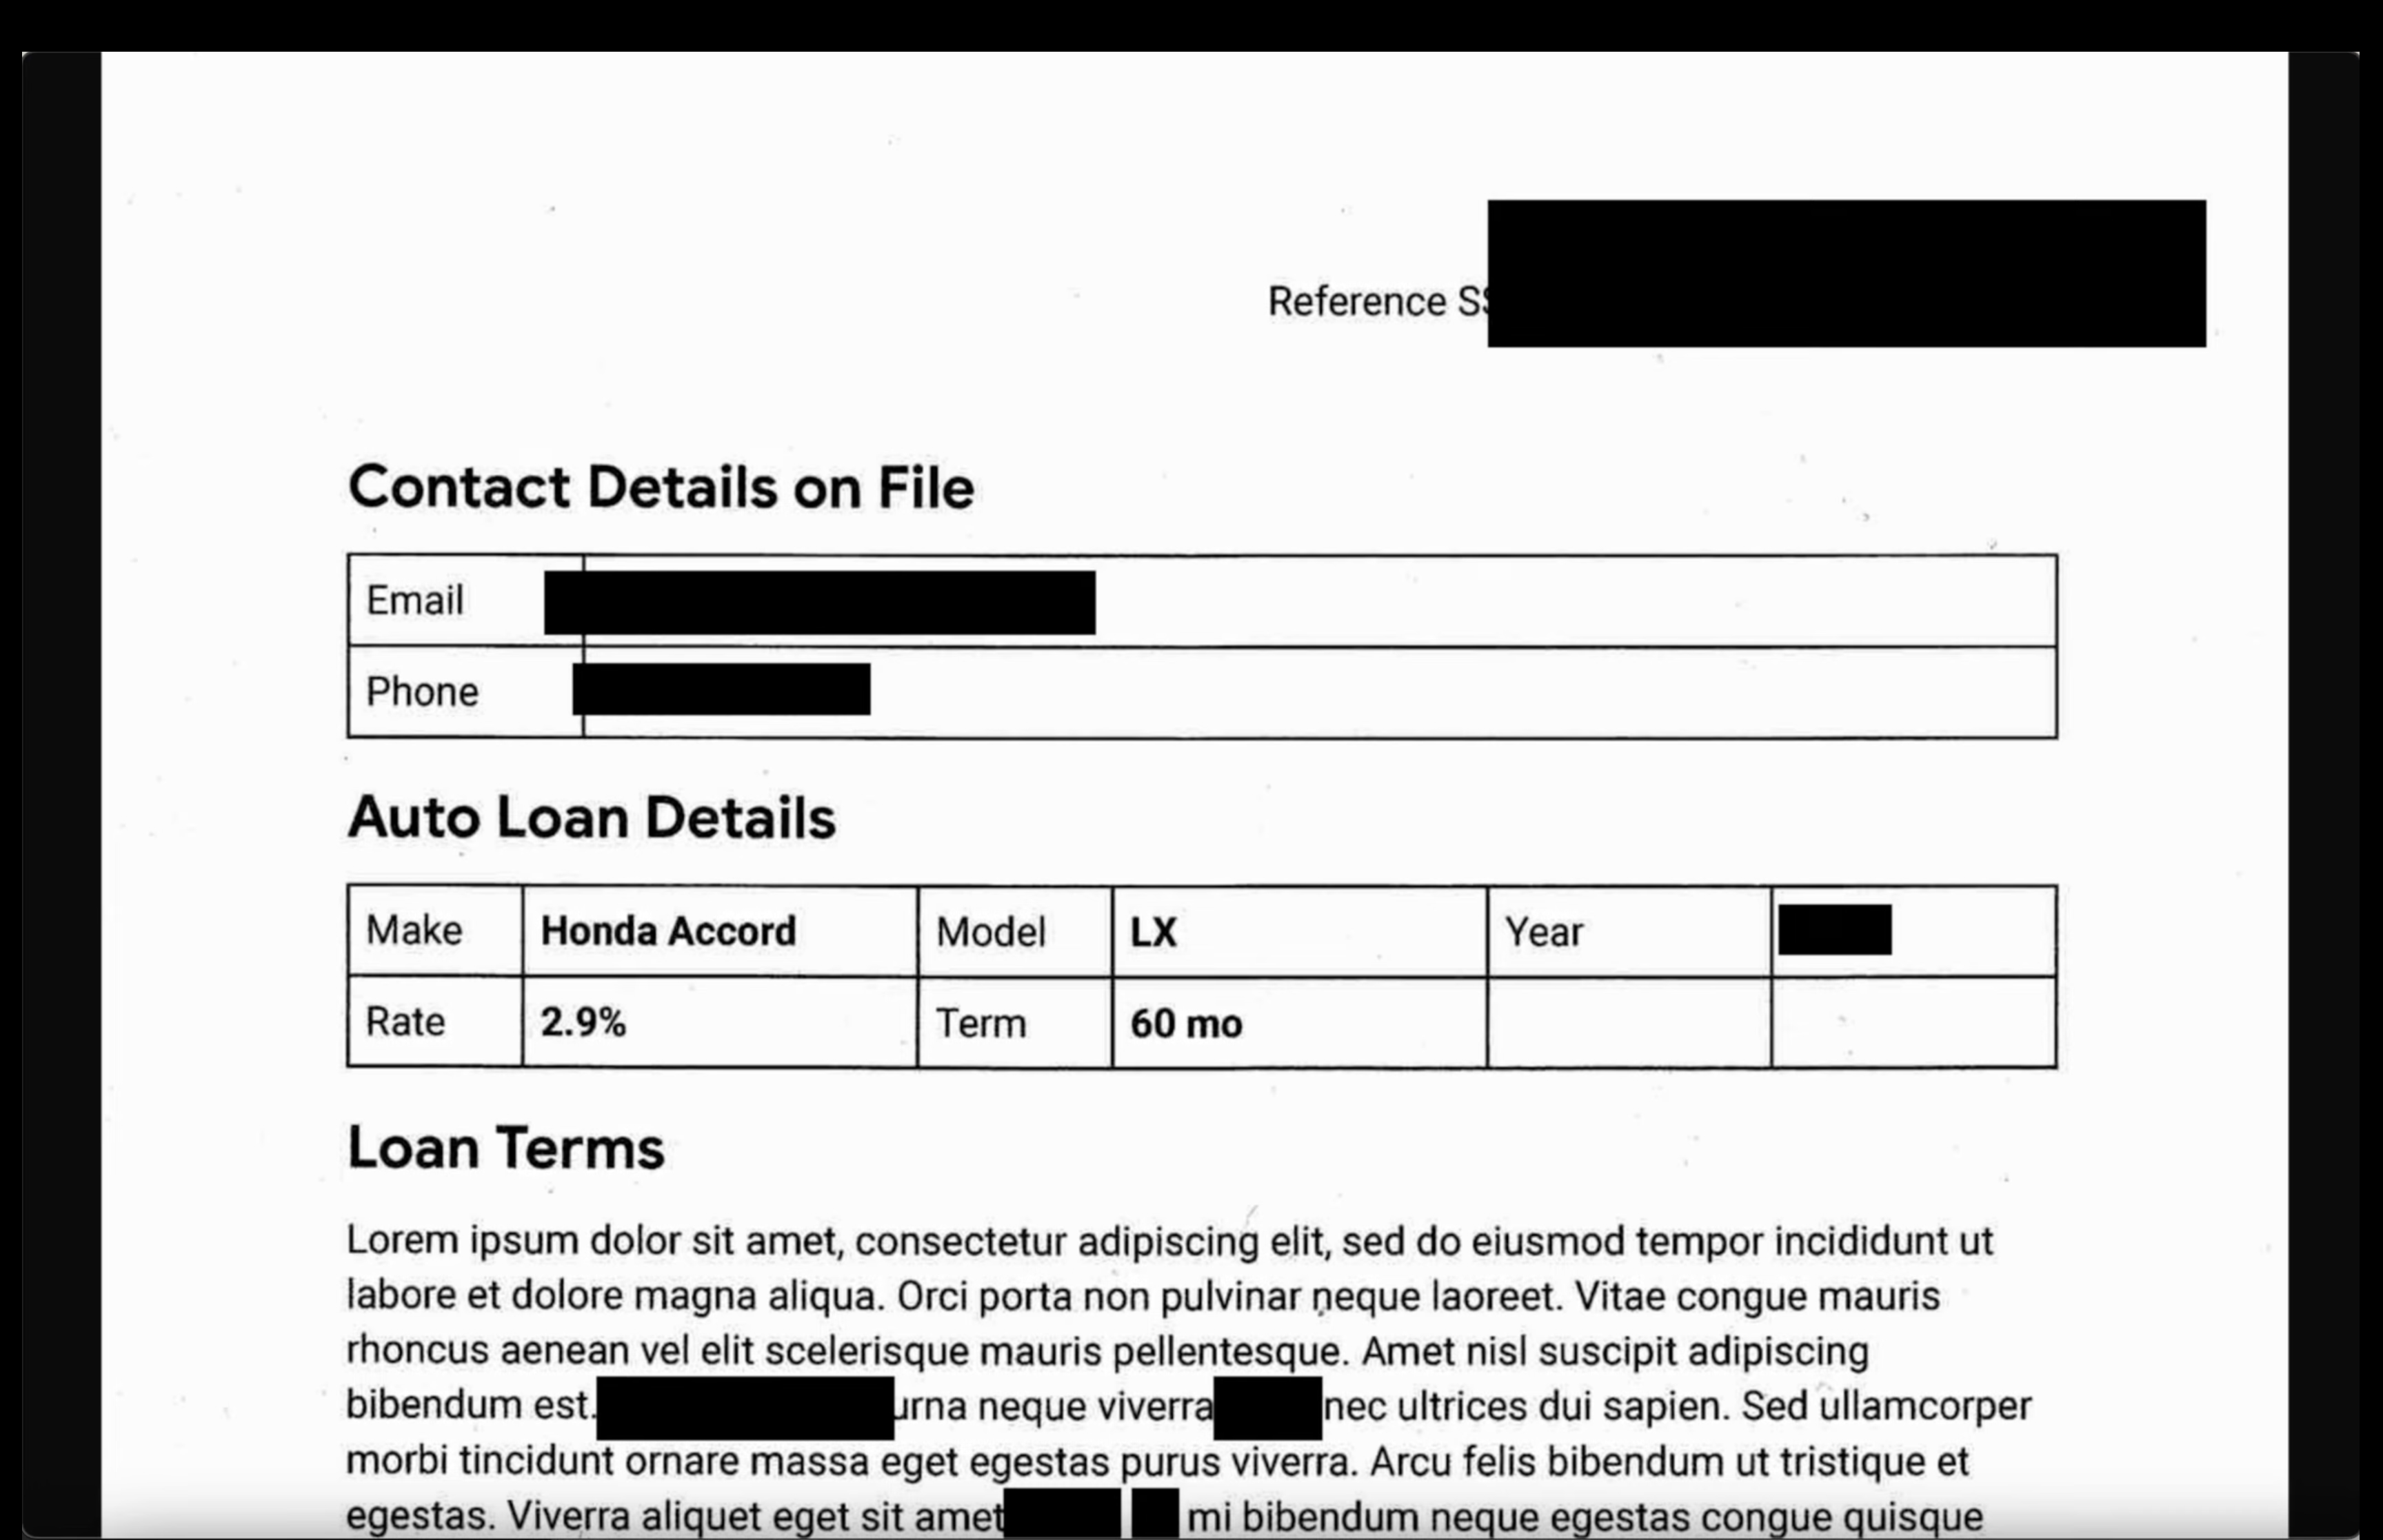
- Images: Open an image from the output bucket. Verify that all sensitive text has been redacted in the output file.
- Unstructured logs: View a log file from both buckets. Confirm that PII in the output log has been replaced with the infoType name (e.g.,
[US_SOCIAL_SECURITY_NUMBER]). - Structured CSVs: Open a CSV file from both buckets. Verify that the user emails and SSNs in the output file are masked with
####@####.com.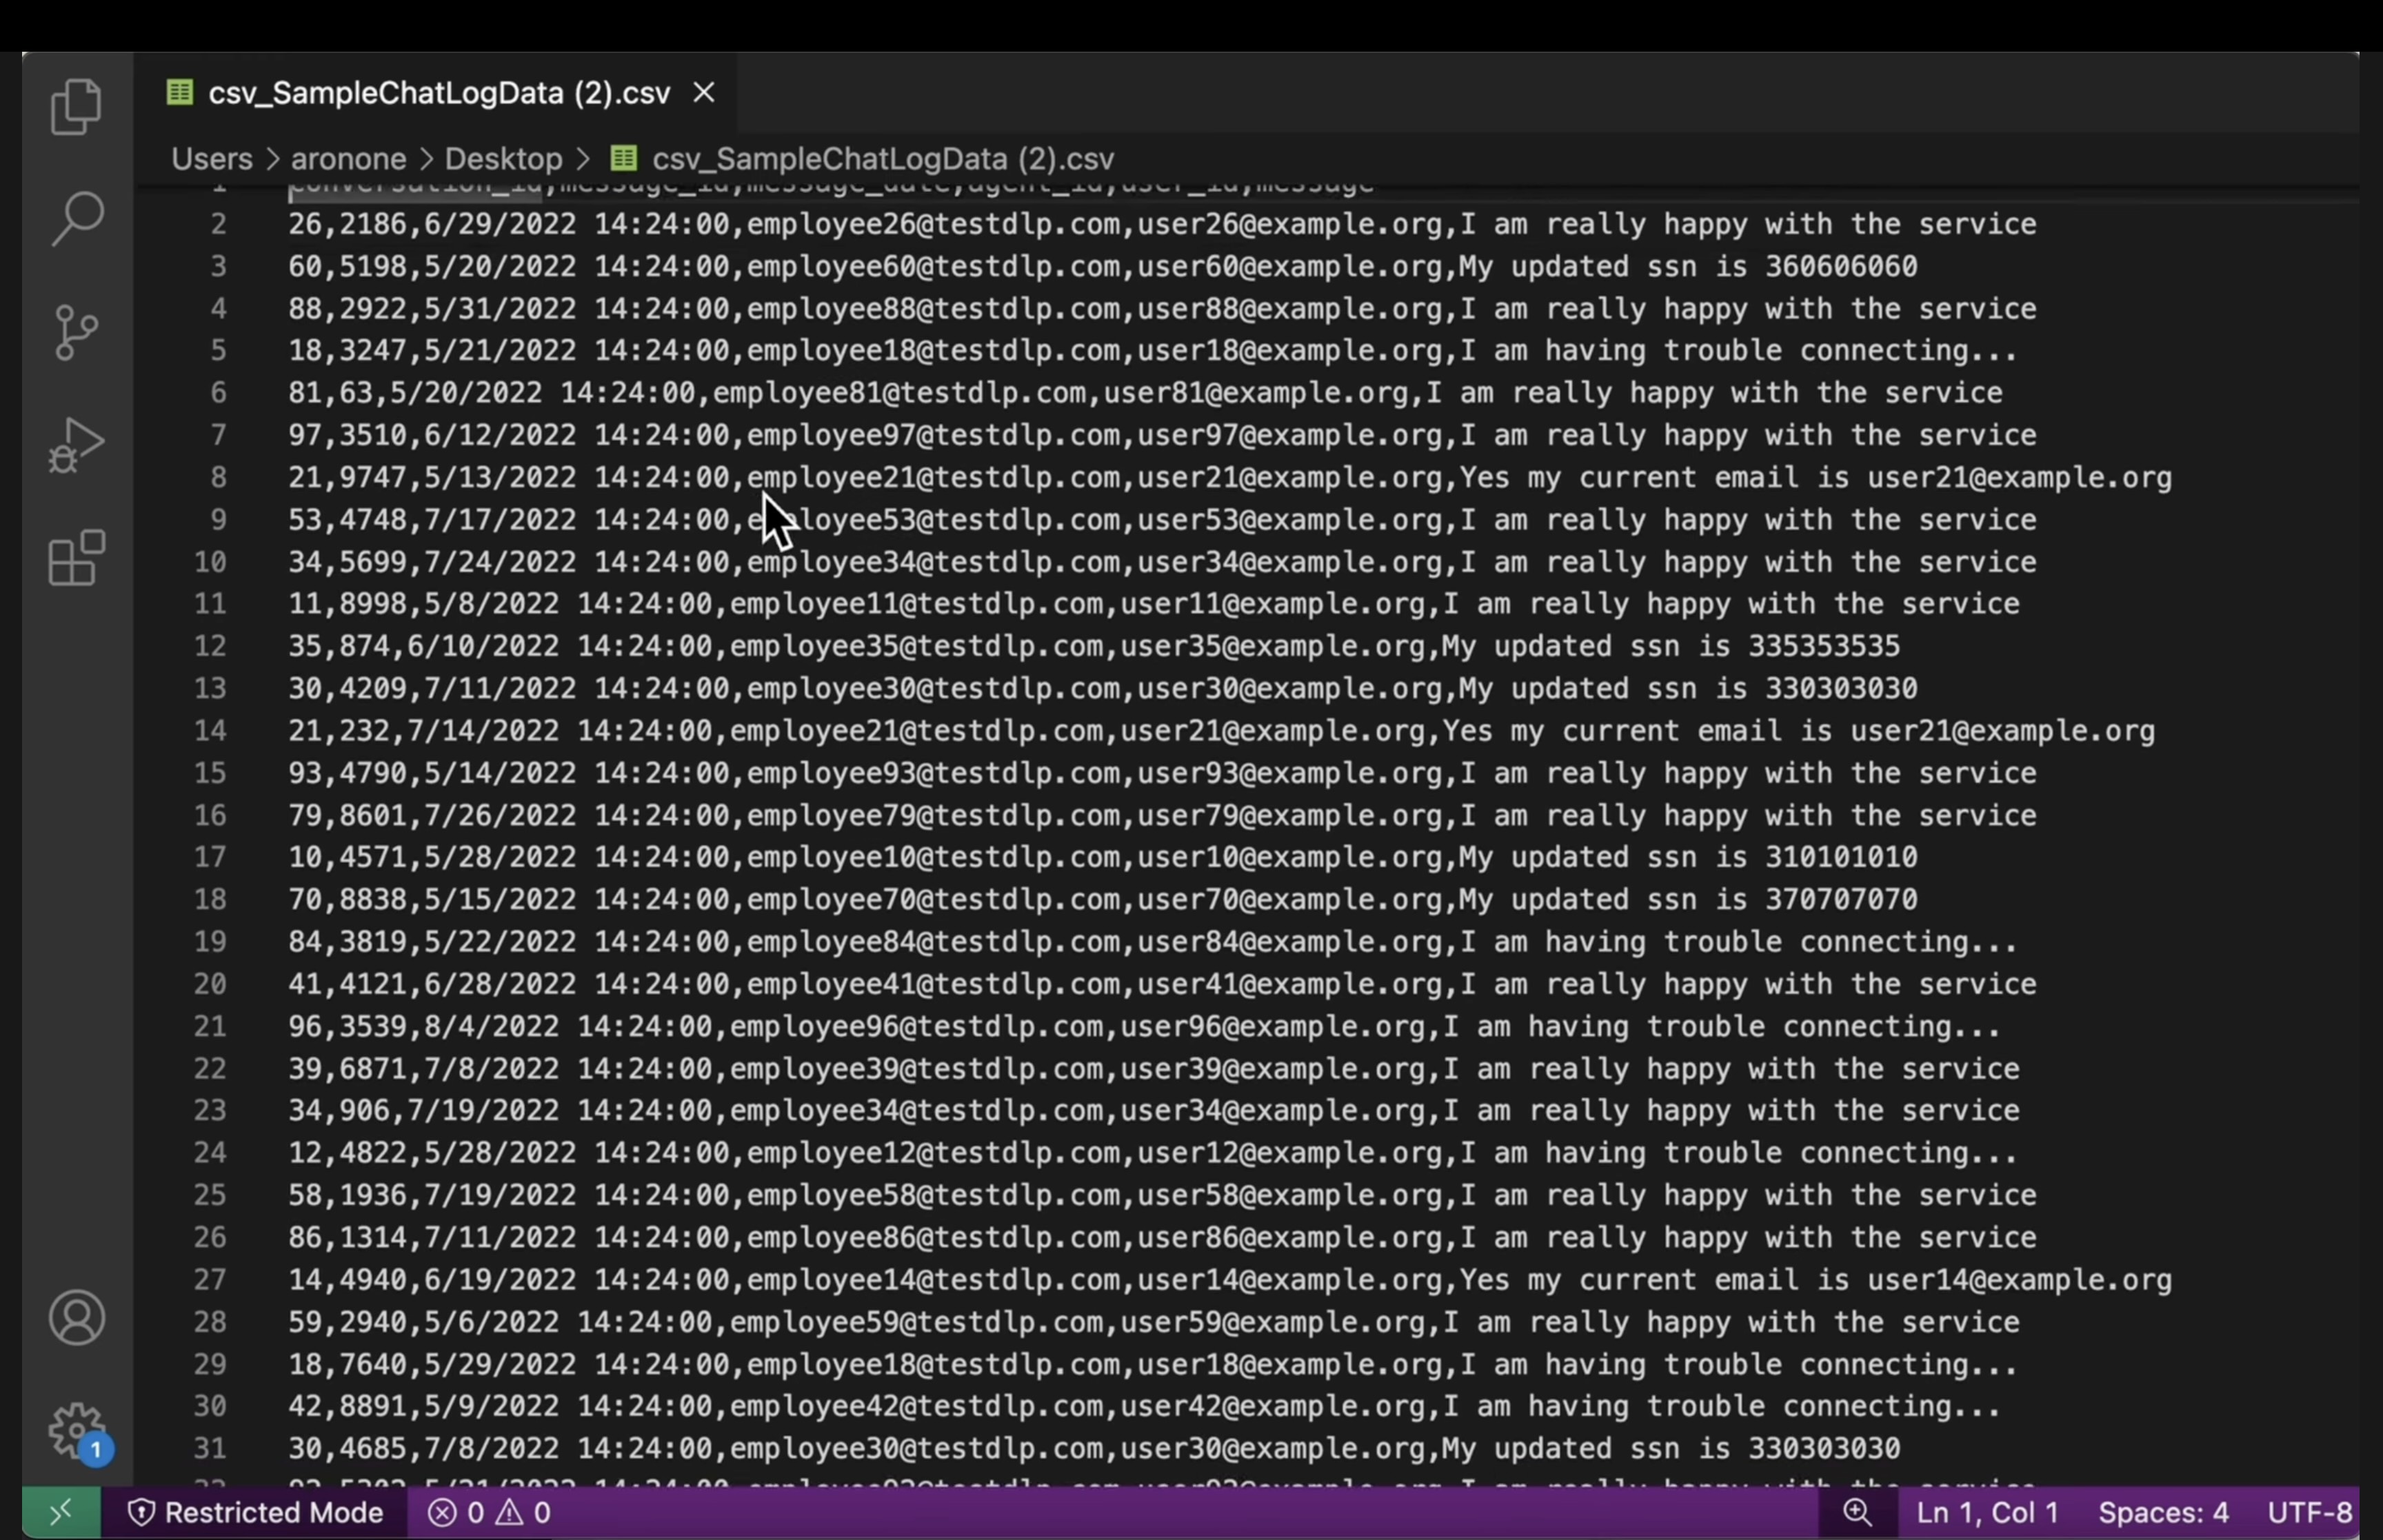
9. From lab to reality: How to use this in your own projects
The principles and configurations you've applied are the blueprint for securing real-world AI projects on Google Cloud. The resources you just built—the inspect template, de-identification templates, and the automated job—act as a secure starter template for any new data intake process.
The automated data sanitization pipeline: Your secure data intake
How you'd use this in your setup
Every time your team needs to ingest new raw customer data for AI development, you would direct it through a pipeline that incorporates the Sensitive Data Protection job you configured. Instead of manually inspecting and redacting, you leverage this automated workflow. This ensures that data scientists and AI models only interact with de-identified data, significantly reducing privacy risks.
Connecting to production
In a production environment, you would take this concept even further by:
- Automation with job triggers: Instead of manually running the job, you'd set up a job trigger whenever a new file is uploaded to your input Cloud Storage bucket. This creates a fully automated, hands-off detection and de-identification process.
- Integration with data lakes/warehouses: The de-identified output data would typically feed into a secure data lake (e.g., on Cloud Storage) or data warehouse (e.g., BigQuery) for further analysis and model training, ensuring privacy is maintained throughout the data lifecycle.
Granular de-identification strategies: Balancing privacy and utility
How you'd use this in your setup
The different de-identification templates (unstructured, structured, image) you created are key. You'd apply similar differentiated strategies based on the specific needs of your AI models. This allows your development team to have high-utility data for their models without compromising privacy.
Connecting to production
In a production environment, this granular control becomes even more critical for:
- Custom infoTypes and dictionaries: For highly specific or domain-specific sensitive data, you would define custom infoTypes and dictionaries within Sensitive Data Protection. This ensures comprehensive detection tailored to your unique business context.
- Format-preserving encryption (FPE): For scenarios where the de-identified data must retain its original format (e.g., credit card numbers for integration testing), you would explore advanced de-identification techniques like Format-Preserving Encryption. This allows for privacy-safe testing with realistic data patterns.
Monitoring and auditing: Ensuring continuous compliance
How you'd use this in your setup
You'd continuously monitor Sensitive Data Protection logs to ensure that all data processing adheres to your privacy policies and that no sensitive information is inadvertently exposed. Regularly reviewing job summaries and findings is part of this continuous audit.
Connecting to production
For a robust production system, consider these key actions:
- Send findings to Security Command Center: For integrated threat management and a centralized view of your security posture, configure your Sensitive Data Protection jobs to send a summary of their findings directly to Security Command Center. This consolidates security alerts and insights.
- Alerting and incident response: You would set up Cloud Monitoring alerts based on Sensitive Data Protection findings or job failures. This ensures that your security team is immediately notified of any potential policy violations or processing issues, enabling a rapid incident response.
10. Conclusion
Congratulations! You have successfully built a data security workflow that can automatically discover and de-identify PII across multiple data types, making it safe for use in downstream AI development and analytics.
Recap
In this lab, you accomplished the following:
- Defined an inspection template to detect specific sensitive information types (infoTypes).
- Built distinct de-identification rules for unstructured, structured, and image data.
- Configured and ran a single job that automatically applied the correct redaction based on file type to the contents of an entire bucket.
- Verified the successful transformation of sensitive data in a secure output location.
Next steps
- Send findings to Security Command Center: For more integrated threat management, configure the job action to send a summary of its findings directly to Security Command Center.
- Automate with Cloud Functions: In a production environment, you could trigger this inspection job automatically whenever a new file is uploaded to the input bucket by using a Cloud Function.