
1. 소개
이 실습에서는 클라이언트 에이전트 서비스의 구현 및 배포에 중점을 둡니다. 에이전트 개발 키트 (ADK)를 사용하여 도구를 사용하는 AI 에이전트를 빌드합니다.
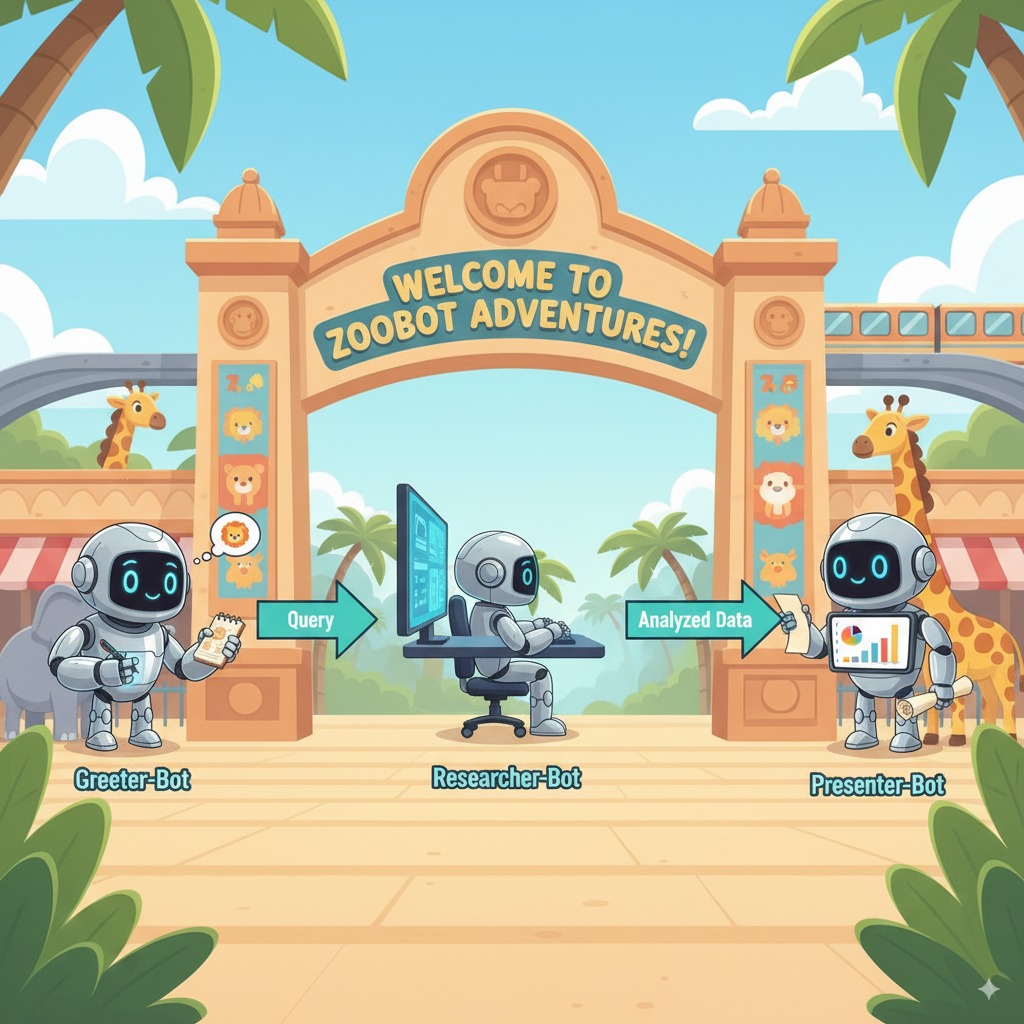
이 실습에서는 위키백과를 사용하여 동물에 관한 질문에 답변하는 동물원 에이전트를 빌드합니다.

마지막으로 투어 가이드 에이전트를 로컬에서만 실행하는 것이 아니라 Google Cloud Run에 배포합니다.
기본 요건
- 결제가 사용 설정된 Google Cloud 프로젝트.
학습할 내용
- ADK 배포를 위한 Python 프로젝트를 구성하는 방법
- google-adk를 사용하여 도구를 사용하는 에이전트를 구현하는 방법
- Python 애플리케이션을 서버리스 컨테이너로 Cloud Run에 배포하는 방법
- IAM 역할을 사용하여 서비스 간의 안전한 인증을 구성하는 방법
- 향후 비용이 청구되지 않도록 Cloud 리소스를 삭제하는 방법
필요한 항목
- Google Cloud 계정 및 Google Cloud 프로젝트
- 웹브라우저(예: Chrome)
2. Cloud Run에 배포해야 하는 이유
Cloud Run은 서버리스 플랫폼이므로 ADK 에이전트를 호스팅하는 데 적합합니다. 즉, 사용자는 기본 인프라 관리가 아닌 코드에 집중할 수 있습니다. Google에서 운영 작업을 처리해 드립니다.
팝업 스토어와 비슷하다고 생각하면 됩니다. 고객(요청)이 도착할 때만 열고 리소스를 사용합니다. 고객이 없을 때는 완전히 문을 닫고 빈 매장에 대한 비용을 지불하지 않습니다.
주요 기능
어디서나 컨테이너 실행:
- 앱이 포함된 컨테이너(Docker 이미지)를 가져옵니다.
- Cloud Run은 Google 인프라에서 이를 실행합니다.
- OS 패치, VM 설정, 확장과 관련된 문제가 없습니다.
자동 확장:
- 앱을 사용하는 사람이 0명인 경우 → 인스턴스가 0개 실행됨 (비용 효율적인 0개 인스턴스로 축소됨).
- 1,000개의 요청이 들어오면 → 필요한 만큼 복사본을 생성합니다.
기본적으로 스테이트리스(Stateless):
- 각 요청은 서로 다른 인스턴스로 이동할 수 있습니다.
- 상태를 저장해야 하는 경우 Cloud SQL, Firestore 또는 Memorystore와 같은 외부 서비스를 사용합니다.
모든 언어 또는 프레임워크 지원:
- Linux 컨테이너에서 실행되는 한 Cloud Run은 Python, Go, Node.js, Java, .Net 등 어떤 언어로 작성되었는지 상관하지 않습니다.
사용한 만큼만 비용 지불:
- 요청 기반 결제: 요청당 청구 + 컴퓨팅 시간 (최대 100ms)
- 인스턴스 기반 결제: 전체 인스턴스 수명 주기에 대해 청구됩니다 (요청당 요금 없음).
3. 프로젝트 설정
Google 계정
아직 개인 Google 계정이 없다면 Google 계정을 만들어야 합니다.
직장 또는 학교 계정 대신 개인 계정을 사용합니다.
Google Cloud 콘솔에 로그인
개인 Google 계정을 사용하여 Google Cloud 콘솔에 로그인합니다.
결제 사용 설정
개인 결제 계정 설정
Google Cloud 크레딧을 사용하여 결제를 설정한 경우 이 단계를 건너뛸 수 있습니다.
개인 결제 계정을 설정하려면 Cloud 콘솔에서 여기에서 결제를 사용 설정하세요.
참고 사항:
- 이 실습을 완료하는 데 드는 Cloud 리소스 비용은 미화 1달러 미만입니다.
- 이 실습이 끝나면 단계에 따라 리소스를 삭제하여 추가 요금이 발생하지 않도록 할 수 있습니다.
- 신규 사용자는 미화$300 상당의 무료 체험판을 사용할 수 있습니다.
프로젝트 만들기(선택사항)
이 실습에 사용할 현재 프로젝트가 없는 경우 여기에서 새 프로젝트를 만드세요.
4. Cloud Shell 편집기 열기
- 이 링크를 클릭하여 Cloud Shell 편집기로 바로 이동합니다.
- 오늘 언제든지 승인하라는 메시지가 표시되면 승인을 클릭하여 계속합니다.

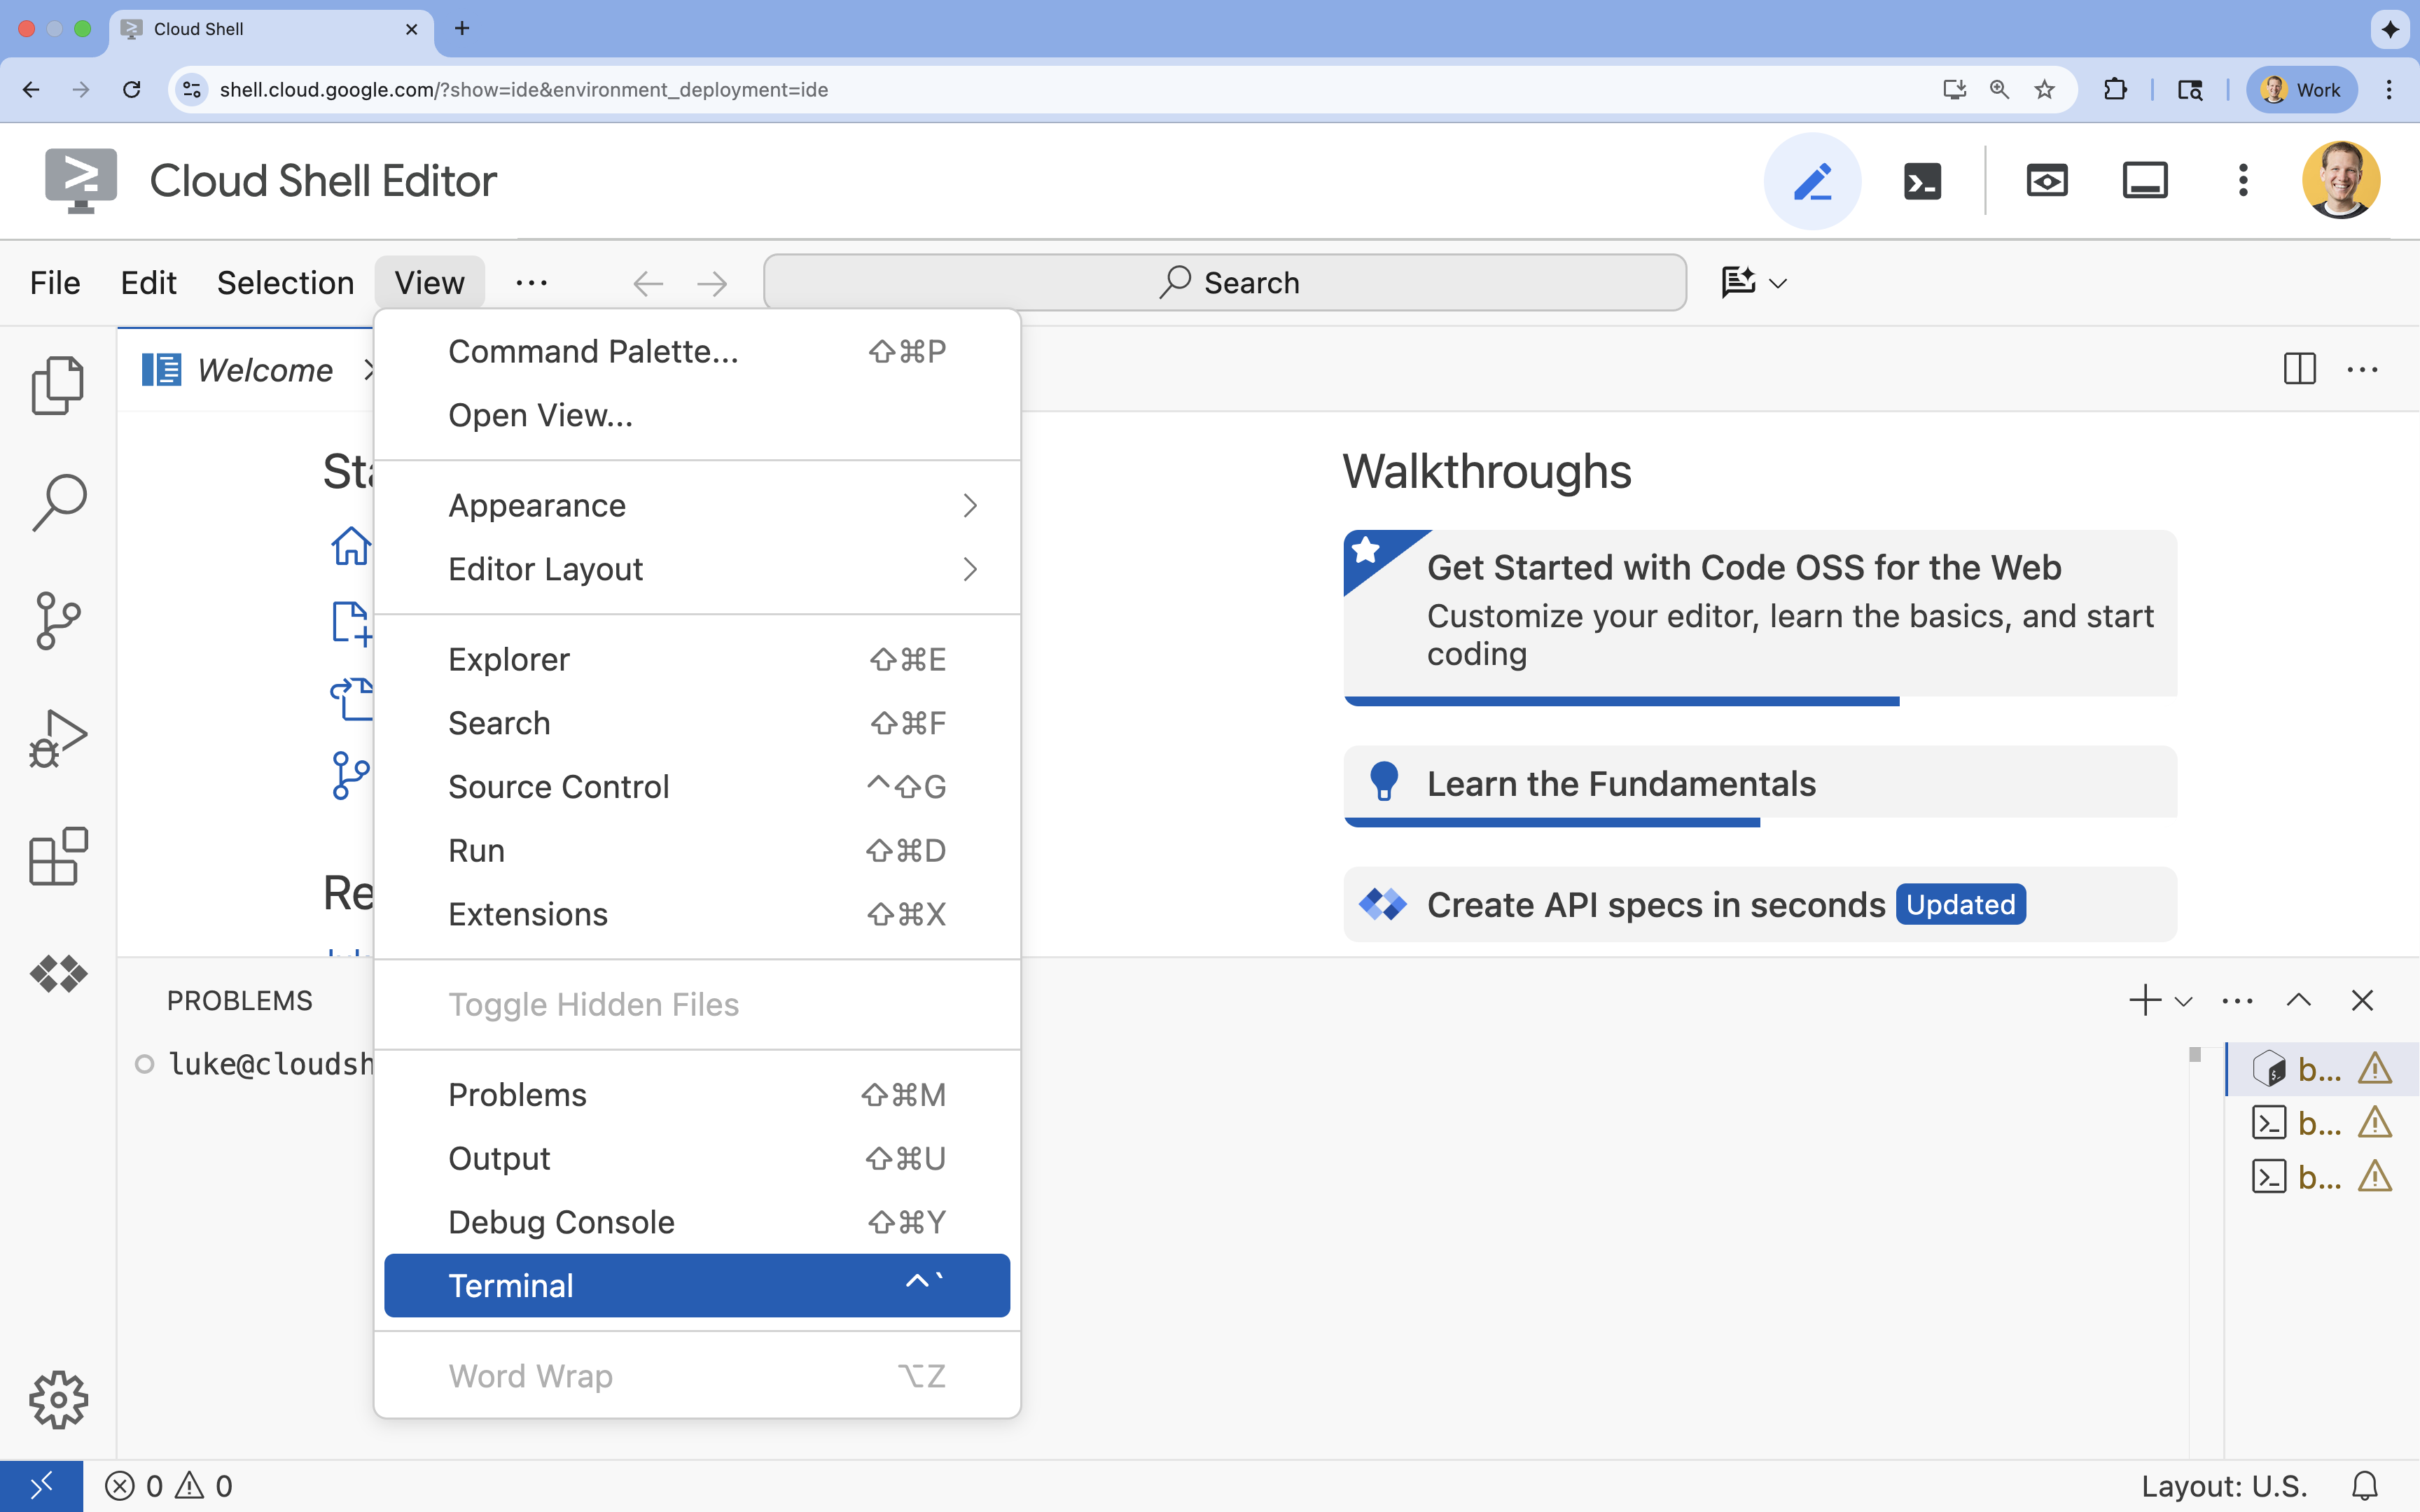
- 터미널이 화면 하단에 표시되지 않으면 다음 단계에 따라 엽니다.
- 보기를 클릭합니다.
- 터미널을 클릭합니다.
5. 프로젝트 설정
- 터미널에서 다음 명령어를 사용하여 프로젝트를 설정합니다.
gcloud config set project [PROJECT_ID]gcloud config set project lab-project-id-example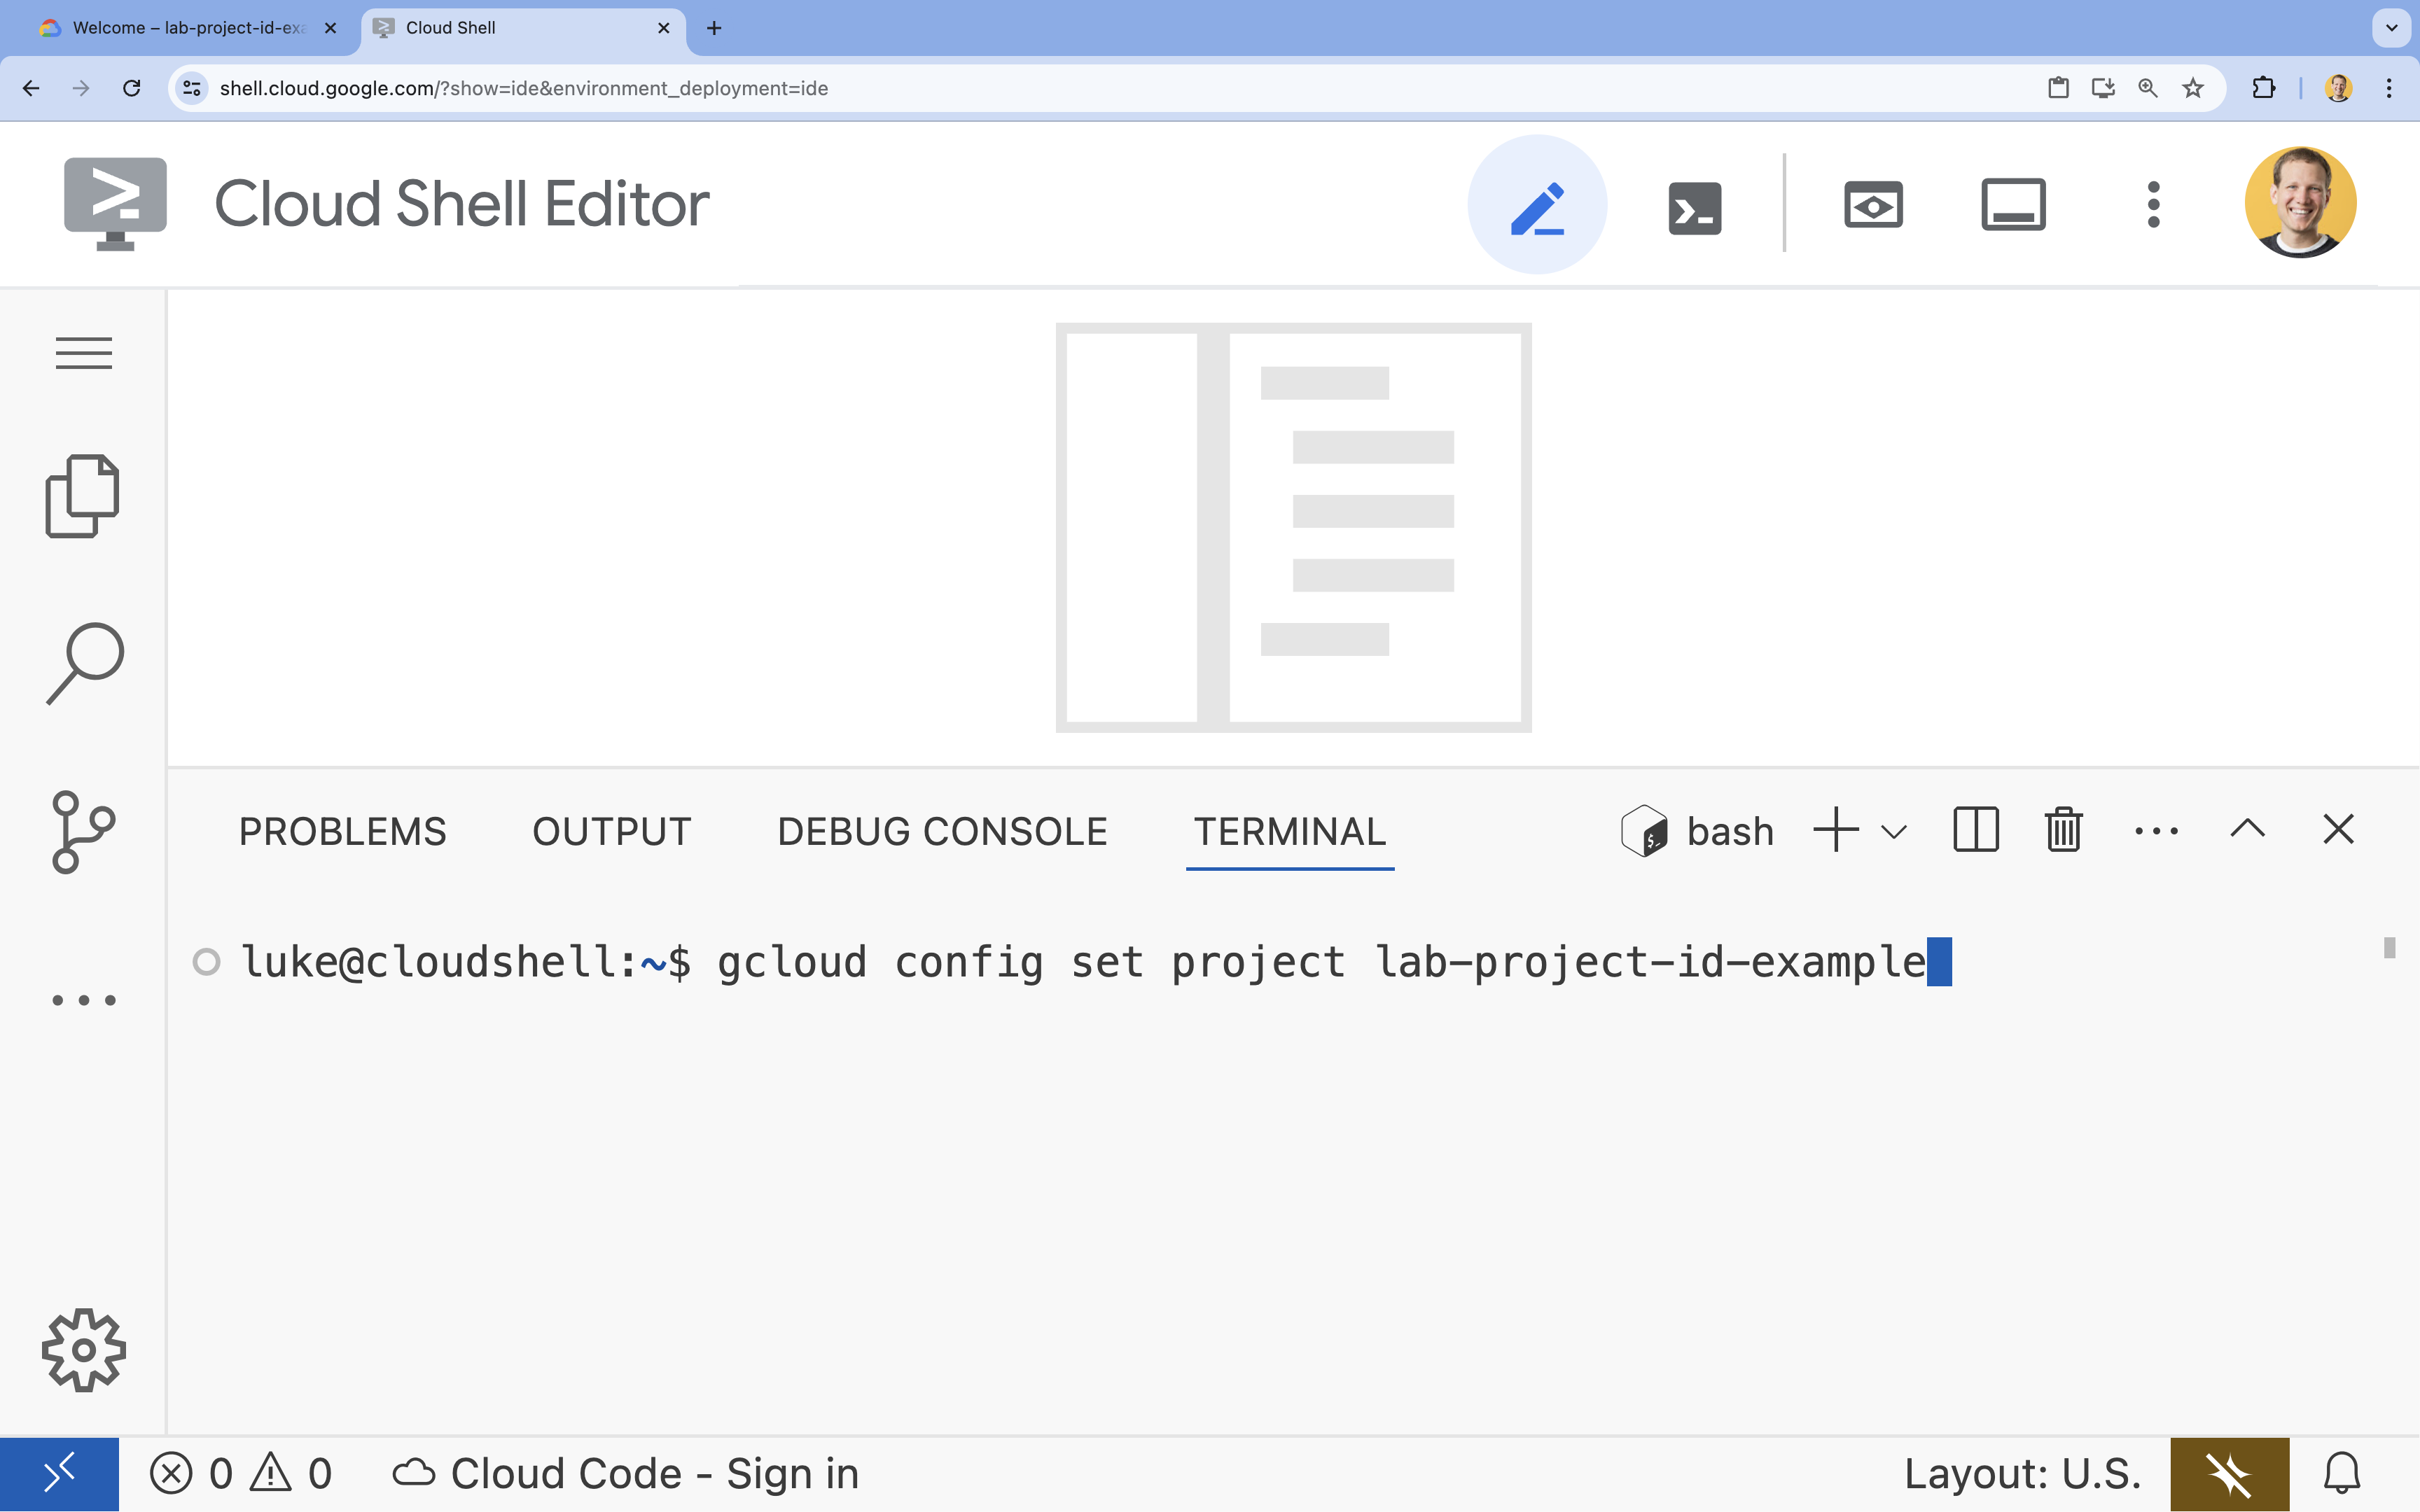
- 다음 메시지가 표시되어야 합니다.
Updated property [core/project].
6. API 사용 설정
Cloud Run, Artifact Registry, Cloud Build, Vertex AI, Compute Engine을 사용하려면 Google Cloud 프로젝트에서 각 API를 사용 설정해야 합니다.
- 터미널에서 API를 사용 설정합니다.
gcloud services enable \ run.googleapis.com \ artifactregistry.googleapis.com \ cloudbuild.googleapis.com \ aiplatform.googleapis.com \ compute.googleapis.comOperation "operations/acat.p2-[GUID]" finished successfully.
API 소개
- Cloud Run Admin API (
run.googleapis.com)를 사용하면 완전 관리형 환경에서 프런트엔드 및 백엔드 서비스, 일괄 작업 또는 웹사이트를 실행할 수 있습니다. 컨테이너화된 애플리케이션을 배포하고 확장하기 위한 인프라를 처리합니다. - Artifact Registry API (
artifactregistry.googleapis.com)는 컨테이너 이미지를 저장할 수 있는 안전한 비공개 저장소를 제공합니다. Container Registry의 후속 버전으로, Cloud Run 및 Cloud Build와 원활하게 통합됩니다. - Cloud Build API (
cloudbuild.googleapis.com)는 Google Cloud 인프라에서 빌드를 실행하는 서버리스 CI/CD 플랫폼입니다. Dockerfile에서 클라우드로 컨테이너 이미지를 빌드하는 데 사용됩니다. - Vertex AI API (
aiplatform.googleapis.com)를 사용하면 배포된 애플리케이션이 Gemini 모델과 통신하여 핵심 AI 작업을 실행할 수 있습니다. Google Cloud의 모든 AI 서비스에 대한 통합 API를 제공합니다. - Compute Engine API (
compute.googleapis.com)는 Google 인프라에서 실행되는 안전하고 맞춤설정 가능한 가상 머신을 제공합니다. Cloud Run은 관리되지만 Compute Engine API는 다양한 네트워킹 및 컴퓨팅 리소스의 기본 종속 항목으로 필요한 경우가 많습니다.
7. 개발 환경 준비
디렉터리 만들기
- 터미널에서 프로젝트 디렉터리와 필요한 하위 디렉터리를 만듭니다.
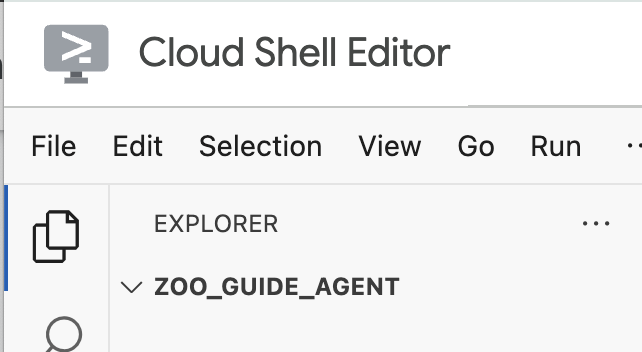
cd && mkdir zoo_guide_agent && cd zoo_guide_agent - 터미널에서 다음 명령어를 실행하여 Cloud Shell 편집기 탐색기에서
zoo_guide_agent디렉터리를 엽니다.cloudshell open-workspace ~/zoo_guide_agent - 왼쪽의 탐색기 패널이 새로고침됩니다. 이제 생성한 디렉터리가 표시됩니다.
설치 요구사항
- 터미널에서 다음 명령어를 실행하여
requirements.txt파일을 만듭니다.cloudshell edit requirements.txt - 새로 만든
requirements.txt파일에 다음을 추가합니다.google-adk==1.14.0 langchain-community==0.3.27 wikipedia==1.4.0 - 터미널에서 uv를 사용하여 가상 환경을 만들고 활성화합니다. 이렇게 하면 프로젝트 종속 항목이 시스템 Python과 충돌하지 않습니다.
uv venv source .venv/bin/activate - 터미널에서 가상 환경에 필요한 패키지를 설치합니다.
uv pip install -r requirements.txt
환경 변수 설정
- 터미널에서 다음 명령어를 사용하여
.env파일을 만듭니다.# 1. Set the variables in your terminal first PROJECT_ID=$(gcloud config get-value project) PROJECT_NUMBER=$(gcloud projects describe $PROJECT_ID --format="value(projectNumber)") SA_NAME=lab2-cr-service # 2. Create the .env file using those variables cat <<EOF > .env PROJECT_ID=$PROJECT_ID PROJECT_NUMBER=$PROJECT_NUMBER SA_NAME=$SA_NAME SERVICE_ACCOUNT=${SA_NAME}@${PROJECT_ID}.iam.gserviceaccount.com MODEL="gemini-2.5-flash" EOF
8. 에이전트 워크플로 만들기
__init__.py 파일 만들기
- 터미널에서 다음을 실행하여 init.py 파일을 만듭니다.
cloudshell edit __init__.py - 새
__init__.py파일에 다음 코드를 추가합니다.from . import agent
agent.py 파일 만들기
- 다음 명령어를 터미널에 붙여넣어 기본
agent.py파일을 만듭니다.cloudshell edit agent.py - 가져오기 및 초기 설정: 현재 비어 있는
agent.py파일에 다음 코드를 추가합니다.import os import logging import google.cloud.logging from dotenv import load_dotenv from google.adk import Agent from google.adk.agents import SequentialAgent from google.adk.tools.tool_context import ToolContext from google.adk.tools.langchain_tool import LangchainTool from langchain_community.tools import WikipediaQueryRun from langchain_community.utilities import WikipediaAPIWrapper import google.auth import google.auth.transport.requests import google.oauth2.id_token # --- Setup Logging and Environment --- cloud_logging_client = google.cloud.logging.Client() cloud_logging_client.setup_logging() load_dotenv() model_name = os.getenv("MODEL")agent.py파일의 이 첫 번째 블록은 ADK와 Google Cloud에서 필요한 모든 라이브러리를 가져옵니다. 또한 로깅을 설정하고.env파일에서 환경 변수를 로드합니다. 이는 모델과 서버 URL에 액세스하는 데 중요합니다. - 도구 정의: 에이전트의 성능은 사용할 수 있는 도구에 따라 달라집니다.
agent.py하단에 다음 코드를 추가하여 도구를 정의합니다.# Greet user and save their prompt def add_prompt_to_state( tool_context: ToolContext, prompt: str ) -> dict[str, str]: """Saves the user's initial prompt to the state.""" tool_context.state["PROMPT"] = prompt logging.info(f"[State updated] Added to PROMPT: {prompt}") return {"status": "success"} # Configuring the Wikipedia Tool wikipedia_tool = LangchainTool( tool=WikipediaQueryRun(api_wrapper=WikipediaAPIWrapper()) )add_prompt_to_state📝: 동물원 방문객이 무엇을 물어봤는지 기억하는 도구입니다. 방문자가 '사자는 어디에 있어?'라고 물으면 이 도구는 해당 질문을 에이전트의 메모리에 저장하여 워크플로의 다른 에이전트가 무엇을 조사해야 하는지 알 수 있도록 합니다.
작동 방식: 방문자의 프롬프트를 공유된tool_context.state사전에 작성하는 Python 함수입니다. 이 도구 컨텍스트는 단일 대화에 대한 에이전트의 단기 메모리를 나타냅니다. 한 에이전트가 상태에 저장한 데이터는 워크플로의 다음 에이전트가 읽을 수 있습니다.LangchainTool🌍: 투어 가이드 에이전트에게 일반적인 세계 지식을 제공합니다. 방문자가 동물원 데이터베이스에 없는 질문(예: '야생에서 사자는 무엇을 먹나요?')을 하면 이 도구를 통해 에이전트가 Wikipedia에서 답을 찾아볼 수 있습니다.
작동 방식: 어댑터 역할을 하여 에이전트가 LangChain 라이브러리의 사전 빌드된 WikipediaQueryRun 도구를 사용할 수 있도록 합니다.
- 전문가 에이전트 정의:
agent.py하단에 다음 코드를 추가하여comprehensive_researcher및response_formatter에이전트를 정의합니다.# 1. Researcher Agent comprehensive_researcher = Agent( name="comprehensive_researcher", model=model_name, description="The primary researcher that can access both internal zoo data and external knowledge from Wikipedia.", instruction=""" You are a helpful research assistant. Your goal is to fully answer the user's PROMPT. You have access to two tools: 1. A tool for getting specific data about animals AT OUR ZOO (names, ages, locations). 2. A tool for searching Wikipedia for general knowledge (facts, lifespan, diet, habitat). First, analyze the user's PROMPT. - If the prompt can be answered by only one tool, use that tool. - If the prompt is complex and requires information from both the zoo's database AND Wikipedia, you MUST use both tools to gather all necessary information. - Synthesize the results from the tool(s) you use into preliminary data outputs. PROMPT: { PROMPT } """, tools=[ wikipedia_tool ], output_key="research_data" # A key to store the combined findings ) # 2. Response Formatter Agent response_formatter = Agent( name="response_formatter", model=model_name, description="Synthesizes all information into a friendly, readable response.", instruction=""" You are the friendly voice of the Zoo Tour Guide. Your task is to take the RESEARCH_DATA and present it to the user in a complete and helpful answer. - First, present the specific information from the zoo (like names, ages, and where to find them). - Then, add the interesting general facts from the research. - If some information is missing, just present the information you have. - Be conversational and engaging. RESEARCH_DATA: { research_data } """ )comprehensive_researcher에이전트는 작업의 '두뇌'입니다. 공유된State에서 사용자의 프롬프트를 가져와 Wikipedia 도구를 검사하고, 어떤 도구를 사용하여 답을 찾을지 결정합니다.response_formatter에이전트의 역할은 프레젠테이션입니다. 연구원 에이전트가 수집한 원시 데이터 (상태를 통해 전달됨)를 가져와 LLM의 언어 기술을 사용하여 친근한 대화형 대답으로 변환합니다.
- 워크플로 에이전트 정의:
agent.py하단에 이 코드 블록을 추가하여 순차적 에이전트tour_guide_workflow를 정의합니다.tour_guide_workflow = SequentialAgent( name="tour_guide_workflow", description="The main workflow for handling a user's request about an animal.", sub_agents=[ comprehensive_researcher, # Step 1: Gather all data response_formatter, # Step 2: Format the final response ] )
방식:SequentialAgent라는 특수한 유형의 에이전트로, 스스로 생각하지 않습니다. 이 에이전트의 유일한 작업은 고정된 순서로sub_agents(연구원 및 포맷터) 목록을 실행하고 공유 메모리를 자동으로 다음 에이전트로 전달하는 것입니다. - 기본 워크플로 어셈블:
agent.py하단에 다음 최종 코드 블록을 추가하여root_agent를 정의합니다.root_agent = Agent( name="greeter", model=model_name, description="The main entry point for the Zoo Tour Guide.", instruction=""" - Let the user know you will help them learn about the animals we have in the zoo. - When the user responds, use the 'add_prompt_to_state' tool to save their response. After using the tool, transfer control to the 'tour_guide_workflow' agent. """, tools=[add_prompt_to_state], sub_agents=[tour_guide_workflow] )root_agent를 모든 새로운 대화의 시작점으로 사용합니다. 이 에이전트의 주요 역할은 전체 프로세스를 조정하는 것입니다. 이 모델은 초기 컨트롤러 역할을 하며 대화의 첫 번째 단계를 관리합니다.
전체 agent.py 파일
이제 agent.py 파일이 완성되었습니다. 이러한 방식으로 빌드하면 도구, 작업자 에이전트, 관리자 에이전트 등 각 구성요소가 최종적인 지능형 시스템을 만드는 데 어떤 역할을 하는지 알 수 있습니다.
전체 파일은 다음과 같습니다.
import os
import logging
import google.cloud.logging
from dotenv import load_dotenv

from google.adk import Agent
from google.adk.agents import SequentialAgent
from google.adk.tools.tool_context import ToolContext
from google.adk.tools.langchain_tool import LangchainTool

from langchain_community.tools import WikipediaQueryRun
from langchain_community.utilities import WikipediaAPIWrapper

import google.auth
import google.auth.transport.requests
import google.oauth2.id_token

# --- Setup Logging and Environment ---

cloud_logging_client = google.cloud.logging.Client()
cloud_logging_client.setup_logging()

load_dotenv()

model_name = os.getenv("MODEL")
# Greet user and save their prompt

def add_prompt_to_state(
    tool_context: ToolContext, prompt: str
) -> dict[str, str]:
    """Saves the user's initial prompt to the state."""
    tool_context.state["PROMPT"] = prompt
    logging.info(f"[State updated] Added to PROMPT: {prompt}")
    return {"status": "success"}

# Configuring the Wikipedia Tool
wikipedia_tool = LangchainTool(
    tool=WikipediaQueryRun(api_wrapper=WikipediaAPIWrapper())
)
# 1. Researcher Agent
comprehensive_researcher = Agent(
    name="comprehensive_researcher",
    model=model_name,
    description="The primary researcher that can access both internal zoo data and external knowledge from Wikipedia.",
    instruction="""
    You are a helpful research assistant. Your goal is to fully answer the user's PROMPT.
    You have access to two tools:
    1. A tool for getting specific data about animals AT OUR ZOO (names, ages, locations).
    2. A tool for searching Wikipedia for general knowledge (facts, lifespan, diet, habitat).

    First, analyze the user's PROMPT.
    - If the prompt can be answered by only one tool, use that tool.
    - If the prompt is complex and requires information from both the zoo's database AND Wikipedia,
      you MUST use both tools to gather all necessary information.
    - Synthesize the results from the tool(s) you use into preliminary data outputs.

    PROMPT:
    { PROMPT }
    """,
    tools=[
        wikipedia_tool
    ],
    output_key="research_data" # A key to store the combined findings
)

# 2. Response Formatter Agent
response_formatter = Agent(
    name="response_formatter",
    model=model_name,
    description="Synthesizes all information into a friendly, readable response.",
    instruction="""
    You are the friendly voice of the Zoo Tour Guide. Your task is to take the
    RESEARCH_DATA and present it to the user in a complete and helpful answer.

    - First, present the specific information from the zoo (like names, ages, and where to find them).
    - Then, add the interesting general facts from the research.
    - If some information is missing, just present the information you have.
    - Be conversational and engaging.

    RESEARCH_DATA:
    { research_data }
    """
)
tour_guide_workflow = SequentialAgent(
    name="tour_guide_workflow",
    description="The main workflow for handling a user's request about an animal.",
    sub_agents=[
        comprehensive_researcher, # Step 1: Gather all data
        response_formatter,       # Step 2: Format the final response
    ]
)
root_agent = Agent(
    name="greeter",
    model=model_name,
    description="The main entry point for the Zoo Tour Guide.",
    instruction="""
    - Let the user know you will help them learn about the animals we have in the zoo.
    - When the user responds, use the 'add_prompt_to_state' tool to save their response.
    After using the tool, transfer control to the 'tour_guide_workflow' agent.
    """,
    tools=[add_prompt_to_state],
    sub_agents=[tour_guide_workflow]
)
다음으로 배포할 차례입니다.
9. 배포를 위한 애플리케이션 준비
최종 구조 확인
배포하기 전에 프로젝트 디렉터리에 올바른 파일이 포함되어 있는지 확인합니다.
zoo_guide_agent폴더가 다음과 같이 표시되는지 확인합니다.zoo_guide_agent/ ├── .env ├── __init__.py ├── agent.py └── requirements.txt
IAM 권한 설정
로컬 코드가 준비되면 다음 단계는 에이전트가 클라우드에서 사용할 ID를 설정하는 것입니다.
- 터미널에서 변수를 셸 세션에 로드합니다.
source .env - Cloud Run 서비스에 전용 서비스 계정을 만들어 자체적인 특정 권한을 갖도록 합니다. 터미널에 다음을 붙여넣습니다.
gcloud iam service-accounts create ${SA_NAME} \ --display-name="Service Account for lab 2 " - 서비스 계정에 Vertex AI 사용자 역할을 부여합니다. 이 역할은 Google 모델을 호출할 수 있는 권한을 제공합니다.
# Grant the "Vertex AI User" role to your service account
gcloud projects add-iam-policy-binding $PROJECT_ID \
  --member="serviceAccount:$SERVICE_ACCOUNT" \
  --role="roles/aiplatform.user"
10. ADK CLI를 사용하여 에이전트 배포
로컬 코드가 준비되고 Google Cloud 프로젝트가 준비되었으므로 이제 에이전트를 배포할 차례입니다. 전체 배포 워크플로를 자동화하는 편리한 도구인 adk deploy cloud_run 명령어를 사용합니다. 이 단일 명령어를 사용하면 코드를 패키징하고, 컨테이너 이미지를 빌드하고, Artifact Registry에 푸시하고, Cloud Run에서 서비스를 실행하여 웹에서 액세스할 수 있게 됩니다.
- 터미널에서 다음 명령어를 실행하여 에이전트를 배포합니다.
# Run the deployment command uvx --from google-adk==1.14.0 \ adk deploy cloud_run \ --project=$PROJECT_ID \ --region=europe-west1 \ --service_name=zoo-tour-guide \ --with_ui \ . \ -- \ --labels=dev-tutorial=codelab-adk \ --service-account=$SERVICE_ACCOUNTuvx명령어를 사용하면 이러한 도구를 전역으로 설치하지 않고도 Python 패키지로 게시된 명령줄 도구를 실행할 수 있습니다. - 다음과 같은 메시지가 표시되면
Deploying from source requires an Artifact Registry Docker repository to store built containers. A repository named [cloud-run-source-deploy] in region
[europe-west1] will be created.

Do you want to continue (Y/n)?
Y를 입력하고 Enter 키를 누릅니다. - 다음과 같은 메시지가 표시되면
Allow unauthenticated invocations to [your-service-name] (y/N)?.
y를 입력하고 Enter 키를 누릅니다. 이렇게 하면 이 실습에서 쉽게 테스트할 수 있도록 인증되지 않은 호출이 허용됩니다. 명령어가 성공적으로 실행되면 배포된 Cloud Run 서비스의 URL이 제공됩니다. (https://zoo-tour-guide-123456789.europe-west1.run.app와 같이 표시됩니다.) - 다음 작업을 위해 배포된 Cloud Run 서비스의 URL을 복사합니다.
11. 배포된 에이전트 테스트
이제 에이전트가 Cloud Run에서 라이브로 실행되므로 테스트를 수행하여 배포가 성공적이었고 에이전트가 예상대로 작동하는지 확인합니다. 공개 서비스 URL (예: https://zoo-tour-guide-123456789.europe-west1.run.app/)을 사용하여 ADK의 웹 인터페이스에 액세스하고 에이전트와 상호작용합니다.
- 웹브라우저에서 공개 Cloud Run 서비스 URL을 엽니다.
--with_ui flag를 사용했으므로 ADK 개발자 UI가 표시됩니다. - 오른쪽 상단에서
Token Streaming를 사용 설정합니다.
이제 동물원 에이전트와 상호작용할 수 있습니다. hello를 입력하고 Enter 키를 눌러 새 대화를 시작합니다.- 결과를 확인합니다. 에이전트는 다음과 같은 인사말로 빠르게 응답해야 합니다.
"Hello! I'm your Zoo Tour Guide. I can help you learn about the amazing animals we have here. What would you like to know or explore today?"
- 에이전트에게 다음과 같은 질문을 합니다.
Where can I find the polar bears in the zoo and what is their diet?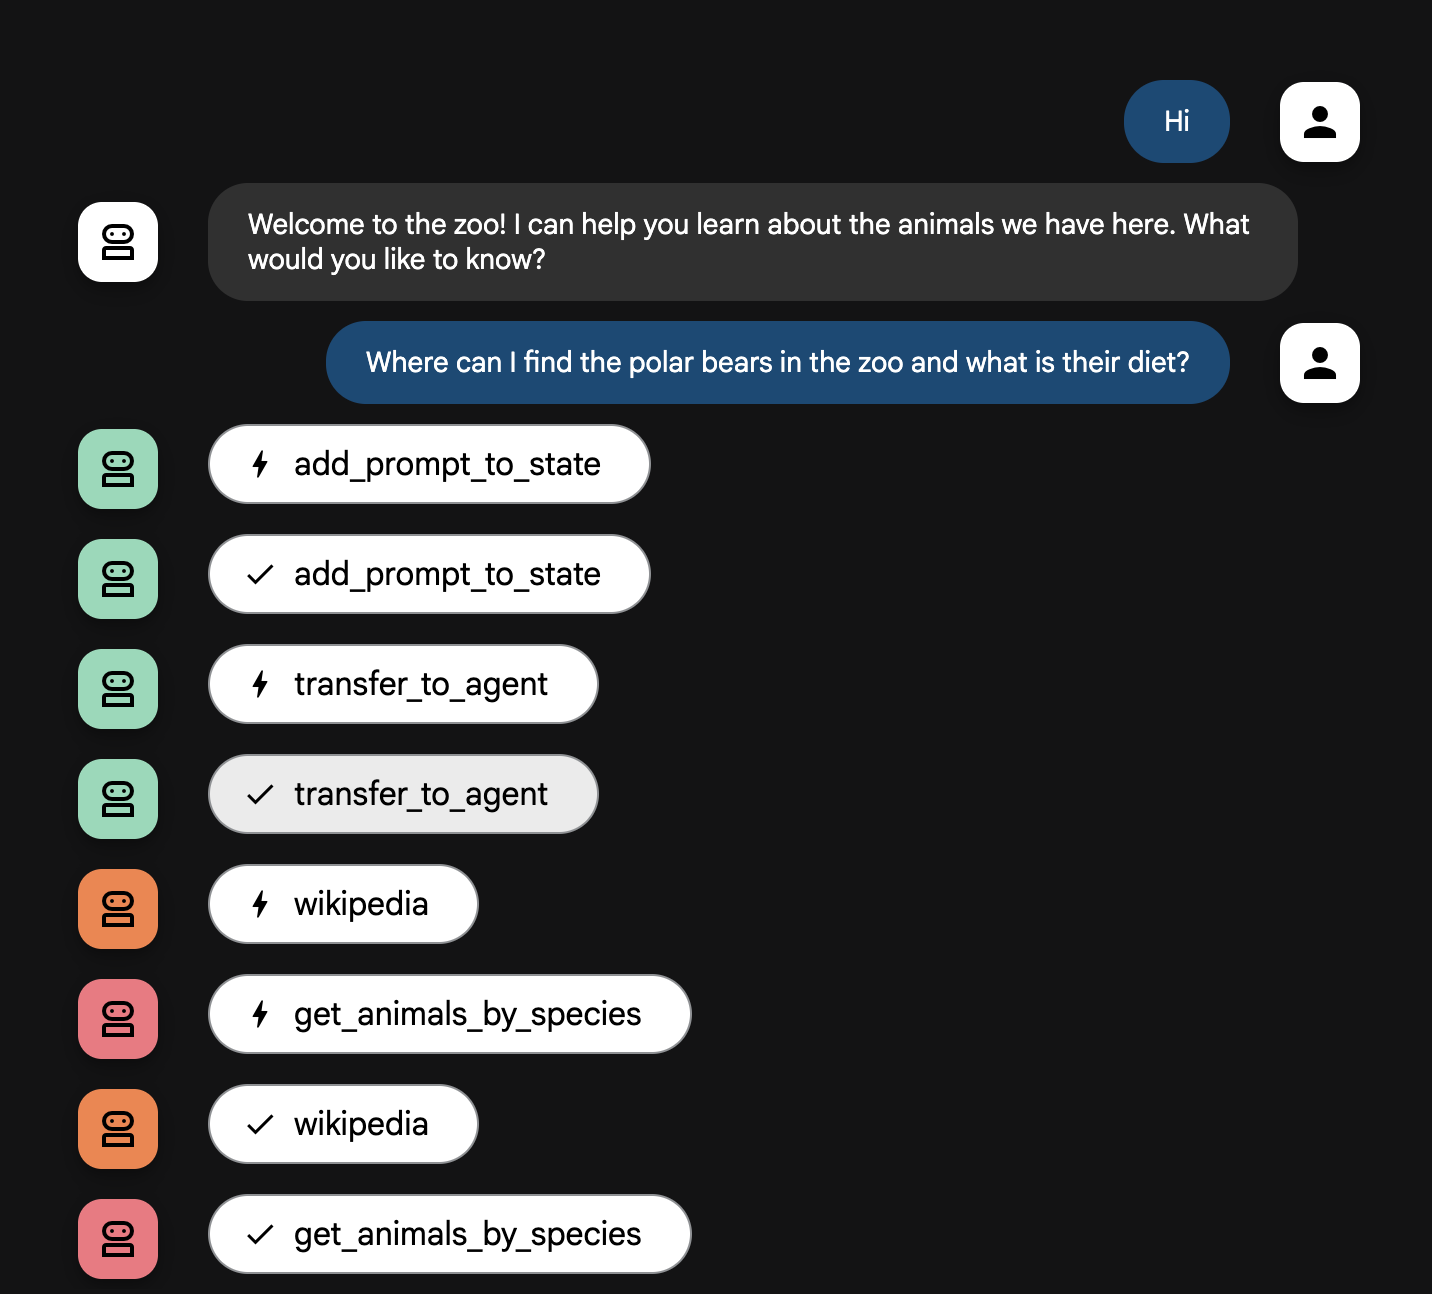
상담사 흐름 설명
시스템은 지능형 멀티 에이전트 팀으로 작동합니다. 이 프로세스는 명확한 순서로 관리되어 사용자의 질문부터 최종적인 상세한 답변까지 원활하고 효율적인 흐름을 보장합니다.
1. 동물원 안내원 (안내 데스크)
전체 프로세스는 안내원 에이전트로부터 시작됩니다.
- 역할: 대화를 시작합니다. 사용자에게 인사하고 어떤 동물에 대해 배우고 싶은지 묻도록 지시받았습니다.
- 도구: 사용자가 대답하면 안내원은 add_prompt_to_state 도구를 사용하여 사용자의 정확한 단어를 캡처하고 (예: '사자에 대해 알려 줘') 시스템의 메모리에 저장합니다.
- 연결: 프롬프트를 저장한 후 즉시 하위 에이전트인 tour_guide_workflow로 제어권을 넘깁니다.
2. 종합 연구원 (슈퍼 연구원)
기본 워크플로의 첫 번째 단계이자 작업의 '두뇌'입니다. 이제 대규모 팀 대신 사용 가능한 모든 정보에 액세스할 수 있는 단일한 고숙련 에이전트를 보유하게 됩니다.
- 역할: 사용자의 질문을 분석하고 지능적인 계획을 수립합니다. 언어 모델의 도구 사용 기능을 사용하여 다음이 필요한지 결정합니다.
- 웹의 일반적인 지식(Wikipedia API를 통해)
- 복잡한 질문인 경우 둘 다
3. 대답 포맷터 (제시자)
종합 연구원이 모든 사실을 수집한 후 실행되는 마지막 에이전트입니다.
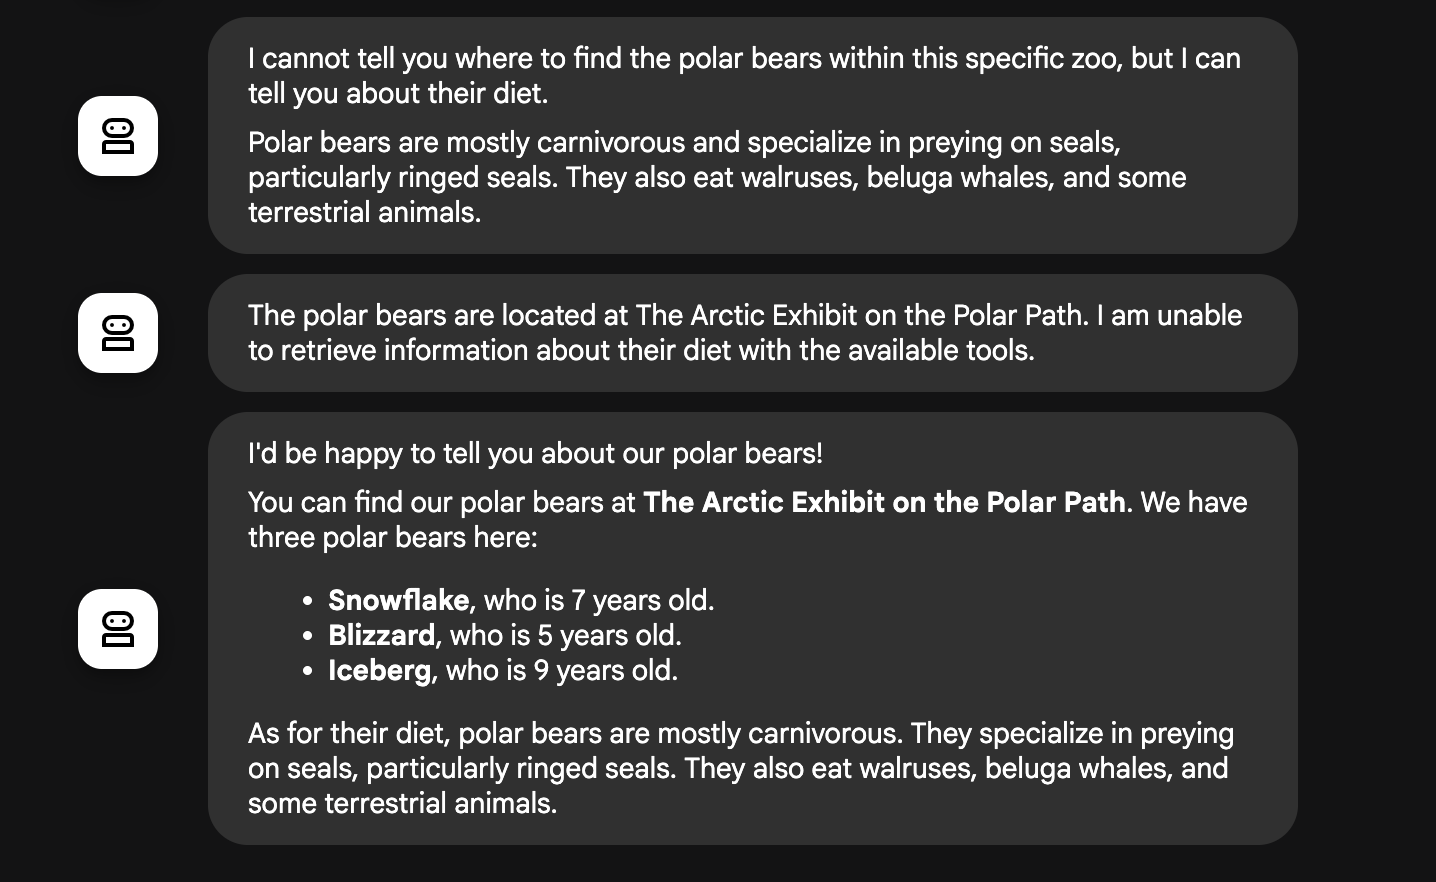
- 역할: 동물원 투어 가이드의 친절한 목소리 역할을 합니다. 이 레이어는 원시 데이터(하나 또는 두 소스 모두에서 가져올 수 있음)를 가져와서 다듬습니다.
- 작업: 모든 정보를 하나의 일관성 있고 흥미로운 답변으로 종합합니다. 지시에 따라 먼저 특정 동물원에 대한 정보를 제시한 다음 흥미로운 일반적인 사실을 추가합니다.
- 최종 결과: 이 에이전트가 생성한 텍스트는 사용자가 채팅 창에서 보게 되는 완전하고 상세한 답변입니다.
에이전트 빌드에 대해 자세히 알아보려면 다음 리소스를 확인하세요.
12. 환경 정리
이 튜토리얼에서 사용된 리소스 비용이 Google Cloud 계정에 청구되지 않도록 하려면 리소스가 포함된 프로젝트를 삭제하거나 프로젝트를 유지하고 개별 리소스를 삭제하세요.
Cloud Run 서비스 및 이미지 삭제
Google Cloud 프로젝트는 유지하면서 이 실습에서 만든 특정 리소스만 삭제하려면 실행 중인 서비스와 레지스트리에 저장된 컨테이너 이미지를 모두 삭제해야 합니다.
- 터미널에서 다음 명령어를 실행합니다.
gcloud run services delete zoo-tour-guide --region=europe-west1 --quiet
gcloud artifacts repositories delete cloud-run-source-deploy --location=europe-west1 --quiet
프로젝트 삭제 (선택사항)
이 실습을 위해 특별히 새 프로젝트를 만들었으며 다시 사용할 계획이 없다면 전체 프로젝트를 삭제하는 것이 가장 쉬운 정리 방법입니다. 이렇게 하면 서비스 계정 및 숨겨진 빌드 아티팩트를 비롯한 모든 리소스가 완전히 삭제됩니다.
- 터미널에서 다음 명령어를 실행합니다. [YOUR_PROJECT_ID] 를 실제 프로젝트 ID로 바꿉니다.
gcloud projects delete $PROJECT_ID
13. 축하합니다
Google Cloud에 멀티 에이전트 AI 애플리케이션을 성공적으로 빌드하고 배포했습니다.
요약
이 실습에서는 빈 디렉터리에서 공개적으로 액세스할 수 있는 라이브 AI 서비스로 전환했습니다. 빌드한 내용은 다음과 같습니다.
- 특화된 팀을 만들었습니다: 일반적인 AI 하나 대신 사실을 찾는 '연구원'과 답변을 다듬는 '서식 지정자'를 만들었습니다.
- 도구 제공: Wikipedia API를 사용하여 에이전트를 외부 세계에 연결했습니다.
- 배송됨: 로컬 Python 코드를 가져와 Cloud Run에 서버리스 컨테이너로 배포하고 전용 서비스 계정으로 보안을 유지했습니다.
학습한 내용
- ADK를 사용하여 배포하기 위한 Python 프로젝트를 구성하는 방법
[SequentialAgent](https://google.github.io/adk-docs/agents/workflow-agents/sequential-agents/)를 사용하여 멀티 에이전트 워크플로를 구현하는 방법- Wikipedia API와 같은 외부 도구를 통합하는 방법
adk deploy명령어를 사용하여 Cloud Run에 에이전트를 배포하는 방법
14. 설문조사
결과: