
1. 概要
このラボでは、Vertex AI Gen AI Evaluation Service を使用して大規模言語モデルを評価する方法を学習します。SDK を使用して評価ジョブを実行し、結果を比較して、モデルのパフォーマンスとプロンプト設計に関するデータドリブンな意思決定を行います。
このラボでは、一般的な評価ワークフローについて説明します。まず、シンプルな計算ベースの指標から始め、よりニュアンスのあるモデルベースの評価に進みます。また、特定の目標に合わせてカスタム指標を作成し、Vertex AI Experiments を使用して作業を追跡する方法も学習します。
学習内容
このラボでは、次のタスクの実行方法について学びます。
- コンピューティング ベースとモデルベースの指標を使用してモデルを評価する。
- 評価をプロダクトの目標に合わせるためのカスタム指標を作成する。
- さまざまなプロンプト テンプレートを並べて比較する。
- 複数のペルソナベースのプロンプトをテストして、最も効果的なバージョンを見つける。
- Vertex AI Experiments を使用して評価の実行を追跡して可視化する。
参照
- コードサンプル: このラボは、Google Cloud 生成 AI リポジトリの例に基づいています。
- ベース: Vertex AI Gen AI Evaluation のドキュメント
- データセット: 指示追従評価用の OpenOrca データセット
2. プロジェクトの設定
Google アカウント
個人の Google アカウントをまだお持ちでない場合は、Google アカウントを作成する必要があります。
仕事用または学校用アカウントではなく個人アカウントを使用 してください。
Google Cloud コンソールにログインする
個人の Google アカウントを使用して Google Cloud コンソール にログインします。
課金を有効にする
課金を有効にするには、2 つの方法があります。個人の請求先アカウントを使用するか、次の手順でクレジットを引き換えることができます。
Google Cloud クレジットを引き換える(省略可)
このワークショップを実行するには、クレジットが設定された請求先アカウントが必要です。開始するには、この Codelab の上部にあるバナーのクレジットを使用します。すでに請求先アカウントに接続している場合は、この手順をスキップできます。
個人の請求先アカウントを設定する
Google Cloud クレジットを使用して課金を設定した場合は、この手順をスキップできます。
個人の請求先アカウントを設定するには、こちらにアクセスして課金を有効にします(Cloud コンソール)。
注意事項:
- このラボを完了するには、Cloud リソースで 1 米ドル未満の費用がかかります。
- 追加の料金が発生しないように、このラボの最後の手順に沿ってリソースを削除できます。
- 新規ユーザーは 300 米ドル分の無料トライアルをご利用いただけます。
プロジェクトの作成(省略可)
このラボで使用する現在のプロジェクトがない場合は、こちらで新しいプロジェクトを作成します。
3. Vertex AI Workbench 環境を設定する
まず、事前構成されたノートブック環境にアクセスし、必要な依存関係をインストールします。
Vertex AI Workbench にアクセスする
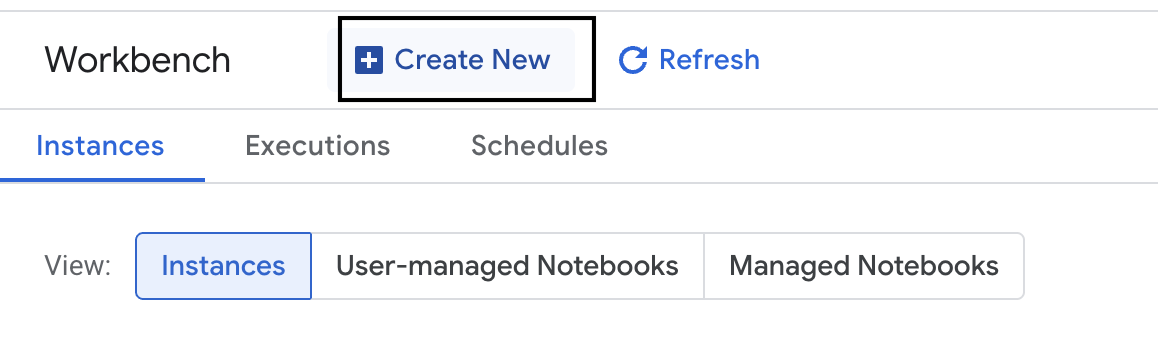
- Google Cloud コンソールで、ナビゲーション メニュー ☰ > [Vertex AI] > [ダッシュボード] をクリックして、Vertex AI に移動します。

- [すべての推奨 API を有効化] をクリックします。注: この手順が完了するまでお待ちください。
- 左側の [ワークベンチ] をクリックして、新しいワークベンチ インスタンスを作成します。
- ワークベンチ インスタンスにevaluation-workbenchという名前を付けて、[作成]をクリックします。
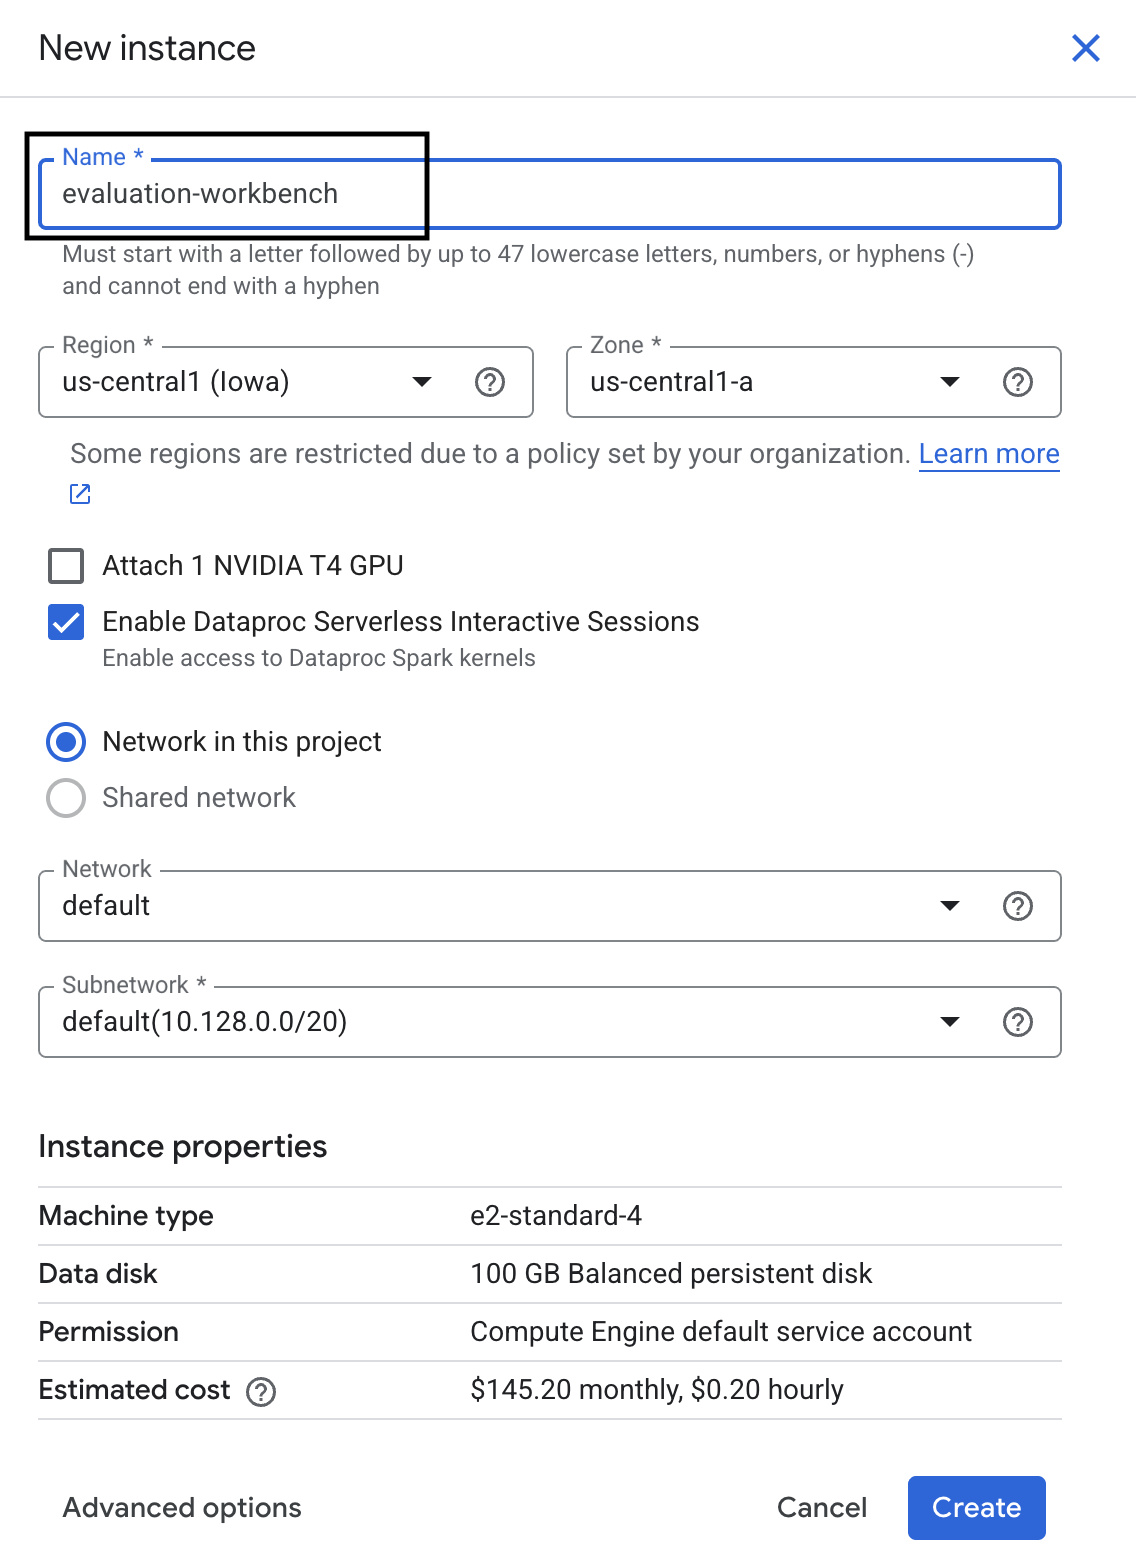
- ワークベンチの設定が完了するまで待ちます。これには数分かかることがあります。

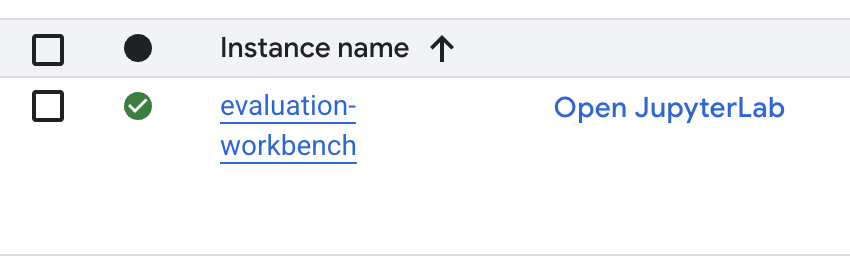
- ワークベンチがプロビジョニングされたら、[JupyterLab を開く] をクリックします。
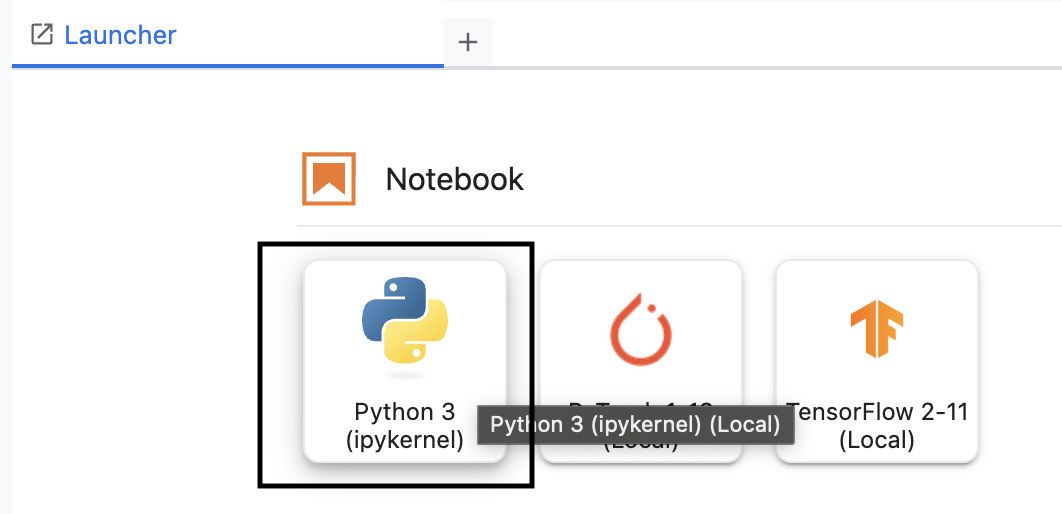
- ワークベンチで、新しい Python3 ノートブックを作成します。
この環境の機能の詳細については、Vertex AI Workbench の公式ドキュメントをご覧ください。
パッケージをインストールして環境を構成する
- ノートブックの最初のセルで、次のインポート ステートメントを追加して実行(SHIFT+ENTER)し、Vertex AI SDK(評価コンポーネントを含む)とその他の必要なパッケージをインストールします。
%pip install -U -q google-cloud-aiplatform[evaluation] %pip install -U -q datasets anthropic[vertex] openai - 新しくインストールしたパッケージを使用するには、次のコード スニペットを実行してカーネルを再起動することをおすすめします。
# Automatically restart kernel after installation so that your environment can access the new packages. import IPython app = IPython.Application.instance() app.kernel.do_shutdown(True) - 以下をプロジェクト ID とロケーションに置き換えて、次のセルを実行します。デフォルトの場所は
europe-west1に設定されていますが、Vertex AI Workbench インスタンスと同じ場所を使用する必要があります。# Configure your project settings PROJECT_ID = "YOUR PROJECT ID" LOCATION = "europe-west1" - 新しいセルで次のコードを実行して、このラボに必要なすべての Python ライブラリをインポートします。
from anthropic import AnthropicVertex
from google.auth import default, transport
import openai
import pandas as pd
from vertexai.evaluation import (
   EvalTask,
   MetricPromptTemplateExamples,
   PairwiseMetric,
   PointwiseMetric,
   PointwiseMetricPromptTemplate,
)
from vertexai.generative_models import GenerativeModel
from vertexai.preview.evaluation import notebook_utils
4. 評価データセットを設定する
このチュートリアルでは、OpenOrca データセット データセットから 10 個のサンプルを使用します。これにより、評価時間を管理可能な範囲に抑えながら、モデル間の意味のある違いを確認するのに十分なデータが得られます。
💡 プロのヒント: 本番環境では、統計的に有意な結果を得るために 100 ~ 500 個のサンプルが必要ですが、10 個のサンプルは学習と迅速なプロトタイピングに最適です。
データセットを準備する
- 新しいセルで次のセルを実行して、データを読み込み、pandas DataFrame に変換し、評価タスクで明確にするために
response列の名前をreferenceに変更して、10 個の例のランダム サンプルを作成します。from datasets import load_dataset ds = ( load_dataset( "Open-Orca/OpenOrca", data_files="1M-GPT4-Augmented.parquet", split="train[:100]", ) .to_pandas() .drop(columns=["id"]) .rename(columns={"response": "reference"}) ) dataset = ds.sample(n=10) - 前のセルの実行が完了したら、次のセルに次のコードを追加して実行し、評価データセットの最初の数行を表示します。
dataset.head()
5. コンピューティング ベースの指標を使用してベースラインを確立する
このタスクでは、コンピューティング ベースの指標を使用してベースライン スコアを確立します。このアプローチは高速で、今後の改善を測定するための客観的なベンチマークを提供します。
要約タスクの標準的な指標である ROUGE (Recall-Oriented Understudy for Gisting Evaluation)を使用します。これは、モデルが生成したレスポンスの単語のシーケンス(n-gram)を、グラウンド トゥルースの reference テキストの単語と比較することで機能します。
ベースライン評価の実行
- 新しいセルで、次のセルを追加して実行し、テストするモデル
gemini-2.0-flashを定義します。generation_configには、temperatureやmax_output_tokensなど、モデルの出力に影響するパラメータが含まれています。# Model to be evaluated model = GenerativeModel( "gemini-2.0-flash", generation_config={"temperature": 0.6, "max_output_tokens": 256, "top_k": 1}, )GenerativeModelクラスは、Vertex AI SDK で大規模言語モデルを操作するための主要なインターフェースです。 - 次のセルに次のコードを追加して実行し、
EvalTaskを作成して実行します。Vertex AI Evaluation SDK のこのオブジェクトは、評価を調整します。データセットと計算する指標(この場合はrouge_l_sum)を使用して構成します。# Define an EvalTask with ROUGE-L-SUM metric rouge_eval_task = EvalTask( dataset=dataset, metrics=["rouge_l_sum"], ) rouge_result = rouge_eval_task.evaluate( model=model, prompt_template="# System_prompt\n{system_prompt} # Question\n{question}", ) - 次のセルでこのコードを実行して結果を表示します。
notebook_utils.display_eval_result(rouge_result)display_eval_result()ユーティリティは、平均スコアと行ごとの結果を表示します。
6. 省略可: モデルベースのポイントワイズ指標で評価する
注: このセクションは、提供された無料クレジットの範囲内で実行されない可能性があります。
ROUGE は便利ですが、語彙の重複のみを測定します(一致する単語のみをカウントし、コンテキスト、同義語、言い換えを理解しません)。そのため、レスポンスが流暢であるか論理的であるかを判断するのに最適ではありません。モデルのパフォーマンスをより深く理解するには、モデルベースのポイントワイズ指標を使用します。
この方法では、別の LLM(「判定モデル」)が、流暢さや一貫性など、事前定義された一連の基準に基づいて各レスポンスを個別に評価します。
モデルベースの指標の詳細をご覧ください。
ポイントワイズ評価を実行する
- 新しいセルで以下を実行して、インタラクティブなプルダウン メニューを作成します。この実行では、リストから [coherence] を選択します。
#Select a pointwise metric to use import ipywidgets as widgets pointwise_single_turn_metrics = [ metric for metric in MetricPromptTemplateExamples.list_example_metric_names() if not metric.startswith("pairwise") and not metric.startswith("multi_turn") ] dropdown = widgets.Dropdown( options=pointwise_single_turn_metrics, description="Select a metric:", font_weight="bold", style={"description_width": "initial"}, ) def dropdown_eventhandler(change): global POINTWISE_METRIC if change["type"] == "change" and change["name"] == "value": POINTWISE_METRIC = change.new print("Selected:", change.new) POINTWISE_METRIC = dropdown.value dropdown.observe(dropdown_eventhandler, names="value") display(dropdown) - 新しいセルで、選択したモデルベースの指標を使用して
EvalTaskを再度実行します。Vertex AI Evaluation Service は、判定モデルのプロンプトを作成します。これには、元のプロンプト、参照回答、候補モデルのレスポンス、選択した指標の手順が含まれます。判定モデルは、数値スコアとその評価の説明を返します。注: このステップの実行には数分かかります。pointwise_result = EvalTask( dataset=dataset, metrics=[POINTWISE_METRIC], ).evaluate( model=model, prompt_template="# System_prompt\n{system_prompt} # Question\n{question}", )
結果を表示する
評価が完了したら、次のステップで出力を分析します。
- 新しいセルで次のコードを実行して、選択した指標の平均スコアを示す概要指標を表示します。
notebook_utils.display_eval_result(pointwise_result) - 次のセルで以下を実行して、行ごとの内訳を表示します。これには、判定モデルのスコアの根拠が含まれます。この定性的なフィードバックは、レスポンスが特定のスコアになった理由を理解するのに役立ちます。
notebook_utils.display_explanations(pointwise_result, num=1, metrics=[POINTWISE_METRIC])
7. より詳細な分析情報のためのカスタム指標を作成する
流暢さなどの事前構築済みの指標は便利ですが、特定のプロダクトでは、独自の目標に対するパフォーマンスを測定する必要があることがよくあります。カスタム ポイントワイズ指標を使用すると、独自の評価基準とルーブリックを定義できます。
このタスクでは、summarization_helpfulness という新しい指標をゼロから作成します。
カスタム指標を定義して実行する
- 新しいセルで以下を実行して、カスタム指標を定義します。
PointwiseMetricPromptTemplateには、指標の構成要素が含まれています。- criteria: 判定モデルに評価する特定のディメンション(「Key Information」、「Conciseness」、「No Distortion」)を伝えます。
- rating_rubric: 各スコアの意味を定義する 5 段階のスコアリング スケールを提供します。
- input_variables: データセットの追加の列を判定モデルに渡します。これにより、評価の実行に必要なコンテキストが提供されます。
# This new custom metric evaluates the actual quality and usefulness of the summary. summarization_helpfulness_metric = PointwiseMetric( metric="summarization_helpfulness", metric_prompt_template=PointwiseMetricPromptTemplate( criteria={ "Key Information": "Does the summary capture the most critical pieces of information from the original text? It should not miss the main topic or key takeaways.", "Conciseness": "Is the summary brief and to the point? It should avoid unnecessary words or repetitive information.", "No Distortion": "Does the summary introduce information or opinions that were NOT present in the original text? It must accurately reflect the source material without adding hallucinations." }, rating_rubric={ "5": "Excellent: Captures all key information, is highly concise, and has zero distortion.", "4": "Good: Captures most key information with minor omissions, is concise, and has no distortion.", "3": "Satisfactory: Captures the main idea but misses some key details OR is not very concise.", "2": "Unsatisfactory: Misses the main idea of the original text OR contains minor distortions/hallucinations.", "1": "Poor: Is completely irrelevant, fails to summarize the text, OR contains significant distortions.", }, input_variables=["prompt", "reference"], ), ) - 次のセルで次のコードを実行して、新しいカスタム指標で
EvalTaskを実行します。# You would then update the EvalTask to use this new metric pointwise_result = EvalTask( dataset=dataset, metrics=[summarization_helpfulness_metric], ).evaluate( model=model, prompt_template="# System_prompt\n{system_prompt} # Question\n{question}", ) - 新しいセルで以下を実行して結果を表示します。
notebook_utils.display_eval_result(pointwise_result)
8. ペアワイズ評価でモデルを比較する
2 つのモデルのうち、特定のタスクでどちらのモデルのパフォーマンスが高いかを判断する必要がある場合は、ペアワイズ モデルベースの評価を使用できます。この方法は A/B テストの一種で、判定モデルが勝者を決定し、データドリブンなモデル選択のための直接的な比較を提供します。
モデル:
- 候補モデル: モデル変数(以前に
gemini-2.0-flashとして定義)が.evaluate()メソッドに渡されます。これがテストするメインモデルです。 - ベースライン モデル: 2 番目のモデル
gemini-2.0-flash-liteは、PairwiseMetric クラス内で指定されます。これが比較対象のモデルです。
ペアワイズ評価を実行する
- 新しいセルで次のコードを追加して実行し、インタラクティブなプルダウン メニューを作成します。これにより、比較に使用するペアワイズ指標を選択できます。この実行では、pairwise_summarization_quality を選択します。
from IPython.display import display import ipywidgets as widgets pairwise_single_turn_metrics = [ metric for metric in MetricPromptTemplateExamples.list_example_metric_names() if metric.startswith("pairwise") and "multi_turn" not in metric ] dropdown = widgets.Dropdown( options=pairwise_single_turn_metrics, description="Select a metric:", font_weight="bold", style={"description_width": "initial"}, ) def dropdown_eventhandler(change): global POINTWISE_METRIC if change["type"] == "change" and change["name"] == "value": POINTWISE_METRIC = change.new print("Selected:", change.new) def dropdown_eventhandler(change): global PAIRWISE_METRIC_NAME if change["type"] == "change" and change["name"] == "value": PAIRWISE_METRIC_NAME = change.new print("Selected:", change.new) PAIRWISE_METRIC_NAME = dropdown.value dropdown.observe(dropdown_eventhandler, names="value") display(dropdown) - 次のセルに次のコードを追加して実行し、
EvalTaskを構成して実行します。PairwiseMetricクラスを使用してベースライン モデル(gemini-2.0-flash-lite)を定義し、候補モデル(gemini-2.0-flash)を.evaluate()メソッドに渡す方法に注意してください。pairwise_result = EvalTask( dataset=dataset, metrics=[ PairwiseMetric( metric=PAIRWISE_METRIC_NAME, metric_prompt_template=MetricPromptTemplateExamples.get_prompt_template( PAIRWISE_METRIC_NAME ), # Define a baseline model to compare against baseline_model=GenerativeModel("gemini-2.0-flash-lite"), ) ], ).evaluate( # Specify a candidate model for pairwise comparison model=model, prompt_template="# System_prompt\n{system_prompt} # Question\n{question}", ) - 新しいセルで次のコードを追加して実行し、結果を表示します。概要テーブルには、各モデルの「勝率」が表示され、判定モデルがより頻繁に優先したモデルが示されます。
notebook_utils.display_eval_result(pairwise_result)
9. 省略可: ペルソナ ドリブン プロンプトを評価する
注: このセクションは、提供された無料クレジットの範囲内で実行されない可能性があります。
このタスクでは、モデルにさまざまなペルソナを採用するよう指示する複数のプロンプト テンプレートをテストします。このプロセスは、プロンプト エンジニアリングまたはプロンプト設計と呼ばれることが多く、特定のユースケースに最適なプロンプトを体系的に見つけることができます。
要約データセットを準備する
この評価を行うには、データセットに次のフィールドが含まれている必要があります。
instruction: モデルに与えるコアタスク。この場合は、「次の記事を要約してください」という簡単なものです。context: モデルが処理する必要があるソーステキスト。ここでは、4 つの異なるニュース スニペットを提供しています。reference: グラウンド トゥルースまたは「ゴールド スタンダード」の要約。モデルが生成した出力は、このテキストと比較され、ROUGE や要約の品質などの指標のスコアが計算されます。
- 新しいセルで次のコードを追加して実行し、要約タスクの
pandas.DataFrameを作成します。instruction = "Summarize the following article: \n" context = [ "Typhoon Phanfone has killed at least one person, a US airman on Okinawa who was washed away by high waves. Thousands of households have lost power and Japan's two largest airlines have suspended many flights. The storm also forced the suspension of the search for people missing after last week's volcanic eruption. The storm-tracking website Tropical Storm Risk forecasts that Phanfone will rapidly lose power over the next few hours as it goes further into the Pacific Ocean. Typhoon Phanfone was downgraded from an earlier status of a super typhoon, but the Japan Meteorological Agency had warned it was still a dangerous storm. Japan averages 11 typhoons a year, according to its weather agency. The typhoon made landfall on Monday morning near the central city of Hamamatsu, with winds of up to 180 km/h (112 mph). The airman was one of three US military personnel swept away by high waves whipped up by the typhoon off southern Okinawa island, where the US has a large military base. The remaining two are still missing. A police spokesman said they had been taking photographs of the sea. A university student who was surfing off the seas of Kanagawa Prefecture, south of Tokyo, was also missing, national broadcast NHK reports. It said at least 10 people had been injured and 9,500 houses were without power. The storm was expected to deposit about 100mm of rain on Tokyo over 24 hours, according to the Transport Ministry website. Many schools were closed on Monday and two car companies in Japan halted production at some plants ahead of the storm. More than 174 domestic flights were affected nationwide, NHK state broadcaster said on Sunday. On Sunday, heavy rain delayed the Japanese Formula One Grand Prix in Suzaka. French driver Jules Bianchi lost control in the wet conditions and crashed, sustaining a severe head injury.", "The blaze started at the detached building in Drivers End in Codicote, near Welwyn, during the morning. There was another fire at the building 20 years ago, after which fire-proof foil was placed under the thatch, which is protecting the main building. More than 15 fire engines and support vehicles were called to tackle the blaze. Roads in the area were closed and traffic diverted.", 'The 18-year-old fell at the New Charter Academy on Broadoak Road in Ashton-under-Lyne at about 09:10 BST, Greater Manchester Police (GMP) said. GMP said he had gone to Manchester Royal Infirmary and his condition was "serious". Principal Jenny Langley said the school would remain "fully open" while police investigated. "Our thoughts are with the family and we\'re doing everything we can to support them along with staff and pupils," she said.', 'But Belgian-born Dutchman Max Verstappen was unable to drive a car legally on his own in either country. That all changed on Wednesday when the youngster turned 18 and passed his driving test at the first attempt. Despite having competed in 14 grands prix since his debut in Australia in March, Verstappen admitted to feeling the pressure during his test. "It\'s a relief," said the Toro Rosso driver, who finished ninth in Japan on Sunday and had only started driving lessons a week ago. "I was a bit nervous to make mistakes, but the exam went well." A bonus of turning 18 is that Verstappen will now be able to drink the champagne if he ever makes it onto the podium.', ] reference = [ "A powerful typhoon has brought many parts of Japan to a standstill and briefly battered Tokyo before heading out to sea.", "A major fire has been burning in the thatched roof of a large property in Hertfordshire.", "A student has been taken to hospital after falling from a balcony at a Greater Manchester school.", "He is Formula 1's youngest ever driver and in charge of a car that can reach over 200mph.", ] response = [ "Typhoon Phanfone, while downgraded from super typhoon status, caused significant disruption and tragedy in Japan. One US airman died after being swept away by high waves, with two more missing. The storm caused power outages for thousands, flight cancellations, and the suspension of rescue efforts for missing volcano victims. Heavy rain and strong winds led to school and factory closures, transportation disruptions, and at least 10 injuries. The typhoon is expected to weaken as it moves over the Pacific Ocean.", "A large fire broke out in a detached thatched building in Codicote, near Welwyn. This is the second fire at the building in 20 years. Thankfully, fire-proof foil installed after the previous fire is protecting the main building. Over 15 fire engines and support vehicles responded, closing roads and diverting traffic in the area.", "An 18-year-old student at New Charter Academy in Ashton-under-Lyne suffered a serious fall and was hospitalized. The incident is under investigation by Greater Manchester Police, but the school remains open. The principal expressed support for the student's family and the school community.", "Max Verstappen, a Formula One driver, was finally able to get his driver's license at age 18. Despite already competing in 14 Grand Prix races, he was not of legal driving age in his native countries. He admitted to being nervous but passed the test on his first attempt. As an added bonus of turning 18, Verstappen can now enjoy champagne on the podium if he places.", ] eval_dataset = pd.DataFrame( { "instruction": instruction, "context": context, "reference": reference, } )
プロンプト評価タスクを実行する
要約データセットの準備が完了したら、このタスクのコアテストを実行できます。複数のプロンプト テンプレートを比較して、モデルから最も高品質な出力を生成するテンプレートを確認します。
- 次のセルで、各プロンプト テストで再利用される単一の
EvalTaskを作成します。experimentパラメータを設定すると、このタスクのすべての評価実行が自動的に記録され、Vertex AI Experiments にグループ化されます。EXPERIMENT_NAME = "eval-sdk-prompt-engineering" # @param {type:"string"} summarization_eval_task = EvalTask( dataset=eval_dataset, metrics=[ "rouge_l_sum", "bleu", "fluency", "coherence", "safety", "groundedness", "summarization_quality", "verbosity", "instruction_following", "text_quality", ], experiment=EXPERIMENT_NAME, )rouge_l_sumやbleuなどのコンピューティング指標から、さまざまなモデルベースの指標(fluency、coherence、summarization_quality、instruction_followingなど)まで、すべてを計算するようにサービスに指示しています。これにより、各プロンプトがモデルの出力品質に与える影響を包括的に 360 度で把握できます。 - 新しいセルで次のコードを追加して実行し、4 つのペルソナ ドリブン プロンプト戦略を定義して評価します。
forループは各テンプレートを反復処理し、評価を実行します。各テンプレートは、モデルに特定のペルソナまたは目標を与えることで、さまざまなスタイルの要約を引き出すように設計されています。- ペルソナ #1(標準): 中立的で率直な要約リクエスト。
- ペルソナ #2(エグゼクティブ): 忙しいエグゼクティブが好むように、結果と影響に焦点を当てて、箇条書きで要約を求めます。
- ペルソナ #3(小学 5 年生): モデルに簡単な言語を使用するよう指示し、出力の複雑さを調整する能力をテストします。
- ペルソナ #4(テクニカル アナリスト): 主要な統計情報とエンティティが保持される、事実に基づいた要約を要求し、モデルの精度をテストします。これらの新しいテンプレートのプレースホルダ(
{context}や{instruction}など)は、このタスクで作成したeval_datasetの新しい列名と一致しています。
        # Define prompt templates that target different user personas
    prompt_templates = [
        # Persona 1: Standard, neutral summary
        "Article: {context}. Task: {instruction}. Summary:",

        # Persona 2: For a busy executive (bullet points)
        "Instruction: {instruction} into three key bullet points for a busy executive. Focus on the main outcome and impact. Article: {context}. Summary:",

        # Persona 3: For a 5th grader (simple language)
        "Instruction: {instruction} such that you're explaining it to a 10-year-old. Use simple words. Article: {context}. Summary:",

        # Persona 4: For a technical analyst (fact-focused)
        "Instruction: Provide a detailed, factual summary of the following text, ensuring all key statistics, names, and locations are preserved. Article: {context}. Summary:",
    ]

    eval_results = []
    for i, prompt_template in enumerate(prompt_templates):
        eval_result = summarization_eval_task.evaluate(
            prompt_template=prompt_template,
            model=GenerativeModel(
                "gemini-2.0-flash",
                generation_config={
                    "temperature": 0.3,
                    "max_output_tokens": 256,
                    "top_k": 1,
                },
            ),
            evaluation_service_qps=5,
        )


        eval_results.append((f"Prompt Persona #{i+1}", eval_result))
結果を分析して可視化する
テストの実行が最初のステップです。真の価値は、結果を分析してデータドリブンな意思決定を行うことにあります。このタスクでは、SDK の可視化ツールを使用して、プロンプト ペルソナ テストの出力を解釈します。
- 新しいセルで次のコードを実行して、テストした 4 つのプロンプト ペルソナの概要結果を表示します。これにより、パフォーマンスの概要を定量的に把握できます。
for title, eval_result in eval_results: notebook_utils.display_eval_result(title=title, eval_result=eval_result) - 新しいセルで次のコードを追加して実行し、各ペルソナの
summarization_quality指標の根拠を確認します。for title, eval_result in eval_results: notebook_utils.display_explanations( eval_result, metrics=["summarization_quality"], num=2 ) - レーダーチャートを生成して、各プロンプトのさまざまな品質指標間のトレードオフを可視化します。新しいセルで次のコードを追加して実行します。
notebook_utils.display_radar_plot( eval_results, metrics=["instruction_following", "fluency", "coherence", "text_quality"], ) - より直接的な並列比較を行うには、棒グラフを作成します。新しいセルで次のコードを追加して実行します。
notebook_utils.display_bar_plot(
    eval_results,
    metrics=["instruction_following", "fluency", "coherence", "text_quality"],
)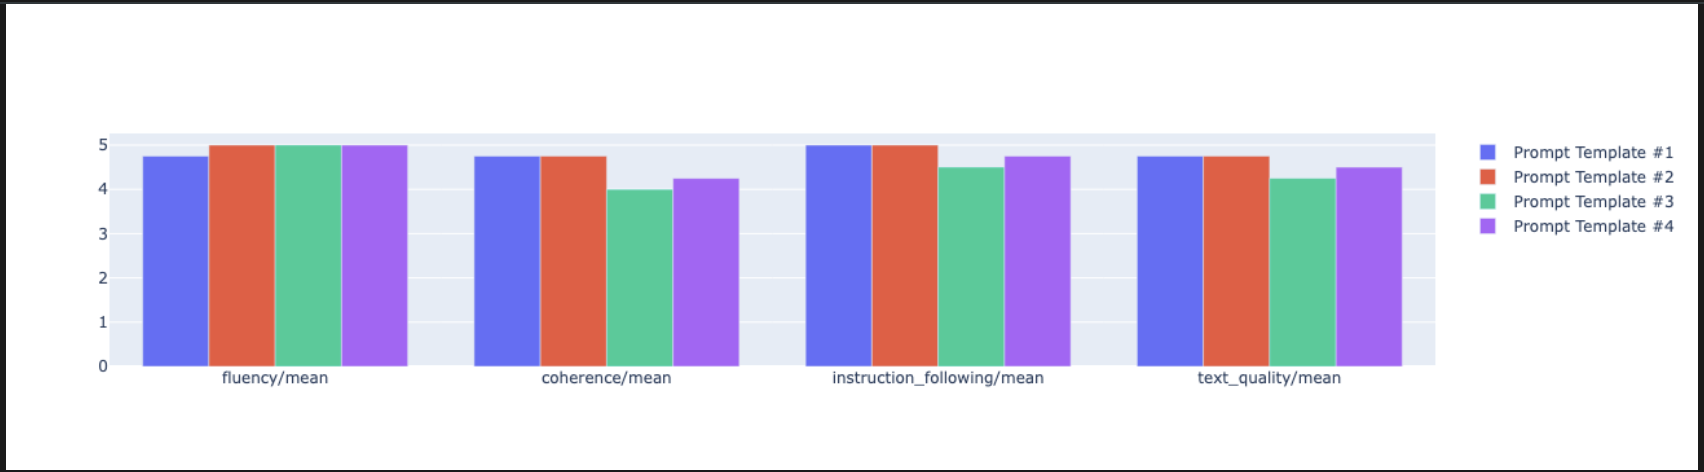
- これで、このタスクの Vertex AI Experiment に記録されたすべての実行の概要を表示できます。これは、時間の経過に伴う作業の追跡に役立ちます。新しいセルで次のコードを追加して実行します。
summarization_eval_task.display_runs()
10. テストをクリーンアップする
プロジェクトを整理し、不要な料金が発生しないようにするには、作成したリソースをクリーンアップすることをおすすめします。このラボでは、すべての評価実行が Vertex AI Experiment に記録されました。次のコードは、この親テストを削除します。これにより、関連するすべての実行とその基盤となるデータも削除されます。
- 新しいセルでこのコードを実行して、Vertex AI Experiment とそれに関連付けられた実行を削除します。
delete_experiment = True

# Please set your LOCATION to the same one used during Vertex AI SDK initialization.
LOCATION = "YOUR LOCATION" # @param {type:"string"}

if delete_experiment:

    from google.cloud import aiplatform

    aiplatform.init(project=PROJECT_ID, location=LOCATION)
    experiment = aiplatform.Experiment(EXPERIMENT_NAME)
    experiment.delete()
11. 実践から本番環境へ
このラボで学習したスキルは、信頼性の高い AI アプリケーションを作成するための構成要素です。ただし、手動で実行するノートブックから本番環境グレードの評価システムに移行するには、追加のインフラストラクチャとより体系的なアプローチが必要です。このセクションでは、スケールアップする際に考慮すべき主なプラクティスと戦略的フレームワークについて説明します。
本番環境の評価戦略を構築する
このラボのスキルを本番環境に適用するには、繰り返し可能な戦略に形式化すると便利です。次のフレームワークでは、モデルの選択、プロンプトの最適化、継続的なモニタリングなど、一般的なシナリオの主な考慮事項について説明します。
モデルの選択の場合:
   # Evaluation strategy for choosing models
   evaluation_strategy = {
      "dataset_size": "100+ examples for statistical significance",
      "metrics": ["task-specific", "general quality", "efficiency"],
      "comparison_type": "pairwise with statistical testing",
      "baseline": "established_model_or_human_benchmark"
   }
プロンプトの最適化の場合
   # Systematic prompt improvement workflow
   prompt_optimization = {
      "hypothesis": "Clear statement of what you're testing",
      "variants": "3-5 different prompt strategies",
      "evaluation": "Same metrics across all variants",
      "analysis": "Statistical significance + qualitative review"
   }
継続的なモニタリングの場合
   # Production evaluation pipeline
   production_eval = {
      "frequency": "Every model update + weekly monitoring",
      "automation": "CI/CD integration with quality gates",
      "metrics": "Speed + quality + cost tracking",
      "alerting": "Performance degradation detection"
   }
費用対効果に関する考慮事項
モデルベースの評価は、大規模になると費用がかかる可能性があります。費用対効果の高い本番環境戦略では、目的ごとに異なる方法を使用します。次の表に、さまざまな評価タイプの速度、費用、ユースケースのトレードオフをまとめます。
評価の種類 | 時間 | サンプルあたりの費用 | 最適な用途 |
ROUGE/BLEU | 秒 | ~$0.001 | 大量のスクリーニング |
モデルベースのポイントワイズ | ~ 1 ~ 2 秒 | ~$0.01 | 品質評価 |
ペアワイズ比較 | ~ 2 ~ 3 秒 | ~$0.02 | モデルの選択 |
人間による評価 | 分 | $1 ~ 10 | ゴールド スタンダードの検証 |
CI/CD とモニタリングで自動化する
ノートブックの手動実行はスケーリングできません。継続的インテグレーション/継続的デプロイ(CI/CD)パイプラインで評価を自動化します。
- 品質ゲートを作成する: 評価タスクを CI/CD パイプライン(Cloud Build など)に統合します。新しいプロンプトまたはモデルで評価を自動的に実行し、主要な品質スコアが定義したしきい値を下回った場合はデプロイをブロックします。
- 傾向をモニタリングする: 評価実行の概要指標を Google Cloud Monitoring などのサービスにエクスポートします。ダッシュボードを作成して品質の推移を追跡し、パフォーマンスが大幅に低下した場合にチームに通知する自動アラートを設定します。
12. まとめ
これでラボは完了です。生成 AI モデルを評価するための基本的なスキルを習得しました。
このラボは、Google Cloud でのプロダクション レディな AI の学習プログラムの一部です。
- プロトタイプから本番環境への移行に役立つカリキュラム全体をご覧ください。
- ハッシュタグ
ProductionReadyAIを使用して進捗状況を共有しましょう。
ハイライト
このラボでは、以下の操作について学習しました。
EvalTaskフレームワークを使用して評価のベスト プラクティスを適用する。- コンピューティング ベースからモデルベースの判定まで、さまざまな指標タイプを使用する。
- さまざまなバージョンをテストしてプロンプトを最適化する。
- テスト追跡を使用して再現可能なワークフローを構築する。
継続学習用の資料
- Vertex AI Gen AI Evaluation のドキュメント
- 高度な評価手法のノートブック
- Gen AI Evaluation SDK のリファレンス
- モデルベースの指標に関する調査
- プロンプト エンジニアリングのベスト プラクティス
このラボで学習した体系的な評価アプローチは、信頼性の高い高品質な AI アプリケーションを構築するための基盤となります。優れた評価は、実験的な AI と本番環境での成功を結びつける架け橋となります。