
1. 簡介
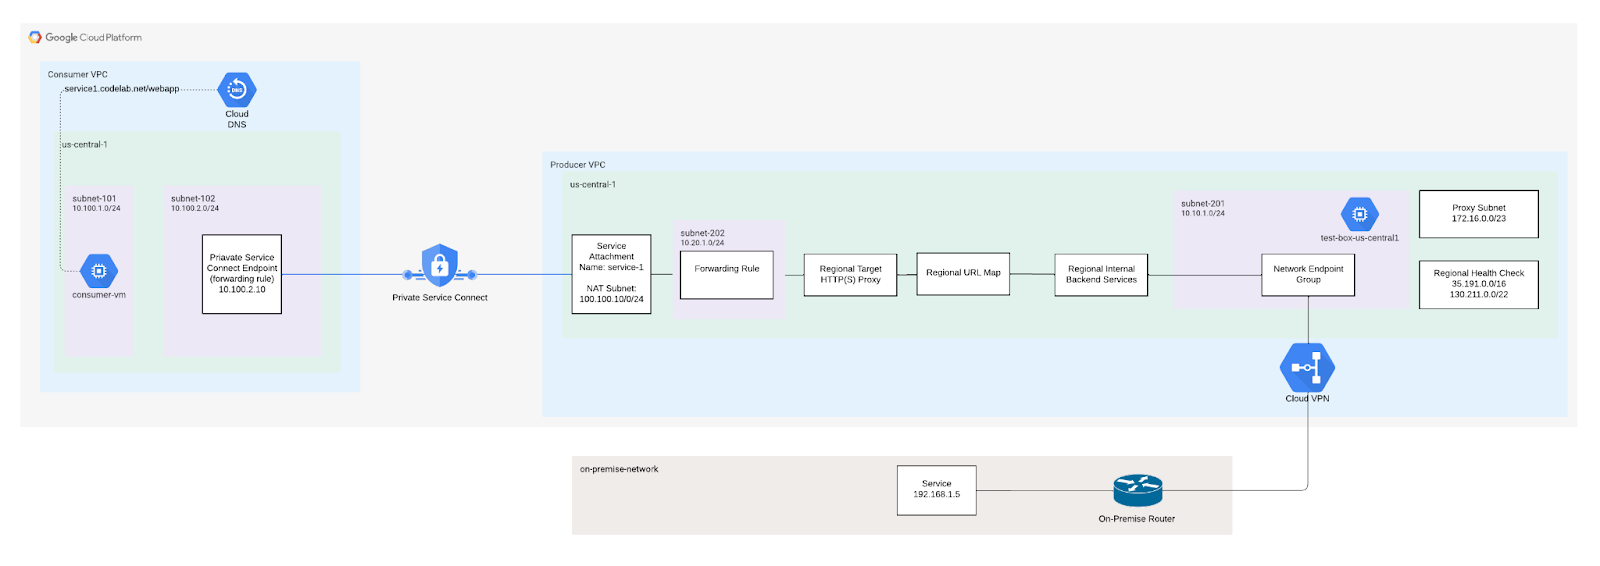
透過混合式連線,內部區域 TCP Proxy 負載平衡器可讓虛擬私有雲網路中的用戶端存取地端部署或其他雲端環境中代管的服務。
如要在其他虛擬私有雲網路中提供混合式服務,可以使用 Private Service Connect 發布服務。在內部區域 TCP Proxy 負載平衡器前方放置服務連結,即可讓其他虛擬私有雲網路中的用戶端,連線至地端部署或其他雲端環境中執行的混合式服務。
建構項目
在本程式碼研究室中,您將使用網路端點群組,透過混合式連線功能,建構連線至地端服務的內部 TCP Proxy 負載平衡器。用戶虛擬私有雲將可與地端服務通訊。
課程內容
- 如何使用混合式 NEG 後端服務建立 TCP Proxy ILB
- 如何建立 Private Service Connect 生產端 (服務連結) 和消費者 (轉送規則)
- 如何測試及驗證消費者與生產者服務之間的通訊
軟硬體需求
- 已建立混合式網路,例如高可用性 VPN、互連網路、SW-WAN
- Google Cloud 專案
建立混合式連線
您的 Google Cloud 和地端部署或其他雲端環境必須透過混合式連線連線,使用 Cloud Interconnect VLAN 連結或 Cloud VPN 通道搭配 Cloud Router。建議您使用高可用性連線。
啟用全域動態轉送的 Cloud Router 會透過 BGP 瞭解特定端點,並將其程式化到 Google Cloud 虛擬私有雲網路中。不支援區域動態轉送。也不支援靜態路徑。
您用來設定 Cloud Interconnect 或 Cloud VPN 的 Google Cloud 虛擬私有雲網路,與您用來設定混合式負載平衡部署作業的網路相同。請確認 VPC 網路的子網路 CIDR 範圍與遠端 CIDR 範圍沒有衝突。如果 IP 位址重疊,系統會優先處理子網路路徑,而非遠端連線。
如需操作說明,請參閱:
自訂路徑通告
下列子網路需要 Cloud Router 向地端部署網路通告自訂路徑,確保地端部署防火牆規則已更新。
子網路 | 說明 |
172.16.0.0/23 | TCP Proxy 子網路,用於直接與地端服務通訊 |
130.211.0.0/22、35.191.0.0/16 |
2. 事前準備
更新專案以支援程式碼研究室
本程式碼研究室會使用 $variables,協助您在 Cloud Shell 中實作 gcloud 設定。
在 Cloud Shell 中執行下列操作:
gcloud config list project
gcloud config set project [YOUR-PROJECT-NAME]
psclab=YOUR-PROJECT-NAME
echo $psclab
3. 設定 Producer
建立生產端虛擬私有雲
在 Cloud Shell 中執行下列操作:
gcloud compute networks create producer-vpc --project=$psclab --subnet-mode=custom
建立 Producer 子網路
在 Cloud Shell 中執行下列操作:
gcloud compute networks subnets create subnet-201 --project=$psclab --range=10.10.1.0/24 --network=producer-vpc --region=us-central1
建立 TCP Proxy 子網路
Proxy 分配是在 VPC 層級,而非負載平衡器層級。您必須在使用 Envoy 型負載平衡器的虛擬網路 (VPC) 的每個區域,建立一個僅限 Proxy 的子網路 。如果您在相同區域和相同虛擬私有雲網路中部署多個負載平衡器,這些負載平衡器會共用同一個僅限 Proxy 的子網路,以進行負載平衡。
- 用戶端連線至負載平衡器轉送規則的 IP 位址和通訊埠。
- 每個 Proxy 都會聽取對應的負載平衡器轉送規則所指定的 IP 位址和通訊埠。其中一個 Proxy 接收並終止用戶端的網路連線。
- Proxy 會根據負載平衡器的網址對應和後端服務,建立與 NEG 中適當後端 VM 或端點的連線。
無論網路是自動模式還是自訂,都必須建立僅限 Proxy 的子網路。僅限 Proxy 的子網路必須提供 64 個以上的 IP 位址。對應的前置字串長度為 /26 以下。建議的子網路大小為 /23 (512 個僅限 Proxy 的位址)。
在 Cloud Shell 中執行下列操作:
gcloud compute networks subnets create proxy-subnet-us-central \
  --purpose=REGIONAL_MANAGED_PROXY \
  --role=ACTIVE \
  --region=us-central1 \
  --network=producer-vpc \
  --range=172.16.0.0/23
建立 Private Service Connect NAT 子網路
建立一或多個專用子網路,以便搭配 Private Service Connect 使用。如果您使用 Google Cloud 控制台發布服務,可以在該程序中建立子網路。在與服務負載平衡器相同的區域建立子網路。您無法將一般子網路轉換為 Private Service Connect 子網路。
在 Cloud Shell 中執行下列操作:
gcloud compute networks subnets create psc-nat-subnet --network=producer-vpc --region=us-central1 --range=100.100.10.0/24 --purpose=private-service-connect
建立 Producer 防火牆規則
設定 防火牆規則,允許 Private Service Connect 端點與服務附件之間的流量。在程式碼實驗室中,建立 Ingress 防火牆規則,允許網路位址轉譯 (NAT) 子網路 100.100.10.0/24 存取 Private Service Connect 服務連結 (內部負載平衡器)。
在 Cloud Shell 中執行下列操作:
gcloud compute --project=$psclab firewall-rules create allow-to-ingress-nat-subnet --direction=INGRESS --priority=1000 --network=producer-vpc --action=ALLOW --rules=all --source-ranges=100.100.10.0/24
在 Cloud Shell 中建立 fw-allow-health-check 規則,允許 Google Cloud 健康狀態檢查透過 TCP 通訊埠 80 連線至地端服務 (後端服務)
gcloud compute firewall-rules create fw-allow-health-check \
    --network=producer-vpc \
    --action=allow \
    --direction=ingress \
    --source-ranges=130.211.0.0/22,35.191.0.0/16 \
    --rules=tcp:80
建立輸入防火牆規則,允許內部部署服務透過通訊埠 80 與 Proxy 子網路通訊
gcloud compute firewall-rules create fw-allow-proxy-only-subnet \
    --network=producer-vpc \
    --action=allow \
    --direction=ingress \
    --source-ranges=172.16.0.0/23 \
    --rules=tcp:80
設定混合式連線 NEG
建立 NEG 時,請使用可盡量縮短 Google Cloud 與地端部署/其他雲端環境之間地理距離的區域。舉例來說,如果您在德國法蘭克福的地端部署環境中代管服務,建立 NEG 時可以指定 europe-west3-a Google Cloud 可用區。
此外,如果您使用 Cloud Interconnect,建立 NEG 時使用的可用區應與設定 Cloud Interconnect 互連網路連結的區域相同。
如要瞭解可用的區域和可用區,請參閱 Compute Engine 說明文件:可用區域和可用區。
在 Cloud Shell 中,使用 gcloud compute network-endpoint-groups create 指令建立混合式連線 NEG
gcloud compute network-endpoint-groups create on-prem-service-neg \
    --network-endpoint-type=NON_GCP_PRIVATE_IP_PORT \
    --zone=us-central1-a \
    --network=producer-vpc
在 Cloud Shell 中,將地端部署 IP:Port 端點新增至混合式 NEG。
gcloud compute network-endpoint-groups update on-prem-service-neg \
    --zone=us-central1-a \
    --add-endpoint="ip=192.168.1.5,port=80"
設定負載平衡器
在下列步驟中,您將設定負載平衡器 (轉送規則),並與網路端點群組建立關聯
在 Cloud Shell 中,建立傳遞至地端服務的區域健康狀態檢查
gcloud compute health-checks create tcp on-prem-service-hc \
    --region=us-central1 \
    --use-serving-port
在 Cloud Shell 中,為地端後端建立後端服務
gcloud compute backend-services create on-premise-service-backend \
   --load-balancing-scheme=INTERNAL_MANAGED \
   --protocol=TCP \
   --region=us-central1 \
   --health-checks=on-prem-service-hc \
   --health-checks-region=us-central1
在 Cloud Shell 中,將混合式 NEG 後端新增至後端服務。在 MAX_CONNECTIONS 中,輸入後端應處理的並行連線數量上限。
gcloud compute backend-services add-backend on-premise-service-backend \
   --network-endpoint-group=on-prem-service-neg \
   --network-endpoint-group-zone=us-central1-a \
   --region=us-central1 \
   --balancing-mode=CONNECTION \
   --max-connections=100
在 Cloud Shell 中建立目標 Proxy
gcloud compute target-tcp-proxies create on-premise-svc-tcpproxy \
   --backend-service=on-premise-service-backend \
   --region=us-central1
在 Cloud Shell 中建立轉送規則 (內部負載平衡器)
使用 gcloud compute forwarding-rules create 指令建立轉送規則。
將 FWD_RULE_PORT 替換為介於 1 至 65535 之間的單一通訊埠號碼。轉送規則只會轉送目的地通訊埠相符的封包。
gcloud compute forwarding-rules create tcp-ilb-psc \
   --load-balancing-scheme=INTERNAL_MANAGED \
   --network=producer-vpc \
   --subnet=subnet-201 \
   --ports=80 \
   --region=us-central1 \
   --target-tcp-proxy=on-premise-svc-tcpproxy \
   --target-tcp-proxy-region=us-central1
取得內部負載平衡器的 IP 位址
gcloud compute forwarding-rules describe tcp-ilb-psc --region=us-central1 | grep -i IPAddress:

Example output:
gcloud compute forwarding-rules describe tcp-ilb-psc --region=us-central1 | grep -i IPAddress:
IPAddress: 10.10.1.2
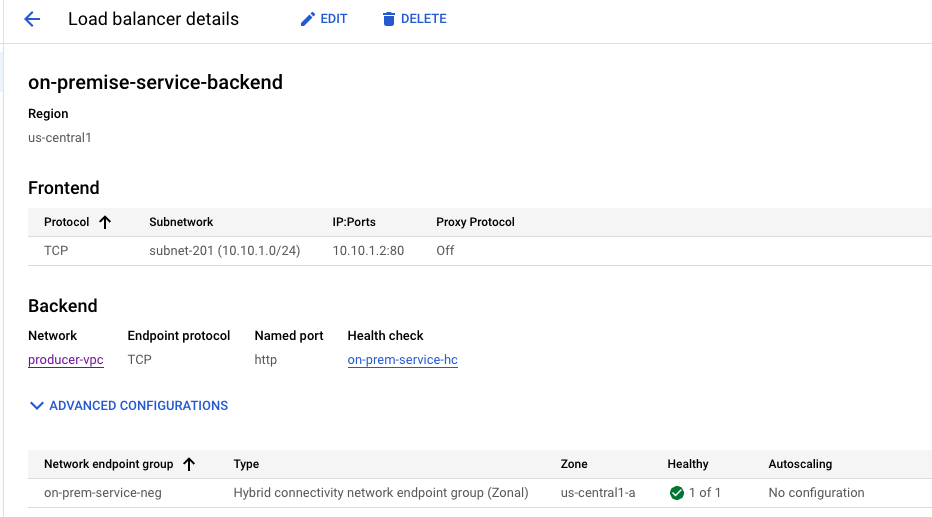
4. 驗證負載平衡器
在 Cloud 控制台中,依序前往「網路服務」→「負載平衡」→「負載平衡器」。請注意,1 個 NEG 為「綠色」,表示已成功對內部部署服務進行健康狀態檢查

選取「on-premise-service-backend」‘on-premise-service-backend'會產生前端 IP 位址
5. 查看從內部部署環境學到的路徑
前往「VPC Network」(虛擬私有雲網路) →「Routes」(路徑)。請注意,系統已瞭解地端部署服務子網路 192.168.1.0/27

6. 驗證與地端服務的連線
我們將從生產者 VPC 建立 VM,測試與內部部署服務的連線,然後設定服務附件。
在 Cloud Shell 中,於生產端 VPC 建立測試執行個體
gcloud compute instances create test-box-us-central1 \
    --zone=us-central1-a \
    --image-family=debian-10 \
    --image-project=debian-cloud \
    --subnet=subnet-201 \
    --no-address
如要允許 IAP 連線至您的 VM 執行個體,請根據以下條件建立防火牆規則:
- 套用至所有您希望能透過 IAP 存取的 VM 執行個體。
- 允許來自 IP 範圍 35.235.240.0/20 的輸入流量。這個範圍包含 IAP 用於 TCP 轉送的所有 IP 位址。
在 Cloud Shell 中,於生產端 VPC 建立測試執行個體
gcloud compute firewall-rules create ssh-iap \
    --network producer-vpc \
    --allow tcp:22 \
    --source-ranges=35.235.240.0/20
使用 Cloud Shell 中的 IAP 登入 test-box-us-central1,對負載平衡 IP 位址執行 curl,驗證與地端服務的連線。如果發生逾時,請重試。
gcloud compute ssh test-box-us-central1 --project=$psclab --zone=us-central1-a --tunnel-through-iap
執行 curl,驗證與內部部署服務的連線。驗證完成後,請退出 VM,返回 Cloud Shell 提示。根據步驟 3 和 4 中識別的輸出內容,替換內部負載平衡器 IP。
deepakmichael@test-box-us-central1:~$ curl -v 10.10.1.2
* Expire in 0 ms for 6 (transfer 0x55b9a6b2f0f0)
*   Trying 10.10.1.2...
* TCP_NODELAY set
* Expire in 200 ms for 4 (transfer 0x55b9a6b2f0f0)
* Connected to 10.10.1.2 (10.10.1.2) port 80 (#0)
> GET / HTTP/1.1
> Host: 10.10.1.2
> User-Agent: curl/7.64.0
> Accept: */*
>
< HTTP/1.1 200 OK
< Content-Type: text/html; charset=utf-8
< Accept-Ranges: bytes
< ETag: "3380914763"
< Last-Modified: Mon, 05 Dec 2022 15:10:56 GMT
< Expires: Mon, 05 Dec 2022 15:42:38 GMT
< Cache-Control: max-age=0
< Content-Length: 37
< Date: Mon, 05 Dec 2022 15:42:38 GMT
< Server: lighttpd/1.4.53
<
Welcome to my on-premise service!!
7. 建立 Private Service Connect 服務連結
在下列步驟中,我們將建立服務連結,與消費者端點配對連線後,即可存取地端部署服務,無須進行虛擬私有雲對接。
建立服務附件
在 Cloud Shell 中建立服務附件
gcloud compute service-attachments create service-1 --region=us-central1 --producer-forwarding-rule=tcp-ilb-psc --connection-preference=ACCEPT_AUTOMATIC --nat-subnets=psc-nat-subnet
選用:如果使用共用 VPC,請在服務專案中建立服務附件
gcloud compute service-attachments create service-1 --region=us-central1 --producer-forwarding-rule=tcp-ilb-psc --connection-preference=ACCEPT_AUTOMATIC --nat-subnets=projects/<hostproject>/regions/<region>/subnetworks/<natsubnet>
驗證 TCP 服務連結
gcloud compute service-attachments describe service-1 --region us-central1
8. 選用:前往「網路服務」→「Private Service Connect」,查看新建立的服務連結
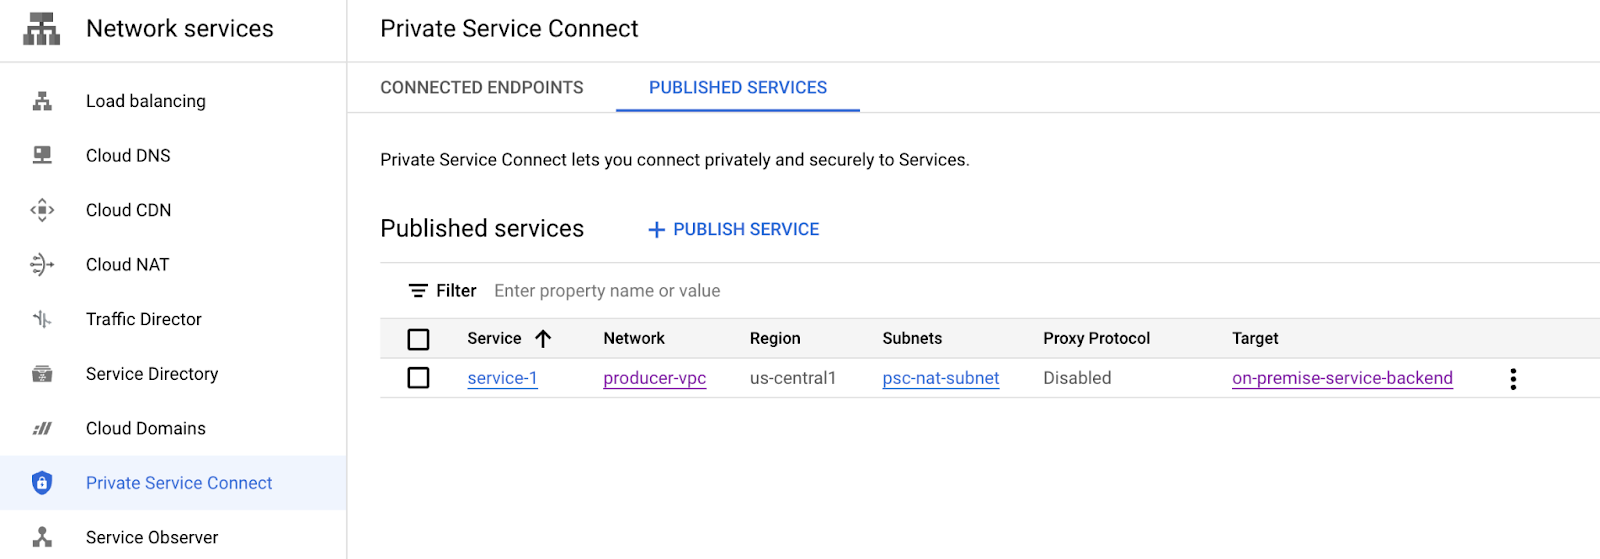
選取「Service-1」Service-1可查看更多詳細資料,包括消費者用來建立 Private Service Connect 的服務連結 URI。請記下 URI,因為後續步驟會用到。

服務附件詳細資料:projects/<projectname>/regions/us-central1/serviceAttachments/service-1
9. 消費者設定
建立 Consumer VPC
在 Cloud Shell 中執行下列操作:
gcloud compute networks create consumer-vpc --project=$psclab --subnet-mode=custom
建立 Consumer 子網路
在 Cloud Shell 中建立 GCE 子網路
gcloud compute networks subnets create subnet-101 --project=$psclab --range=10.100.1.0/24 --network=consumer-vpc --region=us-central1
在 Cloud Shell 中建立 Consumer Endpoint 子網路
gcloud compute networks subnets create subnet-102 --project=$psclab --range=10.100.2.0/24 --network=consumer-vpc --region=us-central1
建立消費者端點 (轉送規則)
在 Cloud Shell 中建立靜態 IP 位址,做為 Consumer 端點
gcloud compute addresses create psc-consumer-ip-1 --region=us-central1 --subnet=subnet-102 --addresses 10.100.2.10
讓我們使用先前產生的服務連結 URI 建立消費者端點
在 Cloud Shell 中建立消費者端點
gcloud compute forwarding-rules create psc-consumer-1 --region=us-central1 --network=consumer-vpc --address=psc-consumer-ip-1 --target-service-attachment=projects/$psclab/regions/us-central1/serviceAttachments/service-1
10. 驗證消費者 Private Service Connect - 消費者 VPC
在消費者虛擬私有雲中,前往「網路服務」→「Private Service Connect」→「已連線的端點」,確認 Private Service Connect 連線是否成功。請注意先前建立的 psc-consumer-1 連線和對應的 IP 位址。

選取 psc-consumer-1 時,系統會提供其他詳細資料,包括服務連結 URI

11. 驗證消費者 Private Service Connect - 供應商虛擬私有雲
從供應商虛擬私有雲前往「Network Services」→「Private Service Connect」→「Published Service」,確認 Private Service Connect 連線是否成功。請注意,已發布的 service-1 連線現在會顯示 1 項轉送規則 (連線端點)。

12. 建立私人 DNS 區域和 A 記錄
建立對應至 PSC 連線端點的私人 DNS 區域,允許從 VPC 內的任何主機無縫存取生產者。
透過 Cloud Shell
gcloud dns --project=$psclab managed-zones create codelab-zone --description="" --dns-name="codelab.net." --visibility="private" --networks="consumer-vpc"

gcloud dns --project=$psclab record-sets create service1.codelab.net. --zone="codelab-zone" --type="A" --ttl="300" --rrdatas="10.100.2.10"
13. 使用 VM 驗證消費者對生產者服務的存取權
我們將從消費者虛擬私有雲建立 VM,存取消費者端點 service1.codelabs.net,測試與地端服務的連線。
在 Cloud Shell 中,於消費者虛擬私有雲建立測試執行個體
gcloud compute instances create consumer-vm \
    --zone=us-central1-a \
    --image-family=debian-10 \
    --image-project=debian-cloud \
    --subnet=subnet-101 \
    --no-address
如要允許 IAP 連線至您的 VM 執行個體,請根據以下條件建立防火牆規則:
- 套用至所有您希望能透過 IAP 存取的 VM 執行個體。
- 允許來自 IP 範圍 35.235.240.0/20 的輸入流量。這個範圍包含 IAP 用於 TCP 轉送的所有 IP 位址。
在 Cloud Shell 中,於消費者虛擬私有雲建立測試執行個體
gcloud compute firewall-rules create ssh-iap-consumer \
    --network consumer-vpc \
    --allow tcp:22 \
    --source-ranges=35.235.240.0/20
在 Cloud Shell 中使用 IAP 登入 consumer-vm,對 dns FQDN service1.codelab.net 執行 curl,驗證與地端服務的連線。如果發生逾時,請重試。
gcloud compute ssh consumer-vm --project=$psclab --zone=us-central1-a --tunnel-through-iap
執行 curl,驗證與內部部署服務的連線。驗證完成後,請退出 VM,返回 Cloud Shell 提示
在 Cloud Shell 中執行 curl
$ curl -v service1.codelab.net
*   Trying 10.100.2.10...
* TCP_NODELAY set
* Expire in 200 ms for 4 (transfer 0x5650fc3390f0)
* Connected to service1.codelab.net (10.100.2.10) port 80 (#0)
> GET / HTTP/1.1
> Host: service1.codelab.net
> User-Agent: curl/7.64.0
> Accept: */*
>
< HTTP/1.1 200 OK
< Content-Type: text/html; charset=utf-8
< Accept-Ranges: bytes
< ETag: "3380914763"
< Last-Modified: Mon, 05 Dec 2022 15:10:56 GMT
< Expires: Mon, 05 Dec 2022 15:15:41 GMT
< Cache-Control: max-age=0
< Content-Length: 37
< Date: Mon, 05 Dec 2022 15:15:41 GMT
< Server: lighttpd/1.4.53
<
Welcome to my on-premise service!!
以下是地端部署服務的擷取範例,請注意,來源 IP 位址 172.16.0.2 來自 TCP Proxy 子網路範圍 172.16.0.0/23

14. 清理 Producer
刪除製作人元件
在 Cloud Shell 中刪除 Producer 元件
gcloud compute instances delete test-box-us-central1 --zone=us-central1-a --quiet

gcloud compute service-attachments delete service-1 --region=us-central1 --quiet

gcloud compute forwarding-rules delete tcp-ilb-psc --region=us-central1 --quiet

gcloud compute target-tcp-proxies delete on-premise-svc-tcpproxy --region=us-central1 --quiet

gcloud compute backend-services delete on-premise-service-backend --region=us-central1 --quiet

gcloud compute network-endpoint-groups delete on-prem-service-neg --zone=us-central1-a --quiet

gcloud compute networks subnets delete psc-nat-subnet subnet-201 proxy-subnet-us-central --region=us-central1 --quiet

gcloud compute firewall-rules delete ssh-iap fw-allow-proxy-only-subnet allow-to-ingress-nat-subnet fw-allow-health-check --quiet

gcloud compute health-checks delete on-prem-service-hc --region=us-central1 --quiet

gcloud compute networks delete producer-vpc --quiet
15. 清理消費者資料
刪除 Consumer 元件
在 Cloud Shell 中刪除消費者元件
gcloud compute instances delete consumer-vm --zone=us-central1-a --quiet

gcloud compute forwarding-rules delete psc-consumer-1 --region=us-central1 --quiet

gcloud compute addresses delete psc-consumer-ip-1 --region=us-central1 --quiet

gcloud compute networks subnets delete subnet-101 subnet-102 --region=us-central1 --quiet

gcloud compute firewall-rules delete ssh-iap-consumer --quiet

gcloud dns record-sets delete service1.codelab.net --type=A --zone=codelab-zone --quiet

gcloud dns managed-zones delete codelab-zone --quiet

gcloud compute networks delete consumer-vpc --quiet
16. 恭喜
恭喜,您已成功設定及驗證 Private Service Connect 和 TCP Proxy。
您已建立生產端基礎架構,並在指向內部部署服務的生產端 VPC 中新增服務附件。您已瞭解如何在消費者虛擬私有雲中建立消費者端點,允許連線至地端服務。
後續步驟
查看一些程式碼研究室…