1. 概要
この Codelab では、パラメータ エフィシエント チューニング(PET)を使用してカスタマイズされたテキスト分類器を作成する方法について説明します。PET 手法では、モデル全体をファインチューニングするのではなく、少量のパラメータのみを更新するため、トレーニングが比較的簡単かつ迅速に行えます。また、モデルが比較的少ないトレーニング データで新しい動作を学習しやすくなります。この手法については、Towards Agile Text Classifiers for Everyone で詳しく説明しています。この論文では、これらの手法をさまざまな安全性タスクに適用し、数百のトレーニング例のみで最先端のパフォーマンスを実現する方法を示しています。
この Codelab では、より高速かつ効率的に実行できるため、LoRA PET メソッドと小規模な Gemma モデル(gemma_instruct_2b_en)を使用します。この Colab では、データの取り込み、LLM 用のフォーマット設定、LoRA 重みのトレーニング、結果の評価の手順について説明します。この Codelab では、YouTube と Reddit のコメントから構築された、ヘイトスピーチを検出するための一般公開データセットである ETHOS データセットでトレーニングを行います。200 個の例(データセットの 1/4)のみでトレーニングした場合、F1: 0.80、ROC-AUC: 0.78 を達成します。これは、現在リーダーボードで報告されている SOTA をわずかに上回っています(2024 年 2 月 15 日時点)。800 個の例すべてでトレーニングすると、F1 スコアは 83.74、ROC-AUC スコアは 88.17 になります。一般的に、gemma_instruct_7b_en などの大規模なモデルほどパフォーマンスは向上しますが、トレーニングと実行の費用も大きくなります。
トリガー警告: この Codelab では、ヘイトスピーチを検出するための安全性分類子を開発するため、結果の例と評価にはひどい言葉が含まれています。
2. インストールとセットアップ
この Codelab では、最新バージョンの keras(3)、keras-nlp(0.8.0)、ベースモデルをダウンロードするための Kaggle アカウントが必要です。
!pip install -q -U keras-nlp
!pip install -q -U keras
Kaggle にログインするには、kaggle.json 認証情報ファイルを ~/.kaggle/kaggle.json に保存するか、Colab 環境で次のコマンドを実行します。
import kagglehub

kagglehub.login()
この Codelab は Keras バックエンドとして Tensorflow を使用してテストされていますが、Tensorflow、Pytorch、JAX を使用できます。
import os

os.environ["KERAS_BACKEND"] = "tensorflow"
3. ETHOS データセットを読み込む
このセクションでは、分類子をトレーニングするデータセットを読み込み、トレーニング セットとテストセットに前処理します。このチュートリアルでは、ソーシャル メディアでのヘイトスピーチを検出するために収集された一般的な研究データセット ETHOS を使用します。データセットの収集方法については、論文 ETHOS: an Online Hate Speech Detection Dataset をご覧ください。
import pandas as pd

gh_root = 'https://raw.githubusercontent.com'
gh_repo = 'intelligence-csd-auth-gr/Ethos-Hate-Speech-Dataset'
gh_path = 'master/ethos/ethos_data/Ethos_Dataset_Binary.csv'
data_url = f'{gh_root}/{gh_repo}/{gh_path}'

df = pd.read_csv(data_url, delimiter=';')
df['hateful'] = (df['isHate'] >= df['isHate'].median()).astype(int)

# Shuffle the dataset.
df = df.sample(frac=1, random_state=32)

# Split into train and test.
df_train, df_test = df[:800],  df[800:]

# Display a sample of the data.
df.head(5)[['hateful', 'comment']]
次のような出力が表示されます。
ラベル | コメント | |
0 |
|
|
1 |
|
|
2 |
|
|
3 |
|
|
4 |
|
|
4. モデルをダウンロードしてインスタンス化する
ドキュメントで説明されているように、Gemma モデルはさまざまな方法で簡単に使用できます。Keras でこれを行うには、次の操作が必要です。
import keras
import keras_nlp

# For reproducibility purposes.
keras.utils.set_random_seed(1234)

# Download the model from Kaggle using Keras.
model = keras_nlp.models.GemmaCausalLM.from_preset('gemma_instruct_2b_en')

# Set the sequence length to a small enough value to fit in memory in Colab.
model.preprocessor.sequence_length = 128
モデルが機能していることをテストするには、テキストを生成します。
model.generate('Question: what is the capital of France? ', max_length=32)
5. テキストの前処理と区切りトークン
モデルが意図をよりよく理解できるように、テキストを前処理して区切り文字トークンを使用できます。これにより、モデルが想定される形式に適合しないテキストを生成する可能性が低くなります。たとえば、次のようなプロンプトを作成して、モデルに感情分類をリクエストできます。
Classify the following text into one of the following classes:[Positive,Negative]

Text: you look very nice today
Classification:
この場合、モデルは探しているものを出力する場合としない場合があります。たとえば、テキストに改行文字が含まれていると、モデルのパフォーマンスに悪影響を及ぼす可能性があります。より堅牢なアプローチは、区切りトークンを使用することです。プロンプトは次のようになります。
Classify the following text into one of the following classes:[Positive,Negative]
<separator>
Text: you look very nice today
<separator>
Prediction:
これは、テキストを前処理する関数を使用して抽象化できます。
def preprocess_text(
    text: str,
    labels: list[str],
    instructions: str,
    separator: str,
) -> str:
  prompt = f'{instructions}:[{",".join(labels)}]'
  return separator.join([prompt, f'Text:{text}', 'Prediction:'])
同じプロンプトとテキストを使用して関数を実行すると、同じ出力が得られます。
text = 'you look very nice today'

prompt = preprocess_text(
    text=text,
    labels=['Positive', 'Negative'],
    instructions='Classify the following text into one of the following classes',
    separator='\n<separator>\n',
)

print(prompt)
出力は次のようになります。
Classify the following text into one of the following classes:[Positive,Negative]
<separator>
Text:well, looks like its time to have another child
<separator>
Prediction:
6. 出力の後処理
モデルの出力は、さまざまな確率を持つトークンです。通常、テキストを生成するには、確率の高い上位のトークンから選択して、文、段落、さらにはドキュメント全体を構築します。ただし、分類の目的では、モデルが Positive の方が Negative よりも確率が高いと判断したかどうか、またはその逆が重要になります。
前にインスタンス化したモデルを使用して、次のトークンが Positive か Negative かの独立した確率にモデルの出力を処理する方法は次のとおりです。
import numpy as np


def compute_output_probability(
    model: keras_nlp.models.GemmaCausalLM,
    prompt: str,
    target_classes: list[str],
) -> dict[str, float]:
  # Shorthands.
  preprocessor = model.preprocessor
  tokenizer = preprocessor.tokenizer

  # NOTE: If a token is not found, it will be considered same as "<unk>".
  token_unk = tokenizer.token_to_id('<unk>')

  # Identify the token indices, which is the same as the ID for this tokenizer.
  token_ids = [tokenizer.token_to_id(word) for word in target_classes]

  # Throw an error if one of the classes maps to a token outside the vocabulary.
  if any(token_id == token_unk for token_id in token_ids):
    raise ValueError('One of the target classes is not in the vocabulary.')

  # Preprocess the prompt in a single batch. This is done one sample at a time
  # for illustration purposes, but it would be more efficient to batch prompts.
  preprocessed = model.preprocessor.generate_preprocess([prompt])

  # Identify output token offset.
  padding_mask = preprocessed["padding_mask"]
  token_offset = keras.ops.sum(padding_mask) - 1

  # Score outputs, extract only the next token's logits.
  vocab_logits = model.score(
      token_ids=preprocessed["token_ids"],
      padding_mask=padding_mask,
  )[0][token_offset]

  # Compute the relative probability of each of the requested tokens.
  token_logits = [vocab_logits[ix] for ix in token_ids]
  logits_tensor = keras.ops.convert_to_tensor(token_logits)
  probabilities = keras.activations.softmax(logits_tensor)

  return dict(zip(target_classes, probabilities.numpy()))
この関数をテストするには、前に作成したプロンプトを使用して関数を実行します。
compute_output_probability(
    model=model,
    prompt=prompt,
    target_classes=['Positive', 'Negative'],
)
出力は次のようになります。
{'Positive': 0.99994016, 'Negative': 5.984089e-05}
7. すべてを分類子としてラップする
使いやすさを考慮して、作成したすべての関数を、predict() や predict_score() などの使い慣れた関数を備えた単一の sklearn のような分類子にラップできます。
import dataclasses


@dataclasses.dataclass(frozen=True)
class AgileClassifier:
  """Agile classifier to be wrapped around a LLM."""

  # The classes whose probability will be predicted.
  labels: tuple[str, ...]

  # Provide default instructions and control tokens, can be overridden by user.
  instructions: str = 'Classify the following text into one of the following classes'
  separator_token: str = '<separator>'
  end_of_text_token: str = '<eos>'

  def encode_for_prediction(self, x_text: str) -> str:
    return preprocess_text(
        text=x_text,
        labels=self.labels,
        instructions=self.instructions,
        separator=self.separator_token,
    )

  def encode_for_training(self, x_text: str, y: int) -> str:
    return ''.join([
        self.encode_for_prediction(x_text),
        self.labels[y],
        self.end_of_text_token,
    ])

  def predict_score(
      self,
      model: keras_nlp.models.GemmaCausalLM,
      x_text: str,
  ) -> list[float]:
    prompt = self.encode_for_prediction(x_text)
    token_probabilities = compute_output_probability(
        model=model,
        prompt=prompt,
        target_classes=self.labels,
    )
    return [token_probabilities[token] for token in self.labels]

  def predict(
      self,
      model: keras_nlp.models.GemmaCausalLM,
      x_eval: str,
  ) -> int:
    return np.argmax(self.predict_score(model, x_eval))


agile_classifier = AgileClassifier(labels=('Positive', 'Negative'))
8. モデルのファインチューニング
LoRA は Low-Rank Adaptation の略です。これは、大規模言語モデルを効率的にファインチューニングするために使用できるファインチューニング手法です。詳細については、LoRA: Low-Rank Adaptation of Large Language Models の論文をご覧ください。
Gemma の Keras 実装には、ファインチューニングに使用できる enable_lora() メソッドが用意されています。
# Enable LoRA for the model and set the LoRA rank to 4.
model.backbone.enable_lora(rank=4)
LoRA を有効にしたら、ファインチューニング プロセスを開始できます。Colab では、エポックごとに約 5 分かかります。
import tensorflow as tf

# Create dataset with preprocessed text + labels.
map_fn = lambda xy: agile_classifier.encode_for_training(*xy)
x_train = list(map(map_fn, df_train[['comment', 'hateful']].values))
ds_train = tf.data.Dataset.from_tensor_slices(x_train).batch(2)

# Compile the model using the Adam optimizer and appropriate loss function.
model.compile(
    loss=keras.losses.SparseCategoricalCrossentropy(from_logits=True),
    optimizer=keras.optimizers.Adam(learning_rate=0.0005),
    weighted_metrics=[keras.metrics.SparseCategoricalAccuracy()],
)

# Begin training.
model.fit(ds_train, epochs=4)
エポック数を増やしてトレーニングすると、過学習が発生するまで精度が向上します。
9. 結果を検査する
これで、トレーニングしたアジャイル分類子の出力を確認できます。このコードは、テキストを指定すると予測されたクラススコアを出力します。
text = 'you look really nice today'
scores = agile_classifier.predict_score(model, text)
dict(zip(agile_classifier.labels, scores))
{'Positive': 0.99899644, 'Negative': 0.0010035498}
10. モデルの評価
最後に、2 つの一般的な指標(F1 スコアと AUC-ROC)を使用して、モデルのパフォーマンスを評価します。F1 スコアは、特定の分類しきい値での適合率と再現率の調和平均を評価することで、偽陰性と偽陽性のエラーを捉えます。一方、AUC-ROC は、さまざまなしきい値における真陽性率と偽陽性率のトレードオフを捉え、この曲線の下の面積を計算します。
from sklearn.metrics import f1_score, roc_auc_score

y_true = df_test['hateful'].values
# Compute the scores (aka probabilities) for each of the labels.
y_score = [agile_classifier.predict_score(model, x) for x in df_test['comment']]
# The label with highest score is considered the predicted class.
y_pred = np.argmax(y_score, axis=1)
# Extract the probability of a comment being considered hateful.
y_prob = [x[agile_classifier.labels.index('Negative')] for x in y_score]

# Compute F1 and AUC-ROC scores.
print(f'F1: {f1_score(y_true, y_pred):.2f}')
print(f'AUC-ROC: {roc_auc_score(y_true, y_prob):.2f}')
F1: 0.84
AUC-ROC: = 0.88
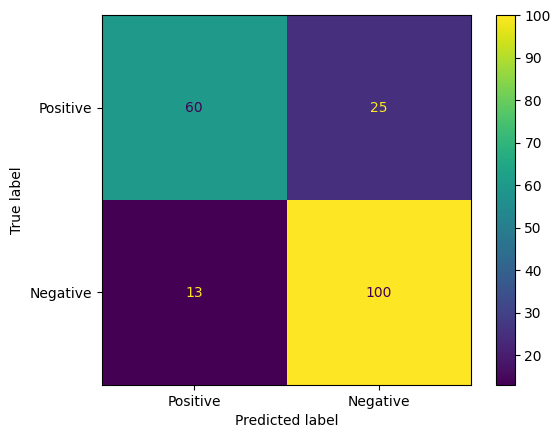
モデルの予測を評価するもう 1 つの興味深い方法は、混同行列を使用することです。混同行列は、さまざまな種類の予測エラーを視覚的に表します。
from sklearn.metrics import confusion_matrix, ConfusionMatrixDisplay

cm = confusion_matrix(y_true, y_pred)
ConfusionMatrixDisplay(
    confusion_matrix=cm,
    display_labels=agile_classifier.labels,
).plot()
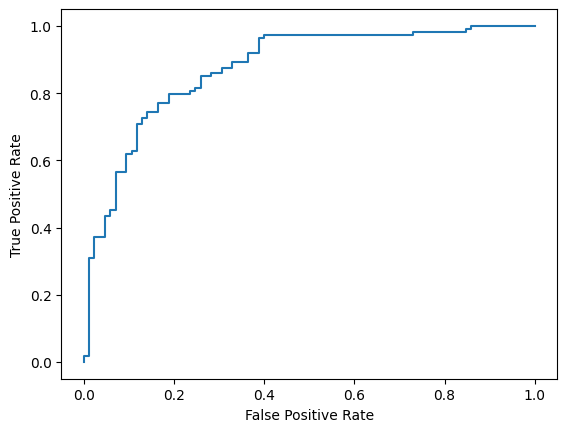
最後に、ROC 曲線を見て、さまざまなスコアリングしきい値を使用した場合の予測エラーの可能性を把握することもできます。
from sklearn.metrics import RocCurveDisplay, roc_curve

fpr, tpr, _ = roc_curve(y_true, y_prob, pos_label=1)
RocCurveDisplay(fpr=fpr, tpr=tpr).plot()