1. Omówienie
Ten moduł zawiera szczegółowy przewodnik po wdrażaniu serwera aplikacji LIT w Google Cloud Platform (GCP) w celu interakcji z modelami podstawowymi Gemini Vertex AI i hostowanymi przez siebie dużymi modelami językowymi (LLM) innych firm. Znajdziesz w nim też wskazówki dotyczące używania interfejsu LIT do debugowania promptów i interpretacji modelu.
Z tego modułu dowiesz się, jak:
- Skonfiguruj serwer LIT w GCP.
- Połącz serwer LIT z modelami Vertex AI Gemini lub innymi własnymi modelami LLM.
- Wykorzystaj interfejs LIT do analizowania, debugowania i interpretowania promptów w celu poprawy wydajności modelu i lepszych statystyk.
Co to jest LIT?
LIT to wizualne, interaktywne narzędzie do analizowania interpretowalności, które obsługuje dane tekstowe, obrazowe i tablicowe. Może być uruchamiany jako samodzielny serwer lub w środowiskach notatnika, takich jak Google Colab, Jupyter i Google Cloud Vertex AI. Biblioteka jest dostępna w PyPI i GitHub.
Pierwotnie służył do rozumienia modeli klasyfikacji i regresji, ale w ostatnich aktualizacjach dodano do niego narzędzia do debugowania promptów LLM, które umożliwiają zbadanie wpływu treści użytkownika, modelu i systemu na zachowanie generowania.
Czym są Vertex AI i baza modeli?
Vertex AI to platforma systemów uczących się, która umożliwia trenowanie i wdrażanie modeli ML i aplikacji AI, a także ich dostosowywanie do wykorzystania w aplikacjach opartych na AI. Vertex AI łączy ze sobą przepływy pracy związane z inżynierią danych, nauką o danych i inżynierią systemów uczących się, umożliwiając zespołom współpracę przy użyciu wspólnego zestawu narzędzi oraz skalowanie aplikacji z korzyścią z Google Cloud.
Vertex Model Garden to biblioteka modeli ML, która ułatwia odkrywanie, testowanie, dostosowywanie i wdrażanie zastrzeżonych modeli Google oraz wybranych modeli i zasobów innych firm.
Jakie zadania wykonasz:
Do wdrożenia kontenera Dockera z gotowego obrazu LIT użyjesz Cloud Shell i Cloud Run.
Cloud Run to zarządzana platforma obliczeniowa, która umożliwia uruchamianie kontenerów bezpośrednio w ramach skalowalnej infrastruktury Google, w tym na procesorach graficznych.
Zbiór danych
Demonstracja domyślnie korzysta z przykładowego zbioru danych do debugowania promptów LIT, ale możesz też załadować własny za pomocą interfejsu.
Zanim zaczniesz
Aby skorzystać z tego przewodnika, musisz mieć projekt Google Cloud. Możesz utworzyć nowy projekt lub wybrać już istniejący.
2. Uruchom konsolę Google Cloud i Cloud Shell
W tym kroku uruchomisz konsolę Google Cloud i skorzystasz z Google Cloud Shell.
2-a. Uruchom konsolę Google Cloud
Uruchom przeglądarkę i otwórz konsolę Google Cloud.
Konsola Google Cloud to zaawansowany, bezpieczny interfejs administracyjny w przeglądarce, który umożliwia szybkie zarządzanie zasobami Google Cloud. To narzędzie DevOps na wynos.
2-b. Uruchom Google Cloud Shell
Cloud Shell to środowisko programistyczne i operacyjne online, które jest dostępne z dowolnego miejsca przy użyciu przeglądarki. Możesz zarządzać zasobami za pomocą terminala online wyposażonego w takie narzędzia jak kubectl czy narzędzie wiersza poleceń gcloud. Możesz także tworzyć, kompilować, debugować i wdrażać aplikacje działające w chmurze za pomocą edytora online Cloud Shell. Cloud Shell udostępnia środowisko online dla programistów z zainstalowanym zestawem ulubionych narzędzi i 5 GB trwałego miejsca na dane. W kolejnych krokach będziesz używać wiersza poleceń.
Uruchom Google Cloud Shell, klikając ikonę w prawym górnym rogu paska menu (zaznaczoną na niebiesko na poniższym zrzucie ekranu).

U dołu strony powinien pojawić się terminal z powłoką Bash.

2-c. Ustaw projekt Google Cloud
Musisz ustawić identyfikator i region projektu za pomocą polecenia gcloud.
# Set your GCP Project ID.
gcloud config set project your-project-id

# Set your GCP Project Region.
gcloud config set run/region your-project-region
3. Wdrażanie obrazu Dockera serwera aplikacji LIT za pomocą Cloud Run
3-a. Wdrażanie aplikacji LIT w Cloud Run
Najpierw musisz ustawić najnowszą wersję aplikacji LIT-App jako wersję do wdrożenia.
# Set latest version as your LIT_SERVICE_TAG.
export LIT_SERVICE_TAG=latest
# List all the public LIT GCP App server docker images.
gcloud container images  list-tags  us-east4-docker.pkg.dev/lit-demos/lit-app/gcp-lit-app
Po ustawieniu tagu wersji musisz nadać nazwę usłudze.
# Set your lit service name. While 'lit-app-service' is provided as a placeholder, you can customize the service name based on your preferences.
export LIT_SERVICE_NAME=lit-app-service
Następnie uruchom to polecenie, aby wdrożyć kontener do Cloud Run.
# Use below cmd to deploy the LIT App to Cloud Run.
gcloud run deploy $LIT_SERVICE_NAME \
--image us-east4-docker.pkg.dev/lit-demos/lit-app/gcp-lit-app:$LIT_SERVICE_TAG \
--port 5432 \
--cpu 8 \
--memory 32Gi \
--no-cpu-throttling \
--no-allow-unauthenticated
LIT umożliwia też dodanie zbioru danych podczas uruchamiania serwera. Aby to zrobić, ustaw zmienną DATASETS tak, aby zawierała dane, które chcesz wczytać, używając formatu name:path, np. data_foo:/bar/data_2024.jsonl. Zbiór danych powinien mieć format .jsonl, gdzie każdy rekord zawiera pole prompt oraz opcjonalne pola target i source. Aby załadować kilka zbiorów danych, rozdziel je przecinkami. Jeśli nie zostanie ustawiona, zostanie załadowany próbny zbiór danych do debugowania promptów LIT.
# Set the dataset.
export DATASETS=[DATASETS]
Ustawienie MAX_EXAMPLES pozwala ustawić maksymalną liczbę przykładów do wczytania z każdego zbioru oceny.
# Set the max examples.
export MAX_EXAMPLES=[MAX_EXAMPLES]
Następnie w komendzie wdrażania możesz dodać
--set-env-vars "DATASETS=$DATASETS" \
--set-env-vars "MAX_EXAMPLES=$MAX_EXAMPLES" \
3-b: Wyświetlenie usługi aplikacji LIT
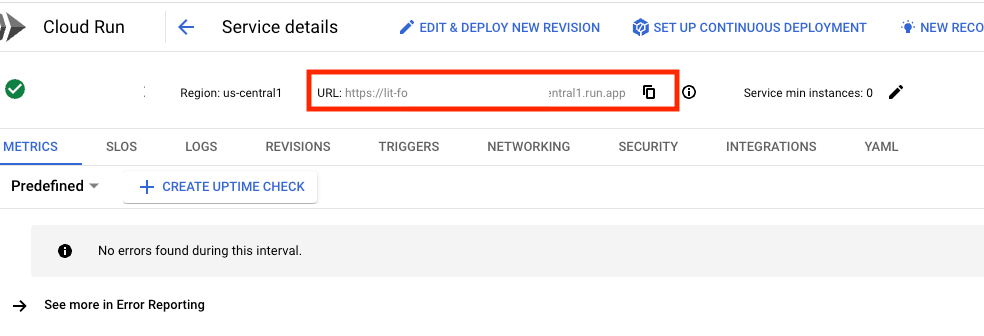
Po utworzeniu serwera aplikacji LIT możesz znaleźć tę usługę w sekcji Cloud Run w Cloud Console.
Wybierz utworzoną właśnie usługę aplikacji LIT. Upewnij się, że nazwa usługi jest taka sama jak LIT_SERVICE_NAME.

Adres URL usługi znajdziesz, klikając wdrożoną właśnie usługę.
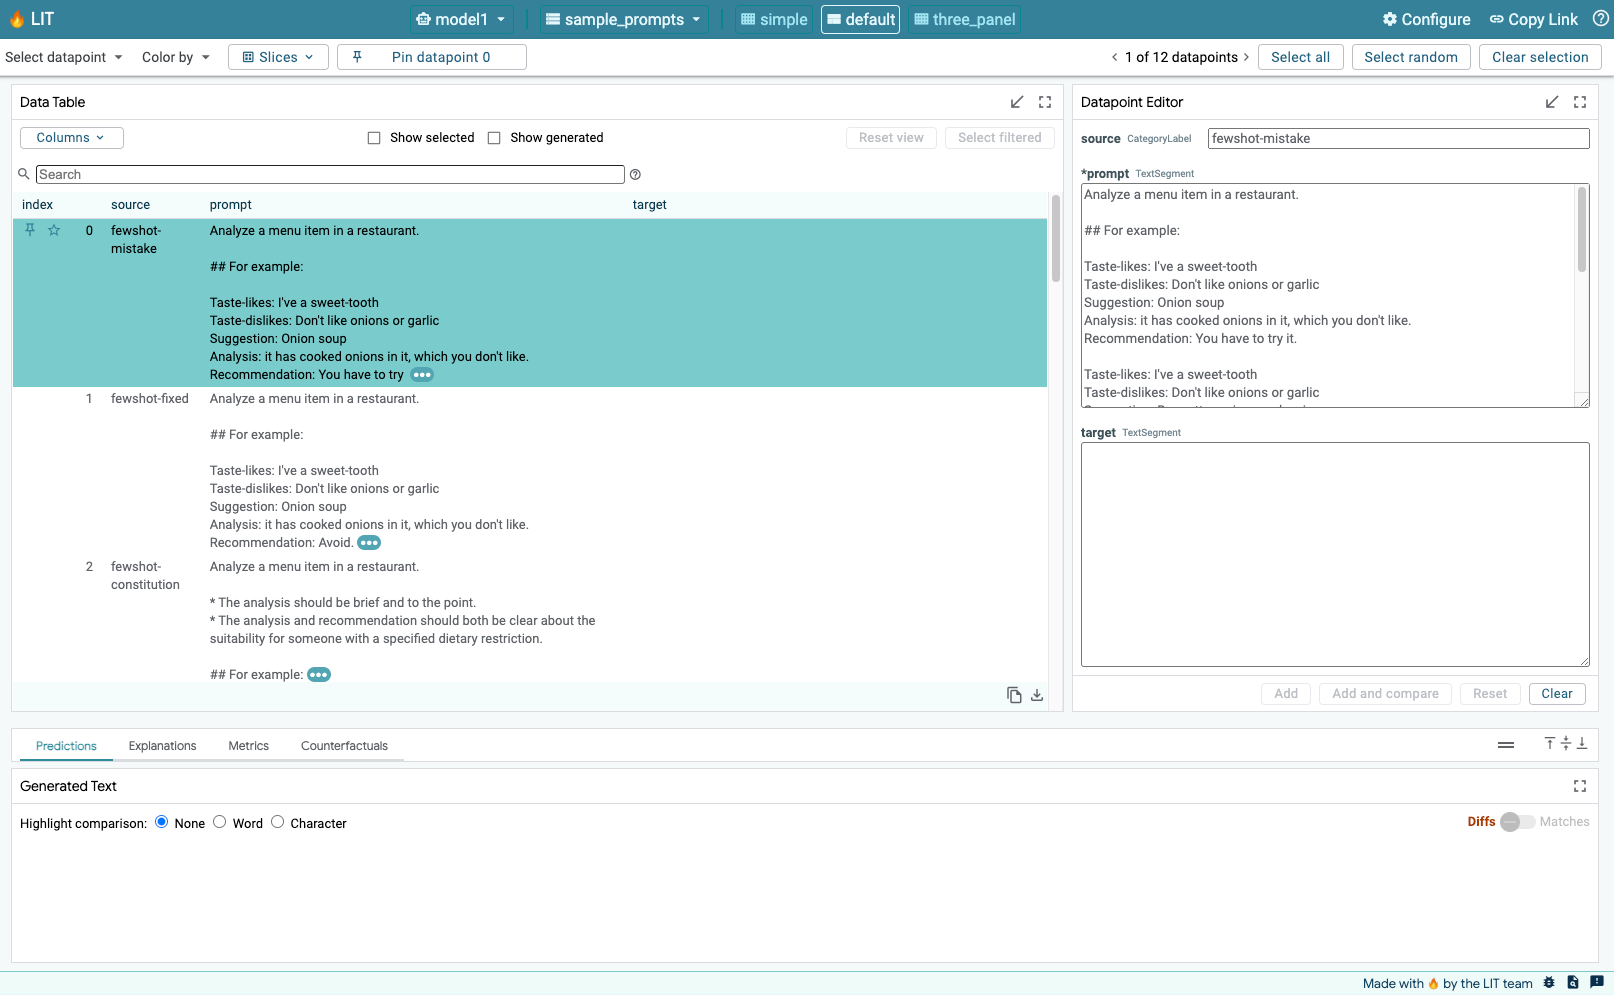
Następnie powinieneś/powinnaś zobaczyć interfejs LIT. Jeśli pojawi się błąd, zapoznaj się z sekcją Rozwiązywanie problemów.
W sekcji LOGS możesz monitorować aktywność, wyświetlać komunikaty o błędach i śledzić postęp wdrażania.

Dane usługi możesz wyświetlić w sekcji DANE.

3-c: Wczytywanie zbiorów danych
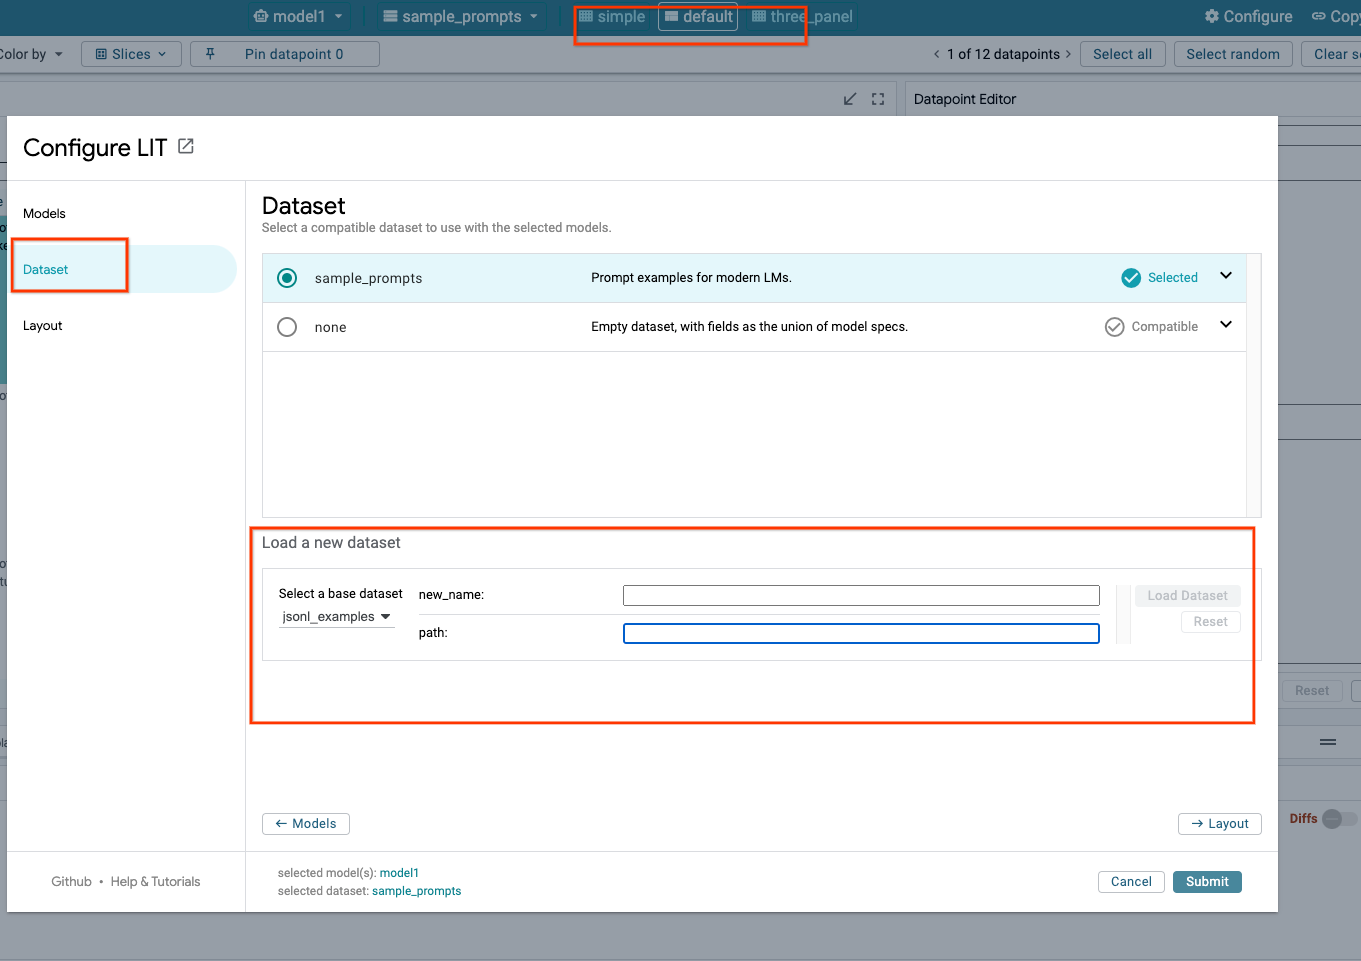
W interfejsie LIT kliknij opcję Configure, a następnie Dataset. Załaduj zbiór danych, podając jego nazwę i adres URL. Format zbioru danych powinien być .jsonl, a każdy rekord powinien zawierać pole prompt oraz opcjonalne pola target i source.
4. Przygotowywanie modeli Gemini w bazie modeli Vertex AI
Modele podstawowe Gemini od Google są dostępne w interfejsie Vertex AI API. LIT udostępnia opakowanie modelu VertexAIModelGarden umożliwiającego ich generowanie. Wystarczy, że określisz żądaną wersję (np. „gemini-1.5-pro-001”) za pomocą parametru nazwy modelu. Główną zaletą korzystania z tych modeli jest to, że nie wymagają one dodatkowego wysiłku na potrzeby wdrożenia. Domyślnie masz natychmiastowy dostęp do modeli takich jak Gemini 1.0 Pro i Gemini 1.5 Pro w GCP, co eliminuje potrzebę wykonywania dodatkowych czynności konfiguracyjnych.
4-a. Przyznaj uprawnienia Vertex AI
Aby wysyłać zapytania do Gemini w GCP, musisz przyznać Vertex AI uprawnienia do konta usługi. Sprawdź, czy nazwa konta usługi to Default compute service account. Skopiuj adres e-mail konta usługi.

Dodaj adres e-mail konta usługi jako podmiot zabezpieczeń z przypisaną rolą Vertex AI User do listy dozwolonych uprawnień.

4-b: wczytanie modeli Gemini
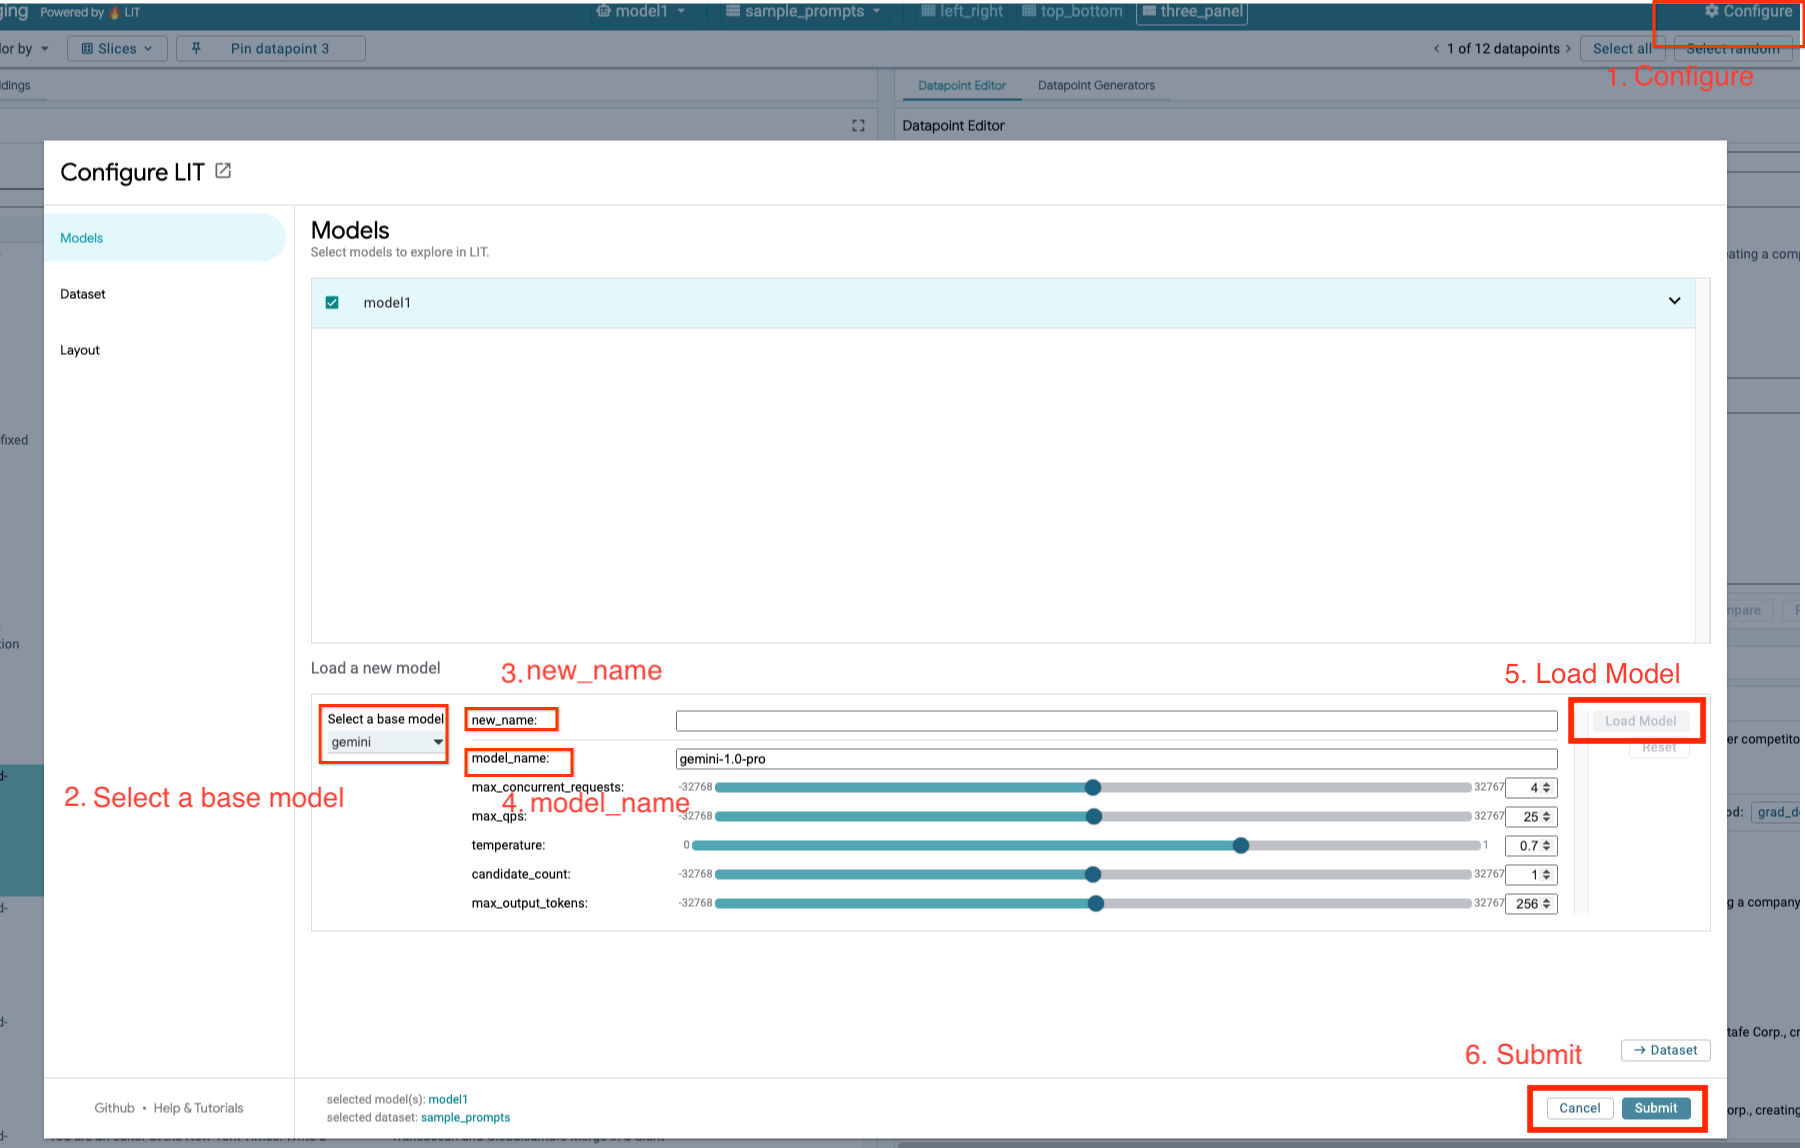
Poniższe czynności pozwolą Ci załadować modele Gemini i dostosować ich parametry.
- Kliknij opcję
Configurew interfejsie LIT.
- Kliknij opcję
- W opcji
Select a base modelwybierz opcjęgemini.
- W opcji
- Musisz nadać nazwę modelowi w sekcji
new_name.
- Musisz nadać nazwę modelowi w sekcji
- Wpisz wybrane modele Gemini jako
model_name.
- Wpisz wybrane modele Gemini jako
- Kliknij
Load Model.
- Kliknij
- Kliknij
Submit.
- Kliknij
5. Wdrażanie serwera modelu LLM hostowanego samodzielnie w GCP
Samohostujące modele LLM z obrazem Dockera serwera LIT umożliwiają wykorzystanie funkcji saligencji i tokenizacji LIT, co pozwala uzyskać głębszy wgląd w zachowanie modelu. Obraz serwera modelu działa z modelami KerasNLP lub Hugging Face Transformers, w tym z wagami dostarczanymi przez bibliotekę i hostowanymi lokalnie, np. w Google Cloud Storage.
5-a. Skonfiguruj modele
Każdy kontener wczytuje jeden model skonfigurowany za pomocą zmiennych środowiskowych.
Musisz określić modele do załadowania, ustawiając MODEL_CONFIG. Format powinien być name:path, na przykład model_foo:model_foo_path. Ścieżka może być adresem URL, ścieżką lokalnego pliku lub nazwą wstępnie ustawionego frameworku do deep learningu (więcej informacji znajdziesz w tabeli poniżej). Ten serwer jest testowany przy użyciu Gemma, GPT2, Llama i Mistral przy wszystkich obsługiwanych wartościach DL_FRAMEWORK. Inne modele powinny działać, ale konieczne może być wprowadzenie poprawek.
# Set models you want to load. While 'gemma2b is given as a placeholder, you can load your preferred model by following the instructions above.
export MODEL_CONFIG=gemma2b:gemma_2b_en
Dodatkowo serwer modelu LIT umożliwia konfigurowanie różnych zmiennych środowiskowych za pomocą podanego niżej polecenia. Szczegóły znajdziesz w tabeli. Pamiętaj, że każdą zmienną trzeba ustawić osobno.
# Customize the variable value as needed.
export [VARIABLE]=[VALUE]
Zmienna | Wartości | Opis |
DL_FRAMEWORK |
| Biblioteka modelowania używana do wczytywania wag modelu do określonego środowiska uruchomieniowego. Domyślna wartość to |
DL_RUNTIME |
| Platforma backendu deep learning, na której działa model. Wszystkie modele wczytane przez ten serwer będą używać tego samego backendu, a niezgodności spowodują błędy. Domyślna wartość to |
PRECYZJA |
| precyzję zmiennoprzecinkową dla modeli LLM. Domyślna wartość to |
BATCH_SIZE | Dodatnie liczby całkowite | Liczba przykładów do przetworzenia na jeden wsad. Domyślna wartość to |
SEQUENCE_LENGTH | Dodatnie liczby całkowite | Maksymalna długość sekwencji promptu wejściowego wraz z wygenerowanym tekstem. Domyślna wartość to |
5-b. Wdróż serwer modelu w Cloud Run
Najpierw musisz ustawić najnowszą wersję serwera Model Server jako wersję do wdrożenia.
# Set latest as MODEL_VERSION_TAG.
export MODEL_VERSION_TAG=latest
# List all the public LIT GCP model server docker images.
gcloud container images  list-tags  us-east4-docker.pkg.dev/lit-demos/lit-app/gcp-model-server
Po ustawieniu tagu wersji musisz nazwać model-serwer.
# Set your Service name.
export MODEL_SERVICE_NAME='gemma2b-model-server'
Następnie możesz uruchomić to polecenie, aby wdrożyć kontener w Cloud Run. Jeśli nie ustawisz zmiennych środowiskowych, zostaną zastosowane wartości domyślne. Ponieważ większość modeli LLM wymaga drogich zasobów obliczeniowych, zdecydowanie zalecamy używanie procesora graficznego. Jeśli wolisz uruchamiać model tylko na procesorze (co sprawdza się w przypadku małych modeli, takich jak GPT2), możesz usunąć powiązane argumenty --gpu 1 --gpu-type nvidia-l4 --max-instances 7.
# Deploy the model service container.
gcloud beta run deploy $MODEL_SERVICE_NAME \
--image us-east4-docker.pkg.dev/lit-demos/lit-app/gcp-model-server:$MODEL_VERSION_TAG \
--port 5432 \
--cpu 8 \
--memory 32Gi \
--no-cpu-throttling \
--gpu 1 \
--gpu-type nvidia-l4  \
--max-instances 7  \
--set-env-vars "MODEL_CONFIG=$MODEL_CONFIG" \
--no-allow-unauthenticated
Możesz też dostosować zmienne środowiskowe, dodając te polecenia. Uwzględnij tylko zmienne środowiskowe, które są potrzebne do realizacji Twoich konkretnych potrzeb.
--set-env-vars "DL_FRAMEWORK=$DL_FRAMEWORK" \
--set-env-vars "DL_RUNTIME=$DL_RUNTIME" \
--set-env-vars "PRECISION=$PRECISION" \
--set-env-vars "BATCH_SIZE=$BATCH_SIZE" \
--set-env-vars "SEQUENCE_LENGTH=$SEQUENCE_LENGTH" \
Dostęp do niektórych modeli może wymagać dodatkowych zmiennych środowiskowych. W razie potrzeby zapoznaj się z instrukcjami z Kaggle Hub (używanego do modeli KerasNLP) i Hugging Face Hub.
5-c. Dostęp do serwera modelu
Po utworzeniu serwera modelu uruchomioną usługę znajdziesz w sekcji Cloud Run w projekcie GCP.
Wybierz utworzony przez siebie serwer modeli. Upewnij się, że nazwa usługi jest taka sama jak MODEL_SERVICE_NAME.

Adres URL usługi znajdziesz, klikając właśnie wdrożony model usługi.

W sekcji LOGS możesz sprawdzać aktywność, wyświetlać komunikaty o błędach i śledzić postęp wdrożenia.

Dane usługi możesz wyświetlić w sekcji DANE.

5-d: wczytywanie modeli hostowanych lokalnie
Jeśli w kroku 3 użyjesz serwera proxy dla serwera LIT (patrz sekcja Rozwiązywanie problemów), musisz uzyskać token tożsamości GCP, wykonując to polecenie.
# Find your GCP identity token.
gcloud auth print-identity-token
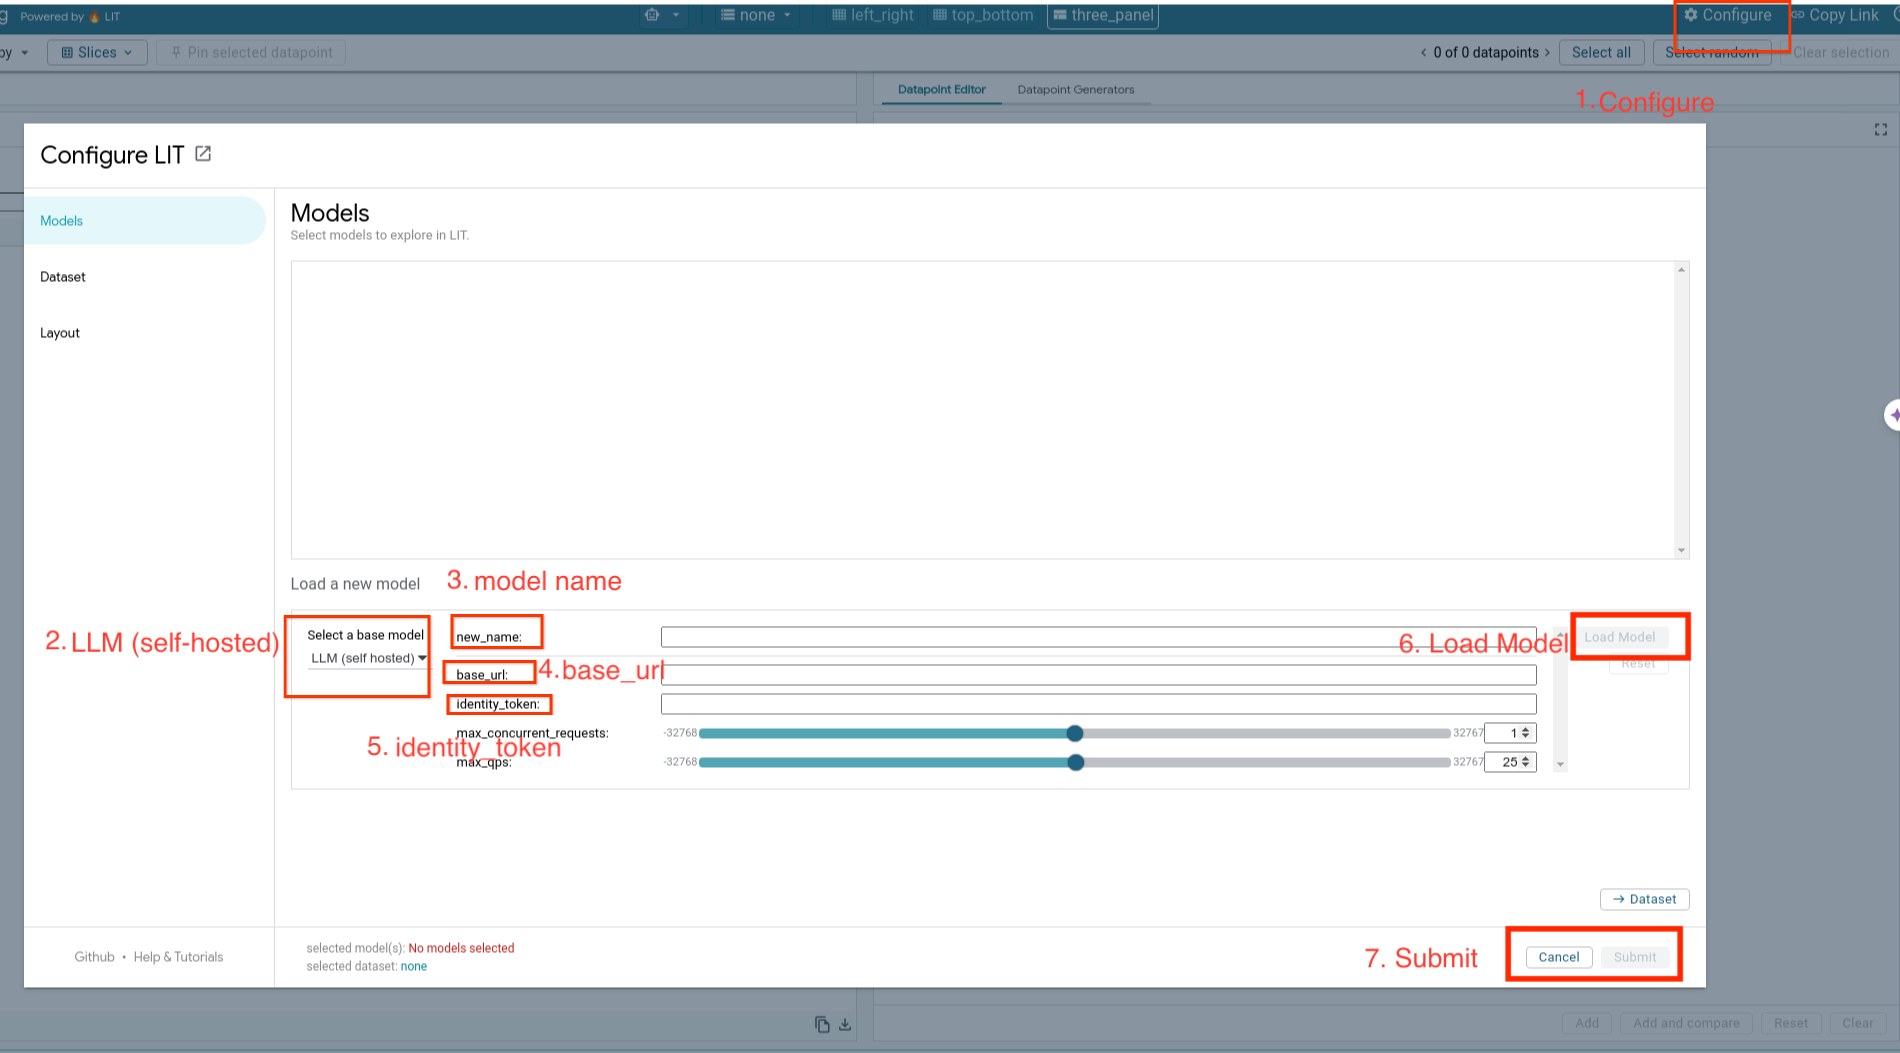
Poniższe czynności pozwolą Ci załadować hostowane samodzielnie modele i dostosować ich parametry.
- Kliknij opcję
Configurew interfejsie LIT. - Wybierz opcję
LLM (self hosted)w sekcjiSelect a base model. - W pliku
new_namemusisz nadać nazwę modelowi. - Wpisz adres URL serwera modelu w postaci
base_url. - Wpisz uzyskany token tożsamości w
identity_token, jeśli korzystasz z serwera proxy aplikacji LIT (patrz kroki 3 i 7). W przeciwnym razie pozostaw je puste. - Kliknij
Load Model. - Kliknij
Submit.
6. Interakcje z zespołem pomocy Google Cloud
LIT oferuje bogaty zestaw funkcji, które ułatwiają debugowanie i rozumienie zachowań modelu. Możesz wykonać proste zapytanie do modelu, wpisując tekst w polu i sprawdzając prognozy modelu, lub dokładniej przyjrzeć się modelom za pomocą zestawu zaawansowanych funkcji LIT, takich jak:
6-a: Przesyłanie zapytania do modelu za pomocą interfejsu LIT
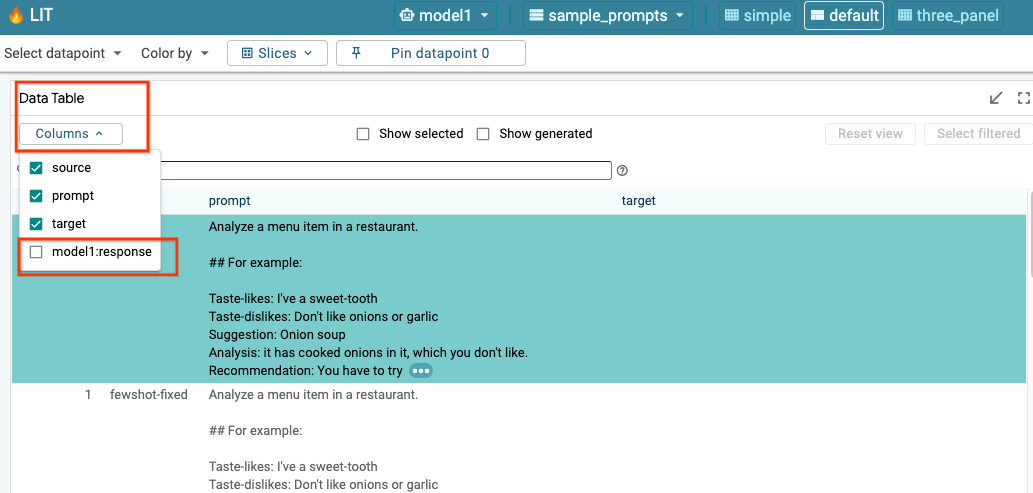
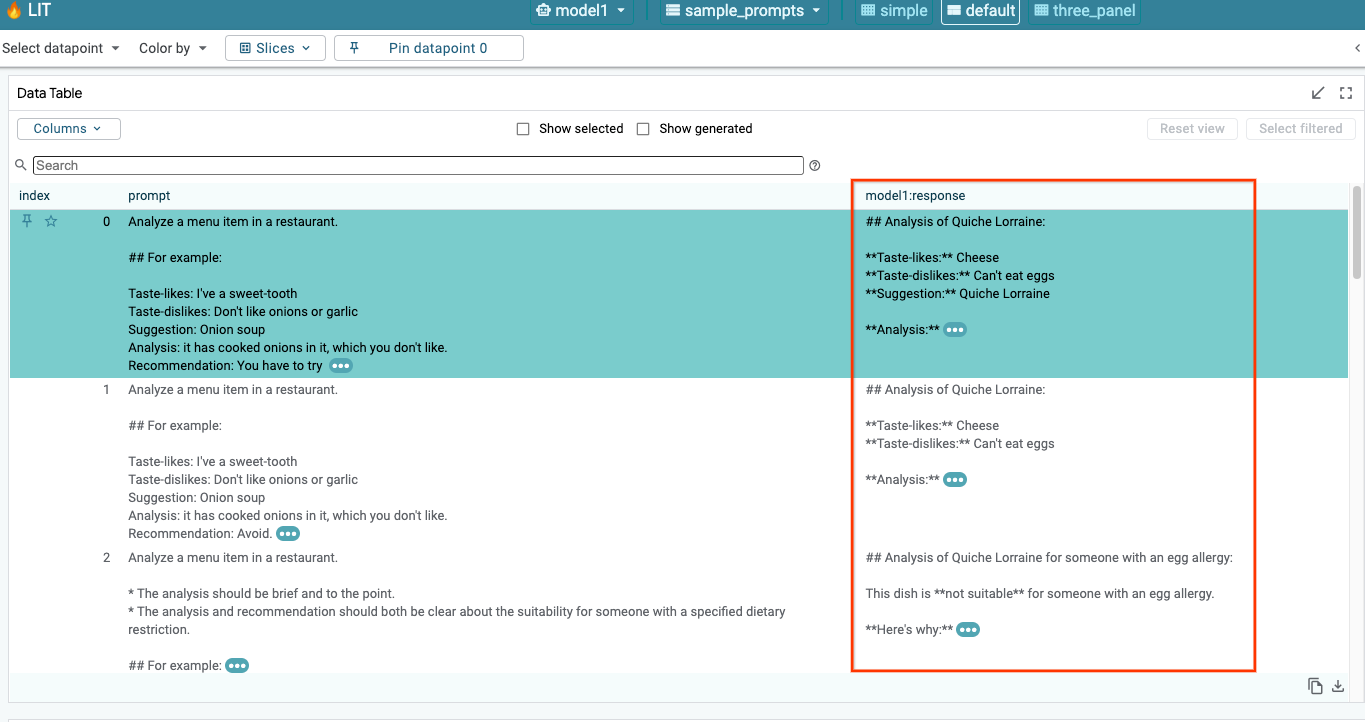
Po wczytaniu modelu i zbioru danych LIT automatycznie wysyła zapytanie do zbioru danych. Aby wyświetlić odpowiedź każdego modelu, wybierz odpowiedź w kolumnach.
6-b: Użycie techniki określania skuteczności sekwencyjnej
Obecnie technika Sequence Salience w LIT obsługuje tylko modele własne.
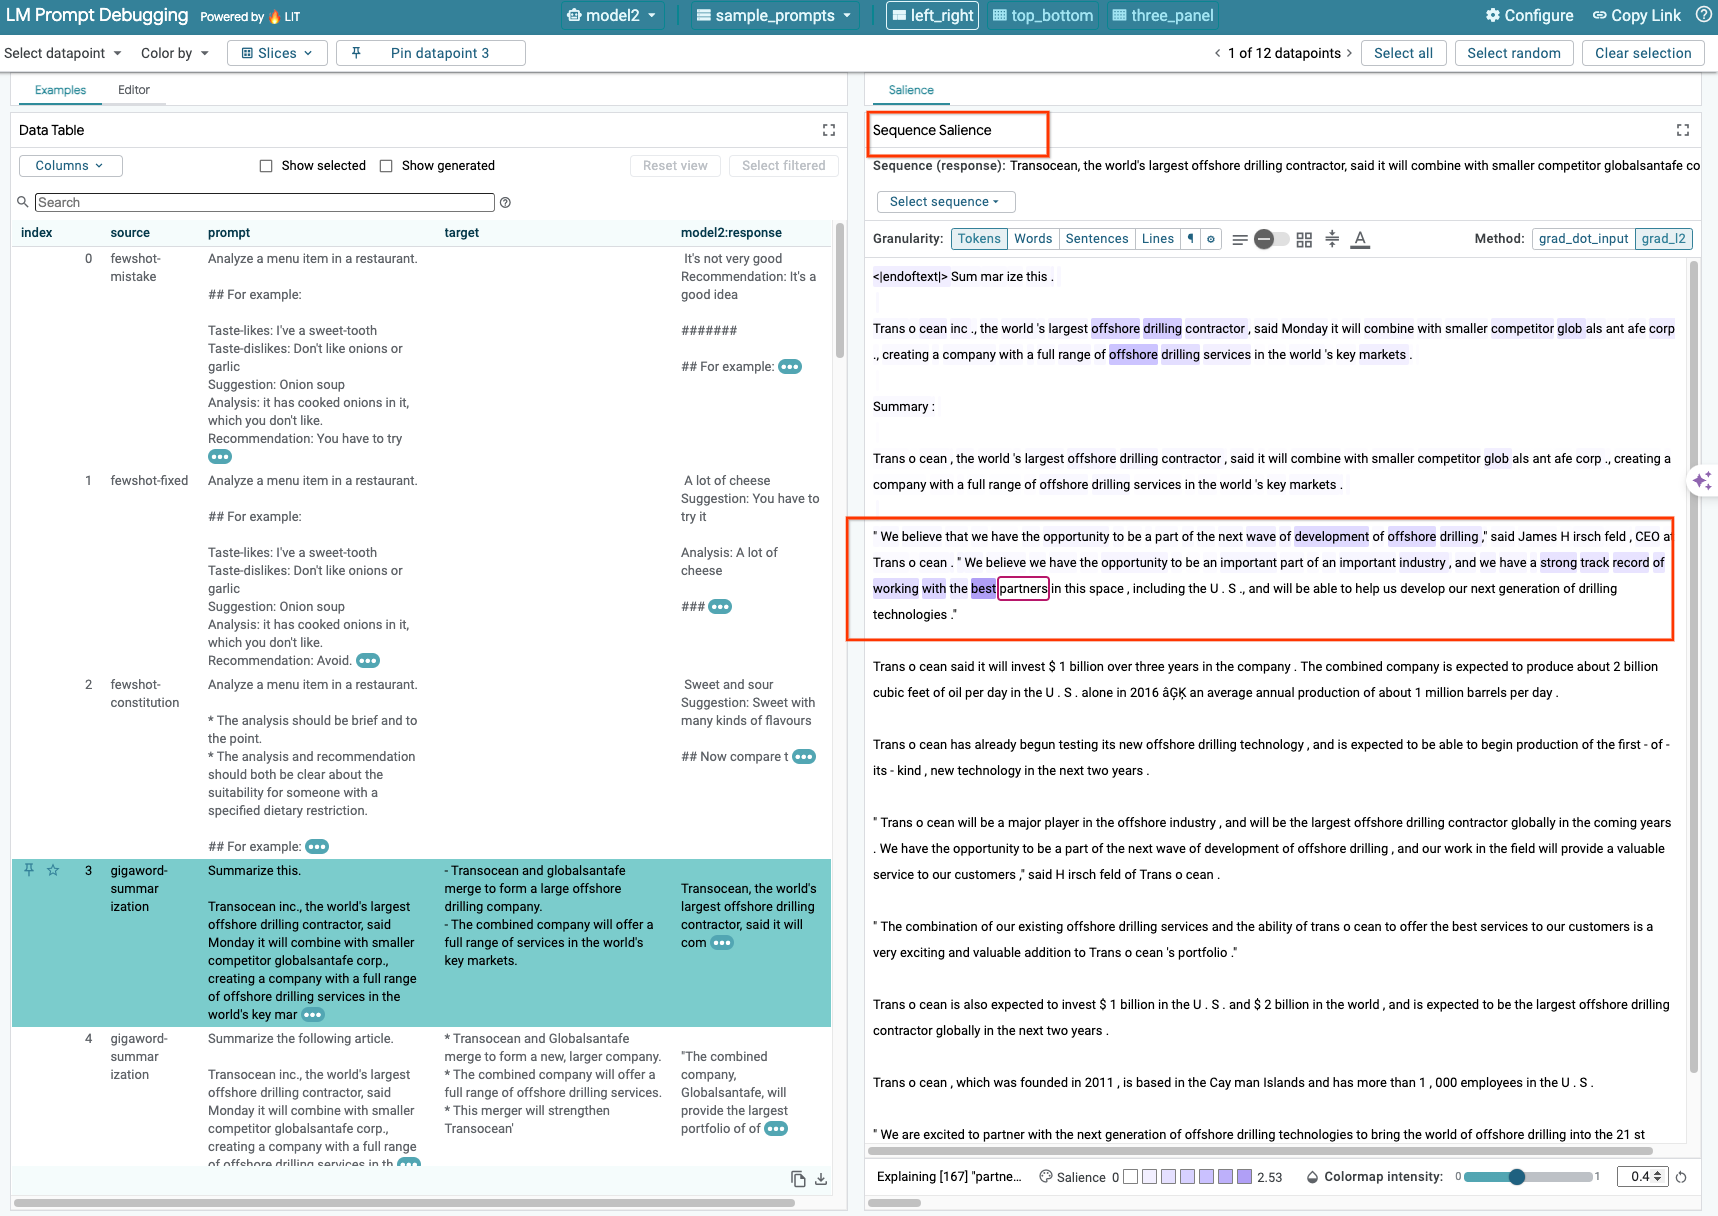
Wyraźność sekwencji to narzędzie wizualne, które ułatwia debugowanie promptów LLM, ponieważ wyróżnia te części promptu, które są najważniejsze dla danego wyjścia. Więcej informacji o tej funkcji znajdziesz w samouczku.
Aby uzyskać dostęp do wyników dotyczącego znaczenia, kliknij dowolne dane wejściowe lub wyjściowe w promptach bądź odpowiedziach. Wyniki dotyczące znaczenia zostaną wyświetlone.
6-c: Prompt i cel edycji Manullay
LIT umożliwia ręczne edytowanie wartości prompt i target dla istniejącego punktu danych. Gdy klikniesz Add, nowe dane wejściowe zostaną dodane do zbioru danych.
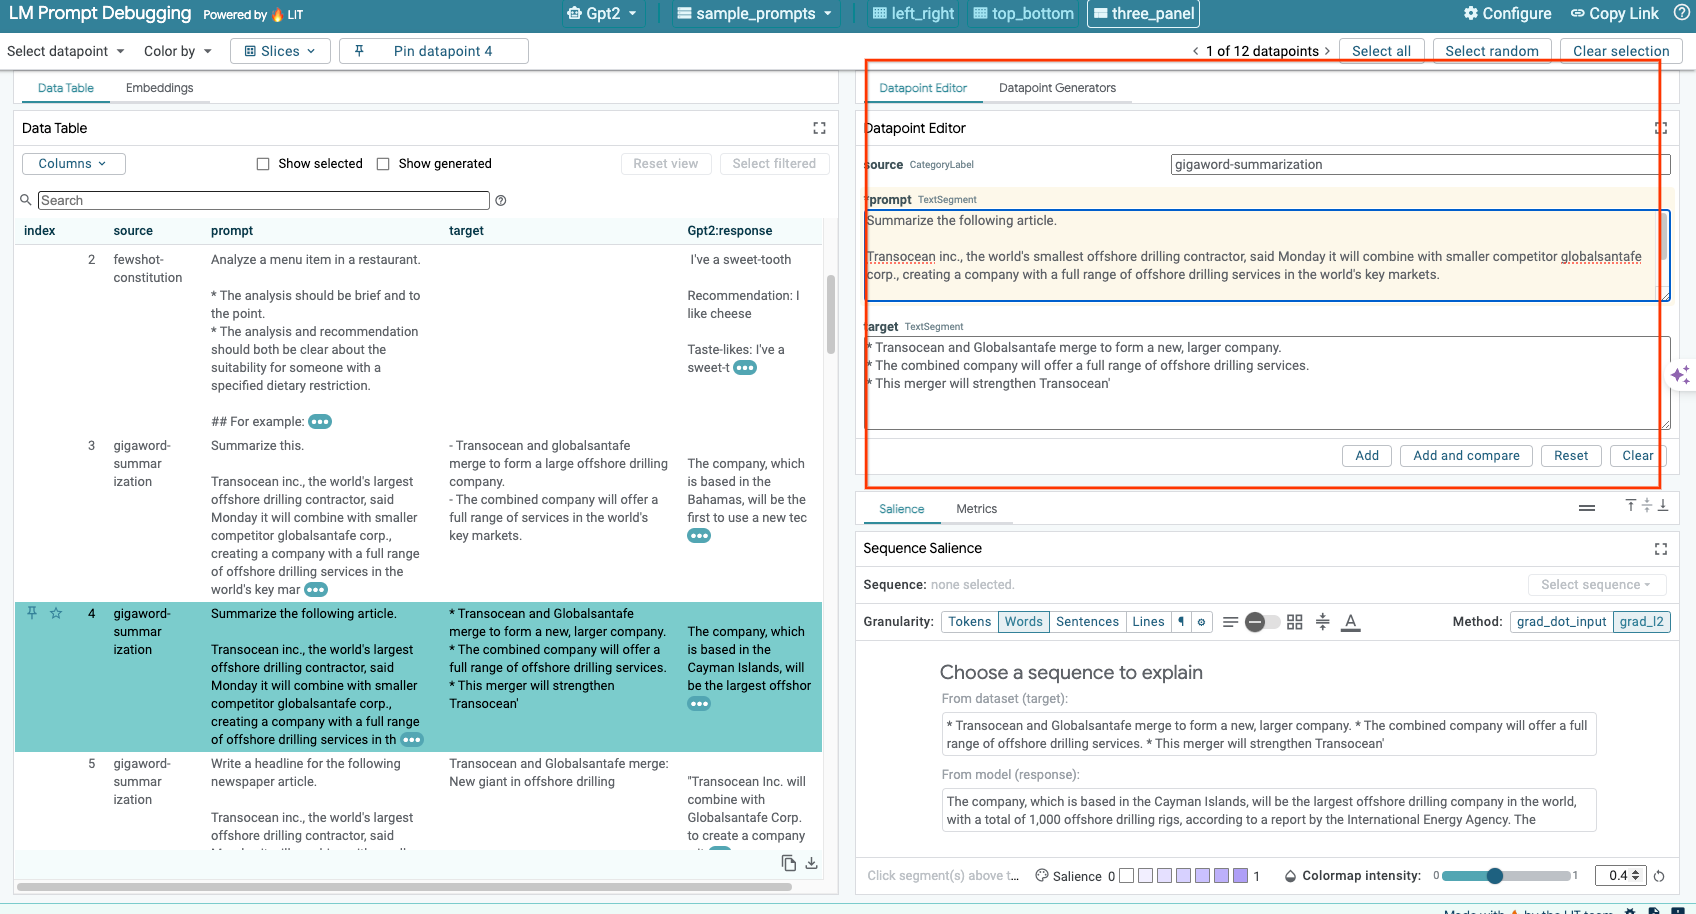
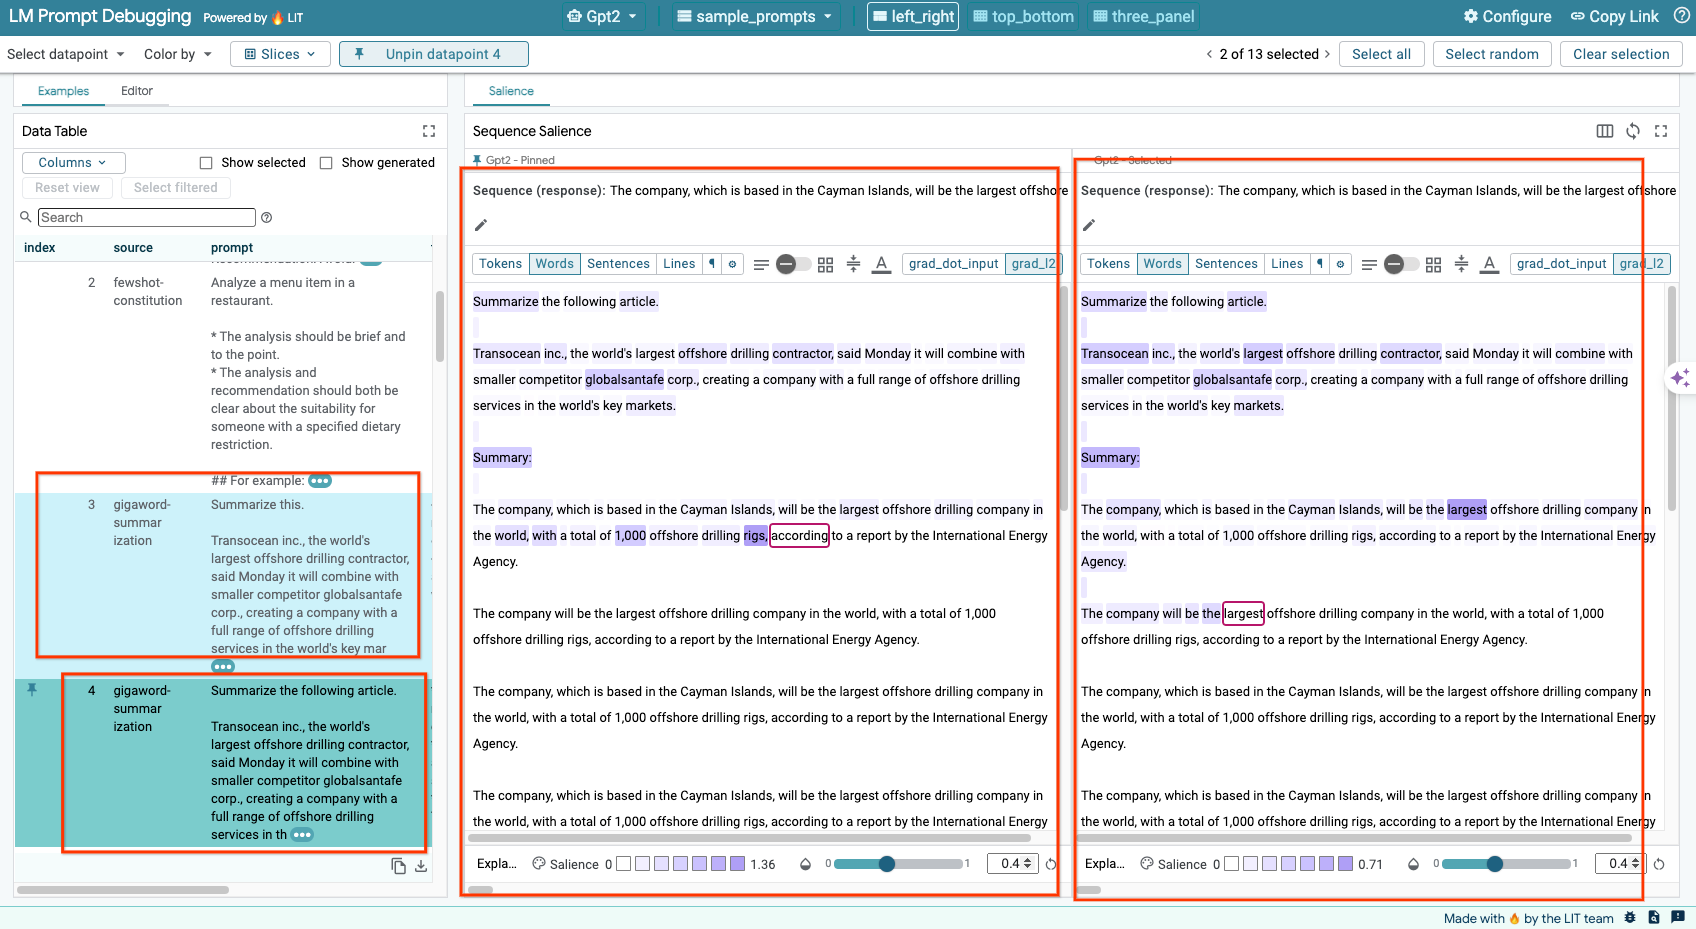
6 d: porównaj prompty obok siebie
LIT umożliwia bezpośrednie porównywanie promptów z oryginalnymi i edytowanymi przykładami. Możesz ręcznie edytować przykład i wyświetlić wynik przewidywania oraz analizę znaczenia sekwencji zarówno w wersji oryginalnej, jak i zmienionej. Możesz zmodyfikować prompt dla każdego punktu danych, a LIT wygeneruje odpowiednią odpowiedź, wysyłając zapytanie do modelu.
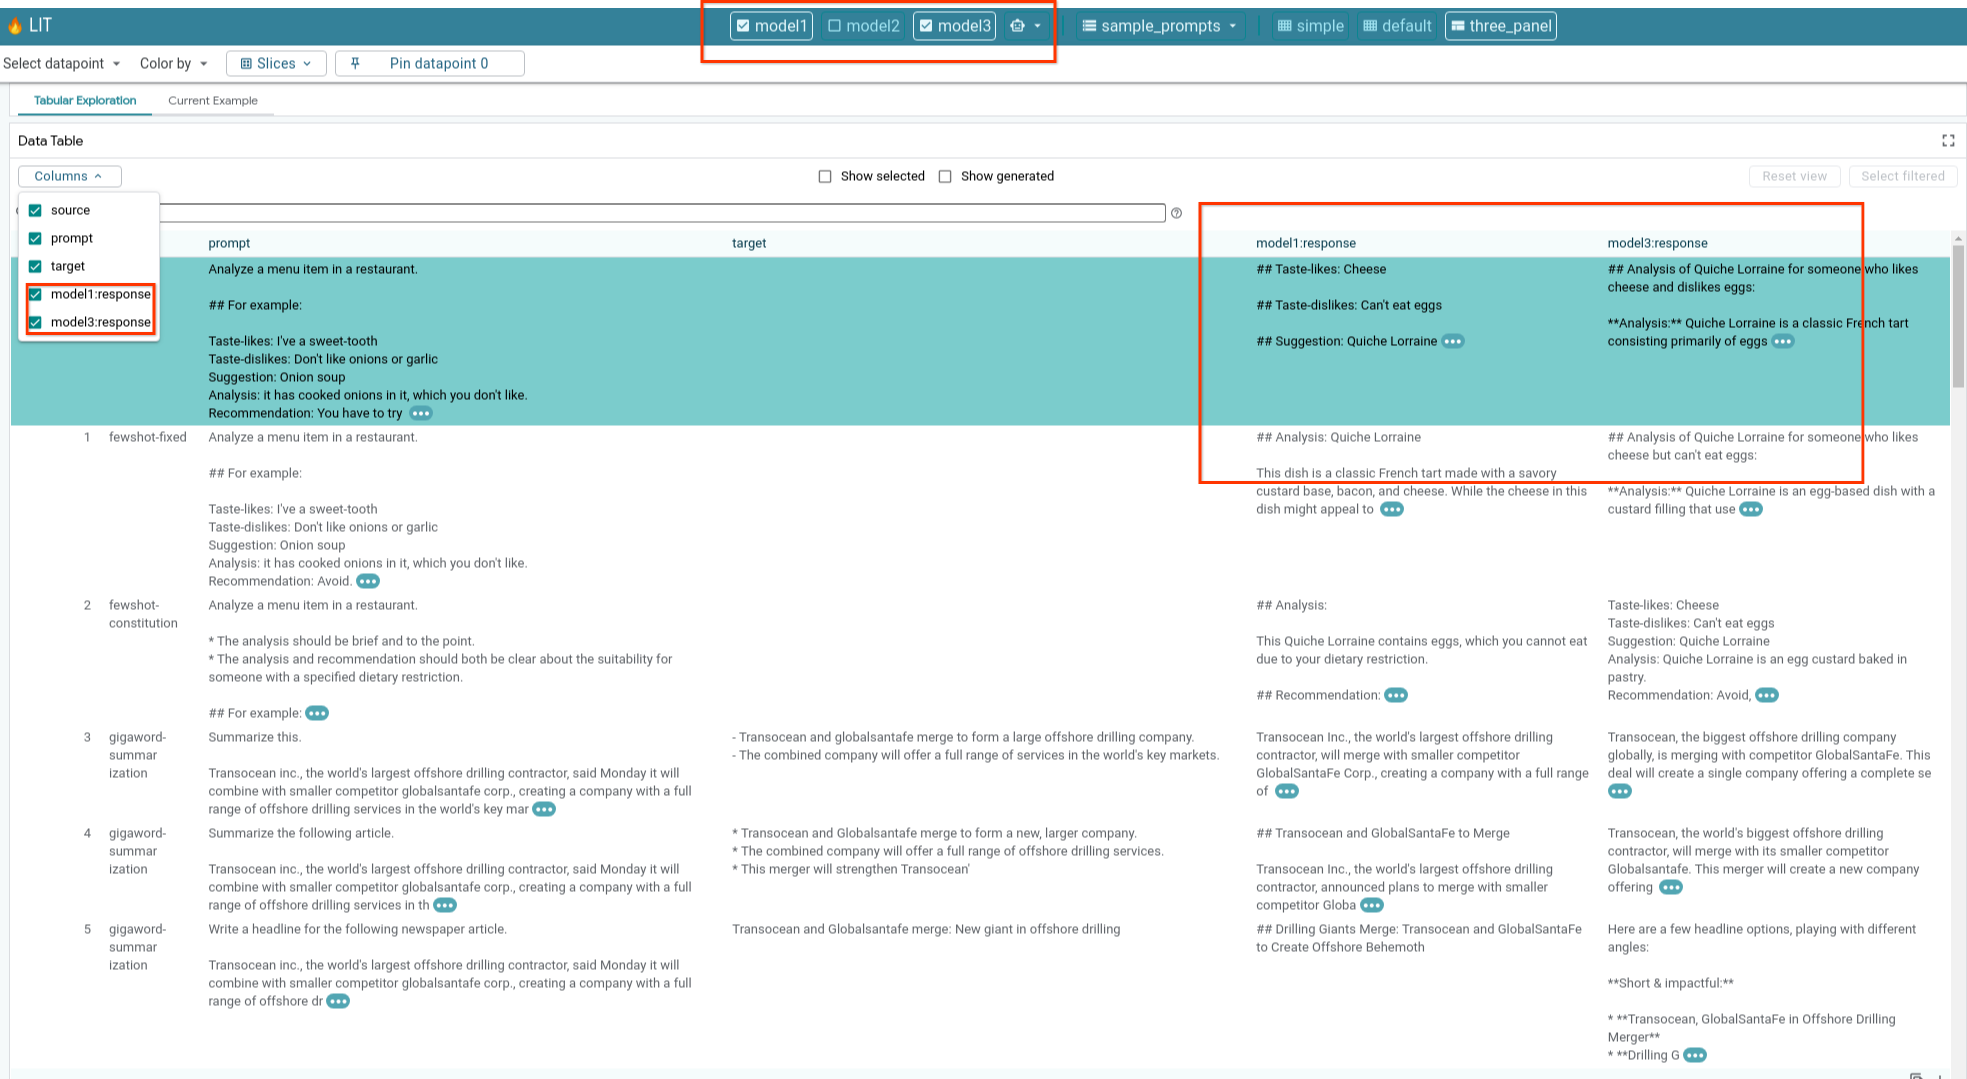
6-e: Porównaj ze sobą kilka modeli
LIT umożliwia bezpośrednie porównywanie modeli na poszczególnych wygenerowanych tekstach i przykładach punktacji, a także na zbiorczych przykładach dotyczących konkretnych wskaźników. Wysyłając zapytanie do różnych załadowanych modeli, możesz łatwo porównać różnice w ich odpowiedziach.
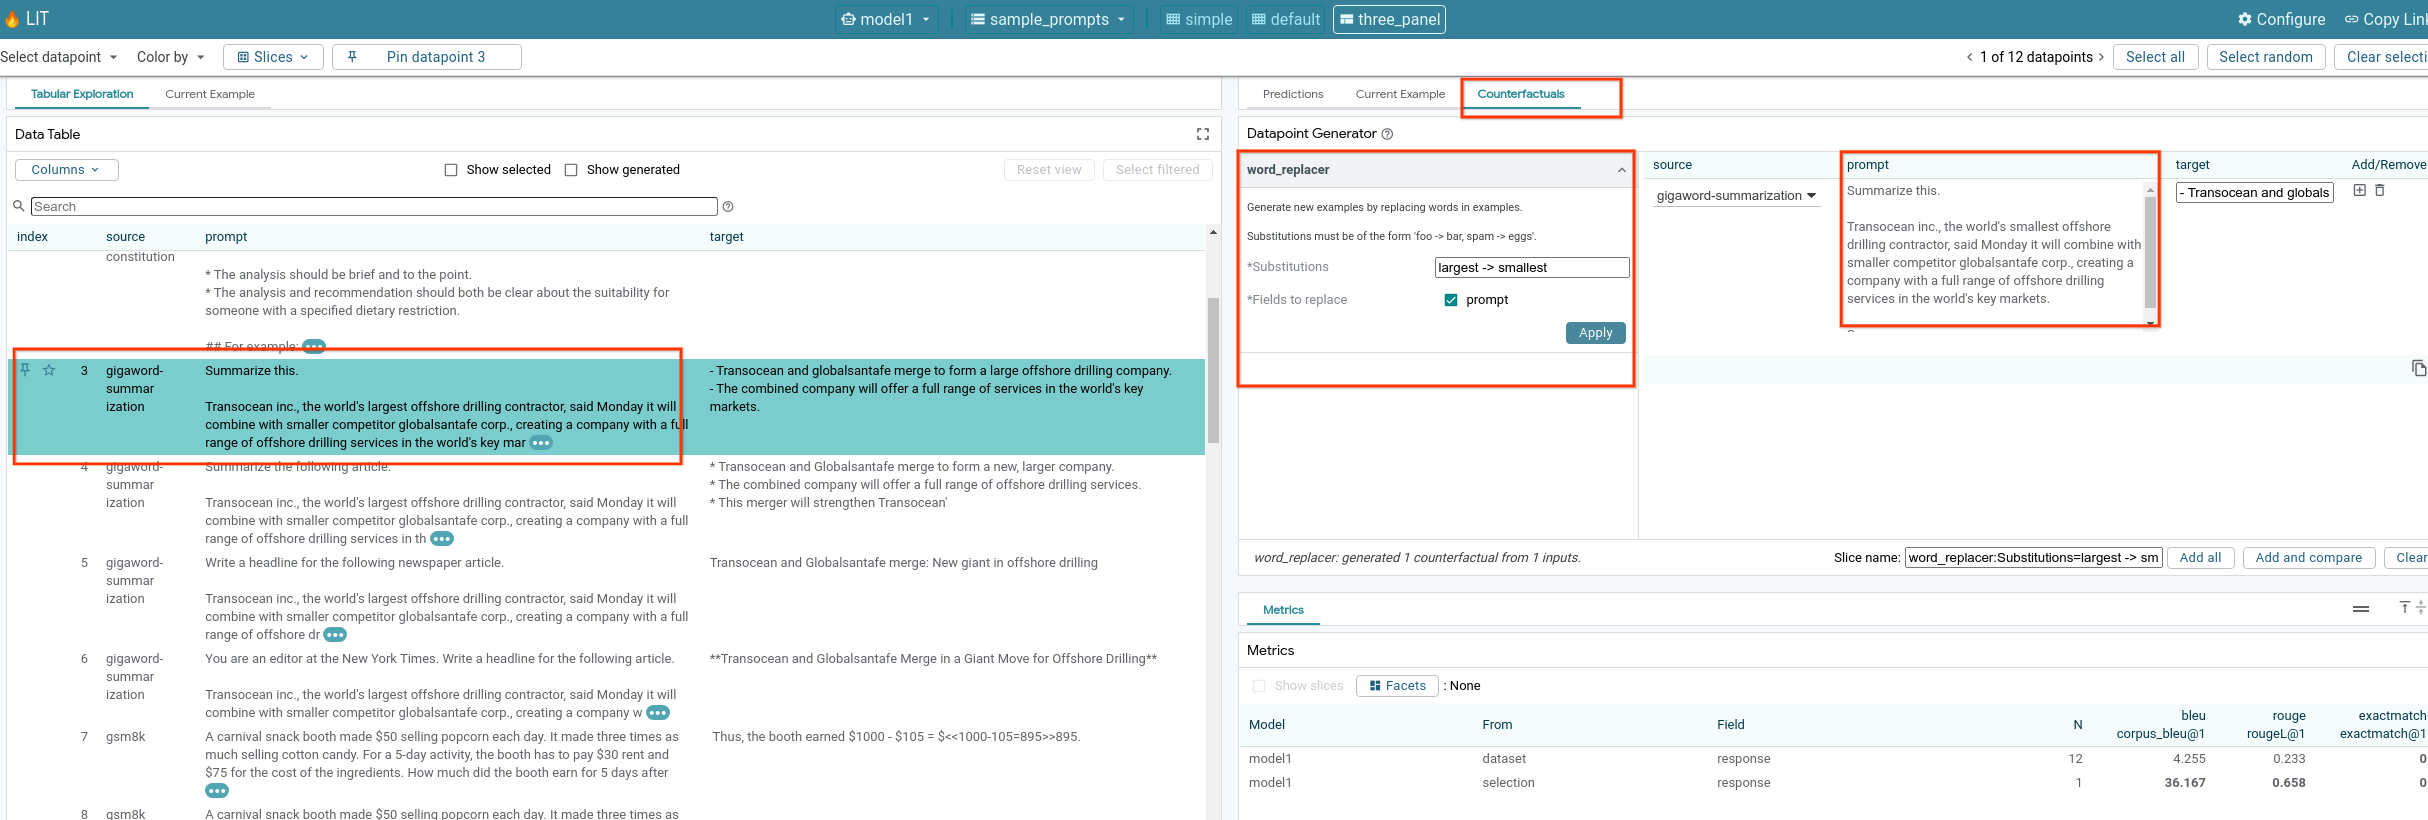
6-f: Automatyczne kontrfaktyczne generatory
Możesz używać automatycznych generatorów kontrafaktualnych, aby tworzyć alternatywne dane wejściowe i od razu sprawdzać, jak zachowuje się Twój model.
6-g. Ocenianie skuteczności modelu
Wydajność modelu możesz ocenić za pomocą wskaźników (obecnie obsługują wyniki BLEU i ROUGE do generowania tekstu) w całym zbiorze danych lub dowolnych podzbiorach filtrowanych lub wybranych przykładów.

7. Rozwiązywanie problemów
7-a: Potencjalne problemy z dostępem i ich rozwiązania
Podczas wdrażania do Cloud Run jest stosowany parametr --no-allow-unauthenticated, więc możesz napotkać błędy dostępu, jak pokazano poniżej.

Dostęp do usługi aplikacji LIT można uzyskać na 2 sposoby.
1. Serwer proxy do usługi lokalnej
Możesz przekierować usługę do hosta lokalnego za pomocą podanego niżej polecenia.
# Proxy the service to local host.
gcloud run services proxy $LIT_SERVICE_NAME
Następnie powinieneś mieć dostęp do serwera LIT, klikając link do usługi proxy.
2. Bezpośrednie uwierzytelnianie użytkowników
Aby uwierzytelnić użytkowników i zezwolić na bezpośredni dostęp do usługi aplikacji LIT, możesz użyć tego linku. Dzięki temu możesz też przyznać dostęp do usługi grupie użytkowników. W przypadku prac wymagających współpracy z wieloma osobami jest to skuteczniejsze rozwiązanie.
7-b: Sprawdzanie, czy serwer modelu został uruchomiony
Aby sprawdzić, czy serwer modelu został uruchomiony, możesz wysłać do niego zapytanie. Serwer modelu udostępnia 3 punkty końcowe: predict, tokenize i salience. Pamiętaj, aby w prośbie podać pola prompt i target.
# Query the model server predict endpoint.
curl -X POST  http://YOUR_MODEL_SERVER_URL/predict -H "Content-Type: application/json" -d '{"inputs":[{"prompt":"[YOUR PROMPT]", "target":[YOUR TARGET]}]}'

# Query the model server tokenize endpoint.
curl -X POST  http://YOUR_MODEL_SERVER_URL/tokenize -H "Content-Type: application/json" -d '{"inputs":[{"prompt":"[YOUR PROMPT]", "target":[YOUR TARGET]}]}'

# Query the model server salience endpoint.
curl -X POST  http://YOUR_MODEL_SERVER_URL/salience -H "Content-Type: application/json" -d '{"inputs":[{"prompt":"[YOUR PROMPT]", "target":[YOUR TARGET]}]}'
Jeśli napotkasz problem z dostępem, zapoznaj się z sekcją 7a powyżej.
8. Gratulacje
Gratulujemy ukończenia ćwiczeń z programowania. Czas na relaks!
Czyszczenie danych
Aby wyczyścić laboratorium, usuń wszystkie usługi Google Cloud utworzone na potrzeby laboratorium. Użyj Google Cloud Shell do uruchomienia tych poleceń.
Jeśli połączenie z Google Cloud zostanie utracone z powodu braku aktywności, zresetuj zmienne, wykonując czynności opisane powyżej.
# Delete the LIT App Service.
gcloud run services delete $LIT_SERVICE_NAME
Jeśli uruchomiono serwer modelu, musisz też usunąć serwer modelu.
# Delete the Model Service.
gcloud run services delete $MODEL_SERVICE_NAME
Więcej informacji
Aby dowiedzieć się więcej o funkcjach narzędzia LIT, skorzystaj z tych materiałów:
- Gemma: link
- Baza kodu open source LIT: repozytorium Git
- Dokument LIT: ArXiv
- Dokument na temat debugowania promptów LIT: ArXiv
- Demonstracja funkcji LIT w filmie: YouTube
- Prezentacja debugowania promptu LIT: YouTube
- Zestaw narzędzi odpowiedzialnej generatywnej AI: link
Nawiązanie kontaktu,
Jeśli masz pytania lub problemy związane z tym Codelab, skontaktuj się z nami na GitHub.
Licencja
To zadanie jest licencjonowane na podstawie ogólnej licencji Creative Commons Uznanie autorstwa 4.0.
