
1. Overview
This lab provides a detailed walk-through on deploying a LIT application server on Google Cloud Platform (GCP) to interact with Vertex AI Gemini foundation models and self-hosted third-party large language models (LLMs). It also includes guidance on how to use the LIT UI for prompt debugging and model interpretation.
By following this lab, users will learn how to:
- Configure a LIT server on GCP.
- Connect the LIT server to Vertex AI Gemini models or other self-hosted LLMs.
- Utilize the LIT UI to analyze, debug, and interpret prompts for better model performance and insights.
What is LIT?
LIT is a visual, interactive model-understanding tool that supports text, image, and tabular data. It can be run as a standalone server, or inside of notebook environments such as Google Colab, Jupyter, and Google Cloud Vertex AI. LIT is available from PyPI and GitHub.
Originally built to understand classification and regression models, recent updates have added tools for debugging LLM prompts allowing you to explore how user, model, and system content influence generation behavior.
What is Vertex AI and Model Garden?
Vertex AI is a machine learning (ML) platform that lets you train and deploy ML models and AI applications, and customize LLMs for use in your AI-powered applications. Vertex AI combines data engineering, data science, and ML engineering workflows, enabling your teams to collaborate using a common toolset and scale your applications using the benefits of Google Cloud.
Vertex Model Garden is an ML model library that helps you discover, test, customize, and deploy Google proprietary and select third party models and assets.
What you will do
You will use Google Cloud Shell and Cloud Run to deploy a Docker container from LIT's prebuilt image.
Cloud Run is a managed compute platform that lets you run containers directly on top of Google's scalable infrastructure, including on GPUs.
Dataset
The demo uses the LIT prompt debugging sample dataset by default, or you can load your own via the UI.
Before you begin
For this reference guide, you need a Google Cloud project. You can create a new one, or select a project you already created.
2. Launch Google Cloud Console and a Cloud Shell
You will launch a Google Cloud Console and use the Google Cloud Shell in this step.
2-a: Launch a Google Cloud Console
Launch a browser and go to Google Cloud Console.
The Google Cloud Console is a powerful, secure web admin interface that lets you manage your Google Cloud resources quickly. It's a DevOps tool on the go.
2-b: Launch a Google Cloud Shell
Cloud Shell is an online development and operations environment accessible anywhere with your browser. You can manage your resources with its online terminal preloaded with utilities such as the gcloud command-line tool, kubectl, and more. You can also develop, build, debug, and deploy your cloud-based APPs using the online Cloud Shell Editor. Cloud Shell provides a developer ready, online environment with a preinstalled favorite tool set and 5GB of persistent storage space. You will be using the command prompt in the next steps.
Launch a Google Cloud Shell using the icon in the upper right of the menu bar, circled in blue in the following screenshot.

You should see a terminal with a Bash shell at the bottom of the page.

2-c: Set Google Cloud Project
You must set the project id and project region using the gcloud command.
# Set your GCP Project ID.
gcloud config set project your-project-id

# Set your GCP Project Region.
gcloud config set run/region your-project-region
3. Deploy the LIT App Server Docker Image with Cloud Run
3-a: Deploy LIT App to Cloud Run
You first need to set the latest version of LIT-App as the version to be deployed.
# Set latest version as your LIT_SERVICE_TAG.
export LIT_SERVICE_TAG=latest
# List all the public LIT GCP App server docker images.
gcloud container images  list-tags  us-east4-docker.pkg.dev/lit-demos/lit-app/gcp-lit-app
After setting the version tag, you need to name the service.
# Set your lit service name. While 'lit-app-service' is provided as a placeholder, you can customize the service name based on your preferences.
export LIT_SERVICE_NAME=lit-app-service
After that, you can run the following command to deploy the container to Cloud Run.
# Use below cmd to deploy the LIT App to Cloud Run.
gcloud run deploy $LIT_SERVICE_NAME \
--image us-east4-docker.pkg.dev/lit-demos/lit-app/gcp-lit-app:$LIT_SERVICE_TAG \
--port 5432 \
--cpu 8 \
--memory 32Gi \
--no-cpu-throttling \
--no-allow-unauthenticated
LIT also allows you to add the dataset when starting the server. To do that, set the DATASETS variable to include the data you want to load, using the format name:path, for example, data_foo:/bar/data_2024.jsonl. The dataset format should be .jsonl, where each record contains prompt and optional target and source fields. To load multiple datasets, separate them with a comma. If not set, the LIT prompt debugging sample dataset will be loaded.
# Set the dataset.
export DATASETS=[DATASETS]
By setting MAX_EXAMPLES, you are able to set maximum number of examples to load from each evaluation set.
# Set the max examples.
export MAX_EXAMPLES=[MAX_EXAMPLES]
Then, in the deploy commad, you can add
--set-env-vars "DATASETS=$DATASETS" \
--set-env-vars "MAX_EXAMPLES=$MAX_EXAMPLES" \
3-b: View LIT App Service
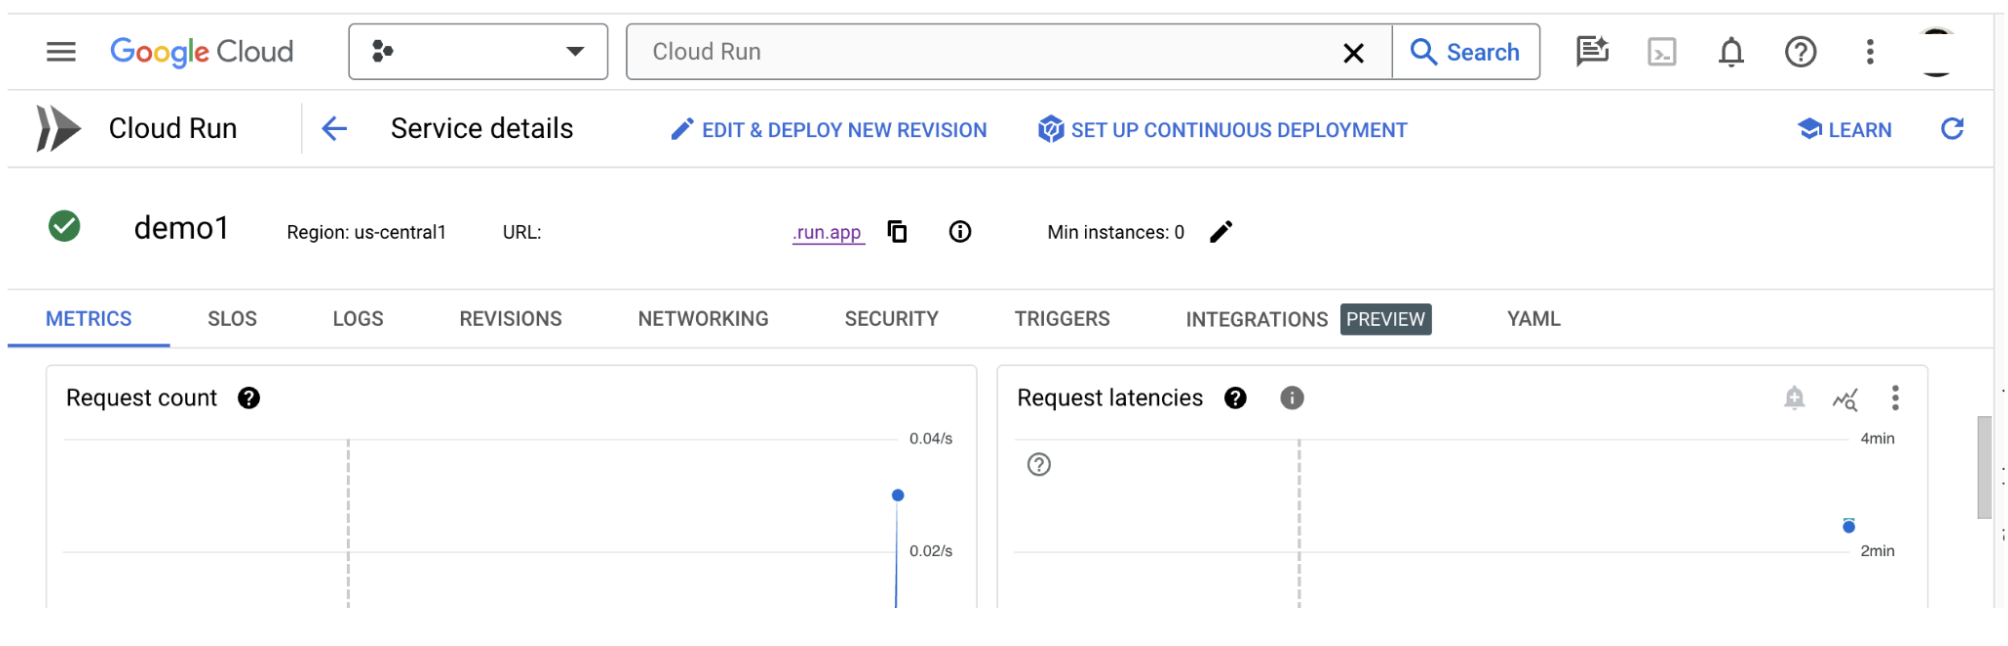
After creating the LIT App server, you can find the service in the Cloud Run section of Cloud Console.
Select the LIT App service that you just created. Make sure the service name is the same as LIT_SERVICE_NAME.
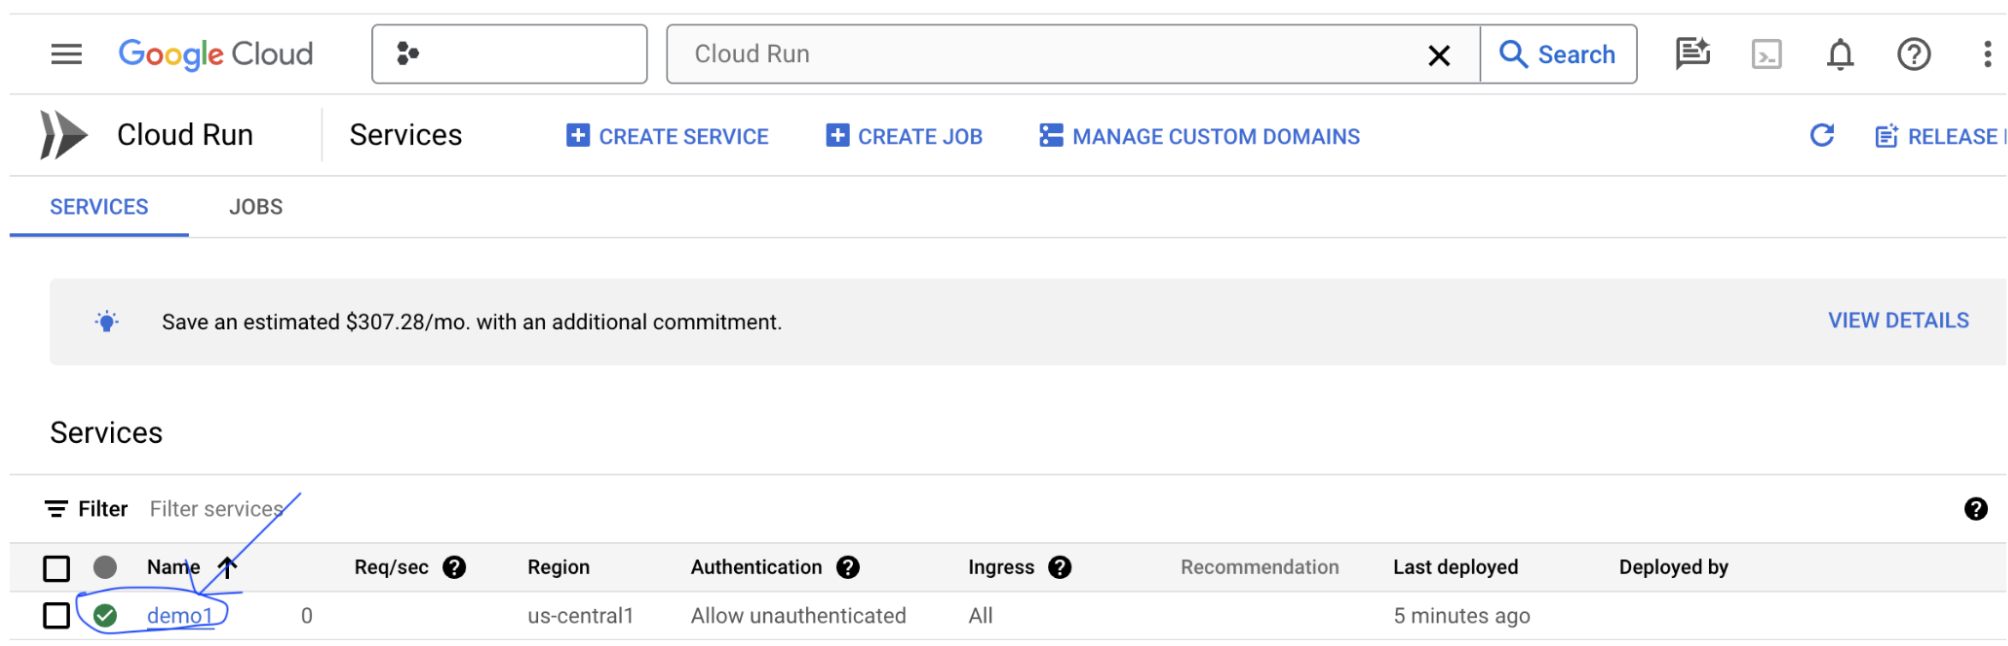
You can find the service URL by clicking the service you just deployed.
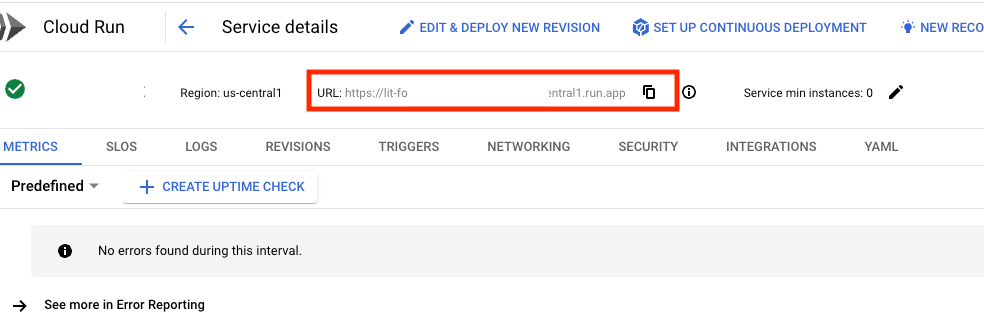
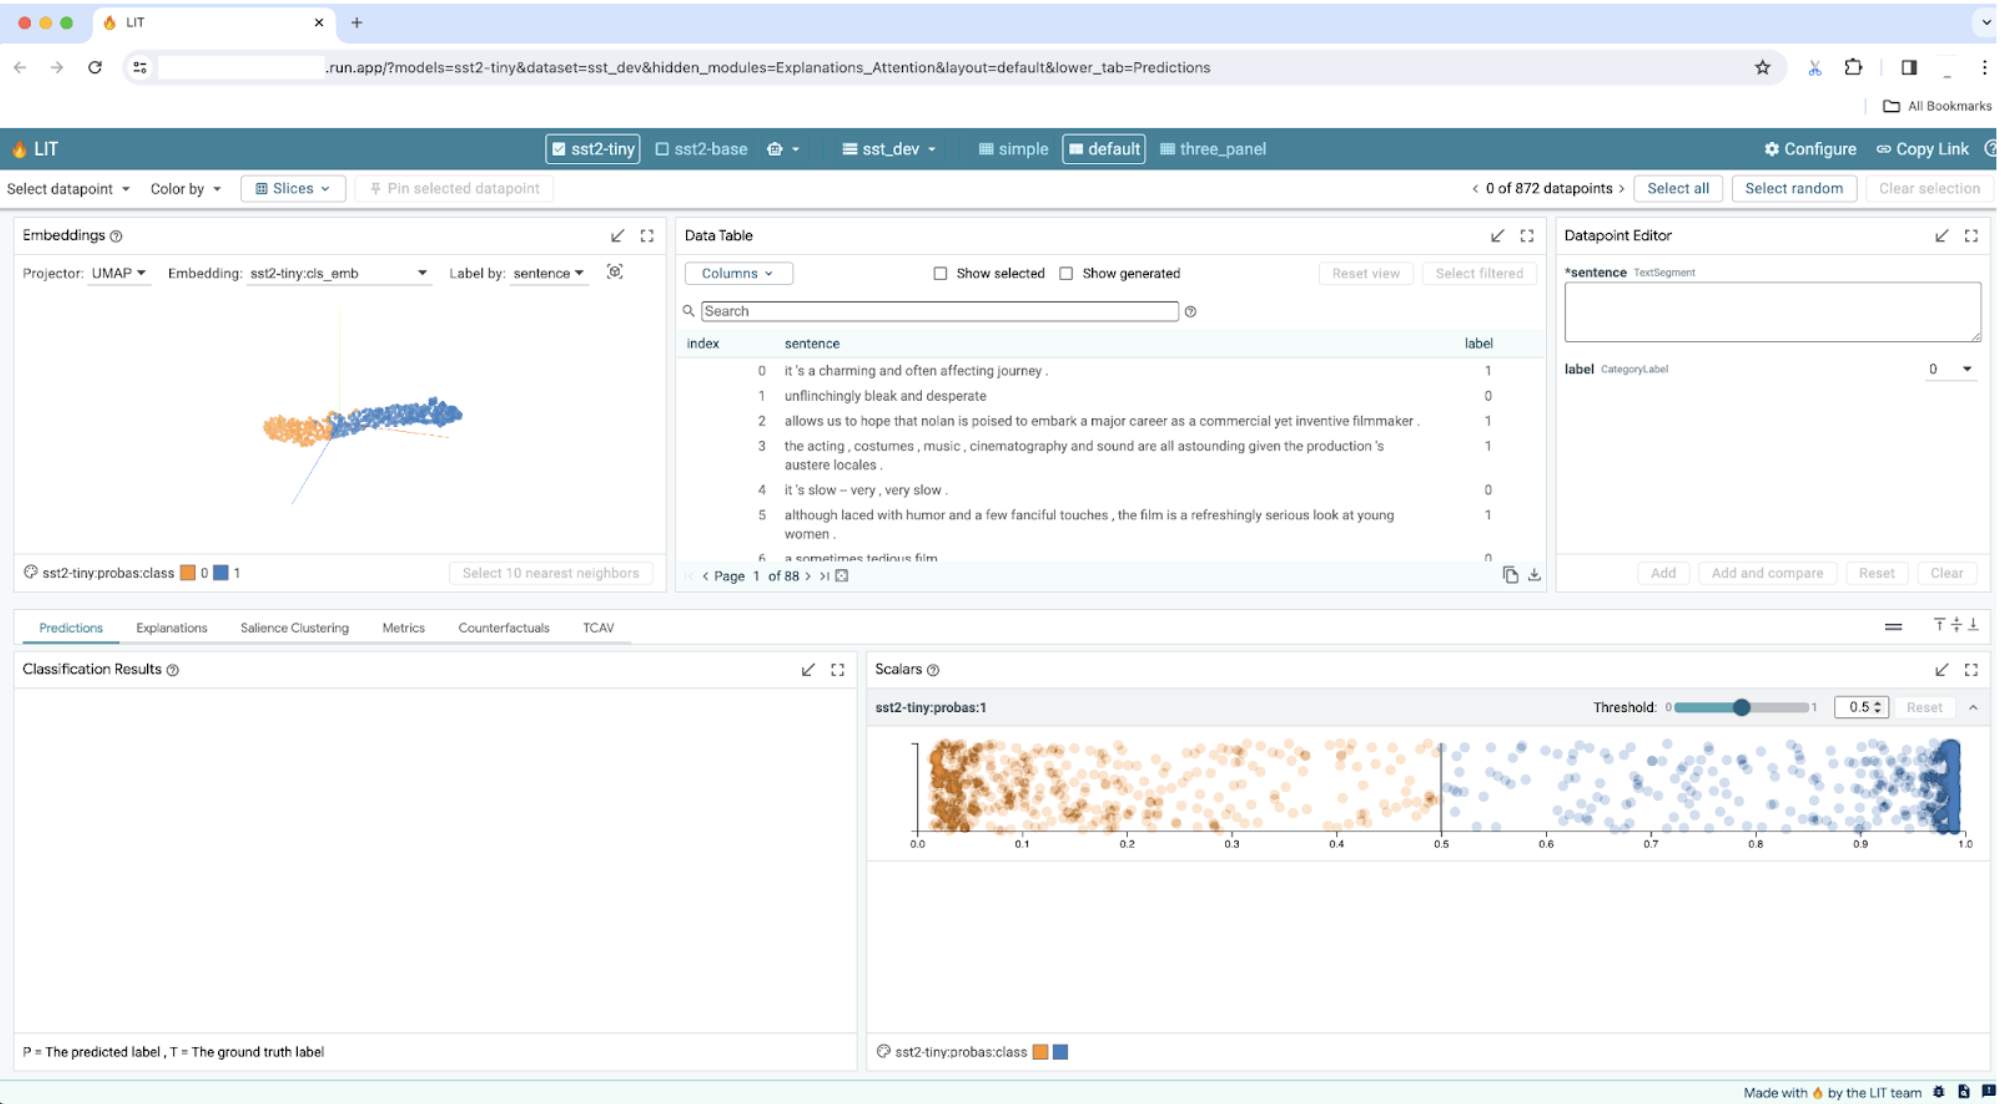
Then you should be able to view the LIT UI. If you encounter an error, check the Troubleshooting section.
You can check the LOGS section to monitor activity, view error messages, and track the progress of the deployment.
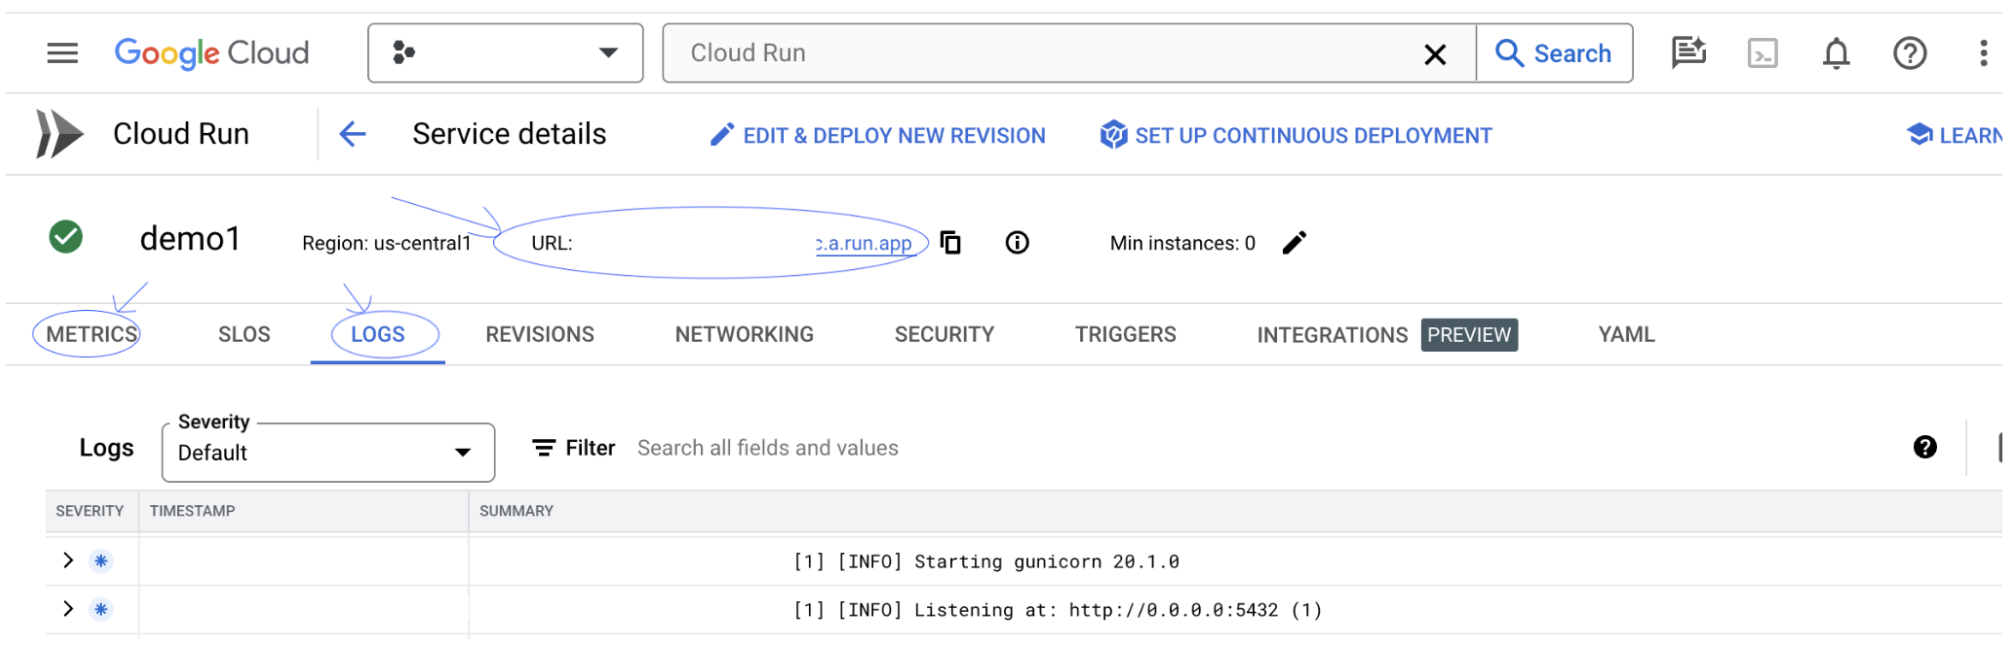
You can check the METRICS section to view the metrics of the service.
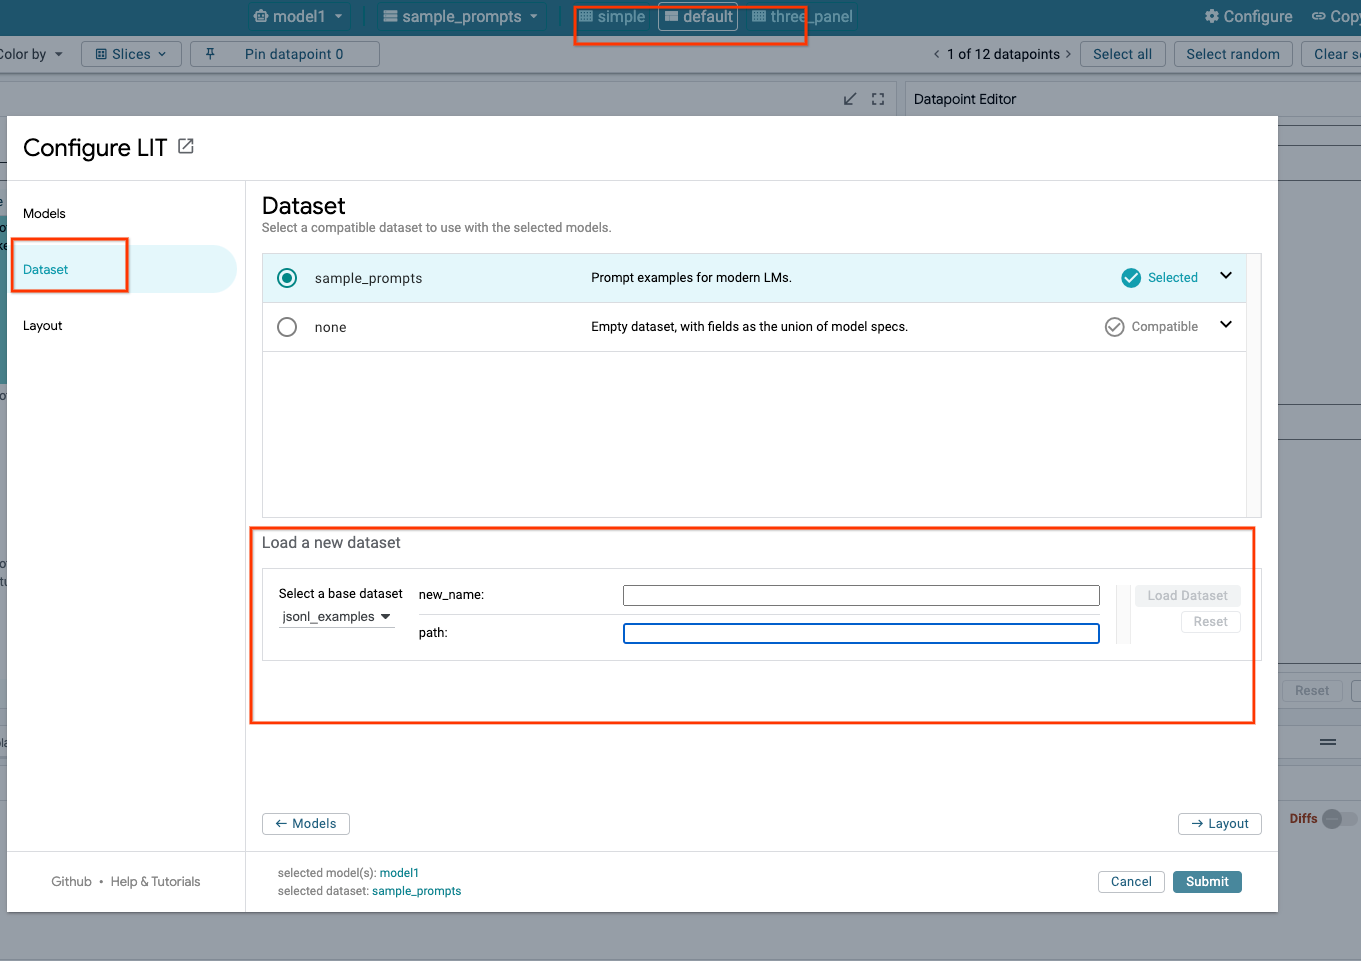
3-c: Load Datasets
Click the Configure option in the LIT UI, select the Dataset. Load the dataset by specifying a name and providing the dataset URL. The dataset format should be .jsonl, where each record contains prompt and optional target and source fields.
4. Prepare Gemini Models in Vertex AI Model Garden
Google's Gemini foundation models are available from the Vertex AI API. LIT provides the VertexAIModelGarden model wrapper to use these models for generation. Simply specify the desired version (e.g., "gemini-1.5-pro-001") via the model name parameter. A key advantage of using these models is that they require no additional effort for deployment. By default, you have immediate access to models such as Gemini 1.0 Pro and Gemini 1.5 Pro on GCP, eliminating the need for extra configuration steps.
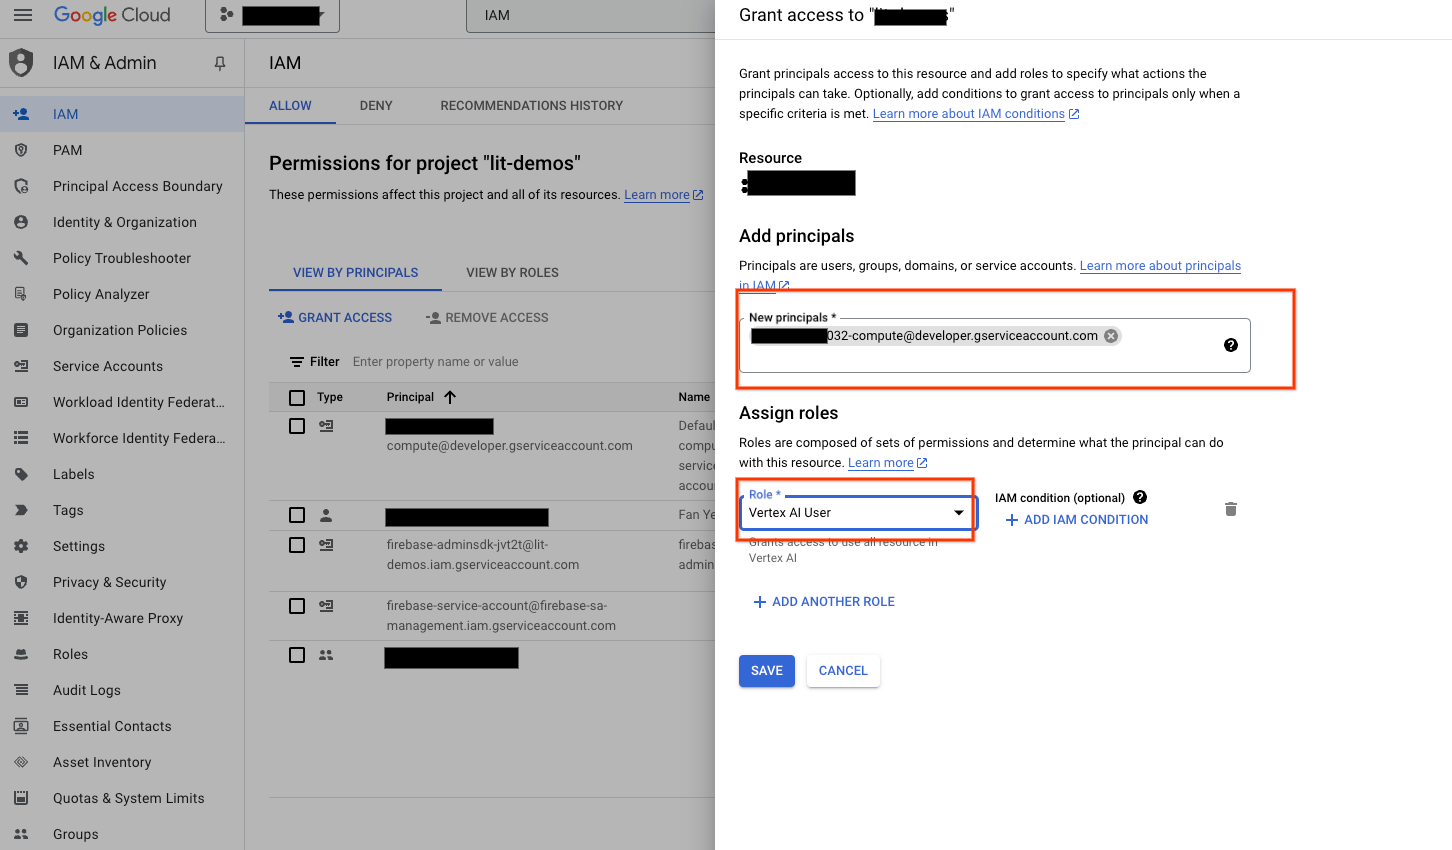
4-a: Grant Vertex AI Permissions
To query Gemini in GCP, you need to grant Vertex AI permissions to the service account. Make sure the service account name is Default compute service account. Copy the service account email of the account.

Add the service account email as a principal with the Vertex AI User role in your IAM allowlist.
4-b: Load Gemini Models
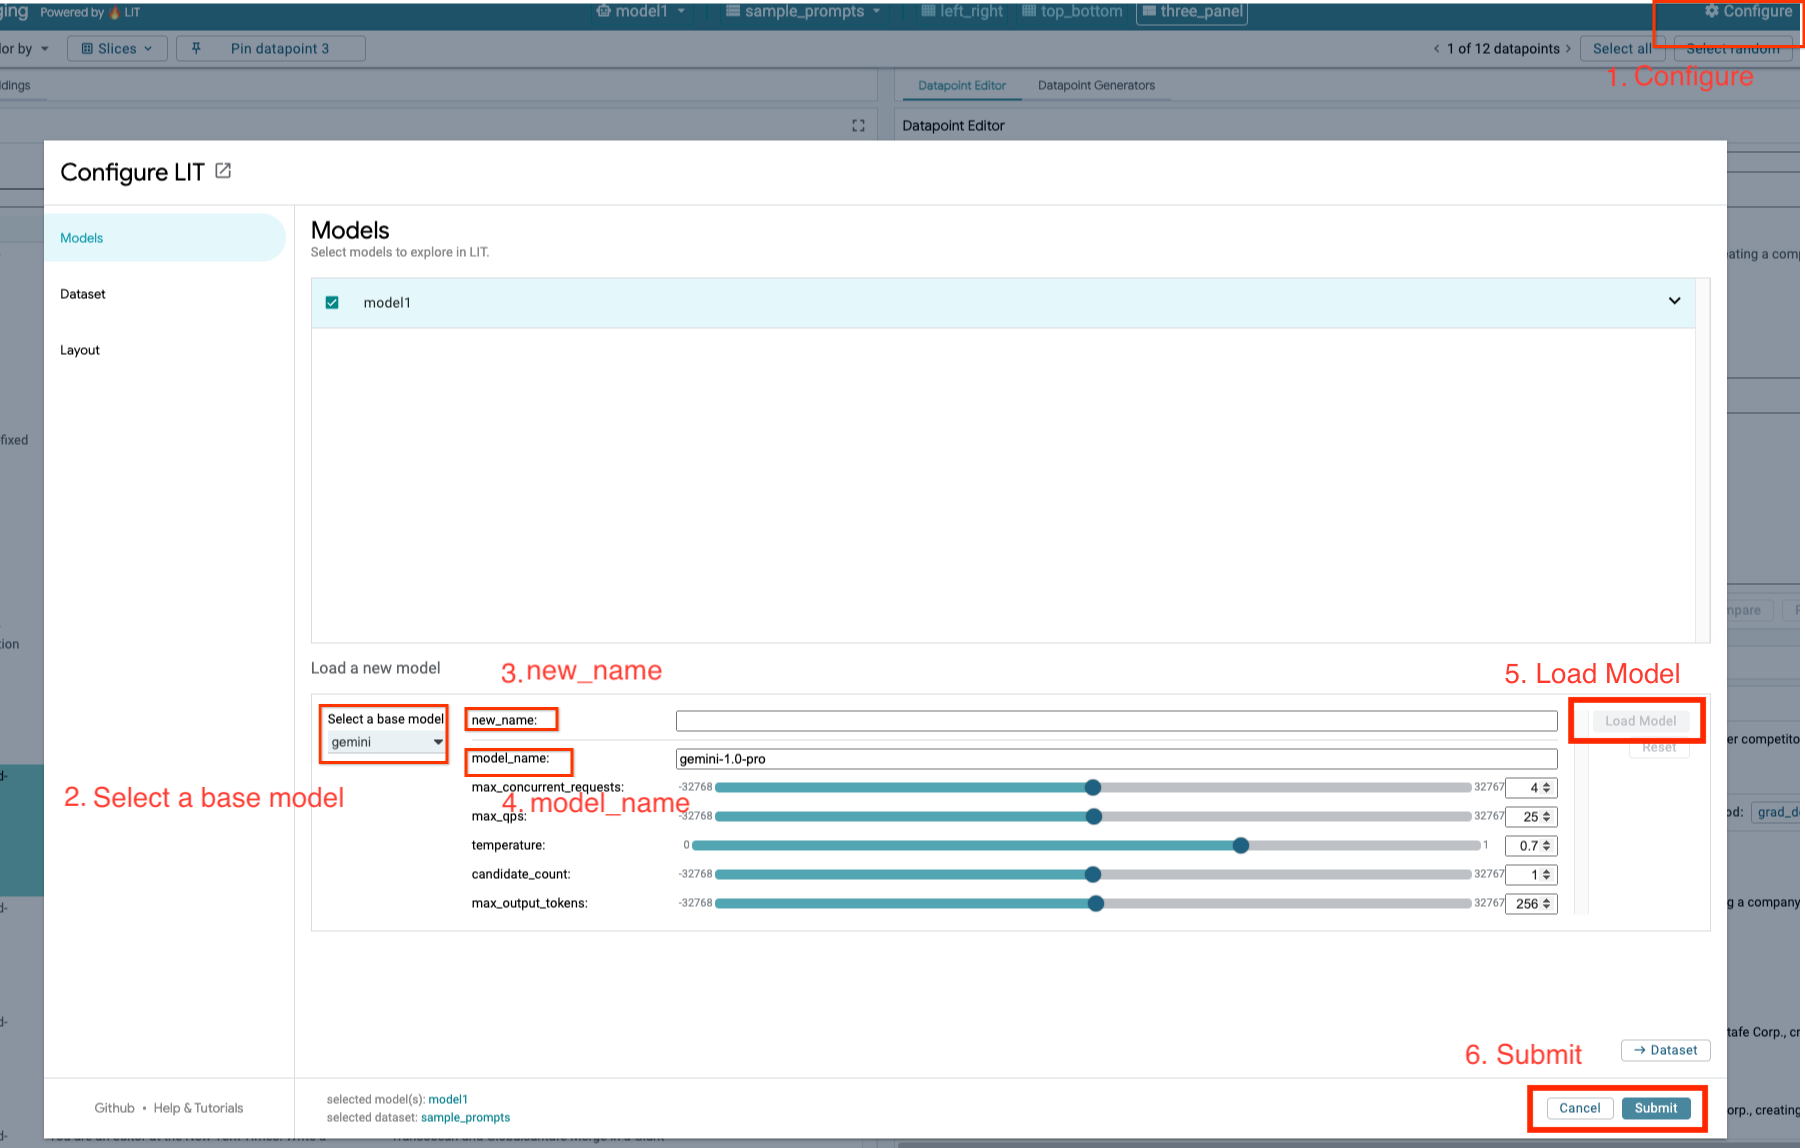
You will be loading Gemini models and adjusting its parameters following steps below.
- Click the
Configureoption in the LIT UI.
- Click the
- Select the
geminioption underSelect a base modeloption.
- Select the
- You need to name the model in
new_name.
- You need to name the model in
- Enter your selected gemini models as the
model_name.
- Enter your selected gemini models as the
- Click
Load Model.
- Click
- Click
Submit.
- Click
5. Deploy Self-Hosted LLMs Model Server on GCP
Self-hosting LLMs with LIT's model server docker image allows you to use LIT's salience and tokenize functions to gain deeper insights into model behavior. The model server image works with KerasNLP or Hugging Face Transformers models, including library-provided and self-hosted weights, e.g., on Google Cloud Storage.
5-a: Configure Models
Each container loads one model, configured using environment variables.
You should specify models to load by setting the MODEL_CONFIG. The format should be name:path, for instance model_foo:model_foo_path. The path can be a URL, a local file path, or the name of a preset for the configured Deep Learning framework (see the following table for more). This server is tested with Gemma, GPT2, Llama, and Mistral on all supported DL_FRAMEWORK values. Other models should work, but adjustments might be needed.
# Set models you want to load. While 'gemma2b is given as a placeholder, you can load your preferred model by following the instructions above.
export MODEL_CONFIG=gemma2b:gemma_2b_en
Additionally, the LIT model server allows configuration of various environment variables using the command below. Please refer to the table for details. Note that each variable must be set individually.
# Customize the variable value as needed.
export [VARIABLE]=[VALUE]
Variable | Values | Description |
DL_FRAMEWORK |
| The modeling library used to load the model weights onto the specified runtime. Defaults to |
DL_RUNTIME |
| The deep learning backend framework that the model runs on. All models loaded by this server will use the same backend, incompatibilities will result in errors. Defaults to |
PRECISION |
| Floating point precision for the LLM models. Defaults to |
BATCH_SIZE | Positive Integers | The number of examples to process per batch. Defaults to |
SEQUENCE_LENGTH | Positive Integers | The maximum sequence length of the input prompt plus generated text. Defaults to |
5-b: Deploy Model Server to Cloud Run
You first need to set the latest version of Model Server as the version to be deployed.
# Set latest as MODEL_VERSION_TAG.
export MODEL_VERSION_TAG=latest
# List all the public LIT GCP model server docker images.
gcloud container images  list-tags  us-east4-docker.pkg.dev/lit-demos/lit-app/gcp-model-server
After setting the version tag, you need to the name your model-server.
# Set your Service name.
export MODEL_SERVICE_NAME='gemma2b-model-server'
After that, you can run the following command to deploy the container to Cloud Run. If you don't set the environment variables, default values will be applied. As most LLMs require expensive computing resources, it is highly recommended to use GPU. If you prefer to run on CPU only (which works fine for small models like GPT2), you can remove the related arguments --gpu 1 --gpu-type nvidia-l4 --max-instances 7.
# Deploy the model service container.
gcloud beta run deploy $MODEL_SERVICE_NAME \
--image us-east4-docker.pkg.dev/lit-demos/lit-app/gcp-model-server:$MODEL_VERSION_TAG \
--port 5432 \
--cpu 8 \
--memory 32Gi \
--no-cpu-throttling \
--gpu 1 \
--gpu-type nvidia-l4  \
--max-instances 7  \
--set-env-vars "MODEL_CONFIG=$MODEL_CONFIG" \
--no-allow-unauthenticated
Besides, you can customize environment variables by adding the following commands. Only include the environment variables that are necessary for your specific needs.
--set-env-vars "DL_FRAMEWORK=$DL_FRAMEWORK" \
--set-env-vars "DL_RUNTIME=$DL_RUNTIME" \
--set-env-vars "PRECISION=$PRECISION" \
--set-env-vars "BATCH_SIZE=$BATCH_SIZE" \
--set-env-vars "SEQUENCE_LENGTH=$SEQUENCE_LENGTH" \
Additional environment variables may be necessary to access certain models. See instructions from Kaggle Hub (used for KerasNLP models) and Hugging Face Hub as appropriate.
5-c: Access Model Server
After creating the model server, the started service could be found in Cloud Run section of your GCP project.
Select the model server that you just created. Make sure the service name is the same as MODEL_SERVICE_NAME.
You can find the service URL by clicking model service you just deployed.
You can check the LOGS section to monitor activity, view error messages, and track the progress of the deployment.
You can check the METRICS section to view the metrics of the service.
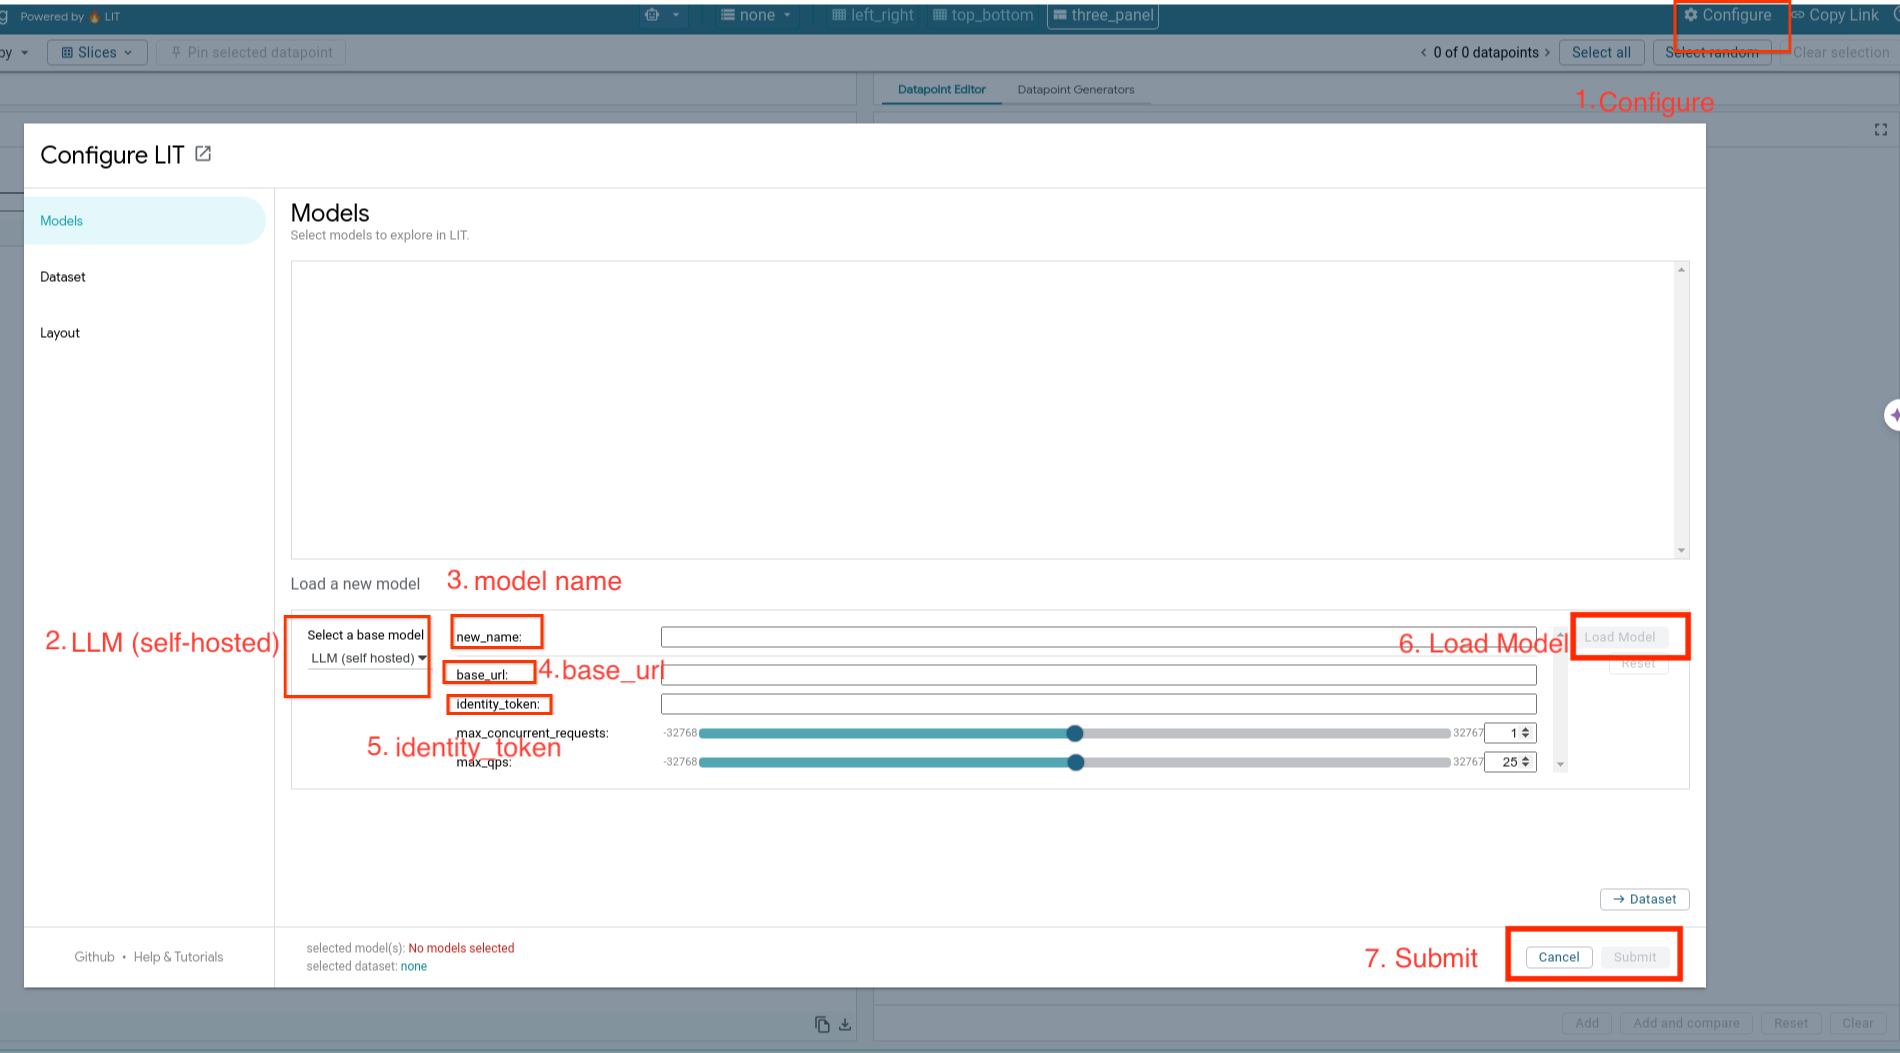
5-d: Load Self-Hosted Models
If you proxy your LIT server in Step 3 (check Troubleshooting section), you'll need to obtain your GCP identity token by running the following command.
# Find your GCP identity token.
gcloud auth print-identity-token
You will be loading self-hosted models and adjusting its parameters following steps below.
- Click the
Configureoption in the LIT UI. - Select the
LLM (self hosted)option underSelect a base modeloption. - You need to name the model in
new_name. - Enter your model server url as the
base_url. - Input the obtained identity token in the
identity_tokenif you proxy the LIT App server (See Step 3 and Step 7). Otherwise, Leave it empty. - Click
Load Model. - Click
Submit.
6. Interact with LIT on GCP
LIT offers a rich set of features to help you debug and understand model behaviors. You can do something as simple as querying the model, by typing text in a box and seeing model predictions, or inspect the models in-depth with LIT's suite of powerful features, including:
6-a: Query the Model via LIT
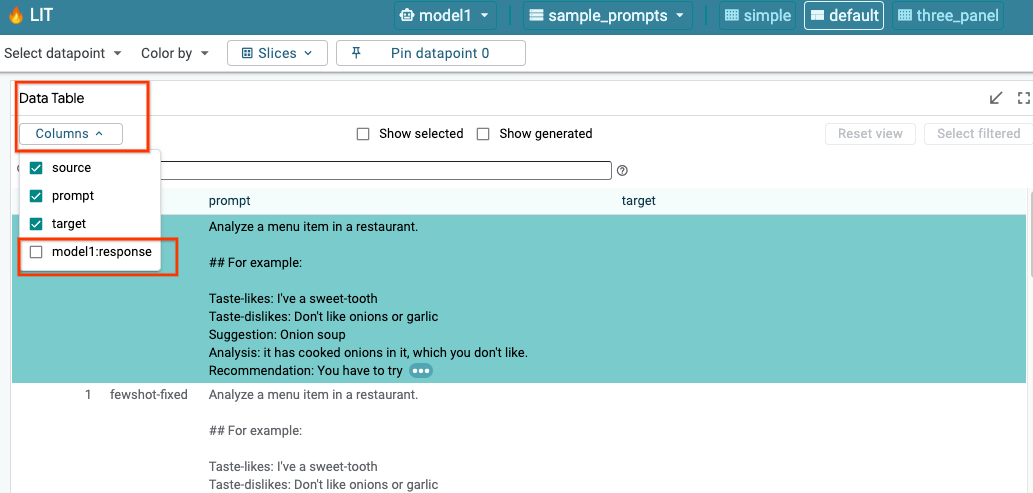
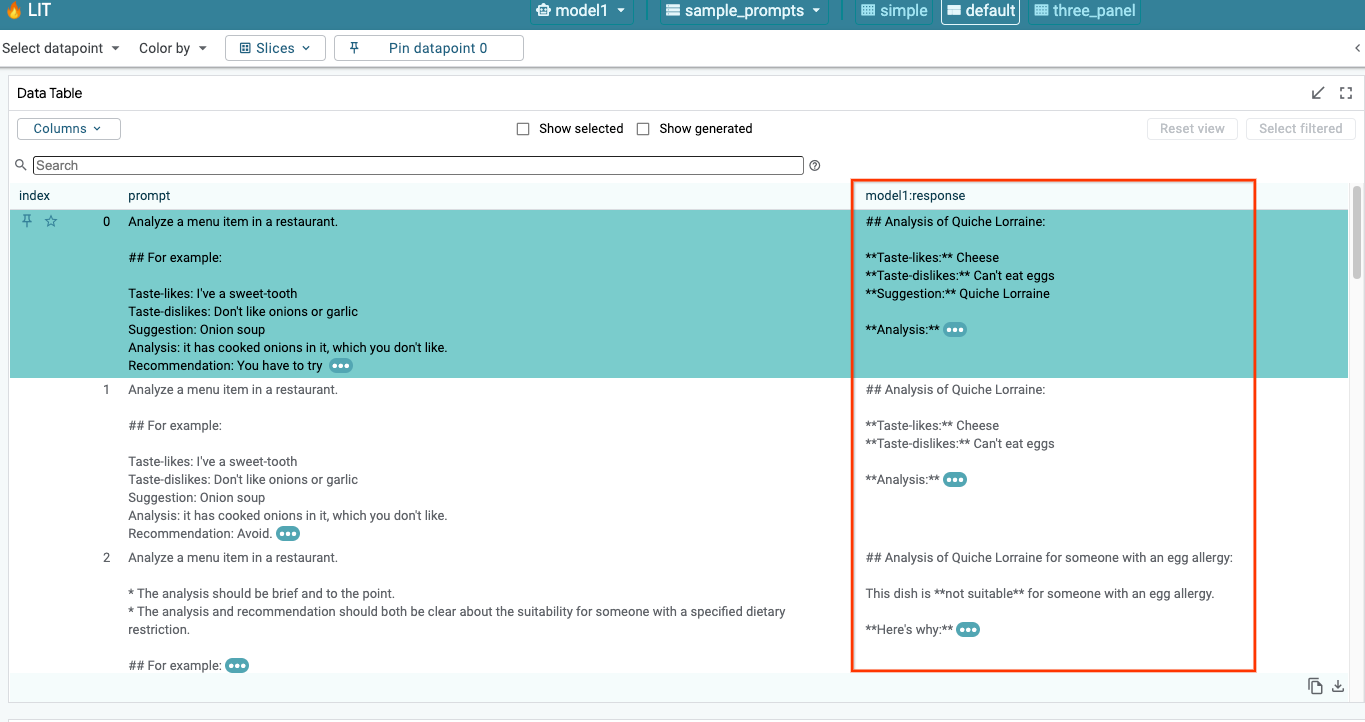
LIT automatically query the dataset after model and dataset loading. You can view the response of each model by selecting the response in the columns.
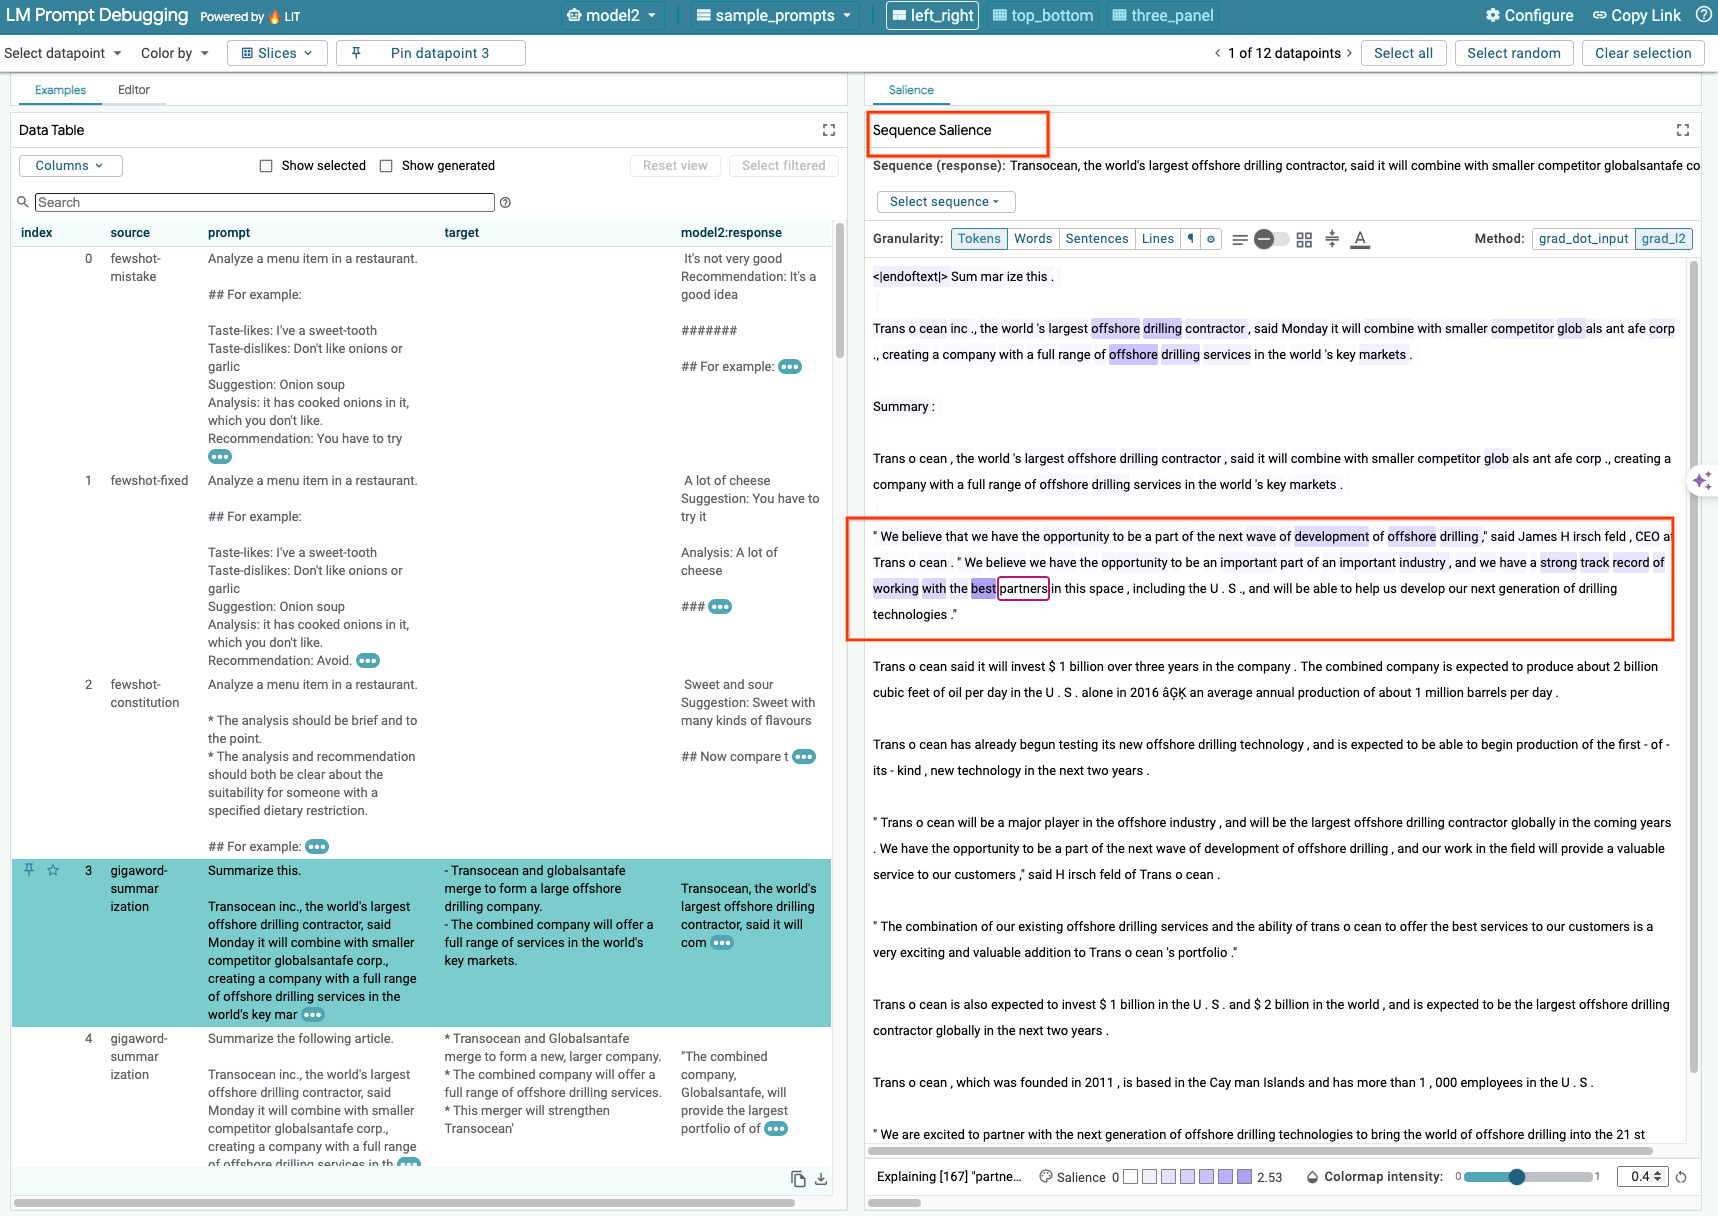
6-b: Use Sequence Salience Technique
Currently Sequence Salience technique on LIT only supports self-hosted models.
Sequence Salience is a visual tool that helps debug LLM prompts by highlighting which parts of a prompt are most important for a given output. For more information on Sequence Salience, check the full tutorial for more on how to use this feature.
To access salience results, click on any input or output in the prompt or response, and the salience results will be displayed.
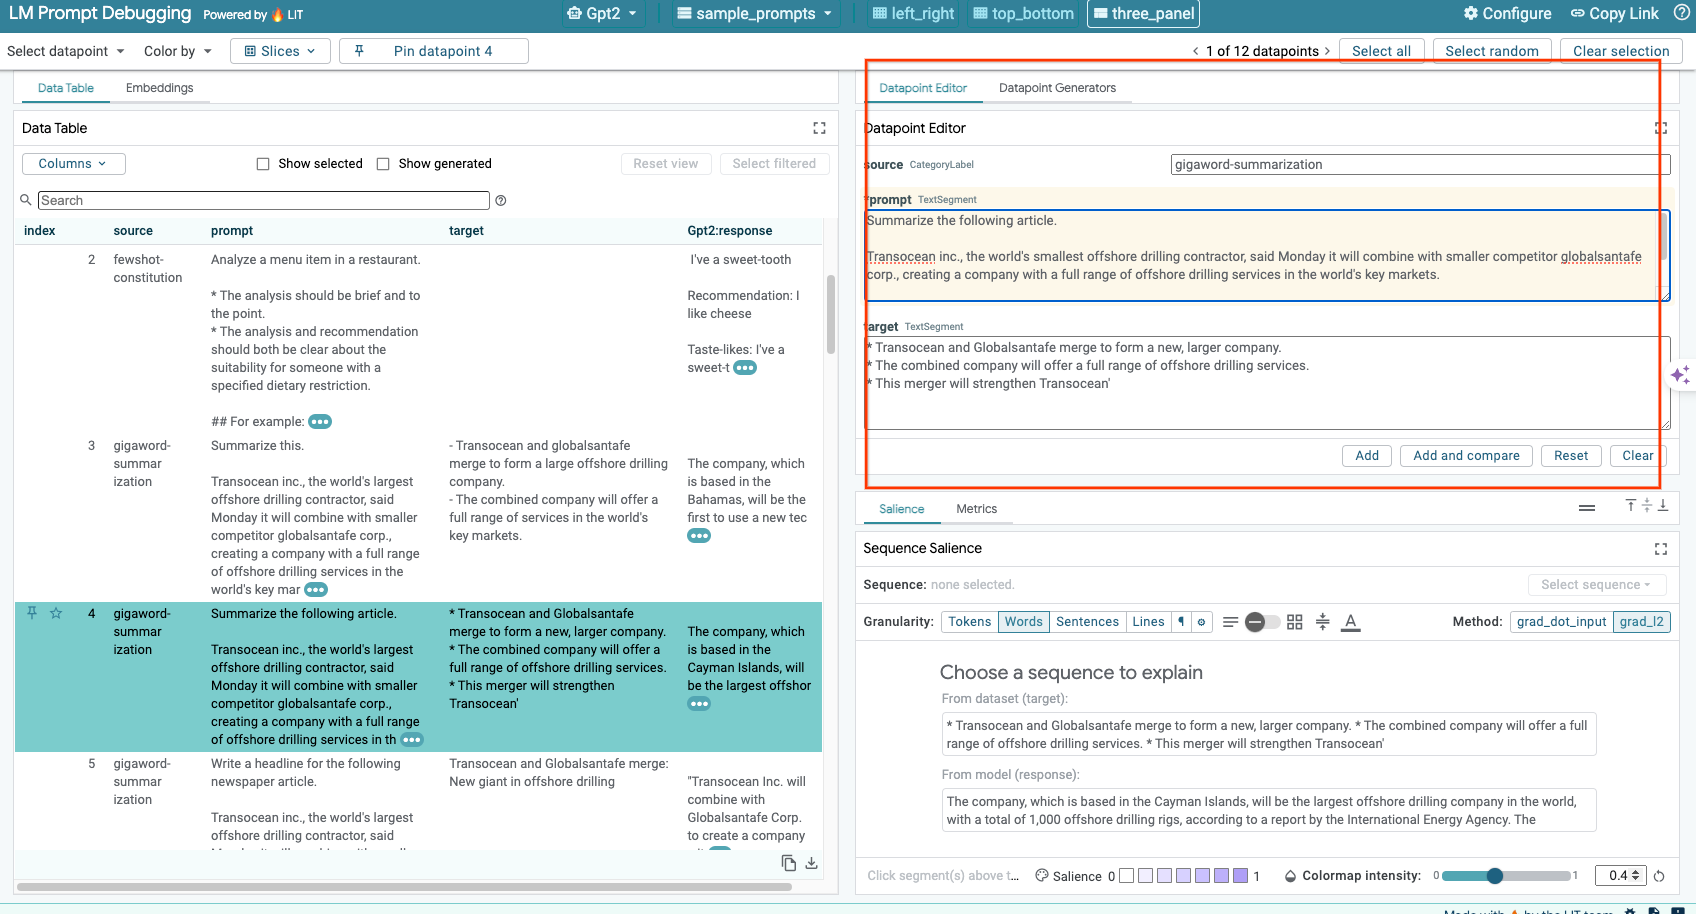
6-c: Manullay Edit Prompt and Target
LIT allows you to manually edit any prompt and target for existing datapoint. By clicking Add, the new input will be added to the dataset.
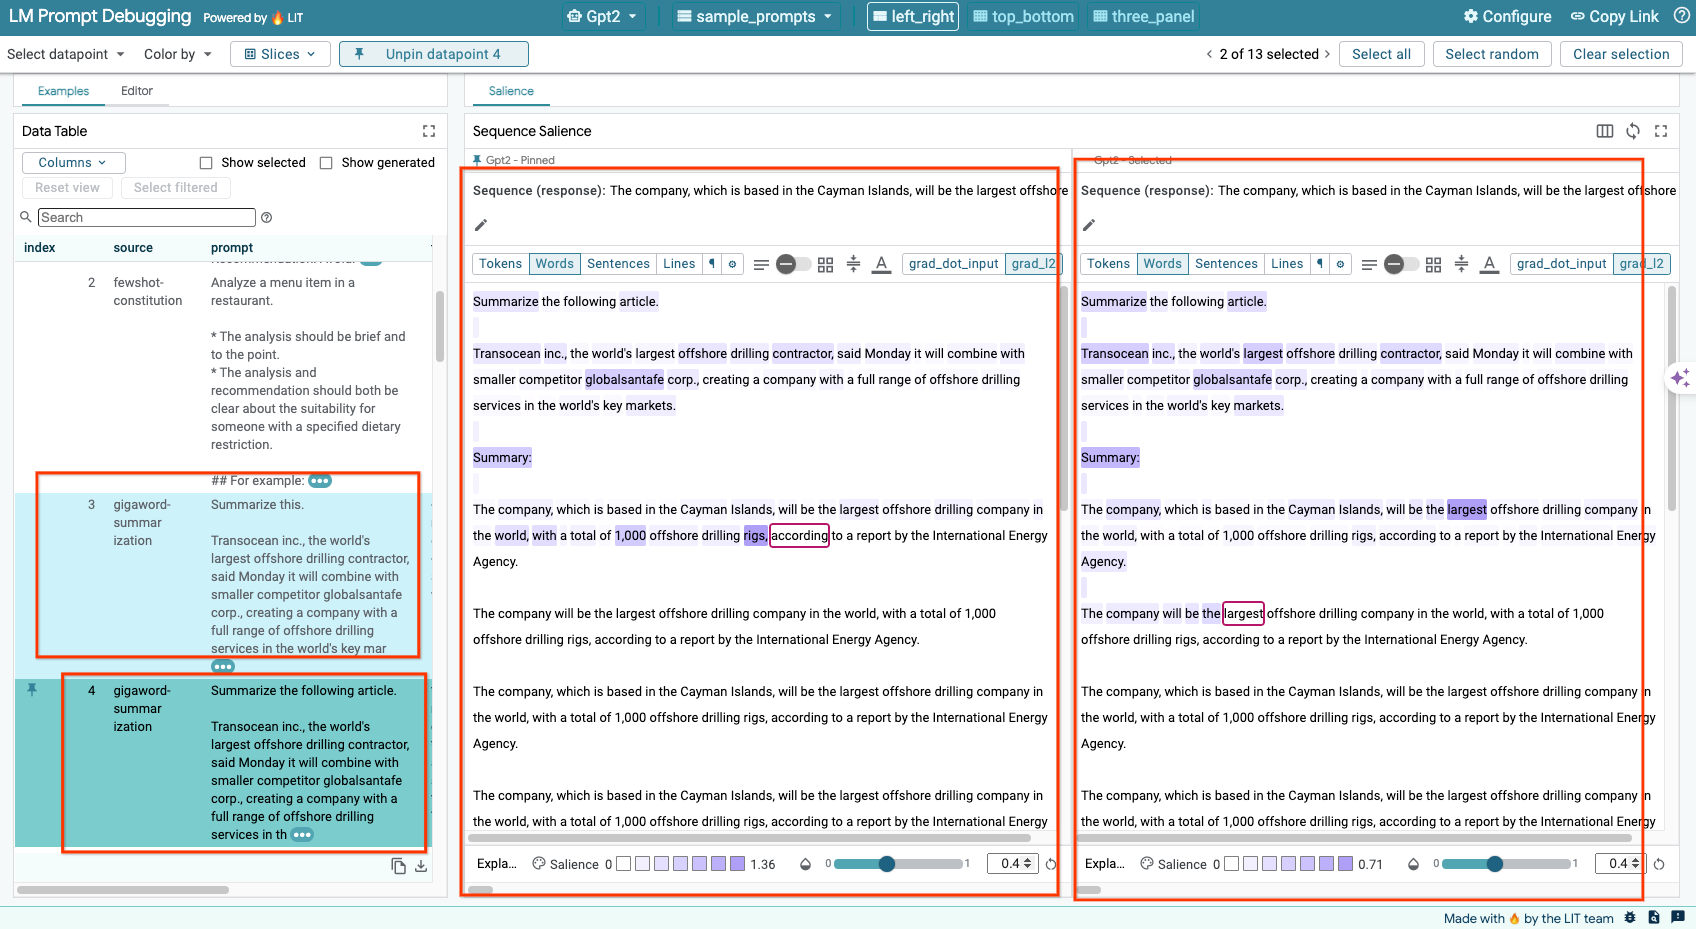
6-d: Compare Prompt Side-By-Side
LIT allows you to compare prompt side-by-side on original and edited examples. You can manually edit an example and view the prediction result and Sequence Salience analysis for both the original and the edited versions simultaneously. You can modify the prompt for each datapoint, and LIT will generate the corresponding response by querying the model.
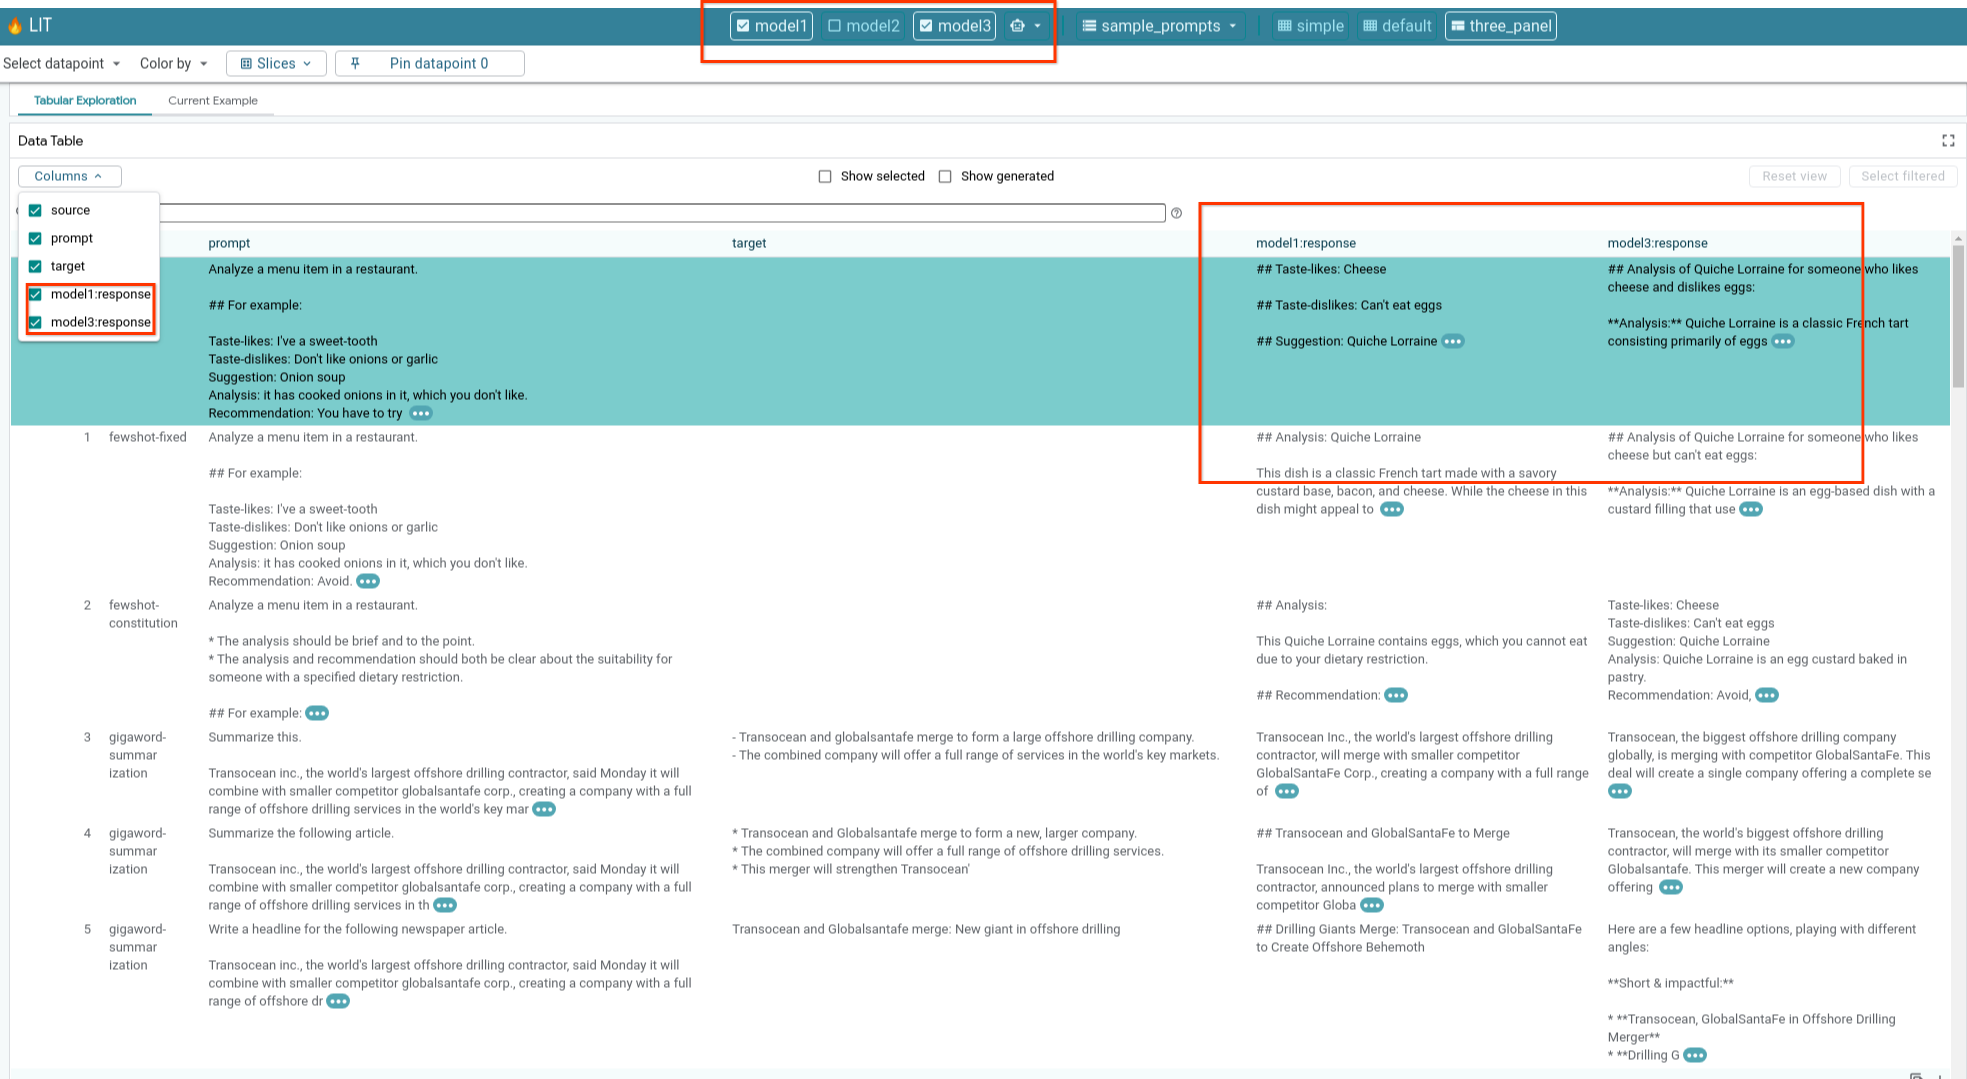
6-e: Compare Multiple Models Side-by-Side
LIT enables side-by-side comparison of models on individual text generation and scoring examples, as well as on aggregated examples for specific metrics. By querying various loaded models, you can easily compare the differences in their responses.
6-f: Automatic Counterfactual Generators
You can use automatic counterfactual generators to create alternative inputs, and see how your model behaves on them right away.
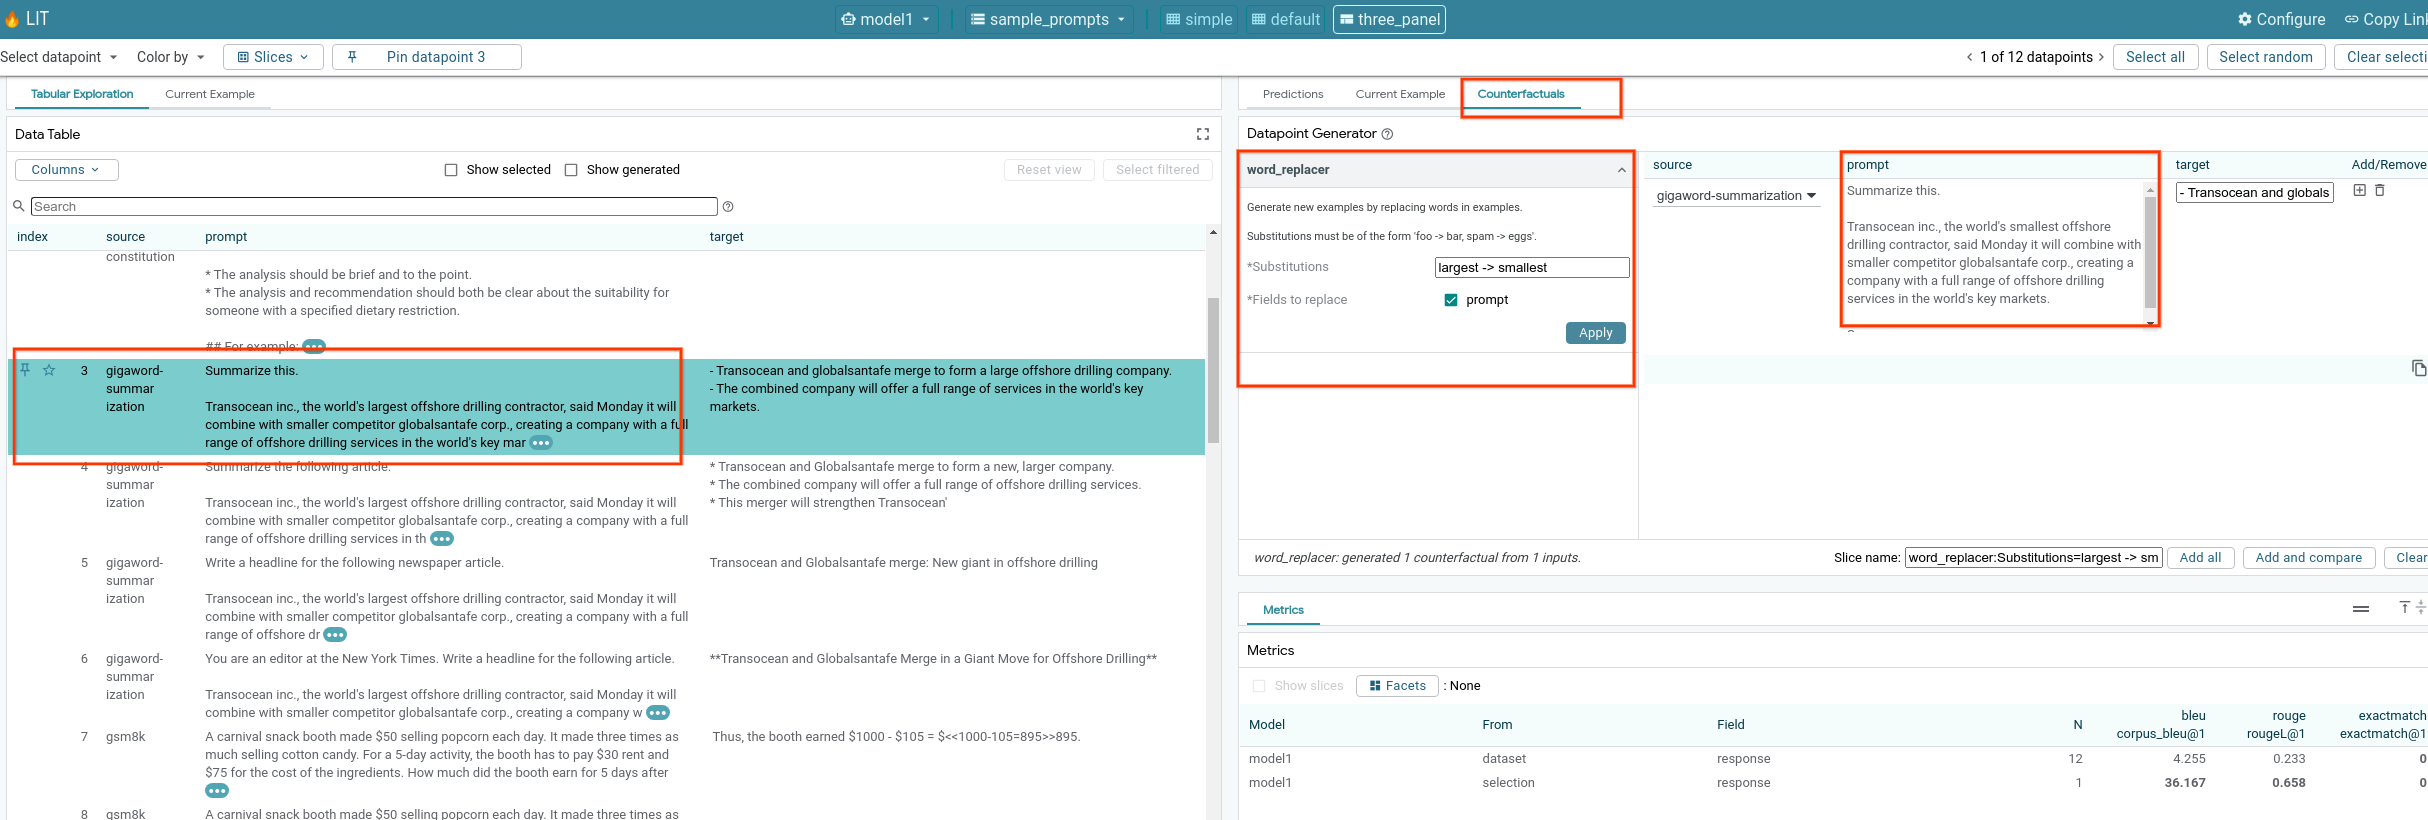
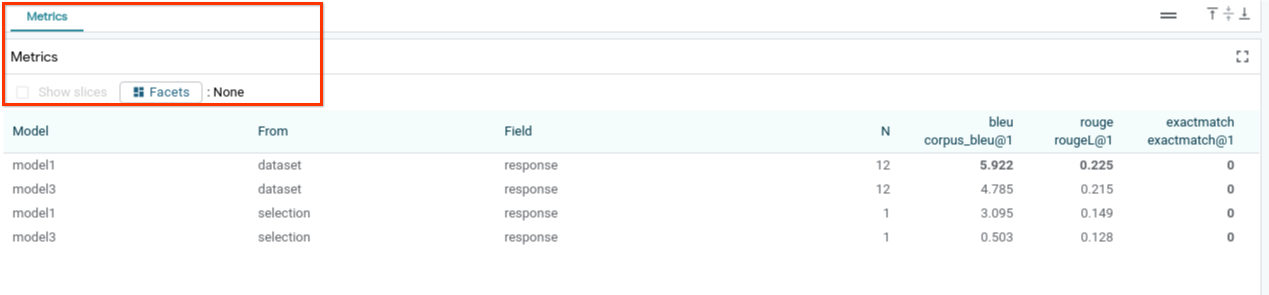
6-g: Evaluate model performance
You can assess model performance using metrics (currently support BLEU and ROUGE scores for text generation) across the entire dataset, or any subsets of filtered or selected examples.
7. Troubleshooting
7-a: Potential access issues and solutions
As --no-allow-unauthenticated is applied when deploying to Cloud Run, you may encounter forbidden errors as shown below.

There are two approaches to access the LIT App service.
1. Proxy to Local Service
You can proxy the service to local host using the command below.
# Proxy the service to local host.
gcloud run services proxy $LIT_SERVICE_NAME
Then you should be able to access to the LIT server by clicking the proxyed service link.
2. Directly Authenticate Users
You can follow this link to authenticate users, allowing direct access to the LIT App service. This approach can also enable a group of users to access the service. For development involving collaboration with multiple people, this is a more effective option.
7-b: Checks to ensure the Model Server has launched successfully
To ensure the model server has launched successfully, you can directly query the model server by sending a request. The model server provides three endpoints, predict, tokenize, and salience. Make sure you provide both the prompt field and target fields in your request.
# Query the model server predict endpoint.
curl -X POST  http://YOUR_MODEL_SERVER_URL/predict -H "Content-Type: application/json" -d '{"inputs":[{"prompt":"[YOUR PROMPT]", "target":[YOUR TARGET]}]}'

# Query the model server tokenize endpoint.
curl -X POST  http://YOUR_MODEL_SERVER_URL/tokenize -H "Content-Type: application/json" -d '{"inputs":[{"prompt":"[YOUR PROMPT]", "target":[YOUR TARGET]}]}'

# Query the model server salience endpoint.
curl -X POST  http://YOUR_MODEL_SERVER_URL/salience -H "Content-Type: application/json" -d '{"inputs":[{"prompt":"[YOUR PROMPT]", "target":[YOUR TARGET]}]}'
If you encounter an access issue, check out section 7-a above.
8. Congratulations
Well done on completing the codelab! Time to chill!
Clean up
To clean up the lab, delete all the Google Cloud Services created for the lab. Use Google Cloud Shell to run the following commands.
If the Google Cloud Connection is lost because of inactivity, then reset the variables following previous steps.
# Delete the LIT App Service.
gcloud run services delete $LIT_SERVICE_NAME
If you started model server, you also need to delete model server.
# Delete the Model Service.
gcloud run services delete $MODEL_SERVICE_NAME
Further reading
Continue learning the LIT tool features with the below materials:
- Gemma: Link
- LIT open source code base: Git repo
- LIT paper: ArXiv
- LIT prompt debugging paper: ArXiv
- LIT feature video demo: Youtube
- LIT prompt debugging demo: Youtube
- Responsible GenAI Toolkit: Link
Contact
For any questions or issues with this codelab, please reach out to us on GitHub.
License
This work is licensed under a Creative Commons Attribution 4.0 Generic License.