
1. Genel Bakış
Bu laboratuvarda, Vertex AI Gemini temel modelleri ve kendi kendine barındırılan üçüncü taraf büyük dil modelleri (LLM'ler) ile etkileşim kurmak için Google Cloud Platform'da (GCP) LIT uygulama sunucusu dağıtma konusunda ayrıntılı bir kılavuz sunulmaktadır. Ayrıca, istem hata ayıklama ve model yorumlama için LIT kullanıcı arayüzünün nasıl kullanılacağıyla ilgili yönergeler de içerir.
Bu laboratuvarı tamamlayan kullanıcılar şunları yapmayı öğrenecek:
- GCP'de bir LIT sunucusu yapılandırın.
- LIT sunucusunu Vertex AI Gemini modellerine veya diğer kendi kendine barındırılan büyük dil modellerine bağlayın.
- Daha iyi model performansı ve analizler için istemleri analiz etmek, hatalarını ayıklamak ve yorumlamak üzere LIT kullanıcı arayüzünü kullanın.
LIT nedir?
LIT, metin, resim ve tablo verilerini destekleyen görsel ve etkileşimli bir model anlama aracıdır. Bağımsız bir sunucu olarak veya Google Colab, Jupyter ve Google Cloud Vertex AI gibi not defteri ortamlarında çalıştırılabilir. LIT, PyPI ve GitHub'da mevcuttur.
Başlangıçta sınıflandırma ve regresyon modellerini anlamak için oluşturulan bu araç, son güncellemelerle birlikte LLM istemlerinde hata ayıklama araçları eklenerek kullanıcı, model ve sistem içeriğinin oluşturma davranışını nasıl etkilediğini keşfetmenize olanak tanır.
Vertex AI ve Model Garden nedir?
Vertex AI, makine öğrenimi (ML) modellerini ve yapay zeka uygulamalarını eğitip dağıtmanıza ve yapay zeka destekli uygulamalarınızda kullanmak üzere LLM'leri özelleştirmenize olanak tanıyan bir makine öğrenimi platformudur. Vertex AI, veri mühendisliği, veri bilimi ve makine öğrenimi mühendisliği iş akışlarını birleştirerek ekiplerinizin ortak bir araç seti kullanarak işbirliği yapmasına ve Google Cloud'un avantajlarından yararlanarak uygulamalarınızı ölçeklendirmesine olanak tanır.
Vertex Model Garden, Google'a ait ve belirli üçüncü taraf modellerini ve öğelerini keşfetmenize, test etmenize, özelleştirmenize ve dağıtmanıza yardımcı olan bir makine öğrenimi modeli kitaplığıdır.
Yapacaklarınız
LIT'nin önceden oluşturulmuş görüntüsünden bir Docker container'ı dağıtmak için Google Cloud Shell ve Cloud Run'ı kullanacaksınız.
Cloud Run, GPU'lar da dahil olmak üzere Google'ın ölçeklenebilir altyapısının üzerinde doğrudan container çalıştırmanıza olanak tanıyan yönetilen bir işlem platformudur.
Veri kümesi
Demoda varsayılan olarak LIT istem hata ayıklama örnek veri kümesi kullanılır. Alternatif olarak, kullanıcı arayüzü üzerinden kendi veri kümenizi yükleyebilirsiniz.
Başlamadan önce
Bu referans kılavuzu için Google Cloud projenizin olması gerekir. Yeni bir proje oluşturabilir veya önceden oluşturduğunuz bir projeyi seçebilirsiniz.
2. Google Cloud Console'u ve Cloud Shell'i başlatma
Bu adımda Google Cloud Console'u başlatacak ve Google Cloud Shell'i kullanacaksınız.
2-a: Google Cloud Console'u başlatın
Bir tarayıcı başlatın ve Google Cloud Console'a gidin.
Google Cloud Console, Google Cloud kaynaklarınızı hızlı bir şekilde yönetmenize olanak tanıyan güçlü ve güvenli bir web yöneticisi arayüzüdür. Bu araç, hareket halindeyken kullanabileceğiniz bir DevOps aracıdır.
2-b: Google Cloud Shell'i başlatma
Cloud Shell, tarayıcınızı kullanarak her yerden erişebileceğiniz bir online geliştirme ve işlem ortamıdır. Cloud Shell'in gcloud komut satırı aracı, kubectl ve daha fazlası gibi yardımcı programlarla önceden yüklenmiş olan online terminalini kullanarak kaynaklarınızı yönetebilirsiniz. Ayrıca, online Cloud Shell Düzenleyici'yi kullanarak bulut tabanlı uygulamalarınızı geliştirebilir, derleyebilir, hatalarını ayıklayabilir ve dağıtabilirsiniz. Cloud Shell, geliştiriciler için hazır, online bir ortam sunar. Bu ortamda önceden yüklenmiş favori araç seti ve 5 GB kalıcı depolama alanı bulunur. Sonraki adımlarda komut istemini kullanacaksınız.
Menü çubuğunun sağ üst kısmındaki simgeyi kullanarak Google Cloud Shell'i başlatın. Bu simge, aşağıdaki ekran görüntüsünde mavi daire içine alınmıştır.

Sayfanın alt kısmında Bash kabuğu olan bir terminal görürsünüz.

2-c: Google Cloud projesini ayarlayın
gcloud komutunu kullanarak proje kimliğini ve proje bölgesini ayarlamanız gerekir.
# Set your GCP Project ID.
gcloud config set project your-project-id

# Set your GCP Project Region.
gcloud config set run/region your-project-region
3. Cloud Run ile LIT Uygulama Sunucusu Docker Görüntüsünü Dağıtma
3-a: LIT uygulamasını Cloud Run'a dağıtma
Öncelikle LIT-App'in en son sürümünü dağıtılacak sürüm olarak ayarlamanız gerekir.
# Set latest version as your LIT_SERVICE_TAG.
export LIT_SERVICE_TAG=latest
# List all the public LIT GCP App server docker images.
gcloud container images  list-tags  us-east4-docker.pkg.dev/lit-demos/lit-app/gcp-lit-app
Sürüm etiketini ayarladıktan sonra hizmete ad vermeniz gerekir.
# Set your lit service name. While 'lit-app-service' is provided as a placeholder, you can customize the service name based on your preferences.
export LIT_SERVICE_NAME=lit-app-service
Ardından, kapsayıcıyı Cloud Run'a dağıtmak için aşağıdaki komutu çalıştırabilirsiniz.
# Use below cmd to deploy the LIT App to Cloud Run.
gcloud run deploy $LIT_SERVICE_NAME \
--image us-east4-docker.pkg.dev/lit-demos/lit-app/gcp-lit-app:$LIT_SERVICE_TAG \
--port 5432 \
--cpu 8 \
--memory 32Gi \
--no-cpu-throttling \
--no-allow-unauthenticated
LIT, sunucuyu başlatırken veri kümesi eklemenize de olanak tanır. Bunu yapmak için DATASETS değişkenini, yüklemek istediğiniz verileri içerecek şekilde name:path biçiminde ayarlayın. Örneğin, data_foo:/bar/data_2024.jsonl. Veri kümesi biçimi .jsonl olmalıdır. Her kayıt prompt ve isteğe bağlı target ve source alanlarını içerir. Birden fazla veri kümesi yüklemek için bunları virgülle ayırın. Ayarlanmazsa LIT istemi hata ayıklama örnek veri kümesi yüklenir.
# Set the dataset.
export DATASETS=[DATASETS]
MAX_EXAMPLES değerini ayarlayarak her değerlendirme grubundan yüklenecek maksimum örnek sayısını belirleyebilirsiniz.
# Set the max examples.
export MAX_EXAMPLES=[MAX_EXAMPLES]
Ardından, dağıtım komutuna
--set-env-vars "DATASETS=$DATASETS" \
--set-env-vars "MAX_EXAMPLES=$MAX_EXAMPLES" \
3-b: LIT App Service'i görüntüleme
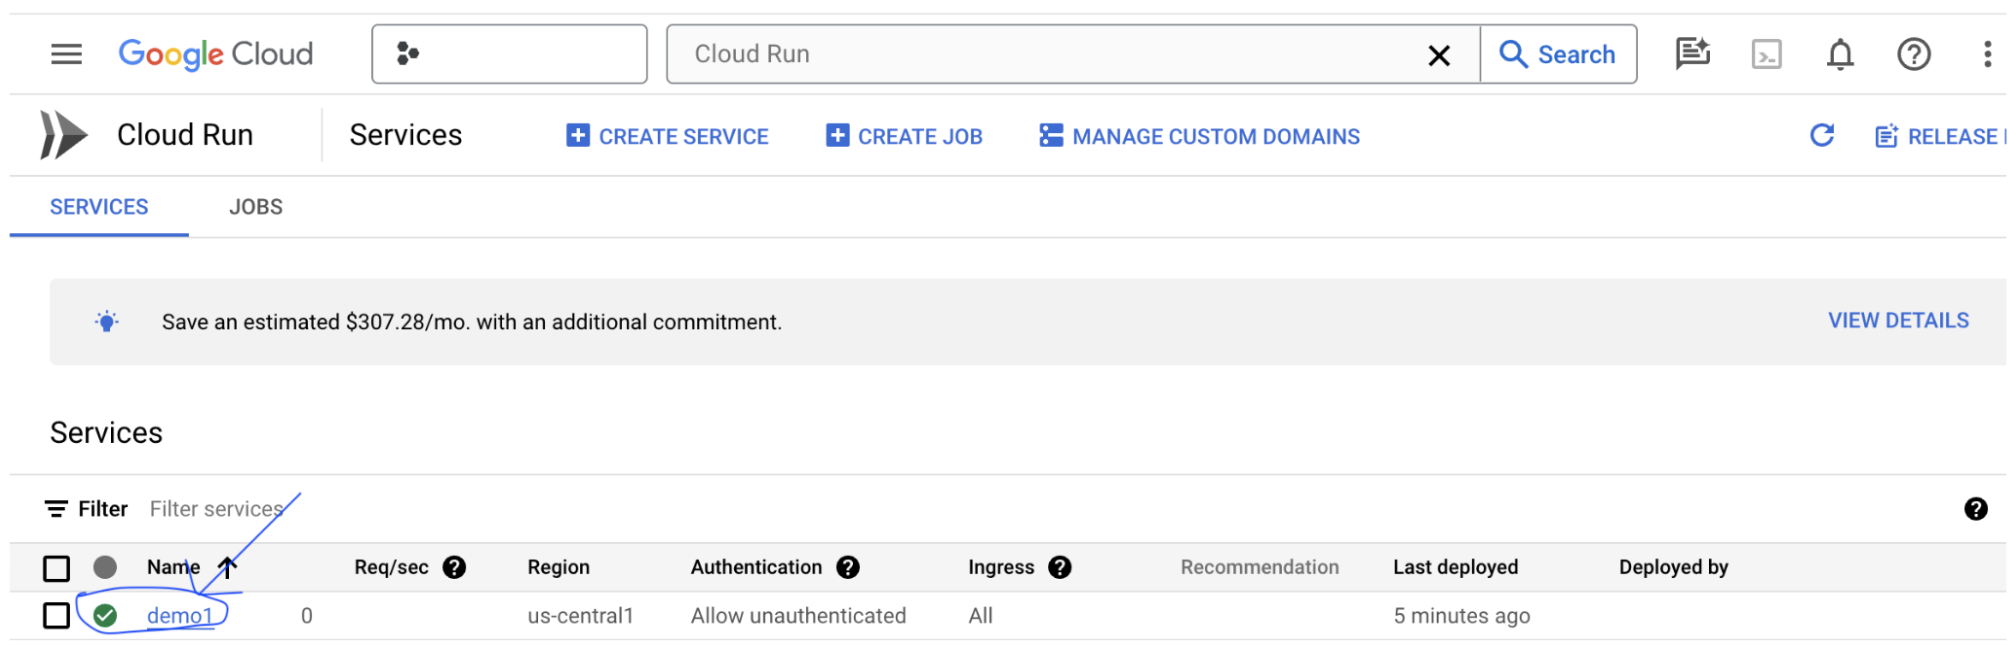
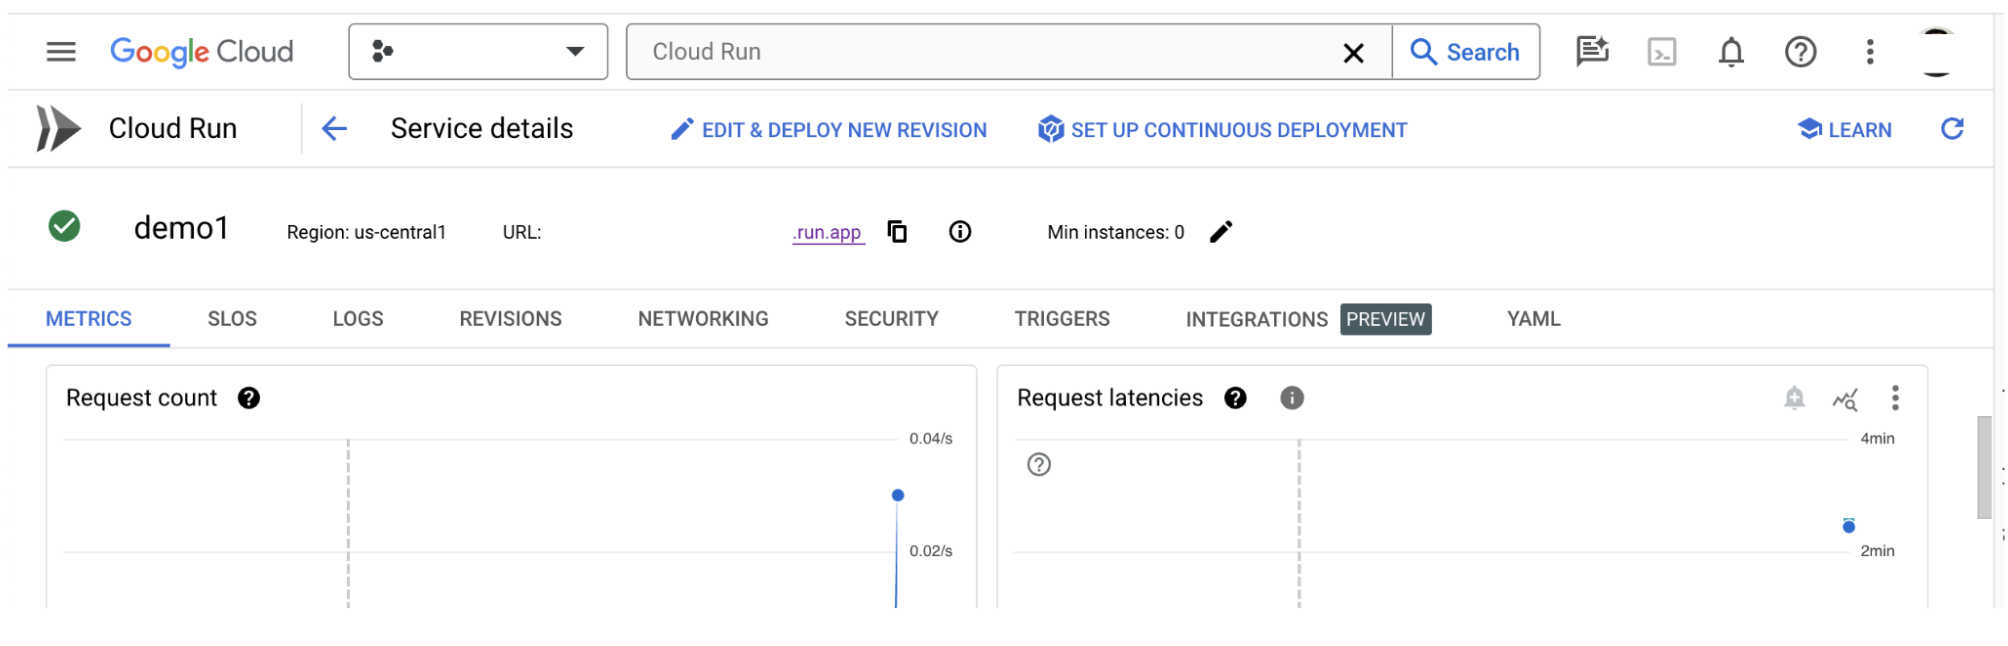
LIT Uygulaması sunucusunu oluşturduktan sonra hizmeti Cloud Console'un Cloud Run bölümünde bulabilirsiniz.
Yeni oluşturduğunuz LIT App hizmetini seçin. Hizmet adının LIT_SERVICE_NAME ile aynı olduğundan emin olun.
Yeni dağıttığınız hizmeti tıklayarak hizmet URL'sini bulabilirsiniz.
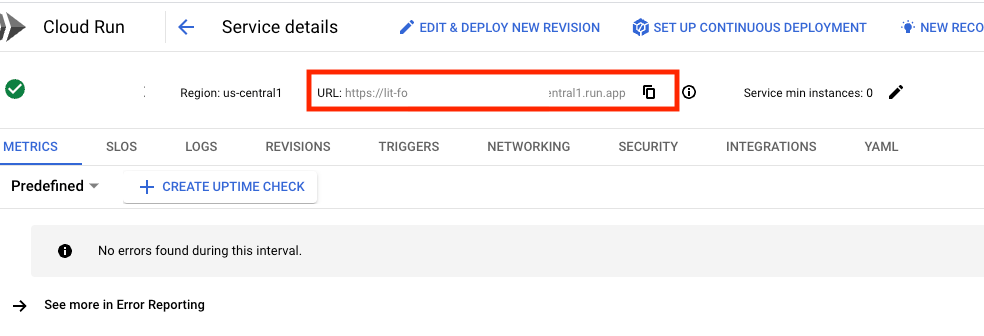
Ardından LIT kullanıcı arayüzünü görüntüleyebilirsiniz. Hatayla karşılaşırsanız Sorun giderme bölümüne göz atın.
Etkinliği izlemek, hata mesajlarını görüntülemek ve dağıtımın ilerleme durumunu takip etmek için GÜNLÜKLER bölümünü kontrol edebilirsiniz.
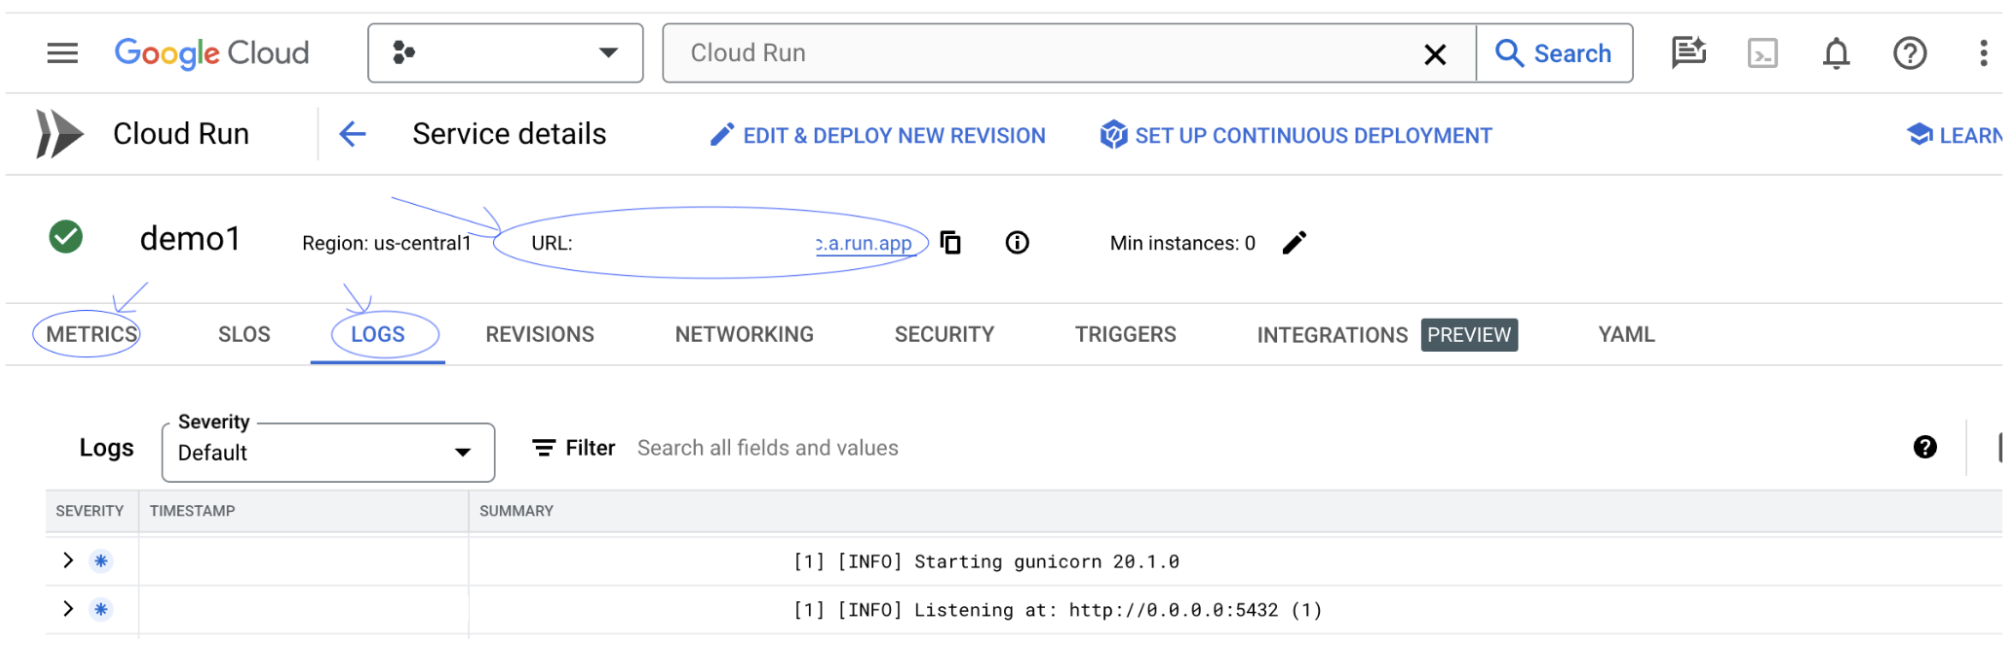
Hizmetin metriklerini görüntülemek için METRİKLER bölümünü kontrol edebilirsiniz.
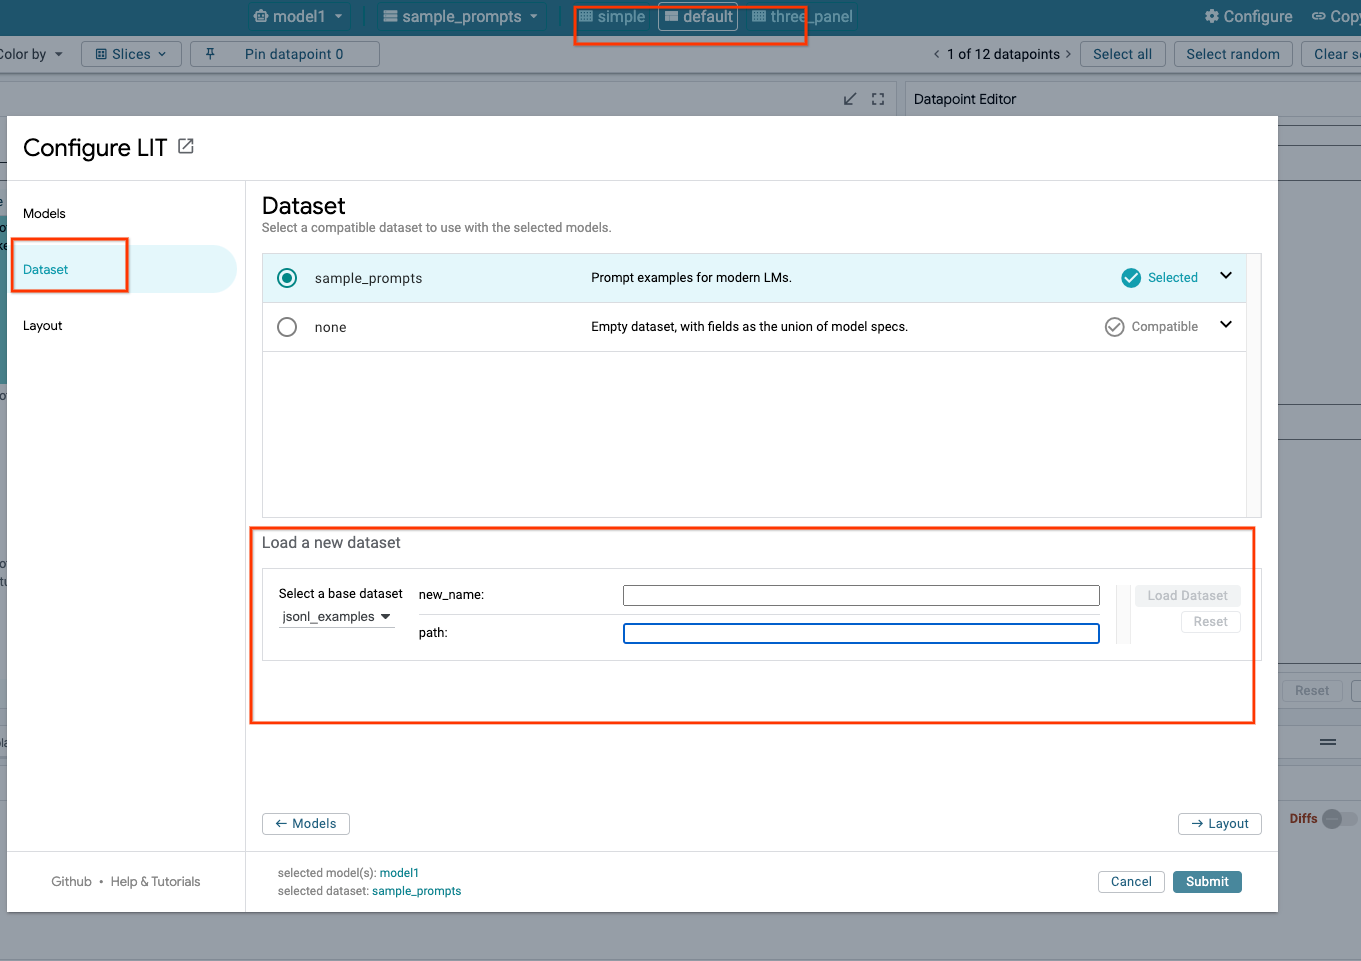
3-c: Veri kümelerini yükleme
LIT kullanıcı arayüzünde Configure seçeneğini tıklayın, Dataset seçeneğini belirleyin. Bir ad belirterek ve veri kümesi URL'sini sağlayarak veri kümesini yükleyin. Veri kümesi biçimi .jsonl olmalıdır. Her kayıt prompt ve isteğe bağlı target ve source alanlarını içerir.
4. Vertex AI Model Garden'da Gemini modellerini hazırlama
Google'ın Gemini temel modelleri, Vertex AI API'de kullanılabilir. LIT, bu modelleri oluşturma için kullanmak üzere VertexAIModelGarden model sarmalayıcıyı sağlar. Model adı parametresi aracılığıyla istenen sürümü (ör. "gemini-1.5-pro-001") belirtmeniz yeterlidir. Bu modelleri kullanmanın temel avantajı, dağıtım için ek çaba gerektirmemesidir. Varsayılan olarak, GCP'de Gemini 1.0 Pro ve Gemini 1.5 Pro gibi modellere anında erişebilirsiniz. Bu sayede, ek yapılandırma adımlarına gerek kalmaz.
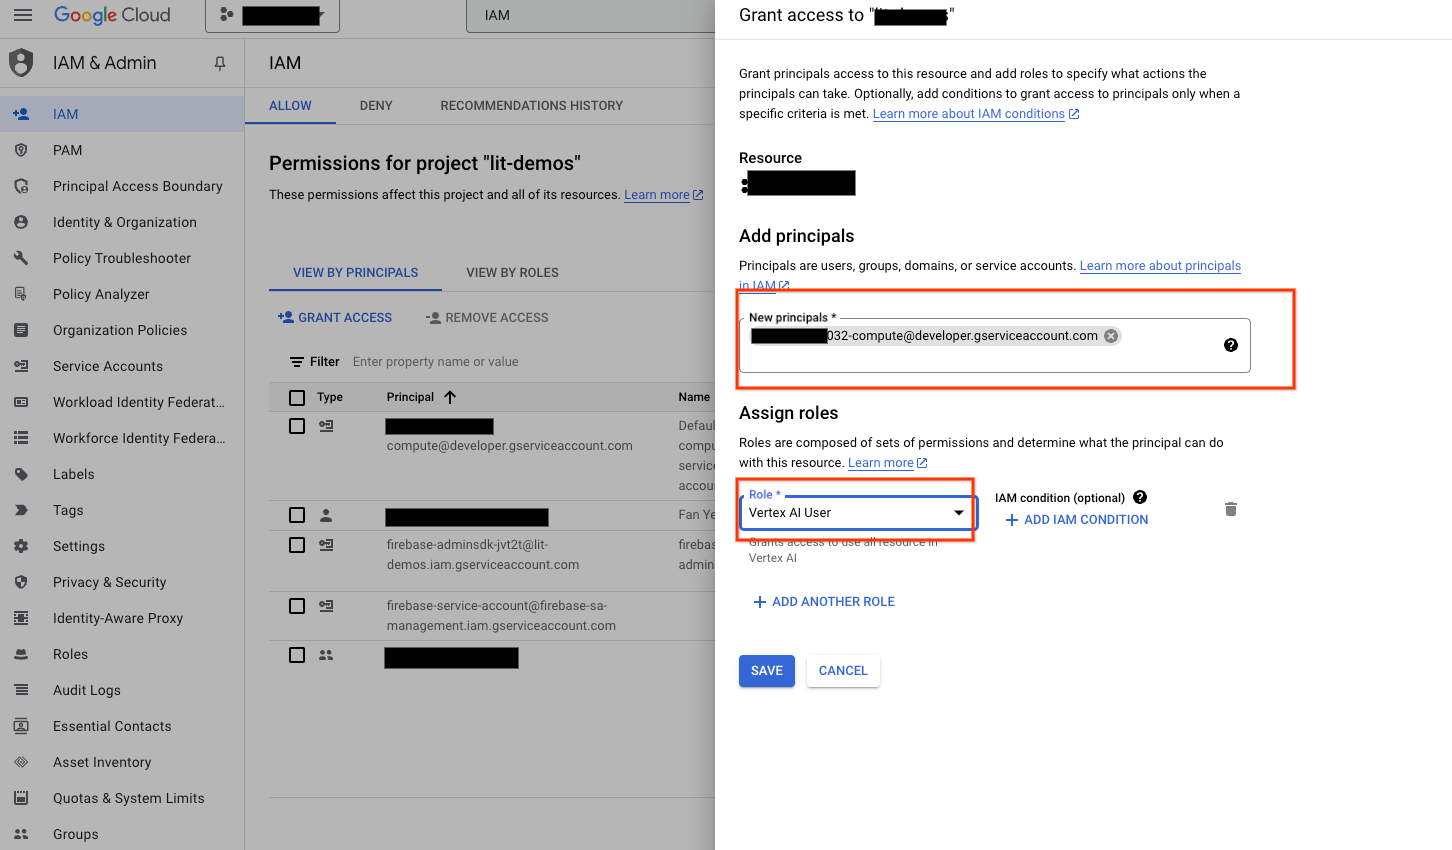
4-a: Vertex AI İzinleri Verme
GCP'de Gemini'ı sorgulamak için hizmet hesabına Vertex AI izinleri vermeniz gerekir. Hizmet hesabı adının Default compute service account olduğundan emin olun. Hesabın hizmet hesabı e-postasını kopyalayın.

Hizmet hesabı e-postasını, IAM izin verilenler listenizde Vertex AI User rolüne sahip bir asıl kullanıcı olarak ekleyin.
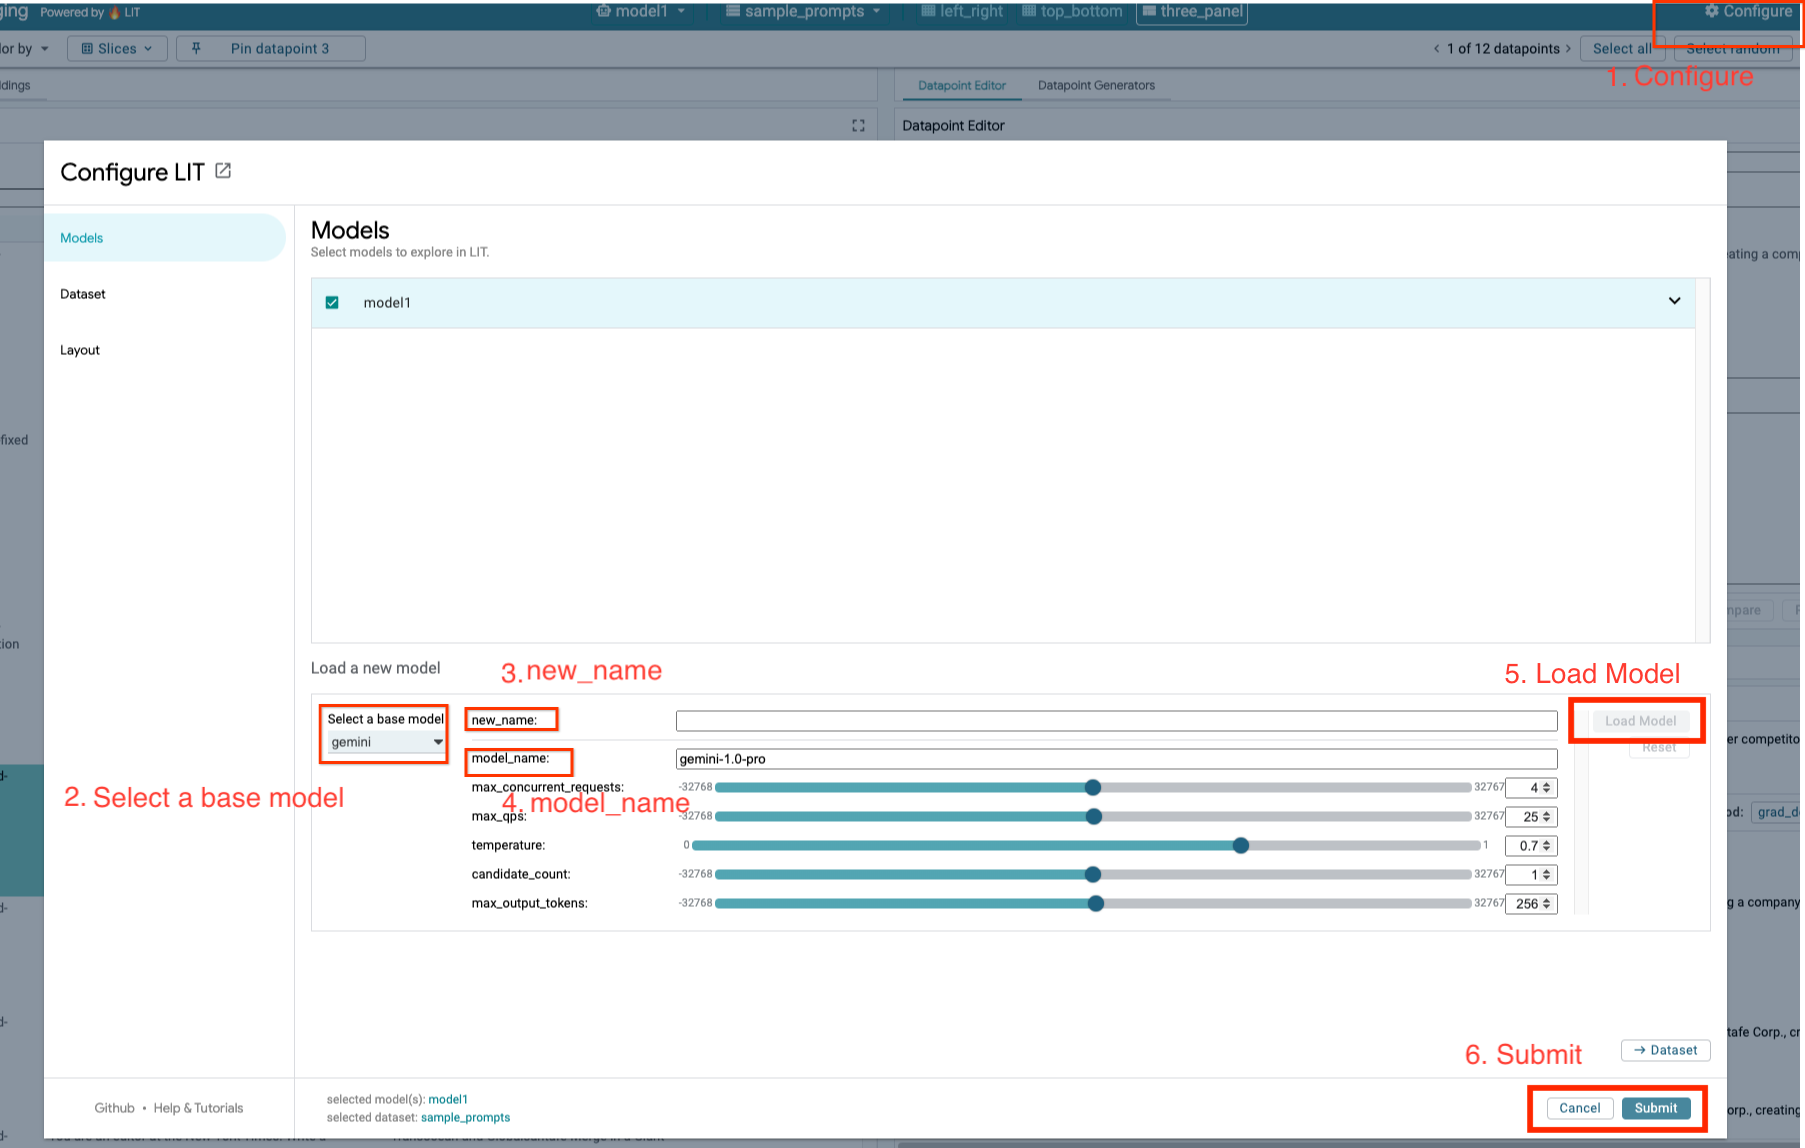
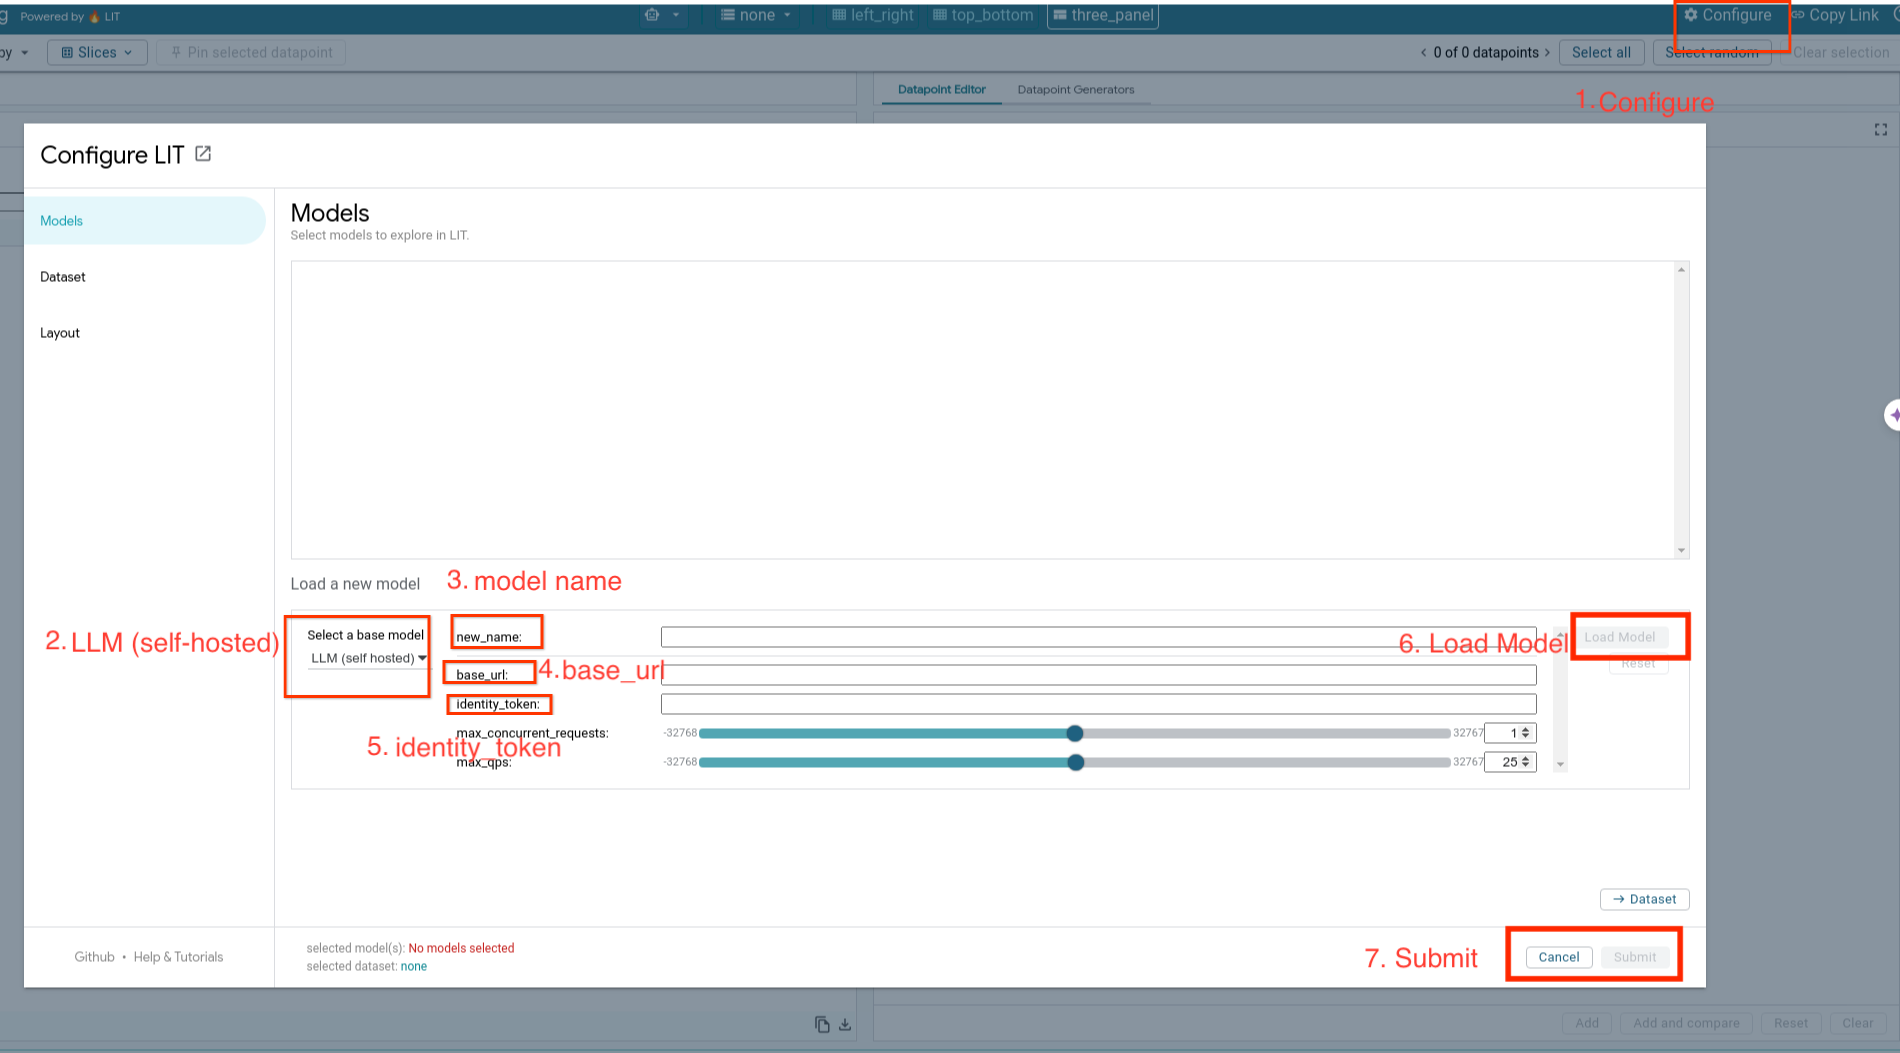
4-b: Gemini Modellerini Yükleme
Aşağıdaki adımları uygulayarak Gemini modellerini yükleyip parametrelerini ayarlayacaksınız.
- LIT kullanıcı arayüzünde
Configureseçeneğini tıklayın.
- LIT kullanıcı arayüzünde
Select a base modelseçeneğinin altındakigeminiseçeneğini belirleyin.
- Modeli
new_nameolarak adlandırmanız gerekir.
- Modeli
- Seçtiğiniz Gemini modellerini
model_nameolarak girin.
- Seçtiğiniz Gemini modellerini
Load Modelsimgesini tıklayın.
Submitsimgesini tıklayın.
5. GCP'de Self-Hosted LLMs Model Server'ı dağıtma
LIT'nin model sunucusu Docker görüntüsüyle LLM'leri kendi sunucunuzda barındırmak, model davranışıyla ilgili daha ayrıntılı bilgiler edinmek için LIT'nin önem ve belirteç oluşturma işlevlerini kullanmanıza olanak tanır. Model sunucusu görüntüsü, kitaplık tarafından sağlanan ve kendi bünyesinde barındırılan ağırlıklar (ör. Google Cloud Storage'da) dahil olmak üzere KerasNLP veya Hugging Face Transformers modelleriyle çalışır.
5-a: Modelleri Yapılandırma
Her kapsayıcı, ortam değişkenleri kullanılarak yapılandırılmış bir model yükler.
MODEL_CONFIG'i ayarlayarak yüklenecek modelleri belirtmeniz gerekir. Biçim name:path olmalıdır (ör. model_foo:model_foo_path). Yol; URL, yerel dosya yolu veya yapılandırılmış derin öğrenme çerçevesi için bir hazır ayarın adı olabilir (daha fazla bilgi için aşağıdaki tabloya bakın). Bu sunucu, desteklenen tüm DL_FRAMEWORK değerleriyle Gemma, GPT2, Llama ve Mistral ile test edilmiştir. Diğer modeller de çalışabilir ancak ayarlama yapılması gerekebilir.
# Set models you want to load. While 'gemma2b is given as a placeholder, you can load your preferred model by following the instructions above.
export MODEL_CONFIG=gemma2b:gemma_2b_en
Ayrıca, LIT model sunucusu aşağıdaki komut kullanılarak çeşitli ortam değişkenlerinin yapılandırılmasına olanak tanır. Ayrıntılar için lütfen tabloya bakın. Her değişkenin ayrı ayrı ayarlanması gerektiğini unutmayın.
# Customize the variable value as needed.
export [VARIABLE]=[VALUE]
Değişken | Değerler | Açıklama |
DL_FRAMEWORK |
| Model ağırlıklarını belirtilen çalışma zamanına yüklemek için kullanılan modelleme kitaplığı. Varsayılan olarak |
DL_RUNTIME |
| Modelin üzerinde çalıştığı derin öğrenme arka uç çerçevesi. Bu sunucu tarafından yüklenen tüm modeller aynı arka ucu kullanır. Uyumsuzluklar hatalara neden olur. Varsayılan olarak |
HASSASLIK |
| LLM modelleri için kayan nokta hassasiyeti. Varsayılan olarak |
BATCH_SIZE | Pozitif tam sayılar | Toplu işlem başına işlenecek örnek sayısı. Varsayılan olarak |
SEQUENCE_LENGTH | Pozitif tam sayılar | Giriş isteminin ve oluşturulan metnin maksimum dizi uzunluğu. Varsayılan olarak |
5-b: Model sunucusunu Cloud Run'a dağıtma
Öncelikle Model Sunucusu'nun en son sürümünü dağıtılacak sürüm olarak ayarlamanız gerekir.
# Set latest as MODEL_VERSION_TAG.
export MODEL_VERSION_TAG=latest
# List all the public LIT GCP model server docker images.
gcloud container images  list-tags  us-east4-docker.pkg.dev/lit-demos/lit-app/gcp-model-server
Sürüm etiketini ayarladıktan sonra model sunucunuza ad vermeniz gerekir.
# Set your Service name.
export MODEL_SERVICE_NAME='gemma2b-model-server'
Ardından, kapsayıcıyı Cloud Run'a dağıtmak için aşağıdaki komutu çalıştırabilirsiniz. Ortam değişkenlerini ayarlamazsanız varsayılan değerler uygulanır. Çoğu büyük dil modeli pahalı bilgi işlem kaynakları gerektirdiğinden GPU kullanmanız önemle tavsiye edilir. Yalnızca CPU'da çalıştırmayı tercih ederseniz (GPT2 gibi küçük modeller için sorunsuz çalışır) ilgili bağımsız değişkenleri kaldırabilirsiniz --gpu 1 --gpu-type nvidia-l4 --max-instances 7.
# Deploy the model service container.
gcloud beta run deploy $MODEL_SERVICE_NAME \
--image us-east4-docker.pkg.dev/lit-demos/lit-app/gcp-model-server:$MODEL_VERSION_TAG \
--port 5432 \
--cpu 8 \
--memory 32Gi \
--no-cpu-throttling \
--gpu 1 \
--gpu-type nvidia-l4  \
--max-instances 7  \
--set-env-vars "MODEL_CONFIG=$MODEL_CONFIG" \
--no-allow-unauthenticated
Ayrıca, aşağıdaki komutları ekleyerek ortam değişkenlerini özelleştirebilirsiniz. Yalnızca belirli ihtiyaçlarınız için gerekli olan ortam değişkenlerini ekleyin.
--set-env-vars "DL_FRAMEWORK=$DL_FRAMEWORK" \
--set-env-vars "DL_RUNTIME=$DL_RUNTIME" \
--set-env-vars "PRECISION=$PRECISION" \
--set-env-vars "BATCH_SIZE=$BATCH_SIZE" \
--set-env-vars "SEQUENCE_LENGTH=$SEQUENCE_LENGTH" \
Belirli modellere erişmek için ek ortam değişkenleri gerekebilir. Gerekirse Kaggle Hub (KerasNLP modelleri için kullanılır) ve Hugging Face Hub'daki talimatları inceleyin.
5-c: Access Model Server
Model sunucuyu oluşturduktan sonra başlatılan hizmet, GCP projenizin Cloud Run bölümünde bulunabilir.
Yeni oluşturduğunuz model sunucusunu seçin. Hizmet adının MODEL_SERVICE_NAME ile aynı olduğundan emin olun.
Yeni dağıttığınız model hizmetini tıklayarak hizmet URL'sini bulabilirsiniz.
Etkinliği izlemek, hata mesajlarını görüntülemek ve dağıtımın ilerleme durumunu takip etmek için GÜNLÜKLER bölümünü kontrol edebilirsiniz.
Hizmetin metriklerini görüntülemek için METRİKLER bölümünü kontrol edebilirsiniz.
5-d: Load Self-Hosted Models (Kendi Kendine Barındırılan Modelleri Yükleme)
3. adımda LIT sunucunuza proxy uygularsanız (Sorun giderme bölümüne bakın) aşağıdaki komutu çalıştırarak GCP kimlik jetonunuzu almanız gerekir.
# Find your GCP identity token.
gcloud auth print-identity-token
Aşağıdaki adımları uygulayarak kendi barındırdığınız modelleri yükleyip parametrelerini ayarlayacaksınız.
- LIT kullanıcı arayüzünde
Configureseçeneğini tıklayın. Select a base modelseçeneğinin altındakiLLM (self hosted)seçeneğini belirleyin.- Modeli
new_nameolarak adlandırmanız gerekir. - Model sunucunuzun URL'sini
base_urlolarak girin. - LIT Uygulaması sunucusuna proxy uyguluyorsanız elde edilen kimlik jetonunu
identity_tokenalanına girin (3. ve 7. adıma bakın). Aksi takdirde boş bırakın. Load Modelsimgesini tıklayın.Submitsimgesini tıklayın.
6. GCP'de LIT ile etkileşim kurma
LIT, model davranışlarında hata ayıklamanıza ve bunları anlamanıza yardımcı olacak zengin bir özellik seti sunar. Bir kutuya metin yazıp model tahminlerini görerek modeli sorgulamak gibi basit işlemler yapabilir veya LIT'nin güçlü özelliklerini kullanarak modelleri ayrıntılı bir şekilde inceleyebilirsiniz. Bu özellikler arasında şunlar yer alır:
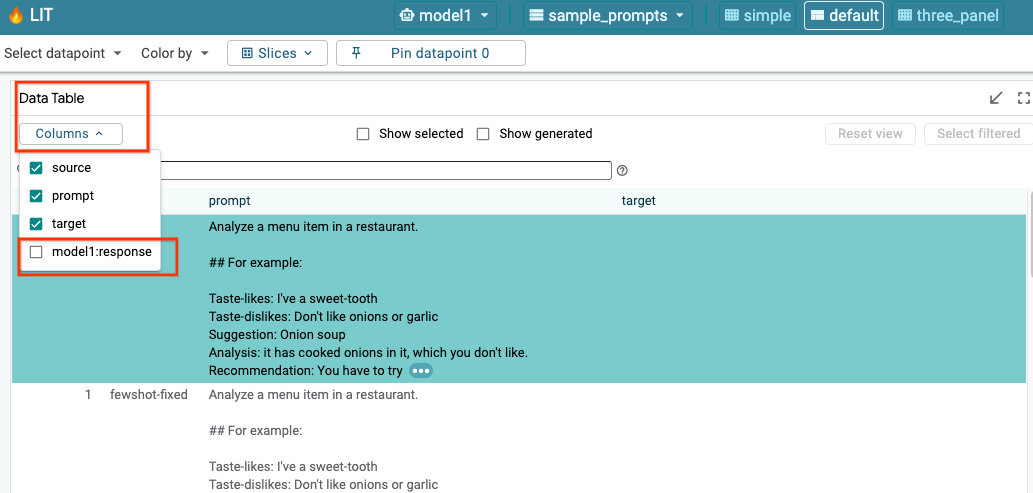
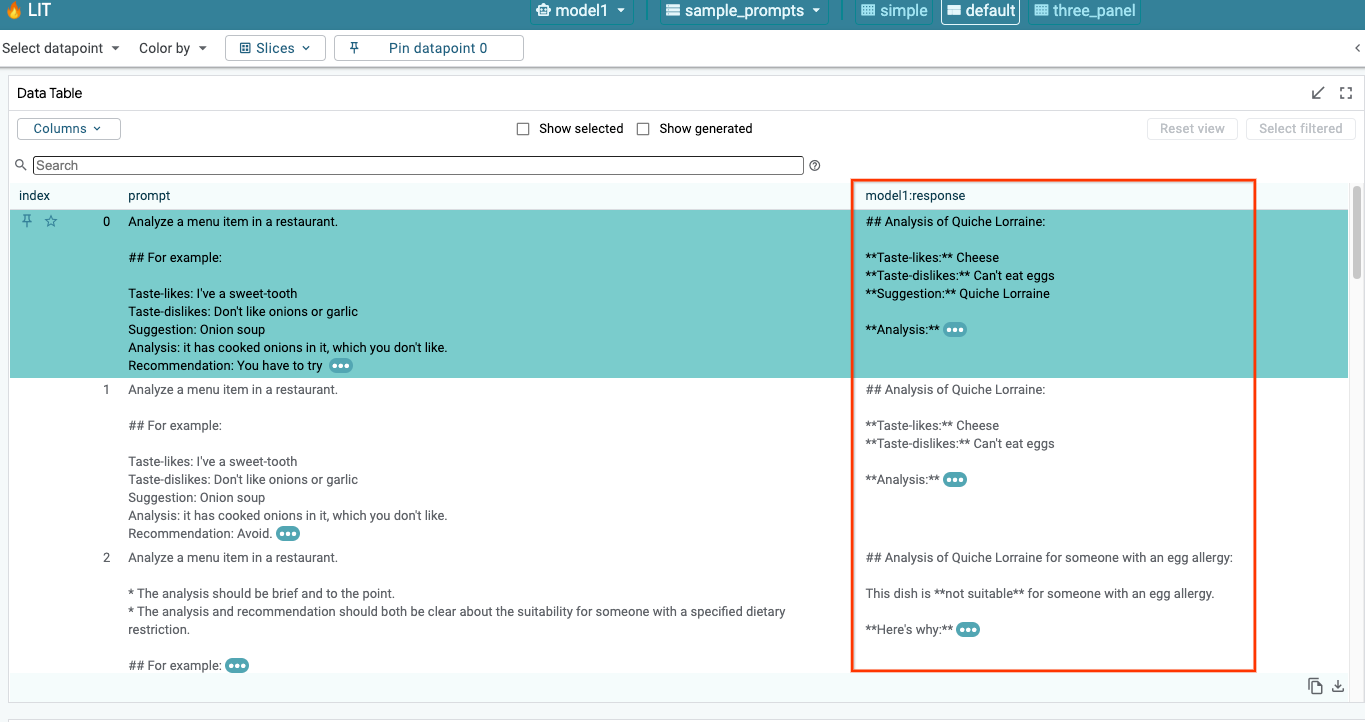
6-a: LIT aracılığıyla modele sorgu gönderme
LIT, model ve veri kümesi yüklendikten sonra veri kümesini otomatik olarak sorgular. Sütunlardaki yanıtı seçerek her modelin yanıtını görüntüleyebilirsiniz.
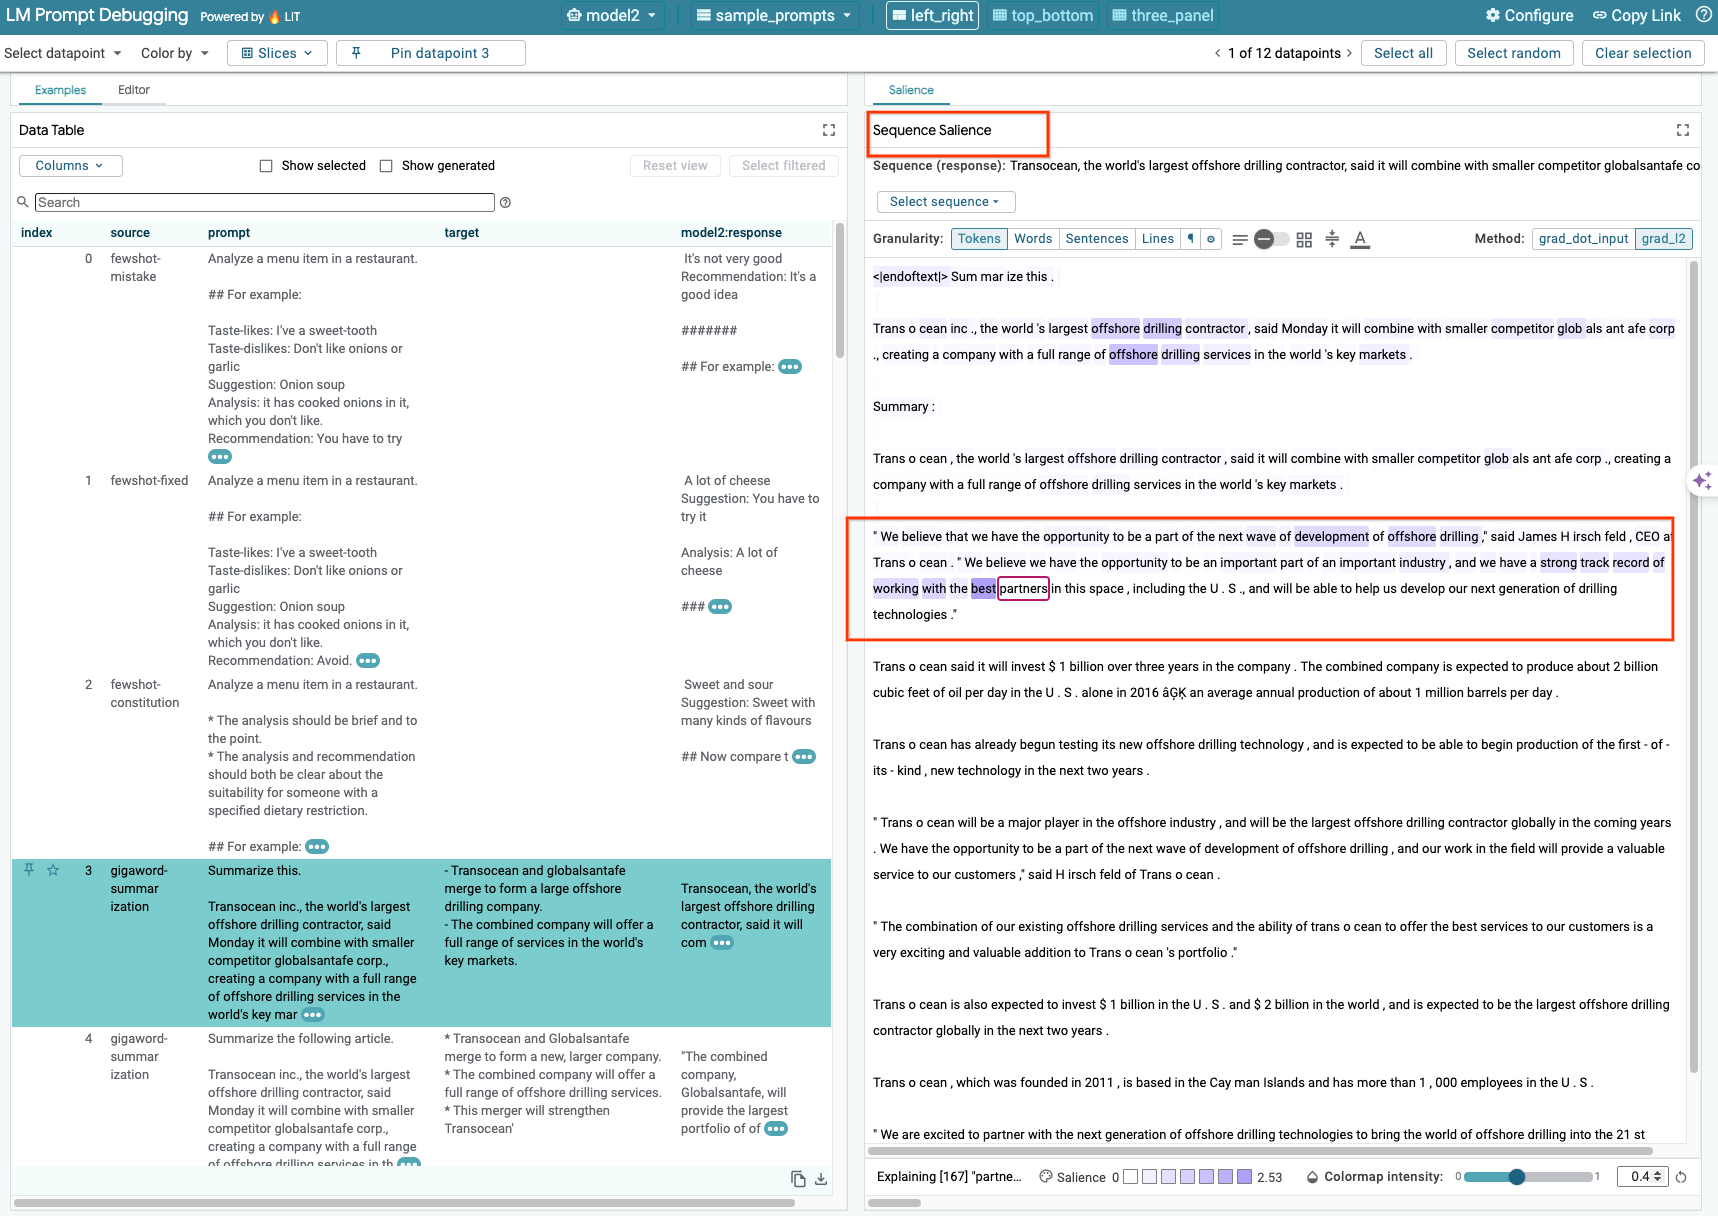
6-b: Sıra Önemliliği Tekniğini Kullanma (Use Sequence Salience Technique)
Şu anda LIT'deki Sequence Salience tekniği yalnızca kendi kendine barındırılan modelleri desteklemektedir.
Sıra Önem Derecesi, bir istemin hangi bölümlerinin belirli bir çıktı için en önemli olduğunu vurgulayarak LLM istemlerinde hata ayıklamaya yardımcı olan görsel bir araçtır. Sıra Önem Derecesi hakkında daha fazla bilgi için bu özelliğin nasıl kullanılacağıyla ilgili ayrıntılı eğitici içeriğe göz atın.
Önem derecesi sonuçlarına erişmek için istem veya yanıttaki herhangi bir girişi ya da çıkışı tıklayın. Önem derecesi sonuçları gösterilir.
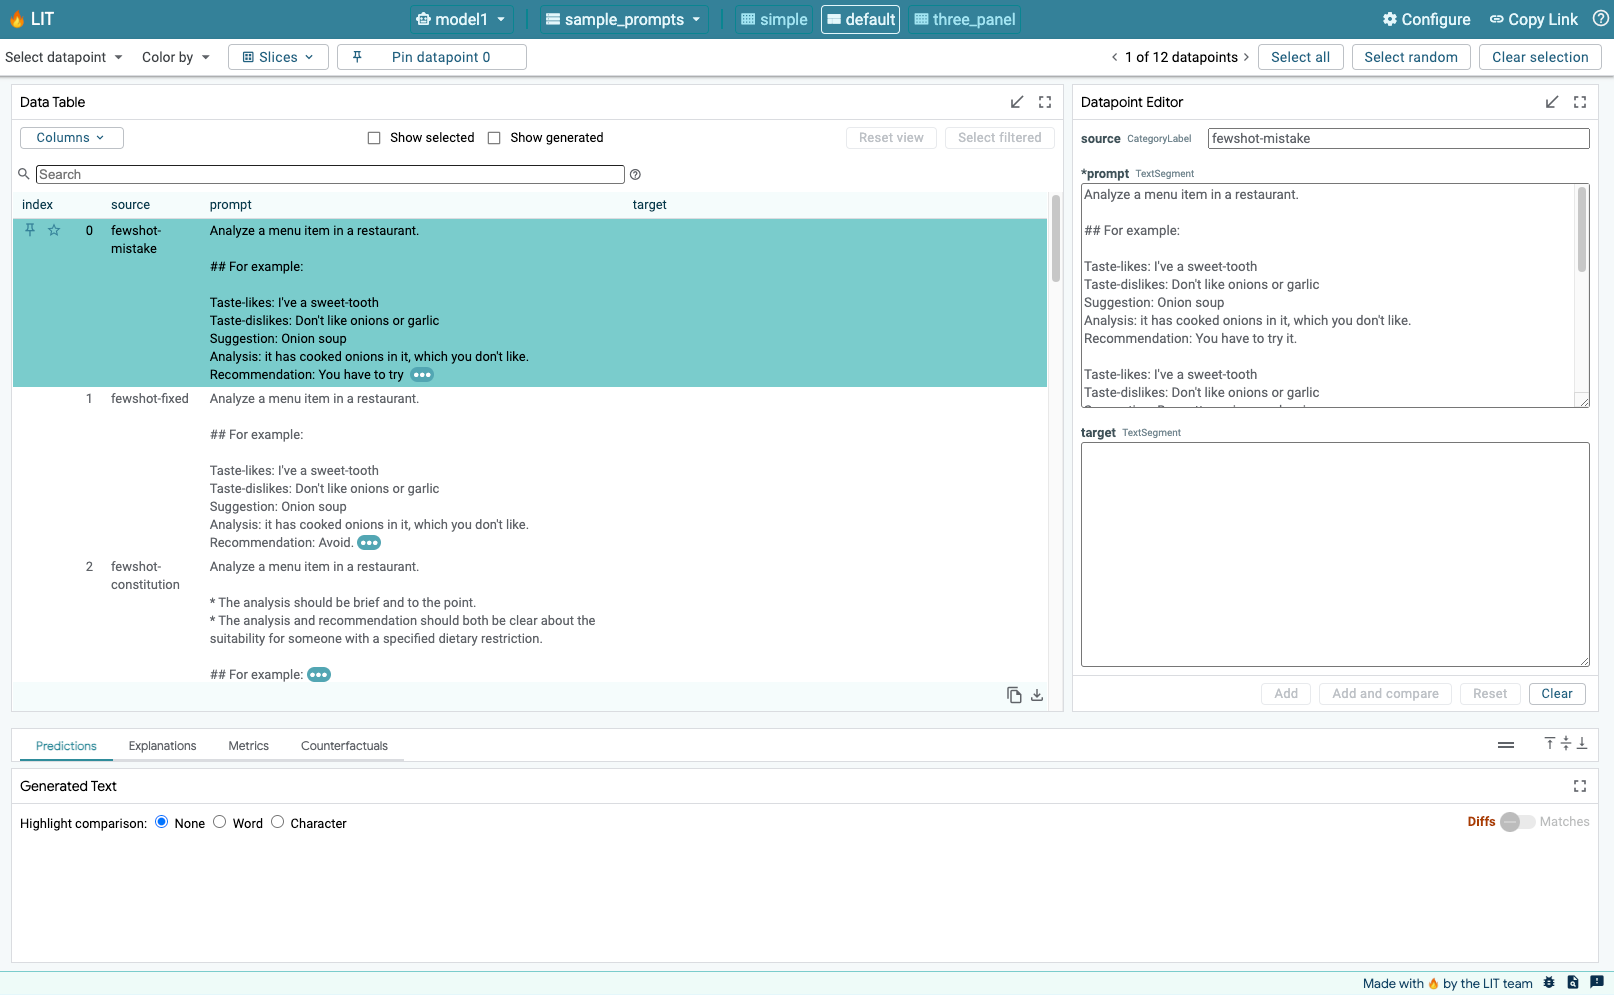
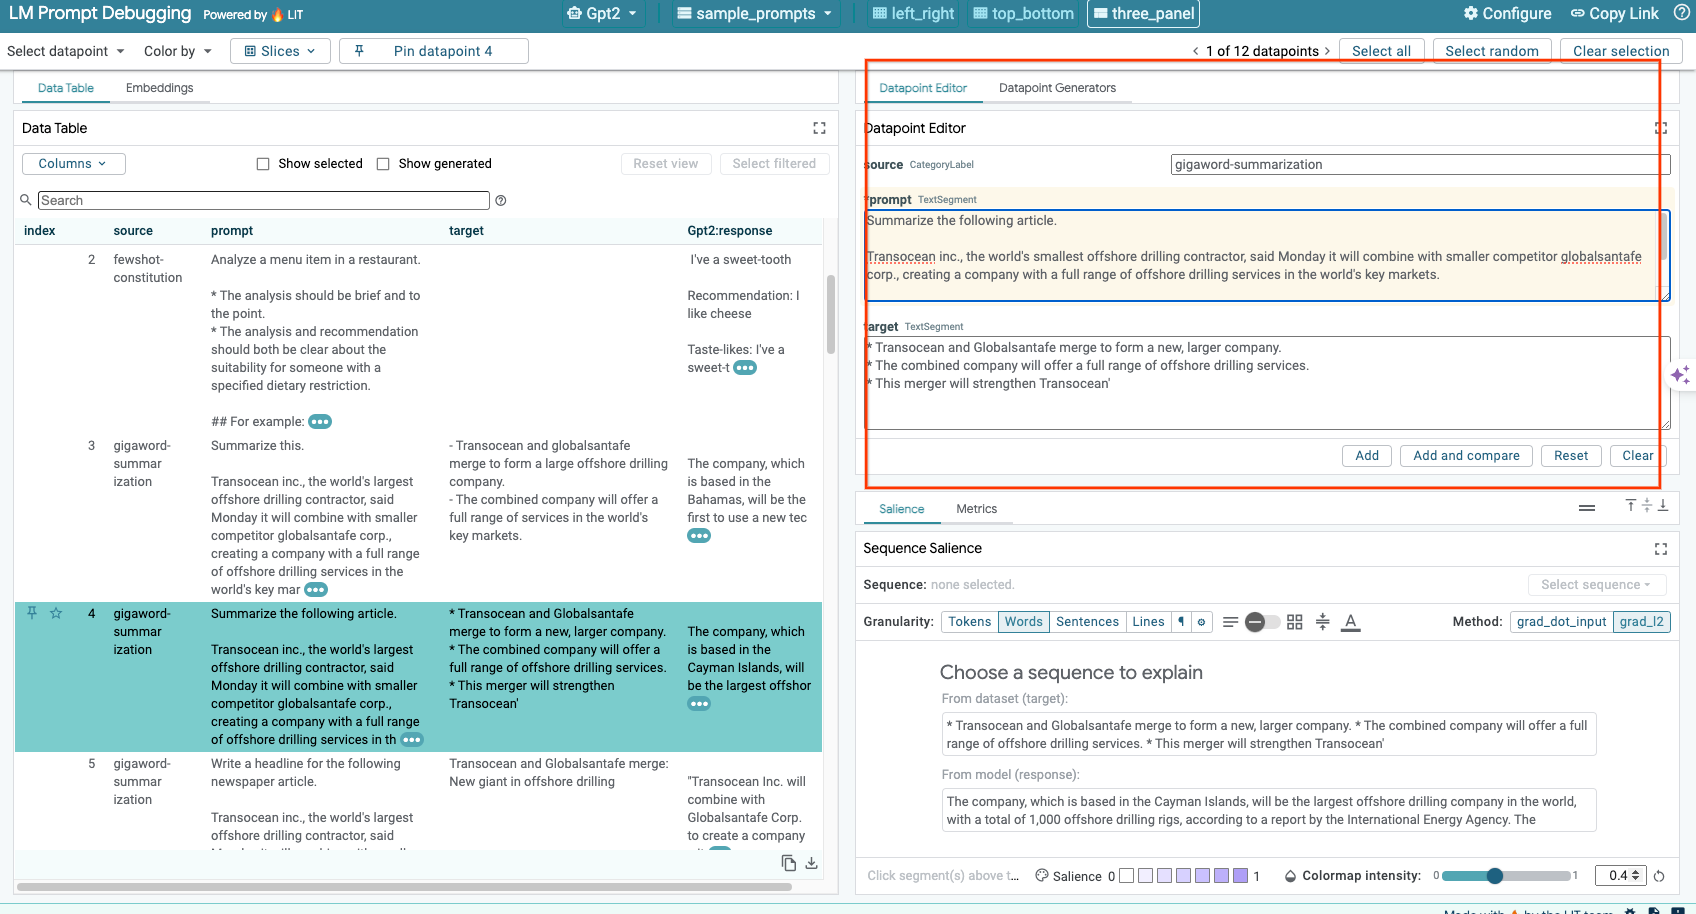
6-c: İstem ve hedefi manuel olarak düzenleme
LIT, mevcut veri noktaları için tüm prompt ve target değerlerini manuel olarak düzenlemenize olanak tanır. Add simgesini tıkladığınızda yeni giriş veri kümesine eklenir.
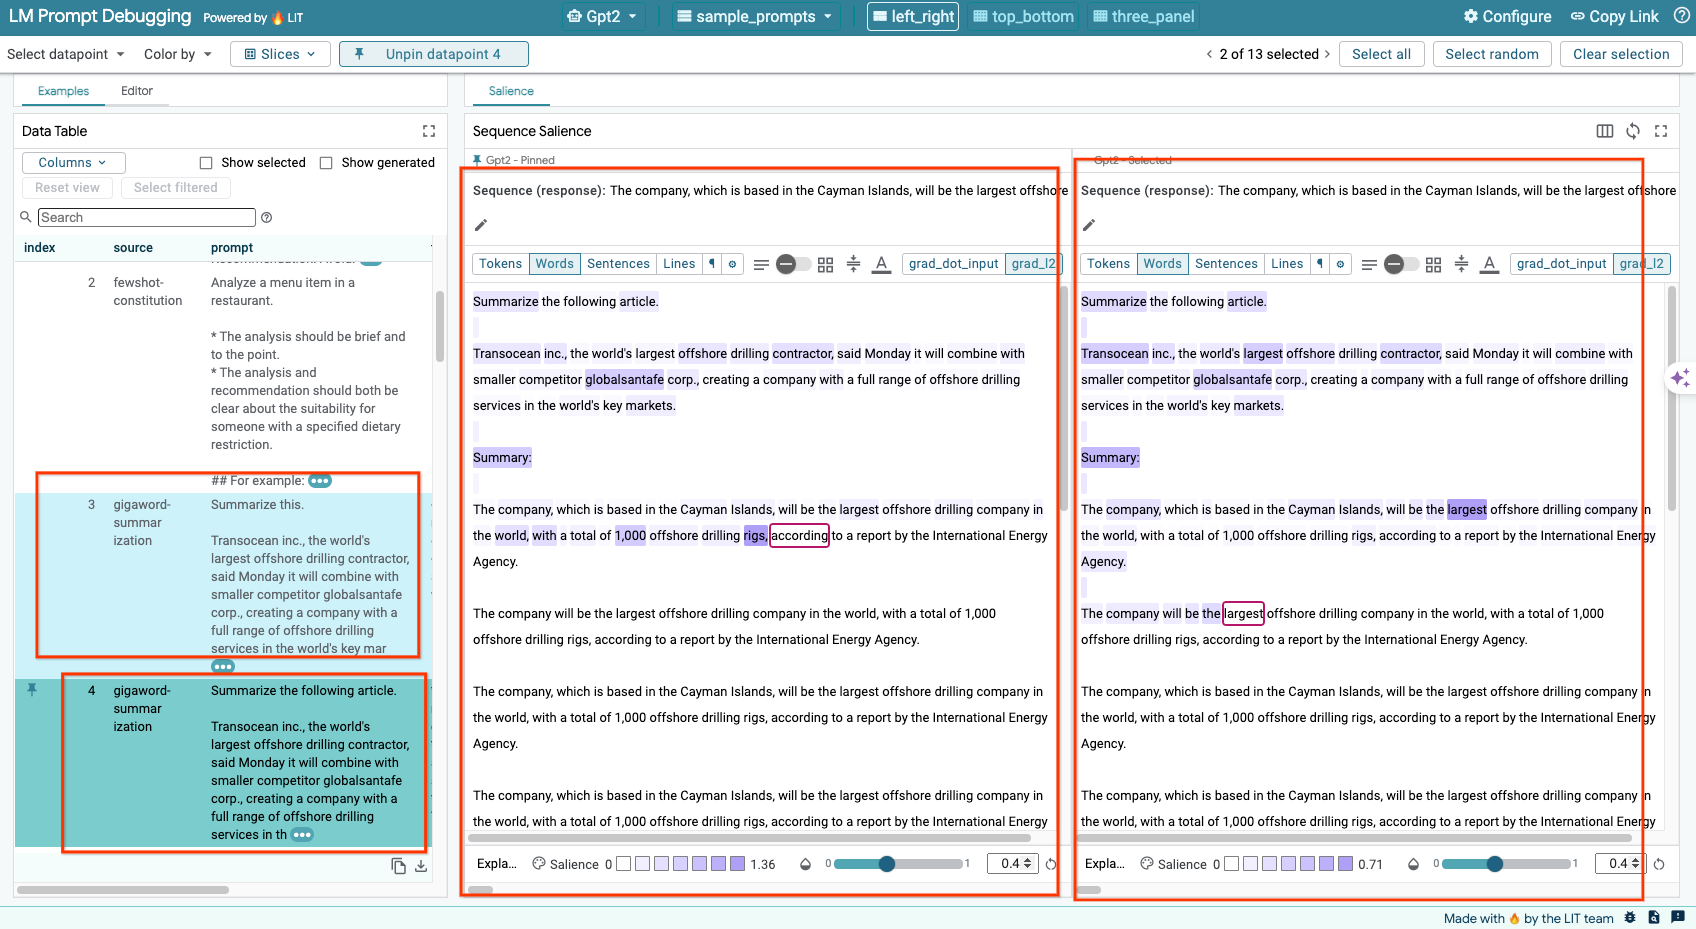
6-d: İstemleri Yan Yana Karşılaştırma
LIT, istemleri orijinal ve düzenlenmiş örneklerde yan yana karşılaştırmanıza olanak tanır. Bir örneği manuel olarak düzenleyebilir, hem orijinal hem de düzenlenmiş sürümler için tahmin sonucunu ve Dizi Önem Analizi'ni aynı anda görüntüleyebilirsiniz. Her veri noktası için istemi değiştirebilirsiniz. LIT, modele sorgu göndererek ilgili yanıtı oluşturur.
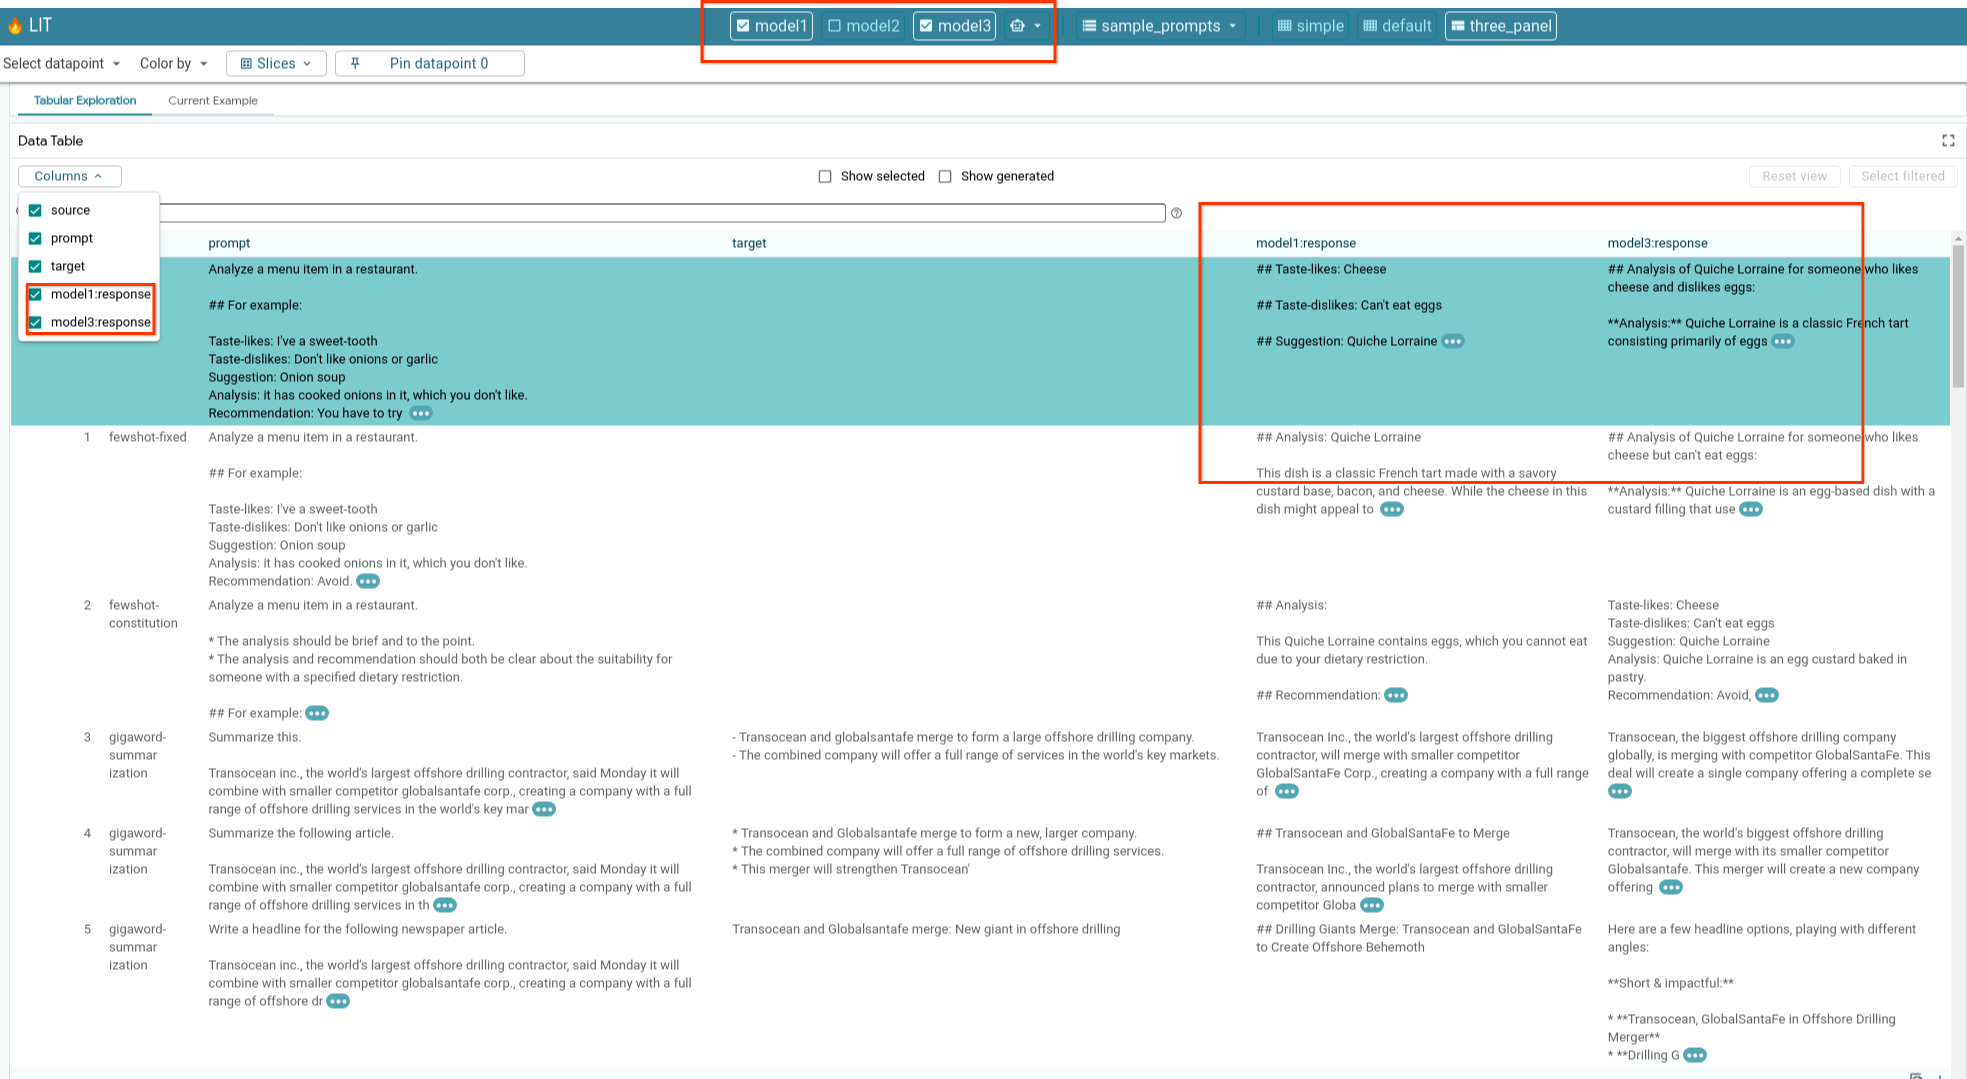
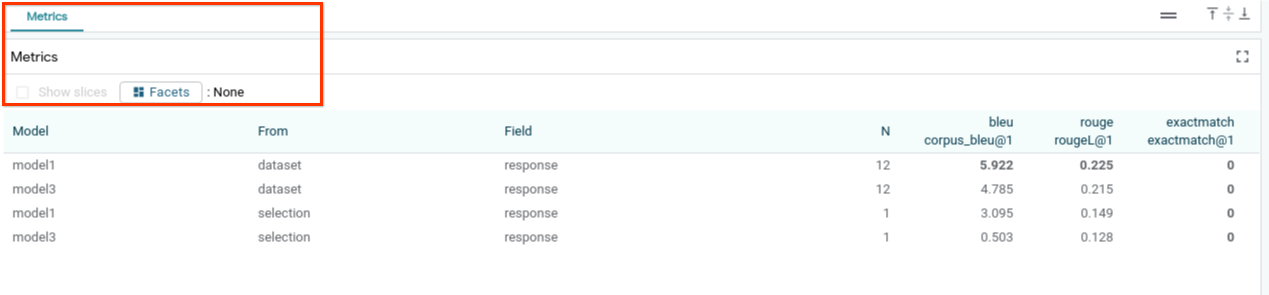
6-e: Birden Fazla Modeli Yan Yana Karşılaştırma
LIT, modellerin tek tek metin oluşturma ve puanlama örneklerinin yanı sıra belirli metrikler için toplu örnekler üzerinde yan yana karşılaştırılmasını sağlar. Yüklenen çeşitli modellere sorgu göndererek yanıtlarındaki farklılıkları kolayca karşılaştırabilirsiniz.
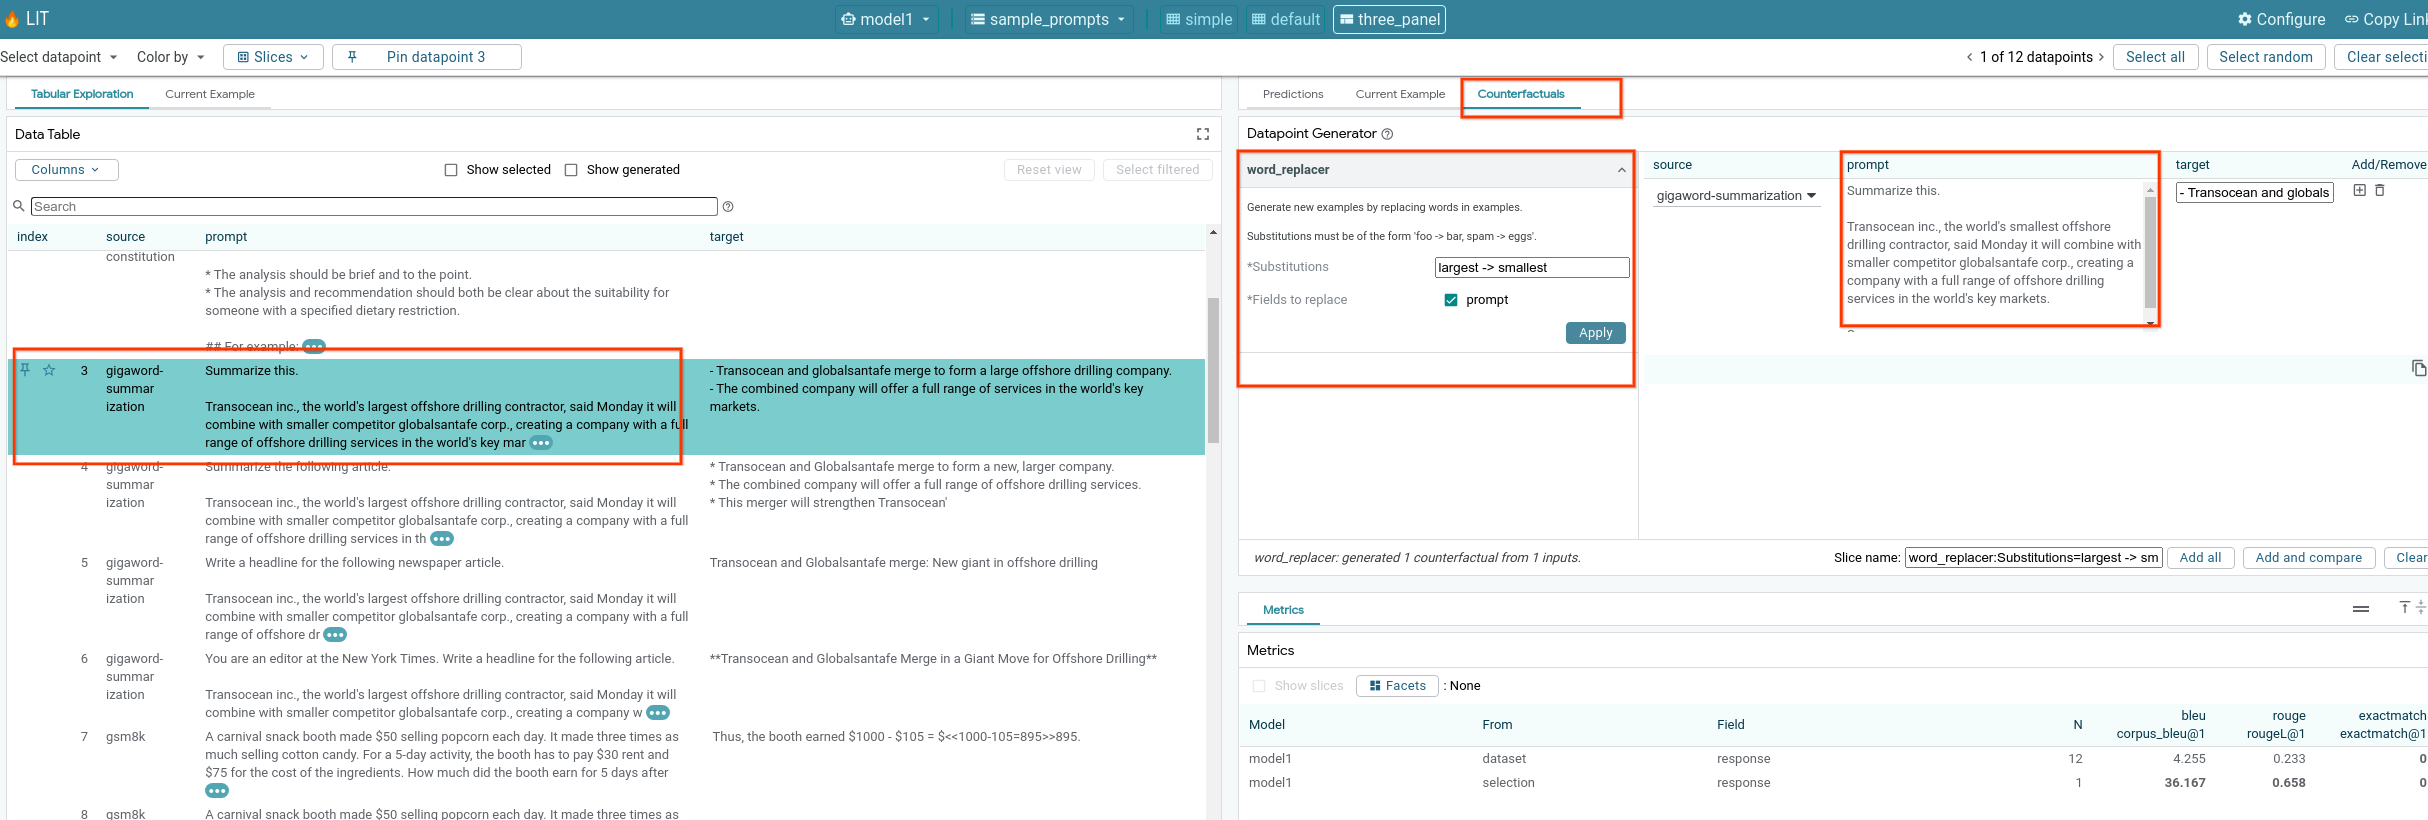
6-f: Otomatik Karşı Olgusal Üreticiler
Alternatif girişler oluşturmak için otomatik karşı olgusal üreticileri kullanabilir ve modelinizin bu girişlerde nasıl davrandığını hemen görebilirsiniz.
6. adım: Model performansını değerlendirin
Model performansını, tüm veri kümesindeki veya filtrelenmiş ya da seçilmiş örneklerin herhangi bir alt kümesindeki metrikleri (şu anda metin oluşturma için BLEU ve ROUGE puanları desteklenmektedir) kullanarak değerlendirebilirsiniz.
7. Sorun giderme
7-a: Olası erişim sorunları ve çözümleri
Cloud Run'a dağıtım yaparken --no-allow-unauthenticated uygulandığından, aşağıda gösterildiği gibi yasaklanmış hatalarla karşılaşabilirsiniz.

LIT App hizmetine erişmek için iki yaklaşım vardır.
1. Yerel Hizmete Proxy
Aşağıdaki komutu kullanarak hizmeti yerel ana makineye yönlendirebilirsiniz.
# Proxy the service to local host.
gcloud run services proxy $LIT_SERVICE_NAME
Ardından, proxy'li hizmet bağlantısını tıklayarak LIT sunucusuna erişebilirsiniz.
2. Kullanıcıların kimliklerini doğrudan doğrulama
Kullanıcıların kimliğini doğrulamak için bu bağlantıyı takip edebilirsiniz. Böylece, LIT App hizmetine doğrudan erişim sağlanır. Bu yaklaşım, bir grup kullanıcının hizmete erişmesini de sağlayabilir. Birden fazla kişiyle ortak çalışmayı içeren geliştirme için bu seçenek daha etkilidir.
7-b: Model sunucusunun başarıyla başlatıldığından emin olmak için kontroller
Model sunucusunun başarıyla başlatıldığından emin olmak için istek göndererek doğrudan model sunucusunu sorgulayabilirsiniz. Model sunucusu predict, tokenize ve salience olmak üzere üç uç nokta sağlar. İsteğinizde hem prompt alanını hem de target alanlarını sağladığınızdan emin olun.
# Query the model server predict endpoint.
curl -X POST  http://YOUR_MODEL_SERVER_URL/predict -H "Content-Type: application/json" -d '{"inputs":[{"prompt":"[YOUR PROMPT]", "target":[YOUR TARGET]}]}'

# Query the model server tokenize endpoint.
curl -X POST  http://YOUR_MODEL_SERVER_URL/tokenize -H "Content-Type: application/json" -d '{"inputs":[{"prompt":"[YOUR PROMPT]", "target":[YOUR TARGET]}]}'

# Query the model server salience endpoint.
curl -X POST  http://YOUR_MODEL_SERVER_URL/salience -H "Content-Type: application/json" -d '{"inputs":[{"prompt":"[YOUR PROMPT]", "target":[YOUR TARGET]}]}'
Erişim sorunuyla karşılaşırsanız yukarıdaki 7-a bölümüne göz atın.
8. Tebrikler
Codelab'i tamamladığınız için tebrik ederiz. Rahatlama zamanı!
Temizleme
Laboratuvarı temizlemek için laboratuvar için oluşturulan tüm Google Cloud Hizmetleri'ni silin. Aşağıdaki komutları çalıştırmak için Google Cloud Shell'i kullanın.
Google Cloud Bağlantısı işlem yapılmaması nedeniyle kaybolursa önceki adımları uygulayarak değişkenleri sıfırlayın.
# Delete the LIT App Service.
gcloud run services delete $LIT_SERVICE_NAME
Model sunucusunu başlattıysanız model sunucusunu da silmeniz gerekir.
# Delete the Model Service.
gcloud run services delete $MODEL_SERVICE_NAME
Daha fazla bilgi
Aşağıdaki materyallerle LIT aracının özelliklerini öğrenmeye devam edin:
- Gemma: Bağlantı
- LIT açık kaynak kodu tabanı: Git deposu
- LIT makalesi: ArXiv
- LIT istemi hata ayıklama makalesi: ArXiv
- LIT özelliği video demosu: YouTube
- LIT istem hata ayıklama demosu: YouTube
- Sorumlu Üretken Yapay Zeka Araç Seti: Bağlantı
İletişim
Bu codelab ile ilgili sorularınız veya sorunlarınız için lütfen GitHub üzerinden bize ulaşın.
Lisans
Bu çalışma, Creative Commons Attribution 4.0 Genel Amaçlı Lisans ile lisans altına alınmıştır.