
1. Before you begin
This codelab guides you through building an iOS application that implements Sign in with Google and runs in a simulator. Implementations using both SwiftUI and UIKit are provided.
SwiftUI is Apple's modern UI framework for new app development. It enables building user interfaces for all Apple platforms from a single shared codebase. It requires a minimum version of iOS 13.
UIKit is Apple's original and foundational UI framework for iOS. It provides backward compatibility for older iOS versions. This makes it a good choice for established apps that need to support a variety of older devices.
You can follow the path for the framework that best aligns with your development needs.
Prerequisites
What you'll learn
- How to create a Google Cloud project
- How to create OAuth clients in the Google Cloud Console
- How to implement Sign in with Google for your iOS app
- How to customize the Sign in with Google button
- How to decode an ID token
- How to enable App Check for your iOS app
What you'll need
- A current version of Xcode
- A computer running macOS that meets the system requirements for the version of Xcode you have installed
This codelab was created using Xcode 16.3 with the iOS 18.3 simulator. You should use the latest version of Xcode for development.
2. Create a new Xcode project
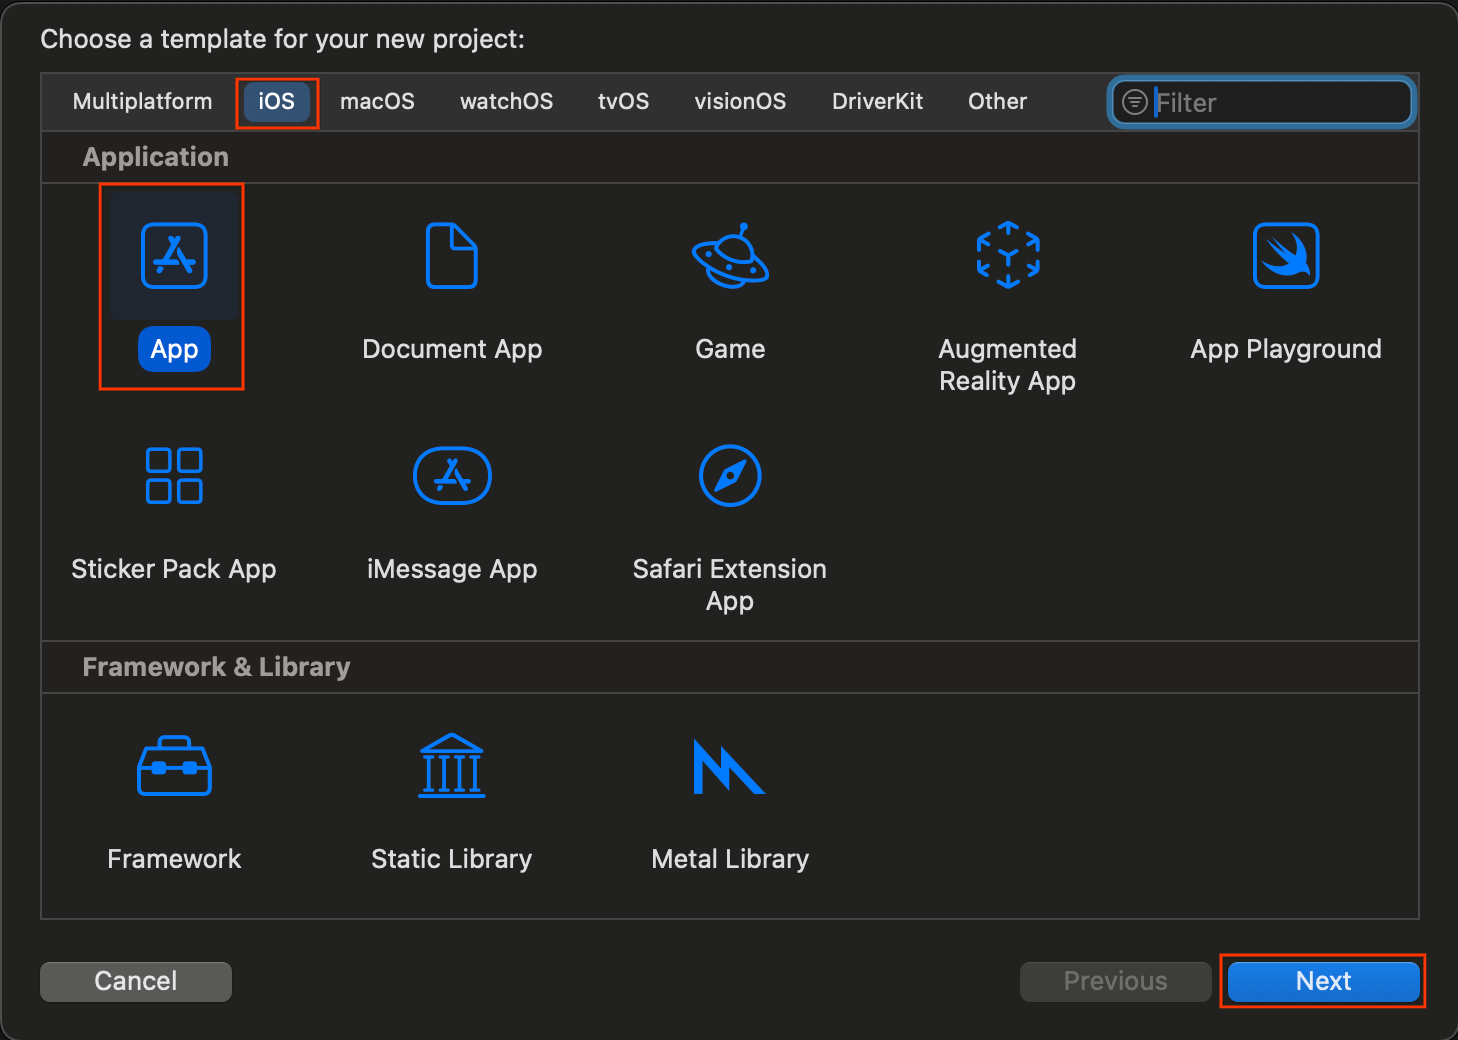
- Open Xcode and select Create a new Xcode project.
- Choose the iOS tab, select the App template, and click Next.
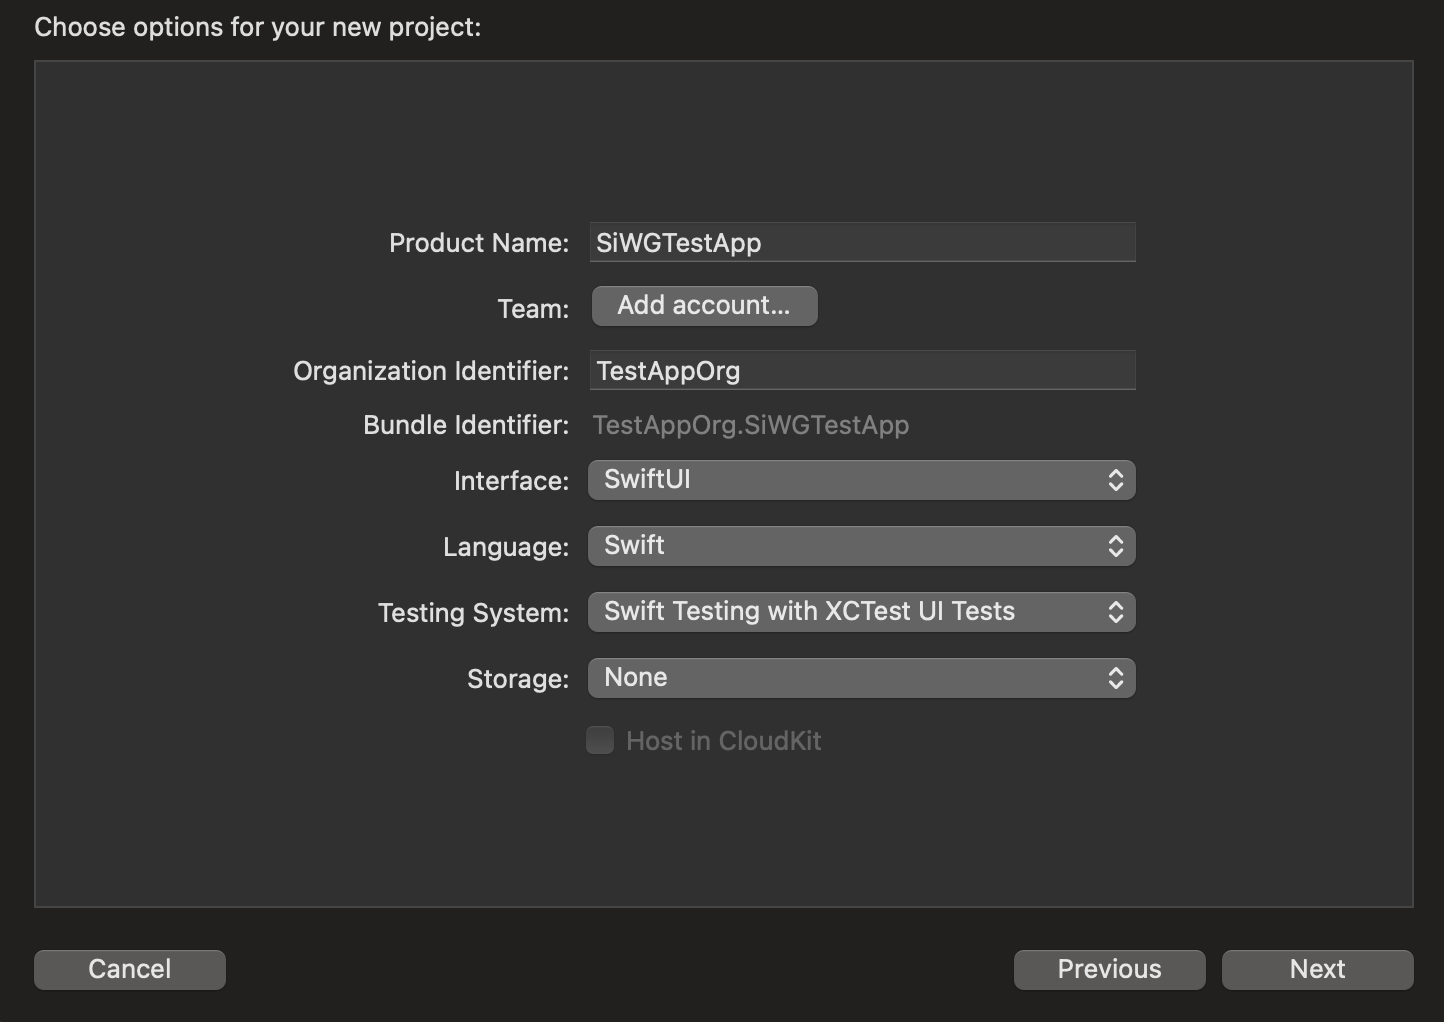
- In project options:
- Enter your Product Name.
- Optionally select your Team.
- Enter your Organization Identifier.
- Make a note of the generated Bundle Identifier. You will need it later.
- For the Interface, choose either:
- SwiftUI for a SwiftUI-based app.
- Storyboard for a UIKit-based app.
- Choose Swift for the Language.
- Click Next and choose a location to save your project.
3. Create an OAuth client
To allow your app to communicate with Google's authentication services, you need to create an OAuth client ID. This requires a Google Cloud project. The following steps will guide you through the process of creating a project and an OAuth client ID.
Select or create a Google Cloud project
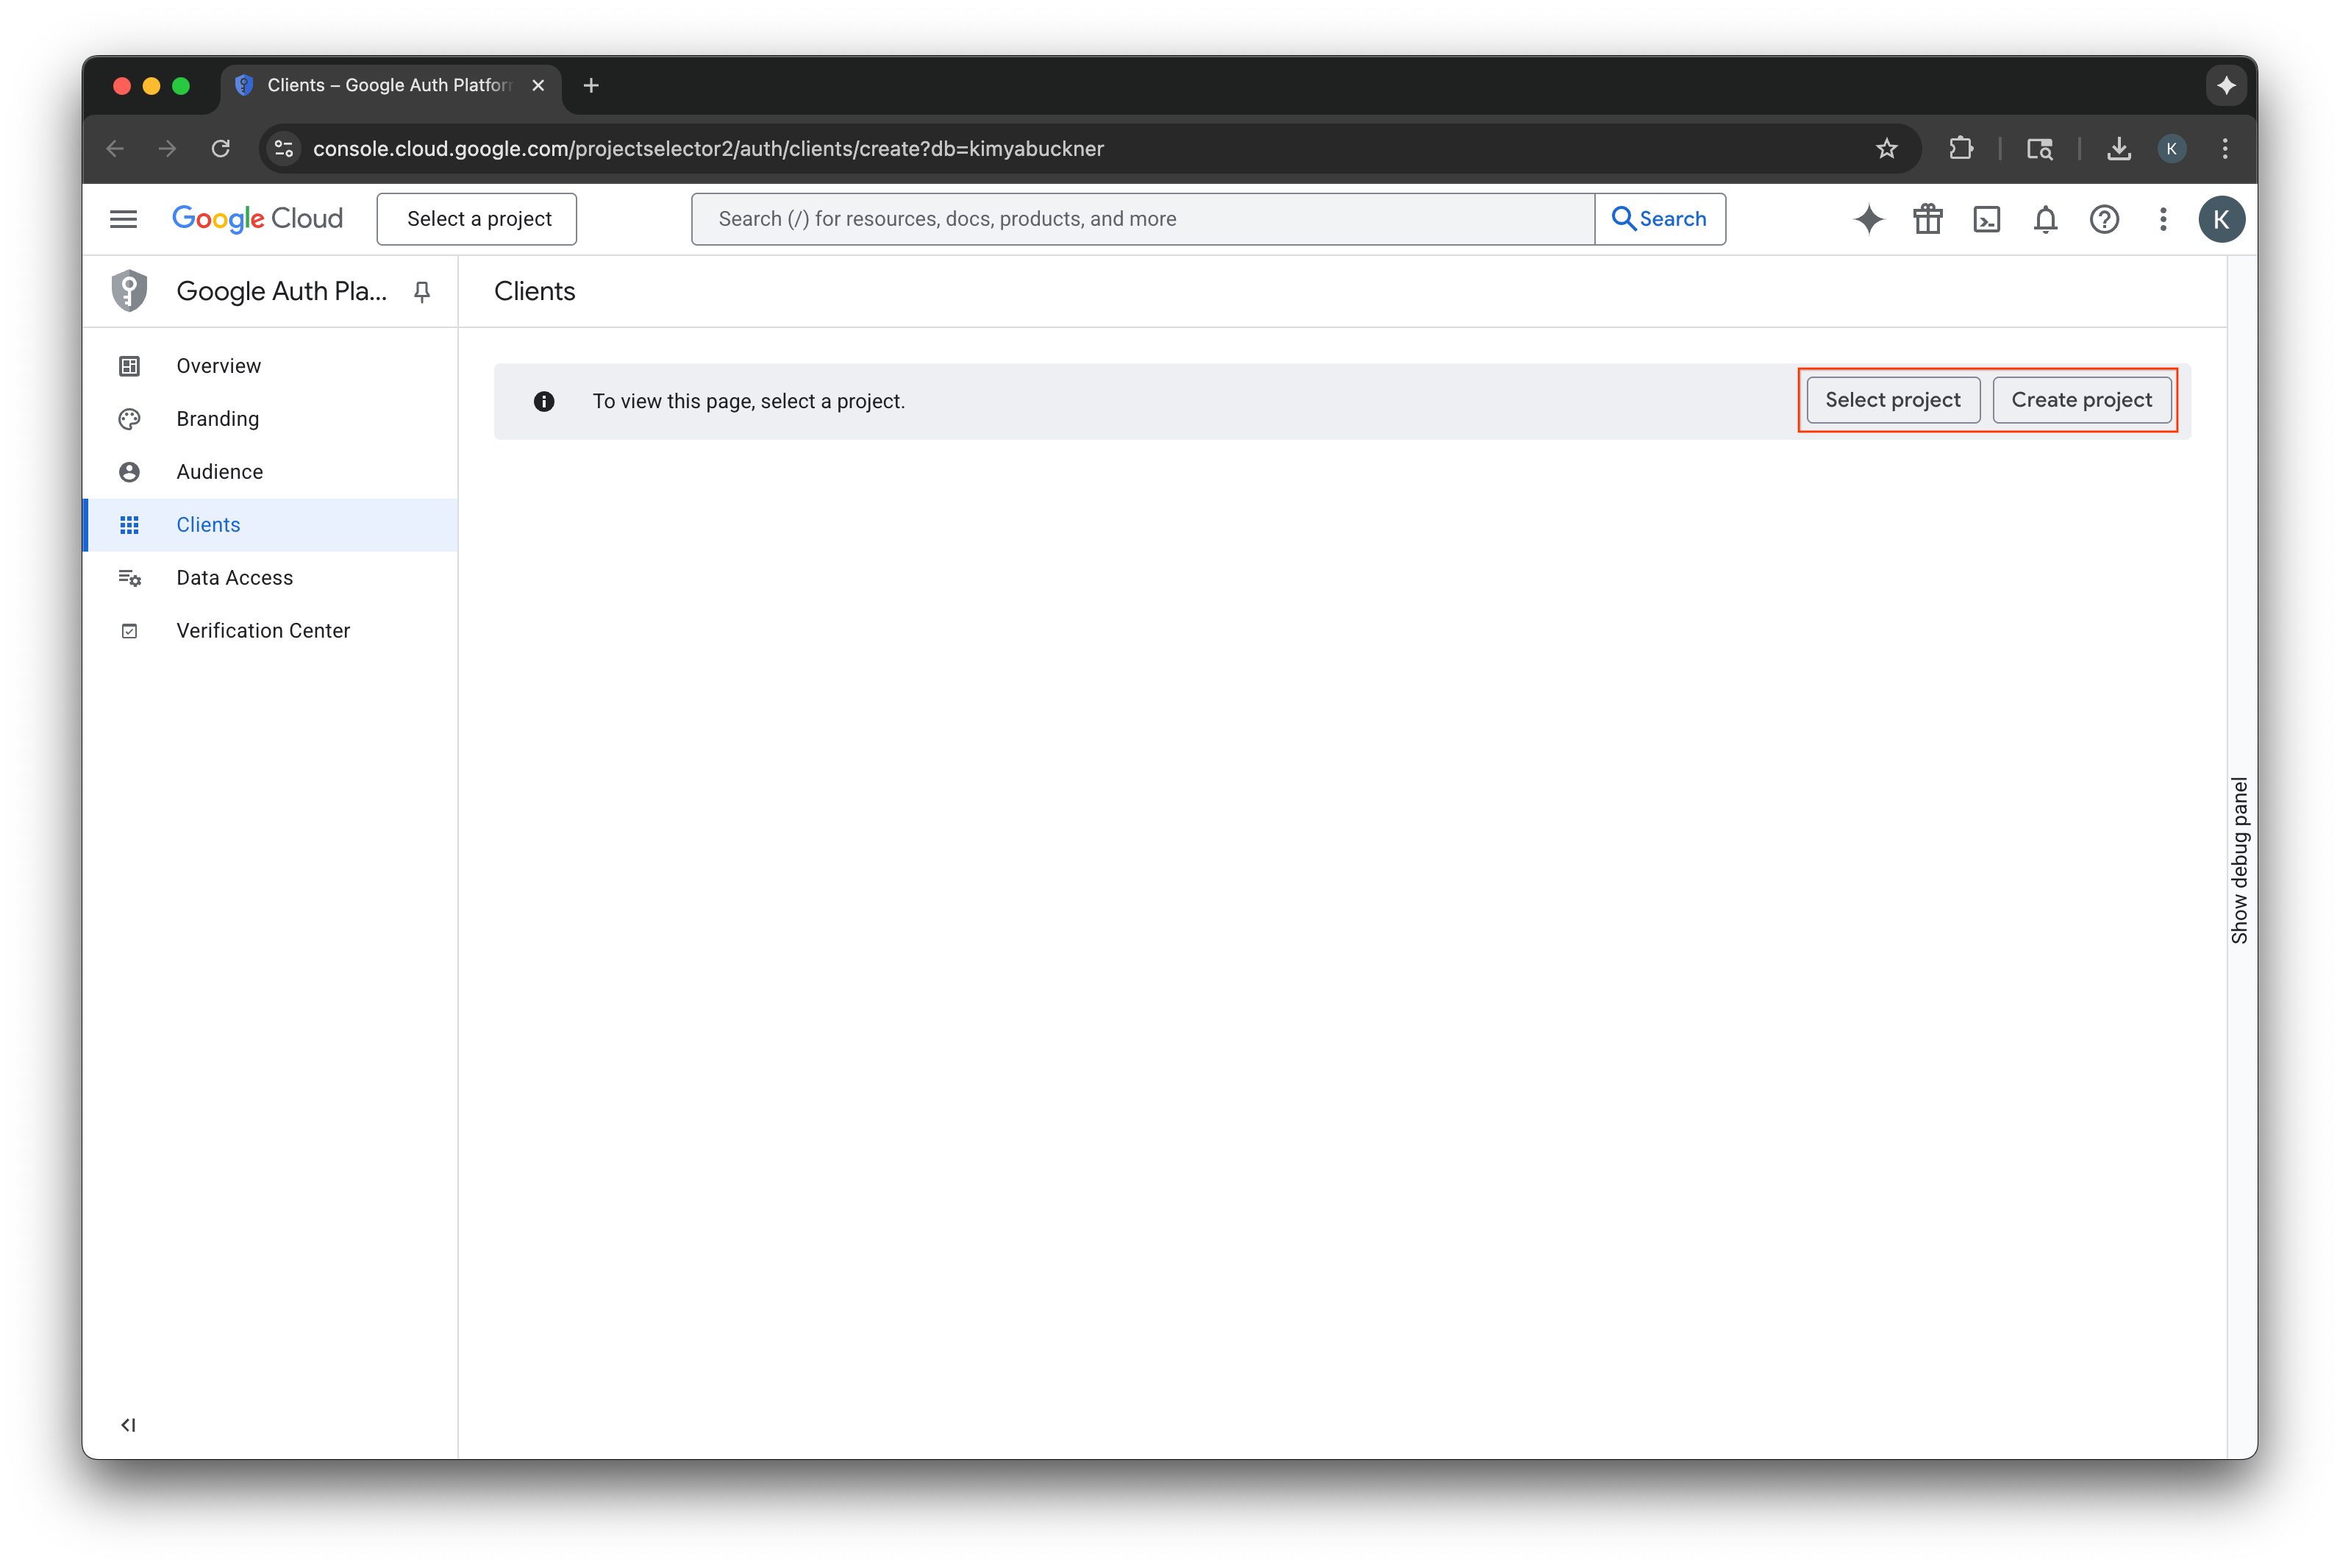
- Go to the Google Cloud Console and select or create a project. If you are selecting a pre-existing project, the console will automatically direct you to the next required step.
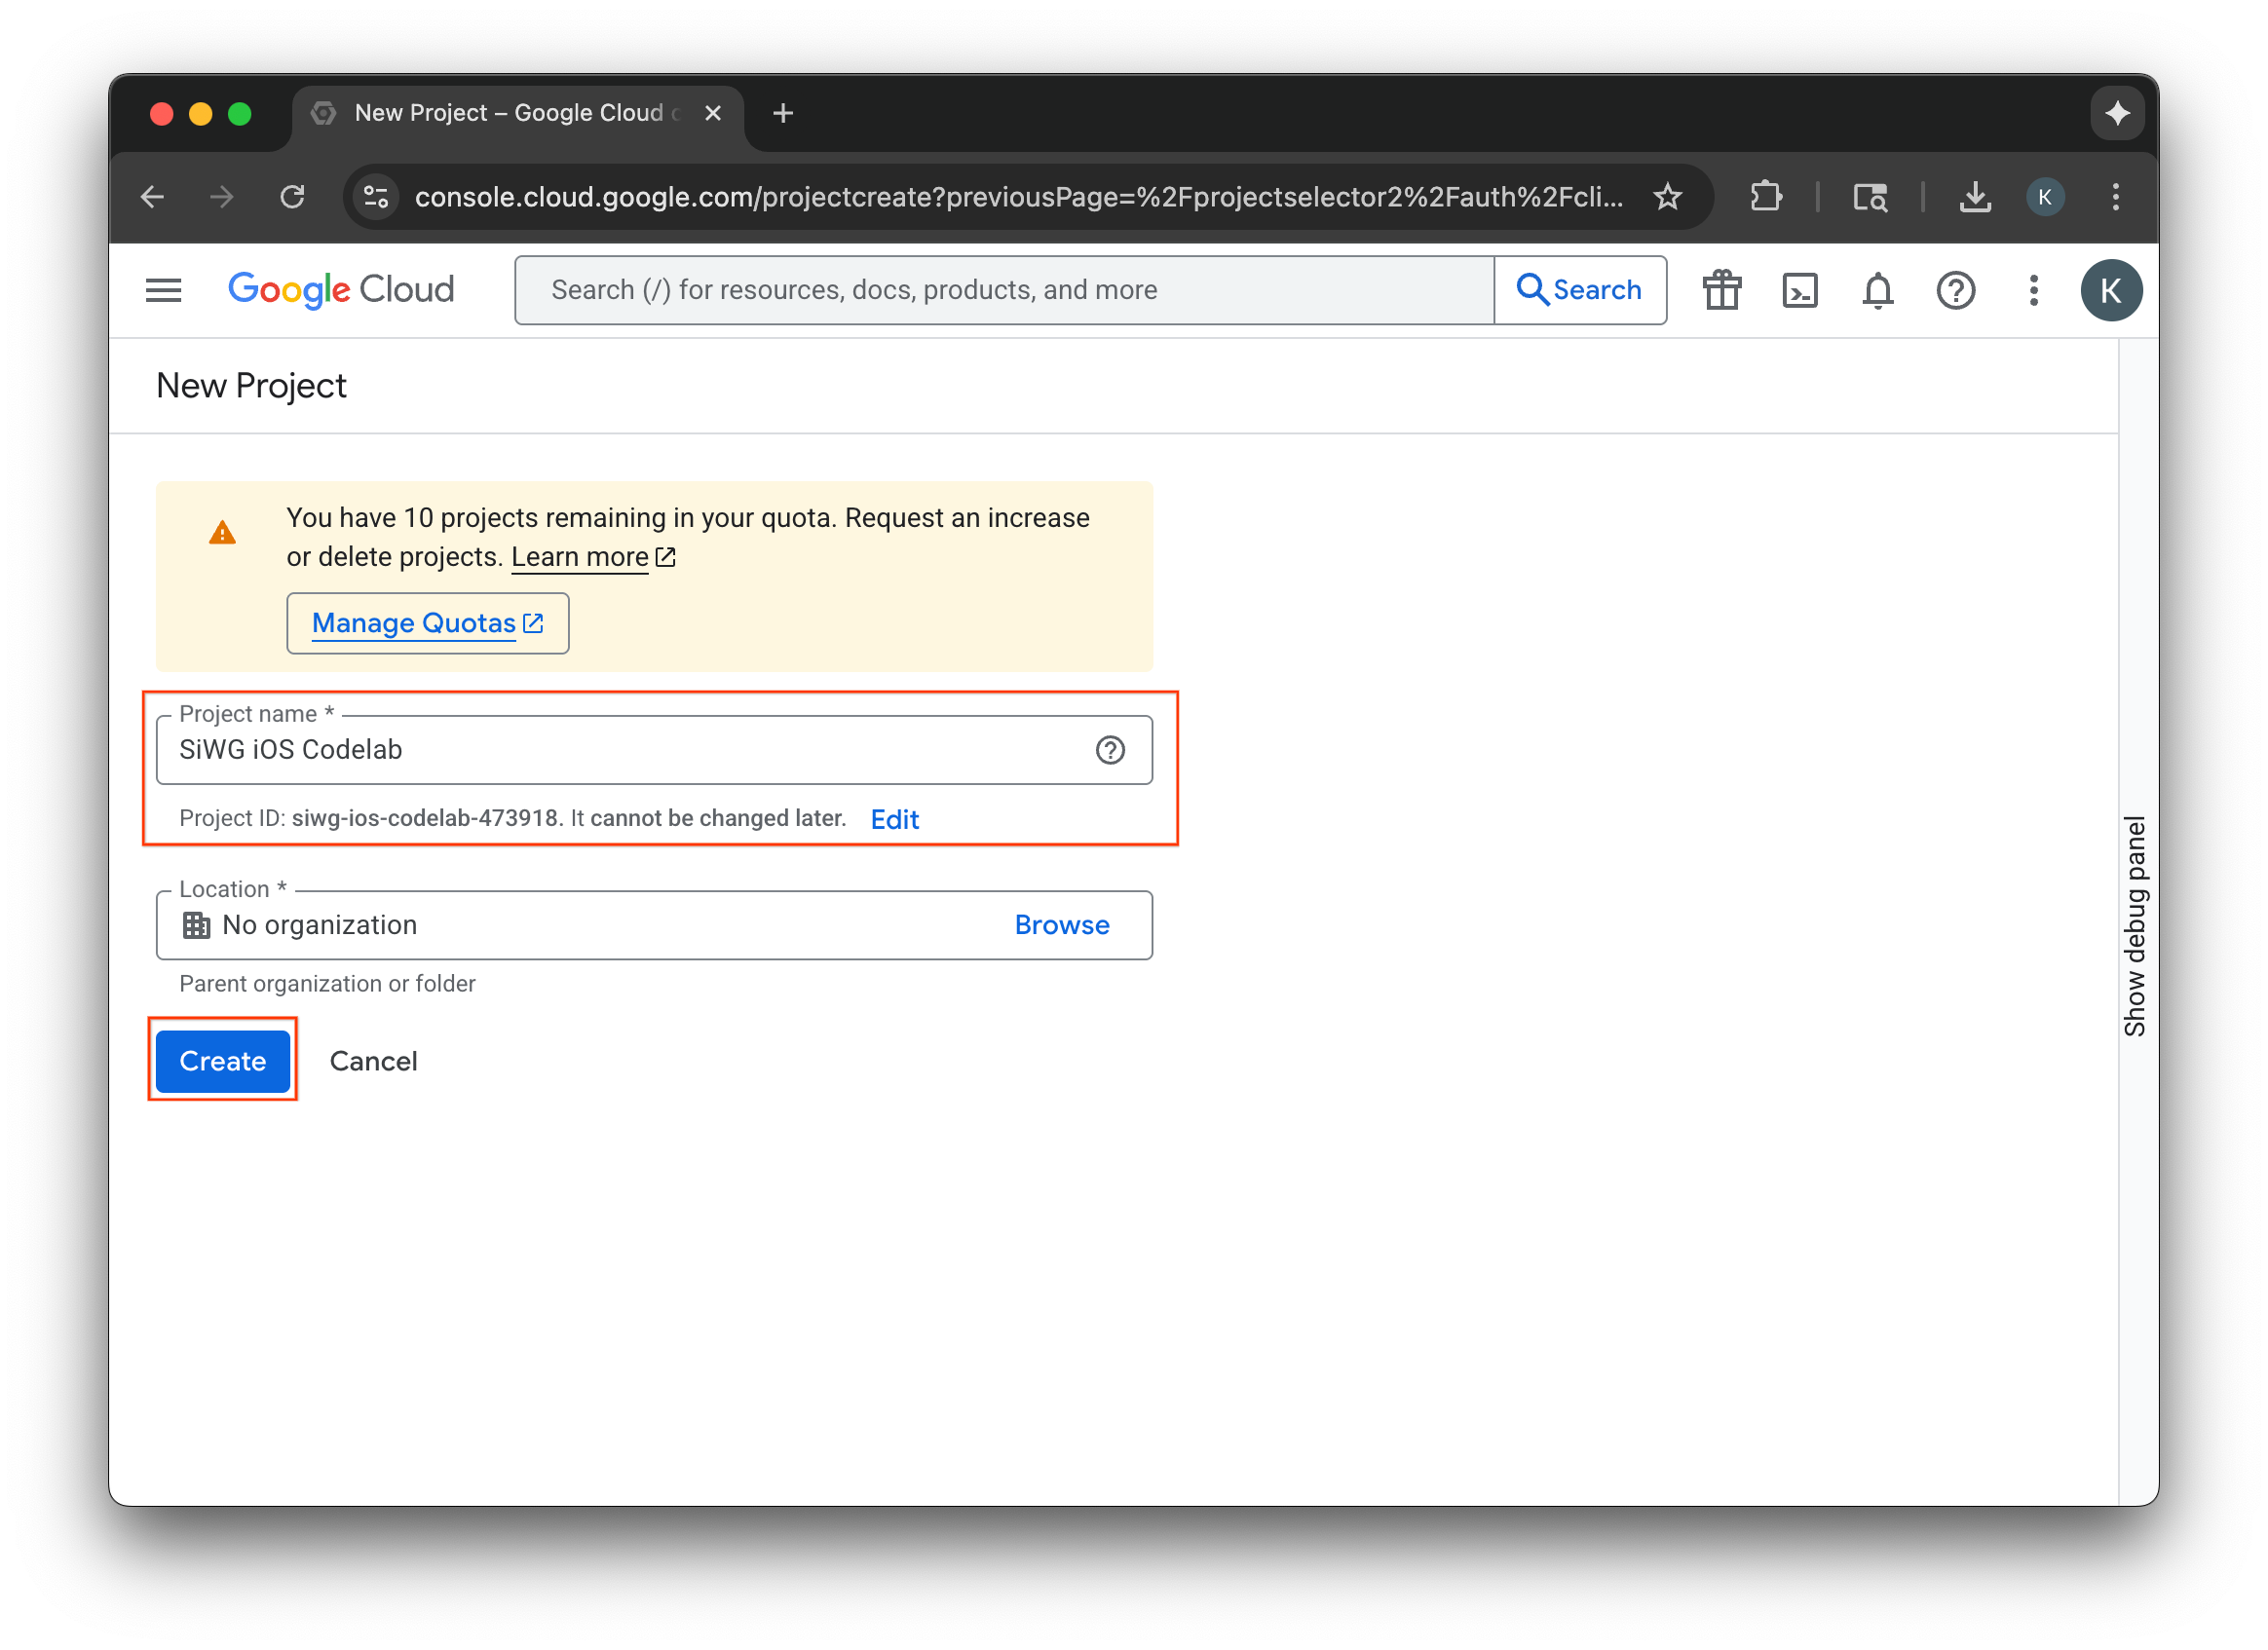
- Input a name for your new Google Cloud project.
- Select Create.
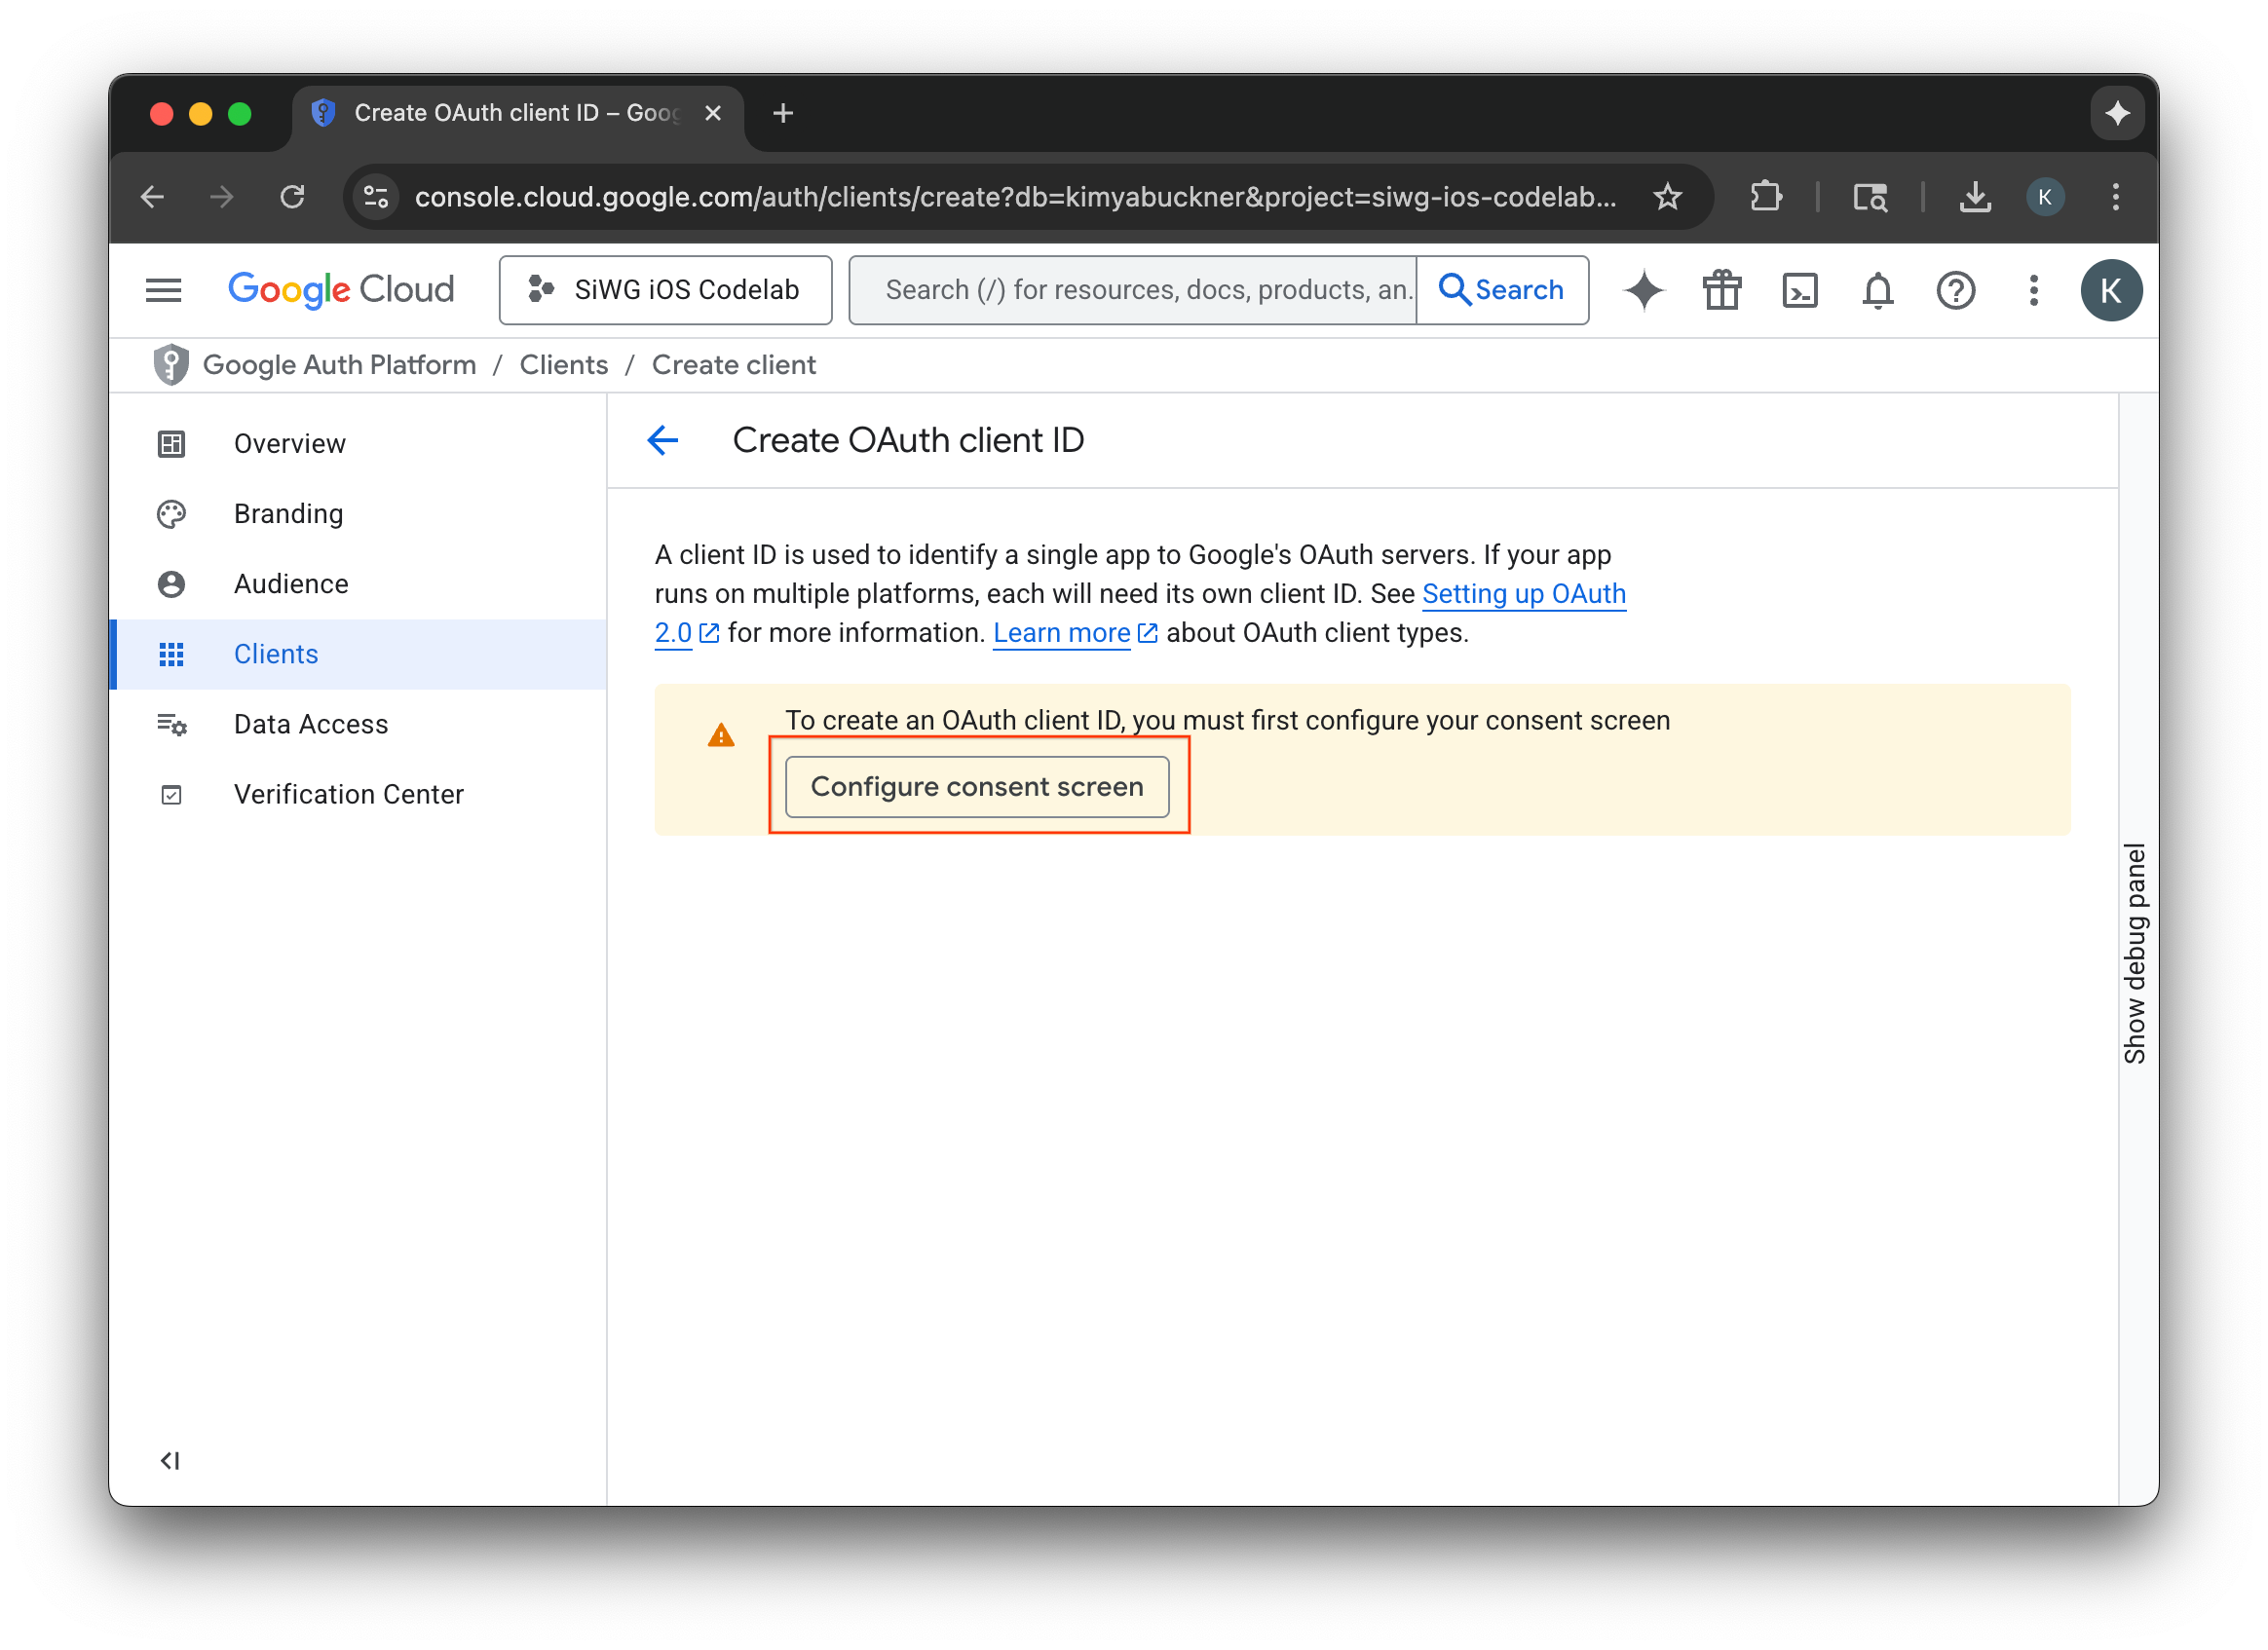
Configure your consent screen
If you have already configured a consent screen for the selected project, you won't be prompted to configure it now. In that case, you can skip this section and move on to Create an OAuth 2.0 client.
- Select Configure consent screen.
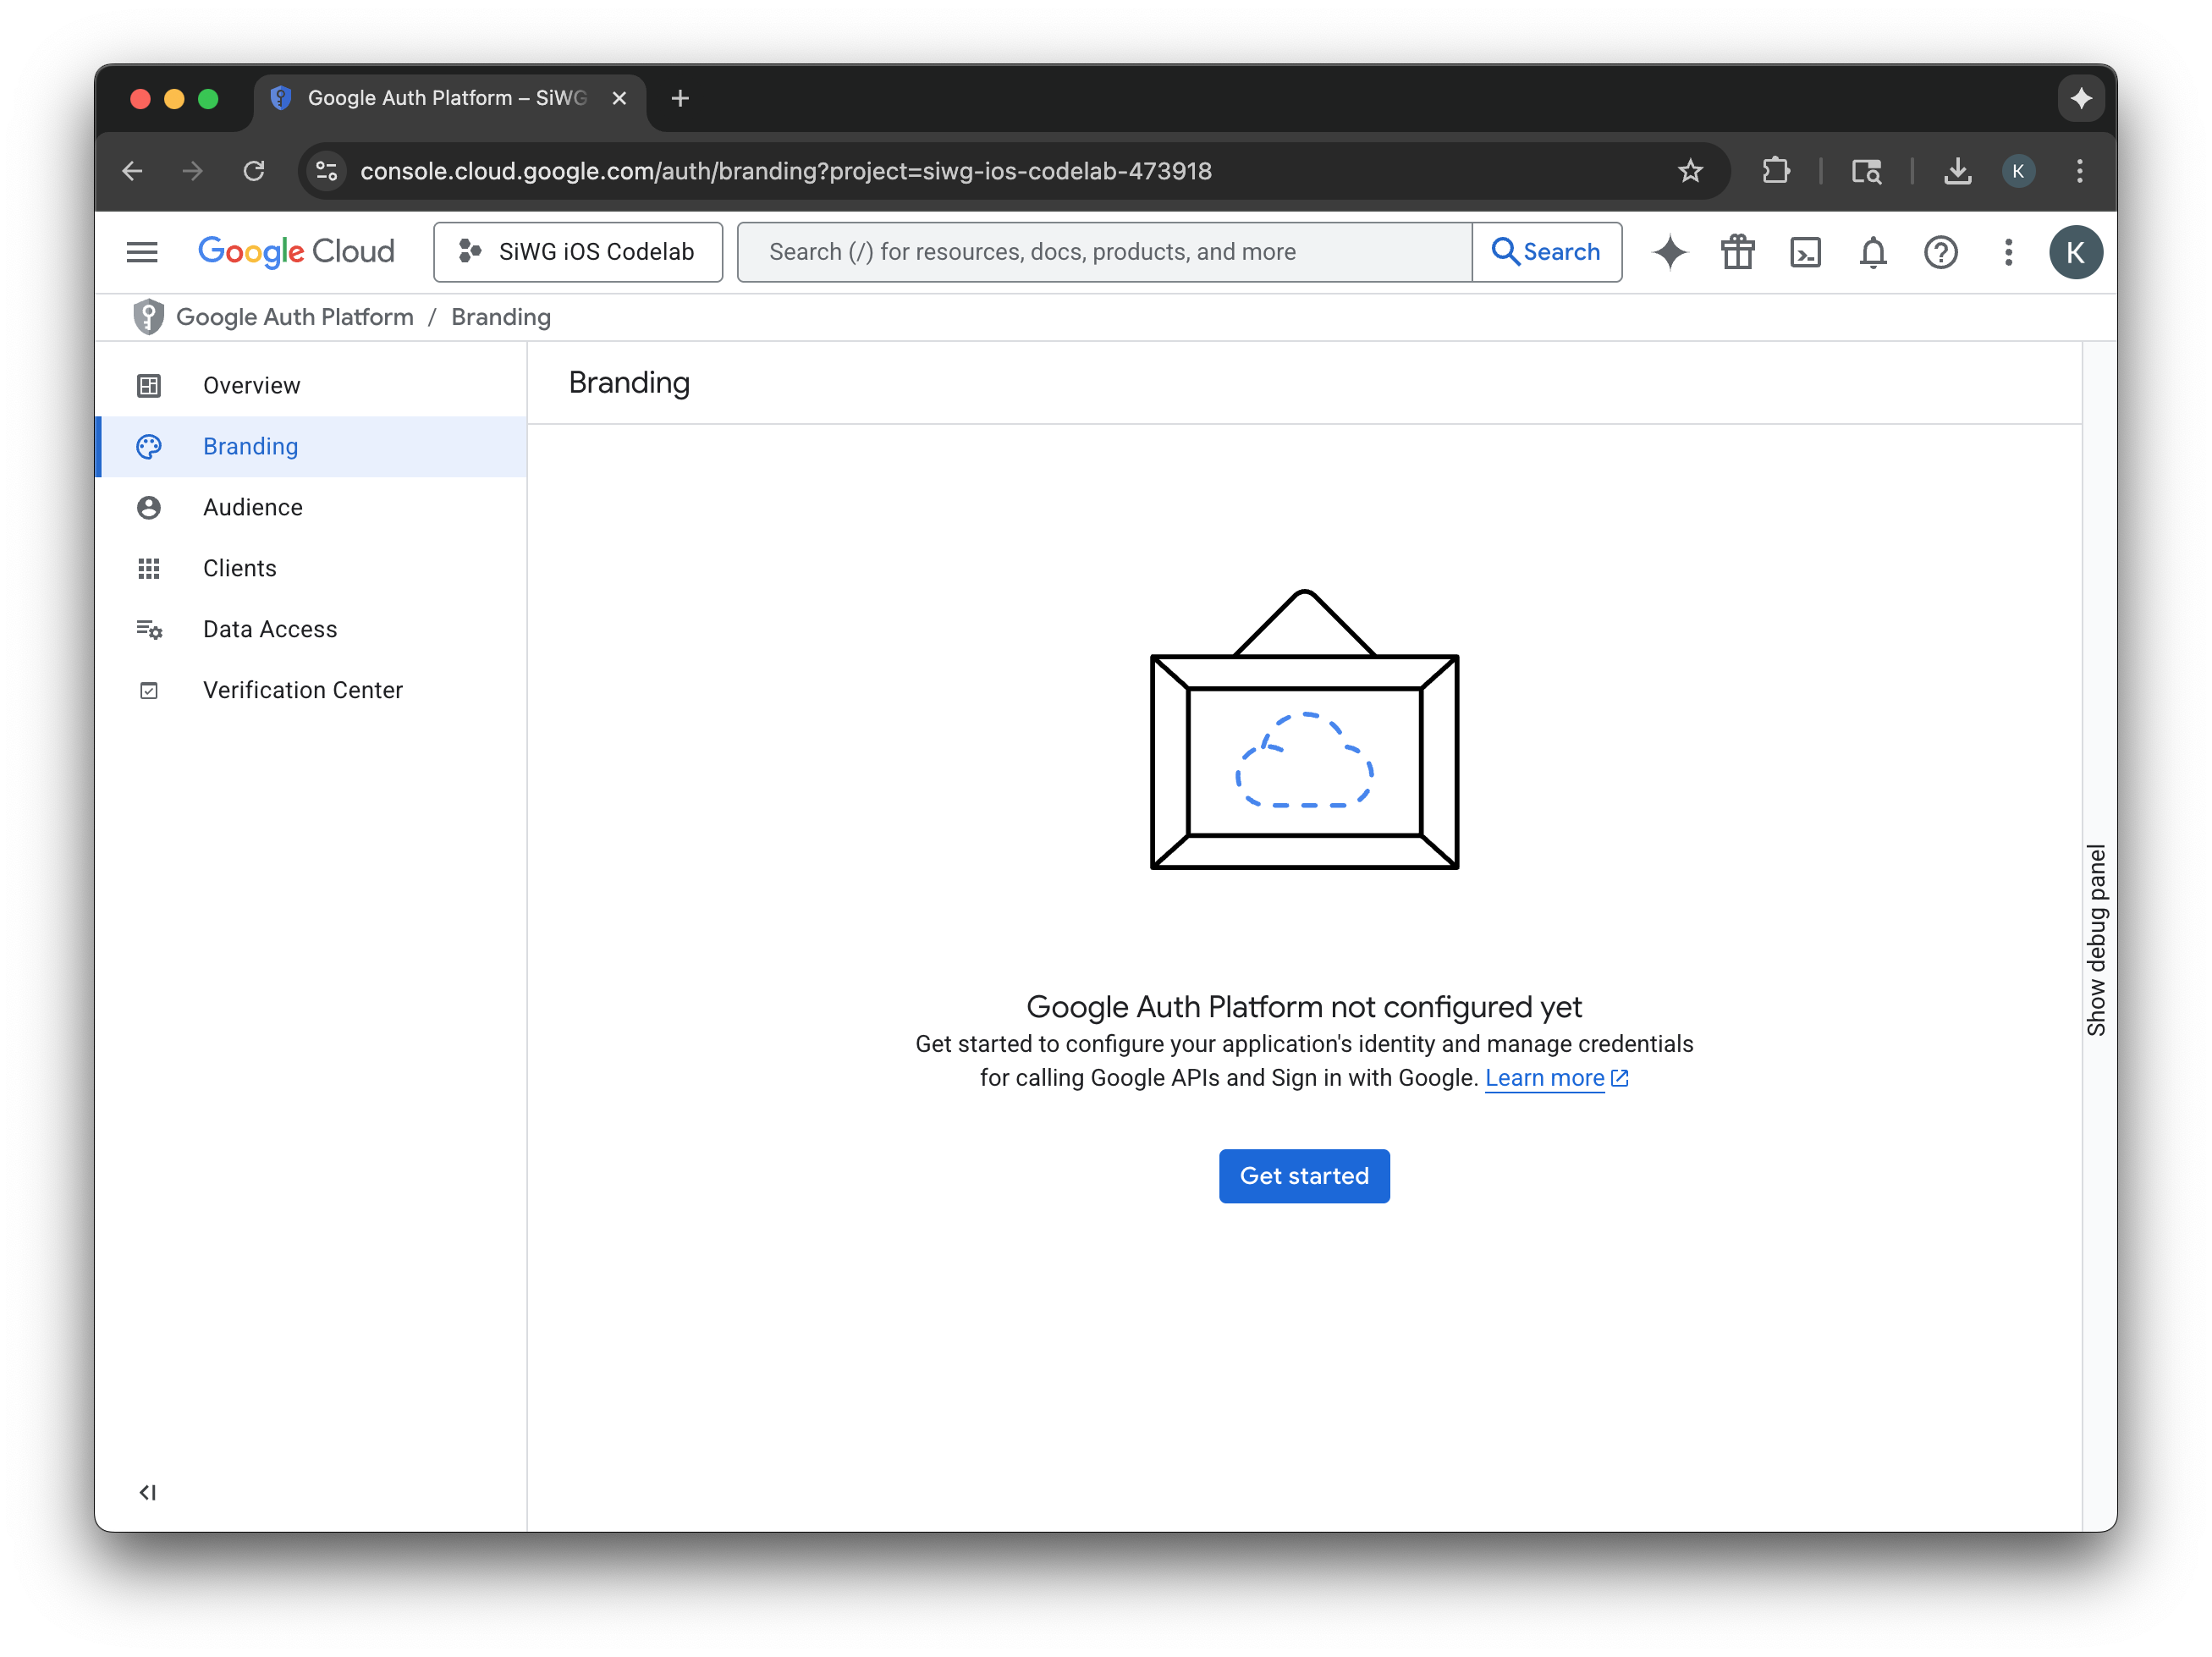
- Select Get started on the branding page.
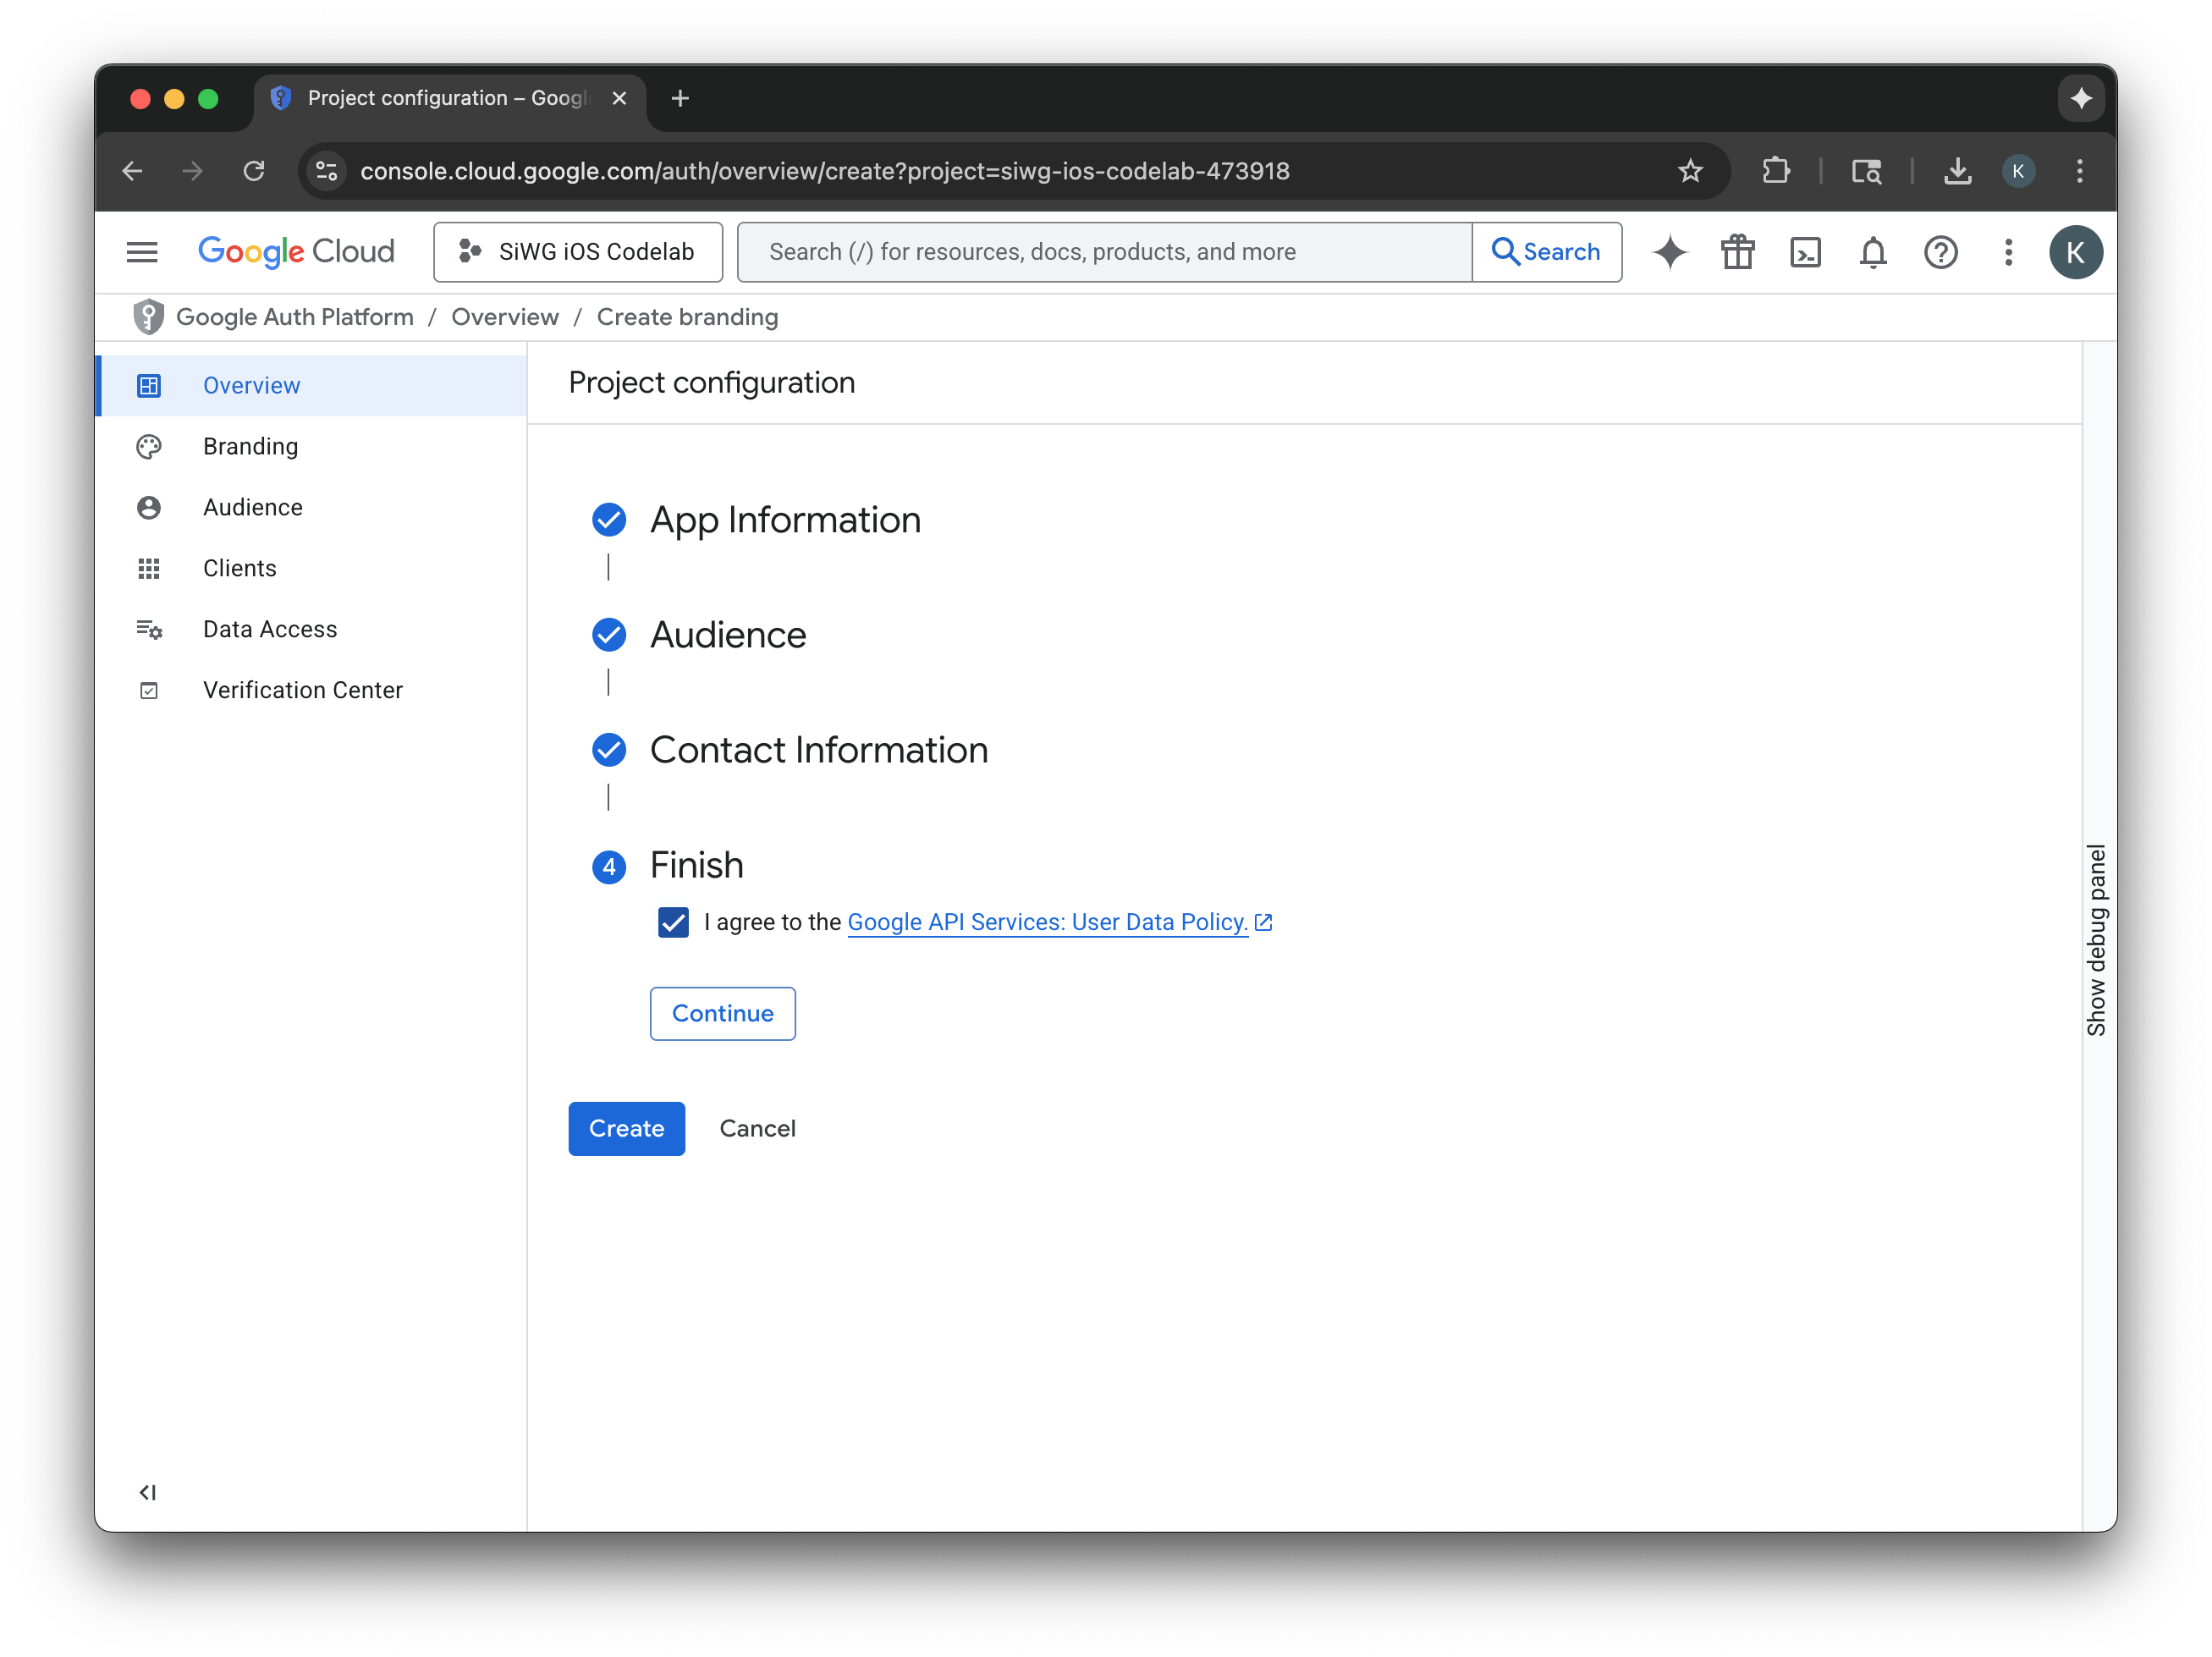
- On the project configuration page fill out the following fields:
- App Information: Enter a name and a user support email for your app. This support email will be publicly displayed for users to contact you with questions about their consent.
- Audience: Select External.
- Contact Information: Enter an email address for Google to contact you about your project.
- Review the Google API Services: User Data Policy.
- Click Create.
- Select the Clients page in the navigation menu.
- Click Create Client.
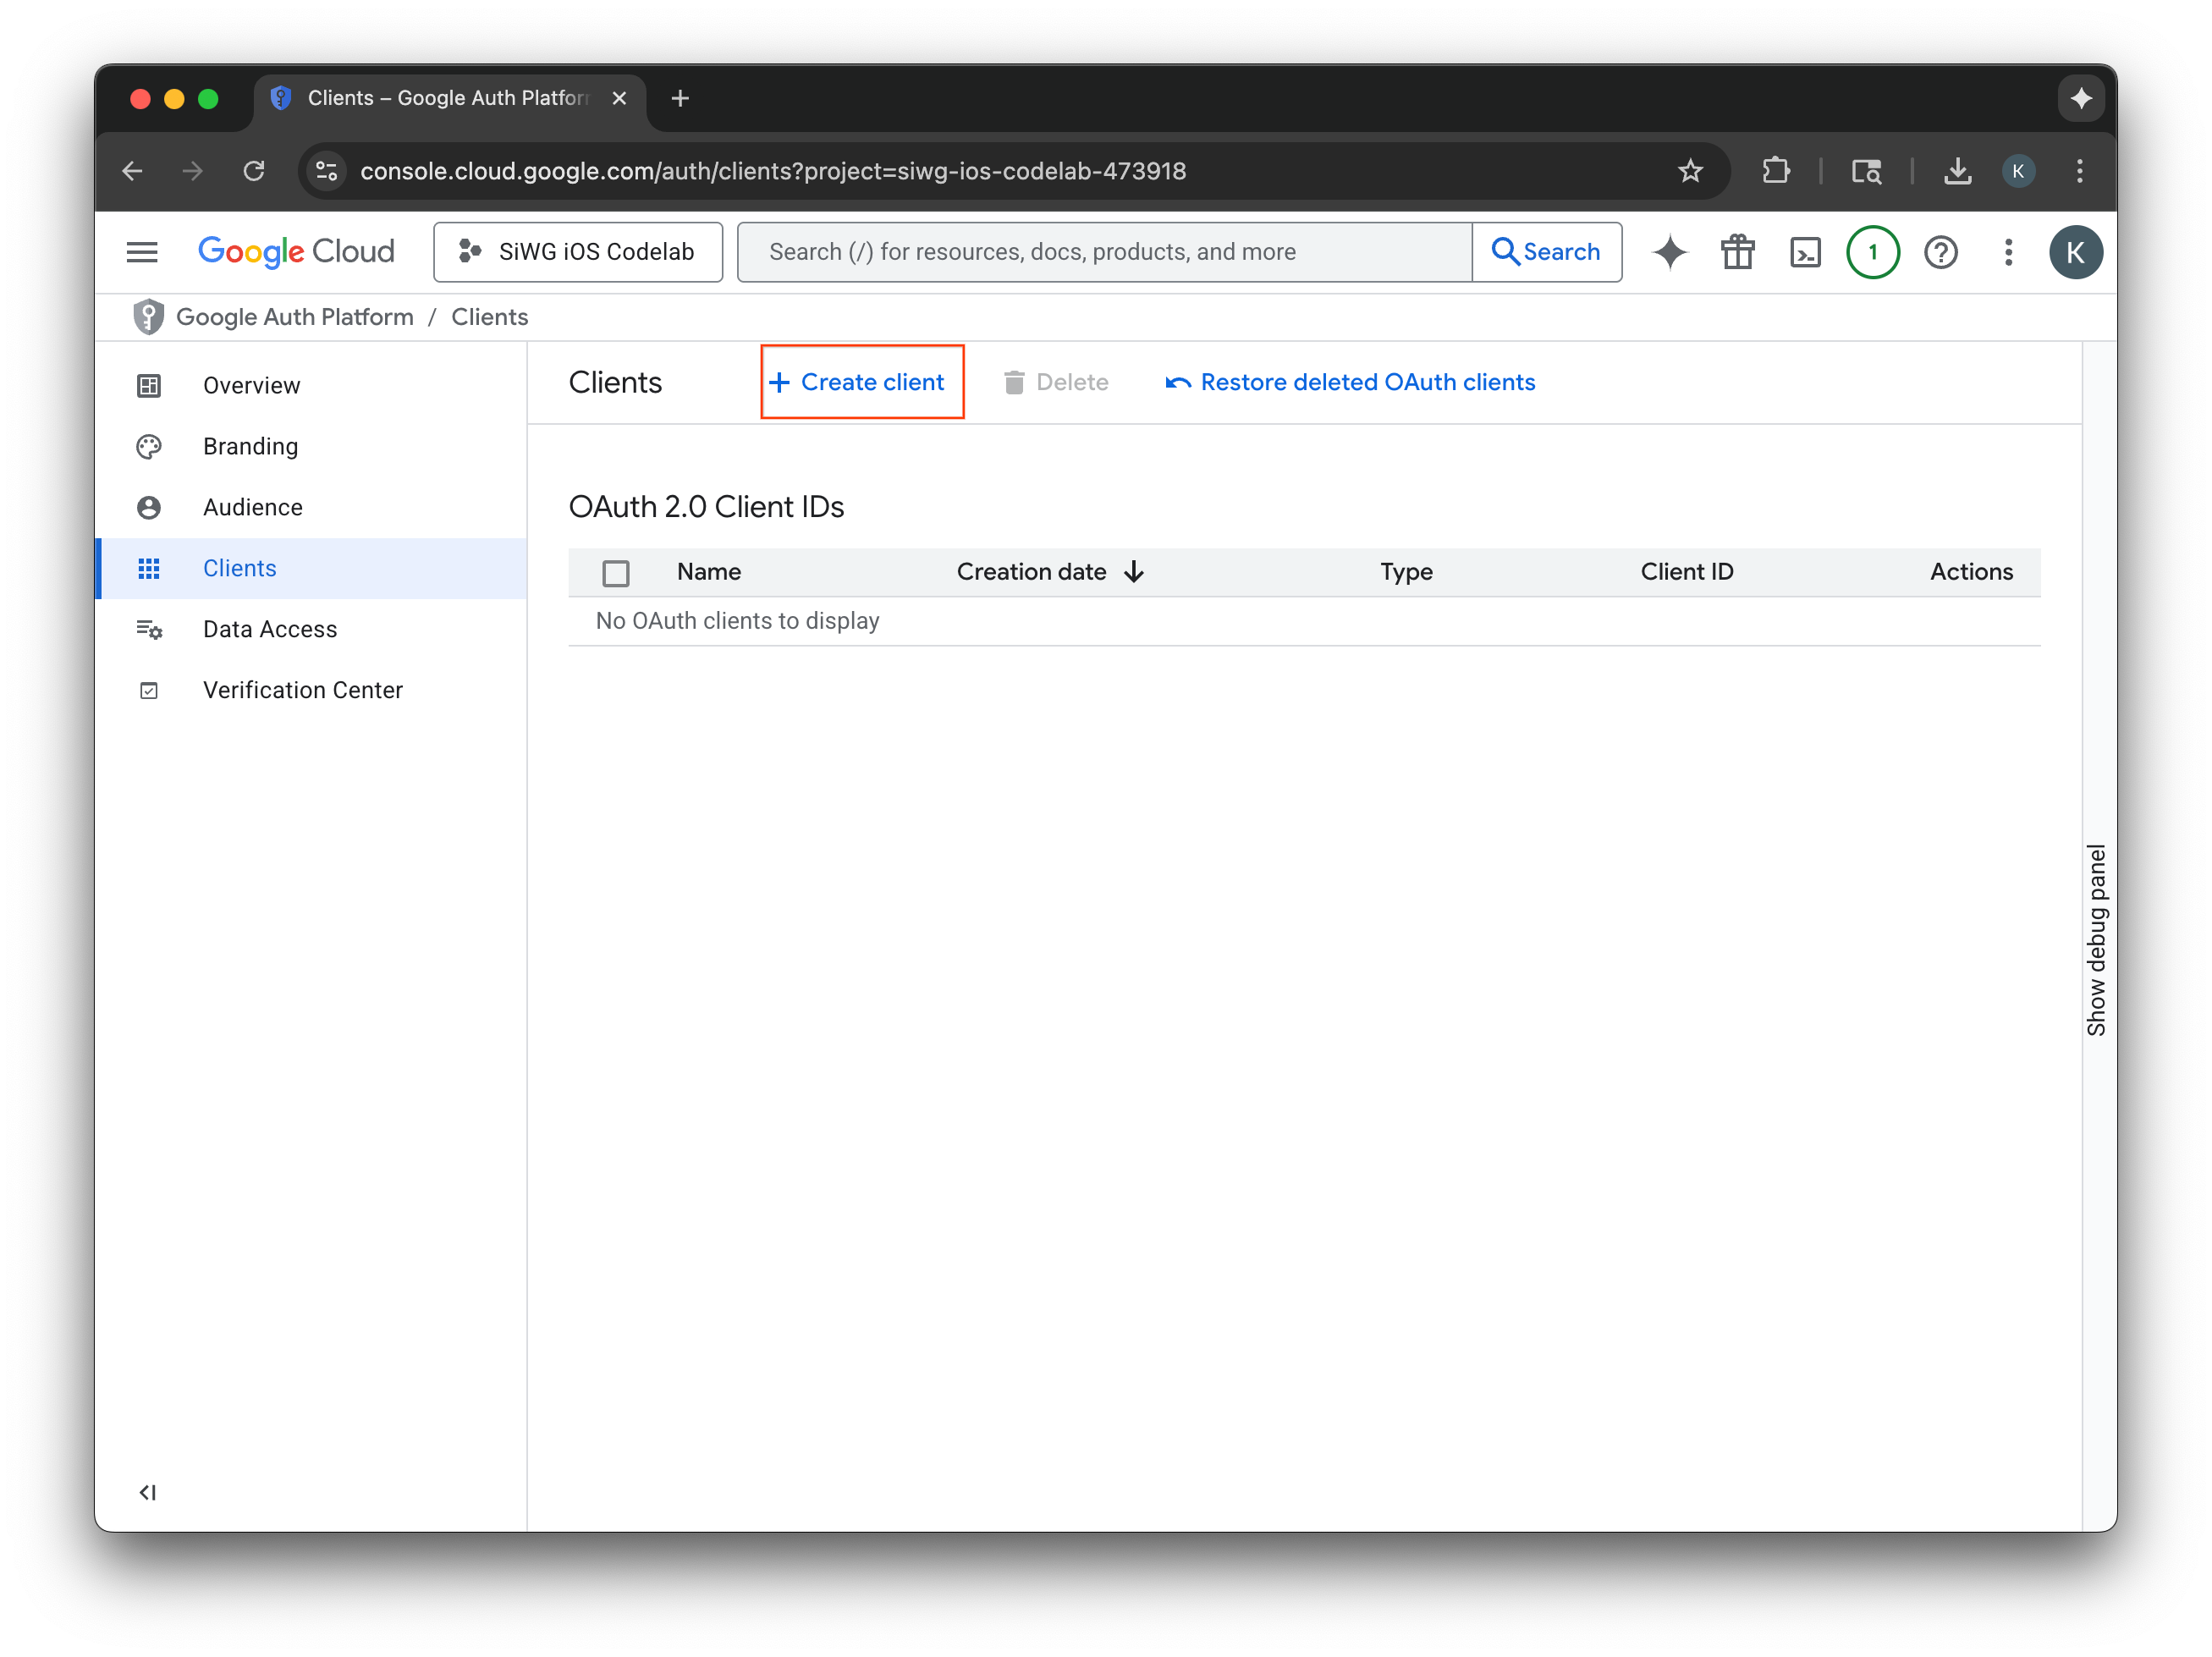
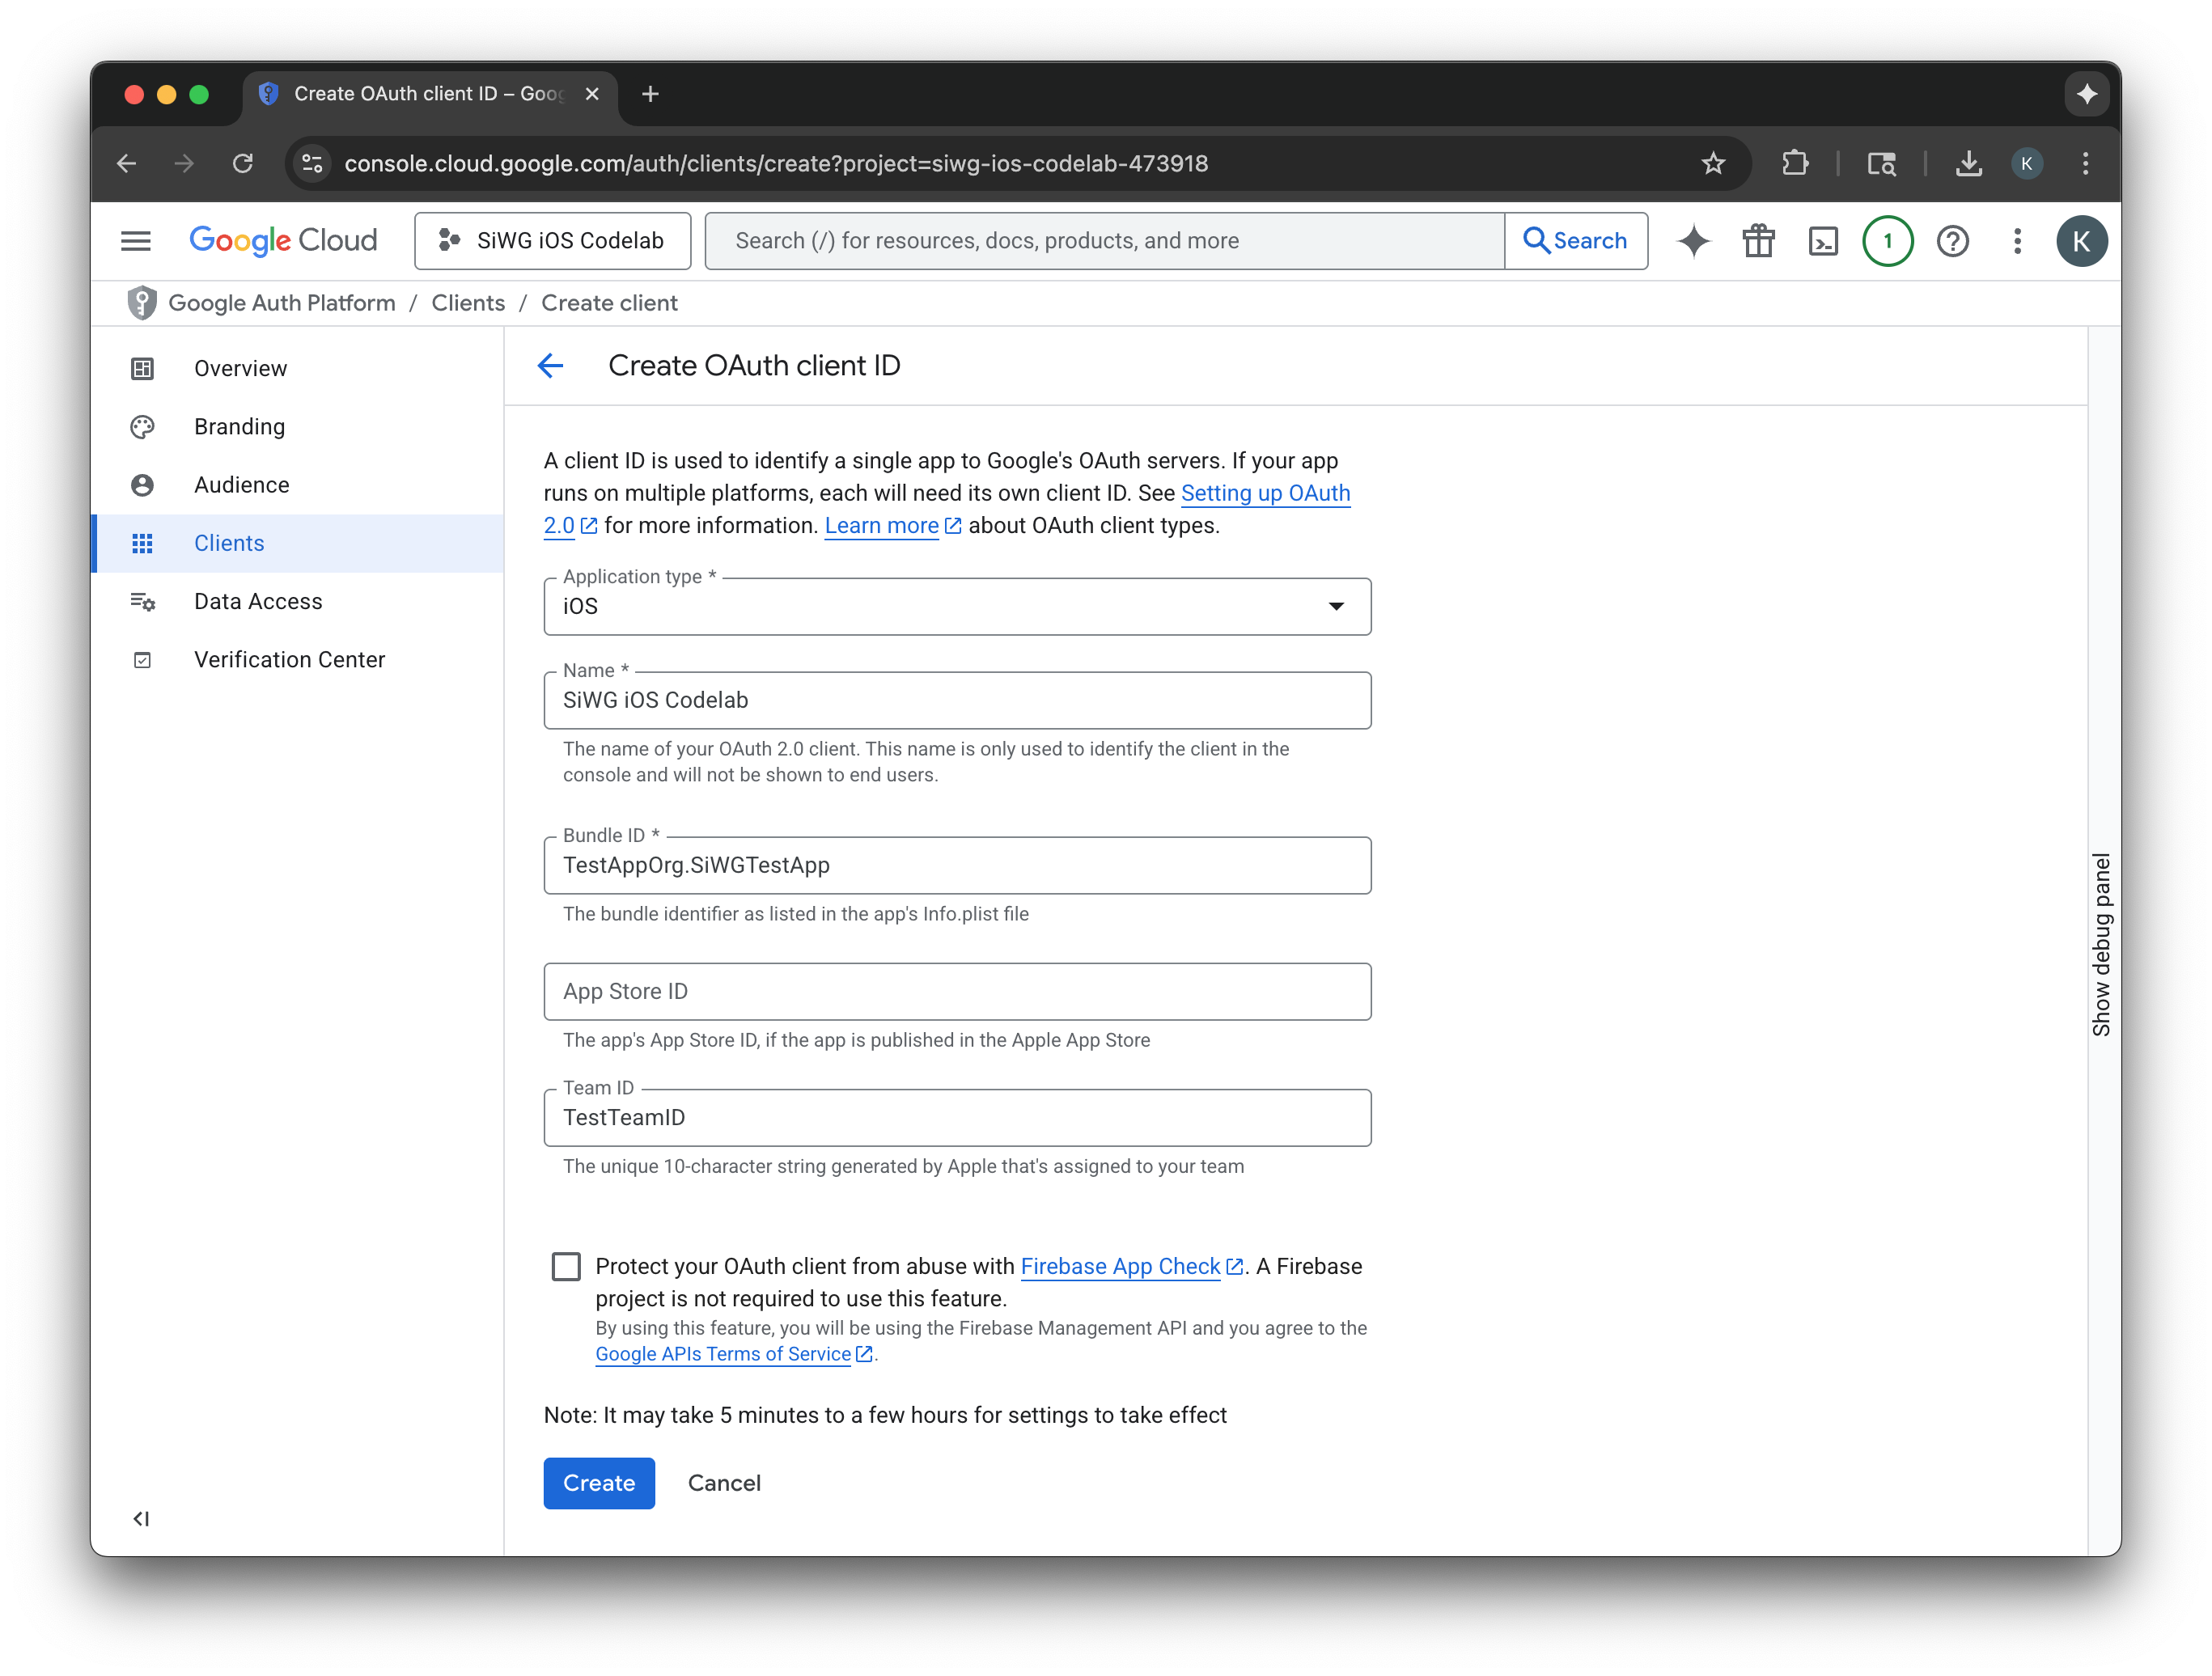
Create an OAuth 2.0 client
- Select iOS for the Application type.
- Enter a name for your client.
- Enter the Bundle Identifier created in the last step.
- Enter the Team ID assigned to your team by Apple. This step is optional for now, but a Team ID is required to enable App Check later in this codelab.
- Select Create.
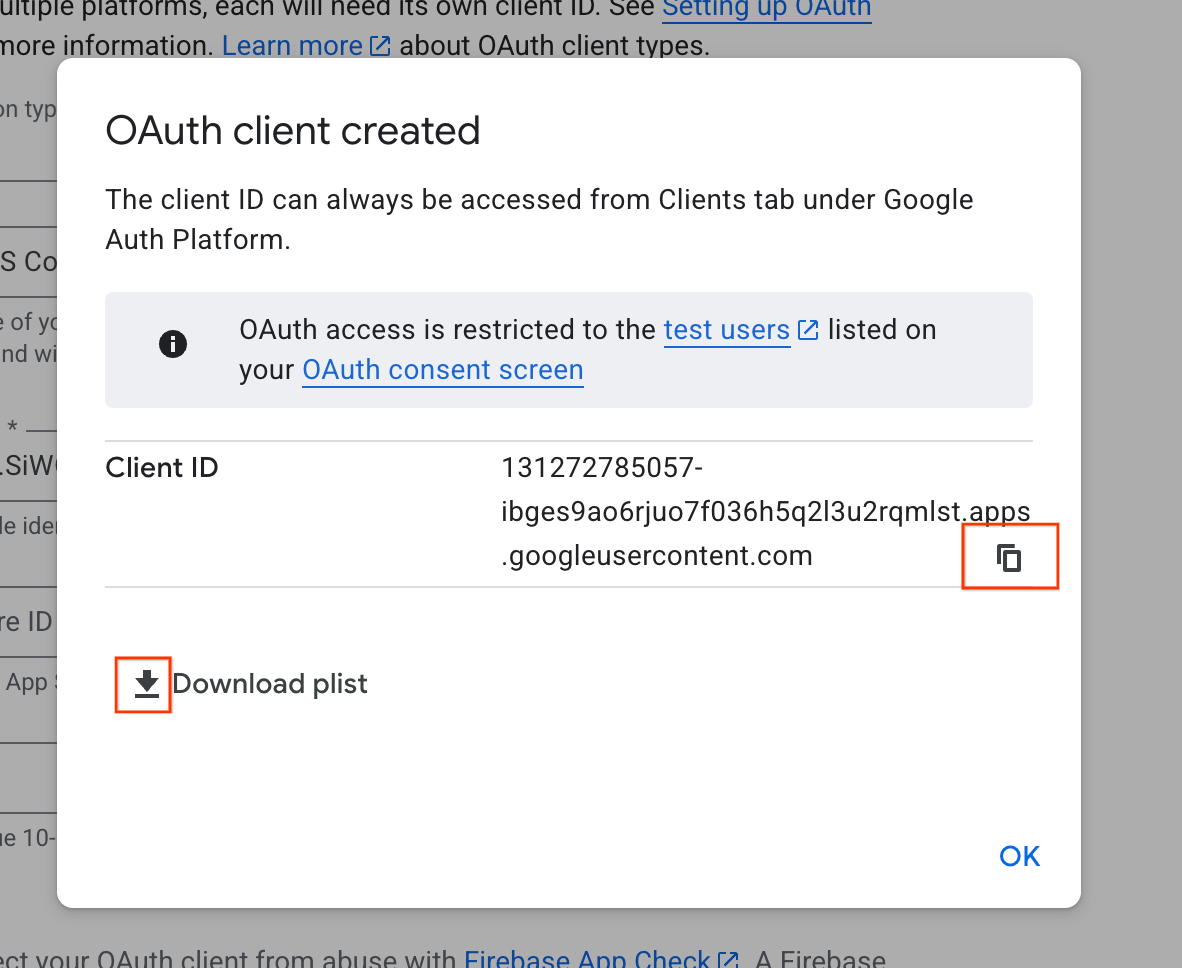
- Copy the Client ID from the dialog window, you'll need this later.
- Download the plist file to reference later.
4. Configure your Xcode project
The next step is to set up your Xcode project to work with the Sign in with Google SDK. This process involves adding the SDK to your project as a dependency and configuring your project settings with a unique client ID. This ID allows the SDK to securely communicate with Google's authentication service during the sign-in process.
Install the Sign in with Google dependencies
- Open your Xcode project.
- Navigate to File > Add Package Dependencies.
- In the search bar, enter the URL for the Sign in with Google repository: https://github.com/google/GoogleSignIn-iOS
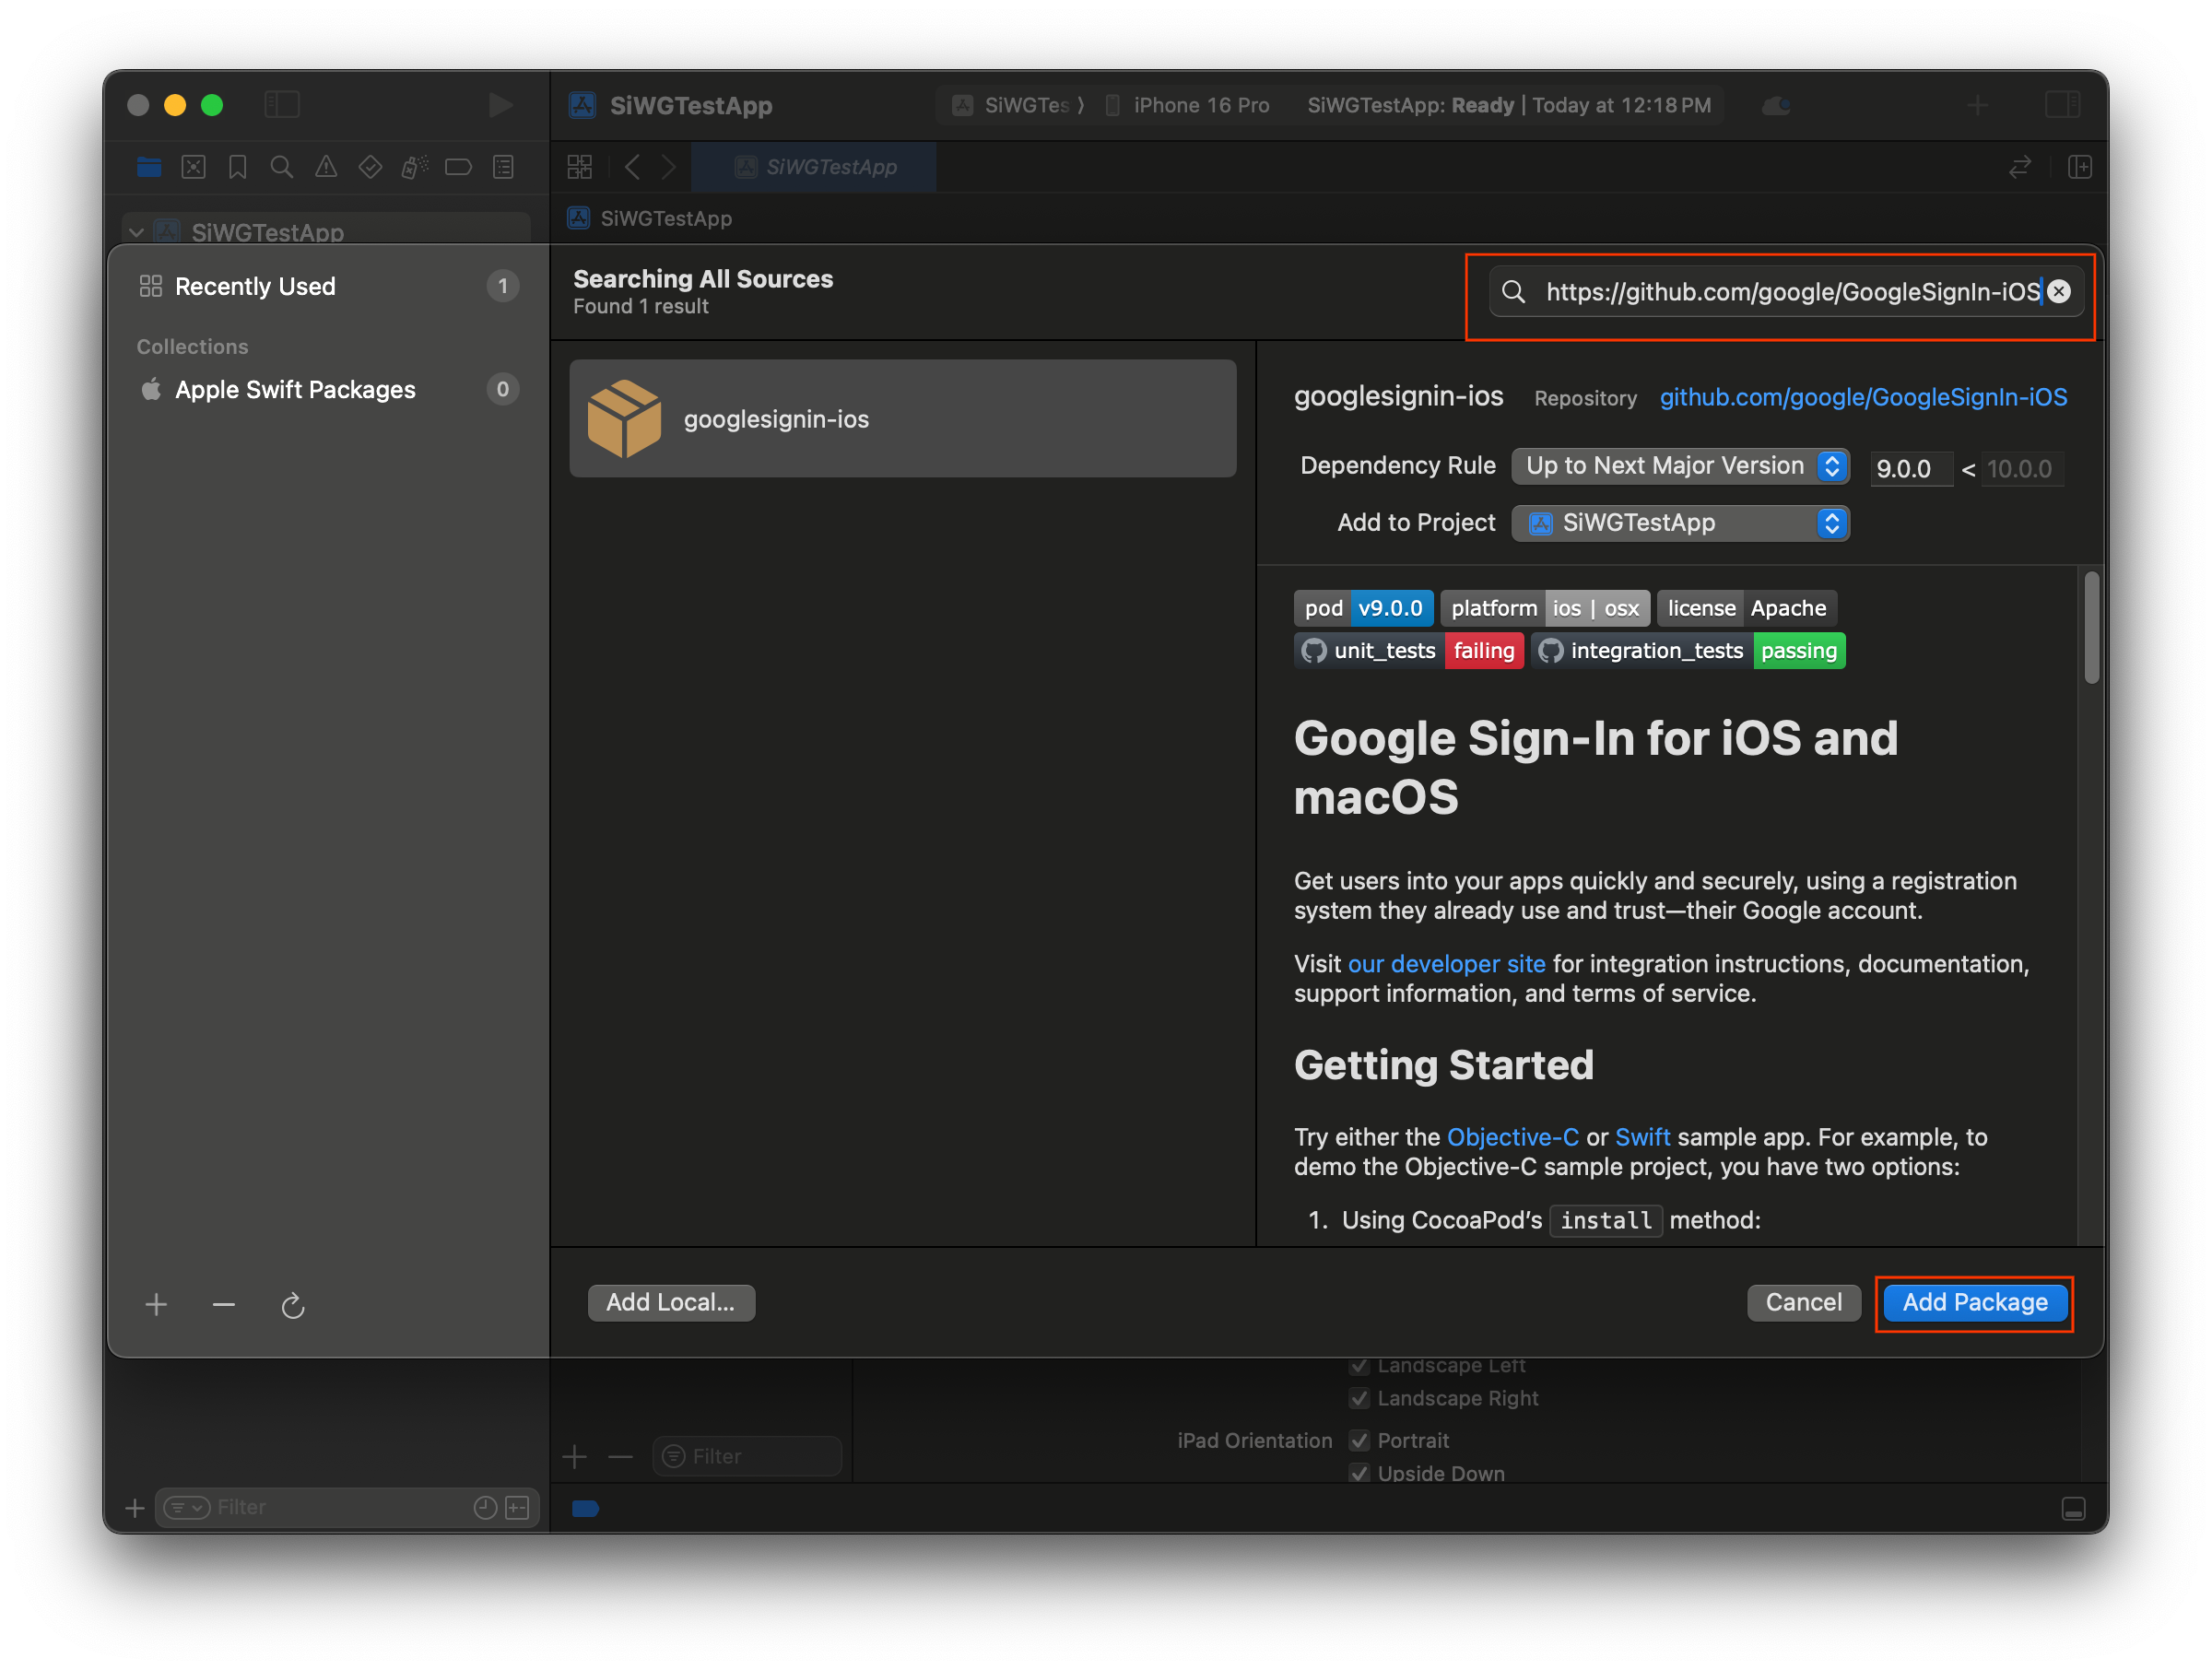
- Select Add Package.
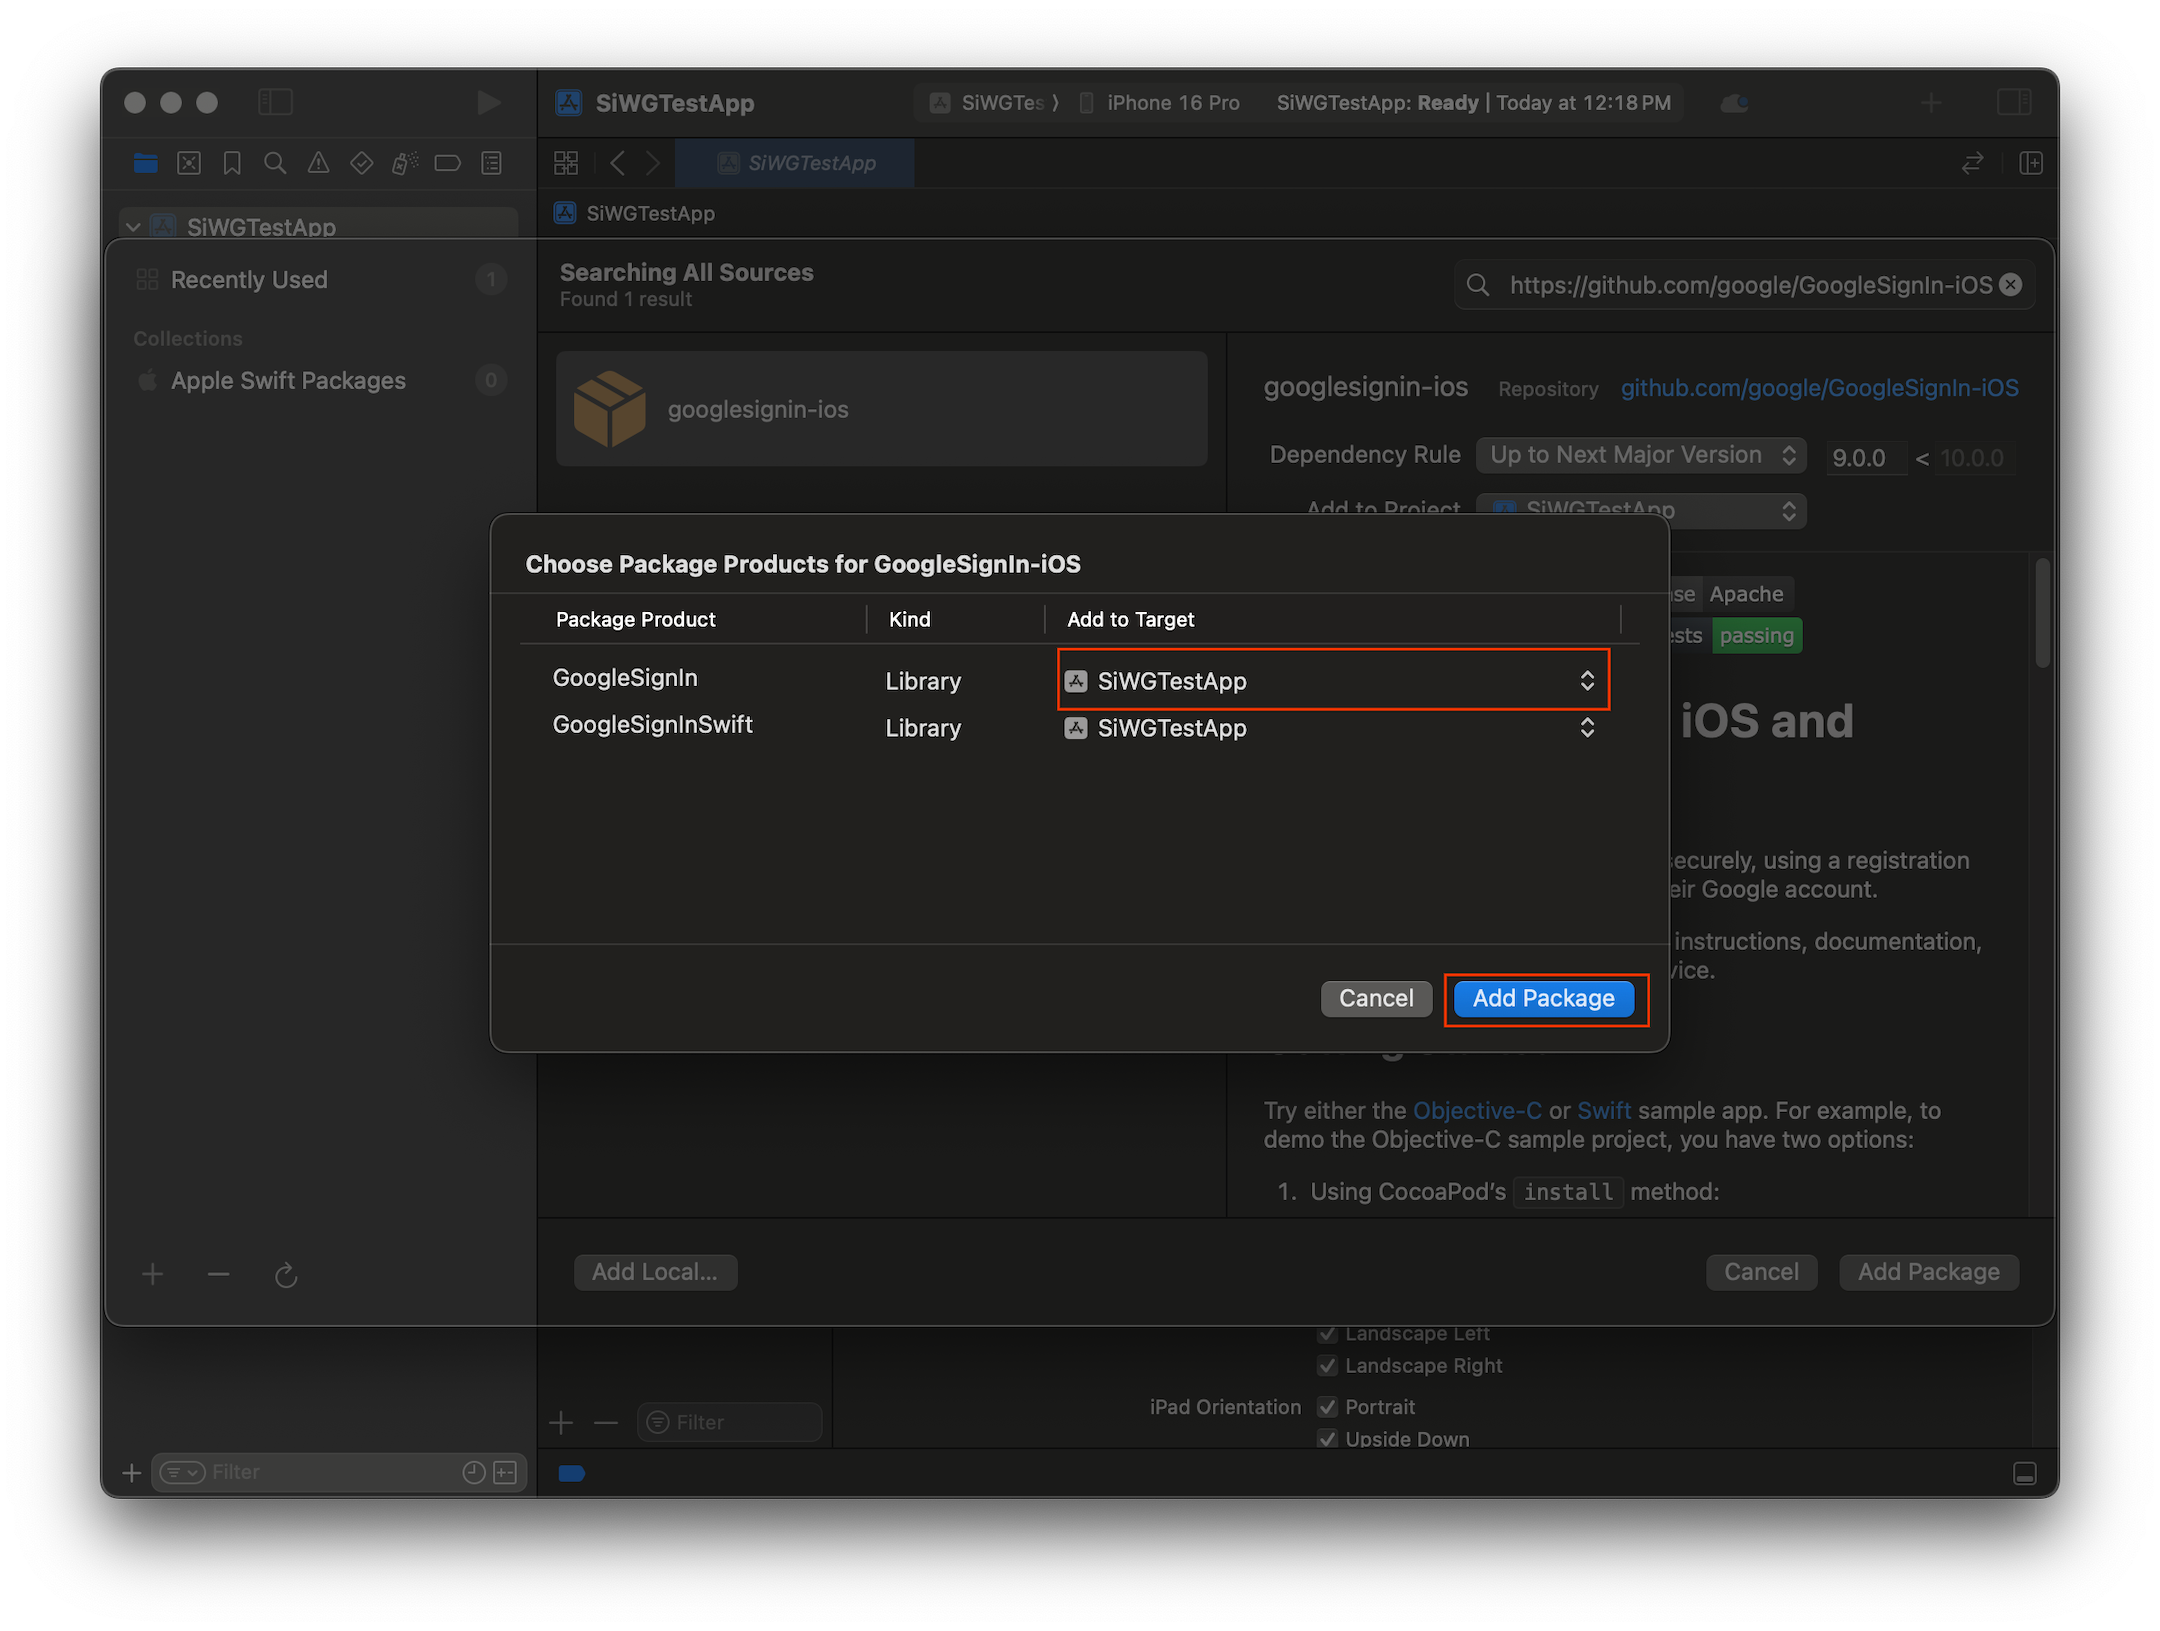
- Select the main application target for the GoogleSignIn package.
- If you are using SwiftUI, select the main application target for the GoogleSignInSwift package. If you plan to use UIKit don't select a target for this package.
- Select Add Package.
Configure your app's credentials
- In the Project Navigator, click the root of your project.
- In the main editor area, select your main application target from the TARGETS list.
- Select the Info tab at the top of the editor area.
- Hover over the last row in the Custom iOS Target Properties section and click the + button that appears.
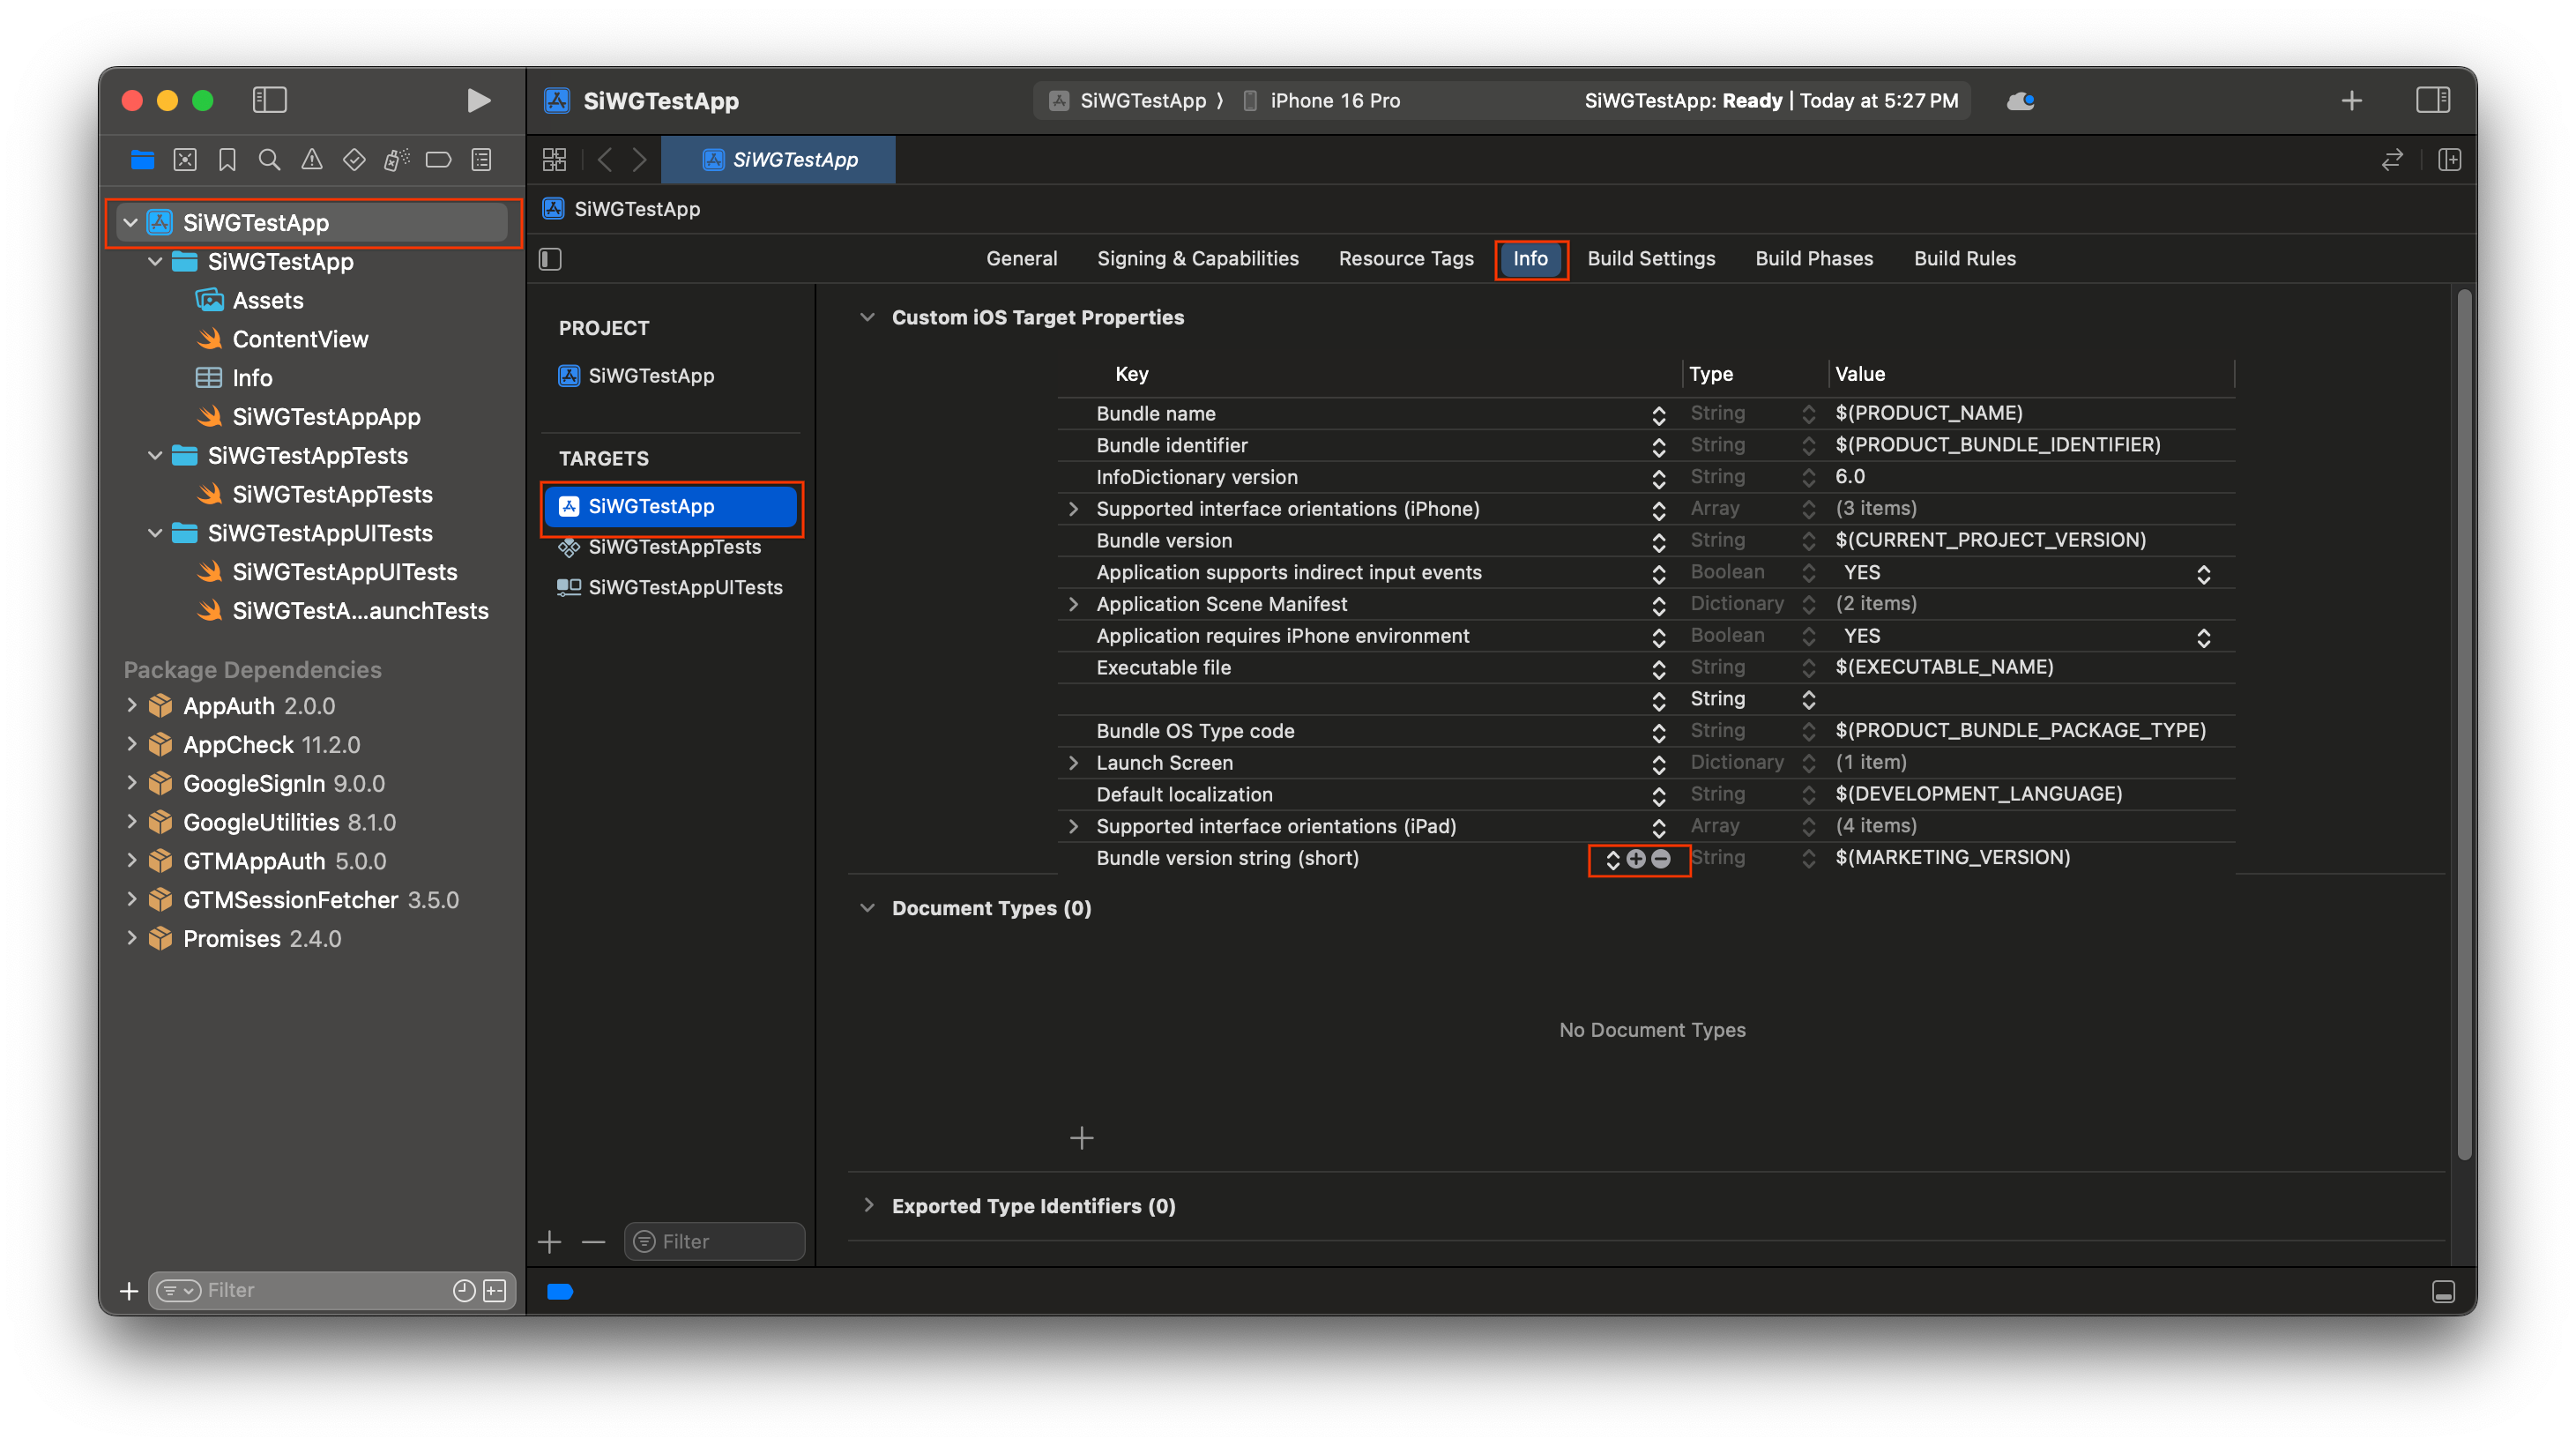
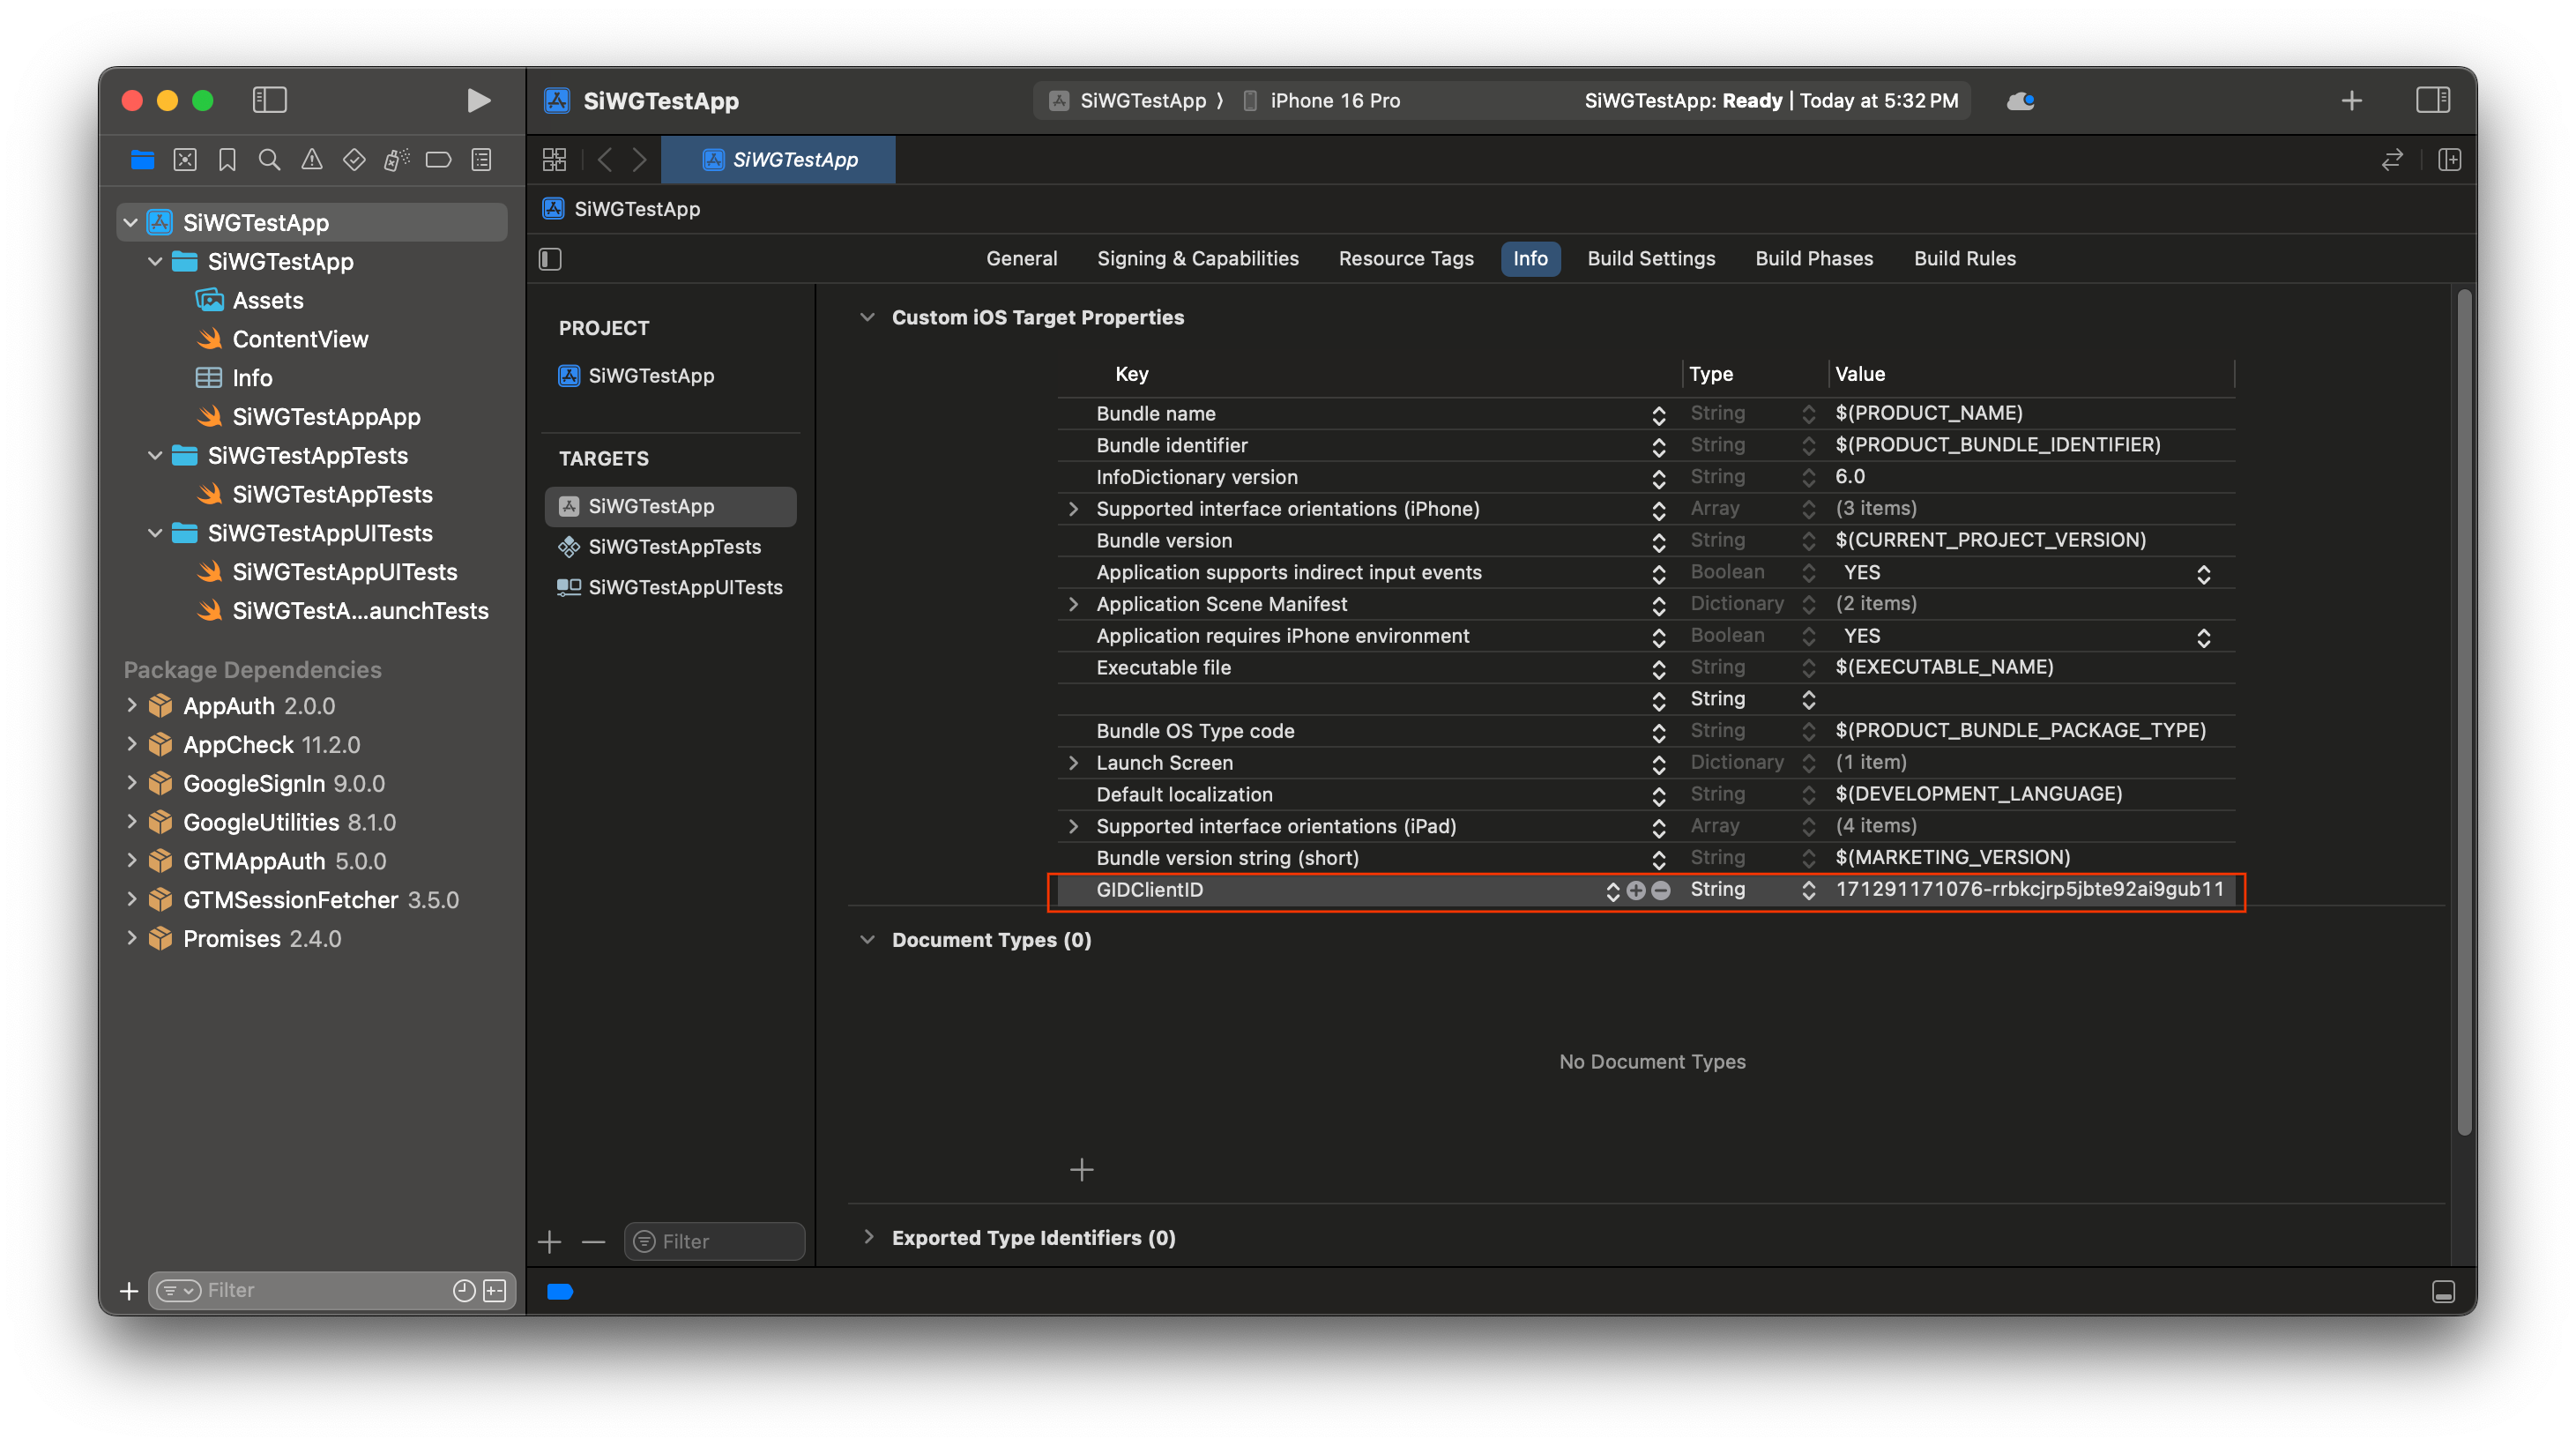
- In the Key column, type GIDClientID
- In the Value column, paste the client ID you copied from the Google Cloud Console.
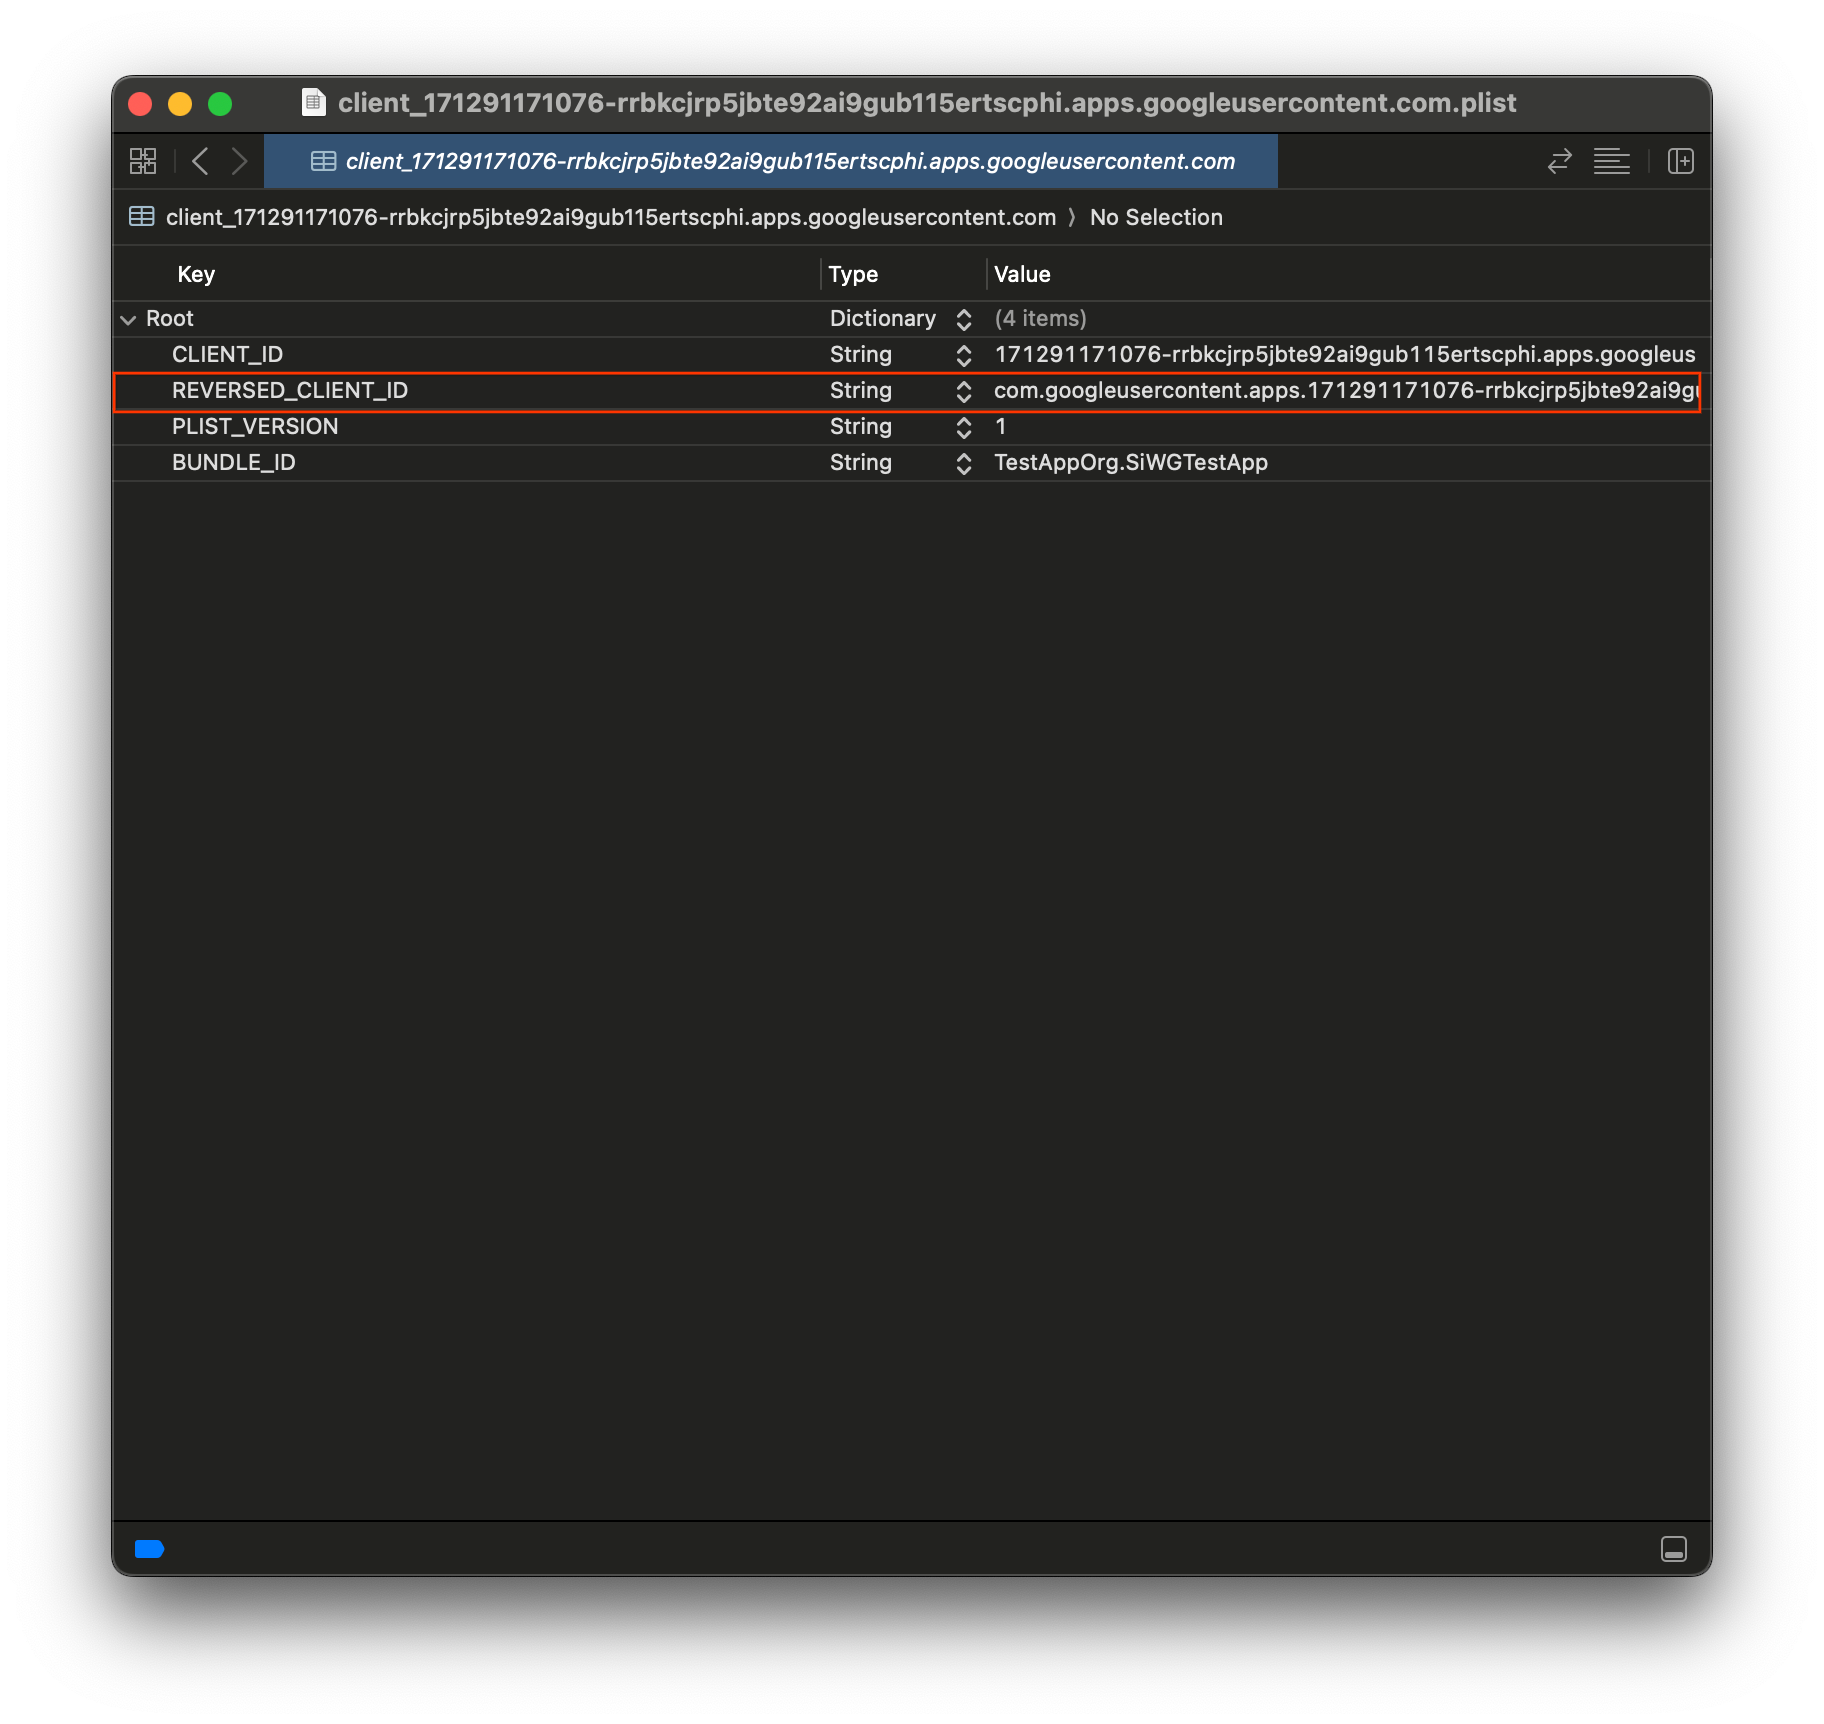
- Open the plist file you downloaded from the Google Cloud Console.
- Copy the value for Reversed Client ID.
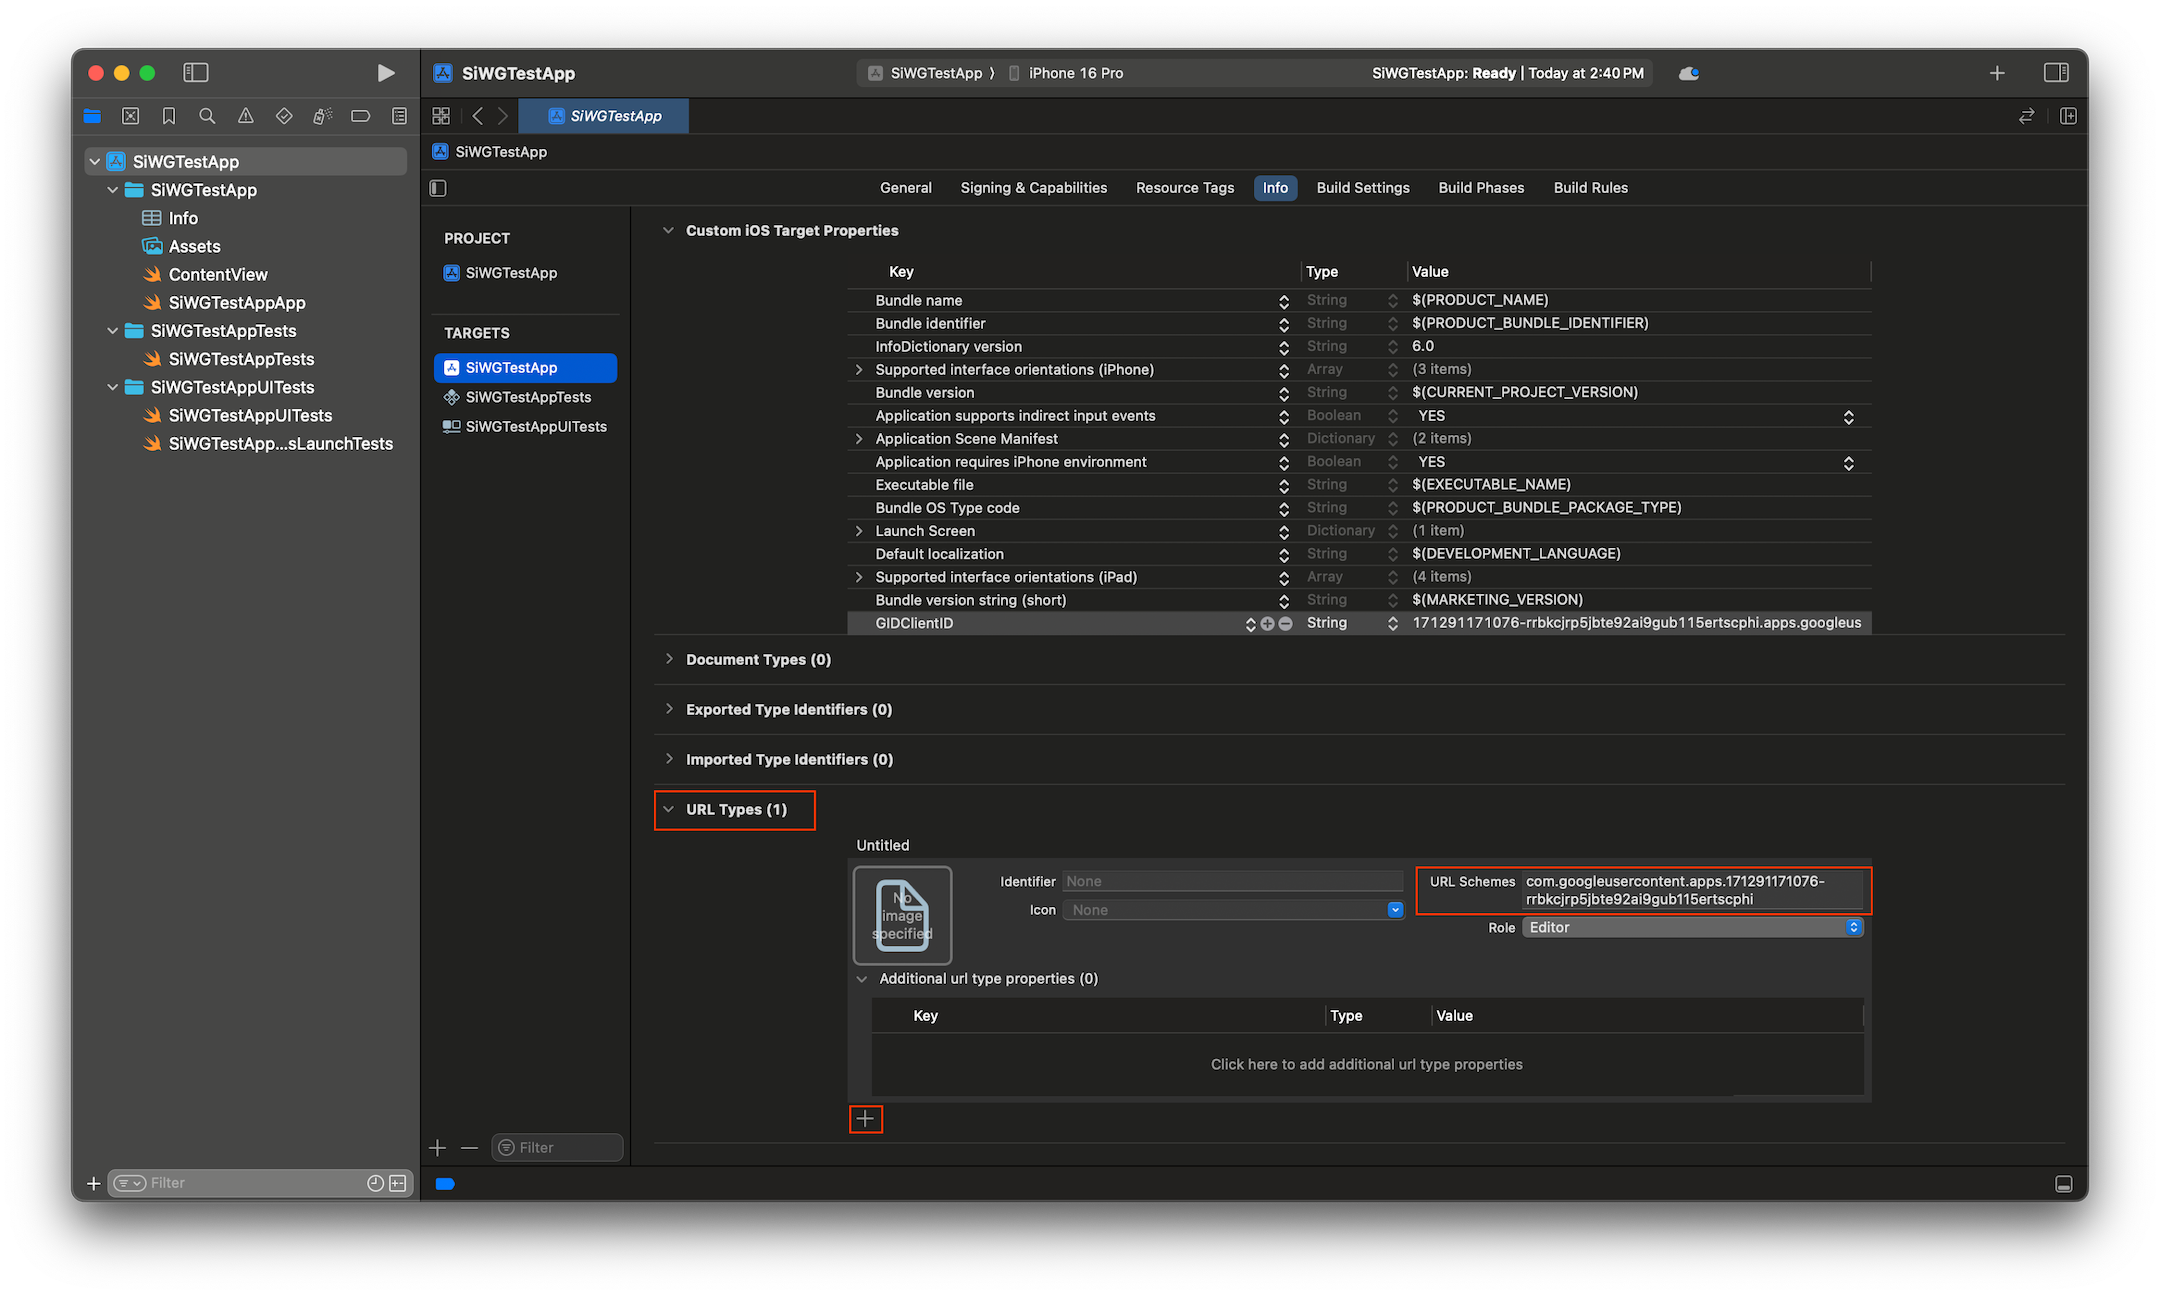
- Expand URL Types, at the bottom of the Info tab.
- Select the + button.
- Enter the Reversed Client ID in the URL Schemes box.
Now we're ready to start adding the sign-in button to our app!
5. Add the sign-in button
With the Xcode project configured, it's time to start adding the Sign in with Google button to the app!
The core logic for this step is the call to GIDSignIn.sharedInstance.signIn. This method kicks off the authentication process, handing control over to the Sign in with Google SDK to present the Sign in with Google flow to the user.
SwiftUI
- Find the ContentView.swift file in the Xcode Project Navigator.
- Replace the contents of this file with the following text:
import GoogleSignIn
import GoogleSignInSwift
import SwiftUI

struct ContentView: View {
  var body: some View {
    VStack {
      GoogleSignInButton(action: handleSignInButton).padding()
    }
  }

  func handleSignInButton() {
    // Find the current window scene.
    guard let windowScene = UIApplication.shared.connectedScenes.first as? UIWindowScene else {
      print("There is no active window scene")
      return
    }

    // Get the root view controller from the window scene.
    guard
      let rootViewController = windowScene.windows.first(where: { $0.isKeyWindow })?
        .rootViewController
    else {
      print("There is no key window or root view controller")
      return
    }

    // Start the sign-in process.
    GIDSignIn.sharedInstance.signIn(
      withPresenting: rootViewController
    ) { signInResult, error in
      guard let result = signInResult else {
        // Inspect error
        print("Error signing in: \(error?.localizedDescription ?? "No error description")")
        return
      }
      // If sign in succeeded, display the app's main content View.
      print("ID Token: \(result.user.idToken?.tokenString ?? "")")
    }
  }
}

#Preview {
  ContentView()
}
UIKit
- Find the ViewController.swift file in the Xcode Project Navigator.
- Replace the contents of this file with the following text:
import GoogleSignIn
import UIKit

class ViewController: UIViewController {

  // Create an instance of the Sign in with Google button
  let signInButton = GIDSignInButton()

  override func viewDidLoad() {
    super.viewDidLoad()

    // Add the sign-in button to your view
    view.addSubview(signInButton)

    // Position the button using constraints
    signInButton.translatesAutoresizingMaskIntoConstraints = false
    NSLayoutConstraint.activate([
      signInButton.centerXAnchor.constraint(equalTo: view.centerXAnchor),
      signInButton.centerYAnchor.constraint(equalTo: view.centerYAnchor),
    ])

    // Add a target to the button to call a method when it's pressed
    signInButton.addTarget(self, action: #selector(signInButtonTapped), for: .touchUpInside)
  }

  // This method is called when the sign-in button is pressed.
  @objc func signInButtonTapped() {
    // Start the sign-in process.
    GIDSignIn.sharedInstance.signIn(withPresenting: self) { signInResult, error in
      guard let result = signInResult else {
        // Inspect error
        print("Error signing in: \(error?.localizedDescription ?? "No error description")")
        return
      }

      // If sign in succeeded, print the ID token.
      print("ID Token: \(result.user.idToken?.tokenString ?? "")")
    }
  }
}
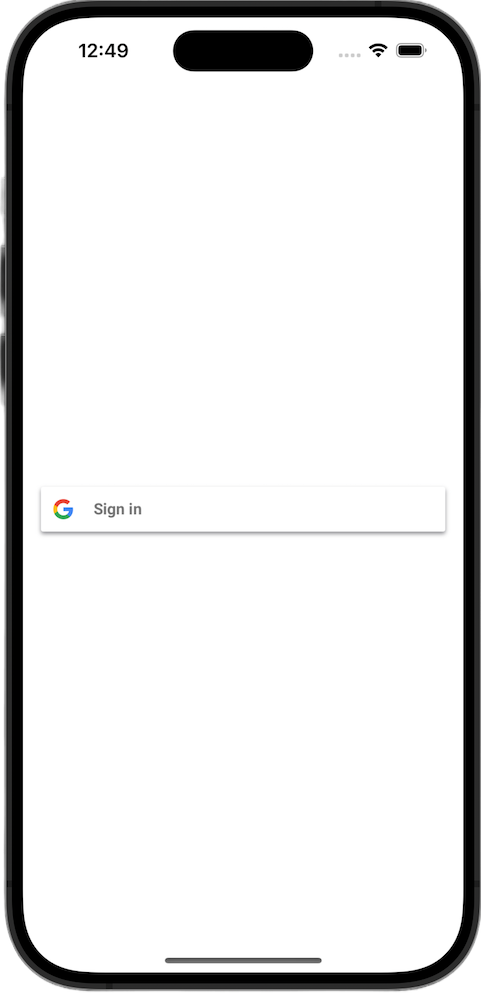
View the sign-in button
Launch your app in the simulator. You will see the Sign in with Google button, but it won't work properly just yet. This is expected, as you still need to implement the code to handle the redirect back to your app after the user authenticates.
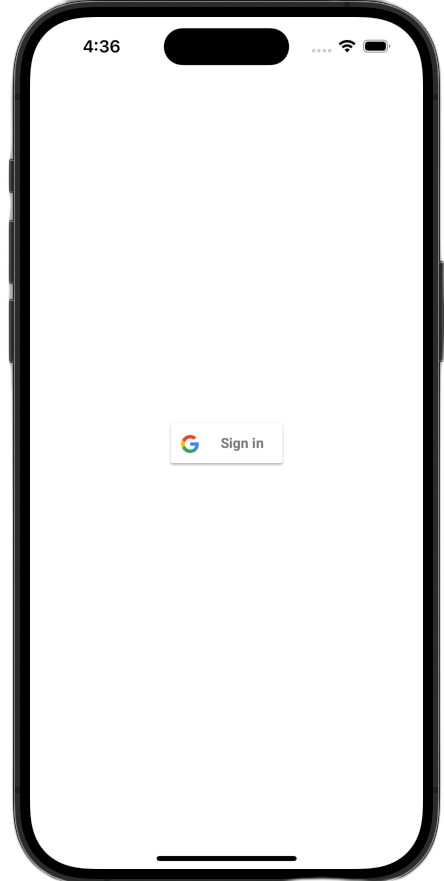
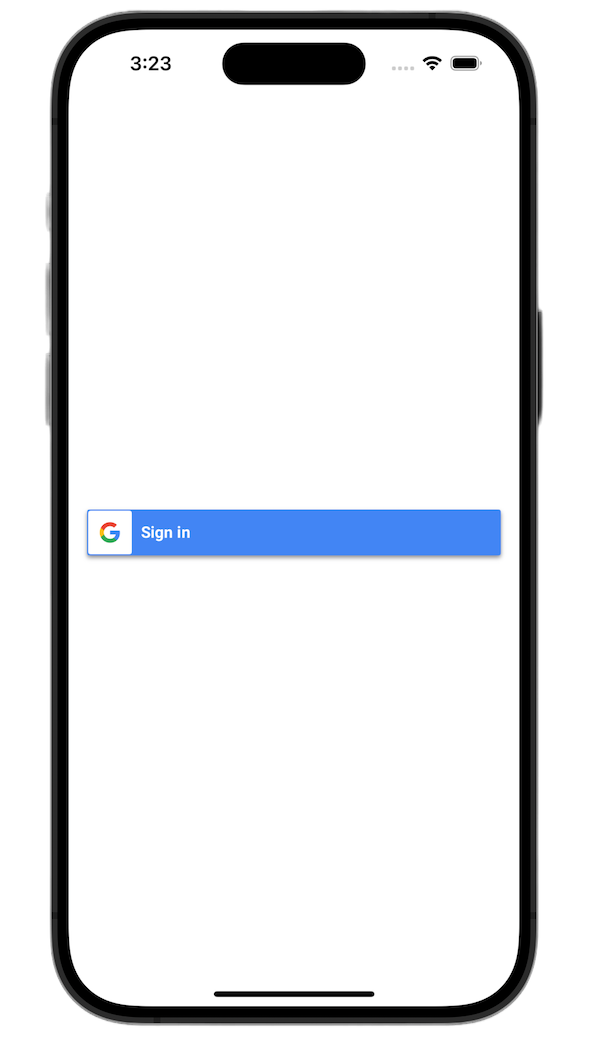
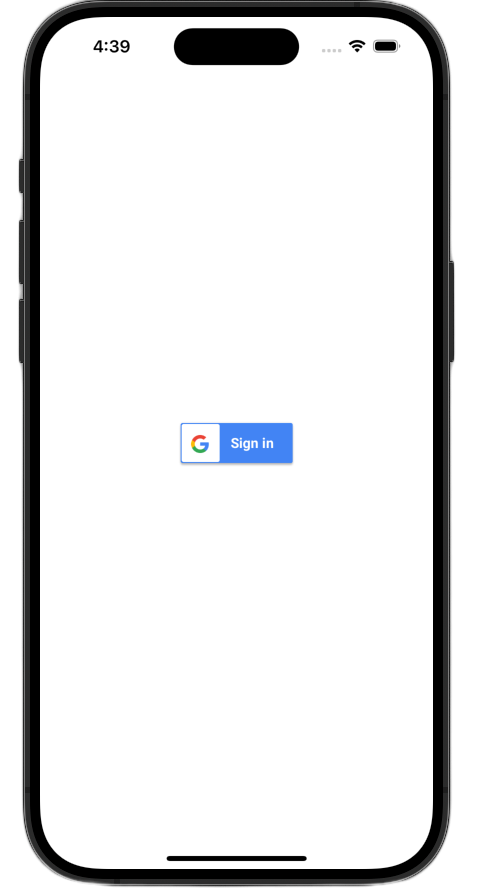
6. Customize the sign-in button
You can customize the default Sign-in with Google button to better fit your app's theme. The Sign in with Google SDK lets you to modify the button's color scheme and style.
SwiftUI
The default button is added to the page with this line of code:
GoogleSignInButton(action: handleSignInButton)
The GoogleSignInButton is customized by passing parameters to its initializer. The following code will make the sign-in button display in dark mode.
- Open ContentView.swift
- Update the initializer for the
GoogleSignInButtonto contain the following values:
GoogleSignInButton(
  scheme: .dark,  // Options: .light, .dark, .auto
  style: .standard,  // Options: .standard, .wide, .icon
  state: .normal,  // Options: .normal, .disabled
  action: handleSignInButton
).padding()
For more information on the customization options see the GoogleSignInSwift Framework Reference
UIKit
The default button is created with these lines of code:
// Create an instance of the Sign in with Google button
let signInButton = GIDSignInButton()

// Add the button to your view
view.addSubview(signInButton)
The GIDSignInButton is customized by setting properties on the button instance. The following code will make the sign-in button display in dark mode.
- Open ViewController.swift.
- Add the following lines of code immediately before adding the sign-in button to the view in the
viewDidLoadfunction:
// Set the width and color of the sign-in button
signInButton.style = .standard  // Options: .standard, .wide, .iconOnly
signInButton.colorScheme = .dark  // Options: .dark, .light
For more information on customization see the GoogleSignIn Framework Reference
7. Handle the authentication redirect URL
With the sign-in button added, the next step is to handle the redirect that occurs after a user authenticates. After authentication, Google returns a URL with a temporary authorization code. To complete the sign-in process, a handler intercepts this URL and passes it to the Sign in with Google SDK to be exchanged for a signed ID token (JWT).
SwiftUI
- Open the file that contains your
Appstruct. This file is named based on your project, so the name will be something like YourProjectNameApp.swift. - Replace the contents of this file with the following text:
import GoogleSignIn
import SwiftUI

@main
struct iOS_Sign_in_with_Google_App: App {
  var body: some Scene {
    WindowGroup {
      ContentView()

        .onOpenURL { url in
          GIDSignIn.sharedInstance.handle(url)
        }
    }
  }
}
UIKit
- Open AppDelegate.swift.
- Add the following import to the top of the file:
import GoogleSignIn
- Add the following authentication handler function inside the
AppDelegateclass. A good place to place it is directly following the closing brace of theapplication(_:didFinishLaunchingWithOptions:)method:
func application(
  _ app: UIApplication,
  open url: URL,
  options: [UIApplication.OpenURLOptionsKey: Any] = [:]
) -> Bool {
  var handled: Bool

  handled = GIDSignIn.sharedInstance.handle(url)
  if handled {
    return true
  }
  // If not handled by this app, return false.
  return false
}
After making these changes, your AppDelegate.swift file should look like this:
import GoogleSignIn
import UIKit

@main
class AppDelegate: UIResponder, UIApplicationDelegate {

  func application(
    _ application: UIApplication,
    didFinishLaunchingWithOptions launchOptions: [UIApplication.LaunchOptionsKey: Any]?
  ) -> Bool {
    // Override point for customization after application launch.
    return true
  }

  func application(
    _ app: UIApplication,
    open url: URL,
    options: [UIApplication.OpenURLOptionsKey: Any] = [:]
  ) -> Bool {
    var handled: Bool

    handled = GIDSignIn.sharedInstance.handle(url)
    if handled {
      return true
    }
    // If not handled by this app, return false.
    return false
  }

  // MARK: UISceneSession Lifecycle

  func application(
    _ application: UIApplication,
    configurationForConnecting connectingSceneSession: UISceneSession,
    options: UIScene.ConnectionOptions
  ) -> UISceneConfiguration {
    // Called when a new scene session is being created.
    // Use this method to select a configuration to create the new scene with.
    return UISceneConfiguration(
      name: "Default Configuration",
      sessionRole: connectingSceneSession.role
    )
  }

  func application(
    _ application: UIApplication,
    didDiscardSceneSessions sceneSessions: Set<UISceneSession>
  ) {
    // Called when the user discards a scene session.
    // If any sessions were discarded while the application was not running, this will be called shortly after application:didFinishLaunchingWithOptions.
    // Use this method to release any resources that were specific to the discarded scenes, as they will not return.
  }
}
Test the sign-in flow
You can now test the complete sign-in flow!
Run your app and tap the sign-in button. After you authenticate, Google will present a consent screen where you can grant permission for the app to access your information. Once you approve, the sign-in will finalize, and you will be returned to the app.
When the sign-in flow completes successfully, the Sign in with Google SDK securely stores the user's credentials in the device's Keychain. These credentials can be used later to allow a user to remain signed in on subsequent app launches.
8. Add a sign-out button
Now that sign-in is working, the next step is to add a sign-out button and update the UI to reflect the user's current sign-in state. When a sign-in is successful, the SDK provides a GIDGoogleUser object. This object contains a profile property with basic information like the user's name and email that you will use to personalize the UI.
SwiftUI
- Open your ContentView.swift file.
- Add a state variable at the top of your
ContentViewstruct. This variable will hold the user's information after they sign in. Since it's a@Statevariable, SwiftUI will automatically update your UI whenever its value changes:
struct ContentView: View {
  @State private var user: GIDGoogleUser?
}
- Replace the current
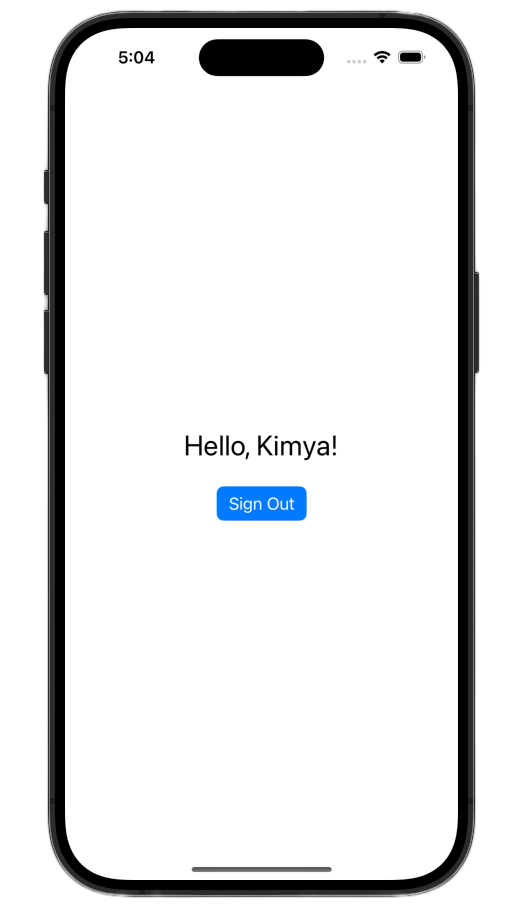
bodyof yourContentViewstruct with the followingVStack. This will check if theuserstate variable contains a user. If it does, it will show a welcome message and a sign-out button. If it doesn't, it will show the original Sign in with Google button:
var body: some View {
  VStack {
    // Check if the user is signed in.
    if let user = user {
      // If signed in, show a welcome message and the sign-out button.
      Text("Hello, \(user.profile?.givenName ?? "User")!")
        .font(.title)
        .padding()

      Button("Sign Out", action: signOut)
        .buttonStyle(.borderedProminent)

    } else {
      // If not signed in, show the "Sign in with Google" button.
      GoogleSignInButton(
        scheme: .dark,  // Options: .light, .dark, .auto
        style: .standard,  // Options: .standard, .wide, .icon
        state: .normal,  // Options: .normal, .disabled
        action: handleSignInButton
      ).padding()
    }
  }
}
- Update the
handleSignInButtoncompletion block to assignsignInResult.userto your newuservariable. This is what triggers the UI to switch to the signed-in view:
func handleSignInButton() {
  // Find the current window scene.
  guard let windowScene = UIApplication.shared.connectedScenes.first as? UIWindowScene else {
    print("There is no active window scene")
    return
  }

  // Get the root view controller from the window scene.
  guard
    let rootViewController = windowScene.windows.first(where: { $0.isKeyWindow })?
      .rootViewController
  else {
    print("There is no key window or root view controller")
    return
  }

  // Start the sign-in process.
  GIDSignIn.sharedInstance.signIn(
    withPresenting: rootViewController
  ) { signInResult, error in
    guard let result = signInResult else {
      // Inspect error
      print("Error signing in: \(error?.localizedDescription ?? "No error description")")
      return
    }

    DispatchQueue.main.async {
      self.user = result.user
    }

    // If sign in succeeded, display the app's main content View.
    print("ID Token: \(result.user.idToken?.tokenString ?? "")")
  }
}
- Add a new
signOutfunction to the bottom of yourContentViewstruct to be called by your sign-out button:
func signOut() {
  GIDSignIn.sharedInstance.signOut()
  // After signing out, set the `user` state variable to `nil`.
  self.user = nil
}
Launch the app and sign in. You should see the UI change after a successful authentication!
After making these changes, your ContentView.swift file should look like this:
import GoogleSignIn
import GoogleSignInSwift
import SwiftUI

struct ContentView: View {

  @State private var user: GIDGoogleUser?

  var body: some View {
    VStack {
      // Check if the user is signed in.
      if let user = user {
        // If signed in, show a welcome message and the sign-out button.
        Text("Hello, \(user.profile?.givenName ?? "User")!")
          .font(.title)
          .padding()

        Button("Sign Out", action: signOut)
          .buttonStyle(.borderedProminent)

      } else {
        // If not signed in, show the "Sign in with Google" button.
        GoogleSignInButton(
          scheme: .dark,  // Options: .light, .dark, .auto
          style: .standard,  // Options: .standard, .wide, .icon
          state: .normal,  // Options: .normal, .disabled
          action: handleSignInButton
        ).padding()
      }
    }
  }

  func handleSignInButton() {
    // Find the current window scene.
    guard let windowScene = UIApplication.shared.connectedScenes.first as? UIWindowScene else {
      print("There is no active window scene")
      return
    }

    // Get the root view controller from the window scene.
    guard
      let rootViewController = windowScene.windows.first(where: { $0.isKeyWindow })?
        .rootViewController
    else {
      print("There is no key window or root view controller")
      return
    }

    // Start the sign-in process.
    GIDSignIn.sharedInstance.signIn(
      withPresenting: rootViewController
    ) { signInResult, error in
      guard let result = signInResult else {
        // Inspect error
        print("Error signing in: \(error?.localizedDescription ?? "No error description")")
        return
      }

      DispatchQueue.main.async {
        self.user = result.user
      }

      // If sign in succeeded, display the app's main content View.
      print("ID Token: \(result.user.idToken?.tokenString ?? "")")
    }
  }

  func signOut() {
    GIDSignIn.sharedInstance.signOut()
    // After signing out, set the `user` state variable to `nil`.
    self.user = nil
  }
}

#Preview {
  ContentView()
}
UIKit
- Open ViewController.swift.
- At the top of the
ViewController, directly below where you declared thesignInButton, add a sign-out button and a welcome label:
let signOutButton = UIButton(type: .system)
let welcomeLabel = UILabel()
- Add the following function to the bottom of the
ViewController. This function will show a different UI to the user based on their sign-in status:
private func updateUI(for user: GIDGoogleUser?) {
if let user = user {
// User is signed in.
signInButton.isHidden = true
signOutButton.isHidden = false
welcomeLabel.isHidden = false
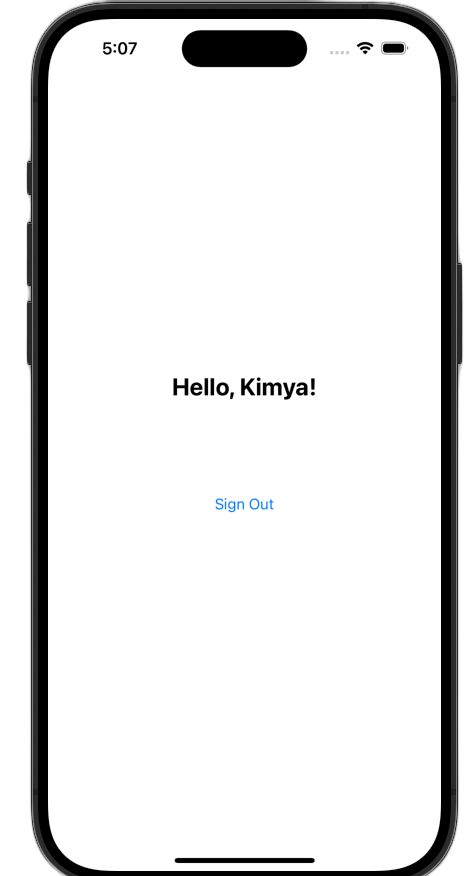
welcomeLabel.text = "Hello, \(user.profile?.givenName ?? "User")!"
} else {
// User is signed out.
signInButton.isHidden = false
signOutButton.isHidden = true
welcomeLabel.isHidden = true
}
}
- At the bottom of the
viewDidLoadfunction, add the following code to add the welcome label and the sign-out button to the view:
// --- Set up the Welcome Label ---
welcomeLabel.translatesAutoresizingMaskIntoConstraints = false
welcomeLabel.textAlignment = .center
welcomeLabel.font = .systemFont(ofSize: 24, weight: .bold)
view.addSubview(welcomeLabel)

NSLayoutConstraint.activate([
  welcomeLabel.centerXAnchor.constraint(equalTo: view.centerXAnchor),
  welcomeLabel.bottomAnchor.constraint(equalTo: signInButton.topAnchor, constant: -20),
])

// --- Set up the Sign-Out Button ---
signOutButton.translatesAutoresizingMaskIntoConstraints = false
signOutButton.setTitle("Sign Out", for: .normal)
view.addSubview(signOutButton)

NSLayoutConstraint.activate([
  signOutButton.centerXAnchor.constraint(equalTo: view.centerXAnchor),
  signOutButton.topAnchor.constraint(equalTo: signInButton.bottomAnchor, constant: 20),
])

signOutButton.addTarget(self, action: #selector(signOutButtonTapped), for: .touchUpInside)

// --- Set Initial UI State ---
updateUI(for: nil)
- Update the
signInButtonTappedfunction to call theUpdateUImethod on a successful sign-in:
@objc func signInButtonTapped() {
  // Start the sign-in process.
  GIDSignIn.sharedInstance.signIn(withPresenting: self) { signInResult, error in
    guard let result = signInResult else {
      // Inspect error
      print("Error signing in: \(error?.localizedDescription ?? "No error description")")
      return
    }

    // If sign in succeeded, print the ID token.
    print("ID Token: \(result.user.idToken?.tokenString ?? "")")

    DispatchQueue.main.async {
      self.updateUI(for: result.user)
    }
  }
}
- Finally, add a
signOutButtonTappedfunction to theViewControllerto handle the sign-out process:
@objc func signOutButtonTapped() {
  GIDSignIn.sharedInstance.signOut()
  // Update the UI for the signed-out state.
  updateUI(for: nil)
}
Launch the app and sign in. You should see the UI change after a successful authentication!
After making these changes, your ViewController.swift file should look like this:
import GoogleSignIn
import UIKit

class ViewController: UIViewController {

  // Create an instance of the Sign in with Google button
  let signInButton = GIDSignInButton()
  let signOutButton = UIButton(type: .system)
  let welcomeLabel = UILabel()

  override func viewDidLoad() {
    super.viewDidLoad()

    // Set the width and color of the sign-in button
    signInButton.style = .standard  // Options: .standard, .wide, .iconOnly
    signInButton.colorScheme = .dark  // Options: .dark, .light

    // Add the sign-in button to your view
    view.addSubview(signInButton)

    // Position the button using constraints
    signInButton.translatesAutoresizingMaskIntoConstraints = false
    NSLayoutConstraint.activate([
      signInButton.centerXAnchor.constraint(equalTo: view.centerXAnchor),
      signInButton.centerYAnchor.constraint(equalTo: view.centerYAnchor),
    ])

    // Add a target to the button to call a method when it's pressed
    signInButton.addTarget(self, action: #selector(signInButtonTapped), for: .touchUpInside)

    // --- Set up the Welcome Label ---
    welcomeLabel.translatesAutoresizingMaskIntoConstraints = false
    welcomeLabel.textAlignment = .center
    welcomeLabel.font = .systemFont(ofSize: 24, weight: .bold)
    view.addSubview(welcomeLabel)

    NSLayoutConstraint.activate([
      welcomeLabel.centerXAnchor.constraint(equalTo: view.centerXAnchor),
      welcomeLabel.bottomAnchor.constraint(equalTo: signInButton.topAnchor, constant: -20),
    ])

    // --- Set up the Sign-Out Button ---
    signOutButton.translatesAutoresizingMaskIntoConstraints = false
    signOutButton.setTitle("Sign Out", for: .normal)
    view.addSubview(signOutButton)

    NSLayoutConstraint.activate([
      signOutButton.centerXAnchor.constraint(equalTo: view.centerXAnchor),
      signOutButton.topAnchor.constraint(equalTo: signInButton.bottomAnchor, constant: 20),
    ])

    signOutButton.addTarget(self, action: #selector(signOutButtonTapped), for: .touchUpInside)

    // --- Set Initial UI State ---
    updateUI(for: nil)
  }

  // This method is called when the sign-in button is pressed.
  @objc func signInButtonTapped() {
    // Start the sign-in process.
    GIDSignIn.sharedInstance.signIn(withPresenting: self) { signInResult, error in
      guard let result = signInResult else {
        // Inspect error
        print("Error signing in: \(error?.localizedDescription ?? "No error description")")
        return
      }

      // If sign in succeeded, print the ID token.
      print("ID Token: \(result.user.idToken?.tokenString ?? "")")

      DispatchQueue.main.async {
        self.updateUI(for: result.user)
      }
    }
  }

  private func updateUI(for user: GIDGoogleUser?) {
    if let user = user {
      // User is signed in.
      signInButton.isHidden = true
      signOutButton.isHidden = false
      welcomeLabel.isHidden = false
      welcomeLabel.text = "Hello, \(user.profile?.givenName ?? "User")!"
    } else {
      // User is signed out.
      signInButton.isHidden = false
      signOutButton.isHidden = true
      welcomeLabel.isHidden = true
    }
  }

  @objc func signOutButtonTapped() {
    GIDSignIn.sharedInstance.signOut()
    // Update the UI for the signed-out state.
    updateUI(for: nil)
  }
}
9. Restore a user's sign-in state
To improve the experience for returning users, the next step is to restore their sign-in state on app launch. Calling restorePreviousSignIn uses the credentials saved in the Keychain to silently sign the user back in, ensuring they don't have to complete the sign-in flow every time.
SwiftUI
- Open ContentView.swift.
- Add the following code directly following the
VStackinside thebodyvariable:
.onAppear {
  // On appear, try to restore a previous sign-in.
  GIDSignIn.sharedInstance.restorePreviousSignIn { user, error in
    // This closure is called when the restoration is complete.
    if let user = user {
      // If a user was restored, update the `user` state variable.
      DispatchQueue.main.async {
        self.user = user
      }

      // Print the ID token to the console when restored.
      print("Restored ID Token: \(user.idToken?.tokenString ?? "")")
    }
  }
}
Your ContentView.swift should look like this:
import GoogleSignIn
import GoogleSignInSwift
import SwiftUI

struct ContentView: View {

  @State private var user: GIDGoogleUser?

  var body: some View {
    VStack {
      // Check if the user is signed in.
      if let user = user {
        // If signed in, show a welcome message and the sign-out button.
        Text("Hello, \(user.profile?.givenName ?? "User")!")
          .font(.title)
          .padding()

        Button("Sign Out", action: signOut)
          .buttonStyle(.borderedProminent)

      } else {
        // If not signed in, show the "Sign in with Google" button.
        GoogleSignInButton(
          scheme: .dark,  // Options: .light, .dark, .auto
          style: .standard,  // Options: .standard, .wide, .icon
          state: .normal,  // Options: .normal, .disabled
          action: handleSignInButton
        ).padding()
      }
    }

    .onAppear {
      // On appear, try to restore a previous sign-in.
      GIDSignIn.sharedInstance.restorePreviousSignIn { user, error in
        // This closure is called when the restoration is complete.
        if let user = user {
          // If a user was restored, update the `user` state variable.
          DispatchQueue.main.async {
            self.user = user
          }

          // Print the ID token to the console when restored.
          print("Restored ID Token: \(user.idToken?.tokenString ?? "")")
        }
      }
    }
  }

  func handleSignInButton() {
    // Find the current window scene.
    guard let windowScene = UIApplication.shared.connectedScenes.first as? UIWindowScene else {
      print("There is no active window scene")
      return
    }

    // Get the root view controller from the window scene.
    guard
      let rootViewController = windowScene.windows.first(where: { $0.isKeyWindow })?
        .rootViewController
    else {
      print("There is no key window or root view controller")
      return
    }

    // Start the sign-in process.
    GIDSignIn.sharedInstance.signIn(
      withPresenting: rootViewController
    ) { signInResult, error in
      guard let result = signInResult else {
        // Inspect error
        print("Error signing in: \(error?.localizedDescription ?? "No error description")")
        return
      }

      DispatchQueue.main.async {
        self.user = result.user
      }

      // If sign in succeeded, display the app's main content View.
      print("ID Token: \(result.user.idToken?.tokenString ?? "")")
    }
  }

  func signOut() {
    GIDSignIn.sharedInstance.signOut()
    // After signing out, set the `user` state variable to `nil`.
    self.user = nil
  }
}

#Preview {
  ContentView()
}
UIKit
- Open ViewController.swift.
- Add the following
restorePreviousSignIncall to the end of theviewDidLoadmethod:
// Attempt to restore a previous sign-in session
GIDSignIn.sharedInstance.restorePreviousSignIn { user, error in
  if let user = user {
    print("Successfully restored sign-in for user: \(user.profile?.givenName ?? "Unknown")")

    // Print the ID token when a session is restored.
    print("Restored ID Token: \(user.idToken?.tokenString ?? "")")

    // On success, update the UI for the signed-in state on the main thread.
    DispatchQueue.main.async {
      self.updateUI(for: user)
    }
  }
}
Your ViewController.swift file should look like this:
import GoogleSignIn
import UIKit

class ViewController: UIViewController {

  // Create an instance of the Sign in with Google button
  let signInButton = GIDSignInButton()
  let signOutButton = UIButton(type: .system)
  let welcomeLabel = UILabel()

  override func viewDidLoad() {
    super.viewDidLoad()

    // Set the width and color of the sign-in button
    signInButton.style = .standard  // Options: .standard, .wide, .iconOnly
    signInButton.colorScheme = .dark  // Options: .dark, .light

    // Add the sign-in button to your view
    view.addSubview(signInButton)

    // Position the button using constraints
    signInButton.translatesAutoresizingMaskIntoConstraints = false
    NSLayoutConstraint.activate([
      signInButton.centerXAnchor.constraint(equalTo: view.centerXAnchor),
      signInButton.centerYAnchor.constraint(equalTo: view.centerYAnchor),
    ])

    // Add a target to the button to call a method when it's pressed
    signInButton.addTarget(self, action: #selector(signInButtonTapped), for: .touchUpInside)

    // --- Set up the Welcome Label ---
    welcomeLabel.translatesAutoresizingMaskIntoConstraints = false
    welcomeLabel.textAlignment = .center
    welcomeLabel.font = .systemFont(ofSize: 24, weight: .bold)
    view.addSubview(welcomeLabel)

    NSLayoutConstraint.activate([
      welcomeLabel.centerXAnchor.constraint(equalTo: view.centerXAnchor),
      welcomeLabel.bottomAnchor.constraint(equalTo: signInButton.topAnchor, constant: -20),
    ])

    // --- Set up the Sign-Out Button ---
    signOutButton.translatesAutoresizingMaskIntoConstraints = false
    signOutButton.setTitle("Sign Out", for: .normal)
    view.addSubview(signOutButton)

    NSLayoutConstraint.activate([
      signOutButton.centerXAnchor.constraint(equalTo: view.centerXAnchor),
      signOutButton.topAnchor.constraint(equalTo: signInButton.bottomAnchor, constant: 20),
    ])

    signOutButton.addTarget(self, action: #selector(signOutButtonTapped), for: .touchUpInside)

    // --- Set Initial UI State ---
    updateUI(for: nil)

    // Attempt to restore a previous sign-in session
    GIDSignIn.sharedInstance.restorePreviousSignIn { user, error in
      if let user = user {
        print("Successfully restored sign-in for user: \(user.profile?.givenName ?? "Unknown")")

        // Print the ID token when a session is restored.
        print("Restored ID Token: \(user.idToken?.tokenString ?? "")")

        // On success, update the UI for the signed-in state on the main thread.
        DispatchQueue.main.async {
          self.updateUI(for: user)
        }
      }
    }
  }

  // This method is called when the sign-in button is pressed.
  @objc func signInButtonTapped() {
    // Start the sign-in process.
    GIDSignIn.sharedInstance.signIn(withPresenting: self) { signInResult, error in
      guard let result = signInResult else {
        // Inspect error
        print("Error signing in: \(error?.localizedDescription ?? "No error description")")
        return
      }

      // If sign in succeeded, print the ID token.
      print("ID Token: \(result.user.idToken?.tokenString ?? "")")

      DispatchQueue.main.async {
        self.updateUI(for: result.user)
      }
    }
  }

  private func updateUI(for user: GIDGoogleUser?) {
    if let user = user {
      // User is signed in.
      signInButton.isHidden = true
      signOutButton.isHidden = false
      welcomeLabel.isHidden = false
      welcomeLabel.text = "Hello, \(user.profile?.givenName ?? "User")!"
    } else {
      // User is signed out.
      signInButton.isHidden = false
      signOutButton.isHidden = true
      welcomeLabel.isHidden = true
    }
  }

  @objc func signOutButtonTapped() {
    GIDSignIn.sharedInstance.signOut()
    // Update the UI for the signed-out state.
    updateUI(for: nil)
  }
}
Test the silent sign-in
After signing in, quit the app completely and launch it again. You should see that you are now automatically signed in without needing to tap the button.
10. Understand the ID token
While the GIDGoogleUser object is convenient for personalizing the UI using the user's name and email, the most important piece of data returned from the SDK is the ID token.
This codelab uses an online tool to inspect the JWT contents. In a production app, you should send this ID token to your backend server. Your server must verify the integrity of the ID token and use the JWT to do something more meaningful, such as creating a new account on your backend platform or establishing a new session for the user.
Access and decode the JWT token
- Launch your app.
- Open the Xcode console. You should see a printed ID Token. It will look something like
eyJhbGciOiJSUzI1Ni ... Hecz6Wm4Q. - Copy the ID token and use an online tool like jwt.io to decode the JWT.
The decoded JWT will look like this:
{
  "alg": "RS256",
  "kid": "c8ab71530972bba20b49f78a09c9852c43ff9118",
  "typ": "JWT"
}
{
  "iss": "https://accounts.google.com",
  "azp": "171291171076-rrbkcjrp5jbte92ai9gub115ertscphi.apps.googleusercontent.com",
  "aud": "171291171076-rrbkcjrp5jbte92ai9gub115ertscphi.apps.googleusercontent.com",
  "sub": "10769150350006150715113082367",
  "email": "example@example.com",
  "email_verified": true,
  "at_hash": "JyCYDmHtzhjkb0-qJhKsMg",
  "name": "Kimya",
  "picture": "https://lh3.googleusercontent.com/a/ACg8ocIyy4VoR31t_n0biPVcScBHwZOCRaKVDb_MoaMYep65fyqoAw=s96-c",
  "given_name": "Kimya",
  "iat": 1758645896,
  "exp": 1758649496
}
Notable token fields
The decoded ID token contains fields with different purposes. While some are easy to understand, like name and email, others are used by your backend server for verification.
The following field is especially important to understand:
- sub: The
subfield is a unique, permanent identifier for the user's Google Account. A user can change their primary email or name, but theirsubID will never change. This makes thesubfield the perfect value to use as a primary key for your backend user accounts.
Obtain user information from the ID token has more information on what all the token fields mean.
11. Secure your app with App Check
It is highly recommended that you enable App Check to ensure only your app can access Google's OAuth 2.0 endpoints on behalf of your project. App Check works by verifying that requests to your backend services originate from your authentic app on a real and untampered device.
This section shows how to integrate App Check into your app and configure it for both debugging in a simulator and for a production build running on real device.
Console setup
Integrating App Check into your application requires a one-time setup in the Google Cloud and Firebase consoles. This involves enabling App Check for your iOS OAuth client in the Google Cloud Console, creating an API Key for use with the App Check debug provider, and linking your Google Cloud project to Firebase.
Enable App Check in the Google Cloud Console
- Navigate to the list of Clients associated with your Google Cloud project.
- Select the OAuth 2.0 client ID you created for your iOS app.
- Toggle on App Check beneath Google Identity for iOS
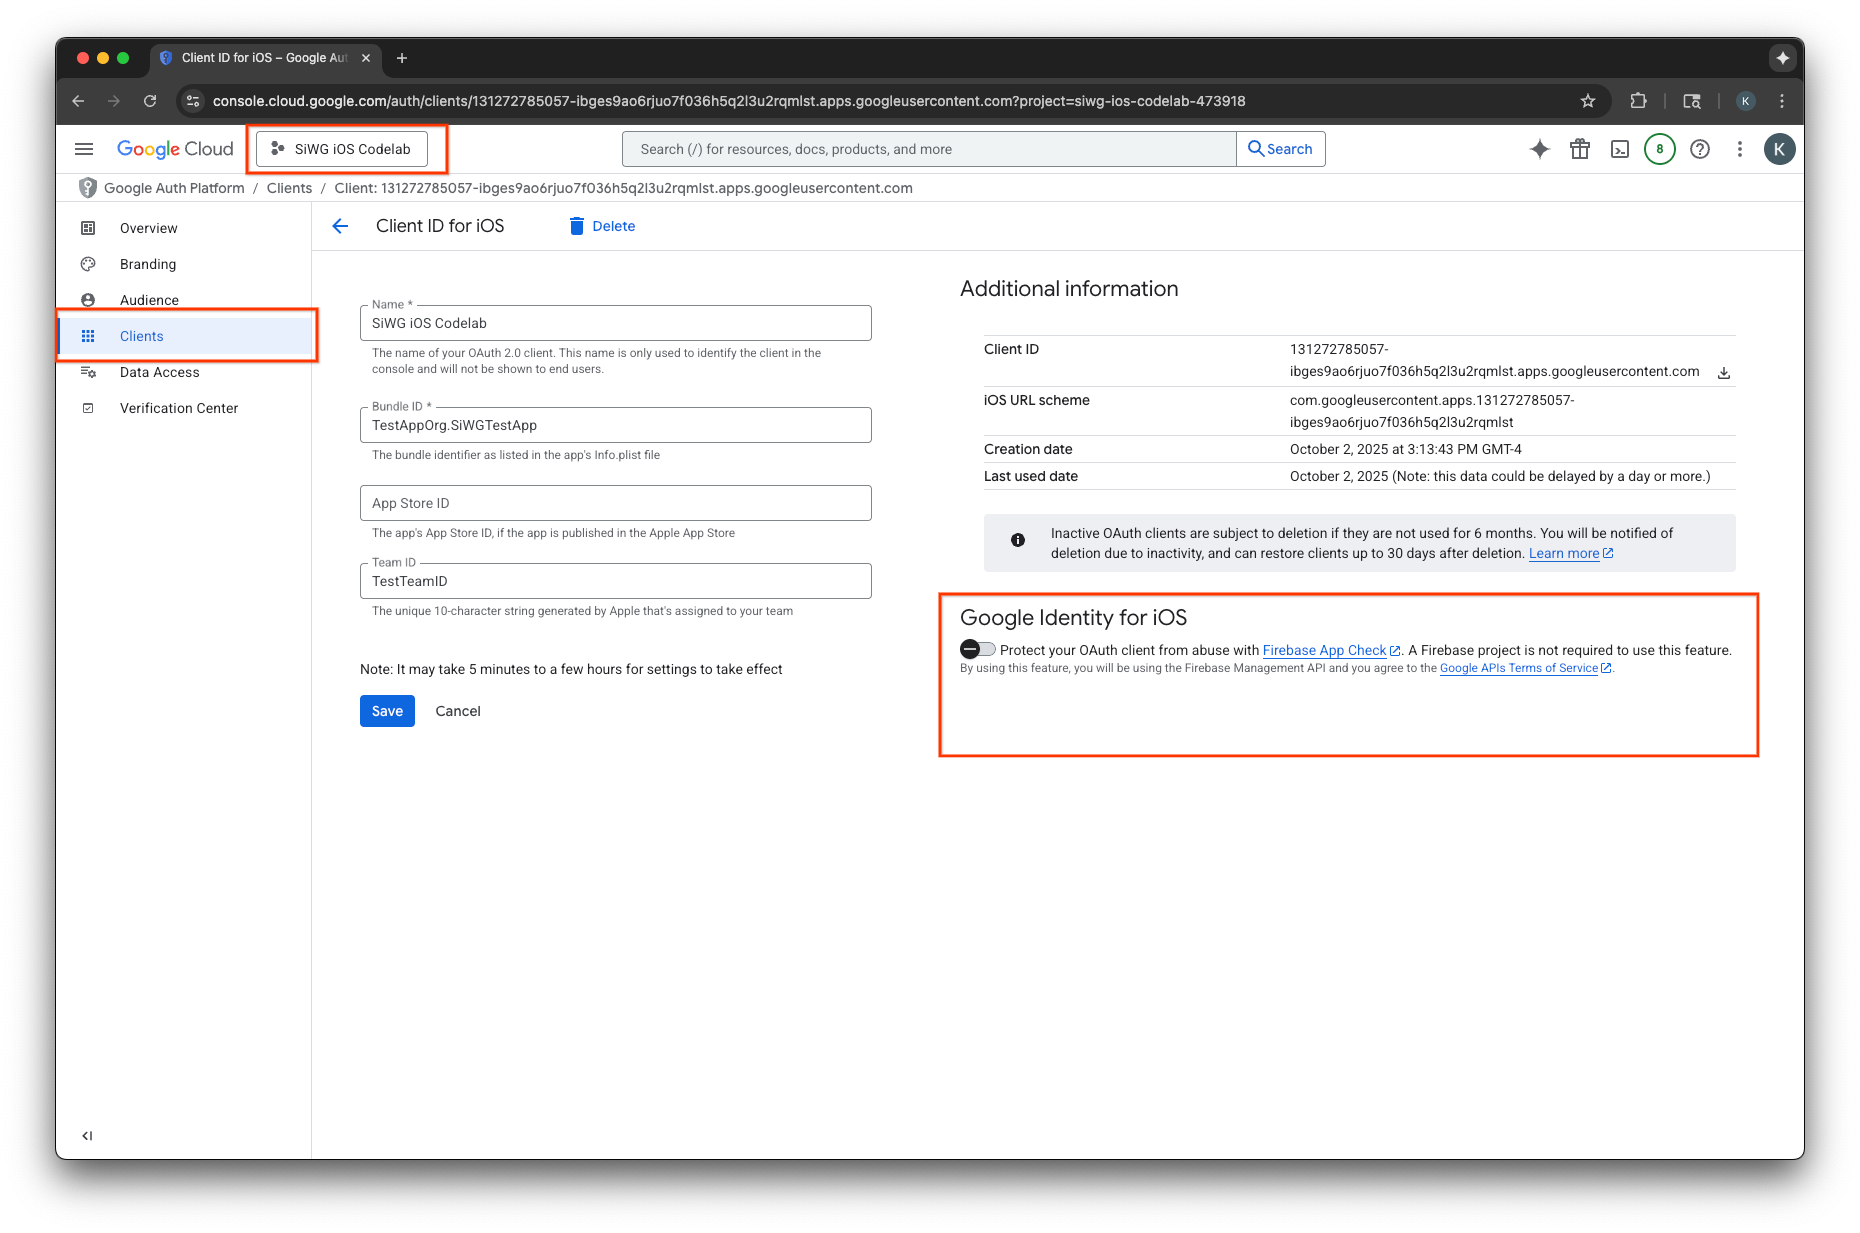
- Click Save.
Create an API key
- Navigate to the API Library page for your Google Cloud project.
- Enter Firebase App Check API in the search bar.
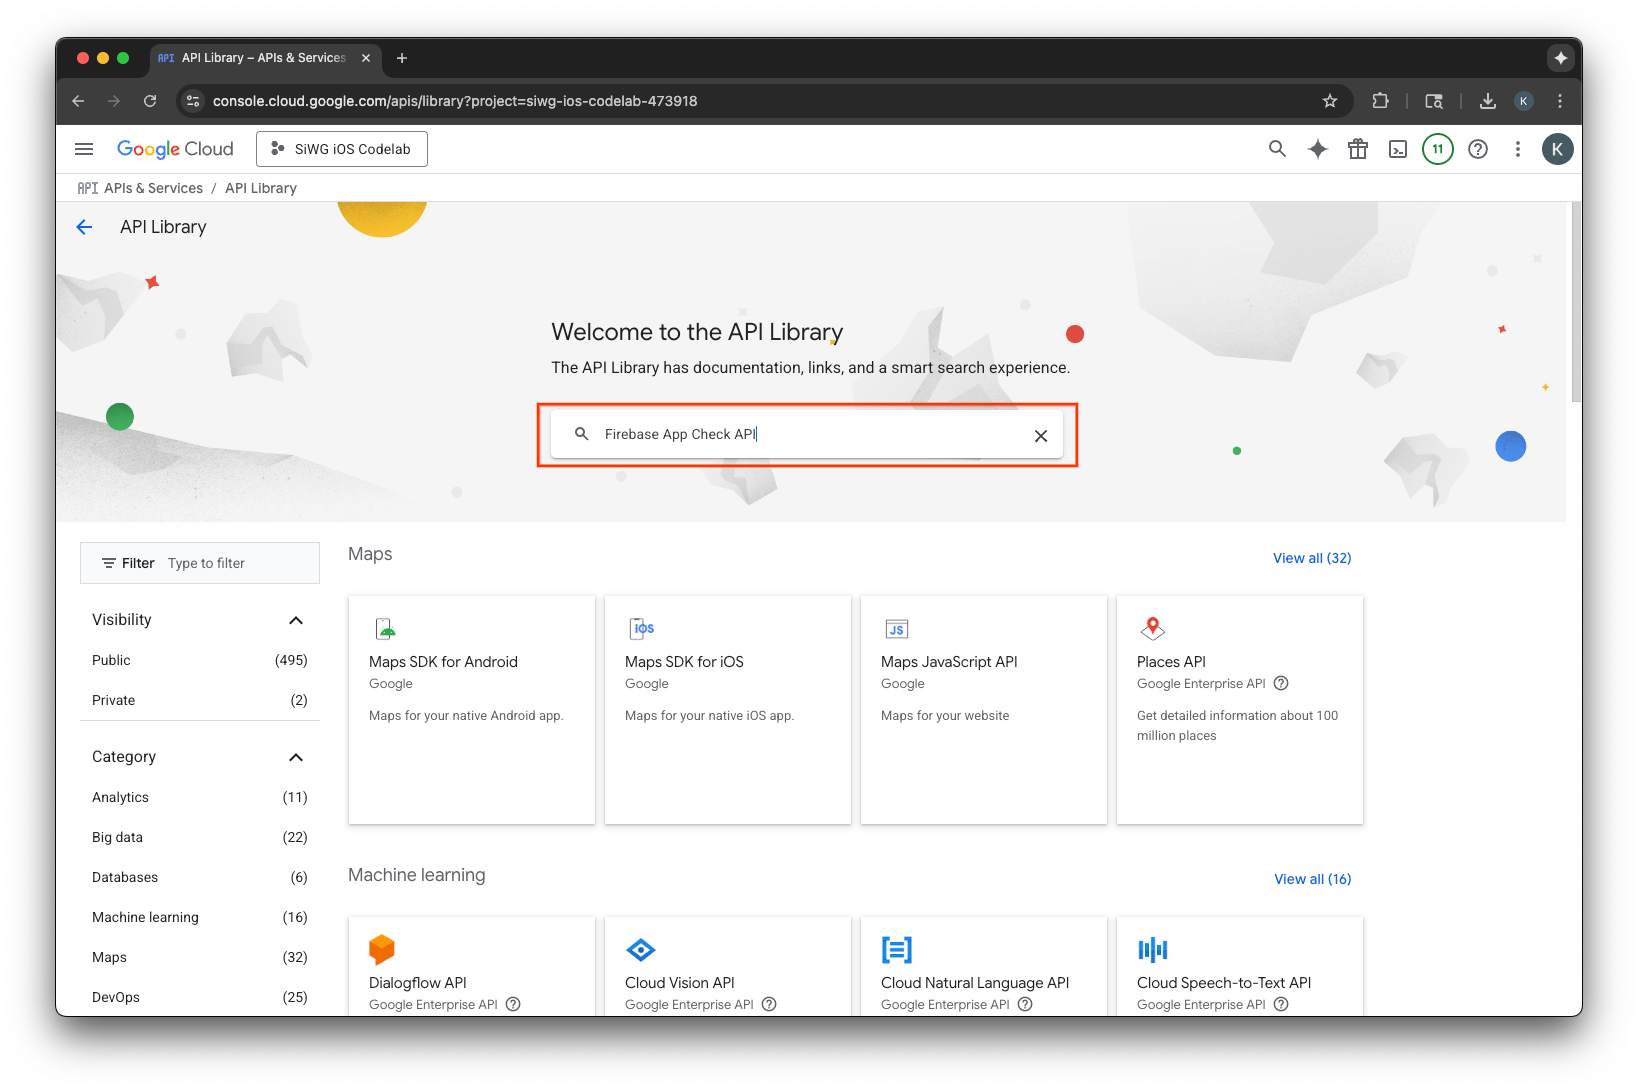
- Select and enable the Firebase App Check API.
- Navigate to APIs & Services and select Credentials in the navigation menu.
- Select Create credentials at the top of the page.
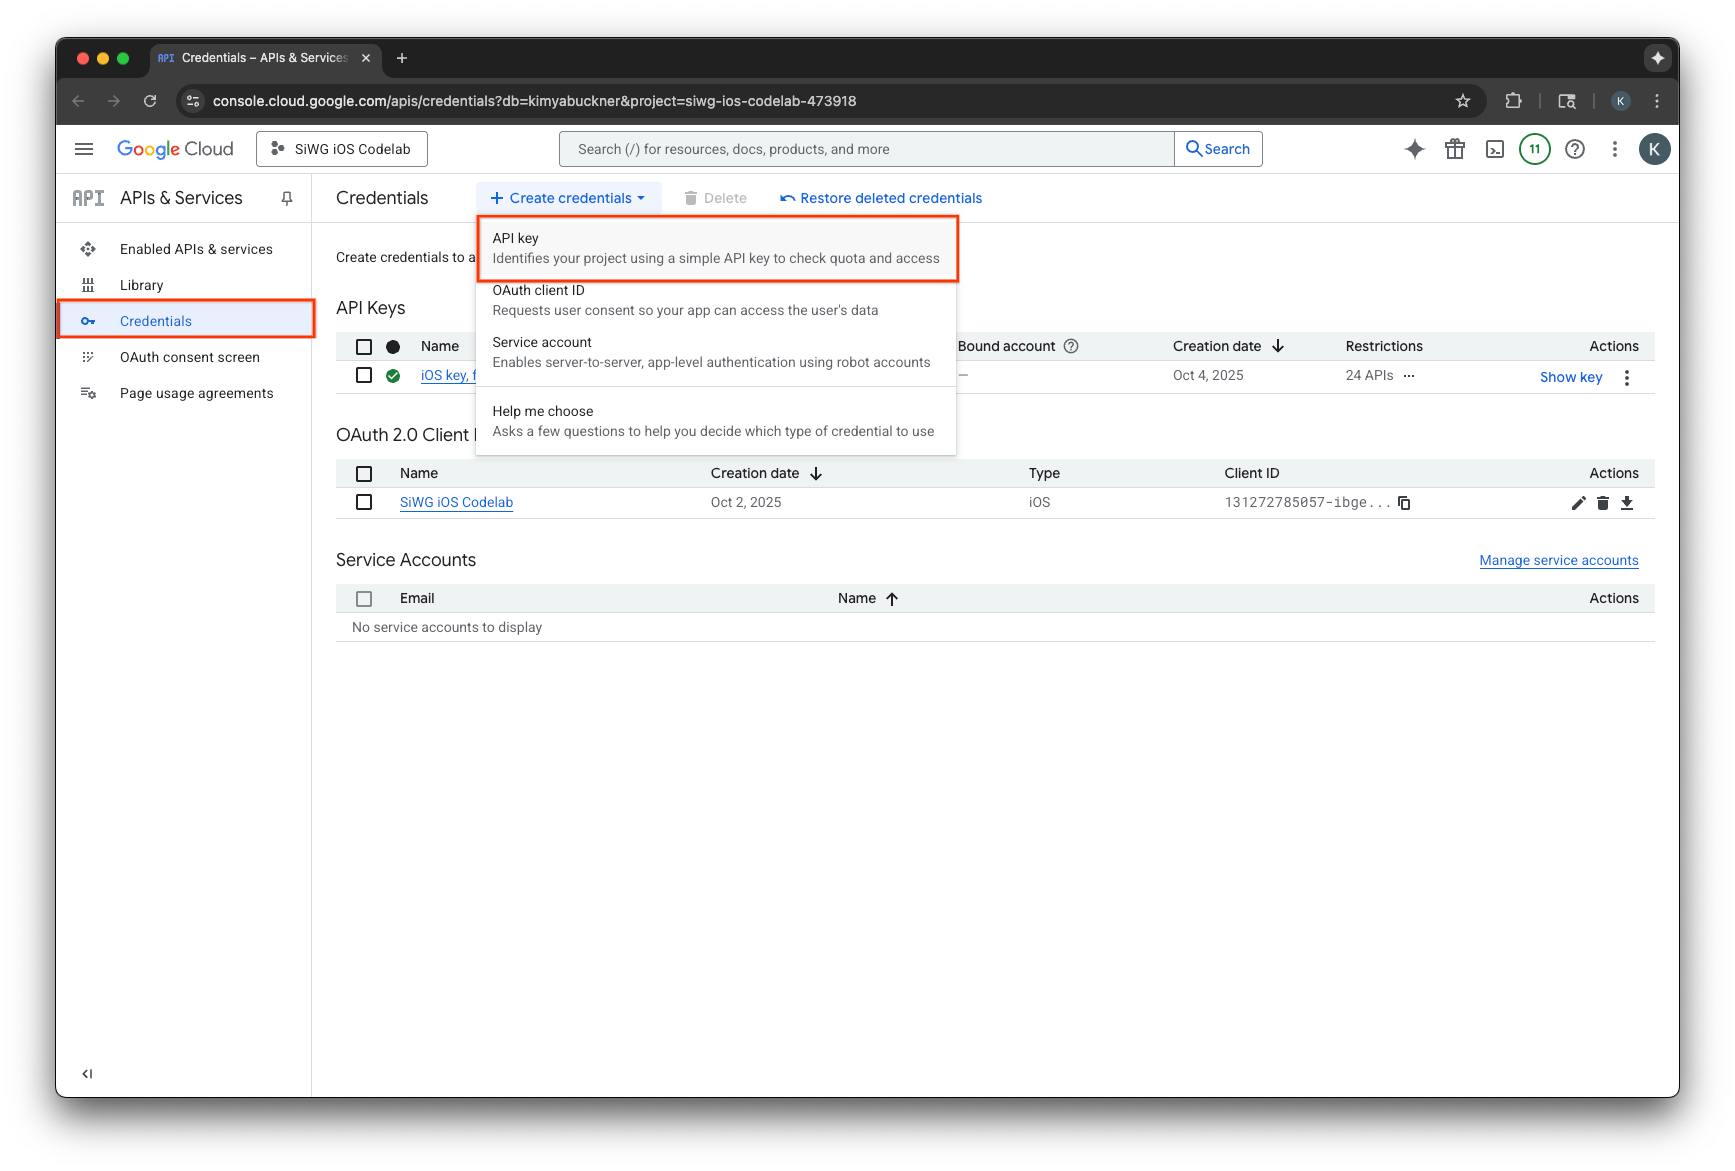
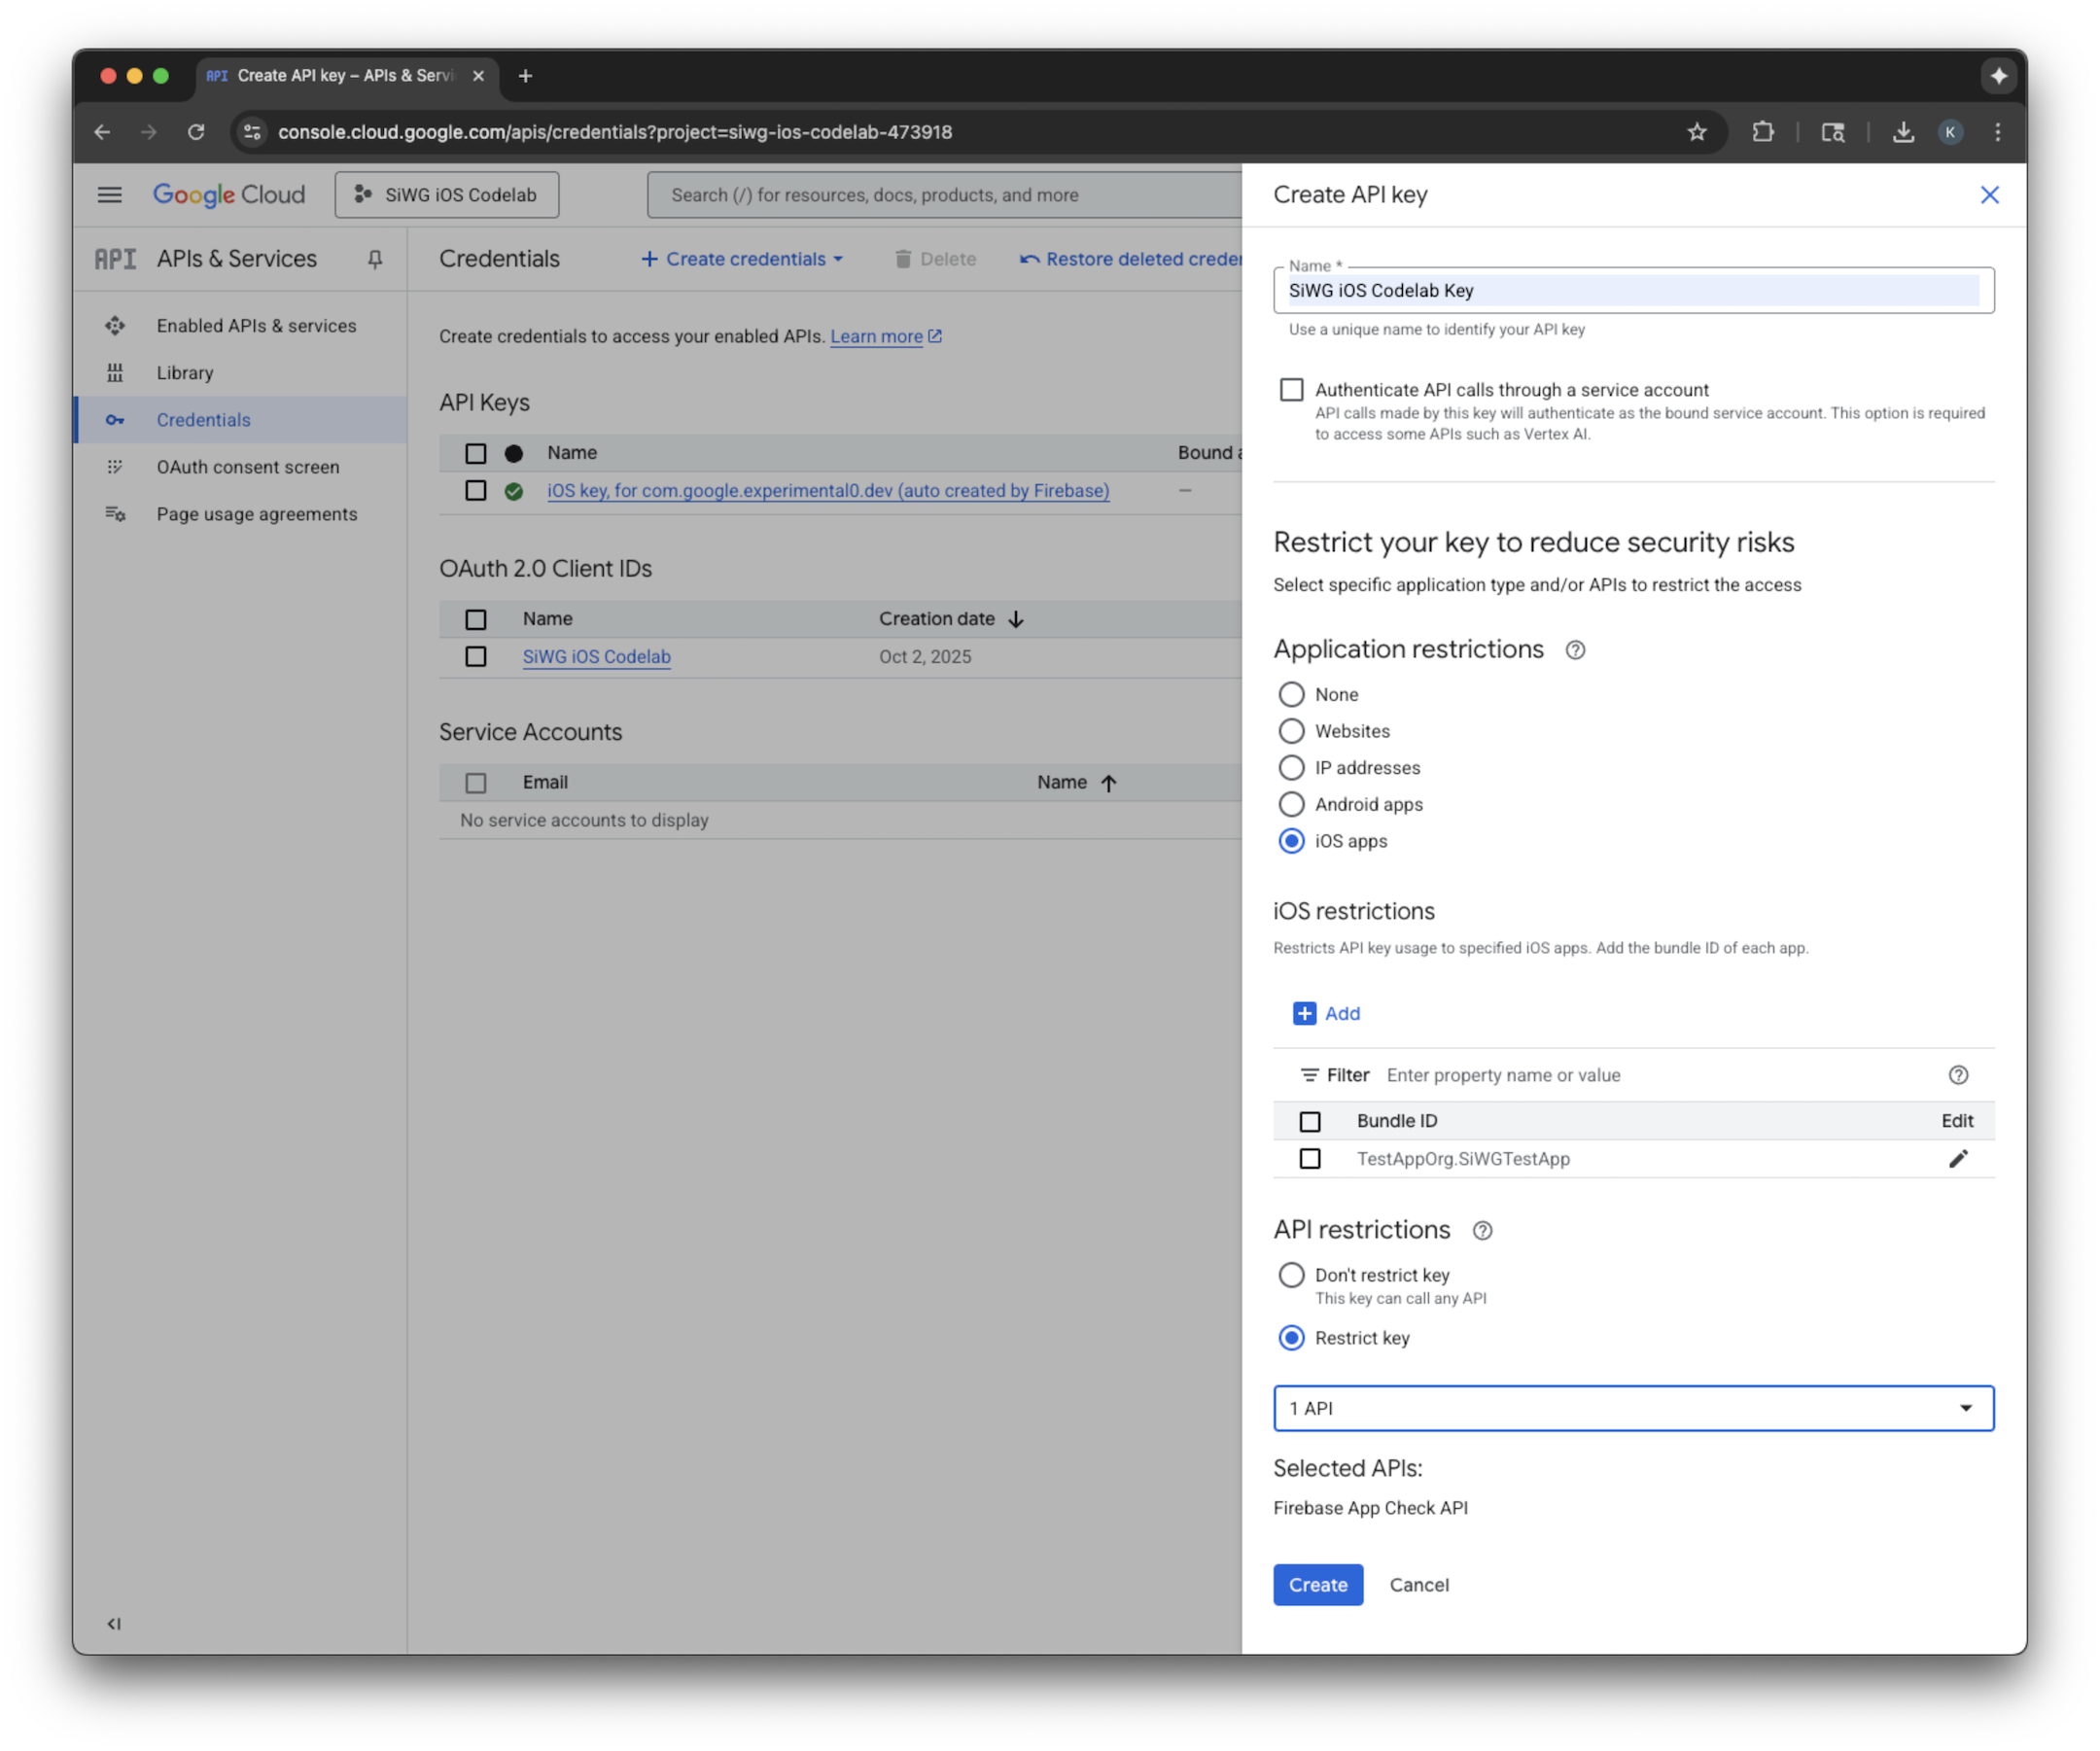
- Assign a name to this API Key.
- Select iOS apps under Application restrictions.
- Add the bundle identifier for your app as an approved application.
- Select Restrict key under API restrictions.
- Select Firebase App Check API from the drop-down menu.
- Select Create.
- Copy the API key that is created. You'll need it in a future step.
Add Firebase to your Google Cloud project
- Navigate to the Firebase Console.
- Select Get started by setting up a Firebase project.
- Select Add Firebase to Google Cloud project.

- Select a Google Cloud project from the drop-down and continue through the sign-up flow.
- Select Add Firebase.
- Once your Firebase project is ready, select Continue to open the project.
Client-side code integration
With the Google Cloud project configured for App Check, it's time to write the client-side code to enable it. The provider used for attestation is different in production and debug environments. A production app on a real device uses Apple's built-in App Attest service to prove its authenticity. However, because the iOS simulator cannot provide this kind of attestation, the debug environment requires a special debug provider that is passed an API key.
The following code handles both scenarios by using a compiler directive to automatically select the correct provider at build time.
SwiftUI
- Open the main app file.
- Define the following
AppDelegateclass after the imports and before the@mainattribute:
class AppDelegate: NSObject, UIApplicationDelegate {
  func application(
    _ application: UIApplication,
    didFinishLaunchingWithOptions launchOptions: [UIApplication.LaunchOptionsKey: Any]? = nil
  ) -> Bool {

    #if targetEnvironment(simulator)
      // Configure for debugging on a simulator.
      // TODO: Replace "YOUR_API_KEY" with the key from your Google Cloud project.
      let apiKey = "YOUR_API_KEY"
      GIDSignIn.sharedInstance.configureDebugProvider(withAPIKey: apiKey) { error in
        if let error {
          print("Error configuring GIDSignIn debug provider: \(error)")
        }
      }
    #else
      // Configure GIDSignIn for App Check on a real device.
      GIDSignIn.sharedInstance.configure { error in
        if let error {
          print("Error configuring GIDSignIn for App Check: \(error)")
        } else {
          print("GIDSignIn configured for App Check.")
        }
      }
    #endif

    return true
  }
}
- Replace
"YOUR_API_KEY"in the provided code with the API Key you copied from the Google Cloud Console. - Add the following line inside your
Appstruct, right before thebodyvariable. This registers your AppDelegate class with the app lifecycle, allowing it to respond to app launch and other system events:
@UIApplicationDelegateAdaptor(AppDelegate.self) var delegate
Your main app file should look like this:
import GoogleSignIn
import SwiftUI

class AppDelegate: NSObject, UIApplicationDelegate {
  func application(
    _ application: UIApplication,
    didFinishLaunchingWithOptions launchOptions: [UIApplication.LaunchOptionsKey: Any]? = nil
  ) -> Bool {

    #if targetEnvironment(simulator)
      // Configure for debugging on a simulator.
      // TODO: Replace "YOUR_API_KEY" with the key from your Google Cloud project.
      let apiKey = "YOUR_API_KEY"
      GIDSignIn.sharedInstance.configureDebugProvider(withAPIKey: apiKey) { error in
        if let error {
          print("Error configuring GIDSignIn debug provider: \(error)")
        }
      }
    #else
      // Configure GIDSignIn for App Check on a real device.
      GIDSignIn.sharedInstance.configure { error in
        if let error {
          print("Error configuring GIDSignIn for App Check: \(error)")
        } else {
          print("GIDSignIn configured for App Check.")
        }
      }
    #endif

    return true
  }
}

@main
struct iOS_Sign_in_with_Google_App: App {

  @UIApplicationDelegateAdaptor(AppDelegate.self) var delegate

  var body: some Scene {
    WindowGroup {
      ContentView()

        .onOpenURL { url in
          GIDSignIn.sharedInstance.handle(url)
        }
    }
  }
}
UIKit
- Open AppDelegate.swift.
- Update the
application(_:didFinishLaunchingWithOptions:)method to contain the App Check initialization:
func application(
  _ application: UIApplication,
  didFinishLaunchingWithOptions launchOptions: [UIApplication.LaunchOptionsKey: Any]?
) -> Bool {

  #if targetEnvironment(simulator)
    // Configure for debugging on a simulator.
    // TODO: Replace "YOUR_API_KEY" with the key from your Google Cloud project.
    let apiKey = "YOUR_API_KEY"
    GIDSignIn.sharedInstance.configureDebugProvider(withAPIKey: apiKey) { error in
      if let error {
        print("Error configuring GIDSignIn debug provider: \(error)")
      }
    }
  #else
    // Configure GIDSignIn for App Check on a real device.
    GIDSignIn.sharedInstance.configure { error in
      if let error {
        print("Error configuring GIDSignIn for App Check: \(error)")
      }
    }
  #endif

  return true
}
- Replace
"YOUR_API_KEY"in the provided code with the API Key you copied from the Google Cloud Console.
Your AppDelegate.swift file should look like this:
import GoogleSignIn
import UIKit

@main
class AppDelegate: UIResponder, UIApplicationDelegate {

  func application(
    _ application: UIApplication,
    didFinishLaunchingWithOptions launchOptions: [UIApplication.LaunchOptionsKey: Any]?
  ) -> Bool {

    #if targetEnvironment(simulator)
      // Configure for debugging on a simulator.
      // TODO: Replace "YOUR_API_KEY" with the key from your Google Cloud project.
      let apiKey = "YOUR_API_KEY"
      GIDSignIn.sharedInstance.configureDebugProvider(withAPIKey: apiKey) { error in
        if let error {
          print("Error configuring GIDSignIn debug provider: \(error)")
        }
      }
    #else
      // Configure GIDSignIn for App Check on a real device.
      GIDSignIn.sharedInstance.configure { error in
        if let error {
          print("Error configuring GIDSignIn for App Check: \(error)")
        }
      }
    #endif

    return true
  }

  func application(
    _ app: UIApplication,
    open url: URL,
    options: [UIApplication.OpenURLOptionsKey: Any] = [:]
  ) -> Bool {
    var handled: Bool

    handled = GIDSignIn.sharedInstance.handle(url)
    if handled {
      return true
    }
    // If not handled by this app, return false.
    return false
  }

  // MARK: UISceneSession Lifecycle

  func application(
    _ application: UIApplication,
    configurationForConnecting connectingSceneSession: UISceneSession,
    options: UIScene.ConnectionOptions
  ) -> UISceneConfiguration {
    // Called when a new scene session is being created.
    // Use this method to select a configuration to create the new scene with.
    return UISceneConfiguration(
      name: "Default Configuration",
      sessionRole: connectingSceneSession.role
    )
  }

  func application(
    _ application: UIApplication,
    didDiscardSceneSessions sceneSessions: Set<UISceneSession>
  ) {
    // Called when the user discards a scene session.
    // If any sessions were discarded while the application was not running, this will be called shortly after application:didFinishLaunchingWithOptions.
    // Use this method to release any resources that were specific to the discarded scenes, as they will not return.
  }
}
Test App Check on the simulator
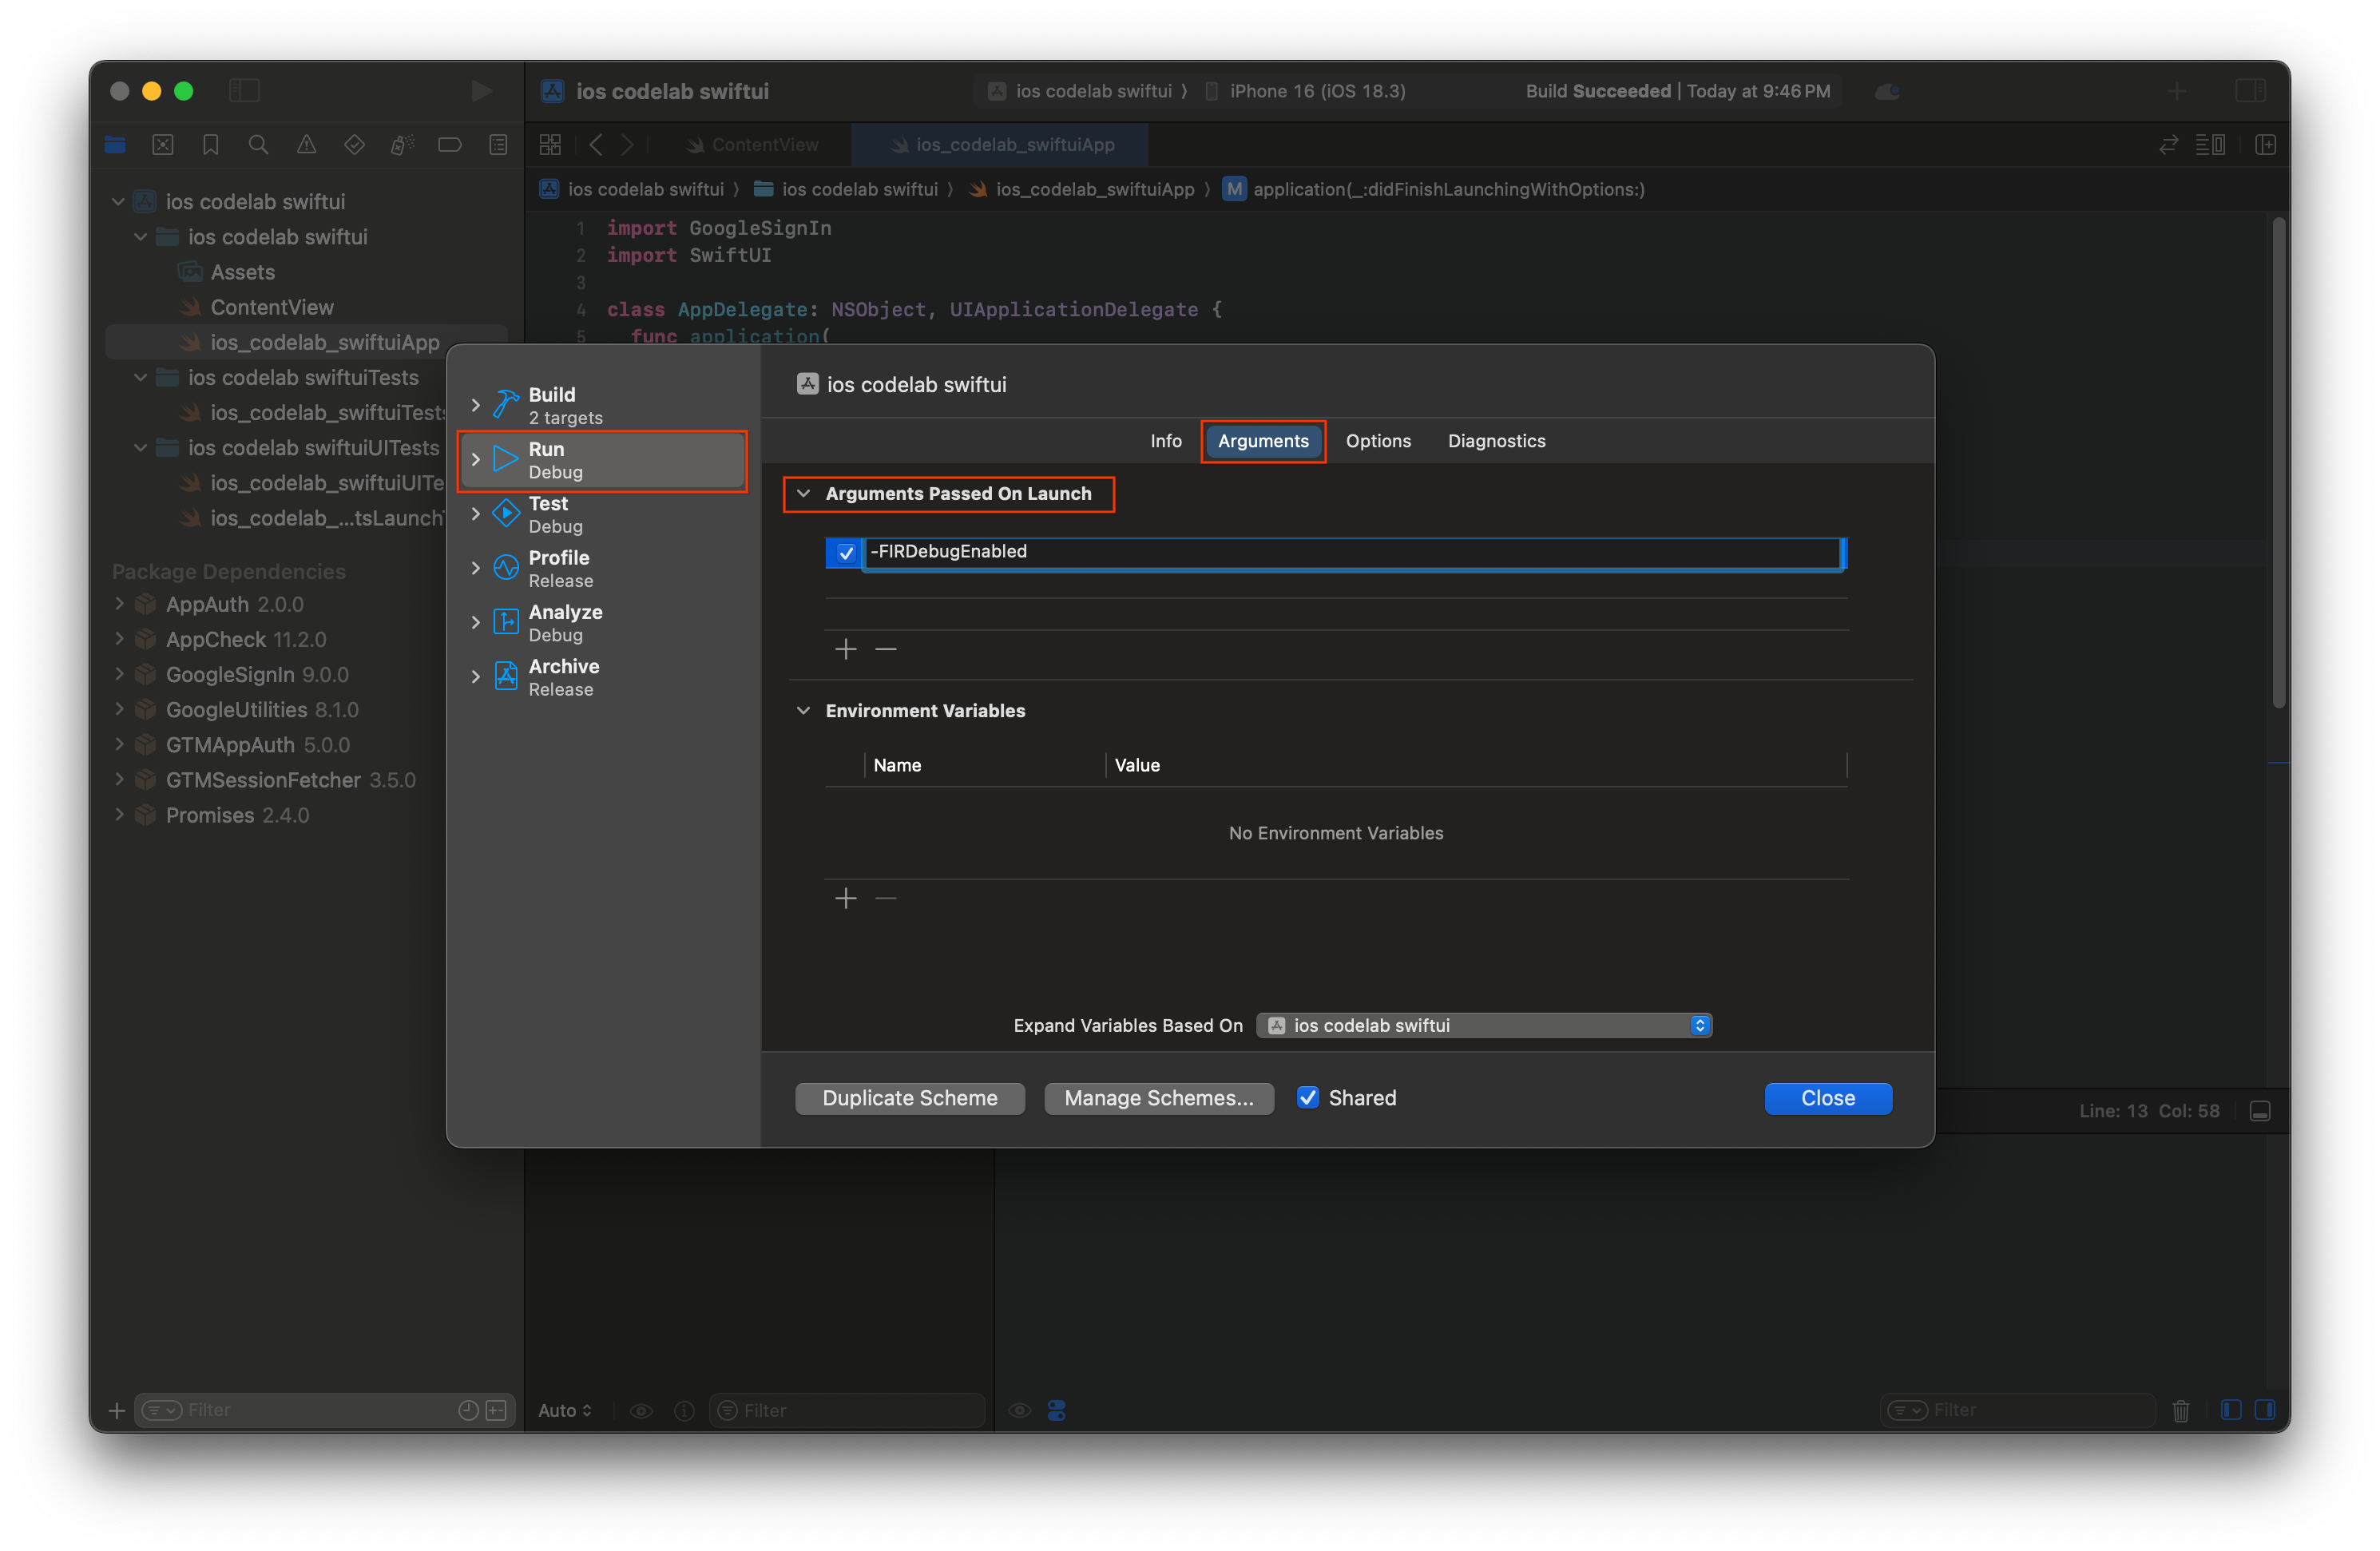
- In the Xcode Menu Bar, navigate to Product > Scheme > Edit Scheme.
- Select Run in the navigation menu.
- Select the Arguments tab.
- In the Arguments Passed on Launch section, select + and add -FIRDebugEnabled. This launch argument enables Firebase debug logging.
- Select Close.
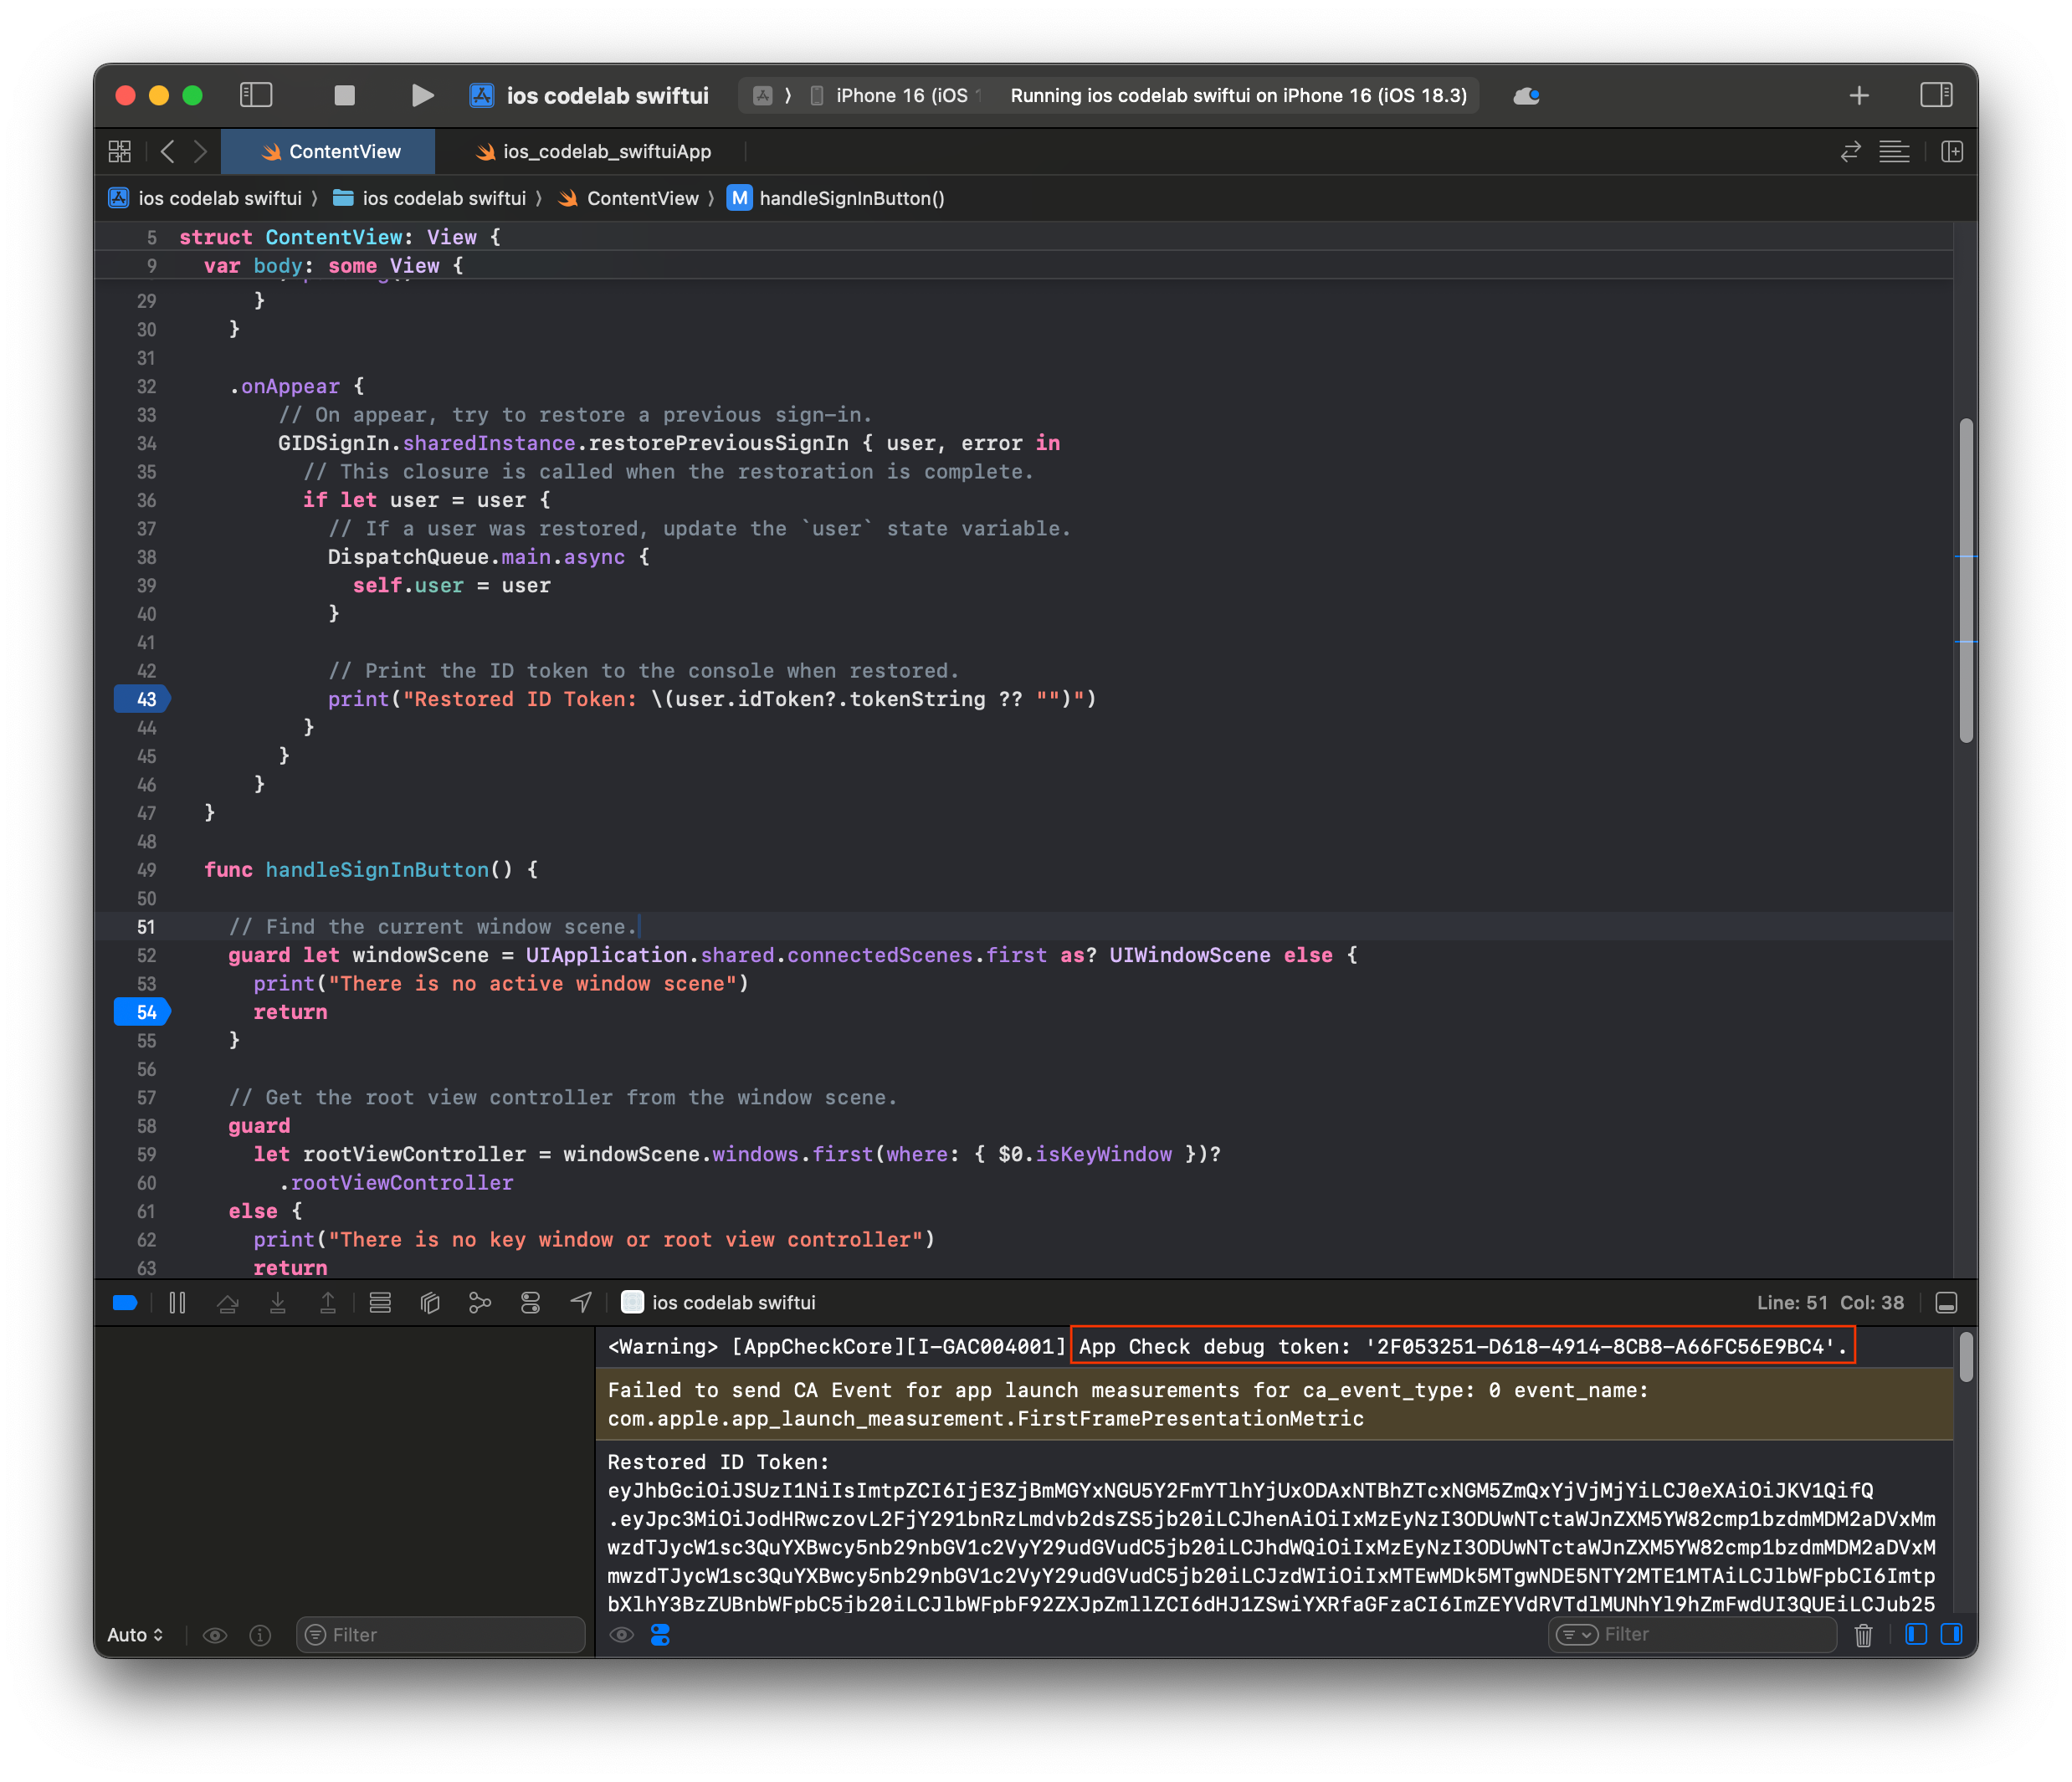
- Launch your app on the simulator.
- Copy the App Check debug token that is printed in the Xcode console.
- Navigate to your project in the Firebase Console.
- Expand the Build section in the navigation menu.
- Select App Check.
- Select the Apps tab.
- Hover over your app and select the three-dot menu icon.
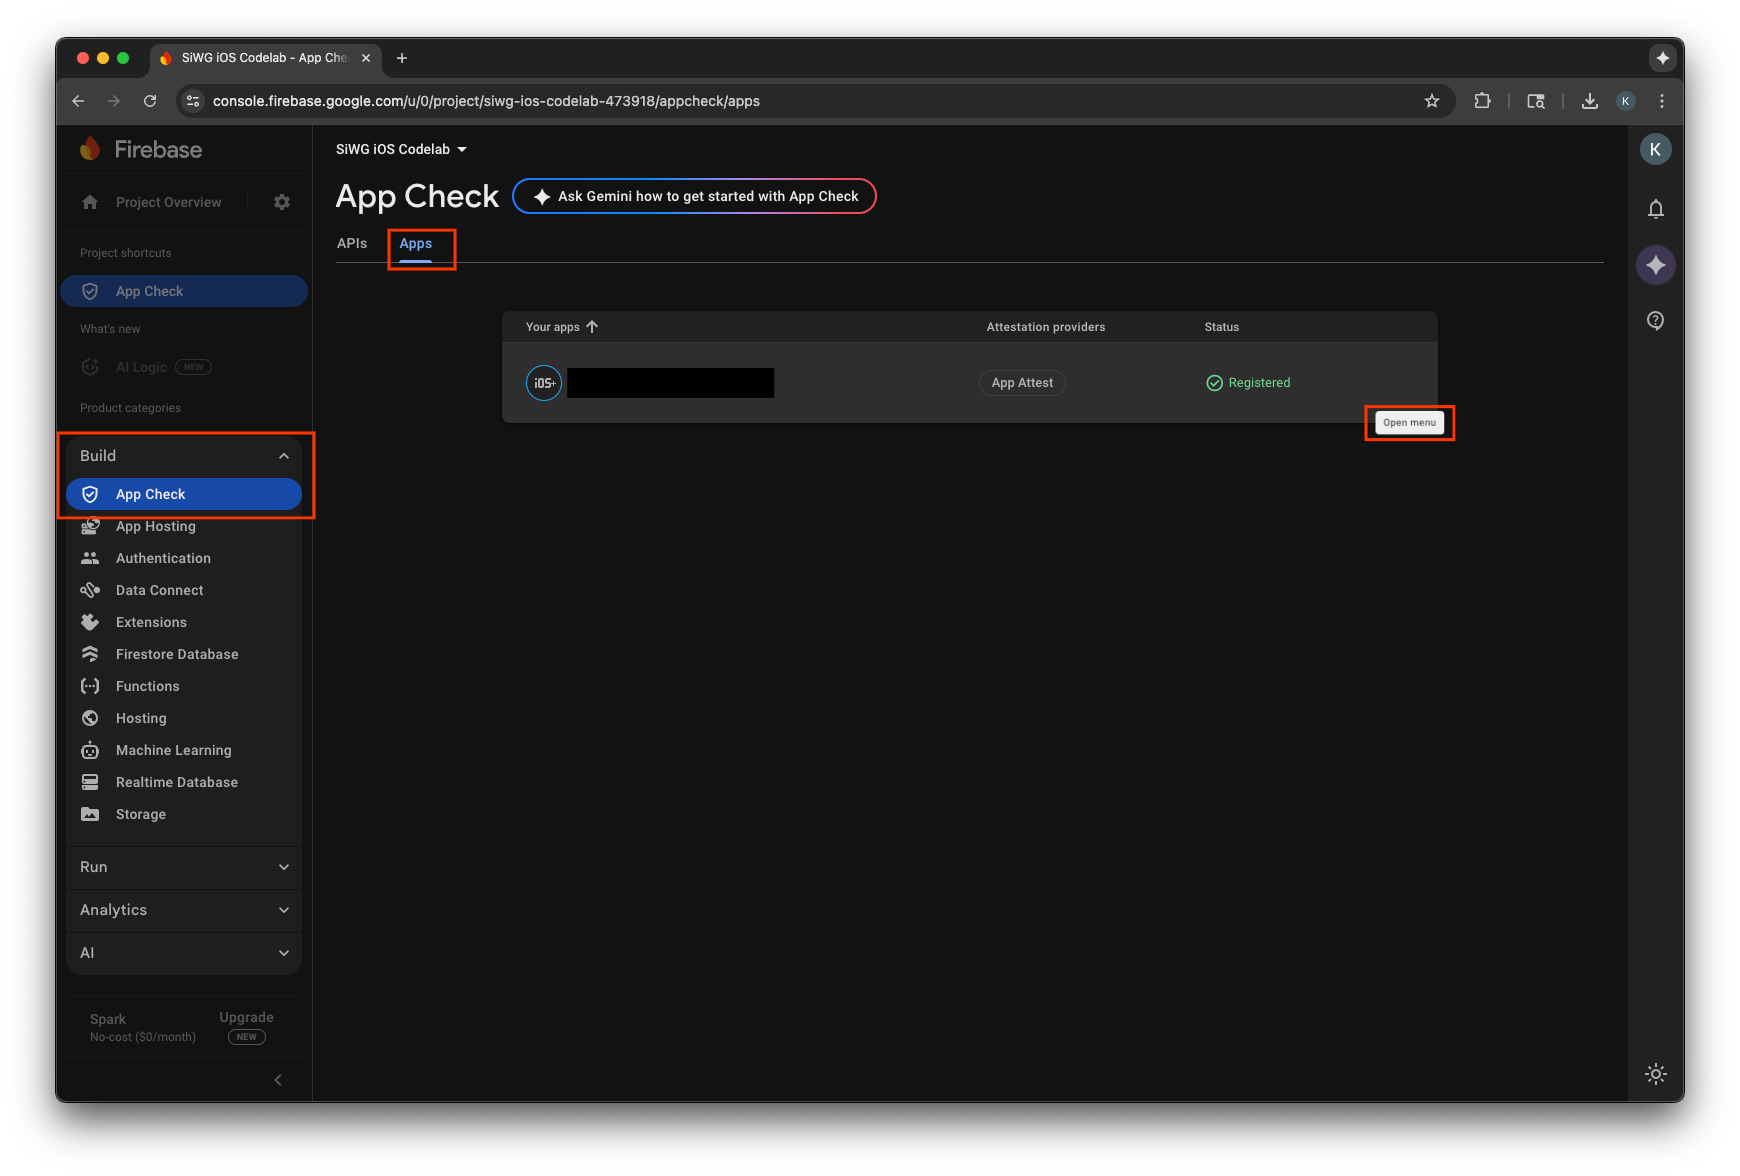
- Select Manage debug tokens.
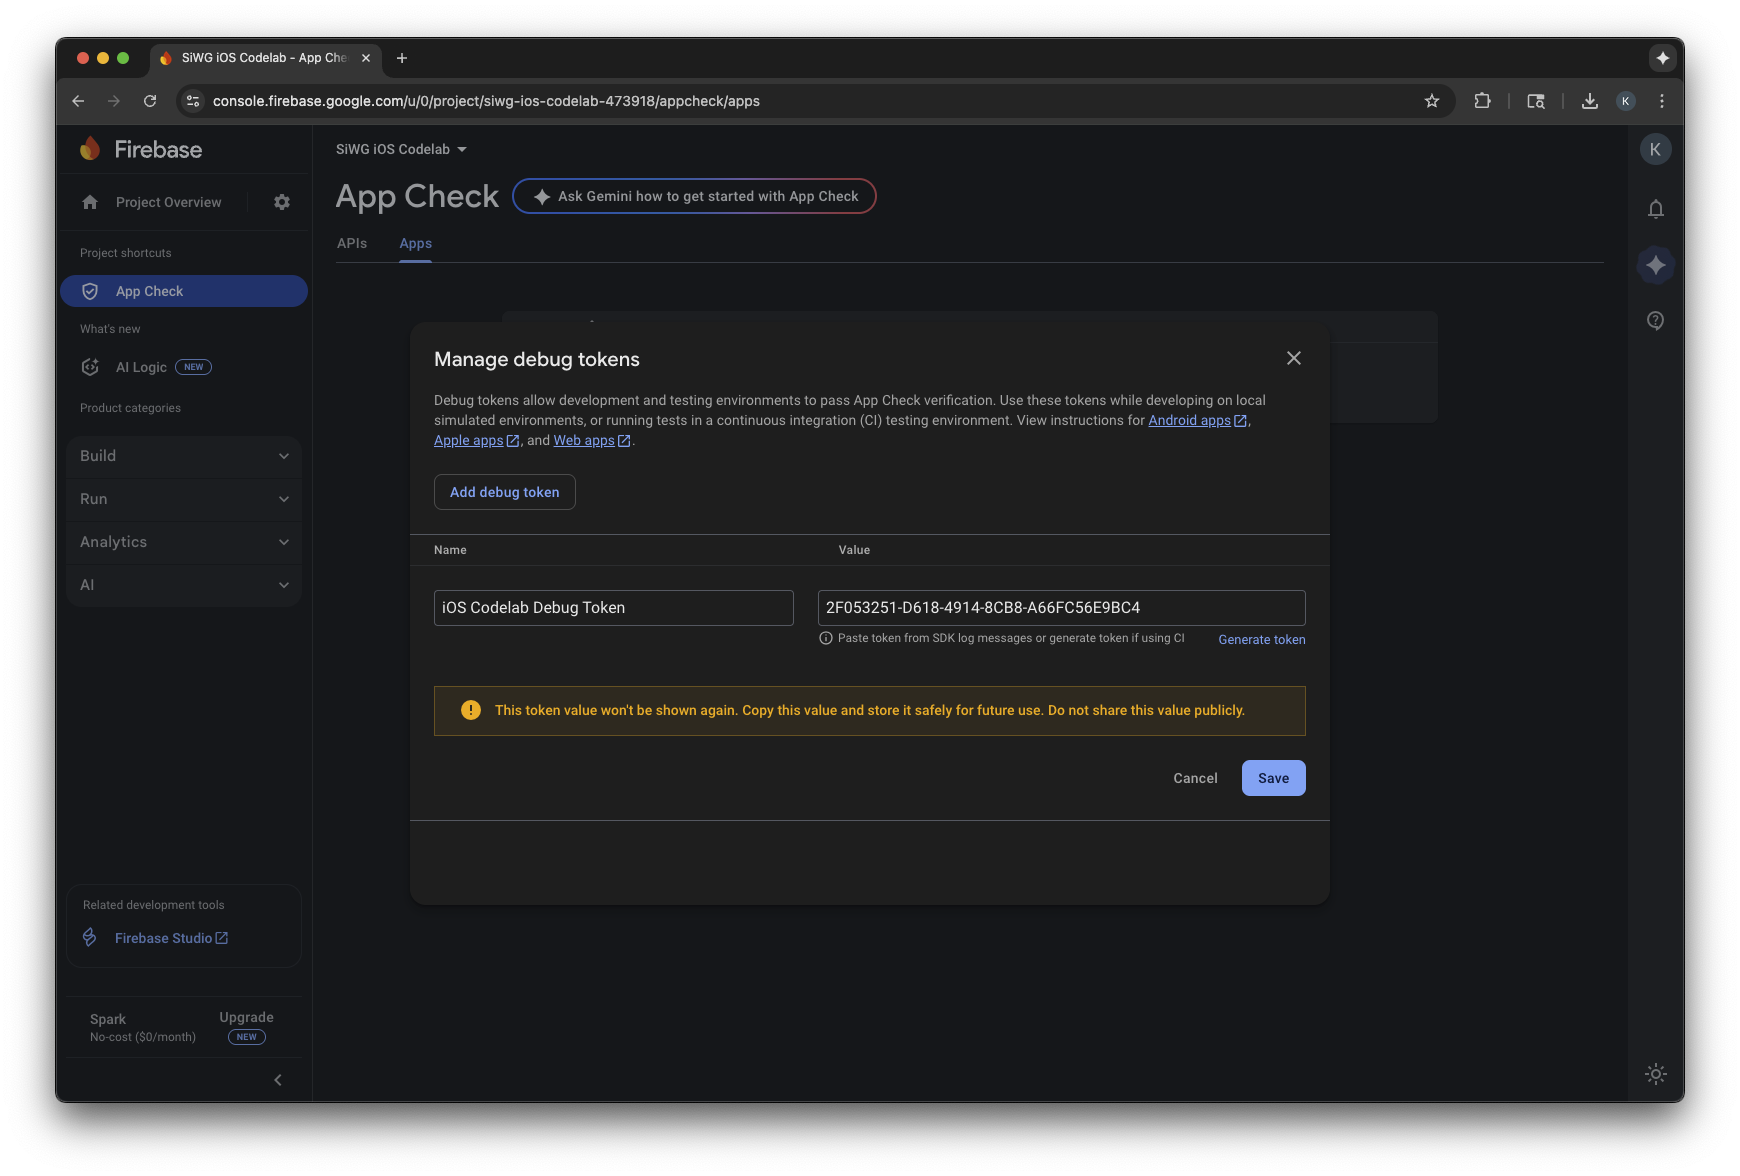
- Select Add debug token.
- Give your debug token a name and paste the debug token you copied earlier for the value.
- Select Save to register your token.
- Return to the simulator and sign in.
It can take several minutes for metrics to appear in the console. Once they do, you can confirm that App Check is working by looking for an increase in Verified requests in one of two places:
- In the App Check section of the Firebase Console, under the APIs tab.
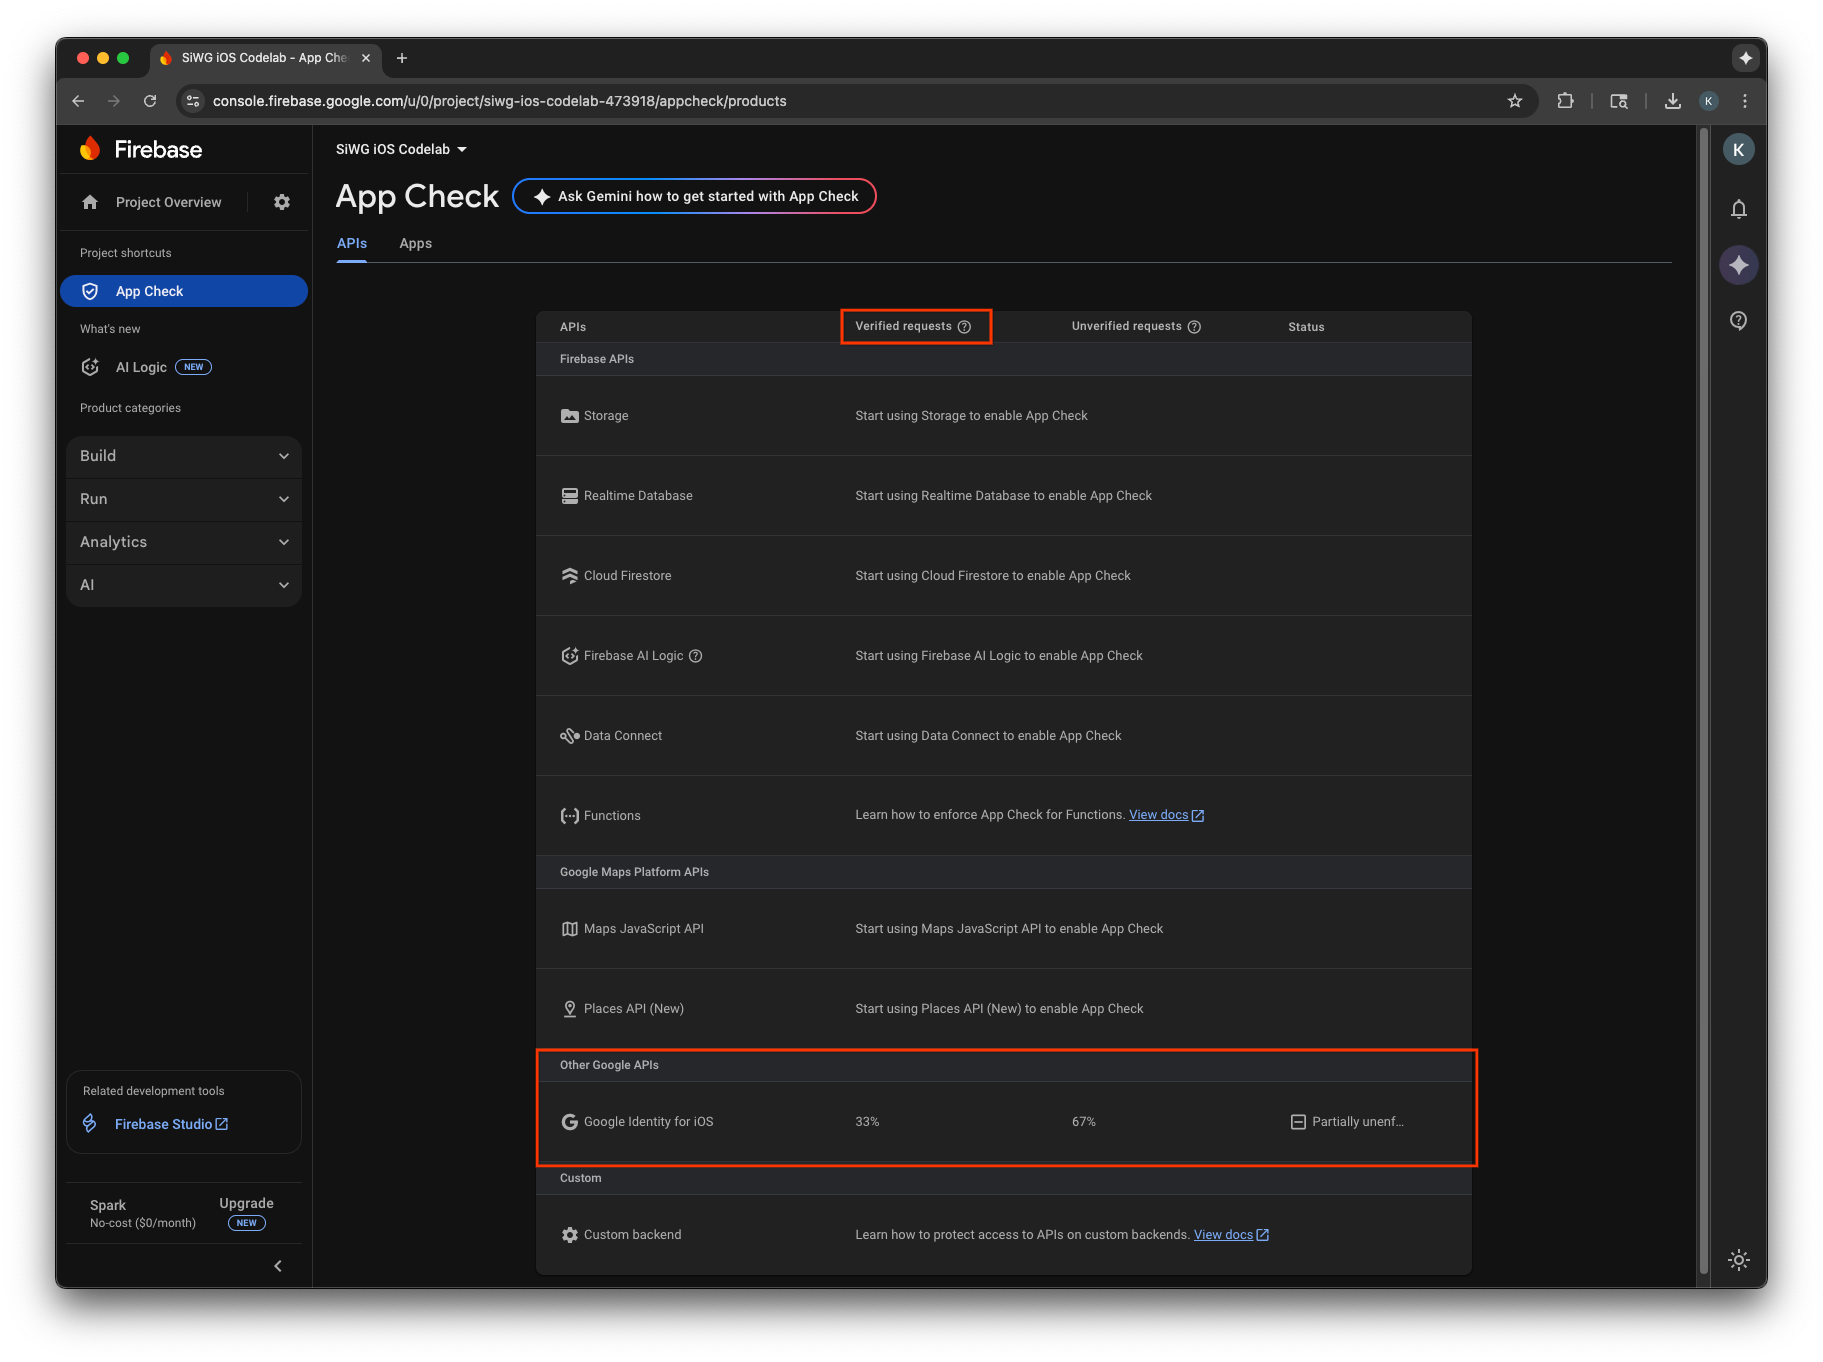
- On the edit page for your OAuth client in the Google Cloud Console.
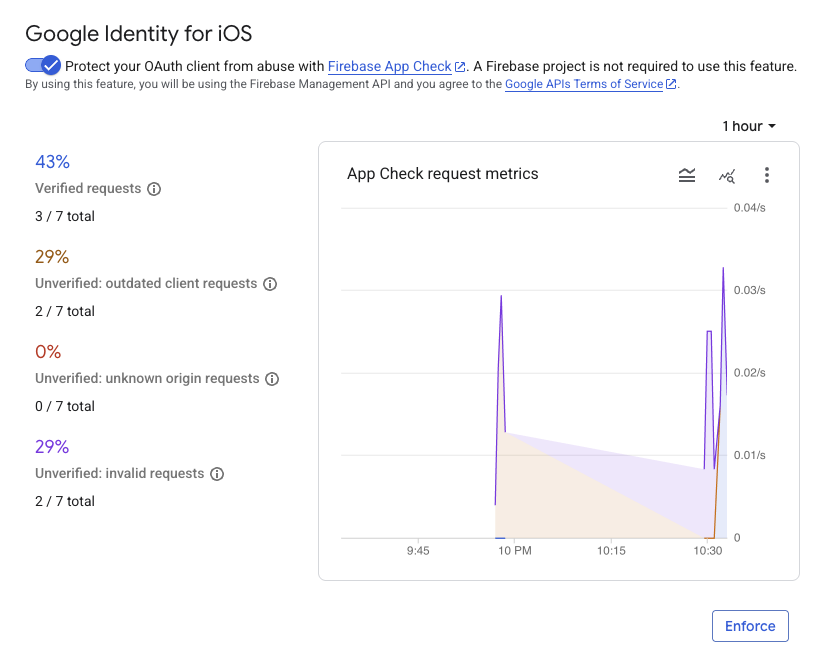
After monitoring your app's App Check metrics and confirming that legitimate requests are being verified, you should enable App Check enforcement. Once enforced, App Check rejects all unverified requests, ensuring only traffic from your authentic app can access Google's OAuth 2.0 endpoints on behalf of your project.
12. Additional resources
Congratulations!
You've configured an OAuth 2.0 iOS client, added a Sign in with Google button to an iOS app, learned how to customize how the button looks, decoded a JWT ID token, and enabled App Check for your app.
These links may help you with next steps:
- How to Get started with Google Sign-In for iOS
- Google Sign-In for iOS repository
- Verify a Google ID token
- Get started using App Check for Google Sign-in on iOS
- Revoking access tokens and disconnecting the app
- Learn more about Google Cloud projects
- Google Identity authentication methods
- Enable App Check enforcement