
1. शुरू करने से पहले
इस कोडलैब में, आपको एक ऐसा iOS ऐप्लिकेशन बनाने का तरीका बताया गया है जिसमें 'Google से साइन इन करें' सुविधा लागू की गई हो और जो सिम्युलेटर में चलता हो. SwiftUI और UIKit, दोनों का इस्तेमाल करके लागू करने के तरीके दिए गए हैं.
SwiftUI, Apple का नया यूज़र इंटरफ़ेस (यूआई) फ़्रेमवर्क है. इसका इस्तेमाल नए ऐप्लिकेशन डेवलप करने के लिए किया जाता है. इससे, Apple के सभी प्लैटफ़ॉर्म के लिए यूज़र इंटरफ़ेस बनाए जा सकते हैं. इसके लिए, एक ही शेयर किए गए कोडबेस का इस्तेमाल किया जाता है. इसके लिए, iOS 13 या इसके बाद का वर्शन होना ज़रूरी है.
UIKit, iOS के लिए Apple का ओरिजनल और बुनियादी यूज़र इंटरफ़ेस (यूआई) फ़्रेमवर्क है. यह पुराने iOS वर्शन के साथ काम करने की सुविधा देता है. इसलिए, यह उन ऐप्लिकेशन के लिए एक अच्छा विकल्प है जो पहले से मौजूद हैं और जिन्हें कई तरह के पुराने डिवाइसों पर काम करना है.
अपनी डेवलपमेंट की ज़रूरतों के हिसाब से, फ़्रेमवर्क का पाथ फ़ॉलो किया जा सकता है.
ज़रूरी शर्तें
आपको क्या सीखने को मिलेगा
- Google Cloud प्रोजेक्ट बनाने का तरीका
- Google Cloud Console में OAuth क्लाइंट बनाने का तरीका
- अपने iOS ऐप्लिकेशन में 'Google से साइन इन करें' सुविधा लागू करने का तरीका
- 'Google से साइन इन करें' बटन को पसंद के मुताबिक बनाने का तरीका
- आईडी टोकन को डिकोड करने का तरीका
- अपने iOS ऐप्लिकेशन के लिए, App Check की सुविधा चालू करने का तरीका
आपको किन चीज़ों की ज़रूरत होगी
- Xcode का मौजूदा वर्शन
- macOS पर चलने वाला ऐसा कंप्यूटर जो Xcode के इंस्टॉल किए गए वर्शन के लिए, सिस्टम से जुड़ी ज़रूरी शर्तें पूरी करता हो
इस कोडलैब को Xcode 16.3 और iOS 18.3 सिम्युलेटर का इस्तेमाल करके बनाया गया है. डेवलपमेंट के लिए, Xcode के नए वर्शन का इस्तेमाल करें.
2. नया Xcode प्रोजेक्ट बनाना
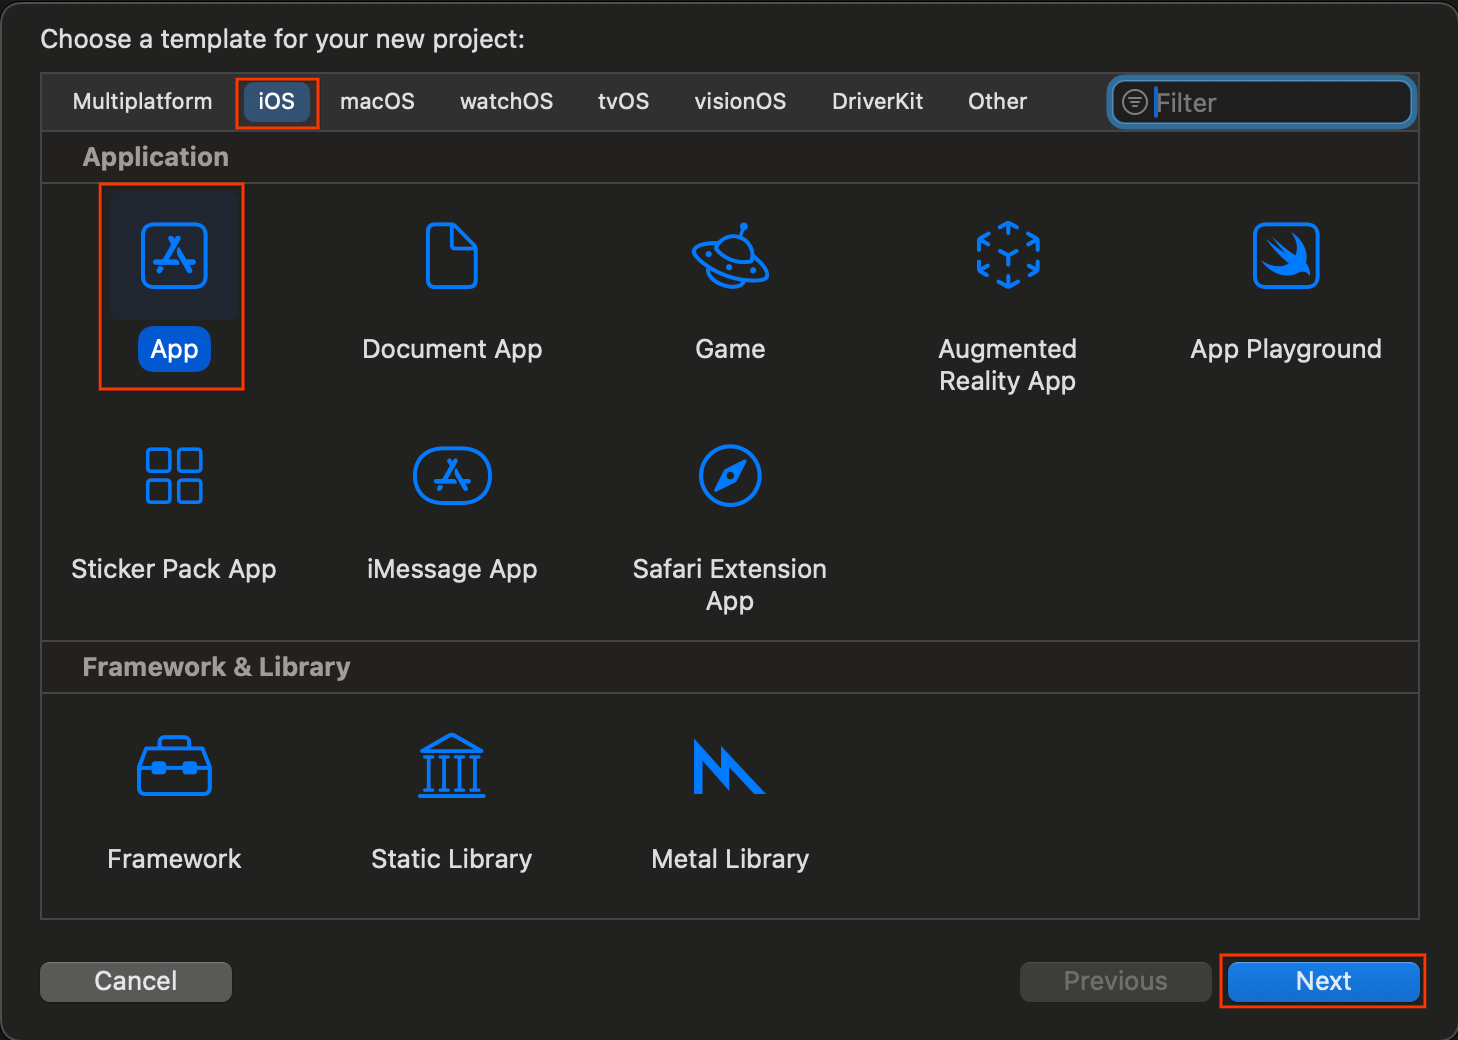
- Xcode खोलें और Create a new Xcode project को चुनें.
- iOS टैब चुनें. इसके बाद, ऐप्लिकेशन टेंप्लेट चुनें और आगे बढ़ें पर क्लिक करें.
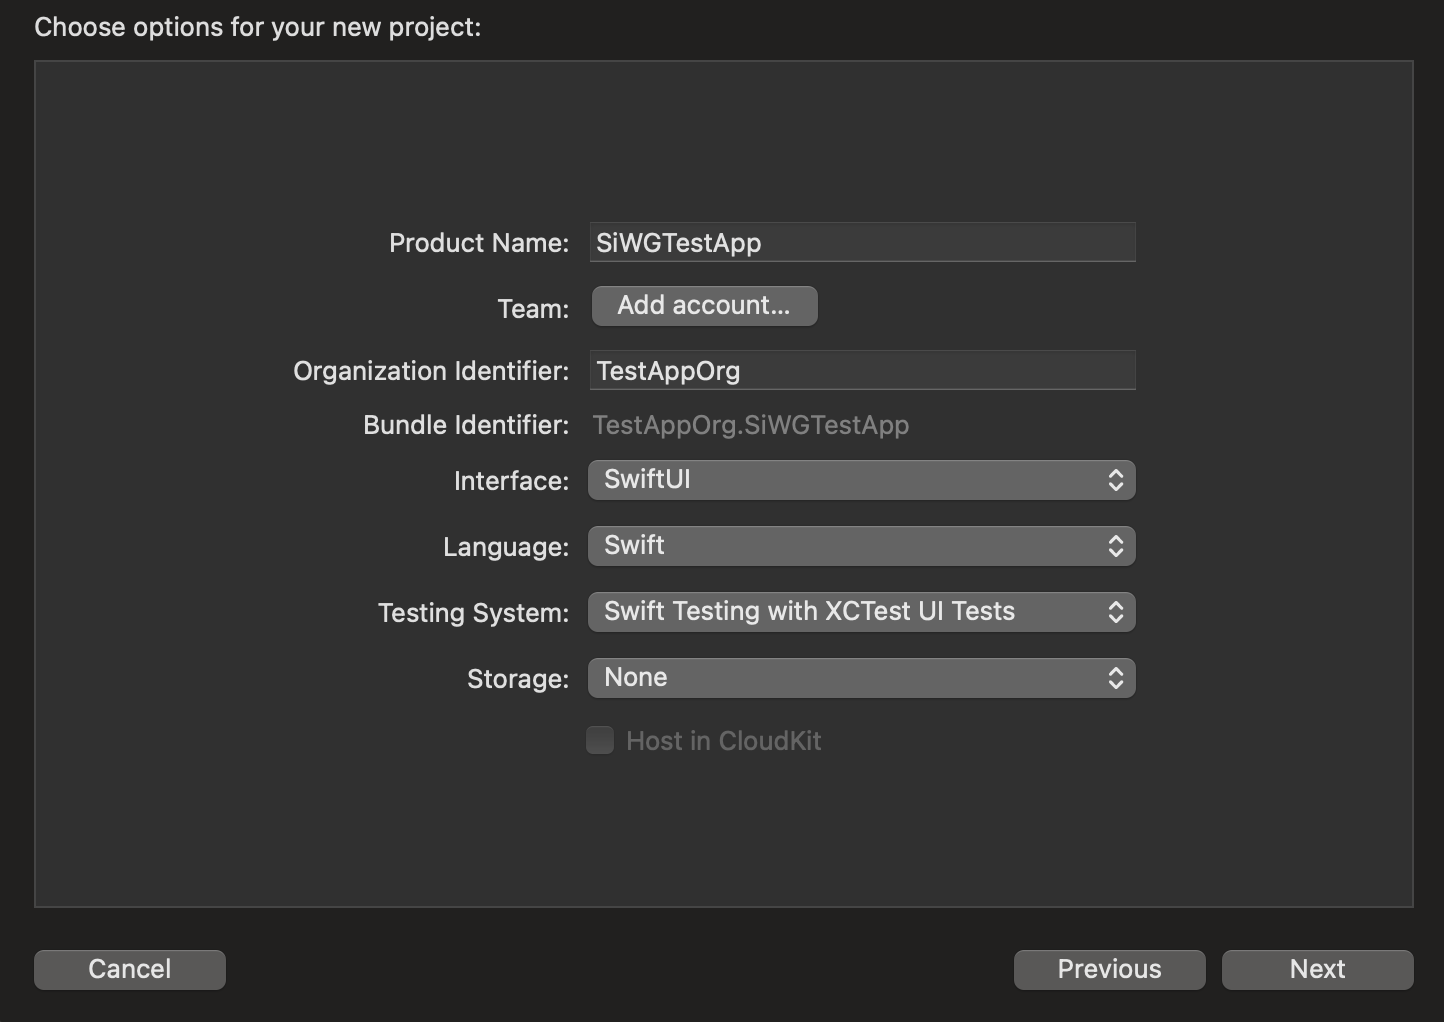
- प्रोजेक्ट के विकल्पों में जाकर:
- अपने प्रॉडक्ट का नाम डालें.
- ज़रूरी नहीं: अपनी टीम चुनें.
- अपना संगठन आइडेंटिफ़ायर डालें.
- जनरेट किए गए बंडल आइडेंटिफ़ायर को नोट करें. आपको इसकी बाद में ज़रूरत होगी.
- इंटरफ़ेस के लिए, इनमें से कोई एक विकल्प चुनें:
- SwiftUI पर आधारित ऐप्लिकेशन के लिए SwiftUI.
- UIKit पर आधारित ऐप्लिकेशन के लिए स्टोरीबोर्ड.
- भाषा के लिए, Swift चुनें.
- आगे बढ़ें पर क्लिक करें और प्रोजेक्ट को सेव करने के लिए कोई जगह चुनें.
3. OAuth क्लाइंट बनाना
अपने ऐप्लिकेशन को Google की पुष्टि करने वाली सेवाओं के साथ कम्यूनिकेट करने की अनुमति देने के लिए, आपको एक OAuth क्लाइंट आईडी बनाना होगा. इसके लिए, Google Cloud प्रोजेक्ट की ज़रूरत होती है. यहां दिए गए तरीके से, प्रोजेक्ट और OAuth क्लाइंट आईडी बनाया जा सकता है.
Google Cloud प्रोजेक्ट चुनना या बनाना
- Google Cloud Console पर जाएं और कोई प्रोजेक्ट चुनें या बनाएं. अगर आपको पहले से मौजूद कोई प्रोजेक्ट चुनना है, तो कंसोल आपको अगले ज़रूरी चरण पर अपने-आप ले जाएगा.
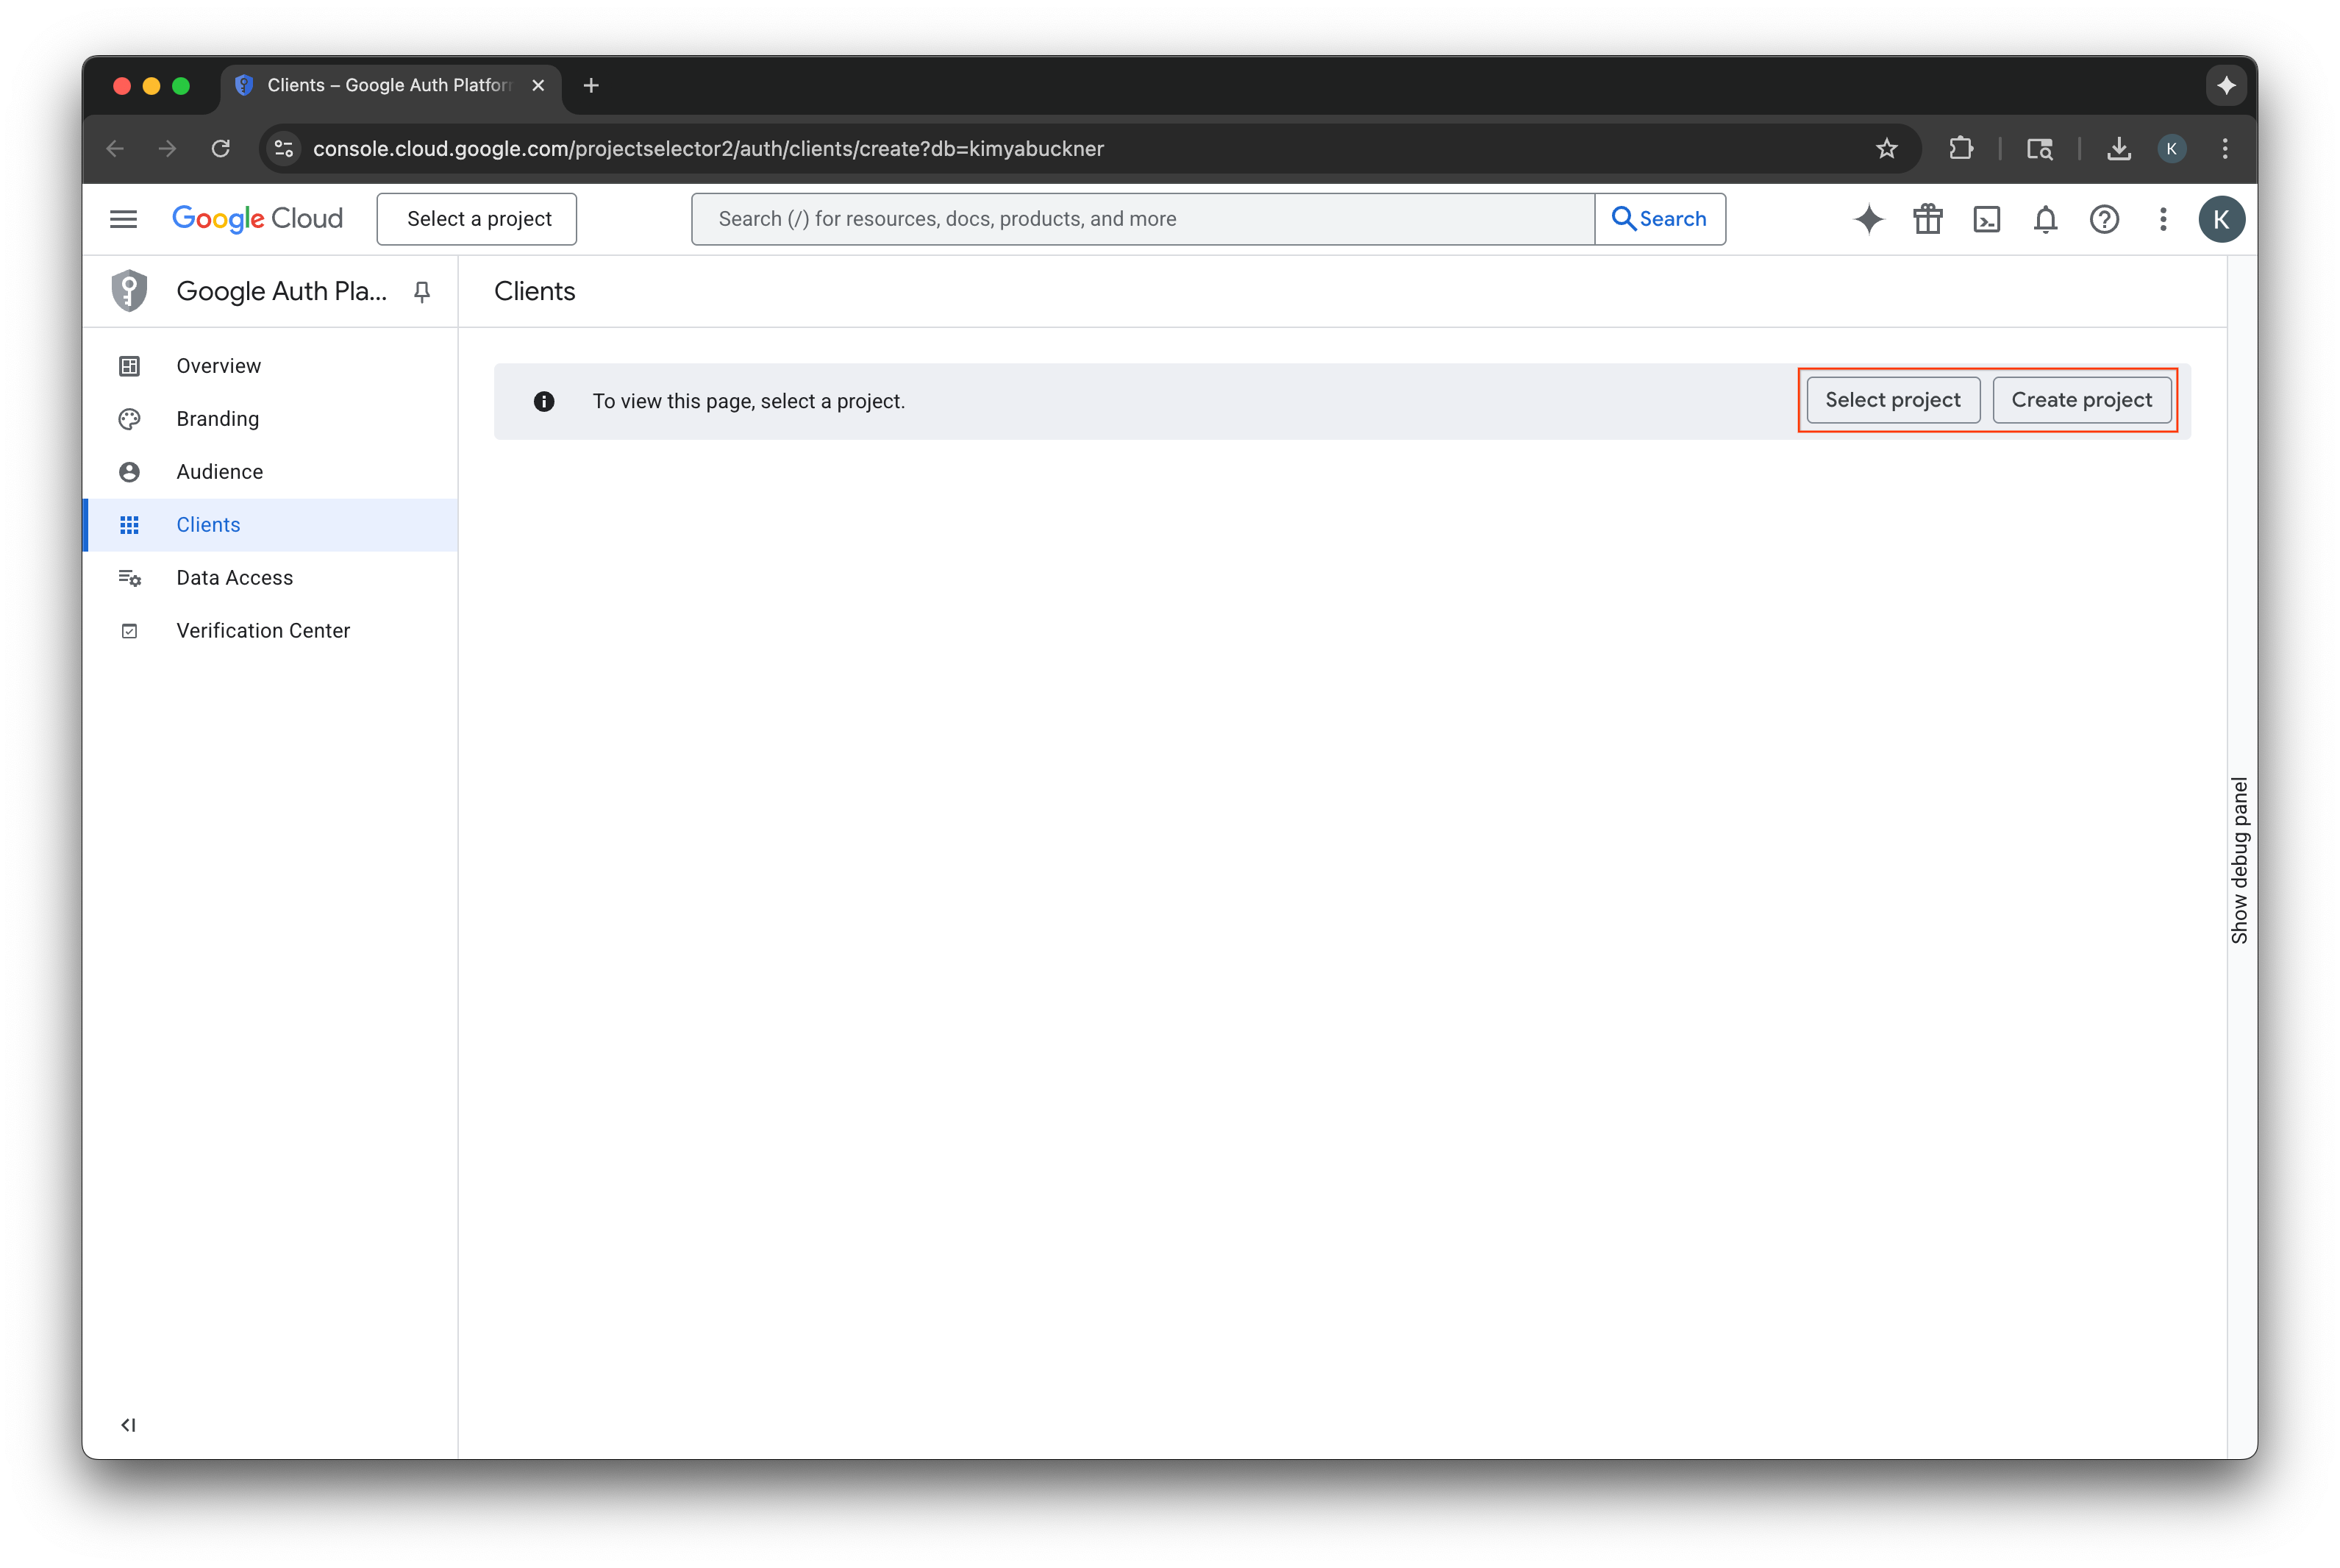
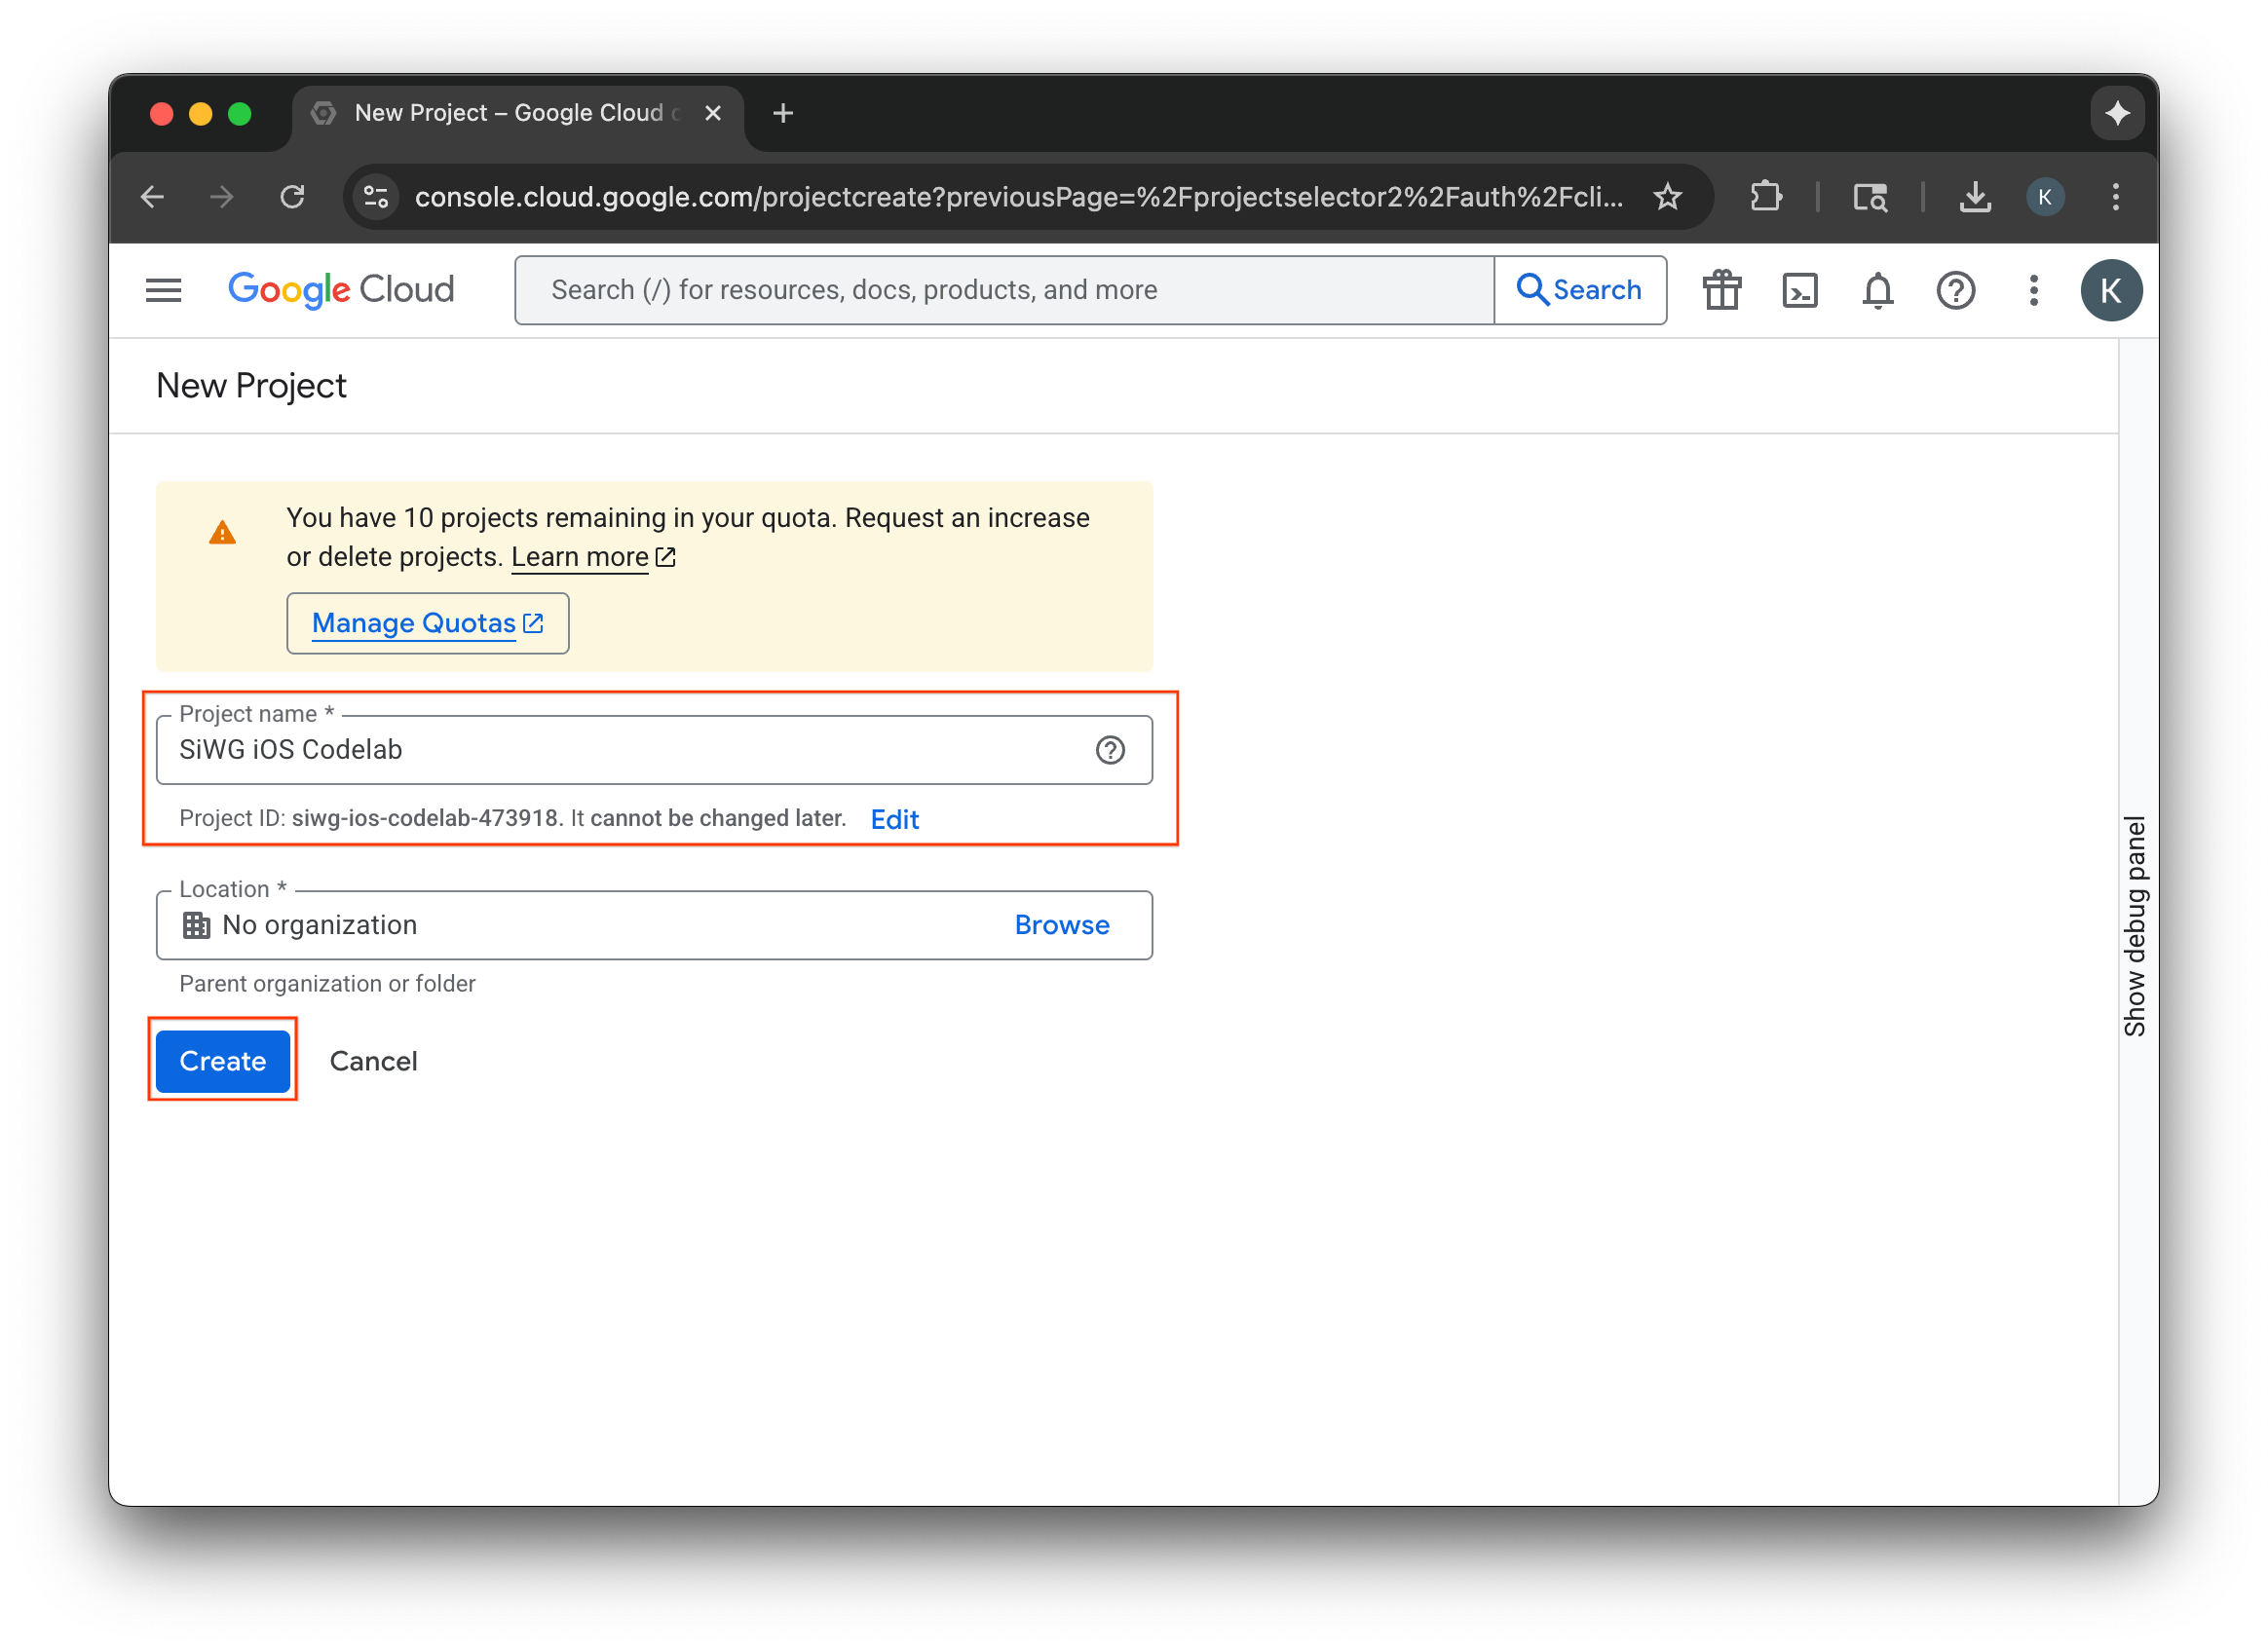
- अपने नए Google Cloud प्रोजेक्ट के लिए कोई नाम डालें.
- बनाएं को चुनें.
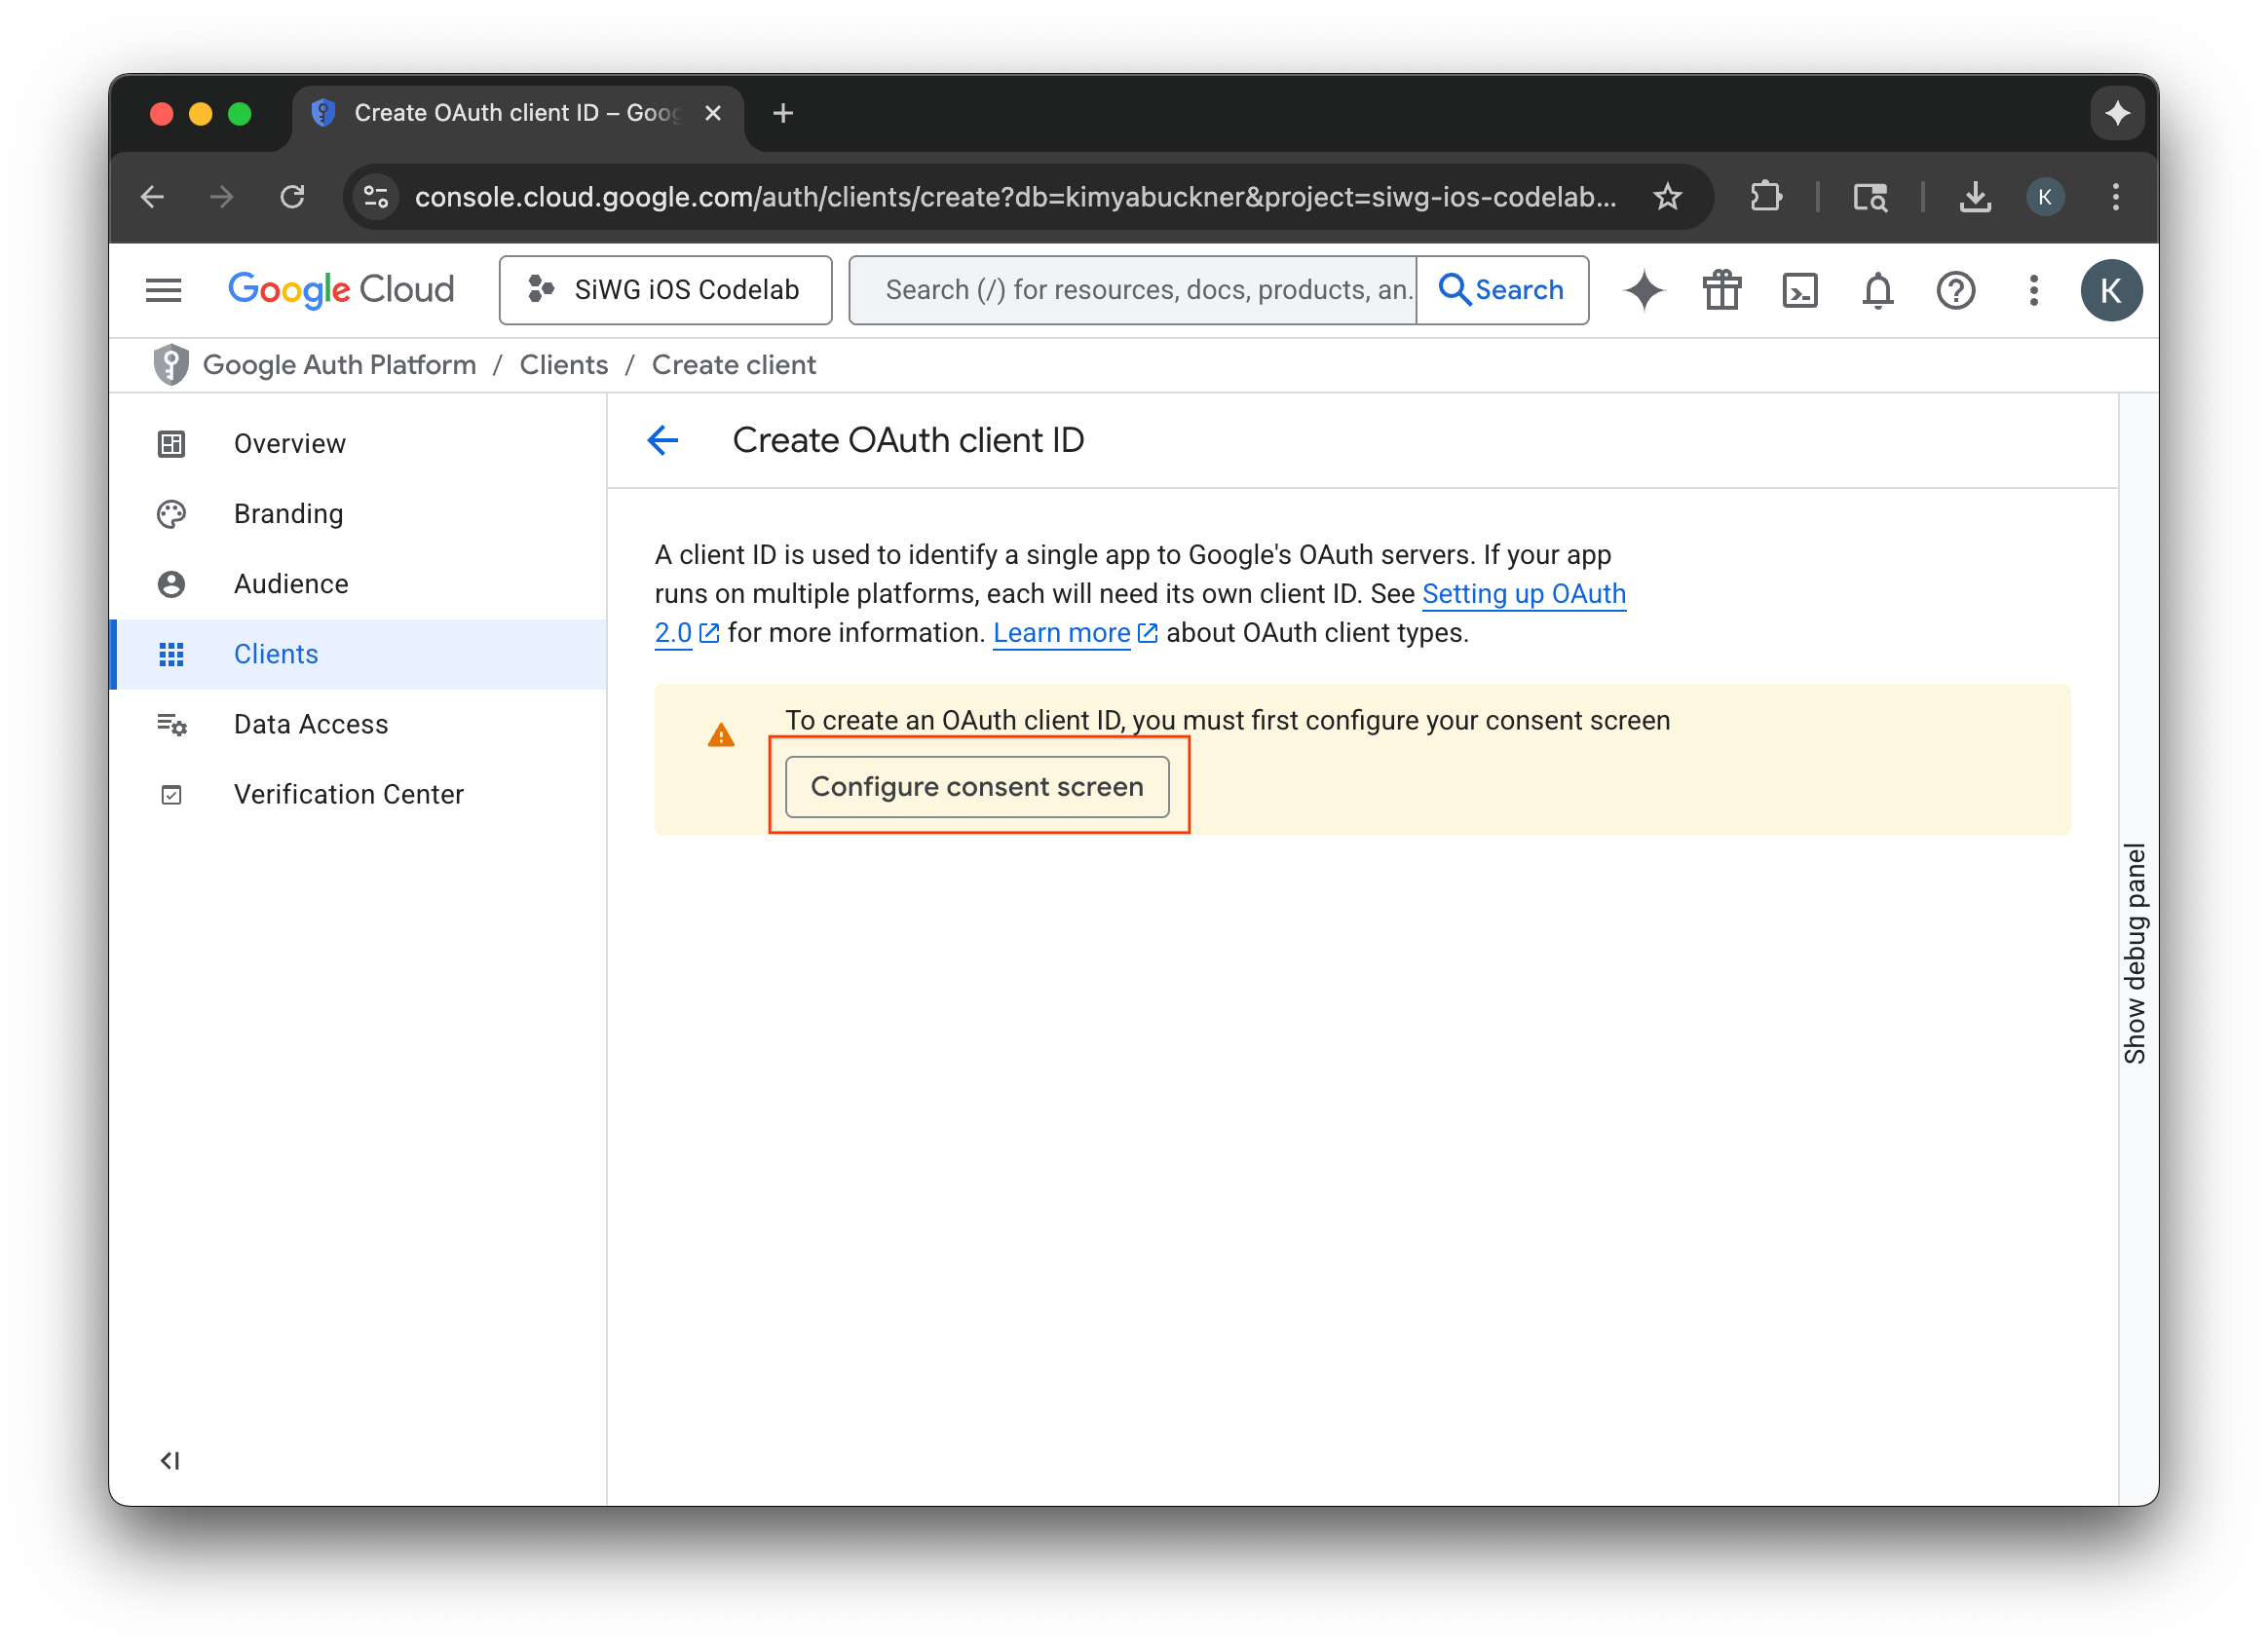
सहमति लेने के लिए स्क्रीन को कॉन्फ़िगर करना
अगर आपने चुने गए प्रोजेक्ट के लिए, सहमति स्क्रीन को पहले ही कॉन्फ़िगर कर लिया है, तो अब आपको इसे कॉन्फ़िगर करने के लिए नहीं कहा जाएगा. ऐसे में, इस सेक्शन को छोड़कर OAuth 2.0 क्लाइंट बनाना पर जाएं.
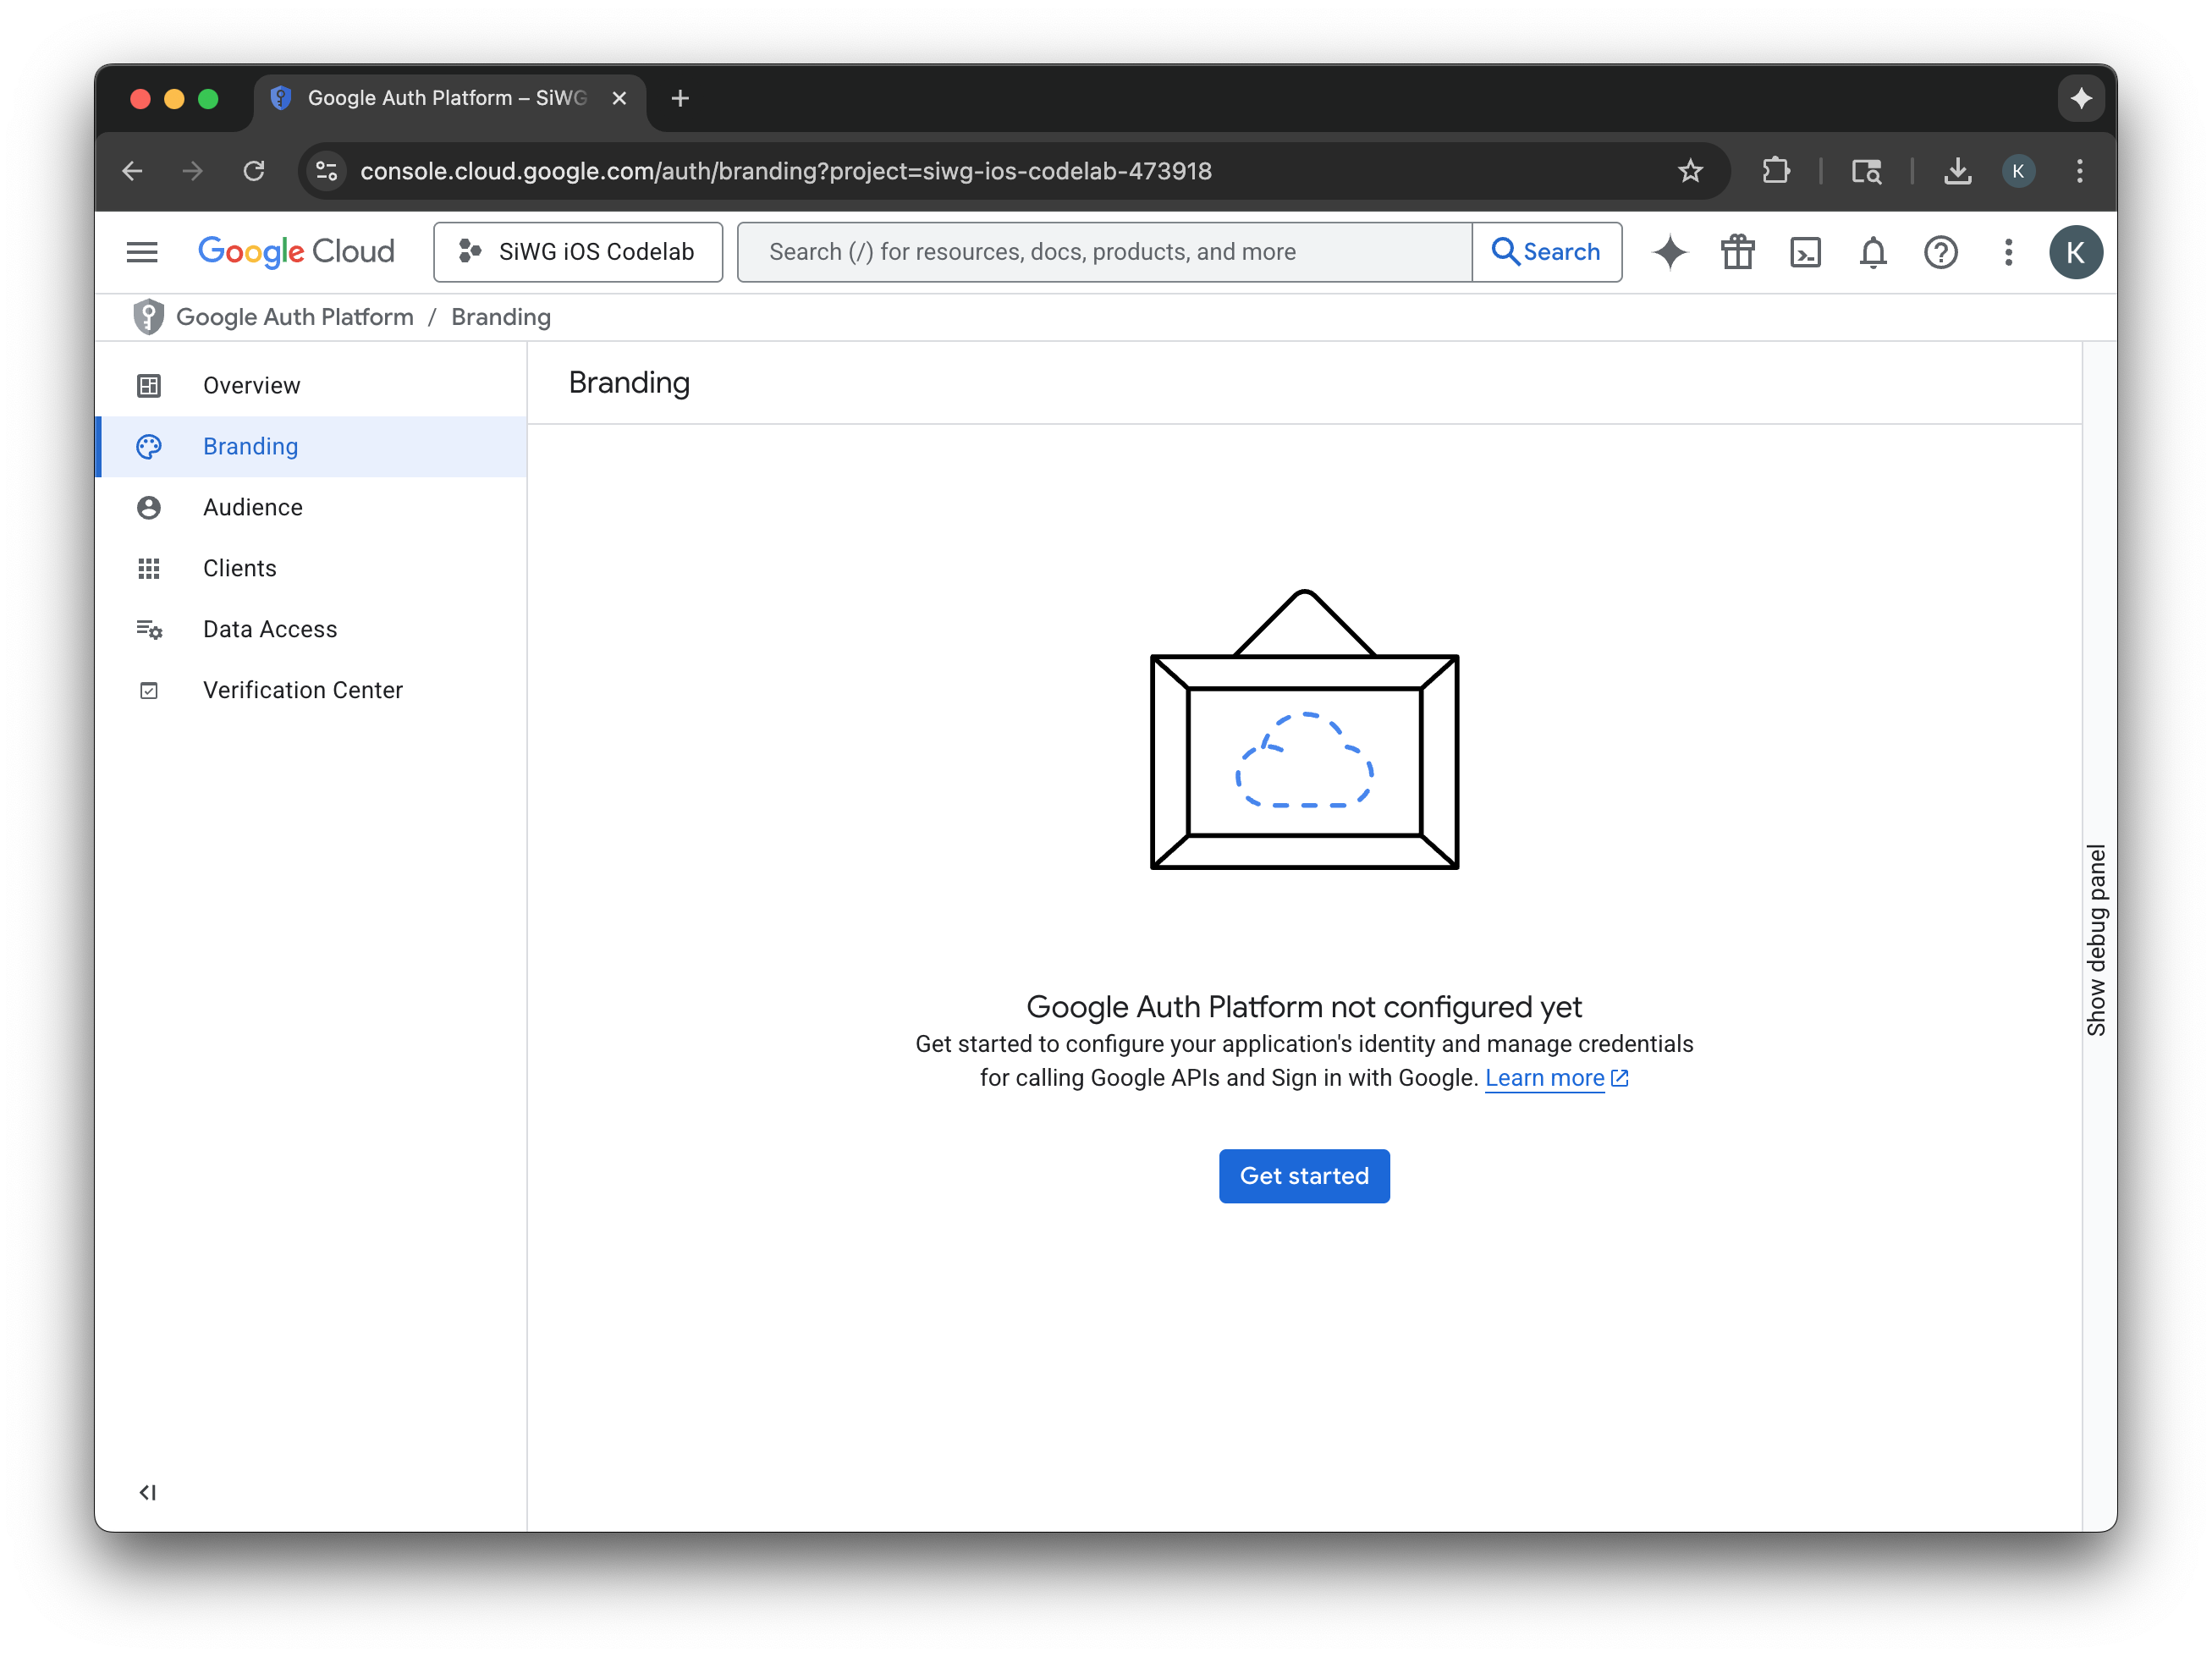
- सहमति लेने के लिए स्क्रीन कॉन्फ़िगर करें को चुनें.
- ब्रैंडिंग पेज पर, शुरू करें को चुनें.
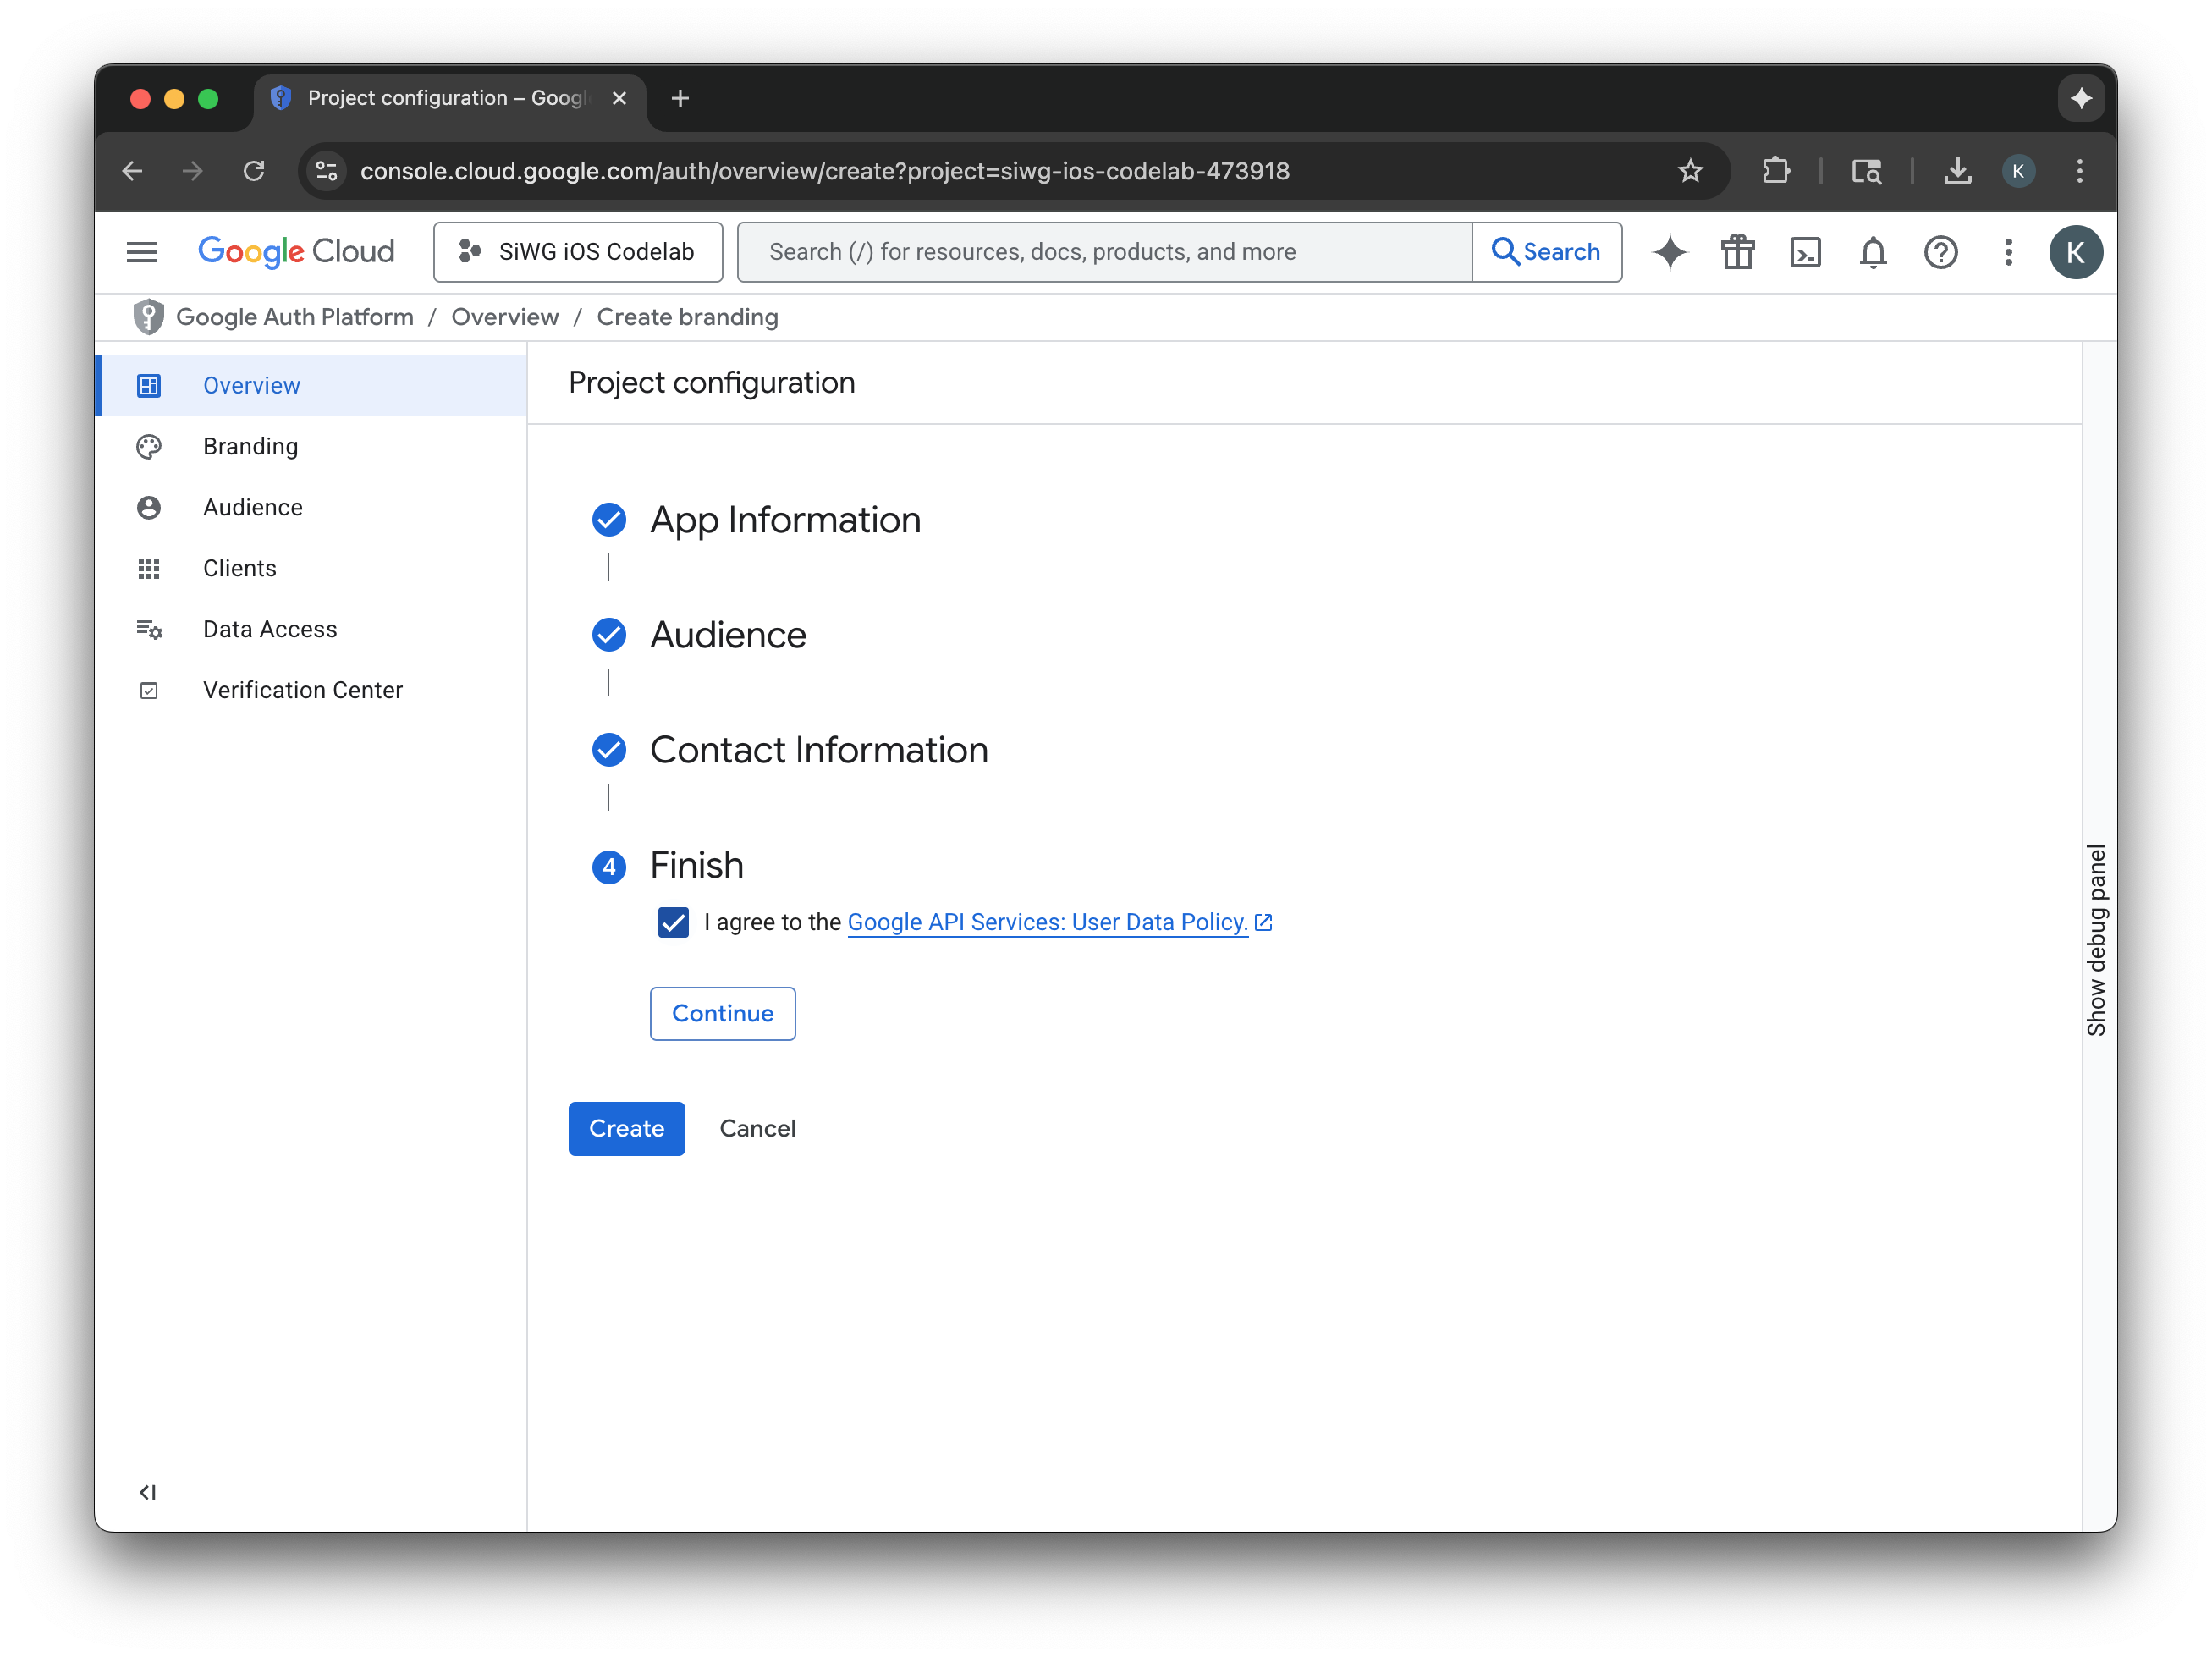
- प्रोजेक्ट कॉन्फ़िगरेशन पेज पर, यहां दिए गए फ़ील्ड भरें:
- ऐप्लिकेशन की जानकारी: अपने ऐप्लिकेशन का नाम और उपयोगकर्ता सहायता के लिए ईमेल पता डालें. यह ईमेल पता सार्वजनिक तौर पर दिखाया जाएगा, ताकि उपयोगकर्ता सहमति से जुड़े सवालों के लिए आपसे संपर्क कर सकें.
- दर्शक: बाहरी चुनें.
- संपर्क जानकारी: Google को आपसे संपर्क करने के लिए, अपना ईमेल पता डालें.
- Google API सेवाएं: उपयोगकर्ता के डेटा की नीति पढ़ें.
- बनाएं पर क्लिक करें.
- नेविगेशन मेन्यू में, क्लाइंट पेज को चुनें.
- क्लाइंट खाता बनाएं पर क्लिक करें.

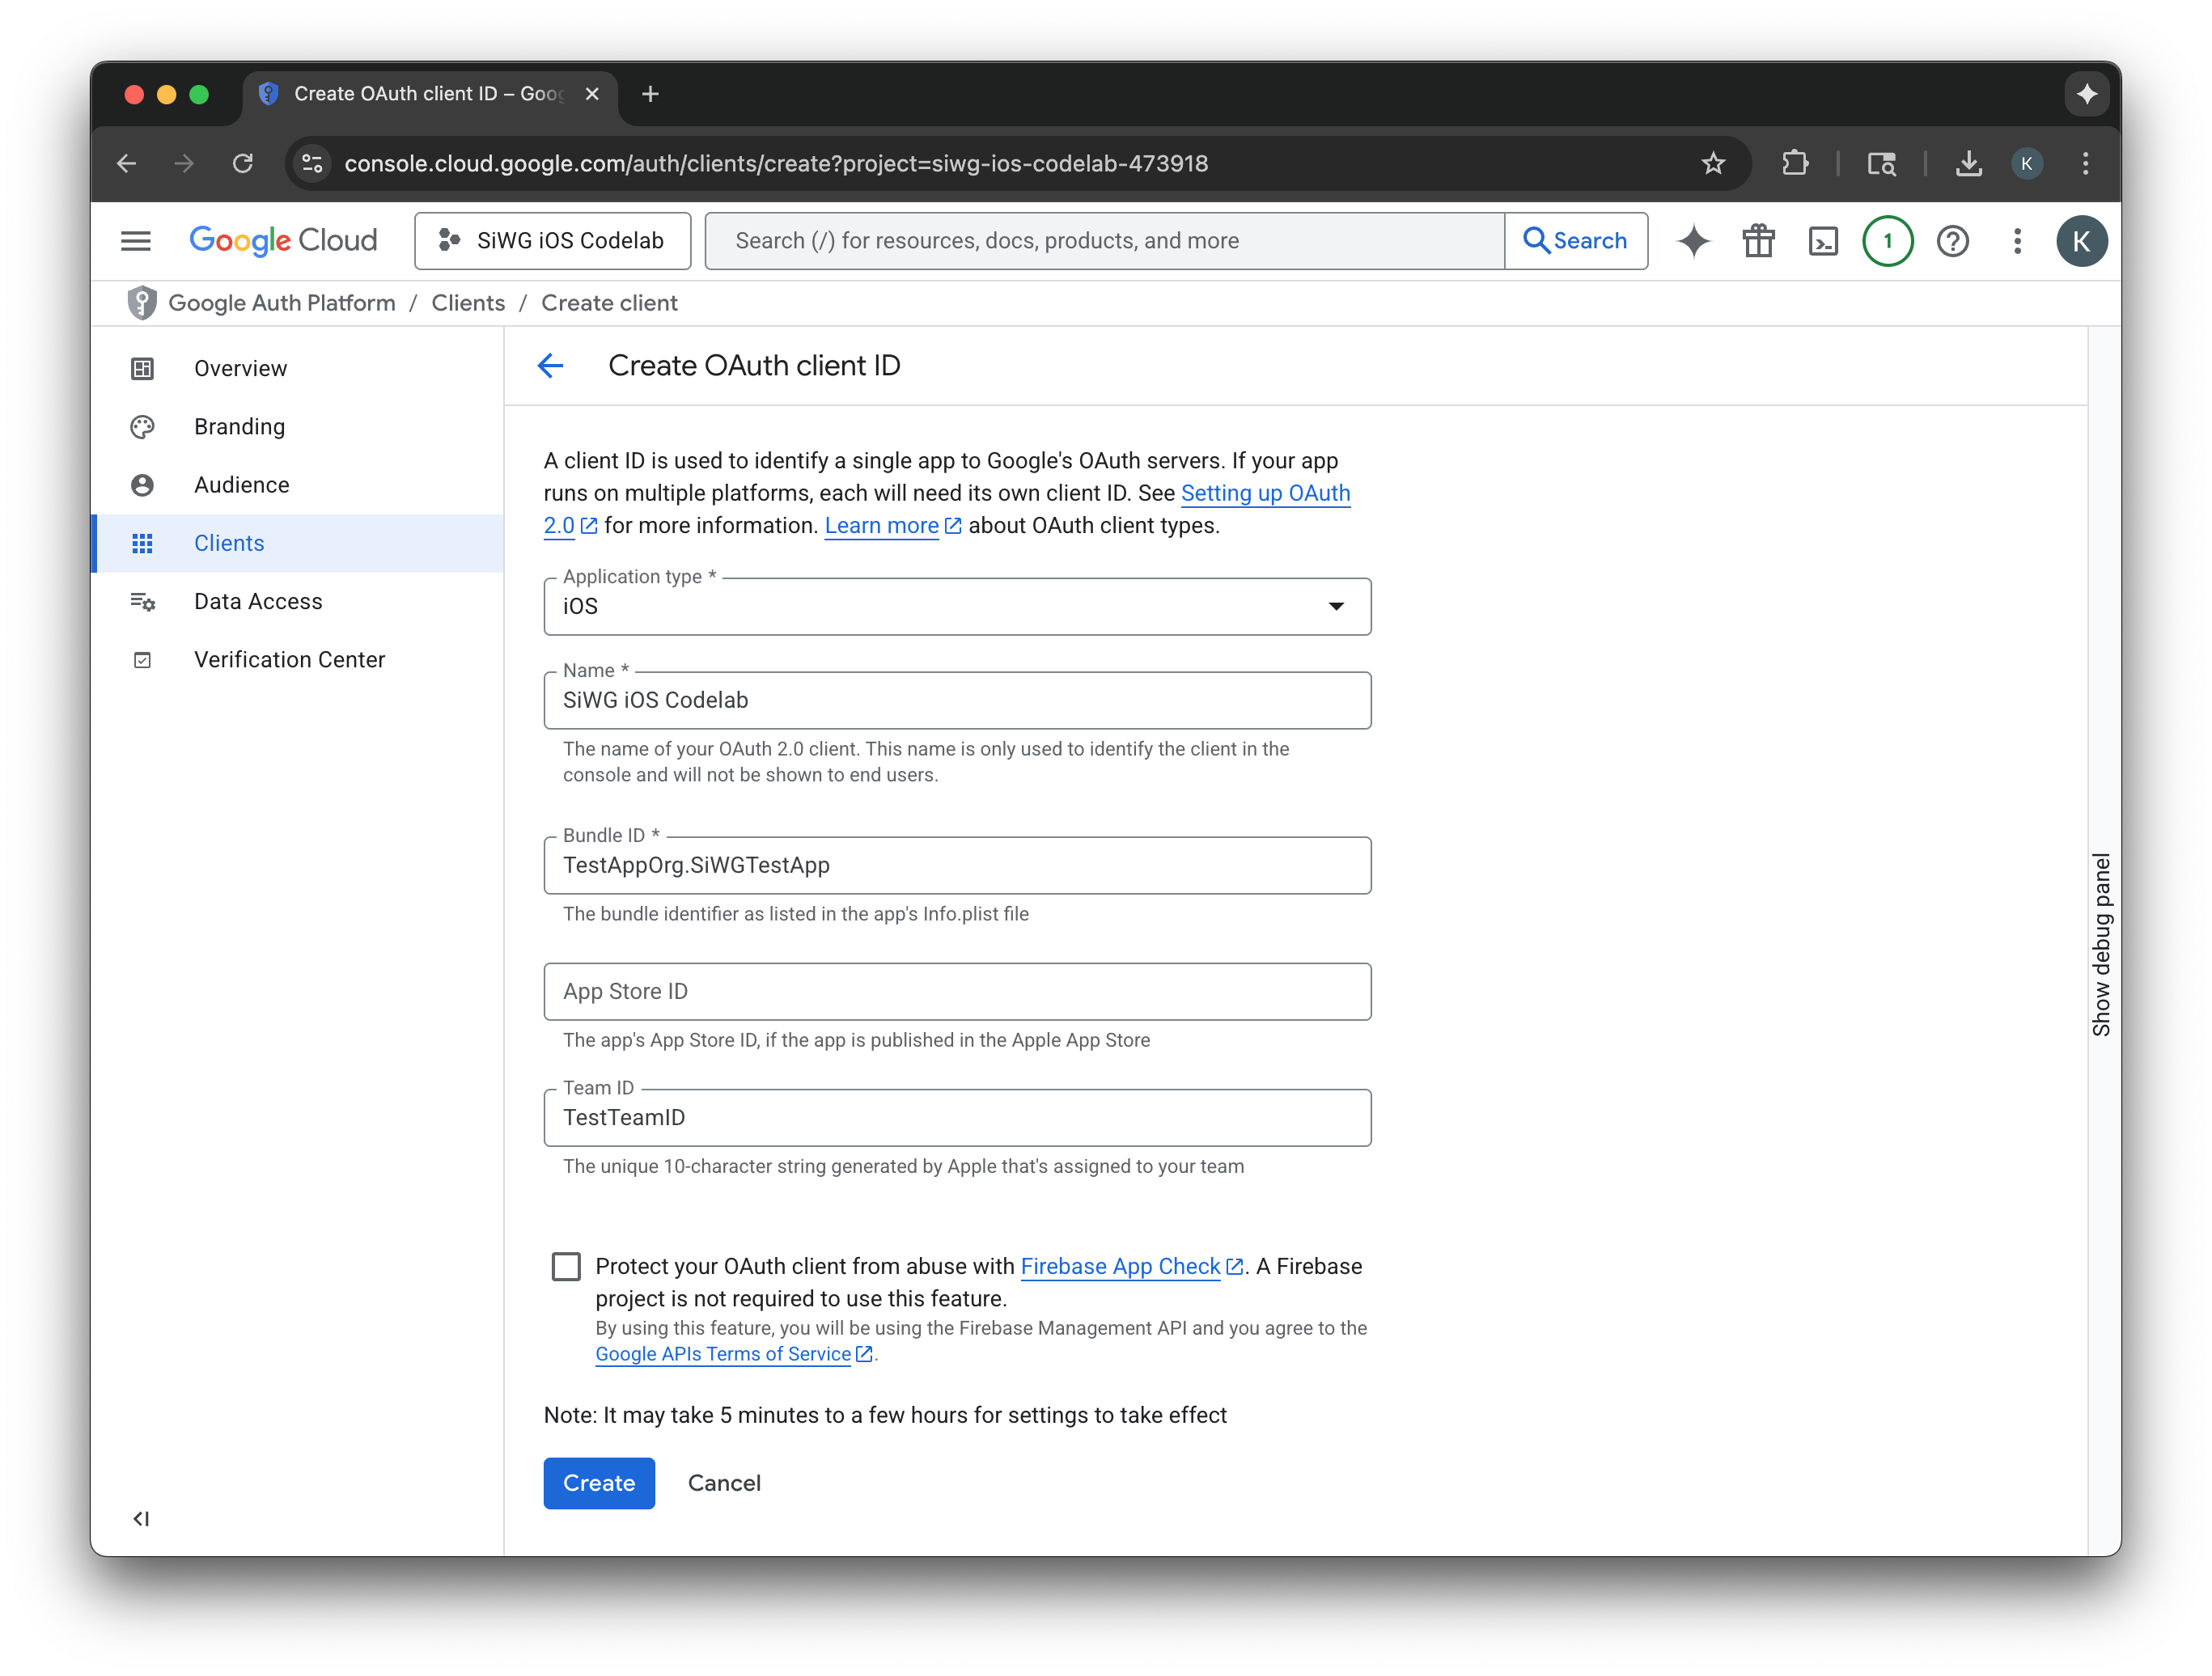
OAuth 2.0 क्लाइंट बनाना
- ऐप्लिकेशन टाइप के लिए, iOS चुनें.
- अपने क्लाइंट का नाम डालें.
- पिछले चरण में बनाया गया बंडल आइडेंटिफ़ायर डालें.
- Apple ने आपकी टीम को जो Team ID असाइन किया है उसे डालें. फ़िलहाल, यह चरण ज़रूरी नहीं है. हालांकि, इस कोडलैब में बाद में App Check को चालू करने के लिए, टीम आईडी की ज़रूरत होगी.
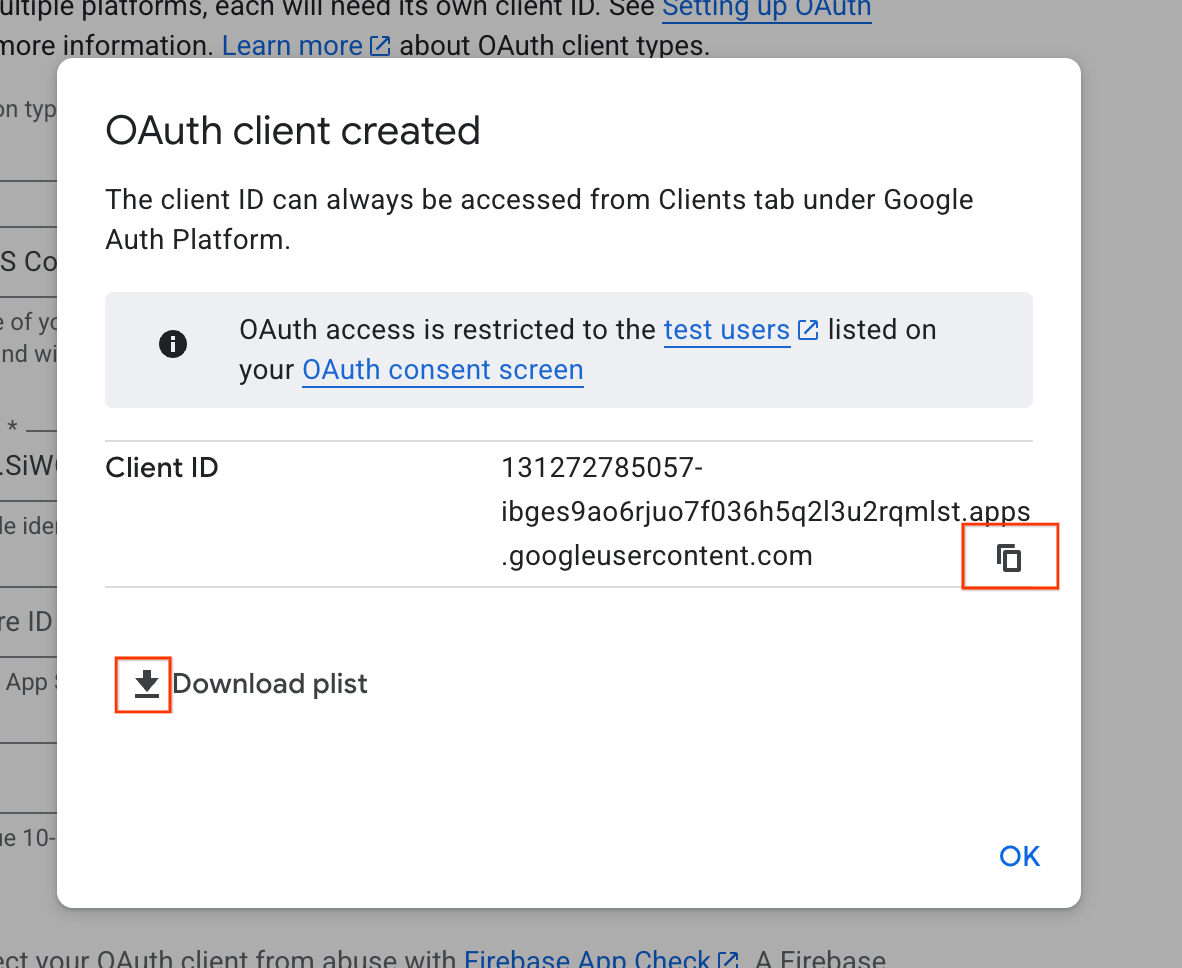
- बनाएं को चुनें.
- डायलॉग विंडो से क्लाइंट आईडी कॉपी करें. आपको इसकी ज़रूरत बाद में पड़ेगी.
- plist फ़ाइल डाउनलोड करें, ताकि बाद में इसका इस्तेमाल किया जा सके.
4. अपना Xcode प्रोजेक्ट कॉन्फ़िगर करना
अगला चरण, Sign in with Google SDK के साथ काम करने के लिए, अपने Xcode प्रोजेक्ट को सेट अप करना है. इस प्रोसेस में, एसडीके को अपने प्रोजेक्ट में डिपेंडेंसी के तौर पर जोड़ना और यूनीक क्लाइंट आईडी के साथ प्रोजेक्ट की सेटिंग कॉन्फ़िगर करना शामिल है. इस आईडी की मदद से SDK, साइन-इन की प्रोसेस के दौरान Google की पुष्टि करने वाली सेवा के साथ सुरक्षित तरीके से कम्यूनिकेट कर पाता है.
'Google से साइन इन करें' सुविधा की डिपेंडेंसी इंस्टॉल करना
- अपना Xcode प्रोजेक्ट खोलें.
- File > Add Package Dependencies पर जाएं.
- खोज बार में, 'Google से साइन इन करें' सुविधा के लिए, रिपॉज़िटरी का यूआरएल डालें: https://github.com/google/GoogleSignIn-iOS
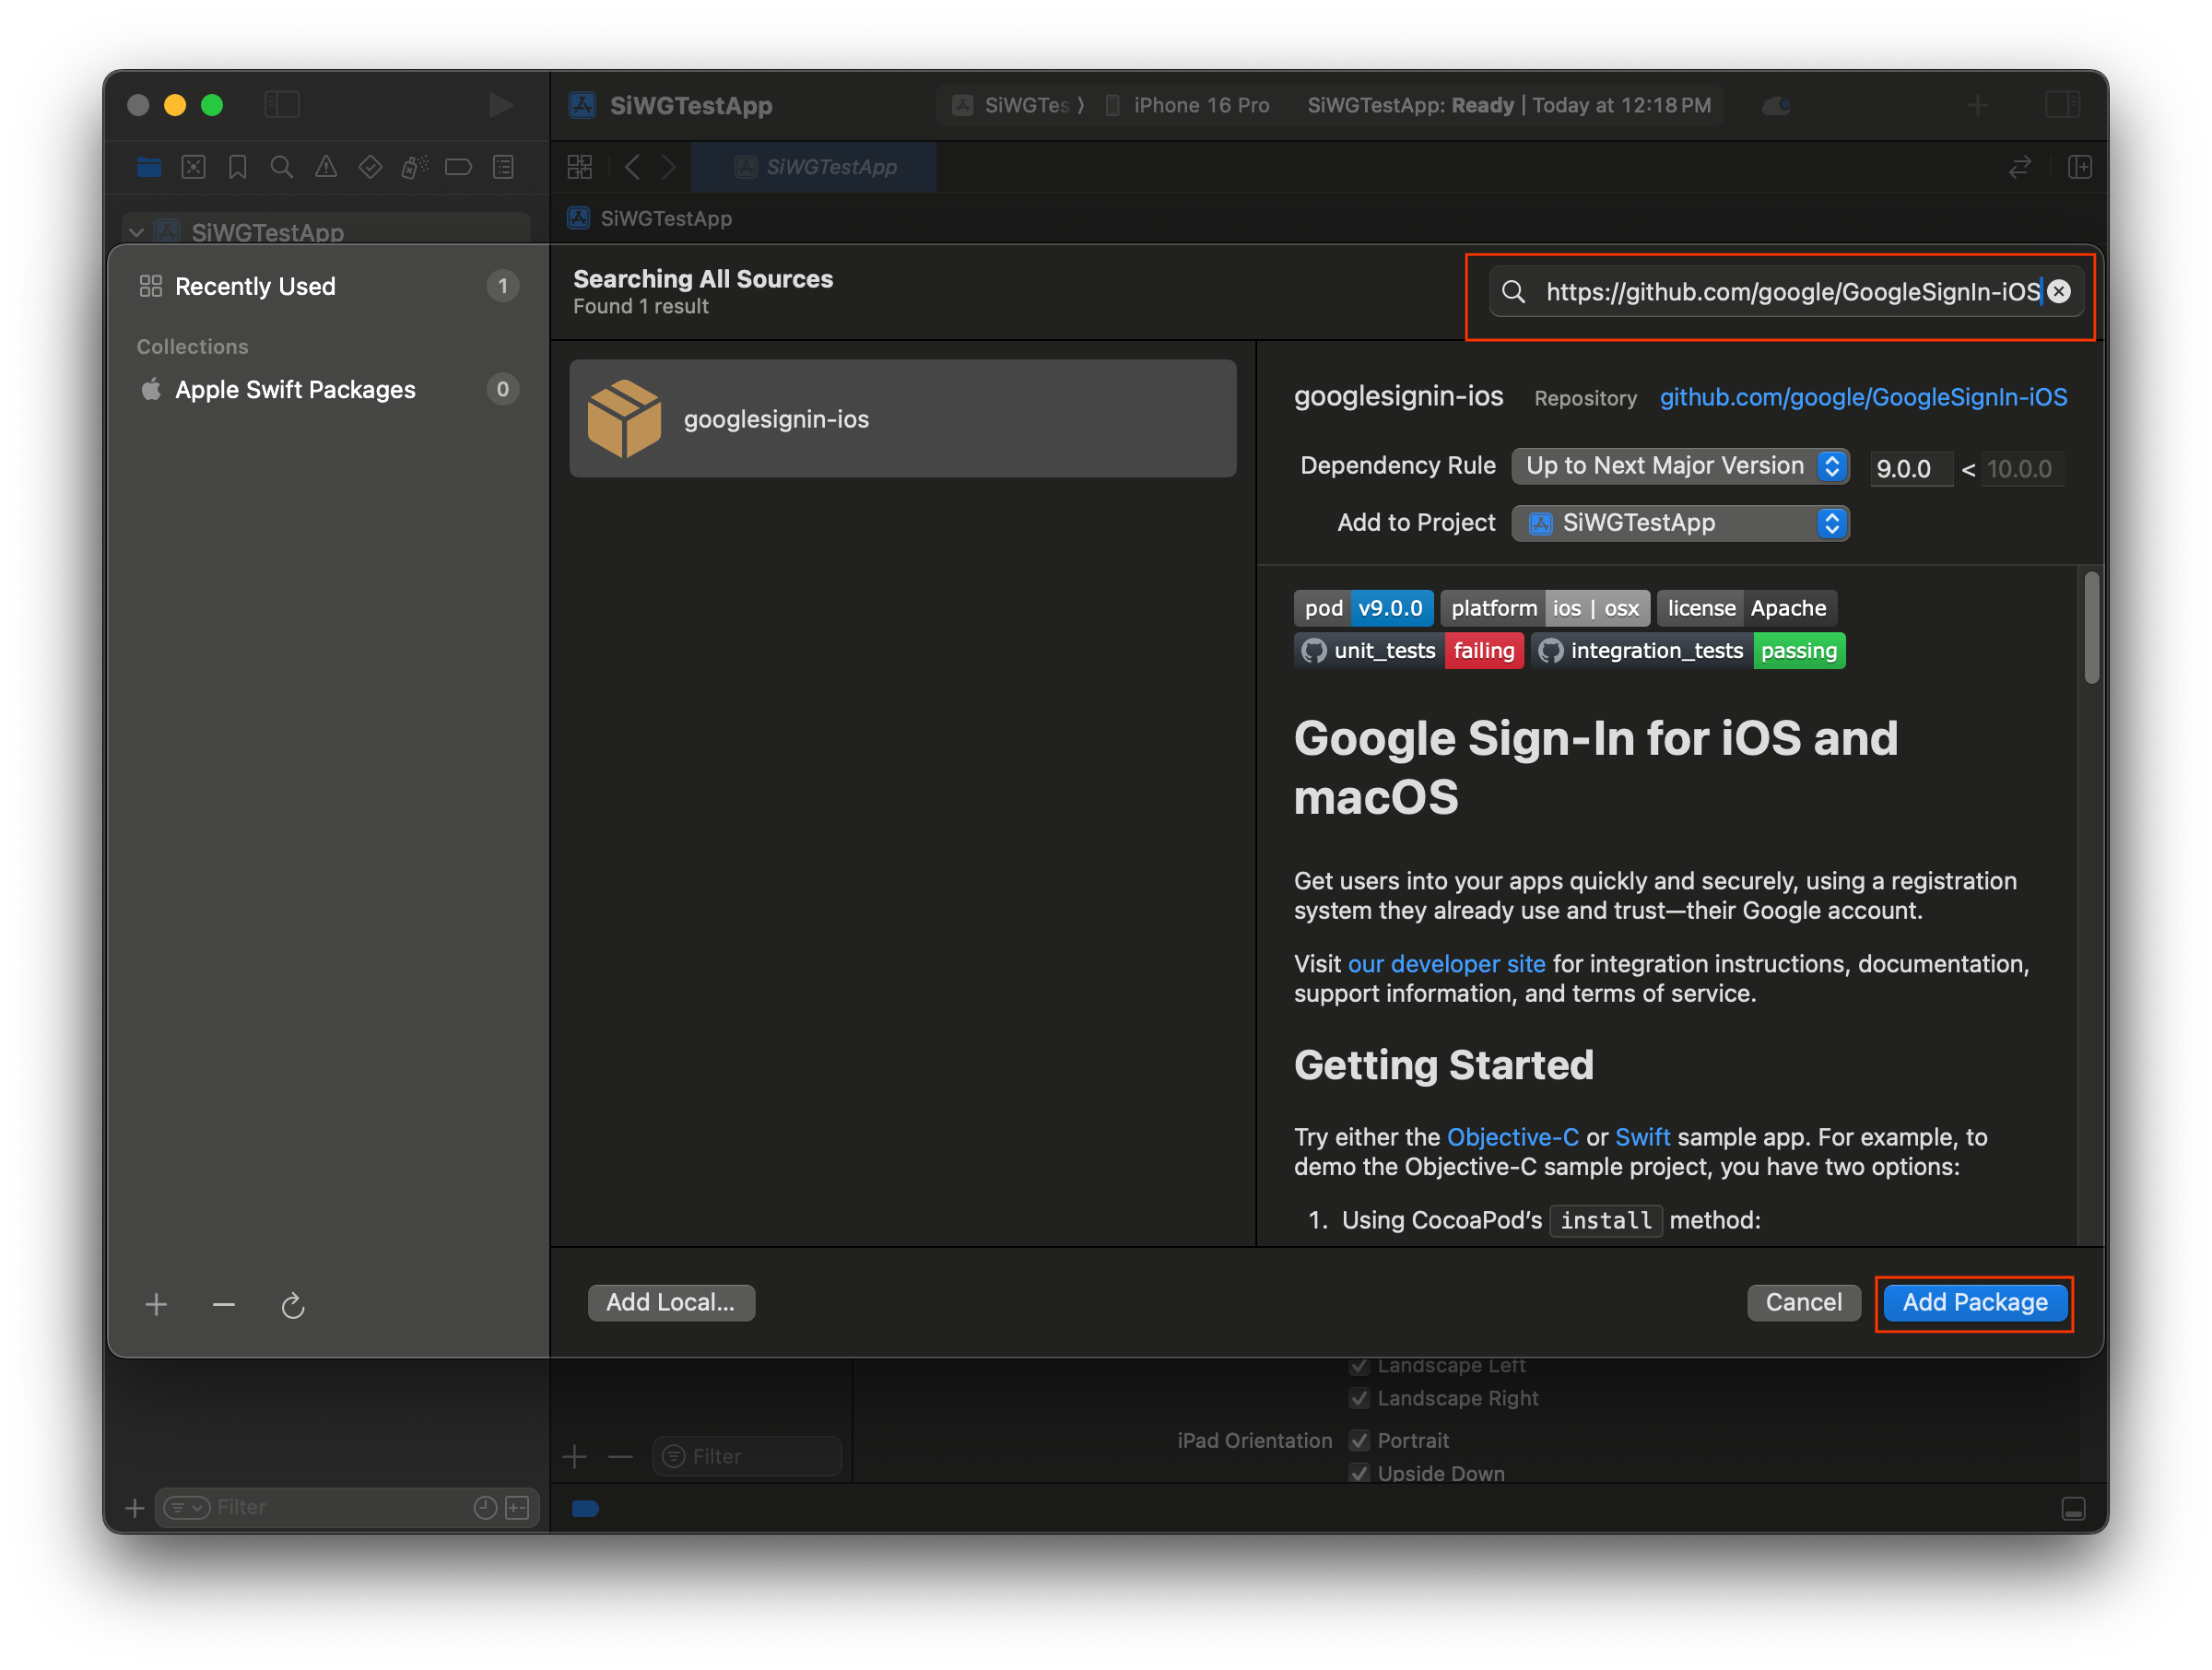
- पैकेज जोड़ें को चुनें.
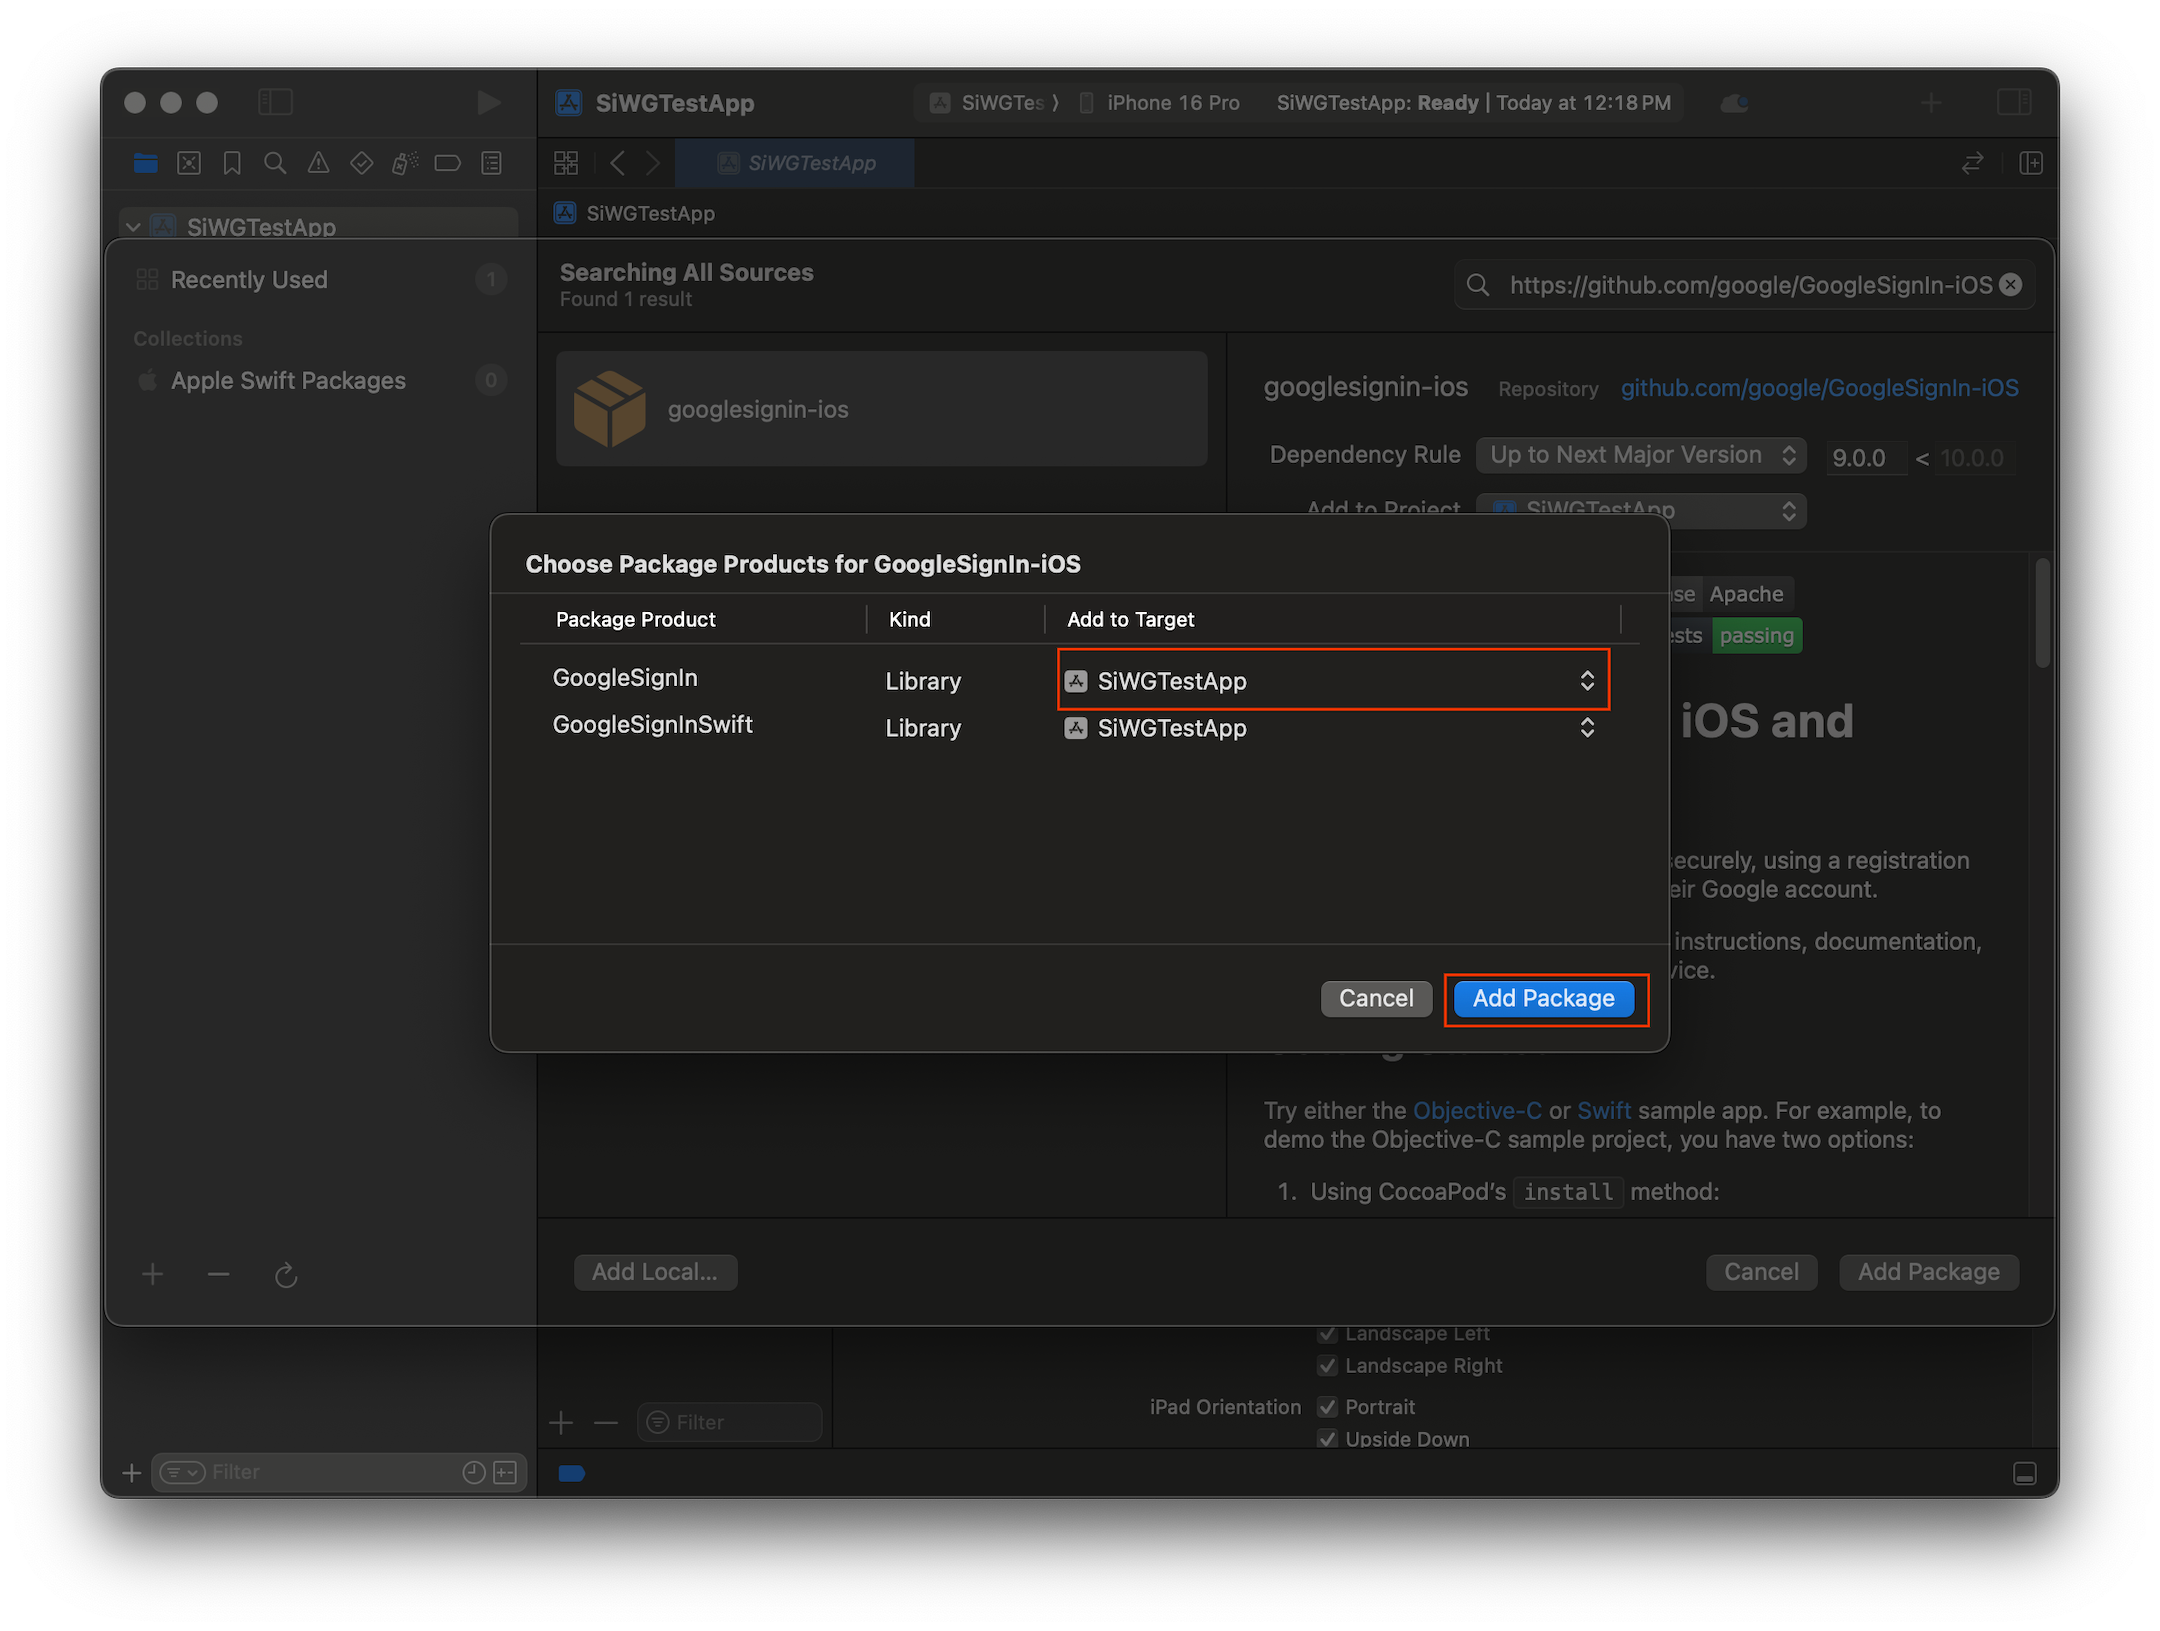
- GoogleSignIn पैकेज के लिए, मुख्य ऐप्लिकेशन टारगेट चुनें.
- अगर SwiftUI का इस्तेमाल किया जा रहा है, तो GoogleSignInSwift पैकेज के लिए मुख्य ऐप्लिकेशन टारगेट चुनें. अगर आपको UIKit का इस्तेमाल करना है, तो इस पैकेज के लिए कोई टारगेट न चुनें.
- पैकेज जोड़ें को चुनें.
अपने ऐप्लिकेशन के क्रेडेंशियल कॉन्फ़िगर करना
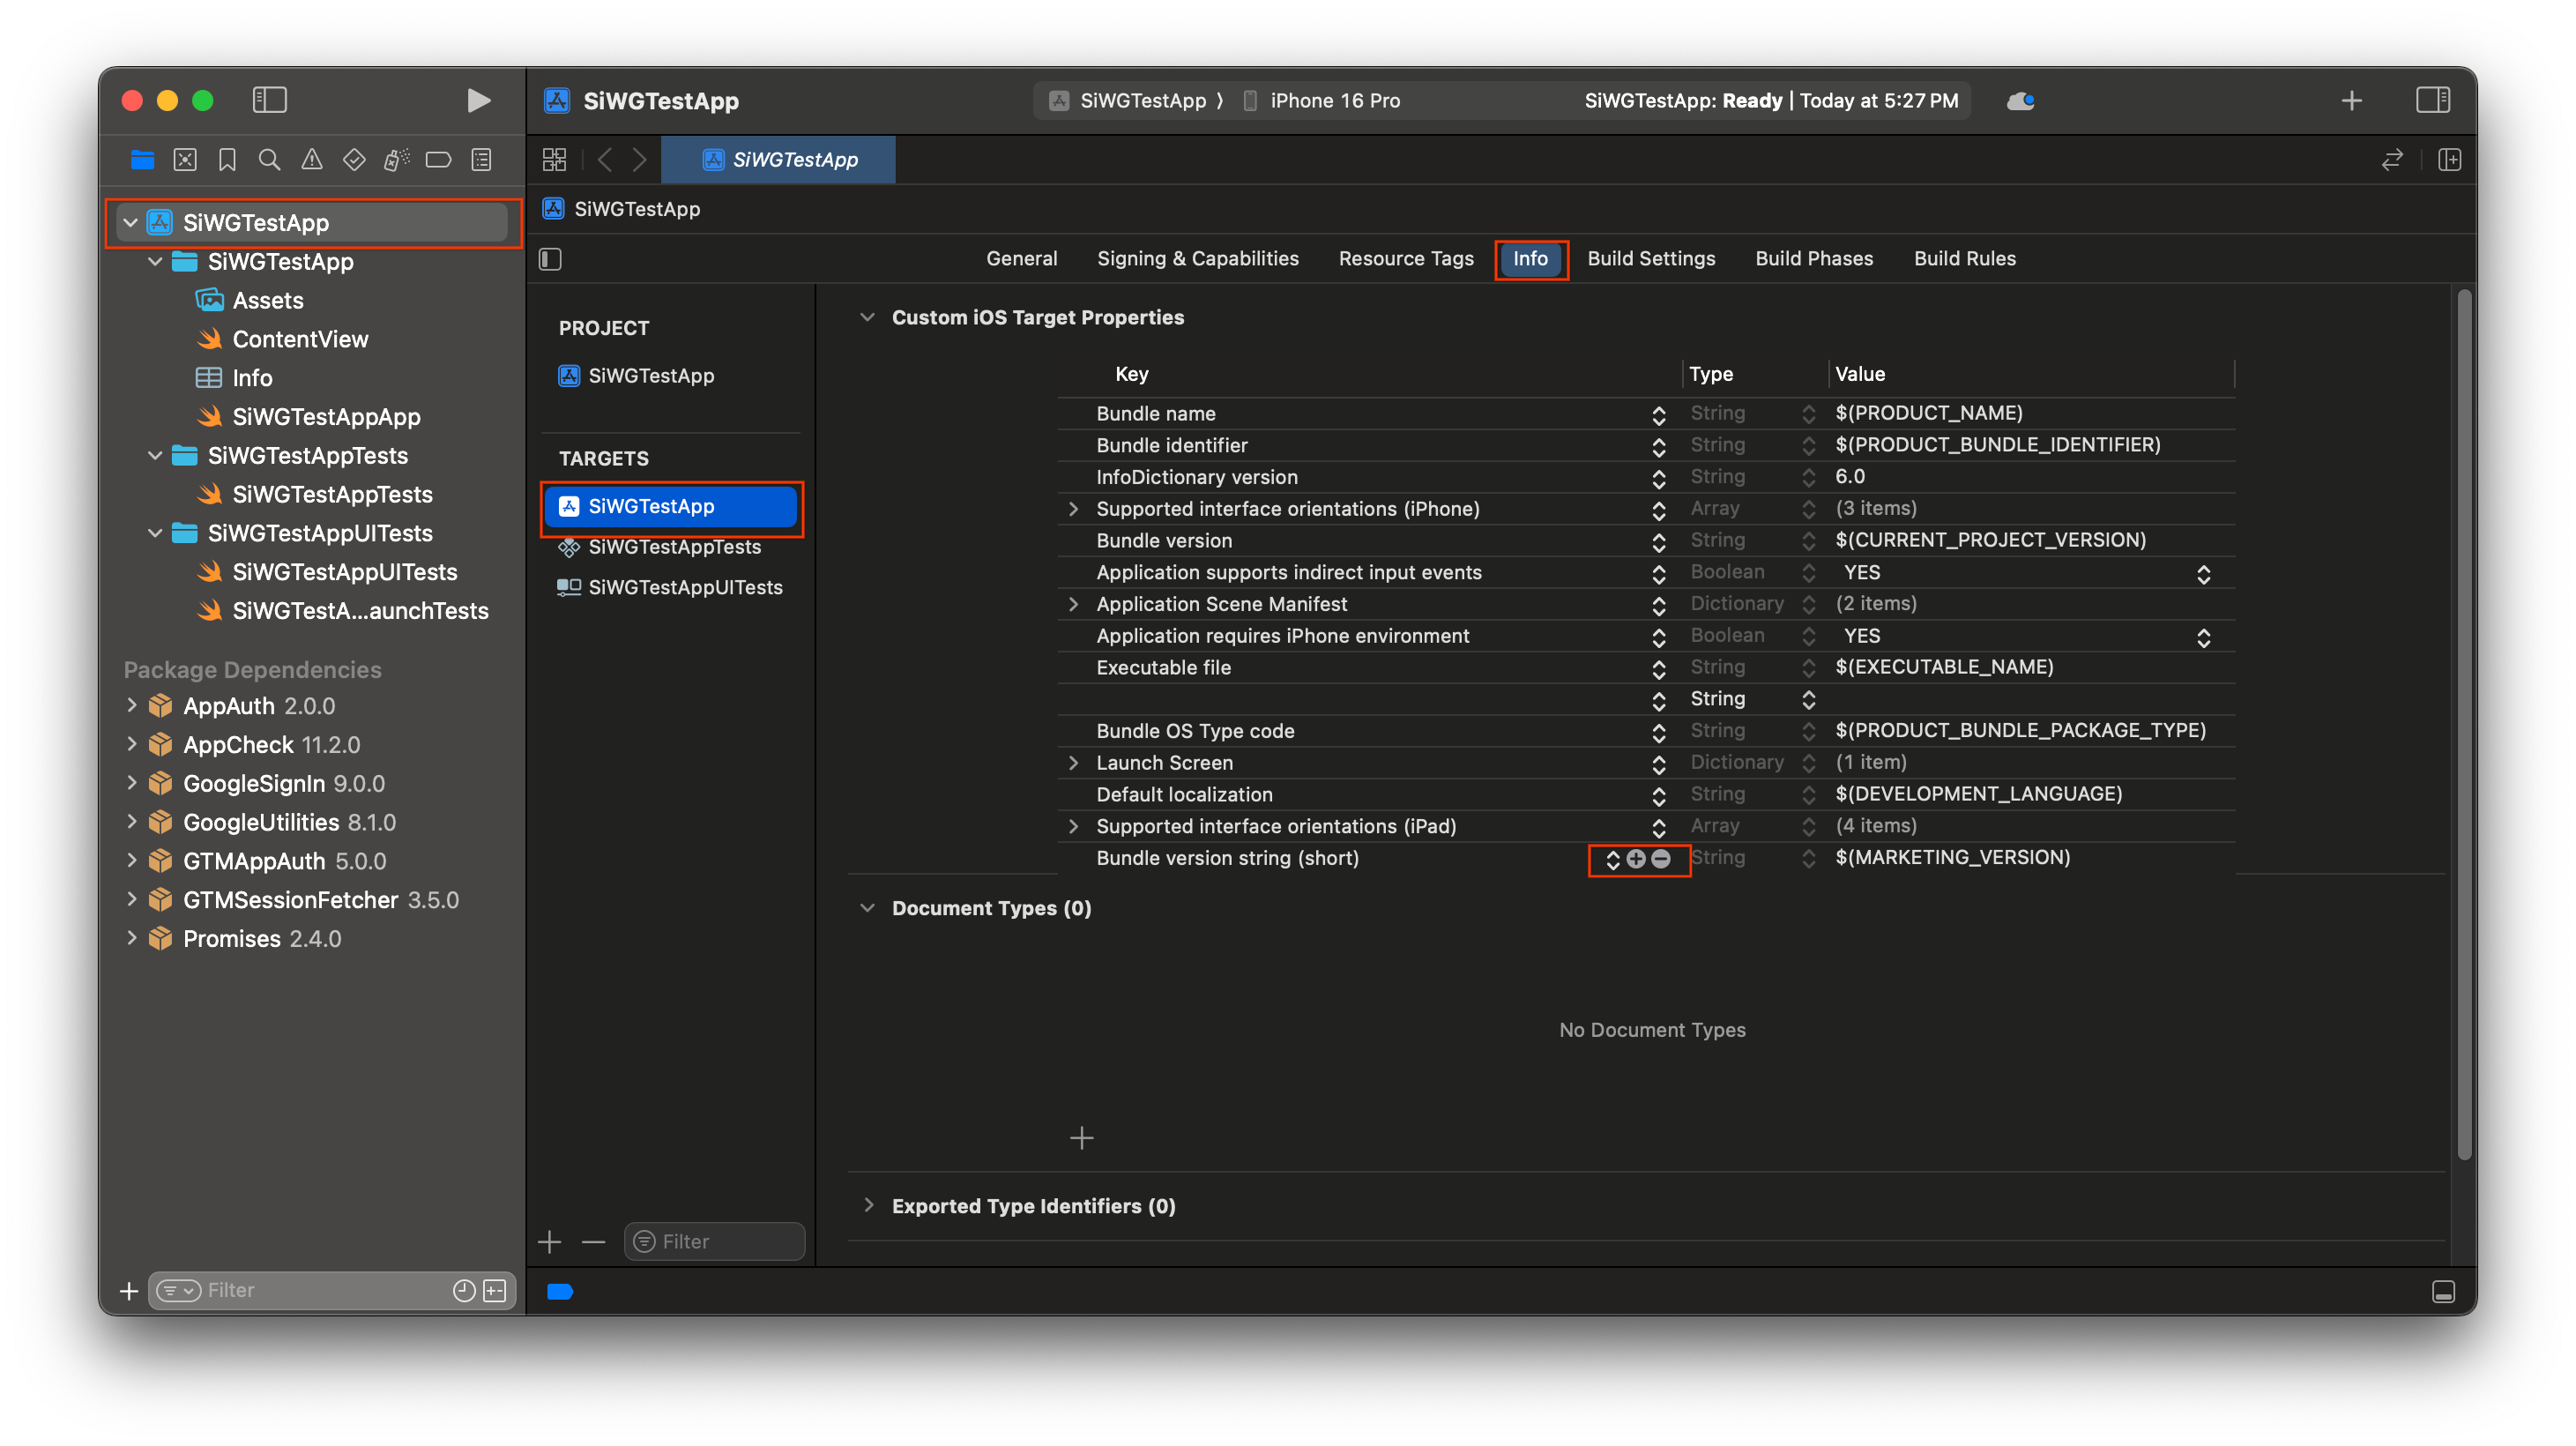
- प्रोजेक्ट नेविगेटर में, अपने प्रोजेक्ट के रूट पर क्लिक करें.
- मुख्य एडिटर एरिया में, TARGETS सूची से अपना मुख्य ऐप्लिकेशन टारगेट चुनें.
- एडिटर एरिया में सबसे ऊपर मौजूद, जानकारी टैब चुनें.
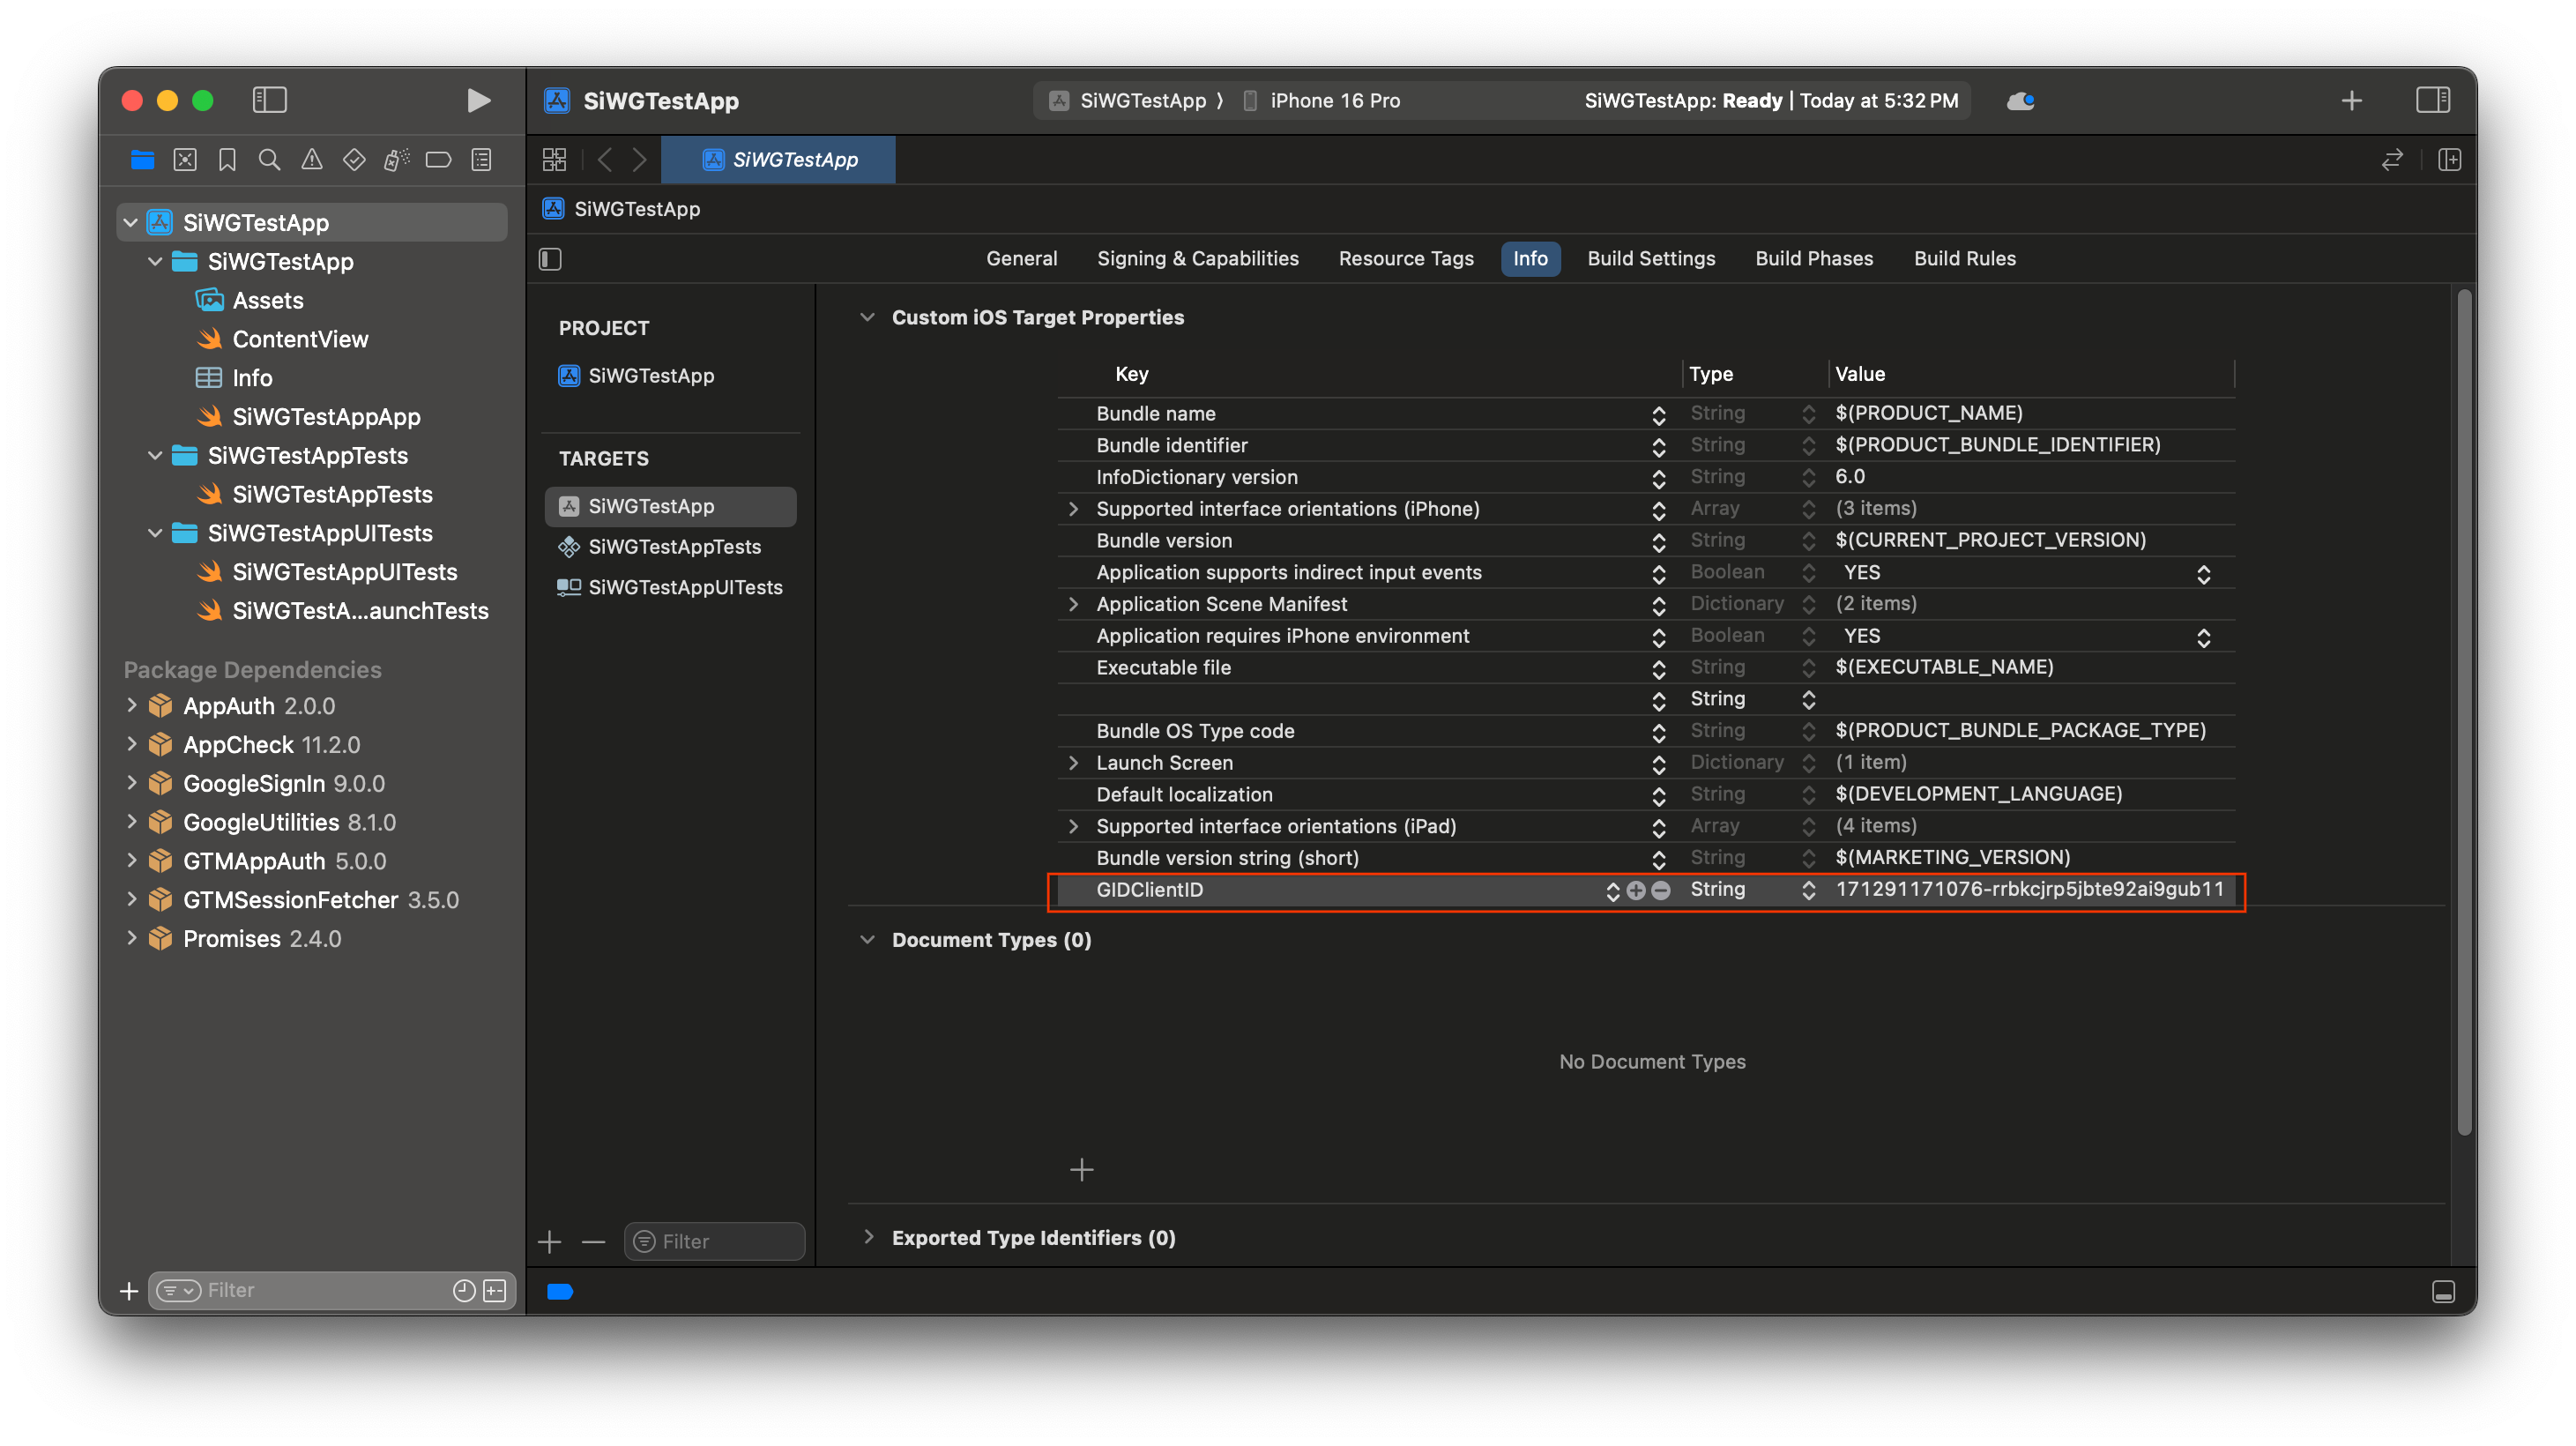
- कस्टम iOS टारगेट प्रॉपर्टी सेक्शन में, आखिरी लाइन पर कर्सर घुमाएं. इसके बाद, दिखने वाले + बटन पर क्लिक करें.
- कुंजी कॉलम में, GIDClientID टाइप करें
- वैल्यू कॉलम में, Google Cloud Console से कॉपी किया गया क्लाइंट आईडी चिपकाएं.
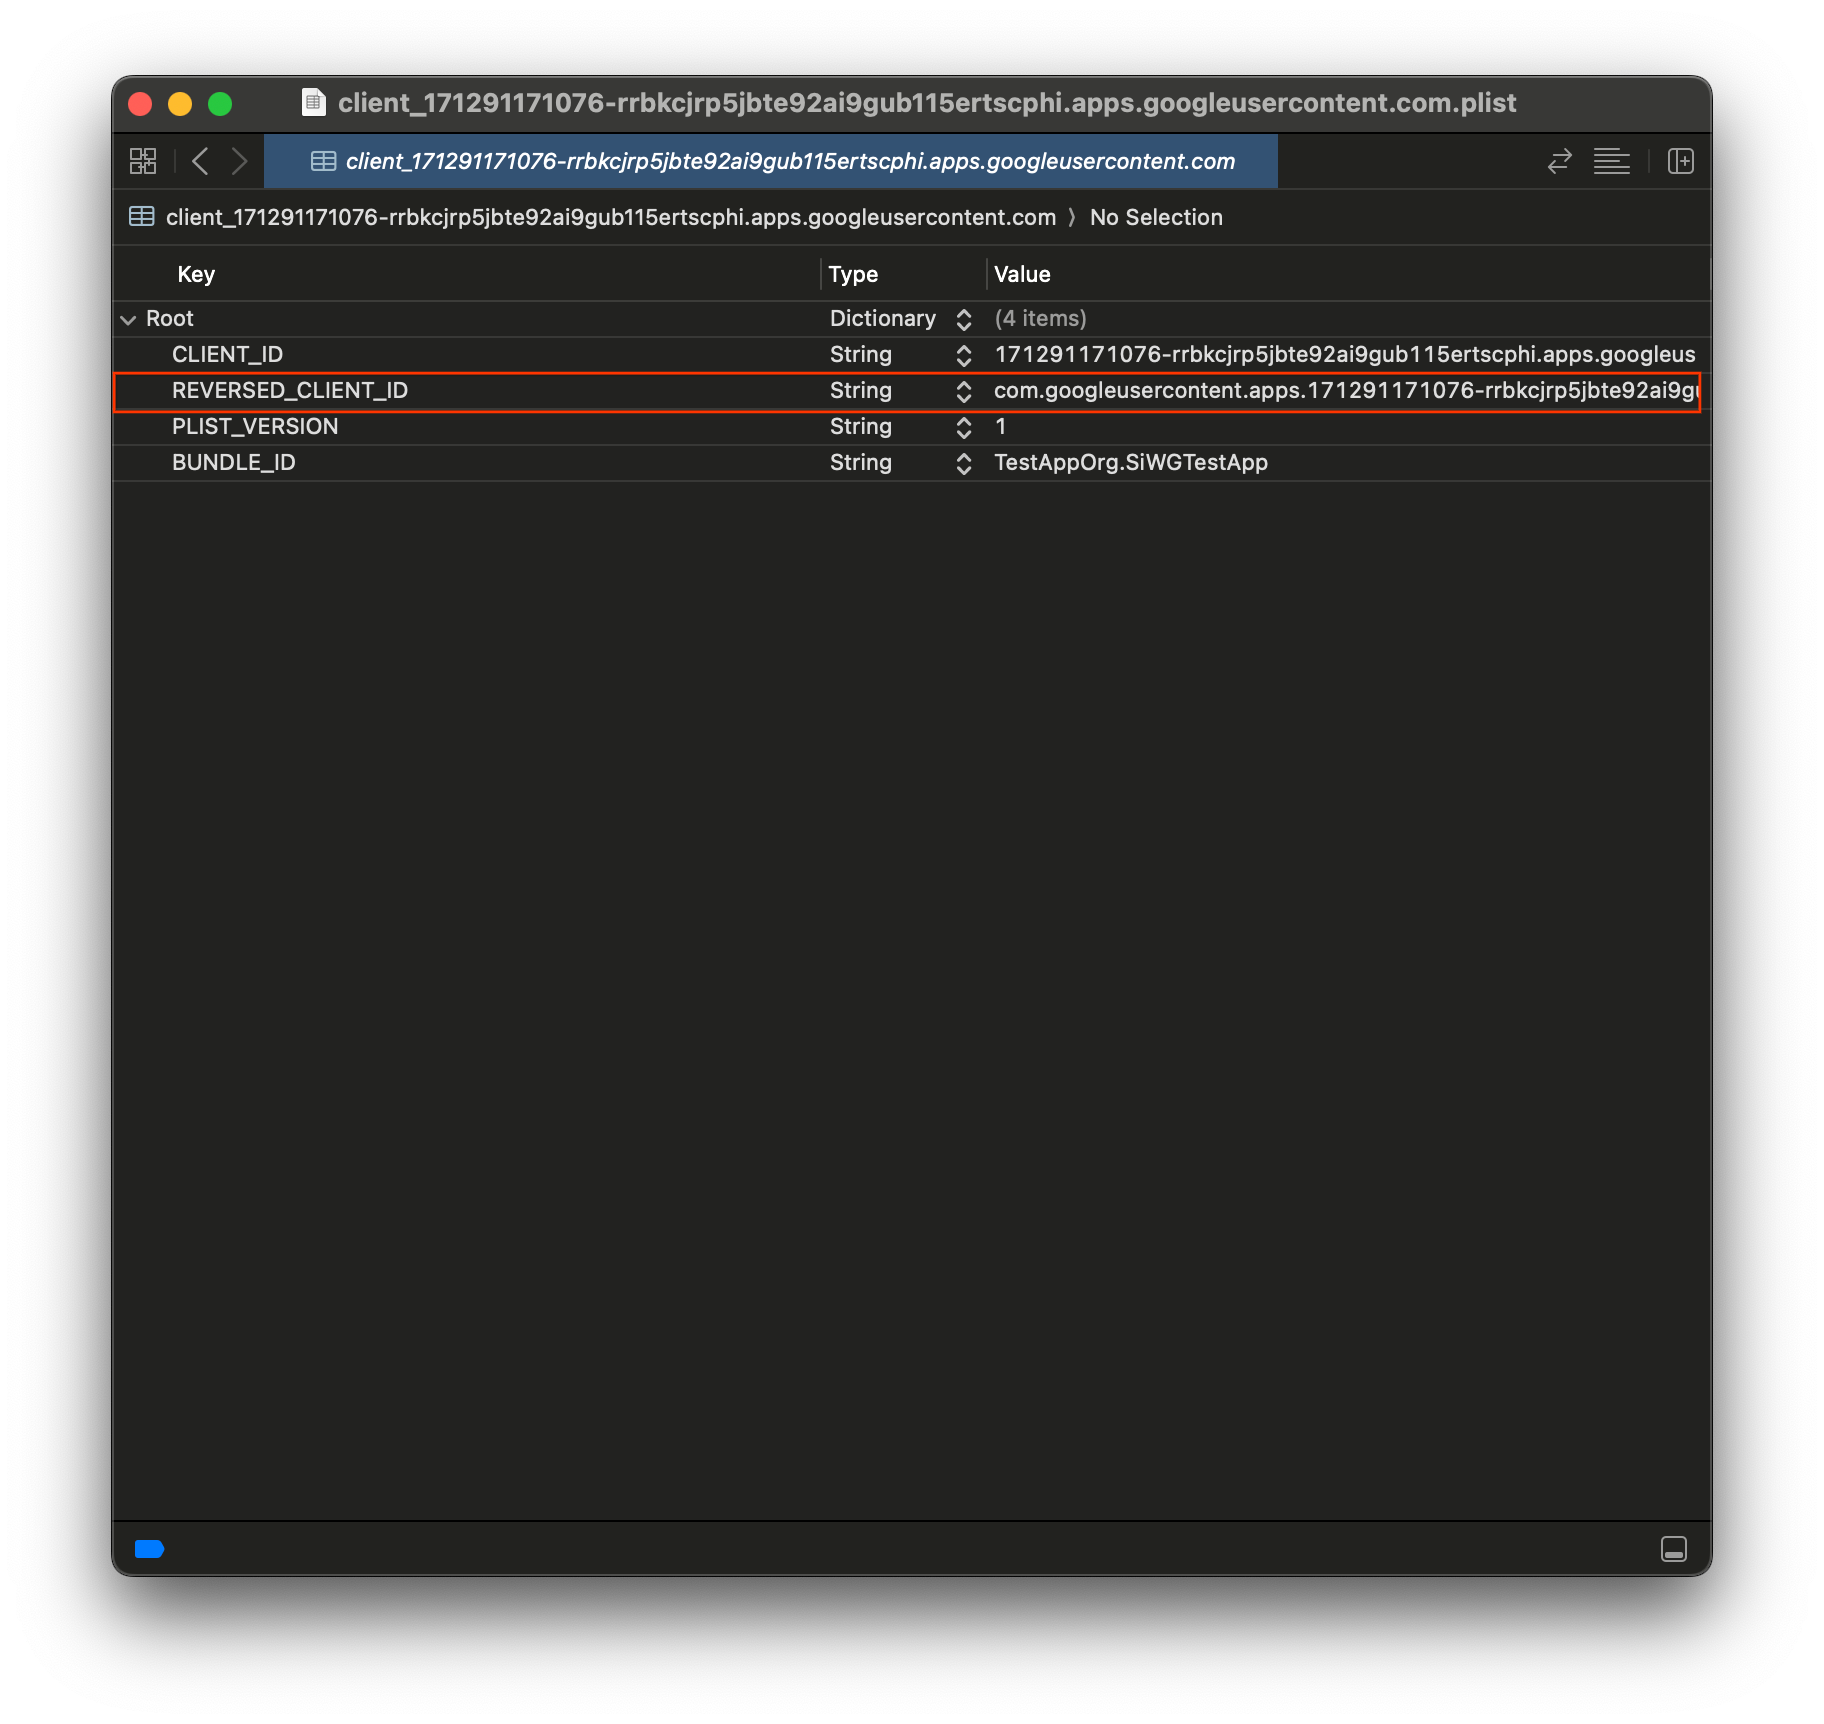
- Google Cloud Console से डाउनलोड की गई plist फ़ाइल खोलें.
- उल्टा किया गया क्लाइंट आईडी की वैल्यू कॉपी करें.
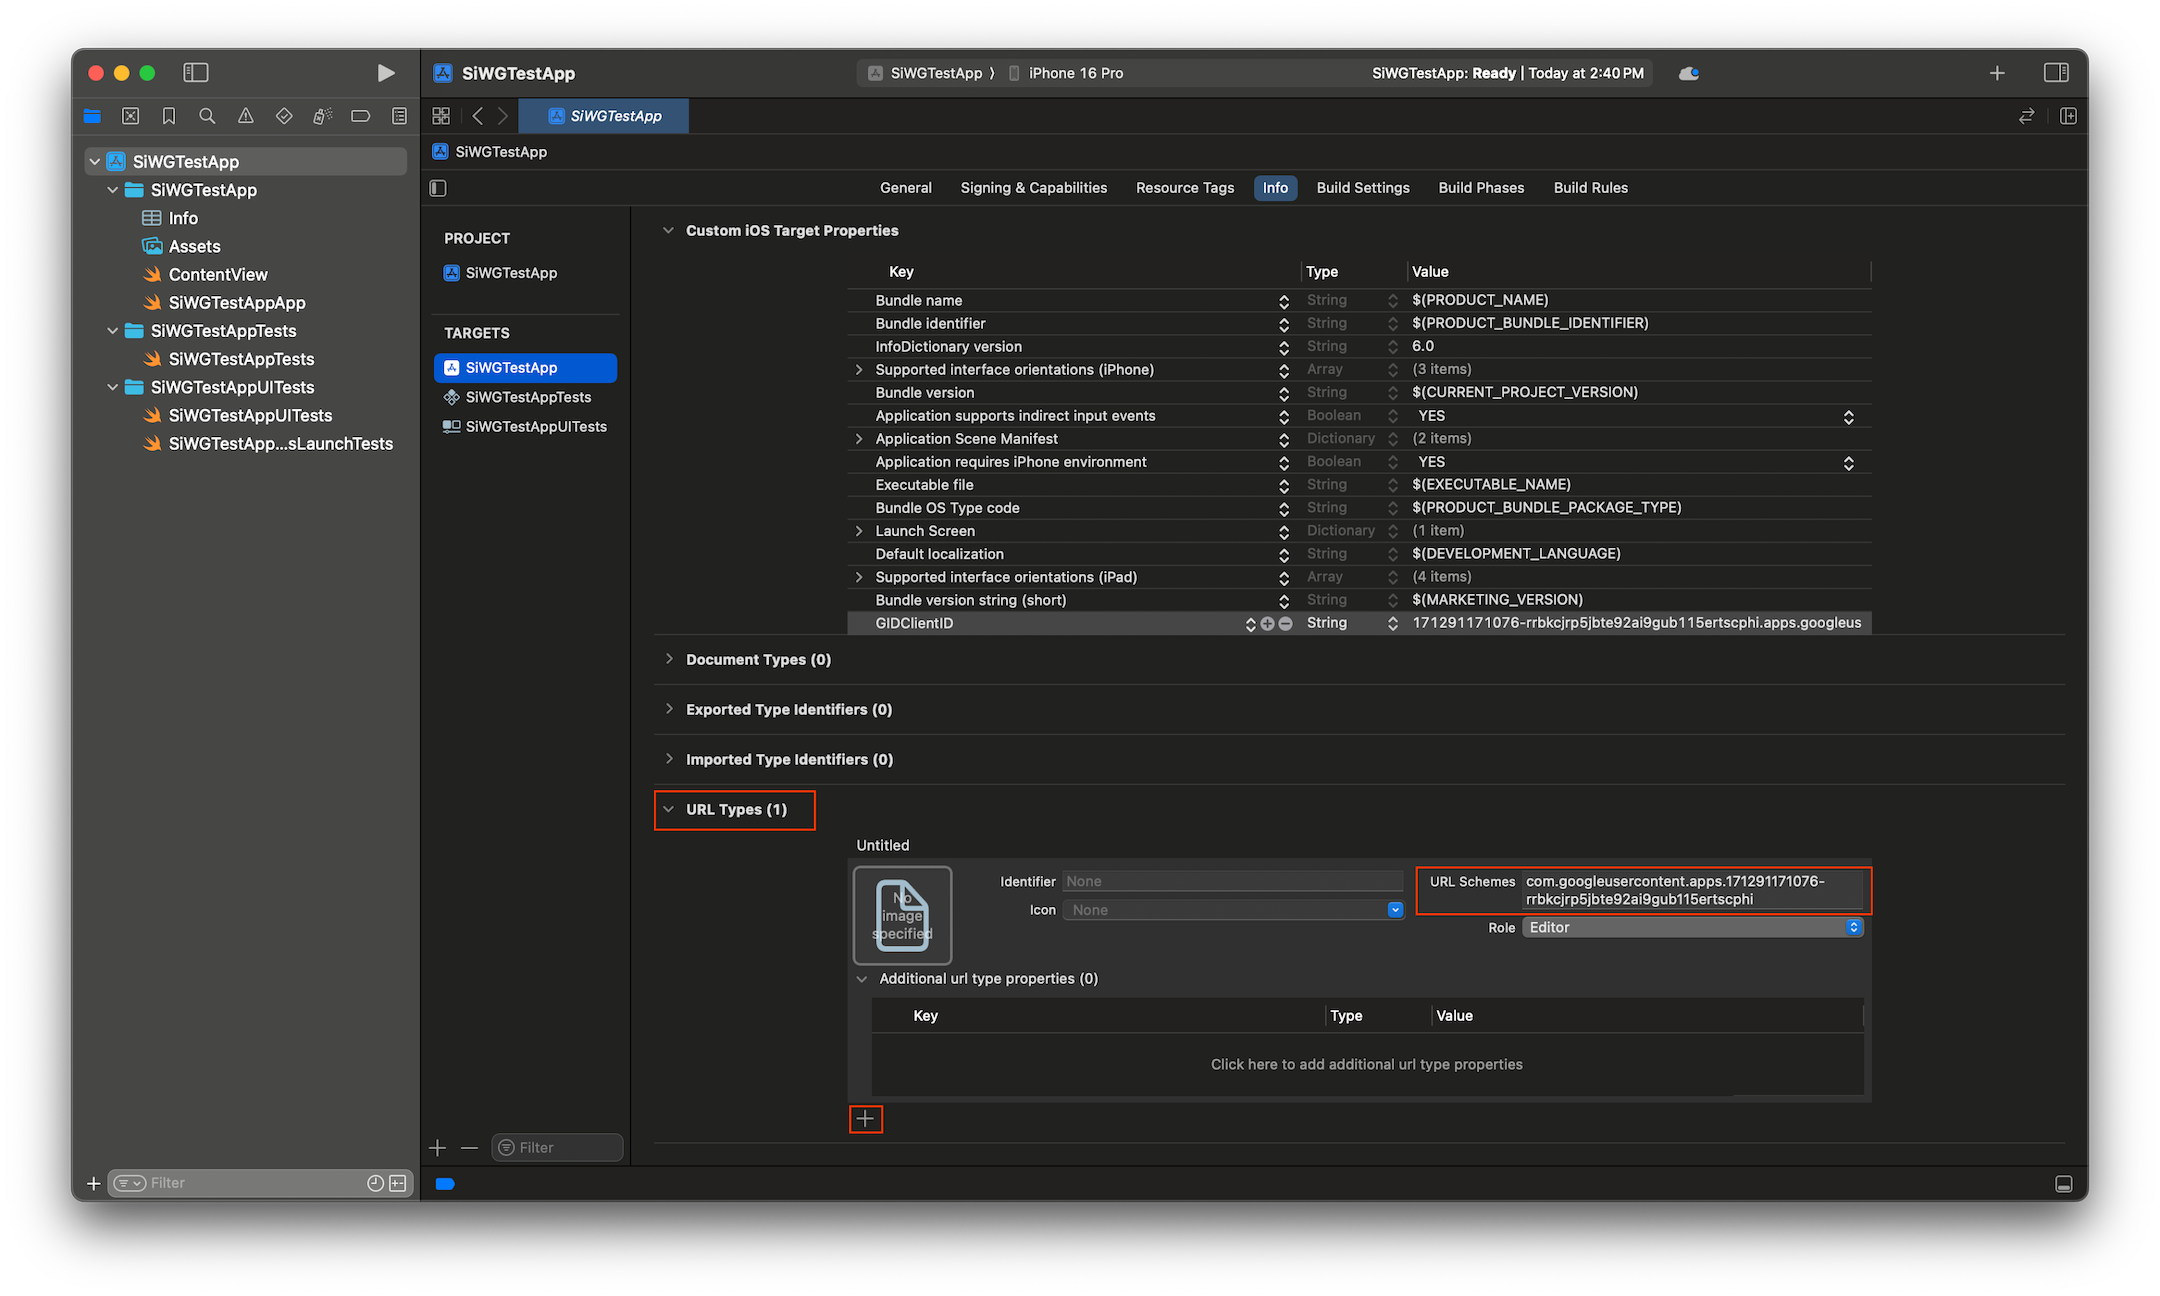
- जानकारी टैब में सबसे नीचे मौजूद, यूआरएल के टाइप को बड़ा करें.
- + बटन चुनें.
- यूआरएल स्कीम बॉक्स में, रिवर्स किया गया क्लाइंट आईडी डालें.
अब हम अपने ऐप्लिकेशन में साइन इन बटन जोड़ने के लिए तैयार हैं!
5. साइन-इन करने का बटन जोड़ना
Xcode प्रोजेक्ट कॉन्फ़िगर हो जाने के बाद, अब ऐप्लिकेशन में 'Google से साइन इन करें' बटन जोड़ने का समय आ गया है!
इस चरण का मुख्य लॉजिक, GIDSignIn.sharedInstance.signIn को कॉल करना है. इस तरीके से पुष्टि करने की प्रोसेस शुरू होती है. साथ ही, यह Sign in with Google SDK को कंट्रोल करने का विकल्प देता है, ताकि उपयोगकर्ता को 'Sign in with Google' फ़्लो दिखाया जा सके.
SwiftUI
- Xcode Project Navigator में, ContentView.swift फ़ाइल ढूंढें.
- इस फ़ाइल के कॉन्टेंट की जगह यह टेक्स्ट डालें:
import GoogleSignIn
import GoogleSignInSwift
import SwiftUI

struct ContentView: View {
  var body: some View {
    VStack {
      GoogleSignInButton(action: handleSignInButton).padding()
    }
  }

  func handleSignInButton() {
    // Find the current window scene.
    guard let windowScene = UIApplication.shared.connectedScenes.first as? UIWindowScene else {
      print("There is no active window scene")
      return
    }

    // Get the root view controller from the window scene.
    guard
      let rootViewController = windowScene.windows.first(where: { $0.isKeyWindow })?
        .rootViewController
    else {
      print("There is no key window or root view controller")
      return
    }

    // Start the sign-in process.
    GIDSignIn.sharedInstance.signIn(
      withPresenting: rootViewController
    ) { signInResult, error in
      guard let result = signInResult else {
        // Inspect error
        print("Error signing in: \(error?.localizedDescription ?? "No error description")")
        return
      }
      // If sign in succeeded, display the app's main content View.
      print("ID Token: \(result.user.idToken?.tokenString ?? "")")
    }
  }
}

#Preview {
  ContentView()
}
UIKit
- Xcode Project Navigator में, ViewController.swift फ़ाइल ढूंढें.
- इस फ़ाइल के कॉन्टेंट की जगह यह टेक्स्ट डालें:
import GoogleSignIn
import UIKit

class ViewController: UIViewController {

  // Create an instance of the Sign in with Google button
  let signInButton = GIDSignInButton()

  override func viewDidLoad() {
    super.viewDidLoad()

    // Add the sign-in button to your view
    view.addSubview(signInButton)

    // Position the button using constraints
    signInButton.translatesAutoresizingMaskIntoConstraints = false
    NSLayoutConstraint.activate([
      signInButton.centerXAnchor.constraint(equalTo: view.centerXAnchor),
      signInButton.centerYAnchor.constraint(equalTo: view.centerYAnchor),
    ])

    // Add a target to the button to call a method when it's pressed
    signInButton.addTarget(self, action: #selector(signInButtonTapped), for: .touchUpInside)
  }

  // This method is called when the sign-in button is pressed.
  @objc func signInButtonTapped() {
    // Start the sign-in process.
    GIDSignIn.sharedInstance.signIn(withPresenting: self) { signInResult, error in
      guard let result = signInResult else {
        // Inspect error
        print("Error signing in: \(error?.localizedDescription ?? "No error description")")
        return
      }

      // If sign in succeeded, print the ID token.
      print("ID Token: \(result.user.idToken?.tokenString ?? "")")
    }
  }
}
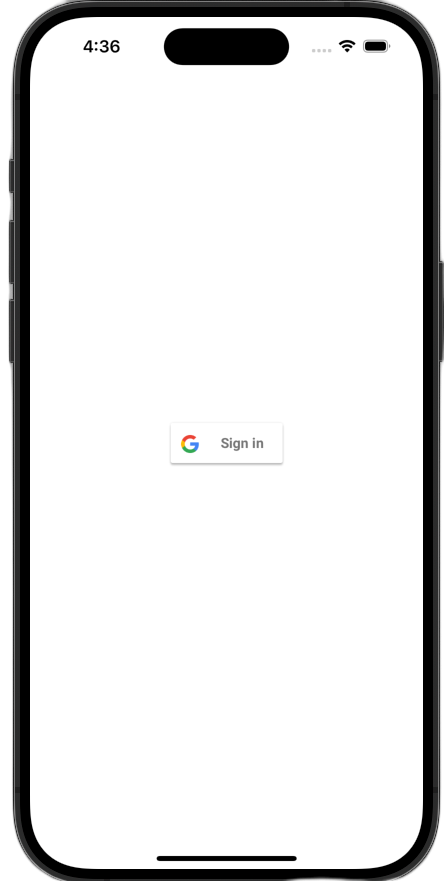
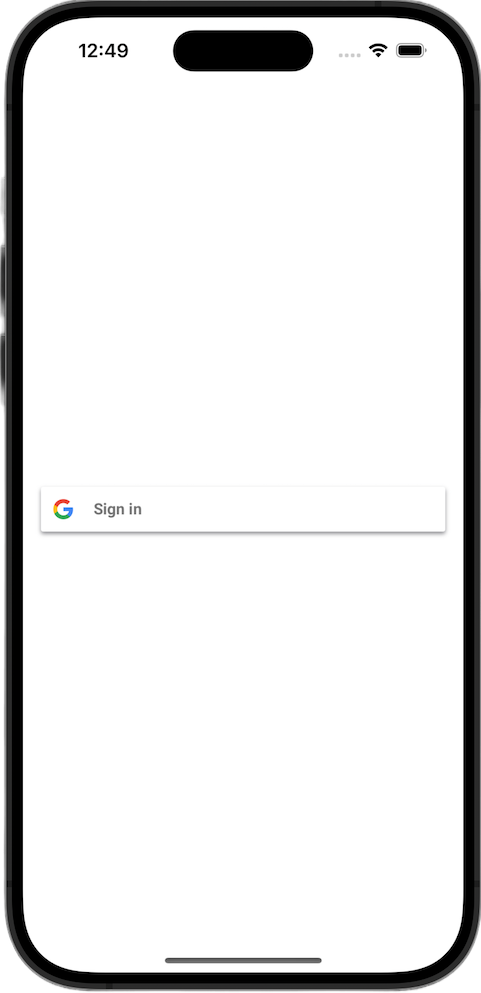
साइन-इन करने का बटन देखना
सिम्युलेटर में अपना ऐप्लिकेशन लॉन्च करें. आपको 'Google से साइन इन करें' बटन दिखेगा, लेकिन यह अभी ठीक से काम नहीं करेगा. ऐसा होना सामान्य है, क्योंकि उपयोगकर्ता की पुष्टि होने के बाद, आपको रीडायरेक्ट करने के लिए कोड लागू करना होगा.
6. साइन-इन बटन को पसंद के मुताबिक बनाना
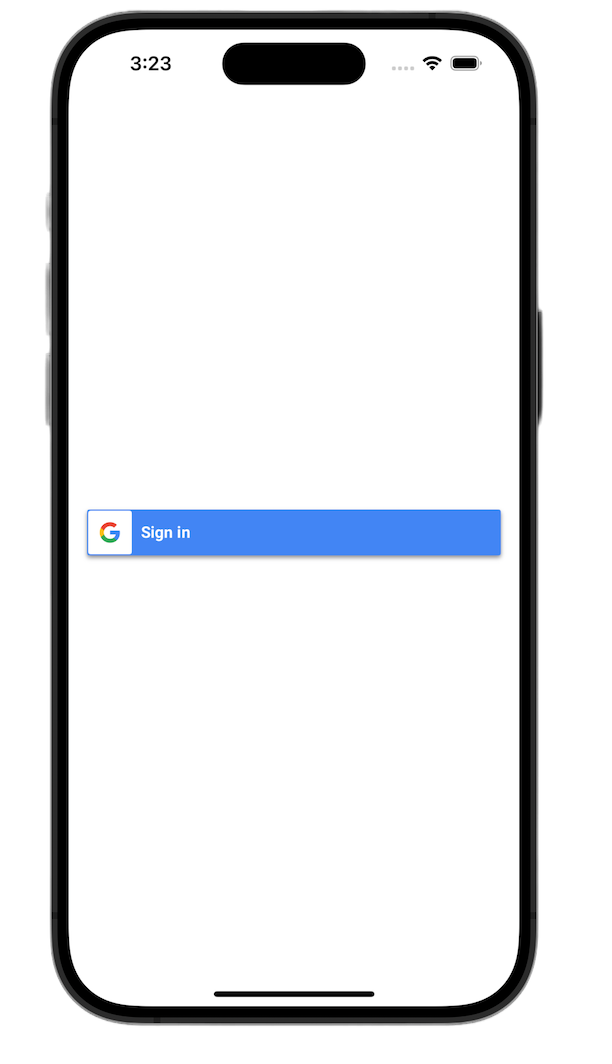
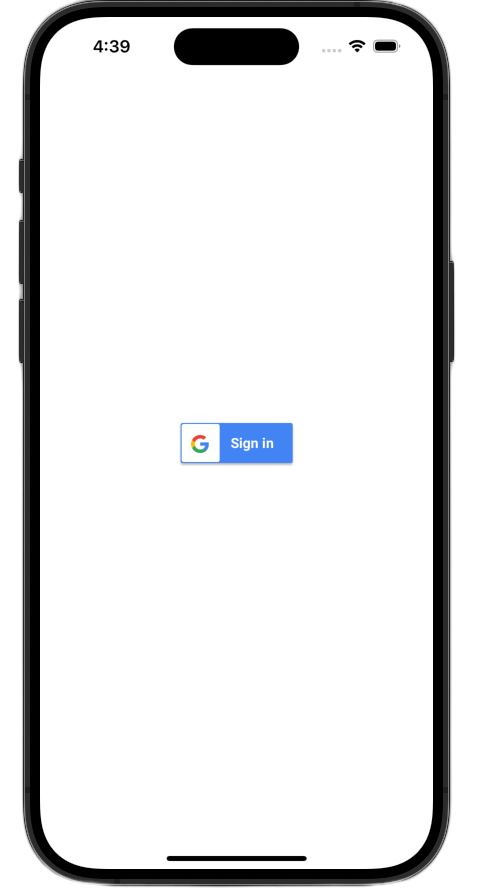
अपने ऐप्लिकेशन की थीम के हिसाब से, 'Google से साइन इन करें' बटन को अपनी पसंद के मुताबिक बनाया जा सकता है. 'Google से साइन इन करें' एसडीके की मदद से, बटन के रंग और स्टाइल में बदलाव किया जा सकता है.
SwiftUI
डिफ़ॉल्ट बटन को इस कोड की मदद से पेज में जोड़ा जाता है:
GoogleSignInButton(action: handleSignInButton)
GoogleSignInButton को इसके इनिशियलाइज़र में पैरामीटर पास करके पसंद के मुताबिक बनाया जाता है. नीचे दिया गया कोड, साइन इन बटन को डार्क मोड में दिखाएगा.
- ContentView.swift खोलें
GoogleSignInButtonके लिए इनिशियलाइज़र को अपडेट करें, ताकि इसमें ये वैल्यू शामिल हों:
GoogleSignInButton(
  scheme: .dark,  // Options: .light, .dark, .auto
  style: .standard,  // Options: .standard, .wide, .icon
  state: .normal,  // Options: .normal, .disabled
  action: handleSignInButton
).padding()
कस्टमाइज़ेशन के विकल्पों के बारे में ज़्यादा जानने के लिए, GoogleSignInSwift फ़्रेमवर्क का रेफ़रंस देखें
UIKit
डिफ़ॉल्ट बटन को कोड की इन लाइनों से बनाया जाता है:
// Create an instance of the Sign in with Google button
let signInButton = GIDSignInButton()

// Add the button to your view
view.addSubview(signInButton)
बटन इंस्टेंस पर प्रॉपर्टी सेट करके, GIDSignInButton को पसंद के मुताबिक बनाया जाता है. नीचे दिया गया कोड, साइन इन बटन को डार्क मोड में दिखाएगा.
- ViewController.swift खोलें.
viewDidLoadफ़ंक्शन में व्यू में साइन-इन बटन जोड़ने से ठीक पहले, कोड की ये लाइनें जोड़ें:
// Set the width and color of the sign-in button
signInButton.style = .standard  // Options: .standard, .wide, .iconOnly
signInButton.colorScheme = .dark  // Options: .dark, .light
कस्टम बनाने के बारे में ज़्यादा जानने के लिए, GoogleSignIn फ़्रेमवर्क का रेफ़रंस देखें
7. पुष्टि करने के लिए रीडायरेक्ट किए गए यूआरएल को मैनेज करना
साइन-इन बटन जोड़ने के बाद, अगला चरण उस रीडायरेक्ट को मैनेज करना है जो उपयोगकर्ता की पुष्टि होने के बाद होता है. पुष्टि हो जाने के बाद, Google एक यूआरएल दिखाता है. इसमें कुछ समय के लिए मान्य ऑथराइज़ेशन कोड होता है. साइन-इन की प्रोसेस पूरी करने के लिए, हैंडलर इस यूआरएल को इंटरसेप्ट करता है और इसे 'Google से साइन इन करें' एसडीके को पास करता है. इससे, इस यूआरएल को हस्ताक्षर किए गए आईडी टोकन (JWT) के लिए बदला जा सकता है.
SwiftUI
- वह फ़ाइल खोलें जिसमें आपका
Appस्ट्रक्चर मौजूद है. इस फ़ाइल का नाम आपके प्रोजेक्ट के हिसाब से रखा जाता है. इसलिए, इसका नाम YourProjectNameApp.swift जैसा होगा. - इस फ़ाइल के कॉन्टेंट की जगह यह टेक्स्ट डालें:
import GoogleSignIn
import SwiftUI

@main
struct iOS_Sign_in_with_Google_App: App {
  var body: some Scene {
    WindowGroup {
      ContentView()

        .onOpenURL { url in
          GIDSignIn.sharedInstance.handle(url)
        }
    }
  }
}
UIKit
- AppDelegate.swift खोलें.
- फ़ाइल में सबसे ऊपर, यह इंपोर्ट जोड़ें:
import GoogleSignIn
AppDelegateक्लास में, पुष्टि करने वाला यह हैंडलर फ़ंक्शन जोड़ें. इसेapplication(_:didFinishLaunchingWithOptions:)तरीके के क्लोज़िंग ब्रेस के ठीक बाद रखा जा सकता है:
func application(
  _ app: UIApplication,
  open url: URL,
  options: [UIApplication.OpenURLOptionsKey: Any] = [:]
) -> Bool {
  var handled: Bool

  handled = GIDSignIn.sharedInstance.handle(url)
  if handled {
    return true
  }
  // If not handled by this app, return false.
  return false
}
ये बदलाव करने के बाद, आपकी AppDelegate.swift फ़ाइल ऐसी दिखनी चाहिए:
import GoogleSignIn
import UIKit

@main
class AppDelegate: UIResponder, UIApplicationDelegate {

  func application(
    _ application: UIApplication,
    didFinishLaunchingWithOptions launchOptions: [UIApplication.LaunchOptionsKey: Any]?
  ) -> Bool {
    // Override point for customization after application launch.
    return true
  }

  func application(
    _ app: UIApplication,
    open url: URL,
    options: [UIApplication.OpenURLOptionsKey: Any] = [:]
  ) -> Bool {
    var handled: Bool

    handled = GIDSignIn.sharedInstance.handle(url)
    if handled {
      return true
    }
    // If not handled by this app, return false.
    return false
  }

  // MARK: UISceneSession Lifecycle

  func application(
    _ application: UIApplication,
    configurationForConnecting connectingSceneSession: UISceneSession,
    options: UIScene.ConnectionOptions
  ) -> UISceneConfiguration {
    // Called when a new scene session is being created.
    // Use this method to select a configuration to create the new scene with.
    return UISceneConfiguration(
      name: "Default Configuration",
      sessionRole: connectingSceneSession.role
    )
  }

  func application(
    _ application: UIApplication,
    didDiscardSceneSessions sceneSessions: Set<UISceneSession>
  ) {
    // Called when the user discards a scene session.
    // If any sessions were discarded while the application was not running, this will be called shortly after application:didFinishLaunchingWithOptions.
    // Use this method to release any resources that were specific to the discarded scenes, as they will not return.
  }
}
साइन-इन फ़्लो की जांच करना
अब साइन इन करने की पूरी प्रोसेस की जांच की जा सकती है!
अपना ऐप्लिकेशन चलाएं और साइन इन करें बटन पर टैप करें. पुष्टि करने के बाद, Google आपको सहमति देने के लिए एक स्क्रीन दिखाएगा. यहां ऐप्लिकेशन को आपकी जानकारी ऐक्सेस करने की अनुमति दी जा सकती है. अनुमति देने के बाद, साइन-इन की प्रोसेस पूरी हो जाएगी. इसके बाद, आपको वापस ऐप्लिकेशन पर भेज दिया जाएगा.
साइन-इन की प्रोसेस पूरी होने के बाद, 'Google से साइन इन करें' एसडीके, उपयोगकर्ता के क्रेडेंशियल को डिवाइस के कीचेन में सुरक्षित तरीके से सेव करता है. इन क्रेडेंशियल का इस्तेमाल बाद में किया जा सकता है. इससे उपयोगकर्ता को ऐप्लिकेशन लॉन्च करने के बाद भी साइन इन रखने की अनुमति मिलती है.
8. साइन आउट करने का बटन जोड़ना
अब साइन-इन करने की सुविधा काम कर रही है. इसलिए, अगला चरण साइन-आउट करने का बटन जोड़ना है. साथ ही, यूज़र इंटरफ़ेस (यूआई) को अपडेट करना है, ताकि उपयोगकर्ता के मौजूदा साइन-इन की स्थिति दिख सके. साइन इन करने के बाद, SDK टूल एक GIDGoogleUser ऑब्जेक्ट उपलब्ध कराता है. इस ऑब्जेक्ट में profile प्रॉपर्टी होती है. इसमें उपयोगकर्ता का नाम और ईमेल जैसी बुनियादी जानकारी होती है. इसका इस्तेमाल, यूज़र इंटरफ़ेस (यूआई) को अपने हिसाब से बनाने के लिए किया जाता है.
SwiftUI
- अपनी ContentView.swift फ़ाइल खोलें.
- अपने
ContentViewस्ट्रक्चर में सबसे ऊपर एक स्टेट वैरिएबल जोड़ें. यह वैरिएबल, उपयोगकर्ता के साइन इन करने के बाद उसकी जानकारी सेव करेगा. यह एक@Stateवैरिएबल है. इसलिए, जब भी इसकी वैल्यू बदलेगी, SwiftUI आपके यूज़र इंटरफ़ेस (यूआई) को अपने-आप अपडेट कर देगा:
struct ContentView: View {
  @State private var user: GIDGoogleUser?
}
- अपनी
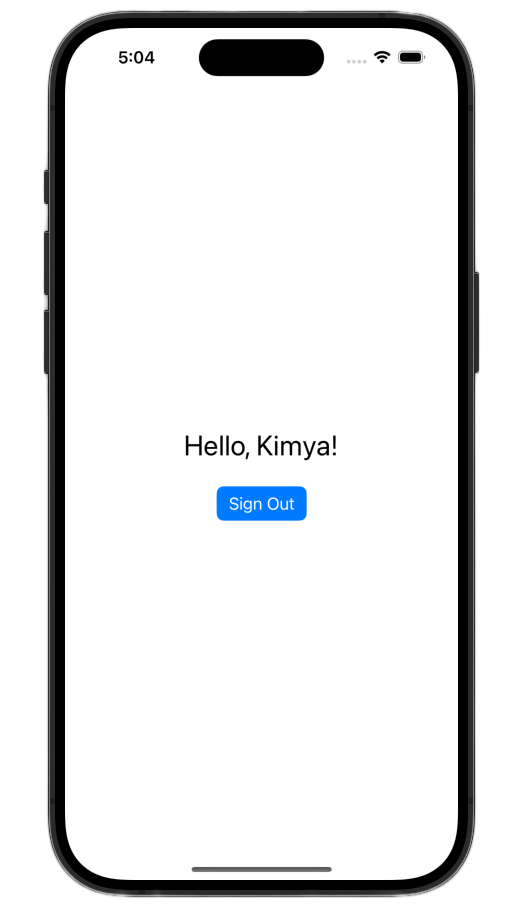
ContentViewस्ट्रक्चर के मौजूदाbodyको यहां दिए गएVStackसे बदलें. इससे यह पता चलेगा किuserके स्टेट वैरिएबल में कोई उपयोगकर्ता मौजूद है या नहीं. अगर ऐसा होता है, तो आपको वेलकम मैसेज और साइन आउट करने का बटन दिखेगा. अगर ऐसा नहीं होता है, तो आपको 'Google से साइन इन करें' बटन का ओरिजनल वर्शन दिखेगा:
var body: some View {
  VStack {
    // Check if the user is signed in.
    if let user = user {
      // If signed in, show a welcome message and the sign-out button.
      Text("Hello, \(user.profile?.givenName ?? "User")!")
        .font(.title)
        .padding()

      Button("Sign Out", action: signOut)
        .buttonStyle(.borderedProminent)

    } else {
      // If not signed in, show the "Sign in with Google" button.
      GoogleSignInButton(
        scheme: .dark,  // Options: .light, .dark, .auto
        style: .standard,  // Options: .standard, .wide, .icon
        state: .normal,  // Options: .normal, .disabled
        action: handleSignInButton
      ).padding()
    }
  }
}
handleSignInButtonके पूरे होने की स्थिति वाले ब्लॉक को अपडेट करें, ताकिsignInResult.userको अपने नएuserवैरिएबल को असाइन किया जा सके. इन वजहों से, यूज़र इंटरफ़ेस (यूआई) साइन इन किए गए व्यू पर स्विच हो जाता है:
func handleSignInButton() {
  // Find the current window scene.
  guard let windowScene = UIApplication.shared.connectedScenes.first as? UIWindowScene else {
    print("There is no active window scene")
    return
  }

  // Get the root view controller from the window scene.
  guard
    let rootViewController = windowScene.windows.first(where: { $0.isKeyWindow })?
      .rootViewController
  else {
    print("There is no key window or root view controller")
    return
  }

  // Start the sign-in process.
  GIDSignIn.sharedInstance.signIn(
    withPresenting: rootViewController
  ) { signInResult, error in
    guard let result = signInResult else {
      // Inspect error
      print("Error signing in: \(error?.localizedDescription ?? "No error description")")
      return
    }

    DispatchQueue.main.async {
      self.user = result.user
    }

    // If sign in succeeded, display the app's main content View.
    print("ID Token: \(result.user.idToken?.tokenString ?? "")")
  }
}
- अपने
ContentViewस्ट्रक्चर के सबसे नीचे एक नयाsignOutफ़ंक्शन जोड़ें, ताकि साइन-आउट बटन से इसे कॉल किया जा सके:
func signOut() {
  GIDSignIn.sharedInstance.signOut()
  // After signing out, set the `user` state variable to `nil`.
  self.user = nil
}
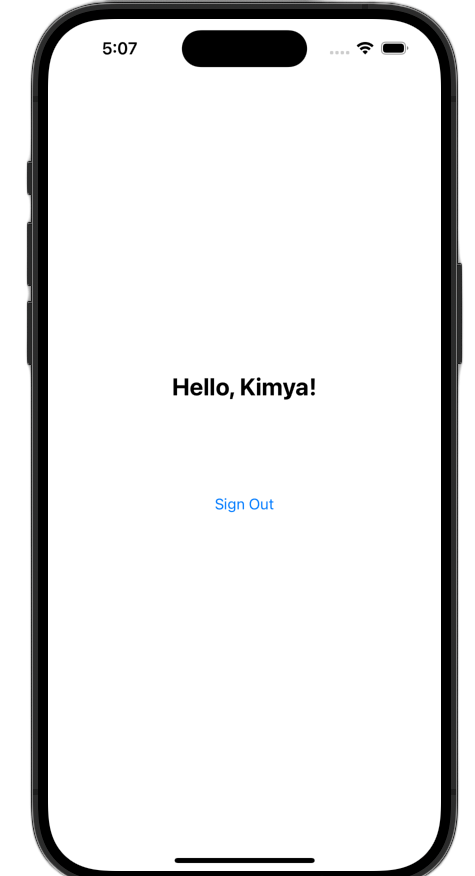
ऐप्लिकेशन लॉन्च करें और साइन इन करें. पुष्टि हो जाने के बाद, आपको यूज़र इंटरफ़ेस (यूआई) में बदलाव दिखेगा!
ये बदलाव करने के बाद, आपकी ContentView.swift फ़ाइल ऐसी दिखनी चाहिए:
import GoogleSignIn
import GoogleSignInSwift
import SwiftUI

struct ContentView: View {

  @State private var user: GIDGoogleUser?

  var body: some View {
    VStack {
      // Check if the user is signed in.
      if let user = user {
        // If signed in, show a welcome message and the sign-out button.
        Text("Hello, \(user.profile?.givenName ?? "User")!")
          .font(.title)
          .padding()

        Button("Sign Out", action: signOut)
          .buttonStyle(.borderedProminent)

      } else {
        // If not signed in, show the "Sign in with Google" button.
        GoogleSignInButton(
          scheme: .dark,  // Options: .light, .dark, .auto
          style: .standard,  // Options: .standard, .wide, .icon
          state: .normal,  // Options: .normal, .disabled
          action: handleSignInButton
        ).padding()
      }
    }
  }

  func handleSignInButton() {
    // Find the current window scene.
    guard let windowScene = UIApplication.shared.connectedScenes.first as? UIWindowScene else {
      print("There is no active window scene")
      return
    }

    // Get the root view controller from the window scene.
    guard
      let rootViewController = windowScene.windows.first(where: { $0.isKeyWindow })?
        .rootViewController
    else {
      print("There is no key window or root view controller")
      return
    }

    // Start the sign-in process.
    GIDSignIn.sharedInstance.signIn(
      withPresenting: rootViewController
    ) { signInResult, error in
      guard let result = signInResult else {
        // Inspect error
        print("Error signing in: \(error?.localizedDescription ?? "No error description")")
        return
      }

      DispatchQueue.main.async {
        self.user = result.user
      }

      // If sign in succeeded, display the app's main content View.
      print("ID Token: \(result.user.idToken?.tokenString ?? "")")
    }
  }

  func signOut() {
    GIDSignIn.sharedInstance.signOut()
    // After signing out, set the `user` state variable to `nil`.
    self.user = nil
  }
}

#Preview {
  ContentView()
}
UIKit
- ViewController.swift खोलें.
ViewControllerके सबसे ऊपर, ठीक उस जगह के नीचे जहां आपनेsignInButtonका एलान किया है, साइन आउट करने का बटन और वेलकम लेबल जोड़ें:
let signOutButton = UIButton(type: .system)
let welcomeLabel = UILabel()
ViewControllerके सबसे नीचे यह फ़ंक्शन जोड़ें. यह फ़ंक्शन, साइन-इन की स्थिति के आधार पर उपयोगकर्ता को अलग-अलग यूज़र इंटरफ़ेस (यूआई) दिखाएगा:
private func updateUI(for user: GIDGoogleUser?) {
  if let user = user {
    // User is signed in.
    signInButton.isHidden = true
    signOutButton.isHidden = false
    welcomeLabel.isHidden = false
    welcomeLabel.text = "Hello, \(user.profile?.givenName ?? "User")!"
  } else {
    // User is signed out.
    signInButton.isHidden = false
    signOutButton.isHidden = true
    welcomeLabel.isHidden = true
  }
}
viewDidLoadफ़ंक्शन के सबसे नीचे, व्यू में वेलकम लेबल और साइन-आउट बटन जोड़ने के लिए, यह कोड जोड़ें:
// --- Set up the Welcome Label ---
welcomeLabel.translatesAutoresizingMaskIntoConstraints = false
welcomeLabel.textAlignment = .center
welcomeLabel.font = .systemFont(ofSize: 24, weight: .bold)
view.addSubview(welcomeLabel)

NSLayoutConstraint.activate([
  welcomeLabel.centerXAnchor.constraint(equalTo: view.centerXAnchor),
  welcomeLabel.bottomAnchor.constraint(equalTo: signInButton.topAnchor, constant: -20),
])

// --- Set up the Sign-Out Button ---
signOutButton.translatesAutoresizingMaskIntoConstraints = false
signOutButton.setTitle("Sign Out", for: .normal)
view.addSubview(signOutButton)

NSLayoutConstraint.activate([
  signOutButton.centerXAnchor.constraint(equalTo: view.centerXAnchor),
  signOutButton.topAnchor.constraint(equalTo: signInButton.bottomAnchor, constant: 20),
])

signOutButton.addTarget(self, action: #selector(signOutButtonTapped), for: .touchUpInside)

// --- Set Initial UI State ---
updateUI(for: nil)
- साइन इन हो जाने पर,
UpdateUIतरीके को कॉल करने के लिए,signInButtonTappedफ़ंक्शन को अपडेट करें:
@objc func signInButtonTapped() {
  // Start the sign-in process.
  GIDSignIn.sharedInstance.signIn(withPresenting: self) { signInResult, error in
    guard let result = signInResult else {
      // Inspect error
      print("Error signing in: \(error?.localizedDescription ?? "No error description")")
      return
    }

    // If sign in succeeded, print the ID token.
    print("ID Token: \(result.user.idToken?.tokenString ?? "")")

    DispatchQueue.main.async {
      self.updateUI(for: result.user)
    }
  }
}
- आखिर में, साइन-आउट की प्रोसेस को मैनेज करने के लिए,
ViewControllerमेंsignOutButtonTappedफ़ंक्शन जोड़ें:
@objc func signOutButtonTapped() {
  GIDSignIn.sharedInstance.signOut()
  // Update the UI for the signed-out state.
  updateUI(for: nil)
}
ऐप्लिकेशन लॉन्च करें और साइन इन करें. पुष्टि हो जाने के बाद, आपको यूज़र इंटरफ़ेस (यूआई) में बदलाव दिखेगा!
ये बदलाव करने के बाद, आपकी ViewController.swift फ़ाइल ऐसी दिखनी चाहिए:
import GoogleSignIn
import UIKit

class ViewController: UIViewController {

  // Create an instance of the Sign in with Google button
  let signInButton = GIDSignInButton()
  let signOutButton = UIButton(type: .system)
  let welcomeLabel = UILabel()

  override func viewDidLoad() {
    super.viewDidLoad()

    // Set the width and color of the sign-in button
    signInButton.style = .standard  // Options: .standard, .wide, .iconOnly
    signInButton.colorScheme = .dark  // Options: .dark, .light

    // Add the sign-in button to your view
    view.addSubview(signInButton)

    // Position the button using constraints
    signInButton.translatesAutoresizingMaskIntoConstraints = false
    NSLayoutConstraint.activate([
      signInButton.centerXAnchor.constraint(equalTo: view.centerXAnchor),
      signInButton.centerYAnchor.constraint(equalTo: view.centerYAnchor),
    ])

    // Add a target to the button to call a method when it's pressed
    signInButton.addTarget(self, action: #selector(signInButtonTapped), for: .touchUpInside)

    // --- Set up the Welcome Label ---
    welcomeLabel.translatesAutoresizingMaskIntoConstraints = false
    welcomeLabel.textAlignment = .center
    welcomeLabel.font = .systemFont(ofSize: 24, weight: .bold)
    view.addSubview(welcomeLabel)

    NSLayoutConstraint.activate([
      welcomeLabel.centerXAnchor.constraint(equalTo: view.centerXAnchor),
      welcomeLabel.bottomAnchor.constraint(equalTo: signInButton.topAnchor, constant: -20),
    ])

    // --- Set up the Sign-Out Button ---
    signOutButton.translatesAutoresizingMaskIntoConstraints = false
    signOutButton.setTitle("Sign Out", for: .normal)
    view.addSubview(signOutButton)

    NSLayoutConstraint.activate([
      signOutButton.centerXAnchor.constraint(equalTo: view.centerXAnchor),
      signOutButton.topAnchor.constraint(equalTo: signInButton.bottomAnchor, constant: 20),
    ])

    signOutButton.addTarget(self, action: #selector(signOutButtonTapped), for: .touchUpInside)

    // --- Set Initial UI State ---
    updateUI(for: nil)
  }

  // This method is called when the sign-in button is pressed.
  @objc func signInButtonTapped() {
    // Start the sign-in process.
    GIDSignIn.sharedInstance.signIn(withPresenting: self) { signInResult, error in
      guard let result = signInResult else {
        // Inspect error
        print("Error signing in: \(error?.localizedDescription ?? "No error description")")
        return
      }

      // If sign in succeeded, print the ID token.
      print("ID Token: \(result.user.idToken?.tokenString ?? "")")

      DispatchQueue.main.async {
        self.updateUI(for: result.user)
      }
    }
  }

  private func updateUI(for user: GIDGoogleUser?) {
    if let user = user {
      // User is signed in.
      signInButton.isHidden = true
      signOutButton.isHidden = false
      welcomeLabel.isHidden = false
      welcomeLabel.text = "Hello, \(user.profile?.givenName ?? "User")!"
    } else {
      // User is signed out.
      signInButton.isHidden = false
      signOutButton.isHidden = true
      welcomeLabel.isHidden = true
    }
  }

  @objc func signOutButtonTapped() {
    GIDSignIn.sharedInstance.signOut()
    // Update the UI for the signed-out state.
    updateUI(for: nil)
  }
}
9. उपयोगकर्ता की साइन-इन स्थिति को वापस लाना
वापस आने वाले उपयोगकर्ताओं को बेहतर अनुभव देने के लिए, अगला चरण यह है कि ऐप्लिकेशन लॉन्च होने पर, उनकी साइन-इन की स्थिति को वापस लाया जाए. restorePreviousSignIn को कॉल करने पर, Keychain में सेव किए गए क्रेडेंशियल का इस्तेमाल करके उपयोगकर्ता को चुपचाप वापस साइन इन कर दिया जाता है. इससे यह पक्का होता है कि उपयोगकर्ता को हर बार साइन-इन फ़्लो पूरा न करना पड़े.
SwiftUI
- ContentView.swift खोलें.
bodyवैरिएबल में मौजूदVStackके ठीक बाद यह कोड जोड़ें:
.onAppear {
  // On appear, try to restore a previous sign-in.
  GIDSignIn.sharedInstance.restorePreviousSignIn { user, error in
    // This closure is called when the restoration is complete.
    if let user = user {
      // If a user was restored, update the `user` state variable.
      DispatchQueue.main.async {
        self.user = user
      }

      // Print the ID token to the console when restored.
      print("Restored ID Token: \(user.idToken?.tokenString ?? "")")
    }
  }
}
आपका ContentView.swift ऐसा दिखना चाहिए:
import GoogleSignIn
import GoogleSignInSwift
import SwiftUI

struct ContentView: View {

  @State private var user: GIDGoogleUser?

  var body: some View {
    VStack {
      // Check if the user is signed in.
      if let user = user {
        // If signed in, show a welcome message and the sign-out button.
        Text("Hello, \(user.profile?.givenName ?? "User")!")
          .font(.title)
          .padding()

        Button("Sign Out", action: signOut)
          .buttonStyle(.borderedProminent)

      } else {
        // If not signed in, show the "Sign in with Google" button.
        GoogleSignInButton(
          scheme: .dark,  // Options: .light, .dark, .auto
          style: .standard,  // Options: .standard, .wide, .icon
          state: .normal,  // Options: .normal, .disabled
          action: handleSignInButton
        ).padding()
      }
    }

    .onAppear {
      // On appear, try to restore a previous sign-in.
      GIDSignIn.sharedInstance.restorePreviousSignIn { user, error in
        // This closure is called when the restoration is complete.
        if let user = user {
          // If a user was restored, update the `user` state variable.
          DispatchQueue.main.async {
            self.user = user
          }

          // Print the ID token to the console when restored.
          print("Restored ID Token: \(user.idToken?.tokenString ?? "")")
        }
      }
    }
  }

  func handleSignInButton() {
    // Find the current window scene.
    guard let windowScene = UIApplication.shared.connectedScenes.first as? UIWindowScene else {
      print("There is no active window scene")
      return
    }

    // Get the root view controller from the window scene.
    guard
      let rootViewController = windowScene.windows.first(where: { $0.isKeyWindow })?
        .rootViewController
    else {
      print("There is no key window or root view controller")
      return
    }

    // Start the sign-in process.
    GIDSignIn.sharedInstance.signIn(
      withPresenting: rootViewController
    ) { signInResult, error in
      guard let result = signInResult else {
        // Inspect error
        print("Error signing in: \(error?.localizedDescription ?? "No error description")")
        return
      }

      DispatchQueue.main.async {
        self.user = result.user
      }

      // If sign in succeeded, display the app's main content View.
      print("ID Token: \(result.user.idToken?.tokenString ?? "")")
    }
  }

  func signOut() {
    GIDSignIn.sharedInstance.signOut()
    // After signing out, set the `user` state variable to `nil`.
    self.user = nil
  }
}

#Preview {
  ContentView()
}
UIKit
- ViewController.swift खोलें.
viewDidLoadतरीके के आखिर में, यहां दिया गयाrestorePreviousSignInकॉल जोड़ें:
// Attempt to restore a previous sign-in session
GIDSignIn.sharedInstance.restorePreviousSignIn { user, error in
  if let user = user {
    print("Successfully restored sign-in for user: \(user.profile?.givenName ?? "Unknown")")

    // Print the ID token when a session is restored.
    print("Restored ID Token: \(user.idToken?.tokenString ?? "")")

    // On success, update the UI for the signed-in state on the main thread.
    DispatchQueue.main.async {
      self.updateUI(for: user)
    }
  }
}
आपकी ViewController.swift फ़ाइल ऐसी दिखनी चाहिए:
import GoogleSignIn
import UIKit

class ViewController: UIViewController {

  // Create an instance of the Sign in with Google button
  let signInButton = GIDSignInButton()
  let signOutButton = UIButton(type: .system)
  let welcomeLabel = UILabel()

  override func viewDidLoad() {
    super.viewDidLoad()

    // Set the width and color of the sign-in button
    signInButton.style = .standard  // Options: .standard, .wide, .iconOnly
    signInButton.colorScheme = .dark  // Options: .dark, .light

    // Add the sign-in button to your view
    view.addSubview(signInButton)

    // Position the button using constraints
    signInButton.translatesAutoresizingMaskIntoConstraints = false
    NSLayoutConstraint.activate([
      signInButton.centerXAnchor.constraint(equalTo: view.centerXAnchor),
      signInButton.centerYAnchor.constraint(equalTo: view.centerYAnchor),
    ])

    // Add a target to the button to call a method when it's pressed
    signInButton.addTarget(self, action: #selector(signInButtonTapped), for: .touchUpInside)

    // --- Set up the Welcome Label ---
    welcomeLabel.translatesAutoresizingMaskIntoConstraints = false
    welcomeLabel.textAlignment = .center
    welcomeLabel.font = .systemFont(ofSize: 24, weight: .bold)
    view.addSubview(welcomeLabel)

    NSLayoutConstraint.activate([
      welcomeLabel.centerXAnchor.constraint(equalTo: view.centerXAnchor),
      welcomeLabel.bottomAnchor.constraint(equalTo: signInButton.topAnchor, constant: -20),
    ])

    // --- Set up the Sign-Out Button ---
    signOutButton.translatesAutoresizingMaskIntoConstraints = false
    signOutButton.setTitle("Sign Out", for: .normal)
    view.addSubview(signOutButton)

    NSLayoutConstraint.activate([
      signOutButton.centerXAnchor.constraint(equalTo: view.centerXAnchor),
      signOutButton.topAnchor.constraint(equalTo: signInButton.bottomAnchor, constant: 20),
    ])

    signOutButton.addTarget(self, action: #selector(signOutButtonTapped), for: .touchUpInside)

    // --- Set Initial UI State ---
    updateUI(for: nil)

    // Attempt to restore a previous sign-in session
    GIDSignIn.sharedInstance.restorePreviousSignIn { user, error in
      if let user = user {
        print("Successfully restored sign-in for user: \(user.profile?.givenName ?? "Unknown")")

        // Print the ID token when a session is restored.
        print("Restored ID Token: \(user.idToken?.tokenString ?? "")")

        // On success, update the UI for the signed-in state on the main thread.
        DispatchQueue.main.async {
          self.updateUI(for: user)
        }
      }
    }
  }

  // This method is called when the sign-in button is pressed.
  @objc func signInButtonTapped() {
    // Start the sign-in process.
    GIDSignIn.sharedInstance.signIn(withPresenting: self) { signInResult, error in
      guard let result = signInResult else {
        // Inspect error
        print("Error signing in: \(error?.localizedDescription ?? "No error description")")
        return
      }

      // If sign in succeeded, print the ID token.
      print("ID Token: \(result.user.idToken?.tokenString ?? "")")

      DispatchQueue.main.async {
        self.updateUI(for: result.user)
      }
    }
  }

  private func updateUI(for user: GIDGoogleUser?) {
    if let user = user {
      // User is signed in.
      signInButton.isHidden = true
      signOutButton.isHidden = false
      welcomeLabel.isHidden = false
      welcomeLabel.text = "Hello, \(user.profile?.givenName ?? "User")!"
    } else {
      // User is signed out.
      signInButton.isHidden = false
      signOutButton.isHidden = true
      welcomeLabel.isHidden = true
    }
  }

  @objc func signOutButtonTapped() {
    GIDSignIn.sharedInstance.signOut()
    // Update the UI for the signed-out state.
    updateUI(for: nil)
  }
}
साइलेंट साइन-इन की सुविधा की जांच करना
साइन इन करने के बाद, ऐप्लिकेशन को पूरी तरह से बंद करें और फिर से लॉन्च करें. आपको दिखेगा कि अब आपको बटन पर टैप किए बिना अपने-आप साइन इन कर दिया गया है.
10. आईडी टोकन के बारे में जानकारी
GIDGoogleUser ऑब्जेक्ट, उपयोगकर्ता के नाम और ईमेल का इस्तेमाल करके यूज़र इंटरफ़ेस (यूआई) को पसंद के मुताबिक बनाने के लिए सुविधाजनक है. हालांकि, एसडीके से मिला सबसे ज़रूरी डेटा, आईडी टोकन होता है.
यह कोडलैब, JWT के कॉन्टेंट की जांच करने के लिए ऑनलाइन टूल का इस्तेमाल करता है. प्रोडक्शन ऐप्लिकेशन में, आपको इस आईडी टोकन को अपने बैकएंड सर्वर पर भेजना चाहिए. आपके सर्वर को आईडी टोकन की पुष्टि करनी होगी. साथ ही, JWT का इस्तेमाल करके कुछ ज़्यादा काम करने होंगे. जैसे, आपके बैकएंड प्लैटफ़ॉर्म पर नया खाता बनाना या उपयोगकर्ता के लिए नया सेशन शुरू करना.
JWT टोकन को ऐक्सेस और डिकोड करना
- अपना ऐप्लिकेशन लॉन्च करें.
- Xcode कंसोल खोलें. आपको प्रिंट किया गया आईडी टोकन दिखेगा. यह कुछ ऐसा दिखेगा:
eyJhbGciOiJSUzI1Ni ... Hecz6Wm4Q. - आईडी टोकन कॉपी करें और JWT को डिकोड करने के लिए, jwt.io जैसे किसी ऑनलाइन टूल का इस्तेमाल करें.
डिकोड किया गया JWT ऐसा दिखेगा:
{
  "alg": "RS256",
  "kid": "c8ab71530972bba20b49f78a09c9852c43ff9118",
  "typ": "JWT"
}
{
  "iss": "https://accounts.google.com",
  "azp": "171291171076-rrbkcjrp5jbte92ai9gub115ertscphi.apps.googleusercontent.com",
  "aud": "171291171076-rrbkcjrp5jbte92ai9gub115ertscphi.apps.googleusercontent.com",
  "sub": "10769150350006150715113082367",
  "email": "example@example.com",
  "email_verified": true,
  "at_hash": "JyCYDmHtzhjkb0-qJhKsMg",
  "name": "Kimya",
  "picture": "https://lh3.googleusercontent.com/a/ACg8ocIyy4VoR31t_n0biPVcScBHwZOCRaKVDb_MoaMYep65fyqoAw=s96-c",
  "given_name": "Kimya",
  "iat": 1758645896,
  "exp": 1758649496
}
अहम टोकन फ़ील्ड
डिकोड किए गए आईडी टोकन में अलग-अलग मकसद वाले फ़ील्ड होते हैं. इनमें से कुछ को समझना आसान होता है, जैसे कि नाम और ईमेल. वहीं, कुछ का इस्तेमाल आपका बैकएंड सर्वर, पुष्टि करने के लिए करता है.
इस फ़ील्ड के बारे में जानना बेहद ज़रूरी है:
- sub:
subफ़ील्ड, उपयोगकर्ता के Google खाते के लिए एक यूनीक और स्थायी आइडेंटिफ़ायर होता है. कोई उपयोगकर्ता अपना मुख्य ईमेल पता या नाम बदल सकता है. हालांकि, उसकाsubआईडी कभी नहीं बदलेगा. इस वजह से,subफ़ील्ड, बैकएंड उपयोगकर्ता खातों के लिए प्राइमरी कुंजी के तौर पर इस्तेमाल करने के लिए सबसे सही वैल्यू है.
आईडी टोकन से उपयोगकर्ता की जानकारी पाना लेख में, टोकन फ़ील्ड के बारे में ज़्यादा जानकारी दी गई है.
11. App Check की मदद से अपने ऐप्लिकेशन को सुरक्षित करना
हमारा सुझाव है कि आप App Check की सुविधा चालू करें. इससे यह पक्का किया जा सकेगा कि आपका ऐप्लिकेशन ही आपके प्रोजेक्ट की ओर से, Google के OAuth 2.0 एंडपॉइंट को ऐक्सेस कर सकता है. App Check, यह पुष्टि करके काम करता है कि आपके बैकएंड सेवाओं के अनुरोध, असली और बिना छेड़छाड़ वाले डिवाइस पर मौजूद आपके असली ऐप्लिकेशन से किए गए हैं.
इस सेक्शन में, App Check को अपने ऐप्लिकेशन में इंटिग्रेट करने का तरीका बताया गया है. साथ ही, इसे सिम्युलेटर में डीबग करने और असली डिवाइस पर चलने वाले प्रोडक्शन बिल्ड, दोनों के लिए कॉन्फ़िगर करने का तरीका बताया गया है.
Console setup
App Check को अपने ऐप्लिकेशन में इंटिग्रेट करने के लिए, Google Cloud और Firebase कंसोल में एक बार सेटअप करना ज़रूरी है. इसके लिए, Google Cloud Console में जाकर, iOS OAuth क्लाइंट के लिए App Check की सुविधा चालू करें. साथ ही, App Check के डीबग प्रोवाइडर के साथ इस्तेमाल करने के लिए, एक एपीआई कुंजी बनाएं. इसके बाद, अपने Google Cloud प्रोजेक्ट को Firebase से लिंक करें.
Google Cloud Console में App Check चालू करना
- अपने Google Cloud प्रोजेक्ट से जुड़े क्लाइंट की सूची पर जाएं.
- अपने iOS ऐप्लिकेशन के लिए बनाया गया OAuth 2.0 क्लाइंट आईडी चुनें.
- Google Identity for iOS के नीचे मौजूद, App Check को टॉगल करके चालू करें
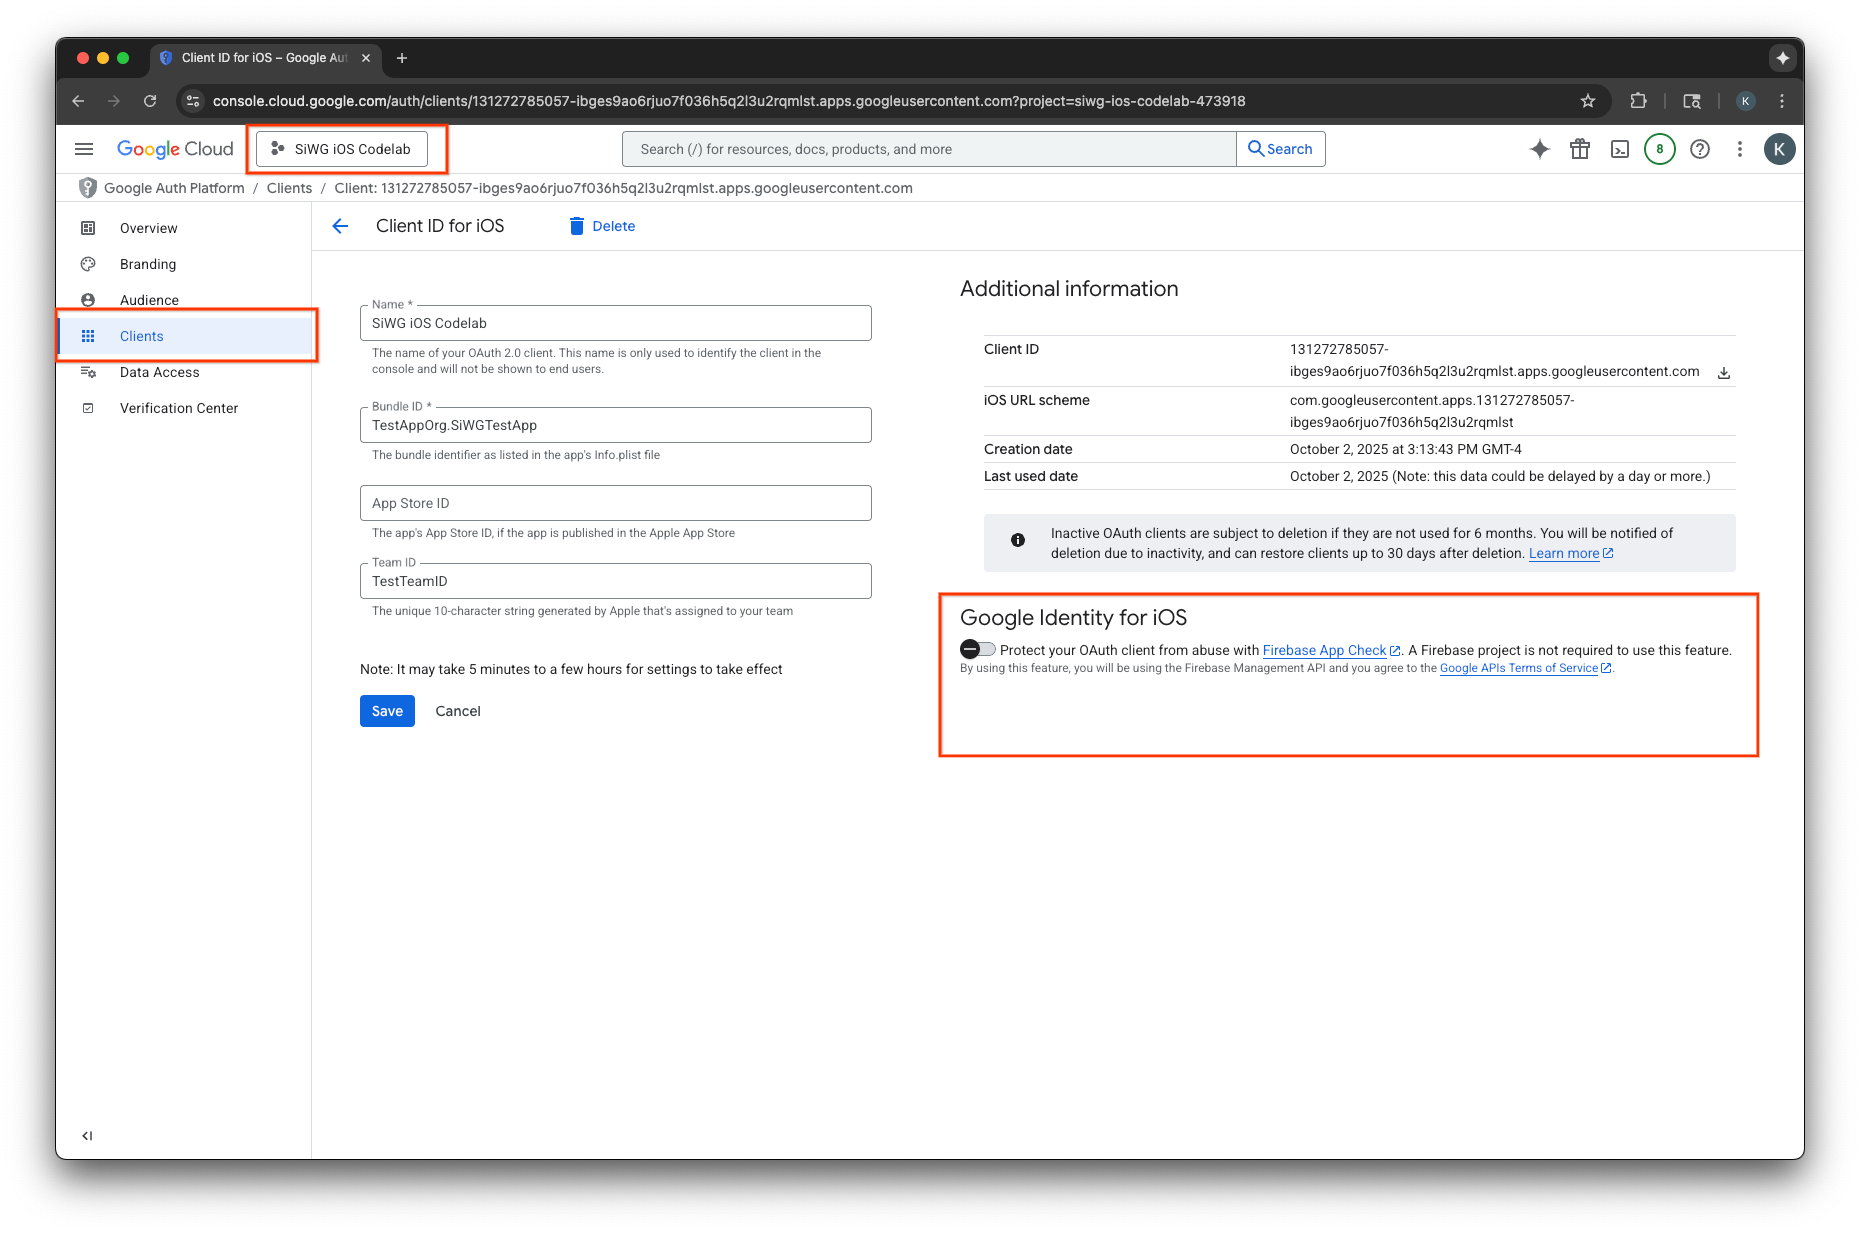
- सेव करें पर क्लिक करें.
एपीआई पासकोड बनाना
- अपने Google Cloud प्रोजेक्ट के लिए, एपीआई लाइब्रेरी पेज पर जाएं.
- खोज बार में Firebase App Check API डालें.
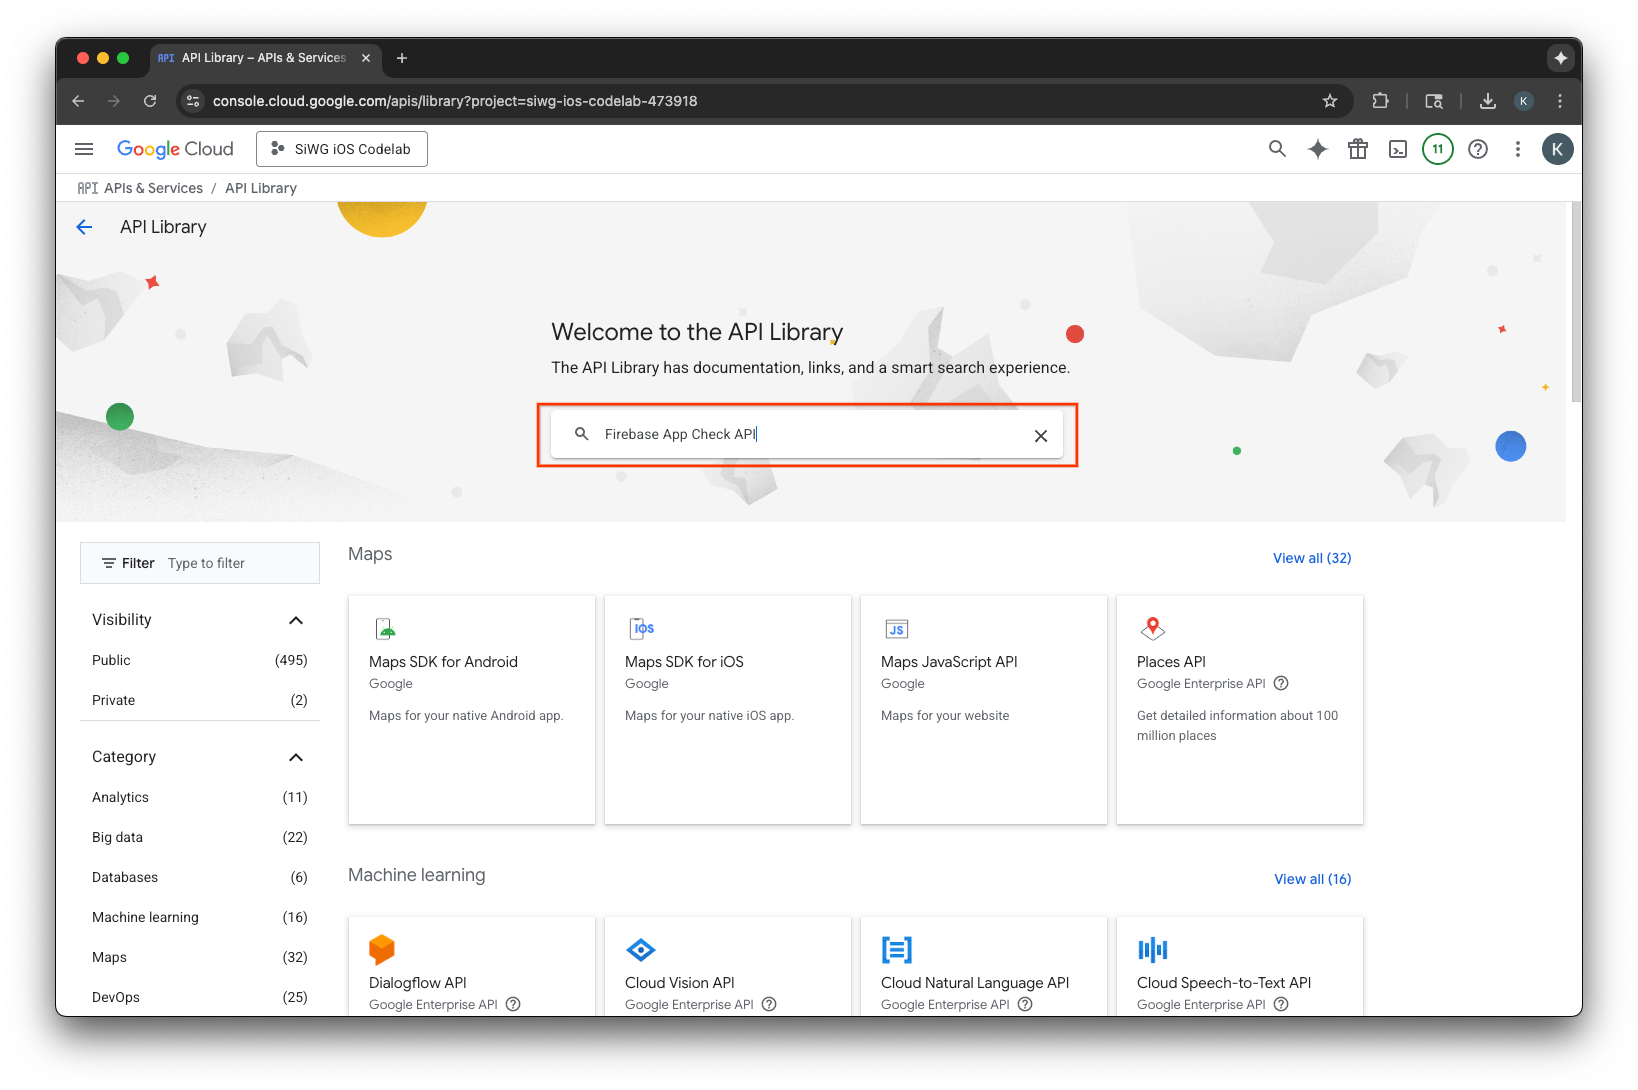
- Firebase App Check API को चुनें और चालू करें.
- एपीआई और सेवाएं पर जाएं. इसके बाद, नेविगेशन मेन्यू में क्रेडेंशियल चुनें.
- पेज पर सबसे ऊपर मौजूद, क्रेडेंशियल बनाएं को चुनें.
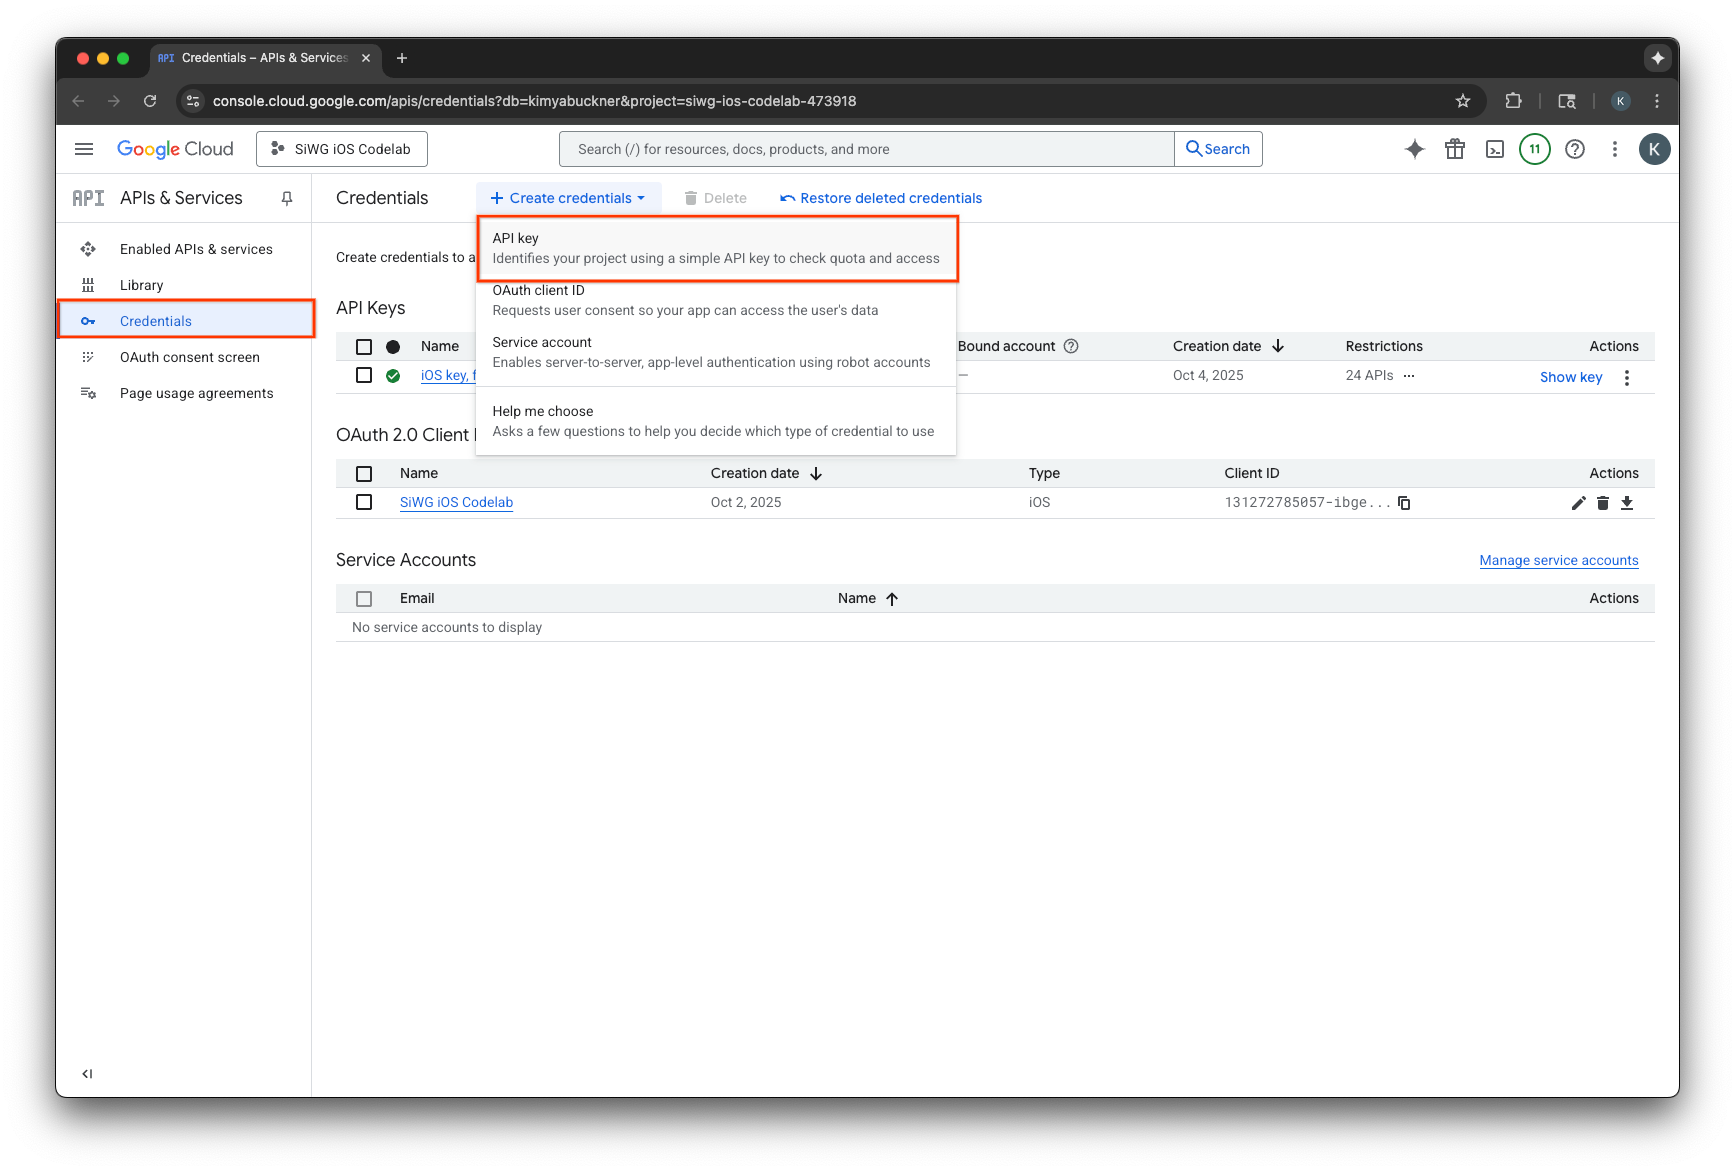
- इस एपीआई पासकोड को कोई नाम असाइन करें.
- ऐप्लिकेशन पर पाबंदियां में जाकर, iOS ऐप्लिकेशन चुनें.
- अपने ऐप्लिकेशन के बंडल आइडेंटिफ़ायर को मंज़ूरी पा चुके ऐप्लिकेशन के तौर पर जोड़ें.
- एपीआई से जुड़ी पाबंदियां में जाकर, कुंजी को सीमित करें को चुनें.
- ड्रॉप-डाउन मेन्यू से, Firebase App Check API चुनें.
- बनाएं को चुनें.
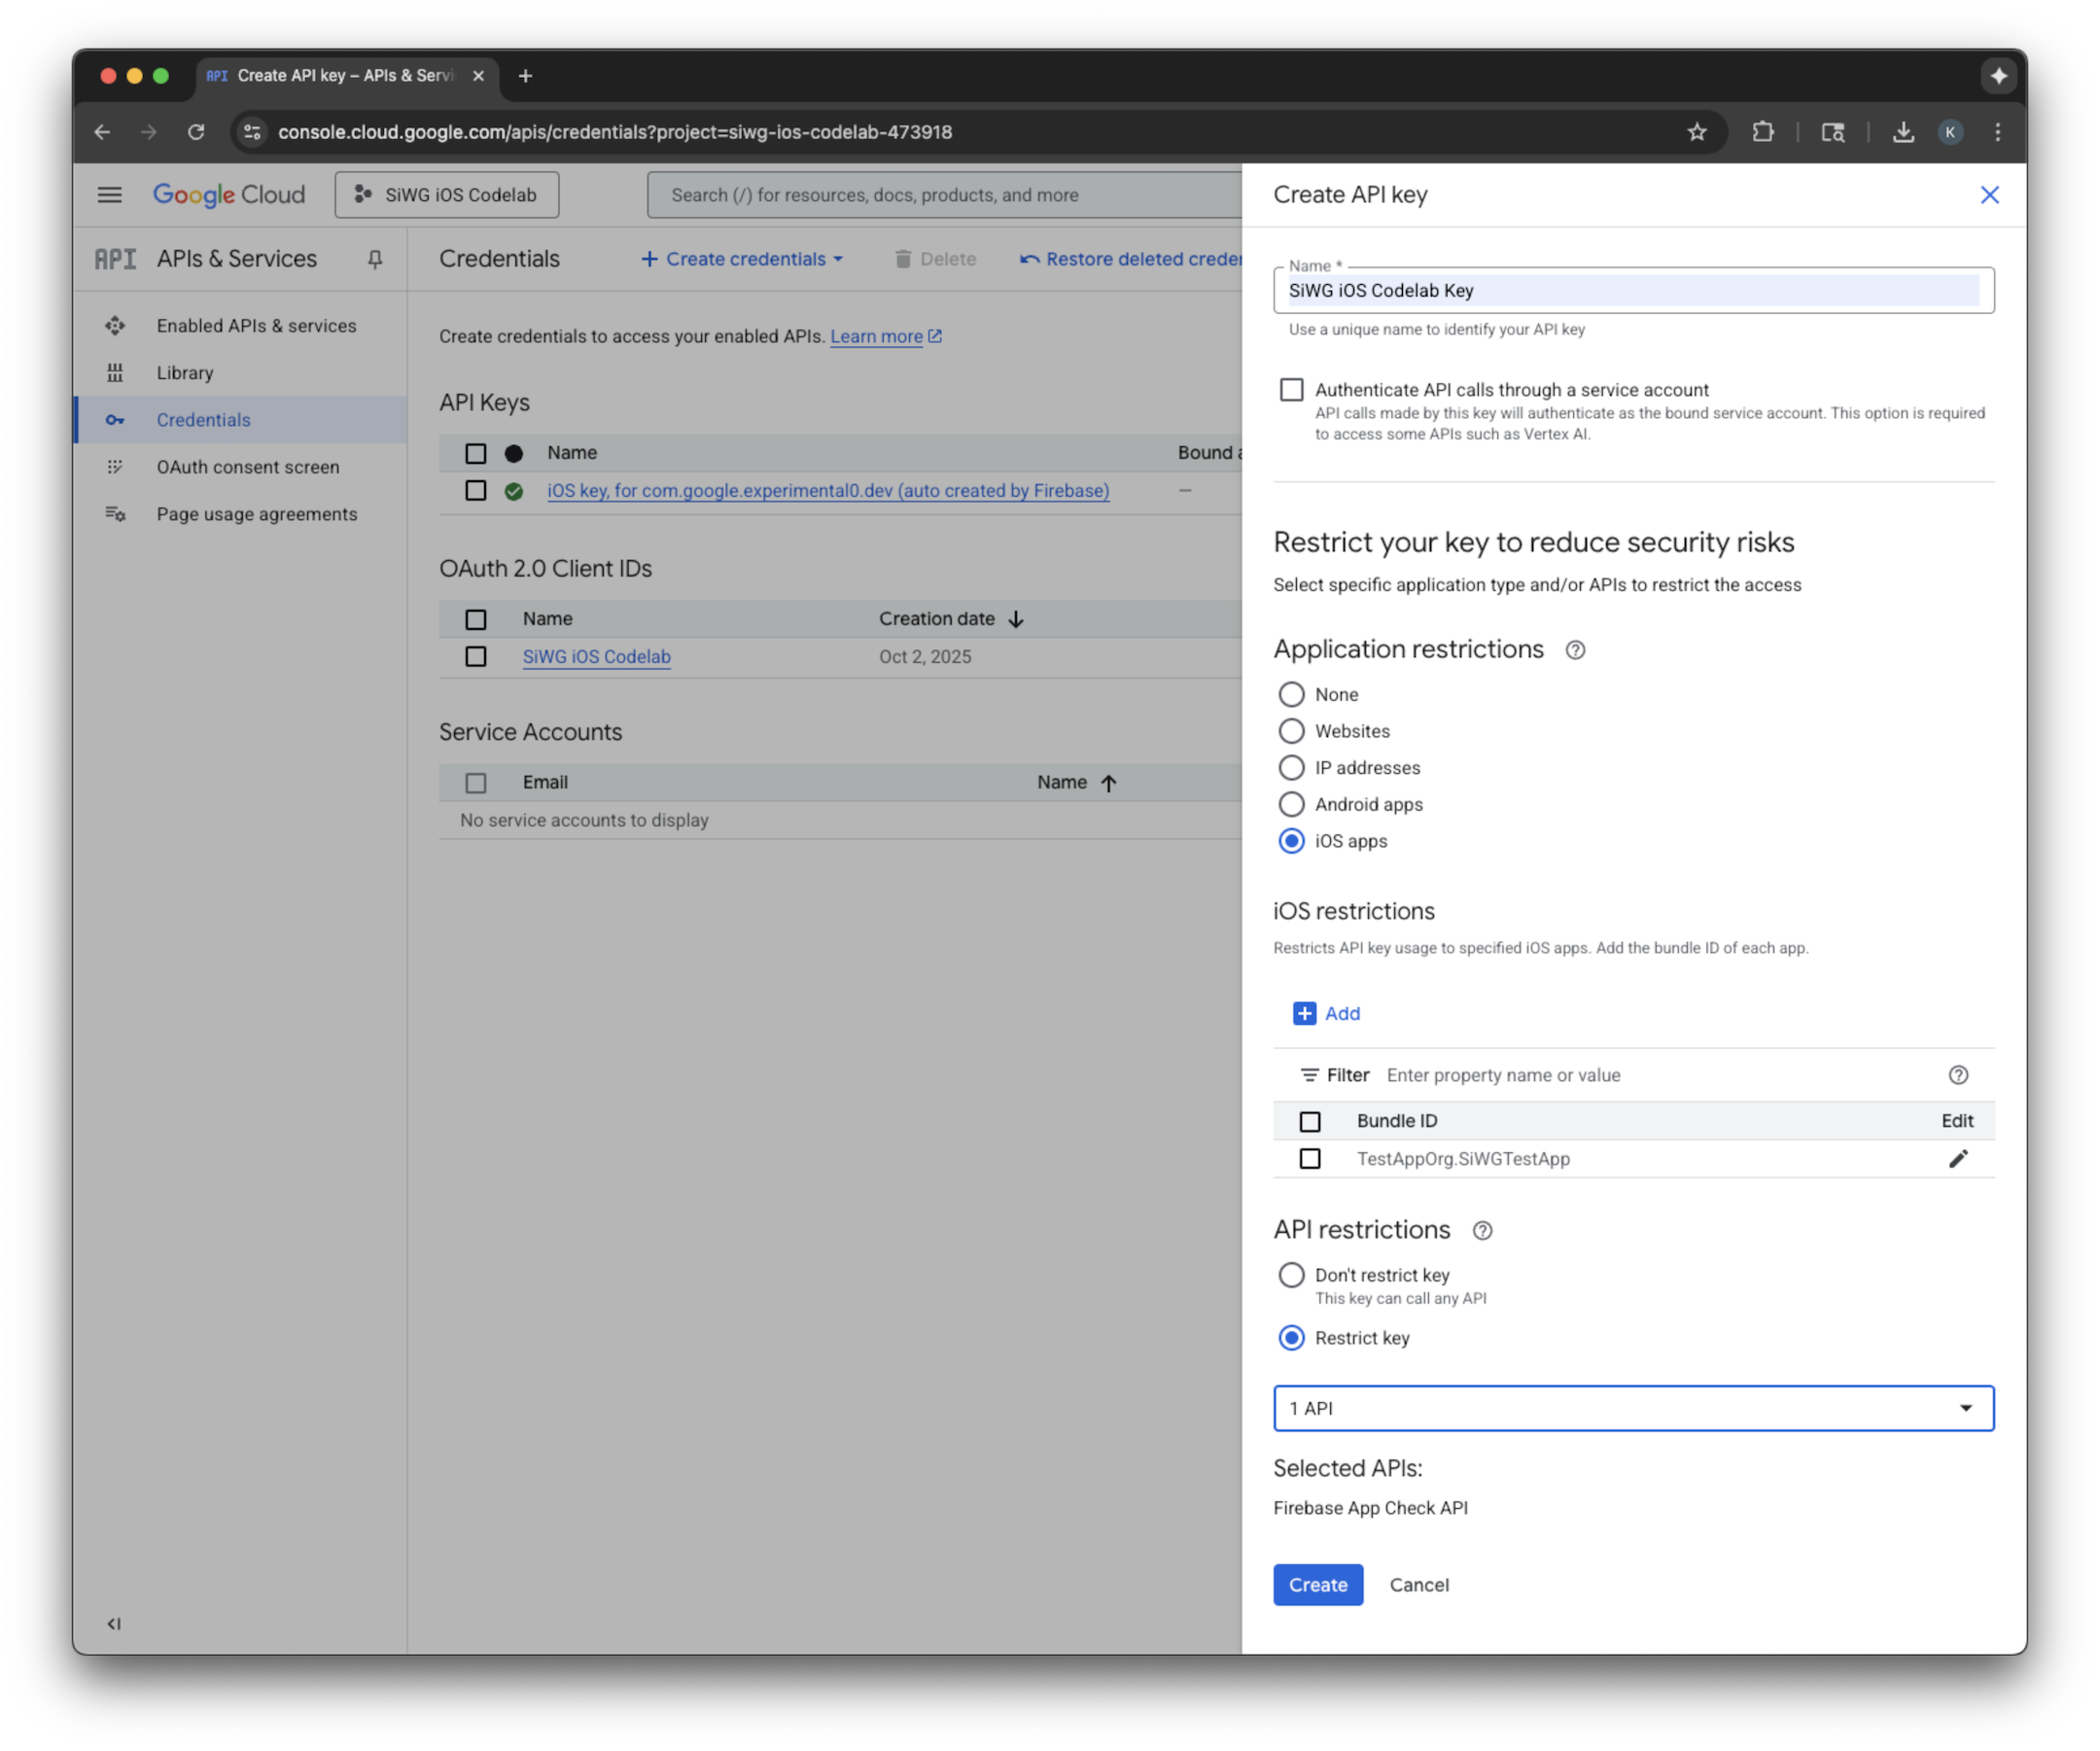
- बनाई गई एपीआई पासकोड को कॉपी करें. आपको इसकी ज़रूरत आने वाले समय में पड़ेगी.
Firebase को अपने Google Cloud प्रोजेक्ट से जोड़ना
- Firebase कंसोल पर जाएं.
- Firebase प्रोजेक्ट सेट अप करके शुरू करें को चुनें.
- Google Cloud प्रोजेक्ट में Firebase जोड़ें को चुनें.

- ड्रॉप-डाउन से कोई Google Cloud प्रोजेक्ट चुनें और साइन-अप की प्रोसेस पूरी करें.
- Firebase जोड़ें को चुनें.
- Firebase प्रोजेक्ट तैयार हो जाने के बाद, प्रोजेक्ट खोलने के लिए जारी रखें को चुनें.
क्लाइंट-साइड कोड इंटिग्रेशन
App Check के लिए कॉन्फ़िगर किए गए Google Cloud प्रोजेक्ट के साथ, अब इसे चालू करने के लिए क्लाइंट-साइड कोड लिखने का समय आ गया है. प्रोडक्शन और डीबग एनवायरमेंट में, पुष्टि करने के लिए इस्तेमाल किया गया प्रोवाइडर अलग-अलग है. असली डिवाइस पर मौजूद प्रोडक्शन ऐप्लिकेशन, Apple की App Attest सेवा का इस्तेमाल करके यह साबित करता है कि वह असली है. हालांकि, iOS सिम्युलेटर इस तरह का अटेस्टेशन नहीं दे सकता. इसलिए, डीबग एनवायरमेंट के लिए एक खास डीबग प्रोवाइडर की ज़रूरत होती है. इसे एपीआई पास किया जाता है.
यहां दिया गया कोड, दोनों स्थितियों को हैंडल करता है. इसके लिए, यह कंपाइलर डायरेक्टिव का इस्तेमाल करता है, ताकि बिल्ड टाइम पर सही प्रोवाइडर को अपने-आप चुना जा सके.
SwiftUI
- मुख्य ऐप्लिकेशन फ़ाइल खोलें.
- इंपोर्ट के बाद और
@mainएट्रिब्यूट से पहले, यहां दी गईAppDelegateक्लास को तय करें:
class AppDelegate: NSObject, UIApplicationDelegate {
  func application(
    _ application: UIApplication,
    didFinishLaunchingWithOptions launchOptions: [UIApplication.LaunchOptionsKey: Any]? = nil
  ) -> Bool {

    #if targetEnvironment(simulator)
      // Configure for debugging on a simulator.
      // TODO: Replace "YOUR_API_KEY" with the key from your Google Cloud project.
      let apiKey = "YOUR_API_KEY"
      GIDSignIn.sharedInstance.configureDebugProvider(withAPIKey: apiKey) { error in
        if let error {
          print("Error configuring GIDSignIn debug provider: \(error)")
        }
      }
    #else
      // Configure GIDSignIn for App Check on a real device.
      GIDSignIn.sharedInstance.configure { error in
        if let error {
          print("Error configuring GIDSignIn for App Check: \(error)")
        } else {
          print("GIDSignIn configured for App Check.")
        }
      }
    #endif

    return true
  }
}
- दिए गए कोड में मौजूद
"YOUR_API_KEY"को, Google Cloud Console से कॉपी किए गए एपीआई पासकोड से बदलें. - अपनी
Appस्ट्रक्चर में,bodyवैरिएबल से ठीक पहले यह लाइन जोड़ें. इससे आपकी AppDelegate क्लास, ऐप्लिकेशन के लाइफ़साइकल के साथ रजिस्टर हो जाती है. इससे ऐप्लिकेशन लॉन्च होने और अन्य सिस्टम इवेंट पर प्रतिक्रिया दी जा सकती है:
@UIApplicationDelegateAdaptor(AppDelegate.self) var delegate
आपकी मुख्य ऐप्लिकेशन फ़ाइल ऐसी दिखनी चाहिए:
import GoogleSignIn
import SwiftUI

class AppDelegate: NSObject, UIApplicationDelegate {
  func application(
    _ application: UIApplication,
    didFinishLaunchingWithOptions launchOptions: [UIApplication.LaunchOptionsKey: Any]? = nil
  ) -> Bool {

    #if targetEnvironment(simulator)
      // Configure for debugging on a simulator.
      // TODO: Replace "YOUR_API_KEY" with the key from your Google Cloud project.
      let apiKey = "YOUR_API_KEY"
      GIDSignIn.sharedInstance.configureDebugProvider(withAPIKey: apiKey) { error in
        if let error {
          print("Error configuring GIDSignIn debug provider: \(error)")
        }
      }
    #else
      // Configure GIDSignIn for App Check on a real device.
      GIDSignIn.sharedInstance.configure { error in
        if let error {
          print("Error configuring GIDSignIn for App Check: \(error)")
        } else {
          print("GIDSignIn configured for App Check.")
        }
      }
    #endif

    return true
  }
}

@main
struct iOS_Sign_in_with_Google_App: App {

  @UIApplicationDelegateAdaptor(AppDelegate.self) var delegate

  var body: some Scene {
    WindowGroup {
      ContentView()

        .onOpenURL { url in
          GIDSignIn.sharedInstance.handle(url)
        }
    }
  }
}
UIKit
- AppDelegate.swift खोलें.
- App Check को शुरू करने के लिए,
application(_:didFinishLaunchingWithOptions:)तरीके को अपडेट करें:
func application(
  _ application: UIApplication,
  didFinishLaunchingWithOptions launchOptions: [UIApplication.LaunchOptionsKey: Any]?
) -> Bool {

  #if targetEnvironment(simulator)
    // Configure for debugging on a simulator.
    // TODO: Replace "YOUR_API_KEY" with the key from your Google Cloud project.
    let apiKey = "YOUR_API_KEY"
    GIDSignIn.sharedInstance.configureDebugProvider(withAPIKey: apiKey) { error in
      if let error {
        print("Error configuring GIDSignIn debug provider: \(error)")
      }
    }
  #else
    // Configure GIDSignIn for App Check on a real device.
    GIDSignIn.sharedInstance.configure { error in
      if let error {
        print("Error configuring GIDSignIn for App Check: \(error)")
      }
    }
  #endif

  return true
}
- दिए गए कोड में मौजूद
"YOUR_API_KEY"को, Google Cloud Console से कॉपी किए गए एपीआई पासकोड से बदलें.
आपकी AppDelegate.swift फ़ाइल ऐसी दिखनी चाहिए:
import GoogleSignIn
import UIKit

@main
class AppDelegate: UIResponder, UIApplicationDelegate {

  func application(
    _ application: UIApplication,
    didFinishLaunchingWithOptions launchOptions: [UIApplication.LaunchOptionsKey: Any]?
  ) -> Bool {

    #if targetEnvironment(simulator)
      // Configure for debugging on a simulator.
      // TODO: Replace "YOUR_API_KEY" with the key from your Google Cloud project.
      let apiKey = "YOUR_API_KEY"
      GIDSignIn.sharedInstance.configureDebugProvider(withAPIKey: apiKey) { error in
        if let error {
          print("Error configuring GIDSignIn debug provider: \(error)")
        }
      }
    #else
      // Configure GIDSignIn for App Check on a real device.
      GIDSignIn.sharedInstance.configure { error in
        if let error {
          print("Error configuring GIDSignIn for App Check: \(error)")
        }
      }
    #endif

    return true
  }

  func application(
    _ app: UIApplication,
    open url: URL,
    options: [UIApplication.OpenURLOptionsKey: Any] = [:]
  ) -> Bool {
    var handled: Bool

    handled = GIDSignIn.sharedInstance.handle(url)
    if handled {
      return true
    }
    // If not handled by this app, return false.
    return false
  }

  // MARK: UISceneSession Lifecycle

  func application(
    _ application: UIApplication,
    configurationForConnecting connectingSceneSession: UISceneSession,
    options: UIScene.ConnectionOptions
  ) -> UISceneConfiguration {
    // Called when a new scene session is being created.
    // Use this method to select a configuration to create the new scene with.
    return UISceneConfiguration(
      name: "Default Configuration",
      sessionRole: connectingSceneSession.role
    )
  }

  func application(
    _ application: UIApplication,
    didDiscardSceneSessions sceneSessions: Set<UISceneSession>
  ) {
    // Called when the user discards a scene session.
    // If any sessions were discarded while the application was not running, this will be called shortly after application:didFinishLaunchingWithOptions.
    // Use this method to release any resources that were specific to the discarded scenes, as they will not return.
  }
}
सिम्युलेटर पर App Check की जांच करना
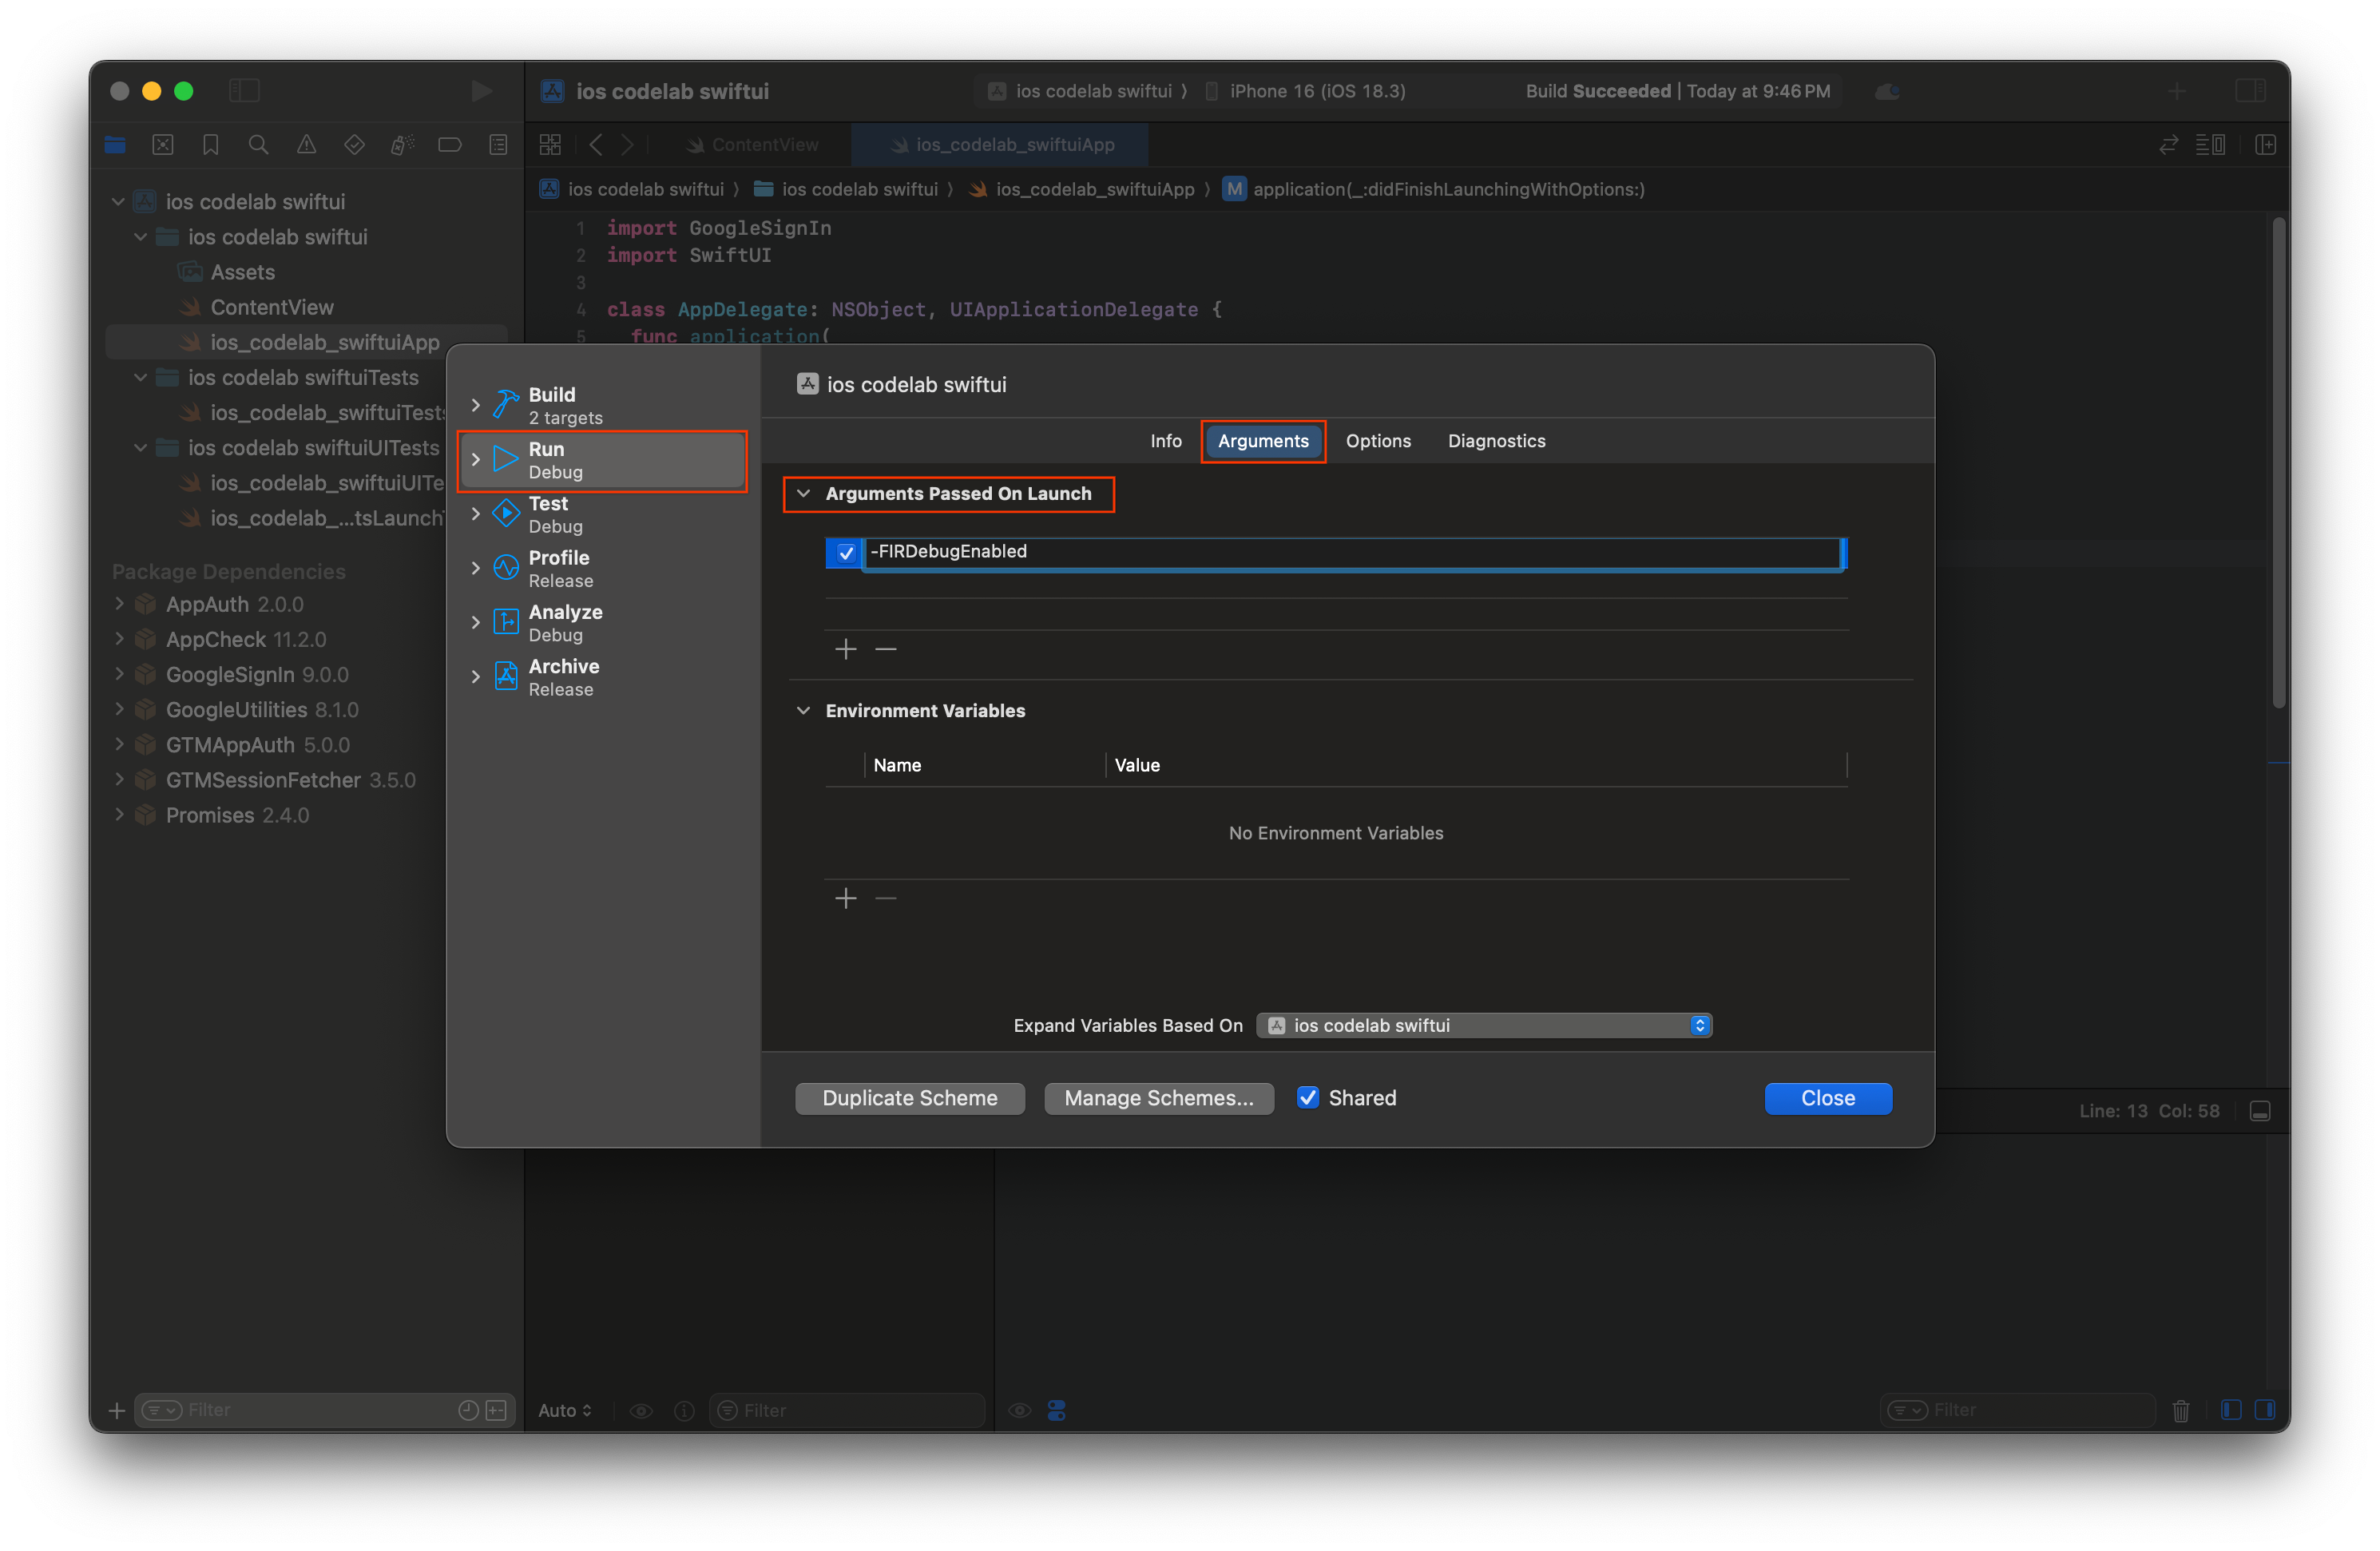
- Xcode के मेन्यू बार में, Product > Scheme > Edit Scheme पर जाएं.
- नेविगेशन मेन्यू में चलाएं को चुनें.
- Arguments टैब चुनें.
- Arguments Passed on Launch सेक्शन में, + को चुनें और -FIRDebugEnabled जोड़ें. लॉन्च करने के इस तर्क से, Firebase की डीबग लॉगिंग चालू होती है.
- बंद करें चुनें.
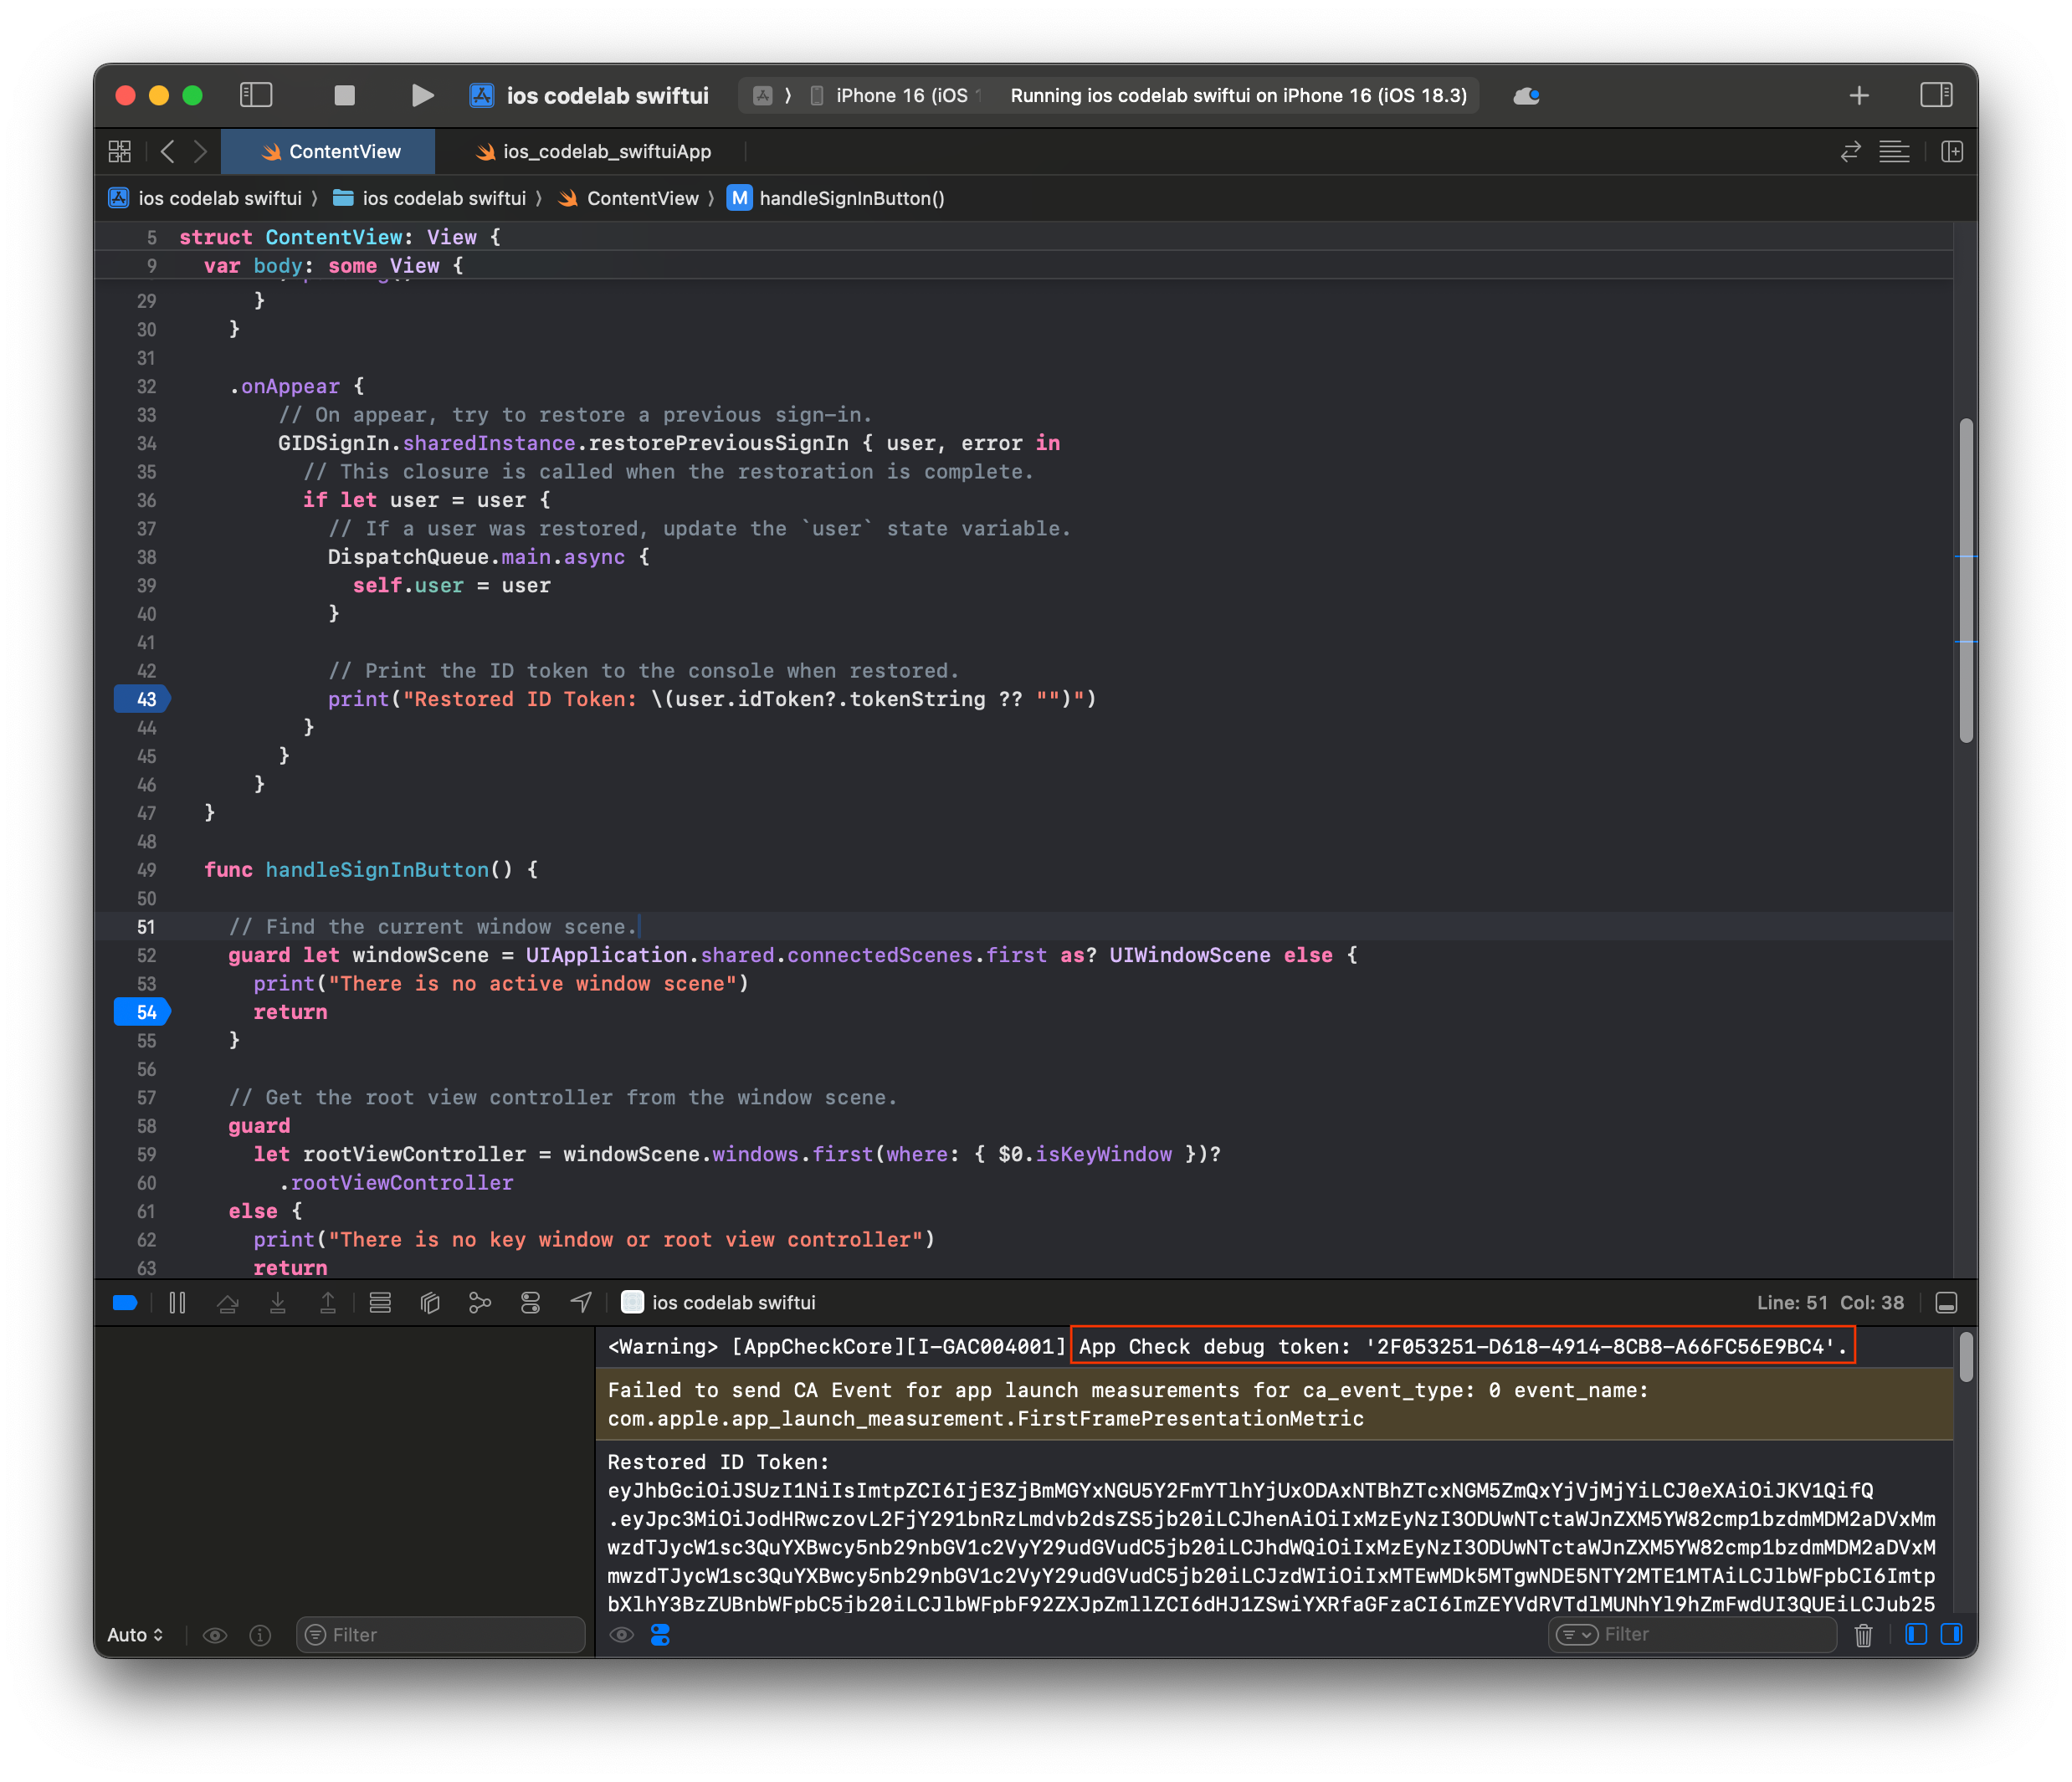
- सिम्युलेटर पर अपना ऐप्लिकेशन लॉन्च करें.
- Xcode कंसोल में प्रिंट किए गए App Check डीबग टोकन को कॉपी करें.
- Firebase कंसोल में अपने प्रोजेक्ट पर जाएं.
- नेविगेशन मेन्यू में, बनाएं सेक्शन को बड़ा करें.
- App Check चुनें.
- ऐप्लिकेशन टैब चुनें.
- अपने ऐप्लिकेशन पर कर्सर घुमाएं और तीन बिंदु वाले मेन्यू आइकॉन को चुनें.
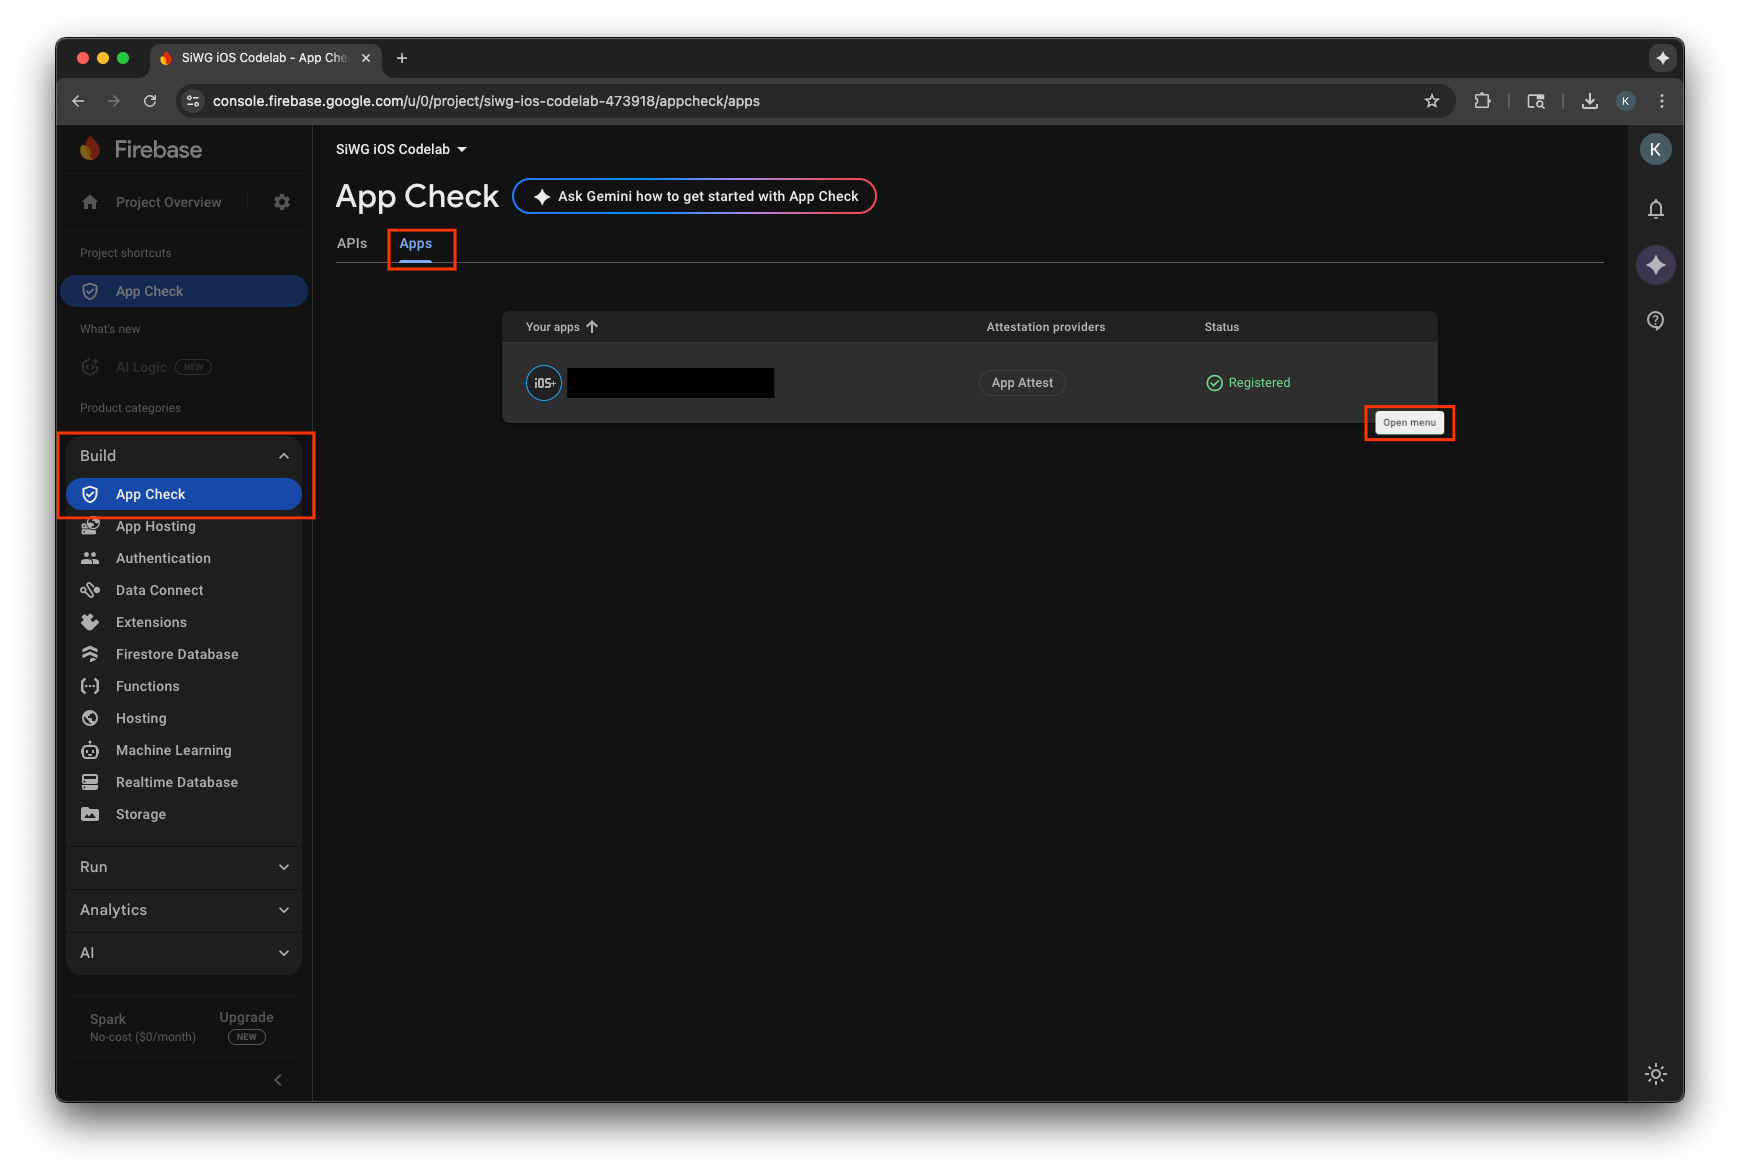
- डीबग टोकन मैनेज करें को चुनें.
- डीबग टोकन जोड़ें को चुनें.
- अपने डीबग टोकन को कोई नाम दें. साथ ही, वैल्यू के लिए पहले कॉपी किया गया डीबग टोकन चिपकाएं.
- अपने टोकन को रजिस्टर करने के लिए, सेव करें को चुनें.

- सिम्युलेटर पर वापस जाएं और साइन इन करें.
कंसोल में मेट्रिक दिखने में कुछ मिनट लग सकते हैं. ऐसा करने के बाद, यह पुष्टि की जा सकती है कि App Check काम कर रहा है. इसके लिए, इन दो जगहों में से किसी एक जगह पर, पुष्टि किए गए अनुरोधों की संख्या में बढ़ोतरी देखें:
- Firebase कंसोल के App Check सेक्शन में, APIs टैब में जाकर.
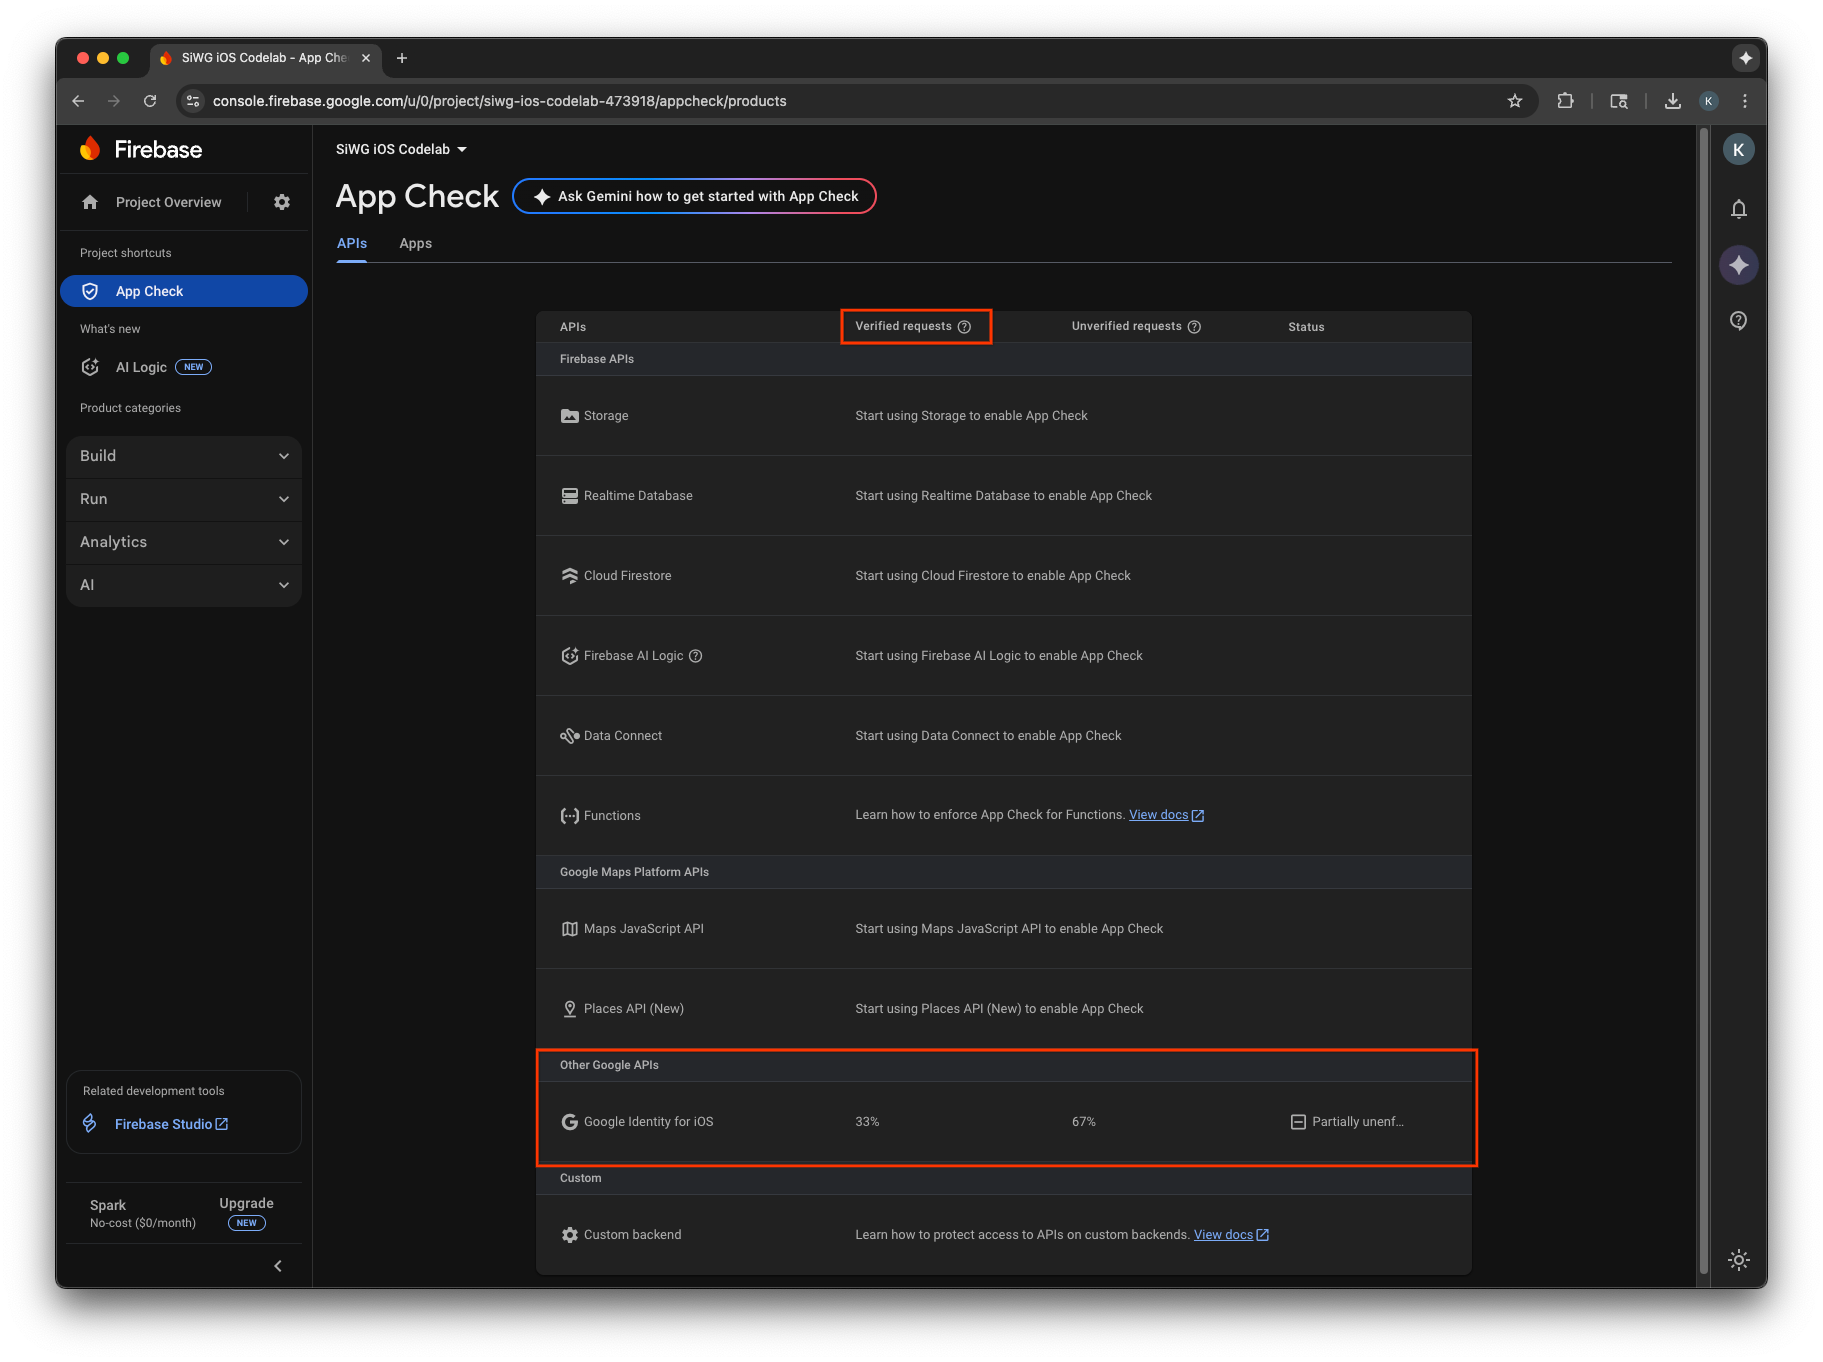
- Google Cloud Console में, OAuth क्लाइंट के लिए 'बदलाव करें' पेज पर.
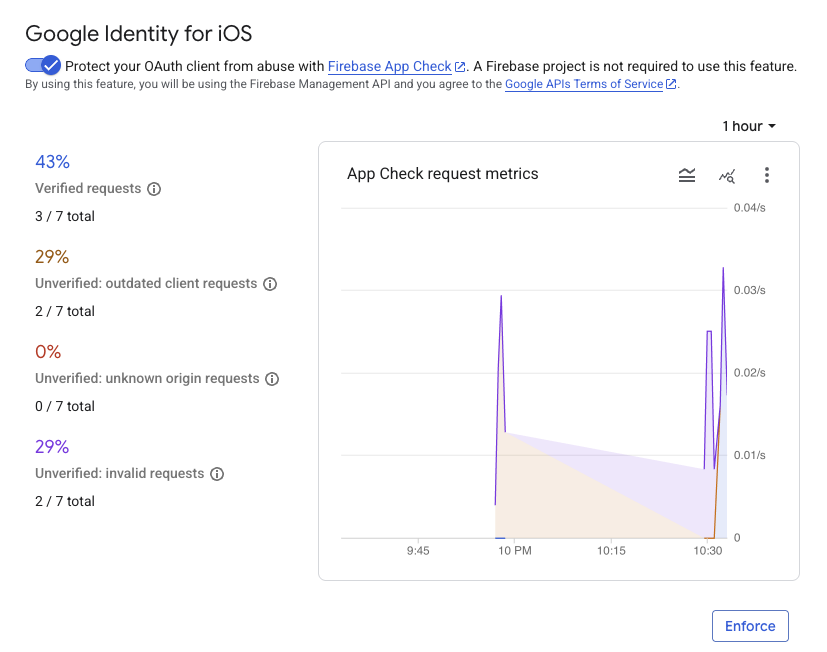
अपने ऐप्लिकेशन के लिए App Check की मेट्रिक मॉनिटर करने और यह पुष्टि करने के बाद कि असली अनुरोधों की पुष्टि की जा रही है, आपको App Check लागू करना चाहिए. लागू होने के बाद, App Check पुष्टि नहीं किए गए सभी अनुरोधों को अस्वीकार कर देता है. इससे यह पक्का होता है कि आपके प्रोजेक्ट की ओर से, सिर्फ़ आपके असली ऐप्लिकेशन का ट्रैफ़िक ही Google के OAuth 2.0 एंडपॉइंट को ऐक्सेस कर सकता है.
12. अन्य संसाधन
बधाई हो!
आपने OAuth 2.0 iOS क्लाइंट को कॉन्फ़िगर किया है. साथ ही, iOS ऐप्लिकेशन में 'Google से साइन इन करें' बटन जोड़ा है. आपने यह भी सीखा है कि बटन के लुक को कैसे पसंद के मुताबिक बनाया जाता है, JWT आईडी टोकन को कैसे डिकोड किया जाता है, और अपने ऐप्लिकेशन के लिए App Check को कैसे चालू किया जाता है.
इन लिंक से, आपको अगले चरणों के बारे में जानकारी मिल सकती है:
- iOS के लिए Google साइन-इन की सुविधा का इस्तेमाल शुरू करने का तरीका
- iOS के लिए Google Sign-In रिपॉज़िटरी
- Google आईडी टोकन की पुष्टि करना
- iOS पर Google Sign-in के लिए, App Check का इस्तेमाल शुरू करना
- ऐक्सेस टोकन रद्द करना और ऐप्लिकेशन को डिसकनेक्ट करना
- Google Cloud प्रोजेक्ट के बारे में ज़्यादा जानें
- Google Identity के पुष्टि करने के तरीके
- App Check लागू करने की सुविधा चालू करना