
1. 始める前に
この Codelab では、Google でログインを実装し、シミュレーターで実行する iOS アプリケーションを構築する手順を説明します。SwiftUI と UIKit の両方を使用する実装が提供されています。
SwiftUI は、新しいアプリ開発向けの Apple の最新の UI フレームワークです。これにより、単一の共有コードベースからすべての Apple プラットフォームのユーザー インターフェースを構築できます。iOS 13 以降が必要です。
UIKit は、iOS 向けの Apple のオリジナルの基盤となる UI フレームワークです。古い iOS バージョンとの下位互換性を提供します。そのため、さまざまな古いデバイスをサポートする必要がある既存のアプリに適しています。
開発のニーズに最も適したフレームワークのパスに沿って進むことができます。
前提条件
学習内容
- Google Cloud プロジェクトを作成する方法
- Google Cloud コンソールで OAuth クライアントを作成する方法
- iOS アプリに「Google でログイン」を実装する方法
- 「Google でログイン」ボタンをカスタマイズする方法
- ID トークンをデコードする方法
- iOS アプリで App Check を有効にする方法
必要なもの
この Codelab は、iOS 18.3 シミュレータで Xcode 16.3 を使用して作成されました。開発には Xcode の最新バージョンを使用する必要があります。
2. 新しい Xcode プロジェクトを作成する
- Xcode を開き、[Create a new Xcode project] を選択します。
- [iOS] タブを選択し、[App] テンプレートを選択して、[Next] をクリックします。
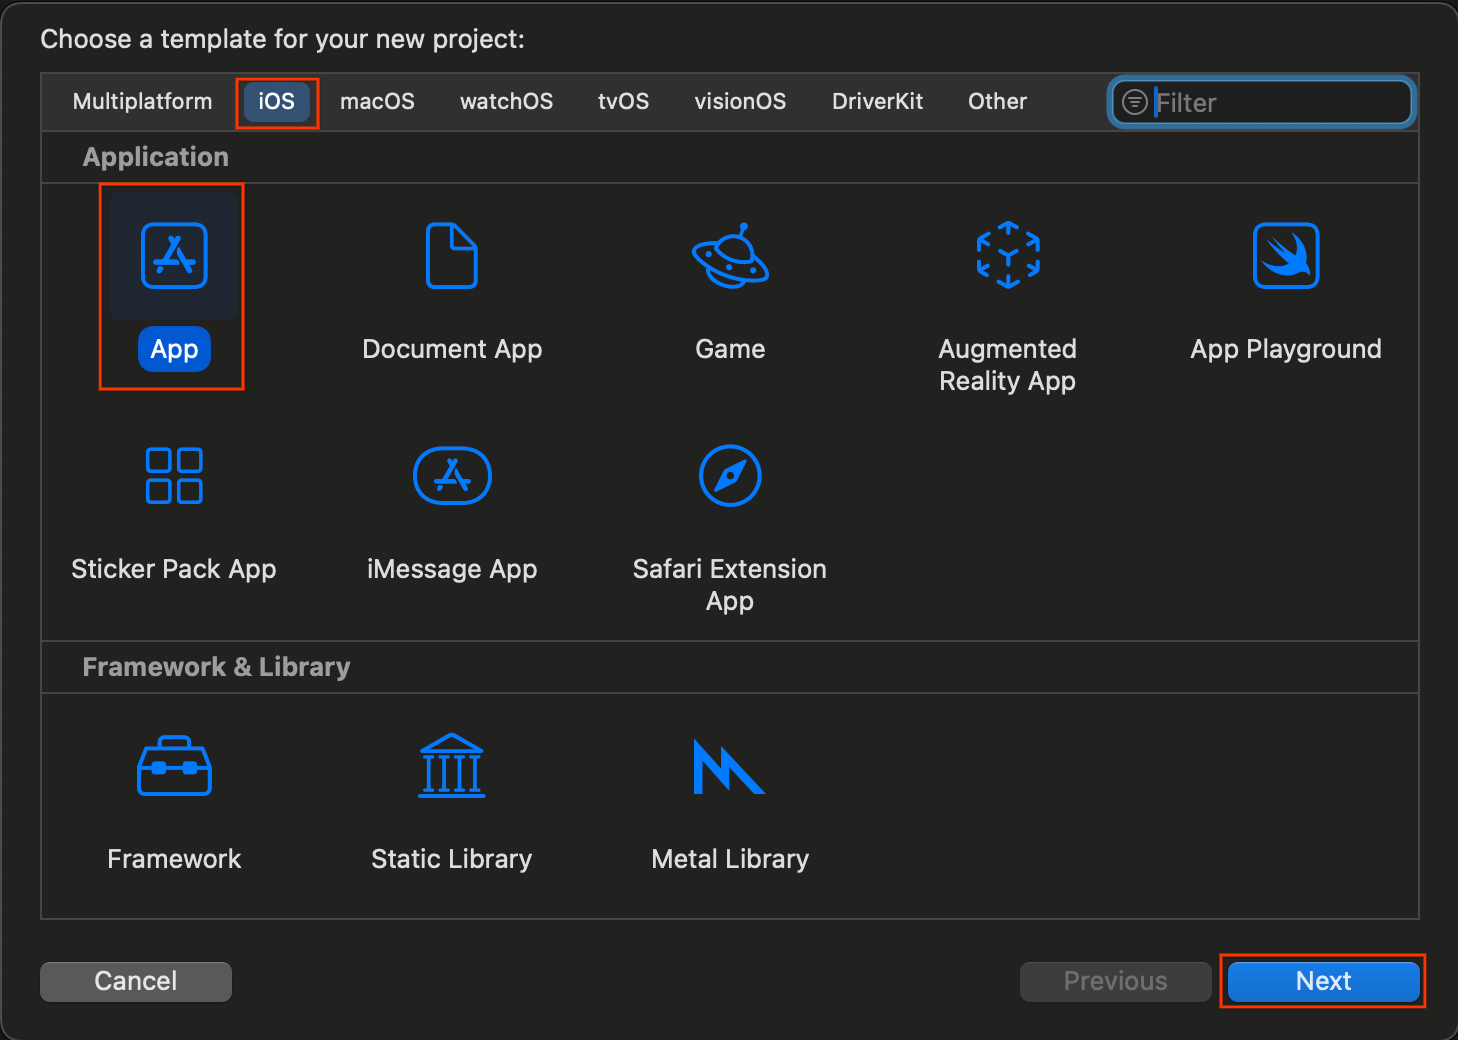
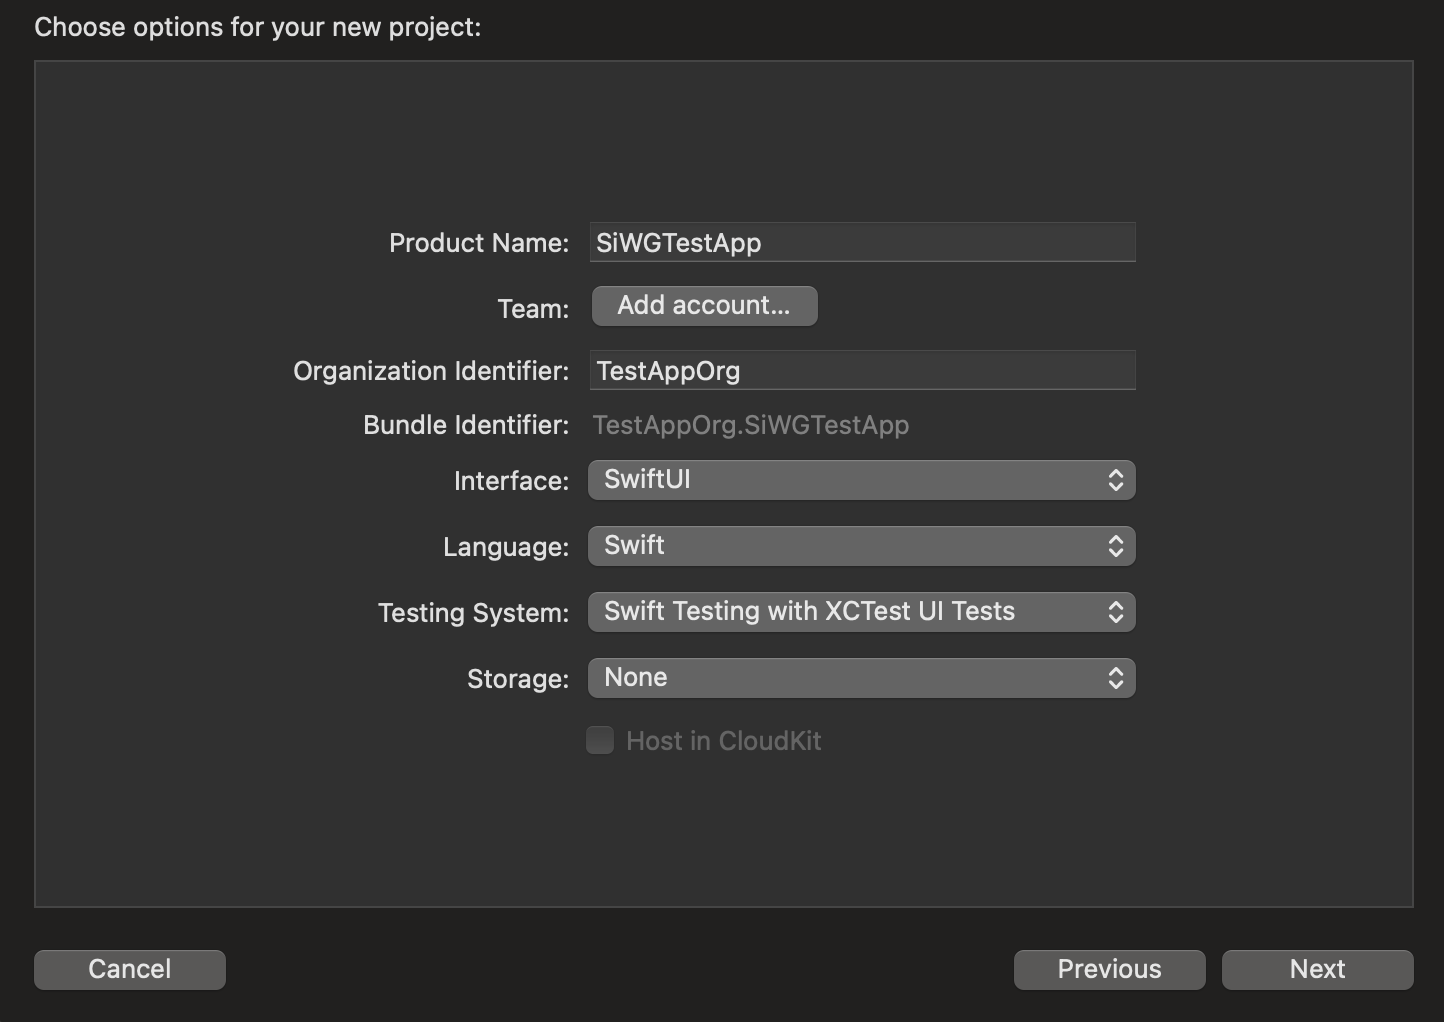
- プロジェクト オプション:
- サービス名を入力します。
- 必要に応じて、[チーム] を選択します。
- 組織 ID を入力します。
- 生成されたバンドル ID をメモします。書き留めておきます。
- [インターフェース] で、次のいずれかを選択します。
- SwiftUI ベースのアプリの場合は SwiftUI。
- UIKit ベースのアプリのストーリーボード。
- [言語] で [Swift] を選択します。
- [次へ] をクリックして、プロジェクトの保存場所を選択します。
3. OAuth クライアントを作成する
アプリが Google の認証サービスと通信できるようにするには、OAuth クライアント ID を作成する必要があります。これには Google Cloud プロジェクトが必要です。次の手順では、プロジェクトと OAuth クライアント ID を作成する手順について説明します。
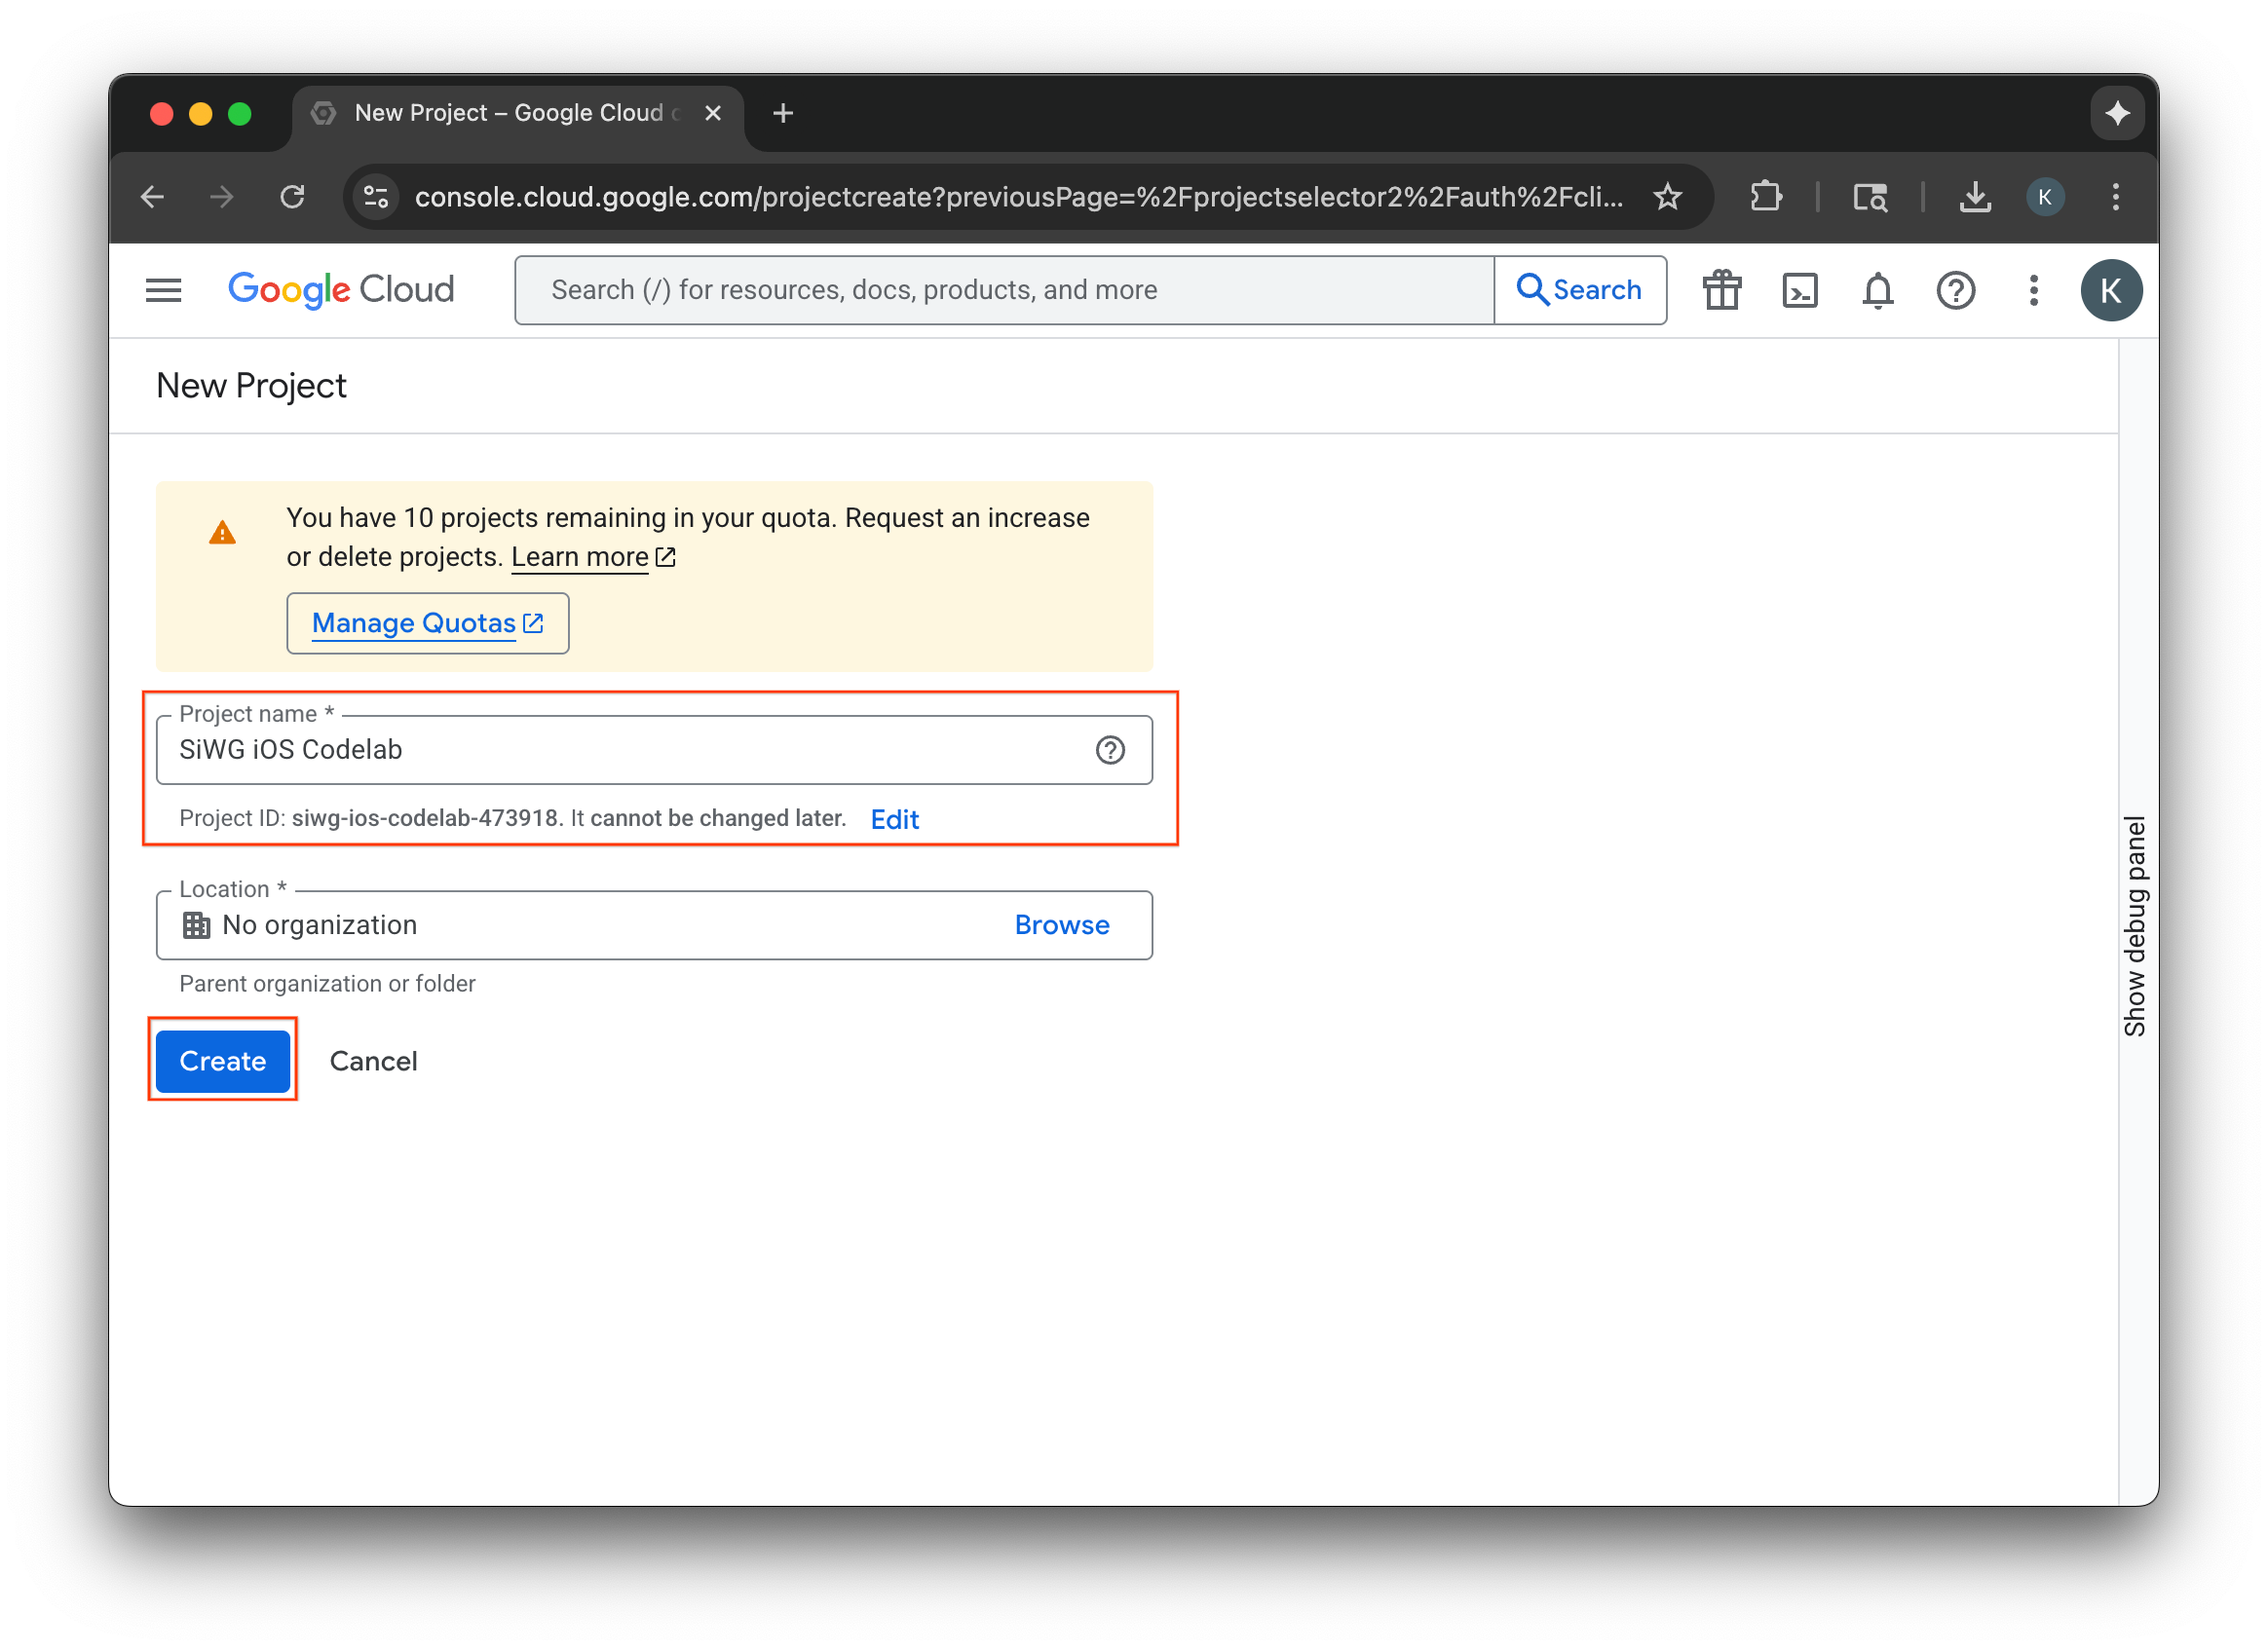
Google Cloud プロジェクトを選択または作成する
- Google Cloud コンソールに移動し、プロジェクトを選択または作成します。既存のプロジェクトを選択すると、コンソールは自動的に次の必要な手順に移動します。
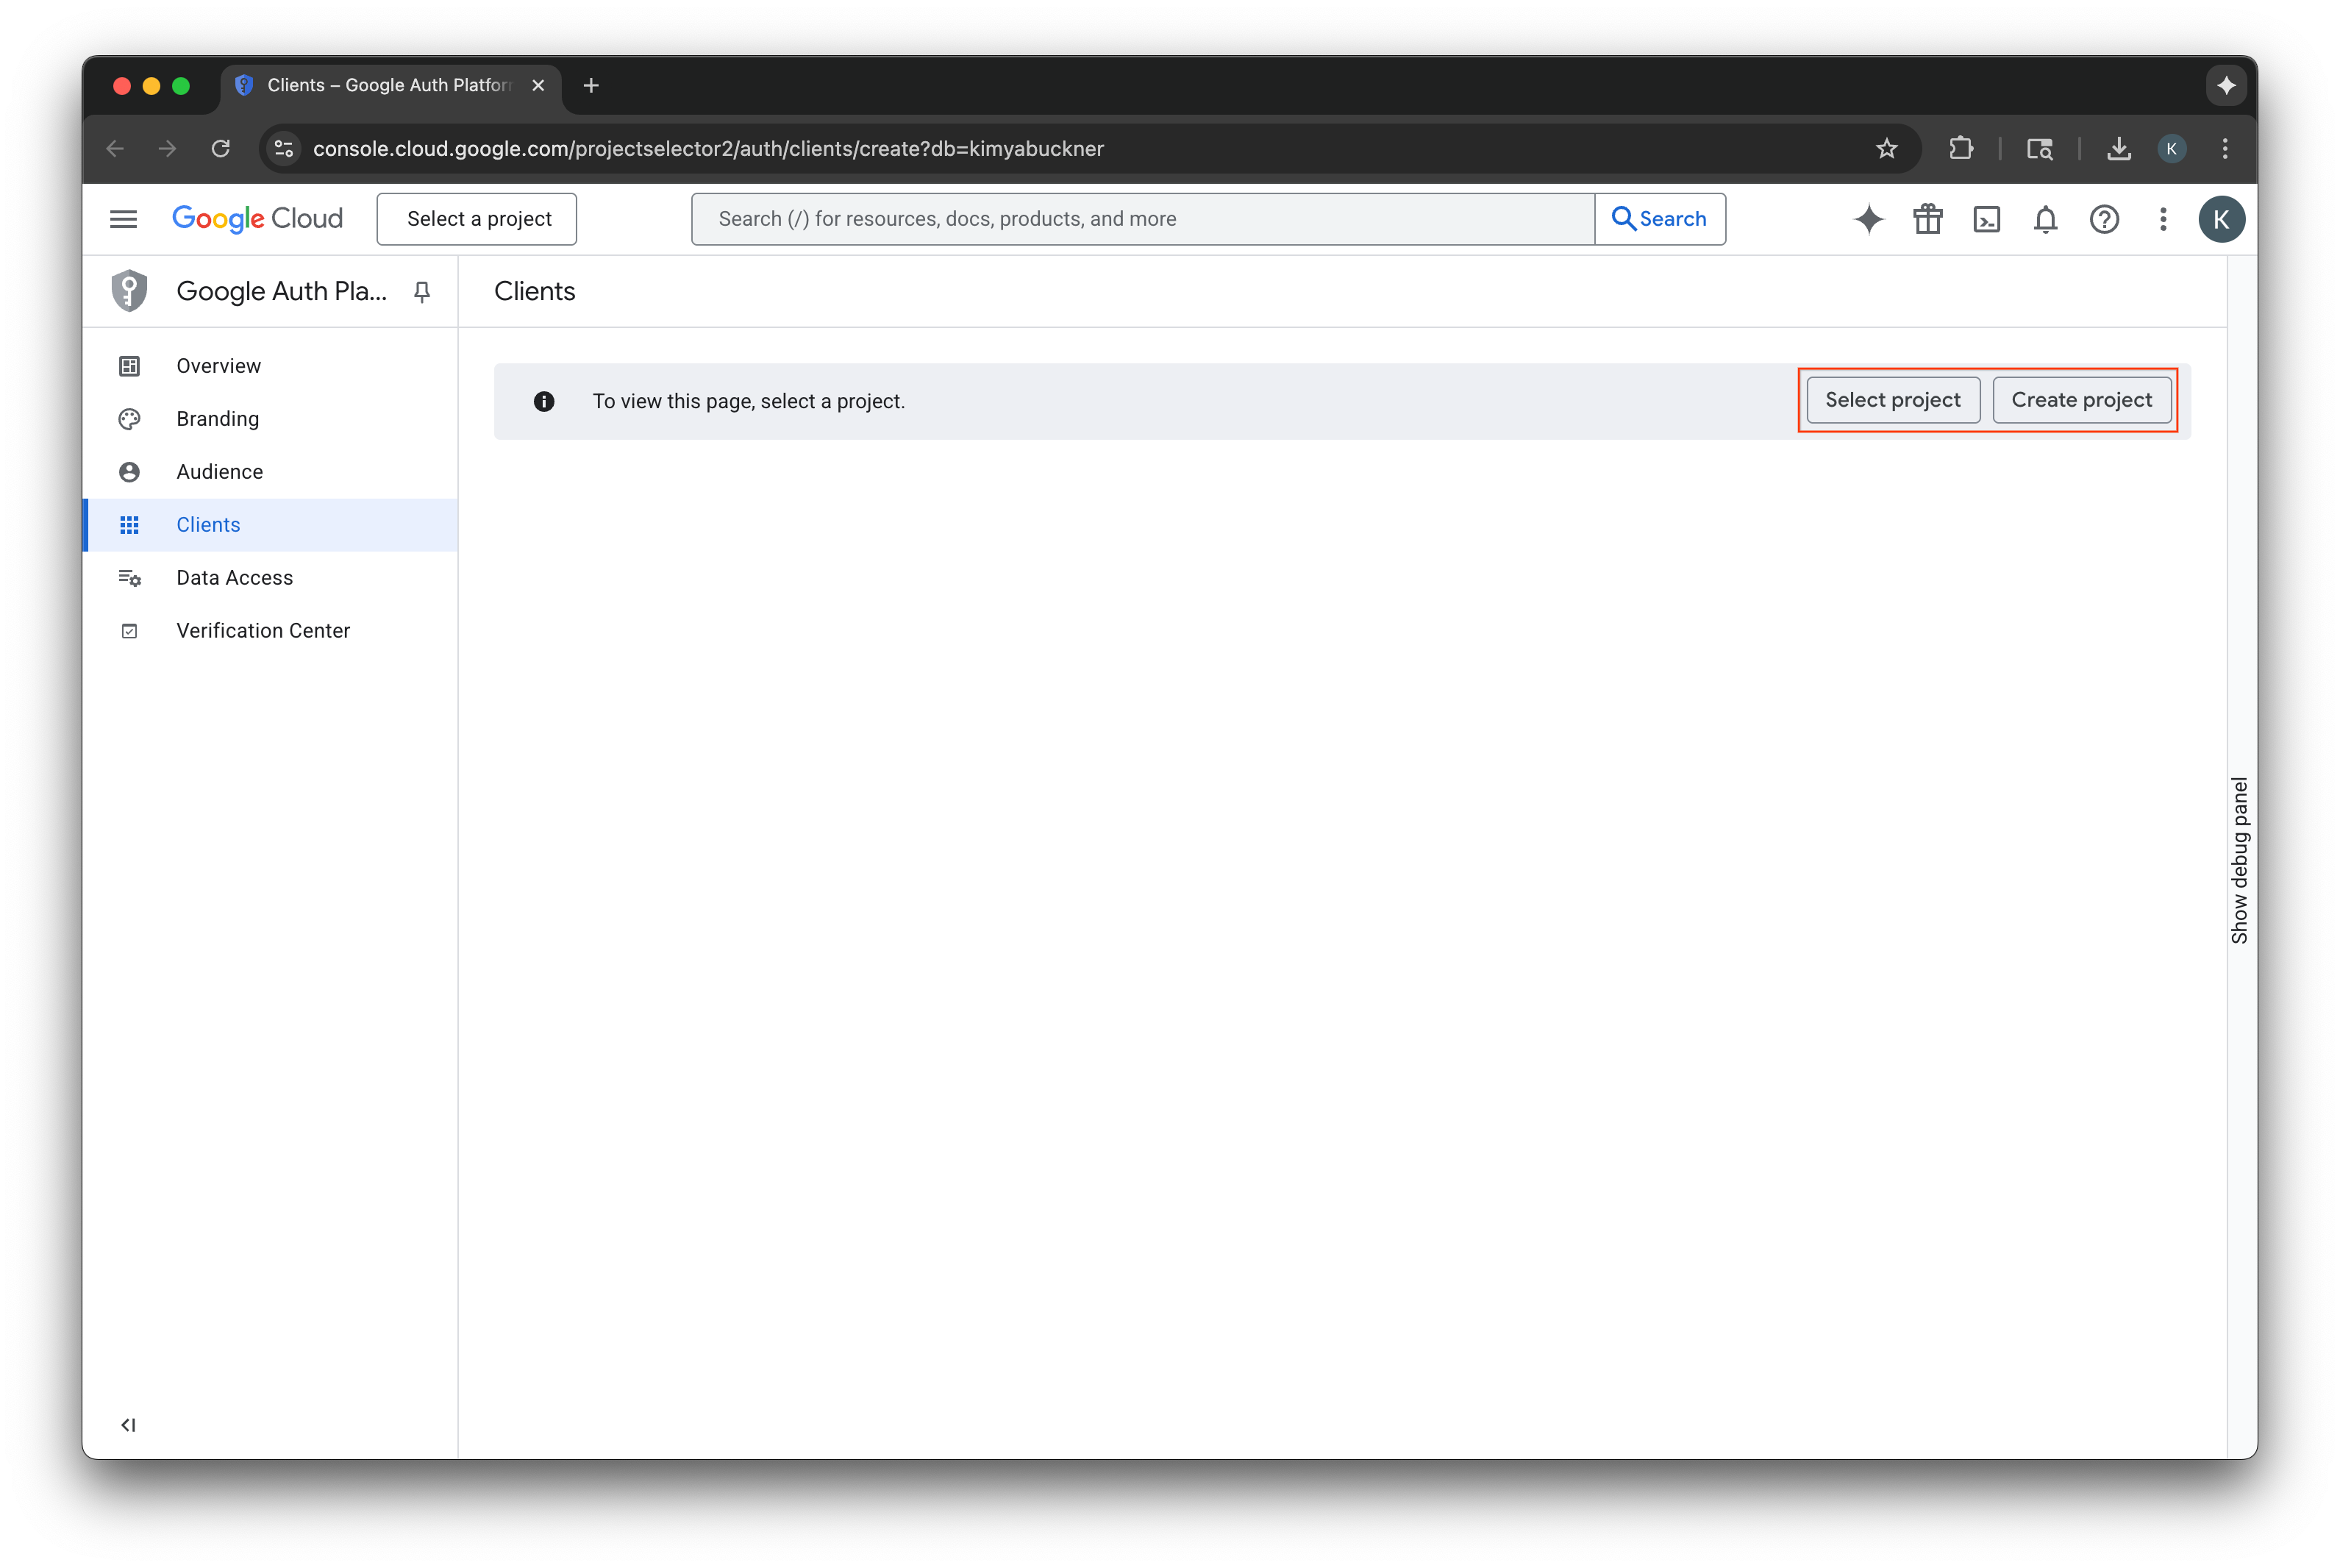
- 新しい Google Cloud プロジェクトの名前を入力します。
- [作成] を選択します。
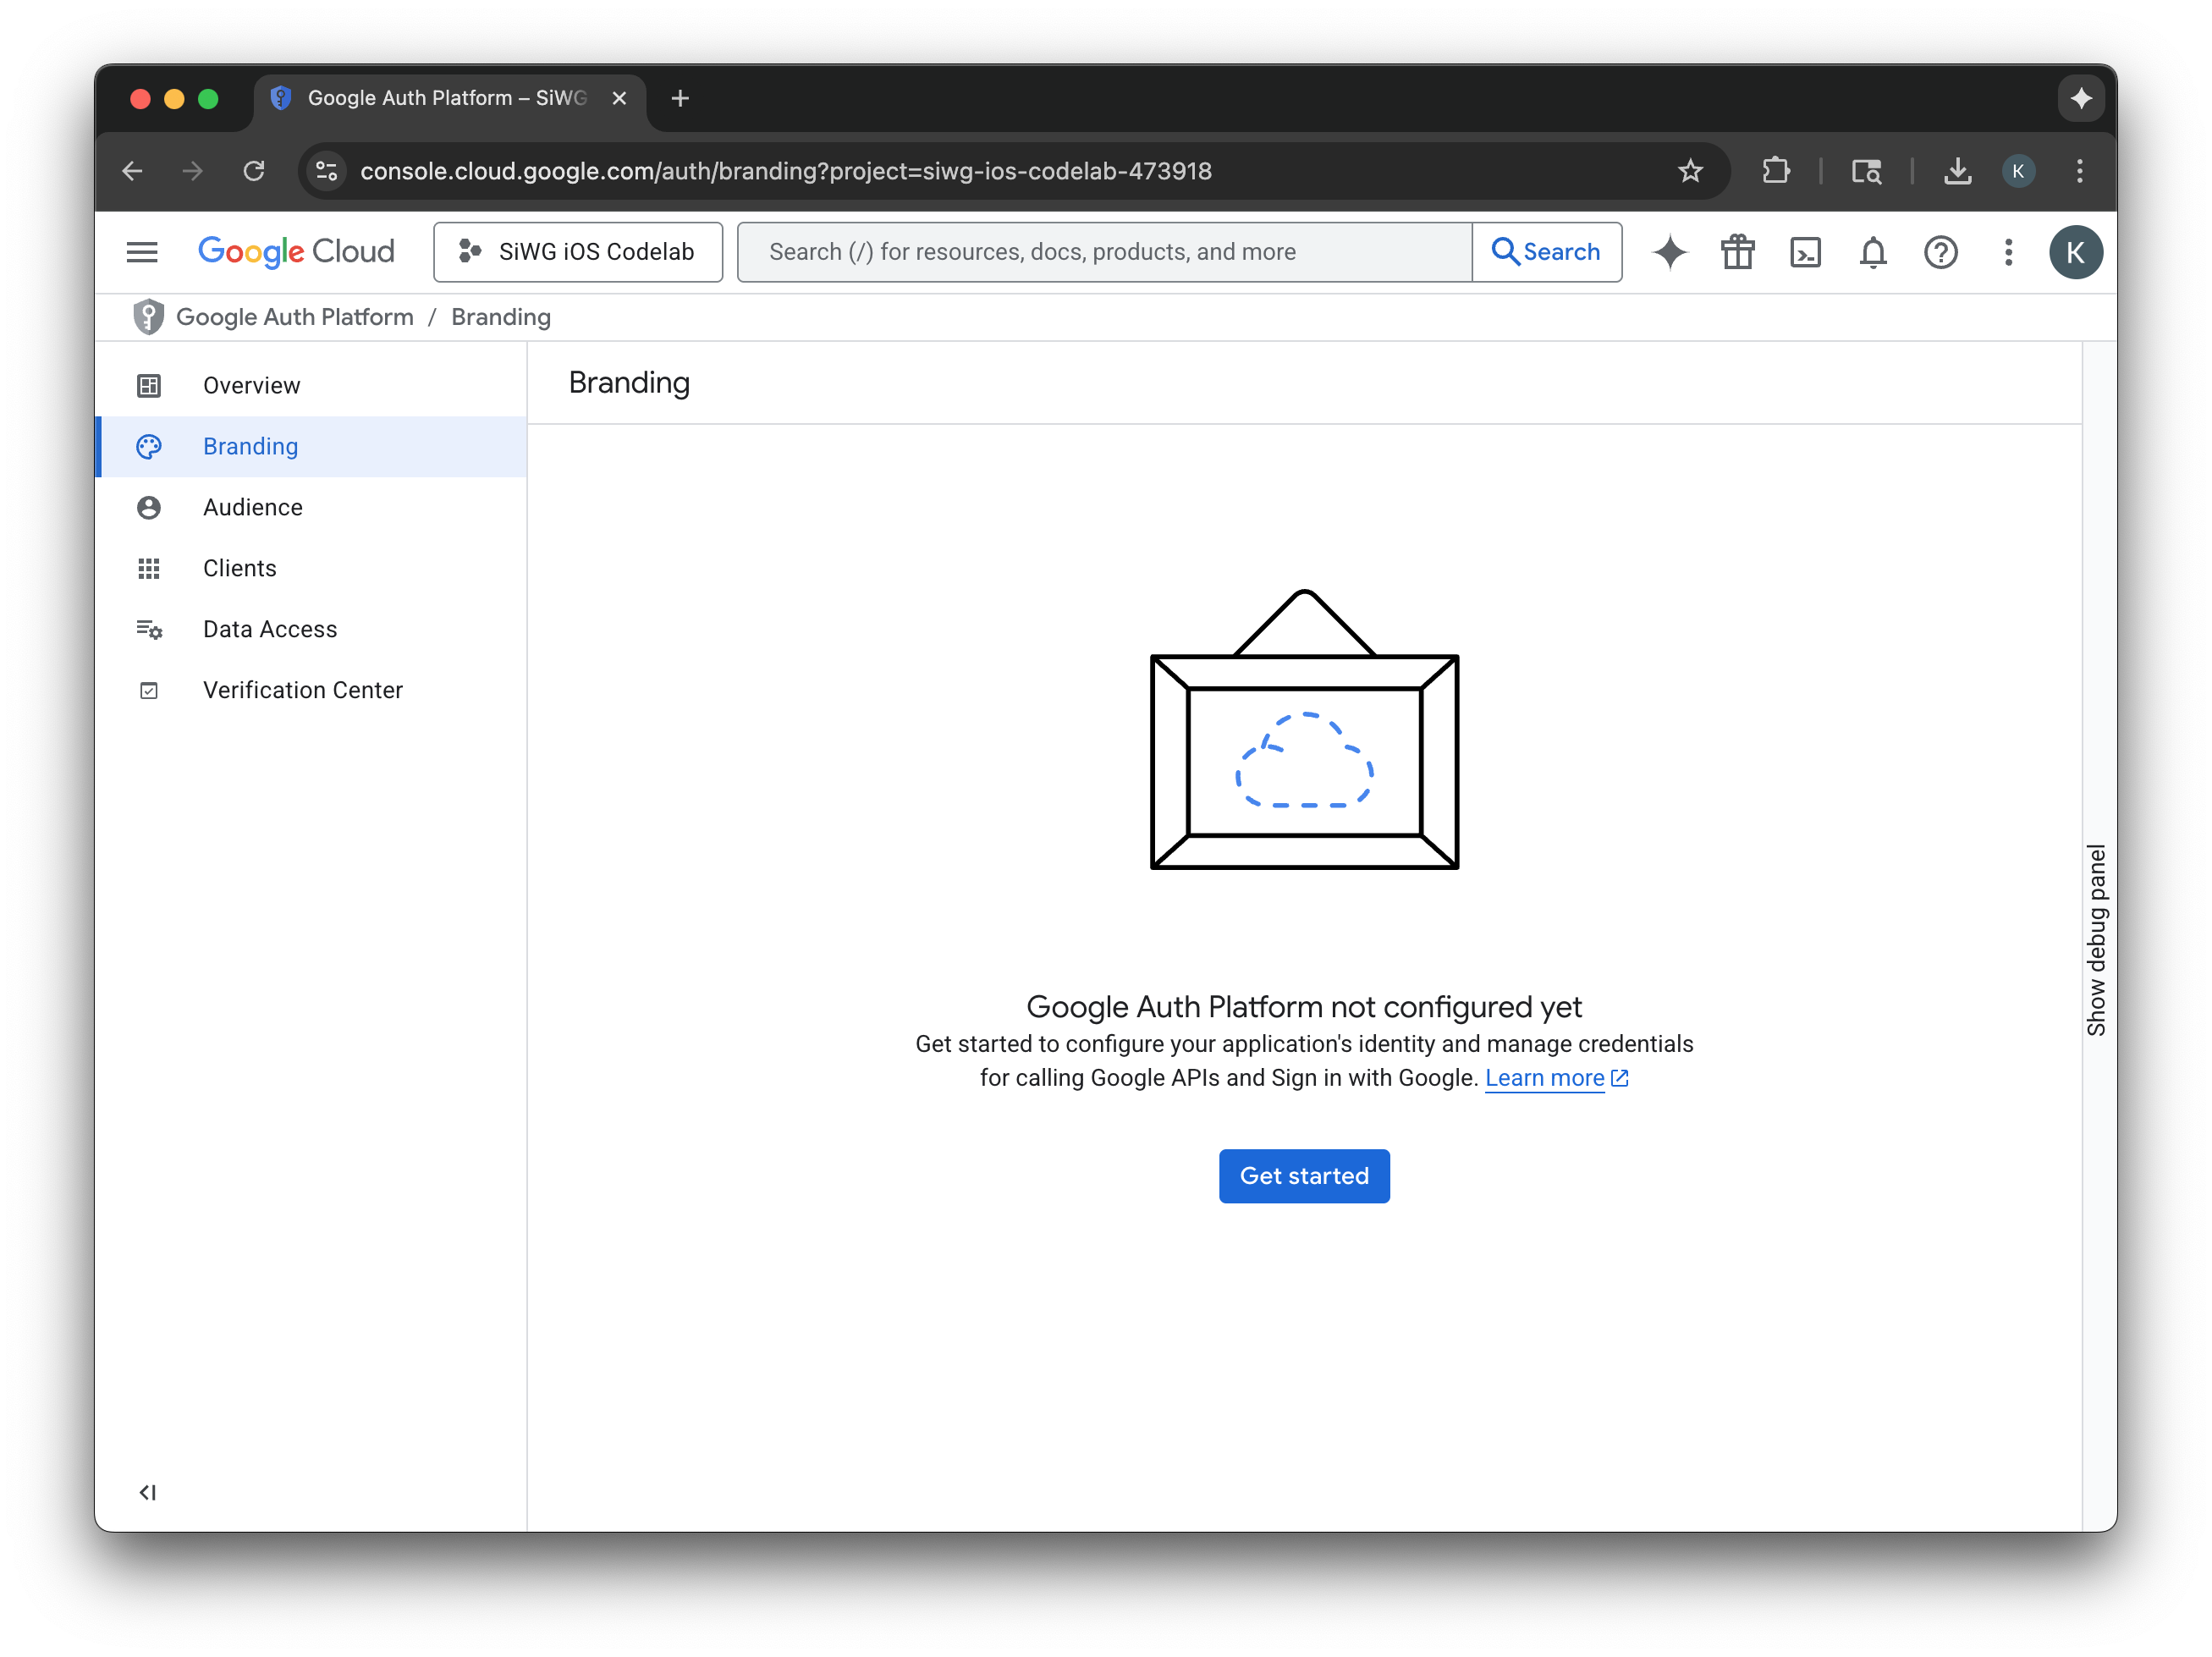
同意画面を構成する
選択したプロジェクトの同意画面をすでに構成している場合は、この段階で構成するよう求められることはありません。その場合は、このセクションをスキップして、OAuth 2.0 クライアントを作成するに進んでください。
- [同意画面を構成] を選択します。
- ブランディング ページで [開始] を選択します。
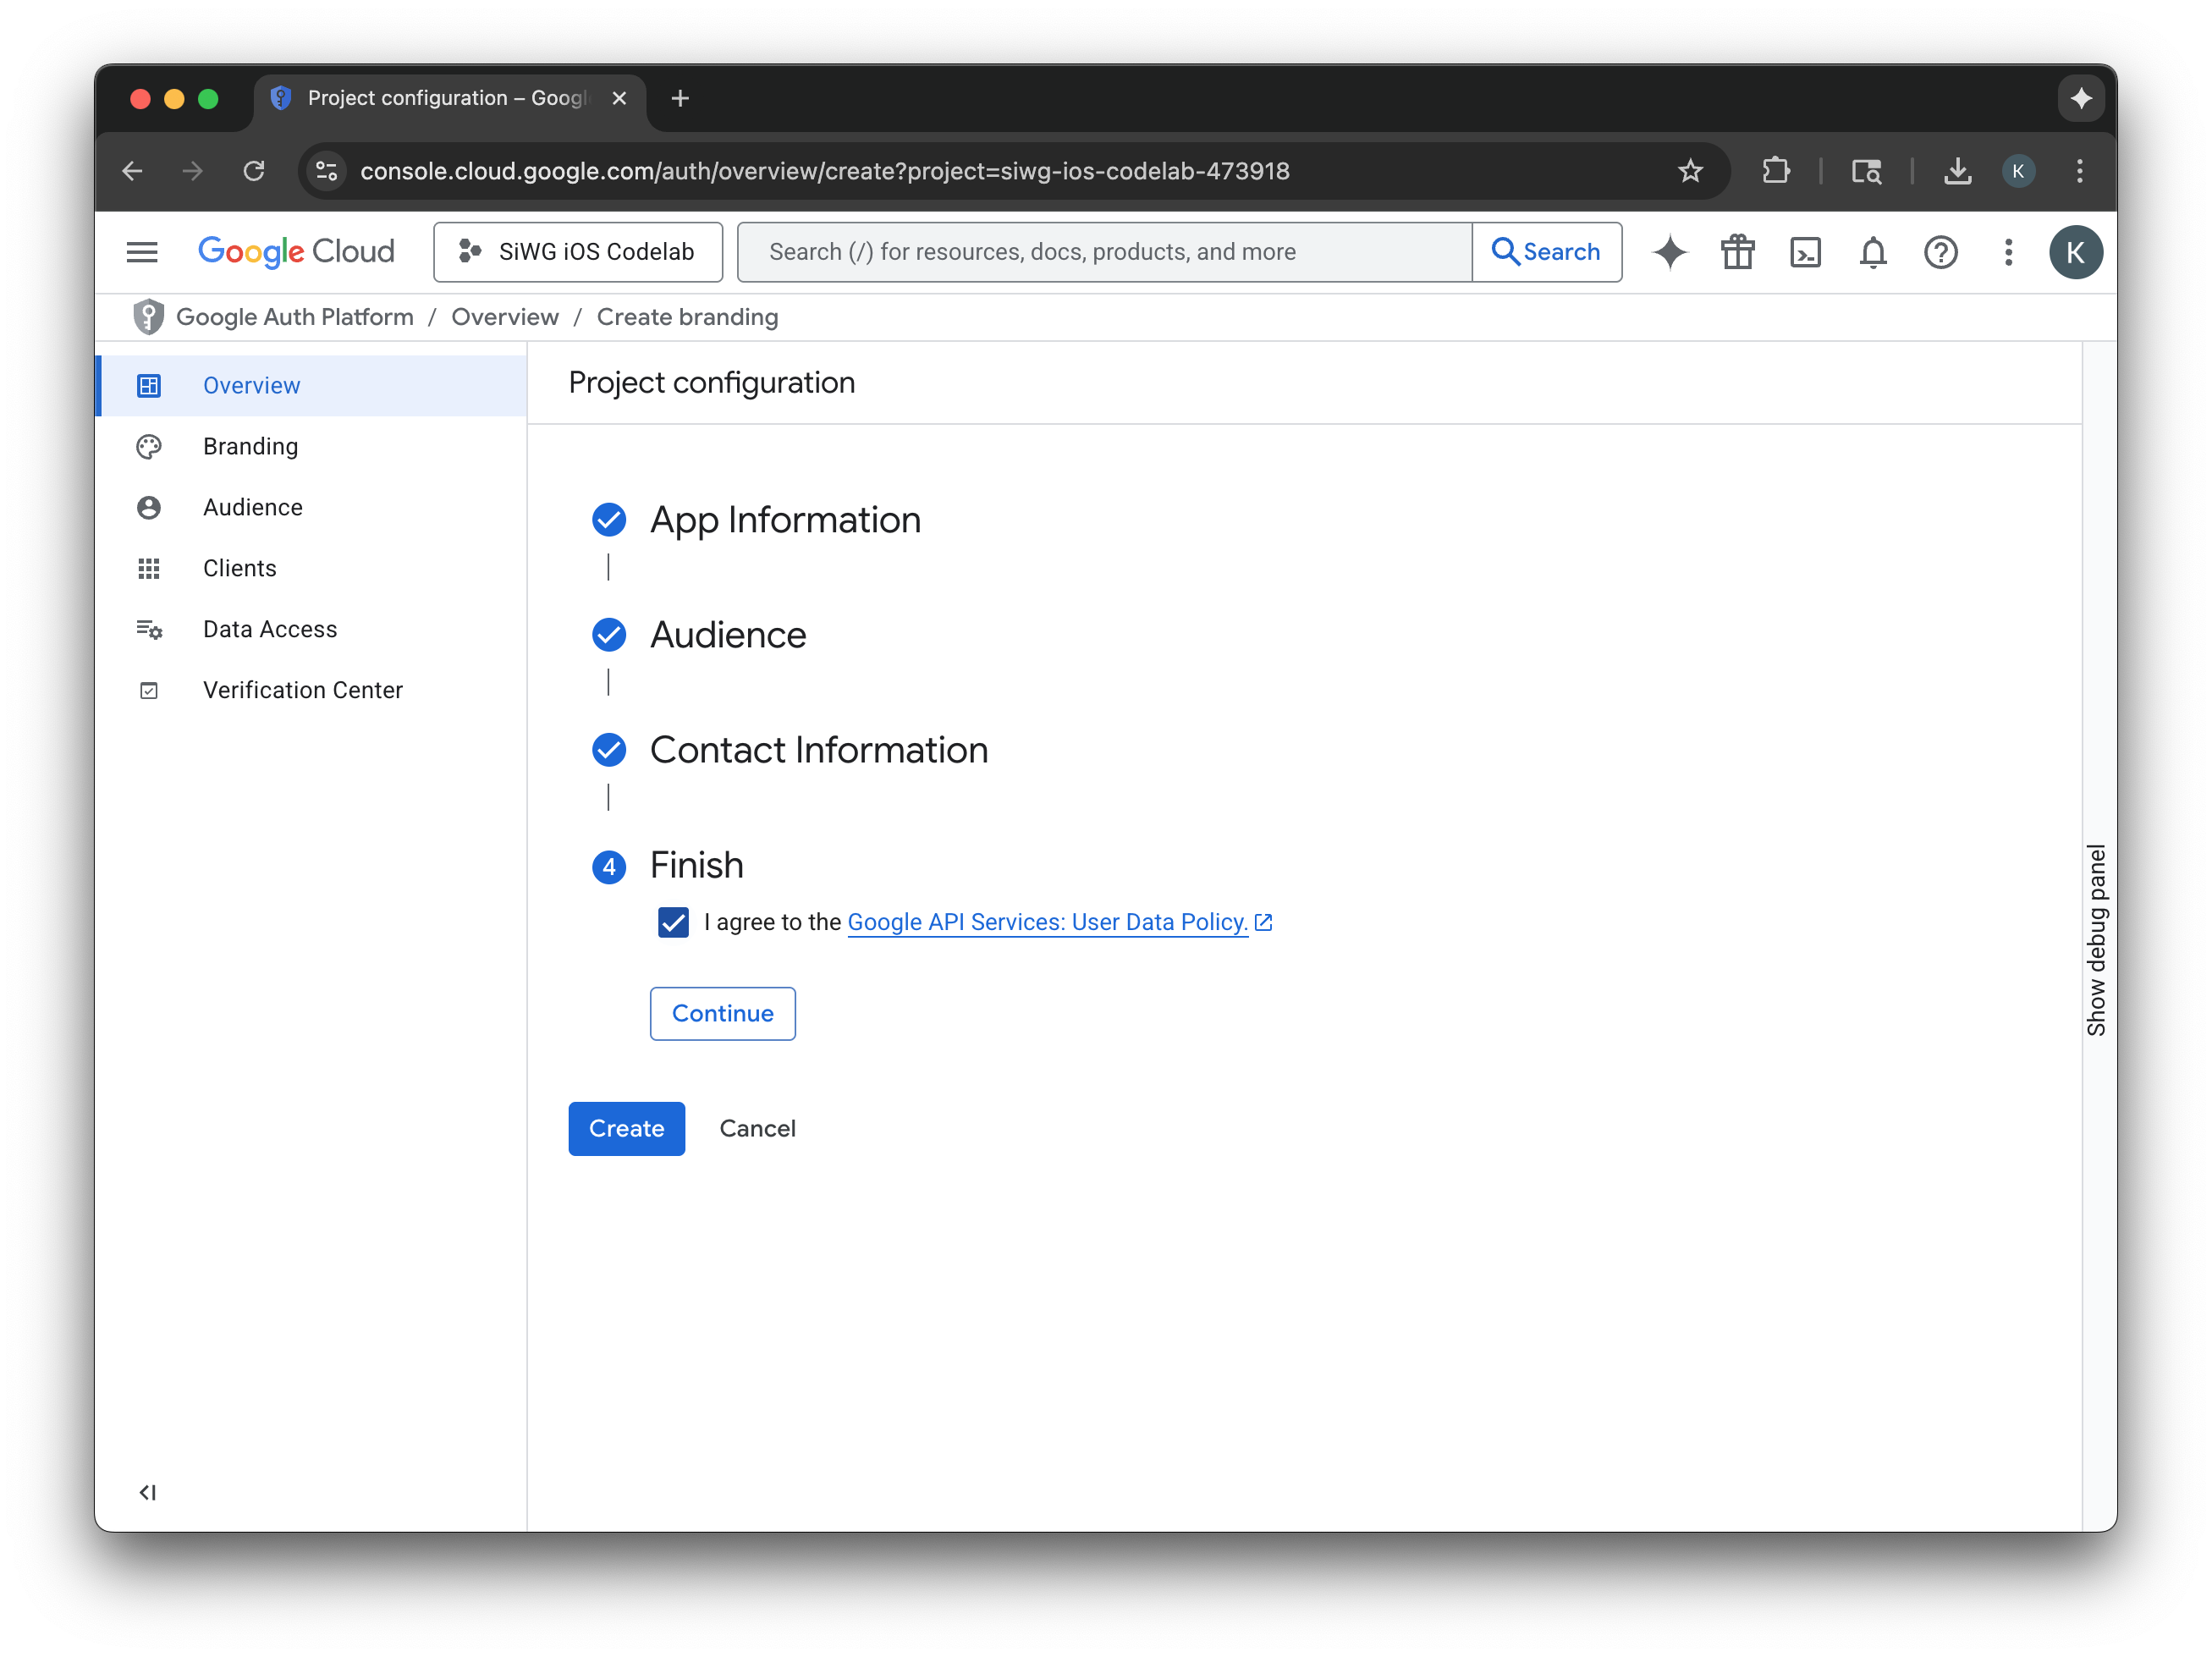
- プロジェクト構成ページで、次のフィールドに入力します。
- アプリ情報: アプリの名前とユーザー サポートメールを入力します。このサポートメールは一般公開され、ユーザーが同意について問い合わせる際に使用されます。
- Audience: [External] を選択します。
- 連絡先情報: Google がプロジェクトについて連絡する際に使用するメールアドレスを入力します。
- Google API サービス: ユーザーデータに関するポリシーを確認します。
- [作成] をクリックします。
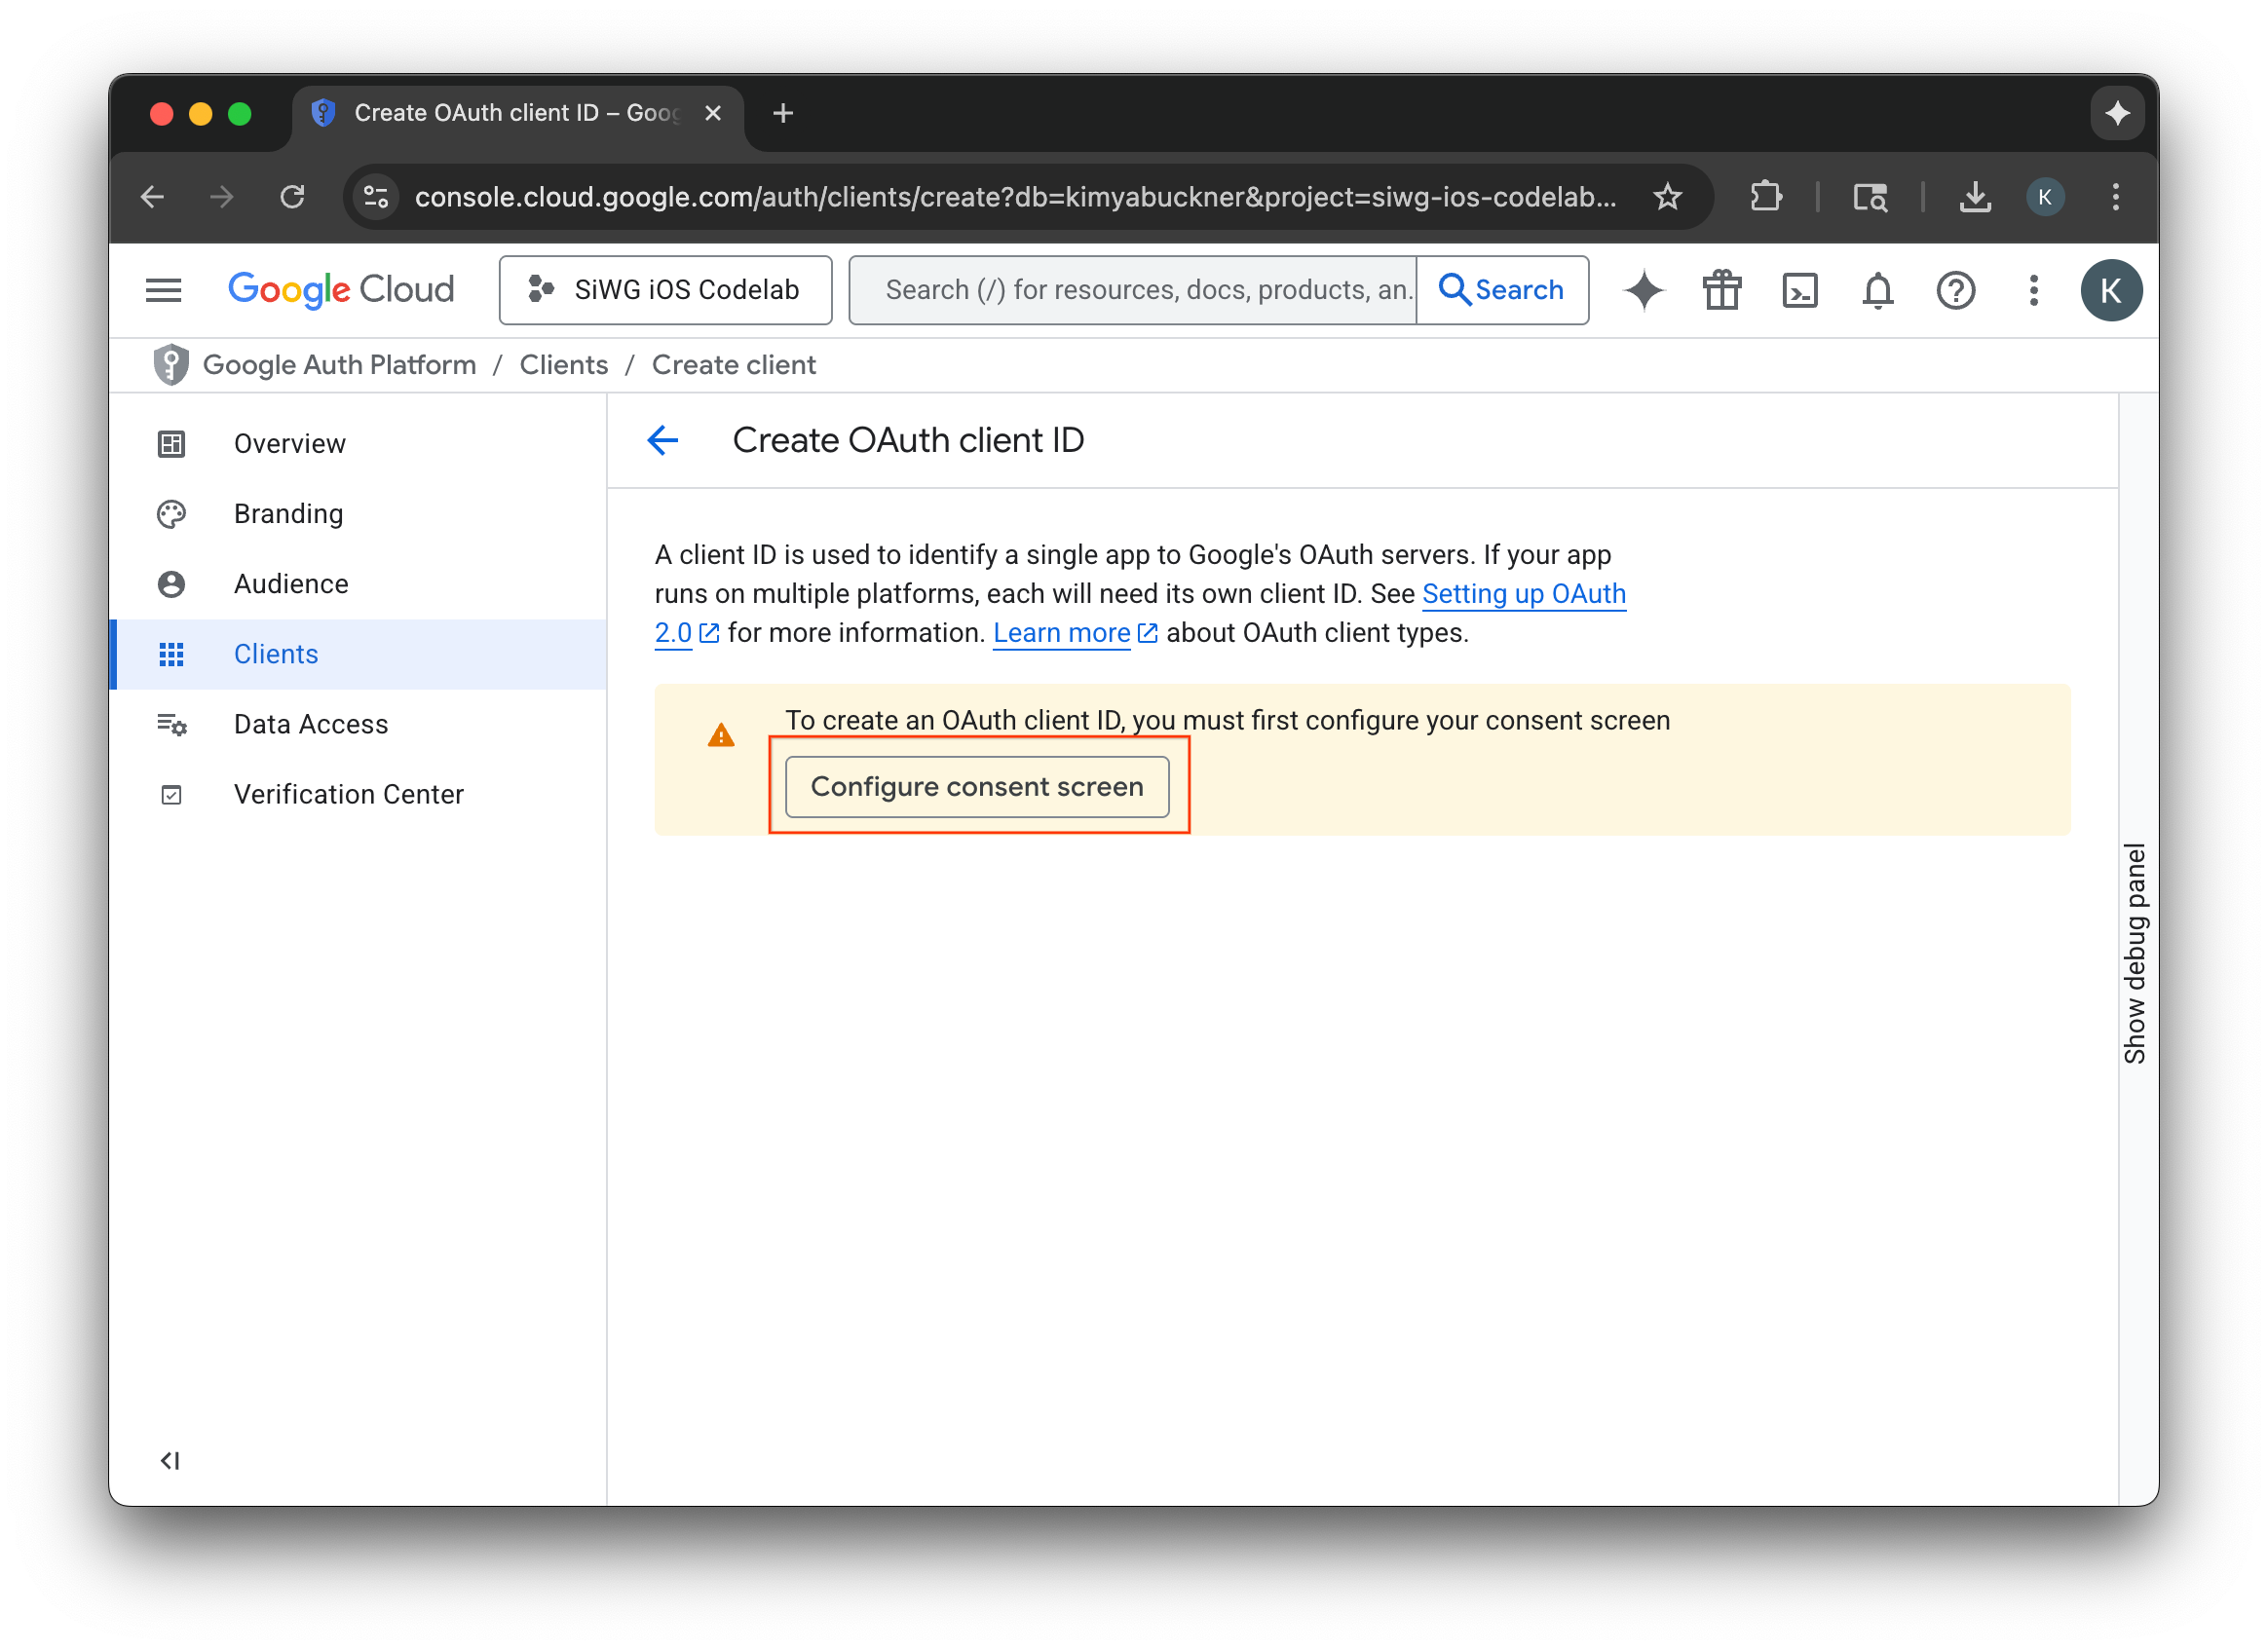
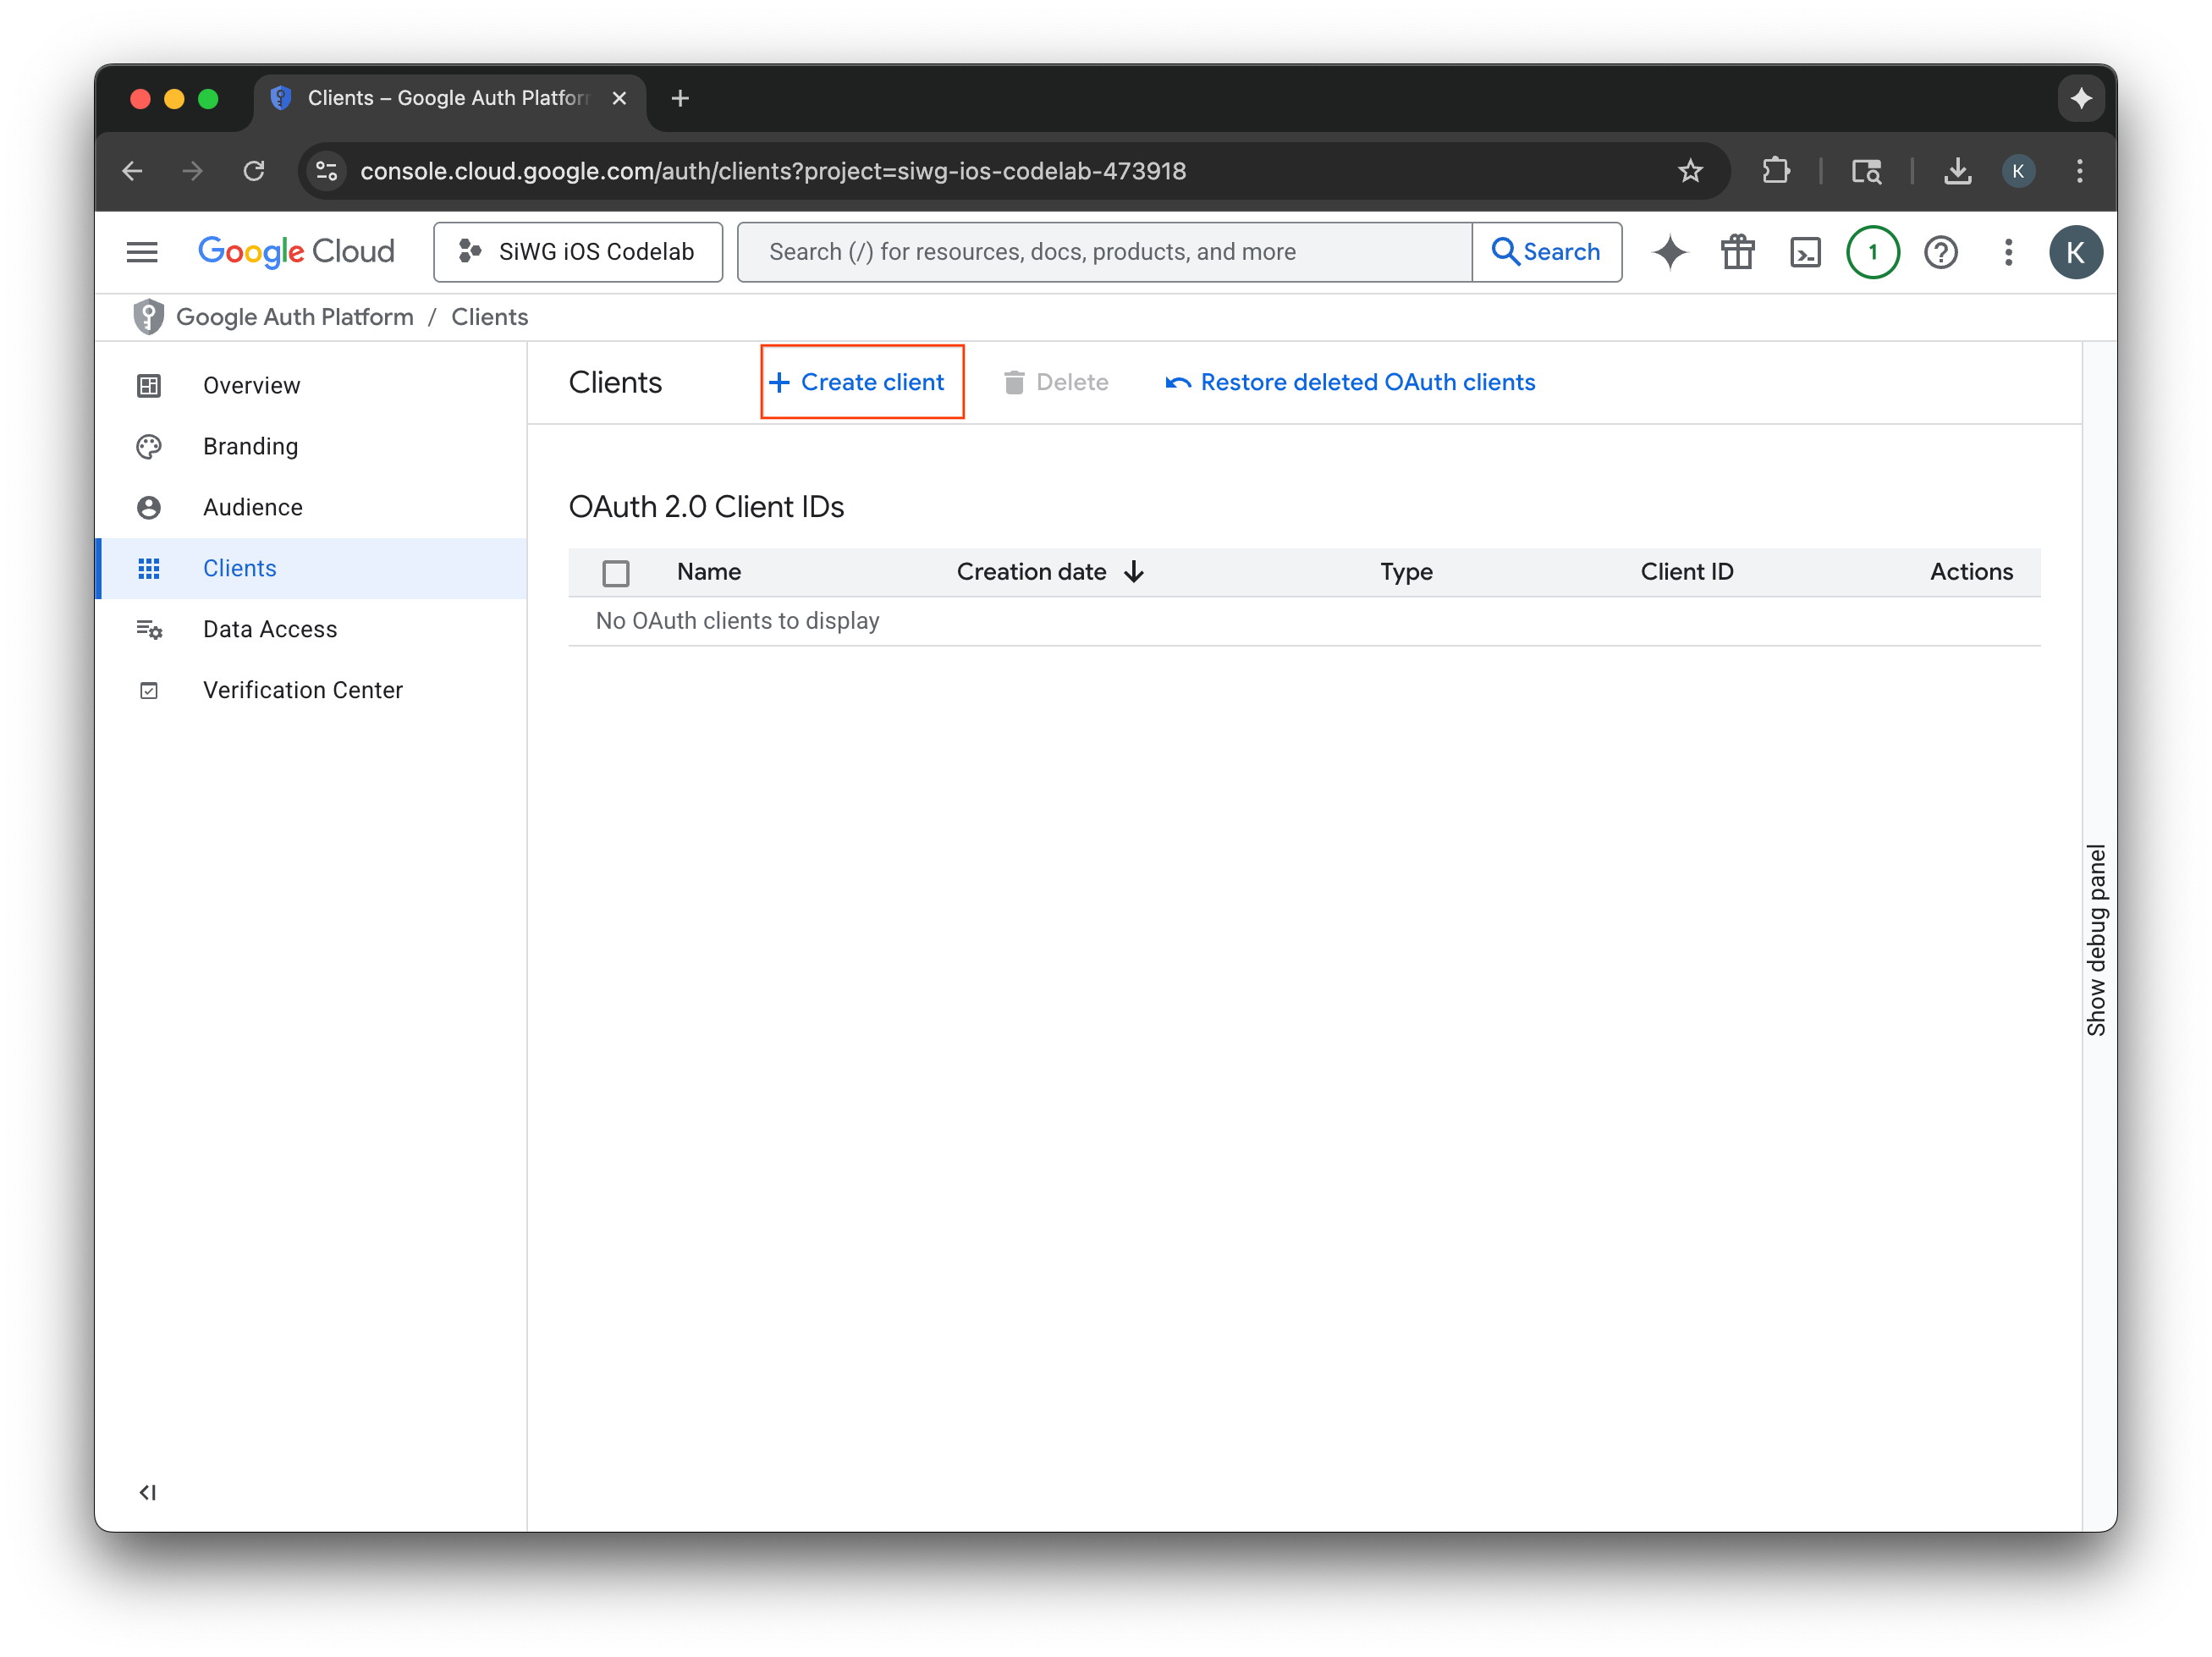
- ナビゲーション メニューで [クライアント] ページを選択します。
- [クライアントを作成] をクリックします。
OAuth 2.0 クライアントを作成する
- [アプリケーションの種類] で [iOS] を選択します。
- クライアントの名前を入力します。
- 前の手順で作成したバンドル ID を入力します。
- Apple によってチームに割り当てられたチーム ID を入力します。この手順は現時点では省略可能ですが、この Codelab の後半で App Check を有効にするには、チーム ID が必要になります。
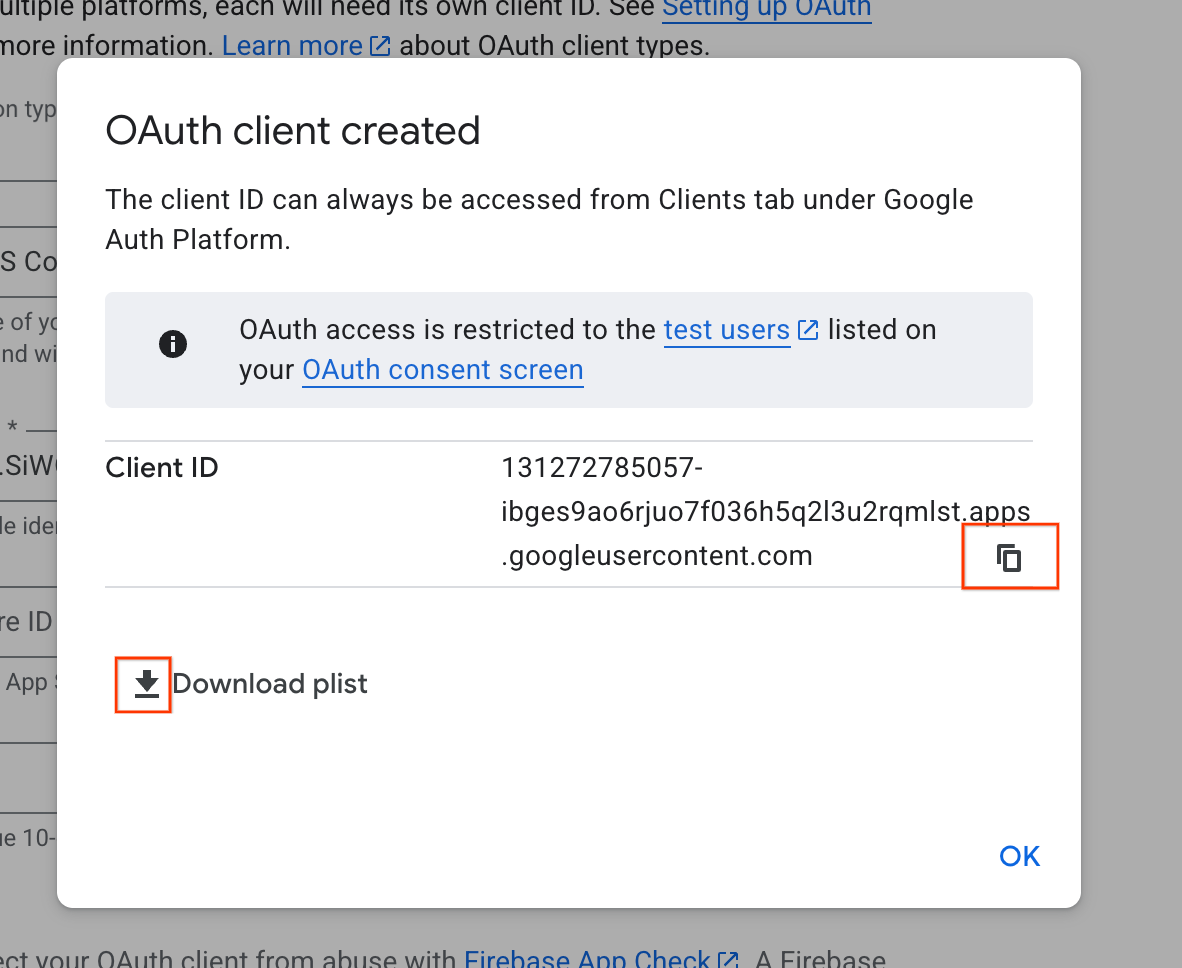
- [作成] を選択します。
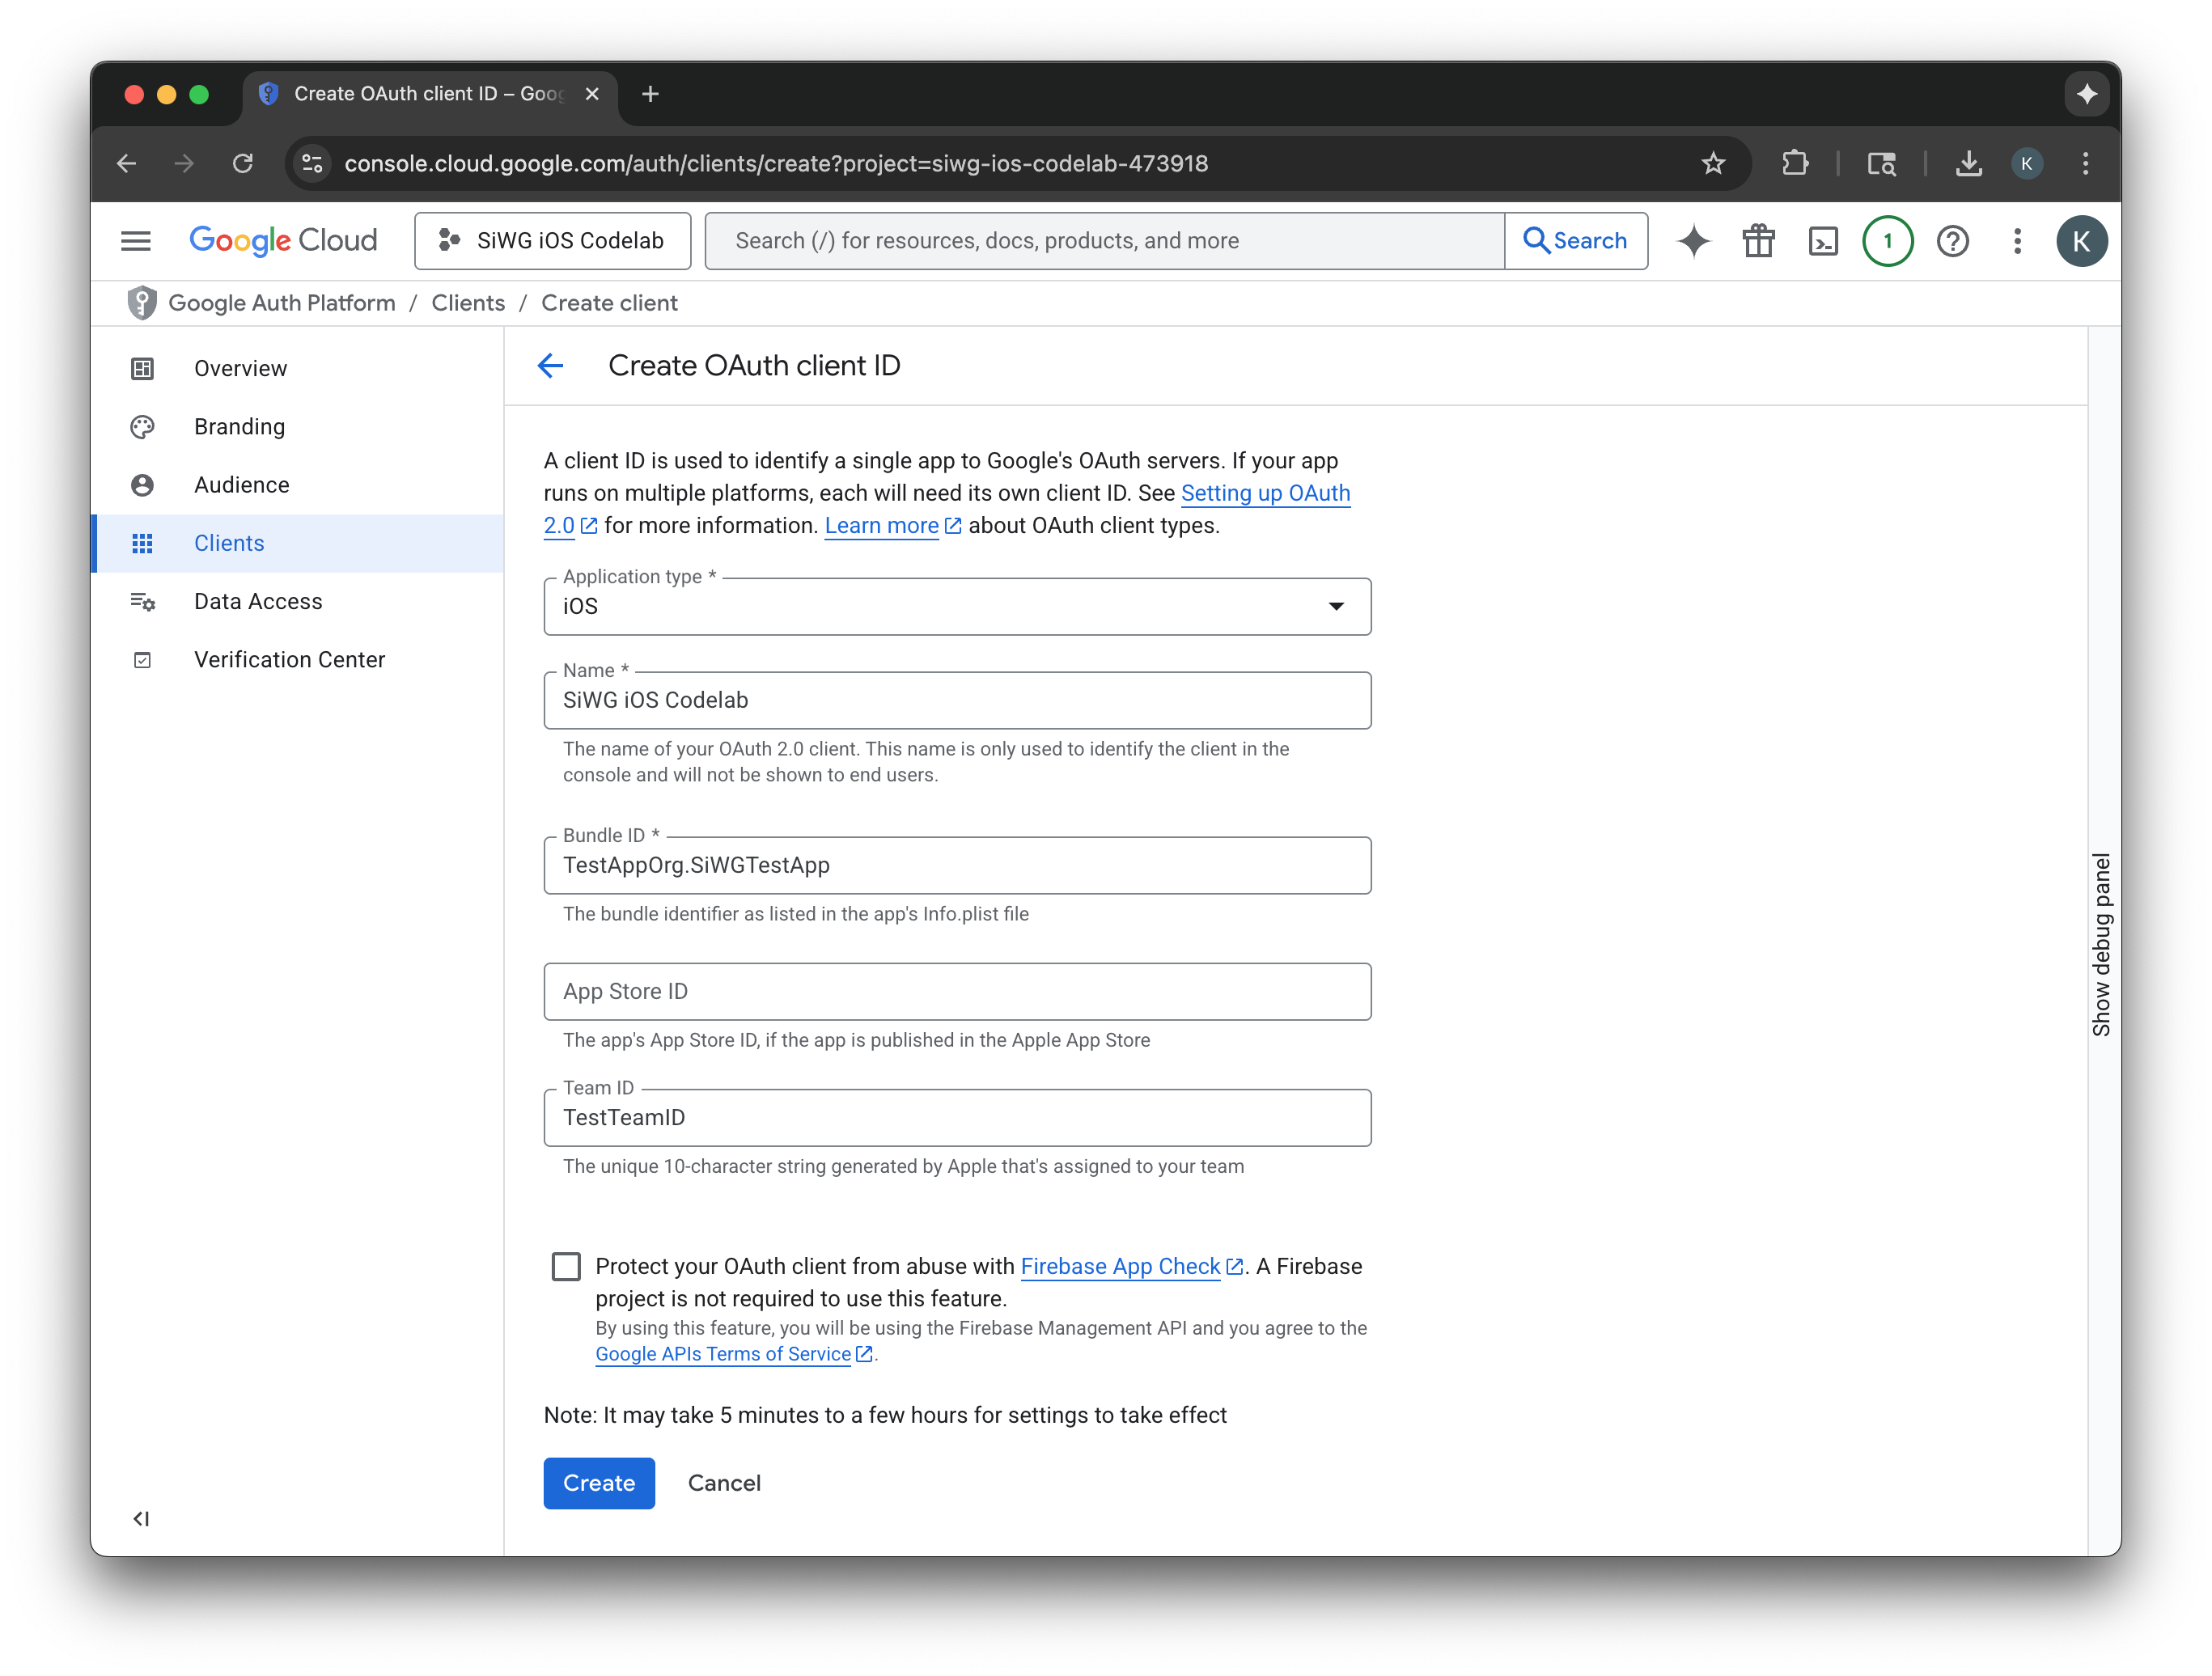
- ダイアログ ウィンドウからクライアント ID をコピーします。これは後で必要になります。
- 後で参照できるように、plist ファイルをダウンロードします。
4. Xcode プロジェクトを構成する
次の手順では、Google でログイン SDK を使用するように Xcode プロジェクトを設定します。このプロセスでは、SDK を依存関係としてプロジェクトに追加し、一意のクライアント ID を使用してプロジェクト設定を構成します。この ID により、SDK はログイン プロセス中に Google の認証サービスと安全に通信できます。
「Google でログイン」の依存関係をインストールする
- Xcode プロジェクトを開きます。
- [File] > [Add Package Dependencies] に移動します。
- 検索バーに、Google でログイン リポジトリの URL(https://github.com/google/GoogleSignIn-iOS)を入力します。
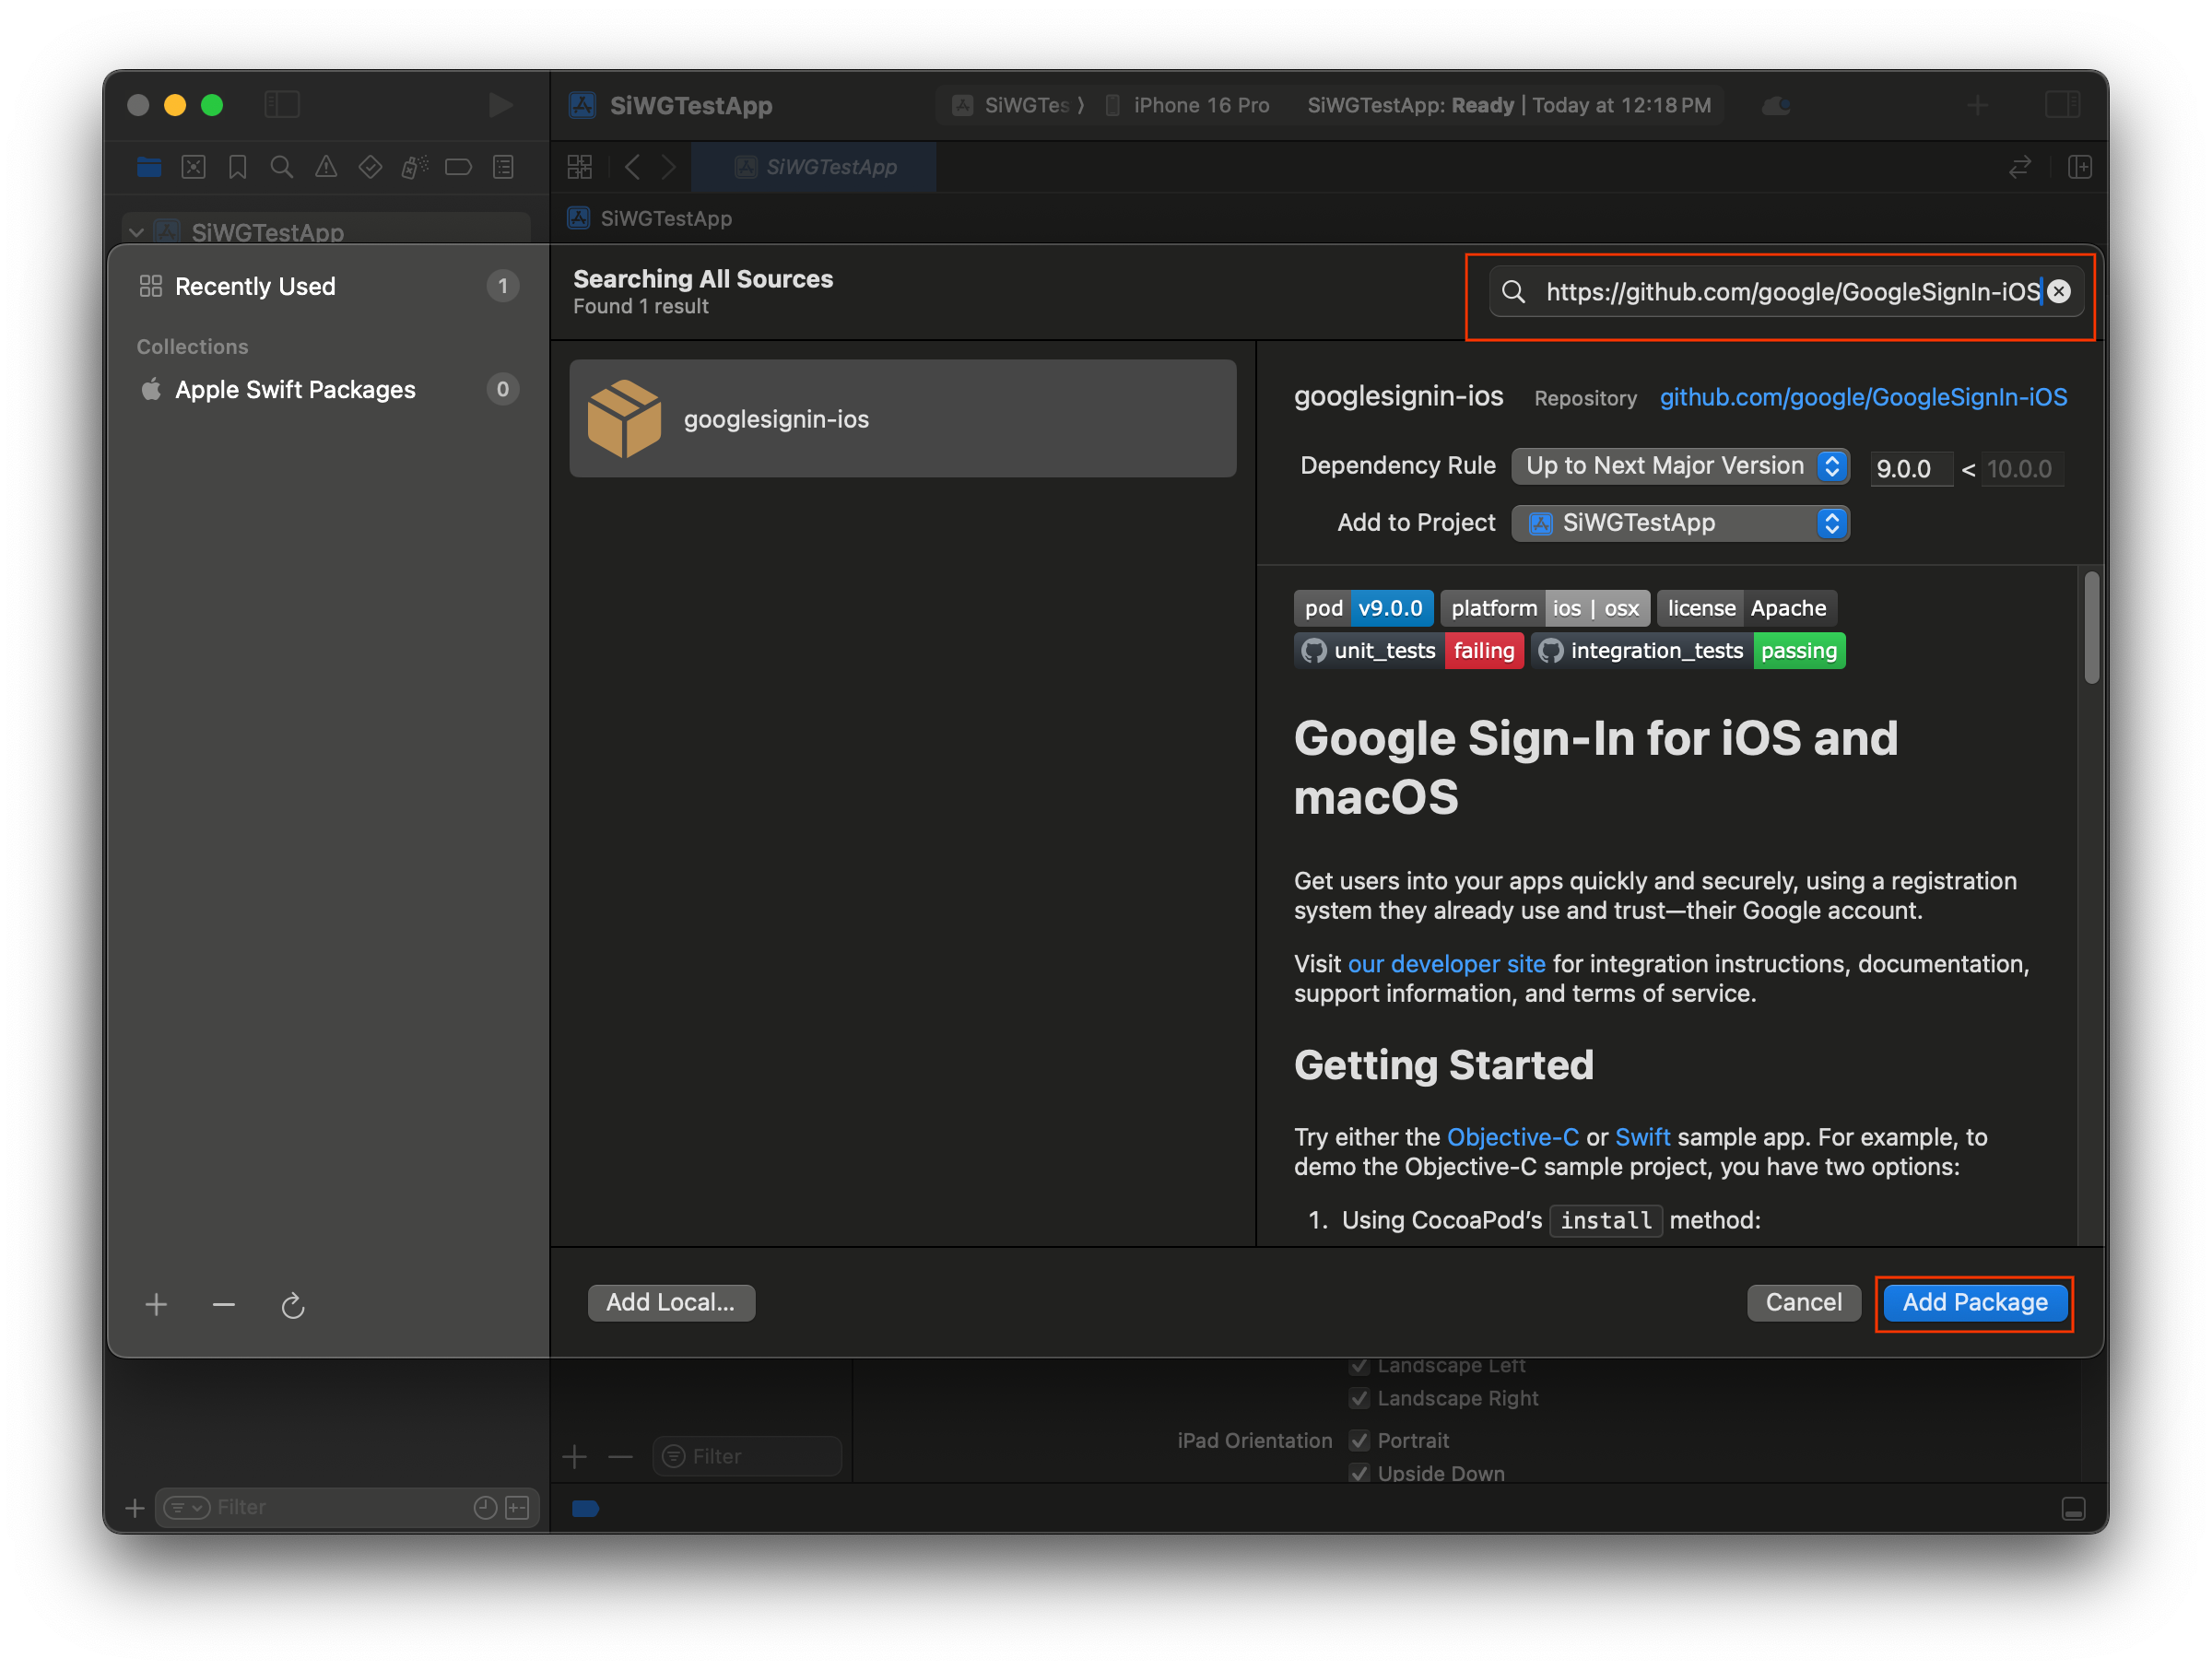
- [パッケージを追加] を選択します。
- GoogleSignIn パッケージのメイン アプリケーション ターゲットを選択します。
- SwiftUI を使用している場合は、GoogleSignInSwift パッケージのメイン アプリケーション ターゲットを選択します。UIKit を使用する場合は、このパッケージのターゲットを選択しないでください。
- [パッケージを追加] を選択します。

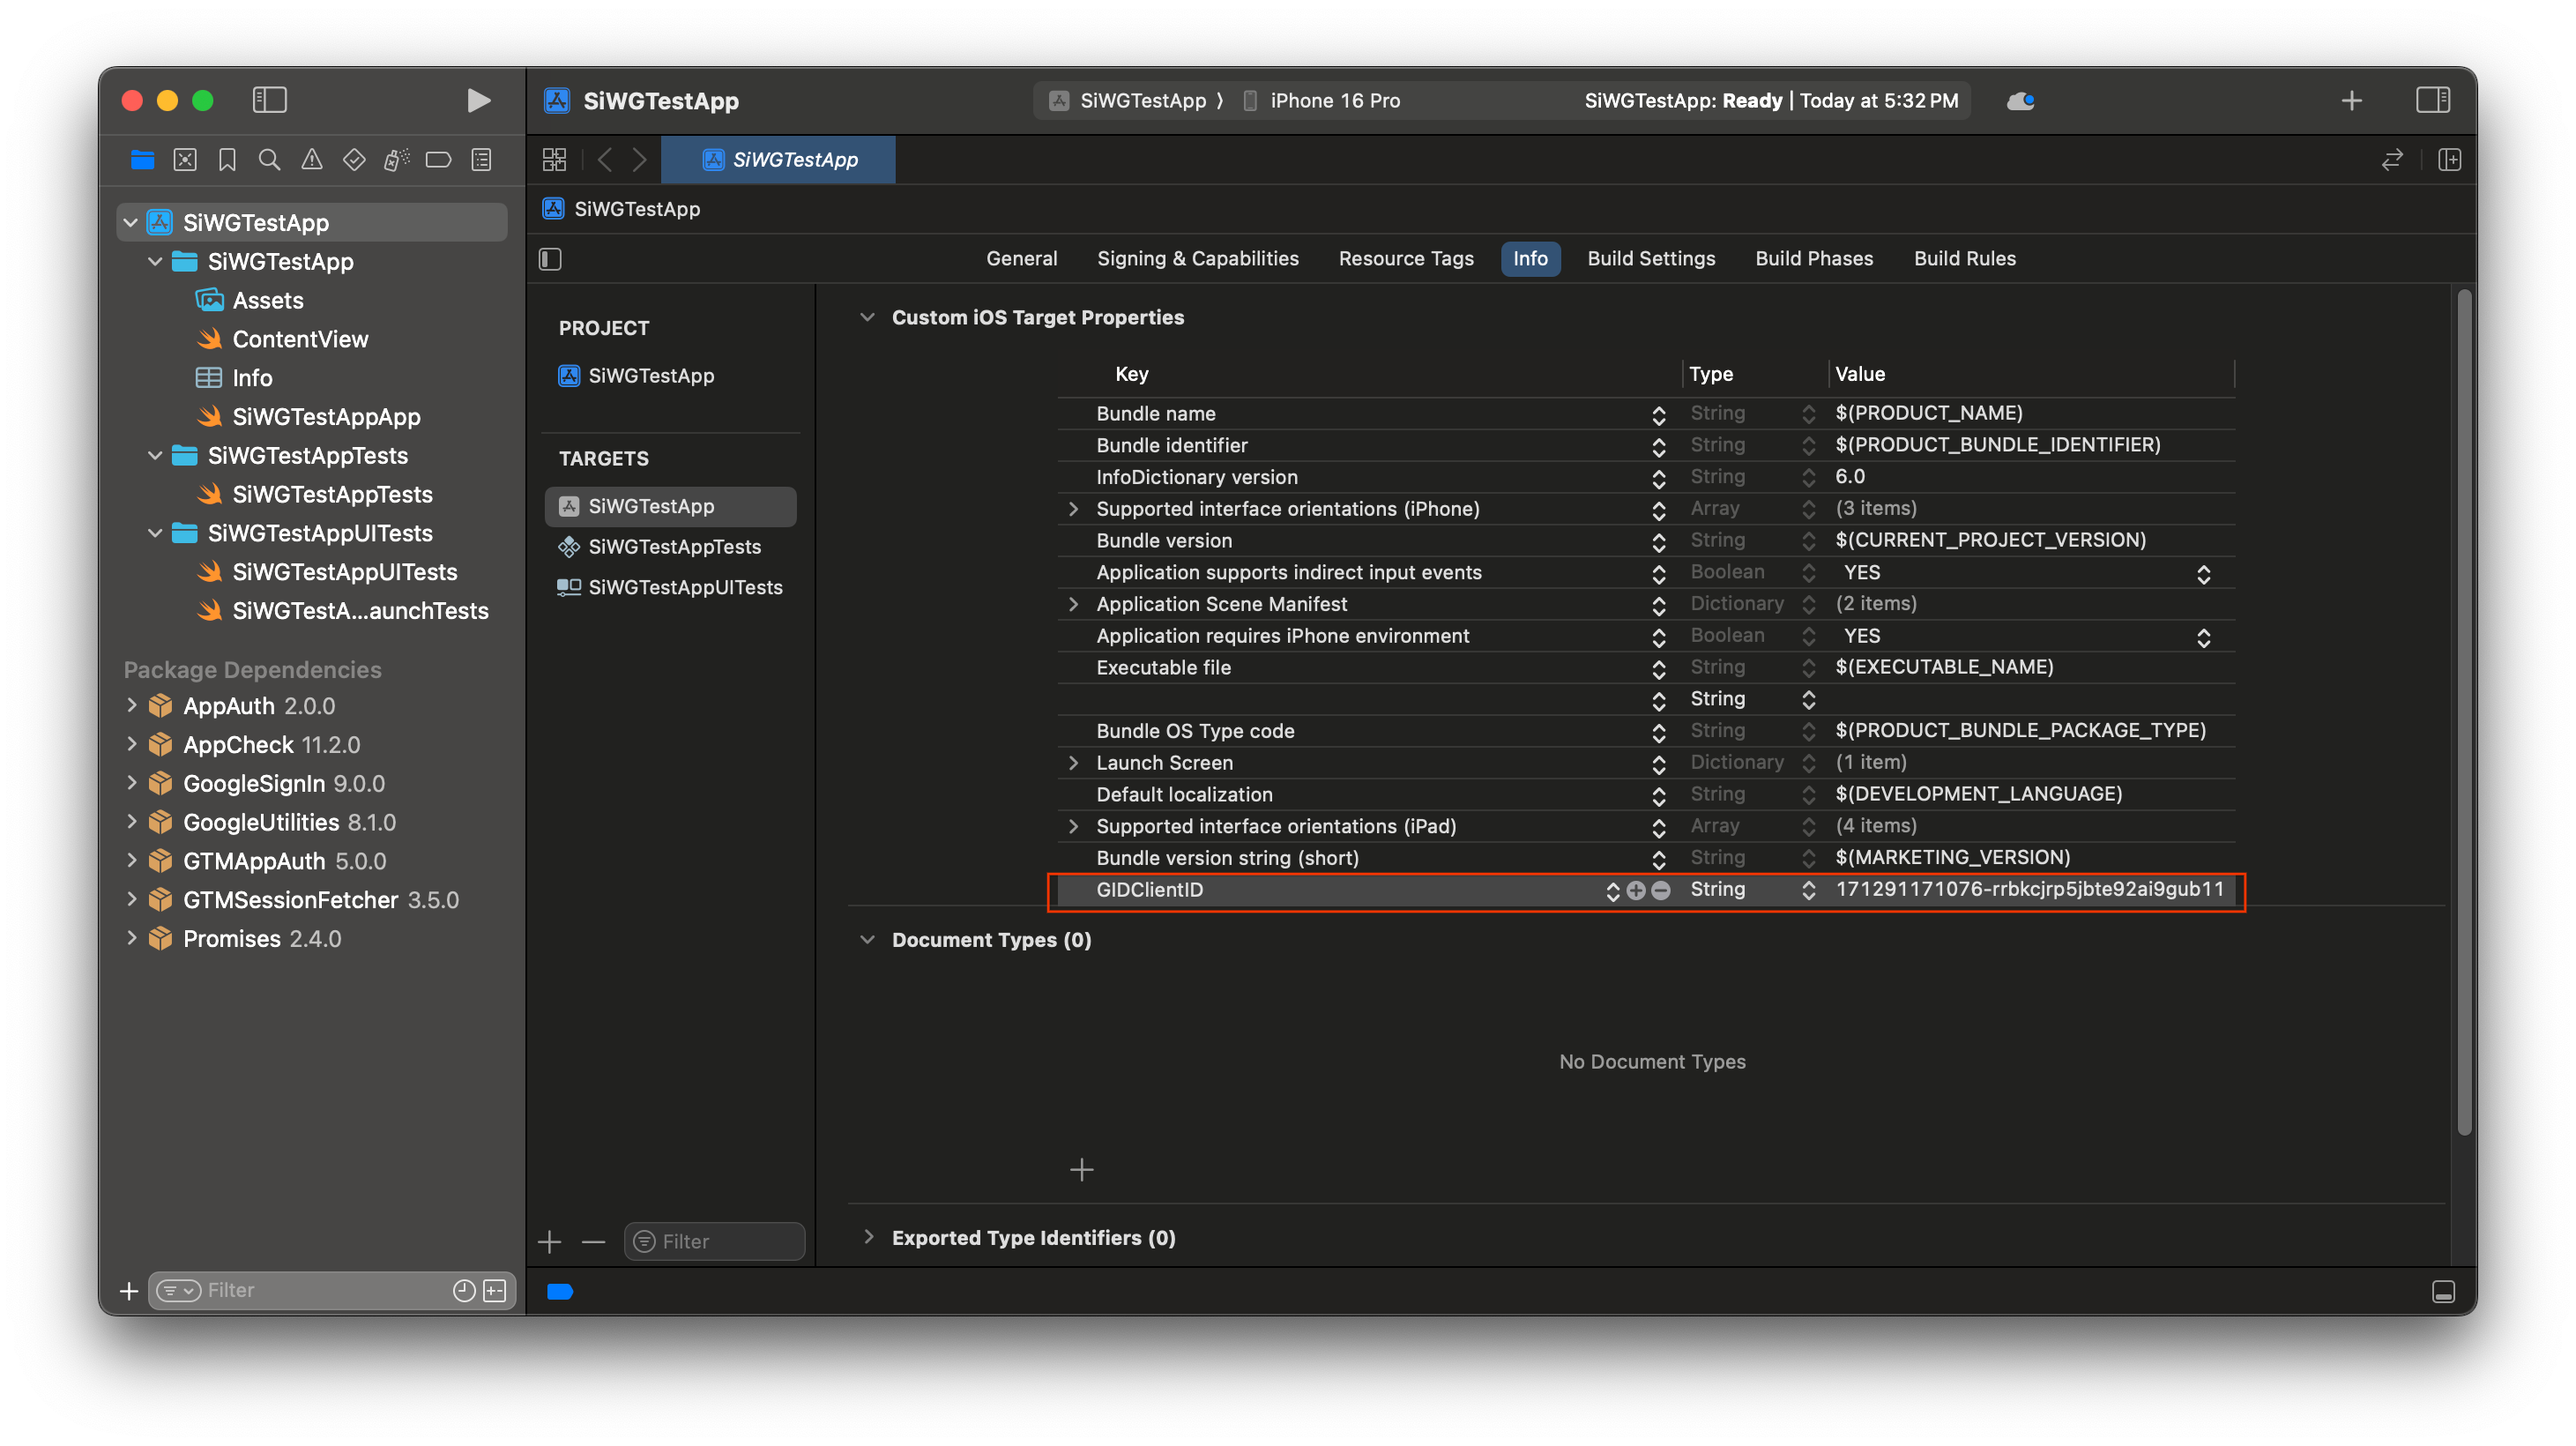
アプリの認証情報を構成する
- Project Navigator で、プロジェクトのルートをクリックします。
- メイン エディタ領域で、[TARGETS] リストからメイン アプリケーション ターゲットを選択します。
- エディタ領域の上部にある [情報] タブを選択します。
- [Custom iOS Target Properties] セクションの最後の行にカーソルを合わせ、表示される [+] ボタンをクリックします。
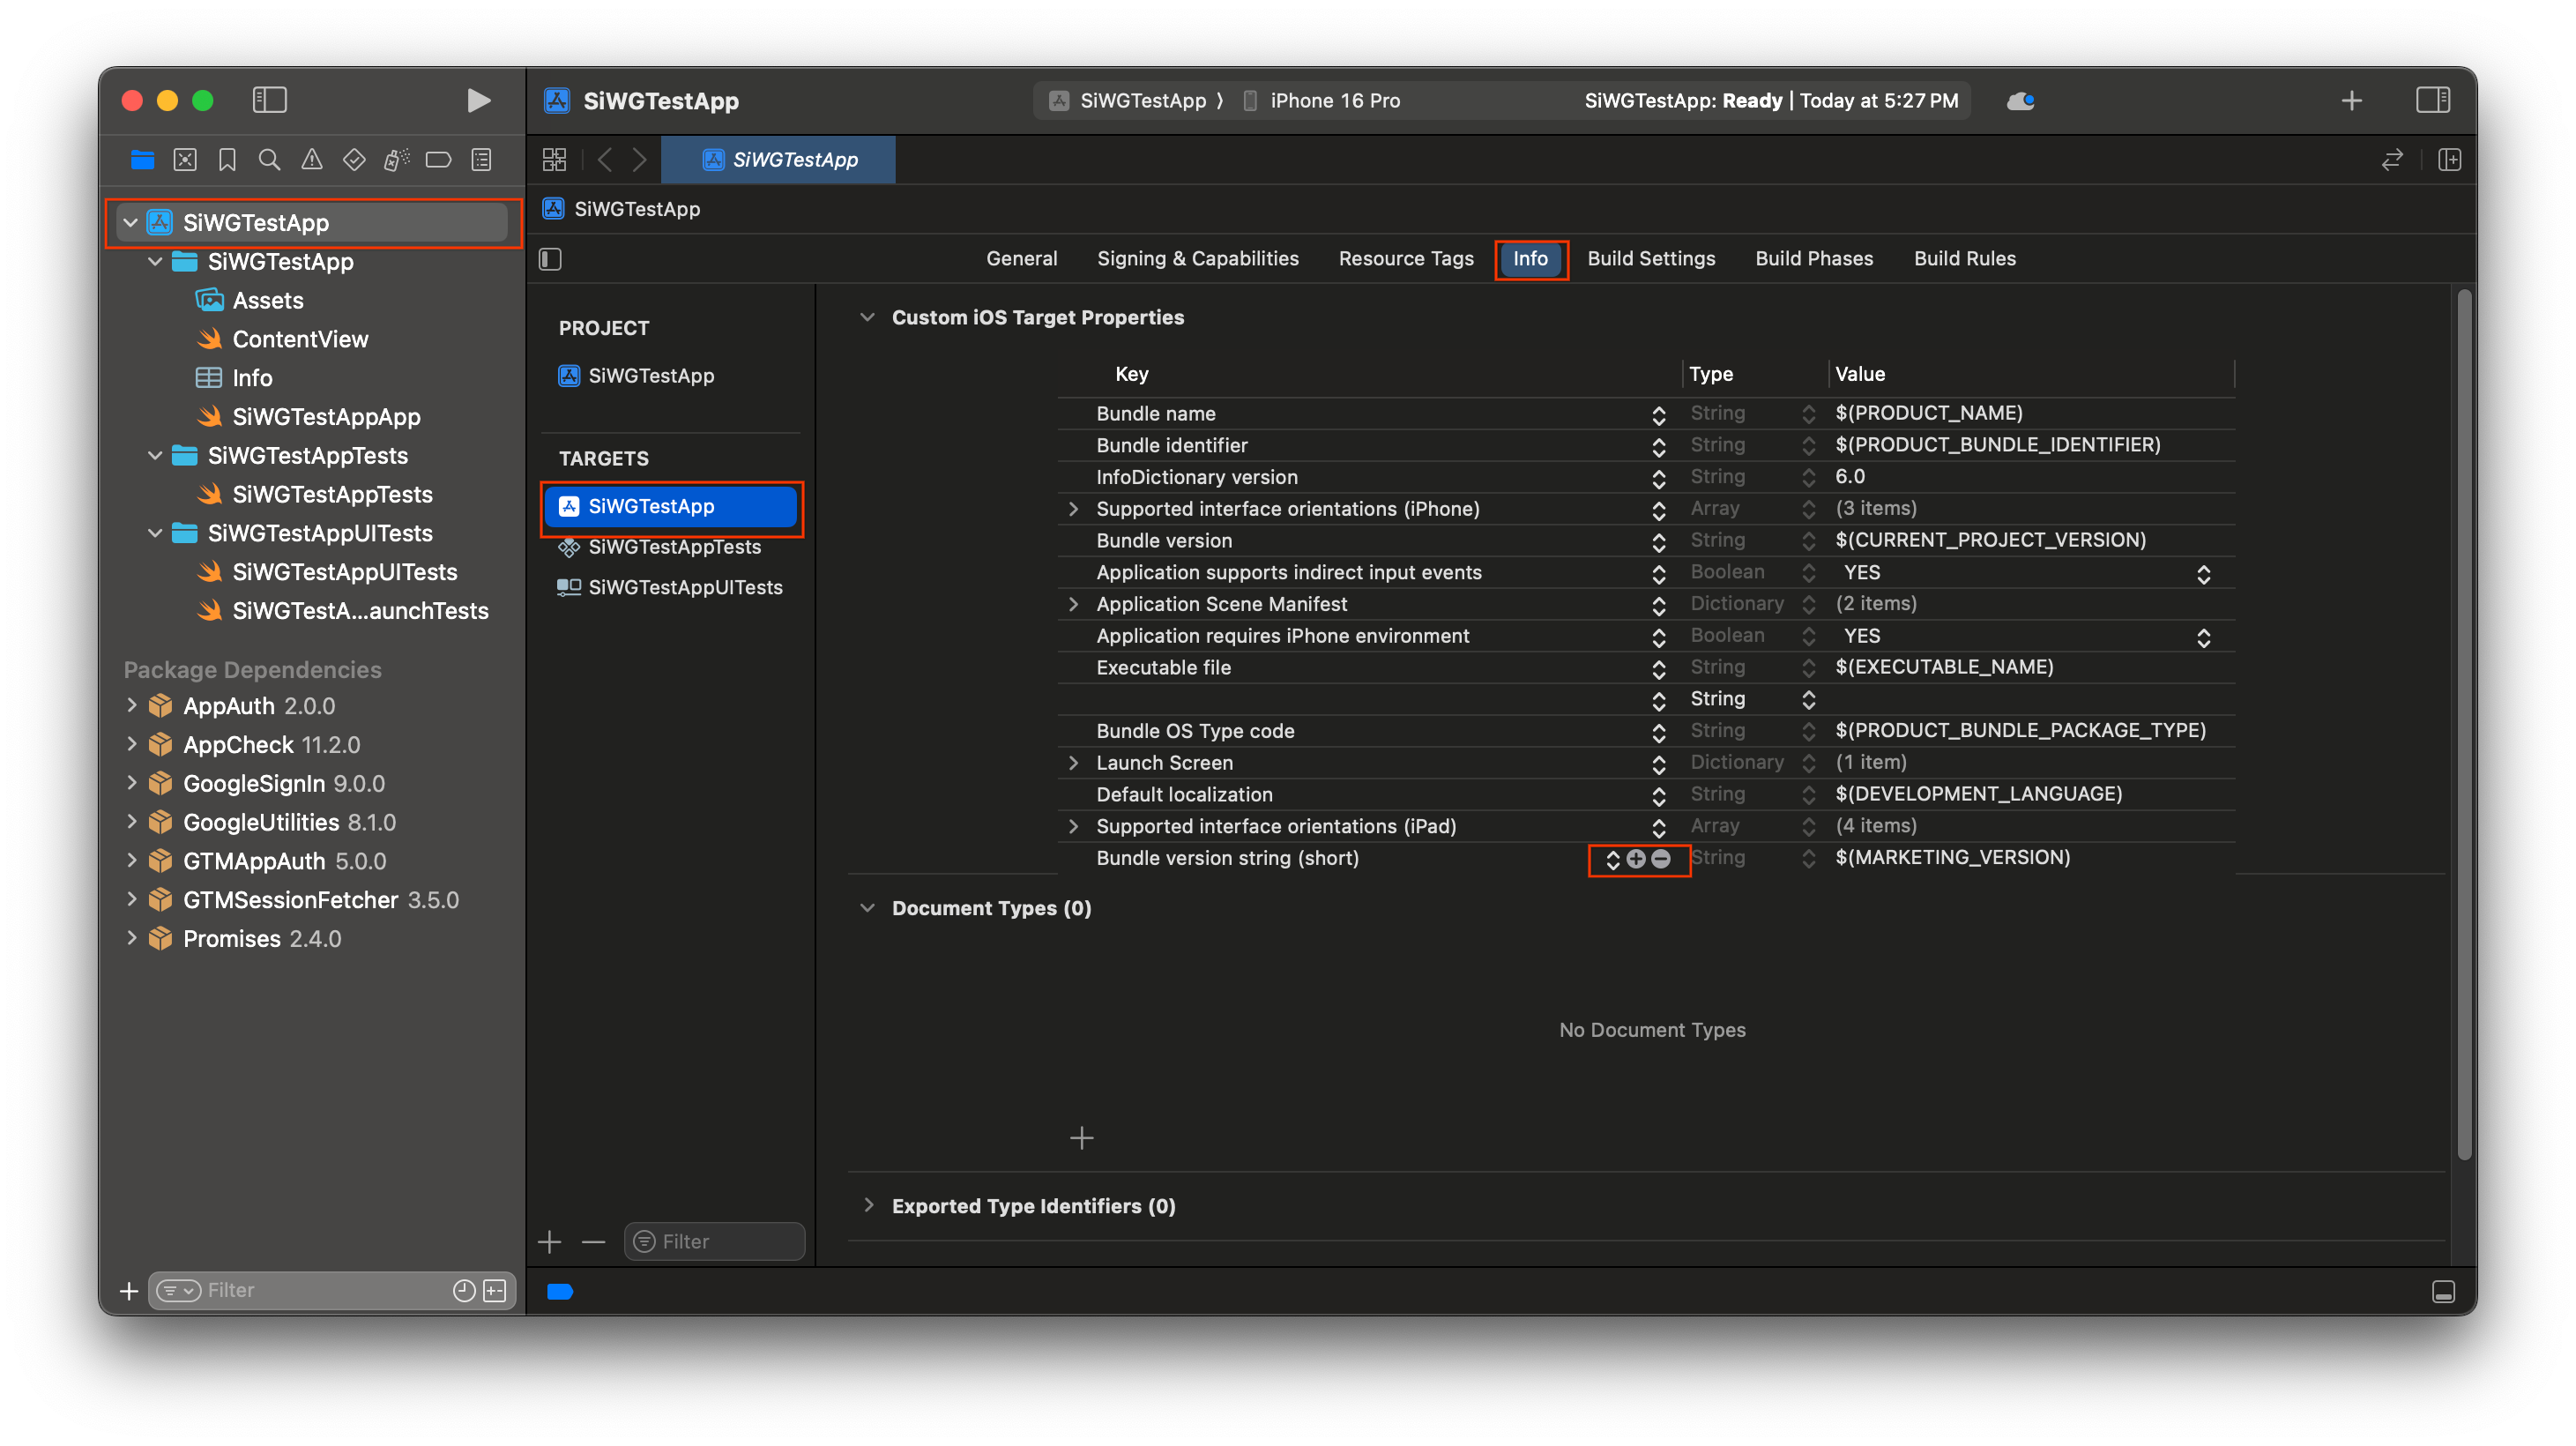
- [Key] 列に「GIDClientID」と入力します。
- [値] 列に、Google Cloud コンソールからコピーしたクライアント ID を貼り付けます。
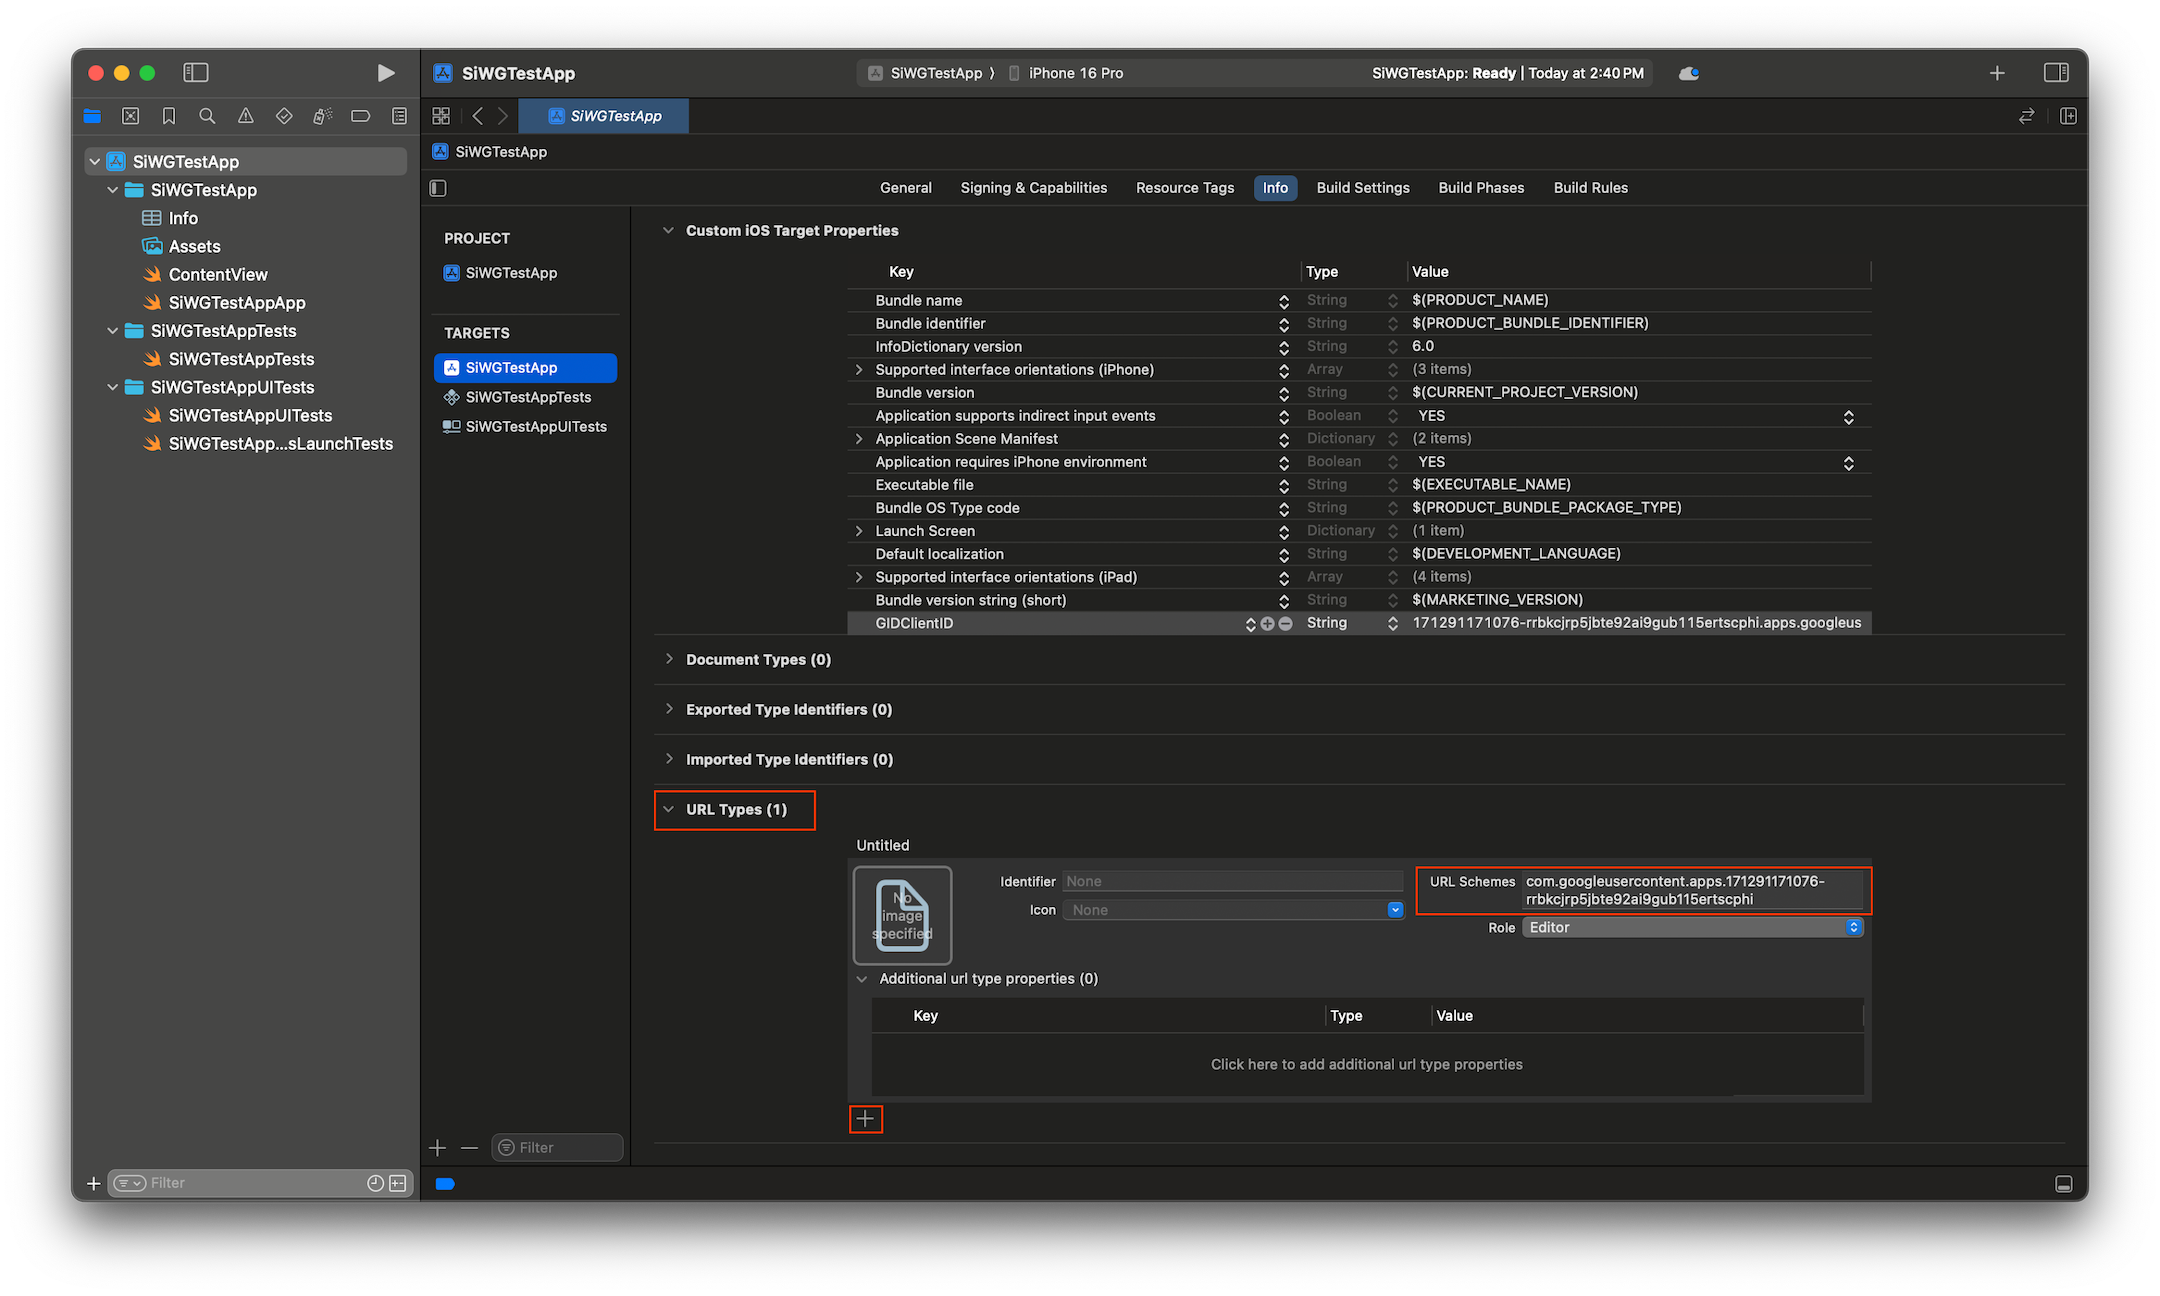
- Google Cloud コンソールからダウンロードした plist ファイルを開きます。
- [Reversed Client ID] の値をコピーします。

- [情報] タブの下部にある [URL タイプ] を展開します。
- [+] ボタンを選択します。
- [URL スキーム] ボックスに反転クライアント ID を入力します。
これで、アプリにログインボタンを追加する準備が整いました。
5. ログインボタンを追加する
Xcode プロジェクトが構成されたら、アプリに [Google でログイン] ボタンを追加します。
このステップのコアロジックは、GIDSignIn.sharedInstance.signIn の呼び出しです。このメソッドは認証プロセスを開始し、Google でログイン SDK に制御を渡して、ユーザーに Google でログイン フローを表示します。
SwiftUI
- Xcode のプロジェクト ナビゲータで ContentView.swift ファイルを見つけます。
- このファイルの内容を次のテキストに置き換えます。
import GoogleSignIn
import GoogleSignInSwift
import SwiftUI

struct ContentView: View {
  var body: some View {
    VStack {
      GoogleSignInButton(action: handleSignInButton).padding()
    }
  }

  func handleSignInButton() {
    // Find the current window scene.
    guard let windowScene = UIApplication.shared.connectedScenes.first as? UIWindowScene else {
      print("There is no active window scene")
      return
    }

    // Get the root view controller from the window scene.
    guard
      let rootViewController = windowScene.windows.first(where: { $0.isKeyWindow })?
        .rootViewController
    else {
      print("There is no key window or root view controller")
      return
    }

    // Start the sign-in process.
    GIDSignIn.sharedInstance.signIn(
      withPresenting: rootViewController
    ) { signInResult, error in
      guard let result = signInResult else {
        // Inspect error
        print("Error signing in: \(error?.localizedDescription ?? "No error description")")
        return
      }
      // If sign in succeeded, display the app's main content View.
      print("ID Token: \(result.user.idToken?.tokenString ?? "")")
    }
  }
}

#Preview {
  ContentView()
}
![iOS シミュレータの SwiftUI フレームワークの [Google でログイン] ボタン](https://codelabs.developers.google.com/static/codelabs/sign-in-with-google-ios/img/sim-sign-in-button-swiftui.png?hl=ja)
UIKit
- Xcode のプロジェクト ナビゲータで ViewController.swift ファイルを見つけます。
- このファイルの内容を次のテキストに置き換えます。
import GoogleSignIn
import UIKit

class ViewController: UIViewController {

  // Create an instance of the Sign in with Google button
  let signInButton = GIDSignInButton()

  override func viewDidLoad() {
    super.viewDidLoad()

    // Add the sign-in button to your view
    view.addSubview(signInButton)

    // Position the button using constraints
    signInButton.translatesAutoresizingMaskIntoConstraints = false
    NSLayoutConstraint.activate([
      signInButton.centerXAnchor.constraint(equalTo: view.centerXAnchor),
      signInButton.centerYAnchor.constraint(equalTo: view.centerYAnchor),
    ])

    // Add a target to the button to call a method when it's pressed
    signInButton.addTarget(self, action: #selector(signInButtonTapped), for: .touchUpInside)
  }

  // This method is called when the sign-in button is pressed.
  @objc func signInButtonTapped() {
    // Start the sign-in process.
    GIDSignIn.sharedInstance.signIn(withPresenting: self) { signInResult, error in
      guard let result = signInResult else {
        // Inspect error
        print("Error signing in: \(error?.localizedDescription ?? "No error description")")
        return
      }

      // If sign in succeeded, print the ID token.
      print("ID Token: \(result.user.idToken?.tokenString ?? "")")
    }
  }
}
![iOS シミュレータの UIKit フレームワークの [Google でログイン] ボタン](https://codelabs.developers.google.com/static/codelabs/sign-in-with-google-ios/img/sim-standard-button-uikit.png?hl=ja)
ログインボタンを表示する
シミュレータでアプリを起動します。[Google でログイン] ボタンが表示されますが、まだ正しく機能しません。これは想定どおりの動作です。ユーザーが認証された後にアプリにリダイレクトする処理を行うコードを実装する必要があります。
6. ログインボタンをカスタマイズする
アプリのテーマに合わせて、デフォルトの [Google でログイン] ボタンをカスタマイズできます。Google でログイン SDK を使用すると、ボタンのカラーパターンとスタイルを変更できます。
SwiftUI
デフォルトのボタンは、次のコード行でページに追加されます。
GoogleSignInButton(action: handleSignInButton)
GoogleSignInButton は、イニシャライザにパラメータを渡すことでカスタマイズされます。次のコードを使用すると、ログインボタンがダークモードで表示されます。
- ContentView.swift を開きます。
GoogleSignInButtonのイニシャライザを更新して、次の値を含めます。
GoogleSignInButton(
  scheme: .dark,  // Options: .light, .dark, .auto
  style: .standard,  // Options: .standard, .wide, .icon
  state: .normal,  // Options: .normal, .disabled
  action: handleSignInButton
).padding()
![iOS シミュレータの SwiftUI フレームワークのダークモードの [Google でログイン] ボタン](https://codelabs.developers.google.com/static/codelabs/sign-in-with-google-ios/img/sim-sign-in-button-dark-mode-swiftui.png?hl=ja)
カスタマイズ オプションの詳細については、GoogleSignInSwift Framework Reference をご覧ください。
UIKit
デフォルトのボタンは、次のコード行で作成されます。
// Create an instance of the Sign in with Google button
let signInButton = GIDSignInButton()

// Add the button to your view
view.addSubview(signInButton)
GIDSignInButton は、ボタン インスタンスのプロパティを設定することでカスタマイズされます。次のコードを使用すると、ログインボタンがダークモードで表示されます。
- ViewController.swift を開きます。
viewDidLoad関数でビューにログインボタンを追加する直前に、次のコード行を追加します。
// Set the width and color of the sign-in button
signInButton.style = .standard  // Options: .standard, .wide, .iconOnly
signInButton.colorScheme = .dark  // Options: .dark, .light
![iOS シミュレータの UIKit フレームワークのダークモードの [Google でログイン] ボタン](https://codelabs.developers.google.com/static/codelabs/sign-in-with-google-ios/img/sim-dark-button-uikit.png?hl=ja)
カスタマイズの詳細については、GoogleSignIn Framework Reference をご覧ください。
7. 認証リダイレクト URL を処理する
ログインボタンを追加したら、次のステップでは、ユーザーが認証された後に発生するリダイレクトを処理します。認証後、Google は一時的な認証コードを含む URL を返します。ログイン プロセスを完了するために、ハンドラはこの URL をインターセプトし、Google でログイン SDK に渡して、署名付き ID トークン(JWT)と交換します。
SwiftUI
App構造体を含むファイルを開きます。このファイルはプロジェクトに基づいて命名されるため、YourProjectNameApp.swift のような名前になります。- このファイルの内容を次のテキストに置き換えます。
import GoogleSignIn
import SwiftUI

@main
struct iOS_Sign_in_with_Google_App: App {
  var body: some Scene {
    WindowGroup {
      ContentView()

        .onOpenURL { url in
          GIDSignIn.sharedInstance.handle(url)
        }
    }
  }
}
UIKit
- AppDelegate.swift を開きます。
- ファイルの先頭に次のインポートを追加します。
import GoogleSignIn
AppDelegateクラス内に次の認証ハンドラ関数を追加します。このコードを配置するのに適した場所は、application(_:didFinishLaunchingWithOptions:)メソッドの閉じ中かっこ直後です。
func application(
  _ app: UIApplication,
  open url: URL,
  options: [UIApplication.OpenURLOptionsKey: Any] = [:]
) -> Bool {
  var handled: Bool

  handled = GIDSignIn.sharedInstance.handle(url)
  if handled {
    return true
  }
  // If not handled by this app, return false.
  return false
}
これらの変更を行うと、AppDelegate.swift ファイルは次のようになります。
import GoogleSignIn
import UIKit

@main
class AppDelegate: UIResponder, UIApplicationDelegate {

  func application(
    _ application: UIApplication,
    didFinishLaunchingWithOptions launchOptions: [UIApplication.LaunchOptionsKey: Any]?
  ) -> Bool {
    // Override point for customization after application launch.
    return true
  }

  func application(
    _ app: UIApplication,
    open url: URL,
    options: [UIApplication.OpenURLOptionsKey: Any] = [:]
  ) -> Bool {
    var handled: Bool

    handled = GIDSignIn.sharedInstance.handle(url)
    if handled {
      return true
    }
    // If not handled by this app, return false.
    return false
  }

  // MARK: UISceneSession Lifecycle

  func application(
    _ application: UIApplication,
    configurationForConnecting connectingSceneSession: UISceneSession,
    options: UIScene.ConnectionOptions
  ) -> UISceneConfiguration {
    // Called when a new scene session is being created.
    // Use this method to select a configuration to create the new scene with.
    return UISceneConfiguration(
      name: "Default Configuration",
      sessionRole: connectingSceneSession.role
    )
  }

  func application(
    _ application: UIApplication,
    didDiscardSceneSessions sceneSessions: Set<UISceneSession>
  ) {
    // Called when the user discards a scene session.
    // If any sessions were discarded while the application was not running, this will be called shortly after application:didFinishLaunchingWithOptions.
    // Use this method to release any resources that were specific to the discarded scenes, as they will not return.
  }
}
ログインフローをテストする
これで、完全なログインフローをテストできるようになりました。
アプリを実行して、ログインボタンをタップします。認証が完了すると、Google から同意画面が表示され、アプリがお客様の情報にアクセスすることを許可できます。承認すると、ログインが完了し、アプリに戻ります。
ログインフローが正常に完了すると、Google でログイン SDK はユーザーの認証情報をデバイスのキーチェーンに安全に保存します。これらの認証情報は、後でユーザーがアプリを起動したときにログイン状態を維持するために使用できます。
8. ログアウト ボタンを追加する
ログインが機能するようになったので、次はログアウト ボタンを追加し、ユーザーの現在のログイン状態を反映するように UI を更新します。ログインが成功すると、SDK は GIDGoogleUser オブジェクトを提供します。このオブジェクトには、UI のカスタマイズに使用するユーザーの名前やメールアドレスなどの基本情報を含む profile プロパティが含まれています。
SwiftUI
- ContentView.swift ファイルを開きます。
ContentView構造体の先頭に状態変数を追加します。この変数は、ユーザーがログインした後にユーザーの情報を保持します。@State変数であるため、値が変更されるたびに SwiftUI が UI を自動的に更新します。
struct ContentView: View {
  @State private var user: GIDGoogleUser?
}
ContentView構造体の現在のbodyを次のVStackに置き換えます。これにより、user状態変数にユーザーが含まれているかどうかが確認されます。ログインしている場合は、ウェルカム メッセージとログアウト ボタンが表示されます。そうでない場合は、元の [Google でログイン] ボタンが表示されます。
var body: some View {
VStack {
// Check if the user is signed in.
if let user = user {
// If signed in, show a welcome message and the sign-out button.
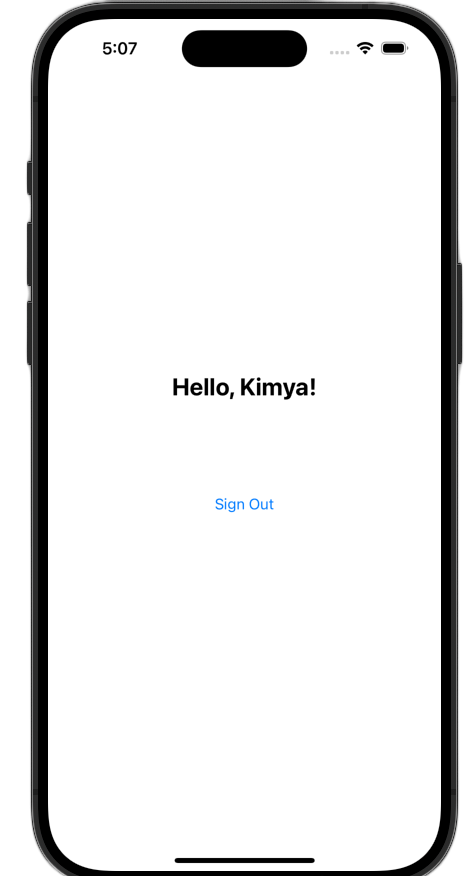
Text("Hello, \(user.profile?.givenName ?? "User")!")
.font(.title)
.padding()
Button("Sign Out", action: signOut)
.buttonStyle(.borderedProminent)
} else {
// If not signed in, show the "Sign in with Google" button.
GoogleSignInButton(
scheme: .dark, // Options: .light, .dark, .auto
style: .standard, // Options: .standard, .wide, .icon
state: .normal, // Options: .normal, .disabled
action: handleSignInButton
).padding()
}
}
}
signInResult.userを新しいuser変数に割り当てるようにhandleSignInButton完了ブロックを更新します。これにより、UI がログイン済みビューに切り替わります。
func handleSignInButton() {
  // Find the current window scene.
  guard let windowScene = UIApplication.shared.connectedScenes.first as? UIWindowScene else {
    print("There is no active window scene")
    return
  }

  // Get the root view controller from the window scene.
  guard
    let rootViewController = windowScene.windows.first(where: { $0.isKeyWindow })?
      .rootViewController
  else {
    print("There is no key window or root view controller")
    return
  }

  // Start the sign-in process.
  GIDSignIn.sharedInstance.signIn(
    withPresenting: rootViewController
  ) { signInResult, error in
    guard let result = signInResult else {
      // Inspect error
      print("Error signing in: \(error?.localizedDescription ?? "No error description")")
      return
    }

    DispatchQueue.main.async {
      self.user = result.user
    }

    // If sign in succeeded, display the app's main content View.
    print("ID Token: \(result.user.idToken?.tokenString ?? "")")
  }
}
- ログアウト ボタンから呼び出される
signOut関数をContentView構造体の末尾に追加します。
func signOut() {
  GIDSignIn.sharedInstance.signOut()
  // After signing out, set the `user` state variable to `nil`.
  self.user = nil
}
アプリを起動してログインします。認証に成功すると、UI が変更されます。

これらの変更を行うと、ContentView.swift ファイルは次のようになります。
import GoogleSignIn
import GoogleSignInSwift
import SwiftUI

struct ContentView: View {

  @State private var user: GIDGoogleUser?

  var body: some View {
    VStack {
      // Check if the user is signed in.
      if let user = user {
        // If signed in, show a welcome message and the sign-out button.
        Text("Hello, \(user.profile?.givenName ?? "User")!")
          .font(.title)
          .padding()

        Button("Sign Out", action: signOut)
          .buttonStyle(.borderedProminent)

      } else {
        // If not signed in, show the "Sign in with Google" button.
        GoogleSignInButton(
          scheme: .dark,  // Options: .light, .dark, .auto
          style: .standard,  // Options: .standard, .wide, .icon
          state: .normal,  // Options: .normal, .disabled
          action: handleSignInButton
        ).padding()
      }
    }
  }

  func handleSignInButton() {
    // Find the current window scene.
    guard let windowScene = UIApplication.shared.connectedScenes.first as? UIWindowScene else {
      print("There is no active window scene")
      return
    }

    // Get the root view controller from the window scene.
    guard
      let rootViewController = windowScene.windows.first(where: { $0.isKeyWindow })?
        .rootViewController
    else {
      print("There is no key window or root view controller")
      return
    }

    // Start the sign-in process.
    GIDSignIn.sharedInstance.signIn(
      withPresenting: rootViewController
    ) { signInResult, error in
      guard let result = signInResult else {
        // Inspect error
        print("Error signing in: \(error?.localizedDescription ?? "No error description")")
        return
      }

      DispatchQueue.main.async {
        self.user = result.user
      }

      // If sign in succeeded, display the app's main content View.
      print("ID Token: \(result.user.idToken?.tokenString ?? "")")
    }
  }

  func signOut() {
    GIDSignIn.sharedInstance.signOut()
    // After signing out, set the `user` state variable to `nil`.
    self.user = nil
  }
}

#Preview {
  ContentView()
}
UIKit
- ViewController.swift を開きます。
ViewControllerの上部、signInButtonを宣言した直下に、ログアウト ボタンとウェルカム ラベルを追加します。
let signOutButton = UIButton(type: .system)
let welcomeLabel = UILabel()
ViewControllerの末尾に次の関数を追加します。この関数は、ユーザーのログイン ステータスに応じて異なる UI を表示します。
private func updateUI(for user: GIDGoogleUser?) {
  if let user = user {
    // User is signed in.
    signInButton.isHidden = true
    signOutButton.isHidden = false
    welcomeLabel.isHidden = false
    welcomeLabel.text = "Hello, \(user.profile?.givenName ?? "User")!"
  } else {
    // User is signed out.
    signInButton.isHidden = false
    signOutButton.isHidden = true
    welcomeLabel.isHidden = true
  }
}
viewDidLoad関数の最後に次のコードを追加して、ウェルカム ラベルとログアウト ボタンをビューに追加します。
// --- Set up the Welcome Label ---
welcomeLabel.translatesAutoresizingMaskIntoConstraints = false
welcomeLabel.textAlignment = .center
welcomeLabel.font = .systemFont(ofSize: 24, weight: .bold)
view.addSubview(welcomeLabel)

NSLayoutConstraint.activate([
  welcomeLabel.centerXAnchor.constraint(equalTo: view.centerXAnchor),
  welcomeLabel.bottomAnchor.constraint(equalTo: signInButton.topAnchor, constant: -20),
])

// --- Set up the Sign-Out Button ---
signOutButton.translatesAutoresizingMaskIntoConstraints = false
signOutButton.setTitle("Sign Out", for: .normal)
view.addSubview(signOutButton)

NSLayoutConstraint.activate([
  signOutButton.centerXAnchor.constraint(equalTo: view.centerXAnchor),
  signOutButton.topAnchor.constraint(equalTo: signInButton.bottomAnchor, constant: 20),
])

signOutButton.addTarget(self, action: #selector(signOutButtonTapped), for: .touchUpInside)

// --- Set Initial UI State ---
updateUI(for: nil)
- ログインが成功した場合に
UpdateUIメソッドを呼び出すようにsignInButtonTapped関数を更新します。
@objc func signInButtonTapped() {
  // Start the sign-in process.
  GIDSignIn.sharedInstance.signIn(withPresenting: self) { signInResult, error in
    guard let result = signInResult else {
      // Inspect error
      print("Error signing in: \(error?.localizedDescription ?? "No error description")")
      return
    }

    // If sign in succeeded, print the ID token.
    print("ID Token: \(result.user.idToken?.tokenString ?? "")")

    DispatchQueue.main.async {
      self.updateUI(for: result.user)
    }
  }
}
- 最後に、ログアウト プロセスを処理する
signOutButtonTapped関数をViewControllerに追加します。
@objc func signOutButtonTapped() {
  GIDSignIn.sharedInstance.signOut()
  // Update the UI for the signed-out state.
  updateUI(for: nil)
}
アプリを起動してログインします。認証に成功すると、UI が変更されます。
これらの変更を行うと、ViewController.swift ファイルは次のようになります。
import GoogleSignIn
import UIKit

class ViewController: UIViewController {

  // Create an instance of the Sign in with Google button
  let signInButton = GIDSignInButton()
  let signOutButton = UIButton(type: .system)
  let welcomeLabel = UILabel()

  override func viewDidLoad() {
    super.viewDidLoad()

    // Set the width and color of the sign-in button
    signInButton.style = .standard  // Options: .standard, .wide, .iconOnly
    signInButton.colorScheme = .dark  // Options: .dark, .light

    // Add the sign-in button to your view
    view.addSubview(signInButton)

    // Position the button using constraints
    signInButton.translatesAutoresizingMaskIntoConstraints = false
    NSLayoutConstraint.activate([
      signInButton.centerXAnchor.constraint(equalTo: view.centerXAnchor),
      signInButton.centerYAnchor.constraint(equalTo: view.centerYAnchor),
    ])

    // Add a target to the button to call a method when it's pressed
    signInButton.addTarget(self, action: #selector(signInButtonTapped), for: .touchUpInside)

    // --- Set up the Welcome Label ---
    welcomeLabel.translatesAutoresizingMaskIntoConstraints = false
    welcomeLabel.textAlignment = .center
    welcomeLabel.font = .systemFont(ofSize: 24, weight: .bold)
    view.addSubview(welcomeLabel)

    NSLayoutConstraint.activate([
      welcomeLabel.centerXAnchor.constraint(equalTo: view.centerXAnchor),
      welcomeLabel.bottomAnchor.constraint(equalTo: signInButton.topAnchor, constant: -20),
    ])

    // --- Set up the Sign-Out Button ---
    signOutButton.translatesAutoresizingMaskIntoConstraints = false
    signOutButton.setTitle("Sign Out", for: .normal)
    view.addSubview(signOutButton)

    NSLayoutConstraint.activate([
      signOutButton.centerXAnchor.constraint(equalTo: view.centerXAnchor),
      signOutButton.topAnchor.constraint(equalTo: signInButton.bottomAnchor, constant: 20),
    ])

    signOutButton.addTarget(self, action: #selector(signOutButtonTapped), for: .touchUpInside)

    // --- Set Initial UI State ---
    updateUI(for: nil)
  }

  // This method is called when the sign-in button is pressed.
  @objc func signInButtonTapped() {
    // Start the sign-in process.
    GIDSignIn.sharedInstance.signIn(withPresenting: self) { signInResult, error in
      guard let result = signInResult else {
        // Inspect error
        print("Error signing in: \(error?.localizedDescription ?? "No error description")")
        return
      }

      // If sign in succeeded, print the ID token.
      print("ID Token: \(result.user.idToken?.tokenString ?? "")")

      DispatchQueue.main.async {
        self.updateUI(for: result.user)
      }
    }
  }

  private func updateUI(for user: GIDGoogleUser?) {
    if let user = user {
      // User is signed in.
      signInButton.isHidden = true
      signOutButton.isHidden = false
      welcomeLabel.isHidden = false
      welcomeLabel.text = "Hello, \(user.profile?.givenName ?? "User")!"
    } else {
      // User is signed out.
      signInButton.isHidden = false
      signOutButton.isHidden = true
      welcomeLabel.isHidden = true
    }
  }

  @objc func signOutButtonTapped() {
    GIDSignIn.sharedInstance.signOut()
    // Update the UI for the signed-out state.
    updateUI(for: nil)
  }
}
9. ユーザーのログイン状態を復元する
リピーターのユーザー エクスペリエンスを向上させるには、アプリの起動時にログイン状態を復元する必要があります。restorePreviousSignIn を呼び出すと、キーチェーンに保存された認証情報を使用してユーザーが自動的に再ログインするため、ユーザーは毎回ログインフローを完了する必要がなくなります。
SwiftUI
- ContentView.swift を開きます。
body変数内のVStackの直後に次のコードを追加します。
.onAppear {
  // On appear, try to restore a previous sign-in.
  GIDSignIn.sharedInstance.restorePreviousSignIn { user, error in
    // This closure is called when the restoration is complete.
    if let user = user {
      // If a user was restored, update the `user` state variable.
      DispatchQueue.main.async {
        self.user = user
      }

      // Print the ID token to the console when restored.
      print("Restored ID Token: \(user.idToken?.tokenString ?? "")")
    }
  }
}
ContentView.swift は次のようになります。
import GoogleSignIn
import GoogleSignInSwift
import SwiftUI

struct ContentView: View {

  @State private var user: GIDGoogleUser?

  var body: some View {
    VStack {
      // Check if the user is signed in.
      if let user = user {
        // If signed in, show a welcome message and the sign-out button.
        Text("Hello, \(user.profile?.givenName ?? "User")!")
          .font(.title)
          .padding()

        Button("Sign Out", action: signOut)
          .buttonStyle(.borderedProminent)

      } else {
        // If not signed in, show the "Sign in with Google" button.
        GoogleSignInButton(
          scheme: .dark,  // Options: .light, .dark, .auto
          style: .standard,  // Options: .standard, .wide, .icon
          state: .normal,  // Options: .normal, .disabled
          action: handleSignInButton
        ).padding()
      }
    }

    .onAppear {
      // On appear, try to restore a previous sign-in.
      GIDSignIn.sharedInstance.restorePreviousSignIn { user, error in
        // This closure is called when the restoration is complete.
        if let user = user {
          // If a user was restored, update the `user` state variable.
          DispatchQueue.main.async {
            self.user = user
          }

          // Print the ID token to the console when restored.
          print("Restored ID Token: \(user.idToken?.tokenString ?? "")")
        }
      }
    }
  }

  func handleSignInButton() {
    // Find the current window scene.
    guard let windowScene = UIApplication.shared.connectedScenes.first as? UIWindowScene else {
      print("There is no active window scene")
      return
    }

    // Get the root view controller from the window scene.
    guard
      let rootViewController = windowScene.windows.first(where: { $0.isKeyWindow })?
        .rootViewController
    else {
      print("There is no key window or root view controller")
      return
    }

    // Start the sign-in process.
    GIDSignIn.sharedInstance.signIn(
      withPresenting: rootViewController
    ) { signInResult, error in
      guard let result = signInResult else {
        // Inspect error
        print("Error signing in: \(error?.localizedDescription ?? "No error description")")
        return
      }

      DispatchQueue.main.async {
        self.user = result.user
      }

      // If sign in succeeded, display the app's main content View.
      print("ID Token: \(result.user.idToken?.tokenString ?? "")")
    }
  }

  func signOut() {
    GIDSignIn.sharedInstance.signOut()
    // After signing out, set the `user` state variable to `nil`.
    self.user = nil
  }
}

#Preview {
  ContentView()
}
UIKit
- ViewController.swift を開きます。
viewDidLoadメソッドの末尾に次のrestorePreviousSignIn呼び出しを追加します。
// Attempt to restore a previous sign-in session
GIDSignIn.sharedInstance.restorePreviousSignIn { user, error in
  if let user = user {
    print("Successfully restored sign-in for user: \(user.profile?.givenName ?? "Unknown")")

    // Print the ID token when a session is restored.
    print("Restored ID Token: \(user.idToken?.tokenString ?? "")")

    // On success, update the UI for the signed-in state on the main thread.
    DispatchQueue.main.async {
      self.updateUI(for: user)
    }
  }
}
ViewController.swift ファイルは次のようになります。
import GoogleSignIn
import UIKit

class ViewController: UIViewController {

  // Create an instance of the Sign in with Google button
  let signInButton = GIDSignInButton()
  let signOutButton = UIButton(type: .system)
  let welcomeLabel = UILabel()

  override func viewDidLoad() {
    super.viewDidLoad()

    // Set the width and color of the sign-in button
    signInButton.style = .standard  // Options: .standard, .wide, .iconOnly
    signInButton.colorScheme = .dark  // Options: .dark, .light

    // Add the sign-in button to your view
    view.addSubview(signInButton)

    // Position the button using constraints
    signInButton.translatesAutoresizingMaskIntoConstraints = false
    NSLayoutConstraint.activate([
      signInButton.centerXAnchor.constraint(equalTo: view.centerXAnchor),
      signInButton.centerYAnchor.constraint(equalTo: view.centerYAnchor),
    ])

    // Add a target to the button to call a method when it's pressed
    signInButton.addTarget(self, action: #selector(signInButtonTapped), for: .touchUpInside)

    // --- Set up the Welcome Label ---
    welcomeLabel.translatesAutoresizingMaskIntoConstraints = false
    welcomeLabel.textAlignment = .center
    welcomeLabel.font = .systemFont(ofSize: 24, weight: .bold)
    view.addSubview(welcomeLabel)

    NSLayoutConstraint.activate([
      welcomeLabel.centerXAnchor.constraint(equalTo: view.centerXAnchor),
      welcomeLabel.bottomAnchor.constraint(equalTo: signInButton.topAnchor, constant: -20),
    ])

    // --- Set up the Sign-Out Button ---
    signOutButton.translatesAutoresizingMaskIntoConstraints = false
    signOutButton.setTitle("Sign Out", for: .normal)
    view.addSubview(signOutButton)

    NSLayoutConstraint.activate([
      signOutButton.centerXAnchor.constraint(equalTo: view.centerXAnchor),
      signOutButton.topAnchor.constraint(equalTo: signInButton.bottomAnchor, constant: 20),
    ])

    signOutButton.addTarget(self, action: #selector(signOutButtonTapped), for: .touchUpInside)

    // --- Set Initial UI State ---
    updateUI(for: nil)

    // Attempt to restore a previous sign-in session
    GIDSignIn.sharedInstance.restorePreviousSignIn { user, error in
      if let user = user {
        print("Successfully restored sign-in for user: \(user.profile?.givenName ?? "Unknown")")

        // Print the ID token when a session is restored.
        print("Restored ID Token: \(user.idToken?.tokenString ?? "")")

        // On success, update the UI for the signed-in state on the main thread.
        DispatchQueue.main.async {
          self.updateUI(for: user)
        }
      }
    }
  }

  // This method is called when the sign-in button is pressed.
  @objc func signInButtonTapped() {
    // Start the sign-in process.
    GIDSignIn.sharedInstance.signIn(withPresenting: self) { signInResult, error in
      guard let result = signInResult else {
        // Inspect error
        print("Error signing in: \(error?.localizedDescription ?? "No error description")")
        return
      }

      // If sign in succeeded, print the ID token.
      print("ID Token: \(result.user.idToken?.tokenString ?? "")")

      DispatchQueue.main.async {
        self.updateUI(for: result.user)
      }
    }
  }

  private func updateUI(for user: GIDGoogleUser?) {
    if let user = user {
      // User is signed in.
      signInButton.isHidden = true
      signOutButton.isHidden = false
      welcomeLabel.isHidden = false
      welcomeLabel.text = "Hello, \(user.profile?.givenName ?? "User")!"
    } else {
      // User is signed out.
      signInButton.isHidden = false
      signOutButton.isHidden = true
      welcomeLabel.isHidden = true
    }
  }

  @objc func signOutButtonTapped() {
    GIDSignIn.sharedInstance.signOut()
    // Update the UI for the signed-out state.
    updateUI(for: nil)
  }
}
サイレント ログインをテストする
ログインしたら、アプリを完全に終了して、もう一度起動します。ボタンをタップしなくても自動的にログインしていることがわかります。
10. ID トークンについて
GIDGoogleUser オブジェクトは、ユーザーの名前とメールアドレスを使用して UI をパーソナライズするのに便利ですが、SDK から返される最も重要なデータは ID トークンです。
この Codelab では、オンライン ツールを使用して JWT の内容を検査します。本番環境のアプリでは、この ID トークンをバックエンド サーバーに送信する必要があります。サーバーは ID トークンの完全性を検証し、JWT を使用して、バックエンド プラットフォームでの新しいアカウントの作成やユーザーの新しいセッションの確立など、より意味のある処理を行う必要があります。
JWT トークンにアクセスしてデコードする
- アプリを起動します。
- Xcode コンソールを開きます。ID トークンが出力されます。
eyJhbGciOiJSUzI1Ni ... Hecz6Wm4Qのようになります。 - ID トークンをコピーし、jwt.io などのオンライン ツールを使用して JWT をデコードします。
デコードされた JWT は次のようになります。
{
  "alg": "RS256",
  "kid": "c8ab71530972bba20b49f78a09c9852c43ff9118",
  "typ": "JWT"
}
{
  "iss": "https://accounts.google.com",
  "azp": "171291171076-rrbkcjrp5jbte92ai9gub115ertscphi.apps.googleusercontent.com",
  "aud": "171291171076-rrbkcjrp5jbte92ai9gub115ertscphi.apps.googleusercontent.com",
  "sub": "10769150350006150715113082367",
  "email": "example@example.com",
  "email_verified": true,
  "at_hash": "JyCYDmHtzhjkb0-qJhKsMg",
  "name": "Kimya",
  "picture": "https://lh3.googleusercontent.com/a/ACg8ocIyy4VoR31t_n0biPVcScBHwZOCRaKVDb_MoaMYep65fyqoAw=s96-c",
  "given_name": "Kimya",
  "iat": 1758645896,
  "exp": 1758649496
}
重要なトークン フィールド
デコードされた ID トークンには、さまざまな目的のフィールドが含まれています。名前やメールアドレスなど、簡単に理解できるものもあれば、バックエンド サーバーで検証に使用されるものもあります。
次のフィールドは特に重要です。
- sub:
subフィールドは、ユーザーの Google アカウントの一意の永続的な識別子です。ユーザーはメインのメールアドレスまたは名前を変更できますが、subID は変更できません。これにより、subフィールドはバックエンド ユーザー アカウントの主キーとして使用するのに最適な値になります。
ID トークンからユーザー情報を取得するでは、すべてのトークン フィールドの意味について詳しく説明しています。
11. App Check でアプリを保護する
App Check を有効にして、自分のアプリだけがプロジェクトに代わって Google の OAuth 2.0 エンドポイントにアクセスできるようにすることを強くおすすめします。App Check は、バックエンド サービスに対するリクエストが、改ざんされていない実機上の正規のアプリから送信されたものであることを確認することで機能します。
このセクションでは、App Check をアプリに統合し、シミュレータでのデバッグと実際のデバイスで実行される本番環境ビルドの両方用に構成する方法について説明します。
コンソールの設定
App Check をアプリケーションに統合するには、Google Cloud コンソールと Firebase コンソールで 1 回限りの設定が必要です。これには、Google Cloud コンソールで iOS OAuth クライアントの App Check を有効にする、App Check デバッグ プロバイダで使用する API キーを作成する、Google Cloud プロジェクトを Firebase にリンクする、といった作業が含まれます。
Google Cloud コンソールで App Check を有効にする
- Google Cloud プロジェクトに関連付けられているクライアントのリストに移動します。
- iOS アプリ用に作成した OAuth 2.0 クライアント ID を選択します。
- [Google Identity for iOS] の下にある [App Check] をオンにします。
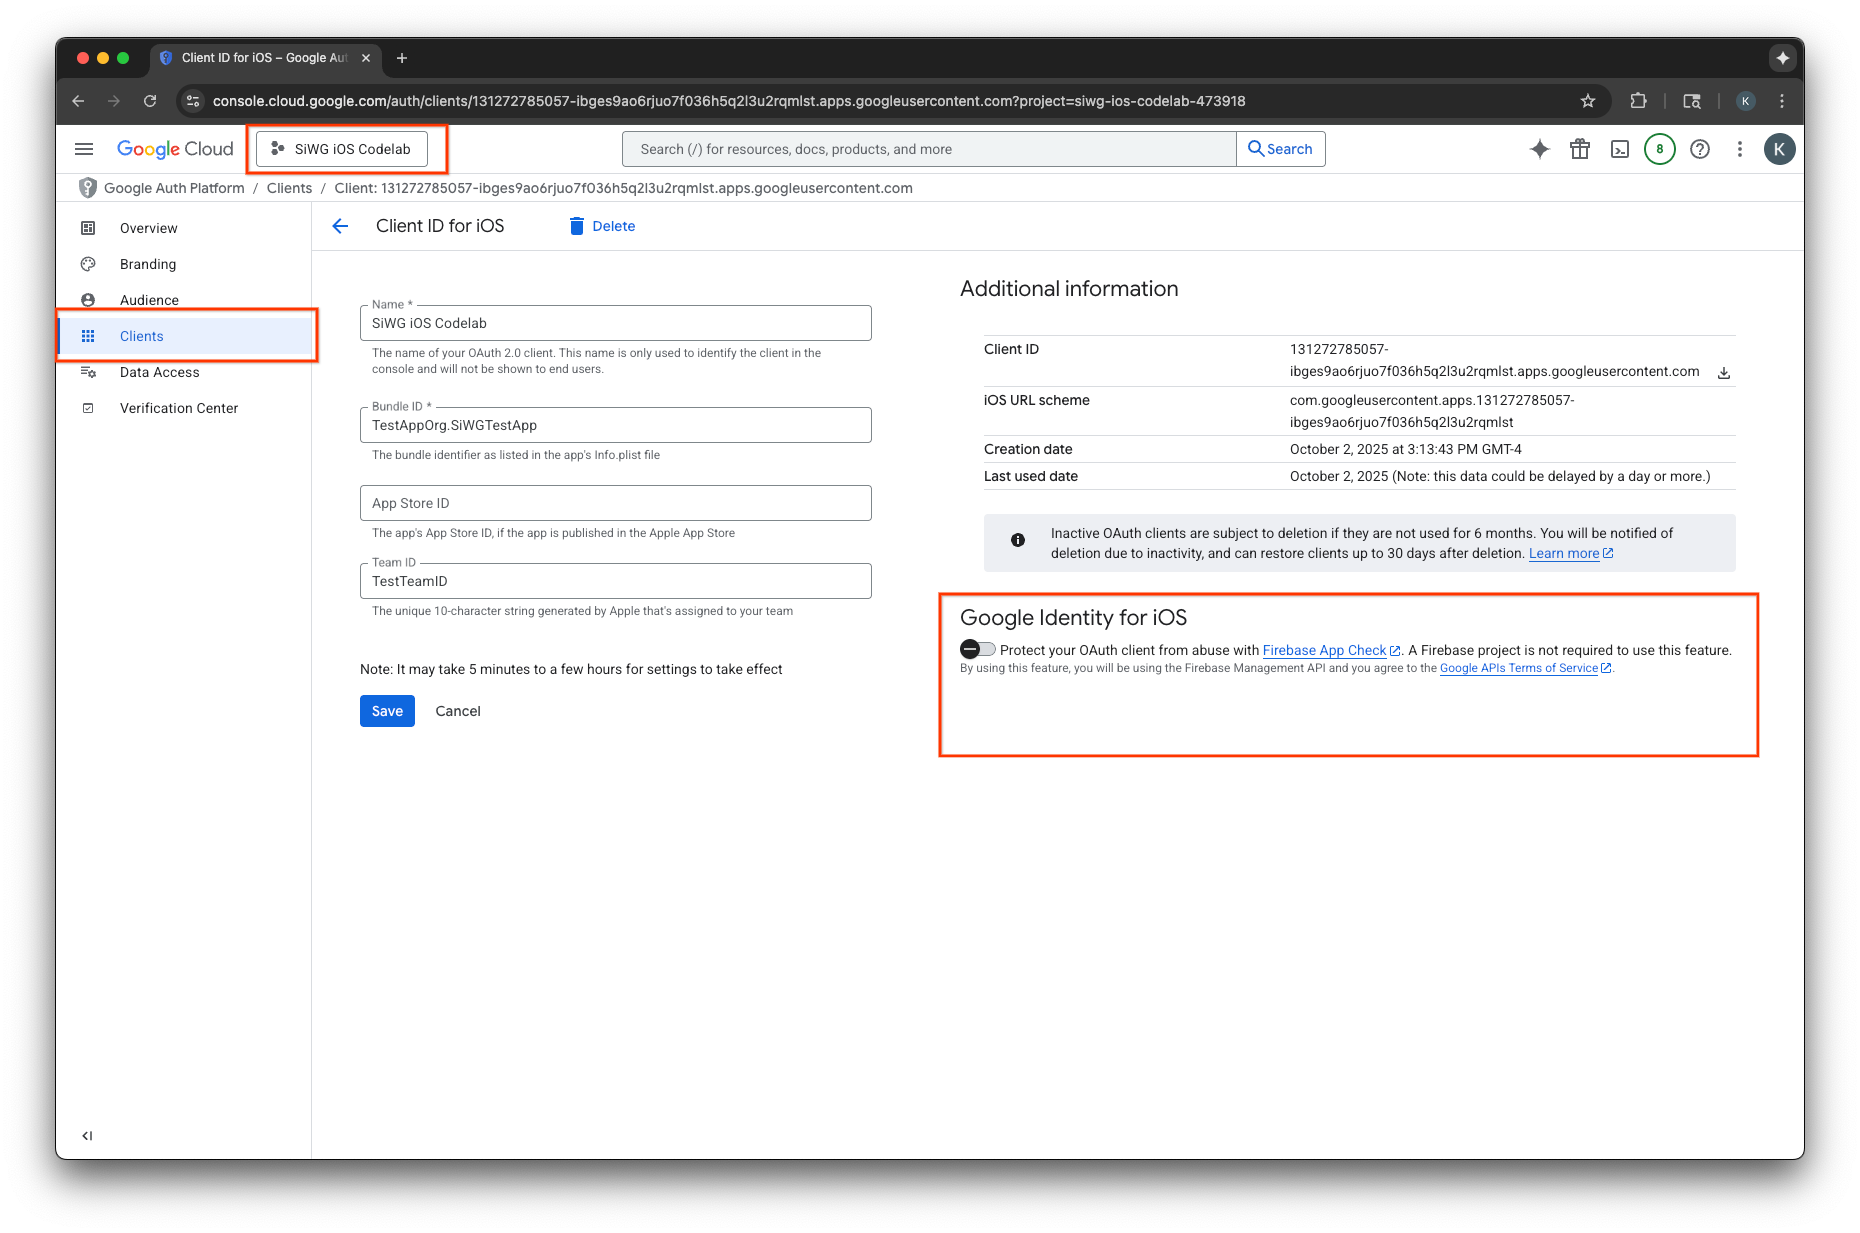
- [保存] をクリックします。
API キーを作成する
- Google Cloud プロジェクトの [API ライブラリ] ページに移動します。
- 検索バーに「Firebase App Check API」と入力します。
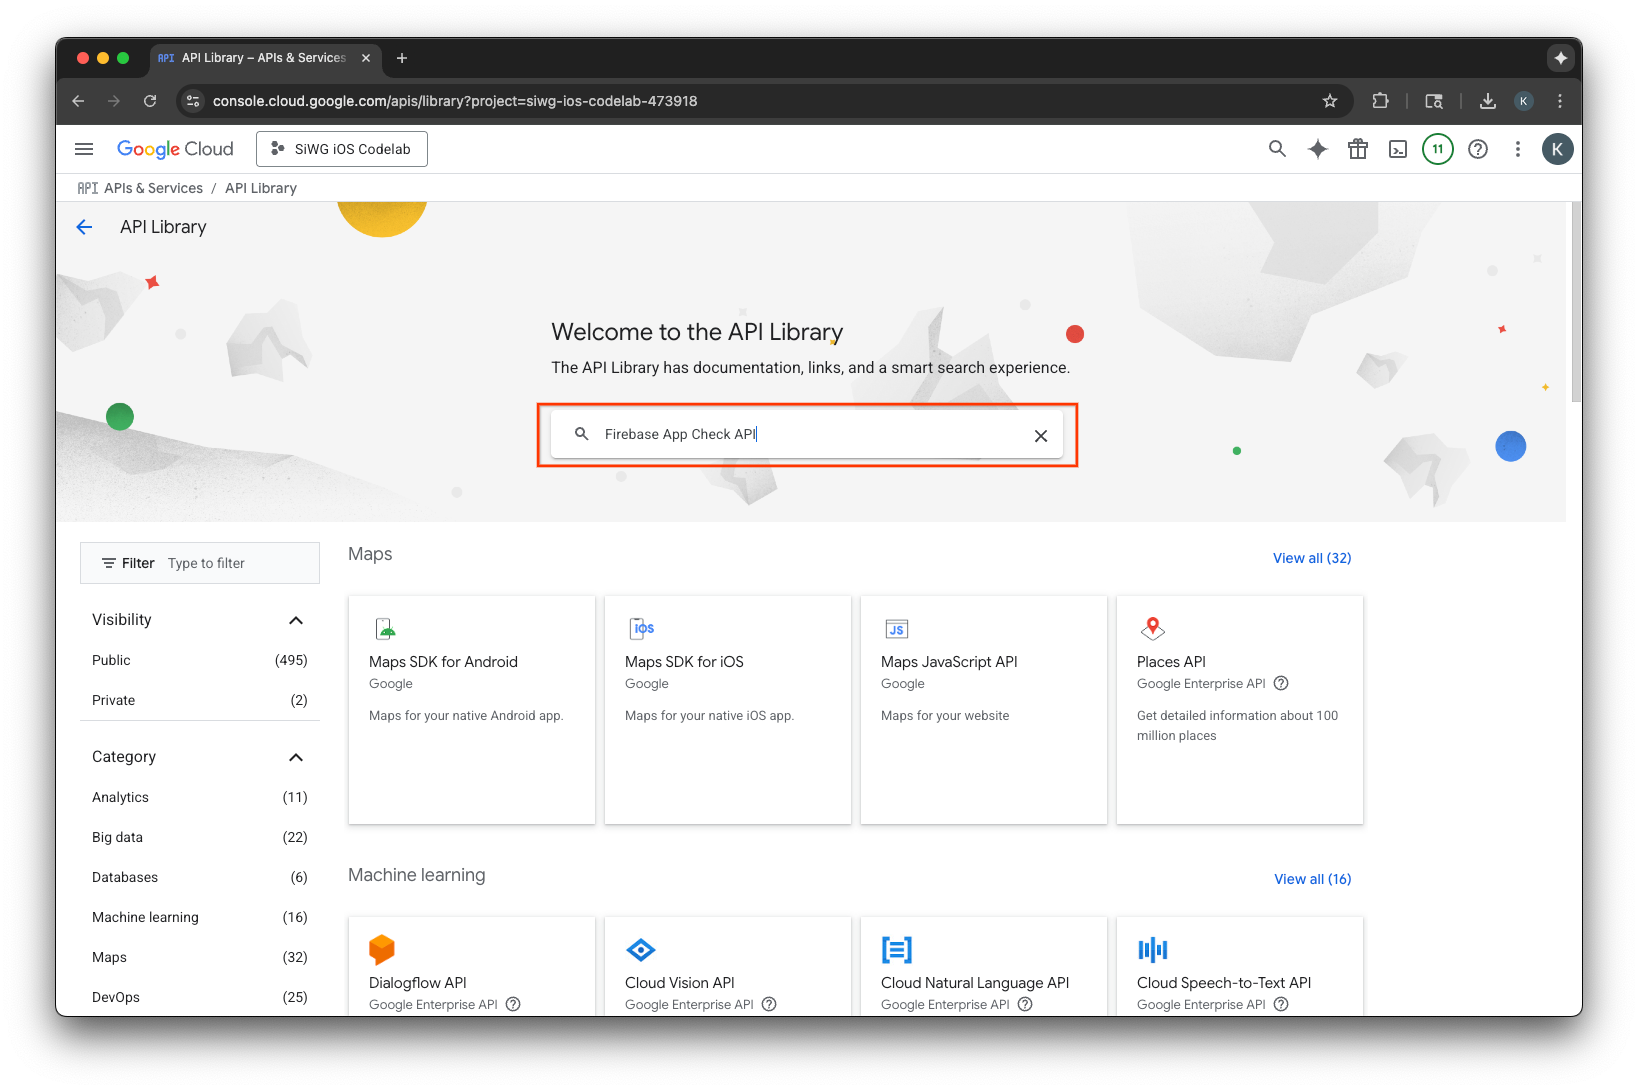
- [Firebase App Check API] を選択して有効にします。
- [API とサービス] に移動し、ナビゲーション メニューで [認証情報] を選択します。
- ページの上部にある [認証情報を作成] を選択します。
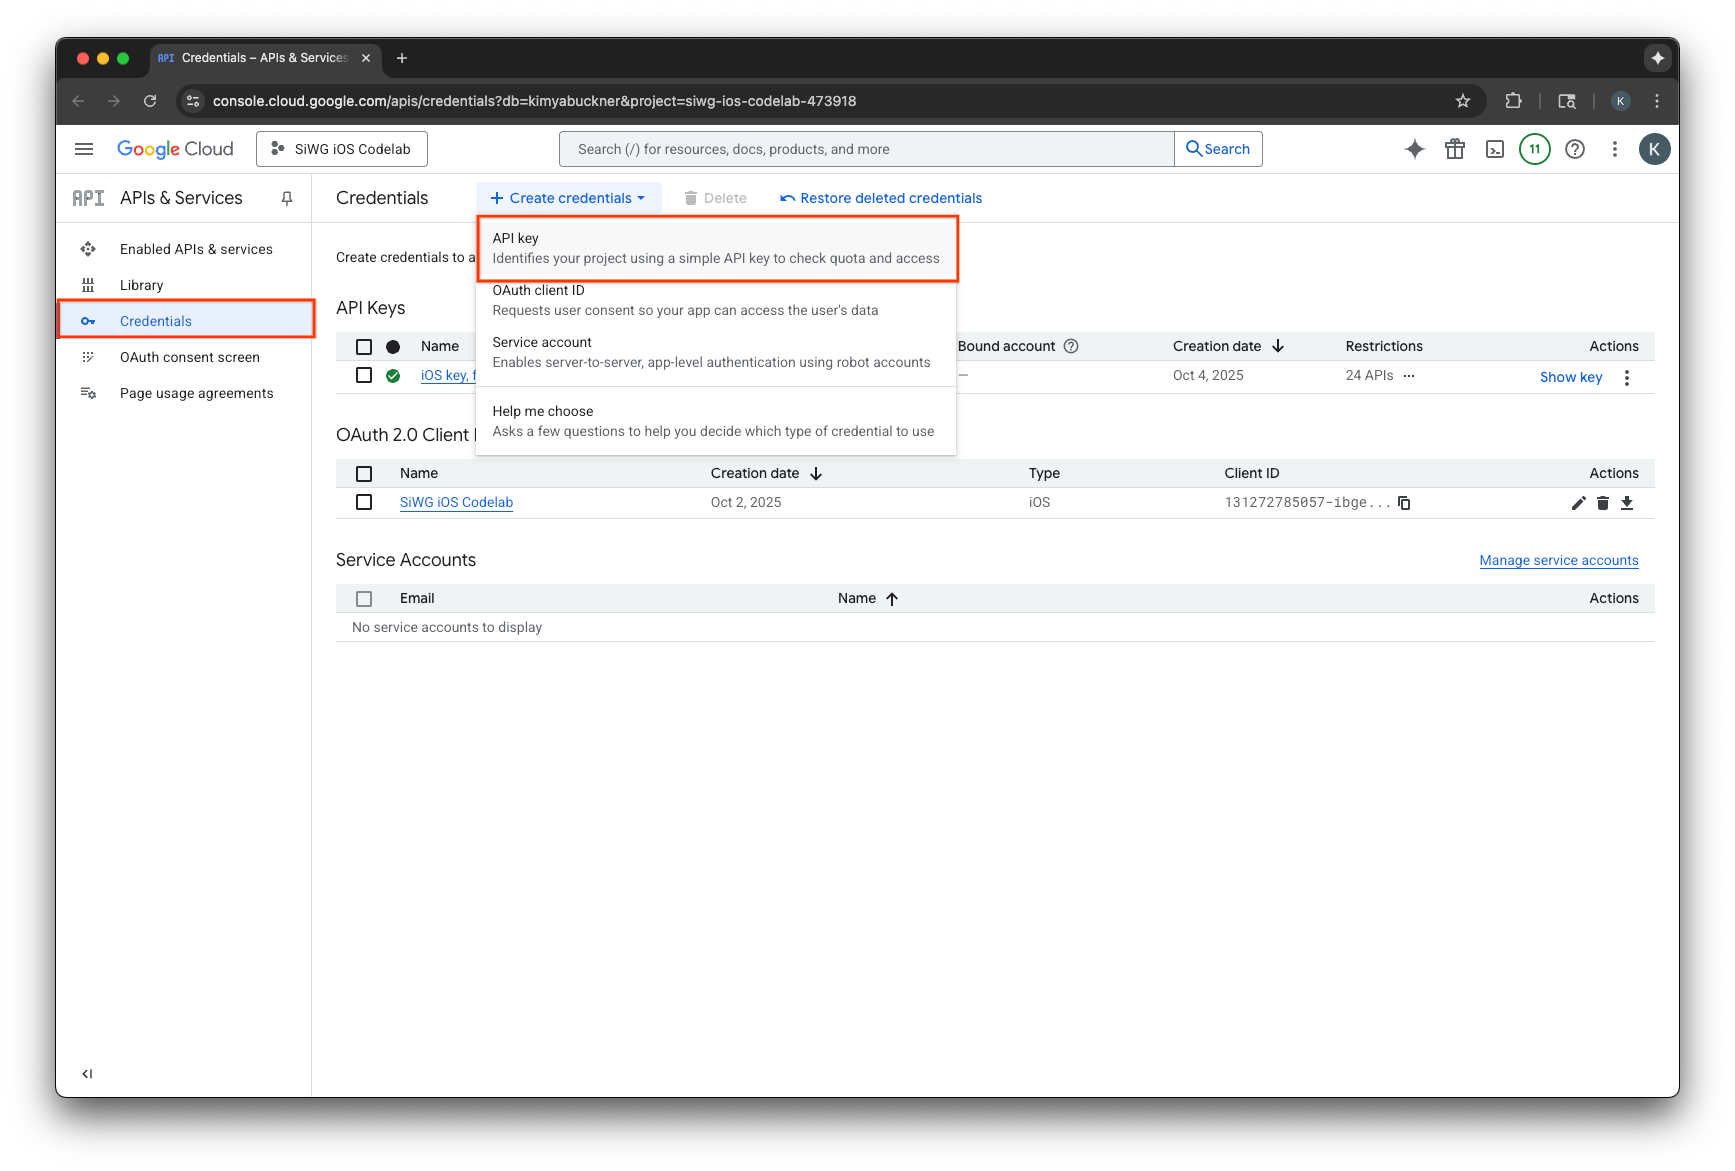
- この API キーに名前を割り当てます。
- [アプリケーションの制限] で [iOS アプリ] を選択します。
- アプリのバンドル ID を承認済みアプリケーションとして追加します。
- [API の制限] で [キーを制限] を選択します。
- プルダウン メニューから [Firebase App Check API] を選択します。
- [作成] を選択します。
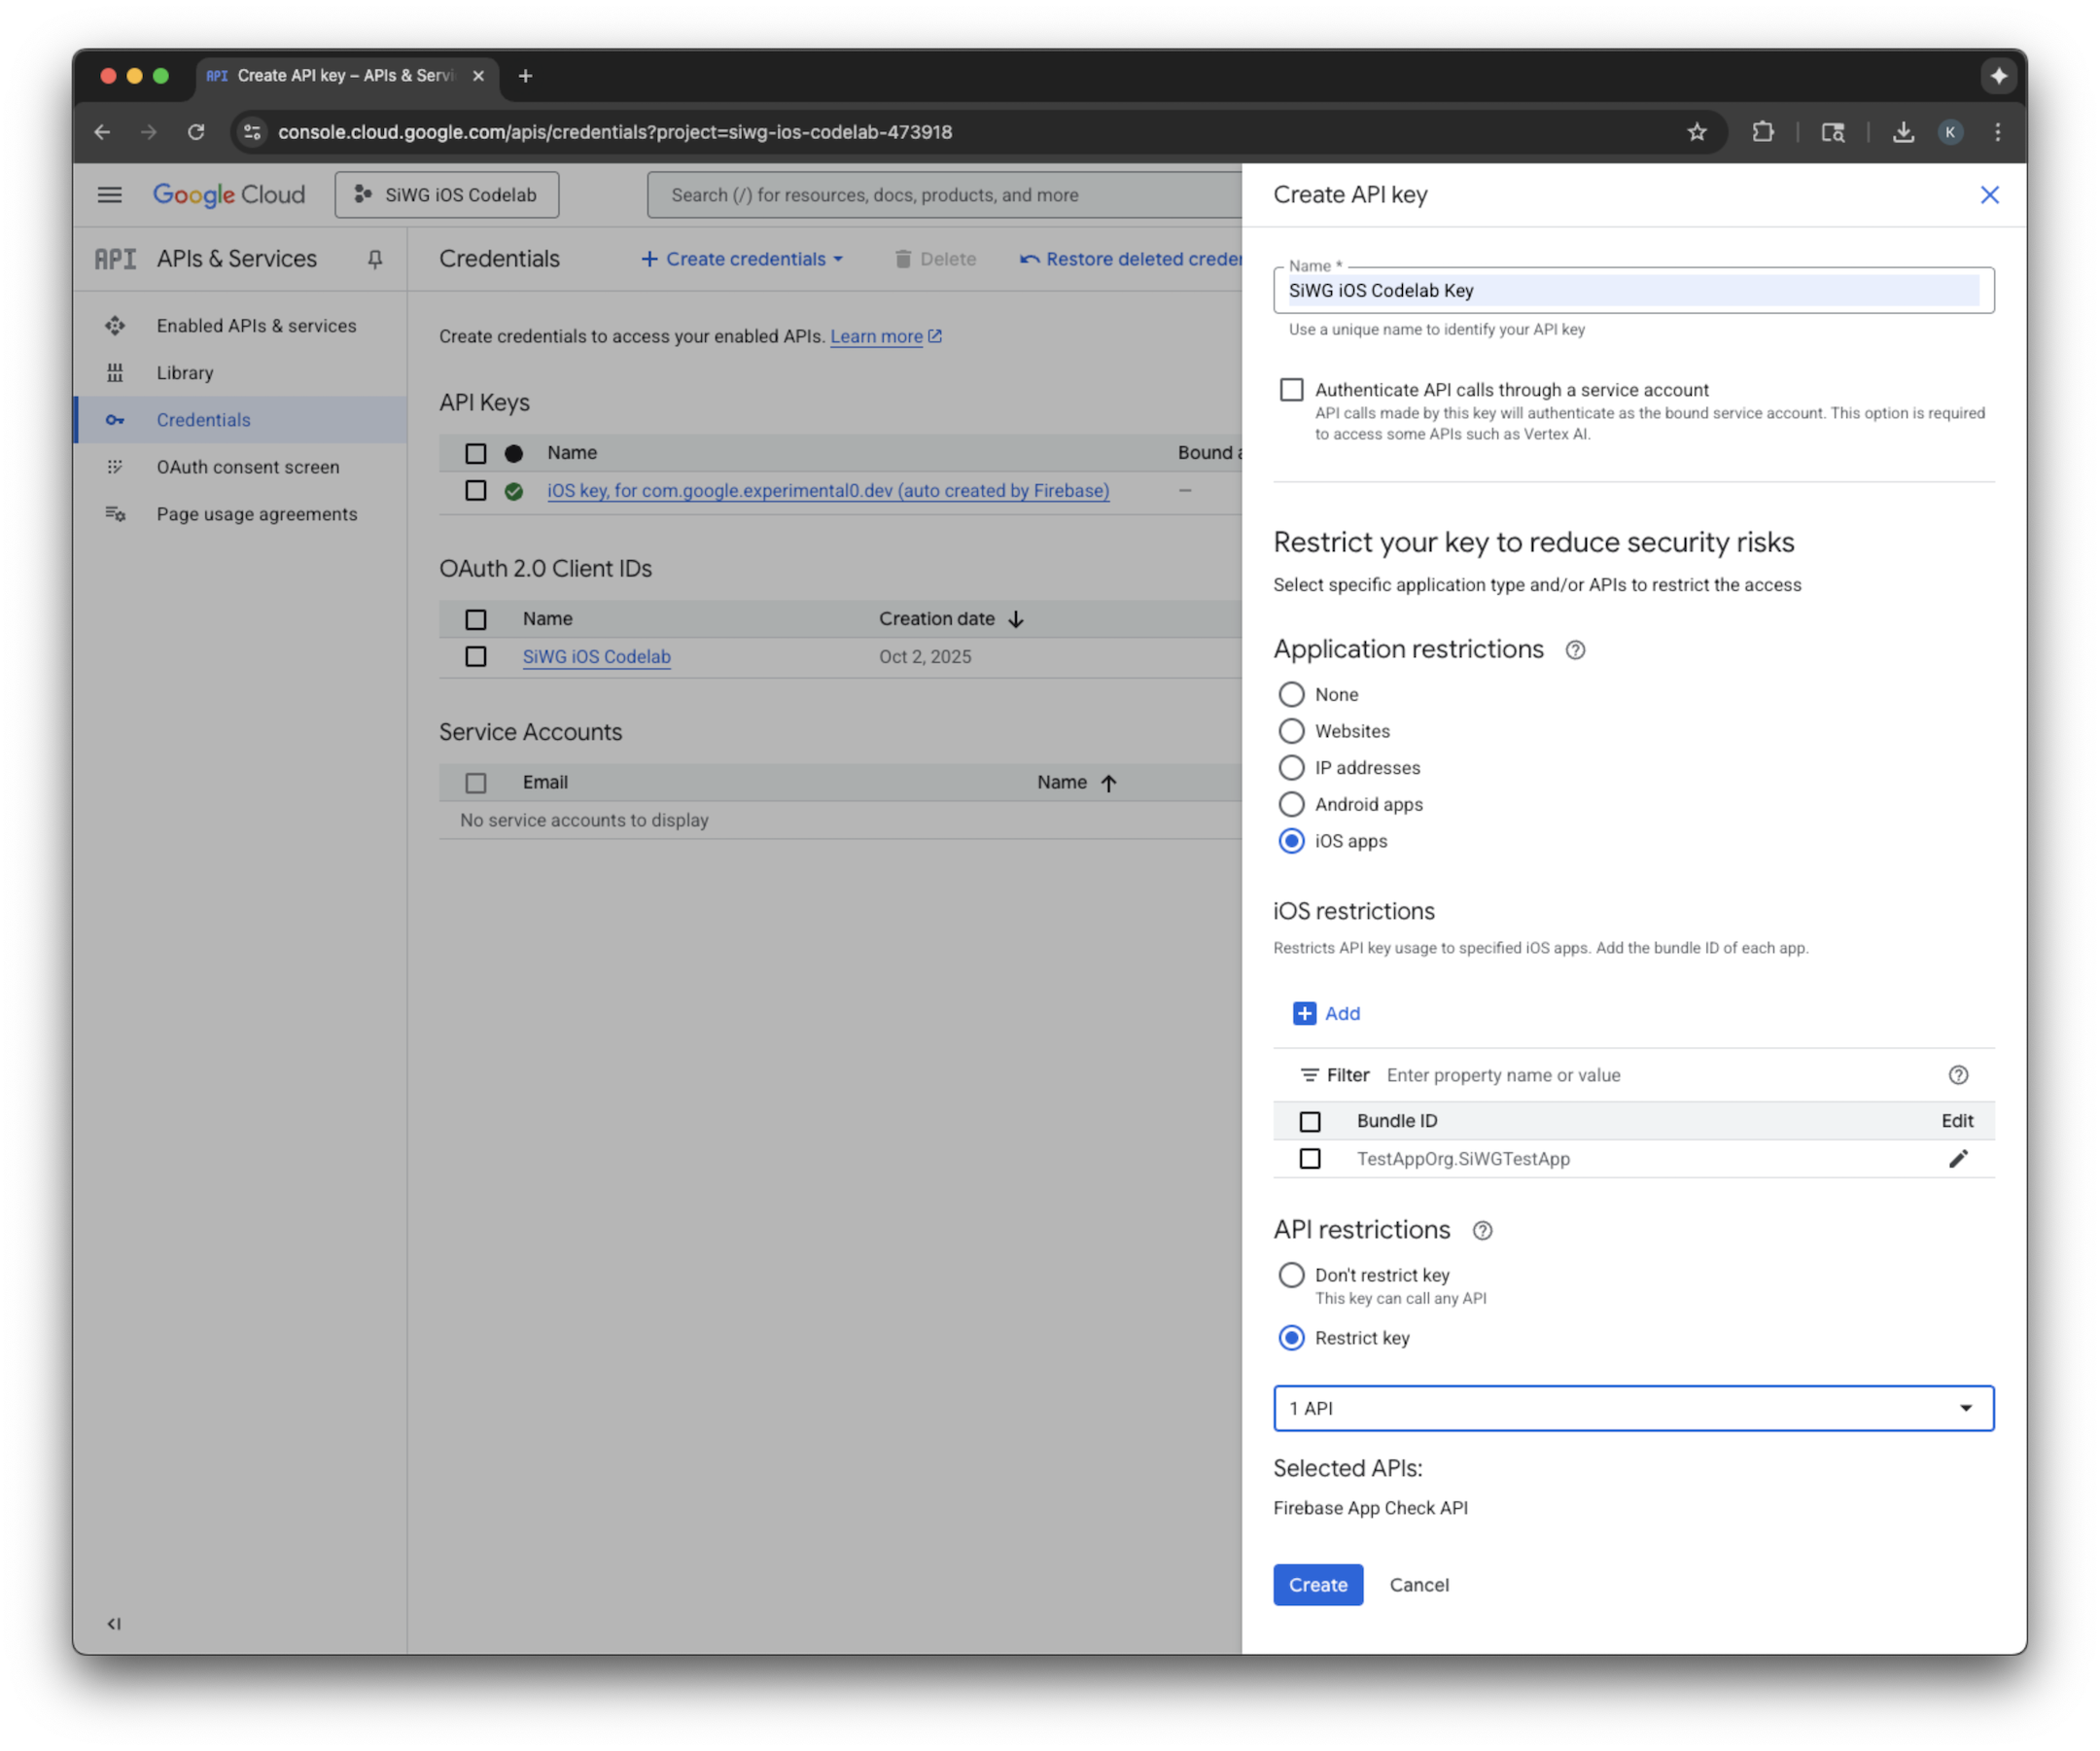
- 作成された API キーをコピーします。これは今後の手順で必要となります。
Firebase を Google Cloud プロジェクトに追加する
- Firebase コンソールに移動します。
- [Firebase プロジェクトを設定して開始] を選択します。
- [Firebase を Google Cloud プロジェクトに追加] を選択します。

- プルダウンから Google Cloud プロジェクトを選択し、登録フローを続行します。
- [Firebase を追加] を選択します。
- Firebase プロジェクトの準備ができたら、[続行] を選択してプロジェクトを開きます。
クライアントサイド コードの統合
App Check 用に Google Cloud プロジェクトを構成したら、クライアントサイド コードを記述して App Check を有効にします。構成証明に使用されるプロバイダは、本番環境とデバッグ環境で異なります。実際のデバイス上の本番環境アプリは、Apple の組み込み App Attest サービスを使用して、その信頼性を証明します。ただし、iOS シミュレータではこの種の証明書を提供できないため、デバッグ環境では API キーが渡される特別なデバッグ プロバイダが必要です。
次のコードでは、コンパイラ ディレクティブを使用してビルド時に正しいプロバイダを自動的に選択することで、両方のシナリオを処理します。
SwiftUI
- メインアプリのファイルを開きます。
- インポートの後、
@main属性の前に、次のAppDelegateクラスを定義します。
class AppDelegate: NSObject, UIApplicationDelegate {
  func application(
    _ application: UIApplication,
    didFinishLaunchingWithOptions launchOptions: [UIApplication.LaunchOptionsKey: Any]? = nil
  ) -> Bool {

    #if targetEnvironment(simulator)
      // Configure for debugging on a simulator.
      // TODO: Replace "YOUR_API_KEY" with the key from your Google Cloud project.
      let apiKey = "YOUR_API_KEY"
      GIDSignIn.sharedInstance.configureDebugProvider(withAPIKey: apiKey) { error in
        if let error {
          print("Error configuring GIDSignIn debug provider: \(error)")
        }
      }
    #else
      // Configure GIDSignIn for App Check on a real device.
      GIDSignIn.sharedInstance.configure { error in
        if let error {
          print("Error configuring GIDSignIn for App Check: \(error)")
        } else {
          print("GIDSignIn configured for App Check.")
        }
      }
    #endif

    return true
  }
}
- 提供されたコードの
"YOUR_API_KEY"を、Google Cloud コンソールからコピーした API キーに置き換えます。 App構造体のbody変数の直前に、次の行を追加します。これにより、AppDelegate クラスがアプリのライフサイクルに登録され、アプリの起動やその他のシステム イベントに応答できるようになります。
@UIApplicationDelegateAdaptor(AppDelegate.self) var delegate
メインアプリ ファイルは次のようになります。
import GoogleSignIn
import SwiftUI

class AppDelegate: NSObject, UIApplicationDelegate {
  func application(
    _ application: UIApplication,
    didFinishLaunchingWithOptions launchOptions: [UIApplication.LaunchOptionsKey: Any]? = nil
  ) -> Bool {

    #if targetEnvironment(simulator)
      // Configure for debugging on a simulator.
      // TODO: Replace "YOUR_API_KEY" with the key from your Google Cloud project.
      let apiKey = "YOUR_API_KEY"
      GIDSignIn.sharedInstance.configureDebugProvider(withAPIKey: apiKey) { error in
        if let error {
          print("Error configuring GIDSignIn debug provider: \(error)")
        }
      }
    #else
      // Configure GIDSignIn for App Check on a real device.
      GIDSignIn.sharedInstance.configure { error in
        if let error {
          print("Error configuring GIDSignIn for App Check: \(error)")
        } else {
          print("GIDSignIn configured for App Check.")
        }
      }
    #endif

    return true
  }
}

@main
struct iOS_Sign_in_with_Google_App: App {

  @UIApplicationDelegateAdaptor(AppDelegate.self) var delegate

  var body: some Scene {
    WindowGroup {
      ContentView()

        .onOpenURL { url in
          GIDSignIn.sharedInstance.handle(url)
        }
    }
  }
}
UIKit
- AppDelegate.swift を開きます。
- App Check の初期化を含むように
application(_:didFinishLaunchingWithOptions:)メソッドを更新します。
func application(
  _ application: UIApplication,
  didFinishLaunchingWithOptions launchOptions: [UIApplication.LaunchOptionsKey: Any]?
) -> Bool {

  #if targetEnvironment(simulator)
    // Configure for debugging on a simulator.
    // TODO: Replace "YOUR_API_KEY" with the key from your Google Cloud project.
    let apiKey = "YOUR_API_KEY"
    GIDSignIn.sharedInstance.configureDebugProvider(withAPIKey: apiKey) { error in
      if let error {
        print("Error configuring GIDSignIn debug provider: \(error)")
      }
    }
  #else
    // Configure GIDSignIn for App Check on a real device.
    GIDSignIn.sharedInstance.configure { error in
      if let error {
        print("Error configuring GIDSignIn for App Check: \(error)")
      }
    }
  #endif

  return true
}
- 提供されたコードの
"YOUR_API_KEY"を、Google Cloud コンソールからコピーした API キーに置き換えます。
AppDelegate.swift ファイルは次のようになります。
import GoogleSignIn
import UIKit

@main
class AppDelegate: UIResponder, UIApplicationDelegate {

  func application(
    _ application: UIApplication,
    didFinishLaunchingWithOptions launchOptions: [UIApplication.LaunchOptionsKey: Any]?
  ) -> Bool {

    #if targetEnvironment(simulator)
      // Configure for debugging on a simulator.
      // TODO: Replace "YOUR_API_KEY" with the key from your Google Cloud project.
      let apiKey = "YOUR_API_KEY"
      GIDSignIn.sharedInstance.configureDebugProvider(withAPIKey: apiKey) { error in
        if let error {
          print("Error configuring GIDSignIn debug provider: \(error)")
        }
      }
    #else
      // Configure GIDSignIn for App Check on a real device.
      GIDSignIn.sharedInstance.configure { error in
        if let error {
          print("Error configuring GIDSignIn for App Check: \(error)")
        }
      }
    #endif

    return true
  }

  func application(
    _ app: UIApplication,
    open url: URL,
    options: [UIApplication.OpenURLOptionsKey: Any] = [:]
  ) -> Bool {
    var handled: Bool

    handled = GIDSignIn.sharedInstance.handle(url)
    if handled {
      return true
    }
    // If not handled by this app, return false.
    return false
  }

  // MARK: UISceneSession Lifecycle

  func application(
    _ application: UIApplication,
    configurationForConnecting connectingSceneSession: UISceneSession,
    options: UIScene.ConnectionOptions
  ) -> UISceneConfiguration {
    // Called when a new scene session is being created.
    // Use this method to select a configuration to create the new scene with.
    return UISceneConfiguration(
      name: "Default Configuration",
      sessionRole: connectingSceneSession.role
    )
  }

  func application(
    _ application: UIApplication,
    didDiscardSceneSessions sceneSessions: Set<UISceneSession>
  ) {
    // Called when the user discards a scene session.
    // If any sessions were discarded while the application was not running, this will be called shortly after application:didFinishLaunchingWithOptions.
    // Use this method to release any resources that were specific to the discarded scenes, as they will not return.
  }
}
シミュレータで App Check をテストする
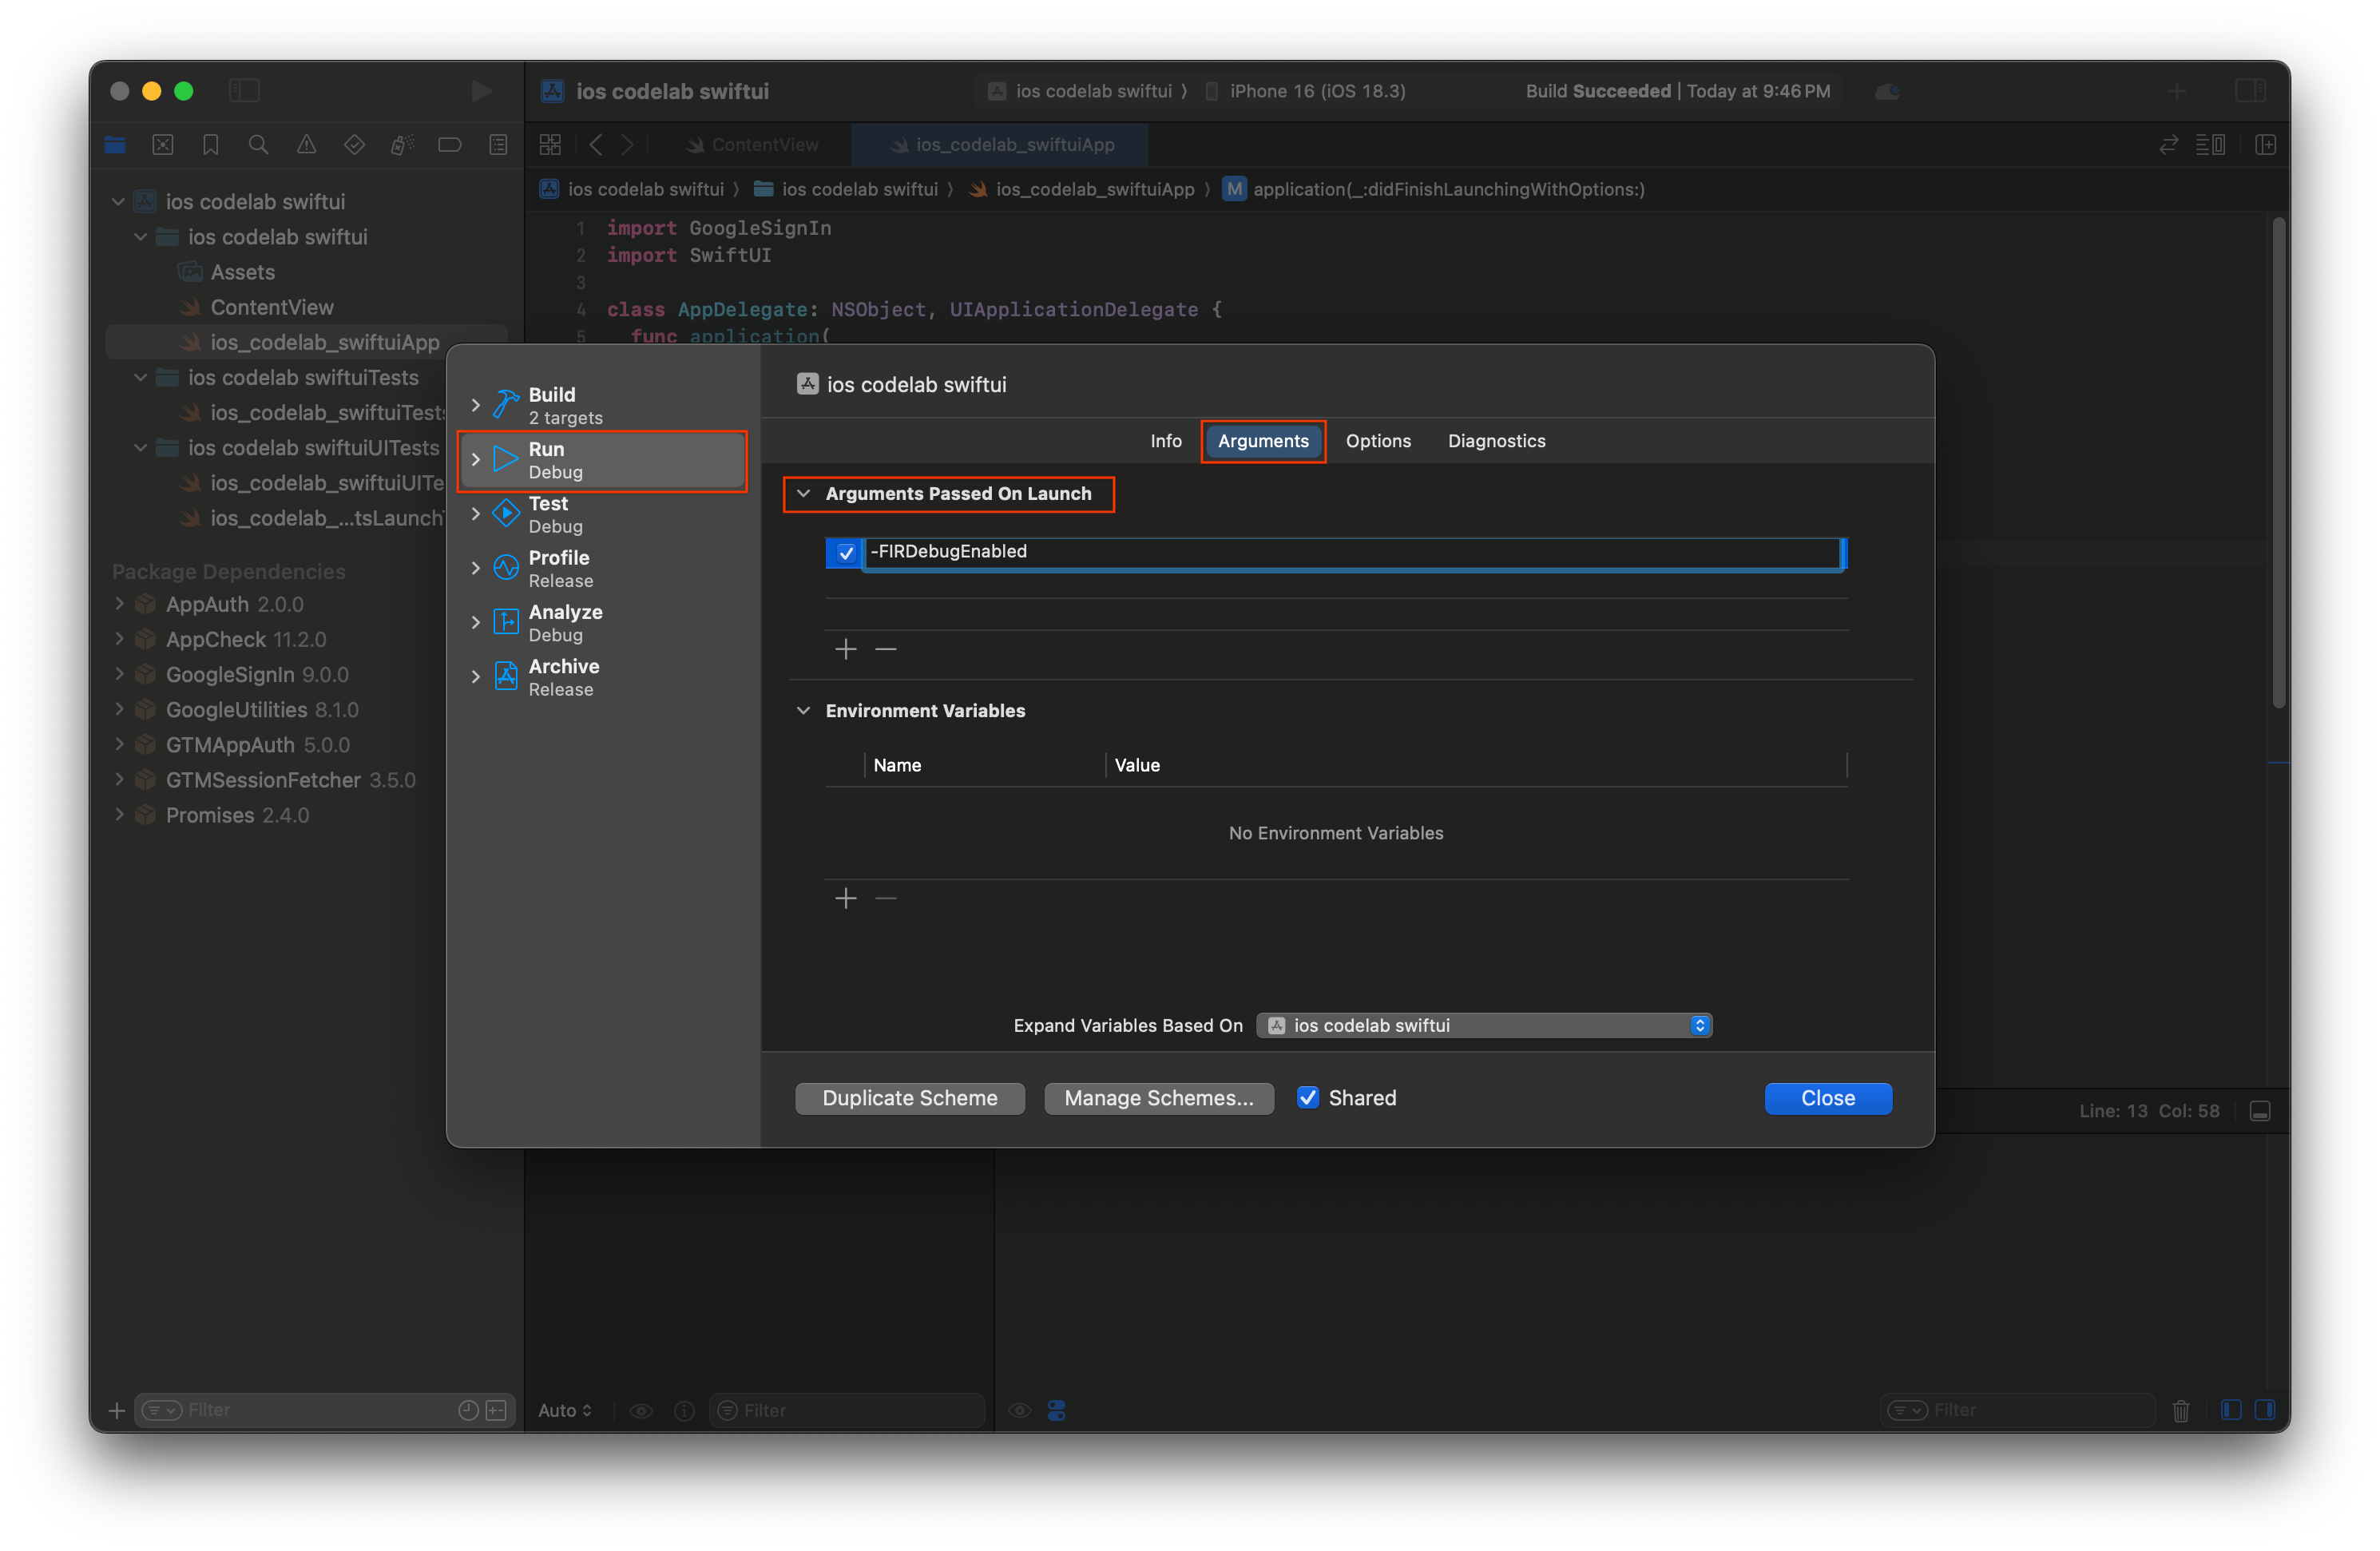
- Xcode のメニューバーで、[Product] > [Scheme] > [Edit Scheme] の順に移動します。
- ナビゲーション メニューで [実行] を選択します。
- [Arguments] タブを選択します。
- [Arguments Passed on Launch] セクションで [+] を選択し、-FIRDebugEnabled を追加します。この起動引数を使用すると、Firebase デバッグ ロギングが有効になります。
- [閉じる] を選択します。
- シミュレータでアプリを起動します。
- Xcode コンソールに出力された App Check デバッグ トークンをコピーします。

- Firebase コンソールでプロジェクトに移動します。
- ナビゲーション メニューの [ビルド] セクションを開きます。
- [App Check] を選択します。
- [アプリ] タブを選択します。
- アプリにカーソルを合わせ、その他メニュー アイコンを選択します。
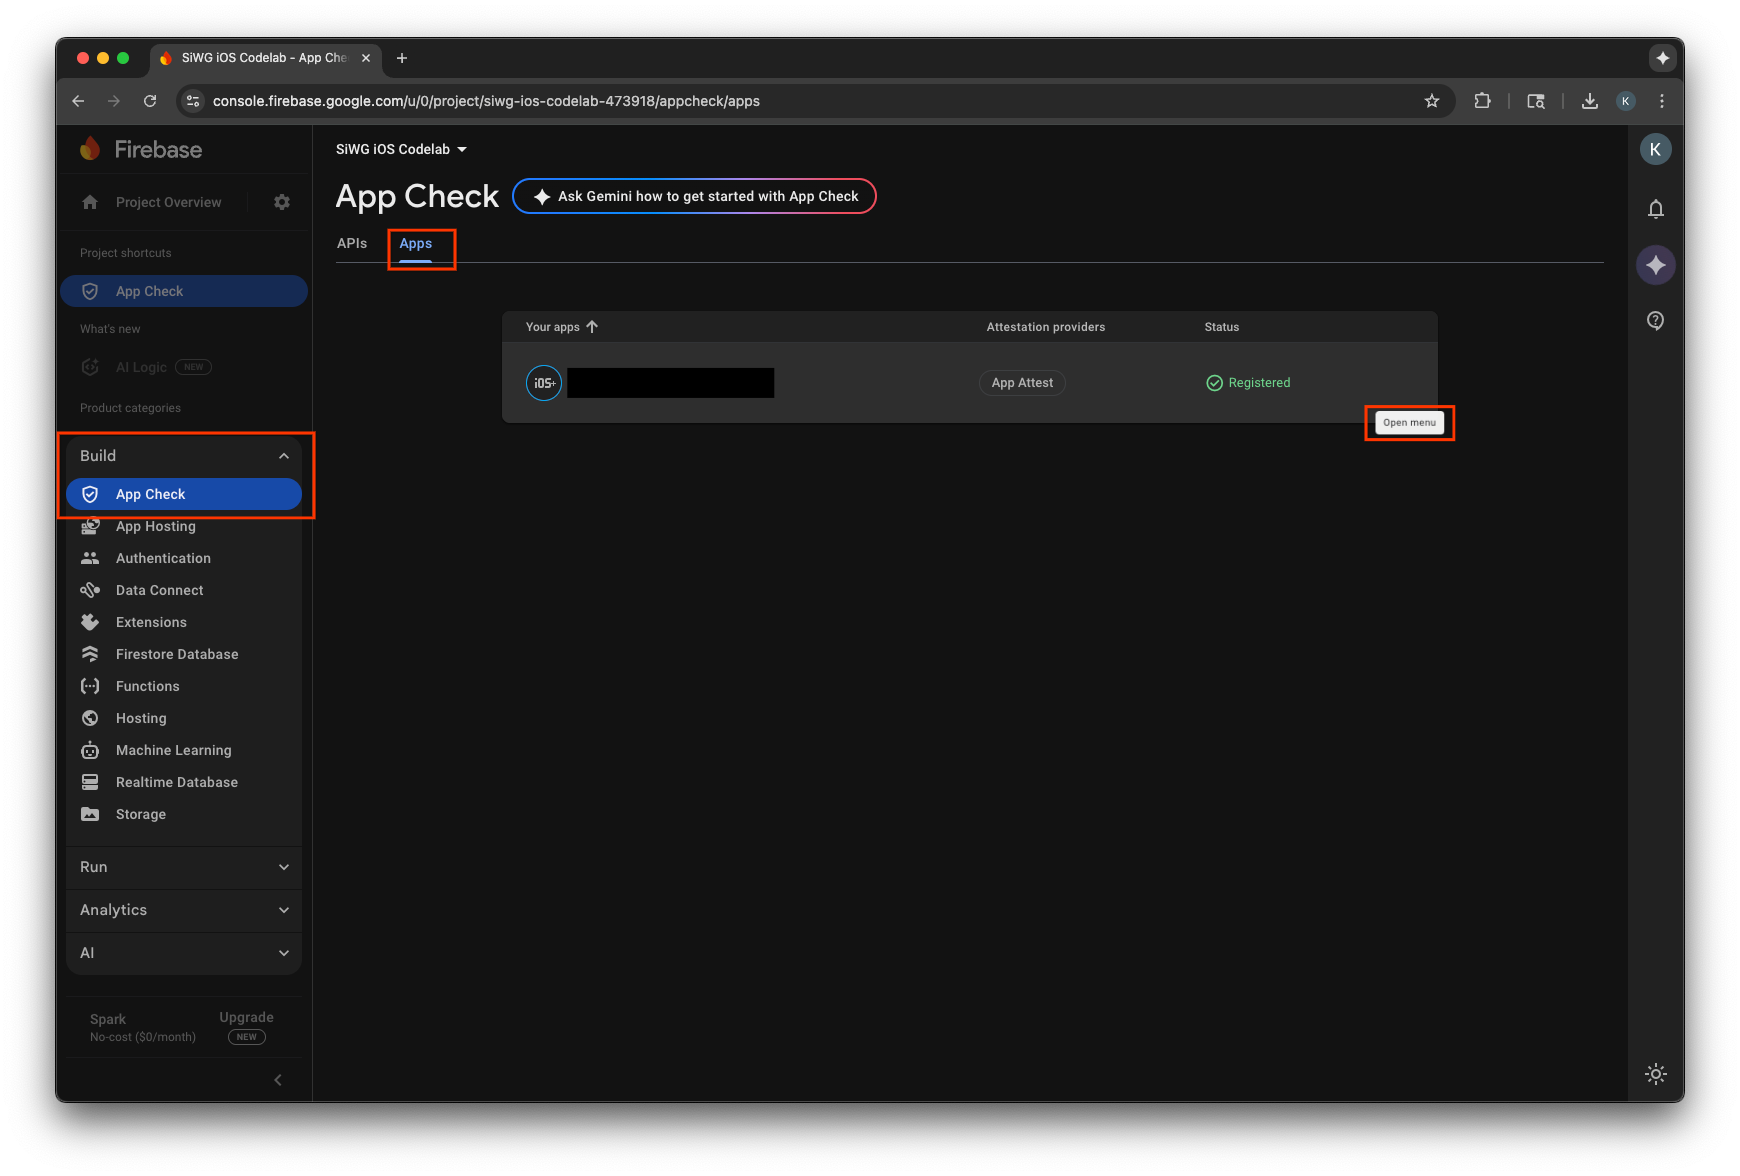
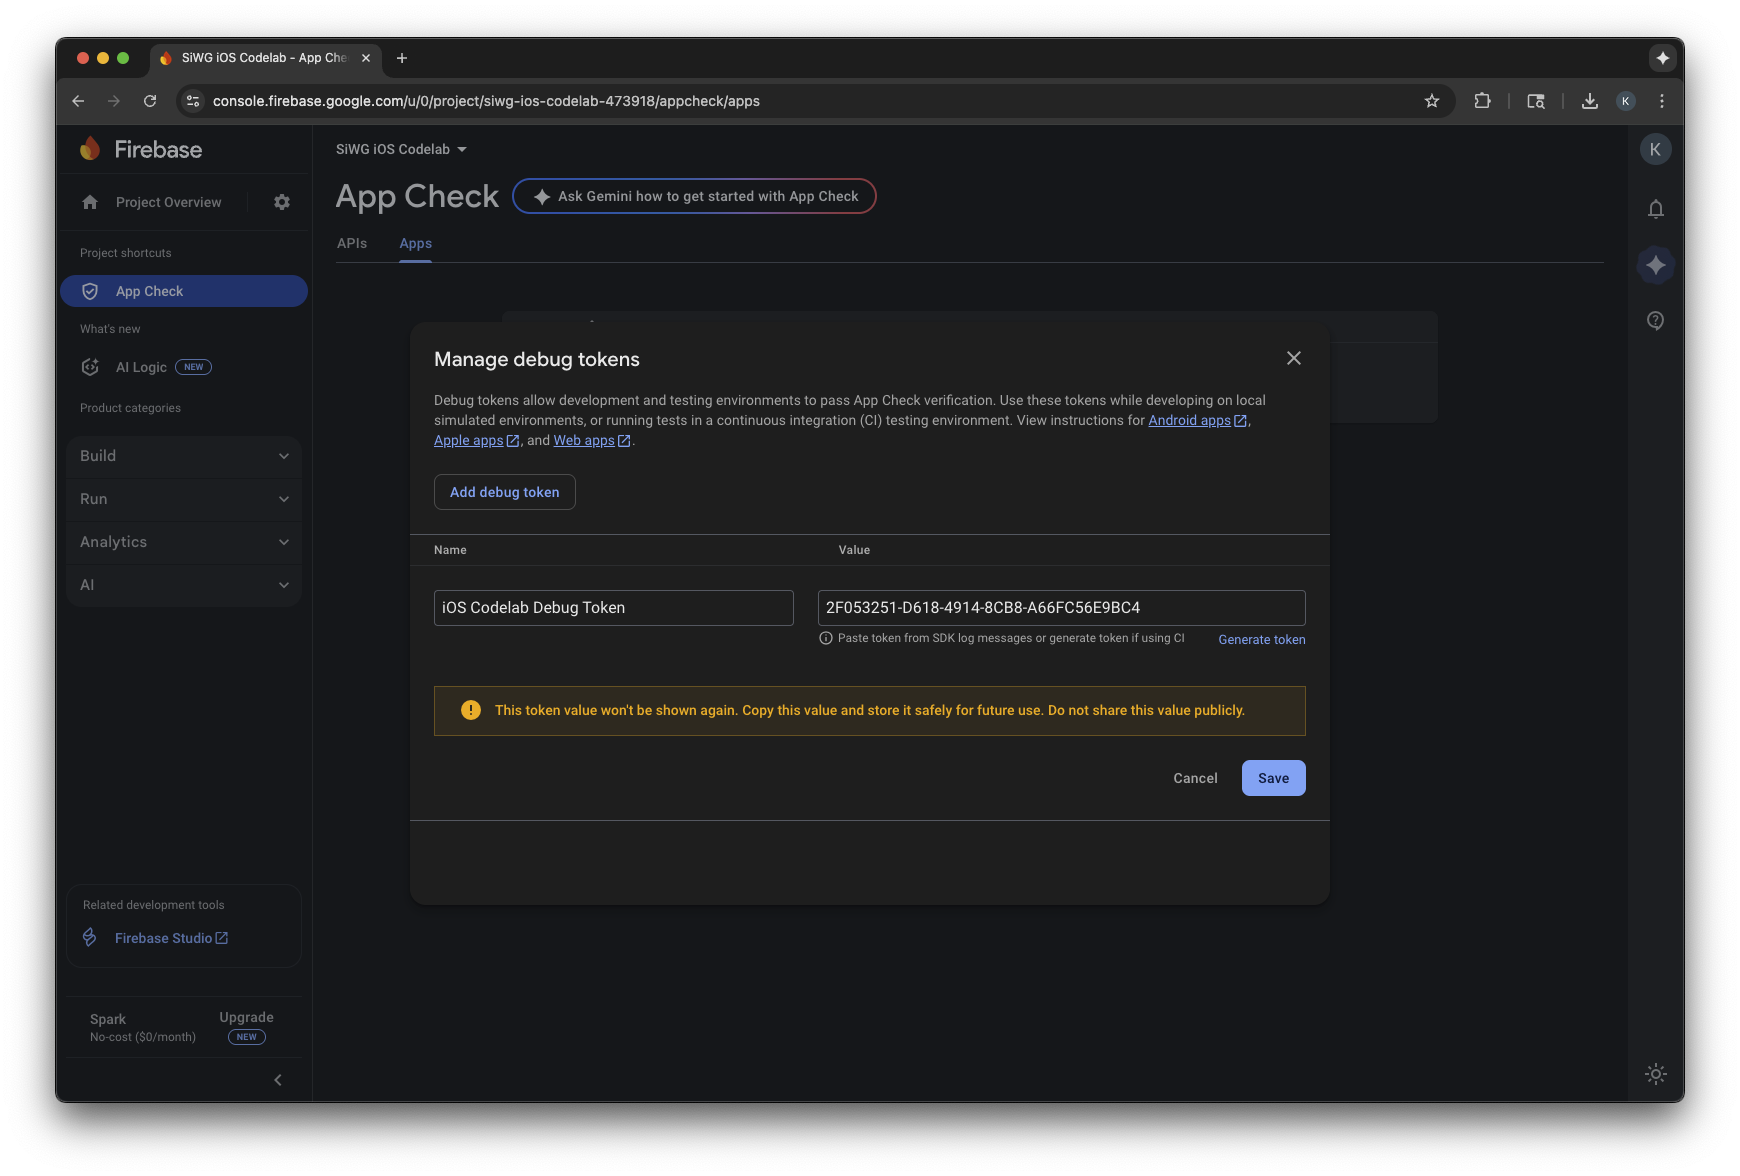
- [デバッグ トークンを管理] を選択します。
- [デバッグ トークンを追加] を選択します。
- デバッグ トークンに名前を付け、先ほどコピーしたデバッグ トークンを値として貼り付けます。
- [保存] を選択してトークンを登録します。
- シミュレータに戻ってログインします。
指標がコンソールに表示されるまでに数分かかることがあります。App Check が有効になると、次のいずれかの場所で確認済みリクエストの増加を確認することで、App Check が機能していることを確認できます。
- Firebase コンソールの [App Check] セクションの [API] タブ。
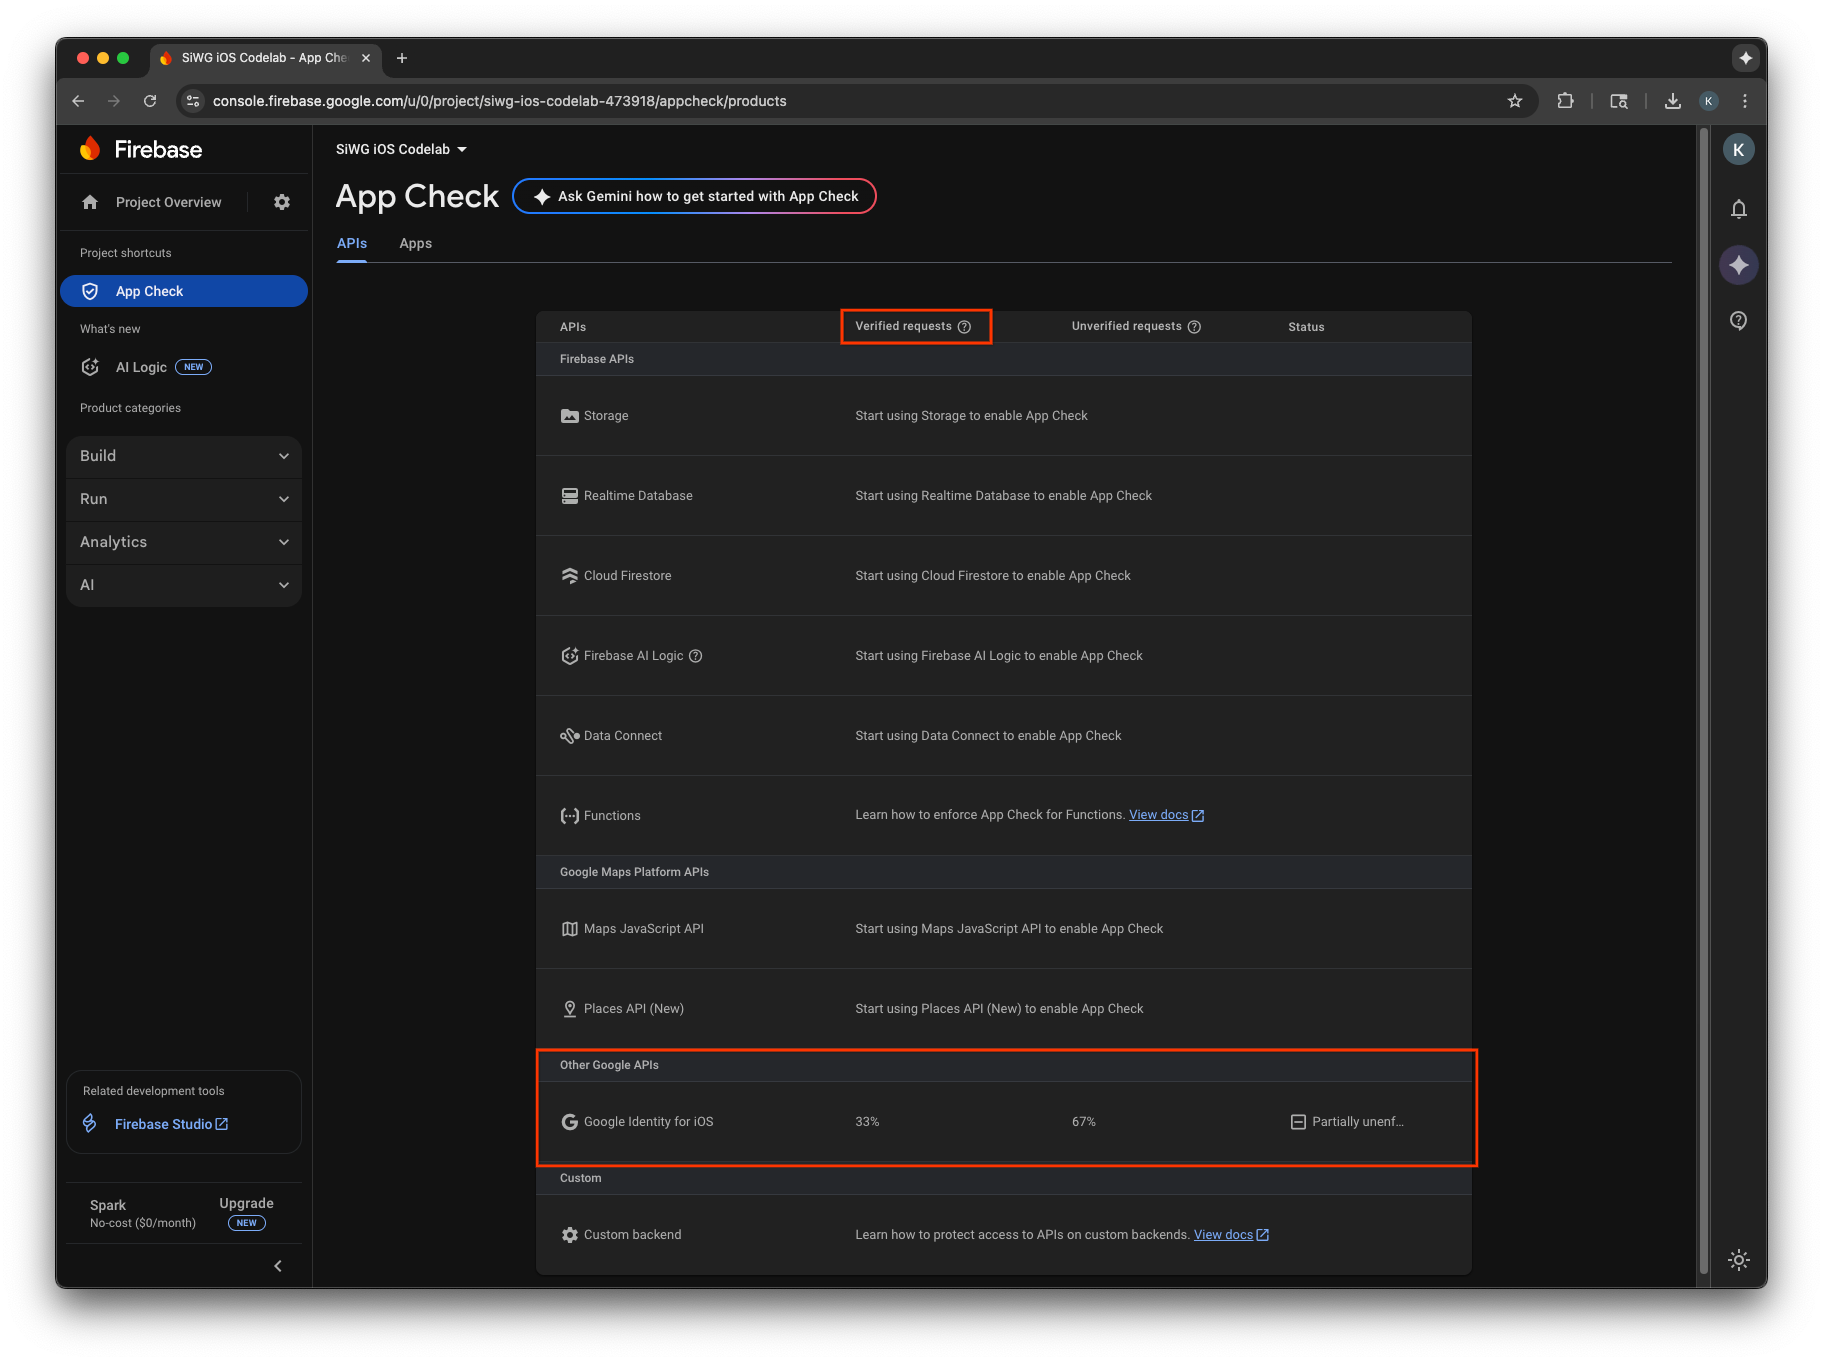
- Google Cloud コンソールの OAuth クライアントの編集ページ。
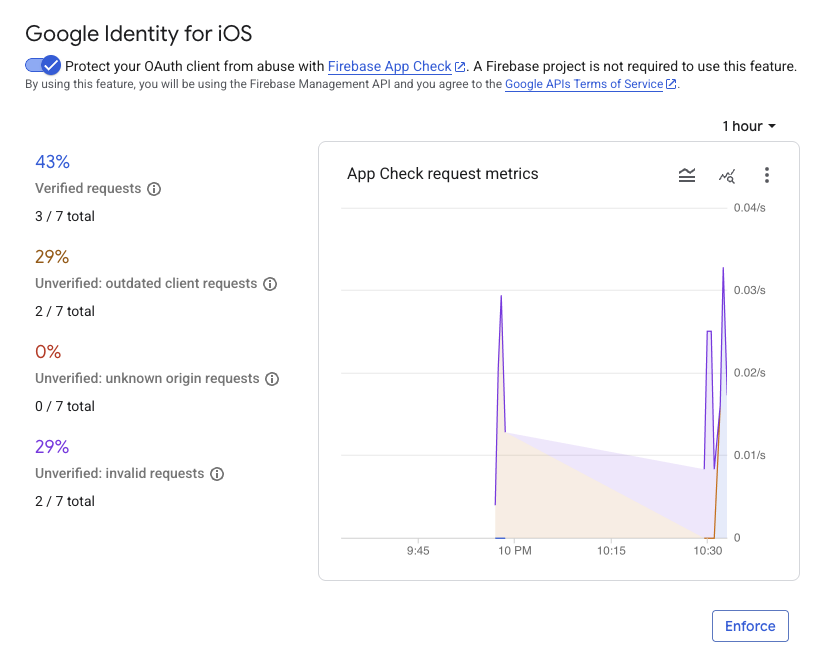
アプリの App Check 指標をモニタリングし、正当なリクエストが検証されていることを確認したら、App Check の適用を有効にします。適用後は、App Check は未検証のリクエストをすべて拒否し、正規のアプリからのトラフィックのみがプロジェクトに代わって Google の OAuth 2.0 エンドポイントにアクセスできるようにします。
12. 参考情報
お疲れさまでした
OAuth 2.0 iOS クライアントを構成し、iOS アプリに [Google でログイン] ボタンを追加し、ボタンの外観をカスタマイズする方法を学び、JWT ID トークンをデコードし、アプリの App Check を有効にしました。
次のリンクは、次の手順を進めるうえで役立ちます。
- iOS 向け Google ログインを使ってみる
- iOS 向け Google ログイン リポジトリ
- Google ID トークンを検証する
- iOS で Google ログインに App Check を使用する
- アクセス トークンを取り消してアプリの接続を解除する
- Google Cloud プロジェクトの詳細
- Google Identity の認証方法
- App Check の適用を有効にする