
1. 시작하기 전에
이 Codelab에서는 Google로 로그인을 구현하고 시뮬레이터에서 실행되는 iOS 애플리케이션을 빌드하는 방법을 안내합니다. SwiftUI와 UIKit를 모두 사용하는 구현이 제공됩니다.
SwiftUI는 새로운 앱 개발을 위한 Apple의 최신 UI 프레임워크입니다. 단일 공유 코드베이스에서 모든 Apple 플랫폼용 사용자 인터페이스를 빌드할 수 있습니다. iOS 13 이상의 버전이 필요합니다.
UIKit은 iOS를 위한 Apple의 원래 기본 UI 프레임워크입니다. 이전 iOS 버전과의 하위 호환성을 제공합니다. 따라서 다양한 이전 기기를 지원해야 하는 기존 앱에 적합합니다.
개발 요구사항에 가장 적합한 프레임워크의 경로를 따를 수 있습니다.
기본 요건
학습할 내용
- Google Cloud 프로젝트를 만드는 방법
- Google Cloud 콘솔에서 OAuth 클라이언트를 만드는 방법
- iOS 앱에 Google 계정으로 로그인 기능을 구현하는 방법
- 'Google 계정으로 로그인' 버튼을 맞춤설정하는 방법
- ID 토큰을 디코딩하는 방법
- iOS 앱에 앱 체크를 사용 설정하는 방법
필요한 항목
이 Codelab은 iOS 18.3 시뮬레이터가 설치된 Xcode 16.3을 사용하여 만들었습니다. 개발에는 최신 버전의 Xcode를 사용해야 합니다.
2. 새 Xcode 프로젝트 만들기
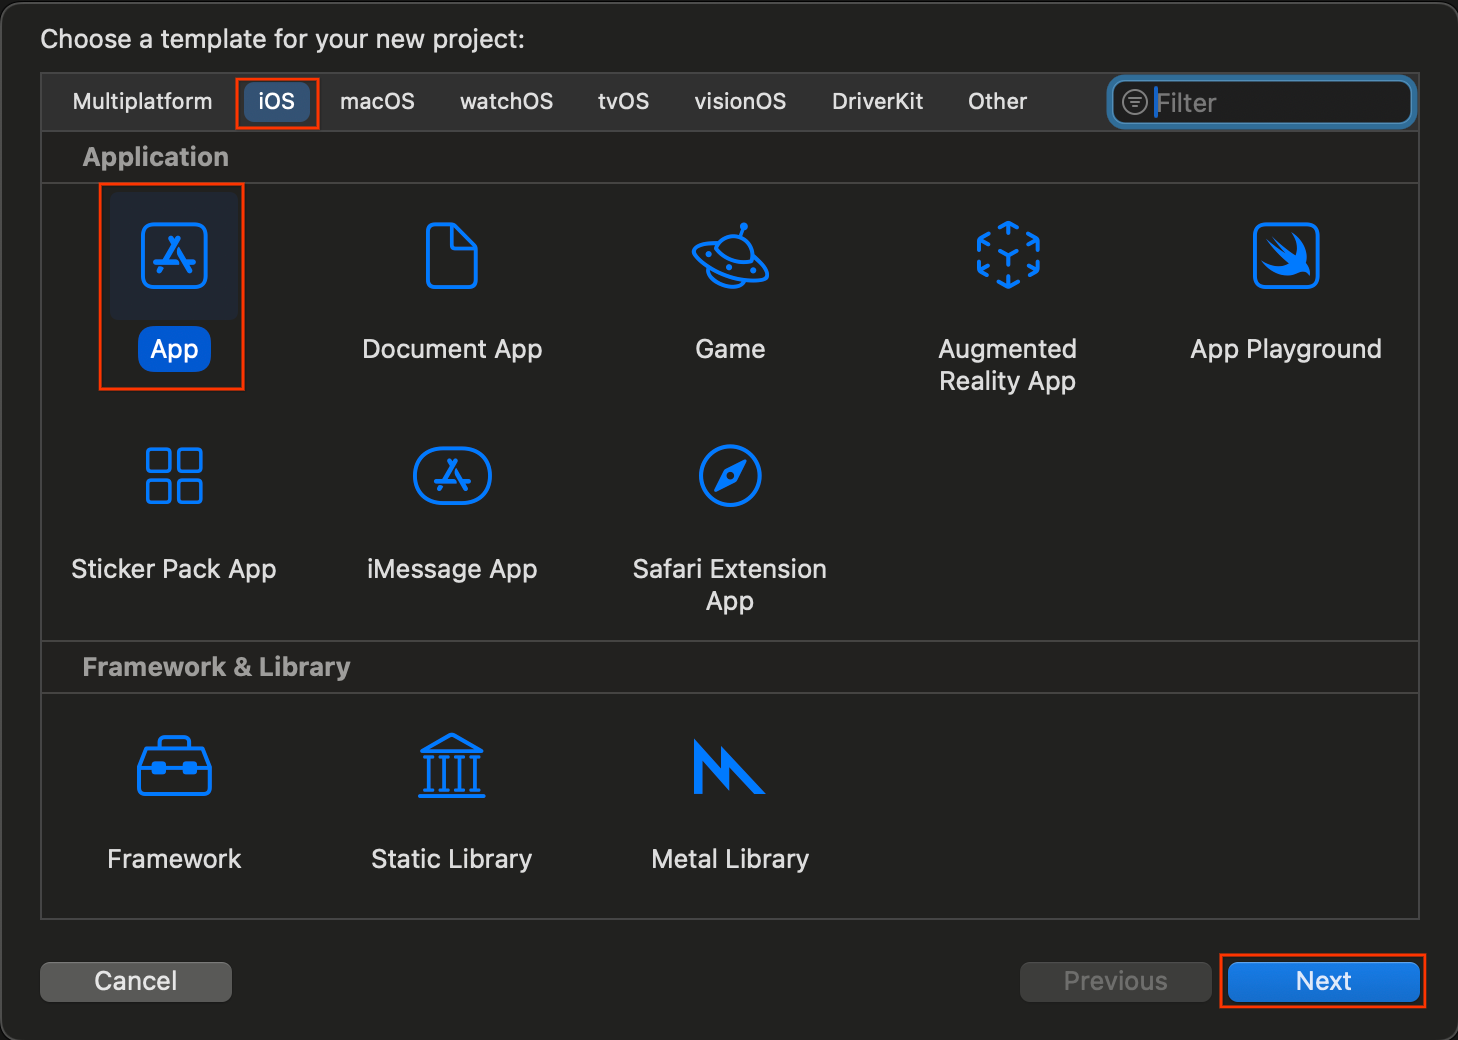
- Xcode를 열고 Create a new Xcode project를 선택합니다.
- iOS 탭을 선택하고 App 템플릿을 선택한 후 Next를 클릭합니다.
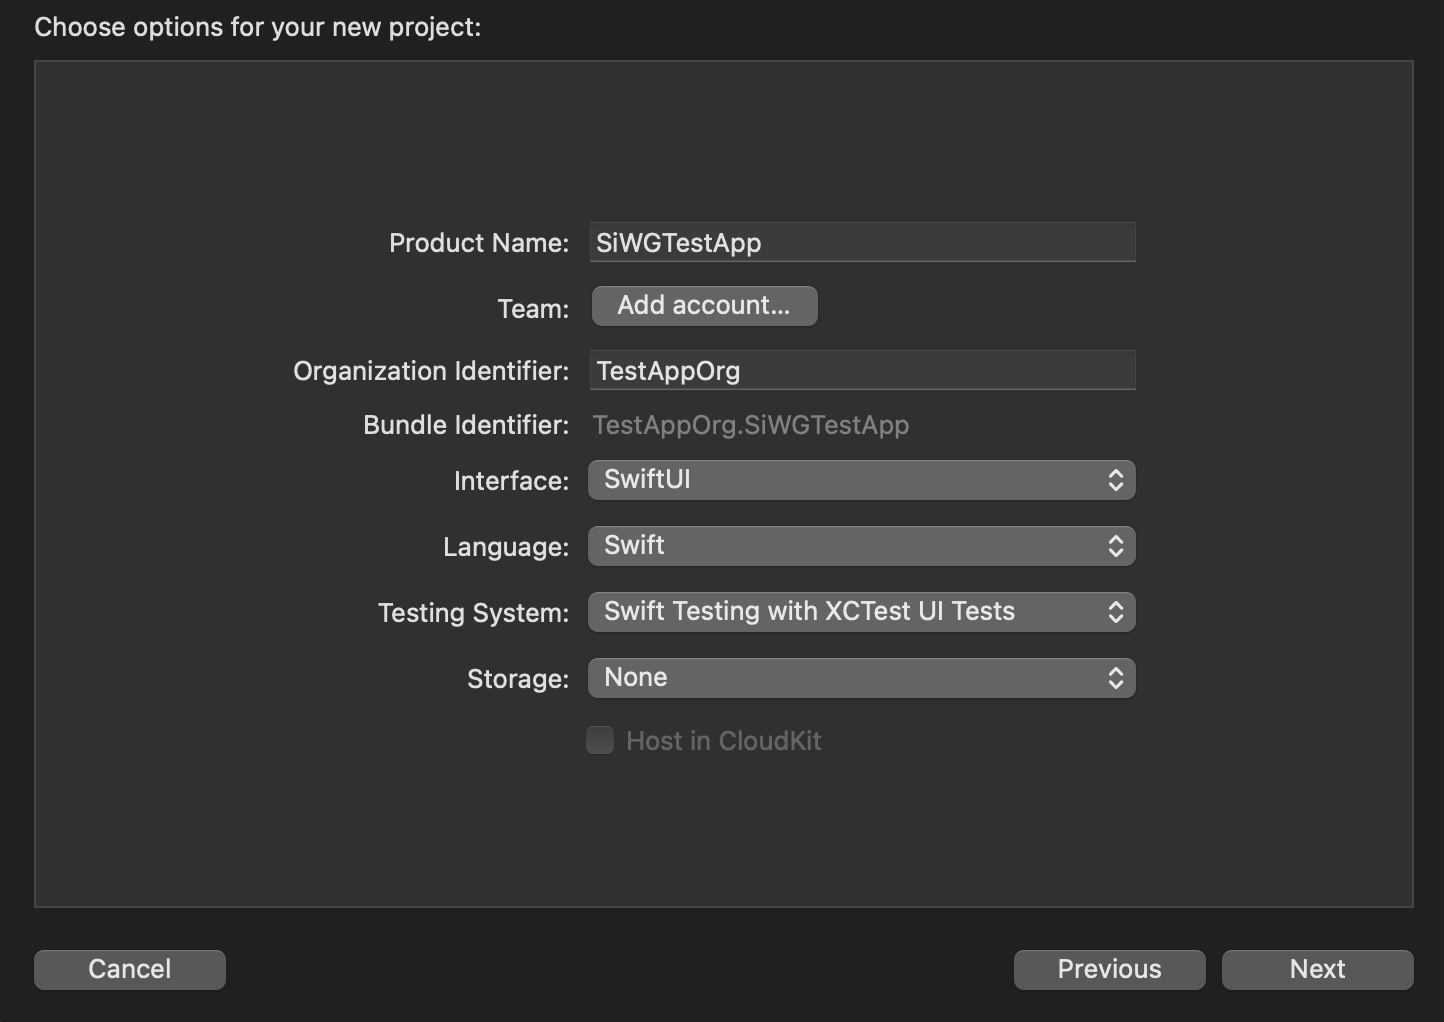
- 프로젝트 옵션에서:
- 제품 이름을 입력합니다.
- 팀을 선택합니다(선택사항).
- 조직 식별자를 입력합니다.
- 생성된 번들 식별자를 기록해 둡니다. 이 파일은 나중에 필요합니다.
- 인터페이스에서 다음 중 하나를 선택합니다.
- SwiftUI 기반 앱의 경우 SwiftUI
- UIKit 기반 앱의 스토리보드
- 언어로 Swift를 선택합니다.
- 다음을 클릭하고 프로젝트를 저장할 위치를 선택합니다.
3. OAuth 클라이언트 만들기
앱이 Google의 인증 서비스와 통신하도록 허용하려면 OAuth 클라이언트 ID를 만들어야 합니다. Google Cloud 프로젝트가 필요합니다. 다음 단계에서는 프로젝트와 OAuth 클라이언트 ID를 만드는 과정을 안내합니다.
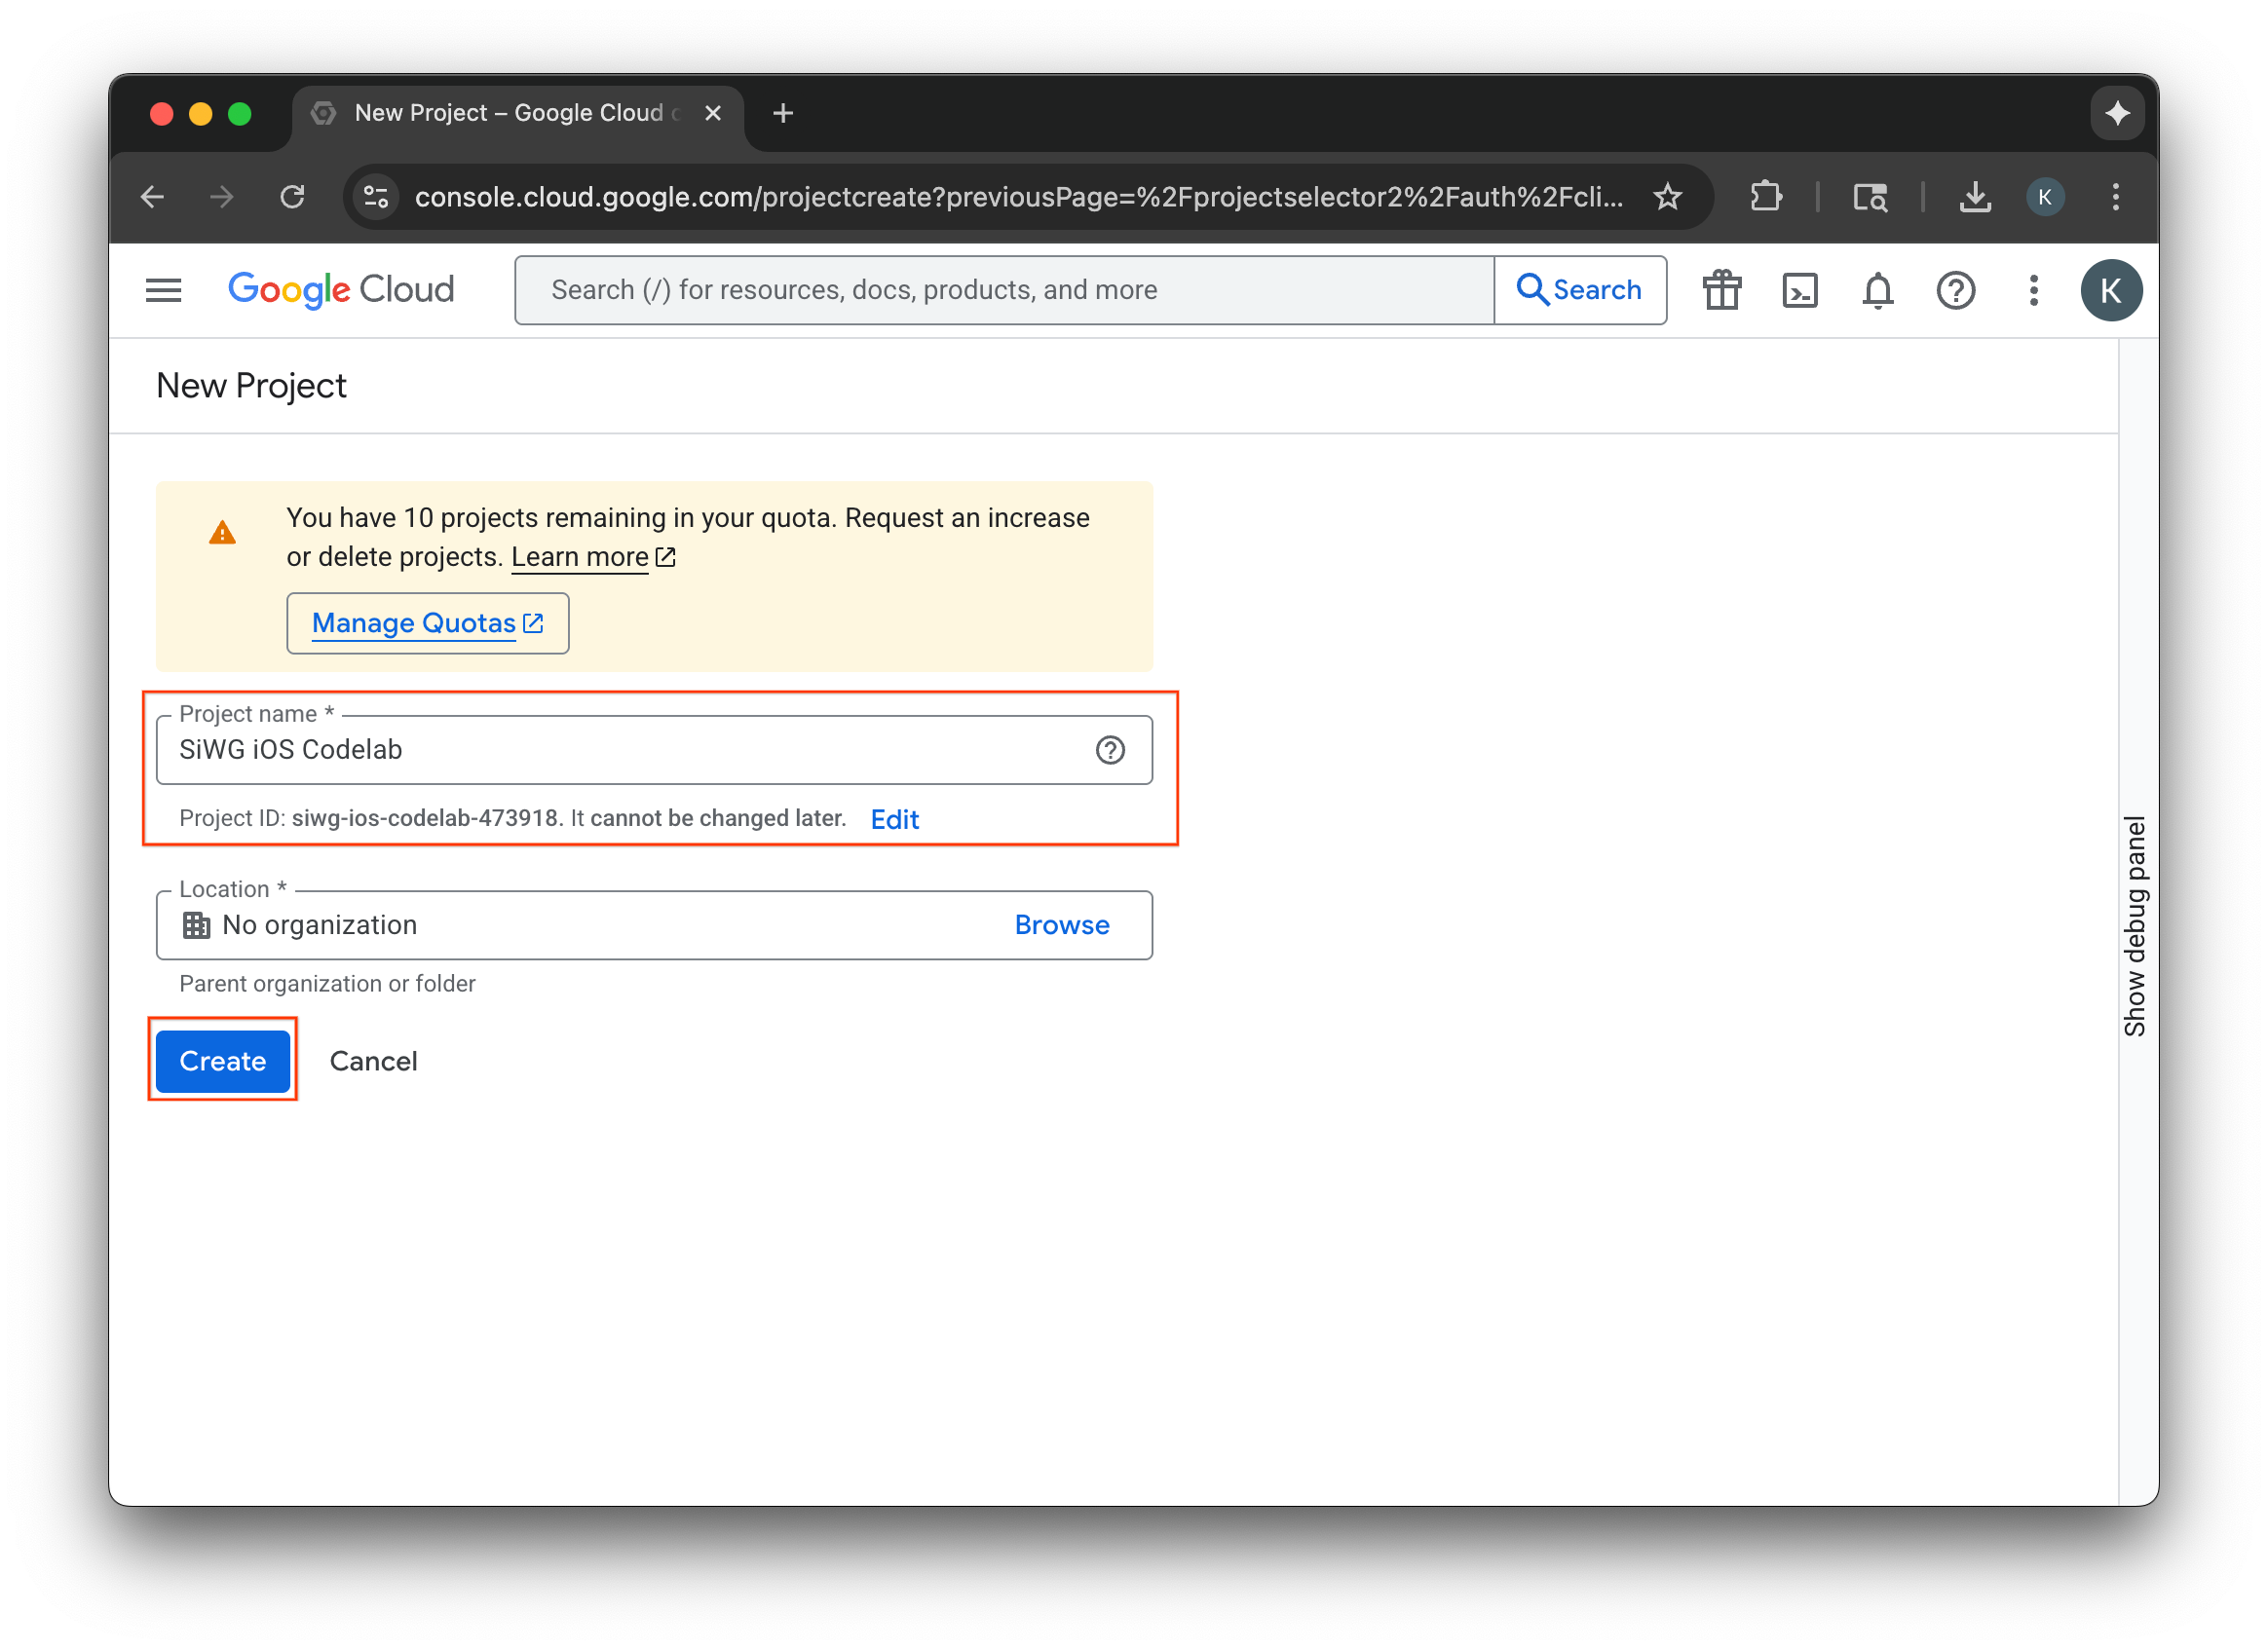
Google Cloud 프로젝트 선택 또는 만들기
- Google Cloud 콘솔로 이동하여 프로젝트를 선택하거나 만듭니다. 기존 프로젝트를 선택하는 경우 콘솔에서 자동으로 다음 필수 단계로 안내합니다.
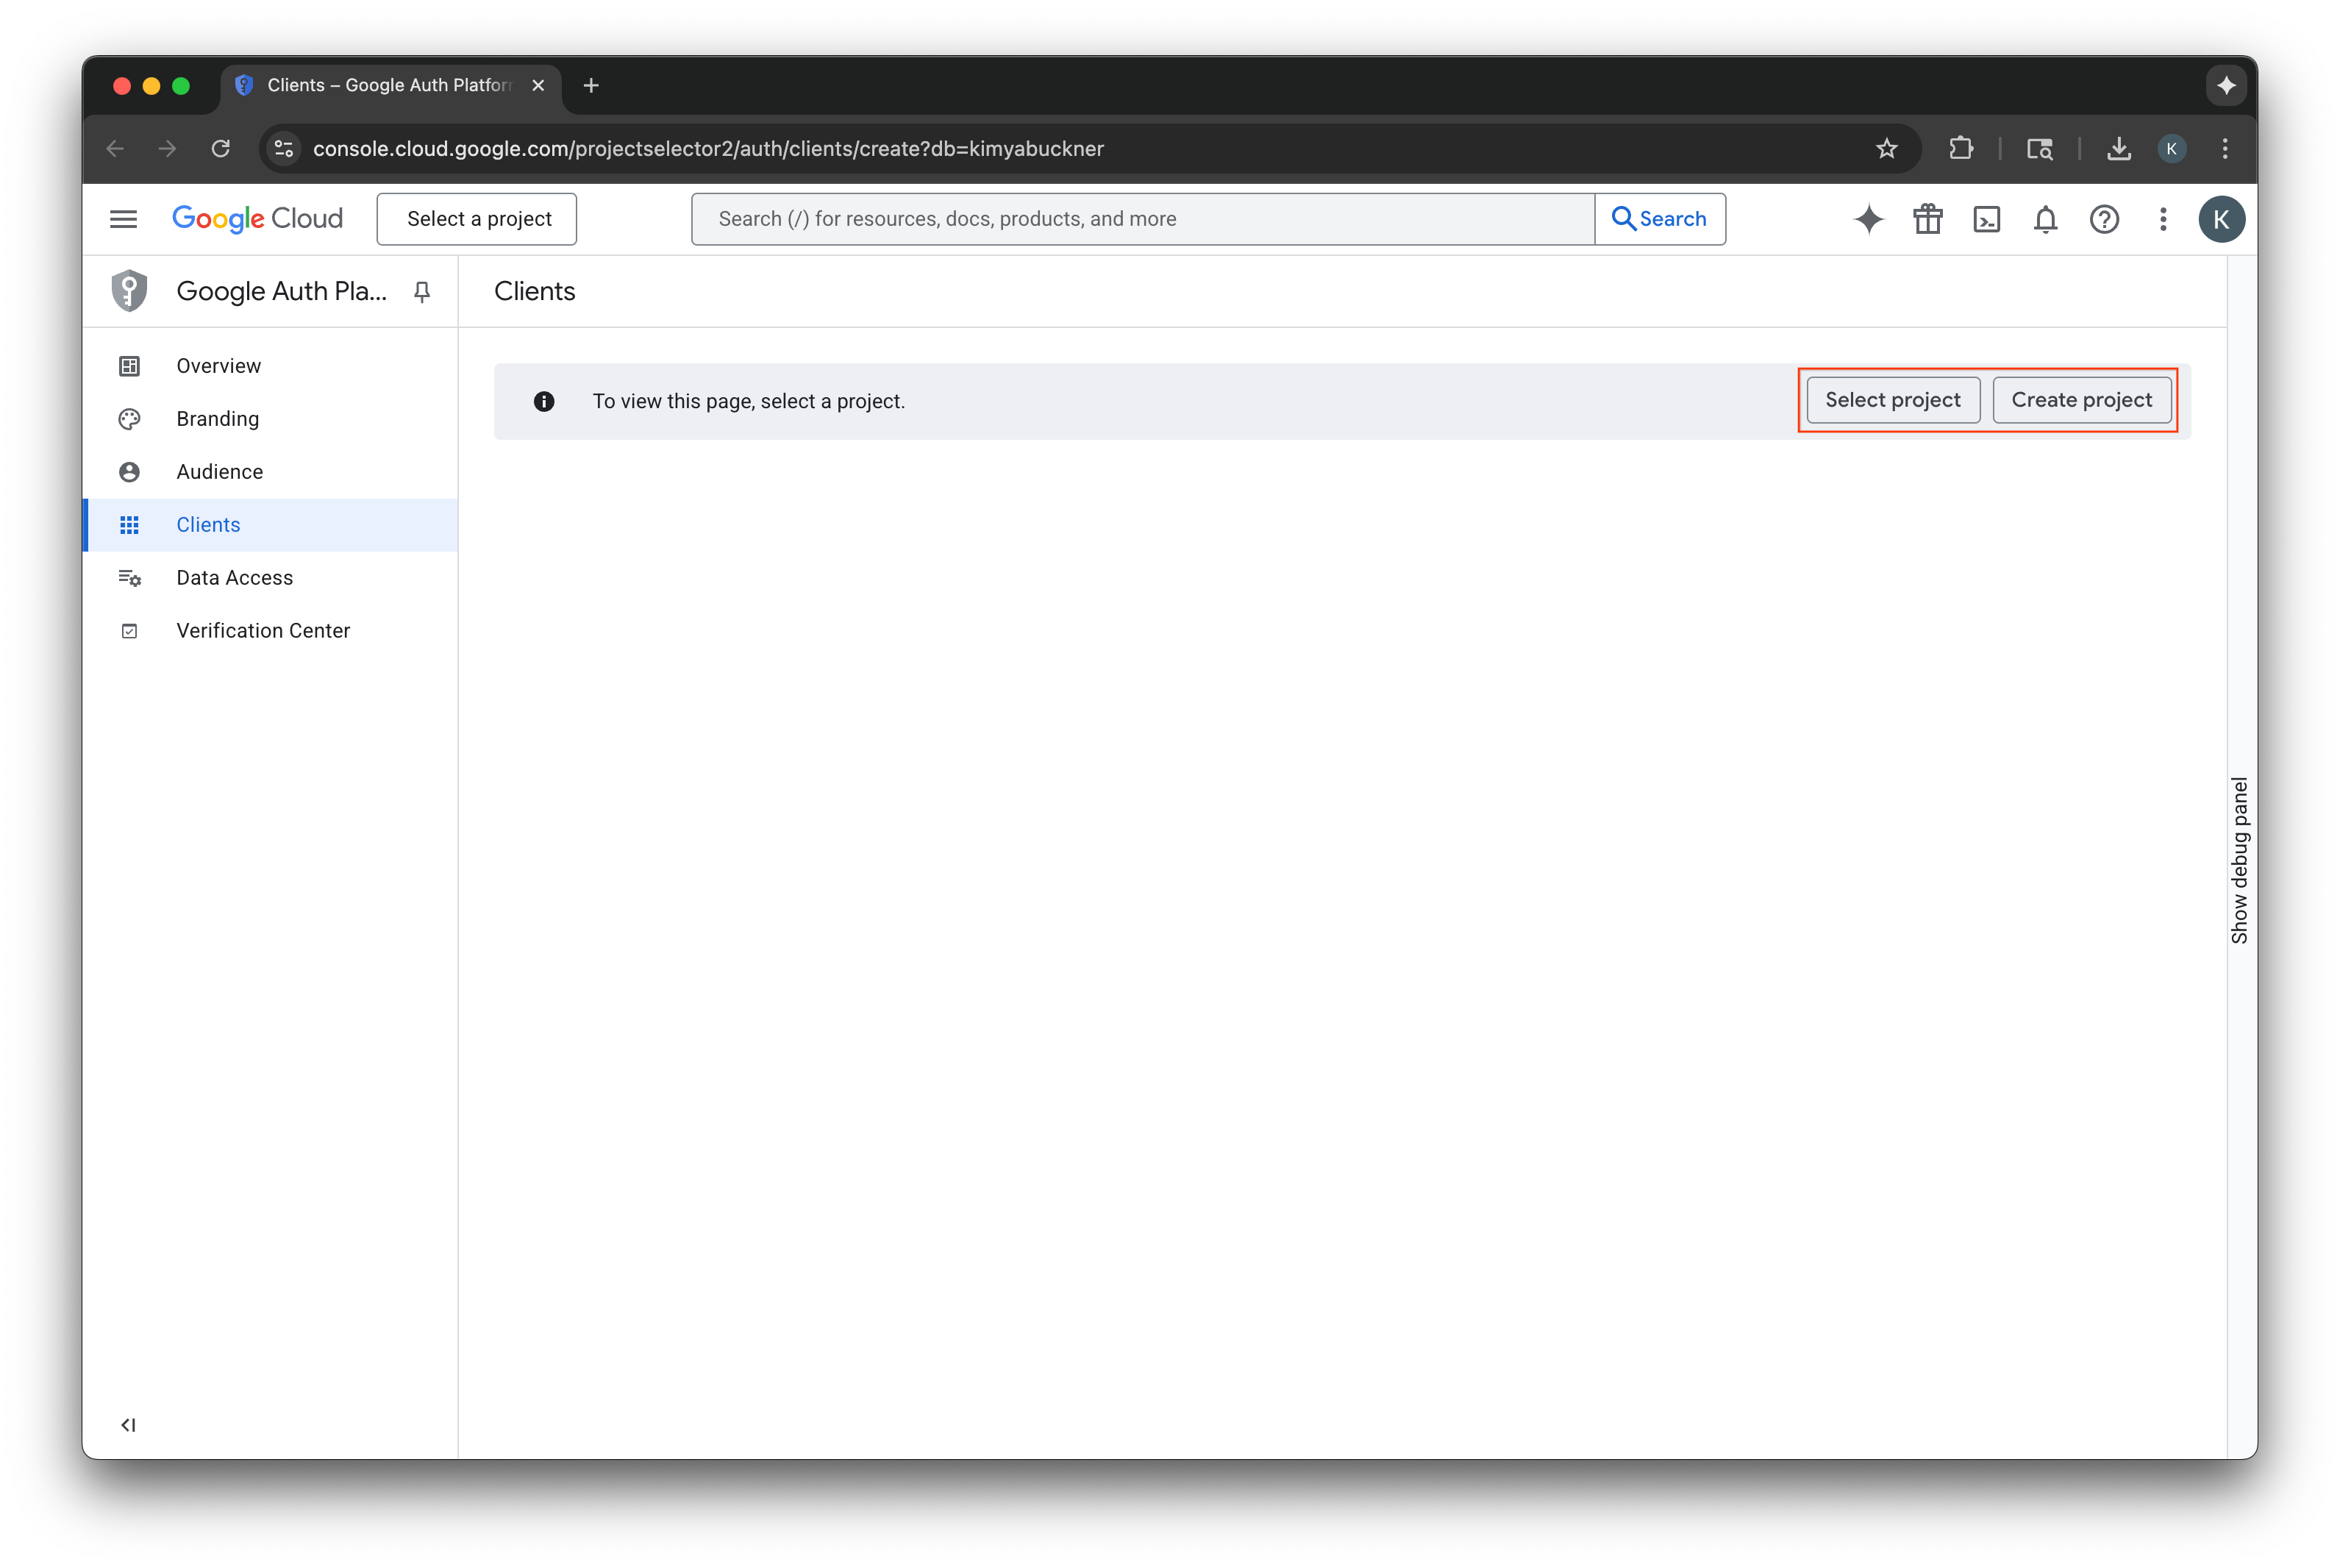
- 새 Google Cloud 프로젝트의 이름을 입력합니다.
- 만들기를 선택합니다.
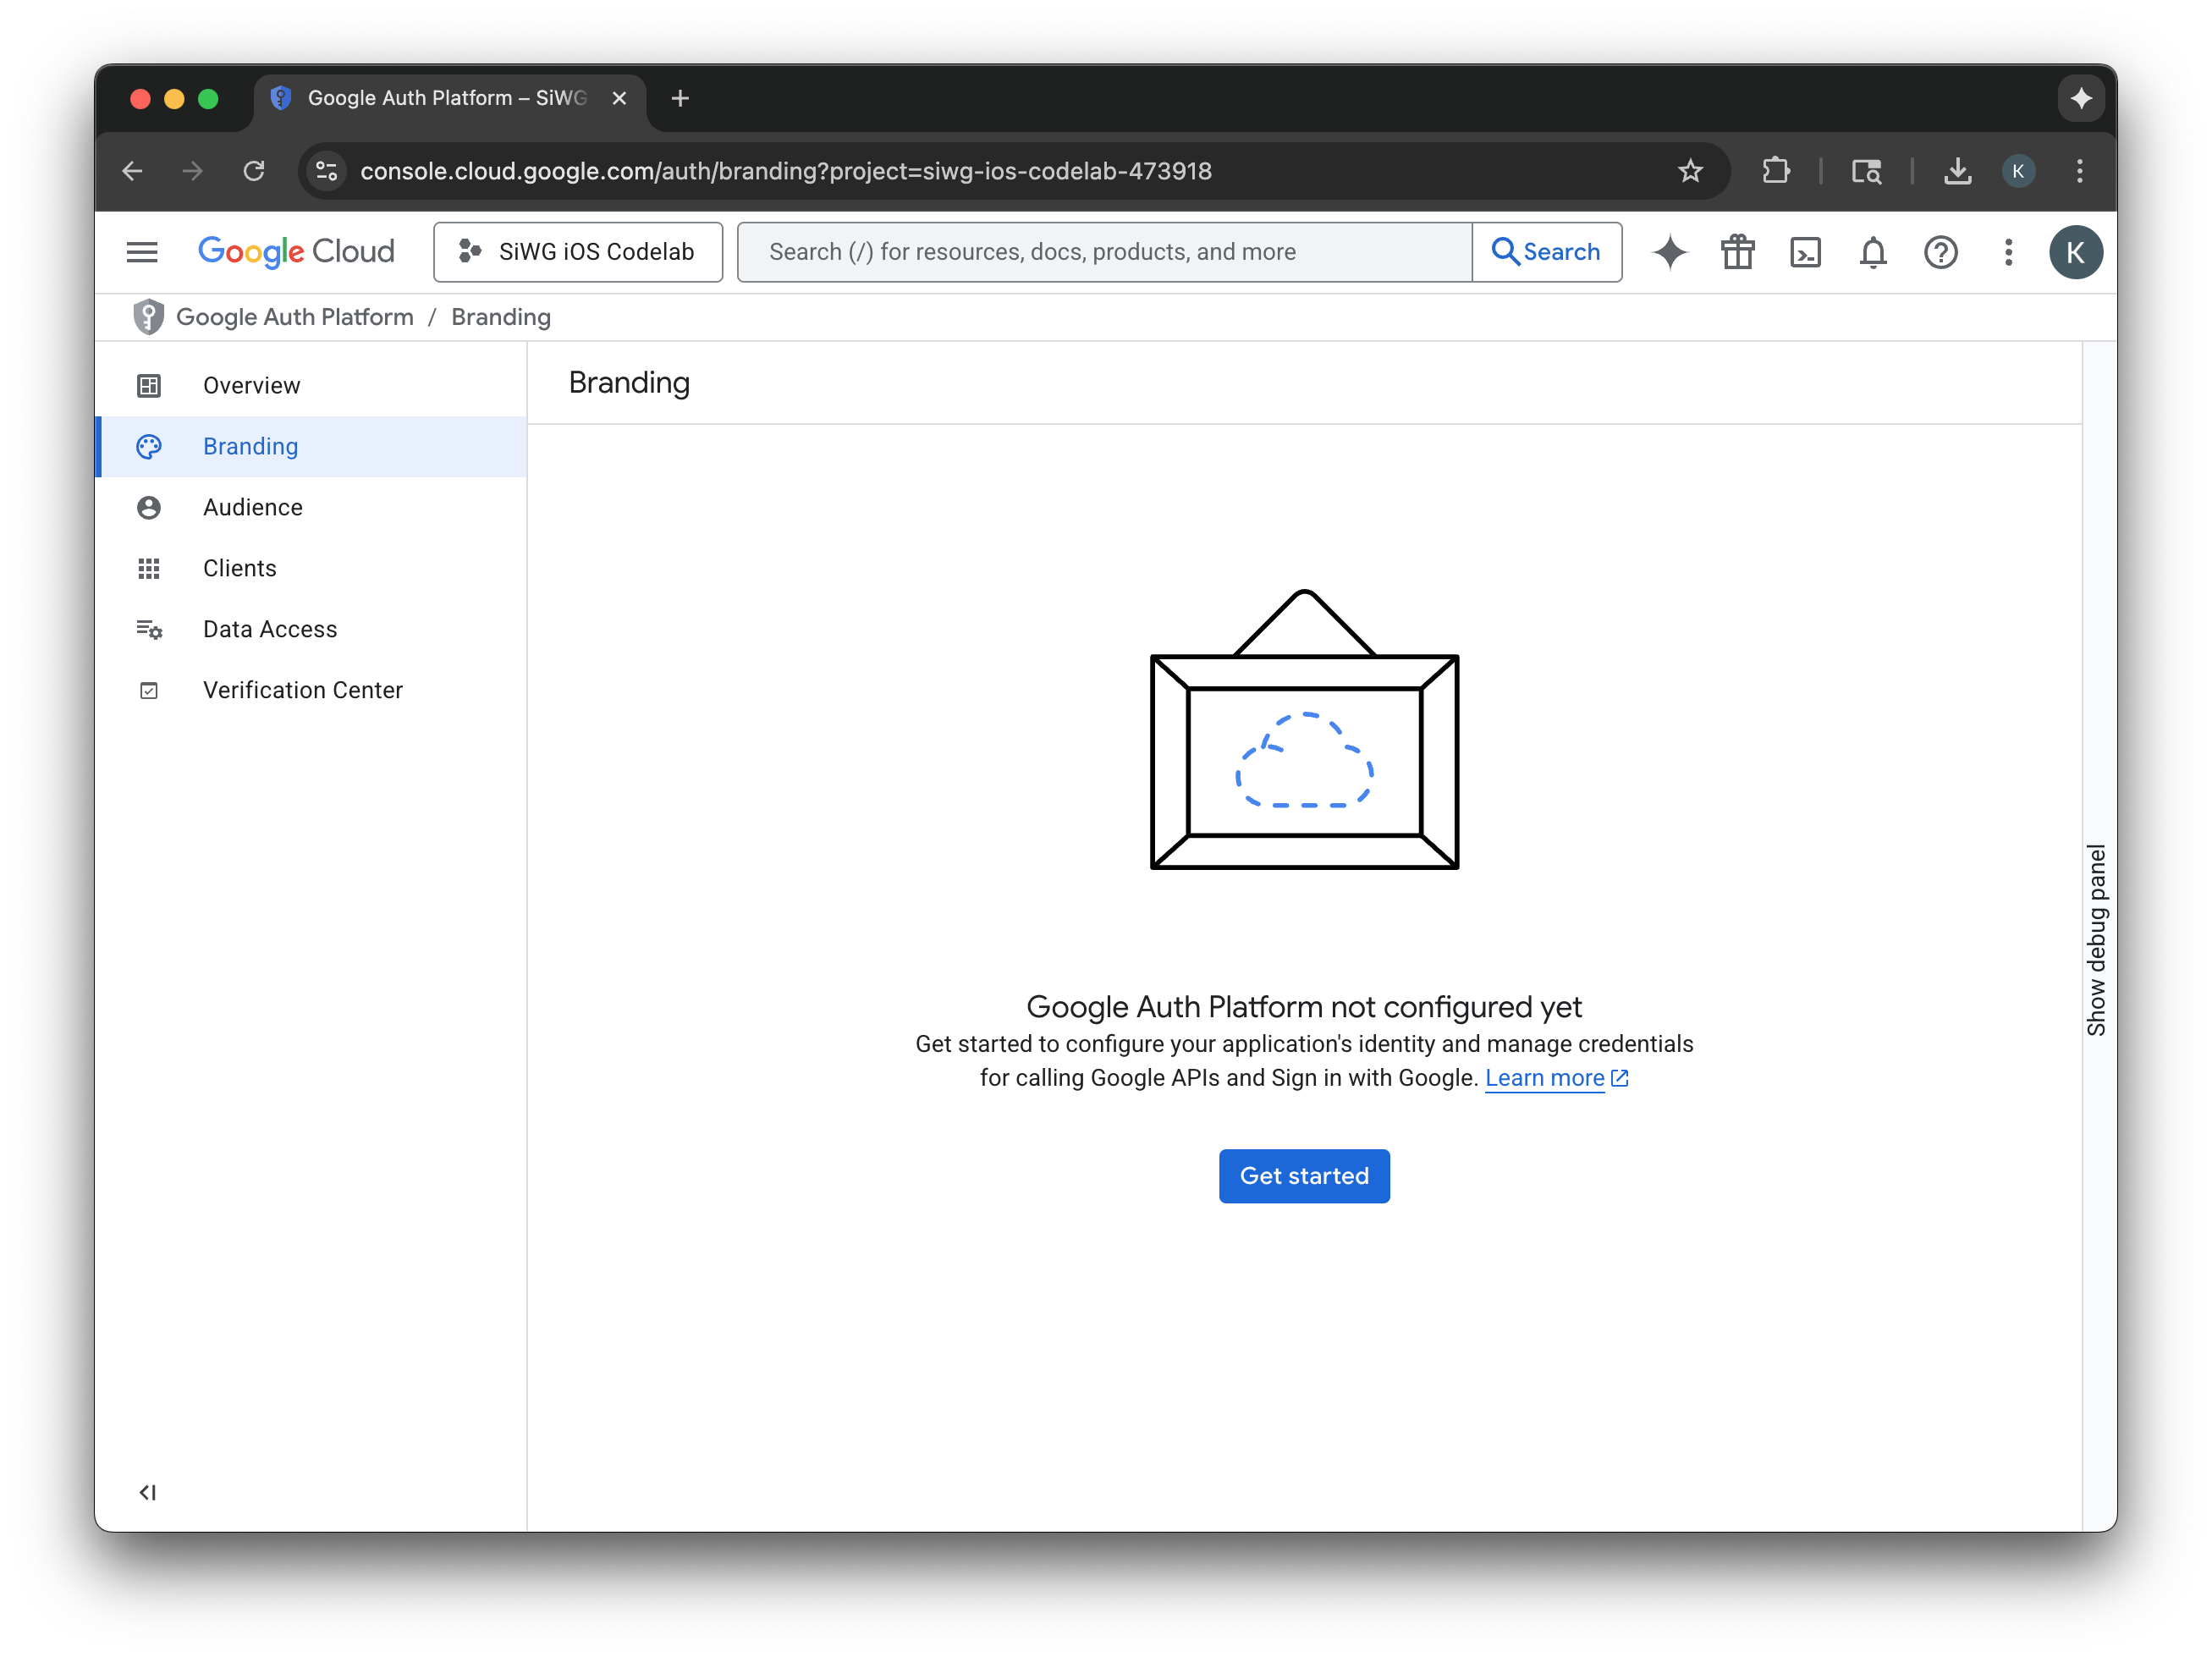
동의 화면 구성
선택한 프로젝트에 대해 동의 화면을 이미 구성한 경우 지금 구성하라는 메시지가 표시되지 않습니다. 이 경우 이 섹션을 건너뛰고 OAuth 2.0 클라이언트 만들기로 이동하세요.
- 동의 화면 구성을 선택합니다.

- 브랜딩 페이지에서 시작하기를 선택합니다.
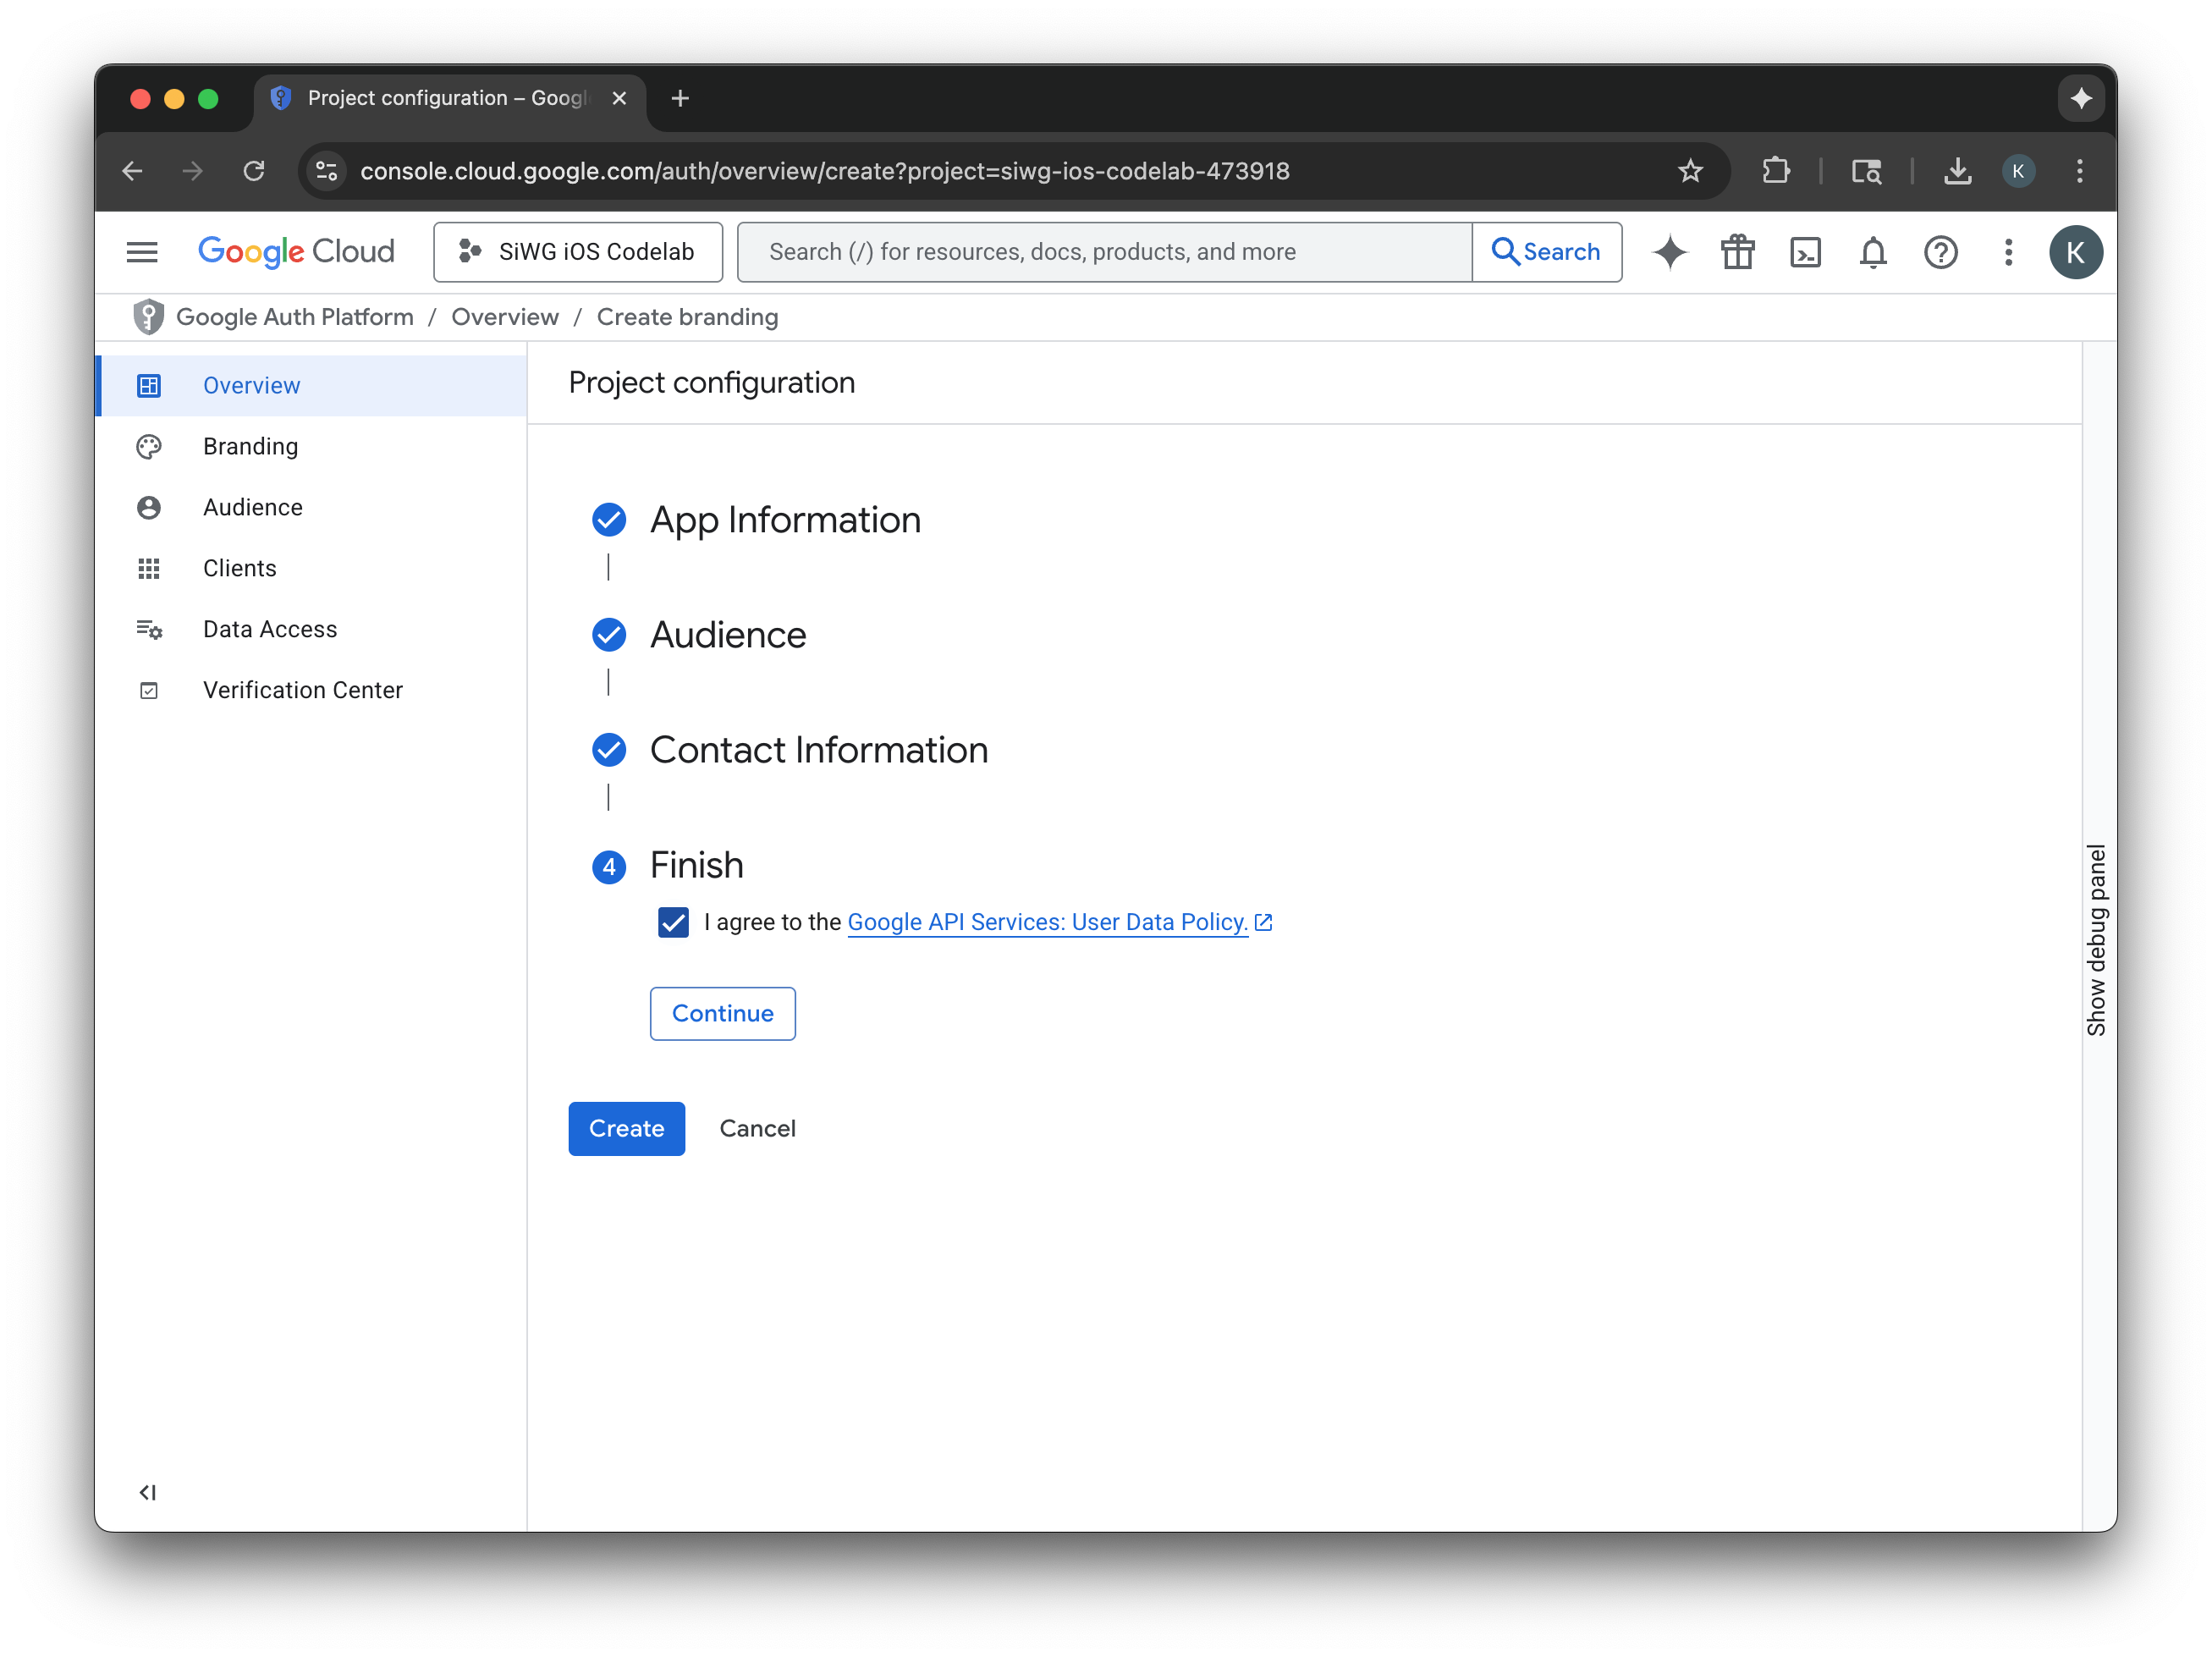
- 프로젝트 구성 페이지에서 다음 필드를 작성합니다.
- 앱 정보: 앱의 이름과 사용자 지원 이메일을 입력합니다. 이 지원 이메일은 사용자가 동의에 대해 문의할 수 있도록 공개적으로 표시됩니다.
- 대상: 외부를 선택합니다.
- 연락처 정보: Google에서 프로젝트에 관해 연락할 수 있는 이메일 주소를 입력합니다.
- Google API 서비스: 사용자 데이터 정책을 검토합니다.
- 만들기를 클릭합니다.
- 탐색 메뉴에서 클라이언트 페이지를 선택합니다.
- 클라이언트 만들기를 클릭합니다.
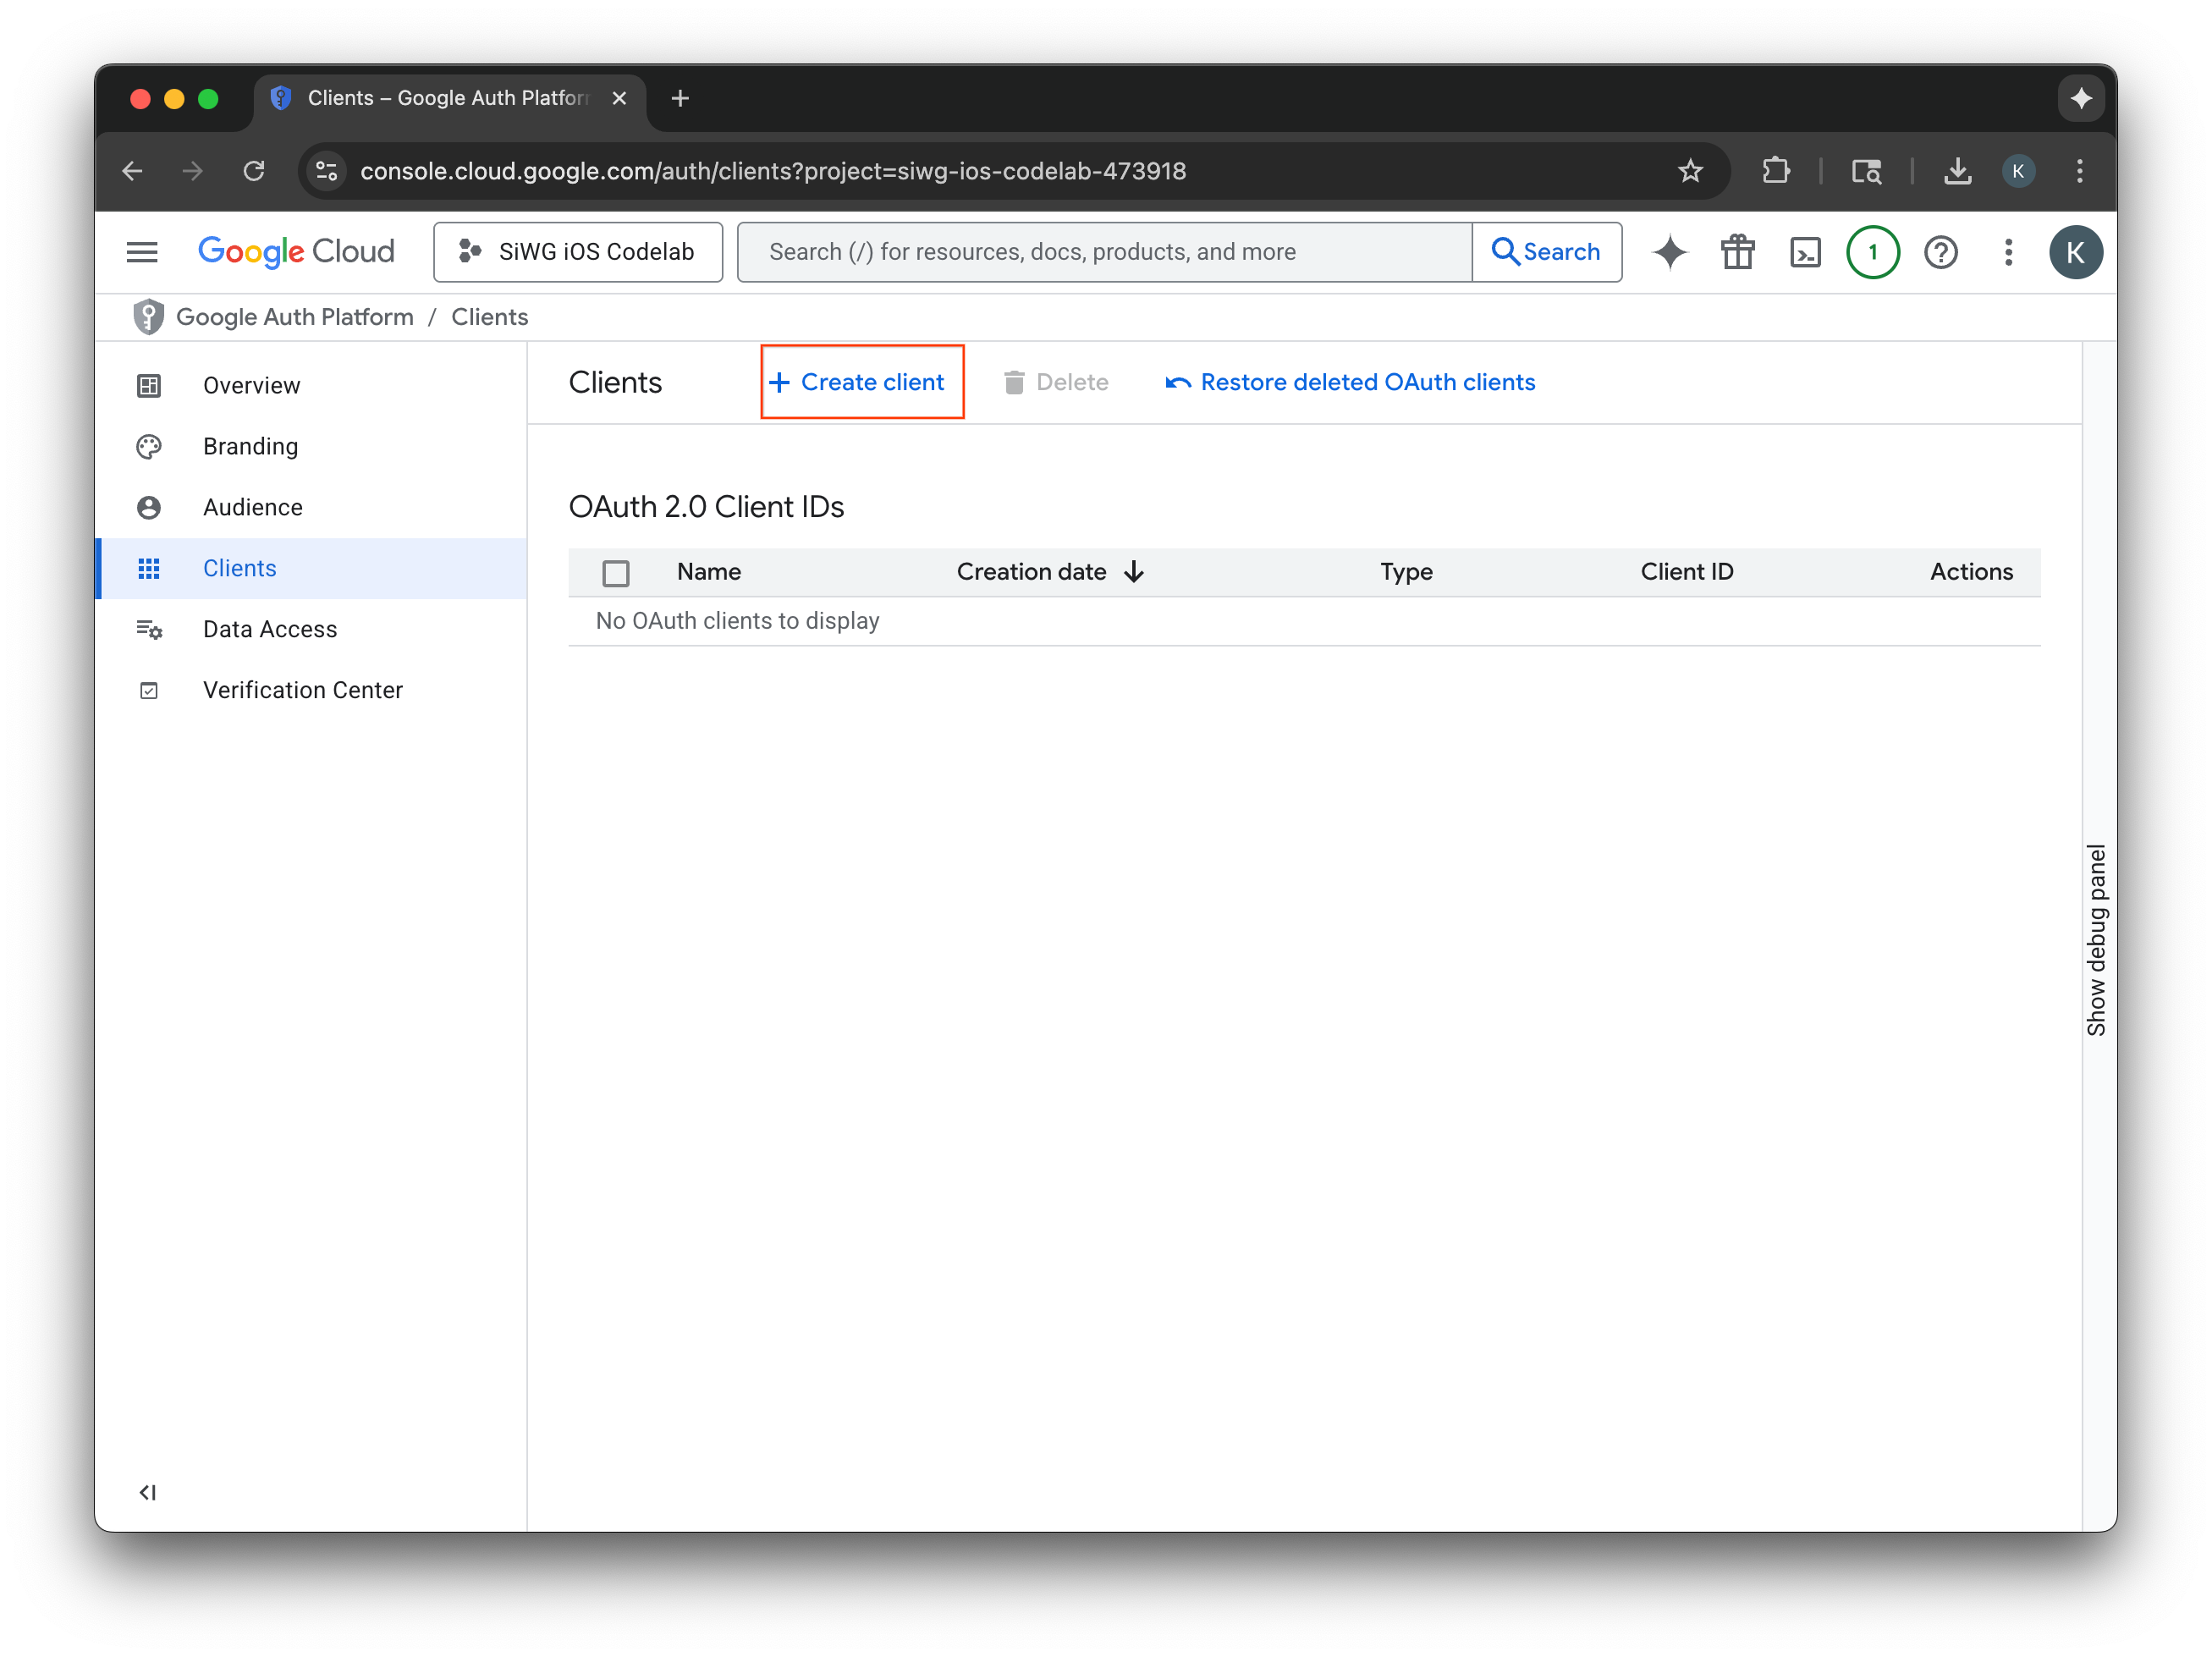
OAuth 2.0 클라이언트 만들기
- 애플리케이션 유형으로 iOS를 선택합니다.
- 클라이언트 이름을 입력합니다.
- 이전 단계에서 만든 번들 식별자를 입력합니다.
- Apple에서 팀에 할당한 팀 ID를 입력합니다. 이 단계는 현재 선택사항이지만 이 Codelab의 뒷부분에서 앱 확인을 사용 설정하려면 팀 ID가 필요합니다.
- 만들기를 선택합니다.
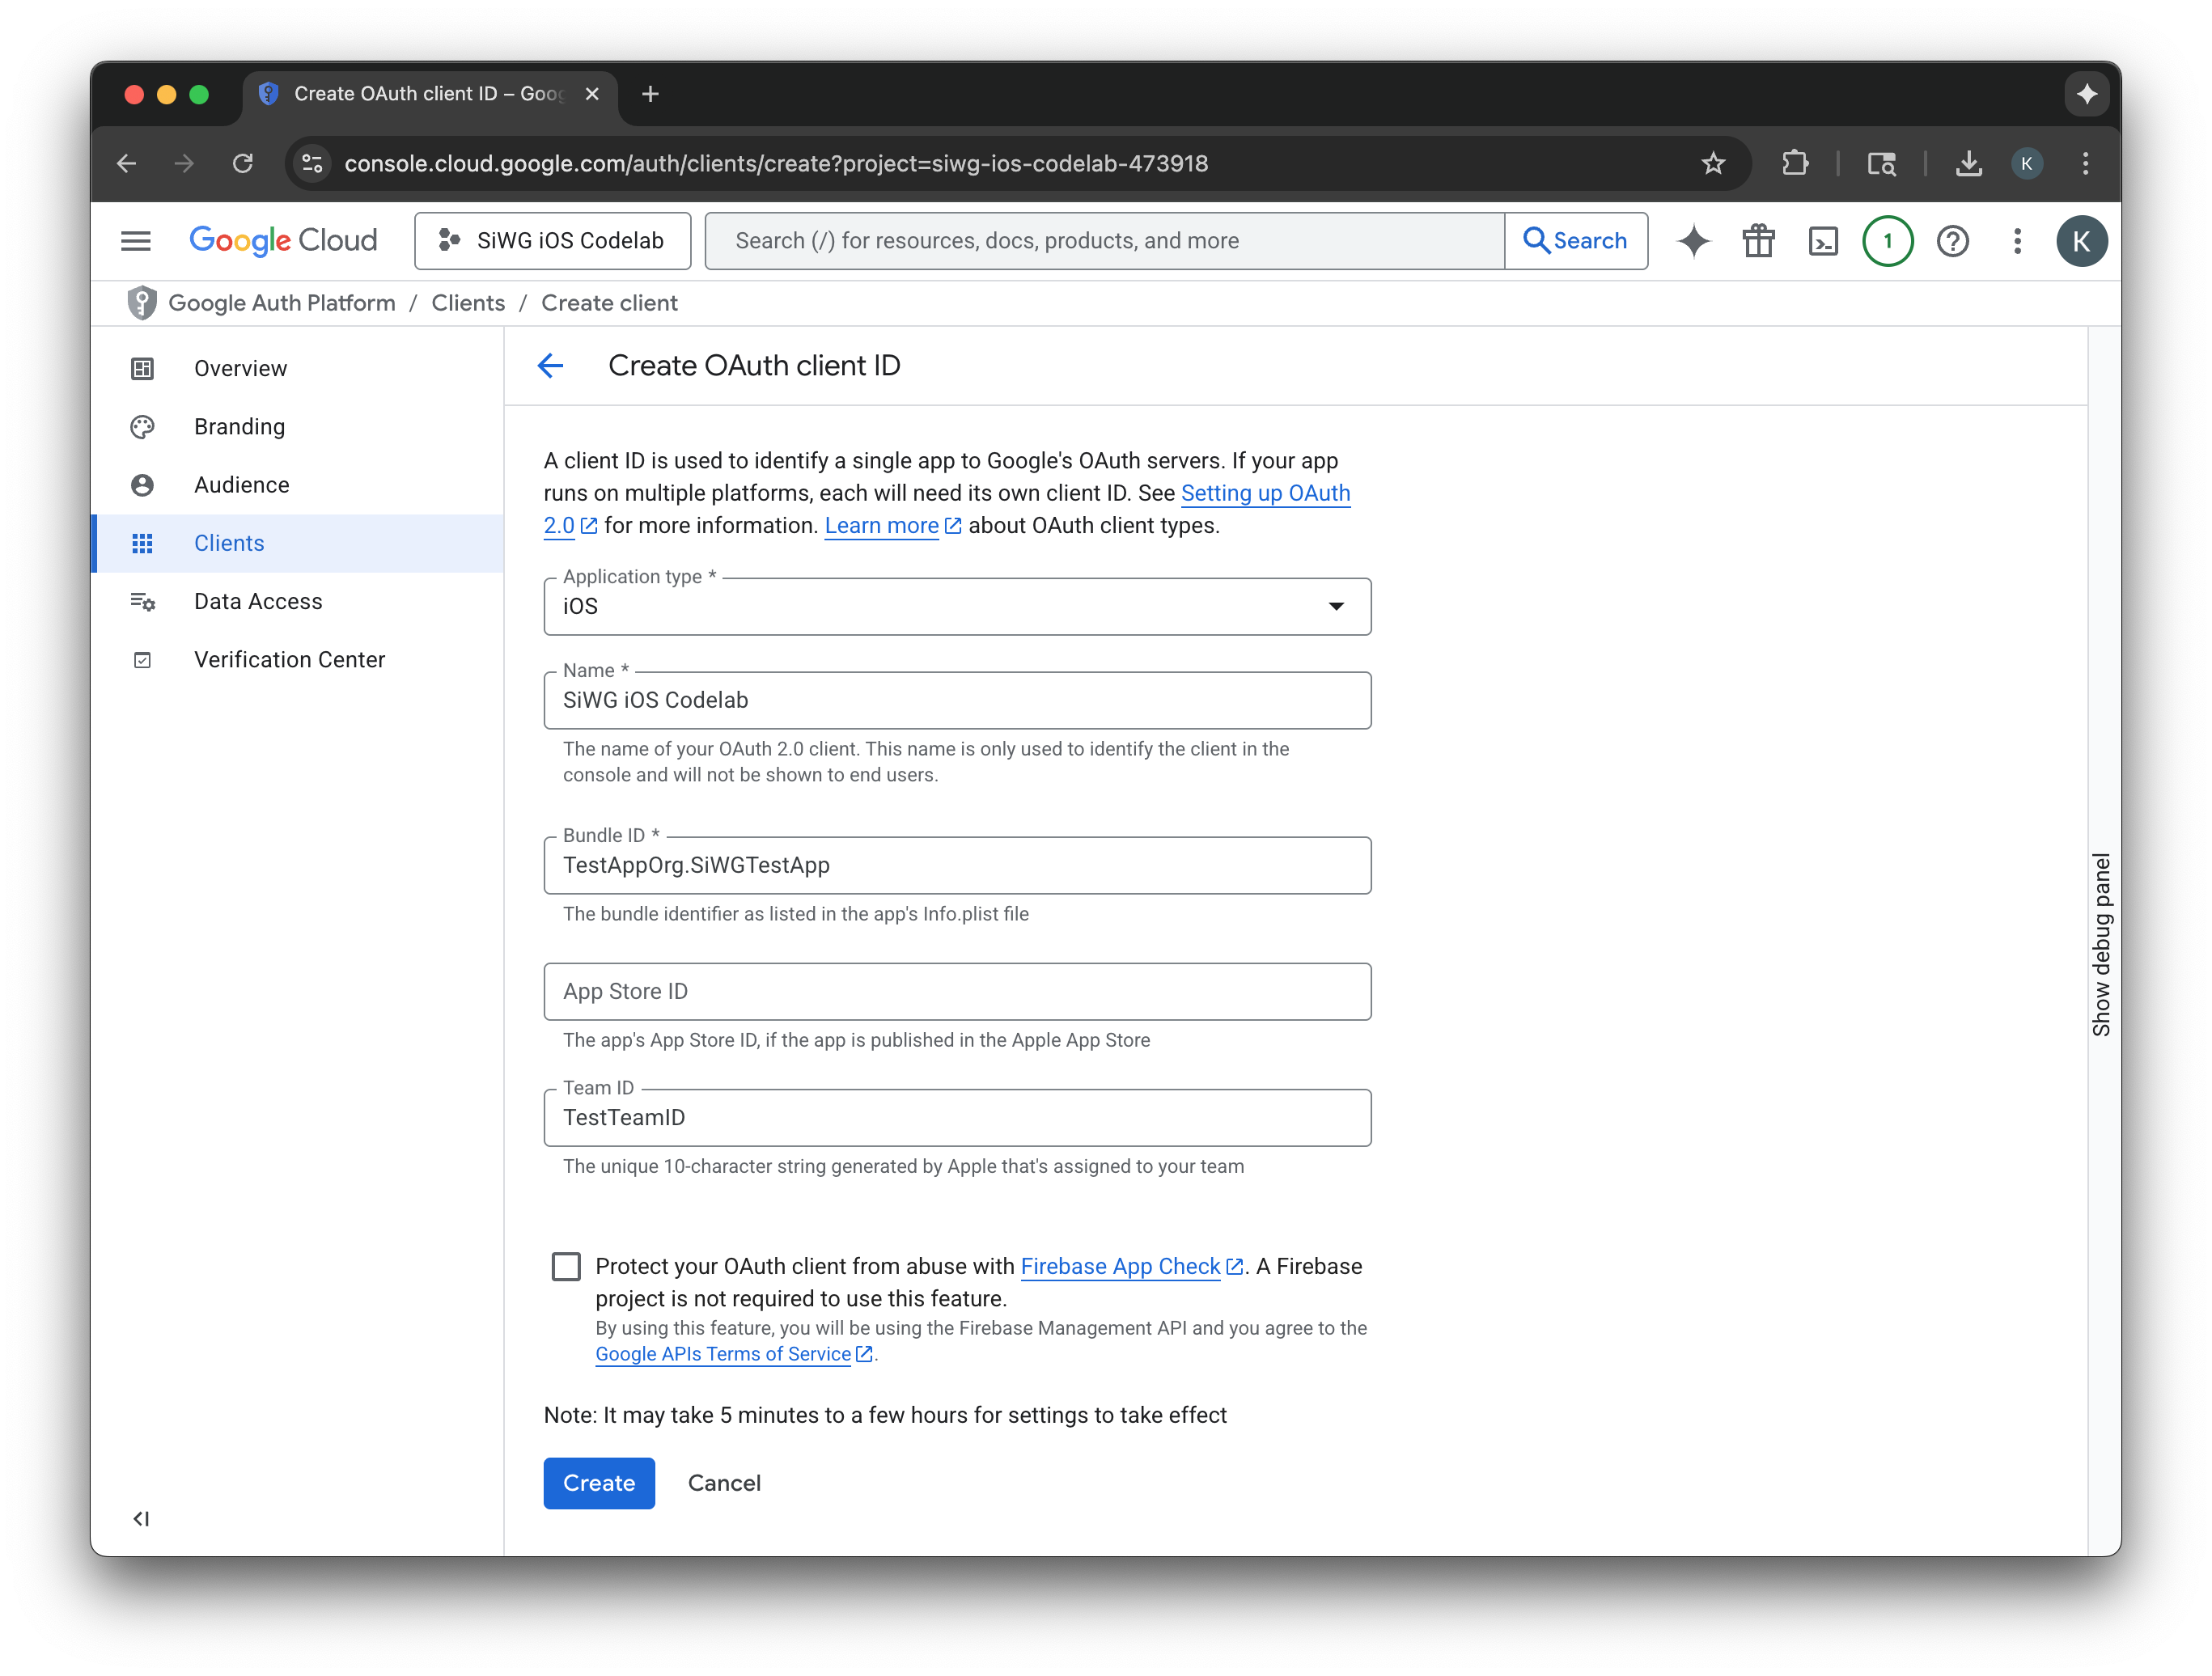
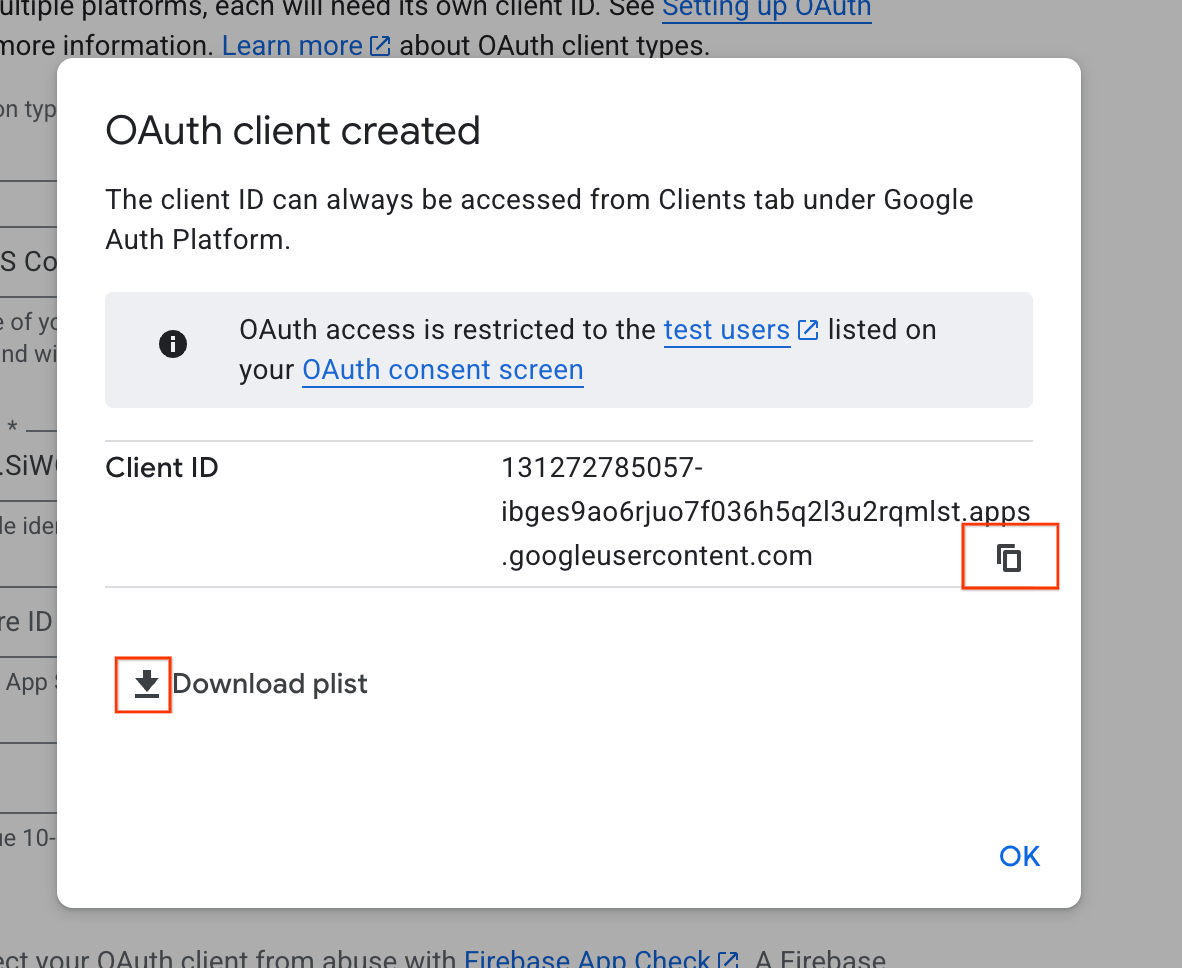
- 대화상자 창에서 클라이언트 ID를 복사합니다. 나중에 필요합니다.
- 나중에 참조할 수 있도록 plist 파일을 다운로드합니다.
4. Xcode 프로젝트 구성
다음 단계는 Google로 로그인 SDK와 함께 작동하도록 Xcode 프로젝트를 설정하는 것입니다. 이 과정에서는 SDK를 종속 항목으로 프로젝트에 추가하고 고유한 클라이언트 ID로 프로젝트 설정을 구성합니다. 이 ID를 사용하면 SDK가 로그인 프로세스 중에 Google의 인증 서비스와 안전하게 통신할 수 있습니다.
Google 계정으로 로그인 종속 항목 설치
- Xcode 프로젝트를 엽니다.
- File(파일) > Add Package Dependencies(패키지 종속 항목 추가)로 이동합니다.
- 검색창에 Google로 로그인 저장소의 URL을 입력합니다. https://github.com/google/GoogleSignIn-iOS
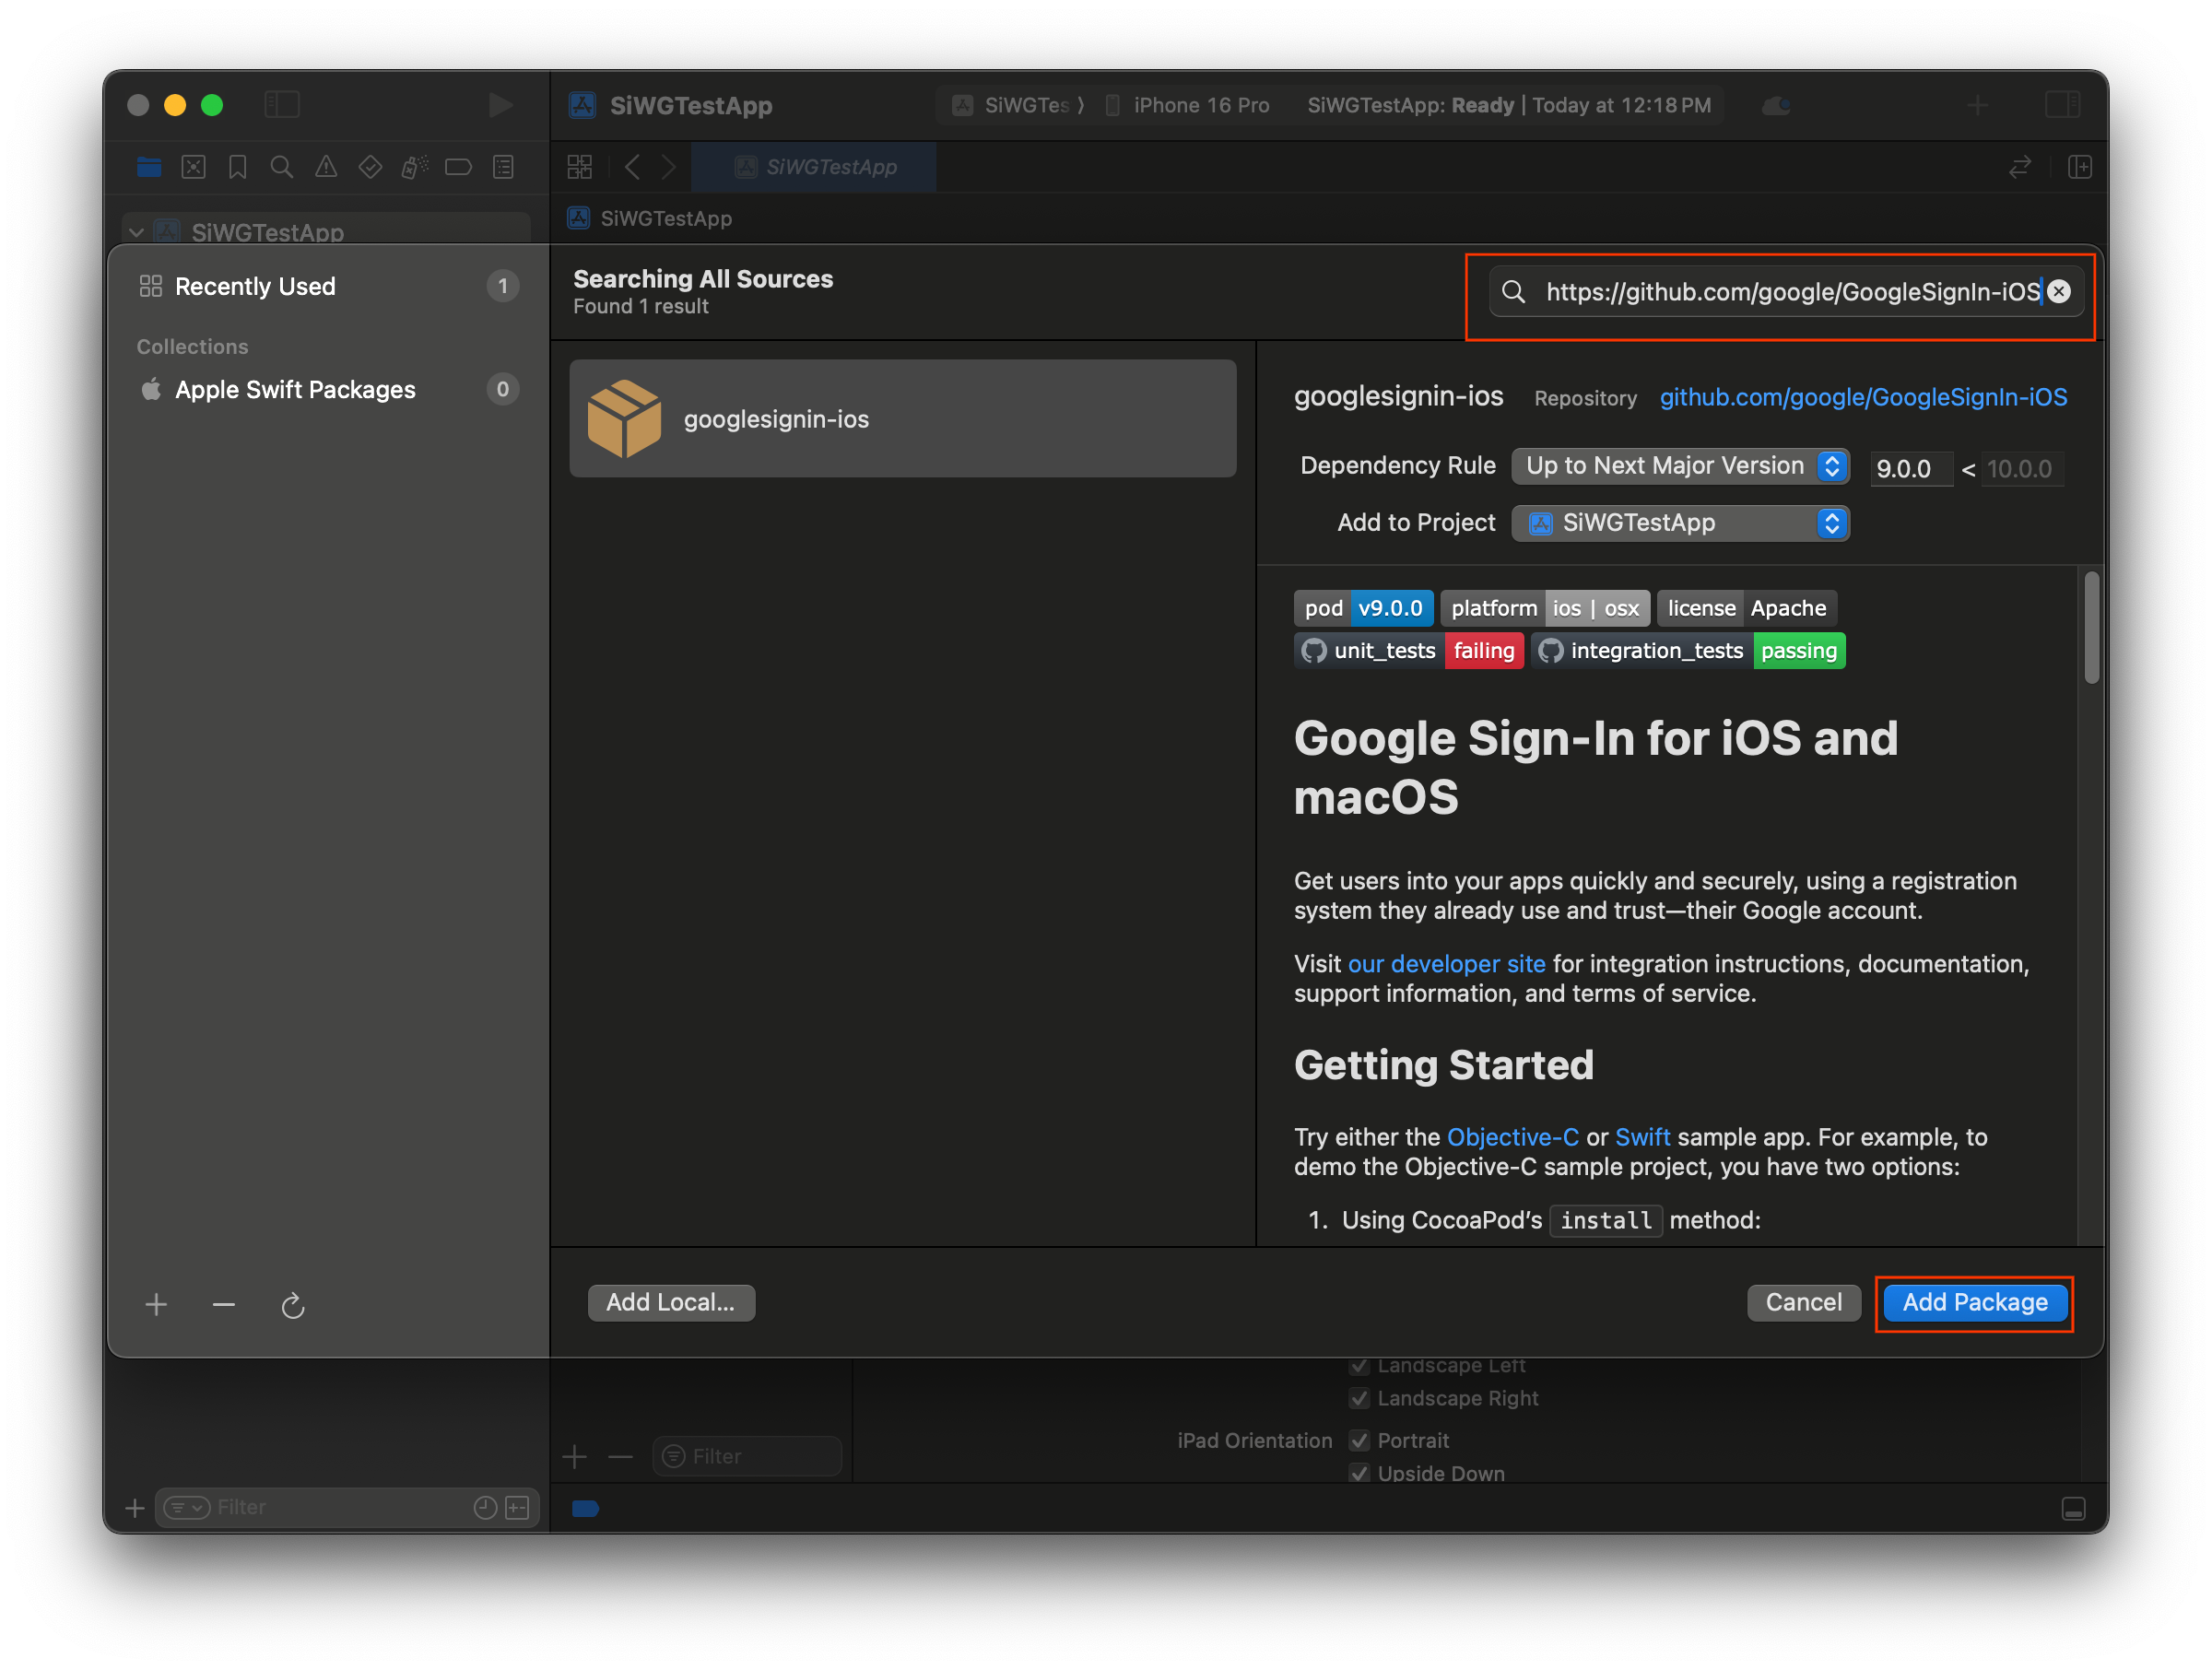
- 패키지 추가를 선택합니다.
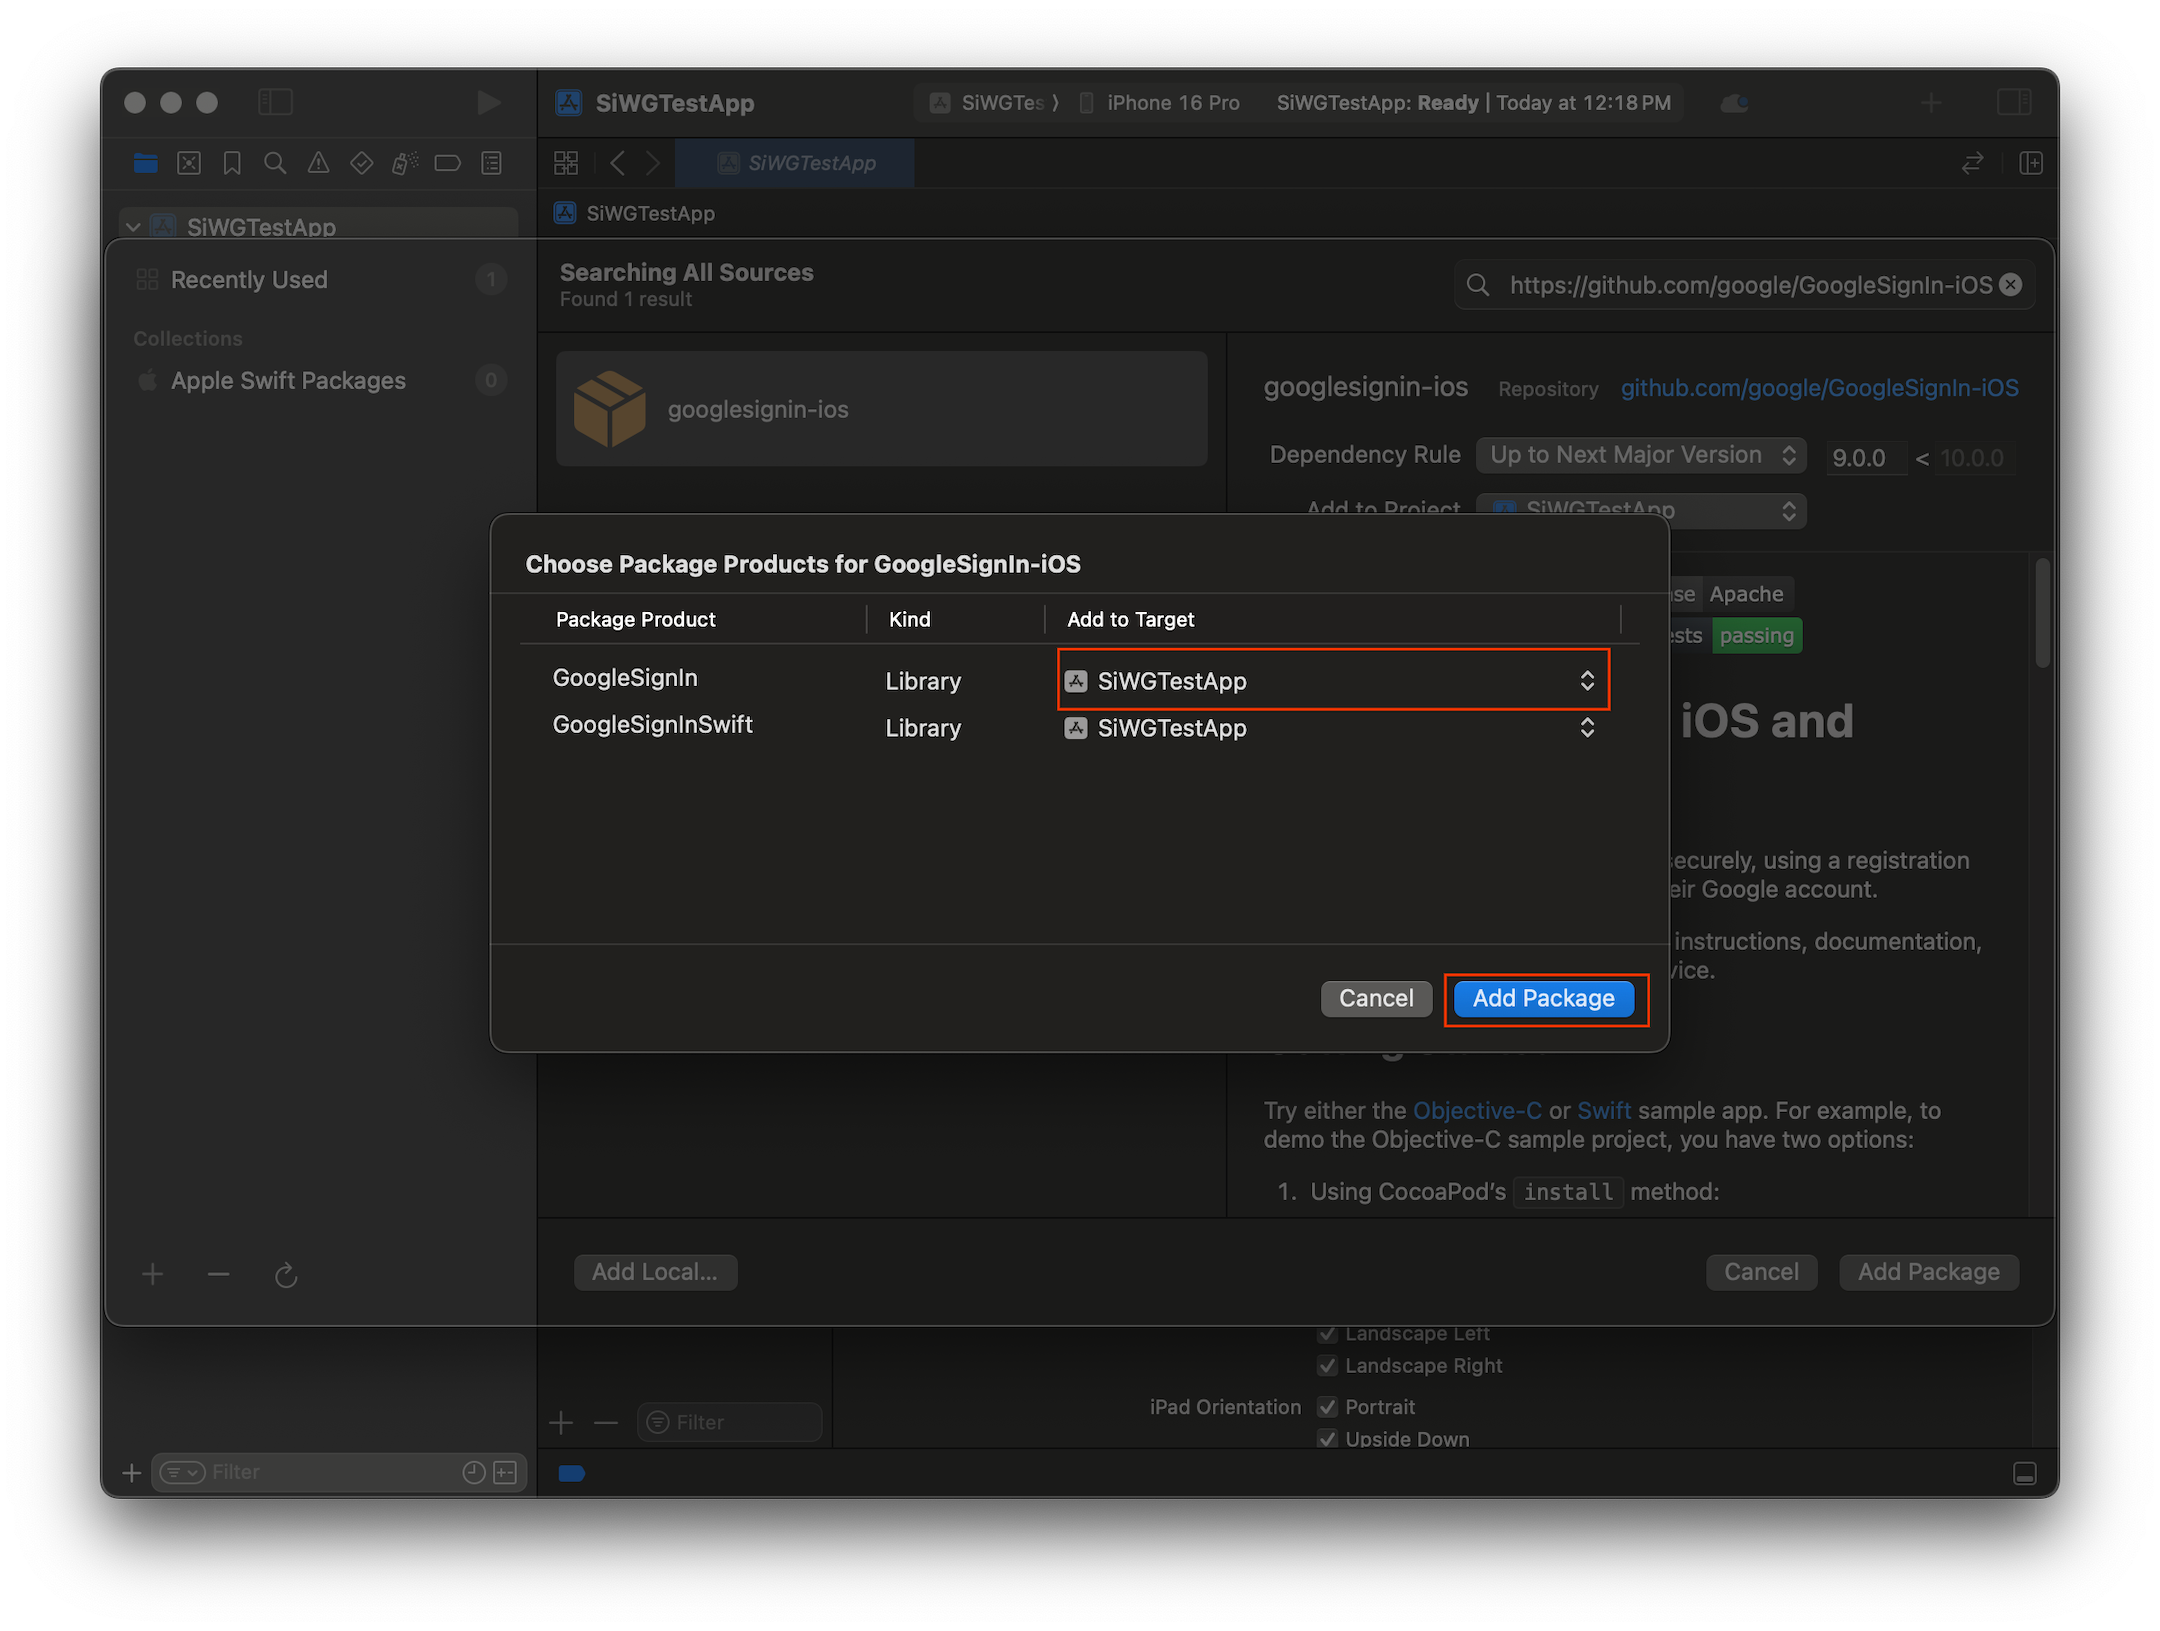
- GoogleSignIn 패키지의 기본 애플리케이션 타겟을 선택합니다.
- SwiftUI를 사용하는 경우 GoogleSignInSwift 패키지의 기본 애플리케이션 타겟을 선택합니다. UIKit을 사용하려면 이 패키지의 타겟을 선택하지 마세요.
- 패키지 추가를 선택합니다.
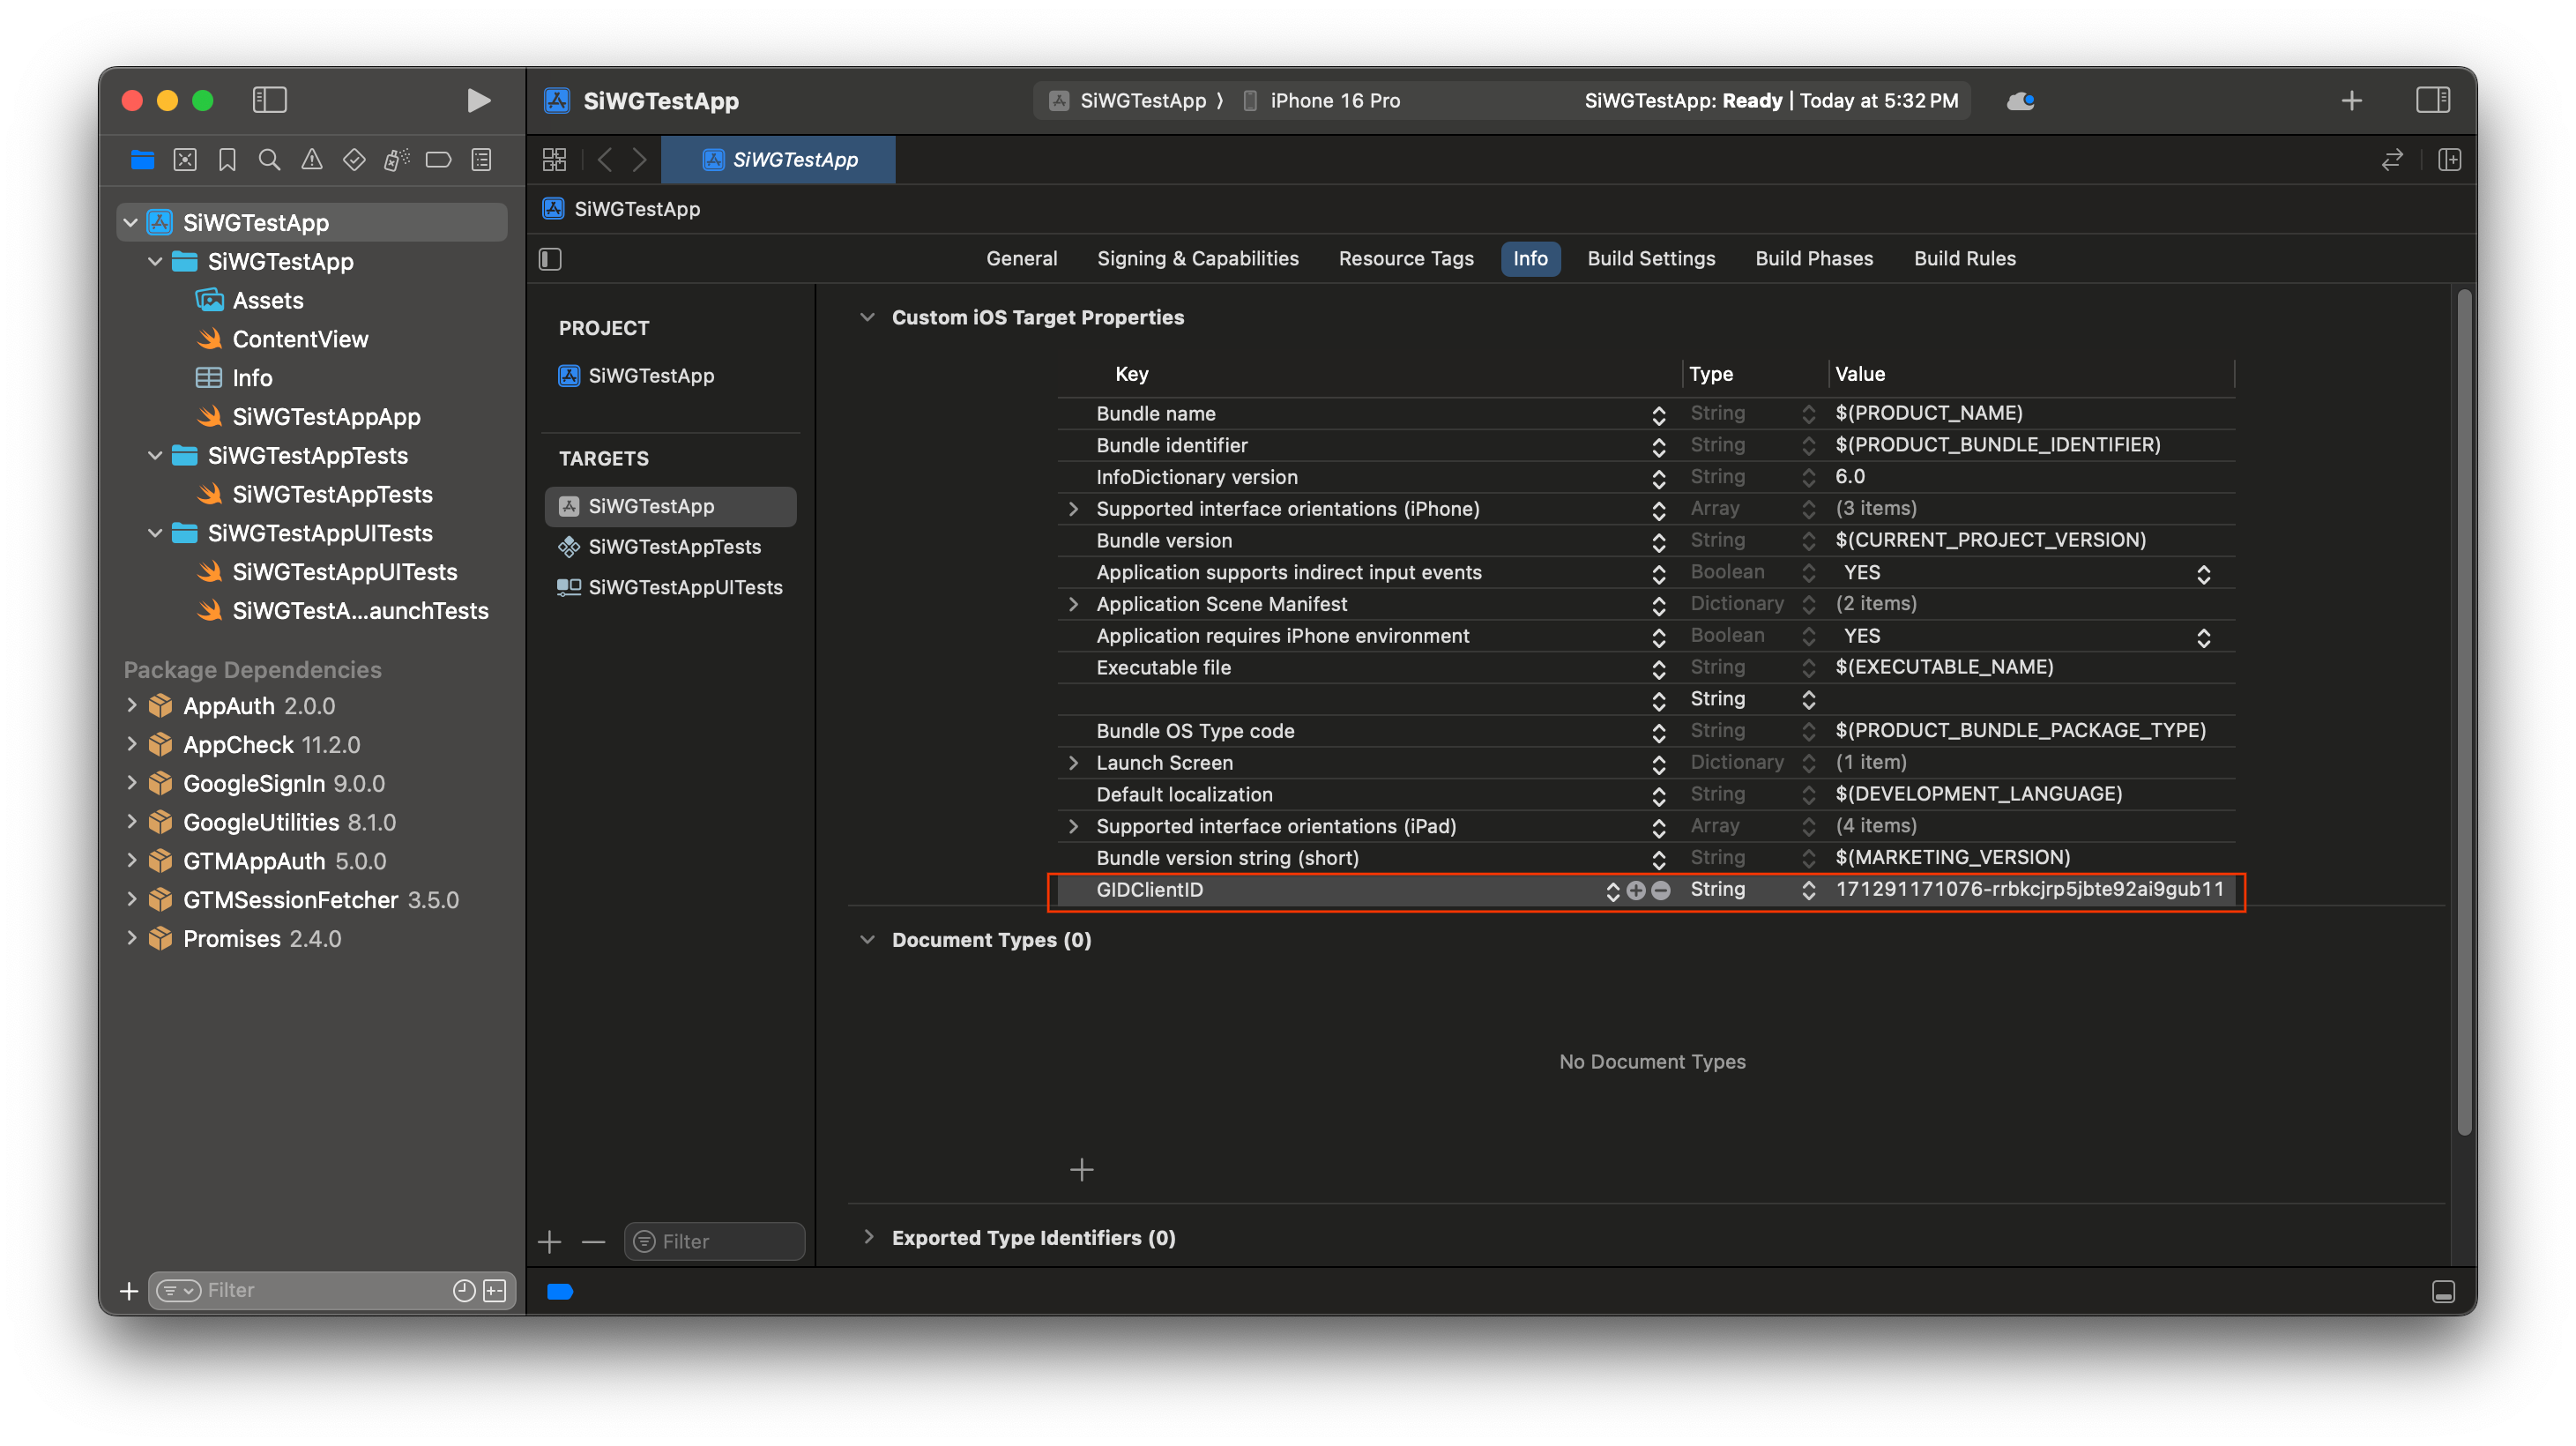
앱의 사용자 인증 정보 구성
- 프로젝트 탐색기에서 프로젝트의 루트를 클릭합니다.
- 기본 편집기 영역의 TARGETS 목록에서 기본 애플리케이션 타겟을 선택합니다.
- 편집기 영역 상단에서 정보 탭을 선택합니다.
- 맞춤 iOS 타겟 속성 섹션의 마지막 행 위로 마우스를 가져가고 표시되는 + 버튼을 클릭합니다.
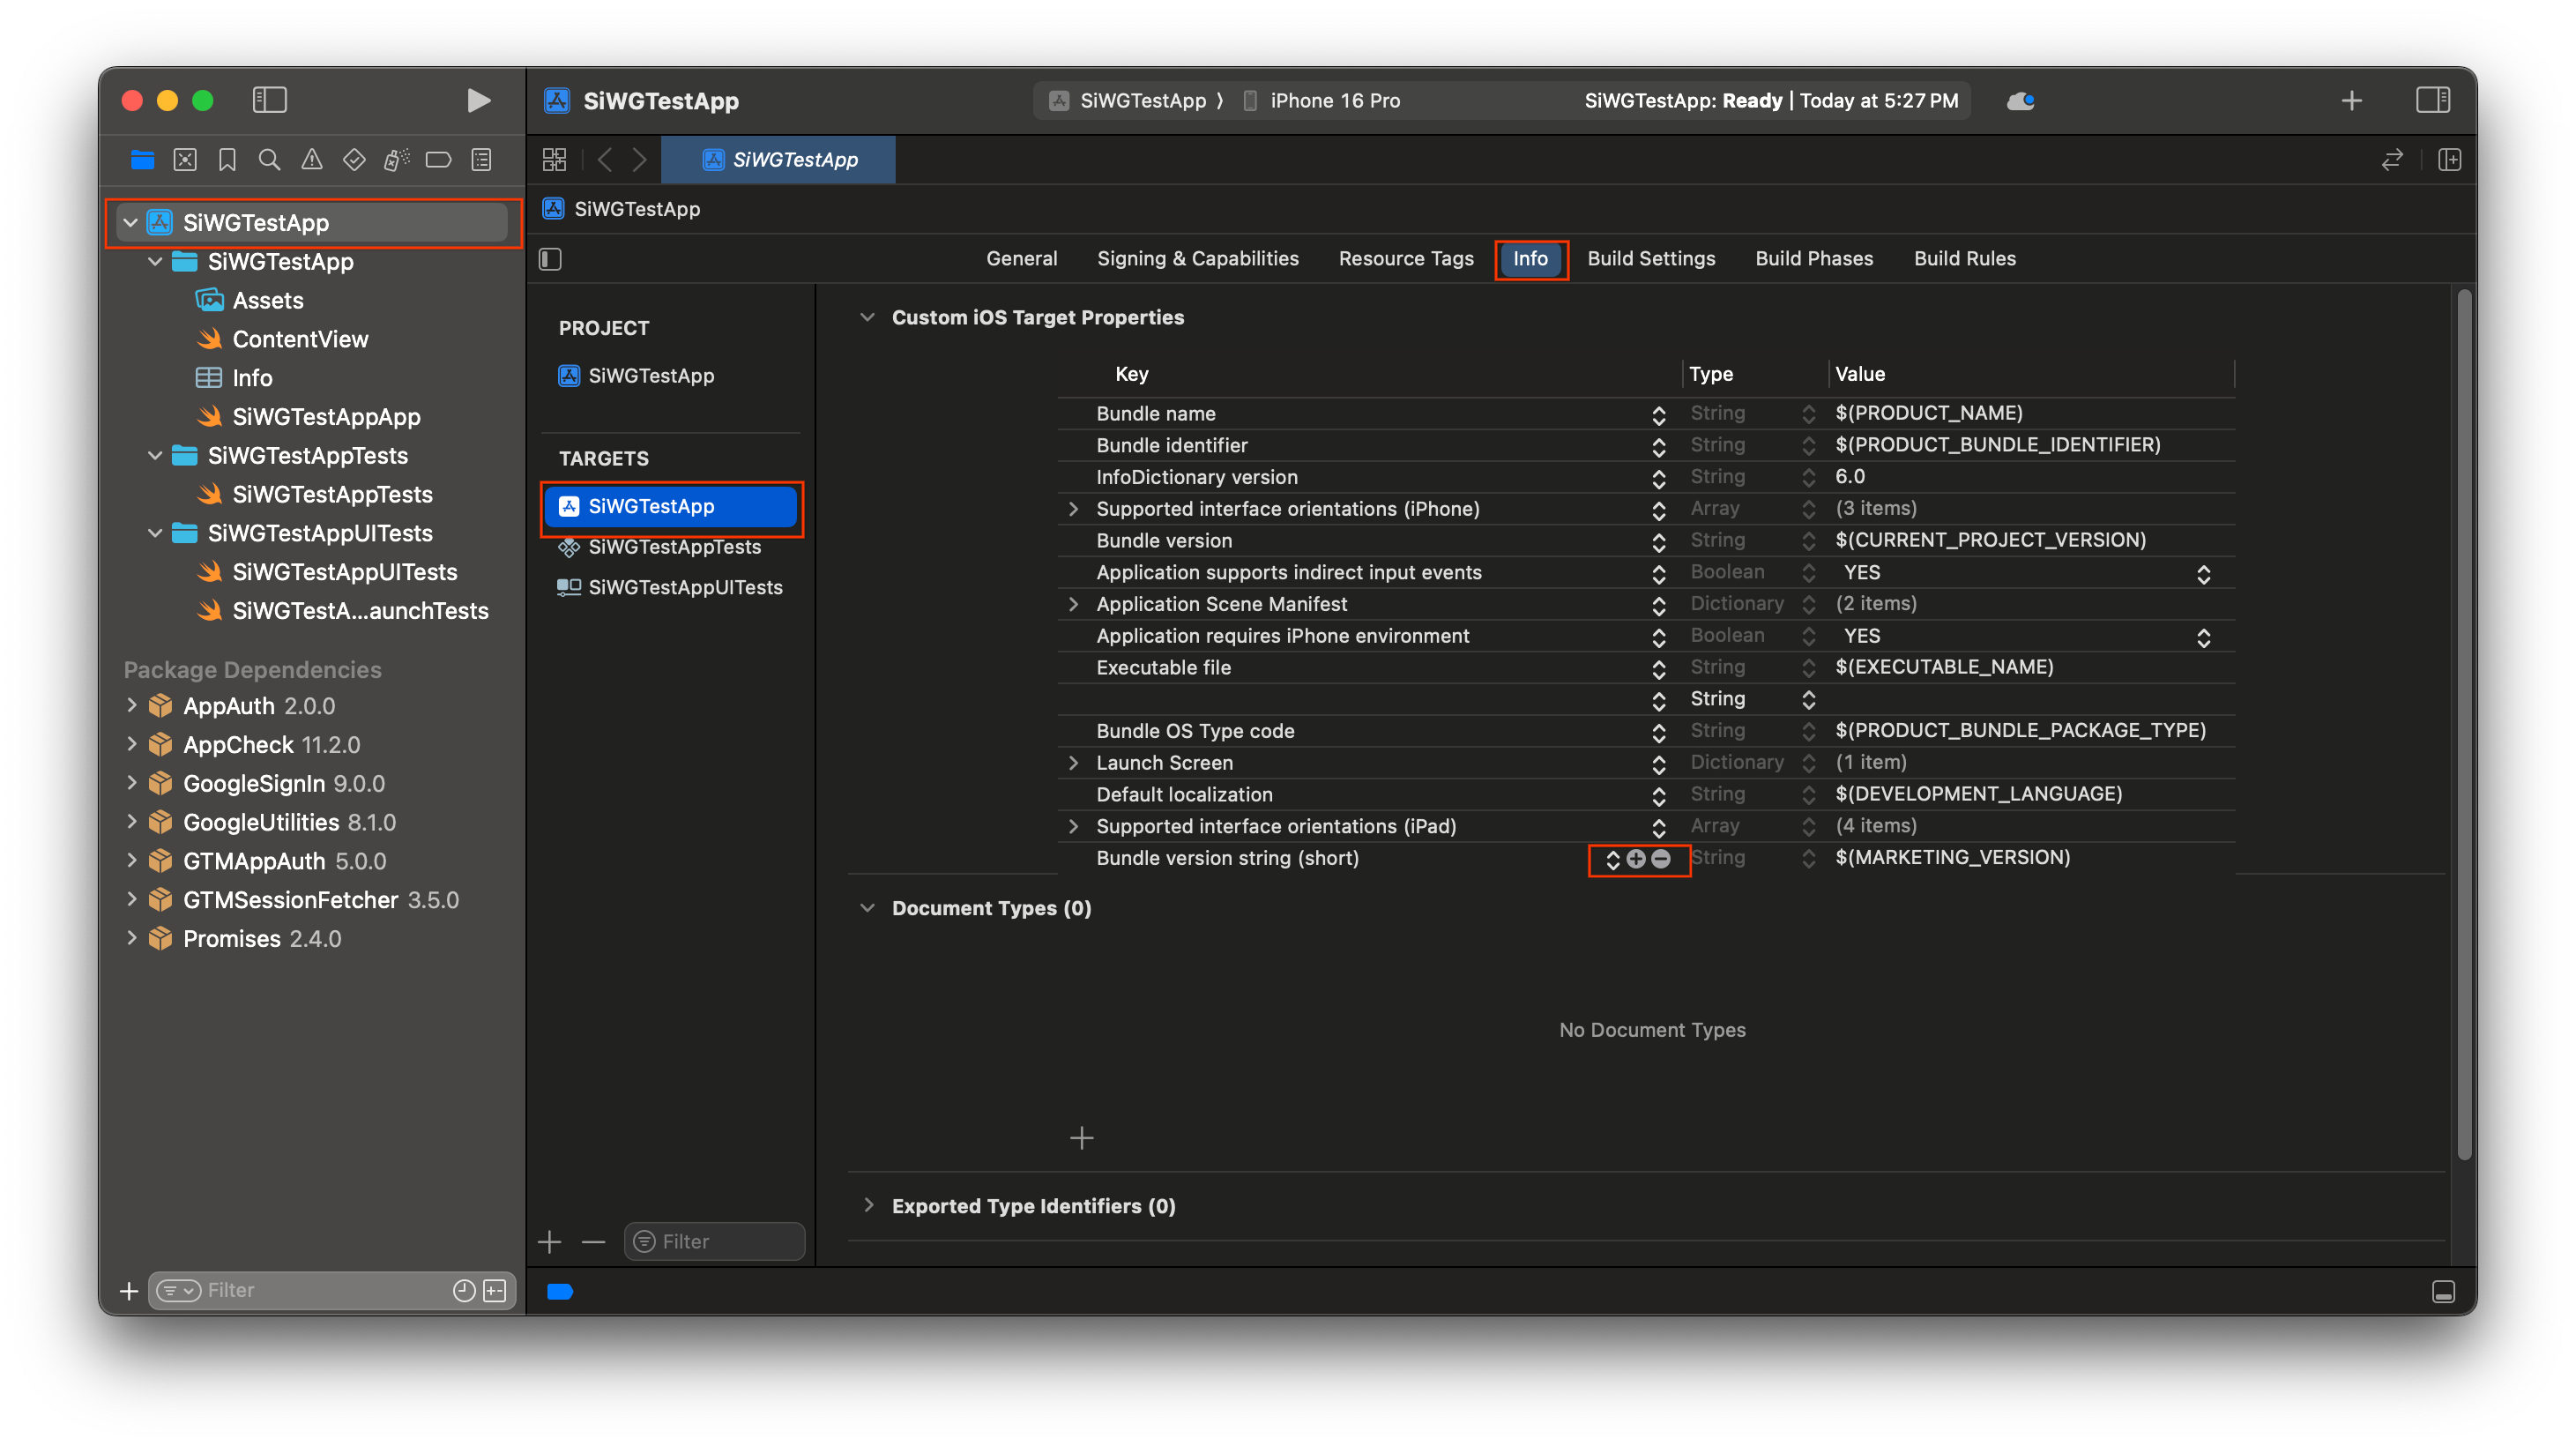
- 키 열에 GIDClientID를 입력합니다.
- 값 열에 Google Cloud 콘솔에서 복사한 클라이언트 ID를 붙여넣습니다.
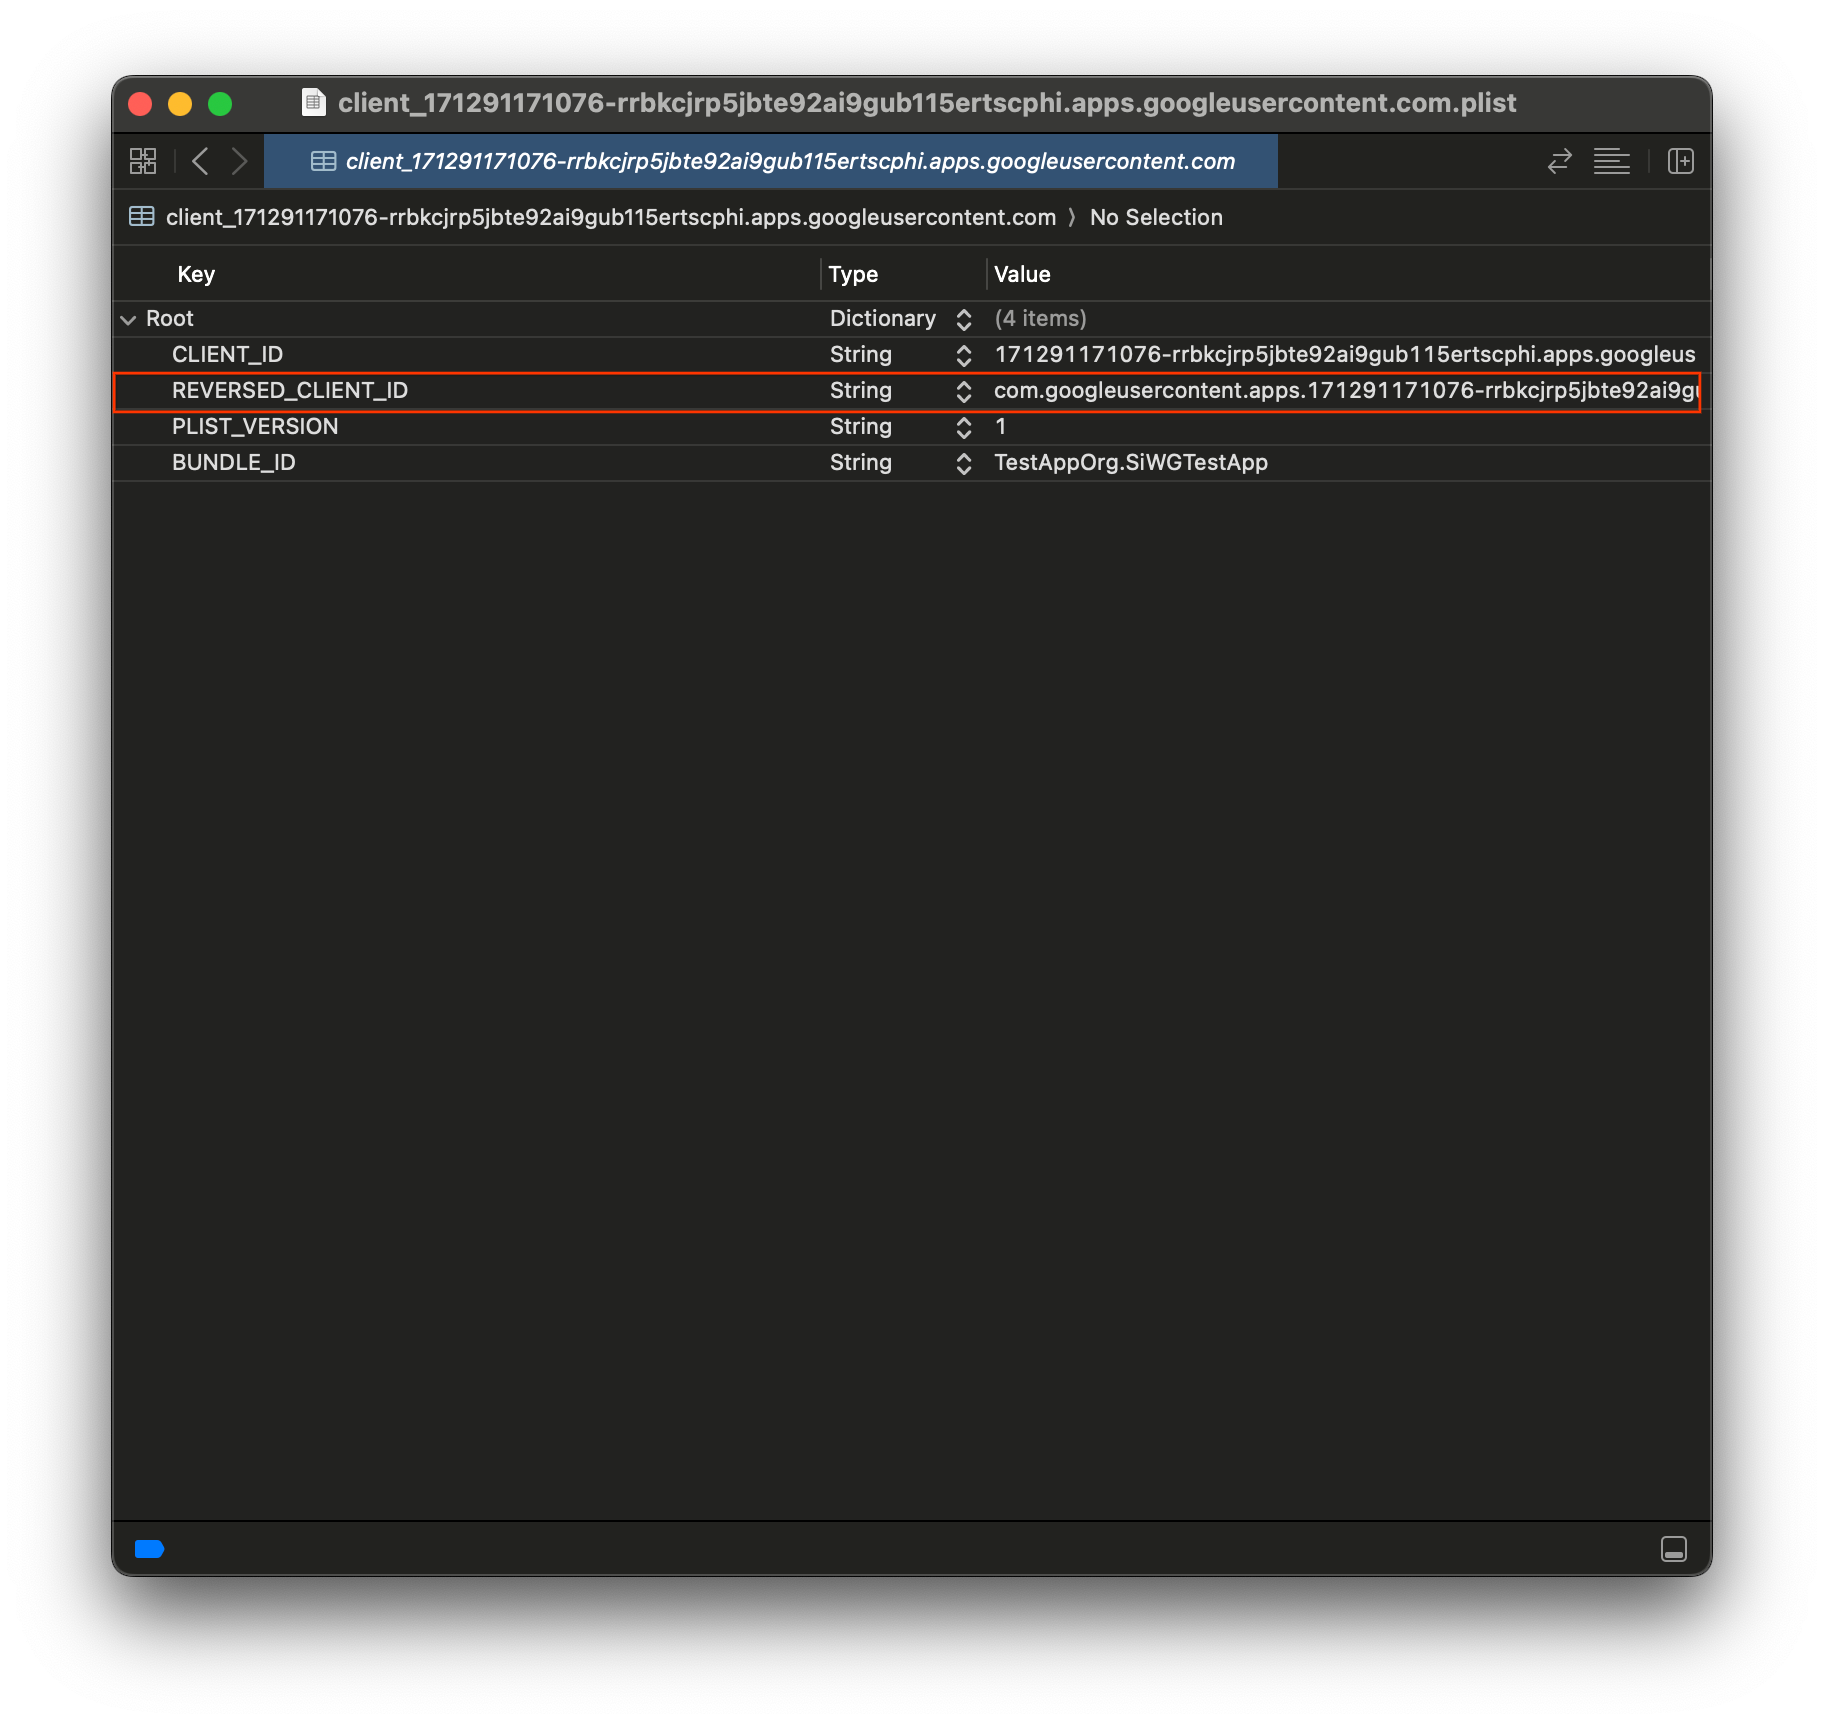
- Google Cloud 콘솔에서 다운로드한 plist 파일을 엽니다.
- Reversed Client ID 값을 복사합니다.
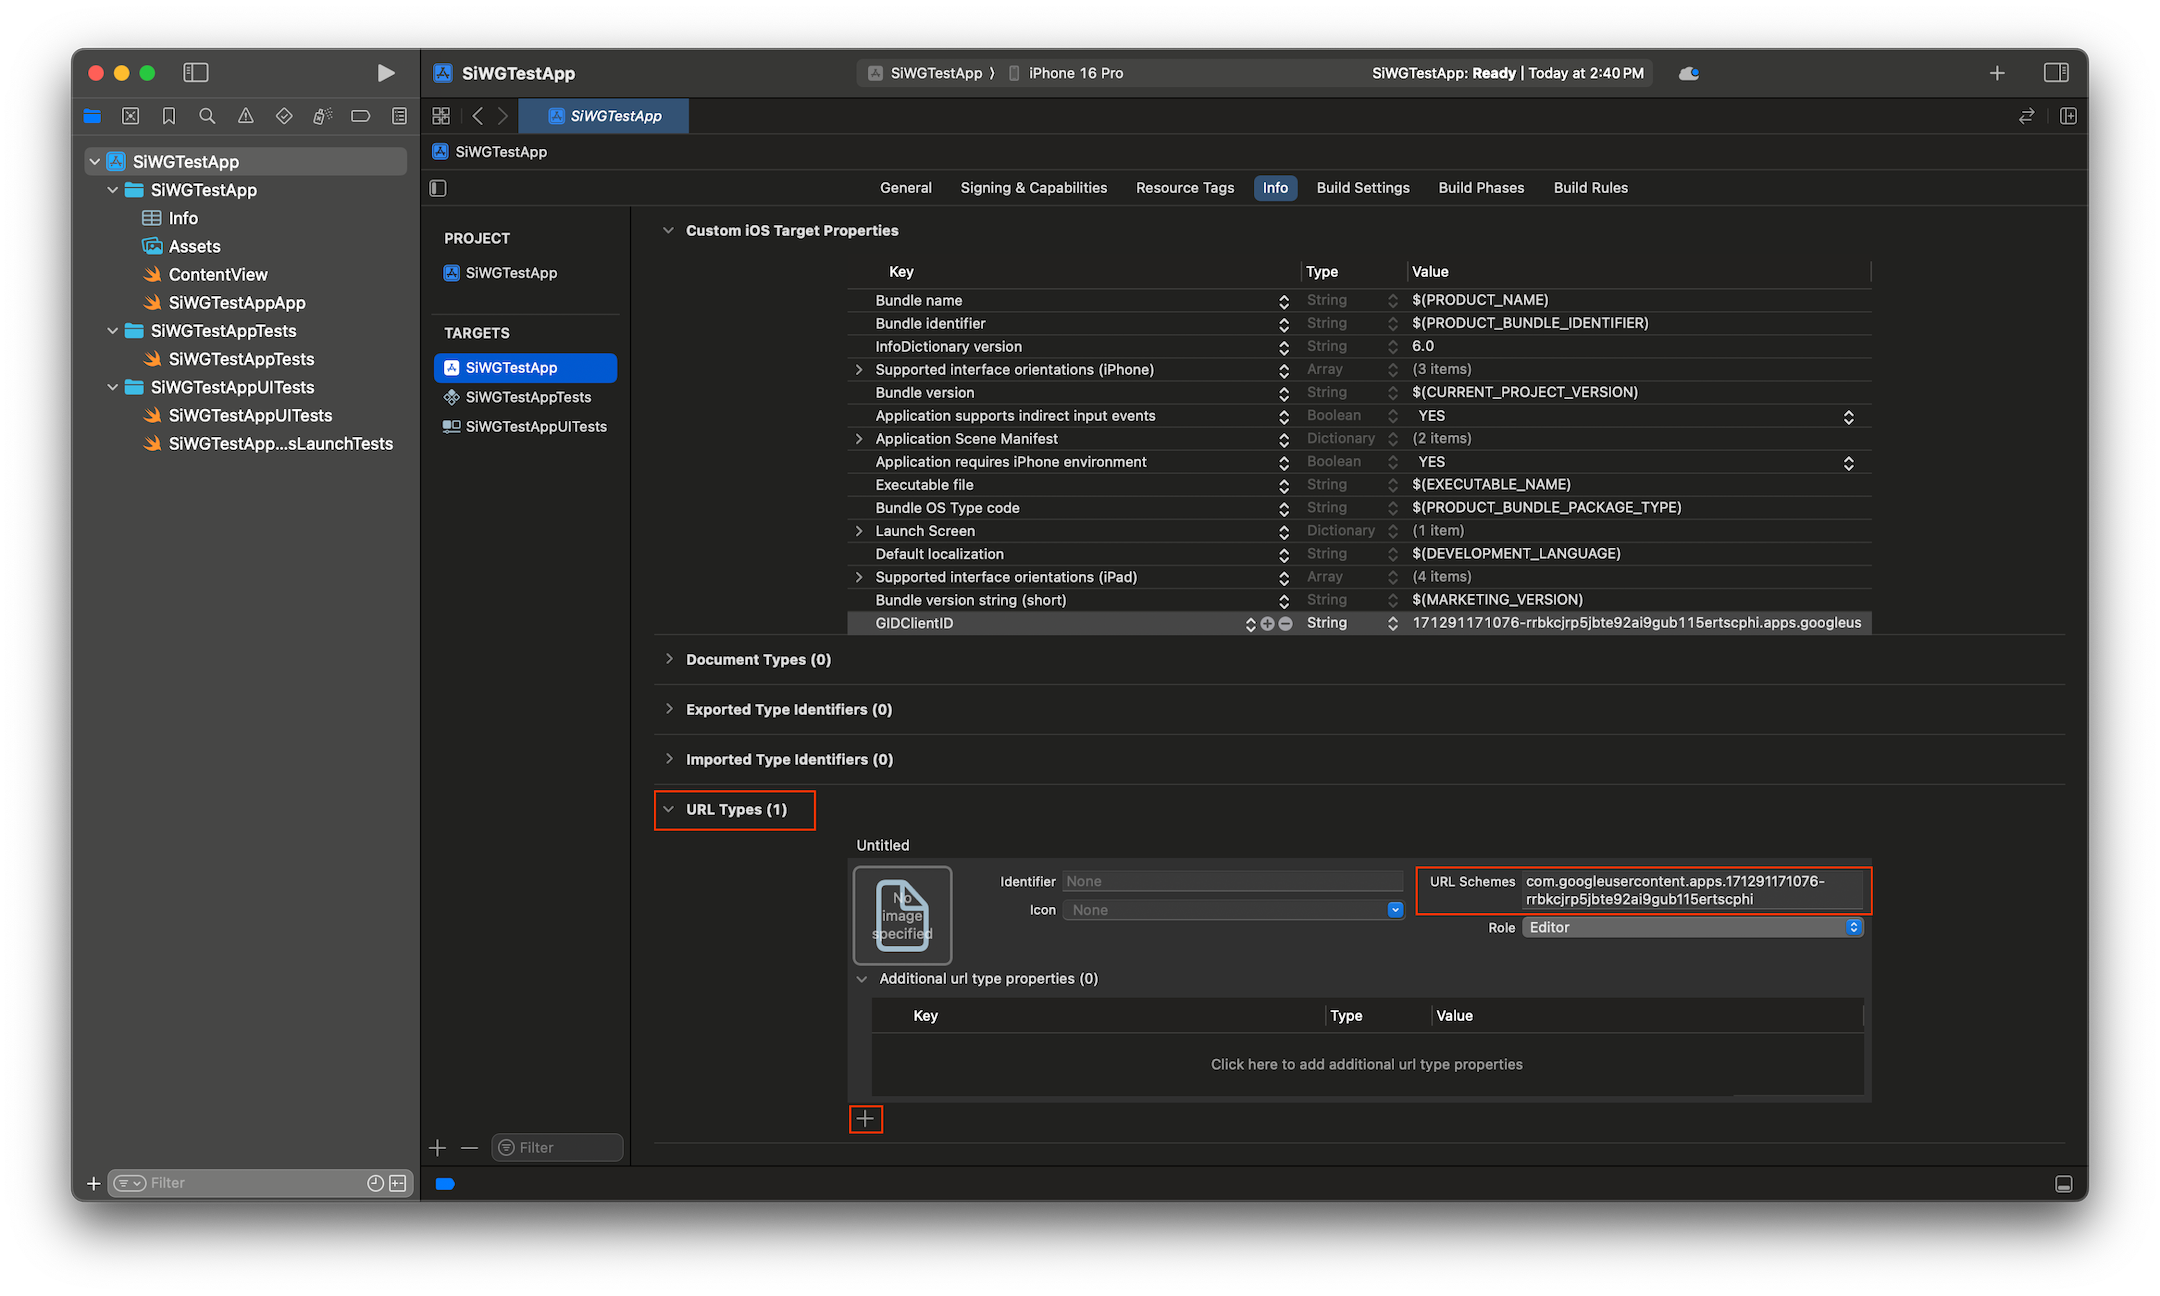
- 정보 탭 하단에서 URL 유형을 펼칩니다.
- + 버튼을 선택합니다.
- URL 스키마 상자에 반전된 클라이언트 ID를 입력합니다.
이제 앱에 로그인 버튼을 추가할 준비가 되었습니다.
5. 로그인 버튼 추가
Xcode 프로젝트가 구성되었으므로 이제 Google 계정으로 로그인 버튼을 앱에 추가할 차례입니다.
이 단계의 핵심 로직은 GIDSignIn.sharedInstance.signIn 호출입니다. 이 메서드는 인증 프로세스를 시작하여 Google로 로그인 SDK에 제어 권한을 넘겨 사용자에게 Google로 로그인 흐름을 표시합니다.
SwiftUI
- Xcode 프로젝트 탐색기에서 ContentView.swift 파일을 찾습니다.
- 이 파일의 콘텐츠를 다음 텍스트로 바꿉니다.
import GoogleSignIn
import GoogleSignInSwift
import SwiftUI

struct ContentView: View {
  var body: some View {
    VStack {
      GoogleSignInButton(action: handleSignInButton).padding()
    }
  }

  func handleSignInButton() {
    // Find the current window scene.
    guard let windowScene = UIApplication.shared.connectedScenes.first as? UIWindowScene else {
      print("There is no active window scene")
      return
    }

    // Get the root view controller from the window scene.
    guard
      let rootViewController = windowScene.windows.first(where: { $0.isKeyWindow })?
        .rootViewController
    else {
      print("There is no key window or root view controller")
      return
    }

    // Start the sign-in process.
    GIDSignIn.sharedInstance.signIn(
      withPresenting: rootViewController
    ) { signInResult, error in
      guard let result = signInResult else {
        // Inspect error
        print("Error signing in: \(error?.localizedDescription ?? "No error description")")
        return
      }
      // If sign in succeeded, display the app's main content View.
      print("ID Token: \(result.user.idToken?.tokenString ?? "")")
    }
  }
}

#Preview {
  ContentView()
}
UIKit
- Xcode 프로젝트 탐색기에서 ViewController.swift 파일을 찾습니다.
- 이 파일의 콘텐츠를 다음 텍스트로 바꿉니다.
import GoogleSignIn
import UIKit

class ViewController: UIViewController {

  // Create an instance of the Sign in with Google button
  let signInButton = GIDSignInButton()

  override func viewDidLoad() {
    super.viewDidLoad()

    // Add the sign-in button to your view
    view.addSubview(signInButton)

    // Position the button using constraints
    signInButton.translatesAutoresizingMaskIntoConstraints = false
    NSLayoutConstraint.activate([
      signInButton.centerXAnchor.constraint(equalTo: view.centerXAnchor),
      signInButton.centerYAnchor.constraint(equalTo: view.centerYAnchor),
    ])

    // Add a target to the button to call a method when it's pressed
    signInButton.addTarget(self, action: #selector(signInButtonTapped), for: .touchUpInside)
  }

  // This method is called when the sign-in button is pressed.
  @objc func signInButtonTapped() {
    // Start the sign-in process.
    GIDSignIn.sharedInstance.signIn(withPresenting: self) { signInResult, error in
      guard let result = signInResult else {
        // Inspect error
        print("Error signing in: \(error?.localizedDescription ?? "No error description")")
        return
      }

      // If sign in succeeded, print the ID token.
      print("ID Token: \(result.user.idToken?.tokenString ?? "")")
    }
  }
}
로그인 버튼 보기
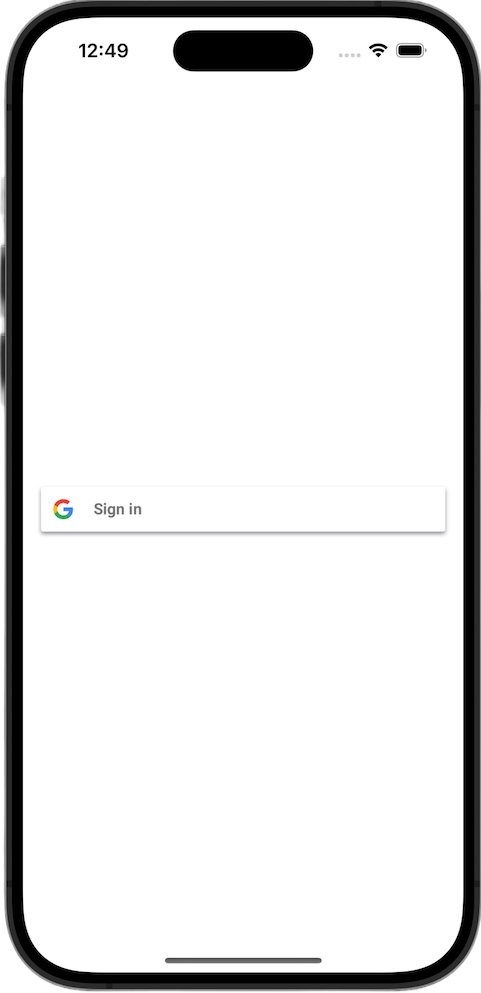
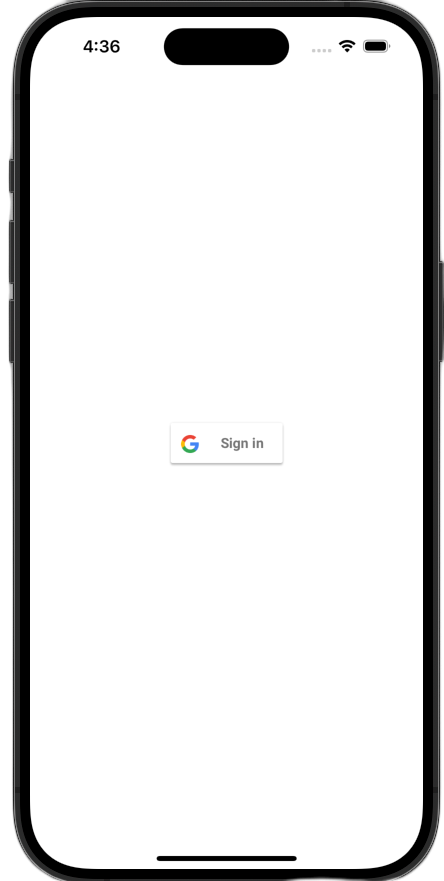
시뮬레이터에서 앱을 실행합니다. Google로 로그인 버튼이 표시되지만 아직 제대로 작동하지는 않습니다. 사용자가 인증한 후 앱으로 다시 리디렉션하는 코드를 구현해야 하므로 이는 예상된 동작입니다.
6. 로그인 버튼 맞춤설정
앱의 테마에 더 잘 맞도록 기본 Google로 로그인 버튼을 맞춤설정할 수 있습니다. Google로 로그인 SDK를 사용하면 버튼의 색 구성표와 스타일을 수정할 수 있습니다.
SwiftUI
기본 버튼은 다음 코드 줄을 사용하여 페이지에 추가됩니다.
GoogleSignInButton(action: handleSignInButton)
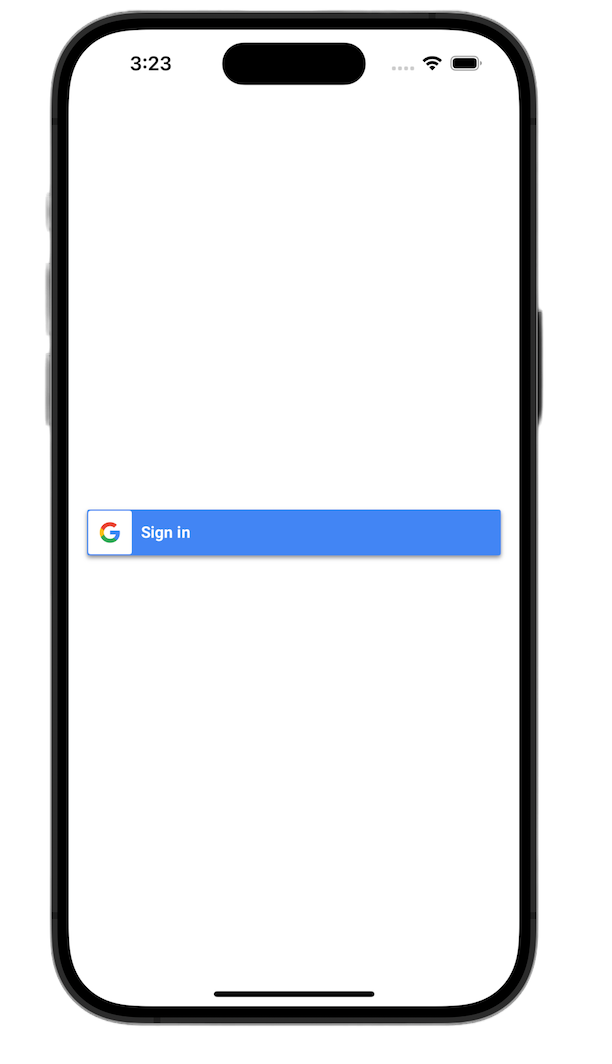
GoogleSignInButton는 초기화 프로그램에 매개변수를 전달하여 맞춤설정됩니다. 다음 코드를 사용하면 로그인 버튼이 어두운 모드로 표시됩니다.
- ContentView.swift를 엽니다.
- 다음 값을 포함하도록
GoogleSignInButton의 이니셜라이저를 업데이트합니다.
GoogleSignInButton(
  scheme: .dark,  // Options: .light, .dark, .auto
  style: .standard,  // Options: .standard, .wide, .icon
  state: .normal,  // Options: .normal, .disabled
  action: handleSignInButton
).padding()
맞춤설정 옵션에 대한 자세한 내용은 GoogleSignInSwift 프레임워크 참조를 참고하세요.
UIKit
기본 버튼은 다음 코드 줄로 생성됩니다.
// Create an instance of the Sign in with Google button
let signInButton = GIDSignInButton()

// Add the button to your view
view.addSubview(signInButton)
GIDSignInButton는 버튼 인스턴스에서 속성을 설정하여 맞춤설정됩니다. 다음 코드를 사용하면 로그인 버튼이 어두운 모드로 표시됩니다.
- ViewController.swift를 엽니다.
viewDidLoad함수에서 뷰에 로그인 버튼을 추가하기 바로 전에 다음 코드 줄을 추가합니다.
// Set the width and color of the sign-in button
signInButton.style = .standard  // Options: .standard, .wide, .iconOnly
signInButton.colorScheme = .dark  // Options: .dark, .light
맞춤설정에 대한 자세한 내용은 GoogleSignIn 프레임워크 참조를 참고하세요.
7. 인증 리디렉션 URL 처리
로그인 버튼을 추가했으므로 다음 단계는 사용자가 인증한 후 발생하는 리디렉션을 처리하는 것입니다. 인증 후 Google은 임시 승인 코드가 포함된 URL을 반환합니다. 로그인 프로세스를 완료하기 위해 핸들러가 이 URL을 가로채서 Google로 로그인 SDK에 전달하여 서명된 ID 토큰 (JWT)으로 교환합니다.
SwiftUI
App구조체가 포함된 파일을 엽니다. 이 파일은 프로젝트를 기반으로 이름이 지정되므로 이름은 YourProjectNameApp.swift와 같습니다.- 이 파일의 콘텐츠를 다음 텍스트로 바꿉니다.
import GoogleSignIn
import SwiftUI

@main
struct iOS_Sign_in_with_Google_App: App {
  var body: some Scene {
    WindowGroup {
      ContentView()

        .onOpenURL { url in
          GIDSignIn.sharedInstance.handle(url)
        }
    }
  }
}
UIKit
- AppDelegate.swift를 엽니다.
- 파일 상단에 다음 가져오기를 추가합니다.
import GoogleSignIn
AppDelegate클래스 내에 다음 인증 핸들러 함수를 추가합니다.application(_:didFinishLaunchingWithOptions:)메서드의 닫는 중괄호 바로 뒤에 배치하는 것이 좋습니다.
func application(
  _ app: UIApplication,
  open url: URL,
  options: [UIApplication.OpenURLOptionsKey: Any] = [:]
) -> Bool {
  var handled: Bool

  handled = GIDSignIn.sharedInstance.handle(url)
  if handled {
    return true
  }
  // If not handled by this app, return false.
  return false
}
이러한 변경사항을 적용하면 AppDelegate.swift 파일이 다음과 같이 표시됩니다.
import GoogleSignIn
import UIKit

@main
class AppDelegate: UIResponder, UIApplicationDelegate {

  func application(
    _ application: UIApplication,
    didFinishLaunchingWithOptions launchOptions: [UIApplication.LaunchOptionsKey: Any]?
  ) -> Bool {
    // Override point for customization after application launch.
    return true
  }

  func application(
    _ app: UIApplication,
    open url: URL,
    options: [UIApplication.OpenURLOptionsKey: Any] = [:]
  ) -> Bool {
    var handled: Bool

    handled = GIDSignIn.sharedInstance.handle(url)
    if handled {
      return true
    }
    // If not handled by this app, return false.
    return false
  }

  // MARK: UISceneSession Lifecycle

  func application(
    _ application: UIApplication,
    configurationForConnecting connectingSceneSession: UISceneSession,
    options: UIScene.ConnectionOptions
  ) -> UISceneConfiguration {
    // Called when a new scene session is being created.
    // Use this method to select a configuration to create the new scene with.
    return UISceneConfiguration(
      name: "Default Configuration",
      sessionRole: connectingSceneSession.role
    )
  }

  func application(
    _ application: UIApplication,
    didDiscardSceneSessions sceneSessions: Set<UISceneSession>
  ) {
    // Called when the user discards a scene session.
    // If any sessions were discarded while the application was not running, this will be called shortly after application:didFinishLaunchingWithOptions.
    // Use this method to release any resources that were specific to the discarded scenes, as they will not return.
  }
}
로그인 흐름 테스트
이제 전체 로그인 흐름을 테스트할 수 있습니다.
앱을 실행하고 로그인 버튼을 탭합니다. 인증이 완료되면 Google에서 앱이 내 정보에 액세스할 수 있는 권한을 부여할 수 있는 동의 화면을 표시합니다. 승인하면 로그인이 완료되고 앱으로 돌아갑니다.
로그인 흐름이 성공적으로 완료되면 Google로 로그인 SDK가 기기의 키체인에 사용자의 사용자 인증 정보를 안전하게 저장합니다. 이 사용자 인증 정보는 나중에 사용자가 후속 앱 실행 시 로그인 상태를 유지하도록 허용하는 데 사용할 수 있습니다.
8. 로그아웃 버튼 추가
이제 로그인이 작동하므로 다음 단계는 로그아웃 버튼을 추가하고 사용자의 현재 로그인 상태를 반영하도록 UI를 업데이트하는 것입니다. 로그인이 성공하면 SDK에서 GIDGoogleUser 객체를 제공합니다. 이 객체에는 UI를 맞춤설정하는 데 사용할 사용자의 이름, 이메일과 같은 기본 정보가 포함된 profile 속성이 포함되어 있습니다.
SwiftUI
- ContentView.swift 파일을 엽니다.
ContentView구조체 상단에 상태 변수를 추가합니다. 이 변수는 사용자가 로그인한 후 사용자 정보를 보유합니다.@State변수이므로 값이 변경될 때마다 SwiftUI가 UI를 자동으로 업데이트합니다.
struct ContentView: View {
  @State private var user: GIDGoogleUser?
}
ContentView구조체의 현재body를 다음VStack로 바꿉니다. 이렇게 하면user상태 변수에 사용자가 포함되어 있는지 확인합니다. 이 경우 환영 메시지와 로그아웃 버튼이 표시됩니다. 그렇지 않으면 원래 Google 계정으로 로그인 버튼이 표시됩니다.
var body: some View {
VStack {
// Check if the user is signed in.
if let user = user {
// If signed in, show a welcome message and the sign-out button.
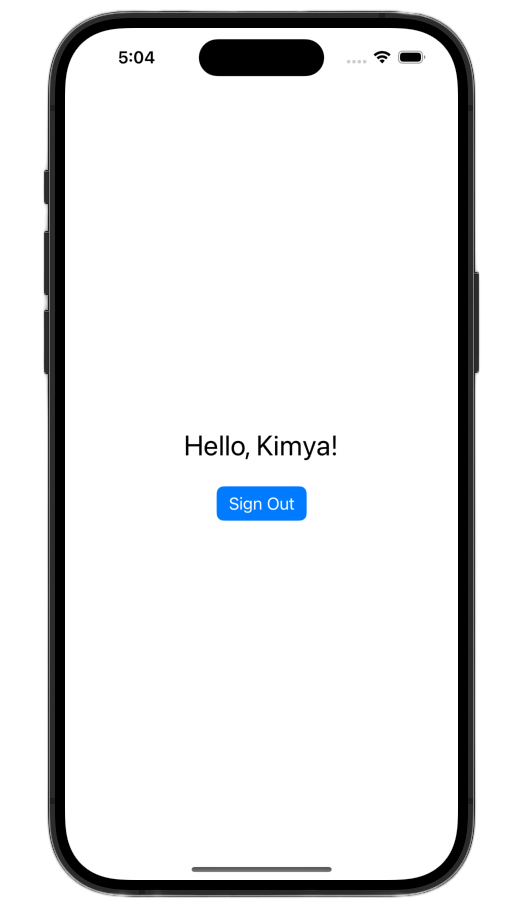
Text("Hello, \(user.profile?.givenName ?? "User")!")
.font(.title)
.padding()
Button("Sign Out", action: signOut)
.buttonStyle(.borderedProminent)
} else {
// If not signed in, show the "Sign in with Google" button.
GoogleSignInButton(
scheme: .dark, // Options: .light, .dark, .auto
style: .standard, // Options: .standard, .wide, .icon
state: .normal, // Options: .normal, .disabled
action: handleSignInButton
).padding()
}
}
}
signInResult.user을 새user변수에 할당하도록handleSignInButton완료 블록을 업데이트합니다. UI가 로그인된 보기로 전환되도록 트리거하는 것은 다음과 같습니다.
func handleSignInButton() {
  // Find the current window scene.
  guard let windowScene = UIApplication.shared.connectedScenes.first as? UIWindowScene else {
    print("There is no active window scene")
    return
  }

  // Get the root view controller from the window scene.
  guard
    let rootViewController = windowScene.windows.first(where: { $0.isKeyWindow })?
      .rootViewController
  else {
    print("There is no key window or root view controller")
    return
  }

  // Start the sign-in process.
  GIDSignIn.sharedInstance.signIn(
    withPresenting: rootViewController
  ) { signInResult, error in
    guard let result = signInResult else {
      // Inspect error
      print("Error signing in: \(error?.localizedDescription ?? "No error description")")
      return
    }

    DispatchQueue.main.async {
      self.user = result.user
    }

    // If sign in succeeded, display the app's main content View.
    print("ID Token: \(result.user.idToken?.tokenString ?? "")")
  }
}
- 로그아웃 버튼에서 호출할 수 있도록
ContentView구조체 하단에 새signOut함수를 추가합니다.
func signOut() {
  GIDSignIn.sharedInstance.signOut()
  // After signing out, set the `user` state variable to `nil`.
  self.user = nil
}
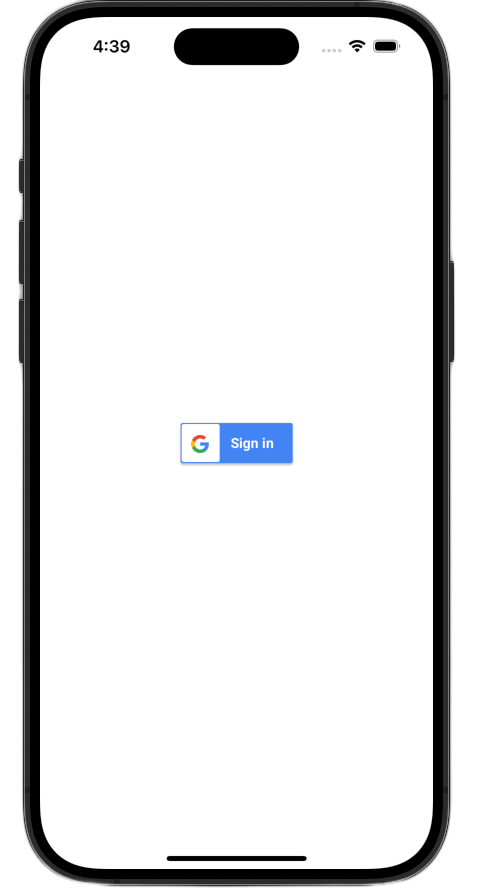
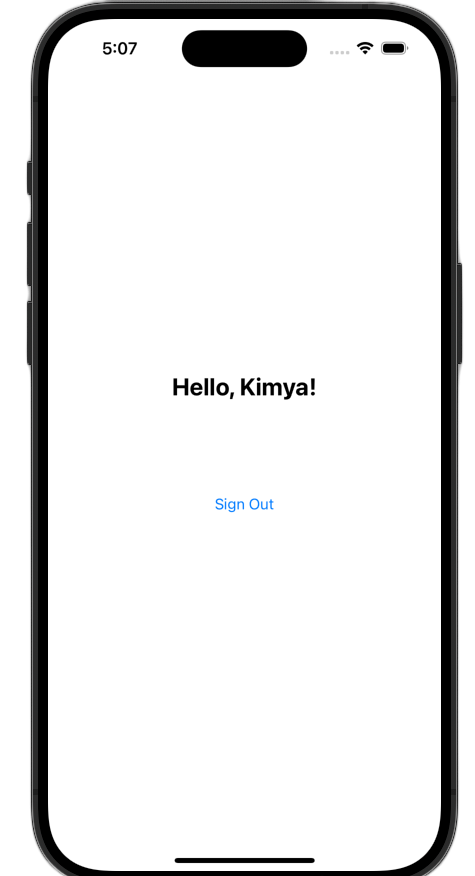
앱을 실행하고 로그인합니다. 인증에 성공하면 UI가 변경됩니다.
이러한 변경사항을 적용하면 ContentView.swift 파일이 다음과 같이 표시됩니다.
import GoogleSignIn
import GoogleSignInSwift
import SwiftUI

struct ContentView: View {

  @State private var user: GIDGoogleUser?

  var body: some View {
    VStack {
      // Check if the user is signed in.
      if let user = user {
        // If signed in, show a welcome message and the sign-out button.
        Text("Hello, \(user.profile?.givenName ?? "User")!")
          .font(.title)
          .padding()

        Button("Sign Out", action: signOut)
          .buttonStyle(.borderedProminent)

      } else {
        // If not signed in, show the "Sign in with Google" button.
        GoogleSignInButton(
          scheme: .dark,  // Options: .light, .dark, .auto
          style: .standard,  // Options: .standard, .wide, .icon
          state: .normal,  // Options: .normal, .disabled
          action: handleSignInButton
        ).padding()
      }
    }
  }

  func handleSignInButton() {
    // Find the current window scene.
    guard let windowScene = UIApplication.shared.connectedScenes.first as? UIWindowScene else {
      print("There is no active window scene")
      return
    }

    // Get the root view controller from the window scene.
    guard
      let rootViewController = windowScene.windows.first(where: { $0.isKeyWindow })?
        .rootViewController
    else {
      print("There is no key window or root view controller")
      return
    }

    // Start the sign-in process.
    GIDSignIn.sharedInstance.signIn(
      withPresenting: rootViewController
    ) { signInResult, error in
      guard let result = signInResult else {
        // Inspect error
        print("Error signing in: \(error?.localizedDescription ?? "No error description")")
        return
      }

      DispatchQueue.main.async {
        self.user = result.user
      }

      // If sign in succeeded, display the app's main content View.
      print("ID Token: \(result.user.idToken?.tokenString ?? "")")
    }
  }

  func signOut() {
    GIDSignIn.sharedInstance.signOut()
    // After signing out, set the `user` state variable to `nil`.
    self.user = nil
  }
}

#Preview {
  ContentView()
}
UIKit
- ViewController.swift를 엽니다.
ViewController상단에서signInButton을 선언한 바로 아래에 로그아웃 버튼과 환영 라벨을 추가합니다.
let signOutButton = UIButton(type: .system)
let welcomeLabel = UILabel()
- 다음 함수를
ViewController하단에 추가합니다. 이 함수는 로그인 상태에 따라 사용자에게 다른 UI를 표시합니다.
private func updateUI(for user: GIDGoogleUser?) {
  if let user = user {
    // User is signed in.
    signInButton.isHidden = true
    signOutButton.isHidden = false
    welcomeLabel.isHidden = false
    welcomeLabel.text = "Hello, \(user.profile?.givenName ?? "User")!"
  } else {
    // User is signed out.
    signInButton.isHidden = false
    signOutButton.isHidden = true
    welcomeLabel.isHidden = true
  }
}
viewDidLoad함수 하단에 다음 코드를 추가하여 시작 라벨과 로그아웃 버튼을 뷰에 추가합니다.
// --- Set up the Welcome Label ---
welcomeLabel.translatesAutoresizingMaskIntoConstraints = false
welcomeLabel.textAlignment = .center
welcomeLabel.font = .systemFont(ofSize: 24, weight: .bold)
view.addSubview(welcomeLabel)

NSLayoutConstraint.activate([
  welcomeLabel.centerXAnchor.constraint(equalTo: view.centerXAnchor),
  welcomeLabel.bottomAnchor.constraint(equalTo: signInButton.topAnchor, constant: -20),
])

// --- Set up the Sign-Out Button ---
signOutButton.translatesAutoresizingMaskIntoConstraints = false
signOutButton.setTitle("Sign Out", for: .normal)
view.addSubview(signOutButton)

NSLayoutConstraint.activate([
  signOutButton.centerXAnchor.constraint(equalTo: view.centerXAnchor),
  signOutButton.topAnchor.constraint(equalTo: signInButton.bottomAnchor, constant: 20),
])

signOutButton.addTarget(self, action: #selector(signOutButtonTapped), for: .touchUpInside)

// --- Set Initial UI State ---
updateUI(for: nil)
- 로그인에 성공하면
UpdateUI메서드를 호출하도록signInButtonTapped함수를 업데이트합니다.
@objc func signInButtonTapped() {
  // Start the sign-in process.
  GIDSignIn.sharedInstance.signIn(withPresenting: self) { signInResult, error in
    guard let result = signInResult else {
      // Inspect error
      print("Error signing in: \(error?.localizedDescription ?? "No error description")")
      return
    }

    // If sign in succeeded, print the ID token.
    print("ID Token: \(result.user.idToken?.tokenString ?? "")")

    DispatchQueue.main.async {
      self.updateUI(for: result.user)
    }
  }
}
- 마지막으로
ViewController에signOutButtonTapped함수를 추가하여 로그아웃 프로세스를 처리합니다.
@objc func signOutButtonTapped() {
  GIDSignIn.sharedInstance.signOut()
  // Update the UI for the signed-out state.
  updateUI(for: nil)
}
앱을 실행하고 로그인합니다. 인증에 성공하면 UI가 변경됩니다.
이러한 변경사항을 적용하면 ViewController.swift 파일이 다음과 같이 표시됩니다.
import GoogleSignIn
import UIKit

class ViewController: UIViewController {

  // Create an instance of the Sign in with Google button
  let signInButton = GIDSignInButton()
  let signOutButton = UIButton(type: .system)
  let welcomeLabel = UILabel()

  override func viewDidLoad() {
    super.viewDidLoad()

    // Set the width and color of the sign-in button
    signInButton.style = .standard  // Options: .standard, .wide, .iconOnly
    signInButton.colorScheme = .dark  // Options: .dark, .light

    // Add the sign-in button to your view
    view.addSubview(signInButton)

    // Position the button using constraints
    signInButton.translatesAutoresizingMaskIntoConstraints = false
    NSLayoutConstraint.activate([
      signInButton.centerXAnchor.constraint(equalTo: view.centerXAnchor),
      signInButton.centerYAnchor.constraint(equalTo: view.centerYAnchor),
    ])

    // Add a target to the button to call a method when it's pressed
    signInButton.addTarget(self, action: #selector(signInButtonTapped), for: .touchUpInside)

    // --- Set up the Welcome Label ---
    welcomeLabel.translatesAutoresizingMaskIntoConstraints = false
    welcomeLabel.textAlignment = .center
    welcomeLabel.font = .systemFont(ofSize: 24, weight: .bold)
    view.addSubview(welcomeLabel)

    NSLayoutConstraint.activate([
      welcomeLabel.centerXAnchor.constraint(equalTo: view.centerXAnchor),
      welcomeLabel.bottomAnchor.constraint(equalTo: signInButton.topAnchor, constant: -20),
    ])

    // --- Set up the Sign-Out Button ---
    signOutButton.translatesAutoresizingMaskIntoConstraints = false
    signOutButton.setTitle("Sign Out", for: .normal)
    view.addSubview(signOutButton)

    NSLayoutConstraint.activate([
      signOutButton.centerXAnchor.constraint(equalTo: view.centerXAnchor),
      signOutButton.topAnchor.constraint(equalTo: signInButton.bottomAnchor, constant: 20),
    ])

    signOutButton.addTarget(self, action: #selector(signOutButtonTapped), for: .touchUpInside)

    // --- Set Initial UI State ---
    updateUI(for: nil)
  }

  // This method is called when the sign-in button is pressed.
  @objc func signInButtonTapped() {
    // Start the sign-in process.
    GIDSignIn.sharedInstance.signIn(withPresenting: self) { signInResult, error in
      guard let result = signInResult else {
        // Inspect error
        print("Error signing in: \(error?.localizedDescription ?? "No error description")")
        return
      }

      // If sign in succeeded, print the ID token.
      print("ID Token: \(result.user.idToken?.tokenString ?? "")")

      DispatchQueue.main.async {
        self.updateUI(for: result.user)
      }
    }
  }

  private func updateUI(for user: GIDGoogleUser?) {
    if let user = user {
      // User is signed in.
      signInButton.isHidden = true
      signOutButton.isHidden = false
      welcomeLabel.isHidden = false
      welcomeLabel.text = "Hello, \(user.profile?.givenName ?? "User")!"
    } else {
      // User is signed out.
      signInButton.isHidden = false
      signOutButton.isHidden = true
      welcomeLabel.isHidden = true
    }
  }

  @objc func signOutButtonTapped() {
    GIDSignIn.sharedInstance.signOut()
    // Update the UI for the signed-out state.
    updateUI(for: nil)
  }
}
9. 사용자의 로그인 상태 복원
재방문 사용자의 환경을 개선하려면 다음 단계로 앱 실행 시 로그인 상태를 복원해야 합니다. restorePreviousSignIn를 호출하면 키체인에 저장된 사용자 인증 정보를 사용하여 사용자가 자동으로 다시 로그인하므로 사용자가 매번 로그인 흐름을 완료하지 않아도 됩니다.
SwiftUI
- ContentView.swift를 엽니다.
body변수 내의VStack바로 뒤에 다음 코드를 추가합니다.
.onAppear {
  // On appear, try to restore a previous sign-in.
  GIDSignIn.sharedInstance.restorePreviousSignIn { user, error in
    // This closure is called when the restoration is complete.
    if let user = user {
      // If a user was restored, update the `user` state variable.
      DispatchQueue.main.async {
        self.user = user
      }

      // Print the ID token to the console when restored.
      print("Restored ID Token: \(user.idToken?.tokenString ?? "")")
    }
  }
}
ContentView.swift는 다음과 같이 표시됩니다.
import GoogleSignIn
import GoogleSignInSwift
import SwiftUI

struct ContentView: View {

  @State private var user: GIDGoogleUser?

  var body: some View {
    VStack {
      // Check if the user is signed in.
      if let user = user {
        // If signed in, show a welcome message and the sign-out button.
        Text("Hello, \(user.profile?.givenName ?? "User")!")
          .font(.title)
          .padding()

        Button("Sign Out", action: signOut)
          .buttonStyle(.borderedProminent)

      } else {
        // If not signed in, show the "Sign in with Google" button.
        GoogleSignInButton(
          scheme: .dark,  // Options: .light, .dark, .auto
          style: .standard,  // Options: .standard, .wide, .icon
          state: .normal,  // Options: .normal, .disabled
          action: handleSignInButton
        ).padding()
      }
    }

    .onAppear {
      // On appear, try to restore a previous sign-in.
      GIDSignIn.sharedInstance.restorePreviousSignIn { user, error in
        // This closure is called when the restoration is complete.
        if let user = user {
          // If a user was restored, update the `user` state variable.
          DispatchQueue.main.async {
            self.user = user
          }

          // Print the ID token to the console when restored.
          print("Restored ID Token: \(user.idToken?.tokenString ?? "")")
        }
      }
    }
  }

  func handleSignInButton() {
    // Find the current window scene.
    guard let windowScene = UIApplication.shared.connectedScenes.first as? UIWindowScene else {
      print("There is no active window scene")
      return
    }

    // Get the root view controller from the window scene.
    guard
      let rootViewController = windowScene.windows.first(where: { $0.isKeyWindow })?
        .rootViewController
    else {
      print("There is no key window or root view controller")
      return
    }

    // Start the sign-in process.
    GIDSignIn.sharedInstance.signIn(
      withPresenting: rootViewController
    ) { signInResult, error in
      guard let result = signInResult else {
        // Inspect error
        print("Error signing in: \(error?.localizedDescription ?? "No error description")")
        return
      }

      DispatchQueue.main.async {
        self.user = result.user
      }

      // If sign in succeeded, display the app's main content View.
      print("ID Token: \(result.user.idToken?.tokenString ?? "")")
    }
  }

  func signOut() {
    GIDSignIn.sharedInstance.signOut()
    // After signing out, set the `user` state variable to `nil`.
    self.user = nil
  }
}

#Preview {
  ContentView()
}
UIKit
- ViewController.swift를 엽니다.
viewDidLoad메서드의 끝에 다음restorePreviousSignIn호출을 추가합니다.
// Attempt to restore a previous sign-in session
GIDSignIn.sharedInstance.restorePreviousSignIn { user, error in
  if let user = user {
    print("Successfully restored sign-in for user: \(user.profile?.givenName ?? "Unknown")")

    // Print the ID token when a session is restored.
    print("Restored ID Token: \(user.idToken?.tokenString ?? "")")

    // On success, update the UI for the signed-in state on the main thread.
    DispatchQueue.main.async {
      self.updateUI(for: user)
    }
  }
}
ViewController.swift 파일은 다음과 같이 표시됩니다.
import GoogleSignIn
import UIKit

class ViewController: UIViewController {

  // Create an instance of the Sign in with Google button
  let signInButton = GIDSignInButton()
  let signOutButton = UIButton(type: .system)
  let welcomeLabel = UILabel()

  override func viewDidLoad() {
    super.viewDidLoad()

    // Set the width and color of the sign-in button
    signInButton.style = .standard  // Options: .standard, .wide, .iconOnly
    signInButton.colorScheme = .dark  // Options: .dark, .light

    // Add the sign-in button to your view
    view.addSubview(signInButton)

    // Position the button using constraints
    signInButton.translatesAutoresizingMaskIntoConstraints = false
    NSLayoutConstraint.activate([
      signInButton.centerXAnchor.constraint(equalTo: view.centerXAnchor),
      signInButton.centerYAnchor.constraint(equalTo: view.centerYAnchor),
    ])

    // Add a target to the button to call a method when it's pressed
    signInButton.addTarget(self, action: #selector(signInButtonTapped), for: .touchUpInside)

    // --- Set up the Welcome Label ---
    welcomeLabel.translatesAutoresizingMaskIntoConstraints = false
    welcomeLabel.textAlignment = .center
    welcomeLabel.font = .systemFont(ofSize: 24, weight: .bold)
    view.addSubview(welcomeLabel)

    NSLayoutConstraint.activate([
      welcomeLabel.centerXAnchor.constraint(equalTo: view.centerXAnchor),
      welcomeLabel.bottomAnchor.constraint(equalTo: signInButton.topAnchor, constant: -20),
    ])

    // --- Set up the Sign-Out Button ---
    signOutButton.translatesAutoresizingMaskIntoConstraints = false
    signOutButton.setTitle("Sign Out", for: .normal)
    view.addSubview(signOutButton)

    NSLayoutConstraint.activate([
      signOutButton.centerXAnchor.constraint(equalTo: view.centerXAnchor),
      signOutButton.topAnchor.constraint(equalTo: signInButton.bottomAnchor, constant: 20),
    ])

    signOutButton.addTarget(self, action: #selector(signOutButtonTapped), for: .touchUpInside)

    // --- Set Initial UI State ---
    updateUI(for: nil)

    // Attempt to restore a previous sign-in session
    GIDSignIn.sharedInstance.restorePreviousSignIn { user, error in
      if let user = user {
        print("Successfully restored sign-in for user: \(user.profile?.givenName ?? "Unknown")")

        // Print the ID token when a session is restored.
        print("Restored ID Token: \(user.idToken?.tokenString ?? "")")

        // On success, update the UI for the signed-in state on the main thread.
        DispatchQueue.main.async {
          self.updateUI(for: user)
        }
      }
    }
  }

  // This method is called when the sign-in button is pressed.
  @objc func signInButtonTapped() {
    // Start the sign-in process.
    GIDSignIn.sharedInstance.signIn(withPresenting: self) { signInResult, error in
      guard let result = signInResult else {
        // Inspect error
        print("Error signing in: \(error?.localizedDescription ?? "No error description")")
        return
      }

      // If sign in succeeded, print the ID token.
      print("ID Token: \(result.user.idToken?.tokenString ?? "")")

      DispatchQueue.main.async {
        self.updateUI(for: result.user)
      }
    }
  }

  private func updateUI(for user: GIDGoogleUser?) {
    if let user = user {
      // User is signed in.
      signInButton.isHidden = true
      signOutButton.isHidden = false
      welcomeLabel.isHidden = false
      welcomeLabel.text = "Hello, \(user.profile?.givenName ?? "User")!"
    } else {
      // User is signed out.
      signInButton.isHidden = false
      signOutButton.isHidden = true
      welcomeLabel.isHidden = true
    }
  }

  @objc func signOutButtonTapped() {
    GIDSignIn.sharedInstance.signOut()
    // Update the UI for the signed-out state.
    updateUI(for: nil)
  }
}
자동 로그인 테스트
로그인한 후 앱을 완전히 종료하고 다시 실행합니다. 이제 버튼을 탭하지 않아도 자동으로 로그인되는 것을 확인할 수 있습니다.
10. ID 토큰 이해하기
GIDGoogleUser 객체는 사용자의 이름과 이메일을 사용하여 UI를 개인화하는 데 편리하지만 SDK에서 반환되는 가장 중요한 데이터는 ID 토큰입니다.
이 Codelab에서는 온라인 도구를 사용하여 JWT 콘텐츠를 검사합니다. 프로덕션 앱에서는 이 ID 토큰을 백엔드 서버로 전송해야 합니다. 서버는 ID 토큰의 무결성을 확인하고 JWT를 사용하여 백엔드 플랫폼에서 새 계정을 만들거나 사용자의 새 세션을 설정하는 등 더 의미 있는 작업을 해야 합니다.
JWT 토큰 액세스 및 디코딩
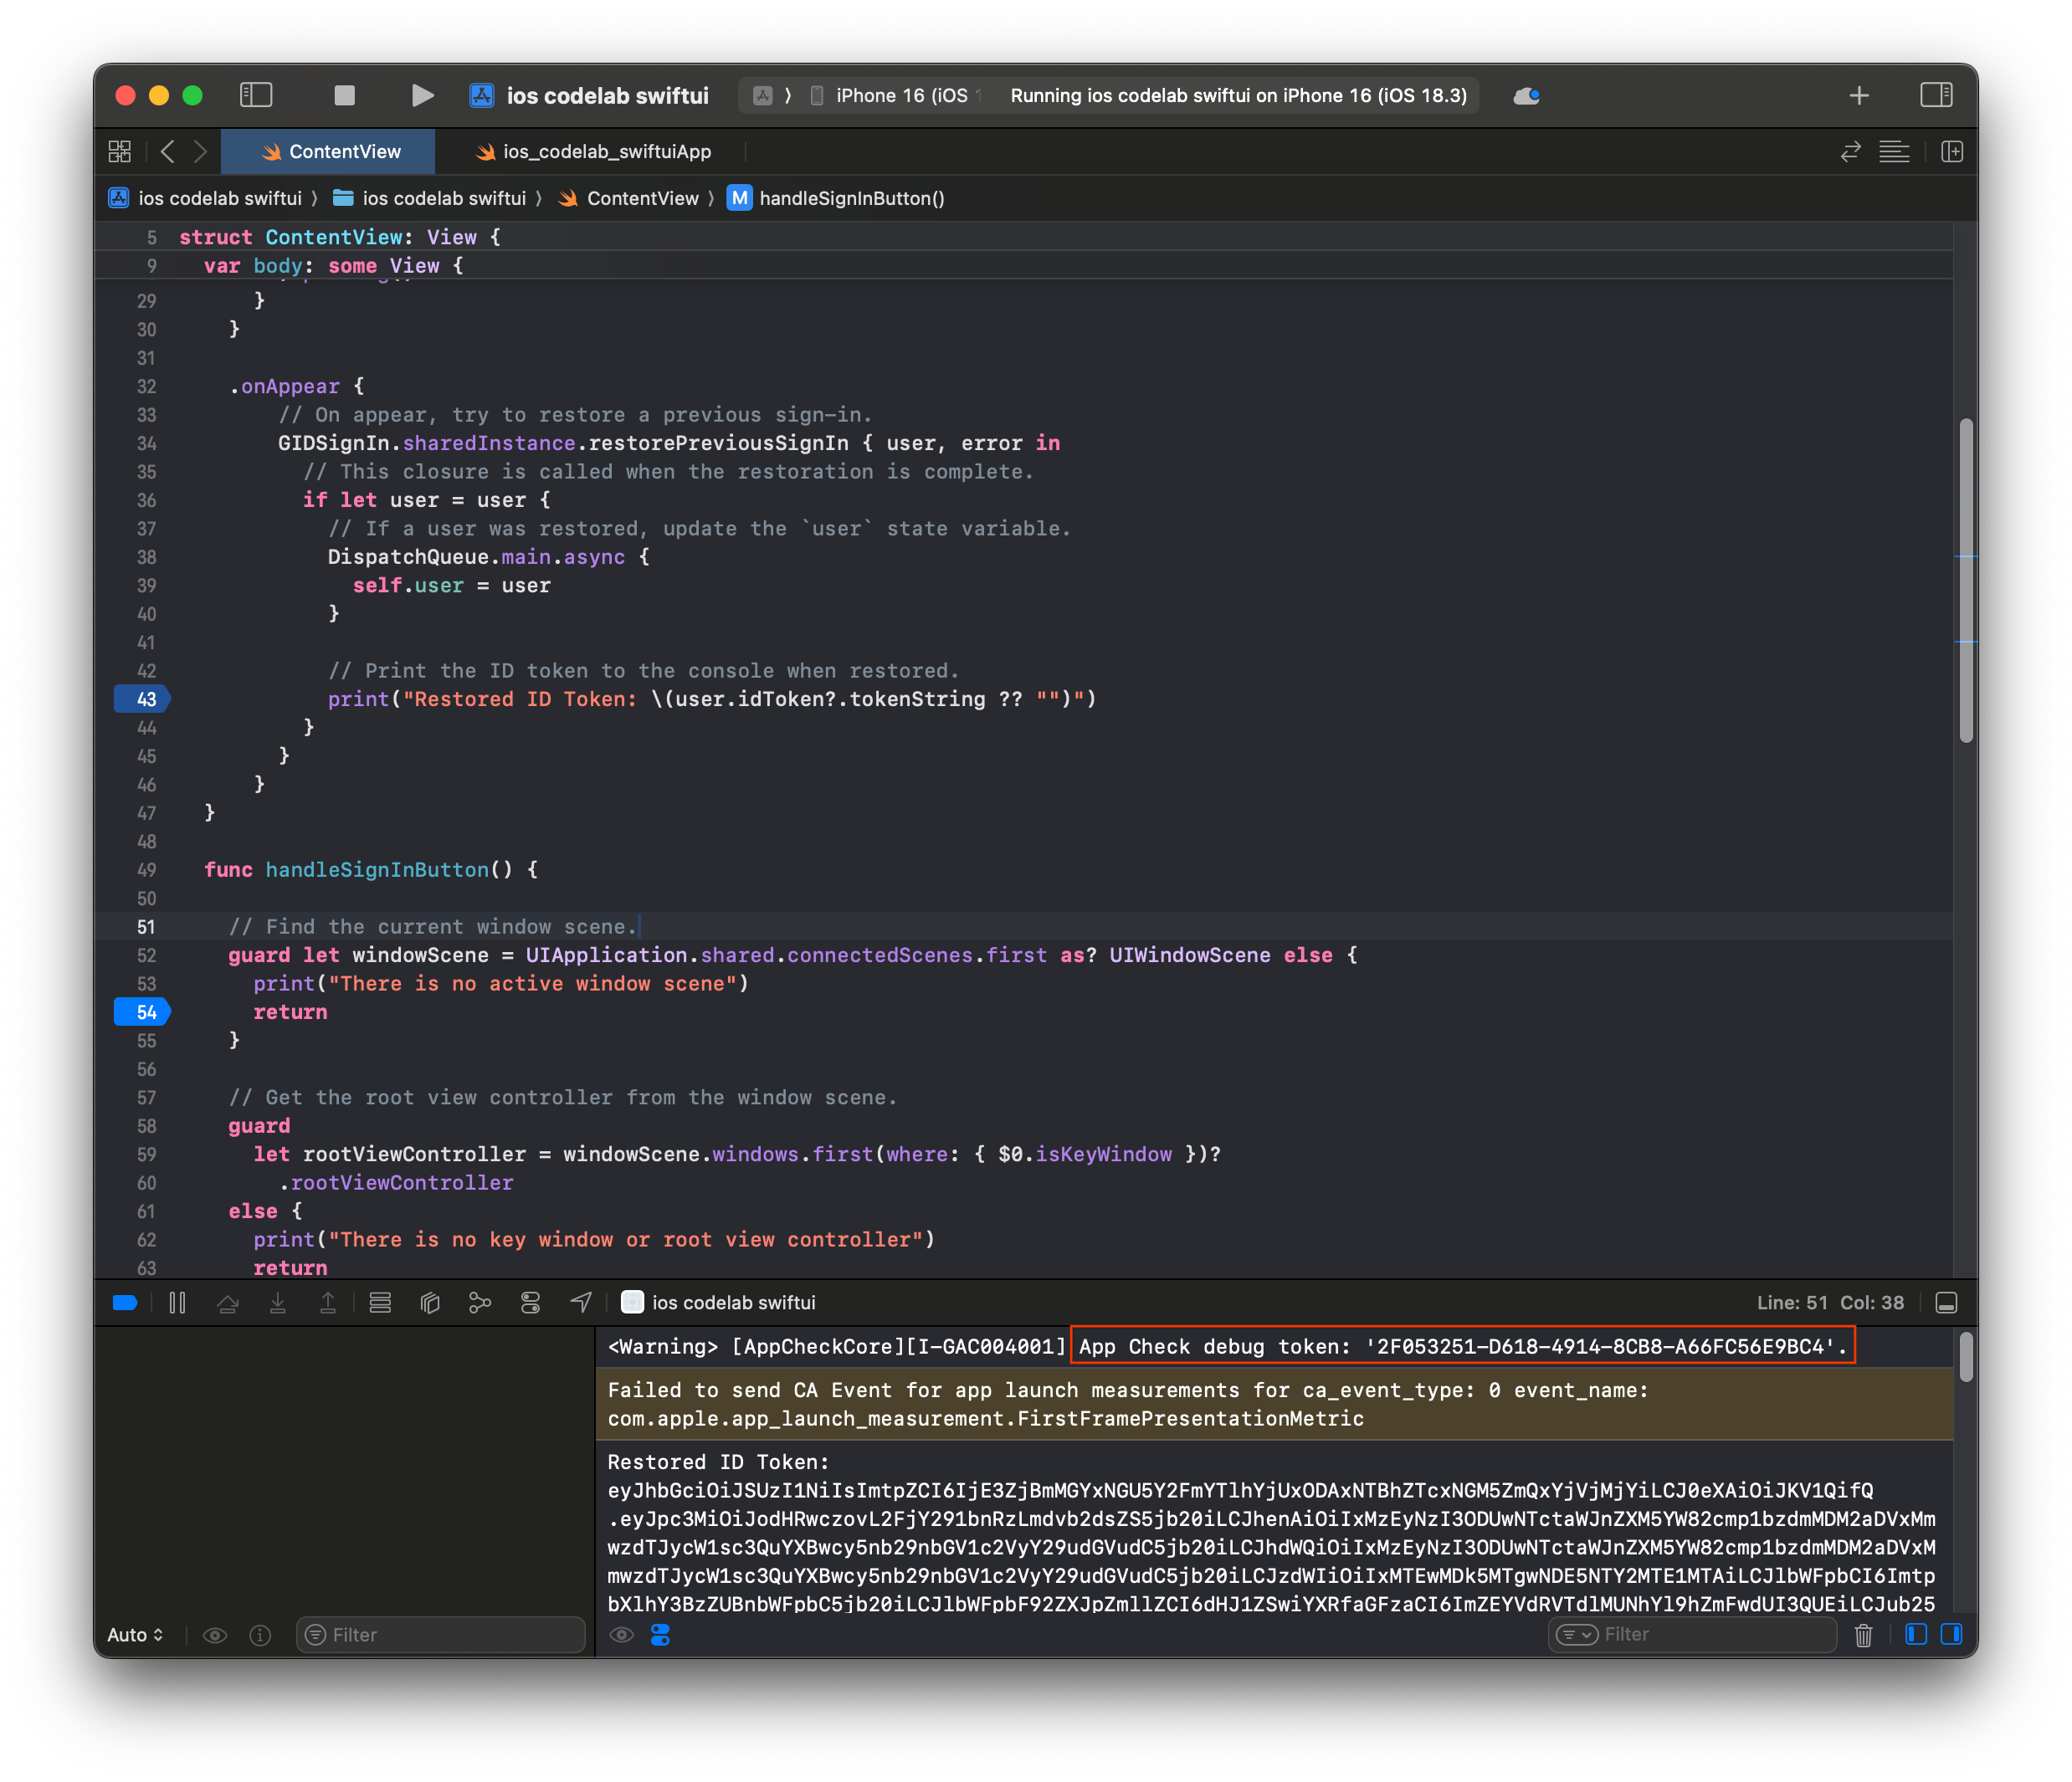
- 앱을 실행합니다.
- Xcode 콘솔을 엽니다. 인쇄된 ID 토큰이 표시됩니다.
eyJhbGciOiJSUzI1Ni ... Hecz6Wm4Q와 같이 표시됩니다. - ID 토큰을 복사하고 jwt.io와 같은 온라인 도구를 사용하여 JWT를 디코딩합니다.
디코딩된 JWT는 다음과 같습니다.
{
  "alg": "RS256",
  "kid": "c8ab71530972bba20b49f78a09c9852c43ff9118",
  "typ": "JWT"
}
{
  "iss": "https://accounts.google.com",
  "azp": "171291171076-rrbkcjrp5jbte92ai9gub115ertscphi.apps.googleusercontent.com",
  "aud": "171291171076-rrbkcjrp5jbte92ai9gub115ertscphi.apps.googleusercontent.com",
  "sub": "10769150350006150715113082367",
  "email": "example@example.com",
  "email_verified": true,
  "at_hash": "JyCYDmHtzhjkb0-qJhKsMg",
  "name": "Kimya",
  "picture": "https://lh3.googleusercontent.com/a/ACg8ocIyy4VoR31t_n0biPVcScBHwZOCRaKVDb_MoaMYep65fyqoAw=s96-c",
  "given_name": "Kimya",
  "iat": 1758645896,
  "exp": 1758649496
}
주요 토큰 필드
디코딩된 ID 토큰에는 용도가 다른 필드가 포함되어 있습니다. 이름, 이메일과 같이 이해하기 쉬운 정보도 있지만 백엔드 서버에서 인증에 사용하는 정보도 있습니다.
다음 필드는 특히 이해하는 것이 중요합니다.
- sub:
sub필드는 사용자의 Google 계정에 대한 고유한 영구 식별자입니다. 사용자는 기본 이메일이나 이름을 변경할 수 있지만subID는 변경할 수 없습니다. 따라서sub필드는 백엔드 사용자 계정의 기본 키로 사용하기에 적합한 값입니다.
ID 토큰에서 사용자 정보 가져오기에는 모든 토큰 필드의 의미에 관한 자세한 정보가 나와 있습니다.
11. 앱 체크로 앱 보호하기
앱만 프로젝트를 대신하여 Google의 OAuth 2.0 엔드포인트에 액세스할 수 있도록 앱 체크를 사용 설정하는 것이 좋습니다. 앱 체크는 백엔드 서비스에 대한 요청이 실제 변조되지 않은 기기의 인증된 앱에서 발생했는지 확인하여 작동합니다.
이 섹션에서는 앱에 앱 체크를 통합하고 시뮬레이터에서 디버깅할 때와 실제 기기에서 실행되는 프로덕션 빌드에 맞게 구성하는 방법을 보여줍니다.
콘솔 설정
앱 체크를 애플리케이션에 통합하려면 Google Cloud 및 Firebase 콘솔에서 일회성 설정을 해야 합니다. 여기에는 Google Cloud 콘솔에서 iOS OAuth 클라이언트에 앱 체크를 사용 설정하고, 앱 체크 디버그 제공업체와 함께 사용할 API 키를 만들고, Google Cloud 프로젝트를 Firebase에 연결하는 작업이 포함됩니다.
Google Cloud 콘솔에서 App Check 사용 설정
- Google Cloud 프로젝트와 연결된 클라이언트 목록으로 이동합니다.
- iOS 앱에 대해 만든 OAuth 2.0 클라이언트 ID를 선택합니다.
- iOS용 Google ID 아래에서 앱 체크를 사용 설정합니다.
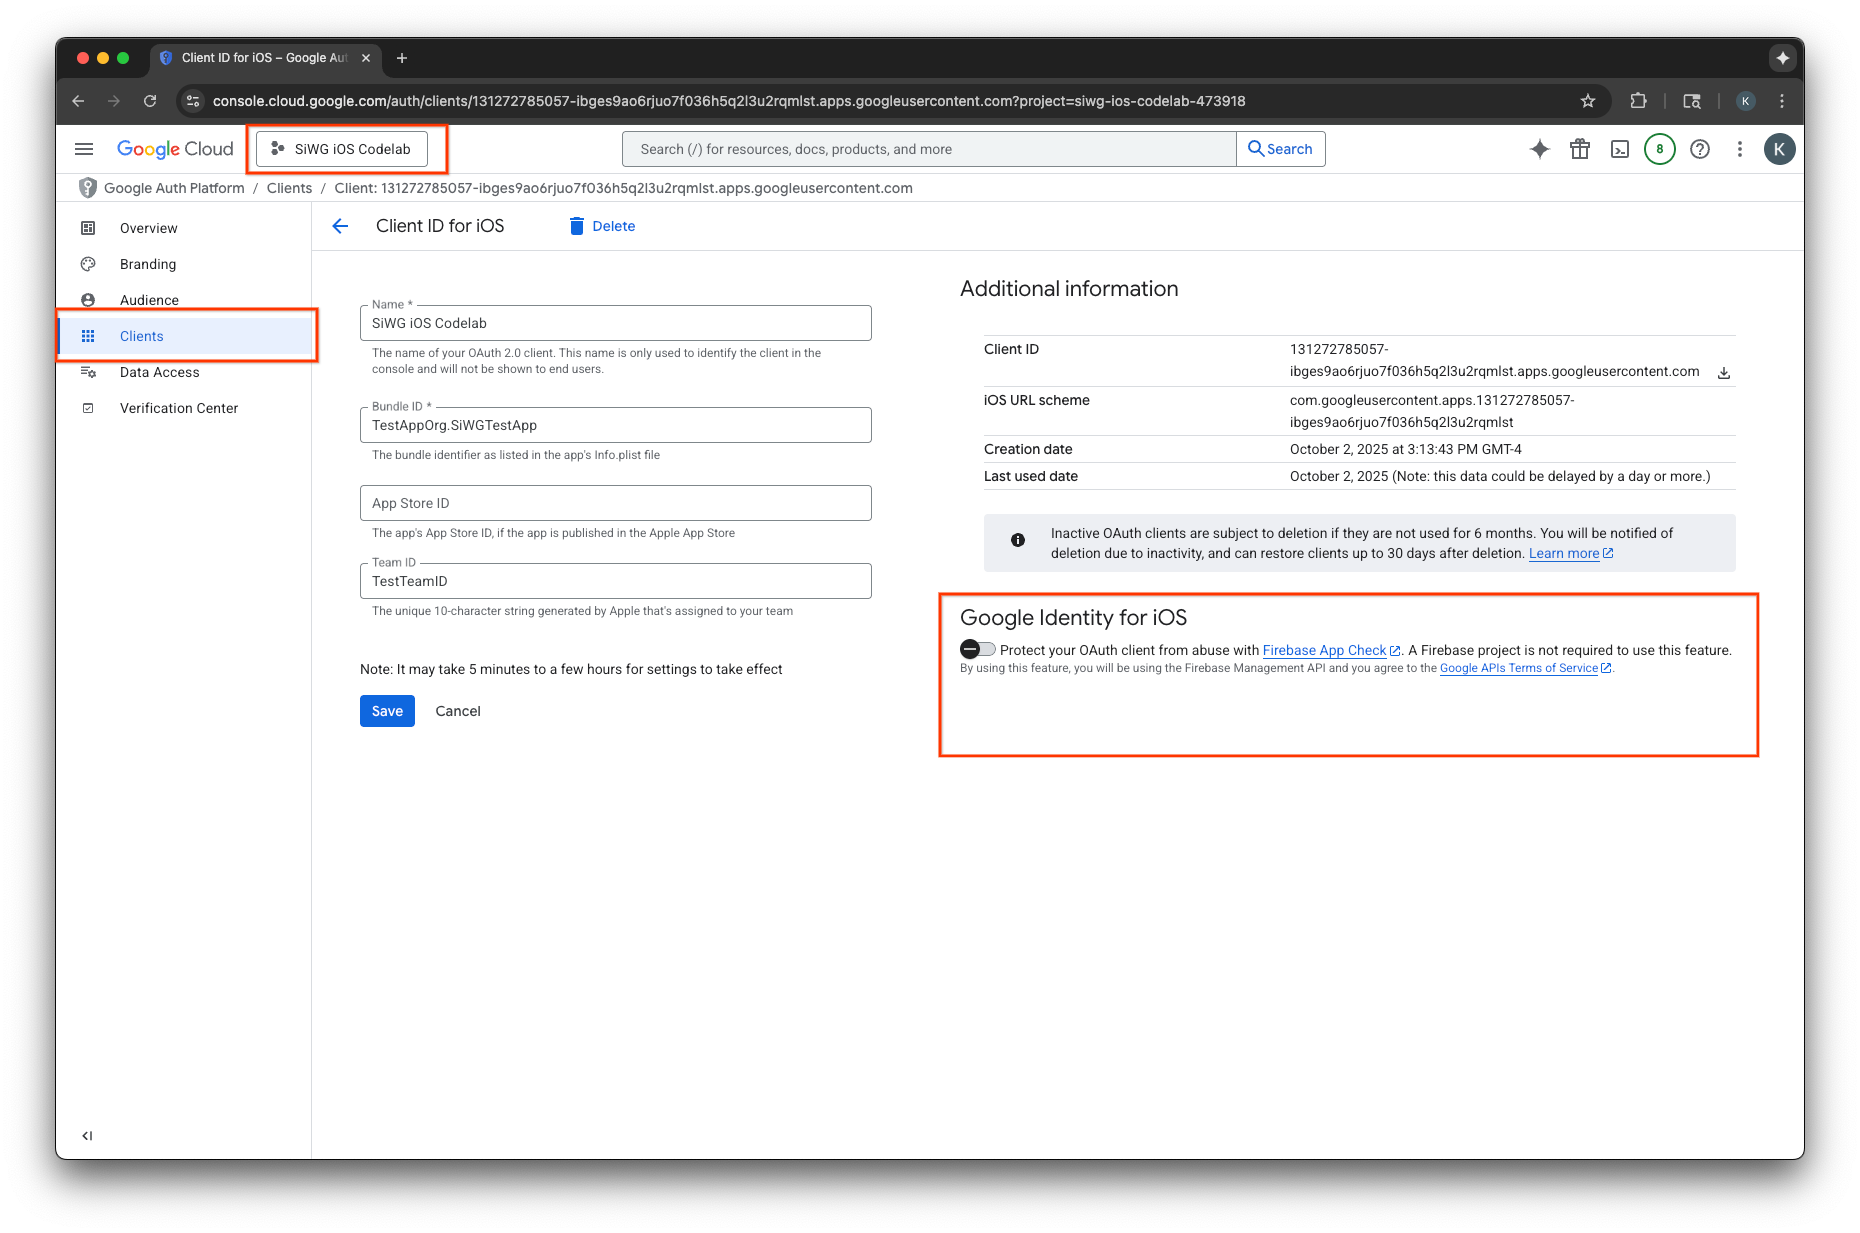
- 저장을 클릭합니다.
API 키 만들기
- Google Cloud 프로젝트의 API 라이브러리 페이지로 이동합니다.
- 검색창에 Firebase App Check API를 입력합니다.
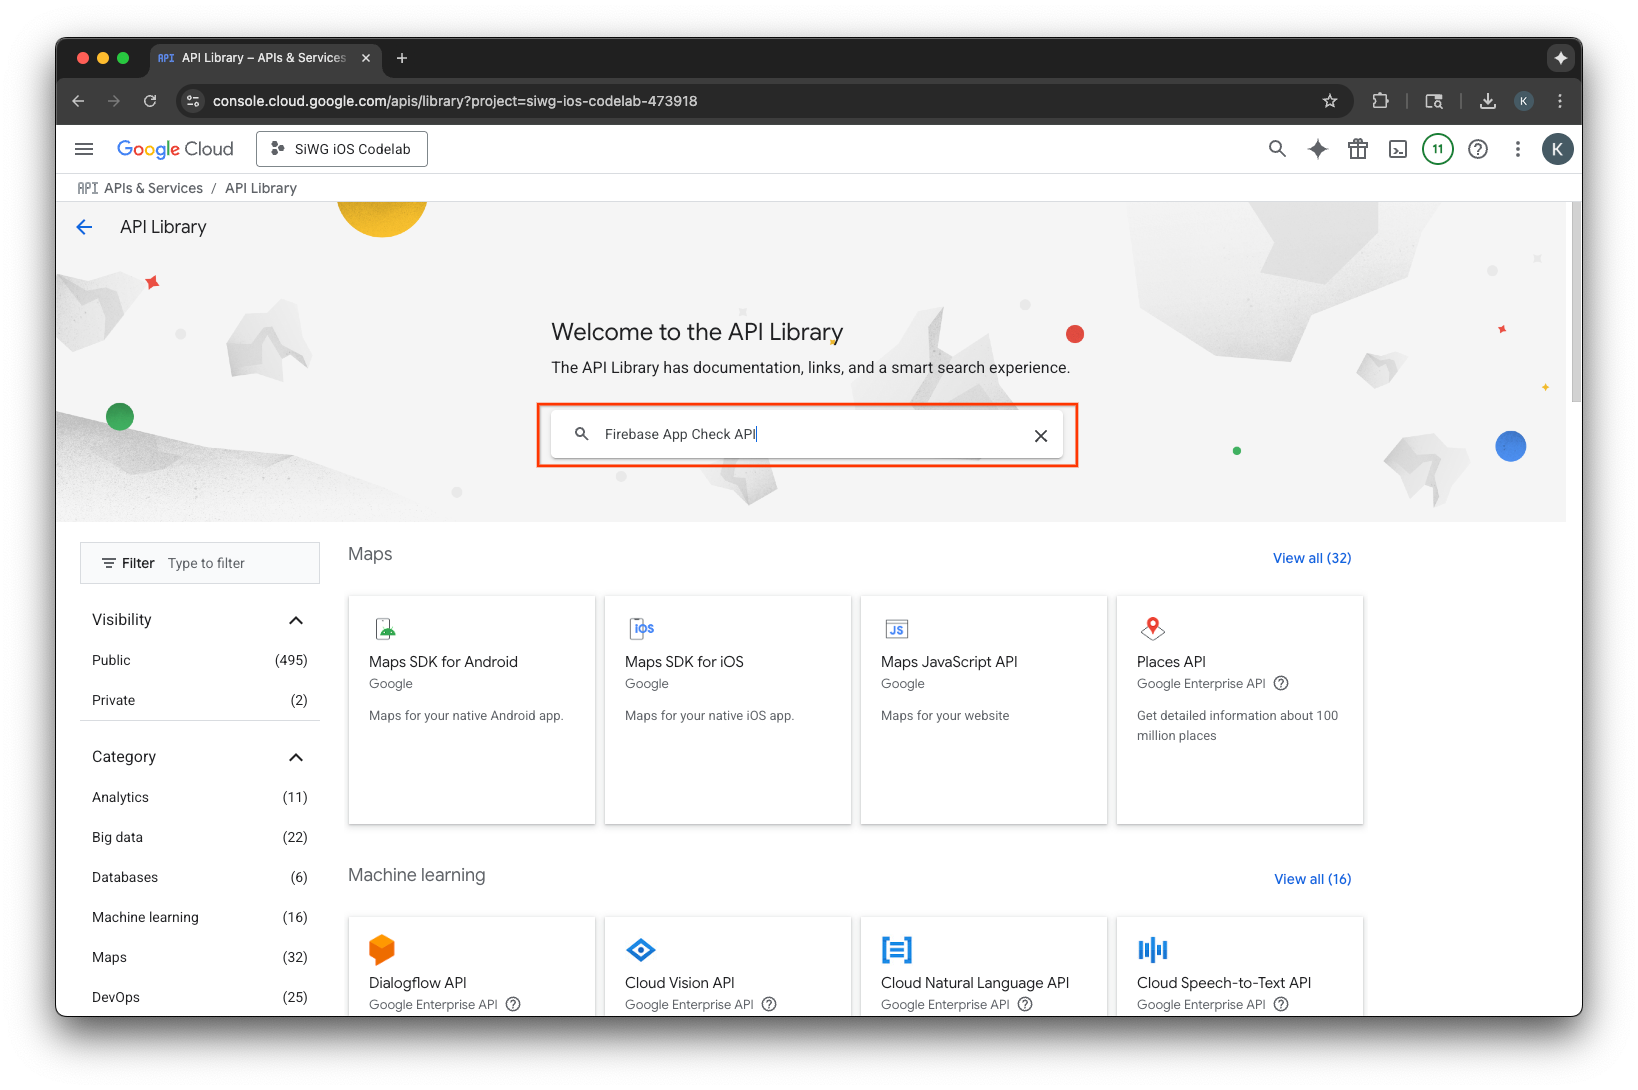
- Firebase App Check API를 선택하고 사용 설정합니다.
- API 및 서비스로 이동하여 탐색 메뉴에서 사용자 인증 정보를 선택합니다.
- 페이지 상단에서 사용자 인증 정보 만들기를 선택합니다.
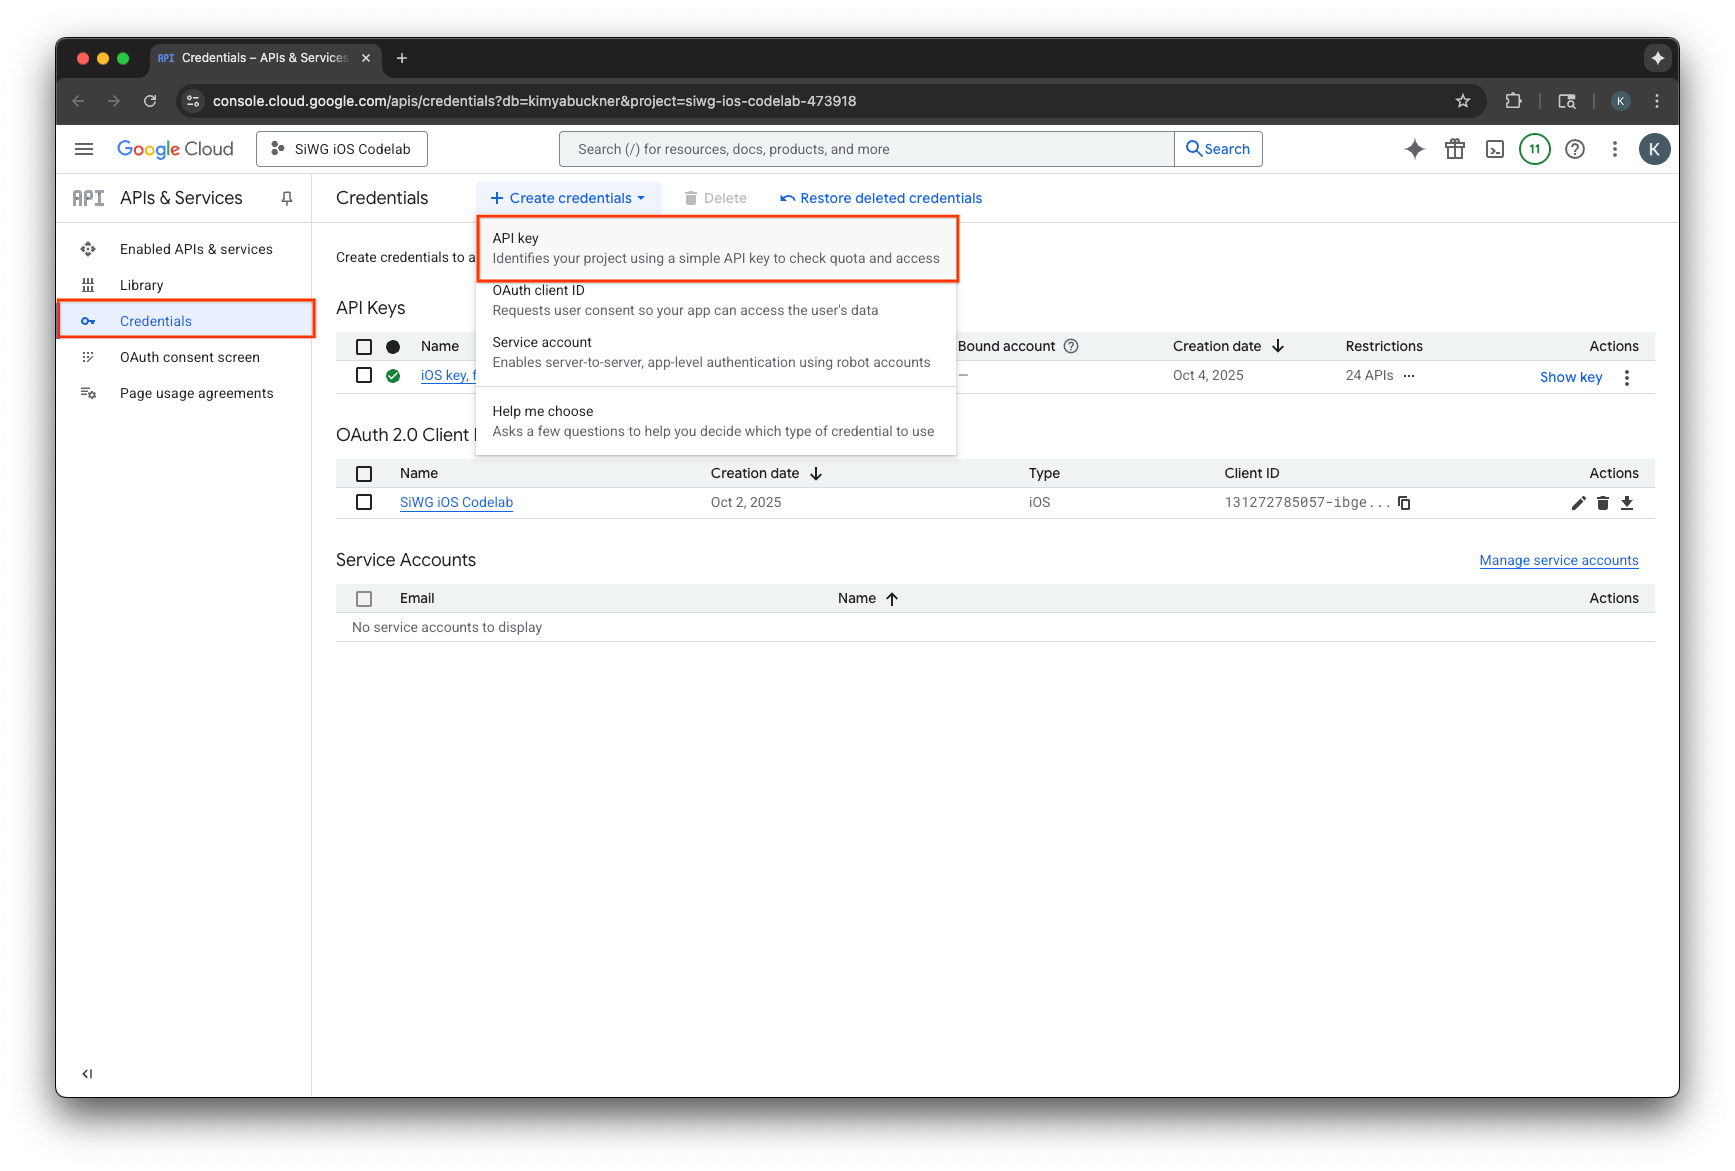
- 이 API 키에 이름을 할당합니다.
- 애플리케이션 제한사항에서 iOS 앱을 선택합니다.
- 앱의 번들 식별자를 승인된 애플리케이션으로 추가합니다.
- API 제한사항에서 키 제한을 선택합니다.
- 드롭다운 메뉴에서 Firebase 앱 체크 API를 선택합니다.
- 만들기를 선택합니다.
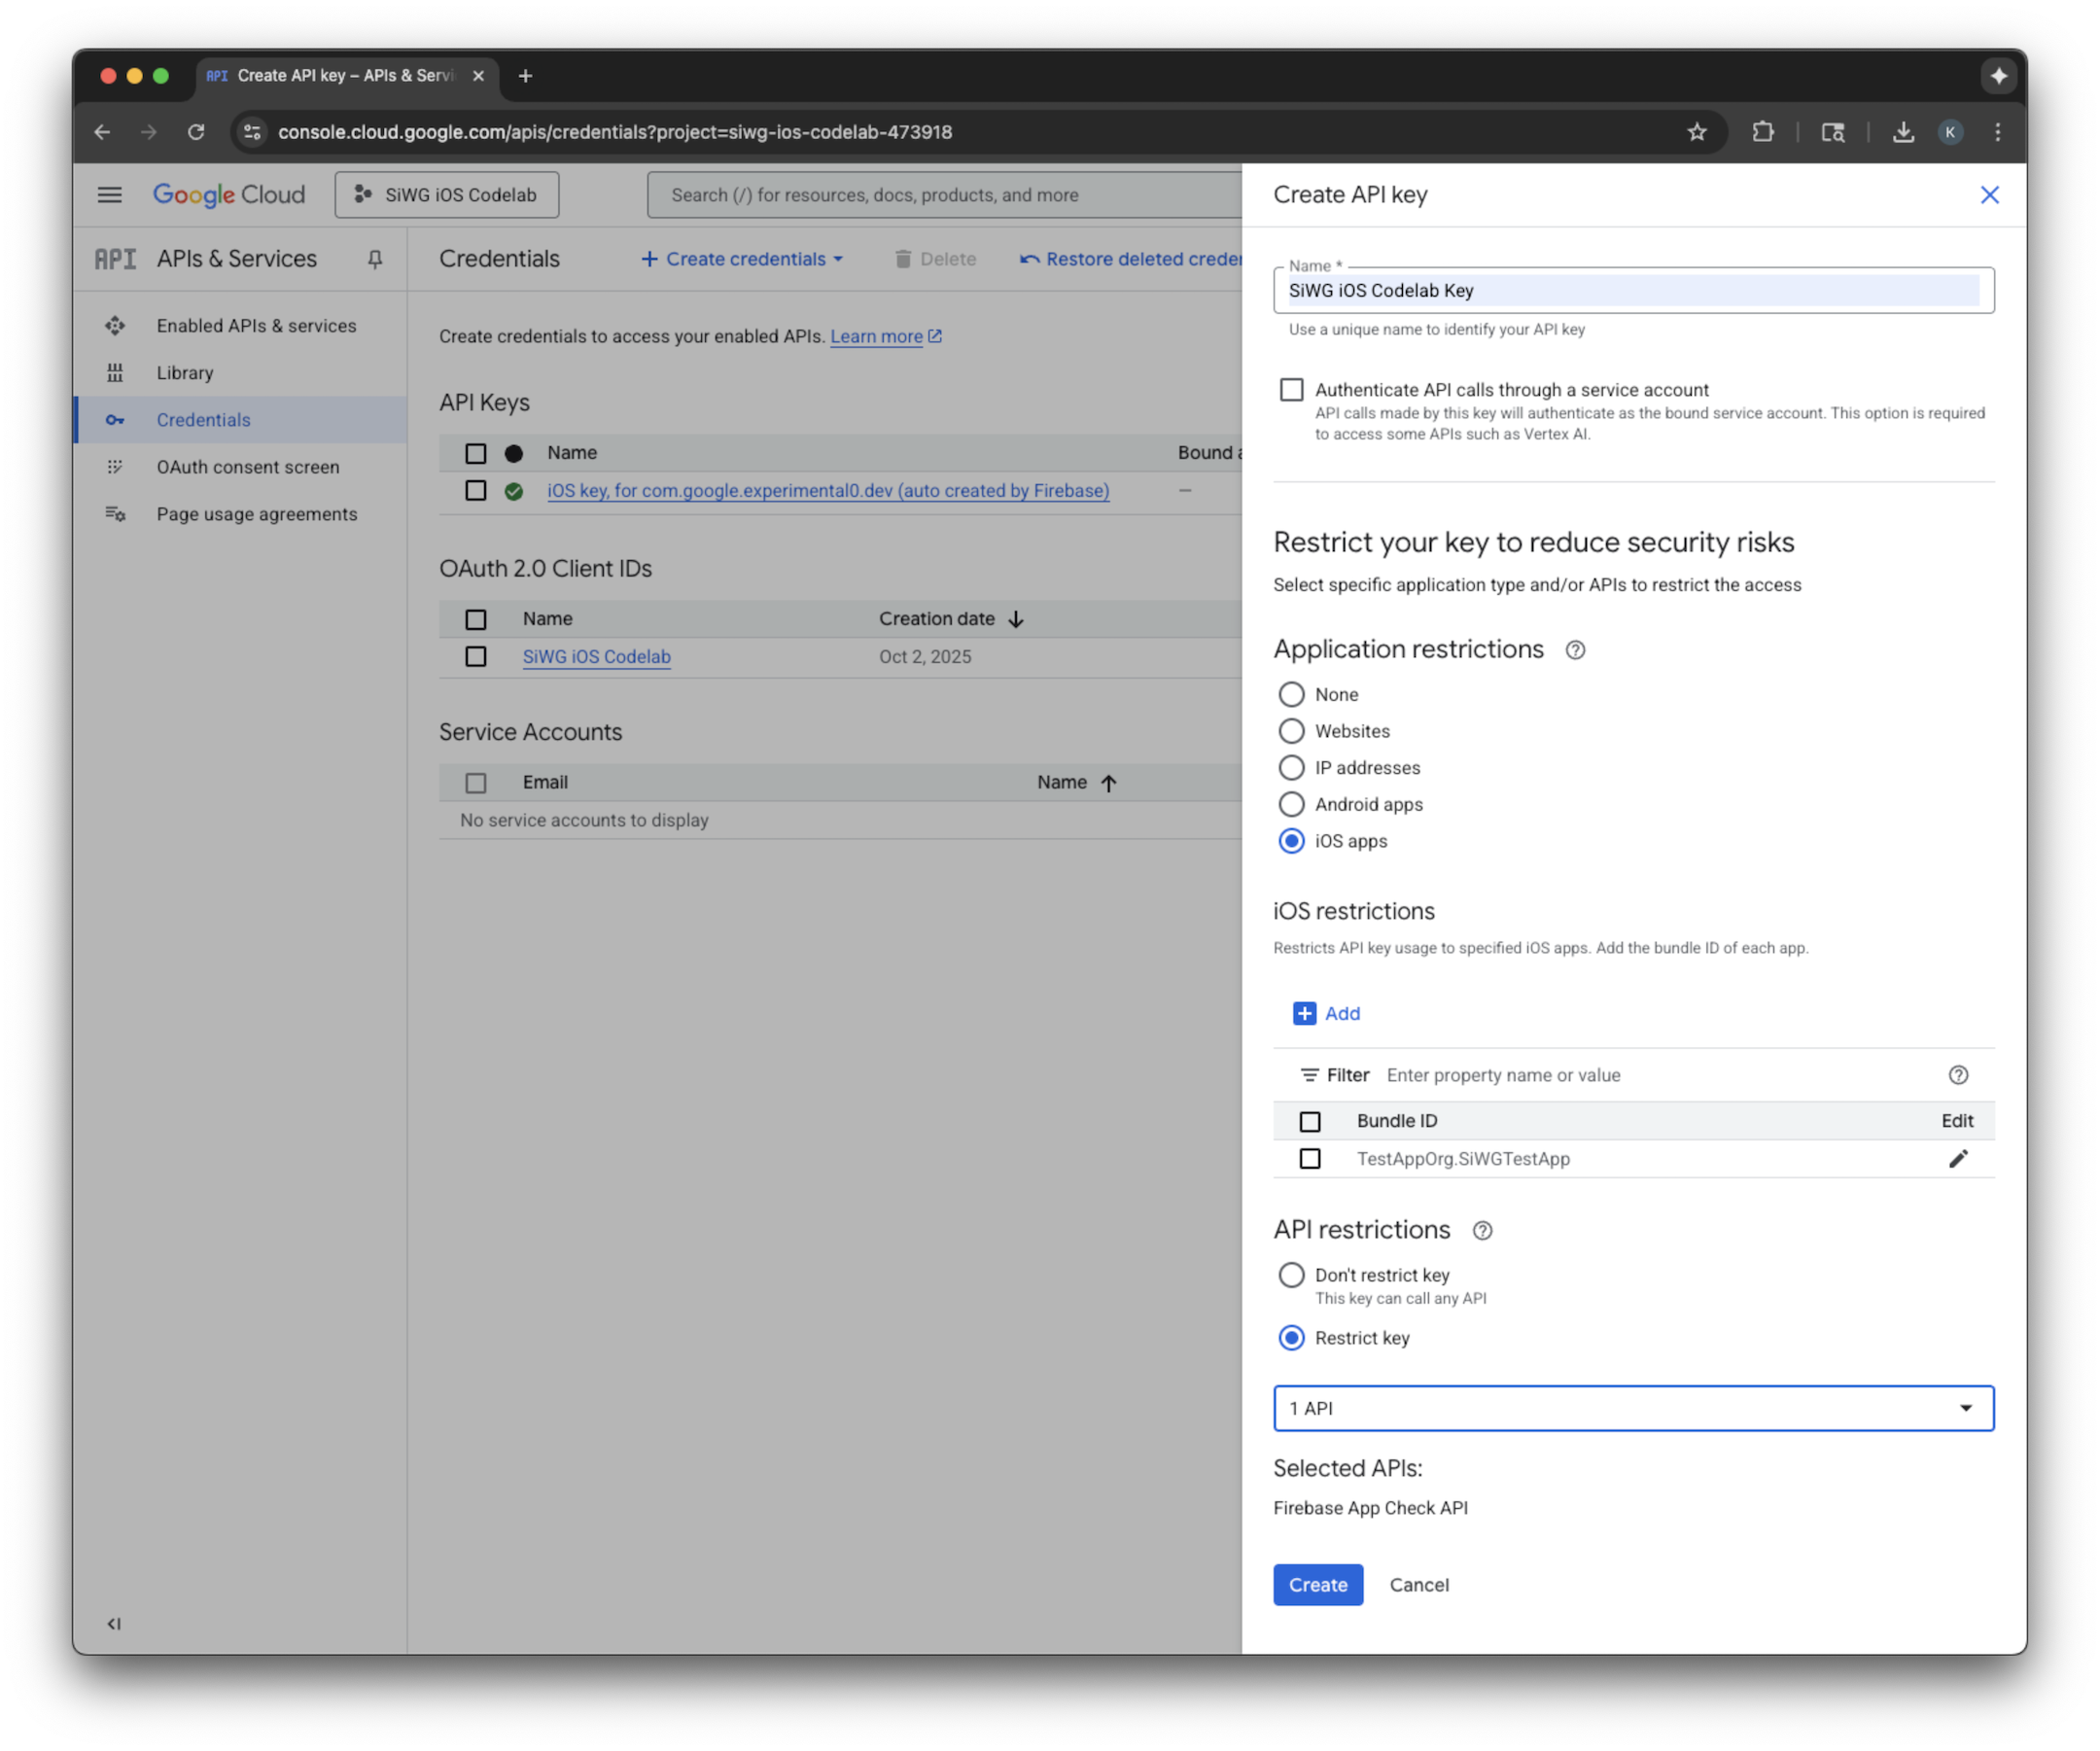
- 생성된 API 키를 복사합니다. 향후 단계에서 필요합니다.
Google Cloud 프로젝트에 Firebase 추가
- Firebase Console로 이동합니다.
- Firebase 프로젝트를 설정하여 시작하기를 선택합니다.
- Google Cloud 프로젝트에 Firebase 추가를 선택합니다.

- 드롭다운에서 Google Cloud 프로젝트를 선택하고 가입 절차를 계속 진행합니다.
- Firebase 추가를 선택합니다.
- Firebase 프로젝트가 준비되면 계속을 선택하여 프로젝트를 엽니다.
클라이언트 측 코드 통합
App Check가 Google Cloud 프로젝트에 구성되었으므로 이제 클라이언트 측 코드를 작성하여 사용 설정할 차례입니다. 증명에 사용되는 제공자는 프로덕션 환경과 디버그 환경에서 다릅니다. 실제 기기의 프로덕션 앱은 Apple의 내장 App Attest 서비스를 사용하여 진위성을 증명합니다. 하지만 iOS 시뮬레이터는 이러한 종류의 증명을 제공할 수 없으므로 디버그 환경에는 API 키가 전달되는 특수 디버그 제공자가 필요합니다.
다음 코드는 컴파일러 지시어를 사용하여 빌드 시 올바른 제공자를 자동으로 선택하여 두 시나리오를 모두 처리합니다.
SwiftUI
- 기본 앱 파일을 엽니다.
- import 후
@main속성 전에 다음AppDelegate클래스를 정의합니다.
class AppDelegate: NSObject, UIApplicationDelegate {
  func application(
    _ application: UIApplication,
    didFinishLaunchingWithOptions launchOptions: [UIApplication.LaunchOptionsKey: Any]? = nil
  ) -> Bool {

    #if targetEnvironment(simulator)
      // Configure for debugging on a simulator.
      // TODO: Replace "YOUR_API_KEY" with the key from your Google Cloud project.
      let apiKey = "YOUR_API_KEY"
      GIDSignIn.sharedInstance.configureDebugProvider(withAPIKey: apiKey) { error in
        if let error {
          print("Error configuring GIDSignIn debug provider: \(error)")
        }
      }
    #else
      // Configure GIDSignIn for App Check on a real device.
      GIDSignIn.sharedInstance.configure { error in
        if let error {
          print("Error configuring GIDSignIn for App Check: \(error)")
        } else {
          print("GIDSignIn configured for App Check.")
        }
      }
    #endif

    return true
  }
}
- 제공된 코드에서
"YOUR_API_KEY"를 Google Cloud 콘솔에서 복사한 API 키로 바꿉니다. App구조체 내에서body변수 바로 앞에 다음 줄을 추가합니다. 이렇게 하면 AppDelegate 클래스가 앱 수명 주기에 등록되어 앱 실행 및 기타 시스템 이벤트에 응답할 수 있습니다.
@UIApplicationDelegateAdaptor(AppDelegate.self) var delegate
기본 앱 파일은 다음과 같이 표시됩니다.
import GoogleSignIn
import SwiftUI

class AppDelegate: NSObject, UIApplicationDelegate {
  func application(
    _ application: UIApplication,
    didFinishLaunchingWithOptions launchOptions: [UIApplication.LaunchOptionsKey: Any]? = nil
  ) -> Bool {

    #if targetEnvironment(simulator)
      // Configure for debugging on a simulator.
      // TODO: Replace "YOUR_API_KEY" with the key from your Google Cloud project.
      let apiKey = "YOUR_API_KEY"
      GIDSignIn.sharedInstance.configureDebugProvider(withAPIKey: apiKey) { error in
        if let error {
          print("Error configuring GIDSignIn debug provider: \(error)")
        }
      }
    #else
      // Configure GIDSignIn for App Check on a real device.
      GIDSignIn.sharedInstance.configure { error in
        if let error {
          print("Error configuring GIDSignIn for App Check: \(error)")
        } else {
          print("GIDSignIn configured for App Check.")
        }
      }
    #endif

    return true
  }
}

@main
struct iOS_Sign_in_with_Google_App: App {

  @UIApplicationDelegateAdaptor(AppDelegate.self) var delegate

  var body: some Scene {
    WindowGroup {
      ContentView()

        .onOpenURL { url in
          GIDSignIn.sharedInstance.handle(url)
        }
    }
  }
}
UIKit
- AppDelegate.swift를 엽니다.
- App Check 초기화를 포함하도록
application(_:didFinishLaunchingWithOptions:)메서드를 업데이트합니다.
func application(
  _ application: UIApplication,
  didFinishLaunchingWithOptions launchOptions: [UIApplication.LaunchOptionsKey: Any]?
) -> Bool {

  #if targetEnvironment(simulator)
    // Configure for debugging on a simulator.
    // TODO: Replace "YOUR_API_KEY" with the key from your Google Cloud project.
    let apiKey = "YOUR_API_KEY"
    GIDSignIn.sharedInstance.configureDebugProvider(withAPIKey: apiKey) { error in
      if let error {
        print("Error configuring GIDSignIn debug provider: \(error)")
      }
    }
  #else
    // Configure GIDSignIn for App Check on a real device.
    GIDSignIn.sharedInstance.configure { error in
      if let error {
        print("Error configuring GIDSignIn for App Check: \(error)")
      }
    }
  #endif

  return true
}
- 제공된 코드에서
"YOUR_API_KEY"를 Google Cloud 콘솔에서 복사한 API 키로 바꿉니다.
AppDelegate.swift 파일은 다음과 같이 표시됩니다.
import GoogleSignIn
import UIKit

@main
class AppDelegate: UIResponder, UIApplicationDelegate {

  func application(
    _ application: UIApplication,
    didFinishLaunchingWithOptions launchOptions: [UIApplication.LaunchOptionsKey: Any]?
  ) -> Bool {

    #if targetEnvironment(simulator)
      // Configure for debugging on a simulator.
      // TODO: Replace "YOUR_API_KEY" with the key from your Google Cloud project.
      let apiKey = "YOUR_API_KEY"
      GIDSignIn.sharedInstance.configureDebugProvider(withAPIKey: apiKey) { error in
        if let error {
          print("Error configuring GIDSignIn debug provider: \(error)")
        }
      }
    #else
      // Configure GIDSignIn for App Check on a real device.
      GIDSignIn.sharedInstance.configure { error in
        if let error {
          print("Error configuring GIDSignIn for App Check: \(error)")
        }
      }
    #endif

    return true
  }

  func application(
    _ app: UIApplication,
    open url: URL,
    options: [UIApplication.OpenURLOptionsKey: Any] = [:]
  ) -> Bool {
    var handled: Bool

    handled = GIDSignIn.sharedInstance.handle(url)
    if handled {
      return true
    }
    // If not handled by this app, return false.
    return false
  }

  // MARK: UISceneSession Lifecycle

  func application(
    _ application: UIApplication,
    configurationForConnecting connectingSceneSession: UISceneSession,
    options: UIScene.ConnectionOptions
  ) -> UISceneConfiguration {
    // Called when a new scene session is being created.
    // Use this method to select a configuration to create the new scene with.
    return UISceneConfiguration(
      name: "Default Configuration",
      sessionRole: connectingSceneSession.role
    )
  }

  func application(
    _ application: UIApplication,
    didDiscardSceneSessions sceneSessions: Set<UISceneSession>
  ) {
    // Called when the user discards a scene session.
    // If any sessions were discarded while the application was not running, this will be called shortly after application:didFinishLaunchingWithOptions.
    // Use this method to release any resources that were specific to the discarded scenes, as they will not return.
  }
}
시뮬레이터에서 앱 체크 테스트
- Xcode 메뉴 바에서 Product(제품) > Scheme(스키마) > Edit Scheme(스키마 수정)으로 이동합니다.
- 탐색 메뉴에서 실행을 선택합니다.
- Arguments(인수) 탭을 선택합니다.
- Arguments Passed on Launch(실행 시 전달 인수) 섹션에서 +를 선택하고 -FIRDebugEnabled를 추가합니다. 이 실행 인수는 Firebase 디버그 로깅을 사용 설정합니다.
- 닫기를 선택합니다.

- 시뮬레이터에서 앱을 실행합니다.
- Xcode 콘솔에 출력된 앱 체크 디버그 토큰을 복사합니다.
- Firebase Console에서 프로젝트로 이동합니다.
- 탐색 메뉴에서 빌드 섹션을 펼칩니다.
- App Check을 선택합니다.
- 앱 탭을 선택합니다.
- 앱 위로 마우스를 가져간 후 점 3개로 된 메뉴 아이콘을 선택합니다.
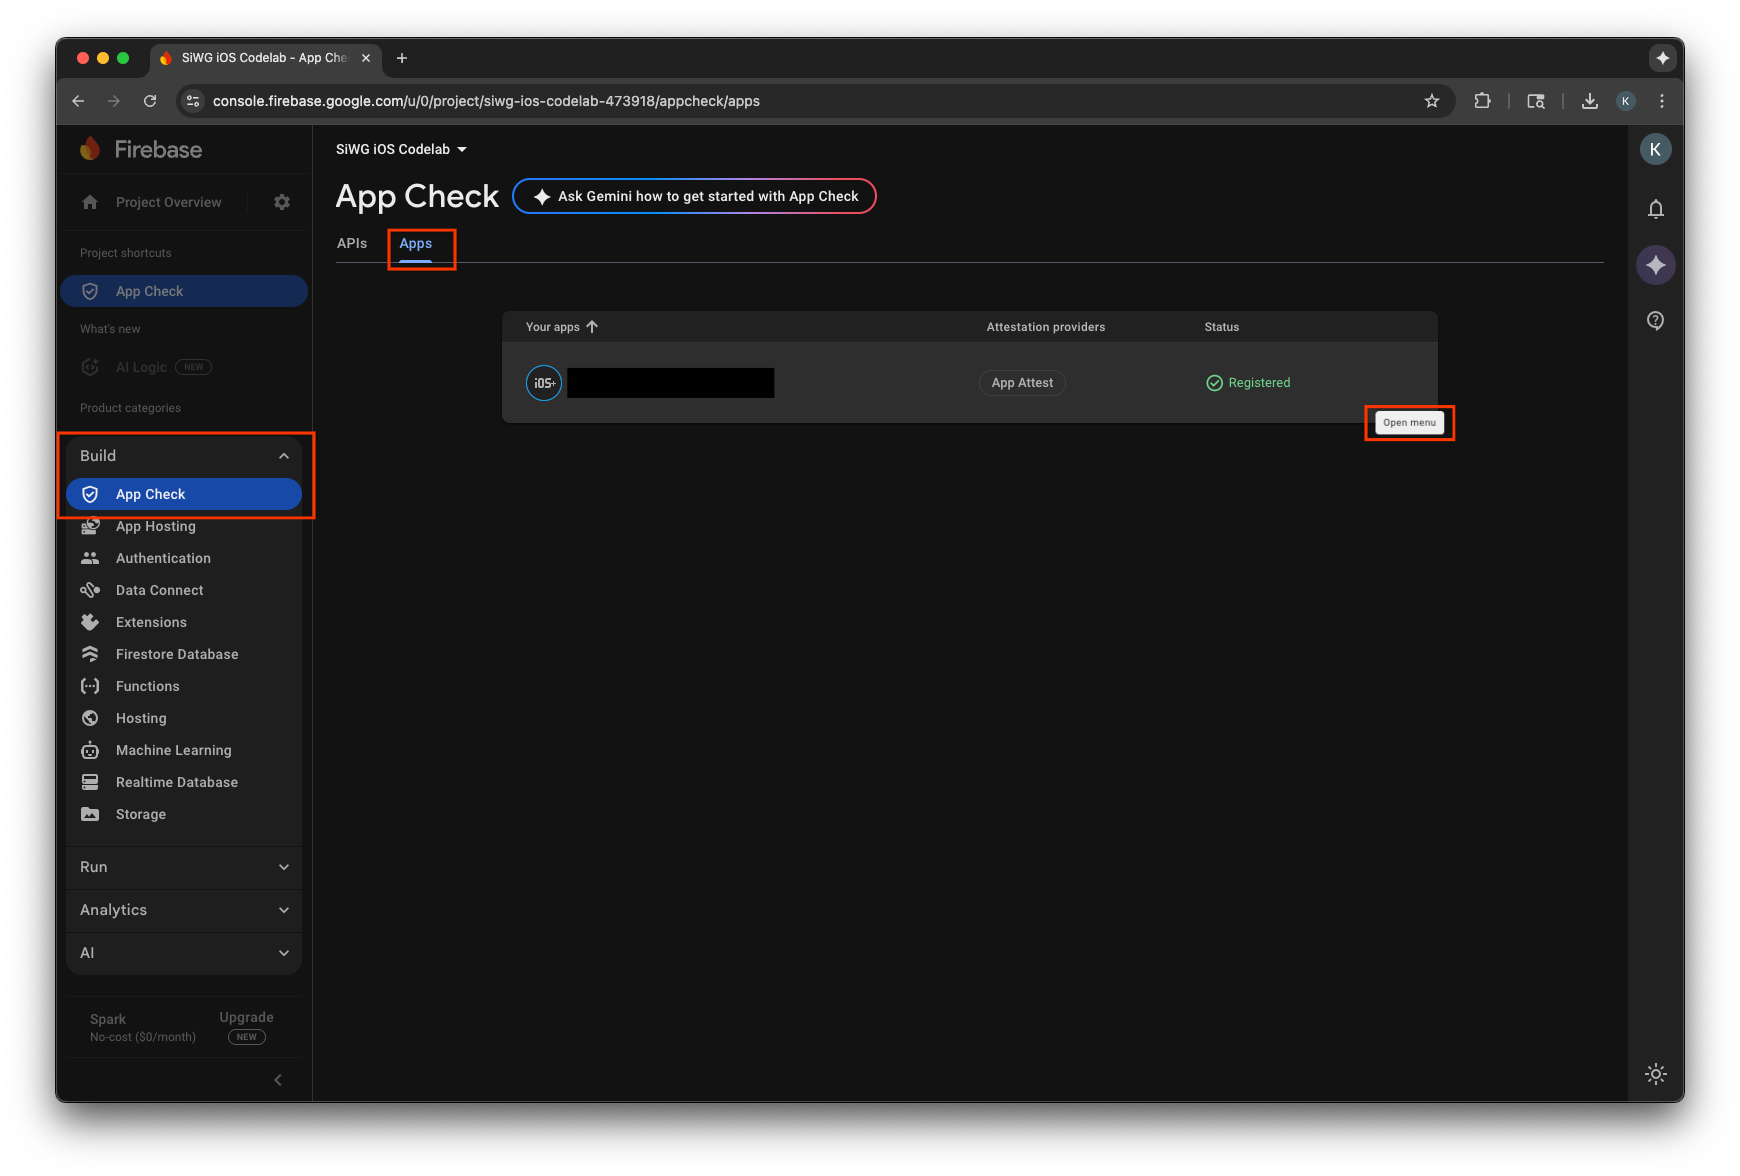
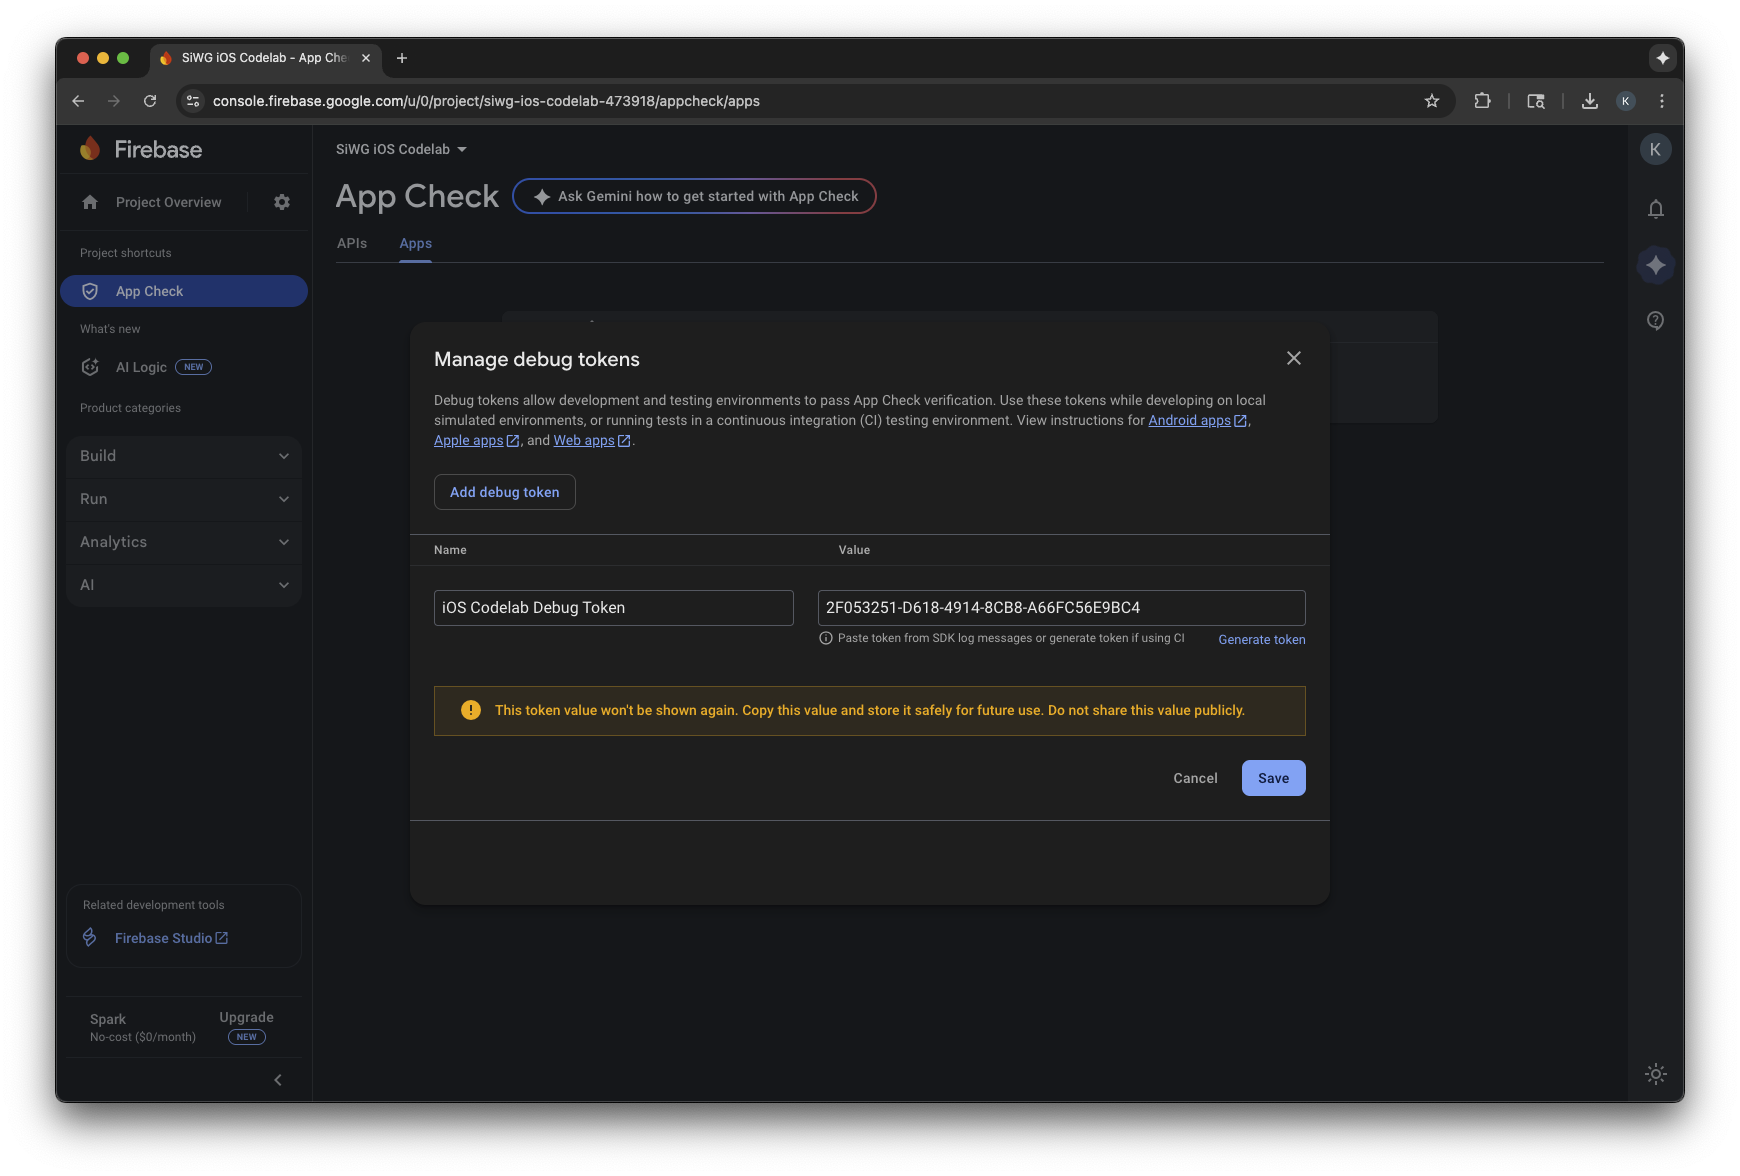
- 디버그 토큰 관리를 선택합니다.
- 디버그 토큰 추가를 선택합니다.
- 디버그 토큰에 이름을 지정하고 이전에 복사한 디버그 토큰을 값으로 붙여넣습니다.
- 저장을 선택하여 토큰을 등록합니다.
- 시뮬레이터로 돌아가서 로그인합니다.
측정항목이 콘솔에 표시되는 데 몇 분 정도 걸릴 수 있습니다. 이러한 요청이 전송되면 다음 두 위치 중 한 곳에서 인증됨 요청이 증가하는지 확인하여 앱 확인이 작동하는지 확인할 수 있습니다.
- Firebase Console의 앱 체크 섹션에 있는 API 탭
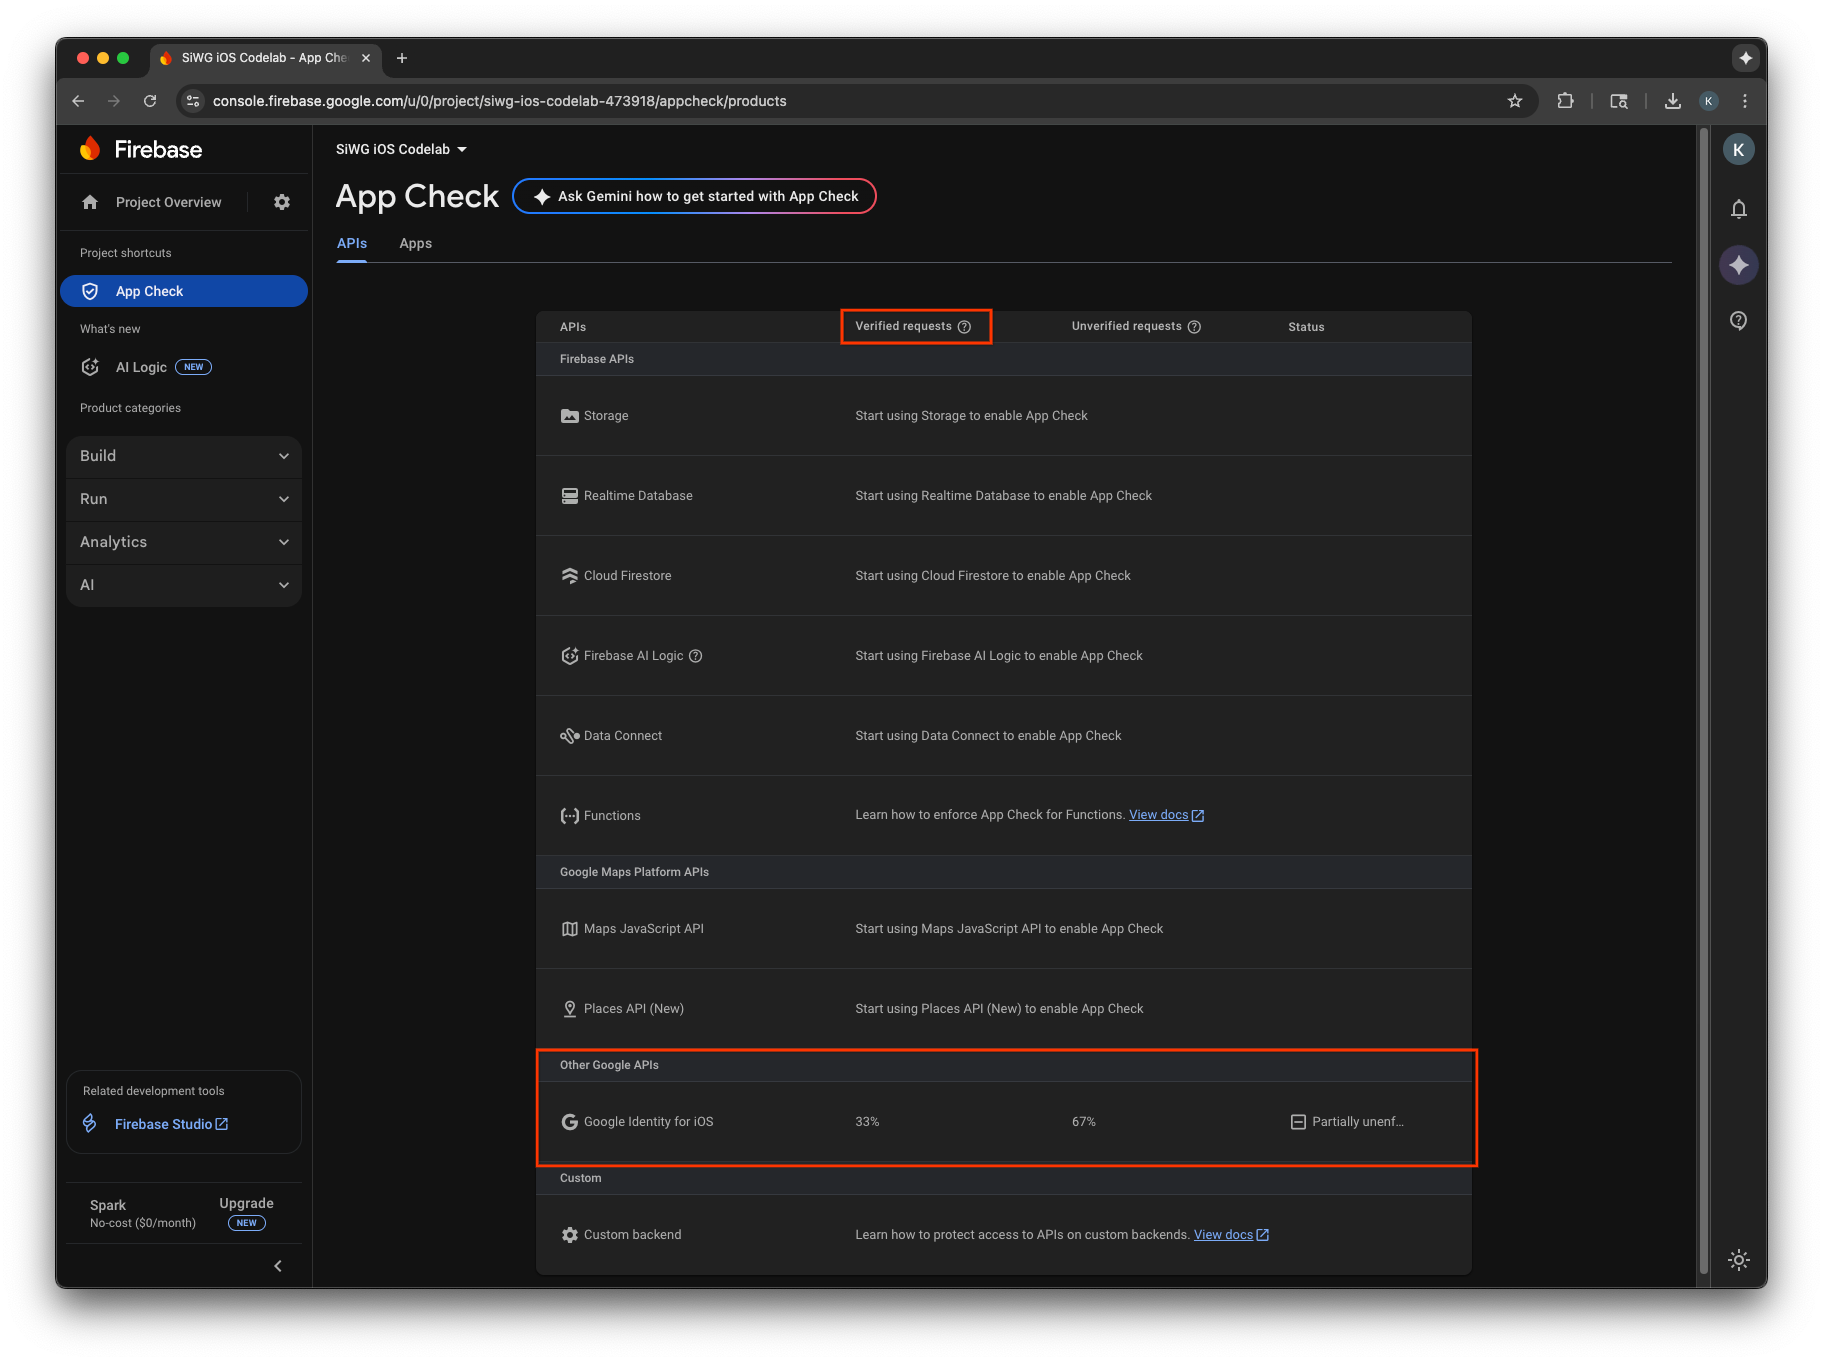
- Google Cloud 콘솔의 OAuth 클라이언트 수정 페이지
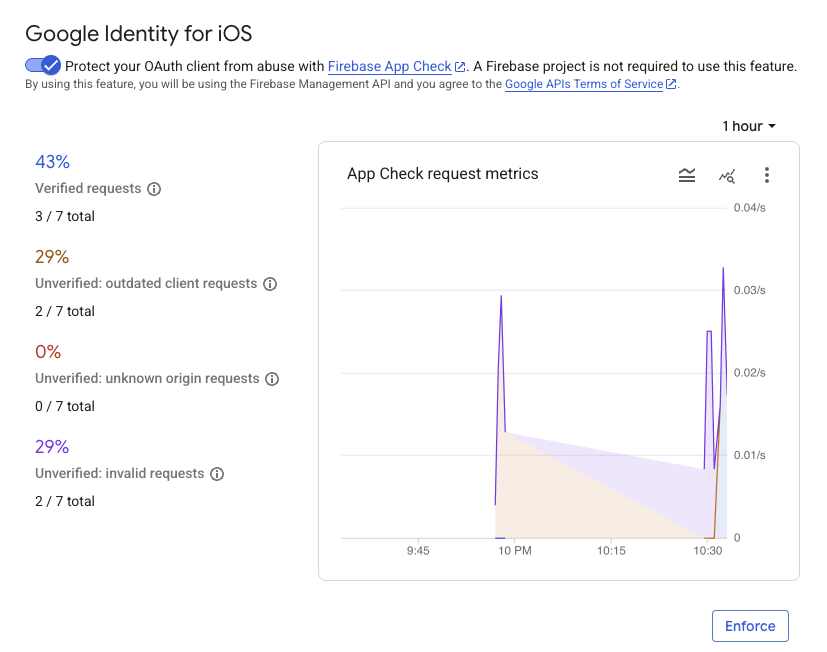
앱의 앱 체크 측정항목을 모니터링하고 적법한 요청이 인증되는지 확인한 후 앱 체크 적용을 사용 설정해야 합니다. 적용되면 앱 체크에서 확인되지 않은 모든 요청을 거부하여 인증된 앱의 트래픽만 프로젝트를 대신하여 Google의 OAuth 2.0 엔드포인트에 액세스할 수 있습니다.
12. 추가 리소스
축하합니다.
OAuth 2.0 iOS 클라이언트를 구성하고, iOS 앱에 Google로 로그인 버튼을 추가하고, 버튼의 모양을 맞춤설정하는 방법을 알아보고, JWT ID 토큰을 디코딩하고, 앱에 App Check를 사용 설정했습니다.
다음 링크가 다음 단계에 도움이 될 수 있습니다.
- iOS용 Google 로그인 시작하기
- iOS용 Google 로그인 저장소
- Google ID 토큰 확인
- iOS에서 Google 로그인용 App Check 사용 시작하기
- 액세스 토큰 취소 및 앱 연결 해제
- Google Cloud 프로젝트 자세히 알아보기
- Google ID 인증 방법
- 앱 체크 적용 사용 설정