
1. ก่อนเริ่มต้น
Codelab นี้จะแนะนำวิธีสร้างแอปพลิเคชัน iOS ที่ใช้ฟีเจอร์ลงชื่อเข้าใช้ด้วย Google และเรียกใช้ในโปรแกรมจำลอง เราได้จัดเตรียมการติดตั้งใช้งานโดยใช้ทั้ง SwiftUI และ UIKit
SwiftUI เป็นเฟรมเวิร์ก UI ที่ทันสมัยของ Apple สำหรับการพัฒนาแอปใหม่ ซึ่งช่วยให้สร้างอินเทอร์เฟซผู้ใช้สำหรับแพลตฟอร์ม Apple ทั้งหมดจากฐานของโค้ดที่แชร์เดียวได้ โดยต้องใช้ iOS เวอร์ชัน 13 ขึ้นไป
UIKit เป็นเฟรมเวิร์ก UI ดั้งเดิมและพื้นฐานของ Apple สำหรับ iOS โดยจะมีความเข้ากันได้แบบย้อนหลังสำหรับ iOS เวอร์ชันเก่า จึงเป็นตัวเลือกที่ดีสำหรับแอปที่สร้างขึ้นแล้วซึ่งต้องรองรับอุปกรณ์รุ่นเก่าที่หลากหลาย
คุณสามารถทำตามเส้นทางสำหรับเฟรมเวิร์กที่สอดคล้องกับความต้องการในการพัฒนาของคุณมากที่สุด
ข้อกำหนดเบื้องต้น
สิ่งที่คุณจะได้เรียนรู้
- วิธีสร้างโปรเจ็กต์ Google Cloud
- วิธีสร้างไคลเอ็นต์ OAuth ในคอนโซล Google Cloud
- วิธีใช้ฟีเจอร์ลงชื่อเข้าใช้ด้วย Google สำหรับแอป iOS
- วิธีปรับแต่งปุ่มลงชื่อเข้าใช้ด้วย Google
- วิธีถอดรหัสโทเค็นรหัส
- วิธีเปิดใช้ App Check สำหรับแอป iOS
สิ่งที่คุณต้องมี
- Xcode เวอร์ชันปัจจุบัน
- คอมพิวเตอร์ที่ใช้ macOS ซึ่งตรงตามข้อกำหนดของระบบสำหรับ Xcode เวอร์ชันที่คุณติดตั้ง
Codelab นี้สร้างขึ้นโดยใช้ Xcode 16.3 กับโปรแกรมจำลอง iOS 18.3 คุณควรใช้ Xcode เวอร์ชันล่าสุดในการพัฒนา
2. สร้างโปรเจ็กต์ Xcode ใหม่
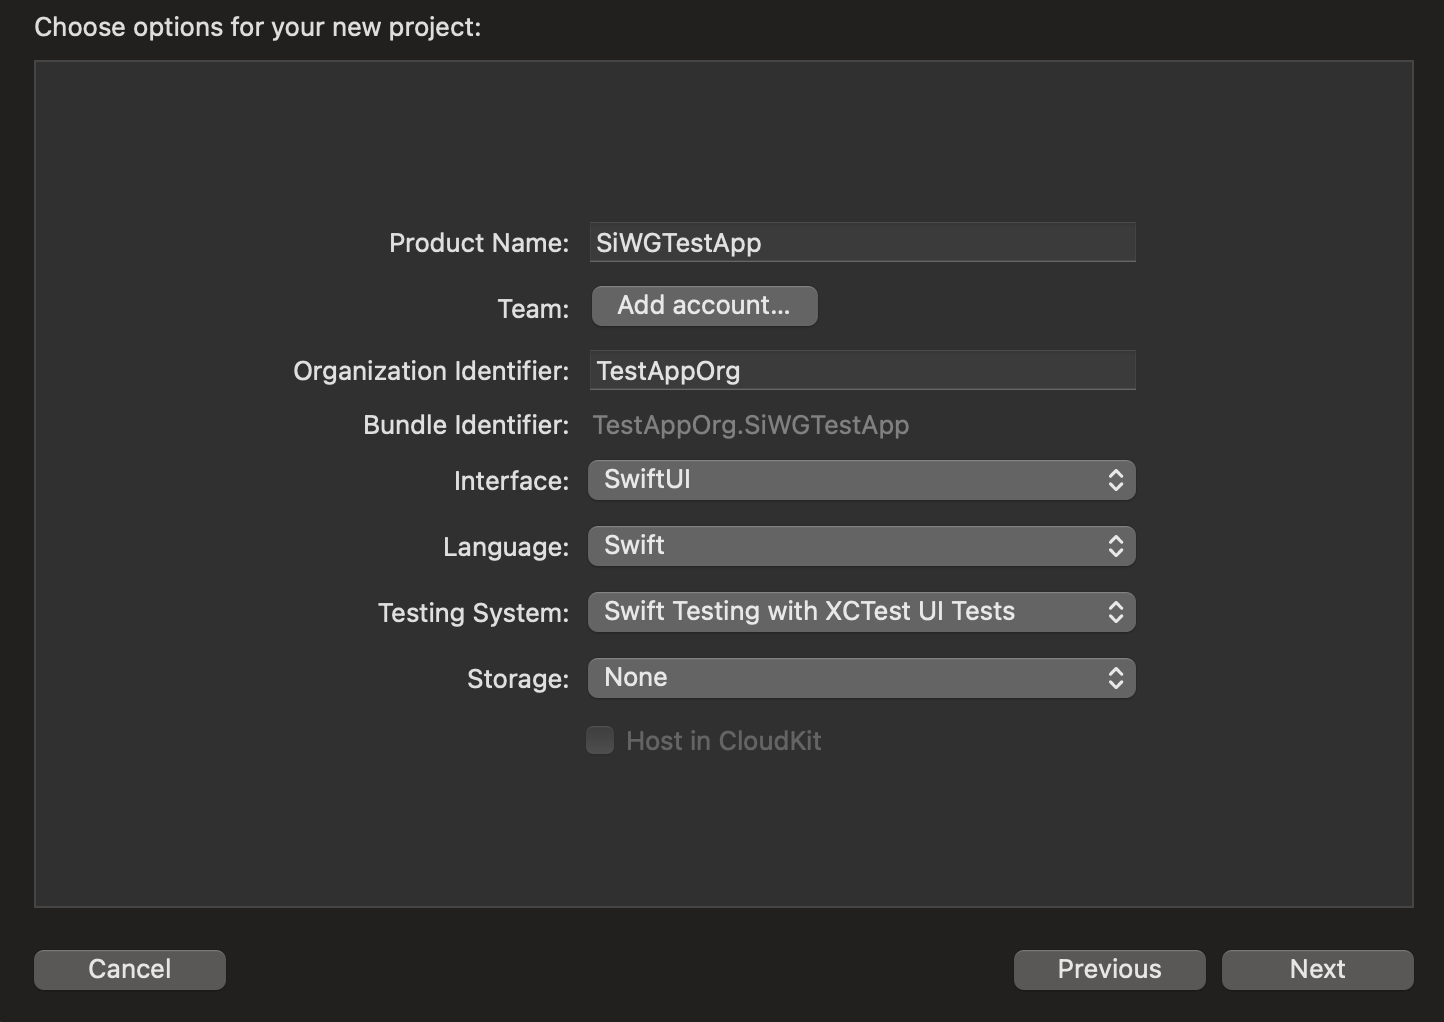
- เปิด Xcode แล้วเลือกสร้างโปรเจ็กต์ Xcode ใหม่
- เลือกแท็บ iOS เลือกเทมเพลตแอป แล้วคลิกถัดไป
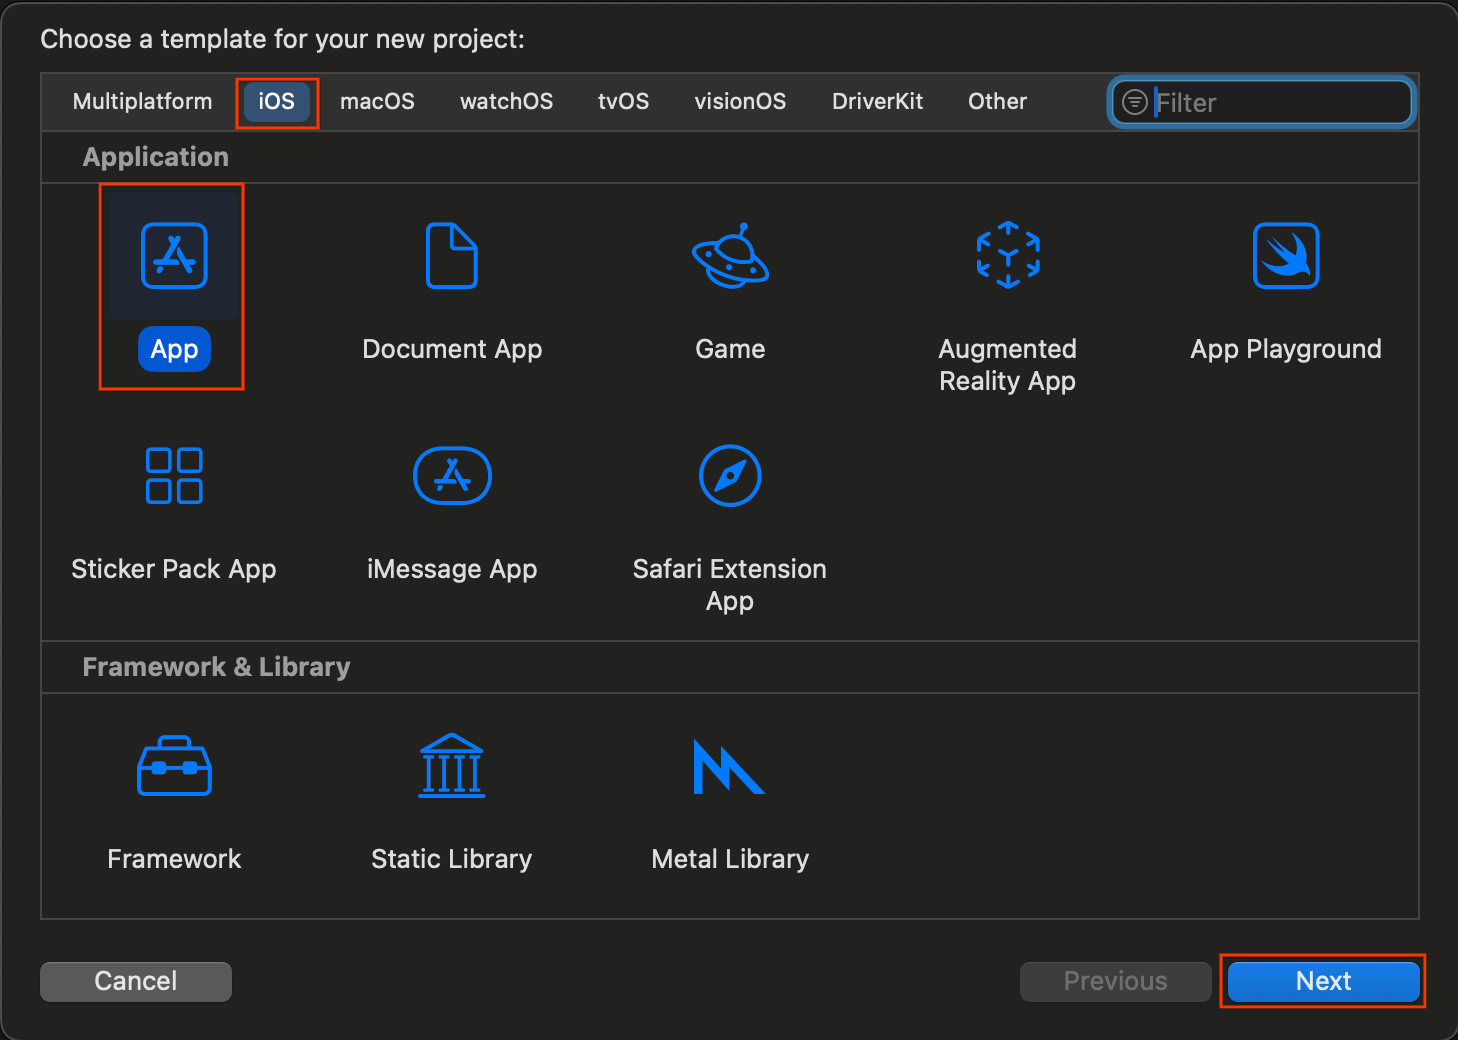
- ในตัวเลือกโปรเจ็กต์ ให้ทำดังนี้
- ป้อนชื่อผลิตภัณฑ์
- เลือกทีม (ไม่บังคับ)
- ป้อนตัวระบุองค์กร
- จดบันทึกรหัสชุดซอฟต์แวร์ที่สร้างขึ้น เนื่องจากต้องใช้ในภายหลัง
- สำหรับอินเทอร์เฟซ ให้เลือกตัวเลือกใดตัวเลือกหนึ่งต่อไปนี้
- SwiftUI สำหรับแอปที่ใช้ SwiftUI
- สตอรีบอร์ดสำหรับแอปที่ใช้ UIKit
- เลือก Swift สำหรับภาษา
- คลิกถัดไป แล้วเลือกตำแหน่งที่จะบันทึกโปรเจ็กต์
3. สร้างไคลเอ็นต์ OAuth
หากต้องการอนุญาตให้แอปสื่อสารกับบริการตรวจสอบสิทธิ์ของ Google คุณต้องสร้างรหัสไคลเอ็นต์ OAuth โดยต้องใช้โปรเจ็กต์ Google Cloud ขั้นตอนต่อไปนี้จะแนะนำกระบวนการสร้างโปรเจ็กต์และรหัสไคลเอ็นต์ OAuth
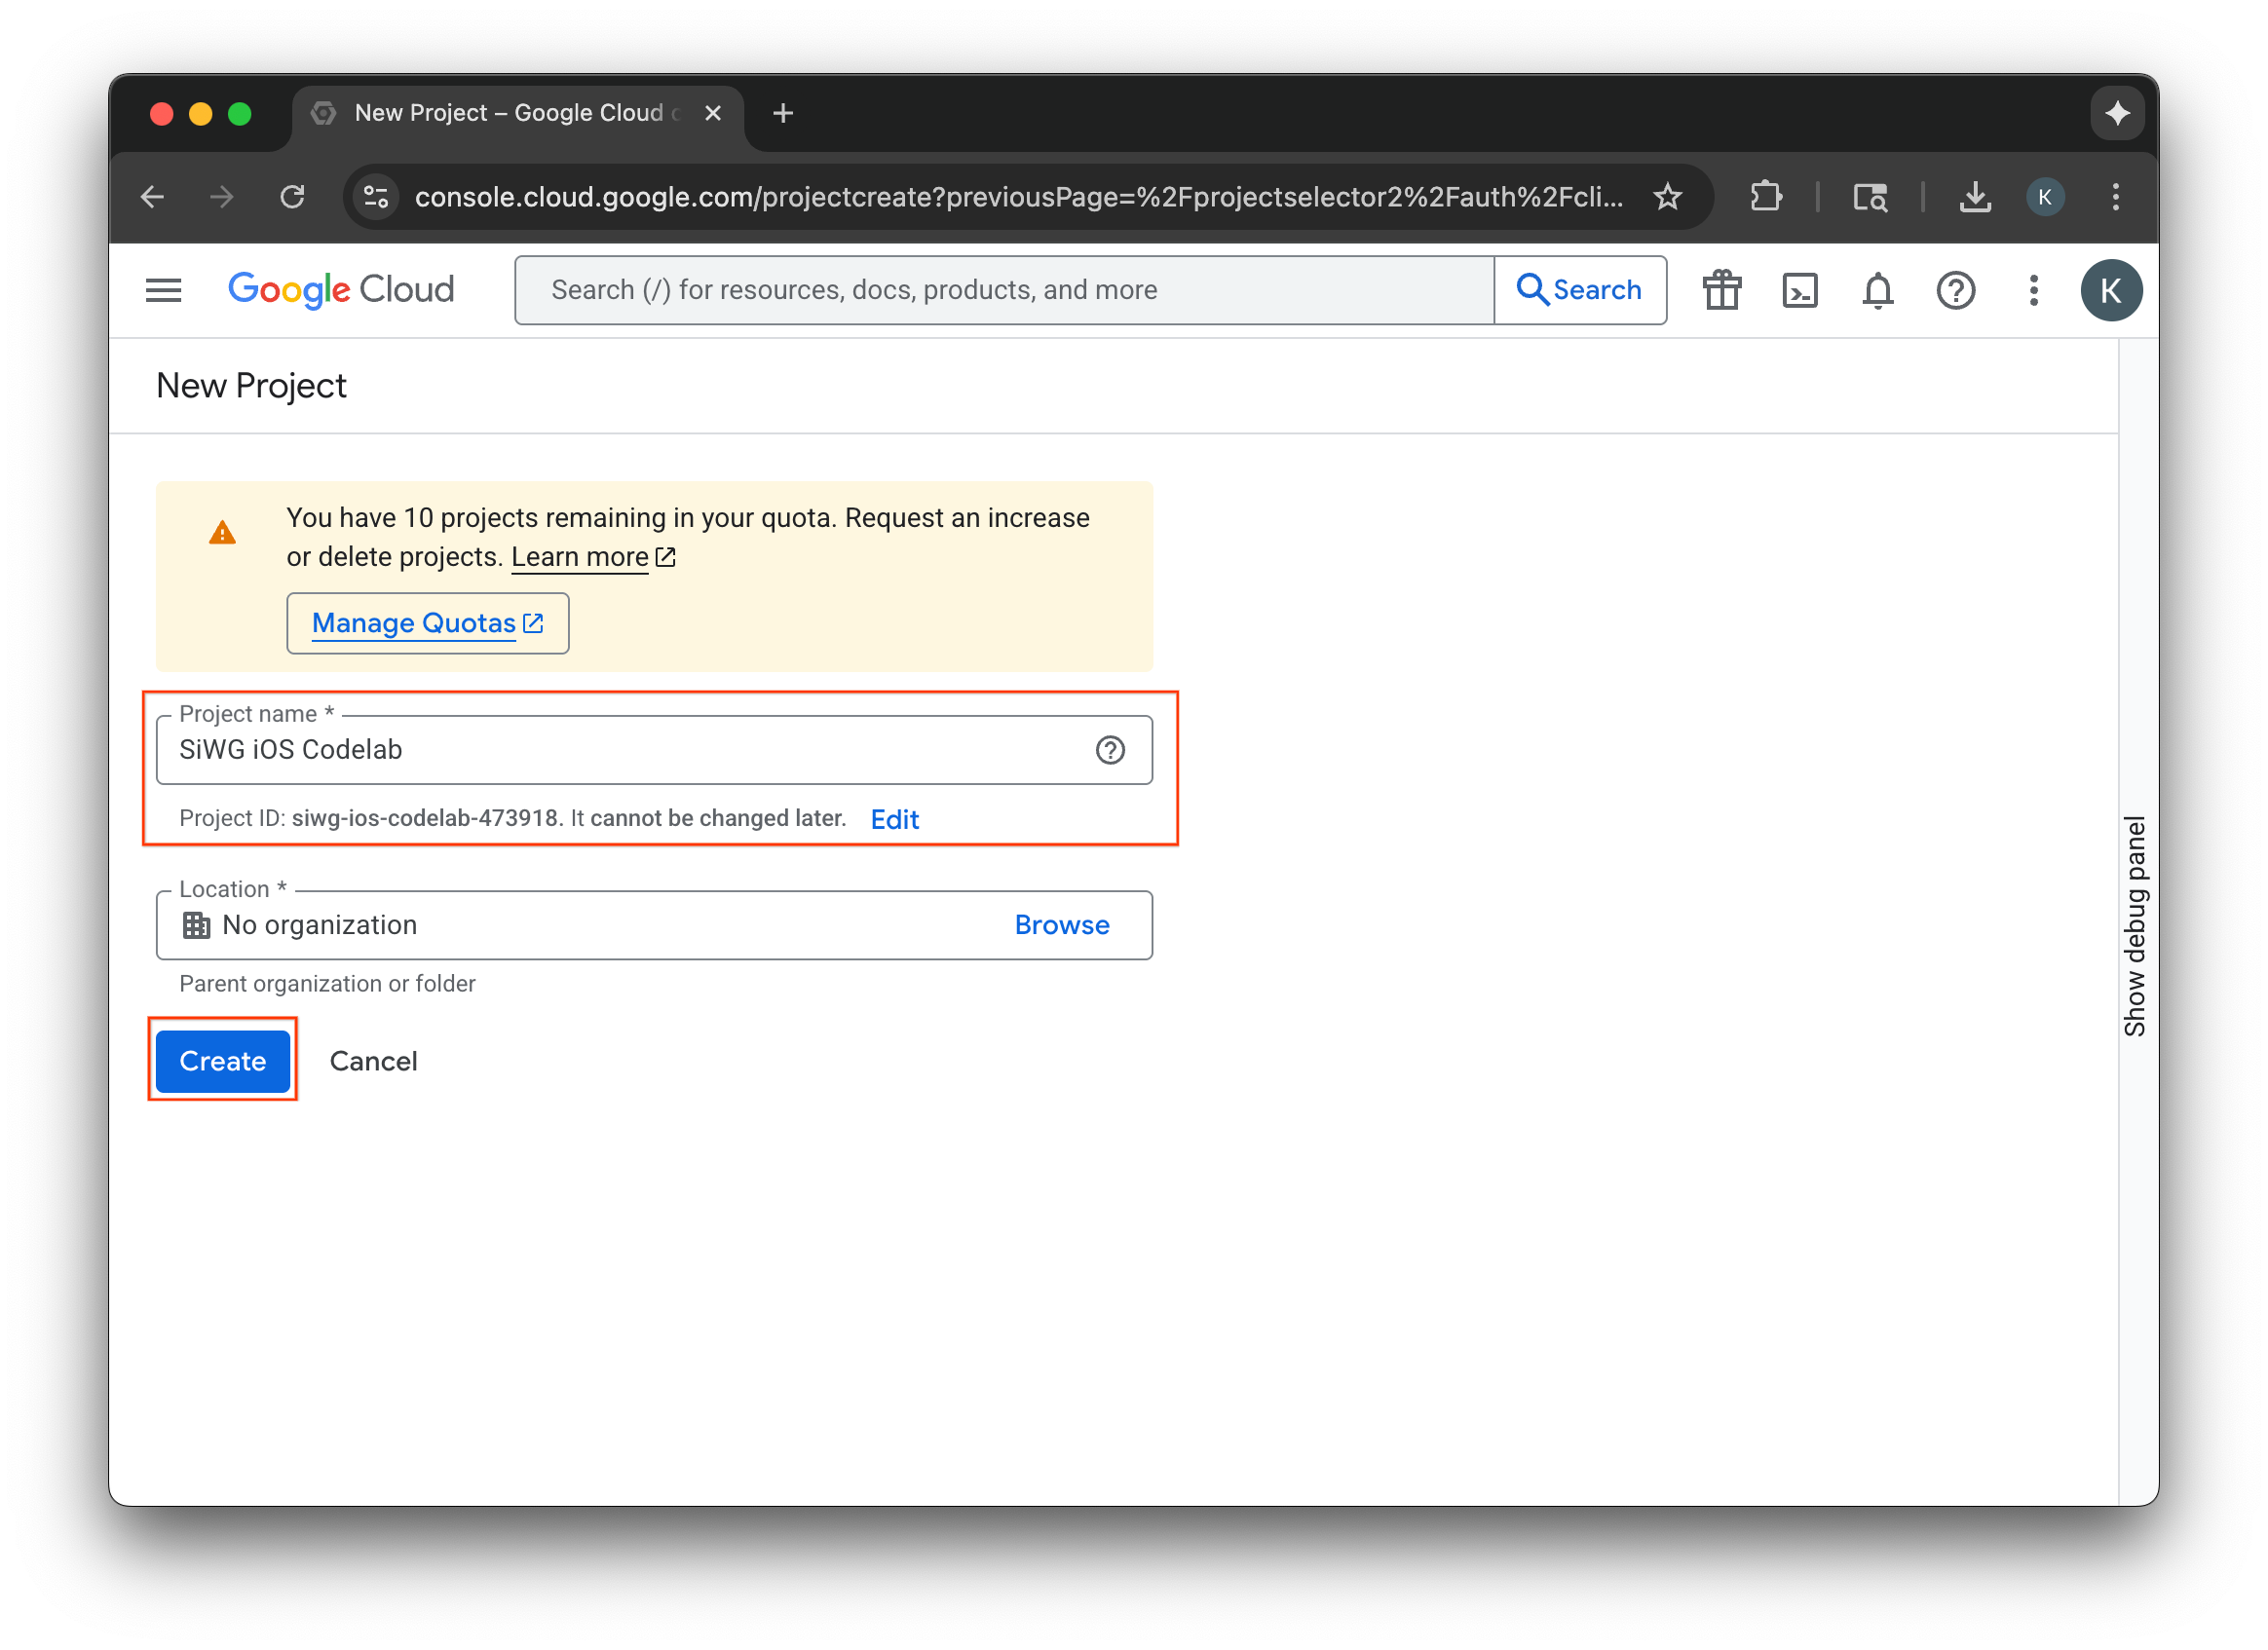
เลือกหรือสร้างโปรเจ็กต์ Google Cloud
- ไปที่ คอนโซล Google Cloud แล้วเลือกหรือสร้างโปรเจ็กต์ หากเลือกโปรเจ็กต์ที่มีอยู่แล้ว คอนโซลจะนำคุณไปยังขั้นตอนถัดไปที่จำเป็นโดยอัตโนมัติ
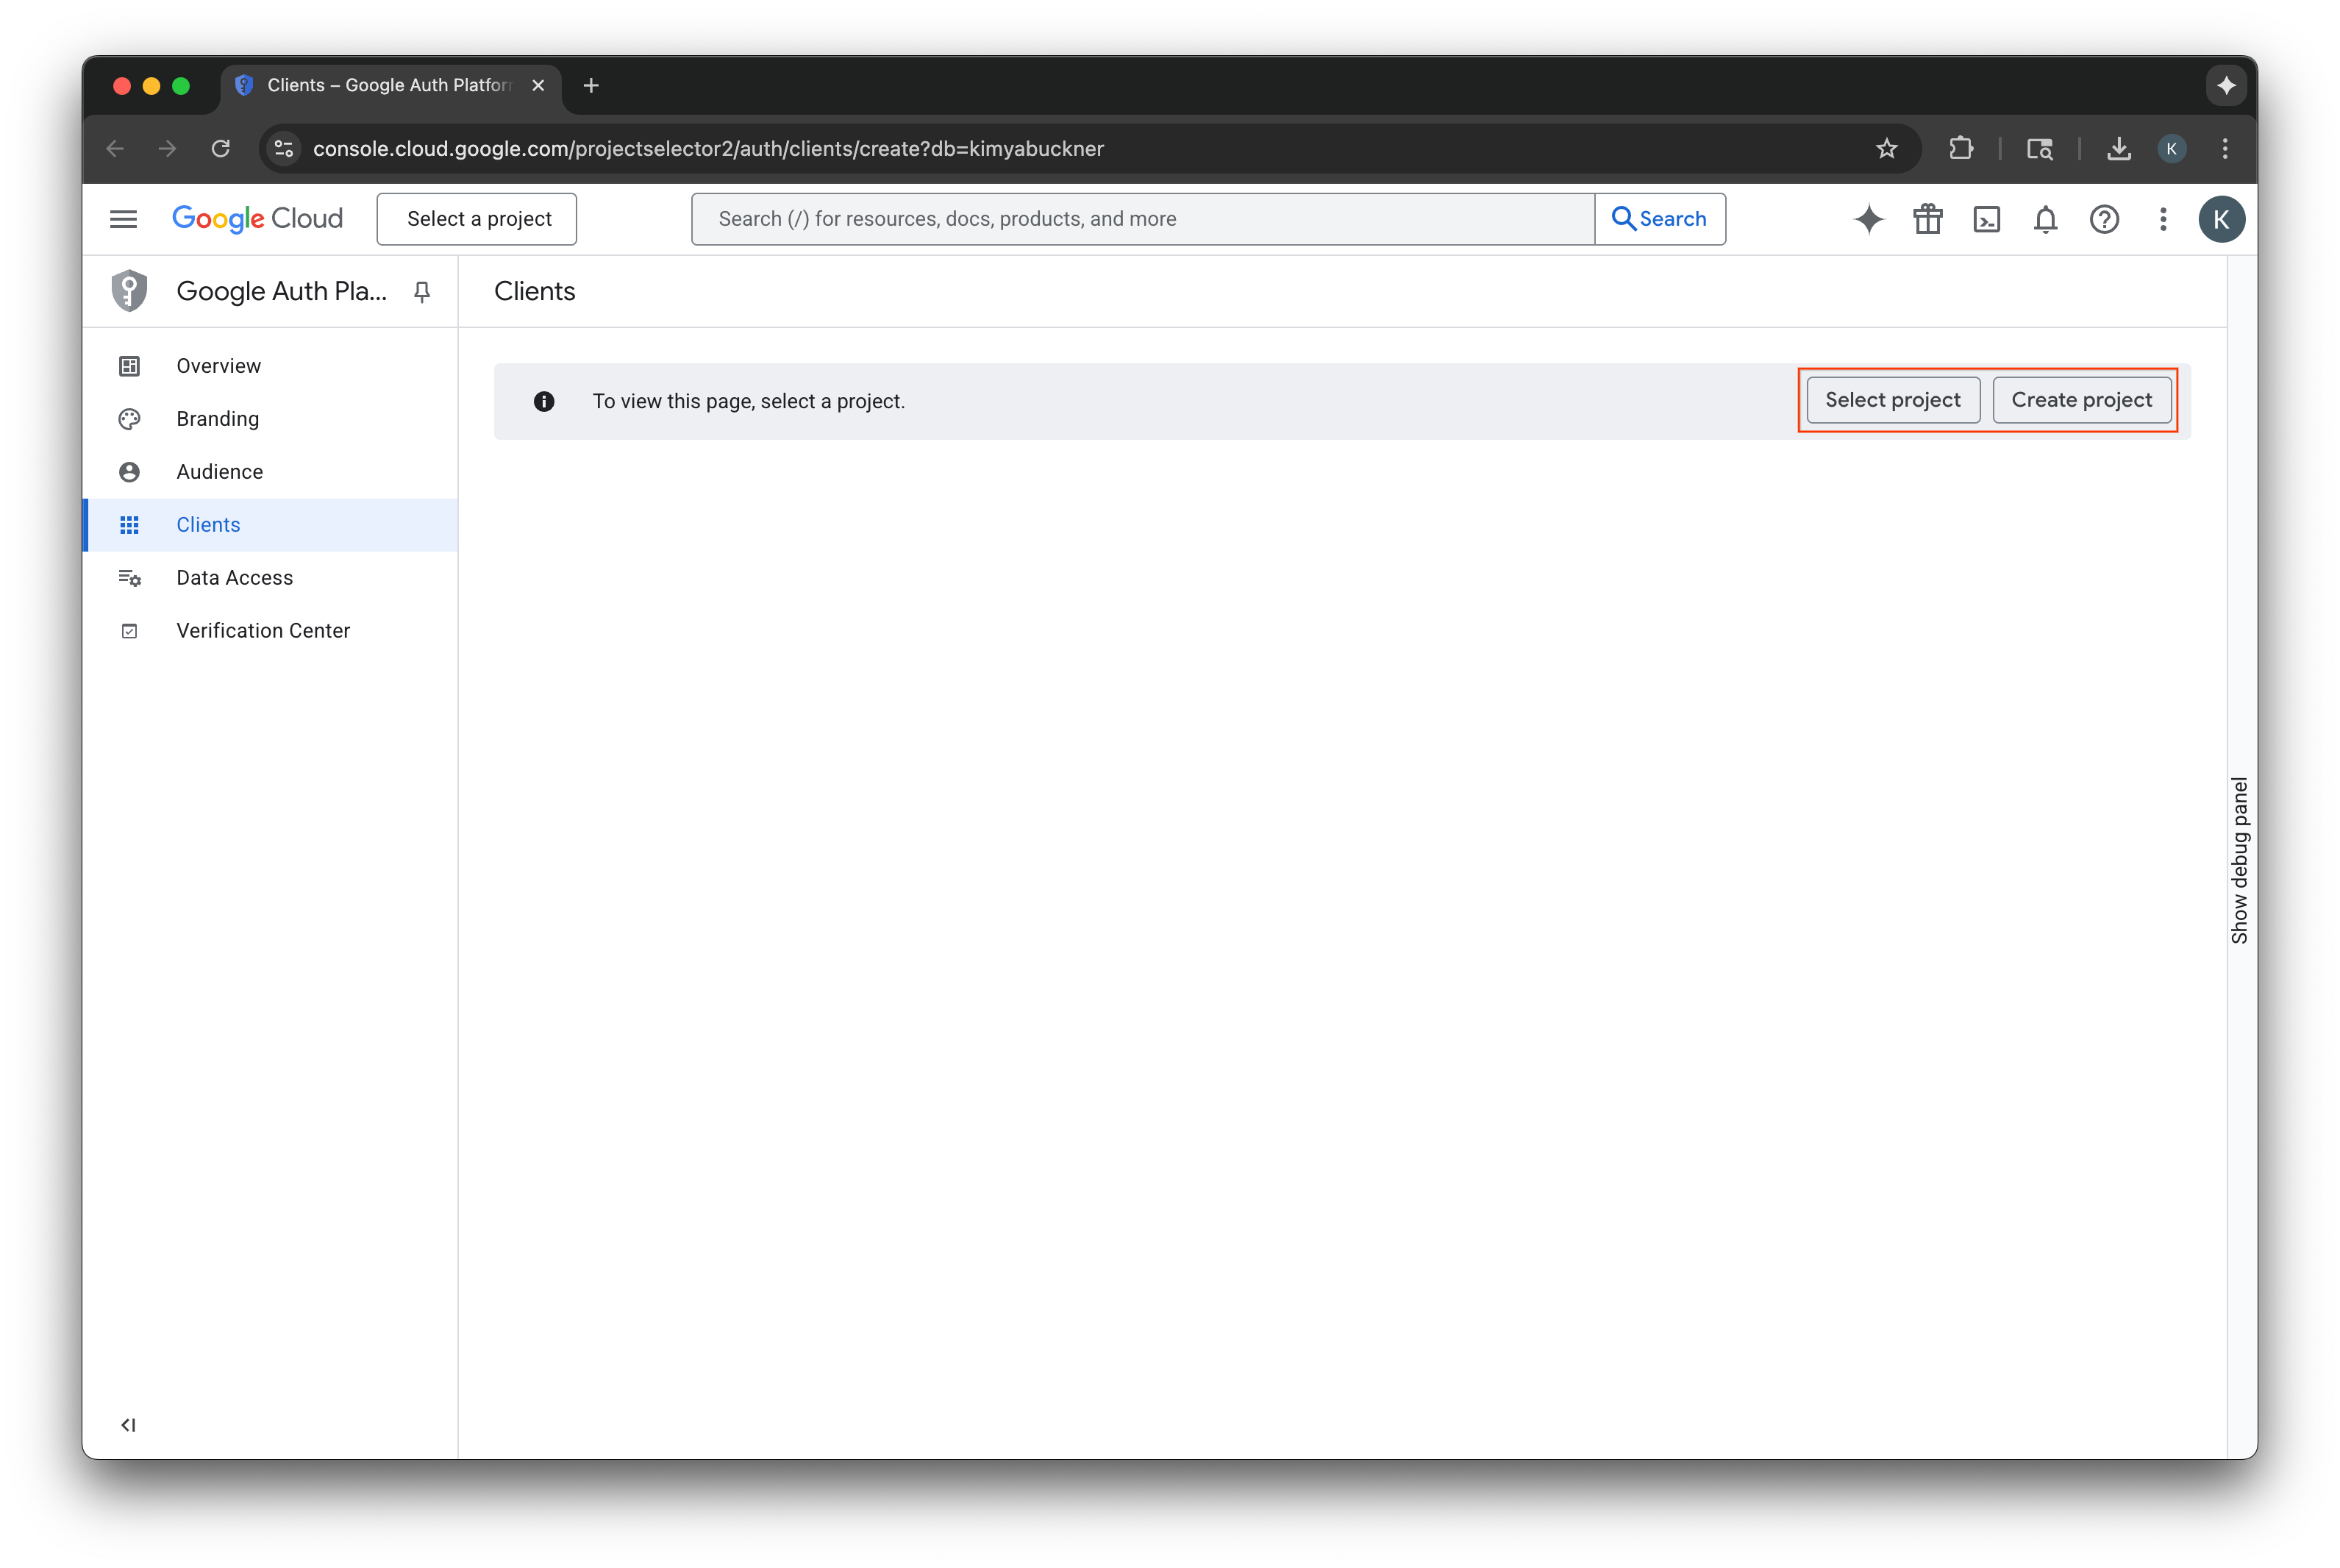
- ป้อนชื่อโปรเจ็กต์ Google Cloud ใหม่
- เลือกสร้าง
กำหนดค่าหน้าจอขอความยินยอม
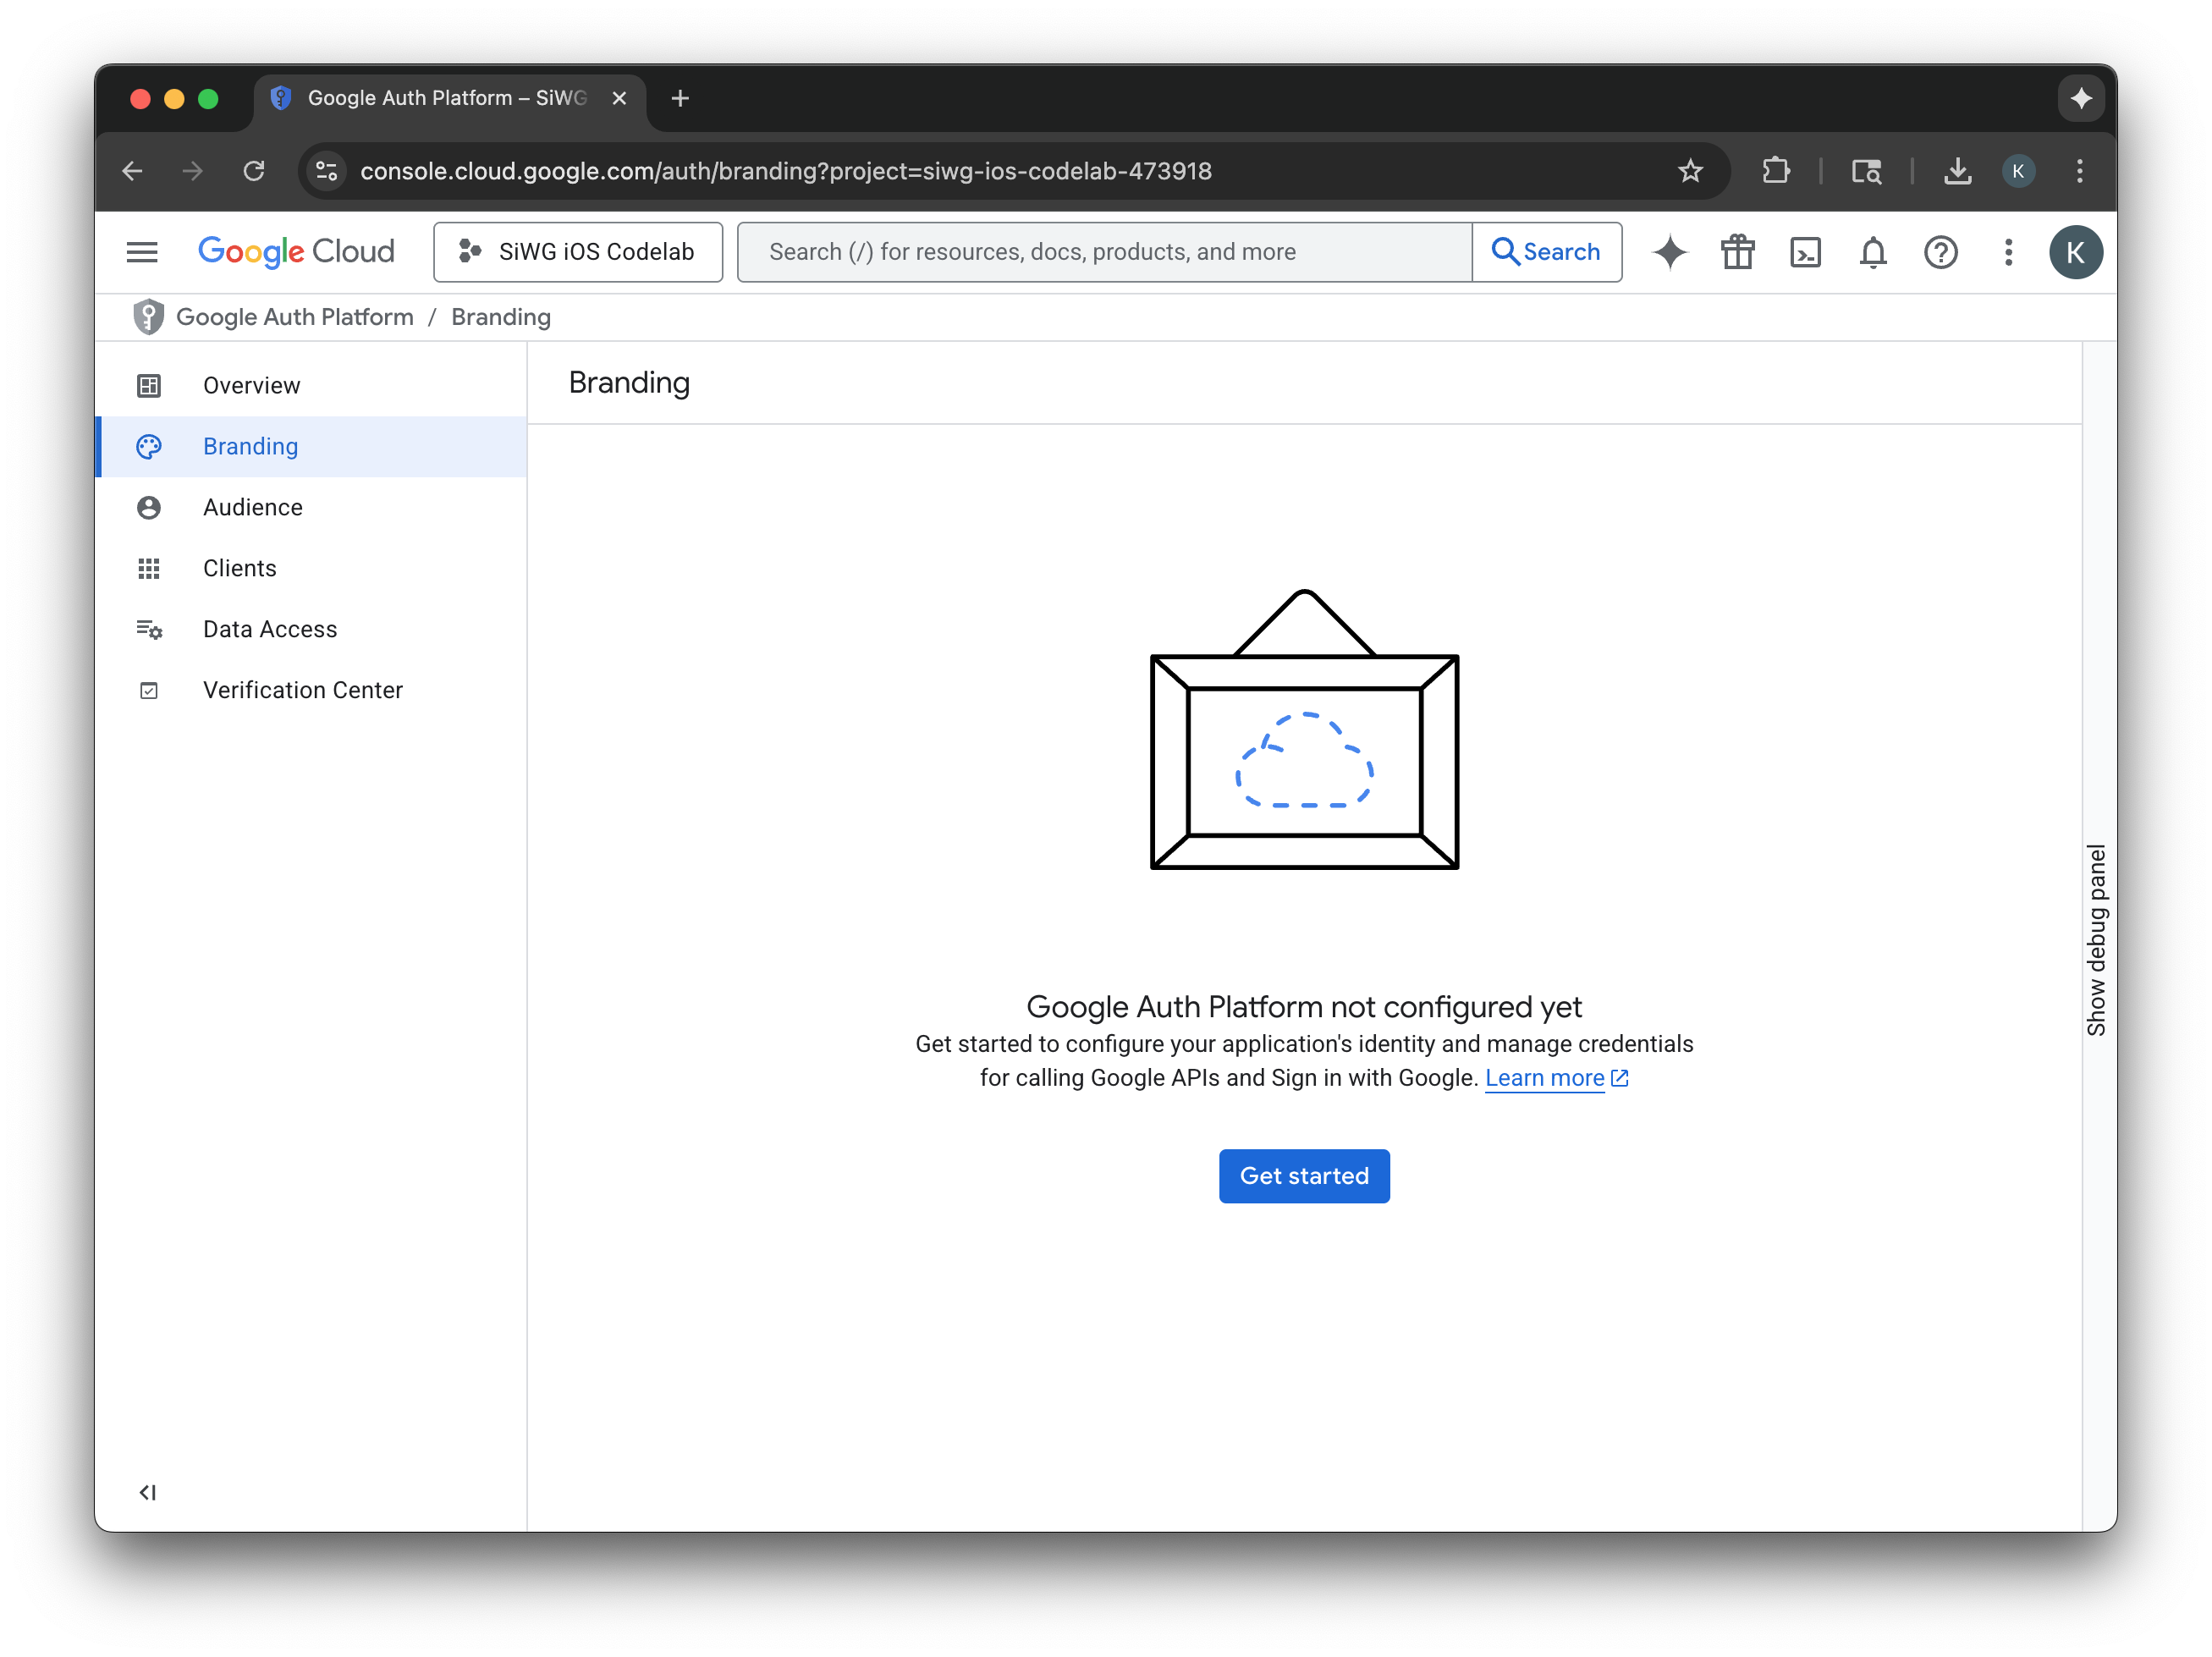
หากกำหนดค่าหน้าจอขอความยินยอมสำหรับโปรเจ็กต์ที่เลือกไว้แล้ว คุณจะไม่ได้รับแจ้งให้กำหนดค่าในตอนนี้ ในกรณีนี้ คุณสามารถข้ามส่วนนี้และไปที่สร้างไคลเอ็นต์ OAuth 2.0 ได้
- เลือกกำหนดค่าหน้าจอขอความยินยอม
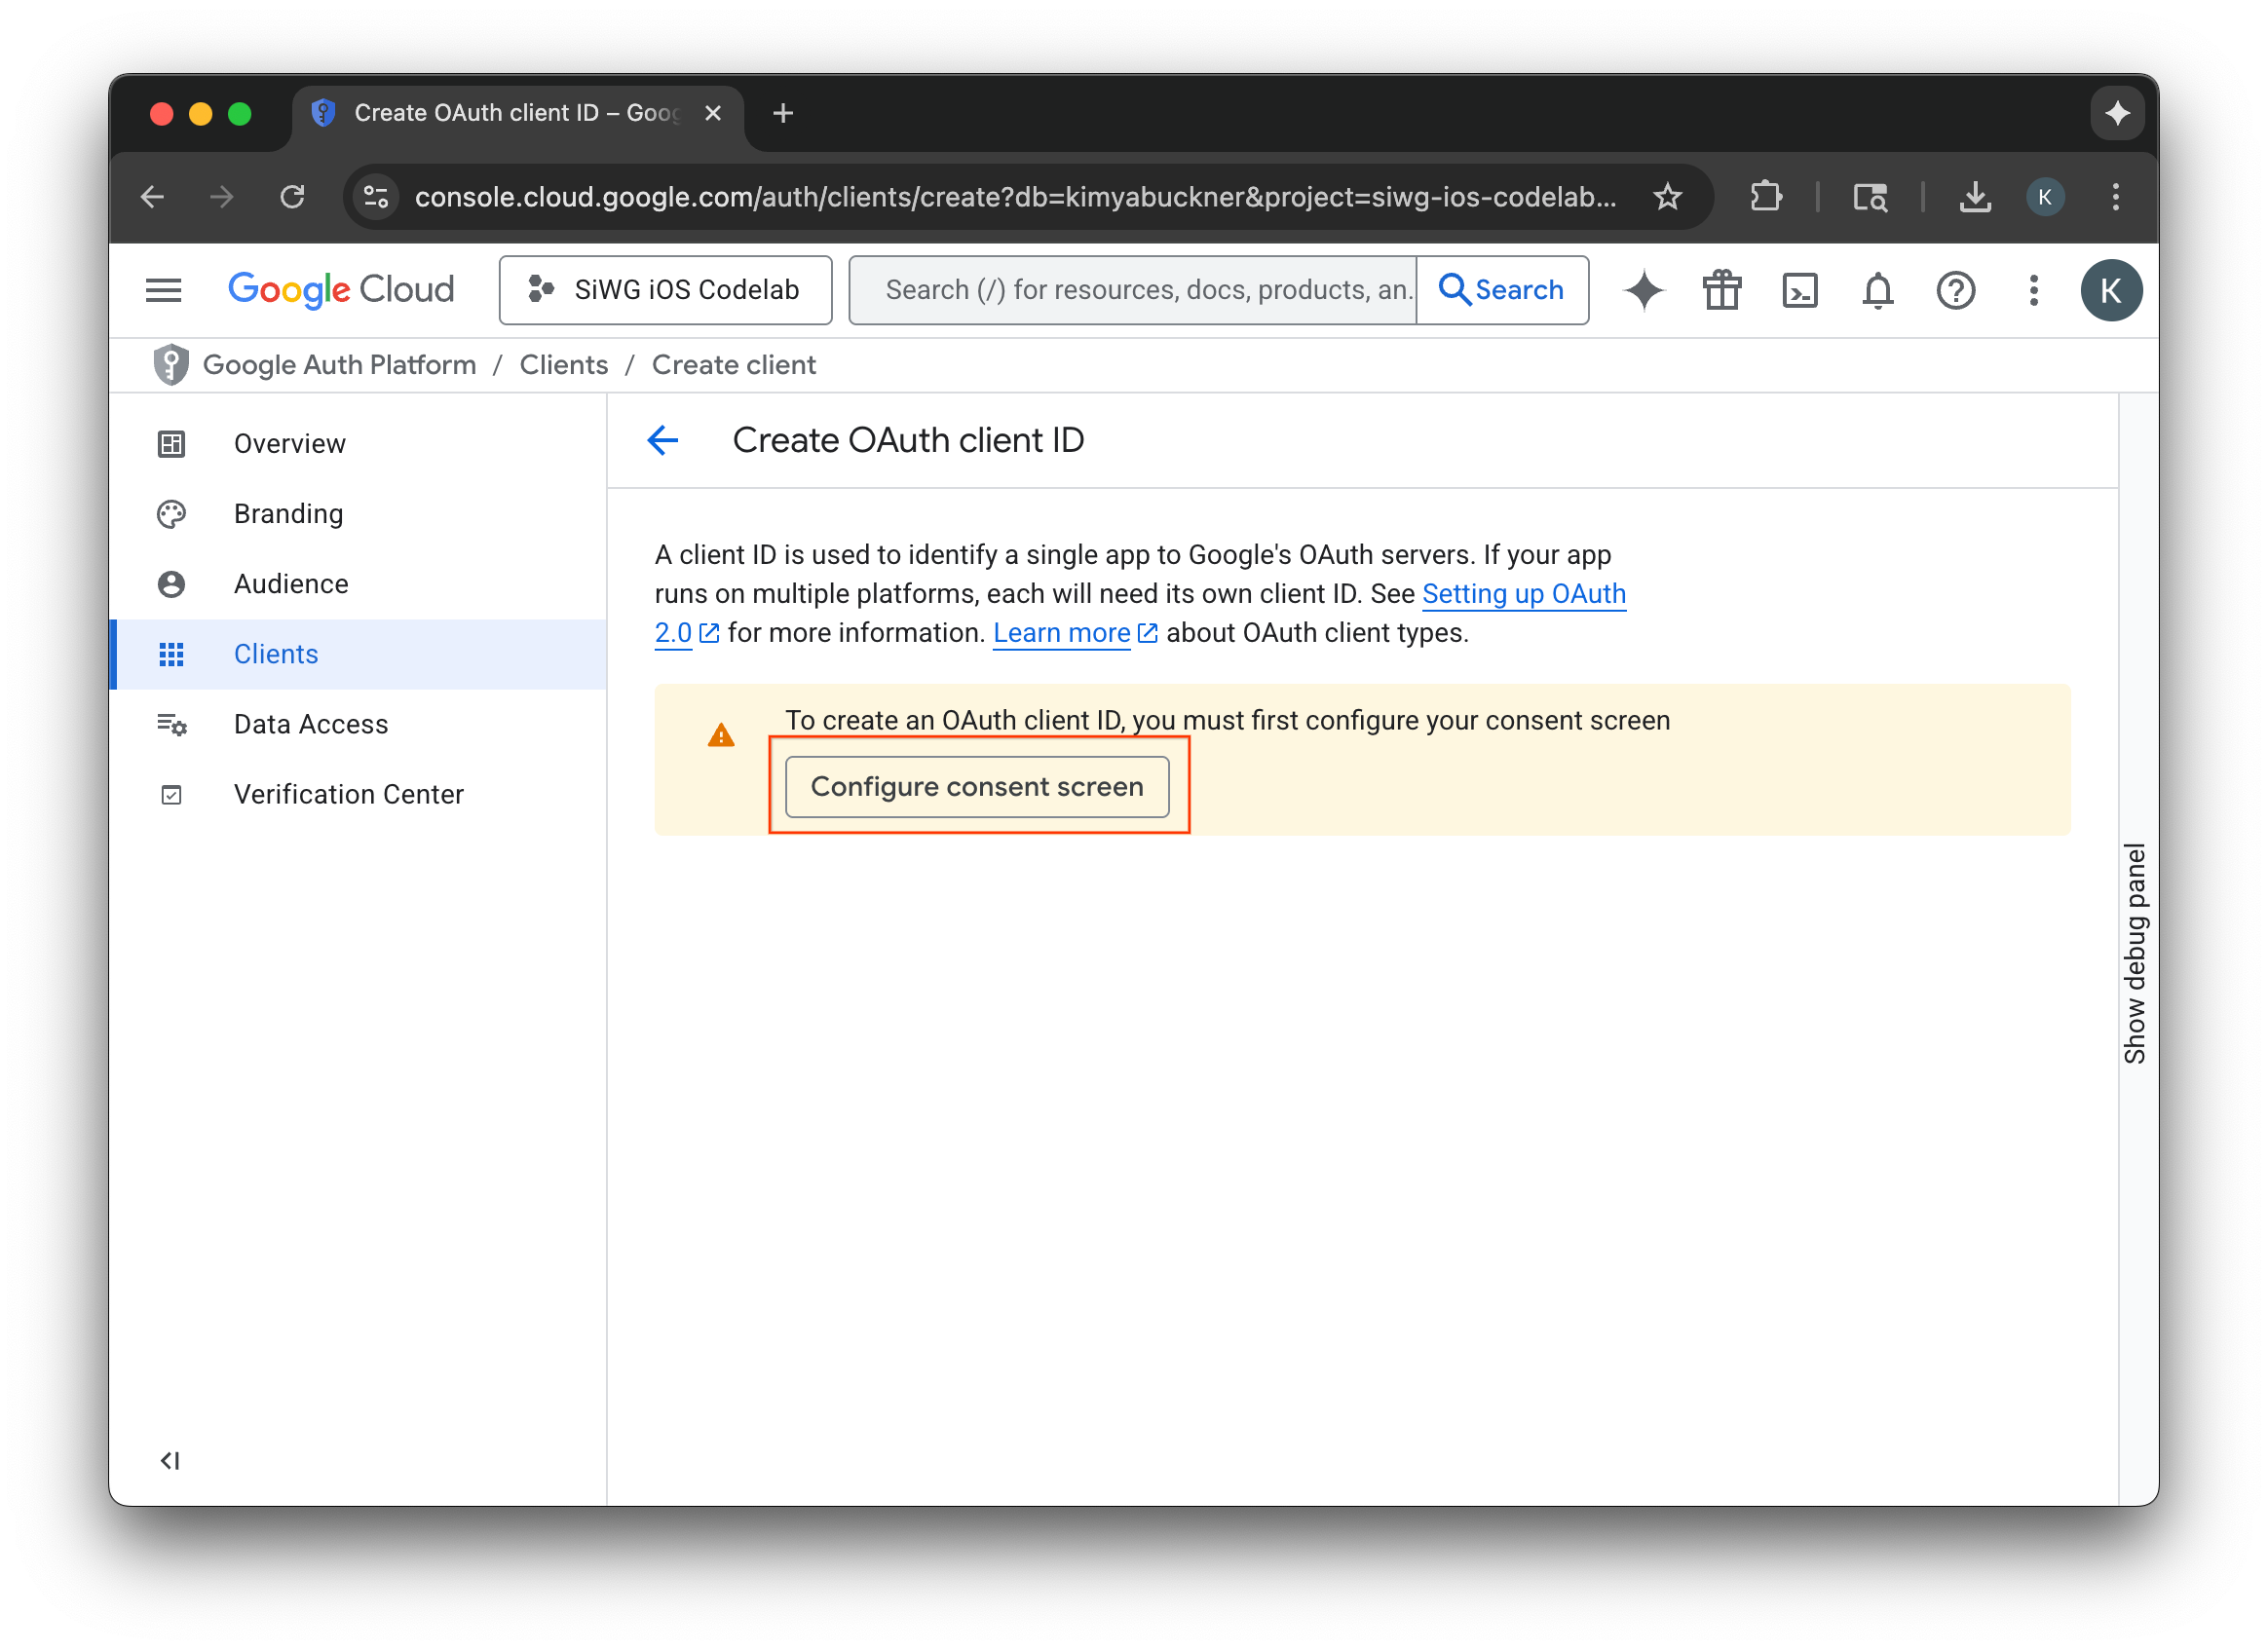
- เลือกเริ่มต้นใช้งานในหน้าการสร้างแบรนด์
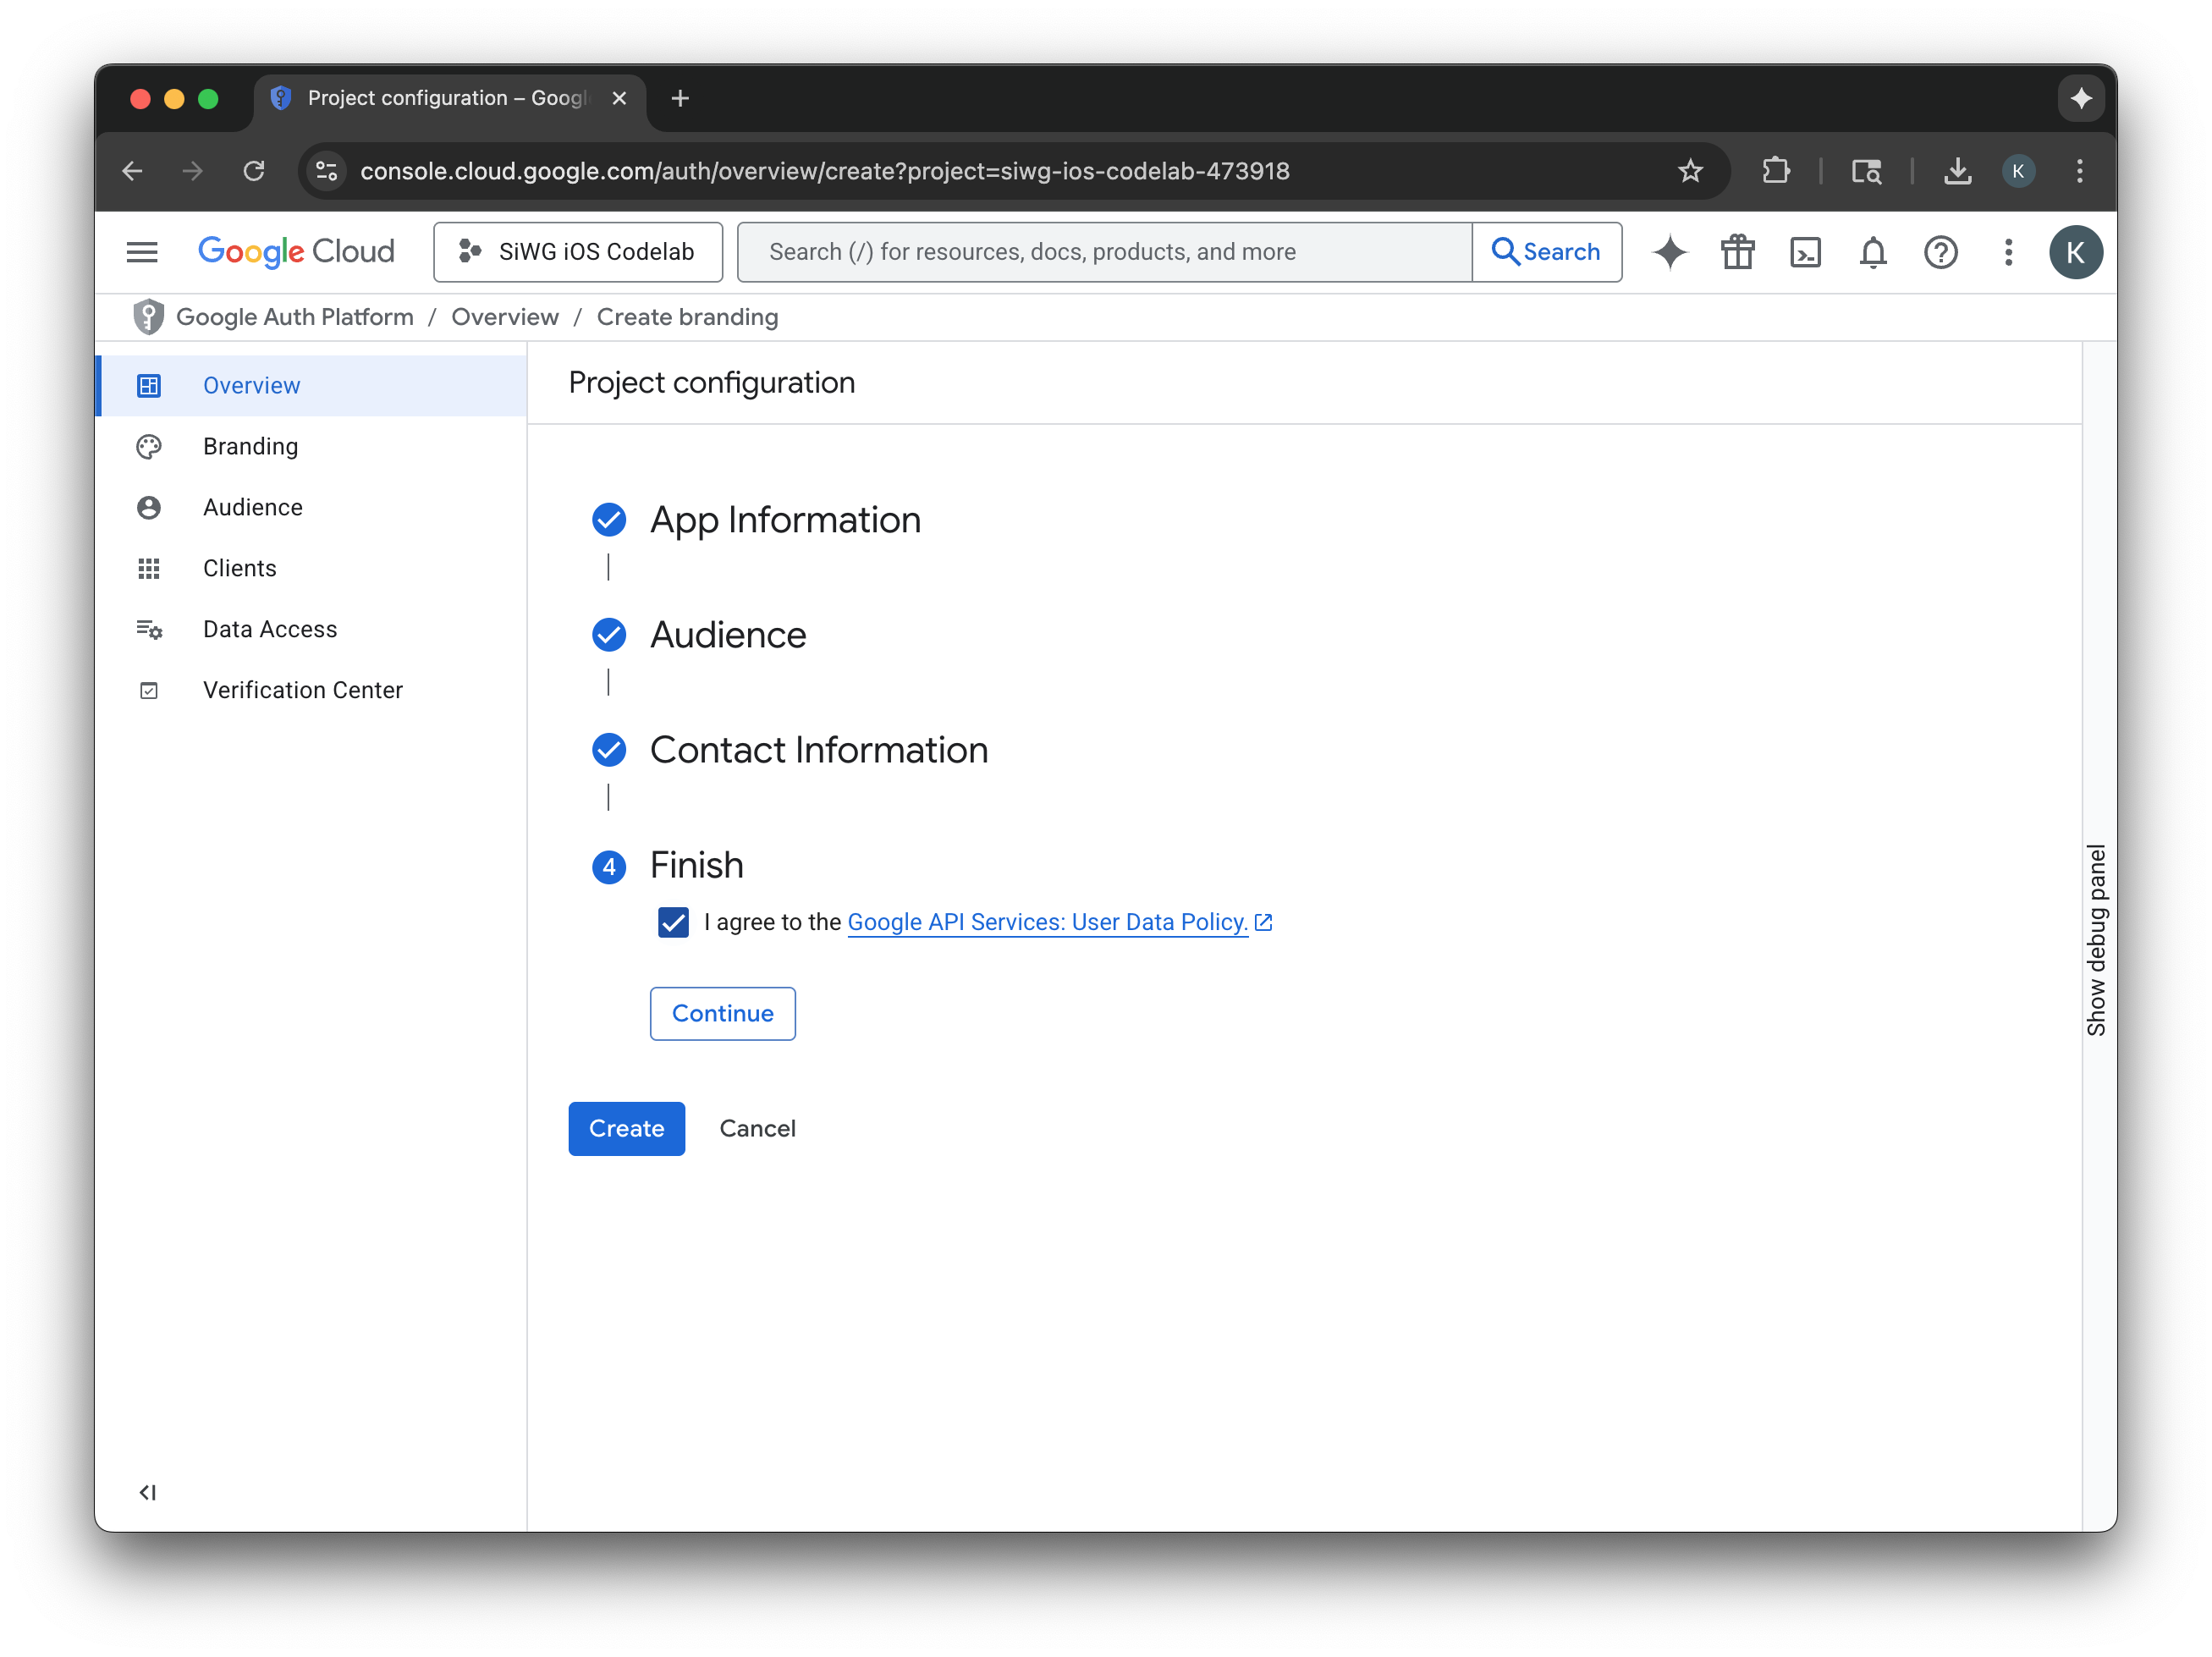
- ในหน้าการกำหนดค่าโปรเจ็กต์ ให้กรอกข้อมูลในช่องต่อไปนี้
- ข้อมูลแอป: ป้อนชื่อและอีเมลสนับสนุนสำหรับผู้ใช้ของแอป อีเมลสนับสนุนนี้จะแสดงต่อสาธารณะเพื่อให้ผู้ใช้ติดต่อคุณได้ในกรณีที่มีข้อสงสัยเกี่ยวกับการยินยอม
- ผู้ชม: เลือกภายนอก
- ข้อมูลติดต่อ: ป้อนอีเมลเพื่อให้ Google ติดต่อคุณเกี่ยวกับโปรเจ็กต์
- อ่านบริการ Google API: นโยบายข้อมูลผู้ใช้
- คลิกสร้าง
- เลือกหน้าไคลเอ็นต์ในเมนูการนำทาง
- คลิกสร้างไคลเอ็นต์
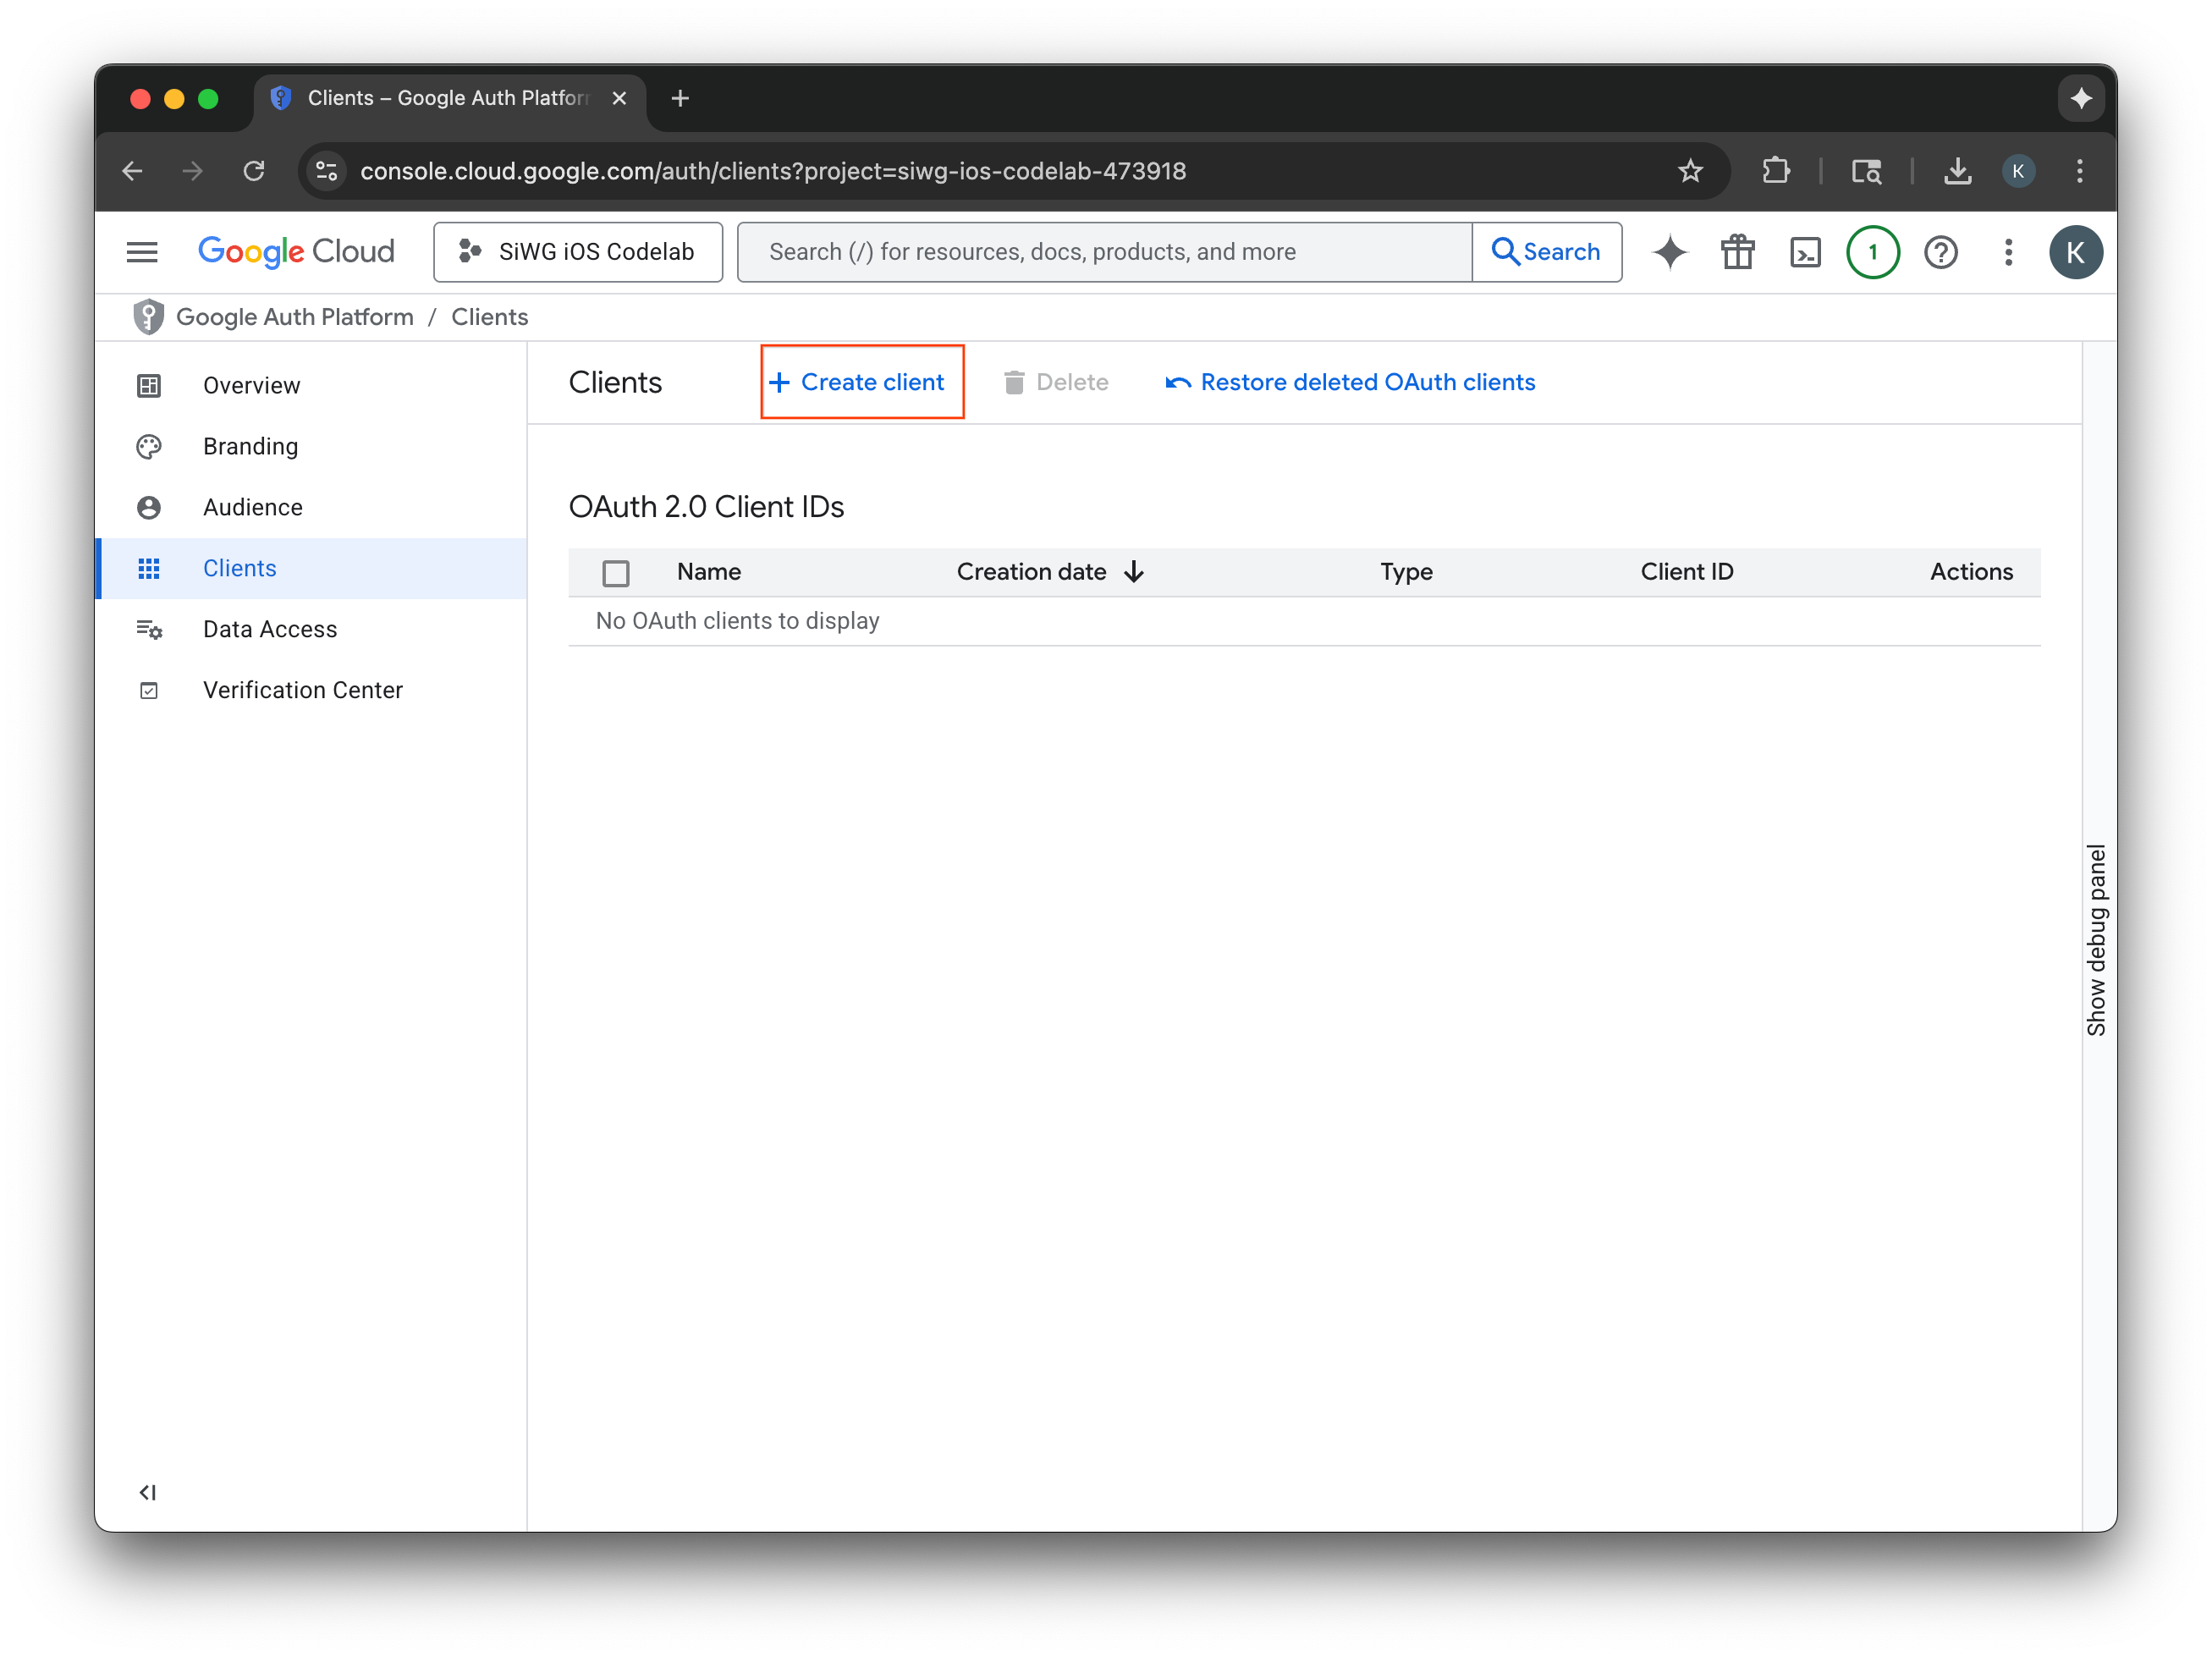
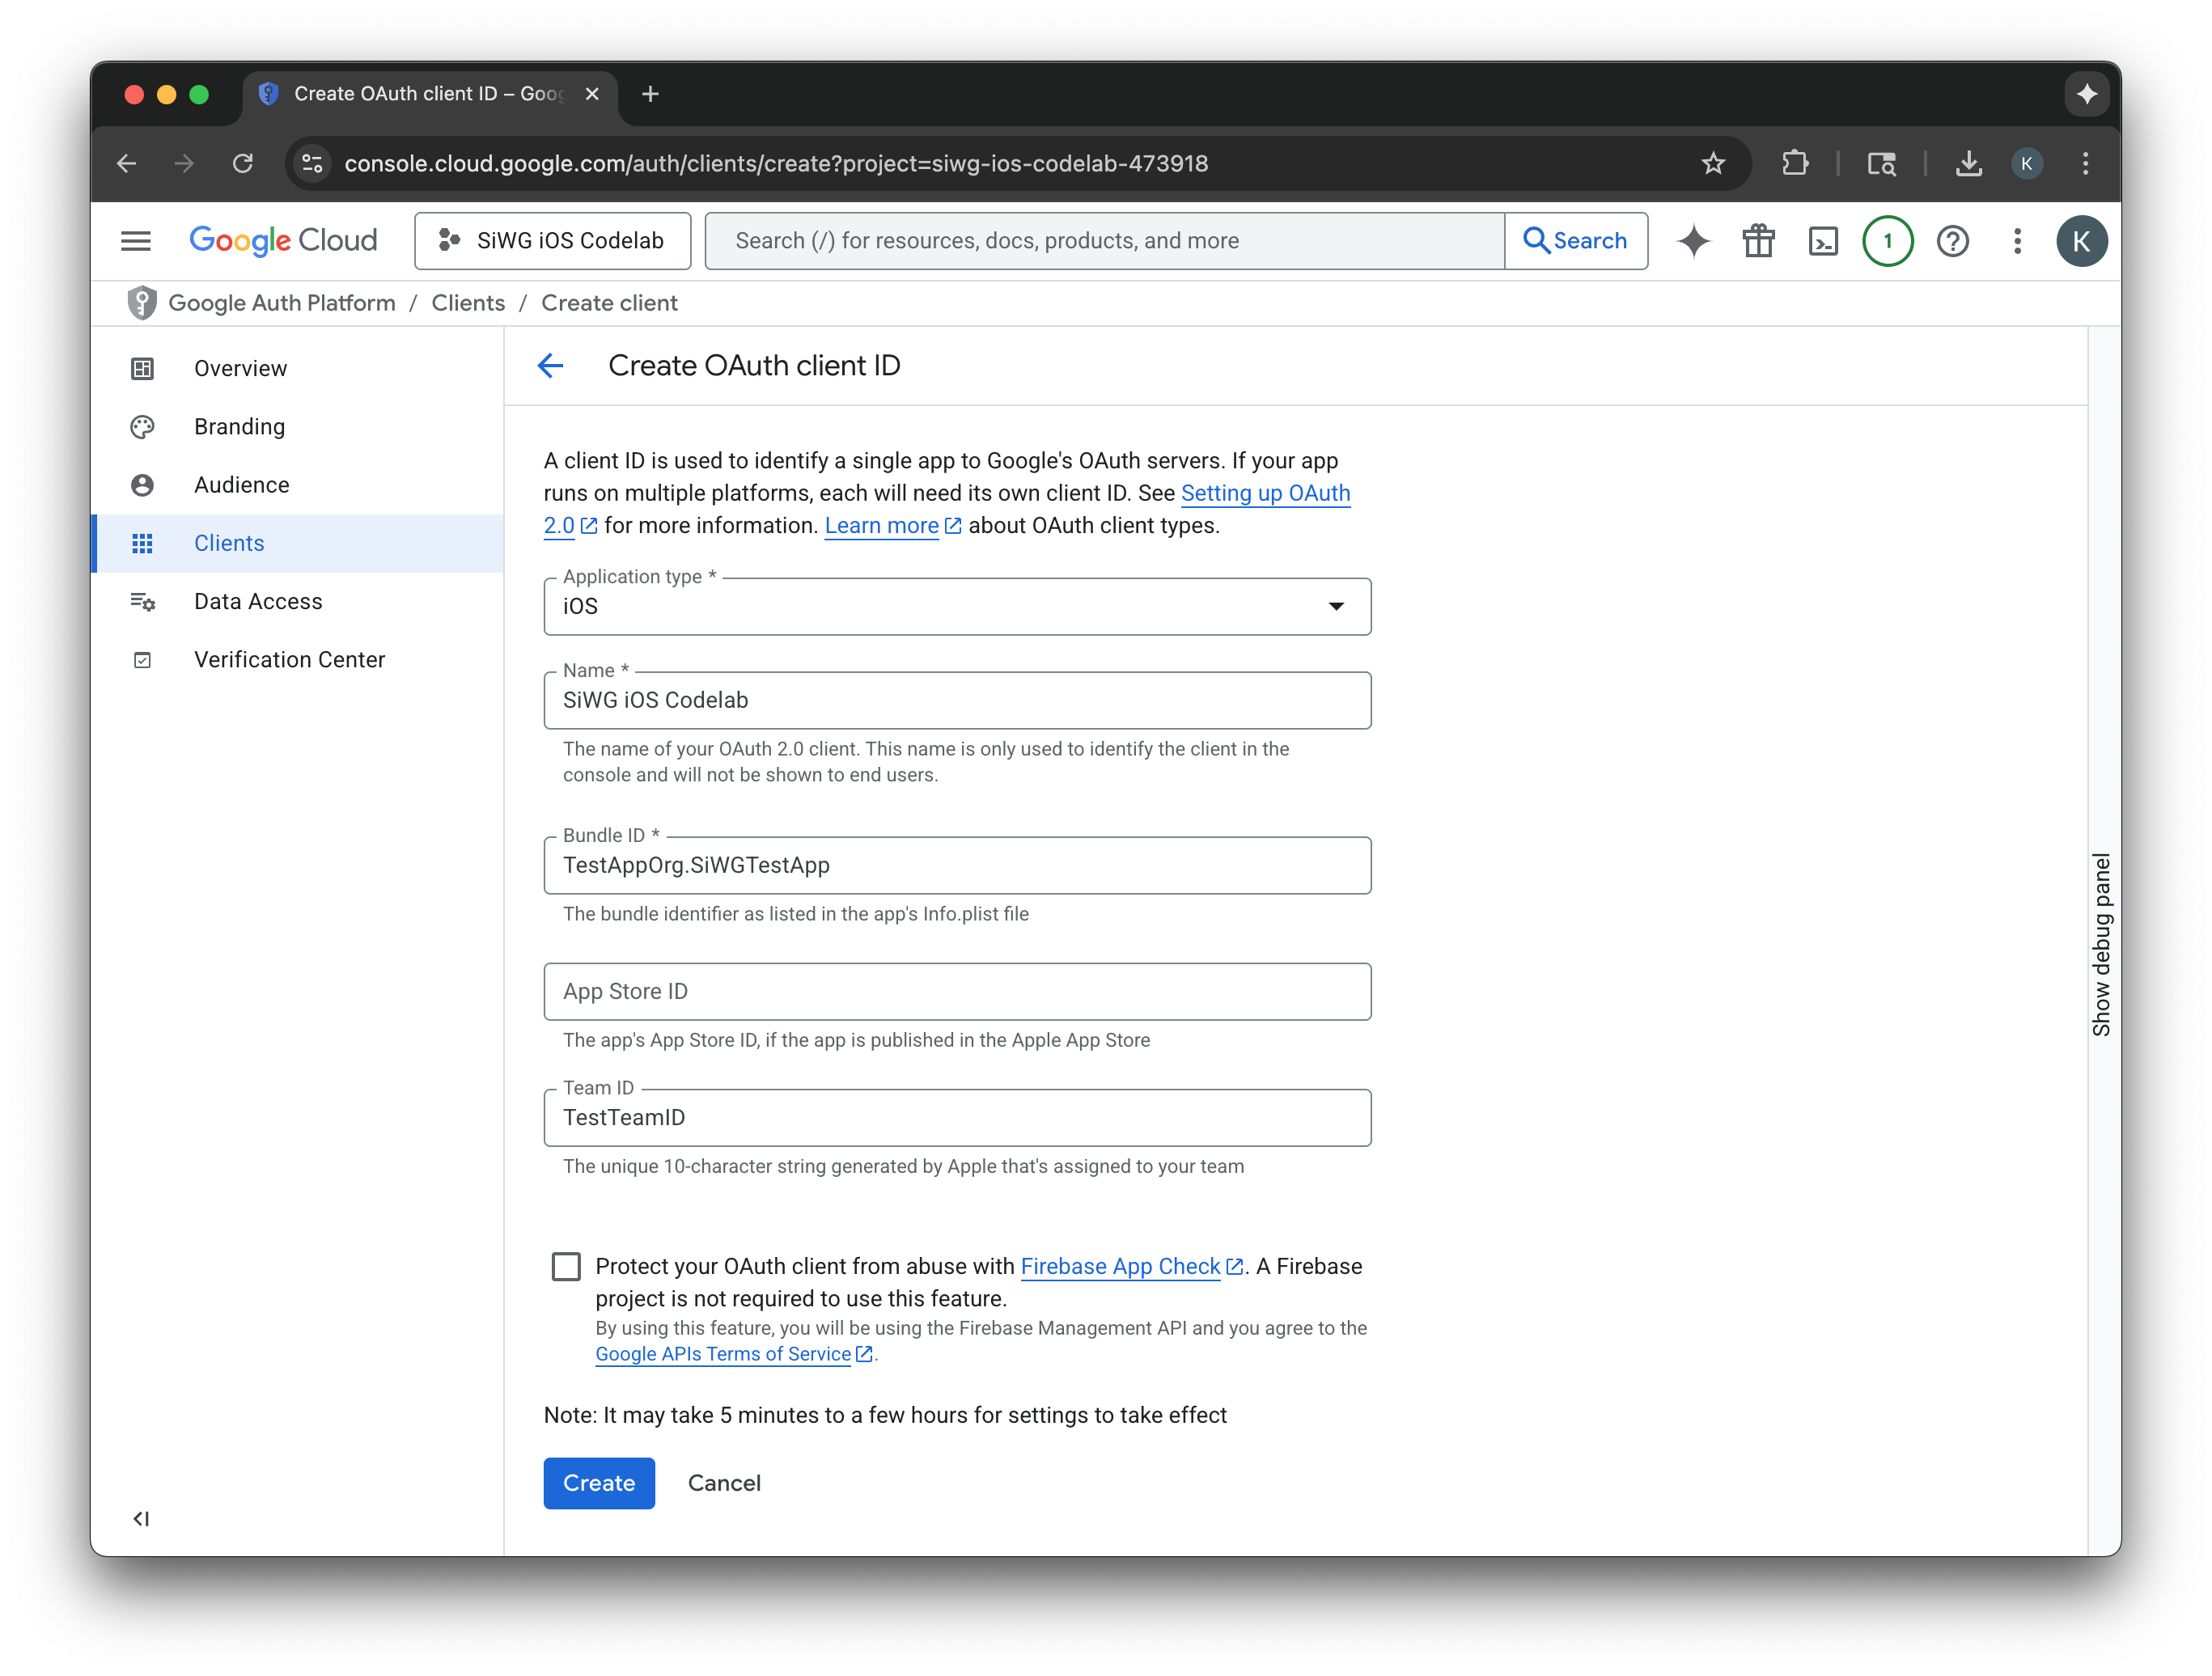
สร้างไคลเอ็นต์ OAuth 2.0
- เลือก iOS สำหรับประเภทแอปพลิเคชัน
- ป้อนชื่อไคลเอ็นต์
- ป้อนตัวระบุแพ็กเกจที่สร้างในขั้นตอนสุดท้าย
- ป้อนรหัสทีมที่ Apple กำหนดให้กับทีมของคุณ ตอนนี้ขั้นตอนนี้เป็นแบบไม่บังคับ แต่คุณต้องมีรหัสทีมเพื่อเปิดใช้ App Check ในภายหลังใน Codelab นี้
- เลือกสร้าง
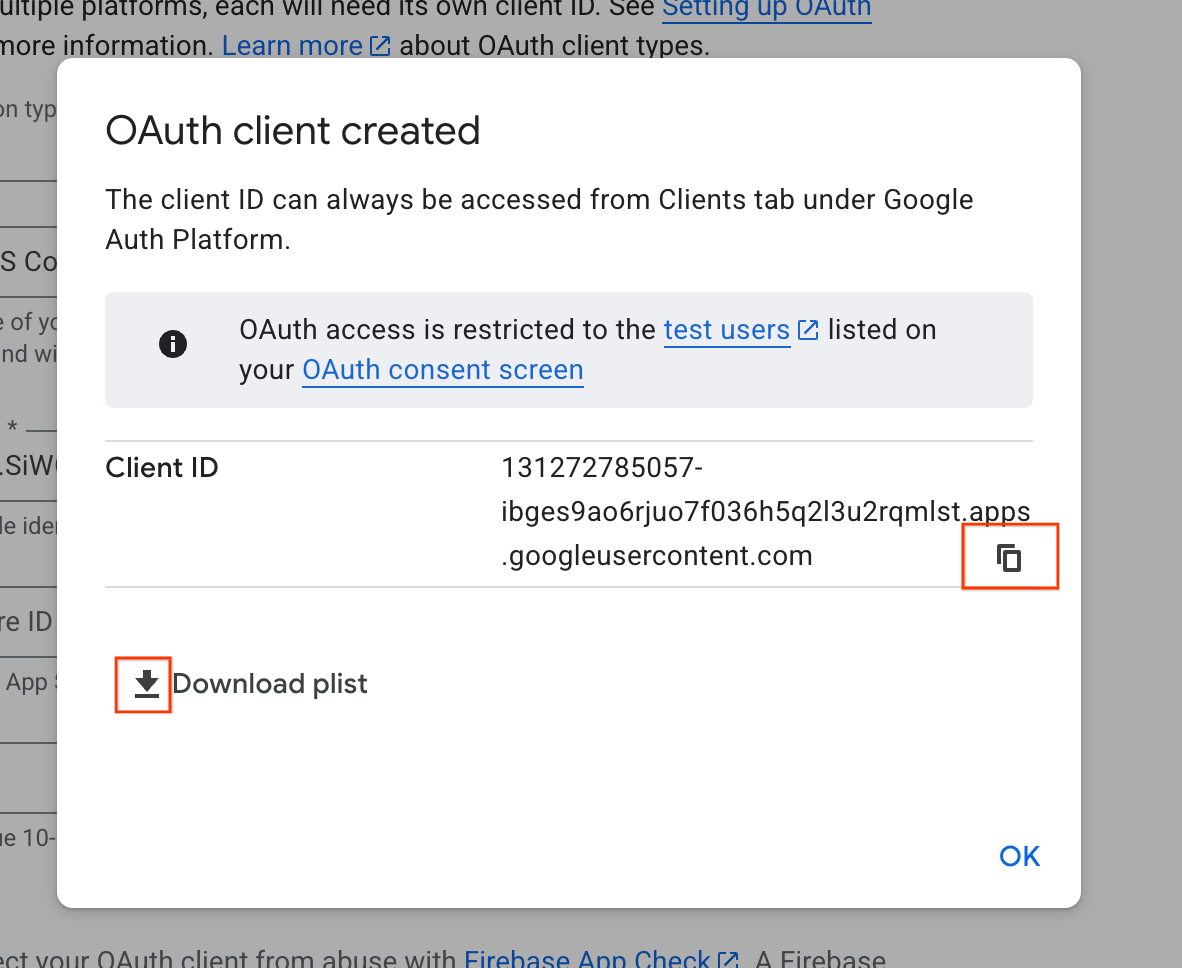
- คัดลอกรหัสไคลเอ็นต์จากหน้าต่างกล่องโต้ตอบ คุณจะต้องใช้รหัสนี้ในภายหลัง
- ดาวน์โหลดไฟล์ plist เพื่อใช้อ้างอิงในภายหลัง
4. กำหนดค่าโปรเจ็กต์ Xcode
ขั้นตอนถัดไปคือการตั้งค่าโปรเจ็กต์ Xcode ให้ทำงานกับ SDK การลงชื่อเข้าใช้ด้วย Google กระบวนการนี้เกี่ยวข้องกับการเพิ่ม SDK ลงในโปรเจ็กต์เป็นทรัพยากร Dependency และการกำหนดการตั้งค่าโปรเจ็กต์ด้วยรหัสไคลเอ็นต์ที่ไม่ซ้ำกัน รหัสนี้ช่วยให้ SDK สื่อสารกับบริการตรวจสอบสิทธิ์ของ Google ได้อย่างปลอดภัยในระหว่างกระบวนการลงชื่อเข้าใช้
ติดตั้งการอ้างอิงของฟีเจอร์ลงชื่อเข้าใช้ด้วย Google
- เปิดโปรเจ็กต์ Xcode
- ไปที่ File > Add Package Dependencies
- ในแถบค้นหา ให้ป้อน URL ของที่เก็บข้อมูลการลงชื่อเข้าใช้ด้วย Google: https://github.com/google/GoogleSignIn-iOS
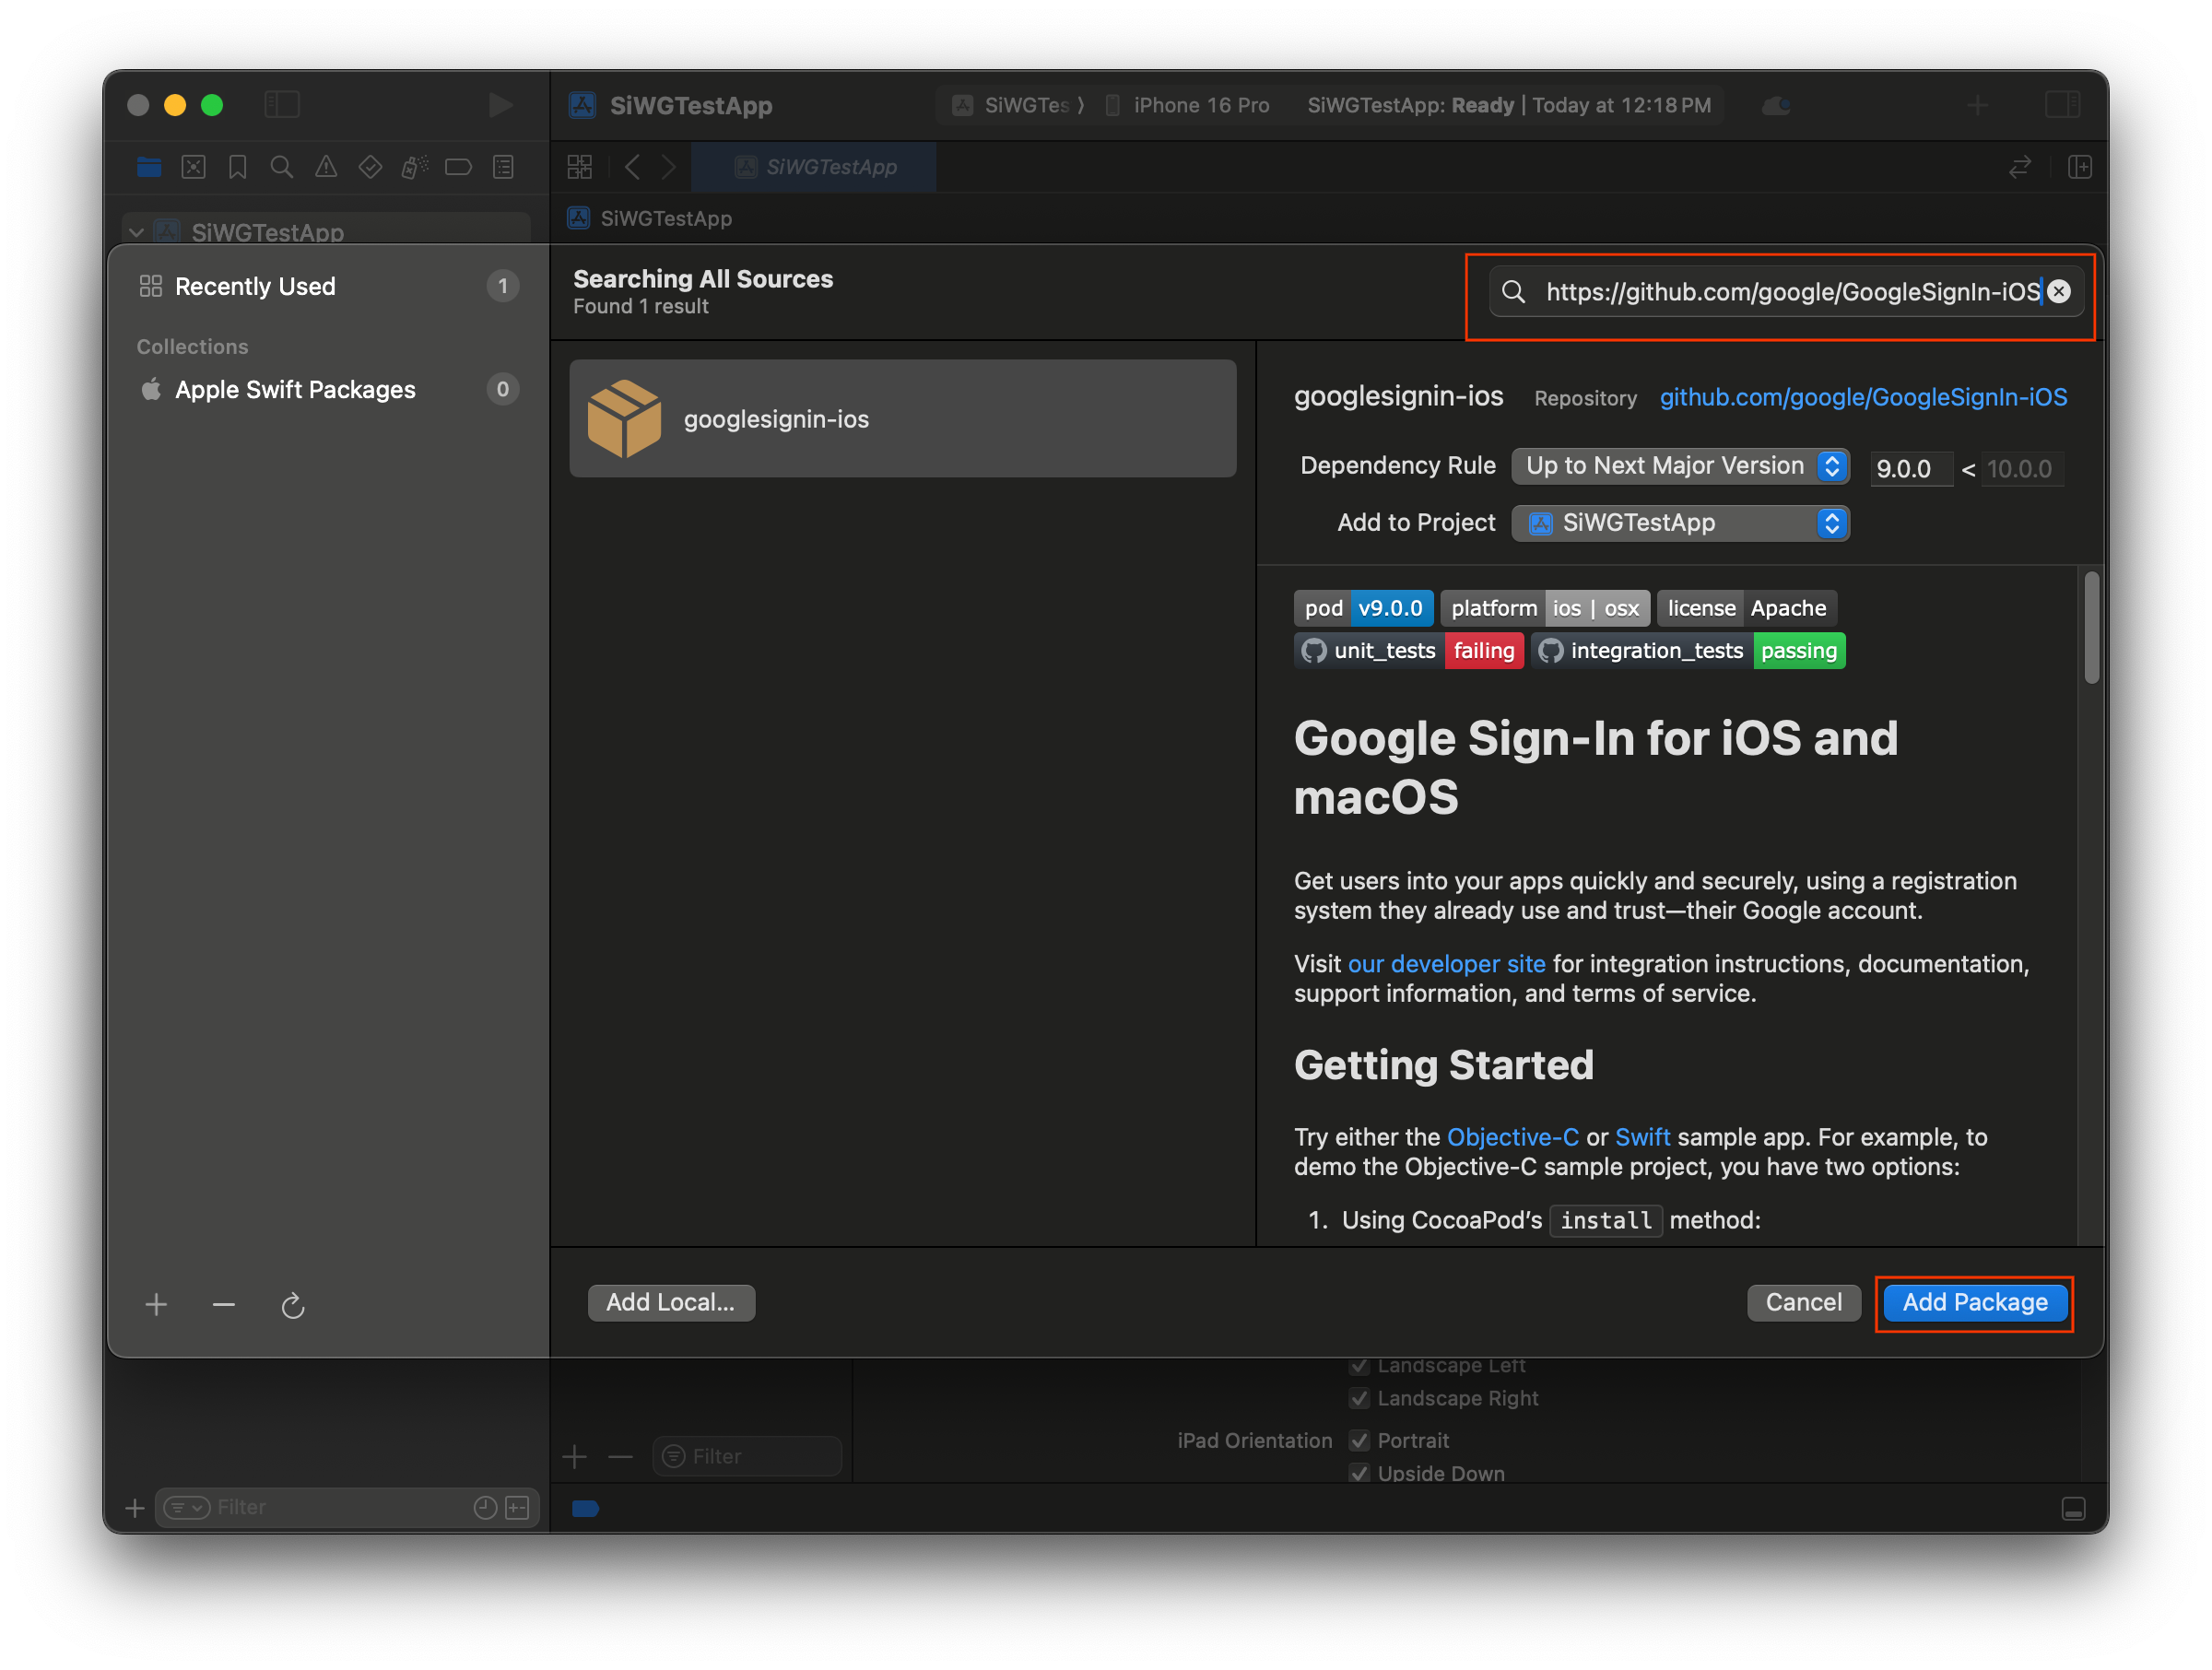
- เลือกเพิ่มแพ็กเกจ
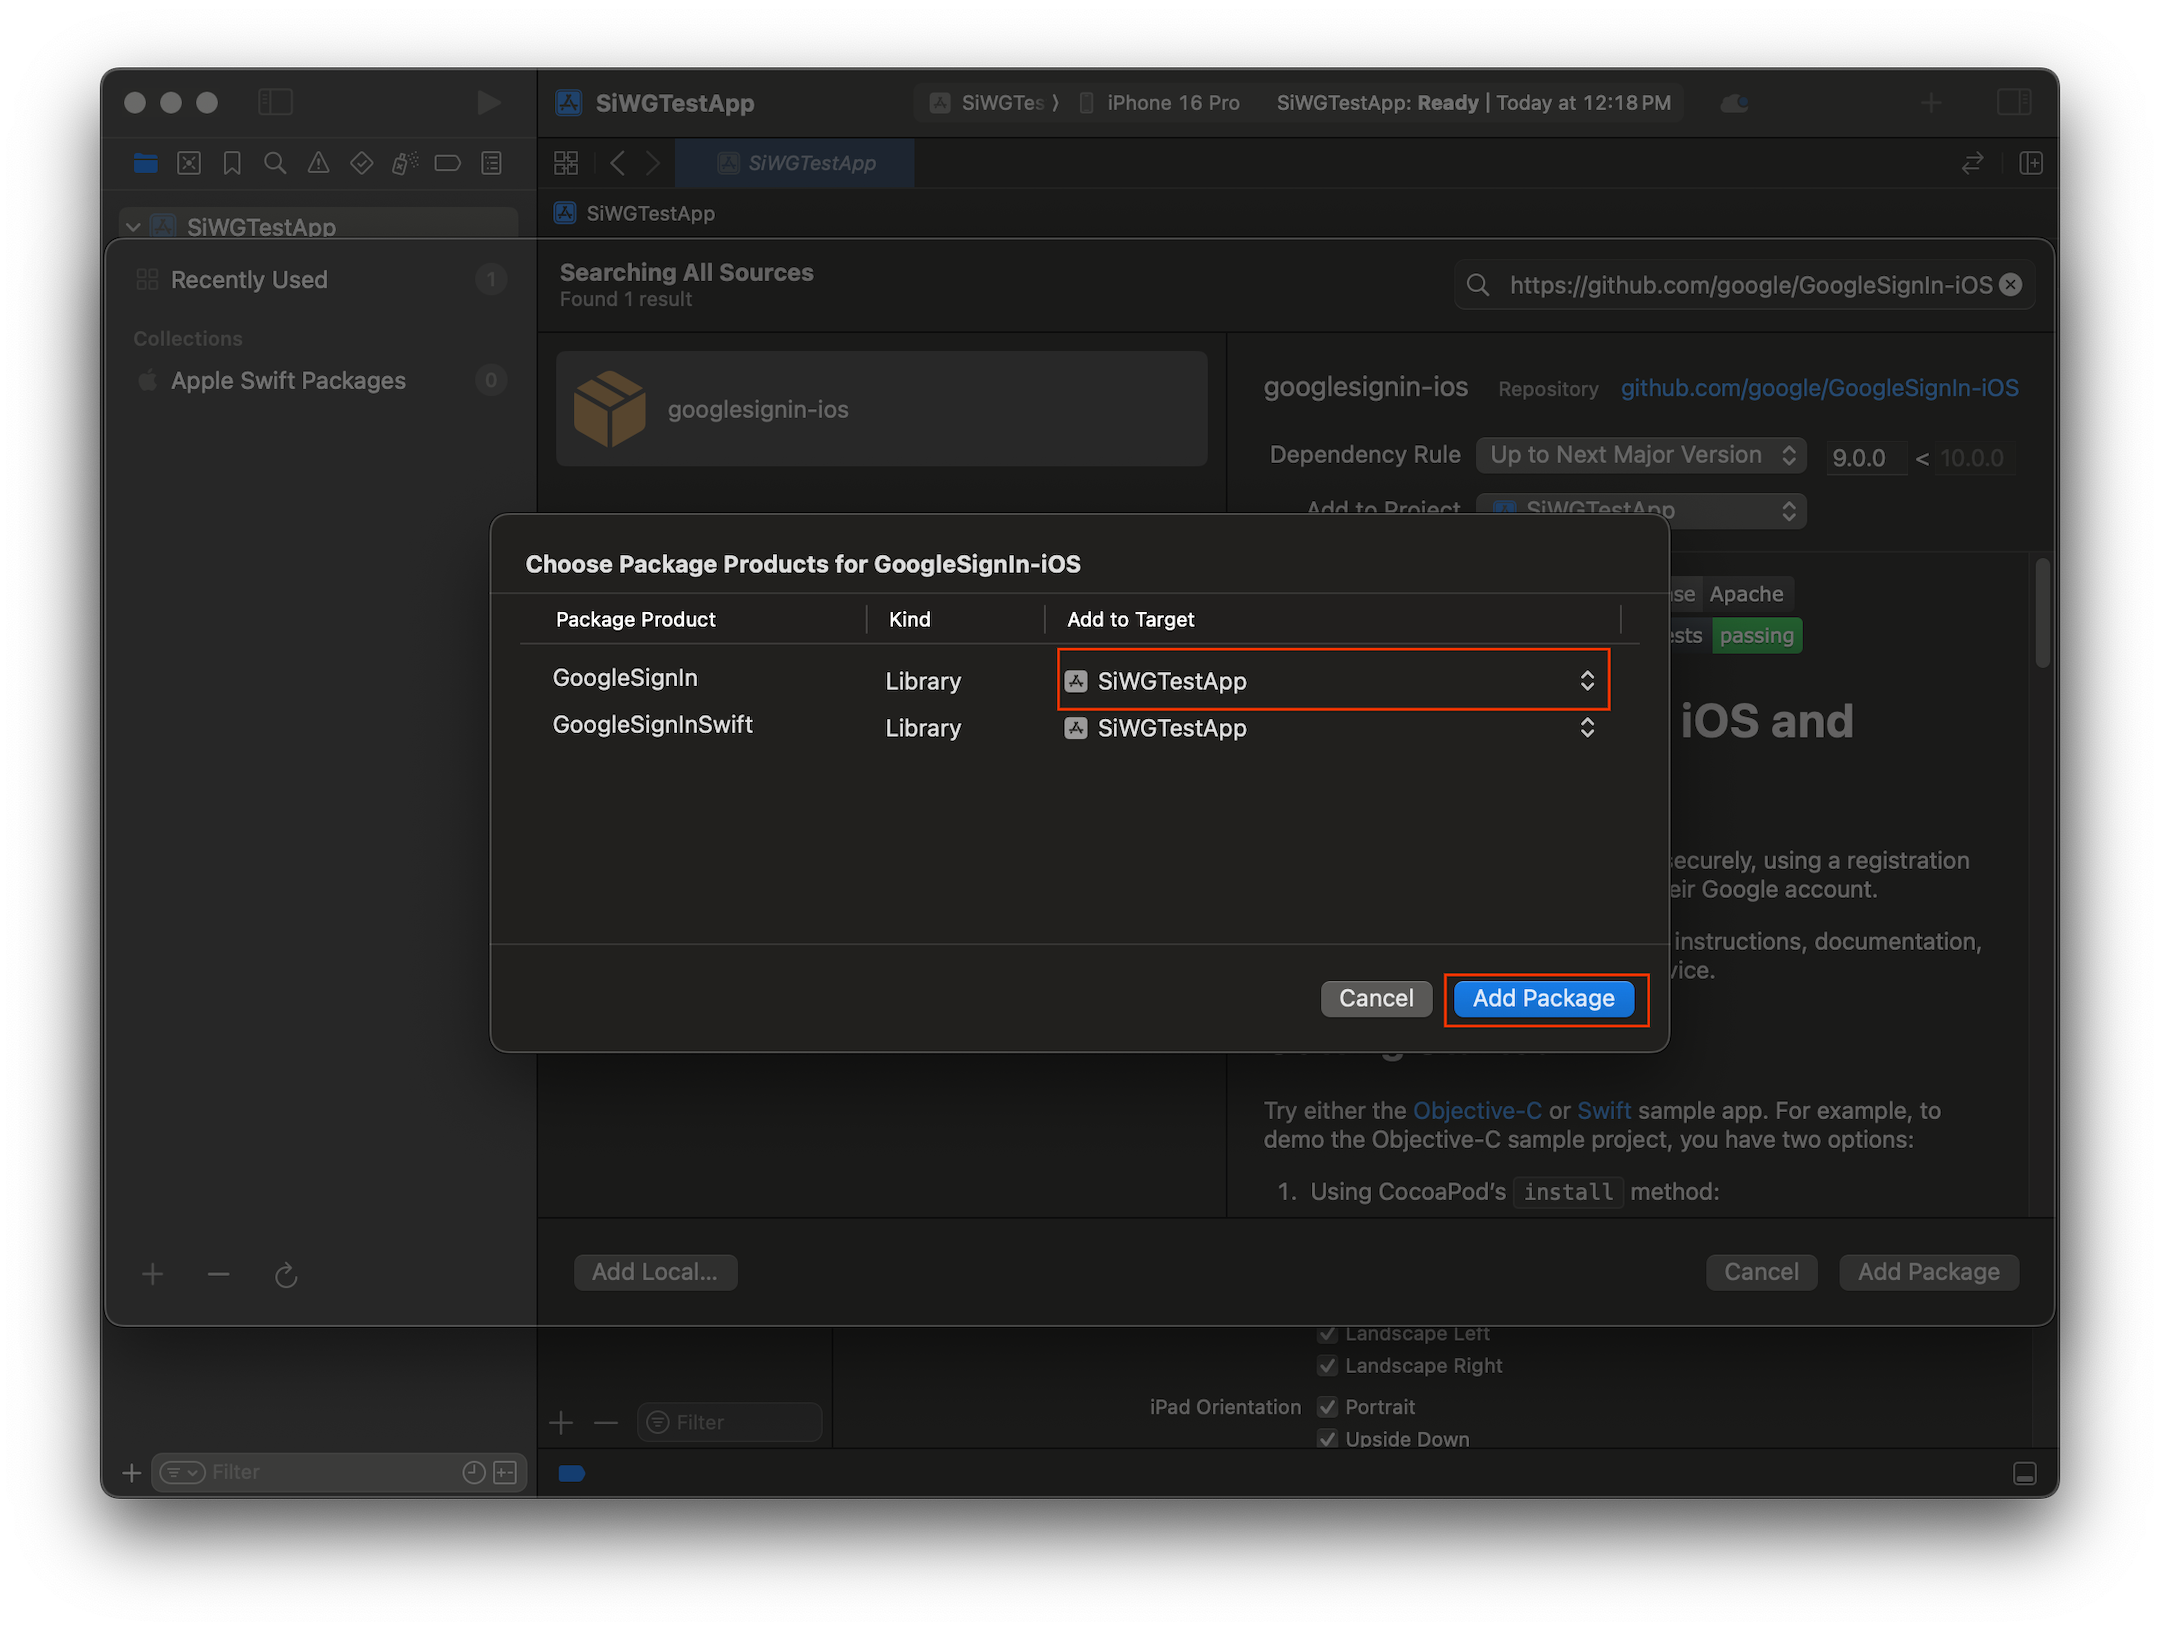
- เลือกเป้าหมายแอปพลิเคชันหลักสำหรับแพ็กเกจ GoogleSignIn
- หากใช้ SwiftUI ให้เลือกเป้าหมายแอปพลิเคชันหลักสำหรับแพ็กเกจ GoogleSignInSwift หากวางแผนที่จะใช้ UIKit อย่าเลือกเป้าหมายสำหรับแพ็กเกจนี้
- เลือกเพิ่มแพ็กเกจ
กำหนดค่าข้อมูลเข้าสู่ระบบของแอป
- ในแถบนำทางของโปรเจ็กต์ ให้คลิกรูทของโปรเจ็กต์
- ในพื้นที่แก้ไขหลัก ให้เลือกเป้าหมายแอปพลิเคชันหลักจากรายการเป้าหมาย
- เลือกแท็บข้อมูลที่ด้านบนของพื้นที่แก้ไข
- วางเมาส์เหนือแถวสุดท้ายในส่วนพร็อพเพอร์ตี้เป้าหมาย iOS ที่กำหนดเอง แล้วคลิกปุ่ม + ที่ปรากฏขึ้น
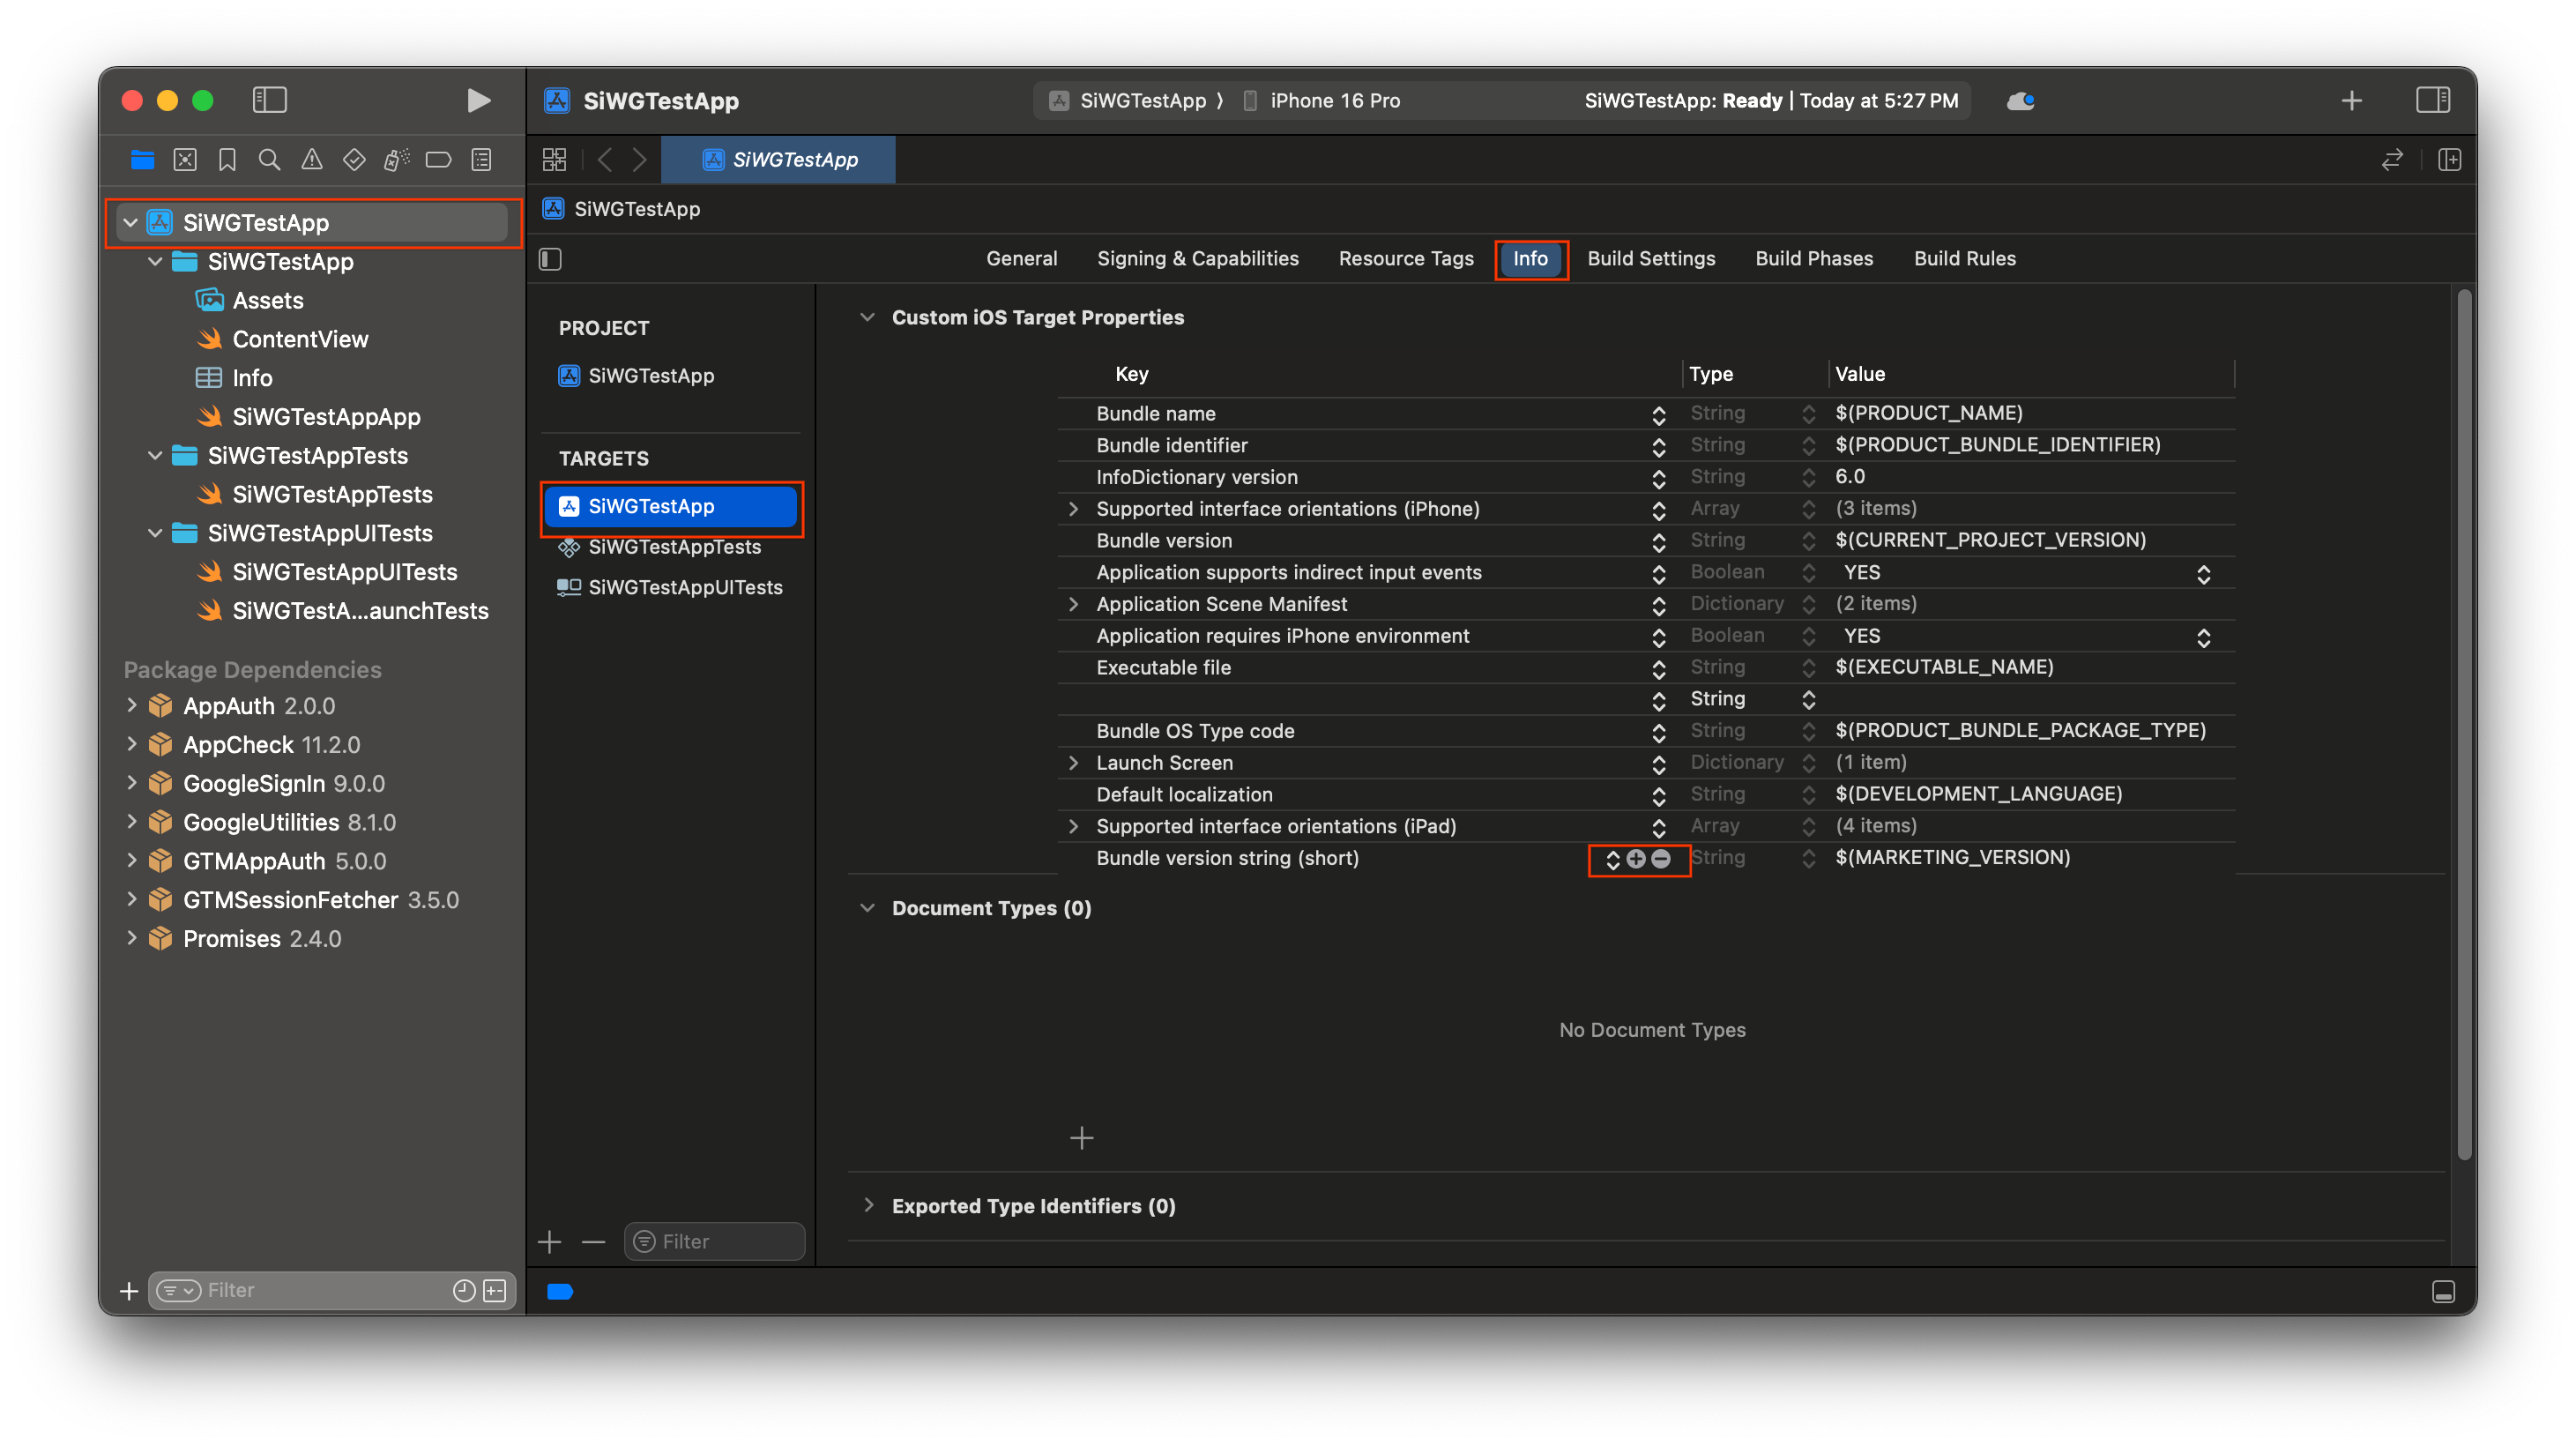
- ในคอลัมน์คีย์ ให้พิมพ์ GIDClientID
- ในคอลัมน์ค่า ให้วางรหัสไคลเอ็นต์ที่คัดลอกจากคอนโซล Google Cloud

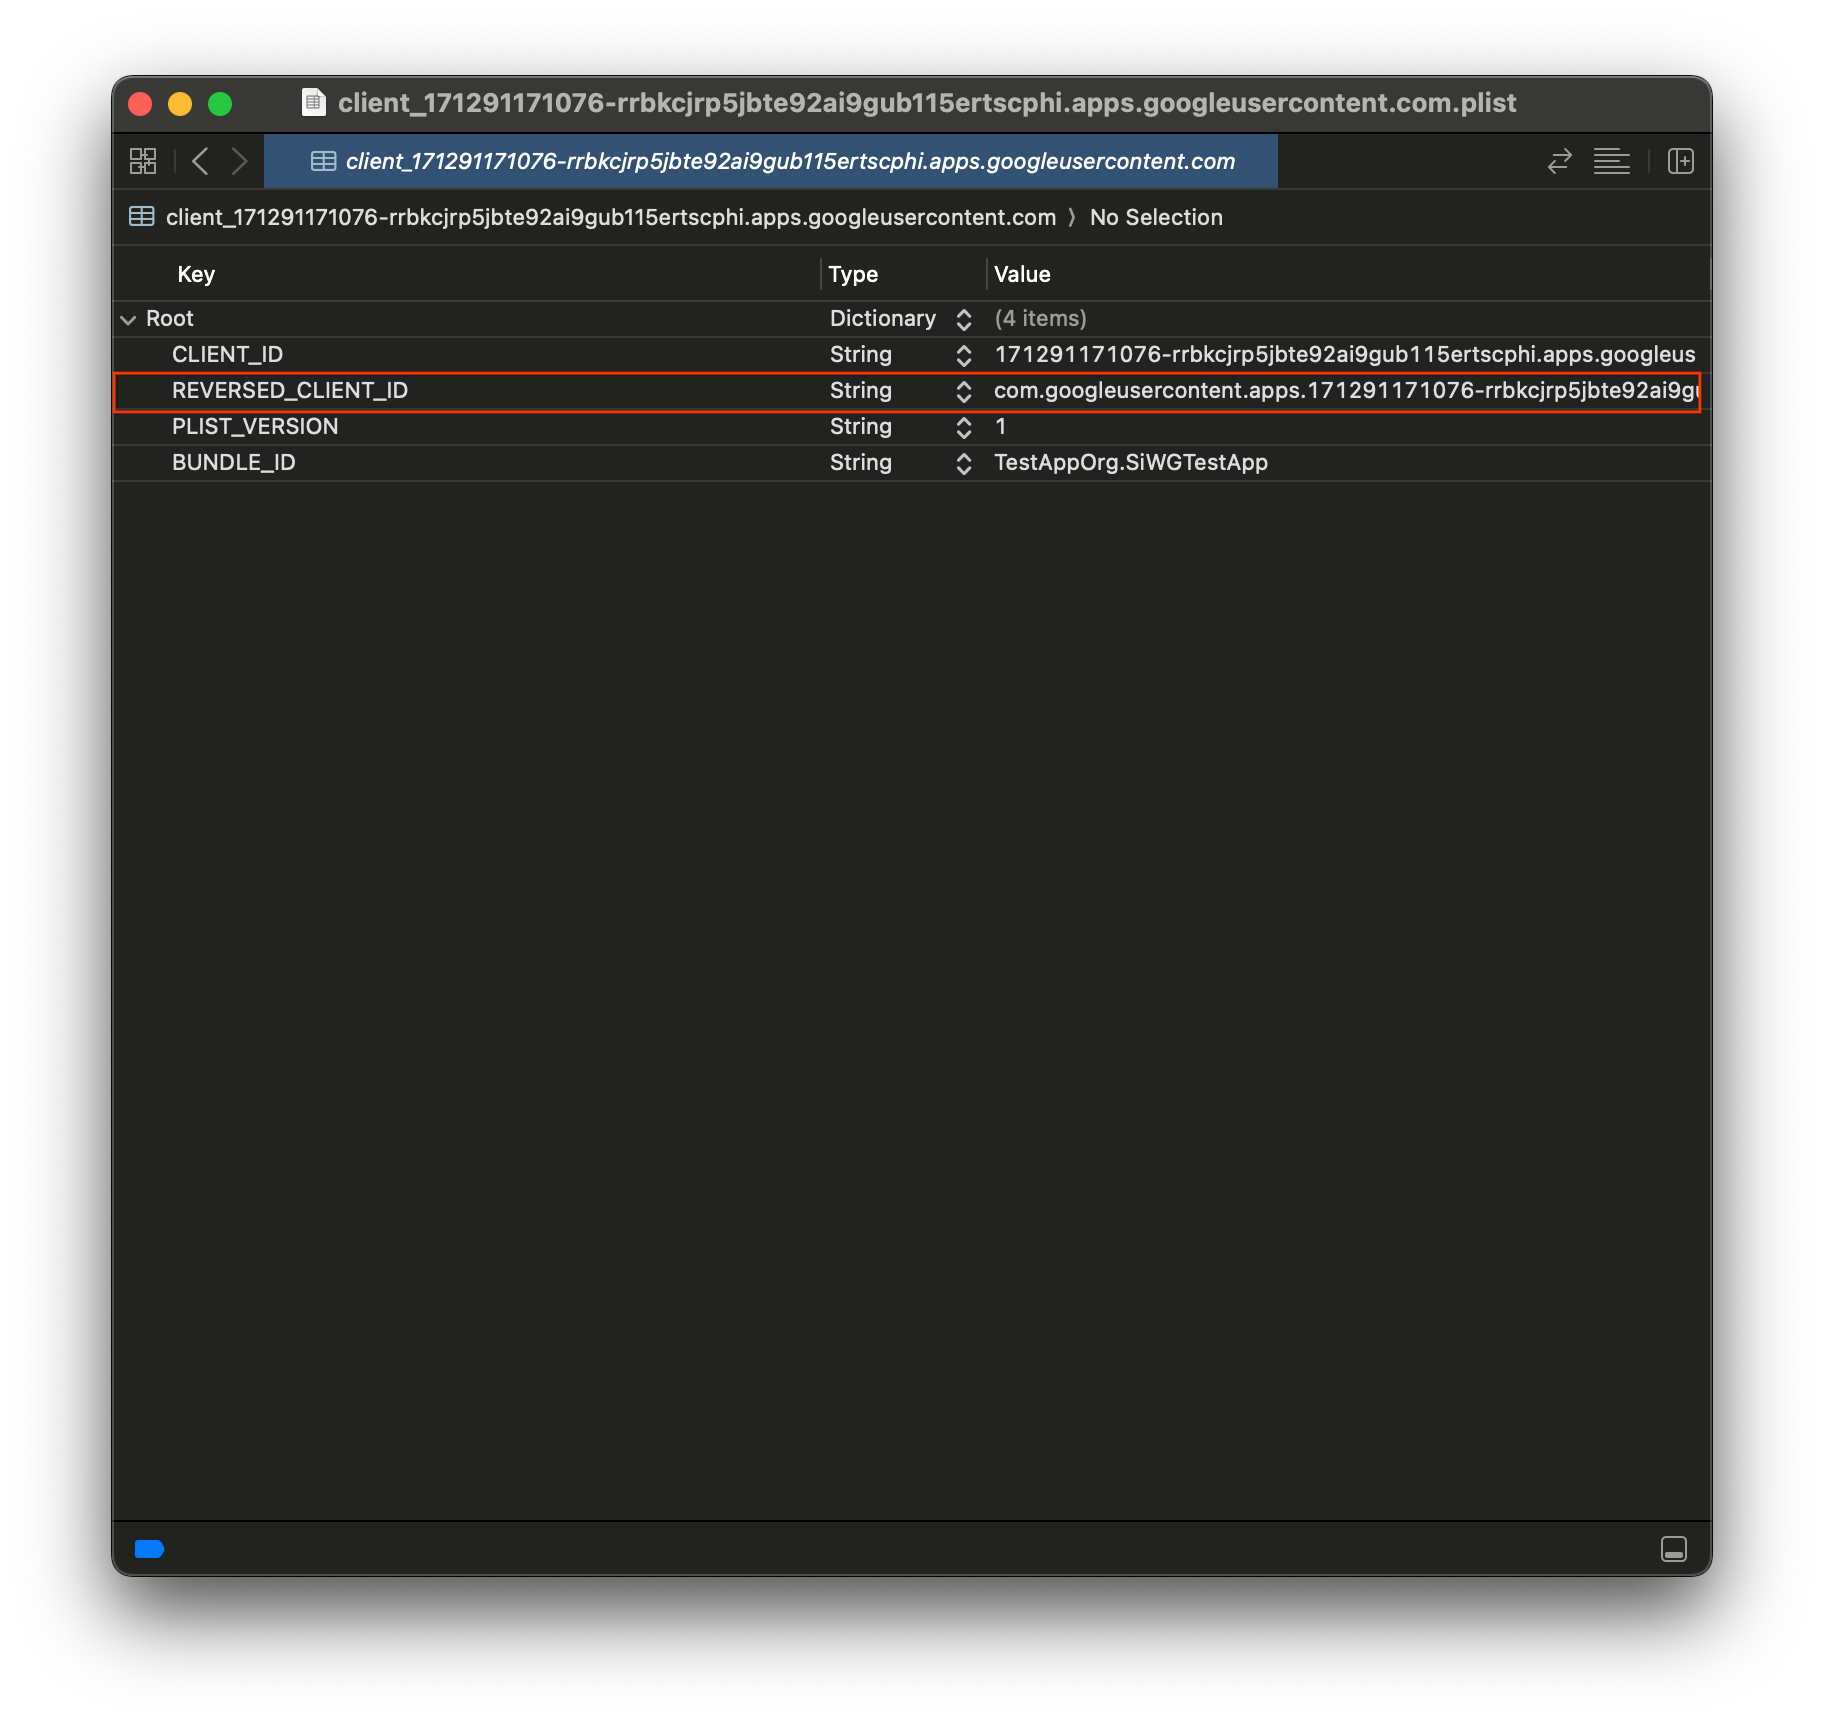
- เปิดไฟล์ plist ที่ดาวน์โหลดจาก คอนโซล Google Cloud
- คัดลอกค่าสำหรับรหัสไคลเอ็นต์แบบย้อนกลับ
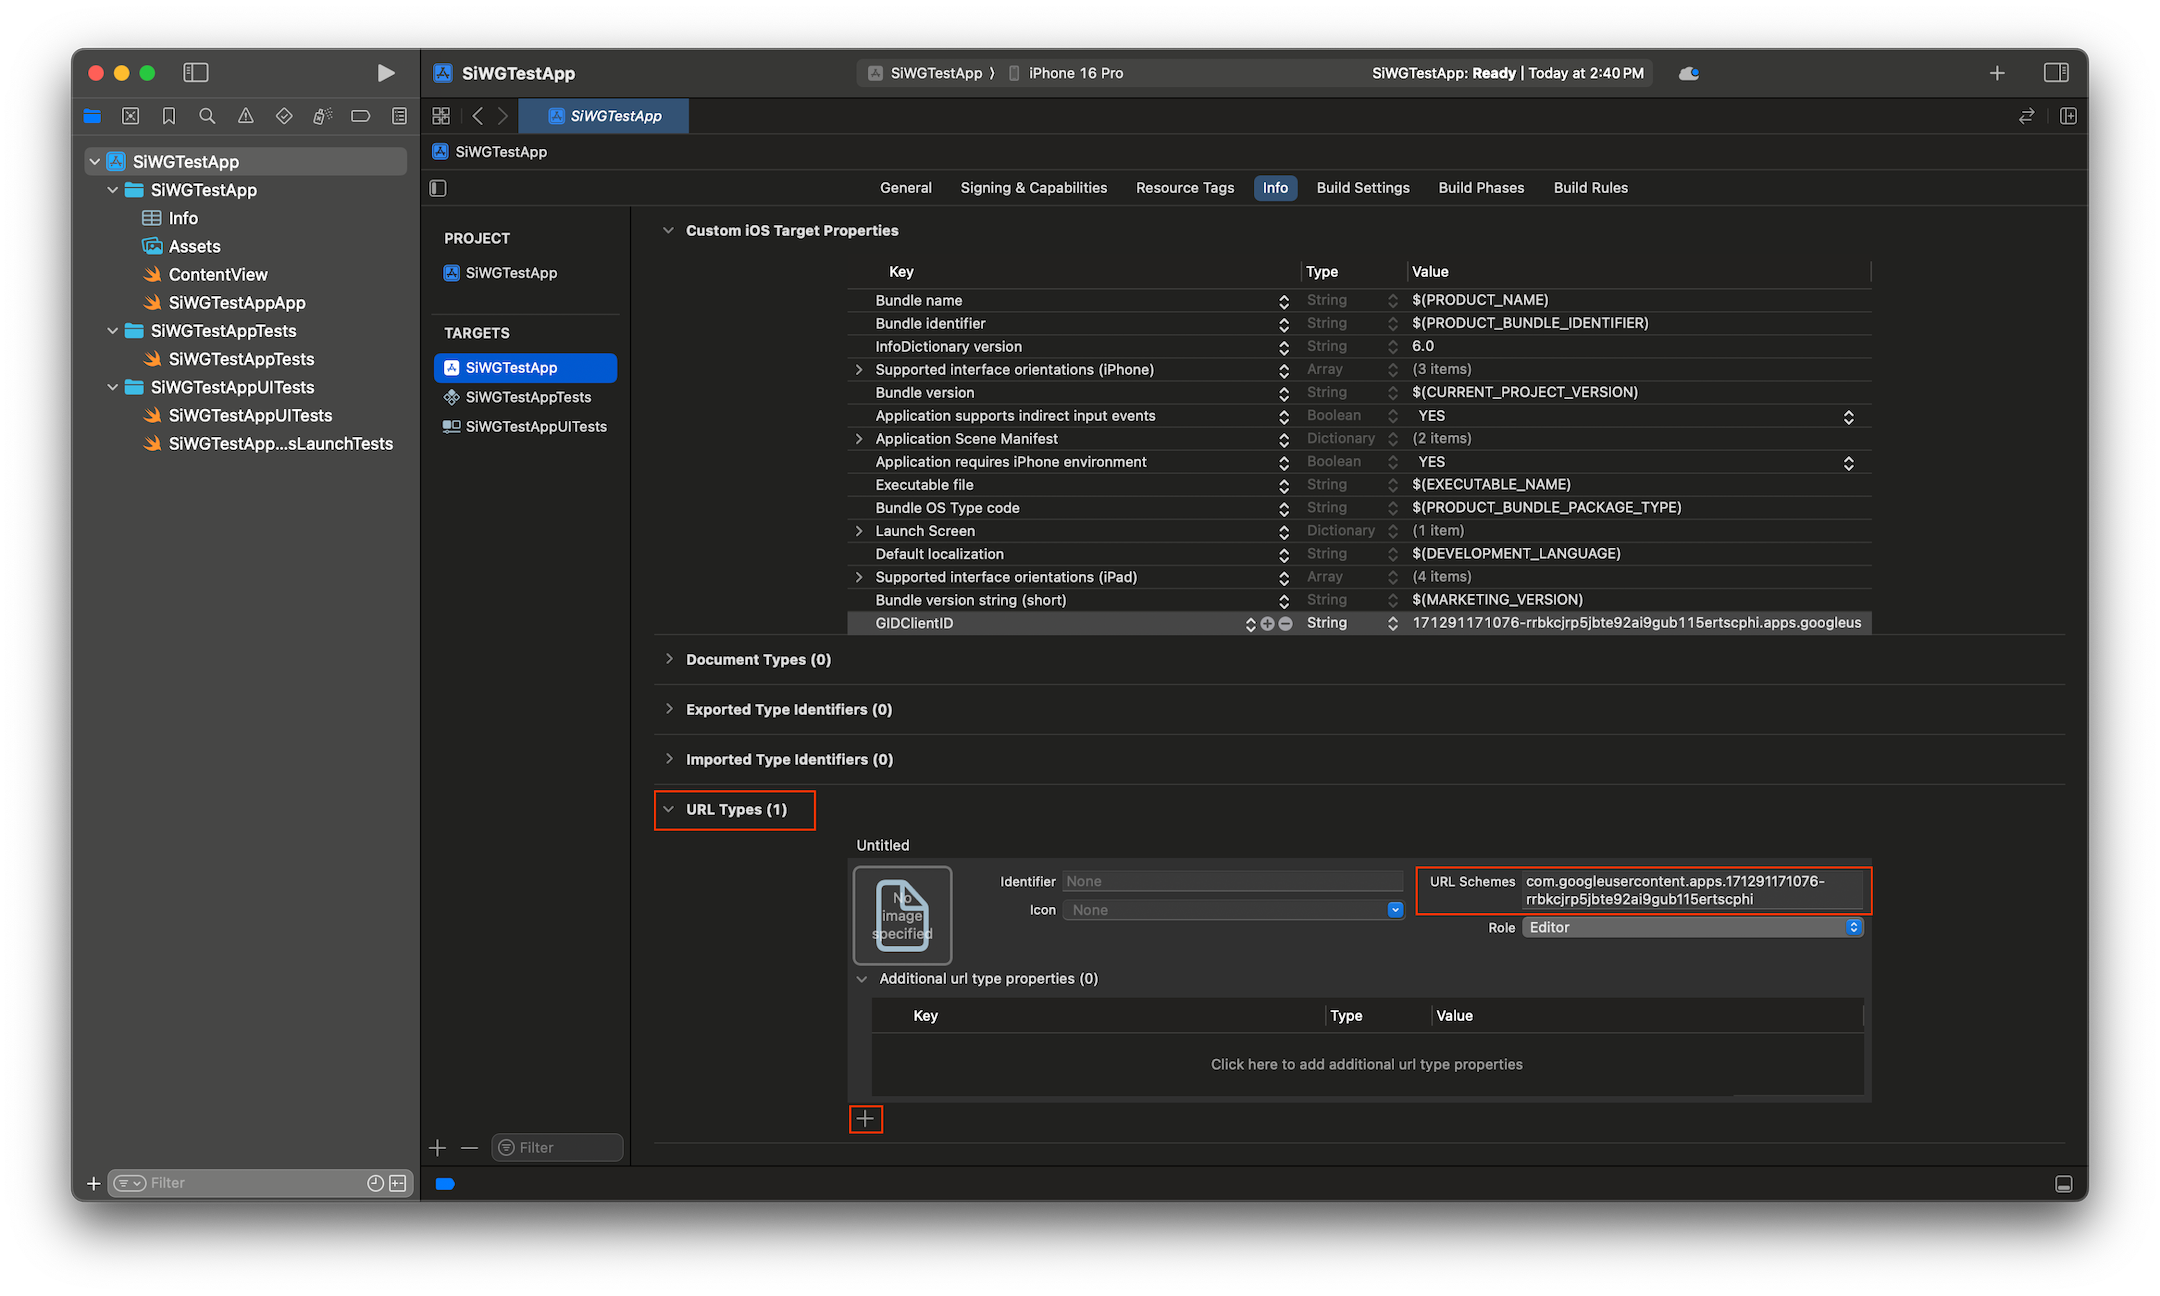
- ขยายประเภท URL ที่ด้านล่างของแท็บข้อมูล
- เลือกปุ่ม +
- ป้อนรหัสไคลเอ็นต์แบบย้อนกลับในช่องรูปแบบ URL
ตอนนี้เราพร้อมที่จะเริ่มเพิ่มปุ่มลงชื่อเข้าใช้ในแอปแล้ว
5. เพิ่มปุ่มลงชื่อเข้าใช้
เมื่อกำหนดค่าโปรเจ็กต์ Xcode แล้ว ก็ถึงเวลาเริ่มเพิ่มปุ่มลงชื่อเข้าใช้ด้วย Google ลงในแอป
ตรรกะหลักสำหรับขั้นตอนนี้คือการเรียกใช้ GIDSignIn.sharedInstance.signIn เมธอดนี้จะเริ่มกระบวนการตรวจสอบสิทธิ์ โดยส่งต่อการควบคุมไปยัง SDK ของการลงชื่อเข้าใช้ด้วย Google เพื่อแสดงขั้นตอนการลงชื่อเข้าใช้ด้วย Google แก่ผู้ใช้
SwiftUI
- ค้นหาไฟล์ ContentView.swift ในแถบนำทางของโปรเจ็กต์ Xcode
- แทนที่เนื้อหาของไฟล์นี้ด้วยข้อความต่อไปนี้
import GoogleSignIn
import GoogleSignInSwift
import SwiftUI

struct ContentView: View {
  var body: some View {
    VStack {
      GoogleSignInButton(action: handleSignInButton).padding()
    }
  }

  func handleSignInButton() {
    // Find the current window scene.
    guard let windowScene = UIApplication.shared.connectedScenes.first as? UIWindowScene else {
      print("There is no active window scene")
      return
    }

    // Get the root view controller from the window scene.
    guard
      let rootViewController = windowScene.windows.first(where: { $0.isKeyWindow })?
        .rootViewController
    else {
      print("There is no key window or root view controller")
      return
    }

    // Start the sign-in process.
    GIDSignIn.sharedInstance.signIn(
      withPresenting: rootViewController
    ) { signInResult, error in
      guard let result = signInResult else {
        // Inspect error
        print("Error signing in: \(error?.localizedDescription ?? "No error description")")
        return
      }
      // If sign in succeeded, display the app's main content View.
      print("ID Token: \(result.user.idToken?.tokenString ?? "")")
    }
  }
}

#Preview {
  ContentView()
}
UIKit
- ค้นหาไฟล์ ViewController.swift ในแถบนำทางของโปรเจ็กต์ Xcode
- แทนที่เนื้อหาของไฟล์นี้ด้วยข้อความต่อไปนี้
import GoogleSignIn
import UIKit

class ViewController: UIViewController {

  // Create an instance of the Sign in with Google button
  let signInButton = GIDSignInButton()

  override func viewDidLoad() {
    super.viewDidLoad()

    // Add the sign-in button to your view
    view.addSubview(signInButton)

    // Position the button using constraints
    signInButton.translatesAutoresizingMaskIntoConstraints = false
    NSLayoutConstraint.activate([
      signInButton.centerXAnchor.constraint(equalTo: view.centerXAnchor),
      signInButton.centerYAnchor.constraint(equalTo: view.centerYAnchor),
    ])

    // Add a target to the button to call a method when it's pressed
    signInButton.addTarget(self, action: #selector(signInButtonTapped), for: .touchUpInside)
  }

  // This method is called when the sign-in button is pressed.
  @objc func signInButtonTapped() {
    // Start the sign-in process.
    GIDSignIn.sharedInstance.signIn(withPresenting: self) { signInResult, error in
      guard let result = signInResult else {
        // Inspect error
        print("Error signing in: \(error?.localizedDescription ?? "No error description")")
        return
      }

      // If sign in succeeded, print the ID token.
      print("ID Token: \(result.user.idToken?.tokenString ?? "")")
    }
  }
}
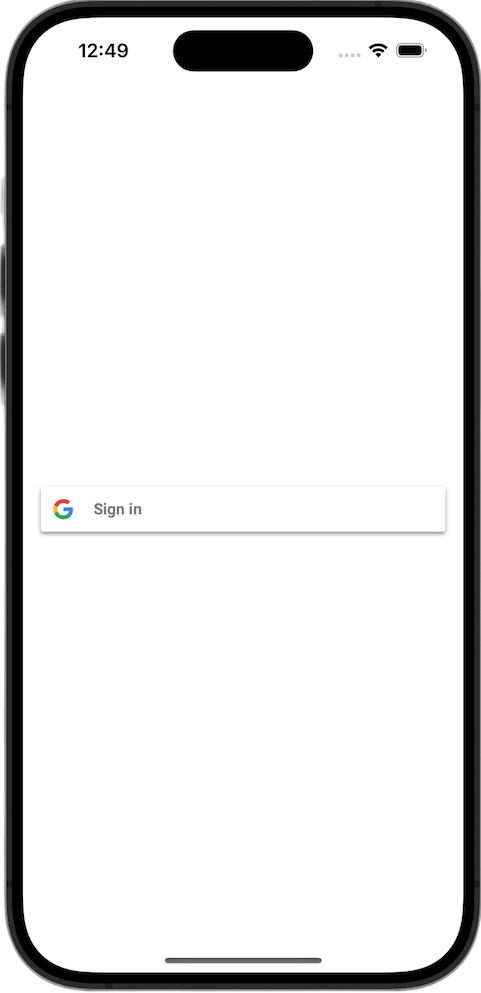
ดูปุ่มลงชื่อเข้าใช้
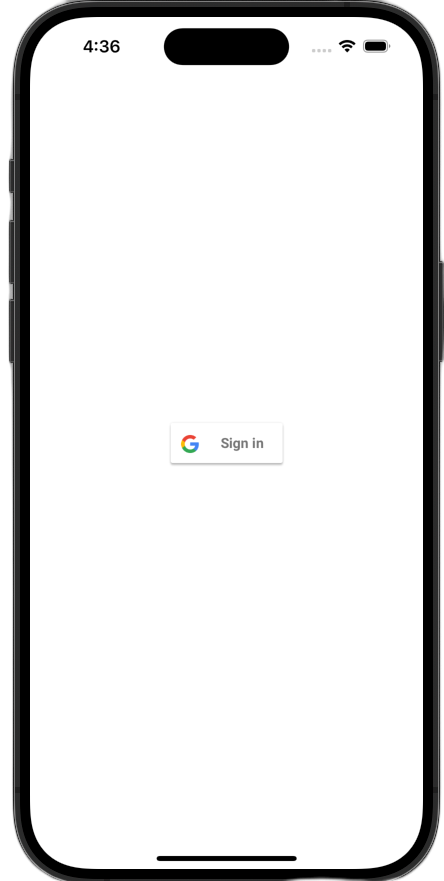
เปิดแอปในเครื่องจำลอง คุณจะเห็นปุ่มลงชื่อเข้าใช้ด้วย Google แต่ปุ่มจะยังทำงานไม่ถูกต้อง ซึ่งเป็นเรื่องปกติ เนื่องจากคุณยังคงต้องติดตั้งใช้งานโค้ดเพื่อจัดการการเปลี่ยนเส้นทางกลับไปยังแอปหลังจากที่ผู้ใช้ตรวจสอบสิทธิ์แล้ว
6. ปรับแต่งปุ่มลงชื่อเข้าใช้
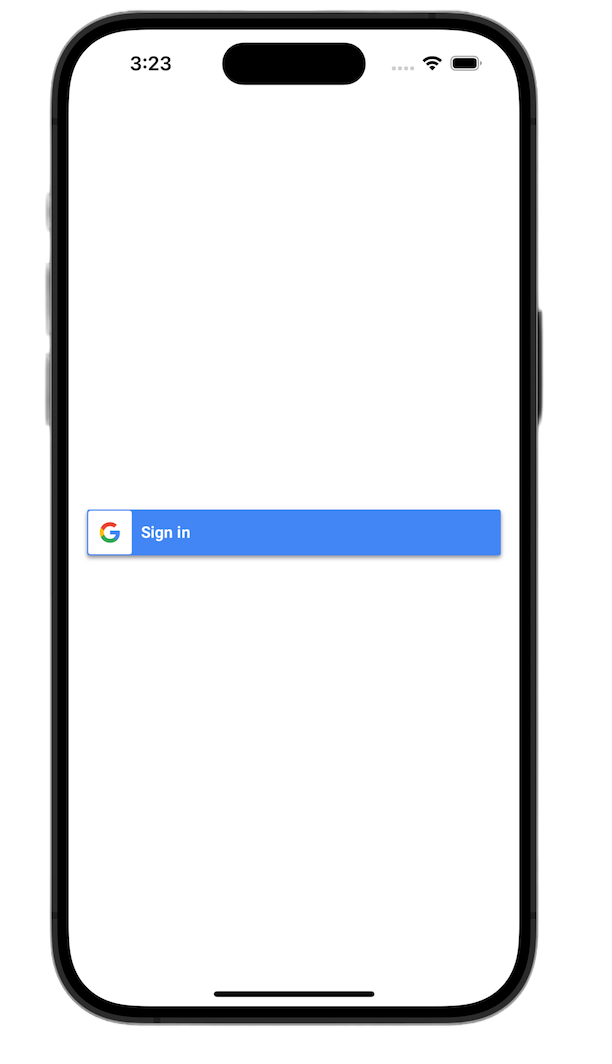
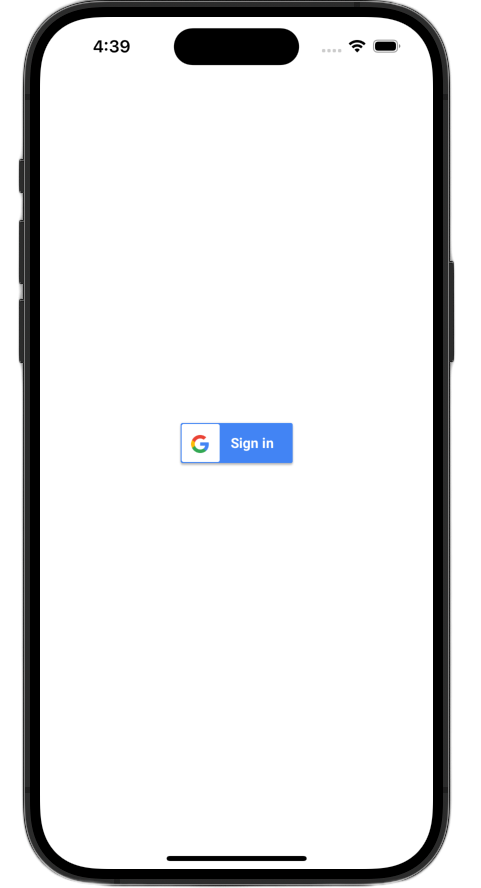
คุณปรับแต่งปุ่มลงชื่อเข้าใช้ด้วย Google เริ่มต้นเพื่อให้เหมาะกับธีมของแอปได้ดียิ่งขึ้น SDK การลงชื่อเข้าใช้ด้วย Google ช่วยให้คุณแก้ไขรูปแบบสีและสไตล์ของปุ่มได้
SwiftUI
ระบบจะเพิ่มปุ่มเริ่มต้นลงในหน้าเว็บด้วยบรรทัดโค้ดนี้
GoogleSignInButton(action: handleSignInButton)
GoogleSignInButton ได้รับการปรับแต่งโดยการส่งพารามิเตอร์ไปยังตัวเริ่มต้น โค้ดต่อไปนี้จะทำให้ปุ่มลงชื่อเข้าใช้แสดงในโหมดมืด
- เปิด ContentView.swift
- อัปเดตตัวเริ่มต้นสำหรับ
GoogleSignInButtonให้มีค่าต่อไปนี้
GoogleSignInButton(
  scheme: .dark,  // Options: .light, .dark, .auto
  style: .standard,  // Options: .standard, .wide, .icon
  state: .normal,  // Options: .normal, .disabled
  action: handleSignInButton
).padding()
ดูข้อมูลเพิ่มเติมเกี่ยวกับตัวเลือกการปรับแต่งได้ที่การอ้างอิงเฟรมเวิร์ก GoogleSignInSwift
UIKit
ปุ่มเริ่มต้นจะสร้างขึ้นด้วยบรรทัดโค้ดต่อไปนี้
// Create an instance of the Sign in with Google button
let signInButton = GIDSignInButton()

// Add the button to your view
view.addSubview(signInButton)
GIDSignInButton ได้รับการปรับแต่งโดยการตั้งค่าพร็อพเพอร์ตี้ในอินสแตนซ์ของปุ่ม โค้ดต่อไปนี้จะทำให้ปุ่มลงชื่อเข้าใช้แสดงในโหมดมืด
- เปิด ViewController.swift
- เพิ่มบรรทัดโค้ดต่อไปนี้ทันทีก่อนเพิ่มปุ่มลงชื่อเข้าใช้ในมุมมองในฟังก์ชัน
viewDidLoad
// Set the width and color of the sign-in button
signInButton.style = .standard  // Options: .standard, .wide, .iconOnly
signInButton.colorScheme = .dark  // Options: .dark, .light
ดูข้อมูลเพิ่มเติมเกี่ยวกับการปรับแต่งได้ที่การอ้างอิงเฟรมเวิร์ก GoogleSignIn
7. จัดการ URL การเปลี่ยนเส้นทางสำหรับการตรวจสอบสิทธิ์
เมื่อเพิ่มปุ่มลงชื่อเข้าใช้แล้ว ขั้นตอนถัดไปคือการจัดการการเปลี่ยนเส้นทางที่เกิดขึ้นหลังจากที่ผู้ใช้ตรวจสอบสิทธิ์ หลังจากตรวจสอบสิทธิ์แล้ว Google จะแสดง URL ที่มีรหัสการให้สิทธิ์ชั่วคราว หากต้องการดำเนินการลงชื่อเข้าใช้ให้เสร็จสมบูรณ์ ตัวแฮนเดิลจะสกัดกั้น URL นี้และส่งไปยัง SDK ของการลงชื่อเข้าใช้ด้วย Google เพื่อแลกเปลี่ยนเป็นโทเค็นรหัสที่ลงชื่อ (JWT)
SwiftUI
- เปิดไฟล์ที่มี
Appstruct ไฟล์นี้จะตั้งชื่อตามโปรเจ็กต์ของคุณ ดังนั้นชื่อจึงเป็น YourProjectNameApp.swift - แทนที่เนื้อหาของไฟล์นี้ด้วยข้อความต่อไปนี้
import GoogleSignIn
import SwiftUI

@main
struct iOS_Sign_in_with_Google_App: App {
  var body: some Scene {
    WindowGroup {
      ContentView()

        .onOpenURL { url in
          GIDSignIn.sharedInstance.handle(url)
        }
    }
  }
}
UIKit
- เปิด AppDelegate.swift
- เพิ่มการนำเข้าต่อไปนี้ที่ด้านบนของไฟล์
import GoogleSignIn
- เพิ่มฟังก์ชันตัวแฮนเดิลการตรวจสอบสิทธิ์ต่อไปนี้ภายในคลาส
AppDelegateตำแหน่งที่เหมาะในการวางคือต่อจากเครื่องหมายปีกกาปิดของapplication(_:didFinishLaunchingWithOptions:)เมธอดโดยตรง
func application(
  _ app: UIApplication,
  open url: URL,
  options: [UIApplication.OpenURLOptionsKey: Any] = [:]
) -> Bool {
  var handled: Bool

  handled = GIDSignIn.sharedInstance.handle(url)
  if handled {
    return true
  }
  // If not handled by this app, return false.
  return false
}
หลังจากทำการเปลี่ยนแปลงเหล่านี้แล้ว ไฟล์ AppDelegate.swift ควรมีลักษณะดังนี้
import GoogleSignIn
import UIKit

@main
class AppDelegate: UIResponder, UIApplicationDelegate {

  func application(
    _ application: UIApplication,
    didFinishLaunchingWithOptions launchOptions: [UIApplication.LaunchOptionsKey: Any]?
  ) -> Bool {
    // Override point for customization after application launch.
    return true
  }

  func application(
    _ app: UIApplication,
    open url: URL,
    options: [UIApplication.OpenURLOptionsKey: Any] = [:]
  ) -> Bool {
    var handled: Bool

    handled = GIDSignIn.sharedInstance.handle(url)
    if handled {
      return true
    }
    // If not handled by this app, return false.
    return false
  }

  // MARK: UISceneSession Lifecycle

  func application(
    _ application: UIApplication,
    configurationForConnecting connectingSceneSession: UISceneSession,
    options: UIScene.ConnectionOptions
  ) -> UISceneConfiguration {
    // Called when a new scene session is being created.
    // Use this method to select a configuration to create the new scene with.
    return UISceneConfiguration(
      name: "Default Configuration",
      sessionRole: connectingSceneSession.role
    )
  }

  func application(
    _ application: UIApplication,
    didDiscardSceneSessions sceneSessions: Set<UISceneSession>
  ) {
    // Called when the user discards a scene session.
    // If any sessions were discarded while the application was not running, this will be called shortly after application:didFinishLaunchingWithOptions.
    // Use this method to release any resources that were specific to the discarded scenes, as they will not return.
  }
}
ทดสอบโฟลว์การลงชื่อเข้าใช้
ตอนนี้คุณสามารถทดสอบขั้นตอนการลงชื่อเข้าใช้ทั้งหมดได้แล้ว
เรียกใช้แอปแล้วแตะปุ่มลงชื่อเข้าใช้ หลังจากที่คุณตรวจสอบสิทธิ์แล้ว Google จะแสดงหน้าจอขอความยินยอมที่คุณสามารถให้สิทธิ์แอปในการเข้าถึงข้อมูลของคุณได้ เมื่ออนุมัติแล้ว ระบบจะลงชื่อเข้าใช้ให้เสร็จสมบูรณ์และนำคุณกลับไปที่แอป
เมื่อขั้นตอนการลงชื่อเข้าใช้เสร็จสมบูรณ์แล้ว SDK การลงชื่อเข้าใช้ด้วย Google จะจัดเก็บข้อมูลเข้าสู่ระบบของผู้ใช้ไว้ในพวงกุญแจของอุปกรณ์อย่างปลอดภัย โดยสามารถใช้ข้อมูลเข้าสู่ระบบเหล่านี้ในภายหลังเพื่อให้ผู้ใช้ยังคงลงชื่อเข้าใช้ได้เมื่อเปิดแอปในครั้งต่อๆ ไป
8. เพิ่มปุ่มออกจากระบบ
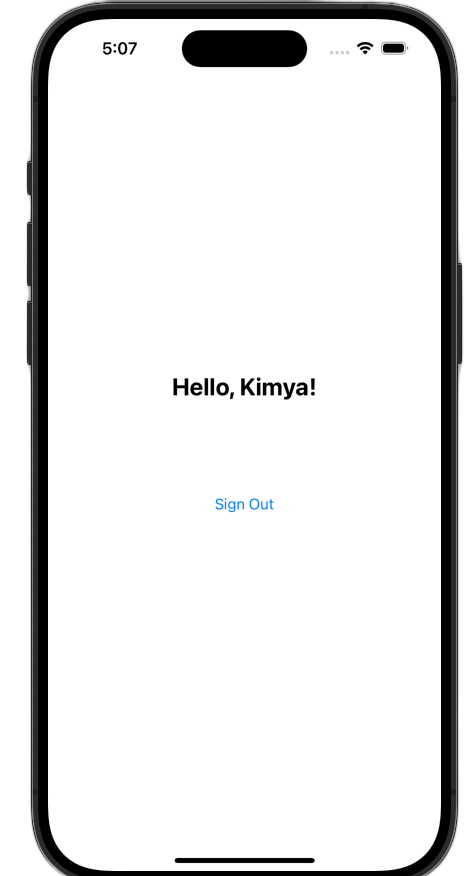
ตอนนี้การลงชื่อเข้าใช้ใช้งานได้แล้ว ขั้นตอนถัดไปคือการเพิ่มปุ่มออกจากระบบและอัปเดต UI เพื่อแสดงสถานะการลงชื่อเข้าใช้ปัจจุบันของผู้ใช้ เมื่อลงชื่อเข้าใช้สำเร็จ SDK จะแสดงออบเจ็กต์ GIDGoogleUser ออบเจ็กต์นี้มีพร็อพเพอร์ตี้ profile ที่มีข้อมูลพื้นฐาน เช่น ชื่อและอีเมลของผู้ใช้ ซึ่งคุณจะใช้เพื่อปรับแต่ง UI
SwiftUI
- เปิดไฟล์ ContentView.swift
- เพิ่มตัวแปรสถานะที่ด้านบนของ
ContentViewstruct ตัวแปรนี้จะเก็บข้อมูลของผู้ใช้หลังจากที่ผู้ใช้ลงชื่อเข้าใช้ เนื่องจากเป็นตัวแปร@StateSwiftUI จะอัปเดต UI โดยอัตโนมัติเมื่อใดก็ตามที่ค่ามีการเปลี่ยนแปลง
struct ContentView: View {
  @State private var user: GIDGoogleUser?
}
- แทนที่
bodyปัจจุบันของโครงสร้างContentViewด้วยVStackต่อไปนี้ ซึ่งจะตรวจสอบว่าตัวแปรสถานะuserมีผู้ใช้หรือไม่ หากมี ระบบจะแสดงข้อความต้อนรับและปุ่มออกจากระบบ หากไม่มีการปรับแต่ง ระบบจะแสดงปุ่มลงชื่อเข้าใช้ด้วย Google แบบเดิม
var body: some View {
  VStack {
    // Check if the user is signed in.
    if let user = user {
      // If signed in, show a welcome message and the sign-out button.
      Text("Hello, \(user.profile?.givenName ?? "User")!")
        .font(.title)
        .padding()

      Button("Sign Out", action: signOut)
        .buttonStyle(.borderedProminent)

    } else {
      // If not signed in, show the "Sign in with Google" button.
      GoogleSignInButton(
        scheme: .dark,  // Options: .light, .dark, .auto
        style: .standard,  // Options: .standard, .wide, .icon
        state: .normal,  // Options: .normal, .disabled
        action: handleSignInButton
      ).padding()
    }
  }
}
- อัปเดตบล็อกการดำเนินการให้เสร็จสมบูรณ์เพื่อกำหนด
signInResult.userให้กับตัวแปรuserใหม่handleSignInButtonสิ่งที่จะทริกเกอร์ให้ UI เปลี่ยนไปเป็นมุมมองที่ลงชื่อเข้าใช้มีดังนี้
func handleSignInButton() {
  // Find the current window scene.
  guard let windowScene = UIApplication.shared.connectedScenes.first as? UIWindowScene else {
    print("There is no active window scene")
    return
  }

  // Get the root view controller from the window scene.
  guard
    let rootViewController = windowScene.windows.first(where: { $0.isKeyWindow })?
      .rootViewController
  else {
    print("There is no key window or root view controller")
    return
  }

  // Start the sign-in process.
  GIDSignIn.sharedInstance.signIn(
    withPresenting: rootViewController
  ) { signInResult, error in
    guard let result = signInResult else {
      // Inspect error
      print("Error signing in: \(error?.localizedDescription ?? "No error description")")
      return
    }

    DispatchQueue.main.async {
      self.user = result.user
    }

    // If sign in succeeded, display the app's main content View.
    print("ID Token: \(result.user.idToken?.tokenString ?? "")")
  }
}
- เพิ่มฟังก์ชัน
signOutใหม่ที่ด้านล่างของโครงสร้างContentViewเพื่อให้ปุ่มออกจากระบบเรียกใช้ได้
func signOut() {
  GIDSignIn.sharedInstance.signOut()
  // After signing out, set the `user` state variable to `nil`.
  self.user = nil
}
เปิดแอปและลงชื่อเข้าใช้ คุณควรเห็นการเปลี่ยนแปลง UI หลังจากตรวจสอบสิทธิ์สำเร็จ

หลังจากทำการเปลี่ยนแปลงเหล่านี้แล้ว ไฟล์ ContentView.swift ควรมีลักษณะดังนี้
import GoogleSignIn
import GoogleSignInSwift
import SwiftUI

struct ContentView: View {

  @State private var user: GIDGoogleUser?

  var body: some View {
    VStack {
      // Check if the user is signed in.
      if let user = user {
        // If signed in, show a welcome message and the sign-out button.
        Text("Hello, \(user.profile?.givenName ?? "User")!")
          .font(.title)
          .padding()

        Button("Sign Out", action: signOut)
          .buttonStyle(.borderedProminent)

      } else {
        // If not signed in, show the "Sign in with Google" button.
        GoogleSignInButton(
          scheme: .dark,  // Options: .light, .dark, .auto
          style: .standard,  // Options: .standard, .wide, .icon
          state: .normal,  // Options: .normal, .disabled
          action: handleSignInButton
        ).padding()
      }
    }
  }

  func handleSignInButton() {
    // Find the current window scene.
    guard let windowScene = UIApplication.shared.connectedScenes.first as? UIWindowScene else {
      print("There is no active window scene")
      return
    }

    // Get the root view controller from the window scene.
    guard
      let rootViewController = windowScene.windows.first(where: { $0.isKeyWindow })?
        .rootViewController
    else {
      print("There is no key window or root view controller")
      return
    }

    // Start the sign-in process.
    GIDSignIn.sharedInstance.signIn(
      withPresenting: rootViewController
    ) { signInResult, error in
      guard let result = signInResult else {
        // Inspect error
        print("Error signing in: \(error?.localizedDescription ?? "No error description")")
        return
      }

      DispatchQueue.main.async {
        self.user = result.user
      }

      // If sign in succeeded, display the app's main content View.
      print("ID Token: \(result.user.idToken?.tokenString ?? "")")
    }
  }

  func signOut() {
    GIDSignIn.sharedInstance.signOut()
    // After signing out, set the `user` state variable to `nil`.
    self.user = nil
  }
}

#Preview {
  ContentView()
}
UIKit
- เปิด ViewController.swift
- ที่ด้านบนของ
ViewControllerใต้ตำแหน่งที่คุณประกาศsignInButtonให้เพิ่มปุ่มออกจากระบบและป้ายกำกับต้อนรับ
let signOutButton = UIButton(type: .system)
let welcomeLabel = UILabel()
- เพิ่มฟังก์ชันต่อไปนี้ที่ด้านล่างของ
ViewControllerฟังก์ชันนี้จะแสดง UI ที่แตกต่างกันต่อผู้ใช้ตามสถานะการลงชื่อเข้าใช้ของผู้ใช้ ดังนี้
private func updateUI(for user: GIDGoogleUser?) {
  if let user = user {
    // User is signed in.
    signInButton.isHidden = true
    signOutButton.isHidden = false
    welcomeLabel.isHidden = false
    welcomeLabel.text = "Hello, \(user.profile?.givenName ?? "User")!"
  } else {
    // User is signed out.
    signInButton.isHidden = false
    signOutButton.isHidden = true
    welcomeLabel.isHidden = true
  }
}
- ที่ด้านล่างของฟังก์ชัน
viewDidLoadให้เพิ่มโค้ดต่อไปนี้เพื่อเพิ่มป้ายกำกับต้อนรับและปุ่มออกจากระบบลงในมุมมอง
// --- Set up the Welcome Label ---
welcomeLabel.translatesAutoresizingMaskIntoConstraints = false
welcomeLabel.textAlignment = .center
welcomeLabel.font = .systemFont(ofSize: 24, weight: .bold)
view.addSubview(welcomeLabel)

NSLayoutConstraint.activate([
  welcomeLabel.centerXAnchor.constraint(equalTo: view.centerXAnchor),
  welcomeLabel.bottomAnchor.constraint(equalTo: signInButton.topAnchor, constant: -20),
])

// --- Set up the Sign-Out Button ---
signOutButton.translatesAutoresizingMaskIntoConstraints = false
signOutButton.setTitle("Sign Out", for: .normal)
view.addSubview(signOutButton)

NSLayoutConstraint.activate([
  signOutButton.centerXAnchor.constraint(equalTo: view.centerXAnchor),
  signOutButton.topAnchor.constraint(equalTo: signInButton.bottomAnchor, constant: 20),
])

signOutButton.addTarget(self, action: #selector(signOutButtonTapped), for: .touchUpInside)

// --- Set Initial UI State ---
updateUI(for: nil)
- อัปเดตฟังก์ชัน
signInButtonTappedเพื่อเรียกใช้เมธอดUpdateUIเมื่อลงชื่อเข้าใช้สำเร็จ
@objc func signInButtonTapped() {
  // Start the sign-in process.
  GIDSignIn.sharedInstance.signIn(withPresenting: self) { signInResult, error in
    guard let result = signInResult else {
      // Inspect error
      print("Error signing in: \(error?.localizedDescription ?? "No error description")")
      return
    }

    // If sign in succeeded, print the ID token.
    print("ID Token: \(result.user.idToken?.tokenString ?? "")")

    DispatchQueue.main.async {
      self.updateUI(for: result.user)
    }
  }
}
- สุดท้าย ให้เพิ่มฟังก์ชัน
signOutButtonTappedลงในViewControllerเพื่อจัดการกระบวนการออกจากระบบ
@objc func signOutButtonTapped() {
  GIDSignIn.sharedInstance.signOut()
  // Update the UI for the signed-out state.
  updateUI(for: nil)
}
เปิดแอปและลงชื่อเข้าใช้ คุณควรเห็นการเปลี่ยนแปลง UI หลังจากตรวจสอบสิทธิ์สำเร็จ
หลังจากทำการเปลี่ยนแปลงเหล่านี้แล้ว ไฟล์ ViewController.swift ควรมีลักษณะดังนี้
import GoogleSignIn
import UIKit

class ViewController: UIViewController {

  // Create an instance of the Sign in with Google button
  let signInButton = GIDSignInButton()
  let signOutButton = UIButton(type: .system)
  let welcomeLabel = UILabel()

  override func viewDidLoad() {
    super.viewDidLoad()

    // Set the width and color of the sign-in button
    signInButton.style = .standard  // Options: .standard, .wide, .iconOnly
    signInButton.colorScheme = .dark  // Options: .dark, .light

    // Add the sign-in button to your view
    view.addSubview(signInButton)

    // Position the button using constraints
    signInButton.translatesAutoresizingMaskIntoConstraints = false
    NSLayoutConstraint.activate([
      signInButton.centerXAnchor.constraint(equalTo: view.centerXAnchor),
      signInButton.centerYAnchor.constraint(equalTo: view.centerYAnchor),
    ])

    // Add a target to the button to call a method when it's pressed
    signInButton.addTarget(self, action: #selector(signInButtonTapped), for: .touchUpInside)

    // --- Set up the Welcome Label ---
    welcomeLabel.translatesAutoresizingMaskIntoConstraints = false
    welcomeLabel.textAlignment = .center
    welcomeLabel.font = .systemFont(ofSize: 24, weight: .bold)
    view.addSubview(welcomeLabel)

    NSLayoutConstraint.activate([
      welcomeLabel.centerXAnchor.constraint(equalTo: view.centerXAnchor),
      welcomeLabel.bottomAnchor.constraint(equalTo: signInButton.topAnchor, constant: -20),
    ])

    // --- Set up the Sign-Out Button ---
    signOutButton.translatesAutoresizingMaskIntoConstraints = false
    signOutButton.setTitle("Sign Out", for: .normal)
    view.addSubview(signOutButton)

    NSLayoutConstraint.activate([
      signOutButton.centerXAnchor.constraint(equalTo: view.centerXAnchor),
      signOutButton.topAnchor.constraint(equalTo: signInButton.bottomAnchor, constant: 20),
    ])

    signOutButton.addTarget(self, action: #selector(signOutButtonTapped), for: .touchUpInside)

    // --- Set Initial UI State ---
    updateUI(for: nil)
  }

  // This method is called when the sign-in button is pressed.
  @objc func signInButtonTapped() {
    // Start the sign-in process.
    GIDSignIn.sharedInstance.signIn(withPresenting: self) { signInResult, error in
      guard let result = signInResult else {
        // Inspect error
        print("Error signing in: \(error?.localizedDescription ?? "No error description")")
        return
      }

      // If sign in succeeded, print the ID token.
      print("ID Token: \(result.user.idToken?.tokenString ?? "")")

      DispatchQueue.main.async {
        self.updateUI(for: result.user)
      }
    }
  }

  private func updateUI(for user: GIDGoogleUser?) {
    if let user = user {
      // User is signed in.
      signInButton.isHidden = true
      signOutButton.isHidden = false
      welcomeLabel.isHidden = false
      welcomeLabel.text = "Hello, \(user.profile?.givenName ?? "User")!"
    } else {
      // User is signed out.
      signInButton.isHidden = false
      signOutButton.isHidden = true
      welcomeLabel.isHidden = true
    }
  }

  @objc func signOutButtonTapped() {
    GIDSignIn.sharedInstance.signOut()
    // Update the UI for the signed-out state.
    updateUI(for: nil)
  }
}
9. กู้คืนสถานะการลงชื่อเข้าใช้ของผู้ใช้
ขั้นตอนถัดไปคือการคืนค่าสถานะการลงชื่อเข้าใช้เมื่อเปิดแอปเพื่อปรับปรุงประสบการณ์การใช้งานสำหรับผู้ใช้ที่กลับมา การเรียกใช้ restorePreviousSignIn จะใช้ข้อมูลเข้าสู่ระบบที่บันทึกไว้ในพวงกุญแจเพื่อลงชื่อเข้าใช้ให้ผู้ใช้อีกครั้งโดยอัตโนมัติ เพื่อให้ผู้ใช้ไม่ต้องทำตามขั้นตอนการลงชื่อเข้าใช้ทุกครั้ง
SwiftUI
- เปิด ContentView.swift
- เพิ่มโค้ดต่อไปนี้ต่อจาก
VStackภายในตัวแปรbodyโดยตรง
.onAppear {
// On appear, try to restore a previous sign-in.
GIDSignIn.sharedInstance.restorePreviousSignIn { user, error in
// This closure is called when the restoration is complete.
if let user = user {
// If a user was restored, update the `user` state variable.
DispatchQueue.main.async {
self.user = user
}
// Print the ID token to the console when restored.
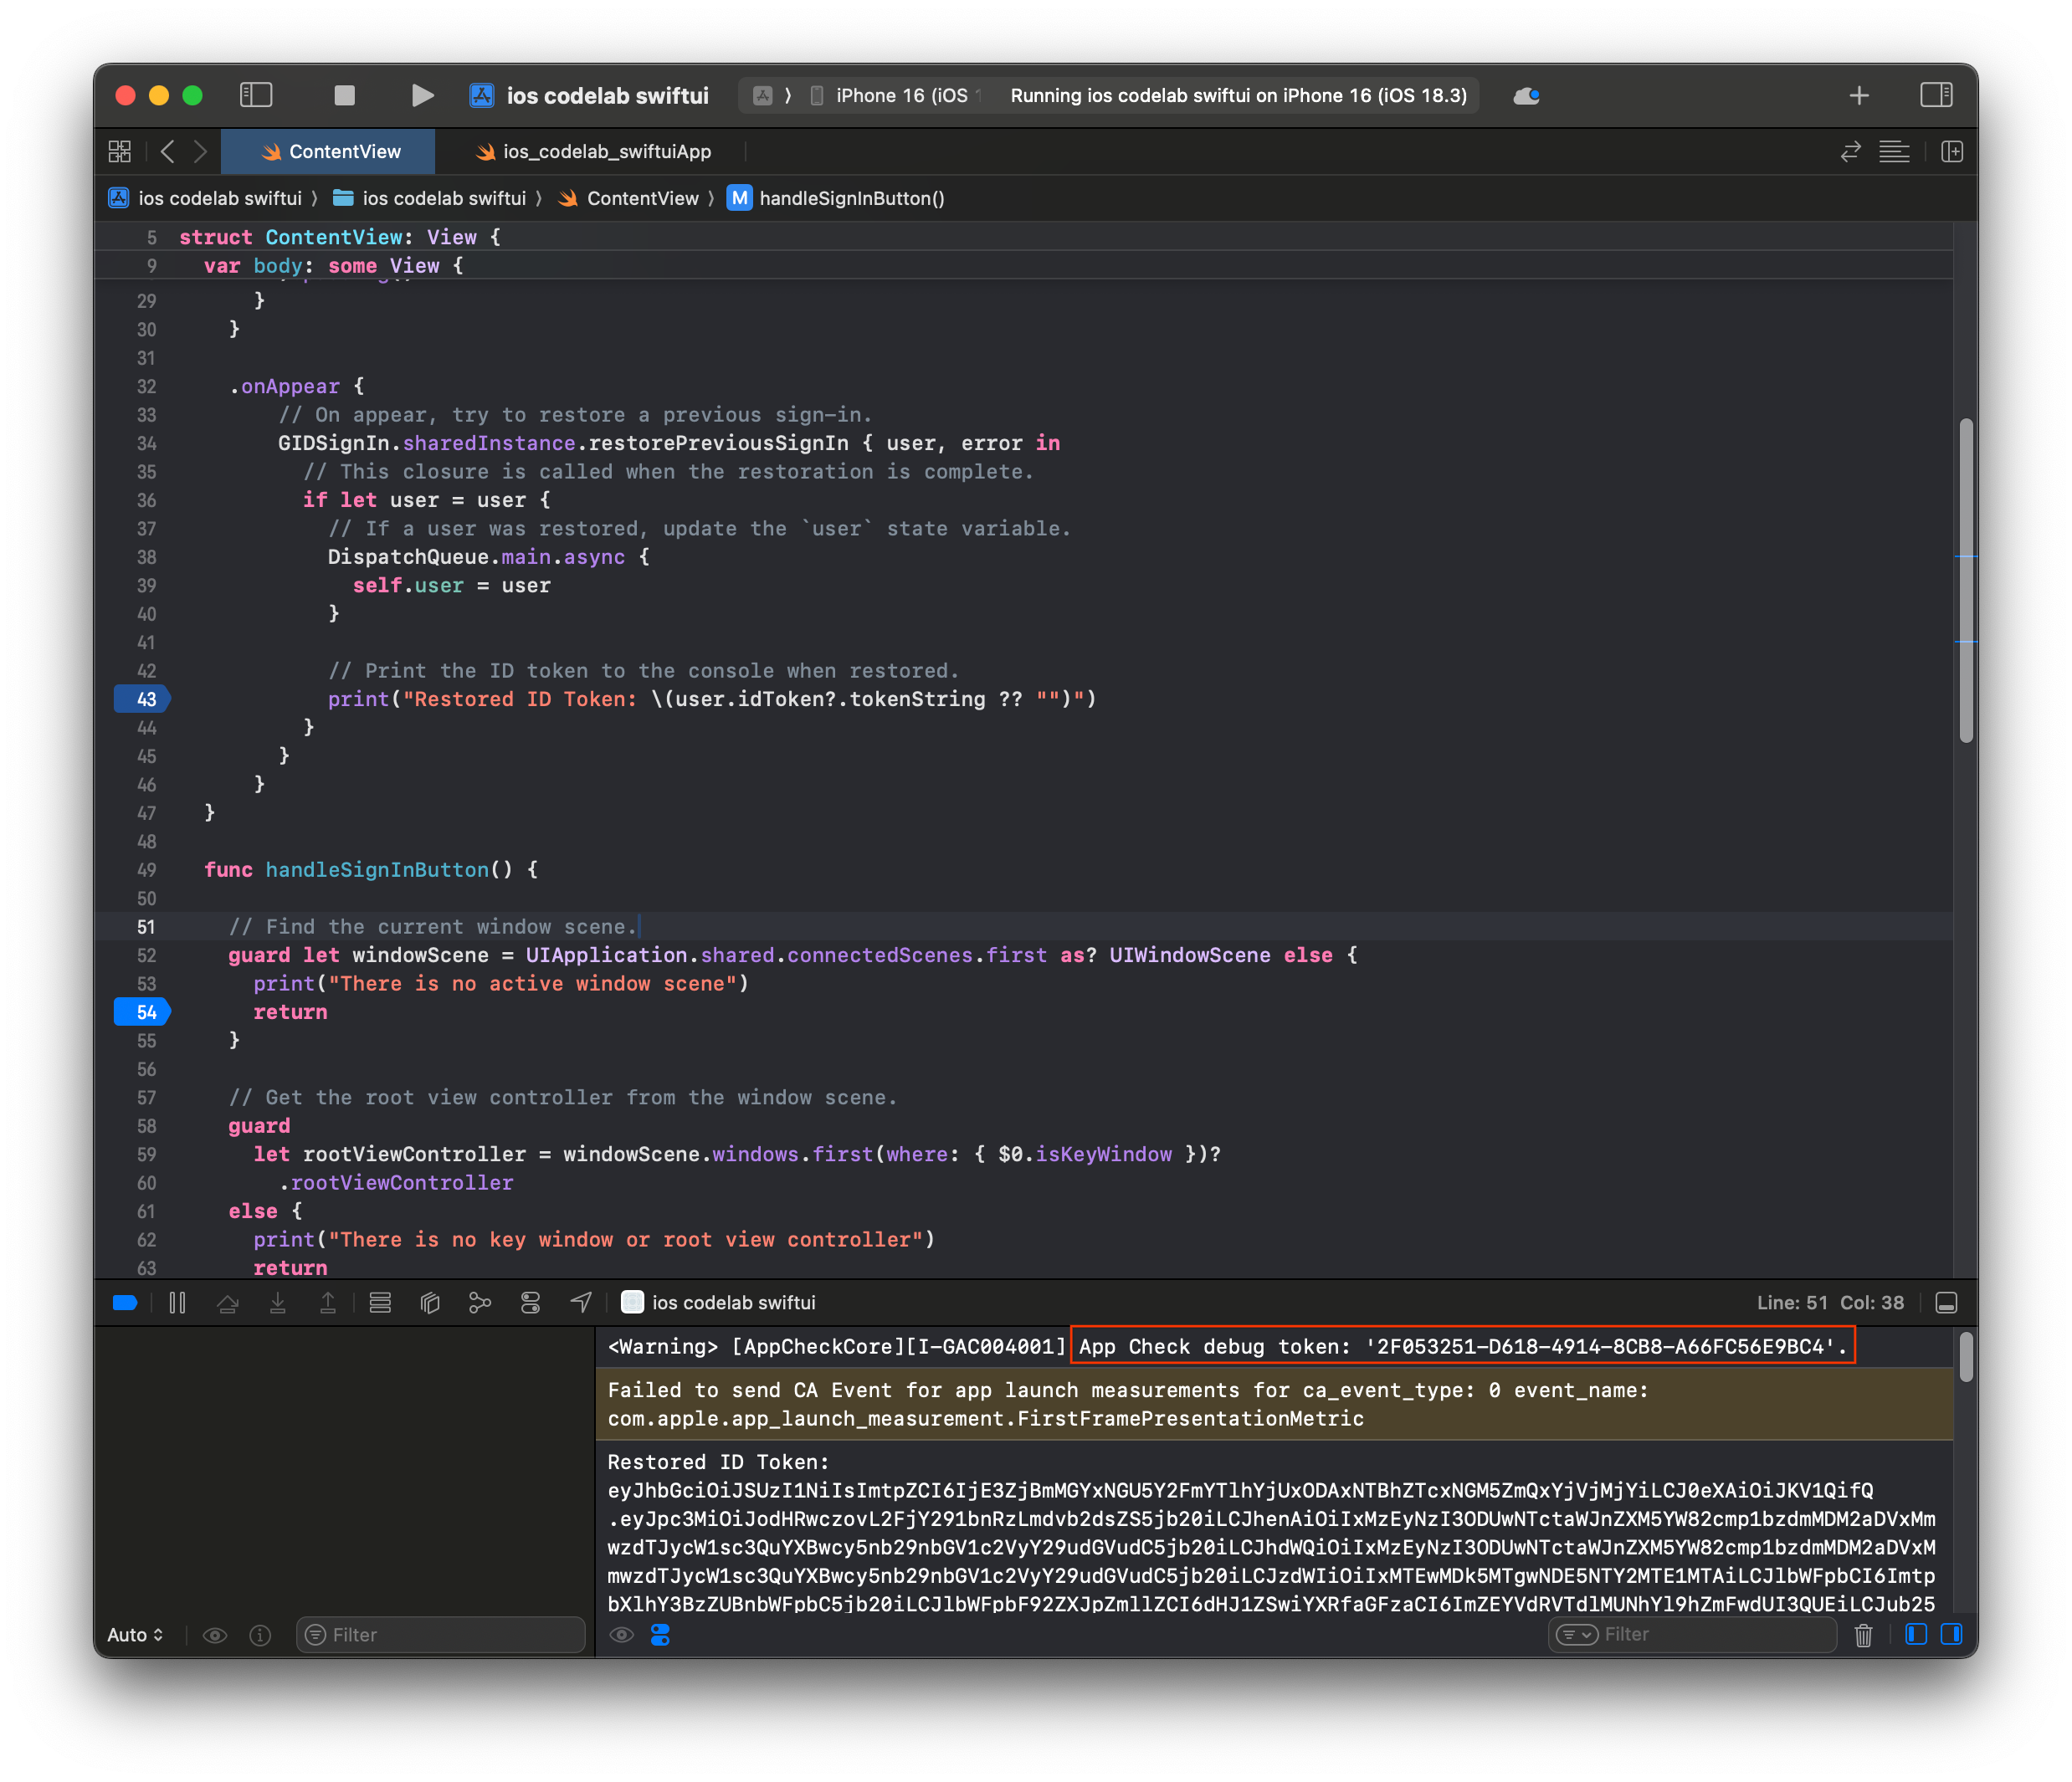
print("Restored ID Token: \(user.idToken?.tokenString ?? "")")
}
}
}
ContentView.swift ควรมีลักษณะดังนี้
import GoogleSignIn
import GoogleSignInSwift
import SwiftUI

struct ContentView: View {

  @State private var user: GIDGoogleUser?

  var body: some View {
    VStack {
      // Check if the user is signed in.
      if let user = user {
        // If signed in, show a welcome message and the sign-out button.
        Text("Hello, \(user.profile?.givenName ?? "User")!")
          .font(.title)
          .padding()

        Button("Sign Out", action: signOut)
          .buttonStyle(.borderedProminent)

      } else {
        // If not signed in, show the "Sign in with Google" button.
        GoogleSignInButton(
          scheme: .dark,  // Options: .light, .dark, .auto
          style: .standard,  // Options: .standard, .wide, .icon
          state: .normal,  // Options: .normal, .disabled
          action: handleSignInButton
        ).padding()
      }
    }

    .onAppear {
      // On appear, try to restore a previous sign-in.
      GIDSignIn.sharedInstance.restorePreviousSignIn { user, error in
        // This closure is called when the restoration is complete.
        if let user = user {
          // If a user was restored, update the `user` state variable.
          DispatchQueue.main.async {
            self.user = user
          }

          // Print the ID token to the console when restored.
          print("Restored ID Token: \(user.idToken?.tokenString ?? "")")
        }
      }
    }
  }

  func handleSignInButton() {
    // Find the current window scene.
    guard let windowScene = UIApplication.shared.connectedScenes.first as? UIWindowScene else {
      print("There is no active window scene")
      return
    }

    // Get the root view controller from the window scene.
    guard
      let rootViewController = windowScene.windows.first(where: { $0.isKeyWindow })?
        .rootViewController
    else {
      print("There is no key window or root view controller")
      return
    }

    // Start the sign-in process.
    GIDSignIn.sharedInstance.signIn(
      withPresenting: rootViewController
    ) { signInResult, error in
      guard let result = signInResult else {
        // Inspect error
        print("Error signing in: \(error?.localizedDescription ?? "No error description")")
        return
      }

      DispatchQueue.main.async {
        self.user = result.user
      }

      // If sign in succeeded, display the app's main content View.
      print("ID Token: \(result.user.idToken?.tokenString ?? "")")
    }
  }

  func signOut() {
    GIDSignIn.sharedInstance.signOut()
    // After signing out, set the `user` state variable to `nil`.
    self.user = nil
  }
}

#Preview {
  ContentView()
}
UIKit
- เปิด ViewController.swift
- เพิ่มการเรียกใช้
restorePreviousSignInต่อไปนี้ที่ส่วนท้ายของเมธอดviewDidLoad
// Attempt to restore a previous sign-in session
GIDSignIn.sharedInstance.restorePreviousSignIn { user, error in
  if let user = user {
    print("Successfully restored sign-in for user: \(user.profile?.givenName ?? "Unknown")")

    // Print the ID token when a session is restored.
    print("Restored ID Token: \(user.idToken?.tokenString ?? "")")

    // On success, update the UI for the signed-in state on the main thread.
    DispatchQueue.main.async {
      self.updateUI(for: user)
    }
  }
}
ไฟล์ ViewController.swift ควรมีลักษณะดังนี้
import GoogleSignIn
import UIKit

class ViewController: UIViewController {

  // Create an instance of the Sign in with Google button
  let signInButton = GIDSignInButton()
  let signOutButton = UIButton(type: .system)
  let welcomeLabel = UILabel()

  override func viewDidLoad() {
    super.viewDidLoad()

    // Set the width and color of the sign-in button
    signInButton.style = .standard  // Options: .standard, .wide, .iconOnly
    signInButton.colorScheme = .dark  // Options: .dark, .light

    // Add the sign-in button to your view
    view.addSubview(signInButton)

    // Position the button using constraints
    signInButton.translatesAutoresizingMaskIntoConstraints = false
    NSLayoutConstraint.activate([
      signInButton.centerXAnchor.constraint(equalTo: view.centerXAnchor),
      signInButton.centerYAnchor.constraint(equalTo: view.centerYAnchor),
    ])

    // Add a target to the button to call a method when it's pressed
    signInButton.addTarget(self, action: #selector(signInButtonTapped), for: .touchUpInside)

    // --- Set up the Welcome Label ---
    welcomeLabel.translatesAutoresizingMaskIntoConstraints = false
    welcomeLabel.textAlignment = .center
    welcomeLabel.font = .systemFont(ofSize: 24, weight: .bold)
    view.addSubview(welcomeLabel)

    NSLayoutConstraint.activate([
      welcomeLabel.centerXAnchor.constraint(equalTo: view.centerXAnchor),
      welcomeLabel.bottomAnchor.constraint(equalTo: signInButton.topAnchor, constant: -20),
    ])

    // --- Set up the Sign-Out Button ---
    signOutButton.translatesAutoresizingMaskIntoConstraints = false
    signOutButton.setTitle("Sign Out", for: .normal)
    view.addSubview(signOutButton)

    NSLayoutConstraint.activate([
      signOutButton.centerXAnchor.constraint(equalTo: view.centerXAnchor),
      signOutButton.topAnchor.constraint(equalTo: signInButton.bottomAnchor, constant: 20),
    ])

    signOutButton.addTarget(self, action: #selector(signOutButtonTapped), for: .touchUpInside)

    // --- Set Initial UI State ---
    updateUI(for: nil)

    // Attempt to restore a previous sign-in session
    GIDSignIn.sharedInstance.restorePreviousSignIn { user, error in
      if let user = user {
        print("Successfully restored sign-in for user: \(user.profile?.givenName ?? "Unknown")")

        // Print the ID token when a session is restored.
        print("Restored ID Token: \(user.idToken?.tokenString ?? "")")

        // On success, update the UI for the signed-in state on the main thread.
        DispatchQueue.main.async {
          self.updateUI(for: user)
        }
      }
    }
  }

  // This method is called when the sign-in button is pressed.
  @objc func signInButtonTapped() {
    // Start the sign-in process.
    GIDSignIn.sharedInstance.signIn(withPresenting: self) { signInResult, error in
      guard let result = signInResult else {
        // Inspect error
        print("Error signing in: \(error?.localizedDescription ?? "No error description")")
        return
      }

      // If sign in succeeded, print the ID token.
      print("ID Token: \(result.user.idToken?.tokenString ?? "")")

      DispatchQueue.main.async {
        self.updateUI(for: result.user)
      }
    }
  }

  private func updateUI(for user: GIDGoogleUser?) {
    if let user = user {
      // User is signed in.
      signInButton.isHidden = true
      signOutButton.isHidden = false
      welcomeLabel.isHidden = false
      welcomeLabel.text = "Hello, \(user.profile?.givenName ?? "User")!"
    } else {
      // User is signed out.
      signInButton.isHidden = false
      signOutButton.isHidden = true
      welcomeLabel.isHidden = true
    }
  }

  @objc func signOutButtonTapped() {
    GIDSignIn.sharedInstance.signOut()
    // Update the UI for the signed-out state.
    updateUI(for: nil)
  }
}
ทดสอบการลงชื่อเข้าใช้แบบเงียบ
หลังจากลงชื่อเข้าใช้แล้ว ให้ออกจากแอปโดยสมบูรณ์แล้วเปิดแอปอีกครั้ง คุณควรเห็นว่าตอนนี้ระบบลงชื่อเข้าใช้ให้คุณโดยอัตโนมัติโดยไม่ต้องแตะปุ่ม
10. ทำความเข้าใจโทเค็นรหัส
แม้ว่าออบเจ็กต์ GIDGoogleUser จะสะดวกในการปรับแต่ง UI โดยใช้ชื่อและอีเมลของผู้ใช้ แต่ข้อมูลที่สำคัญที่สุดที่ SDK ส่งคืนคือโทเค็นรหัส
Codelab นี้ใช้เครื่องมือออนไลน์เพื่อตรวจสอบเนื้อหา JWT ในแอปเวอร์ชันที่ใช้งานจริง คุณควรส่งโทเค็นรหัสนี้ไปยังเซิร์ฟเวอร์แบ็กเอนด์ เซิร์ฟเวอร์ต้องยืนยันความสมบูรณ์ของโทเค็นรหัสและใช้ JWT เพื่อทำสิ่งที่มีความหมายมากขึ้น เช่น สร้างบัญชีใหม่ในแพลตฟอร์มแบ็กเอนด์หรือสร้างเซสชันใหม่สำหรับผู้ใช้
เข้าถึงและถอดรหัสโทเค็น JWT
- เปิดแอป
- เปิดคอนโซล Xcode คุณควรเห็นโทเค็นรหัสที่พิมพ์ออกมา โดยจะมีลักษณะดังนี้
eyJhbGciOiJSUzI1Ni ... Hecz6Wm4Q - คัดลอกโทเค็นรหัสและใช้เครื่องมือออนไลน์ เช่น jwt.io เพื่อถอดรหัส JWT
JWT ที่ถอดรหัสแล้วจะมีลักษณะดังนี้
{
  "alg": "RS256",
  "kid": "c8ab71530972bba20b49f78a09c9852c43ff9118",
  "typ": "JWT"
}
{
  "iss": "https://accounts.google.com",
  "azp": "171291171076-rrbkcjrp5jbte92ai9gub115ertscphi.apps.googleusercontent.com",
  "aud": "171291171076-rrbkcjrp5jbte92ai9gub115ertscphi.apps.googleusercontent.com",
  "sub": "10769150350006150715113082367",
  "email": "example@example.com",
  "email_verified": true,
  "at_hash": "JyCYDmHtzhjkb0-qJhKsMg",
  "name": "Kimya",
  "picture": "https://lh3.googleusercontent.com/a/ACg8ocIyy4VoR31t_n0biPVcScBHwZOCRaKVDb_MoaMYep65fyqoAw=s96-c",
  "given_name": "Kimya",
  "iat": 1758645896,
  "exp": 1758649496
}
ฟิลด์โทเค็นที่สำคัญ
โทเค็นรหัสที่ถอดรหัสแล้วมีช่องที่มีวัตถุประสงค์แตกต่างกัน แม้ว่าบางอย่างจะเข้าใจได้ง่าย เช่น ชื่อและอีเมล แต่เซิร์ฟเวอร์แบ็กเอนด์จะใช้ข้อมูลอื่นๆ เพื่อการยืนยัน
คุณควรทำความเข้าใจช่องต่อไปนี้เป็นพิเศษ
- sub: ฟิลด์
subคือตัวระบุที่ไม่ซ้ำกันและถาวรสำหรับบัญชี Google ของผู้ใช้ ผู้ใช้สามารถเปลี่ยนอีเมลหลักหรือชื่อได้ แต่จะเปลี่ยนรหัสsubไม่ได้ ซึ่งทำให้ฟิลด์subเป็นค่าที่เหมาะที่สุดที่จะใช้เป็นคีย์หลักสำหรับบัญชีผู้ใช้แบ็กเอนด์
รับข้อมูลผู้ใช้จากโทเค็นรหัสมีข้อมูลเพิ่มเติมเกี่ยวกับความหมายของฟิลด์โทเค็นทั้งหมด
11. รักษาความปลอดภัยให้แอปด้วย App Check
เราขอแนะนำอย่างยิ่งให้คุณเปิดใช้ App Check เพื่อให้มั่นใจว่าจะมีเพียงแอปของคุณเท่านั้นที่เข้าถึงปลายทาง OAuth 2.0 ของ Google ในนามของโปรเจ็กต์ได้ App Check ทำงานโดยการยืนยันว่าคำขอที่ส่งไปยังบริการแบ็กเอนด์ของคุณมาจากแอปจริงในอุปกรณ์จริงที่ไม่มีการดัดแปลง
ส่วนนี้แสดงวิธีผสานรวม App Check เข้ากับแอปและกำหนดค่าสำหรับการแก้ไขข้อบกพร่องในโปรแกรมจำลองและสำหรับการสร้างเวอร์ชันที่ใช้งานจริงซึ่งทำงานบนอุปกรณ์จริง
การตั้งค่าคอนโซล
การผสานรวม App Check เข้ากับแอปพลิเคชันของคุณต้องมีการตั้งค่าแบบครั้งเดียวในคอนโซล Google Cloud และ Firebase ซึ่งรวมถึงการเปิดใช้ App Check สำหรับไคลเอ็นต์ OAuth ของ iOS ในคอนโซล Google Cloud, การสร้างคีย์ API เพื่อใช้กับผู้ให้บริการแก้ไขข้อบกพร่องของ App Check และการลิงก์โปรเจ็กต์ Google Cloud กับ Firebase
เปิดใช้ App Check ในคอนโซล Google Cloud
- ไปที่รายการไคลเอ็นต์ที่เชื่อมโยงกับโปรเจ็กต์ที่อยู่ในระบบคลาวด์ของ Google
- เลือกรหัสไคลเอ็นต์ OAuth 2.0 ที่คุณสร้างขึ้นสำหรับแอป iOS
- เปิด App Check ใต้ Google Identity สำหรับ iOS

- คลิกบันทึก
สร้างคีย์ API
- ไปที่หน้าไลบรารี API สำหรับโปรเจ็กต์ Google Cloud
- ป้อน Firebase App Check API ในแถบค้นหา
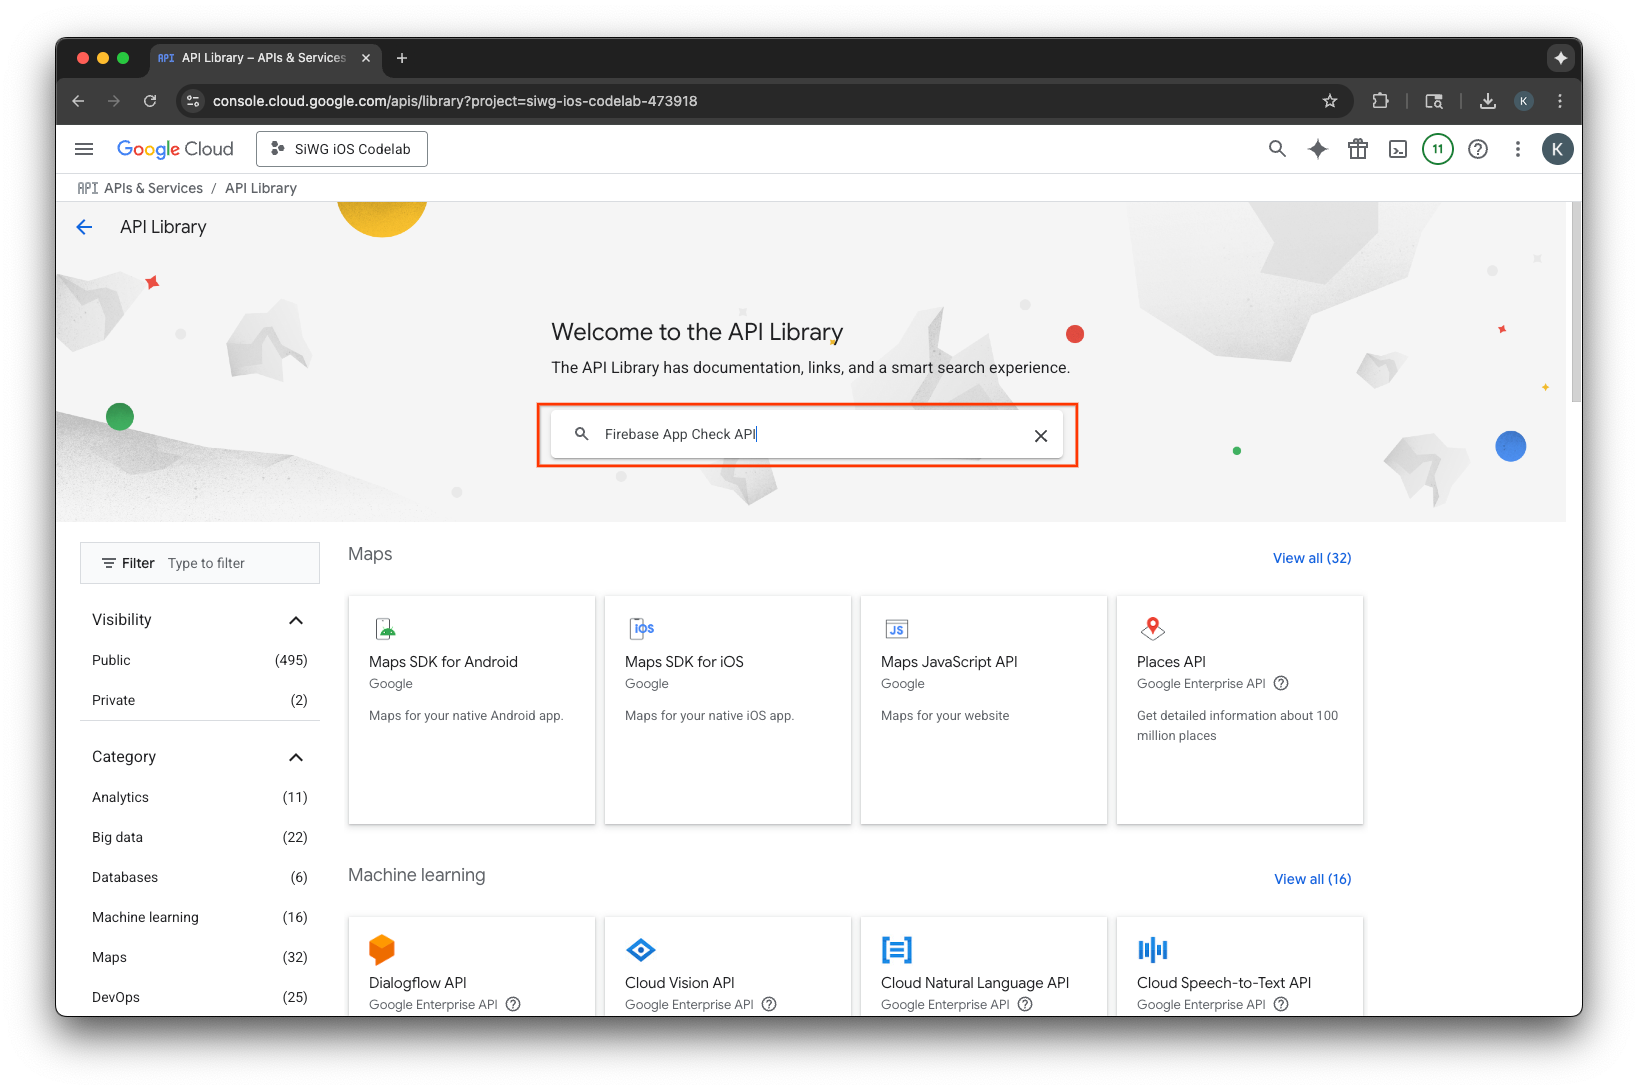
- เลือกและเปิดใช้ Firebase App Check API
- ไปที่ API และบริการ แล้วเลือกข้อมูลเข้าสู่ระบบในเมนูการนำทาง
- เลือกสร้างข้อมูลเข้าสู่ระบบที่ด้านบนของหน้า
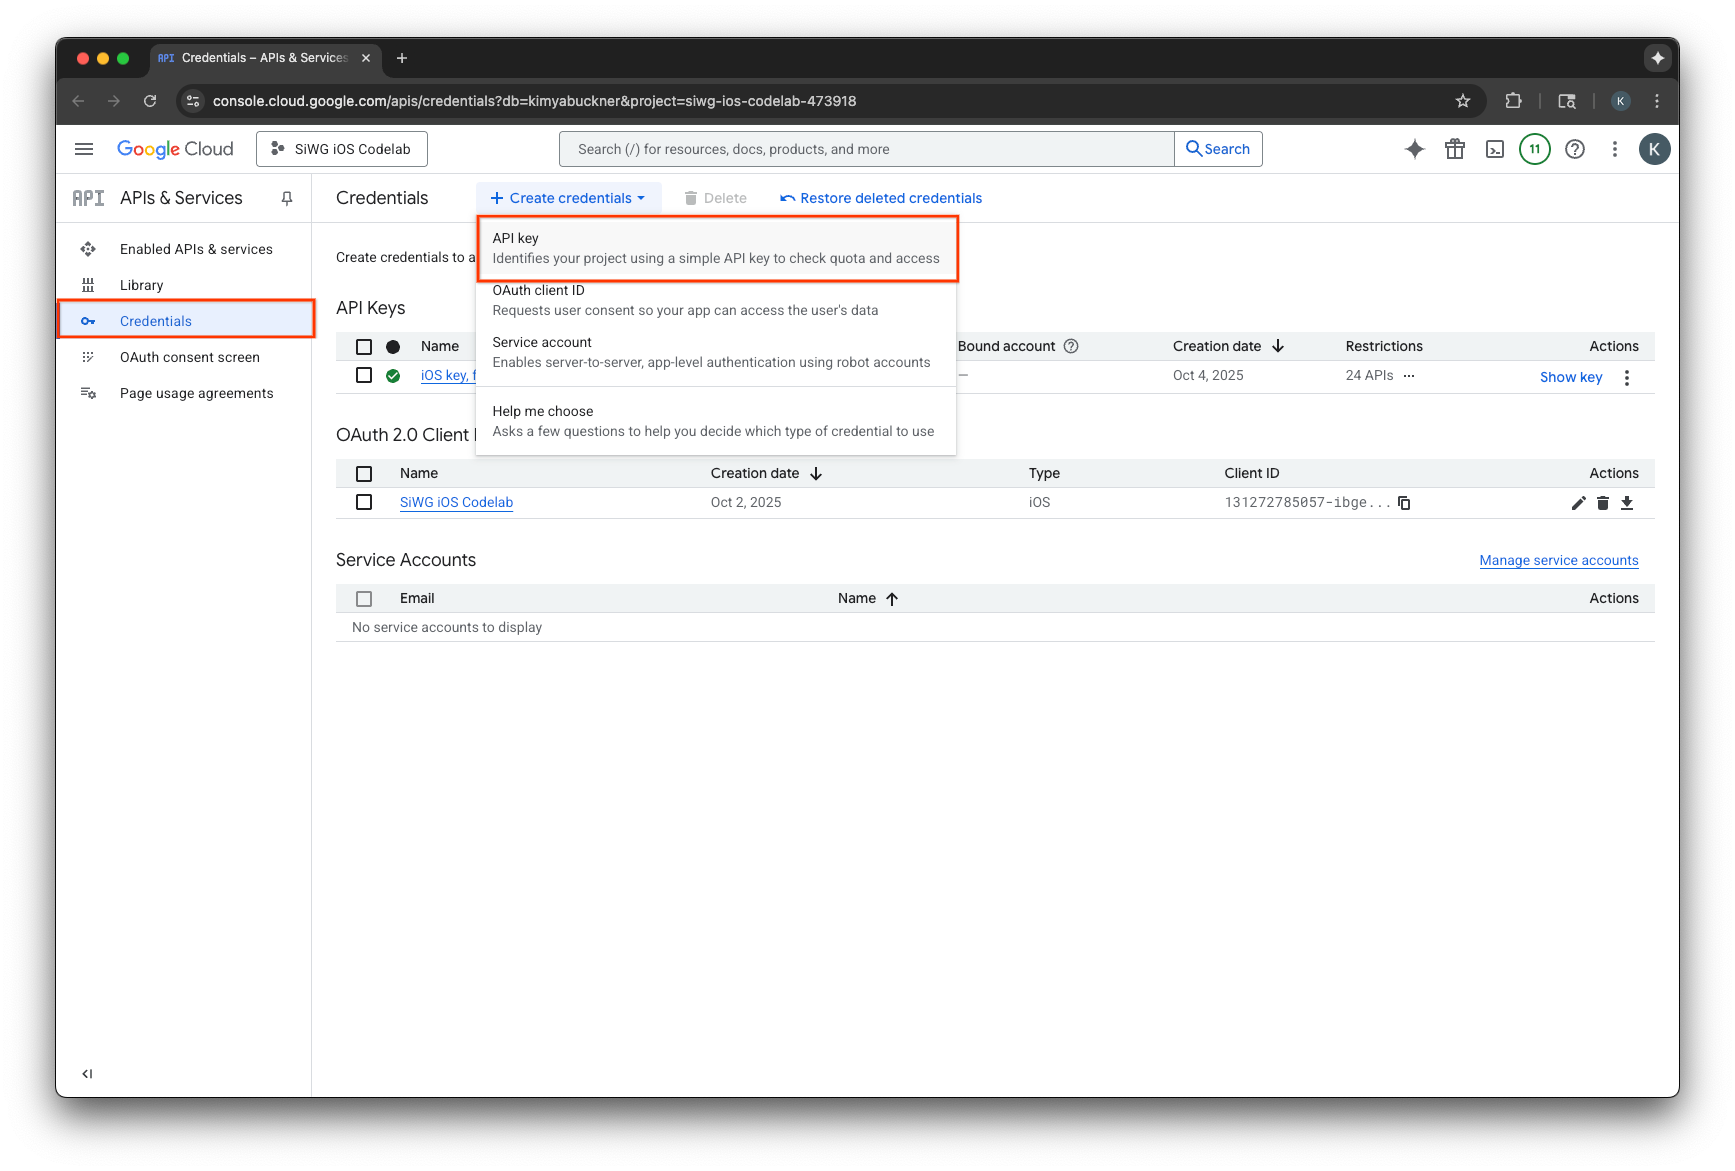
- ตั้งชื่อคีย์ API นี้
- เลือกแอป iOS ในส่วนการจำกัดแอปพลิเคชัน
- เพิ่มรหัสชุดซอฟต์แวร์สำหรับแอปเป็นแอปพลิเคชันที่ได้รับอนุมัติ
- เลือกจำกัดคีย์ในส่วนการจำกัด API
- เลือก Firebase App Check API จากเมนูแบบเลื่อนลง
- เลือกสร้าง
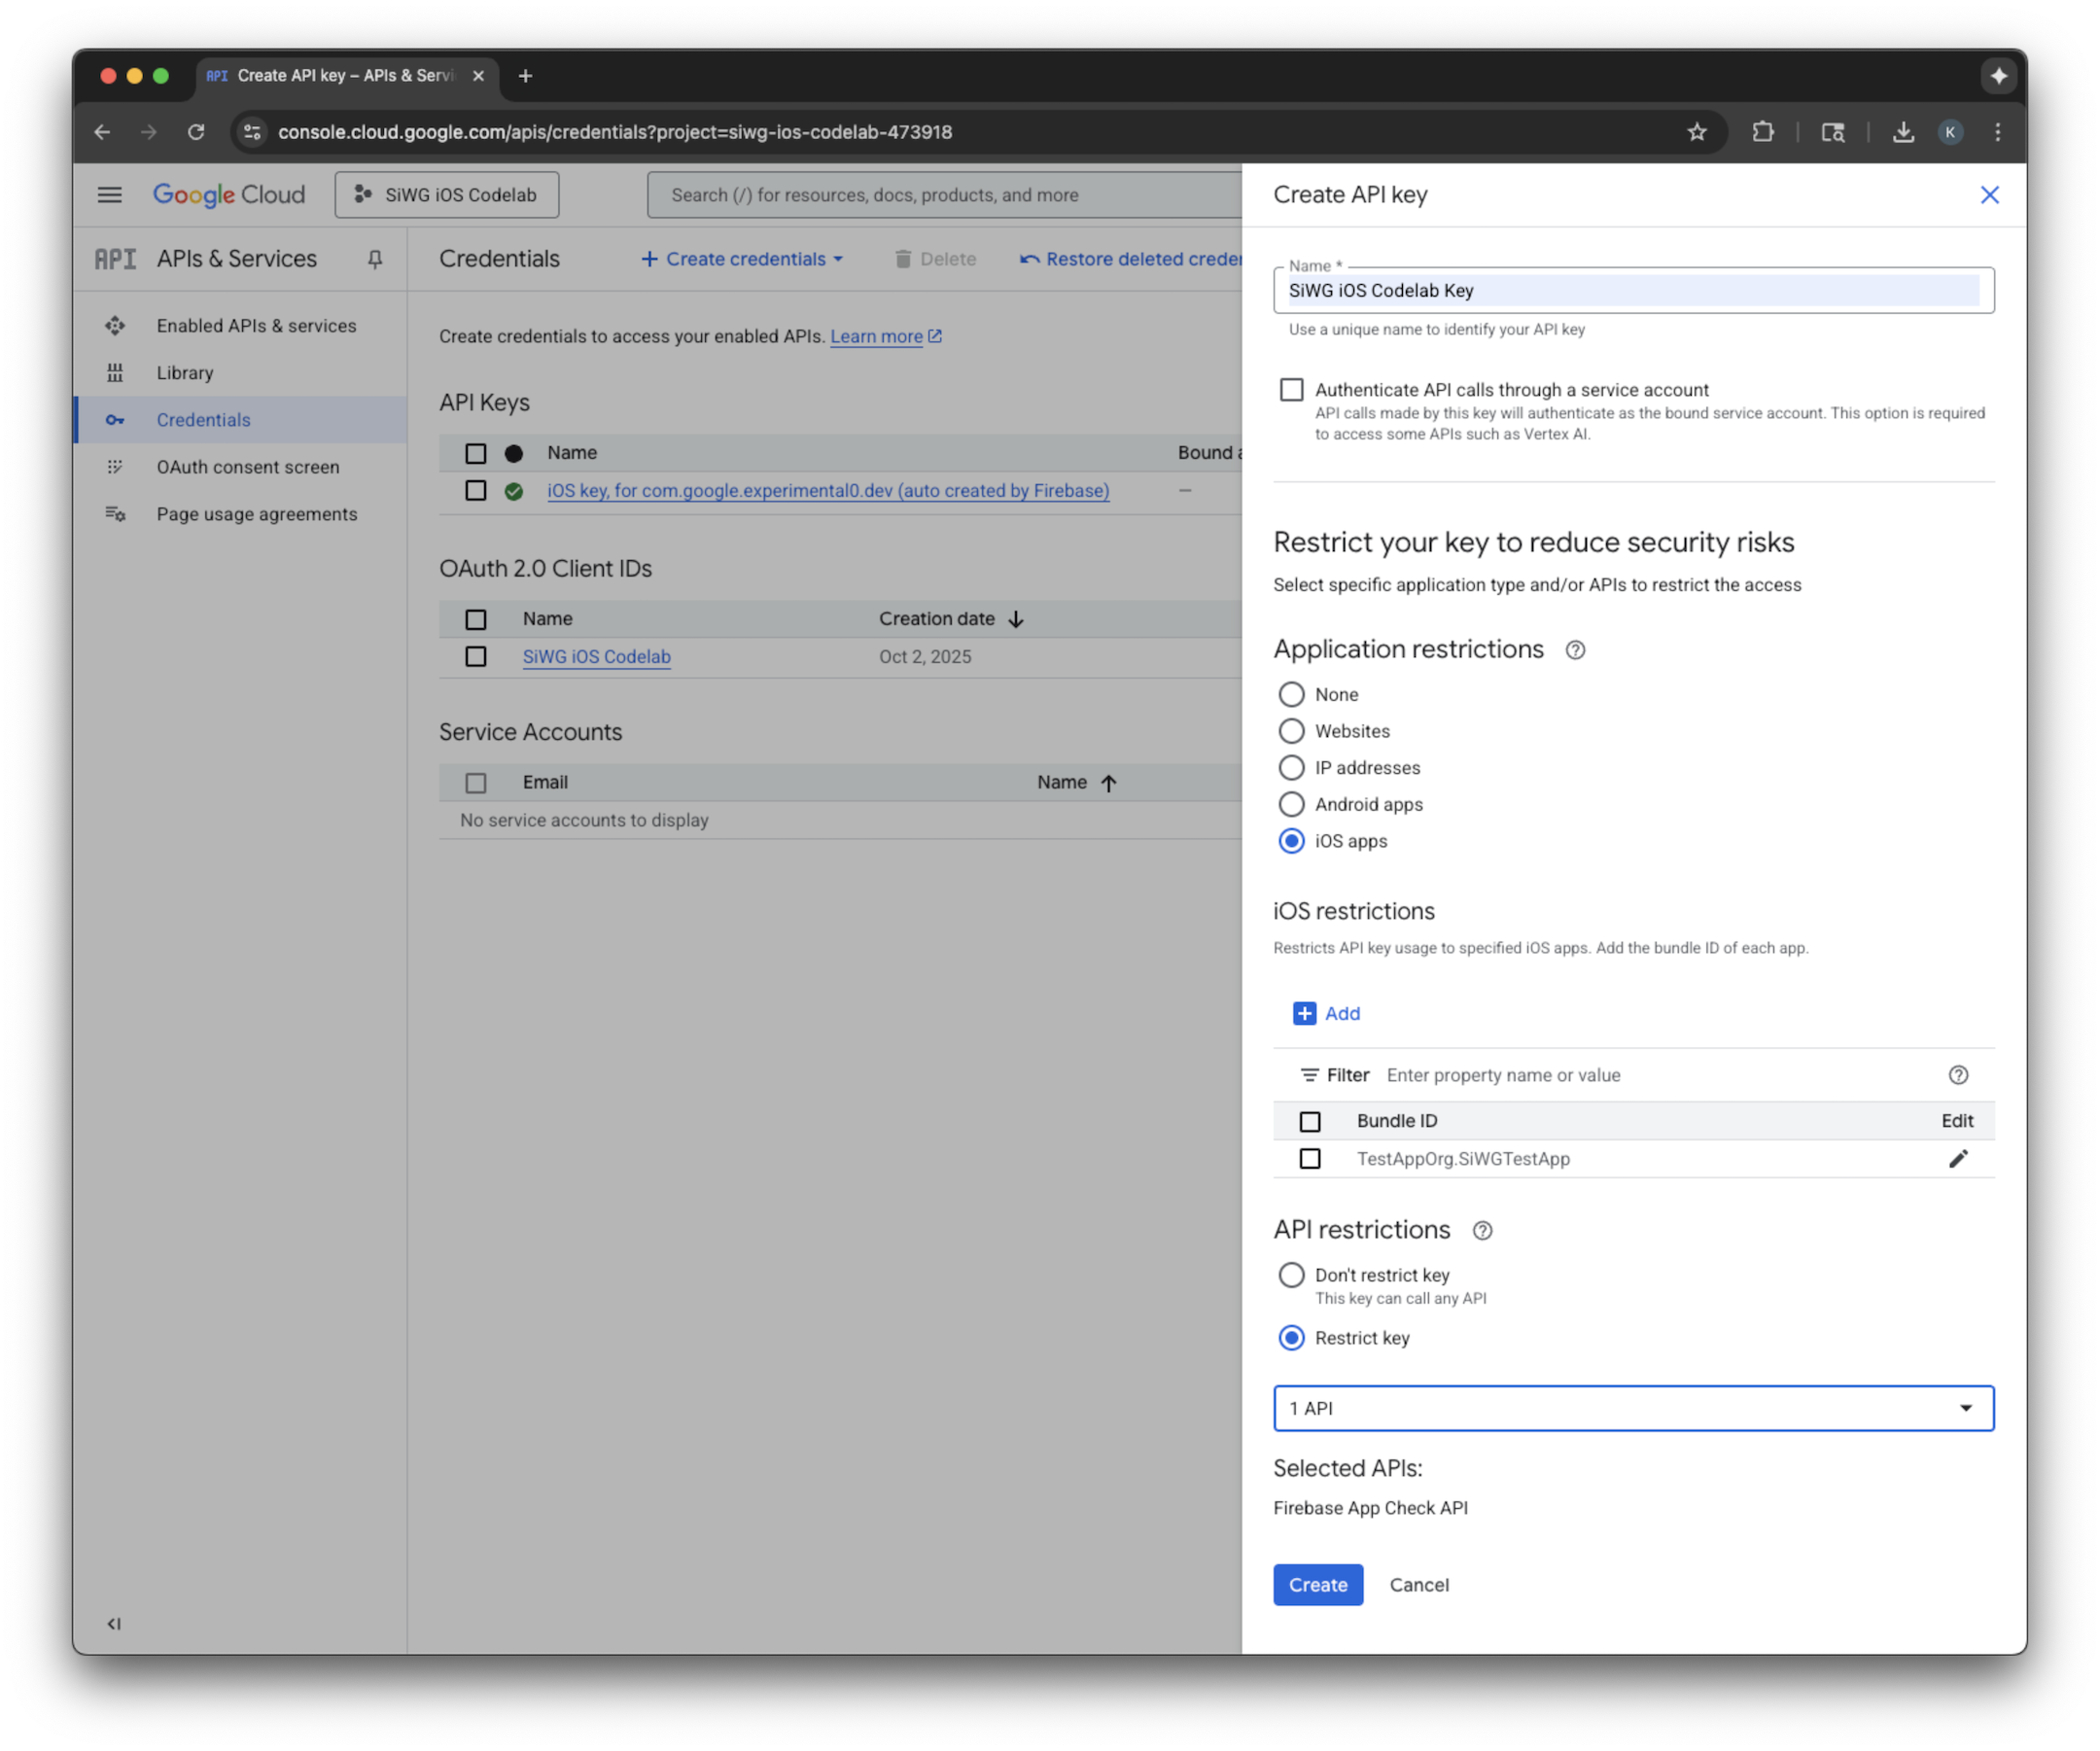
- คัดลอกคีย์ API ที่สร้างขึ้น เนื่องจากคุณจะต้องใช้ที่อยู่ IP นี้ในขั้นตอนต่อไป
เพิ่ม Firebase ไปยังโปรเจ็กต์ Google Cloud
- ไปที่คอนโซล Firebase
- เลือกเริ่มต้นใช้งานโดยการตั้งค่าโปรเจ็กต์ Firebase
- เลือกเพิ่ม Firebase ไปยังโปรเจ็กต์ Google Cloud
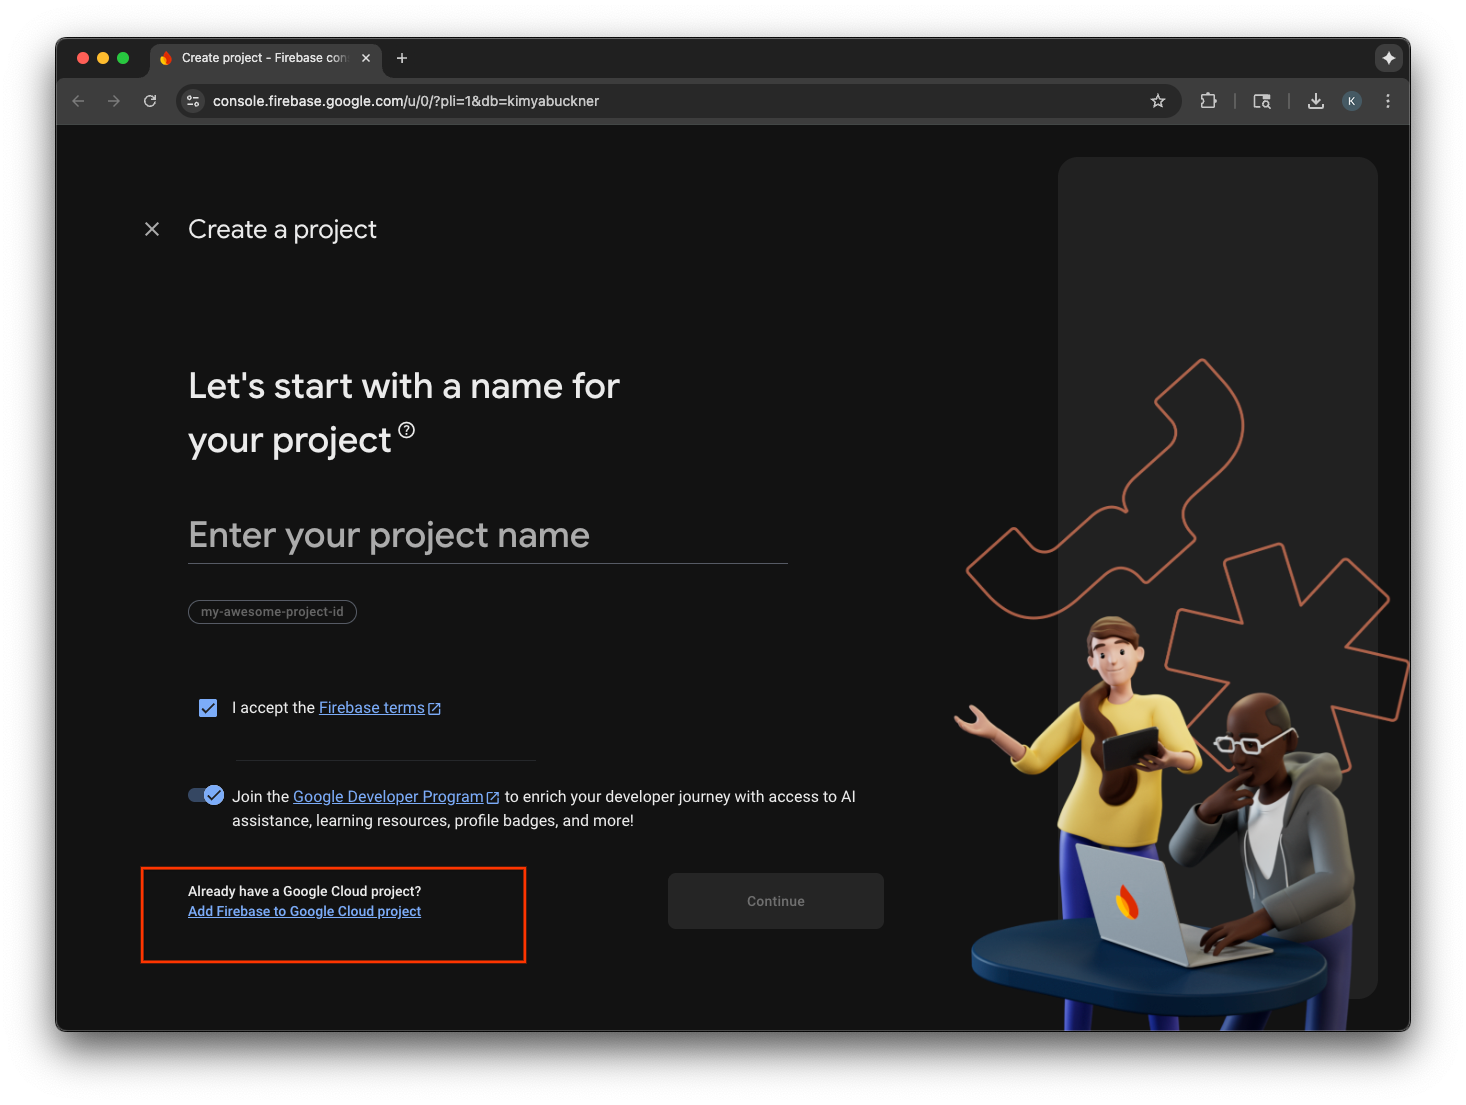
- เลือกโปรเจ็กต์ที่อยู่ในระบบคลาวด์ของ Google จากเมนูแบบเลื่อนลง แล้วดำเนินการต่อในขั้นตอนการลงชื่อสมัครใช้
- เลือกเพิ่ม Firebase
- เมื่อโปรเจ็กต์ Firebase พร้อมแล้ว ให้เลือกต่อไปเพื่อเปิดโปรเจ็กต์
การผสานรวมโค้ดฝั่งไคลเอ็นต์
เมื่อกำหนดค่าโปรเจ็กต์ที่อยู่ในระบบคลาวด์ของ Google สำหรับ App Check แล้ว ก็ถึงเวลาเขียนโค้ดฝั่งไคลเอ็นต์เพื่อเปิดใช้ ผู้ให้บริการที่ใช้สำหรับการรับรองจะแตกต่างกันในสภาพแวดล้อมการใช้งานจริงและสภาพแวดล้อมการแก้ไขข้อบกพร่อง แอปเวอร์ชันที่ใช้งานจริงในอุปกรณ์จริงจะใช้บริการ App Attest ในตัวของ Apple เพื่อพิสูจน์ความถูกต้อง อย่างไรก็ตาม เนื่องจากโปรแกรมจำลอง iOS ไม่สามารถให้เอกสารรับรองประเภทนี้ได้ สภาพแวดล้อมการแก้ไขข้อบกพร่องจึงต้องใช้ผู้ให้บริการการแก้ไขข้อบกพร่องพิเศษที่ส่งคีย์ API
โค้ดต่อไปนี้จะจัดการทั้ง 2 สถานการณ์โดยใช้คำสั่งคอมไพเลอร์เพื่อเลือกผู้ให้บริการที่ถูกต้องโดยอัตโนมัติในเวลาบิลด์
SwiftUI
- เปิดไฟล์แอปหลัก
- กำหนดคลาส
AppDelegateต่อไปนี้หลังการนำเข้าและก่อนแอตทริบิวต์@main
class AppDelegate: NSObject, UIApplicationDelegate {
  func application(
    _ application: UIApplication,
    didFinishLaunchingWithOptions launchOptions: [UIApplication.LaunchOptionsKey: Any]? = nil
  ) -> Bool {

    #if targetEnvironment(simulator)
      // Configure for debugging on a simulator.
      // TODO: Replace "YOUR_API_KEY" with the key from your Google Cloud project.
      let apiKey = "YOUR_API_KEY"
      GIDSignIn.sharedInstance.configureDebugProvider(withAPIKey: apiKey) { error in
        if let error {
          print("Error configuring GIDSignIn debug provider: \(error)")
        }
      }
    #else
      // Configure GIDSignIn for App Check on a real device.
      GIDSignIn.sharedInstance.configure { error in
        if let error {
          print("Error configuring GIDSignIn for App Check: \(error)")
        } else {
          print("GIDSignIn configured for App Check.")
        }
      }
    #endif

    return true
  }
}
- แทนที่
"YOUR_API_KEY"ในโค้ดที่ระบุด้วยคีย์ API ที่คุณคัดลอกจากคอนโซล Google Cloud - เพิ่มบรรทัดต่อไปนี้ภายในโครงสร้าง
Appก่อนตัวแปรbodyซึ่งจะลงทะเบียนคลาส AppDelegate กับวงจรแอป ทำให้คลาสนี้ตอบสนองต่อการเปิดแอปและเหตุการณ์อื่นๆ ของระบบได้
@UIApplicationDelegateAdaptor(AppDelegate.self) var delegate
ไฟล์แอปหลักควรมีลักษณะดังนี้
import GoogleSignIn
import SwiftUI

class AppDelegate: NSObject, UIApplicationDelegate {
  func application(
    _ application: UIApplication,
    didFinishLaunchingWithOptions launchOptions: [UIApplication.LaunchOptionsKey: Any]? = nil
  ) -> Bool {

    #if targetEnvironment(simulator)
      // Configure for debugging on a simulator.
      // TODO: Replace "YOUR_API_KEY" with the key from your Google Cloud project.
      let apiKey = "YOUR_API_KEY"
      GIDSignIn.sharedInstance.configureDebugProvider(withAPIKey: apiKey) { error in
        if let error {
          print("Error configuring GIDSignIn debug provider: \(error)")
        }
      }
    #else
      // Configure GIDSignIn for App Check on a real device.
      GIDSignIn.sharedInstance.configure { error in
        if let error {
          print("Error configuring GIDSignIn for App Check: \(error)")
        } else {
          print("GIDSignIn configured for App Check.")
        }
      }
    #endif

    return true
  }
}

@main
struct iOS_Sign_in_with_Google_App: App {

  @UIApplicationDelegateAdaptor(AppDelegate.self) var delegate

  var body: some Scene {
    WindowGroup {
      ContentView()

        .onOpenURL { url in
          GIDSignIn.sharedInstance.handle(url)
        }
    }
  }
}
UIKit
- เปิด AppDelegate.swift
- อัปเดตเมธอด
application(_:didFinishLaunchingWithOptions:)ให้มีการเริ่มต้น App Check ดังนี้
func application(
  _ application: UIApplication,
  didFinishLaunchingWithOptions launchOptions: [UIApplication.LaunchOptionsKey: Any]?
) -> Bool {

  #if targetEnvironment(simulator)
    // Configure for debugging on a simulator.
    // TODO: Replace "YOUR_API_KEY" with the key from your Google Cloud project.
    let apiKey = "YOUR_API_KEY"
    GIDSignIn.sharedInstance.configureDebugProvider(withAPIKey: apiKey) { error in
      if let error {
        print("Error configuring GIDSignIn debug provider: \(error)")
      }
    }
  #else
    // Configure GIDSignIn for App Check on a real device.
    GIDSignIn.sharedInstance.configure { error in
      if let error {
        print("Error configuring GIDSignIn for App Check: \(error)")
      }
    }
  #endif

  return true
}
- แทนที่
"YOUR_API_KEY"ในโค้ดที่ระบุด้วยคีย์ API ที่คุณคัดลอกจากคอนโซล Google Cloud
ไฟล์ AppDelegate.swift ควรมีลักษณะดังนี้
import GoogleSignIn
import UIKit

@main
class AppDelegate: UIResponder, UIApplicationDelegate {

  func application(
    _ application: UIApplication,
    didFinishLaunchingWithOptions launchOptions: [UIApplication.LaunchOptionsKey: Any]?
  ) -> Bool {

    #if targetEnvironment(simulator)
      // Configure for debugging on a simulator.
      // TODO: Replace "YOUR_API_KEY" with the key from your Google Cloud project.
      let apiKey = "YOUR_API_KEY"
      GIDSignIn.sharedInstance.configureDebugProvider(withAPIKey: apiKey) { error in
        if let error {
          print("Error configuring GIDSignIn debug provider: \(error)")
        }
      }
    #else
      // Configure GIDSignIn for App Check on a real device.
      GIDSignIn.sharedInstance.configure { error in
        if let error {
          print("Error configuring GIDSignIn for App Check: \(error)")
        }
      }
    #endif

    return true
  }

  func application(
    _ app: UIApplication,
    open url: URL,
    options: [UIApplication.OpenURLOptionsKey: Any] = [:]
  ) -> Bool {
    var handled: Bool

    handled = GIDSignIn.sharedInstance.handle(url)
    if handled {
      return true
    }
    // If not handled by this app, return false.
    return false
  }

  // MARK: UISceneSession Lifecycle

  func application(
    _ application: UIApplication,
    configurationForConnecting connectingSceneSession: UISceneSession,
    options: UIScene.ConnectionOptions
  ) -> UISceneConfiguration {
    // Called when a new scene session is being created.
    // Use this method to select a configuration to create the new scene with.
    return UISceneConfiguration(
      name: "Default Configuration",
      sessionRole: connectingSceneSession.role
    )
  }

  func application(
    _ application: UIApplication,
    didDiscardSceneSessions sceneSessions: Set<UISceneSession>
  ) {
    // Called when the user discards a scene session.
    // If any sessions were discarded while the application was not running, this will be called shortly after application:didFinishLaunchingWithOptions.
    // Use this method to release any resources that were specific to the discarded scenes, as they will not return.
  }
}
ทดสอบ App Check ในโปรแกรมจำลอง
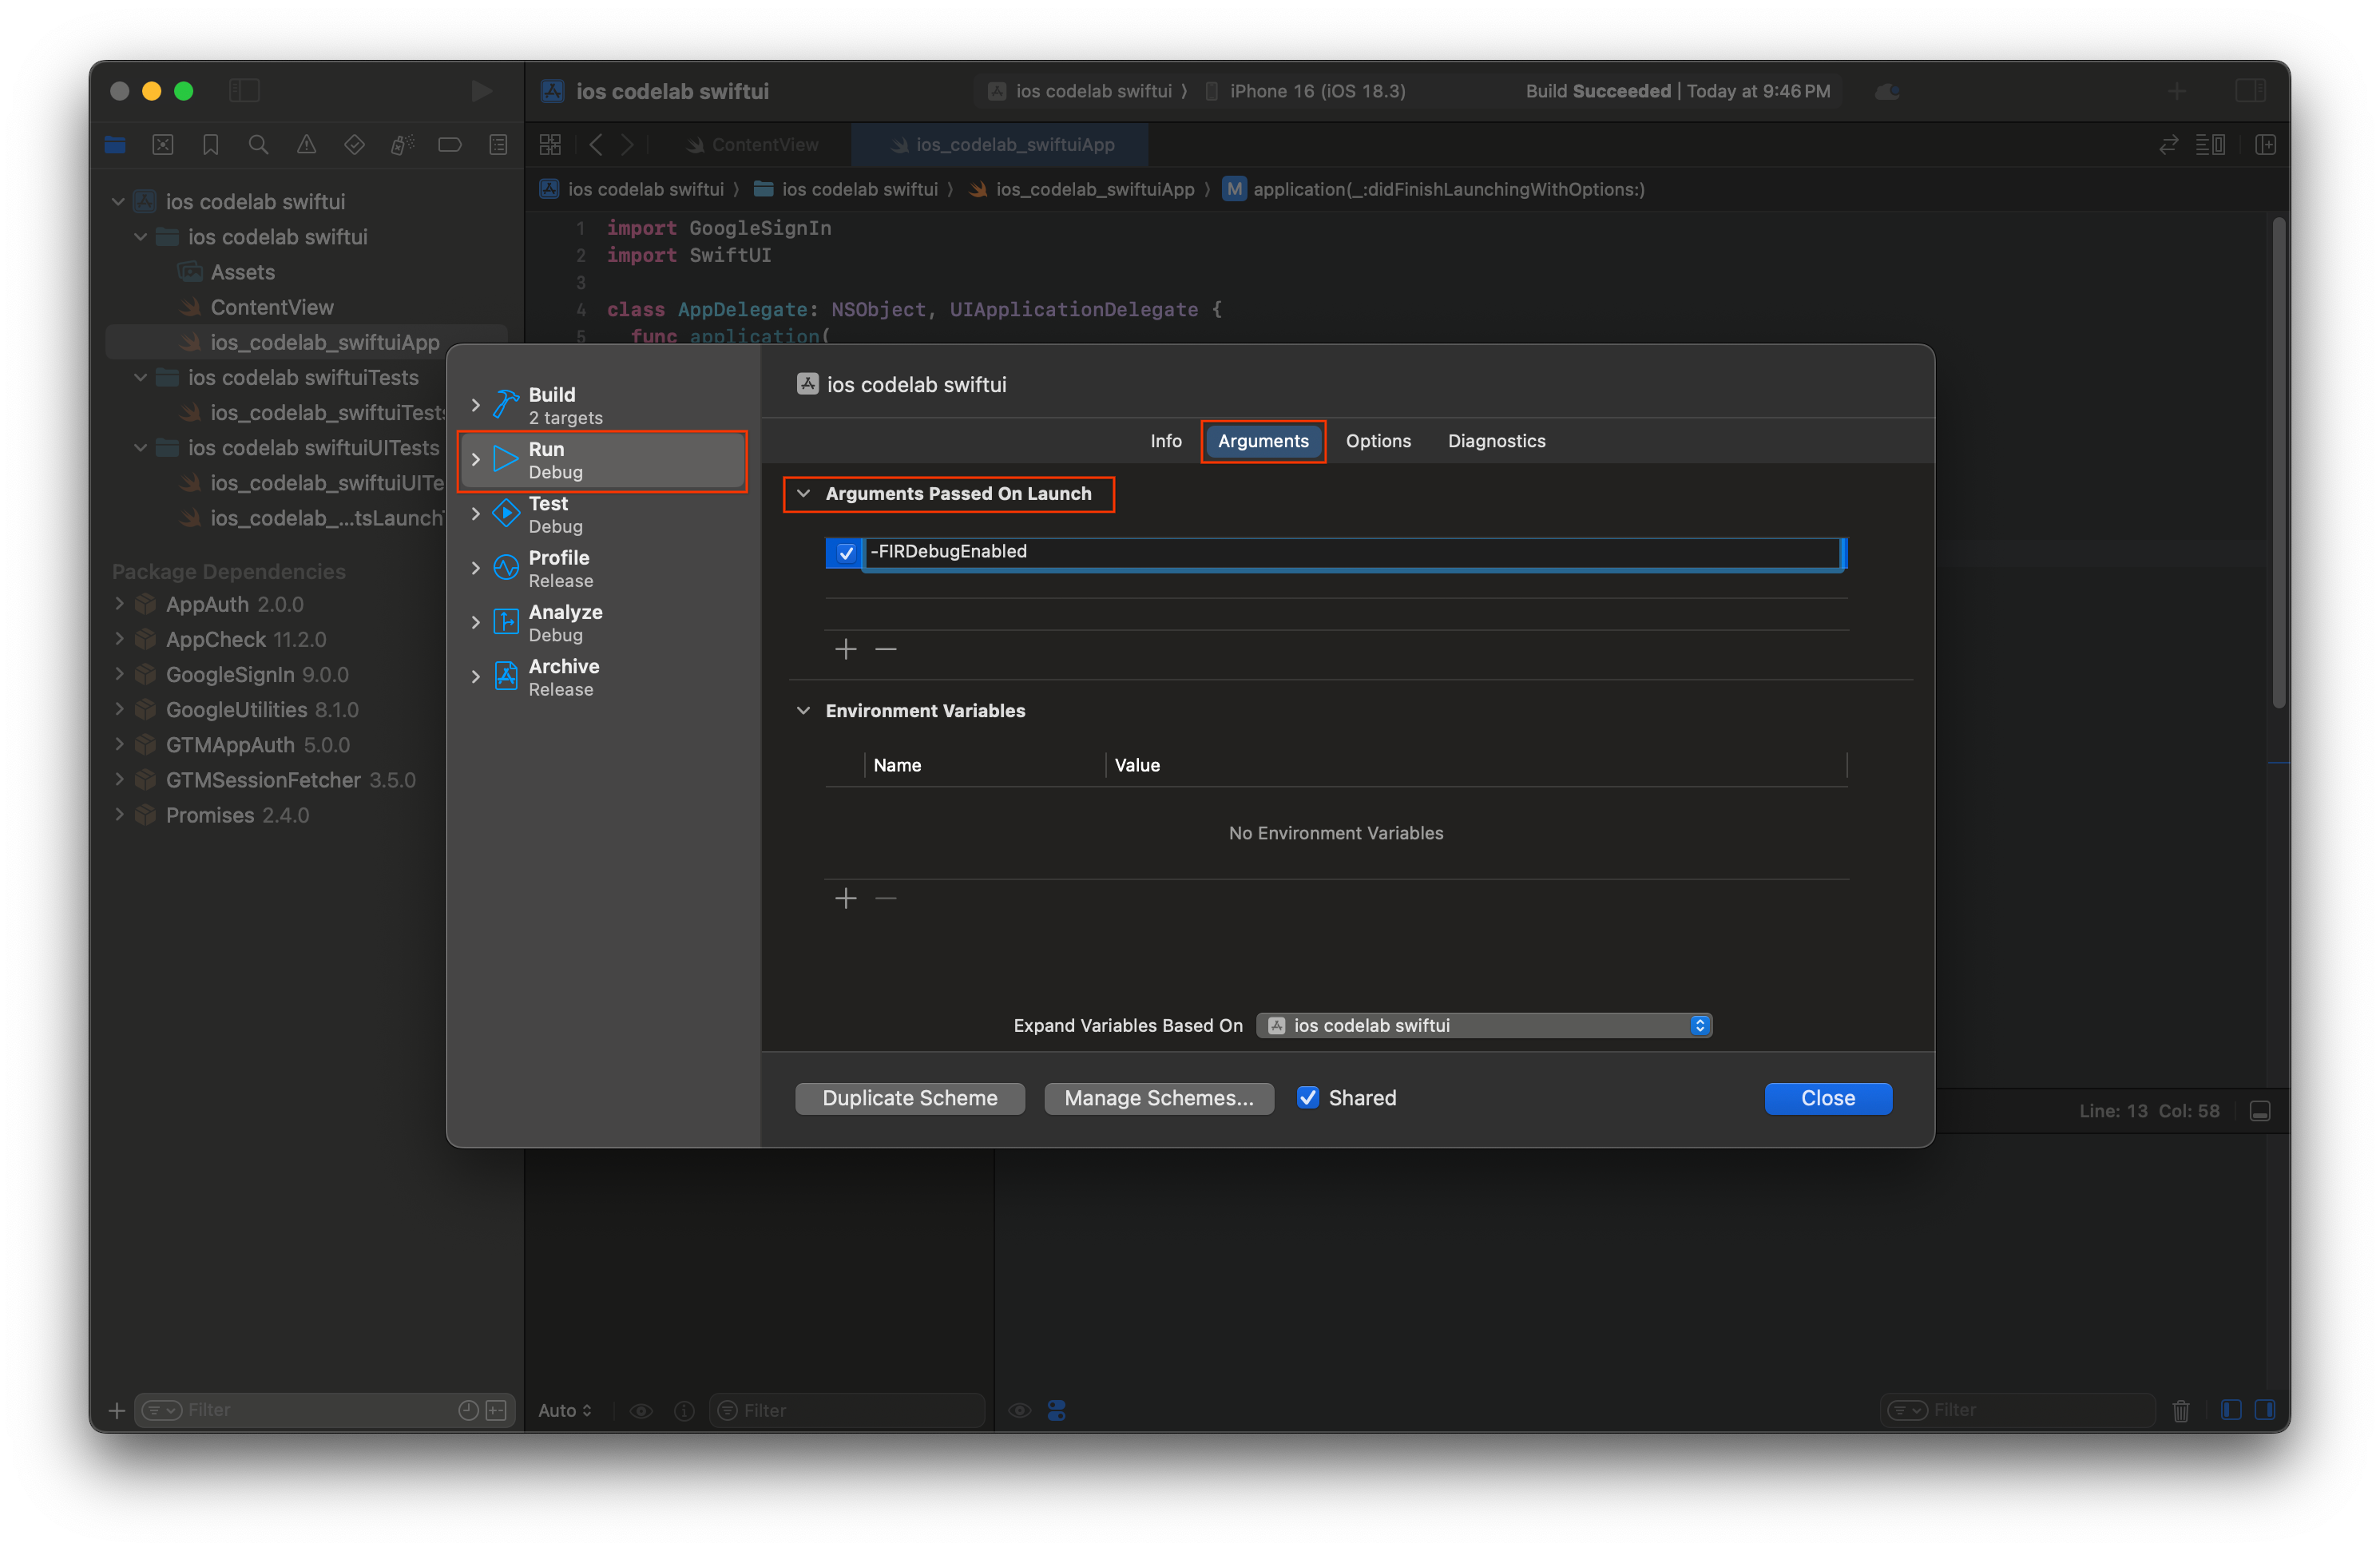
- ในแถบเมนู Xcode ให้ไปที่ผลิตภัณฑ์ > รูปแบบ > แก้ไขรูปแบบ
- เลือกเรียกใช้ในเมนูการนำทาง
- เลือกแท็บอาร์กิวเมนต์
- ในส่วนอาร์กิวเมนต์ที่ส่งเมื่อตอนเริ่ม ให้เลือก + แล้วเพิ่ม -FIRDebugEnabled อาร์กิวเมนต์การเปิดตัวนี้จะเปิดใช้การบันทึกการแก้ไขข้อบกพร่องของ Firebase
- เลือกปิด
- เปิดแอปในโปรแกรมจำลอง
- คัดลอกโทเค็นการแก้ไขข้อบกพร่องของ App Check ที่พิมพ์ในคอนโซล Xcode
- ไปที่โปรเจ็กต์ในคอนโซล Firebase
- ขยายส่วนสร้างในเมนูการนำทาง
- เลือกApp Check
- เลือกแท็บแอป
- วางเมาส์เหนือแอป แล้วเลือกไอคอนเมนู 3 จุด
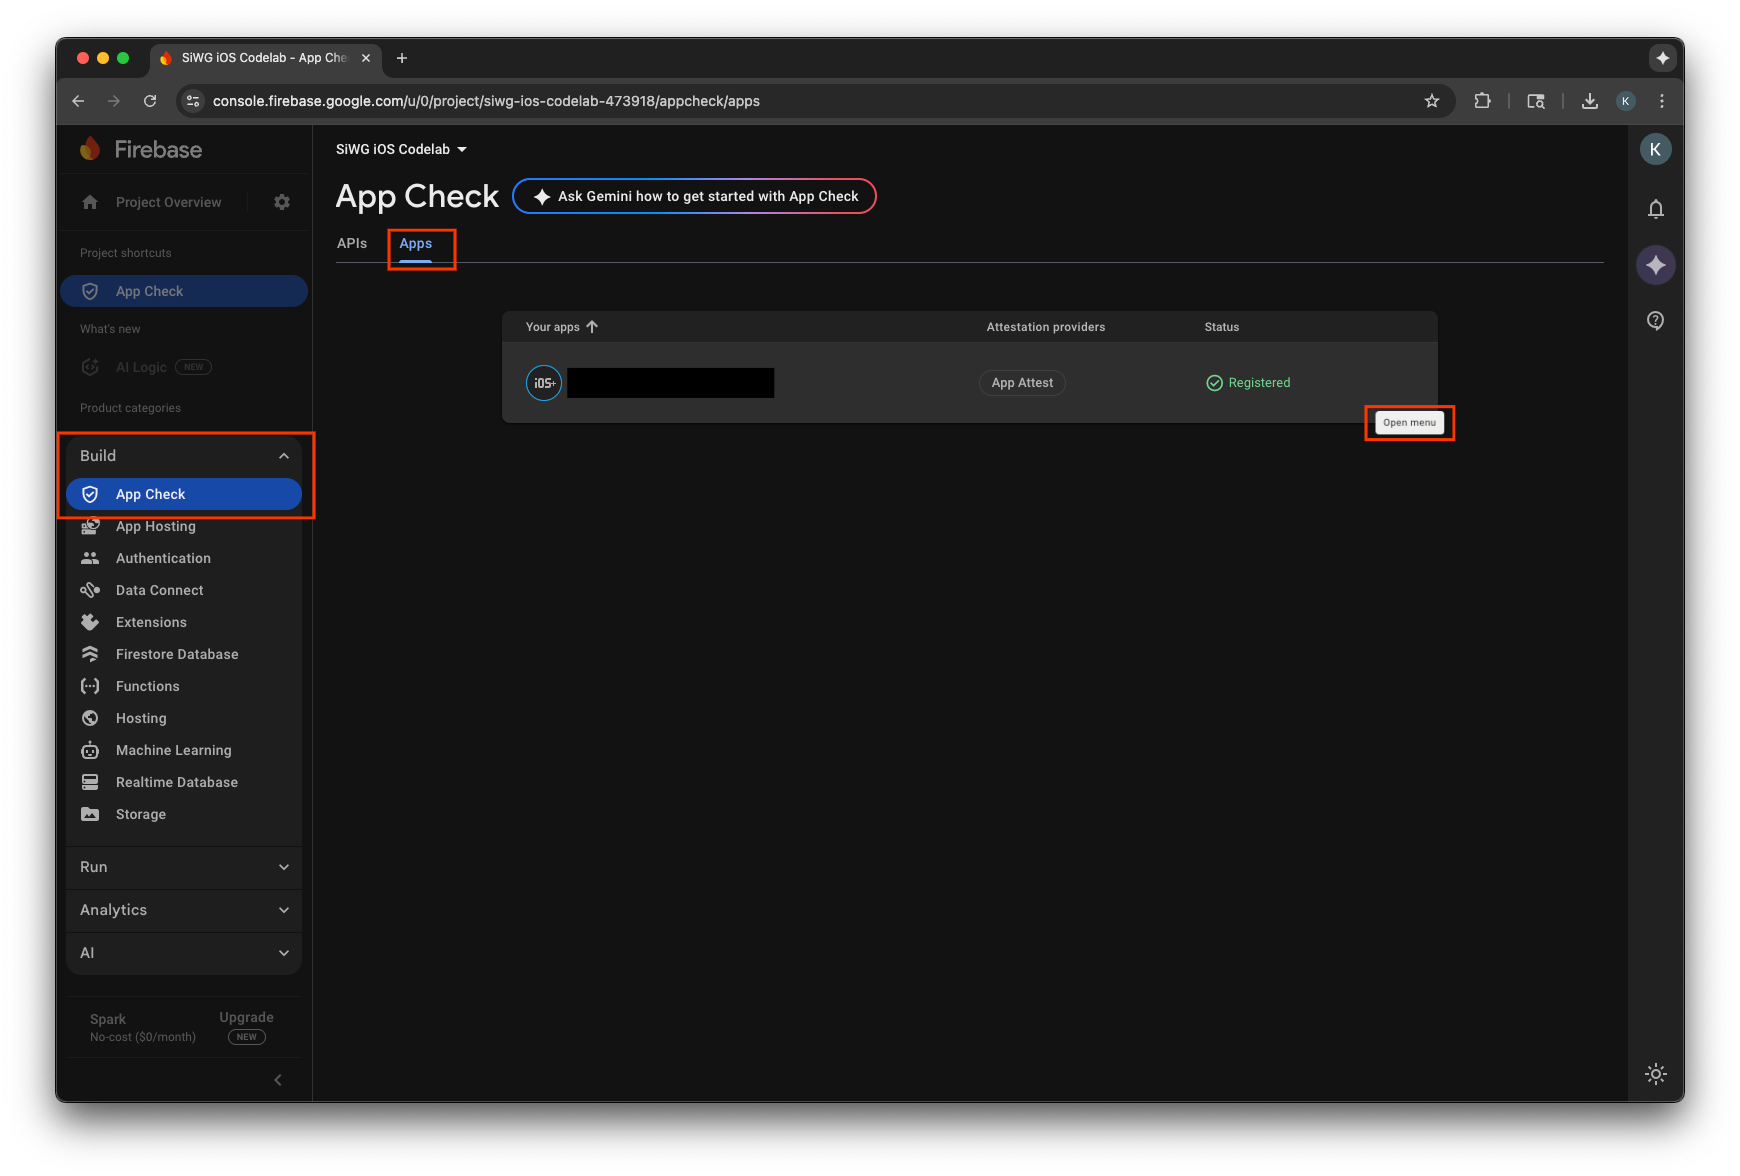
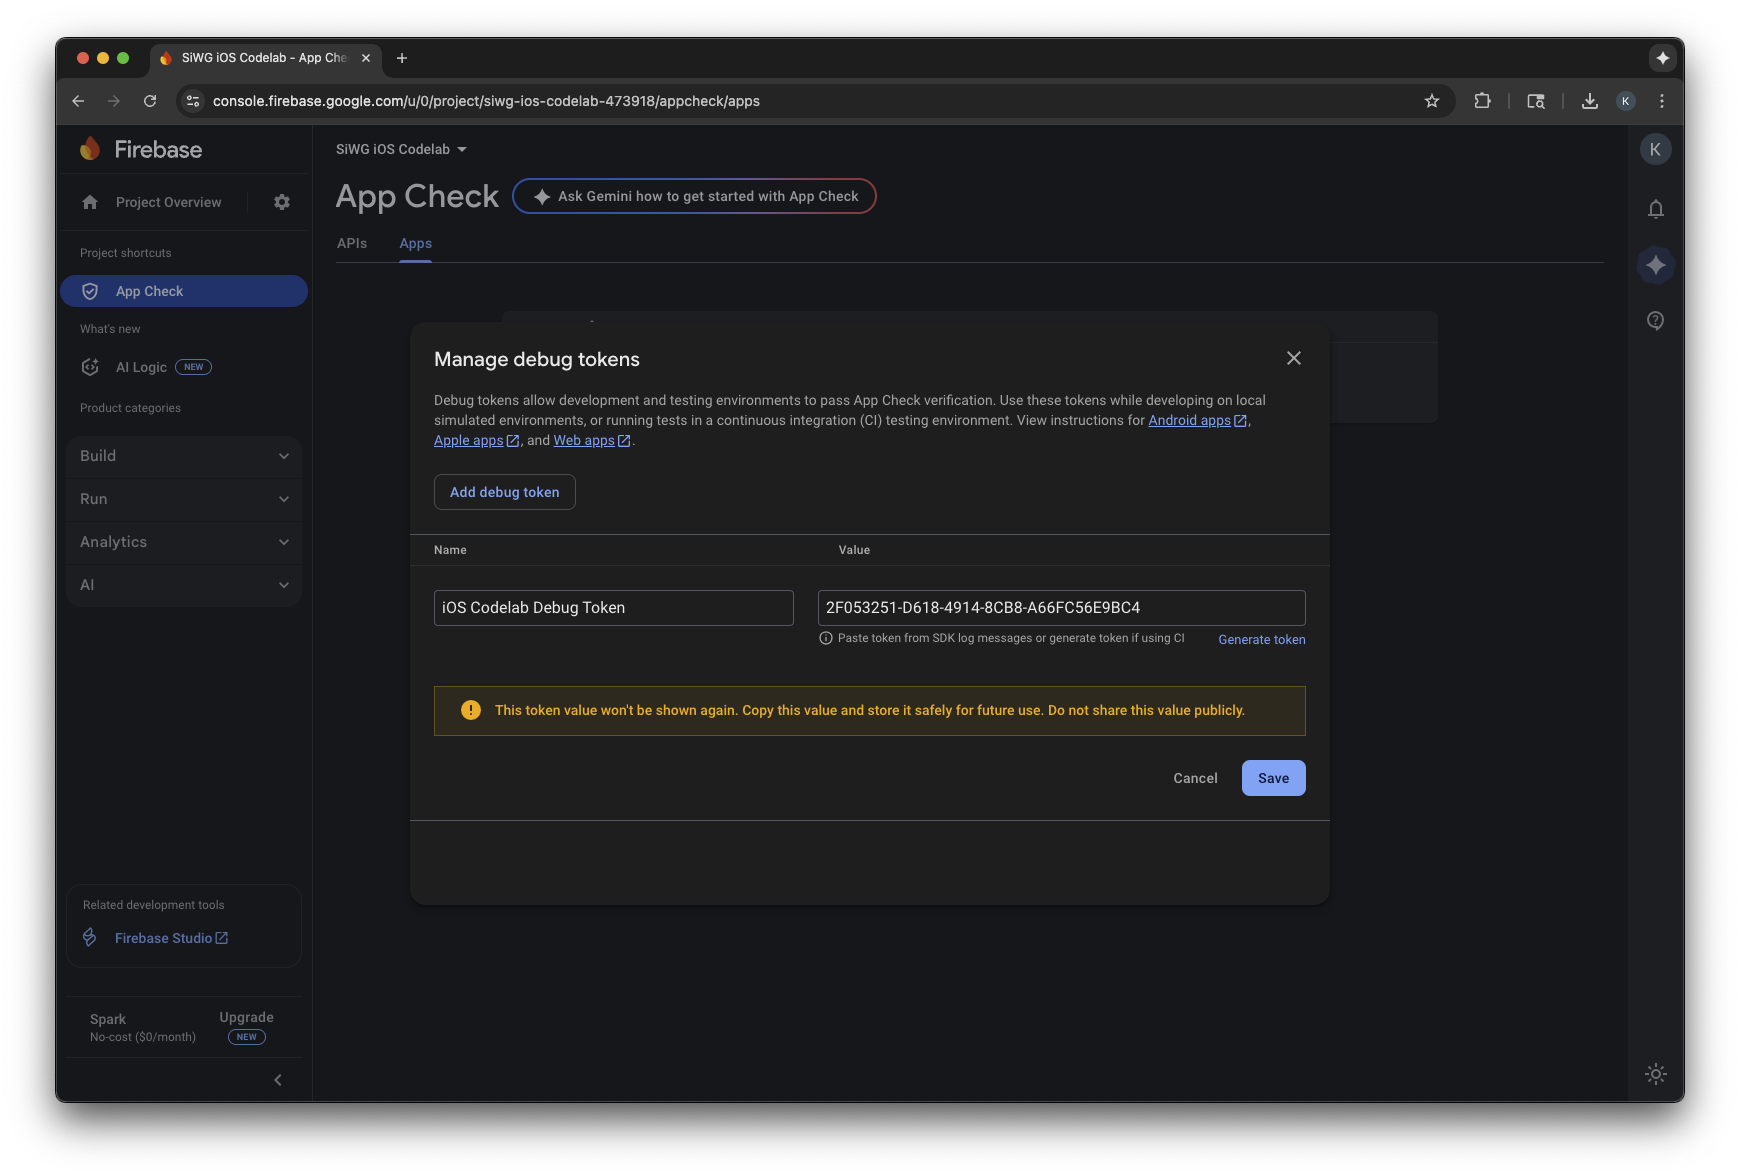
- เลือกจัดการโทเค็นการแก้ไขข้อบกพร่อง
- เลือกเพิ่มโทเค็นการแก้ไขข้อบกพร่อง
- ตั้งชื่อโทเค็นการแก้ไขข้อบกพร่อง แล้ววางโทเค็นการแก้ไขข้อบกพร่องที่คัดลอกไว้ก่อนหน้านี้เป็นค่า
- เลือกบันทึกเพื่อลงทะเบียนโทเค็น
- กลับไปที่เครื่องจำลองแล้วลงชื่อเข้าใช้
อาจใช้เวลาหลายนาทีก่อนที่เมตริกจะปรากฏในคอนโซล เมื่อผู้ใช้ดำเนินการดังกล่าวแล้ว คุณจะยืนยันได้ว่า App Check ทำงานได้โดยดูจำนวนคำขอที่ยืนยันแล้วที่เพิ่มขึ้นใน 1 ใน 2 ที่ต่อไปนี้
- ในส่วน App Check ของคอนโซล Firebase ภายในแท็บ API
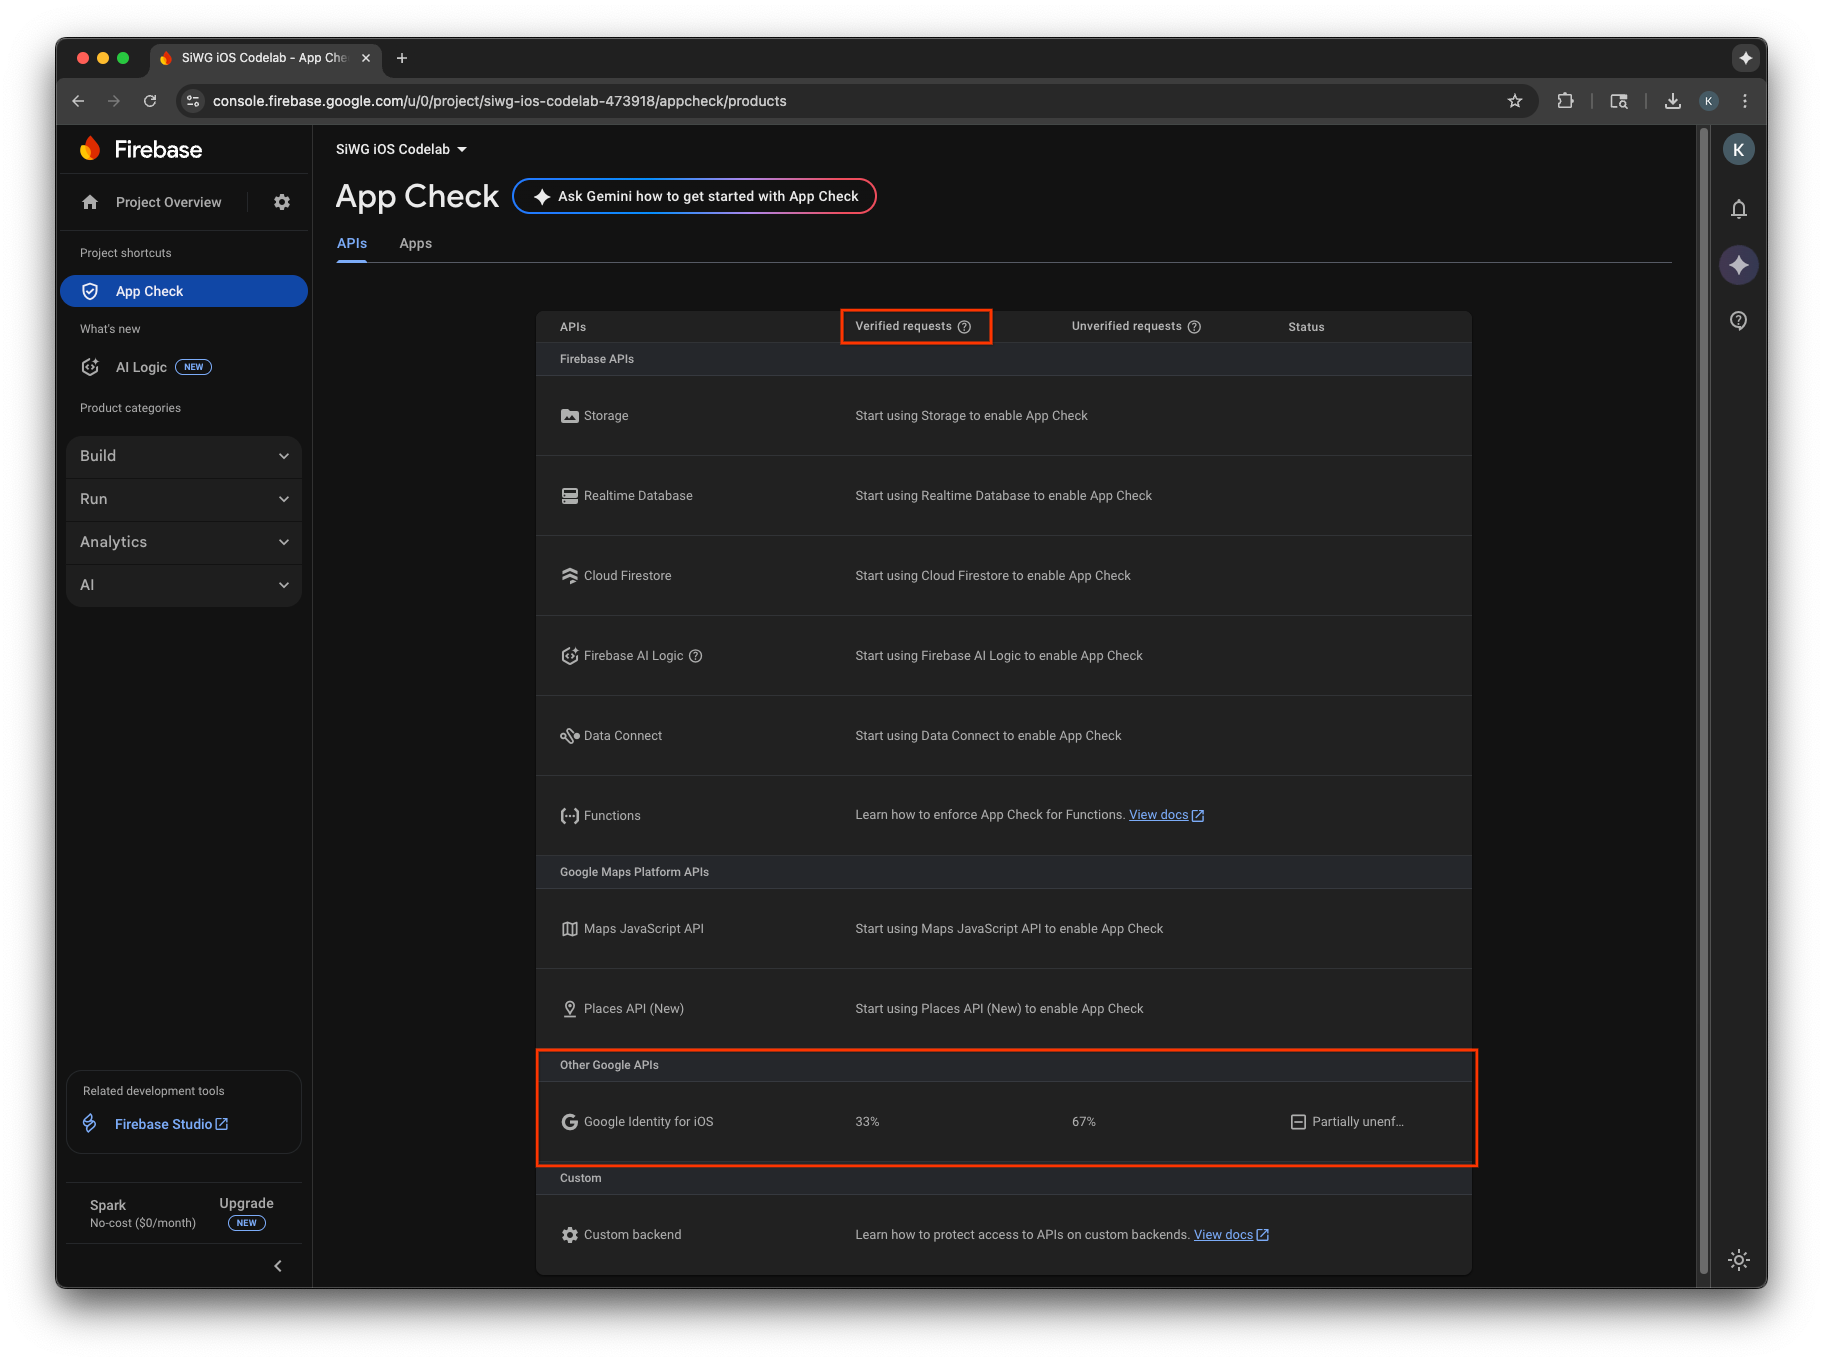
- ในหน้าแก้ไขสำหรับไคลเอ็นต์ OAuth ในคอนโซล Google Cloud
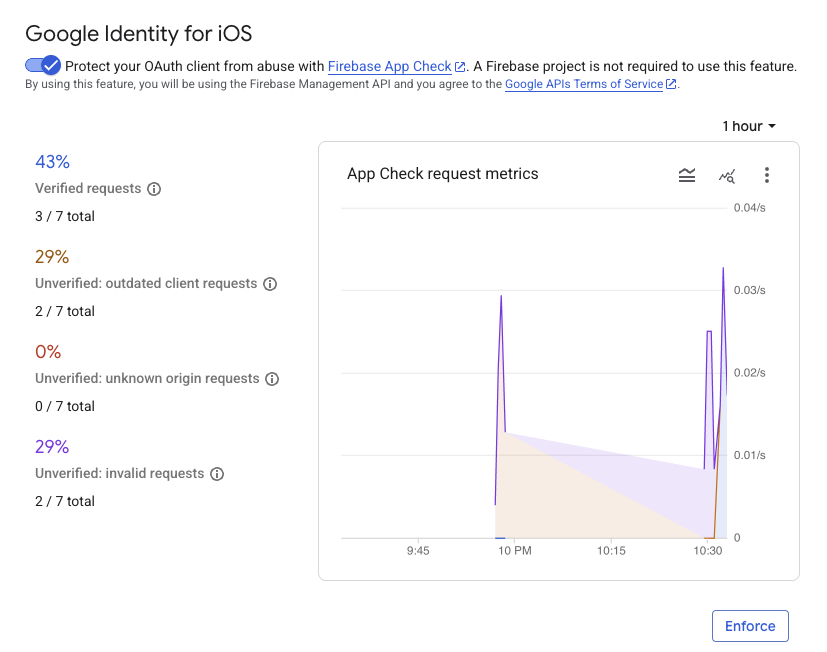
หลังจากตรวจสอบเมตริก App Check ของแอปและยืนยันว่าคำขอที่ถูกต้องตามกฎหมายได้รับการยืนยันแล้ว คุณควรเปิดใช้การบังคับใช้ App Check เมื่อบังคับใช้แล้ว App Check จะปฏิเสธคำขอที่ยังไม่ยืนยันทั้งหมด เพื่อให้มั่นใจว่าเฉพาะการเข้าชมจากแอปจริงของคุณเท่านั้นที่จะเข้าถึงปลายทาง OAuth 2.0 ของ Google ในนามของโปรเจ็กต์ได้
12. แหล่งข้อมูลเพิ่มเติม
ยินดีด้วย
คุณได้กำหนดค่าไคลเอ็นต์ OAuth 2.0 iOS, เพิ่มปุ่มลงชื่อเข้าใช้ด้วย Google ลงในแอป iOS, เรียนรู้วิธีปรับแต่งลักษณะของปุ่ม, ถอดรหัสโทเค็นรหัส JWT และเปิดใช้ App Check สำหรับแอป
ลิงก์ต่อไปนี้อาจช่วยคุณในขั้นตอนถัดไปได้
- วิธีเริ่มต้นใช้งาน Google Sign-In สำหรับ iOS
- ที่เก็บ Google Sign-In สำหรับ iOS
- ยืนยันโทเค็นรหัส Google
- เริ่มต้นใช้งาน App Check สำหรับ Google Sign-In ใน iOS
- การเพิกถอนโทเค็นเพื่อการเข้าถึงและการยกเลิกการเชื่อมต่อแอป
- ดูข้อมูลเพิ่มเติมเกี่ยวกับโปรเจ็กต์ Google Cloud
- วิธีการตรวจสอบสิทธิ์ตัวตนของ Google
- เปิดใช้การบังคับใช้ App Check