
1. Trước khi bắt đầu
Lớp học lập trình này hướng dẫn bạn cách tạo một ứng dụng iOS triển khai tính năng Đăng nhập bằng Google và chạy trong một trình mô phỏng. Chúng tôi cung cấp các phương thức triển khai bằng cả SwiftUI và UIKit.
SwiftUI là khung giao diện người dùng hiện đại của Apple để phát triển ứng dụng mới. Nền tảng này cho phép tạo giao diện người dùng cho tất cả các nền tảng của Apple từ một cơ sở mã dùng chung duy nhất. Ứng dụng này yêu cầu phiên bản iOS 13 trở lên.
UIKit là khung giao diện người dùng cơ bản và nguyên gốc của Apple dành cho iOS. Thư viện này cung cấp khả năng tương thích ngược cho các phiên bản iOS cũ. Đây là lựa chọn phù hợp cho những ứng dụng đã được thiết lập và cần hỗ trợ nhiều thiết bị cũ.
Bạn có thể làm theo đường dẫn cho khung phù hợp nhất với nhu cầu phát triển của mình.
Điều kiện tiên quyết
Kiến thức bạn sẽ học được
- Cách tạo dự án trên Google Cloud
- Cách tạo ứng dụng OAuth trong Google Cloud Console
- Cách triển khai tính năng Đăng nhập bằng Google cho ứng dụng iOS
- Cách tuỳ chỉnh nút Đăng nhập bằng Google
- Cách giải mã mã thông báo nhận dạng
- Cách bật Kiểm tra ứng dụng cho ứng dụng iOS
Bạn cần có
- Phiên bản hiện tại của Xcode
- Một máy tính chạy macOS đáp ứng yêu cầu về hệ thống đối với phiên bản Xcode mà bạn đã cài đặt
Lớp học lập trình này được tạo bằng Xcode 16.3 với trình mô phỏng iOS 18.3. Bạn nên sử dụng phiên bản Xcode mới nhất để phát triển.
2. Tạo một dự án Xcode mới
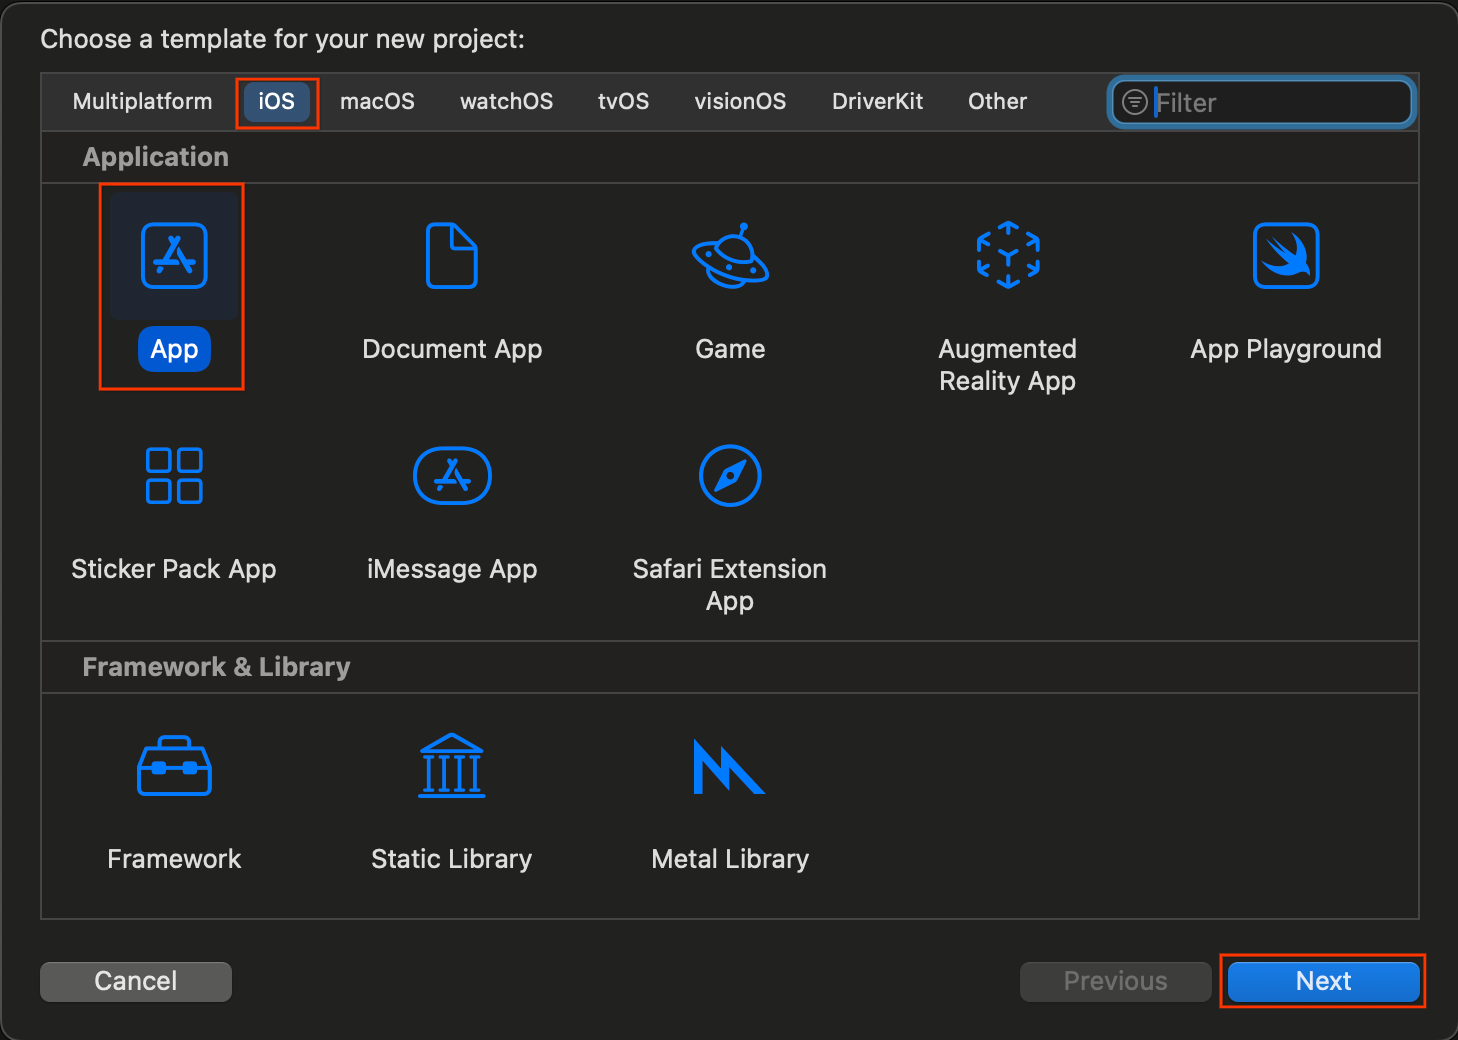
- Mở Xcode rồi chọn Create a new Xcode project (Tạo một dự án Xcode mới).
- Chọn thẻ iOS, chọn mẫu App (Ứng dụng) rồi nhấp vào Next (Tiếp theo).
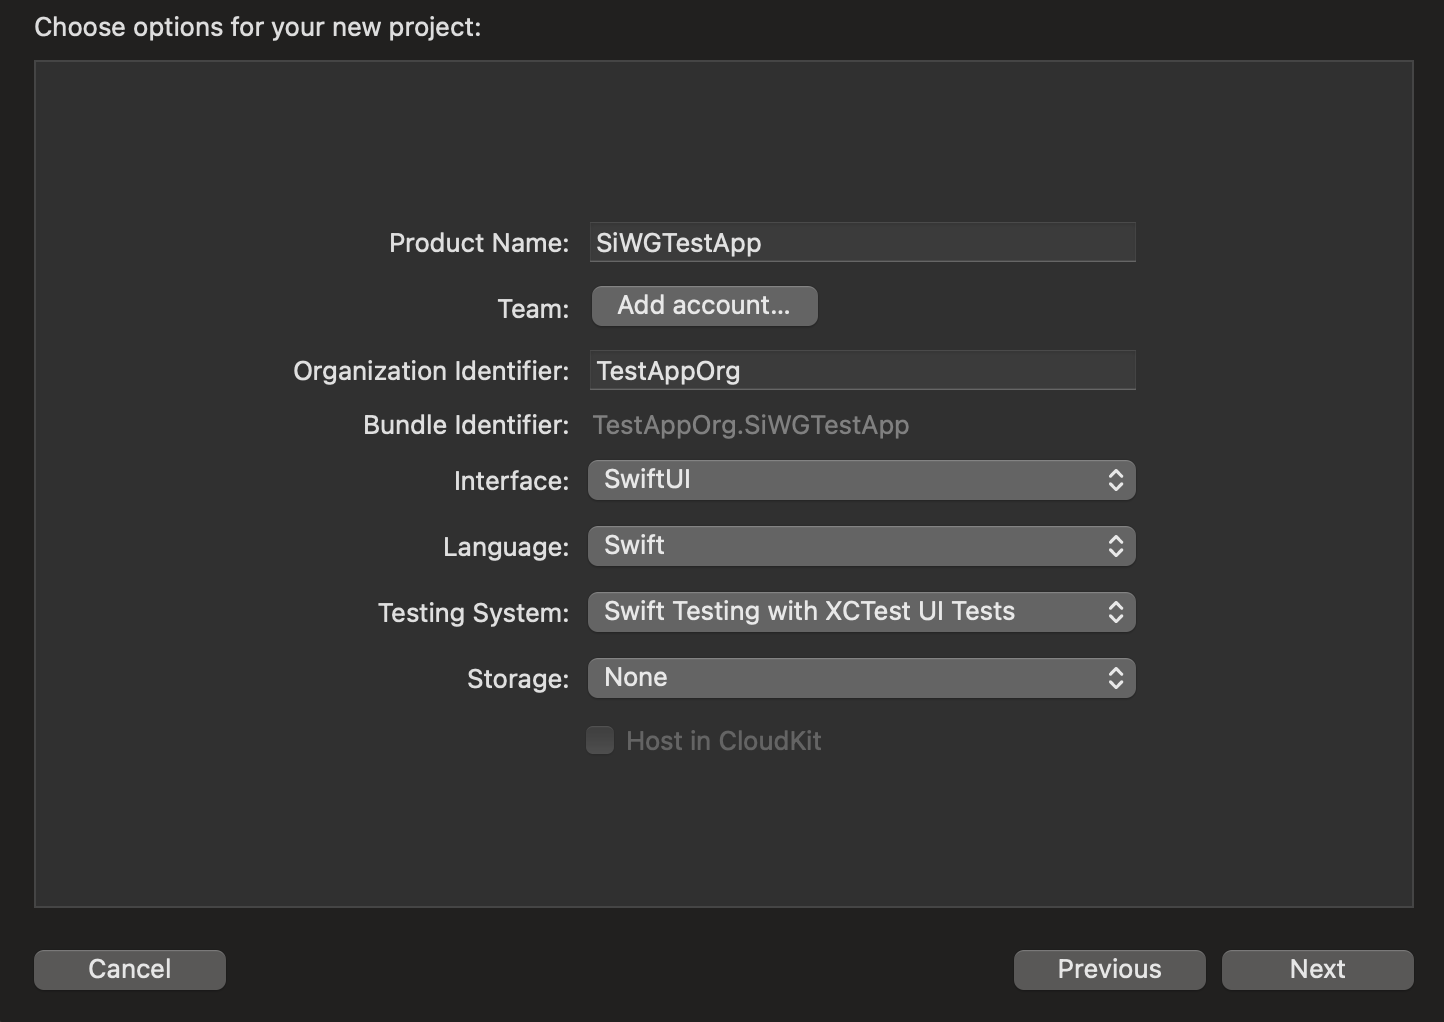
- Trong phần lựa chọn dự án:
- Nhập Tên sản phẩm.
- Chọn Nhóm (không bắt buộc).
- Nhập Mã nhận dạng tổ chức.
- Ghi lại Mã nhận dạng gói đã tạo. Bạn sẽ cần đến nó sau này.
- Đối với Giao diện, hãy chọn một trong hai lựa chọn sau:
- SwiftUI cho một ứng dụng dựa trên SwiftUI.
- Bảng phân cảnh cho một ứng dụng dựa trên UIKit.
- Chọn Swift cho Ngôn ngữ.
- Nhấp vào Tiếp theo rồi chọn một vị trí để lưu dự án.
3. Tạo ứng dụng OAuth
Để cho phép ứng dụng của bạn giao tiếp với các dịch vụ xác thực của Google, bạn cần tạo một mã ứng dụng khách OAuth. Bạn cần có một dự án trên Google Cloud để làm được việc này. Các bước sau đây sẽ hướng dẫn bạn quy trình tạo dự án và Ứng dụng OAuth.
Chọn hoặc tạo một dự án trên Google Cloud
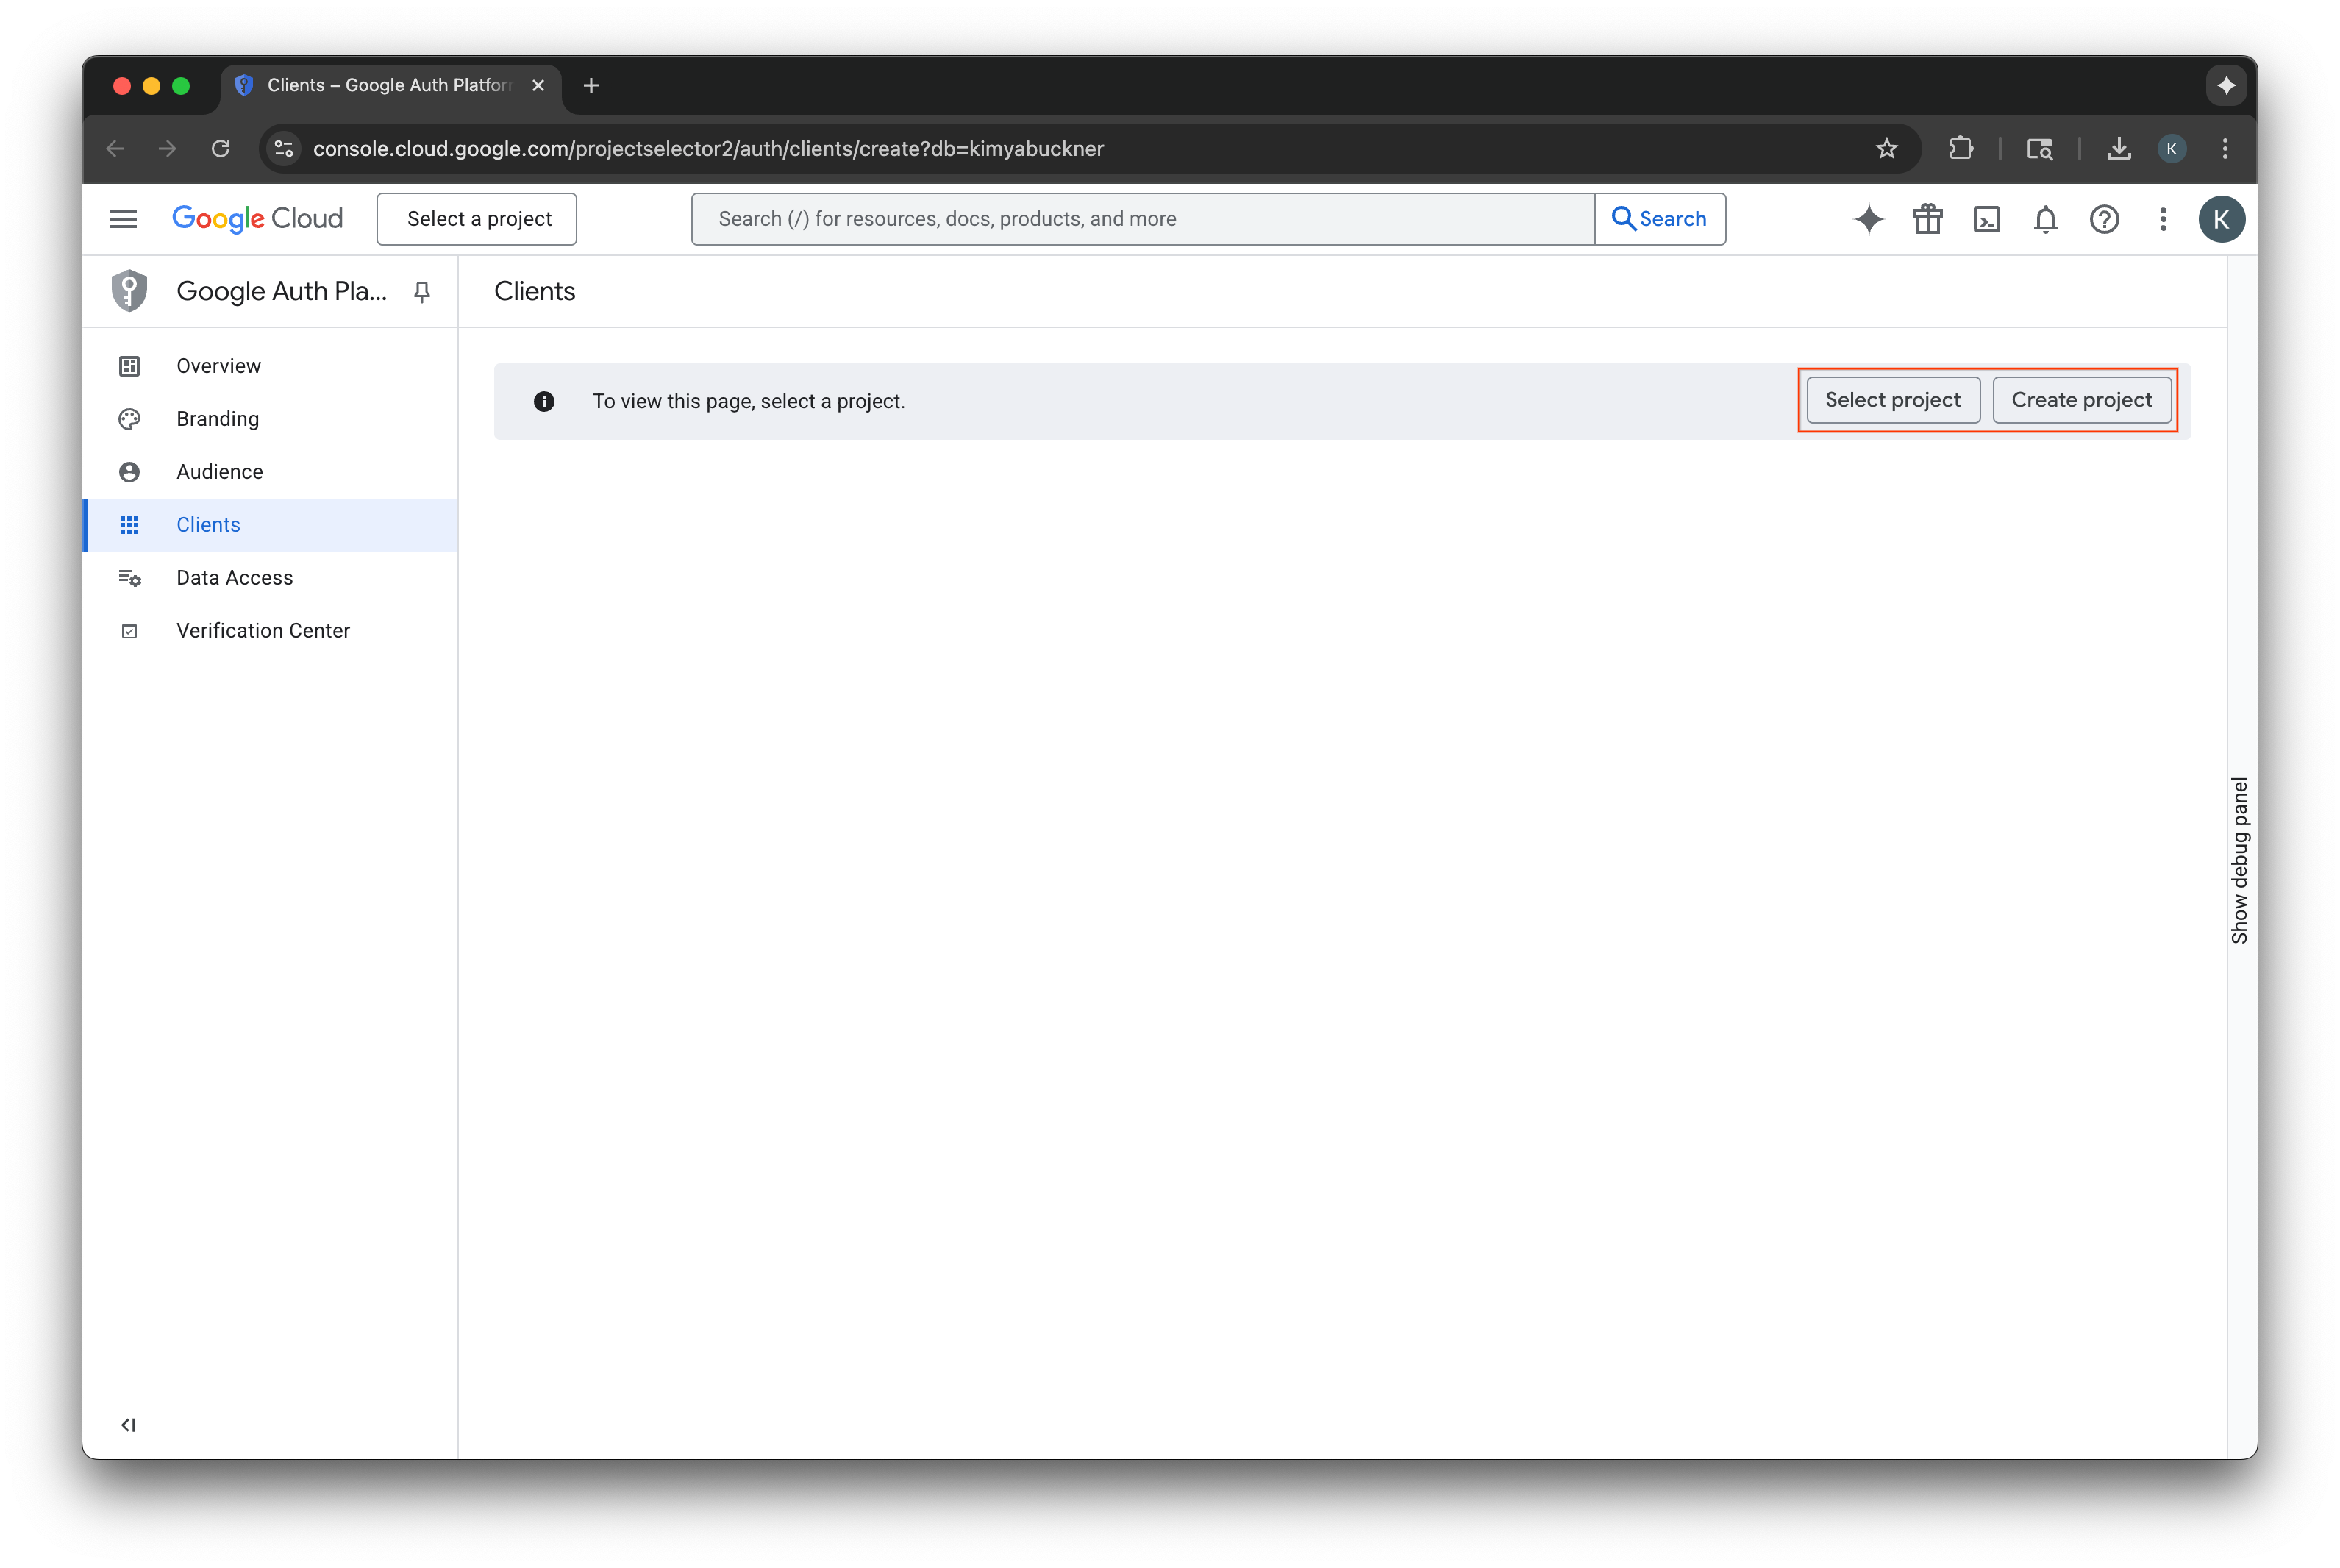
- Truy cập vào Google Cloud Console rồi chọn hoặc tạo một dự án. Nếu bạn chọn một dự án đã có, bảng điều khiển sẽ tự động chuyển bạn đến bước bắt buộc tiếp theo.
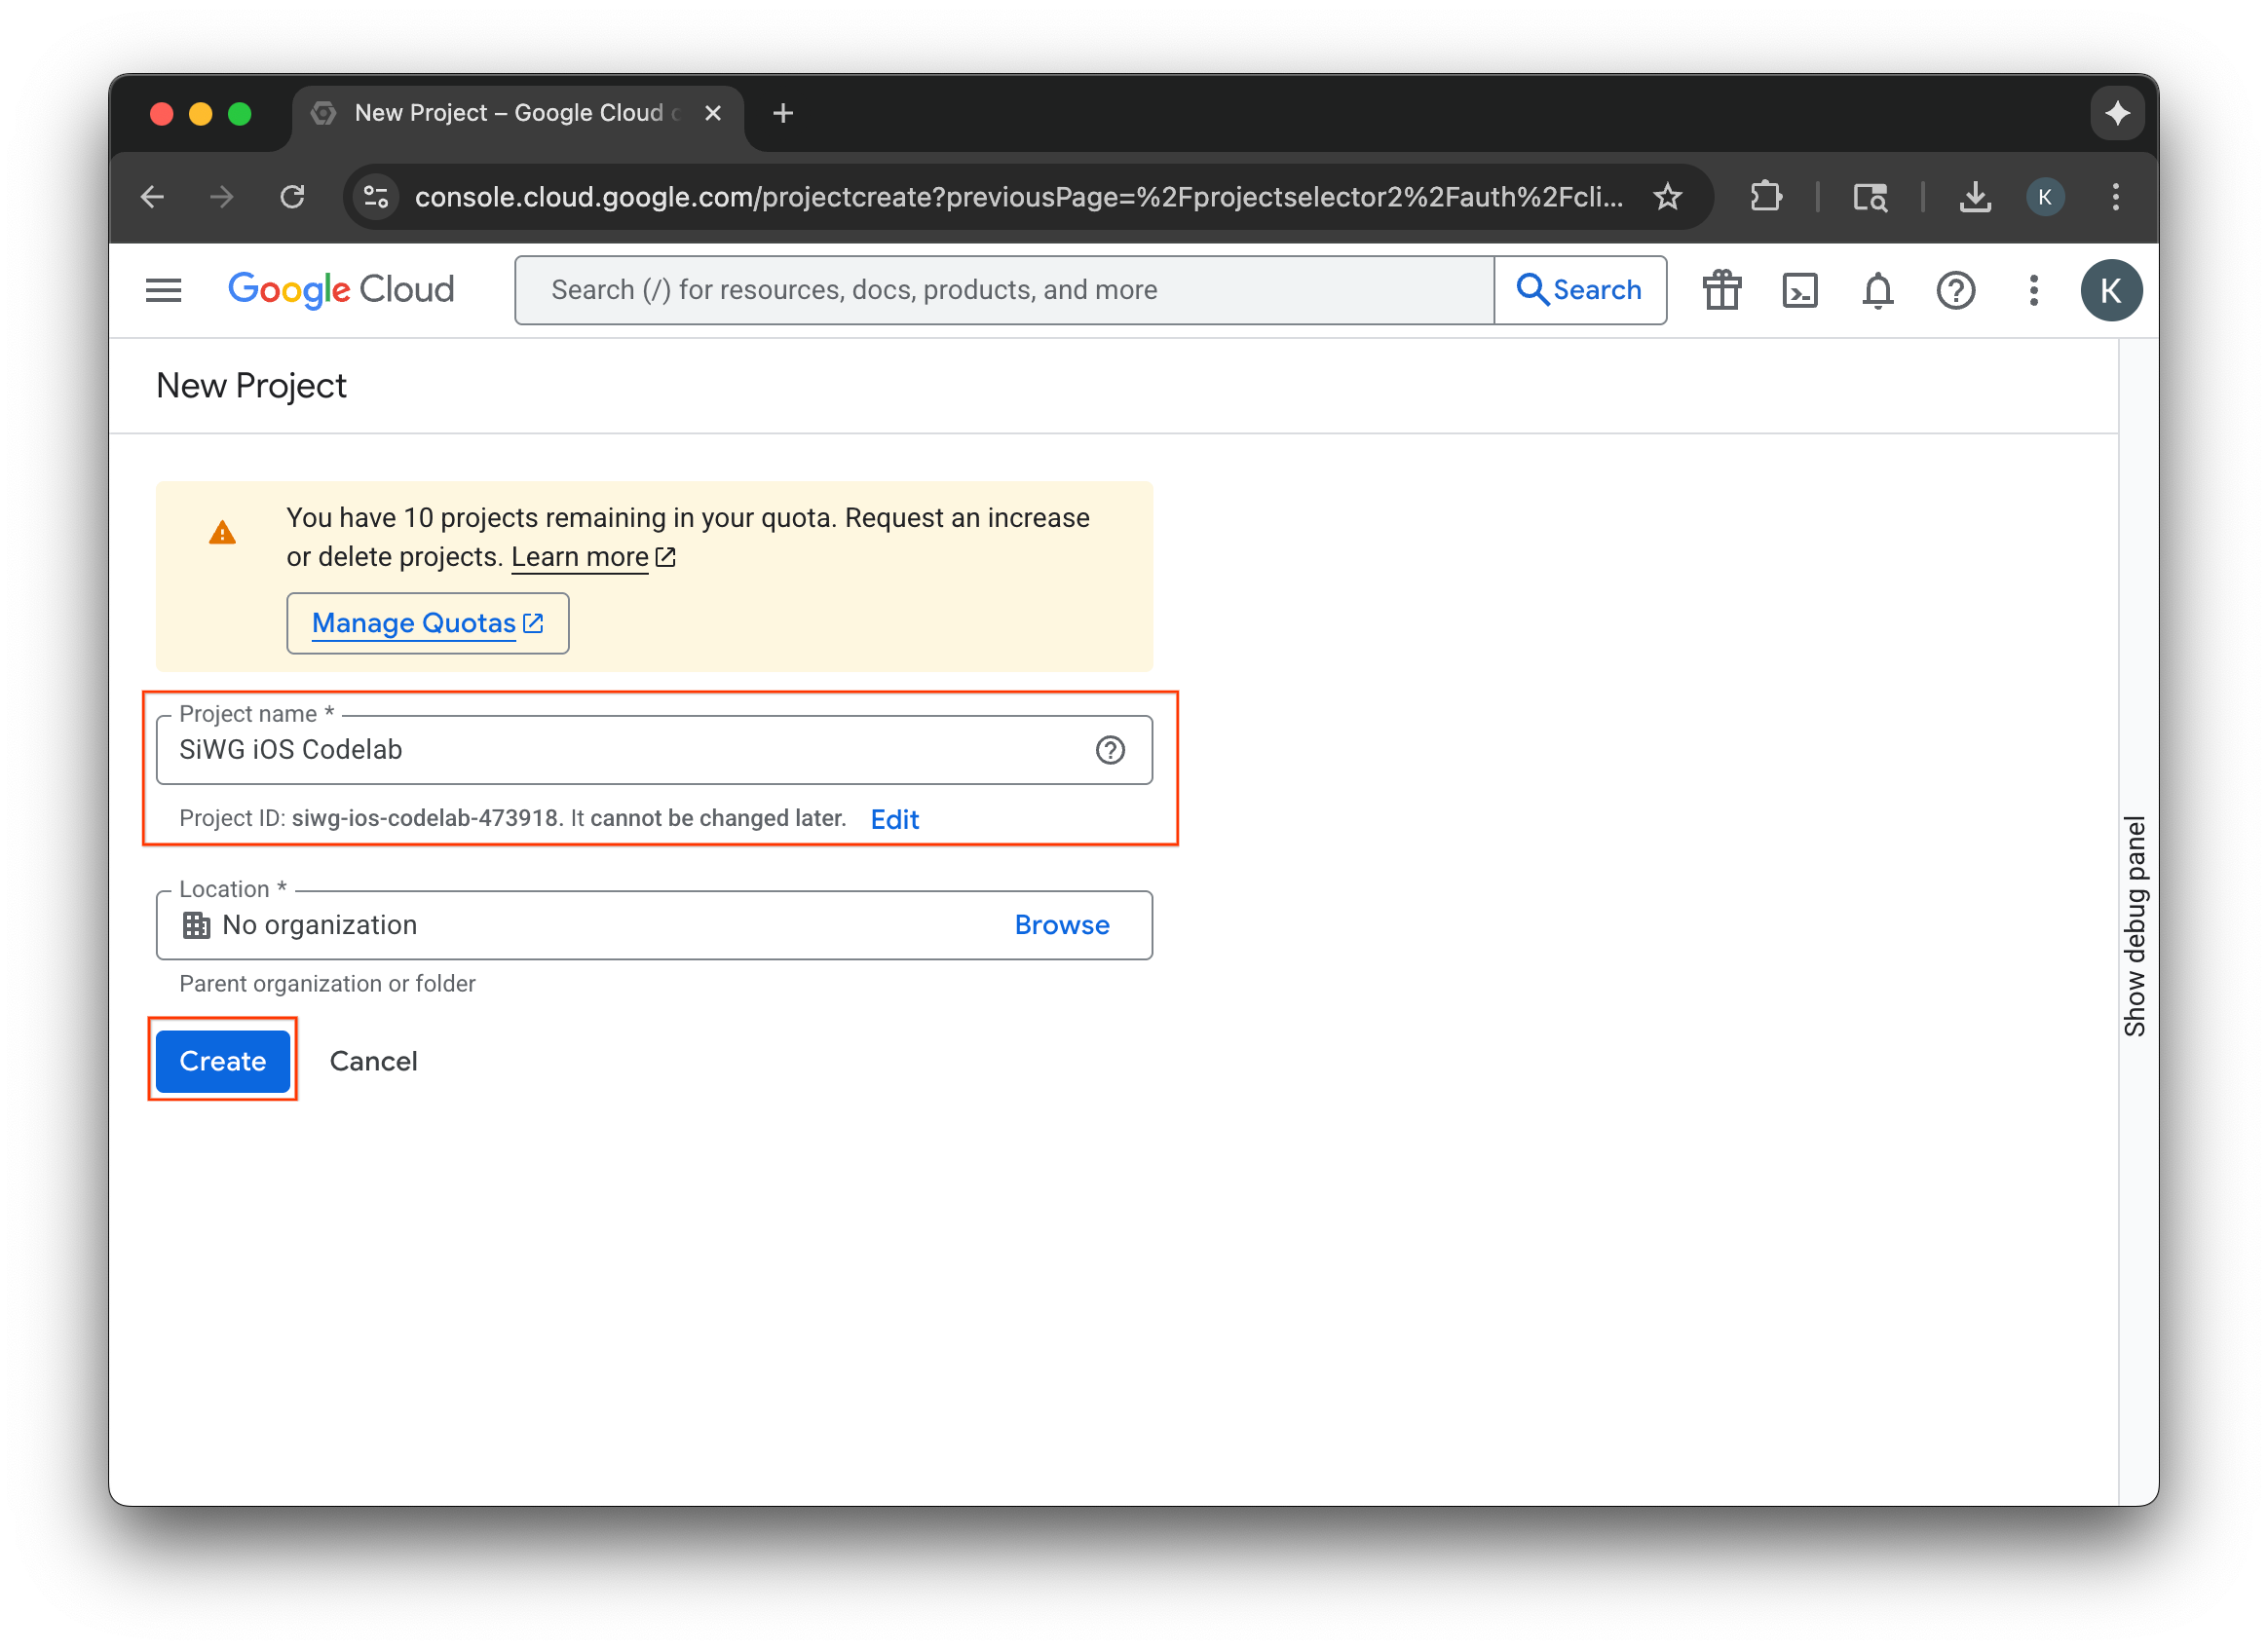
- Nhập tên cho dự án mới trên Google Cloud.
- Chọn Tạo.
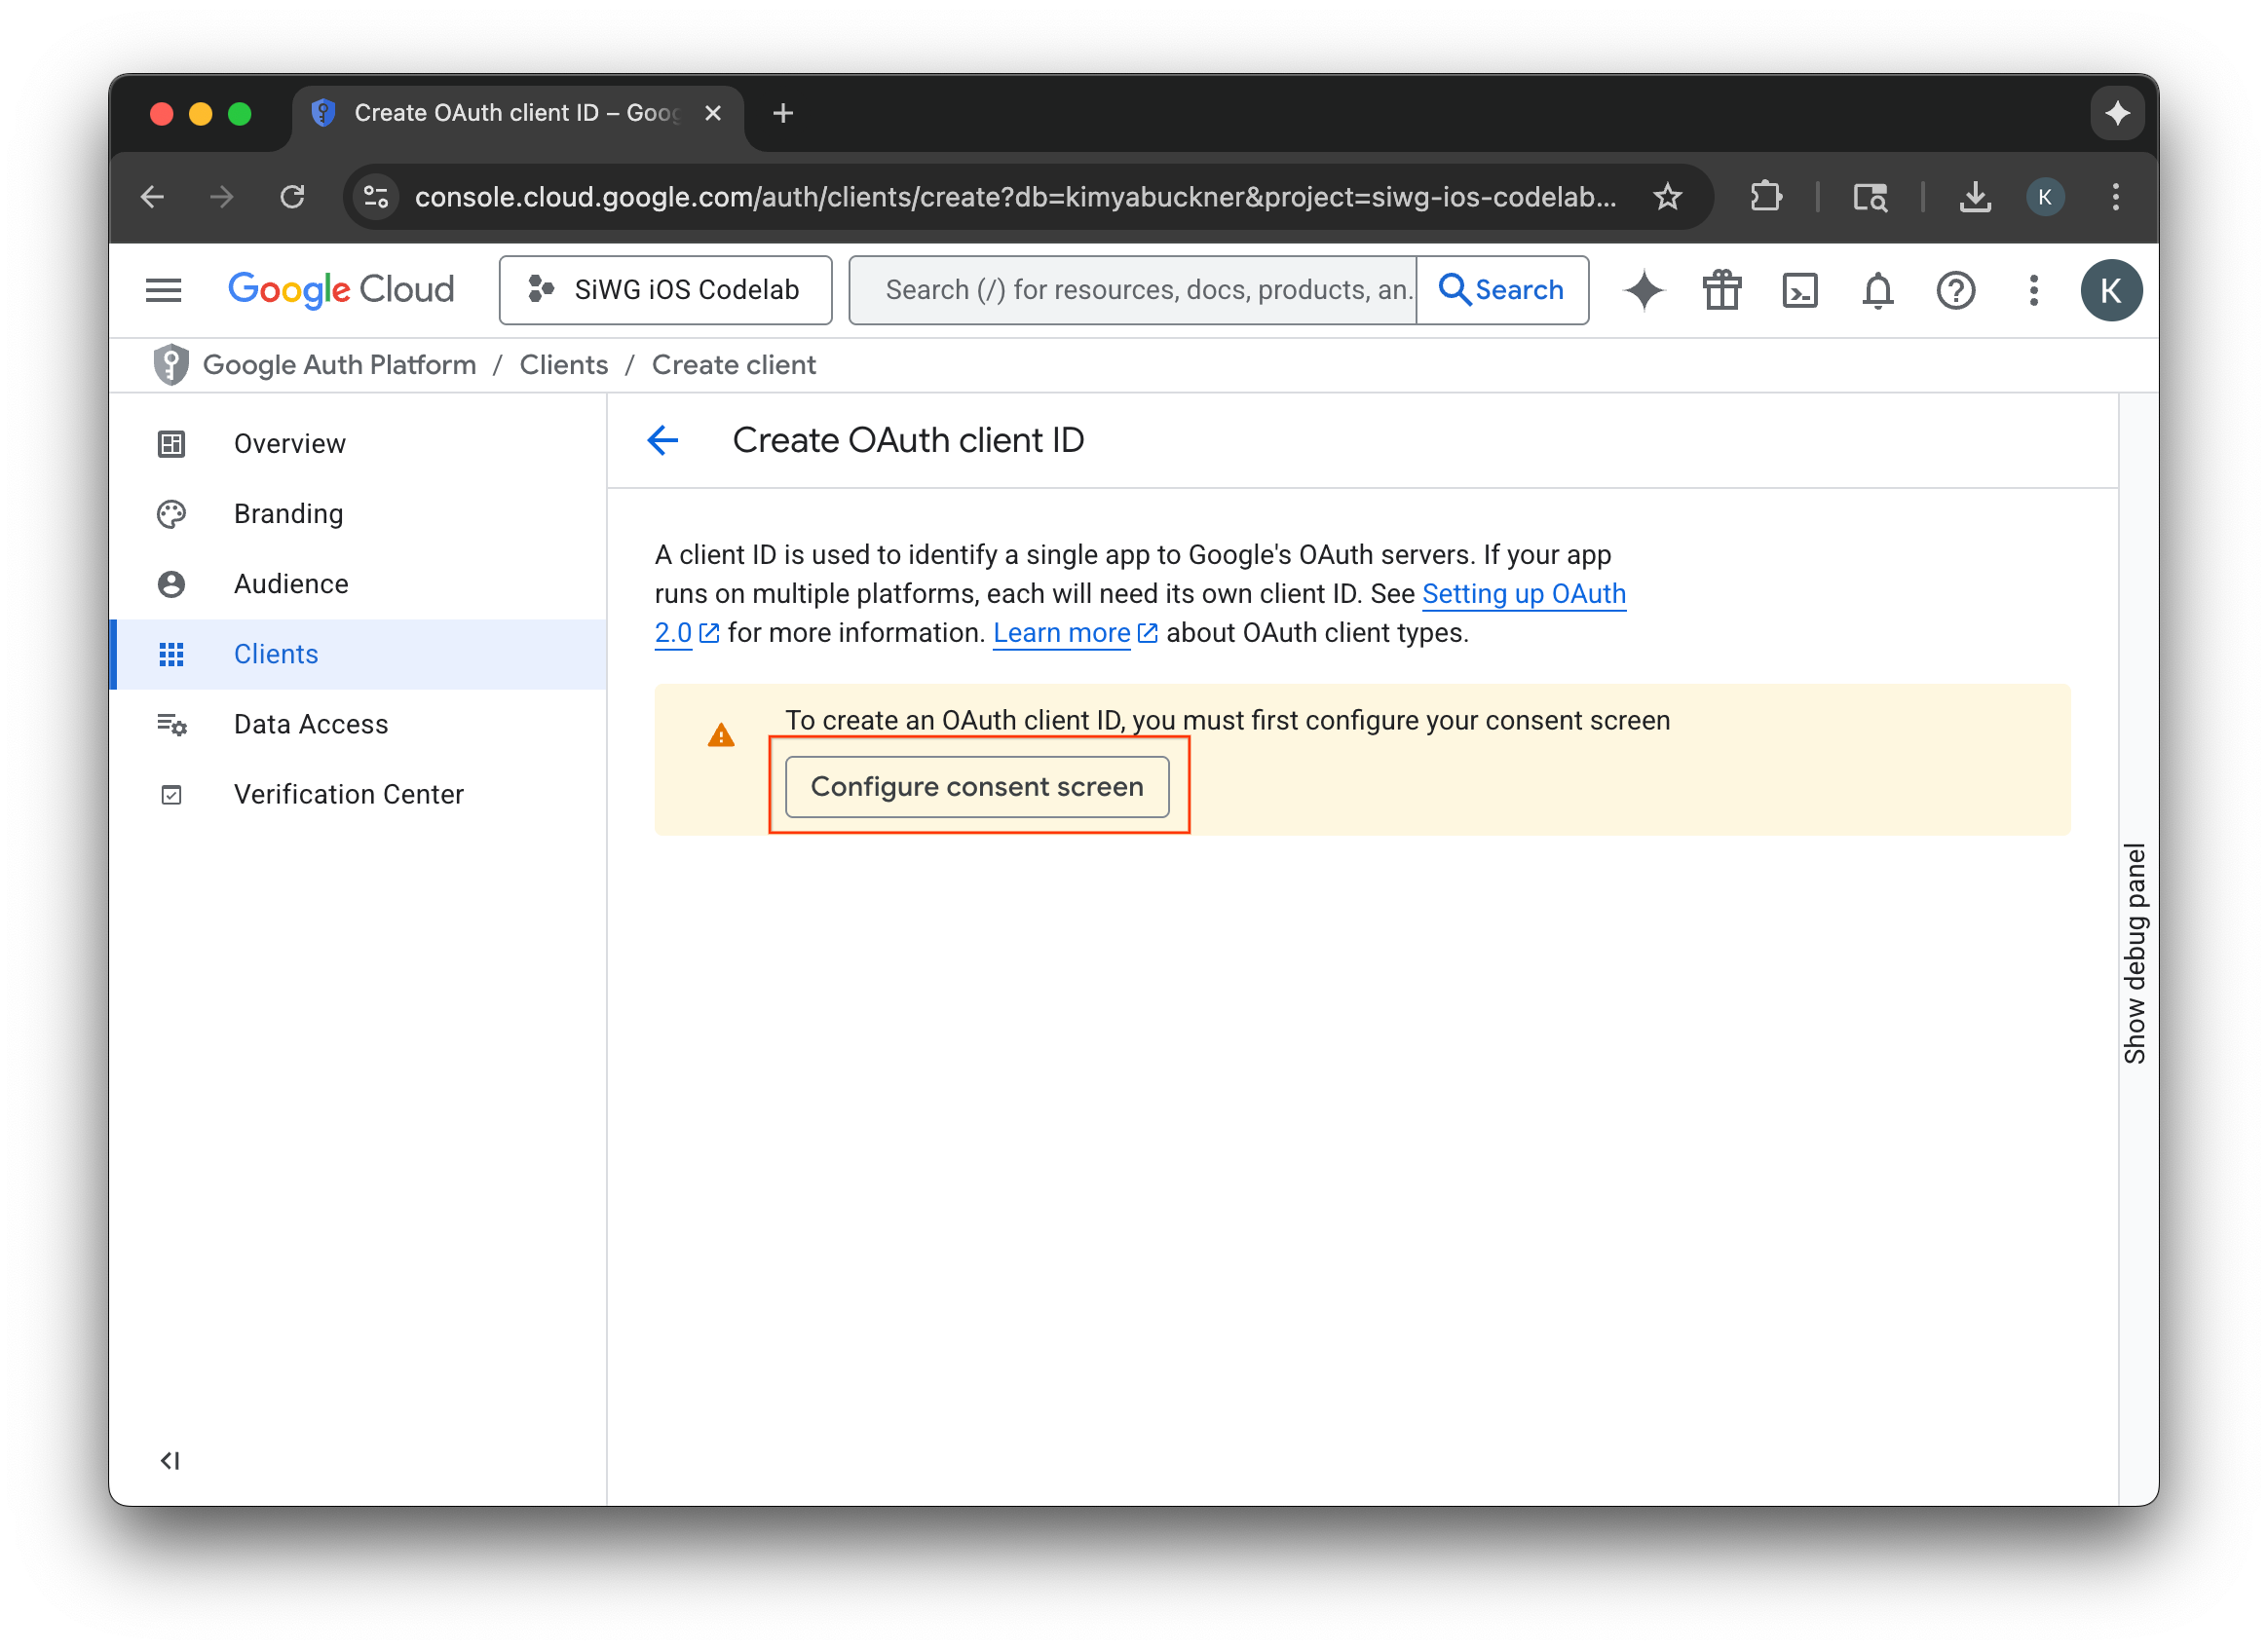
Định cấu hình màn hình xin phép
Nếu đã định cấu hình màn hình xin phép cho dự án đã chọn, thì bạn sẽ không được nhắc định cấu hình màn hình đó ngay bây giờ. Trong trường hợp đó, bạn có thể bỏ qua phần này và chuyển sang phần Tạo ứng dụng OAuth 2.0.
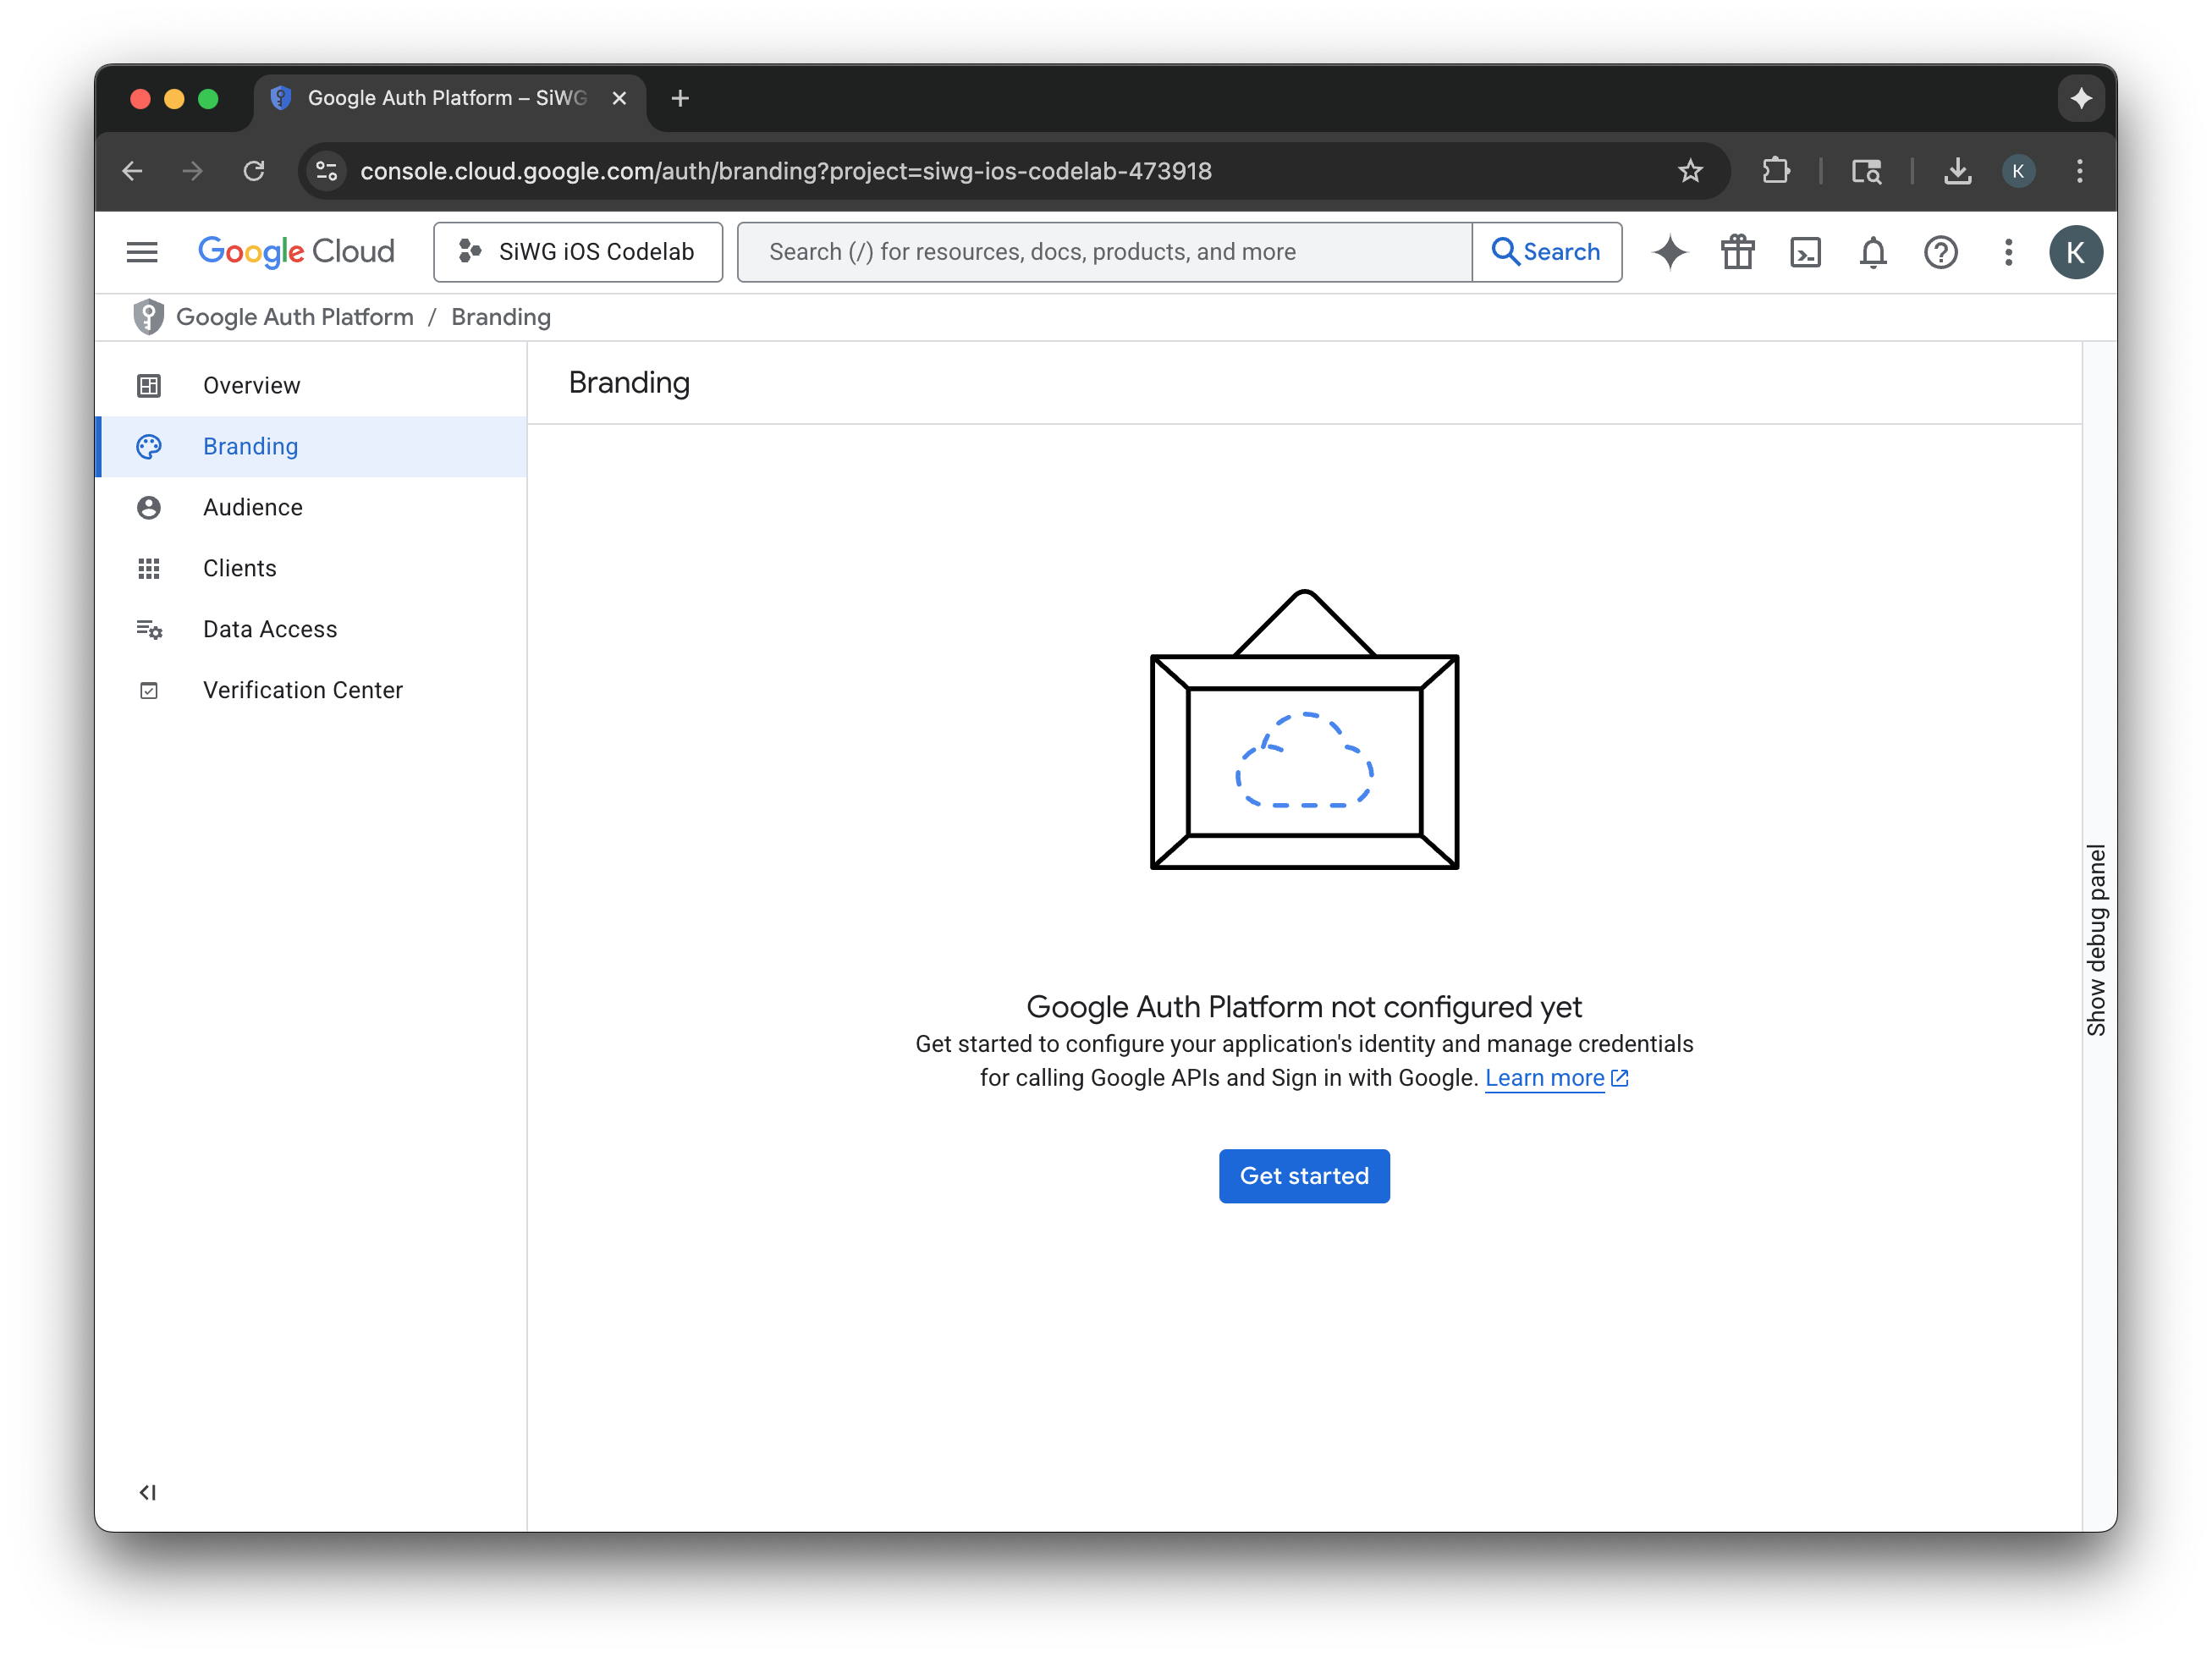
- Chọn Định cấu hình màn hình xin phép.
- Chọn Bắt đầu trên trang xây dựng thương hiệu.
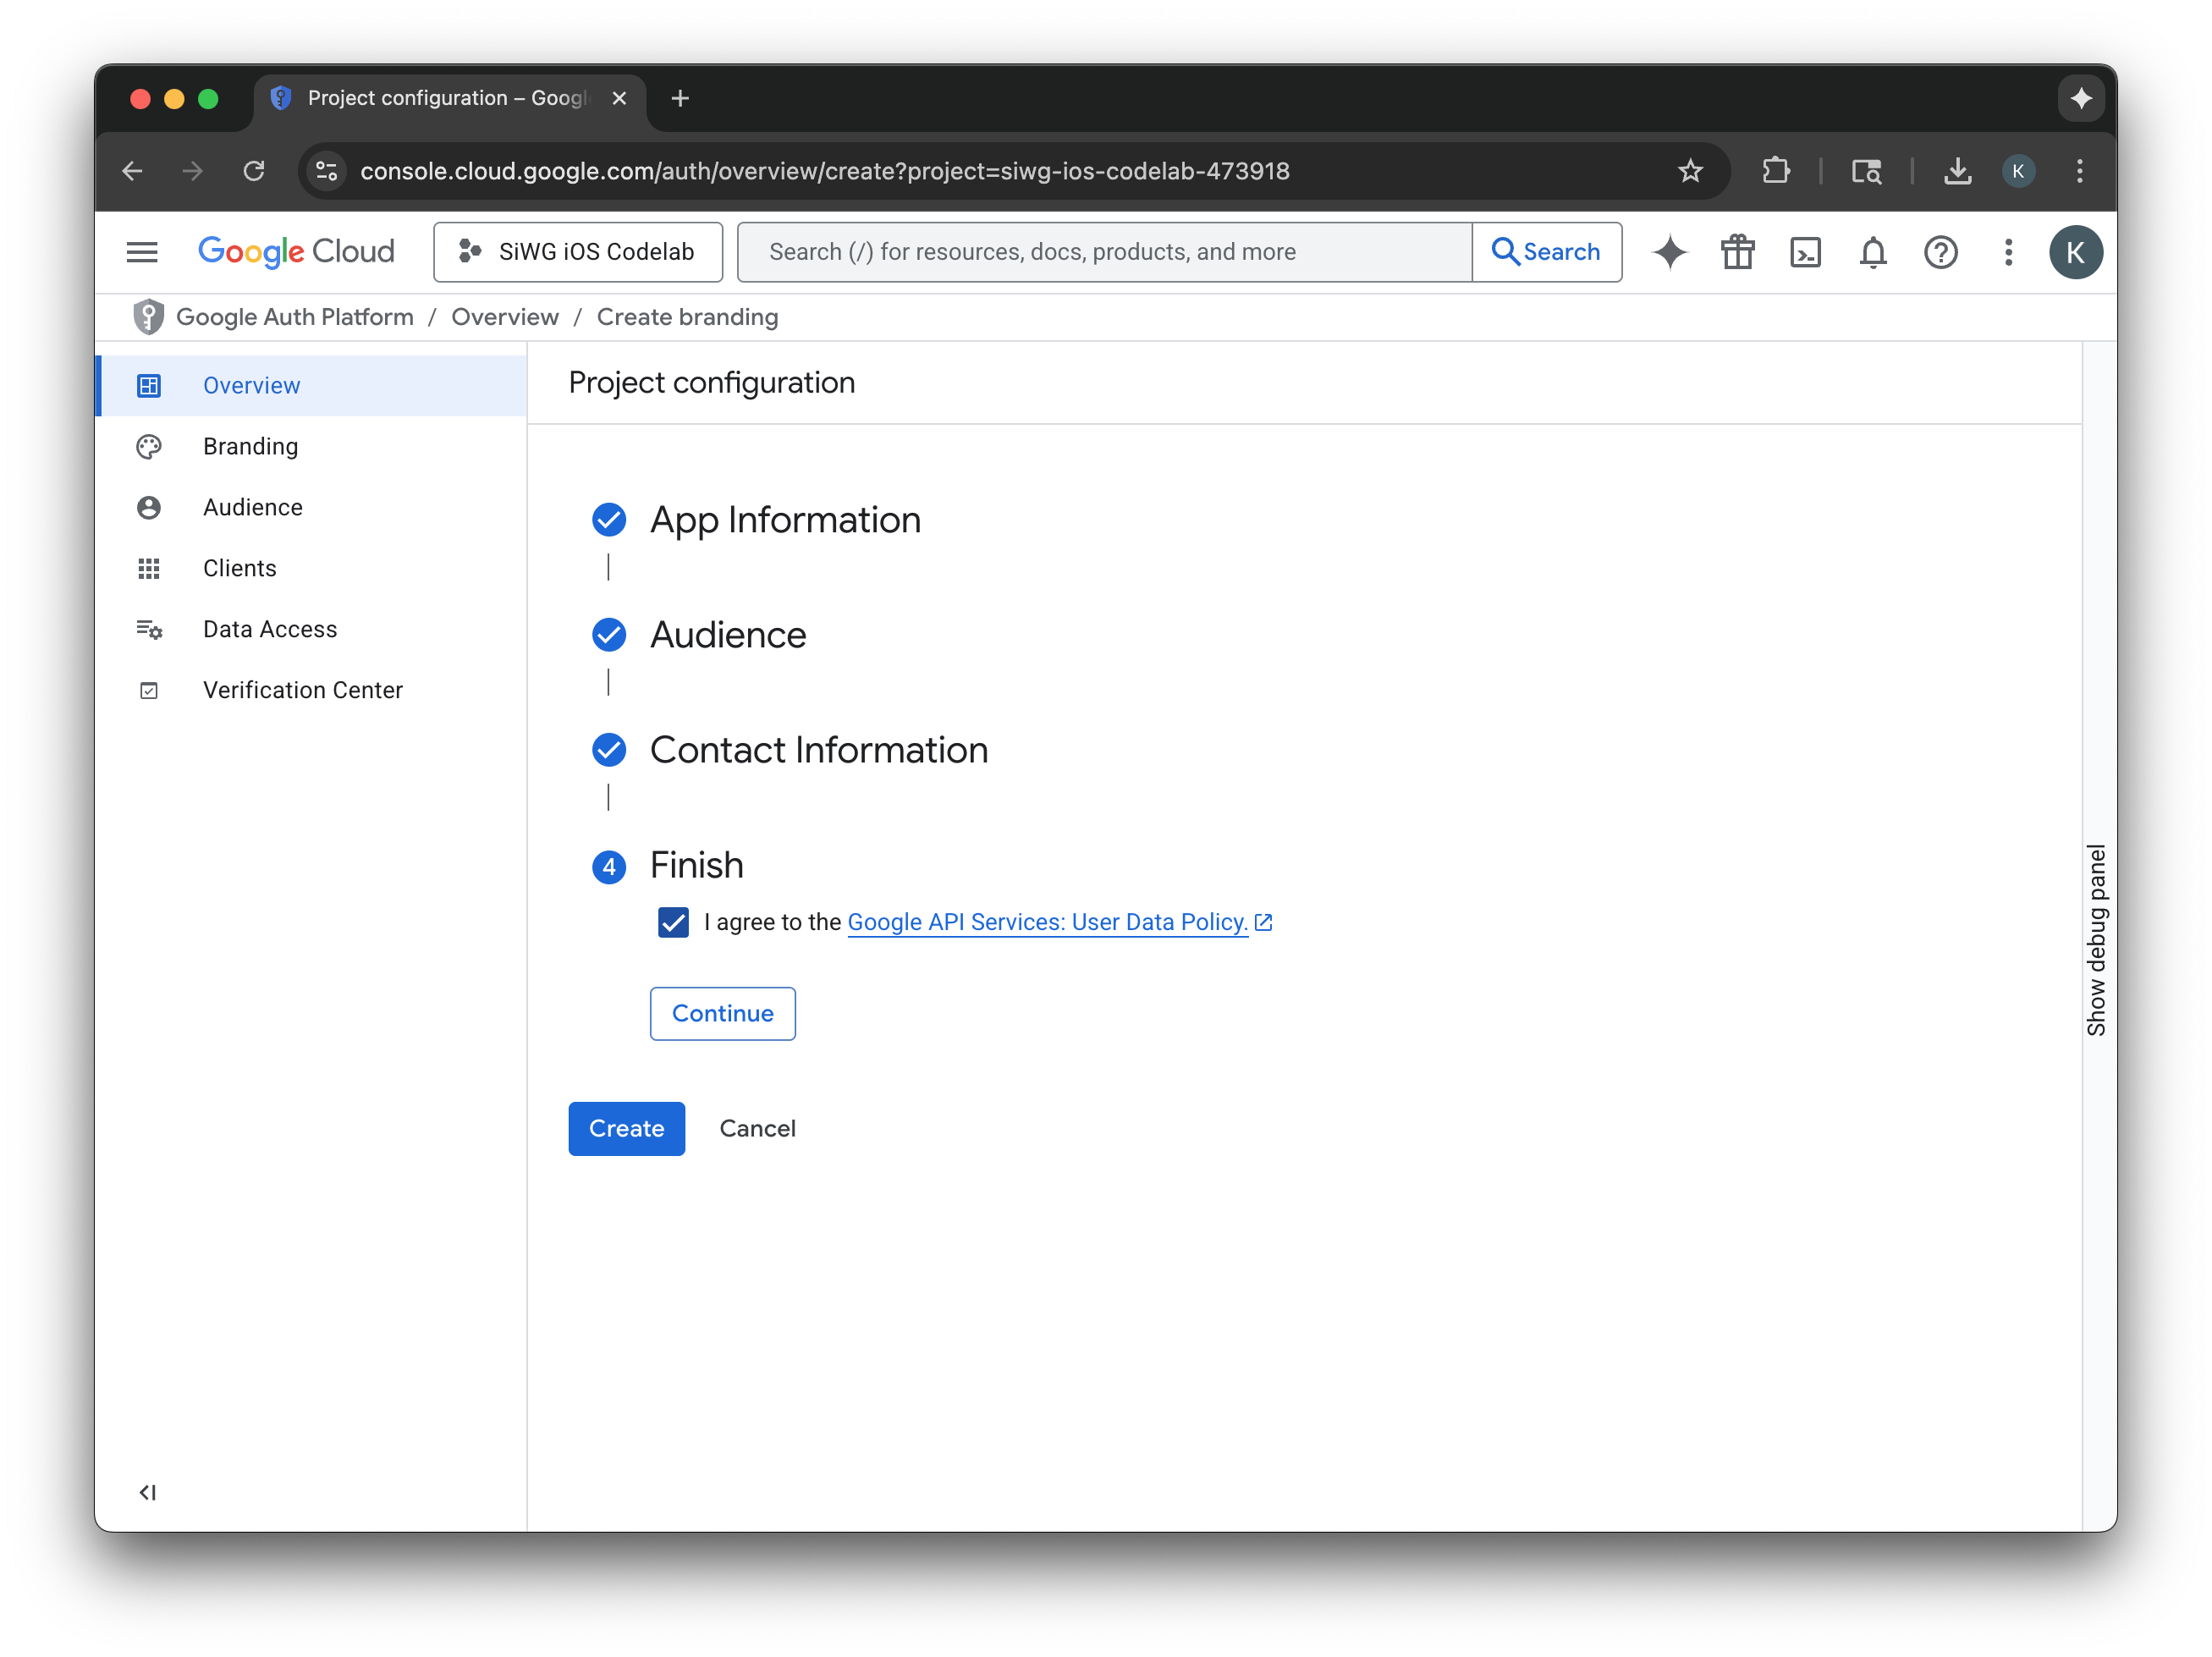
- Trên trang cấu hình dự án, hãy điền vào các trường sau:
- Thông tin về ứng dụng: Nhập tên và email hỗ trợ người dùng cho ứng dụng của bạn. Email hỗ trợ này sẽ xuất hiện công khai để người dùng có thể liên hệ với bạn nếu có thắc mắc về sự đồng ý của họ.
- Đối tượng: Chọn Bên ngoài.
- Thông tin liên hệ: Nhập địa chỉ email để Google liên hệ với bạn về dự án của bạn.
- Xem Chính sách dữ liệu người dùng của dịch vụ API của Google.
- Nhấp vào Tạo.
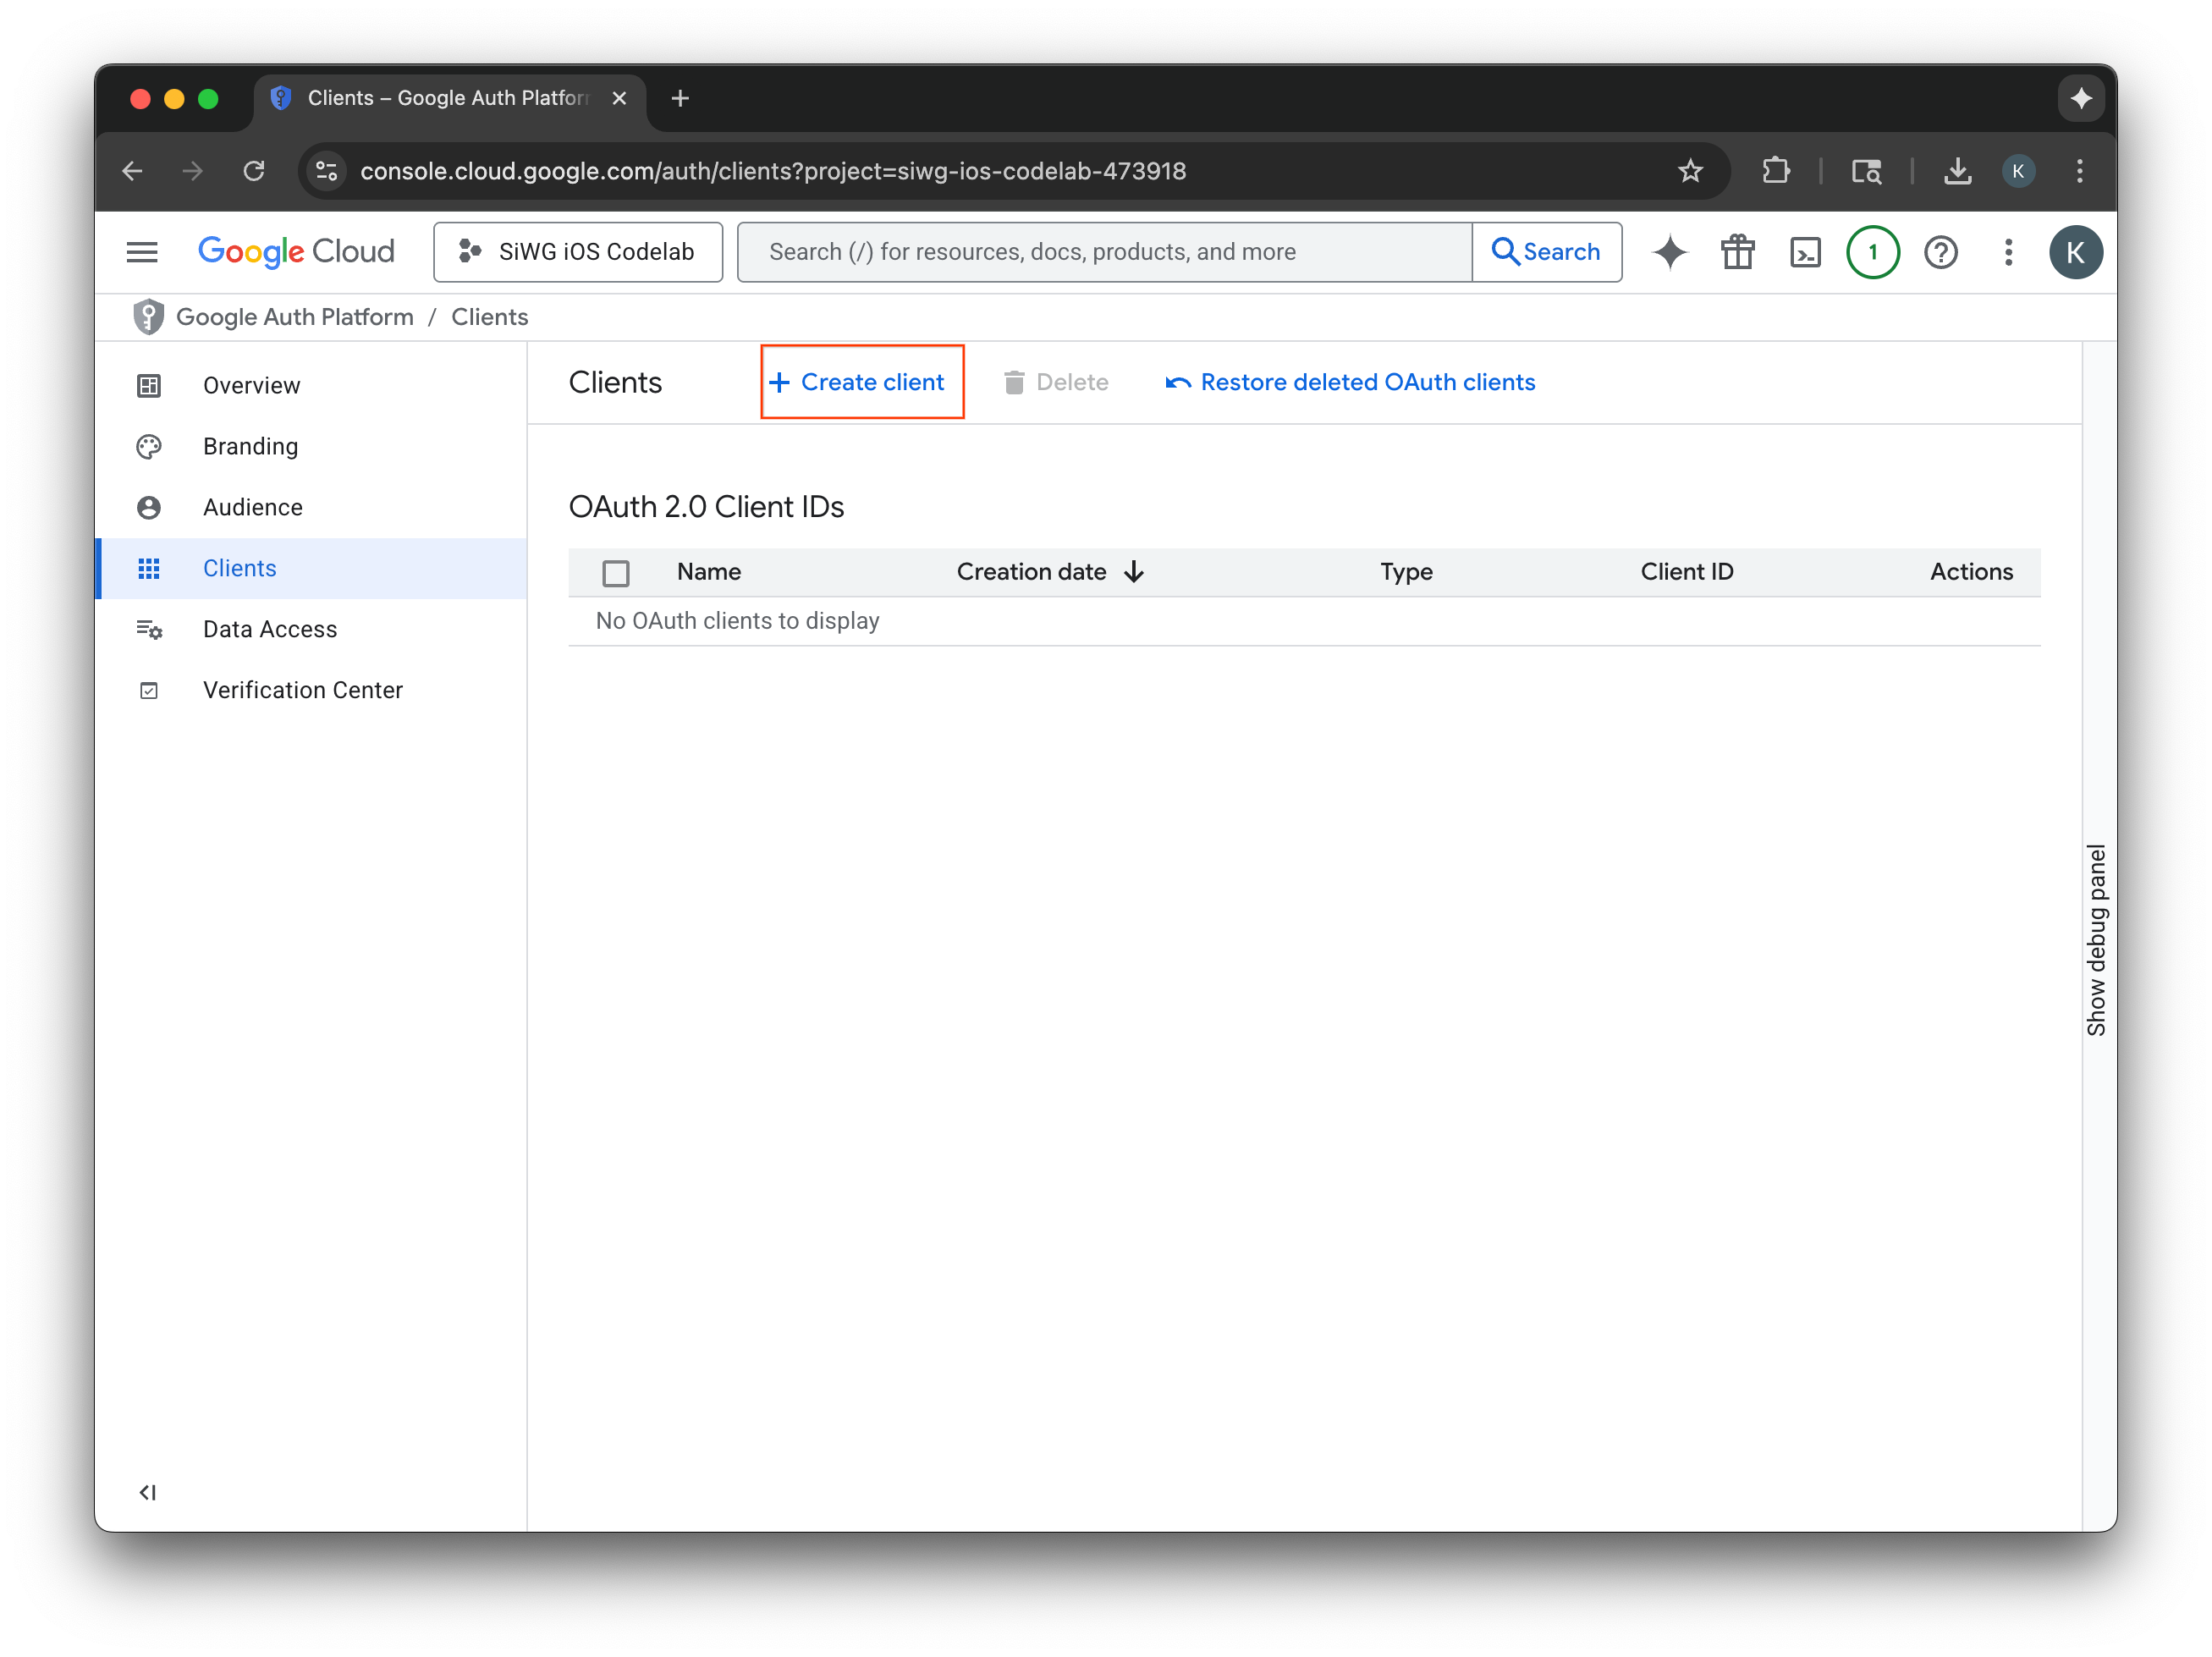
- Chọn trang Khách hàng trong trình đơn điều hướng.
- Nhấp vào Tạo ứng dụng.
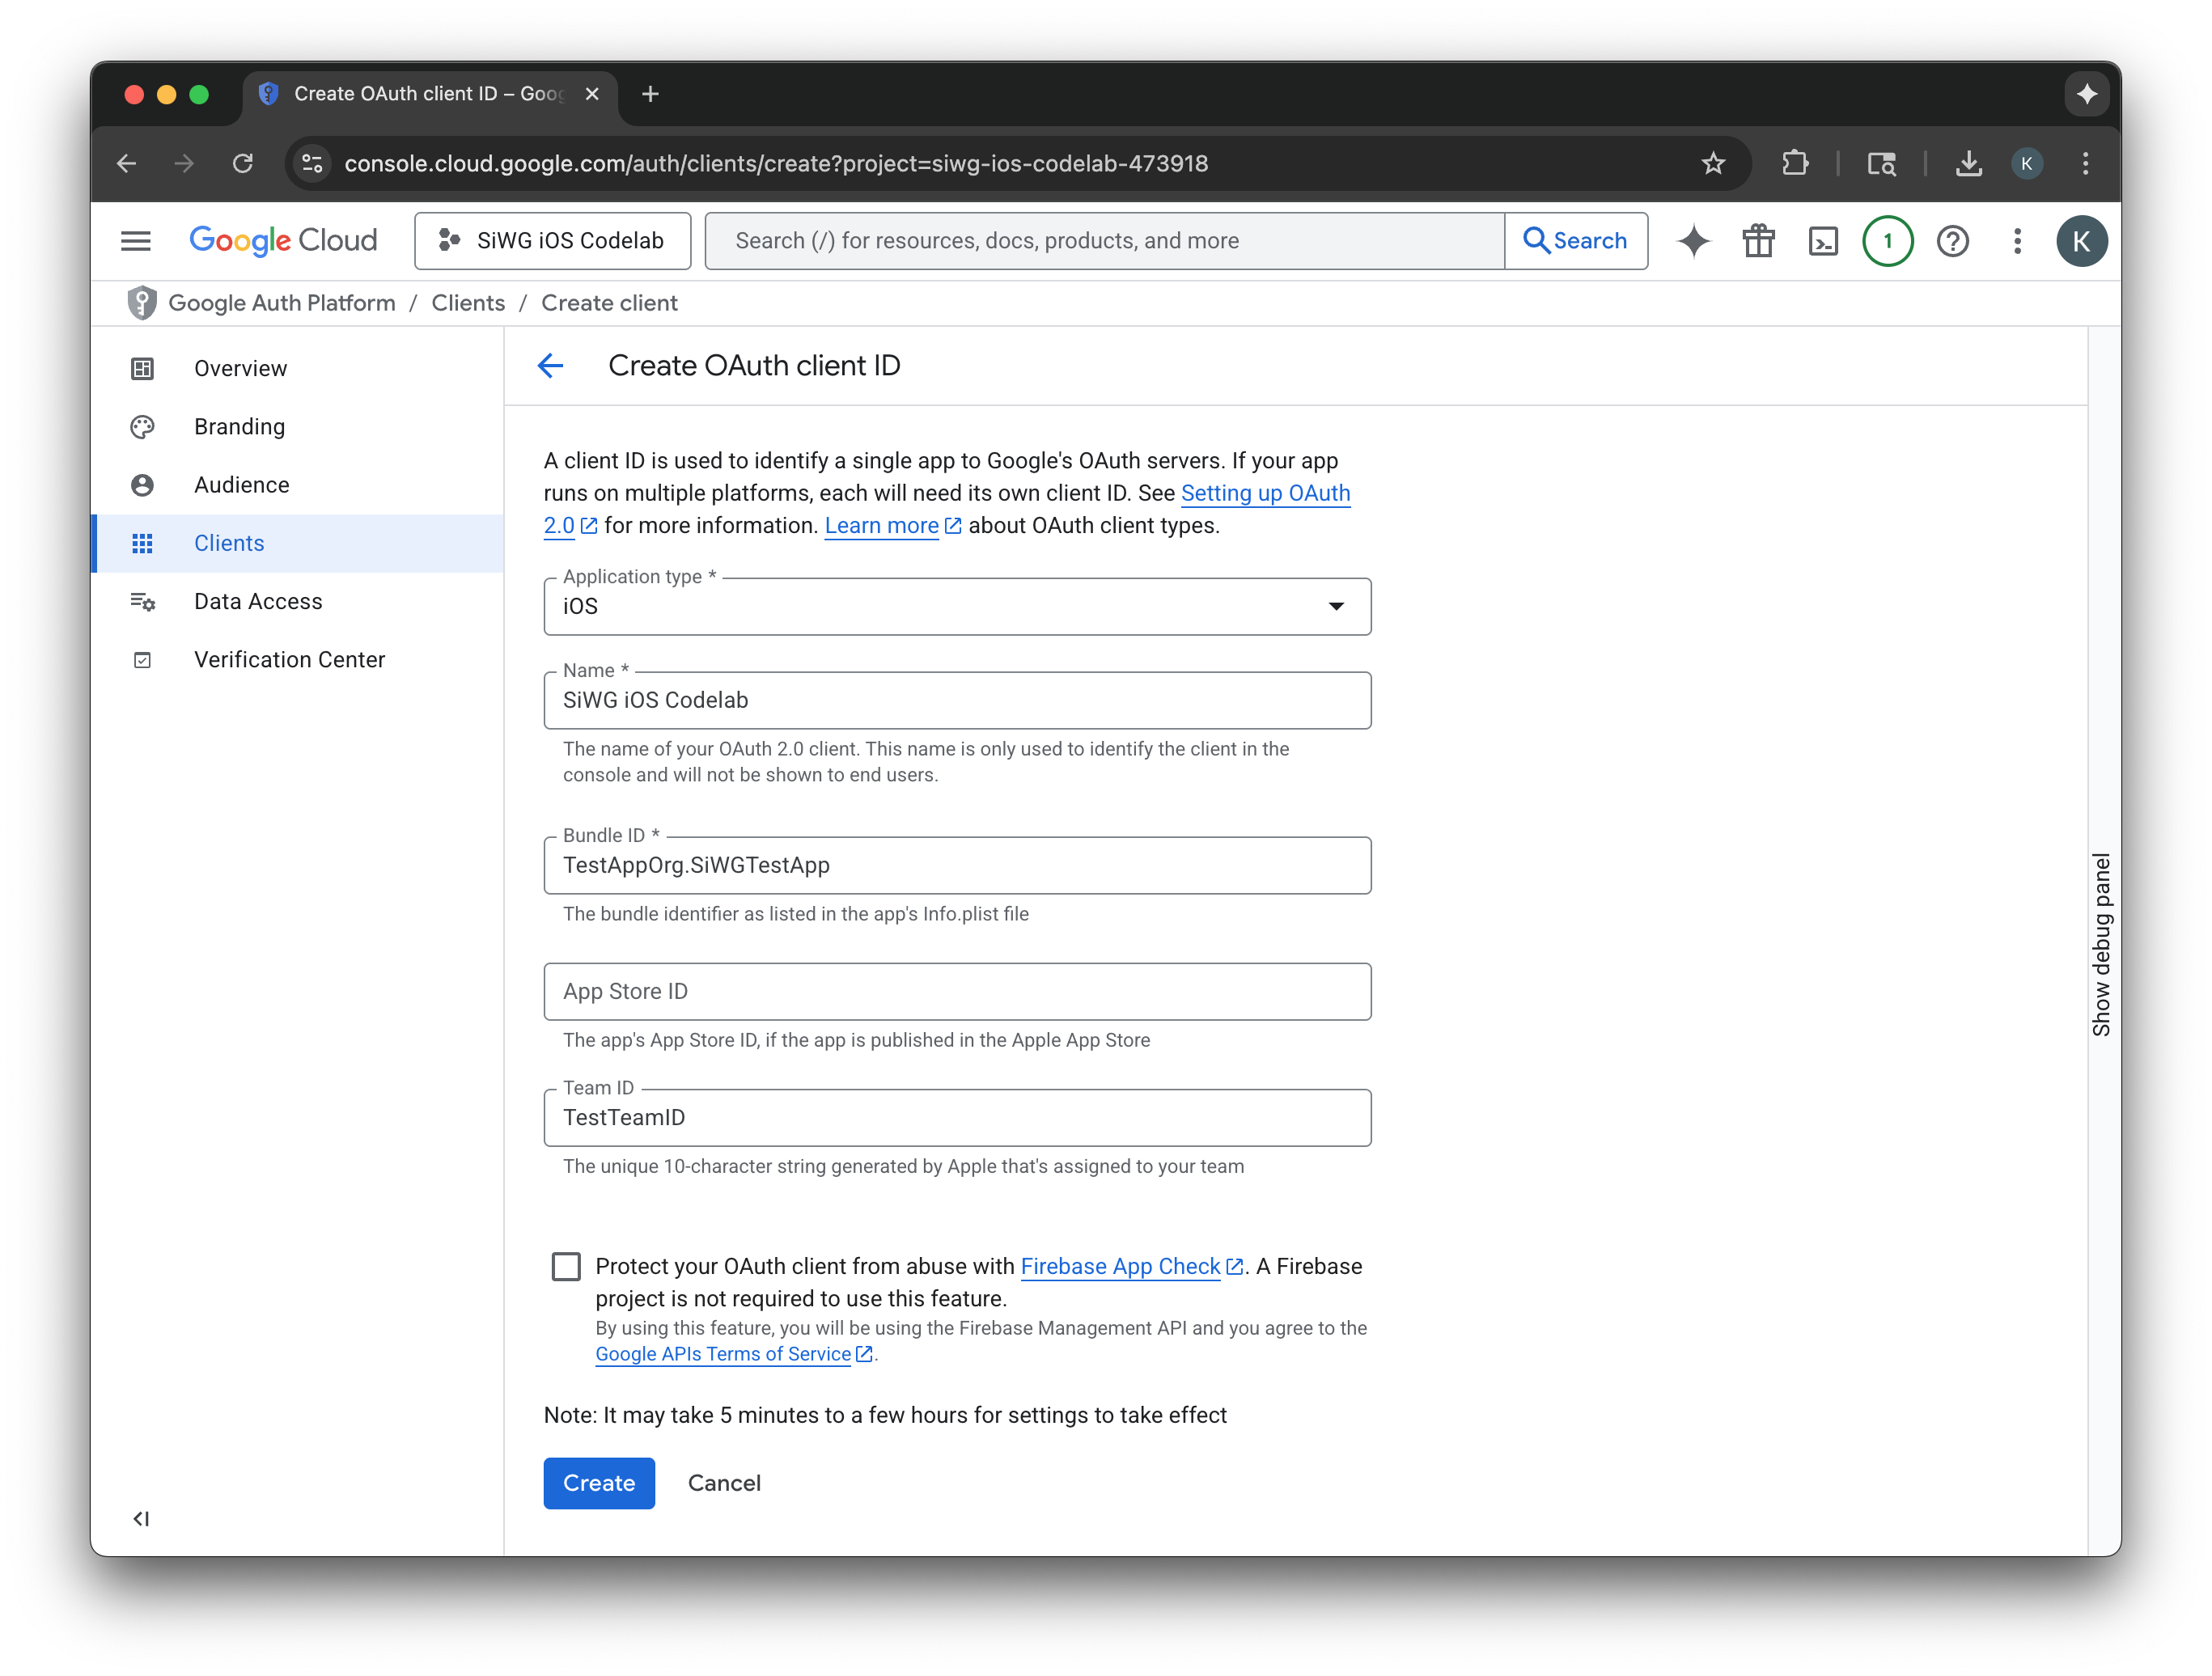
Tạo ứng dụng OAuth 2.0
- Chọn iOS cho Loại ứng dụng.
- Nhập tên cho ứng dụng khách của bạn.
- Nhập Bundle Identifier (Mã nhận dạng gói) được tạo ở bước cuối cùng.
- Nhập Mã nhóm do Apple chỉ định cho nhóm của bạn. Hiện tại, bước này là không bắt buộc, nhưng bạn cần có Team ID để bật Kiểm tra ứng dụng sau này trong lớp học lập trình này.
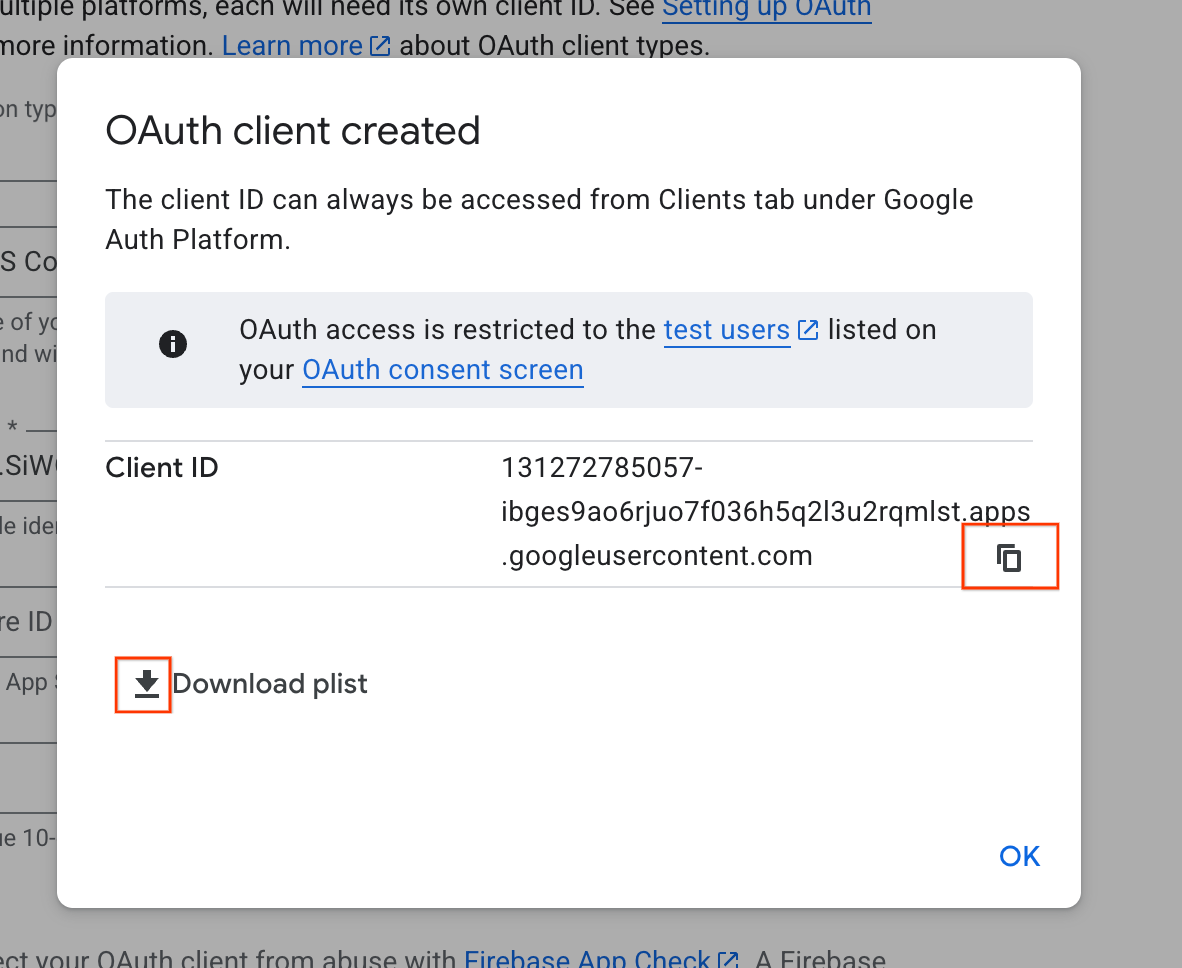
- Chọn Tạo.
- Sao chép Mã ứng dụng khách từ cửa sổ hộp thoại. Bạn sẽ cần mã này sau.
- Tải tệp plist xuống để tham chiếu sau.
4. Định cấu hình dự án Xcode
Bước tiếp theo là thiết lập dự án Xcode để hoạt động với SDK Đăng nhập bằng Google. Quy trình này bao gồm việc thêm SDK vào dự án dưới dạng một phần phụ thuộc và định cấu hình chế độ cài đặt dự án bằng một mã ứng dụng khách duy nhất. Mã nhận dạng này cho phép SDK giao tiếp an toàn với dịch vụ xác thực của Google trong quá trình đăng nhập.
Cài đặt các phần phụ thuộc của tính năng Đăng nhập bằng Google
- Mở dự án Xcode.
- Chuyển đến File > Add Package Dependencies (Tệp > Thêm phần phụ thuộc của gói).
- Trong thanh tìm kiếm, hãy nhập URL cho kho lưu trữ Đăng nhập bằng Google: https://github.com/google/GoogleSignIn-iOS
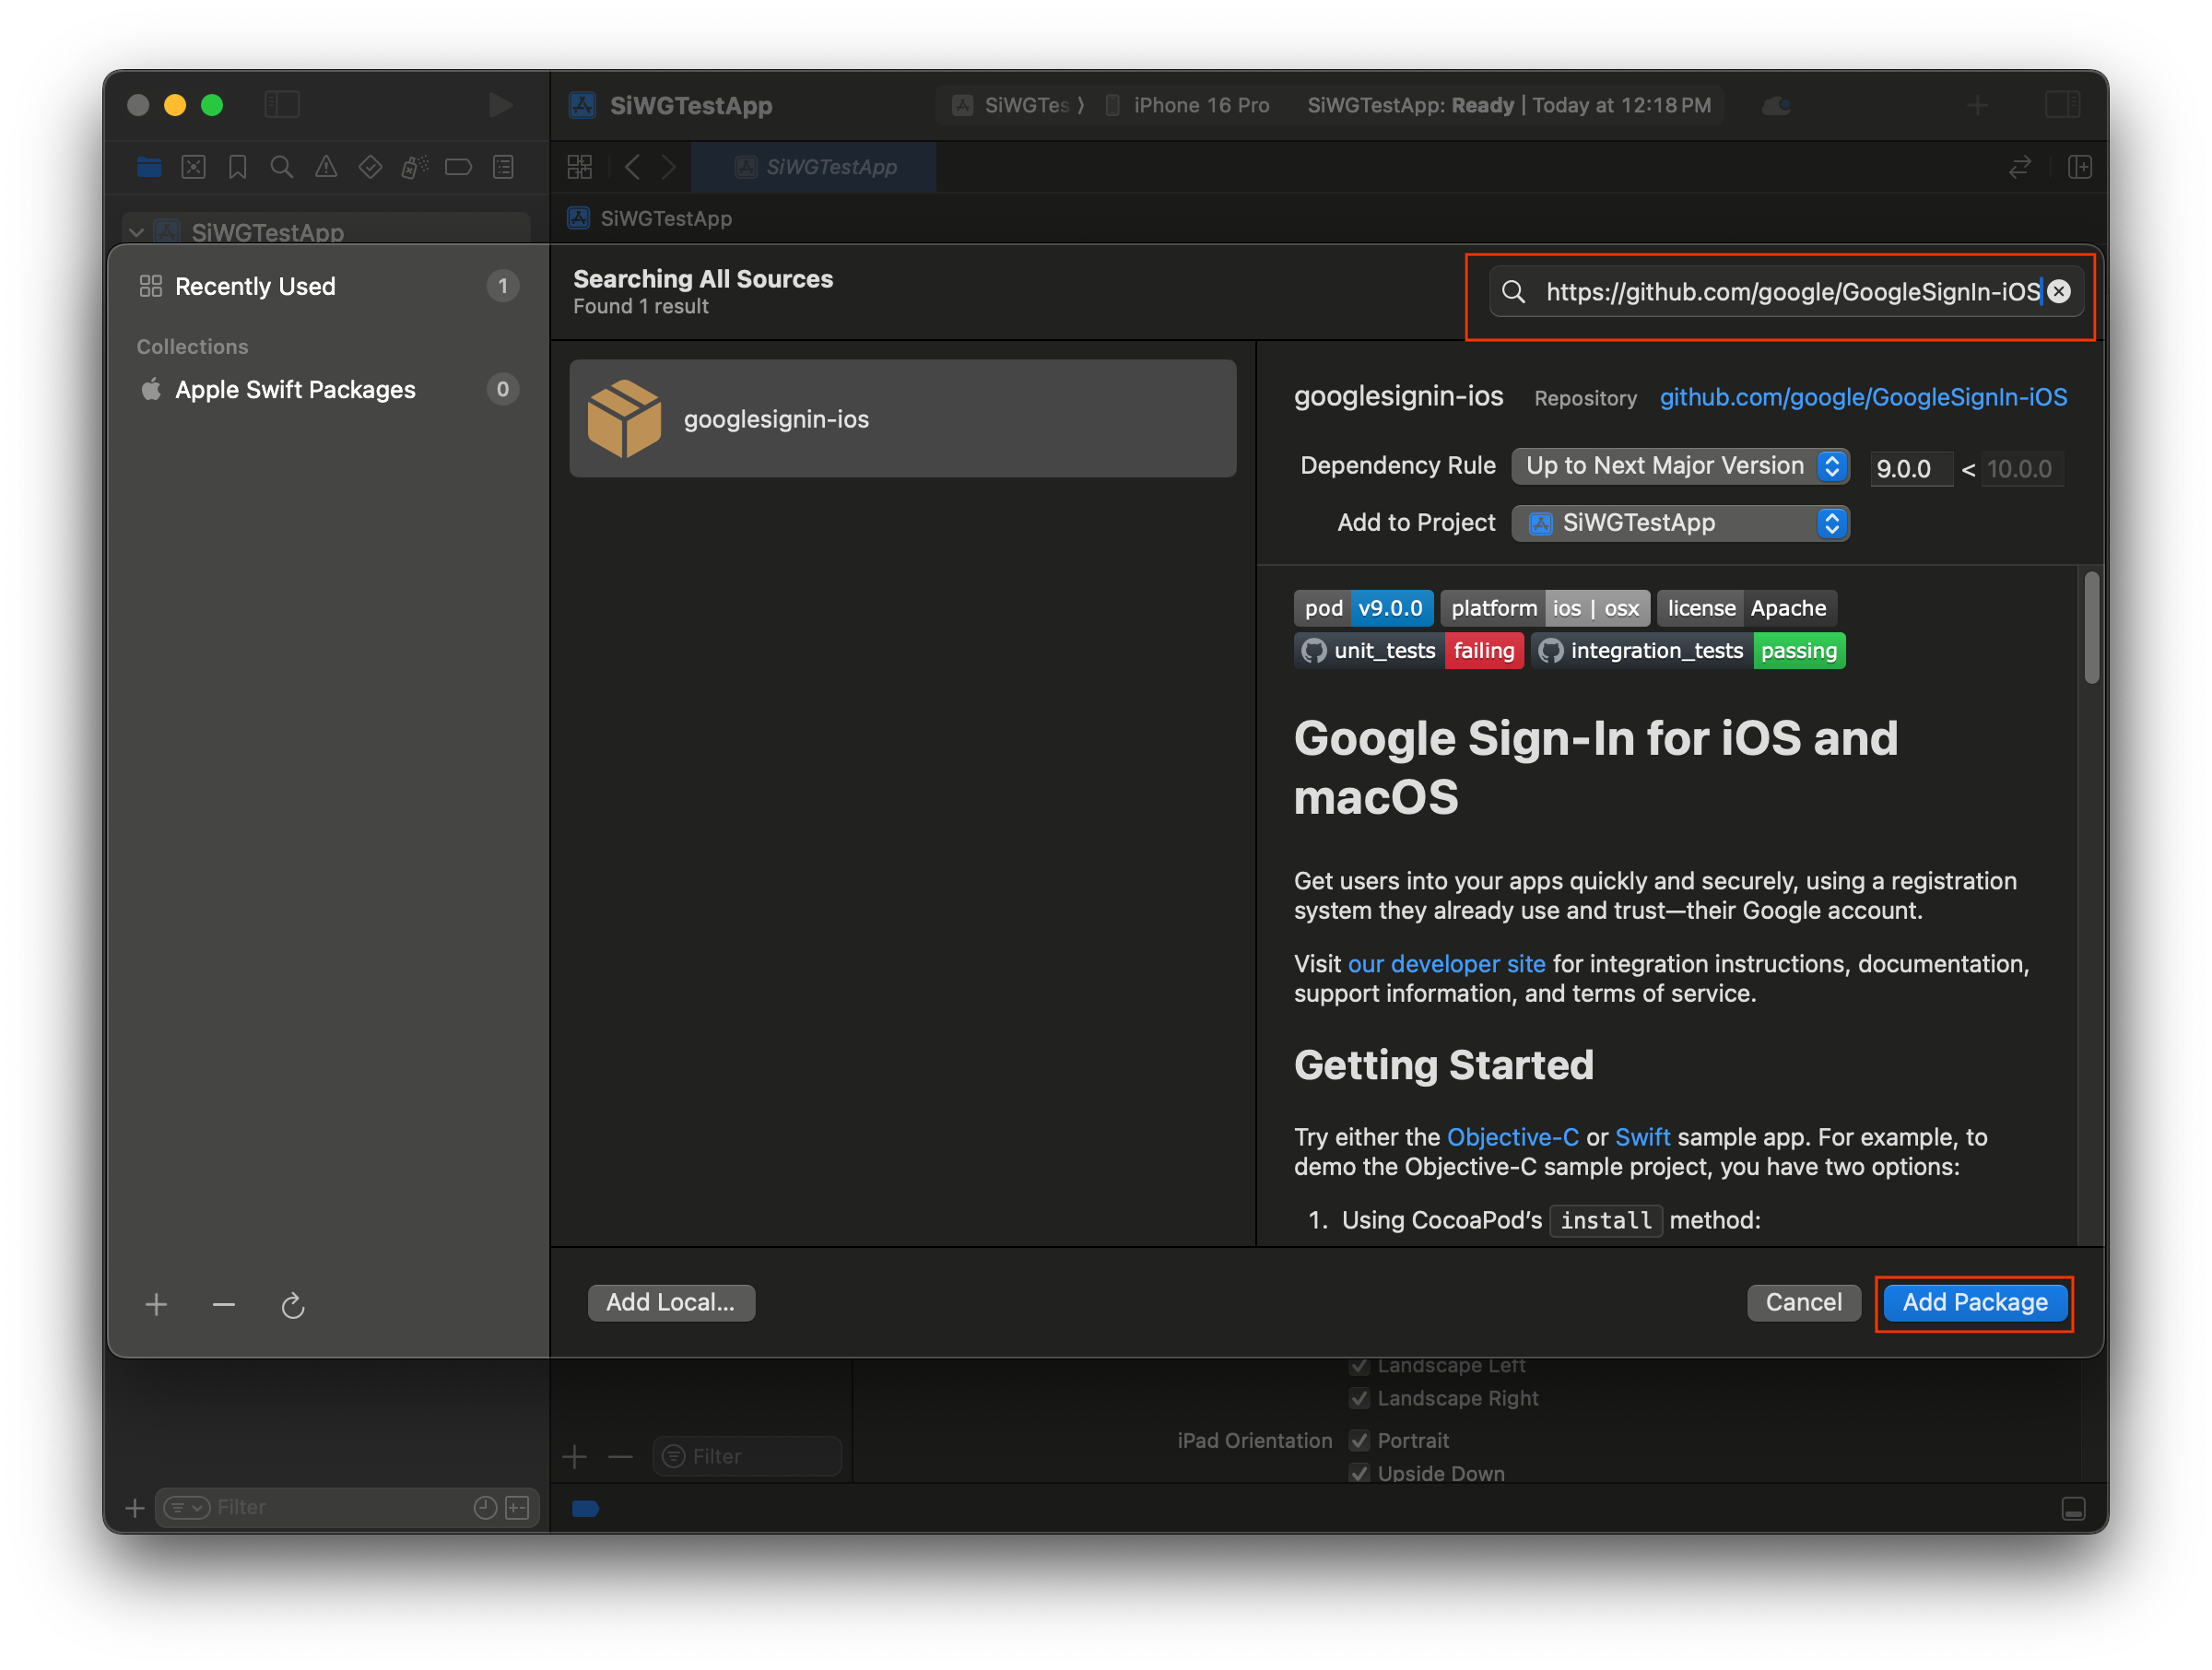
- Chọn Thêm gói.
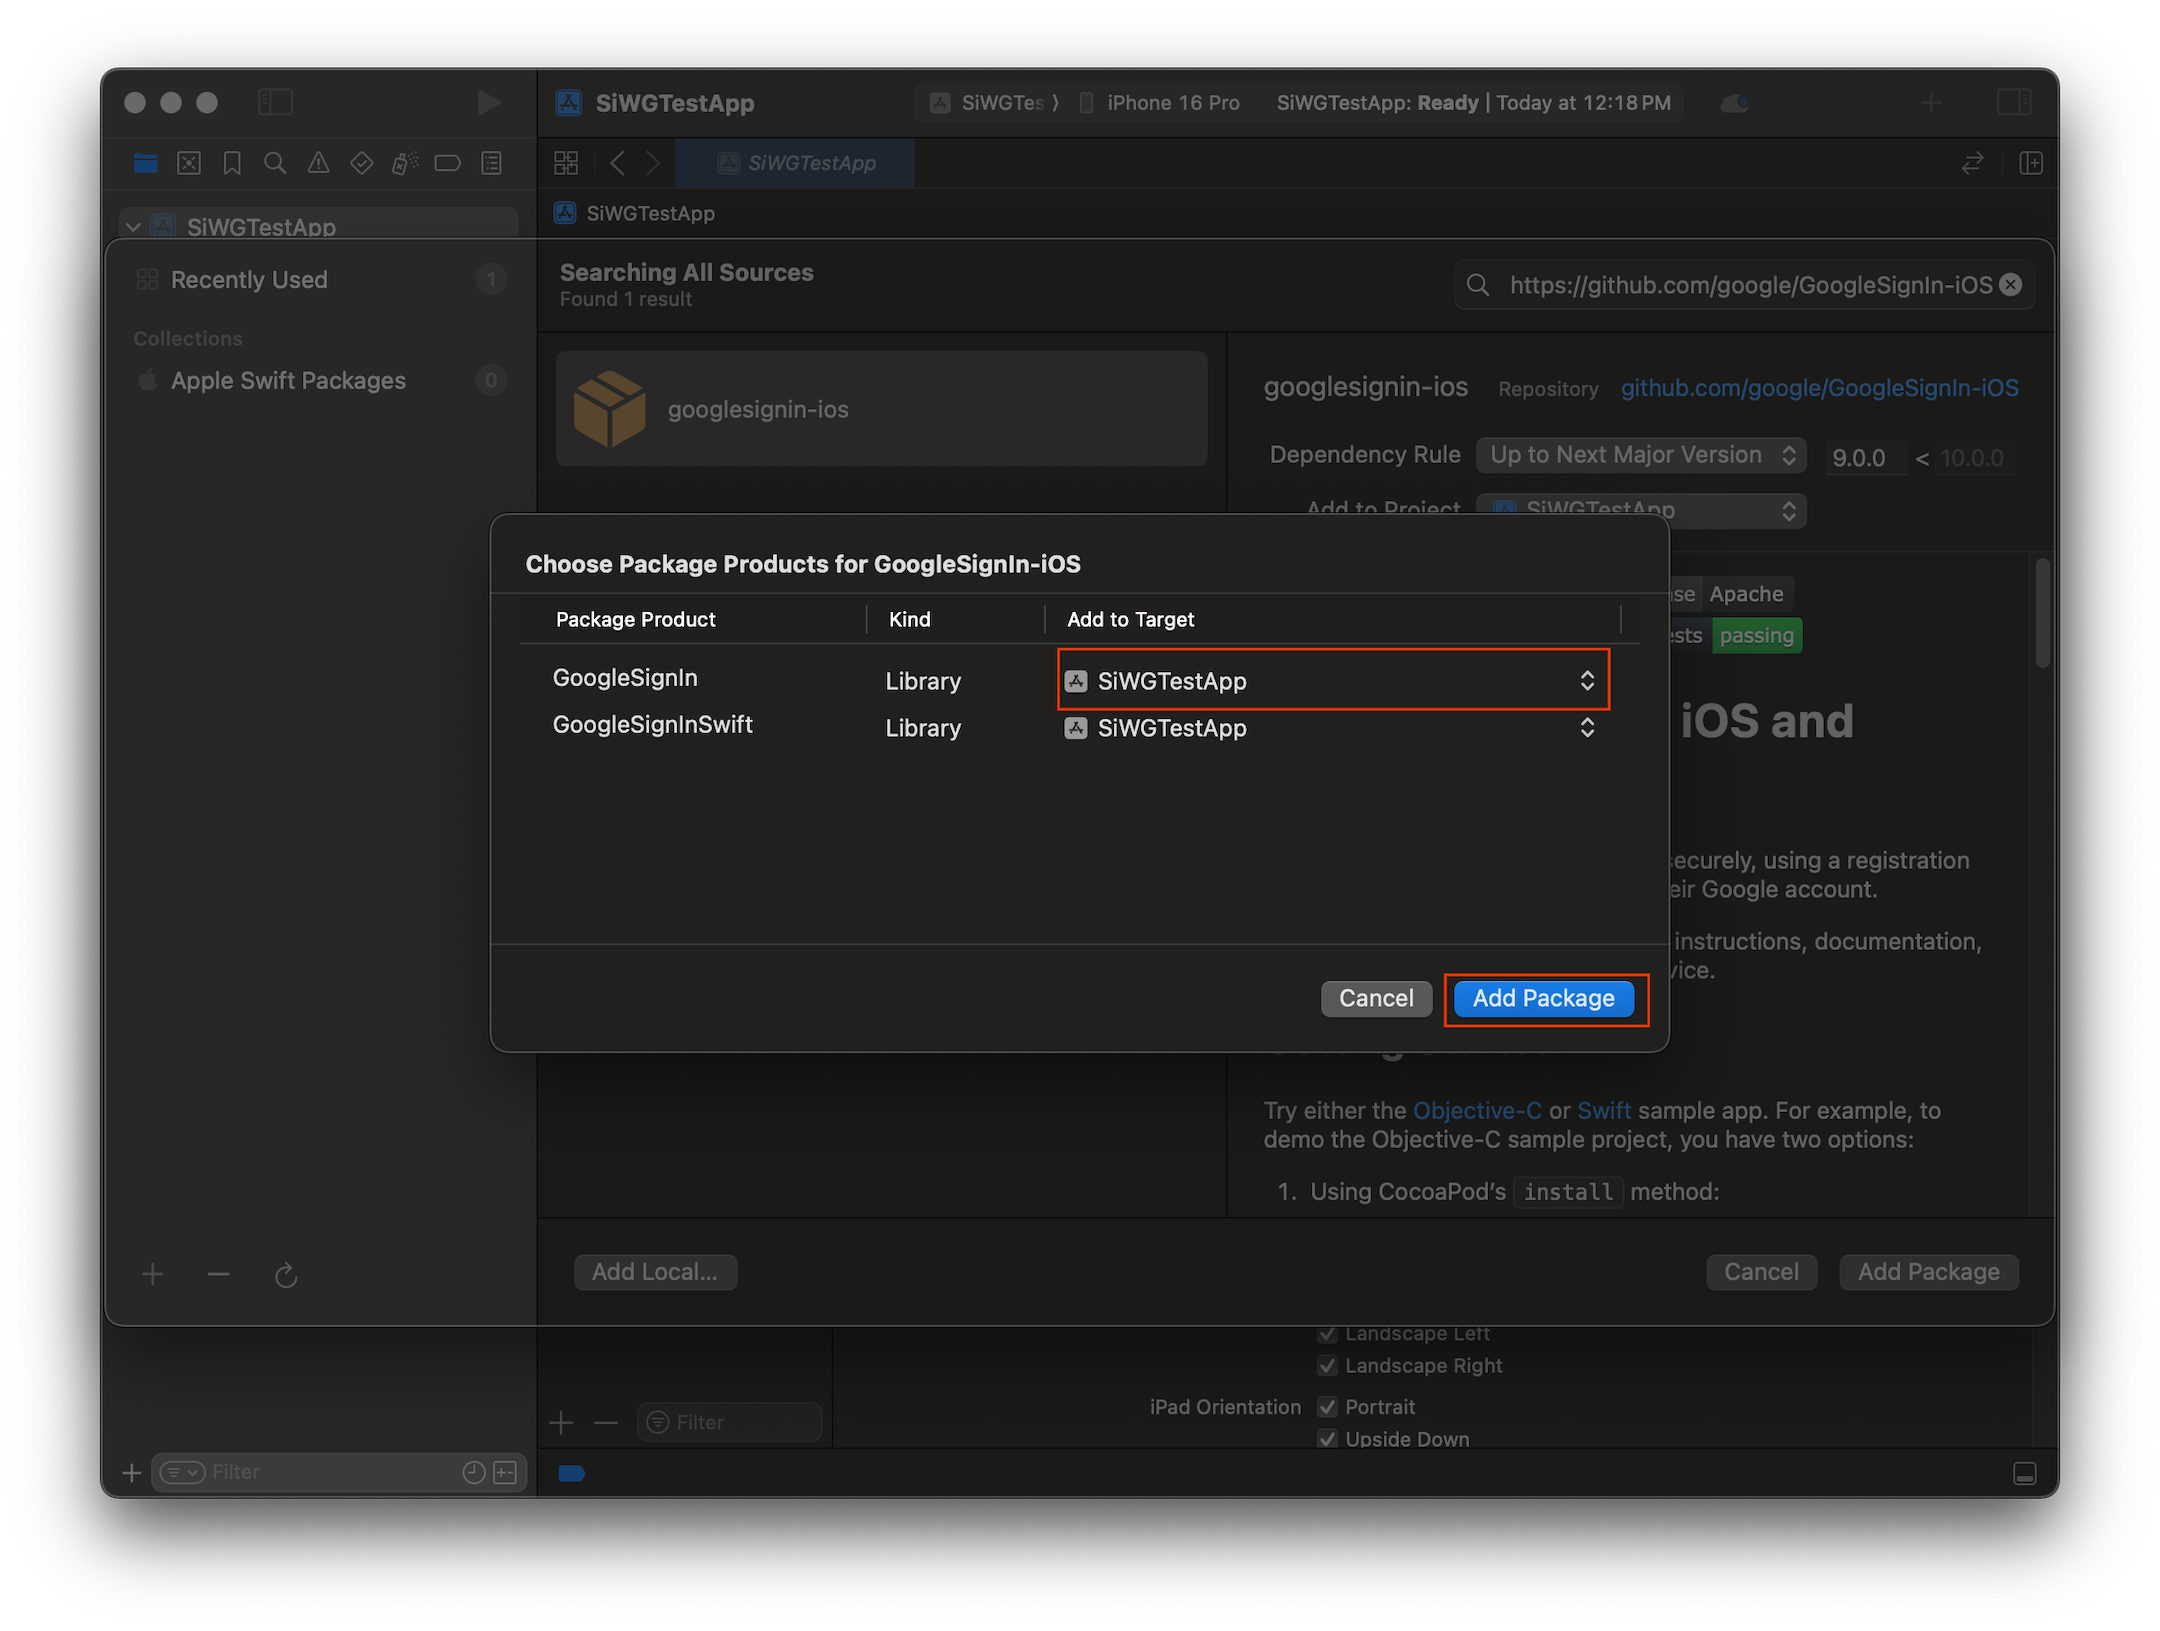
- Chọn mục tiêu ứng dụng chính cho gói GoogleSignIn.
- Nếu bạn đang sử dụng SwiftUI, hãy chọn mục tiêu ứng dụng chính cho gói GoogleSignInSwift. Nếu bạn dự định sử dụng UIKit, đừng chọn mục tiêu cho gói này.
- Chọn Thêm gói.
Định cấu hình thông tin đăng nhập của ứng dụng
- Trong Project Navigator (Trình điều hướng dự án), hãy nhấp vào thư mục gốc của dự án.
- Trong khu vực trình chỉnh sửa chính, hãy chọn mục tiêu ứng dụng chính trong danh sách TARGETS (MỤC TIÊU).
- Chọn thẻ Thông tin ở đầu khu vực chỉnh sửa.
- Di chuột qua hàng cuối cùng trong mục Custom iOS Target Properties (Thuộc tính mục tiêu tuỳ chỉnh trên iOS) rồi nhấp vào nút + xuất hiện.
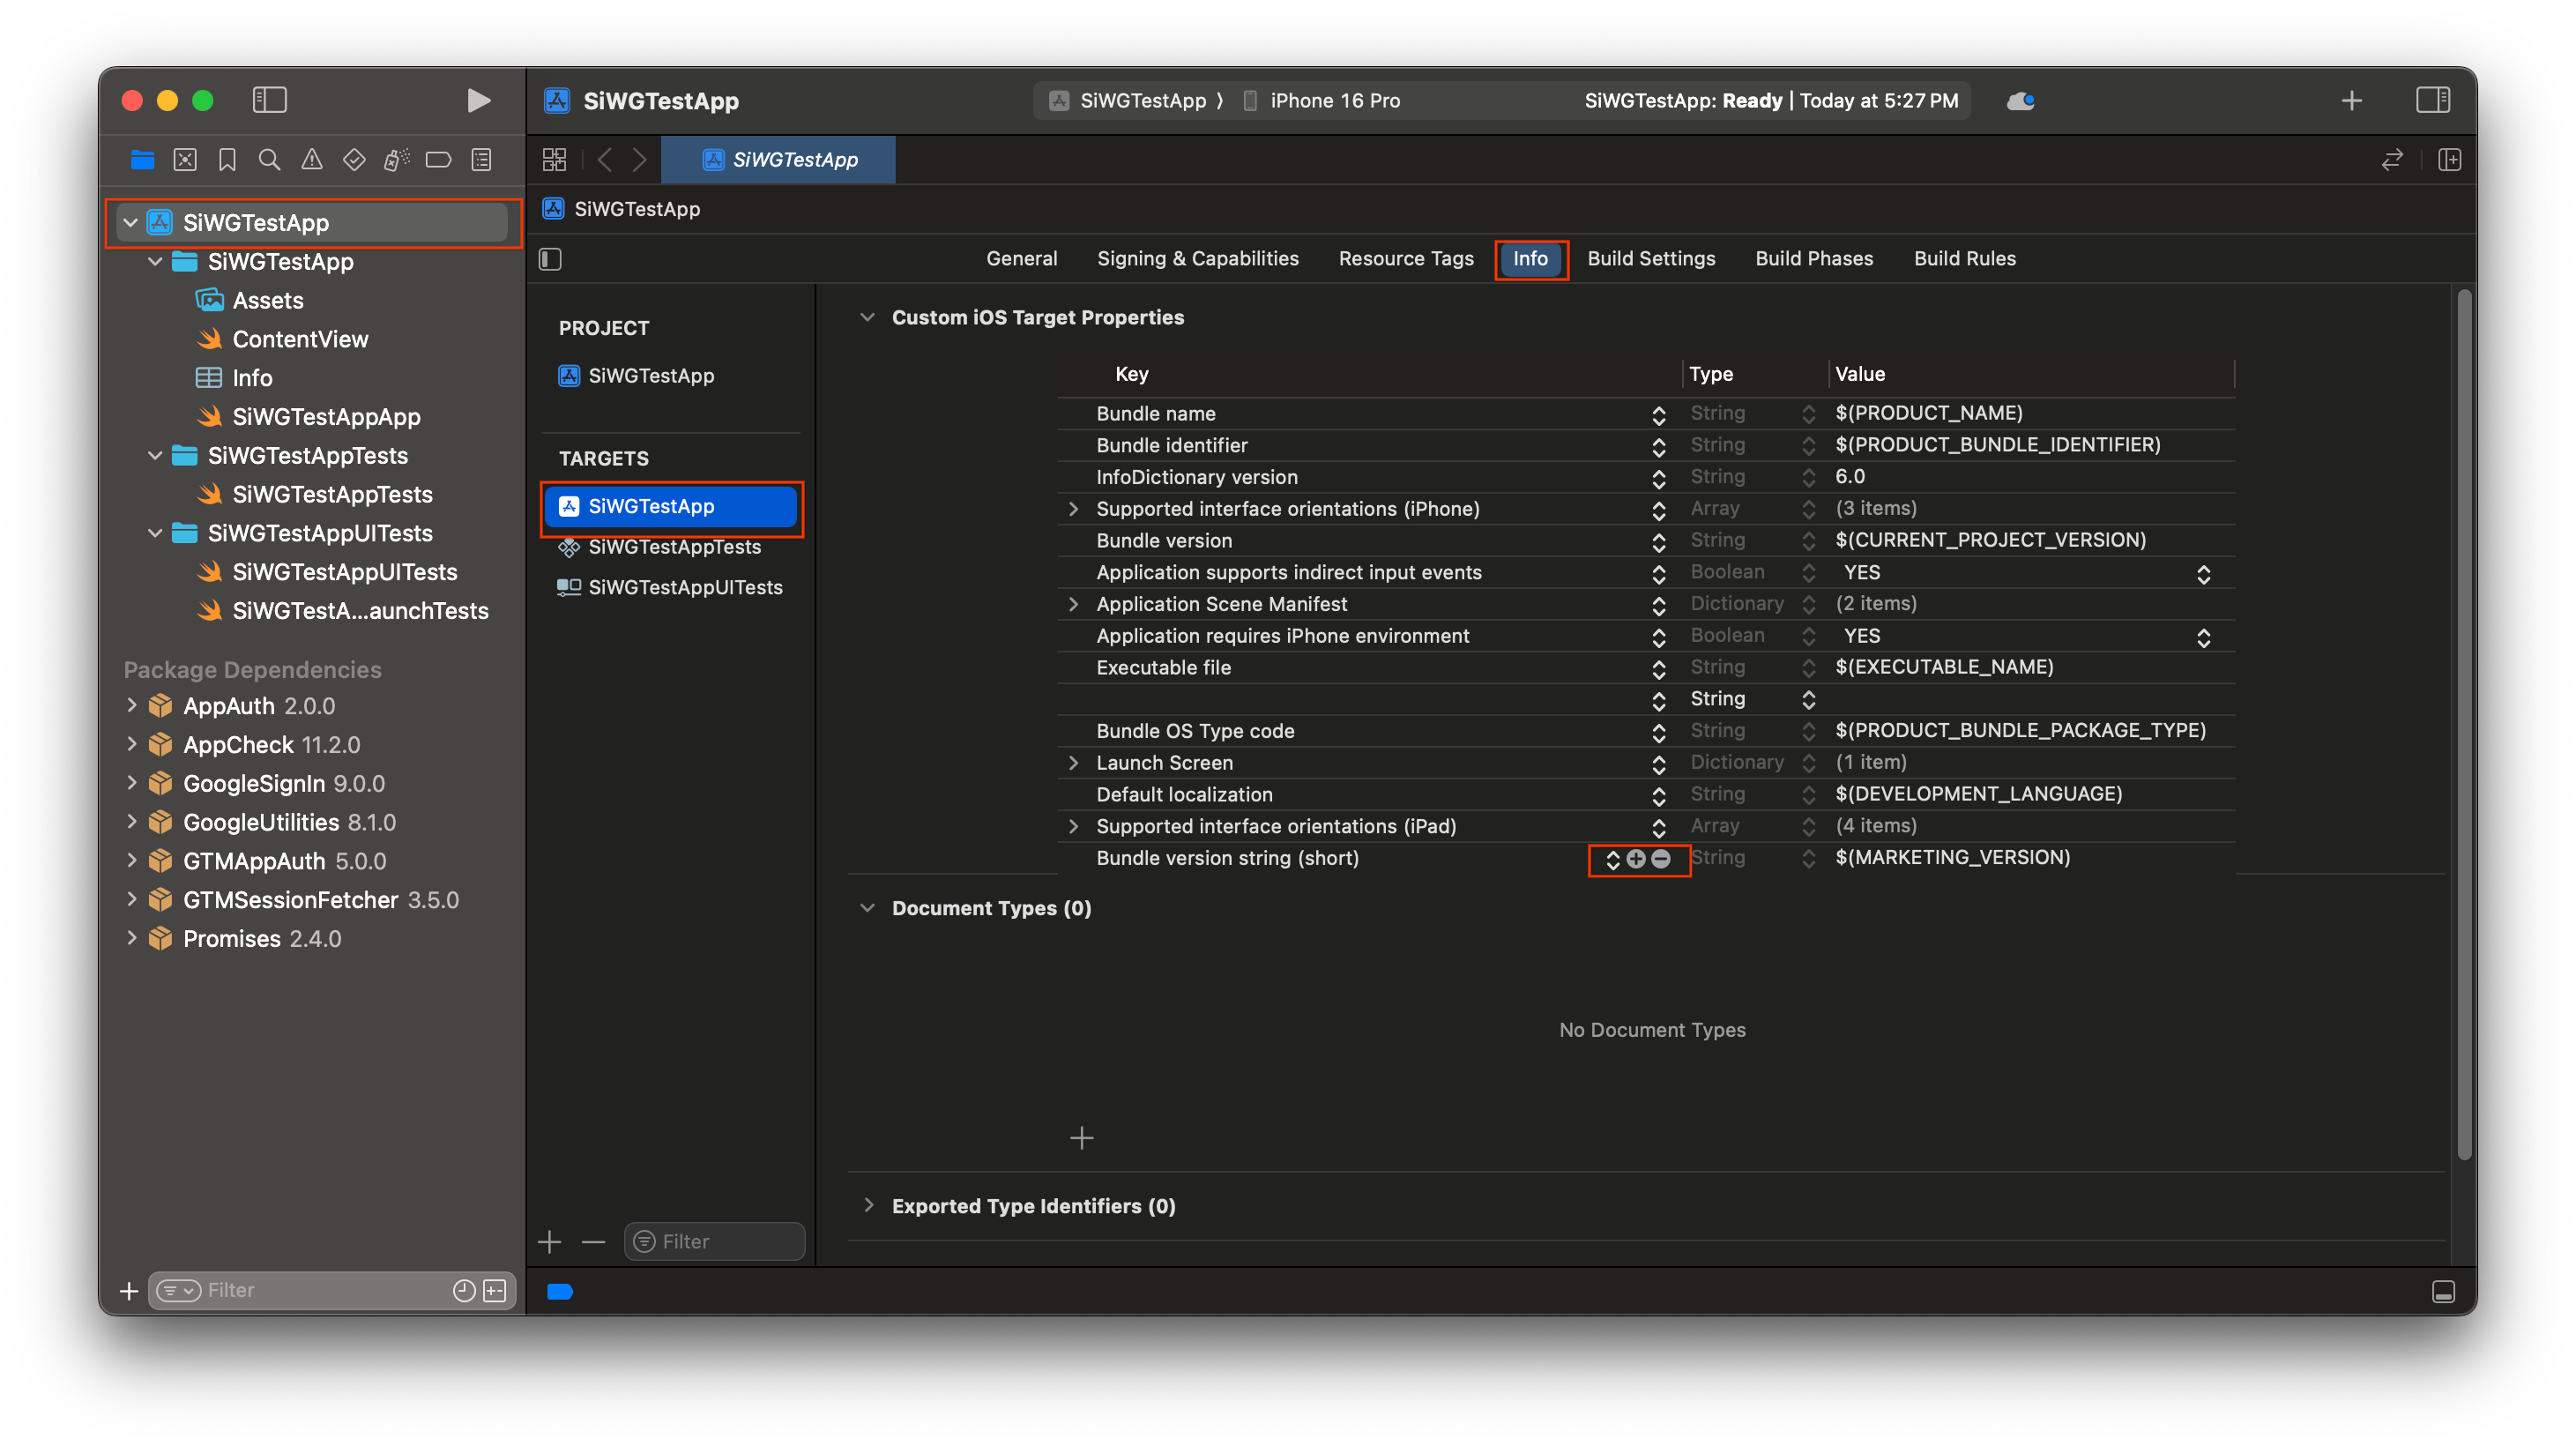
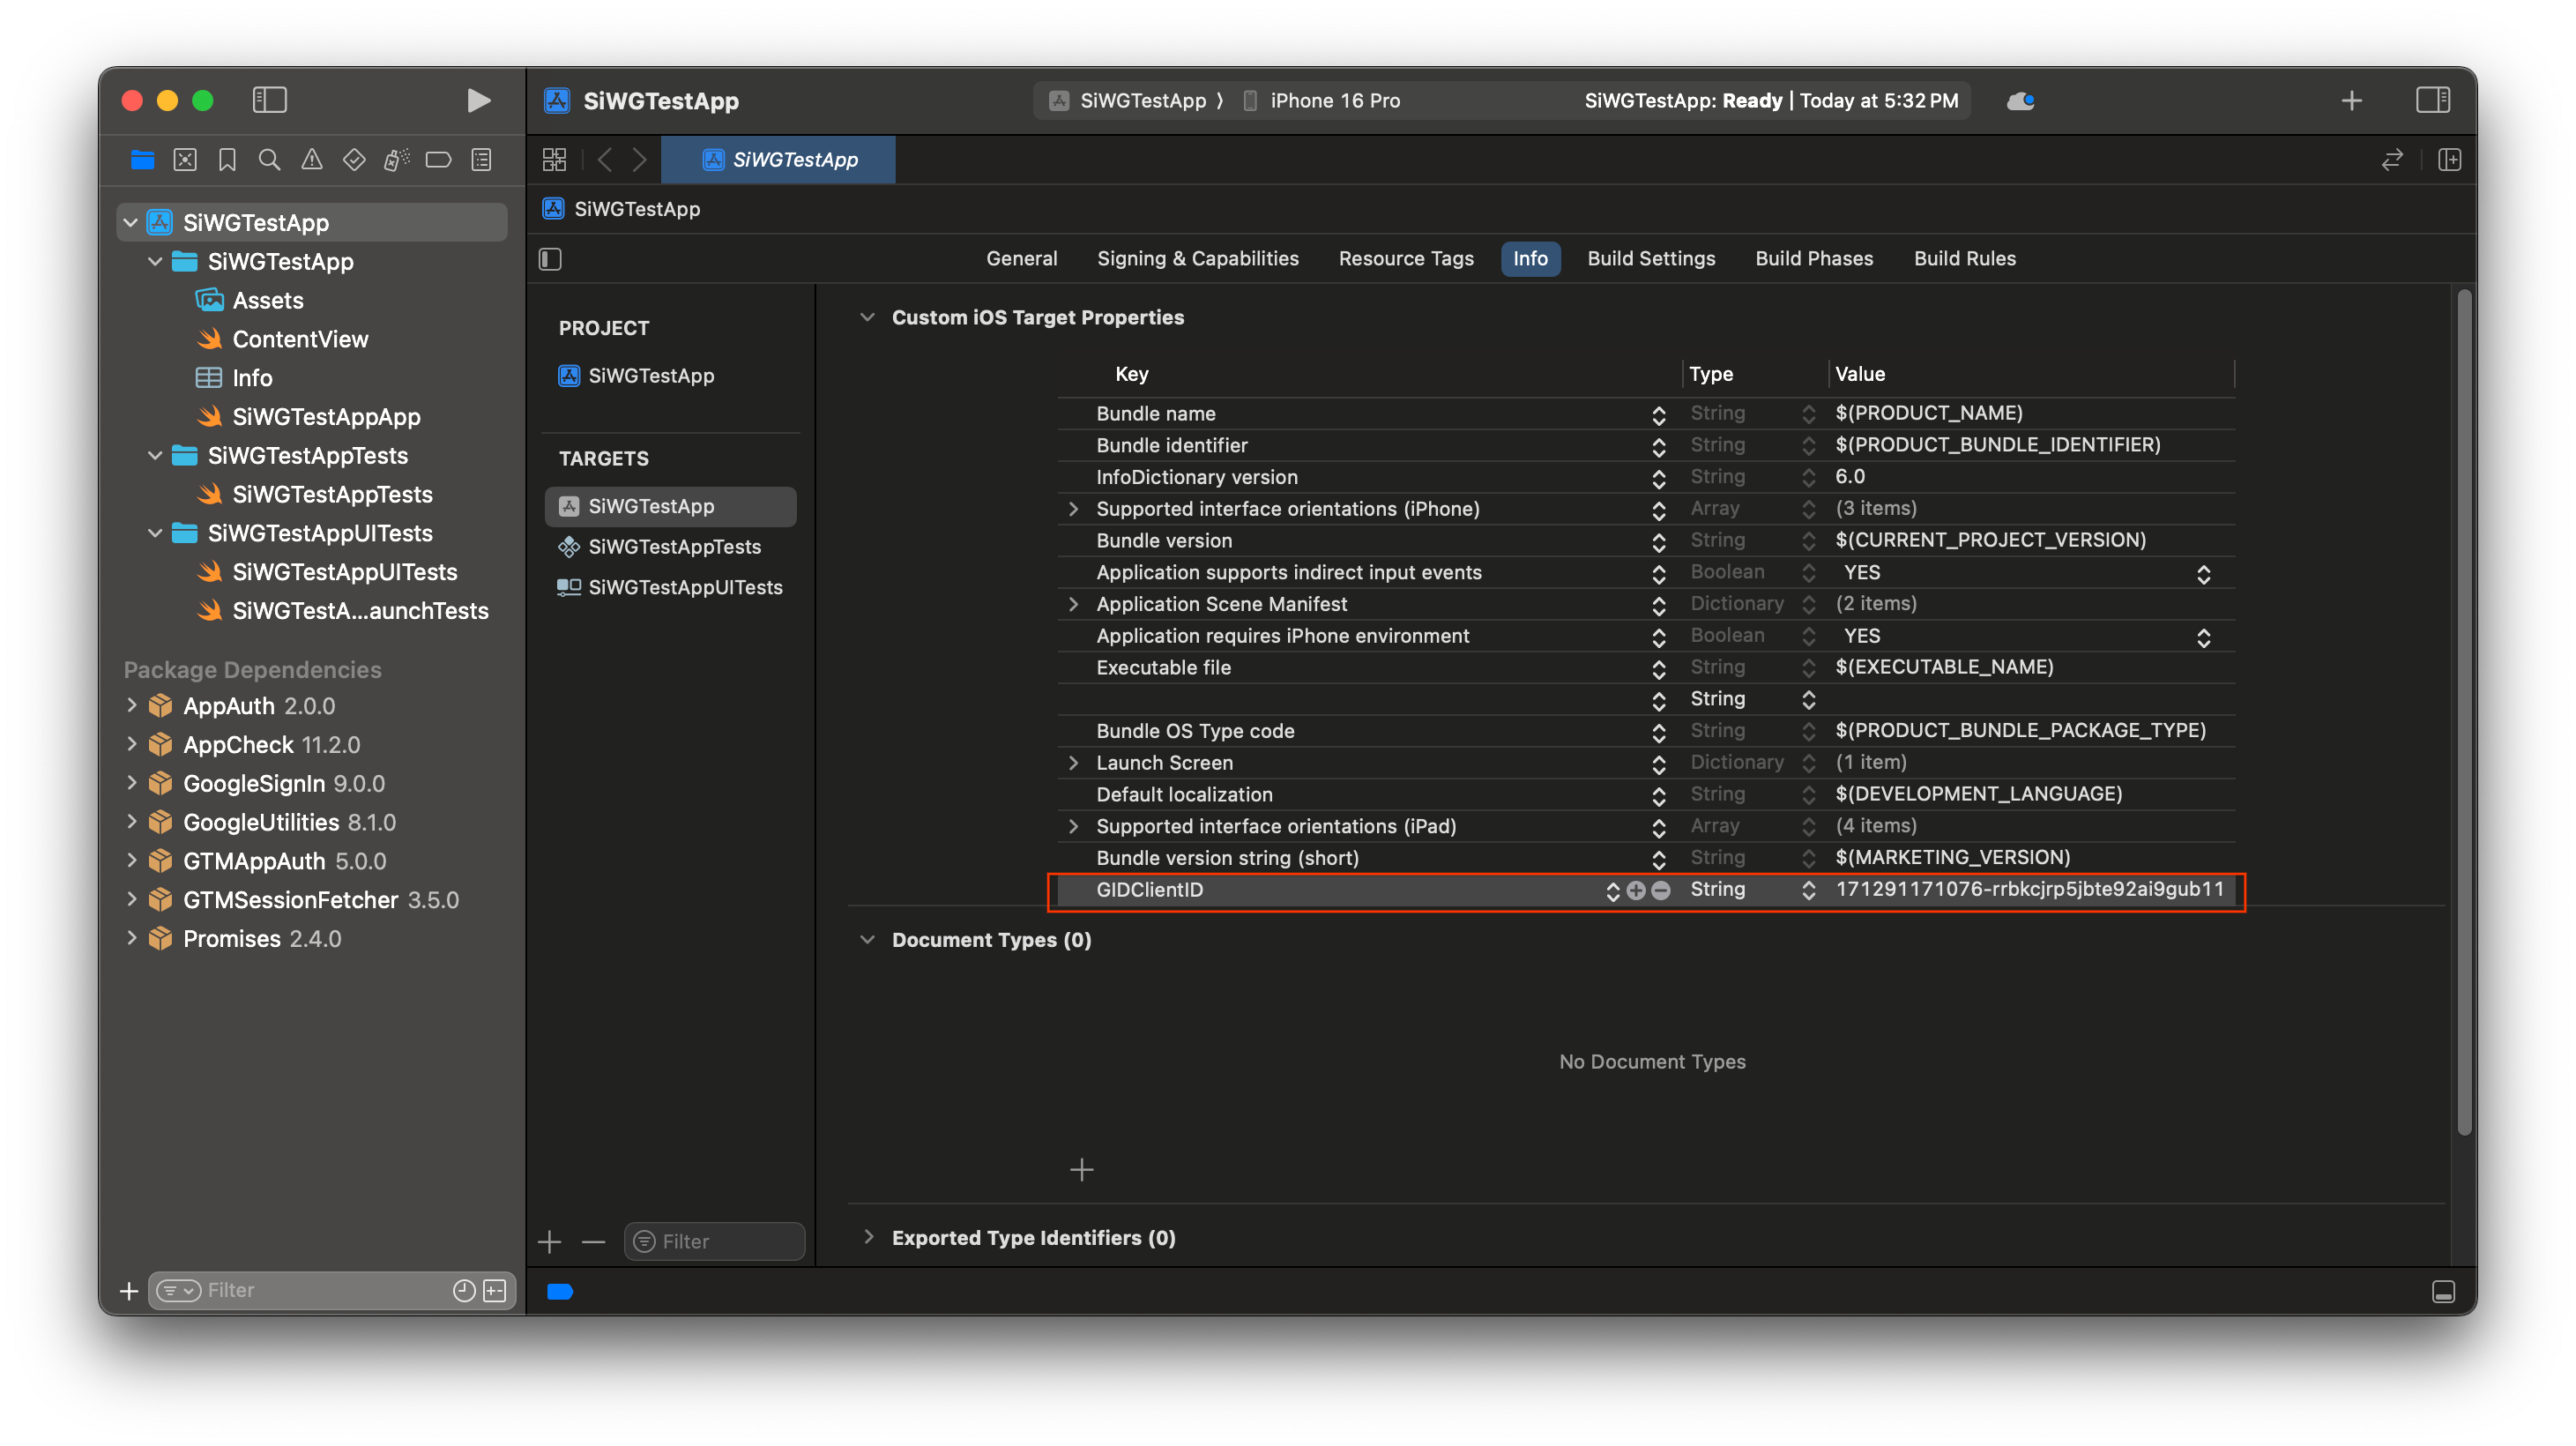
- Trong cột Khoá, hãy nhập GIDClientID
- Trong cột Giá trị, hãy dán mã ứng dụng khách mà bạn đã sao chép từ Google Cloud Console.
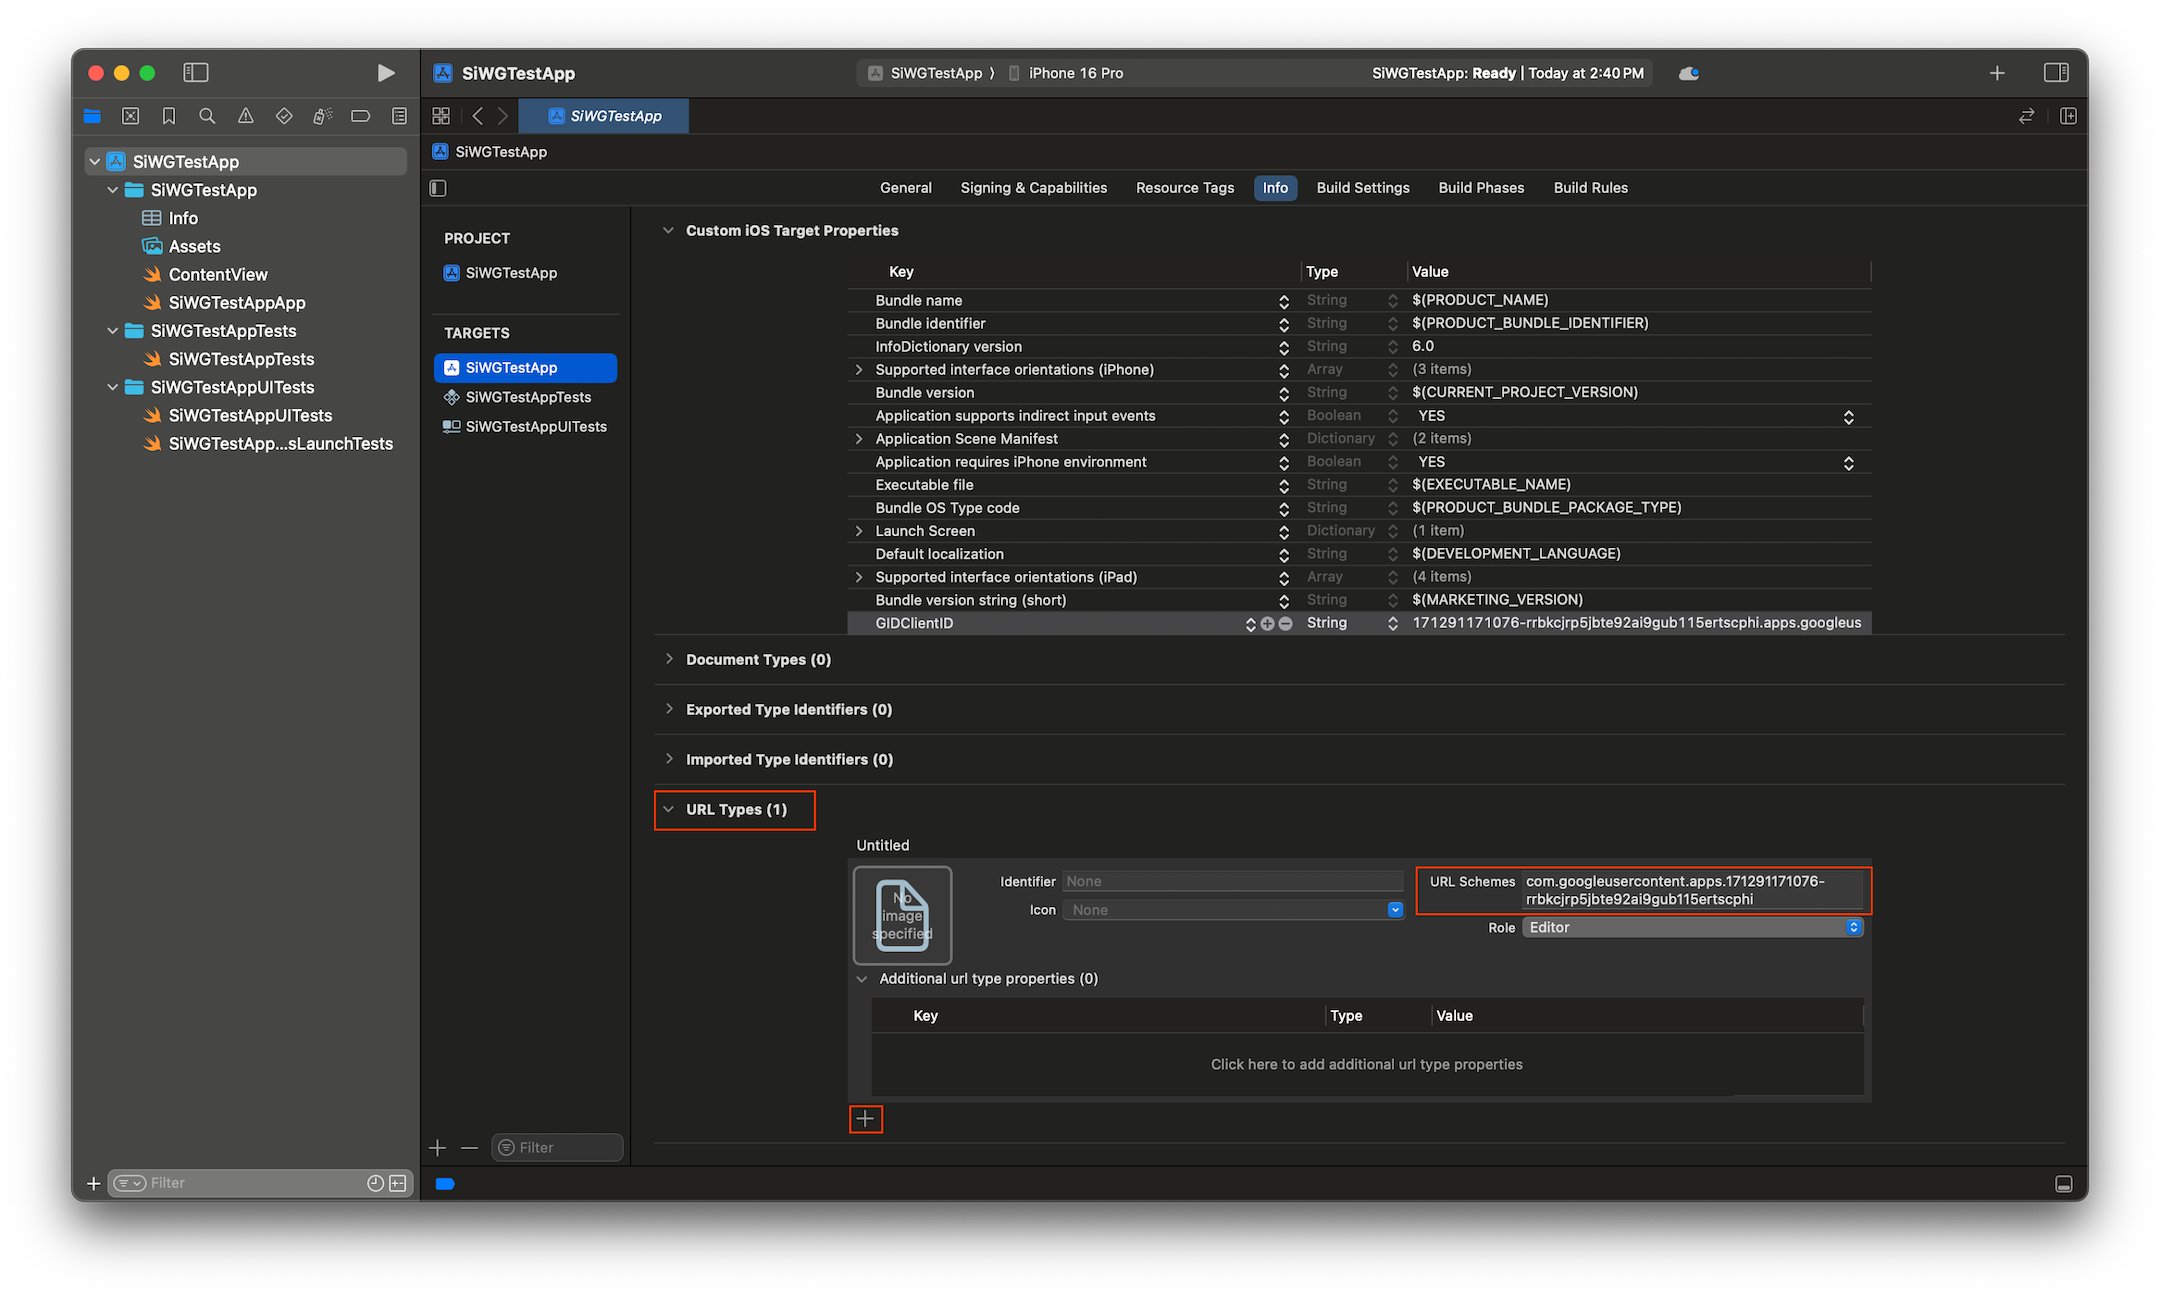
- Mở tệp plist mà bạn đã tải xuống từ Google Cloud Console.
- Sao chép giá trị cho Mã ứng dụng khách đảo ngược.

- Mở rộng Các loại URL ở cuối thẻ Thông tin.
- Chọn nút +.
- Nhập Mã ứng dụng khách đảo ngược vào hộp Lược đồ URL.
Giờ đây, chúng ta đã sẵn sàng bắt đầu thêm nút đăng nhập vào ứng dụng của mình!
5. Thêm nút đăng nhập
Sau khi định cấu hình dự án Xcode, đã đến lúc bắt đầu thêm nút Đăng nhập bằng Google vào ứng dụng!
Logic cốt lõi cho bước này là lệnh gọi đến GIDSignIn.sharedInstance.signIn. Phương thức này bắt đầu quy trình xác thực, chuyển quyền kiểm soát cho SDK Đăng nhập bằng Google để trình bày quy trình Đăng nhập bằng Google cho người dùng.
SwiftUI
- Tìm tệp ContentView.swift trong Trình điều hướng dự án của Xcode.
- Thay thế nội dung của tệp này bằng văn bản sau:
import GoogleSignIn
import GoogleSignInSwift
import SwiftUI

struct ContentView: View {
  var body: some View {
    VStack {
      GoogleSignInButton(action: handleSignInButton).padding()
    }
  }

  func handleSignInButton() {
    // Find the current window scene.
    guard let windowScene = UIApplication.shared.connectedScenes.first as? UIWindowScene else {
      print("There is no active window scene")
      return
    }

    // Get the root view controller from the window scene.
    guard
      let rootViewController = windowScene.windows.first(where: { $0.isKeyWindow })?
        .rootViewController
    else {
      print("There is no key window or root view controller")
      return
    }

    // Start the sign-in process.
    GIDSignIn.sharedInstance.signIn(
      withPresenting: rootViewController
    ) { signInResult, error in
      guard let result = signInResult else {
        // Inspect error
        print("Error signing in: \(error?.localizedDescription ?? "No error description")")
        return
      }
      // If sign in succeeded, display the app's main content View.
      print("ID Token: \(result.user.idToken?.tokenString ?? "")")
    }
  }
}

#Preview {
  ContentView()
}
UIKit
- Tìm tệp ViewController.swift trong Trình điều hướng dự án của Xcode.
- Thay thế nội dung của tệp này bằng văn bản sau:
import GoogleSignIn
import UIKit

class ViewController: UIViewController {

  // Create an instance of the Sign in with Google button
  let signInButton = GIDSignInButton()

  override func viewDidLoad() {
    super.viewDidLoad()

    // Add the sign-in button to your view
    view.addSubview(signInButton)

    // Position the button using constraints
    signInButton.translatesAutoresizingMaskIntoConstraints = false
    NSLayoutConstraint.activate([
      signInButton.centerXAnchor.constraint(equalTo: view.centerXAnchor),
      signInButton.centerYAnchor.constraint(equalTo: view.centerYAnchor),
    ])

    // Add a target to the button to call a method when it's pressed
    signInButton.addTarget(self, action: #selector(signInButtonTapped), for: .touchUpInside)
  }

  // This method is called when the sign-in button is pressed.
  @objc func signInButtonTapped() {
    // Start the sign-in process.
    GIDSignIn.sharedInstance.signIn(withPresenting: self) { signInResult, error in
      guard let result = signInResult else {
        // Inspect error
        print("Error signing in: \(error?.localizedDescription ?? "No error description")")
        return
      }

      // If sign in succeeded, print the ID token.
      print("ID Token: \(result.user.idToken?.tokenString ?? "")")
    }
  }
}
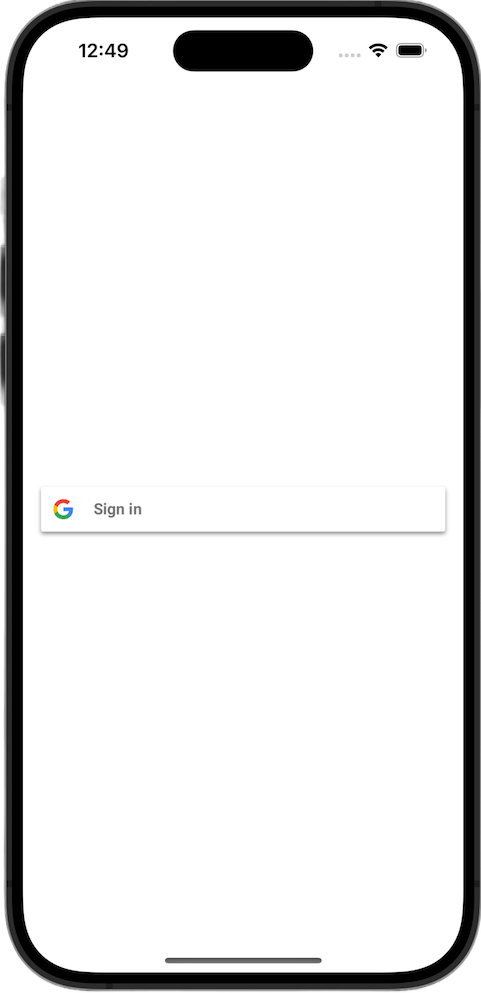
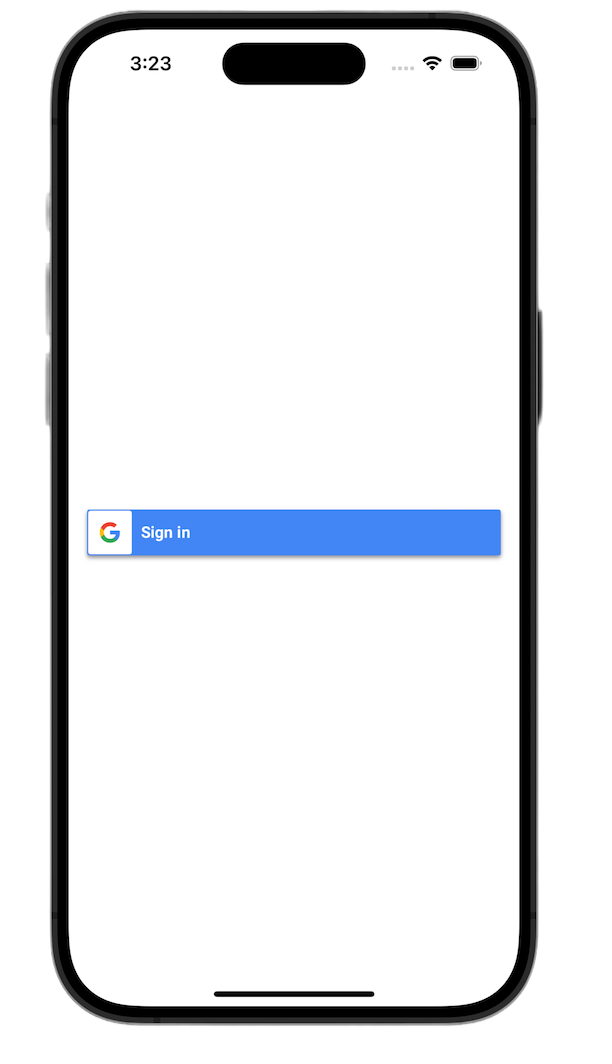
Xem nút đăng nhập
Khởi chạy ứng dụng trong trình mô phỏng. Bạn sẽ thấy nút Đăng nhập bằng Google, nhưng nút này chưa hoạt động đúng cách. Điều này là bình thường vì bạn vẫn cần triển khai mã để xử lý việc chuyển hướng trở lại ứng dụng của mình sau khi người dùng xác thực.
6. Tuỳ chỉnh nút đăng nhập
Bạn có thể tuỳ chỉnh nút Đăng nhập bằng Google mặc định để phù hợp hơn với giao diện của ứng dụng. SDK Đăng nhập bằng Google cho phép bạn sửa đổi bảng phối màu và kiểu nút.
SwiftUI
Nút mặc định được thêm vào trang bằng dòng mã sau:
GoogleSignInButton(action: handleSignInButton)
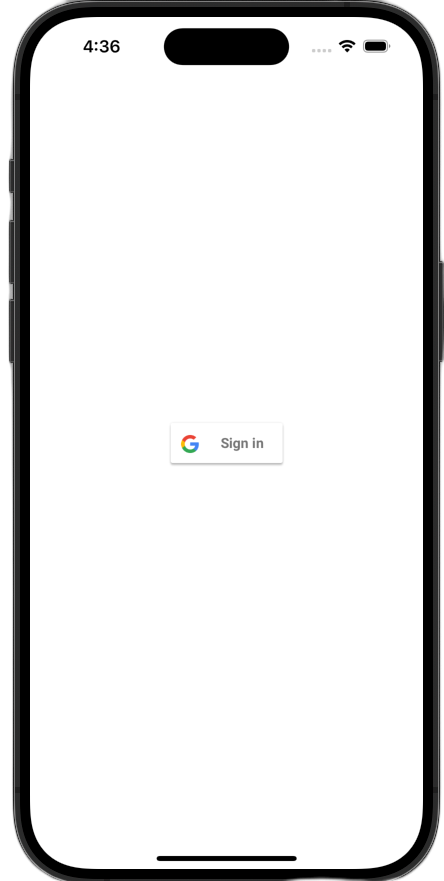
GoogleSignInButton được tuỳ chỉnh bằng cách truyền các tham số đến trình khởi tạo của nó. Đoạn mã sau đây sẽ khiến nút đăng nhập xuất hiện ở chế độ tối.
- Mở ContentView.swift
- Cập nhật trình khởi tạo cho
GoogleSignInButtonđể chứa các giá trị sau:
GoogleSignInButton(
  scheme: .dark,  // Options: .light, .dark, .auto
  style: .standard,  // Options: .standard, .wide, .icon
  state: .normal,  // Options: .normal, .disabled
  action: handleSignInButton
).padding()
Để biết thêm thông tin về các lựa chọn tuỳ chỉnh, hãy xem Tài liệu tham khảo về GoogleSignInSwift Framework
UIKit
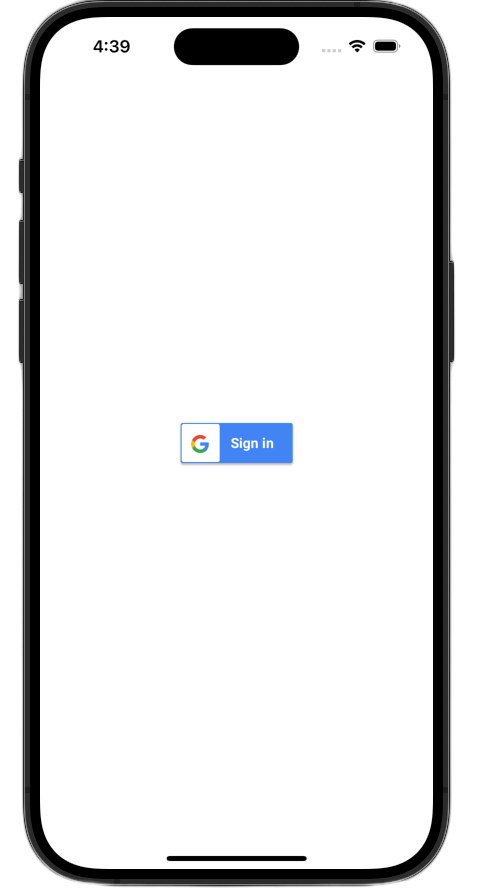
Nút mặc định được tạo bằng các dòng mã sau:
// Create an instance of the Sign in with Google button
let signInButton = GIDSignInButton()

// Add the button to your view
view.addSubview(signInButton)
Bạn có thể tuỳ chỉnh GIDSignInButton bằng cách đặt các thuộc tính trên thực thể nút. Đoạn mã sau đây sẽ khiến nút đăng nhập xuất hiện ở chế độ tối.
- Mở ViewController.swift.
- Thêm các dòng mã sau ngay trước khi thêm nút đăng nhập vào khung hiển thị trong hàm
viewDidLoad:
// Set the width and color of the sign-in button
signInButton.style = .standard  // Options: .standard, .wide, .iconOnly
signInButton.colorScheme = .dark  // Options: .dark, .light
Để biết thêm thông tin về cách tuỳ chỉnh, hãy xem Tài liệu tham khảo về GoogleSignIn Framework
7. Xử lý URL chuyển hướng xác thực
Sau khi thêm nút đăng nhập, bước tiếp theo là xử lý lệnh chuyển hướng xảy ra sau khi người dùng xác thực. Sau khi xác thực, Google sẽ trả về một URL có mã uỷ quyền tạm thời. Để hoàn tất quy trình đăng nhập, một trình xử lý sẽ chặn URL này và truyền URL đó đến SDK Đăng nhập bằng Google để đổi lấy một mã thông báo nhận dạng đã ký (JWT).
SwiftUI
- Mở tệp chứa cấu trúc
Appcủa bạn. Tệp này được đặt tên dựa trên dự án của bạn, vì vậy tên sẽ có dạng như YourProjectNameApp.swift. - Thay thế nội dung của tệp này bằng văn bản sau:
import GoogleSignIn
import SwiftUI

@main
struct iOS_Sign_in_with_Google_App: App {
  var body: some Scene {
    WindowGroup {
      ContentView()

        .onOpenURL { url in
          GIDSignIn.sharedInstance.handle(url)
        }
    }
  }
}
UIKit
- Mở AppDelegate.swift.
- Thêm nội dung nhập sau vào đầu tệp:
import GoogleSignIn
- Thêm hàm trình xử lý xác thực sau đây vào bên trong lớp
AppDelegate. Một vị trí thích hợp để đặt nó là ngay sau dấu ngoặc nhọn đóng của phương thứcapplication(_:didFinishLaunchingWithOptions:):
func application(
  _ app: UIApplication,
  open url: URL,
  options: [UIApplication.OpenURLOptionsKey: Any] = [:]
) -> Bool {
  var handled: Bool

  handled = GIDSignIn.sharedInstance.handle(url)
  if handled {
    return true
  }
  // If not handled by this app, return false.
  return false
}
Sau khi thực hiện những thay đổi này, tệp AppDelegate.swift của bạn sẽ có dạng như sau:
import GoogleSignIn
import UIKit

@main
class AppDelegate: UIResponder, UIApplicationDelegate {

  func application(
    _ application: UIApplication,
    didFinishLaunchingWithOptions launchOptions: [UIApplication.LaunchOptionsKey: Any]?
  ) -> Bool {
    // Override point for customization after application launch.
    return true
  }

  func application(
    _ app: UIApplication,
    open url: URL,
    options: [UIApplication.OpenURLOptionsKey: Any] = [:]
  ) -> Bool {
    var handled: Bool

    handled = GIDSignIn.sharedInstance.handle(url)
    if handled {
      return true
    }
    // If not handled by this app, return false.
    return false
  }

  // MARK: UISceneSession Lifecycle

  func application(
    _ application: UIApplication,
    configurationForConnecting connectingSceneSession: UISceneSession,
    options: UIScene.ConnectionOptions
  ) -> UISceneConfiguration {
    // Called when a new scene session is being created.
    // Use this method to select a configuration to create the new scene with.
    return UISceneConfiguration(
      name: "Default Configuration",
      sessionRole: connectingSceneSession.role
    )
  }

  func application(
    _ application: UIApplication,
    didDiscardSceneSessions sceneSessions: Set<UISceneSession>
  ) {
    // Called when the user discards a scene session.
    // If any sessions were discarded while the application was not running, this will be called shortly after application:didFinishLaunchingWithOptions.
    // Use this method to release any resources that were specific to the discarded scenes, as they will not return.
  }
}
Kiểm thử quy trình đăng nhập
Giờ đây, bạn có thể kiểm thử toàn bộ quy trình đăng nhập!
Chạy ứng dụng rồi nhấn vào nút đăng nhập. Sau khi bạn xác thực, Google sẽ hiển thị một màn hình xin phép để bạn có thể cấp quyền cho ứng dụng truy cập vào thông tin của bạn. Sau khi bạn phê duyệt, quá trình đăng nhập sẽ hoàn tất và bạn sẽ được chuyển về ứng dụng.
Khi quy trình đăng nhập hoàn tất thành công, SDK Đăng nhập bằng Google sẽ lưu trữ thông tin đăng nhập của người dùng một cách an toàn trong Chuỗi khoá của thiết bị. Sau này, bạn có thể dùng những thông tin đăng nhập này để cho phép người dùng duy trì trạng thái đăng nhập khi khởi chạy ứng dụng vào những lần tiếp theo.
8. Thêm nút đăng xuất
Giờ đây, khi tính năng đăng nhập đã hoạt động, bước tiếp theo là thêm nút đăng xuất và cập nhật giao diện người dùng để phản ánh trạng thái đăng nhập hiện tại của người dùng. Khi đăng nhập thành công, SDK sẽ cung cấp một đối tượng GIDGoogleUser. Đối tượng này chứa một thuộc tính profile với thông tin cơ bản như tên và email của người dùng mà bạn sẽ dùng để cá nhân hoá giao diện người dùng.
SwiftUI
- Mở tệp ContentView.swift.
- Thêm một biến trạng thái ở đầu cấu trúc
ContentView. Biến này sẽ lưu giữ thông tin của người dùng sau khi họ đăng nhập. Vì đây là một biến@State, nên SwiftUI sẽ tự động cập nhật giao diện người dùng của bạn bất cứ khi nào giá trị của biến này thay đổi:
struct ContentView: View {
  @State private var user: GIDGoogleUser?
}
- Thay thế
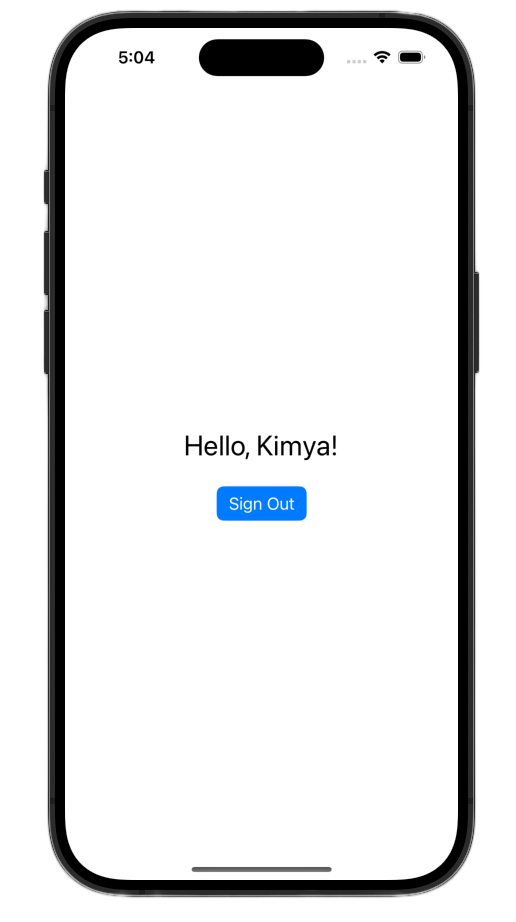
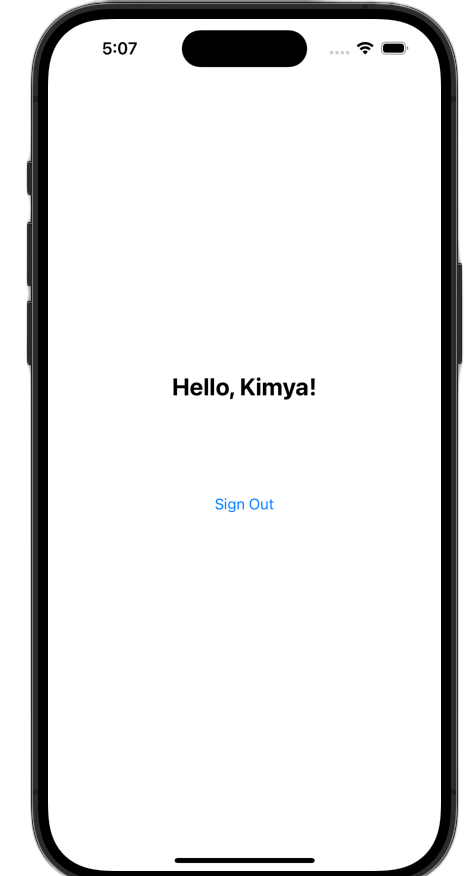
bodyhiện tại của cấu trúcContentViewbằngVStacksau đây. Thao tác này sẽ kiểm tra xem biến trạng tháiusercó chứa người dùng hay không. Nếu có, thì hệ thống sẽ hiện một thông báo chào mừng và nút đăng xuất. Nếu không, nút Đăng nhập bằng Google ban đầu sẽ xuất hiện:
var body: some View {
  VStack {
    // Check if the user is signed in.
    if let user = user {
      // If signed in, show a welcome message and the sign-out button.
      Text("Hello, \(user.profile?.givenName ?? "User")!")
        .font(.title)
        .padding()

      Button("Sign Out", action: signOut)
        .buttonStyle(.borderedProminent)

    } else {
      // If not signed in, show the "Sign in with Google" button.
      GoogleSignInButton(
        scheme: .dark,  // Options: .light, .dark, .auto
        style: .standard,  // Options: .standard, .wide, .icon
        state: .normal,  // Options: .normal, .disabled
        action: handleSignInButton
      ).padding()
    }
  }
}
- Cập nhật khối hoàn thành
handleSignInButtonđể chỉ địnhsignInResult.usercho biếnusermới. Đây là điều kiện kích hoạt để giao diện người dùng chuyển sang chế độ xem đã đăng nhập:
func handleSignInButton() {
  // Find the current window scene.
  guard let windowScene = UIApplication.shared.connectedScenes.first as? UIWindowScene else {
    print("There is no active window scene")
    return
  }

  // Get the root view controller from the window scene.
  guard
    let rootViewController = windowScene.windows.first(where: { $0.isKeyWindow })?
      .rootViewController
  else {
    print("There is no key window or root view controller")
    return
  }

  // Start the sign-in process.
  GIDSignIn.sharedInstance.signIn(
    withPresenting: rootViewController
  ) { signInResult, error in
    guard let result = signInResult else {
      // Inspect error
      print("Error signing in: \(error?.localizedDescription ?? "No error description")")
      return
    }

    DispatchQueue.main.async {
      self.user = result.user
    }

    // If sign in succeeded, display the app's main content View.
    print("ID Token: \(result.user.idToken?.tokenString ?? "")")
  }
}
- Thêm một hàm
signOutmới vào cuối cấu trúcContentViewđể nút đăng xuất gọi:
func signOut() {
  GIDSignIn.sharedInstance.signOut()
  // After signing out, set the `user` state variable to `nil`.
  self.user = nil
}
Khởi chạy ứng dụng rồi đăng nhập. Bạn sẽ thấy giao diện người dùng thay đổi sau khi xác thực thành công!
Sau khi thực hiện những thay đổi này, tệp ContentView.swift của bạn sẽ có dạng như sau:
import GoogleSignIn
import GoogleSignInSwift
import SwiftUI

struct ContentView: View {

  @State private var user: GIDGoogleUser?

  var body: some View {
    VStack {
      // Check if the user is signed in.
      if let user = user {
        // If signed in, show a welcome message and the sign-out button.
        Text("Hello, \(user.profile?.givenName ?? "User")!")
          .font(.title)
          .padding()

        Button("Sign Out", action: signOut)
          .buttonStyle(.borderedProminent)

      } else {
        // If not signed in, show the "Sign in with Google" button.
        GoogleSignInButton(
          scheme: .dark,  // Options: .light, .dark, .auto
          style: .standard,  // Options: .standard, .wide, .icon
          state: .normal,  // Options: .normal, .disabled
          action: handleSignInButton
        ).padding()
      }
    }
  }

  func handleSignInButton() {
    // Find the current window scene.
    guard let windowScene = UIApplication.shared.connectedScenes.first as? UIWindowScene else {
      print("There is no active window scene")
      return
    }

    // Get the root view controller from the window scene.
    guard
      let rootViewController = windowScene.windows.first(where: { $0.isKeyWindow })?
        .rootViewController
    else {
      print("There is no key window or root view controller")
      return
    }

    // Start the sign-in process.
    GIDSignIn.sharedInstance.signIn(
      withPresenting: rootViewController
    ) { signInResult, error in
      guard let result = signInResult else {
        // Inspect error
        print("Error signing in: \(error?.localizedDescription ?? "No error description")")
        return
      }

      DispatchQueue.main.async {
        self.user = result.user
      }

      // If sign in succeeded, display the app's main content View.
      print("ID Token: \(result.user.idToken?.tokenString ?? "")")
    }
  }

  func signOut() {
    GIDSignIn.sharedInstance.signOut()
    // After signing out, set the `user` state variable to `nil`.
    self.user = nil
  }
}

#Preview {
  ContentView()
}
UIKit
- Mở ViewController.swift.
- Ở đầu
ViewController, ngay bên dưới vị trí bạn khai báosignInButton, hãy thêm một nút đăng xuất và nhãn chào mừng:
let signOutButton = UIButton(type: .system)
let welcomeLabel = UILabel()
- Thêm hàm sau vào cuối
ViewController. Hàm này sẽ cho người dùng thấy một giao diện người dùng khác dựa trên trạng thái đăng nhập của họ:
private func updateUI(for user: GIDGoogleUser?) {
  if let user = user {
    // User is signed in.
    signInButton.isHidden = true
    signOutButton.isHidden = false
    welcomeLabel.isHidden = false
    welcomeLabel.text = "Hello, \(user.profile?.givenName ?? "User")!"
  } else {
    // User is signed out.
    signInButton.isHidden = false
    signOutButton.isHidden = true
    welcomeLabel.isHidden = true
  }
}
- Ở cuối hàm
viewDidLoad, hãy thêm mã sau để thêm nhãn chào mừng và nút đăng xuất vào khung hiển thị:
// --- Set up the Welcome Label ---
welcomeLabel.translatesAutoresizingMaskIntoConstraints = false
welcomeLabel.textAlignment = .center
welcomeLabel.font = .systemFont(ofSize: 24, weight: .bold)
view.addSubview(welcomeLabel)

NSLayoutConstraint.activate([
  welcomeLabel.centerXAnchor.constraint(equalTo: view.centerXAnchor),
  welcomeLabel.bottomAnchor.constraint(equalTo: signInButton.topAnchor, constant: -20),
])

// --- Set up the Sign-Out Button ---
signOutButton.translatesAutoresizingMaskIntoConstraints = false
signOutButton.setTitle("Sign Out", for: .normal)
view.addSubview(signOutButton)

NSLayoutConstraint.activate([
  signOutButton.centerXAnchor.constraint(equalTo: view.centerXAnchor),
  signOutButton.topAnchor.constraint(equalTo: signInButton.bottomAnchor, constant: 20),
])

signOutButton.addTarget(self, action: #selector(signOutButtonTapped), for: .touchUpInside)

// --- Set Initial UI State ---
updateUI(for: nil)
- Cập nhật hàm
signInButtonTappedđể gọi phương thứcUpdateUIkhi đăng nhập thành công:
@objc func signInButtonTapped() {
  // Start the sign-in process.
  GIDSignIn.sharedInstance.signIn(withPresenting: self) { signInResult, error in
    guard let result = signInResult else {
      // Inspect error
      print("Error signing in: \(error?.localizedDescription ?? "No error description")")
      return
    }

    // If sign in succeeded, print the ID token.
    print("ID Token: \(result.user.idToken?.tokenString ?? "")")

    DispatchQueue.main.async {
      self.updateUI(for: result.user)
    }
  }
}
- Cuối cùng, hãy thêm một hàm
signOutButtonTappedvàoViewControllerđể xử lý quy trình đăng xuất:
@objc func signOutButtonTapped() {
  GIDSignIn.sharedInstance.signOut()
  // Update the UI for the signed-out state.
  updateUI(for: nil)
}
Khởi chạy ứng dụng rồi đăng nhập. Bạn sẽ thấy giao diện người dùng thay đổi sau khi xác thực thành công!
Sau khi thực hiện những thay đổi này, tệp ViewController.swift của bạn sẽ có dạng như sau:
import GoogleSignIn
import UIKit

class ViewController: UIViewController {

  // Create an instance of the Sign in with Google button
  let signInButton = GIDSignInButton()
  let signOutButton = UIButton(type: .system)
  let welcomeLabel = UILabel()

  override func viewDidLoad() {
    super.viewDidLoad()

    // Set the width and color of the sign-in button
    signInButton.style = .standard  // Options: .standard, .wide, .iconOnly
    signInButton.colorScheme = .dark  // Options: .dark, .light

    // Add the sign-in button to your view
    view.addSubview(signInButton)

    // Position the button using constraints
    signInButton.translatesAutoresizingMaskIntoConstraints = false
    NSLayoutConstraint.activate([
      signInButton.centerXAnchor.constraint(equalTo: view.centerXAnchor),
      signInButton.centerYAnchor.constraint(equalTo: view.centerYAnchor),
    ])

    // Add a target to the button to call a method when it's pressed
    signInButton.addTarget(self, action: #selector(signInButtonTapped), for: .touchUpInside)

    // --- Set up the Welcome Label ---
    welcomeLabel.translatesAutoresizingMaskIntoConstraints = false
    welcomeLabel.textAlignment = .center
    welcomeLabel.font = .systemFont(ofSize: 24, weight: .bold)
    view.addSubview(welcomeLabel)

    NSLayoutConstraint.activate([
      welcomeLabel.centerXAnchor.constraint(equalTo: view.centerXAnchor),
      welcomeLabel.bottomAnchor.constraint(equalTo: signInButton.topAnchor, constant: -20),
    ])

    // --- Set up the Sign-Out Button ---
    signOutButton.translatesAutoresizingMaskIntoConstraints = false
    signOutButton.setTitle("Sign Out", for: .normal)
    view.addSubview(signOutButton)

    NSLayoutConstraint.activate([
      signOutButton.centerXAnchor.constraint(equalTo: view.centerXAnchor),
      signOutButton.topAnchor.constraint(equalTo: signInButton.bottomAnchor, constant: 20),
    ])

    signOutButton.addTarget(self, action: #selector(signOutButtonTapped), for: .touchUpInside)

    // --- Set Initial UI State ---
    updateUI(for: nil)
  }

  // This method is called when the sign-in button is pressed.
  @objc func signInButtonTapped() {
    // Start the sign-in process.
    GIDSignIn.sharedInstance.signIn(withPresenting: self) { signInResult, error in
      guard let result = signInResult else {
        // Inspect error
        print("Error signing in: \(error?.localizedDescription ?? "No error description")")
        return
      }

      // If sign in succeeded, print the ID token.
      print("ID Token: \(result.user.idToken?.tokenString ?? "")")

      DispatchQueue.main.async {
        self.updateUI(for: result.user)
      }
    }
  }

  private func updateUI(for user: GIDGoogleUser?) {
    if let user = user {
      // User is signed in.
      signInButton.isHidden = true
      signOutButton.isHidden = false
      welcomeLabel.isHidden = false
      welcomeLabel.text = "Hello, \(user.profile?.givenName ?? "User")!"
    } else {
      // User is signed out.
      signInButton.isHidden = false
      signOutButton.isHidden = true
      welcomeLabel.isHidden = true
    }
  }

  @objc func signOutButtonTapped() {
    GIDSignIn.sharedInstance.signOut()
    // Update the UI for the signed-out state.
    updateUI(for: nil)
  }
}
9. Khôi phục trạng thái đăng nhập của người dùng
Để cải thiện trải nghiệm cho người dùng cũ, bước tiếp theo là khôi phục trạng thái đăng nhập của họ khi khởi chạy ứng dụng. Việc gọi restorePreviousSignIn sẽ sử dụng thông tin đăng nhập đã lưu trong Keychain để đăng nhập lại cho người dùng một cách âm thầm, đảm bảo rằng họ không phải hoàn tất quy trình đăng nhập mỗi lần.
SwiftUI
- Mở ContentView.swift.
- Thêm mã sau ngay sau
VStackbên trong biếnbody:
.onAppear {
  // On appear, try to restore a previous sign-in.
  GIDSignIn.sharedInstance.restorePreviousSignIn { user, error in
    // This closure is called when the restoration is complete.
    if let user = user {
      // If a user was restored, update the `user` state variable.
      DispatchQueue.main.async {
        self.user = user
      }

      // Print the ID token to the console when restored.
      print("Restored ID Token: \(user.idToken?.tokenString ?? "")")
    }
  }
}
ContentView.swift sẽ có dạng như sau:
import GoogleSignIn
import GoogleSignInSwift
import SwiftUI

struct ContentView: View {

  @State private var user: GIDGoogleUser?

  var body: some View {
    VStack {
      // Check if the user is signed in.
      if let user = user {
        // If signed in, show a welcome message and the sign-out button.
        Text("Hello, \(user.profile?.givenName ?? "User")!")
          .font(.title)
          .padding()

        Button("Sign Out", action: signOut)
          .buttonStyle(.borderedProminent)

      } else {
        // If not signed in, show the "Sign in with Google" button.
        GoogleSignInButton(
          scheme: .dark,  // Options: .light, .dark, .auto
          style: .standard,  // Options: .standard, .wide, .icon
          state: .normal,  // Options: .normal, .disabled
          action: handleSignInButton
        ).padding()
      }
    }

    .onAppear {
      // On appear, try to restore a previous sign-in.
      GIDSignIn.sharedInstance.restorePreviousSignIn { user, error in
        // This closure is called when the restoration is complete.
        if let user = user {
          // If a user was restored, update the `user` state variable.
          DispatchQueue.main.async {
            self.user = user
          }

          // Print the ID token to the console when restored.
          print("Restored ID Token: \(user.idToken?.tokenString ?? "")")
        }
      }
    }
  }

  func handleSignInButton() {
    // Find the current window scene.
    guard let windowScene = UIApplication.shared.connectedScenes.first as? UIWindowScene else {
      print("There is no active window scene")
      return
    }

    // Get the root view controller from the window scene.
    guard
      let rootViewController = windowScene.windows.first(where: { $0.isKeyWindow })?
        .rootViewController
    else {
      print("There is no key window or root view controller")
      return
    }

    // Start the sign-in process.
    GIDSignIn.sharedInstance.signIn(
      withPresenting: rootViewController
    ) { signInResult, error in
      guard let result = signInResult else {
        // Inspect error
        print("Error signing in: \(error?.localizedDescription ?? "No error description")")
        return
      }

      DispatchQueue.main.async {
        self.user = result.user
      }

      // If sign in succeeded, display the app's main content View.
      print("ID Token: \(result.user.idToken?.tokenString ?? "")")
    }
  }

  func signOut() {
    GIDSignIn.sharedInstance.signOut()
    // After signing out, set the `user` state variable to `nil`.
    self.user = nil
  }
}

#Preview {
  ContentView()
}
UIKit
- Mở ViewController.swift.
- Thêm lệnh gọi
restorePreviousSignInsau đây vào cuối phương thứcviewDidLoad:
// Attempt to restore a previous sign-in session
GIDSignIn.sharedInstance.restorePreviousSignIn { user, error in
  if let user = user {
    print("Successfully restored sign-in for user: \(user.profile?.givenName ?? "Unknown")")

    // Print the ID token when a session is restored.
    print("Restored ID Token: \(user.idToken?.tokenString ?? "")")

    // On success, update the UI for the signed-in state on the main thread.
    DispatchQueue.main.async {
      self.updateUI(for: user)
    }
  }
}
Tệp ViewController.swift của bạn sẽ có dạng như sau:
import GoogleSignIn
import UIKit

class ViewController: UIViewController {

  // Create an instance of the Sign in with Google button
  let signInButton = GIDSignInButton()
  let signOutButton = UIButton(type: .system)
  let welcomeLabel = UILabel()

  override func viewDidLoad() {
    super.viewDidLoad()

    // Set the width and color of the sign-in button
    signInButton.style = .standard  // Options: .standard, .wide, .iconOnly
    signInButton.colorScheme = .dark  // Options: .dark, .light

    // Add the sign-in button to your view
    view.addSubview(signInButton)

    // Position the button using constraints
    signInButton.translatesAutoresizingMaskIntoConstraints = false
    NSLayoutConstraint.activate([
      signInButton.centerXAnchor.constraint(equalTo: view.centerXAnchor),
      signInButton.centerYAnchor.constraint(equalTo: view.centerYAnchor),
    ])

    // Add a target to the button to call a method when it's pressed
    signInButton.addTarget(self, action: #selector(signInButtonTapped), for: .touchUpInside)

    // --- Set up the Welcome Label ---
    welcomeLabel.translatesAutoresizingMaskIntoConstraints = false
    welcomeLabel.textAlignment = .center
    welcomeLabel.font = .systemFont(ofSize: 24, weight: .bold)
    view.addSubview(welcomeLabel)

    NSLayoutConstraint.activate([
      welcomeLabel.centerXAnchor.constraint(equalTo: view.centerXAnchor),
      welcomeLabel.bottomAnchor.constraint(equalTo: signInButton.topAnchor, constant: -20),
    ])

    // --- Set up the Sign-Out Button ---
    signOutButton.translatesAutoresizingMaskIntoConstraints = false
    signOutButton.setTitle("Sign Out", for: .normal)
    view.addSubview(signOutButton)

    NSLayoutConstraint.activate([
      signOutButton.centerXAnchor.constraint(equalTo: view.centerXAnchor),
      signOutButton.topAnchor.constraint(equalTo: signInButton.bottomAnchor, constant: 20),
    ])

    signOutButton.addTarget(self, action: #selector(signOutButtonTapped), for: .touchUpInside)

    // --- Set Initial UI State ---
    updateUI(for: nil)

    // Attempt to restore a previous sign-in session
    GIDSignIn.sharedInstance.restorePreviousSignIn { user, error in
      if let user = user {
        print("Successfully restored sign-in for user: \(user.profile?.givenName ?? "Unknown")")

        // Print the ID token when a session is restored.
        print("Restored ID Token: \(user.idToken?.tokenString ?? "")")

        // On success, update the UI for the signed-in state on the main thread.
        DispatchQueue.main.async {
          self.updateUI(for: user)
        }
      }
    }
  }

  // This method is called when the sign-in button is pressed.
  @objc func signInButtonTapped() {
    // Start the sign-in process.
    GIDSignIn.sharedInstance.signIn(withPresenting: self) { signInResult, error in
      guard let result = signInResult else {
        // Inspect error
        print("Error signing in: \(error?.localizedDescription ?? "No error description")")
        return
      }

      // If sign in succeeded, print the ID token.
      print("ID Token: \(result.user.idToken?.tokenString ?? "")")

      DispatchQueue.main.async {
        self.updateUI(for: result.user)
      }
    }
  }

  private func updateUI(for user: GIDGoogleUser?) {
    if let user = user {
      // User is signed in.
      signInButton.isHidden = true
      signOutButton.isHidden = false
      welcomeLabel.isHidden = false
      welcomeLabel.text = "Hello, \(user.profile?.givenName ?? "User")!"
    } else {
      // User is signed out.
      signInButton.isHidden = false
      signOutButton.isHidden = true
      welcomeLabel.isHidden = true
    }
  }

  @objc func signOutButtonTapped() {
    GIDSignIn.sharedInstance.signOut()
    // Update the UI for the signed-out state.
    updateUI(for: nil)
  }
}
Kiểm thử tính năng đăng nhập thầm lặng
Sau khi đăng nhập, hãy thoát hoàn toàn ứng dụng rồi khởi chạy lại. Bạn sẽ thấy mình được tự động đăng nhập mà không cần nhấn vào nút.
10. Tìm hiểu về mã nhận dạng
Mặc dù đối tượng GIDGoogleUser rất thuận tiện cho việc cá nhân hoá giao diện người dùng bằng tên và email của người dùng, nhưng phần quan trọng nhất của dữ liệu được trả về từ SDK là mã nhận dạng.
Lớp học lập trình này sử dụng một công cụ trực tuyến để kiểm tra nội dung JWT. Trong một ứng dụng phát hành công khai, bạn nên gửi mã thông báo nhận dạng này đến máy chủ phụ trợ của mình. Máy chủ của bạn phải xác minh tính toàn vẹn của mã thông báo nhận dạng và sử dụng JWT để làm điều gì đó có ý nghĩa hơn, chẳng hạn như tạo một tài khoản mới trên nền tảng phụ trợ hoặc thiết lập một phiên mới cho người dùng.
Truy cập và giải mã mã thông báo JWT
- Khởi chạy ứng dụng.
- Mở bảng điều khiển Xcode. Bạn sẽ thấy một mã thông báo nhận dạng được in. Biểu tượng này sẽ có dạng như
eyJhbGciOiJSUzI1Ni ... Hecz6Wm4Q. - Sao chép mã thông báo nhận dạng và sử dụng một công cụ trực tuyến như jwt.io để giải mã JWT.
JWT đã giải mã sẽ có dạng như sau:
{
  "alg": "RS256",
  "kid": "c8ab71530972bba20b49f78a09c9852c43ff9118",
  "typ": "JWT"
}
{
  "iss": "https://accounts.google.com",
  "azp": "171291171076-rrbkcjrp5jbte92ai9gub115ertscphi.apps.googleusercontent.com",
  "aud": "171291171076-rrbkcjrp5jbte92ai9gub115ertscphi.apps.googleusercontent.com",
  "sub": "10769150350006150715113082367",
  "email": "example@example.com",
  "email_verified": true,
  "at_hash": "JyCYDmHtzhjkb0-qJhKsMg",
  "name": "Kimya",
  "picture": "https://lh3.googleusercontent.com/a/ACg8ocIyy4VoR31t_n0biPVcScBHwZOCRaKVDb_MoaMYep65fyqoAw=s96-c",
  "given_name": "Kimya",
  "iat": 1758645896,
  "exp": 1758649496
}
Các trường mã thông báo đáng chú ý
Mã thông báo nhận dạng đã giải mã chứa các trường có nhiều mục đích. Mặc dù một số thông tin dễ hiểu (như tên và email), nhưng những thông tin khác được máy chủ phụ trợ của bạn dùng để xác minh.
Bạn cần đặc biệt hiểu rõ trường sau:
- sub: Trường
sublà giá trị nhận dạng duy nhất, vĩnh viễn cho Tài khoản Google của người dùng. Người dùng có thể thay đổi email chính hoặc tên, nhưng mã nhận dạngsubcủa họ sẽ không bao giờ thay đổi. Điều này khiến trườngsubtrở thành giá trị hoàn hảo để dùng làm khoá chính cho tài khoản người dùng phụ trợ của bạn.
Lấy thông tin người dùng từ mã nhận dạng có thêm thông tin về ý nghĩa của tất cả các trường mã thông báo.
11. Bảo mật ứng dụng bằng App Check
Bạn nên bật Kiểm tra ứng dụng để đảm bảo chỉ ứng dụng của bạn mới có thể truy cập vào các điểm cuối OAuth 2.0 của Google thay cho dự án của bạn. Tính năng Kiểm tra ứng dụng hoạt động bằng cách xác minh rằng các yêu cầu gửi đến dịch vụ phụ trợ của bạn đến từ ứng dụng chính thống của bạn trên một thiết bị thực và chưa bị giả mạo.
Phần này trình bày cách tích hợp Kiểm tra ứng dụng vào ứng dụng và định cấu hình Kiểm tra ứng dụng cho cả việc gỡ lỗi trong trình mô phỏng và cho bản dựng phát hành công khai chạy trên thiết bị thực.
Thiết lập bảng điều khiển
Để tích hợp tính năng Kiểm tra ứng dụng vào ứng dụng của bạn, bạn cần thiết lập một lần trong bảng điều khiển của Google Cloud và Firebase. Việc này bao gồm bật tính năng Kiểm tra ứng dụng cho ứng dụng OAuth trên iOS trong Google Cloud Console, tạo một khoá API để dùng với trình gỡ lỗi Kiểm tra ứng dụng và liên kết dự án trên đám mây của Google với Firebase.
Bật Kiểm tra ứng dụng trong Google Cloud Console
- Chuyển đến danh sách Ứng dụng được liên kết với dự án trên đám mây của bạn trên Google Cloud.
- Chọn mã ứng dụng khách OAuth 2.0 mà bạn đã tạo cho ứng dụng iOS.
- Bật Kiểm tra ứng dụng bên dưới Google Identity for iOS
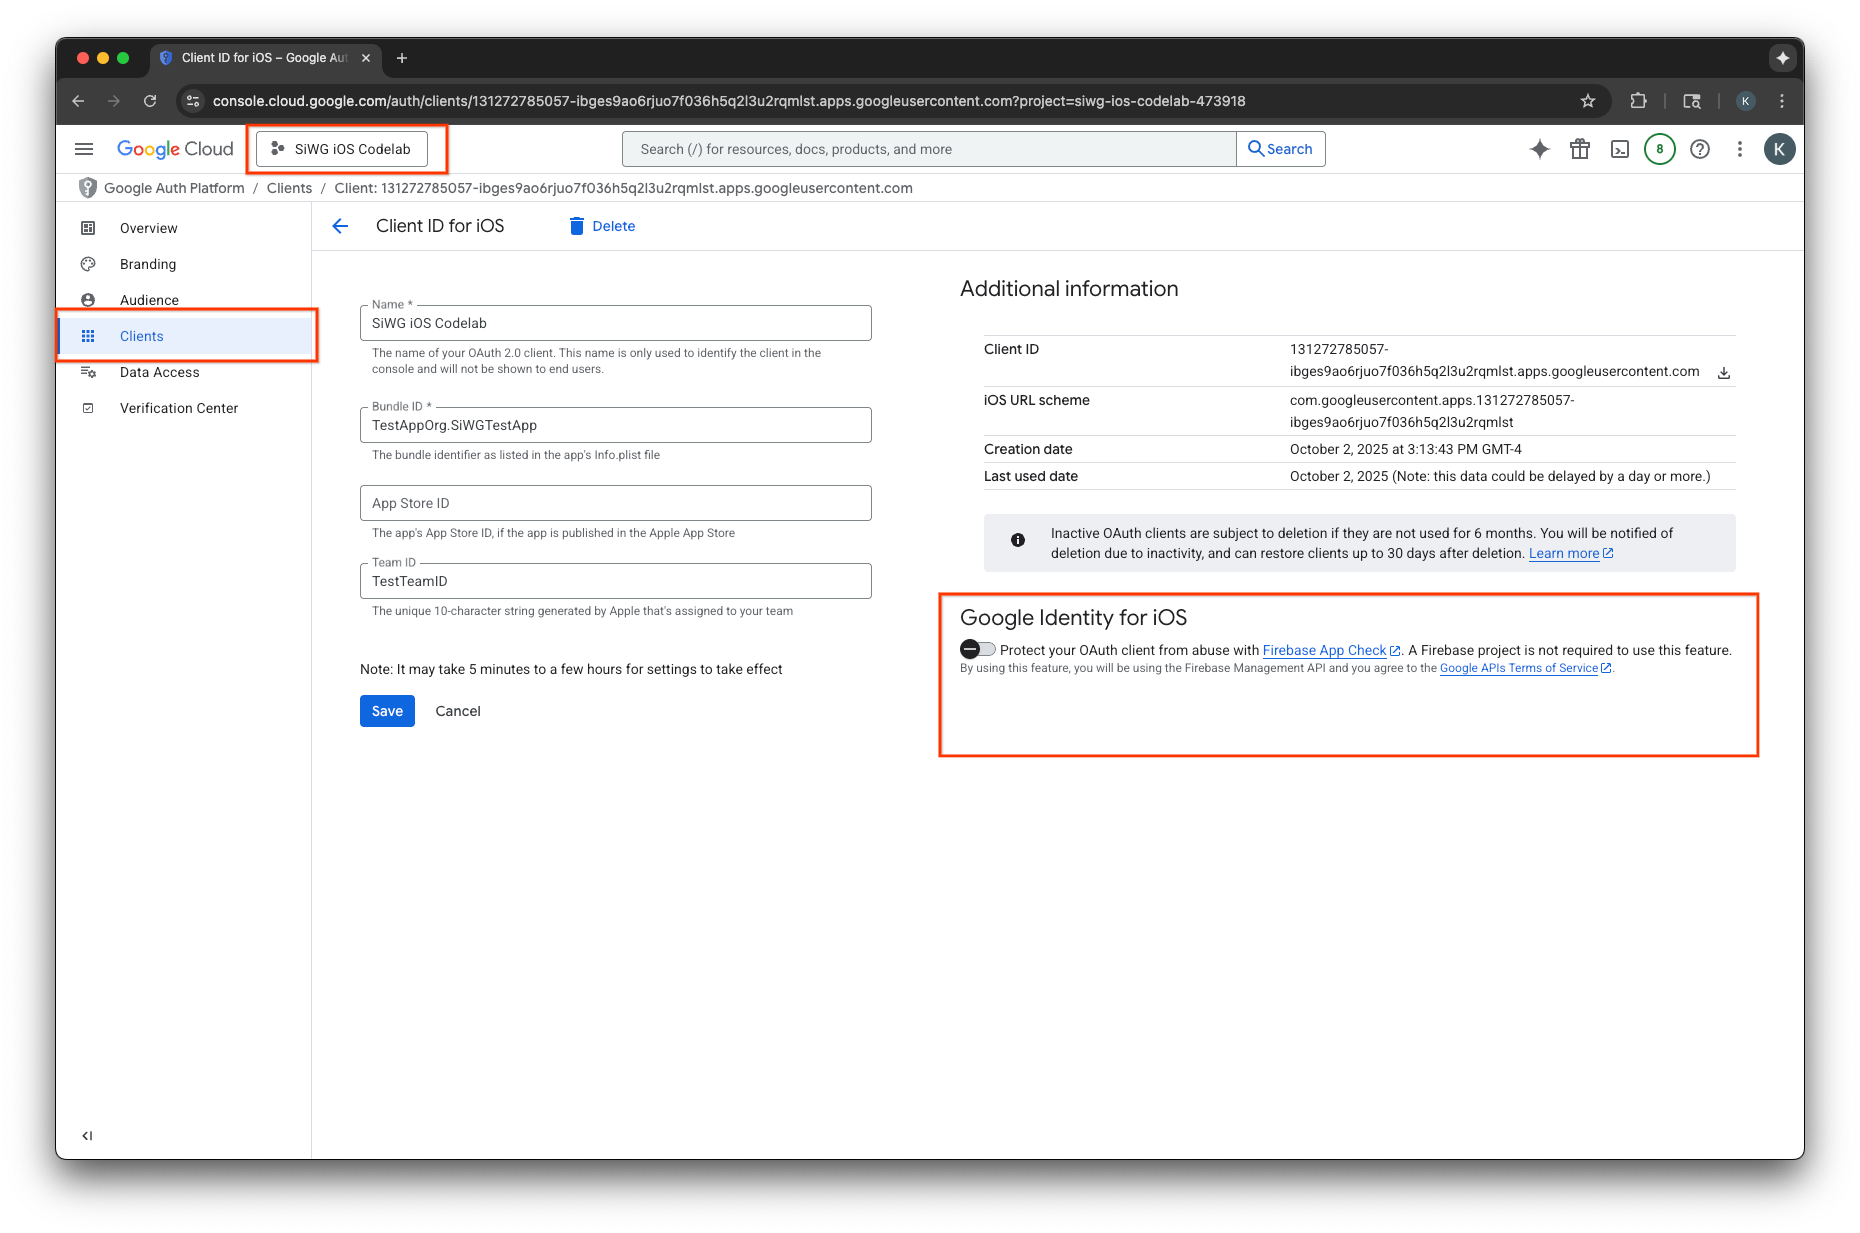
- Nhấp vào Lưu.
Tạo một khoá API
- Chuyển đến trang Thư viện API cho dự án trên đám mây của Google Cloud.
- Nhập API Kiểm tra ứng dụng Firebase vào thanh tìm kiếm.
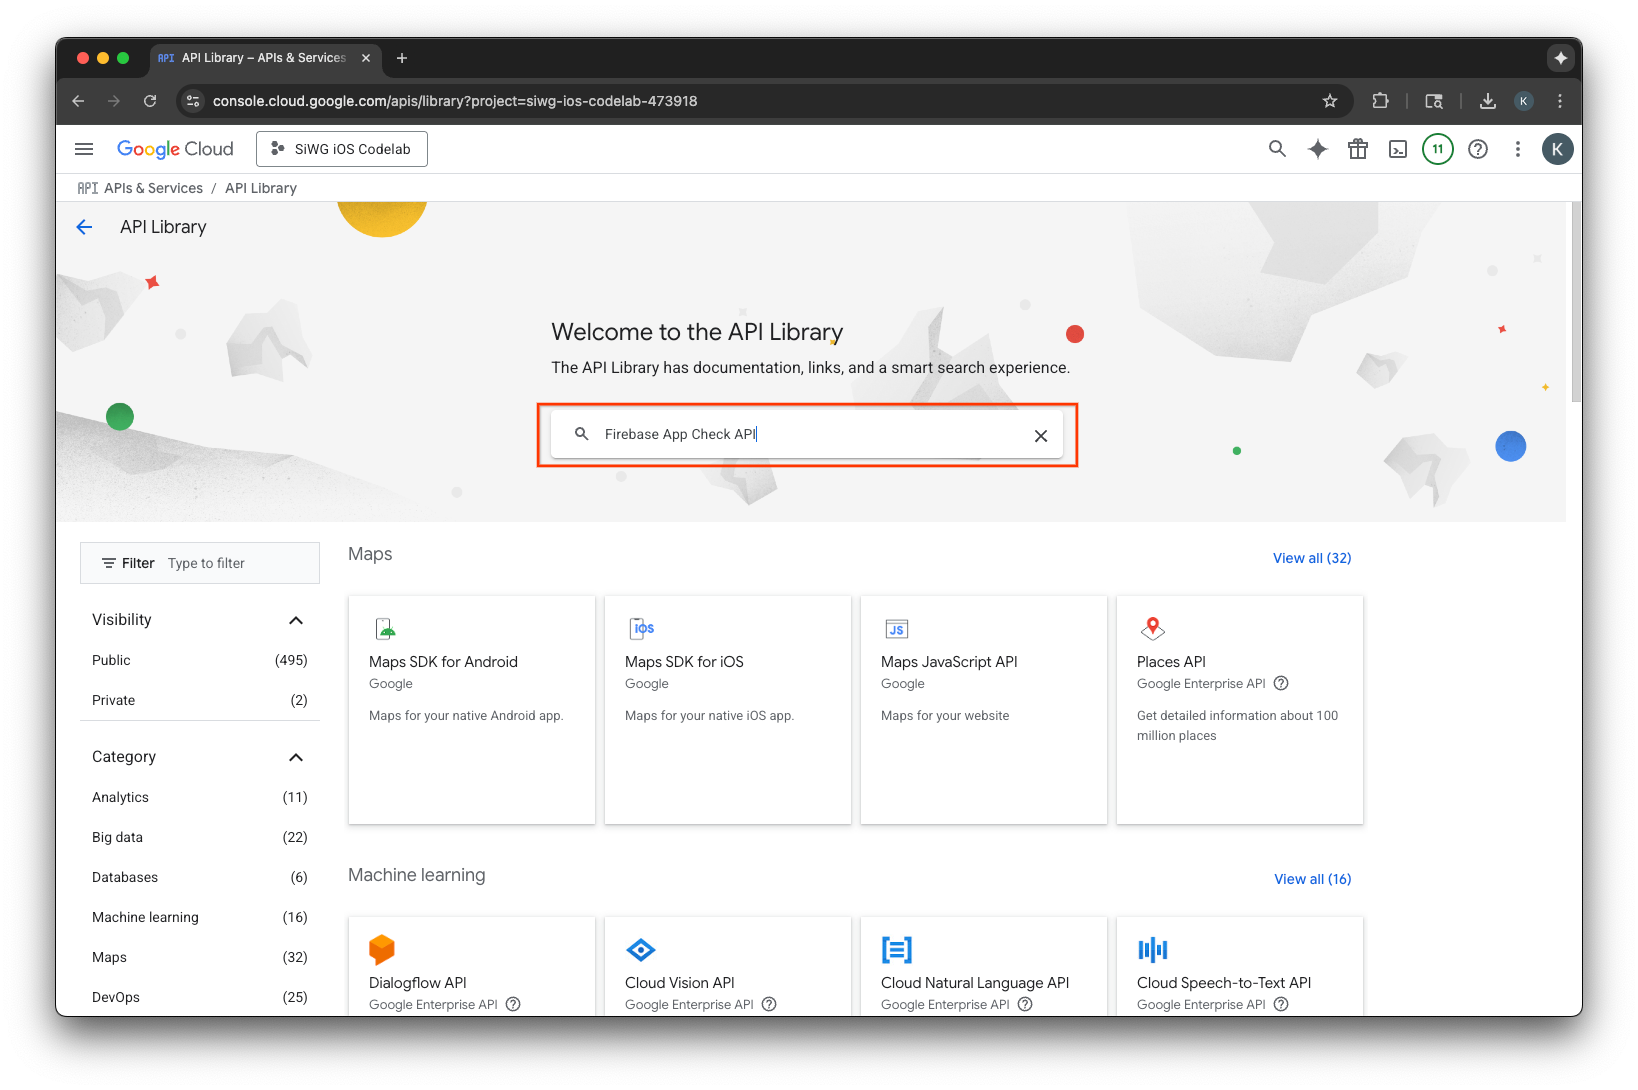
- Chọn và bật API Kiểm tra ứng dụng Firebase.
- Chuyển đến phần API và dịch vụ rồi chọn Thông tin xác thực trong trình đơn điều hướng.
- Chọn Tạo thông tin xác thực ở đầu trang.
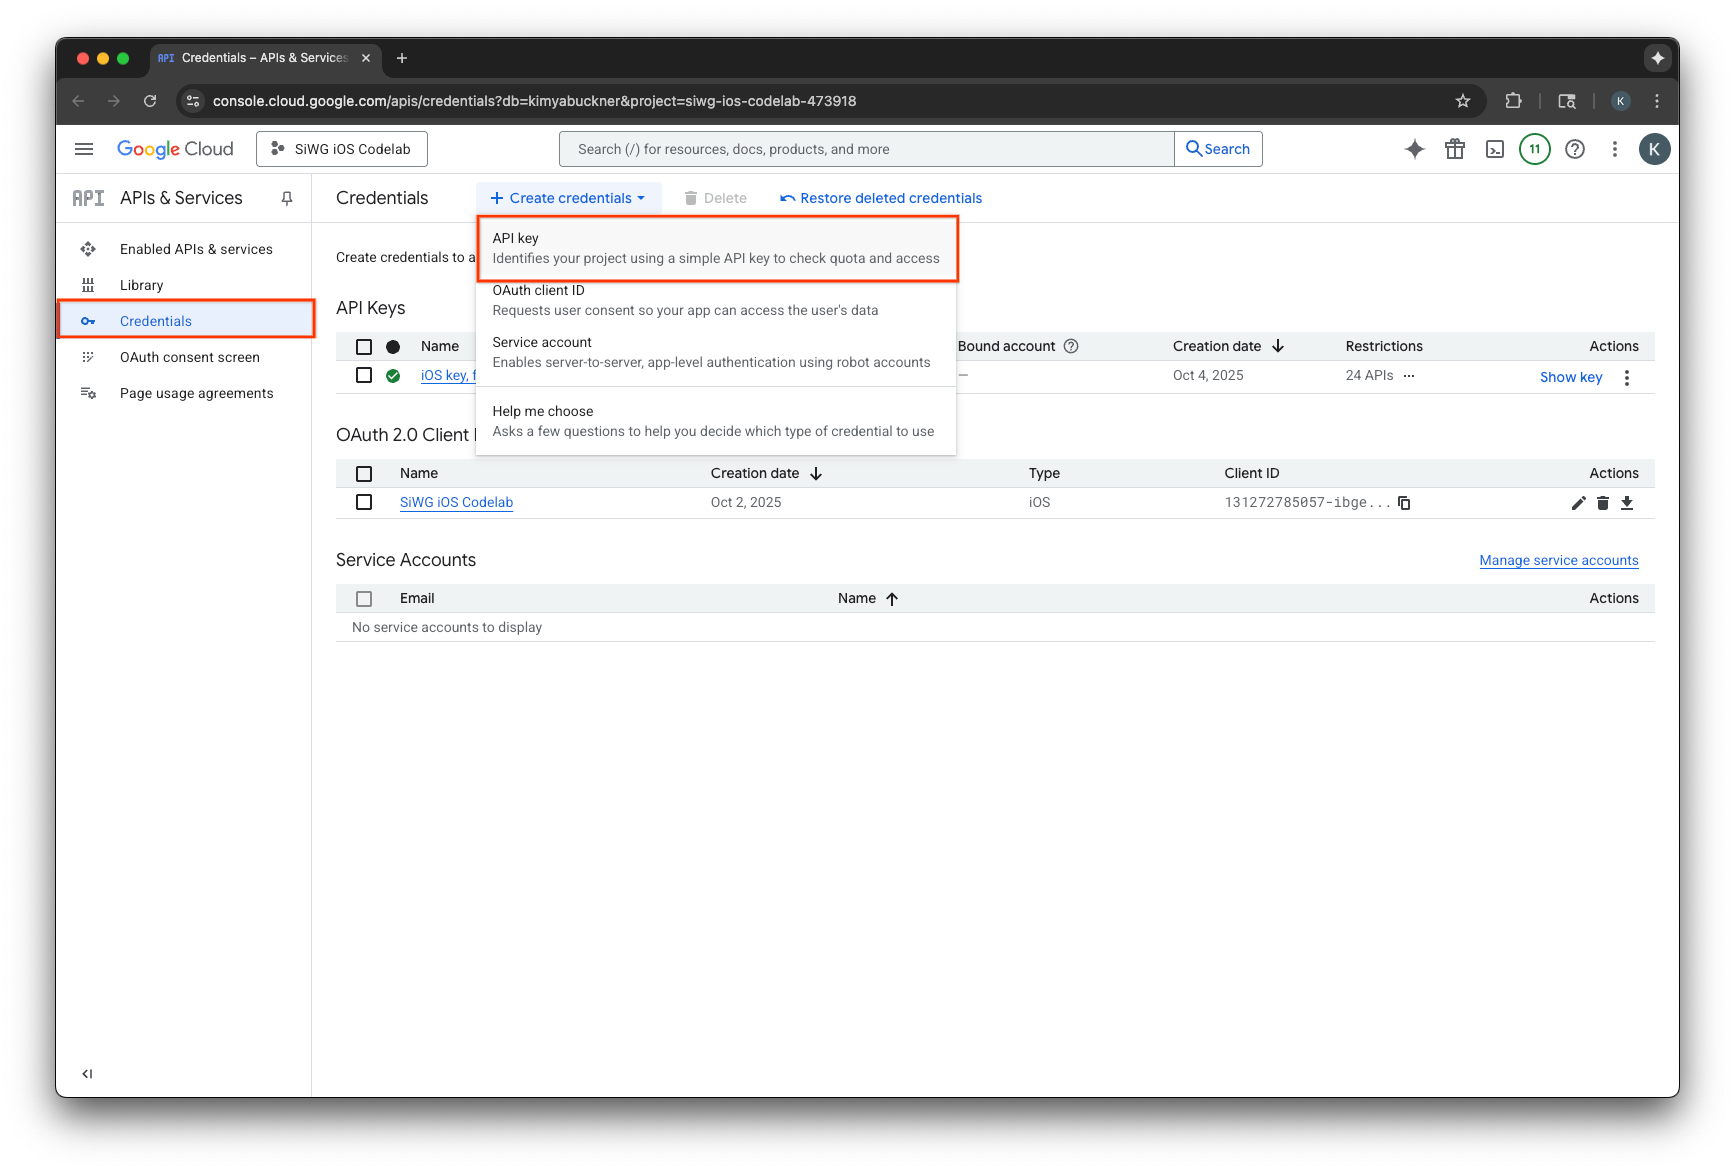
- Chỉ định tên cho Khoá API này.
- Chọn ứng dụng iOS trong mục Application restrictions (Hạn chế cho ứng dụng).
- Thêm mã nhận dạng gói cho ứng dụng của bạn làm ứng dụng được phê duyệt.
- Chọn Restrict key (Hạn chế cho khoá) trong mục API restrictions (Hạn chế cho API).
- Chọn Firebase App Check API trong trình đơn thả xuống.
- Chọn Tạo.
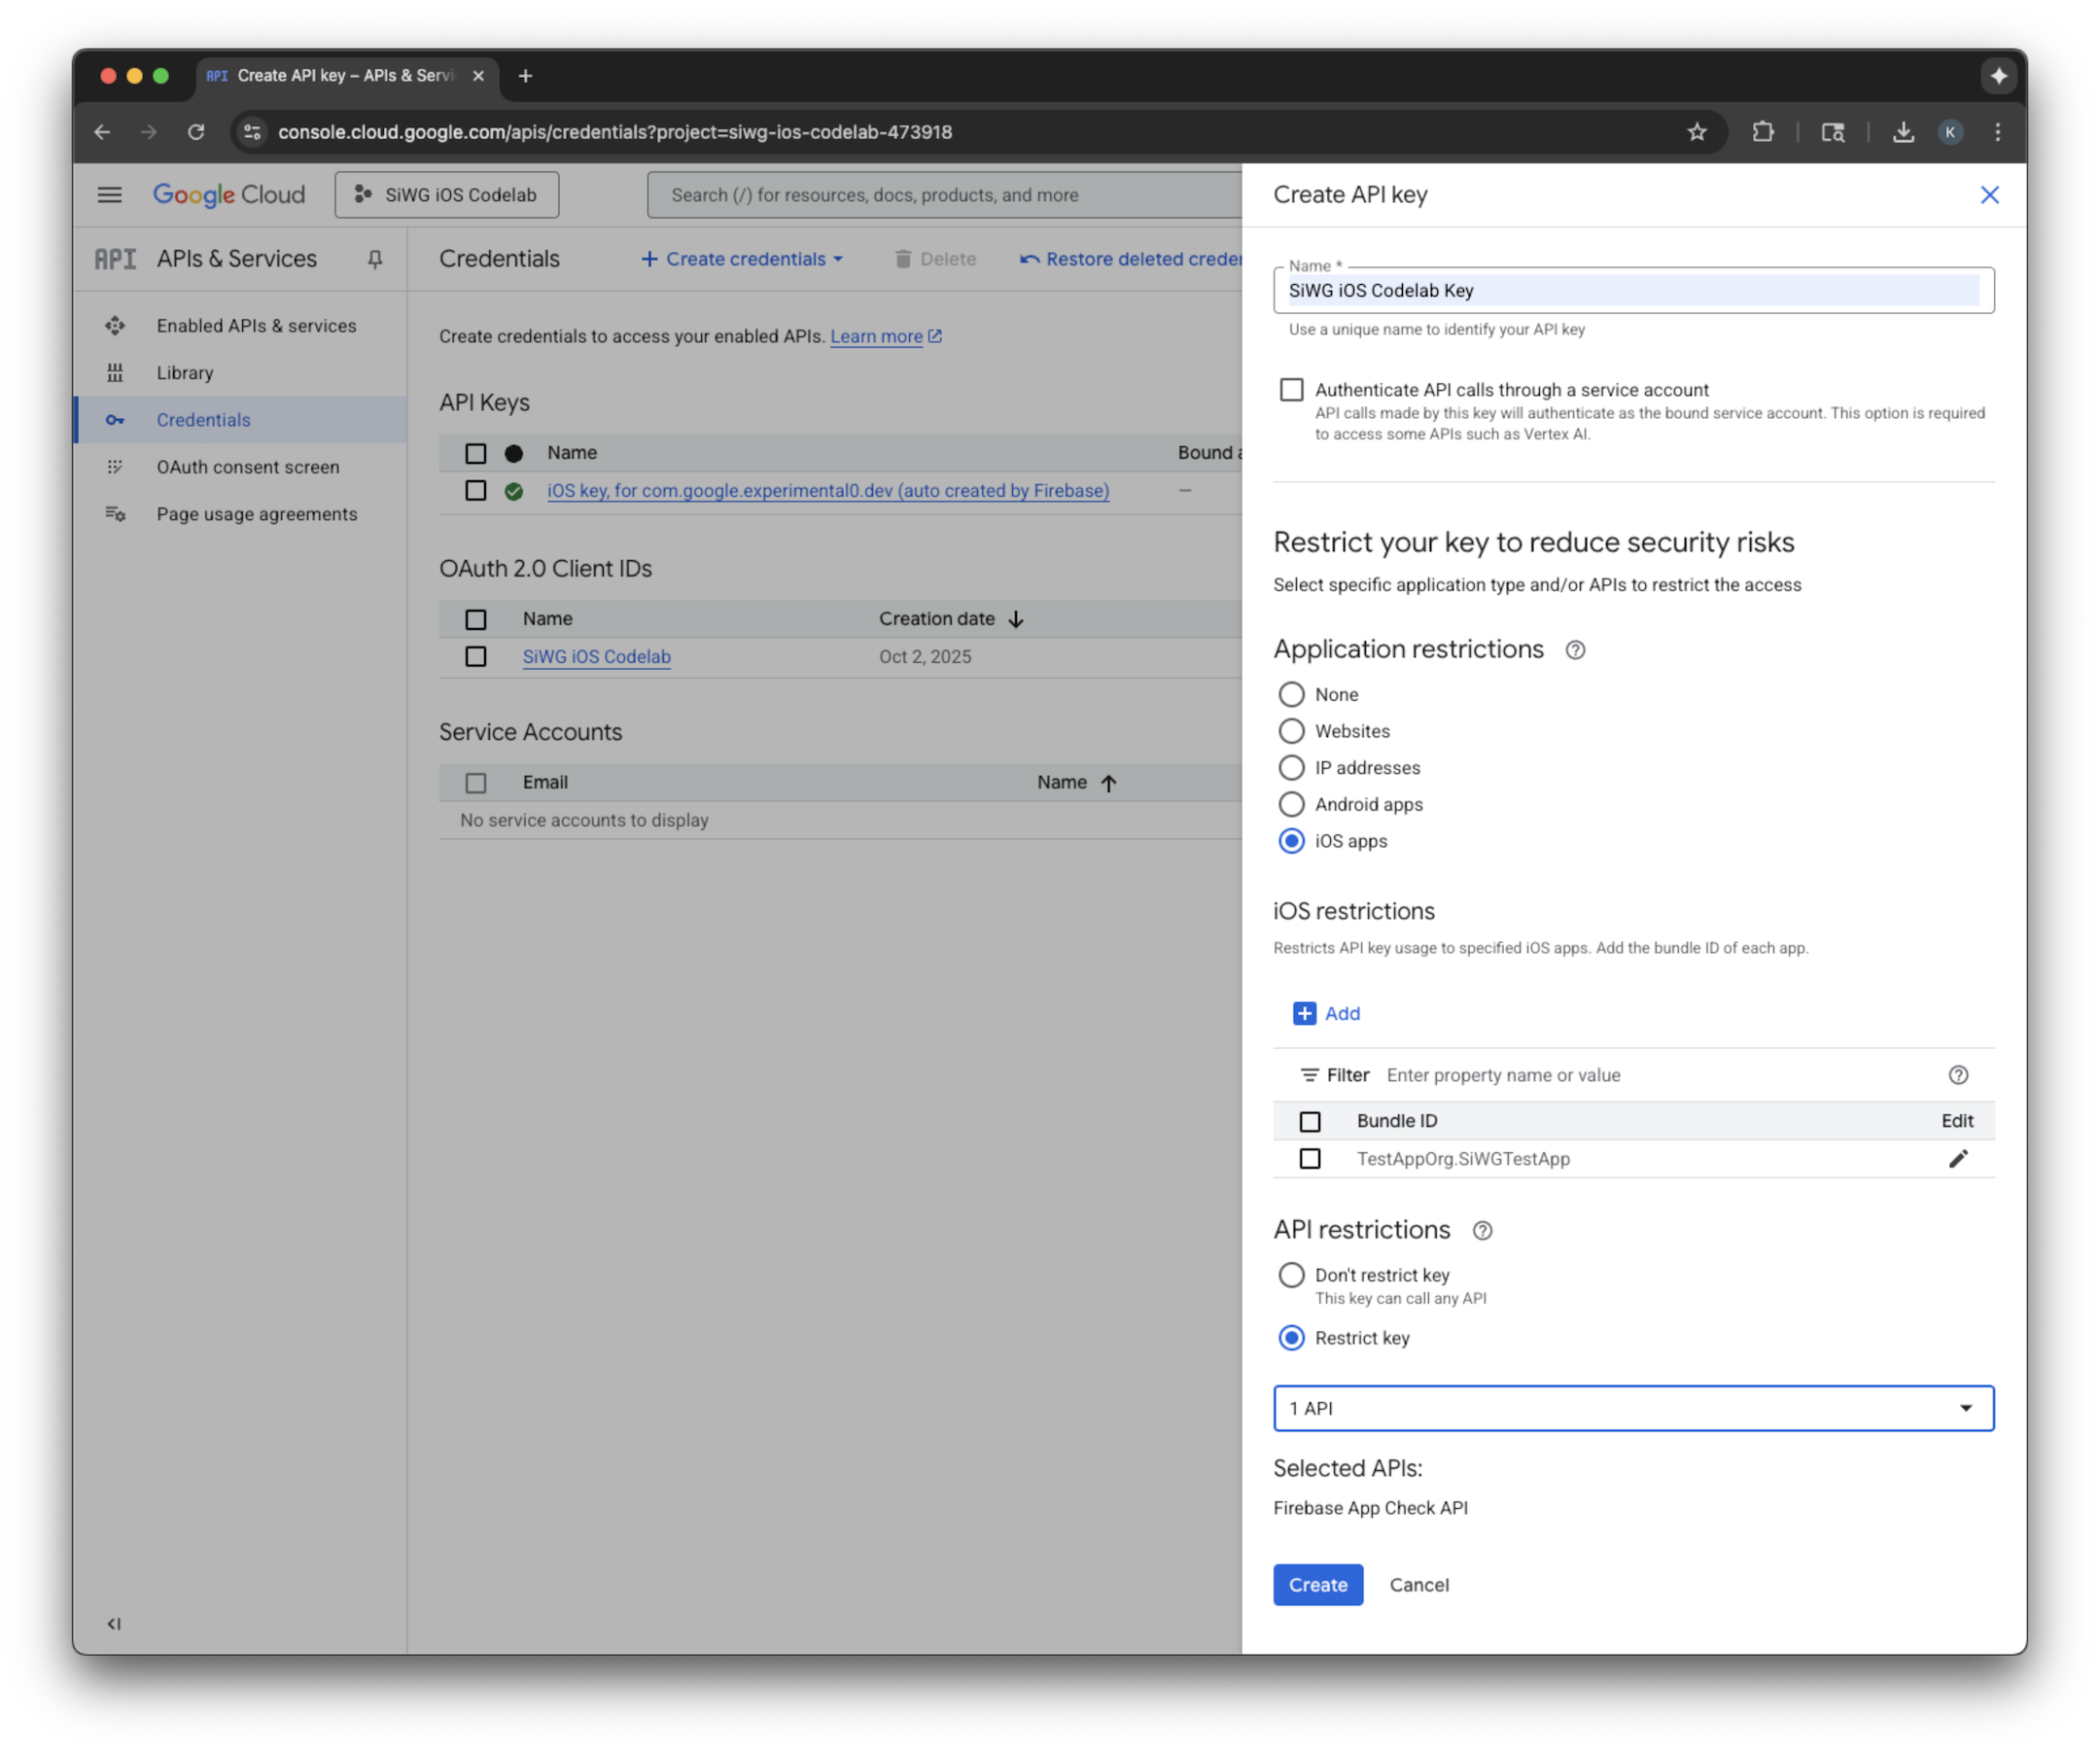
- Sao chép khoá API đã tạo. Bạn sẽ cần mã này trong một bước sau.
Thêm Firebase vào dự án trên Google Cloud
- Chuyển đến Bảng điều khiển của Firebase.
- Chọn Bắt đầu bằng cách thiết lập một dự án Firebase.
- Chọn Thêm Firebase vào dự án trên Google Cloud.
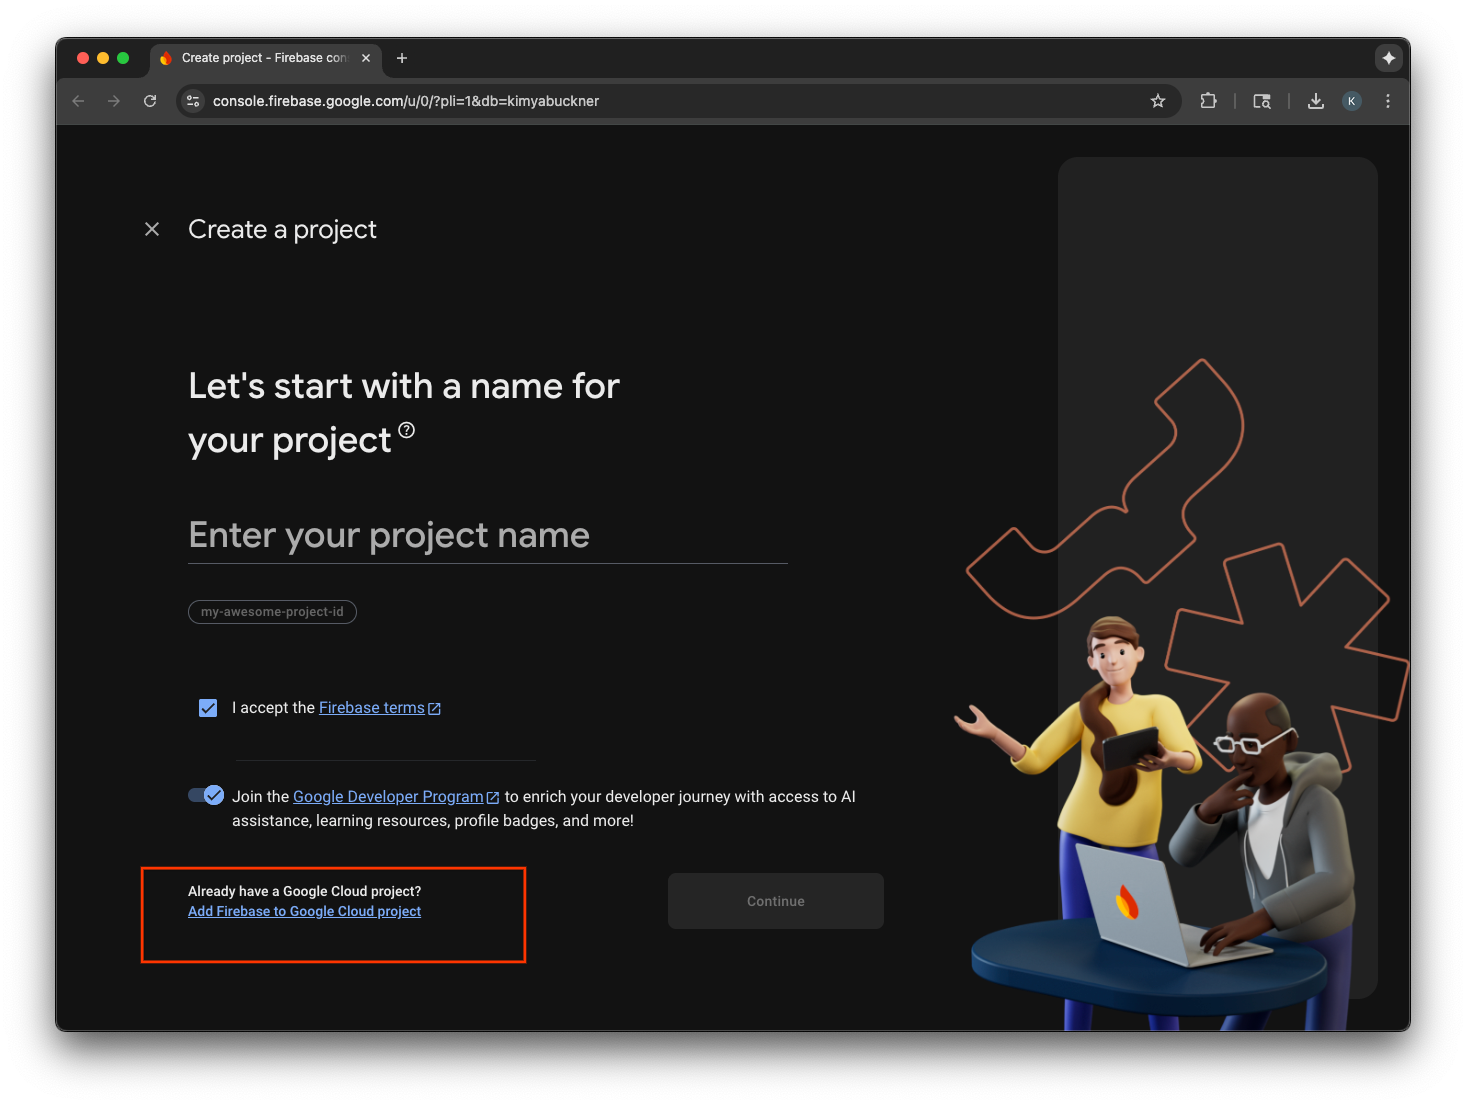
- Chọn một dự án trên đám mây của Google Cloud trong trình đơn thả xuống rồi tiếp tục quy trình đăng ký.
- Chọn Thêm Firebase.
- Sau khi dự án Firebase của bạn đã sẵn sàng, hãy chọn Tiếp tục để mở dự án.
Tích hợp mã phía máy khách
Sau khi định cấu hình dự án trên đám mây của Google cho Kiểm tra ứng dụng, bạn có thể viết mã phía máy khách để bật tính năng này. Nhà cung cấp được dùng để chứng thực khác nhau trong môi trường phát hành công khai và môi trường gỡ lỗi. Ứng dụng phát hành chính thức trên một thiết bị thực sẽ sử dụng dịch vụ Chứng thực ứng dụng tích hợp sẵn của Apple để chứng minh tính xác thực của ứng dụng. Tuy nhiên, vì trình mô phỏng iOS không thể cung cấp loại chứng thực này, nên môi trường gỡ lỗi yêu cầu một trình cung cấp gỡ lỗi đặc biệt được truyền khoá API.
Đoạn mã sau đây xử lý cả hai trường hợp bằng cách sử dụng một chỉ thị của trình biên dịch để tự động chọn trình cung cấp chính xác tại thời gian xây dựng.
SwiftUI
- Mở tệp ứng dụng chính.
- Xác định lớp
AppDelegatesau đây sau phần nội dung nhập và trước thuộc tính@main:
class AppDelegate: NSObject, UIApplicationDelegate {
  func application(
    _ application: UIApplication,
    didFinishLaunchingWithOptions launchOptions: [UIApplication.LaunchOptionsKey: Any]? = nil
  ) -> Bool {

    #if targetEnvironment(simulator)
      // Configure for debugging on a simulator.
      // TODO: Replace "YOUR_API_KEY" with the key from your Google Cloud project.
      let apiKey = "YOUR_API_KEY"
      GIDSignIn.sharedInstance.configureDebugProvider(withAPIKey: apiKey) { error in
        if let error {
          print("Error configuring GIDSignIn debug provider: \(error)")
        }
      }
    #else
      // Configure GIDSignIn for App Check on a real device.
      GIDSignIn.sharedInstance.configure { error in
        if let error {
          print("Error configuring GIDSignIn for App Check: \(error)")
        } else {
          print("GIDSignIn configured for App Check.")
        }
      }
    #endif

    return true
  }
}
- Thay thế
"YOUR_API_KEY"trong mã được cung cấp bằng Khoá API mà bạn đã sao chép từ Google Cloud Console. - Thêm dòng sau vào bên trong cấu trúc
App, ngay trước biếnbody. Thao tác này sẽ đăng ký lớp AppDelegate với vòng đời của ứng dụng, cho phép lớp này phản hồi khi ứng dụng khởi chạy và các sự kiện khác của hệ thống:
@UIApplicationDelegateAdaptor(AppDelegate.self) var delegate
Tệp ứng dụng chính của bạn sẽ có dạng như sau:
import GoogleSignIn
import SwiftUI

class AppDelegate: NSObject, UIApplicationDelegate {
  func application(
    _ application: UIApplication,
    didFinishLaunchingWithOptions launchOptions: [UIApplication.LaunchOptionsKey: Any]? = nil
  ) -> Bool {

    #if targetEnvironment(simulator)
      // Configure for debugging on a simulator.
      // TODO: Replace "YOUR_API_KEY" with the key from your Google Cloud project.
      let apiKey = "YOUR_API_KEY"
      GIDSignIn.sharedInstance.configureDebugProvider(withAPIKey: apiKey) { error in
        if let error {
          print("Error configuring GIDSignIn debug provider: \(error)")
        }
      }
    #else
      // Configure GIDSignIn for App Check on a real device.
      GIDSignIn.sharedInstance.configure { error in
        if let error {
          print("Error configuring GIDSignIn for App Check: \(error)")
        } else {
          print("GIDSignIn configured for App Check.")
        }
      }
    #endif

    return true
  }
}

@main
struct iOS_Sign_in_with_Google_App: App {

  @UIApplicationDelegateAdaptor(AppDelegate.self) var delegate

  var body: some Scene {
    WindowGroup {
      ContentView()

        .onOpenURL { url in
          GIDSignIn.sharedInstance.handle(url)
        }
    }
  }
}
UIKit
- Mở AppDelegate.swift.
- Cập nhật phương thức
application(_:didFinishLaunchingWithOptions:)để chứa quá trình khởi tạo Kiểm tra ứng dụng:
func application(
  _ application: UIApplication,
  didFinishLaunchingWithOptions launchOptions: [UIApplication.LaunchOptionsKey: Any]?
) -> Bool {

  #if targetEnvironment(simulator)
    // Configure for debugging on a simulator.
    // TODO: Replace "YOUR_API_KEY" with the key from your Google Cloud project.
    let apiKey = "YOUR_API_KEY"
    GIDSignIn.sharedInstance.configureDebugProvider(withAPIKey: apiKey) { error in
      if let error {
        print("Error configuring GIDSignIn debug provider: \(error)")
      }
    }
  #else
    // Configure GIDSignIn for App Check on a real device.
    GIDSignIn.sharedInstance.configure { error in
      if let error {
        print("Error configuring GIDSignIn for App Check: \(error)")
      }
    }
  #endif

  return true
}
- Thay thế
"YOUR_API_KEY"trong mã được cung cấp bằng Khoá API mà bạn đã sao chép từ Google Cloud Console.
Tệp AppDelegate.swift của bạn sẽ có dạng như sau:
import GoogleSignIn
import UIKit

@main
class AppDelegate: UIResponder, UIApplicationDelegate {

  func application(
    _ application: UIApplication,
    didFinishLaunchingWithOptions launchOptions: [UIApplication.LaunchOptionsKey: Any]?
  ) -> Bool {

    #if targetEnvironment(simulator)
      // Configure for debugging on a simulator.
      // TODO: Replace "YOUR_API_KEY" with the key from your Google Cloud project.
      let apiKey = "YOUR_API_KEY"
      GIDSignIn.sharedInstance.configureDebugProvider(withAPIKey: apiKey) { error in
        if let error {
          print("Error configuring GIDSignIn debug provider: \(error)")
        }
      }
    #else
      // Configure GIDSignIn for App Check on a real device.
      GIDSignIn.sharedInstance.configure { error in
        if let error {
          print("Error configuring GIDSignIn for App Check: \(error)")
        }
      }
    #endif

    return true
  }

  func application(
    _ app: UIApplication,
    open url: URL,
    options: [UIApplication.OpenURLOptionsKey: Any] = [:]
  ) -> Bool {
    var handled: Bool

    handled = GIDSignIn.sharedInstance.handle(url)
    if handled {
      return true
    }
    // If not handled by this app, return false.
    return false
  }

  // MARK: UISceneSession Lifecycle

  func application(
    _ application: UIApplication,
    configurationForConnecting connectingSceneSession: UISceneSession,
    options: UIScene.ConnectionOptions
  ) -> UISceneConfiguration {
    // Called when a new scene session is being created.
    // Use this method to select a configuration to create the new scene with.
    return UISceneConfiguration(
      name: "Default Configuration",
      sessionRole: connectingSceneSession.role
    )
  }

  func application(
    _ application: UIApplication,
    didDiscardSceneSessions sceneSessions: Set<UISceneSession>
  ) {
    // Called when the user discards a scene session.
    // If any sessions were discarded while the application was not running, this will be called shortly after application:didFinishLaunchingWithOptions.
    // Use this method to release any resources that were specific to the discarded scenes, as they will not return.
  }
}
Kiểm thử Kiểm tra ứng dụng trên trình mô phỏng
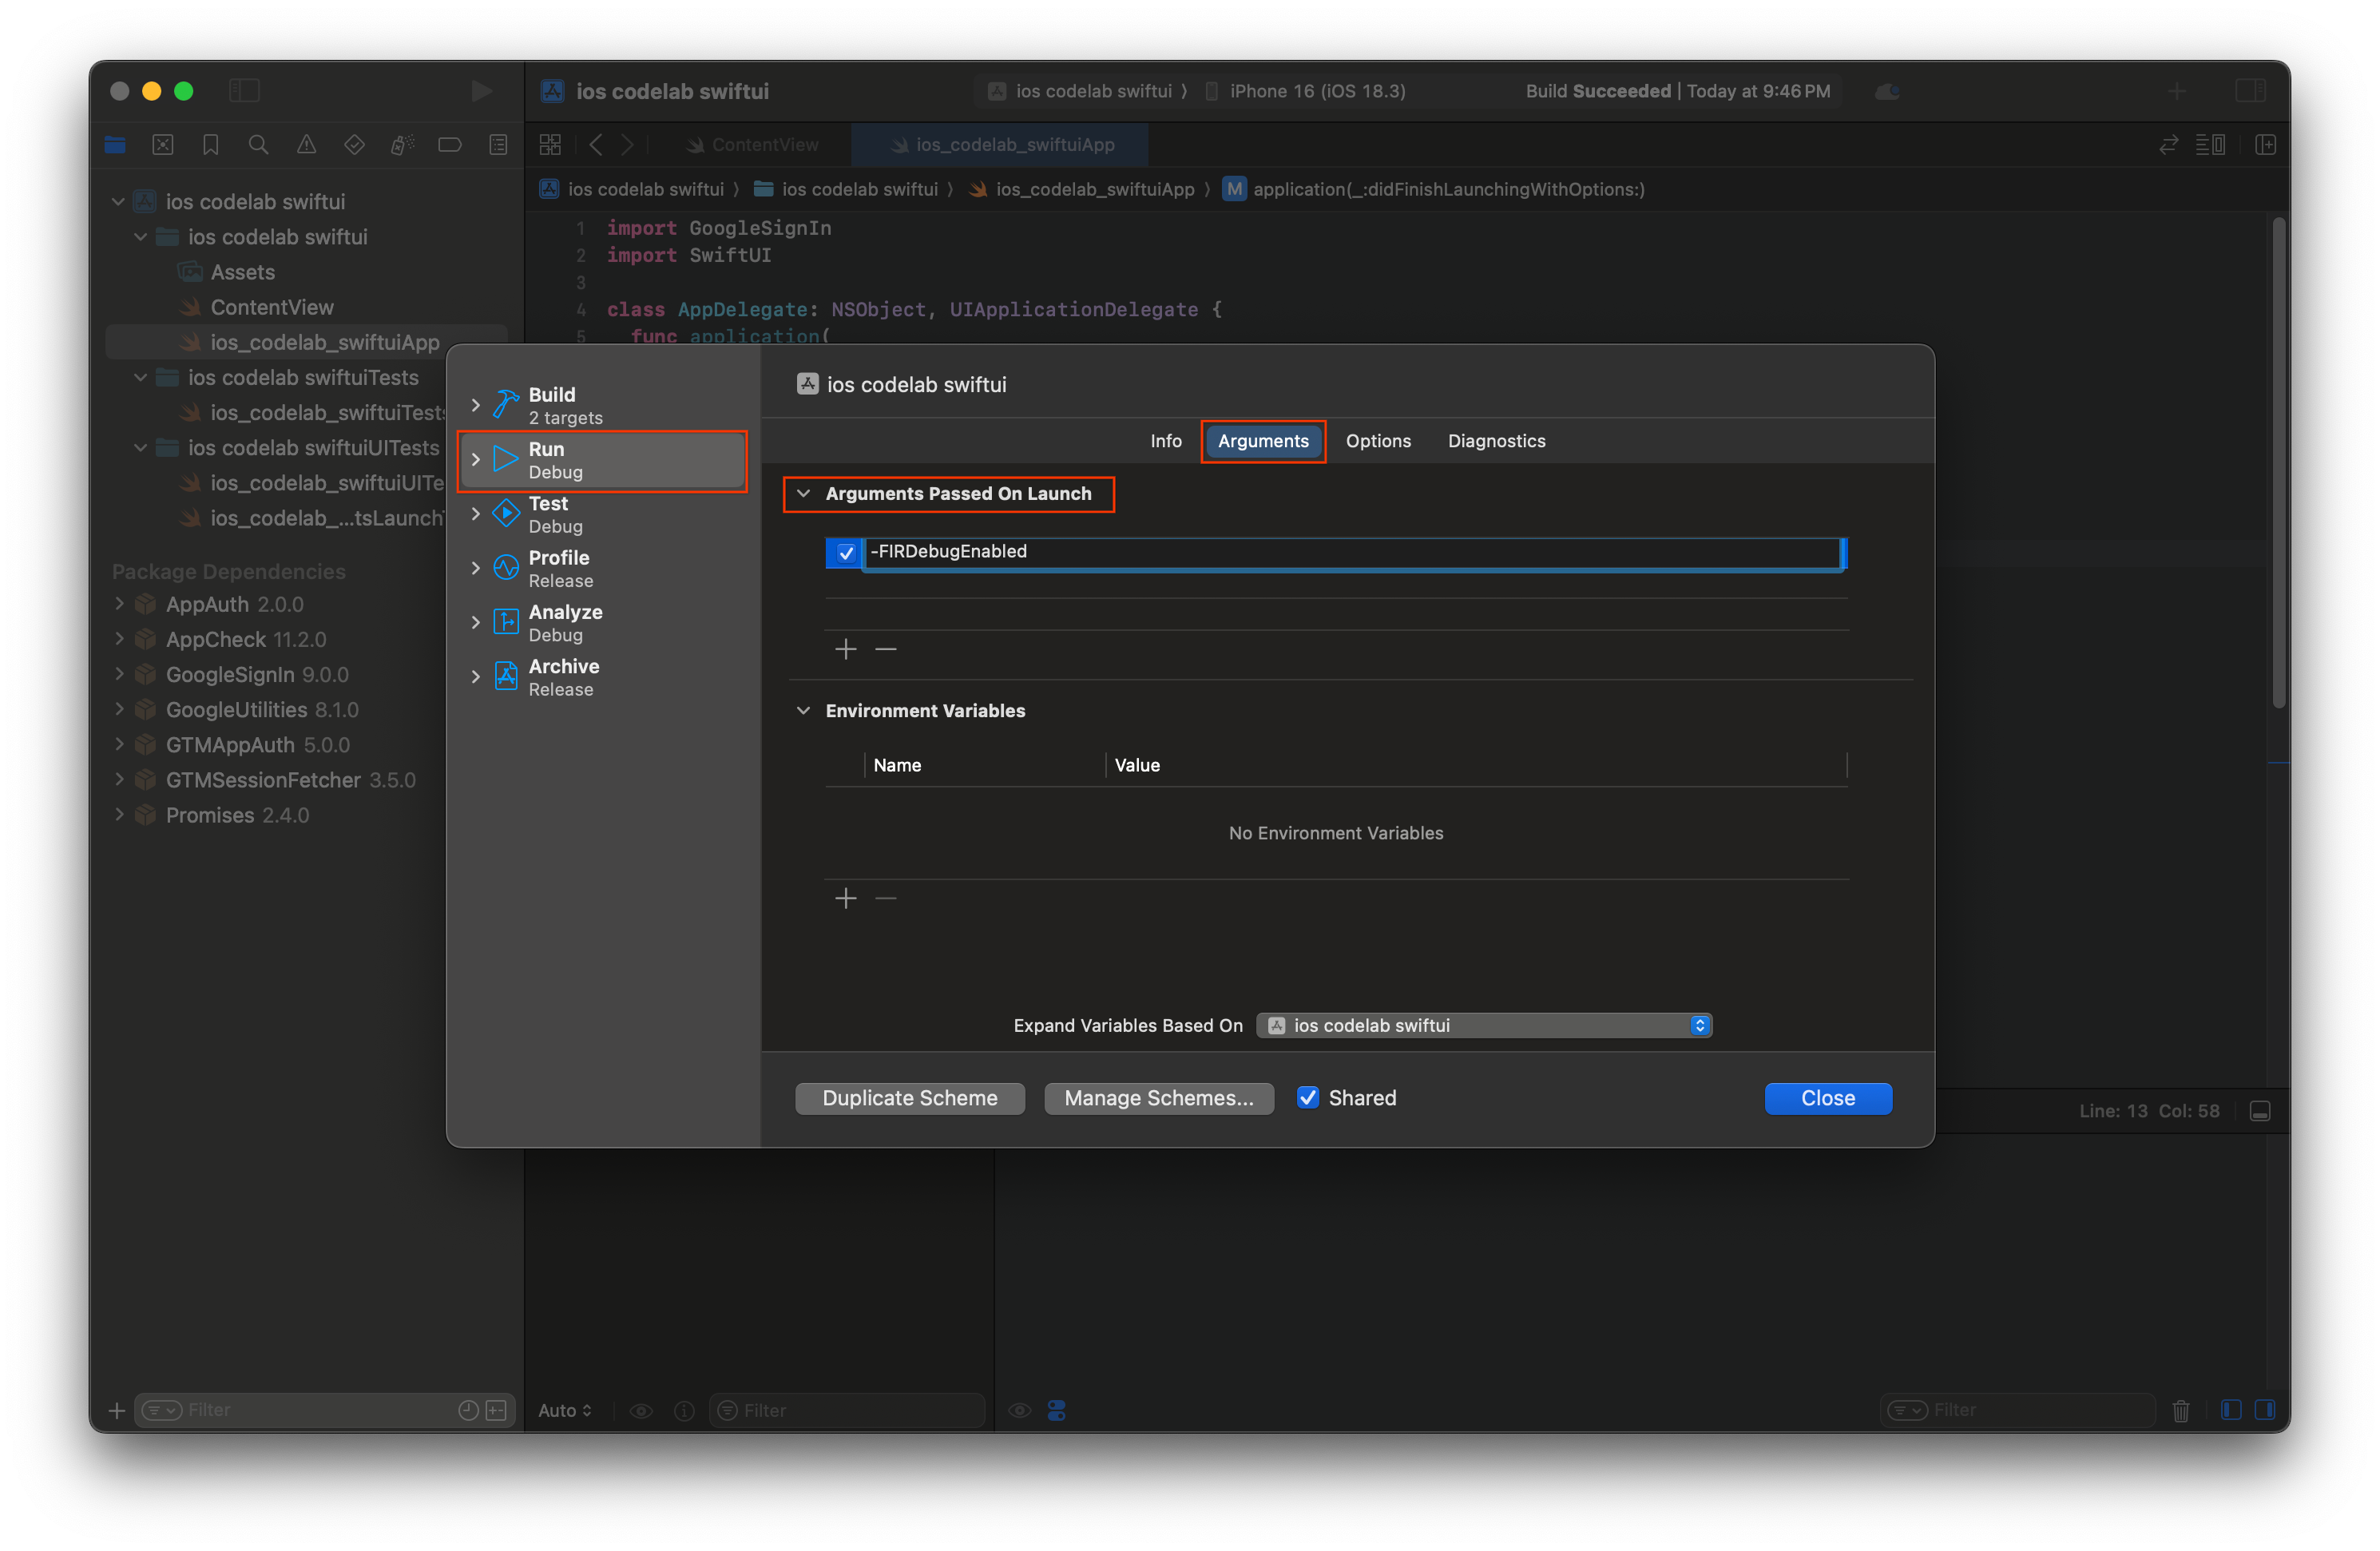
- Trong Thanh trình đơn Xcode, hãy chuyển đến Product (Sản phẩm) > Scheme (Lược đồ) > Edit Scheme (Chỉnh sửa lược đồ).
- Chọn Chạy trong trình đơn điều hướng.
- Chọn thẻ Arguments (Đối số).
- Trong mục Arguments Passed on Launch (Đối số được chuyển khi mở), hãy chọn + rồi thêm -FIRDebugEnabled. Đối số khởi chạy này cho phép ghi nhật ký gỡ lỗi Firebase.
- Chọn Đóng.
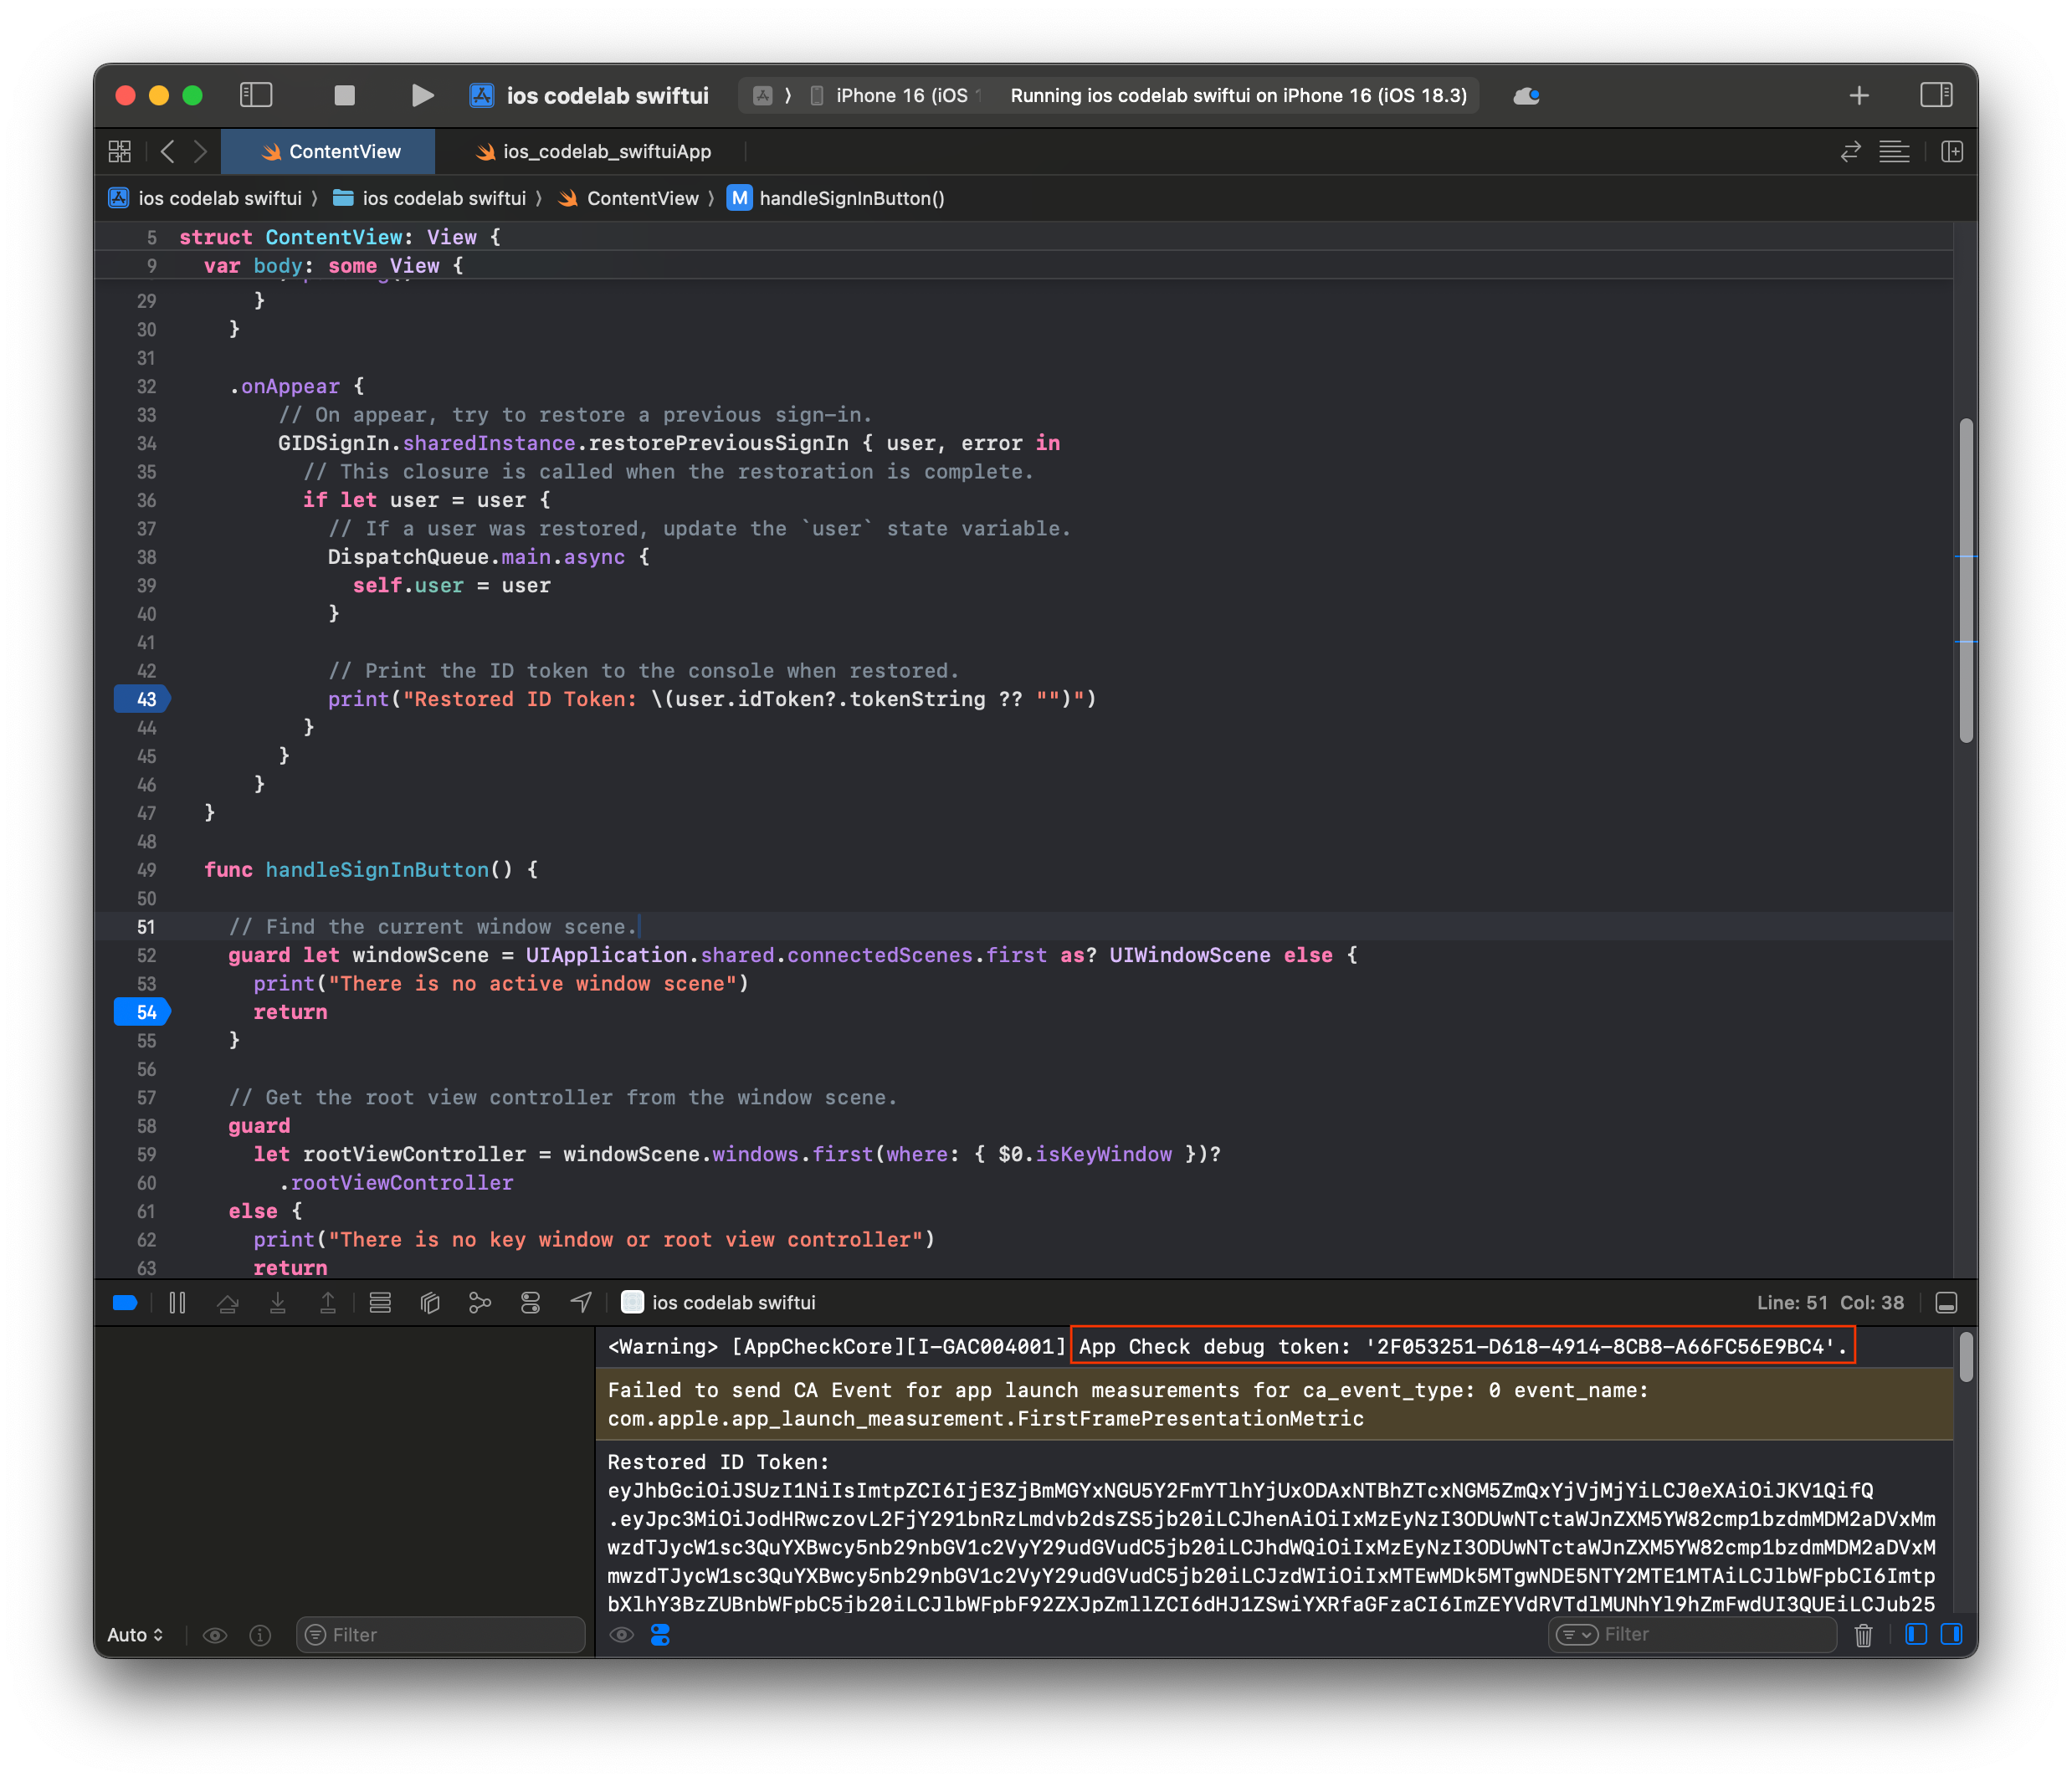
- Chạy ứng dụng trên trình mô phỏng.
- Sao chép mã thông báo gỡ lỗi Kiểm tra ứng dụng được in trong bảng điều khiển Xcode.
- Chuyển đến dự án của bạn trong Bảng điều khiển của Firebase.
- Mở rộng mục Tạo trong trình đơn điều hướng.
- Chọn App Check.
- Chọn thẻ Ứng dụng.
- Di chuột lên ứng dụng rồi chọn biểu tượng trình đơn có ba dấu chấm.
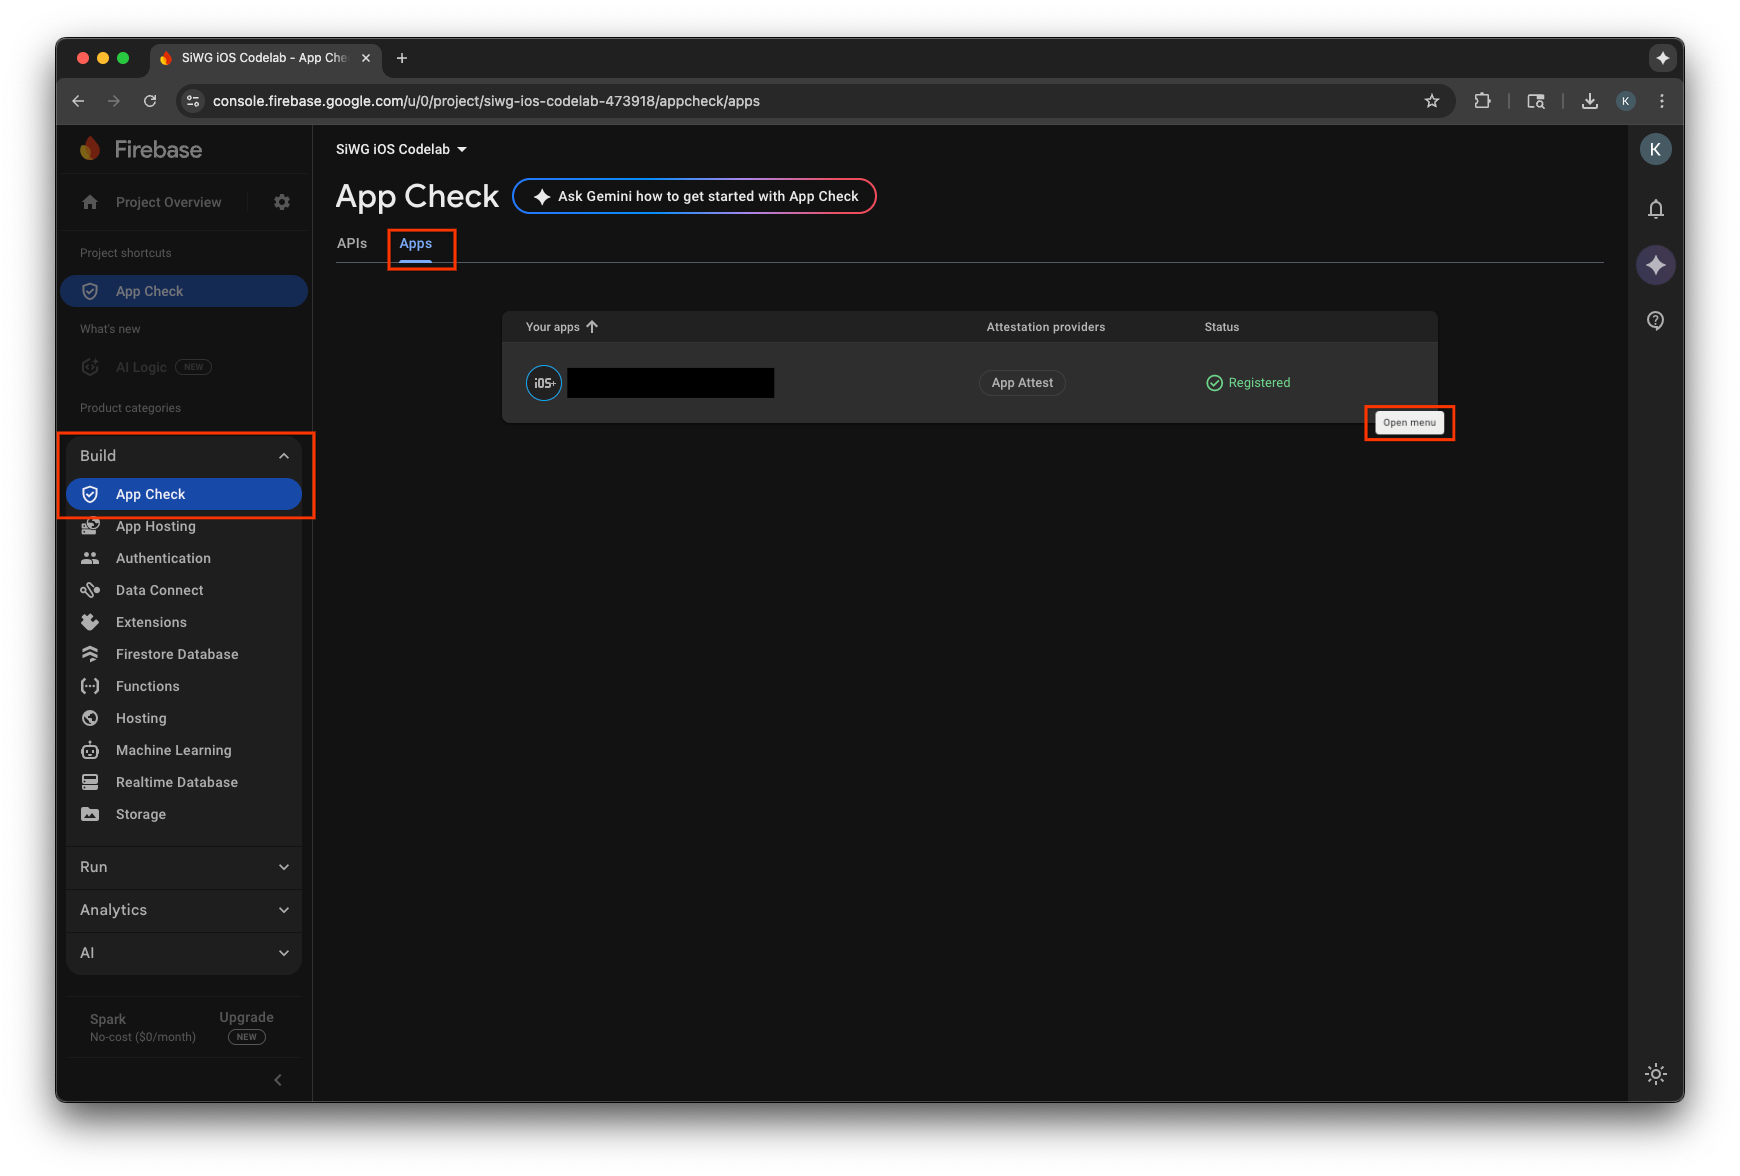
- Chọn Quản lý mã gỡ lỗi.
- Chọn Thêm mã gỡ lỗi.
- Đặt tên cho mã gỡ lỗi và dán mã gỡ lỗi mà bạn đã sao chép trước đó vào phần giá trị.
- Chọn Lưu để đăng ký mã thông báo.

- Quay lại trình mô phỏng rồi đăng nhập.
Có thể mất vài phút thì các chỉ số mới xuất hiện trong bảng điều khiển. Sau khi họ thực hiện, bạn có thể xác nhận rằng Kiểm tra ứng dụng đang hoạt động bằng cách tìm kiếm sự gia tăng về số lượng yêu cầu Đã xác minh ở một trong hai vị trí sau:
- Trong mục Kiểm tra ứng dụng của Bảng điều khiển Firebase, trong thẻ API.
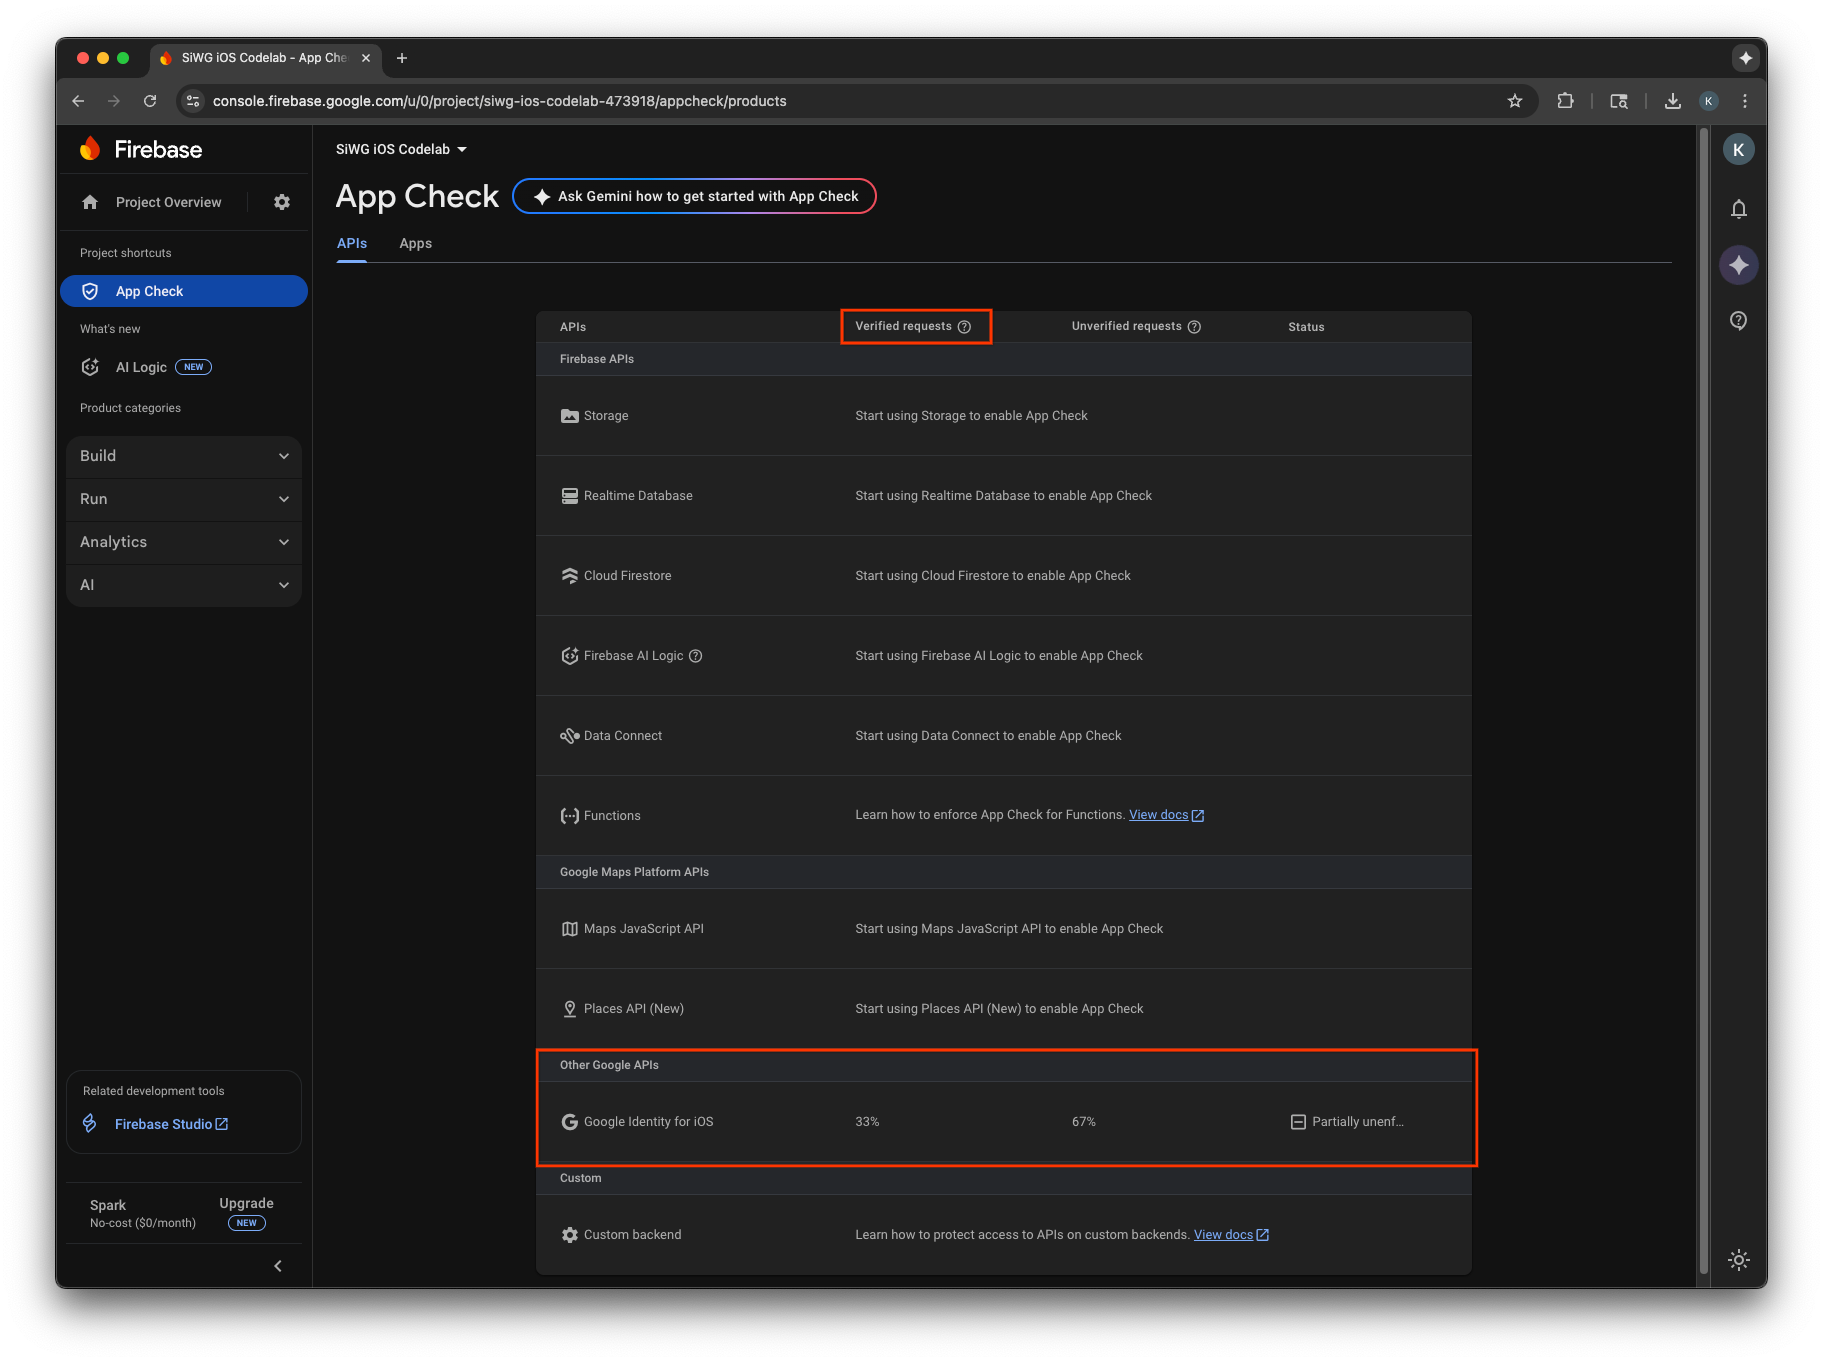
- Trên trang chỉnh sửa cho ứng dụng OAuth của bạn trong Bảng điều khiển Google Cloud.
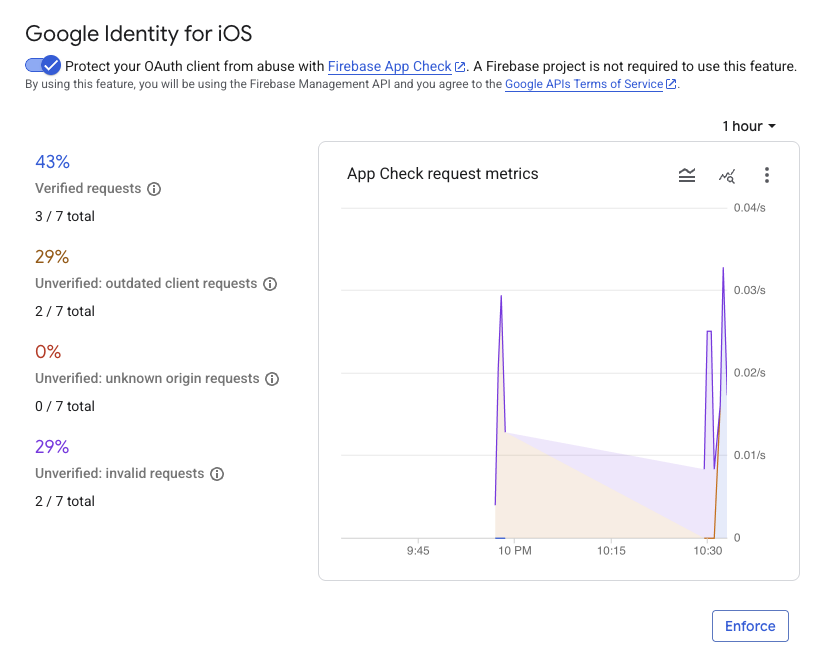
Sau khi theo dõi các chỉ số Kiểm tra ứng dụng của ứng dụng và xác nhận rằng các yêu cầu hợp lệ đang được xác minh, bạn nên bật chế độ thực thi Kiểm tra ứng dụng. Sau khi được thực thi, Kiểm tra ứng dụng sẽ từ chối tất cả các yêu cầu chưa được xác minh, đảm bảo chỉ lưu lượng truy cập từ ứng dụng chính thức của bạn mới có thể truy cập vào các điểm cuối OAuth 2.0 của Google thay cho dự án của bạn.
12. Tài nguyên khác
Xin chúc mừng!
Bạn đã định cấu hình một ứng dụng iOS OAuth 2.0, thêm nút Đăng nhập bằng Google vào một ứng dụng iOS, tìm hiểu cách tuỳ chỉnh giao diện của nút, giải mã mã thông báo mã nhận dạng JWT và bật Kiểm tra ứng dụng cho ứng dụng của mình.
Các đường liên kết này có thể giúp bạn thực hiện các bước tiếp theo:
- Cách Bắt đầu sử dụng tính năng Đăng nhập bằng Google cho iOS
- Kho lưu trữ Đăng nhập bằng Google cho iOS
- Xác minh mã thông báo nhận dạng của Google
- Bắt đầu sử dụng Kiểm tra ứng dụng cho tính năng Đăng nhập bằng Google trên iOS
- Thu hồi mã truy cập và ngắt kết nối ứng dụng
- Tìm hiểu thêm về các dự án trên Google Cloud
- Phương thức xác thực danh tính của Google
- Bật chế độ thực thi Kiểm tra ứng dụng