
1. 准备工作
此 Codelab 将引导您构建一个实现了“使用 Google 账号登录”功能并在模拟器中运行的 iOS 应用。我们提供了使用 SwiftUI 和 UIKit 的实现。
SwiftUI 是 Apple 针对新应用开发推出的现代界面框架。它支持使用单个共享代码库为所有 Apple 平台构建用户界面。它需要最低 iOS 版本 13。
UIKit 是 Apple 针对 iOS 推出的原始基础界面框架。它可向后兼容旧版 iOS。因此,对于需要支持各种旧版设备的成熟应用,这是一种不错的选择。
您可以选择最符合自己开发需求的框架路径。
前提条件
学习内容
- 如何创建 Google Cloud 项目
- 如何在 Google Cloud 控制台中创建 OAuth 客户端
- 如何为 iOS 应用实现“使用 Google 账号登录”功能
- 如何自定义“使用 Google 账号登录”按钮
- 如何解码 ID 令牌
- 如何为 iOS 应用启用 App Check
所需条件
此 Codelab 是使用 Xcode 16.3 和 iOS 18.3 模拟器创建的。您应该使用最新版本的 Xcode 进行开发。
2. 创建新的 Xcode 项目
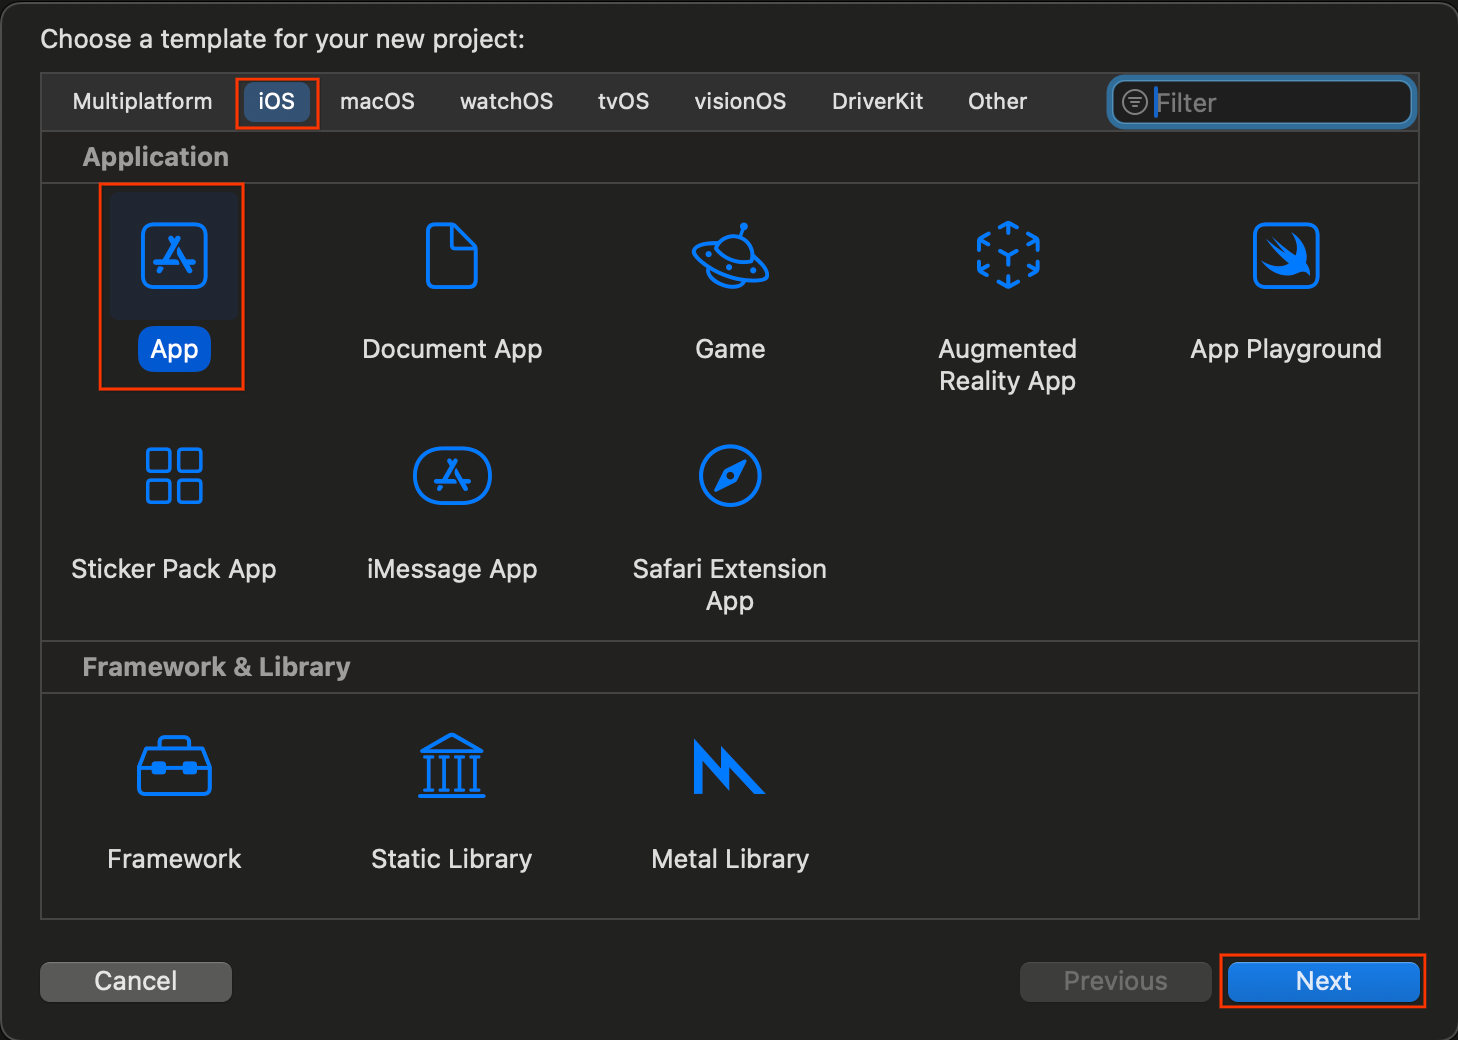
- 打开 Xcode,然后选择创建新的 Xcode 项目。
- 选择 iOS 标签页,选择 App 模板,然后点击 Next。
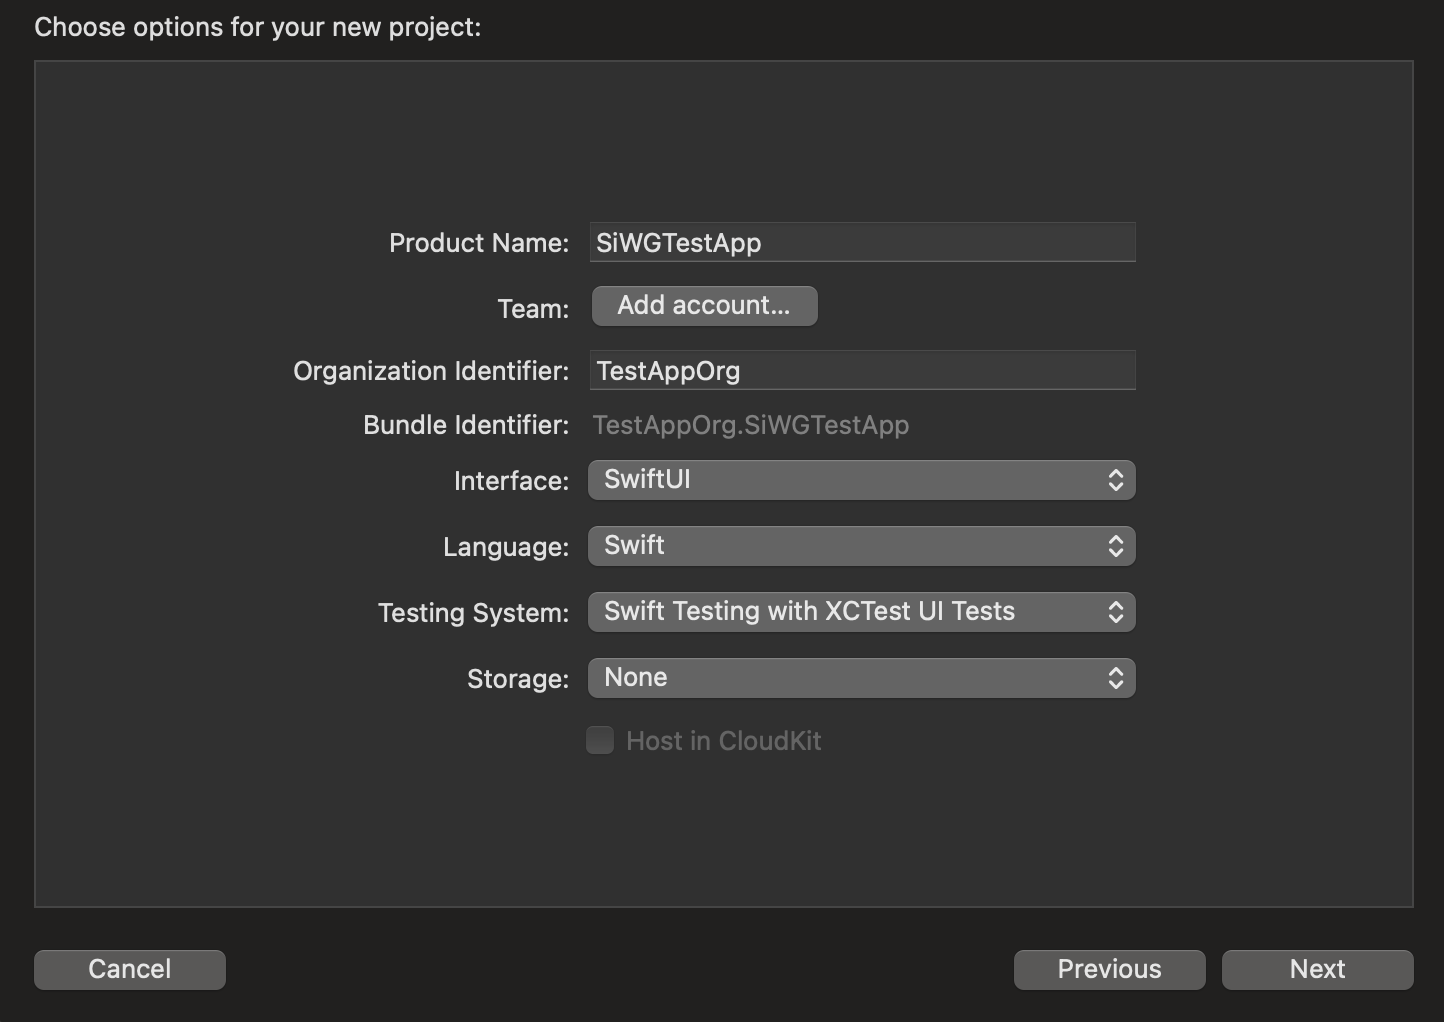
- 在项目选项中:
- 输入您的商品名称。
- (可选)选择您的团队。
- 输入您的组织标识符。
- 记下生成的软件包标识符。以便稍后使用。
- 在接口中,选择以下任一选项:
- 基于 SwiftUI 的应用的 SwiftUI。
- 基于 UIKit 的应用的故事板。
- 为语言选择 Swift。
- 点击下一步,然后选择一个位置来保存项目。
3. 创建 OAuth 客户端
如需允许您的应用与 Google 的身份验证服务通信,您需要创建 OAuth 客户端 ID。这需要一个 Google Cloud 项目。以下步骤将引导您完成创建项目和 OAuth 客户端 ID 的整个过程。
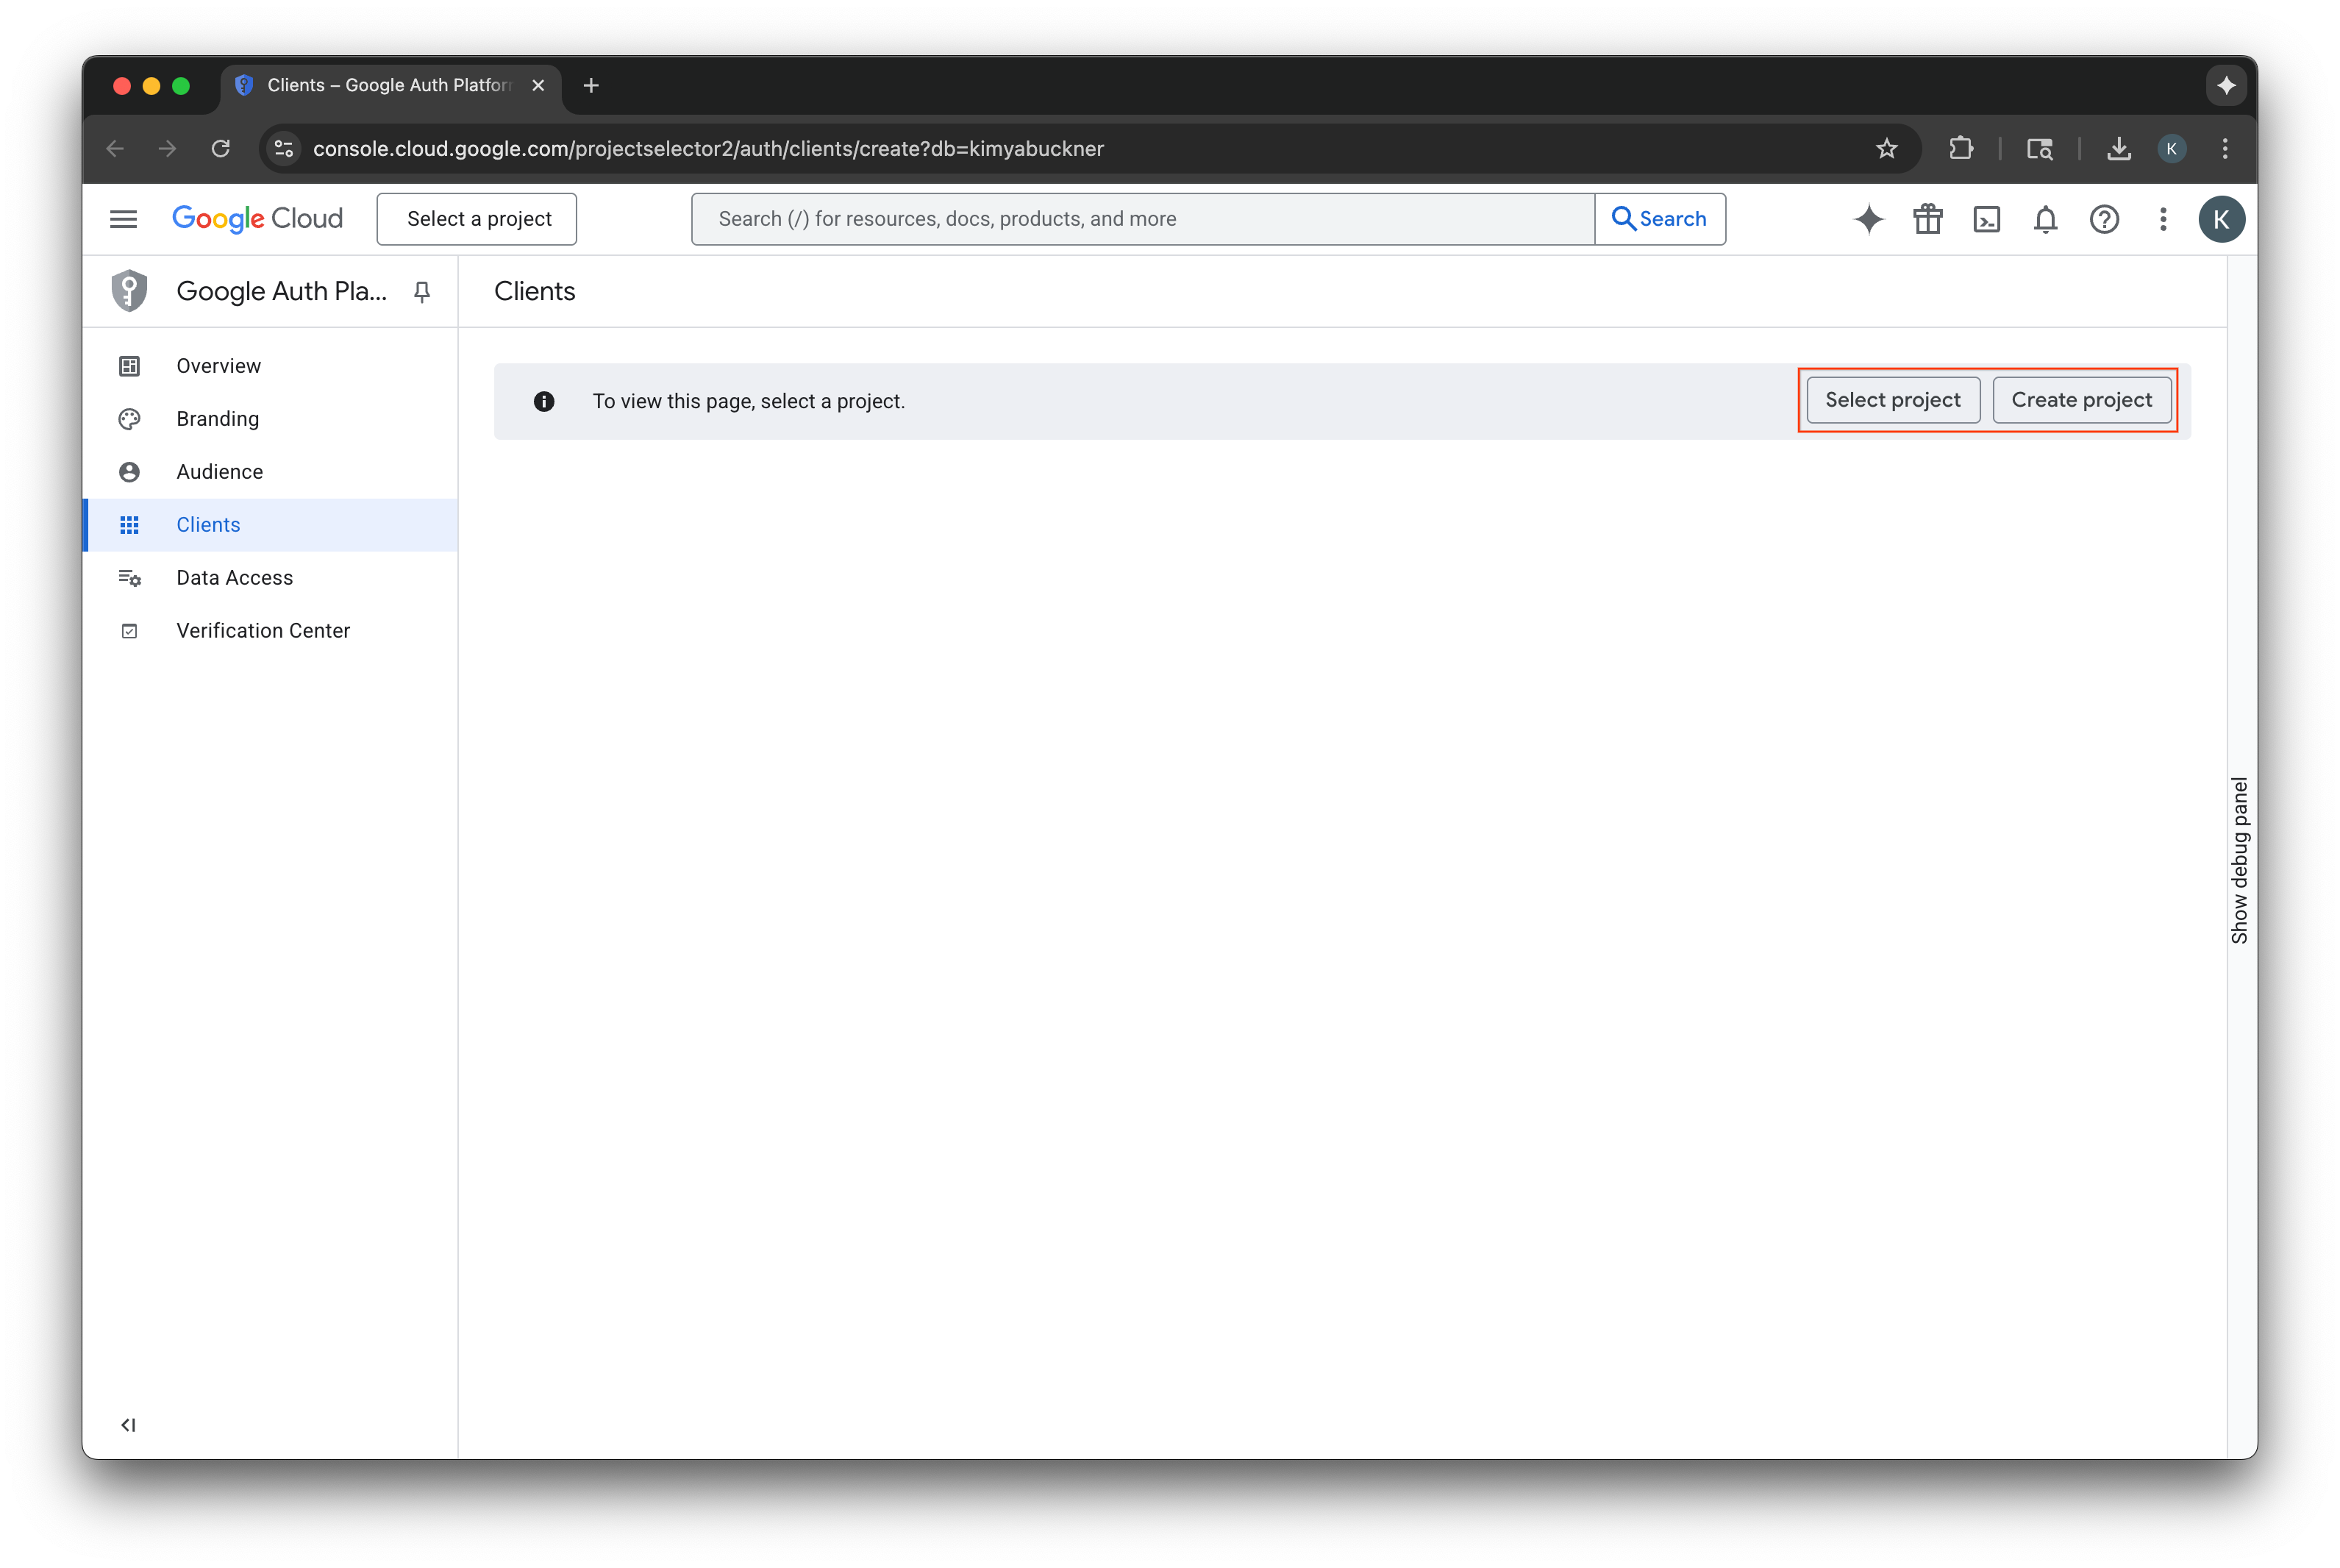
选择或创建 Google Cloud 项目
- 前往 Google Cloud 控制台,然后选择或创建项目。如果您选择的是现有项目,控制台会自动引导您完成下一个必需的步骤。
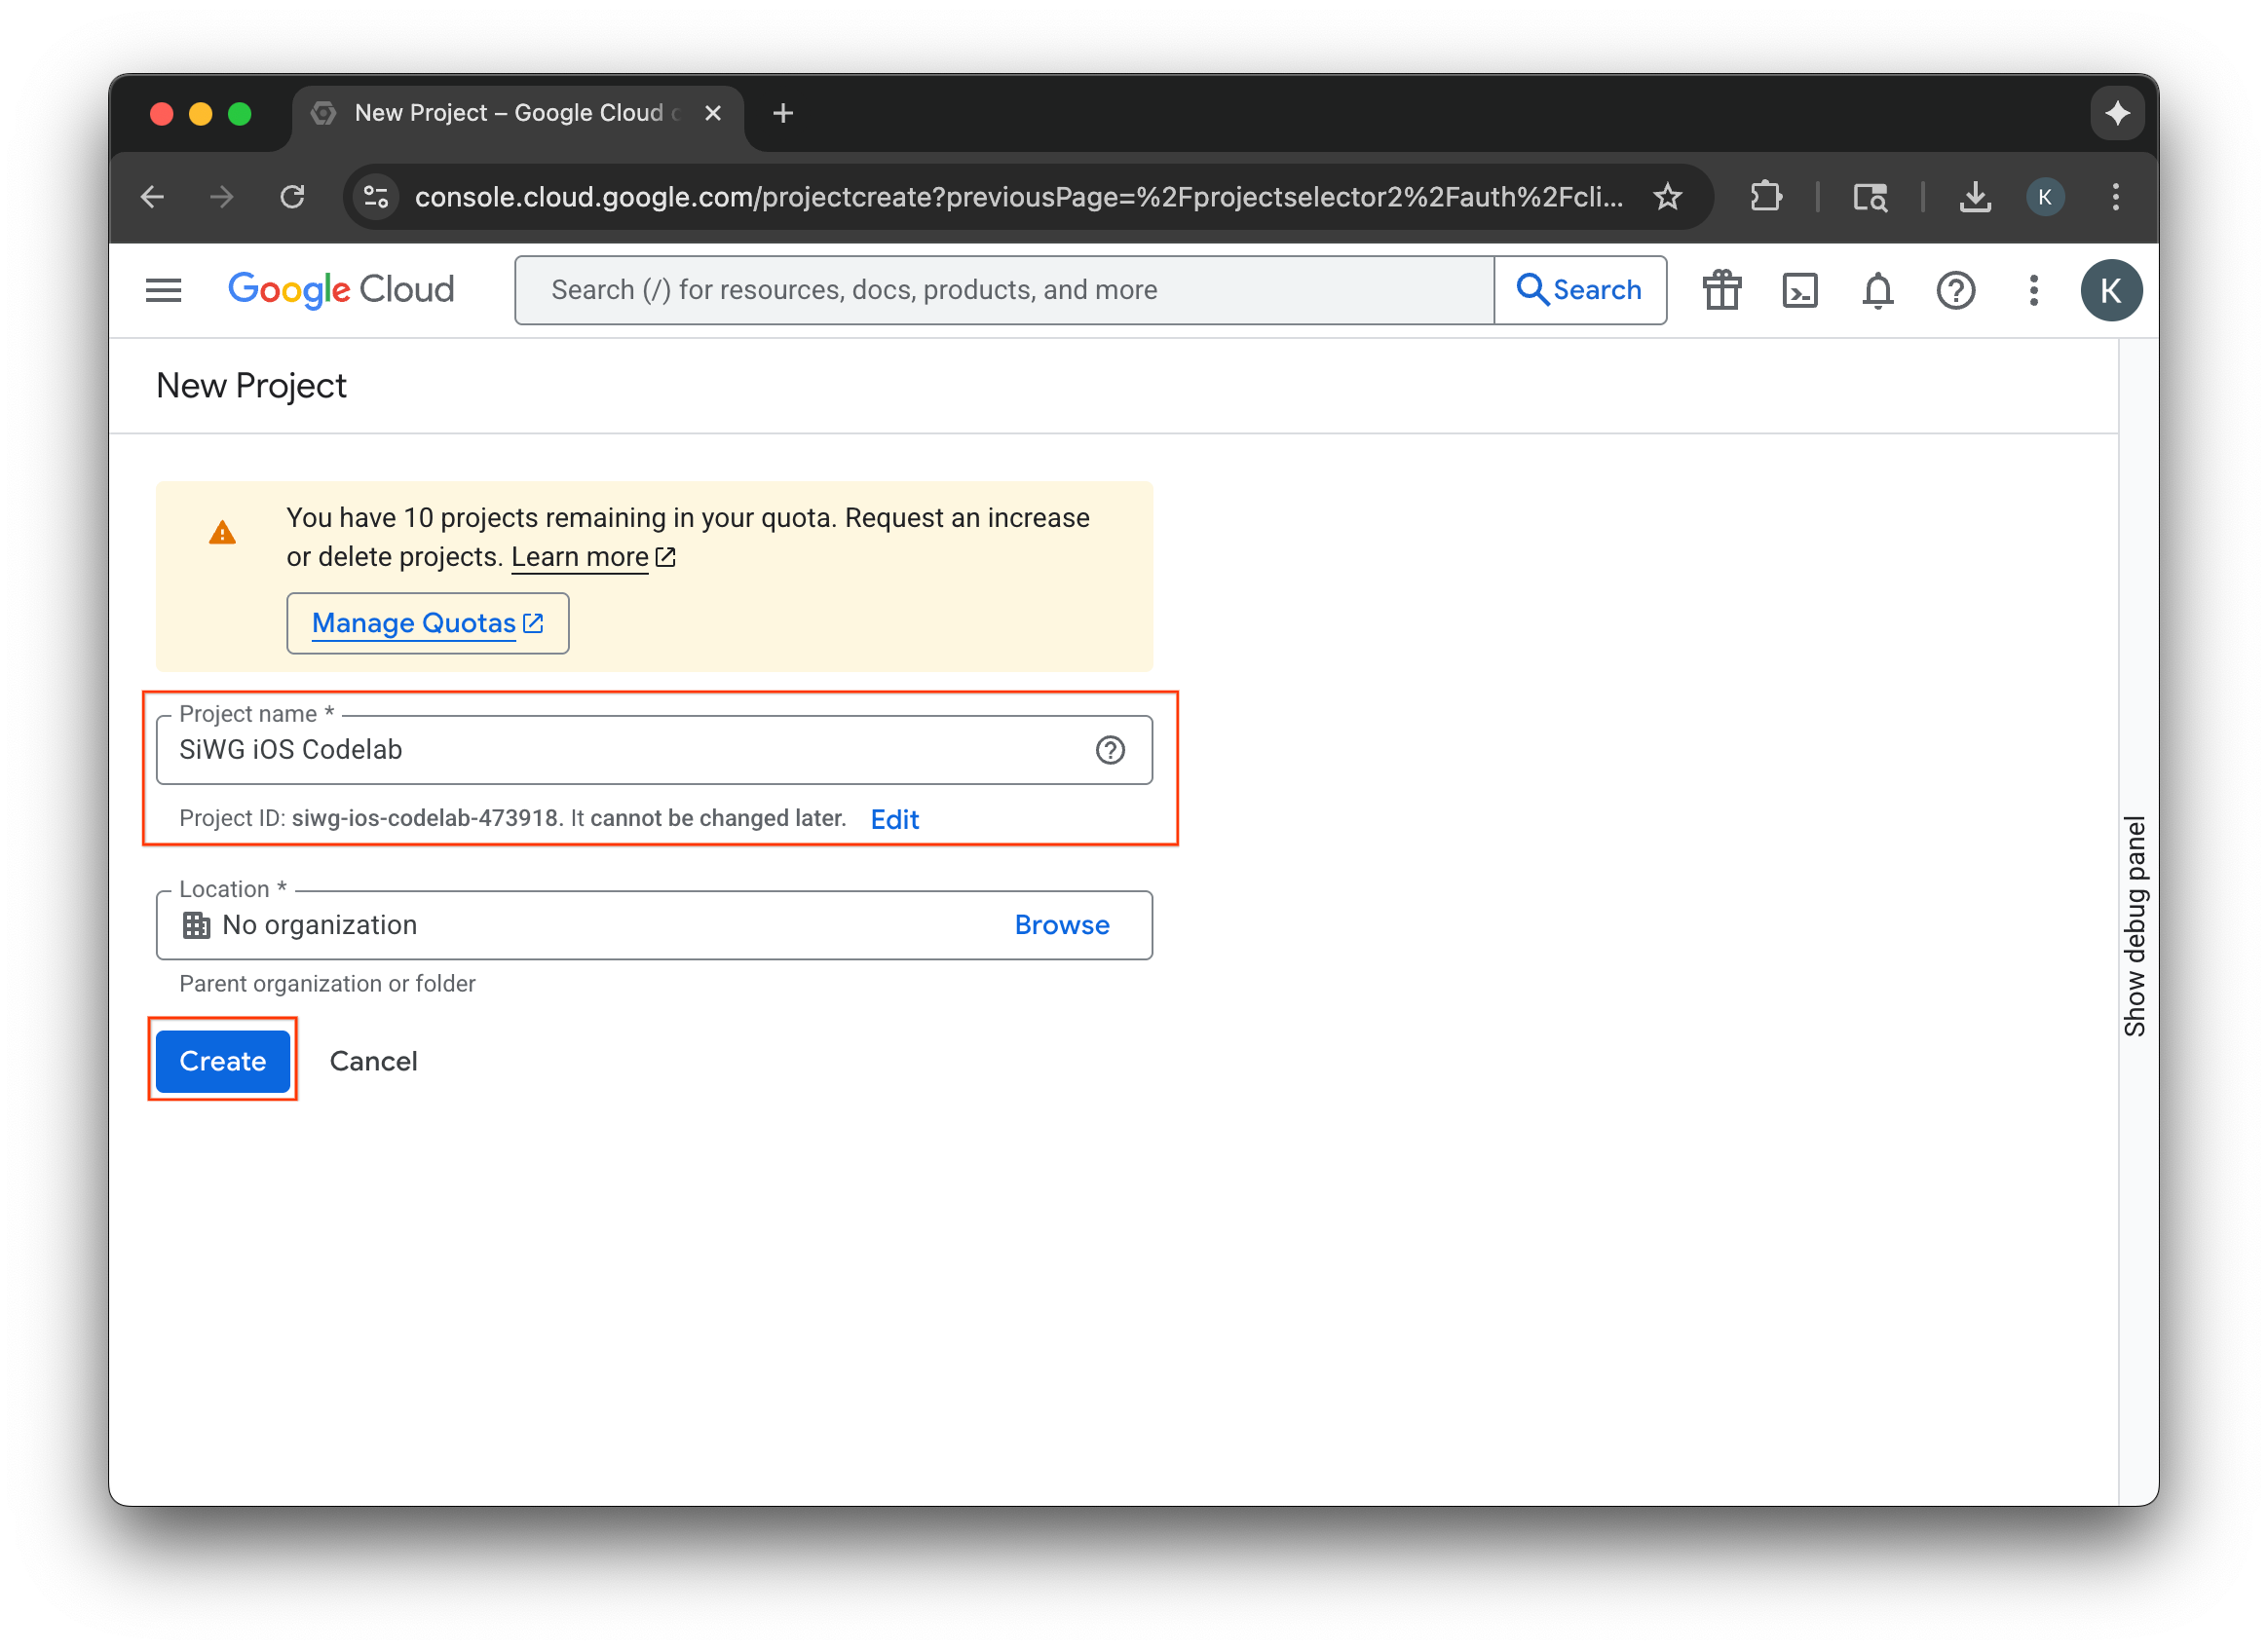
- 为新的 Google Cloud 项目输入名称。
- 选择创建。
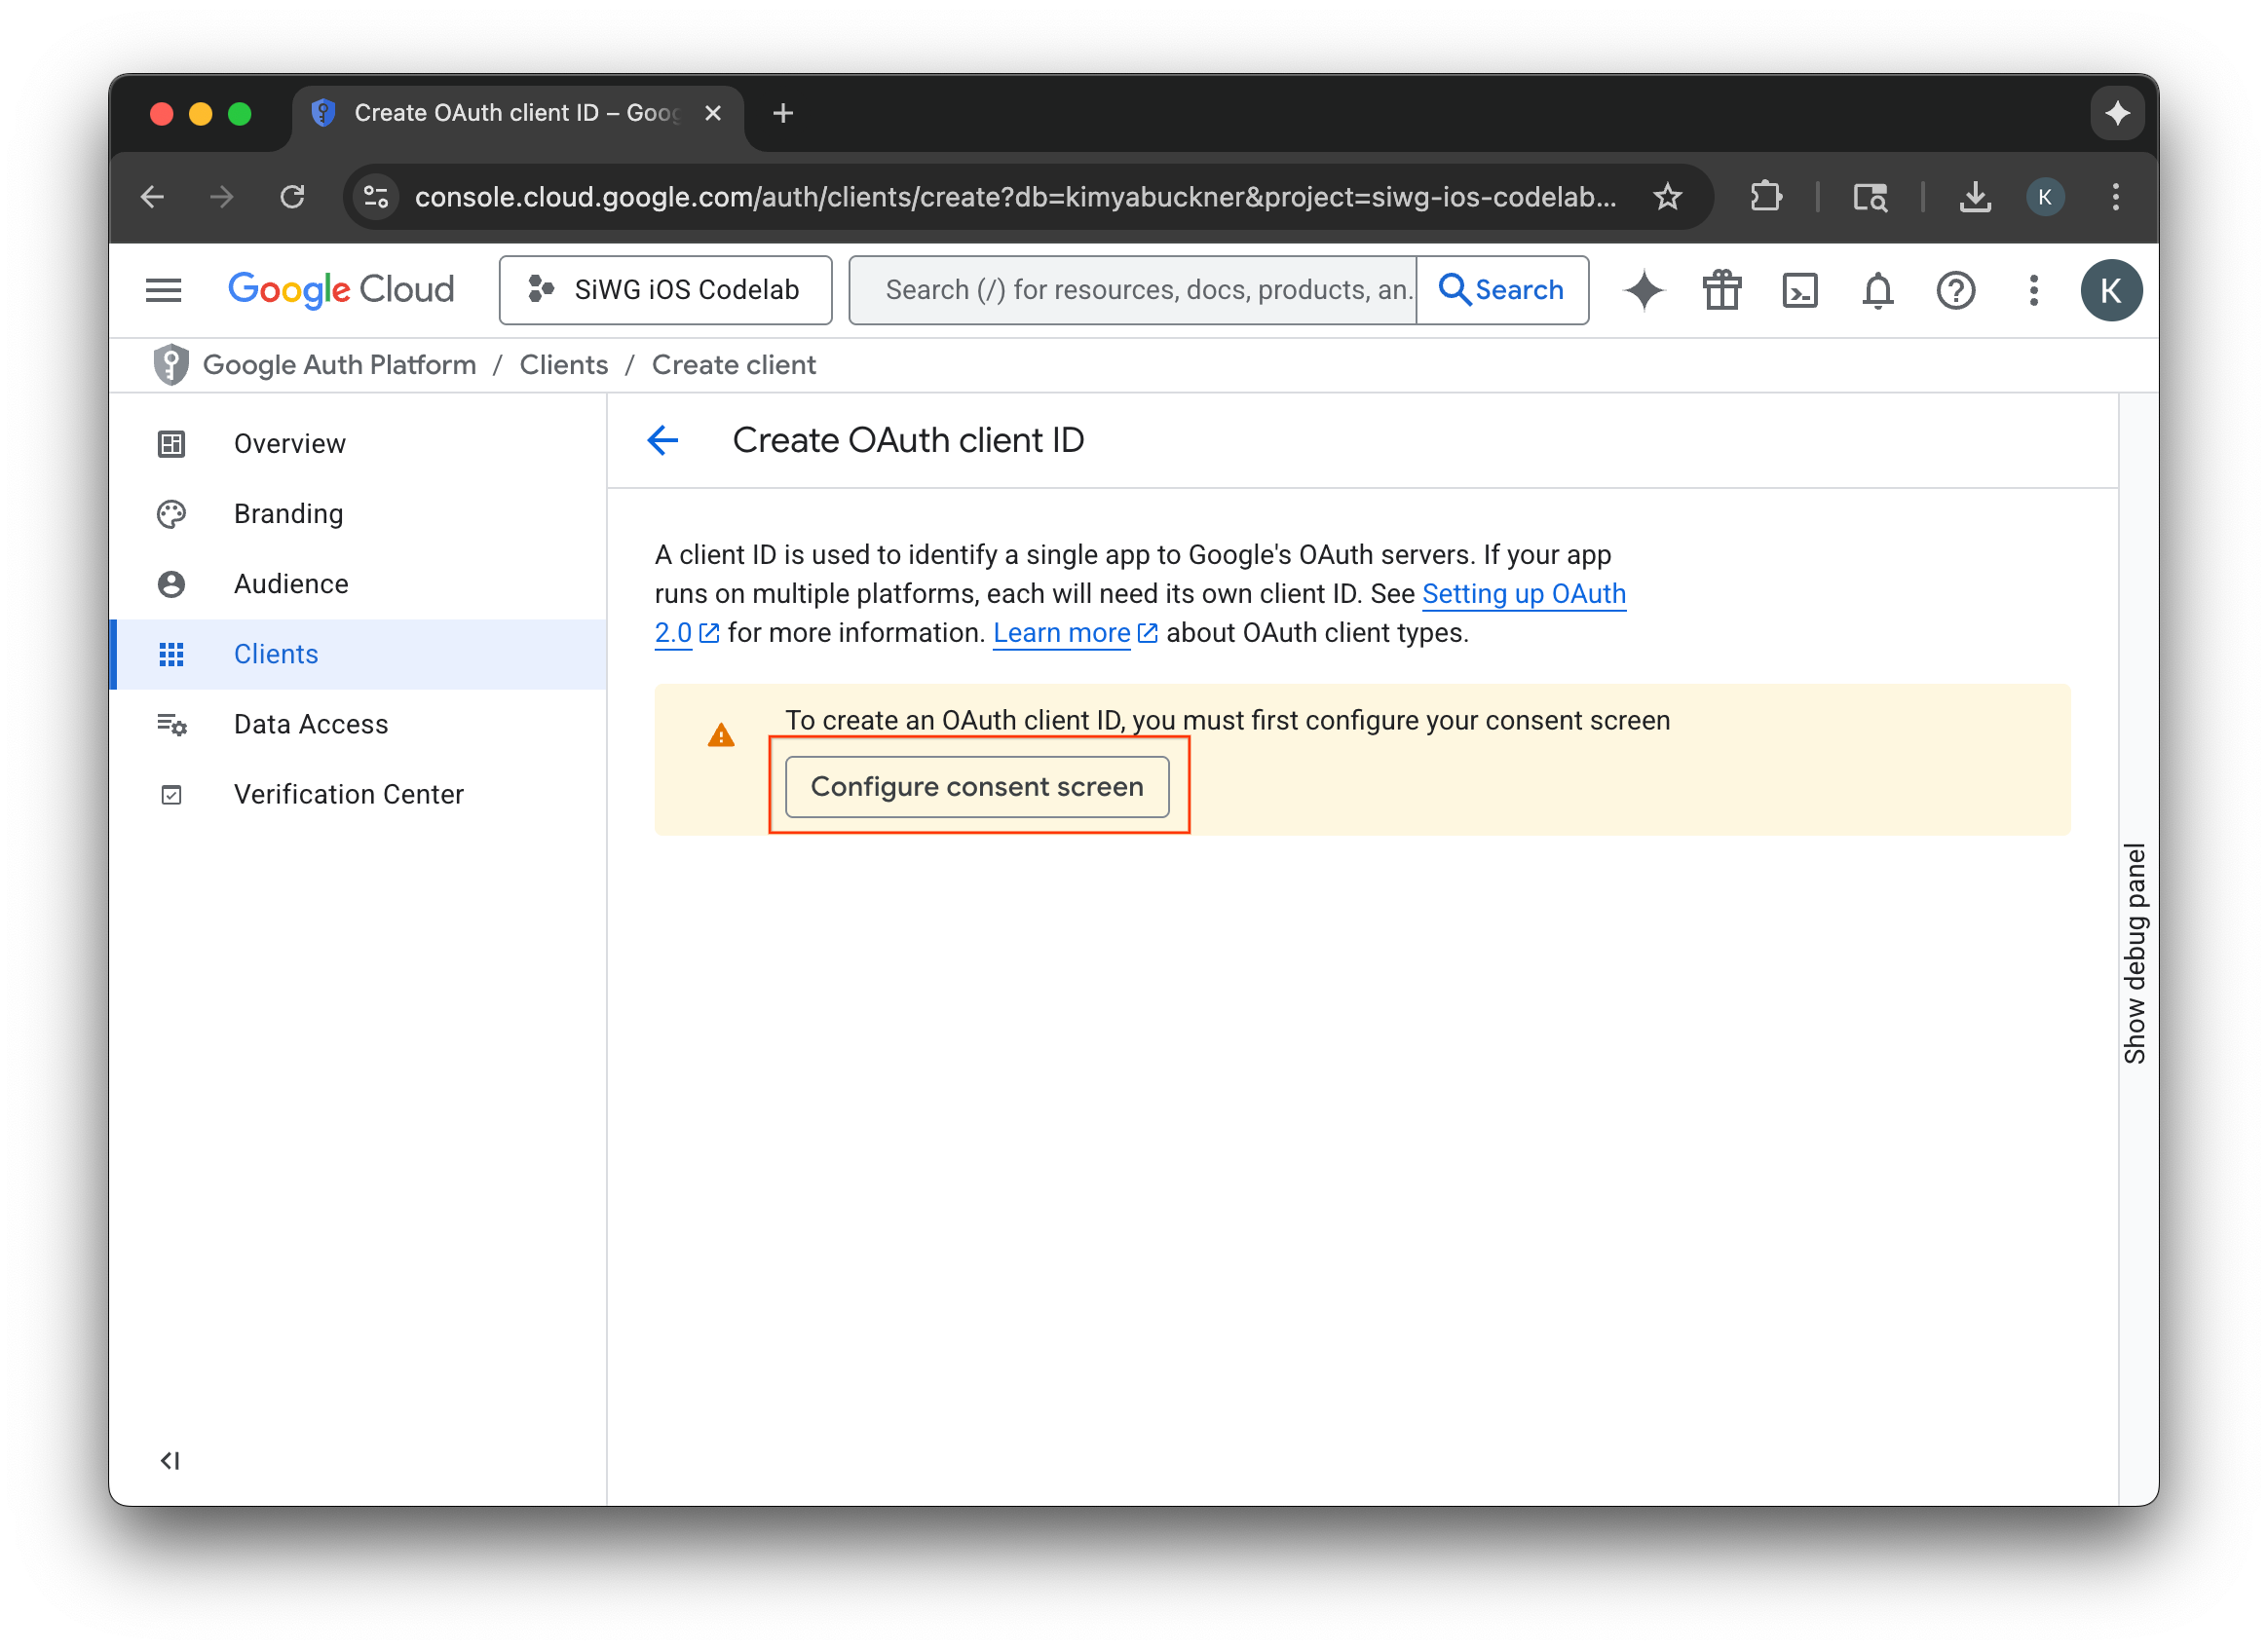
配置权限请求页面
如果您已为所选项目配置了权限请求页面,系统不会提示您立即进行配置。在这种情况下,您可以跳过本部分,直接前往创建 OAuth 2.0 客户端。
- 选择配置权限请求页面。
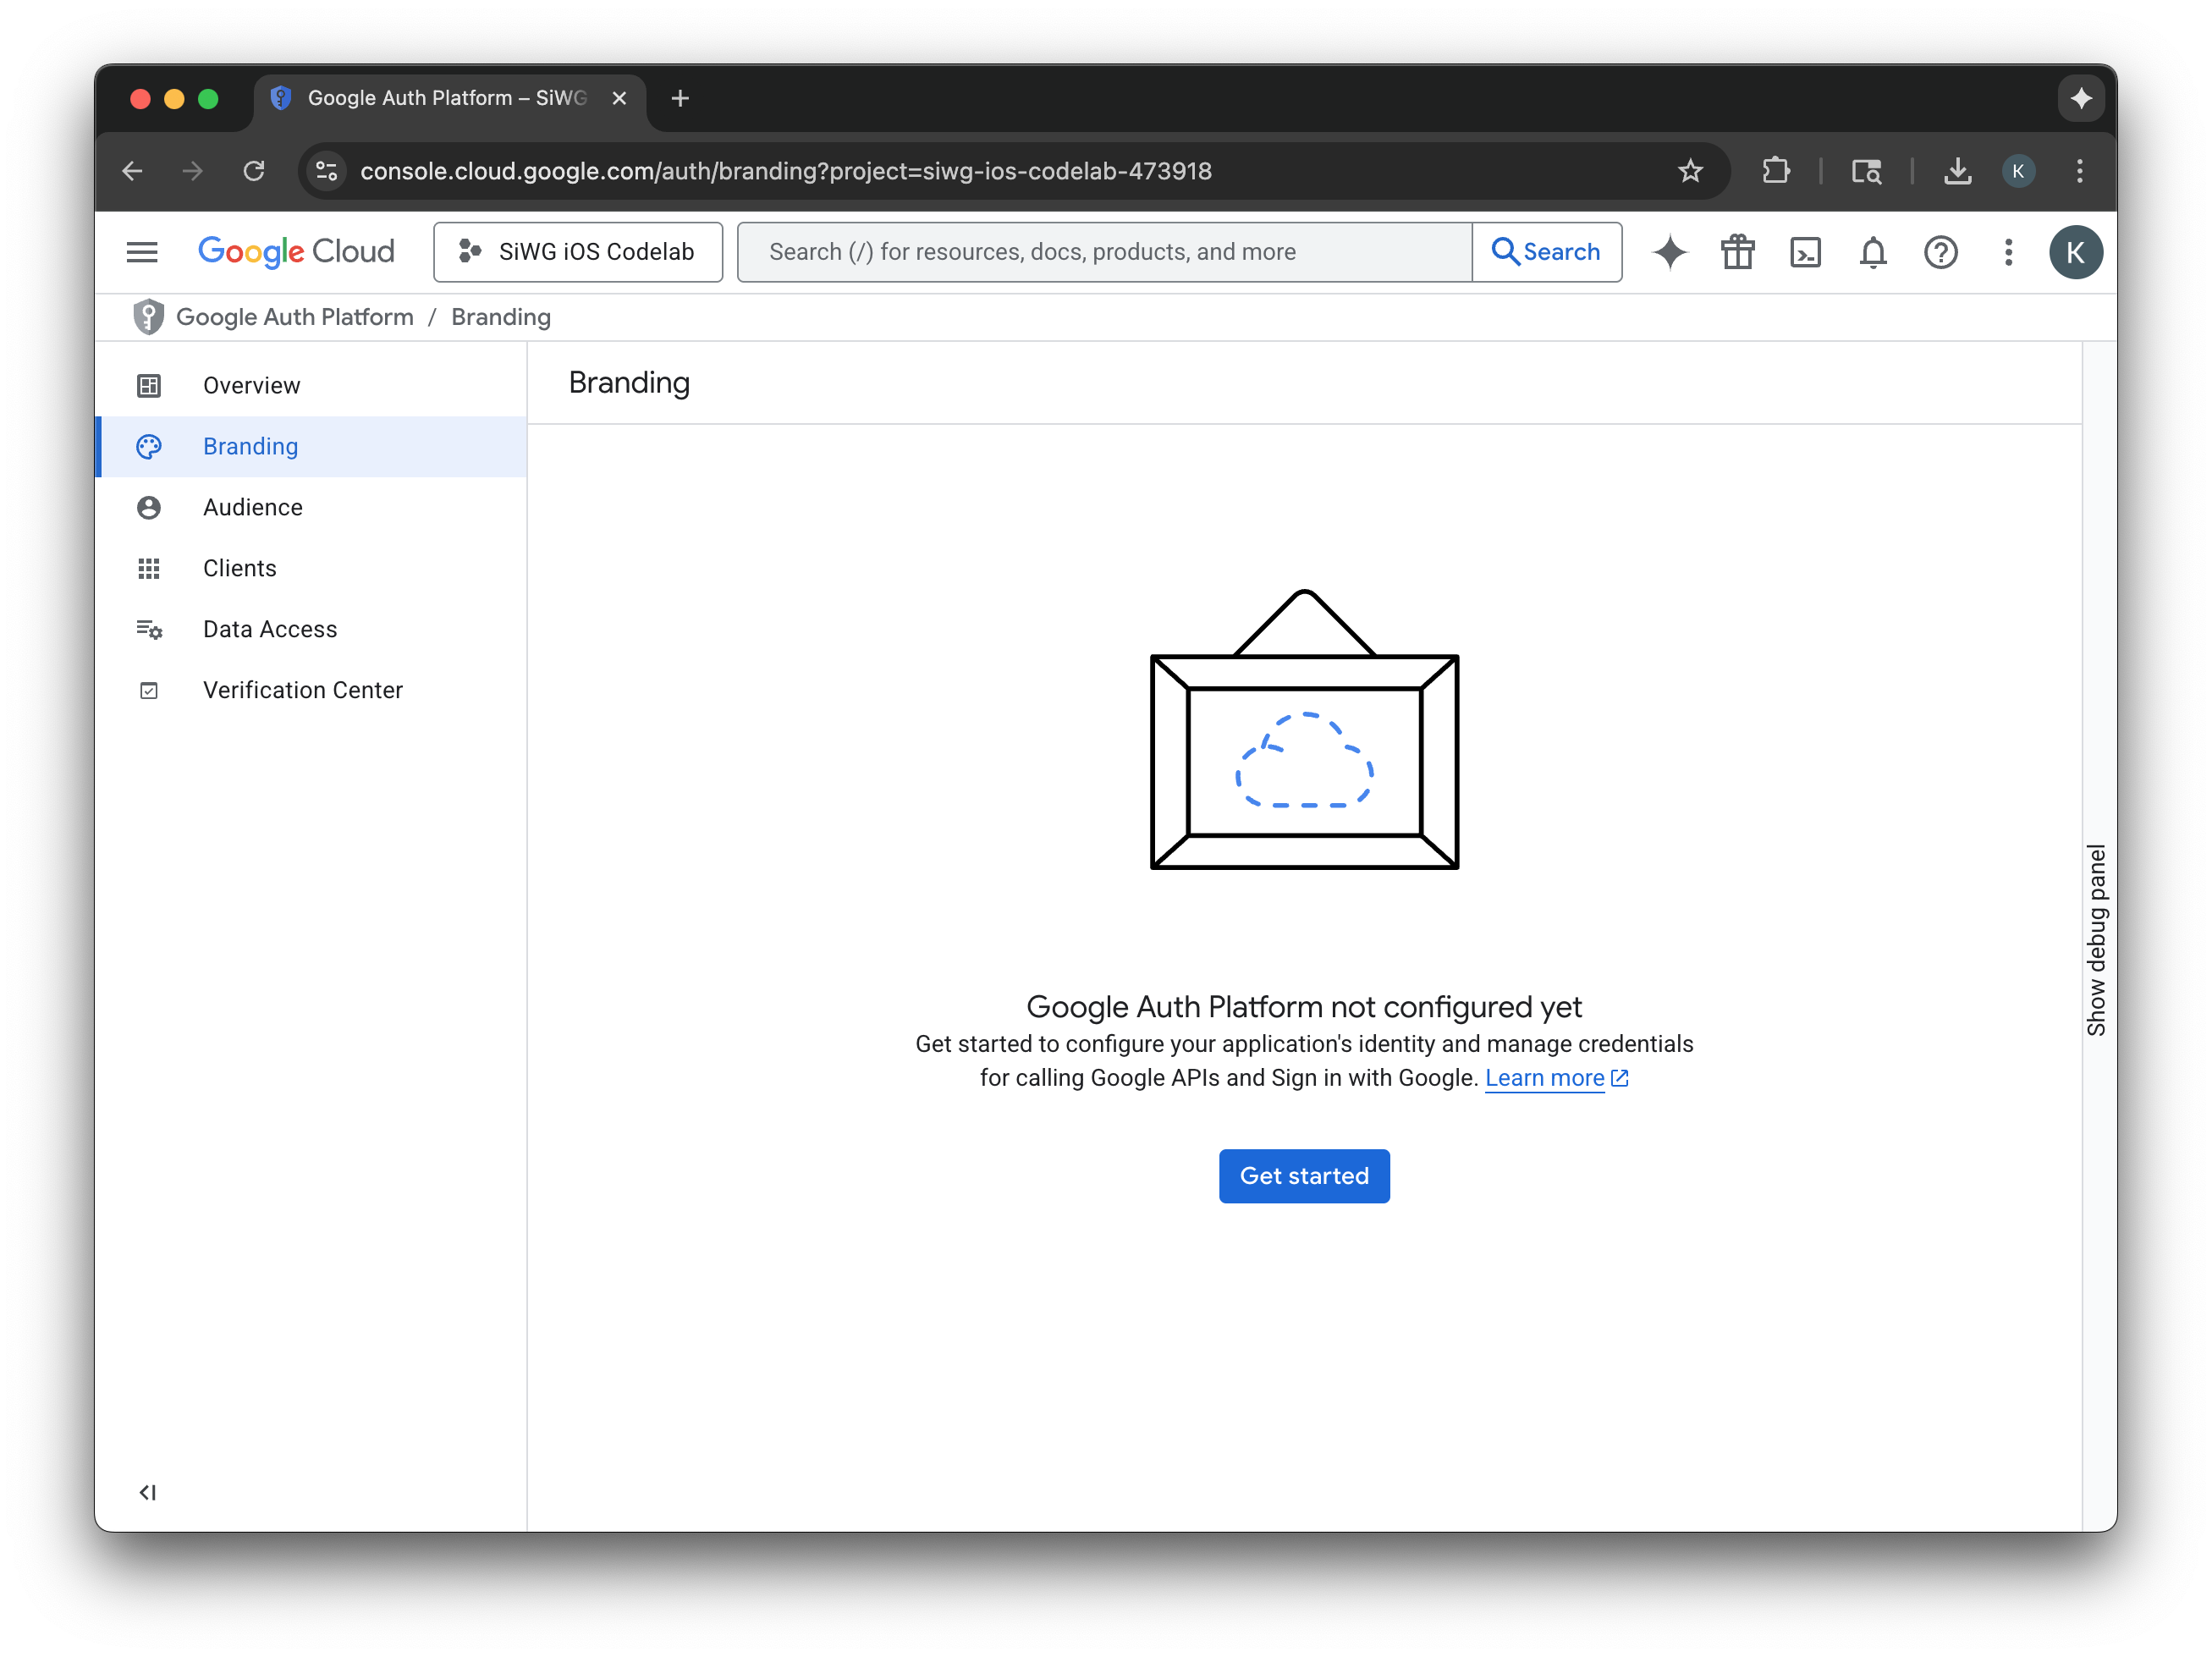
- 在“品牌”页面上,选择开始。
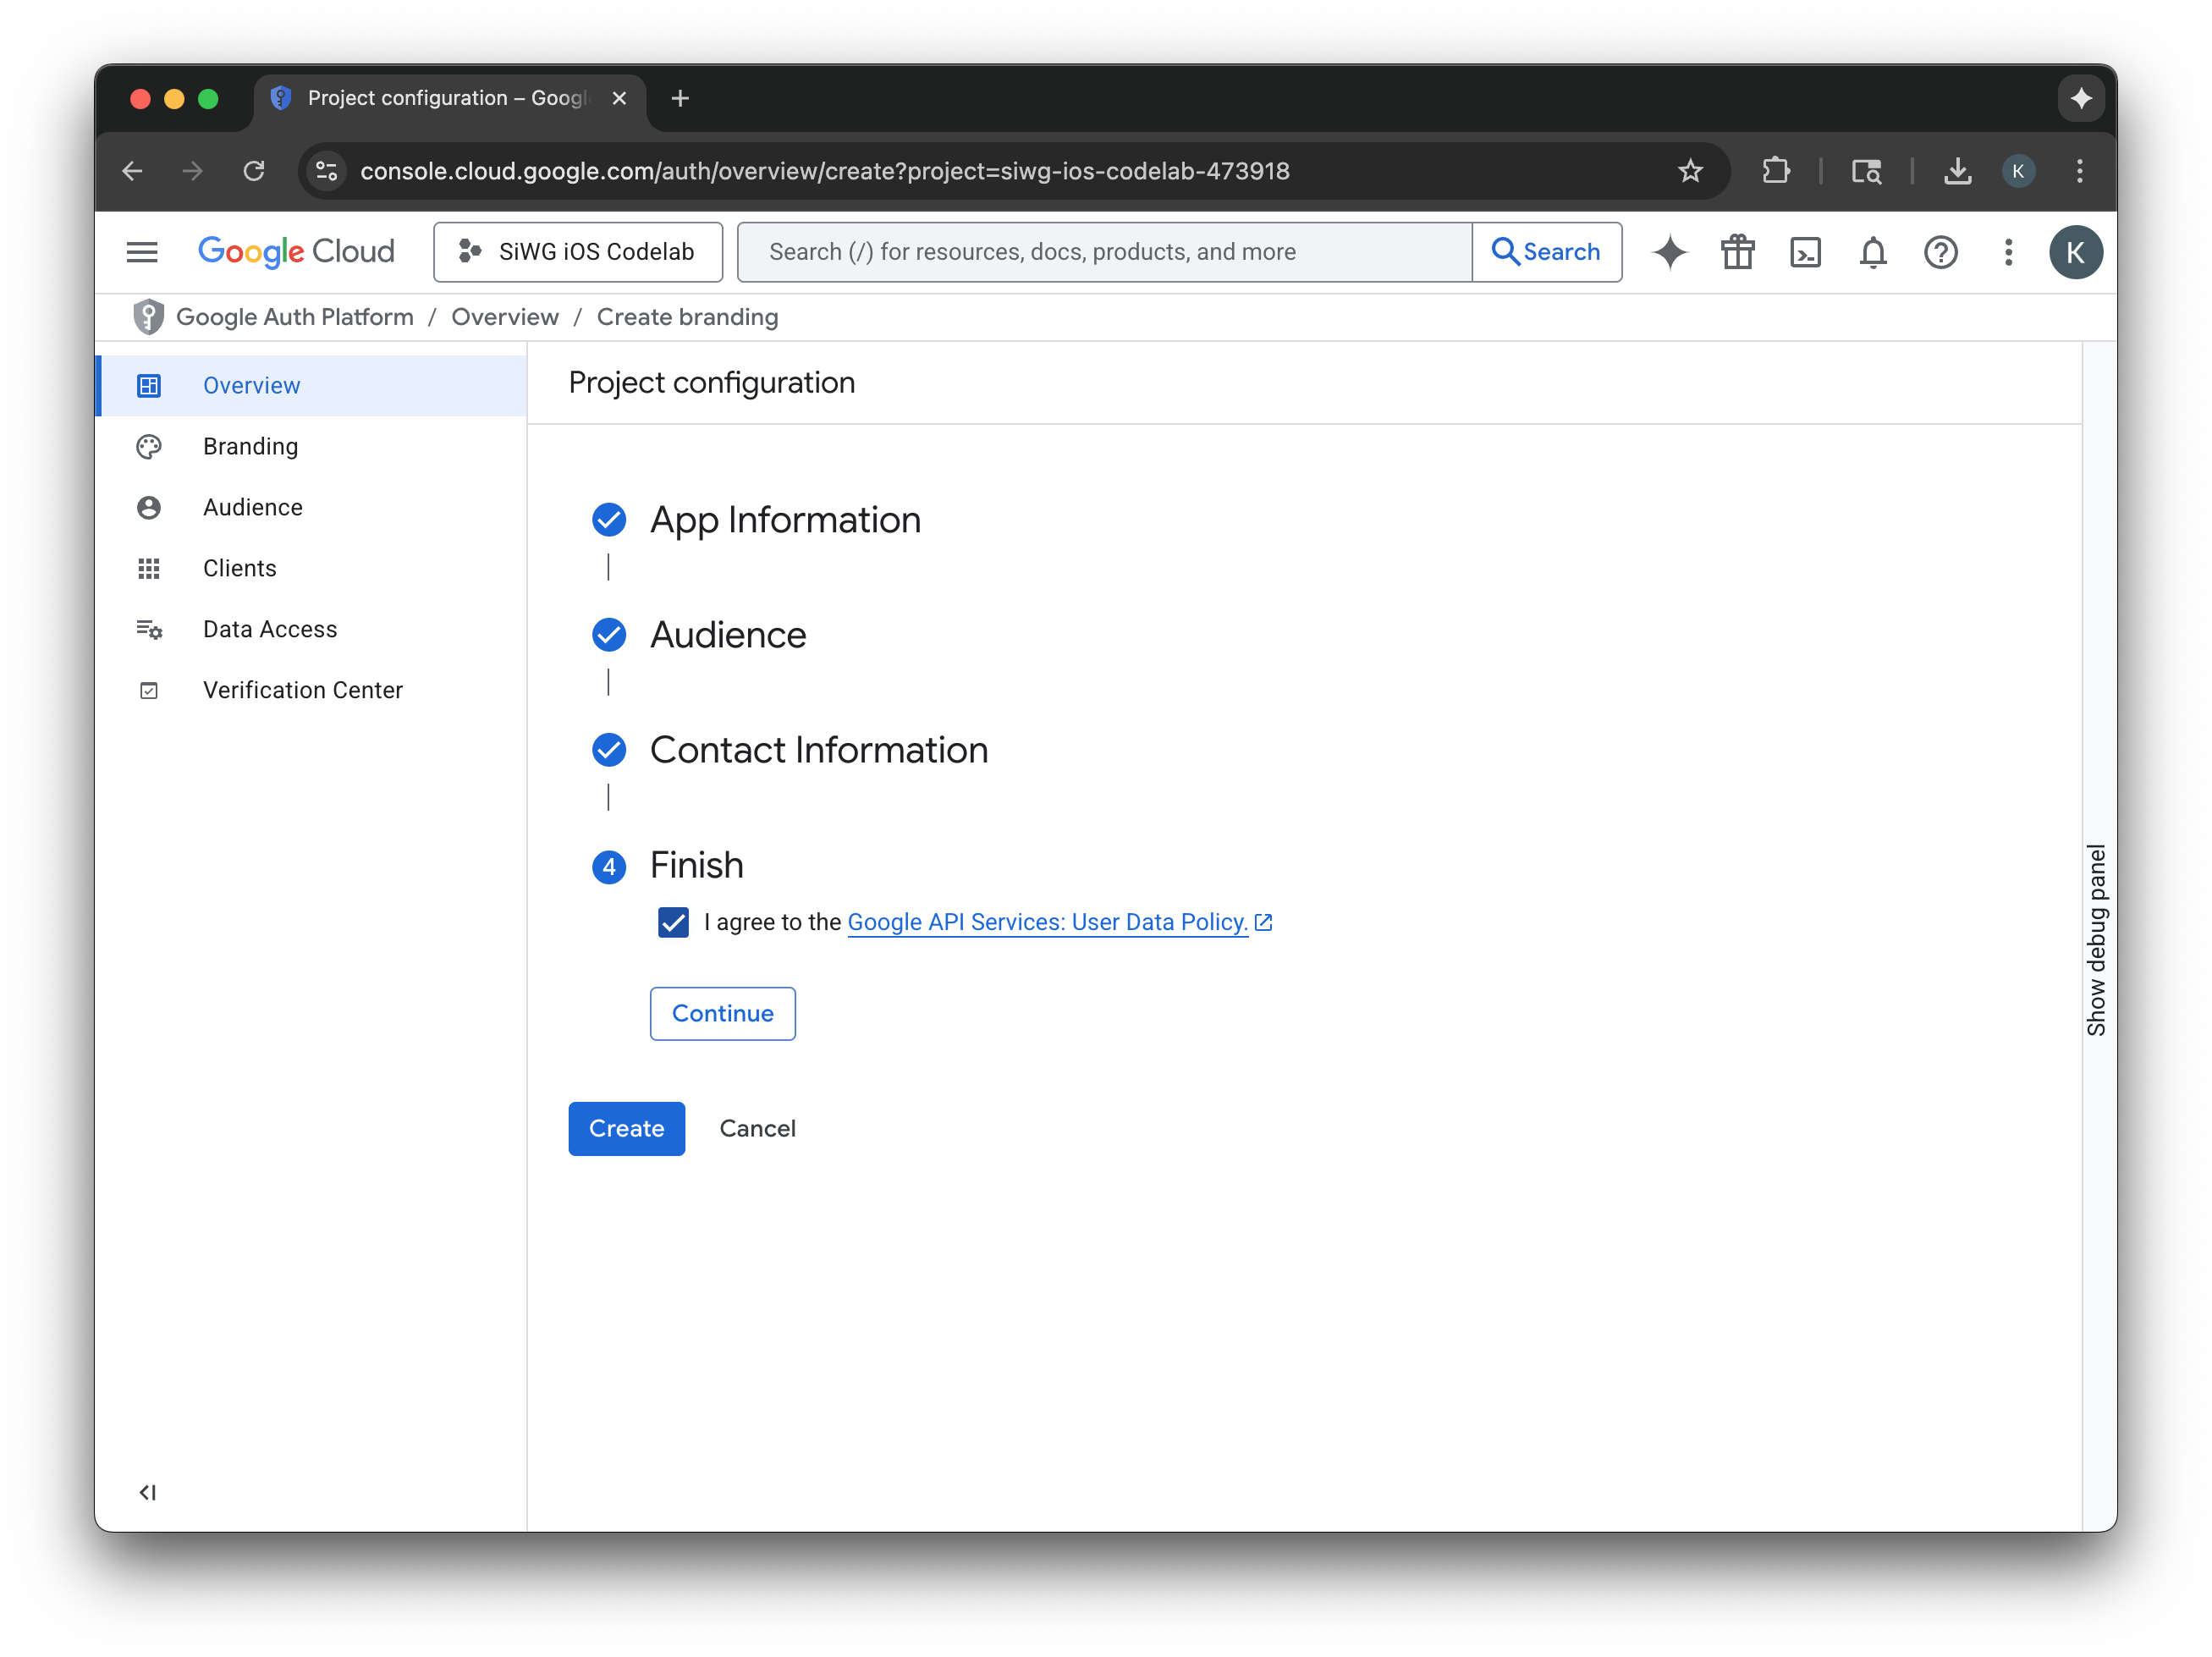
- 在项目配置页面上,填写以下字段:
- 应用信息:输入应用的名称和用户支持电子邮件地址。此支持电子邮件地址将公开显示,以便用户针对其同意情况与您联系。
- 受众群体:选择外部。
- 联系信息:输入一个电子邮件地址,以便 Google 就您的项目与您联系。
- 查看 Google API 服务:用户数据政策。
- 点击创建。
- 在导航菜单中选择客户页面。
- 点击创建客户端。
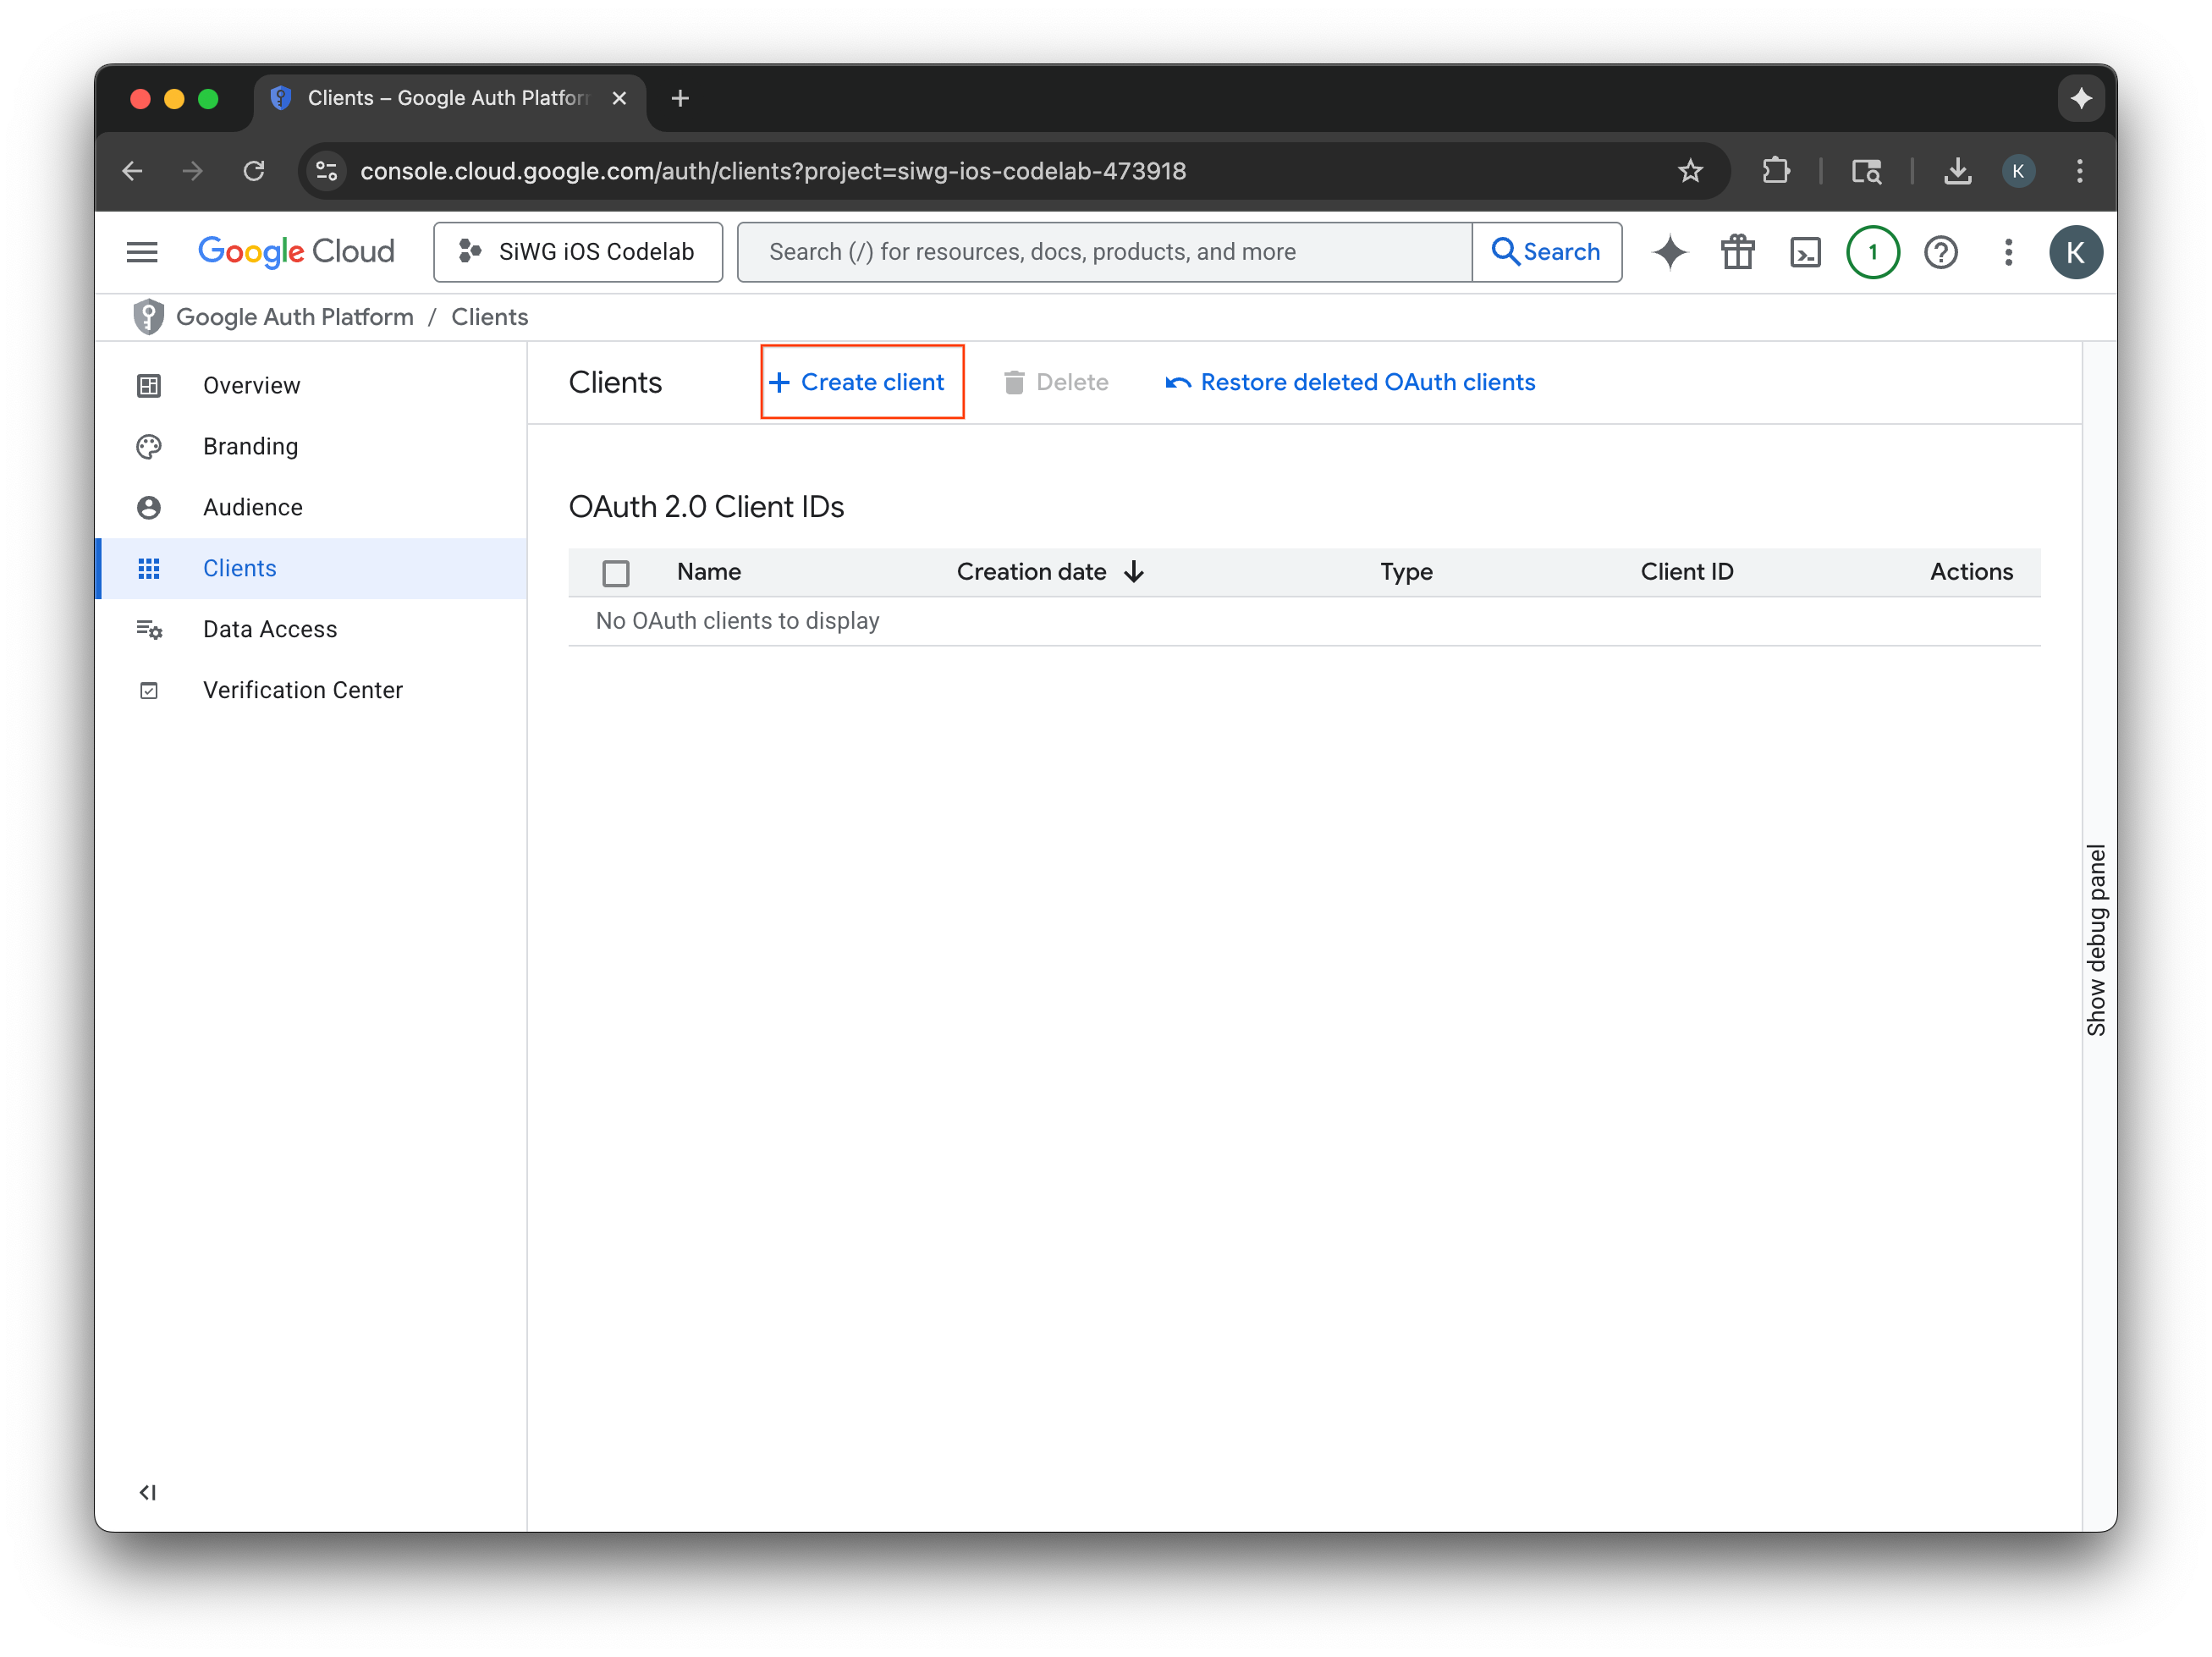
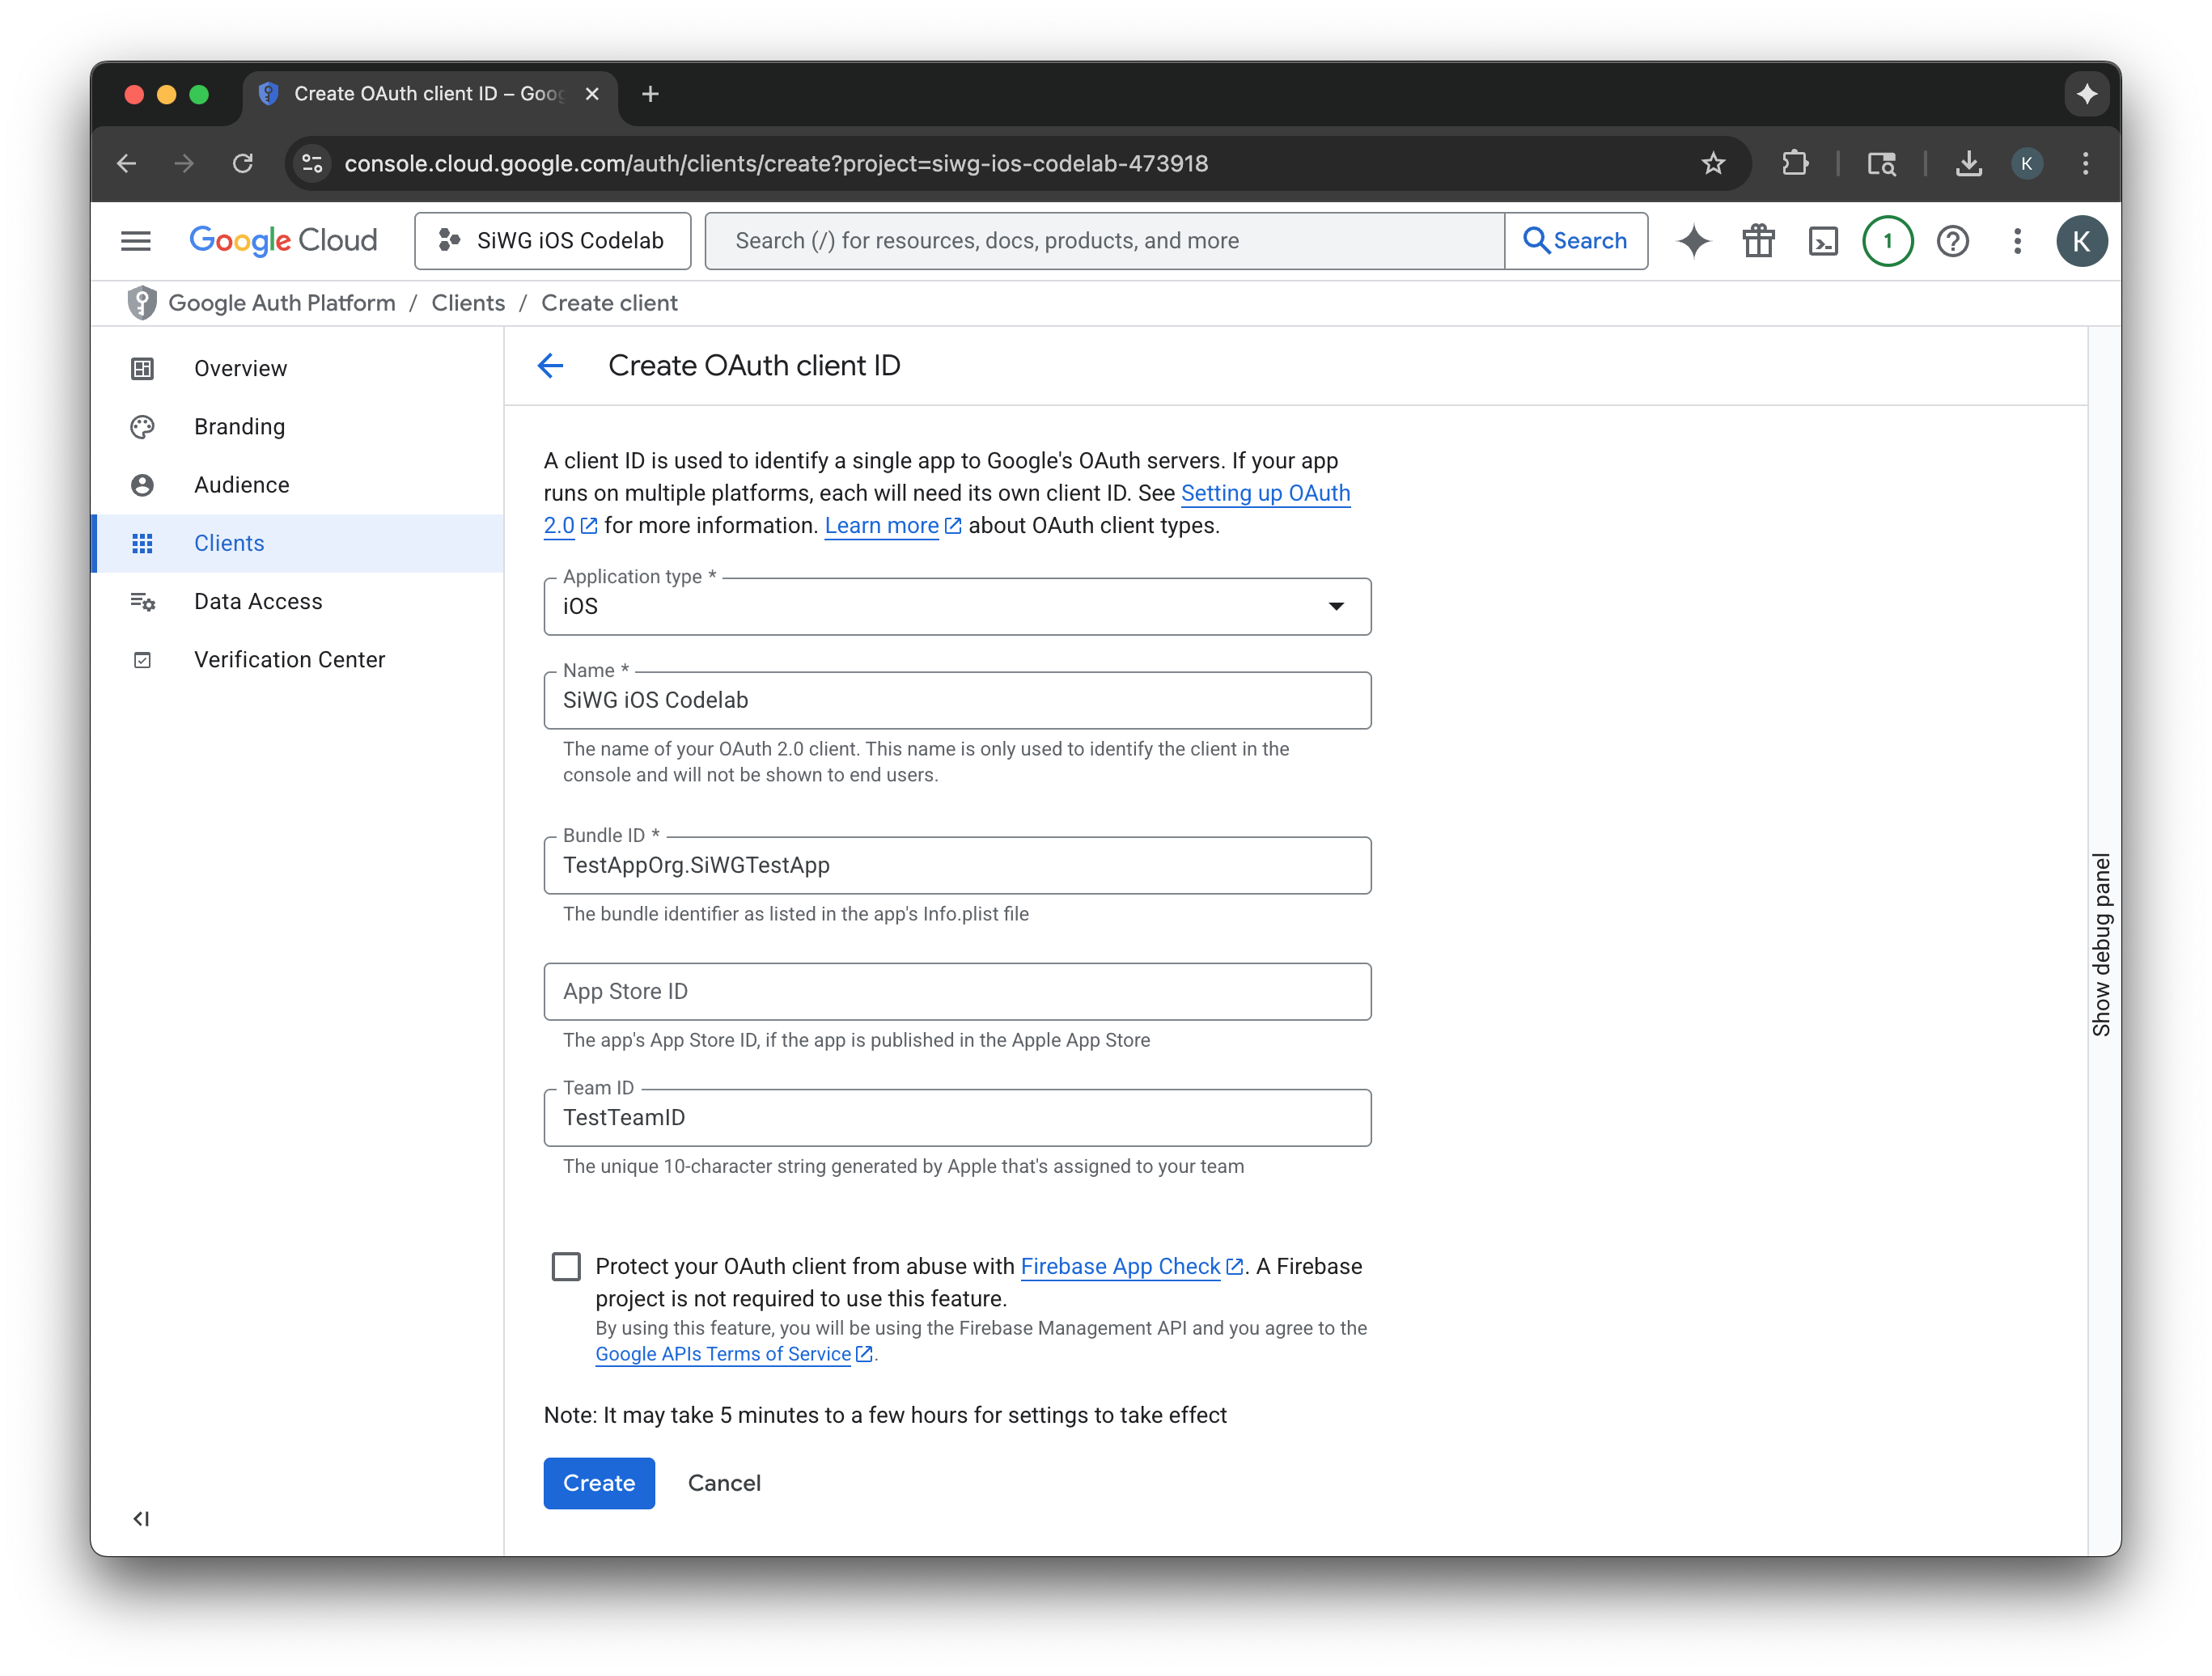
创建 OAuth 2.0 客户端
- 为应用类型选择 iOS。
- 输入客户端的名称。
- 输入在上一步中创建的软件包标识符。
- 输入 Apple 分配给您团队的团队 ID。此步骤目前是可选的,但若要在本 Codelab 的后面部分启用 App Check,则必须提供团队 ID。
- 选择创建。
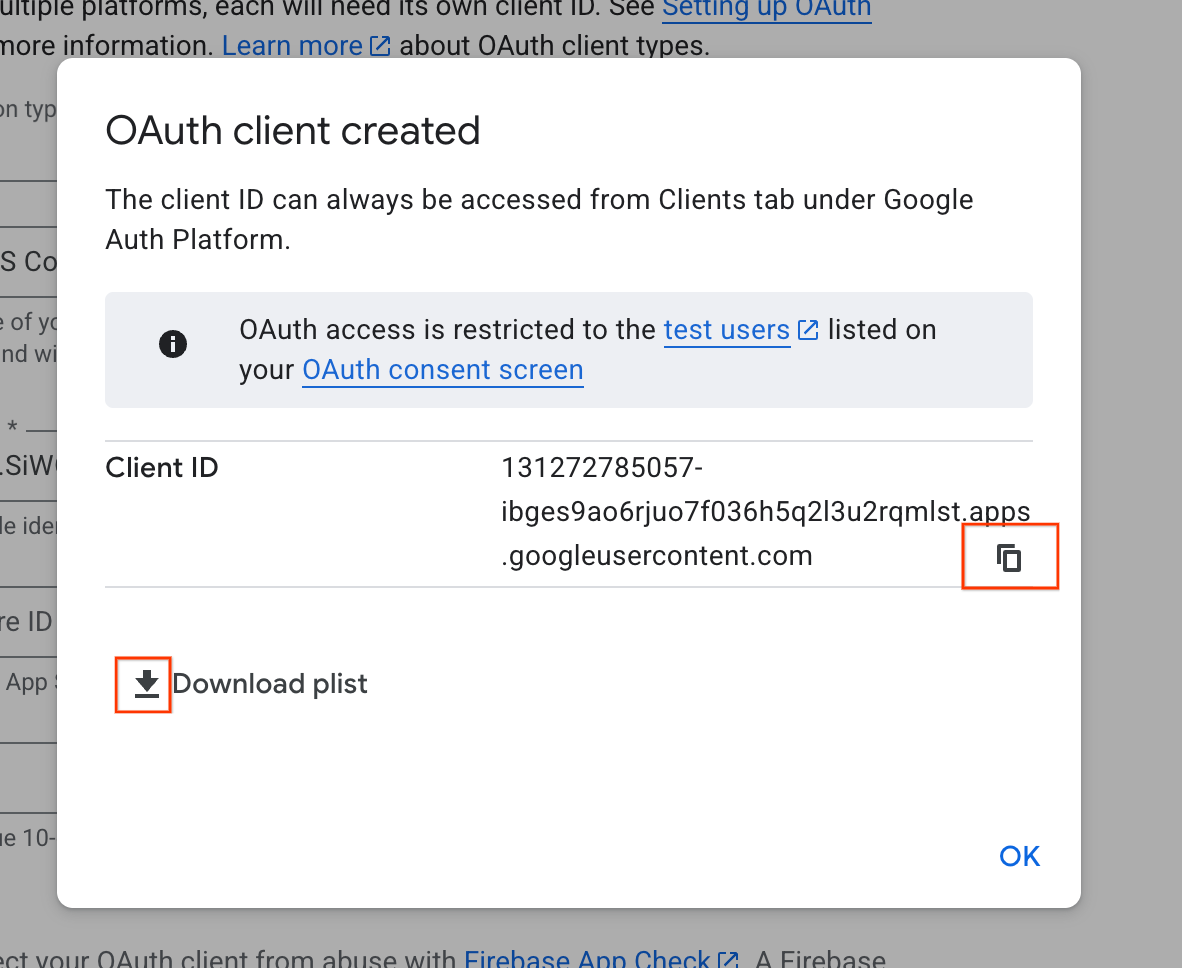
- 从对话框窗口中复制客户端 ID,您稍后会用到它。
- 下载 plist 文件以供日后参考。
4. 配置 Xcode 项目
下一步是设置 Xcode 项目,以便使用“使用 Google 账号登录”SDK。此过程包括将 SDK 作为依赖项添加到项目中,以及使用唯一的客户端 ID 配置项目设置。此 ID 可让 SDK 在登录过程中与 Google 的身份验证服务安全地通信。
安装“使用 Google 账号登录”依赖项
- 打开您的 Xcode 项目。
- 前往 File > Add Package Dependencies。
- 在搜索栏中,输入“使用 Google 账号登录”代码库的网址:https://github.com/google/GoogleSignIn-iOS
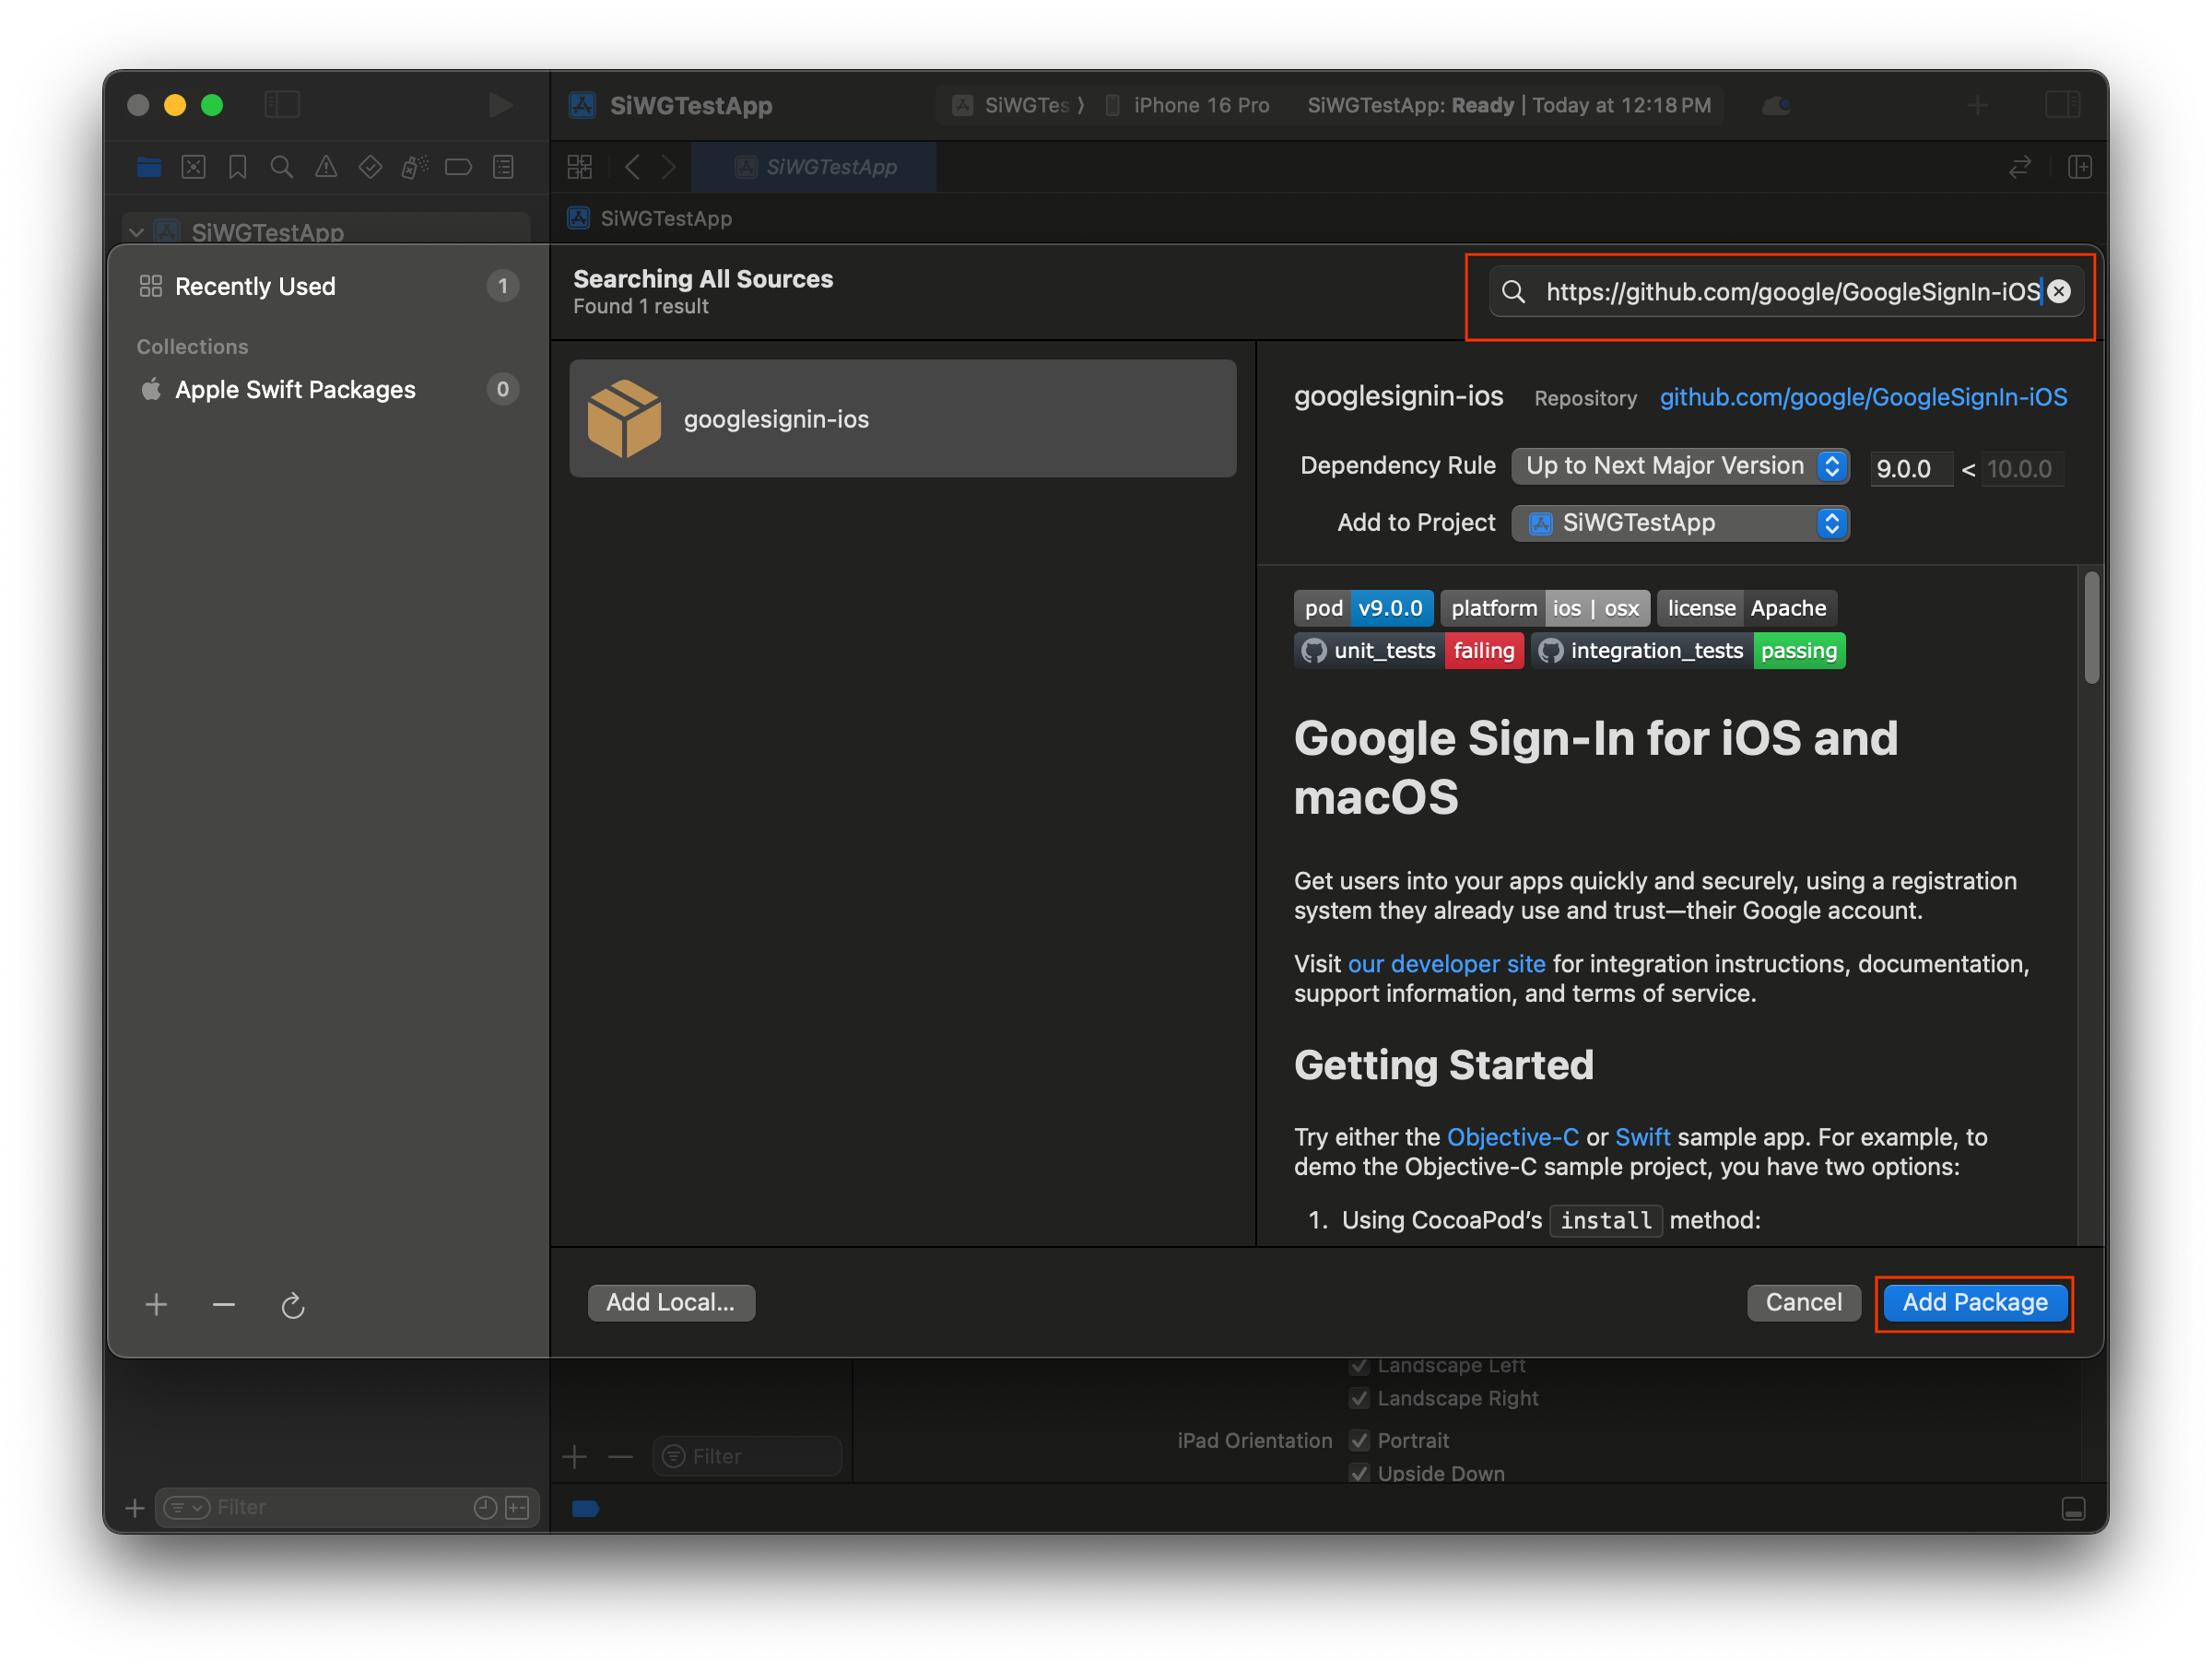
- 选择添加软件包。
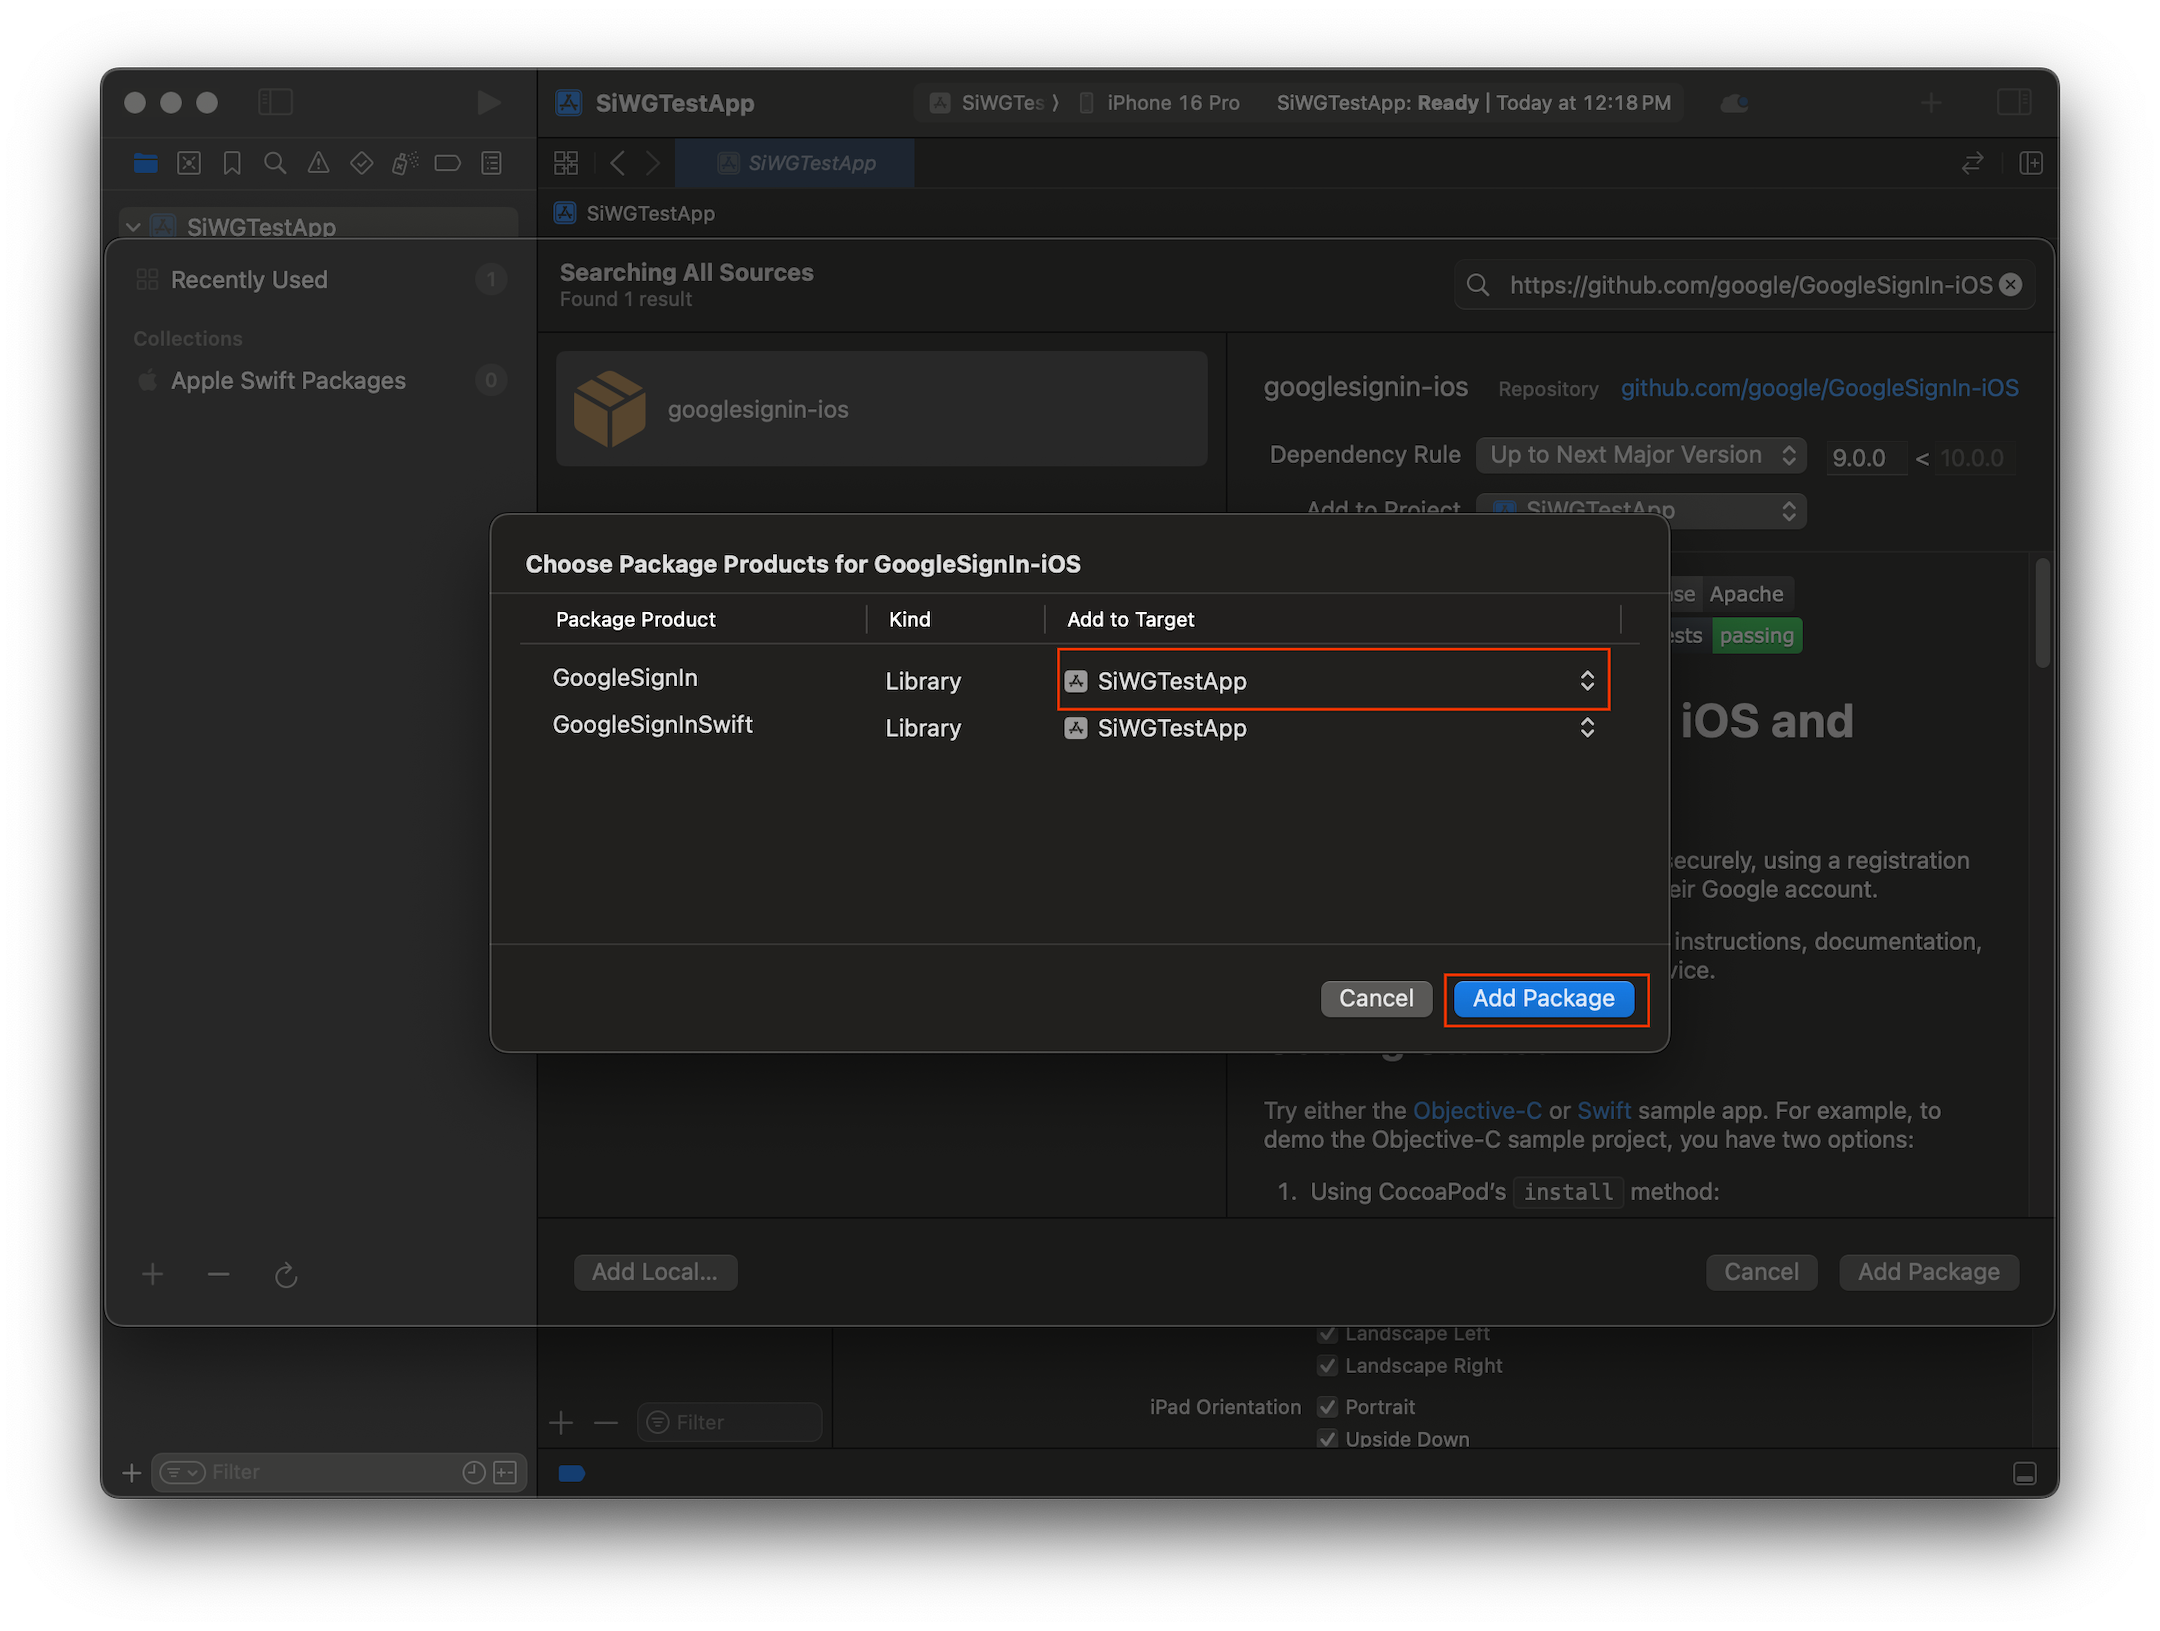
- 为 GoogleSignIn 软件包选择主要应用目标。
- 如果您使用的是 SwiftUI,请为 GoogleSignInSwift 软件包选择主要应用目标。如果您计划使用 UIKit,请勿为此软件包选择目标平台。
- 选择添加软件包。
配置应用的凭据
- 在项目导航器中,点击项目的根目录。
- 在主编辑器区域中,从 TARGETS(目标)列表中选择您的主要应用目标。
- 选择编辑器区域顶部的信息标签页。
- 将鼠标指针悬停在自定义 iOS 目标属性部分的最后一行上,然后点击显示的 + 按钮。
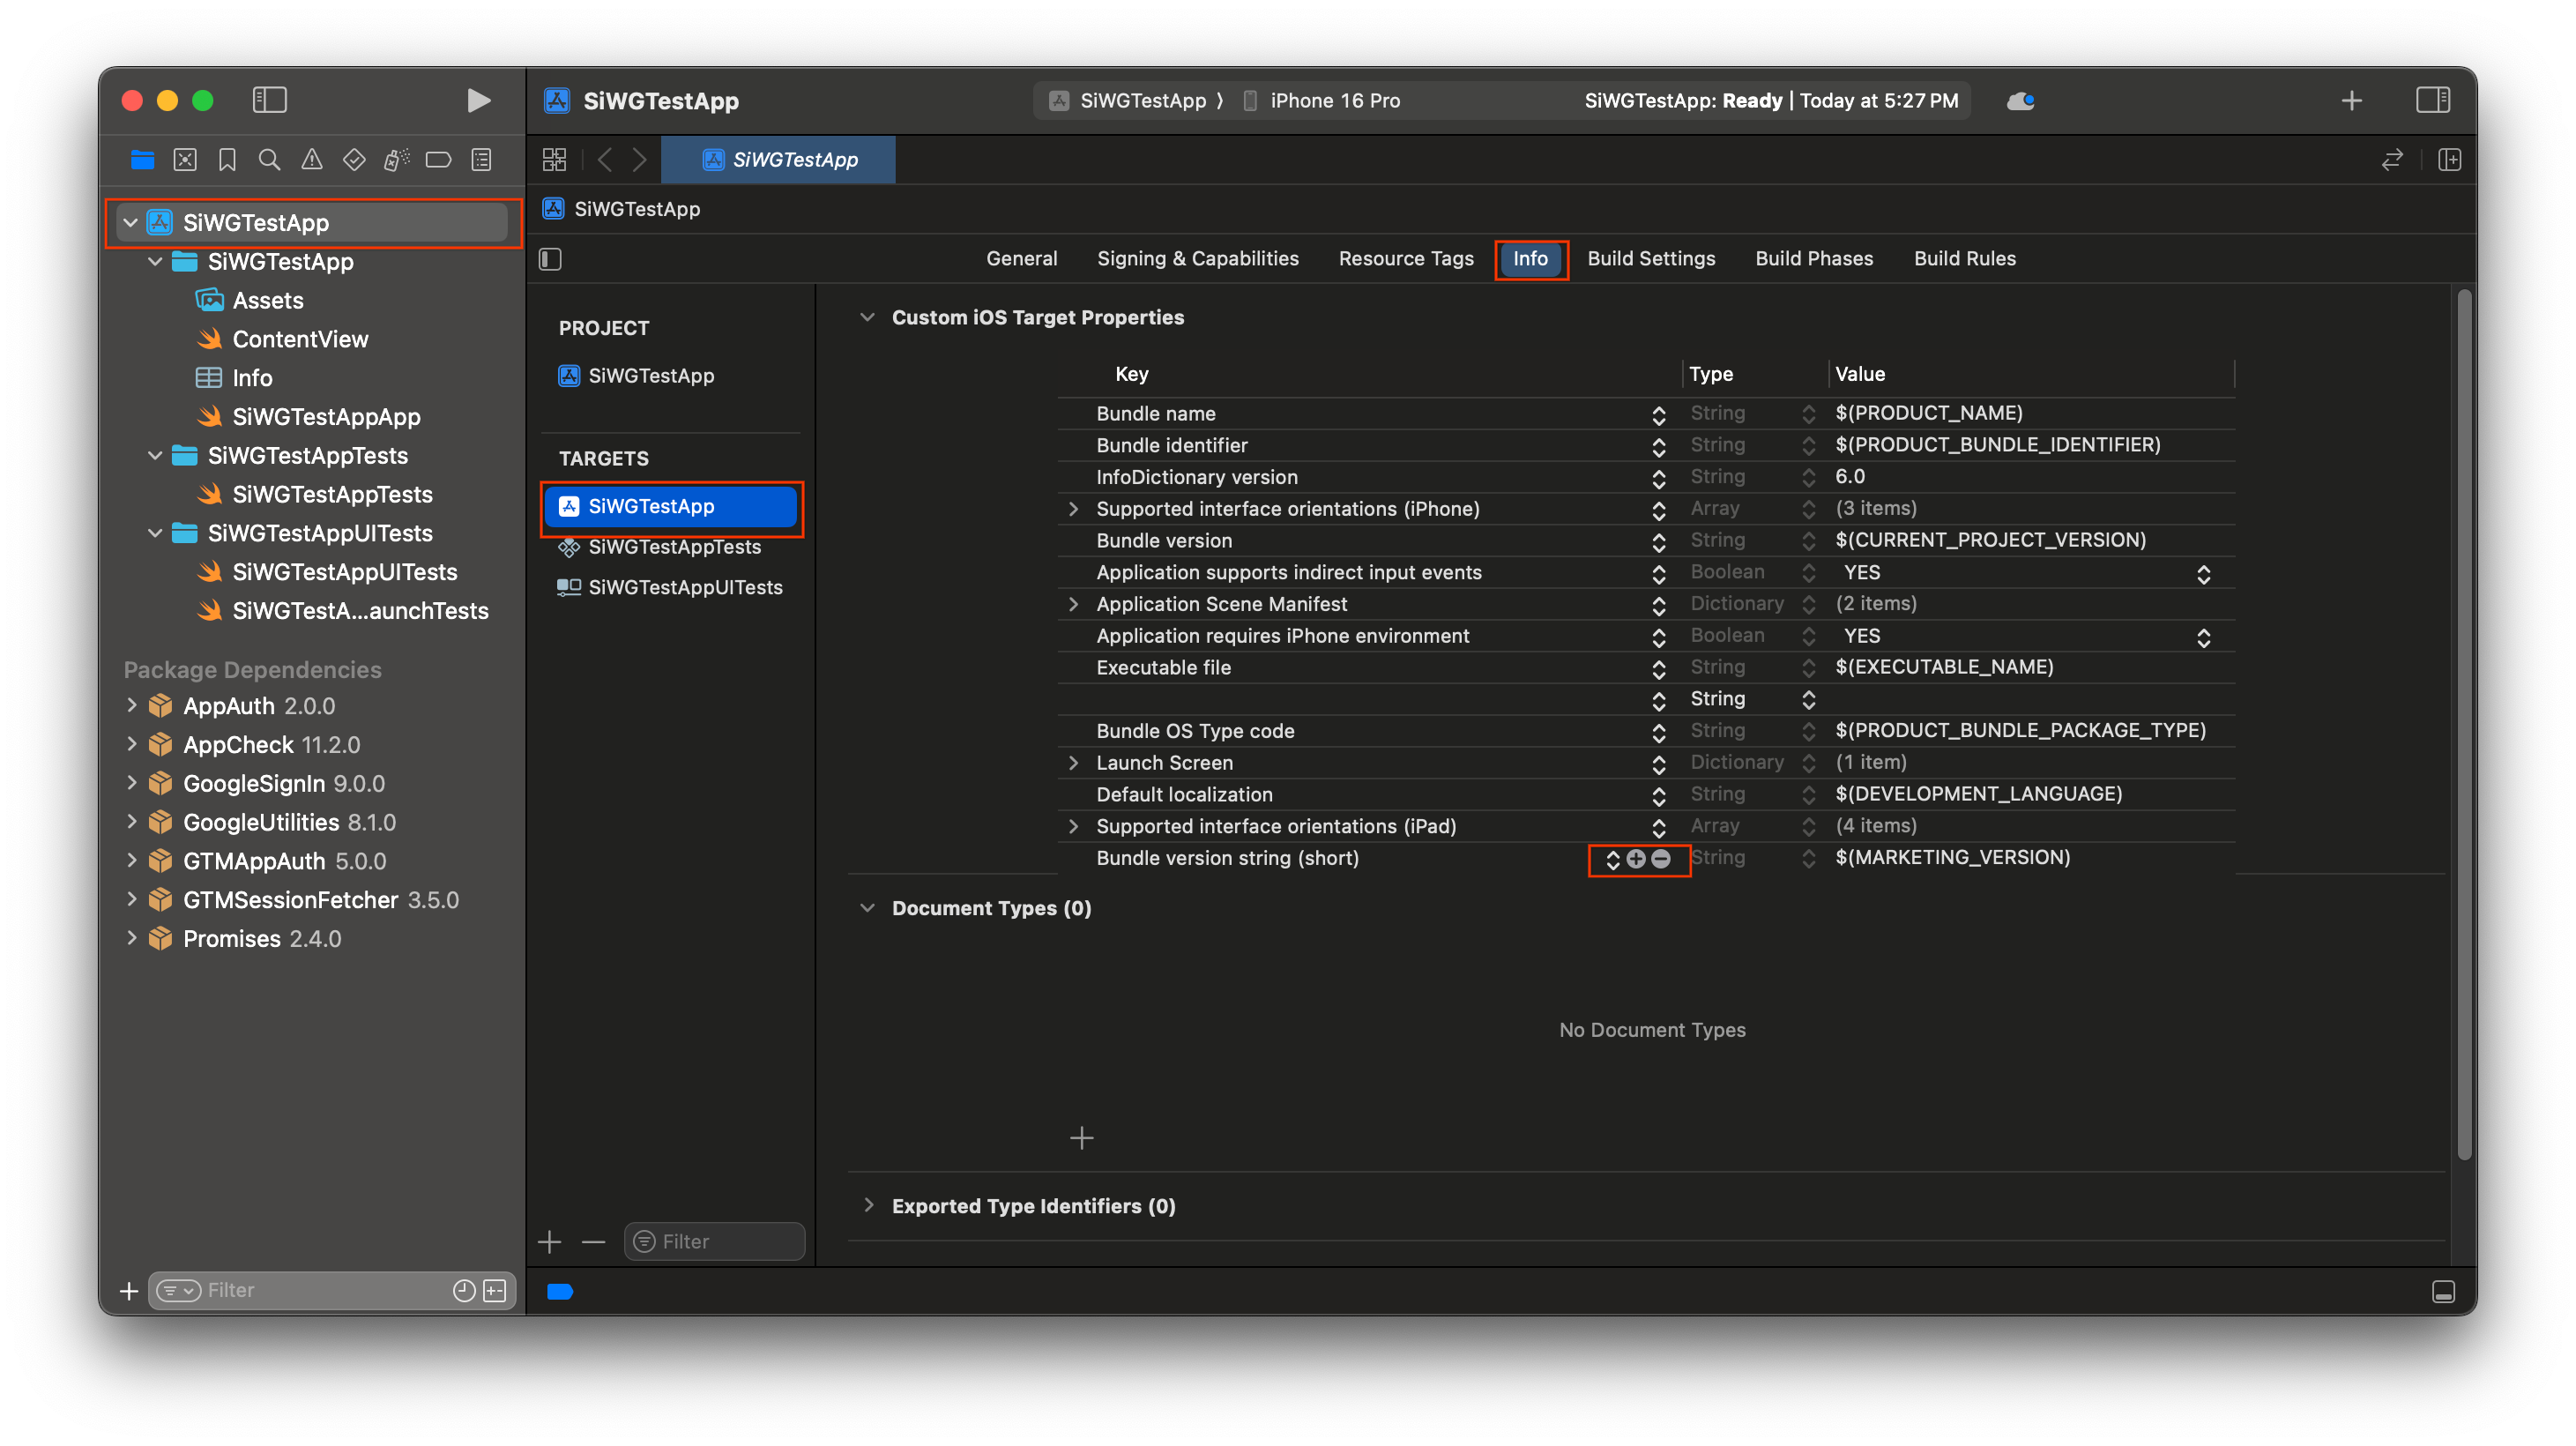
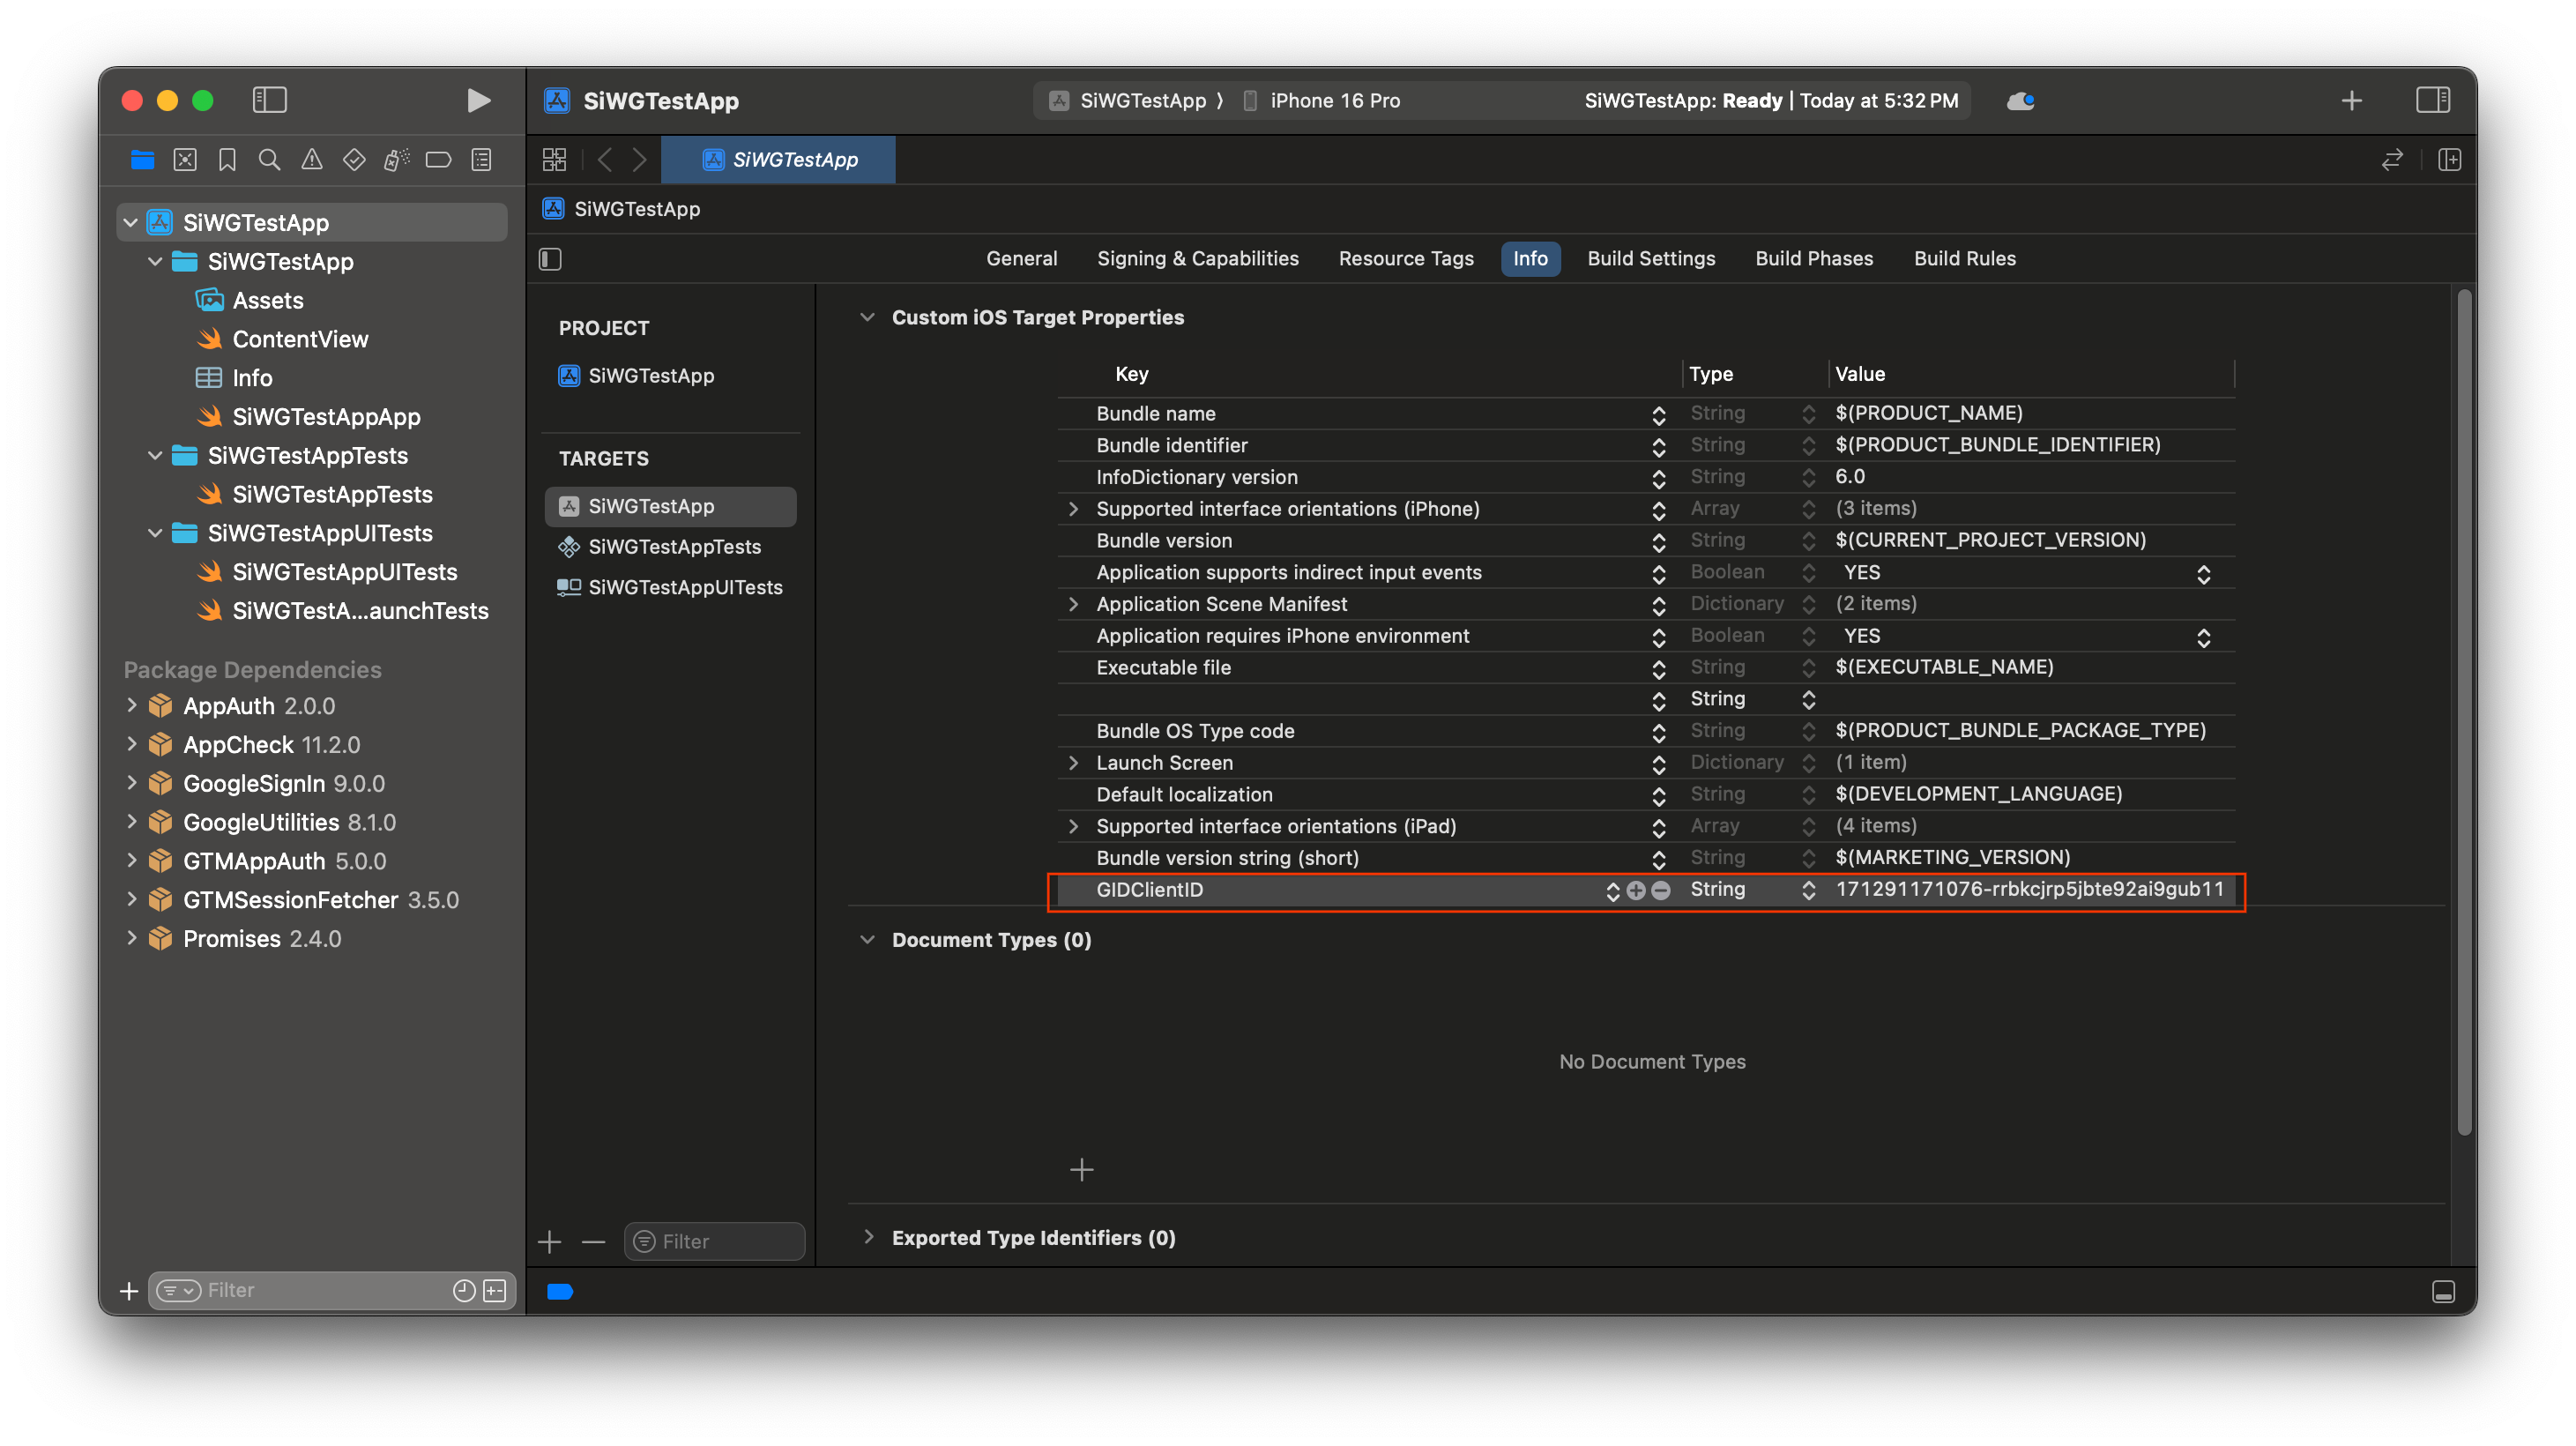
- 在键列中,输入 GIDClientID
- 在值列中,粘贴您从 Google Cloud 控制台中复制的客户端 ID。
- 打开从 Google Cloud 控制台下载的 plist 文件。
- 复制反向客户端 ID 的值。

- 展开信息标签页底部的网址类型。
- 选择 + 按钮。
- 在网址方案框中输入倒序客户端 ID。

现在,我们已准备好开始向应用添加登录按钮了!
5. 添加登录按钮
配置好 Xcode 项目后,就可以开始向应用添加“使用 Google 账号登录”按钮了!
此步骤的核心逻辑是对 GIDSignIn.sharedInstance.signIn 的调用。此方法会启动身份验证流程,并将控制权交给“使用 Google 账号登录”SDK,以便向用户显示“使用 Google 账号登录”流程。
SwiftUI
- 在 Xcode 项目导航器中找到 ContentView.swift 文件。
- 将此文件的内容替换为以下文本:
import GoogleSignIn
import GoogleSignInSwift
import SwiftUI

struct ContentView: View {
  var body: some View {
    VStack {
      GoogleSignInButton(action: handleSignInButton).padding()
    }
  }

  func handleSignInButton() {
    // Find the current window scene.
    guard let windowScene = UIApplication.shared.connectedScenes.first as? UIWindowScene else {
      print("There is no active window scene")
      return
    }

    // Get the root view controller from the window scene.
    guard
      let rootViewController = windowScene.windows.first(where: { $0.isKeyWindow })?
        .rootViewController
    else {
      print("There is no key window or root view controller")
      return
    }

    // Start the sign-in process.
    GIDSignIn.sharedInstance.signIn(
      withPresenting: rootViewController
    ) { signInResult, error in
      guard let result = signInResult else {
        // Inspect error
        print("Error signing in: \(error?.localizedDescription ?? "No error description")")
        return
      }
      // If sign in succeeded, display the app's main content View.
      print("ID Token: \(result.user.idToken?.tokenString ?? "")")
    }
  }
}

#Preview {
  ContentView()
}
UIKit
- 在 Xcode 项目导航器中找到 ViewController.swift 文件。
- 将此文件的内容替换为以下文本:
import GoogleSignIn
import UIKit

class ViewController: UIViewController {

  // Create an instance of the Sign in with Google button
  let signInButton = GIDSignInButton()

  override func viewDidLoad() {
    super.viewDidLoad()

    // Add the sign-in button to your view
    view.addSubview(signInButton)

    // Position the button using constraints
    signInButton.translatesAutoresizingMaskIntoConstraints = false
    NSLayoutConstraint.activate([
      signInButton.centerXAnchor.constraint(equalTo: view.centerXAnchor),
      signInButton.centerYAnchor.constraint(equalTo: view.centerYAnchor),
    ])

    // Add a target to the button to call a method when it's pressed
    signInButton.addTarget(self, action: #selector(signInButtonTapped), for: .touchUpInside)
  }

  // This method is called when the sign-in button is pressed.
  @objc func signInButtonTapped() {
    // Start the sign-in process.
    GIDSignIn.sharedInstance.signIn(withPresenting: self) { signInResult, error in
      guard let result = signInResult else {
        // Inspect error
        print("Error signing in: \(error?.localizedDescription ?? "No error description")")
        return
      }

      // If sign in succeeded, print the ID token.
      print("ID Token: \(result.user.idToken?.tokenString ?? "")")
    }
  }
}
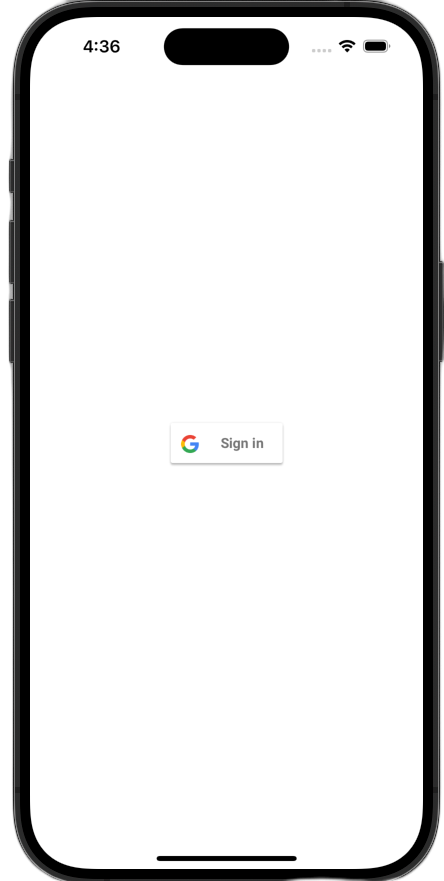
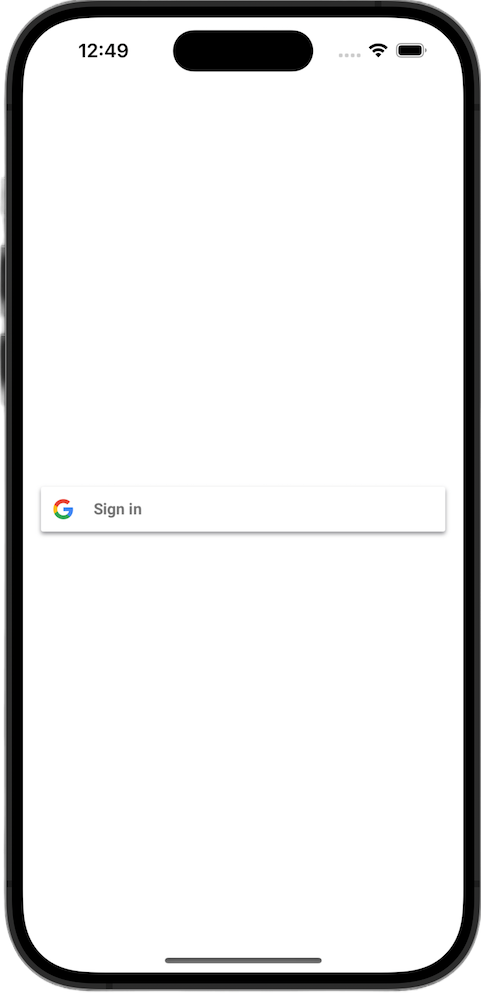
查看登录按钮
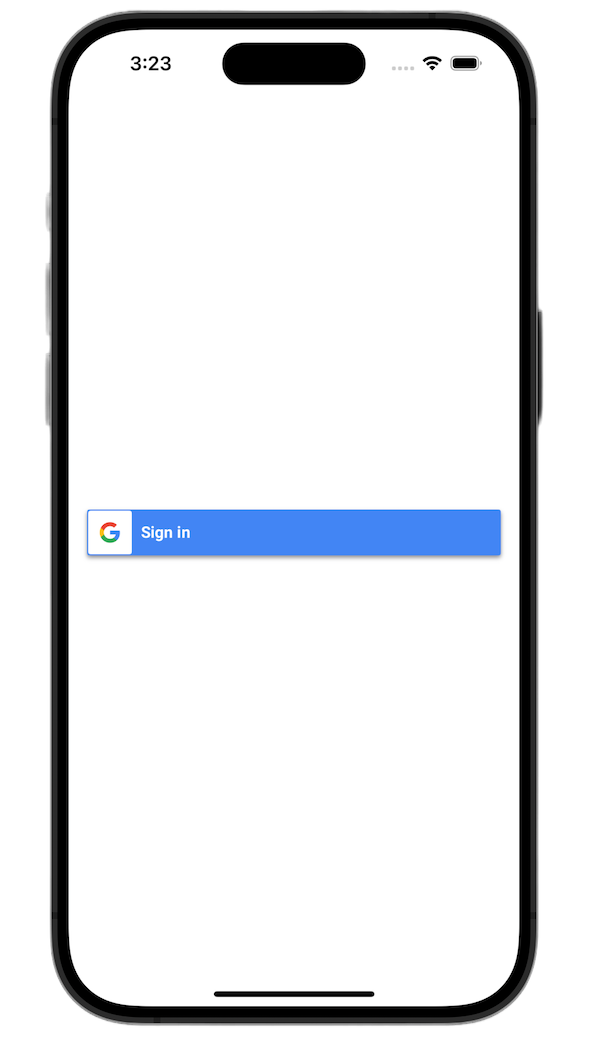
在模拟器中启动应用。您会看到“使用 Google 账号登录”按钮,但该按钮暂时还无法正常使用。这是预期行为,因为您仍需实现代码来处理用户完成身份验证后重定向回您的应用的操作。
6. 自定义登录按钮
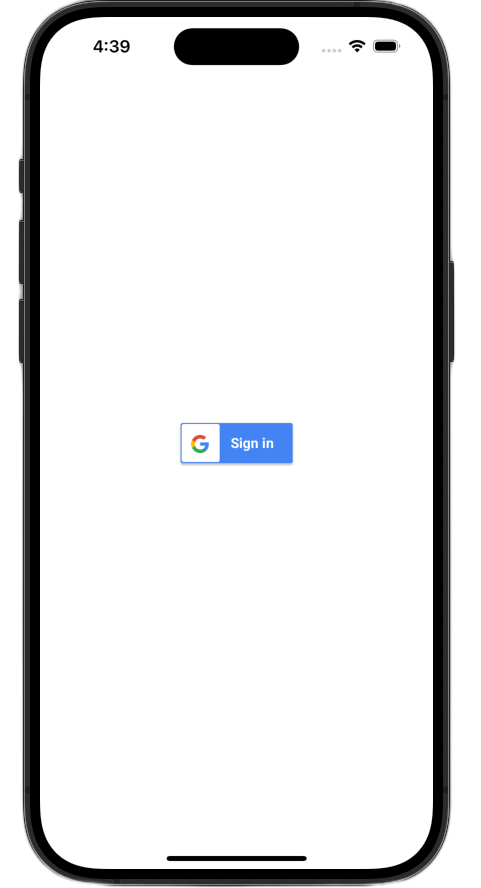
您可以自定义默认的“使用 Google 账号登录”按钮,使其更贴合应用的主题。使用 Google 账号登录 SDK 让您可以修改按钮的配色方案和样式。
SwiftUI
使用以下这行代码将默认按钮添加到网页中:
GoogleSignInButton(action: handleSignInButton)
通过向 GoogleSignInButton 的初始化函数传递参数,可以自定义该对象。以下代码将使登录按钮在深色模式下显示。
- 打开 ContentView.swift
- 更新
GoogleSignInButton的初始化程序,使其包含以下值:
GoogleSignInButton(
  scheme: .dark,  // Options: .light, .dark, .auto
  style: .standard,  // Options: .standard, .wide, .icon
  state: .normal,  // Options: .normal, .disabled
  action: handleSignInButton
).padding()
如需详细了解自定义选项,请参阅 GoogleSignInSwift 框架参考文档
UIKit
默认按钮是使用以下代码行创建的:
// Create an instance of the Sign in with Google button
let signInButton = GIDSignInButton()

// Add the button to your view
view.addSubview(signInButton)
通过在按钮实例上设置属性来自定义 GIDSignInButton。以下代码将使登录按钮在深色模式下显示。
- 打开 ViewController.swift。
- 在
viewDidLoad函数中向视图添加登录按钮之前,立即添加以下代码行:
// Set the width and color of the sign-in button
signInButton.style = .standard  // Options: .standard, .wide, .iconOnly
signInButton.colorScheme = .dark  // Options: .dark, .light
如需详细了解自定义,请参阅 GoogleSignIn 框架参考
7. 处理身份验证重定向网址
添加登录按钮后,下一步是处理用户通过身份验证后发生的重定向。身份验证完成后,Google 会返回一个包含临时授权代码的网址。为了完成登录流程,处理程序会拦截此网址,并将其传递给使用 Google 账号登录 SDK,以换取已签名的 ID 令牌 (JWT)。
SwiftUI
- 打开包含
App结构体的文件。此文件的命名方式取决于您的项目,因此名称类似于 YourProjectNameApp.swift。 - 将此文件的内容替换为以下文本:
import GoogleSignIn
import SwiftUI

@main
struct iOS_Sign_in_with_Google_App: App {
  var body: some Scene {
    WindowGroup {
      ContentView()

        .onOpenURL { url in
          GIDSignIn.sharedInstance.handle(url)
        }
    }
  }
}
UIKit
- 打开 AppDelegate.swift。
- 将以下 import 添加到文件顶部:
import GoogleSignIn
- 在
AppDelegate类中添加以下身份验证处理程序函数。建议将其放置在application(_:didFinishLaunchingWithOptions:)方法的右大括号后面:
func application(
  _ app: UIApplication,
  open url: URL,
  options: [UIApplication.OpenURLOptionsKey: Any] = [:]
) -> Bool {
  var handled: Bool

  handled = GIDSignIn.sharedInstance.handle(url)
  if handled {
    return true
  }
  // If not handled by this app, return false.
  return false
}
完成这些更改后,您的 AppDelegate.swift 文件应如下所示:
import GoogleSignIn
import UIKit

@main
class AppDelegate: UIResponder, UIApplicationDelegate {

  func application(
    _ application: UIApplication,
    didFinishLaunchingWithOptions launchOptions: [UIApplication.LaunchOptionsKey: Any]?
  ) -> Bool {
    // Override point for customization after application launch.
    return true
  }

  func application(
    _ app: UIApplication,
    open url: URL,
    options: [UIApplication.OpenURLOptionsKey: Any] = [:]
  ) -> Bool {
    var handled: Bool

    handled = GIDSignIn.sharedInstance.handle(url)
    if handled {
      return true
    }
    // If not handled by this app, return false.
    return false
  }

  // MARK: UISceneSession Lifecycle

  func application(
    _ application: UIApplication,
    configurationForConnecting connectingSceneSession: UISceneSession,
    options: UIScene.ConnectionOptions
  ) -> UISceneConfiguration {
    // Called when a new scene session is being created.
    // Use this method to select a configuration to create the new scene with.
    return UISceneConfiguration(
      name: "Default Configuration",
      sessionRole: connectingSceneSession.role
    )
  }

  func application(
    _ application: UIApplication,
    didDiscardSceneSessions sceneSessions: Set<UISceneSession>
  ) {
    // Called when the user discards a scene session.
    // If any sessions were discarded while the application was not running, this will be called shortly after application:didFinishLaunchingWithOptions.
    // Use this method to release any resources that were specific to the discarded scenes, as they will not return.
  }
}
测试登录流程
现在,您可以测试完整的登录流程了!
运行应用,然后点按登录按钮。完成身份验证后,Google 会显示一个权限请求页面,您可以在其中授予应用访问您信息的权限。您批准后,登录流程将完成,系统会将您返回到相应应用。
登录流程成功完成后,“使用 Google 账号登录”SDK 会将用户的凭据安全地存储在设备的钥匙串中。这些凭据可供日后使用,以便用户在后续启动应用时保持登录状态。
8. 添加退出按钮
现在,登录功能已正常运行,下一步是添加退出账号按钮并更新界面,以反映用户的当前登录状态。登录成功后,SDK 会提供一个 GIDGoogleUser 对象。此对象包含一个 profile 属性,其中包含用户的姓名和电子邮件地址等基本信息,您将使用这些信息来个性化界面。
SwiftUI
- 打开 ContentView.swift 文件。
- 在
ContentView结构体的顶部添加一个状态变量。此变量将在用户登录后保存其信息。由于它是@State变量,因此每当其值发生变化时,SwiftUI 都会自动更新界面:
struct ContentView: View {
  @State private var user: GIDGoogleUser?
}
- 将
ContentView结构的当前body替换为以下VStack。这将检查user状态变量是否包含用户。如果已登录,系统会显示欢迎消息和退出按钮。如果未显示,则会显示原来的“使用 Google 账号登录”按钮:
var body: some View {
  VStack {
    // Check if the user is signed in.
    if let user = user {
      // If signed in, show a welcome message and the sign-out button.
      Text("Hello, \(user.profile?.givenName ?? "User")!")
        .font(.title)
        .padding()

      Button("Sign Out", action: signOut)
        .buttonStyle(.borderedProminent)

    } else {
      // If not signed in, show the "Sign in with Google" button.
      GoogleSignInButton(
        scheme: .dark,  // Options: .light, .dark, .auto
        style: .standard,  // Options: .standard, .wide, .icon
        state: .normal,  // Options: .normal, .disabled
        action: handleSignInButton
      ).padding()
    }
  }
}
- 更新
handleSignInButton完成代码块,以将signInResult.user分配给新的user变量。这会触发界面切换到已登录视图:
func handleSignInButton() {
  // Find the current window scene.
  guard let windowScene = UIApplication.shared.connectedScenes.first as? UIWindowScene else {
    print("There is no active window scene")
    return
  }

  // Get the root view controller from the window scene.
  guard
    let rootViewController = windowScene.windows.first(where: { $0.isKeyWindow })?
      .rootViewController
  else {
    print("There is no key window or root view controller")
    return
  }

  // Start the sign-in process.
  GIDSignIn.sharedInstance.signIn(
    withPresenting: rootViewController
  ) { signInResult, error in
    guard let result = signInResult else {
      // Inspect error
      print("Error signing in: \(error?.localizedDescription ?? "No error description")")
      return
    }

    DispatchQueue.main.async {
      self.user = result.user
    }

    // If sign in succeeded, display the app's main content View.
    print("ID Token: \(result.user.idToken?.tokenString ?? "")")
  }
}
- 在
ContentView结构的底部添加一个由退出登录按钮调用的新signOut函数:
func signOut() {
  GIDSignIn.sharedInstance.signOut()
  // After signing out, set the `user` state variable to `nil`.
  self.user = nil
}
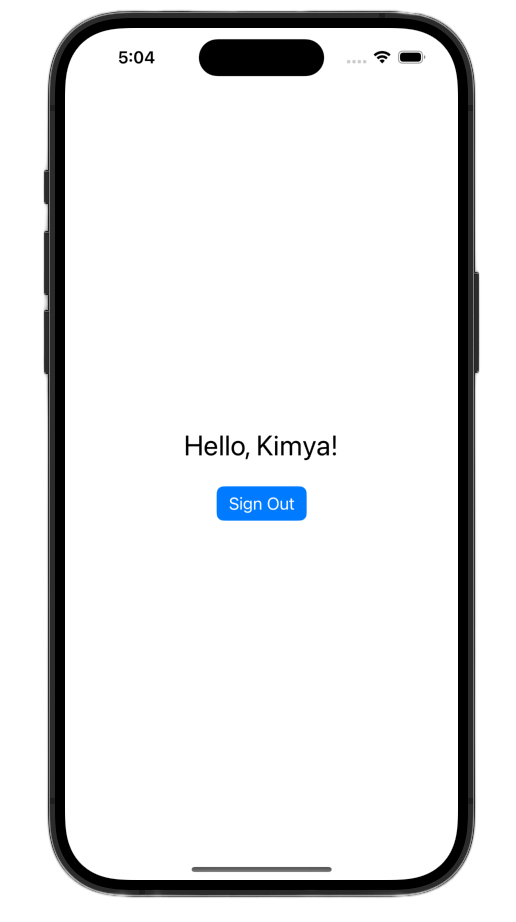
启动应用并登录。成功进行身份验证后,您应该会看到界面发生变化!
完成这些更改后,您的 ContentView.swift 文件应如下所示:
import GoogleSignIn
import GoogleSignInSwift
import SwiftUI

struct ContentView: View {

  @State private var user: GIDGoogleUser?

  var body: some View {
    VStack {
      // Check if the user is signed in.
      if let user = user {
        // If signed in, show a welcome message and the sign-out button.
        Text("Hello, \(user.profile?.givenName ?? "User")!")
          .font(.title)
          .padding()

        Button("Sign Out", action: signOut)
          .buttonStyle(.borderedProminent)

      } else {
        // If not signed in, show the "Sign in with Google" button.
        GoogleSignInButton(
          scheme: .dark,  // Options: .light, .dark, .auto
          style: .standard,  // Options: .standard, .wide, .icon
          state: .normal,  // Options: .normal, .disabled
          action: handleSignInButton
        ).padding()
      }
    }
  }

  func handleSignInButton() {
    // Find the current window scene.
    guard let windowScene = UIApplication.shared.connectedScenes.first as? UIWindowScene else {
      print("There is no active window scene")
      return
    }

    // Get the root view controller from the window scene.
    guard
      let rootViewController = windowScene.windows.first(where: { $0.isKeyWindow })?
        .rootViewController
    else {
      print("There is no key window or root view controller")
      return
    }

    // Start the sign-in process.
    GIDSignIn.sharedInstance.signIn(
      withPresenting: rootViewController
    ) { signInResult, error in
      guard let result = signInResult else {
        // Inspect error
        print("Error signing in: \(error?.localizedDescription ?? "No error description")")
        return
      }

      DispatchQueue.main.async {
        self.user = result.user
      }

      // If sign in succeeded, display the app's main content View.
      print("ID Token: \(result.user.idToken?.tokenString ?? "")")
    }
  }

  func signOut() {
    GIDSignIn.sharedInstance.signOut()
    // After signing out, set the `user` state variable to `nil`.
    self.user = nil
  }
}

#Preview {
  ContentView()
}
UIKit
- 打开 ViewController.swift。
- 在
ViewController的顶部,紧挨着您声明signInButton的位置下方,添加一个退出按钮和一个欢迎标签:
let signOutButton = UIButton(type: .system)
let welcomeLabel = UILabel()
- 将以下函数添加到
ViewController的底部。此函数会根据用户的登录状态向其显示不同的界面:
private func updateUI(for user: GIDGoogleUser?) {
  if let user = user {
    // User is signed in.
    signInButton.isHidden = true
    signOutButton.isHidden = false
    welcomeLabel.isHidden = false
    welcomeLabel.text = "Hello, \(user.profile?.givenName ?? "User")!"
  } else {
    // User is signed out.
    signInButton.isHidden = false
    signOutButton.isHidden = true
    welcomeLabel.isHidden = true
  }
}
- 在
viewDidLoad函数的底部,添加以下代码以将欢迎标签和退出按钮添加到视图中:
// --- Set up the Welcome Label ---
welcomeLabel.translatesAutoresizingMaskIntoConstraints = false
welcomeLabel.textAlignment = .center
welcomeLabel.font = .systemFont(ofSize: 24, weight: .bold)
view.addSubview(welcomeLabel)

NSLayoutConstraint.activate([
  welcomeLabel.centerXAnchor.constraint(equalTo: view.centerXAnchor),
  welcomeLabel.bottomAnchor.constraint(equalTo: signInButton.topAnchor, constant: -20),
])

// --- Set up the Sign-Out Button ---
signOutButton.translatesAutoresizingMaskIntoConstraints = false
signOutButton.setTitle("Sign Out", for: .normal)
view.addSubview(signOutButton)

NSLayoutConstraint.activate([
  signOutButton.centerXAnchor.constraint(equalTo: view.centerXAnchor),
  signOutButton.topAnchor.constraint(equalTo: signInButton.bottomAnchor, constant: 20),
])

signOutButton.addTarget(self, action: #selector(signOutButtonTapped), for: .touchUpInside)

// --- Set Initial UI State ---
updateUI(for: nil)
- 更新
signInButtonTapped函数,以便在成功登录后调用UpdateUI方法:
@objc func signInButtonTapped() {
  // Start the sign-in process.
  GIDSignIn.sharedInstance.signIn(withPresenting: self) { signInResult, error in
    guard let result = signInResult else {
      // Inspect error
      print("Error signing in: \(error?.localizedDescription ?? "No error description")")
      return
    }

    // If sign in succeeded, print the ID token.
    print("ID Token: \(result.user.idToken?.tokenString ?? "")")

    DispatchQueue.main.async {
      self.updateUI(for: result.user)
    }
  }
}
- 最后,向
ViewController添加一个signOutButtonTapped函数,以处理退出流程:
@objc func signOutButtonTapped() {
  GIDSignIn.sharedInstance.signOut()
  // Update the UI for the signed-out state.
  updateUI(for: nil)
}
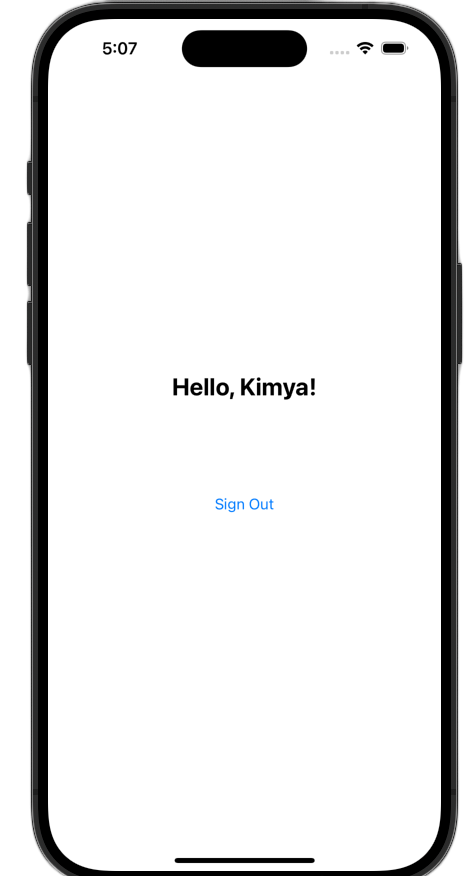
启动应用并登录。成功进行身份验证后,您应该会看到界面发生变化!
完成这些更改后,您的 ViewController.swift 文件应如下所示:
import GoogleSignIn
import UIKit

class ViewController: UIViewController {

  // Create an instance of the Sign in with Google button
  let signInButton = GIDSignInButton()
  let signOutButton = UIButton(type: .system)
  let welcomeLabel = UILabel()

  override func viewDidLoad() {
    super.viewDidLoad()

    // Set the width and color of the sign-in button
    signInButton.style = .standard  // Options: .standard, .wide, .iconOnly
    signInButton.colorScheme = .dark  // Options: .dark, .light

    // Add the sign-in button to your view
    view.addSubview(signInButton)

    // Position the button using constraints
    signInButton.translatesAutoresizingMaskIntoConstraints = false
    NSLayoutConstraint.activate([
      signInButton.centerXAnchor.constraint(equalTo: view.centerXAnchor),
      signInButton.centerYAnchor.constraint(equalTo: view.centerYAnchor),
    ])

    // Add a target to the button to call a method when it's pressed
    signInButton.addTarget(self, action: #selector(signInButtonTapped), for: .touchUpInside)

    // --- Set up the Welcome Label ---
    welcomeLabel.translatesAutoresizingMaskIntoConstraints = false
    welcomeLabel.textAlignment = .center
    welcomeLabel.font = .systemFont(ofSize: 24, weight: .bold)
    view.addSubview(welcomeLabel)

    NSLayoutConstraint.activate([
      welcomeLabel.centerXAnchor.constraint(equalTo: view.centerXAnchor),
      welcomeLabel.bottomAnchor.constraint(equalTo: signInButton.topAnchor, constant: -20),
    ])

    // --- Set up the Sign-Out Button ---
    signOutButton.translatesAutoresizingMaskIntoConstraints = false
    signOutButton.setTitle("Sign Out", for: .normal)
    view.addSubview(signOutButton)

    NSLayoutConstraint.activate([
      signOutButton.centerXAnchor.constraint(equalTo: view.centerXAnchor),
      signOutButton.topAnchor.constraint(equalTo: signInButton.bottomAnchor, constant: 20),
    ])

    signOutButton.addTarget(self, action: #selector(signOutButtonTapped), for: .touchUpInside)

    // --- Set Initial UI State ---
    updateUI(for: nil)
  }

  // This method is called when the sign-in button is pressed.
  @objc func signInButtonTapped() {
    // Start the sign-in process.
    GIDSignIn.sharedInstance.signIn(withPresenting: self) { signInResult, error in
      guard let result = signInResult else {
        // Inspect error
        print("Error signing in: \(error?.localizedDescription ?? "No error description")")
        return
      }

      // If sign in succeeded, print the ID token.
      print("ID Token: \(result.user.idToken?.tokenString ?? "")")

      DispatchQueue.main.async {
        self.updateUI(for: result.user)
      }
    }
  }

  private func updateUI(for user: GIDGoogleUser?) {
    if let user = user {
      // User is signed in.
      signInButton.isHidden = true
      signOutButton.isHidden = false
      welcomeLabel.isHidden = false
      welcomeLabel.text = "Hello, \(user.profile?.givenName ?? "User")!"
    } else {
      // User is signed out.
      signInButton.isHidden = false
      signOutButton.isHidden = true
      welcomeLabel.isHidden = true
    }
  }

  @objc func signOutButtonTapped() {
    GIDSignIn.sharedInstance.signOut()
    // Update the UI for the signed-out state.
    updateUI(for: nil)
  }
}
9. 恢复用户的登录状态
为了改善回访用户的体验,下一步是在应用启动时恢复其登录状态。调用 restorePreviousSignIn 会使用保存在钥匙串中的凭据以静默方式重新登录用户,确保用户不必每次都完成登录流程。
SwiftUI
- 打开 ContentView.swift。
- 在
body变量中的VStack后面直接添加以下代码:
.onAppear {
  // On appear, try to restore a previous sign-in.
  GIDSignIn.sharedInstance.restorePreviousSignIn { user, error in
    // This closure is called when the restoration is complete.
    if let user = user {
      // If a user was restored, update the `user` state variable.
      DispatchQueue.main.async {
        self.user = user
      }

      // Print the ID token to the console when restored.
      print("Restored ID Token: \(user.idToken?.tokenString ?? "")")
    }
  }
}
您的 ContentView.swift 应如下所示:
import GoogleSignIn
import GoogleSignInSwift
import SwiftUI

struct ContentView: View {

  @State private var user: GIDGoogleUser?

  var body: some View {
    VStack {
      // Check if the user is signed in.
      if let user = user {
        // If signed in, show a welcome message and the sign-out button.
        Text("Hello, \(user.profile?.givenName ?? "User")!")
          .font(.title)
          .padding()

        Button("Sign Out", action: signOut)
          .buttonStyle(.borderedProminent)

      } else {
        // If not signed in, show the "Sign in with Google" button.
        GoogleSignInButton(
          scheme: .dark,  // Options: .light, .dark, .auto
          style: .standard,  // Options: .standard, .wide, .icon
          state: .normal,  // Options: .normal, .disabled
          action: handleSignInButton
        ).padding()
      }
    }

    .onAppear {
      // On appear, try to restore a previous sign-in.
      GIDSignIn.sharedInstance.restorePreviousSignIn { user, error in
        // This closure is called when the restoration is complete.
        if let user = user {
          // If a user was restored, update the `user` state variable.
          DispatchQueue.main.async {
            self.user = user
          }

          // Print the ID token to the console when restored.
          print("Restored ID Token: \(user.idToken?.tokenString ?? "")")
        }
      }
    }
  }

  func handleSignInButton() {
    // Find the current window scene.
    guard let windowScene = UIApplication.shared.connectedScenes.first as? UIWindowScene else {
      print("There is no active window scene")
      return
    }

    // Get the root view controller from the window scene.
    guard
      let rootViewController = windowScene.windows.first(where: { $0.isKeyWindow })?
        .rootViewController
    else {
      print("There is no key window or root view controller")
      return
    }

    // Start the sign-in process.
    GIDSignIn.sharedInstance.signIn(
      withPresenting: rootViewController
    ) { signInResult, error in
      guard let result = signInResult else {
        // Inspect error
        print("Error signing in: \(error?.localizedDescription ?? "No error description")")
        return
      }

      DispatchQueue.main.async {
        self.user = result.user
      }

      // If sign in succeeded, display the app's main content View.
      print("ID Token: \(result.user.idToken?.tokenString ?? "")")
    }
  }

  func signOut() {
    GIDSignIn.sharedInstance.signOut()
    // After signing out, set the `user` state variable to `nil`.
    self.user = nil
  }
}

#Preview {
  ContentView()
}
UIKit
- 打开 ViewController.swift。
- 在
viewDidLoad方法的末尾添加以下restorePreviousSignIn调用:
// Attempt to restore a previous sign-in session
GIDSignIn.sharedInstance.restorePreviousSignIn { user, error in
  if let user = user {
    print("Successfully restored sign-in for user: \(user.profile?.givenName ?? "Unknown")")

    // Print the ID token when a session is restored.
    print("Restored ID Token: \(user.idToken?.tokenString ?? "")")

    // On success, update the UI for the signed-in state on the main thread.
    DispatchQueue.main.async {
      self.updateUI(for: user)
    }
  }
}
您的 ViewController.swift 文件应如下所示:
import GoogleSignIn
import UIKit

class ViewController: UIViewController {

  // Create an instance of the Sign in with Google button
  let signInButton = GIDSignInButton()
  let signOutButton = UIButton(type: .system)
  let welcomeLabel = UILabel()

  override func viewDidLoad() {
    super.viewDidLoad()

    // Set the width and color of the sign-in button
    signInButton.style = .standard  // Options: .standard, .wide, .iconOnly
    signInButton.colorScheme = .dark  // Options: .dark, .light

    // Add the sign-in button to your view
    view.addSubview(signInButton)

    // Position the button using constraints
    signInButton.translatesAutoresizingMaskIntoConstraints = false
    NSLayoutConstraint.activate([
      signInButton.centerXAnchor.constraint(equalTo: view.centerXAnchor),
      signInButton.centerYAnchor.constraint(equalTo: view.centerYAnchor),
    ])

    // Add a target to the button to call a method when it's pressed
    signInButton.addTarget(self, action: #selector(signInButtonTapped), for: .touchUpInside)

    // --- Set up the Welcome Label ---
    welcomeLabel.translatesAutoresizingMaskIntoConstraints = false
    welcomeLabel.textAlignment = .center
    welcomeLabel.font = .systemFont(ofSize: 24, weight: .bold)
    view.addSubview(welcomeLabel)

    NSLayoutConstraint.activate([
      welcomeLabel.centerXAnchor.constraint(equalTo: view.centerXAnchor),
      welcomeLabel.bottomAnchor.constraint(equalTo: signInButton.topAnchor, constant: -20),
    ])

    // --- Set up the Sign-Out Button ---
    signOutButton.translatesAutoresizingMaskIntoConstraints = false
    signOutButton.setTitle("Sign Out", for: .normal)
    view.addSubview(signOutButton)

    NSLayoutConstraint.activate([
      signOutButton.centerXAnchor.constraint(equalTo: view.centerXAnchor),
      signOutButton.topAnchor.constraint(equalTo: signInButton.bottomAnchor, constant: 20),
    ])

    signOutButton.addTarget(self, action: #selector(signOutButtonTapped), for: .touchUpInside)

    // --- Set Initial UI State ---
    updateUI(for: nil)

    // Attempt to restore a previous sign-in session
    GIDSignIn.sharedInstance.restorePreviousSignIn { user, error in
      if let user = user {
        print("Successfully restored sign-in for user: \(user.profile?.givenName ?? "Unknown")")

        // Print the ID token when a session is restored.
        print("Restored ID Token: \(user.idToken?.tokenString ?? "")")

        // On success, update the UI for the signed-in state on the main thread.
        DispatchQueue.main.async {
          self.updateUI(for: user)
        }
      }
    }
  }

  // This method is called when the sign-in button is pressed.
  @objc func signInButtonTapped() {
    // Start the sign-in process.
    GIDSignIn.sharedInstance.signIn(withPresenting: self) { signInResult, error in
      guard let result = signInResult else {
        // Inspect error
        print("Error signing in: \(error?.localizedDescription ?? "No error description")")
        return
      }

      // If sign in succeeded, print the ID token.
      print("ID Token: \(result.user.idToken?.tokenString ?? "")")

      DispatchQueue.main.async {
        self.updateUI(for: result.user)
      }
    }
  }

  private func updateUI(for user: GIDGoogleUser?) {
    if let user = user {
      // User is signed in.
      signInButton.isHidden = true
      signOutButton.isHidden = false
      welcomeLabel.isHidden = false
      welcomeLabel.text = "Hello, \(user.profile?.givenName ?? "User")!"
    } else {
      // User is signed out.
      signInButton.isHidden = false
      signOutButton.isHidden = true
      welcomeLabel.isHidden = true
    }
  }

  @objc func signOutButtonTapped() {
    GIDSignIn.sharedInstance.signOut()
    // Update the UI for the signed-out state.
    updateUI(for: nil)
  }
}
测试静默登录
登录后,完全退出该应用,然后重新启动。您应该会看到,您现在已自动登录,无需点按按钮。
10. 了解 ID 令牌
虽然 GIDGoogleUser 对象可用于使用用户的姓名和电子邮件地址来个性化界面,但从 SDK 返回的最重要的数据是 ID 令牌。
此 Codelab 使用在线工具来检查 JWT 内容。在正式版应用中,您应将此 ID 令牌发送到后端服务器。您的服务器必须验证 ID 令牌的完整性,并使用 JWT 执行更有意义的操作,例如在后端平台上创建新账号或为用户建立新会话。
访问并解码 JWT 令牌
- 启动应用。
- 打开 Xcode 控制台。您应该会看到输出的 ID 令牌。其格式应为
eyJhbGciOiJSUzI1Ni ... Hecz6Wm4Q。 - 复制 ID 令牌,然后使用 jwt.io 等在线工具解码 JWT。
解码后的 JWT 将如下所示:
{
  "alg": "RS256",
  "kid": "c8ab71530972bba20b49f78a09c9852c43ff9118",
  "typ": "JWT"
}
{
  "iss": "https://accounts.google.com",
  "azp": "171291171076-rrbkcjrp5jbte92ai9gub115ertscphi.apps.googleusercontent.com",
  "aud": "171291171076-rrbkcjrp5jbte92ai9gub115ertscphi.apps.googleusercontent.com",
  "sub": "10769150350006150715113082367",
  "email": "example@example.com",
  "email_verified": true,
  "at_hash": "JyCYDmHtzhjkb0-qJhKsMg",
  "name": "Kimya",
  "picture": "https://lh3.googleusercontent.com/a/ACg8ocIyy4VoR31t_n0biPVcScBHwZOCRaKVDb_MoaMYep65fyqoAw=s96-c",
  "given_name": "Kimya",
  "iat": 1758645896,
  "exp": 1758649496
}
值得注意的令牌字段
解码后的 ID 令牌包含具有不同用途的字段。虽然有些信息(例如姓名和电子邮件地址)很容易理解,但其他信息则由后端服务器用于验证。
以下字段尤其需要了解:
- sub:
sub字段是用户 Google 账号的唯一永久标识符。用户可以更改其主电子邮件地址或姓名,但其subID 永远不会更改。因此,sub字段非常适合用作后端用户账号的主键。
从 ID 令牌获取用户信息一文详细介绍了所有令牌字段的含义。
11. 使用 App Check 保护应用的安全
强烈建议您启用 App Check,以确保只有您的应用可以代表您的项目访问 Google 的 OAuth 2.0 端点。App Check 的运作方式是验证发送到后端服务的请求是否来自真实且未被篡改的设备上的正版应用。
本部分介绍了如何将 App Check 集成到应用中,并将其配置为既可在模拟器中进行调试,又可在真实设备上运行的正式版 build 中使用。
控制台设置
将 App Check 集成到应用中需要在 Google Cloud 控制台和 Firebase 控制台中进行一次性设置。这包括在 Google Cloud 控制台中为 iOS OAuth 客户端启用 App Check、创建用于 App Check 调试提供程序的 API 密钥,以及将 Google Cloud 项目关联到 Firebase。
在 Google Cloud 控制台中启用 App Check
- 前往与您的 Google Cloud 项目关联的客户端列表。
- 选择您为 iOS 应用创建的 OAuth 2.0 客户端 ID。
- 在 iOS 版 Google Identity 下方,将 App Check 切换为开启状态
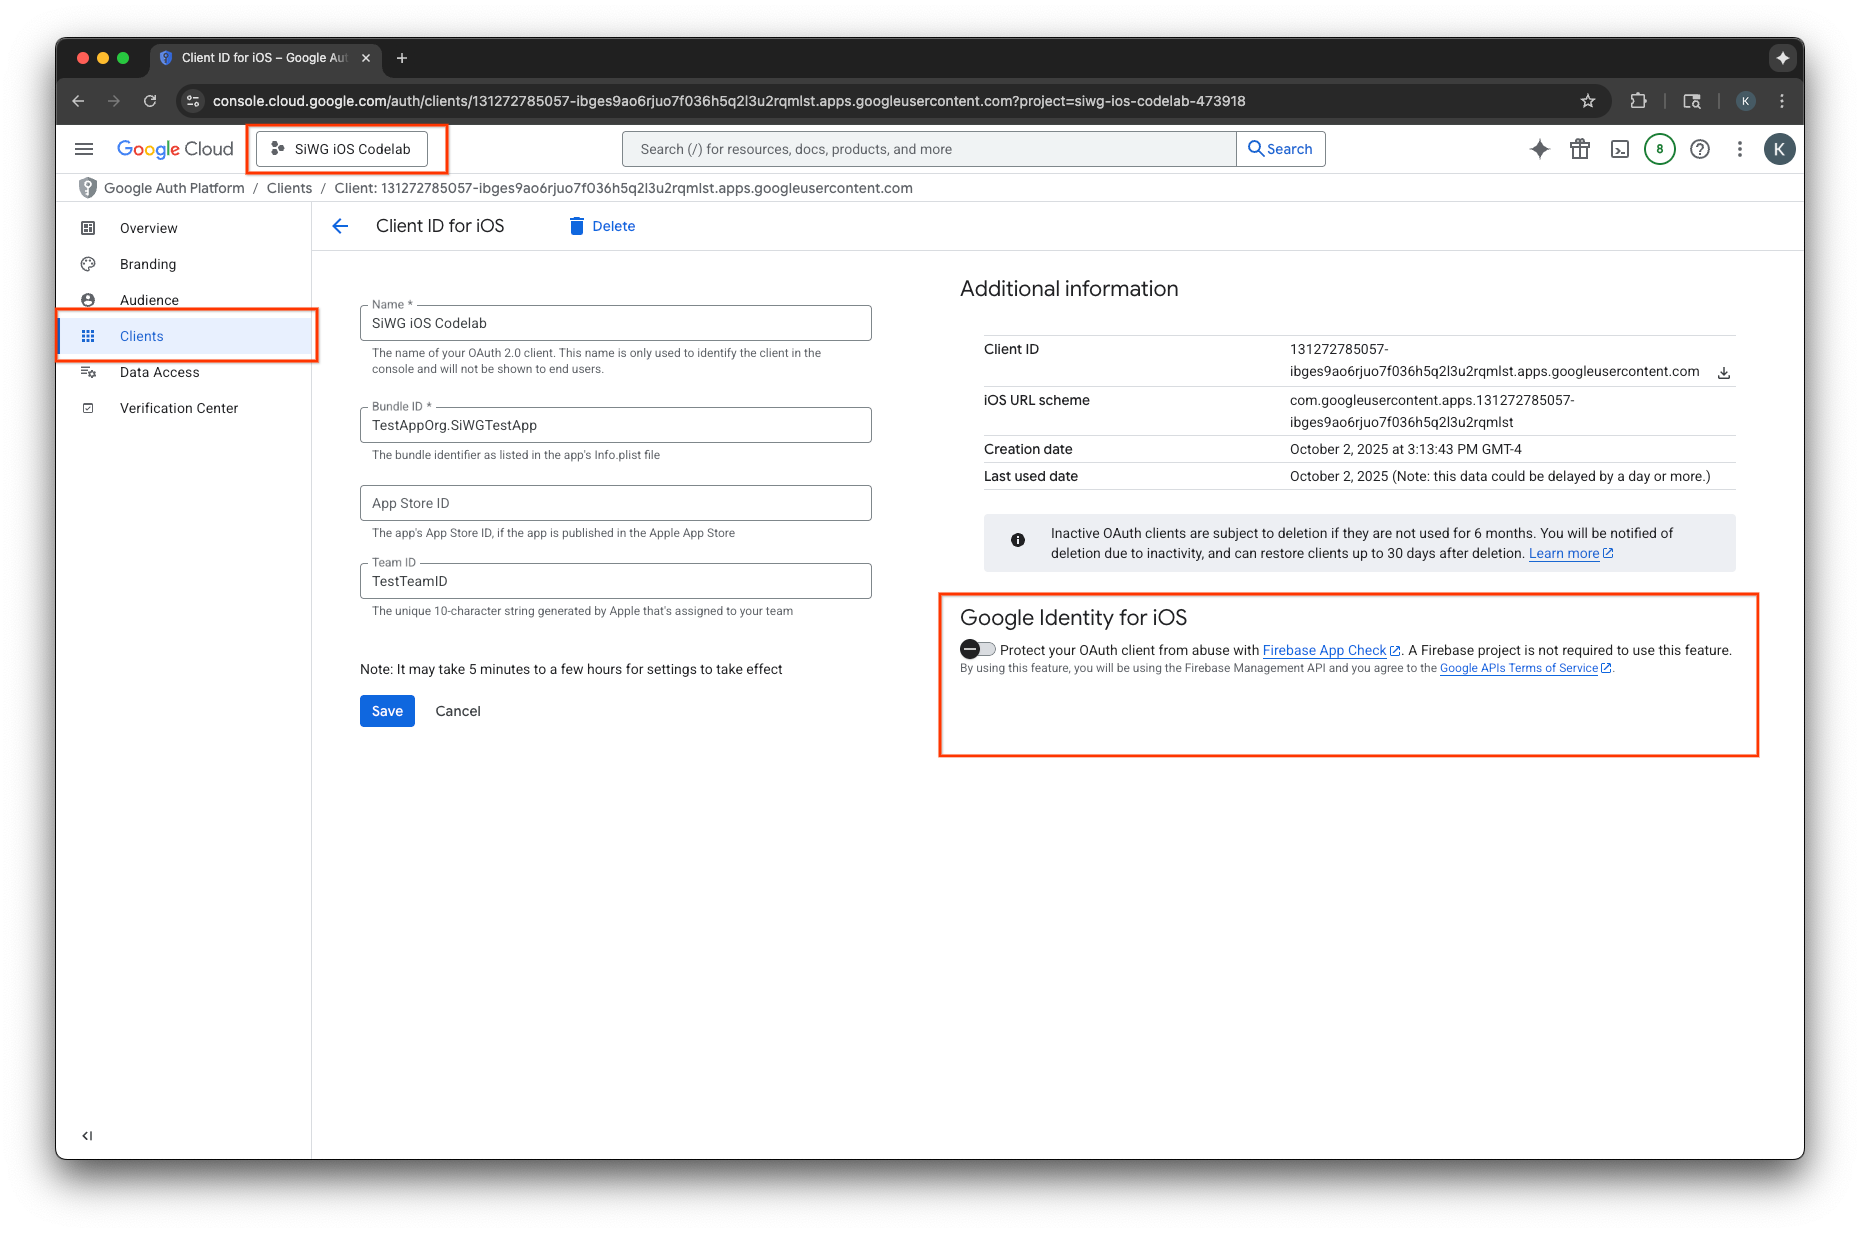
- 点击保存。
创建 API 密钥
- 前往 Google Cloud 项目的 API 库页面。
- 在搜索栏中输入 Firebase App Check API。
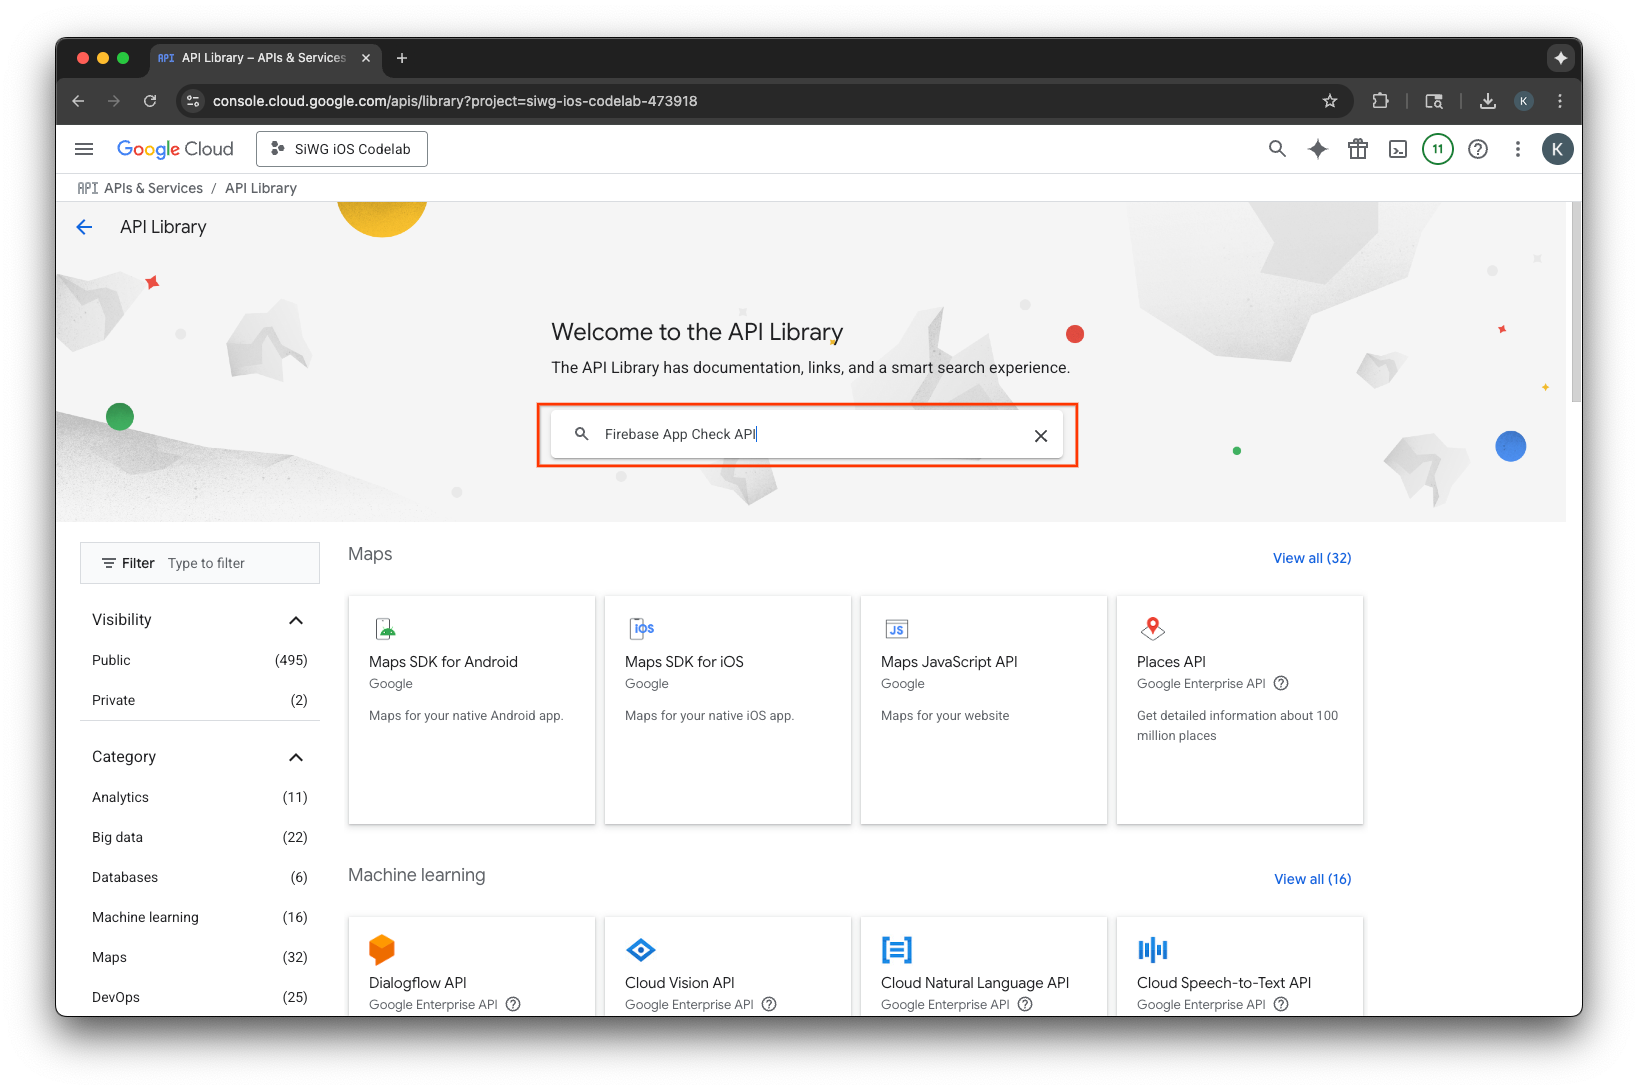
- 选择并启用 Firebase App Check API。
- 前往 API 和服务,然后在导航菜单中选择凭据。
- 选择页面顶部的创建凭据。
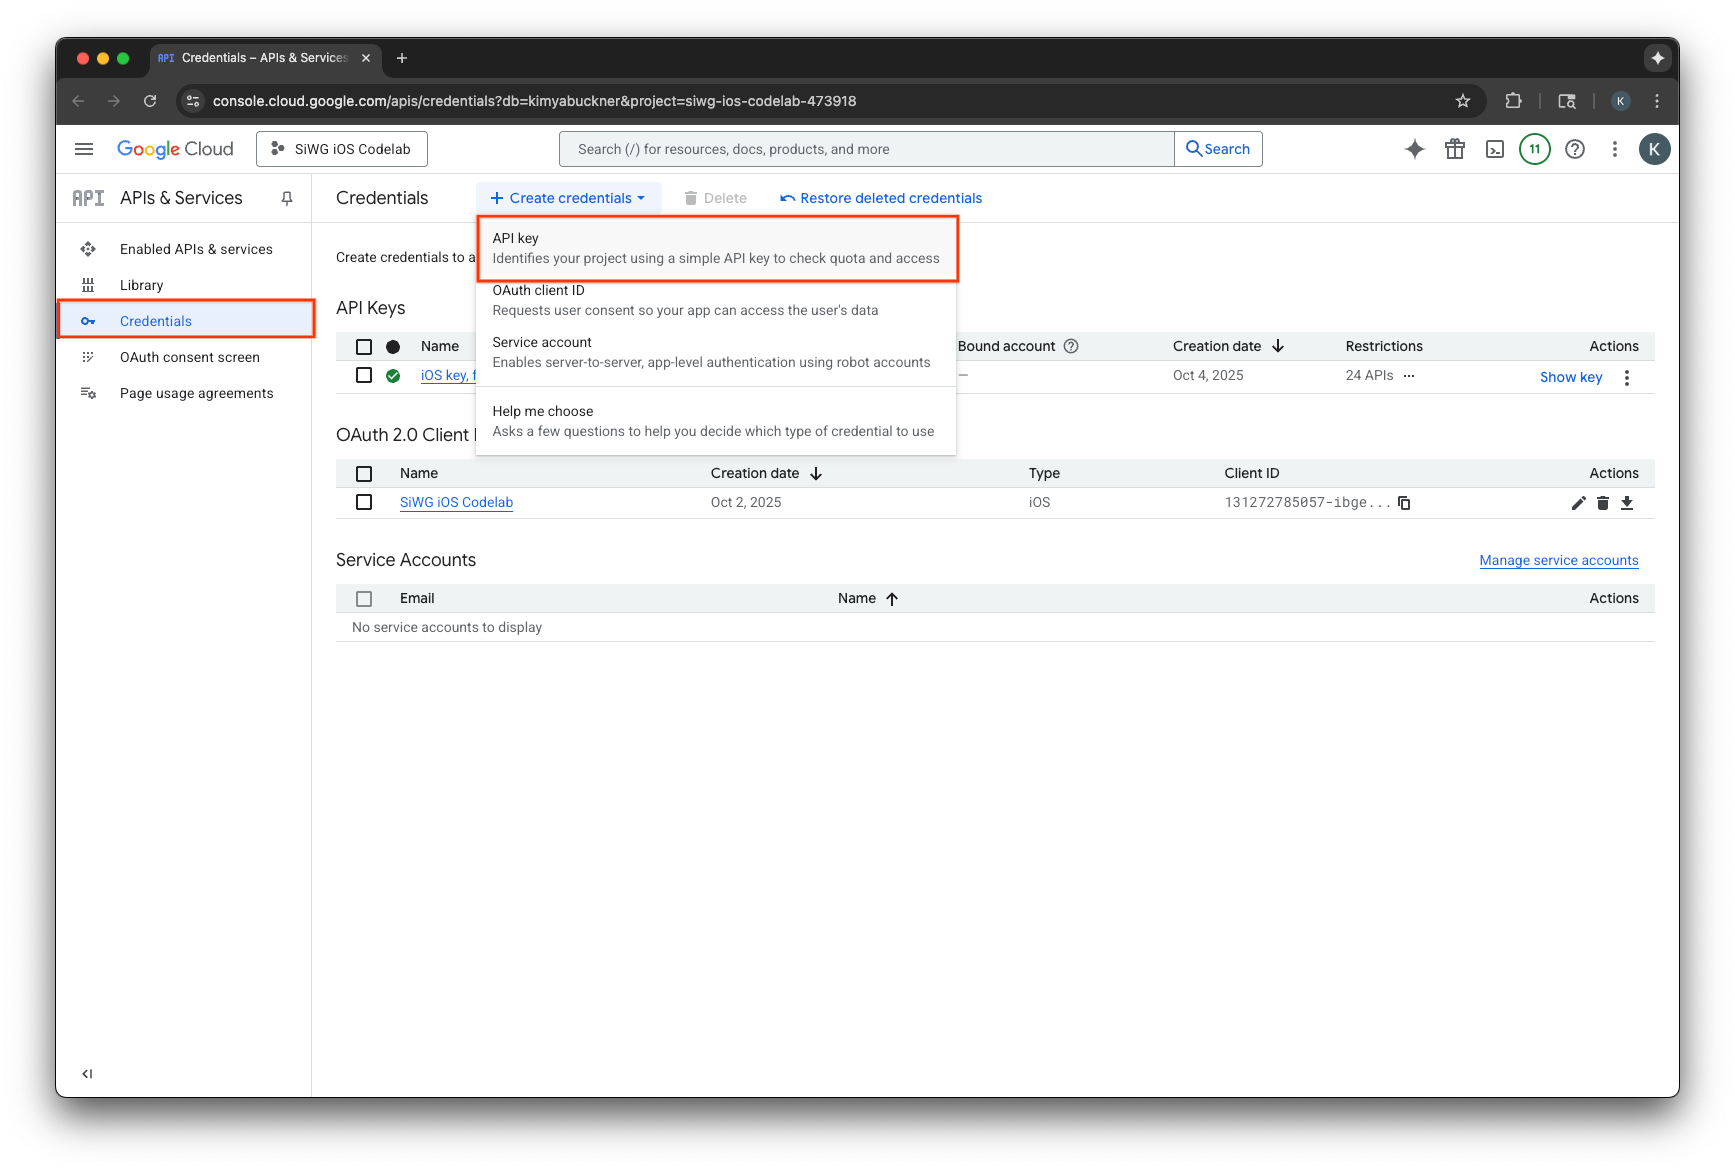
- 为此 API 密钥分配一个名称。
- 在应用限制下,选择“iOS 应用”。
- 将应用的软件包标识符添加为获批应用。
- 在 API 限制下,选择限制密钥。
- 从下拉菜单中选择 Firebase App Check API。
- 选择创建。

- 复制创建的 API 密钥。后续步骤将会用到该地址。
将 Firebase 添加到您的 Google Cloud 项目
- 前往 Firebase 控制台。
- 选择开始之前,请先设置 Firebase 项目。
- 选择将 Firebase 添加到 Google Cloud 项目。
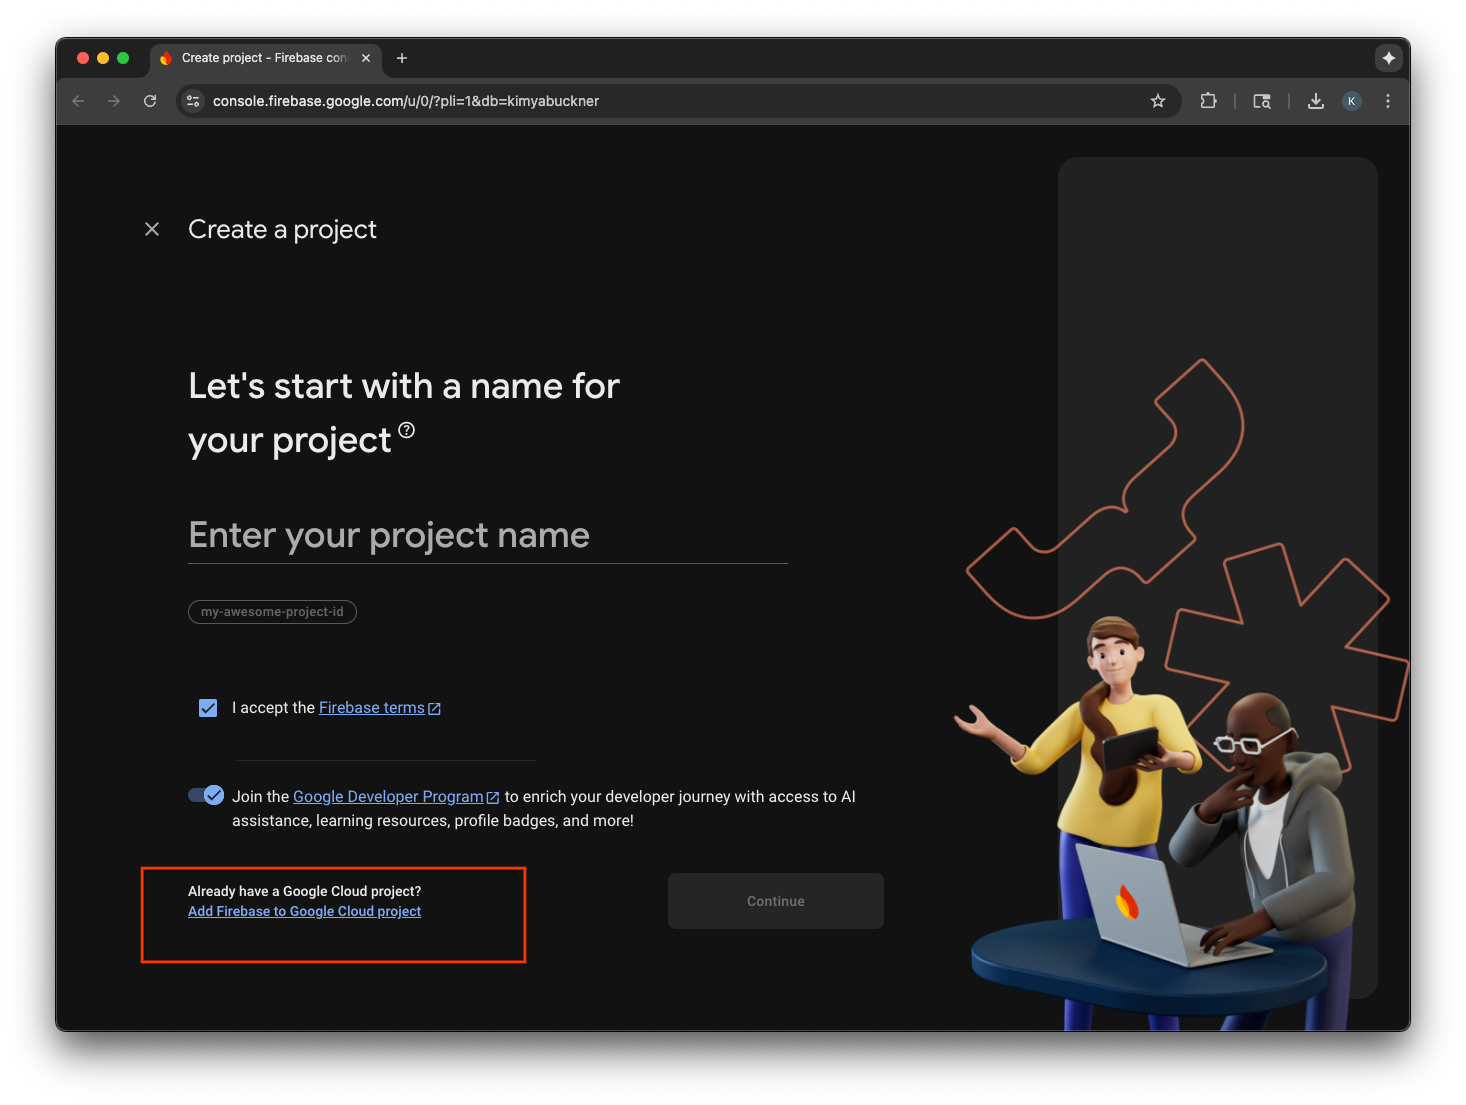
- 从下拉菜单中选择一个 Google Cloud 项目,然后继续完成注册流程。
- 选择添加 Firebase。
- Firebase 项目准备就绪后,选择继续以打开项目。
客户端代码集成
Google Cloud 项目已配置为支持 App Check,现在可以编写客户端代码来启用它了。在生产环境和调试环境中,用于证明的提供方不同。真实设备上的正式版应用会使用 Apple 的内置 App Attest 服务来证明其真实性。不过,由于 iOS 模拟器无法提供此类证明,因此调试环境需要一个特殊的调试提供方,该提供方会传递 API 密钥。
以下代码使用编译器指令在构建时自动选择正确的提供程序,从而处理这两种情况。
SwiftUI
- 打开主应用文件。
- 在导入部分之后和
@main属性之前定义以下AppDelegate类:
class AppDelegate: NSObject, UIApplicationDelegate {
  func application(
    _ application: UIApplication,
    didFinishLaunchingWithOptions launchOptions: [UIApplication.LaunchOptionsKey: Any]? = nil
  ) -> Bool {

    #if targetEnvironment(simulator)
      // Configure for debugging on a simulator.
      // TODO: Replace "YOUR_API_KEY" with the key from your Google Cloud project.
      let apiKey = "YOUR_API_KEY"
      GIDSignIn.sharedInstance.configureDebugProvider(withAPIKey: apiKey) { error in
        if let error {
          print("Error configuring GIDSignIn debug provider: \(error)")
        }
      }
    #else
      // Configure GIDSignIn for App Check on a real device.
      GIDSignIn.sharedInstance.configure { error in
        if let error {
          print("Error configuring GIDSignIn for App Check: \(error)")
        } else {
          print("GIDSignIn configured for App Check.")
        }
      }
    #endif

    return true
  }
}
- 将所提供代码中的
"YOUR_API_KEY"替换为您从 Google Cloud 控制台中复制的 API 密钥。 - 在
App结构体内,紧挨着body变量添加以下代码行。这会将您的 AppDelegate 类注册到应用生命周期,使其能够响应应用启动和其他系统事件:
@UIApplicationDelegateAdaptor(AppDelegate.self) var delegate
您的主应用文件应如下所示:
import GoogleSignIn
import SwiftUI

class AppDelegate: NSObject, UIApplicationDelegate {
  func application(
    _ application: UIApplication,
    didFinishLaunchingWithOptions launchOptions: [UIApplication.LaunchOptionsKey: Any]? = nil
  ) -> Bool {

    #if targetEnvironment(simulator)
      // Configure for debugging on a simulator.
      // TODO: Replace "YOUR_API_KEY" with the key from your Google Cloud project.
      let apiKey = "YOUR_API_KEY"
      GIDSignIn.sharedInstance.configureDebugProvider(withAPIKey: apiKey) { error in
        if let error {
          print("Error configuring GIDSignIn debug provider: \(error)")
        }
      }
    #else
      // Configure GIDSignIn for App Check on a real device.
      GIDSignIn.sharedInstance.configure { error in
        if let error {
          print("Error configuring GIDSignIn for App Check: \(error)")
        } else {
          print("GIDSignIn configured for App Check.")
        }
      }
    #endif

    return true
  }
}

@main
struct iOS_Sign_in_with_Google_App: App {

  @UIApplicationDelegateAdaptor(AppDelegate.self) var delegate

  var body: some Scene {
    WindowGroup {
      ContentView()

        .onOpenURL { url in
          GIDSignIn.sharedInstance.handle(url)
        }
    }
  }
}
UIKit
- 打开 AppDelegate.swift。
- 更新
application(_:didFinishLaunchingWithOptions:)方法以包含 App Check 初始化:
func application(
  _ application: UIApplication,
  didFinishLaunchingWithOptions launchOptions: [UIApplication.LaunchOptionsKey: Any]?
) -> Bool {

  #if targetEnvironment(simulator)
    // Configure for debugging on a simulator.
    // TODO: Replace "YOUR_API_KEY" with the key from your Google Cloud project.
    let apiKey = "YOUR_API_KEY"
    GIDSignIn.sharedInstance.configureDebugProvider(withAPIKey: apiKey) { error in
      if let error {
        print("Error configuring GIDSignIn debug provider: \(error)")
      }
    }
  #else
    // Configure GIDSignIn for App Check on a real device.
    GIDSignIn.sharedInstance.configure { error in
      if let error {
        print("Error configuring GIDSignIn for App Check: \(error)")
      }
    }
  #endif

  return true
}
- 将所提供代码中的
"YOUR_API_KEY"替换为您从 Google Cloud 控制台中复制的 API 密钥。
您的 AppDelegate.swift 文件应如下所示:
import GoogleSignIn
import UIKit

@main
class AppDelegate: UIResponder, UIApplicationDelegate {

  func application(
    _ application: UIApplication,
    didFinishLaunchingWithOptions launchOptions: [UIApplication.LaunchOptionsKey: Any]?
  ) -> Bool {

    #if targetEnvironment(simulator)
      // Configure for debugging on a simulator.
      // TODO: Replace "YOUR_API_KEY" with the key from your Google Cloud project.
      let apiKey = "YOUR_API_KEY"
      GIDSignIn.sharedInstance.configureDebugProvider(withAPIKey: apiKey) { error in
        if let error {
          print("Error configuring GIDSignIn debug provider: \(error)")
        }
      }
    #else
      // Configure GIDSignIn for App Check on a real device.
      GIDSignIn.sharedInstance.configure { error in
        if let error {
          print("Error configuring GIDSignIn for App Check: \(error)")
        }
      }
    #endif

    return true
  }

  func application(
    _ app: UIApplication,
    open url: URL,
    options: [UIApplication.OpenURLOptionsKey: Any] = [:]
  ) -> Bool {
    var handled: Bool

    handled = GIDSignIn.sharedInstance.handle(url)
    if handled {
      return true
    }
    // If not handled by this app, return false.
    return false
  }

  // MARK: UISceneSession Lifecycle

  func application(
    _ application: UIApplication,
    configurationForConnecting connectingSceneSession: UISceneSession,
    options: UIScene.ConnectionOptions
  ) -> UISceneConfiguration {
    // Called when a new scene session is being created.
    // Use this method to select a configuration to create the new scene with.
    return UISceneConfiguration(
      name: "Default Configuration",
      sessionRole: connectingSceneSession.role
    )
  }

  func application(
    _ application: UIApplication,
    didDiscardSceneSessions sceneSessions: Set<UISceneSession>
  ) {
    // Called when the user discards a scene session.
    // If any sessions were discarded while the application was not running, this will be called shortly after application:didFinishLaunchingWithOptions.
    // Use this method to release any resources that were specific to the discarded scenes, as they will not return.
  }
}
在模拟器上测试 App Check
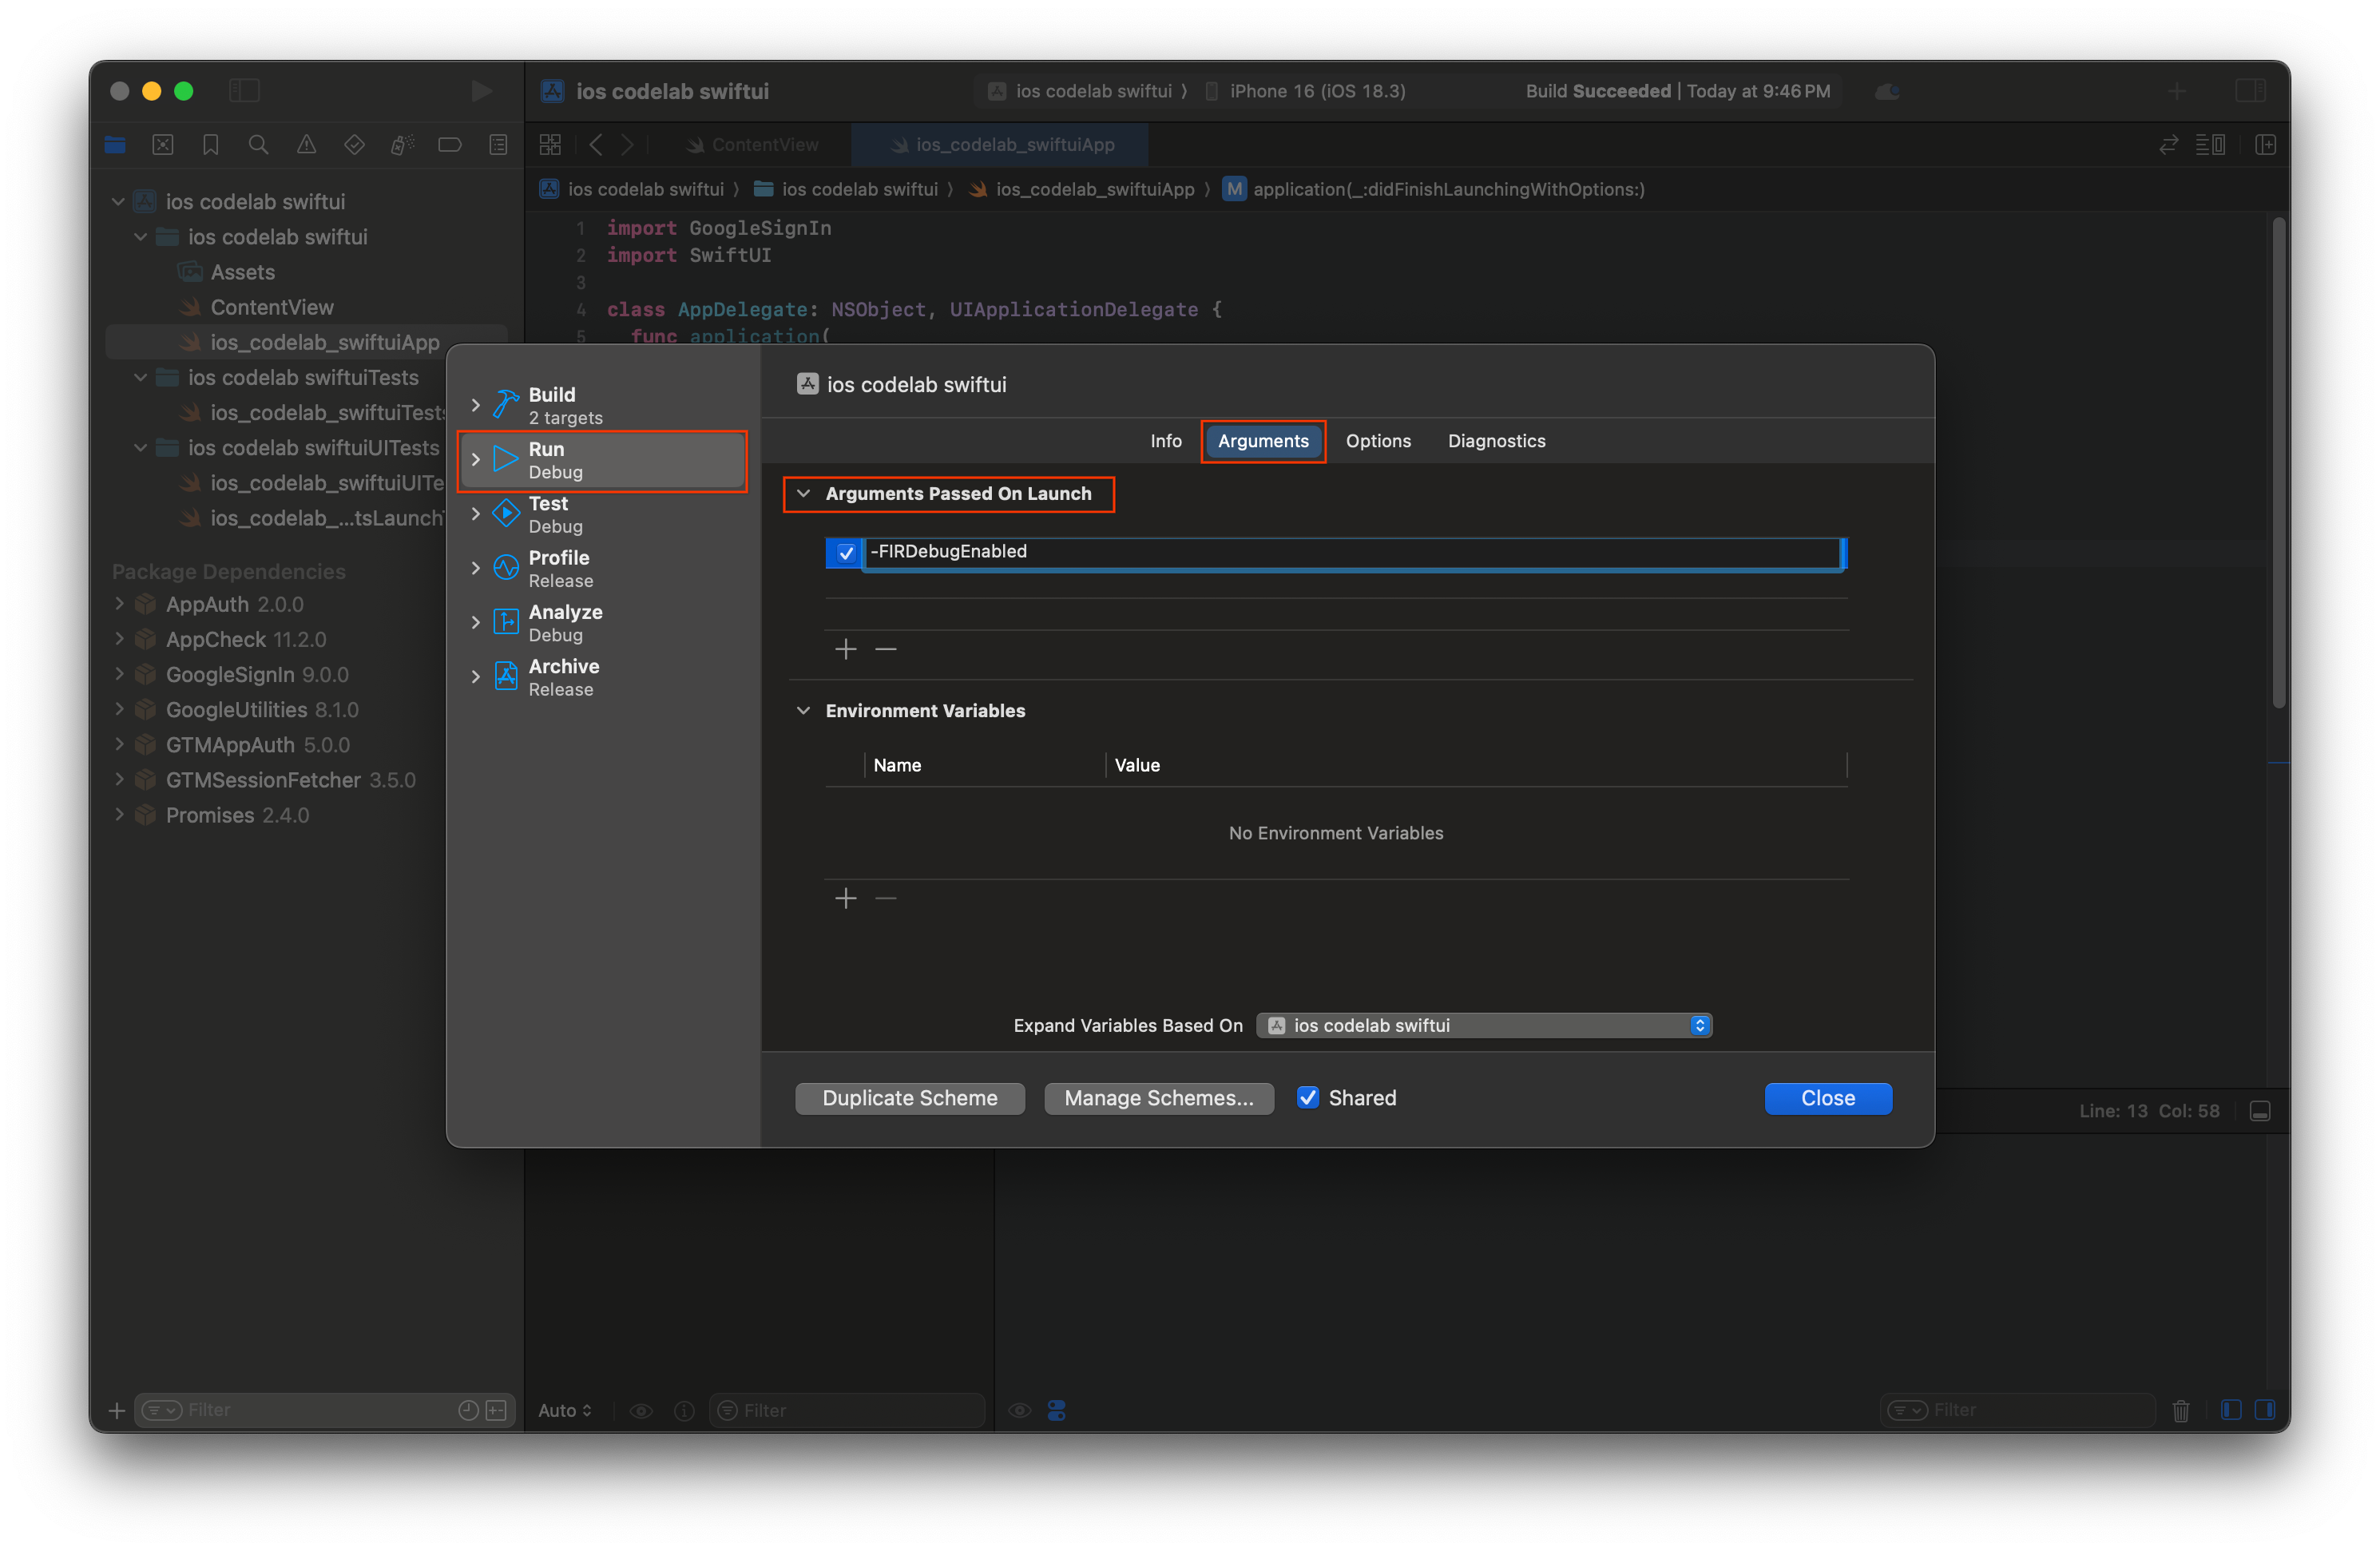
- 在 Xcode 菜单栏中,依次前往 Product > Scheme > Edit Scheme。
- 在导航菜单中选择运行。
- 选择 Arguments 标签页。
- 在 Arguments Passed on Launch 部分中,选择 + 并添加 -FIRDebugEnabled。此启动实参可启用 Firebase 调试日志记录。
- 选择关闭。
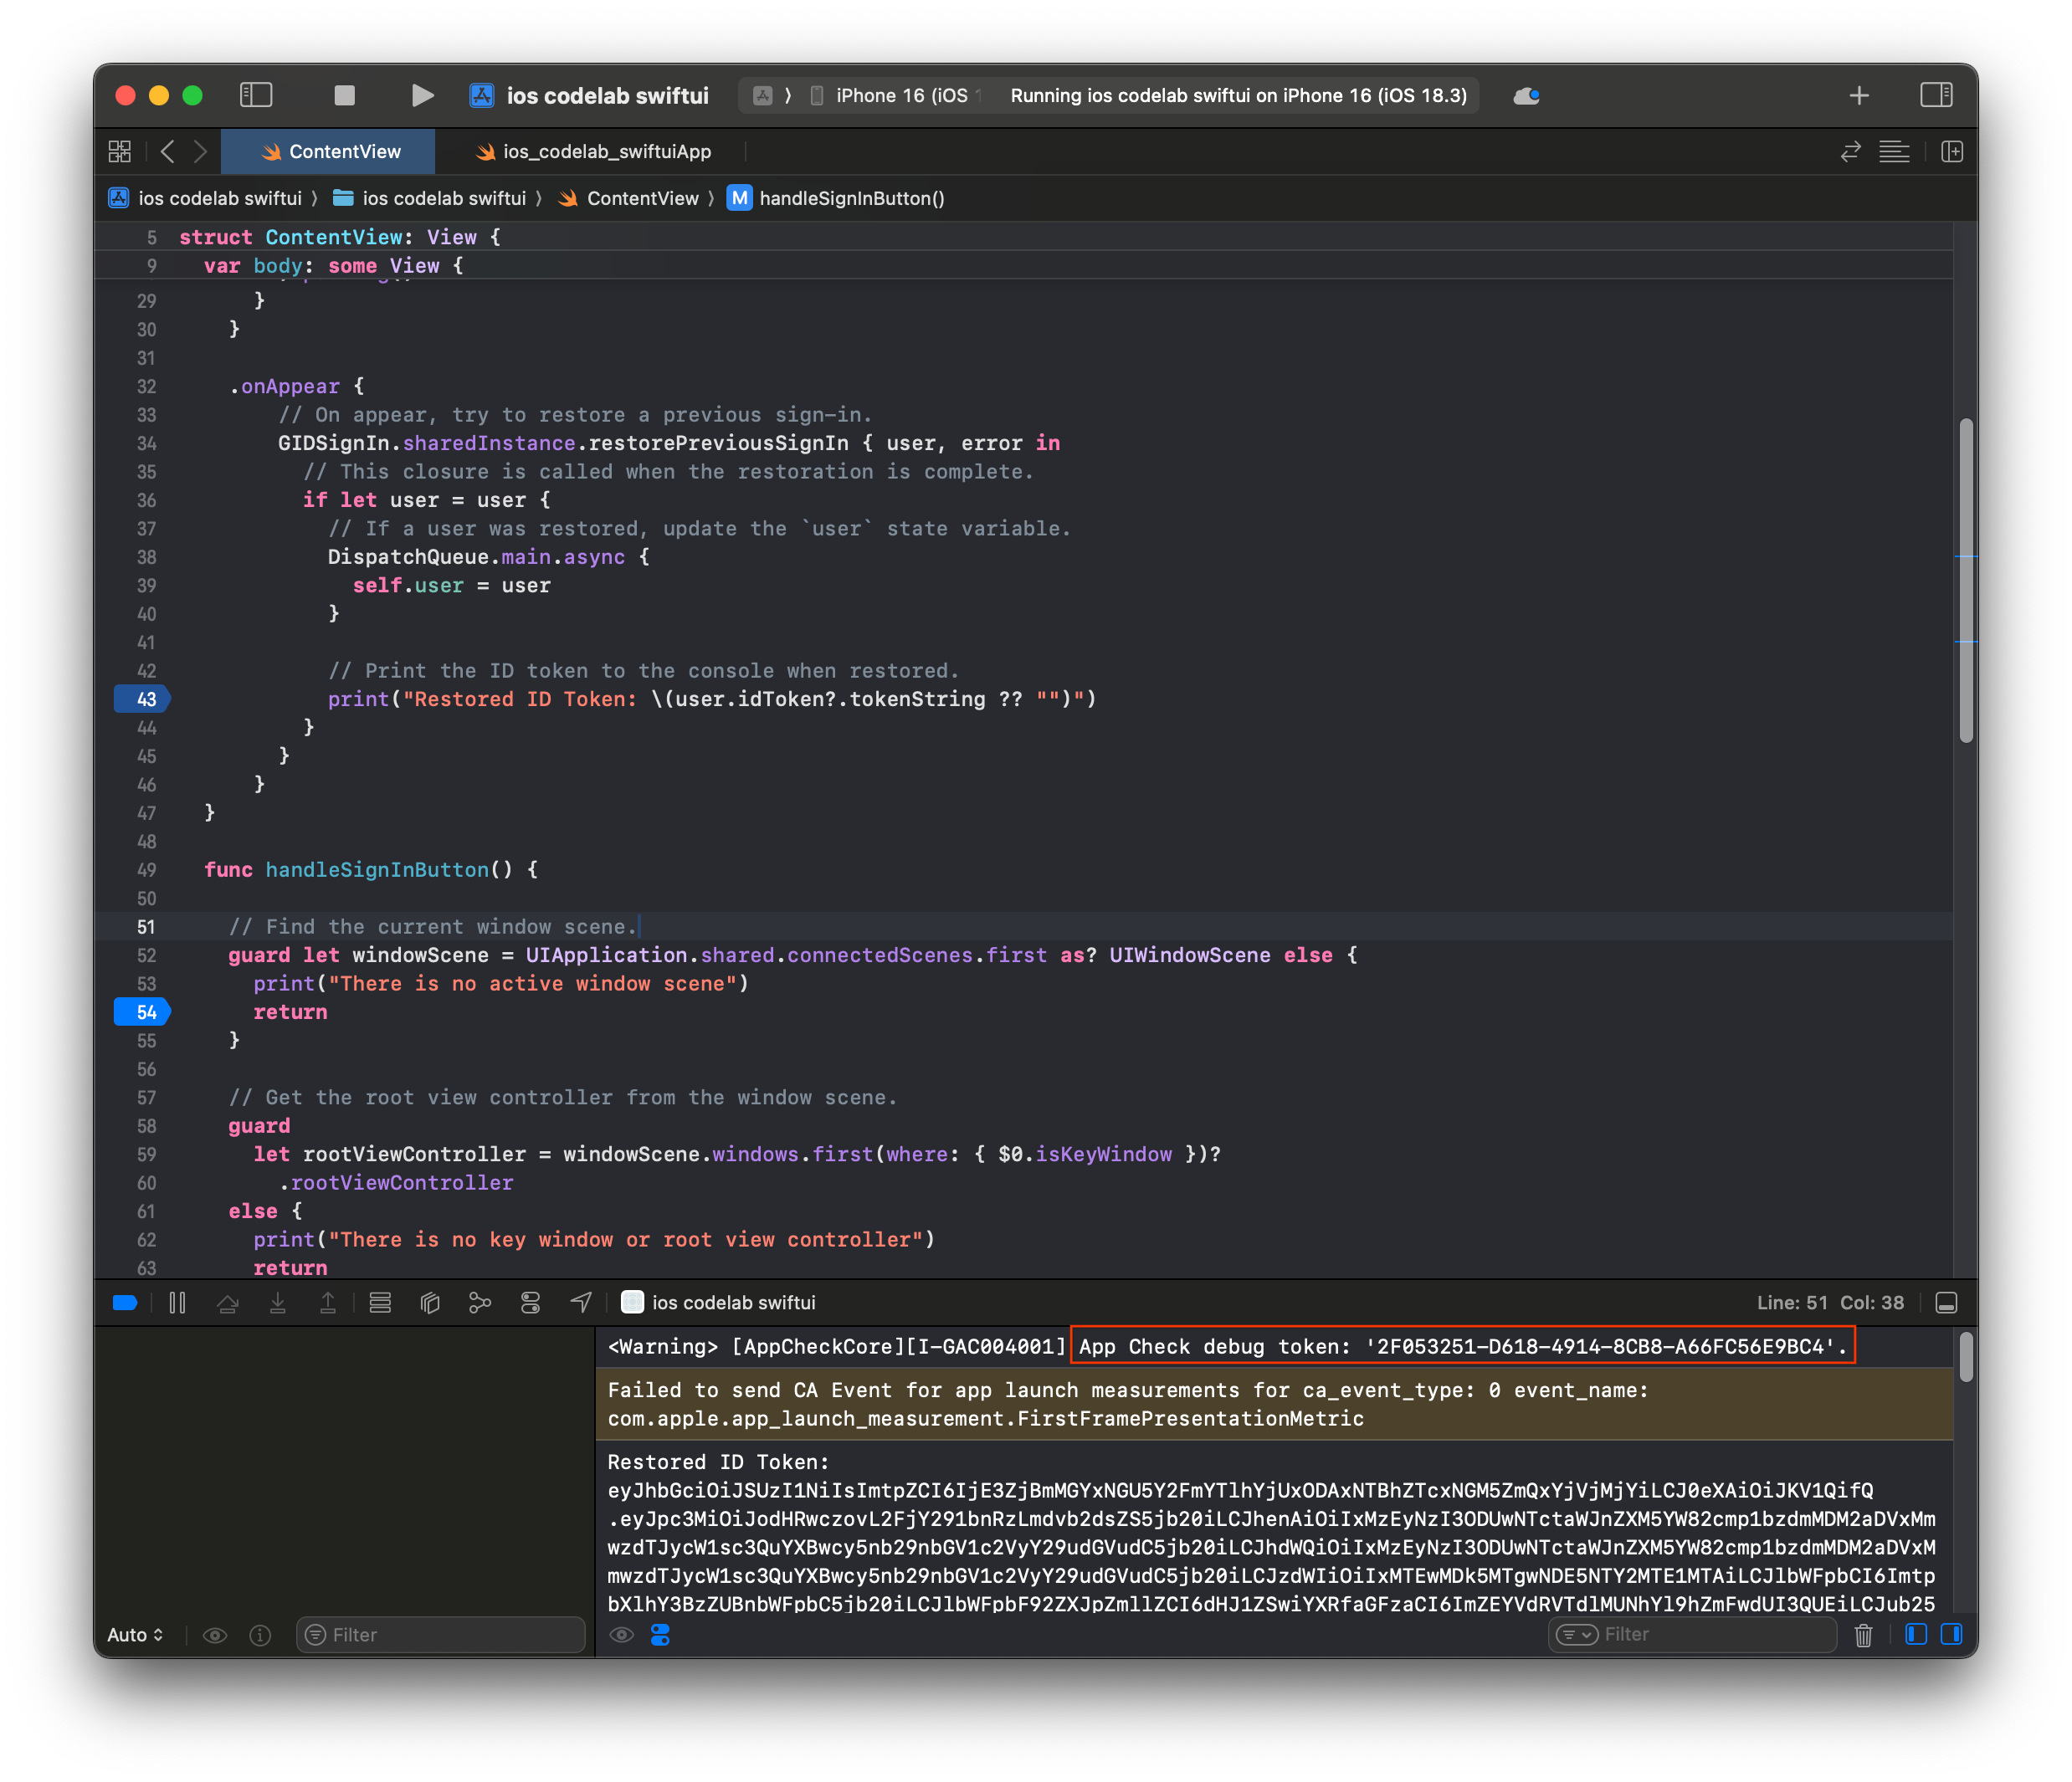
- 在模拟器上启动应用。
- 复制在 Xcode 控制台中输出的 App Check 调试令牌。
- 前往 Firebase 控制台中的项目。
- 展开导航菜单中的构建部分。
- 选择App Check。
- 选择应用标签页。
- 将鼠标悬停在应用上,然后选择三点状菜单图标。
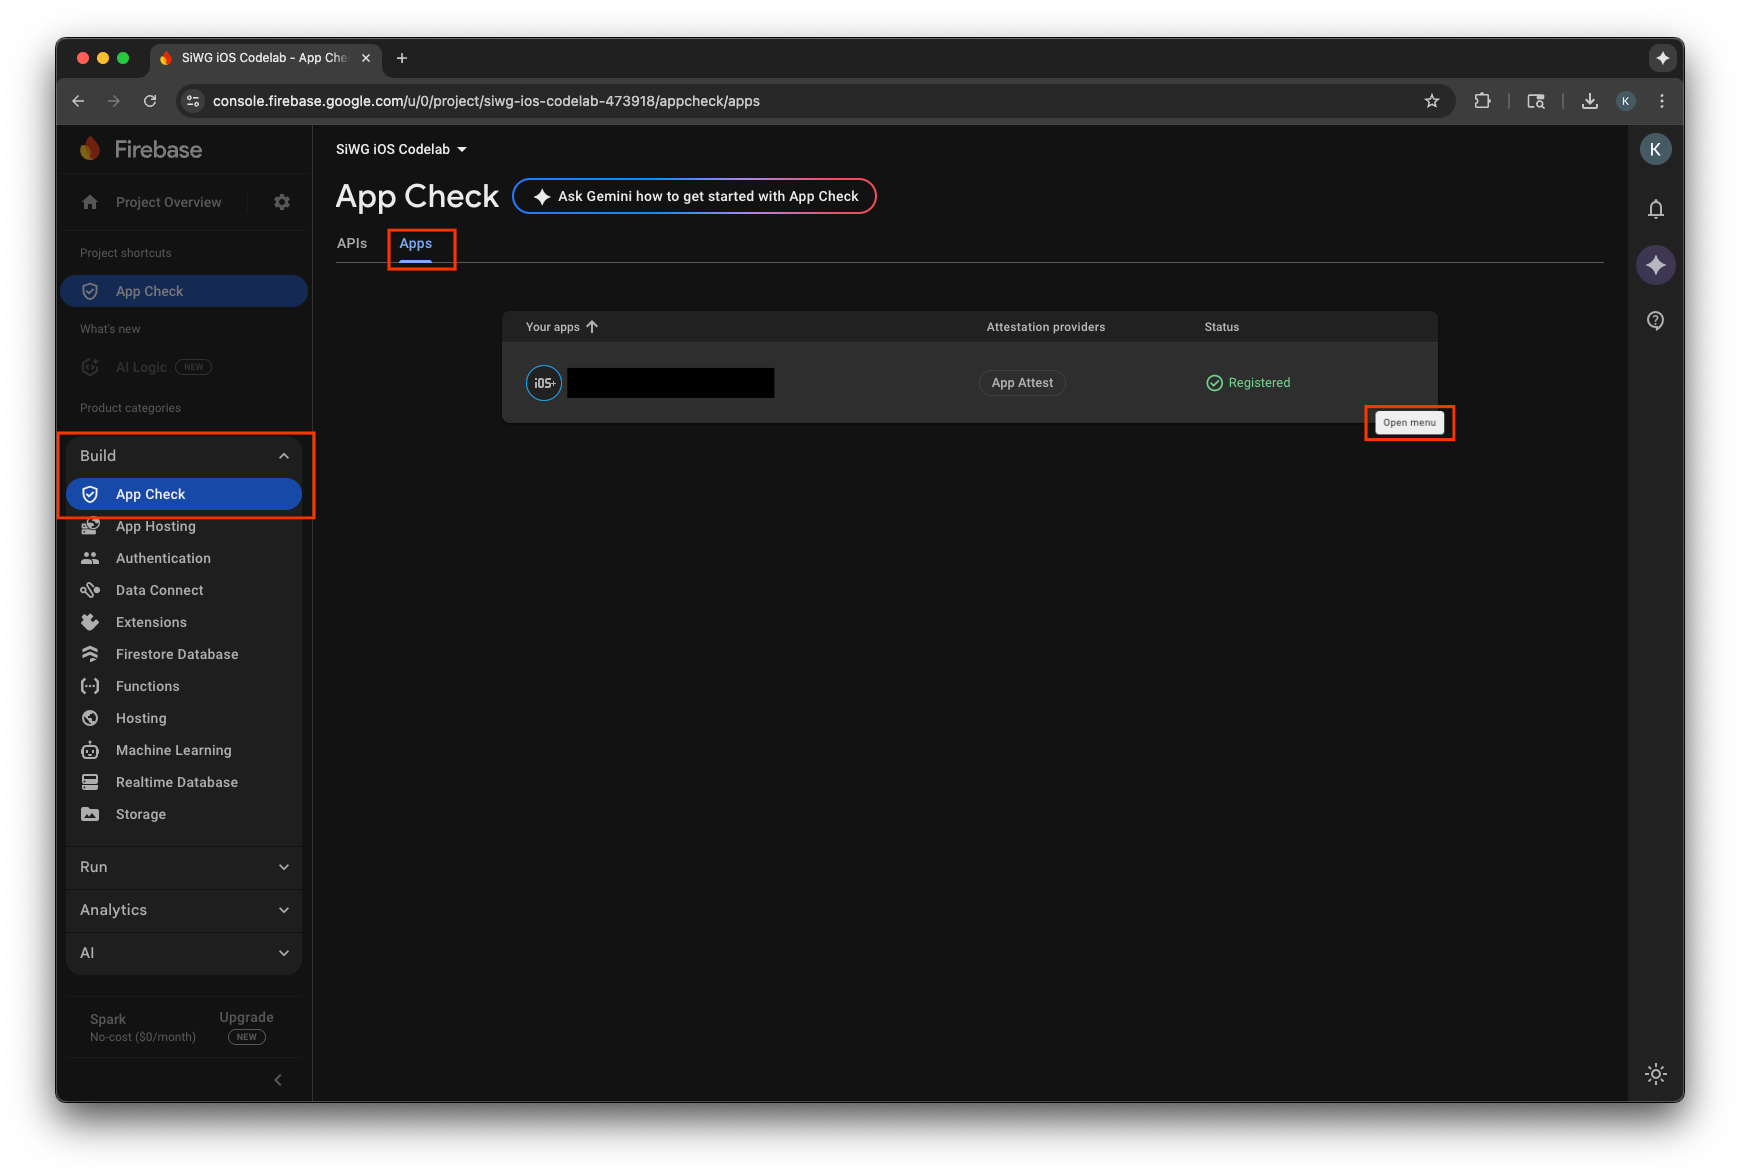
- 选择管理调试令牌。
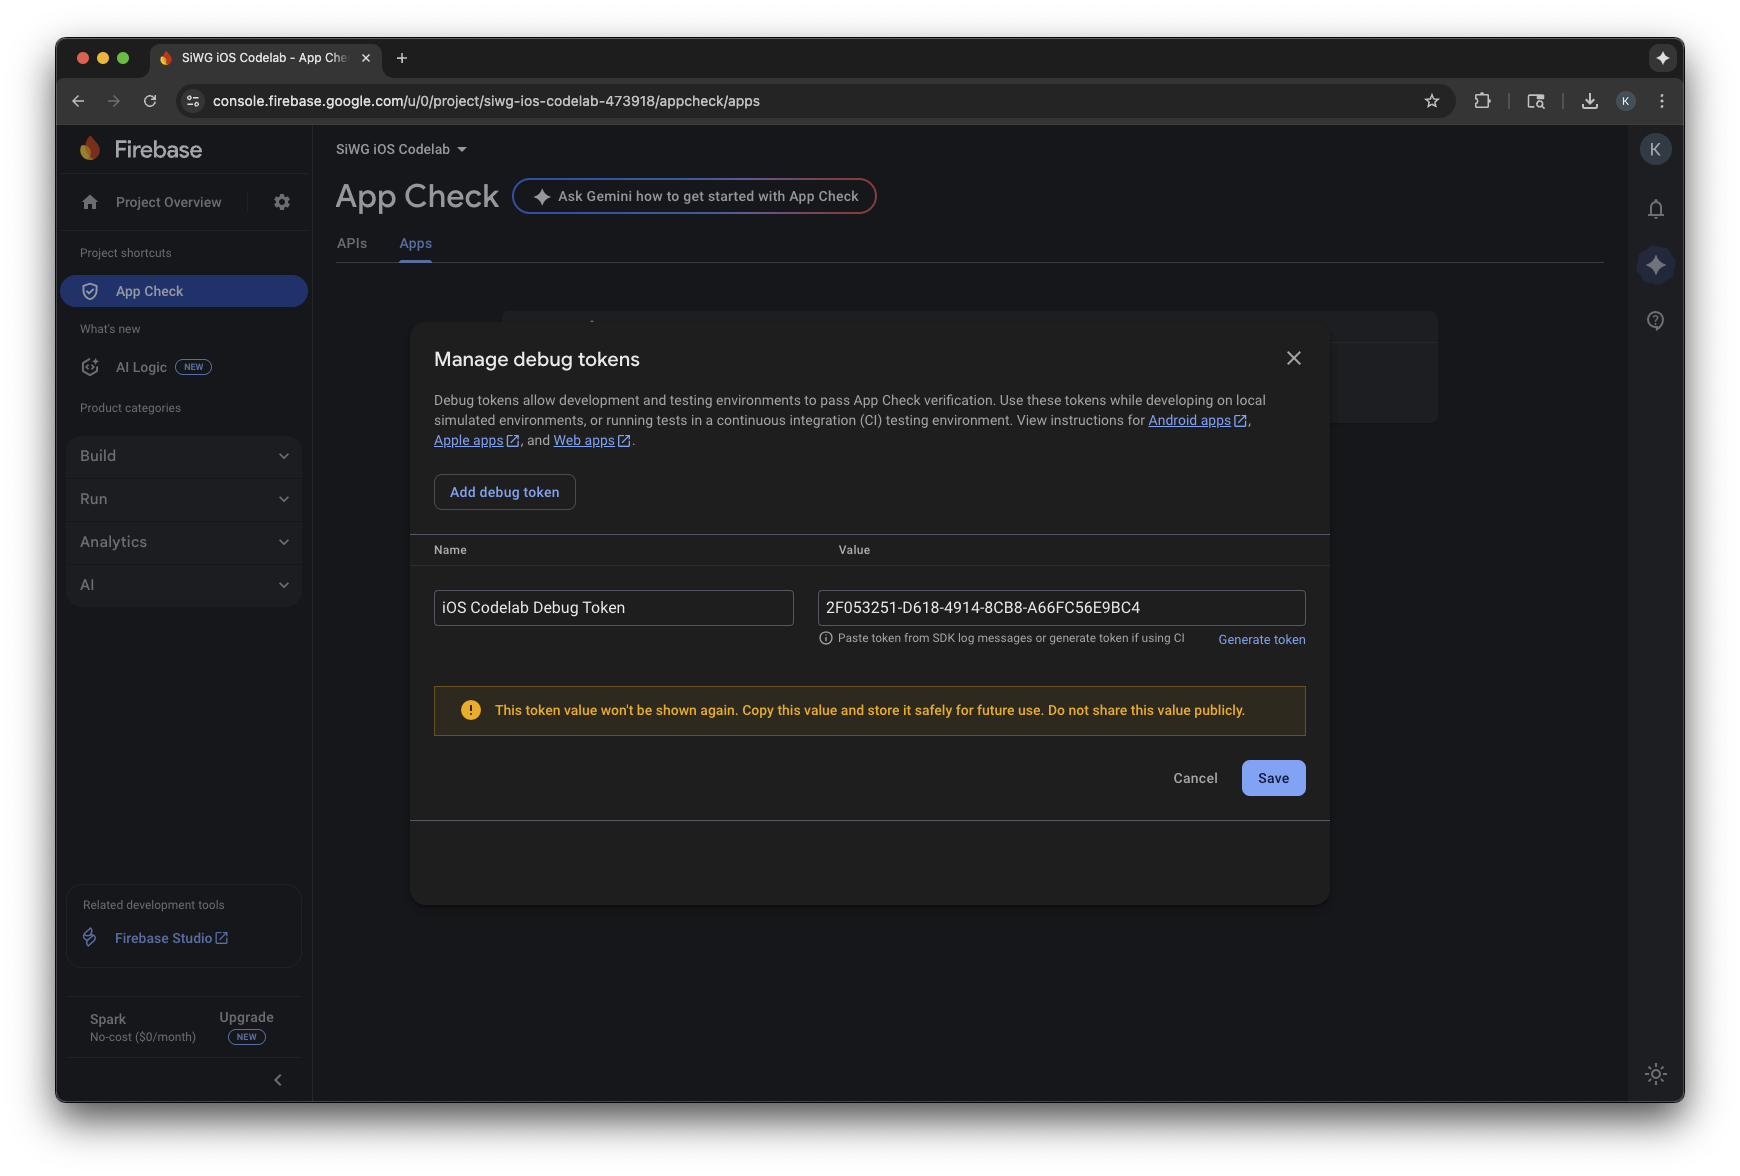
- 选择添加调试令牌。
- 为调试令牌指定一个名称,然后粘贴您之前复制的调试令牌作为值。
- 选择保存以注册您的令牌。
- 返回模拟器并登录。
指标可能需要几分钟才能显示在控制台中。在用户执行此操作后,您可以在以下任一位置查找已验证请求的增加情况,以确认 App Check 是否正常运行:
- 在 Firebase 控制台的“App Check”部分中,位于“API”标签页下。
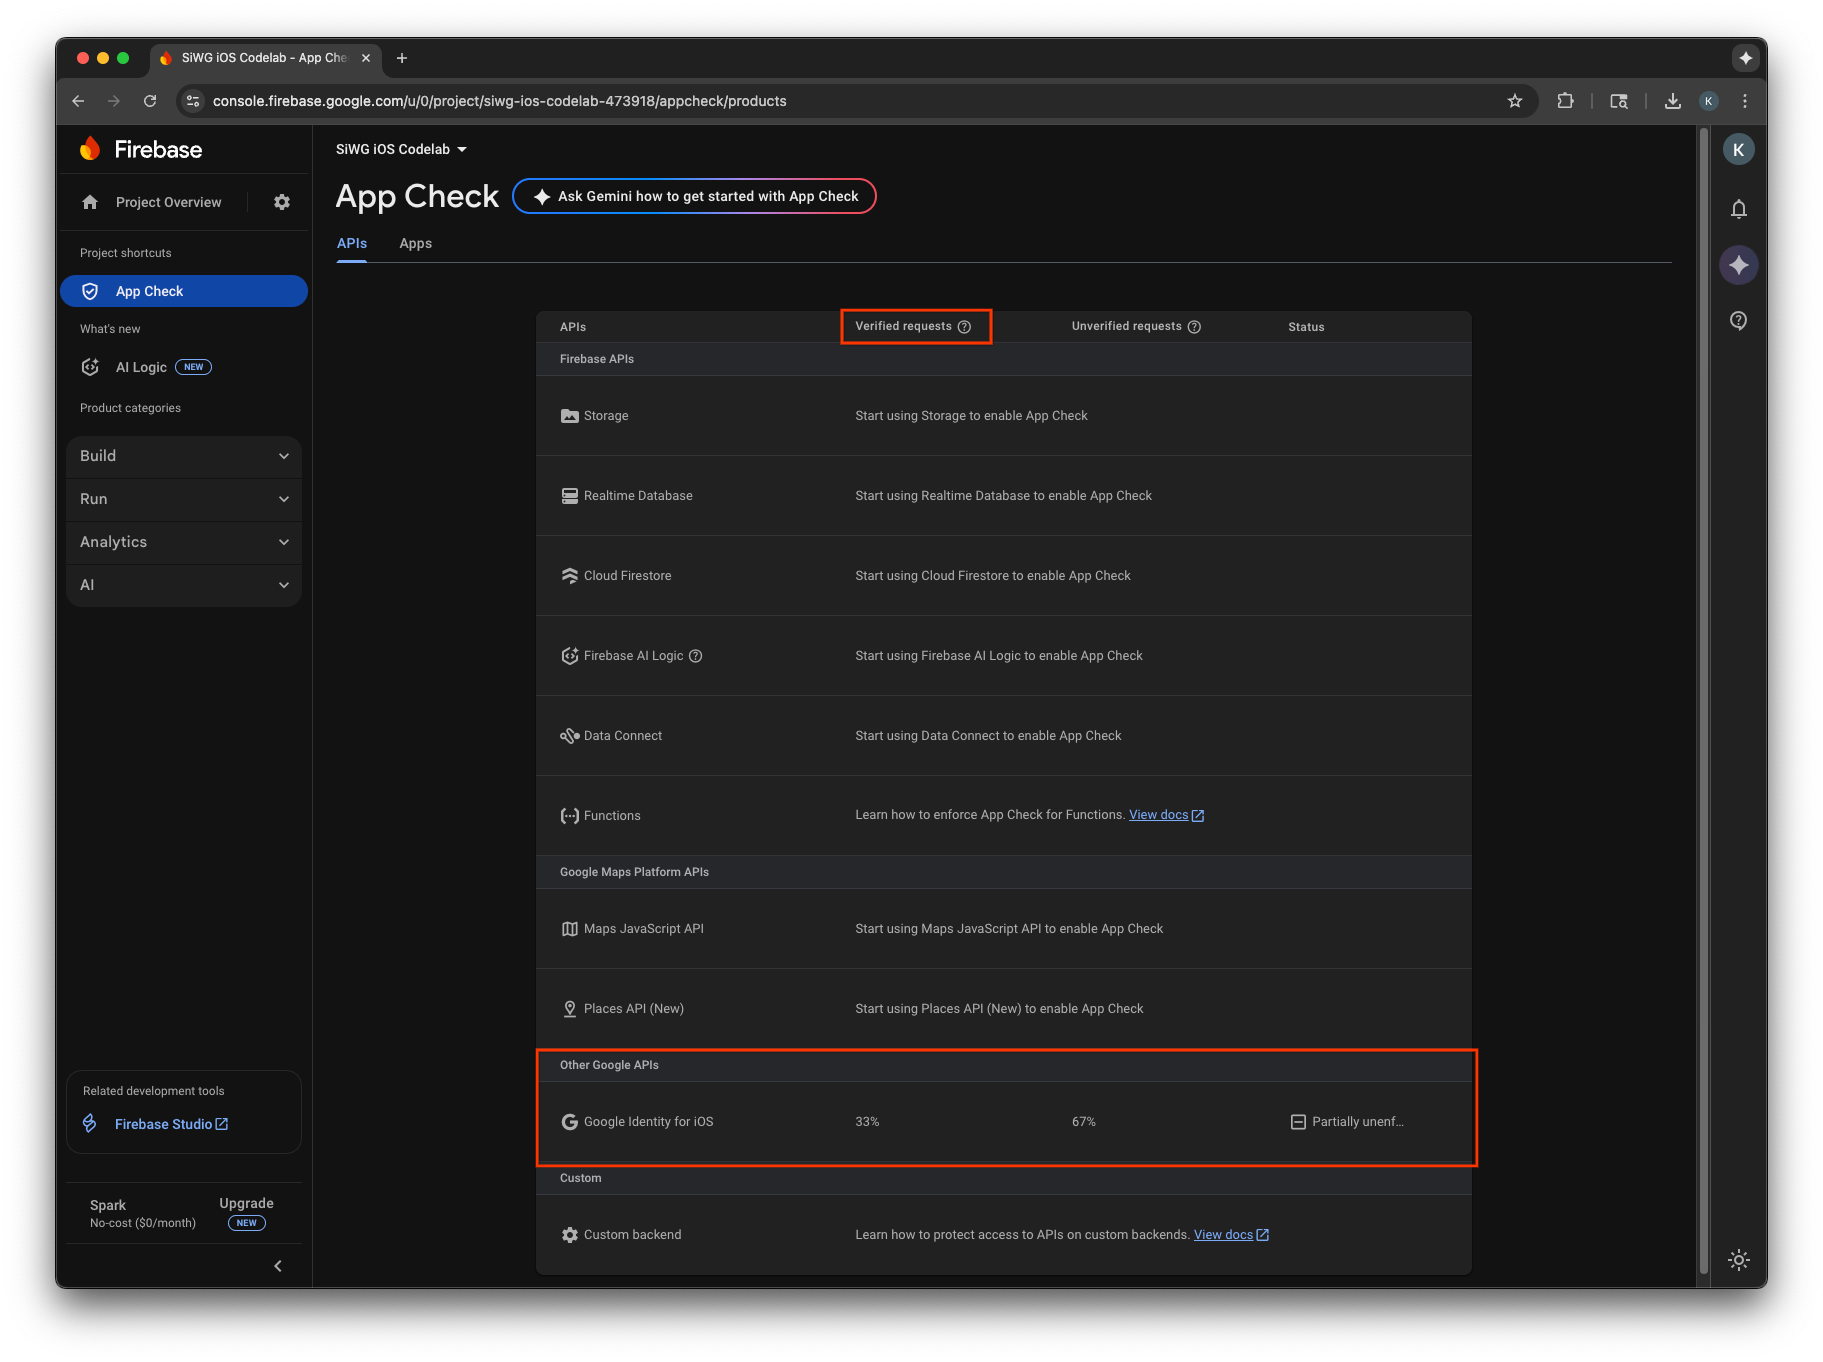
- 在 Google Cloud 控制台中,进入 OAuth 客户端的修改页面。
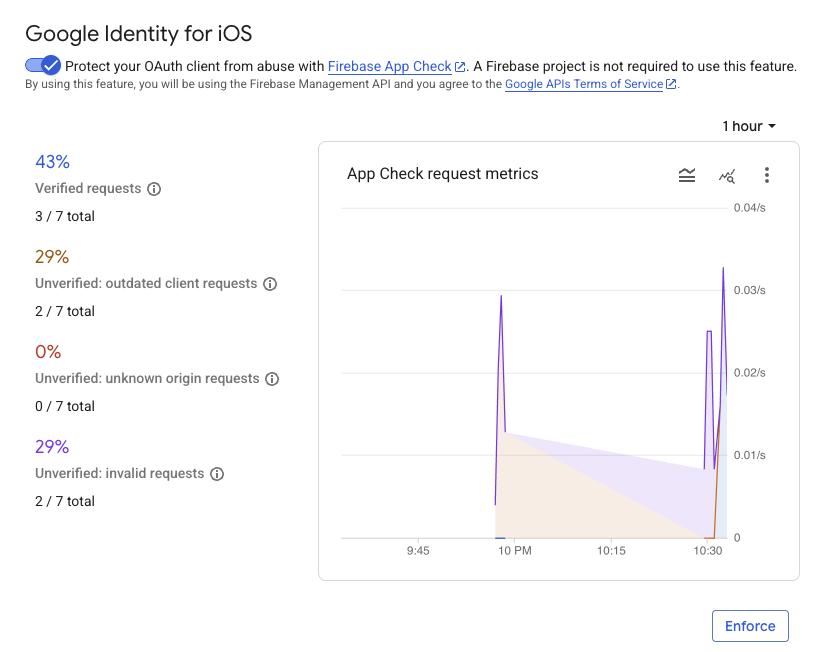
在监控应用的 App Check 指标并确认合法请求已通过验证后,您应启用 App Check 强制执行。强制执行后,App Check 会拒绝所有未经验证的请求,确保只有来自您的正版应用的流量才能代表您的项目访问 Google 的 OAuth 2.0 端点。
12. 其他资源
恭喜!
您已配置 OAuth 2.0 iOS 客户端,向 iOS 应用添加了“使用 Google 账号登录”按钮,了解了如何自定义按钮的外观,解码了 JWT ID 令牌,并为应用启用了 App Check。
以下链接可能有助于您采取后续步骤:
- 如何开始使用 iOS 版 Google 登录
- iOS 版 Google 登录代码库
- 验证 Google ID 令牌
- 开始在 iOS 上使用 App Check 进行 Google 登录
- 撤消访问令牌并断开应用连接
- 详细了解 Google Cloud 项目
- Google Identity 身份验证方法
- 启用 App Check 强制执行