
1. 事前準備
本程式碼研究室會引導您建構 iOS 應用程式,實作「使用 Google 帳戶登入」功能,並在模擬器中執行。我們提供使用 SwiftUI 和 UIKit 的實作方式。
SwiftUI 是 Apple 的新式 UI 架構,適用於開發新應用程式。您可以使用單一共用程式碼集,為所有 Apple 平台建構使用者介面。最低須使用 iOS 13。
UIKit 是 Apple 針對 iOS 打造的原始基礎 UI 架構,可提供舊版 iOS 的回溯相容性。因此,如果現有應用程式需要支援各種舊裝置,這會是不錯的選擇。
您可以選擇最符合開發需求的架構路徑。
必要條件
課程內容
- 如何建立 Google Cloud 專案
- 如何在 Google Cloud 控制台中建立 OAuth 用戶端
- 如何為 iOS 應用程式導入「使用 Google 帳戶登入」功能
- 如何自訂「使用 Google 帳戶登入」按鈕
- 如何解碼 ID 權杖
- 如何為 iOS 應用程式啟用 App Check
軟硬體需求
本程式碼研究室是使用 Xcode 16.3 和 iOS 18.3 模擬器建立。開發時應使用最新版 Xcode。
2. 建立新的 Xcode 專案
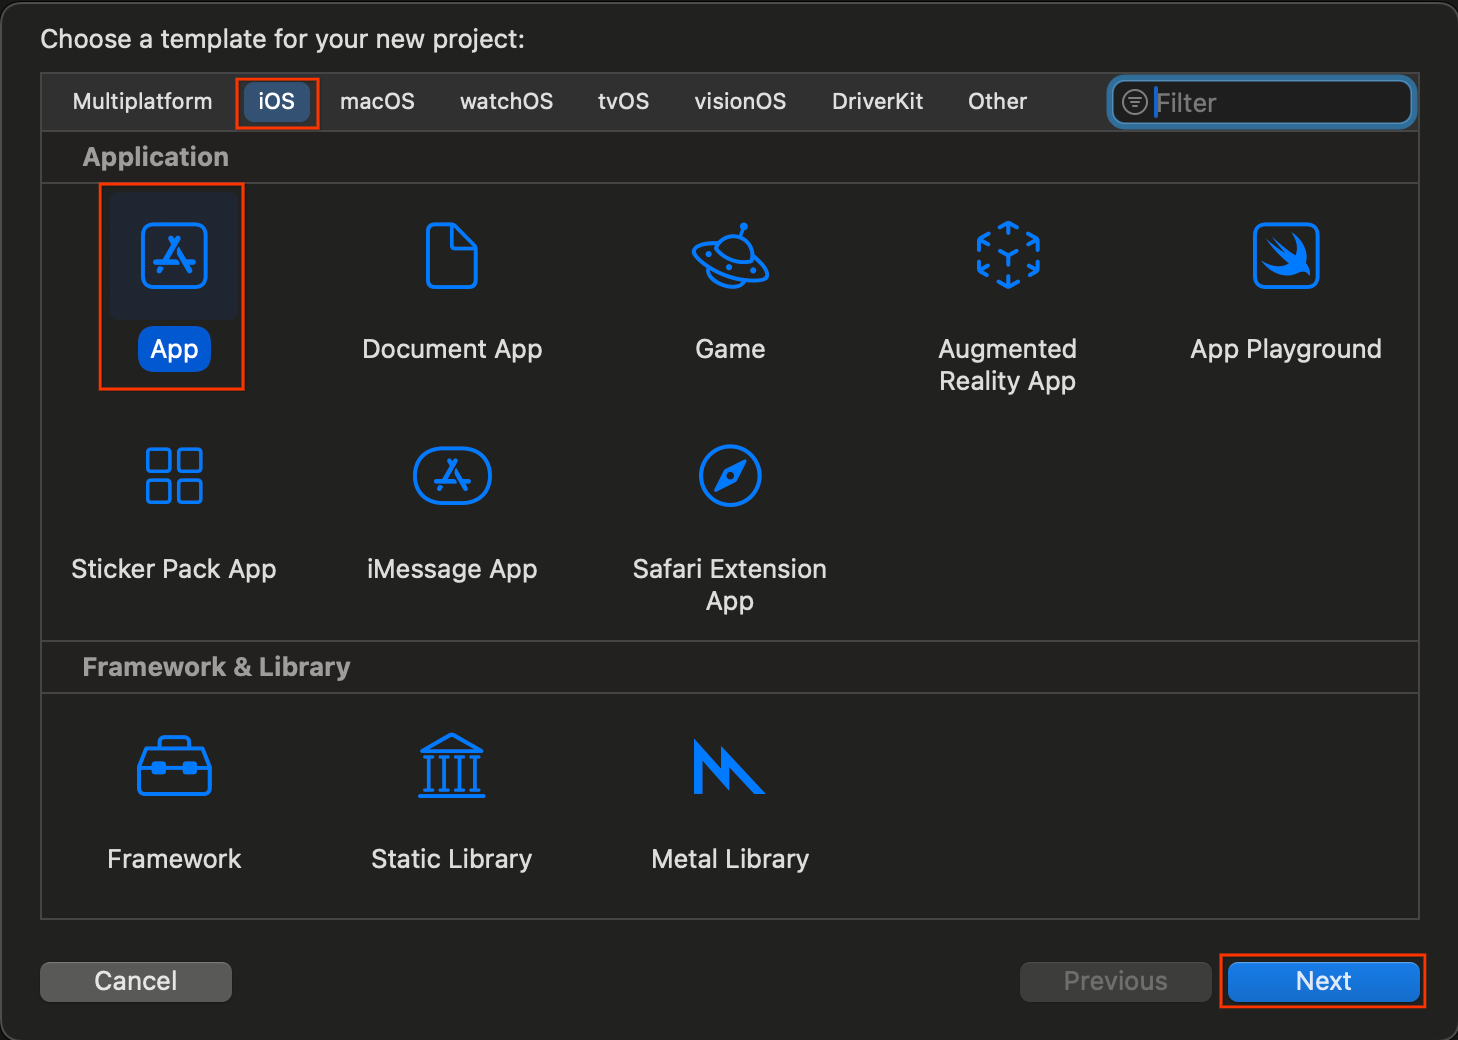
- 開啟 Xcode,然後選取「Create a new Xcode project」(建立新的 Xcode 專案)。
- 選擇「iOS」分頁標籤,選取「App」範本,然後點選「Next」。
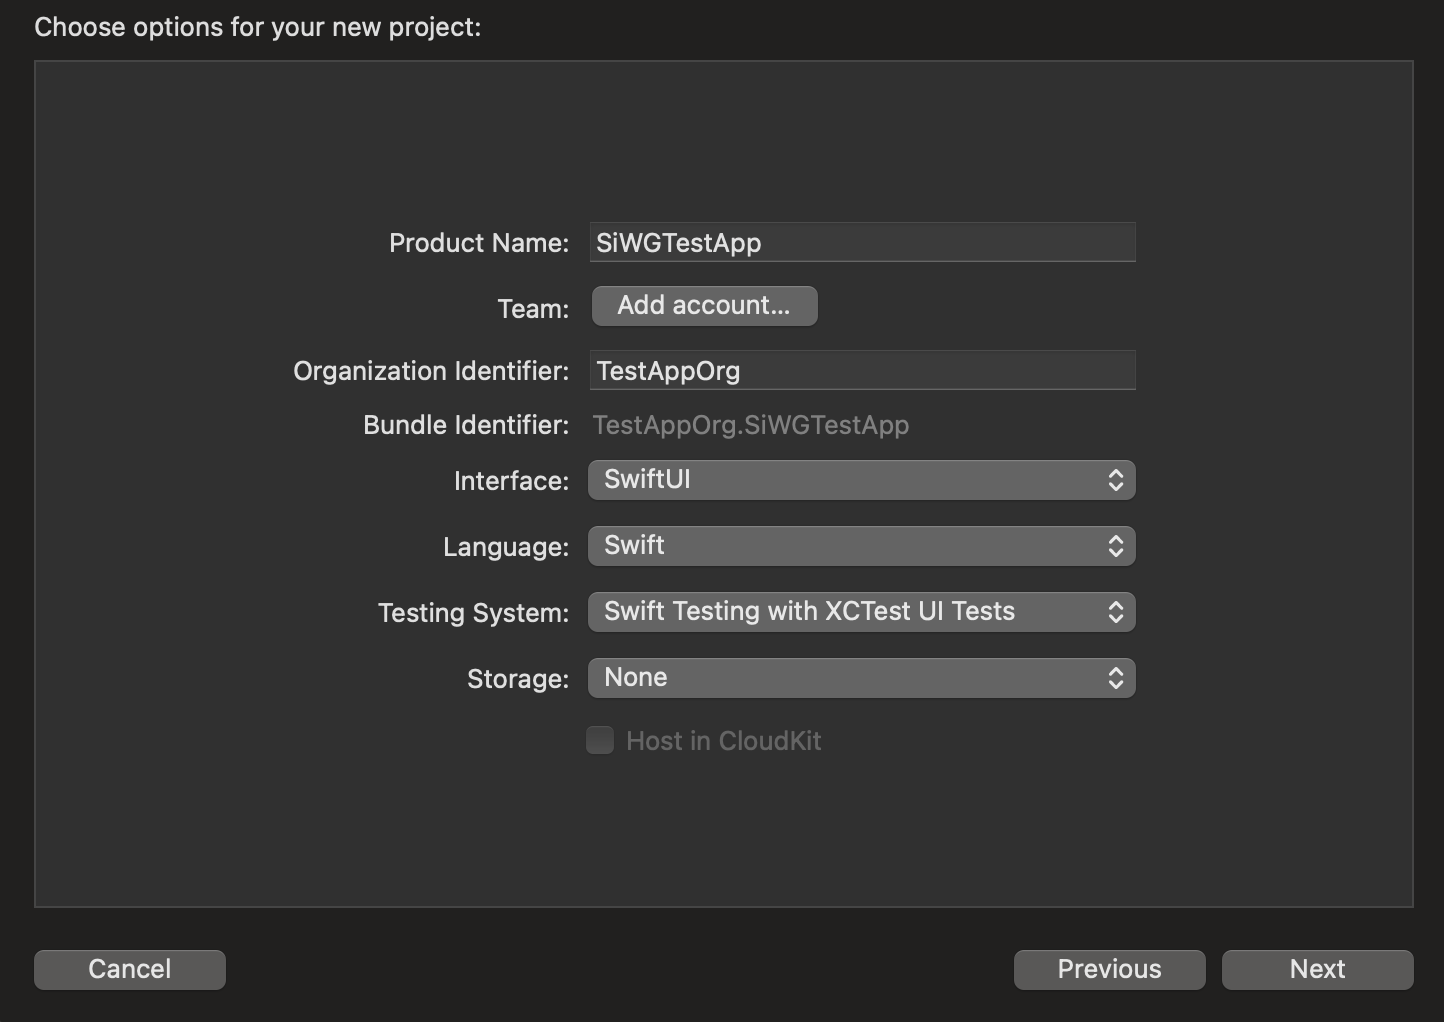
- 在專案選項中:
- 輸入產品名稱。
- 視需要選取「團隊」。
- 輸入機構 ID。
- 記下系統產生的軟體包 ID。稍後會用到。
- 在「介面」部分,選擇下列任一選項:
- 適用於以 SwiftUI 為基礎的應用程式。SwiftUI
- 以 UIKit 為基礎的應用程式分鏡腳本。
- 選擇「Swift」做為「語言」。
- 按一下「下一步」,然後選擇專案的儲存位置。
3. 建立 OAuth 用戶端
如要讓應用程式與 Google 的驗證服務通訊,您必須建立 OAuth 用戶端 ID。這需要 Google Cloud 專案。請按照下列步驟建立專案和 OAuth 用戶端 ID。
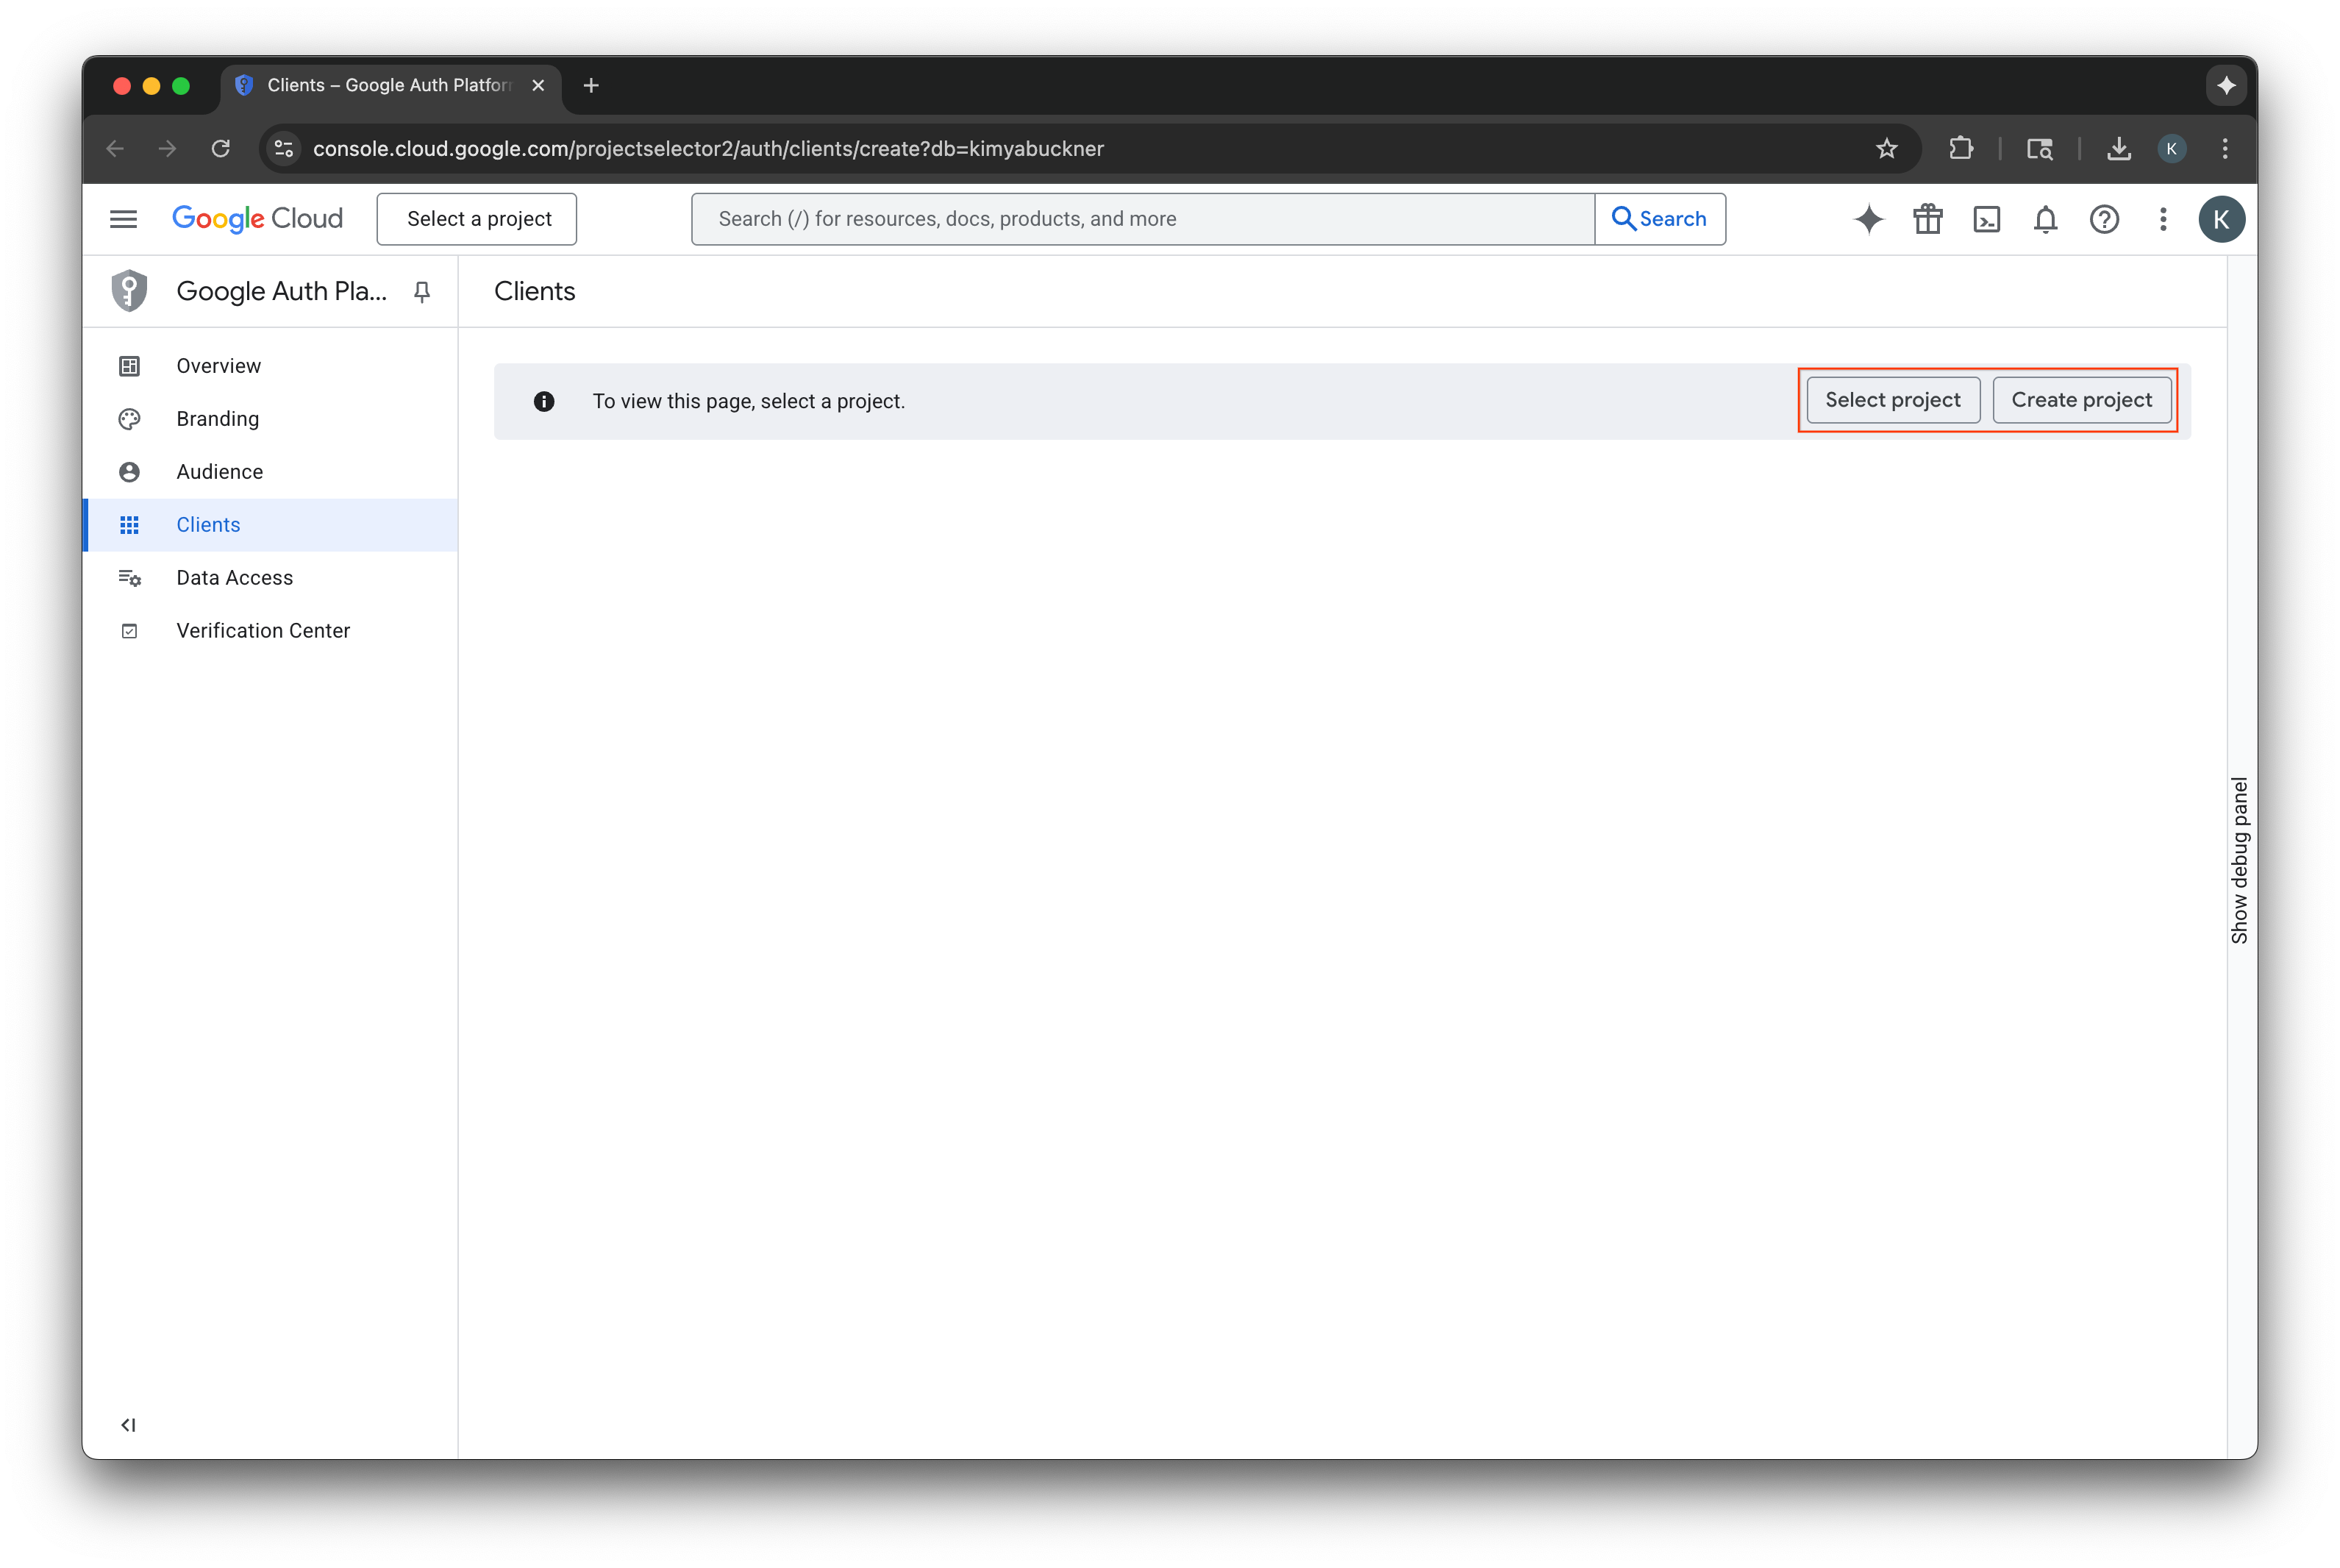
選取或建立 Google Cloud 專案
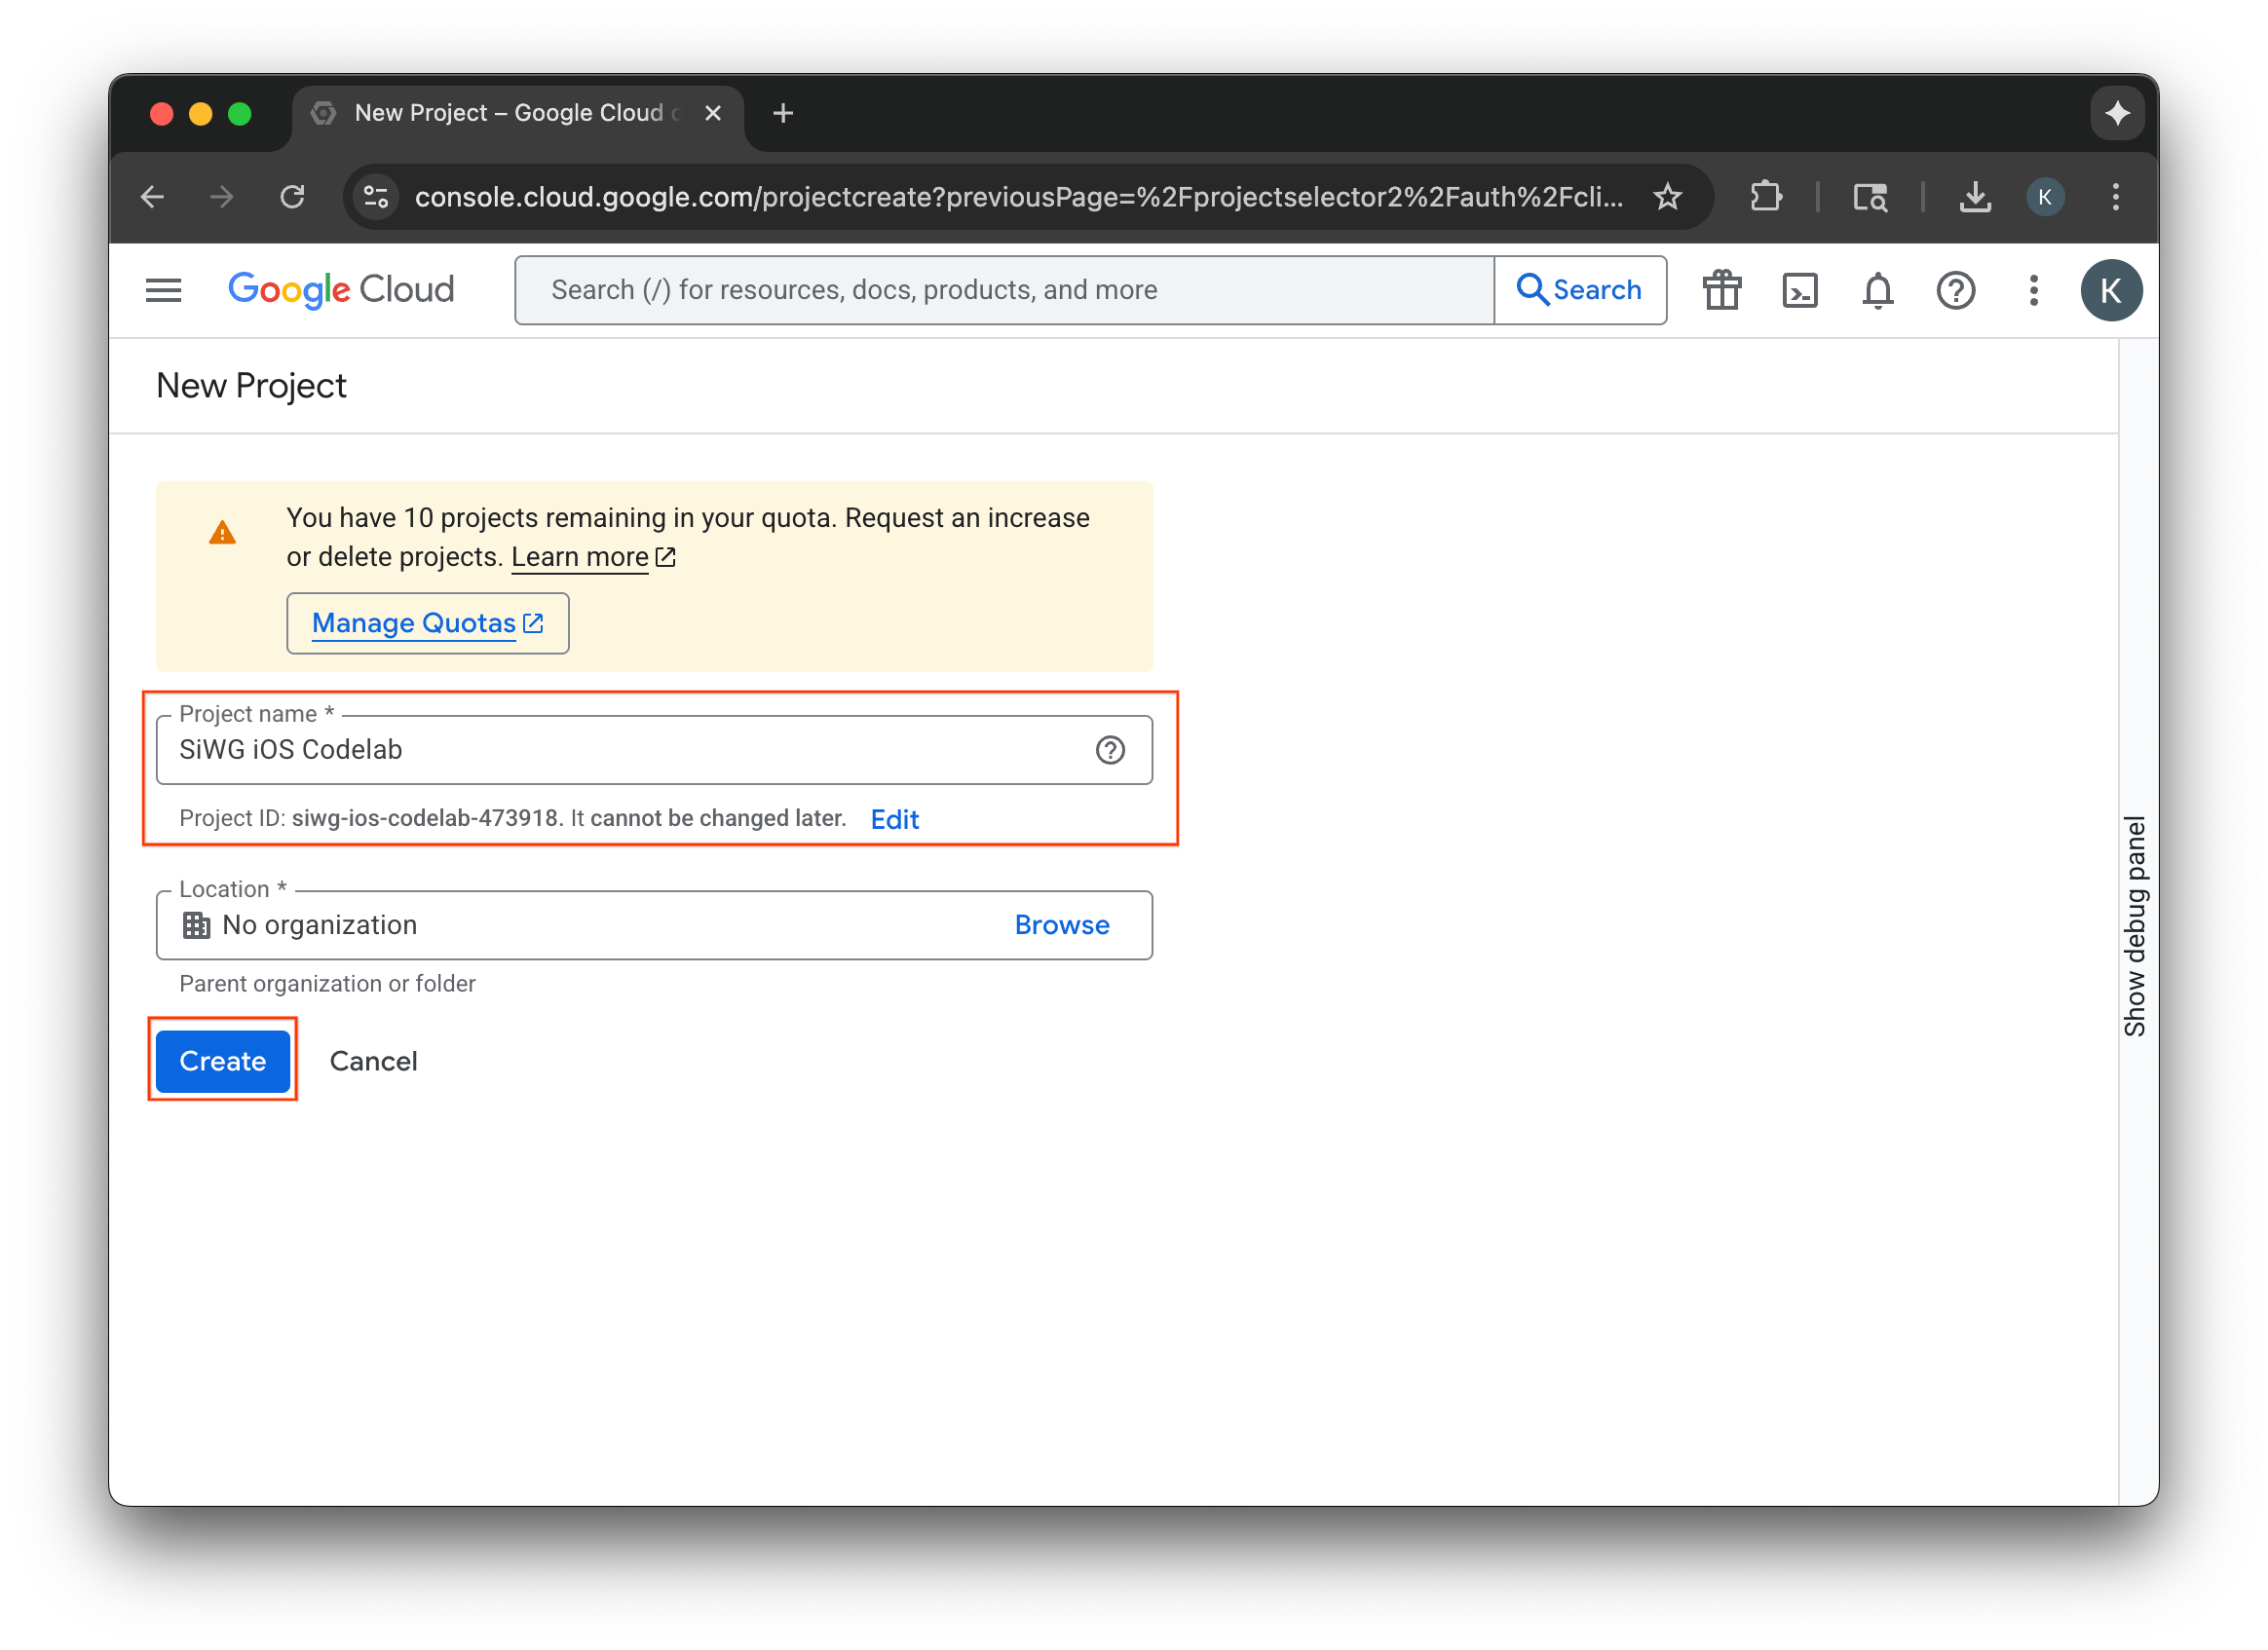
- 前往 Google Cloud 控制台,然後選取或建立專案。如果您選取現有專案,主控台會自動引導您完成下一個必要步驟。
- 輸入新 Google Cloud 專案的名稱。
- 選取「建立」。
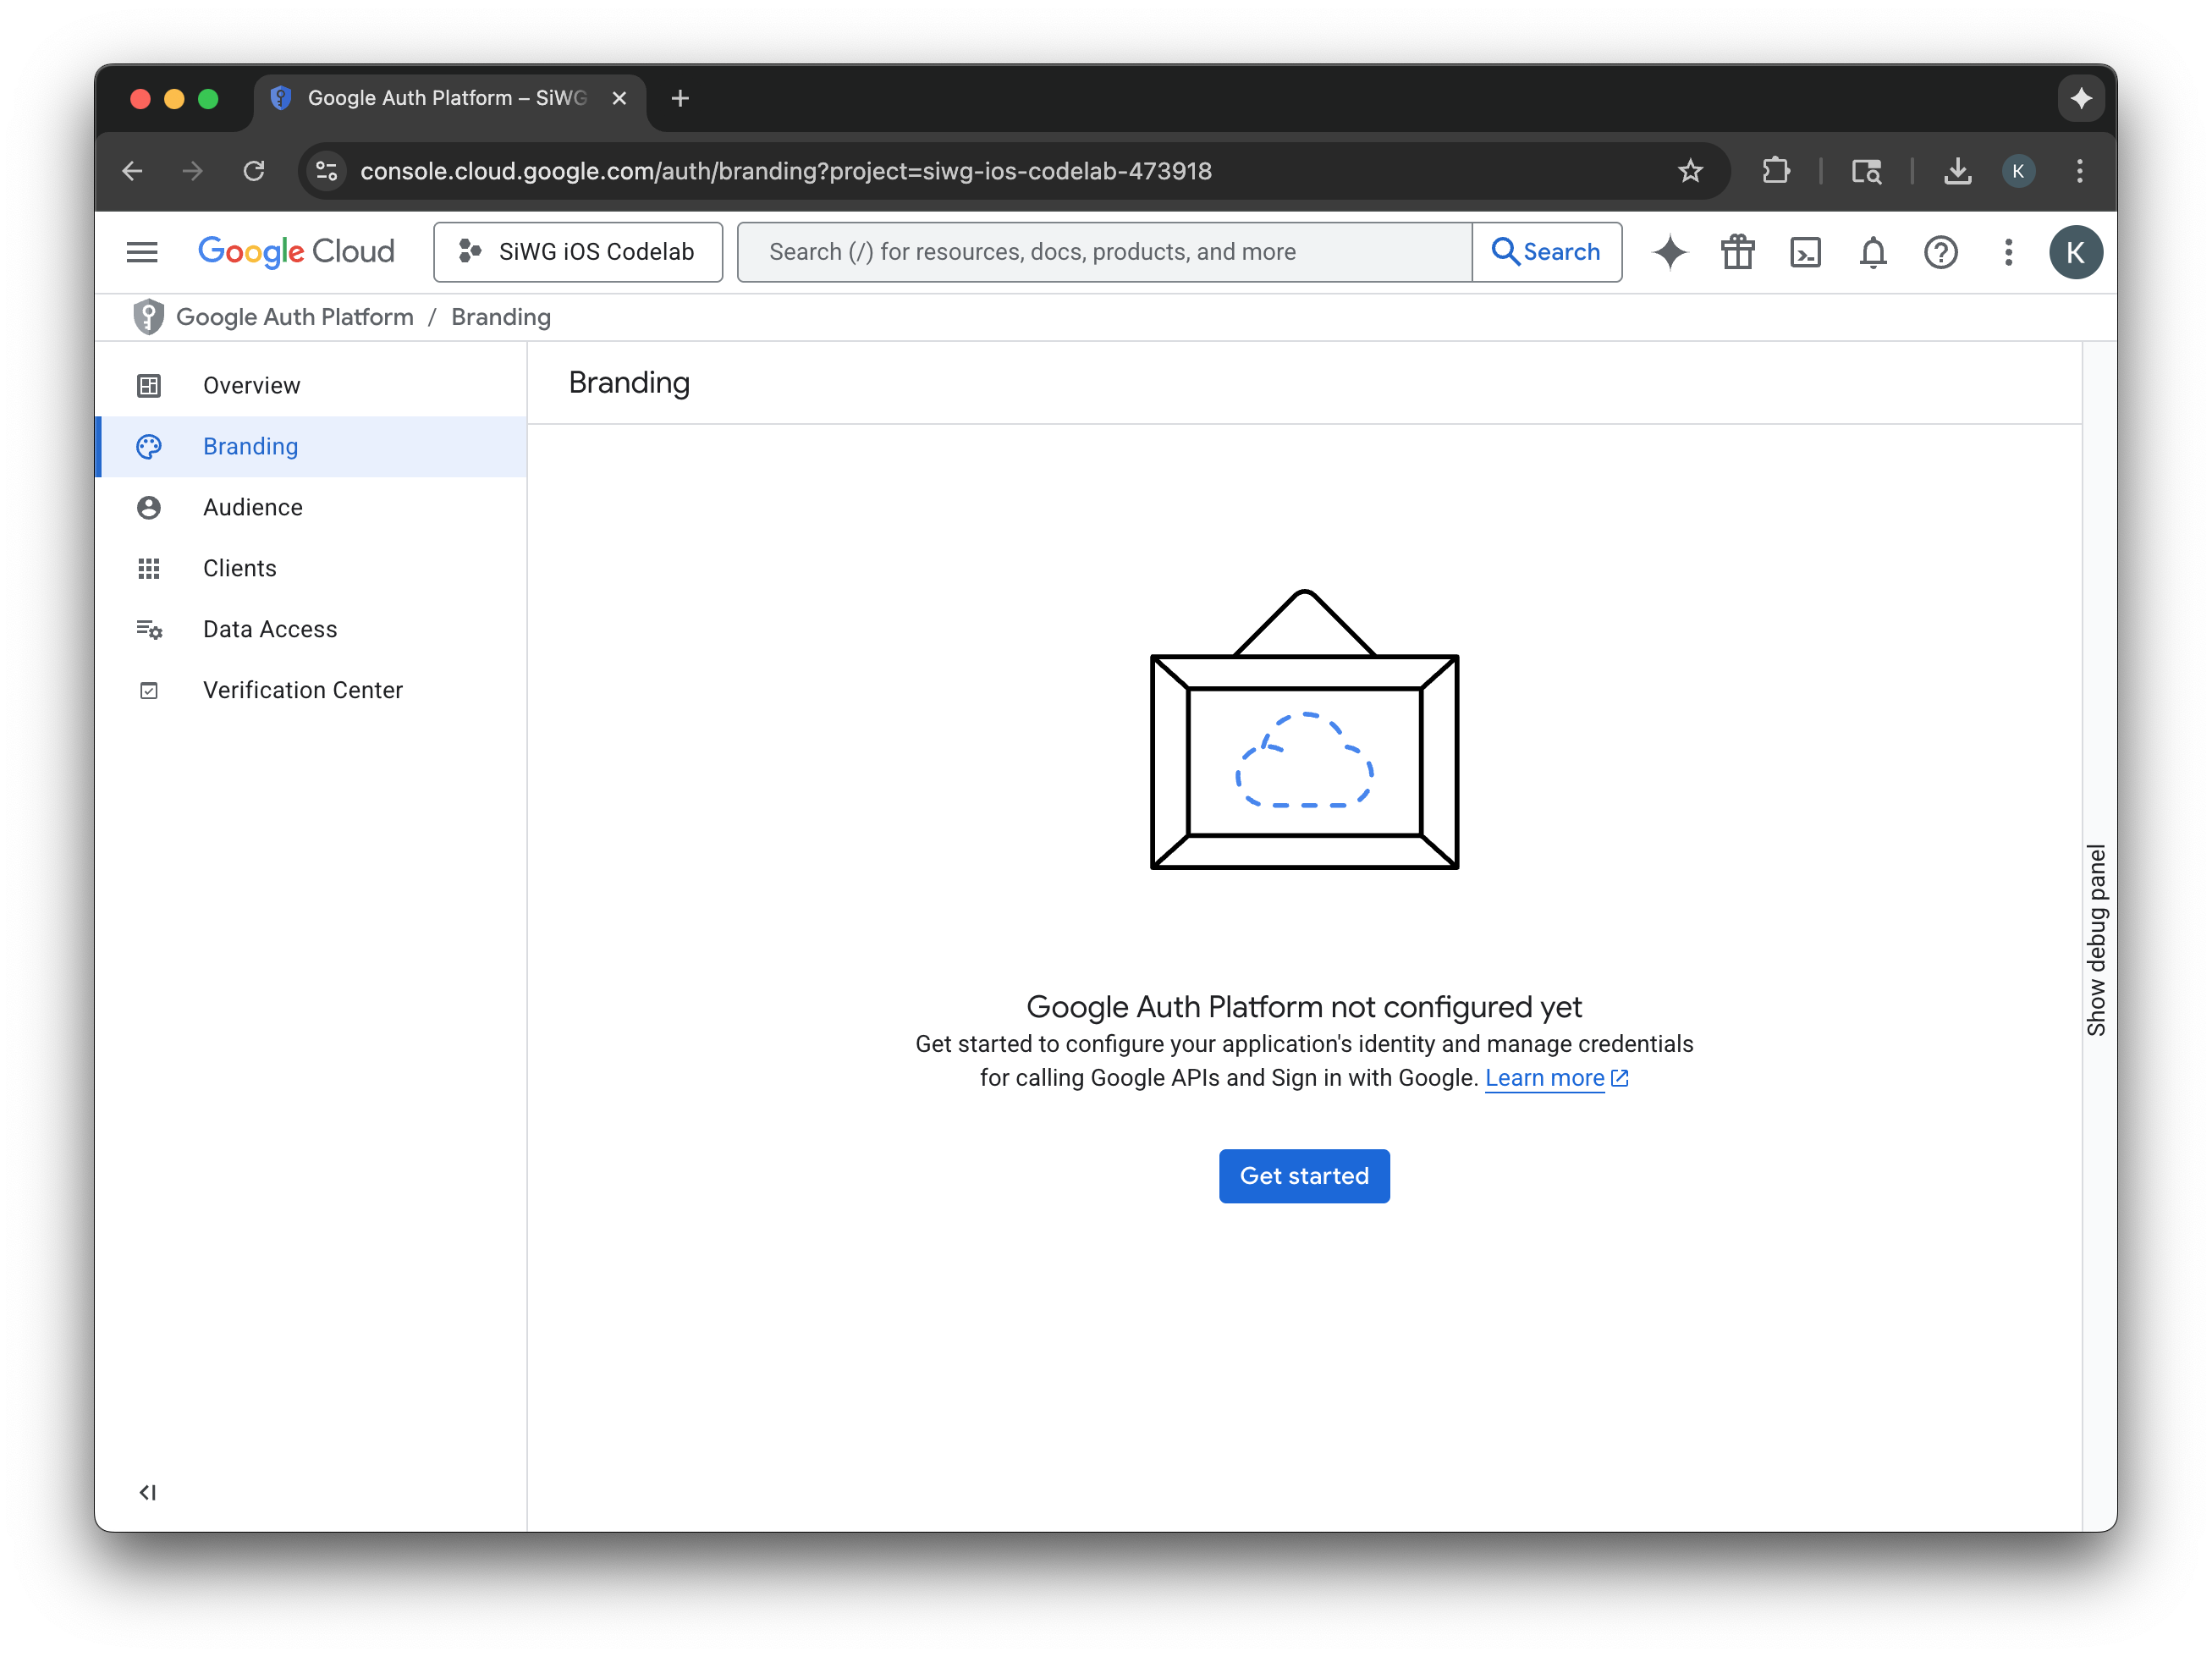
設定同意畫面
如果您已為所選專案設定同意畫面,系統就不會提示您進行設定。在這種情況下,您可以略過本節,直接前往「建立 OAuth 2.0 用戶端」。
- 選取「設定同意畫面」。
- 在品牌宣傳頁面選取「開始使用」。
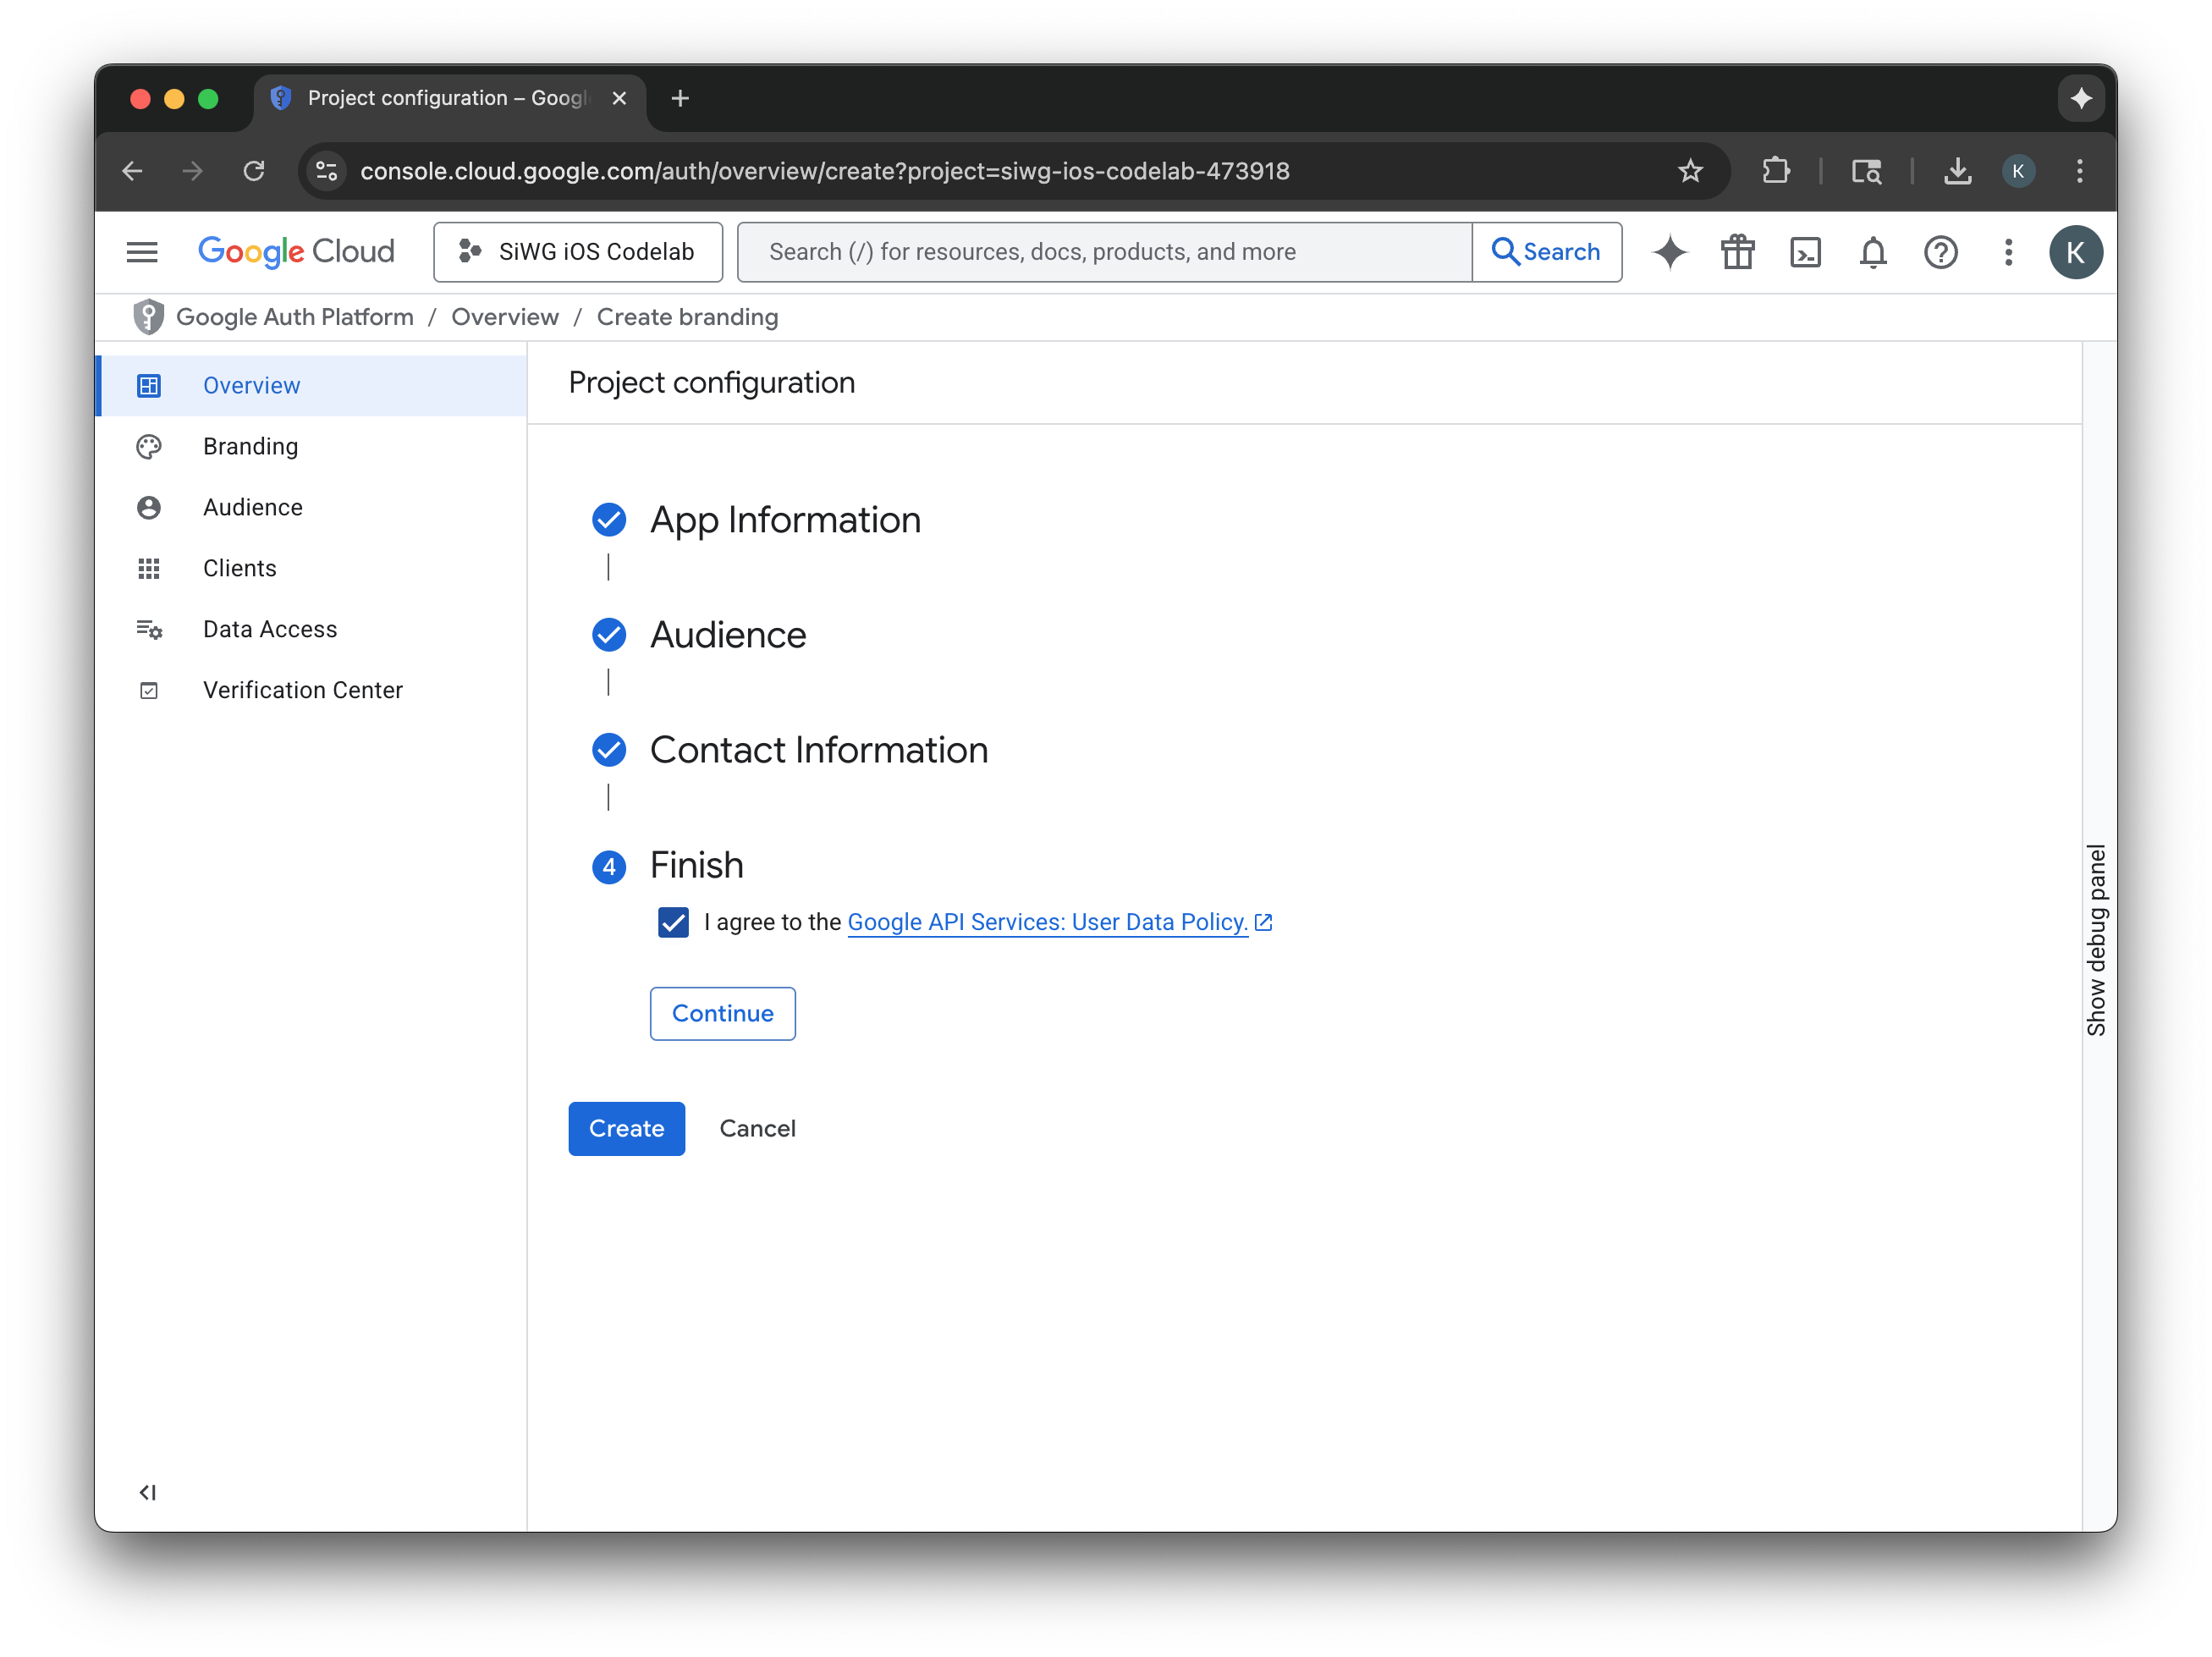
- 在專案設定頁面中,填寫下列欄位:
- 應用程式資訊:輸入應用程式名稱和使用者支援電子郵件地址。這封支援電子郵件地址會公開顯示,方便使用者在同意聲明方面有任何疑問時與您聯絡。
- 目標對象:選取「外部」。
- 聯絡資訊:輸入電子郵件地址,方便 Google 就專案與您聯絡。
- 詳閱《Google API 服務:使用者資料政策》。
- 點選「建立」。
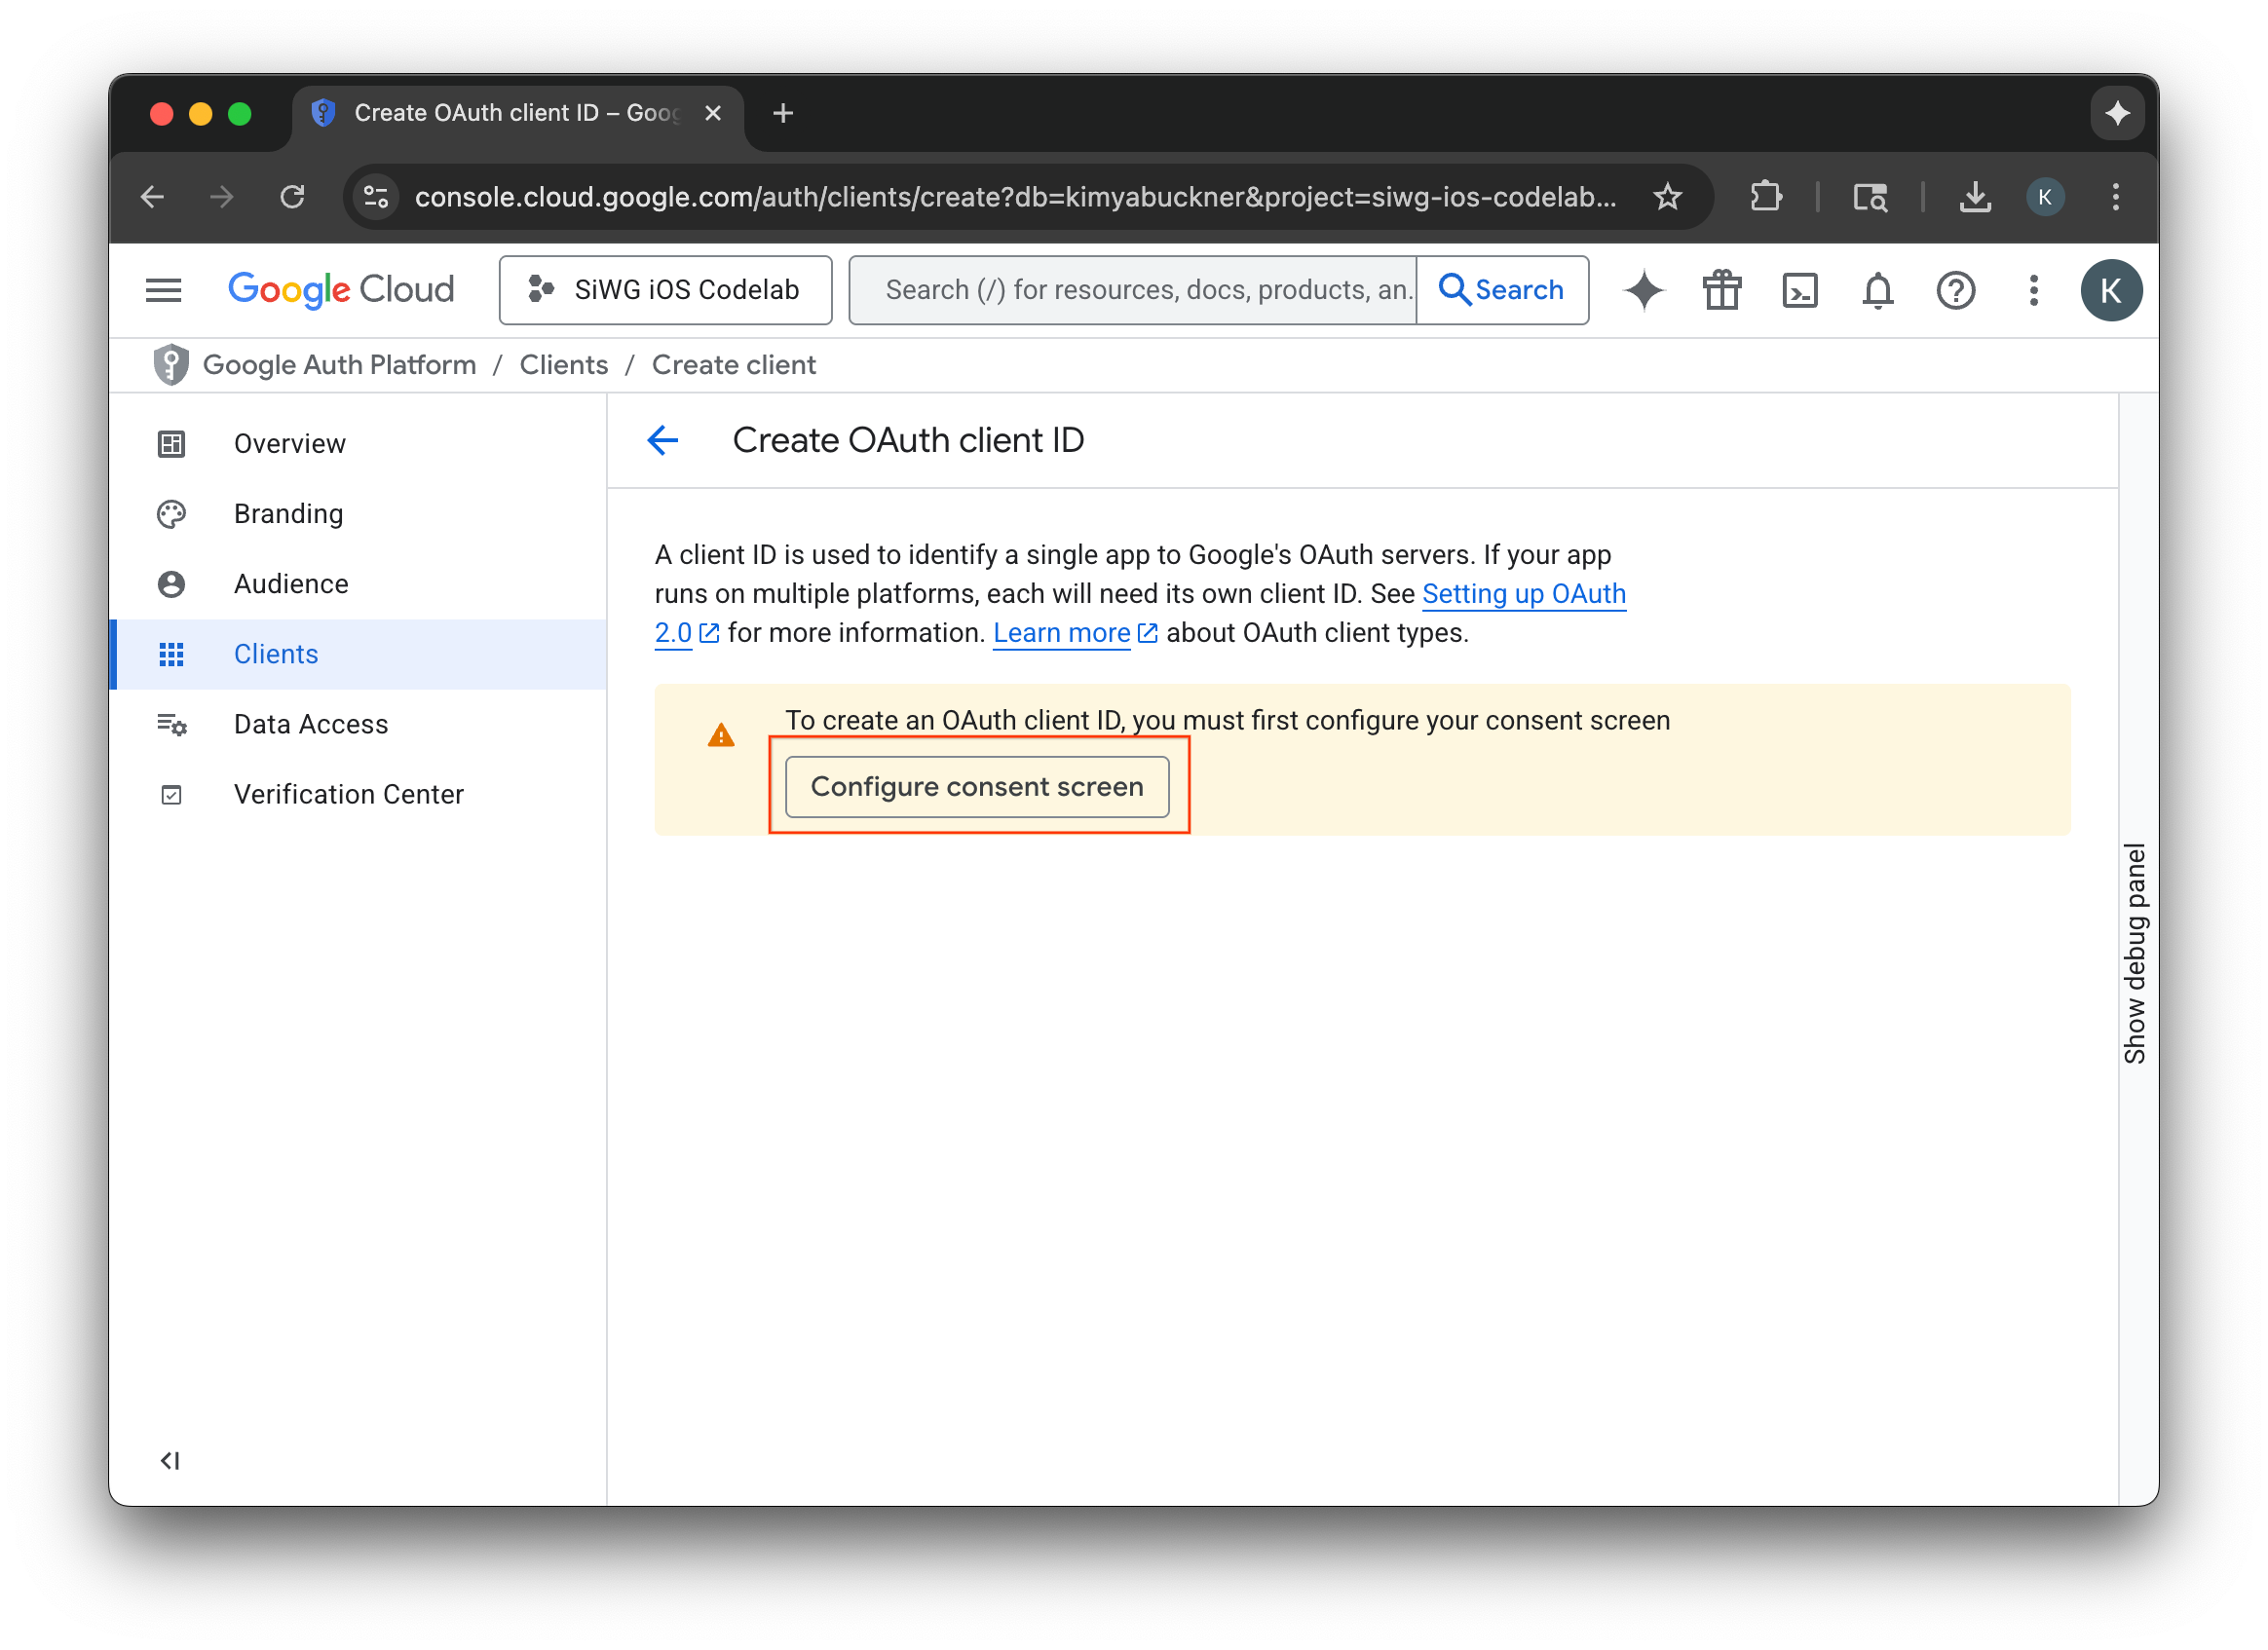
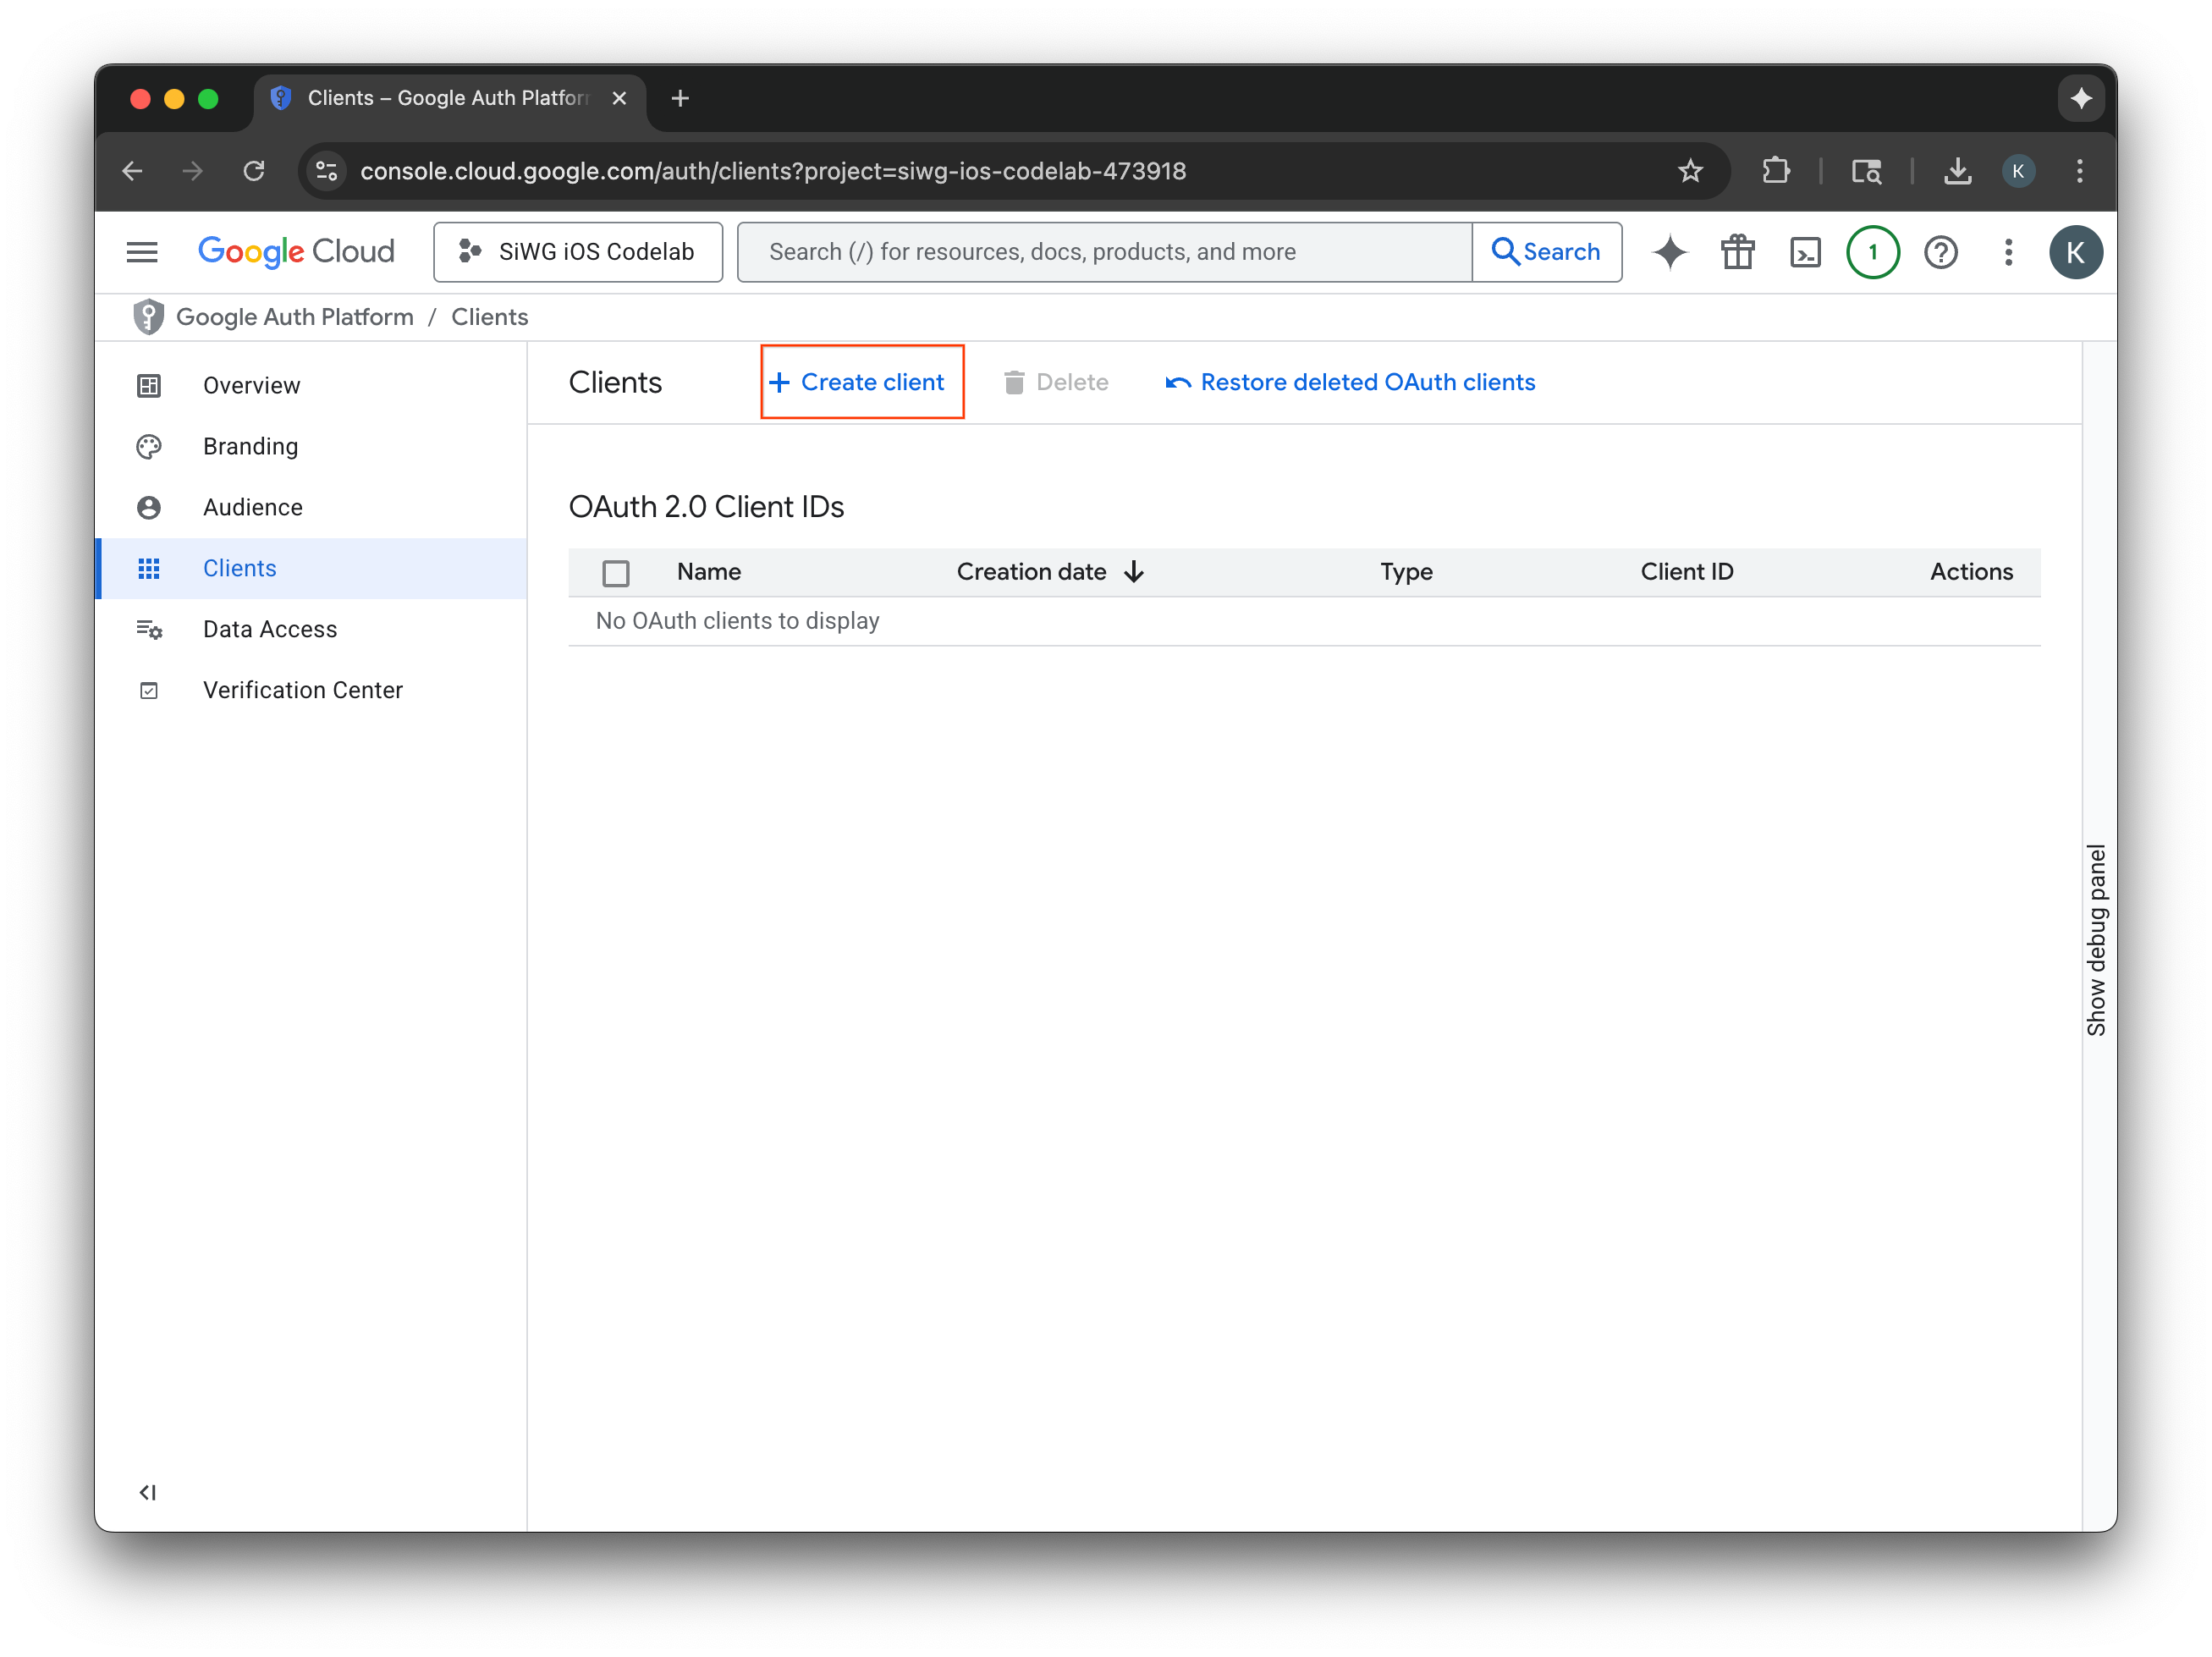
- 在導覽選單中選取「客戶」頁面。
- 按一下「Create Client」(建立用戶端)。
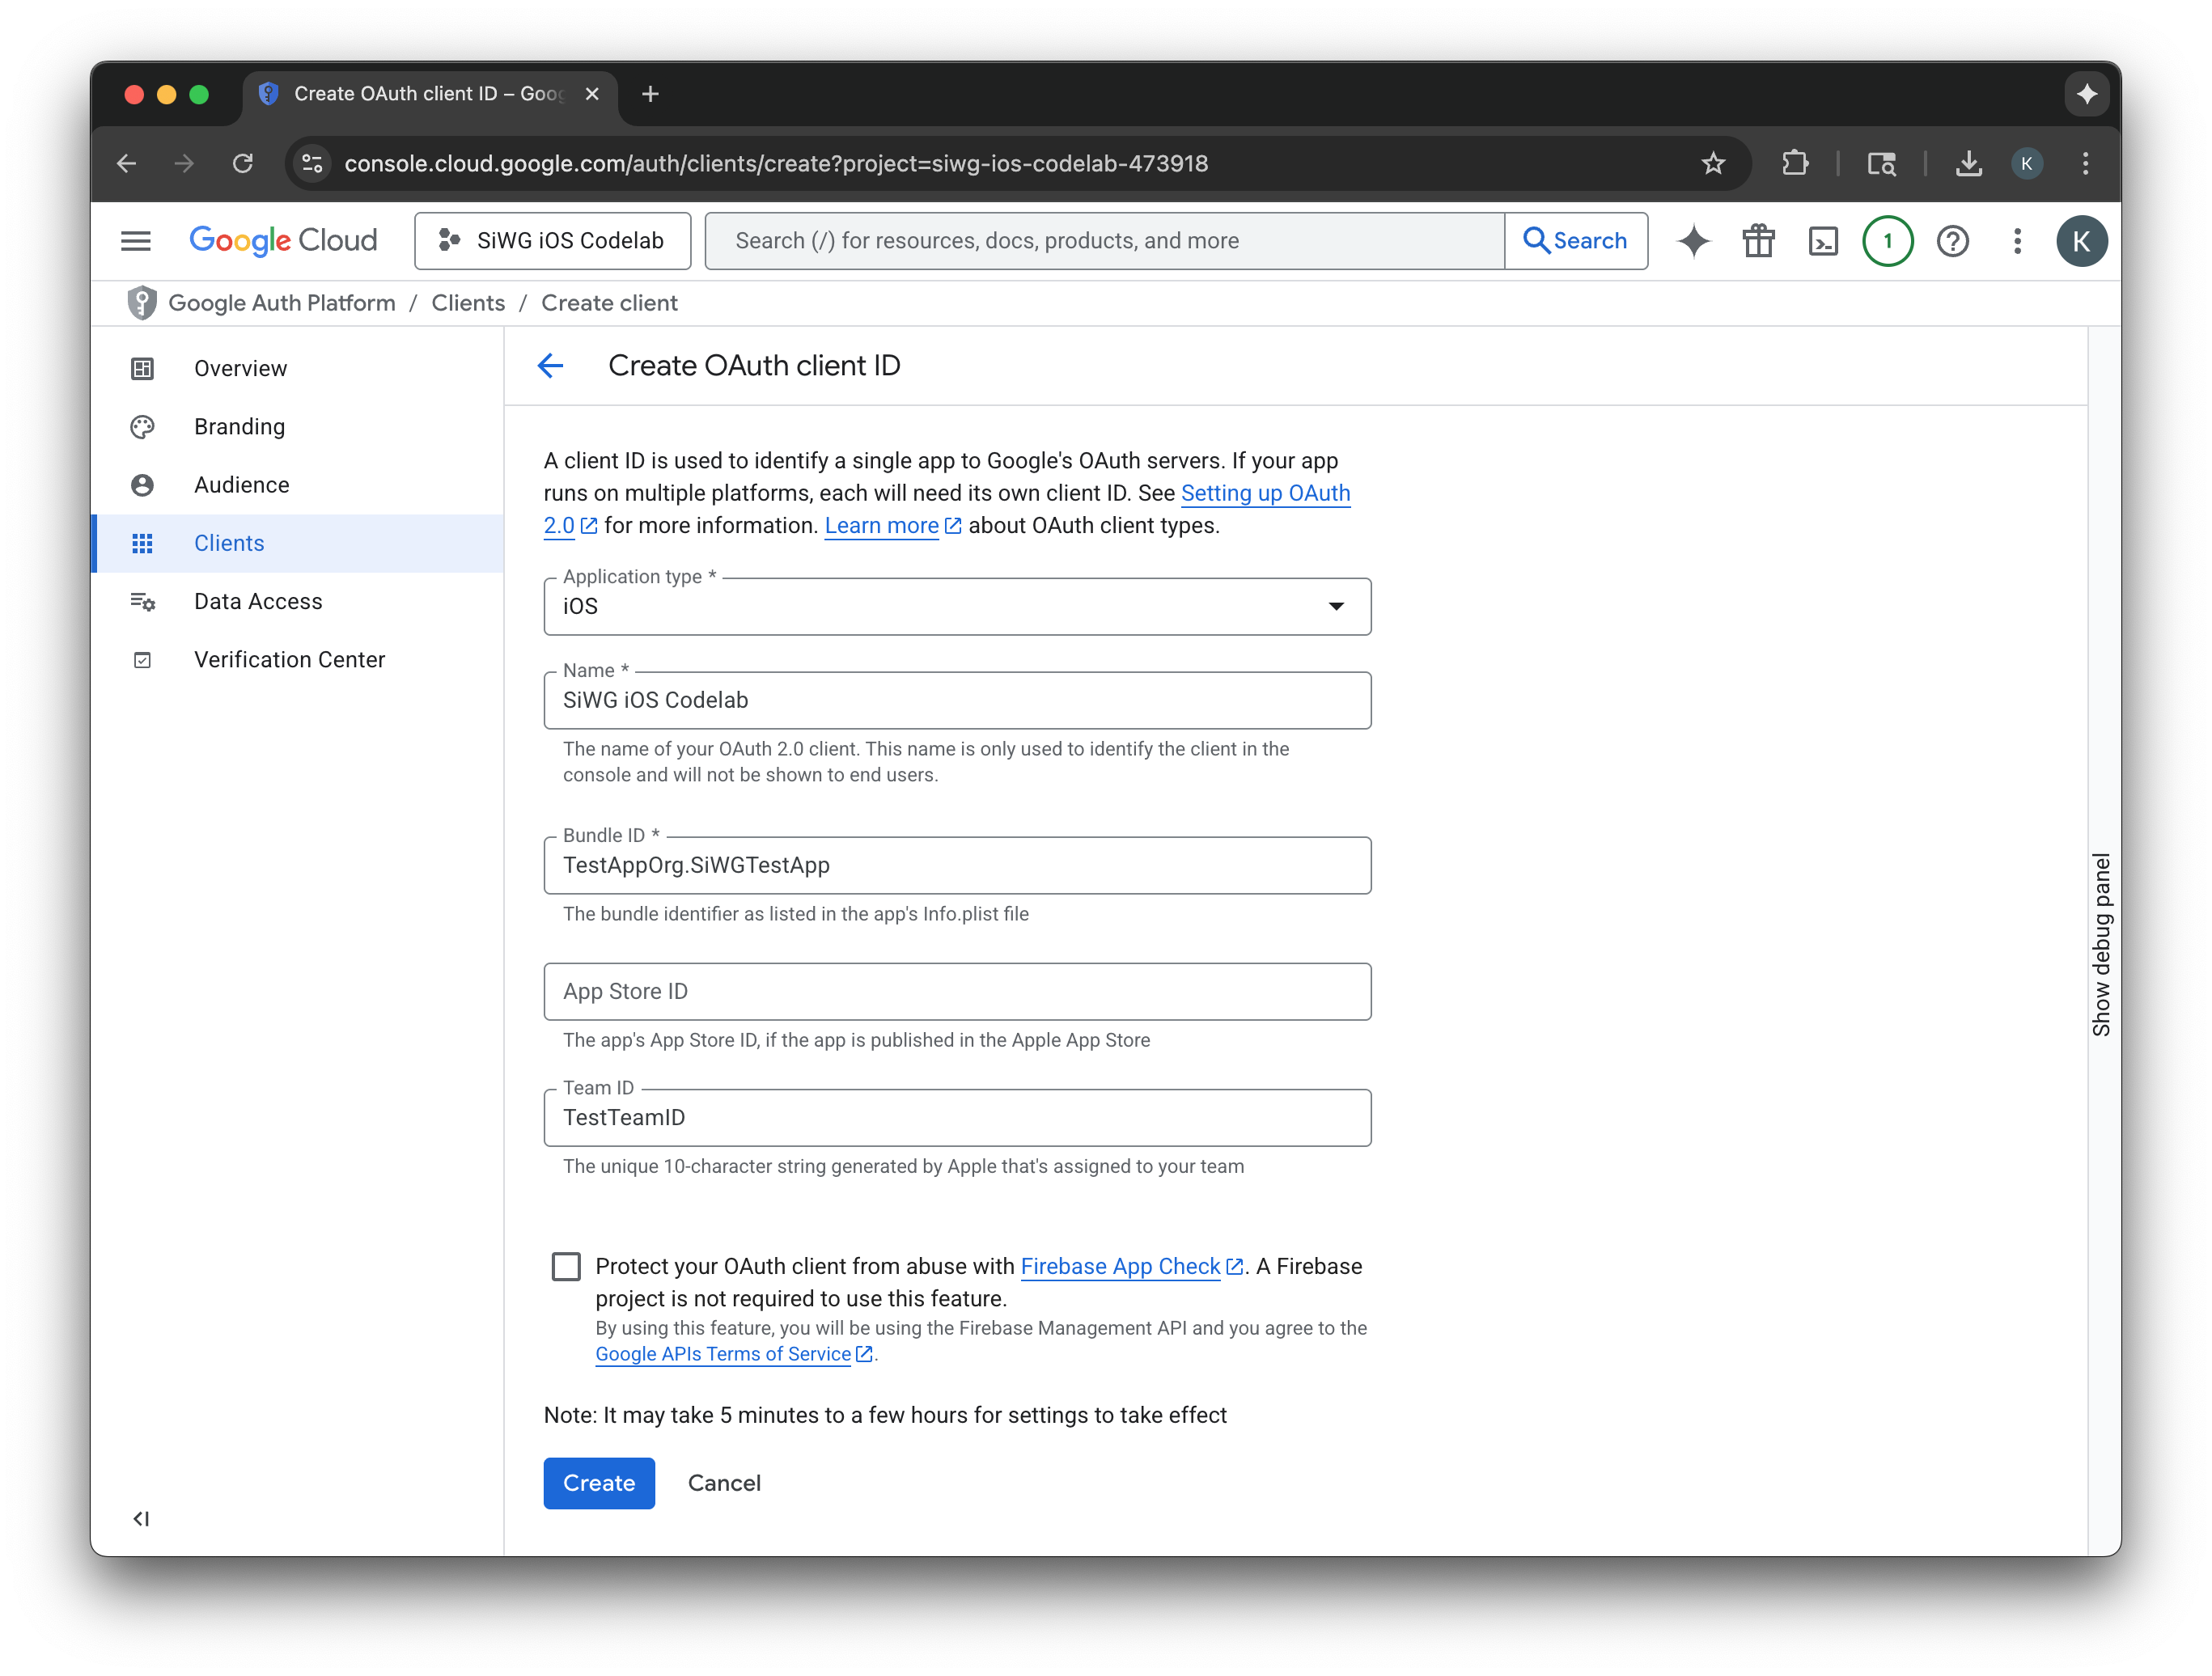
建立 OAuth 2.0 用戶端
- 在「應用程式類型」部分,選取「iOS」。
- 輸入用戶端名稱。
- 輸入上一個步驟中建立的「套件 ID」。
- 輸入 Apple 指派給您團隊的「Team ID」(團隊 ID)。這個步驟目前為選用,但如要在本程式碼研究室稍後啟用 App Check,則必須提供團隊 ID。
- 選取「建立」。
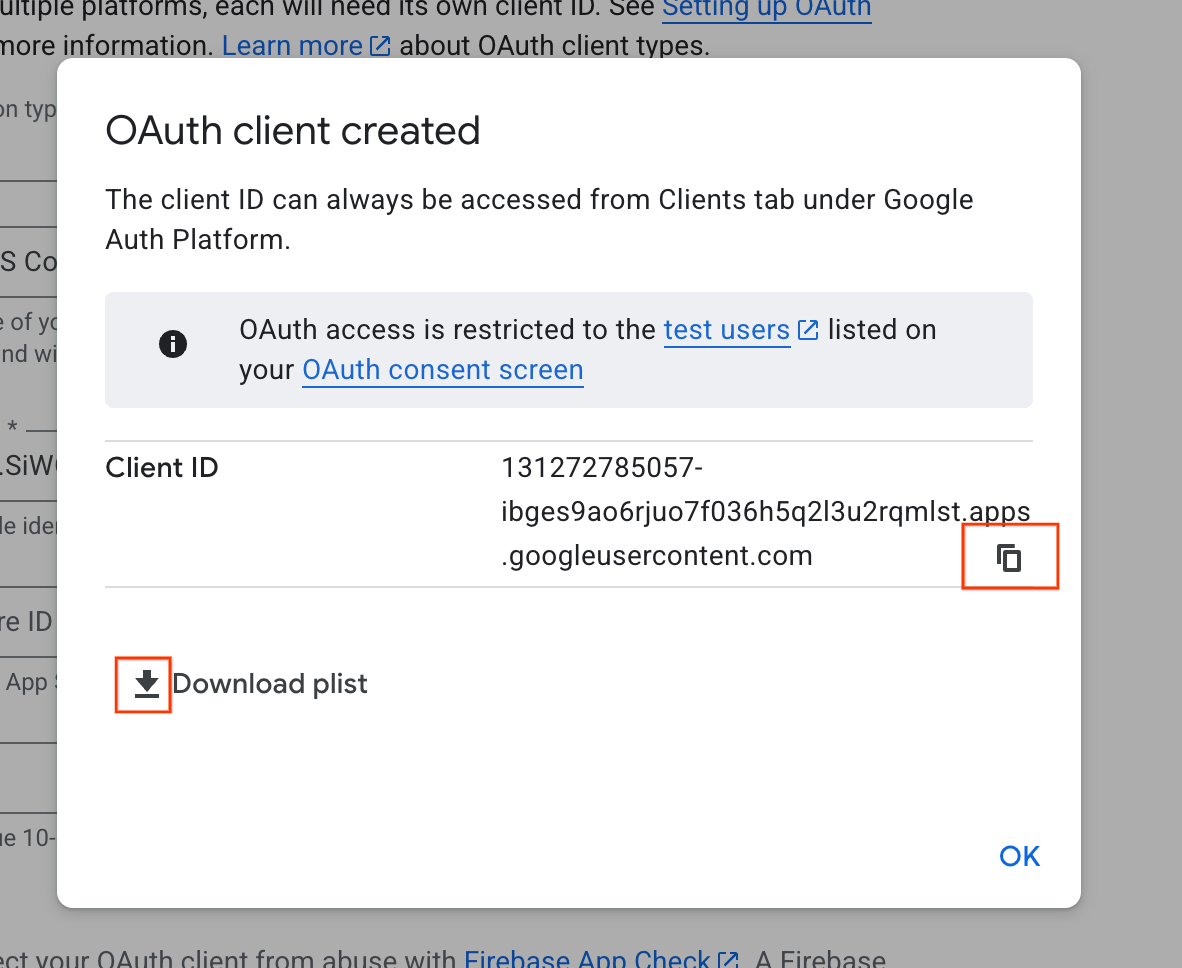
- 從對話方塊視窗複製「用戶端 ID」,稍後會用到。
- 下載 plist 檔案,以供日後參考。
4. 設定 Xcode 專案
下一步是設定 Xcode 專案,以便使用 Google 帳戶登入 SDK。這個程序包括將 SDK 新增至專案做為依附元件,以及使用專屬的用戶端 ID 設定專案設定。這個 ID 可讓 SDK 在登入程序中,安全地與 Google 的驗證服務通訊。
安裝「使用 Google 帳戶登入」依附元件
- 開啟 Xcode 專案。
- 依序前往「File」>「Add Package Dependencies」。
- 在搜尋列中,輸入「使用 Google 帳戶登入」存放區的網址:https://github.com/google/GoogleSignIn-iOS
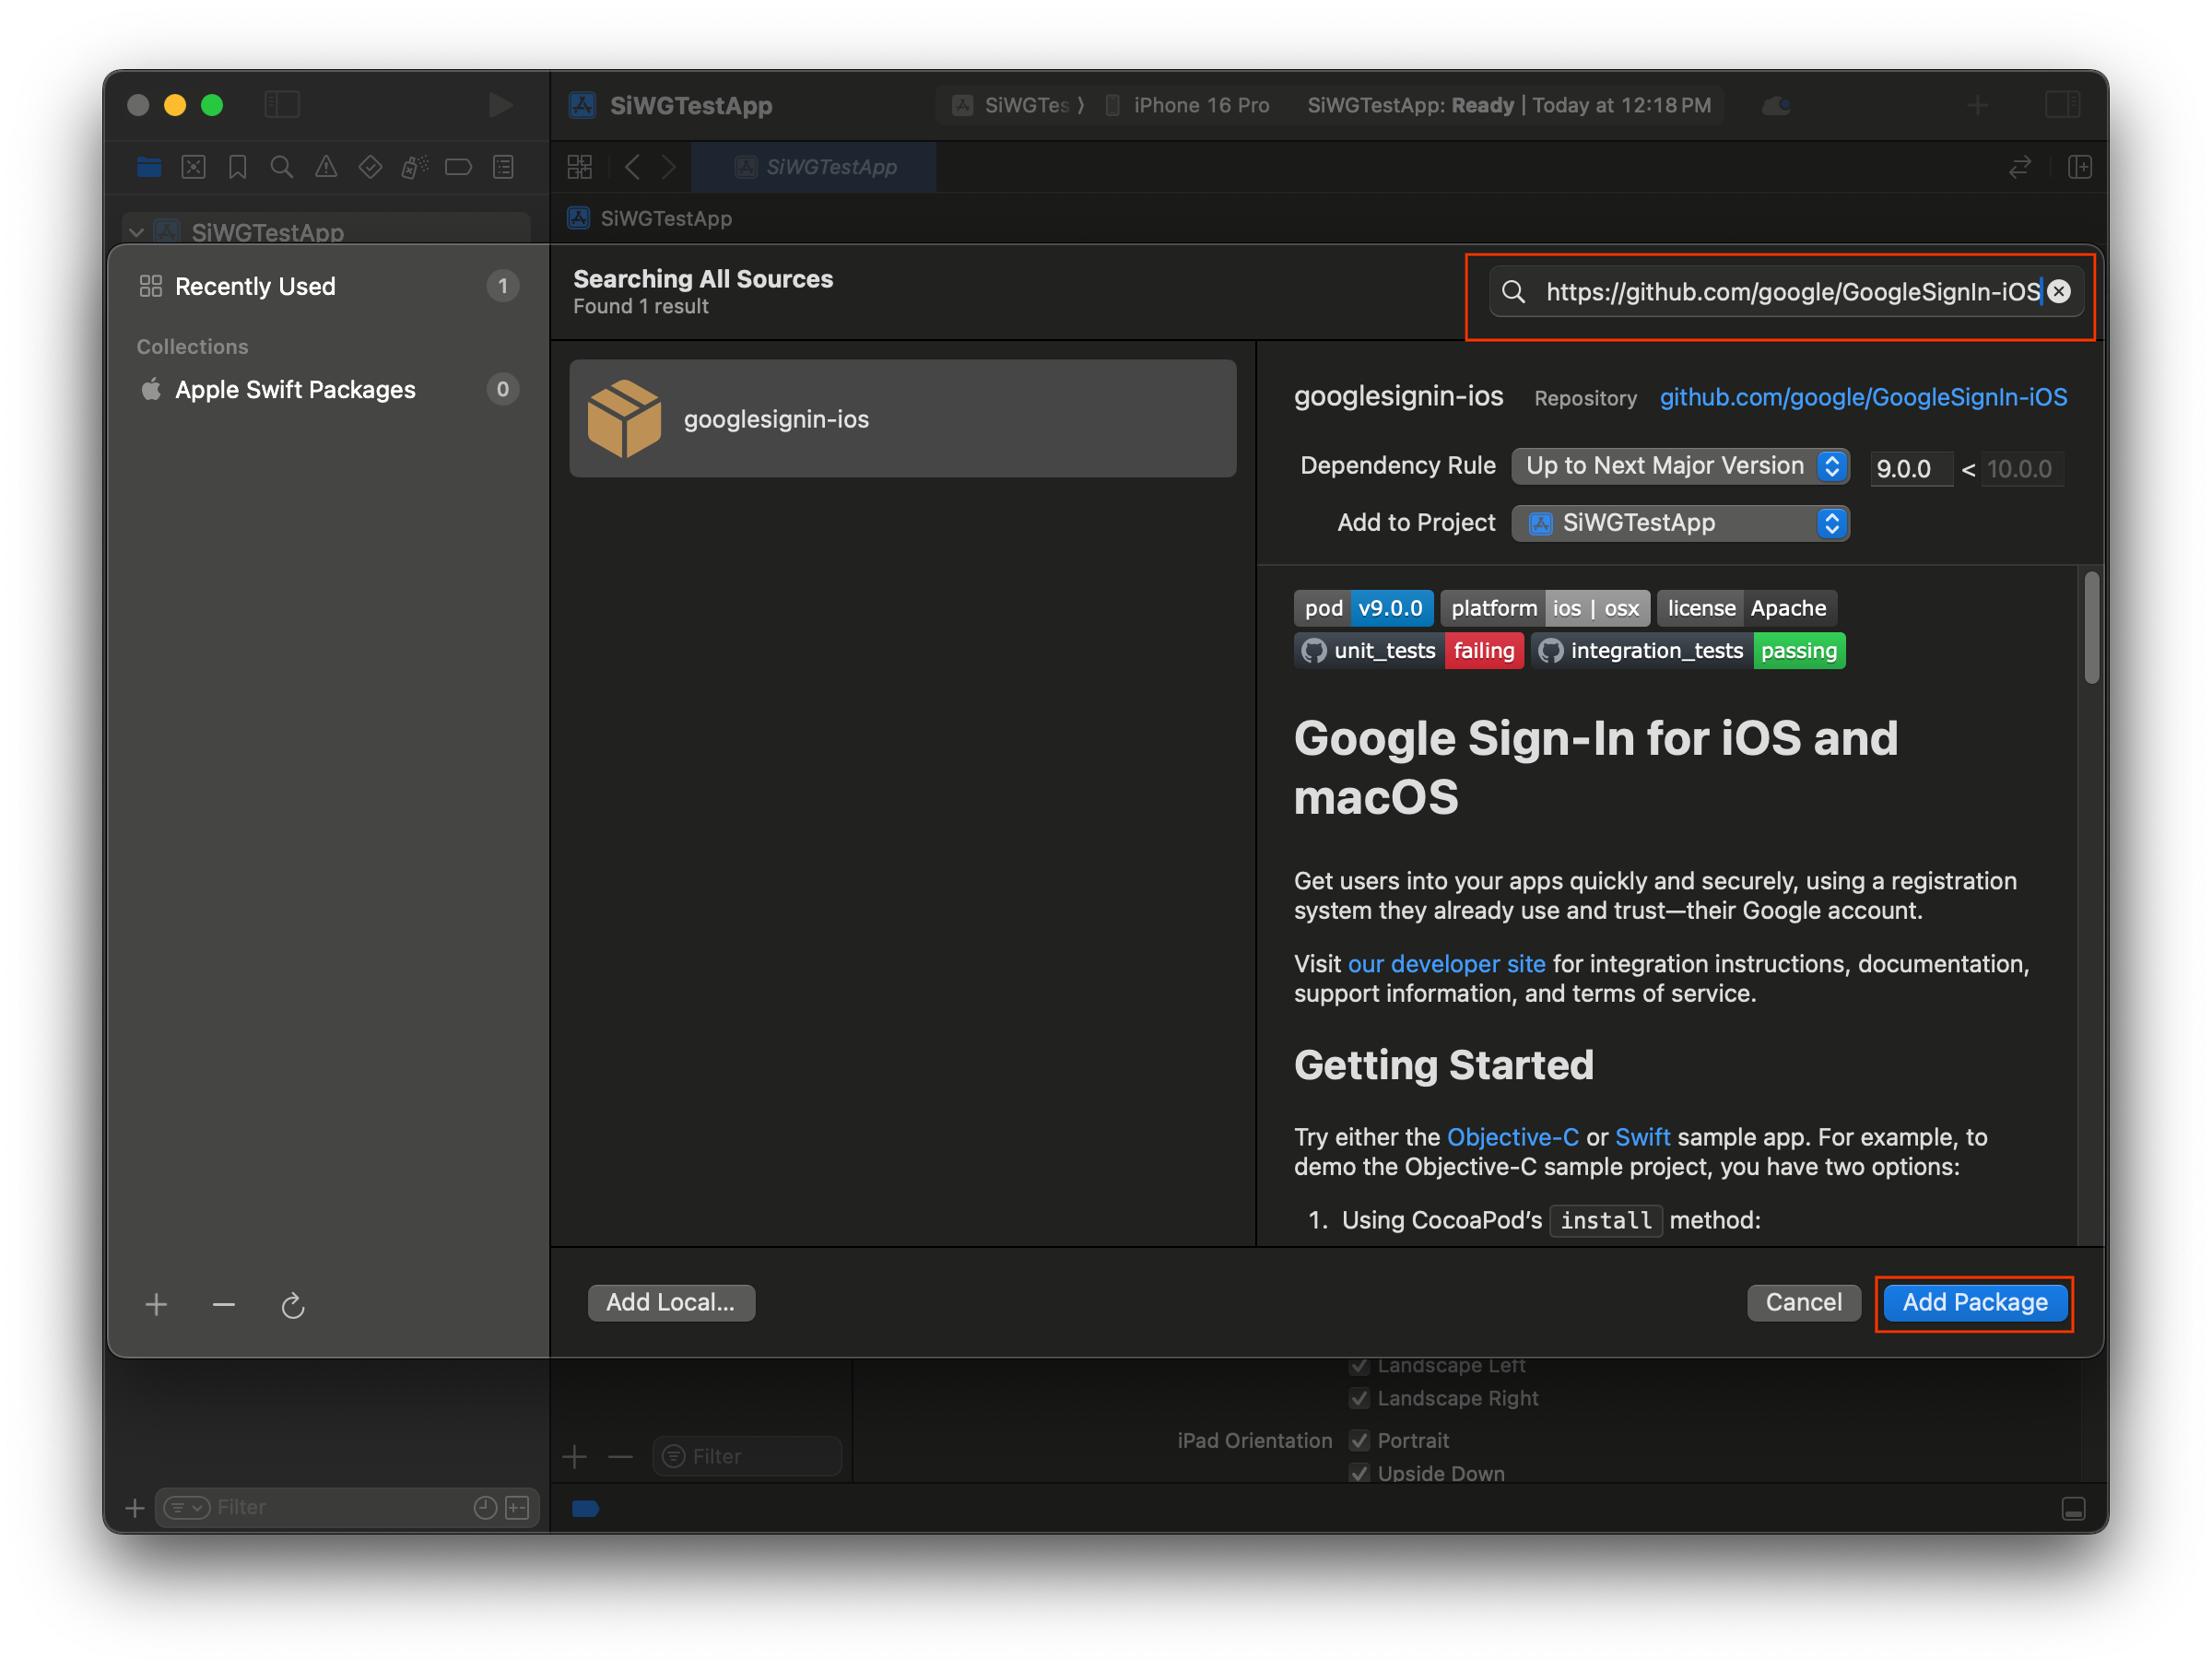
- 選取「新增套件」。
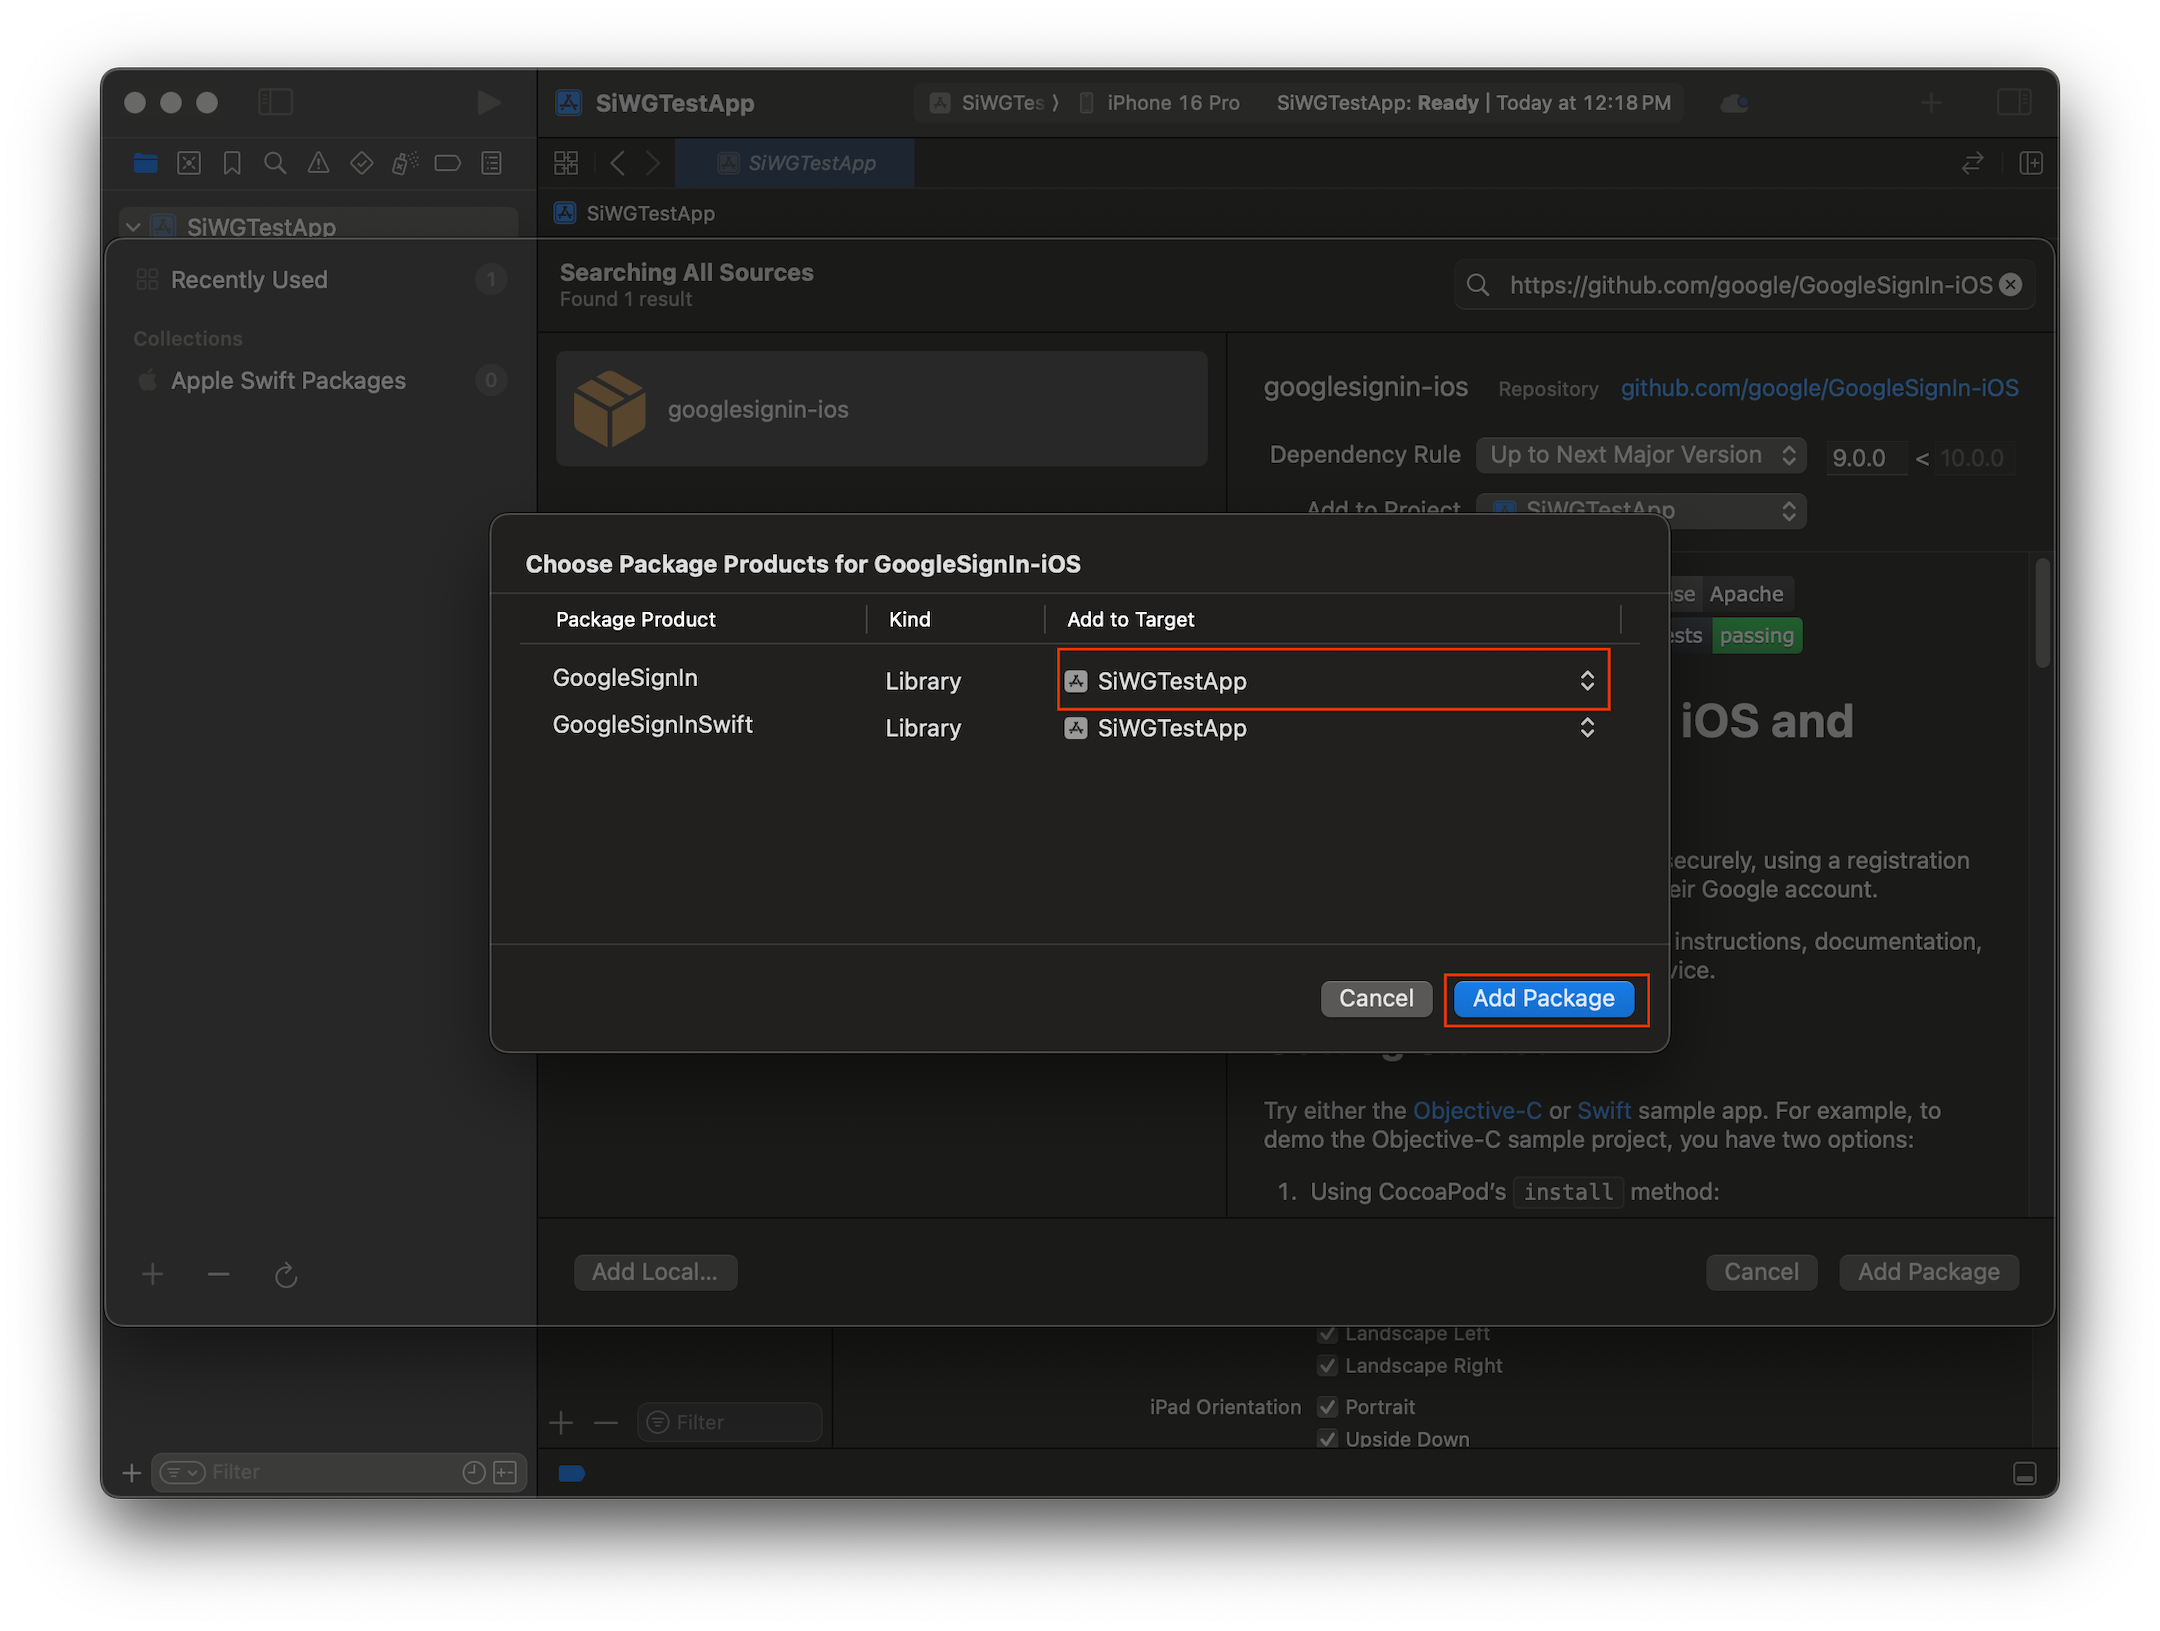
- 選取 GoogleSignIn 套件的主要應用程式目標。
- 如果您使用 SwiftUI,請選取 GoogleSignInSwift 套件的主要應用程式目標。如果您打算使用 UIKit,請勿選取這個套件的目標。
- 選取「新增套件」。
設定應用程式的憑證
- 在「Project Navigator」中,按一下專案的根目錄。
- 在主要編輯器區域中,從「TARGETS」(目標) 清單選取主要應用程式目標。
- 選取編輯器區域頂端的「資訊」分頁標籤。
- 將游標懸停在「自訂 iOS 目標屬性」部分的最後一列,然後點按顯示的「+」按鈕。
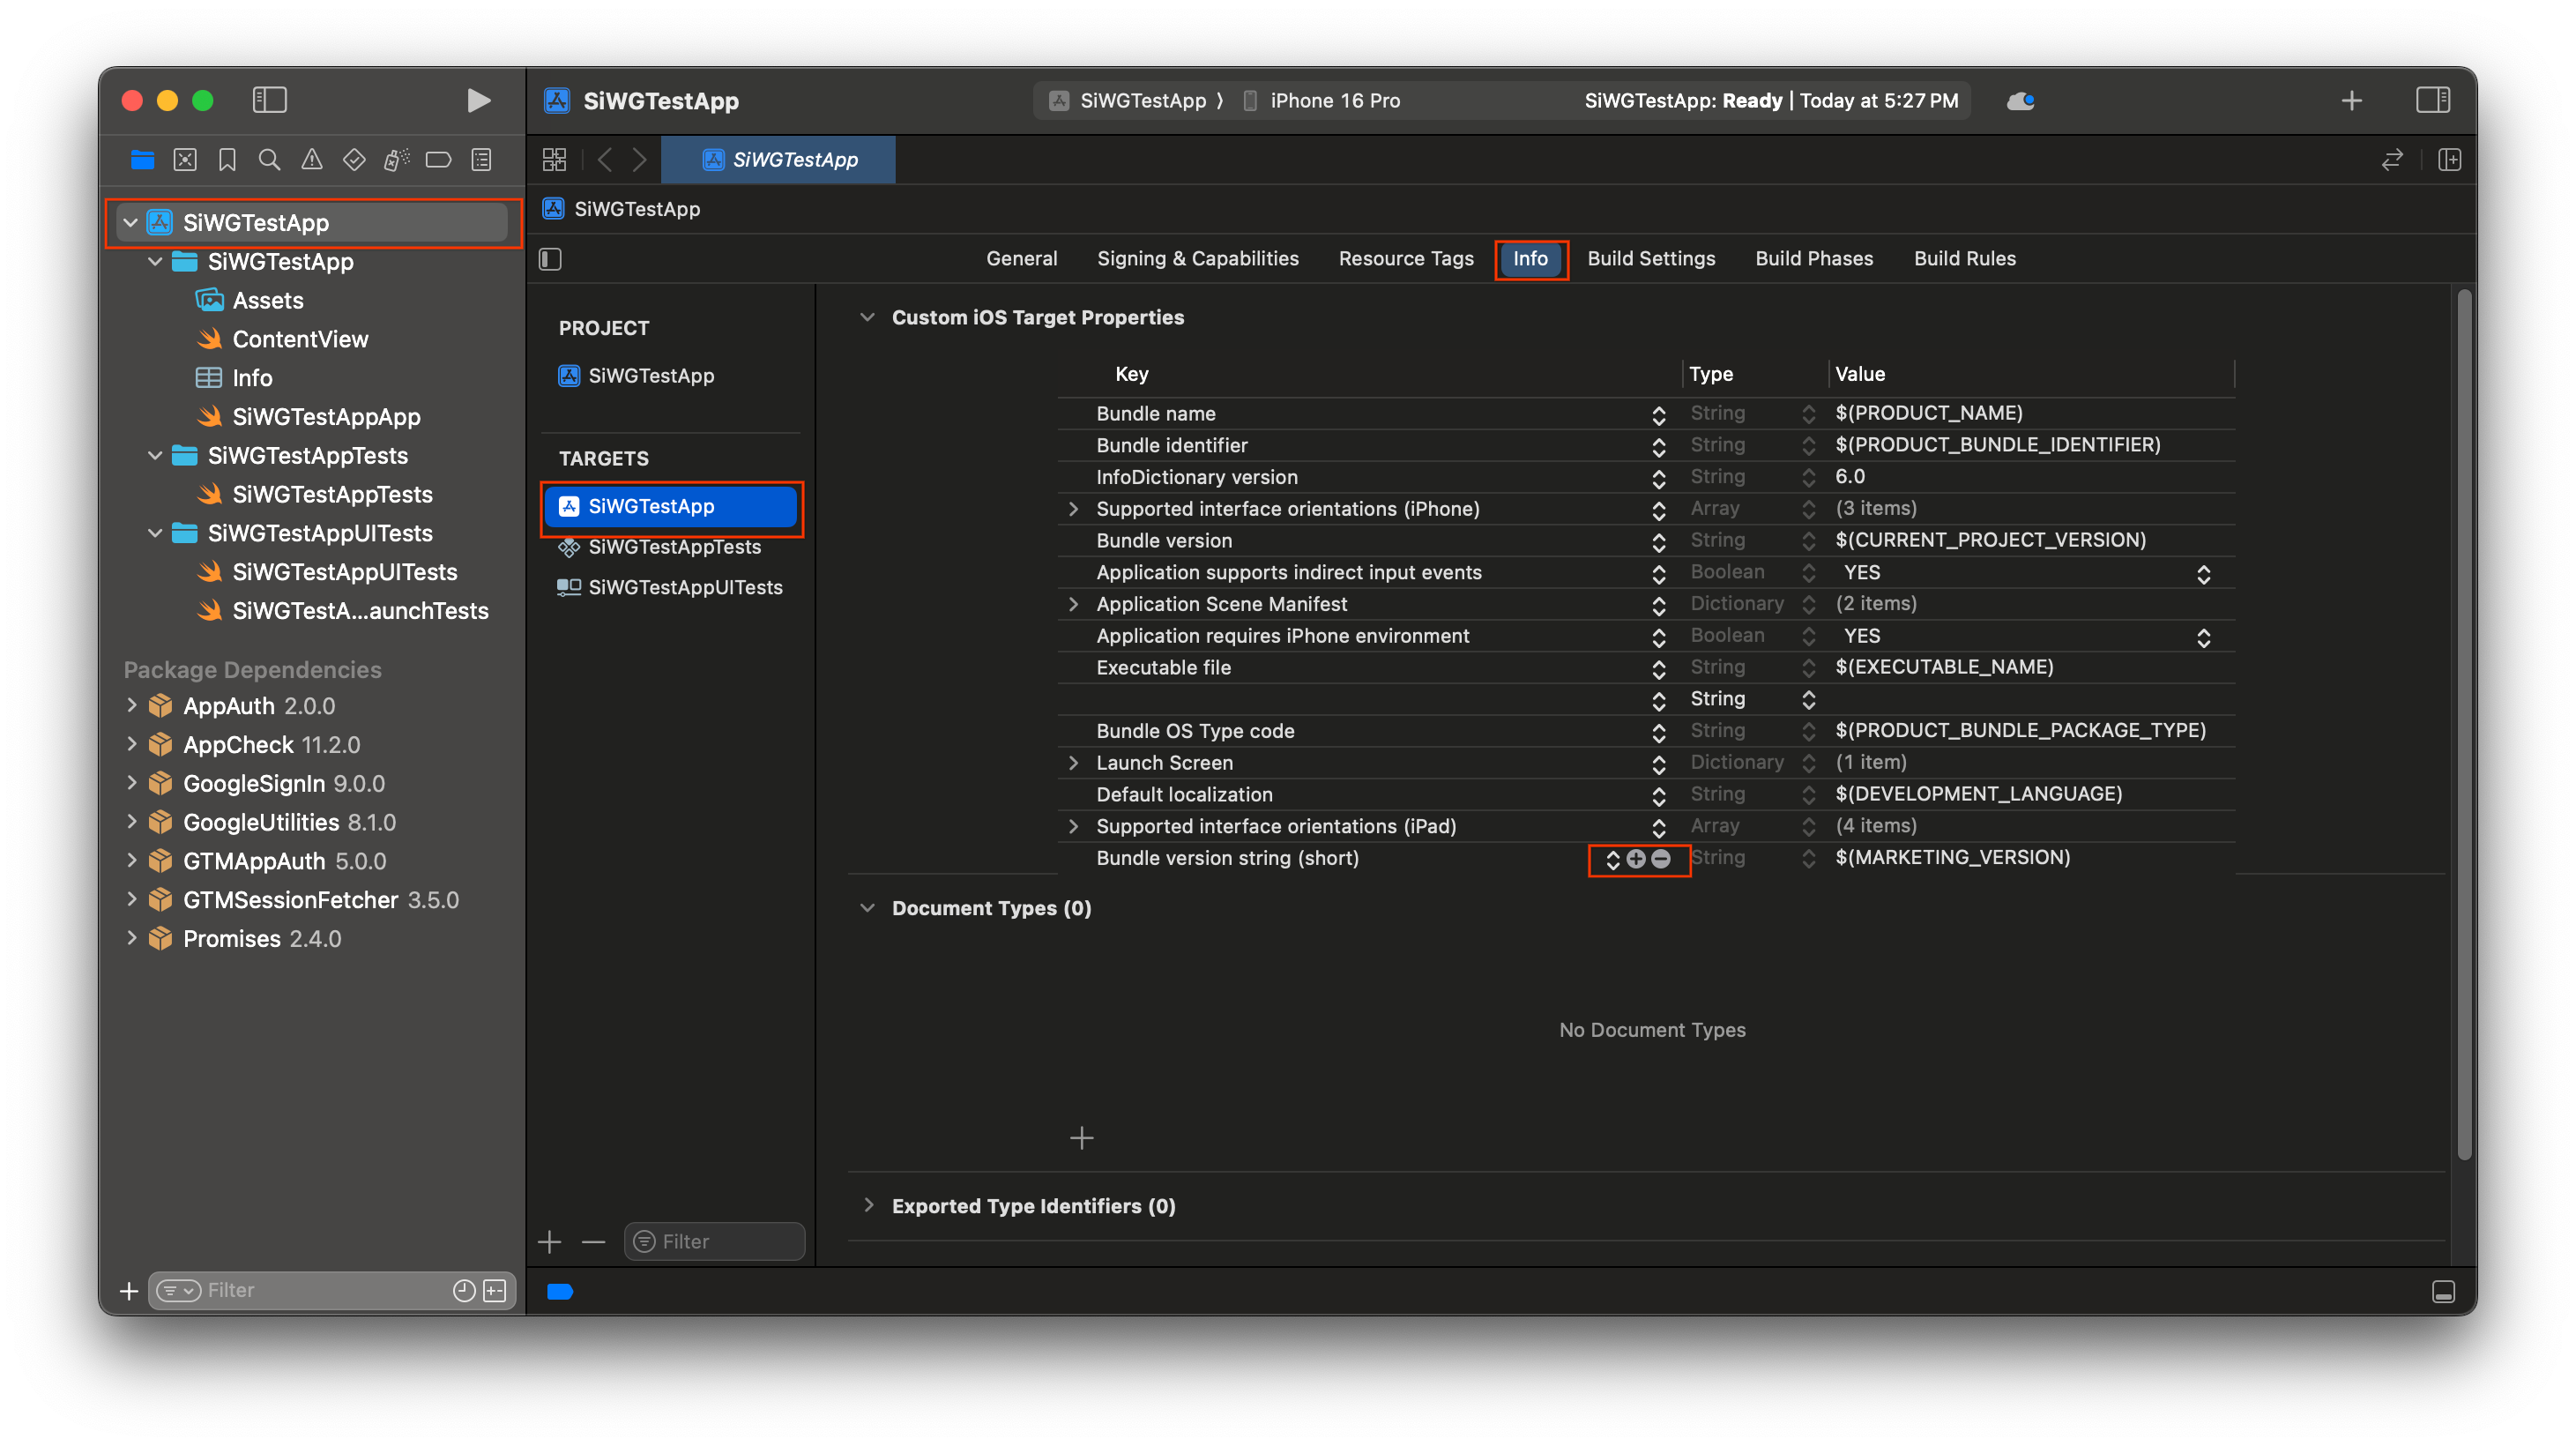
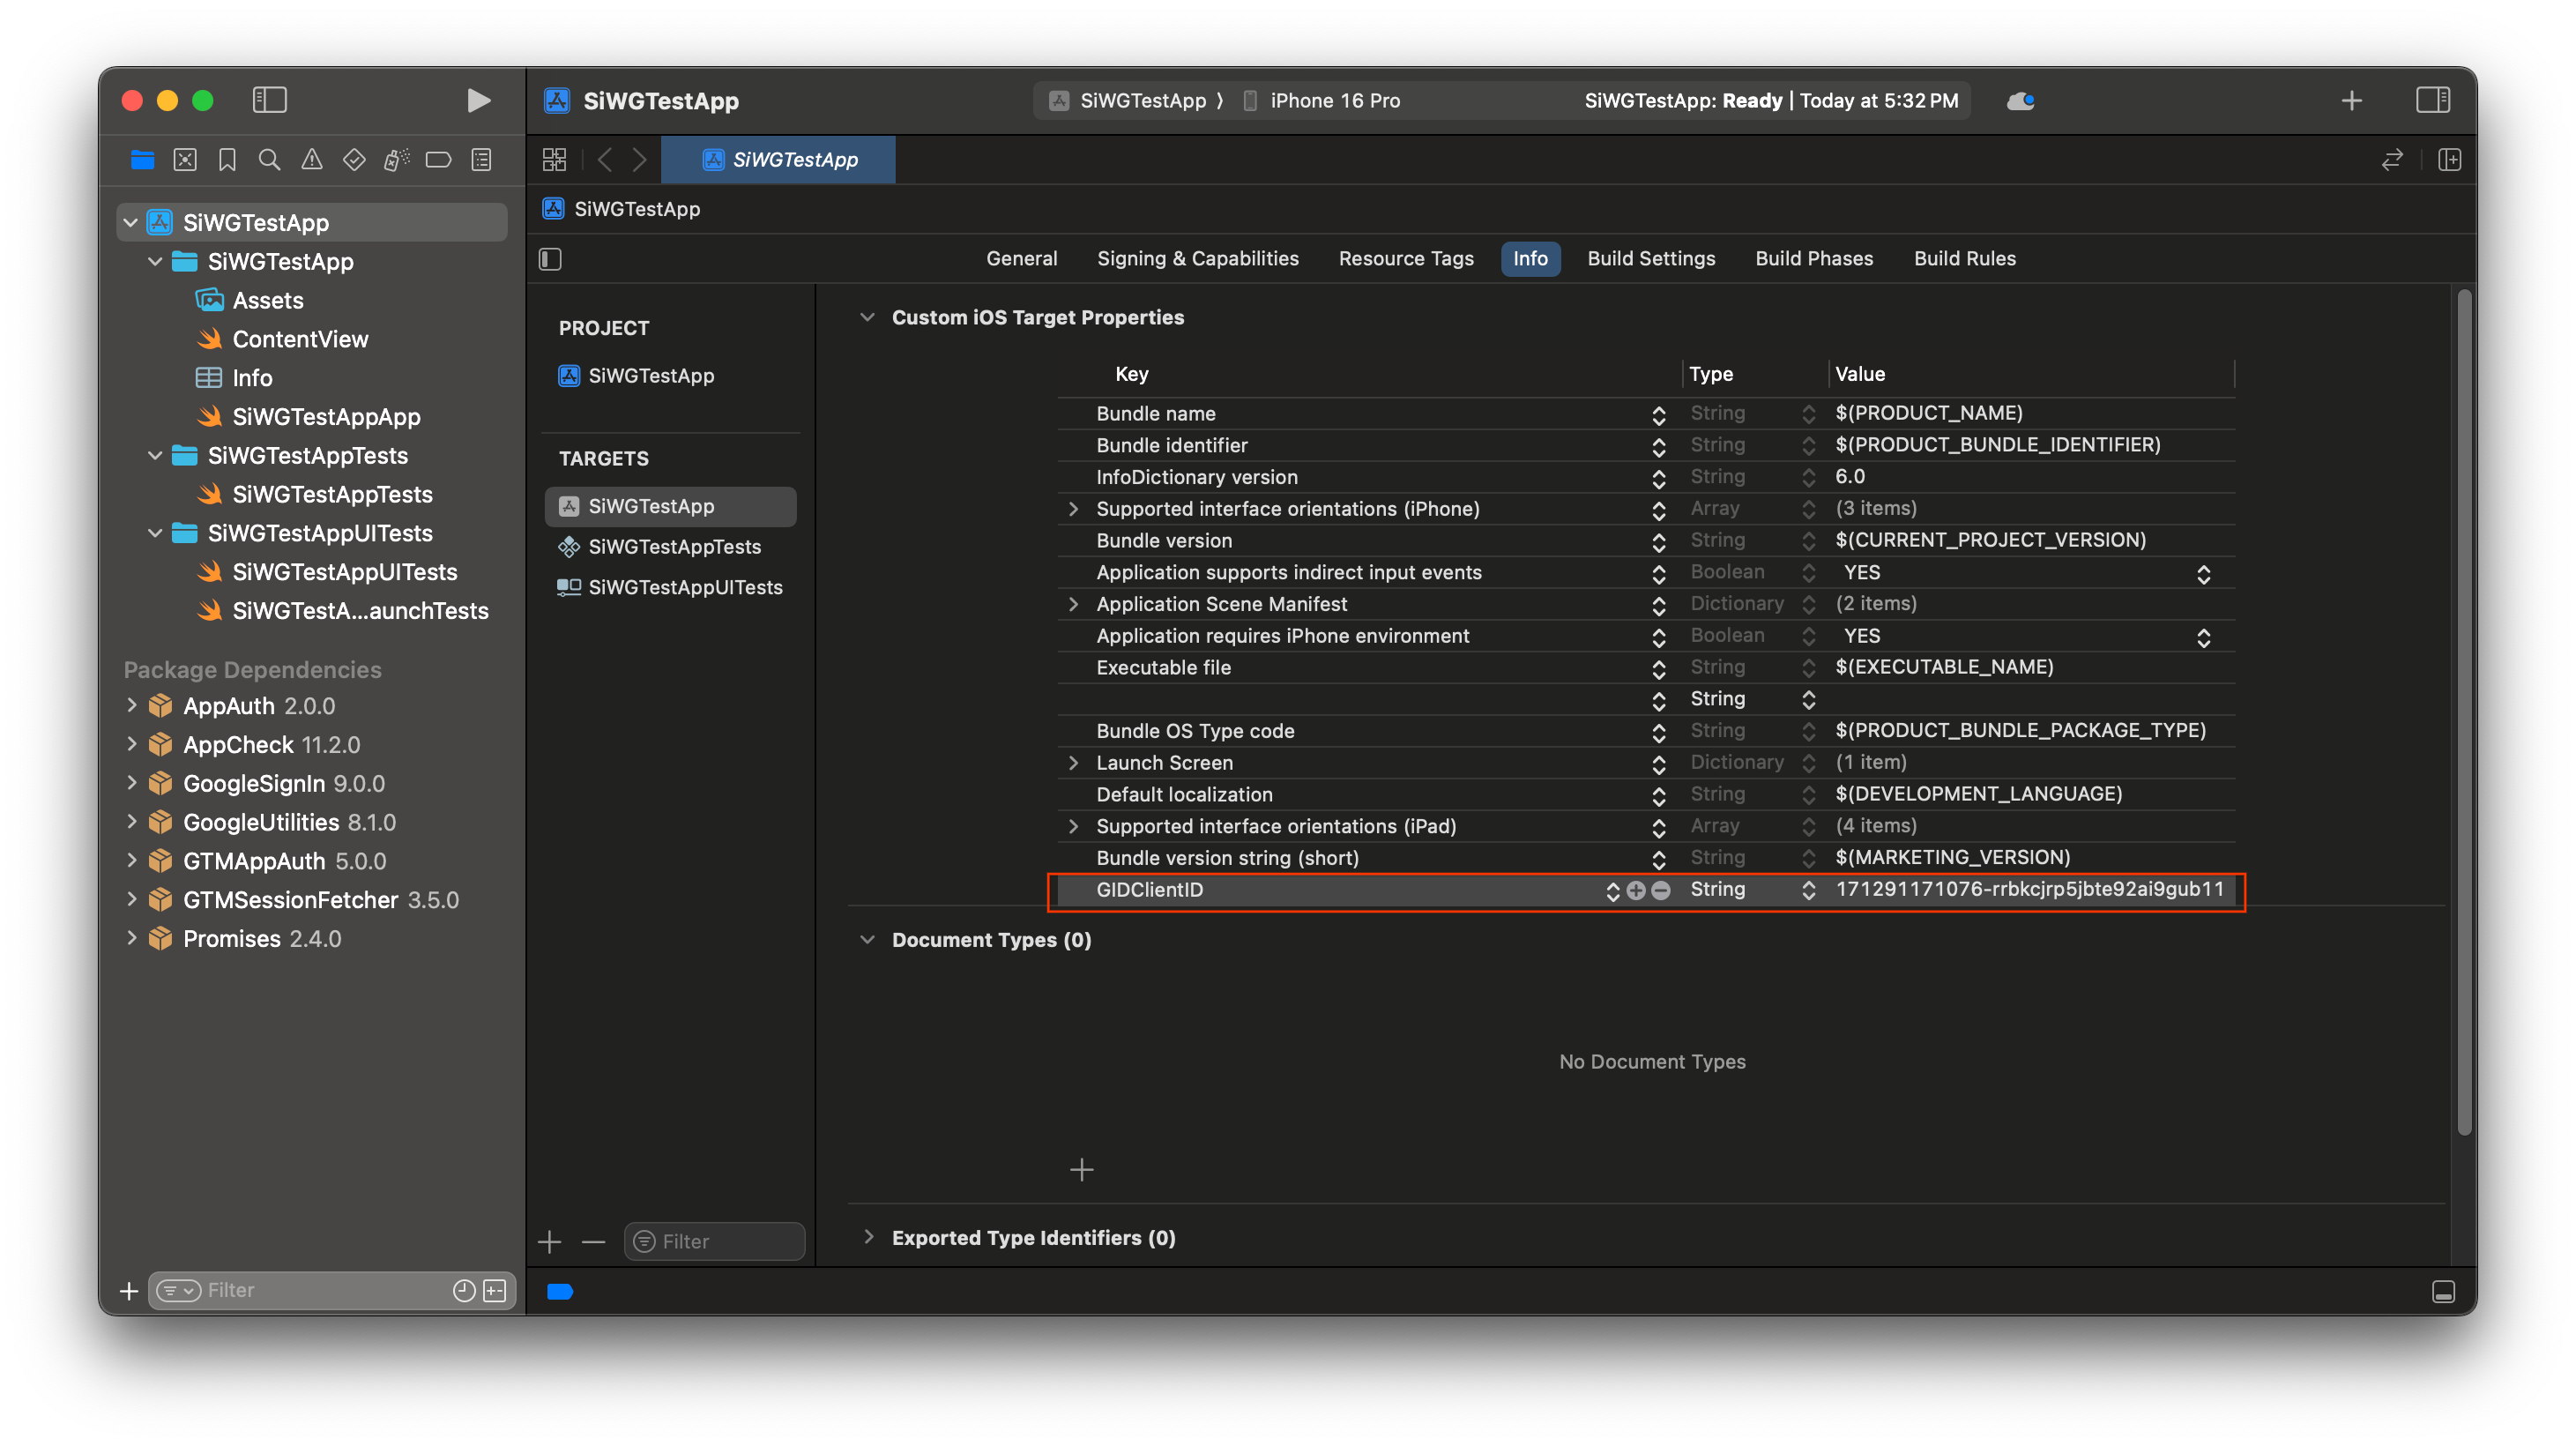
- 在「Key」(鍵) 欄中,輸入「GIDClientID」
- 在「值」欄中,貼上從 Google Cloud 控制台複製的用戶端 ID。
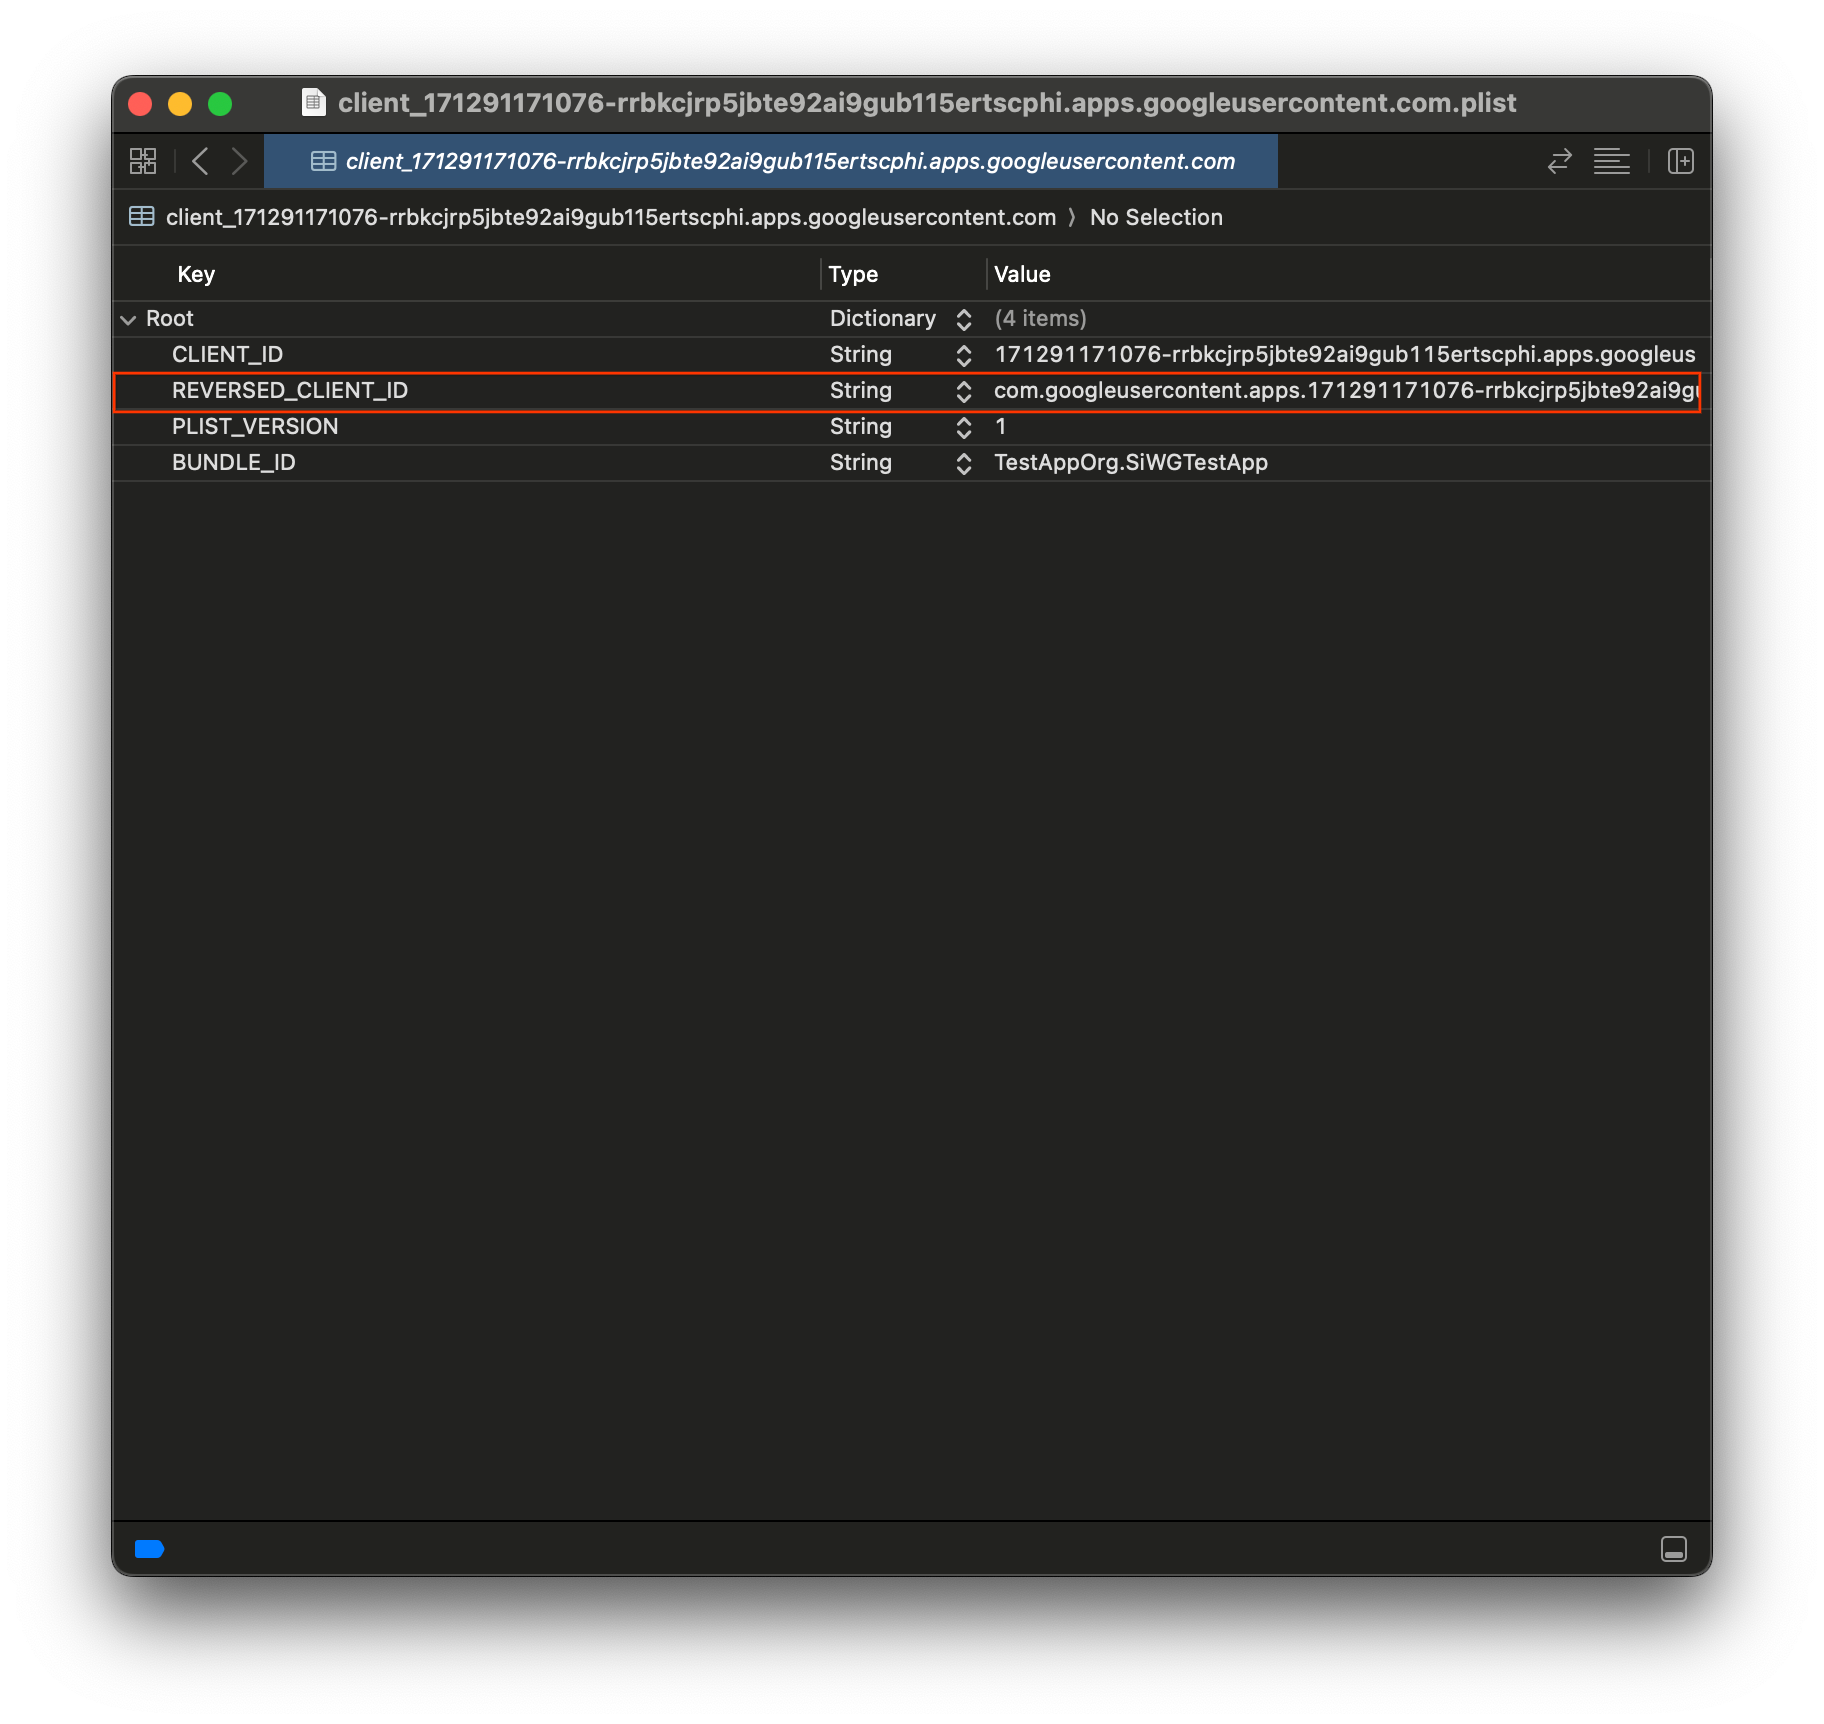
- 開啟從 Google Cloud 控制台下載的 plist 檔案。
- 複製「反向用戶端 ID」的值。
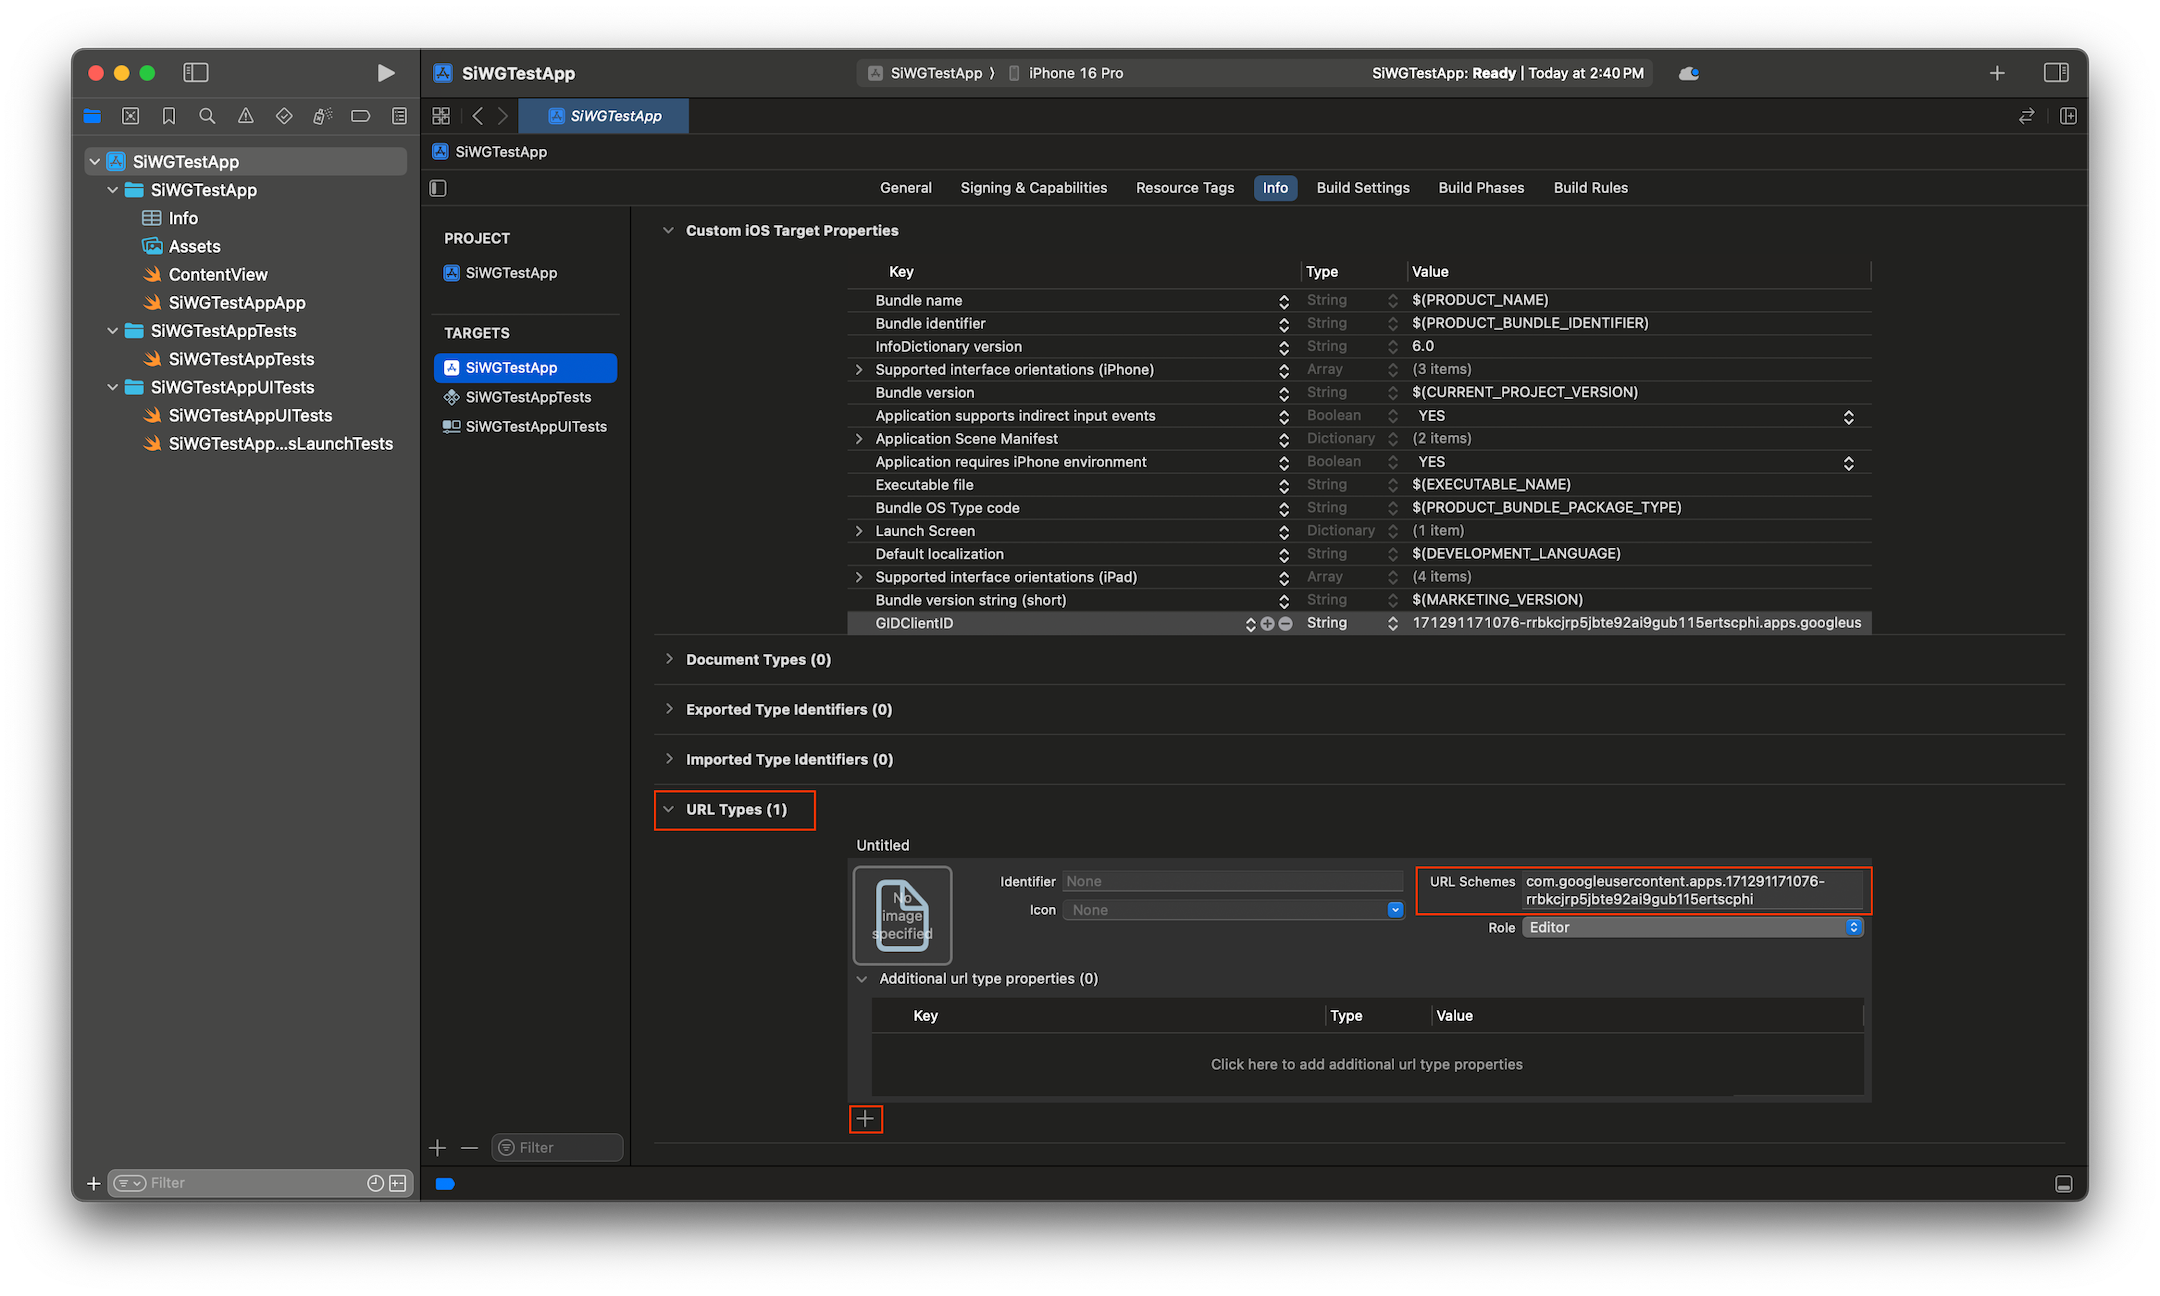
- 展開「資訊」分頁底部的「網址類型」。
- 選取 + 按鈕。
- 在「URL Schemes」(網址配置) 方塊中輸入「Reversed Client ID」(反向用戶端 ID)。
現在可以開始在應用程式中新增登入按鈕了!
5. 新增登入按鈕
Xcode 專案設定完成後,就可以開始在應用程式中新增「使用 Google 帳戶登入」按鈕!
這個步驟的核心邏輯是對 GIDSignIn.sharedInstance.signIn 的呼叫。這個方法會啟動驗證程序,將控制權交給「使用 Google 帳戶登入」SDK,向使用者顯示「使用 Google 帳戶登入」流程。
SwiftUI
- 在 Xcode 專案導覽器中找出 ContentView.swift 檔案。
- 將這個檔案的內容替換成下列文字:
import GoogleSignIn
import GoogleSignInSwift
import SwiftUI

struct ContentView: View {
  var body: some View {
    VStack {
      GoogleSignInButton(action: handleSignInButton).padding()
    }
  }

  func handleSignInButton() {
    // Find the current window scene.
    guard let windowScene = UIApplication.shared.connectedScenes.first as? UIWindowScene else {
      print("There is no active window scene")
      return
    }

    // Get the root view controller from the window scene.
    guard
      let rootViewController = windowScene.windows.first(where: { $0.isKeyWindow })?
        .rootViewController
    else {
      print("There is no key window or root view controller")
      return
    }

    // Start the sign-in process.
    GIDSignIn.sharedInstance.signIn(
      withPresenting: rootViewController
    ) { signInResult, error in
      guard let result = signInResult else {
        // Inspect error
        print("Error signing in: \(error?.localizedDescription ?? "No error description")")
        return
      }
      // If sign in succeeded, display the app's main content View.
      print("ID Token: \(result.user.idToken?.tokenString ?? "")")
    }
  }
}

#Preview {
  ContentView()
}
UIkit
- 在 Xcode 專案導覽器中找出 ViewController.swift 檔案。
- 將這個檔案的內容替換成下列文字:
import GoogleSignIn
import UIKit

class ViewController: UIViewController {

  // Create an instance of the Sign in with Google button
  let signInButton = GIDSignInButton()

  override func viewDidLoad() {
    super.viewDidLoad()

    // Add the sign-in button to your view
    view.addSubview(signInButton)

    // Position the button using constraints
    signInButton.translatesAutoresizingMaskIntoConstraints = false
    NSLayoutConstraint.activate([
      signInButton.centerXAnchor.constraint(equalTo: view.centerXAnchor),
      signInButton.centerYAnchor.constraint(equalTo: view.centerYAnchor),
    ])

    // Add a target to the button to call a method when it's pressed
    signInButton.addTarget(self, action: #selector(signInButtonTapped), for: .touchUpInside)
  }

  // This method is called when the sign-in button is pressed.
  @objc func signInButtonTapped() {
    // Start the sign-in process.
    GIDSignIn.sharedInstance.signIn(withPresenting: self) { signInResult, error in
      guard let result = signInResult else {
        // Inspect error
        print("Error signing in: \(error?.localizedDescription ?? "No error description")")
        return
      }

      // If sign in succeeded, print the ID token.
      print("ID Token: \(result.user.idToken?.tokenString ?? "")")
    }
  }
}
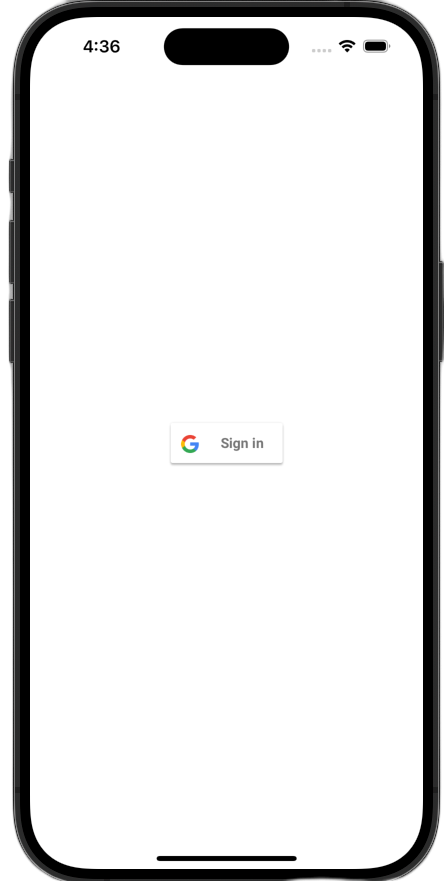
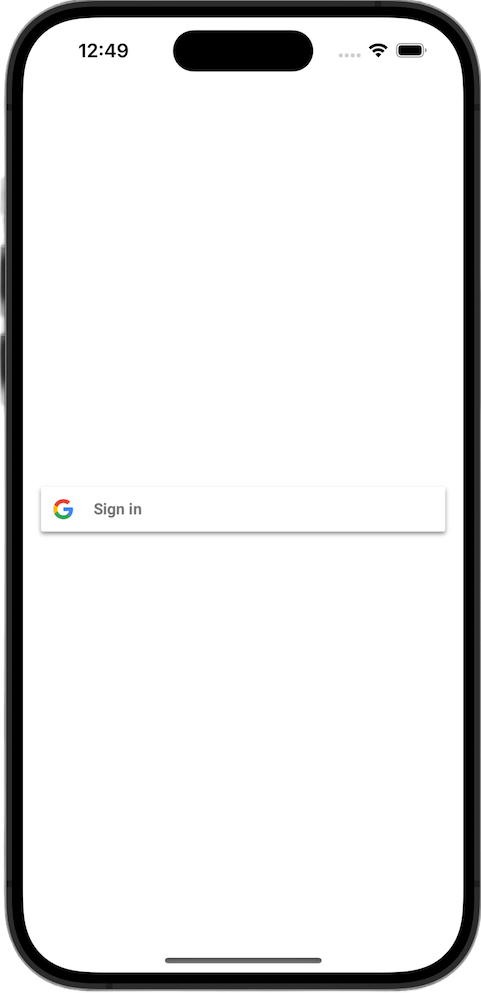
查看登入按鈕
在模擬器中啟動應用程式。你會看到「使用 Google 帳戶登入」按鈕,但目前還無法正常運作。這是預期行為,因為您仍須實作程式碼,處理使用者驗證後重新導向回應用程式的程序。
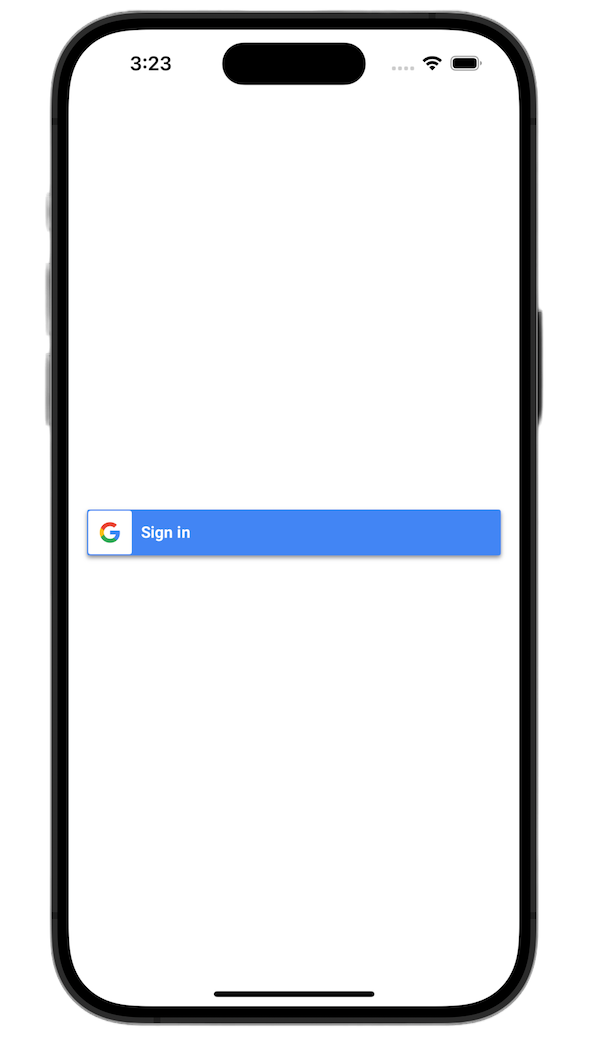
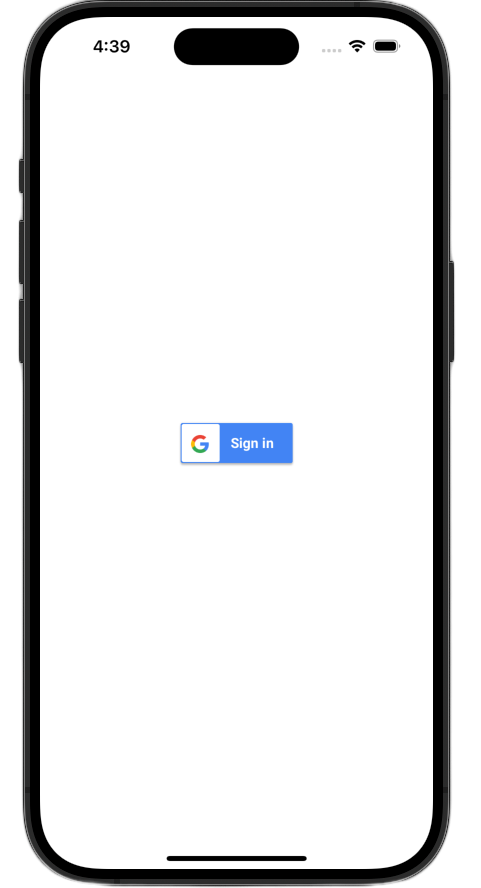
6. 自訂登入按鈕
您可以自訂預設的「使用 Google 帳戶登入」按鈕,讓按鈕更符合應用程式的主題。您可以使用「使用 Google 帳戶登入」SDK 修改按鈕的色彩配置和樣式。
SwiftUI
系統會使用這行程式碼,將預設按鈕新增至網頁:
GoogleSignInButton(action: handleSignInButton)
將參數傳遞至初始化程式,即可自訂 GoogleSignInButton。下列程式碼會讓登入按鈕以深色模式顯示。
- 開啟 ContentView.swift
- 更新
GoogleSignInButton的初始值,使其包含下列值:
GoogleSignInButton(
  scheme: .dark,  // Options: .light, .dark, .auto
  style: .standard,  // Options: .standard, .wide, .icon
  state: .normal,  // Options: .normal, .disabled
  action: handleSignInButton
).padding()
如要進一步瞭解自訂選項,請參閱 GoogleSignInSwift 架構參考資料
UIkit
系統會使用下列程式碼行建立預設按鈕:
// Create an instance of the Sign in with Google button
let signInButton = GIDSignInButton()

// Add the button to your view
view.addSubview(signInButton)
只要在按鈕例項上設定屬性,即可自訂 GIDSignInButton。下列程式碼會讓登入按鈕以深色模式顯示。
- 開啟「ViewController.swift」ViewController.swift。
- 在
viewDidLoad函式中,將登入按鈕新增至檢視區塊之前,請先加入下列程式碼行:
// Set the width and color of the sign-in button
signInButton.style = .standard  // Options: .standard, .wide, .iconOnly
signInButton.colorScheme = .dark  // Options: .dark, .light
如要進一步瞭解自訂功能,請參閱 GoogleSignIn 架構參考資料
7. 處理驗證重新導向網址
新增登入按鈕後,下一步是處理使用者完成驗證後發生的重新導向。驗證完成後,Google 會傳回含有臨時授權碼的網址。如要完成登入程序,處理常式會攔截這個網址,並將其傳遞至「使用 Google 帳戶登入」SDK,以換取已簽署的 ID 權杖 (JWT)。
SwiftUI
- 開啟包含
App結構體的檔案。這個檔案會根據專案命名,因此名稱會類似 YourProjectNameApp.swift。 - 將這個檔案的內容替換成下列文字:
import GoogleSignIn
import SwiftUI

@main
struct iOS_Sign_in_with_Google_App: App {
  var body: some Scene {
    WindowGroup {
      ContentView()

        .onOpenURL { url in
          GIDSignIn.sharedInstance.handle(url)
        }
    }
  }
}
UIkit
- 開啟 AppDelegate.swift。
- 在檔案頂端新增下列匯入項目:
import GoogleSignIn
- 在
AppDelegate類別中加入下列驗證處理常式函式。建議您將其放在application(_:didFinishLaunchingWithOptions:)方法的右大括號後面:
func application(
  _ app: UIApplication,
  open url: URL,
  options: [UIApplication.OpenURLOptionsKey: Any] = [:]
) -> Bool {
  var handled: Bool

  handled = GIDSignIn.sharedInstance.handle(url)
  if handled {
    return true
  }
  // If not handled by this app, return false.
  return false
}
完成這些變更後,您的 AppDelegate.swift 檔案應如下所示:
import GoogleSignIn
import UIKit

@main
class AppDelegate: UIResponder, UIApplicationDelegate {

  func application(
    _ application: UIApplication,
    didFinishLaunchingWithOptions launchOptions: [UIApplication.LaunchOptionsKey: Any]?
  ) -> Bool {
    // Override point for customization after application launch.
    return true
  }

  func application(
    _ app: UIApplication,
    open url: URL,
    options: [UIApplication.OpenURLOptionsKey: Any] = [:]
  ) -> Bool {
    var handled: Bool

    handled = GIDSignIn.sharedInstance.handle(url)
    if handled {
      return true
    }
    // If not handled by this app, return false.
    return false
  }

  // MARK: UISceneSession Lifecycle

  func application(
    _ application: UIApplication,
    configurationForConnecting connectingSceneSession: UISceneSession,
    options: UIScene.ConnectionOptions
  ) -> UISceneConfiguration {
    // Called when a new scene session is being created.
    // Use this method to select a configuration to create the new scene with.
    return UISceneConfiguration(
      name: "Default Configuration",
      sessionRole: connectingSceneSession.role
    )
  }

  func application(
    _ application: UIApplication,
    didDiscardSceneSessions sceneSessions: Set<UISceneSession>
  ) {
    // Called when the user discards a scene session.
    // If any sessions were discarded while the application was not running, this will be called shortly after application:didFinishLaunchingWithOptions.
    // Use this method to release any resources that were specific to the discarded scenes, as they will not return.
  }
}
測試登入流程
現在可以測試完整的登入流程了!
執行應用程式,然後輕觸登入按鈕。完成驗證後,Google 會顯示同意畫面,您可以授予應用程式存取您資訊的權限。核准後,系統會完成登入程序,並將你導回應用程式。
登入流程順利完成後,「使用 Google 帳戶登入」SDK 會將使用者的憑證安全地儲存在裝置的鑰匙圈中。之後,使用者就能在後續啟動應用程式時,使用這些憑證保持登入狀態。
8. 新增登出按鈕
登入功能運作正常後,下一步是新增登出按鈕,並更新 UI 來反映使用者目前的登入狀態。登入成功後,SDK 會提供 GIDGoogleUser 物件。這個物件包含 profile 屬性,其中含有使用者名稱和電子郵件等基本資訊,可用於個人化 UI。
SwiftUI
- 開啟 ContentView.swift 檔案。
- 在
ContentView結構體的頂端新增狀態變數。使用者登入後,這項變數會保留使用者的資訊。由於這是@State變數,因此只要值有變更,SwiftUI 就會自動更新 UI:
struct ContentView: View {
  @State private var user: GIDGoogleUser?
}
- 將
ContentView結構體的目前body換成下列VStack。這會檢查user狀態變數是否包含使用者。如果已登入,系統會顯示歡迎訊息和登出按鈕。如果沒有,系統會顯示原始的「使用 Google 帳戶登入」按鈕:
var body: some View {
VStack {
// Check if the user is signed in.
if let user = user {
// If signed in, show a welcome message and the sign-out button.
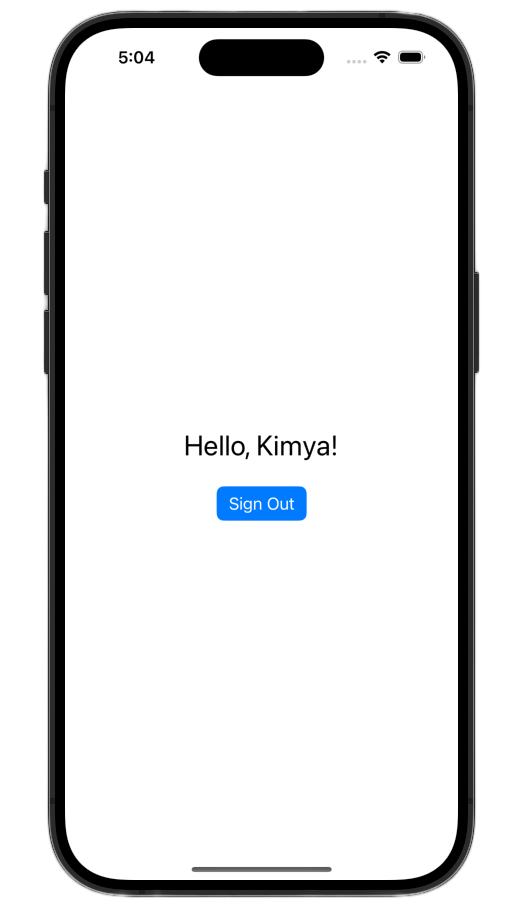
Text("Hello, \(user.profile?.givenName ?? "User")!")
.font(.title)
.padding()
Button("Sign Out", action: signOut)
.buttonStyle(.borderedProminent)
} else {
// If not signed in, show the "Sign in with Google" button.
GoogleSignInButton(
scheme: .dark, // Options: .light, .dark, .auto
style: .standard, // Options: .standard, .wide, .icon
state: .normal, // Options: .normal, .disabled
action: handleSignInButton
).padding()
}
}
}
- 更新
handleSignInButton完成區塊,將signInResult.user指派給新的user變數。這會觸發 UI 切換至已登入檢視畫面:
func handleSignInButton() {
  // Find the current window scene.
  guard let windowScene = UIApplication.shared.connectedScenes.first as? UIWindowScene else {
    print("There is no active window scene")
    return
  }

  // Get the root view controller from the window scene.
  guard
    let rootViewController = windowScene.windows.first(where: { $0.isKeyWindow })?
      .rootViewController
  else {
    print("There is no key window or root view controller")
    return
  }

  // Start the sign-in process.
  GIDSignIn.sharedInstance.signIn(
    withPresenting: rootViewController
  ) { signInResult, error in
    guard let result = signInResult else {
      // Inspect error
      print("Error signing in: \(error?.localizedDescription ?? "No error description")")
      return
    }

    DispatchQueue.main.async {
      self.user = result.user
    }

    // If sign in succeeded, display the app's main content View.
    print("ID Token: \(result.user.idToken?.tokenString ?? "")")
  }
}
- 在
ContentView結構體的底部新增signOut函式,供登出按鈕呼叫:
func signOut() {
  GIDSignIn.sharedInstance.signOut()
  // After signing out, set the `user` state variable to `nil`.
  self.user = nil
}
啟動應用程式並登入帳戶。成功驗證後,您應該會看到 UI 變更!
完成這些變更後,ContentView.swift 檔案應如下所示:
import GoogleSignIn
import GoogleSignInSwift
import SwiftUI

struct ContentView: View {

  @State private var user: GIDGoogleUser?

  var body: some View {
    VStack {
      // Check if the user is signed in.
      if let user = user {
        // If signed in, show a welcome message and the sign-out button.
        Text("Hello, \(user.profile?.givenName ?? "User")!")
          .font(.title)
          .padding()

        Button("Sign Out", action: signOut)
          .buttonStyle(.borderedProminent)

      } else {
        // If not signed in, show the "Sign in with Google" button.
        GoogleSignInButton(
          scheme: .dark,  // Options: .light, .dark, .auto
          style: .standard,  // Options: .standard, .wide, .icon
          state: .normal,  // Options: .normal, .disabled
          action: handleSignInButton
        ).padding()
      }
    }
  }

  func handleSignInButton() {
    // Find the current window scene.
    guard let windowScene = UIApplication.shared.connectedScenes.first as? UIWindowScene else {
      print("There is no active window scene")
      return
    }

    // Get the root view controller from the window scene.
    guard
      let rootViewController = windowScene.windows.first(where: { $0.isKeyWindow })?
        .rootViewController
    else {
      print("There is no key window or root view controller")
      return
    }

    // Start the sign-in process.
    GIDSignIn.sharedInstance.signIn(
      withPresenting: rootViewController
    ) { signInResult, error in
      guard let result = signInResult else {
        // Inspect error
        print("Error signing in: \(error?.localizedDescription ?? "No error description")")
        return
      }

      DispatchQueue.main.async {
        self.user = result.user
      }

      // If sign in succeeded, display the app's main content View.
      print("ID Token: \(result.user.idToken?.tokenString ?? "")")
    }
  }

  func signOut() {
    GIDSignIn.sharedInstance.signOut()
    // After signing out, set the `user` state variable to `nil`.
    self.user = nil
  }
}

#Preview {
  ContentView()
}
UIkit
- 開啟「ViewController.swift」ViewController.swift。
- 在
ViewController頂端,直接在您宣告signInButton的位置下方,新增登出按鈕和歡迎標籤:
let signOutButton = UIButton(type: .system)
let welcomeLabel = UILabel()
- 在
ViewController的底部新增下列函式。這個函式會根據使用者的登入狀態,向使用者顯示不同的 UI:
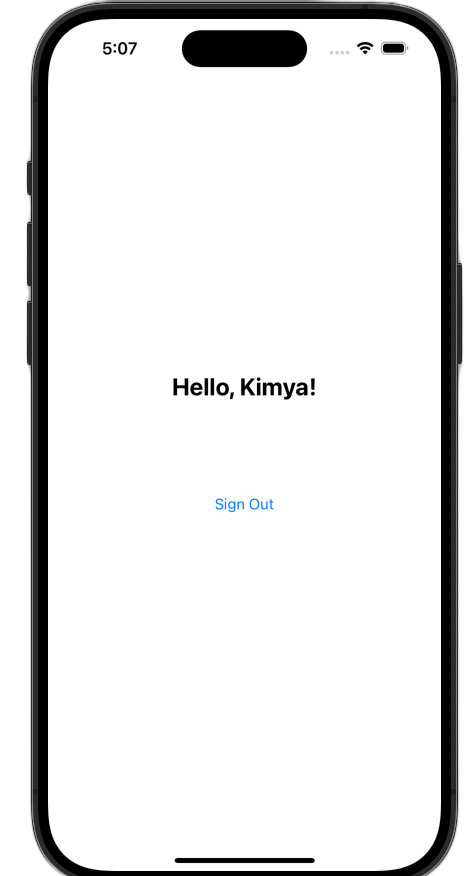
private func updateUI(for user: GIDGoogleUser?) {
  if let user = user {
    // User is signed in.
    signInButton.isHidden = true
    signOutButton.isHidden = false
    welcomeLabel.isHidden = false
    welcomeLabel.text = "Hello, \(user.profile?.givenName ?? "User")!"
  } else {
    // User is signed out.
    signInButton.isHidden = false
    signOutButton.isHidden = true
    welcomeLabel.isHidden = true
  }
}
- 在
viewDidLoad函式的底部,新增下列程式碼,將歡迎標籤和登出按鈕新增至檢視區塊:
// --- Set up the Welcome Label ---
welcomeLabel.translatesAutoresizingMaskIntoConstraints = false
welcomeLabel.textAlignment = .center
welcomeLabel.font = .systemFont(ofSize: 24, weight: .bold)
view.addSubview(welcomeLabel)

NSLayoutConstraint.activate([
  welcomeLabel.centerXAnchor.constraint(equalTo: view.centerXAnchor),
  welcomeLabel.bottomAnchor.constraint(equalTo: signInButton.topAnchor, constant: -20),
])

// --- Set up the Sign-Out Button ---
signOutButton.translatesAutoresizingMaskIntoConstraints = false
signOutButton.setTitle("Sign Out", for: .normal)
view.addSubview(signOutButton)

NSLayoutConstraint.activate([
  signOutButton.centerXAnchor.constraint(equalTo: view.centerXAnchor),
  signOutButton.topAnchor.constraint(equalTo: signInButton.bottomAnchor, constant: 20),
])

signOutButton.addTarget(self, action: #selector(signOutButtonTapped), for: .touchUpInside)

// --- Set Initial UI State ---
updateUI(for: nil)
- 更新
signInButtonTapped函式,在登入成功時呼叫UpdateUI方法:
@objc func signInButtonTapped() {
  // Start the sign-in process.
  GIDSignIn.sharedInstance.signIn(withPresenting: self) { signInResult, error in
    guard let result = signInResult else {
      // Inspect error
      print("Error signing in: \(error?.localizedDescription ?? "No error description")")
      return
    }

    // If sign in succeeded, print the ID token.
    print("ID Token: \(result.user.idToken?.tokenString ?? "")")

    DispatchQueue.main.async {
      self.updateUI(for: result.user)
    }
  }
}
- 最後,在
ViewController中新增signOutButtonTapped函式,處理登出程序:
@objc func signOutButtonTapped() {
  GIDSignIn.sharedInstance.signOut()
  // Update the UI for the signed-out state.
  updateUI(for: nil)
}
啟動應用程式並登入帳戶。成功驗證後,您應該會看到 UI 變更!
完成這些變更後,ViewController.swift 檔案應如下所示:
import GoogleSignIn
import UIKit

class ViewController: UIViewController {

  // Create an instance of the Sign in with Google button
  let signInButton = GIDSignInButton()
  let signOutButton = UIButton(type: .system)
  let welcomeLabel = UILabel()

  override func viewDidLoad() {
    super.viewDidLoad()

    // Set the width and color of the sign-in button
    signInButton.style = .standard  // Options: .standard, .wide, .iconOnly
    signInButton.colorScheme = .dark  // Options: .dark, .light

    // Add the sign-in button to your view
    view.addSubview(signInButton)

    // Position the button using constraints
    signInButton.translatesAutoresizingMaskIntoConstraints = false
    NSLayoutConstraint.activate([
      signInButton.centerXAnchor.constraint(equalTo: view.centerXAnchor),
      signInButton.centerYAnchor.constraint(equalTo: view.centerYAnchor),
    ])

    // Add a target to the button to call a method when it's pressed
    signInButton.addTarget(self, action: #selector(signInButtonTapped), for: .touchUpInside)

    // --- Set up the Welcome Label ---
    welcomeLabel.translatesAutoresizingMaskIntoConstraints = false
    welcomeLabel.textAlignment = .center
    welcomeLabel.font = .systemFont(ofSize: 24, weight: .bold)
    view.addSubview(welcomeLabel)

    NSLayoutConstraint.activate([
      welcomeLabel.centerXAnchor.constraint(equalTo: view.centerXAnchor),
      welcomeLabel.bottomAnchor.constraint(equalTo: signInButton.topAnchor, constant: -20),
    ])

    // --- Set up the Sign-Out Button ---
    signOutButton.translatesAutoresizingMaskIntoConstraints = false
    signOutButton.setTitle("Sign Out", for: .normal)
    view.addSubview(signOutButton)

    NSLayoutConstraint.activate([
      signOutButton.centerXAnchor.constraint(equalTo: view.centerXAnchor),
      signOutButton.topAnchor.constraint(equalTo: signInButton.bottomAnchor, constant: 20),
    ])

    signOutButton.addTarget(self, action: #selector(signOutButtonTapped), for: .touchUpInside)

    // --- Set Initial UI State ---
    updateUI(for: nil)
  }

  // This method is called when the sign-in button is pressed.
  @objc func signInButtonTapped() {
    // Start the sign-in process.
    GIDSignIn.sharedInstance.signIn(withPresenting: self) { signInResult, error in
      guard let result = signInResult else {
        // Inspect error
        print("Error signing in: \(error?.localizedDescription ?? "No error description")")
        return
      }

      // If sign in succeeded, print the ID token.
      print("ID Token: \(result.user.idToken?.tokenString ?? "")")

      DispatchQueue.main.async {
        self.updateUI(for: result.user)
      }
    }
  }

  private func updateUI(for user: GIDGoogleUser?) {
    if let user = user {
      // User is signed in.
      signInButton.isHidden = true
      signOutButton.isHidden = false
      welcomeLabel.isHidden = false
      welcomeLabel.text = "Hello, \(user.profile?.givenName ?? "User")!"
    } else {
      // User is signed out.
      signInButton.isHidden = false
      signOutButton.isHidden = true
      welcomeLabel.isHidden = true
    }
  }

  @objc func signOutButtonTapped() {
    GIDSignIn.sharedInstance.signOut()
    // Update the UI for the signed-out state.
    updateUI(for: nil)
  }
}
9. 還原使用者的登入狀態
為提升回訪者的體驗,下一步是在應用程式啟動時還原登入狀態。呼叫 restorePreviousSignIn 會使用儲存在鑰匙圈中的憑證,以無聲方式讓使用者重新登入,確保他們不必每次都完成登入流程。
SwiftUI
- 開啟「ContentView.swift」ContentView.swift。
- 在
body變數中,於VStack後方直接加入下列程式碼:
.onAppear {
  // On appear, try to restore a previous sign-in.
  GIDSignIn.sharedInstance.restorePreviousSignIn { user, error in
    // This closure is called when the restoration is complete.
    if let user = user {
      // If a user was restored, update the `user` state variable.
      DispatchQueue.main.async {
        self.user = user
      }

      // Print the ID token to the console when restored.
      print("Restored ID Token: \(user.idToken?.tokenString ?? "")")
    }
  }
}
您的 ContentView.swift 應如下所示:
import GoogleSignIn
import GoogleSignInSwift
import SwiftUI

struct ContentView: View {

  @State private var user: GIDGoogleUser?

  var body: some View {
    VStack {
      // Check if the user is signed in.
      if let user = user {
        // If signed in, show a welcome message and the sign-out button.
        Text("Hello, \(user.profile?.givenName ?? "User")!")
          .font(.title)
          .padding()

        Button("Sign Out", action: signOut)
          .buttonStyle(.borderedProminent)

      } else {
        // If not signed in, show the "Sign in with Google" button.
        GoogleSignInButton(
          scheme: .dark,  // Options: .light, .dark, .auto
          style: .standard,  // Options: .standard, .wide, .icon
          state: .normal,  // Options: .normal, .disabled
          action: handleSignInButton
        ).padding()
      }
    }

    .onAppear {
      // On appear, try to restore a previous sign-in.
      GIDSignIn.sharedInstance.restorePreviousSignIn { user, error in
        // This closure is called when the restoration is complete.
        if let user = user {
          // If a user was restored, update the `user` state variable.
          DispatchQueue.main.async {
            self.user = user
          }

          // Print the ID token to the console when restored.
          print("Restored ID Token: \(user.idToken?.tokenString ?? "")")
        }
      }
    }
  }

  func handleSignInButton() {
    // Find the current window scene.
    guard let windowScene = UIApplication.shared.connectedScenes.first as? UIWindowScene else {
      print("There is no active window scene")
      return
    }

    // Get the root view controller from the window scene.
    guard
      let rootViewController = windowScene.windows.first(where: { $0.isKeyWindow })?
        .rootViewController
    else {
      print("There is no key window or root view controller")
      return
    }

    // Start the sign-in process.
    GIDSignIn.sharedInstance.signIn(
      withPresenting: rootViewController
    ) { signInResult, error in
      guard let result = signInResult else {
        // Inspect error
        print("Error signing in: \(error?.localizedDescription ?? "No error description")")
        return
      }

      DispatchQueue.main.async {
        self.user = result.user
      }

      // If sign in succeeded, display the app's main content View.
      print("ID Token: \(result.user.idToken?.tokenString ?? "")")
    }
  }

  func signOut() {
    GIDSignIn.sharedInstance.signOut()
    // After signing out, set the `user` state variable to `nil`.
    self.user = nil
  }
}

#Preview {
  ContentView()
}
UIkit
- 開啟「ViewController.swift」ViewController.swift。
- 在
viewDidLoad方法結尾新增下列restorePreviousSignIn呼叫:
// Attempt to restore a previous sign-in session
GIDSignIn.sharedInstance.restorePreviousSignIn { user, error in
  if let user = user {
    print("Successfully restored sign-in for user: \(user.profile?.givenName ?? "Unknown")")

    // Print the ID token when a session is restored.
    print("Restored ID Token: \(user.idToken?.tokenString ?? "")")

    // On success, update the UI for the signed-in state on the main thread.
    DispatchQueue.main.async {
      self.updateUI(for: user)
    }
  }
}
您的 ViewController.swift 檔案應如下所示:
import GoogleSignIn
import UIKit

class ViewController: UIViewController {

  // Create an instance of the Sign in with Google button
  let signInButton = GIDSignInButton()
  let signOutButton = UIButton(type: .system)
  let welcomeLabel = UILabel()

  override func viewDidLoad() {
    super.viewDidLoad()

    // Set the width and color of the sign-in button
    signInButton.style = .standard  // Options: .standard, .wide, .iconOnly
    signInButton.colorScheme = .dark  // Options: .dark, .light

    // Add the sign-in button to your view
    view.addSubview(signInButton)

    // Position the button using constraints
    signInButton.translatesAutoresizingMaskIntoConstraints = false
    NSLayoutConstraint.activate([
      signInButton.centerXAnchor.constraint(equalTo: view.centerXAnchor),
      signInButton.centerYAnchor.constraint(equalTo: view.centerYAnchor),
    ])

    // Add a target to the button to call a method when it's pressed
    signInButton.addTarget(self, action: #selector(signInButtonTapped), for: .touchUpInside)

    // --- Set up the Welcome Label ---
    welcomeLabel.translatesAutoresizingMaskIntoConstraints = false
    welcomeLabel.textAlignment = .center
    welcomeLabel.font = .systemFont(ofSize: 24, weight: .bold)
    view.addSubview(welcomeLabel)

    NSLayoutConstraint.activate([
      welcomeLabel.centerXAnchor.constraint(equalTo: view.centerXAnchor),
      welcomeLabel.bottomAnchor.constraint(equalTo: signInButton.topAnchor, constant: -20),
    ])

    // --- Set up the Sign-Out Button ---
    signOutButton.translatesAutoresizingMaskIntoConstraints = false
    signOutButton.setTitle("Sign Out", for: .normal)
    view.addSubview(signOutButton)

    NSLayoutConstraint.activate([
      signOutButton.centerXAnchor.constraint(equalTo: view.centerXAnchor),
      signOutButton.topAnchor.constraint(equalTo: signInButton.bottomAnchor, constant: 20),
    ])

    signOutButton.addTarget(self, action: #selector(signOutButtonTapped), for: .touchUpInside)

    // --- Set Initial UI State ---
    updateUI(for: nil)

    // Attempt to restore a previous sign-in session
    GIDSignIn.sharedInstance.restorePreviousSignIn { user, error in
      if let user = user {
        print("Successfully restored sign-in for user: \(user.profile?.givenName ?? "Unknown")")

        // Print the ID token when a session is restored.
        print("Restored ID Token: \(user.idToken?.tokenString ?? "")")

        // On success, update the UI for the signed-in state on the main thread.
        DispatchQueue.main.async {
          self.updateUI(for: user)
        }
      }
    }
  }

  // This method is called when the sign-in button is pressed.
  @objc func signInButtonTapped() {
    // Start the sign-in process.
    GIDSignIn.sharedInstance.signIn(withPresenting: self) { signInResult, error in
      guard let result = signInResult else {
        // Inspect error
        print("Error signing in: \(error?.localizedDescription ?? "No error description")")
        return
      }

      // If sign in succeeded, print the ID token.
      print("ID Token: \(result.user.idToken?.tokenString ?? "")")

      DispatchQueue.main.async {
        self.updateUI(for: result.user)
      }
    }
  }

  private func updateUI(for user: GIDGoogleUser?) {
    if let user = user {
      // User is signed in.
      signInButton.isHidden = true
      signOutButton.isHidden = false
      welcomeLabel.isHidden = false
      welcomeLabel.text = "Hello, \(user.profile?.givenName ?? "User")!"
    } else {
      // User is signed out.
      signInButton.isHidden = false
      signOutButton.isHidden = true
      welcomeLabel.isHidden = true
    }
  }

  @objc func signOutButtonTapped() {
    GIDSignIn.sharedInstance.signOut()
    // Update the UI for the signed-out state.
    updateUI(for: nil)
  }
}
測試自動登入功能
登入後,請完全關閉應用程式,然後再次啟動。現在應該會看到系統自動登入,不必輕觸按鈕。
10. 瞭解 ID 權杖
雖然 GIDGoogleUser 物件可讓您使用使用者名稱和電子郵件地址,輕鬆個人化 UI,但 SDK 傳回的最重要資料是 ID 權杖。
本程式碼研究室會使用線上工具檢查 JWT 內容。在正式版應用程式中,您應將這個 ID 權杖傳送至後端伺服器。伺服器必須驗證 ID 權杖的完整性,並使用 JWT 執行更有意義的操作,例如在後端平台建立新帳戶,或為使用者建立新工作階段。
存取及解碼 JWT 權杖
- 啟動應用程式。
- 開啟 Xcode 控制台。您應該會看到列印的 ID 權杖。看起來應該像
eyJhbGciOiJSUzI1Ni ... Hecz6Wm4Q。 - 複製 ID 權杖,並使用 jwt.io 等線上工具解碼 JWT。
解碼後的 JWT 如下所示:
{
  "alg": "RS256",
  "kid": "c8ab71530972bba20b49f78a09c9852c43ff9118",
  "typ": "JWT"
}
{
  "iss": "https://accounts.google.com",
  "azp": "171291171076-rrbkcjrp5jbte92ai9gub115ertscphi.apps.googleusercontent.com",
  "aud": "171291171076-rrbkcjrp5jbte92ai9gub115ertscphi.apps.googleusercontent.com",
  "sub": "10769150350006150715113082367",
  "email": "example@example.com",
  "email_verified": true,
  "at_hash": "JyCYDmHtzhjkb0-qJhKsMg",
  "name": "Kimya",
  "picture": "https://lh3.googleusercontent.com/a/ACg8ocIyy4VoR31t_n0biPVcScBHwZOCRaKVDb_MoaMYep65fyqoAw=s96-c",
  "given_name": "Kimya",
  "iat": 1758645896,
  "exp": 1758649496
}
重要權杖欄位
解碼後的 ID 權杖包含不同用途的欄位。有些詳細資料很容易理解,例如姓名和電子郵件地址,其他資料則供後端伺服器用於驗證。
請特別留意下列欄位:
- sub:
sub欄位是使用者 Google 帳戶的專屬永久 ID。使用者可以變更主要電子郵件地址或名稱,但subID 永遠不會變更。因此,sub欄位非常適合做為後端使用者帳戶的主鍵。
如要進一步瞭解所有權杖欄位的意義,請參閱「從 ID 權杖取得使用者資訊」。
11. 使用 App Check 保護應用程式
強烈建議您啟用 App Check,確保只有您的應用程式能代表專案存取 Google 的 OAuth 2.0 端點。App Check 會驗證傳送至後端服務的要求,確認是否確實來自您的應用程式,且裝置未經竄改。
本節說明如何將 App Check 整合至應用程式,並設定在模擬器中偵錯,以及在實際裝置上執行的正式版建構作業。
主控台設定
將 App Check 整合至應用程式時,您需要在 Google Cloud 和 Firebase 控制台中進行一次性設定。包括在 Google Cloud 控制台中為 iOS OAuth 用戶端啟用 App Check、建立 API 金鑰以搭配 App Check 偵錯供應商使用,以及將 Google Cloud 專案連結至 Firebase。
在 Google Cloud 控制台中啟用 App Check
- 前往與 Google Cloud 雲端專案相關聯的「用戶端」清單。
- 選取為 iOS 應用程式建立的 OAuth 2.0 用戶端 ID。
- 在「Google Identity for iOS」下方開啟「App Check」

- 按一下 [儲存]。
建立 API 金鑰
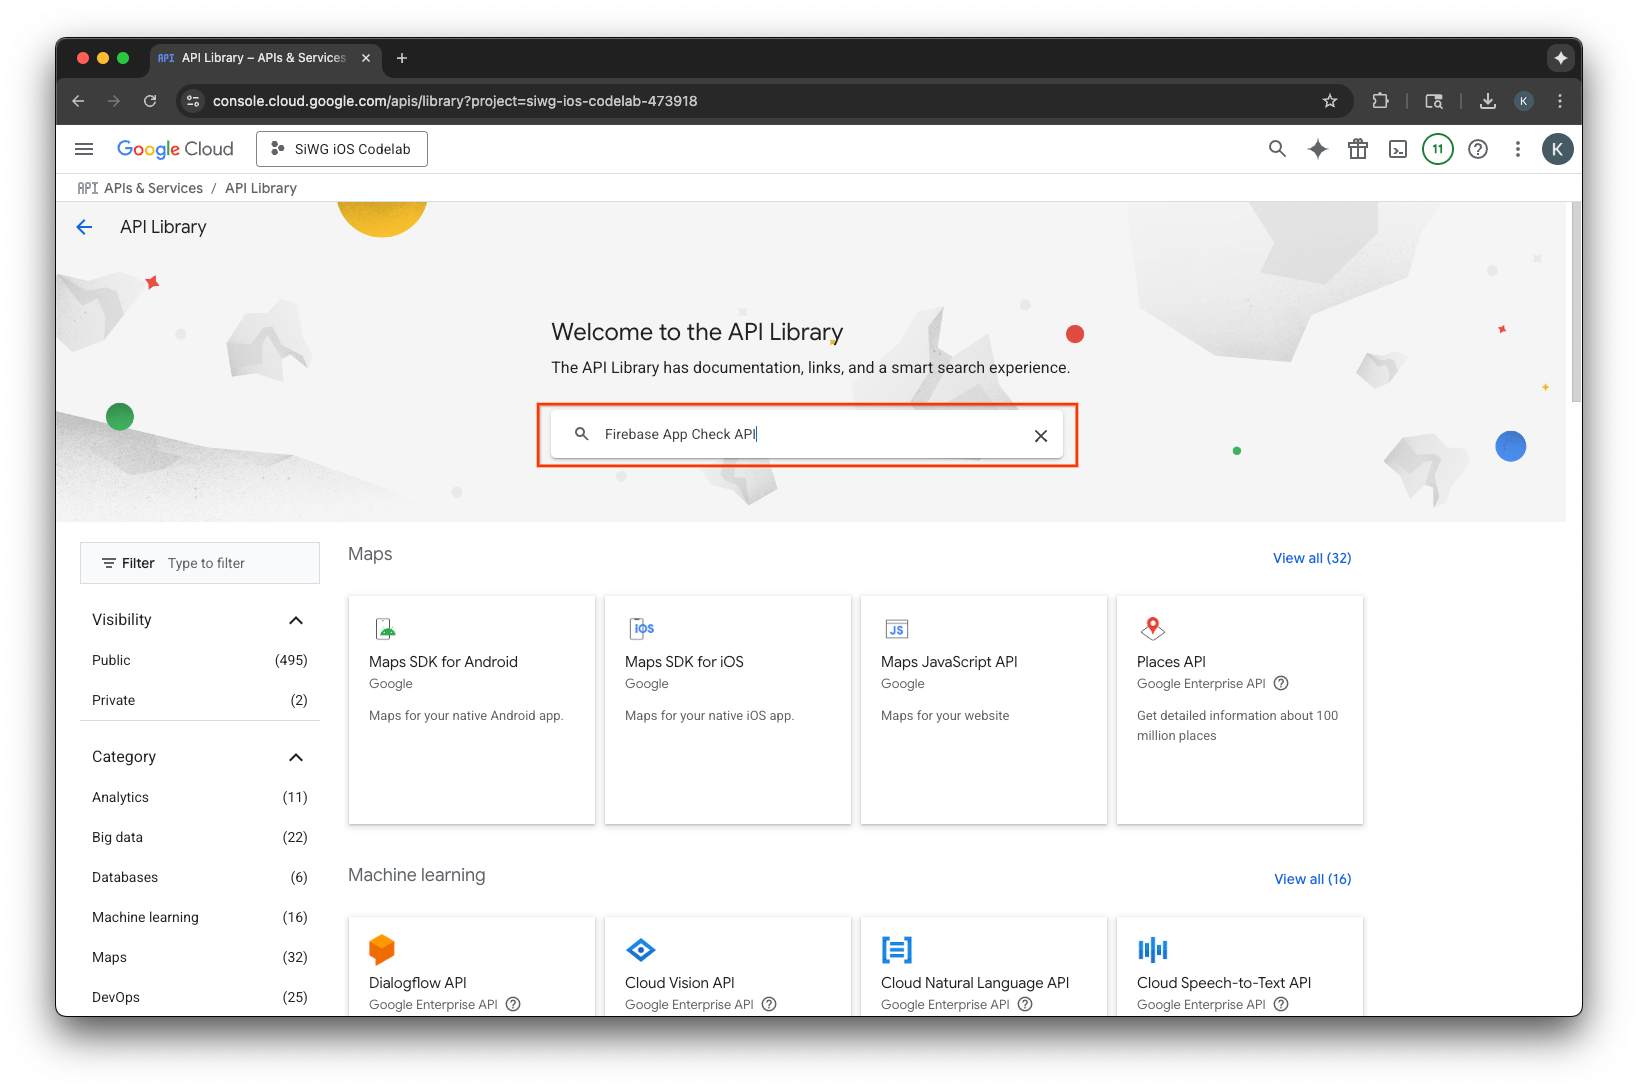
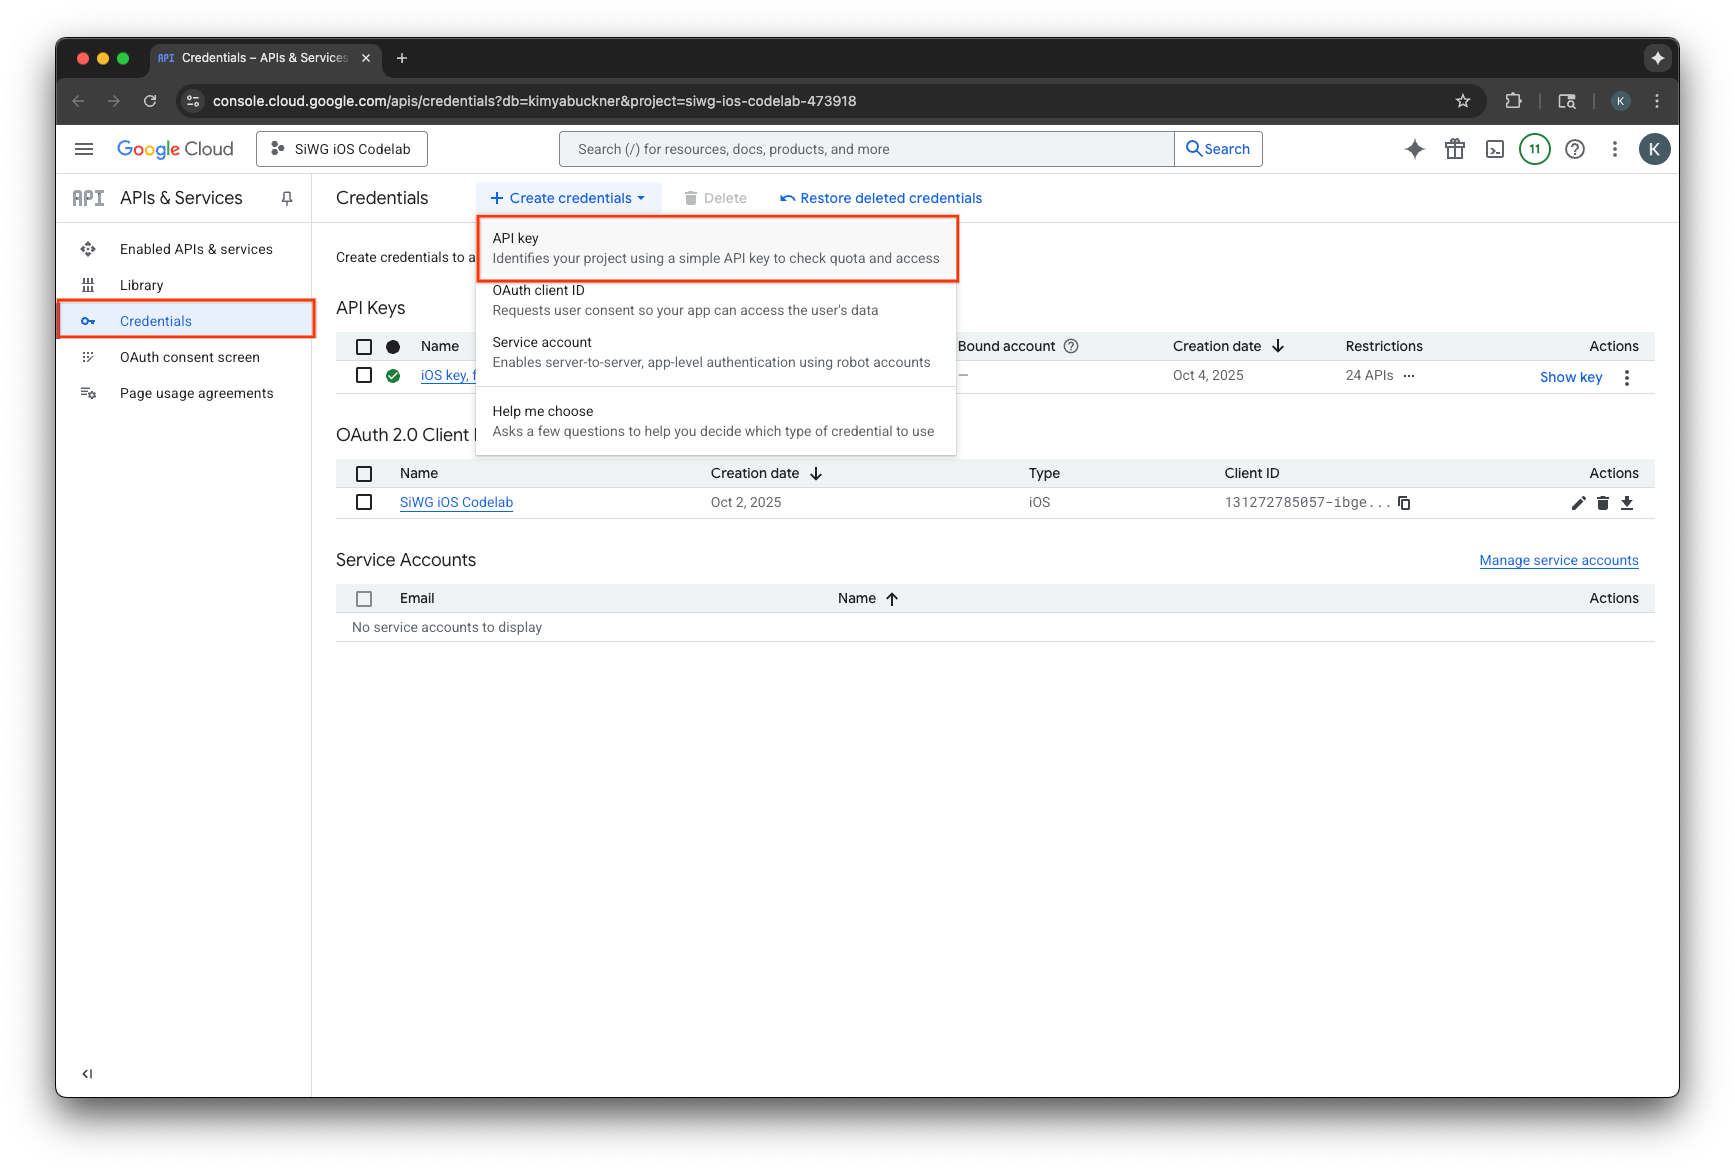
- 為這個 API 金鑰指派名稱。
- 在「應用程式限制」下方,選取「iOS 應用程式」。
- 將應用程式的軟體包 ID 新增為已核准的應用程式。
- 在「API 限制」下方選取「限制金鑰」。
- 從下拉式選單中選取「Firebase App Check API」。
- 選取「建立」。
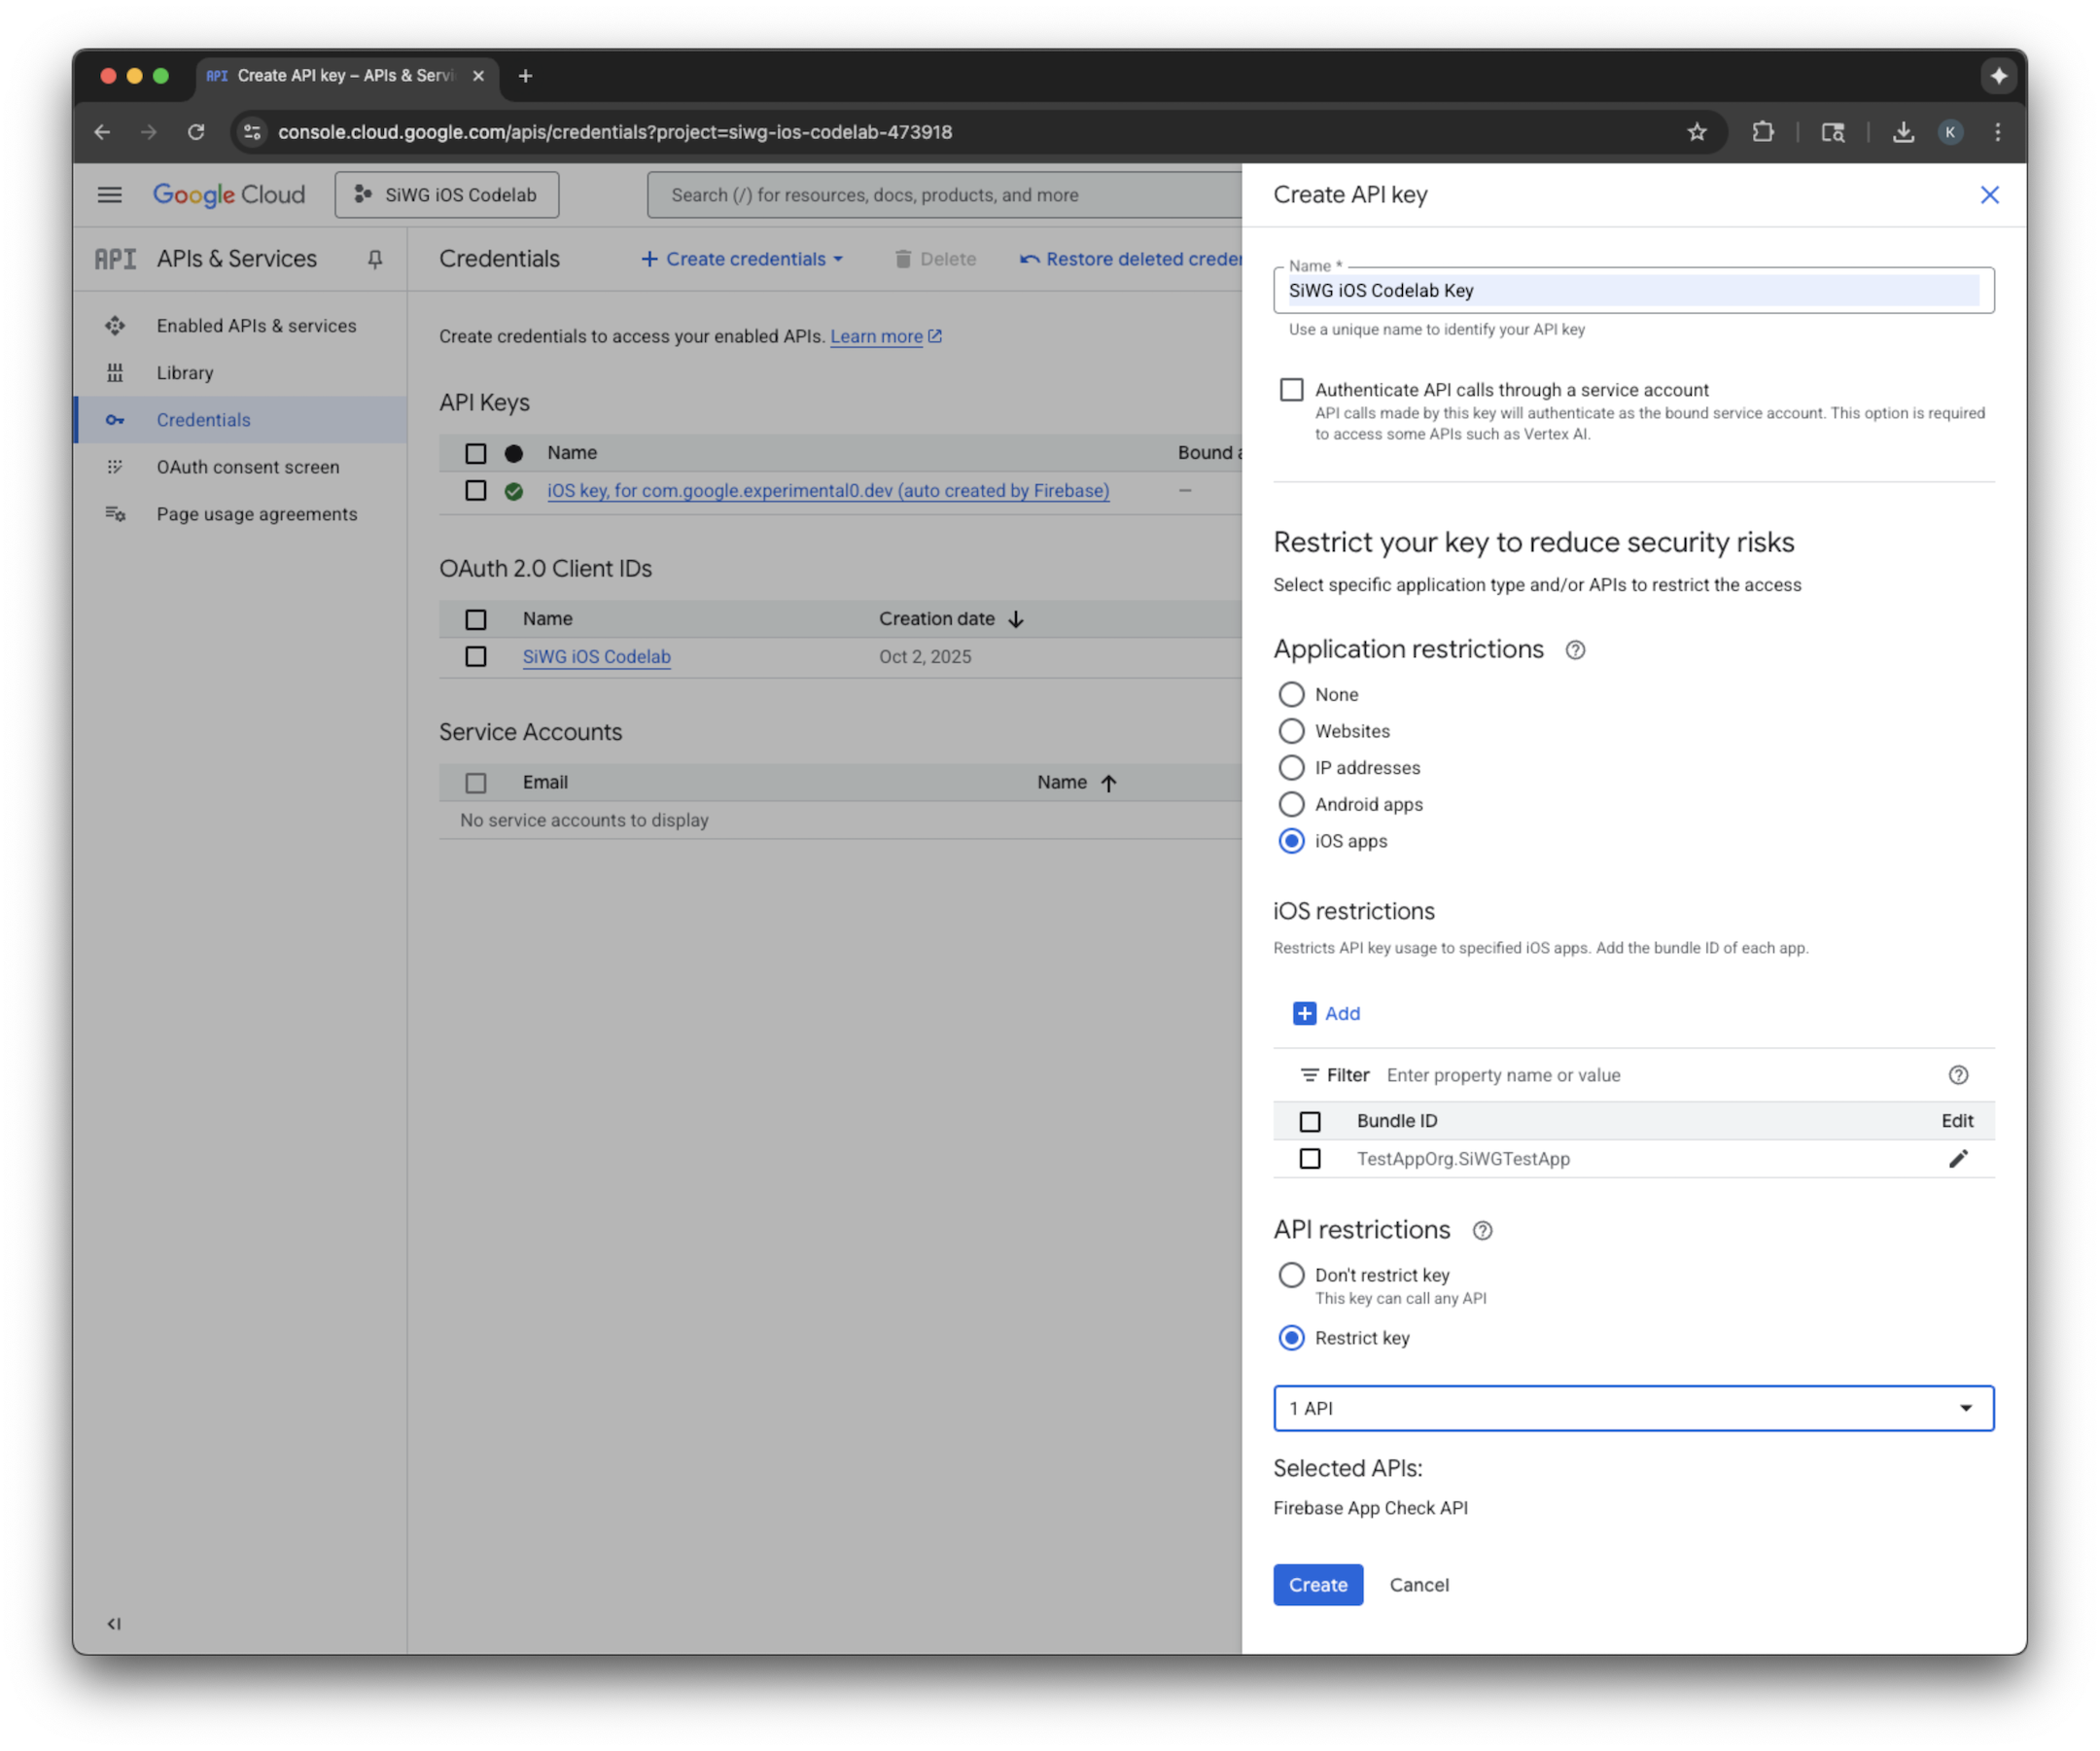
- 複製建立的 API 金鑰。後續步驟將會用到。
將 Firebase 新增至 Google Cloud 專案
- 前往 Firebase 控制台。
- 選取「如要開始使用,請設定 Firebase 專案」。
- 選取「將 Firebase 新增到 Google Cloud 專案」。
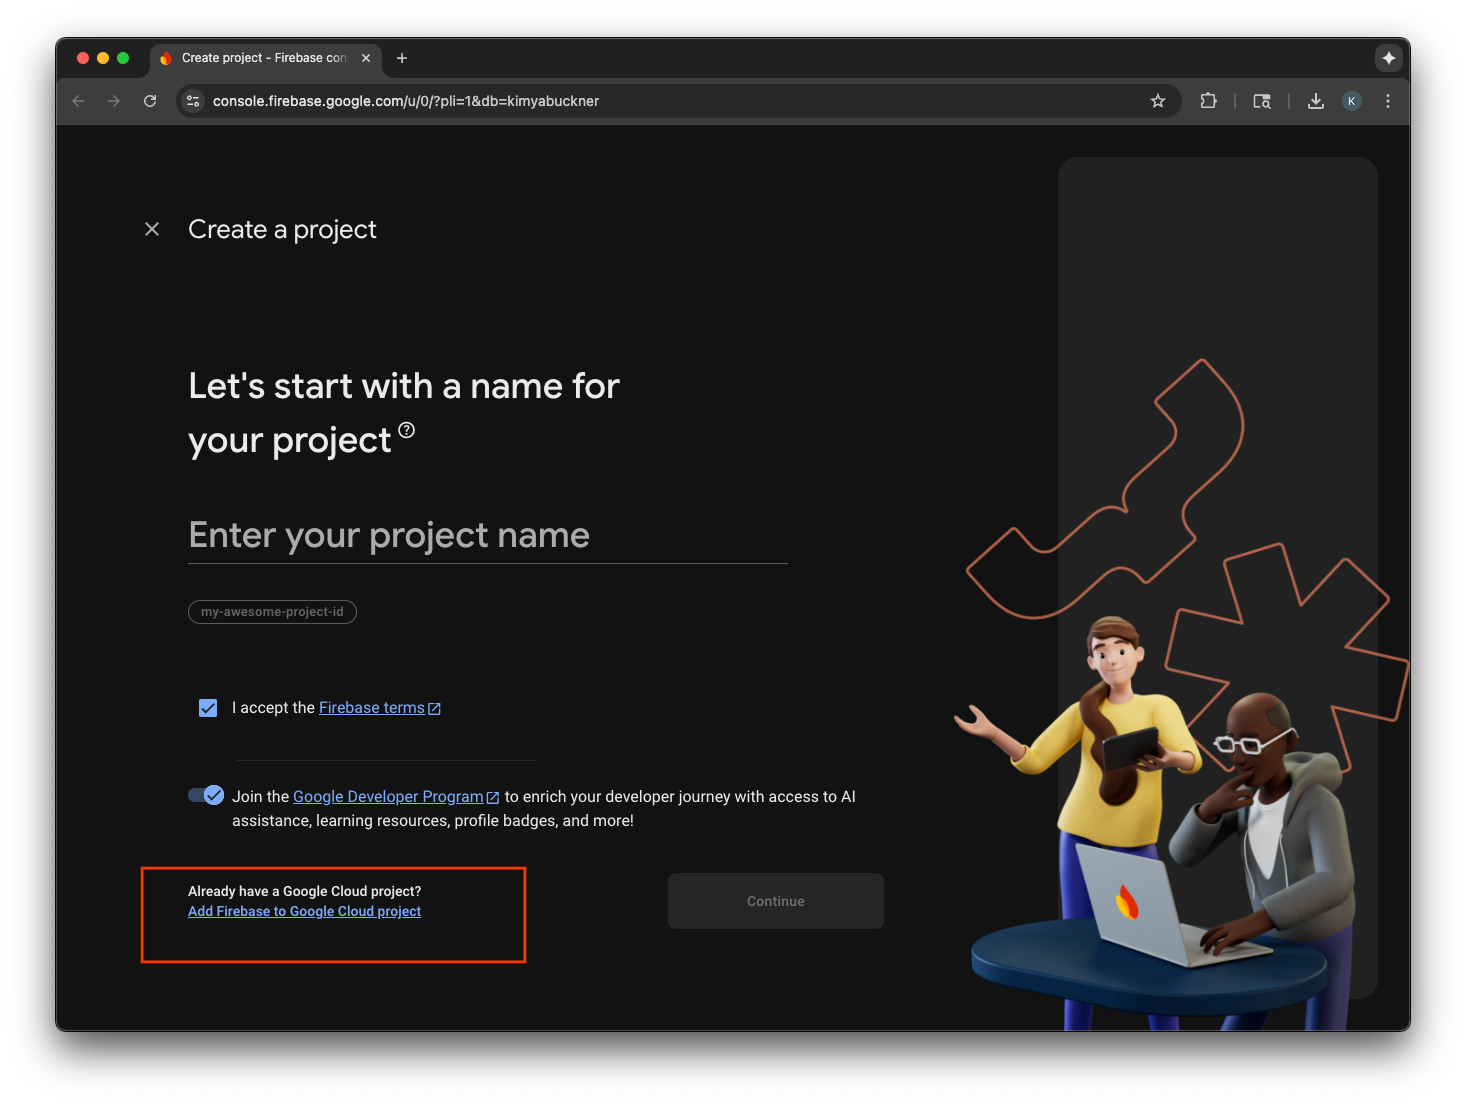
- 從下拉式選單中選取 Google Cloud 專案,然後繼續完成註冊流程。
- 選取「新增 Firebase」。
- Firebase 專案準備就緒後,請選取「繼續」開啟專案。
整合用戶端程式碼
設定 Google Cloud 雲端專案以啟用 App Check 後,接下來請編寫用戶端程式碼來啟用這項功能。實際工作環境和偵錯環境使用的認證供應商不同。實際裝置上的正式版應用程式會使用 Apple 內建的 App Attest 服務證明自身真實性。不過,由於 iOS 模擬器無法提供這類驗證,因此偵錯環境需要傳遞 API 金鑰的特殊偵錯供應商。
下列程式碼會使用編譯器指令,在建構時間自動選取正確的供應商,處理這兩種情況。
SwiftUI
- 開啟主要應用程式檔案。
- 在匯入作業完成後,以及
@main屬性之前,定義下列AppDelegate類別:
class AppDelegate: NSObject, UIApplicationDelegate {
  func application(
    _ application: UIApplication,
    didFinishLaunchingWithOptions launchOptions: [UIApplication.LaunchOptionsKey: Any]? = nil
  ) -> Bool {

    #if targetEnvironment(simulator)
      // Configure for debugging on a simulator.
      // TODO: Replace "YOUR_API_KEY" with the key from your Google Cloud project.
      let apiKey = "YOUR_API_KEY"
      GIDSignIn.sharedInstance.configureDebugProvider(withAPIKey: apiKey) { error in
        if let error {
          print("Error configuring GIDSignIn debug provider: \(error)")
        }
      }
    #else
      // Configure GIDSignIn for App Check on a real device.
      GIDSignIn.sharedInstance.configure { error in
        if let error {
          print("Error configuring GIDSignIn for App Check: \(error)")
        } else {
          print("GIDSignIn configured for App Check.")
        }
      }
    #endif

    return true
  }
}
- 將提供的程式碼中的
"YOUR_API_KEY",換成您從 Google Cloud 控制台複製的 API 金鑰。 - 在
App結構體中,於body變數之前新增下列程式碼行。這會向應用程式生命週期註冊 AppDelegate 類別,允許該類別回應應用程式啟動和其他系統事件:
@UIApplicationDelegateAdaptor(AppDelegate.self) var delegate
主要應用程式檔案應如下所示:
import GoogleSignIn
import SwiftUI

class AppDelegate: NSObject, UIApplicationDelegate {
  func application(
    _ application: UIApplication,
    didFinishLaunchingWithOptions launchOptions: [UIApplication.LaunchOptionsKey: Any]? = nil
  ) -> Bool {

    #if targetEnvironment(simulator)
      // Configure for debugging on a simulator.
      // TODO: Replace "YOUR_API_KEY" with the key from your Google Cloud project.
      let apiKey = "YOUR_API_KEY"
      GIDSignIn.sharedInstance.configureDebugProvider(withAPIKey: apiKey) { error in
        if let error {
          print("Error configuring GIDSignIn debug provider: \(error)")
        }
      }
    #else
      // Configure GIDSignIn for App Check on a real device.
      GIDSignIn.sharedInstance.configure { error in
        if let error {
          print("Error configuring GIDSignIn for App Check: \(error)")
        } else {
          print("GIDSignIn configured for App Check.")
        }
      }
    #endif

    return true
  }
}

@main
struct iOS_Sign_in_with_Google_App: App {

  @UIApplicationDelegateAdaptor(AppDelegate.self) var delegate

  var body: some Scene {
    WindowGroup {
      ContentView()

        .onOpenURL { url in
          GIDSignIn.sharedInstance.handle(url)
        }
    }
  }
}
UIkit
- 開啟 AppDelegate.swift。
- 更新
application(_:didFinishLaunchingWithOptions:)方法,加入 App Check 初始化作業:
func application(
  _ application: UIApplication,
  didFinishLaunchingWithOptions launchOptions: [UIApplication.LaunchOptionsKey: Any]?
) -> Bool {

  #if targetEnvironment(simulator)
    // Configure for debugging on a simulator.
    // TODO: Replace "YOUR_API_KEY" with the key from your Google Cloud project.
    let apiKey = "YOUR_API_KEY"
    GIDSignIn.sharedInstance.configureDebugProvider(withAPIKey: apiKey) { error in
      if let error {
        print("Error configuring GIDSignIn debug provider: \(error)")
      }
    }
  #else
    // Configure GIDSignIn for App Check on a real device.
    GIDSignIn.sharedInstance.configure { error in
      if let error {
        print("Error configuring GIDSignIn for App Check: \(error)")
      }
    }
  #endif

  return true
}
- 將提供的程式碼中的
"YOUR_API_KEY",換成您從 Google Cloud 控制台複製的 API 金鑰。
您的 AppDelegate.swift 檔案應如下所示:
import GoogleSignIn
import UIKit

@main
class AppDelegate: UIResponder, UIApplicationDelegate {

  func application(
    _ application: UIApplication,
    didFinishLaunchingWithOptions launchOptions: [UIApplication.LaunchOptionsKey: Any]?
  ) -> Bool {

    #if targetEnvironment(simulator)
      // Configure for debugging on a simulator.
      // TODO: Replace "YOUR_API_KEY" with the key from your Google Cloud project.
      let apiKey = "YOUR_API_KEY"
      GIDSignIn.sharedInstance.configureDebugProvider(withAPIKey: apiKey) { error in
        if let error {
          print("Error configuring GIDSignIn debug provider: \(error)")
        }
      }
    #else
      // Configure GIDSignIn for App Check on a real device.
      GIDSignIn.sharedInstance.configure { error in
        if let error {
          print("Error configuring GIDSignIn for App Check: \(error)")
        }
      }
    #endif

    return true
  }

  func application(
    _ app: UIApplication,
    open url: URL,
    options: [UIApplication.OpenURLOptionsKey: Any] = [:]
  ) -> Bool {
    var handled: Bool

    handled = GIDSignIn.sharedInstance.handle(url)
    if handled {
      return true
    }
    // If not handled by this app, return false.
    return false
  }

  // MARK: UISceneSession Lifecycle

  func application(
    _ application: UIApplication,
    configurationForConnecting connectingSceneSession: UISceneSession,
    options: UIScene.ConnectionOptions
  ) -> UISceneConfiguration {
    // Called when a new scene session is being created.
    // Use this method to select a configuration to create the new scene with.
    return UISceneConfiguration(
      name: "Default Configuration",
      sessionRole: connectingSceneSession.role
    )
  }

  func application(
    _ application: UIApplication,
    didDiscardSceneSessions sceneSessions: Set<UISceneSession>
  ) {
    // Called when the user discards a scene session.
    // If any sessions were discarded while the application was not running, this will be called shortly after application:didFinishLaunchingWithOptions.
    // Use this method to release any resources that were specific to the discarded scenes, as they will not return.
  }
}
在模擬器上測試 App Check
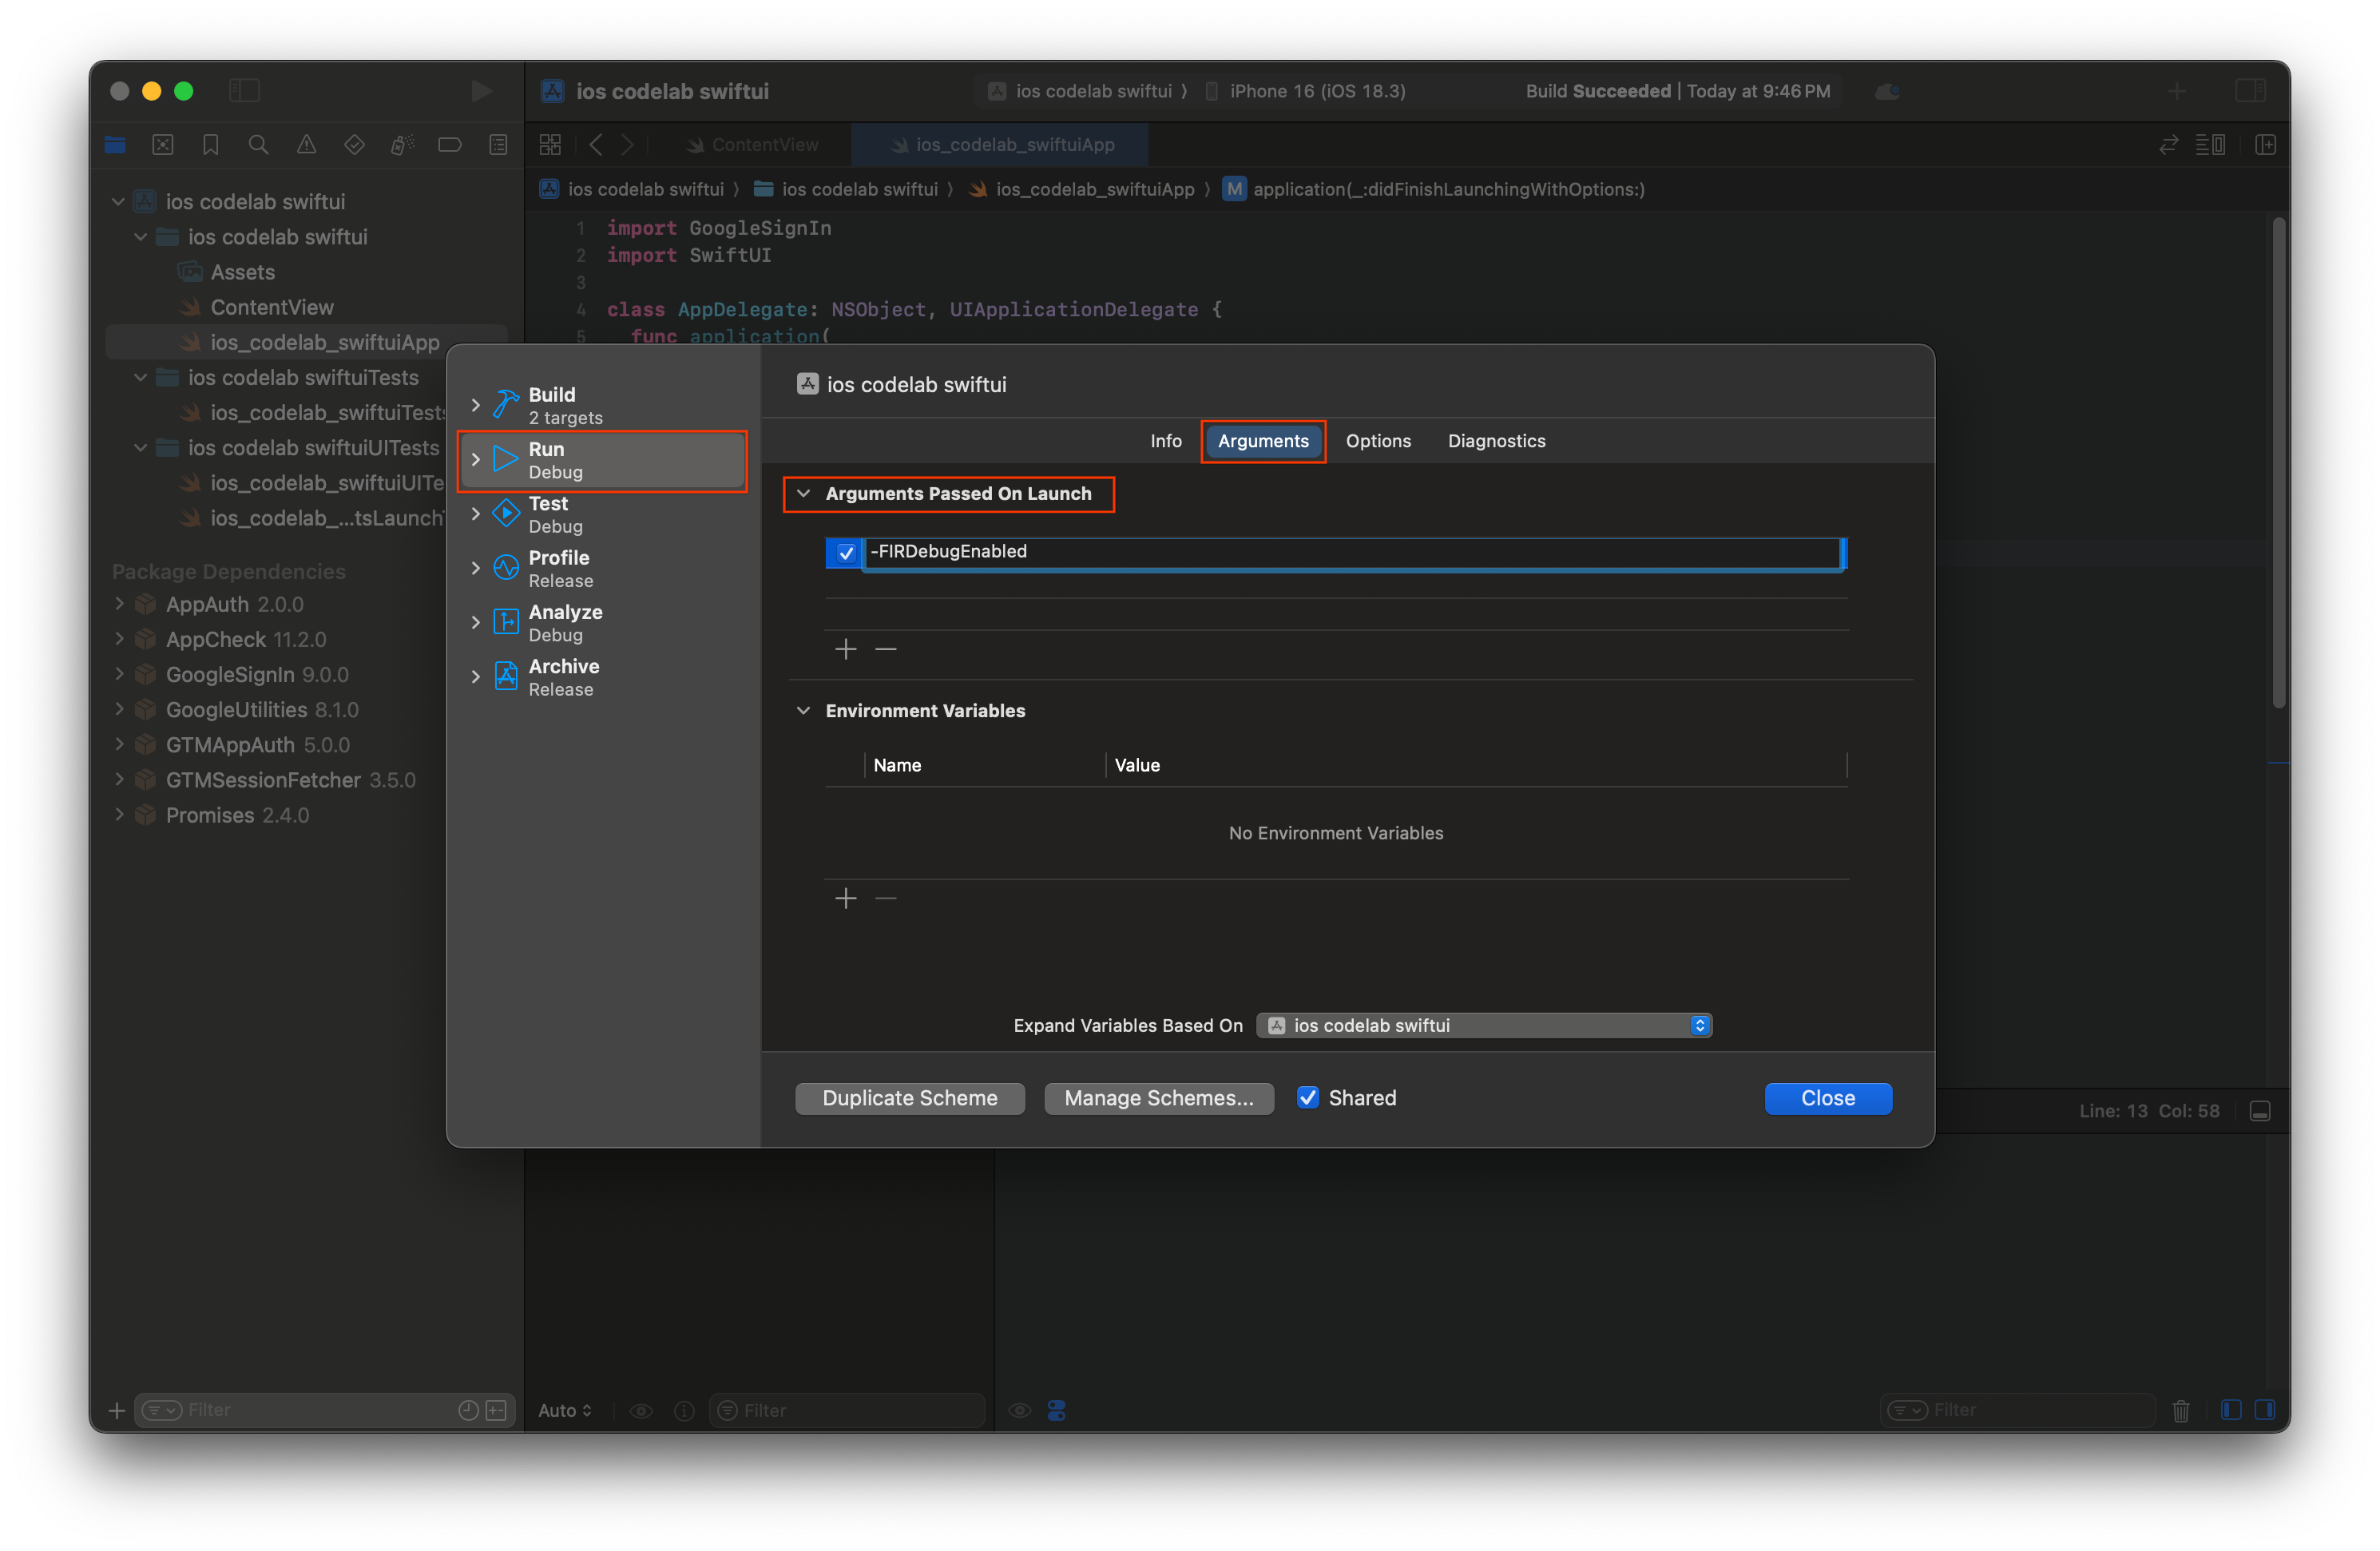
- 在 Xcode 選單列中,依序前往「Product」 >「Scheme」 >「Edit Scheme」。
- 選取導覽選單中的「執行」。
- 選取「Arguments」分頁標籤。
- 在「Arguments Passed on Launch」部分中,選取「+」並加入「-FIRDebugEnabled」。這個啟動引數會啟用 Firebase 偵錯記錄。
- 選取「關閉」。
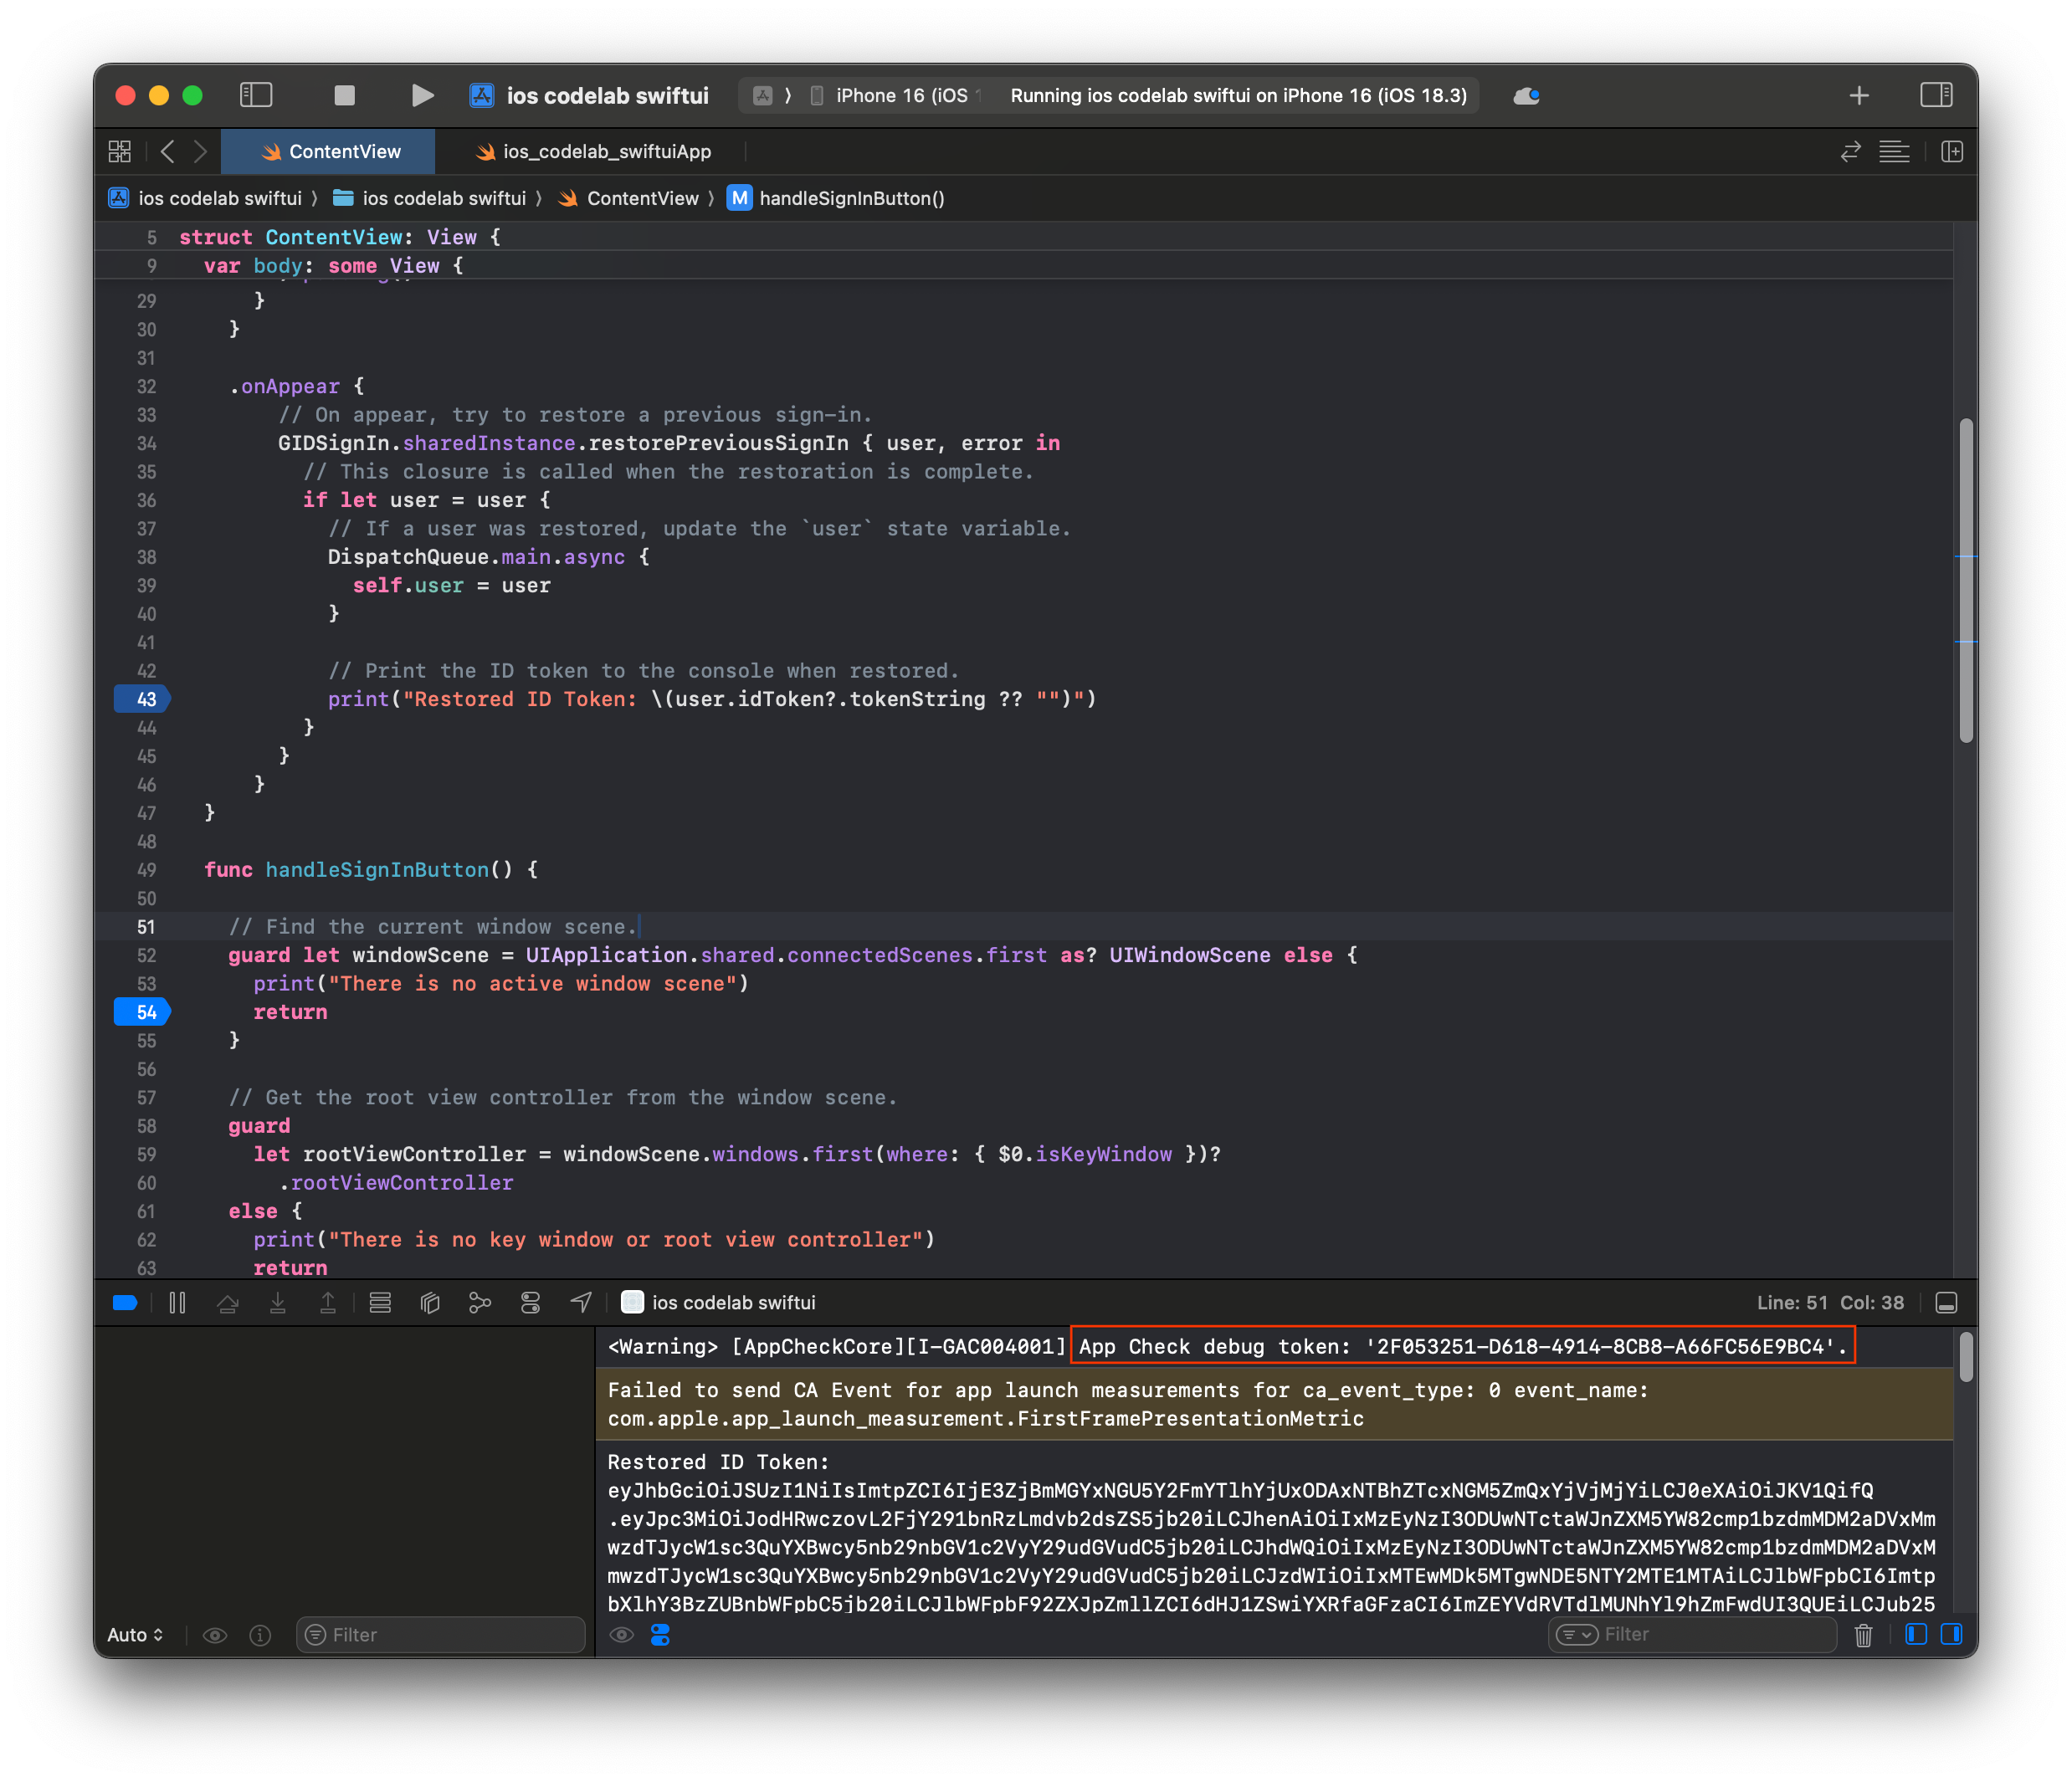
- 在模擬器上啟動應用程式。
- 複製 Xcode 控制台中列印的 App Check 偵錯權杖。
- 在 Firebase 控制台中前往您的專案。
- 展開導覽選單中的「建構」部分。
- 選取「App Check」。
- 選取「應用程式」分頁標籤。
- 將滑鼠游標懸停在應用程式上,然後選取三點選單圖示。
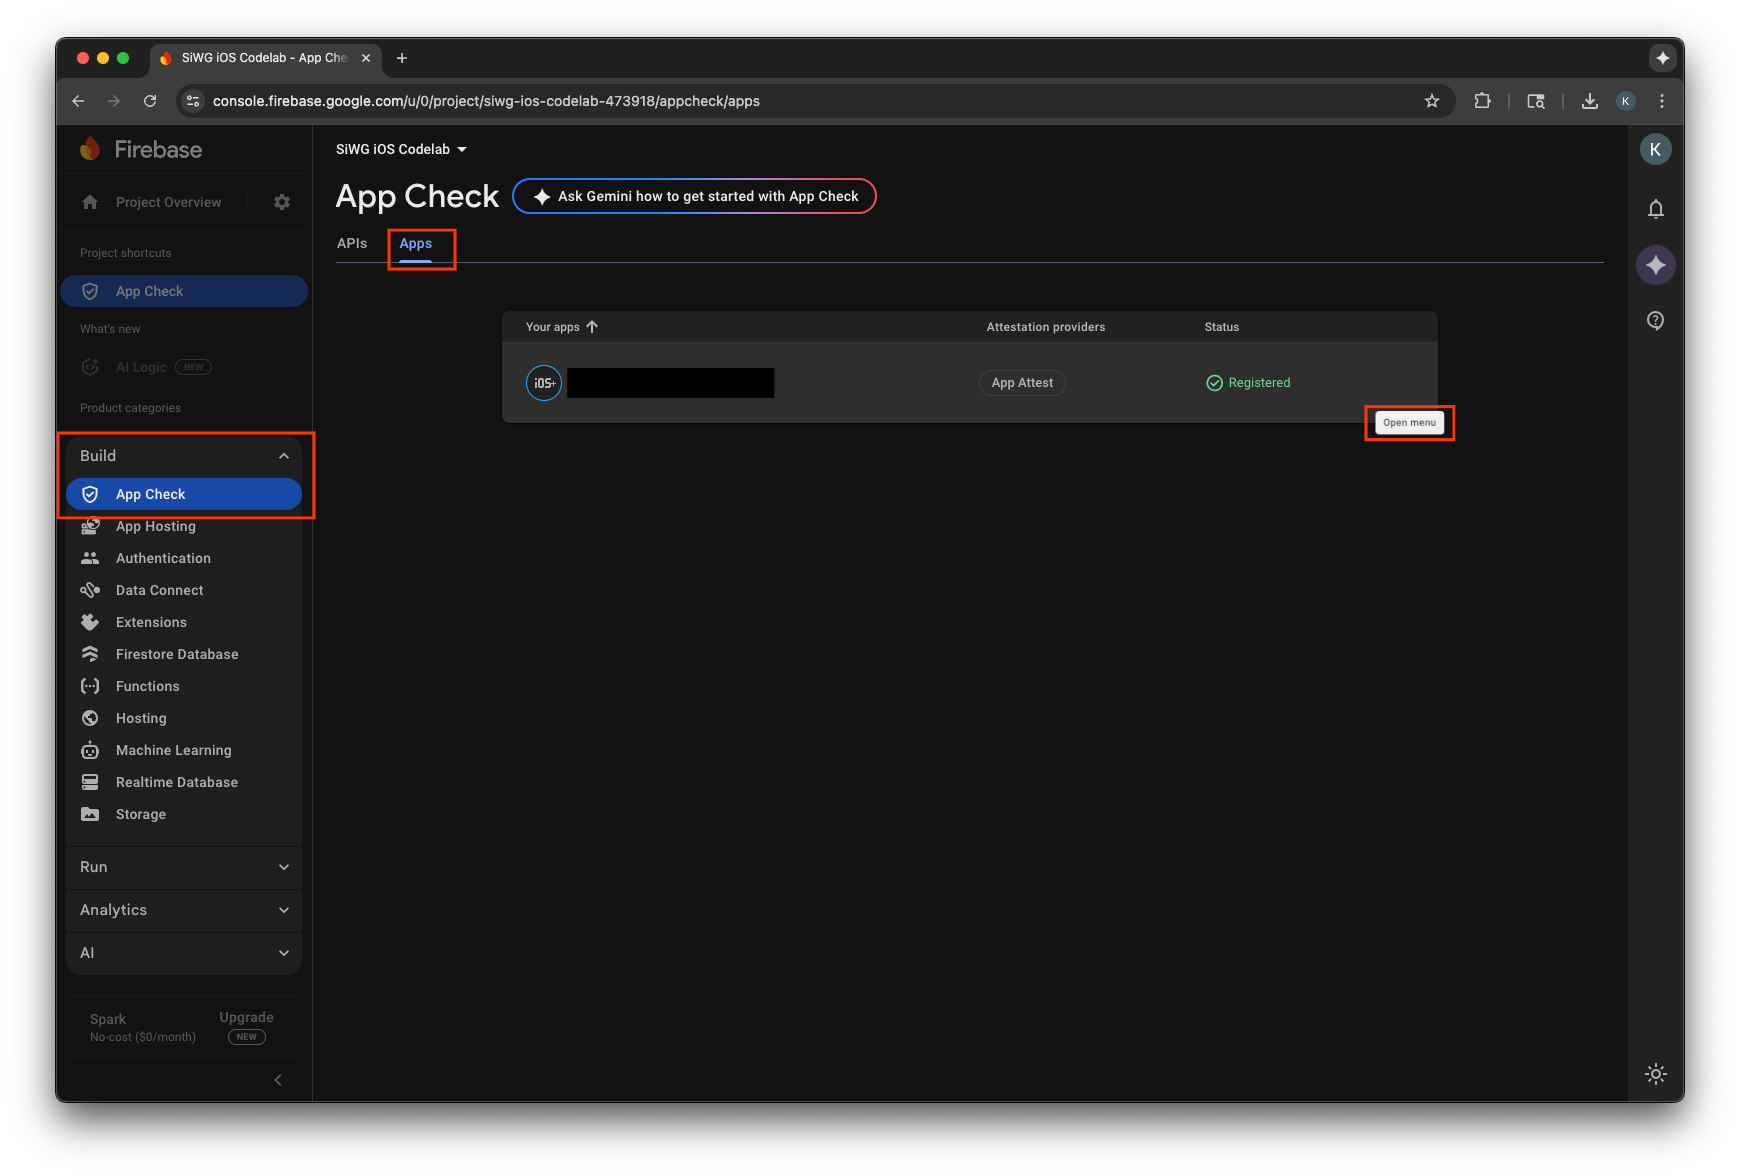
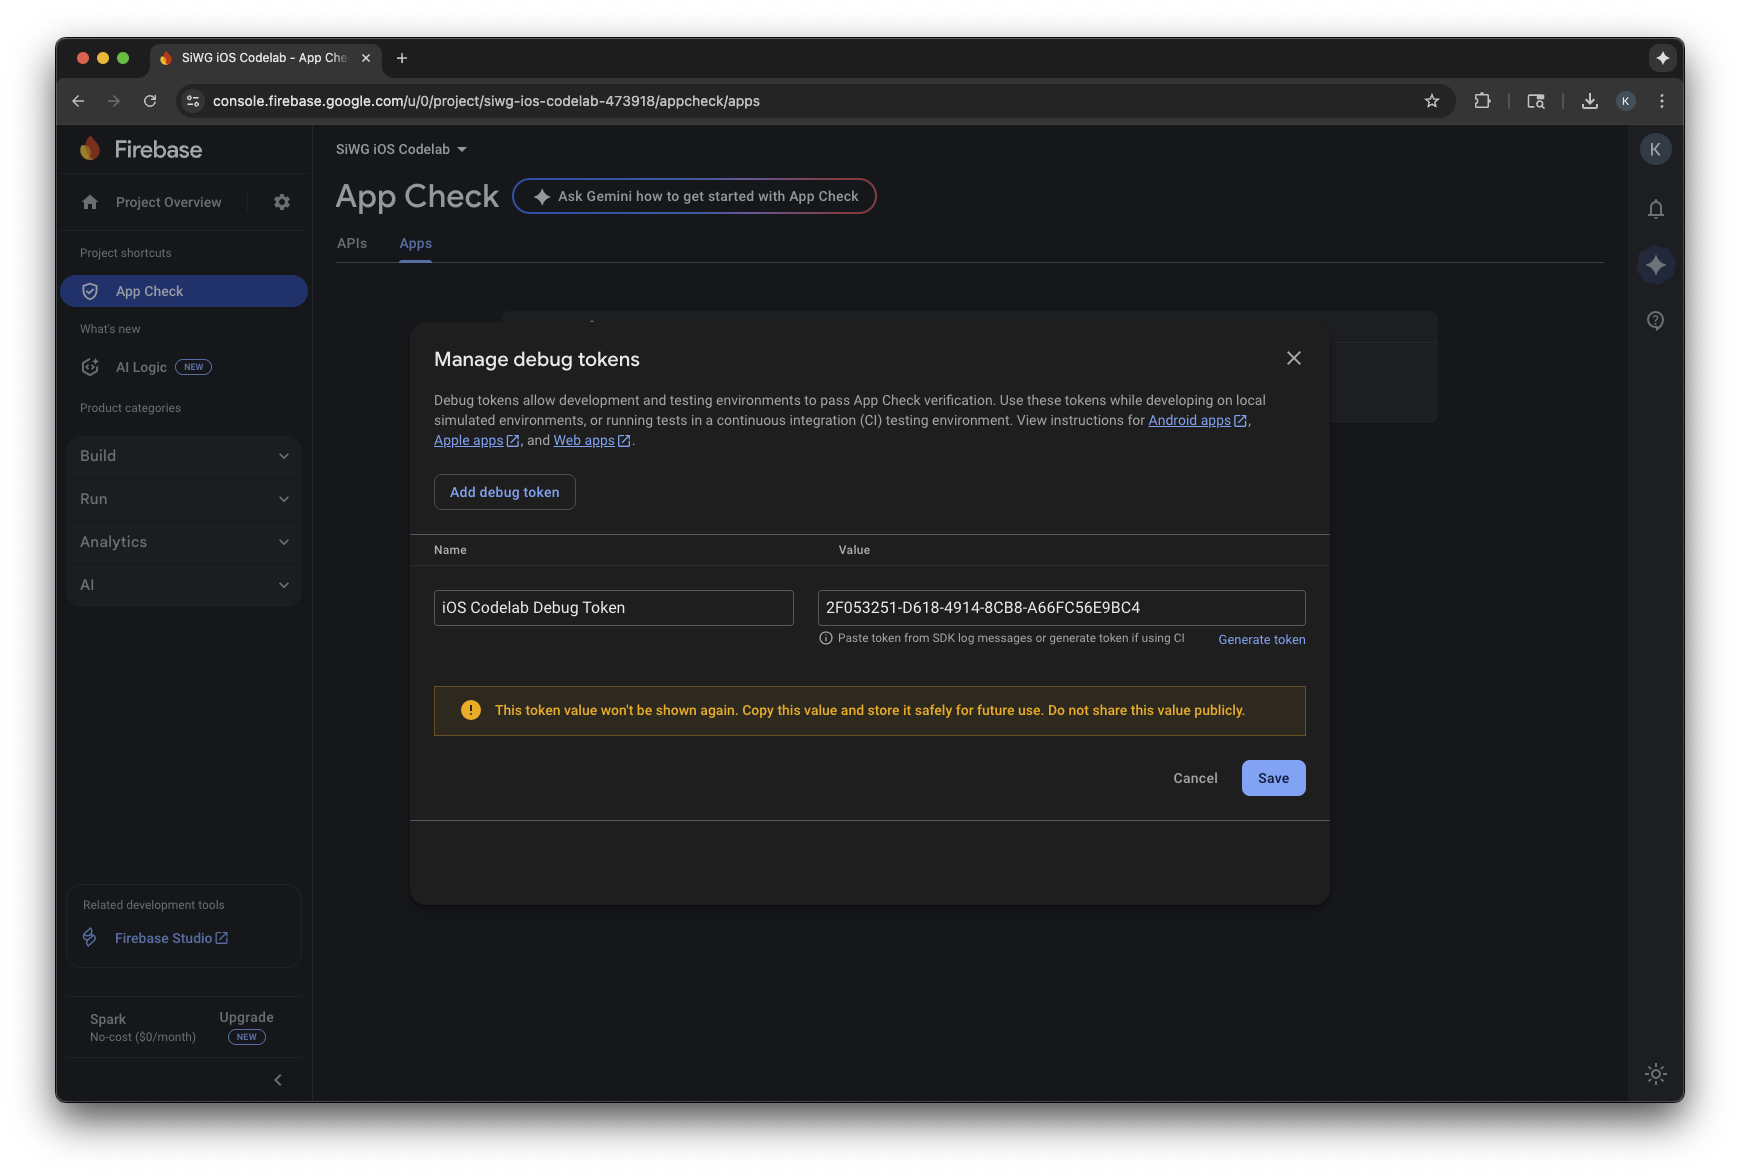
- 選取「管理偵錯符記」。
- 選取「新增偵錯符記」。
- 為偵錯權杖命名,然後貼上先前複製的偵錯權杖值。
- 選取「儲存」即可註冊權杖。
- 返回模擬器並登入。
指標可能需要幾分鐘才會顯示在控制台中。確認完成後,您可以在下列任一位置查看「已驗證」要求是否增加,確認 App Check 是否正常運作:
- 在 Firebase 控制台的「App Check」部分,位於「API」分頁標籤下方。
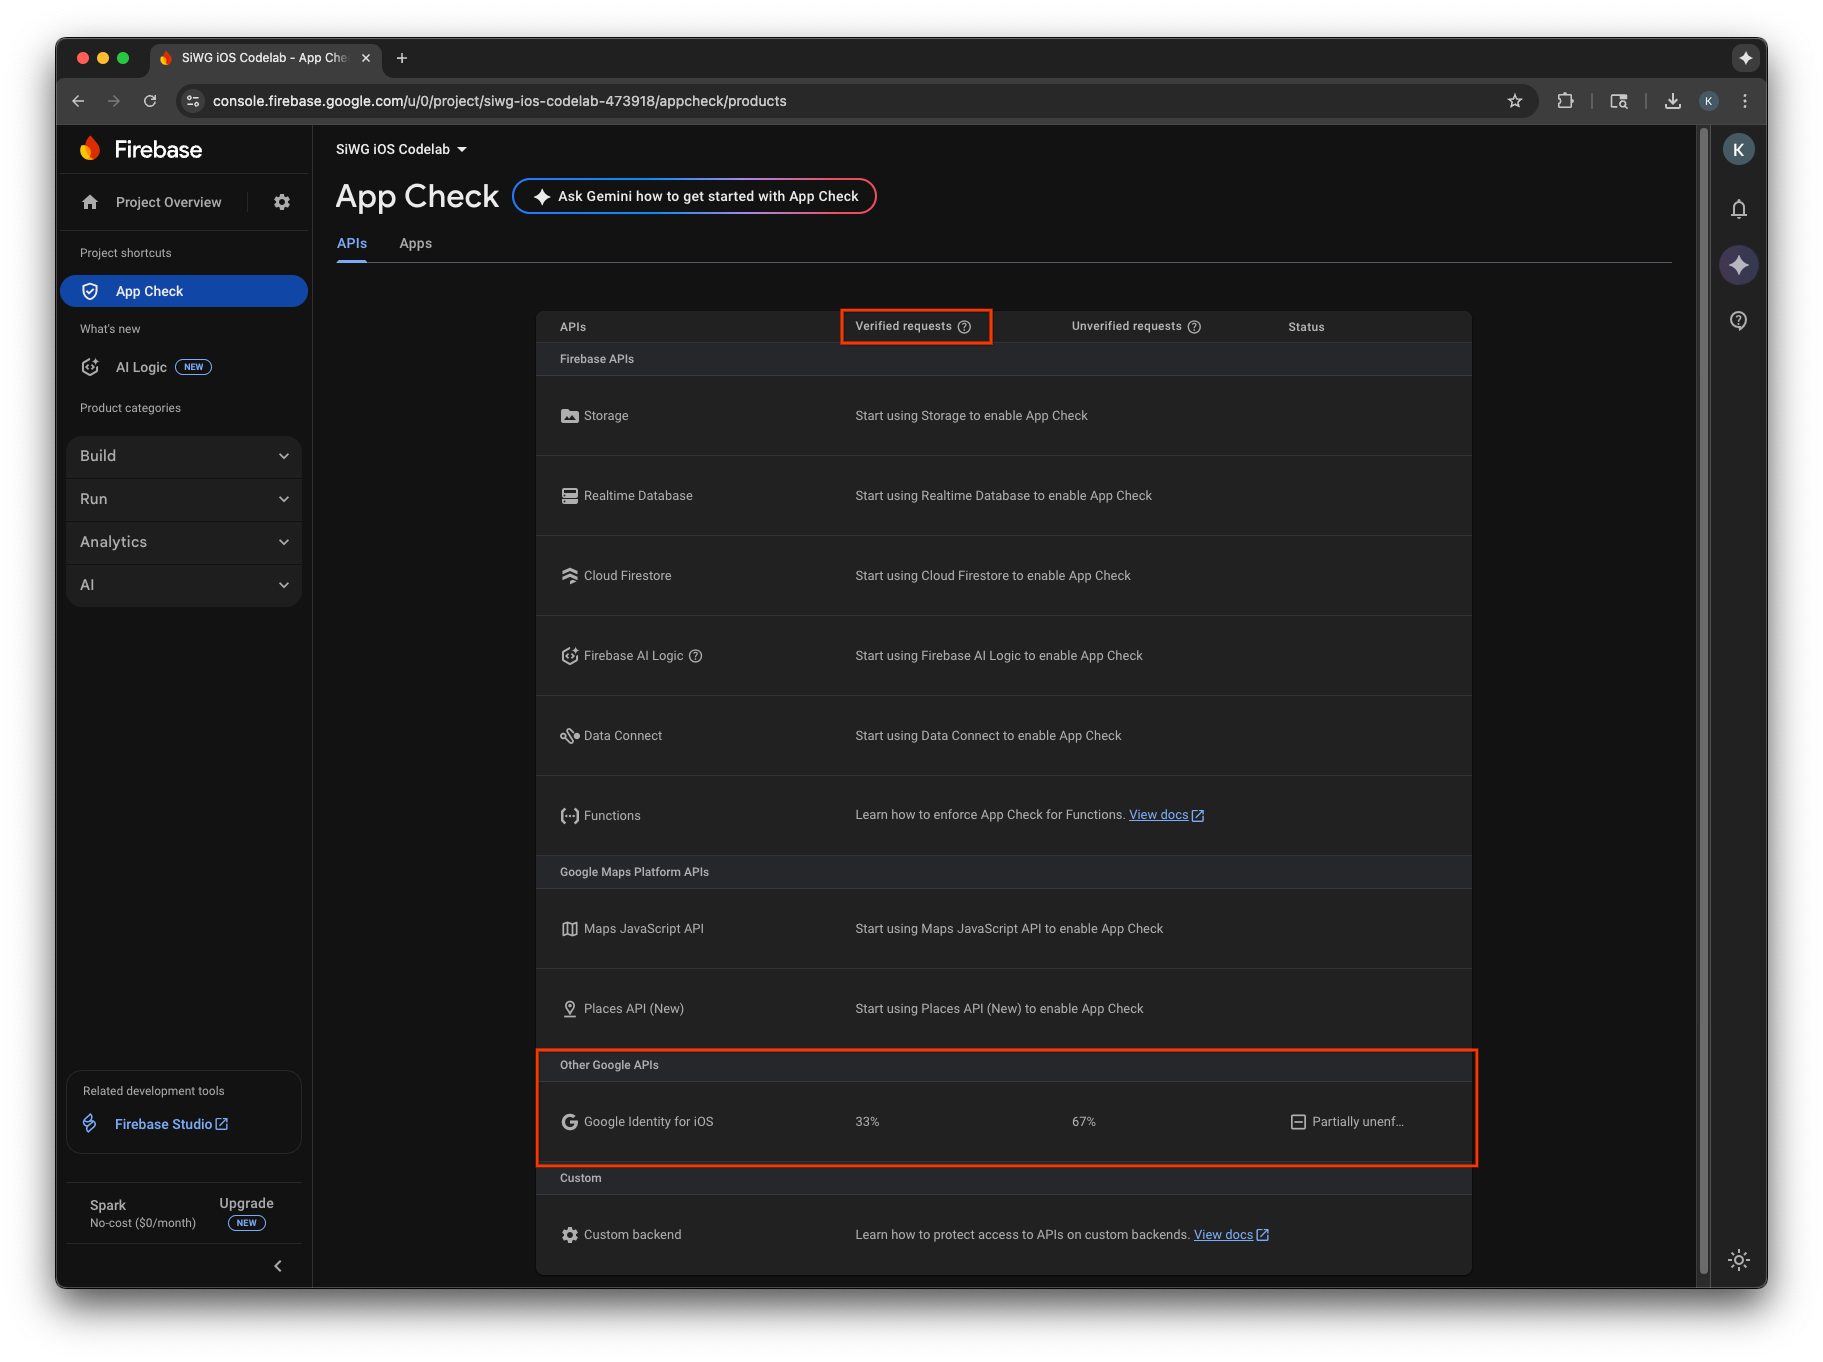
- 在 Google Cloud 控制台的 OAuth 用戶端編輯頁面。
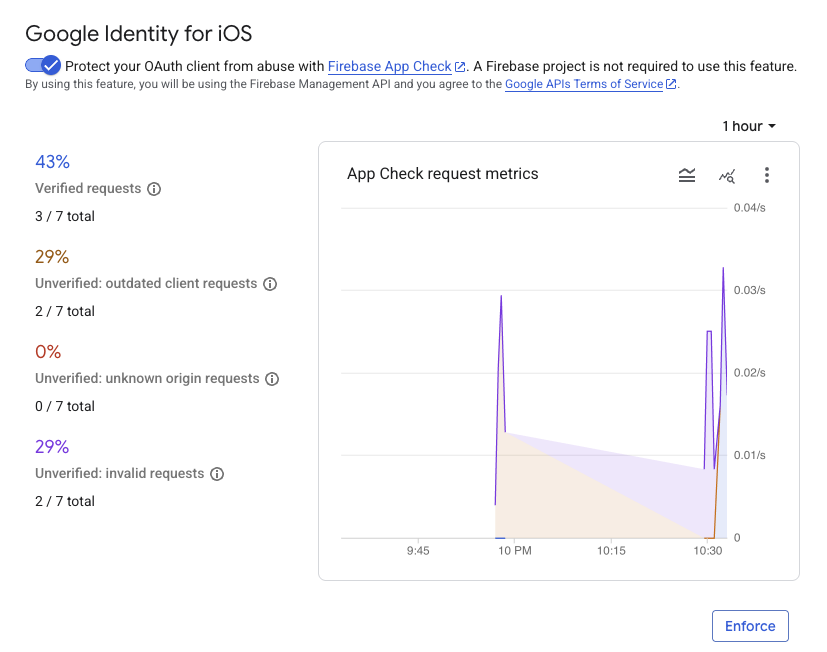
監控應用程式的 App Check 指標,確認系統正在驗證合法要求後,請啟用 App Check 強制執行功能。強制執行後,App Check 會拒絕所有未經驗證的要求,確保只有來自您正版應用程式的流量,才能代表專案存取 Google 的 OAuth 2.0 端點。
12. 其他資源
恭喜!
您已設定 OAuth 2.0 iOS 用戶端、在 iOS 應用程式中新增「使用 Google 帳戶登入」按鈕、瞭解如何自訂按鈕外觀、解碼 JWT ID 權杖,以及為應用程式啟用 App Check。
這些連結或許有助於採取後續行動:
- 如何開始使用 iOS 適用的 Google 登入
- iOS 適用的 Google 登入存放區
- 驗證 Google ID 權杖
- 開始在 iOS 裝置上使用 App Check 進行 Google 登入
- 撤銷存取權杖並中斷應用程式連線
- 進一步瞭解 Google Cloud 專案
- Google Identity 驗證方式
- 啟用 App Check 強制執行功能