1. Introduction
Spanner is a fully managed, horizontally scalable, globally distributed database service that is great for both relational and non-relational operational workloads.
Spanner has built-in vector search support, enabling you to perform similarity or semantic search and implement retrieval augmented generation (RAG) in GenAI applications at scale, leveraging either exact K-nearest neighbor (KNN) or approximate nearest neighbor (ANN) features.
Spanner's vector search queries return fresh real-time data as soon as transactions are committed, just like any other query on your operational data.
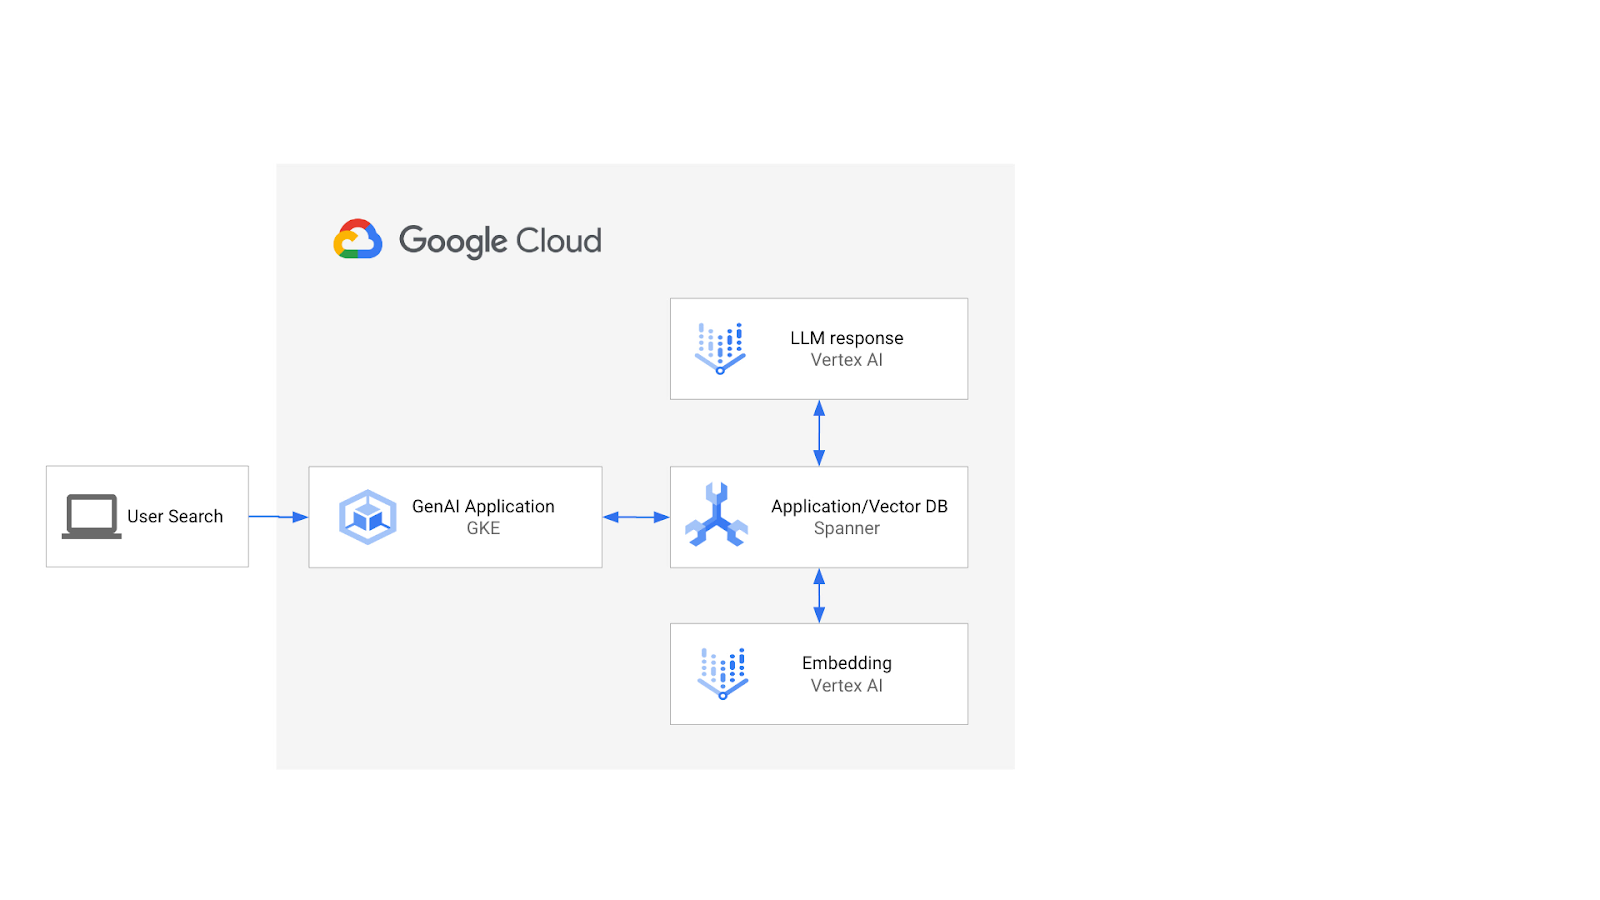
In this lab, you'll walk through setting up the basic features required to leverage Spanner to perform vector search, and access embedding and LLM models from VertexAI's model garden using SQL.
The architecture would look like this:
With that foundation, you will learn how to create a vector index backed by the ScaNN algorithm, and use the APPROX distance functions when your semantic workloads need to scale.
What you'll build
As part of this lab, you will:
- Create a Spanner instance
- Set up Spanner's database schema to integrate with embedding and LLM models in VertexAI
- Load a retail data set
- Issue similarity search queries against the dataset
- Provide context to the LLM model to generate product-specific recommendations.
- Modify the schema and create a vector index.
- Change the queries to leverage the newly created vector index.
What you'll learn
- How to setup a Spanner instance
- How to integrate with VertexAI
- How to use Spanner to perform vector search to find similar items in a retail dataset
- How to prepare your database to scale vector search workloads using ANN search.
What you'll need
2. Setup and requirements
Create a project
If you don't already have a Google Account (Gmail or Google Apps), you must create one. Sign-in to Google Cloud Platform console ( console.cloud.google.com) and create a new project.
If you already have a project, click on the project selection pull down menu in the upper left of the console:

and click the ‘NEW PROJECT' button in the resulting dialog to create a new project:

If you don't already have a project, you should see a dialog like this to create your first one:
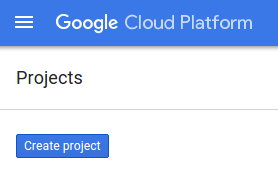
The subsequent project creation dialog allows you to enter the details of your new project:
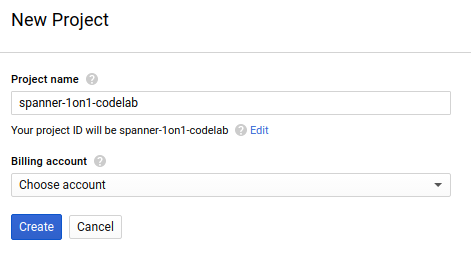
Remember the project ID, which is a unique name across all Google Cloud projects (the name above has already been taken and will not work for you, sorry!). It will be referred to later in this codelab as PROJECT_ID.
Next, if you haven't already done so, you'll need to enable billing in the Developers Console in order to use Google Cloud resources and enable the Spanner API.

Running through this codelab shouldn't cost you more than a few dollars, but it could be more if you decide to use more resources or if you leave them running (see "cleanup" section at the end of this document). Google Cloud Spanner pricing is documented here.
New users of Google Cloud Platform are eligible for a $300 free trial, which should make this codelab entirely free of charge.
Google Cloud Shell Setup
While Google Cloud and Spanner can be operated remotely from your laptop, in this codelab we will be using Google Cloud Shell, a command line environment running in the Cloud.
This Debian-based virtual machine is loaded with all the development tools you'll need. It offers a persistent 5GB home directory and runs in Google Cloud, greatly enhancing network performance and authentication. This means that all you will need for this codelab is a browser (yes, it works on a Chromebook).
- To activate Cloud Shell from the Cloud Console, simply click Activate Cloud Shell
 (it should only take a few moments to provision and connect to the environment).


Once connected to Cloud Shell, you should see that you are already authenticated and that the project is already set to your PROJECT_ID.
gcloud auth list
Command output
Credentialed accounts:
 - <myaccount>@<mydomain>.com (active)
gcloud config list project
Command output
[core]
project = <PROJECT_ID>
If, for some reason, the project is not set, simply issue the following command:
gcloud config set project <PROJECT_ID>
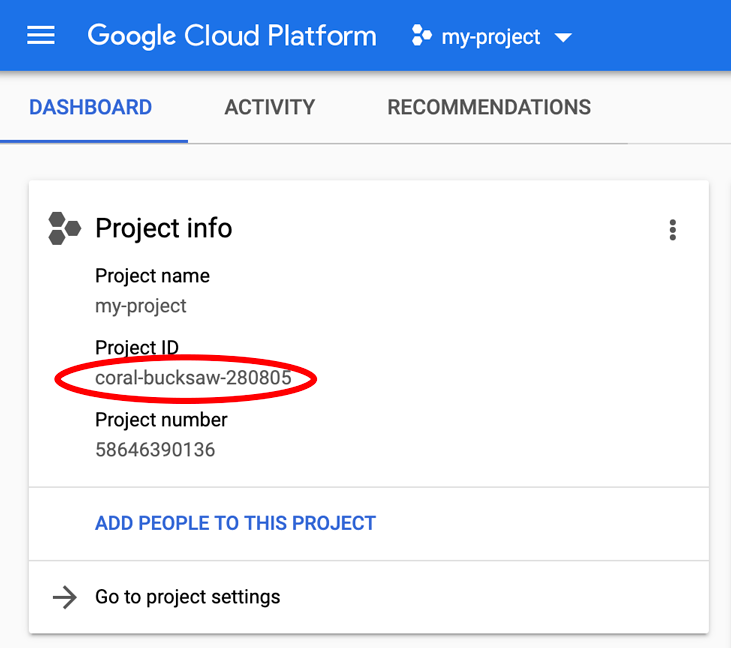
Looking for your PROJECT_ID? Check out what ID you used in the setup steps or look it up in the Cloud Console dashboard:
Cloud Shell also sets some environment variables by default, which may be useful as you run future commands.
echo $GOOGLE_CLOUD_PROJECT
Command output
<PROJECT_ID>
Enable the Spanner API
gcloud services enable spanner.googleapis.com
Summary
In this step you have set up your project if you didn't already have one, activated cloud shell, and enabled the required APIs.
Next up
Next, you will set up the Spanner instance and database.
3. Create a Spanner instance and database
Create the Spanner instance
In this step we set up our Spanner Instance for the codelab. To do this, open up Cloud Shell and run this command:
export SPANNER_INSTANCE_ID=retail-demo
gcloud spanner instances create $SPANNER_INSTANCE_ID \
--config=regional-us-central1 \
--description="spanner AI retail demo" \
--nodes=1
--edition=ENTERPRISE
Command output:
$ gcloud spanner instances create $SPANNER_INSTANCE_ID \
--config=regional-us-central1 \
--description="spanner AI retail demo" \
--nodes=1
--edition=ENTERPRISE
Creating instance...done.
Create the database
Once your instance is running, you can create the database. Spanner allows for multiple databases on a single instance.
The database is where you define your schema. You can also control who has access to the database, set up custom encryption, configure the optimizer, and set the retention period.
To create the database, again use the gcloud command line tool:
export SPANNER_DATABASE=cymbal-bikes
gcloud spanner databases create $SPANNER_DATABASE \
 --instance=$SPANNER_INSTANCE_ID
Command output:
$ gcloud spanner databases create $SPANNER_DATABASE \
 --instance=$SPANNER_INSTANCE_ID
Creating database...done.
Summary
In this step you have created the Spanner instance and database.
Next up
Next, you will set up the Spanner schema and data.
4. Load Cymbal schema and data
Create the Cymbal schema
To set up the schema, navigate to Spanner Studio:
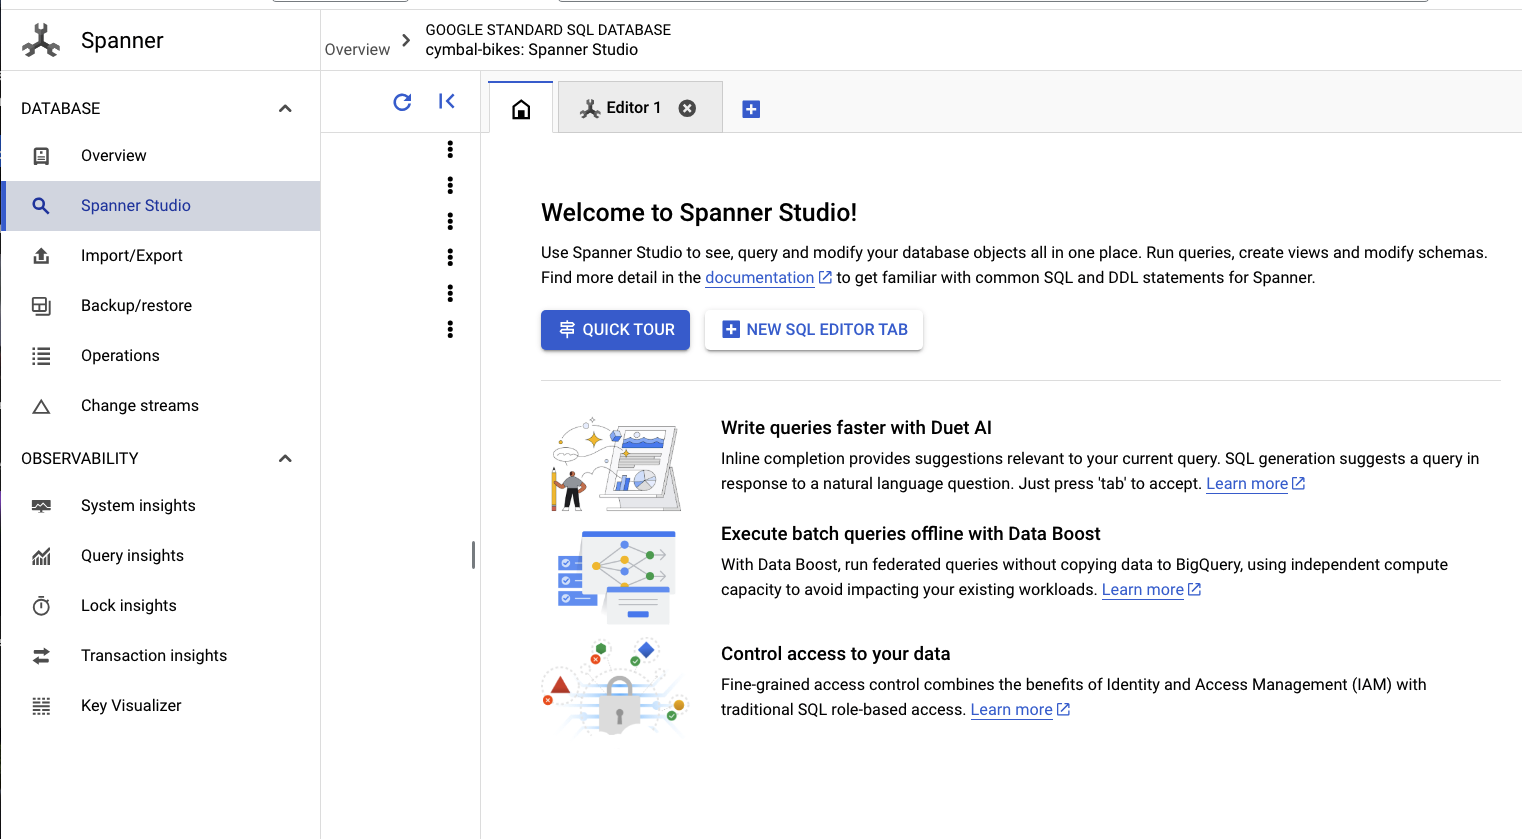
There are two parts to the schema. First, you want to add the products table. Copy and paste this statement in the empty tab.
For the schema, copy and paste this DDL into the box:
CREATE TABLE products (
categoryId INT64 NOT NULL,
productId INT64 NOT NULL,
productName STRING(MAX) NOT NULL,
productDescription STRING(MAX) NOT NULL,
productDescriptionEmbedding ARRAY<FLOAT32>,
createTime TIMESTAMP NOT NULL OPTIONS (
allow_commit_timestamp = true
),
inventoryCount INT64 NOT NULL,
priceInCents INT64,
) PRIMARY KEY(categoryId, productId);
Then, click the run button and wait a few seconds for your schema to be created.
Next, you will create the two models and configure them to VertexAI model endpoints.
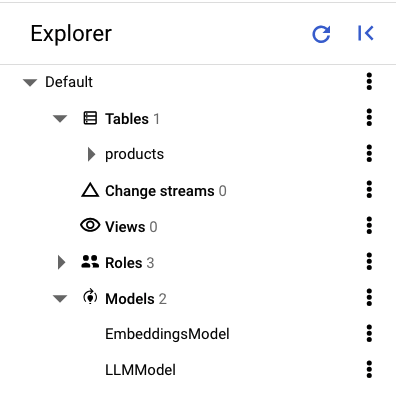
The first model is an Embedding model that is used to generate embeddings from text, and the second is an LLM model used to generate responses based on the data in Spanner.
Paste the following schema into a new tab in Spanner Studio:
CREATE MODEL EmbeddingsModel INPUT(
content STRING(MAX),
) OUTPUT(
embeddings STRUCT<statistics STRUCT<truncated BOOL, token_count FLOAT32>, values ARRAY<FLOAT32>>,
) REMOTE OPTIONS (
endpoint = '//aiplatform.googleapis.com/projects/<PROJECT_ID>/locations/us-central1/publishers/google/models/text-embedding-004'
);


CREATE MODEL LLMModel INPUT(
prompt STRING(MAX),
) OUTPUT(
content STRING(MAX),
) REMOTE OPTIONS (
endpoint = '//aiplatform.googleapis.com/projects/<PROJECT_ID>/locations/us-central1/publishers/google/models/gemini-pro',
default_batch_size = 1
);
Then, click the run button and wait a few seconds for your models to be created.
In the left pane of Spanner Studio you should see the following tables and models:
Load the data
Now, you will want to insert some products into your database. Open up a new tab in Spanner Studio, then copy and paste the following insert statements:
INSERT INTO products (categoryId, productId, productName, productDescription, createTime, inventoryCount, priceInCents)
VALUES (1, 1, "Cymbal Helios Helmet", "Safety meets style with the Cymbal children's bike helmet. Its lightweight design, superior ventilation, and adjustable fit ensure comfort and protection on every ride. Stay bright and keep your child safe under the sun with Cymbal Helios!", PENDING_COMMIT_TIMESTAMP(), 100, 10999),
(1, 2, "Cymbal Sprout", "Let their cycling journey begin with the Cymbal Sprout, the ideal balance bike for beginning riders ages 2-4 years. Its lightweight frame, low seat height, and puncture-proof tires promote stability and confidence as little ones learn to balance and steer. Watch them sprout into cycling enthusiasts with Cymbal Sprout!", PENDING_COMMIT_TIMESTAMP(), 10, 13999),
(1, 3, "Cymbal Spark Jr.", "Light, vibrant, and ready for adventure, the Spark Jr. is the perfect first bike for young riders (ages 5-8). Its sturdy frame, easy-to-use brakes, and puncture-resistant tires inspire confidence and endless playtime. Let the spark of cycling ignite with Cymbal!", PENDING_COMMIT_TIMESTAMP(), 34, 13900),
(1, 4, "Cymbal Summit", "Conquering trails is a breeze with the Summit mountain bike. Its lightweight aluminum frame, responsive suspension, and powerful disc brakes provide exceptional control and comfort for experienced bikers navigating rocky climbs or shredding downhill. Reach new heights with Cymbal Summit!", PENDING_COMMIT_TIMESTAMP(), 0, 79999),
(1, 5, "Cymbal Breeze", "Cruise in style and embrace effortless pedaling with the Breeze electric bike. Its whisper-quiet motor and long-lasting battery let you conquer hills and distances with ease. Enjoy scenic rides, commutes, or errands with a boost of confidence from Cymbal Breeze!", PENDING_COMMIT_TIMESTAMP(), 72, 129999),
(1, 6, "Cymbal Trailblazer Backpack", "Carry all your essentials in style with the Trailblazer backpack. Its water-resistant material, multiple compartments, and comfortable straps keep your gear organized and accessible, allowing you to focus on the adventure. Blaze new trails with Cymbal Trailblazer!", PENDING_COMMIT_TIMESTAMP(), 24, 7999),
(1, 7, "Cymbal Phoenix Lights", "See and be seen with the Phoenix bike lights. Powerful LEDs and multiple light modes ensure superior visibility, enhancing your safety and enjoyment during day or night rides. Light up your journey with Cymbal Phoenix!", PENDING_COMMIT_TIMESTAMP(), 87, 3999),
(1, 8, "Cymbal Windstar Pump", "Flat tires are no match for the Windstar pump. Its compact design, lightweight construction, and high-pressure capacity make inflating tires quick and effortless. Get back on the road in no time with Cymbal Windstar!", PENDING_COMMIT_TIMESTAMP(), 36, 24999),
(1, 9,"Cymbal Odyssey Multi-Tool","Be prepared for anything with the Odyssey multi-tool. This handy gadget features essential tools like screwdrivers, hex wrenches, and tire levers, keeping you ready for minor repairs and adjustments on the go. Conquer your journey with Cymbal Odyssey!", PENDING_COMMIT_TIMESTAMP(), 52, 999),
(1, 10,"Cymbal Nomad Water Bottle","Stay hydrated on every ride with the Nomad water bottle. Its sleek design, BPA-free construction, and secure lock lid make it the perfect companion for staying refreshed and motivated throughout your adventures. Hydrate and explore with Cymbal Nomad!", PENDING_COMMIT_TIMESTAMP(), 42, 1299);
Click the run button to insert the data.
Summary
In this step you created the schema and loaded some basic data into the cymbal-bikes database.
Next up
Next, you will integrate with the Embedding model to generate embeddings for the product descriptions, as well as convert a textual search request into an embedding to search for relevant products.
5. Work with embeddings
Generate vector embeddings for product descriptions
For similarity search to work on the products, you need to generate embeddings for the product descriptions.
With the EmbeddingsModel created in the schema, this is a simple UPDATE DML statement.
UPDATE products p1
SET productDescriptionEmbedding =
(SELECT embeddings.values from ML.PREDICT(MODEL EmbeddingsModel,
(SELECT productDescription as content FROM products p2 where p2.productId=p1.productId)))
WHERE categoryId=1;
Click the run button to update the product descriptions.
Using vector search
In this example, you will provide a natural language search request via a SQL query. This query will turn the search request into an embedding, then search for similar results based on the stored embeddings of the product descriptions that were generated in the previous step.
-- Use Spanner's vector search, and integration with embedding and LLM models to
-- return items that are semantically relevant and available in inventory based on
-- real-time data.


SELECT productName, productDescription, inventoryCount, COSINE_DISTANCE(
productDescriptionEmbedding,
(   SELECT embeddings.values
FROM ML.PREDICT(
MODEL EmbeddingsModel,
(SELECT "I'd like to buy a starter bike for my 3 year old child" as content)
)
)
) as distance
FROM products
WHERE inventoryCount > 0
ORDER BY distance
LIMIT 5;
Click the run button to find the similar products. The results should look like this:
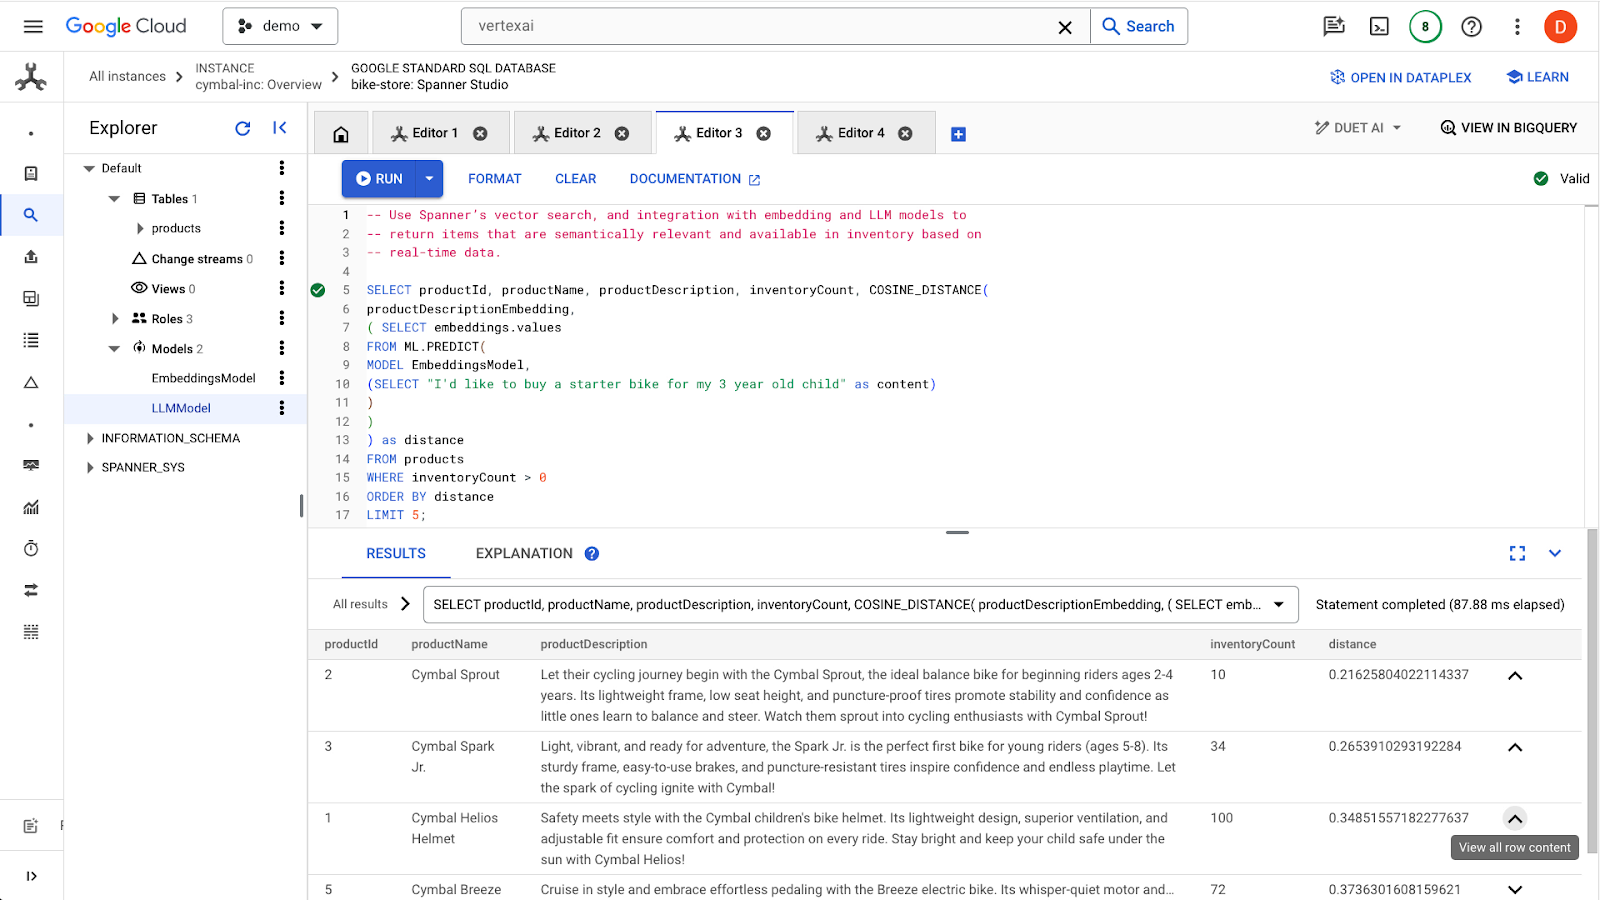
Notice that additional filters are used on the query, such as only being interested in products that are in stock (inventoryCount > 0).
Summary
In this step, you created product description embeddings and a search request embedding using SQL, leveraging Spanner's integration with models in VertexAI. You also performed a vector search to find similar products that match the search request.
Next Steps
Next, let's use the search results to feed into an LLM to generate a custom response for each product.
6. Work with an LLM
Spanner makes it easy to integrate with LLM models served from VertexAI. This allows developers to use SQL to interface with LLMs directly, rather than requiring the application to perform the logic.
For example, we have the results from the previous SQL query from the user "I'd like to buy a starter bike for my 3 year old child".
The developer would like to provide a response for each result on whether the product is a good fit for the user, using the following prompt:
"Answer with ‘Yes' or ‘No' and explain why: Is this a good fit for me? I'd like to buy a starter bike for my 3 year old child"
Here is the query you can use:
-- Use an LLM to analyze this list and provide a recommendation on whether each
-- product is a good fit for the user. We use the vector search and real time
-- inventory data to first filter the products to reduce the size of the prompt to
-- the LLM.
SELECT productName, productDescription, inventoryCount, content AS LLMResponse
FROM ML.PREDICT(
MODEL LLMModel,
(   SELECT
inventoryCount,
productName,
productDescription,
CONCAT(
"Answer with ‘Yes' or ‘No' and explain why: Is this a good fit for me?",
"I'd like to buy a starter bike for my 3 year old child \n",
"Product Name: ", productName, "\n",
"Product Description:", productDescription) AS prompt,
FROM products
WHERE inventoryCount > 0
ORDER by COSINE_DISTANCE(
productDescriptionEmbedding,
(   SELECT embeddings.values
FROM ML.PREDICT(
MODEL EmbeddingsModel,
( SELECT "I'd like to buy a starter bike for my 3 year old child" as content)
)
)
) LIMIT 5
),
STRUCT(256 AS maxOutputTokens)
);
Click the run button to issue the query. The results should look like this:
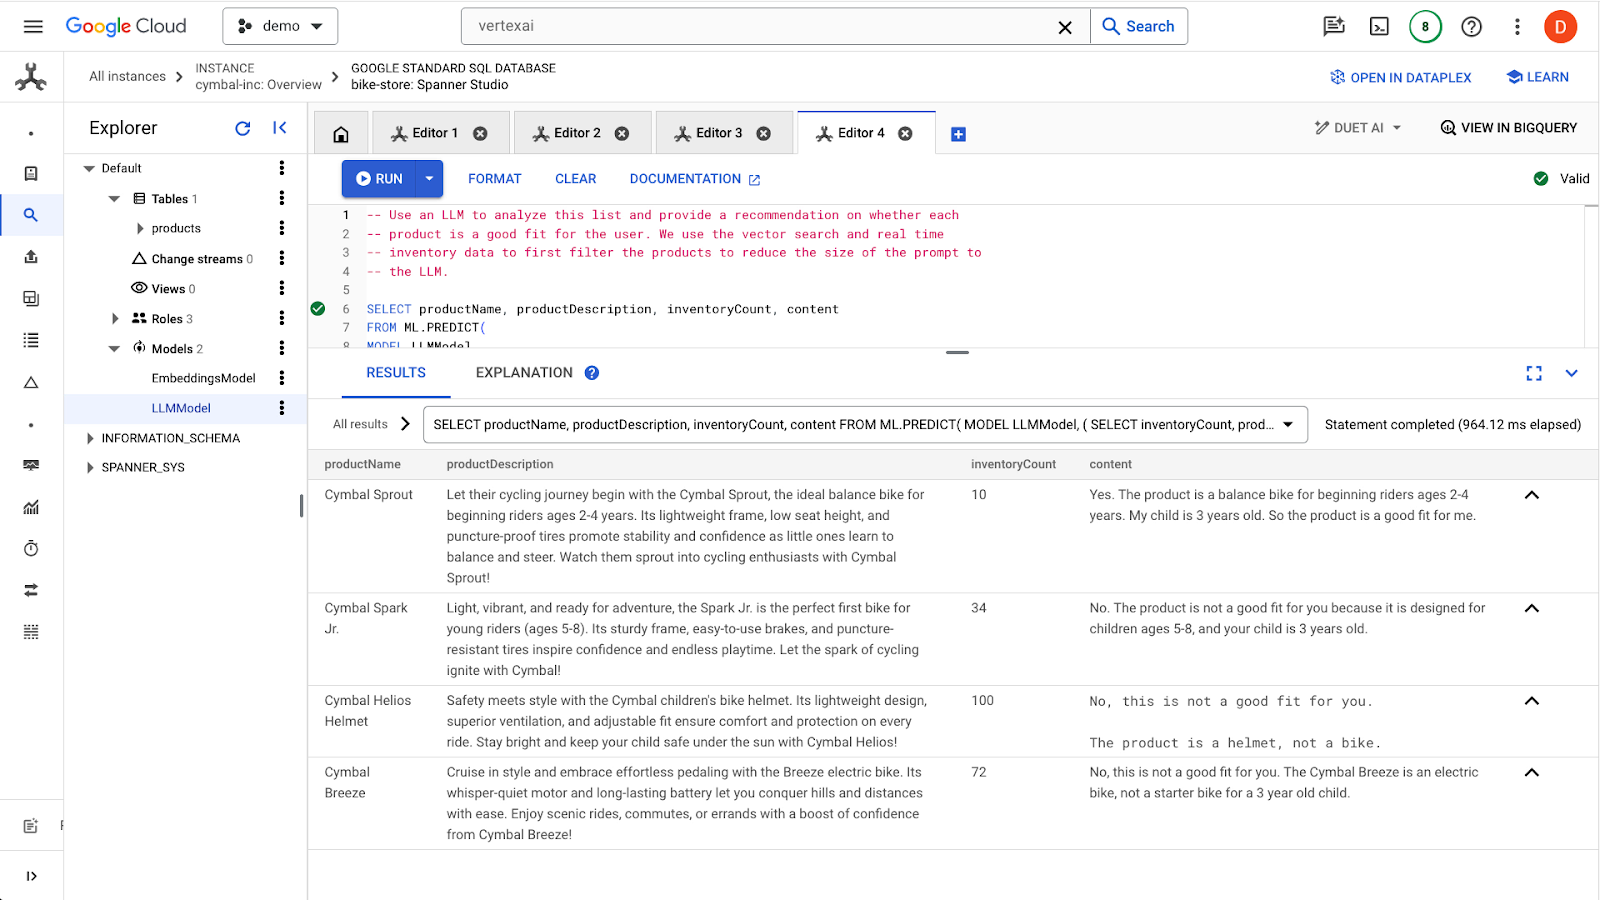
The first product is a fit for a 3-year old because of the age range in the product description (2-4 year olds). The other products are not great fits.
Summary
In this step, you worked with an LLM to generate basic responses to prompts from a user.
Next Steps
Next, let's learn how to use ANN for scaling vector search.
7. Scaling vector search
The previous vector search examples leveraged exact-KNN vector search. This is great when you are able to query very specific subsets of your Spanner data. Those types of queries are said to be highly-partitionable.
If you don't have workloads that are highly partitionable, and you have a large amount of data, you will want to use ANN vector search leveraging the ScaNN algorithm to increase lookup performance.
To do that in Spanner, you will need to do two things:
- Create a Vector Index
- Modify your query to make use of the APPROX distance functions.
Create the Vector Index
To create a vector index on this dataset, we will first need to modify the productDescriptionEmbeddings column to define the length of each vector. To add the vector length to a column, you must drop the original column and re-create it.
ALTER TABLE `products` DROP COLUMN `productDescriptionEmbedding`;
ALTER TABLE
  `products` ADD COLUMN `productDescriptionEmbedding` ARRAY<FLOAT32>(vector_length=>768);
Next, create the embeddings again from the Generate Vector embedding step you previously ran.
UPDATE products p1
SET productDescriptionEmbedding =
(SELECT embeddings.values from ML.PREDICT(MODEL EmbeddingsModel,
(SELECT productDescription as content FROM products p2 where p2.productId=p1.productId)))
WHERE categoryId=1;
After the column is created, create the index:
CREATE VECTOR INDEX ProductDescriptionEmbeddingIndex
    ON products(productDescriptionEmbedding)
    WHERE productDescriptionEmbedding IS NOT NULL
OPTIONS (
 distance_type = 'COSINE'
);
Use the new index
To use the new vector index, you will have to modify the previous embedding query slightly.
Here's the original query:
SELECT productName, productDescription, inventoryCount, COSINE_DISTANCE(
productDescriptionEmbedding,
(   SELECT embeddings.values
FROM ML.PREDICT(
MODEL EmbeddingsModel,
(SELECT "I'd like to buy a starter bike for my 3 year old child" as content)
)
)
) as distance
FROM products
WHERE inventoryCount > 0
ORDER BY distance
LIMIT 5;
You will have to do the following changes:
- Use an index hint for the new vector index:
@{force_index=ProductDescriptionEmbeddingIndex} - Change the
COSINE_DISTANCEfunction call toAPPROX_COSINE_DISTANCE. Note the JSON options in the final query below are also required. - Generate the embeddings from the ML.PREDICT function separately.
- Copy the results of the embeddings into the final query.
Generate the embeddings
-- Generate the prompt embeddings
SELECT embeddings.values
FROM ML.PREDICT(
  MODEL EmbeddingsModel,
   (SELECT "I'd like to buy a starter bike for my 3 year old child" as content)
  )
)
Highlight the results from the query, and copy them.

Then replace <VECTOR> in the following query by pasting the embeddings you copied.
-- Embedding query now using the vector index


SELECT productName, productDescription, inventoryCount,
  APPROX_COSINE_DISTANCE(productDescriptionEmbedding, array<float32>[@VECTOR], options => JSON '{\"num_leaves_to_search\": 10}')
FROM products @{force_index=ProductDescriptionEmbeddingIndex}
WHERE productDescriptionEmbedding IS NOT NULL AND inventoryCount > 0
ORDER BY distance
LIMIT 5;
It should look something like this:
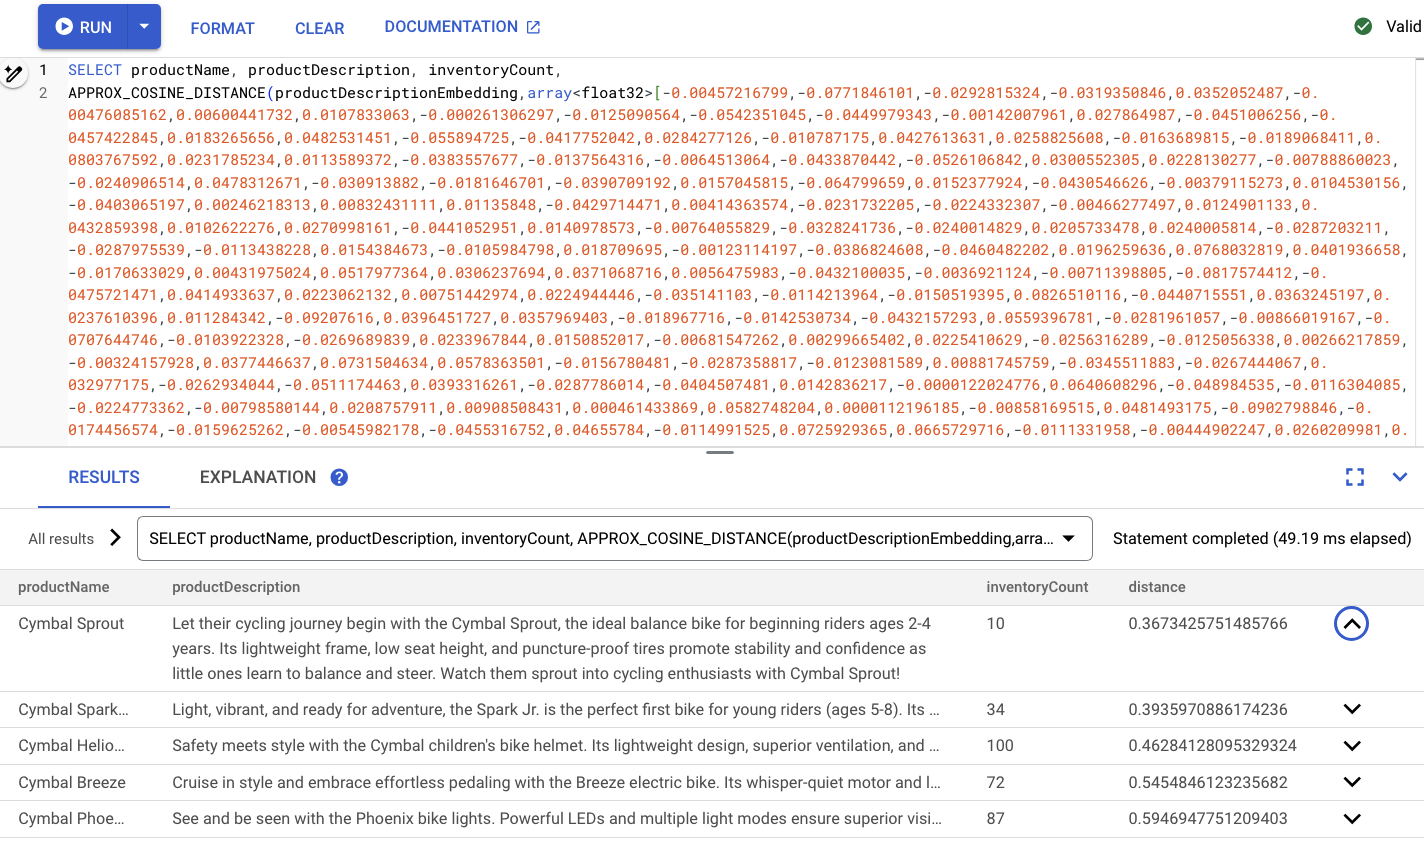
Summary
In this step, you converted your schema to create a vector index. And then you rewrote the embedding query to perform ANN search using the vector index. This is an important step as your data grows to scale vector search workloads.
Next Steps
Next, it is time to clean up!
8. Cleaning up (optional)
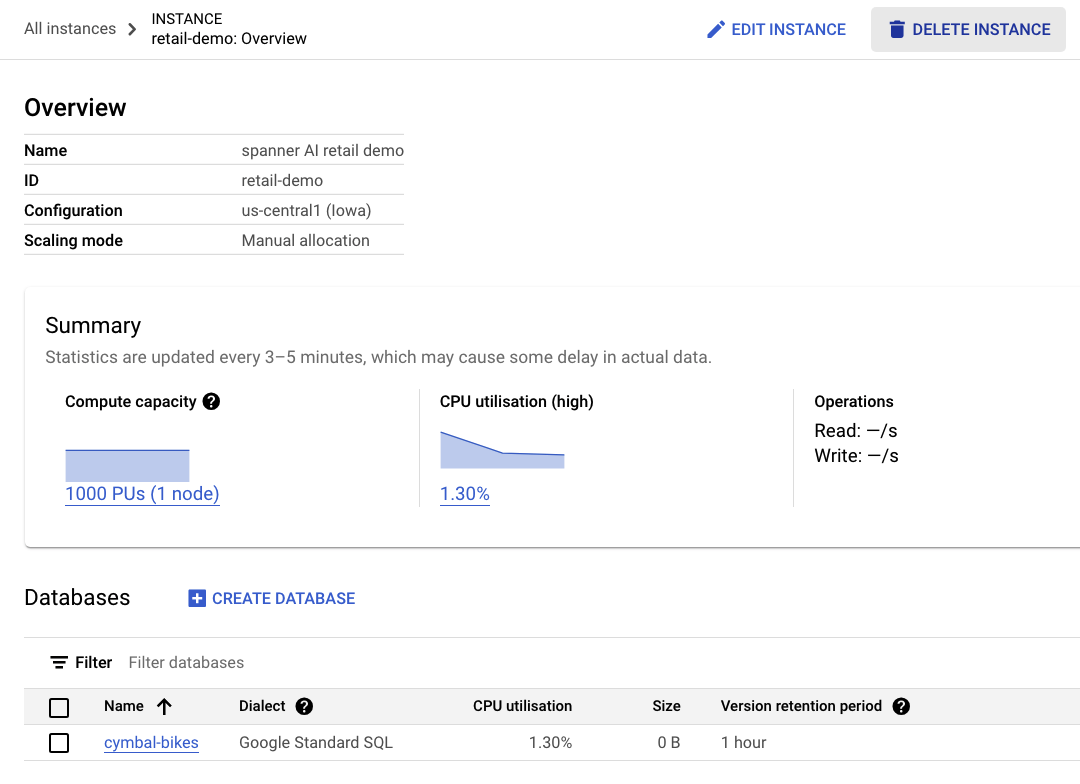
To clean up, just go into the Cloud Spanner section of the Cloud Console and delete the 'retail-demo' instance we created in the codelab.
9. Congratulations!
Congratulations, you have successfully performed a similarity search using Spanner's built-in vector search. Additionally, you saw how easy it is to work with embedding and LLM models to provide generative AI functionality directly using SQL.
Finally, you learned the process to perform ANN search backed by the ScaNN algorithm for scaling vector search workloads.
What's next?
Learn more about Spanner's exact nearest neighbor (KNN vector search) feature here: https://cloud.google.com/spanner/docs/find-k-nearest-neighbors
Learn more about Spanner's approximate nearest neighbor (ANN vector search) feature here: https://cloud.google.com/spanner/docs/find-approximate-nearest-neighbors
You can also read more about how to perform online predictions with SQL using Spanner's VertexAI integration here: https://cloud.google.com/spanner/docs/ml

