1. 개요
자연어 처리 (NLP)는 텍스트 데이터에서 유용한 정보를 얻고 분석을 수행하는 연구입니다. 인터넷에서 생성되는 글의 양이 계속 증가함에 따라 조직은 그 어느 때보다도 텍스트를 활용하여 비즈니스와 관련된 정보를 얻으려고 하고 있습니다.
NLP는 언어 번역부터 감정 분석, 문장 생성부터 문장 생성 등 다양한 작업에 사용할 수 있습니다. 이는 우리가 텍스트로 작업하는 방식을 변화시키고 있는 연구의 활발한 영역입니다.
대량의 텍스트 데이터에 대규모로 NLP를 사용하는 방법을 살펴보겠습니다. 이 작업은 확실히 부담스러울 수 있습니다. 다행히 Spark MLlib 및 spark-nlp와 같은 라이브러리를 활용하면 이를 더 쉽게 수행할 수 있습니다.
2. 사용 사례
(가상) 조직 'FoodCorp'의 수석 데이터 과학자 식품 산업 트렌드에 대해 자세히 알아보려고 합니다. 우리는 사람들이 무엇에 대해 이야기하고 있는지 탐색하는 데 사용할 Reddit 하위 Reddit r/food의 게시물 형태의 텍스트 데이터 코퍼스에 액세스할 수 있습니다.
이를 위한 한 가지 접근 방식은 '주제 모델링'으로 알려진 NLP 방법을 사용하는 것입니다. 주제 모델링은 문서 그룹의 의미론적 의미에서 트렌드를 파악할 수 있는 통계적 방법입니다. 즉, Reddit '게시물' 코퍼스에 주제 모델을 구축할 수 있습니다 이렇게 하면 목록에 있는 '주제' 목록이 트렌드를 설명하는 단어 그룹을 사용할 수 있습니다.
이 모델을 빌드하기 위해 텍스트를 클러스터링하는 데 자주 사용되는 LDA (잠재 디리치렛 할당)라는 알고리즘을 사용할 것입니다. LDA에 대한 유용한 소개는 여기에서 확인할 수 있습니다.
3. 프로젝트 만들기
아직 Google 계정(Gmail 또는 Google Apps)이 없으면 계정을 만들어야 합니다. Google Cloud Platform 콘솔 ( console.cloud.google.com)에 로그인하고 새 프로젝트를 만듭니다.


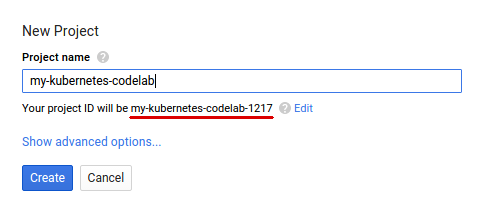
다음으로 Google Cloud 리소스를 사용할 수 있도록 Cloud 콘솔에서 결제를 사용 설정해야 합니다.
이 Codelab을 실행하는 데에는 많은 비용이 들지 않지만 더 많은 리소스를 사용하기로 결정하거나 계속 실행하면 비용이 더 많이 들 수 있습니다. PySpark-BigQuery 및 Spark-NLP Codelab은 각각 '삭제'를 설명합니다. 끝부분에 있습니다.
Google Cloud Platform의 신규 사용자에게는 $300의 무료 체험판이 제공됩니다.
4. 환경 조성
먼저 Dataproc과 Compute Engine API를 사용 설정해야 합니다.
화면 왼쪽 상단의 메뉴 아이콘을 클릭합니다.

드롭다운에서 API 관리자를 선택합니다.
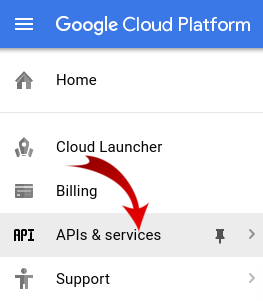
API 및 서비스 사용 설정을 클릭합니다.

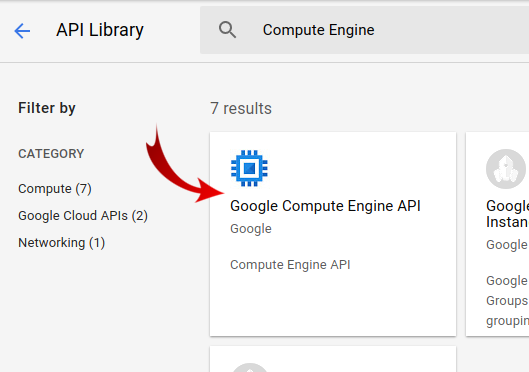
'Compute Engine'을 검색합니다. 을 입력합니다. 'Google Compute Engine API'를 클릭합니다. 를 입력합니다.
Google Compute Engine 페이지에서 사용 설정을 클릭합니다.
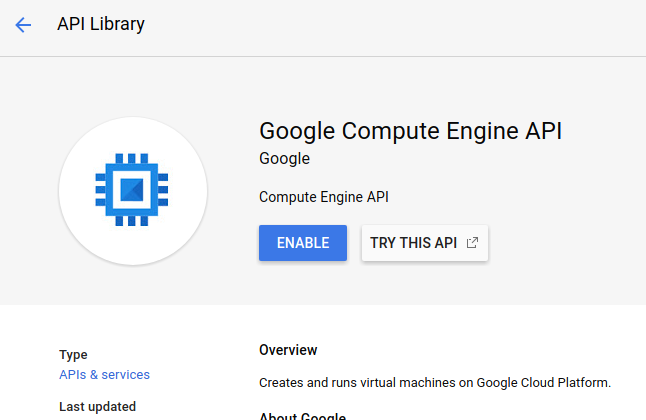
사용하도록 설정한 후 왼쪽을 가리키는 화살표를 클릭하면 이전 화면으로 돌아갈 수 있습니다.
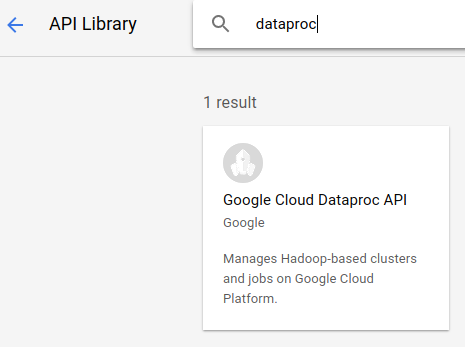
이제 'Google Dataproc API'를 검색합니다. 사용 설정합니다
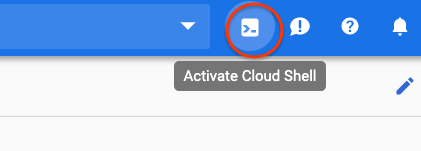
그런 다음 Cloud 콘솔의 오른쪽 상단에 있는 버튼을 클릭하여 Cloud Shell을 엽니다.
Codelab을 진행하면서 참조할 수 있는 몇 가지 환경 변수를 설정하겠습니다. 먼저 만들려는 Dataproc 클러스터의 이름(예: 'my-cluster')을 선택하고 환경에서 설정합니다. 원하는 이름을 자유롭게 사용하세요.
CLUSTER_NAME=my-cluster
그런 다음 여기에서 제공되는 영역 중 하나를 선택합니다. 예를 들면 us-east1-b.입니다.
REGION=us-east1
마지막으로 작업이 데이터를 읽을 소스 버킷을 설정해야 합니다. bm_reddit 버킷에 샘플 데이터가 있지만, 이 작업 전에 BigQuery 데이터 사전 처리를 위한 PySpark에서 생성한 데이터를 사용해도 됩니다.
BUCKET_NAME=bm_reddit
환경 변수를 구성한 상태에서 다음 명령어를 실행하여 Dataproc 클러스터를 만들어 보겠습니다.
 gcloud beta dataproc clusters create ${CLUSTER_NAME} \
     --region ${REGION} \
     --metadata 'PIP_PACKAGES=google-cloud-storage spark-nlp==2.7.2' \
     --worker-machine-type n1-standard-8 \
     --num-workers 4 \
     --image-version 1.4-debian10 \
     --initialization-actions gs://dataproc-initialization-actions/python/pip-install.sh \
     --optional-components=JUPYTER,ANACONDA \
     --enable-component-gateway
다음 각 명령어를 단계별로 살펴보겠습니다.
gcloud beta dataproc clusters create ${CLUSTER_NAME}: 앞에서 제공한 이름으로 Dataproc 클러스터 생성을 시작합니다. 여기서는 아래에 설명된 Component Gateway와 같은 Dataproc의 베타 기능을 사용 설정하기 위해 beta를 포함합니다.
--zone=${ZONE}: 클러스터의 위치를 설정합니다.
--worker-machine-type n1-standard-8: 작업자에 사용할 머신 유형입니다.
--num-workers 4: 클러스터에 4개의 작업자가 있습니다.
--image-version 1.4-debian9: 사용할 Dataproc의 이미지 버전을 나타냅니다.
--initialization-actions ...: 초기화 작업은 클러스터 및 작업자를 만들 때 실행되는 커스텀 스크립트입니다. 사용자가 생성하여 GCS 버킷에 저장하거나 공개 버킷 dataproc-initialization-actions에서 참조할 수 있습니다. 여기에 포함된 초기화 작업을 통해 --metadata 플래그와 함께 제공되는 Pip를 사용하여 Python 패키지를 설치할 수 있습니다.
--metadata 'PIP_PACKAGES=google-cloud-storage spark-nlp': Dataproc에 설치할 패키지 목록이며 공백으로 구분됩니다. 여기서는 google-cloud-storage Python 클라이언트 라이브러리와 spark-nlp를 설치합니다.
--optional-components=ANACONDA: 선택적 구성요소는 Dataproc과 함께 사용되는 일반 패키지로, 생성 중에 Dataproc 클러스터에 자동으로 설치됩니다. 초기화 작업보다 선택적 구성요소를 사용하면 시작 시간이 단축되고 특정 Dataproc 버전에 대해 테스트할 수 있다는 장점이 있습니다. 전반적으로 안정성이 더 우수합니다.
--enable-component-gateway: 이 플래그를 사용하면 Dataproc의 구성요소 게이트웨이를 활용하여 Zeppelin, Jupyter 또는 Spark 기록과 같은 일반적인 UI를 볼 수 있습니다. 참고: 이 중 일부에는 연결된 선택적 구성요소가 필요합니다.
Dataproc에 대한 더 자세한 소개는 이 Codelab을 확인하세요.
그런 다음 Cloud Shell에서 다음 명령어를 실행하여 샘플 코드가 있는 저장소를 클론하고 올바른 디렉터리로 cd하세요.
cd
git clone https://github.com/GoogleCloudPlatform/cloud-dataproc
cd cloud-dataproc/codelabs/spark-nlp
5. Spark MLlib
Spark MLlib는 Apache Spark로 작성된 확장 가능한 머신러닝 라이브러리입니다. MLlib는 미세 조정된 머신러닝 알고리즘 제품군과 함께 Spark의 효율성을 활용하여 대량의 데이터를 분석할 수 있습니다. Java, Scala, Python, R로 된 API를 제공합니다. 이 Codelab에서는 특히 Python에 중점을 둡니다.
MLlib에는 대규모 Transformer와 에스티메이터 세트가 포함되어 있습니다. Transformer는 일반적으로 transform() 함수를 사용하여 데이터를 변경 또는 변경할 수 있는 도구이고, 에스티메이터는 일반적으로 fit() 함수를 사용하여 데이터를 학습시킬 수 있는 사전 빌드된 알고리즘입니다.
변환기의 예는 다음과 같습니다.
- 토큰화 (단어 집합에서 숫자 벡터 생성)
- 원-핫 인코딩 (문자열에 있는 단어를 나타내는 숫자로 구성된 희소 벡터 생성)
- 불용어 삭제 (문자열에 의미적 값을 추가하지 않는 단어 삭제)
에스티메이터의 예는 다음과 같습니다.
- 분류 (사과인가요, 오렌지?)
- 회귀 (이 사과에 얼마의 비용이 드나요?)
- 클러스터링 (모든 사과가 서로 얼마나 비슷한가?)
- 결정 트리 (색상 == 주황색이면 오렌지색입니다. 그렇지 않으면 사과입니다.)
- 데이터 세트에서 특성을 제거하면서 사과와 오렌지를 구분할 수 있는가?
MLlib에는 초매개변수 조정 및 선택, 교차 검증과 같은 머신러닝의 다른 일반적인 방법을 위한 도구도 포함되어 있습니다.
또한 MLlib에는 Pipelines API가 포함되어 있어 재실행 가능한 다양한 변환기를 사용하여 데이터 변환 파이프라인을 빌드할 수 있습니다.
6. Spark-NLP
Spark-nlp는 Spark를 사용하여 효율적인 자연어 처리 작업을 수행하기 위해 John Snow Labs에서 만든 라이브러리입니다. 여기에는 다음과 같은 일반적인 작업을 위한 주석자라는 기본 제공 도구가 포함되어 있습니다.
- 토큰화 (단어 집합에서 숫자 벡터 생성)
- 단어 임베딩 생성 (벡터를 통해 단어 간 관계 정의)
- 품사 태그 (어떤 단어가 명사인가요? 동사는 무엇인가요?)
이 Codelab의 범위를 벗어나지만 spark-nlp는 TensorFlow와도 원활하게 통합됩니다.
가장 중요한 점은 Spark-NLP가 MLlib 파이프라인에 쉽게 삽입할 수 있는 구성요소를 제공하여 Spark MLlib의 기능을 확장한다는 것입니다.
7. 자연어 처리 권장사항
데이터에서 유용한 정보를 추출하려면 먼저 몇 가지 준비 작업을 해야 합니다. 수행할 전처리 단계는 다음과 같습니다.
토큰화
일반적으로 가장 먼저 하는 작업은 '토큰화'입니다. 데이터를 얻을 수 있습니다. 여기에는 데이터를 가져와 '토큰'을 기준으로 분할하는 작업이 포함됩니다. 알 수 있습니다. 일반적으로 이 단계에서는 구두점을 삭제하고 모든 단어를 소문자로 설정합니다. 예를 들어 다음과 같은 문자열이 있다고 가정해 보겠습니다. What time is it? 토큰화 후에는 이 문장이 4개의 토큰으로 구성됩니다. "what" , "time", "is", "it". 모델에서 what라는 단어를 대문자가 서로 다른 두 개의 단어로 처리하지 않도록 하려고 합니다. 또한 구두점은 일반적으로 단어에서 추론을 더 잘 학습하는 데 도움이 되지 않으므로 구두점도 삭제합니다.
정규화
우리는 종종 데이터를 '정규화'하거나 데이터를 얻을 수 있습니다. 이렇게 하면 의미가 비슷한 단어는 같은 것으로 대체됩니다. 예를 들어 '싸움', '전투'라는 단어가 및 'dueled' 정규화되지 않은 경우 정규화는 '배틀됨'으로 대체될 수 있음 및 'dueled' '싸움'이라는 단어 포함
스테밍
어간을 사용하면 단어가 어근의 의미로 대체됩니다. 예를 들어 '자동차', '자동차'라는 단어를 사용할 수 있습니다. 및 'car's' 모두 '자동차'라는 단어로 대체됩니다. 이 모든 단어가 뿌리에서 같은 것을 의미하기 때문입니다.
불용어 삭제
불용어는 'and', 및 'the' 일반적으로 문장의 의미론적 의미에 가치를 더하지 않는 단어입니다. 일반적으로 텍스트 데이터 세트의 노이즈를 줄이기 위한 수단으로 이러한 주석을 삭제하는 것이 좋습니다.
8. 작업 실행
실행할 작업을 살펴보겠습니다. 코드는 cloud-dataproc/codelabs/spark-nlp/topic_model.py에서 찾을 수 있습니다. 적어도 몇 분 동안 이 도움말과 관련 댓글을 읽어보고 무슨 일이 일어나고 있는지 파악하세요. 다음 섹션에서도 살펴볼 것입니다.
# Python imports
import sys

# spark-nlp components. Each one is incorporated into our pipeline.
from sparknlp.annotator import Lemmatizer, Stemmer, Tokenizer, Normalizer
from sparknlp.base import DocumentAssembler, Finisher

# A Spark Session is how we interact with Spark SQL to create Dataframes
from pyspark.sql import SparkSession

# These allow us to create a schema for our data
from pyspark.sql.types import StructField, StructType, StringType, LongType

# Spark Pipelines allow us to sequentially add components such as transformers
from pyspark.ml import Pipeline

# These are components we will incorporate into our pipeline.
from pyspark.ml.feature import StopWordsRemover, CountVectorizer, IDF

# LDA is our model of choice for topic modeling
from pyspark.ml.clustering import LDA

# Some transformers require the usage of other Spark ML functions. We import them here
from pyspark.sql.functions import col, lit, concat

# This will help catch some PySpark errors
from pyspark.sql.utils import AnalysisException

# Assign bucket where the data lives
try:
    bucket = sys.argv[1]
except IndexError:
    print("Please provide a bucket name")
    sys.exit(1)

# Create a SparkSession under the name "reddit". Viewable via the Spark UI
spark = SparkSession.builder.appName("reddit topic model").getOrCreate()

# Create a three column schema consisting of two strings and a long integer
fields = [StructField("title", StringType(), True),
          StructField("body", StringType(), True),
          StructField("created_at", LongType(), True)]
schema = StructType(fields)

# We'll attempt to process every year / month combination below.
years = ['2016', '2017', '2018', '2019']
months = ['01', '02', '03', '04', '05', '06',
          '07', '08', '09', '10', '11', '12']

# This is the subreddit we're working with.
subreddit = "food"

# Create a base dataframe.
reddit_data = spark.createDataFrame([], schema)

# Keep a running list of all files that will be processed
files_read = []

for year in years:
    for month in months:

        # In the form of <project-id>.<dataset>.<table>
        gs_uri = f"gs://{bucket}/reddit_posts/{year}/{month}/{subreddit}.csv.gz"

        # If the table doesn't exist we will simply continue and not
        # log it into our "tables_read" list
        try:
            reddit_data = (
                spark.read.format('csv')
                .options(codec="org.apache.hadoop.io.compress.GzipCodec")
                .load(gs_uri, schema=schema)
                .union(reddit_data)
            )

            files_read.append(gs_uri)

        except AnalysisException:
            continue

if len(files_read) == 0:
    print('No files read')
    sys.exit(1)

# Replacing null values with their respective typed-equivalent is usually
# easier to work with. In this case, we'll replace nulls with empty strings.
# Since some of our data doesn't have a body, we can combine all of the text
# for the titles and bodies so that every row has useful data.

df_train = (
    reddit_data
    # Replace null values with an empty string
    .fillna("")
    .select(
         # Combine columns
        concat(
            # First column to concatenate. col() is used to specify that we're referencing a column
            col("title"),
            # Literal character that will be between the concatenated columns.
            lit(" "),
            # Second column to concatenate.
            col("body")
        # Change the name of the new column
        ).alias("text")
    )
)

# Now, we begin assembling our pipeline. Each component here is used to some transformation to the data.
# The Document Assembler takes the raw text data and convert it into a format that can
# be tokenized. It becomes one of spark-nlp native object types, the "Document".
document_assembler = DocumentAssembler().setInputCol("text").setOutputCol("document")

# The Tokenizer takes data that is of the "Document" type and tokenizes it.
# While slightly more involved than this, this is effectively taking a string and splitting
# it along ths spaces, so each word is its own string. The data then becomes the
# spark-nlp native type "Token".
tokenizer = Tokenizer().setInputCols(["document"]).setOutputCol("token")

# The Normalizer will group words together based on similar semantic meaning.
normalizer = Normalizer().setInputCols(["token"]).setOutputCol("normalizer")

# The Stemmer takes objects of class "Token" and converts the words into their
# root meaning. For instance, the words "cars", "cars'" and "car's" would all be replaced
# with the word "car".
stemmer = Stemmer().setInputCols(["normalizer"]).setOutputCol("stem")

# The Finisher signals to spark-nlp allows us to access the data outside of spark-nlp
# components. For instance, we can now feed the data into components from Spark MLlib.
finisher = Finisher().setInputCols(["stem"]).setOutputCols(["to_spark"]).setValueSplitSymbol(" ")

# Stopwords are common words that generally don't add much detail to the meaning
# of a body of text. In English, these are mostly "articles" such as the words "the"
# and "of".
stopword_remover = StopWordsRemover(inputCol="to_spark", outputCol="filtered")

# Here we implement TF-IDF as an input to our LDA model. CountVectorizer (TF) keeps track
# of the vocabulary that's being created so we can map our topics back to their
# corresponding words.
# TF (term frequency) creates a matrix that counts how many times each word in the
# vocabulary appears in each body of text. This then gives each word a weight based
# on its frequency.
tf = CountVectorizer(inputCol="filtered", outputCol="raw_features")

# Here we implement the IDF portion. IDF (Inverse document frequency) reduces
# the weights of commonly-appearing words.
idf = IDF(inputCol="raw_features", outputCol="features")

# LDA creates a statistical representation of how frequently words appear
# together in order to create "topics" or groups of commonly appearing words.
lda = LDA(k=10, maxIter=10)

# We add all of the transformers into a Pipeline object. Each transformer
# will execute in the ordered provided to the "stages" parameter
pipeline = Pipeline(
    stages = [
        document_assembler,
        tokenizer,
        normalizer,
        stemmer,
        finisher,
        stopword_remover,
        tf,
        idf,
        lda
    ]
)

# We fit the data to the model.
model = pipeline.fit(df_train)

# Now that we have completed a pipeline, we want to output the topics as human-readable.
# To do this, we need to grab the vocabulary generated from our pipeline, grab the topic
# model and do the appropriate mapping.  The output from each individual component lives
# in the model object. We can access them by referring to them by their position in
# the pipeline via model.stages[<ind>]

# Let's create a reference our vocabulary.
vocab = model.stages[-3].vocabulary

# Next, let's grab the topics generated by our LDA model via describeTopics(). Using collect(),
# we load the output into a Python array.
raw_topics = model.stages[-1].describeTopics().collect()

# Lastly, let's get the indices of the vocabulary terms from our topics
topic_inds = [ind.termIndices for ind in raw_topics]

# The indices we just grab directly map to the term at position <ind> from our vocabulary.
# Using the below code, we can generate the mappings from our topic indices to our vocabulary.
topics = []
for topic in topic_inds:
    _topic = []
    for ind in topic:
        _topic.append(vocab[ind])
    topics.append(_topic)

# Let's see our topics!
for i, topic in enumerate(topics, start=1):
    print(f"topic {i}: {topic}")
작업 실행
이제 작업을 실행해 보겠습니다. 다음 명령어를 실행합니다.
gcloud dataproc jobs submit pyspark --cluster ${CLUSTER_NAME}\
    --region ${REGION}\
    --properties=spark.jars.packages=com.johnsnowlabs.nlp:spark-nlp_2.11:2.7.2\
    --driver-log-levels root=FATAL \
    topic_model.py \
    -- ${BUCKET_NAME}
이 명령어를 사용하면 Dataproc Jobs API를 활용할 수 있습니다. pyspark 명령어를 포함하여 클러스터에 PySpark 작업임을 나타냅니다. 클러스터 이름, 여기에서 제공되는 매개변수의 선택적 매개변수, 작업이 포함된 파일의 이름을 제공합니다. 여기서는 Spark, Yarn 또는 Dataproc의 다양한 속성을 변경할 수 있는 --properties 매개변수를 제공합니다. 작업과 함께 spark-nlp를 포함하고 싶다는 것을 Spark에 알릴 수 있도록 Spark 속성 packages를 변경합니다. 또한 오류를 제외하고 PySpark의 로그 출력을 대부분 억제하는 --driver-log-levels root=FATAL 매개변수도 제공됩니다. 일반적으로 Spark 로그에는 노이즈가 많습니다.
마지막으로 -- ${BUCKET}는 버킷 이름을 제공하는 Python 스크립트 자체의 명령줄 인수입니다. --와 ${BUCKET} 사이의 공백에 유의하세요.
작업을 실행하고 몇 분 후에 모델이 포함된 출력이 표시됩니다.

대단해!! 모델의 출력을 보고 추세를 추론할 수 있나요? 우리는 어떠신가요?
위 출력에서 주제 8에서 아침 식사용 음식과 주제 9에서 디저트에 대한 추세를 추론할 수 있습니다.
9. 삭제
이 빠른 시작을 완료한 후 GCP 계정에 불필요한 비용이 청구되지 않도록 하려면 다음 안내를 따르세요.
- 내가 만든 환경의 Cloud Storage 버킷 삭제
- Dataproc 환경을 삭제합니다.
이 Codelab만을 위해 프로젝트를 만든 경우 선택적으로 프로젝트를 삭제할 수도 있습니다.
- GCP Console에서 프로젝트 페이지로 이동합니다.
- 프로젝트 목록에서 삭제할 프로젝트를 선택하고 삭제를 클릭합니다.
- 상자에 프로젝트 ID를 입력한 후 종료를 클릭하여 프로젝트를 삭제합니다.
라이선스
이 작업물은 Creative Commons Attribution 3.0 일반 라이선스 및 Apache 2.0 라이선스에 따라 사용이 허가되었습니다.
