
1. Introduction
What you'll build
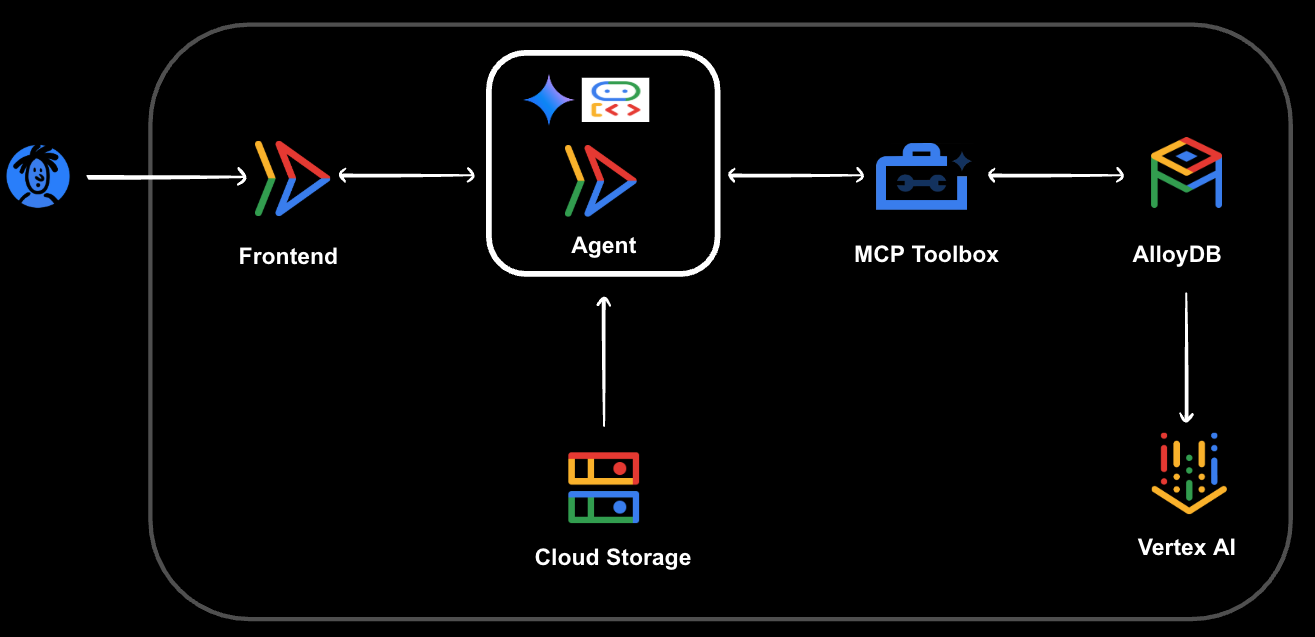
In this codelab, you'll learn how to build a Sports Shop Agent AI assistant. This next-generation Agent AI application, powered by ADK, MCP Toolbox, and AlloyDB, will assist users with various tasks, including:
- Searching for products using natural language.
- Finding nearby stores to purchase recommended products.
- Placing new orders.
- Checking existing order statuses.
- Updating orders with preferred delivery methods.
What you'll learn
- Provisioning and populating an AlloyDB for PostgreSQL database.
- Setting up MCP Toolbox for Databases with your AlloyDB for PostgreSQL instance.
- Designing and developing an AI Agent using the Agent Development Kit (ADK) to assist with sports shop queries.
- Testing your Agent and MCP Toolbox for Databases in a cloud environment.
- Leveraging AlloyDB's advanced query capabilities for intelligent agent responses.
What you'll need
To complete this codelab, you will need:
- A Chrome web browser.
- A Gmail account.
- A Google Cloud Project with billing enabled.
This codelab is designed for developers of all levels, including beginners.
2. Before you begin
This section guides you through the initial setup required in your Google Cloud Project before you can start building the Sports Shop Agent AI assistant.
Create a project
- In the Google Cloud Console, on the project selector page, select or create a Google Cloud project.
- Make sure that billing is enabled for your Cloud project. Learn how to check if billing is enabled on a project .
- Activate Cloud Shell by clicking this link. You can toggle between Cloud Shell Terminal (for running cloud commands) and Editor (for building projects) by clicking on the corresponding button from Cloud Shell.

- Once connected to Cloud Shell, you check that you're already authenticated and that the project is set to your project ID using the following command:
gcloud auth list
- Run the following command in Cloud Shell to confirm that the gcloud command knows about your project.
gcloud config list project
- Set the variable PROJECT_ID, use the following command to set it:
export PROJECT_ID=[YOUR_PROJECT_ID]
gcloud config set project $PROJECT_ID
- Enable the following APIs by running the following commands:
gcloud services enable alloydb.googleapis.com \
                       compute.googleapis.com \
                       cloudresourcemanager.googleapis.com \
                       servicenetworking.googleapis.com \
                       vpcaccess.googleapis.com \
                       aiplatform.googleapis.com
3. Create the AlloyDB Instance
In this section, you will set up your AlloyDB database cluster and instance, and configure the necessary networking and permissions for your AI Agent.
First, run the following command in your Cloud Shell terminal to create the AlloyDB Cluster:
gcloud alloydb clusters create alloydb-cluster \
    --password=alloydb\
    --network=default \
    --region=us-central1 \
    --database-version=POSTGRES_16
AlloyDB relies on private IP connectivity for secure and high-performance access. You need to allocate a private IP range within your VPC for Google to use for the service peering connection to the Google-managed service networking infrastructure. Run the following command:
gcloud compute addresses create peering-range-for-alloydb \
    --global \
    --purpose=VPC_PEERING \
    --prefix-length=16 \
    --description="Automatically allocated IP range for service networking" \
    --network=default
Next, create the VPC Service Peering connection. This allows your Google Cloud Virtual Private Cloud (VPC) network to communicate securely and privately with Google's managed services, including AlloyDB. Run the following command:
gcloud services vpc-peerings connect \
--service=servicenetworking.googleapis.com \
--ranges=peering-range-for-alloydb \
--network=default
Now, create the primary instance within your AlloyDB cluster. This is the actual database endpoint your applications will connect to. Run the following command to create an AlloyDB Instance:
gcloud alloydb instances create alloydb-inst \
     --instance-type=PRIMARY \
     --cpu-count=2 \
     --region=us-central1 \
     --cluster=alloydb-cluster \
     --availability-type=ZONAL \
     --ssl-mode=ALLOW_UNENCRYPTED_AND_ENCRYPTED
Note: Instance creation can take approximately 10 minutes to complete. Please wait for this operation to finish before proceeding.
Enable Vertex AI Integration
To allow your AlloyDB instance to perform vector search queries (which are essential for AI functionalities like semantic search) and call models deployed in Vertex AI, you need to grant Vertex AI permissions to the AlloyDB Service Agent.
First, retrieve your Google Cloud Project Number, as it's required for the IAM binding.
PROJECT_NUMBER=$(gcloud projects describe $PROJECT_ID --format="value(projectNumber)")
gcloud projects describe $PROJECT_ID --format="value(projectNumber)"
Then grant Vertex AI permission to the AlloyDB Service Agent:
gcloud projects add-iam-policy-binding $PROJECT_ID \
--member="serviceAccount:service-$PROJECT_NUMBER@gcp-sa-alloydb.iam.gserviceaccount.com" \
--role="roles/aiplatform.user"
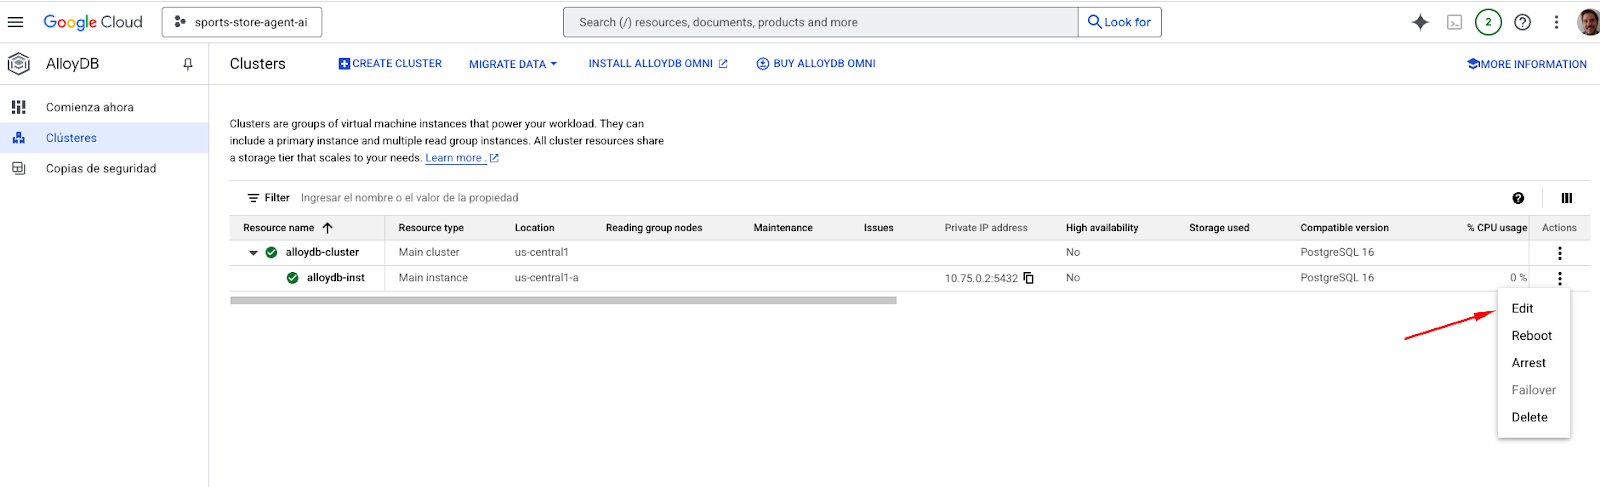
Enable Public IP
In preparation for following steps, we will enable the Public IP Connectivity in our AlloyDB instance.
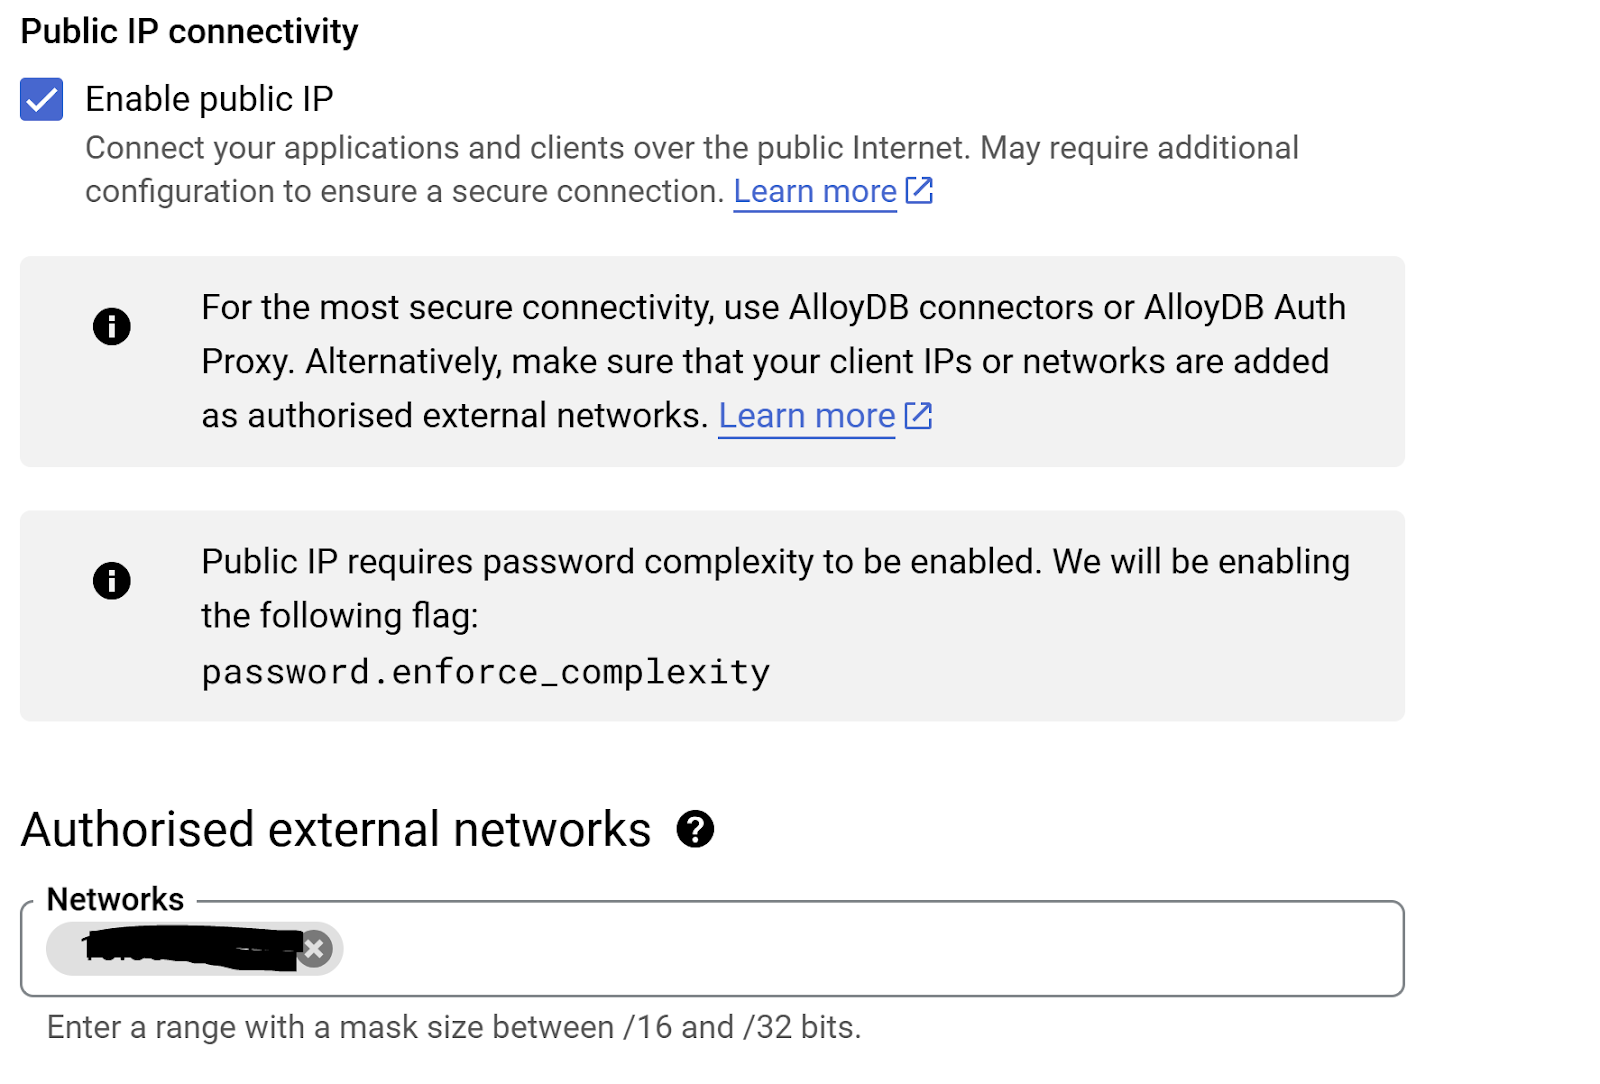
In the Console, go to the search field at the top middle of the screen and introduce "alloydb", then, edit and go to the Public IP connectivity section. Check the "Enable Public IP" checkbox and enter the IP address of your Cloud Shell machine.
To get your IP of your Cloud Shell machine, go to Cloud Shell Terminal and enter the command " ifconfig | grep -A 1 eth0". From the result, replace the last 2 digits with 0.0 with a mask size ‘/16'. For Example it would look like "XX.XX.0.0/16" where XX are numbers.
Paste this IP in the Authorized external networks "Networks" textbox of the edit instance page.
Note: Update operation can take until 3 minutes
4. Load the Database
Create the store database
Now it's time to create your database and load the initial data for your Sports Shop.
To enable psql to connect to your private AlloyDB instance from Cloud Shell, you'll use the AlloyDB Auth Proxy. This utility securely tunnels your connection to the database. (Refer to AlloyDB Auth Proxy)
Download AlloyDB Auth Proxy using the following command:
wget https://storage.googleapis.com/alloydb-auth-proxy/v1.13.6/alloydb-auth-proxy.linux.amd64 -O alloydb-auth-proxy
Make it executable:
chmod +x alloydb-auth-proxy
Run this command in your first Cloud Shell terminal window. The proxy will run in the background and forward connections.
nohup ./alloydb-auth-proxy "projects/$PROJECT_ID/locations/us-central1/clusters/alloydb-cluster/instances/alloydb-inst" --public-ip &
Connect to the AlloyDB Instance using psql:
psql -h 127.0.0.1 -U postgres
Note: When prompted, enter the password you set for the postgres user during cluster creation (if you are following the documentation directly the password is alloydb).
And create the store database for our application (run the commands one by one):
CREATE DATABASE store;
\c store
exit
Source Code
Now, clone the codelab's source code repository. Make sure you are in your home directory or a suitable location before cloning and run the following command:
git clone https://github.com/mtoscano84/sports-agent-adk-mcp-alloydb.git
Populate the database
Navigate into the cloned project's data folder to access the database dump file.
cd sports-agent-adk-mcp-alloydb/data
Then, import the sample dataset into your store database using the store_backup.sql file from the repository.
psql -h 127.0.0.1 -U postgres -d store -f store_backup.sql
Note: You may see some WARNING and ERROR messages during this import, which can be safely ignored for this codelab. These often relate to permissions or objects that already exist if the dump contains full schema.you will find some WARNING and ERRORS that can be ignored
5. Authorization Service Set up
In this section, you will set up the Authorization Service for your application. This service is crucial for securing access and providing protection against prompt injection vulnerabilities in your AI Agent.
First, you'll add a sample user to the users table in your store database. This user will be used for authentication in your application.
Go to the console and navigate to AlloyDB, select the primary instance and then AlloyDB Studio:
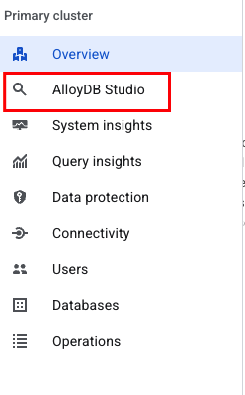
When prompted, sign into AlloyDB Studio using the credentials you created when you set up the cluster:
- Username: "postgres"
- Database: "store"
- Password: "alloydb"
In the SQL Editor, execute an INSERT statement to add your user to the database. Change the name and surname and email address.
Important:
- Keep the LOCATION as it is in the example
- Use the same email address your using to register in the Google Cloud Console
INSERT INTO users (user_id, first_name, last_name, Address, city, postal_code, location, email)
VALUES (10,'John', 'Doe', 'Carrer Muntaner 39', 'Barcelona', '08019', '0101000020E61000008AAE0B3F38B144401FBB0B9414780140', 'john.doe@example.com');
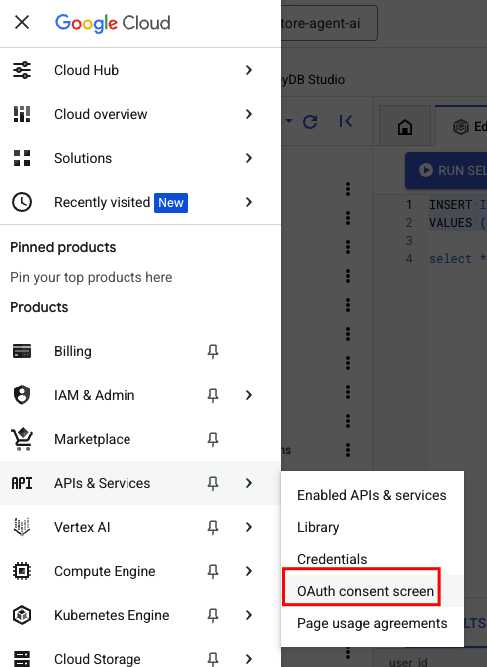
Next, you need to configure the OAuth Consent Screen for your project. This screen is presented to users when your application requests access to their Google Account and defines your application's brand.
In the Console, navigate to "APIs and Services", "Google OAuth Consent":
Provide the following information to create your application's brand:
- App Name: "Sports Shopping Agent AI"
- User support email: "YOUR_EMAIL"
- Audience: "External"
- Contact Information: "YOUR_EMAIL"
Now, you will create the OAuth Client ID that your frontend application will use to validate user identity with Google.
First, ensure you have your Google Cloud Project Number. This is required for configuring the redirect URIs correctly. Run the following command in a Cloud Shell Terminal:
In case your PROJECT_ID variable is not set in this Cloud Shell Terminal window, execute:
export PROJECT_ID=[YOUR_PROJECT_ID]
Then, get the PROJECT_NUMBER using the following command:
gcloud projects describe $PROJECT_ID --format="value(projectNumber)"
Then, navigate to "APIs and Services" -> "Credentials" -> "Create Credentials" -> "OAuth Client ID"
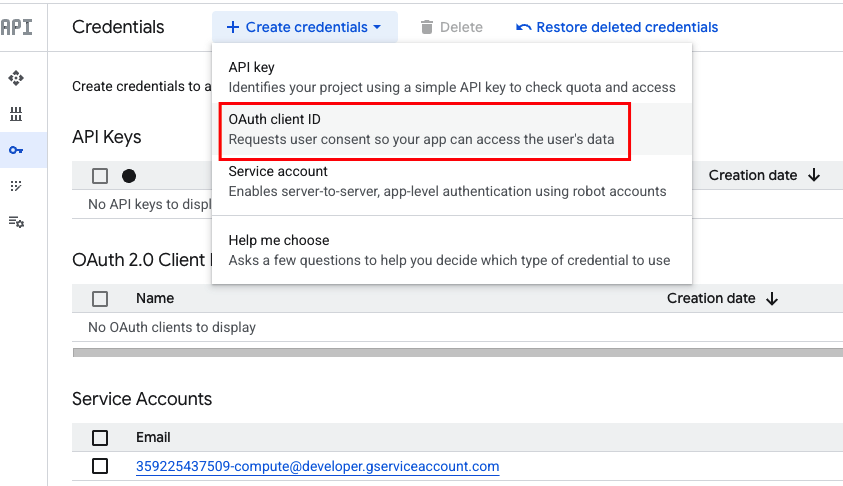
Use the following information to create the credential:
- Application type: "Web Application"
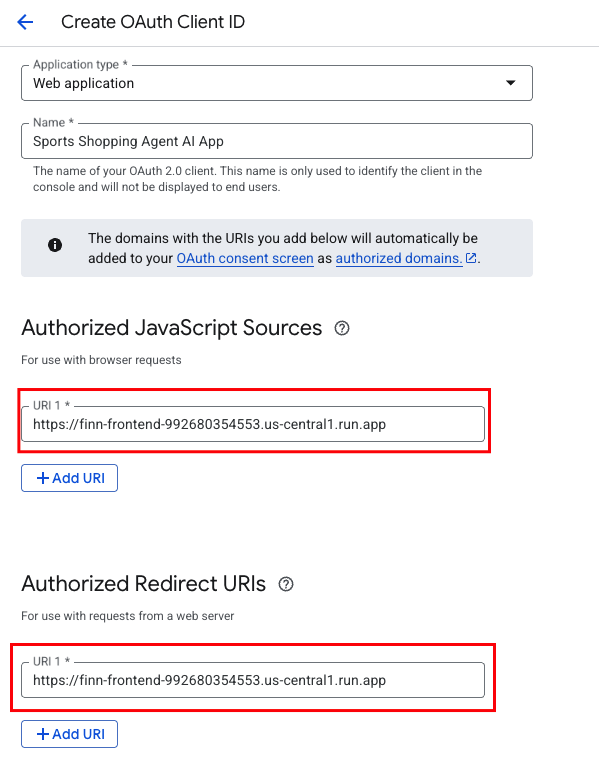
- Name: "Sports Shopping Agent AI App"
Authorized JavaScript origins:
- URL1: https://finn-frontend-[YOUR_PROJECT_NUMBER].us-central1.run.app
Authorized redirect URIs:
- URL1: https://finn-frontend-[YOUR_PROJECT_NUMBER].us-central1.run.app
Note: The URL https://finn-frontend-[YOUR_PROJECT_NUMBER].us-central1.run.app is the expected deployment URL for your frontend application, which will be set up later in this codelab. Ensure you replace [YOUR_PROJECT_NUMBER] with the actual number you copied.
Important: After creation, a pop-up will display your OAuth Client ID and, sometimes, a Client Secret. Store your OAuth Client ID in a safe place, as you will need it in a later step when configuring your frontend.
6. MCP ToolBox for Databases Setup
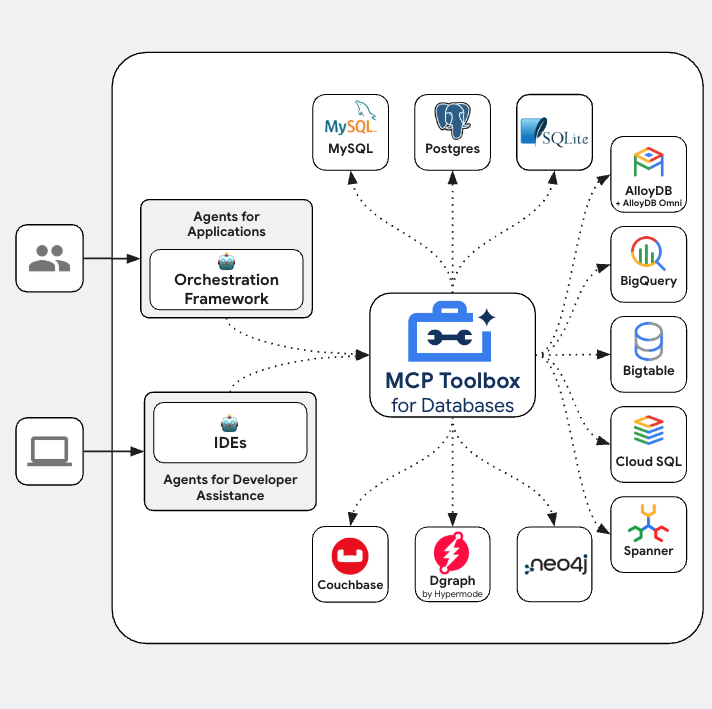
Toolbox sits between your application's orchestration framework and your database, providing a control plane that is used to modify, distribute, or invoke tools. It simplifies the management of your tools by providing you with a centralized location to store and update tools, allowing you to share tools between agents and applications and update those tools without necessarily redeploying your application.
Since one of the databases supported by MCP Toolbox for Databases is AlloyDB, and we have already provisioned that in the previous section, let's go ahead and set up Toolbox.
First, you'll set up the MCP Toolbox server locally in your Cloud Shell environment to verify its functionality.
- In your Cloud Shell Terminal, navigate to the
toolboxfolder located within your cloned project repository:"
cd sports-agent-adk-mcp-alloydb/src/toolbox
- Run the following commands to download the Toolbox binary and grant it execution permissions:
# see releases page for other versions
export VERSION=0.16.0

curl -O https://storage.googleapis.com/mcp-toolbox-for-databases/v$VERSION/linux/amd64/toolbox

chmod +x toolbox
Note: The version 0.16.0 is specified here. For production environments, always verify and use the latest stable release from the Toolbox releases page.
- Navigate to the Cloud Shell Editor (you can toggle from the Terminal by clicking the Editor icon).
In the same sports-agent-adk-mcp-alloydb/src/toolbox directory, you will find a file named tools.yaml. Open this file and update the placeholders with your OAuth Client ID and Google Cloud Project ID from the previous steps.
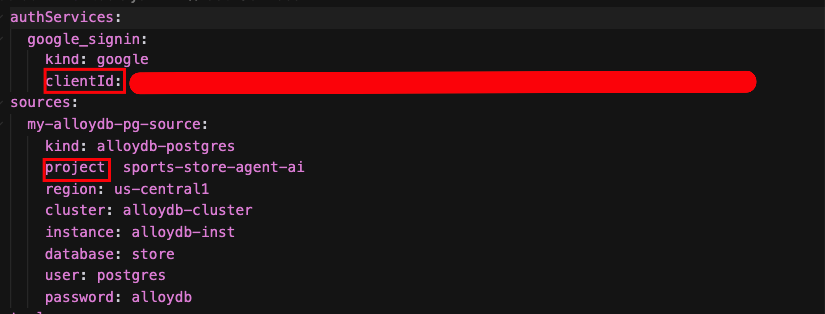
Let's understand tools.yaml
Sources represent your different data sources that a tool can interact with. A Source represents a data source that a tool can interact with. You can define Sources as a map in the sources section of your tools.yaml file. Typically, a source configuration will contain any information needed to connect with and interact with the database.
Tools define actions an agent can take – such as reading and writing to a source. A tool represents an action your agent can take, such as running a SQL statement. You can define Tools as a map in the tools section of your tools.yaml file. Typically, a tool will require a source to act on.
For more details on configuring your tools.yaml, refer to this documentation.
Let's run the MCP Toolbox for Databases Server
Run the following command (from the mcp-toolbox folder) to start the server:
./toolbox --tools-file "tools.yaml"
Now, if you open the server in a web preview mode on the cloud, you should be able to see the Toolbox server up and running with all the tools of our application.
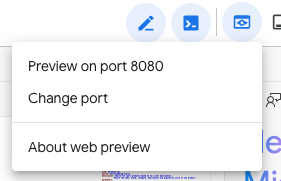
The MCP Toolbox Server runs by default on port 5000. Let us use Cloud Shell to test this out.
Click on Web Preview in Cloud Shell as shown below:
Click on Change port and set the port to 5000 as shown below and click on Change and Preview.
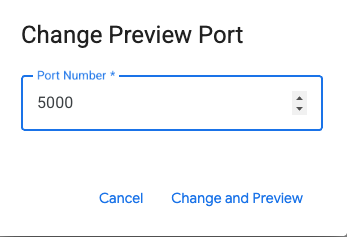
This should bring the output:

The MCP Toolkit for Databases describes a Python SDK for you to validate and test out the tools, which is documented over here. We will skip that and jump directly into the Agent Development Kit (ADK) in the next section that will utilize these tools.
Let's deploy our Toolbox to Cloud Run
To make your Toolbox server accessible as a public endpoint that can be integrated with other applications and your AI Agent, you will deploy it to Cloud Run. Detailed instructions for hosting the Toolbox on Cloud Run are given here.
Come back to the Cloud Shell terminal and navigate to the toolbox folder:
cd sports-agent-adk-mcp-alloydb/src/toolbox
Ensure your PROJECT_ID environment variable is set to your Google Cloud Project ID.
export PROJECT_ID=$PROJECT_ID
Next, verify that the following Google Cloud services are enabled in the project.
gcloud services enable run.googleapis.com \
                       cloudbuild.googleapis.com \
                       artifactregistry.googleapis.com \
                       iam.googleapis.com \
                       secretmanager.googleapis.com
Let's create a separate service account that will be acting as the identity for the Toolbox service that we will be deploying on Google Cloud Run. We are also ensuring that this service account has the correct roles i.e. ability to access Secret Manager and talk to AlloyDB.
gcloud iam service-accounts create toolbox-identity

gcloud projects add-iam-policy-binding $PROJECT_ID \
   --member serviceAccount:toolbox-identity@$PROJECT_ID.iam.gserviceaccount.com \
   --role roles/secretmanager.secretAccessor


gcloud projects add-iam-policy-binding $PROJECT_ID \
    --member='serviceAccount:toolbox-identity@'$PROJECT_ID'.iam.gserviceaccount.com' \
    --role='roles/alloydb.client'


gcloud projects add-iam-policy-binding $PROJECT_ID \
  --member='serviceAccount:toolbox-identity@'$PROJECT_ID'.iam.gserviceaccount.com' \
    --role='roles/serviceusage.serviceUsageConsumer'
Then, you'll upload the tools.yaml file as a secret and since we have to install the Toolbox in Cloud Run, we are going to use the latest Container image for the toolbox and set that in the IMAGE variable.
gcloud secrets create tools --data-file=tools.yaml

export IMAGE=us-central1-docker.pkg.dev/database-toolbox/toolbox/toolbox:latest
Finally, deploy your Toolbox server to Cloud Run using the following command. This command will containerize your application, configure the service account, inject the secret, and expose it publicly:
gcloud run deploy toolbox \
--image $IMAGE \
--service-account toolbox-identity \
--region us-central1 \
--set-secrets "/app/tools.yaml=tools:latest" \
--args="--tools_file=/app/tools.yaml","--address=0.0.0.0","--port=8080" \
--allow-unauthenticated
This should start the process of deploying the Toolbox Server with our configured tools.yaml to Cloud Run. On successful deployment, you should see a message similar to the following:
Deploying container to Cloud Run service [toolbox] in project [sports-store-agent-ai] region [us-central1]
OK Deploying... Done.
  OK Creating Revision...
  OK Routing traffic...
  OK Setting IAM Policy...
Done.
Service [toolbox] revision [toolbox-00002-dn2] has been deployed and is serving 100 percent of traffic.
Service URL: https://toolbox-[YOUR_PROJECT_NUMBER].us-central1.run.app
You can now visit the Service URL listed above in the browser. It should display the "Hello World" message that we saw earlier. Additionally, you can also visit the following URL to see the tools available:
https://toolbox-[YOUR_PROJECT_NUMBER].us-central1.run.app/api/toolset
You can also visit Cloud Run from the Google Cloud console and you will see the Toolbox service available in the list of services in Cloud Run.
7. Agent built on ADK
In this section, you will deploy your AI Agent, which is built using the Agent Development Kit (ADK), to Cloud Run.
First, enable the necessary APIs in your project for building and deploying your Agent on Cloud Run, and for interacting with Artifact Registry and Cloud Storage. Run the following command in your Cloud Shell Terminal:
gcloud services enable artifactregistry.googleapis.com \
                       cloudbuild.googleapis.com \
                       run.googleapis.com \
                       storage.googleapis.com
Then, we'll assign the necessary permissions to the Default Compute Service Account in our project. First, run the following command in your Cloud Shell terminal to get the PROJECT_NUMBER:
PROJECT_NUMBER=$(gcloud projects describe $PROJECT_ID --format="value(projectNumber)")
Assign permissions to the Default Compute Service Account:
# Grant Cloud Run service account access to GCS
gcloud projects add-iam-policy-binding $PROJECT_ID \
--member="serviceAccount:$PROJECT_NUMBER-compute@developer.gserviceaccount.com" \
--role="roles/storage.admin"

gcloud projects add-iam-policy-binding $PROJECT_ID \
--member="serviceAccount:$PROJECT_NUMBER-compute@developer.gserviceaccount.com" \
--role="roles/run.admin"

gcloud projects add-iam-policy-binding $PROJECT_ID \
--member="serviceAccount:$PROJECT_NUMBER-compute@developer.gserviceaccount.com" \
--role="roles/artifactregistry.writer"

gcloud projects add-iam-policy-binding $PROJECT_ID \
--member="serviceAccount:$PROJECT_NUMBER@cloudbuild.gserviceaccount.com" \
--role="roles/artifactregistry.repoAdmin"

# Grant Vertex AI User role to the service account
gcloud projects add-iam-policy-binding $PROJECT_ID \
--member="serviceAccount:$PROJECT_NUMBER-compute@developer.gserviceaccount.com" \
--role="roles/aiplatform.user"

# Grant Vertex AI Model User role to the service account
gcloud projects add-iam-policy-binding $PROJECT_ID \
--member="serviceAccount:$PROJECT_NUMBER-compute@developer.gserviceaccount.com" \
--role="roles/aiplatform.modelUser"
Connect our Agent to Tools
We are going to connect our Agent to Tools. In the context of ADK, a Tool represents a specific capability provided to an AI agent, enabling it to perform actions and interact with the world beyond its core text generation and reasoning abilities.
In our case, we are going to equip our Agent now with the Tools that we have configured in the MCP Toolbox for Databases.
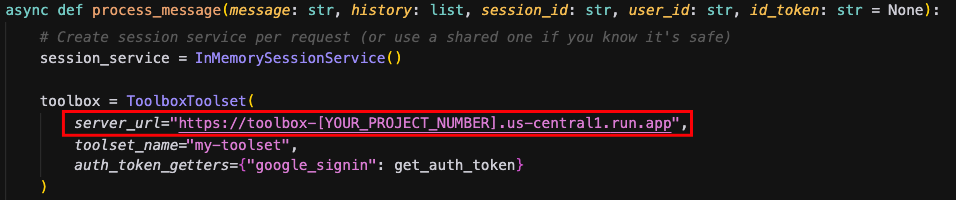
Using the Cloud Shell Editor, navigate to sports-agent-adk-mcp-alloydb/src/backend/ and edit the "finn_agent.py" file with the following code. Notice that we are using Cloud Run Service URL from the MCP ToolBox Server deployed in the previous step:
Deploy our Agent on Cloud Run
Finally, you will deploy your configured AI Agent to Cloud Run, making it accessible via an HTTP endpoint.
First, create a Docker repository in Artifact Registry to store your Agent's container images. Run the following command in Cloud Shell:
gcloud artifacts repositories create finn-agent-images \
    --repository-format=docker \
    --location=us-central1 \
    --project=$PROJECT_ID \
    --description="Repository for finn-agent images"
Next, build the Docker image for your Agent using Cloud Build. Run this command from the root directory of your cloned project (sports-agent-adk-mcp-alloydb/):
gcloud builds submit src/backend/ --tag us-central1-docker.pkg.dev/$PROJECT_ID/finn-agent-images/finn-agent
Now, deploy the Agent service. This command will create a Cloud Run service, pull the image from Artifact Registry, and configure environment variables
gcloud run deploy finn-agent \
    --image us-central1-docker.pkg.dev/$PROJECT_ID/finn-agent-images/finn-agent \
    --platform managed \
    --allow-unauthenticated \
    --region us-central1 \
    --project $PROJECT_ID --set-env-vars="GOOGLE_CLOUD_PROJECT=$PROJECT_ID,GOOGLE_CLOUD_LOCATION=us-central1,GOOGLE_GENAI_USE_VERTEXAI=TRUE"
Note: We are dynamically setting environment variables, including GOOGLE_CLOUD_PROJECT (using the shell variable $PROJECT_ID)
You should get an output similar to this, indicating the successful deployment of your Agent:
Deploying container to Cloud Run service [finn-agent] in project [sports-store-agent-ai] region [us-central1]
OK Deploying... Done.
  OK Creating Revision...
  OK Routing traffic...
  OK Setting IAM Policy...
Done.
Service [finn-agent] revision [finn-agent-00005-476] has been deployed and is serving 100 percent of traffic.
Service URL: https://finn-agent-359225437509.us-central1.run.app
Finally, test your agent by executing this curl command from your Cloud Shell Terminal:
curl -X POST \
  -H "Content-Type: application/json" \
  -d '{"message":"Hello"}' \
  https://finn-agent-[YOUR_PROJECT_NUMBER].us-central1.run.app/chat
You'll get an output similar to this:
"Hello! I'm Finn, your AI Sports shopping assistant. I can help you find sports products, gear, and equipment. How can I assist you today?"
At this point, you have successfully validated the deployment of AlloyDB, MCP Toolbox, and your Agent built using ADK.
8. Deploy the Frontend
In this section, you will deploy the conversational user interface for your AI assistant on Cloud Run. This frontend is built using React and JavaScript.
Before deploying, you need to update the frontend's source code with the URLs of your deployed Agent and your OAuth Client ID.
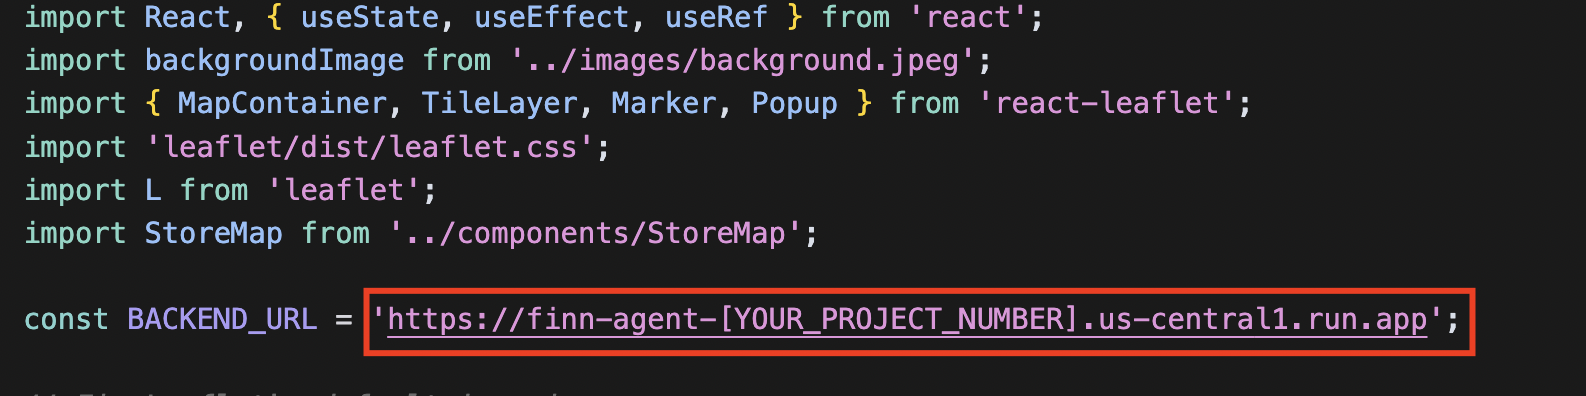
Using the Cloud Shell Editor, navigate to sports-agent-adk-mcp-alloydb/src/frontend/src/pages/ and open the Home.jsx file. You will need to update the placeholder for your Agent's Cloud Run Service URL. Then, replace it with your Agent's Cloud Run Service URL from the previous step (e.g., https://finn-agent-[YOUR_PROJECT_NUMBER].us-central1.run.app).
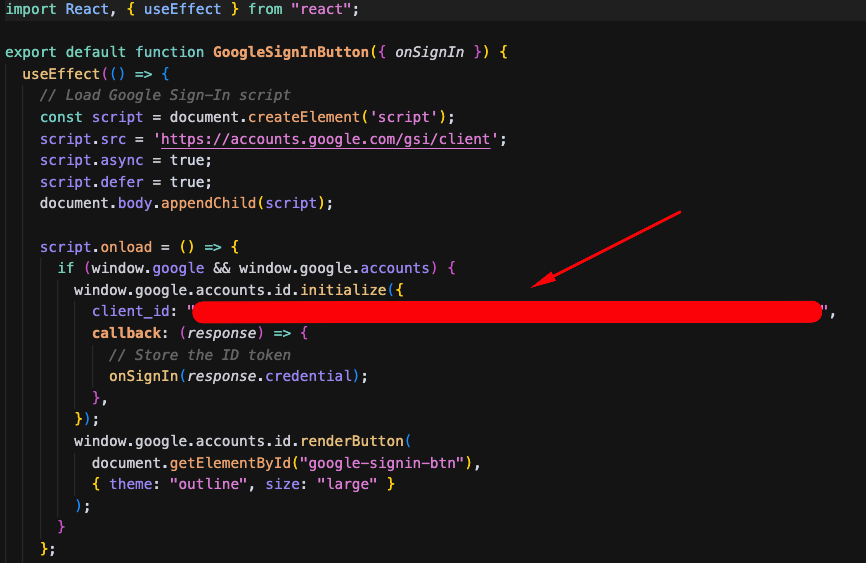
Now, Next, navigate to sports-agent-adk-mcp-alloydb/src/frontend/src/components/ and open the GoogleSignInButton.jsx file. You will update this file with the OAuth Client ID you obtained in the "Authorization Service Setup" section:
Deploy the frontend on Cloud Run
Now that your frontend application is configured, you are ready to deploy it to Cloud Run.
Run the following command in a Cloud Shell Terminal from the root directory (sports-agent-adk-mcp-alloydb/) to create a Docker repository in Artifact Registry for your frontend images.
gcloud artifacts repositories create finn-frontend-images \
    --repository-format=docker \
    --location=us-central1 \
    --project=$PROJECT_ID \
    --description="Repository for finn-frontend images"
Next, build the Docker image for your frontend application using Cloud Build. Run this command from the root directory of your project:
gcloud builds submit src/frontend/ --tag us-central1-docker.pkg.dev/$PROJECT_ID/finn-frontend-images/finn-frontend
Finally, we'll deploy the frontend on Cloud Run using the following command:
gcloud run deploy finn-frontend \
    --image us-central1-docker.pkg.dev/$PROJECT_ID/finn-frontend-images/finn-frontend \
    --platform managed \
    --allow-unauthenticated \
    --region us-central1 \
    --project $PROJECT_ID
You should get an output similar to this, indicating the successful deployment of your frontend:
Deploying container to Cloud Run service [finn-frontend] in project [sport-store-agent-ai] region [us-central1]
OK Deploying... Done.
  OK Creating Revision...
  OK Routing traffic...
  OK Setting IAM Policy...
Done.
Service [finn-frontend] revision [finn-frontend-00002-mwc] has been deployed and is serving 100 percent of traffic.
Service URL: https://finn-frontend-535807247199.us-central1.run.app
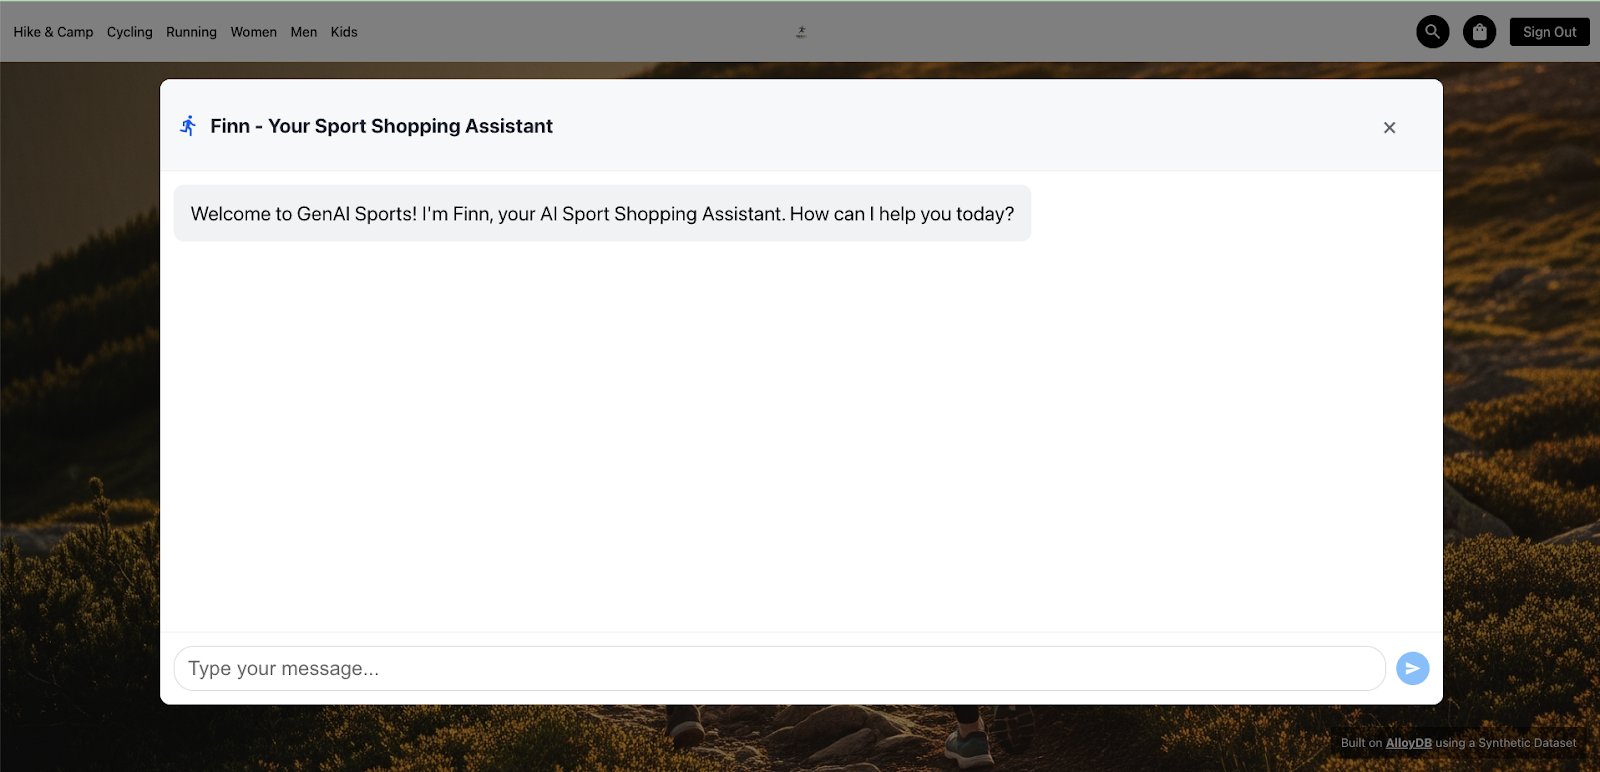
Open your web browser and use the Service URL from the previous step to open your newly deployed application, powered by your AI Agent!
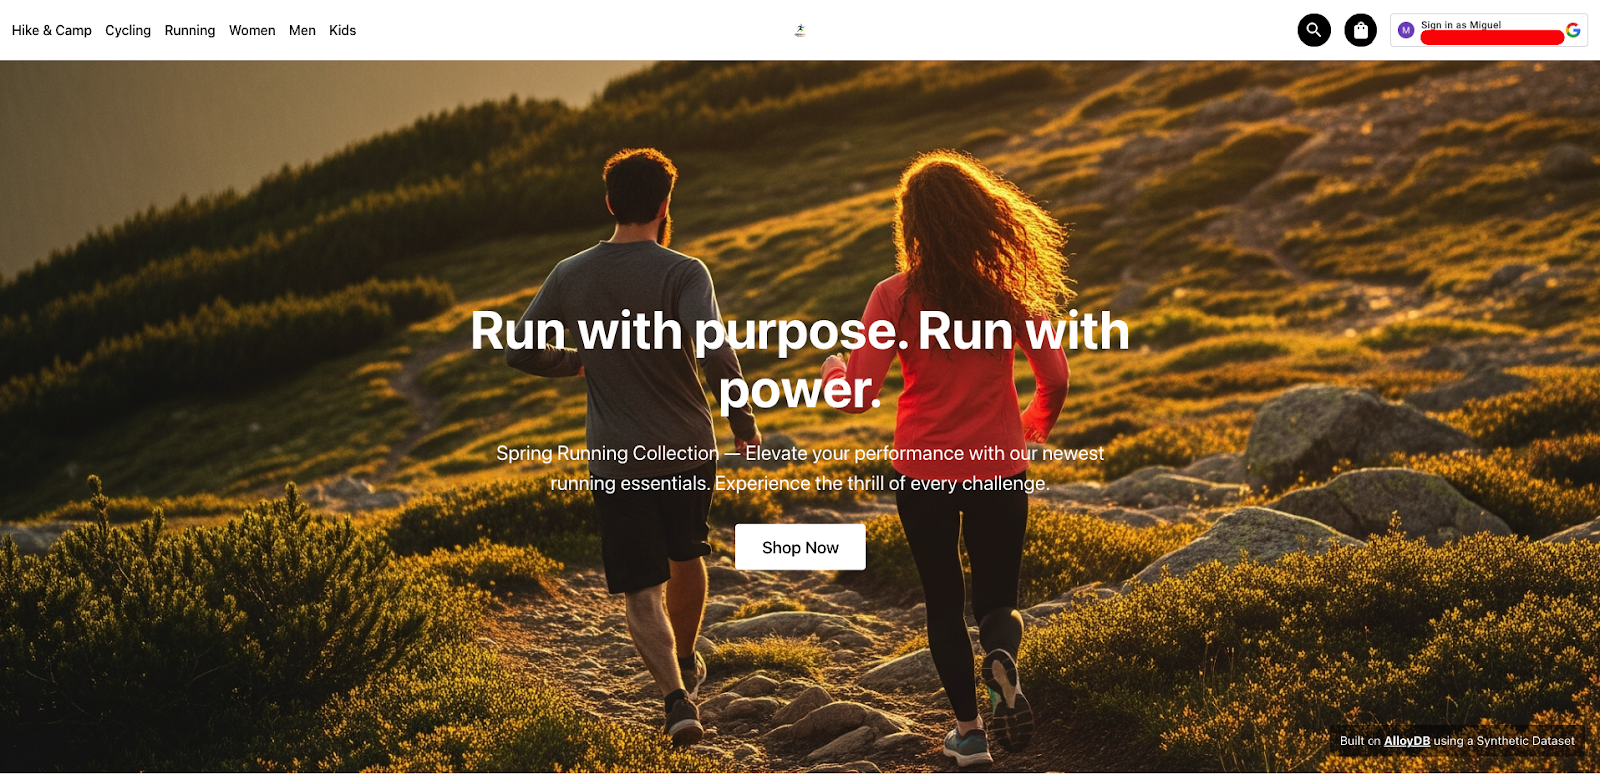
9. Run our Agent
Your Sports Store Agent AI assistant, Finn, is now fully deployed and ready to help with purchases!
Open your web browser and navigate to the Service URL of your frontend application from the previous step. The URL follows this format: https://finn-frontend-[YOUR_PROJECT_NUMBER].us-central1.run.app
Once the frontend loads, click on the top-right button (typically labeled "Sign in" or a similar prompt) to authenticate using your Google credentials. This action will leverage the OAuth configuration you set up earlier.
After successful authentication, you're ready to interact with Finn! Click on the "Shop Now" button to begin your conversational shopping experience.
Use the following script to test the various functionalities of your AI Agent. Copy and paste these prompts into the chat interface one by one:
- Hello Finn !
- I'm looking for running shoes for an ultra-trail
- Tell me more details about Ultra Glide
- Add Ultra Glide, size 40, color Red/Grey to my shopping list
- Show my shopping list
- Find stores near me
- Please, place an order using my shopping list for the store Sports Diagonal Mar
- Check the status for my orders
- Please list delivery methods for the store Sports Diagonal Mar
- Update the delivery method to Express Delivery for my order [YOUR_ORDER_NUMBER]
- Check the status for my orders
- Thanks Finn !
For a visual demonstration of the deployed Finn Agent and its capabilities, check out the video below:
10. Results
Having executed the previous script, you have successfully validated the complete integration of your ADK Agent, its connection to AlloyDB, and its utilization of the MCP Toolbox. This section highlights the core capabilities you've implemented.
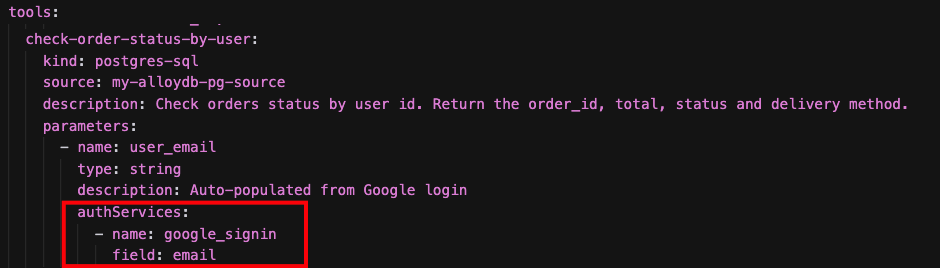
- Authorization Service
The MCP Toolbox for Databases provides the capability to federate an Authorization Service (specifically, Google Sign-In in this codelab) to authenticate users within your application. With MCP Toolbox, your OAuth Client ID is used to validate user identity when a tool is invoked.
This robust authentication mechanism offers an excellent solution to protect your agentic application against prompt injection, a type of attack where malicious input attempts to bypass or manipulate the agent's intended behavior. For more details, you can refer to the Wikipedia article on Prompt Injection
In this application, this technique is utilized when a user asks to "check the status of our orders." or "show my shopping list". The agent is designed to show only the orders that belong to the authenticated user, preventing unauthorized access to order information.
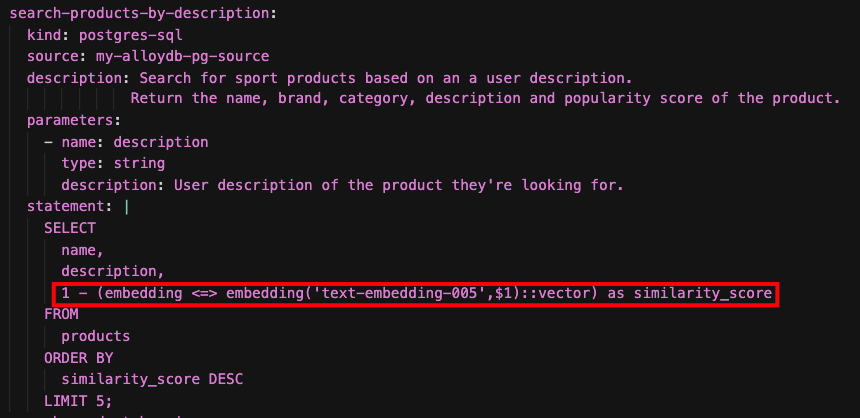
- Vector Search
Your agentic application leverages AlloyDB for PostgreSQL to provide advanced query capabilities, particularly through vector search. AlloyDB supports online embedding generation directly inside the database using SQL functions.
This powerful feature allows the agent to translate a user's natural language input into a numerical embedding representation. Subsequently, it can execute a similarity search against your product catalog (or other relevant data) based on these embeddings, enabling highly relevant search results.
In your application, you experience this technique when you ask Finn: "I'm looking for running shoes for an ultra-trail".
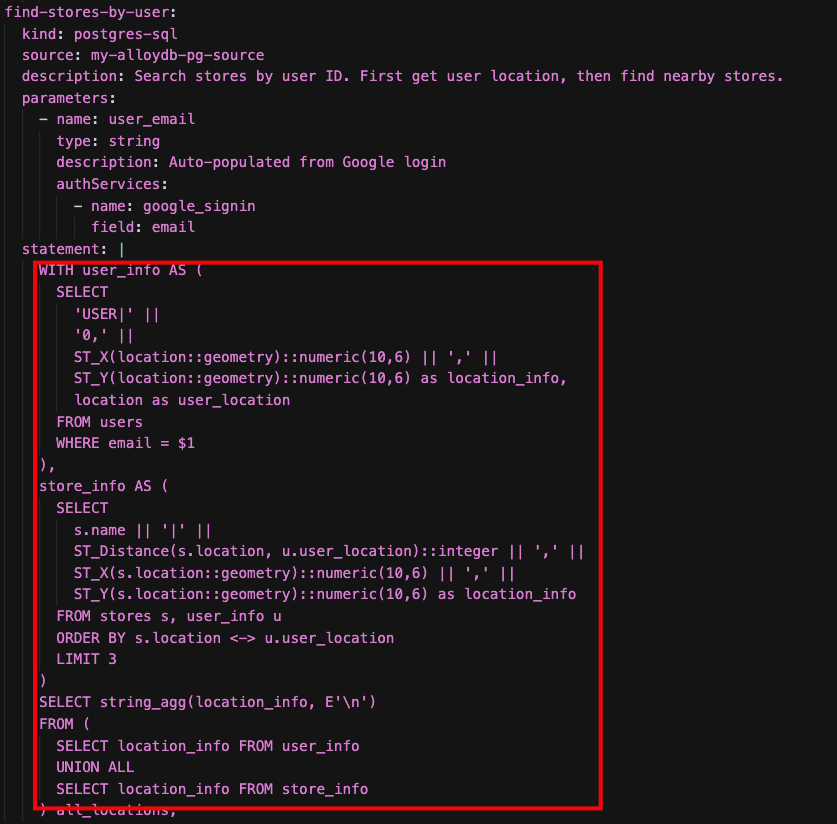
- Geospatial Capabilities (PostGis)
AlloyDB for PostgreSQL maintains 100% compatibility with standard PostgreSQL features. In this application, we utilize the popular PostgreSQL extension PostGIS to provide geospatial location capabilities to the agent.
When you ask the agent: "Find stores near me", the agent executes a tool that leverages PostGIS indexes within the database to efficiently locate the stores nearest to the user's specified or inferred location.
11. (Optional) Test AlloyDB AI Natural Language to SQL
This section introduces an advanced, Pre-GA feature of AlloyDB for PostgreSQL: Natural Language to SQL. This feature allows you to generate SQL queries directly from natural language prompts, leveraging the power of AI within your database.
Important: As this is a Pre-GA feature, it requires you to sign up and get access enabled for your Google Cloud Project, AlloyDB Cluster, and database.
- Sign-up for Access: Please follow this form to request access for your project
- Documentation: You can learn more about leveraging AlloyDB AI Natural Language to SQL in the official documentation
After you have signed up and confirmed access for your project, proceed with the following steps in AlloyDB Studio.
Sign into AlloyDB using the credentials our created when you created the cluster:
- Username: "postgres"
- Database: "store"
- Password: "alloydb"
1- Create the alloydb_ai_nl extension. This extension provides the necessary functions for AlloyDB AI Natural Language capabilities.
CREATE EXTENSION alloydb_ai_nl cascade;
2- Create a configuration for your application. A configuration defines the schema context that the AI model will use to understand your database.
SELECT
 alloydb_ai_nl.g_create_configuration(
   'finn_app_config'        -- configuration_id
 );
3- Register the schema / tables with the configuration. Add the specific tables and schemas that your application's agent will interact with to the configuration.
SELECT alloydb_ai_nl.g_manage_configuration(
   operation => 'register_table_view',
   configuration_id_in => 'finn_app_config',
   table_views_in=>'{public.products, public.products_variants, public.orders, public.orders_items, public.users, public.inventory, public.stores}'
);
4- Generate the context for the schema / tables. This step processes the registered tables to generate the necessary context for the AI model. This process can take approximately 2-3 minutes.
SELECT alloydb_ai_nl.generate_schema_context(
 'finn_app_config',
 TRUE
);
5- Check the auto-generated context for specific tables and columns (optional). You can inspect the generated context to understand how the AI model interprets your schema.
SELECT object_context
FROM alloydb_ai_nl.generated_schema_context_view
WHERE schema_object = 'public.inventory';


SELECT object_context
FROM alloydb_ai_nl.generated_schema_context_view
WHERE schema_object = 'public.products.name';


SELECT object_context
FROM alloydb_ai_nl.generated_schema_context_view
WHERE schema_object = 'public.products.popularity_score';
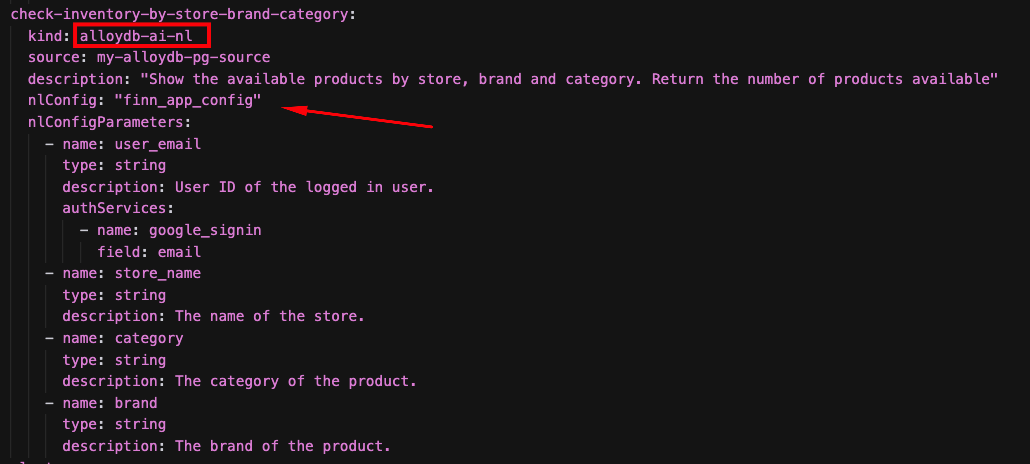
You'll find a tool called "check-inventory-by-store-brand-category" In the "tools.yaml" of our Agent. This tool uses AlloyDB Natural Language to SQL:
Open a Web browser, and use the service URL to open the application: "https://finn-frontend-[YOUR_PROJECT_NUMBER].us-central1.run.app"
Then, use the following script in the chat interface to test this new capability:
- Hello Finn !
- What is the total quantity of category Running products of Salomon in stock at the "Sports Diagonal Mar" store?
To see the actual SQL query that AlloyDB AI generated from your natural language input, return to AlloyDB Studio and execute the following query:
SELECT
   alloydb_ai_nl.get_sql(
       'finn_app_config',
       'What is the total quantity of category Running products of Salomon in stock at the "Sports Diagonal Mar" store?'
   ) ->> 'sql';
This will display the SQL statement that was generated by AlloyDB AI.
12. Clean Up
To avoid incurring charges to your Google Cloud account for the resources used in this lab, follow these steps:
- In the Google Cloud console, go to the Manage resources page.
- In the project list, select the project that you want to delete, and then click Delete.
- In the dialog, type the project ID, and then click Shut down to delete the project.
13. Congratulations
Congratulations! You have successfully created a Data-Driven Agentic AI application using ADK, MCP Toolbox for Databases and AlloyDB for PostgreSQL
For more information, refer to product docs: Agent Development Kit, MCP Toolbox for Databases and AlloyDB for PostgreSQL