
1. Introduction

1. The Challenge
In disaster response scenarios, coordinating survivors with different skills, resources, and needs across multiple locations requires intelligent data management and search capabilities. This workshop teaches you to build a production AI system that combines:
- 🗄️ Graph Database (Spanner): Store complex relationships between survivors, skills, and resources
- 🔍 AI-Powered Search: Semantic + keyword hybrid search using embeddings
- 📸 Multimodal Processing: Extract structured data from images, text, and video
- 🤖 Multi-Agent Orchestration: Coordinate specialized agents for complex workflows
- 🧠 Long-Term Memory: Personalization with Vertex AI Memory Bank

2. What You'll Build
A Survivor Network Graph Database with:
- 🗺️ 3D Interactive Graph Visualization of survivor relationships
- 🔍 Intelligent Search (keyword, semantic, and hybrid)
- 📸 Multimodal Upload Pipeline (extract entities from images/video)
- 🤖 Multi-Agent System for complex task orchestration
- 🧠 Memory Bank Integration for personalized interactions
3. Core Technologies
Component | Technology | Purpose |
Database | Cloud Spanner Graph | Store nodes (survivors, skills) and edges (relationships) |
AI Search | Gemini + Embeddings | Semantic understanding + similarity search |
Agent Framework | ADK (Agent Development Kit) | Orchestrate AI workflows |
Memory | Vertex AI Memory Bank | Long-term user preference storage |
Frontend | React + Three.js | Interactive 3D graph visualization |
2. 🛠️ Environment Prep (Skip if you in Workshop)
Part One: Enable Billing Account
To run this codelab, you need a billing account with some credit. Use the credits from the banner at the top of this codelab to get started. If you are already connected to a billing account, you can skip this step.
Part Two: Open Environment
- 👉 Click this link to navigate directly to Cloud Shell Editor
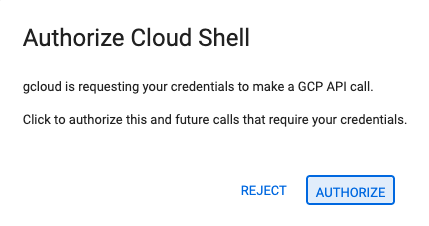
- 👉 If prompted to authorize at any point today, click Authorize to continue.
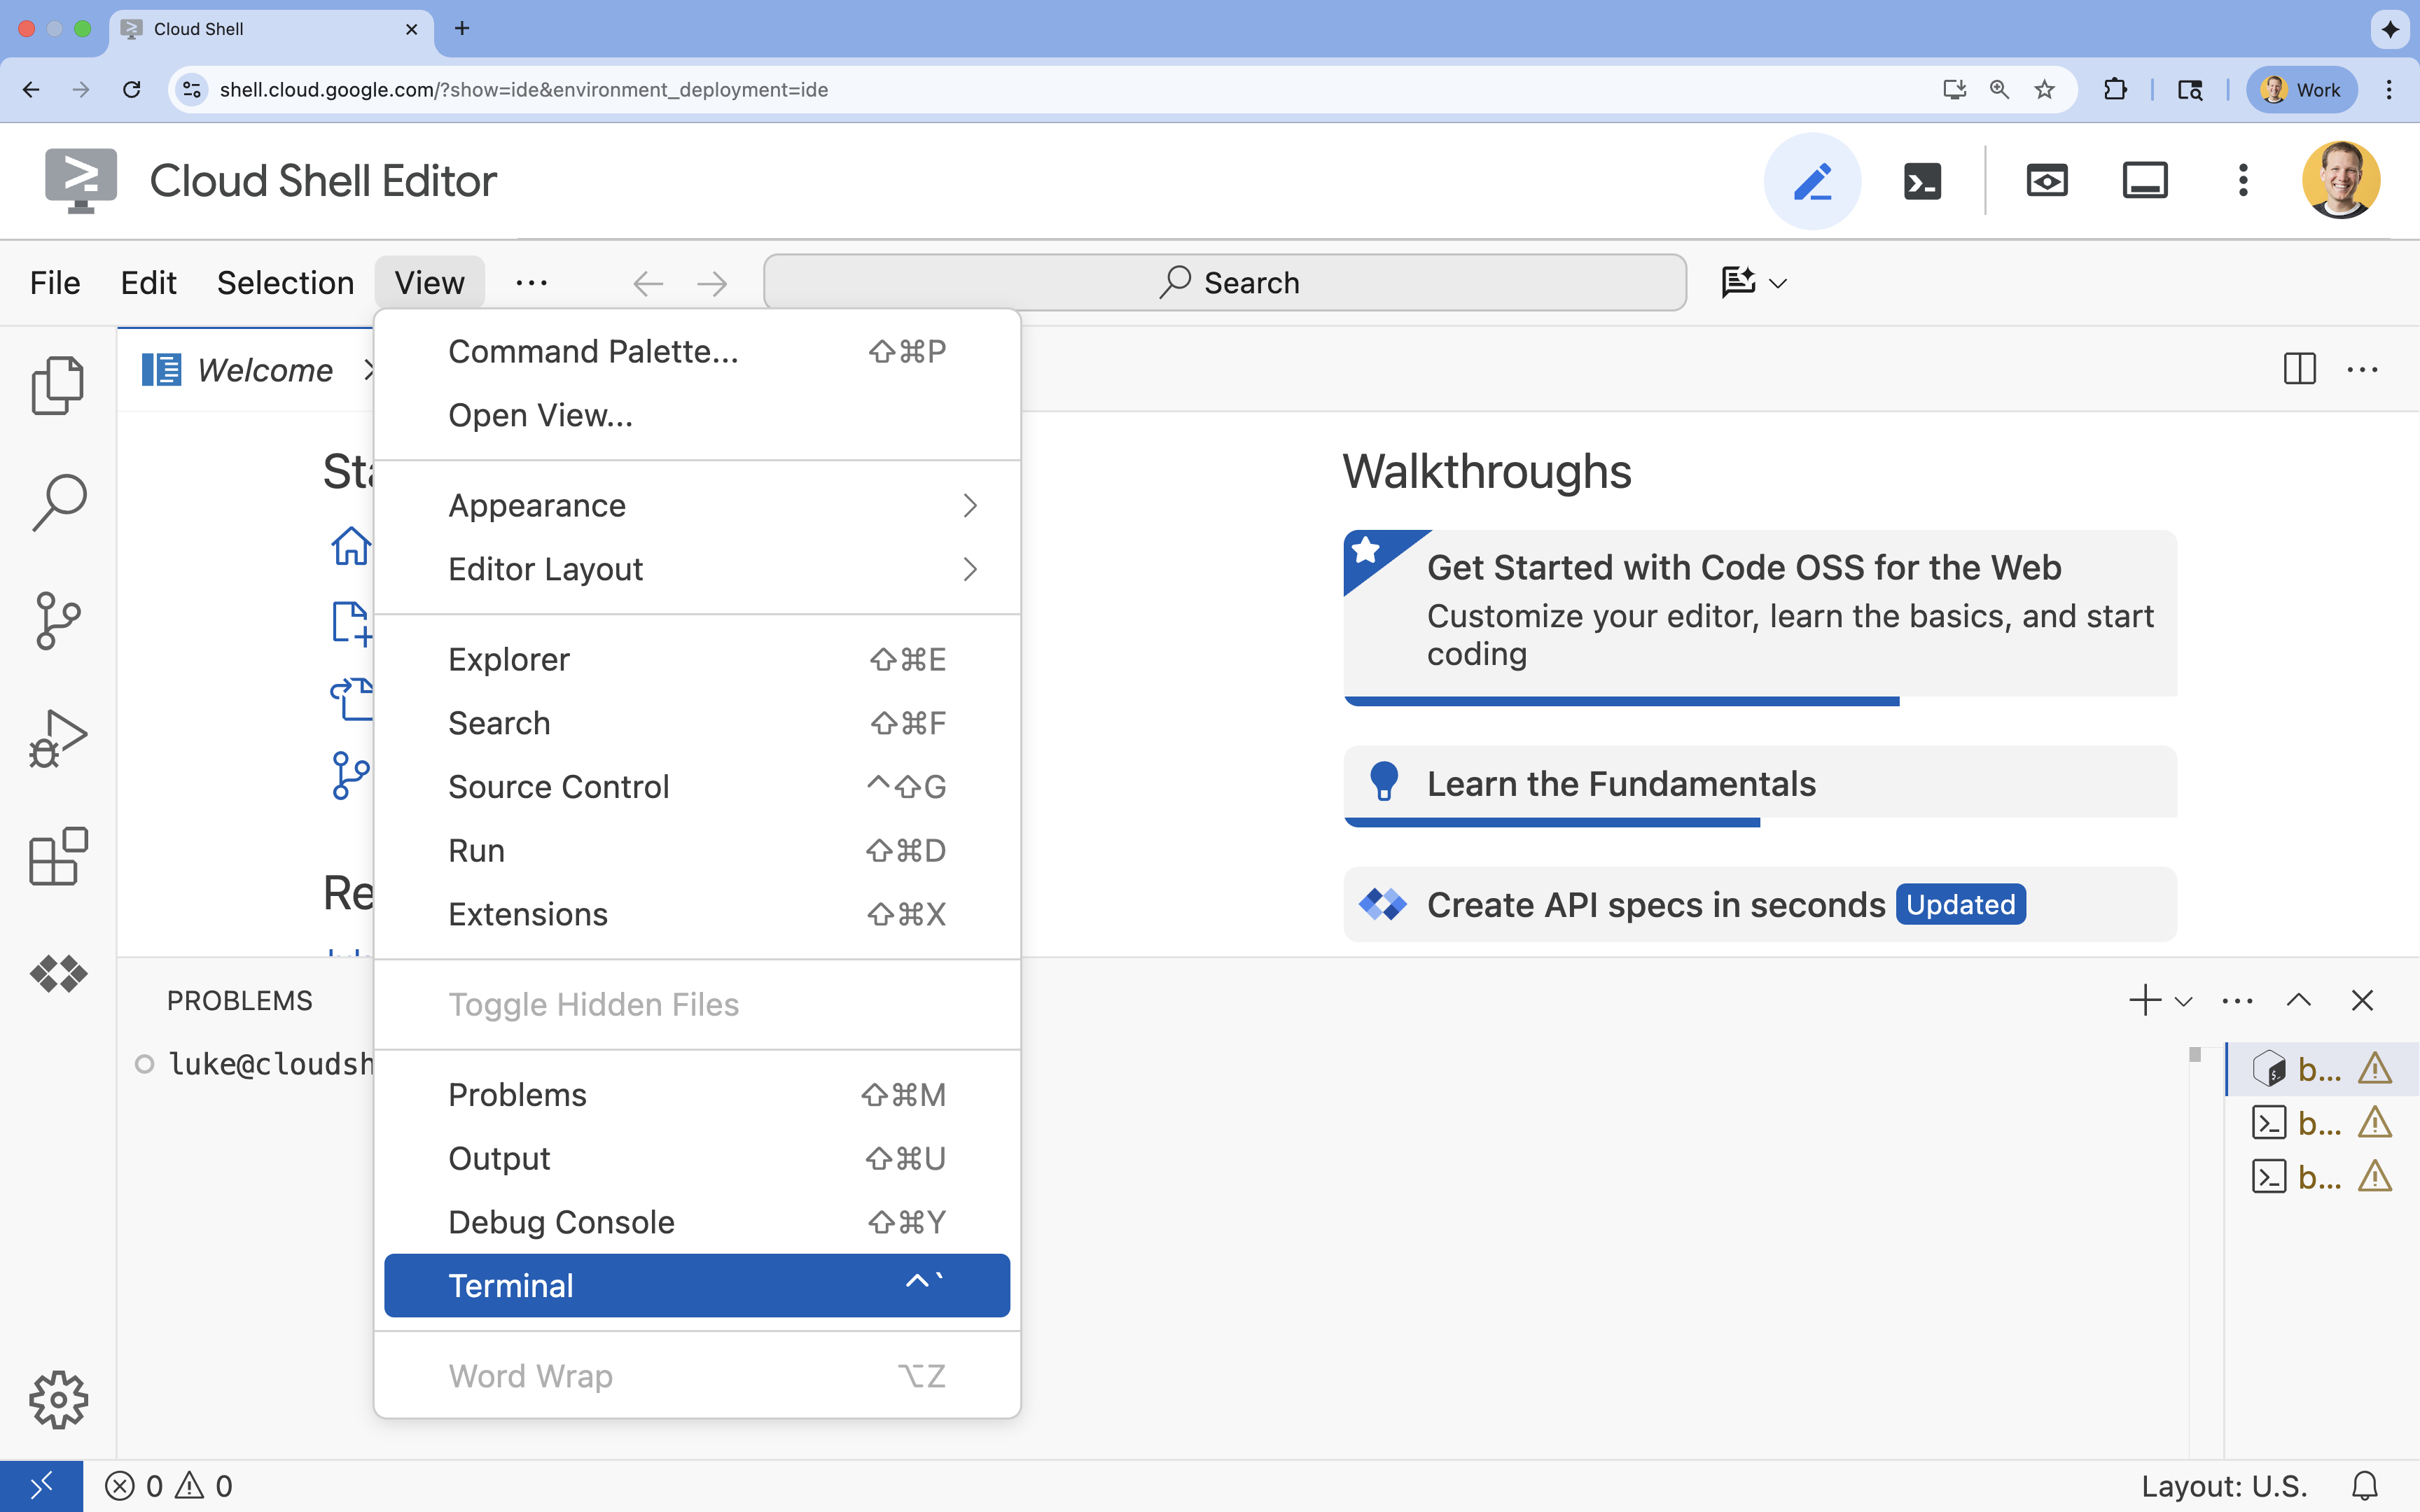
- 👉 If the terminal doesn't appear at the bottom of the screen, open it:
- Click View
- Click Terminal
- 👉💻 In the terminal, verify that you're already authenticated and that the project is set to your project ID using the following command:
gcloud auth list - 👉💻 Clone the bootstrap project from GitHub:
git clone https://github.com/gca-americas/way-back-home.git
Part Three: Create a new project
👉💻 In the terminal, Make the init script executable and run it:
cd ~/way-back-home/level_2
./init.sh
3. 🛠️ Environment Setup
1. Open Cloud Shell
In Cloud Shell Editor terminal, if the terminal doesn't appear at the bottom of the screen, open it:
- Click View
- Click Terminal
2. Configure Project
👉💻 In the terminal, set your project ID:
gcloud config set project $(cat ~/project_id.txt) --quiet
👉💻 Enable required APIs (this takes ~2-3 minutes):
gcloud services enable compute.googleapis.com \
                       aiplatform.googleapis.com \
                       run.googleapis.com \
                       cloudbuild.googleapis.com \
                       artifactregistry.googleapis.com \
                       spanner.googleapis.com \
                       storage.googleapis.com
3. Run Setup Script
👉💻 Execute the setup script:
cd ~/way-back-home/level_2
./setup.sh
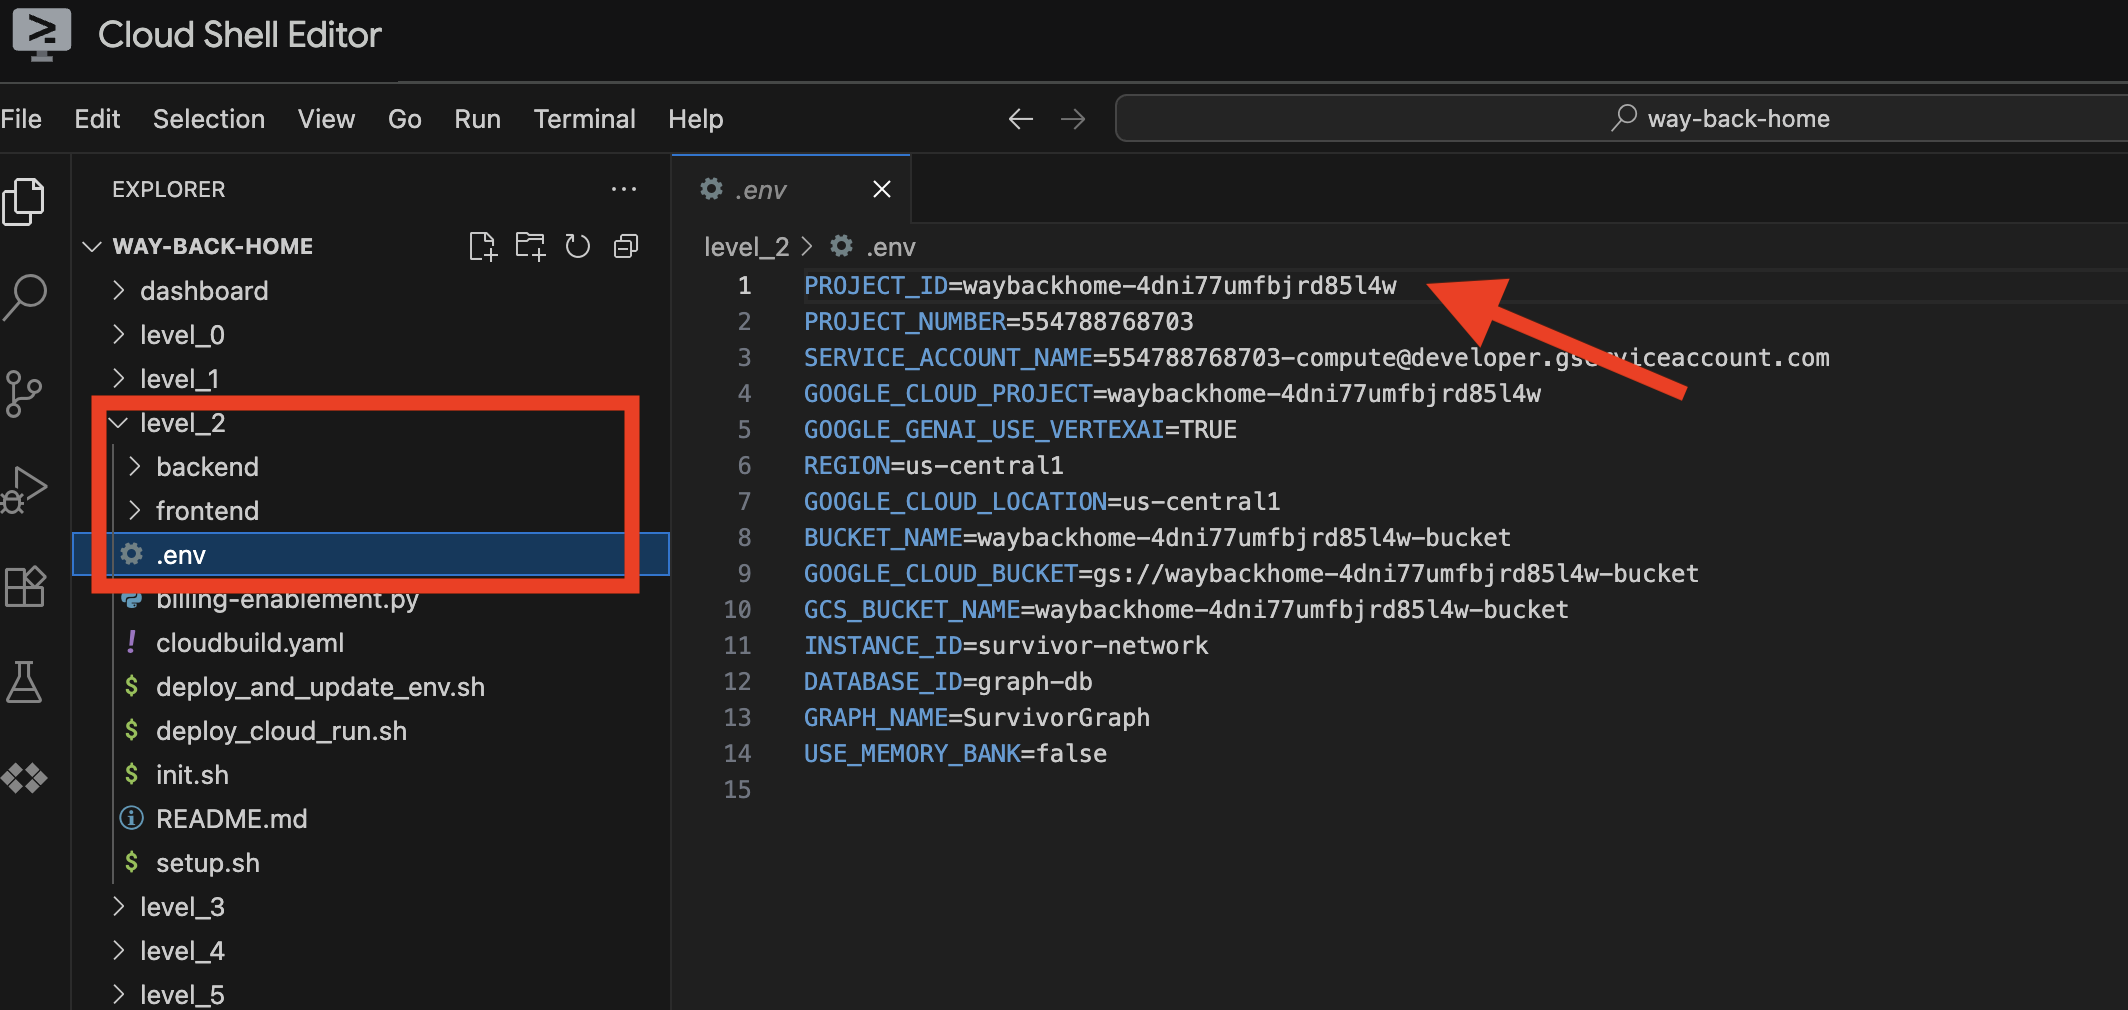
This will create .env for you. In your cloudshell, open way_back_homeproject. Under level_2 folder, you can see .env file is created for you. If you cannot find it, you can click View -> Toggle Hidden File to see it. 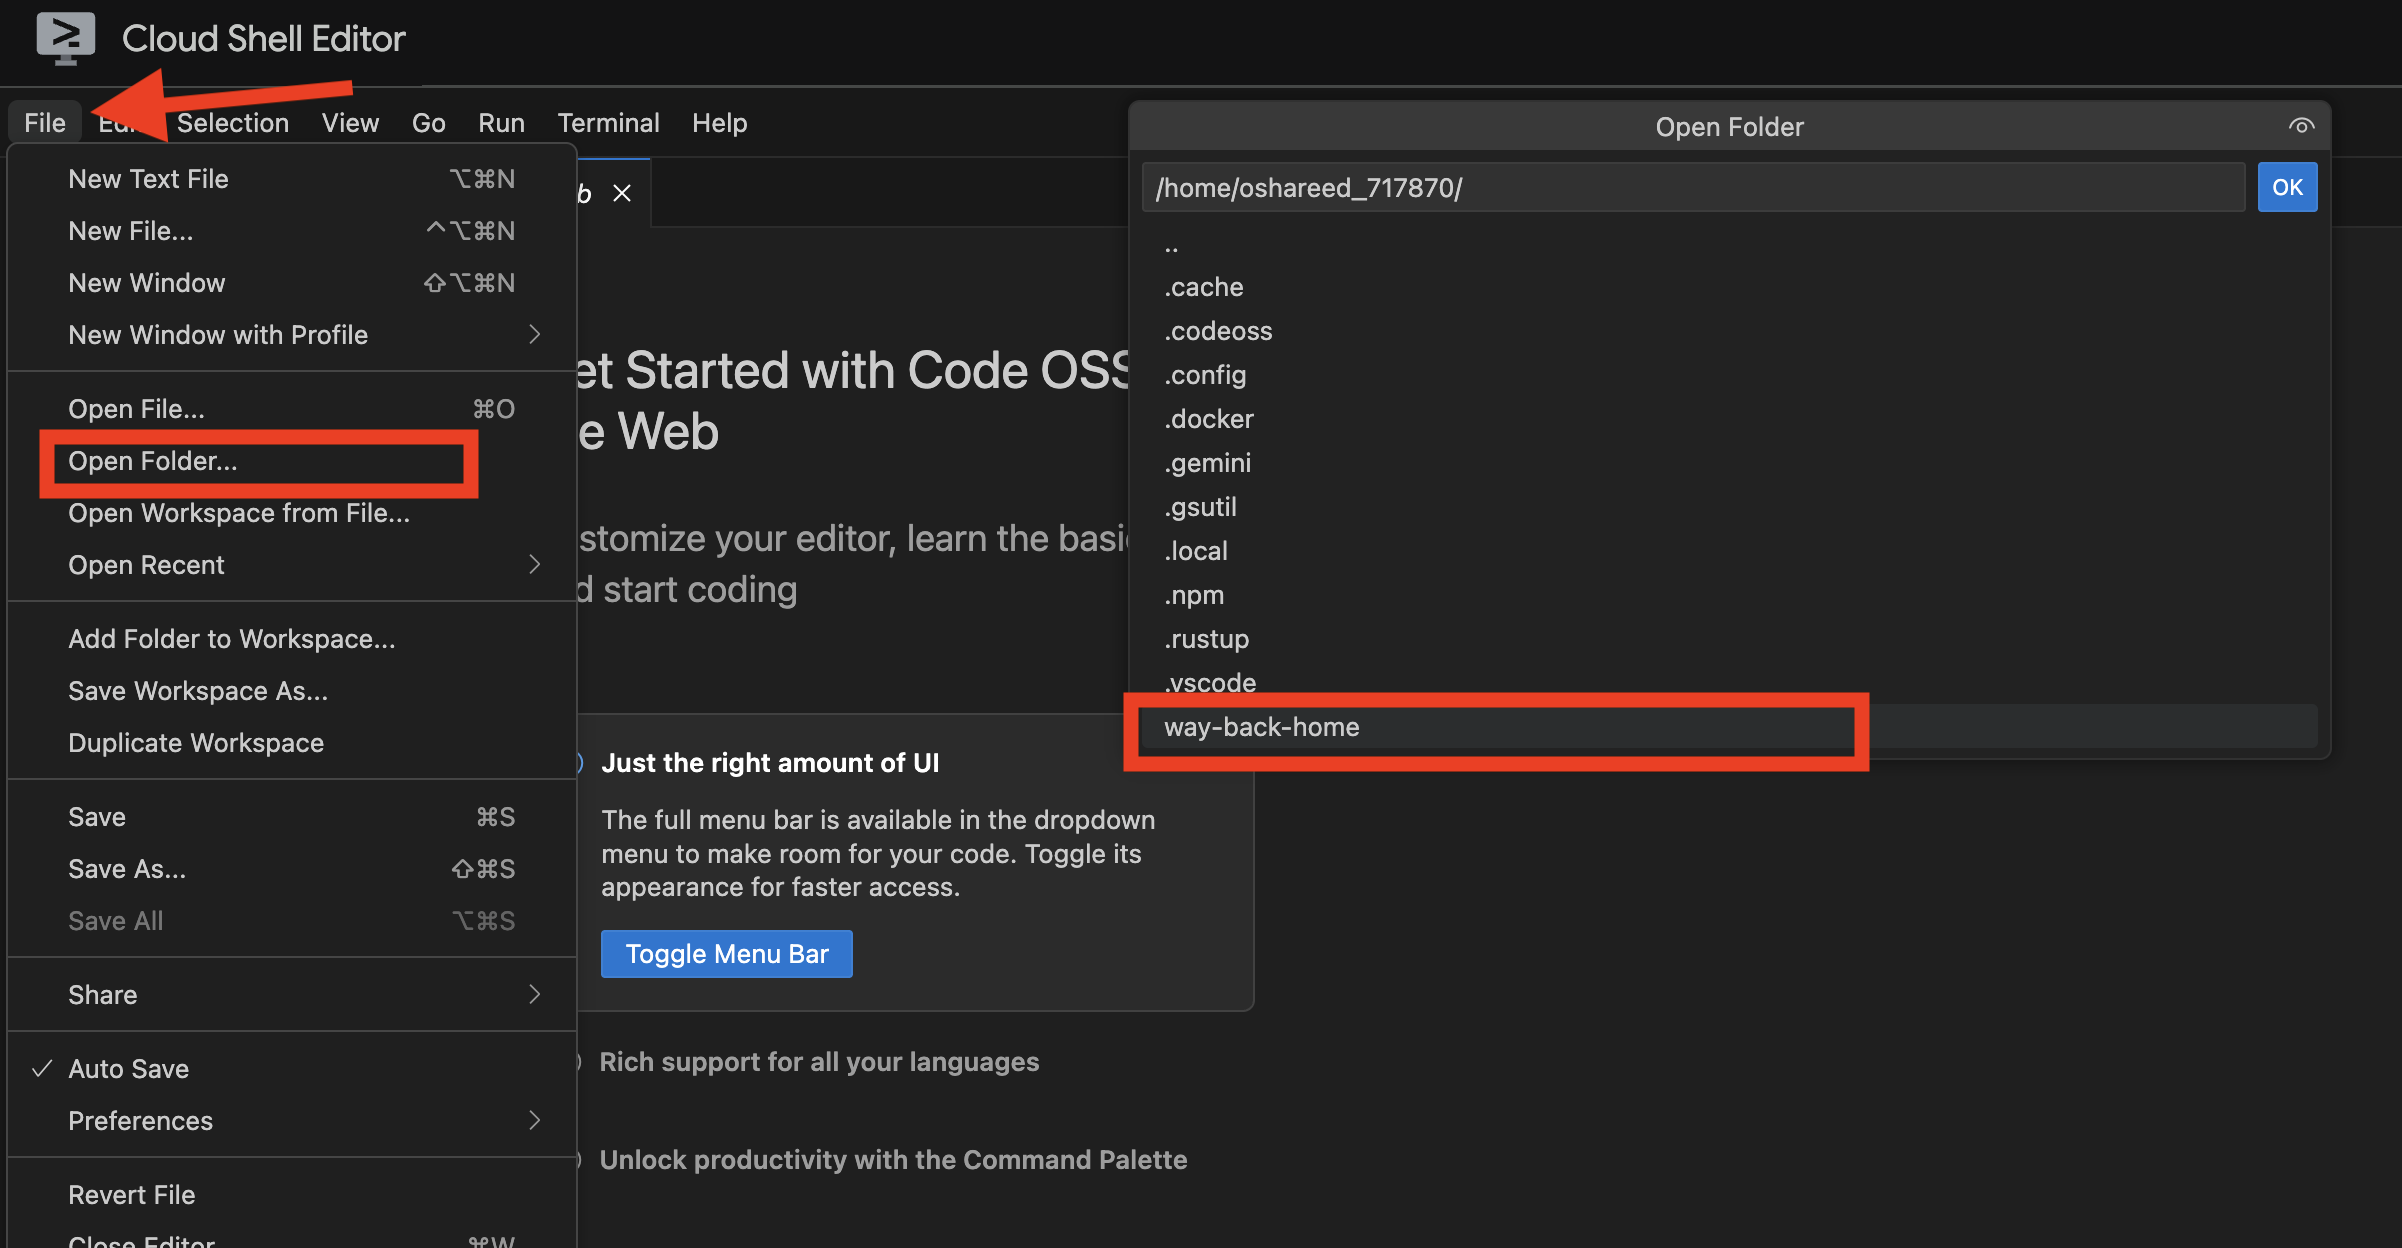
4. Load Sample Data
👉💻 Navigate to backend and install dependencies:
cd ~/way-back-home/level_2/backend
uv sync
👉💻 Load initial survivor data:
uv run python ~/way-back-home/level_2/backend/setup_data.py
This creates:
- Spanner instance (
survivor-network) - Database (
graph-db) - All node and edge tables
- Property graphs for querying Expected output:
============================================================
SUCCESS! Database setup complete.
============================================================
Instance: survivor-network
Database: graph-db
Graph: SurvivorGraph
Access your database at:
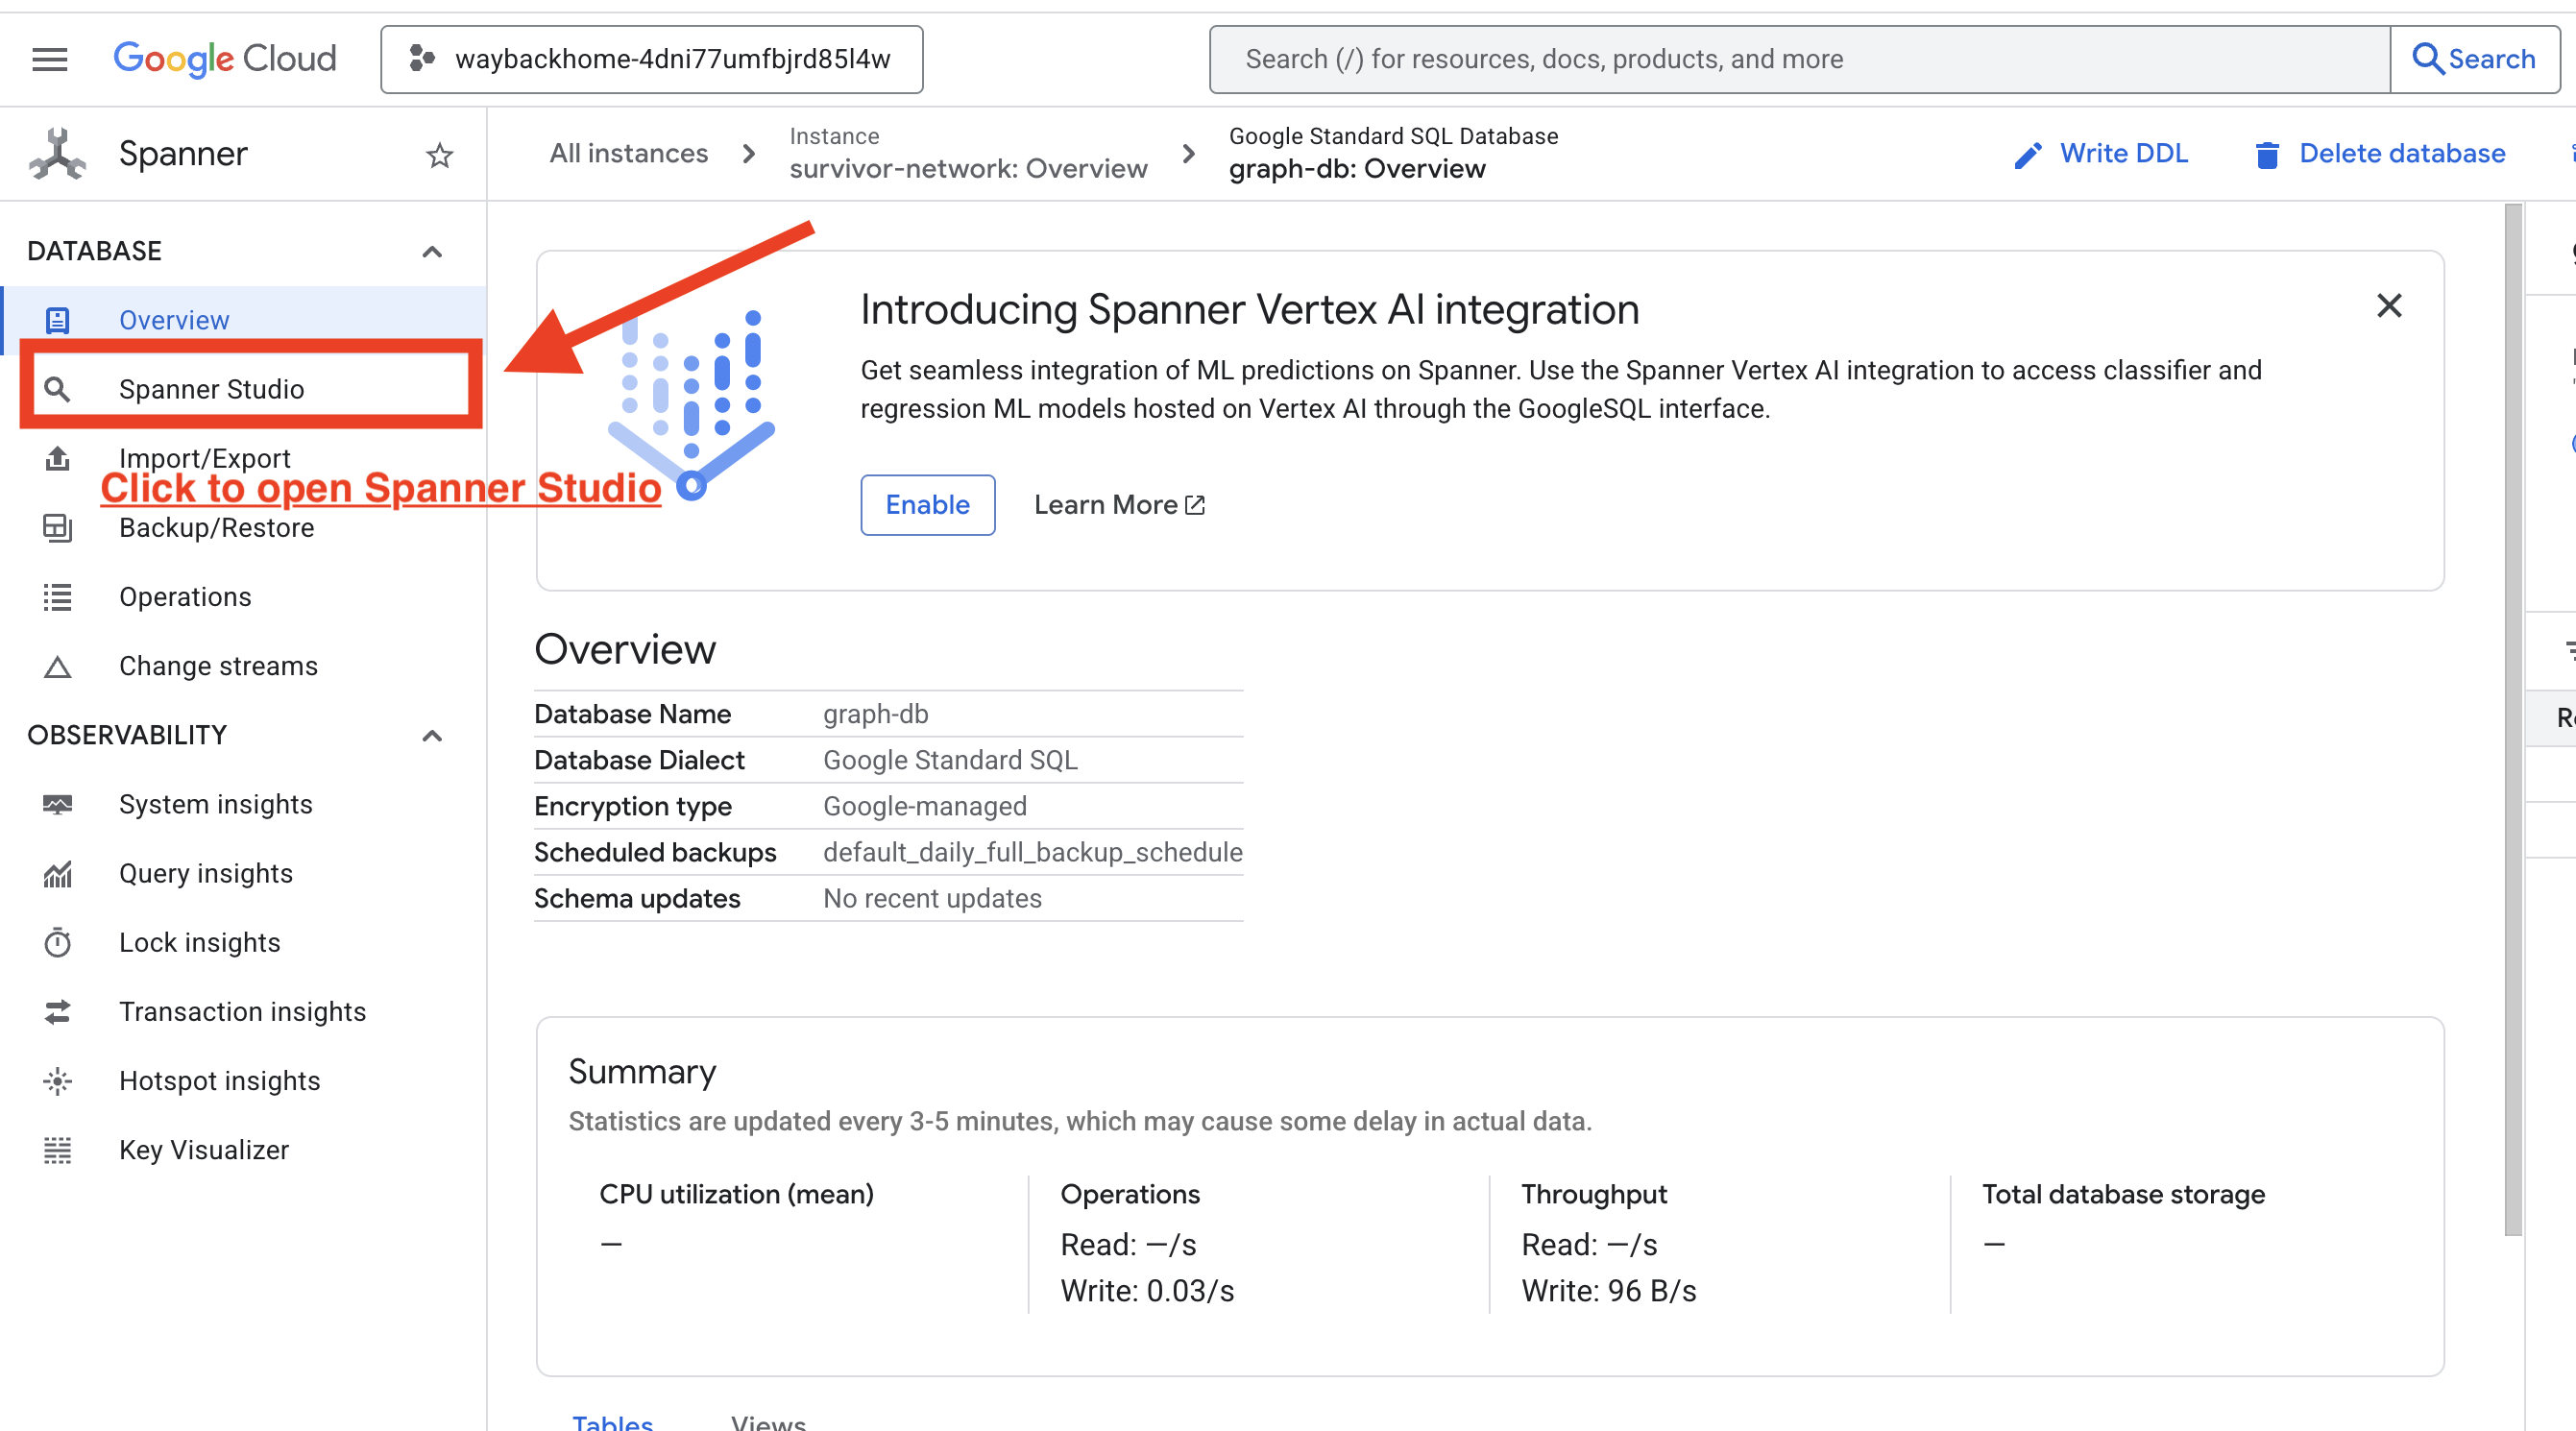
https://console.cloud.google.com/spanner/instances/survivor-network/databases/graph-db?project=waybackhome
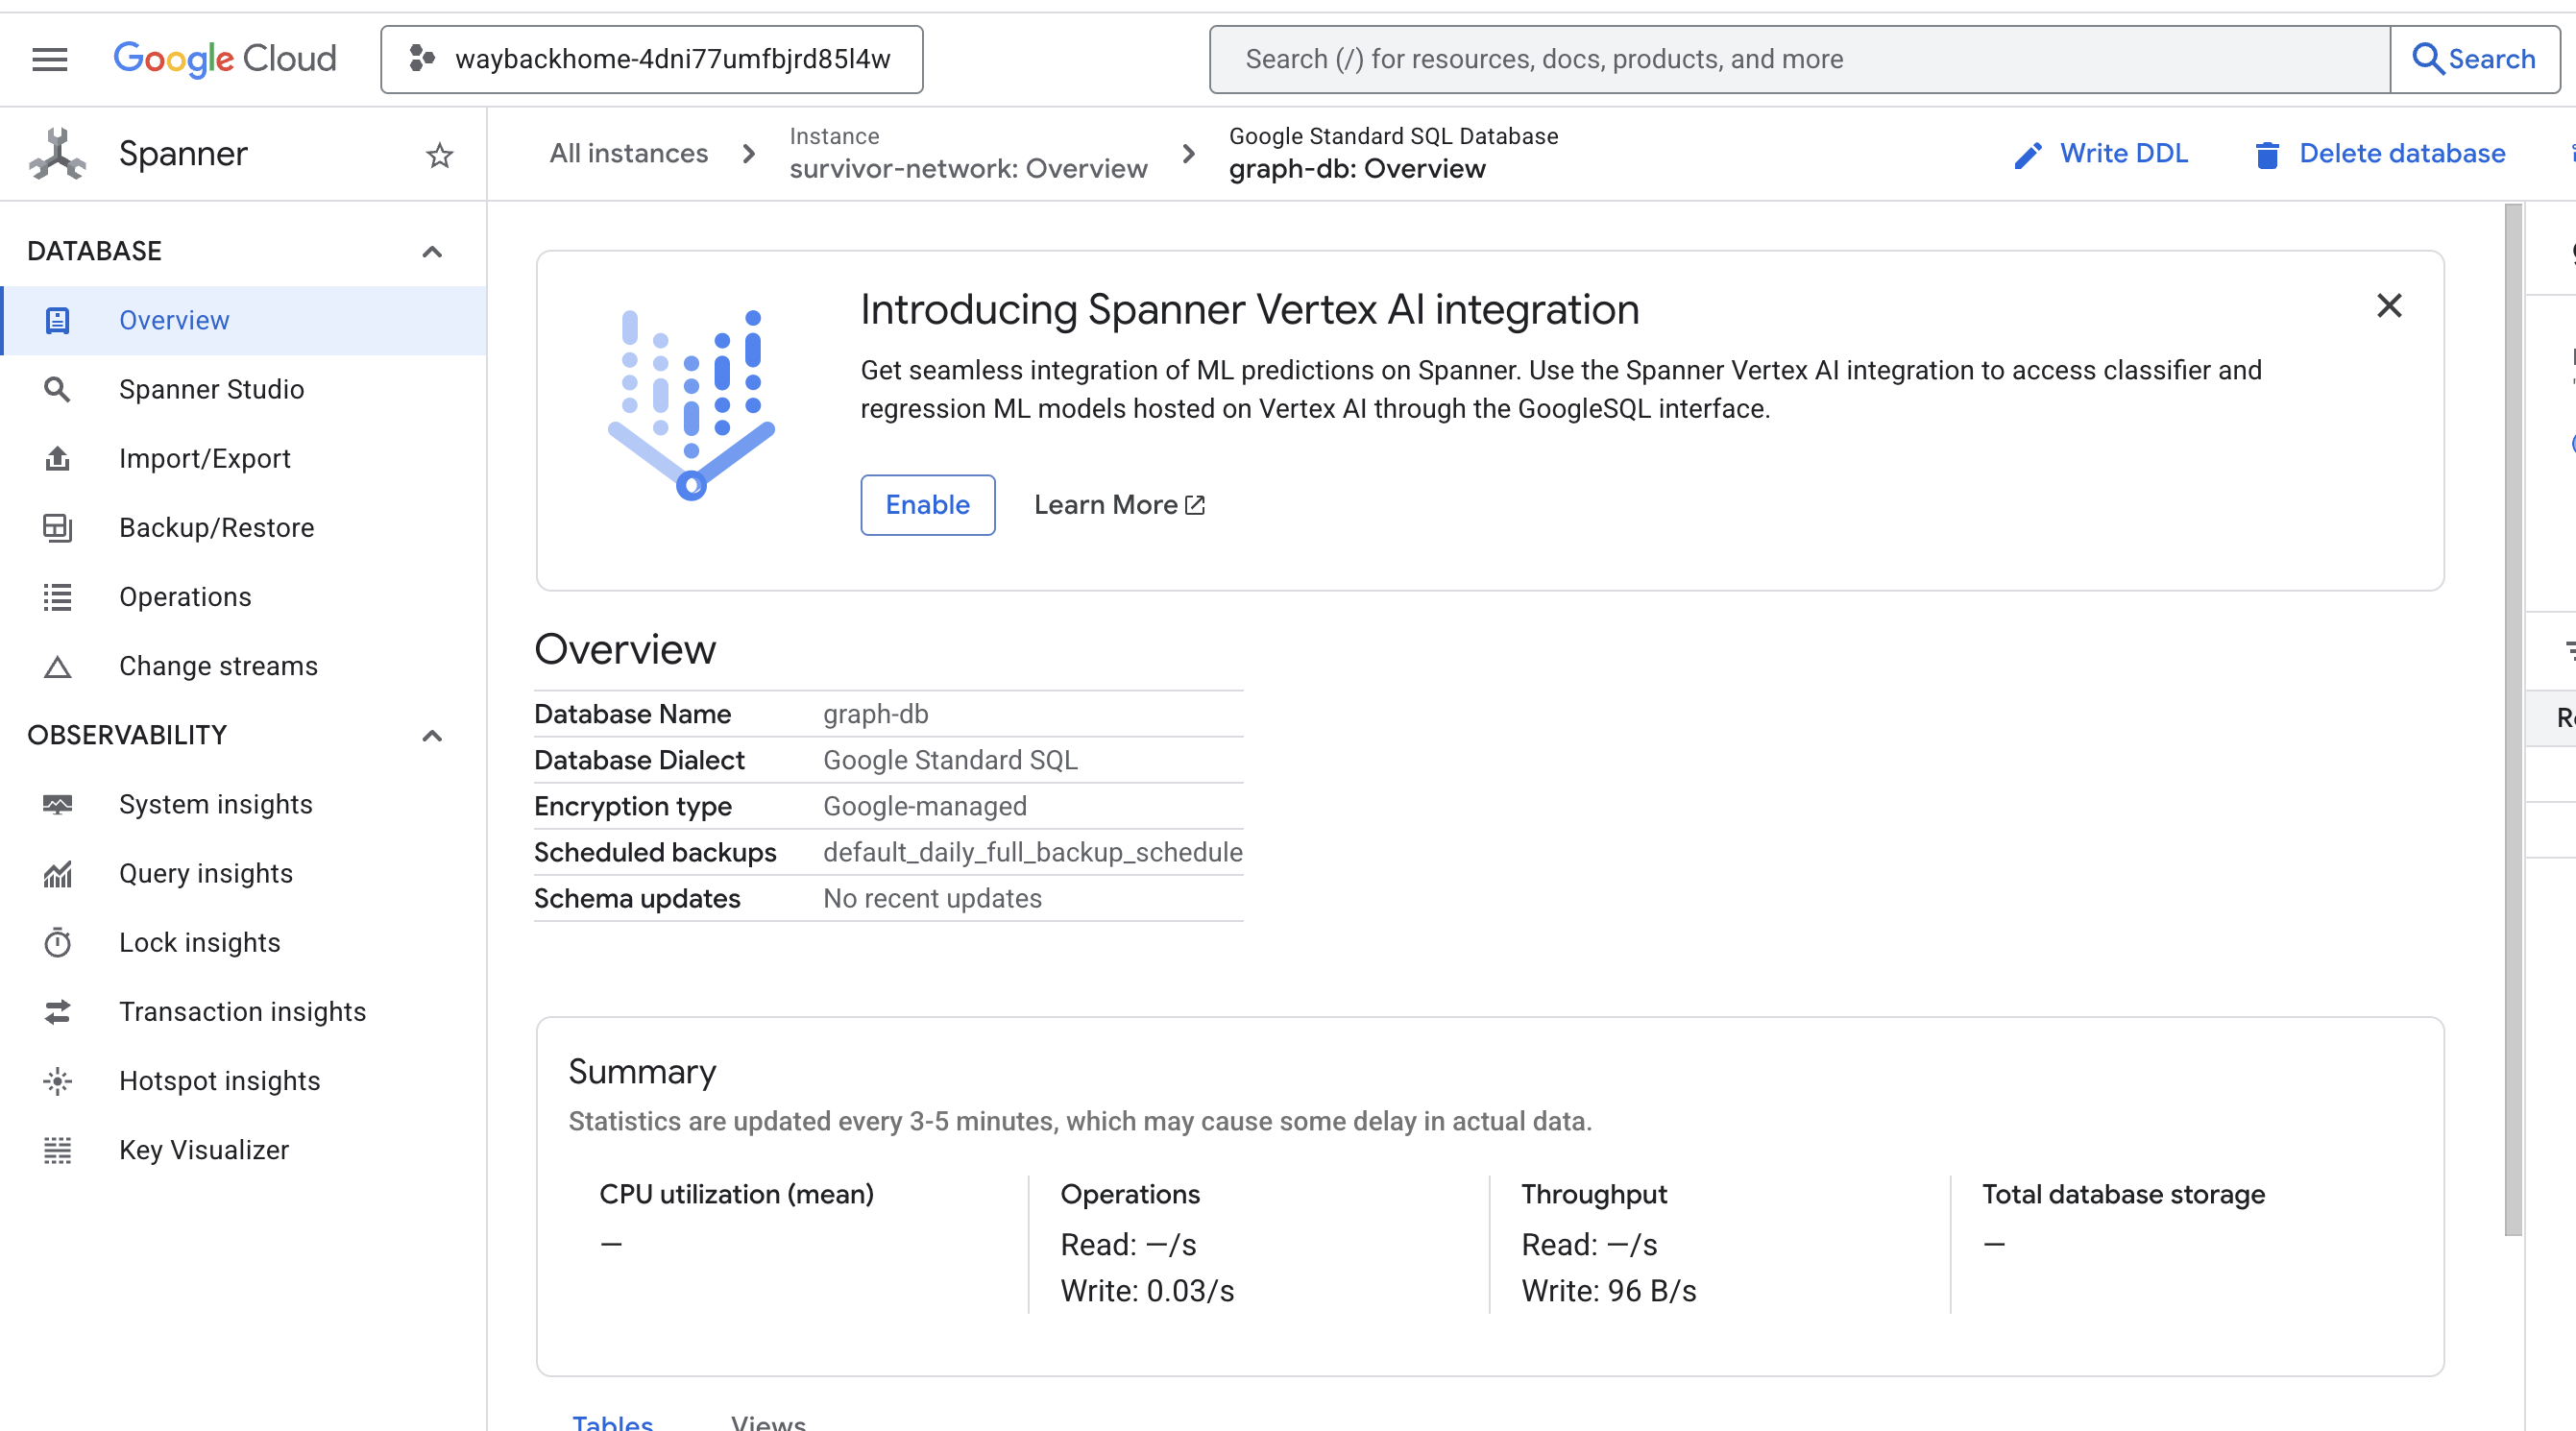
If you click into the link after Access your database at in the output, you can open Google Cloud Console Spanner.

And You will see Spanner at Google Cloud Console!
4. 🚀 Visualizing Graph Data in Spanner Studio
This guide helps you visualize and interact with the Survivor Network graph data directly in the Google Cloud Console using Spanner Studio. This is a great way to verify your data and understand the graph structure before building your AI agent.
1. Access Spanner Studio
- In the last step, make sure you click the link and open the Spanner Studio.
2. Understanding Graph Structure (The "Big Picture")
Think of the Survivor Network dataset as a logic puzzle or a Game State:
Entity | Role in the System | Analogy |
Survivors | The agents/players | Players |
Biomes | Where they are located | Map Zones |
Skills | What they can do | Abilities |
Needs | What they lack (Crises) | Quests/Missions |
Resources | Items found in the world | Loot |
The Goal: The AI agent's job is to connect Skills (Solutions) to Needs (Problems), considering Biomes (Location constraints).
🔗 Edges (Relationships):
SurvivorInBiome: Location trackingSurvivorHasSkill: Inventory of abilitiesSurvivorHasNeed: List of active problemsSurvivorFoundResource: Inventory of itemsSurvivorCanHelp: Inferred relationship (The AI calculates this!)
3. Querying the Graph
Let's run a few queries to see the "Story" in the data.
Spanner Graph uses GQL (Graph Query Language). To run a query, use GRAPH SurvivorNetwork followed by your match pattern.
👉 Query 1: The Global Roster (Who is where?) This is your foundation - understanding location is critical for rescue operations.
GRAPH SurvivorNetwork
MATCH result = (s:Survivors)-[:SurvivorInBiome]->(b:Biomes)
RETURN TO_JSON(result) AS json_result
Expect to see result as below: 
👉 Query 2: The Skill Matrix (Capabilities) Now that you know where everyone is, find out what they can do.
GRAPH SurvivorNetwork
MATCH result = (s:Survivors)-[h:SurvivorHasSkill]->(k:Skills)
RETURN TO_JSON(result) AS json_result
Expect to see result as below: 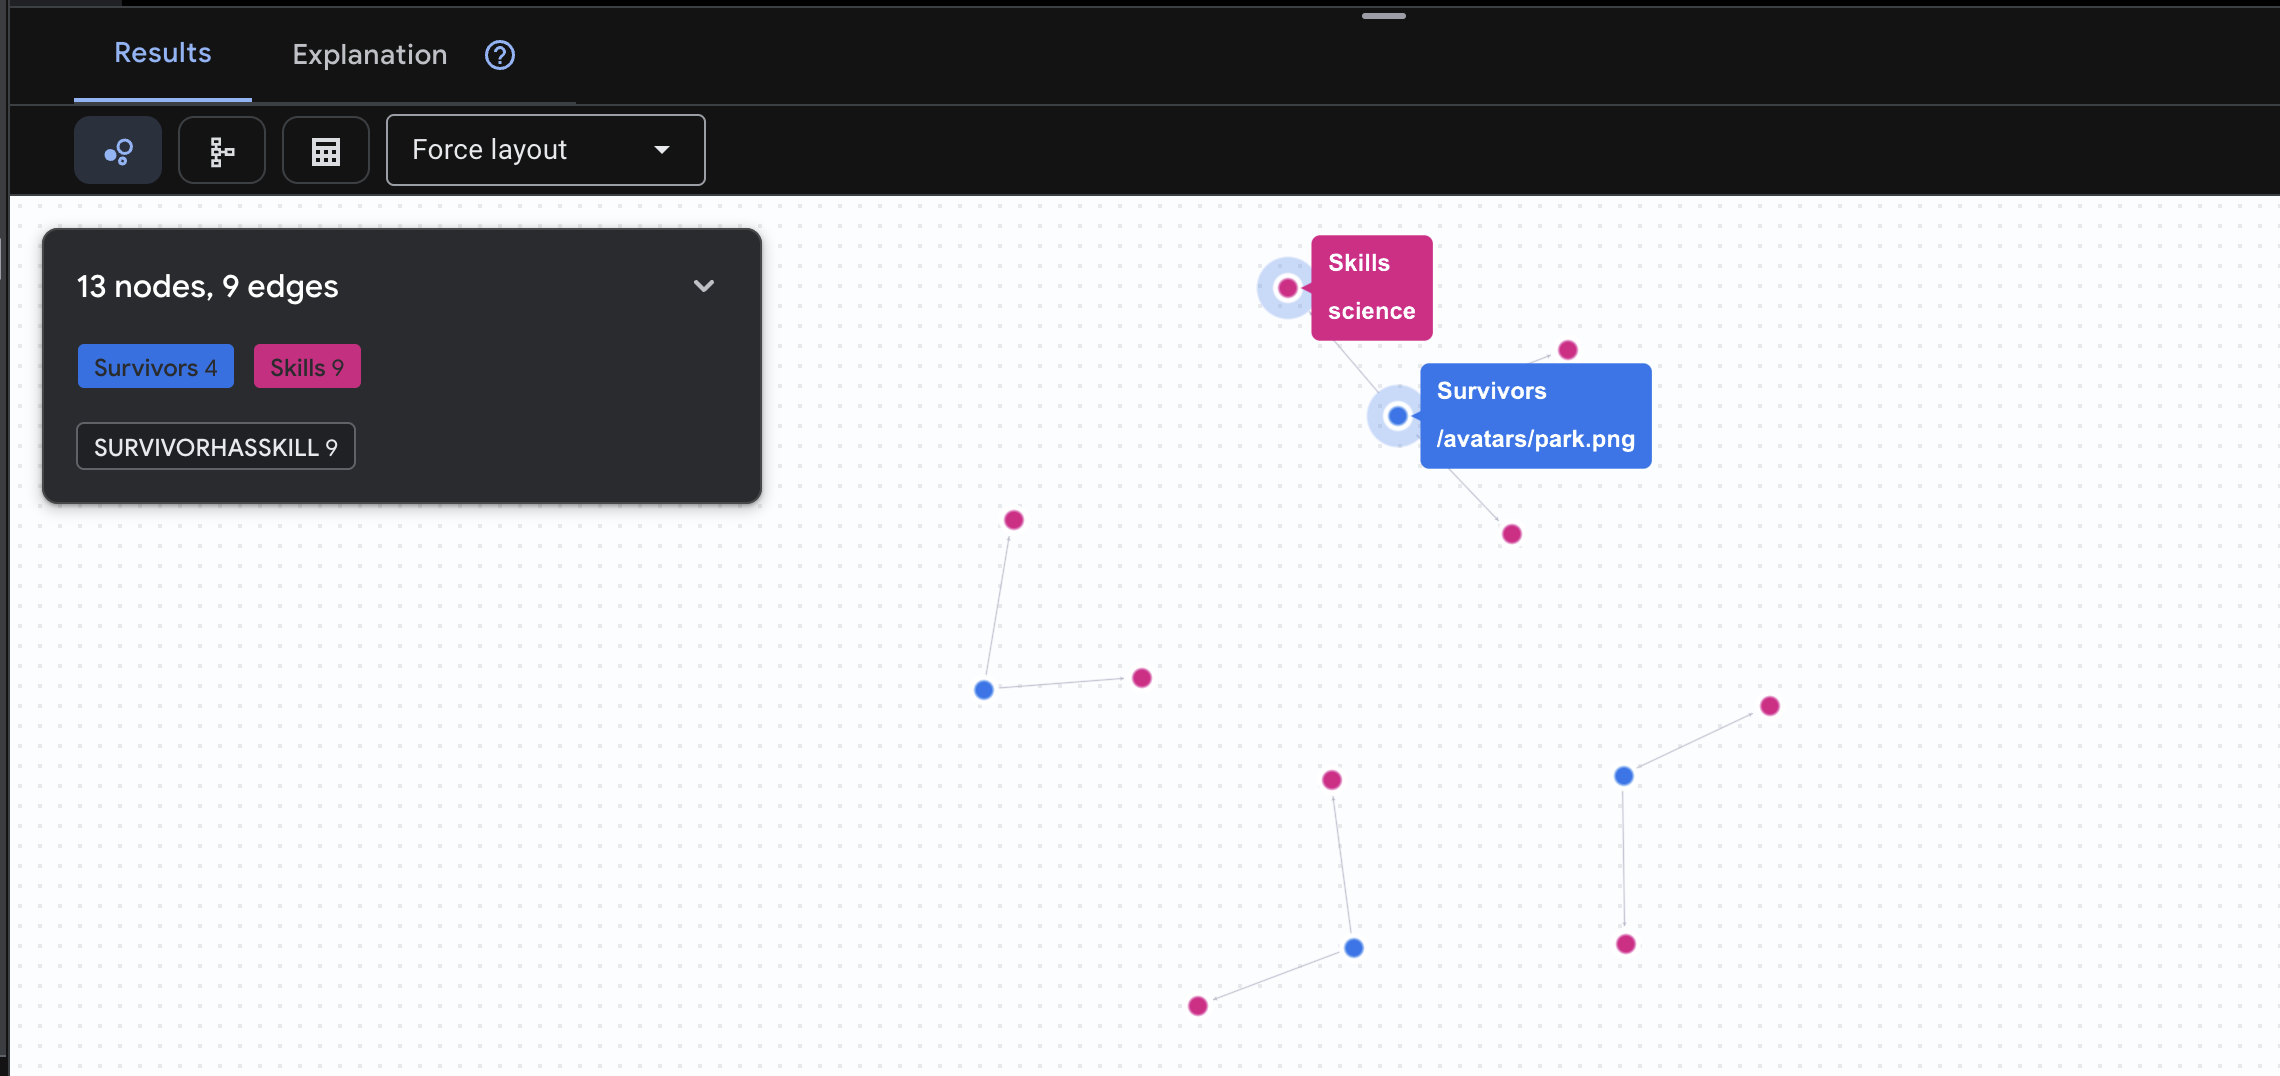
👉 Query 3: Who is in Crisis? (The "Mission Board") See the survivors who need help and what they need.
GRAPH SurvivorNetwork
MATCH result = (s:Survivors)-[h:SurvivorHasNeed]->(n:Needs)
RETURN TO_JSON(result) AS json_result
Expect to see result as below: 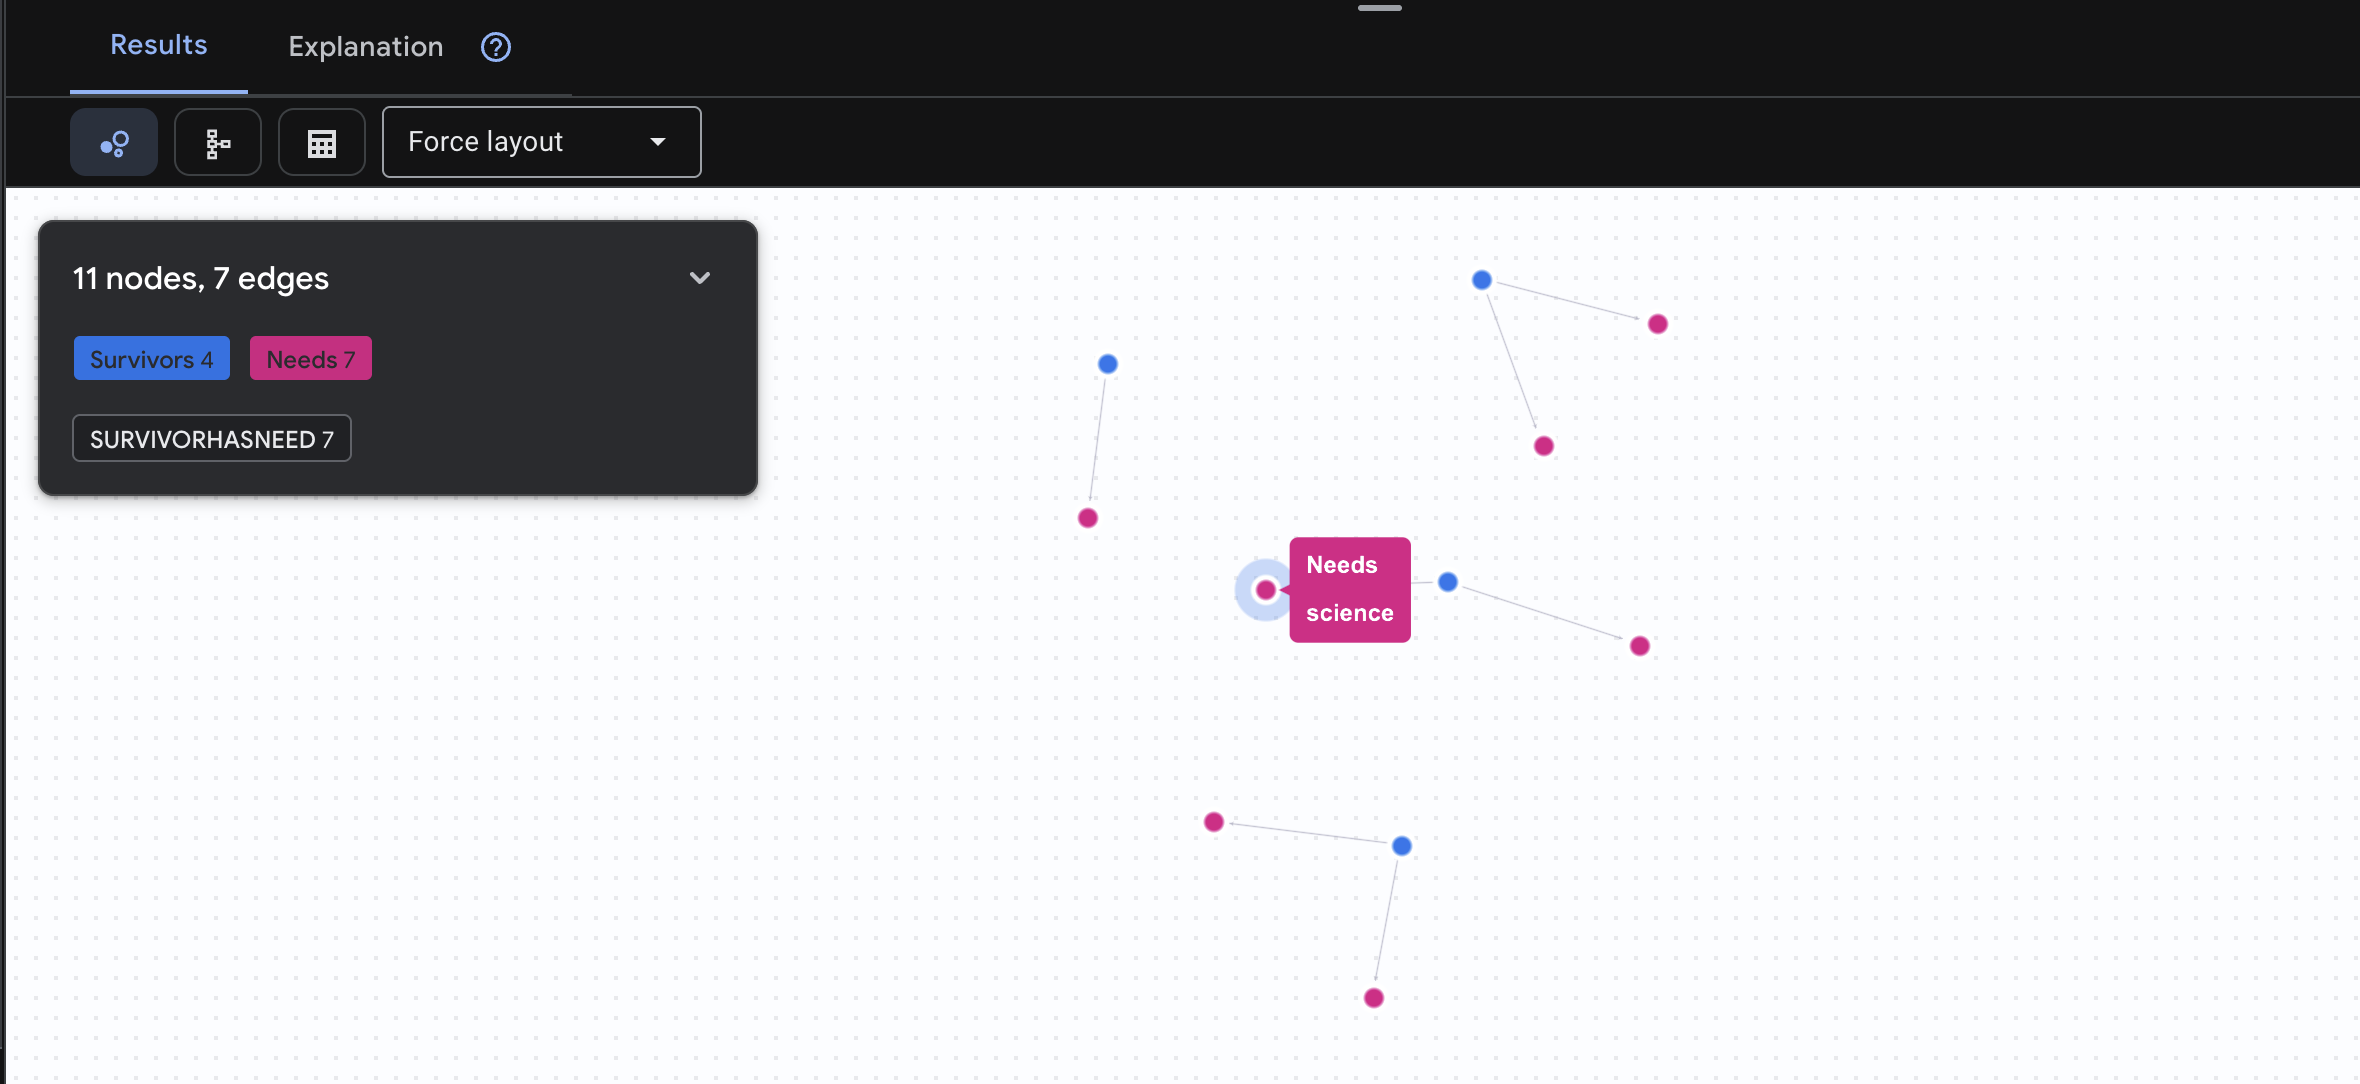
🔎 [Optional] Matchmaking - Who Can Help Whom?
This is where the graph becomes powerful! This query finds survivors who have skills that can treat other survivors' needs.
GRAPH SurvivorNetwork
MATCH result = (helper:Survivors)-[:SurvivorHasSkill]->(skill:Skills)-[:SkillTreatsNeed]->(need:Needs)<-[:SurvivorHasNeed]-(helpee:Survivors)
RETURN TO_JSON(result) AS json_result
Expect to see result as below: 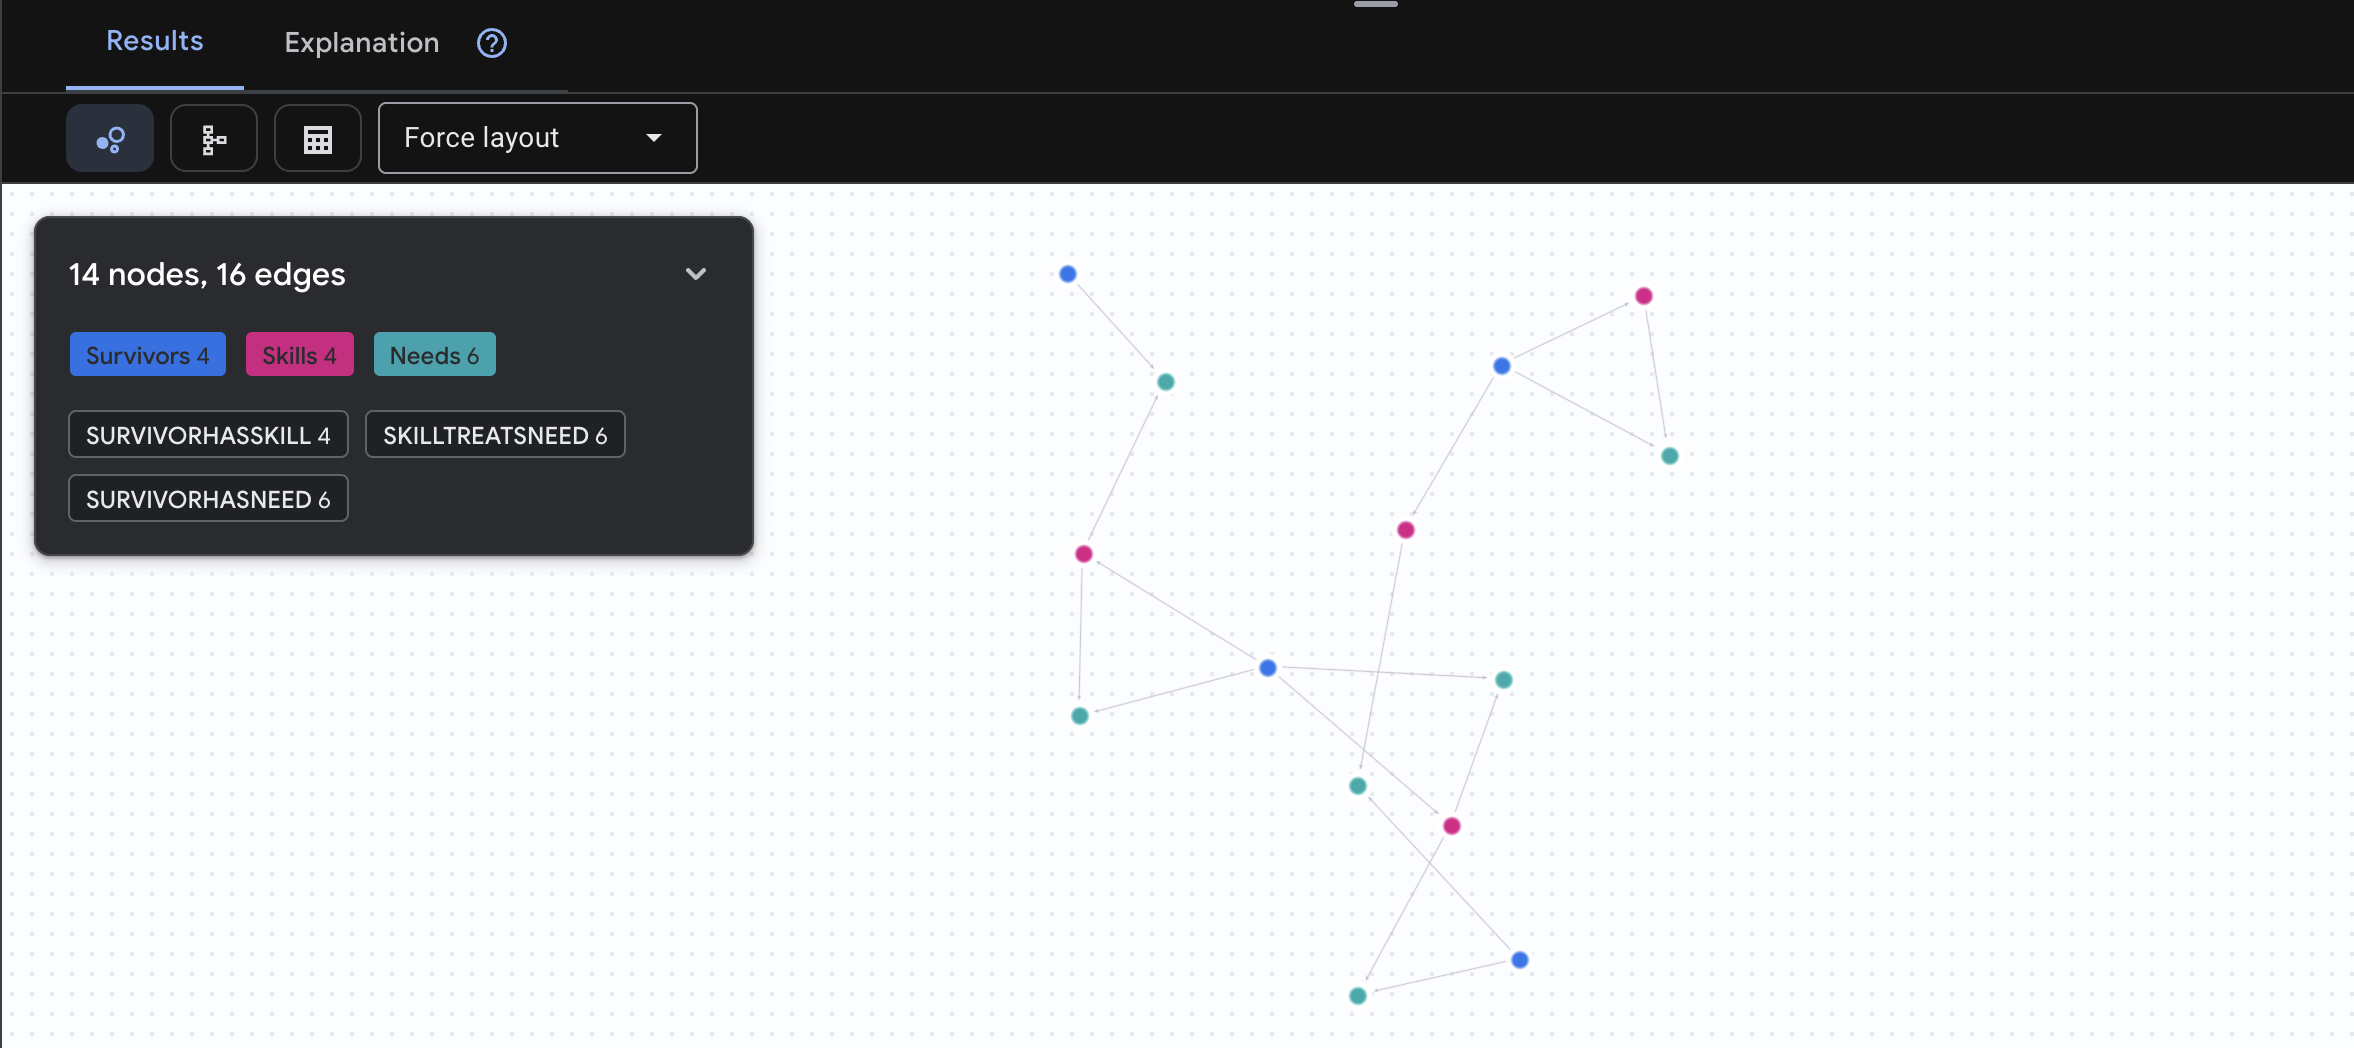
aside positive What This Query Does:
Instead of just showing "First Aid treats burns" (which is obvious from the schema), this query finds:
- Dr. Elena Frost (who has Medical Training) → can treat → Captain Tanaka (who has burns)
- David Chen (who has First Aid) → can treat → Lt. Park (who has a sprained ankle)
Why This Is Powerful:
What Your AI Agent Will Do:
When a user asks "Who can treat burns?", the agent will:
- Run a similar graph query
- Return: "Dr. Frost has Medical Training and can help Captain Tanaka"
- The user doesn't need to know about intermediate tables or relationships!
5. 🚀 AI-Powered Embeddings in Spanner
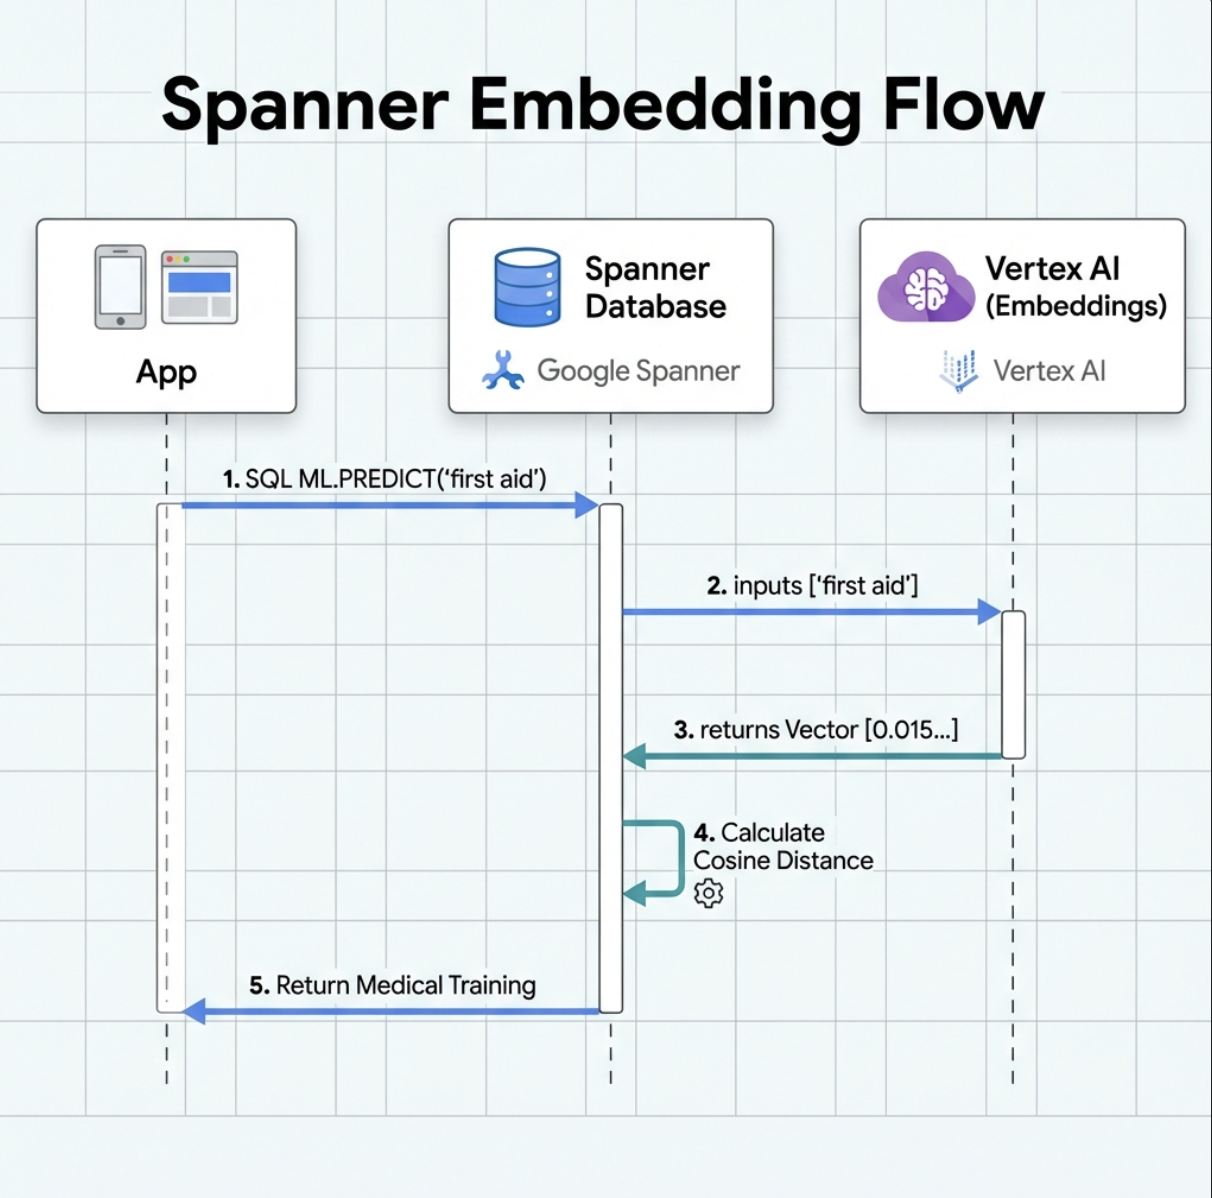
1. Why Embeddings? (No action, read only)
In the survival scenario, time is critical. When a survivor reports an emergency, like I need someone who can treat burns or Looking for a medic, they can't waste time guessing exact skill names in the database.
Real Scenario: Survivor: Captain Tanaka has burns—we need medical help NOW!
Traditional keyword search for "medic" → 0 results ❌
Semantic search with embeddings → Finds "Medical Training", "First Aid" ✅
This is exactly what agents need: intelligent, human-like search that understands intent, not just keywords.
2. Create Embedding Model
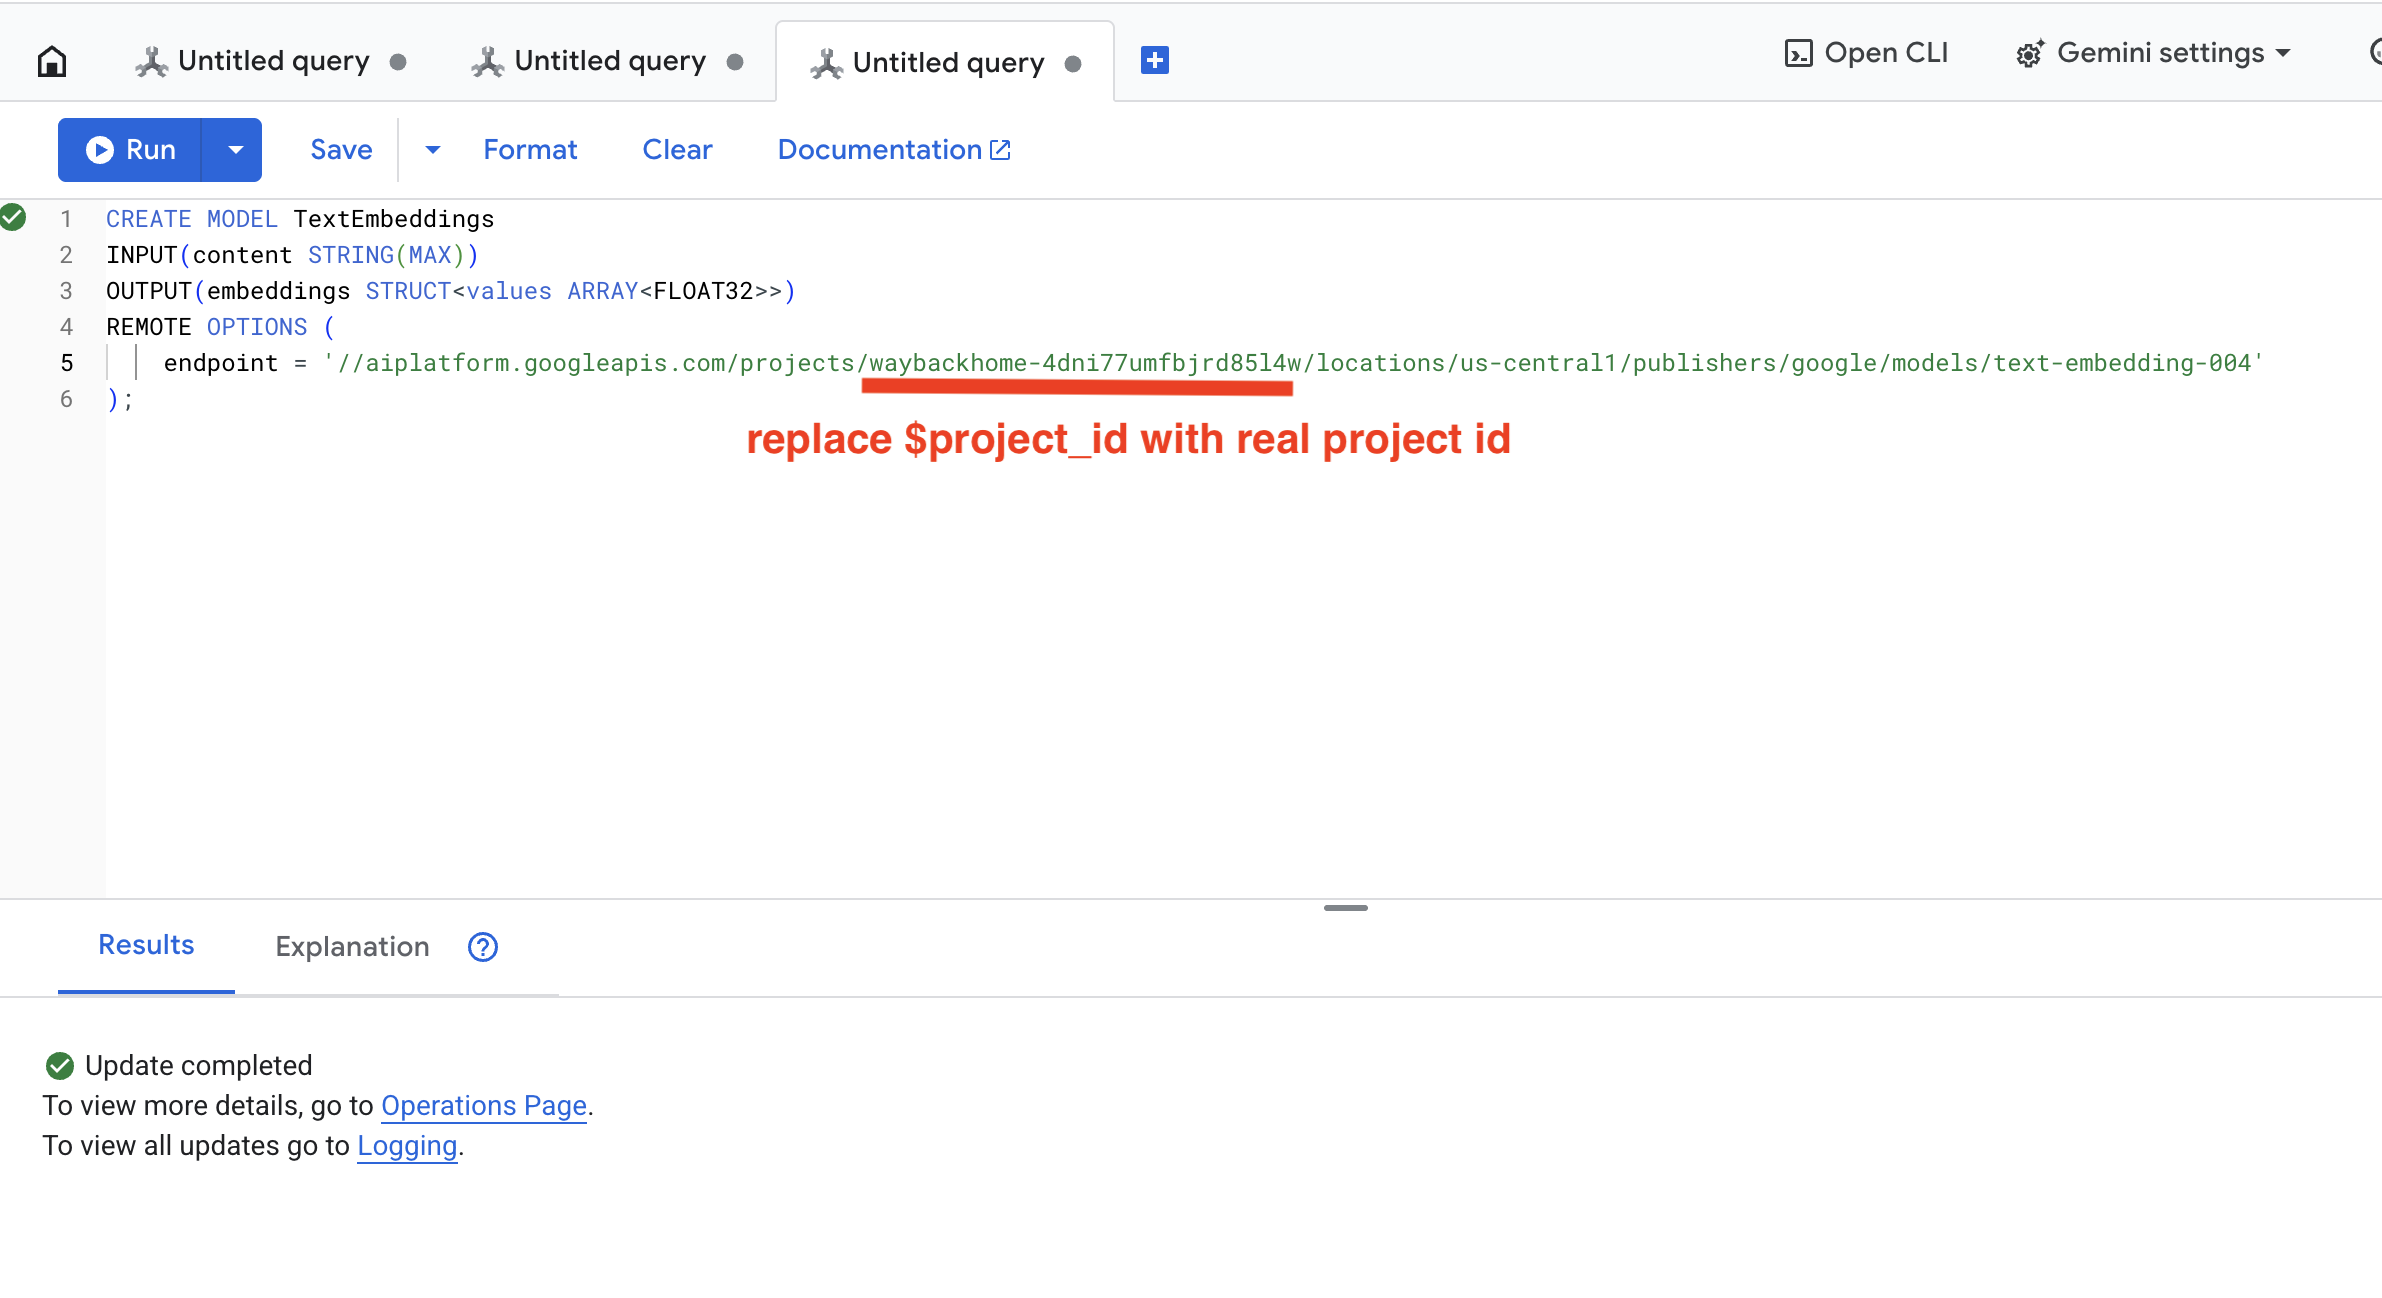
Now let's create a model that converts text into embeddings using Google's text-embedding-004.
👉 In Spanner Studio, run this SQL (replace $YOUR_PROJECT_ID with your actual project id):
‼️ In Cloud shell editor, open File -> Open Folder -> way-back-home/level_2 to see the whole project.
👉 Run this query in Spanner Studio by copy and paste the query below, and then click Run button:
CREATE OR REPLACE MODEL TextEmbeddings
INPUT(content STRING(MAX))
OUTPUT(embeddings STRUCT<values ARRAY<FLOAT32>>)
REMOTE OPTIONS (
    endpoint = '//aiplatform.googleapis.com/projects/$YOUR_PROJECT_ID/locations/us-central1/publishers/google/models/text-embedding-004'
);
What This Does:
- Creates a virtual model in Spanner (no model weights stored locally)
- Points to Google's
text-embedding-004on Vertex AI - Defines the contract: Input is text, output is a 768-dimension float array
Why "REMOTE OPTIONS"?
- Spanner doesn't run the model itself
- It calls Vertex AI via API when you use
ML.PREDICT - Zero-ETL: No need to export data to Python, process, and re-import
Click Run button, once it's succeed, you can see the result as below:
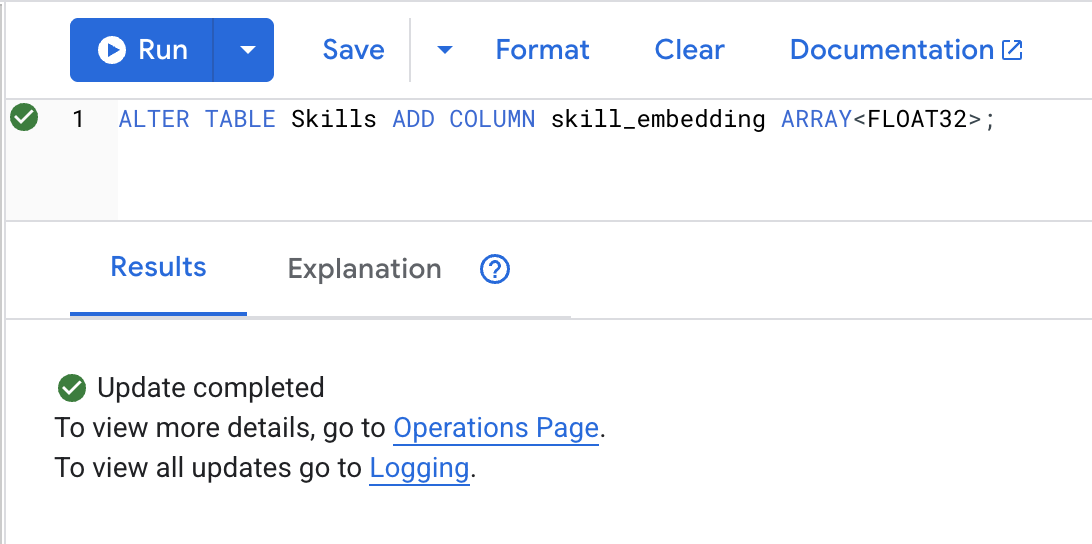
3. Add Embedding Column
👉 Add a column to store embeddings:
ALTER TABLE Skills ADD COLUMN skill_embedding ARRAY<FLOAT32>;
Click Run button, once it's succeed, you can see the result as below:
4. Generate Embeddings
👉 Use AI to create vector embeddings for each skill:
UPDATE Skills
SET skill_embedding = (
    SELECT embeddings.values
    FROM ML.PREDICT(
        MODEL TextEmbeddings,
        (SELECT name AS content)
    )
)
WHERE skill_embedding IS NULL;
Click Run button, once it's succeed, you can see the result as below:
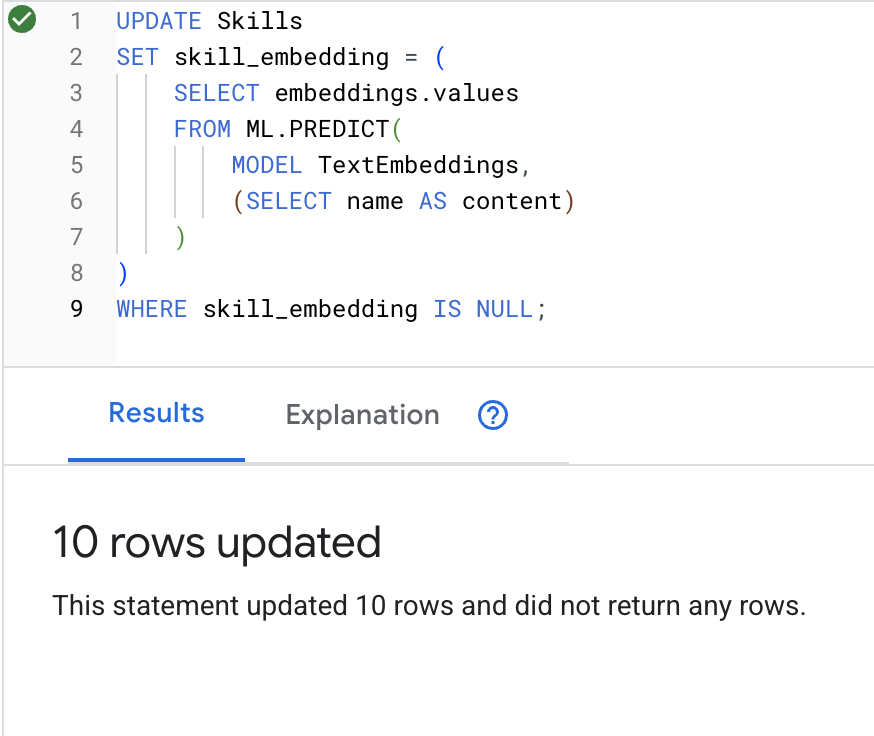
What happens: Each skill name (e.g., "first aid") is converted to a 768-dimension vector representing its semantic meaning.
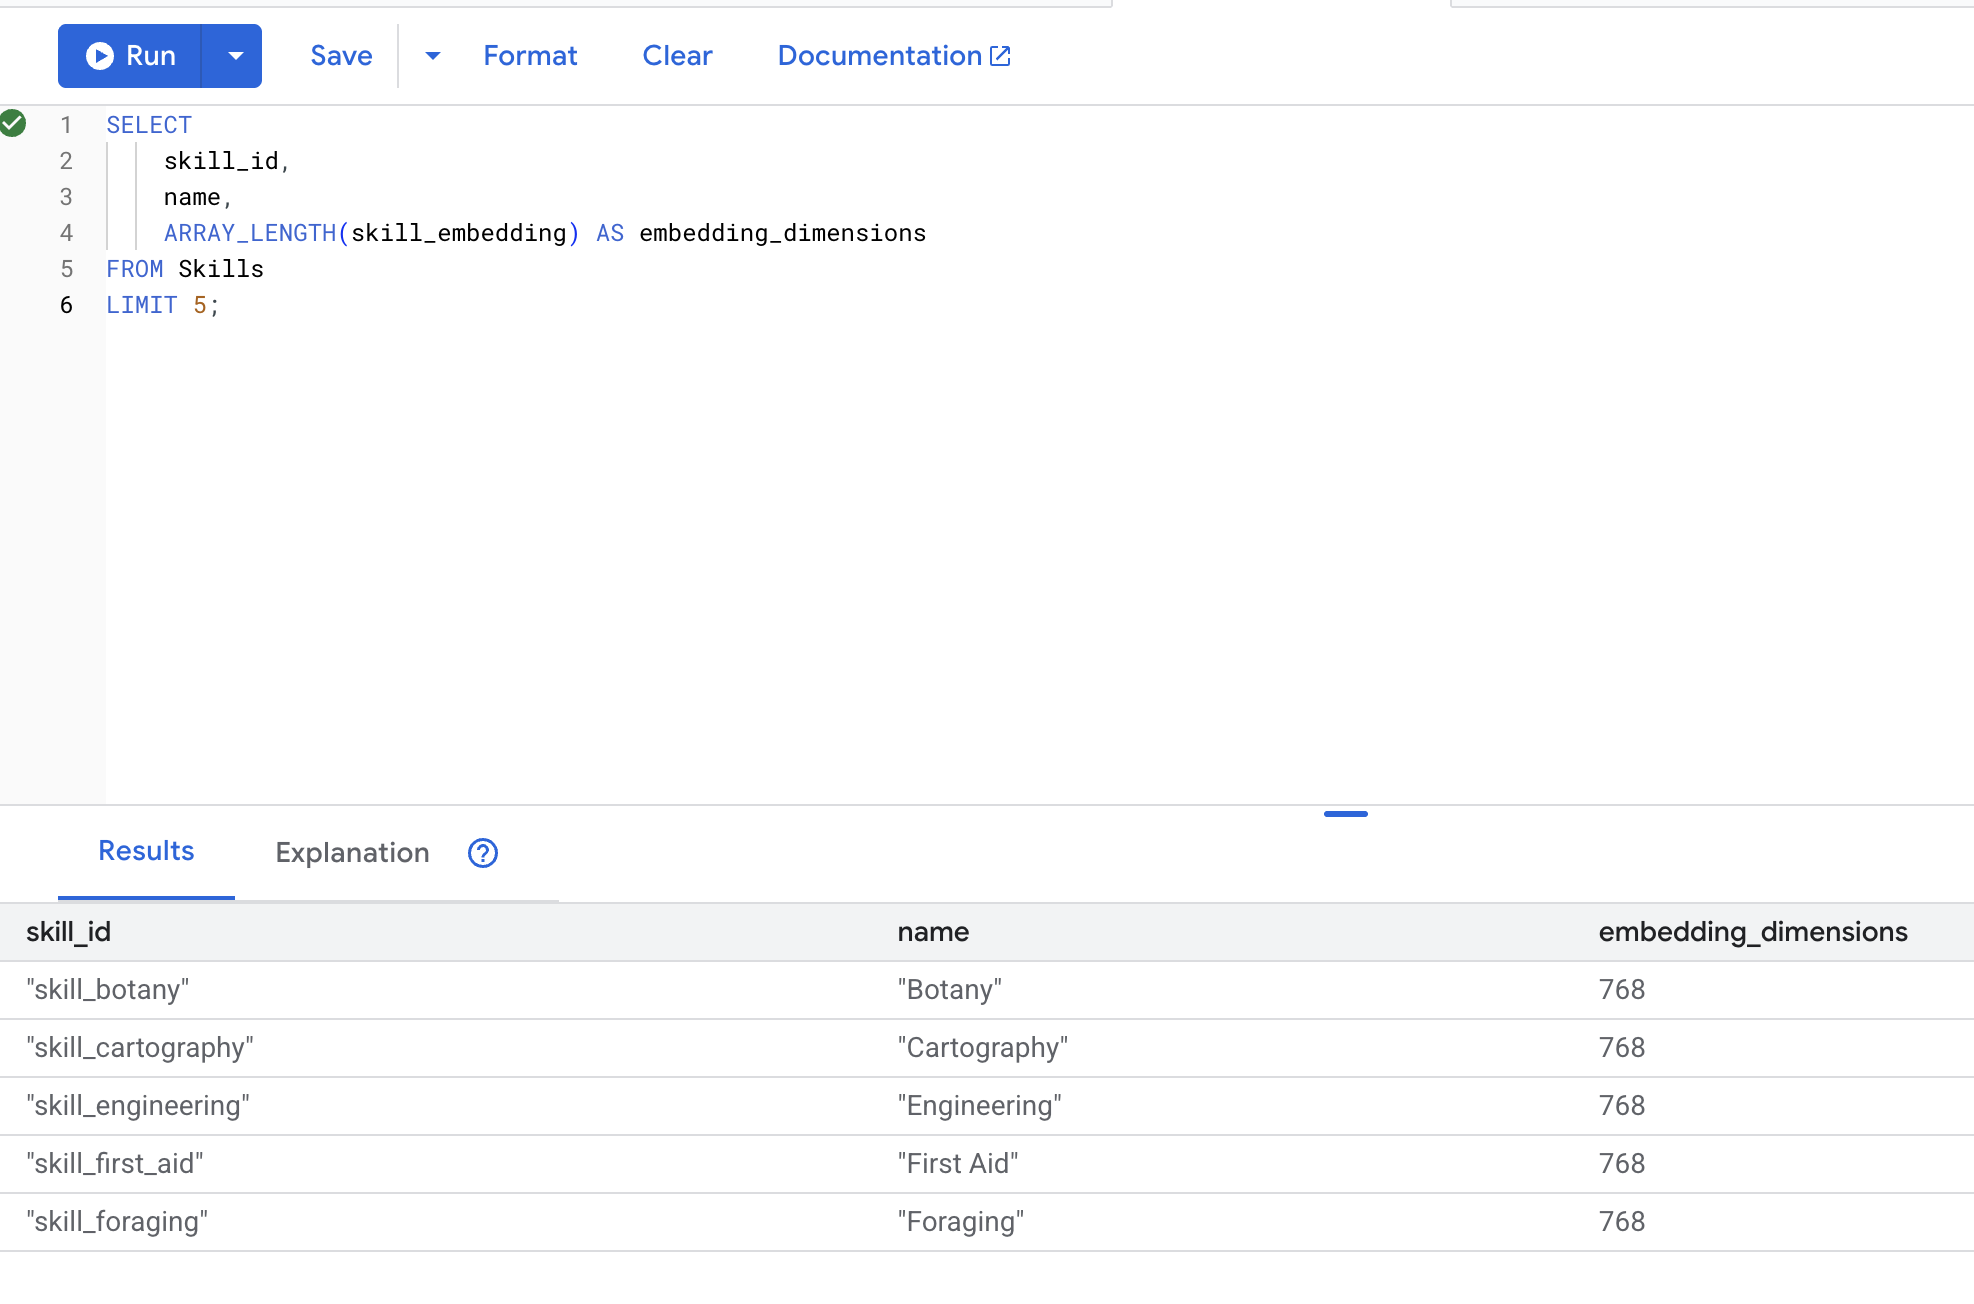
5. Verify Embeddings
👉 Check that embeddings were created:
SELECT
    skill_id,
    name,
    ARRAY_LENGTH(skill_embedding) AS embedding_dimensions
FROM Skills
LIMIT 5;
Expected output:
6. Test Semantic Search
Now we test the exact use case from our scenario: finding medical skills using the term "medic".
👉 Find skills similar to "medic":
WITH query_embedding AS (
    SELECT embeddings.values AS val
    FROM ML.PREDICT(MODEL TextEmbeddings, (SELECT "medic" AS content))
)
SELECT
    s.name AS skill_name,
    s.category,
    COSINE_DISTANCE(s.skill_embedding, (SELECT val FROM query_embedding)) AS distance
FROM Skills AS s
WHERE s.skill_embedding IS NOT NULL
ORDER BY distance ASC
LIMIT 10;
- Converts user's search term "medic" into an embedding
- Stores it in the
query_embeddingtemporary table
Expected results (lower distance = more similar):

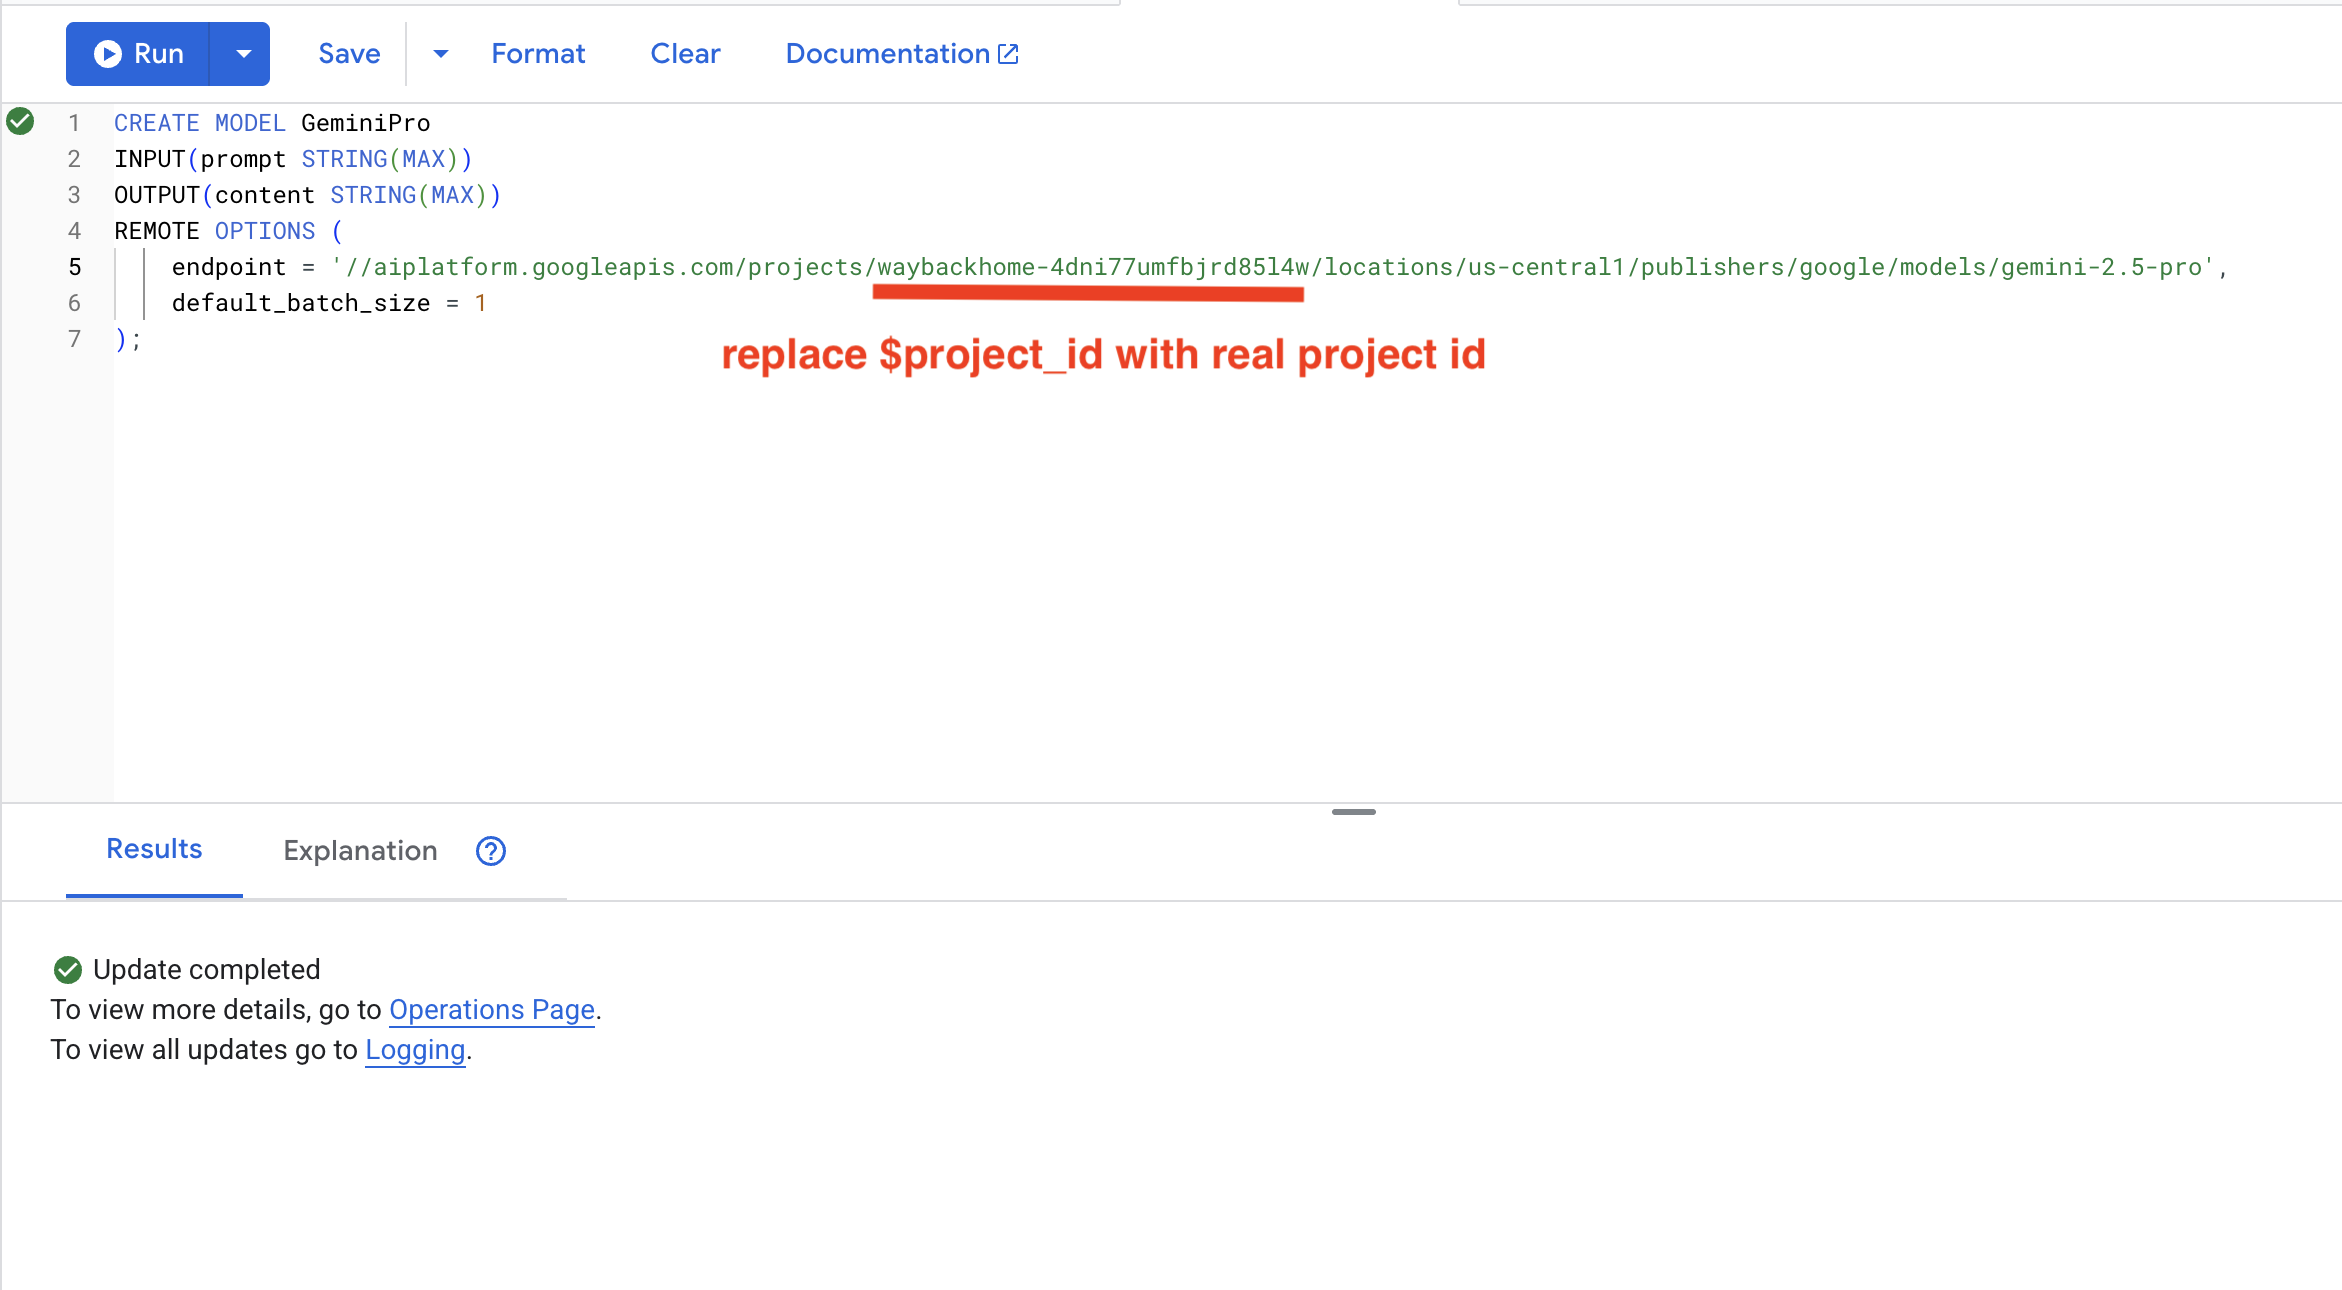
7. Create Gemini Model for Analysis
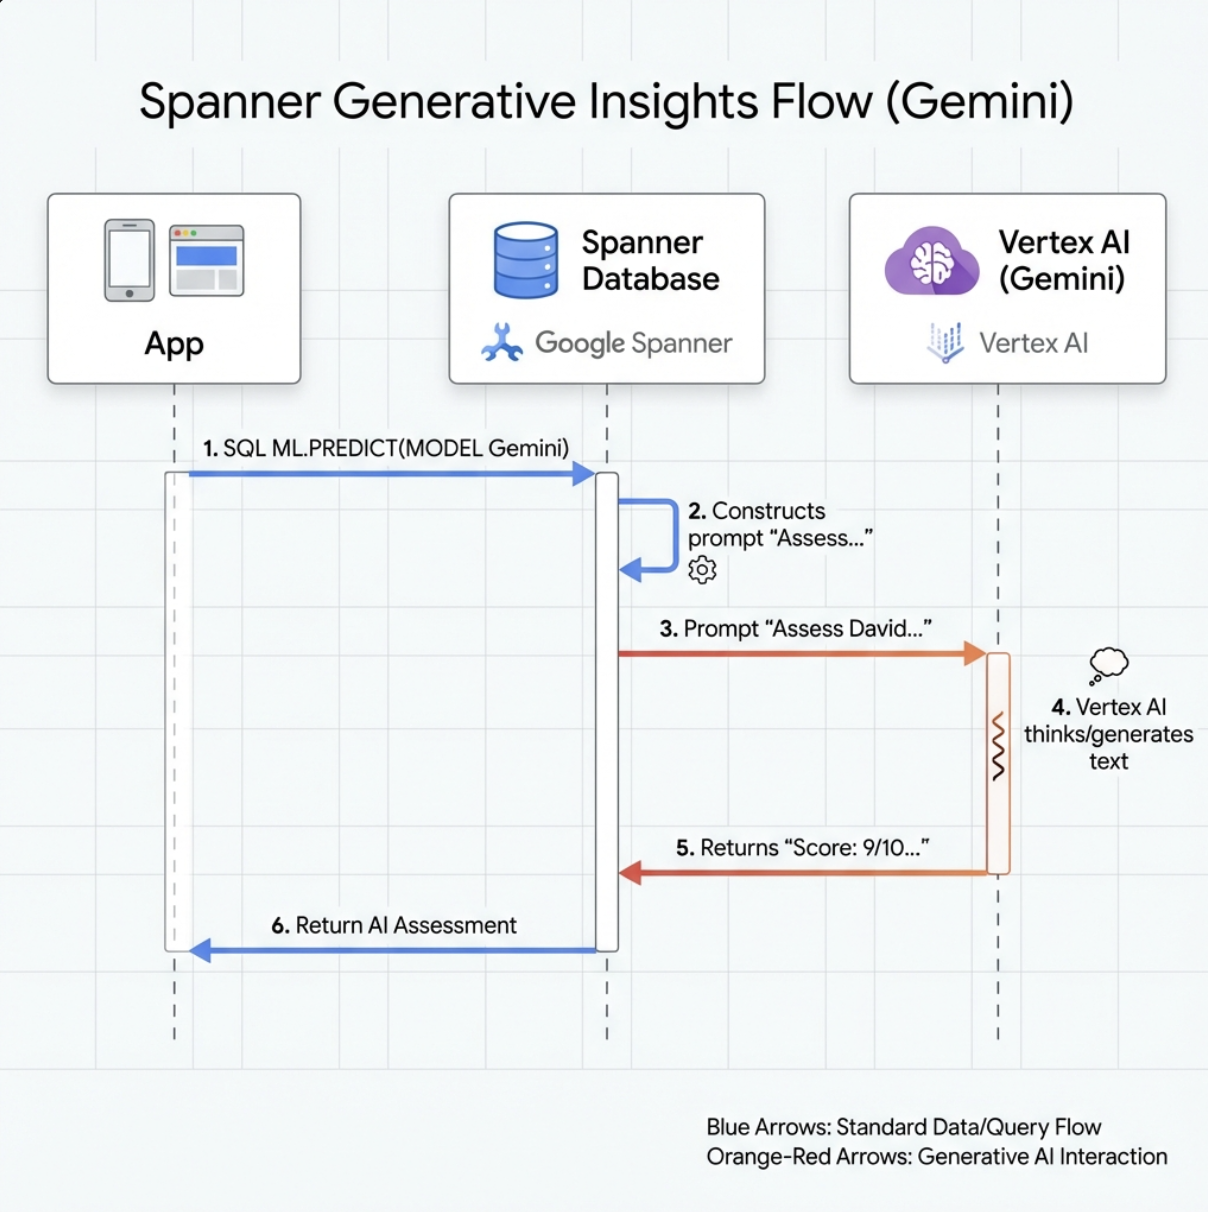
👉 Create a generative AI model reference (replace $YOUR_PROJECT_ID with your actual project id):
CREATE OR REPLACE MODEL GeminiPro
INPUT(prompt STRING(MAX))
OUTPUT(content STRING(MAX))
REMOTE OPTIONS (
    endpoint = '//aiplatform.googleapis.com/projects/$YOUR_PROJECT_ID/locations/us-central1/publishers/google/models/gemini-2.5-pro',
    default_batch_size = 1
);
Difference from Embeddings Model:
- Embeddings: Text → Vector (for similarity search)
- Gemini: Text → Generated Text (for reasoning/analysis)
8. Use Gemini for Compatibility Analysis
👉 Analyze survivor pairs for mission compatibility:
WITH PairData AS (
    SELECT
        s1.name AS Name_A,
        s2.name AS Name_B,
        CONCAT(
            "Assess compatibility of these two survivors for a resource-gathering mission. ",
            "Survivor 1: ", s1.name, ". ",
            "Survivor 2: ", s2.name, ". ",
            "Give a score from 1-10 and a 1-sentence reason."
        ) AS prompt
    FROM Survivors s1
    JOIN Survivors s2 ON s1.survivor_id < s2.survivor_id
    LIMIT 1
)
SELECT
    Name_A,
    Name_B,
    content AS ai_assessment
FROM ML.PREDICT(
    MODEL GeminiPro,
    (SELECT Name_A, Name_B, prompt FROM PairData)
);
Expected output:
Name_A          | Name_B            | ai_assessment
----------------|-------------------|----------------
"David Chen"    | "Dr. Elena Frost" | "**Score: 9/10** Their compatibility is extremely high as David's practical, hands-on scavenging skills are perfectly complemented by Dr. Frost's specialized knowledge to identify critical medical supplies and avoid biological hazards."
6. 🚀 Building Your Graph RAG Agent with Hybrid Search
1. System Architecture Overview
This section builds a multi-method search system that gives your agent flexibility to handle different types of queries. The system has three layers: Agent Layer, Tool Layer, Service Layer.
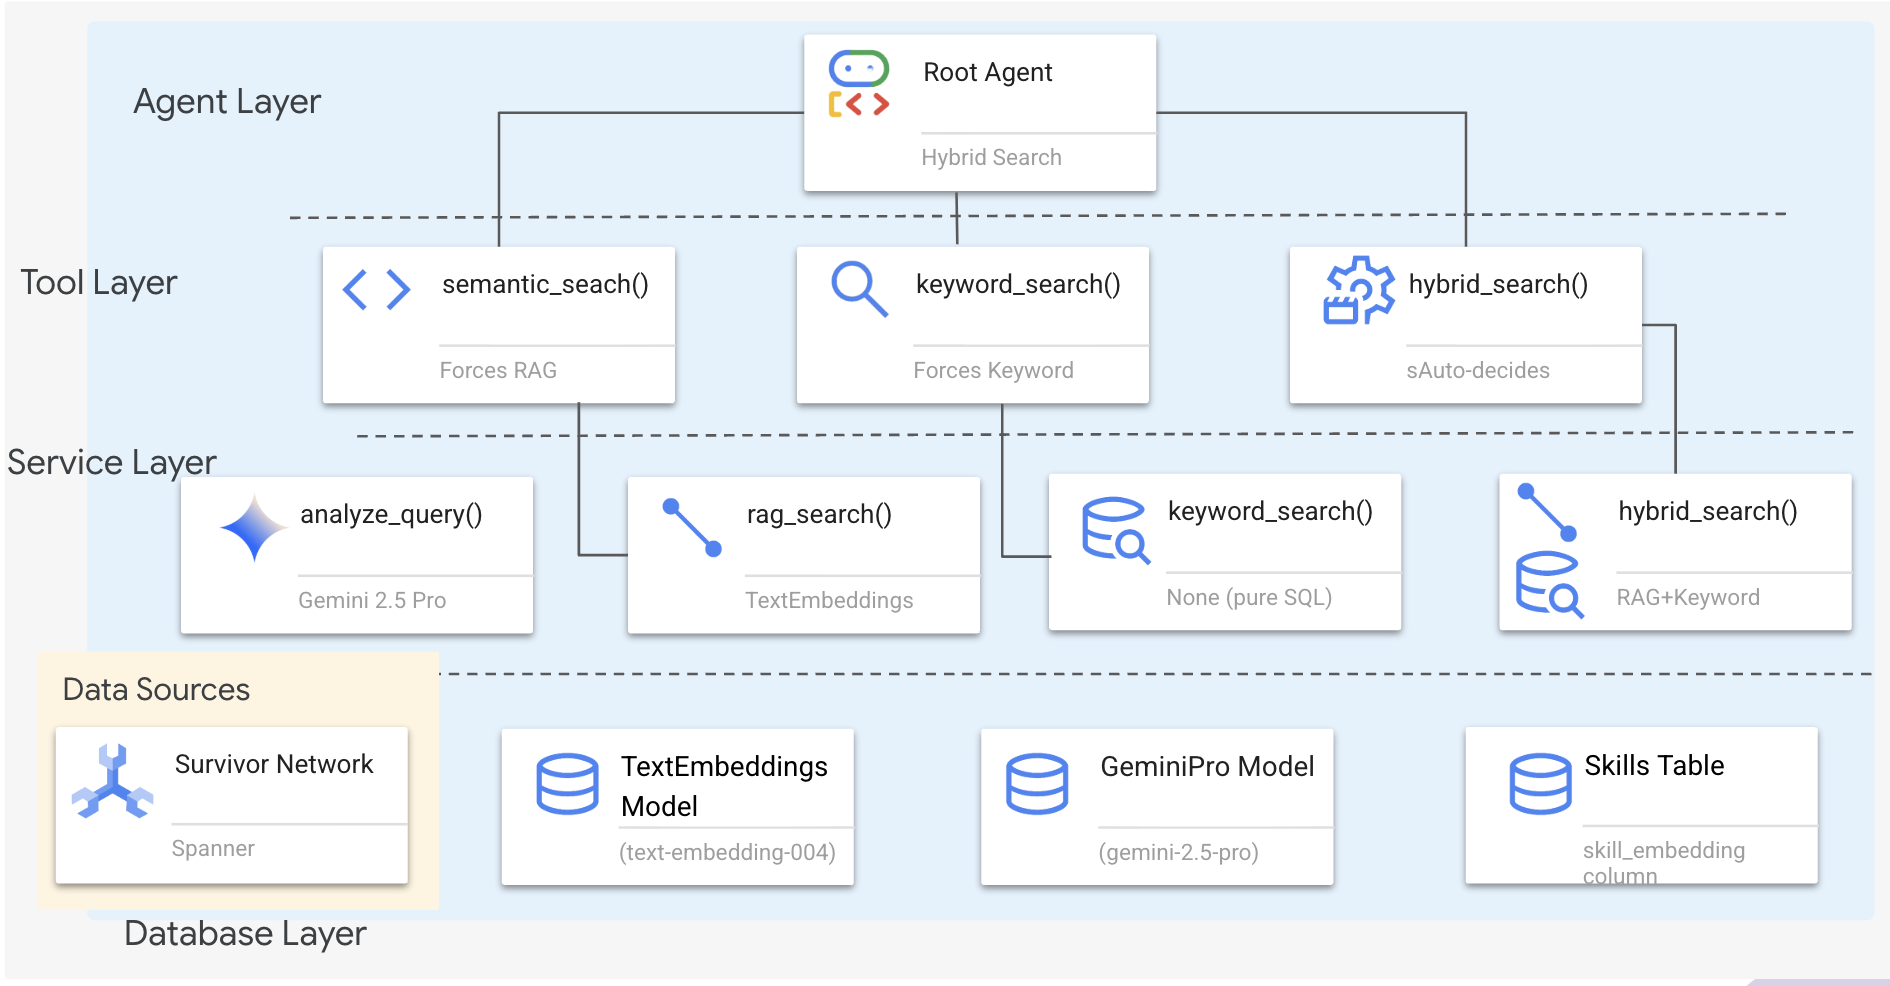
Why Three Layers?
- Separation of concerns: Agent focuses on intent, tools on interface, service on implementation
- Flexibility: Agent can force specific methods or let AI auto-route
- Optimization: Can skip expensive AI analysis when method is known
In this section, you'll primarily implement semantic search (RAG) - finding results by meaning not just keywords. Later, we'll explain how the hybrid search merges multiple methods.
2. RAG Service Implementation
👉💻 In the terminal, open the file in the Cloud Shell Editor by running:
cloudshell edit ~/way-back-home/level_2/backend/services/hybrid_search_service.py
Locate the comment # TODO: REPLACE_SQL
Replace this whole line with the following code:
        # This is your working query from the successful run!
        sql = """
            WITH query_embedding AS (
                SELECT embeddings.values AS val
                FROM ML.PREDICT(
                    MODEL TextEmbeddings,
                    (SELECT @query AS content)
                )
            )
            SELECT
                s.survivor_id,
                s.name AS survivor_name,
                s.biome,
                sk.skill_id,
                sk.name AS skill_name,
                sk.category,
                COSINE_DISTANCE(
                    sk.skill_embedding,
                    (SELECT val FROM query_embedding)
                ) AS distance
            FROM Survivors s
            JOIN SurvivorHasSkill shs ON s.survivor_id = shs.survivor_id
            JOIN Skills sk ON shs.skill_id = sk.skill_id
            WHERE sk.skill_embedding IS NOT NULL
            ORDER BY distance ASC
            LIMIT @limit
        """
3. Semantic Search Tool Definition
👉💻 In the terminal, open the file in the Cloud Shell Editor by running:
cloudshell edit ~/way-back-home/level_2/backend/agent/tools/hybrid_search_tools.py
In hybrid_search_tools.py, locate the comment # TODO: REPLACE_SEMANTIC_SEARCH_TOOL
👉Replace this whole line with the following code:
async def semantic_search(query: str, limit: int = 10) -> str:
    """
    Force semantic (RAG) search using embeddings.

    Use this when you specifically want to find things by MEANING,
    not just matching keywords. Great for:
    - Finding conceptually similar items
    - Handling vague or abstract queries
    - When exact terms are unknown

    Example: "healing abilities" will find "first aid", "surgery",
    "herbalism" even though no keywords match exactly.

    Args:
        query: What you're looking for (describe the concept)
        limit: Maximum results

    Returns:
        Semantically similar results ranked by relevance
    """
    try:
        service = _get_service()
        result = service.smart_search(
            query,
            force_method=SearchMethod.RAG,
            limit=limit
        )

        return _format_results(
            result["results"],
            result["analysis"],
            show_analysis=True
        )

    except Exception as e:
        return f"Error in semantic search: {str(e)}"
When Agent Uses:
- Queries asking for similarity ("find similar to X")
- Conceptual queries ("healing abilities")
- When understanding meaning is critical
4. Agent Decision Guide (Instructions)
In agent definition, copy paste the semantic search related part to the instruction.
👉💻 In the terminal, open the file in the Cloud Shell Editor by running:
cloudshell edit ~/way-back-home/level_2/backend/agent/agent.py
The agent uses this instruction to select the right tool:
👉In agent.py file, locate the comment # TODO: REPLACE_SEARCH_LOGIC, Replace this whole line with the following code:
- `semantic_search`: Force RAG/embedding search
  Use for: "Find similar to X", conceptual queries, unknown terminology
  Example: "Find skills related to healing"
👉Locate the comment # TODO: ADD_SEARCH_TOOLReplace this whole line with the following code:
semantic_search, # Force RAG
5. Understanding How Hybrid Search Works (Read Only, No Action Needed)
In steps 2-4, you implemented semantic search (RAG), the core search method that finds results by meaning. But you may have noticed the system is called "Hybrid Search". Here's how it all fits together:
How Hybrid Merge Works:
In the file way-back-home/level_2/backend/services/hybrid_search_service.py, when hybrid_search() is called, the service runs BOTH searches and merges results:
# Location: backend/services/hybrid_search_service.py

    rank_kw = keyword_ranks.get(surv_id, float('inf'))
    rank_rag = rag_ranks.get(surv_id, float('inf'))

    rrf_score = 0.0
    if rank_kw != float('inf'):
        rrf_score += 1.0 / (K + rank_kw)
    if rank_rag != float('inf'):
        rrf_score += 1.0 / (K + rank_rag)

    combined_score = rrf_score
For this codelab, you implemented the semantic search component (RAG), which is the foundation. The keyword and hybrid methods are already implemented in the service - your agent can use all three!
Congratulations! You have successfully finished your Graph RAG Agent with hybrid search!
7. 🚀 Testing Your Agent with ADK Web
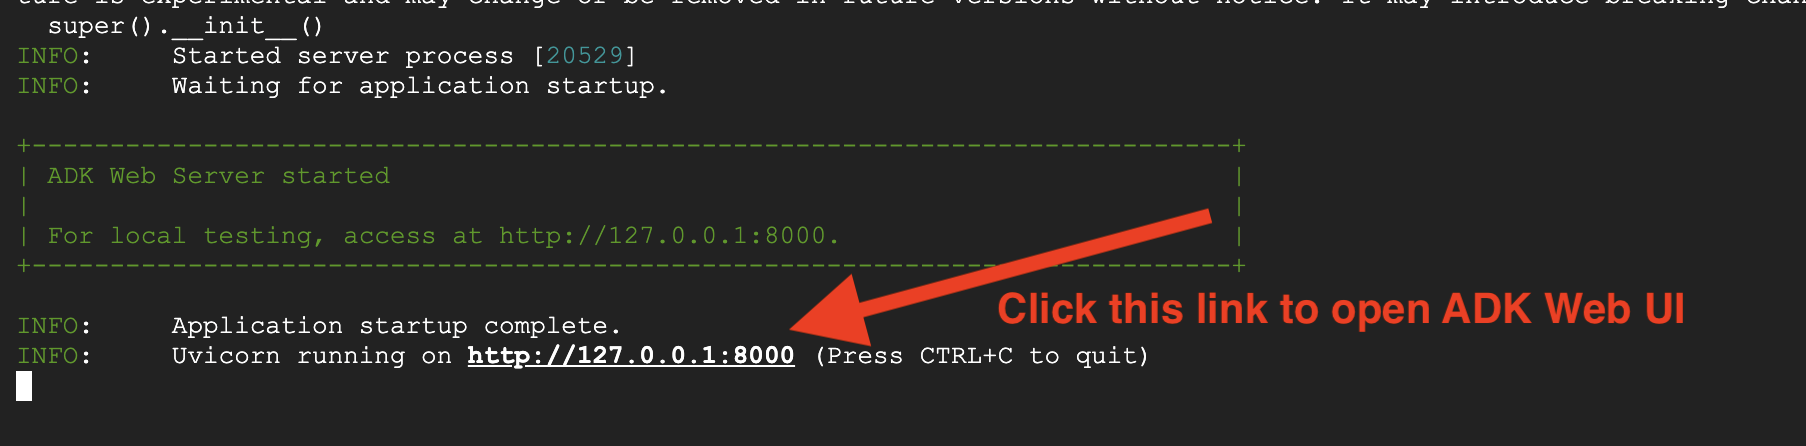
The easiest way to test your agent is using the adk web command, which launches your agent with a built-in chat interface.
1. Running the Agent
👉💻 Navigate to the backend directory (where your agent is defined) and launch the Web Interface::
cd ~/way-back-home/level_2/backend
uv run adk web
This command starts the agent defined in
agent/agent.py
and opens a web interface for testing.
👉 Open the URL:
The command will output a local URL (usually http://127.0.0.1:8000 or similar). Open this in your browser.
Once you click on the URL, you will see the ADK Web UI. Make sure you select the "agent" from top left corner.
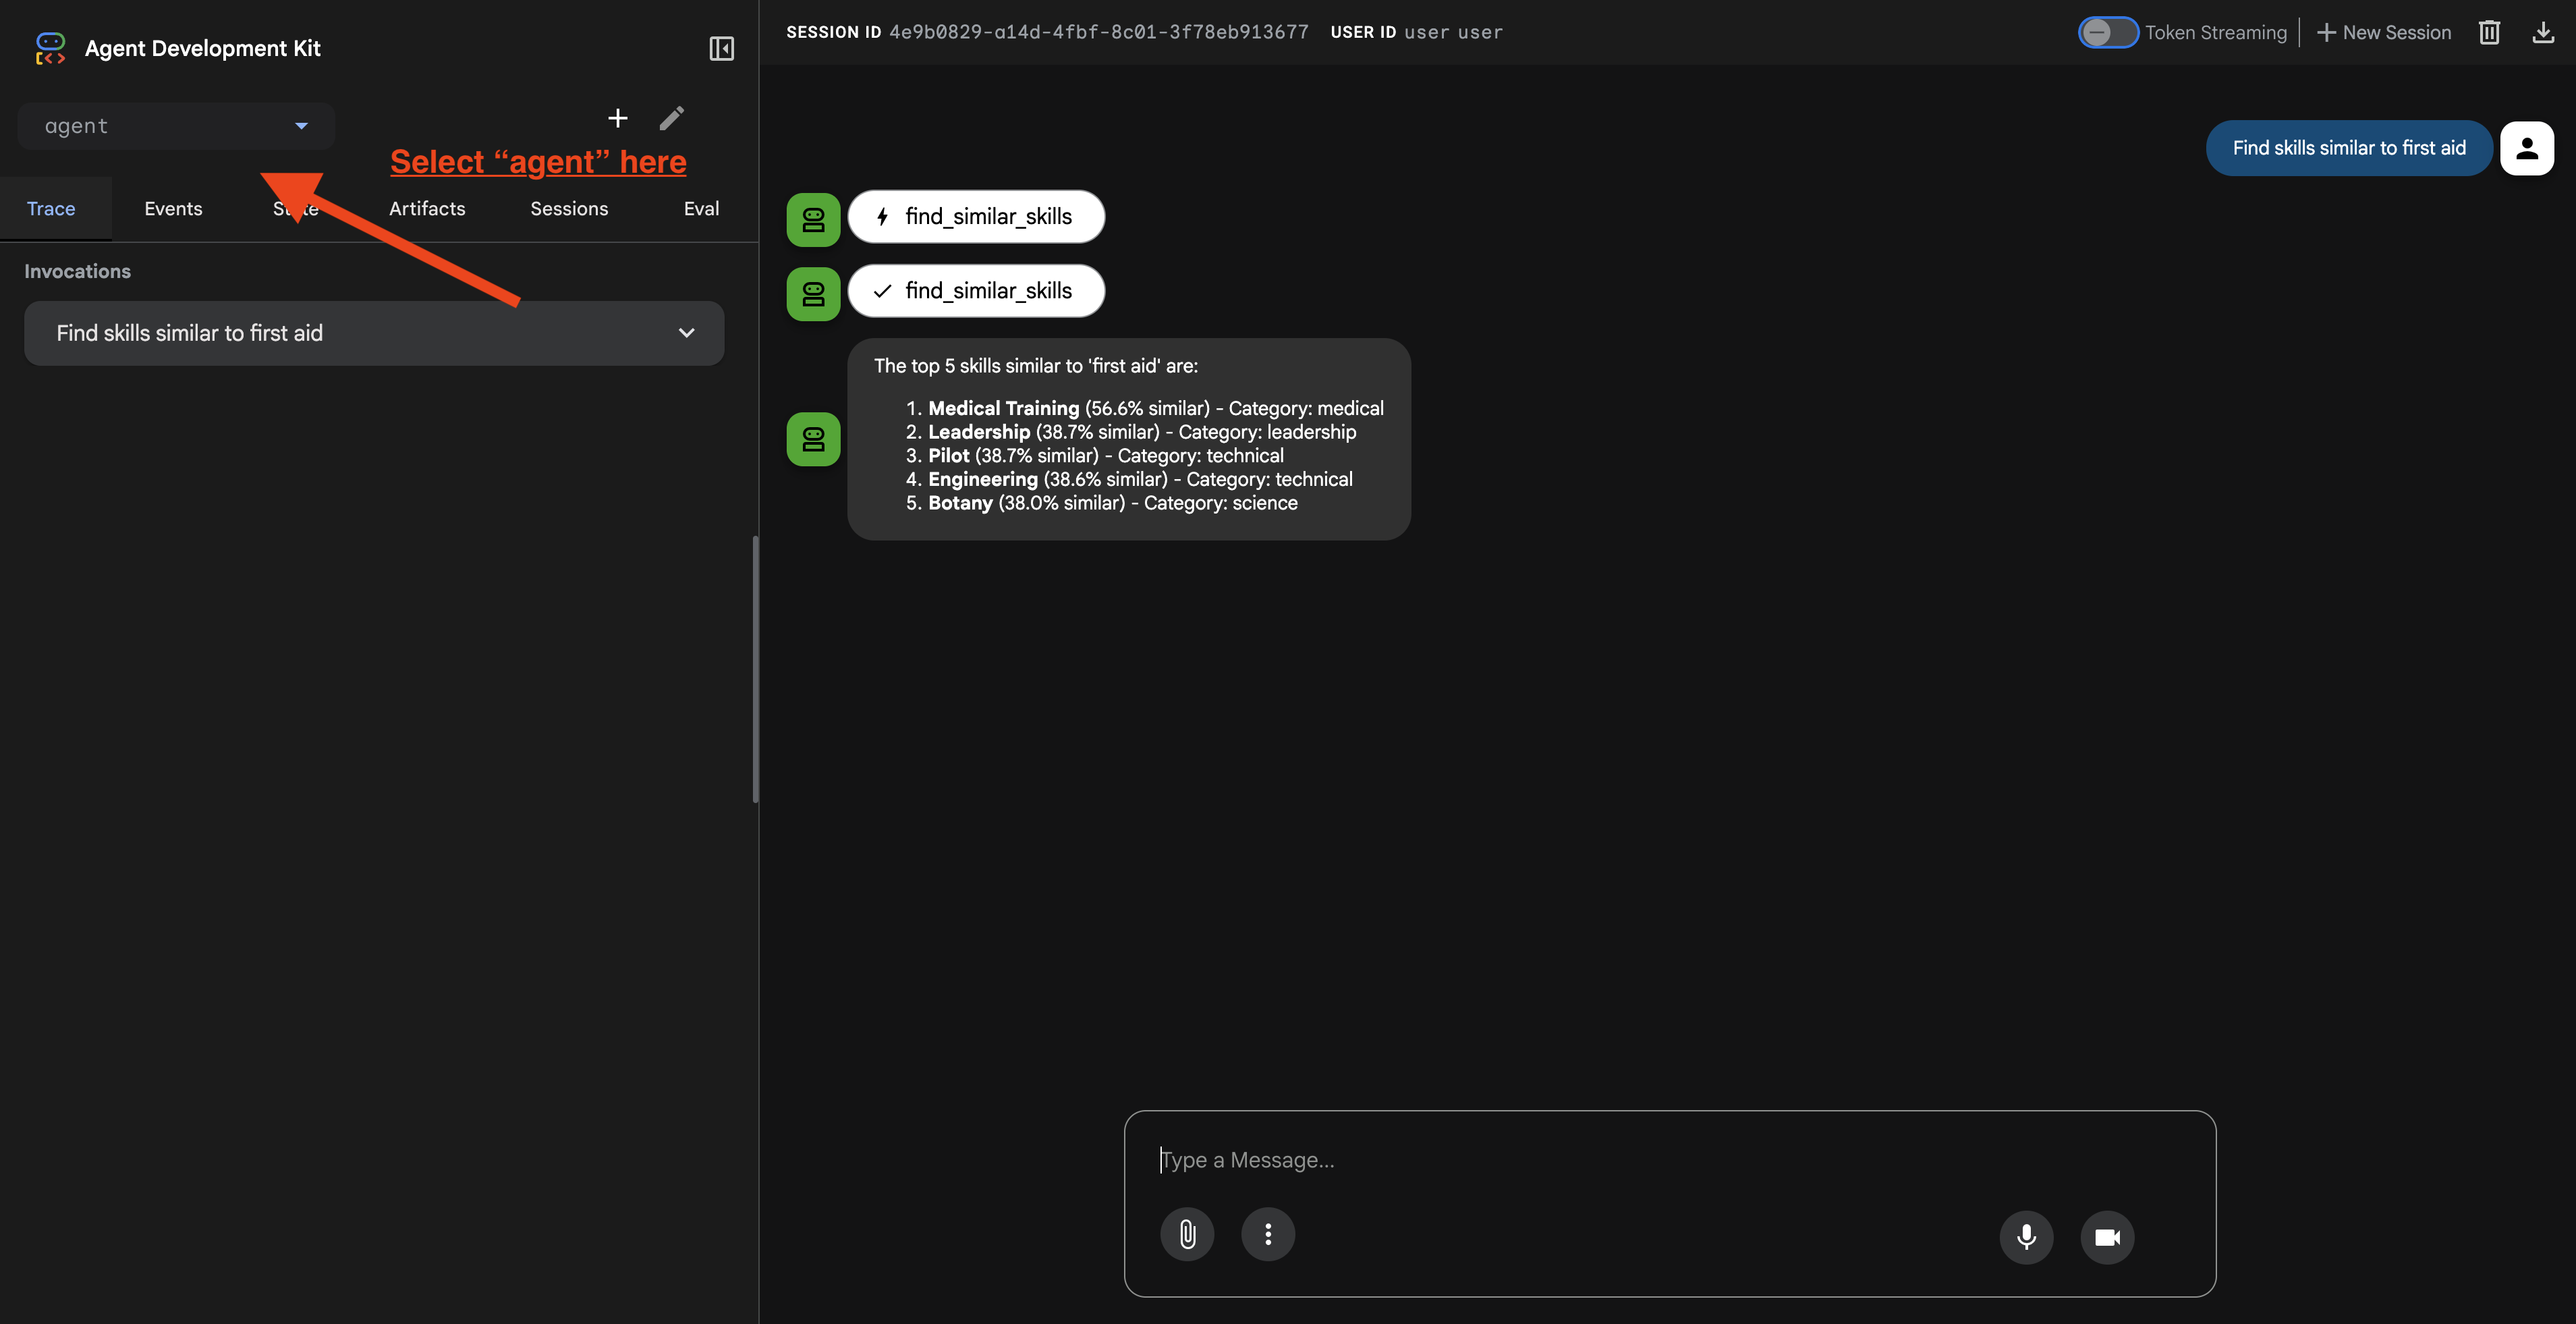
2. Testing Search Capabilities
The agent is designed to intelligently route your queries. Try the following inputs in the chat window to see different search methods in action.
🧬 A. Graph RAG (Semantic Search)
Finds items based on meaning and concept, even if keywords don't match.
Test Queries: (Choose any of the below)
Who can help with injuries?
What abilities are related to survival?
What to look for:
- The reasoning should mention Semantic or RAG search.
- You should see results that are conceptually related (e.g., "Surgery" when asking for "First Aid").
- Results will have the 🧬 icon.
🔀 B. Hybrid Search
Combines keyword filters with semantic understanding for complex queries.
Test Queries:(Choose any of the below)
Find someone who can fly a plane in the volcanic area
Who has healing abilities in the FOSSILIZED?
Who has healing abilities in the mountains?
What to look for:
- The reasoning should mention Hybrid search.
- Results should match BOTH criteria (concept + location/category).
- Results found by both methods will have the 🔀 icon and are ranked highest.
👉💻 When you finish testing, end the process by pressing Ctrl+C in your command line.
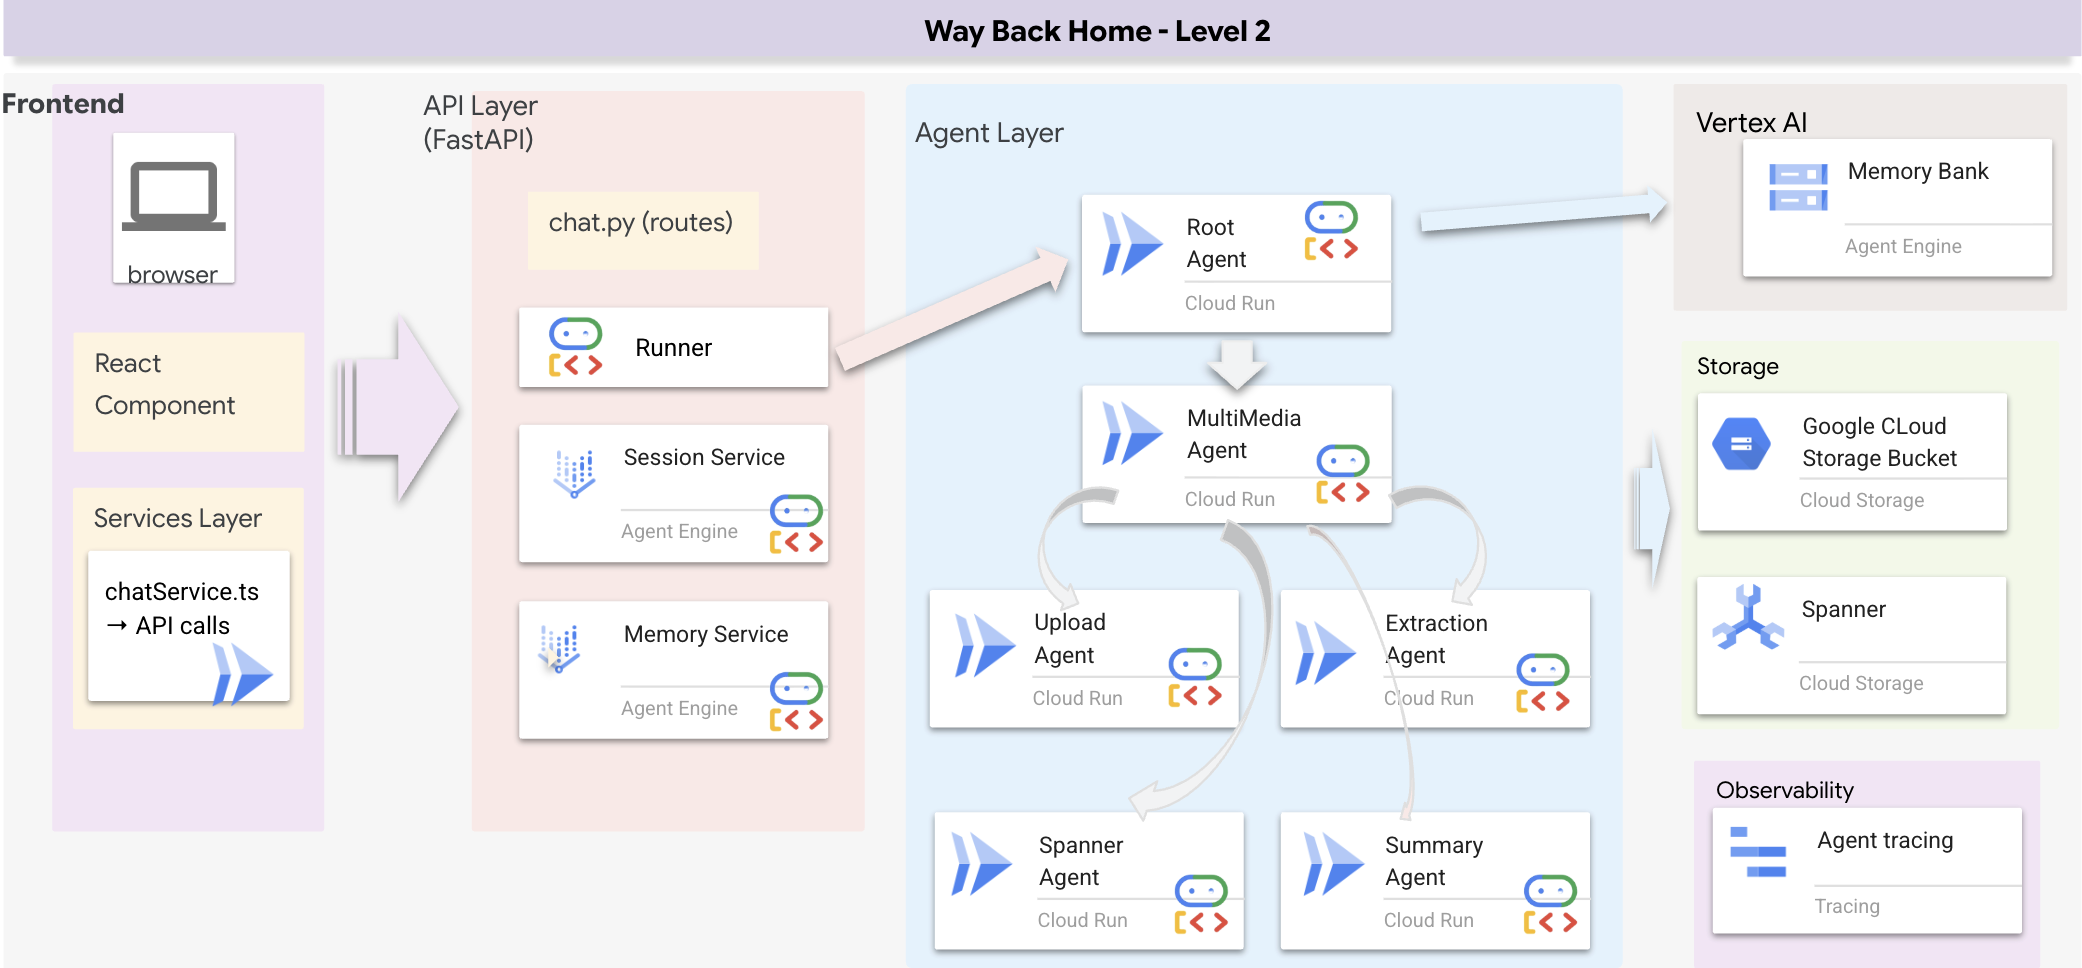
8. 🚀 Running the Full Application
Full Stack Architecture Overview
Add SessionService & Runner
👉💻 In the terminal, open the file chat.py in the Cloud Shell Editor by running (make sure you did "ctrl+C" to end the previous process before proceeding):
cloudshell edit ~/way-back-home/level_2/backend/api/routes/chat.py
👉In chat.py file, locate the comment # TODO: REPLACE_INMEMORY_SERVICES, Replace this whole line with the following code:
    session_service = InMemorySessionService()
    memory_service = InMemoryMemoryService()
👉In chat.py file, locate the comment # TODO: REPLACE_RUNNER, Replace this whole line with the following code:
runner = Runner(
    agent=root_agent,
    session_service=session_service,
    memory_service=memory_service,
    app_name="survivor-network"
)
1. Start Application
If the previous terminal is still running, end it by pressing Ctrl+C.
👉💻 Start App:
cd ~/way-back-home/level_2/
./start_app.sh
When it successfully start backend, you will see Local: http://localhost:5173/" as below: 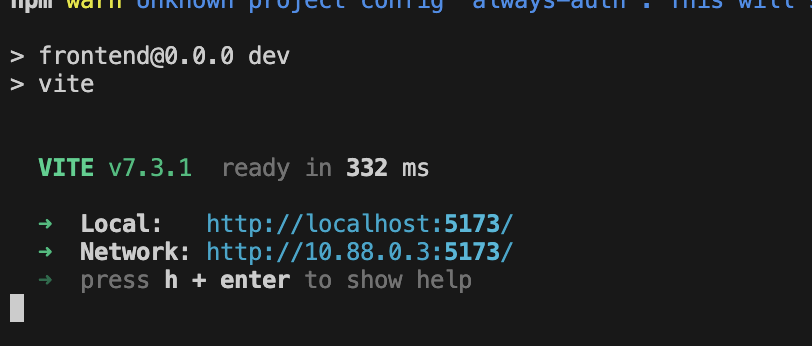
👉 Click Local: http://localhost:5173/ from the terminal.
2. Test Semantic Search
Query:
Find skills similar to healing
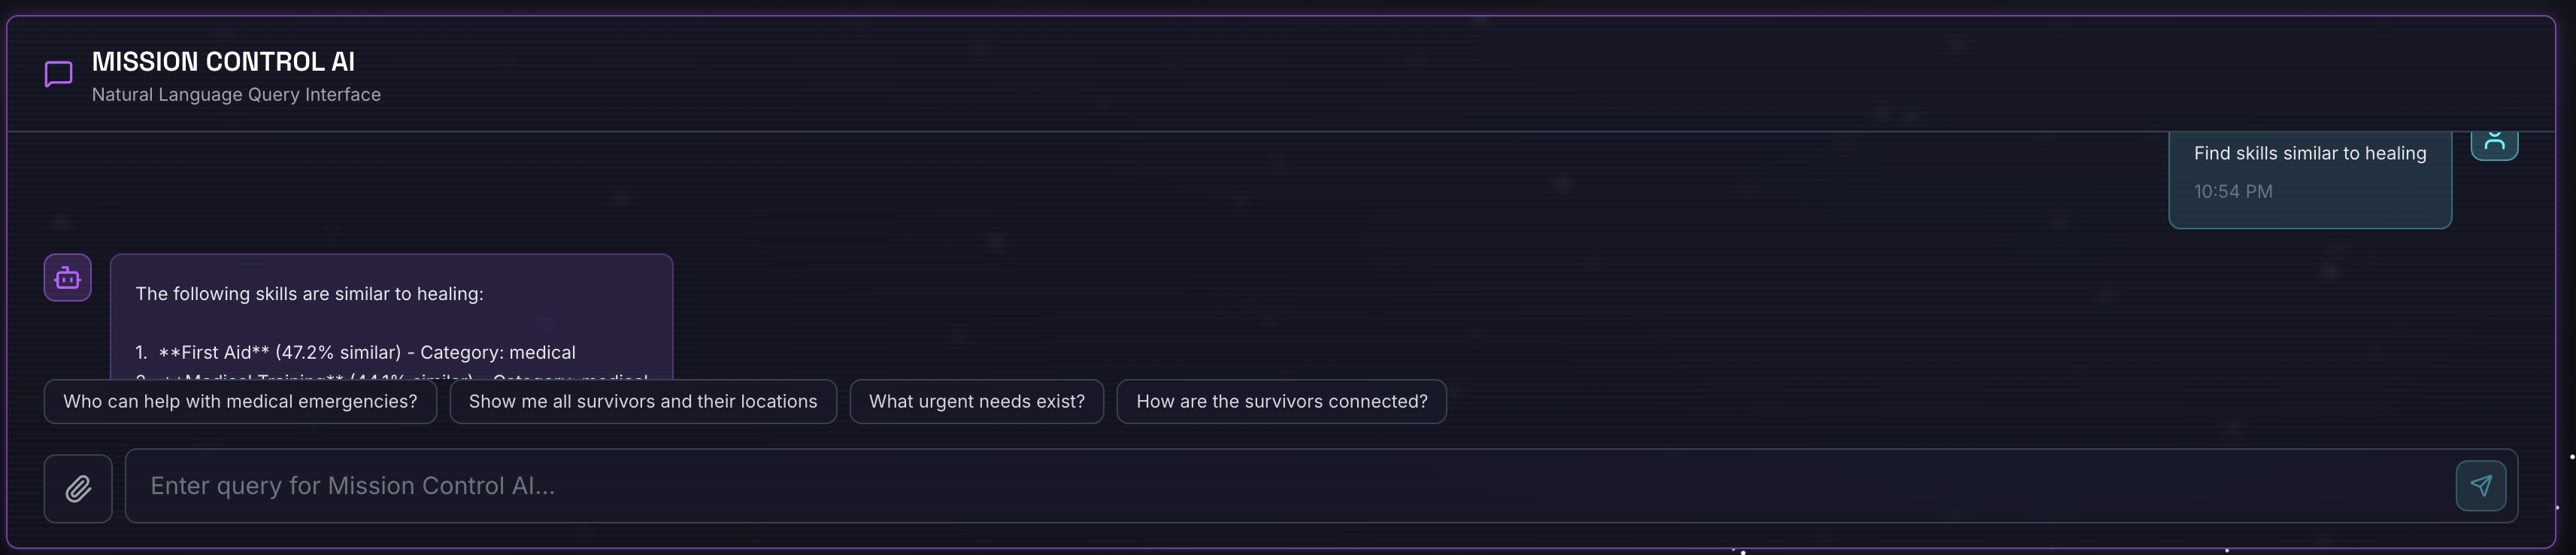
What happens:
- Agent recognizes similarity request
- Generates embedding for "healing"
- Uses cosine distance to find semantically similar skills
- Returns: first aid (even though names don't match "healing")
3. Test Hybrid Search
Query:
Find medical skills in the mountains
What happens:
- Keyword component: Filter for
category='medical' - Semantic component: Embed "medical" and rank by similarity
- Merge: Combine results, prioritizing those found by both methods 🔀
Query(optional):
Who is good at survival and in the forest?
What happens:
- Keyword finds:
biome='forest' - Semantic finds: skills similar to "survival"
- Hybrid combines both for best results
👉💻 When you finish testing, in the terminal, end it by pressing Ctrl+C.
4. (!ONLY FOR WORKSHOP ATTENDEE) Update your location
👉💻 Run the completion script:
cd ~/way-back-home/level_2
./set_level_2.sh
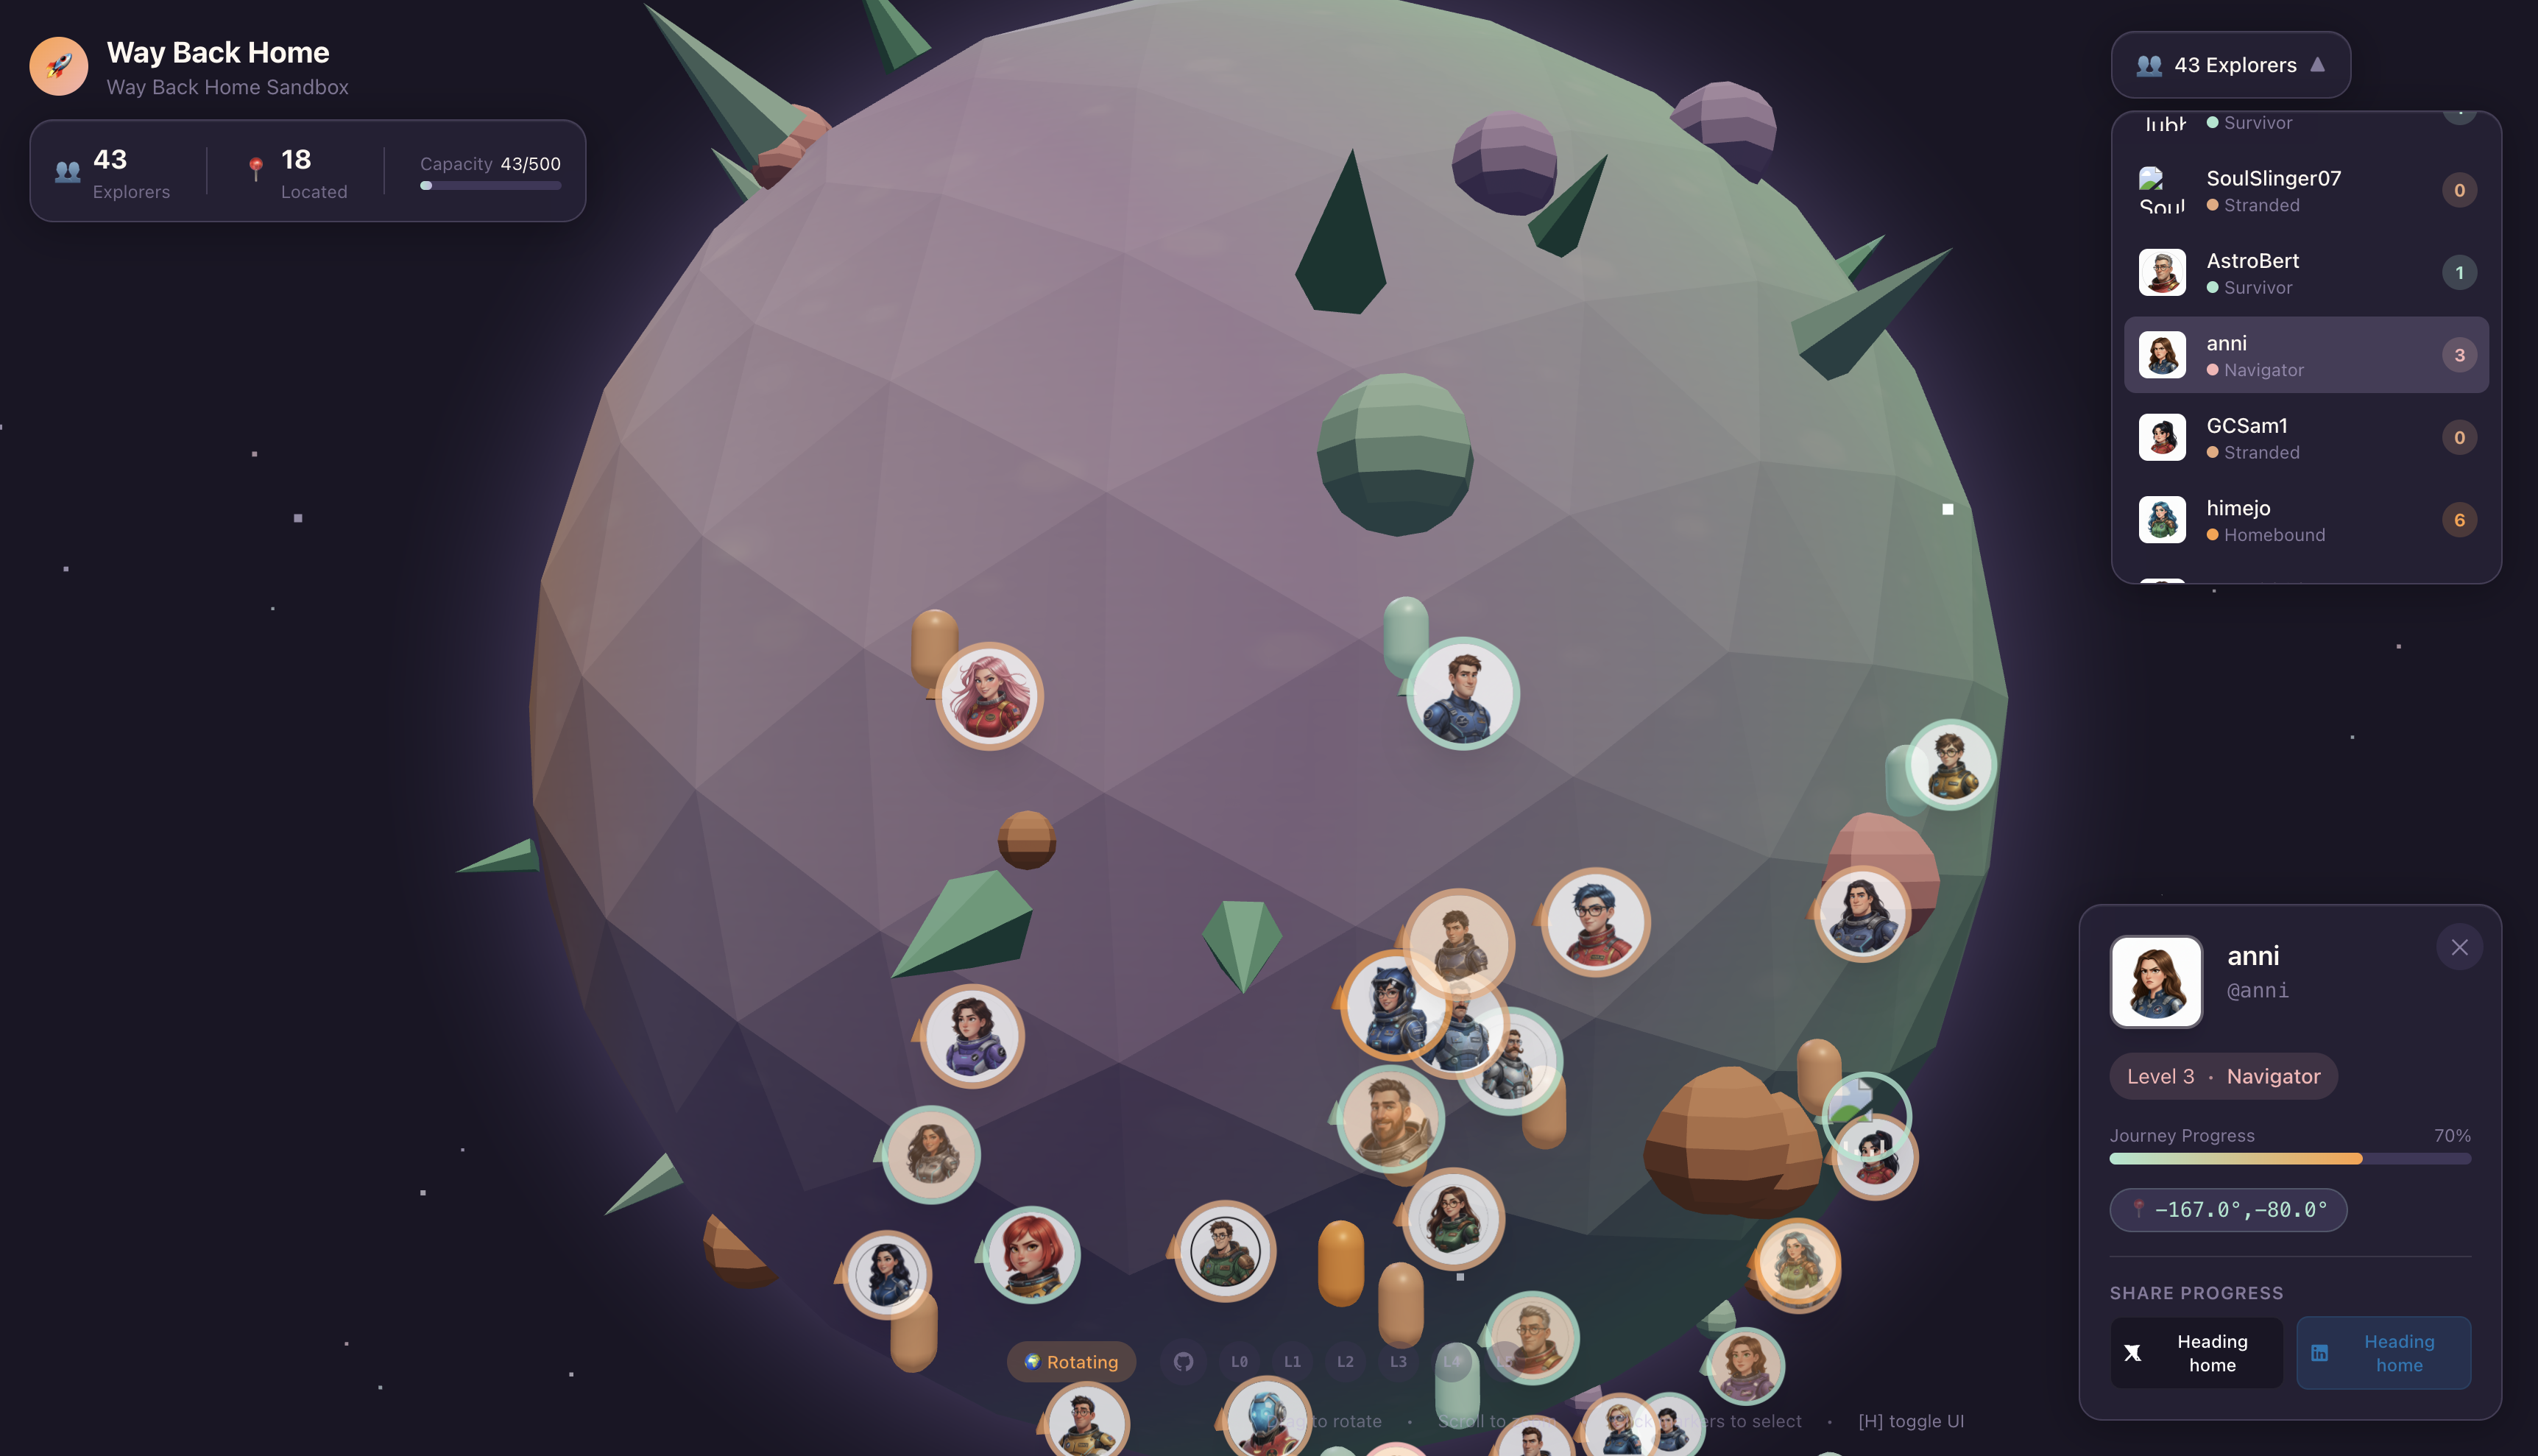
Now open waybackhome.dev, and you will see your location has updated. Congratulations on finishing level 2!
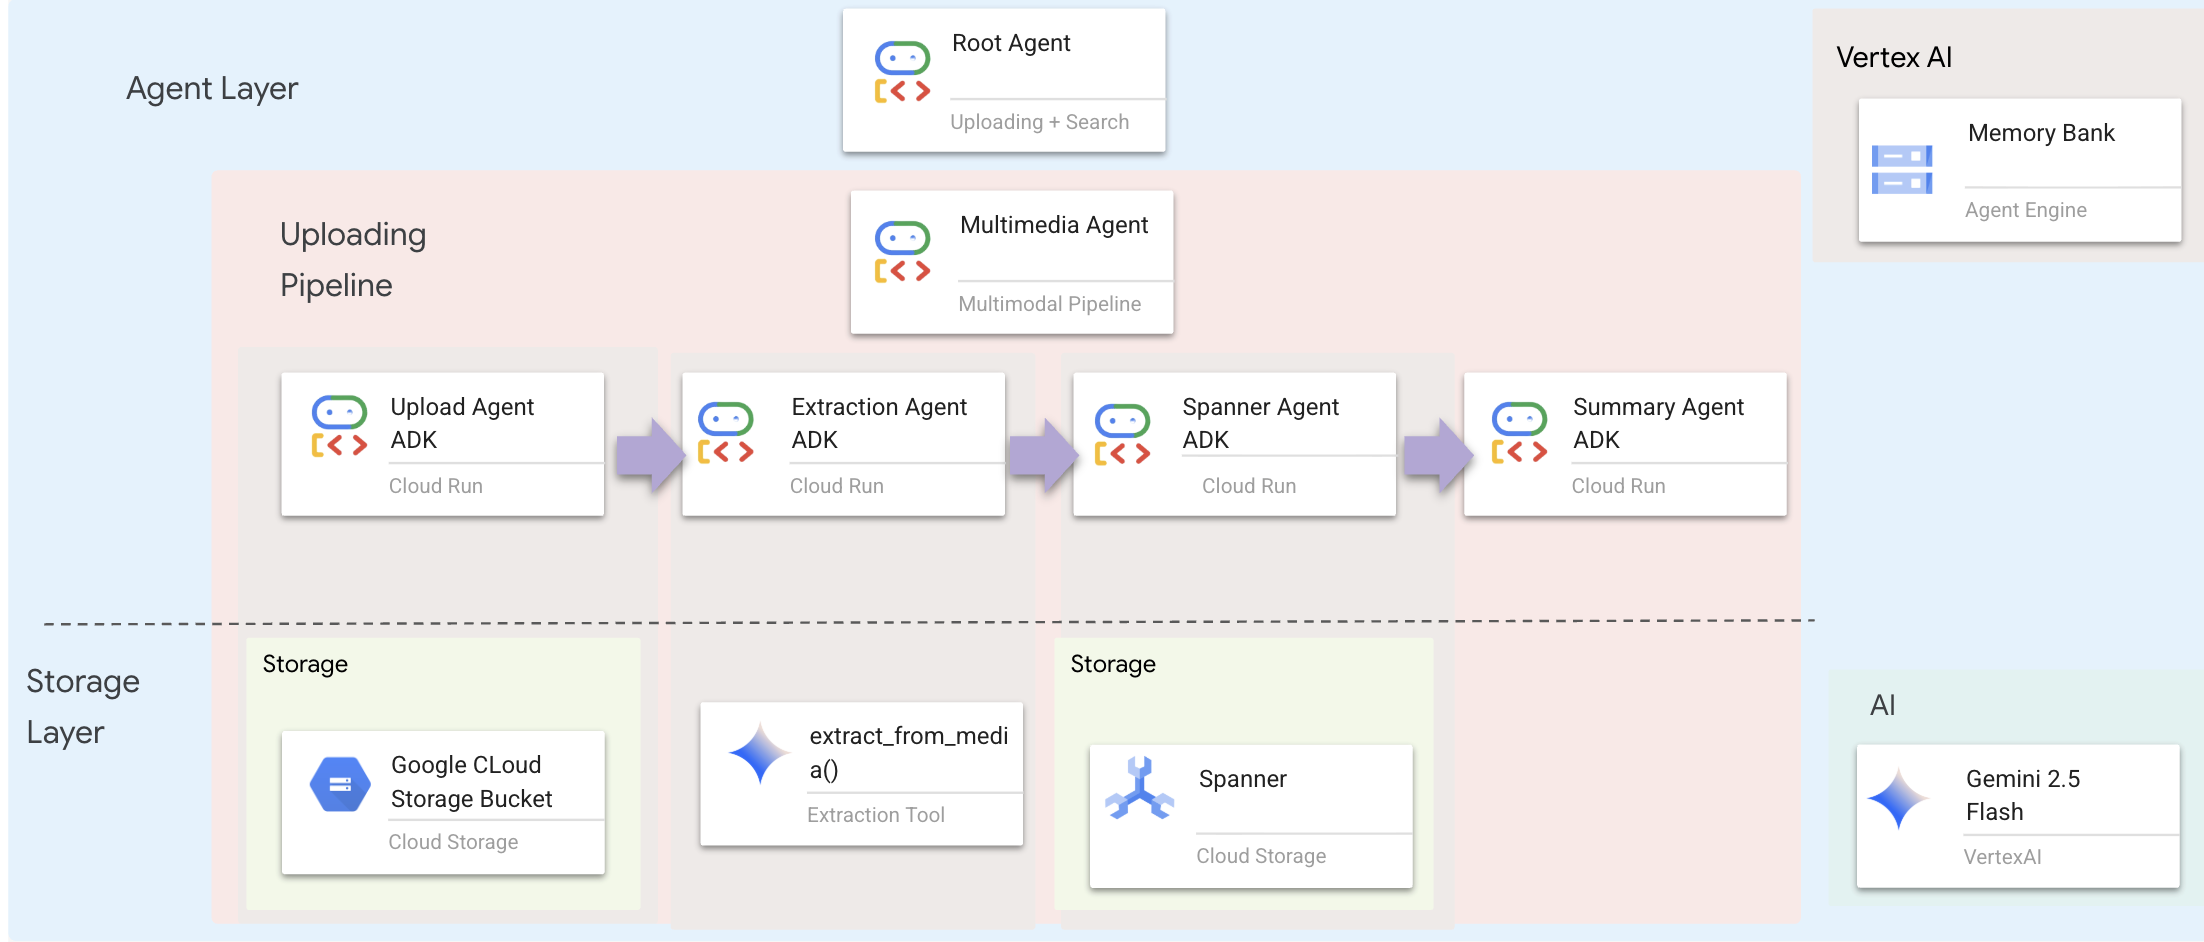
9. ☕️ [Optional] Multimodal Pipeline (Read Only) — Tooling Layer
Why Do We Need a Multimodal Pipeline?
The survival network isn't just text. Survivors in the field send unstructured data directly through the chat:
- 📸 Images: Photos of resources, hazards, or equipment
- 🎥 Videos: Status reports or SOS broadcasts
- 📄 Text: Field notes or logs
What Files Are We Processing?
Unlike the previous step where we searched existing data, here we process User-Uploaded Files. The chat.py interface handles file attachments dynamically:
Source | Content | Goal |
User Attachment | Image/Video/Text | Information to add to the graph |
Chat Context | "Here is a photo of the supplies" | Intent and additional details |
The Planned Approach: Sequential Agent Pipeline
We use a Sequential Agent (multimedia_agent.py) that chains specialized agents together:
This is defined in backend/agent/multimedia_agent.py as a SequentialAgent.
The tooling layer provides the capabilities that agents can invoke. Tools handle the "how" — uploading files, extracting entities, and saving to the database.
1. Open the Tools File
👉💻 Open the file level_2/backend/agent/tools/extraction_tools.py or by typing the following command in terminal. Open a new terminal. In the terminal, open the file in the Cloud Shell Editor:
cloudshell edit ~/way-back-home/level_2/backend/agent/tools/extraction_tools.py
2. Implement upload_media Tool
This tool uploads a local file to Google Cloud Storage.
👉 In def upload_media(file_path: str, survivor_id: Optional[str] = None) -> Dict[str, Any]:, the following code is about how to upload files to GCS detect its type:
    """
    Upload media file to GCS and detect its type.

    Args:
        file_path: Path to the local file
        survivor_id: Optional survivor ID to associate with upload

    Returns:
        Dict with gcs_uri, media_type, and status
    """
    try:
        if not file_path:
            return {"status": "error", "error": "No file path provided"}

        # Strip quotes if present
        file_path = file_path.strip().strip("'").strip('"')

        if not os.path.exists(file_path):
            return {"status": "error", "error": f"File not found: {file_path}"}

        gcs_uri, media_type, signed_url = gcs_service.upload_file(file_path, survivor_id)

        return {
            "status": "success",
            "gcs_uri": gcs_uri,
            "signed_url": signed_url,
            "media_type": media_type.value,
            "file_name": os.path.basename(file_path),
            "survivor_id": survivor_id
        }
    except Exception as e:
        logger.error(f"Upload failed: {e}")
        return {"status": "error", "error": str(e)}
3. Implement extract_from_media Tool
This tool is a router — it checks the media_type and dispatches to the correct extractor (text, image, or video).
👉 In async def extract_from_media(gcs_uri: str, media_type: str, signed_url: Optional[str] = None) -> Dict[str, Any]:, the following code is about how to extract entities and relationships from uploaded media.
    """
    Extract entities and relationships from uploaded media.

    Args:
        gcs_uri: GCS URI of the uploaded file
        media_type: Type of media (text/image/video)
        signed_url: Optional signed URL for public/temporary access

    Returns:
        Dict with extraction results
    """
    try:
        if not gcs_uri:
             return {"status": "error", "error": "No GCS URI provided"}

        # Select appropriate extractor
        if media_type == MediaType.TEXT.value or media_type == "text":
            result = await text_extractor.extract(gcs_uri)
        elif media_type == MediaType.IMAGE.value or media_type == "image":
            result = await image_extractor.extract(gcs_uri)
        elif media_type == MediaType.VIDEO.value or media_type == "video":
            result = await video_extractor.extract(gcs_uri)
        else:
            return {"status": "error", "error": f"Unsupported media type: {media_type}"}

        # Inject signed URL into broadcast info if present
        if signed_url:
            if not result.broadcast_info:
                result.broadcast_info = {}
            result.broadcast_info['thumbnail_url'] = signed_url

        return {
            "status": "success",
            "extraction_result": result.to_dict(), # Return valid JSON dict instead of object
            "summary": result.summary,
            "entities_count": len(result.entities),
            "relationships_count": len(result.relationships),
            "entities": [e.to_dict() for e in result.entities],
            "relationships": [r.to_dict() for r in result.relationships]
        }
    except Exception as e:
        logger.error(f"Extraction failed: {e}")
        return {"status": "error", "error": str(e)}
Key Implementation Details:
- Multimodal Input: We pass both the text prompt (
_get_extraction_prompt()) and the image object togenerate_content. - Structured Output:
response_mime_type="application/json"ensures the LLM returns valid JSON, which is critical for the pipeline. - Visual Entity Linking: The prompt includes known entities so Gemini can recognize specific characters.
4. Implement save_to_spanner Tool
This tool persists the extracted entities and relationships to Spanner Graph DB.
👉 In def save_to_spanner(extraction_result: Any, survivor_id: Optional[str] = None) -> Dict[str, Any]:, the following code is about how to save extracted entities and relationships to Spanner Graph DB.
    """
    Save extracted entities and relationships to Spanner Graph DB.

    Args:
        extraction_result: ExtractionResult object (or dict from previous step if passed as dict)
        survivor_id: Optional survivor ID to associate with the broadcast

    Returns:
        Dict with save statistics
    """
    try:
        # Handle if extraction_result is passed as the wrapper dict from extract_from_media
        result_obj = extraction_result
        if isinstance(extraction_result, dict) and 'extraction_result' in extraction_result:
             result_obj = extraction_result['extraction_result']

        # If result_obj is a dict (from to_dict()), reconstruct it
        if isinstance(result_obj, dict):
            from extractors.base_extractor import ExtractionResult
            result_obj = ExtractionResult.from_dict(result_obj)

        if not result_obj:
            return {"status": "error", "error": "No extraction result provided"}

        stats = spanner_service.save_extraction_result(result_obj, survivor_id)

        return {
            "status": "success",
            "entities_created": stats['entities_created'],
            "entities_existing": stats['entities_found_existing'],
            "relationships_created": stats['relationships_created'],
            "broadcast_id": stats['broadcast_id'],
            "errors": stats['errors'] if stats['errors'] else None
        }
    except Exception as e:
        logger.error(f"Spanner save failed: {e}")
        return {"status": "error", "error": str(e)}
By giving agents high-level tools, we ensure data integrity while leveraging the agent's reasoning capabilities.
5. Update GCS Service
The GCSService handles the actual file upload to Google Cloud Storage.
👉💻 Open the file level_2/backend/services/gcs_service.py, or you can type in the terminal to open the file in the Cloud Shell Editor:
cloudshell edit ~/way-back-home/level_2/backend/services/gcs_service.py
👉 In def upload_file(self, file_path: str, survivor_id: Optional[str] = None) -> Tuple[str, MediaType, str]:, the following code is about how to save extracted entities and relationships to Spanner Graph DB.
        blob = self.bucket.blob(blob_name)
        blob.upload_from_filename(file_path)
By abstracting this into a service, the Agent doesn't need to know about GCS buckets, blob names, or signed URL generation. It just asks to "upload".
6. Why Agentic Workflow > Traditional Approaches?
The Agentic Advantage:
Feature | Batch Pipeline | Event-Driven | Agentic Workflow |
Complexity | Low (1 script) | High (5+ services) | Low (1 Python file: |
State Management | Global variables | Hard (decoupled) | Unified (Agent state) |
Error Handling | Crashes | Silent logs | Interactive ("I couldn't read that file") |
User Feedback | Console prints | Need polling | Immediate (Part of chat) |
Adaptability | Fixed logic | Rigid functions | Intelligent (LLM decides next step) |
Context Awareness | None | None | Full (Knows user intent) |
Why This Matters: By using multimedia_agent.py (a SequentialAgent with 4 sub-agents: Upload → Extract → Save → Summary), we replace complex infrastructure AND fragile scripts with intelligent, conversational application logic.
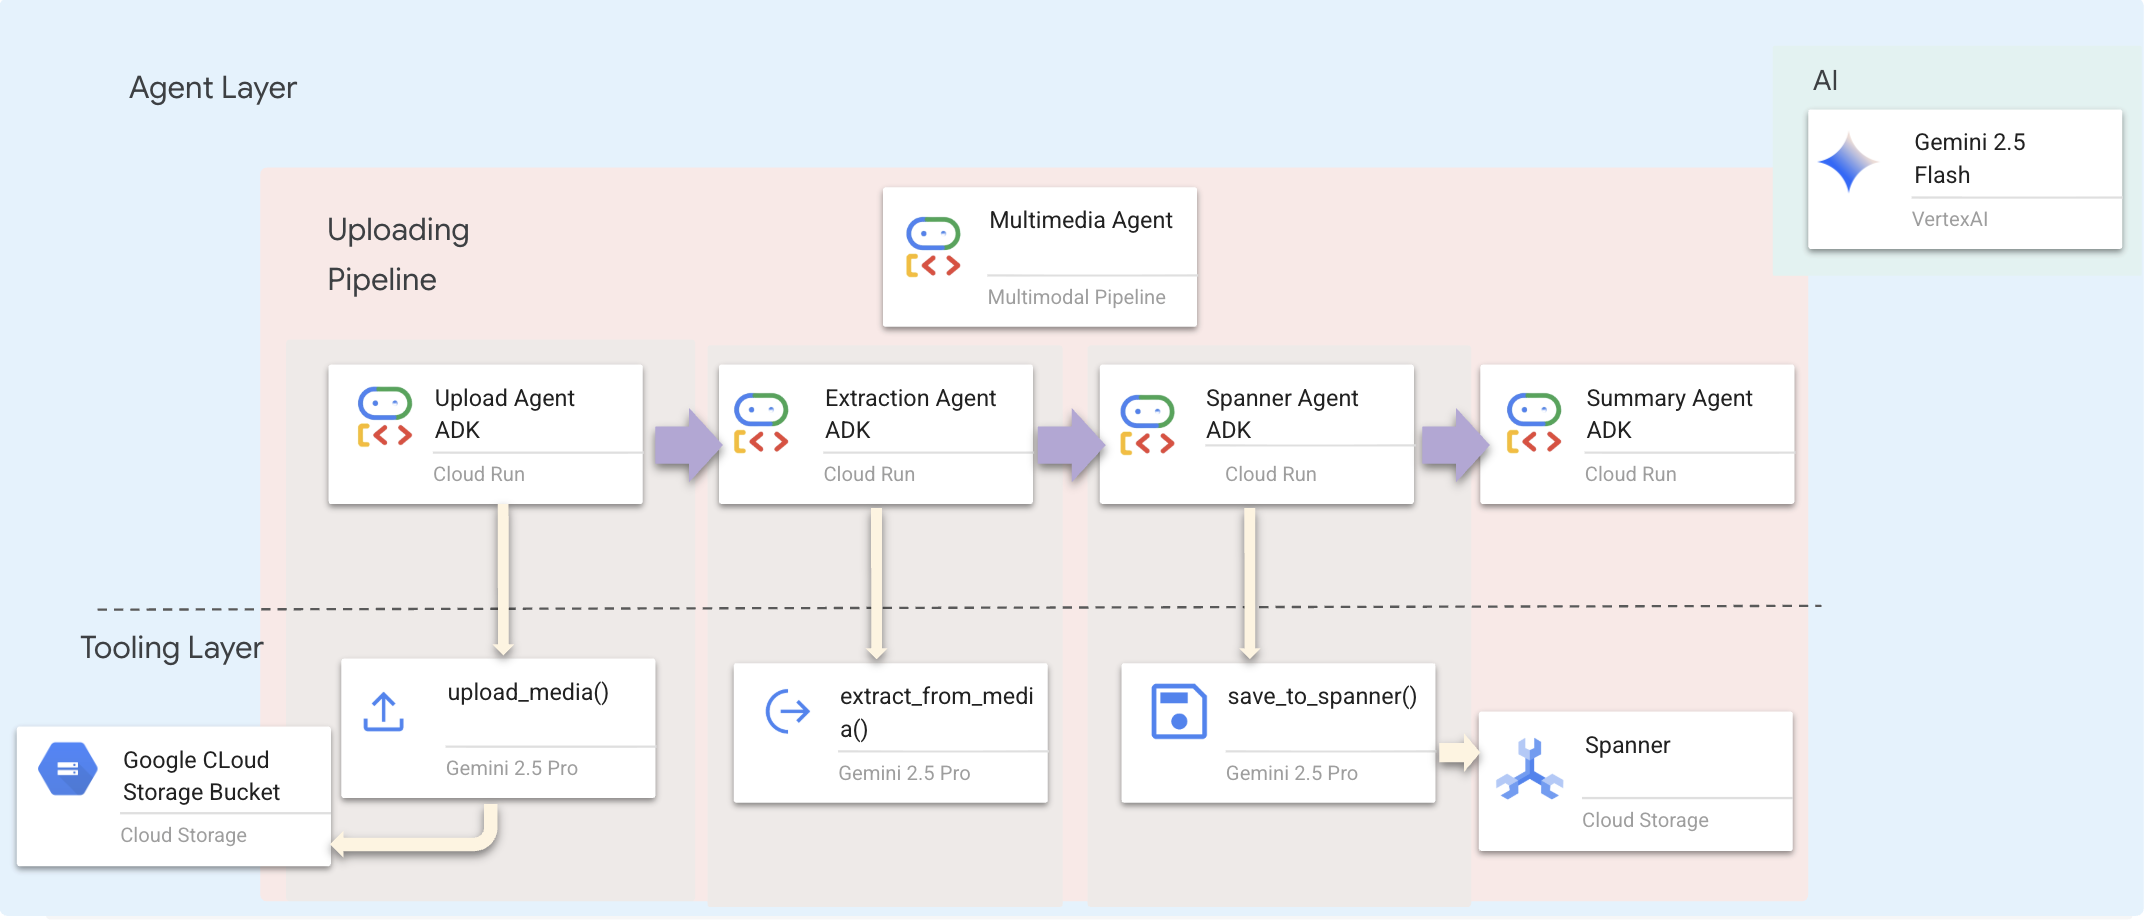
10. ☕️ [Optional] Multimodal Pipeline (Read Only) — Agent Layer
The agent layer defines the intelligence — agents that use tools to accomplish tasks. Each agent has a specific role and passes context to the next. Below is architecture diagram for multiagent system.
1. Open the Agent File
👉💻 Open the file level_2/backend/agent/multimedia_agent.py or by typing the following command in terminal. Open a new terminal. In the terminal, open the file in the Cloud Shell Editor:
cloudshell edit ~/way-back-home/level_2/backend/agent/multimedia_agent.py
2. Define the Upload Agent
This agent extracts a file path from the user's message and uploads it to GCS.
👉In the file multimedia_agent.py, with the following code, it creates upload_agent that uploading to GCS:
upload_agent = LlmAgent(
    name="UploadAgent",
    model="gemini-2.5-flash",
    instruction="""Extract the file path from the user's message and upload it.

Use `upload_media(file_path, survivor_id)` to upload the file.
The survivor_id is optional - include it if the user mentions a specific survivor (e.g., "survivor Sarah" -> "Sarah").
If the user provides a path like "/path/to/file", use that.

Return the upload result with gcs_uri and media_type.""",
    tools=[upload_media],
    output_key="upload_result"
)
3. Define the Extraction Agent
This agent "sees" the uploaded media and extracts structured data using Gemini Vision.
👉In the file multimedia_agent.py, with the following code,it creates extraction_agent that extract information from the uploaded media:
extraction_agent = LlmAgent(
    name="ExtractionAgent",
    model="gemini-2.5-flash",
    instruction="""Extract information from the uploaded media.

Previous step result: {upload_result}

Use `extract_from_media(gcs_uri, media_type, signed_url)` with the values from the upload result.
The gcs_uri is in upload_result['gcs_uri'], media_type in upload_result['media_type'], and signed_url in upload_result['signed_url'].

Return the extraction results including entities and relationships found.""",
    tools=[extract_from_media],
    output_key="extraction_result"
)
Notice how the instruction references {upload_result} — this is how state is passed between agents in ADK.
4. Define the Spanner Agent
This agent saves the extracted entities and relationships to the graph database.
👉In the file multimedia_agent.py, with the following code,it creates spanner_agent that Save the extracted information to the database:
spanner_agent = LlmAgent(
    name="SpannerAgent",
    model="gemini-2.5-flash",
    instruction="""Save the extracted information to the database.

Upload result: {upload_result}
Extraction result: {extraction_result}

Use `save_to_spanner(extraction_result, survivor_id)` to save to Spanner.
Pass the WHOLE `extraction_result` object/dict from the previous step.
Include survivor_id if it was provided in the upload step.

Return the save statistics.""",
    tools=[save_to_spanner],
    output_key="spanner_result"
)
This agent receives context from both previous steps (upload_result and extraction_result).
5. Define the Summary Agent
This agent synthesizes results from all previous steps into a user-friendly response.
👉In the file multimedia_agent.py, with the following code, it defines the prompt for summary_agent that summarize the result:
USE_MEMORY_BANK = os.getenv("USE_MEMORY_BANK", "false").lower() == "true"
save_msg = "6. Mention that the data is also being synced to the memory bank." if USE_MEMORY_BANK else ""

summary_instruction = f"""Provide a user-friendly summary of the media processing.

Upload: {{upload_result}}
Extraction: {{extraction_result}}
Database: {{spanner_result}}

Summarize:
1. What file was processed (name and type)
2. Key information extracted (survivors, skills, needs, resources found) - list names and counts
3. Relationships identified
4. What was saved to the database (broadcast ID, number of entities)
5. Any issues encountered
{save_msg}

Be concise but informative."""
This agent doesn't need tools — it just reads the shared context and generates a clean summary for the user.
🧠 Architecture Summary
Layer | File | Responsibility |
Tooling |
| How — Upload, extract, save |
Agent |
| What — Orchestrate the pipeline |
11. 🚀 Multimodal Data Pipeline — Orchestration
The core of our new system is the MultimediaExtractionPipeline defined in backend/agent/multimedia_agent.py. It uses the Sequential Agent pattern from the ADK (Agent Development Kit).
1. Why Sequential?
Processing an upload is a linear dependency chain:
- You cannot extract data until you have the file (Upload).
- You cannot save data until you extract it (Extraction).
- You cannot summarize until you have the results (Save).
A SequentialAgent is perfect for this. It passes the output of one agent as the context/input to the next.
2. The Agent Definition
Let's look at how the pipeline is assembled at the bottom of multimedia_agent.py: 👉💻 In the terminal, open the file in the Cloud Shell Editor by running:
cloudshell edit ~/way-back-home/level_2/backend/agent/multimedia_agent.py
It receives inputs from both previous steps. Locate the comment # TODO: REPLACE_ORCHESTRATION. Replace this whole line with the following code:
sub_agents=[upload_agent, extraction_agent, spanner_agent, summary_agent]
3. Connect with Root Agent
👉💻 In the terminal, open the file in the Cloud Shell Editor by running:
cloudshell edit ~/way-back-home/level_2/backend/agent/agent.py
Locate the comment # TODO: REPLACE_ADD_SUBAGENT. Replace this whole line with the following code:
sub_agents=[multimedia_agent],
This single object effectively bundles four "experts" into one callable entity.
4. Data Flow Between Agents
Each agent stores its output in a shared context that subsequent agents can access:
5. Open application (skip if app is still running)
👉💻 Start App:
cd ~/way-back-home/level_2/
./start_app.sh
👉 Click Local: http://localhost:5173/ from the terminal.
6. Test Image Upload
👉 In the chat interface, choose any of the photo here and upload to the UI:
In the chat interface, tell the agent about your specific context:
Here is the survivor note
And then attach the image here.

👉💻 In the terminal, when you finished testing, press "Ctrl+C" to end the process.
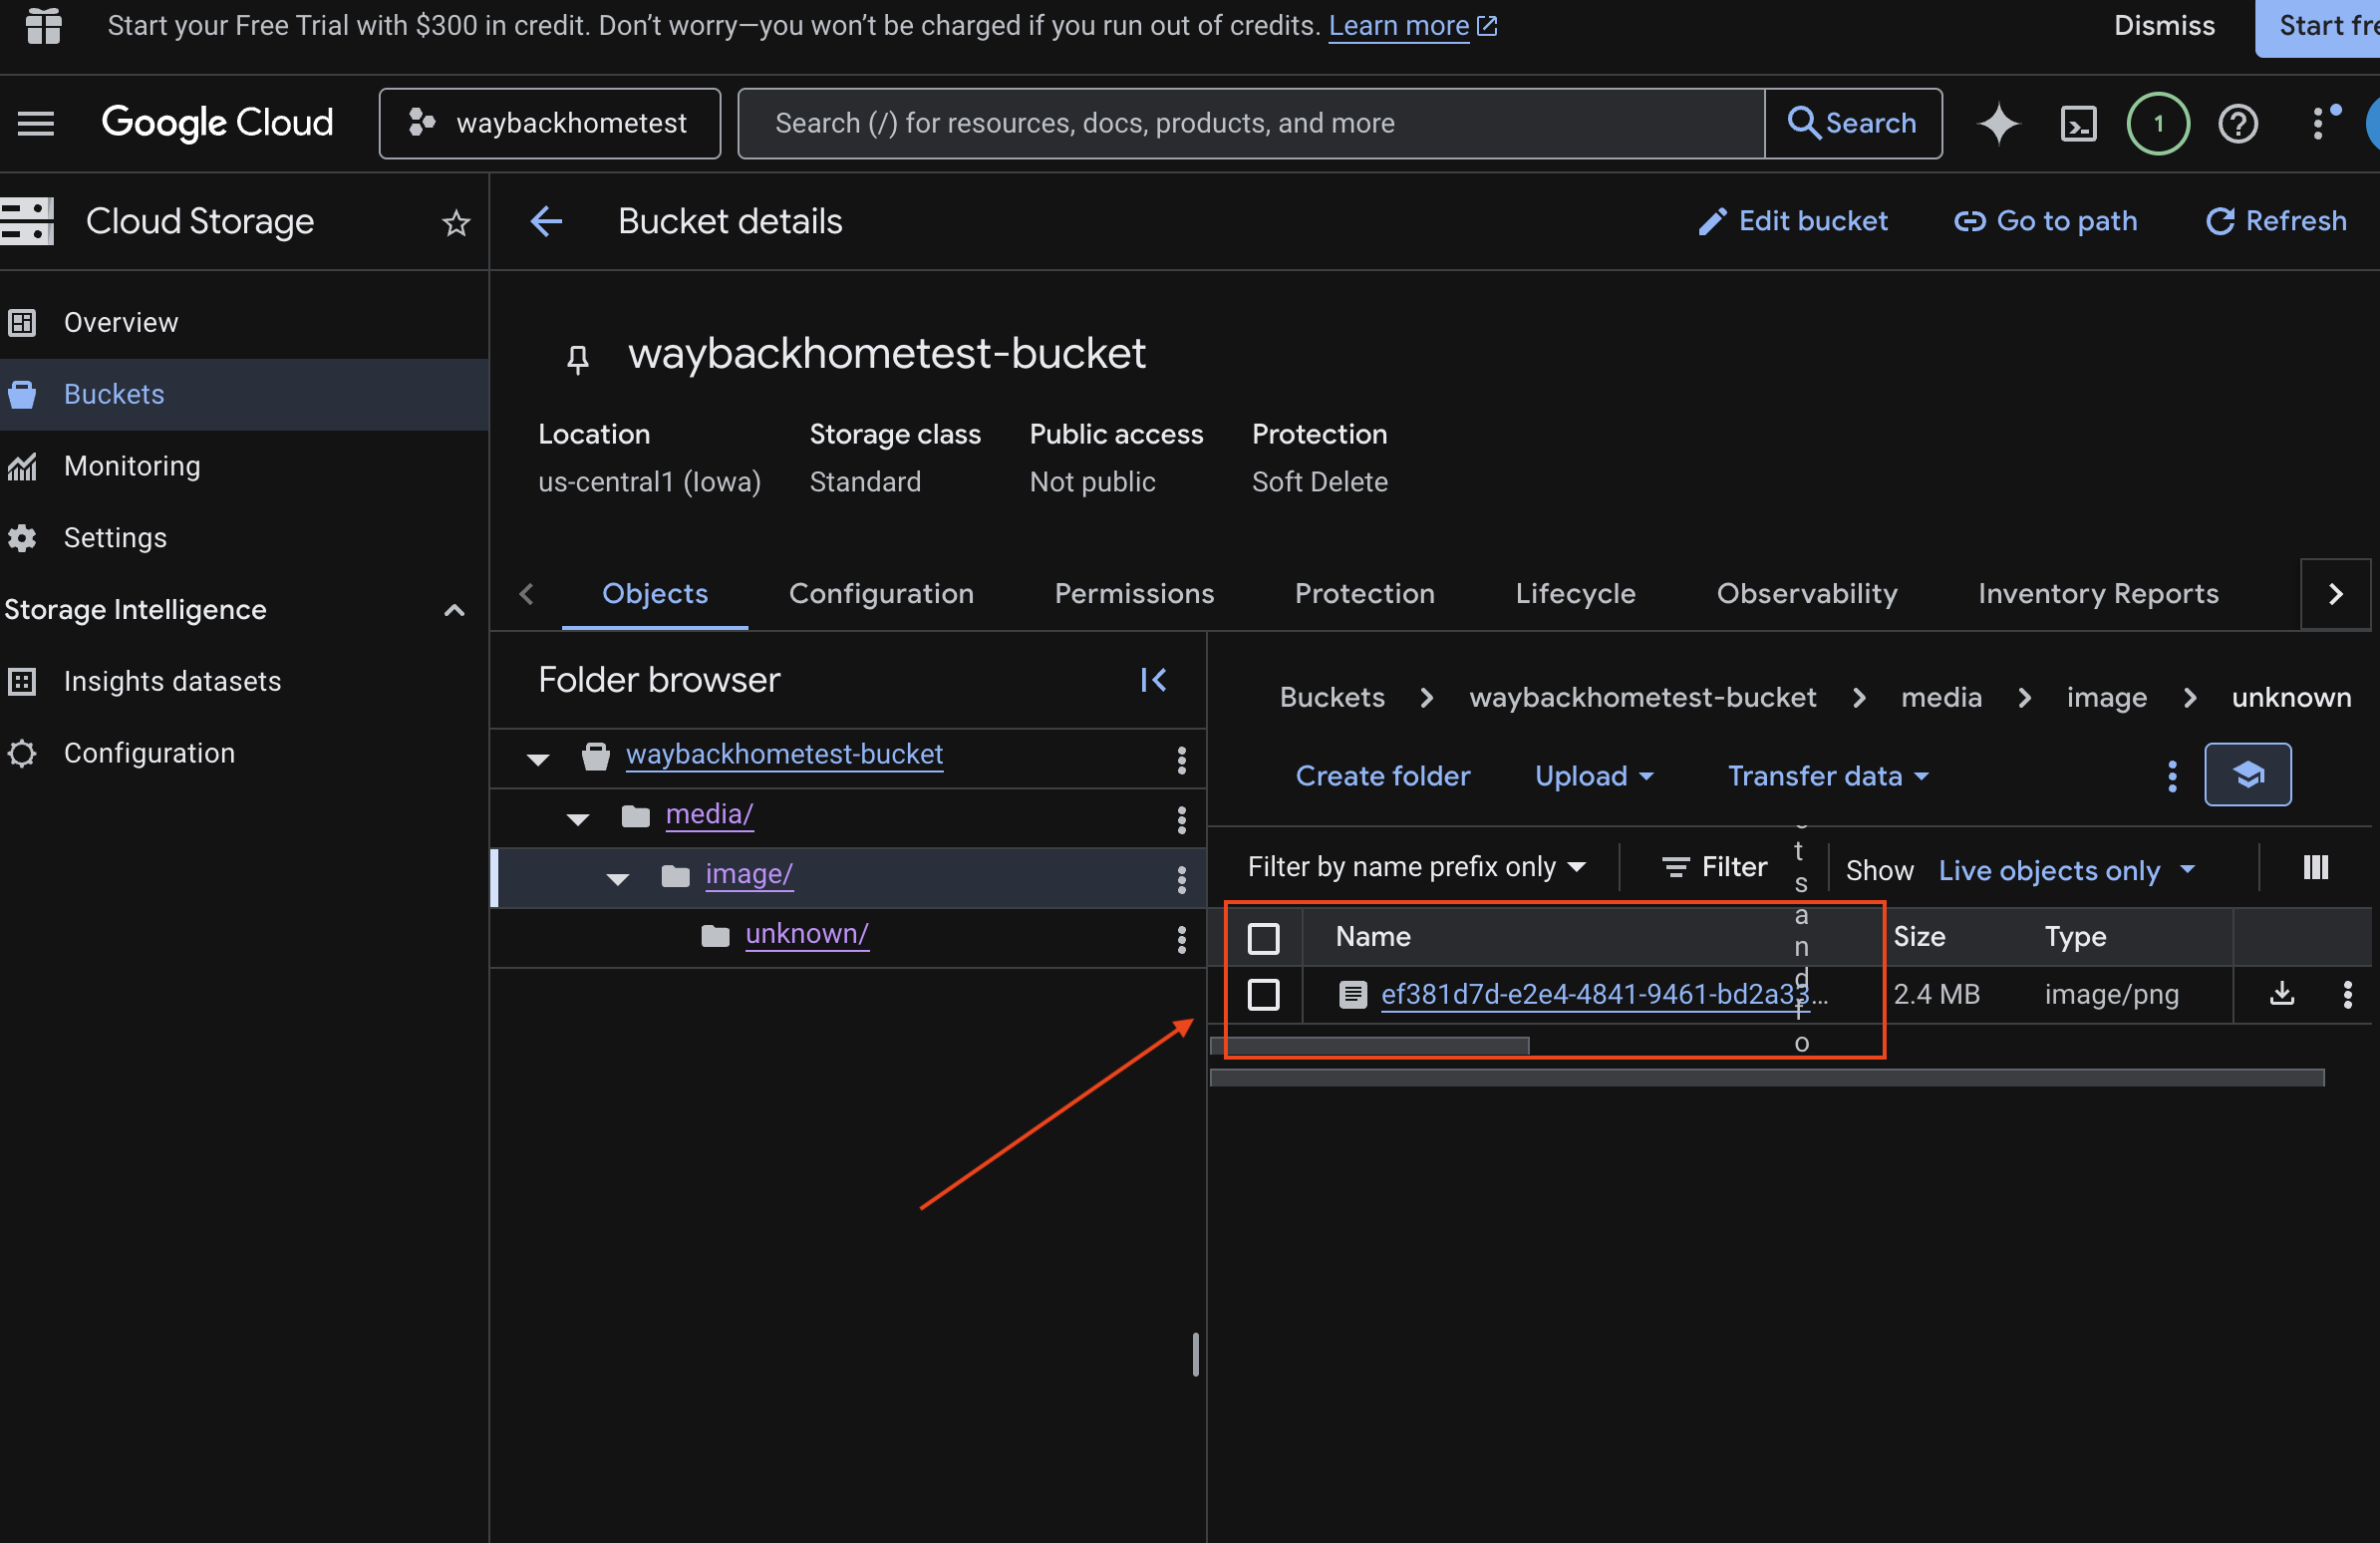
6. Verify Multimodal Uploading in GCS Bucket
- Open the Google Cloud Console Storage.
- Select "bucket" in cloud storage
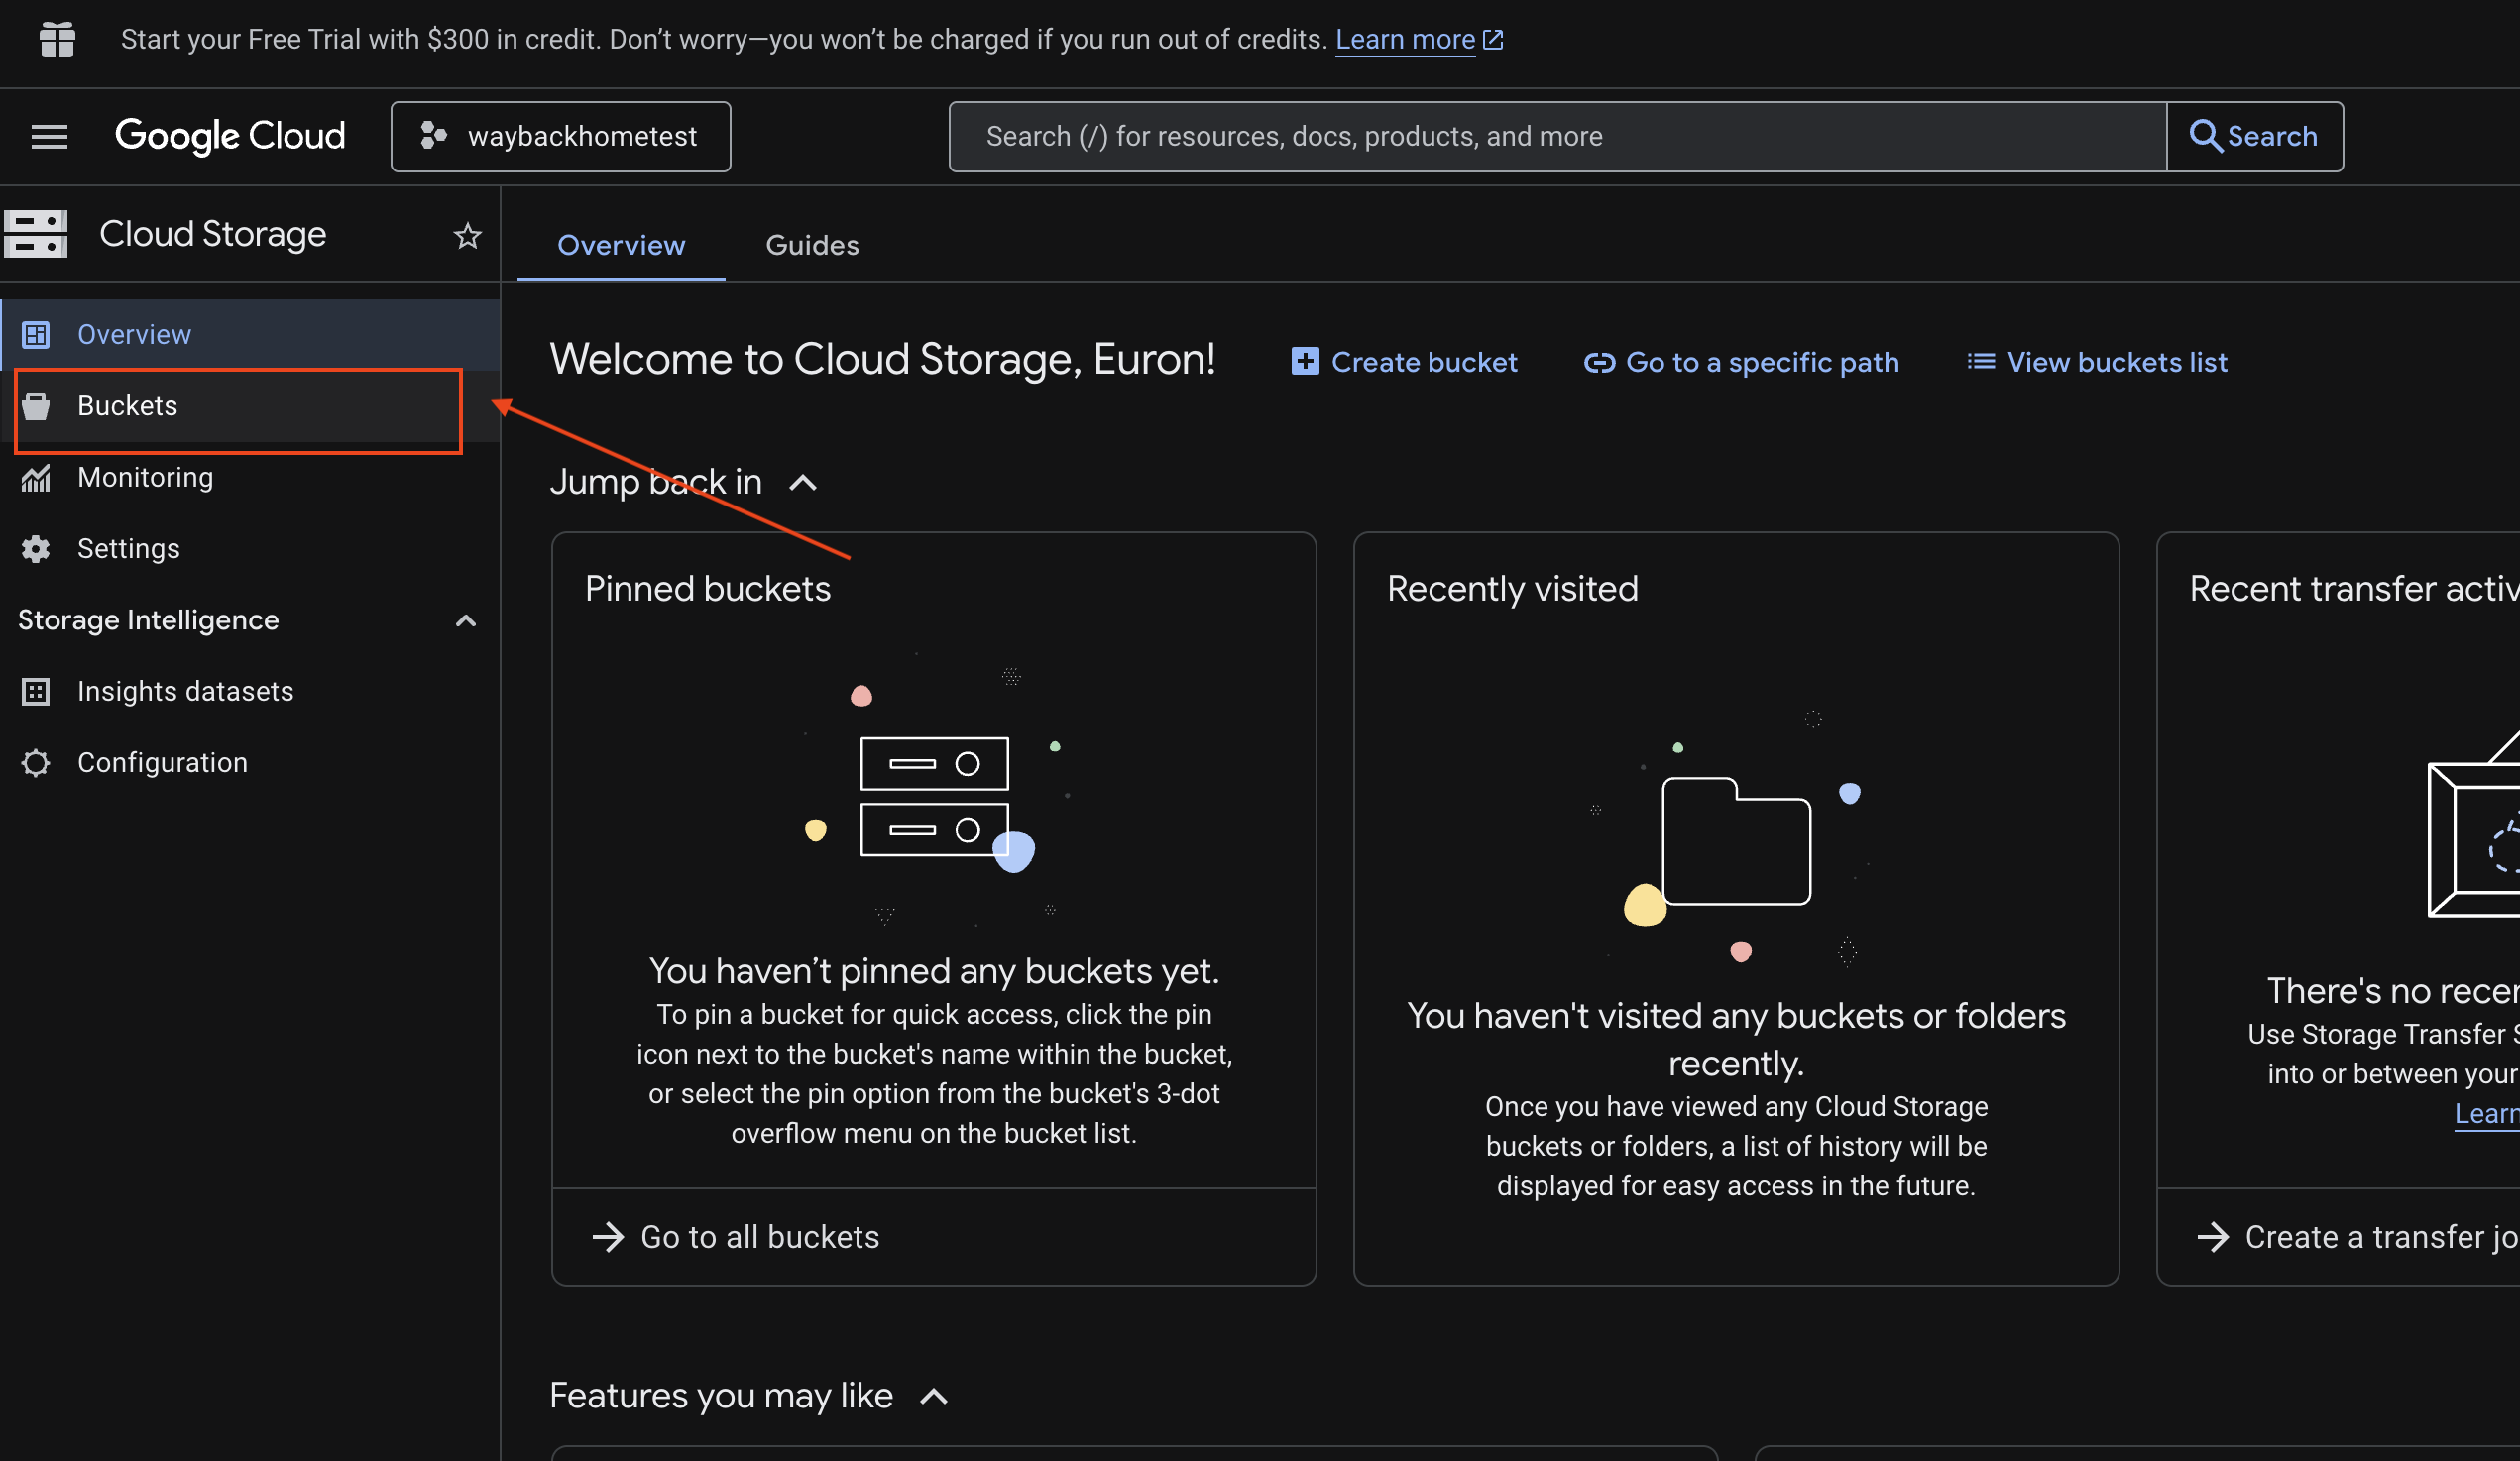
- Select your bucket and click into
media.
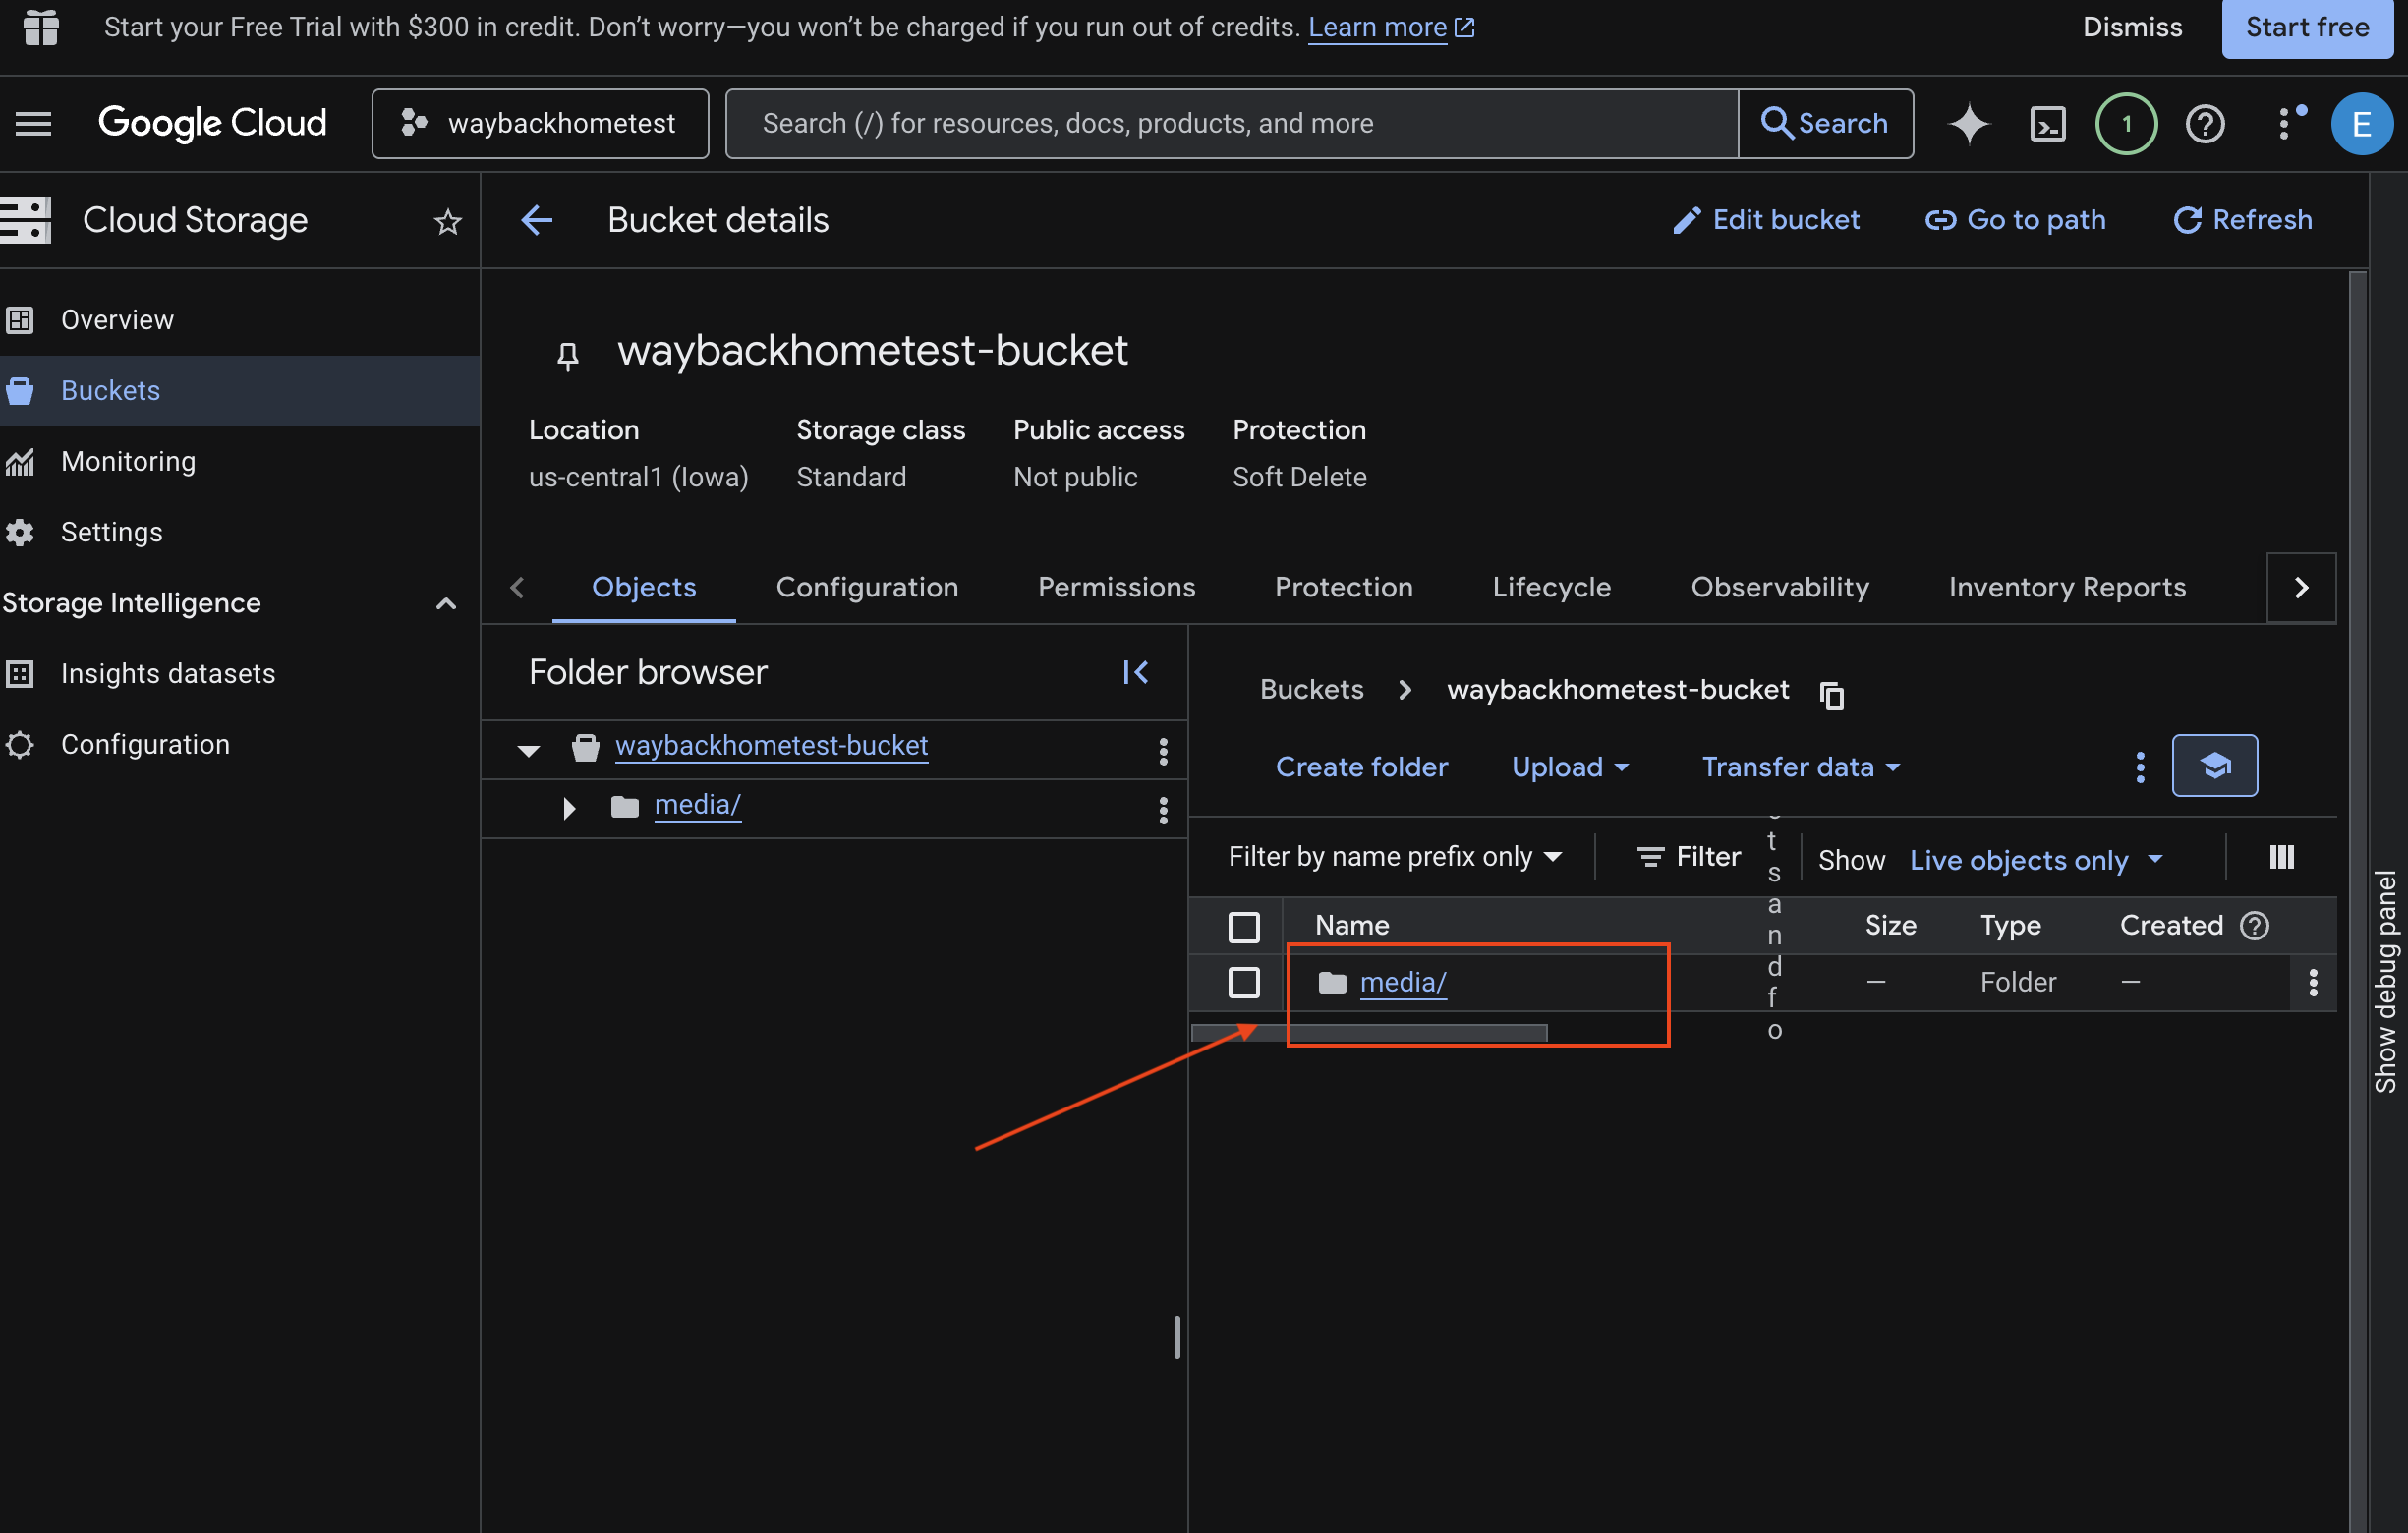
- View your uploaded image here.
7. Verify Multimodal Uploading in Spanner (Optional)
Below is example output in UI for test_photo1.
- Open the Google Cloud Console Spanner.
- Select your instance:
Survivor Network - Select your database:
graph-db - In the left sidebar, click Spanner Studio
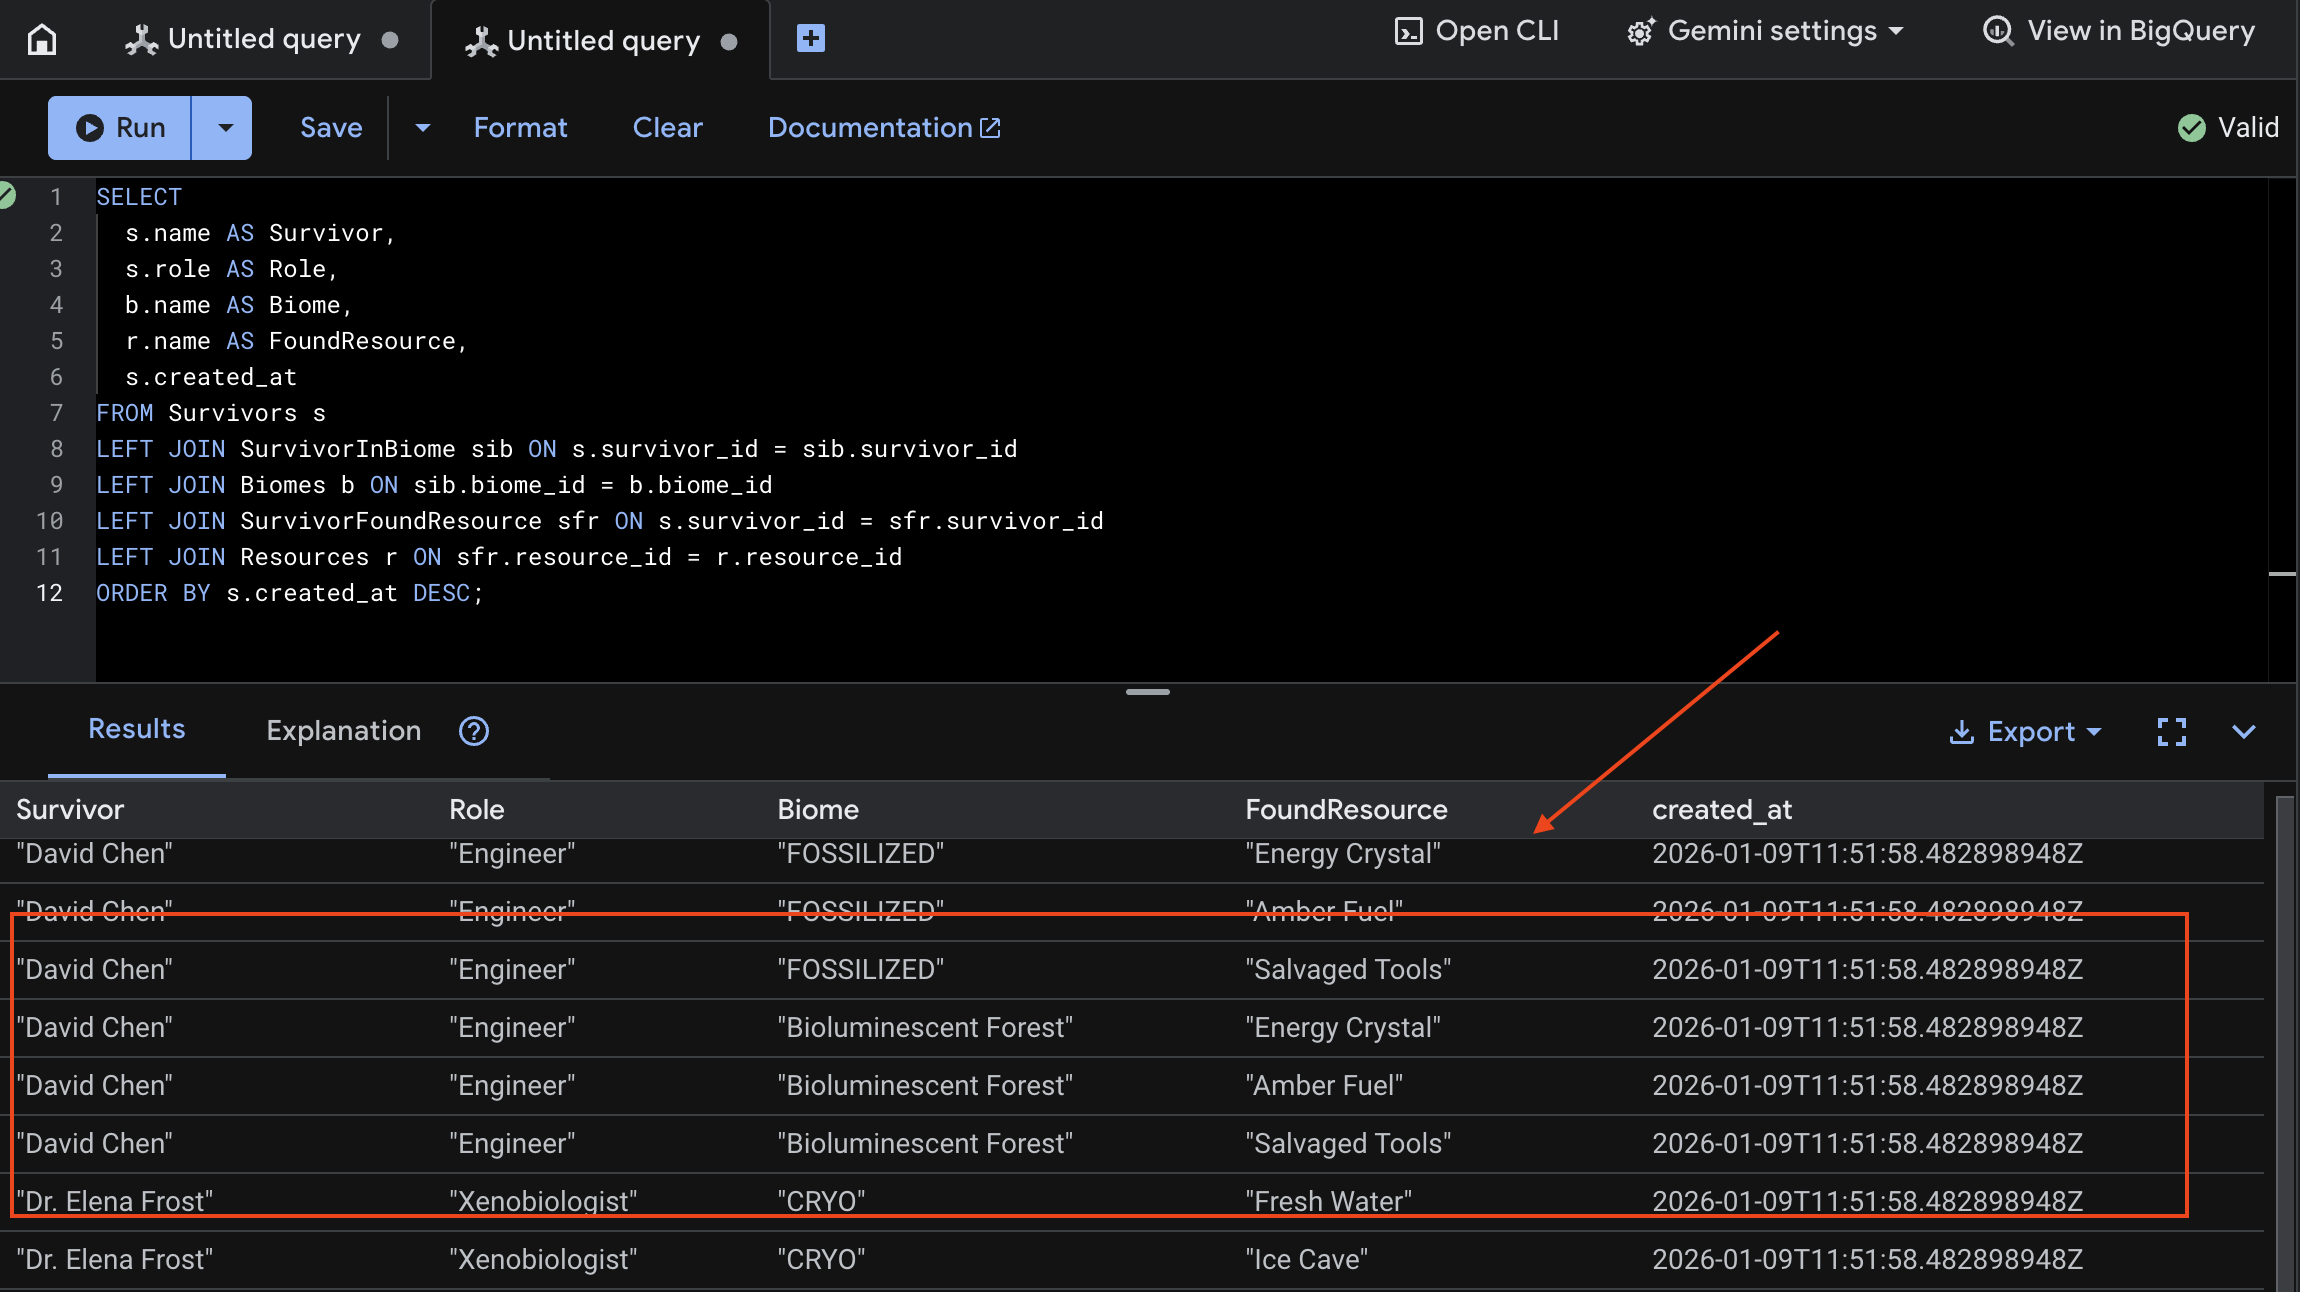
👉 In Spanner Studio, query the new data:
SELECT
  s.name AS Survivor,
  s.role AS Role,
  b.name AS Biome,
  r.name AS FoundResource,
  s.created_at
FROM Survivors s
LEFT JOIN SurvivorInBiome sib ON s.survivor_id = sib.survivor_id
LEFT JOIN Biomes b ON sib.biome_id = b.biome_id
LEFT JOIN SurvivorFoundResource sfr ON s.survivor_id = sfr.survivor_id
LEFT JOIN Resources r ON sfr.resource_id = r.resource_id
ORDER BY s.created_at DESC;
We can verify it by see the result below:
12. ☕️ [Optional] Memory Bank with Agent Engine
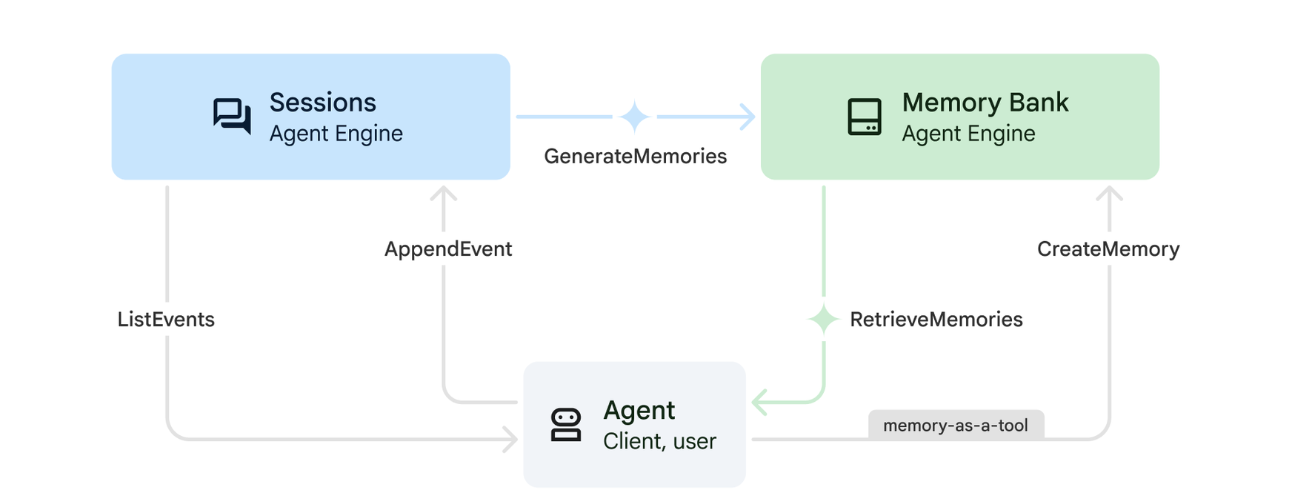
1. How Memory Works
The system uses a dual-memory approach to handle both immediate context and long-term learning.
2. What Are Memory Topics?
Memory Topics define the categories of information the agent should remember across conversations. Think of them as filing cabinets for different types of user preferences.
Our 2 Topics:
search_preferences: How the user likes to search- Do they prefer keyword or semantic search?
- What skills/biomes do they search for often?
- Example memory: "User prefers semantic search for medical skills"
urgent_needs_context: What crises they're tracking- What resources are they monitoring?
- Which survivors are they concerned about?
- Example memory: "User is tracking medicine shortage in Northern Camp"
3. Setting Up Memory Topics
Custom memory topics define what the agent should remember. These are configured when deploying the Agent Engine.
👉💻 In the terminal, open the file in the Cloud Shell Editor by running:
cloudshell edit ~/way-back-home/level_2/backend/deploy_agent.py
This opens ~/way-back-home/level_2/backend/deploy_agent.py in your editor.
We define structure MemoryTopic objects to guide the LLM on what information to extract and save.
👉In the file deploy_agent.py, replace the # TODO: SET_UP_TOPIC with the following:
# backend/deploy_agent.py

    custom_topics = [
        # Topic 1: Survivor Search Preferences
        MemoryTopic(
            custom_memory_topic=CustomMemoryTopic(
                label="search_preferences",
                description="""Extract the user's preferences for how they search for survivors. Include:
                - Preferred search methods (keyword, semantic, direct lookup)
                - Common filters used (biome, role, status)
                - Specific skills they value or frequently look for
                - Geographic areas of interest (e.g., "forest biome", "mountain outpost")

                Example: "User prefers semantic search for finding similar skills."
                Example: "User frequently checks for survivors in the Swamp Biome."
                """,
            )
        ),
        # Topic 2: Urgent Needs Context
        MemoryTopic(
            custom_memory_topic=CustomMemoryTopic(
                label="urgent_needs_context",
                description="""Track the user's focus on urgent needs and resource shortages. Include:
                - Specific resources they are monitoring (food, medicine, ammo)
                - Critical situations they are tracking
                - Survivors they are particularly concerned about

                Example: "User is monitoring the medicine shortage in the Northern Camp."
                Example: "User is looking for a doctor for the injured survivors."
                """,
            )
        )
    ]
4. Agent Integration
The agent code must be aware of the Memory Bank to save and retrieve information.
👉💻 In the terminal, open the file in the Cloud Shell Editor by running:
cloudshell edit ~/way-back-home/level_2/backend/agent/agent.py
This opens ~/way-back-home/level_2/backend/agent/agent.py in your editor.
Agent Creation
When creating the agent, we pass the after_agent_callback to ensure sessions are saved to memory after interactions. The add_session_to_memory function runs asynchronously to avoid slowing down the chat response.
👉In the file agent.py, locate the comment # TODO: REPLACE_ADD_SESSION_MEMORY, Replace this whole line with the following code:
async def add_session_to_memory(
        callback_context: CallbackContext
) -> Optional[types.Content]:
    """Automatically save completed sessions to memory bank in the background"""
    if hasattr(callback_context, "_invocation_context"):
        invocation_context = callback_context._invocation_context
        if invocation_context.memory_service:
            # Use create_task to run this in the background without blocking the response
            asyncio.create_task(
                invocation_context.memory_service.add_session_to_memory(
                    invocation_context.session
                )
            )
            logger.info("Scheduled session save to memory bank in background")
Background Saving
👉In the file agent.py, locate the comment # TODO: REPLACE_ADD_MEMORY_BANK_TOOL, Replace this whole line with the following code:
if USE_MEMORY_BANK:
    agent_tools.append(PreloadMemoryTool())
👉In the file agent.py, locate the comment # TODO: REPLACE_ADD_CALLBACK, Replace this whole line with the following code:
after_agent_callback=add_session_to_memory if USE_MEMORY_BANK else None
Set Up Vertex AI Session Service
👉💻 In the terminal, open the file chat.py in the Cloud Shell Editor by running:
cloudshell edit ~/way-back-home/level_2/backend/api/routes/chat.py
👉In chat.py file, locate the comment # TODO: REPLACE_VERTEXAI_SERVICES, Replace this whole line with the following code:
    session_service = VertexAiSessionService(
        project=project_id,
        location=location,
        agent_engine_id=agent_engine_id
    )
    memory_service = VertexAiMemoryBankService(
        project=project_id,
        location=location,
        agent_engine_id=agent_engine_id
    )
13. ☕️ [Optional] Attach Agent with Agent Engine
1. Setup & Deployment
Before testing the memory features, you need to deploy the agent with the new memory topics and ensure your environment is configured correctly.
We have provided a convenience script to handle this process.
Running the Deployment Script
👉💻 In the terminal, run the deployment script:
cd ~/way-back-home/level_2
./deploy_and_update_env.sh
This script performs the following actions:
- Runs
backend/deploy_agent.pyto register the agent and memory topics with Vertex AI. - Captures the new Agent Engine ID.
- Automatically updates your
.envfile withAGENT_ENGINE_ID. - Ensures
USE_MEMORY_BANK=TRUEis set in your.envfile.
[!IMPORTANT] If you make changes to custom_topics in deploy_agent.py, you must re-run this script to update the Agent Engine.
Verify Memory Bank
Now you can verify that the memory bank is working by teaching the agent a preference and checking if it persists across sessions.
Step One. Open the application
Open the Application again by following the instruction below: If the previous terminal is still running, end it by pressing Ctrls+C.
👉💻 Start App:
cd ~/way-back-home/level_2/
./start_app.sh
👉 Click Local: http://localhost:5173/ from the terminal.
Step Two. Testing Memory Bank with Text
In the chat interface, tell the agent about your specific context:
"I'm planning a medical rescue mission in the mountains. I need survivors with first aid and climbing skills."
👉 Wait ~30 seconds for the memory to process in the background.
Step Three. Start a New Session
Refresh the page to clear the current conversation history (short-term memory).
Ask a question that relies on the context you provided earlier:
"What kind of missions am I interested in?"
Expected Response:
"Based on your previous conversations, you're interested in:
- Medical rescue missions
- Mountain/high-altitude operations
- Skills needed: first aid, climbing
Would you like me to find survivors matching these criteria?"
Step Four. Test with Image Upload
Upload an image, and ask:
remember this
You can choose any of the photo here or your own and upload to the UI:
Step Five. Verify in Vertex AI Agent Engine
Go to Google Cloud Console Agent Engine
- Make sure you select the project from top left project selector:
- Verify the agent engine you just deployed from previous command
use_memory_bank.sh: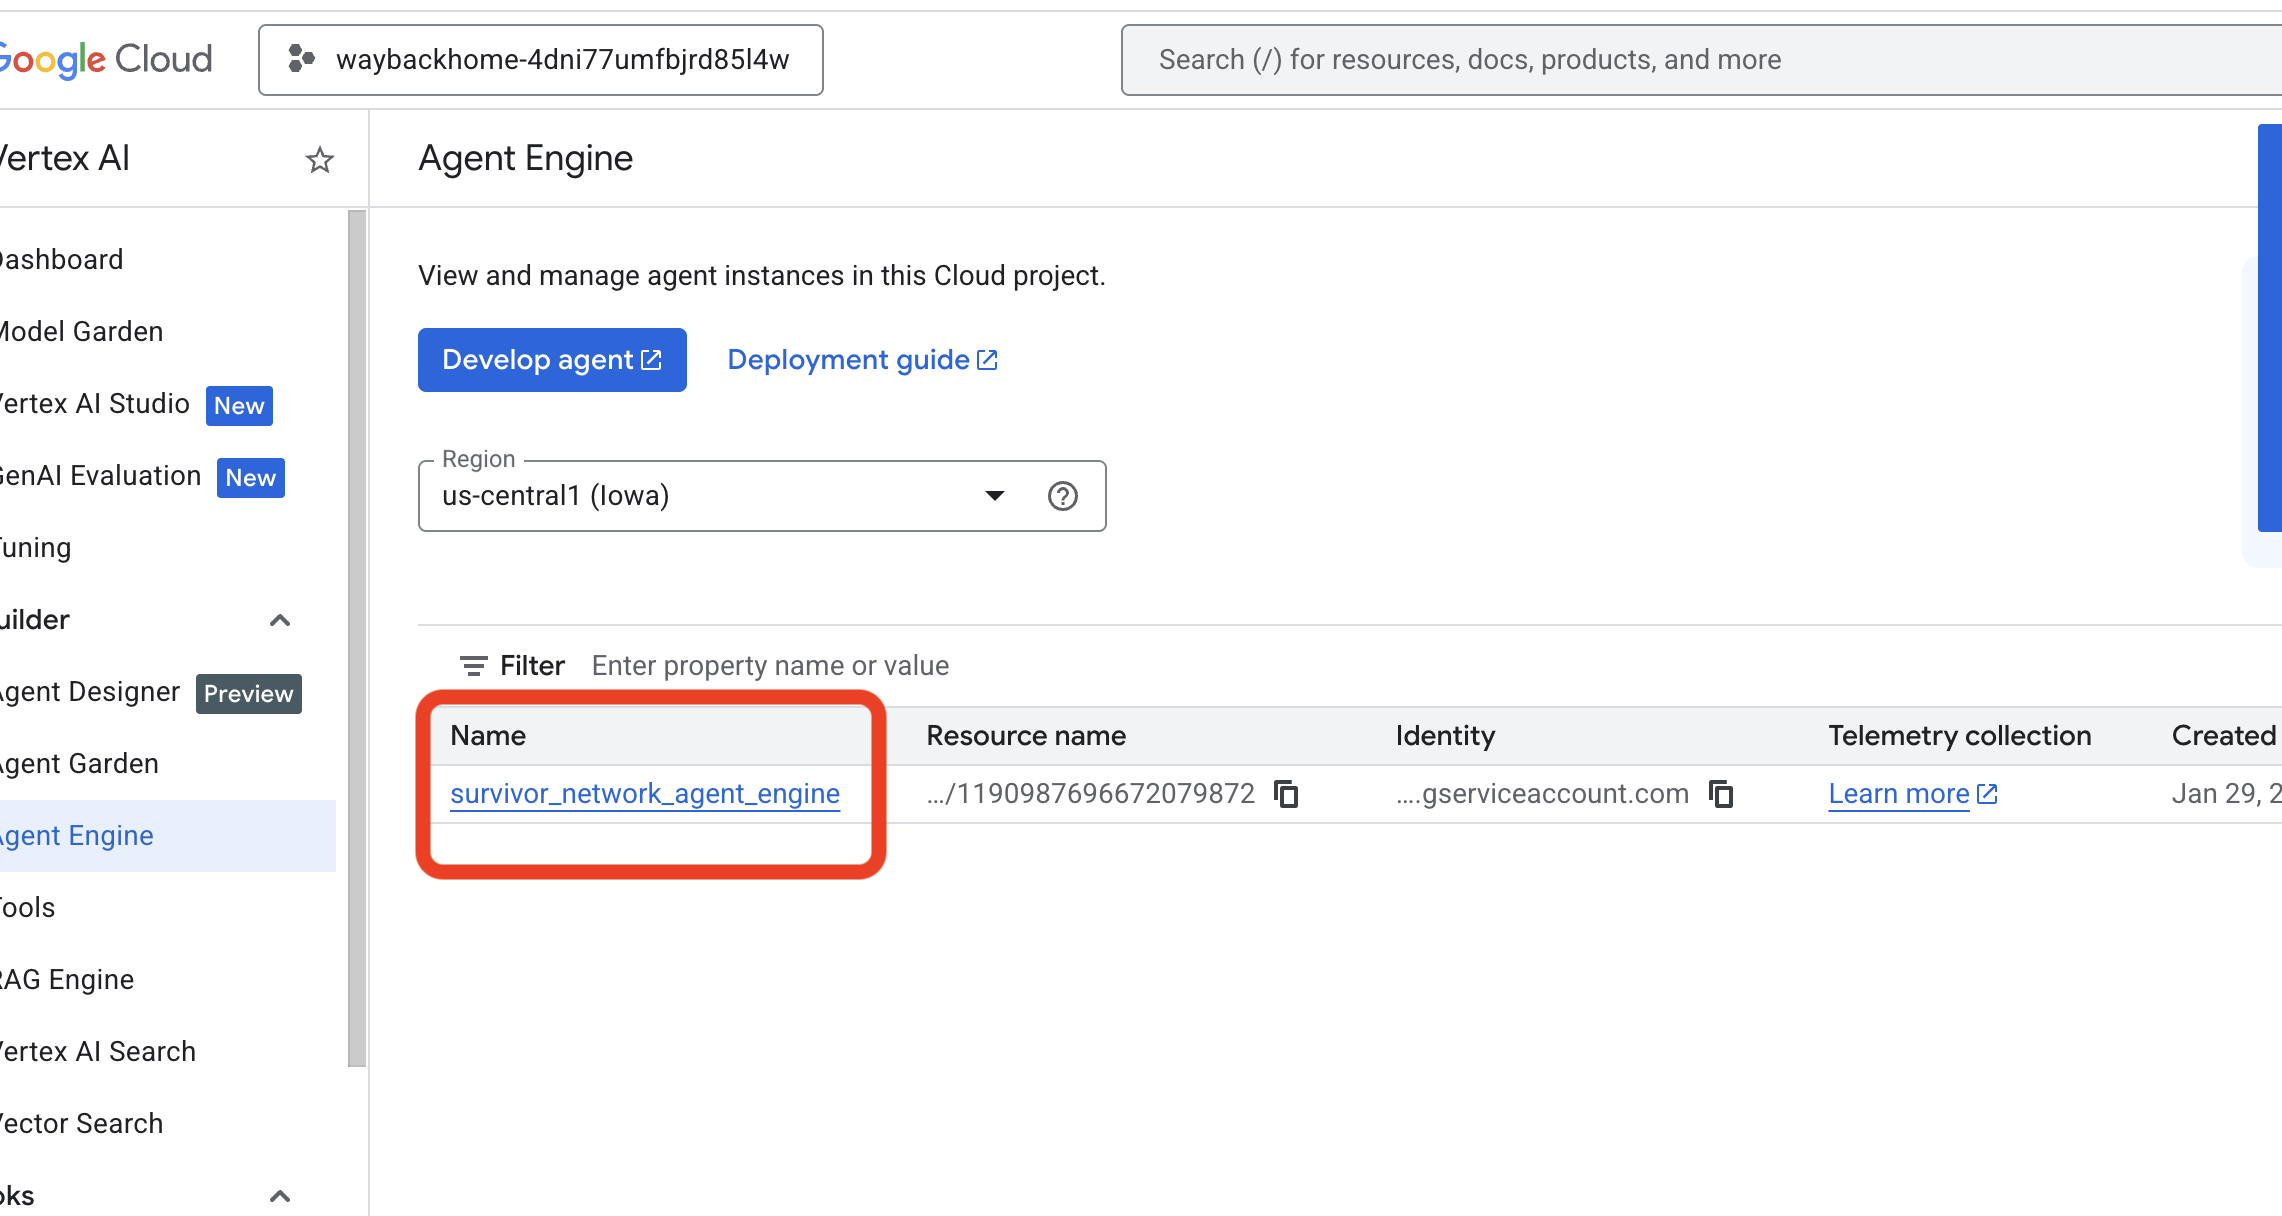 Click into the agent engine you just created.
 - Click the
MemoriesTab in this deployed agent, you can view all the memory here.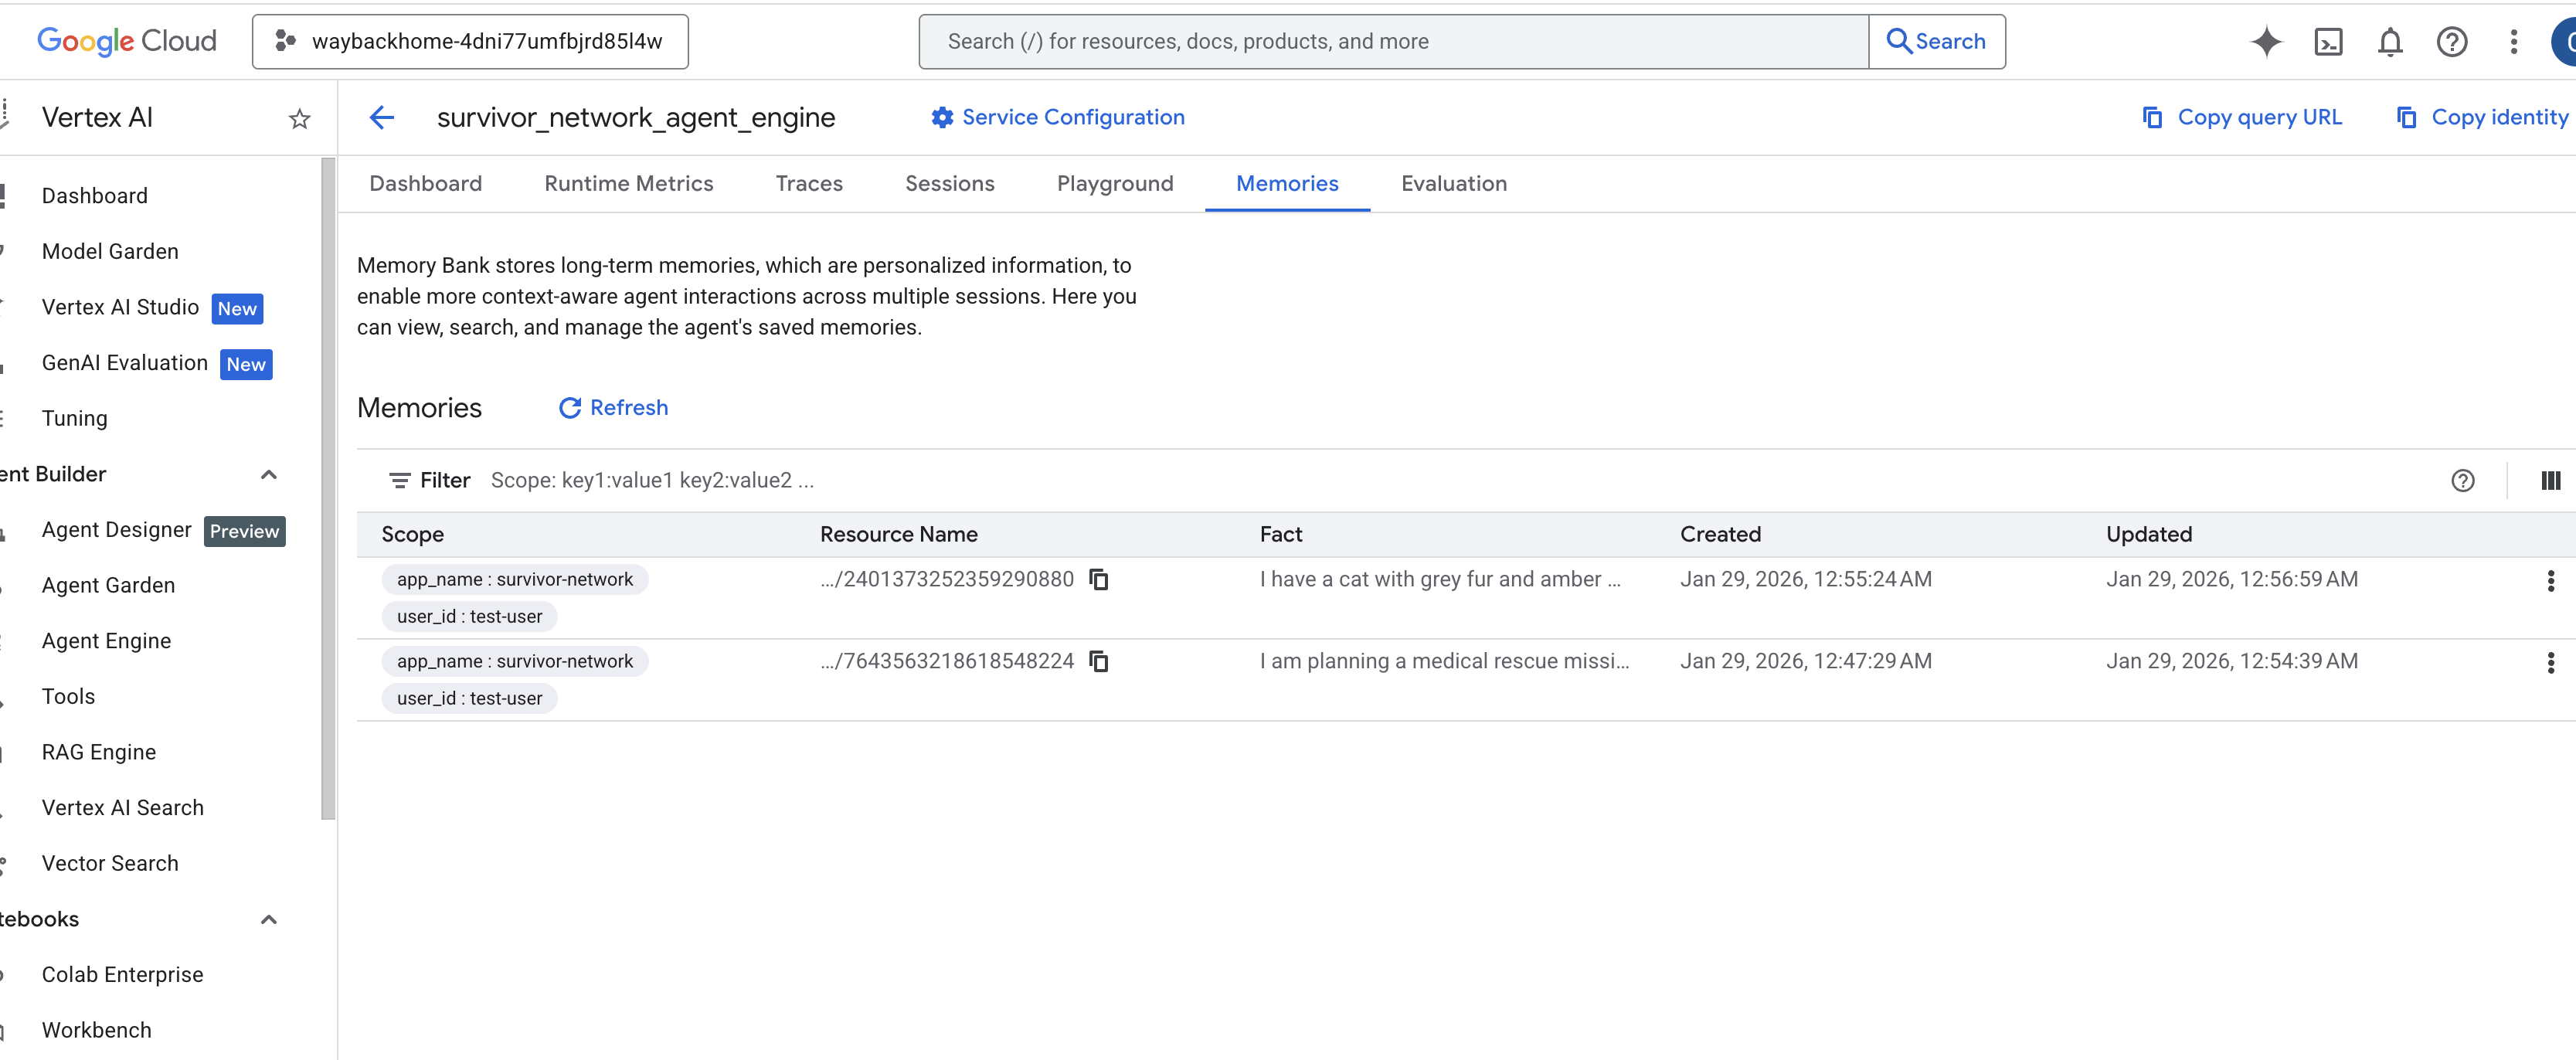
👉💻 When you finish testing, in you terminal, click "Ctrl + C" to end the process.
🎉 Congratulations! You just attached the memory bank to your agent!
14. ☕️ [Optional] Deploy to Cloud Run
1. Run the Deployment Script
👉💻 Run the deployment script:
cd ~/way-back-home/level_2
./deploy_cloud_run.sh
After it successfully deployed, you will have the url, this is deployed url for you! 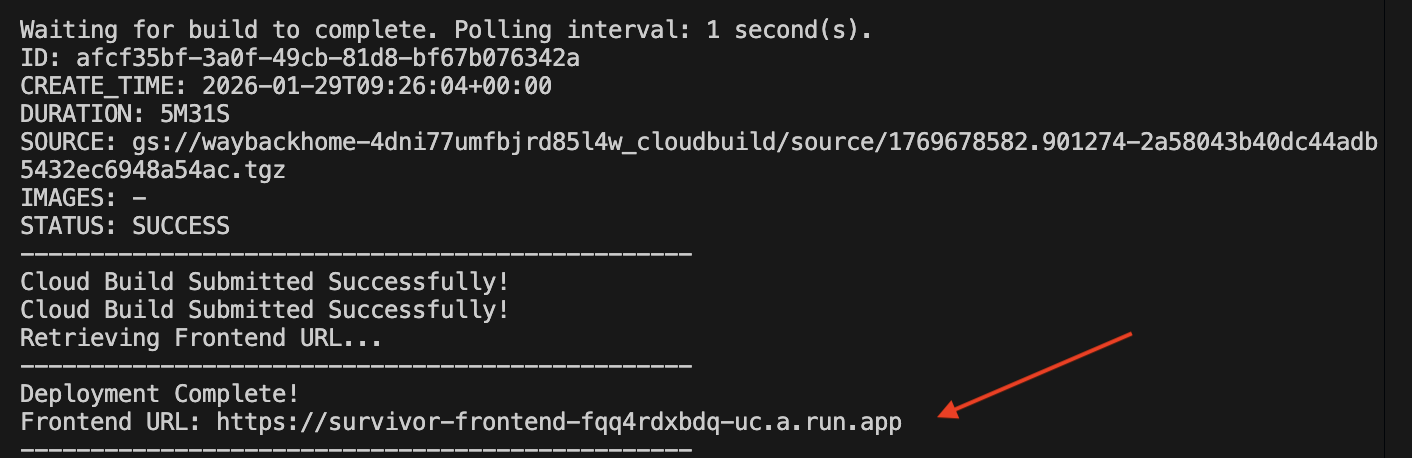
👉💻 Before you grab the url, grant the permission by running:
source .env && gcloud run services add-iam-policy-binding survivor-frontend --region $REGION --member=allUsers --role=roles/run.invoker && gcloud run services add-iam-policy-binding survivor-backend --region $REGION --member=allUsers --role=roles/run.invoker
Go to the deployed url, and you will see you application live there!
2. Understanding the Build Pipeline
The cloudbuild.yaml file defines the following sequential steps:
- Backend Build: Builds the Docker image from
backend/Dockerfile. - Backend Deploy: Deploys the backend container to Cloud Run.
- Capture URL: Gets the new Backend URL.
- Frontend Build:
- Installs dependencies.
- Builds the React app, injecting
VITE_API_URL=.
- Frontend Image: Builds the Docker image from
frontend/Dockerfile(packaging the static assets). - Frontend Deploy: Deploys the frontend container.
3. Verify Deployment
Once the build completes (check the logs link provided by the script), you can verify:
- Go to the Cloud Run Console.
- Find the
survivor-frontendservice. - Click the URL to open the application.
- Perform a search query to ensure the frontend can talk to the backend.
(OPTIONAL) 4. Manual Deployment
If you prefer to run the commands manually or understand the process better, here is how to use cloudbuild.yaml directly.
Writing cloudbuild.yaml
A cloudbuild.yaml file tells Google Cloud Build what steps to execute.
- steps: A list of sequential actions. Each step runs in a container (e.g.,
docker,gcloud,node,bash). - substitutions: Variables that can be passed at build time (e.g.,
$_REGION). - workspace: A shared directory where steps can share files (like how we share
backend_url.txt).
Running the Deployment
To deploy manually without the script, use the gcloud builds submit command. You MUST pass the required substitution variables.
# Load your env vars first or replace these values manually
export PROJECT_ID=your-project-id
export REGION=us-central1

gcloud builds submit --config cloudbuild.yaml \
    --project "$PROJECT_ID" \
    --substitutions _REGION="us-central1",_GOOGLE_API_KEY="",_AGENT_ENGINE_ID="your-agent-id",_USE_MEMORY_BANK="TRUE",_GOOGLE_GENAI_USE_VERTEXAI="TRUE"
15. Conclusion
1. What You've Built
✅ Graph Database: Spanner with nodes (survivors, skills) and edges (relationships)
✅ AI Search: Keyword, semantic, and hybrid search with embeddings
✅ Multimodal Pipeline: Extract entities from images/video with Gemini
✅ Multi-Agent System: Coordinated workflow with ADK
✅ Memory Bank: Long-term personalization with Vertex AI
✅ Production Deployment: Cloud Run + Agent Engine
2. Architecture Summary
3. Key Learnings
- Graph RAG: Combines graph database structure with semantic embeddings for intelligent search
- Multi-Agent Patterns: Sequential pipelines for complex, multi-step workflows
- Multimodal AI: Extract structured data from unstructured media (images/video)
- Stateful Agents: Memory Bank enables personalization across sessions
4. Workshop Content
- Level0: Identify Yourself
- Level1: Pinpoint Location
- Level2 This One: Build a Multimodal AI Agent with Graph RAG, ADK & Memory Bank
- Level3: Building an ADK Bi-Directional Streaming Agent
- Level4: Live Bidirectional Multi-Agent system
- Level5: Event-Driven Architecture with Google ADK, A2A, and Kafka