
1. 개요
Confidential GKE (CGKE) 노드는 워크로드의 데이터가 사용 중 암호화되도록 보장합니다. CGKE 워크로드에 vTPM 기기를 노출하면 워크로드가 vTPM 기능을 사용할 수 있습니다. 이 Codelab에서는 vTPM의 두 가지 기능을 살펴봅니다.
- vTPM 원격 증명을 사용하면 원격 당사자가 워크로드를 호스팅하는 CGKE 노드가 컨피덴셜 VM (CVM)에서 실행되고 있는지 확인할 수 있습니다.
- vTPM 승인 및 vTPM 봉인
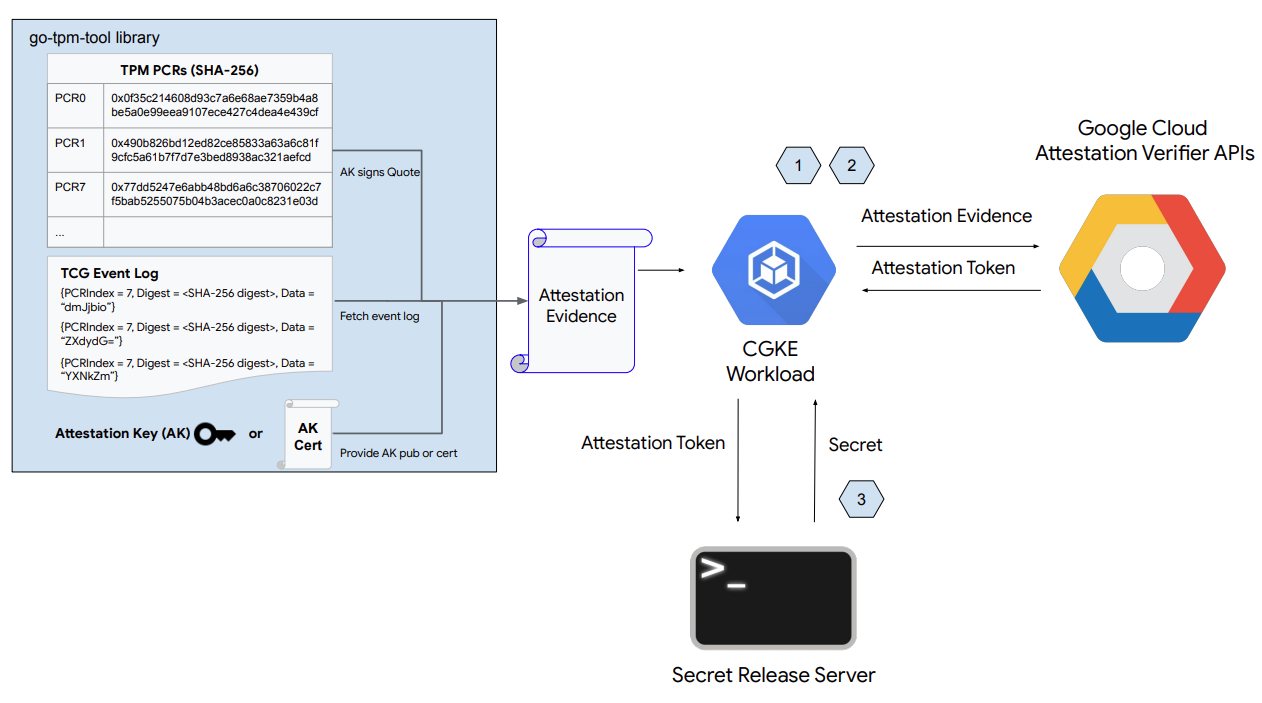
위 그림에 표시된 것처럼 이 Codelab의 첫 번째 부분에는 다음 단계가 포함됩니다.
- CGKE 노드는 vTPM 기기를 설정하고 선택한 워크로드에 노출합니다.
- 워크로드를 배포하고 워크로드를 호스팅하는 CGKE 노드를 원격 증명합니다.
- Secret Release 웹 서버 설정
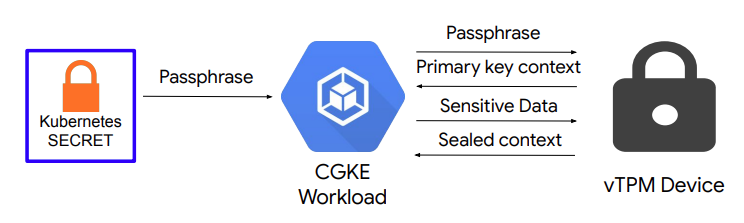
위 그림에 표시된 것처럼 이 Codelab의 두 번째 부분에는 다음이 포함됩니다.
- CGKE 노드에서 vTPM 승인 설정 및 vTPM 봉인
학습할 내용
- CGKE 워크로드에 vTPM 기기를 노출하는 방법
- CGKE 워크로드에서 컨피덴셜 컴퓨팅 API (증명 검증 도구 서비스)를 통해 원격으로 증명하는 방법
- vTPM 승인을 설정하고 vTPM 봉인을 실행하는 방법
필요한 항목
- Google Cloud Platform 프로젝트
- 브라우저(Chrome, Firefox 등)
- Google Compute Engine ( 코드랩), 컨피덴셜 VM, 컨피덴셜 GKE 노드, Artifact Registry에 대한 기본 지식
2. 설정 및 요구사항:
필요한 API를 사용 설정하려면 Cloud 콘솔 또는 로컬 개발 환경에서 다음 명령어를 실행하세요.
gcloud auth login

gcloud services enable \
    cloudapis.googleapis.com \
    cloudshell.googleapis.com \
    container.googleapis.com \
    containerregistry.googleapis.com \
    confidentialcomputing.googleapis.com \
    iamcredentials.googleapis.com \
    compute.googleapis.com
3. CGKE 노드 설정 및 선택한 워크로드에 vTPM 기기 노출
이 단계에서 이 Codelab의 첫 번째 부분을 시작합니다. 이 단계에서는 CGKE 클러스터를 시작하고 기기 플러그인을 적용하여 CVM vTPM 기기를 워크로드에 노출합니다. 명령어를 실행할 클라우드 콘솔 또는 로컬 개발 환경으로 이동합니다.
1) CGKE 클러스터를 만들고 워크로드 아이덴티티 풀을 사용하여 CGKE 워크로드가 GCP 컨피덴셜 컴퓨팅 API를 사용하도록 허용합니다. CGKE 워크로드가 GCP 리소스에 액세스해야 하므로 워크로드 아이덴티티 풀이 필요합니다. GCP 리소스에 액세스하려면 CGKE 워크로드에 ID가 있어야 합니다.
gcloud container clusters create cgke-attestation-codelab \
    --machine-type=n2d-standard-2        \
    --enable-confidential-nodes \
--zone us-central1-c \
--workload-pool=${PROJECT_ID}.svc.id.goog \
--workload-metadata=GKE_METADATA
다음을 바꿉니다.
project-id는 프로젝트의 고유 식별자입니다.
2) CGKE 클러스터가 vTPM 기기를 워크로드에 노출할 수 있도록 기기 플러그인을 시작합니다. Kubernetes 기기 플러그인을 사용하여 새 리소스인 google.com/cc를 만듭니다. 새 리소스와 연결된 모든 워크로드는 작업자 노드에서 vTPM 기기를 볼 수 있습니다.
gcloud container clusters get-credentials cgke-attestation-codelab --zone us-central1-c --project ${PROJECT_ID}

kubectl create -f https://raw.githubusercontent.com/google/cc-device-plugin/main/manifests/cc-device-plugin.yaml
다음을 바꿉니다.
project-id는 프로젝트의 고유 식별자입니다.
다음 명령어를 사용하면 배포된 cc-device-plugin을 확인할 수 있습니다.
kubectl get pods -A | grep "cc-device-plugin"
참고: 혼합 모드 GKE 클러스터 (Confidential GKE 워커 노드와 비공개 GKE 워커 노드가 모두 있음)의 경우 운영자는 Confidential GKE 워커 노드에만 cc-device-plugin을 배포하는 것이 좋습니다.
(선택사항) CGKE 포드 Prometheus 모니터링을 적용합니다. 모니터링을 사용 설정하면 기기 플러그인 상태를 관찰할 수 있습니다.
kubectl apply -f https://raw.githubusercontent.com/google/cc-device-plugin/main/manifests/cc-device-plugin-pod-monitoring.yaml
https://console.cloud.google.com/monitoring/metrics-explorer로 이동하여 cc-device-plugin 측정항목을 찾거나 PROMQL을 사용합니다. 예를 들어 다음 PROMQL 명령어는 각 cc-device-plugin 프로세스의 CPU 초를 보여줍니다.
rate(process_cpu_seconds_total[${__interval}])
4. 워크로드 배포 및 워크로드에 대한 원격 증명 실행
이 단계에서는 이전 단계에서 만든 CGKE 클러스터에 워크로드를 만들고 배포하며, 작업자 노드에서 증명 토큰 (OIDC 토큰)을 가져오기 위해 vTPM 원격 증명을 실행합니다.
1) 애플리케이션 컨테이너 이미지를 만들고 이를 Artifact Registry에 푸시합니다. 애플리케이션 컨테이너 이미지에는 증명 증거를 수집하고 증명 토큰 (OIDC 토큰)을 위해 증명 검증 도구 서비스로 전송할 수 있는 go-tpm 도구가 포함되어 있습니다.
- 애플리케이션 컨테이너 이미지의 Dockerfile을 만듭니다.
Dockerfile
FROM golang:1.21.0 as builder
WORKDIR /
RUN git clone https://github.com/google/go-tpm-tools.git
WORKDIR /go-tpm-tools/cmd/gotpm
RUN CGO_ENABLED=0 GOOS=linux go build -o /gotpm

FROM debian:trixie
WORKDIR /
RUN apt-get update -y
RUN DEBIAN_FRONTEND=noninteractive apt-get install -y ca-certificates
RUN rm -rf /etc/apt/sources.list.d
COPY --from=builder /gotpm /gotpm
CMD ["tail", "-f", "/dev/null"]
- Artifact Registry를 만듭니다.
gcloud artifacts repositories create codelab-repo \
    --repository-format=docker \
    --location=us
- 애플리케이션 컨테이너 이미지를 Artifact Registry로 푸시합니다.
docker build -t us-docker.pkg.dev/${PROJECT_ID}/codelab-repo/go-tpm:latest .
docker push us-docker.pkg.dev/${PROJECT_ID}/codelab-repo/go-tpm:latest
2) GCP 리소스에 대한 GCP 서비스 계정의 권한을 상속하도록 Kubernetes 서비스 계정을 설정합니다.
- Kubernetes 서비스 계정
codelab-ksa을 만듭니다.
kubectl create serviceaccount codelab-ksa \
    --namespace default
Confidential_Computing_Workload_User역할을 만들고 컨피덴셜 컴퓨팅 API에 액세스할 수 있는 역할 권한을 부여합니다.
gcloud iam roles create Confidential_Computing_Workload_User --project=<project-id> \
    --title="CGKE Workload User" --description="Grants the ability to generate an attestation token in a GKE workload." \
 --permissions="confidentialcomputing.challenges.create,confidentialcomputing.challenges.verify,confidentialcomputing.locations.get,confidentialcomputing.locations.list" --stage=GA
다음을 바꿉니다.
project-id는 프로젝트의 고유 식별자입니다.
- GCP 서비스 계정
codelab-csa을 만들고 기밀 컴퓨팅 API에 액세스할 수 있는 권한이 있는 역할Confidential_Computing_Workload_User. So that codelab-csa과 바인딩합니다.
gcloud iam service-accounts create codelab-csa \
    --project=<project-id>

gcloud projects add-iam-policy-binding <project-id> \
    --member "serviceAccount:codelab-csa@<project-id>.iam.gserviceaccount.com" \
    --role "projects/<project-id>/roles/Confidential_Computing_Workload_User"

gcloud iam service-accounts add-iam-policy-binding codelab-csa@<project-id>.iam.gserviceaccount.com \
    --role roles/iam.workloadIdentityUser \
    --member "serviceAccount:<project-id>.svc.id.goog[default/codelab-ksa]"
다음을 바꿉니다.
project-id는 프로젝트의 고유 식별자입니다.
- Kubernetes 서비스 계정
codelab-ksa을 GCP 서비스 계정codelab-csa과 바인딩합니다.codelab-ksa가 컨피덴셜 컴퓨팅 API에 액세스할 수 있는 권한을 갖도록 합니다.
kubectl annotate serviceaccount codelab-ksa \
    --namespace default \
    iam.gke.io/gcp-service-account=codelab-csa@<project-id>.iam.gserviceaccount.com
다음을 바꿉니다.
project-id는 프로젝트의 고유 식별자입니다.
3) 데모 애플리케이션의 애플리케이션 배포 YAML을 만듭니다. 선택한 워크로드에 Kubernetes 서비스 계정 codelab-ksa를 할당합니다.
deploy.yaml
apiVersion: v1
kind: Pod
metadata:
  name: go-tpm-demo
  labels:
    app.kubernetes.io/name: go-tpm-demo
spec:
  serviceAccountName: codelab-ksa
  nodeSelector:
    iam.gke.io/gke-metadata-server-enabled: "true"
  containers:
  - name: go-tpm
    image: us-docker.pkg.dev/<project-id>/codelab-repo/go-tpm:latest
    resources:
      limits:
        google.com/cc: 1
다음을 바꿉니다.
project-id는 프로젝트의 고유 식별자입니다.
4). CGKE 클러스터에 배포를 적용합니다.
kubectl create -f deploy.yaml
5) 워크로드에 연결하고 원격 증명을 실행하여 증명 토큰 (OIDC 토큰) 가져오기
kubectl exec -it go-tpm-demo -- /bin/bash
./gotpm token --event-log=/run/cc-device-plugin/binary_bios_measurements > attestation_token
jwt.io에서 증명 토큰을 디코딩하여 클레임을 확인할 수 있습니다.
5. Secret Release 웹 서버 설정
이 단계에서는 이전 SSH 세션을 종료하고 다른 VM을 설정합니다. 이 VM에서 비밀 출시 웹 서버를 설정합니다. 웹 서버는 수신된 증명 토큰과 클레임을 검증합니다. 유효성 검사가 성공하면 요청자에게 비밀번호를 전달합니다.
1) 클라우드 콘솔 또는 로컬 개발 환경으로 이동합니다. 가상 머신을 만듭니다.
gcloud config set project <project-id>

gcloud compute instances create cgke-attestation-codelab-web-server \
    --machine-type=n2d-standard-2 \
    --zone=us-central1-c \
    --image=ubuntu-2204-jammy-v20240228 \
    --image-project=ubuntu-os-cloud
다음을 바꿉니다.
project-id는 프로젝트의 고유 식별자입니다.
2) 새 VM에 SSH로 연결합니다.
gcloud compute ssh --zone us-central1-c cgke-attestation-codelab-web-server
3) Go 환경을 설정합니다.
wget https://go.dev/dl/go1.22.0.linux-amd64.tar.gz
sudo tar -C /usr/local -xzf go1.22.0.linux-amd64.tar.gz
export PATH=$PATH:/usr/local/go/bin
4). 보안 비밀 출시 웹 서버의 소스 코드를 저장하는 다음 두 파일을 만듭니다 (nano로 복사하여 붙여넣기).
main.go
package main

import (
        "fmt"
        "net/http"
        "strings"
        "time"
        "log"

        "github.com/golang-jwt/jwt/v4"
)

const (
        theSecret = "This is the super secret information!"
)

func homePage(w http.ResponseWriter, r *http.Request) {
        tokenString := r.Header.Get("Authorization")
        if tokenString != "" {
                tokenString, err := extractToken(tokenString)
                if err != nil {
                        http.Error(w, err.Error(), http.StatusUnauthorized)
                }

                tokenBytes := []byte(tokenString)
                // A method to return a public key from the well-known endpoint
                keyFunc := getRSAPublicKeyFromJWKsFile

                token, err := decodeAndValidateToken(tokenBytes, keyFunc)
                if err != nil {
                        http.Error(w, "Invalid JWT Token", http.StatusUnauthorized)
                }

                if ok, err := isValid(token.Claims.(jwt.MapClaims)); ok {
                        fmt.Fprintln(w, theSecret)
                } else {
                        if err != nil {
                                http.Error(w, "Error validating JWT claims: "+err.Error(), http.StatusUnauthorized)
                        } else {
                                http.Error(w, "Invalid JWT token Claims", http.StatusUnauthorized)
                        }
                }
        } else {
                http.Error(w, "Authorization token required", http.StatusUnauthorized)
        }
}

func extractToken(tokenString string) (string, error) {
        if strings.HasPrefix(tokenString, "Bearer ") {
                return strings.TrimPrefix(tokenString, "Bearer "), nil
        }
        return "", fmt.Errorf("invalid token format")
}

func isValid(claims jwt.MapClaims) (bool, error) {
        // 1. Evaluating Standard Claims:
        subject, ok := claims["sub"].(string)
        if !ok {
                return false, fmt.Errorf("missing or invalid 'sub' claim")
        }
        fmt.Println("Subject:", subject)
        // e.g. "sub":"https://www.googleapis.com/compute/v1/projects/<project_id>/zones/<project_zone>/instances/<instance_name>"

        issuedAt, ok := claims["iat"].(float64)
        if !ok {
                return false, fmt.Errorf("missing or invalid 'iat' claim")
        }
        fmt.Println("Issued At:", time.Unix(int64(issuedAt), 0))

        // 2. Evaluating Remote Attestation Claims:
        hwModel, ok := claims["hwmodel"].(string)
        if !ok || hwModel != "GCP_AMD_SEV" {
                return false, fmt.Errorf("missing or invalid 'hwModel'")
        }
        fmt.Println("hwmodel:", hwModel)

        swName, ok := claims["swname"].(string)
        if !ok || swName != "GCE" {
                return false, fmt.Errorf("missing or invalid 'hwModel'")
        }
        fmt.Println("swname:", swName)

        return true, nil
}

func main() {
        http.HandleFunc("/", homePage)
        fmt.Println("Server listening on :8080")
        err := http.ListenAndServe(":8080", nil)
        if err != nil {
                log.Fatalf("Server failed to start: %v", err)
        }
}
helper.go
package main

import (
        "crypto/rsa"
        "encoding/base64"
        "encoding/json"
        "errors"
        "fmt"
        "io"
        "math/big"
        "net/http"

        "github.com/golang-jwt/jwt/v4"
)

const (
        socketPath     = "/run/container_launcher/teeserver.sock"
        expectedIssuer = "https://confidentialcomputing.googleapis.com"
        wellKnownPath  = "/.well-known/openid-configuration"
)

type jwksFile struct {
        Keys []jwk `json:"keys"`
}

type jwk struct {
        N   string `json:"n"`   // "nMMTBwJ7H6Id8zUCZd-L7uoNyz9b7lvoyse9izD9l2rtOhWLWbiG-7pKeYJyHeEpilHP4KdQMfUo8JCwhd-OMW0be_XtEu3jXEFjuq2YnPSPFk326eTfENtUc6qJohyMnfKkcOcY_kTE11jM81-fsqtBKjO_KiSkcmAO4wJJb8pHOjue3JCP09ZANL1uN4TuxbM2ibcyf25ODt3WQn54SRQTV0wn098Y5VDU-dzyeKYBNfL14iP0LiXBRfHd4YtEaGV9SBUuVhXdhx1eF0efztCNNz0GSLS2AEPLQduVuFoUImP4s51YdO9TPeeQ3hI8aGpOdC0syxmZ7LsL0rHE1Q",
        E   string `json:"e"`   // "AQAB" or 65537 as an int
        Kid string `json:"kid"` // "1f12fa916c3a0ef585894b4b420ad17dc9d6cdf5",

        // Unused fields:
        // Alg string `json:"alg"` // "RS256",
        // Kty string `json:"kty"` // "RSA",
        // Use string `json:"use"` // "sig",
}

type wellKnown struct {
        JwksURI string `json:"jwks_uri"` // "https://www.googleapis.com/service_accounts/v1/metadata/jwk/signer@confidentialspace-sign.iam.gserviceaccount.com"

        // Unused fields:
        // Iss                                   string `json:"issuer"`                                // "https://confidentialcomputing.googleapis.com"
        // Subject_types_supported               string `json:"subject_types_supported"`               // [ "public" ]
        // Response_types_supported              string `json:"response_types_supported"`              // [ "id_token" ]
        // Claims_supported                      string `json:"claims_supported"`                      // [ "sub", "aud", "exp", "iat", "iss", "jti", "nbf", "dbgstat", "eat_nonce", "google_service_accounts", "hwmodel", "oemid", "secboot", "submods", "swname", "swversion" ]
        // Id_token_signing_alg_values_supported string `json:"id_token_signing_alg_values_supported"` // [ "RS256" ]
        // Scopes_supported                      string `json:"scopes_supported"`                      // [ "openid" ]
}

func getWellKnownFile() (wellKnown, error) {
        httpClient := http.Client{}
        resp, err := httpClient.Get(expectedIssuer + wellKnownPath)
        if err != nil {
                return wellKnown{}, fmt.Errorf("failed to get raw .well-known response: %w", err)
        }

        wellKnownJSON, err := io.ReadAll(resp.Body)
        if err != nil {
                return wellKnown{}, fmt.Errorf("failed to read .well-known response: %w", err)
        }

        wk := wellKnown{}
        json.Unmarshal(wellKnownJSON, &wk)
        return wk, nil
}

func getJWKFile() (jwksFile, error) {
        wk, err := getWellKnownFile()
        if err != nil {
                return jwksFile{}, fmt.Errorf("failed to get .well-known json: %w", err)
        }

        // Get JWK URI from .wellknown
        uri := wk.JwksURI
        fmt.Printf("jwks URI: %v\n", uri)

        httpClient := http.Client{}
        resp, err := httpClient.Get(uri)
        if err != nil {
                return jwksFile{}, fmt.Errorf("failed to get raw JWK response: %w", err)
        }

        jwkbytes, err := io.ReadAll(resp.Body)
        if err != nil {
                return jwksFile{}, fmt.Errorf("failed to read JWK body: %w", err)
        }

        file := jwksFile{}
        err = json.Unmarshal(jwkbytes, &file)
        if err != nil {
                return jwksFile{}, fmt.Errorf("failed to unmarshall JWK content: %w", err)
        }

        return file, nil
}

// N and E are 'base64urlUInt' encoded: https://www.rfc-editor.org/rfc/rfc7518#section-6.3
func base64urlUIntDecode(s string) (*big.Int, error) {
        b, err := base64.RawURLEncoding.DecodeString(s)
        if err != nil {
                return nil, err
        }
        z := new(big.Int)
        z.SetBytes(b)
        return z, nil
}

func getRSAPublicKeyFromJWKsFile(t *jwt.Token) (any, error) {
        keysfile, err := getJWKFile()
        if err != nil {
                return nil, fmt.Errorf("failed to fetch the JWK file: %w", err)
        }

        // Multiple keys are present in this endpoint to allow for key rotation.
        // This method finds the key that was used for signing to pass to the validator.
        kid := t.Header["kid"]
        for _, key := range keysfile.Keys {
                if key.Kid != kid {
                        continue // Select the key used for signing
                }

                n, err := base64urlUIntDecode(key.N)
                if err != nil {
                        return nil, fmt.Errorf("failed to decode key.N %w", err)
                }
                e, err := base64urlUIntDecode(key.E)
                if err != nil {
                        return nil, fmt.Errorf("failed to decode key.E %w", err)
                }

                // The parser expects an rsa.PublicKey: https://github.com/golang-jwt/jwt/blob/main/rsa.go#L53
                // or an array of keys. We chose to show passing a single key in this example as its possible
                // not all validators accept multiple keys for validation.
                return &rsa.PublicKey{
                        N: n,
                        E: int(e.Int64()),
                }, nil
        }

        return nil, fmt.Errorf("failed to find key with kid '%v' from well-known endpoint", kid)
}

func decodeAndValidateToken(tokenBytes []byte, keyFunc func(t *jwt.Token) (any, error)) (*jwt.Token, error) {
        var err error
        fmt.Println("Unmarshalling token and checking its validity...")
        token, err := jwt.NewParser().Parse(string(tokenBytes), keyFunc)

        fmt.Printf("Token valid: %v\n", token.Valid)
        if token.Valid {
                return token, nil
        }
        if ve, ok := err.(*jwt.ValidationError); ok {
                if ve.Errors&jwt.ValidationErrorMalformed != 0 {
                        return nil, fmt.Errorf("token format invalid. Please contact the Confidential Space team for assistance")
                }
                if ve.Errors&(jwt.ValidationErrorNotValidYet) != 0 {
                        // If device time is not synchronized with the Attestation Service you may need to account for that here.
                        return nil, errors.New("token is not active yet")
                }
                if ve.Errors&(jwt.ValidationErrorExpired) != 0 {
                        return nil, fmt.Errorf("token is expired")
                }
                return nil, fmt.Errorf("unknown validation error: %v", err)
        }

        return nil, fmt.Errorf("couldn't handle this token or couldn't read a validation error: %v", err)
}
5) 다음 명령어를 실행하여 웹 서버를 빌드하고 실행합니다. 이렇게 하면 :8080 포트에서 보안 비밀 출시 웹 서버가 시작됩니다.
go mod init google.com/codelab
go mod tidy
go get github.com/golang-jwt/jwt/v4
go build
./codelab
문제 해결: go mod tidy:를 실행할 때 다음 경고가 표시될 수 있으며 이는 무시해도 됩니다.
go: finding module for package github.com/golang-jwt/jwt/v4
go: downloading github.com/golang-jwt/jwt v3.2.2+incompatible
go: downloading github.com/golang-jwt/jwt/v4 v4.5.0
go: found github.com/golang-jwt/jwt/v4 in github.com/golang-jwt/jwt/v4 v4.5.0
go: google.com/codelab/go/pkg/mod/github.com/golang-jwt/jwt@v3.2.2+incompatible: import path "google.com/codelab/go/pkg/mod/github.com/golang-jwt/jwt@v3.2.2+incompatible" should not have @version
go: google.com/codelab/go/pkg/mod/github.com/golang-jwt/jwt@v3.2.2+incompatible/cmd/jwt: import path "google.com/codelab/go/pkg/mod/github.com/golang-jwt/jwt@v3.2.2+incompatible/cmd/jwt" should not have @version
go: google.com/codelab/go/pkg/mod/github.com/golang-jwt/jwt@v3.2.2+incompatible/request: import path "google.com/codelab/go/pkg/mod/github.com/golang-jwt/jwt@v3.2.2+incompatible/request" should not have @version
go: google.com/codelab/go/pkg/mod/github.com/golang-jwt/jwt@v3.2.2+incompatible/test: import path "google.com/codelab/go/pkg/mod/github.com/golang-jwt/jwt@v3.2.2+incompatible/test" should not have @version
6) 다른 클라우드 콘솔 탭이나 로컬 개발 환경 세션을 시작하고 다음 명령어를 실행합니다. 이렇게 하면 cgke-attestation-codelab-web-server-internal-ip을 얻을 수 있습니다.
gcloud compute instances describe cgke-attestation-codelab-web-server --format='get(networkInterfaces[0].networkIP)' --zone=us-central1-c
7페이지). CGKE 워크로드에 연결하고 원격 증명을 실행하여 증명 토큰 (OIDC 토큰)을 가져옵니다. 그런 다음 다음 명령어에 attestation-token 및 cgke-attestation-codelab-web-server-internal-ip의 콘텐츠를 삽입합니다. 이렇게 하면 보안 비밀 출시 웹 서버에서 보유한 보안 비밀이 가져옵니다.
kubectl exec -it go-tpm-demo -- /bin/bash
./gotpm token --event-log=/run/cc-device-plugin/binary_bios_measurements > attestation_token
curl http://<cgke-attestation-codelab-web-server-internal-ip>:8080 -H "Authorization: Bearer $(cat ./attestation_token)"
다음을 바꿉니다.
cgke-attestation-codelab-web-server-internal-ip은cgke-attestation-codelab-web-serverVM 인스턴스의 내부 IP입니다.
6. CGKE 노드의 vTPM 봉인
이 단계에서 이 Codelab의 두 번째 부분이 시작됩니다. 이 단계에서는 CGKE 노드에서 vTPM 소유자 승인을 설정하고 vTPM 소유자 비밀번호로 워크로드를 배포합니다. 그런 다음 vTPM 봉인 기능을 사용하여 워크로드에서 데이터를 봉인하고 봉인 해제하는 vTPM 기본 키를 만듭니다.
1) CGKE 노드에서 vTPM 소유자 승인을 설정합니다.
- 일회성 작업 컨테이너 이미지를 만듭니다. 일회성 작업은 모든 vTPM의 소유자 비밀번호를 설정합니다. 다음은 컨테이너 이미지를 만드는 Dockerfile입니다.
Dockerfile
FROM debian:latest

RUN echo 'debconf debconf/frontend select Noninteractive' | debconf-set-selections
RUN apt-get update

RUN apt -y install \
  autoconf-archive \
  libcmocka0 \
  libcmocka-dev \
  net-tools \
  build-essential \
  git \
  pkg-config \
  gcc \
  g++ \
  m4 \
  libtool \
  automake \
  libgcrypt20-dev \
  libssl-dev \
  uthash-dev \
  autoconf \
  uuid-dev \
  libcurl4-openssl-dev \
  libjson-c-dev

RUN mkdir /src

WORKDIR /src
RUN git clone https://github.com/tpm2-software/tpm2-tss
WORKDIR /src/tpm2-tss
RUN ./bootstrap
RUN ./configure --prefix=/usr/local
RUN make all install

WORKDIR /src
RUN git clone https://github.com/tpm2-software/tpm2-tools
WORKDIR /src/tpm2-tools
RUN apt-get -y install libcurl4 libcurl4-openssl-dev pandoc man-db
RUN ./bootstrap
RUN ./configure --prefix=/usr/local
RUN make all install

RUN apt-get -y install vim

ENTRYPOINT ["/bin/bash"]
- 일회성 작업 컨테이너 이미지를 빌드하고 아티팩트 레지스트리에 푸시합니다.
docker build -t us-docker.pkg.dev/<project-id>/codelab-repo/tpm-tools:latest .
docker push us-docker.pkg.dev/<project-id>/codelab-repo/tpm-tools:latest
다음을 바꿉니다.
project-id는 프로젝트의 고유 식별자입니다.
- Kubernetes 작업을 통해 일회성 작업을 실행합니다. (경고: 이 작업은 각 CVM에서 vTPM을 삭제합니다. CVM이 vTPM을 사용하여 디스크를 암호화하는 경우 이 작업으로 인해 재부팅 후 CVM을 사용할 수 없게 됩니다.
lsblk -f명령어를 사용하여 디스크에 FSTYPEcrypto_LUKS이 있는지 확인할 수 있습니다.
tpm-tools-task.yaml
apiVersion: batch/v1
kind: Job
metadata:
  name: tpm-tools-task
spec:
  template:
    spec:
      containers:
      - name: tpm-tools
        image: us-docker.pkg.dev/<project-id>/codelab-repo/tpm-tools:latest
        command: ["/bin/sh", "-c"]
        args: ["tpm2_clear; tpm2_changeauth -c owner this_is_passphrase"]
        resources:
          limits:
            google.com/cc: 1
      restartPolicy: Never
다음을 바꿉니다.
project-id는 프로젝트의 고유 식별자입니다.
- 일회성 작업을 실행합니다. 이 작업은 모든 작업자 노드에서 vTPM 소유자 비밀번호를 설정합니다.
kubectl create -f tpm-tools-task.yaml
2) vTPM 소유자 비밀번호를 포함할 Kubernetes 보안 비밀을 만듭니다.
kubectl create secret generic tpm-secret --from-literal=passphrase='this_is_passphrase'
3) 데모 애플리케이션 컨테이너를 만들고 비밀번호를 전달합니다. 데모 애플리케이션 컨테이너에는 vTPM과 상호작용하는 tpm2 도구가 포함되어 있습니다.
- 데모 애플리케이션 컨테이너의 배포 YAML 파일을 만듭니다.
deploy_demo.yaml
apiVersion: v1
kind: Pod
metadata:
  name: tpm-tools-demo
  labels:
    app.kubernetes.io/name: tpm-tools-demo
spec:
  containers:
  - name: tpm-tools
    image: us-docker.pkg.dev/<project-id>/codelab-repo/tpm-tools:latest
    command: ["tail", "-f", "/dev/null"]
    resources:
      limits:
        google.com/cc: 1
    volumeMounts:
      - name: secret-volume
        mountPath: "/etc/tpmsecret"
        readOnly: true
  volumes:
    - name: secret-volume
      secret:
        secretName: tpm-secret
다음을 바꿉니다.
project-id는 프로젝트의 고유 식별자입니다.
- 데모 애플리케이션을 배포합니다.
kubectl create -f deploy_demo.yaml
4). 데모 애플리케이션 컨테이너에서 vTPM 봉인 실행
- 데모 애플리케이션 컨테이너에 연결하고 비밀번호로 기본 키를 설정합니다.
kubectl exec -it tpm-tools-demo -- /bin/bash
tpm2_createprimary -C o -c primary.ctx -P $(cat /etc/tpmsecret/passphrase)
tpm2_createprimary는 vTPM과 상호작용하여 지정된 계층 구조와 템플릿을 기반으로 기본 객체를 생성합니다.
- -C o: 기본 키가 TPM의 소유자 계층 구조 아래에 생성됨을 나타냅니다.
- -c primary.ctx: 생성된 기본 객체의 컨텍스트 (핸들 및 연결된 데이터)를 primary.ctx 파일에 저장합니다. 이 컨텍스트는 나중에 작업하는 데 필수적입니다.
워크로드는 잘못된 소유자 암호를 사용하여 기본 키를 만들 수 없습니다.
tpm2_createprimary -C o -P wrong_passphrase
이 명령어는 다음 오류를 반환합니다.
WARNING:esys:src/tss2-esys/api/Esys_CreatePrimary.c:401:Esys_CreatePrimary_Finish() Received TPM Error
ERROR:esys:src/tss2-esys/api/Esys_CreatePrimary.c:135:Esys_CreatePrimary() Esys Finish ErrorCode (0x000009a2)
ERROR: Esys_CreatePrimary(0x9A2) - tpm:session(1):authorization failure without DA implications
ERROR: Unable to run tpm2_createprimary
- 생성된 기본 키는 데이터를 봉인하고 봉인 해제하는 데 사용할 수 있습니다.
echo "This is my secret message" > secret.txt
tpm2_create -C primary.ctx -u sealed.pub -r sealed.priv -i secret.txt
tpm2_load -C primary.ctx -u sealed.pub -r sealed.priv -c sealed.ctx
tpm2_unseal -c sealed.ctx -o unsealed.txt
tpm2_create은 vTPM과 상호작용하여 원하는 암호화 객체를 생성합니다.
- -C primary.ctx: 이전에 만든 기본 키 컨텍스트를 사용합니다.
- -u sealed.pub: 봉인 키의 공개 부분을 sealed.pub에 저장합니다 (봉인 해제에 필요).
- -r sealed.priv: 봉인 키의 비공개 부분을 sealed.priv에 저장합니다.
- -i secret.txt: 봉인할 보안 비밀이 포함된 파일입니다.
tpm2_load: 공개 및 비공개 부분 (sealed.pub, sealed.priv)을 사용하여 TPM에 봉인 키를 로드하고 컨텍스트를 sealed.ctx에 저장합니다.
tpm2_unseal: vTPM 봉인 객체를 사용하여 이전에 암호화 (봉인)된 데이터를 복호화 (봉인 해제)합니다.
primary.ctx, sealed.priv 파일은 하나의 vTPM 기기에서만 사용할 수 있습니다. vTPM 기기와 이러한 파일에 액세스할 수 있는 사용자는 봉인된 데이터에 액세스할 수 있습니다. PCR 값에 관한 정책을 사용하여 데이터를 봉인할 수도 있지만 이 Codelab의 범위에는 포함되지 않습니다.
7. 삭제
Cloud 콘솔 또는 로컬 개발 환경에서 다음 명령어를 실행합니다.
gcloud config set project <project-id>

# Delete the CGKE cluster
gcloud container clusters delete cgke-attestation-codelab --zone us-central1-c

# Delete the Artifact Registry
gcloud artifacts repositories delete codelab-repo --location=us

# Delete the web server VM instance
gcloud compute instances delete cgke-attestation-codelab-web-server --zone=us-central1-c

# Delete the GCP service account
gcloud iam service-accounts delete codelab-csa@<project-id>.iam.gserviceaccount.com

# Delete the role
gcloud iam roles delete Confidential_Computing_Workload_User
다음을 바꿉니다.
project-id는 프로젝트의 고유 식별자입니다.
8. 다음 단계
Confidential GKE Node에 대해 자세히 알아보세요.