
1. Tổng quan
Các nút GKE bảo mật (CGKE) đảm bảo dữ liệu trong khối lượng công việc được mã hoá khi sử dụng. Việc hiển thị thiết bị vTPM cho khối lượng công việc CGKE cho phép khối lượng công việc sử dụng các tính năng của vTPM. Trong lớp học lập trình này, bạn sẽ được giới thiệu 2 tính năng của vTPM.
- Chứng thực từ xa vTPM cho phép một bên từ xa xác minh rằng các nút CGKE lưu trữ khối lượng công việc đang chạy trên Máy ảo bảo mật (CVM).
- Uỷ quyền vTPM và niêm phong vTPM.
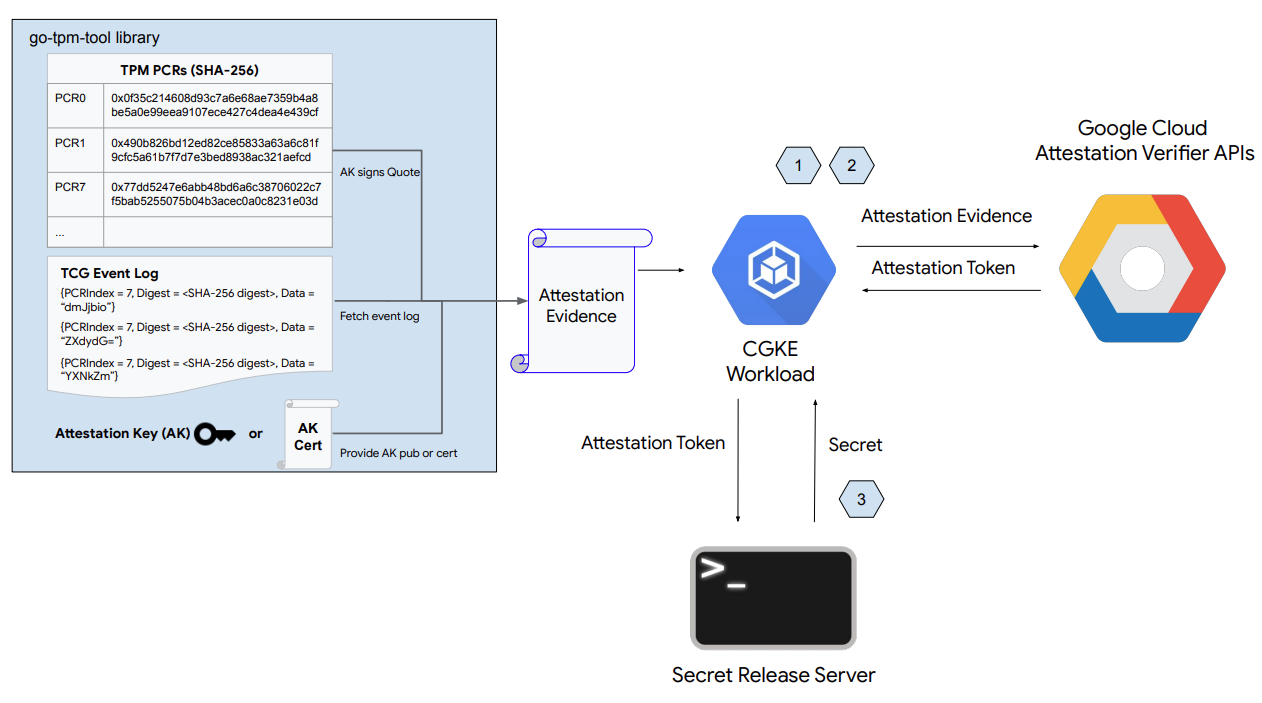
Như minh hoạ trong hình trên, phần đầu tiên của lớp học lập trình này bao gồm các bước sau:
- Thiết lập các nút CGKE và hiển thị thiết bị vTPM cho các khối lượng công việc đã chọn.
- Triển khai một khối lượng công việc và chứng thực từ xa nút CGKE lưu trữ khối lượng công việc đó.
- Thiết lập máy chủ web phát hành bí mật.
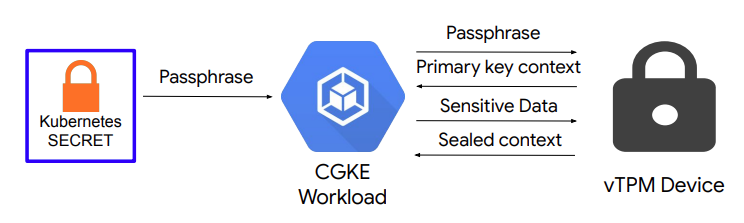
Như minh hoạ trong hình trên, phần thứ hai của lớp học lập trình này bao gồm:
- Thiết lập uỷ quyền vTPM và niêm phong vTPM trên các nút CGKE.
Kiến thức bạn sẽ học được
- Cách hiển thị thiết bị vTPM cho khối lượng công việc CGKE.
- Cách chứng thực từ xa thông qua API Điện toán bảo mật (dịch vụ Trình xác minh chứng thực) trên khối lượng công việc CGKE.
- Cách thiết lập cơ chế uỷ quyền vTPM và thực hiện quy trình niêm phong vTPM.
Bạn cần có
- Một dự án trên Google Cloud Platform
- Một trình duyệt, chẳng hạn như Chrome hoặc Firefox
- Kiến thức cơ bản về Google Compute Engine ( lớp học lập trình), Máy ảo bảo mật, Nút GKE bảo mật và Artifact Registry
2. Thiết lập và yêu cầu:
Để bật các API cần thiết, hãy chạy lệnh sau trong bảng điều khiển đám mây hoặc môi trường phát triển cục bộ:
gcloud auth login

gcloud services enable \
    cloudapis.googleapis.com \
    cloudshell.googleapis.com \
    container.googleapis.com \
    containerregistry.googleapis.com \
    confidentialcomputing.googleapis.com \
    iamcredentials.googleapis.com \
    compute.googleapis.com
3. Thiết lập các nút CGKE và hiển thị thiết bị vTPM cho các khối lượng công việc đã chọn
Bước này bắt đầu phần đầu tiên của lớp học lập trình này. Trong bước này, bạn sẽ khởi động một cụm CGKE và áp dụng một device plugin (trình bổ trợ thiết bị) để hiển thị thiết bị CVM vTPM cho các tải công việc. Truy cập vào Cloud Console hoặc môi trường phát triển cục bộ để chạy các lệnh.
1). Tạo một cụm CGKE, sử dụng nhóm danh tính tải để cho phép các tải CGKE sử dụng API điện toán bảo mật của GCP. Nhóm danh tính tải là cần thiết vì các tải CGKE cần truy cập vào tài nguyên GCP. Để truy cập vào các tài nguyên trên GCP, các đơn vị công việc CGKE cần phải có một danh tính.
gcloud container clusters create cgke-attestation-codelab \
    --machine-type=n2d-standard-2        \
    --enable-confidential-nodes \
--zone us-central1-c \
--workload-pool=${PROJECT_ID}.svc.id.goog \
--workload-metadata=GKE_METADATA
Thay thế nội dung sau:
project-idlà giá trị nhận dạng duy nhất của dự án.
2). Khởi động trình bổ trợ thiết bị để cho phép cụm CGKE hiển thị thiết bị vTPM cho các tải. Chúng tôi sử dụng trình bổ trợ thiết bị Kubernetes để tạo một tài nguyên mới – google.com/cc. Mọi khối lượng công việc được liên kết với tài nguyên mới đều có thể thấy thiết bị vTPM trên nút tính toán.
gcloud container clusters get-credentials cgke-attestation-codelab --zone us-central1-c --project ${PROJECT_ID}

kubectl create -f https://raw.githubusercontent.com/google/cc-device-plugin/main/manifests/cc-device-plugin.yaml
Thay thế nội dung sau:
project-idlà giá trị nhận dạng duy nhất của dự án.
Lệnh sau đây cho phép bạn xem cc-device-plugin đã triển khai.
kubectl get pods -A | grep "cc-device-plugin"
Lưu ý: Trong trường hợp cụm GKE ở chế độ hỗn hợp (với cả nút tính toán GKE bảo mật và không bảo mật), bạn nên chỉ triển khai cc-device-plugin trên các nút tính toán GKE bảo mật.
(Tùy chọn). Áp dụng tính năng giám sát Prometheus của nhóm CGKE. Khi bật tính năng giám sát, bạn có thể quan sát trạng thái của trình bổ trợ thiết bị.
kubectl apply -f https://raw.githubusercontent.com/google/cc-device-plugin/main/manifests/cc-device-plugin-pod-monitoring.yaml
Truy cập vào https://console.cloud.google.com/monitoring/metrics-explorer rồi tìm chỉ số cc-device-plugin hoặc sử dụng PROMQL. Ví dụ: Lệnh PROMQL sau đây cho biết số giây CPU cho mỗi quy trình cc-device-plugin.
rate(process_cpu_seconds_total[${__interval}])
4. Triển khai một khối lượng công việc và thực hiện chứng thực từ xa trên khối lượng công việc đó
Ở bước này, bạn sẽ tạo và triển khai một tải trọng cho cụm CGKE mà bạn đã tạo ở bước trước, đồng thời thực hiện chứng thực từ xa vTPM để truy xuất Mã thông báo chứng thực (Mã thông báo OIDC) trên nút tính toán.
1). Tạo hình ảnh vùng chứa ứng dụng rồi đẩy hình ảnh đó vào Artifact Registry. Hình ảnh vùng chứa ứng dụng chứa công cụ go-tpm, có thể thu thập bằng chứng chứng thực và gửi đến dịch vụ Trình xác minh chứng thực để lấy Mã thông báo chứng thực (Mã thông báo OIDC).
- Tạo Dockerfile cho hình ảnh vùng chứa ứng dụng.
Dockerfile
FROM golang:1.21.0 as builder
WORKDIR /
RUN git clone https://github.com/google/go-tpm-tools.git
WORKDIR /go-tpm-tools/cmd/gotpm
RUN CGO_ENABLED=0 GOOS=linux go build -o /gotpm

FROM debian:trixie
WORKDIR /
RUN apt-get update -y
RUN DEBIAN_FRONTEND=noninteractive apt-get install -y ca-certificates
RUN rm -rf /etc/apt/sources.list.d
COPY --from=builder /gotpm /gotpm
CMD ["tail", "-f", "/dev/null"]
- Tạo một Artifact Registry.
gcloud artifacts repositories create codelab-repo \
    --repository-format=docker \
    --location=us
- Đẩy hình ảnh vùng chứa ứng dụng vào Artifact Registry.
docker build -t us-docker.pkg.dev/${PROJECT_ID}/codelab-repo/go-tpm:latest .
docker push us-docker.pkg.dev/${PROJECT_ID}/codelab-repo/go-tpm:latest
2). Thiết lập tài khoản dịch vụ Kubernetes để kế thừa các quyền của tài khoản dịch vụ GCP đối với tài nguyên GCP.
- Tạo tài khoản dịch vụ Kubernetes
codelab-ksa.
kubectl create serviceaccount codelab-ksa \
    --namespace default
- Tạo một vai trò
Confidential_Computing_Workload_Uservà cấp cho vai trò này các quyền truy cập vào API Điện toán bảo mật.
gcloud iam roles create Confidential_Computing_Workload_User --project=<project-id> \
    --title="CGKE Workload User" --description="Grants the ability to generate an attestation token in a GKE workload." \
 --permissions="confidentialcomputing.challenges.create,confidentialcomputing.challenges.verify,confidentialcomputing.locations.get,confidentialcomputing.locations.list" --stage=GA
Thay thế nội dung sau:
project-idlà giá trị nhận dạng duy nhất của dự án.
- Tạo tài khoản dịch vụ GCP
codelab-csavà liên kết tài khoản đó với vai tròConfidential_Computing_Workload_User. So that codelab-csacó quyền truy cập vào API Điện toán bảo mật.
gcloud iam service-accounts create codelab-csa \
    --project=<project-id>

gcloud projects add-iam-policy-binding <project-id> \
    --member "serviceAccount:codelab-csa@<project-id>.iam.gserviceaccount.com" \
    --role "projects/<project-id>/roles/Confidential_Computing_Workload_User"

gcloud iam service-accounts add-iam-policy-binding codelab-csa@<project-id>.iam.gserviceaccount.com \
    --role roles/iam.workloadIdentityUser \
    --member "serviceAccount:<project-id>.svc.id.goog[default/codelab-ksa]"
Thay thế nội dung sau:
project-idlà giá trị nhận dạng duy nhất của dự án.
- Liên kết tài khoản dịch vụ Kubernetes
codelab-ksavới tài khoản dịch vụ GCPcodelab-csa. Đểcodelab-ksacó quyền truy cập vào API Điện toán bảo mật.
kubectl annotate serviceaccount codelab-ksa \
    --namespace default \
    iam.gke.io/gcp-service-account=codelab-csa@<project-id>.iam.gserviceaccount.com
Thay thế nội dung sau:
project-idlà giá trị nhận dạng duy nhất của dự án.
3). Tạo tệp yaml triển khai ứng dụng cho ứng dụng minh hoạ. Chỉ định tài khoản dịch vụ Kubernetes codelab-ksa cho các tải đã chọn.
deploy.yaml
apiVersion: v1
kind: Pod
metadata:
  name: go-tpm-demo
  labels:
    app.kubernetes.io/name: go-tpm-demo
spec:
  serviceAccountName: codelab-ksa
  nodeSelector:
    iam.gke.io/gke-metadata-server-enabled: "true"
  containers:
  - name: go-tpm
    image: us-docker.pkg.dev/<project-id>/codelab-repo/go-tpm:latest
    resources:
      limits:
        google.com/cc: 1
Thay thế nội dung sau:
project-idlà giá trị nhận dạng duy nhất của dự án.
4). Áp dụng việc triển khai cho cụm CGKE.
kubectl create -f deploy.yaml
5). Kết nối với tải và khởi chạy quy trình chứng thực từ xa để tìm nạp Mã thông báo chứng thực (Mã thông báo OIDC)
kubectl exec -it go-tpm-demo -- /bin/bash
./gotpm token --event-log=/run/cc-device-plugin/binary_bios_measurements > attestation_token
Bạn có thể giải mã mã thông báo chứng thực trong jwt.io để xem các thông tin xác nhận!
5. Thiết lập máy chủ web phát hành bí mật
Trong bước này, bạn sẽ thoát khỏi phiên SSH trước và thiết lập một VM khác. Trên VM này, bạn thiết lập một máy chủ web phát hành bí mật. Máy chủ web xác thực Mã thông báo chứng thực đã nhận và các xác nhận quyền sở hữu của mã thông báo đó. Nếu quá trình xác thực thành công, thì nó sẽ chuyển bí mật cho người yêu cầu.
1). Truy cập vào bảng điều khiển đám mây hoặc môi trường phát triển cục bộ. Tạo một máy ảo.
gcloud config set project <project-id>

gcloud compute instances create cgke-attestation-codelab-web-server \
    --machine-type=n2d-standard-2 \
    --zone=us-central1-c \
    --image=ubuntu-2204-jammy-v20240228 \
    --image-project=ubuntu-os-cloud
Thay thế nội dung sau:
project-idlà giá trị nhận dạng duy nhất của dự án.
2). Tạo kết nối SSH đến máy ảo mới.
gcloud compute ssh --zone us-central1-c cgke-attestation-codelab-web-server
3). Thiết lập môi trường Go.
wget https://go.dev/dl/go1.22.0.linux-amd64.tar.gz
sudo tar -C /usr/local -xzf go1.22.0.linux-amd64.tar.gz
export PATH=$PATH:/usr/local/go/bin
4). Tạo 2 tệp sau đây để lưu trữ mã nguồn của máy chủ web phát hành bí mật (sao chép và dán bằng nano).
main.go
package main

import (
        "fmt"
        "net/http"
        "strings"
        "time"
        "log"

        "github.com/golang-jwt/jwt/v4"
)

const (
        theSecret = "This is the super secret information!"
)

func homePage(w http.ResponseWriter, r *http.Request) {
        tokenString := r.Header.Get("Authorization")
        if tokenString != "" {
                tokenString, err := extractToken(tokenString)
                if err != nil {
                        http.Error(w, err.Error(), http.StatusUnauthorized)
                }

                tokenBytes := []byte(tokenString)
                // A method to return a public key from the well-known endpoint
                keyFunc := getRSAPublicKeyFromJWKsFile

                token, err := decodeAndValidateToken(tokenBytes, keyFunc)
                if err != nil {
                        http.Error(w, "Invalid JWT Token", http.StatusUnauthorized)
                }

                if ok, err := isValid(token.Claims.(jwt.MapClaims)); ok {
                        fmt.Fprintln(w, theSecret)
                } else {
                        if err != nil {
                                http.Error(w, "Error validating JWT claims: "+err.Error(), http.StatusUnauthorized)
                        } else {
                                http.Error(w, "Invalid JWT token Claims", http.StatusUnauthorized)
                        }
                }
        } else {
                http.Error(w, "Authorization token required", http.StatusUnauthorized)
        }
}

func extractToken(tokenString string) (string, error) {
        if strings.HasPrefix(tokenString, "Bearer ") {
                return strings.TrimPrefix(tokenString, "Bearer "), nil
        }
        return "", fmt.Errorf("invalid token format")
}

func isValid(claims jwt.MapClaims) (bool, error) {
        // 1. Evaluating Standard Claims:
        subject, ok := claims["sub"].(string)
        if !ok {
                return false, fmt.Errorf("missing or invalid 'sub' claim")
        }
        fmt.Println("Subject:", subject)
        // e.g. "sub":"https://www.googleapis.com/compute/v1/projects/<project_id>/zones/<project_zone>/instances/<instance_name>"

        issuedAt, ok := claims["iat"].(float64)
        if !ok {
                return false, fmt.Errorf("missing or invalid 'iat' claim")
        }
        fmt.Println("Issued At:", time.Unix(int64(issuedAt), 0))

        // 2. Evaluating Remote Attestation Claims:
        hwModel, ok := claims["hwmodel"].(string)
        if !ok || hwModel != "GCP_AMD_SEV" {
                return false, fmt.Errorf("missing or invalid 'hwModel'")
        }
        fmt.Println("hwmodel:", hwModel)

        swName, ok := claims["swname"].(string)
        if !ok || swName != "GCE" {
                return false, fmt.Errorf("missing or invalid 'hwModel'")
        }
        fmt.Println("swname:", swName)

        return true, nil
}

func main() {
        http.HandleFunc("/", homePage)
        fmt.Println("Server listening on :8080")
        err := http.ListenAndServe(":8080", nil)
        if err != nil {
                log.Fatalf("Server failed to start: %v", err)
        }
}
helper.go
package main

import (
        "crypto/rsa"
        "encoding/base64"
        "encoding/json"
        "errors"
        "fmt"
        "io"
        "math/big"
        "net/http"

        "github.com/golang-jwt/jwt/v4"
)

const (
        socketPath     = "/run/container_launcher/teeserver.sock"
        expectedIssuer = "https://confidentialcomputing.googleapis.com"
        wellKnownPath  = "/.well-known/openid-configuration"
)

type jwksFile struct {
        Keys []jwk `json:"keys"`
}

type jwk struct {
        N   string `json:"n"`   // "nMMTBwJ7H6Id8zUCZd-L7uoNyz9b7lvoyse9izD9l2rtOhWLWbiG-7pKeYJyHeEpilHP4KdQMfUo8JCwhd-OMW0be_XtEu3jXEFjuq2YnPSPFk326eTfENtUc6qJohyMnfKkcOcY_kTE11jM81-fsqtBKjO_KiSkcmAO4wJJb8pHOjue3JCP09ZANL1uN4TuxbM2ibcyf25ODt3WQn54SRQTV0wn098Y5VDU-dzyeKYBNfL14iP0LiXBRfHd4YtEaGV9SBUuVhXdhx1eF0efztCNNz0GSLS2AEPLQduVuFoUImP4s51YdO9TPeeQ3hI8aGpOdC0syxmZ7LsL0rHE1Q",
        E   string `json:"e"`   // "AQAB" or 65537 as an int
        Kid string `json:"kid"` // "1f12fa916c3a0ef585894b4b420ad17dc9d6cdf5",

        // Unused fields:
        // Alg string `json:"alg"` // "RS256",
        // Kty string `json:"kty"` // "RSA",
        // Use string `json:"use"` // "sig",
}

type wellKnown struct {
        JwksURI string `json:"jwks_uri"` // "https://www.googleapis.com/service_accounts/v1/metadata/jwk/signer@confidentialspace-sign.iam.gserviceaccount.com"

        // Unused fields:
        // Iss                                   string `json:"issuer"`                                // "https://confidentialcomputing.googleapis.com"
        // Subject_types_supported               string `json:"subject_types_supported"`               // [ "public" ]
        // Response_types_supported              string `json:"response_types_supported"`              // [ "id_token" ]
        // Claims_supported                      string `json:"claims_supported"`                      // [ "sub", "aud", "exp", "iat", "iss", "jti", "nbf", "dbgstat", "eat_nonce", "google_service_accounts", "hwmodel", "oemid", "secboot", "submods", "swname", "swversion" ]
        // Id_token_signing_alg_values_supported string `json:"id_token_signing_alg_values_supported"` // [ "RS256" ]
        // Scopes_supported                      string `json:"scopes_supported"`                      // [ "openid" ]
}

func getWellKnownFile() (wellKnown, error) {
        httpClient := http.Client{}
        resp, err := httpClient.Get(expectedIssuer + wellKnownPath)
        if err != nil {
                return wellKnown{}, fmt.Errorf("failed to get raw .well-known response: %w", err)
        }

        wellKnownJSON, err := io.ReadAll(resp.Body)
        if err != nil {
                return wellKnown{}, fmt.Errorf("failed to read .well-known response: %w", err)
        }

        wk := wellKnown{}
        json.Unmarshal(wellKnownJSON, &wk)
        return wk, nil
}

func getJWKFile() (jwksFile, error) {
        wk, err := getWellKnownFile()
        if err != nil {
                return jwksFile{}, fmt.Errorf("failed to get .well-known json: %w", err)
        }

        // Get JWK URI from .wellknown
        uri := wk.JwksURI
        fmt.Printf("jwks URI: %v\n", uri)

        httpClient := http.Client{}
        resp, err := httpClient.Get(uri)
        if err != nil {
                return jwksFile{}, fmt.Errorf("failed to get raw JWK response: %w", err)
        }

        jwkbytes, err := io.ReadAll(resp.Body)
        if err != nil {
                return jwksFile{}, fmt.Errorf("failed to read JWK body: %w", err)
        }

        file := jwksFile{}
        err = json.Unmarshal(jwkbytes, &file)
        if err != nil {
                return jwksFile{}, fmt.Errorf("failed to unmarshall JWK content: %w", err)
        }

        return file, nil
}

// N and E are 'base64urlUInt' encoded: https://www.rfc-editor.org/rfc/rfc7518#section-6.3
func base64urlUIntDecode(s string) (*big.Int, error) {
        b, err := base64.RawURLEncoding.DecodeString(s)
        if err != nil {
                return nil, err
        }
        z := new(big.Int)
        z.SetBytes(b)
        return z, nil
}

func getRSAPublicKeyFromJWKsFile(t *jwt.Token) (any, error) {
        keysfile, err := getJWKFile()
        if err != nil {
                return nil, fmt.Errorf("failed to fetch the JWK file: %w", err)
        }

        // Multiple keys are present in this endpoint to allow for key rotation.
        // This method finds the key that was used for signing to pass to the validator.
        kid := t.Header["kid"]
        for _, key := range keysfile.Keys {
                if key.Kid != kid {
                        continue // Select the key used for signing
                }

                n, err := base64urlUIntDecode(key.N)
                if err != nil {
                        return nil, fmt.Errorf("failed to decode key.N %w", err)
                }
                e, err := base64urlUIntDecode(key.E)
                if err != nil {
                        return nil, fmt.Errorf("failed to decode key.E %w", err)
                }

                // The parser expects an rsa.PublicKey: https://github.com/golang-jwt/jwt/blob/main/rsa.go#L53
                // or an array of keys. We chose to show passing a single key in this example as its possible
                // not all validators accept multiple keys for validation.
                return &rsa.PublicKey{
                        N: n,
                        E: int(e.Int64()),
                }, nil
        }

        return nil, fmt.Errorf("failed to find key with kid '%v' from well-known endpoint", kid)
}

func decodeAndValidateToken(tokenBytes []byte, keyFunc func(t *jwt.Token) (any, error)) (*jwt.Token, error) {
        var err error
        fmt.Println("Unmarshalling token and checking its validity...")
        token, err := jwt.NewParser().Parse(string(tokenBytes), keyFunc)

        fmt.Printf("Token valid: %v\n", token.Valid)
        if token.Valid {
                return token, nil
        }
        if ve, ok := err.(*jwt.ValidationError); ok {
                if ve.Errors&jwt.ValidationErrorMalformed != 0 {
                        return nil, fmt.Errorf("token format invalid. Please contact the Confidential Space team for assistance")
                }
                if ve.Errors&(jwt.ValidationErrorNotValidYet) != 0 {
                        // If device time is not synchronized with the Attestation Service you may need to account for that here.
                        return nil, errors.New("token is not active yet")
                }
                if ve.Errors&(jwt.ValidationErrorExpired) != 0 {
                        return nil, fmt.Errorf("token is expired")
                }
                return nil, fmt.Errorf("unknown validation error: %v", err)
        }

        return nil, fmt.Errorf("couldn't handle this token or couldn't read a validation error: %v", err)
}
5). Chạy các lệnh sau để tạo và chạy máy chủ web. Thao tác này sẽ khởi động máy chủ web phát hành bí mật tại cổng :8080.
go mod init google.com/codelab
go mod tidy
go get github.com/golang-jwt/jwt/v4
go build
./codelab
Khắc phục sự cố: bạn có thể thấy cảnh báo sau đây và có thể bỏ qua cảnh báo này khi chạy go mod tidy:
go: finding module for package github.com/golang-jwt/jwt/v4
go: downloading github.com/golang-jwt/jwt v3.2.2+incompatible
go: downloading github.com/golang-jwt/jwt/v4 v4.5.0
go: found github.com/golang-jwt/jwt/v4 in github.com/golang-jwt/jwt/v4 v4.5.0
go: google.com/codelab/go/pkg/mod/github.com/golang-jwt/jwt@v3.2.2+incompatible: import path "google.com/codelab/go/pkg/mod/github.com/golang-jwt/jwt@v3.2.2+incompatible" should not have @version
go: google.com/codelab/go/pkg/mod/github.com/golang-jwt/jwt@v3.2.2+incompatible/cmd/jwt: import path "google.com/codelab/go/pkg/mod/github.com/golang-jwt/jwt@v3.2.2+incompatible/cmd/jwt" should not have @version
go: google.com/codelab/go/pkg/mod/github.com/golang-jwt/jwt@v3.2.2+incompatible/request: import path "google.com/codelab/go/pkg/mod/github.com/golang-jwt/jwt@v3.2.2+incompatible/request" should not have @version
go: google.com/codelab/go/pkg/mod/github.com/golang-jwt/jwt@v3.2.2+incompatible/test: import path "google.com/codelab/go/pkg/mod/github.com/golang-jwt/jwt@v3.2.2+incompatible/test" should not have @version
6). Bắt đầu một phiên khác trong thẻ bảng điều khiển đám mây hoặc môi trường phát triển cục bộ rồi chạy lệnh sau. Thao tác này sẽ giúp bạn nhận được cgke-attestation-codelab-web-server-internal-ip.
gcloud compute instances describe cgke-attestation-codelab-web-server --format='get(networkInterfaces[0].networkIP)' --zone=us-central1-c
7). Kết nối với tải CGKE và chạy quy trình chứng thực từ xa để tìm nạp Mã thông báo chứng thực (Mã thông báo OIDC). Sau đó, hãy nhúng nội dung của attestation-token và cgke-attestation-codelab-web-server-internal-ip vào lệnh sau. Thao tác này sẽ tìm nạp cho bạn bí mật do máy chủ web phát hành bí mật nắm giữ!
kubectl exec -it go-tpm-demo -- /bin/bash
./gotpm token --event-log=/run/cc-device-plugin/binary_bios_measurements > attestation_token
curl http://<cgke-attestation-codelab-web-server-internal-ip>:8080 -H "Authorization: Bearer $(cat ./attestation_token)"
Thay thế nội dung sau:
cgke-attestation-codelab-web-server-internal-iplà IP nội bộ của phiên thể máy ảocgke-attestation-codelab-web-server.
6. Niêm phong vTPM trên các nút CGKE
Bước này bắt đầu phần thứ hai của lớp học lập trình này. Trong bước này, bạn sẽ thiết lập chế độ uỷ quyền của chủ sở hữu vTPM trên các nút CGKE và triển khai một khối lượng công việc bằng cụm mật khẩu của chủ sở hữu vTPM. Sau đó, bạn tạo một khoá chính vTPM để niêm phong và mở niêm phong dữ liệu trong khối lượng công việc bằng khả năng niêm phong vTPM.
1). Thiết lập uỷ quyền của chủ sở hữu vTPM trên các nút CGKE.
- Tạo một hình ảnh vùng chứa công việc một lần. Công việc một lần này đặt mật khẩu của chủ sở hữu cho tất cả vTPM. Sau đây là dockerfile để tạo hình ảnh vùng chứa.
Dockerfile
FROM debian:latest

RUN echo 'debconf debconf/frontend select Noninteractive' | debconf-set-selections
RUN apt-get update

RUN apt -y install \
  autoconf-archive \
  libcmocka0 \
  libcmocka-dev \
  net-tools \
  build-essential \
  git \
  pkg-config \
  gcc \
  g++ \
  m4 \
  libtool \
  automake \
  libgcrypt20-dev \
  libssl-dev \
  uthash-dev \
  autoconf \
  uuid-dev \
  libcurl4-openssl-dev \
  libjson-c-dev

RUN mkdir /src

WORKDIR /src
RUN git clone https://github.com/tpm2-software/tpm2-tss
WORKDIR /src/tpm2-tss
RUN ./bootstrap
RUN ./configure --prefix=/usr/local
RUN make all install

WORKDIR /src
RUN git clone https://github.com/tpm2-software/tpm2-tools
WORKDIR /src/tpm2-tools
RUN apt-get -y install libcurl4 libcurl4-openssl-dev pandoc man-db
RUN ./bootstrap
RUN ./configure --prefix=/usr/local
RUN make all install

RUN apt-get -y install vim

ENTRYPOINT ["/bin/bash"]
- Tạo và đẩy hình ảnh vùng chứa của tác vụ một lần vào Artifact Registry.
docker build -t us-docker.pkg.dev/<project-id>/codelab-repo/tpm-tools:latest .
docker push us-docker.pkg.dev/<project-id>/codelab-repo/tpm-tools:latest
Thay thế nội dung sau:
project-idlà giá trị nhận dạng duy nhất của dự án.
- Thực thi công việc một lần thông qua một công việc Kubernetes. (CẢNH BÁO: thao tác này sẽ xoá vTPM trên mỗi CVM. Nếu CVM của bạn dùng vTPM để mã hoá ổ đĩa, thì thao tác này sẽ khiến CVM không dùng được sau khi khởi động lại. Bạn có thể kiểm tra xem ổ đĩa của mình có FSTYPE
crypto_LUKSbằng lệnhlsblk -fhay không)
tpm-tools-task.yaml
apiVersion: batch/v1
kind: Job
metadata:
  name: tpm-tools-task
spec:
  template:
    spec:
      containers:
      - name: tpm-tools
        image: us-docker.pkg.dev/<project-id>/codelab-repo/tpm-tools:latest
        command: ["/bin/sh", "-c"]
        args: ["tpm2_clear; tpm2_changeauth -c owner this_is_passphrase"]
        resources:
          limits:
            google.com/cc: 1
      restartPolicy: Never
Thay thế nội dung sau:
project-idlà giá trị nhận dạng duy nhất của dự án.
- Khởi chạy công việc một lần. Tác vụ này đặt cụm mật khẩu của chủ sở hữu vTPM trên tất cả các nút worker.
kubectl create -f tpm-tools-task.yaml
2). Tạo một khoá bí mật Kubernetes để lưu trữ cụm mật khẩu của chủ sở hữu vTPM.
kubectl create secret generic tpm-secret --from-literal=passphrase='this_is_passphrase'
3). Tạo một vùng chứa ứng dụng minh hoạ và truyền cụm mật khẩu vào vùng chứa đó. Vùng chứa ứng dụng minh hoạ chứa các công cụ tpm2 để tương tác với vTPM.
- Tạo tệp yaml triển khai cho vùng chứa ứng dụng minh hoạ.
deploy_demo.yaml
apiVersion: v1
kind: Pod
metadata:
  name: tpm-tools-demo
  labels:
    app.kubernetes.io/name: tpm-tools-demo
spec:
  containers:
  - name: tpm-tools
    image: us-docker.pkg.dev/<project-id>/codelab-repo/tpm-tools:latest
    command: ["tail", "-f", "/dev/null"]
    resources:
      limits:
        google.com/cc: 1
    volumeMounts:
      - name: secret-volume
        mountPath: "/etc/tpmsecret"
        readOnly: true
  volumes:
    - name: secret-volume
      secret:
        secretName: tpm-secret
Thay thế nội dung sau:
project-idlà giá trị nhận dạng duy nhất của dự án.
- Triển khai ứng dụng minh hoạ.
kubectl create -f deploy_demo.yaml
4). Thực hiện hoạt động niêm phong vTPM trong vùng chứa ứng dụng minh hoạ.
- Kết nối với vùng chứa ứng dụng minh hoạ và đặt khoá chính bằng cụm mật khẩu.
kubectl exec -it tpm-tools-demo -- /bin/bash
tpm2_createprimary -C o -c primary.ctx -P $(cat /etc/tpmsecret/passphrase)
tpm2_createprimary tương tác với vTPM để tạo đối tượng chính dựa trên hệ thống phân cấp và mẫu được chỉ định.
- -C o: Cho biết khoá chính sẽ được tạo trong hệ thống phân cấp của chủ sở hữu TPM.
- -c primary.ctx: Lưu ngữ cảnh (xử lý và dữ liệu liên kết) của đối tượng chính đã tạo vào tệp primary.ctx. Bối cảnh này là điều kiện thiết yếu cho các thao tác sau.
Tải không thể sử dụng cụm mật khẩu chủ sở hữu không chính xác để tạo khoá chính.
tpm2_createprimary -C o -P wrong_passphrase
Lệnh này trả về các lỗi sau:
WARNING:esys:src/tss2-esys/api/Esys_CreatePrimary.c:401:Esys_CreatePrimary_Finish() Received TPM Error
ERROR:esys:src/tss2-esys/api/Esys_CreatePrimary.c:135:Esys_CreatePrimary() Esys Finish ErrorCode (0x000009a2)
ERROR: Esys_CreatePrimary(0x9A2) - tpm:session(1):authorization failure without DA implications
ERROR: Unable to run tpm2_createprimary
- Sau đó, bạn có thể dùng khoá chính đã tạo để niêm phong và mở niêm phong dữ liệu.
echo "This is my secret message" > secret.txt
tpm2_create -C primary.ctx -u sealed.pub -r sealed.priv -i secret.txt
tpm2_load -C primary.ctx -u sealed.pub -r sealed.priv -c sealed.ctx
tpm2_unseal -c sealed.ctx -o unsealed.txt
tpm2_create tương tác với vTPM để tạo đối tượng mật mã mong muốn.
- -C primary.ctx: Sử dụng ngữ cảnh khoá chính mà chúng ta đã tạo trước đó.
- –u sealed.pub: Lưu trữ phần công khai của khoá niêm phong (cần thiết để mở niêm phong) trong sealed.pub.
- -r sealed.priv: Lưu trữ phần riêng tư của khoá niêm phong trong sealed.priv.
- -i secret.txt: Tệp chứa khoá bí mật cần được niêm phong.
tpm2_load: Tải khoá niêm phong vào TPM bằng cách sử dụng các phần công khai và riêng tư (sealed.pub, sealed.priv) rồi lưu ngữ cảnh của khoá vào sealed.ctx.
tpm2_unseal: giải mã (mở) dữ liệu đã được mã hoá (niêm phong) trước đó bằng đối tượng niêm phong vTPM.
Xin lưu ý rằng: Bạn chỉ có thể dùng các tệp primary.ctx, sealed.priv trên một thiết bị vTPM. Bất cứ ai có quyền truy cập vào thiết bị vTPM và các tệp này đều có thể truy cập vào dữ liệu được niêm phong. Bạn có thể sử dụng thêm chính sách về giá trị PCR để niêm phong dữ liệu, nhưng điều này nằm ngoài phạm vi của lớp học lập trình này.
7. Dọn dẹp
Chạy các lệnh sau trong bảng điều khiển đám mây hoặc môi trường phát triển cục bộ:
gcloud config set project <project-id>

# Delete the CGKE cluster
gcloud container clusters delete cgke-attestation-codelab --zone us-central1-c

# Delete the Artifact Registry
gcloud artifacts repositories delete codelab-repo --location=us

# Delete the web server VM instance
gcloud compute instances delete cgke-attestation-codelab-web-server --zone=us-central1-c

# Delete the GCP service account
gcloud iam service-accounts delete codelab-csa@<project-id>.iam.gserviceaccount.com

# Delete the role
gcloud iam roles delete Confidential_Computing_Workload_User
Thay thế nội dung sau:
project-idlà giá trị nhận dạng duy nhất của dự án.
8. Bước tiếp theo
Tìm hiểu thêm về Nút GKE bảo mật.