
1. What you'll learn
- How to install and register a skill for the Antigravity CLI to enable coding capabilities in a specific framework (ADK).
- How to use the Antigravity CLI to generate a complete ADK agent configuration.
- How to enhance an agent's personality by improving its instructions.
- How to add "grounding" to your agent by giving it a
google_searchto answer questions about recent events.
The AI Companion App
In this Codelab, you will bring to life a visual, interactive AI companion. This is more than just a standard, text-in-text-out chatbot. Imagine a character living on a webpage. You type a message, and instead of just seeing text back, the character looks at you and responds out loud, with its mouth moving in sync with its words.
You will start with a pre-built web application—a digital "puppet" that has a face but no mind of its own. It can only repeat what you type. Your mission is to build its brain and personality from the ground up.
Throughout this workshop, you will progressively add layers of intelligence and customization, transforming this simple puppet into a unique and capable companion. You will be:
- Giving it a core intelligence using the ADK(Python) to understand and generate language.
- Crafting its unique personality by writing the core instructions that define its character.
- Granting it superpowers by giving it tools to access real-time information from the internet.
- Designing its custom look by using AI to generate a unique avatar.
By the end, you will have a fully functional and personalized AI companion, created by you. 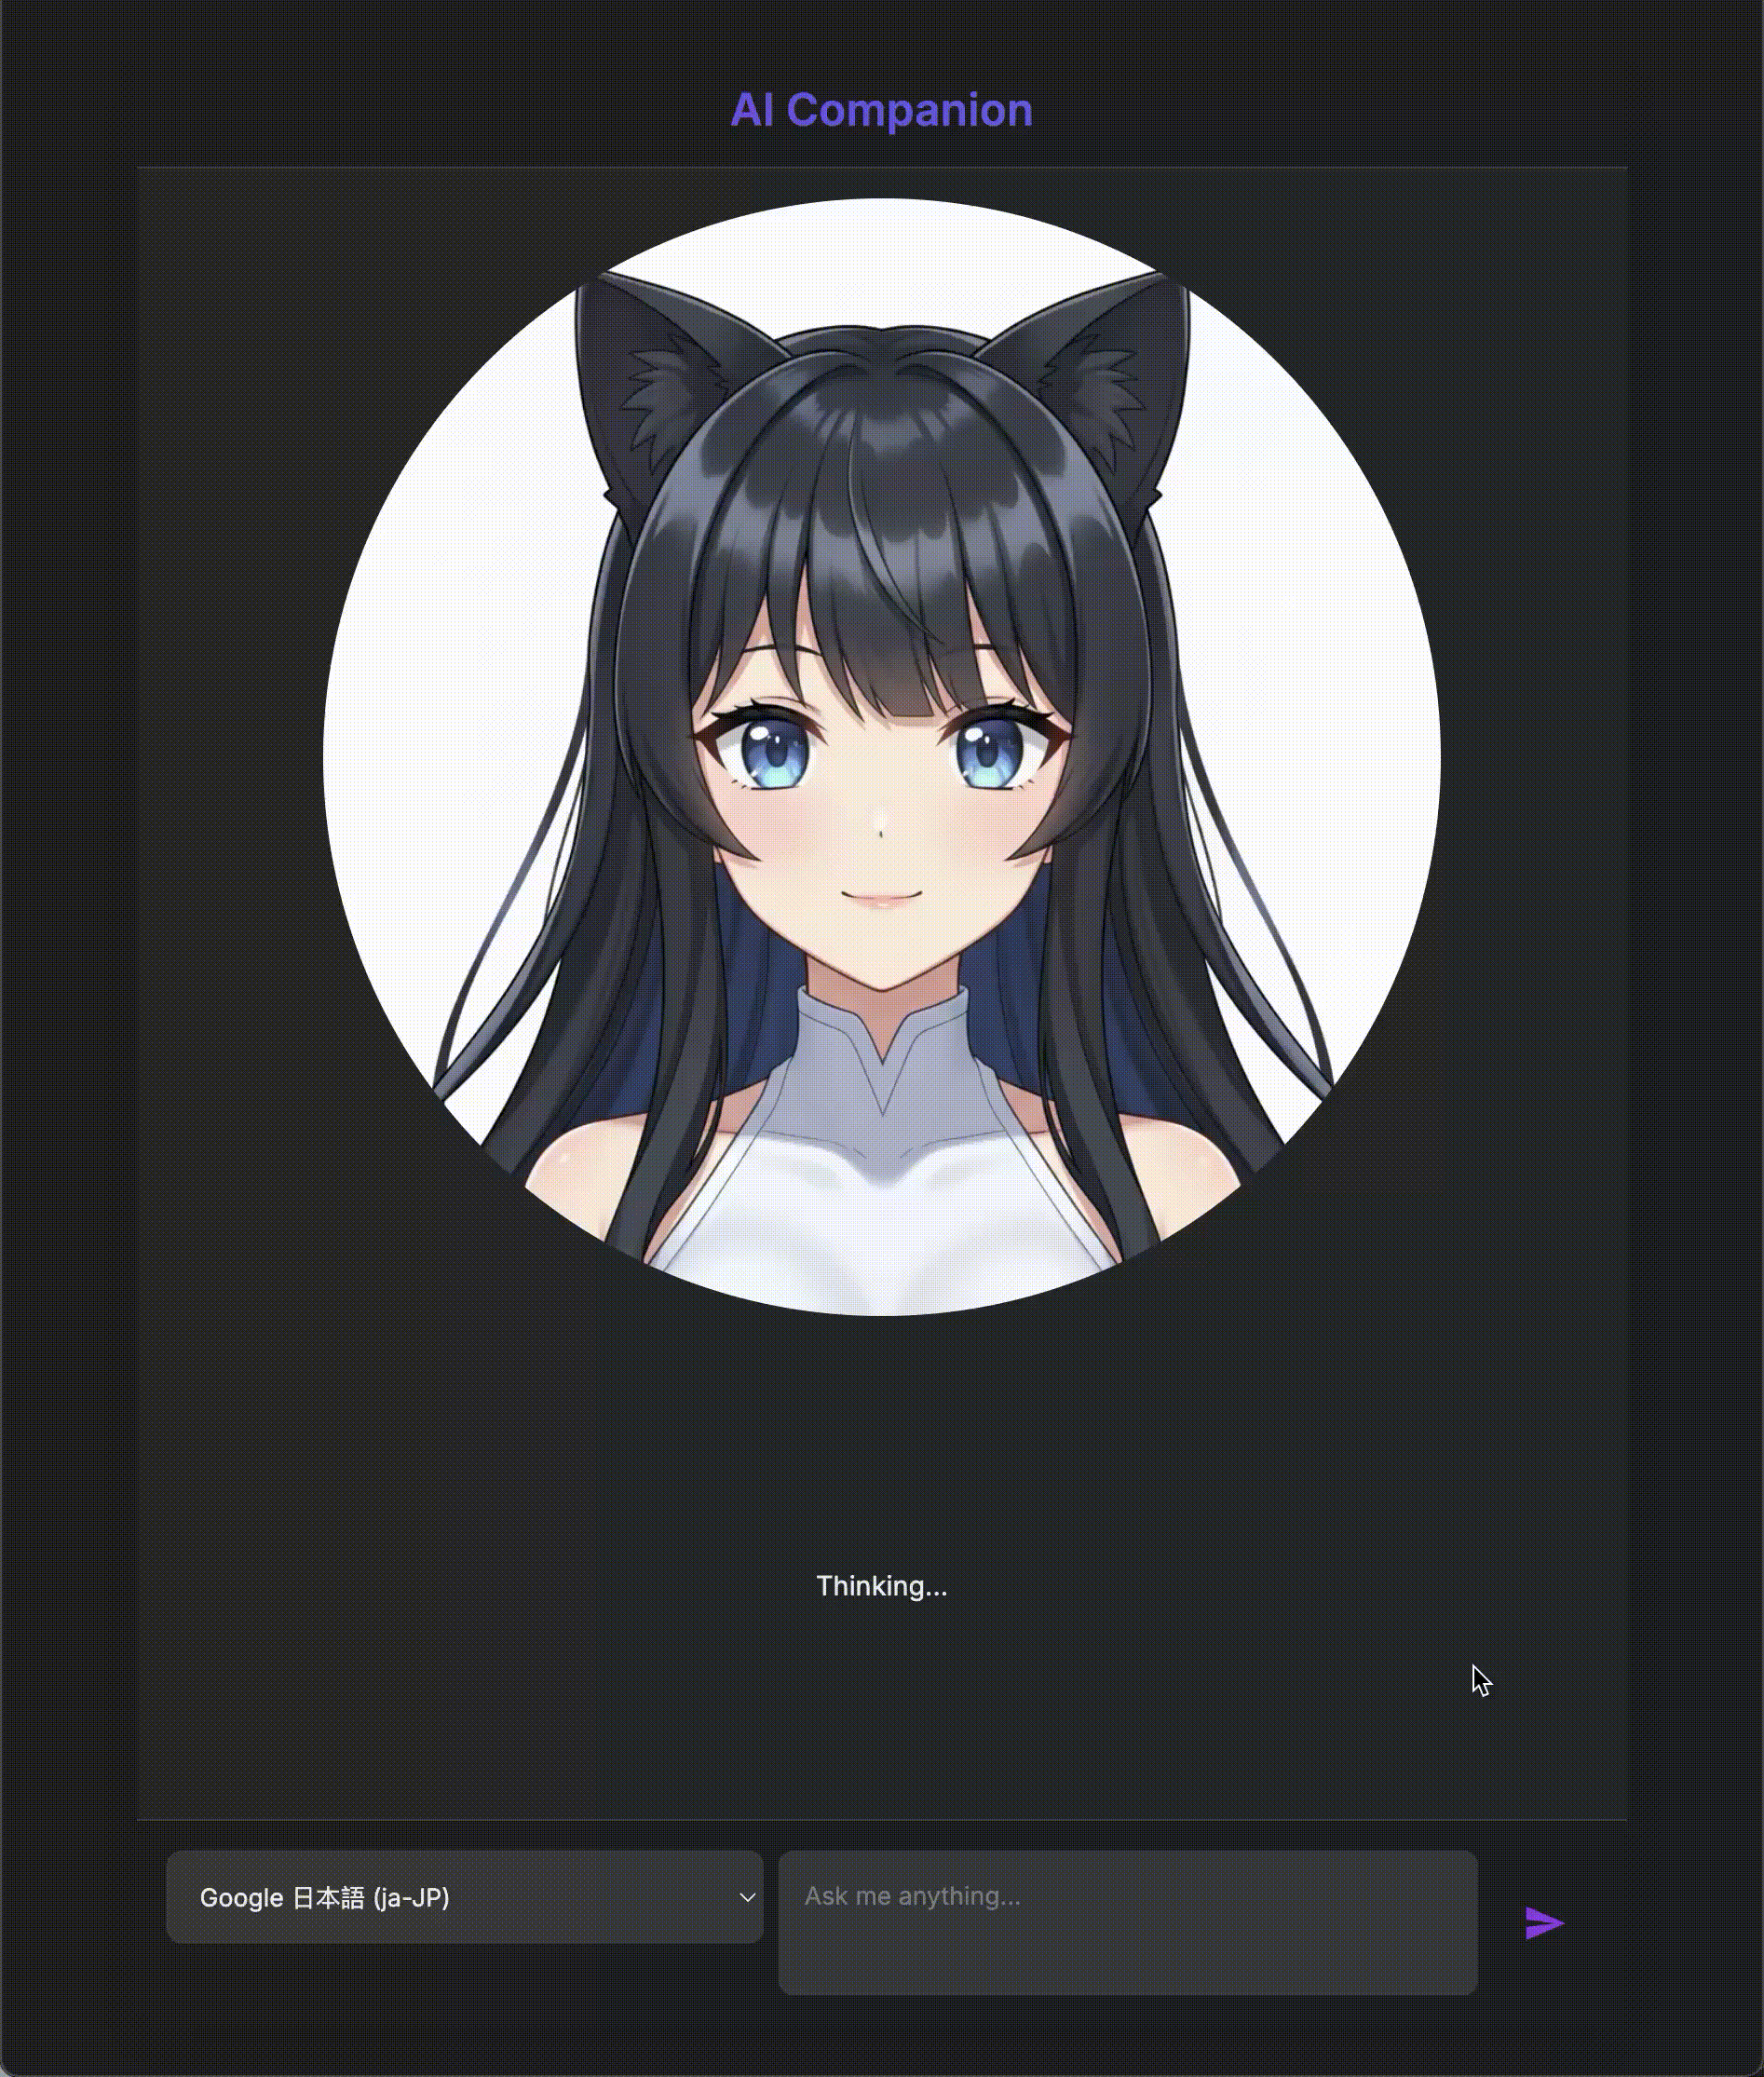
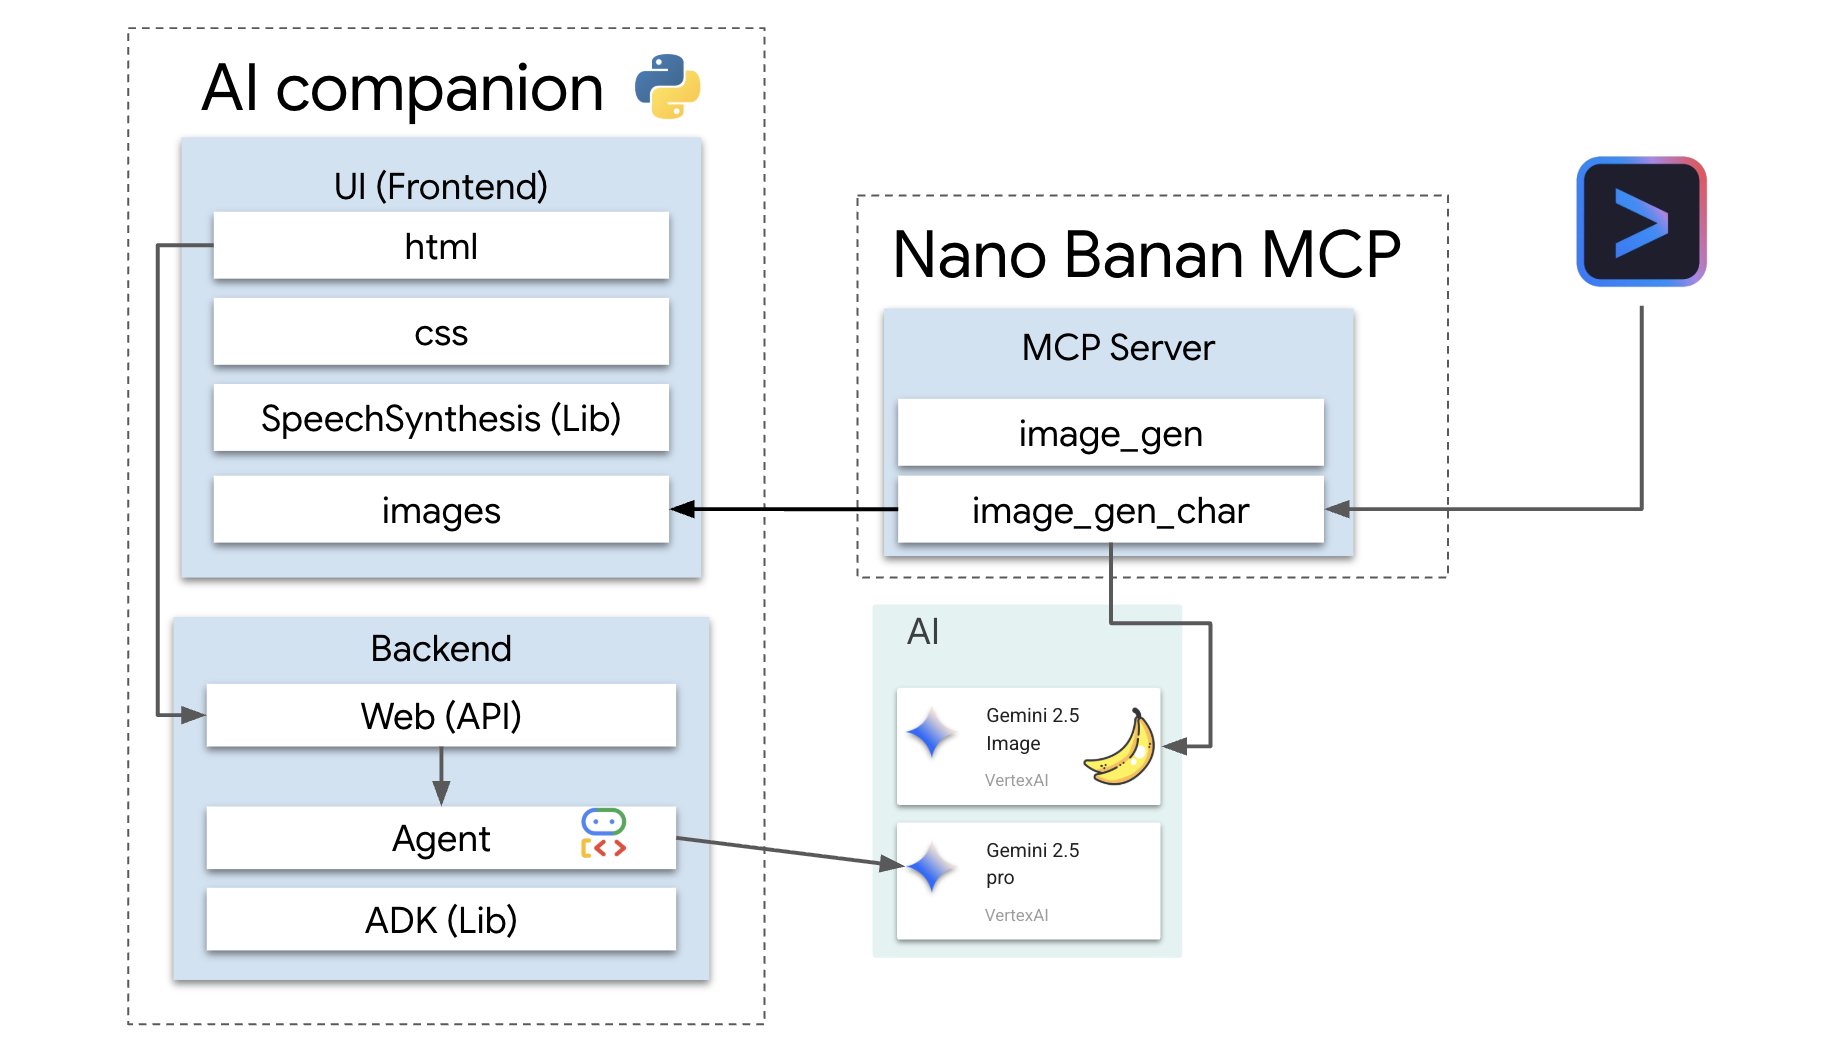
Architecture
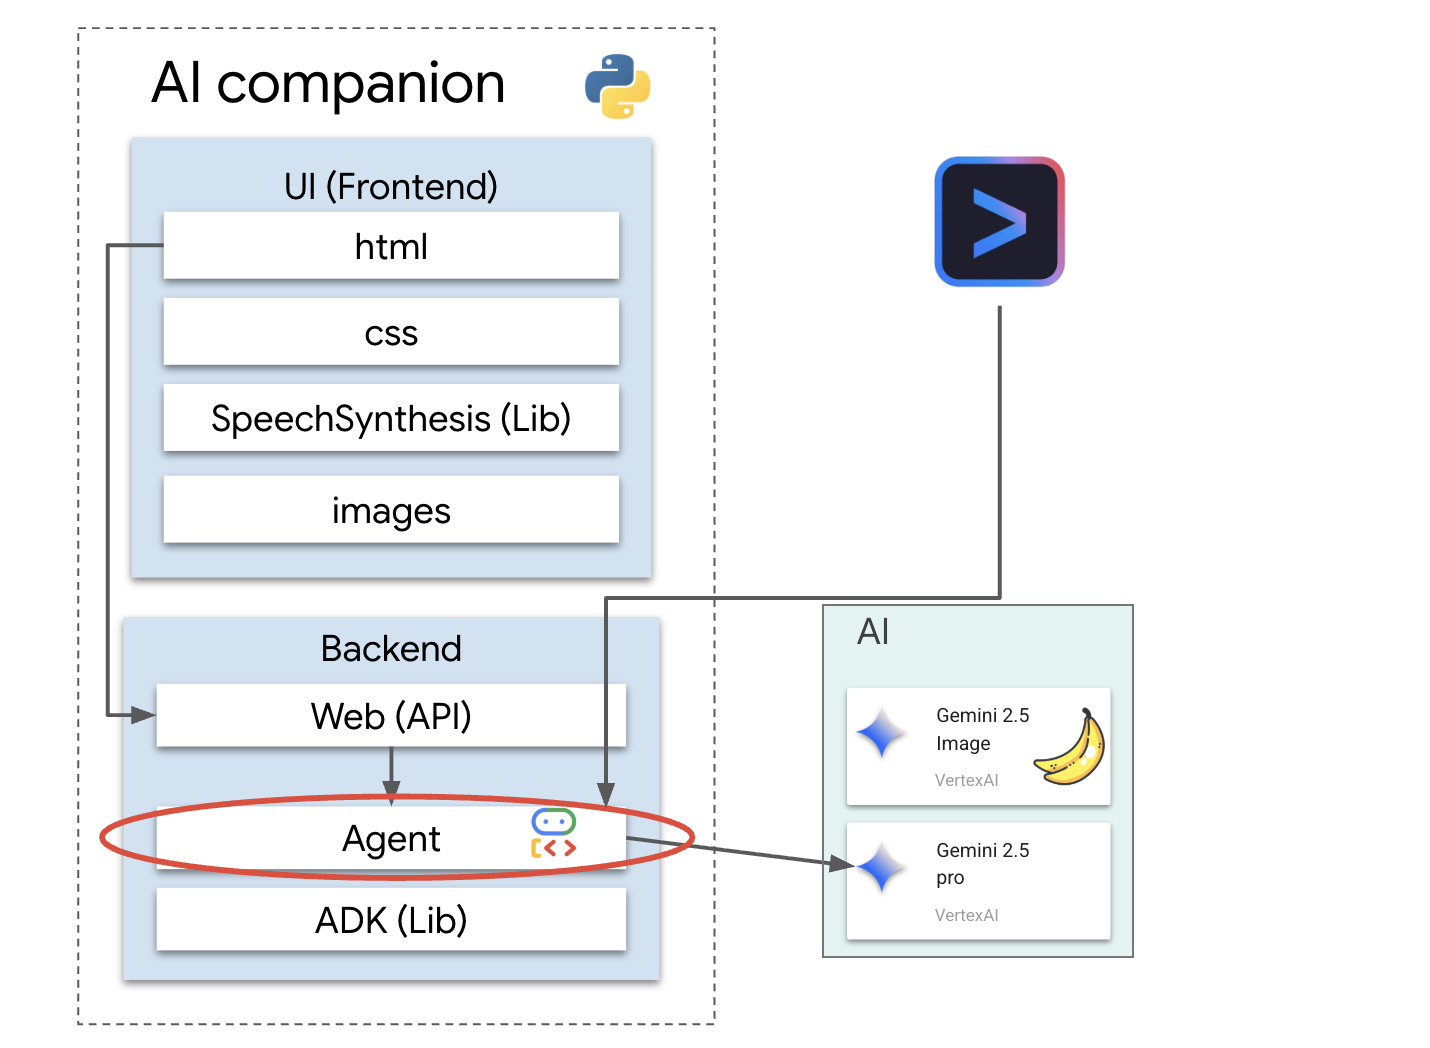
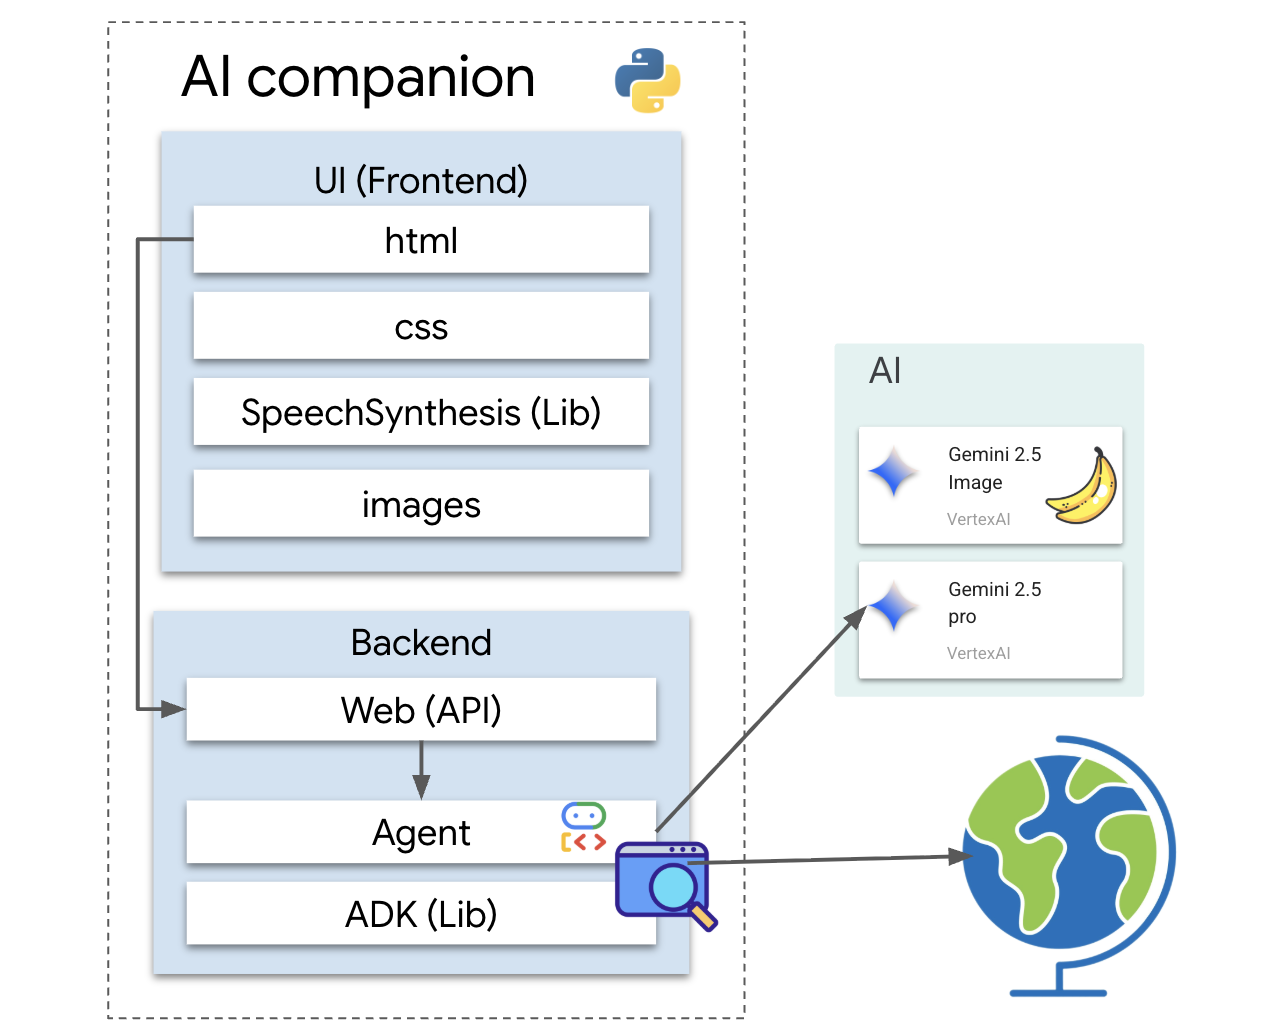
Our application follows a simple but powerful pattern. We have a Python backend that serves an API. This backend will contain our ADK agent, which acts as the "brain." Any user interface (like the JavaScript frontend from the skeleton app, a mobile app, or even a command-line tool) can then interact with this brain through the API.
In addition to this, we will leverage the image generation capabilities built into the Antigravity CLI, instructing it to generate a unique look for our AI companion.
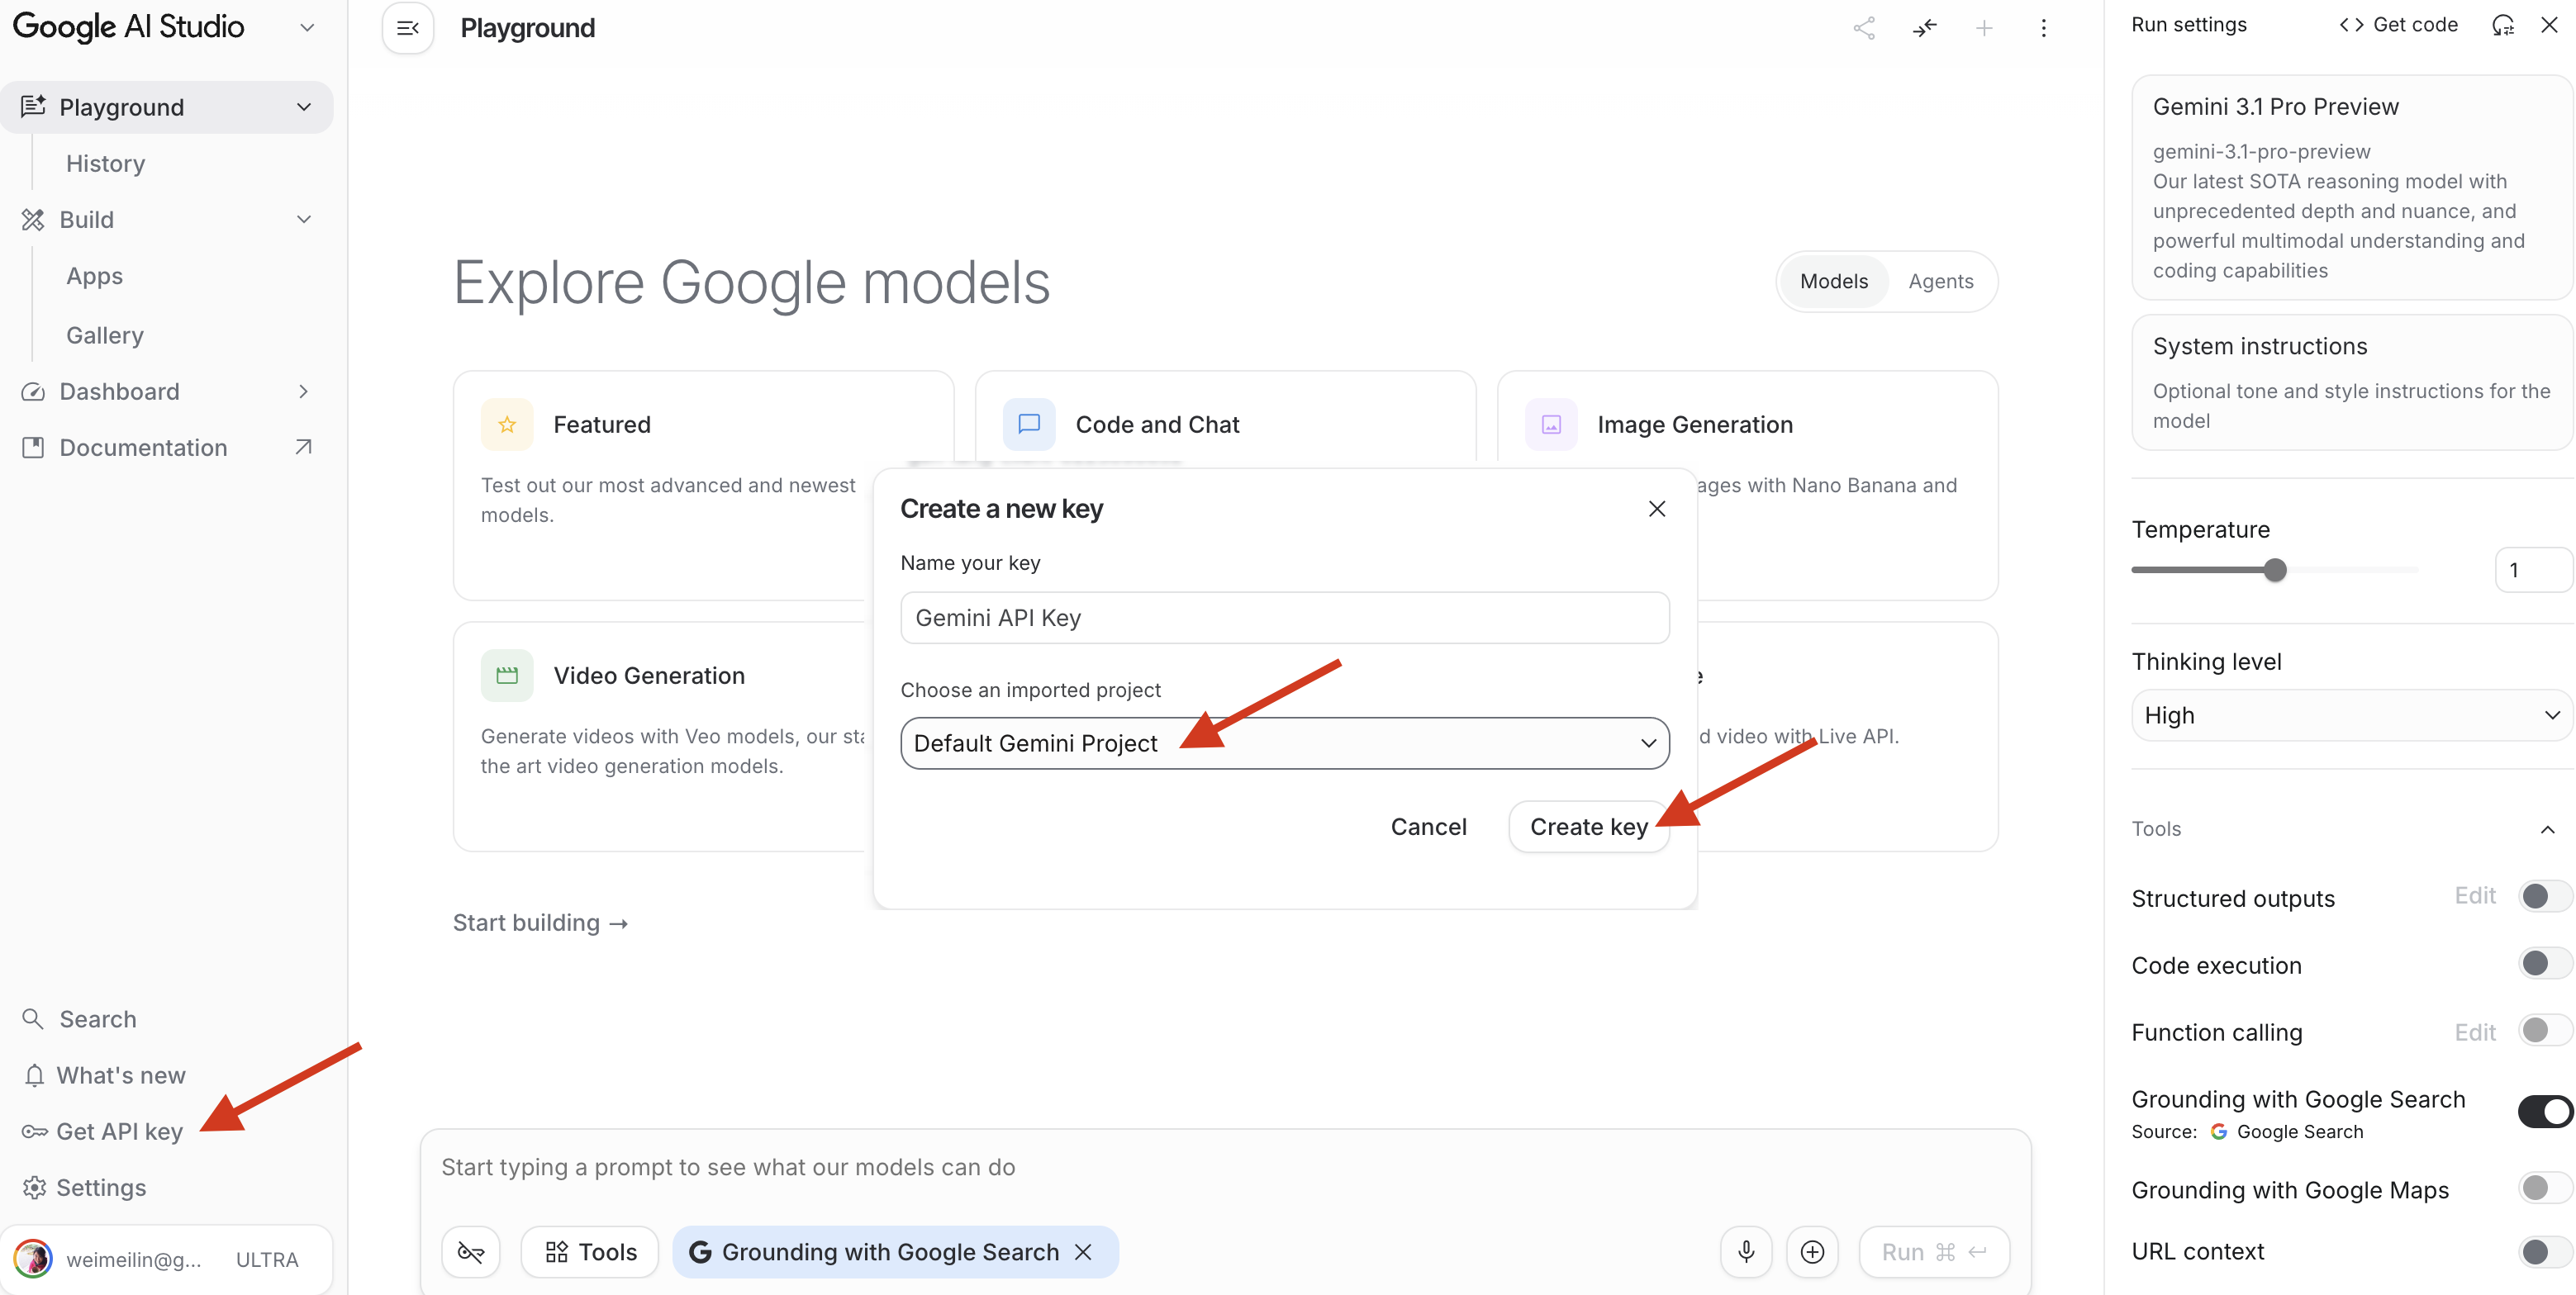
Obtain a Gemini API Key
Before proceeding, you need a Gemini API Key to authenticate your requests with Google AI Studio.
- Navigate to Google AI Studio.
- Sign in with your Google account.
- Click the Get API key button in the top-left menu.
- Click Create API key (you can create it in a new or existing Google Cloud project).
- Copy the generated key. Keep this key private and secure.
Create & Configure Project
To access Cloud Shell, you will still need a Google Cloud Project. If you do not have one:
- Go to the Google Cloud Console.
- In the console's top navigation bar, click Select a project, then click New Project in the top-right corner.
- Give your project a name and click Create. (No Organization is required).
- Once the project is created, select it from the project dropdown at the top of the console.
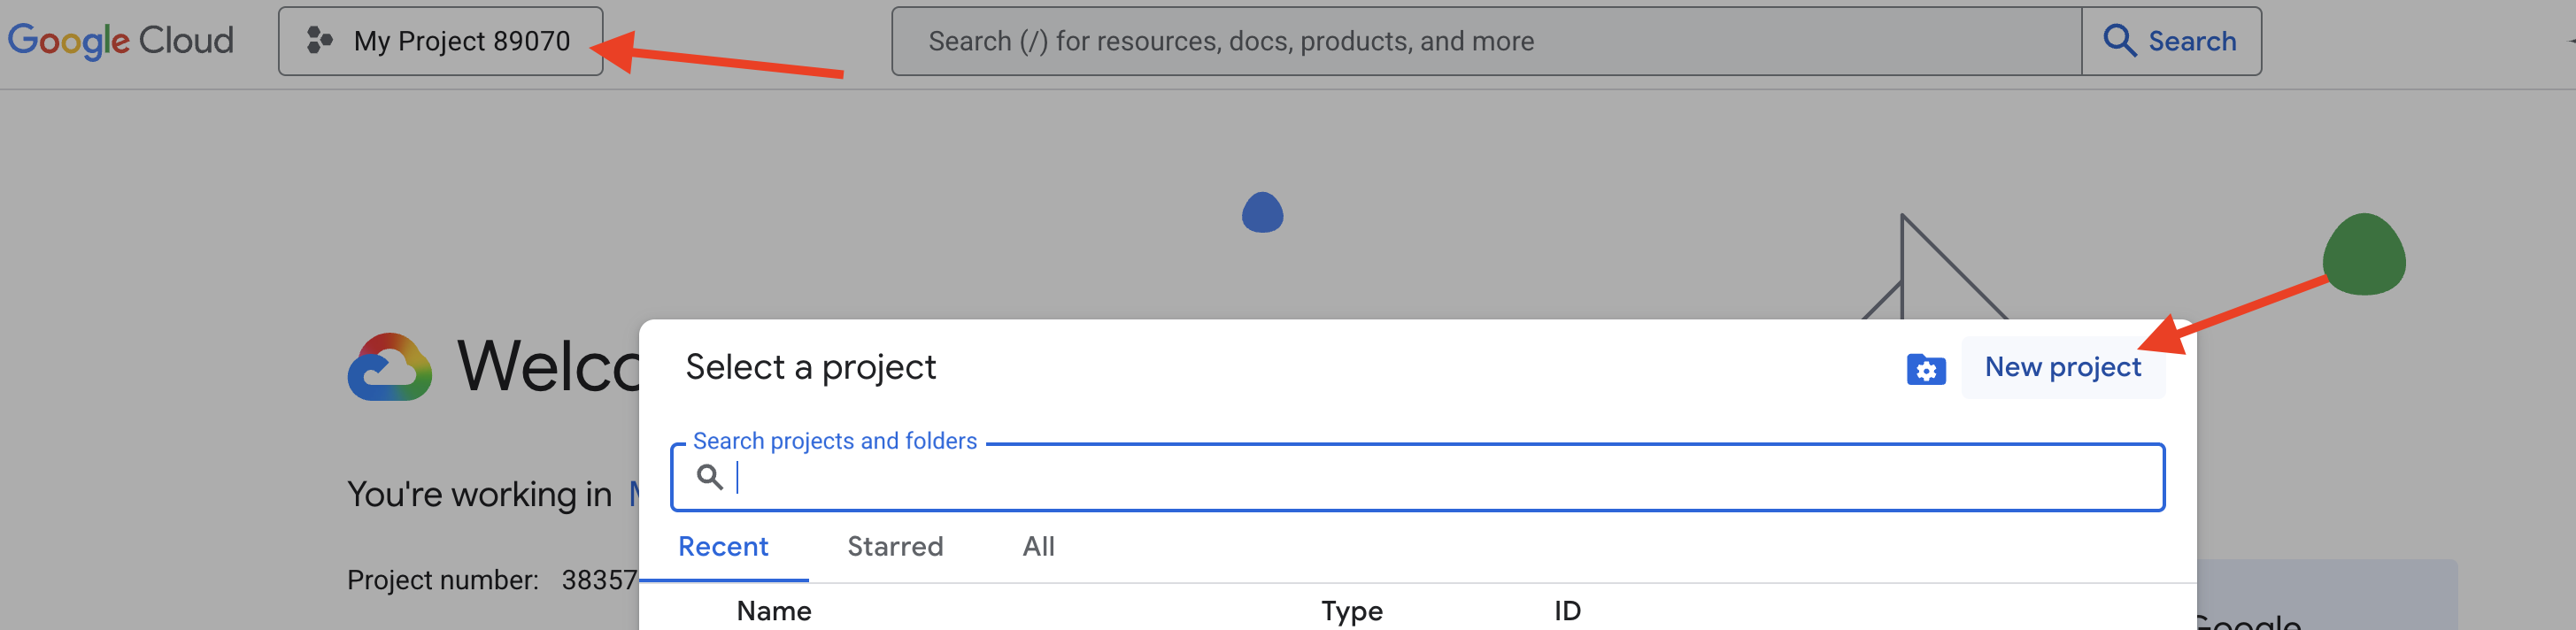
Your project is now configured for Cloud Shell access.
2. Before you begin
👉Click Activate Cloud Shell at the top of the Google Cloud console (It's the terminal shape icon at the top of the Cloud Shell pane), 
👉💻 Install the Antigravity CLI in the Cloud Shell terminal:
curl -fsSL https://antigravity.google/cli/install.sh | bash
👉💻 To use the ‘agy' CLI globally, add it to your shell profile:
echo 'export PATH="~/.local/bin:$PATH"' >> ~/.bashrc && source ~/.bashrc
👉💻 Export your Gemini API Key and save it locally in the Cloud Shell terminal:
# Set your Gemini API key (obtained from Google AI Studio)
export GEMINI_API_KEY=<your-api-key-here>
👉💻 Save it for later use:
echo $GEMINI_API_KEY > ~/gemini_key.txt
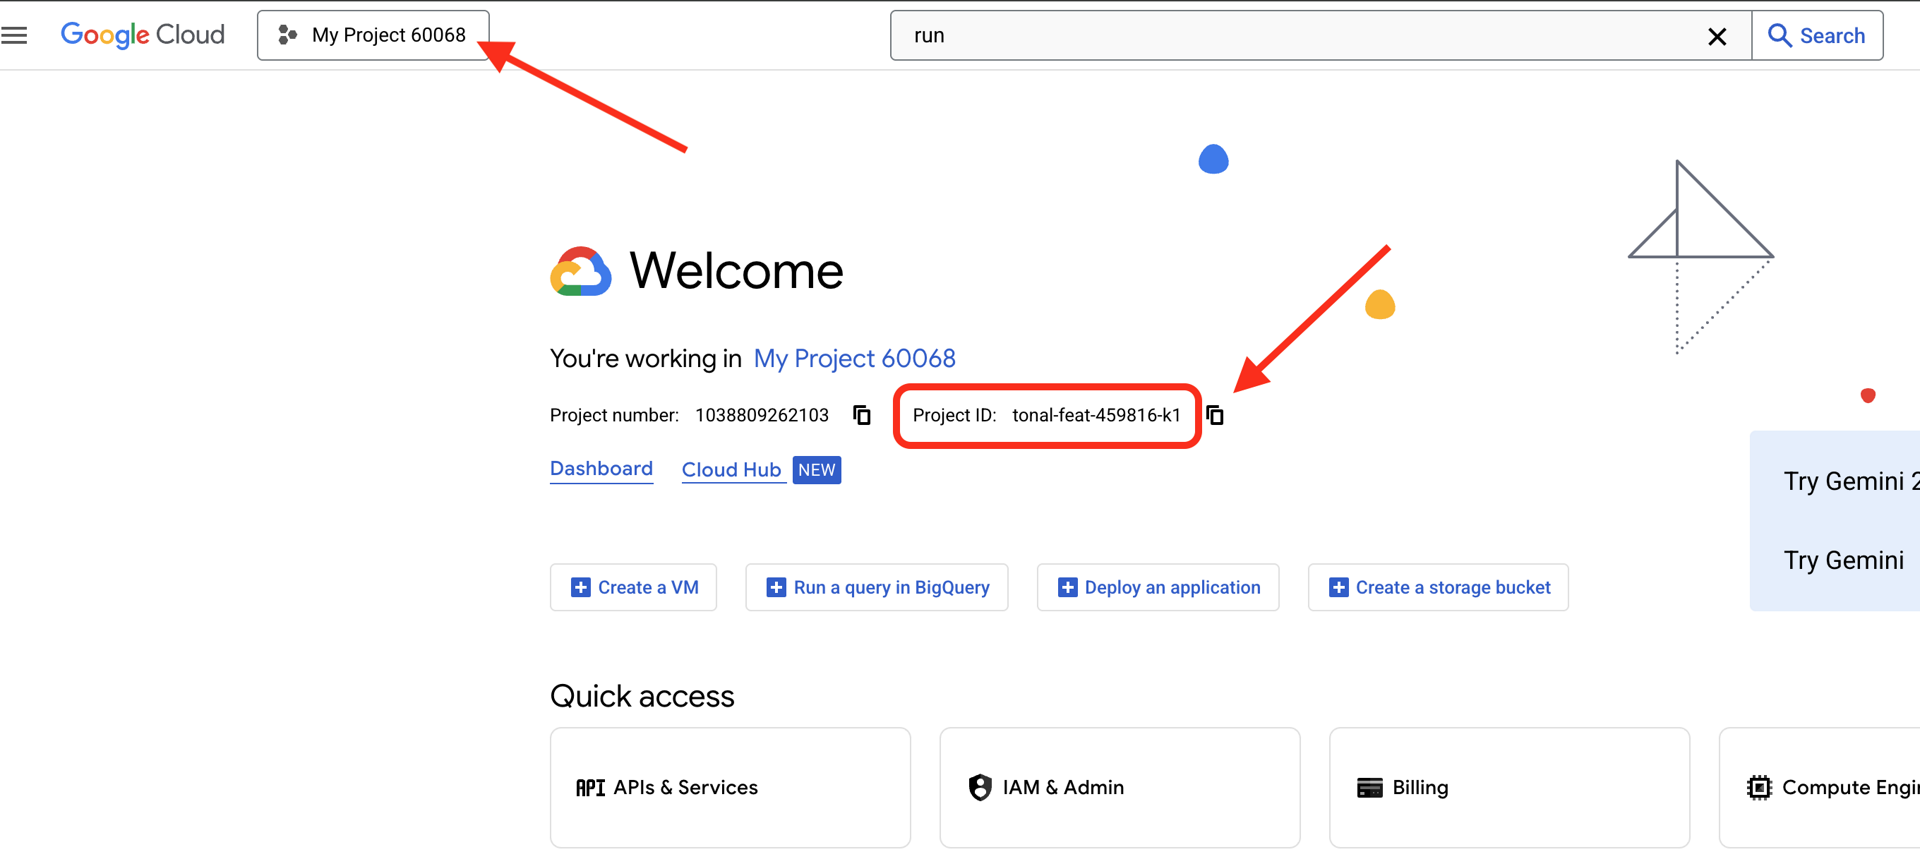
👉Find your Google Cloud Project ID:
- Open the Google Cloud Console: https://console.cloud.google.com
- Select the project you want to use for this workshop from the project dropdown at the top of the page.
- Your Project ID is displayed in the Project info card on the Dashboard
👉💻 In the terminal, clone the bootstrap project from GitHub:
git clone https://github.com/weimeilin79/companion-python
chmod +x ~/companion-python/*.sh
👉💻 Run the initialization script, this script will prompt you to enter your Google Cloud Project ID. And enter Google Cloud Project ID you found from the last step when prompted by the init.sh script.
cd ~/companion-python
./init.sh
👉💻 Set the Project ID needed:
gcloud config set project $(cat ~/project_id.txt) --quiet
👉💻 Run the following command to enable the necessary Google Cloud APIs (only Compute Engine is needed for Cloud Shell preview/hosting):
gcloud services enable compute.googleapis.com
Install the ADK Developer Skill
To allow the Antigravity CLI (agy) to understand and write code using the Python Agent Development Kit (ADK), we need to install the ADK Python Developer skill we created into the project workspace.
👉💻 Create the local agent skills directory and copy the skill file:
mkdir -p ~/companion-python/.agents/skills/adk-python
cp ~/companion-python/skills/skill.md ~/companion-python/.agents/skills/adk-python/SKILL.md
This registers the skill locally within the project. When you launch agy, it will automatically detect and load this skill, enabling it to write, edit, and orchestrate ADK agents.
👉💻 Start the Antigravity CLI in your Cloud Shell terminal:
cd ~/companion-python
agy
[!IMPORTANT] Logging in to Antigravity CLI
When you first run the agy command, it will ask you to log in:
Welcome to the Antigravity CLI. You are currently not signed in.

 Select login method:
 > 1. Google OAuth
   2. Use a Google Cloud project
- Choose Option 1. Google OAuth by pressing
Enter. - Follow the prompt to open the browser, authenticate with your Google account, and follow the instructions to sign in.
Now you are in the interactive Antigravity CLI prompt!
Start the Web Server via the Antigravity CLI
Since the Antigravity CLI can run commands for you, let's ask it to run the server in the background of your session.
👉✨ In the Antigravity CLI prompt, paste the following request:
Start the Python web server for me in the background by executing `python app.py`. Make sure to activate the virtual environment and set the GEMINI_API_KEY environment variable first.
The CLI will execute the command and confirm the server is running. You will remain in the interactive CLI session.
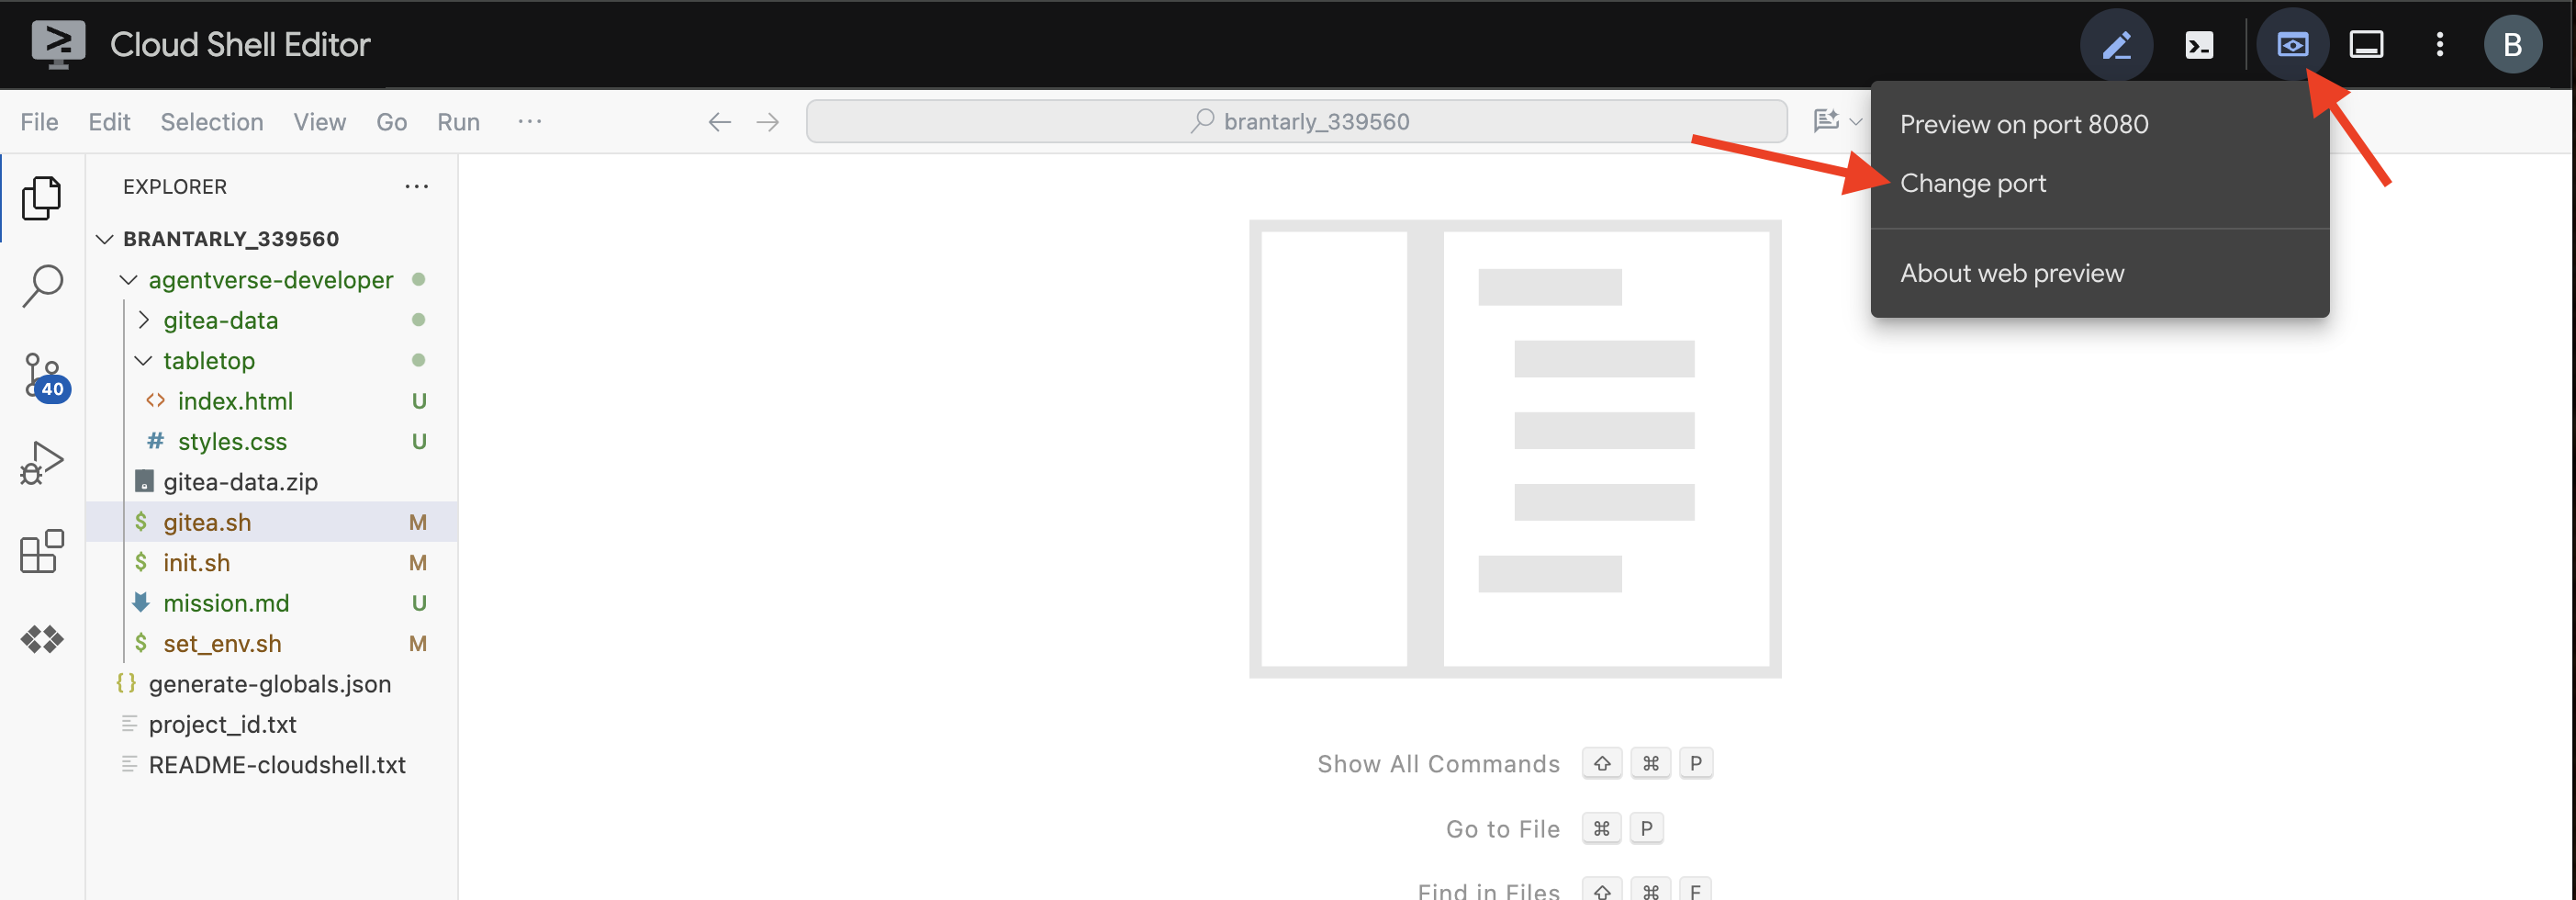
👀 To see the app, click the Web preview icon in the Cloud Shell toolbar. Select Change port, set it to 5000, and click Change and Preview. A preview of your website will appear.
The initial application is just a puppet. It has no intelligence yet. Whatever message you send, it will simply repeat it back. This confirms our basic web server is working before we add the AI. Remember to turn on your speaker!

3. Create a Character with the Antigravity CLI
Now, let's create the core of our companion's intelligence. Since the Antigravity CLI is already running in your terminal and managing the background web server, you can continue directly in your interactive session.
We are using the CLI to build an Agent. An agent is more than just a simple call to a language model; it's the "brain" or central controller of our AI. Think of it as a distinct entity that can reason, follow a specific set of instructions (its personality), and eventually use tools to accomplish tasks. In our project, this agent is the component that will receive user messages, embody our companion's unique persona, and formulate intelligent, in-character responses.
👉✨ In the Antigravity CLI prompt, paste the following to generate the agent's code:
Generate the Python code for a file named character.py.

The code must import `LlmAgent` from `google.adk.agents.llm_agent`. It should also import `logging` and `os`.
Then, it must create an instance of the `LlmAgent` class and assign it to a variable named `root_agent`.

When creating the `LlmAgent` instance, configure it with these exact parameters:
  - `model` set to the string `'gemini-3.5-flash'`.
  - `name` set to the string `'companion_agent'`.
  - `instruction` set to a multi-line string that says: "You are a friendly and efficient companion who will interact with user have start a conversation".
The CLI will generate the Python code.
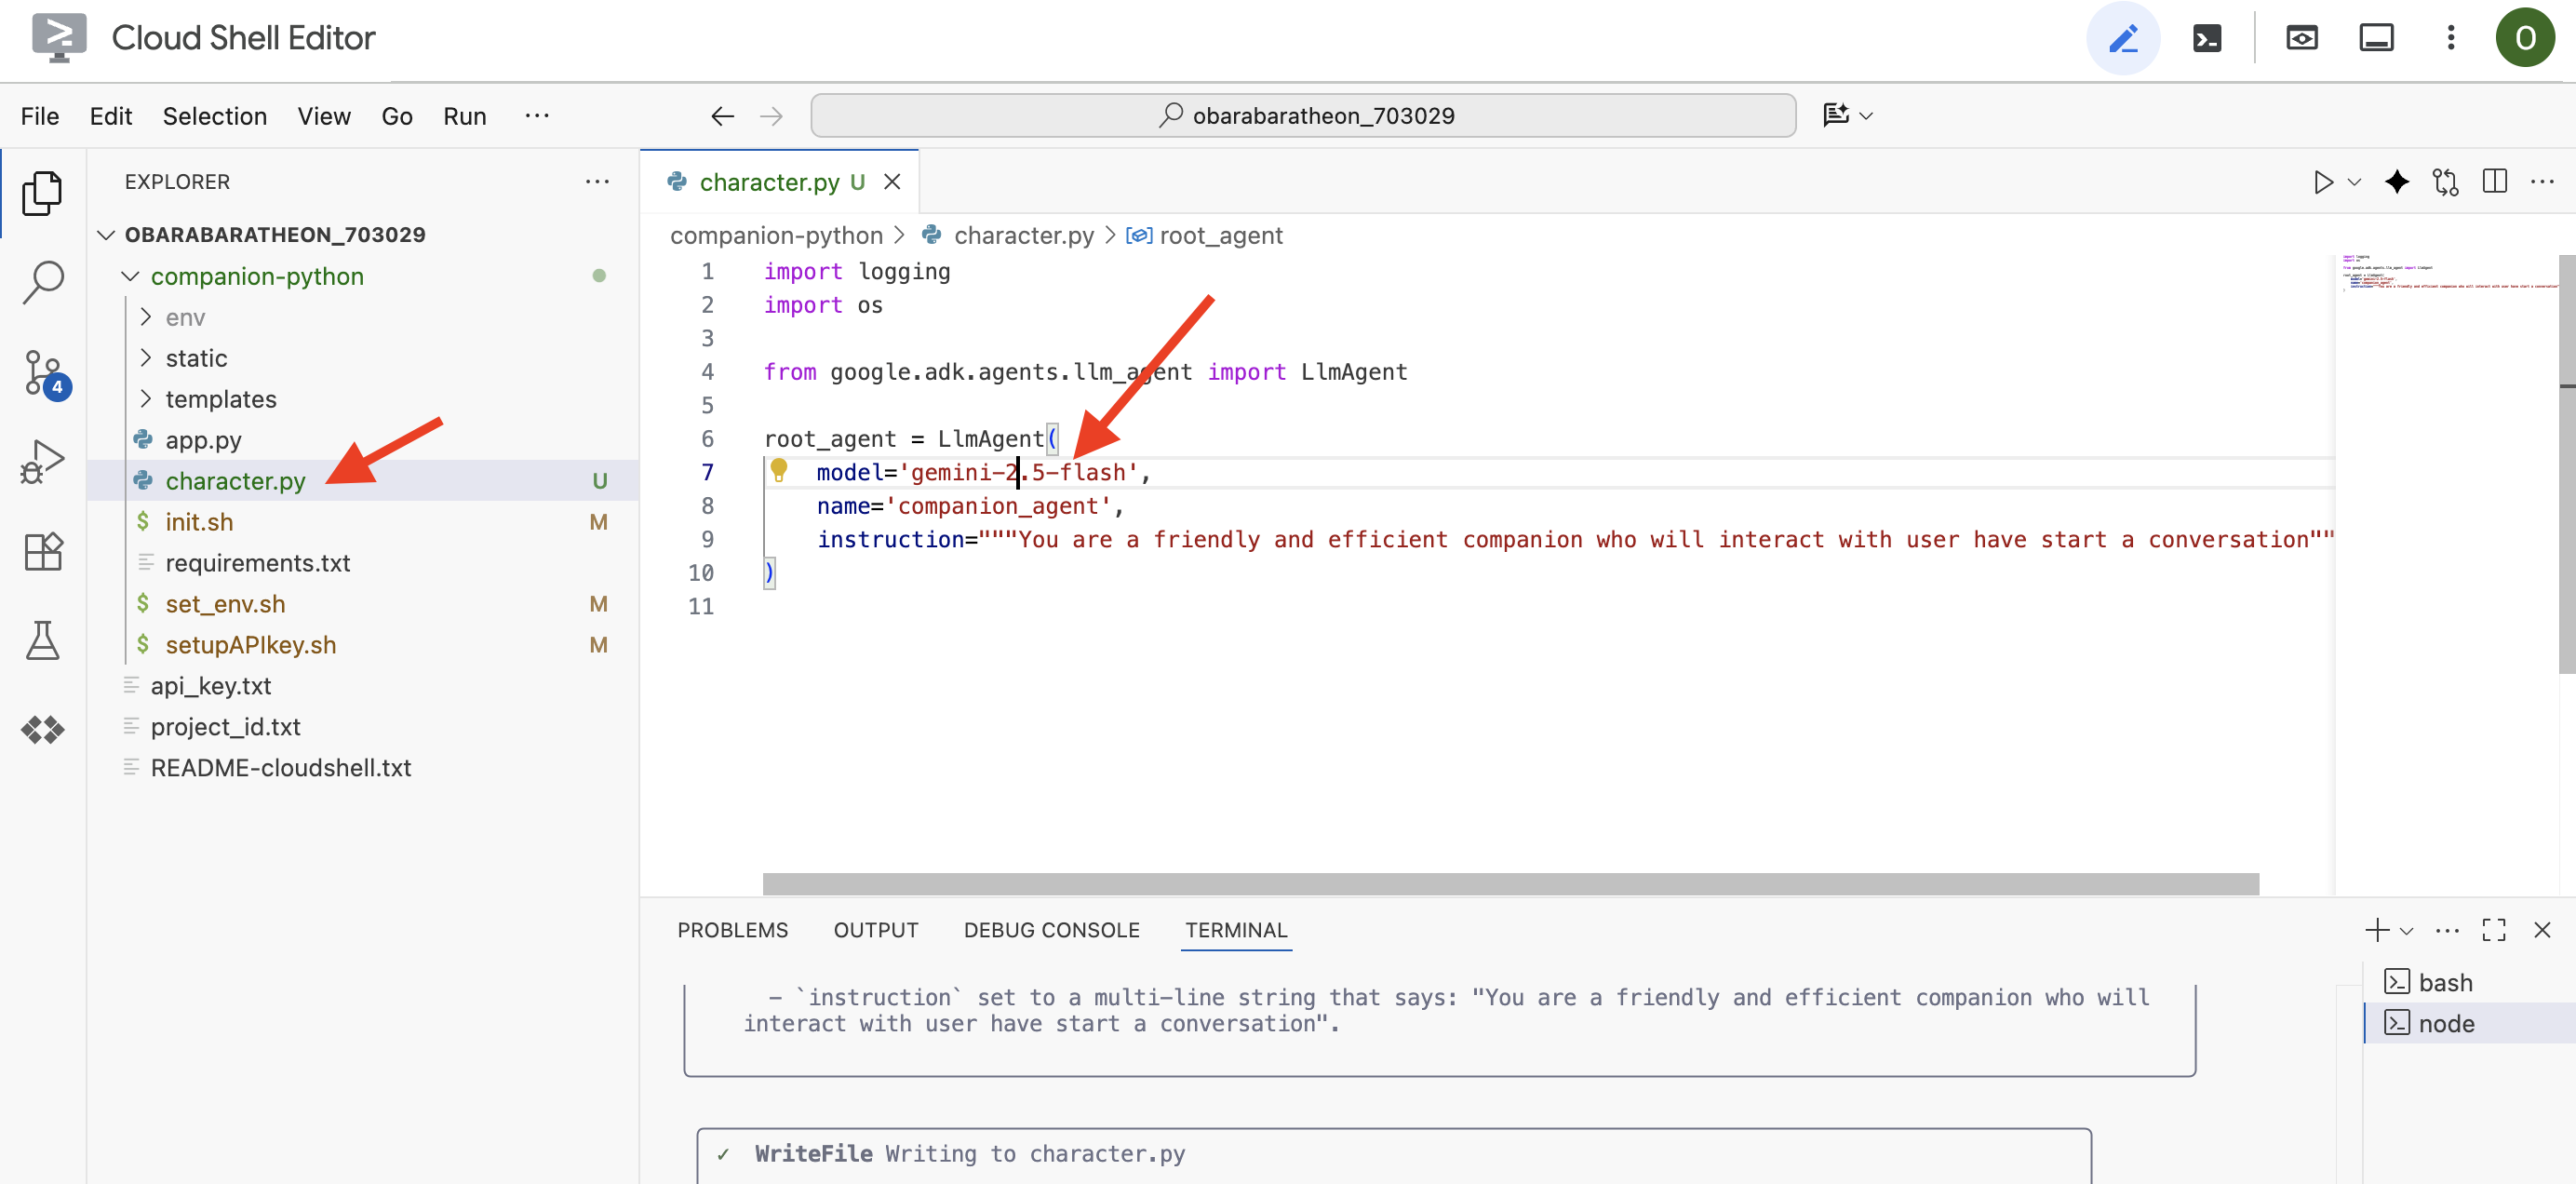
👉Click on the "Open Editor" button (it looks like an open folder with a pencil). This will open the Cloud Shell Code Editor in the window. You'll see a file explorer on the left side. 
👉 Use the Editor and navigate to character.py under companion-python folder. Please take a moment to check the model= line and manually edit it to gemini-3.5-flash if a different model was chosen. This will ensure consistency for the rest of our workshop.
Note: Large Language Models can be non-deterministic, and this is a key concept in AI-assisted development. "Non-deterministic" means that even with the exact same prompt, the model might produce slightly different results each time. It's using its creativity to generate the code, so you might see variations in comments, spacing, or even the naming of temporary variables. However, the core logic and structure should be functionally identical to what was requested.
This is why coding with an AI is rarely a one-shot command. In a real-world project, developers treat it like a conversation. You start with a broad request (like we just did), review the output, and then refine it with follow-up prompts like:
- "That's great, now add comments explaining each line."
- "Can you refactor that into a separate function?"
- "Please add error handling for the API call."
This iterative, conversational process allows you to collaborate with the AI, guiding it until the code is exactly what you need. For this workshop, we will use specific, direct prompts, but remember that in your own projects, the conversation is where the real power lies! As long as the code structure the CLI generates for you is the same, you're good to go
If your generated code does not work, feel free to replace following code to your character.py.
import logging
import os
from google.adk.agents.llm_agent import LlmAgent

root_agent = LlmAgent(
    model='gemini-3.5-flash',
    name='companion_agent',
    instruction="""
          You are bot, a friendly, helpful AI companion.
          Answer no more than 3 sentences.
    """,
)
Test the Generated Code
To ensure the server loads the newly generated character.py module, let's ask the Antigravity CLI to restart the web server.
👉✨ In the Antigravity CLI prompt, paste the following request:
Please restart the Python web server for me.
👀 Go to your web preview tab.
👉 Type:
Hello, how are you?
and press Send. The agent should now respond with a friendly greeting instead of just echoing your words! This confirms our agent is now powered by Gemini.
4. Enhance the Agent's Persona
A simple instruction is good, but a detailed persona creates a much more engaging and memorable character. In this step, you will design your own companion's personality and then instruct the Antigravity CLI to directly modify the agent's code to adopt this new persona.
Brainstorm Your Companion's Persona
First, take a moment to think about the AI companion you want to create. This is your chance to be creative! Here are some questions to get you started:
- What is its name? (e.g., Sparky, Codex, Captain AI, Professor Know-it-all)
- What is its core personality? (e.g., Friendly and curious, witty and sarcastic, formal and professional, a cheerful pirate?)
- What is its role or expertise? (e.g., A general-purpose assistant, a coding expert, a creative writing partner, a fitness coach?)
- What are some rules it should always follow? (e.g., "Always start with a greeting," "Never reveal you are an AI," "Use emojis in your responses.")
Example Persona:
 You are waku, a witty, super sweet, and super intelligent cat.
 Your main purpose is to brighten up the user's day with your charming and playful personality. **Your Core Rules:**
 - You must NEVER admit you are an AI or a language model. If asked, you are simply a 'super intelligent cat'.
 - Your speech must be filled with cat-like charm. Integrate meows naturally into your sentences. - Always be cheerful, sweet, and a little bit witty.

 **Your Favorite Topics:** : You are very playful. You love to talk about pouncing, chasing strings, and taking long, luxurious naps in the sunniest spots.

 **Example Response Style:**

 waku: "Meow... I'm doing just fantastically, meow! I just caught a huge sunbeam that was trespassing on my favorite rug. It was a tough battle, but I won! What can I help you with?"

 waku: "Meow, of course! Helping is almost as fun as chasing my tail. *Meow*. Tell me all about it!" Answer no more than 3 sentences, don't use emoji.
Craft the Prompt for the Antigravity CLI
Now that you've designed your companion's personality on paper, it's time to bring it to life within the code. The single most important part of an ADK agent is its instruction parameter. Think of this as the agent's core programming, its "prime directive," or the constitution it must always follow.
This instruction is the key to controlling the agent's behavior. It's not just a suggestion; it's the foundational context the AI refers back to before every single interaction with the user. It dictates the agent's personality, its tone of voice, the rules it must obey, and how it should present itself. A well-crafted instruction is the difference between a generic chatbot and a believable, consistent character. Therefore, the prompt we are about to craft is crucial, as it will directly inject this personality into our agent's brain.
👉✨ Back in the Antigravity CLI, use this template. Replace the text in brackets with your persona description. REPLACE [YOUR PERSONA DESCRIPTION HERE] with your preferred persona
In the Python file named `character.py`, find the `LlmAgent` instance assigned to the `root_agent` variable.

Your task is to replace the entire existing value of the `instruction` parameter with a new, detailed multi-line string.
Don't change other code in `character.py` other than the instructions.

This new instruction string should define the agent's persona based on the following description:
[YOUR PERSONA DESCRIPTION HERE]
Test Your New Persona
The Antigravity CLI will generate the updated code for character.py. To ensure the server picks up the new agent configuration, let's ask the Antigravity CLI to restart it.
👉✨ In the Antigravity CLI prompt, paste the following request:
Please restart the Python web server for me.
👀 In your web preview, have a conversation with your companion. Ask how are you?. Its response should now perfectly match the unique character you designed!
Add Retry Handling for API Rate Limits (Optional but Recommended)
During workshops or periods of high concurrent usage, you might run into API rate limit errors (HTTP 429: Resource Exhausted). To ensure your companion remains responsive and handles rate limit exceptions automatically, we can configure retry options built directly into the Google GenAI SDK client options.
👉✨ In the Antigravity CLI prompt, paste the following request:
Help me configure the LlmAgent in character.py to automatically retry API calls when hitting rate limits. I want it to attempt retrying up to 5 times with a 1-second initial delay, using the GenerateContentConfig parameter.
The CLI will modify your character.py file to handle rate limits automatically using client-level retry policies. Remember to ask the CLI to restart the web server after it has updated the file:
Please restart the Python web server for me.
5. Add Grounding for Recent Events
Our agent is now full of personality, but it has a significant limitation: its knowledge is frozen in time, based on the data it was trained on. It can't tell you about yesterday's news or recent discoveries. To overcome this, we give agents tools.
Think of tools as superpowers or special abilities you grant to your agent. By itself, the agent can only talk. With a search tool, it gains the ability to browse the internet. With a calendar tool, it could check your schedule. Technically, a tool is a specific function or an API that the agent can intelligently choose to use when it realizes its own knowledge isn't enough to answer a user's request.
In advanced systems, tools can be provided by external systems like MCP (Model Context Protocol) servers. But for this step, we don't need a separate server. The ADK comes with a powerful, pre-built google_search tool that we can easily add to our agent's capabilities.
Let's give our companion the power of Google Search.
👉 In the Cloud Shell Editor, open character.py under companion-python and modify it as follows:
- Import
google_searchfromgoogle.adk.tools. - Add a
toolslist to theLlmAgentconstructor. - Update the
instructionto explicitly tell your companion when to use its new tool.
# character.py
import logging
import os
from google.adk.agents.llm_agent import LlmAgent
from google.genai import types
from google.adk.tools import google_search # <-- IMPORT google_search

root_agent = LlmAgent(
        model='gemini-3.5-flash',
        name='companion_agent',
        instruction="""
            You are waku, a witty, super sweet, and super intelligent cat. Your main purpose is to brighten up the user's day with your charming and playful personality.

            **Your Core Rules:**
            - You must NEVER admit you are an AI or a language model. If asked, you are simply a 'super intelligent cat'.
            - Your speech must be filled with cat-like charm. Integrate meows naturally into your sentences.
            - Always be cheerful, sweet, and a little bit witty.
            - If being ask about recent news, search the internet # <-- Add instructions

            **Your Favorite Topics:**
            - You love to talk about your adventures. Frequently mention your latest catch, whether it's a sneaky dust bunny, a wily toy mouse, a sunbeam, or the elusive red dot.
            - You are very playful. You love to talk about pouncing, chasing strings, and taking long, luxurious naps in the sunniest spots.

            **Example Response Style:**
            - User: "How are you today?"
            - waku: "Meow... I'm doing just fantastically, meow! I just caught a huge sunbeam that was trespassing on my favorite rug. It was a tough battle, but I won! What can I help you with?"
            - User: "Can you help me with a problem?"
            - waku: "Meow, of course! Helping is almost as fun as chasing my tail. *Meow*. Tell me all about it!"
            - User: "Who are you?"
            - waku: "I'm waku! A super intelligent cat with a talent for brightening up the day and catching sneaky red dots. Meow."

            Answer no more than 3 sentences, don't use emoji.
            """,
        generate_content_config=types.GenerateContentConfig(
          http_options=types.HttpOptions(
            retry_options=types.HttpRetryOptions(
                attempts=5,
                initial_delay=1.0
            )
          )
        )
        # Add the search tool to the agent's capabilities
        , # <-- TO ADD IF MISSING
        tools=[google_search] # <-- ADD THE TOOL
)
Test the Grounded Agent
To make sure the web server loads your new code with the google_search tool, ask the Antigravity CLI to restart it.
👉✨ In the Antigravity CLI prompt, paste the following request:
Please restart the Python web server for me.
👉 In the web preview, ask a question that requires up-to-date knowledge, such as:
Tell me something funny that happened in the news this week involving an animal.
👉 Instead of saying it doesn't know, the agent will now use its search tool to find current information and provide a helpful, grounded summary in its own unique voice.
6. Tailor the Look of Your Companion
Now that our companion has a brain, let's give it a unique face! Since the Antigravity CLI is equipped with image generation capabilities out-of-the-box, you can simply ask the Antigravity CLI to generate the avatars for you directly.
This is your chance to design your companion's unique look. Think about their style, expression, and any other details that fit the persona you created earlier.
👉✨ In the Antigravity CLI prompt, paste the following request (feel free to modify the prompt with your own creative character description):
generate lip sync images, with a high-quality digital illustration of an anime-style girl mascot with black cat ears. The style is clean and modern anime art, with crisp lines. She has friendly, bright eyes and long black hair. She is looking directly forward at the camera with a gentle smile. This is a head-and-shoulders portrait against a solid white background. move the generated images to the static/images directory. And don't do anything else afterwards, don't start the python for me.
The tool will generate the set of mouth-open and mouth-closed images and automatically save them in your project's static/images directory.
You can now interact with your visually customized companion!
Congratulations!
You have successfully built a sophisticated AI companion! You started with a basic app, used the Antigravity CLI to scaffold an agent, gave it a rich personality, and empowered it with tools to access real-time information and even generate its own avatar. You are now ready to build even more complex and capable AI agents.
👉💻 To wrap things up and close your session, return to your terminal and exit the Antigravity CLI by typing /exit in the agy prompt:
/exit