
1. Introduction
In this codelab, you will learn how to plan and build software applications with the Conductor plugin. Conductor is a Google-built, open-source plugin that enables spec-driven development features like planning and implementation tracking. You will start by building a "greenfield" application completely from scratch. Then, you will treat it as a "brownfield" project, iterating on it to add authentication and storage.
What you'll do
- Install the Conductor plugin in the Antigravity CLI or Claude Code
- Build a "Picker Wheel" web app from scratch using Conductor's planning and implementation capabilities
- Add personalization to the application by adding authentication and storage using Firebase
What you'll learn
- How to use the Conductor plugin to plan, implement, and review a "greenfield" application
- How to use the Conductor plugin to add features to a "brownfield" application
What you'll need
- A web browser such as Chrome
- A Google Cloud project with billing enabled
- Node.js installed (version 18+ recommended)
- A local code editor like Visual Studio Code
- A coding agent like Antigravity CLI or Claude Code
2. Before you begin
Create a Google Cloud Project
- In the Google Cloud Console, on the project selector page, select or create a Google Cloud project.
- Make sure that billing is enabled for your Cloud project. Learn how to check if billing is enabled on a project.
Start Cloud Shell
Cloud Shell is a command-line environment running in Google Cloud that comes preloaded with necessary tools.
- Click Activate Cloud Shell at the top of the Google Cloud console.
- Once connected to Cloud Shell, verify your authentication:
gcloud auth list - Confirm your project is configured:
gcloud config get project - If your project is not set as expected, set it:
export PROJECT_ID=<YOUR_PROJECT_ID>
gcloud config set project $PROJECT_ID
Enable APIs
Enable the Firebase Management API in your Google Cloud project.
gcloud services enable firebase.googleapis.com
Add Firebase to your project
The Firebase CLI comes pre-installed in Cloud Shell. From Cloud Shell, sign in with the same Google Account that gives you access to the Google Cloud project. If you are working locally, install the Firebase CLI by following the instructions.
firebase login
Run the following command to add Firebase to your Google Cloud project:
firebase projects:addfirebase
If this is your first time running the firebase CLI, answer any questions that you are asked.
Exit Cloud Shell
You may close the Cloud Shell window. In the following section we'll configure your local environment.
3. Install and authenticate CLI coding agents
In this step, you will prepare your local development environment by installing and authenticating Antigravity CLI or Claude Code in your local code editor using your Google Cloud credentials.
Install and Authenticate Antigravity CLI
- Install the latest version of the Antigravity CLI.
# MacOS and Linux curl -fsSL https://antigravity.google/cli/install.sh | bash # Windows Powershell irm https://antigravity.google/cli/install.ps1 | iex # Windows CMD curl -fsSL https://antigravity.google/cli/install.cmd -o install.cmd && install.cmd && del install.cmd - Restart your terminal so that
agyis added to your PATH. - Verify the installation has installed the latest version.
agy --version - Authenticate using your Google Cloud credentials.
- Start Antigravity CLI.
agy - When asked to Select login method, select Use a Google Cloud project. Open the secure authorization URL in a web browser. Sign in with your approved credentials and complete the authentication. The browser displays a unique alphanumeric authorization code. Copy this code, return to your terminal, and paste it into the the prompt.
- Start Antigravity CLI.
- Exit Antigravity CLI.Type
/exitfrom the CLI terminal to end your live Antigravity CLI session before continuing.
Install and Authenticate Claude Code
Alternatively, you can use the Conductor Plugin with Claude Code. Here we will install and authenticate Claude Code using your Google Cloud credentials.
- Install the latest version of Claude Code.
- Authenticate using your Google Cloud credentials.
- Start Claude Code.
claude - Type
/loginto select your login method. Choose the option 3rd-party platform · Amazon Bedrock, Microsoft Foundry, or Vertex AI and Google Vertex AI. To set up Google Vertex AI, choose Application Default Credentials (google auth), and complete the setup as prompted.
- Start Claude Code.
- Restart Claude Code.
4. Install the Conductor Plugin
Conductor is a Google-built, open-source plugin that enables spec-driven development features like planning and implementation tracking.
Install in Antigravity CLI
- Install the plugin:
- Antigravity CLI
agy plugins install https://github.com/gemini-cli-extensions/conductor
- Antigravity CLI
- Verify the installation:
- Start Antigravity CLI.
agy - Type
/conductorand you will see a list of commands like/conductor:conductor-setup,/conductor:conductor-new-track,conductor:conductor-implement, etc.
- Start Antigravity CLI.
- Exit the CLI.Type
/exitfrom the terminal to end your live CLI session before continuing.
Install in Claude Code
- Register the marketplace repository and install the Conductor plugin directly in your Claude Code session.
/plugin marketplace add gemini-cli-extensions/conductor /plugin install conductor /reload-plugin - Verify the installation.
- Type
/conductorand you will see a list of commands like/conductor-setup,conductor-new-track,conductor-implement, etc.
- Type
- Exit the CLI.Type
/exitfrom the Claude Code terminal to end your live CLI session before continuing.
5. Greenfield Development: The Picker Wheel
Now that your environment is set up, you will build a new application from scratch. You'll create a "Picker Wheel" — a lightweight web app that spins to select a random option.
Setup Product Context
- Create and change to a new project directory.We now work on a project in a
picker-wheeldirectory. Create this directory and change to it.mkdir picker-wheel cd picker-wheel - Start Antigravity CLI.Start a new CLI session from your project directory with either Antigravity CLI or Claude Code.
# Antigravity CLI agy # Claude Code claude- When asked "Do you trust the files in this folder?", select Trust folder (picker-wheel)
- Initialize Conductor.Run the setup command to scaffold the project and set up the Conductor environment.
# Antigravity CLI /conductor:conductor-setup # Claude Code /conductor-setup - Follow the interactive prompts.The interactive prompts you see won't match these examples exactly. Focus a simpler design to familiarize yourself with the Conductor workflow.
- Product goal: A web application that displays a configurable spinning wheel to select a random item from a list.
- Target Audience → General Public
- Interaction → Tap/Click to Spin
- Customization → Basic
- Platform → Desktop-First
- Product guidelines: Autogenerate.
- Tech stack:
- Languages → TypeScript/JavaScript - Ideal for full-stack web
- Frontend → Vue.js - Intuitive web interfaces
- Backend → Express.js - Fast Node backend
- Database → None - No database needed
- Workflow: Standard.
- Product requirements:
- User Stories → Customizable Options, Clear Winner Display
- Key Features → Editable Option List, Randomized Colors
- Constraints → Client-Side Only, High Performance
- Non-Functional → High Test Coverage, TypeScript & Vue.js, Responsive Design
conductor/directory. - Product goal: A web application that displays a configurable spinning wheel to select a random item from a list.
Create a New Track
A "Track" in Conductor represents a feature or a unit of work.
- Start a new track using
/conductor-new-rack.Conductor might propose an initial track based on the product context. Alternatively, you can propose your own or ask conductor to suggest a track. - Review the generated plan.Conductor will generate an
index.md, aspec.md, and aplan.mdinsideconductor/tracks/{track-id}/. Take a moment to read them. If everything looks good, Conductor will prompt you to save and commit the initial setup files.
Implement the Track
- Start implementation.
# Antigravity CLI /conductor:conductor-implement # Claude Code /conductor-implement - Verify the application.Throughout the implementation phase, Conductor will prompt you to manually test the application. For example, it will ask you to open the local web server, preview the application in your browser, and verify the changes. When the implementation is complete, you should see a functional picker wheel.
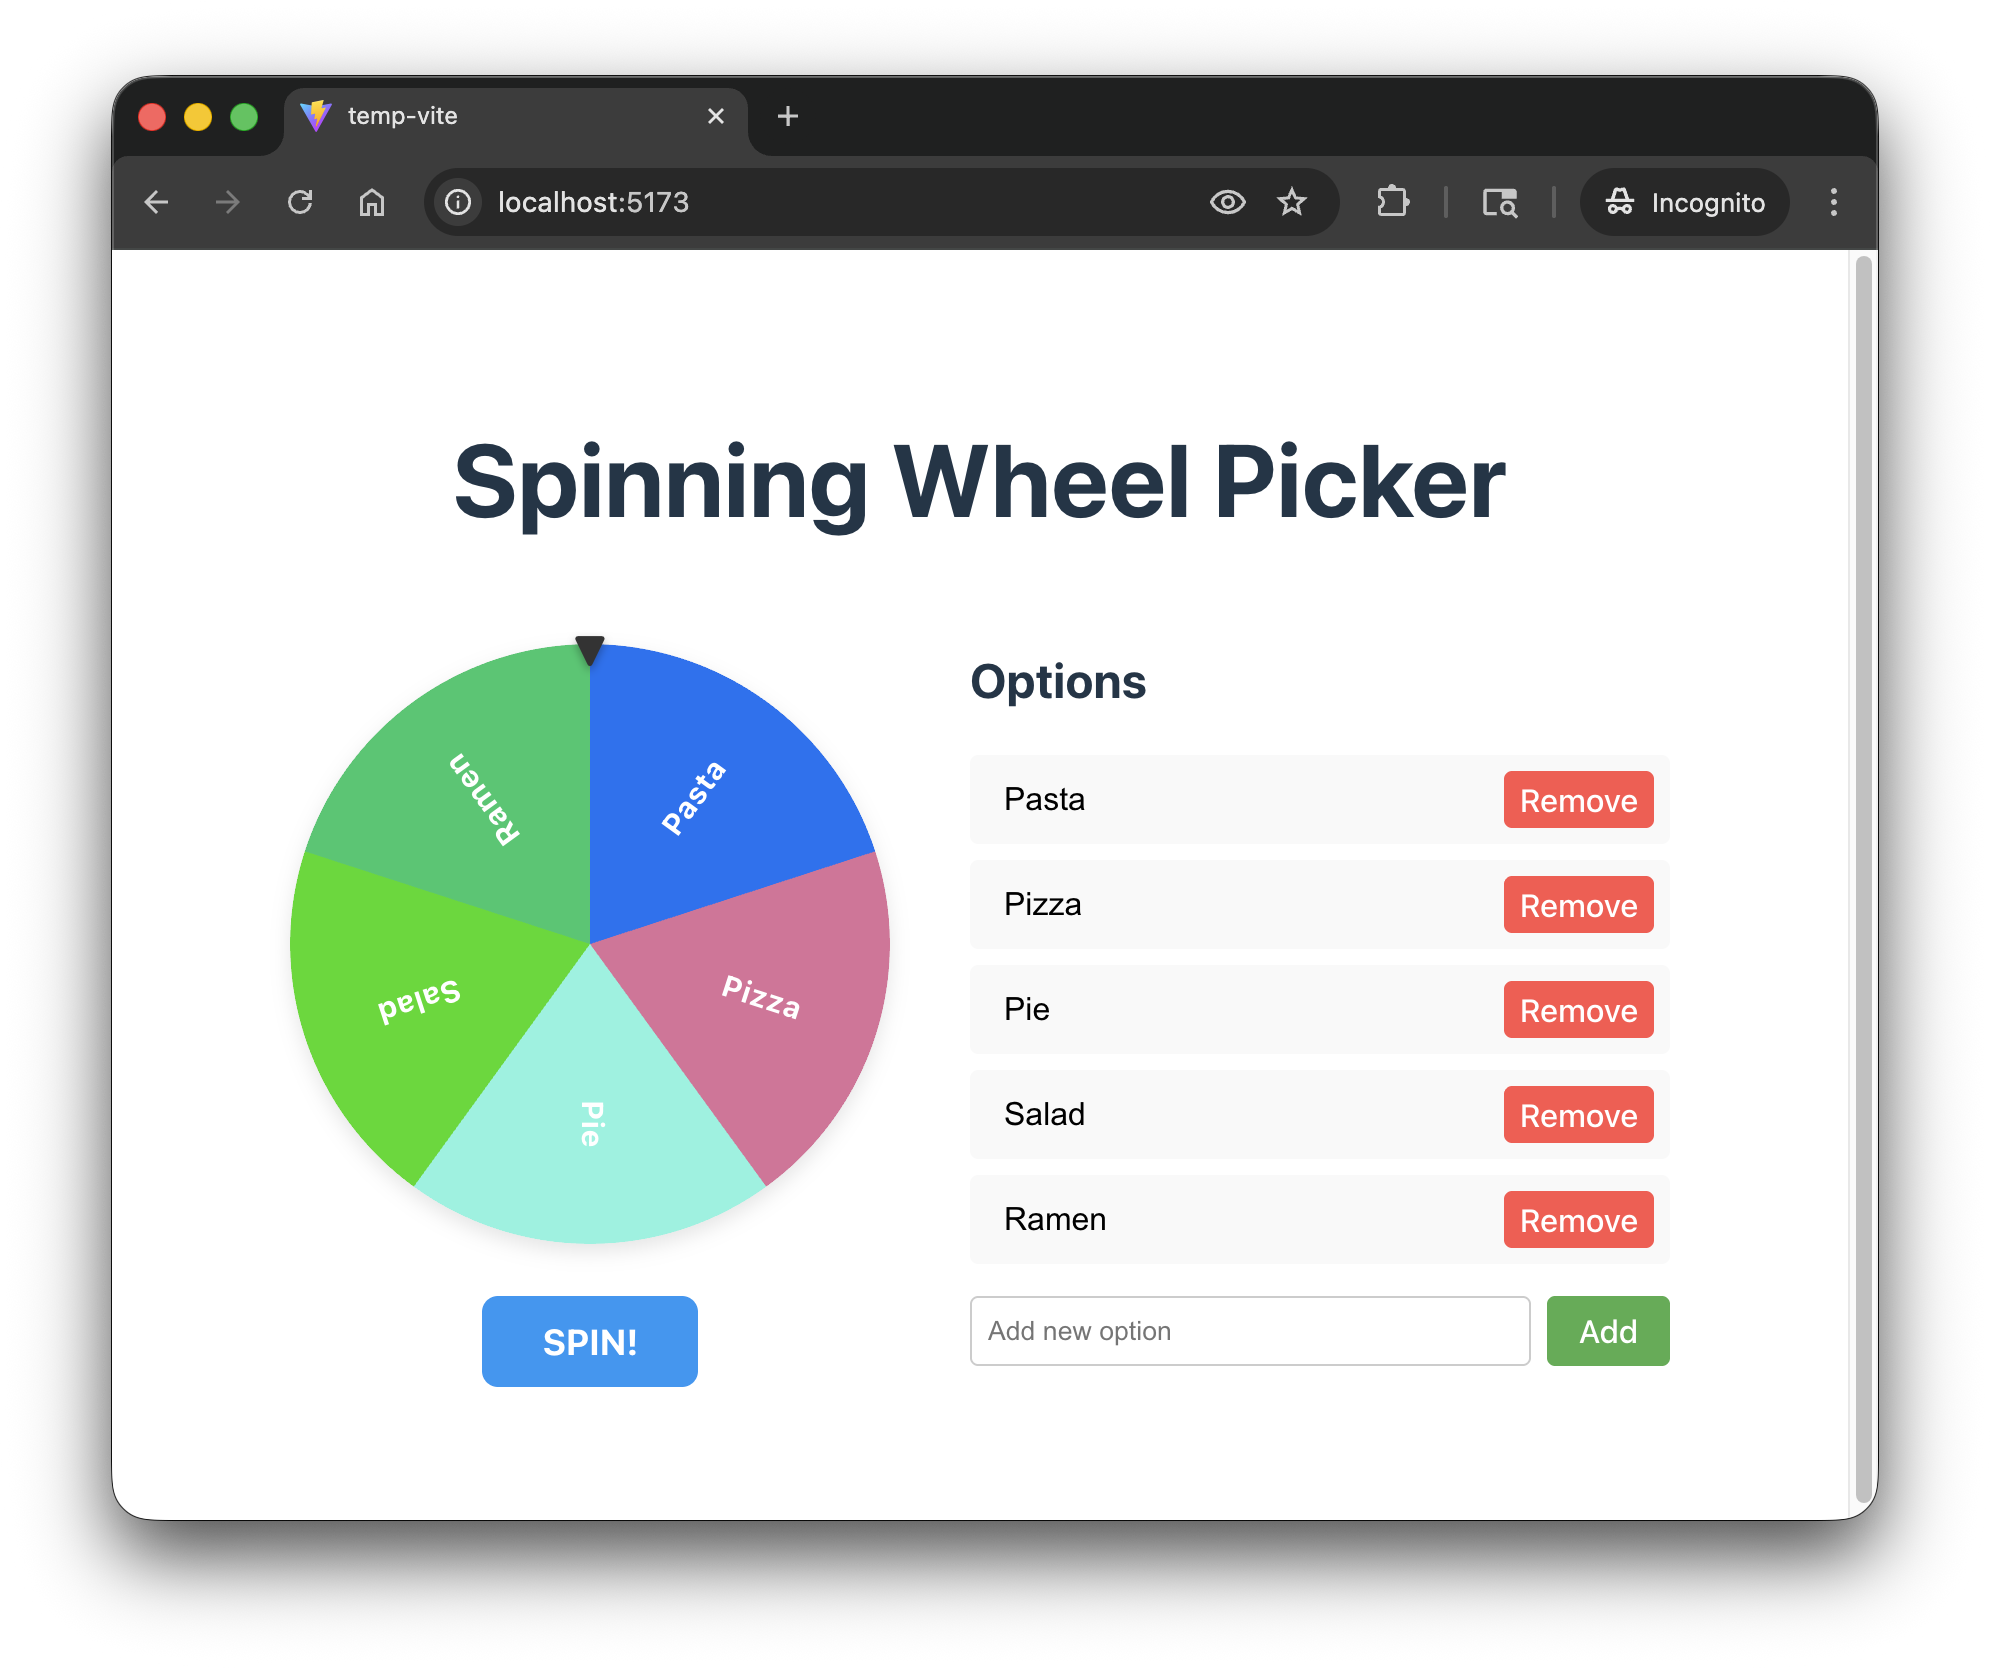
- Review the implementation.As a last step, you can ask Conductor to review the implementation. It should review the source code, synchronize the project documentation, and archive the track.
# Antigravity CLI
/conductor:conductor-review

# Claude Code
/conductor-review
6. Brownfield Iteration: Add Personalization
Now you will pivot to "brownfield" development. You will improve the picker wheel web application from the previous section so that signed-in users can save and restore their picker wheel configurations.
Create a Personalization Track
- In the following "brownfield" example, we will use Firebase for authentication and storage. Install the Firebase skills so Conductor can use it.
- Start your CLI agent.Start a new CLI session.
# Antigravity CLI /new # Claude Code /new - Start a new track.Start a new track.
# Antigravity CLI /conductor:conductor-new-track "I want users to be able to log in to their accounts and save their picker wheel configurations." # Claude Code /conductor-new-track "I want users to be able to log in to their accounts and save their picker wheel configurations." - Follow the interactive prompts.The interactive prompts you see will not match these examples exactly. Focus a simpler design to familiarize yourself with the Conductor workflow.
- Track goal:
- Auth Provider → Firebase Auth
- Saved Configs → Wheel Options
- Data Storage → Firestore
- Firestore Login UI → Modal Overlay
conductor/tracks/{track-id}. - Track goal:
- Review the generated plan.Take a moment to read a
index.md, aspec.md, and aplan.mdinsideconductor/tracks/{track-id}/. - Implement.If everything looks good, you can start the implementation.
# Antigravity CLI /conductor:conductor-implement # Claude Code /conductor-implement - Verify.Reload your application. You should see an updated application.
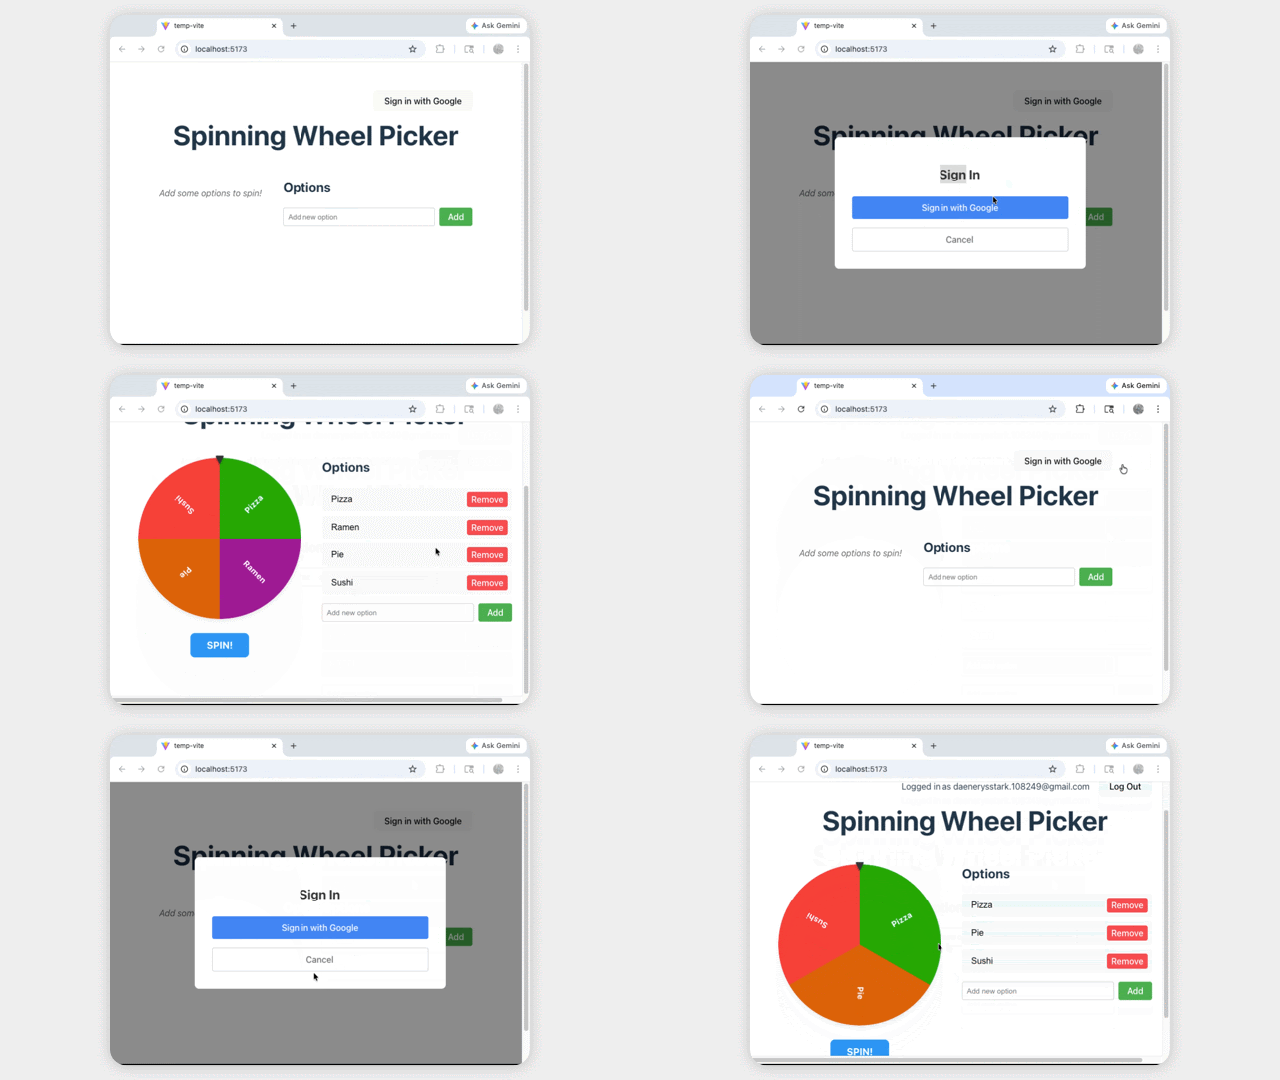
Here is the golden code for a reference implementation. You must provide your Firebase project in .firebaserc and your Firebase configurations in firebase.ts to start your application properly.
7. Clean up
To avoid ongoing charges to your Google Cloud account, delete the resources created during this codelab.
Delete the Firebase Project and Google Cloud Project
The easiest way to clean up is to delete the project entirely.
- In the Google Cloud Console, select the project you created.
- Click DELETE.
Alternatively, if you want to keep the project but delete resources:
- Delete Firestore Database: Go to Firebase Console > Firestore and delete the database.
- Delete Authentication: Go to Firebase Console > AuthenticationSign-in method, disable Google.
8. Congratulations
Congratulations! You have successfully used the Conductor plugin in your choice of coding agents (Antigravity CLI or Claude Code) to build a web application from scratch and then iterate on it with complex features like authentication and database integration.
Next steps
- Explore the Antigravity CLI plugins documentation
- Explore the Claude Code plugins documentation