
1. Introduction
Imagine you are a Data Scientist at Cymbal Financial, a high-volume payment processor. A wave of settlement delays has occurred, and the compliance team suspects coordinated fraud. You need to build a pipeline to ingest raw clearinghouse transaction logs, clean the data, train a machine learning model, run batch inference, and sink high-risk transactions into a Cloud Spanner review queue for manual auditing.
Normally, this requires days of writing repetitive setup code (Spark notebooks, dbt configurations, training scripts, Airflow DAGs) and constant context-switching between console interfaces and editors.
In this codelab, you will pair-program with an agent using the Google Cloud Data Agent Kit (DAK) inside the Antigravity IDE. Using conversational natural language, the agent will help you generate Spark notebooks, compile a dbt project, construct an inference loop, and orchestrate the workflow using the Managed Service for Apache Airflow.
What you'll do
- Ingest clearinghouse logs from Cloud Storage using Managed Service for Apache Spark (Spark Serverless) into a BigQuery table.
- Deduplicate and normalize transactions using dbt to establish clean data layers (Raw, Staging, Enriched).
- Train a distributed Random Forest classification model (
RandomForestClassifier) on Spark Serverless. - Run batch inference on new transactions and write high-risk alerts directly to Cloud Spanner.
- Orchestrate, visually configure, and deploy the entire pipeline using Managed Service for Apache Airflow and interactive DAG monitoring inside the IDE.
What you'll need
- A web browser such as Chrome
- A Google Cloud project with billing enabled (we recommend using a new, dedicated project for hands-on labs).
- Basic familiarity with SQL, Python, and PySpark.
- Antigravity IDE with a Google AI Pro subscription (recommended)
The resources created in this codelab should cost less than $5. Be sure to follow the Clean Up instructions at the end of the lab to delete provisioned resources.
2. Environment setup
To kick off the lab, you will run a bootstrap script. This script automatically enables required GCP APIs, creates an ingestion Cloud Storage bucket, generates mock transaction and directory datasets, loads reference directories into BigQuery, and kicks off background provisioning of Cloud Spanner and Managed Service for Apache Airflow (formerly known as Cloud Composer).
Select or create a project
Choose an existing project or create a new project in the Google Cloud Console.
Verify billing
Make sure that billing is enabled for your Google Cloud project. You can learn more on how to do this by following this guide.
Run the setup script
You will use Google Cloud Shell (or your local shell configured with the Google Cloud CLI) to launch the environment setup.
- Open the Google Cloud Console.
- Click Activate Cloud Shell in the top-right toolbar.

- In the Cloud Shell terminal, configure your active project:
gcloud config set project <<YOUR_PROJECT_ID>>
export PROJECT_ID=$(gcloud config get-value project)
- Clone the codelab repository and navigate to the scripts folder:
cd ~/
git clone --filter=blob:none --no-checkout https://github.com/GoogleCloudPlatform/devrel-demos.git
cd ~/devrel-demos
git sparse-checkout init --cone
git sparse-checkout set codelabs/agentic-data-labs/data-science
git checkout main
cd codelabs/agentic-data-labs/data-science/scripts
- Run the bootstrap setup script to deploy all resources to
us-central1:
chmod +x setup.sh setup_spanner.sh setup_composer.sh
export REGION=us-central1
./setup.sh
- When the script finishes, you will see a summary output indicating that your BigQuery dataset and Cloud Storage bucket are ready. In the background, Cloud Spanner (takes ~2 minutes) and Managed Airflow (takes ~20 minutes) will continue provisioning. You can monitor their progress at any time by running:
tail -f /tmp/spanner_setup.log
tail -f /tmp/composer_setup.log
Open the Antigravity IDE
- Download and install the Antigravity IDE from the Google Antigravity download page.
- Launch the Antigravity IDE.
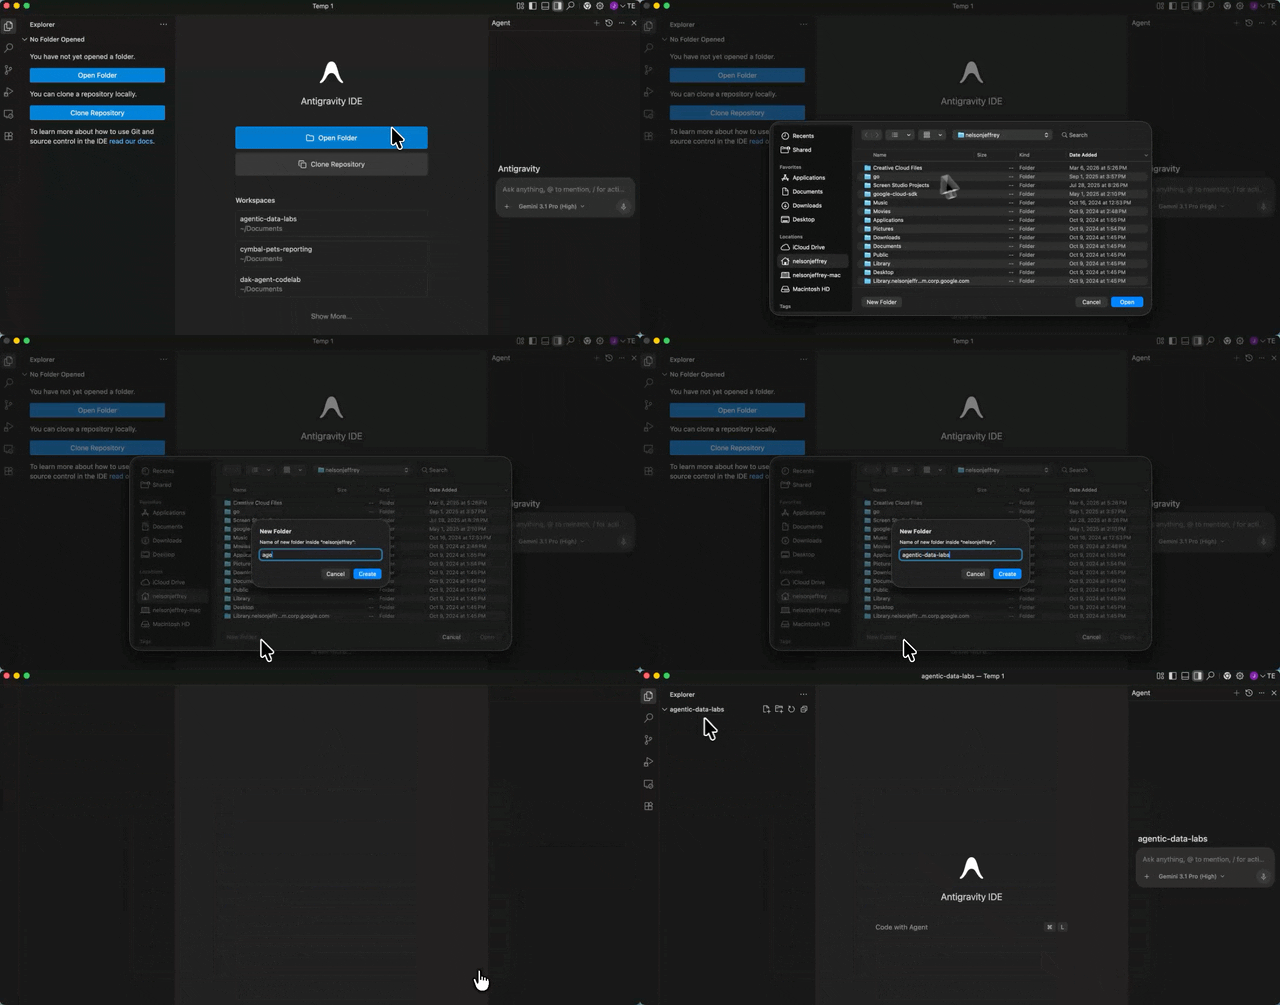
- Create a new, empty folder on your local machine (e.g named
agentic-data-labs), and open it in the IDE by choosing Open Folder. This will act as your local workspace for the codelab.
Install the Data Agent Kit extension
The Google Cloud Data Agent Kit extension provides deep integration with Google Cloud data services directly within your editor, allowing you to interact with BigQuery, Cloud SQL, Cloud Storage, and more without switching contexts.
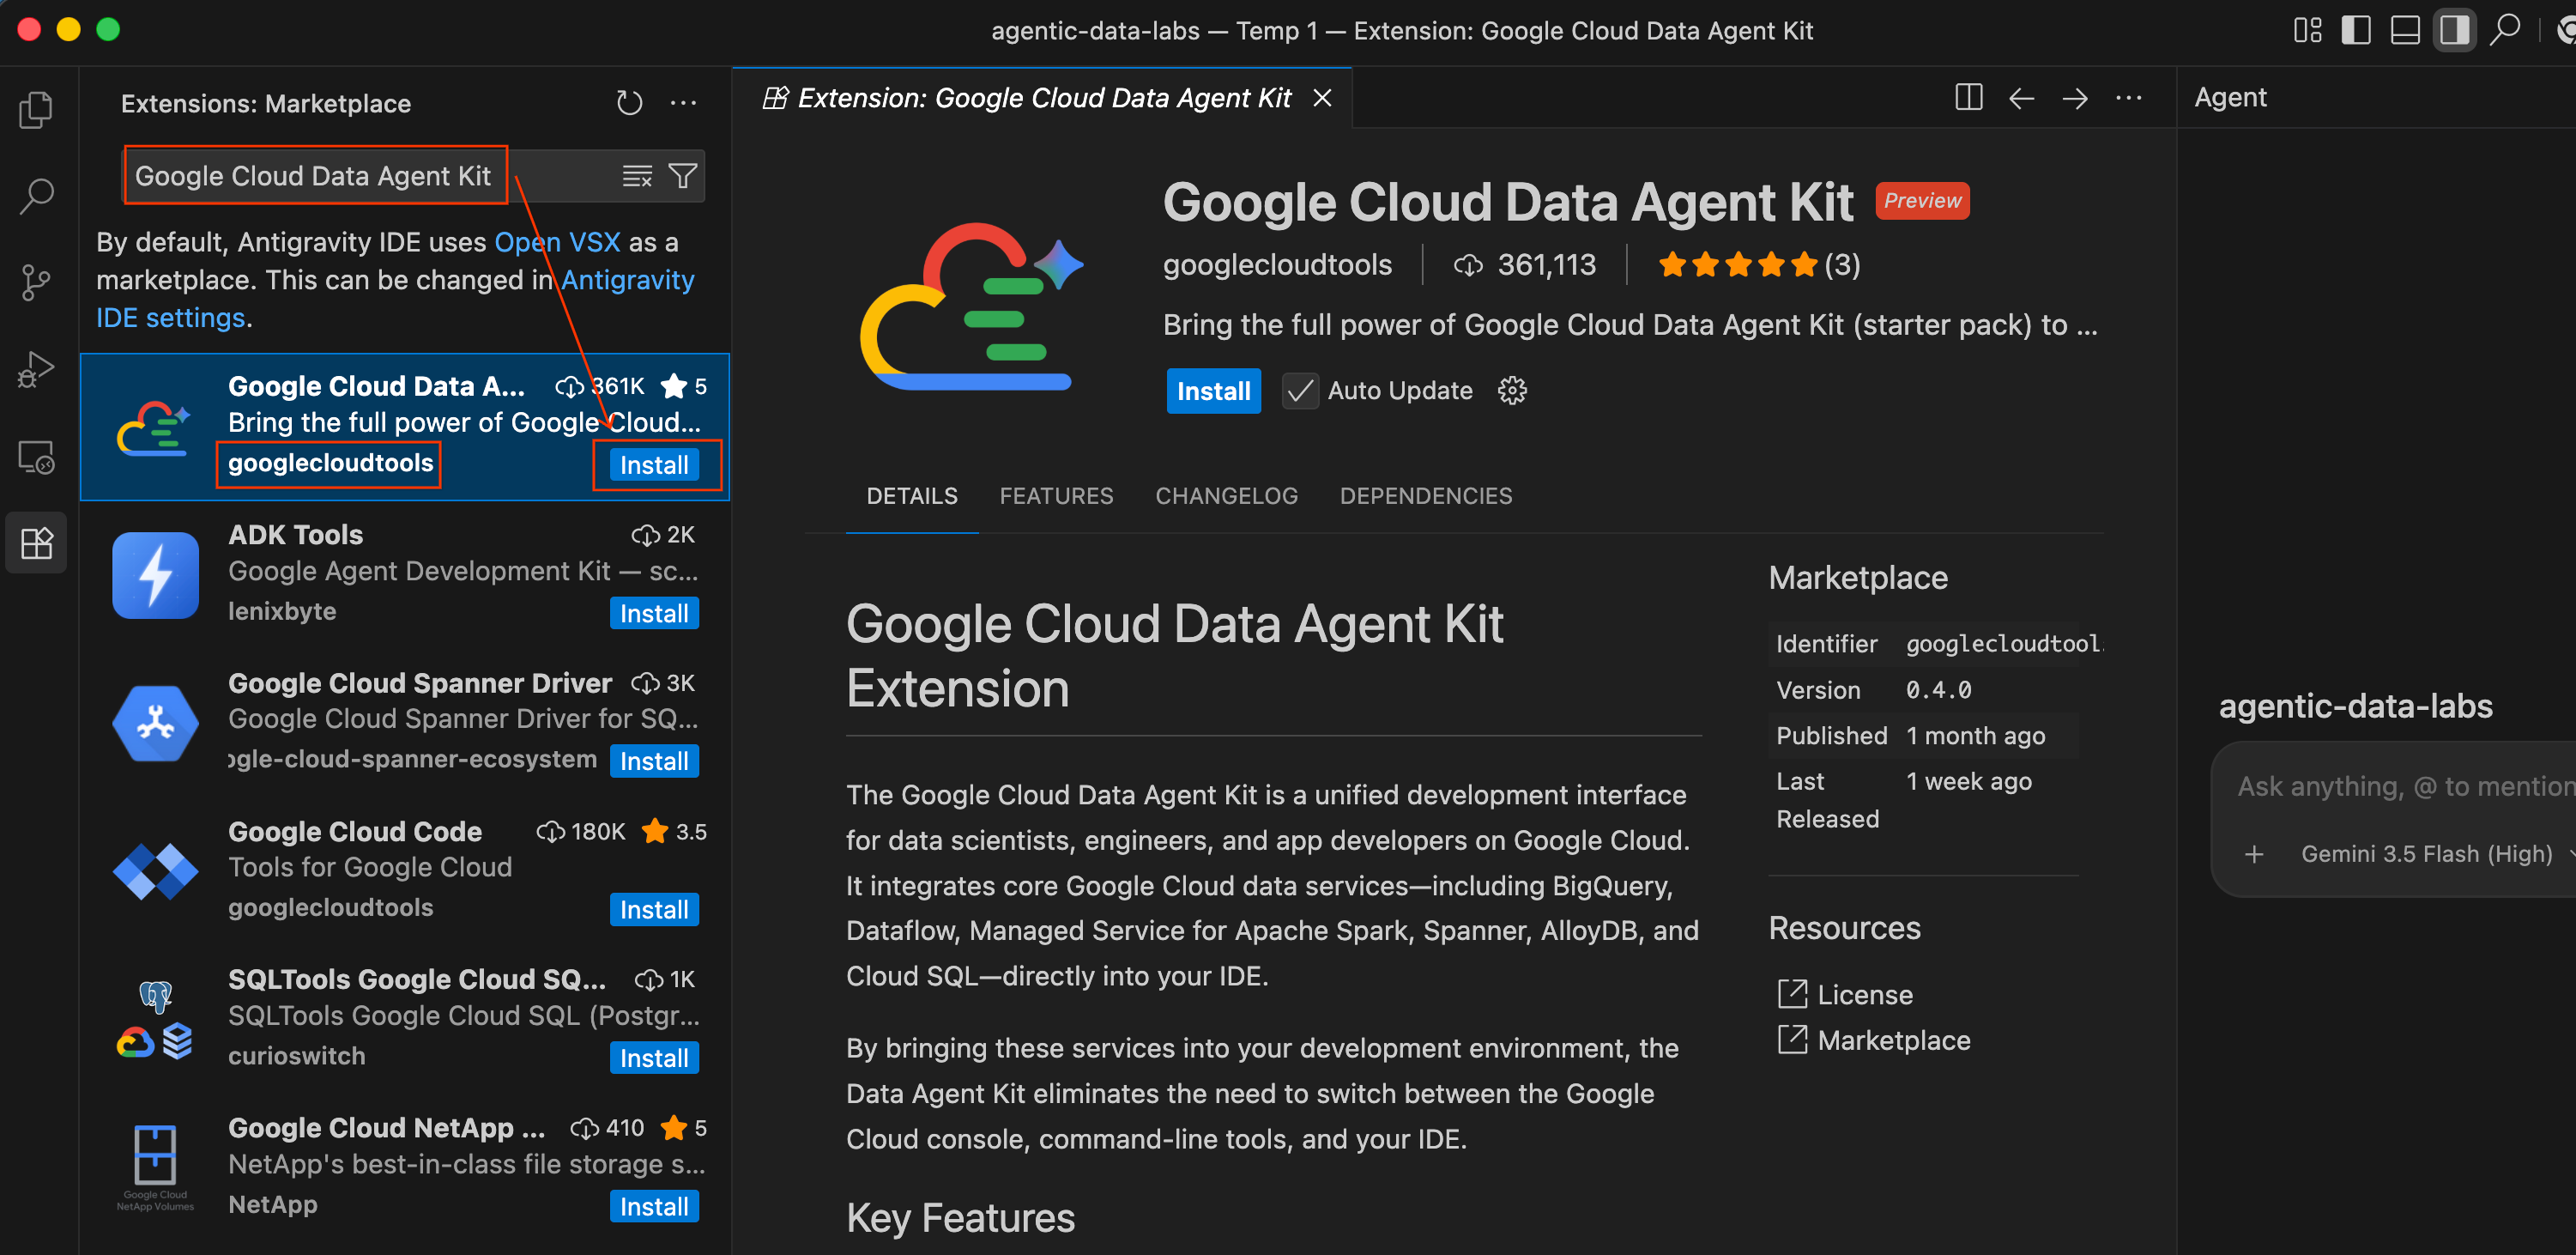
- In the Antigravity IDE, click the Extensions icon in the Activity Bar on the far left side of the screen (it looks like four squares).
- In the search bar at the top of the Extensions pane, type
Google Cloud Data Agent Kit. - Locate the extension named Google Cloud Data Agent Kit published by
googlecloudtools - Click the Install button.
- A prompt may appear asking, "Do you trust publisher ‘googlecloudtools' and their extensions?". Click Trust Publishers & Install to proceed.
Once installed, you'll see a new Google Cloud Data Agent Kit icon appear in the Activity Bar on the far left of the Antigravity IDE.
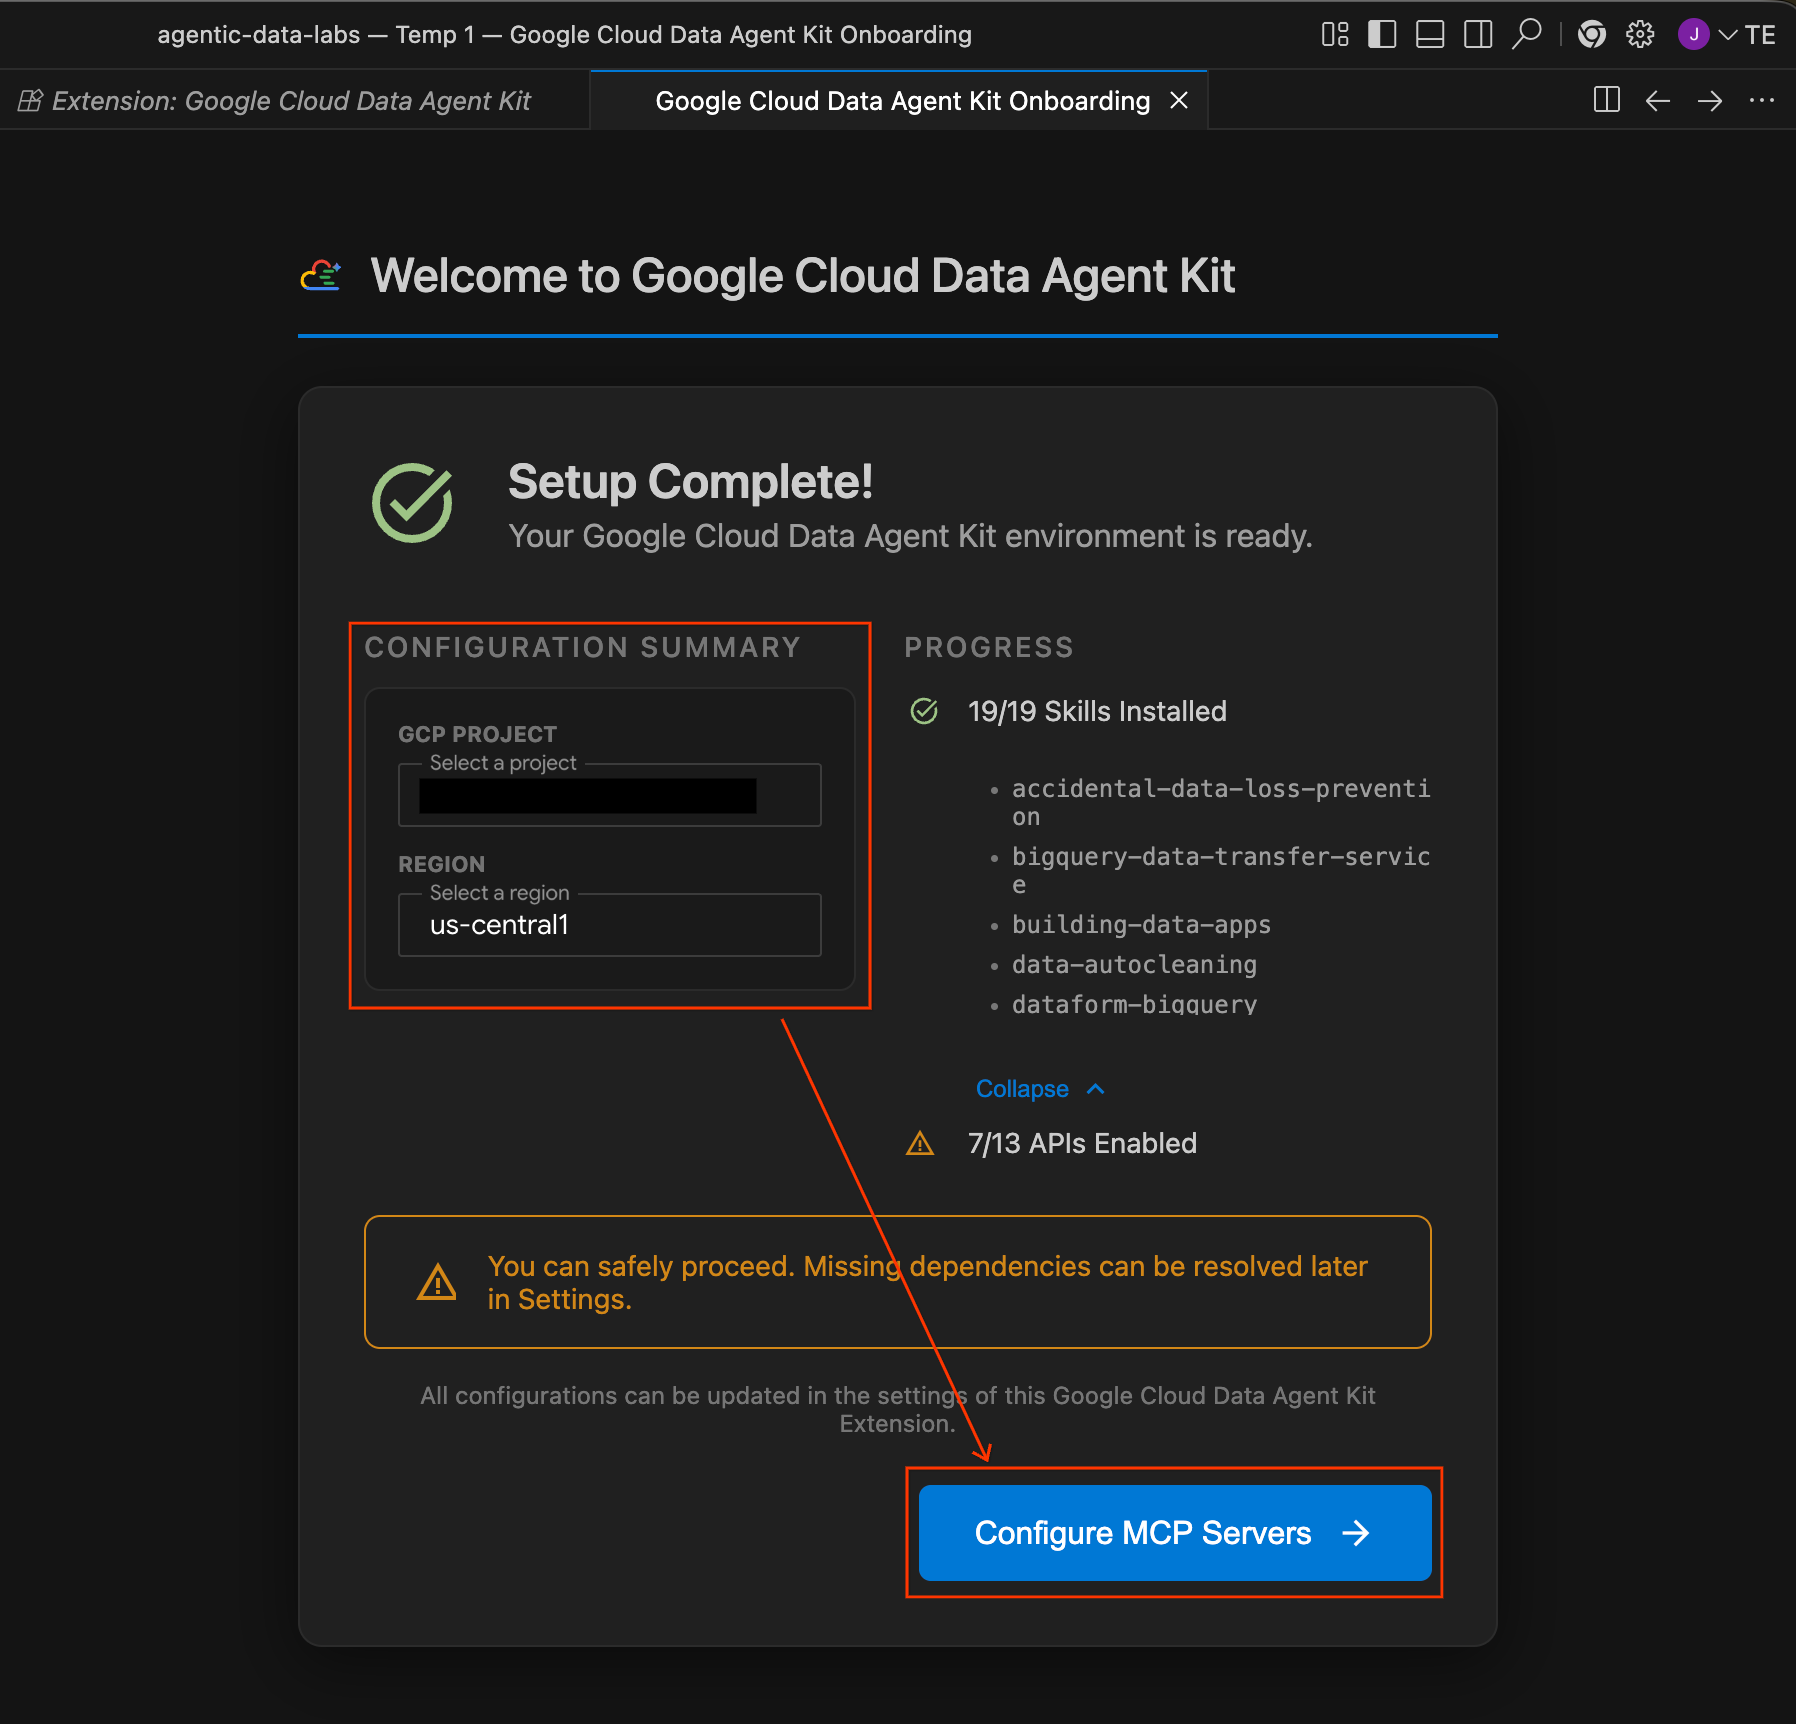
- An onboarding page titled "Welcome to Google Cloud Data Agent Kit" should automatically open. If you aren't signed into your Cloud account, follow any prompts to allow access.
- In the Configuration Summary section, locate the project field. Click the dropdown and select your Google Cloud project. Set your region as
us-central1. Then select Configure MCP Servers.
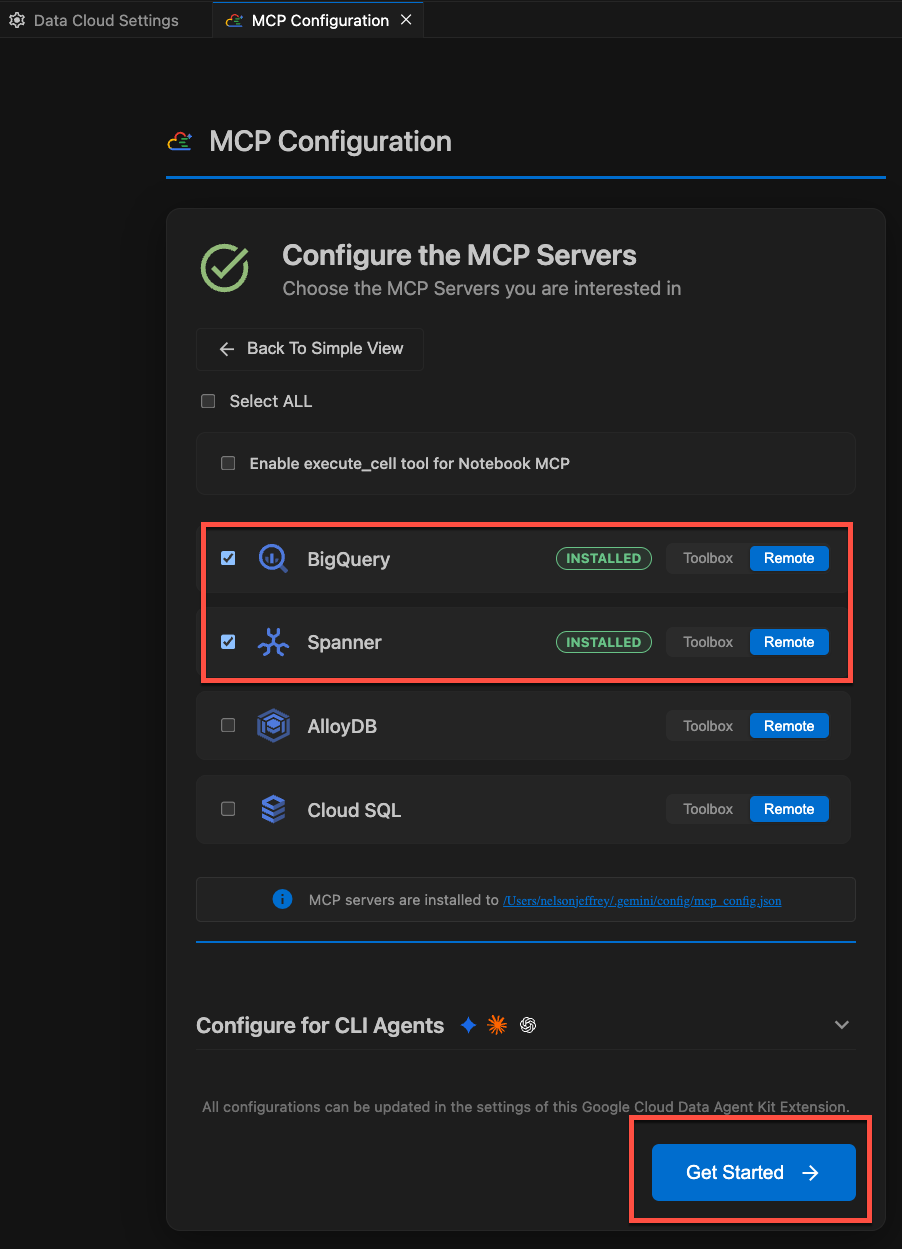
- Select Configure MCP Servers. Under the MCP Configuration pane, ensure you enable the following remote MCP servers:
- BigQuery
- Spanner
- Notebooks
Then click Get Started.
Explore configuration options
Once setup is complete, you'll land on the "Get started with Google Cloud Data Agent Kit" page.
- Under "Setup & Configuration", click Get Started.
- This opens the Data Agent Kit Configuration panel. Explore the tabs:
- Project and Region: Verify your selected Project ID and confirm that the setup script enabled all requisite APIs (Compute Engine, Cloud Storage, BigQuery, Spanner, etc.).
- BigQuery: Configure the default location for your BigQuery queries. Use the region
us-central1. - Configure MCP Servers: View the enabled MCP servers (BigQuery, Notebooks, Spanner, etc.) that allow AI agents to securely interact with your data.
- Skills: Explore pre-built skills that provide agents with specialized capabilities for complex data tasks.
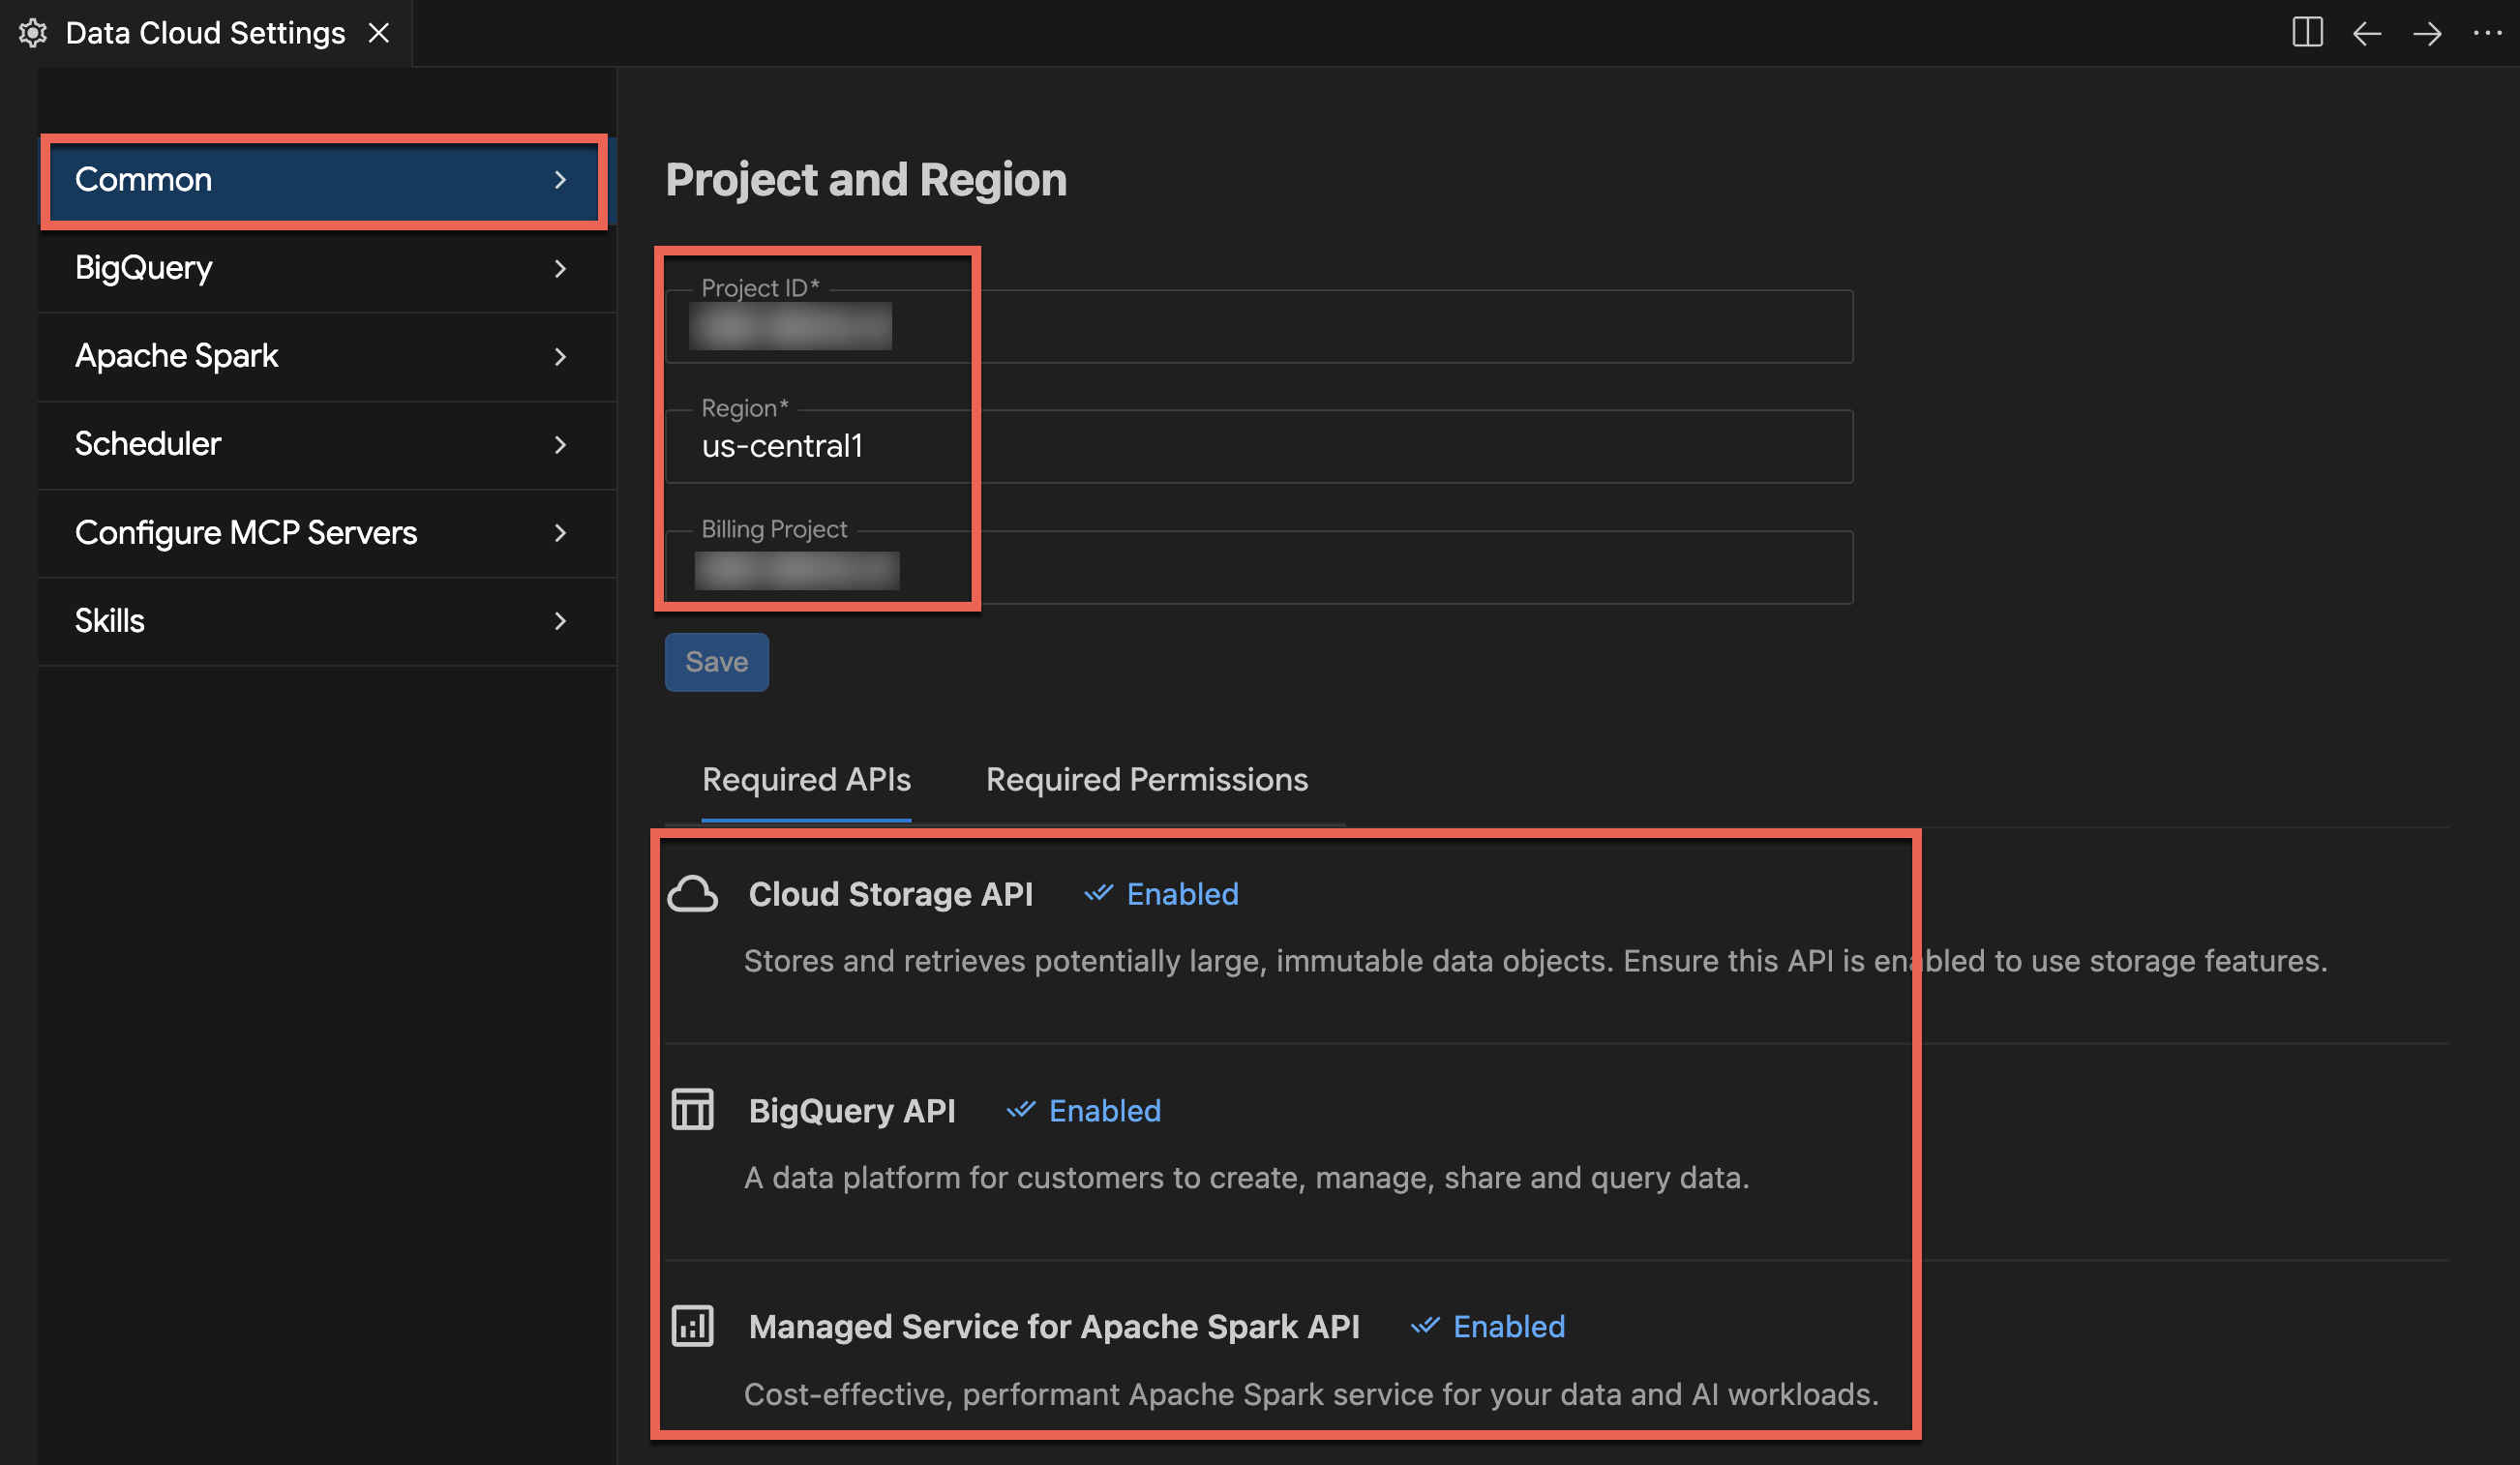
Section Recap: You ran the bootstrap script to create GCS and BigQuery assets while Spanner and Airflow build in the background. You then opened the project in the Antigravity IDE and activated the Google Cloud Data Agent Kit extension. You are now ready to write your first notebook.
3. Ingest raw logs using Spark Serverless
In this section, you will ingest raw JSON transaction logs into the data lake. Managed Service for Apache Spark (Spark Serverless) connects directly with BigQuery's native storage. You will use the standard BigQuery connector to manage tabular data and enable direct querying and analytics.
Explore the pre-configured Spark Serverless runtime
Before executing Spark code, inspect the Serverless Runtime template that was pre-configured by the setup script. This template defines the target execution environment backend and bundles necessary connector dependencies.
- In the IDE activity bar, open the Google Cloud Data Agent Kit panel.
- Expand the Apache Spark drop-down menu, then expand Serverless.
- Right-click
fraud-pipeline-runtimeand select Profile to open its configuration view in the editor. - In the Profile tab, scroll down and expand Properties to inspect the custom dependencies attached to the environment:
spark.jars: Containsgs://spark-lib/spanner/spark-3.5-spanner-1.4.0.jar, which uses the Spark Spanner connector to allow Spark jobs to write inference results directly to Cloud Spanner later in the lab. (Note: Dataproc Serverless includes Google Cloud's Spark BigQuery connector by default, requiring no additional jar configuration to read and write BigQuery tables).
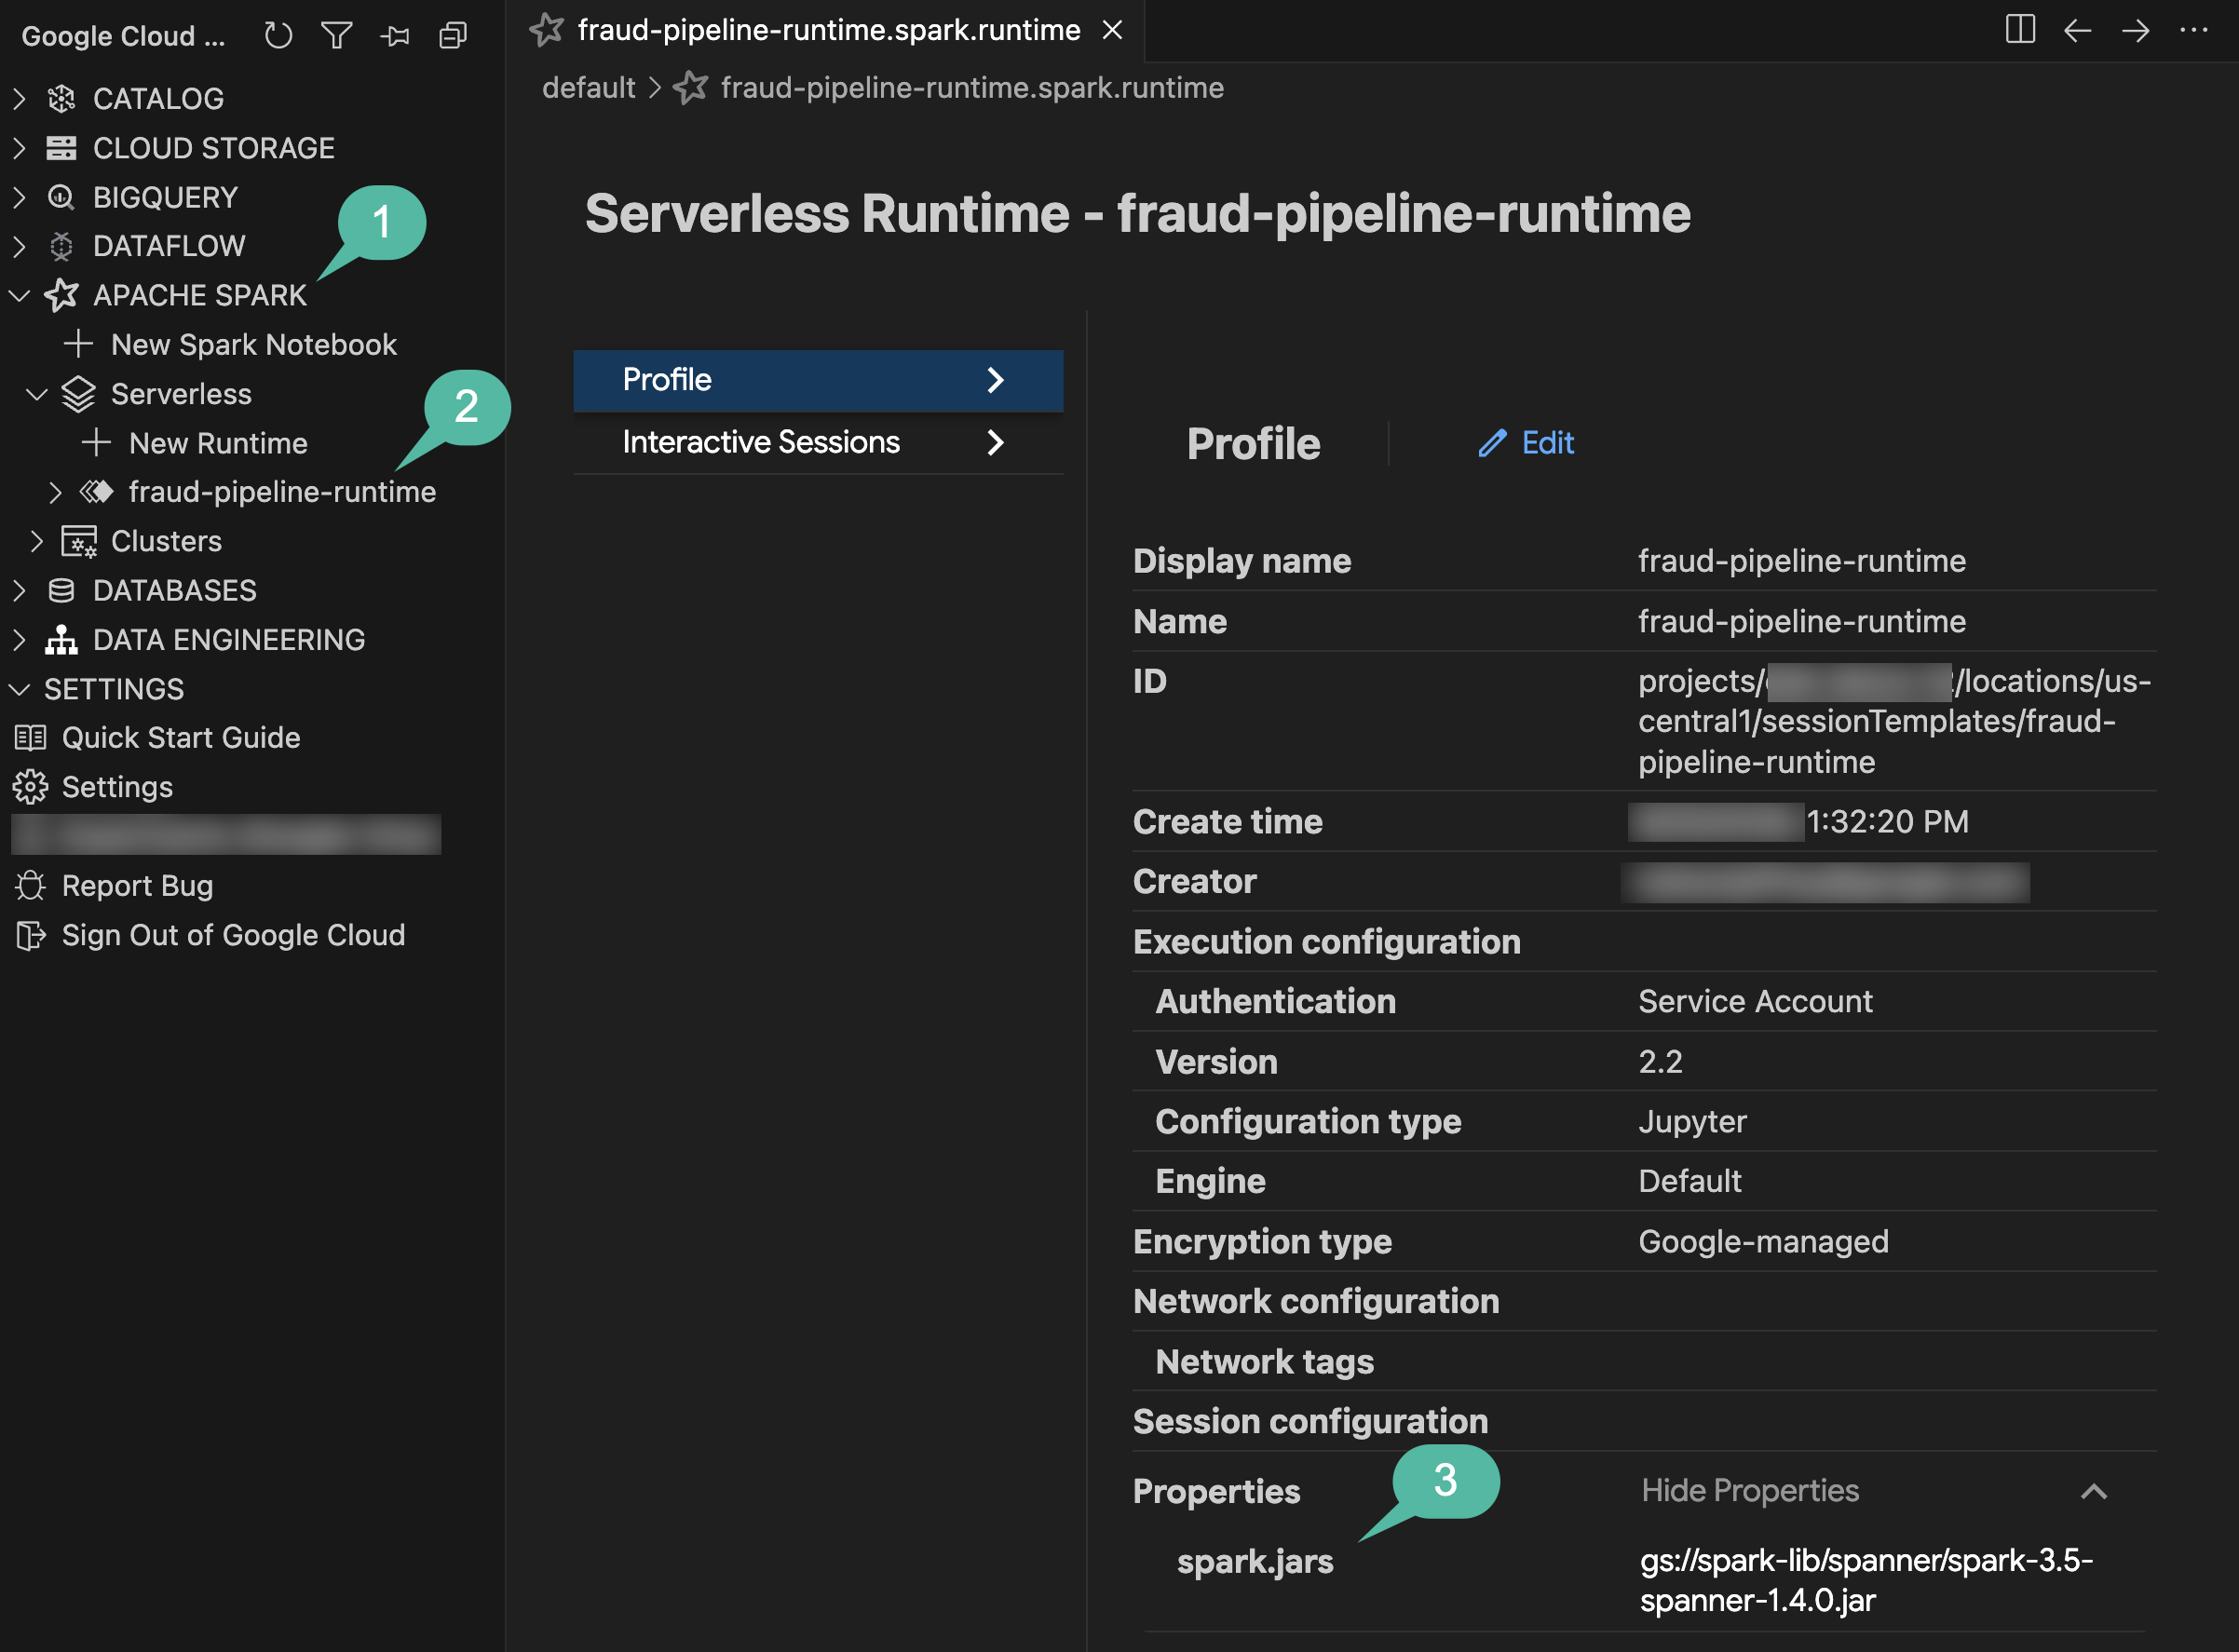
- Notice the Interactive Sessions tab on the left. It is currently empty because you have not executed any code yet. As soon as you run the notebook in the next step, a live serverless compute session will dynamically provision and appear here!
Ingest data using the Data Agent Kit
Instead of manually configuring a Spark Session or writing PySpark loading scripts from scratch, you will pair-program with an agent using the Data Agent Kit.
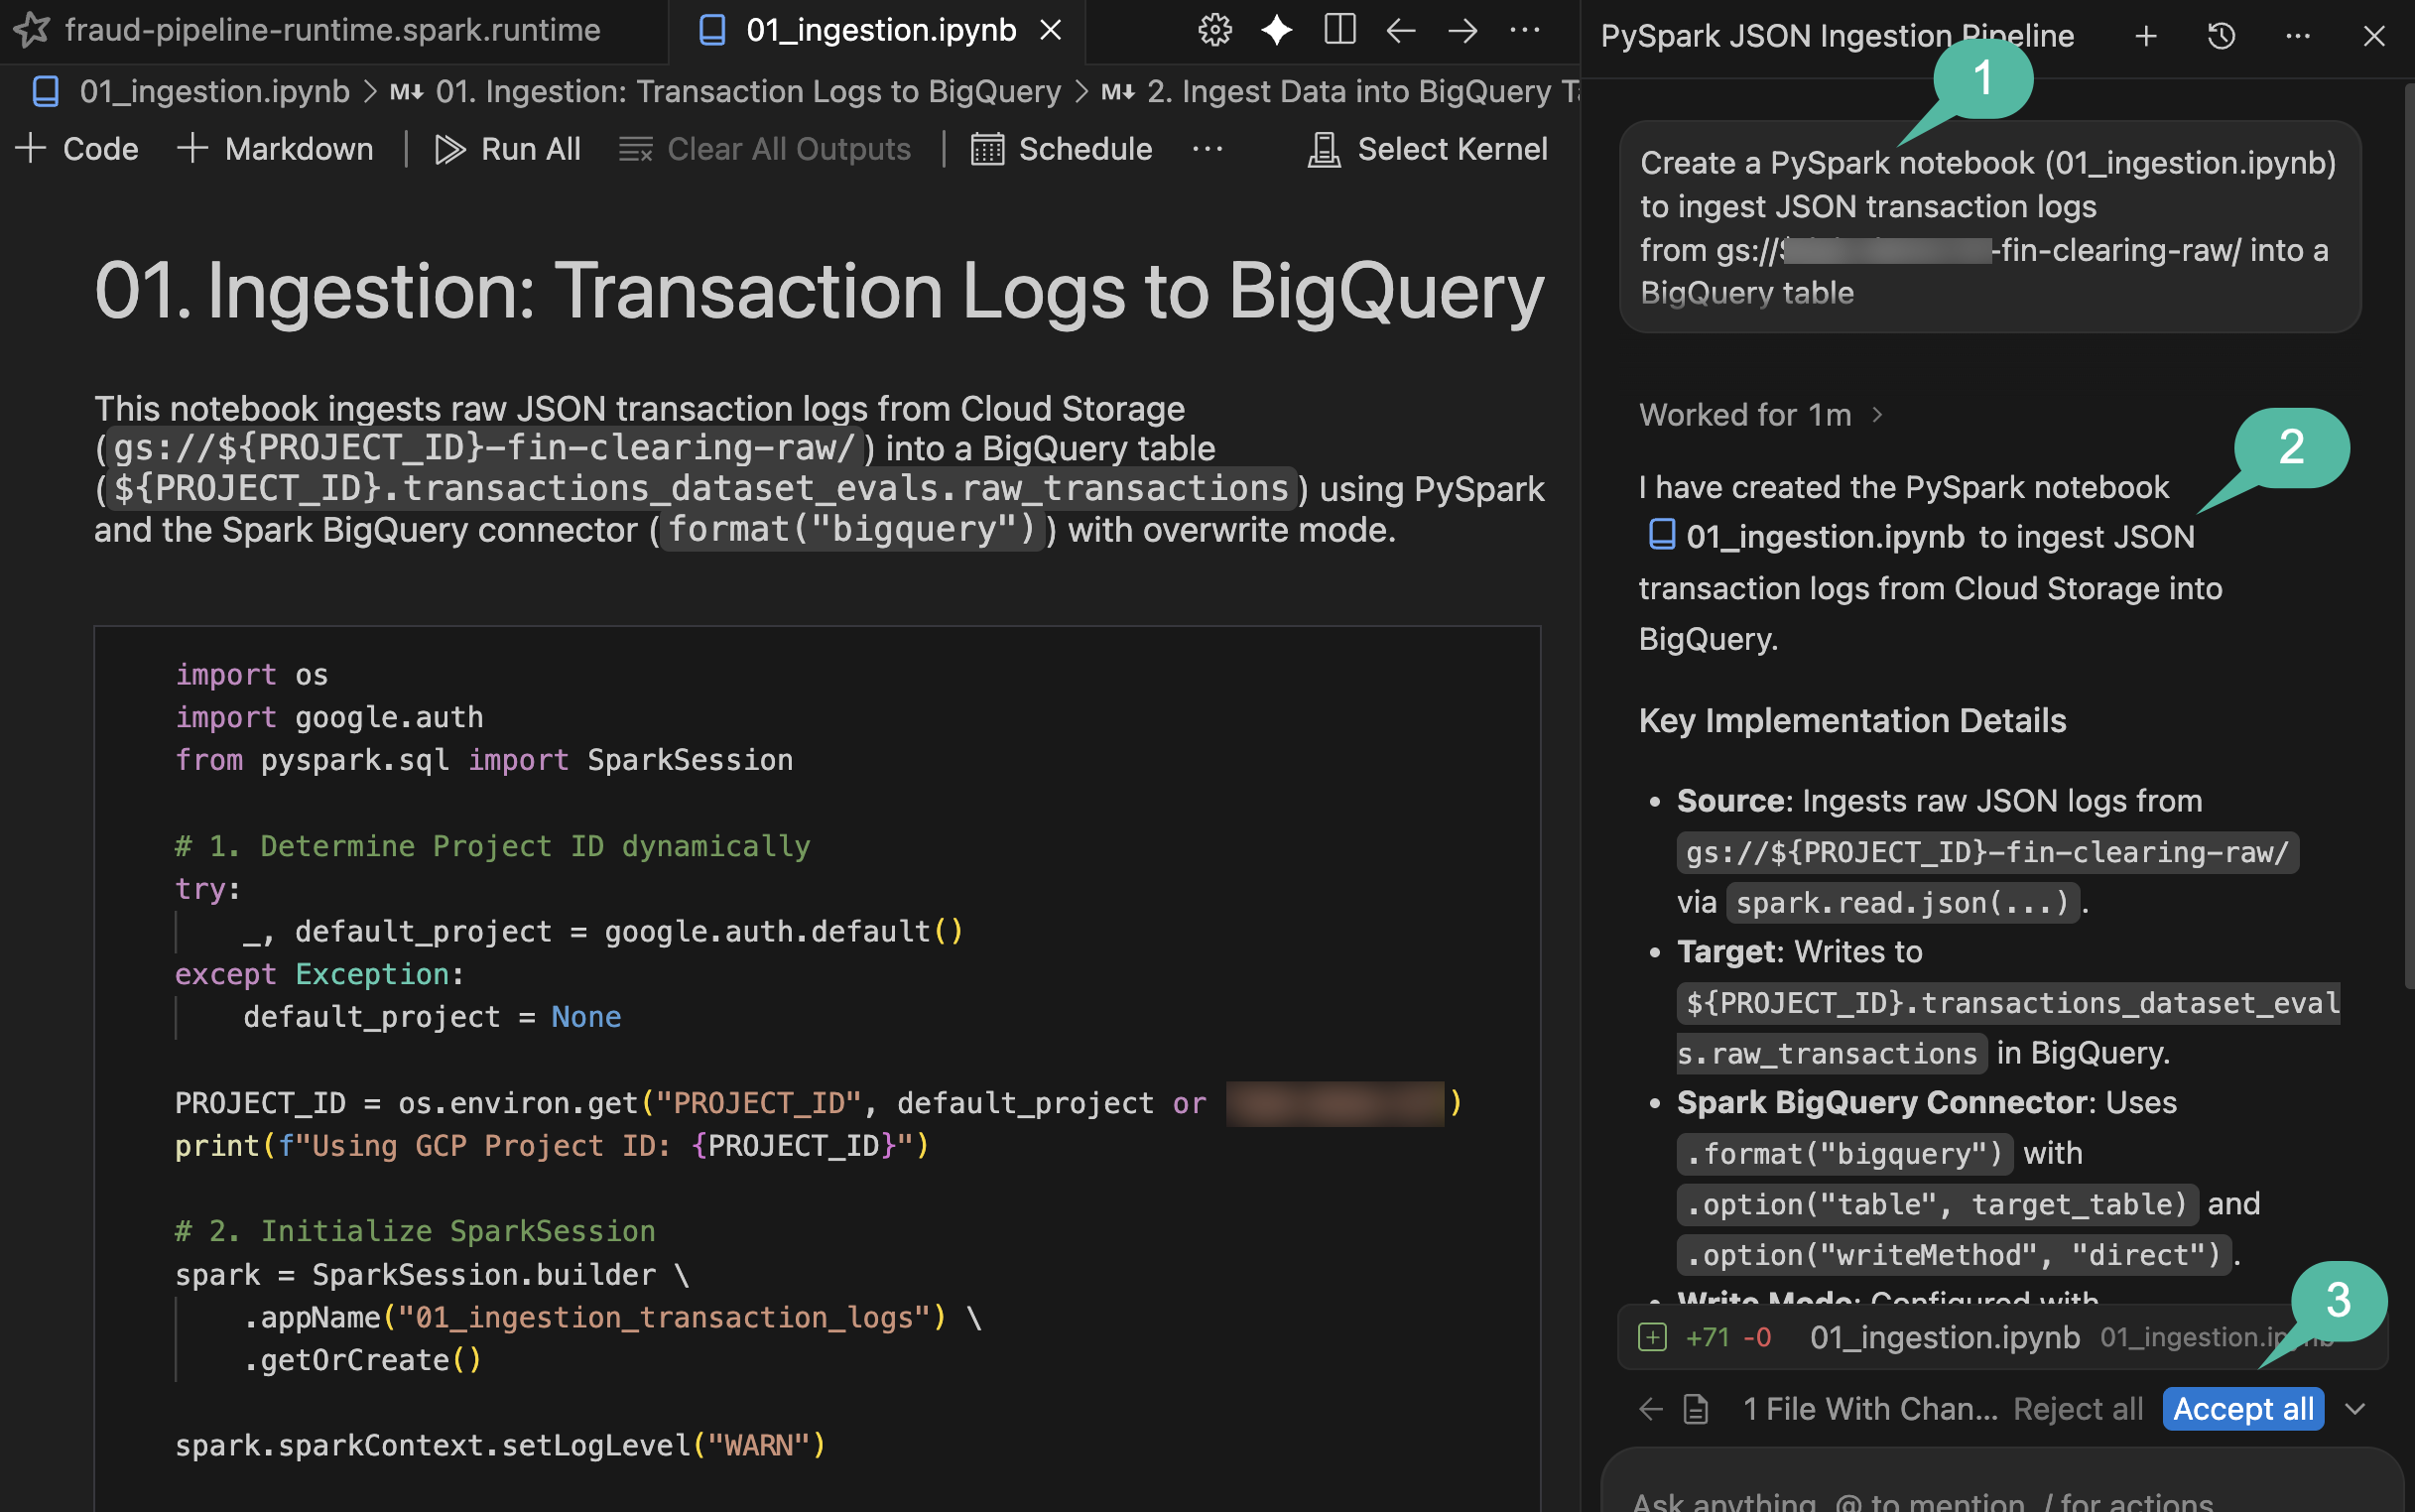
- Open the Agent Chat pane by clicking the Toggle Agent icon in the top-right toolbar.
- Paste the following prompt into the chat (be sure to replace
${PROJECT_ID}with your actual Google Cloud Project ID):
Create a PySpark notebook (01_ingestion.ipynb) to ingest JSON transaction logs
from gs://${PROJECT_ID}-fin-clearing-raw/ into a BigQuery table
`${PROJECT_ID}.transactions_dataset_evals.raw_transactions`
using the Spark BigQuery connector (`format("bigquery")`) with overwrite mode.
- If the agent asks for permission to execute background verification commands (e.g. "Allow running this command?"), review the proposed command and select Yes, allow this time (or Yes, and always allow).
- When the agent finishes generating the file, click the blue Accept all button (or the checkmark icon) at the bottom of the chat pane to save
notebooks/01_ingestion.ipynbto your workspace.
Review and execute the notebook
- Open the newly generated
notebooks/01_ingestion.ipynbin the IDE. - Review the PySpark code for the BigQuery connector write logic.
- Click Run All in the IDE's notebook toolbar.
- If this is your first time running a remote Spark notebook, the IDE may prompt you to install local dependencies. If prompted, click Install dependencies for Remote Spark Kernels and confirm the installation dialogs, then click Run All again.
- In the Select Kernel dropdown menu, choose Remote Spark Kernels -> fraud-pipeline-runtime on Serverless Spark. (Tip: If you do not see your pre-configured runtime template listed, click the refresh icon in the top right of the kernel picker dropdown to reload available remote kernels).
- Look at the status bar in the bottom left of the editor. You will see
Connecting to kernel: fraud-pipeline-runtime on Serverless Spark.... Because this is the initial launch of the Spark Serverless runtime kernel backend, it will take a few minutes to provision and boot up. - Once the kernel finishes connecting, the notebook will automatically begin executing all cells sequentially to process the raw transaction logs into your BigQuery dataset.
Verification
Once execution completes, check the Data Agent Kit catalog to verify the table creation:
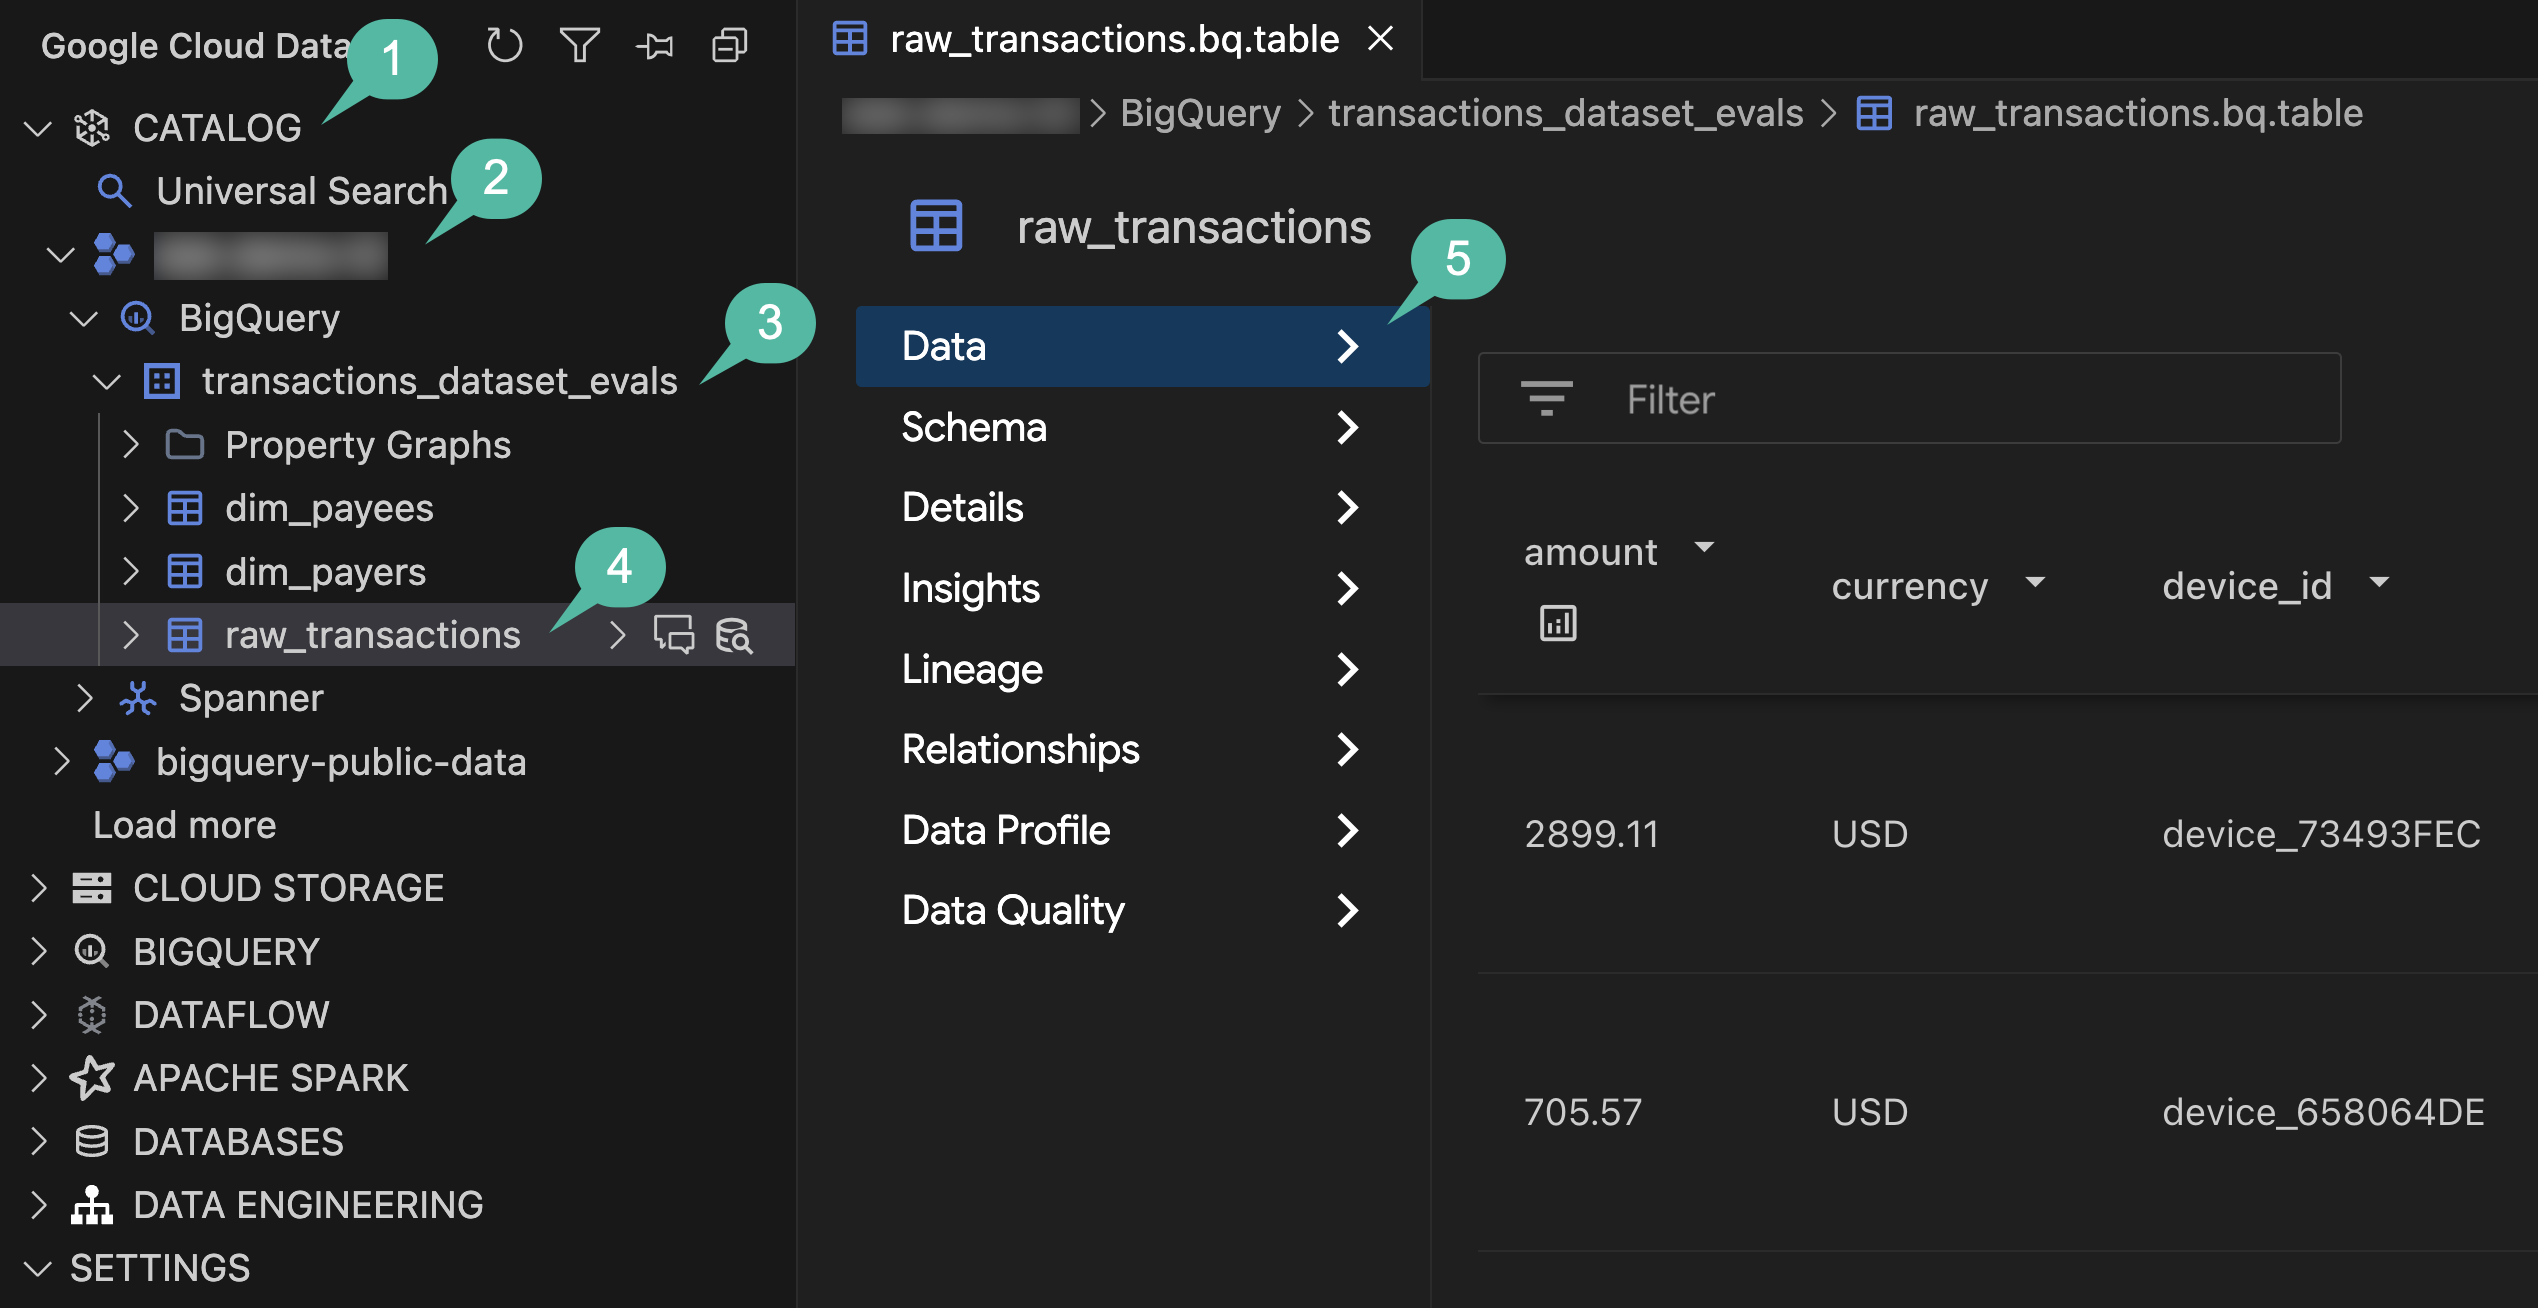
- In the IDE activity bar, open the Google Cloud Data Agent Kit panel.
- Expand the CATALOG section.
- Expand your project ID.
- Expand BigQuery.
- Expand the
transactions_dataset_evalsdataset. - Click the
raw_transactionstable to open its detail view in the main editor. - In the left navigation, explore the Data, Schema, and Details tabs to inspect the ingested records and metadata.
Section Recap: You used natural language in the Agent Chat to generate a complete Spark Serverless workload. You then executed it to process unstructured JSON logs into a BigQuery (raw) table.
4. Deduplicate and normalize with dbt
Before training the ML model, you will enforce data quality by removing duplicate streaming logs, isolating bad records (such as empty transaction IDs), and joining dimensional data (payers and payees). This process requires idempotent, reliable SQL transformations, making dbt (data build tool) a great fit.
Scaffold the dbt pipeline
Use the agent to generate a dbt project over the BigQuery dataset:
- Return to the Agent Chat pane.
- Provide the following instruction to generate the dbt project:
Scaffold a us-central1 dbt project in dbt_project/ that maps raw_transactions
through to an enriched_transactions model in dataset transactions_dataset_evals.

Deduplicate by transaction_id in staging. Quarantine null IDs to an invalid_transactions model.
Join the valid staging records with dim_payers and dim_payees for the enriched_transactions model,
preserving the historical `is_fraud` label column, and finally add a transaction uniqueness test.

Create an implementation plan first.
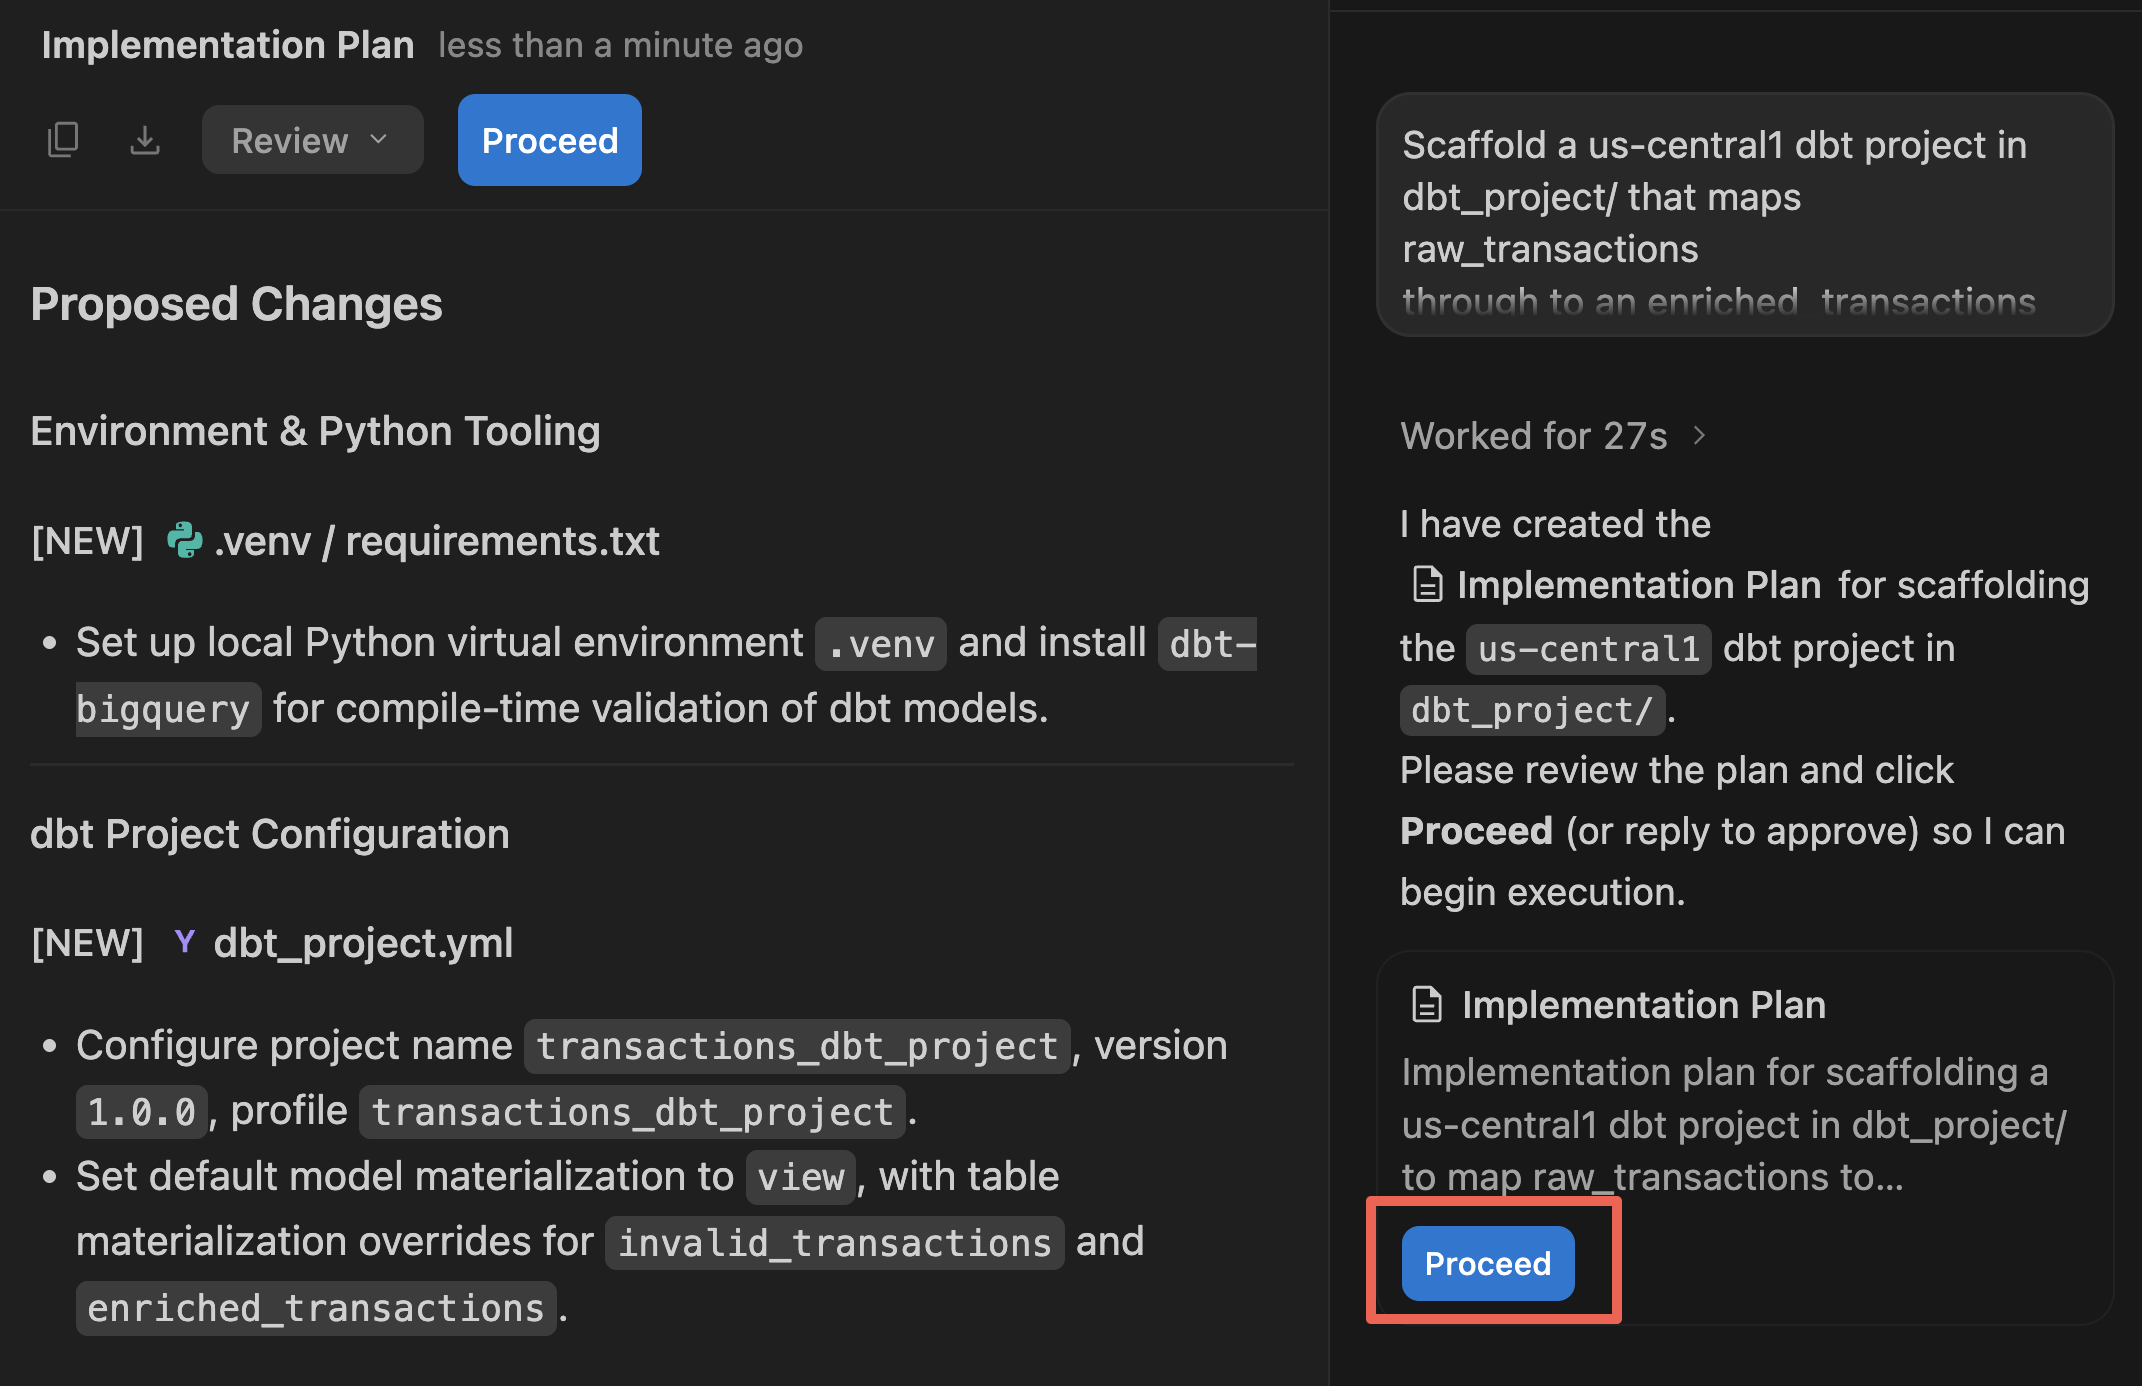
- The agent will present an Implementation Plan artifact in the main editor pane. Review the proposed file structure and SQL logic.
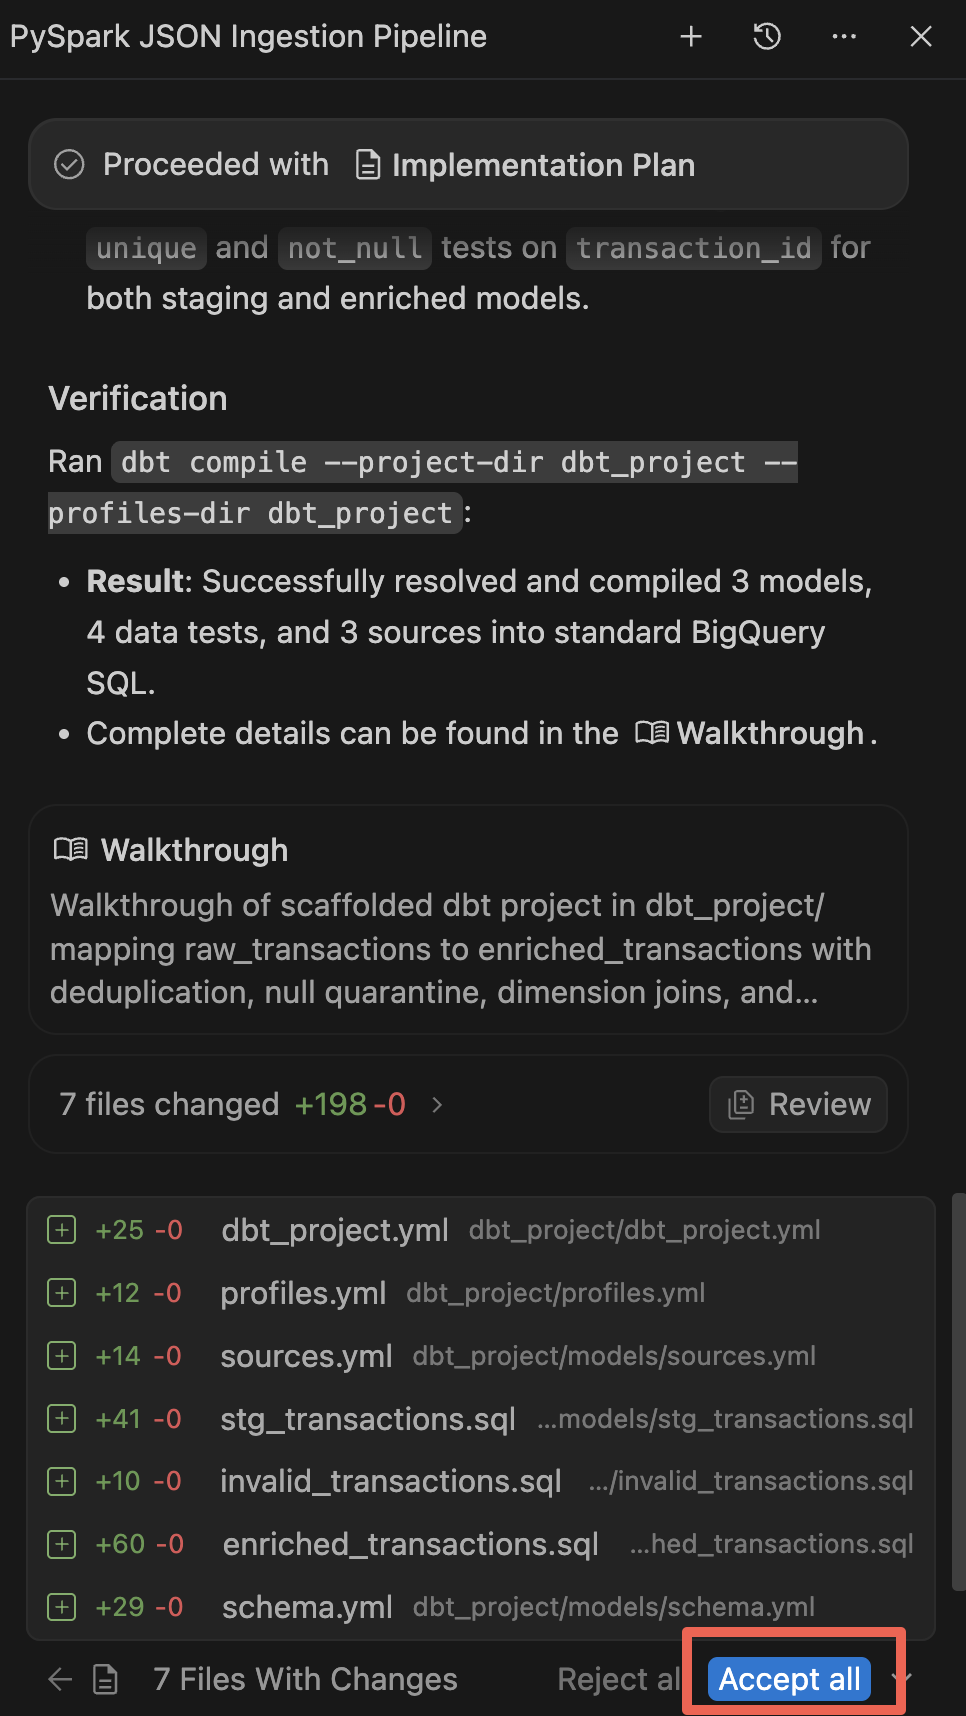
- Click Proceed (and then Accept all) to allow the agent to generate the files in your workspace.
- Once generation completes, the agent displays a Walkthrough summarizing the new components. Accept all changes if prompted.
Build and test
Although the agent automatically ran dbt compile to ensure the generated SQL was syntactically valid, you will now materialize these views and tables into BigQuery and run the data quality tests for local verification. (Note: Later in the lab, you will automate this dbt step as part of an end-to-end Airflow DAG).
- In the activity bar on the far left, click the Explorer icon (or press
Cmd/Ctrl+Shift+E). - Expand
dbt_project->modelsto inspect the generated SQL models. Click onenriched_transactions.sqlto open and review the transformation and fraud feature logic in the editor. - In the File Explorer, right-click the
dbt_projectfolder and select Open in Integrated Terminal. This automatically opens a terminal pane set directly to the requireddbt_projectworking directory. - If you do not already have
dbtinstalled, create a virtual environment outsidedbt_project/(at your home or workspace root) and install the BigQuery adapter:
python3 -m venv ~/.venv/dbt
source ~/.venv/dbt/bin/activate
pip install dbt-bigquery
- Run the dbt models and their associated data quality tests:
dbt build
- Watch the terminal output. dbt will compile the SQL, materialize the staging and enriched tables in BigQuery, and execute the data tests.
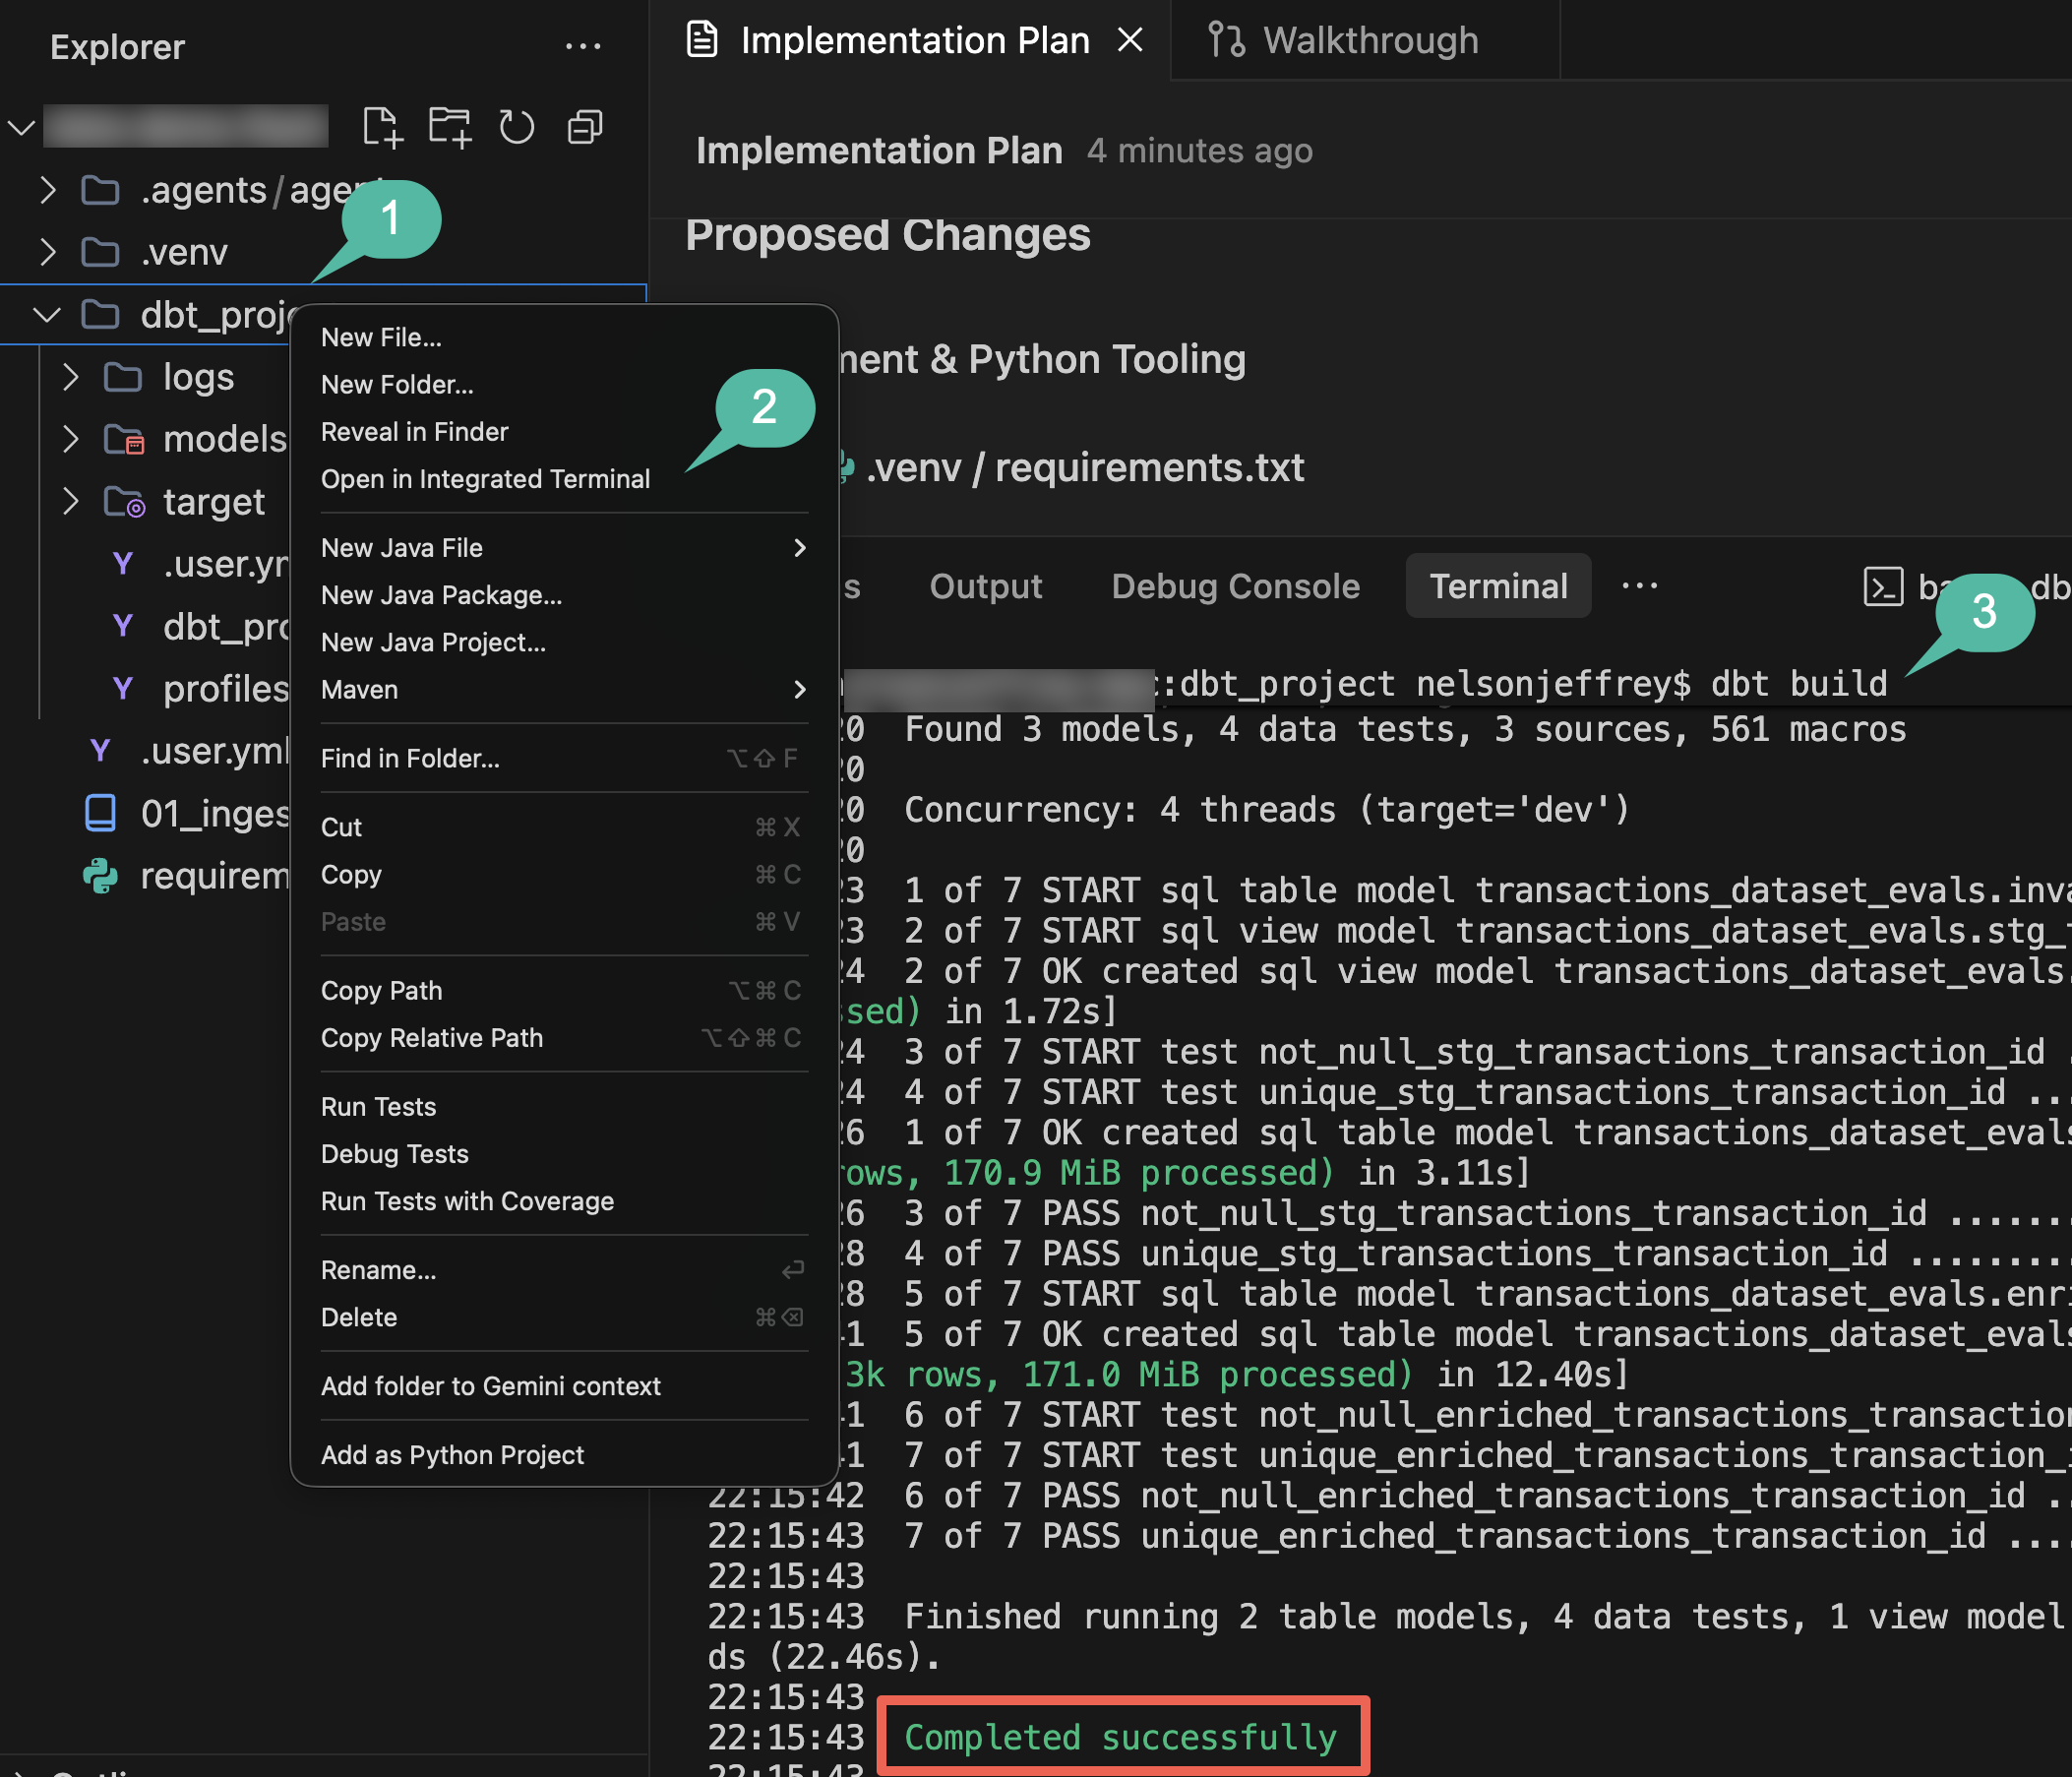
- Once the build finishes, close the terminal pane to free up screen space for the remaining steps.
Section Recap: You generated a dbt project with the agent, ran data quality tests, and transformed the raw records into staging and enriched BigQuery tables.
5. Train distributed fraud detection model with Random Forest
With the enriched transactions materialized in BigQuery, you will build a machine learning model to classify fraudulent events. Random Forest is an ensemble learning method well-suited for tabular classification data. Running a RandomForestClassifier on Spark Serverless distributes model training across worker nodes without requiring you to manage infrastructure.
In this step, you will use the agent to generate the Spark ML training pipeline.
Generate the ML training notebook
- Open the Agent Chat pane.
- Provide the following prompt to design the model training sequence (remember to replace
${PROJECT_ID}with your active project ID):
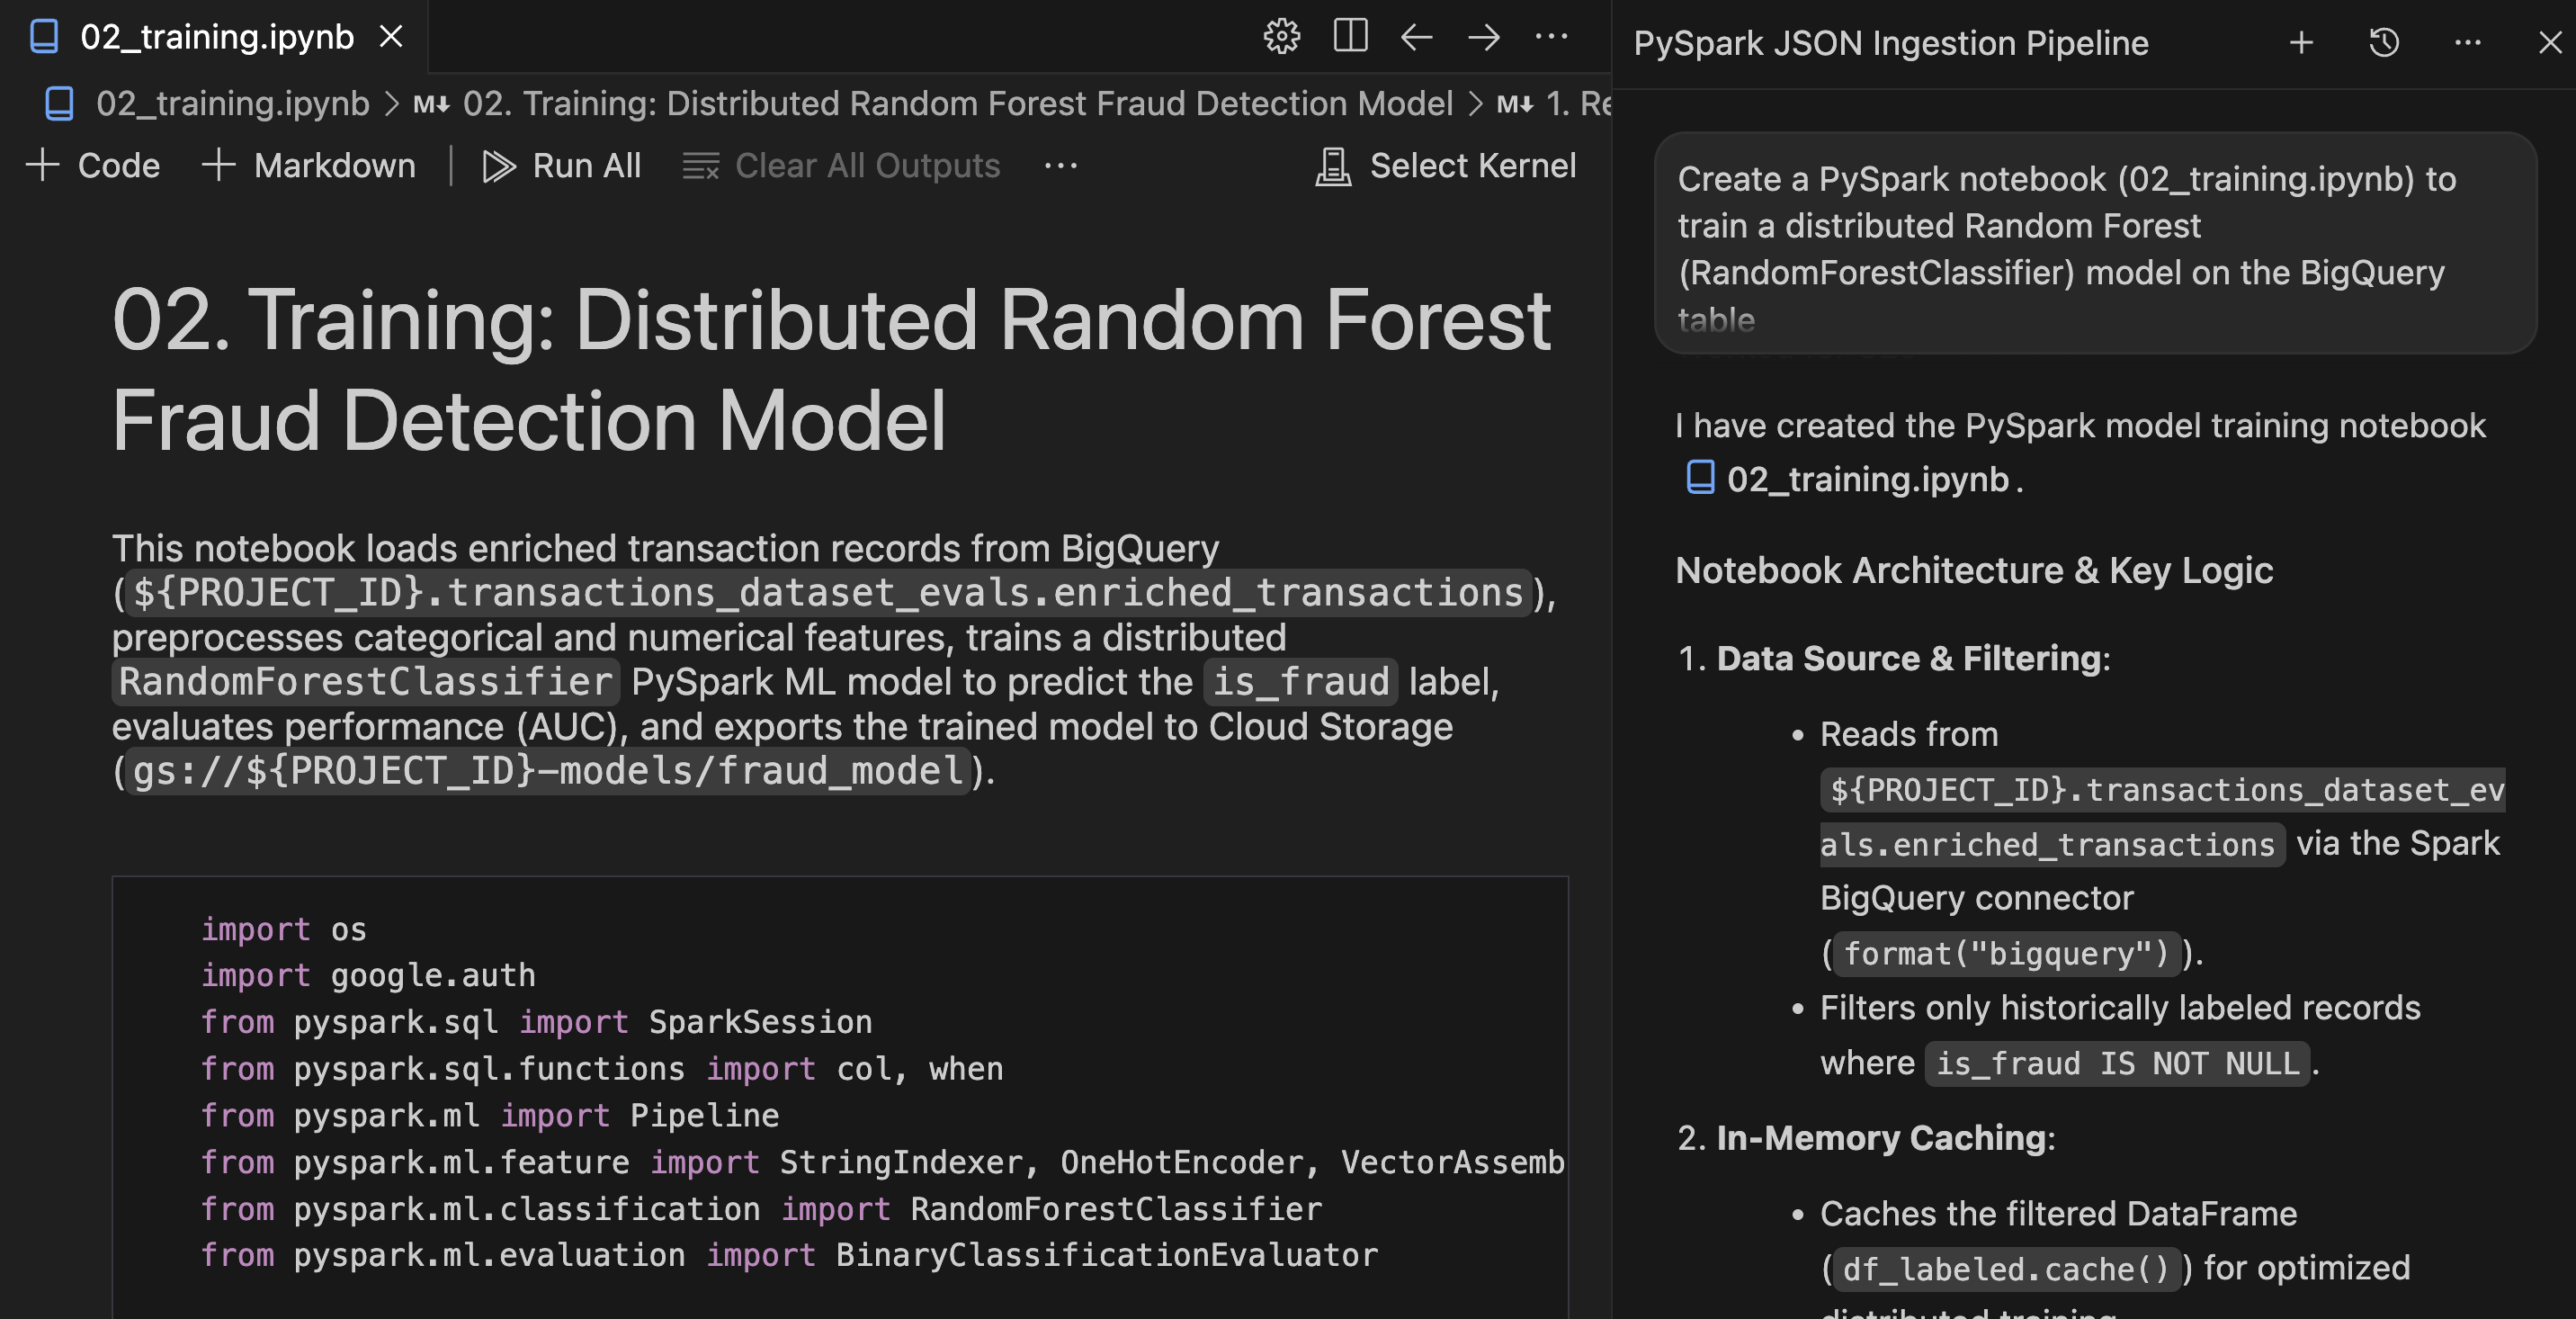
Create a PySpark notebook (02_training.ipynb) to train a distributed Random Forest
(RandomForestClassifier) model on the BigQuery table
`transactions_dataset_evals`.`enriched_transactions`, predicting the `is_fraud` label.
Train only on historically labeled records where `is_fraud` is not null.

One-hot encode categorical strings, scale amounts, cache the dataset in memory,
evaluate AUC, and save the evaluated model to gs://${PROJECT_ID}-models/fraud_model.
- Review the agent's plan or generated code and click Proceed / Accept all to save
notebooks/02_training.ipynbto your workspace.
Review and execute the notebook
- Open
notebooks/02_training.ipynbin the editor. - Review the PySpark ML pipeline stages for feature encoding, vector assembly, and Random Forest classification logic.
- Click Run All in the IDE's notebook toolbar.
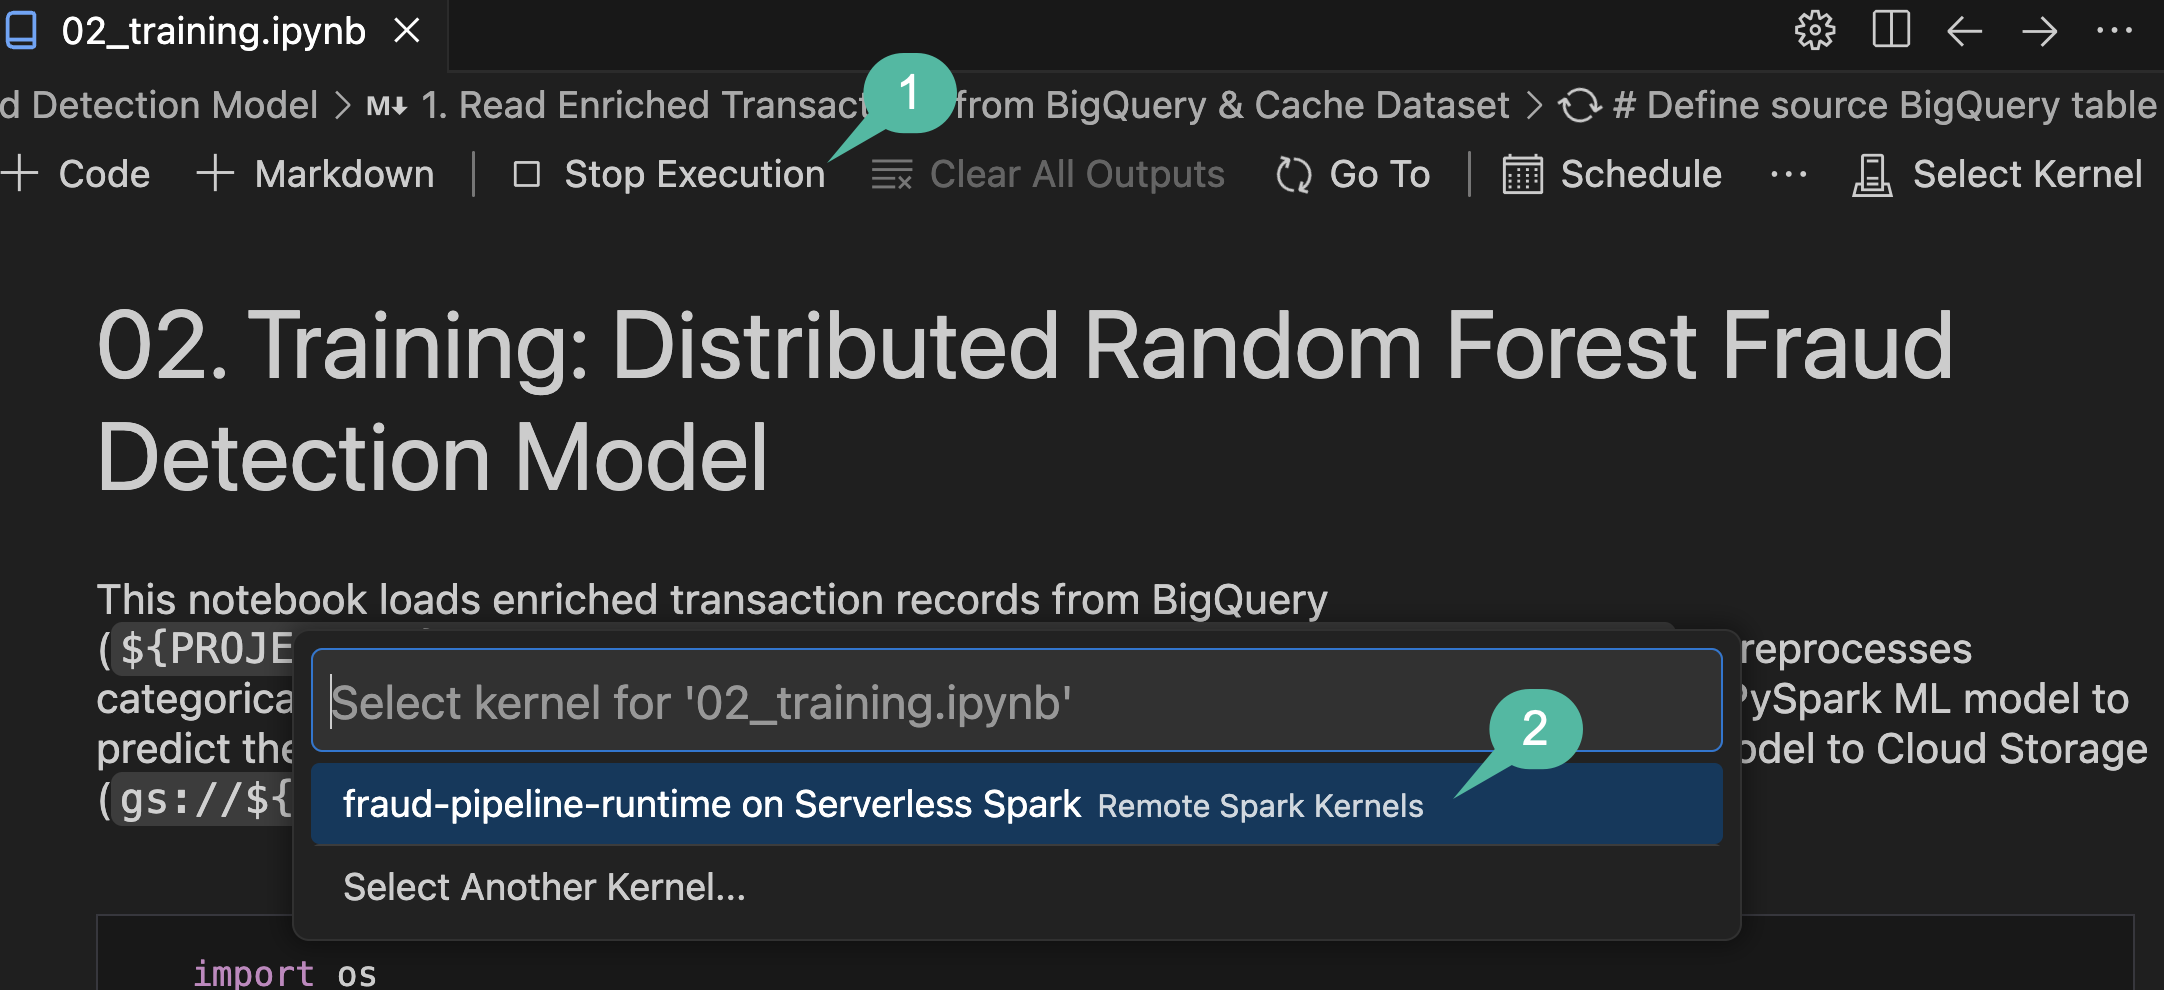
- When the Select Kernel dropdown picker opens, select fraud-pipeline-runtime on Serverless Spark.
Verification
Once execution completes, confirm the model was trained and exported correctly:
- Review the evaluation cell outputs near the bottom of the notebook to verify the reported Area Under ROC (AUC) score.
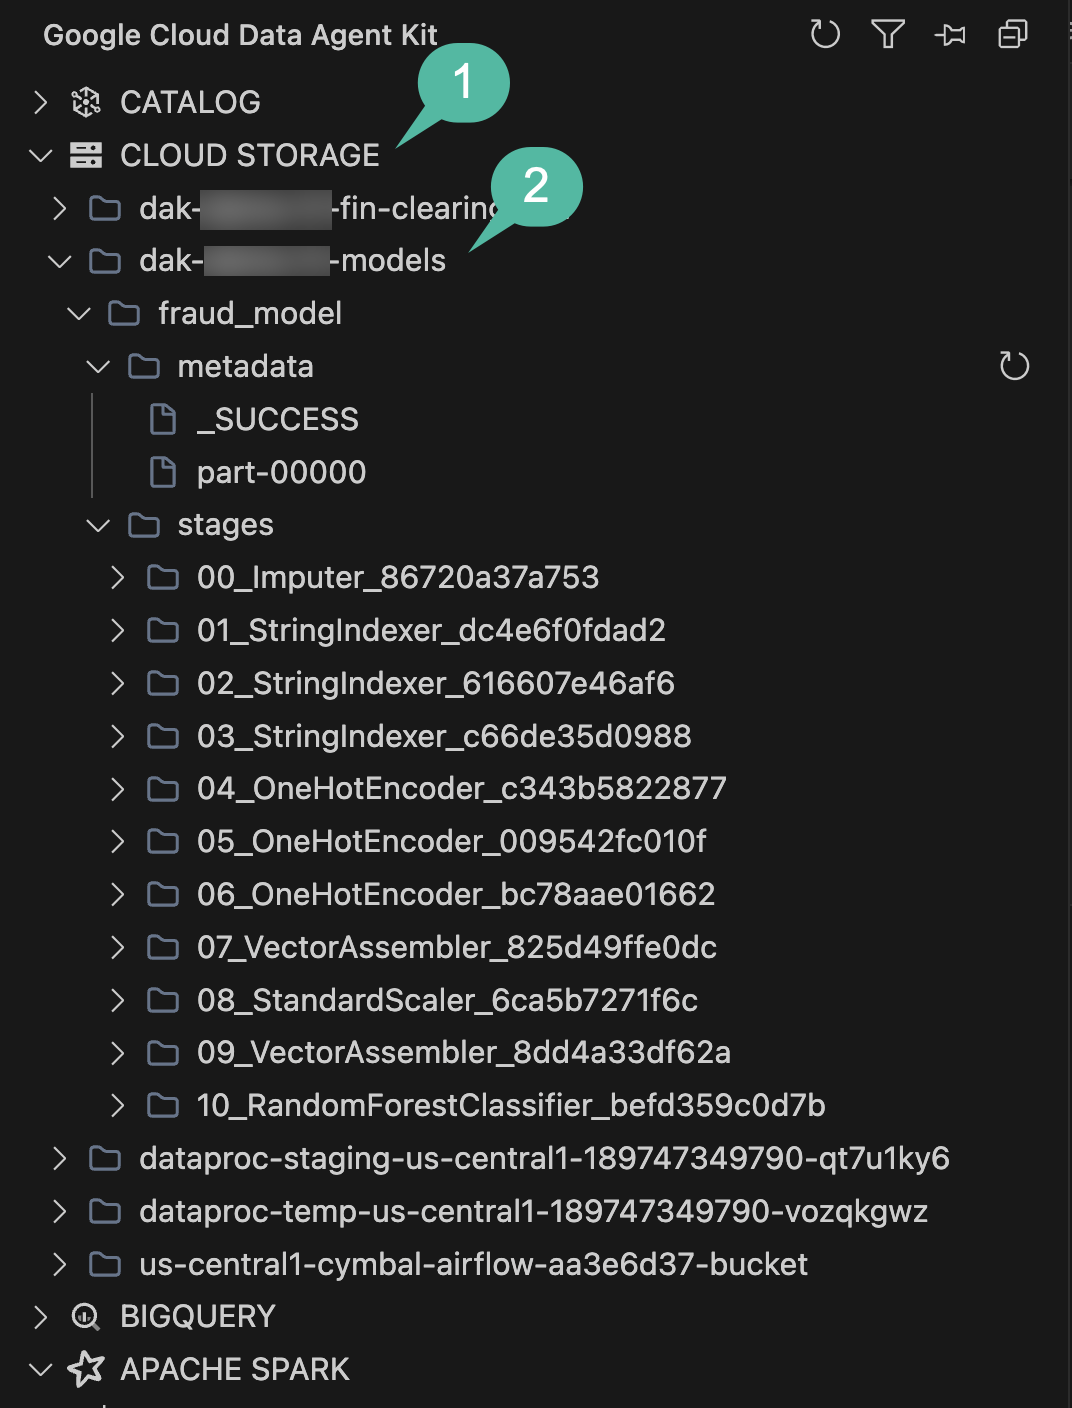
- To ensure the model artifacts were successfully saved to GCS, expand the STORAGE explorer pane in the Data Agent Kit sidebar.
- Locate the bucket ending in
-models(tied to your active Project ID), expand it, and drill down to verify thefraud_modeldirectory and its pipeline stages exist.
Section Recap: You used the agent to create a PySpark ML training pipeline, trained a Random Forest model on your enriched BigQuery table, and exported the model to Cloud Storage.
6. Batch inference and Cloud Spanner write
With a trained predictive model stored in Cloud Storage, you will run batch inference on new transactions flowing through BigQuery. High-risk transactions need to be routed to an operational system so that a compliance team can review them. Cloud Spanner provides a scalable transactional database for this review queue.
Generate the batch inference notebook
Use the agent to create an inference notebook connecting BigQuery, Cloud Storage, and Cloud Spanner:
- Open the Agent Chat pane.
- Provide the following prompt:
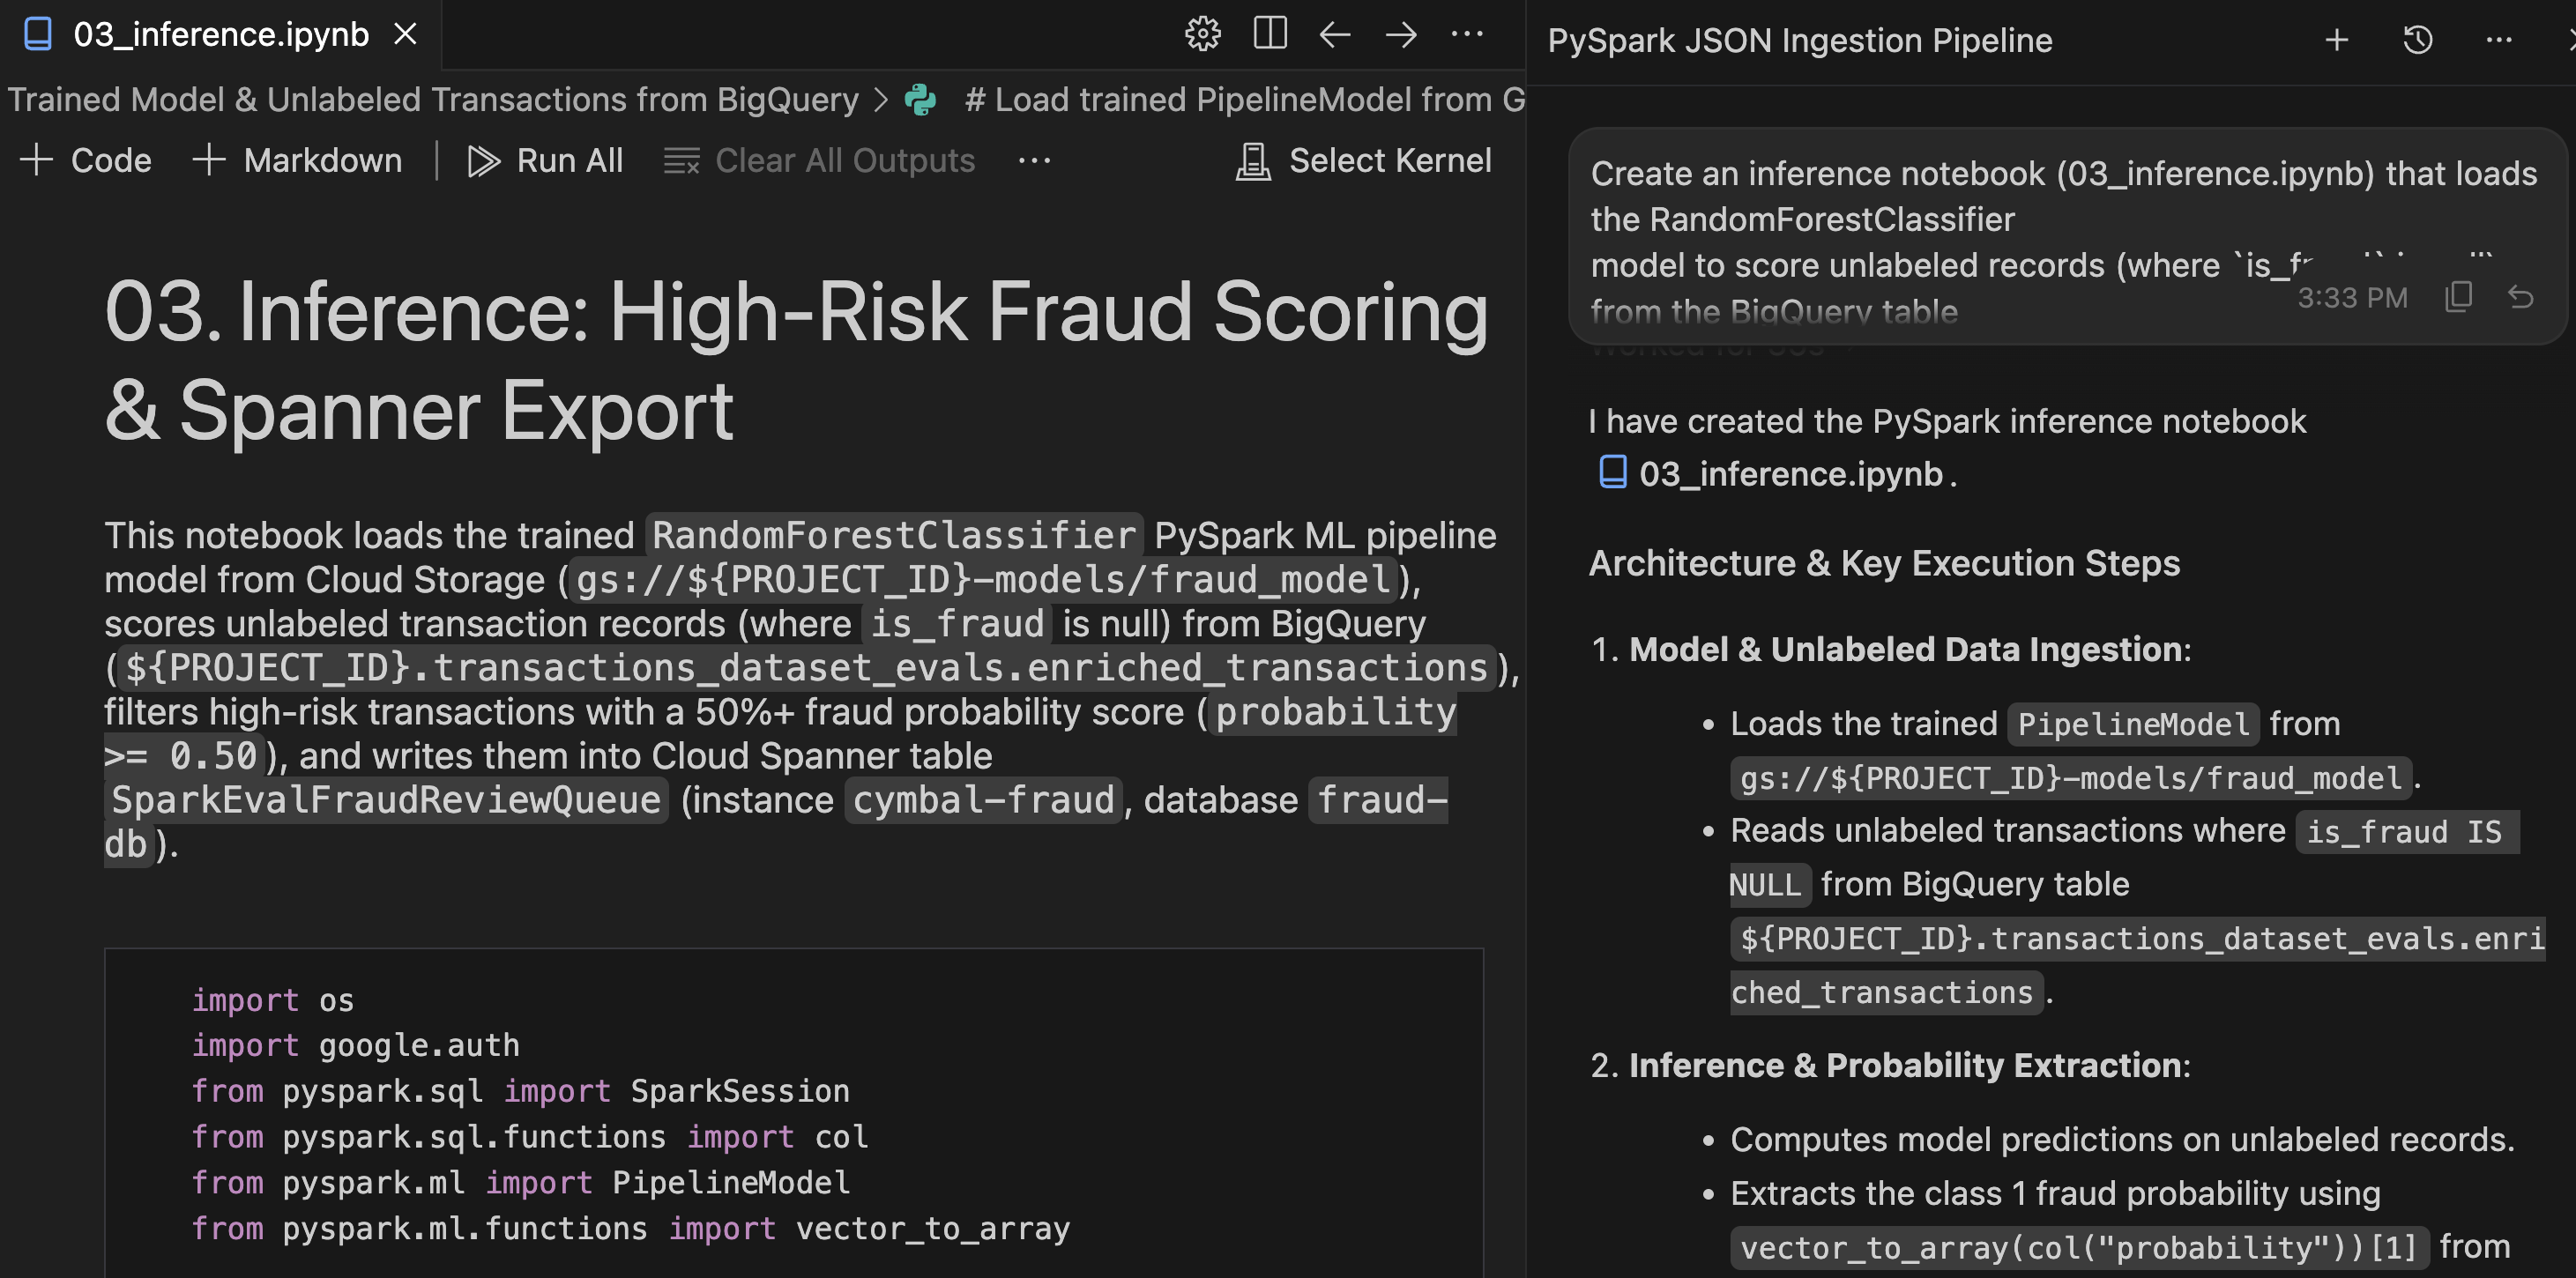
Create an inference notebook (03_inference.ipynb) that loads the RandomForestClassifier
model to score unlabeled records (where `is_fraud` is null) from the BigQuery table
`transactions_dataset_evals`.`enriched_transactions`.

Filter for high-risk transactions with a 50%+ fraud probability score (probability >= 0.50)
and write them to the Cloud Spanner table SparkEvalFraudReviewQueue in the cymbal-fraud instance
under fraud-db.
- Accept the generated notebook to save
notebooks/03_inference.ipynbto your workspace.
Review and execute the notebook
- Open the newly generated
notebooks/03_inference.ipynbin the editor. - Review the PySpark inference sequence:
- Dependencies: The Serverless Runtime template provides the required
cloud-spannerJAR dependencies for Spark execution. - Data Formatting: The script drops complex Spark ML vector columns (such as raw features and probabilities) before writing to match the Spanner table schema.
- Spanner Connector: It writes the flagged rows using
.format("cloud-spanner")to append directly to the review queue.
- Dependencies: The Serverless Runtime template provides the required
- Click Run All in the IDE's notebook toolbar.
- When prompted to select a kernel, select fraud-pipeline-runtime on Serverless Spark.
Verification
Once the inference notebook finishes processing, you can query your operational Spanner database directly inside the IDE:
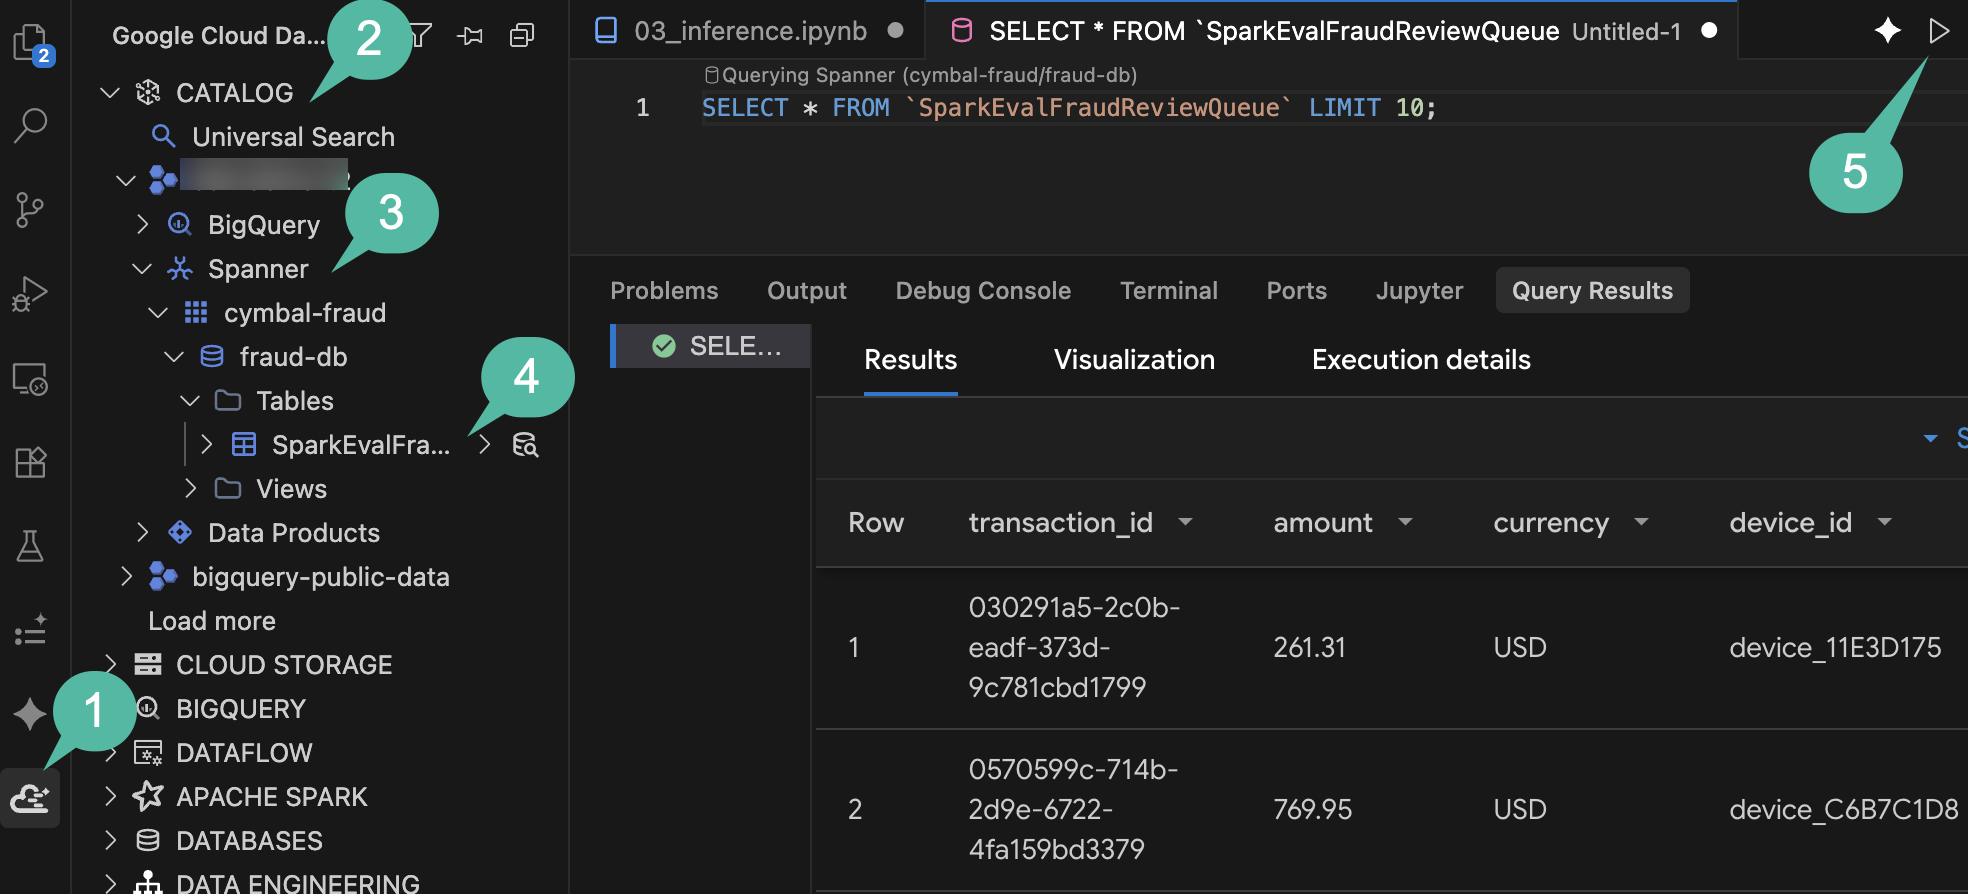
- In the IDE activity bar, open the Google Cloud Data Agent Kit panel.
- Expand the CATALOG section.
- Expand your project ID, then expand Spanner.
- Navigate to
cymbal-fraud->fraud-db->Tables->SparkEvalFraudReviewQueue. - Right-click the table and select Query Table, then execute the query:
SELECT *
FROM `SparkEvalFraudReviewQueue`
LIMIT 100;
- In the Query Results pane below, you should see newly inserted rows representing high-risk transactions flagged for manual review.
Section Recap: You used the agent to create a batch inference notebook, scored unlabeled BigQuery records with your trained model, and wrote high-risk transactions directly to Cloud Spanner.
7. Scaffold and orchestrate with Managed Airflow
Your pipeline currently consists of discrete steps: an ingestion notebook, a dbt transformation project, and a batch inference notebook. To make this production-ready, you will stitch them together into a scheduled dependency graph.
Managed Service for Apache Airflow (formerly known as Cloud Composer) provides a managed orchestration engine for this workflow. The Data Agent Kit includes an Orchestration Pipelines feature that translates declarative YAML pipeline definitions directly into Airflow DAGs.
Define the pipeline
Use the agent to generate the orchestration pipeline configuration:
- In the Agent Chat, provide the following prompt (remembering to replace
${PROJECT_ID}):
Initialize and define an orchestration pipeline (fraud_analysis_pipeline) triggering
the ingestion notebook, dbt project, and inference notebook in sequential order.
For Dataproc Serverless engine configs in us-central1, use resourceProfile.inline
(defining properties with spark.jars: "gs://spark-lib/spanner/spark-3.5-spanner-1.4.0.jar"
for inference) rather than resourceProfile.path or overrides.

Set the schedule interval to run daily at midnight, and use
gs://${PROJECT_ID}-airflow-artifacts for artifact storage.
Review the DAG configuration
The Data Agent Kit Orchestrator uses declarative YAML configurations to define and deploy pipelines to Apache Airflow, allowing definitions to be version controlled and deployed via CI/CD.
In the IDE Explorer pane, review the two pipeline files the agent generated at the root of your workspace:
deployment.yaml: Open this file. This serves as your environment registry. It maps your logicaldevpipeline to thecymbal-airflowenvironment, sets the execution region (us-central1), and defines theartifact_storagebucket where compiled DAGs and dependencies are staged.fraud_analysis_pipeline.yaml: Open this file. This defines the execution graph. It specifies the trigger schedule (interval: '0 0 * * *') and sequences the three steps under theactionsblock:- An ingestion
notebookaction for01_ingestion.ipynbrunning on Dataproc Serverless. - A transformation
pipelineaction targeting thedbt_projectdirectory, with adependsOndependency pointing to the ingestion step. - An inference
notebookaction for03_inference.ipynbwith adependsOndependency pointing to the dbt step, bundling the Spanner JAR property.
- An ingestion
- The agent will also summarize these generated artifacts into a Walkthrough tab in your editor pane, outlining the configurations and validations performed.
Interactive DAG configuration
The Data Agent Kit renders your pipeline configuration as an interactive visual graph for inspecting and editing Airflow DAG properties.
- In the IDE activity bar, open the Google Cloud Data Agent Kit panel.
- Under
DATA ENGINEERING, expandOrchestration Pipelines. - Click
fraud_analysis_pipeline.yamlto open the visual DAG canvas in the main editor.
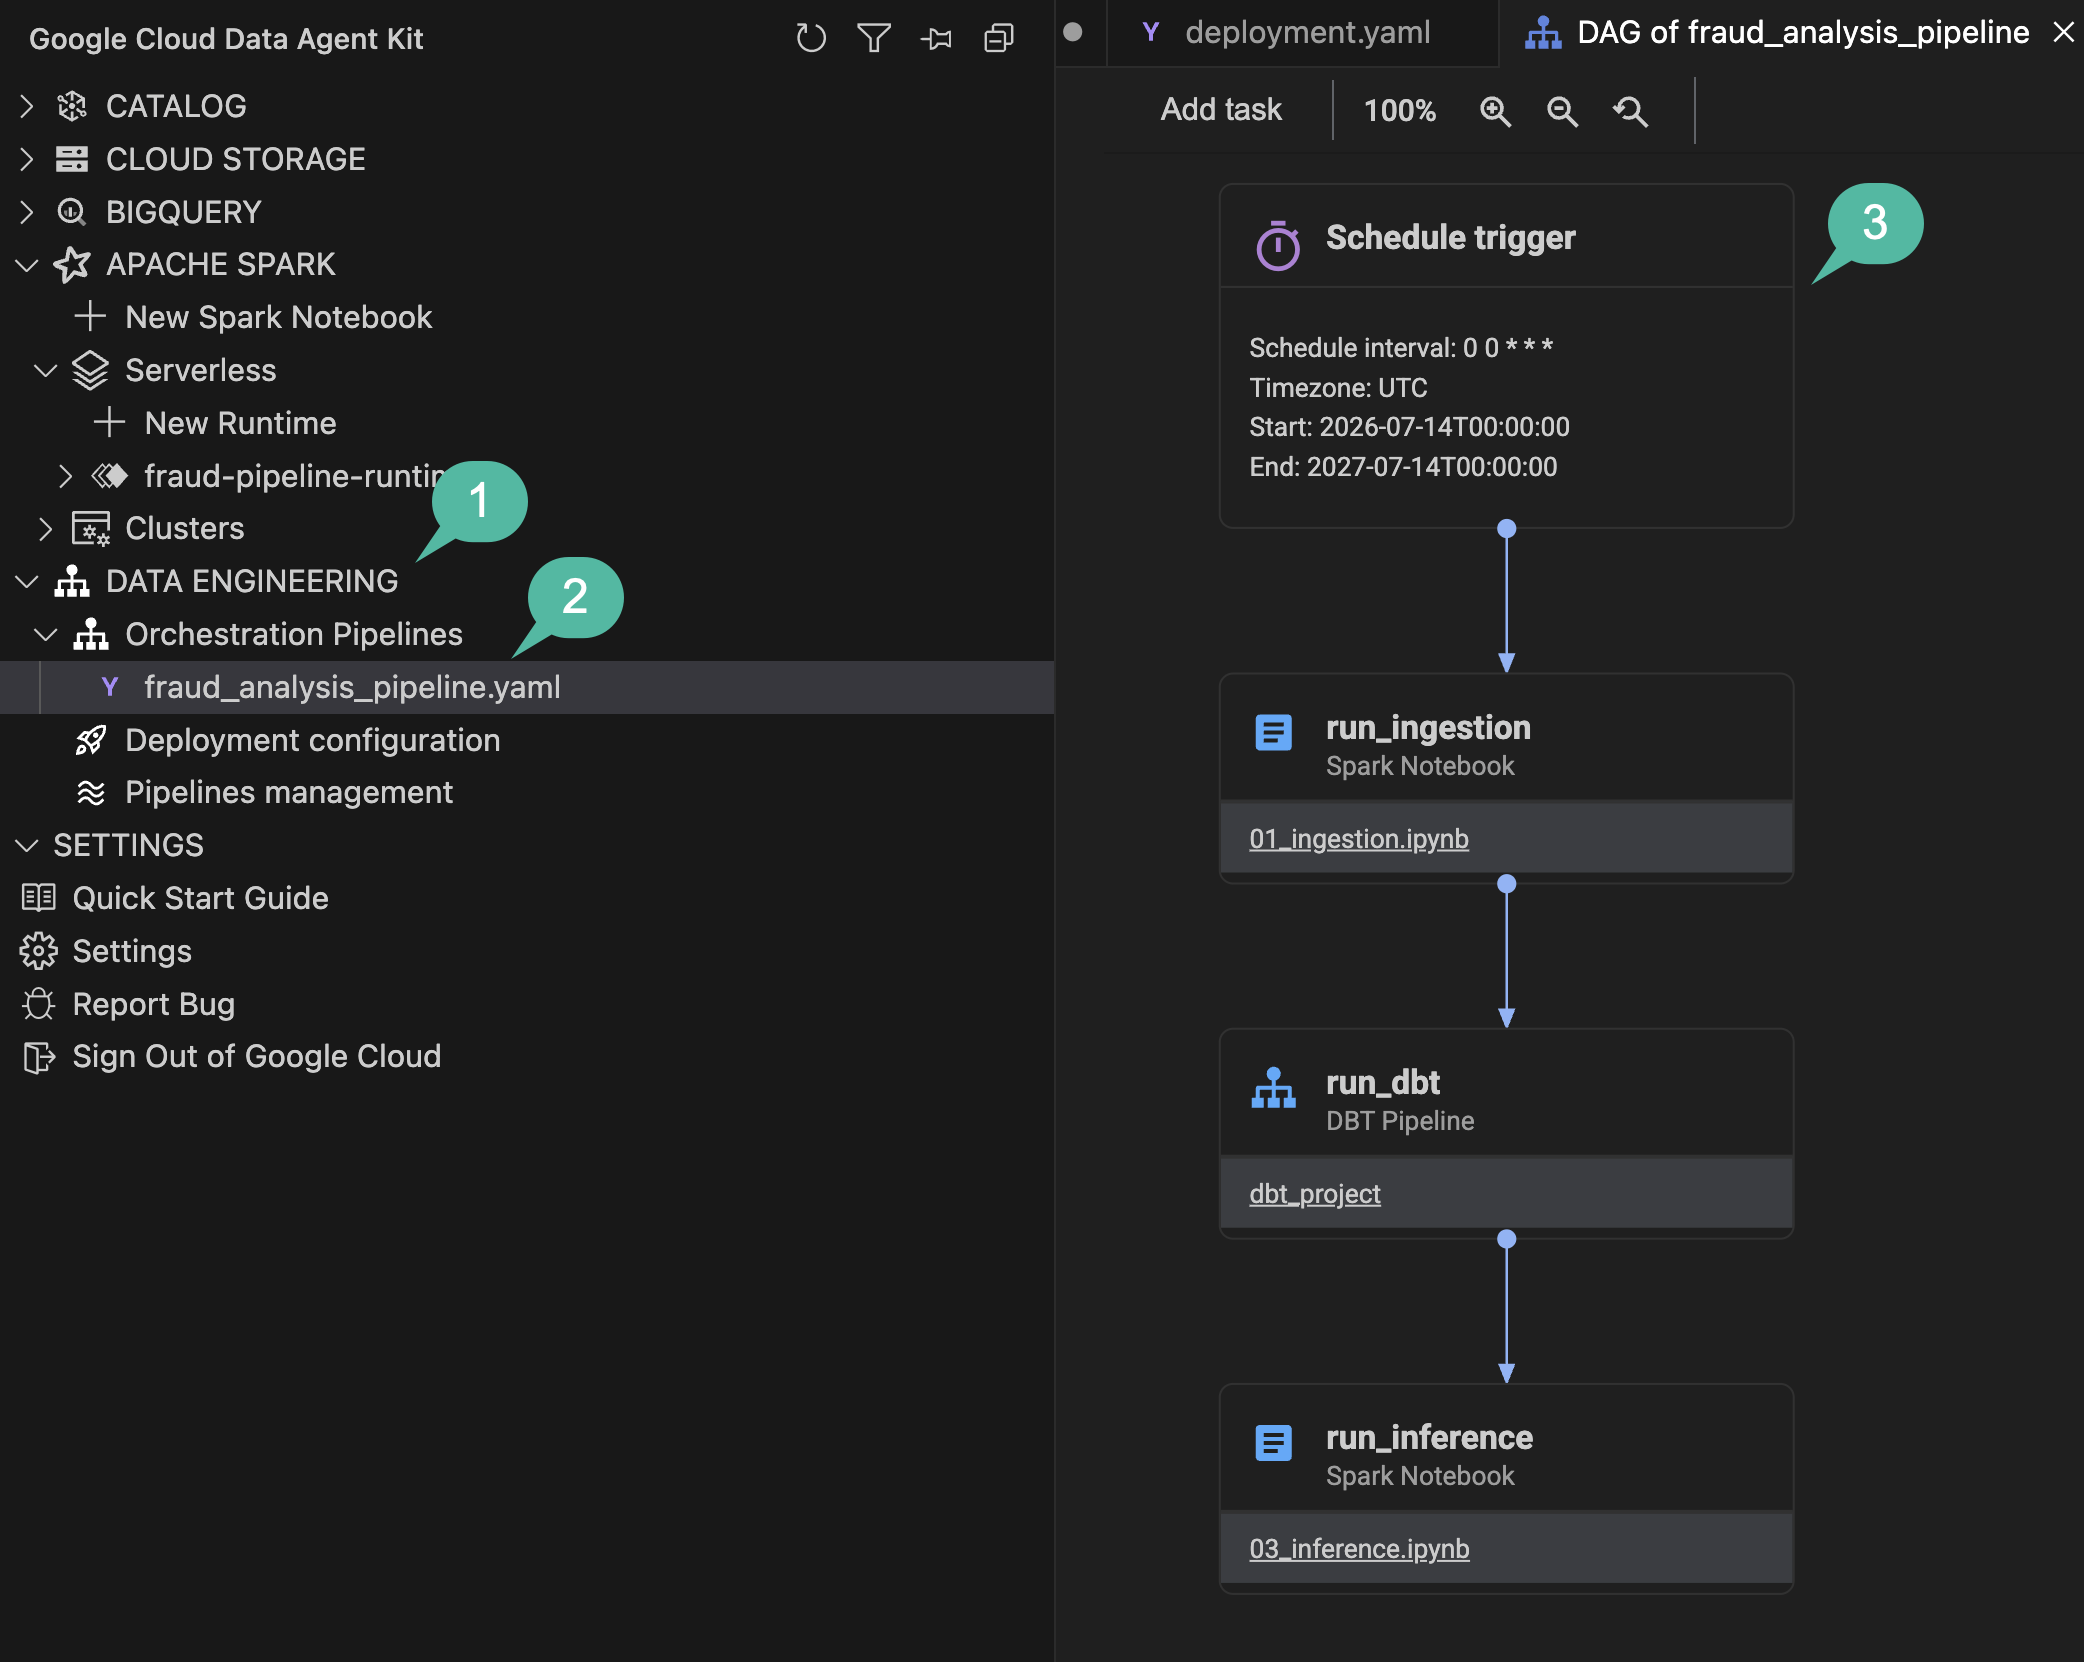
- Click the
Schedule triggernode at the top. A configuration flyout opens on the right, displaying the parsed Cron string (0 0 * * *) and allowing you to adjust parameters like backfill and catchup. - Click either notebook task node (such as the ingestion or inference step). The flyout updates to display the specific Dataproc Serverless execution mappings and connector properties.
- Notice the notebook filename hyperlink (such as
01_ingestion.ipynb) inside the node block. Clicking it opens the notebook directly in your editor. - In the left sidebar underneath Orchestration Pipelines, click
Deployment configuration. This view shows your targetdevenvironment cluster and output GCS bucket artifacts.
Section Recap: You generated an orchestration pipeline configuration with the agent, defining dependencies between ingestion, dbt, and inference tasks in an interactive visual canvas.
8. Deploy, execute, and monitor
With the DAG defined locally, you will connect to the Managed Airflow environment provisioned during setup and deploy the pipeline.
Configure Managed Service for Apache Airflow
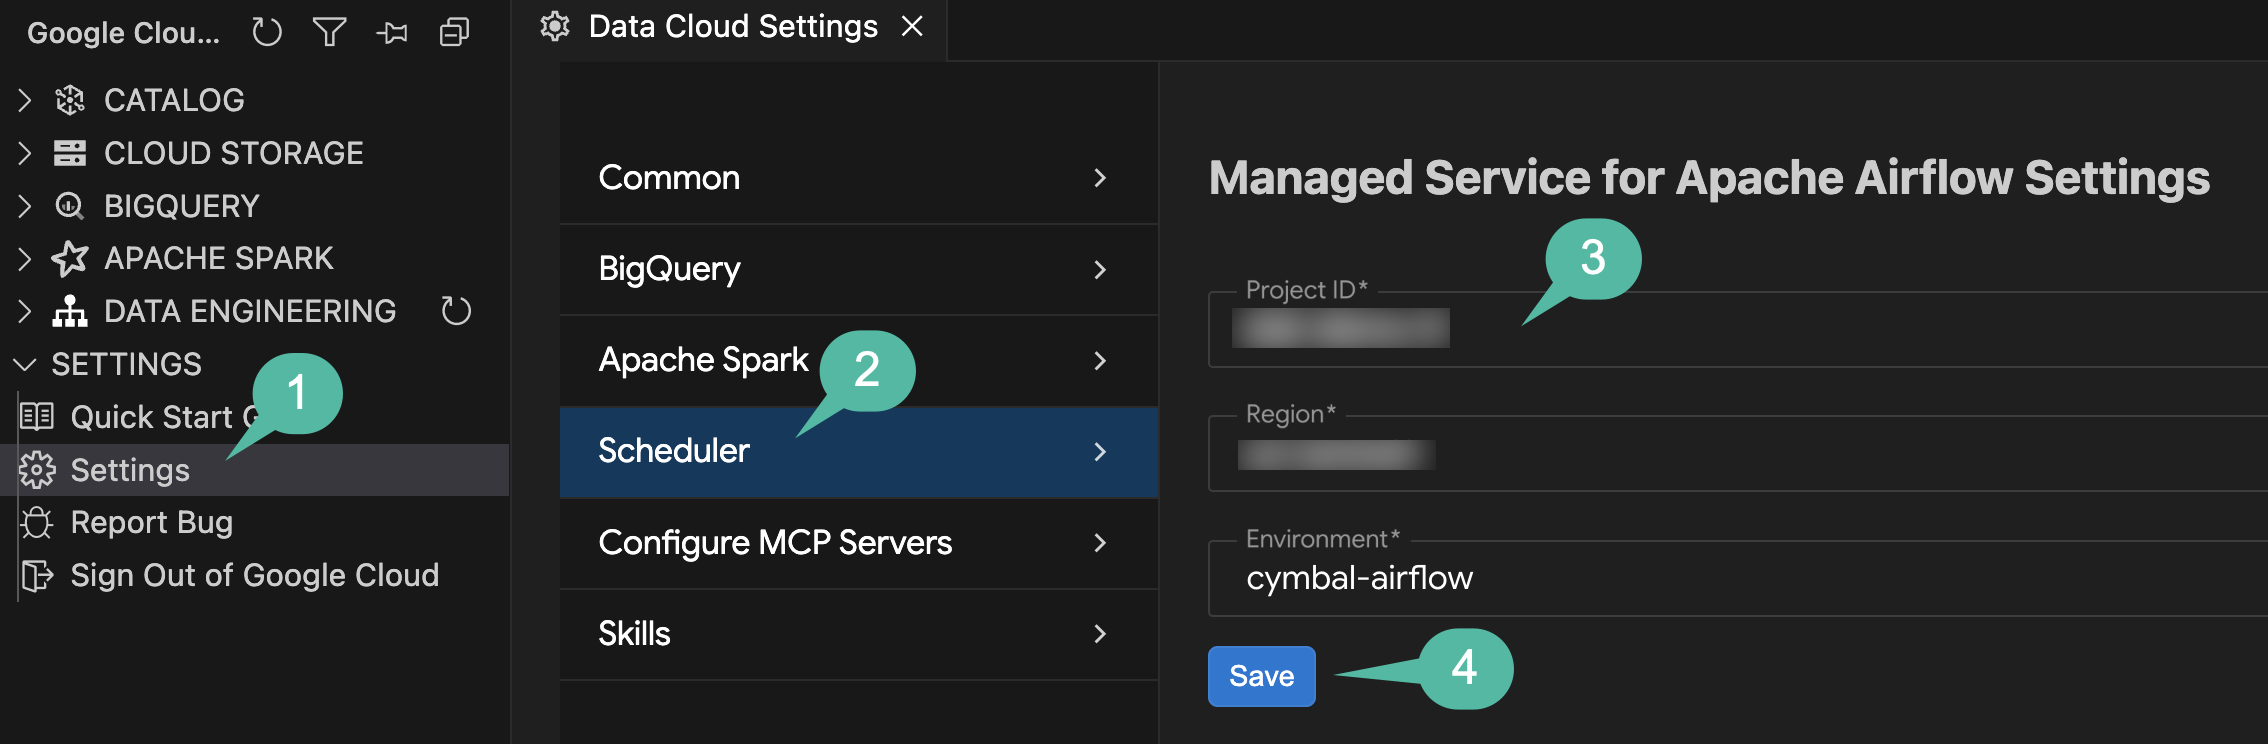
Before deploying, configure the Scheduler connection in the Data Agent Kit settings so the extension targets your Managed Airflow environment:
- In the IDE activity bar, open the Google Cloud Data Agent Kit panel.
- Under
SETTINGS, click Settings. - Select Scheduler from the left menu.
- Configure the settings:
- Project ID: Select your active project ID.
- Region: Select
us-central1. - Environment: Select
cymbal-airflow.
- Click Save.
Deploy the DAG
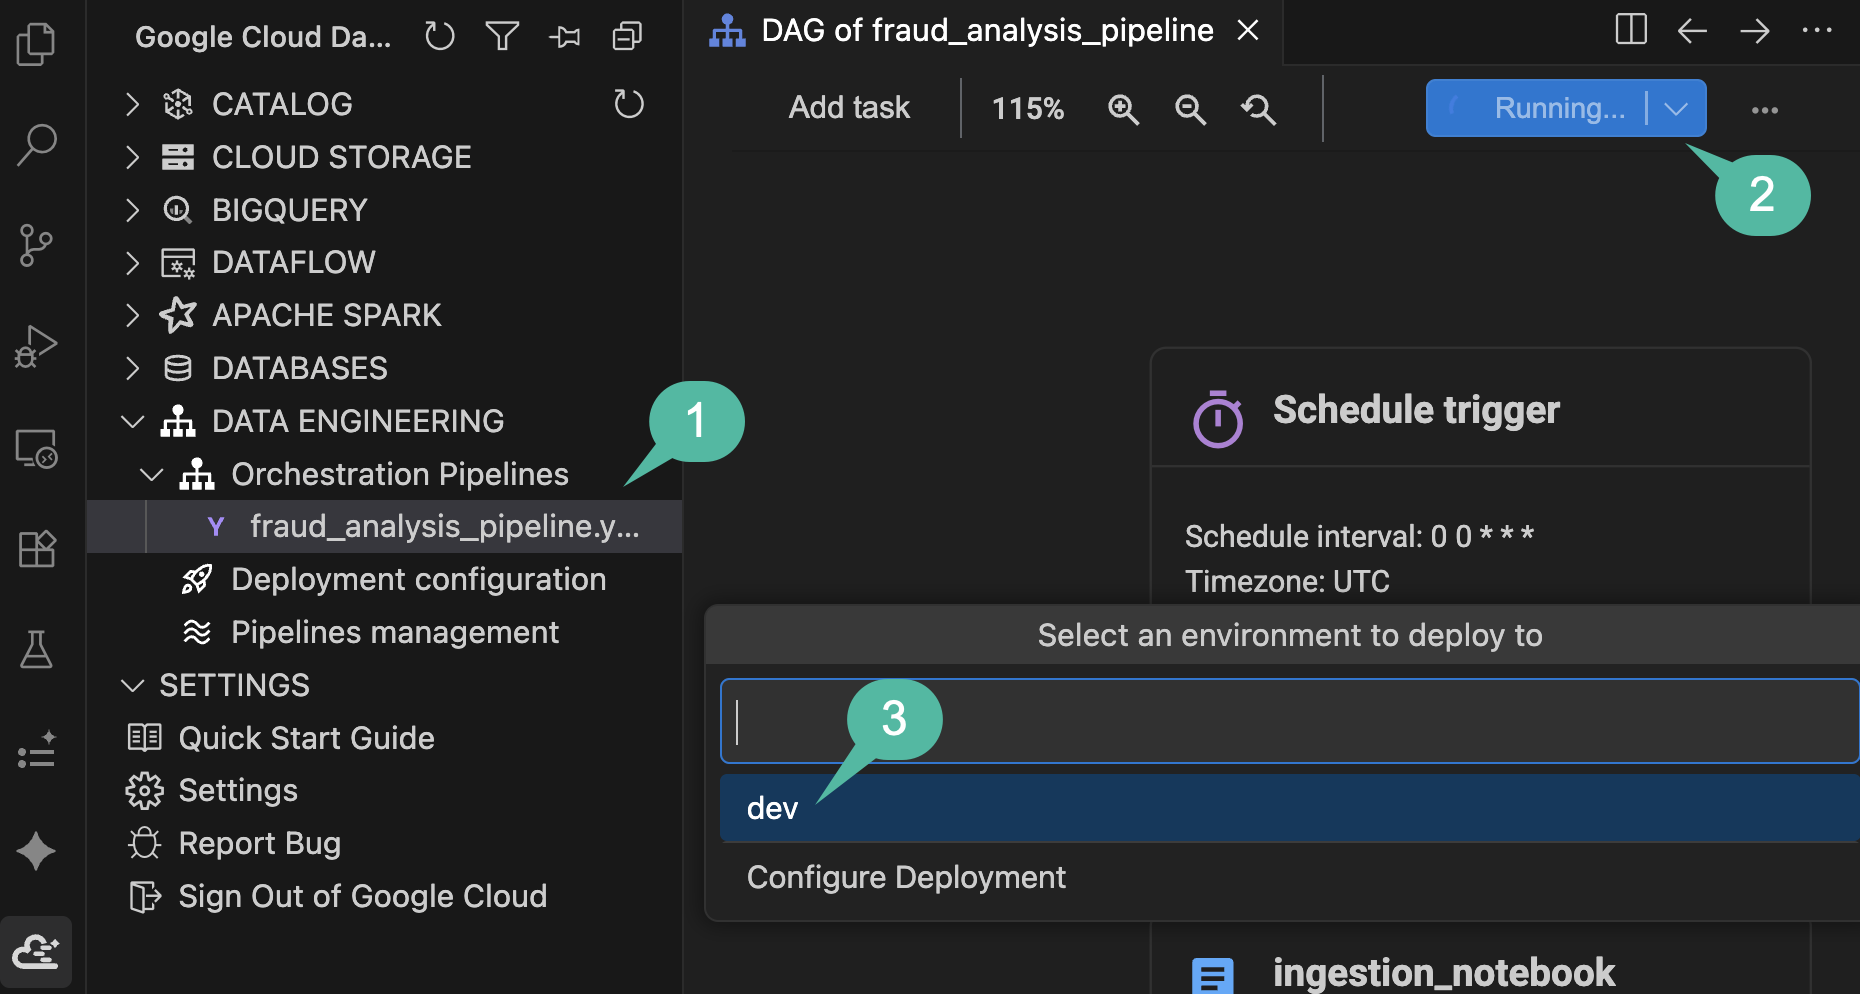
You will now deploy the configured pipeline directly to your Managed Airflow environment from the visual canvas:
- In the Google Cloud Data Agent Kit sidebar, expand
DATA ENGINEERING>Orchestration Pipelinesand clickfraud_analysis_pipeline.yamlto open the visual DAG canvas. - In the top right corner of the canvas toolbar, click the blue Run pipeline button.
- In the environment dropdown picker, select
dev. - Observe the progress notification in the bottom status area (
Running pipeline: Building pipeline locally...). The extension will automatically compile your DAG, package the notebook and dbt assets, and upload them to your Managed Airflow environment's GCS bucket (this takes about 3–4 minutes to complete).
Monitor the run
Once local compilation completes and the popup notification confirms Triggered a new run for pipeline... successfully, monitor the live execution:
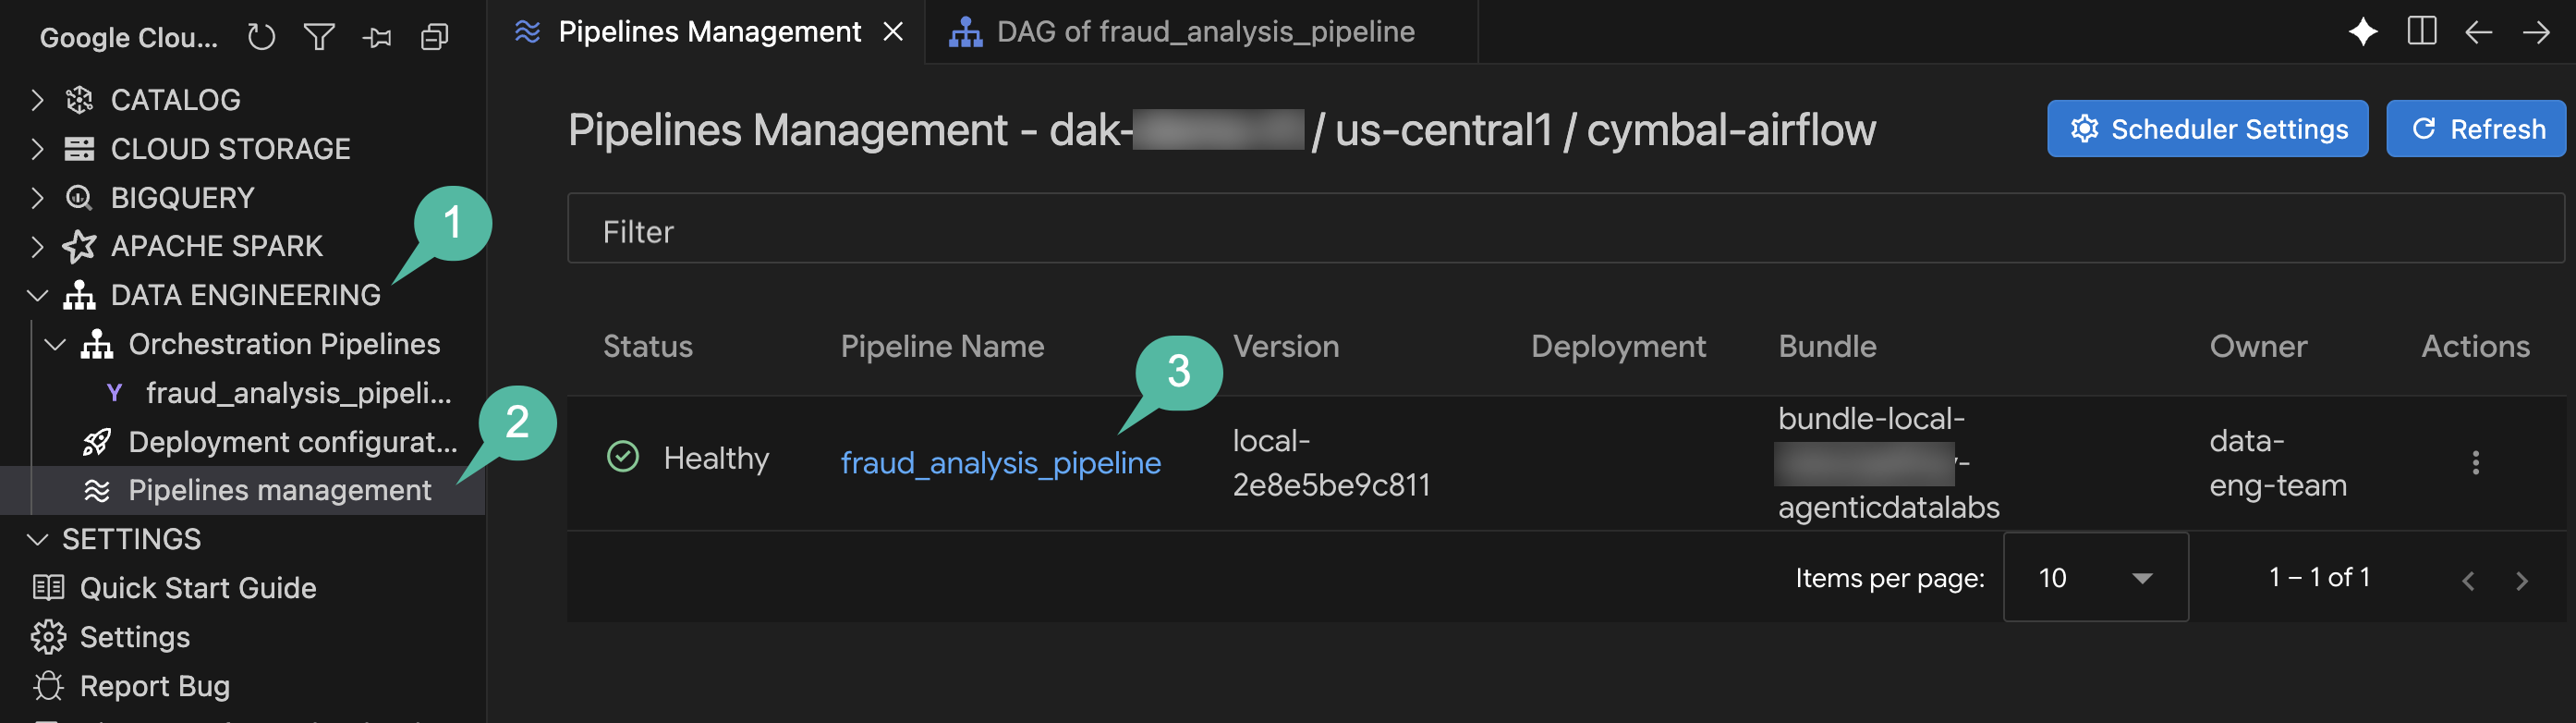
- In the Google Cloud Data Agent Kit sidebar, expand
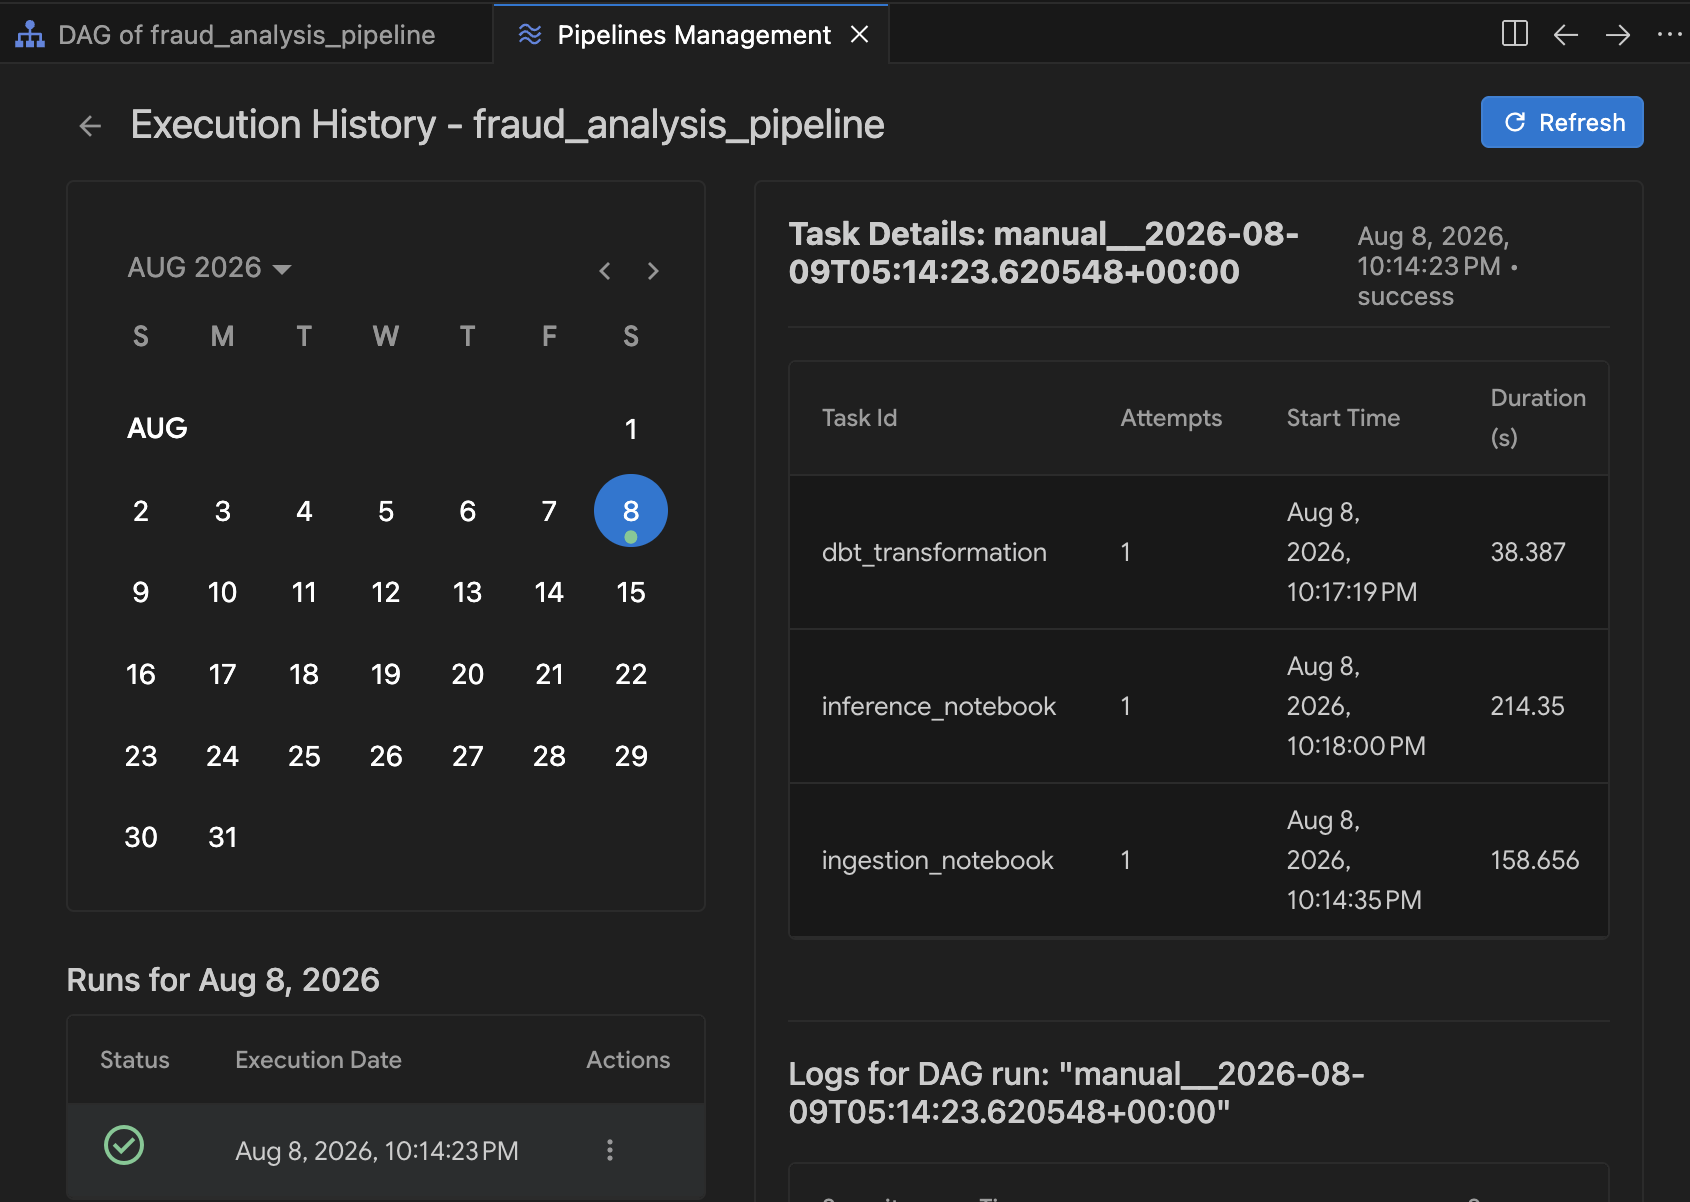
DATA ENGINEERING>Orchestration Pipelines. - Click Pipelines management.
- In the Pipelines Management table, click on
fraud_analysis_pipelineto open its execution history.
- In the Execution History view, select the active run from the calendar.
- As the execution progresses across each pipeline task (ingestion, dbt transformation, and inference), status indicators update and task durations populate. Click any task to inspect its live execution output and Airflow DAG logs.
Section Recap: You configured the Airflow Scheduler connection, deployed your end-to-end analytical pipeline to Managed Airflow, and monitored a live execution, verifying the system from raw logs to final Cloud Spanner predictions.
9. Clean up
To avoid incurring ongoing charges to your Google Cloud project for the resources used in this codelab, tear down the environment using the automated script.
- In the Terminal panel (or in Cloud Shell), navigate to the scripts directory and execute:
cd ~/devrel-demos/codelabs/agentic-data-labs/data-science/scripts
chmod +x teardown.sh
./teardown.sh
- The script will list all the resources it plans to delete and prompt for confirmation:
- Managed Airflow Environment (
cymbal-airflow) - Cloud Spanner Instance (
cymbal-fraud) - BigQuery Dataset (
transactions_dataset_evals) - Cloud Storage Buckets (
gs://${PROJECT_ID}-fin-clearing-rawandgs://${PROJECT_ID}-models) - Worker Service Account (
composer-worker-sa)
- Managed Airflow Environment (
- Type
yto confirm. The teardown script will remove all provisioned GCP services and clean up local files.
10. Congratulations!
You have built an end-to-end fraud detection pipeline spanning Cloud Storage, BigQuery, Managed Service for Apache Spark (Spark Serverless), dbt, Cloud Spanner, and Managed Service for Apache Airflow, pair-programming with the Google Cloud Data Agent Kit inside the Antigravity IDE.
What you accomplished
- 📥 Ingested raw transaction logs into a BigQuery table using Managed Service for Apache Spark and the Data Agent Kit.
- 🧹 Deduplicated and normalized data by creating a dbt project with data quality tests.
- 🤖 Trained a distributed Random Forest model using
RandomForestClassifierand exported the trained model to Cloud Storage. - ⚡ Executed batch inference on incoming transactions and routed high-risk records into Cloud Spanner for audit review.
- 🔄 Orchestrated, deployed, and monitored the workflow as a scheduled Airflow DAG using Managed Service for Apache Airflow and the IDE's visual DAG management tools.
Key concepts
Concept | What you learned |
Pair-programming inside the IDE using natural language to generate PySpark notebooks, configure dbt models, and define Airflow DAGs | |
Scalable tabular storage for analytical SQL, dbt transformations, and ML training | |
Serverless execution for distributed PySpark data loading and Random Forest ML training | |
Writing batch Spark inference predictions directly into operational database review queues | |
YAML DAG Declarations | Declarative pipeline definitions rendered as interactive Airflow visual graphs in the IDE |
Visual DAG Management | Inspecting pipeline dependencies, deploying to Managed Airflow, and monitoring live task execution history inside the IDE |
Next steps
- Explore the Google Cloud Data Agent Kit documentation
- Learn more about Managed Service for Apache Spark
- Learn more about Managed Service for Apache Airflow
- Build your own multi-service pipelines using the Antigravity IDE