

۱. مقدمه
تصور کنید که شما یک دانشمند داده در Cymbal Financial ، یک پردازنده پرداخت با حجم بالا هستید. موجی از تأخیر در تسویه حساب رخ داده است و تیم انطباق مشکوک به کلاهبرداری هماهنگ است. شما باید یک خط لوله ایجاد کنید تا گزارشهای خام تراکنشهای Clearinghouse را دریافت کنید، دادهها را پاکسازی کنید، یک مدل یادگیری ماشینی آموزش دهید، استنتاج دستهای را اجرا کنید و تراکنشهای پرخطر را برای حسابرسی دستی در صف بررسی Cloud Spanner قرار دهید.
معمولاً این کار مستلزم روزها نوشتن کدهای تنظیمات تکراری (دفترچههای Spark، پیکربندیهای dbt، اسکریپتهای آموزشی، DAGهای Airflow) و تغییر مداوم زمینه بین رابطهای کنسول و ویرایشگرها است.
در این آزمایشگاه کد، شما با استفاده از Google Cloud Data Agent Kit (DAK) در داخل Antigravity IDE ، با یک عامل (agent) برنامهنویسی جفتی انجام خواهید داد. با استفاده از زبان طبیعی محاورهای، عامل به شما در تولید دفترچههای Spark، کامپایل یک پروژه dbt، ساخت یک حلقه استنتاج و هماهنگسازی گردش کار با استفاده از Managed Service for Apache Airflow کمک خواهد کرد.
کاری که انجام خواهید داد
- لاگهای Clearinghouse را از Cloud Storage با استفاده از Managed Service for Apache Spark (Spark Serverless) در یک جدول BigQuery وارد کنید.
- تراکنشهای تکراری را با استفاده از dbt حذف و عادیسازی کنید تا لایههای دادهای تمیز (خام، مرحلهبندی، غنیشده) ایجاد شود.
- یک مدل طبقهبندی جنگل تصادفی توزیعشده (
RandomForestClassifier) را روی Spark Serverless آموزش دهید. - استنتاج دستهای را روی تراکنشهای جدید اجرا کنید و هشدارهای پرخطر را مستقیماً در Cloud Spanner بنویسید.
- با استفاده از سرویس مدیریتشده برای جریان هوای آپاچی و نظارت تعاملی DAG در داخل IDE، کل خط لوله را هماهنگ، پیکربندی بصری و مستقر کنید .
آنچه نیاز دارید
- یک مرورگر وب مانند کروم
- یک پروژه Google Cloud با قابلیت پرداخت (برای کارهای عملی، استفاده از یک پروژه جدید و اختصاصی را توصیه میکنیم).
- آشنایی اولیه با SQL، پایتون و PySpark.
- محیط برنامهنویسی Antigravity به همراه اشتراک Google AI Pro (توصیه میشود)
منابع ایجاد شده در این آزمایشگاه کد باید کمتر از ۵ دلار هزینه داشته باشند. حتماً دستورالعملهای پاکسازی در انتهای آزمایشگاه را برای حذف منابع تأمینشده دنبال کنید.
۲. تنظیمات محیطی
برای شروع آزمایشگاه، یک اسکریپت بوتاسترپ اجرا خواهید کرد. این اسکریپت به طور خودکار APIهای مورد نیاز GCP را فعال میکند، یک سطل ذخیرهسازی ابری برای دریافت داده ایجاد میکند، مجموعه دادههای تراکنش و دایرکتوری ساختگی تولید میکند، دایرکتوریهای مرجع را در BigQuery بارگذاری میکند و آمادهسازی پسزمینه Cloud Spanner و Managed Service را برای Apache Airflow (که قبلاً با نام Cloud Composer شناخته میشد) آغاز میکند.
انتخاب یا ایجاد پروژه
یک پروژه موجود را انتخاب کنید یا یک پروژه جدید در کنسول Google Cloud ایجاد کنید .
تأیید صورتحساب
مطمئن شوید که پرداخت برای پروژه Google Cloud شما فعال است. میتوانید با دنبال کردن این راهنما ، اطلاعات بیشتری در مورد نحوه انجام این کار کسب کنید.
اسکریپت راهاندازی را اجرا کنید
شما برای راهاندازی تنظیمات محیط از Google Cloud Shell (یا پوسته محلی پیکربندیشده با Google Cloud CLI) استفاده خواهید کرد.
- کنسول ابری گوگل را باز کنید.
- روی فعال کردن Cloud Shell در نوار ابزار بالا سمت راست کلیک کنید.

- در ترمینال Cloud Shell، پروژه فعال خود را پیکربندی کنید:
gcloud config set project <<YOUR_PROJECT_ID>>
export PROJECT_ID=$(gcloud config get-value project)
- مخزن codelab را کلون کنید و به پوشه scripts بروید:
cd ~/
git clone --filter=blob:none --no-checkout https://github.com/GoogleCloudPlatform/devrel-demos.git
cd ~/devrel-demos
git sparse-checkout init --cone
git sparse-checkout set codelabs/agentic-data-labs/data-science
git checkout main
cd codelabs/agentic-data-labs/data-science/scripts
- اسکریپت راهاندازی بوتاسترپ را اجرا کنید تا تمام منابع را در
us-central1مستقر کنید:
chmod +x setup.sh setup_spanner.sh setup_composer.sh
export REGION=us-central1
./setup.sh
- وقتی اسکریپت تمام شد، یک خروجی خلاصه خواهید دید که نشان میدهد مجموعه داده BigQuery و مخزن ذخیرهسازی ابری شما آماده هستند. در پسزمینه، Cloud Spanner (حدود ۲ دقیقه طول میکشد) و Managed Airflow (حدود ۲۰ دقیقه طول میکشد) به آمادهسازی ادامه میدهند. میتوانید پیشرفت آنها را در هر زمان با اجرای دستور زیر رصد کنید:
tail -f /tmp/spanner_setup.log
tail -f /tmp/composer_setup.log
نرمافزار Antigravity IDE را باز کنید.
- IDE ضد جاذبه را از صفحه دانلود گوگل ضد جاذبه دانلود و نصب کنید.
- نرمافزار Antigravity IDE را اجرا کنید.
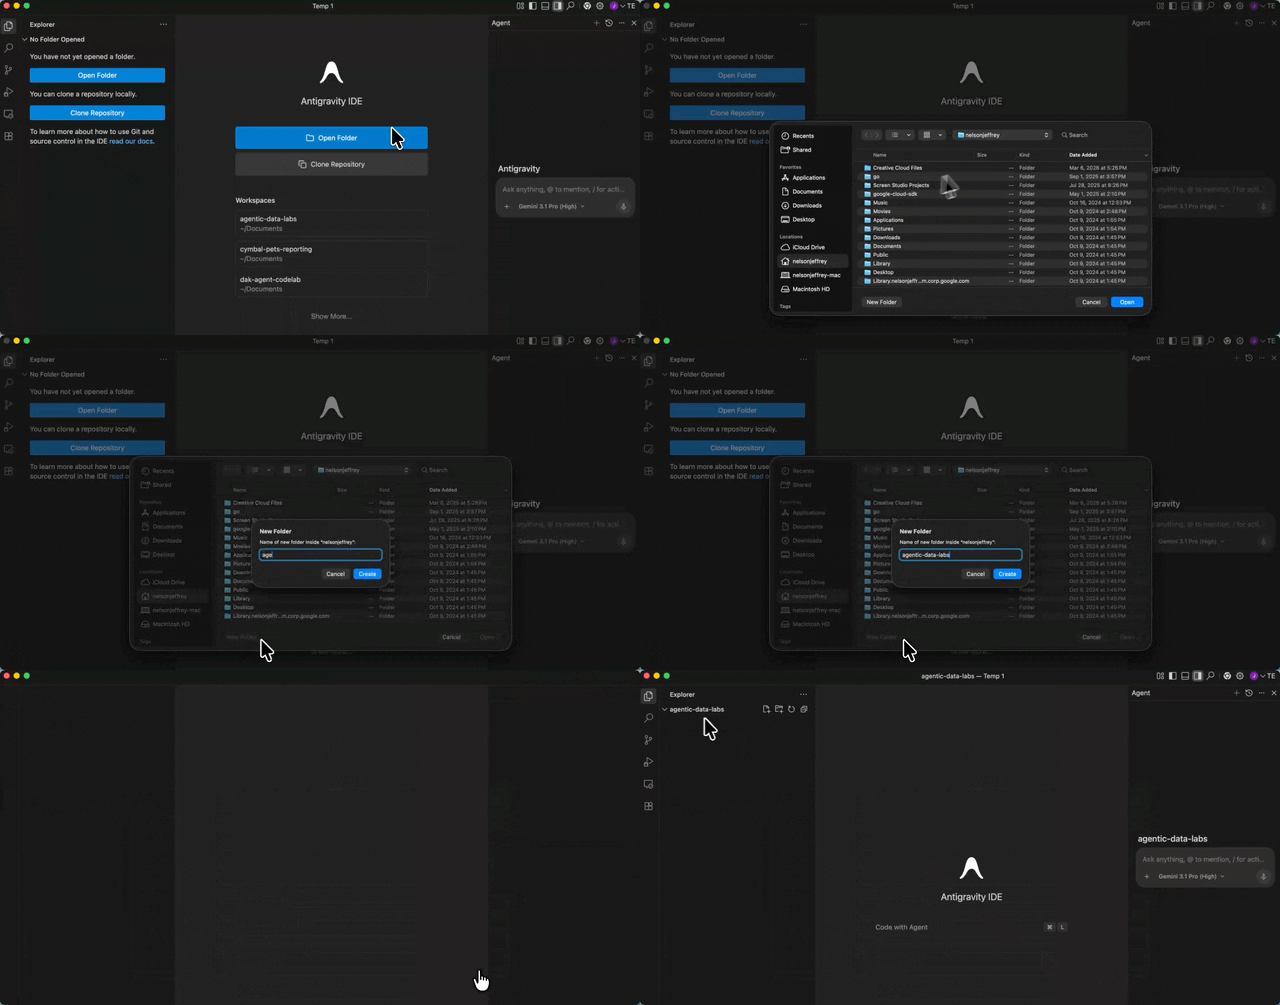
- یک پوشه جدید و خالی روی دستگاه محلی خود ایجاد کنید (مثلاً با نام
agentic-data-labs) و با انتخاب Open Folder آن را در IDE باز کنید. این پوشه به عنوان فضای کاری محلی شما برای codelab عمل خواهد کرد.
افزونه Data Agent Kit را نصب کنید
افزونه Google Cloud Data Agent Kit ادغام عمیقی را با سرویسهای داده Google Cloud مستقیماً در ویرایشگر شما فراهم میکند و به شما امکان میدهد بدون تغییر زمینه، با BigQuery، Cloud SQL، Cloud Storage و موارد دیگر تعامل داشته باشید.
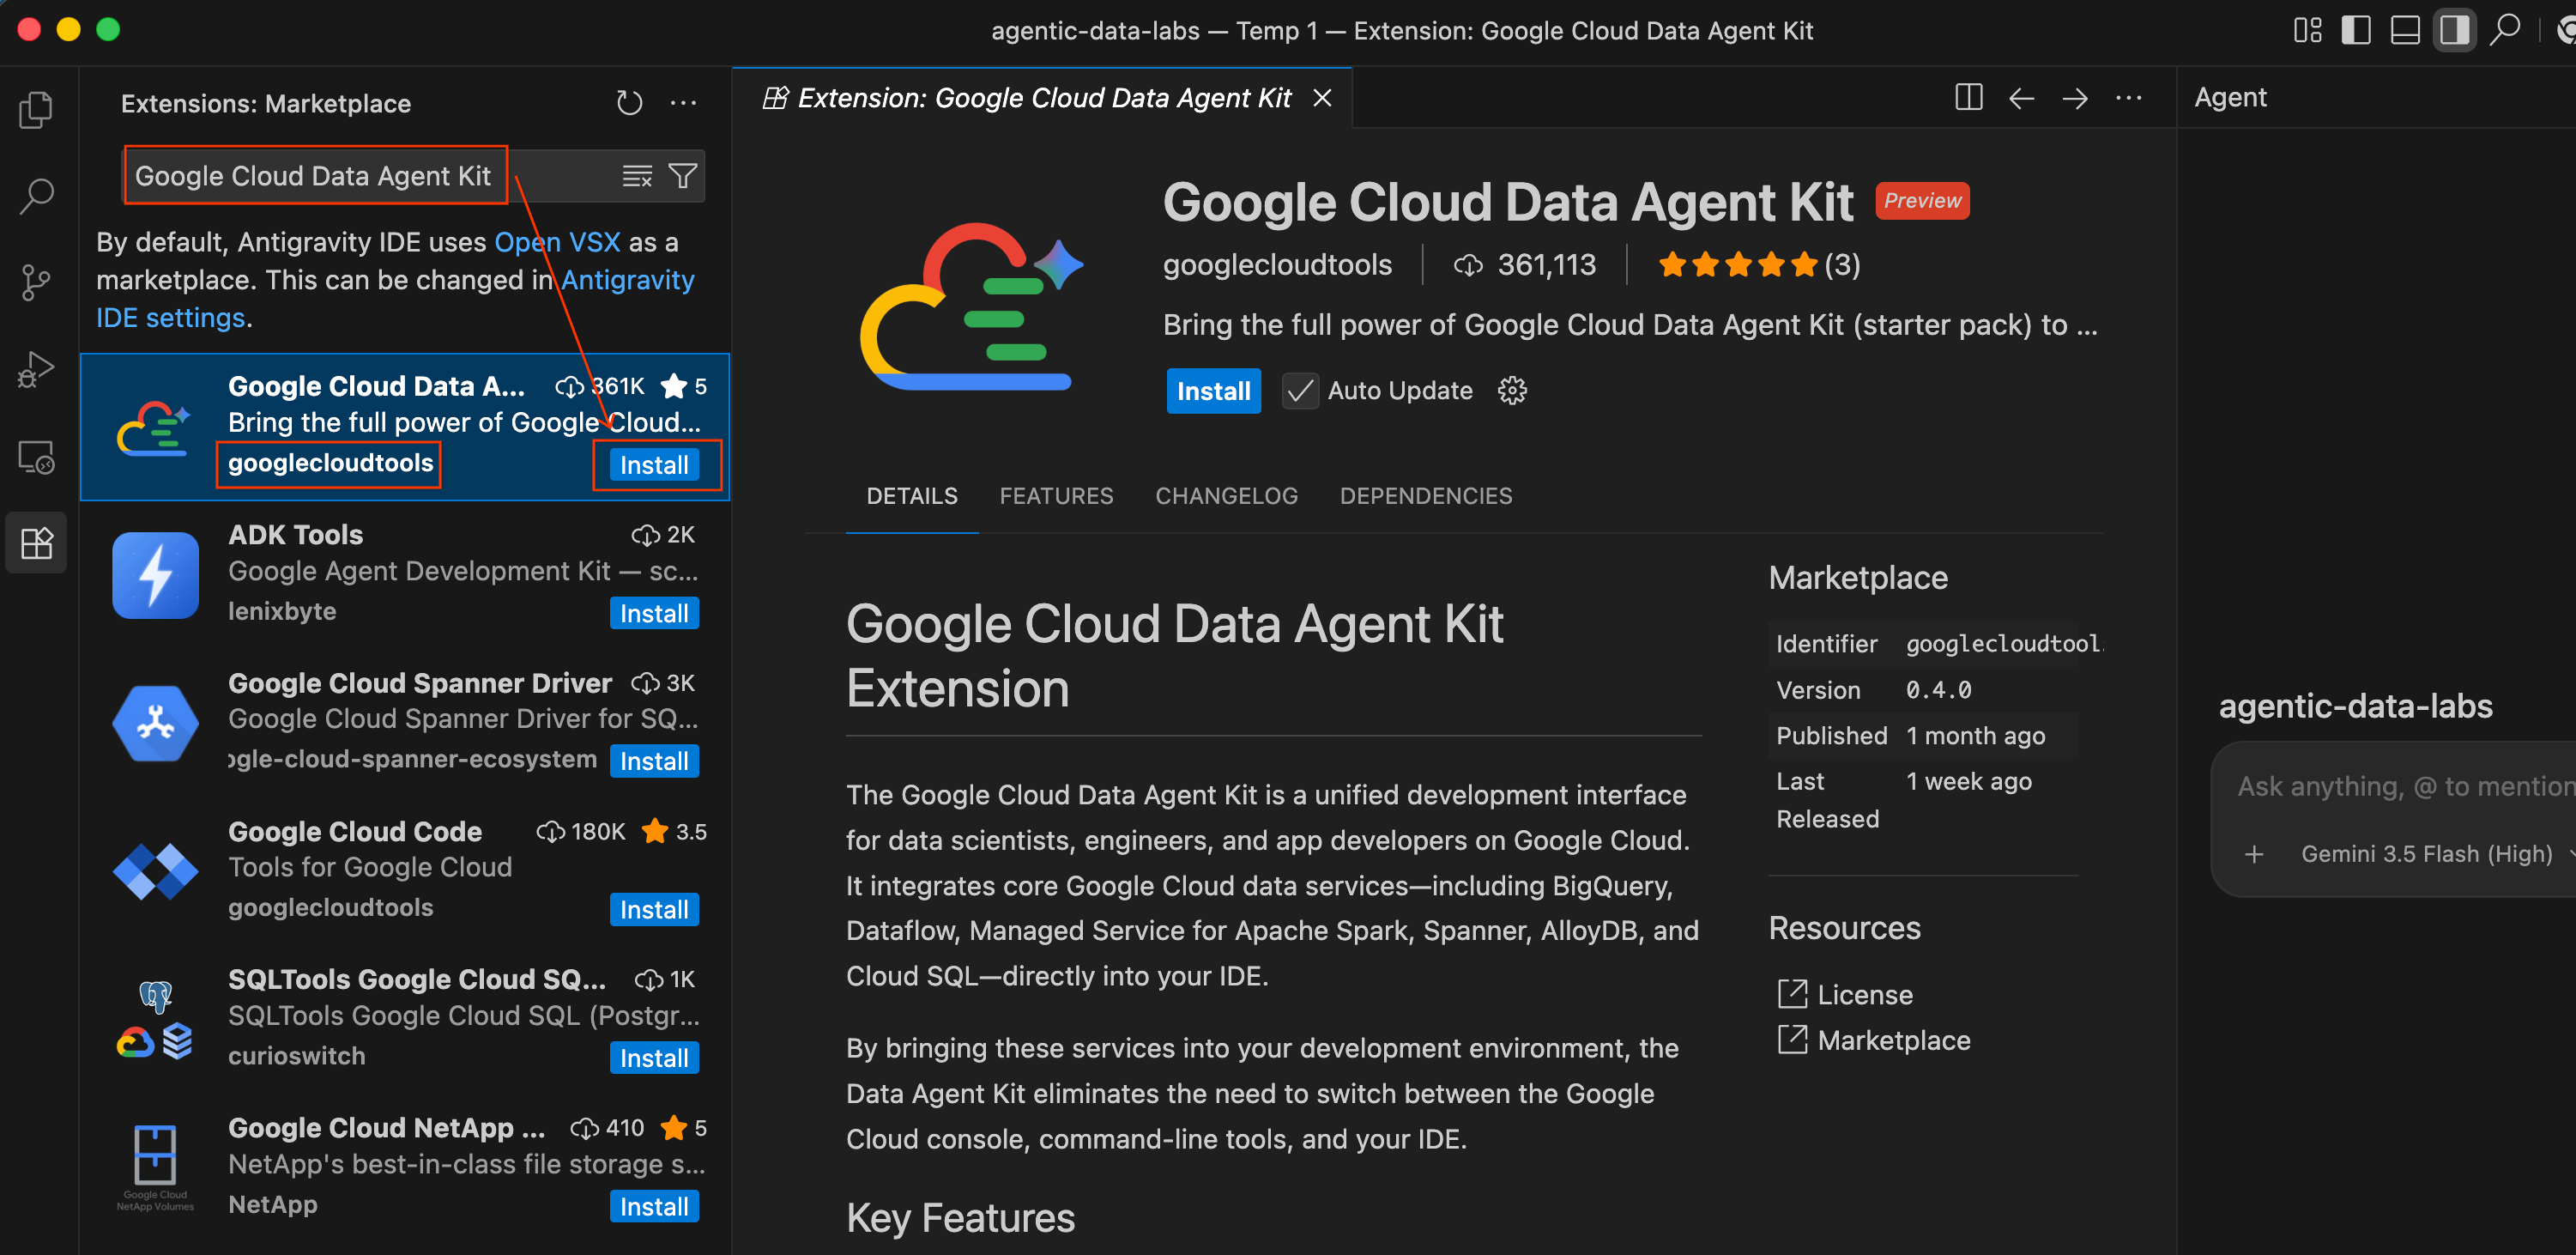
- در محیط توسعه آنتیگراویتی (Antigravity IDE)، روی آیکون افزونهها (Extensions) در نوار فعالیت (Activity Bar) در سمت چپ صفحه کلیک کنید (شکل آن شبیه چهار مربع است).
- در نوار جستجو در بالای پنل افزونهها، عبارت
Google Cloud Data Agent Kitتایپ کنید. - افزونهای به نام Google Cloud Data Agent Kit که توسط
googlecloudtoolsمنتشر شده است را پیدا کنید. - روی دکمه نصب کلیک کنید.
- ممکن است پیامی ظاهر شود که میپرسد: «آیا به ناشر «googlecloudtools» و افزونههای آن اعتماد دارید؟». برای ادامه، روی «اعتماد به ناشران و نصب» کلیک کنید.
پس از نصب، آیکون جدید Google Cloud Data Agent Kit را در نوار فعالیت (Activity Bar) در سمت چپ Antigravity IDE مشاهده خواهید کرد.
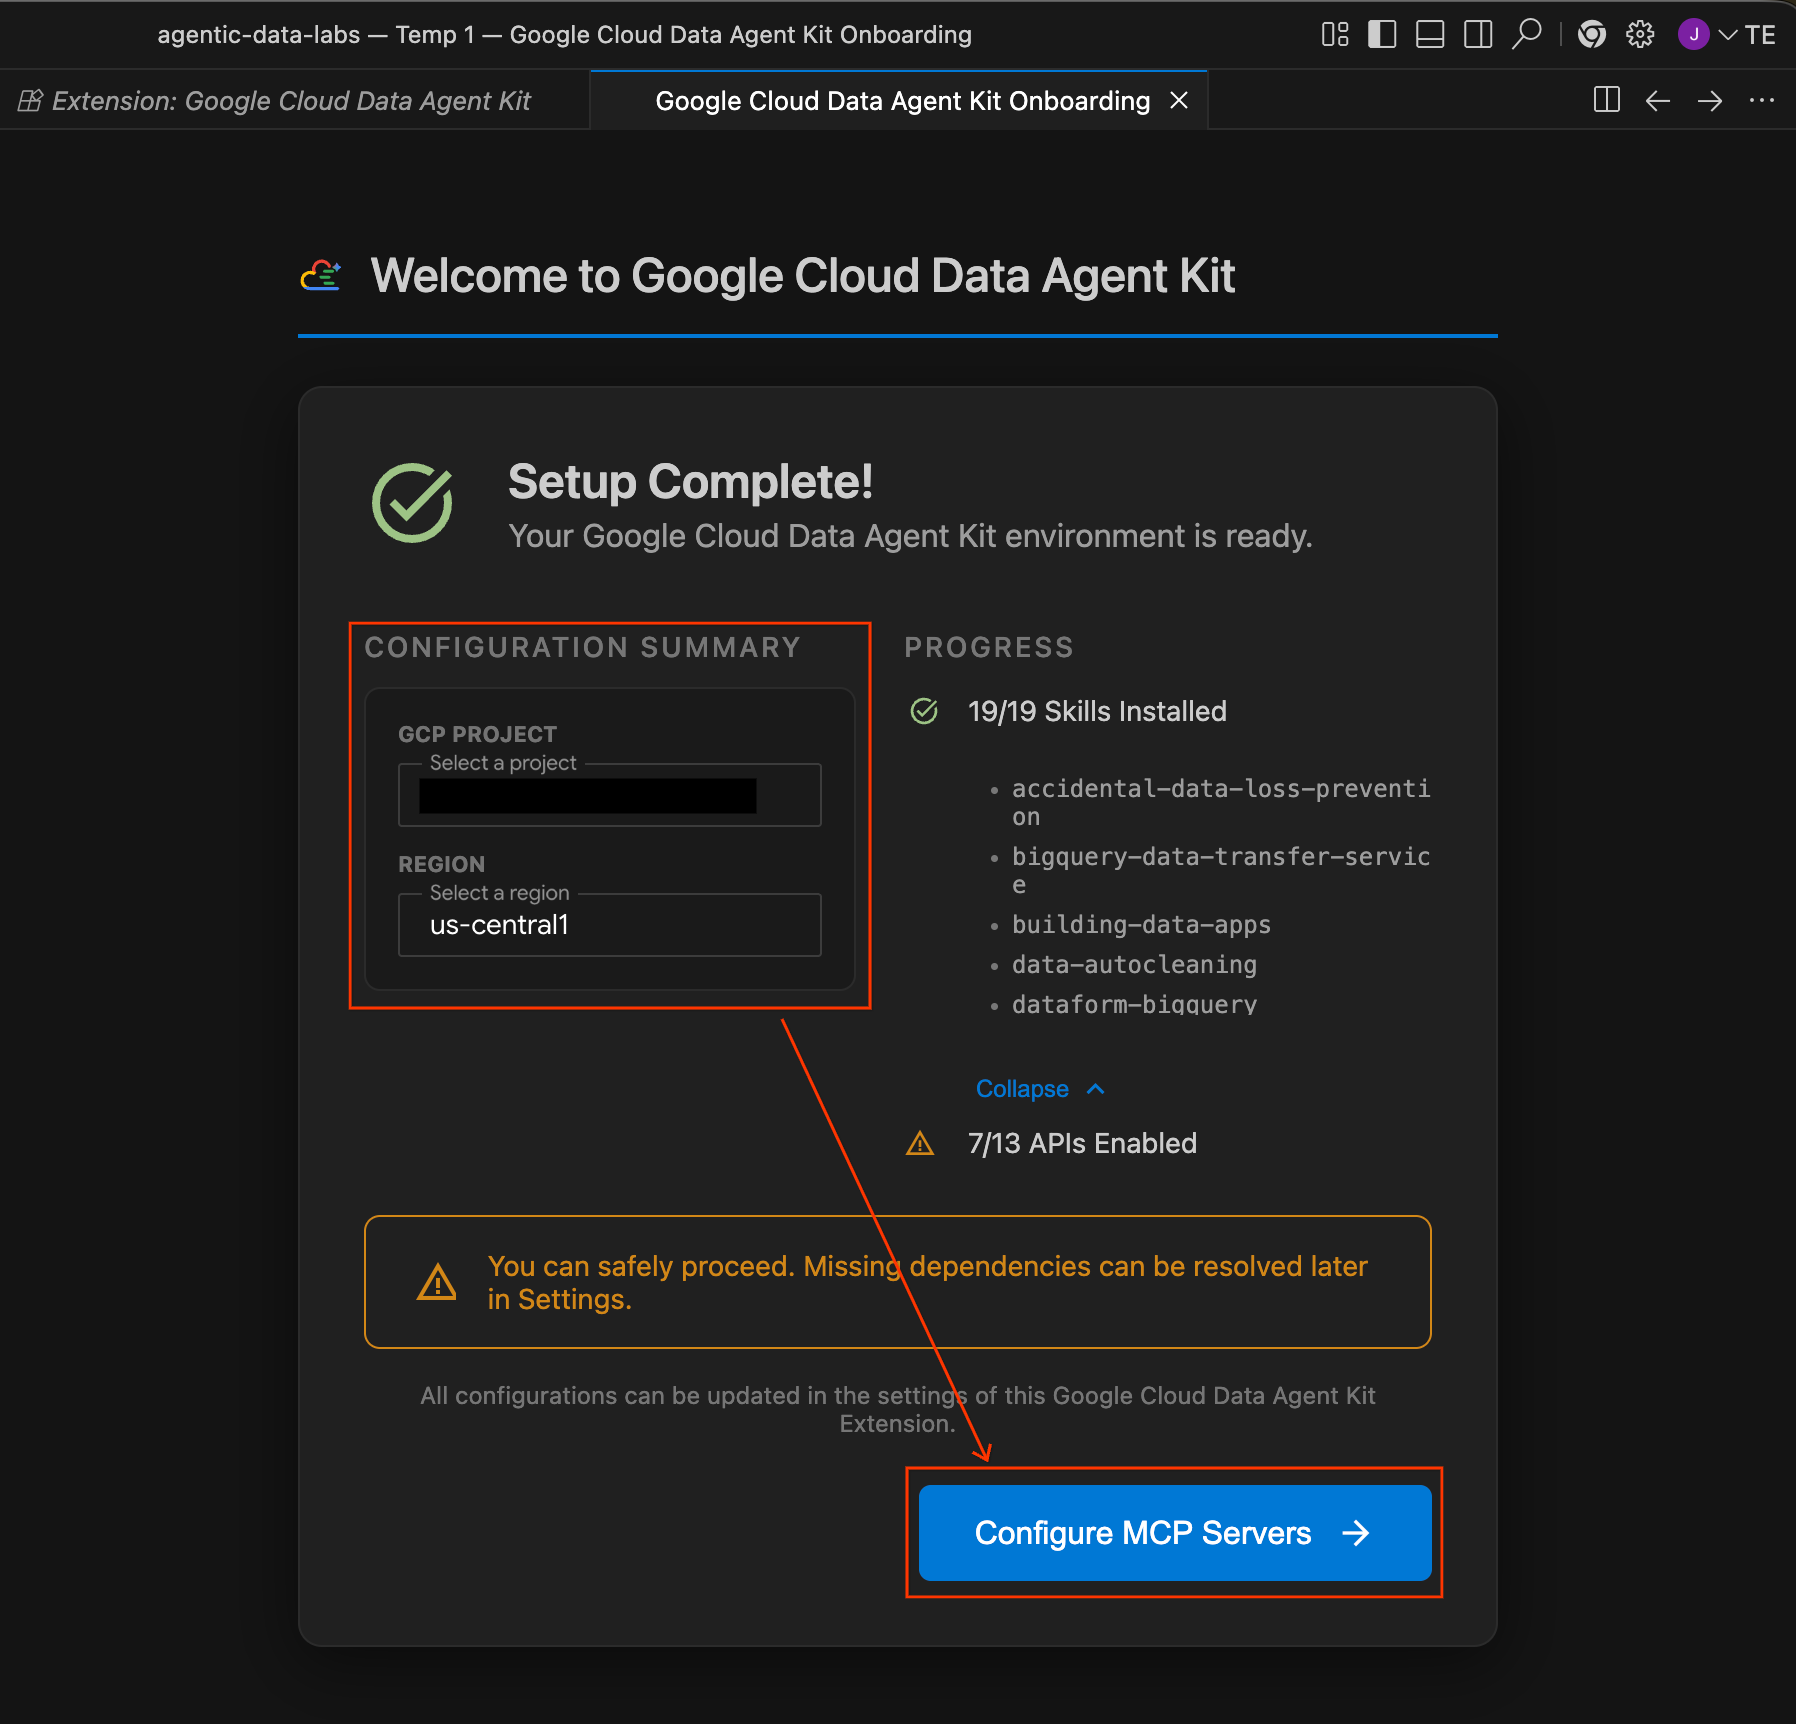
- یک صفحهی شروع با عنوان «به کیت عامل دادههای ابری گوگل خوش آمدید» باید بهطور خودکار باز شود. اگر وارد حساب ابری خود نشدهاید، برای اجازه دسترسی، هرگونه درخواستی را دنبال کنید.
- در بخش خلاصه پیکربندی ، فیلد پروژه را پیدا کنید. روی منوی کشویی کلیک کنید و پروژه Google Cloud خود را انتخاب کنید. منطقه خود را به عنوان
us-central1تنظیم کنید. سپس پیکربندی سرورهای MCP را انتخاب کنید.
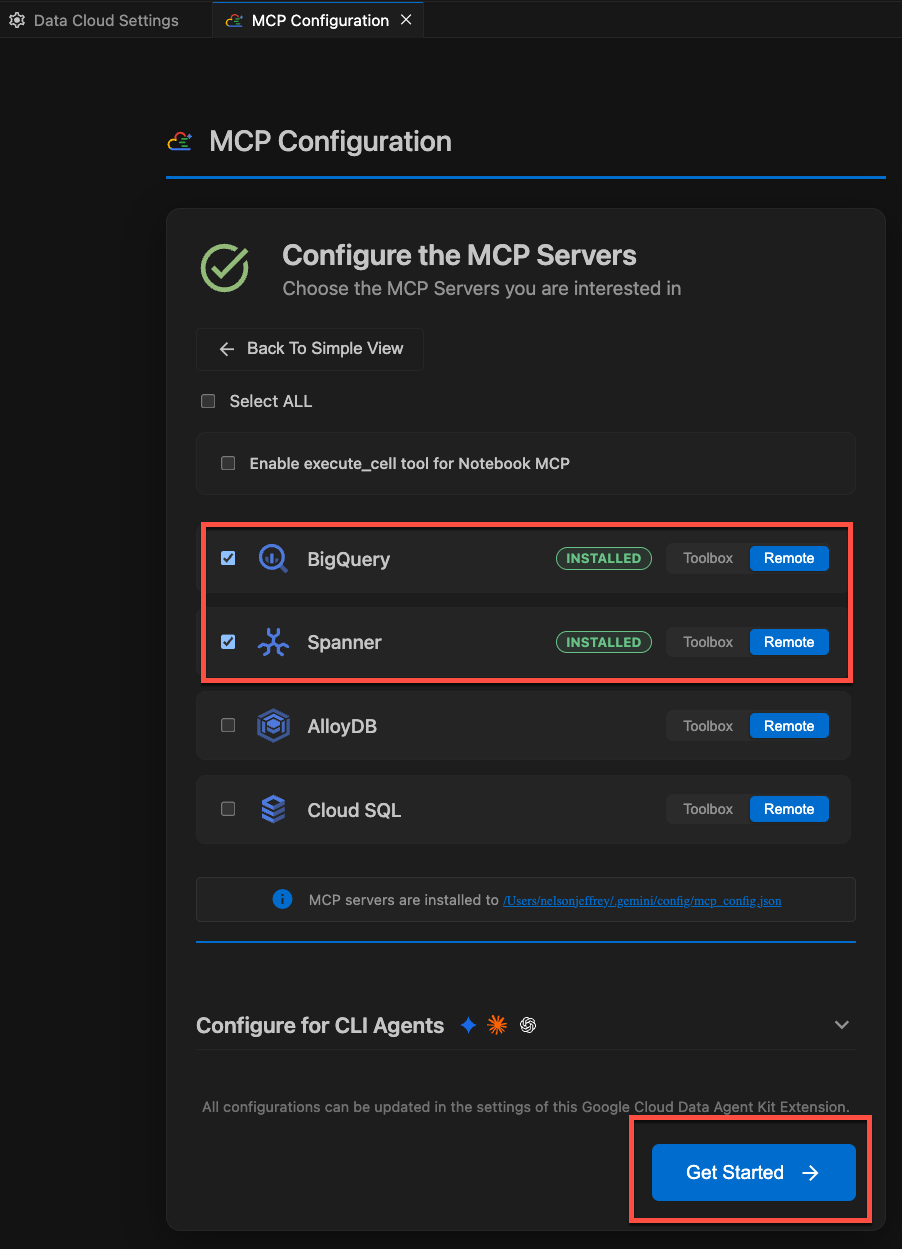
- پیکربندی سرورهای MCP را انتخاب کنید. در زیر پنل پیکربندی MCP ، مطمئن شوید که سرورهای MCP از راه دور زیر را فعال کردهاید:
- بیگکوئری
- آچار
- نوت بوک ها
سپس روی شروع به کار کلیک کنید.
بررسی گزینههای پیکربندی
پس از اتمام راهاندازی، به صفحه «شروع به کار با Google Cloud Data Agent Kit» خواهید رسید.
- در قسمت «تنظیمات و پیکربندی»، روی «شروع به کار » کلیک کنید.
- این پنل پیکربندی کیت عامل داده را باز میکند. تبها را بررسی کنید:
- پروژه و منطقه: شناسه پروژه انتخابی خود را تأیید کنید و تأیید کنید که اسکریپت راهاندازی، تمام APIهای لازم (موتور محاسباتی، فضای ذخیرهسازی ابری، BigQuery، Spanner و غیره) را فعال کرده است.
- BigQuery: مکان پیشفرض برای کوئریهای BigQuery خود را پیکربندی کنید. از ناحیه
us-central1استفاده کنید. - پیکربندی سرورهای MCP: سرورهای MCP فعال (BigQuery، Notebooks، Spanner و غیره) را که به عوامل هوش مصنوعی اجازه میدهند تا به طور ایمن با دادههای شما تعامل داشته باشند، مشاهده کنید.
- مهارتها: مهارتهای از پیش ساخته شدهای را بررسی کنید که قابلیتهای تخصصی را برای وظایف پیچیده داده در اختیار عاملها قرار میدهند.
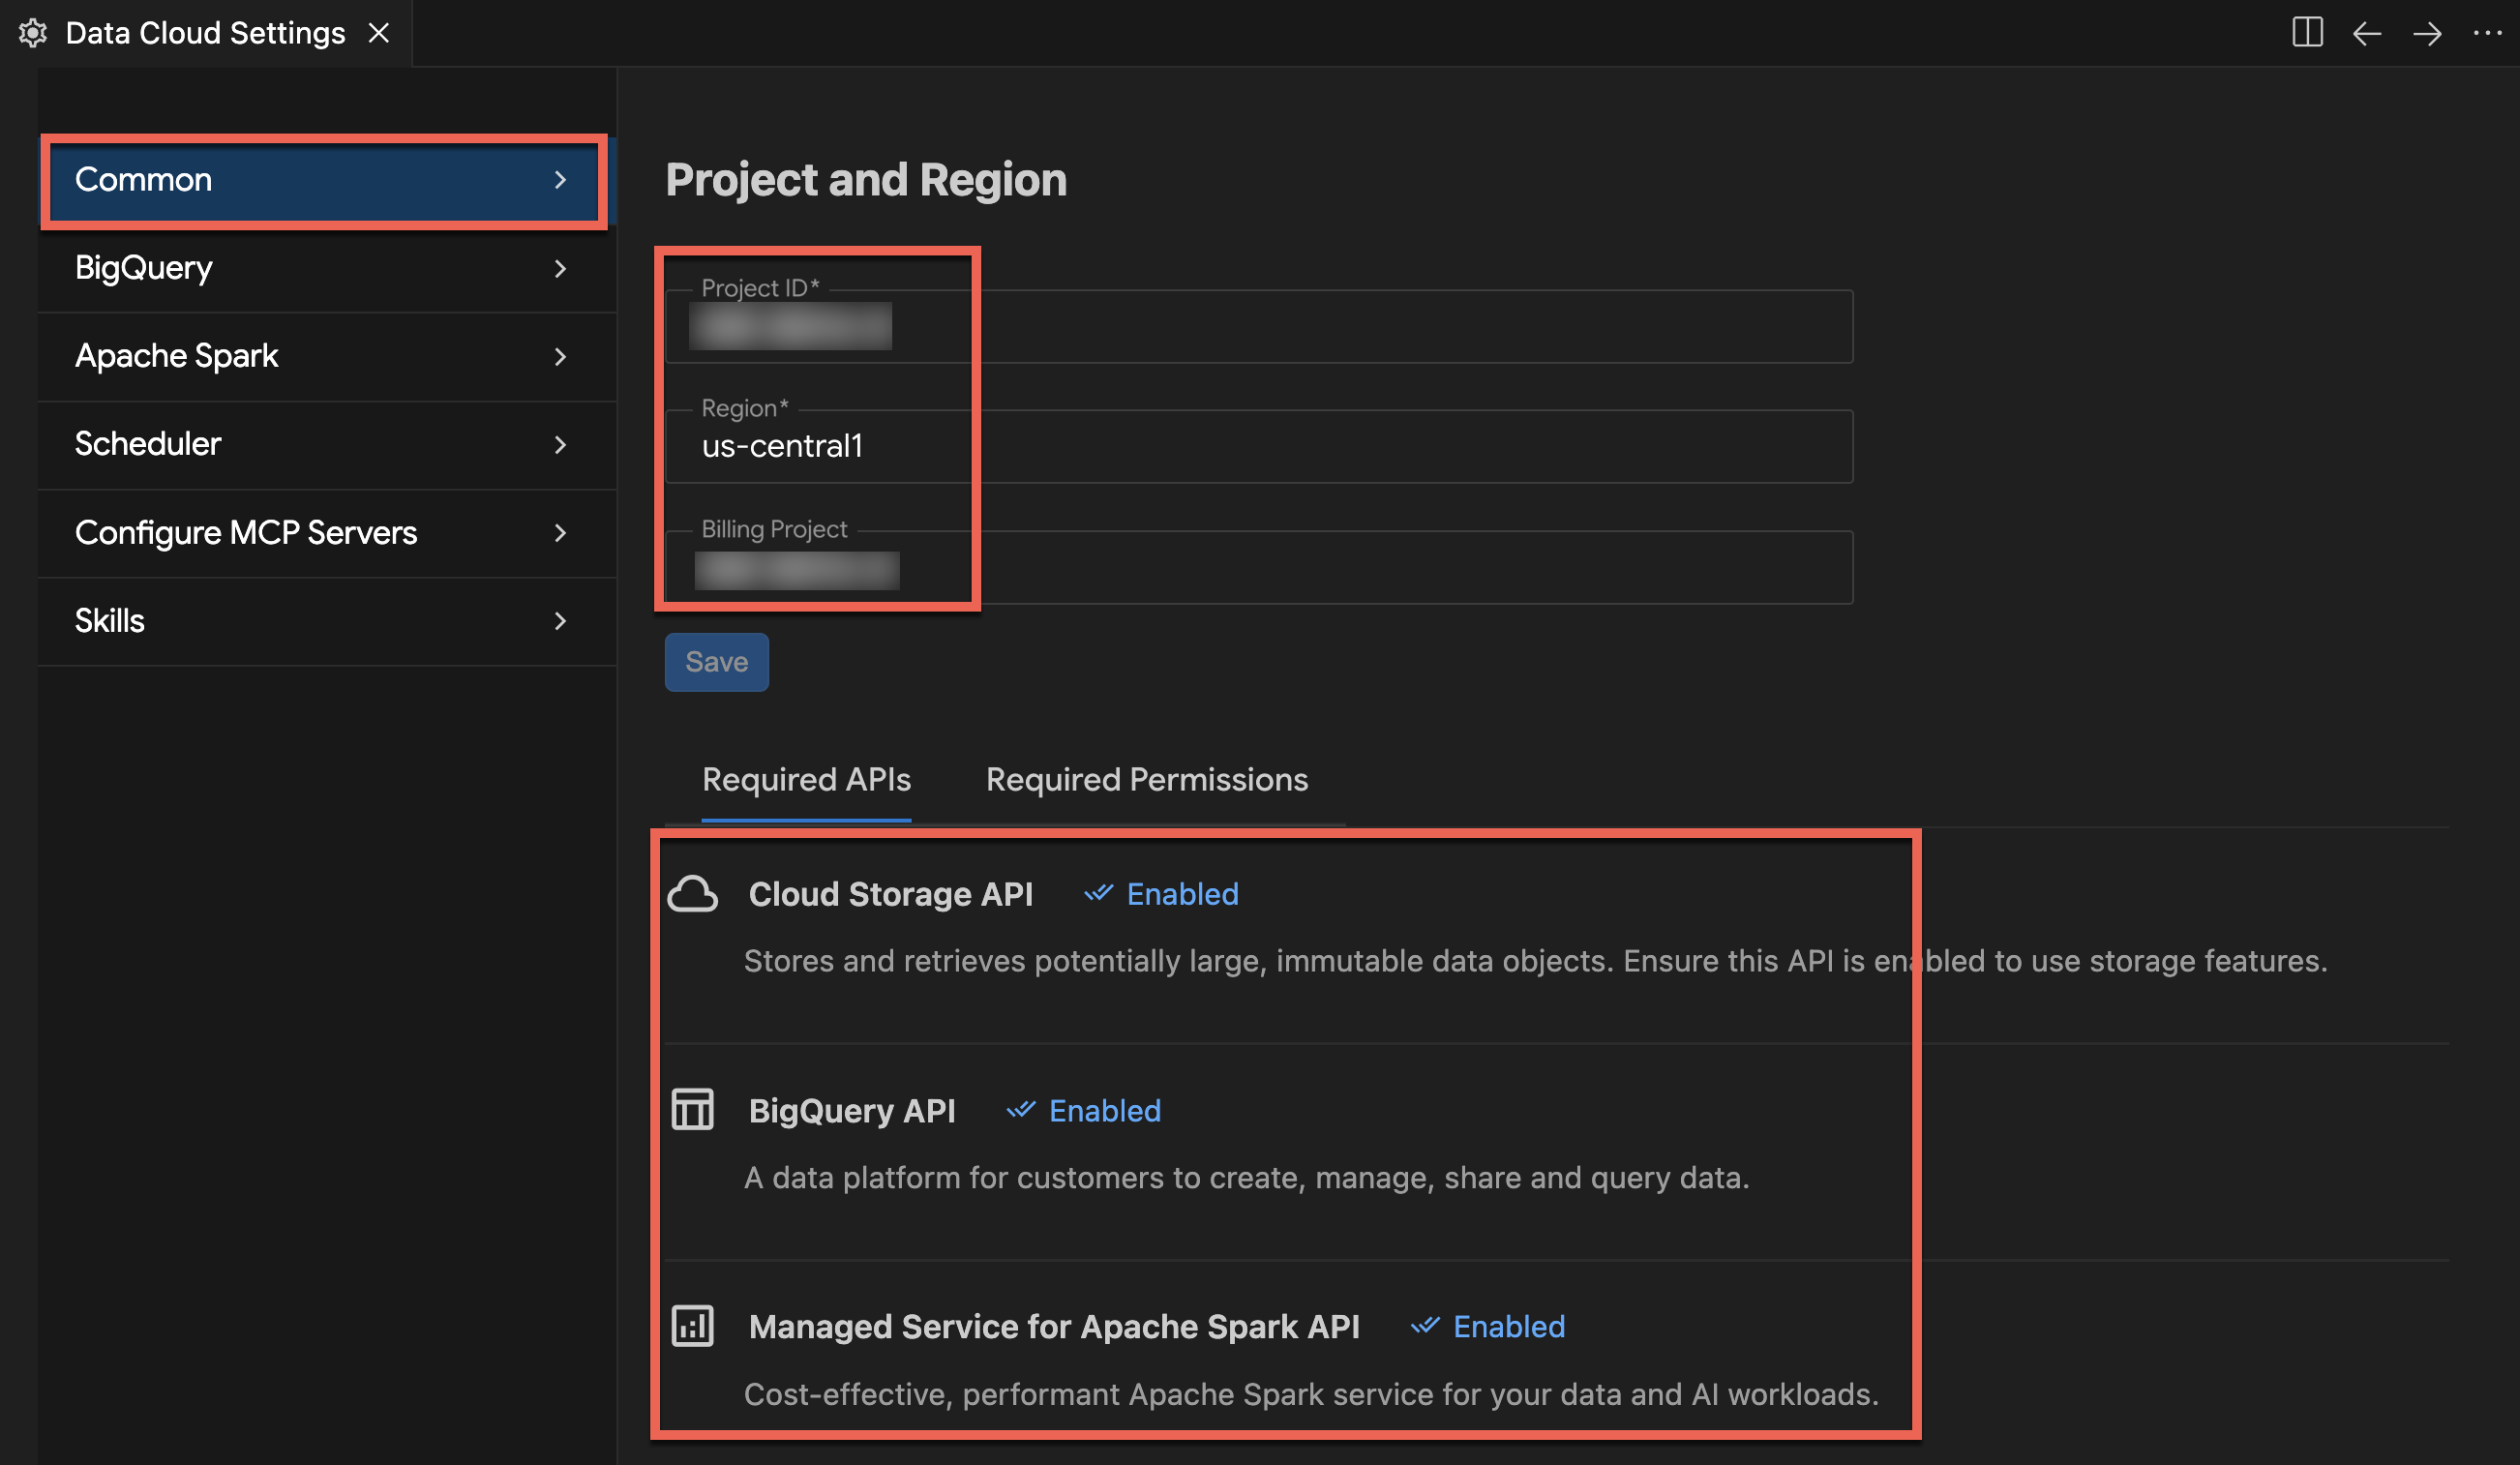
خلاصه بخش: شما اسکریپت bootstrap را برای ایجاد فایلهای GCS و BigQuery اجرا کردید، در حالی که Spanner و Airflow در پسزمینه در حال ساخت هستند. سپس پروژه را در Antigravity IDE باز کردید و افزونه Google Cloud Data Agent Kit را فعال کردید. اکنون آماده نوشتن اولین دفترچه یادداشت خود هستید.
۳. دریافت لاگهای خام با استفاده از Spark Serverless
در این بخش، شما گزارشهای تراکنش خام JSON را به دریاچه داده وارد خواهید کرد. سرویس مدیریتشده برای آپاچی اسپارک (Spark Serverless) مستقیماً به فضای ذخیرهسازی بومی BigQuery متصل میشود. شما از کانکتور استاندارد BigQuery برای مدیریت دادههای جدولی و فعال کردن پرسوجو و تجزیه و تحلیل مستقیم استفاده خواهید کرد.
بررسی زمان اجرای از پیش پیکربندی شده Spark Serverless
قبل از اجرای کد Spark، الگوی Serverless Runtime را که توسط اسکریپت setup از پیش پیکربندی شده است، بررسی کنید. این الگو، محیط اجرایی هدف را تعریف میکند و وابستگیهای اتصال لازم را بستهبندی میکند.
- در نوار فعالیت IDE، پنل Google Cloud Data Agent Kit را باز کنید.
- منوی کشویی Apache Spark را باز کنید، سپس Serverless را باز کنید.
- روی
fraud-pipeline-runtimeکلیک راست کرده و Profile را انتخاب کنید تا نمای پیکربندی آن در ویرایشگر باز شود. - در برگه Profile ، به پایین اسکرول کنید و Properties را باز کنید تا وابستگیهای سفارشی متصل به محیط را بررسی کنید:
-
spark.jars: شاملgs://spark-lib/spanner/spark-3.5-spanner-1.4.0.jarاست که از رابط Spark Spanner استفاده میکند تا به کارهای Spark اجازه دهد نتایج استنتاج را بعداً در آزمایشگاه مستقیماً در Cloud Spanner بنویسند. (نکته: Dataproc Serverless به طور پیشفرض شامل رابط Spark BigQuery گوگل کلود است و برای خواندن و نوشتن جداول BigQuery نیازی به پیکربندی jar اضافی ندارد).
-
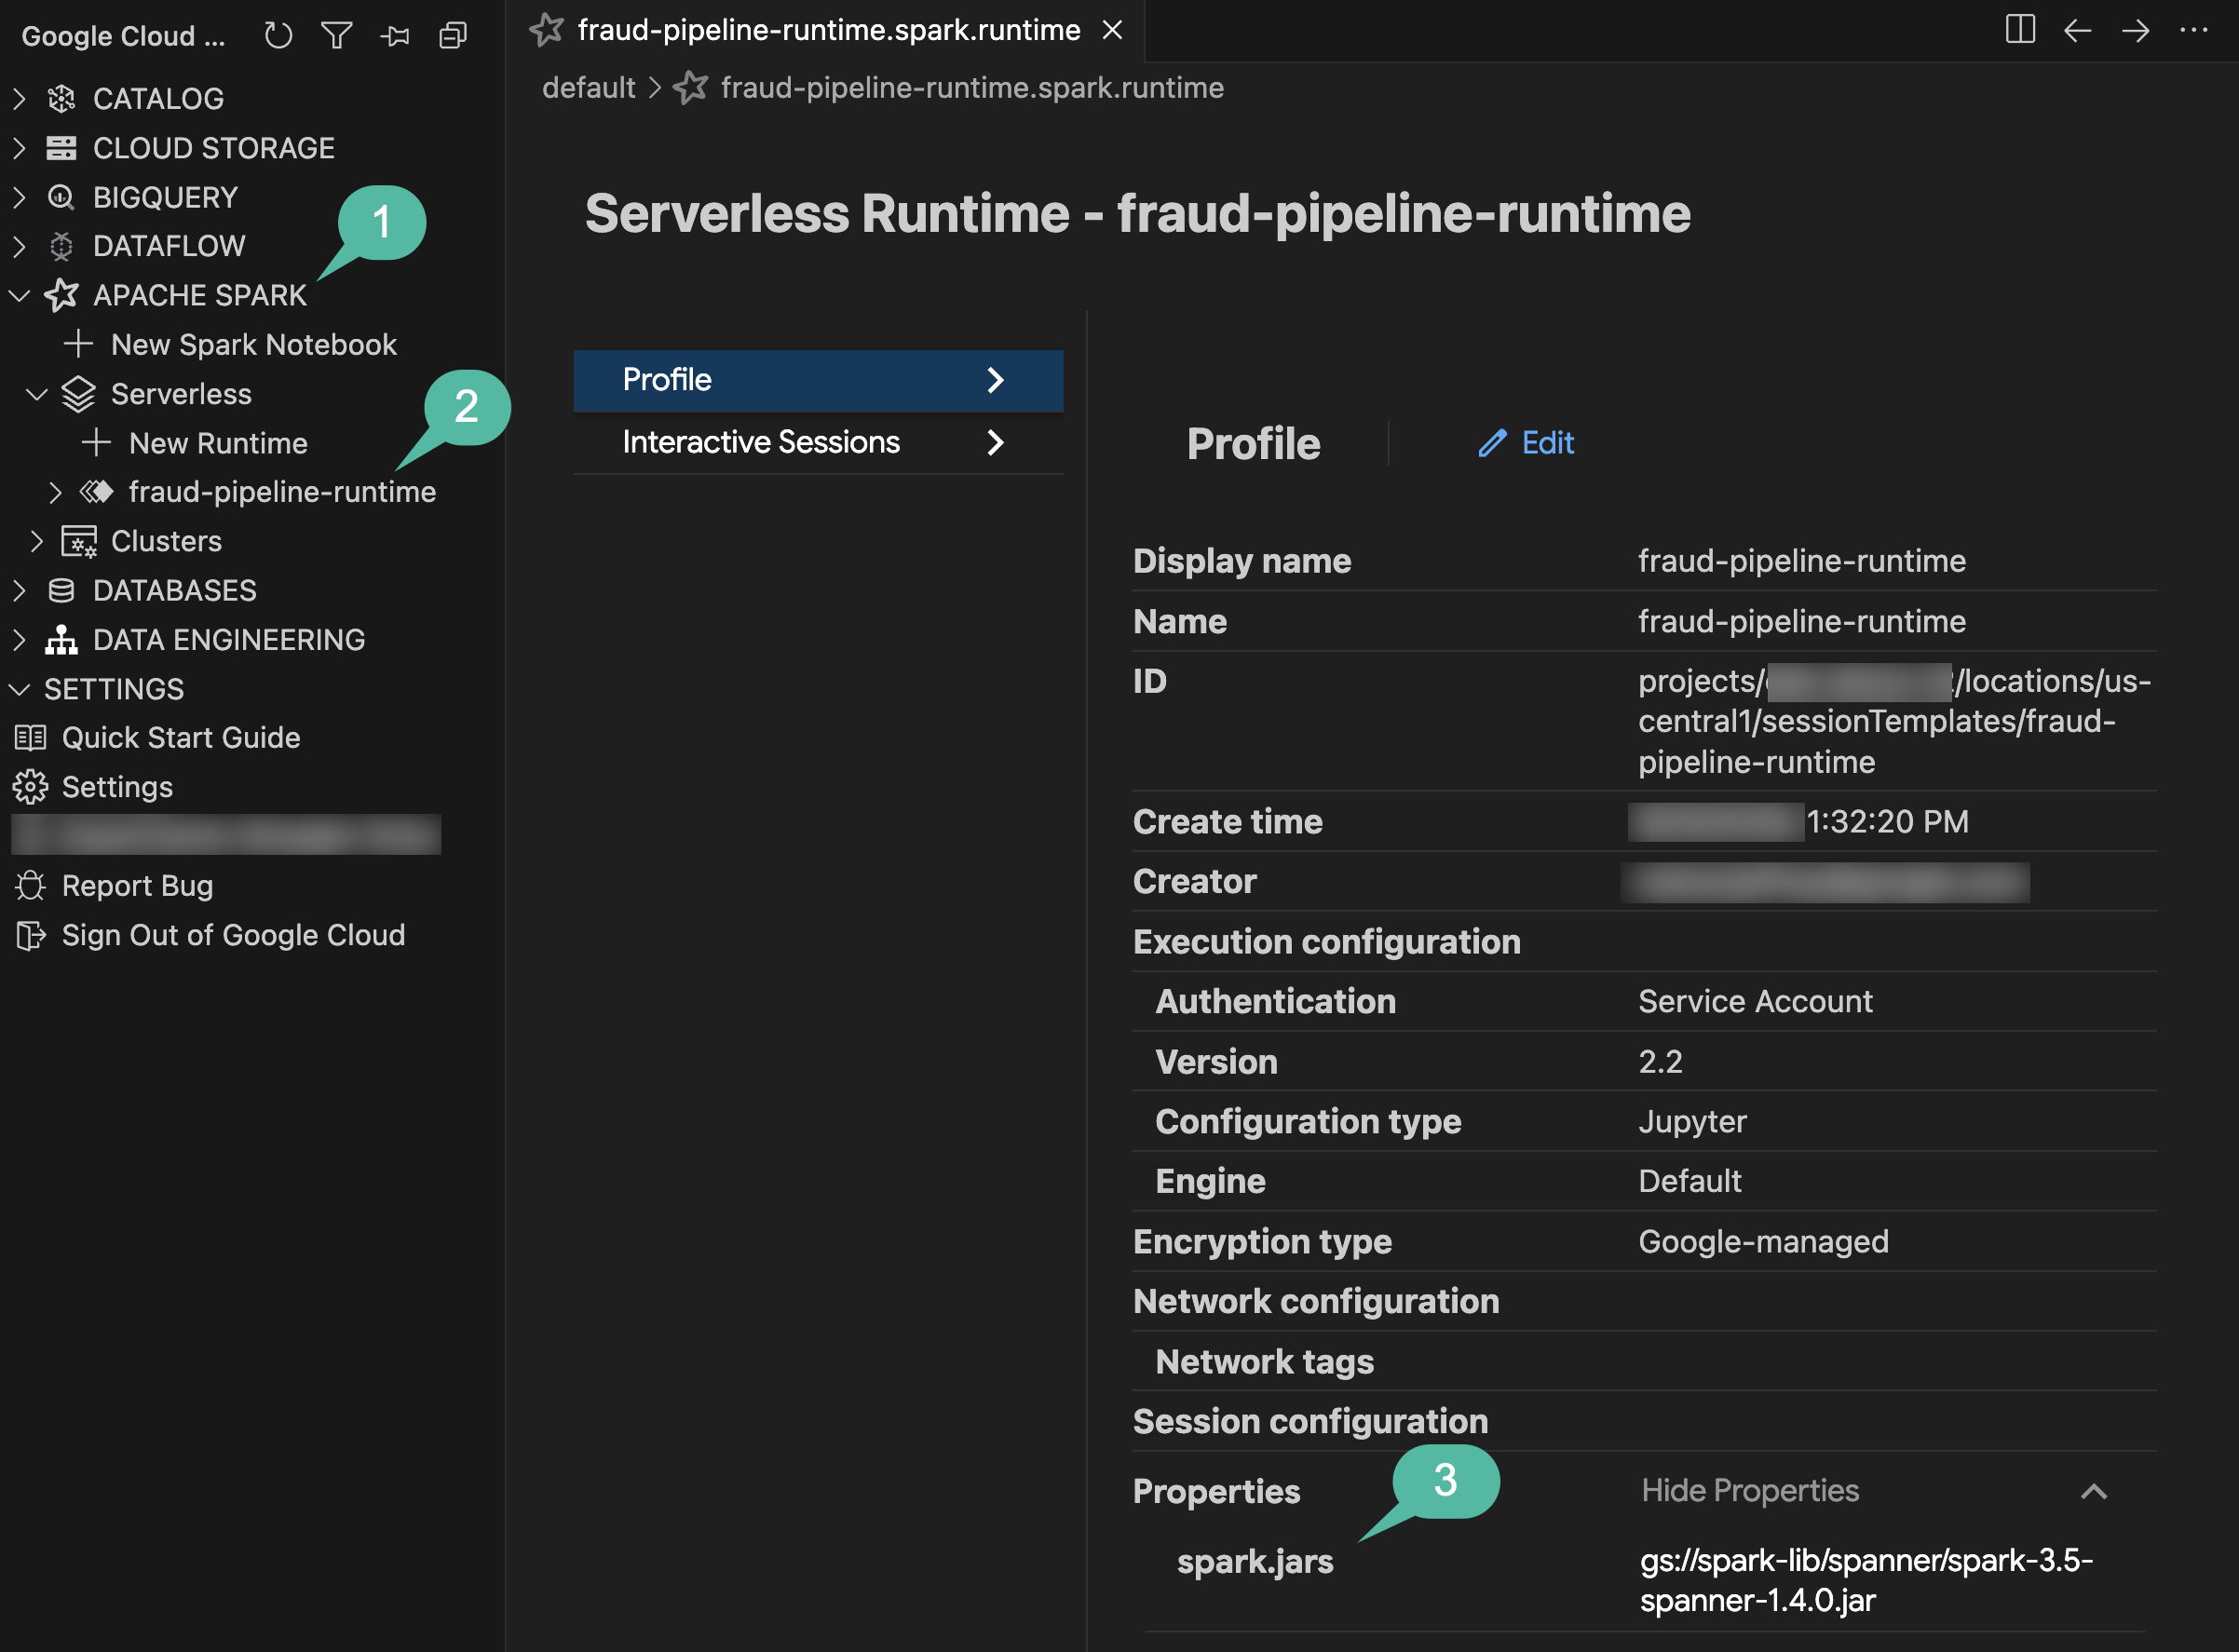
- به تب Interactive Sessions در سمت چپ توجه کنید. در حال حاضر خالی است زیرا هنوز هیچ کدی را اجرا نکردهاید. به محض اینکه نوتبوک را در مرحله بعدی اجرا کنید، یک جلسه محاسباتی زنده بدون سرور به صورت پویا ارائه و در اینجا ظاهر میشود!
دریافت دادهها با استفاده از کیت عامل داده
به جای پیکربندی دستی یک جلسه Spark یا نوشتن اسکریپتهای بارگذاری PySpark از ابتدا، شما با استفاده از Data Agent Kit با یک عامل جفتسازی خواهید کرد.
- با کلیک روی آیکون Toggle Agent در نوار ابزار بالا سمت راست، پنل چت Agent را باز کنید.
- دستور زیر را در چت وارد کنید (مطمئن شوید که به جای
${PROJECT_ID}، شناسه واقعی پروژه گوگل کلود خود را وارد کردهاید):
Create a PySpark notebook (01_ingestion.ipynb) to ingest JSON transaction logs
from gs://${PROJECT_ID}-fin-clearing-raw/ into a BigQuery table
`${PROJECT_ID}.transactions_dataset_evals.raw_transactions`
using the Spark BigQuery connector (`format("bigquery")`) with overwrite mode.
- اگر عامل درخواست اجازه برای اجرای دستورات تأیید پسزمینه (مثلاً «اجازه اجرای این دستور را میدهید؟» ) را کرد، دستور پیشنهادی را بررسی کنید و بله، این بار اجازه دهید (یا بله، و همیشه اجازه دهید ) را انتخاب کنید.
- وقتی عامل، تولید فایل را تمام کرد، روی دکمه آبی «پذیرش همه» (یا نماد علامت تیک) در پایین صفحه چت کلیک کنید تا
notebooks/01_ingestion.ipynbدر فضای کاری شما ذخیره شود.
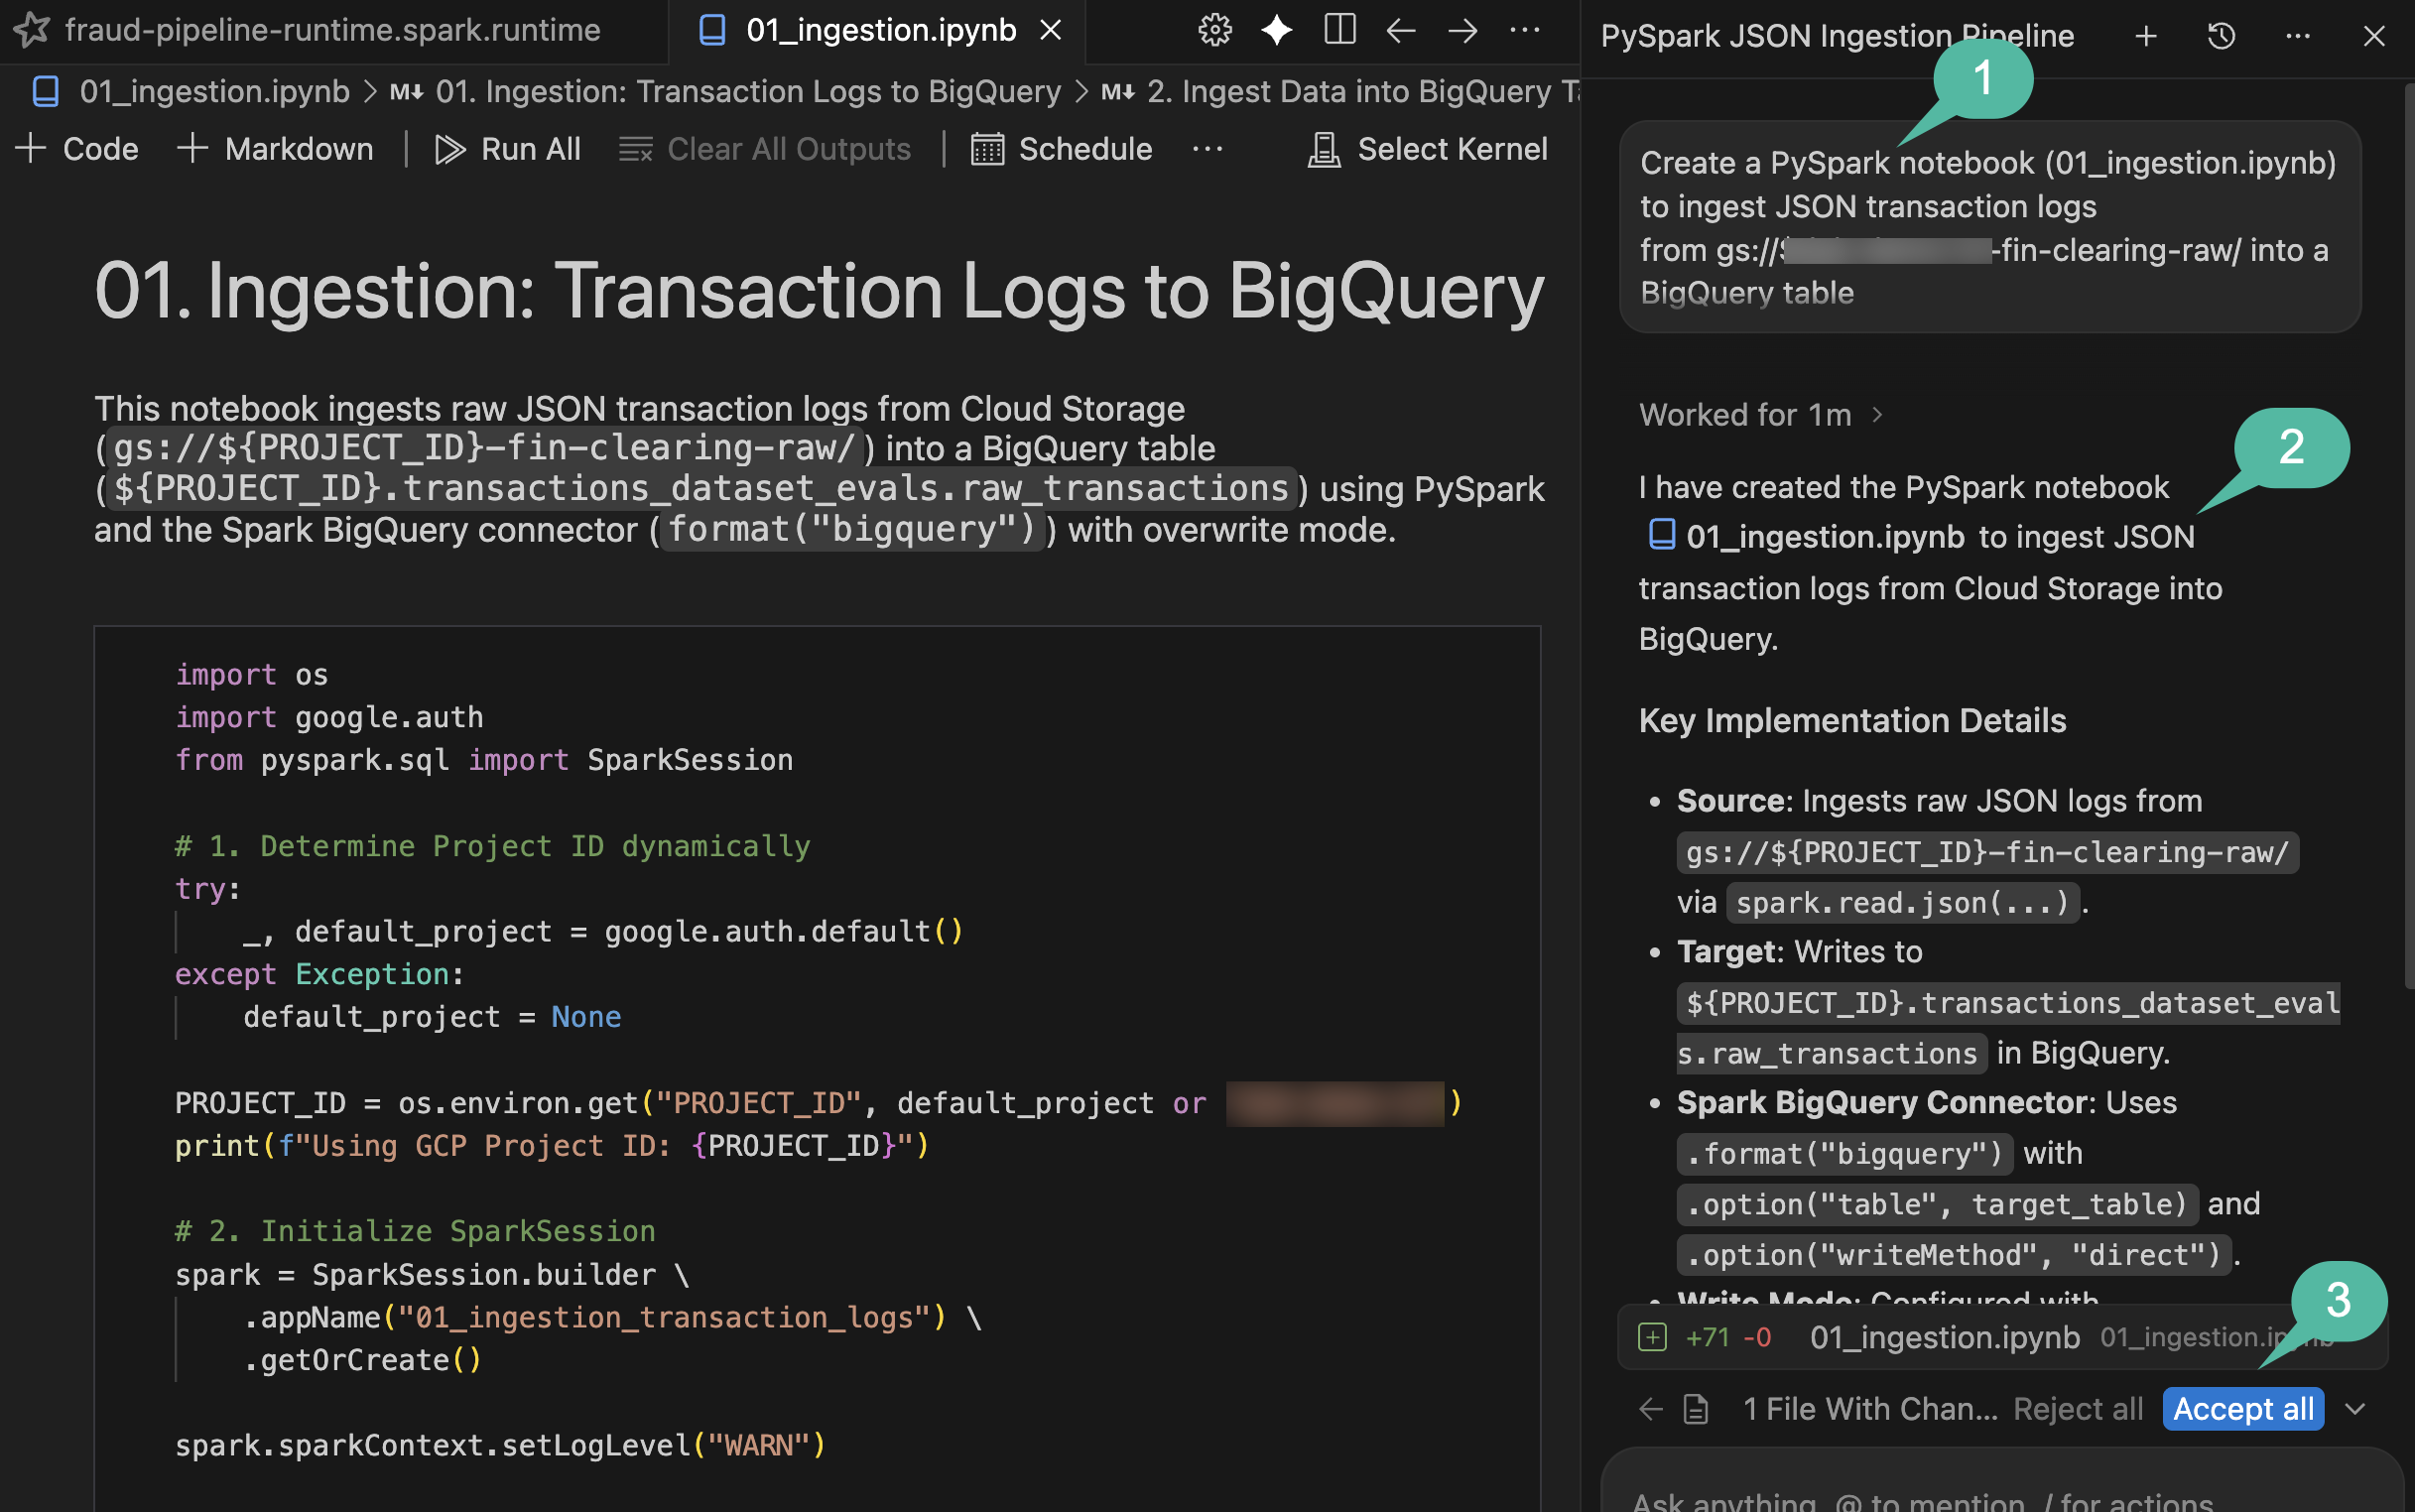
دفترچه یادداشت را بررسی و اجرا کنید
-
notebooks/01_ingestion.ipynbکه به تازگی ایجاد شده است را در IDE باز کنید. - کد PySpark مربوط به منطق نوشتن کانکتور BigQuery را بررسی کنید.
- روی Run All در نوار ابزار نوتبوک IDE کلیک کنید.
- اگر این اولین بار است که یک نوتبوک اسپارک از راه دور را اجرا میکنید، ممکن است IDE از شما بخواهد وابستگیهای محلی را نصب کنید. در صورت درخواست، روی «نصب وابستگیها برای هستههای اسپارک از راه دور» کلیک کنید و پنجرههای نصب را تأیید کنید، سپس دوباره روی «اجرای همه» کلیک کنید.
- در منوی کشویی Select Kernel ، گزینه Remote Spark Kernels -> fraud-pipeline-runtime را در Serverless Spark انتخاب کنید. (نکته: اگر الگوی زمان اجرای از پیش پیکربندی شده خود را در لیست مشاهده نمیکنید، برای بارگیری مجدد هستههای از راه دور موجود، روی نماد بهروزرسانی در سمت راست بالای منوی کشویی انتخاب هسته کلیک کنید).
- به نوار وضعیت در پایین سمت چپ ویرایشگر نگاه کنید.
Connecting to kernel: fraud-pipeline-runtime on Serverless Spark...را خواهید دید. از آنجا که این اولین راهاندازی backend هستهی زمان اجرای Spark Serverless است، آمادهسازی و بوت شدن آن چند دقیقه طول خواهد کشید. - به محض اینکه اتصال هسته به پایان برسد، نوتبوک به طور خودکار شروع به اجرای متوالی تمام سلولها میکند تا گزارشهای خام تراکنشها را در مجموعه داده BigQuery شما پردازش کند.
تأیید
پس از اتمام اجرا، کاتالوگ Data Agent Kit را بررسی کنید تا ایجاد جدول را تأیید کنید:
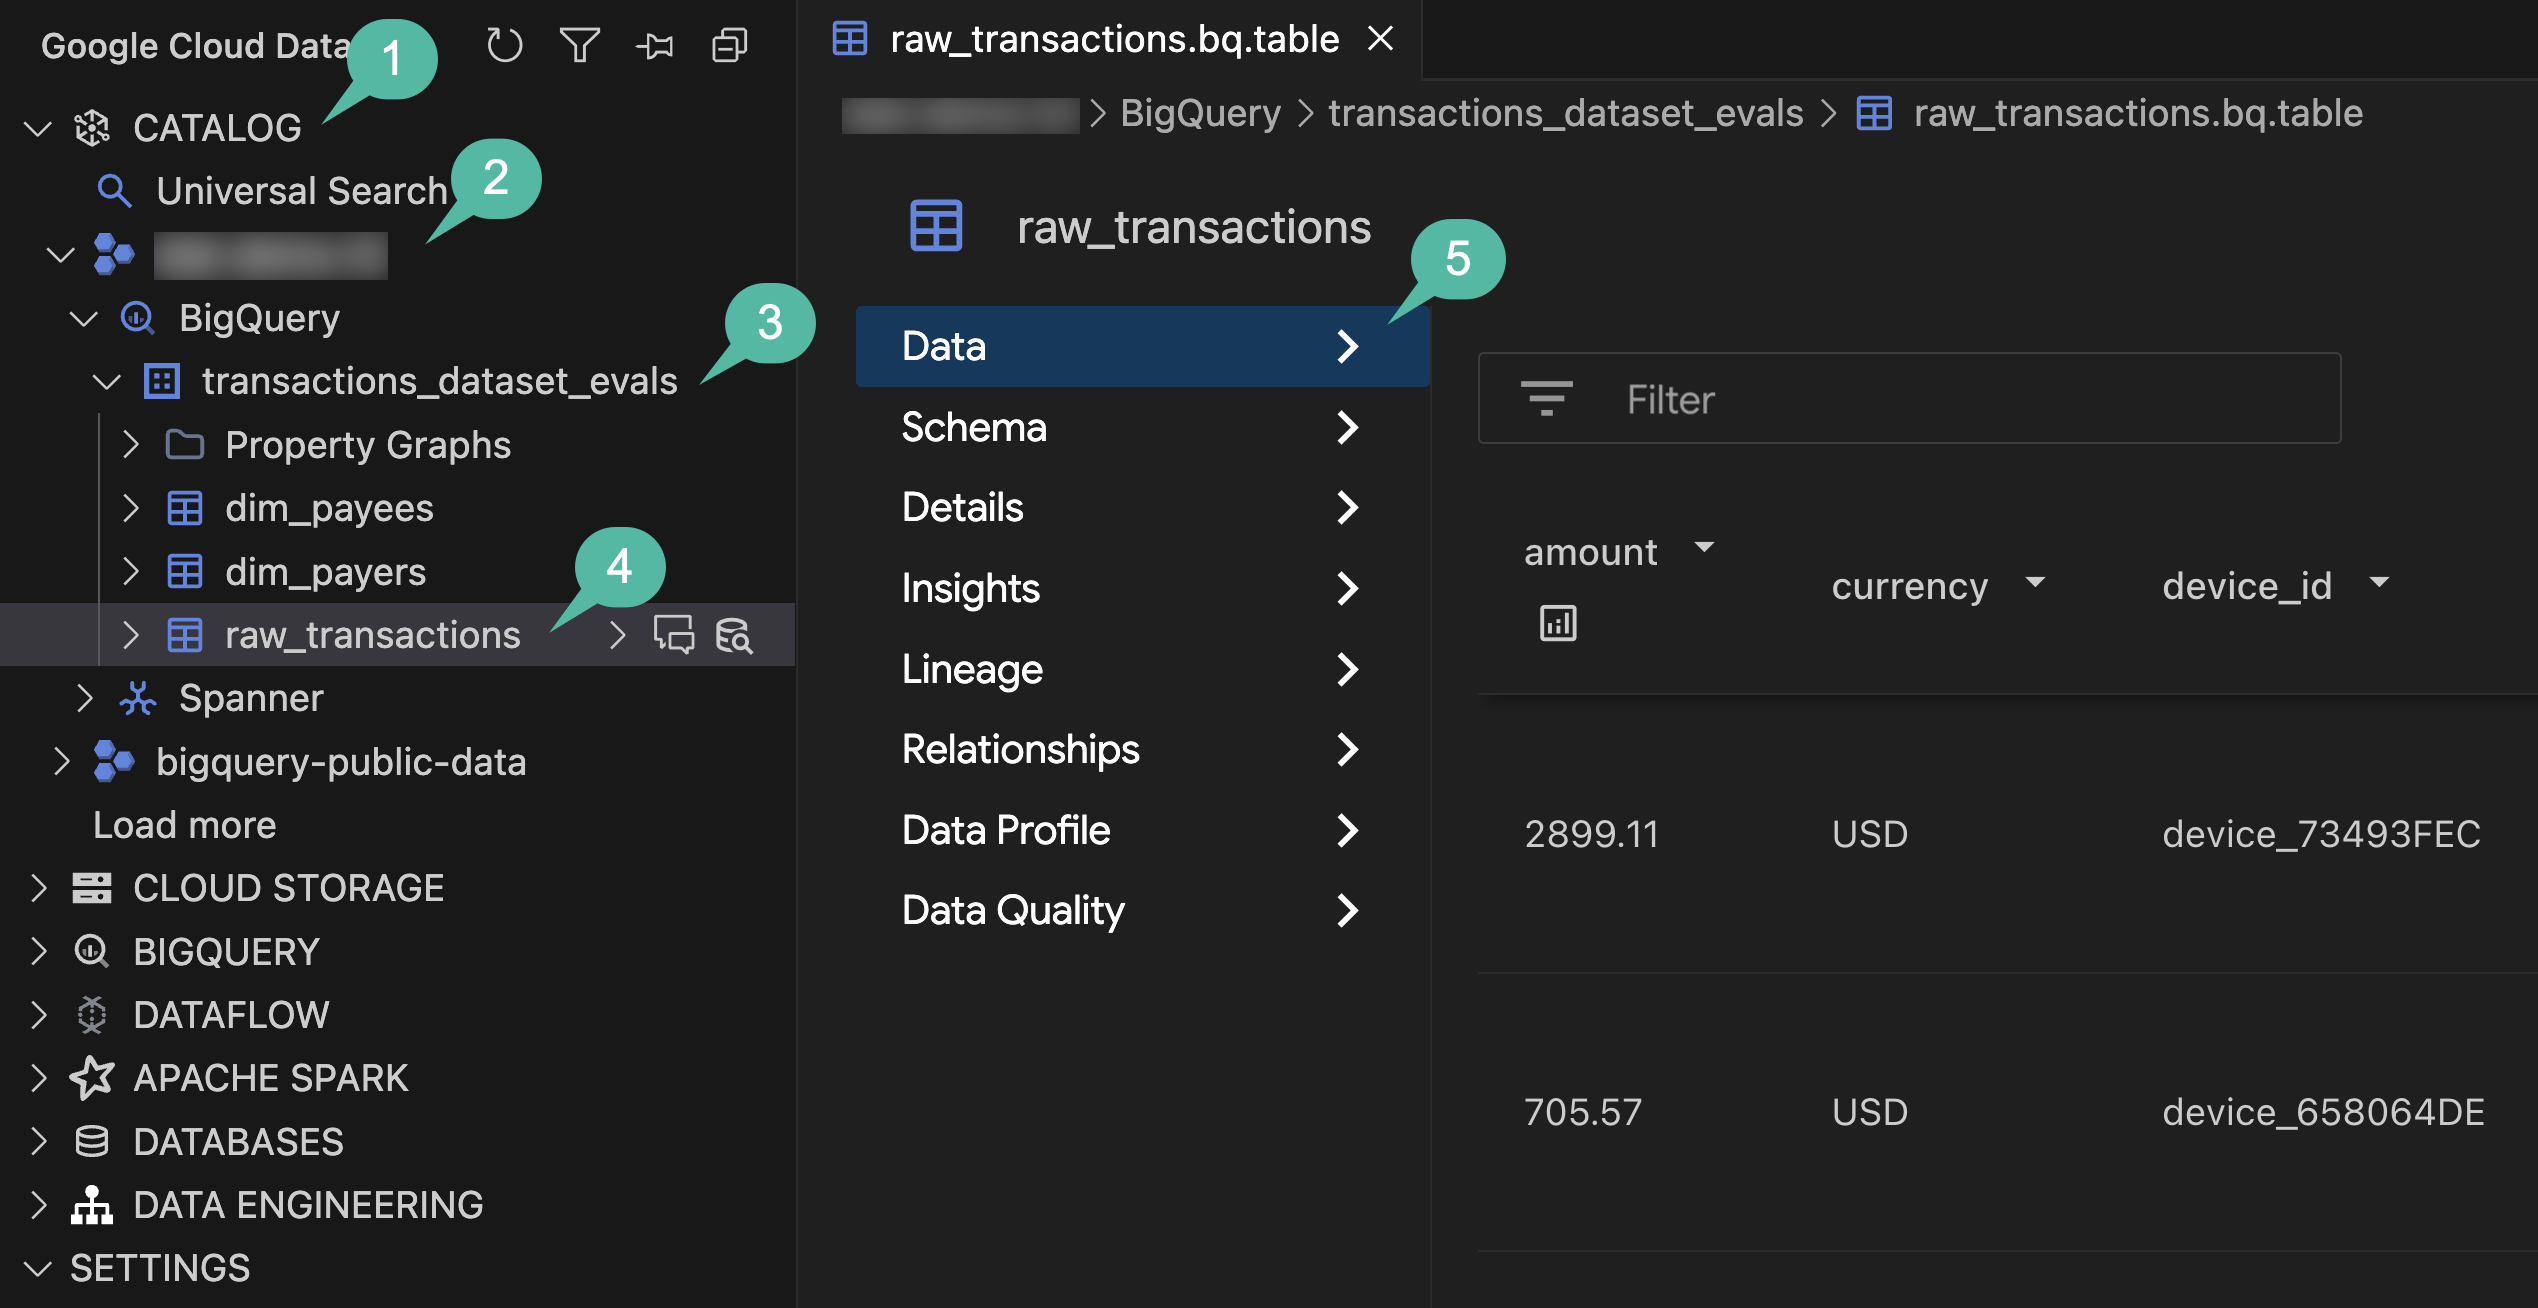
- در نوار فعالیت IDE، پنل Google Cloud Data Agent Kit را باز کنید.
- بخش کاتالوگ را گسترش دهید.
- شناسه پروژه خود را گسترش دهید.
- BigQuery را گسترش دهید.
- مجموعه داده
transactions_dataset_evalsرا گسترش دهید. - روی جدول
raw_transactionsکلیک کنید تا نمای جزئیات آن در ویرایشگر اصلی باز شود. - در نوار ناوبری سمت چپ، زبانههای Data ، Schema و Details را بررسی کنید تا رکوردها و فرادادههای دریافتشده را بررسی کنید.
خلاصه بخش: شما از زبان طبیعی در چت عامل برای ایجاد یک بار کاری کامل Spark Serverless استفاده کردید. سپس آن را برای پردازش گزارشهای JSON بدون ساختار در یک جدول BigQuery (خام) اجرا کردید.
۴. حذف دادههای تکراری و نرمالسازی با dbt
قبل از آموزش مدل یادگیری ماشین، شما با حذف گزارشهای جریان تکراری، جداسازی رکوردهای بد (مانند شناسه تراکنشهای خالی) و اتصال دادههای ابعادی (پرداختکنندگان و دریافتکنندگان) کیفیت دادهها را تقویت خواهید کرد. این فرآیند نیاز به تبدیلهای SQL خودتوان و قابل اعتماد دارد، که dbt (ابزار ساخت داده) را بسیار مناسب میکند.
داربست خط لوله dbt
از عامل برای تولید یک پروژه dbt روی مجموعه داده BigQuery استفاده کنید:
- به پنل گفتگوی نمایندگان برگردید.
- برای تولید پروژه dbt، دستورالعمل زیر را ارائه دهید:
Scaffold a us-central1 dbt project in dbt_project/ that maps raw_transactions
through to an enriched_transactions model in dataset transactions_dataset_evals.

Deduplicate by transaction_id in staging. Quarantine null IDs to an invalid_transactions model.
Join the valid staging records with dim_payers and dim_payees for the enriched_transactions model,
preserving the historical `is_fraud` label column, and finally add a transaction uniqueness test.

Create an implementation plan first.
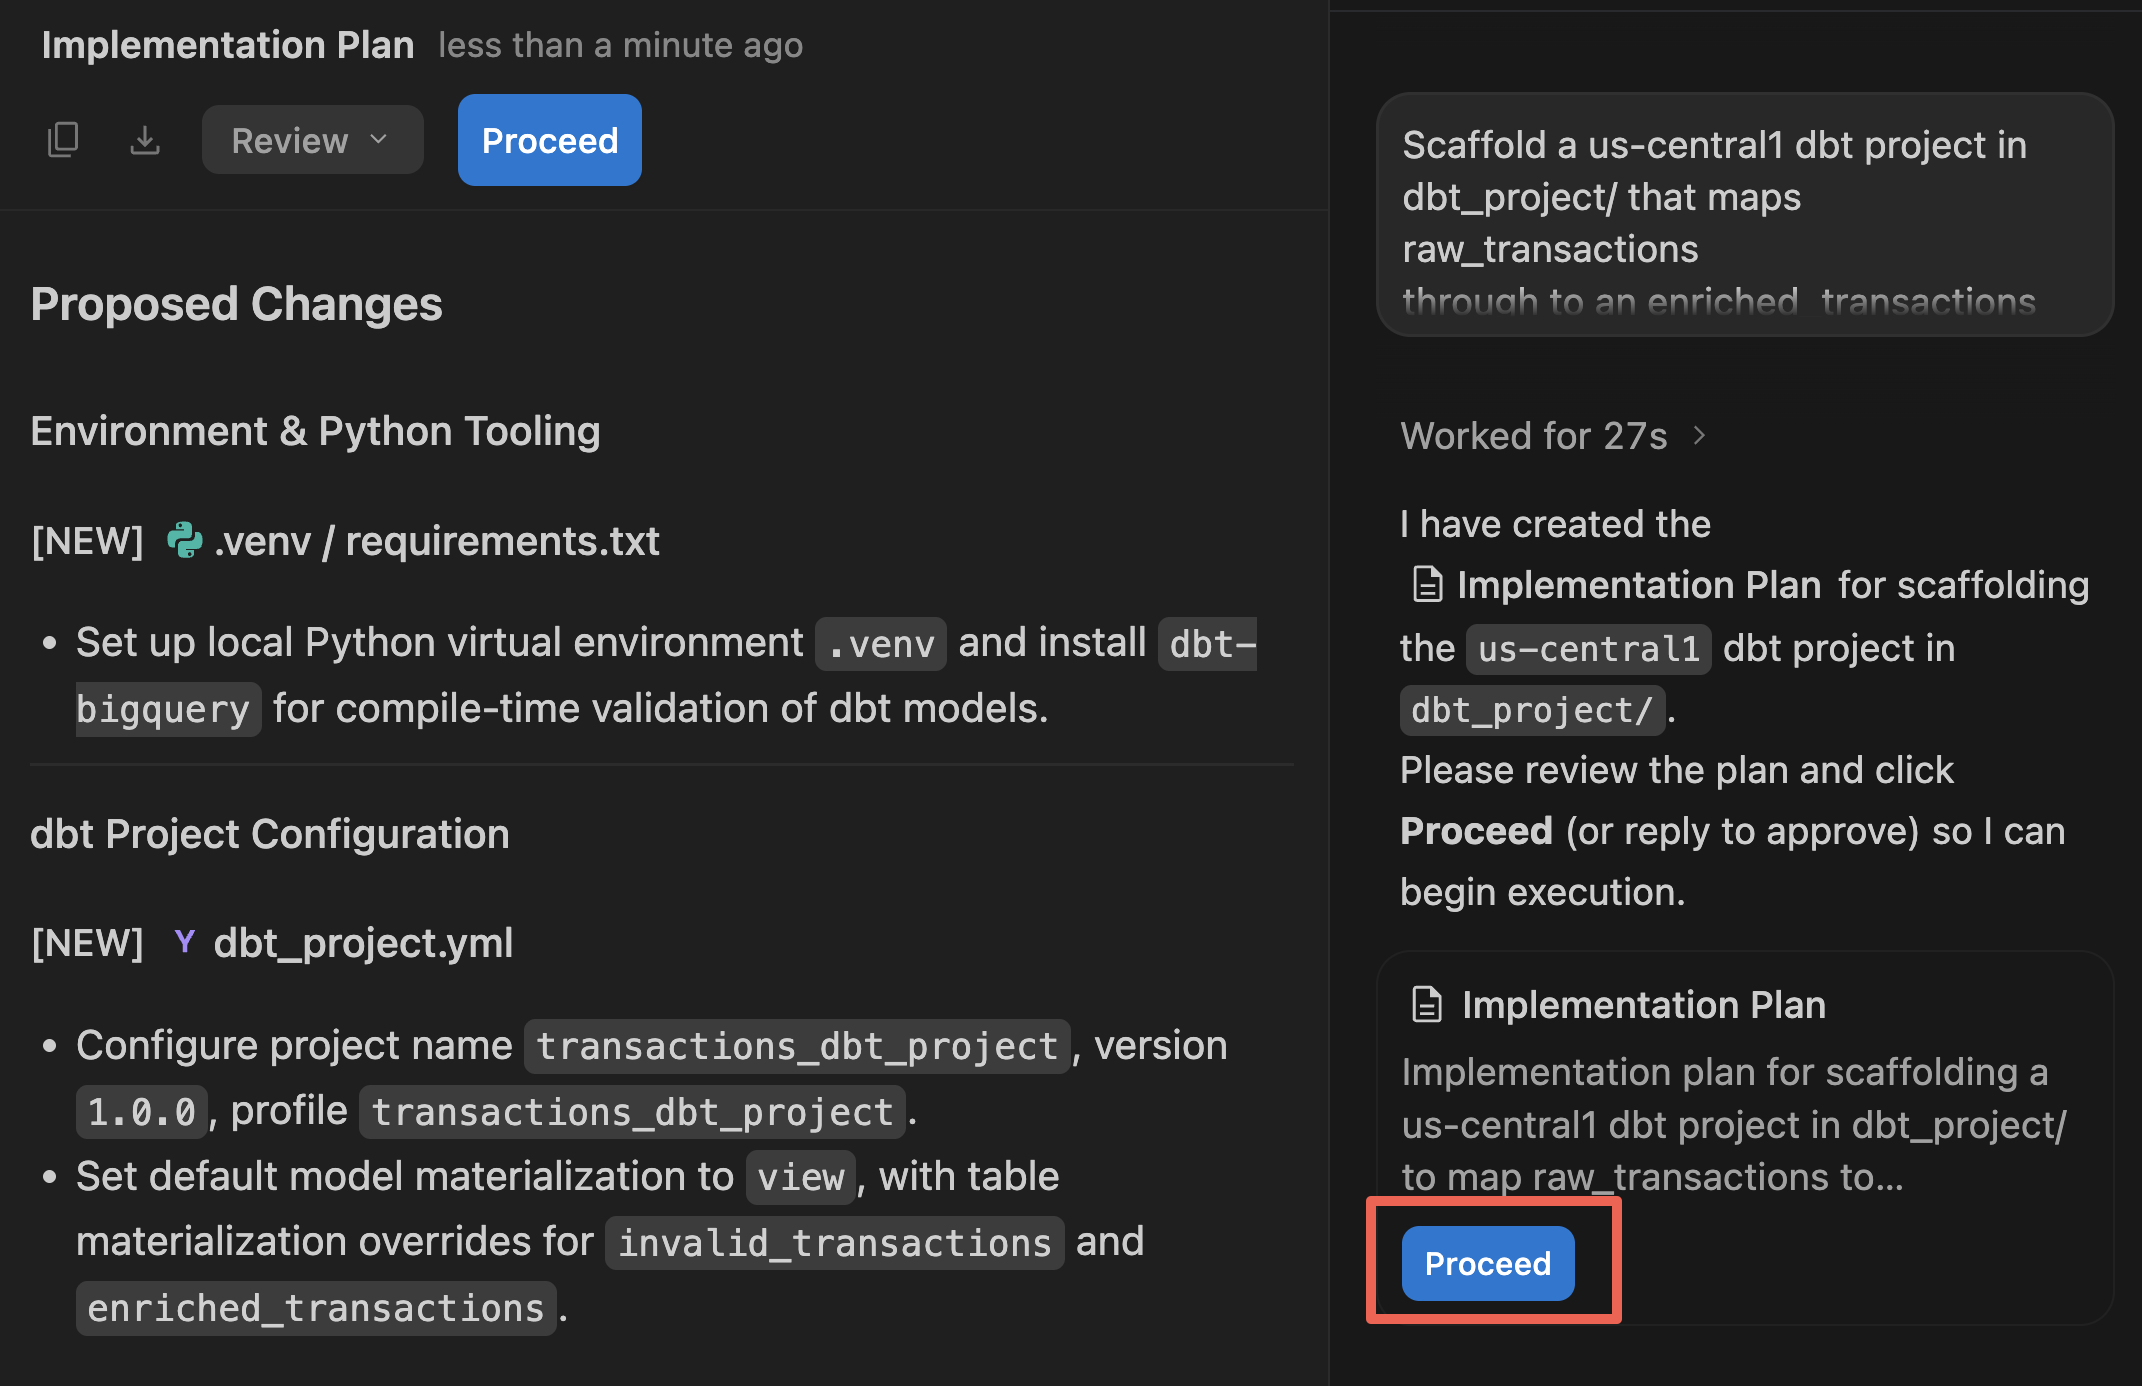
- عامل، یک مصنوع طرح پیادهسازی را در صفحه ویرایشگر اصلی ارائه میدهد. ساختار فایل پیشنهادی و منطق SQL را بررسی کنید.
- روی «ادامه» (و سپس «پذیرش همه ») کلیک کنید تا به عامل اجازه دهید فایلها را در فضای کاری شما تولید کند.
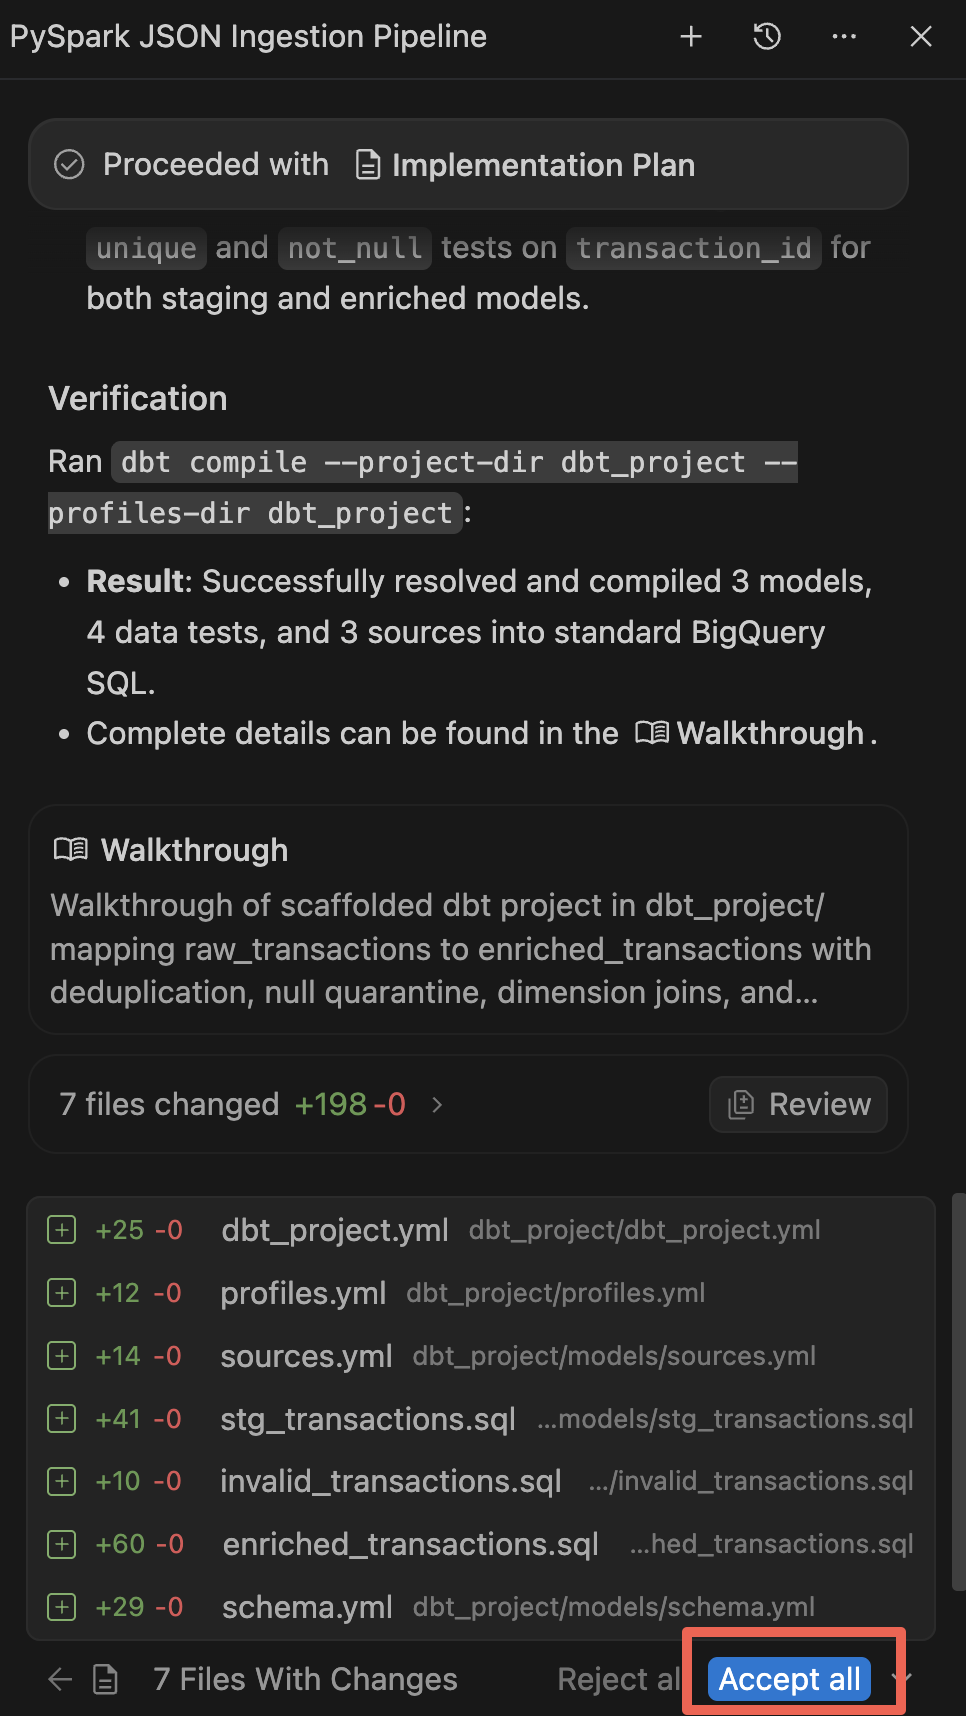
- پس از اتمام تولید، عامل یک راهنمای گام به گام (Walkthrough) را نمایش میدهد که خلاصهای از اجزای جدید را نشان میدهد. در صورت درخواست، تمام تغییرات را بپذیرید.
ساخت و آزمایش
اگرچه عامل به طور خودکار dbt compile اجرا کرد تا از اعتبار نحوی SQL تولید شده اطمینان حاصل کند، اکنون این نماها و جداول را در BigQuery پیادهسازی کرده و تستهای کیفیت دادهها را برای تأیید محلی اجرا خواهید کرد. (نکته: بعداً در آزمایشگاه، این مرحله dbt را به عنوان بخشی از یک DAG جریان هوای سرتاسری خودکار خواهید کرد).
- در نوار فعالیت در سمت چپ، روی آیکون اکسپلورر کلیک کنید (یا
Cmd/Ctrl+Shift+Eرا فشار دهید). - برای بررسی مدلهای SQL تولید شده،
dbt_project->modelsرا باز کنید. برای باز کردن و بررسی منطق ویژگیهای تبدیل و کلاهبرداری در ویرایشگر، رویenriched_transactions.sqlکلیک کنید. - در فایل اکسپلورر، روی پوشه
dbt_projectکلیک راست کرده و گزینه Open in Integrated Terminal را انتخاب کنید. این کار به طور خودکار یک پنجره ترمینال را باز میکند که مستقیماً روی دایرکتوری کاریdbt_projectمورد نیاز تنظیم شده است. - اگر
dbtرا از قبل نصب نکردهاید، یک محیط مجازی خارج ازdbt_project/(در ریشه خانه یا فضای کاری خود) ایجاد کنید و آداپتور BigQuery را نصب کنید:
python3 -m venv ~/.venv/dbt
source ~/.venv/dbt/bin/activate
pip install dbt-bigquery
- مدلهای dbt و تستهای کیفیت دادههای مرتبط با آنها را اجرا کنید:
dbt build
- به خروجی ترمینال توجه کنید. dbt فایل SQL را کامپایل میکند، جداول مرحلهبندی و غنیشده را در BigQuery پیادهسازی میکند و تستهای داده را اجرا میکند.
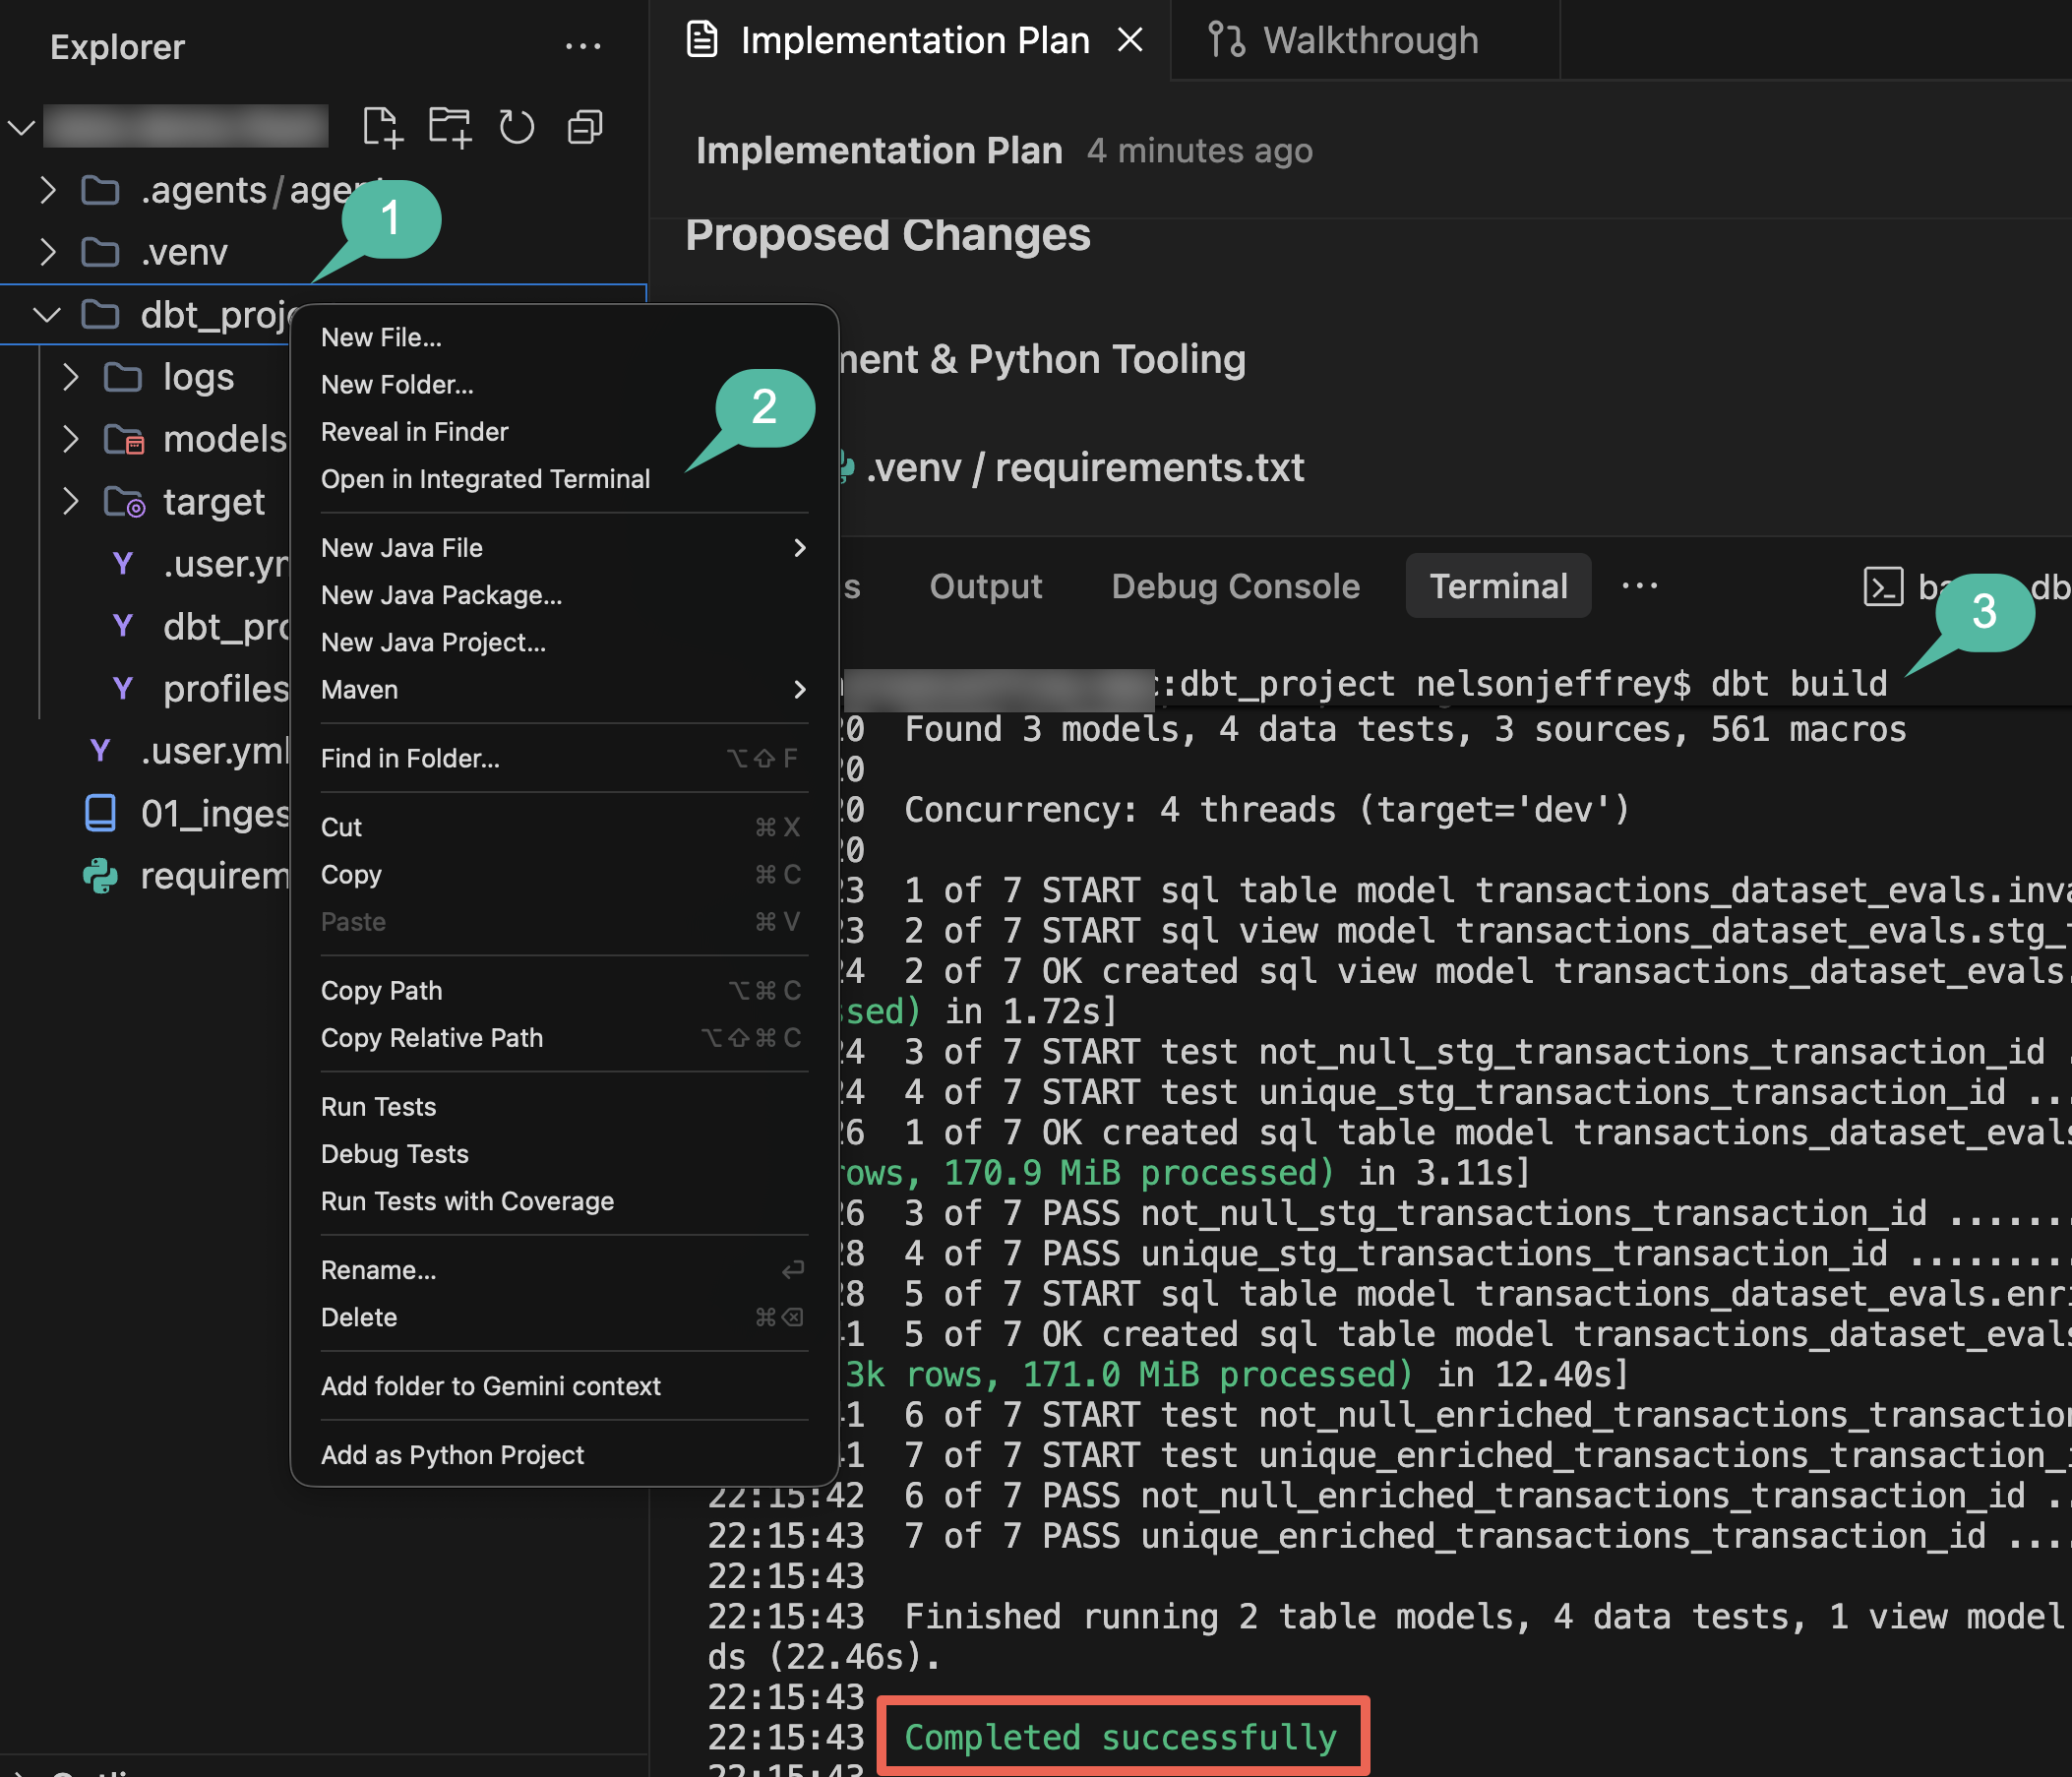
- پس از اتمام ساخت، پنجره ترمینال را ببندید تا فضای صفحه نمایش برای مراحل باقی مانده آزاد شود.
خلاصه بخش: شما یک پروژه dbt را با عامل ایجاد کردید، تستهای کیفیت دادهها را اجرا کردید و رکوردهای خام را به جداول مرحلهبندی و غنیشده BigQuery تبدیل کردید.
۵. آموزش مدل تشخیص تقلب توزیعشده با جنگل تصادفی
با تراکنشهای غنیشدهای که در BigQuery پیادهسازی میشوند، شما یک مدل یادگیری ماشین برای طبقهبندی رویدادهای جعلی خواهید ساخت. جنگل تصادفی یک روش یادگیری گروهی است که برای دادههای طبقهبندی جدولی بسیار مناسب است. اجرای یک RandomForestClassifier جنگل تصادفی روی Spark Serverless، آموزش مدل را در بین گرههای کارگر توزیع میکند، بدون اینکه شما را ملزم به مدیریت زیرساخت کند.
در این مرحله، از عامل برای تولید خط لوله آموزشی Spark ML استفاده خواهید کرد.
دفترچه آموزش یادگیری ماشین را ایجاد کنید
- پنجره چت با نمایندگان را باز کنید.
- برای طراحی توالی آموزش مدل، اعلان زیر را ارائه دهید (به یاد داشته باشید که
${PROJECT_ID}را با شناسه پروژه فعال خود جایگزین کنید):
Create a PySpark notebook (02_training.ipynb) to train a distributed Random Forest
(RandomForestClassifier) model on the BigQuery table
`transactions_dataset_evals`.`enriched_transactions`, predicting the `is_fraud` label.
Train only on historically labeled records where `is_fraud` is not null.

One-hot encode categorical strings, scale amounts, cache the dataset in memory,
evaluate AUC, and save the evaluated model to gs://${PROJECT_ID}-models/fraud_model.
- طرح یا کد تولید شده توسط عامل را بررسی کنید و برای ذخیره
notebooks/02_training.ipynbدر فضای کاری خود، روی «ادامه» / «پذیرش همه» کلیک کنید.
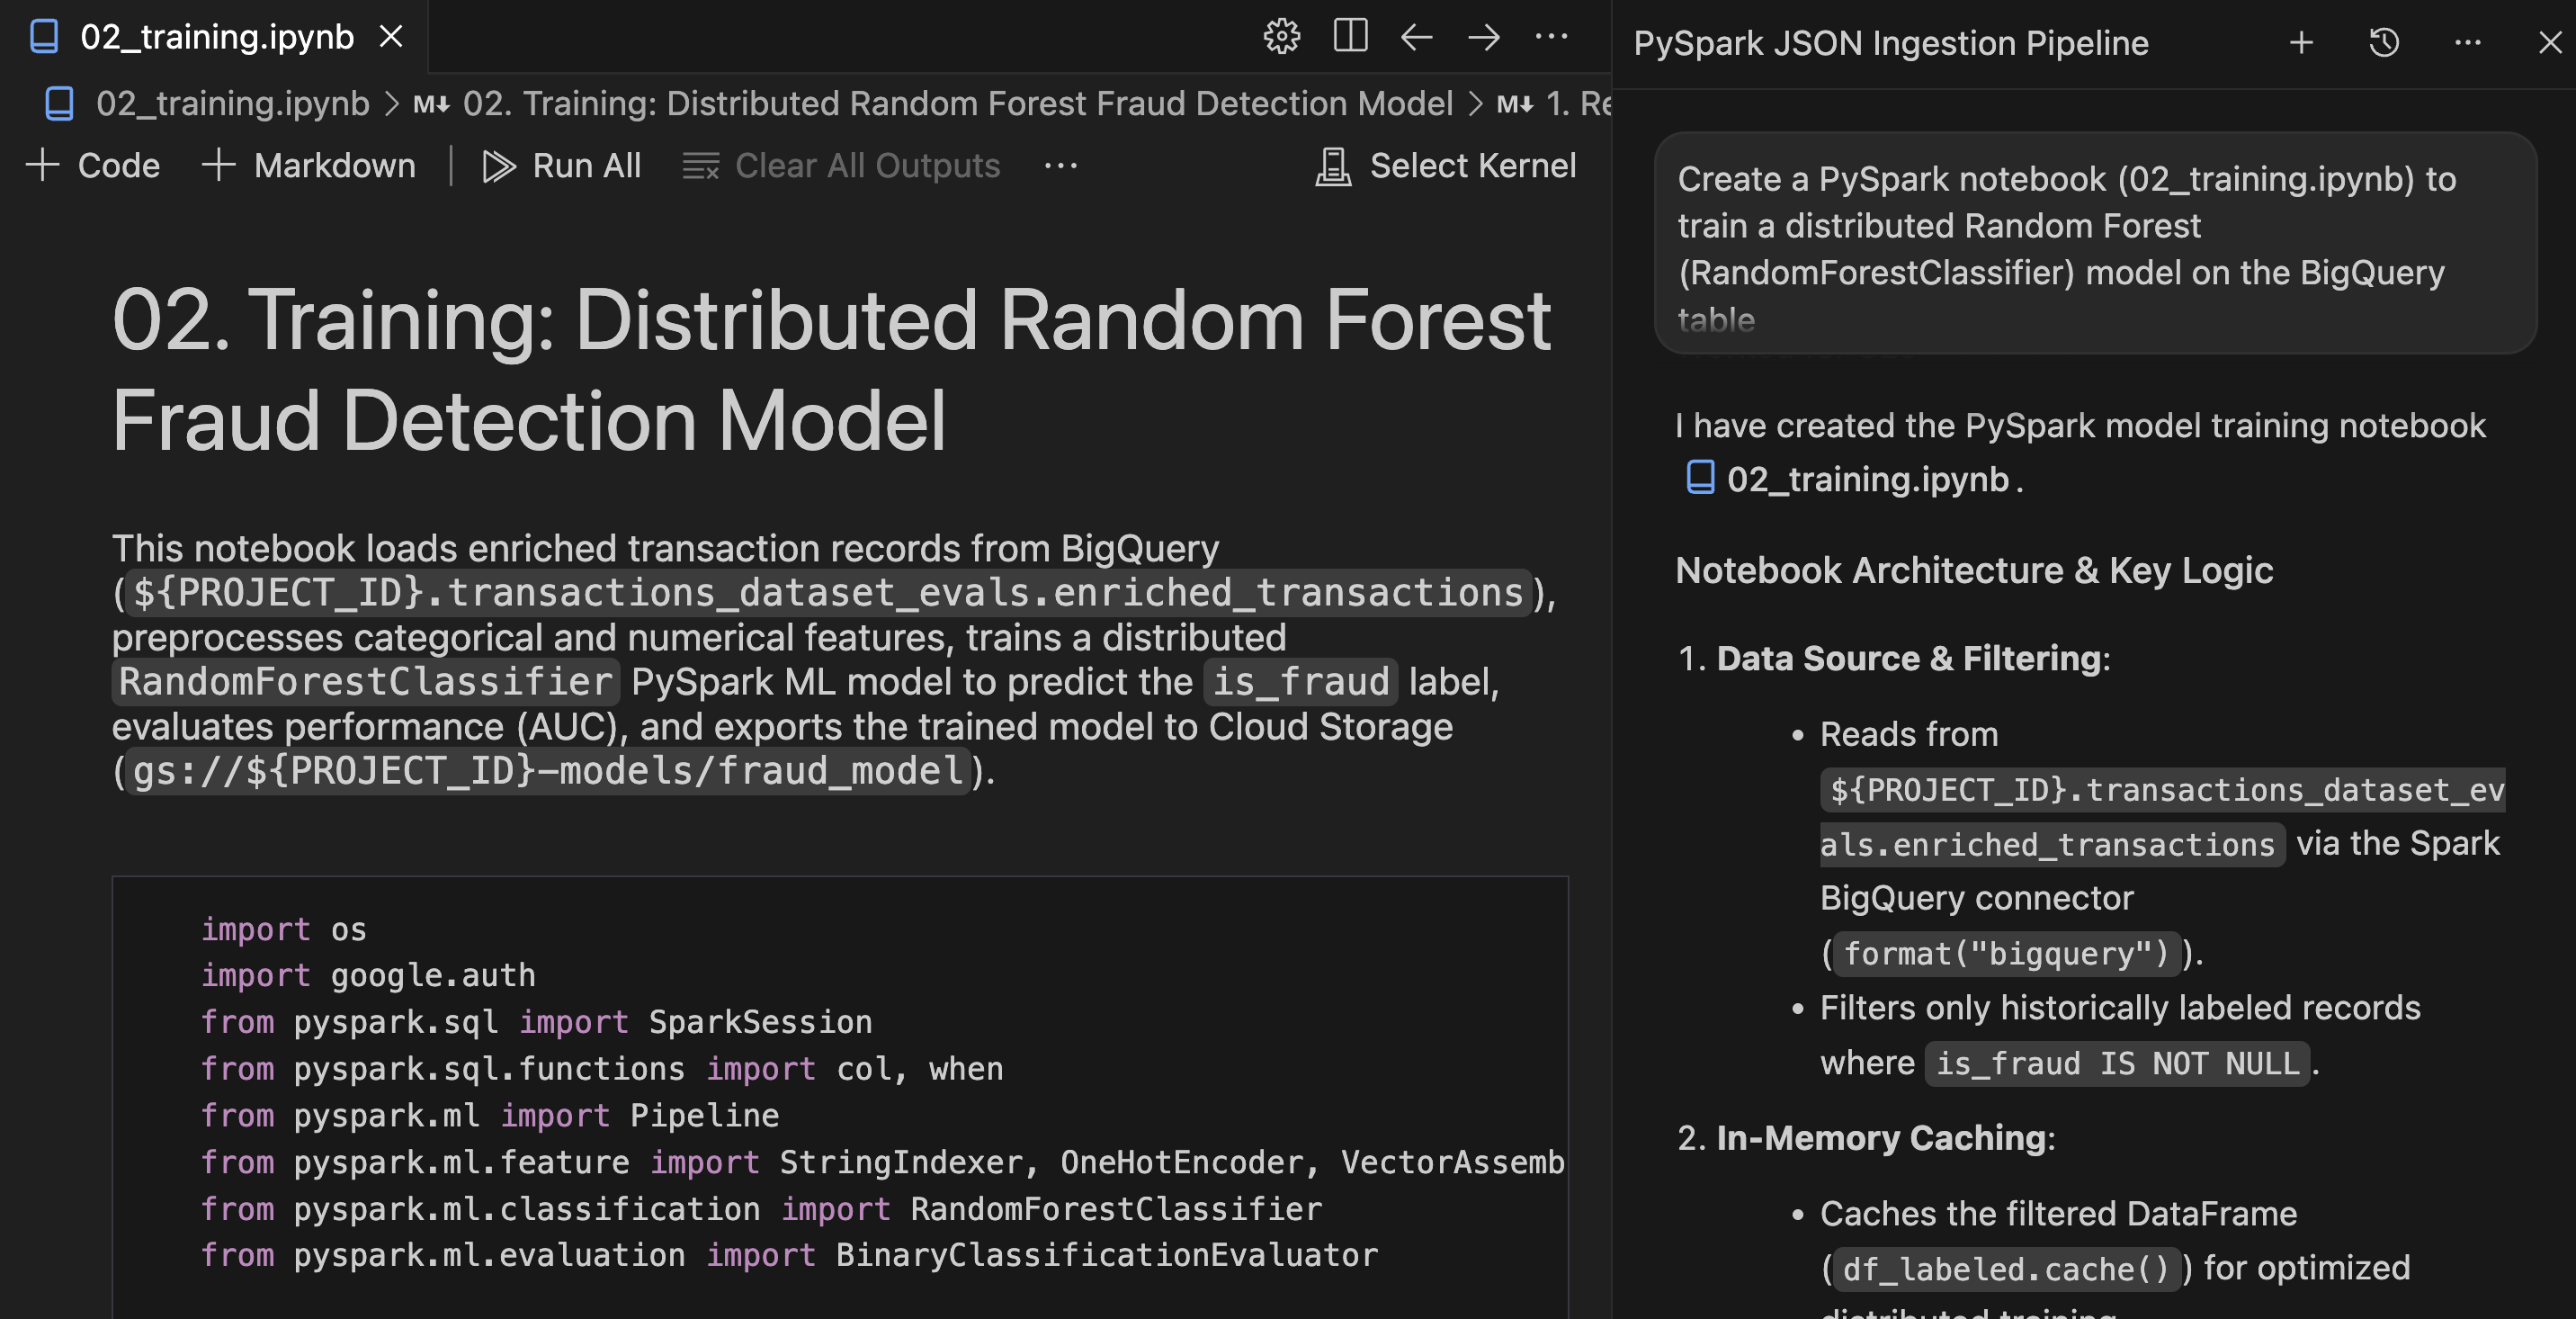
دفترچه یادداشت را بررسی و اجرا کنید
-
notebooks/02_training.ipynbرا در ویرایشگر باز کنید. - مراحل خط لوله یادگیری ماشینی PySpark را برای کدگذاری ویژگی، مونتاژ بردار و منطق طبقهبندی جنگل تصادفی مرور کنید.
- روی Run All در نوار ابزار نوتبوک IDE کلیک کنید.
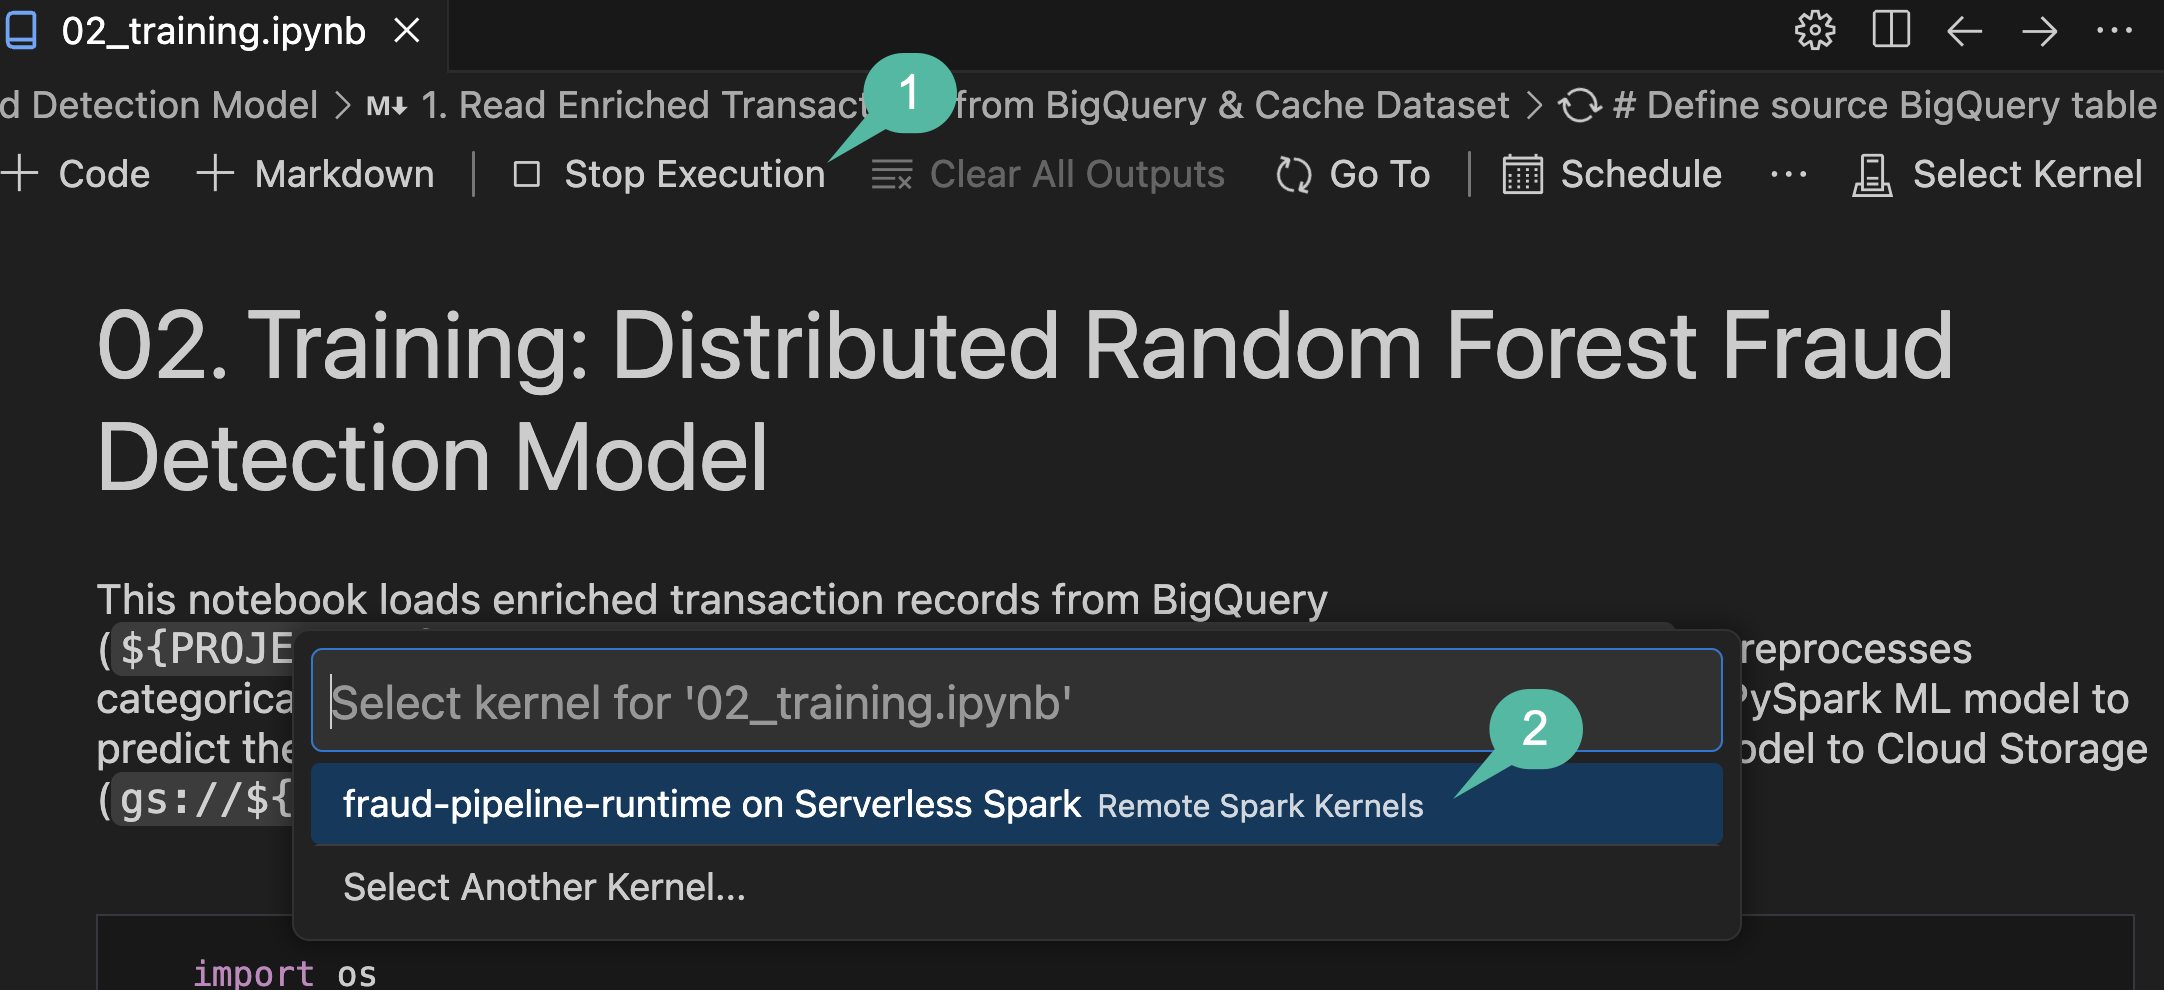
- وقتی منوی کشویی Select Kernel باز شد، در Serverless Spark گزینه fraud-pipeline-runtime را انتخاب کنید.
تأیید
پس از اتمام اجرا، تأیید کنید که مدل به درستی آموزش دیده و خروجی گرفته شده است:
- خروجیهای سلول ارزیابی نزدیک پایین دفترچه یادداشت را بررسی کنید تا امتیاز گزارششدهی «ناحیه زیر ROC» (AUC) را تأیید کنید.
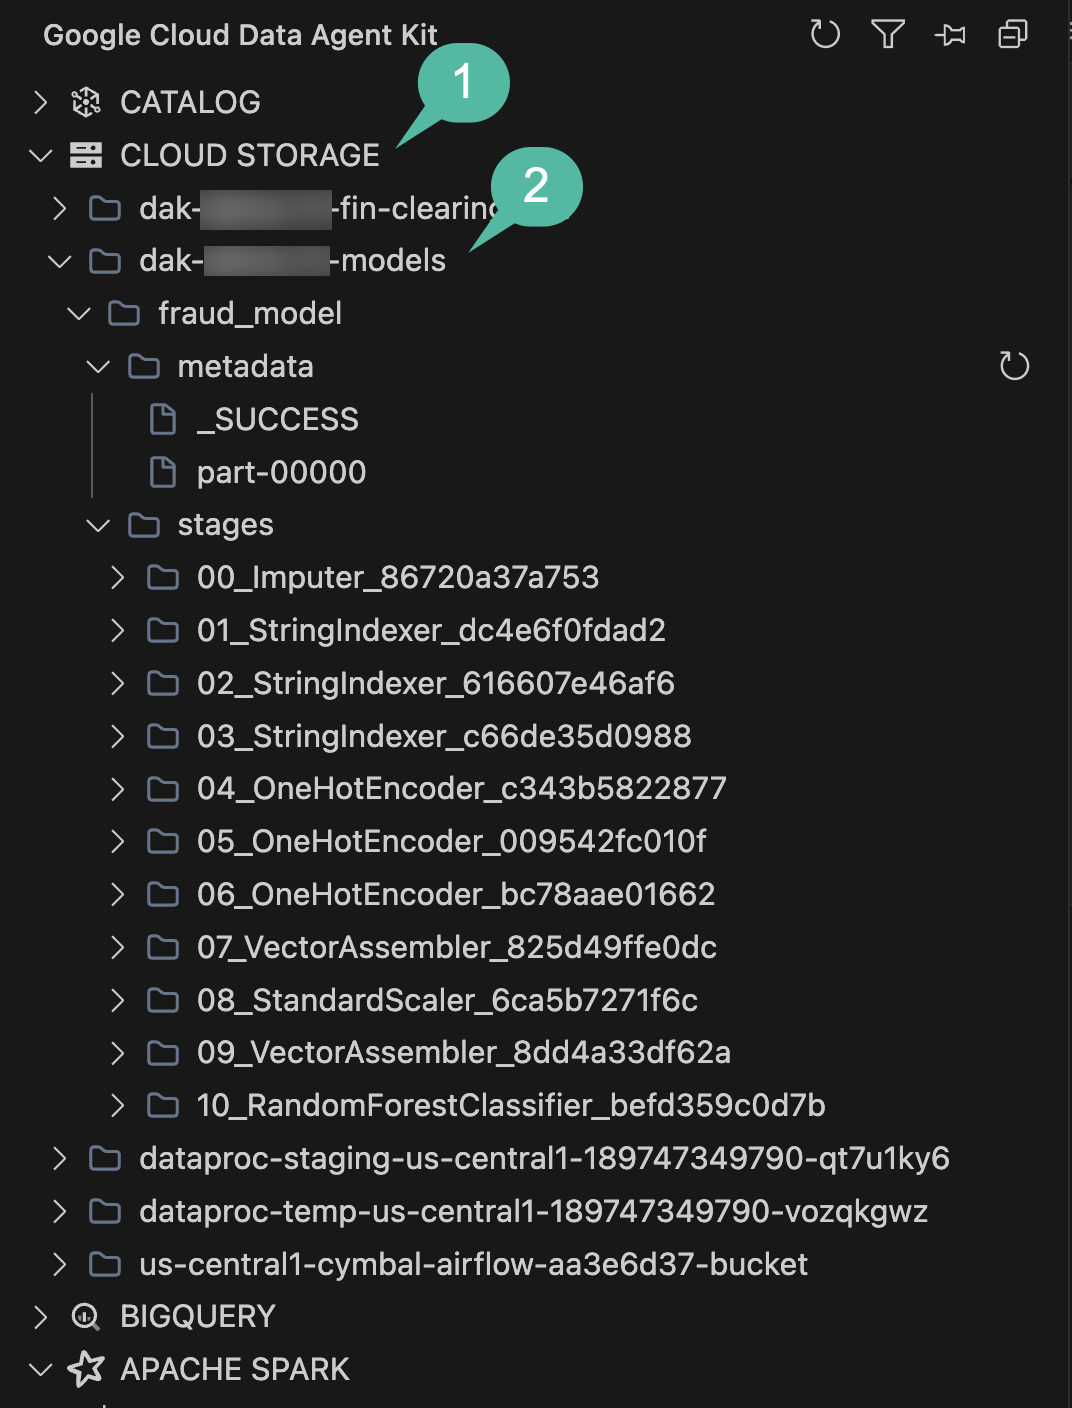
- برای اطمینان از ذخیره موفقیتآمیز مصنوعات مدل در GCS، پنجره کاوشگر STORAGE را در نوار کناری Data Agent Kit باز کنید.
- سطلی که به
-modelsختم میشود (مرتبط با شناسه پروژه فعال شما) را پیدا کنید، آن را باز کنید و برای تأیید وجود دایرکتوریfraud_modelو مراحل خط لوله آن، به پایین بروید.
خلاصه بخش: شما از عامل برای ایجاد یک خط لوله آموزشی PySpark ML استفاده کردید، یک مدل جنگل تصادفی را روی جدول BigQuery غنی شده خود آموزش دادید و مدل را به Cloud Storage صادر کردید.
۶. استنتاج دستهای و نوشتن Cloud Spanner
با یک مدل پیشبینی آموزشدیده که در Cloud Storage ذخیره شده است، شما استنتاج دستهای را روی تراکنشهای جدیدی که از طریق BigQuery در جریان هستند، اجرا خواهید کرد. تراکنشهای پرخطر باید به یک سیستم عملیاتی هدایت شوند تا یک تیم انطباق بتواند آنها را بررسی کند. Cloud Spanner یک پایگاه داده تراکنشی مقیاسپذیر برای این صف بررسی فراهم میکند.
دفترچه استنتاج دستهای را تولید کنید
از عامل برای ایجاد یک دفترچه استنتاج که BigQuery، Cloud Storage و Cloud Spanner را به هم متصل میکند، استفاده کنید:
- پنجره چت با نمایندگان را باز کنید.
- دستور زیر را ارائه دهید:
Create an inference notebook (03_inference.ipynb) that loads the RandomForestClassifier
model to score unlabeled records (where `is_fraud` is null) from the BigQuery table
`transactions_dataset_evals`.`enriched_transactions`.

Filter for high-risk transactions with a 50%+ fraud probability score (probability >= 0.50)
and write them to the Cloud Spanner table SparkEvalFraudReviewQueue in the cymbal-fraud instance
under fraud-db.
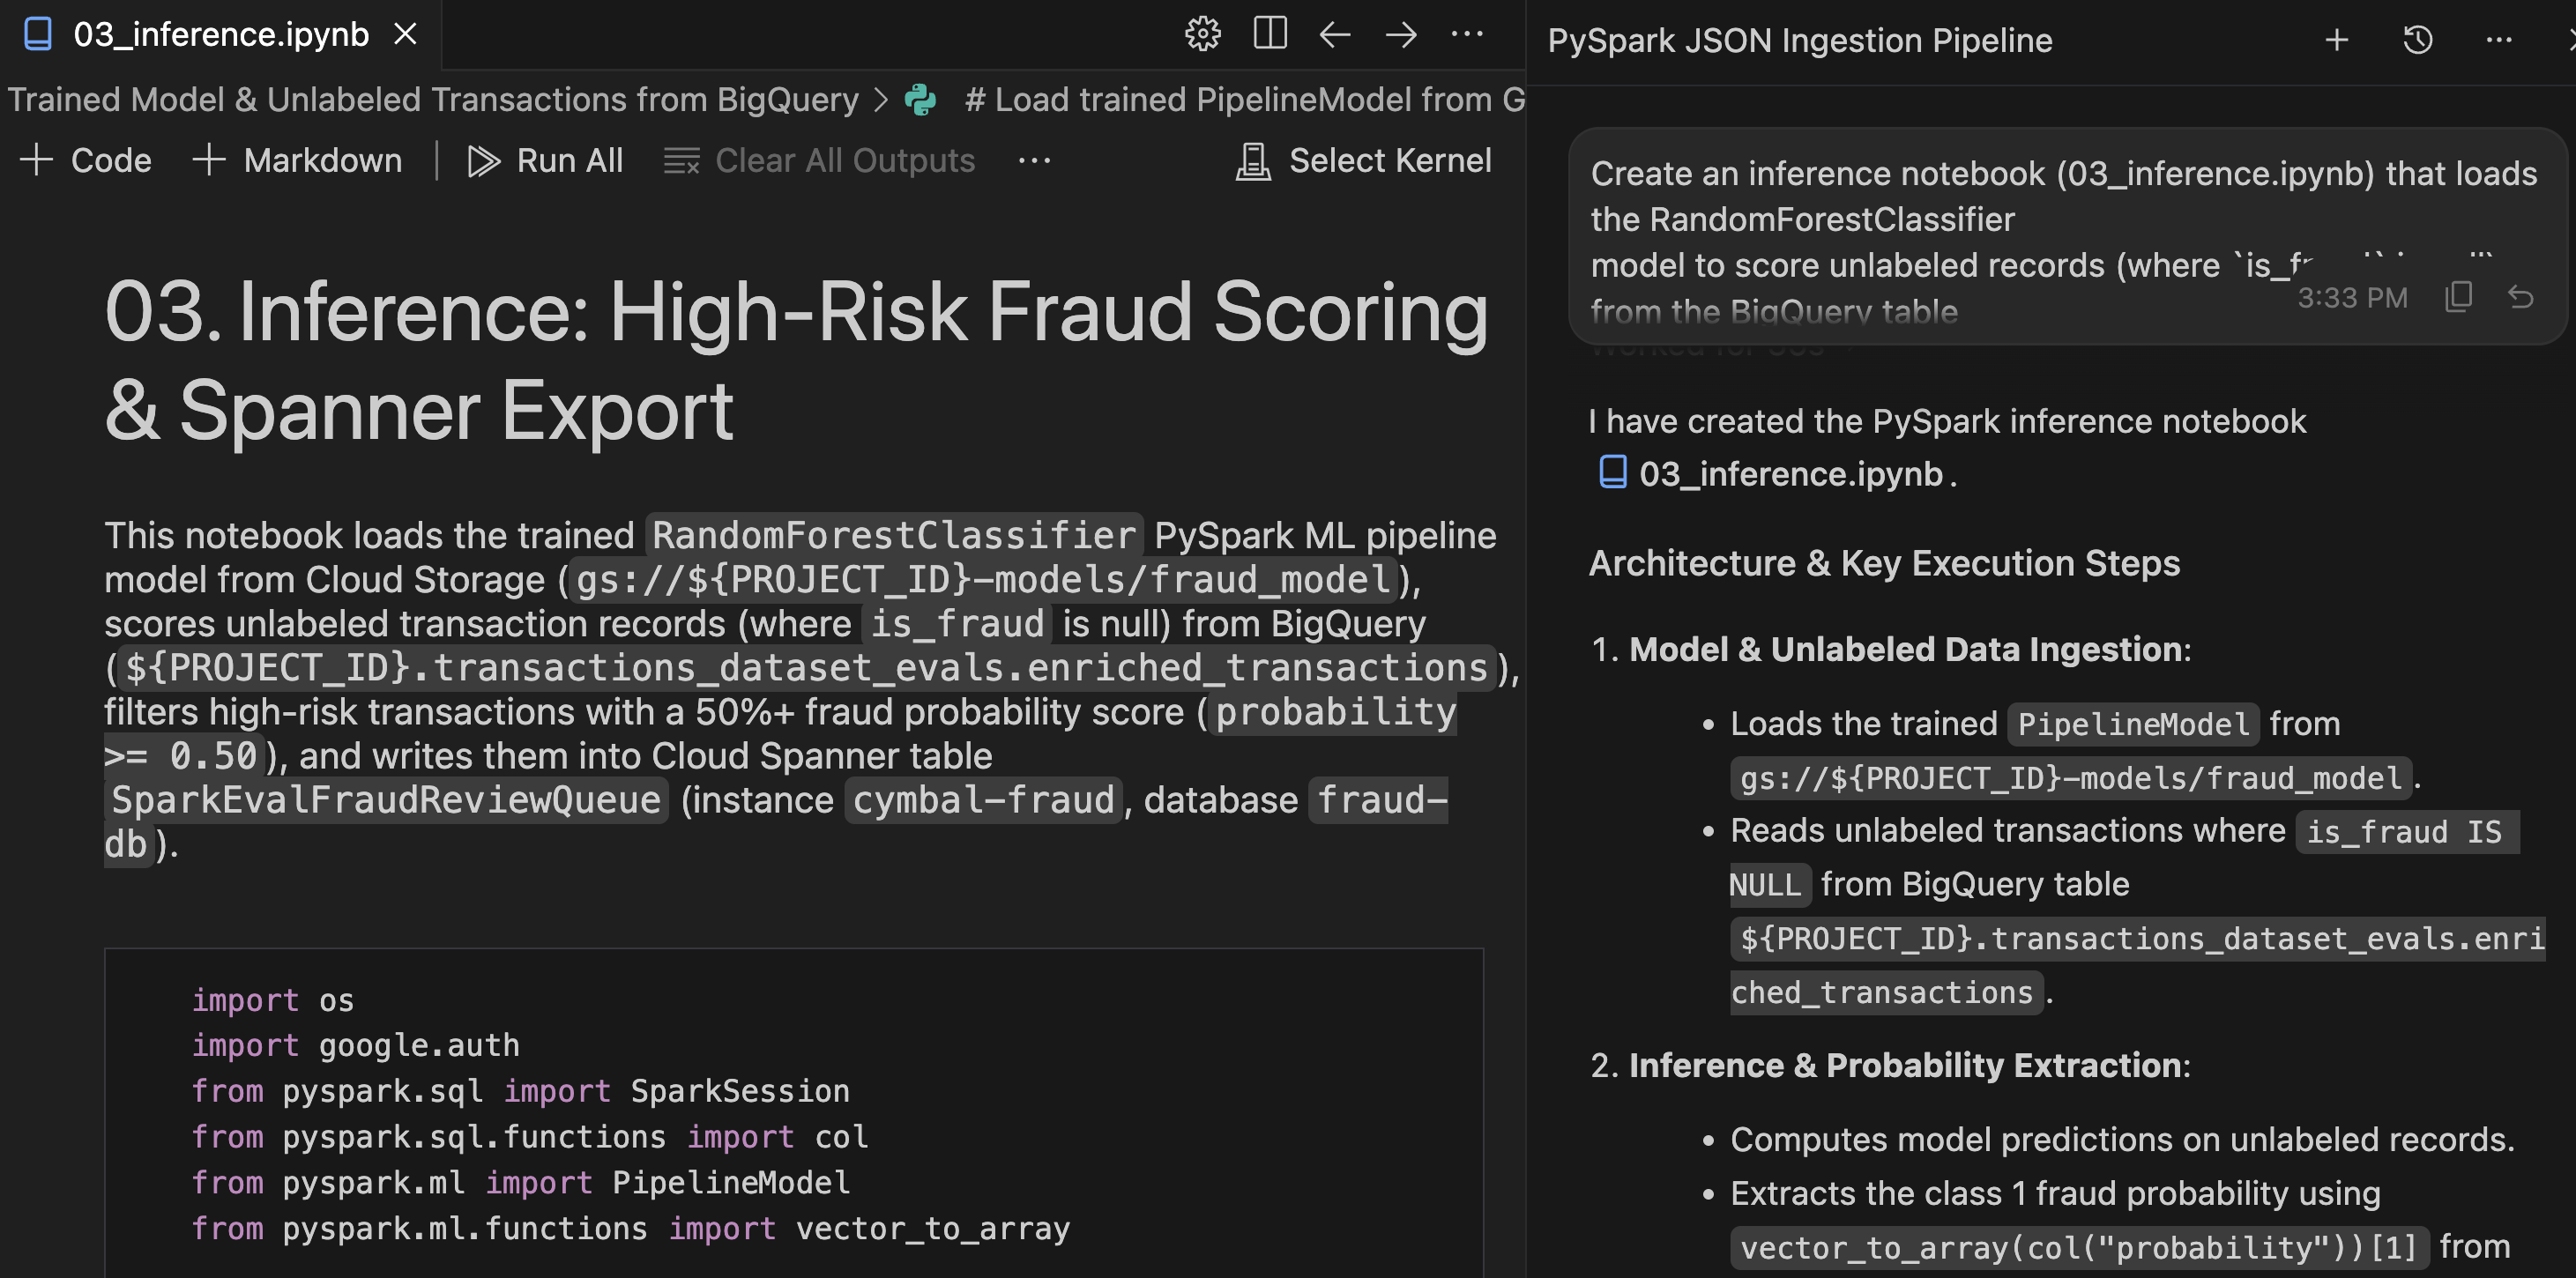
- دفترچه یادداشت تولید شده را بپذیرید تا
notebooks/03_inference.ipynbدر فضای کاری شما ذخیره شود.
دفترچه یادداشت را بررسی و اجرا کنید
-
notebooks/03_inference.ipynbکه به تازگی ایجاد شده است را در ویرایشگر باز کنید. - توالی استنتاج PySpark را مرور کنید:
- وابستگیها: الگوی Serverless Runtime وابستگیهای
cloud-spannerمورد نیاز برای اجرای Spark را فراهم میکند. - قالببندی دادهها: اسکریپت قبل از نوشتن، ستونهای برداری پیچیده Spark ML (مانند ویژگیهای خام و احتمالات) را حذف میکند تا با طرح جدول Spanner مطابقت داشته باشد.
- رابط آچار: ردیفهای علامتگذاری شده را با استفاده از
.format("cloud-spanner") مینویسد تا مستقیماً به صف بررسی اضافه شود.
- وابستگیها: الگوی Serverless Runtime وابستگیهای
- روی Run All در نوار ابزار نوتبوک IDE کلیک کنید.
- وقتی از شما خواسته شد یک هسته انتخاب کنید، در Serverless Spark گزینه fraud-pipeline-runtime را انتخاب کنید.
تأیید
پس از اتمام پردازش نوتبوک استنتاج، میتوانید مستقیماً از داخل IDE به پایگاه داده Spanner عملیاتی خود پرسوجو کنید:
- در نوار فعالیت IDE، پنل Google Cloud Data Agent Kit را باز کنید.
- بخش کاتالوگ را گسترش دهید.
- شناسه پروژه خود را باز کنید، سپس Spanner را باز کنید.
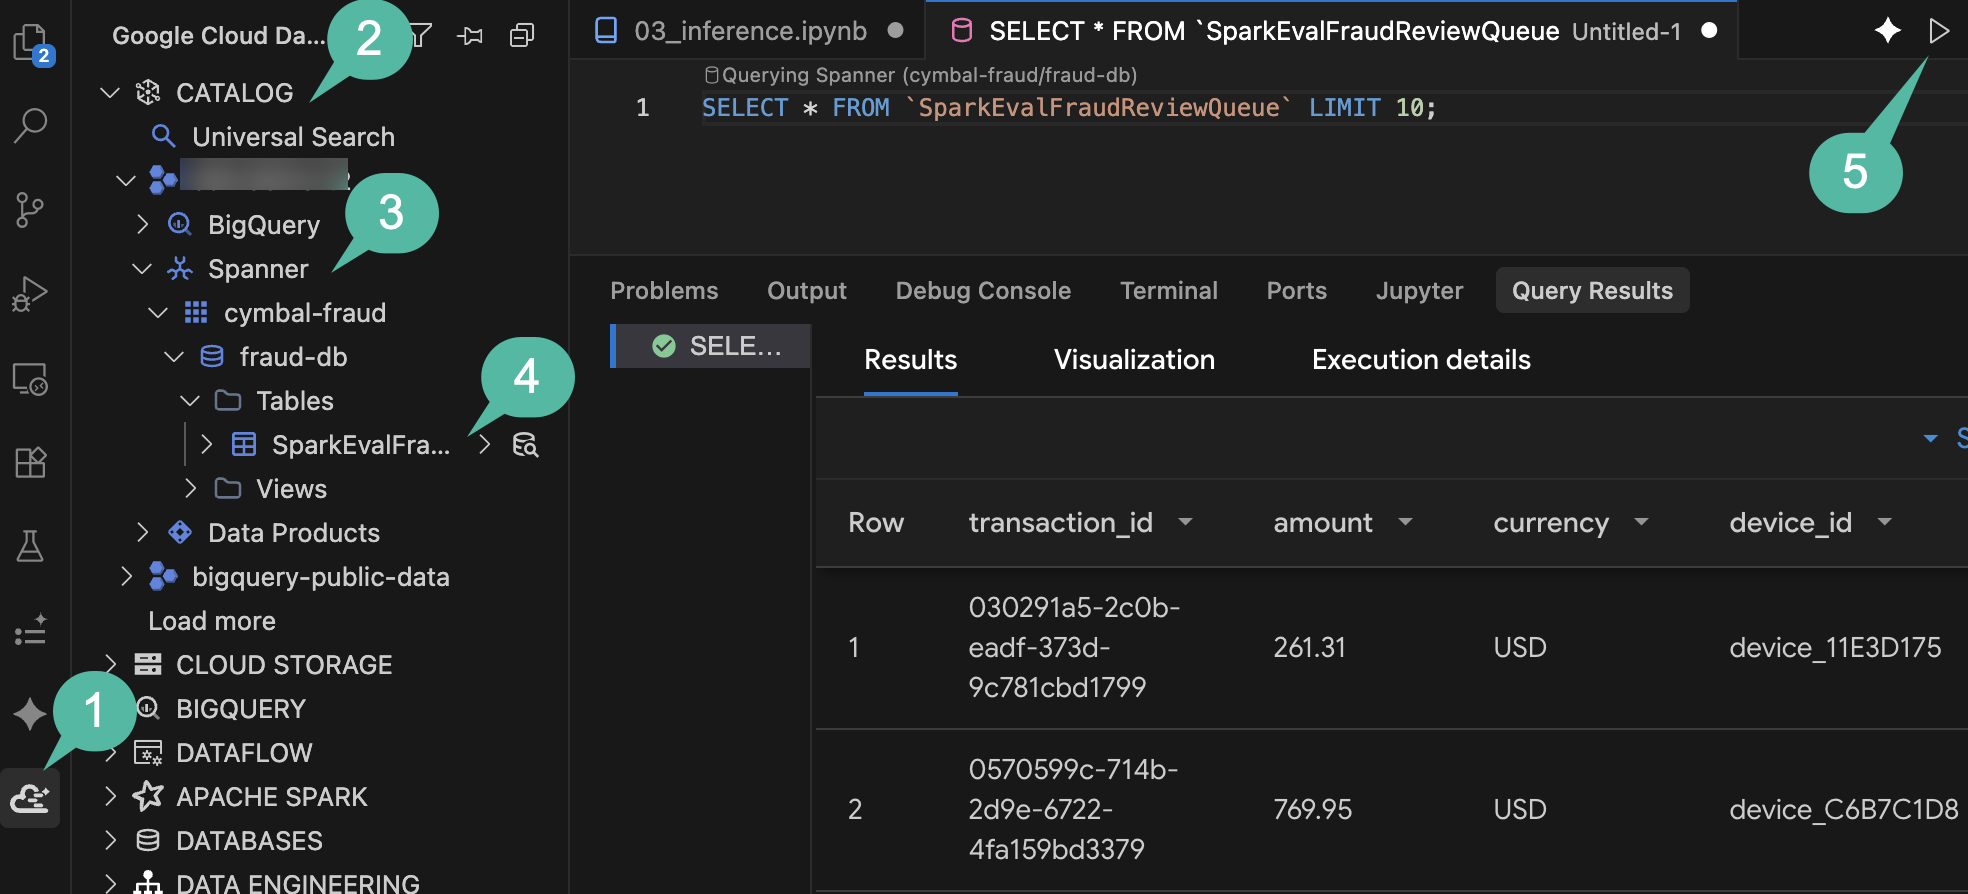
- به
cymbal-fraud->fraud-db->Tables->SparkEvalFraudReviewQueueبروید. - روی جدول کلیک راست کرده و Query Table را انتخاب کنید، سپس پرس و جو را اجرا کنید:
SELECT *
FROM `SparkEvalFraudReviewQueue`
LIMIT 100;
- در پنل نتایج پرسوجو در زیر، باید ردیفهای تازه اضافه شدهای را ببینید که نشاندهنده تراکنشهای پرخطر هستند و برای بررسی دستی علامتگذاری شدهاند.
خلاصه بخش: شما از عامل برای ایجاد یک دفترچه استنتاج دستهای استفاده کردید، رکوردهای بدون برچسب BigQuery را با مدل آموزشدیده خود امتیازدهی کردید و تراکنشهای پرخطر را مستقیماً در Cloud Spanner نوشتید.
۷. با جریان هوای مدیریتشده هماهنگ و یکپارچه شوید
خط تولید شما در حال حاضر از مراحل گسسته تشکیل شده است: یک دفترچه مصرف، یک پروژه تبدیل dbt و یک دفترچه استنتاج دستهای. برای آمادهسازی این مرحله برای تولید، آنها را در یک نمودار وابستگی زمانبندی شده به هم متصل خواهید کرد.
سرویس مدیریتشده برای Apache Airflow (که قبلاً با نام Cloud Composer شناخته میشد) یک موتور هماهنگسازی مدیریتشده برای این گردش کار ارائه میدهد. کیت Data Agent شامل یک ویژگی Orchestration Pipelines است که تعاریف اعلانی خط لوله YAML را مستقیماً به DAGهای Airflow ترجمه میکند.
تعریف خط لوله
از عامل برای تولید پیکربندی خط لوله ارکستراسیون استفاده کنید:
- در چت نماینده ، عبارت زیر را وارد کنید (به یاد داشته باشید که
${PROJECT_ID}را جایگزین کنید):
Initialize and define an orchestration pipeline (fraud_analysis_pipeline) triggering
the ingestion notebook, dbt project, and inference notebook in sequential order.
For Dataproc Serverless engine configs in us-central1, use resourceProfile.inline
(defining properties with spark.jars: "gs://spark-lib/spanner/spark-3.5-spanner-1.4.0.jar"
for inference) rather than resourceProfile.path or overrides.

Set the schedule interval to run daily at midnight, and use
gs://${PROJECT_ID}-airflow-artifacts for artifact storage.
بررسی پیکربندی DAG
هماهنگکنندهی کیت عامل داده (Data Agent Kit Orchestrator) از پیکربندیهای اعلانی YAML برای تعریف و استقرار خطوط لوله (pipelines) در Apache Airflow استفاده میکند و امکان کنترل نسخه و استقرار تعاریف را از طریق CI/CD فراهم میکند.
در پنل IDE Explorer، دو فایل خط لولهای که عامل در ریشه فضای کاری شما ایجاد کرده است را بررسی کنید:
-
deployment.yaml: این فایل را باز کنید. این فایل به عنوان رجیستری محیط شما عمل میکند. این فایل، خط لولهdevمنطقی شما را به محیطcymbal-airflowنگاشت میکند، ناحیه اجرا (us-central1) را تنظیم میکند و مخزنartifact_storageرا که DAGها و وابستگیهای کامپایل شده در آن قرار میگیرند، تعریف میکند. -
fraud_analysis_pipeline.yaml: این فایل را باز کنید. این فایل نمودار اجرا را تعریف میکند. برنامهی زمانبندی تریگر (interval: '0 0 * * *') را مشخص میکند و سه مرحلهی زیر بلوکactionsرا به ترتیب نشان میدهد:- یک اکشن
notebookمصرف برای01_ingestion.ipynbکه روی Dataproc Serverless اجرا میشود. - یک اقدام
pipelineتبدیل که دایرکتوریdbt_projectرا هدف قرار میدهد، با یک وابستگیdependsOnکه به مرحله مصرف اشاره میکند. - یک اکشن
notebookاستنتاج برای03_inference.ipynbبا یک وابستگیdependsOnکه به مرحله dbt اشاره میکند و ویژگی Spanner JAR را بستهبندی میکند.
- یک اکشن
- همچنین، عامل، این مصنوعات تولید شده را در یک برگه Walkthrough در صفحه ویرایشگر شما خلاصه میکند و پیکربندیها و اعتبارسنجیهای انجام شده را شرح میدهد.
پیکربندی تعاملی DAG
کیت عامل داده، پیکربندی خط لوله شما را به عنوان یک نمودار بصری تعاملی برای بررسی و ویرایش ویژگیهای DAG جریان هوا ارائه میدهد.
- در نوار فعالیت IDE، پنل Google Cloud Data Agent Kit را باز کنید.
- در
DATA ENGINEERING،Orchestration Pipelinesرا باز کنید. - برای باز کردن بوم DAG بصری در ویرایشگر اصلی، روی
fraud_analysis_pipeline.yamlکلیک کنید.
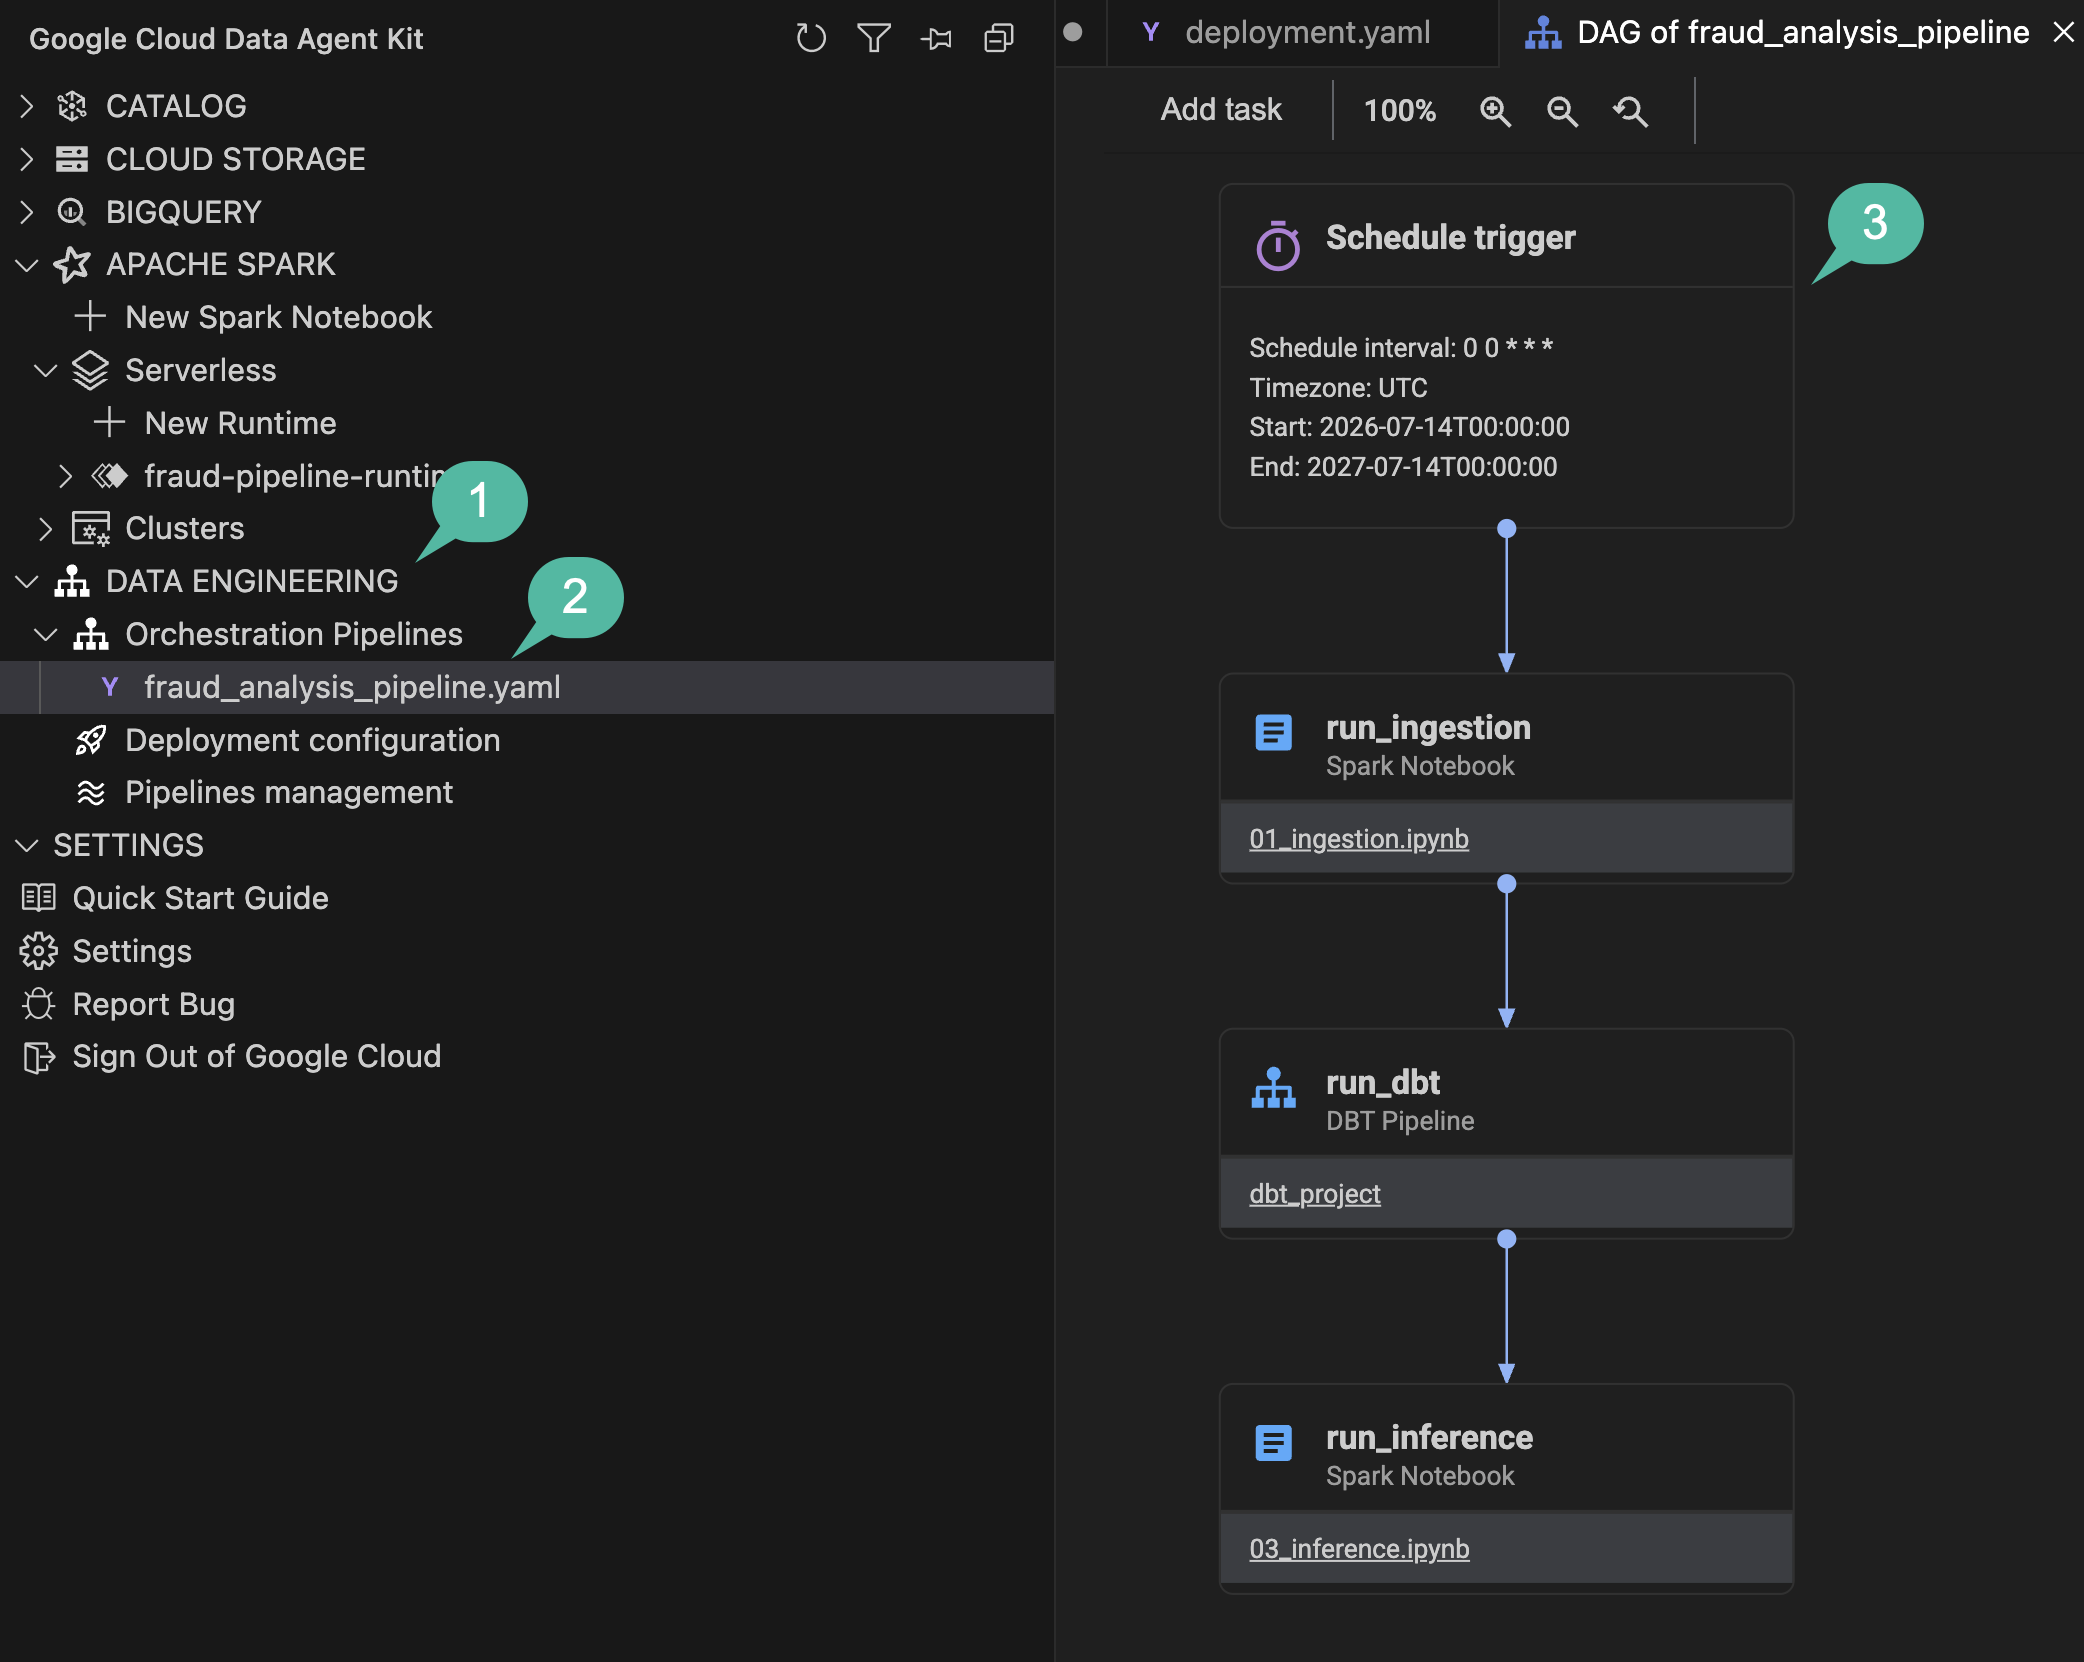
- روی گرهی
Schedule triggerدر بالا کلیک کنید. یک منوی تنظیمات در سمت راست باز میشود که رشتهی تجزیهشدهی Cron (0 0 * * *) را نمایش میدهد و به شما امکان میدهد پارامترهایی مانند backfill و catchup را تنظیم کنید. - روی هر یک از گرههای وظیفه نوتبوک (مانند مرحله ingestion یا inference) کلیک کنید. پنجره flyout بهروزرسانی میشود تا نگاشتهای اجرایی Dataproc Serverless و ویژگیهای کانکتور خاص را نمایش دهد.
- به پیوند نام فایل نوتبوک (مانند
01_ingestion.ipynb) درون بلوک گره توجه کنید. کلیک بر روی آن، نوتبوک را مستقیماً در ویرایشگر شما باز میکند. - در نوار کناری سمت چپ، زیر Orchestration Pipelines، روی
Deployment configurationکلیک کنید. این نما، خوشه محیطdevهدف و مصنوعات سطل GCS خروجی شما را نشان میدهد.
خلاصه بخش: شما یک پیکربندی خط لوله ارکستراسیون با عامل ایجاد کردید و وابستگیهای بین وظایف مصرف، dbt و استنتاج را در یک بوم بصری تعاملی تعریف کردید.
۸. استقرار، اجرا و نظارت
با تعریف DAG به صورت محلی، به محیط Managed Airflow که در طول راهاندازی فراهم شده است متصل شده و pipeline را مستقر خواهید کرد.
پیکربندی سرویس مدیریتشده برای Apache Airflow
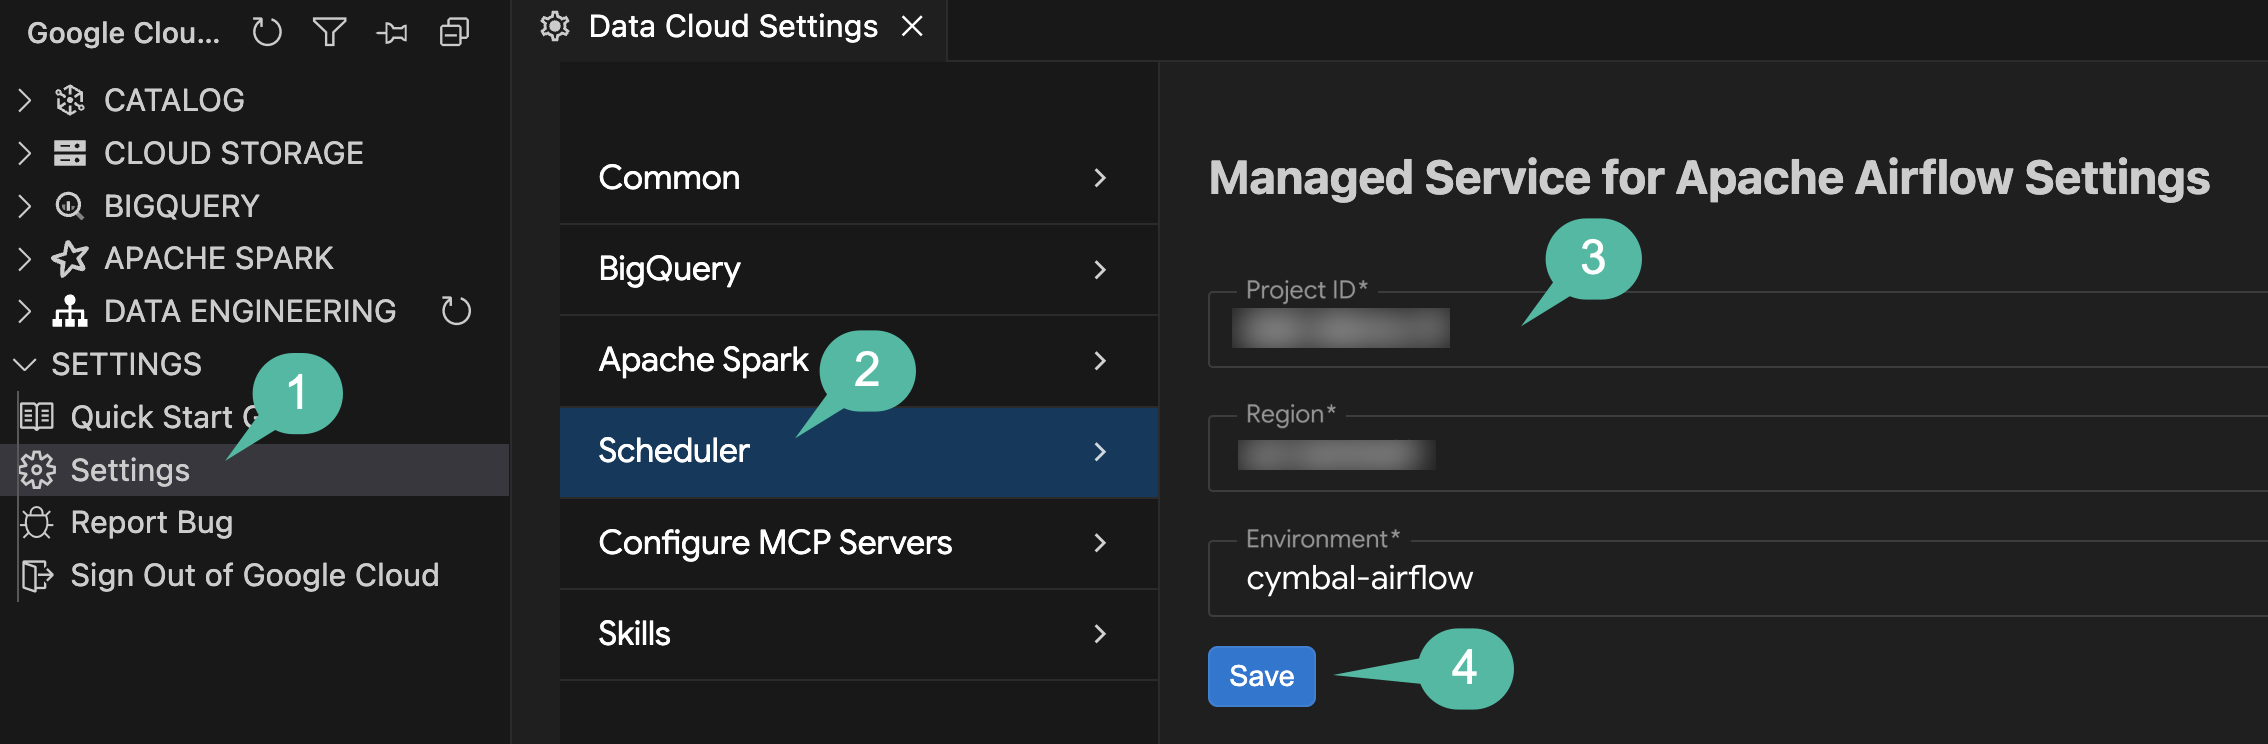
قبل از استقرار، اتصال Scheduler را در تنظیمات Data Agent Kit پیکربندی کنید تا افزونه محیط Managed Airflow شما را هدف قرار دهد:
- در نوار فعالیت IDE، پنل Google Cloud Data Agent Kit را باز کنید.
- در
SETTINGS، روی تنظیمات کلیک کنید. - از منوی سمت چپ، برنامهریز (Scheduler) را انتخاب کنید.
- تنظیمات را پیکربندی کنید:
- شناسه پروژه : شناسه پروژه فعال خود را انتخاب کنید.
- منطقه :
us-central1را انتخاب کنید. - محیط :
cymbal-airflowانتخاب کنید.
- روی ذخیره کلیک کنید.
استقرار DAG
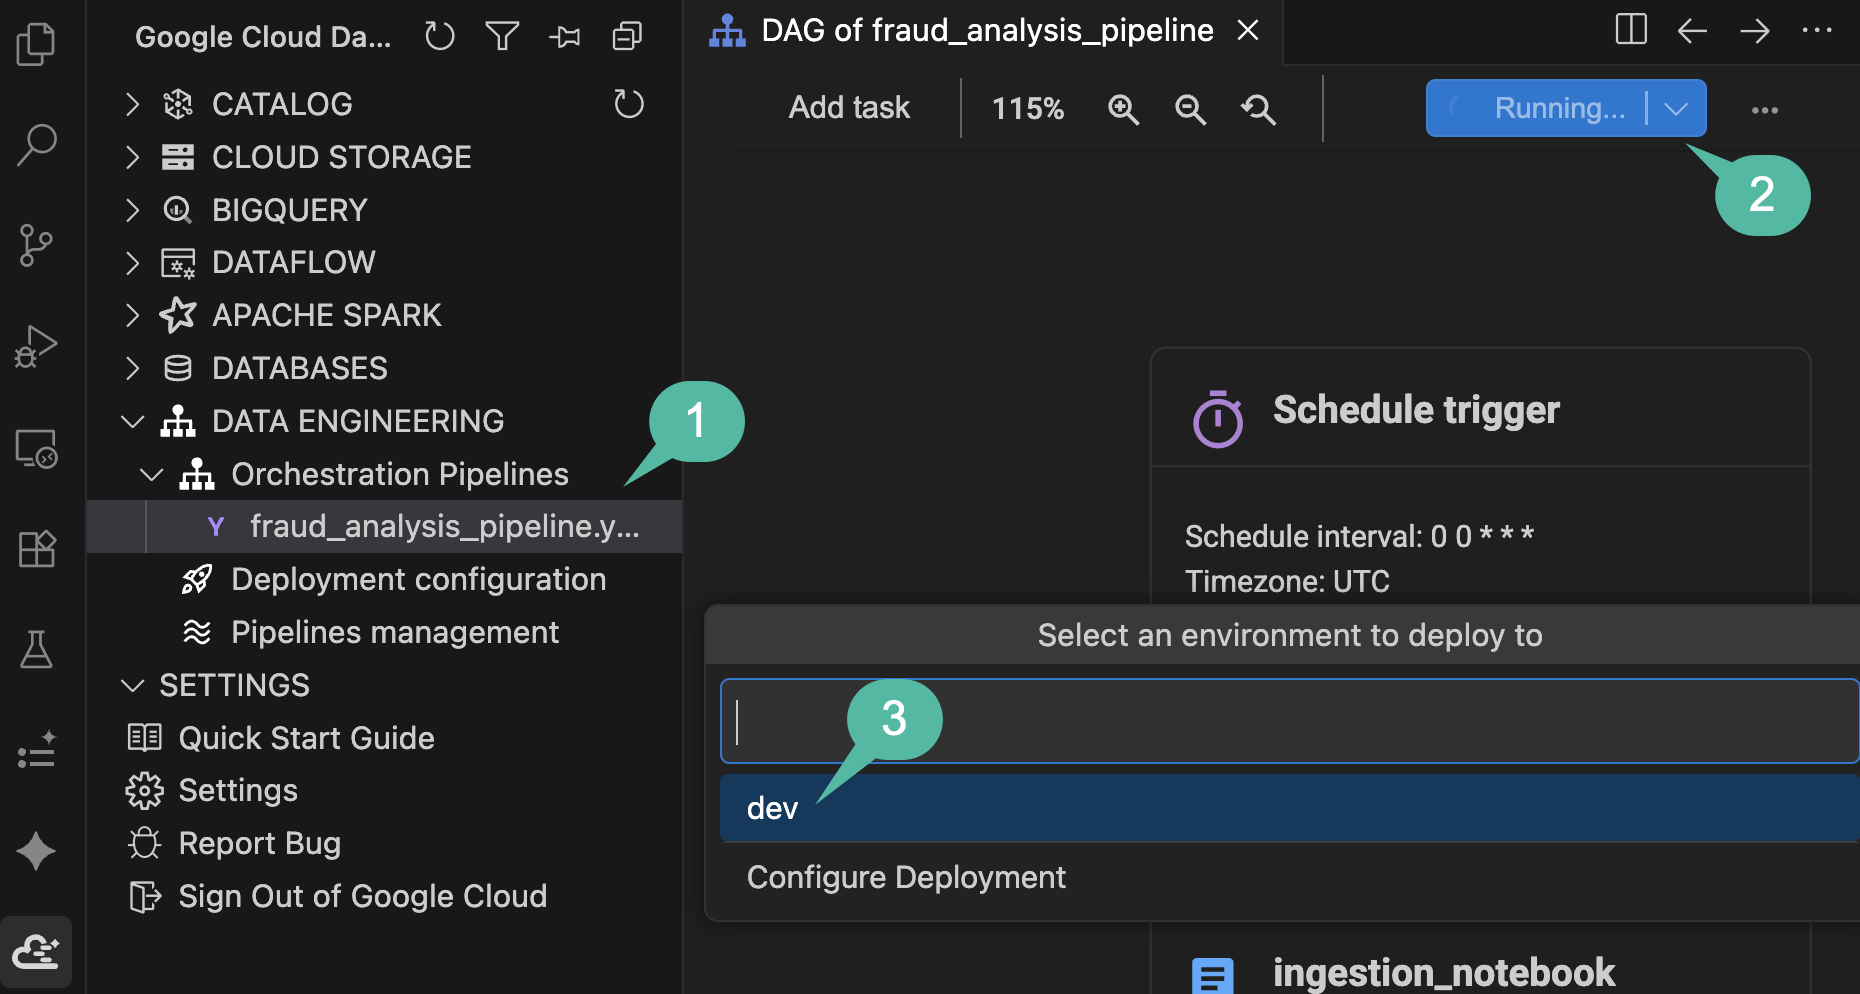
اکنون خط لوله پیکربندی شده را مستقیماً از بوم بصری به محیط جریان هوای مدیریت شده خود مستقر خواهید کرد:
- در نوار کناری Google Cloud Data Agent Kit ، مسیر
DATA ENGINEERING>Orchestration Pipelinesرا باز کنید و رویfraud_analysis_pipeline.yamlکلیک کنید تا بوم بصری DAG باز شود. - در گوشه سمت راست بالای نوار ابزار بوم، روی دکمه آبی رنگ اجرای خط لوله کلیک کنید.
- در انتخابگر کشویی محیط،
devرا انتخاب کنید. - اعلان پیشرفت را در قسمت وضعیت پایین مشاهده کنید (
Running pipeline: Building pipeline locally...). این افزونه به طور خودکار DAG شما را کامپایل میکند، فایلهای نوتبوک و dbt را بستهبندی میکند و آنها را در سطل GCS محیط Managed Airflow شما آپلود میکند (این کار حدود ۳ تا ۴ دقیقه طول میکشد).
اجرا را زیر نظر داشته باشید
پس از اتمام کامپایل محلی و تأیید Triggered a new run for pipeline... successfully توسط اعلان پاپآپ، اجرای زنده را رصد کنید:
- در نوار کناری Google Cloud Data Agent Kit ، بخش
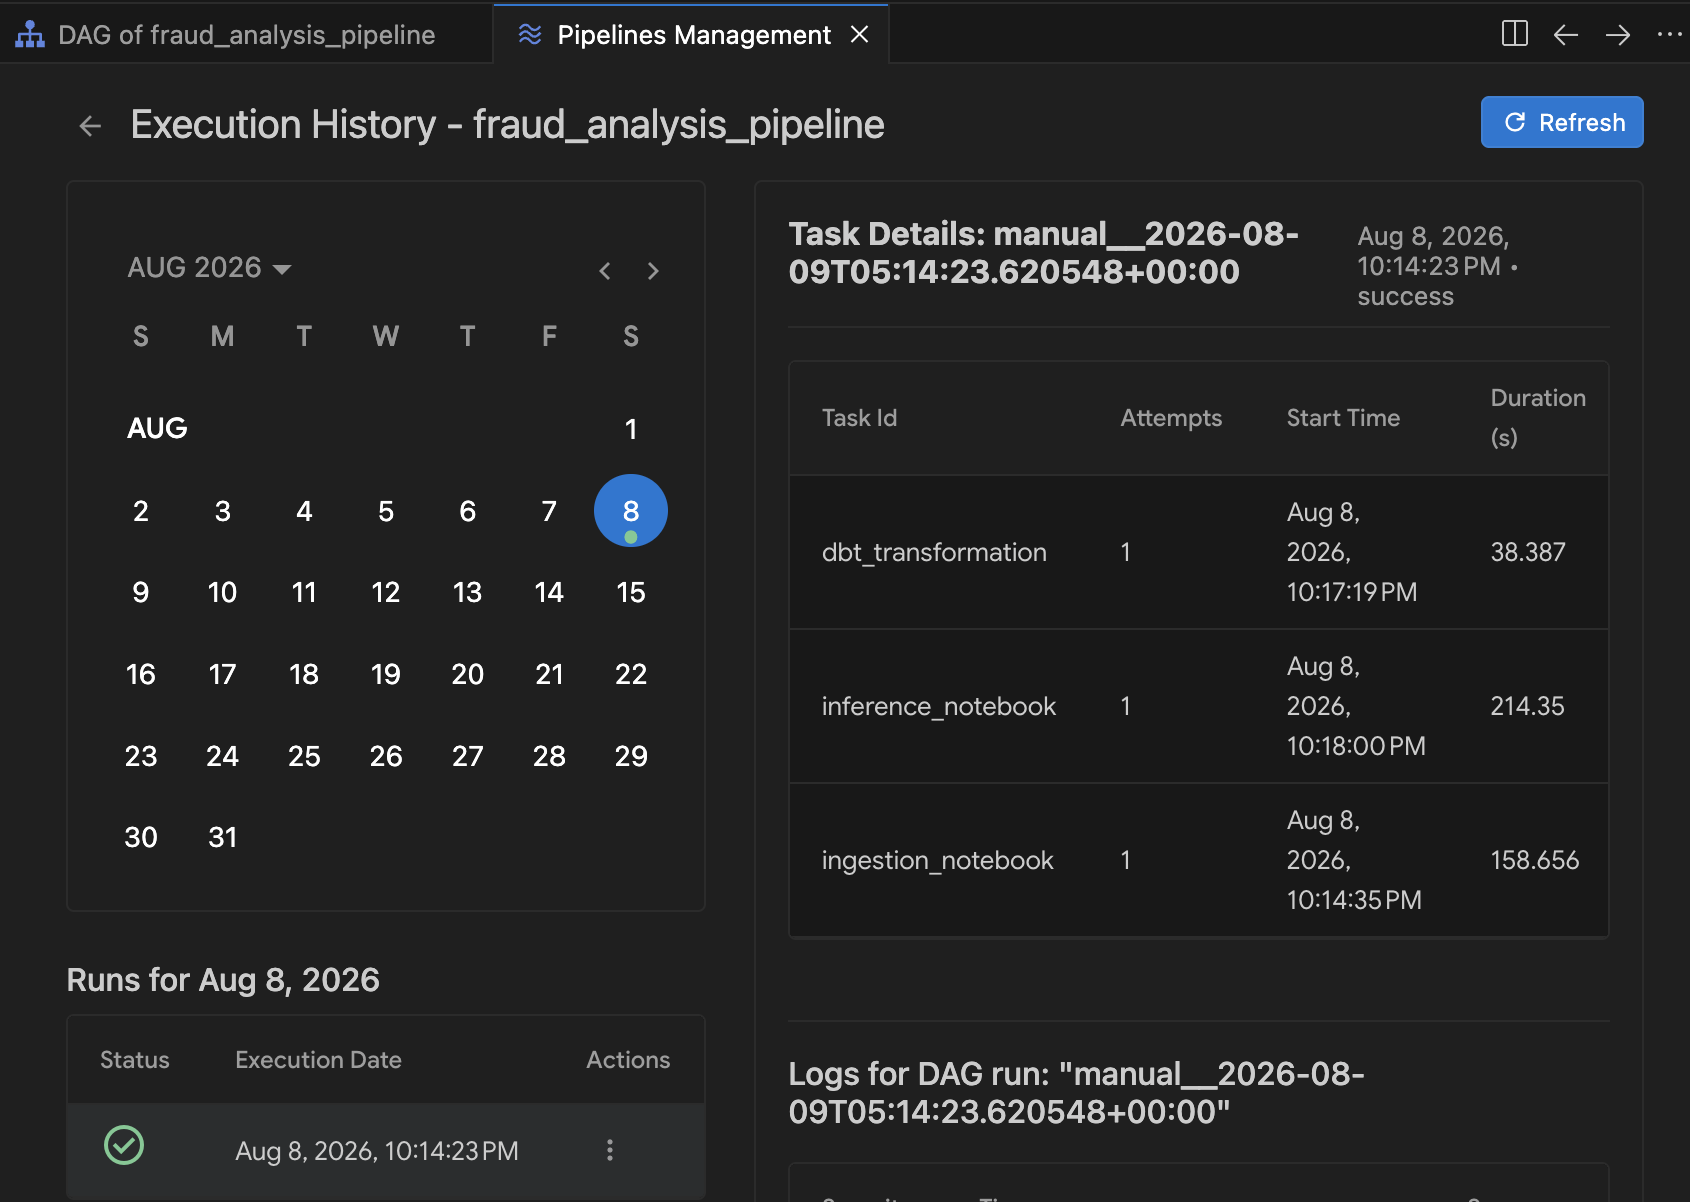
DATA ENGINEERING>Orchestration Pipelinesرا باز کنید. - روی مدیریت خطوط لوله کلیک کنید.
- در جدول مدیریت خطوط لوله، روی
fraud_analysis_pipelineکلیک کنید تا تاریخچه اجرای آن باز شود.
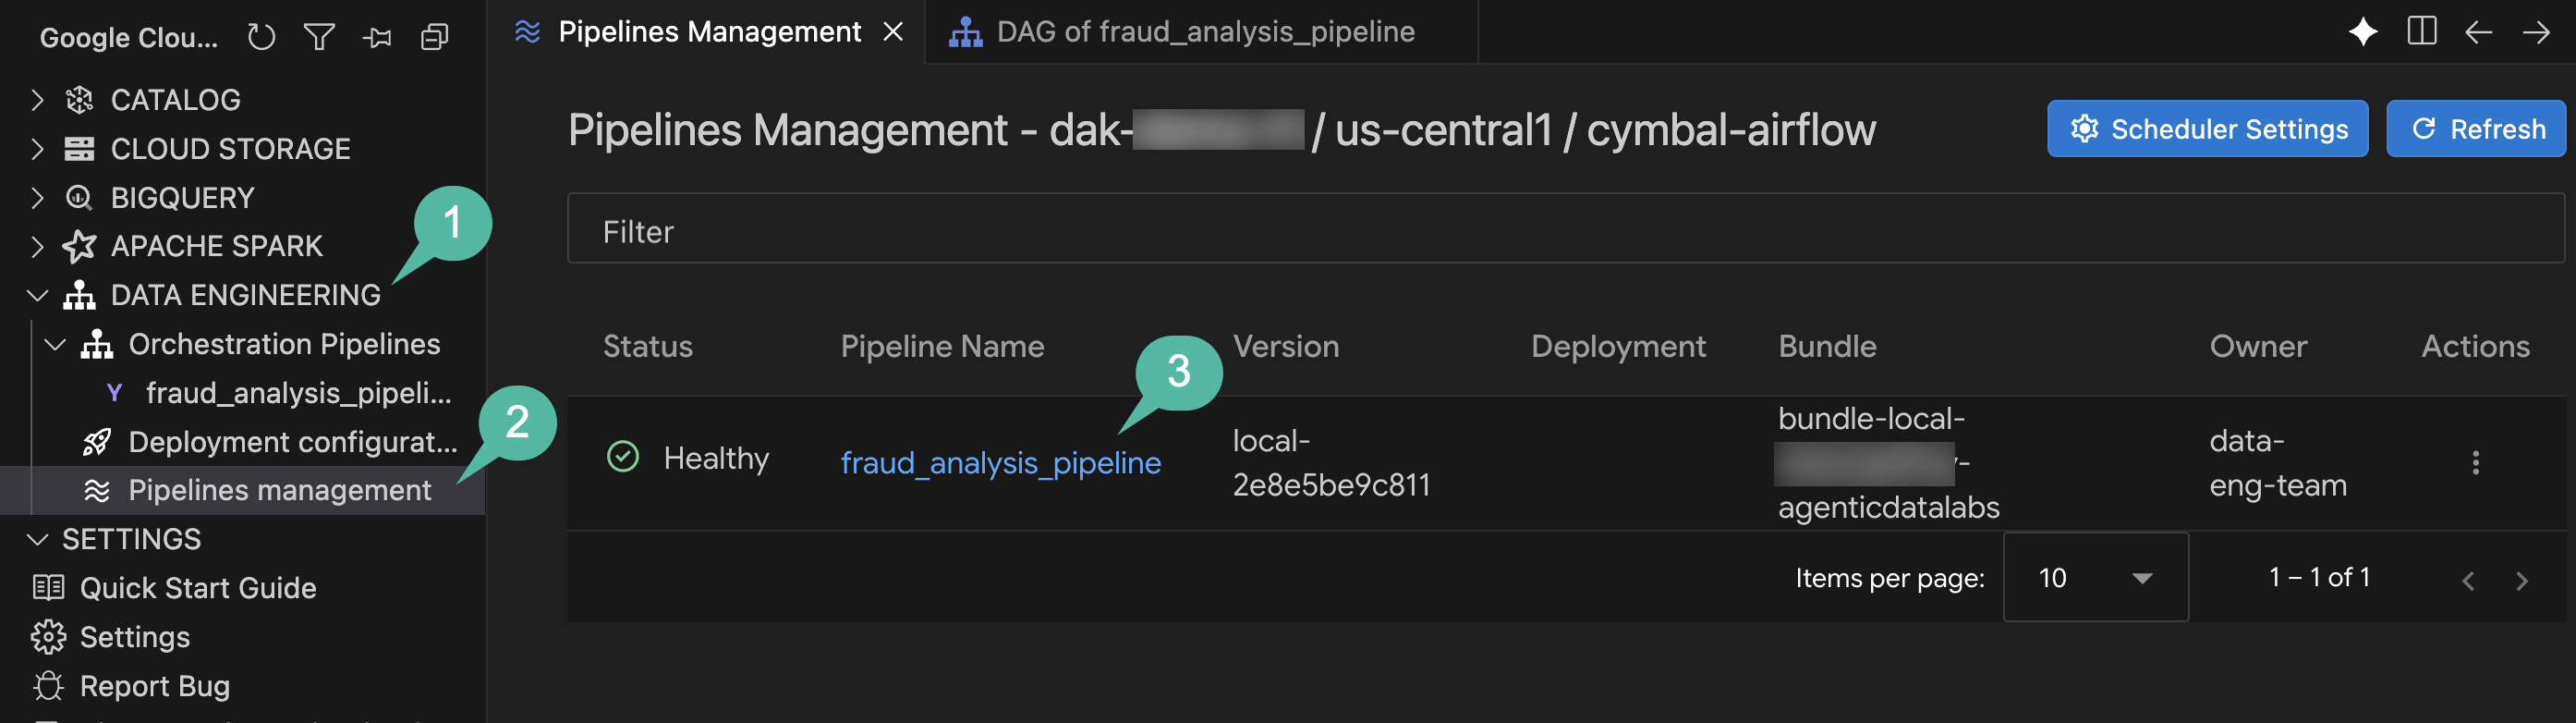
- در نمای تاریخچه اجرا ، اجرای فعال را از تقویم انتخاب کنید.
- با پیشرفت اجرا در هر وظیفه خط لوله (مصرف، تبدیل dbt و استنتاج)، نشانگرهای وضعیت بهروزرسانی میشوند و مدت زمان وظیفه نمایش داده میشود. برای بررسی خروجی اجرای زنده و گزارشهای Airflow DAG روی هر وظیفه کلیک کنید.
خلاصه بخش: شما اتصال Airflow Scheduler را پیکربندی کردید، خط لوله تحلیلی سرتاسری خود را به Managed Airflow مستقر کردید و اجرای زنده را رصد کردید و سیستم را از لاگهای خام تا پیشبینیهای نهایی Cloud Spanner تأیید کردید.
۹. تمیز کردن
برای جلوگیری از تحمیل هزینههای مداوم به پروژه Google Cloud خود برای منابع مورد استفاده در این آزمایشگاه کد، با استفاده از اسکریپت خودکار، محیط را از هم بپاشانید.
- در پنل ترمینال (یا در Cloud Shell)، به دایرکتوری اسکریپتها بروید و دستور زیر را اجرا کنید:
cd ~/devrel-demos/codelabs/agentic-data-labs/data-science/scripts
chmod +x teardown.sh
./teardown.sh
- این اسکریپت تمام منابعی را که قصد حذف آنها را دارد، فهرست میکند و از شما تأیید میخواهد:
- محیط جریان هوای مدیریتشده (
cymbal-airflow) - نمونهی اسپنر ابری (
cymbal-fraud) - مجموعه داده BigQuery (
transactions_dataset_evals) - سطلهای ذخیرهسازی ابری (
gs://${PROJECT_ID}-fin-clearing-rawوgs://${PROJECT_ID}-models) - حساب کاربری خدمات کارگر (
composer-worker-sa)
- محیط جریان هوای مدیریتشده (
- برای تأیید،
yرا تایپ کنید. اسکریپت teardown تمام سرویسهای GCP ارائه شده را حذف کرده و فایلهای محلی را پاک میکند.
۱۰. تبریک میگویم!
شما یک خط لوله تشخیص تقلب سرتاسری ساختهاید که شامل Cloud Storage، BigQuery، Managed Service برای Apache Spark (Spark Serverless)، dbt، Cloud Spanner و Managed Service برای Apache Airflow میشود و با استفاده از برنامه نویسی جفتی با Google Cloud Data Agent Kit در داخل Antigravity IDE انجام شده است.
کاری که شما انجام دادید
- 📥 لاگهای خام تراکنشها با استفاده از Managed Service for Apache Spark و Data Agent Kit در یک جدول BigQuery وارد شدند .
- 🧹 با ایجاد یک پروژه dbt با تستهای کیفیت داده، دادههای تکراری را حذف و نرمالسازی کنید .
- 🤖 یک مدل جنگل تصادفی توزیعشده با استفاده از
RandomForestClassifierآموزش داده شد و مدل آموزشدیده به فضای ذخیرهسازی ابری (Cloud Storage) صادر شد. - ⚡ استنتاج دستهای روی تراکنشهای ورودی اجرا شد و رکوردهای پرخطر برای بررسی حسابرسی به Cloud Spanner هدایت شدند.
- 🔄 با استفاده از سرویس مدیریتشده برای Apache Airflow و ابزارهای مدیریت DAG بصری IDE، گردش کار به عنوان یک DAG برنامهریزیشده Airflow، هماهنگ، مستقر و نظارت شد .
مفاهیم کلیدی
مفهوم | آنچه آموختید |
برنامهنویسی جفتی درون IDE با استفاده از زبان طبیعی برای تولید نوتبوکهای PySpark، پیکربندی مدلهای dbt و تعریف DAGهای جریان هوا | |
ذخیرهسازی جدولی مقیاسپذیر برای SQL تحلیلی، تبدیلات dbt و آموزش ML | |
اجرای بدون سرور برای بارگذاری دادههای توزیعشدهی PySpark و آموزش یادگیری ماشینی جنگل تصادفی | |
نوشتن پیشبینیهای استنتاج دستهای اسپارک به طور مستقیم در صفهای بررسی پایگاه داده عملیاتی | |
اعلامیههای YAML DAG | تعاریف اعلانی خط لوله به صورت نمودارهای بصری تعاملی جریان هوا در IDE ارائه میشوند. |
مدیریت بصری DAG | بررسی وابستگیهای خط لوله، استقرار در Managed Airflow و نظارت بر تاریخچه اجرای وظایف به صورت زنده در داخل IDE |
مراحل بعدی
- مستندات Google Cloud Data Agent Kit را بررسی کنید
- درباره سرویس مدیریتشده برای آپاچی اسپارک بیشتر بدانید
- درباره سرویس مدیریتشده برای Apache Airflow بیشتر بدانید
- با استفاده از Antigravity IDE ، خطوط لوله چند سرویسی خود را بسازید
۱. مقدمه
Imagine you are a Data Scientist at Cymbal Financial , a high-volume payment processor. A wave of settlement delays has occurred, and the compliance team suspects coordinated fraud. You need to build a pipeline to ingest raw clearinghouse transaction logs, clean the data, train a machine learning model, run batch inference, and sink high-risk transactions into a Cloud Spanner review queue for manual auditing.
Normally, this requires days of writing repetitive setup code (Spark notebooks, dbt configurations, training scripts, Airflow DAGs) and constant context-switching between console interfaces and editors.
In this codelab, you will pair-program with an agent using the Google Cloud Data Agent Kit (DAK) inside the Antigravity IDE . Using conversational natural language, the agent will help you generate Spark notebooks, compile a dbt project, construct an inference loop, and orchestrate the workflow using the Managed Service for Apache Airflow .
What you'll do
- Ingest clearinghouse logs from Cloud Storage using Managed Service for Apache Spark (Spark Serverless) into a BigQuery table.
- Deduplicate and normalize transactions using dbt to establish clean data layers (Raw, Staging, Enriched).
- Train a distributed Random Forest classification model (
RandomForestClassifier) on Spark Serverless. - Run batch inference on new transactions and write high-risk alerts directly to Cloud Spanner .
- Orchestrate, visually configure, and deploy the entire pipeline using Managed Service for Apache Airflow and interactive DAG monitoring inside the IDE.
What you'll need
- A web browser such as Chrome
- A Google Cloud project with billing enabled (we recommend using a new, dedicated project for hands-on labs).
- Basic familiarity with SQL, Python, and PySpark.
- Antigravity IDE with a Google AI Pro subscription (recommended)
The resources created in this codelab should cost less than $5. Be sure to follow the Clean Up instructions at the end of the lab to delete provisioned resources.
2. Environment setup
To kick off the lab, you will run a bootstrap script. This script automatically enables required GCP APIs, creates an ingestion Cloud Storage bucket, generates mock transaction and directory datasets, loads reference directories into BigQuery, and kicks off background provisioning of Cloud Spanner and Managed Service for Apache Airflow (formerly known as Cloud Composer).
Select or create a project
Choose an existing project or create a new project in the Google Cloud Console.
Verify billing
Make sure that billing is enabled for your Google Cloud project. You can learn more on how to do this by following this guide .
Run the setup script
You will use Google Cloud Shell (or your local shell configured with the Google Cloud CLI) to launch the environment setup.
- Open the Google Cloud Console .
- Click Activate Cloud Shell in the top-right toolbar.
- In the Cloud Shell terminal, configure your active project:
gcloud config set project <<YOUR_PROJECT_ID>>
export PROJECT_ID=$(gcloud config get-value project)
- Clone the codelab repository and navigate to the scripts folder:
cd ~/
git clone --filter=blob:none --no-checkout https://github.com/GoogleCloudPlatform/devrel-demos.git
cd ~/devrel-demos
git sparse-checkout init --cone
git sparse-checkout set codelabs/agentic-data-labs/data-science
git checkout main
cd codelabs/agentic-data-labs/data-science/scripts
- Run the bootstrap setup script to deploy all resources to
us-central1:
chmod +x setup.sh setup_spanner.sh setup_composer.sh
export REGION=us-central1
./setup.sh
- When the script finishes, you will see a summary output indicating that your BigQuery dataset and Cloud Storage bucket are ready. In the background, Cloud Spanner (takes ~2 minutes) and Managed Airflow (takes ~20 minutes) will continue provisioning. You can monitor their progress at any time by running:
tail -f /tmp/spanner_setup.log
tail -f /tmp/composer_setup.log
Open the Antigravity IDE
- Download and install the Antigravity IDE from the Google Antigravity download page .
- Launch the Antigravity IDE .
- Create a new, empty folder on your local machine (eg named
agentic-data-labs), and open it in the IDE by choosing Open Folder . This will act as your local workspace for the codelab.
Install the Data Agent Kit extension
The Google Cloud Data Agent Kit extension provides deep integration with Google Cloud data services directly within your editor, allowing you to interact with BigQuery, Cloud SQL, Cloud Storage, and more without switching contexts.
- In the Antigravity IDE, click the Extensions icon in the Activity Bar on the far left side of the screen (it looks like four squares).
- In the search bar at the top of the Extensions pane, type
Google Cloud Data Agent Kit. - Locate the extension named Google Cloud Data Agent Kit published by
googlecloudtools - Click the Install button.
- A prompt may appear asking, "Do you trust publisher 'googlecloudtools' and their extensions?". Click Trust Publishers & Install to proceed.
Once installed, you'll see a new Google Cloud Data Agent Kit icon appear in the Activity Bar on the far left of the Antigravity IDE.
- An onboarding page titled "Welcome to Google Cloud Data Agent Kit" should automatically open. If you aren't signed into your Cloud account, follow any prompts to allow access.
- In the Configuration Summary section, locate the project field. Click the dropdown and select your Google Cloud project. Set your region as
us-central1. Then select Configure MCP Servers .
- Select Configure MCP Servers . Under the MCP Configuration pane, ensure you enable the following remote MCP servers:
- BigQuery
- Spanner
- نوت بوک ها
Then click Get Started .
Explore configuration options
Once setup is complete, you'll land on the "Get started with Google Cloud Data Agent Kit" page.
- Under "Setup & Configuration", click Get Started .
- This opens the Data Agent Kit Configuration panel. Explore the tabs:
- Project and Region: Verify your selected Project ID and confirm that the setup script enabled all requisite APIs (Compute Engine, Cloud Storage, BigQuery, Spanner, etc.).
- BigQuery: Configure the default location for your BigQuery queries. Use the region
us-central1. - Configure MCP Servers: View the enabled MCP servers (BigQuery, Notebooks, Spanner, etc.) that allow AI agents to securely interact with your data.
- Skills: Explore pre-built skills that provide agents with specialized capabilities for complex data tasks.
Section Recap: You ran the bootstrap script to create GCS and BigQuery assets while Spanner and Airflow build in the background. You then opened the project in the Antigravity IDE and activated the Google Cloud Data Agent Kit extension. You are now ready to write your first notebook.
3. Ingest raw logs using Spark Serverless
In this section, you will ingest raw JSON transaction logs into the data lake. Managed Service for Apache Spark (Spark Serverless) connects directly with BigQuery 's native storage. You will use the standard BigQuery connector to manage tabular data and enable direct querying and analytics.
Explore the pre-configured Spark Serverless runtime
Before executing Spark code, inspect the Serverless Runtime template that was pre-configured by the setup script. This template defines the target execution environment backend and bundles necessary connector dependencies.
- In the IDE activity bar, open the Google Cloud Data Agent Kit panel.
- Expand the Apache Spark drop-down menu, then expand Serverless .
- Right-click
fraud-pipeline-runtimeand select Profile to open its configuration view in the editor. - In the Profile tab, scroll down and expand Properties to inspect the custom dependencies attached to the environment:
-
spark.jars: Containsgs://spark-lib/spanner/spark-3.5-spanner-1.4.0.jar, which uses the Spark Spanner connector to allow Spark jobs to write inference results directly to Cloud Spanner later in the lab. (Note: Dataproc Serverless includes Google Cloud's Spark BigQuery connector by default, requiring no additional jar configuration to read and write BigQuery tables).
-
- Notice the Interactive Sessions tab on the left. It is currently empty because you have not executed any code yet. As soon as you run the notebook in the next step, a live serverless compute session will dynamically provision and appear here!
Ingest data using the Data Agent Kit
Instead of manually configuring a Spark Session or writing PySpark loading scripts from scratch, you will pair-program with an agent using the Data Agent Kit.
- Open the Agent Chat pane by clicking the Toggle Agent icon in the top-right toolbar.
- Paste the following prompt into the chat (be sure to replace
${PROJECT_ID}with your actual Google Cloud Project ID):
Create a PySpark notebook (01_ingestion.ipynb) to ingest JSON transaction logs
from gs://${PROJECT_ID}-fin-clearing-raw/ into a BigQuery table
`${PROJECT_ID}.transactions_dataset_evals.raw_transactions`
using the Spark BigQuery connector (`format("bigquery")`) with overwrite mode.
- If the agent asks for permission to execute background verification commands (eg "Allow running this command?" ), review the proposed command and select Yes, allow this time (or Yes, and always allow ).
- When the agent finishes generating the file, click the blue Accept all button (or the checkmark icon) at the bottom of the chat pane to save
notebooks/01_ingestion.ipynbto your workspace.
Review and execute the notebook
- Open the newly generated
notebooks/01_ingestion.ipynbin the IDE. - Review the PySpark code for the BigQuery connector write logic.
- Click Run All in the IDE's notebook toolbar.
- If this is your first time running a remote Spark notebook, the IDE may prompt you to install local dependencies. If prompted, click Install dependencies for Remote Spark Kernels and confirm the installation dialogs, then click Run All again.
- In the Select Kernel dropdown menu, choose Remote Spark Kernels -> fraud-pipeline-runtime on Serverless Spark . (Tip: If you do not see your pre-configured runtime template listed, click the refresh icon in the top right of the kernel picker dropdown to reload available remote kernels).
- Look at the status bar in the bottom left of the editor. You will see
Connecting to kernel: fraud-pipeline-runtime on Serverless Spark.... Because this is the initial launch of the Spark Serverless runtime kernel backend, it will take a few minutes to provision and boot up. - Once the kernel finishes connecting, the notebook will automatically begin executing all cells sequentially to process the raw transaction logs into your BigQuery dataset.
تأیید
Once execution completes, check the Data Agent Kit catalog to verify the table creation:
- In the IDE activity bar, open the Google Cloud Data Agent Kit panel.
- Expand the CATALOG section.
- Expand your project ID.
- Expand BigQuery .
- Expand the
transactions_dataset_evalsdataset. - Click the
raw_transactionstable to open its detail view in the main editor. - In the left navigation, explore the Data , Schema , and Details tabs to inspect the ingested records and metadata.
Section Recap: You used natural language in the Agent Chat to generate a complete Spark Serverless workload. You then executed it to process unstructured JSON logs into a BigQuery (raw) table.
4. Deduplicate and normalize with dbt
Before training the ML model, you will enforce data quality by removing duplicate streaming logs, isolating bad records (such as empty transaction IDs), and joining dimensional data (payers and payees). This process requires idempotent, reliable SQL transformations, making dbt (data build tool) a great fit.
Scaffold the dbt pipeline
Use the agent to generate a dbt project over the BigQuery dataset:
- Return to the Agent Chat pane.
- Provide the following instruction to generate the dbt project:
Scaffold a us-central1 dbt project in dbt_project/ that maps raw_transactions
through to an enriched_transactions model in dataset transactions_dataset_evals.

Deduplicate by transaction_id in staging. Quarantine null IDs to an invalid_transactions model.
Join the valid staging records with dim_payers and dim_payees for the enriched_transactions model,
preserving the historical `is_fraud` label column, and finally add a transaction uniqueness test.

Create an implementation plan first.
- The agent will present an Implementation Plan artifact in the main editor pane. Review the proposed file structure and SQL logic.
- Click Proceed (and then Accept all ) to allow the agent to generate the files in your workspace.
- Once generation completes, the agent displays a Walkthrough summarizing the new components. Accept all changes if prompted.
Build and test
Although the agent automatically ran dbt compile to ensure the generated SQL was syntactically valid, you will now materialize these views and tables into BigQuery and run the data quality tests for local verification. (Note: Later in the lab, you will automate this dbt step as part of an end-to-end Airflow DAG).
- In the activity bar on the far left, click the Explorer icon (or press
Cmd/Ctrl+Shift+E). - Expand
dbt_project->modelsto inspect the generated SQL models. Click onenriched_transactions.sqlto open and review the transformation and fraud feature logic in the editor. - In the File Explorer, right-click the
dbt_projectfolder and select Open in Integrated Terminal . This automatically opens a terminal pane set directly to the requireddbt_projectworking directory. - If you do not already have
dbtinstalled, create a virtual environment outsidedbt_project/(at your home or workspace root) and install the BigQuery adapter:
python3 -m venv ~/.venv/dbt
source ~/.venv/dbt/bin/activate
pip install dbt-bigquery
- Run the dbt models and their associated data quality tests:
dbt build
- Watch the terminal output. dbt will compile the SQL, materialize the staging and enriched tables in BigQuery, and execute the data tests.
- Once the build finishes, close the terminal pane to free up screen space for the remaining steps.
Section Recap: You generated a dbt project with the agent, ran data quality tests, and transformed the raw records into staging and enriched BigQuery tables.
5. Train distributed fraud detection model with Random Forest
With the enriched transactions materialized in BigQuery, you will build a machine learning model to classify fraudulent events. Random Forest is an ensemble learning method well-suited for tabular classification data. Running a RandomForestClassifier on Spark Serverless distributes model training across worker nodes without requiring you to manage infrastructure.
In this step, you will use the agent to generate the Spark ML training pipeline.
Generate the ML training notebook
- Open the Agent Chat pane.
- Provide the following prompt to design the model training sequence (remember to replace
${PROJECT_ID}with your active project ID):
Create a PySpark notebook (02_training.ipynb) to train a distributed Random Forest
(RandomForestClassifier) model on the BigQuery table
`transactions_dataset_evals`.`enriched_transactions`, predicting the `is_fraud` label.
Train only on historically labeled records where `is_fraud` is not null.

One-hot encode categorical strings, scale amounts, cache the dataset in memory,
evaluate AUC, and save the evaluated model to gs://${PROJECT_ID}-models/fraud_model.
- Review the agent's plan or generated code and click Proceed / Accept all to save
notebooks/02_training.ipynbto your workspace.
Review and execute the notebook
- Open
notebooks/02_training.ipynbin the editor. - Review the PySpark ML pipeline stages for feature encoding, vector assembly, and Random Forest classification logic.
- Click Run All in the IDE's notebook toolbar.
- When the Select Kernel dropdown picker opens, select fraud-pipeline-runtime on Serverless Spark .
تأیید
Once execution completes, confirm the model was trained and exported correctly:
- Review the evaluation cell outputs near the bottom of the notebook to verify the reported Area Under ROC (AUC) score.
- To ensure the model artifacts were successfully saved to GCS, expand the STORAGE explorer pane in the Data Agent Kit sidebar.
- Locate the bucket ending in
-models(tied to your active Project ID), expand it, and drill down to verify thefraud_modeldirectory and its pipeline stages exist.
Section Recap: You used the agent to create a PySpark ML training pipeline, trained a Random Forest model on your enriched BigQuery table, and exported the model to Cloud Storage.
6. Batch inference and Cloud Spanner write
With a trained predictive model stored in Cloud Storage, you will run batch inference on new transactions flowing through BigQuery. High-risk transactions need to be routed to an operational system so that a compliance team can review them. Cloud Spanner provides a scalable transactional database for this review queue.
Generate the batch inference notebook
Use the agent to create an inference notebook connecting BigQuery, Cloud Storage, and Cloud Spanner:
- Open the Agent Chat pane.
- Provide the following prompt:
Create an inference notebook (03_inference.ipynb) that loads the RandomForestClassifier
model to score unlabeled records (where `is_fraud` is null) from the BigQuery table
`transactions_dataset_evals`.`enriched_transactions`.

Filter for high-risk transactions with a 50%+ fraud probability score (probability >= 0.50)
and write them to the Cloud Spanner table SparkEvalFraudReviewQueue in the cymbal-fraud instance
under fraud-db.
- Accept the generated notebook to save
notebooks/03_inference.ipynbto your workspace.
Review and execute the notebook
- Open the newly generated
notebooks/03_inference.ipynbin the editor. - Review the PySpark inference sequence:
- Dependencies: The Serverless Runtime template provides the required
cloud-spannerJAR dependencies for Spark execution. - Data Formatting: The script drops complex Spark ML vector columns (such as raw features and probabilities) before writing to match the Spanner table schema.
- Spanner Connector: It writes the flagged rows using
.format("cloud-spanner")to append directly to the review queue.
- Dependencies: The Serverless Runtime template provides the required
- Click Run All in the IDE's notebook toolbar.
- When prompted to select a kernel, select fraud-pipeline-runtime on Serverless Spark .
تأیید
Once the inference notebook finishes processing, you can query your operational Spanner database directly inside the IDE:
- In the IDE activity bar, open the Google Cloud Data Agent Kit panel.
- Expand the CATALOG section.
- Expand your project ID, then expand Spanner .
- Navigate to
cymbal-fraud->fraud-db->Tables->SparkEvalFraudReviewQueue. - Right-click the table and select Query Table , then execute the query:
SELECT *
FROM `SparkEvalFraudReviewQueue`
LIMIT 100;
- In the Query Results pane below, you should see newly inserted rows representing high-risk transactions flagged for manual review.
Section Recap: You used the agent to create a batch inference notebook, scored unlabeled BigQuery records with your trained model, and wrote high-risk transactions directly to Cloud Spanner.
7. Scaffold and orchestrate with Managed Airflow
Your pipeline currently consists of discrete steps: an ingestion notebook, a dbt transformation project, and a batch inference notebook. To make this production-ready, you will stitch them together into a scheduled dependency graph.
Managed Service for Apache Airflow (formerly known as Cloud Composer) provides a managed orchestration engine for this workflow. The Data Agent Kit includes an Orchestration Pipelines feature that translates declarative YAML pipeline definitions directly into Airflow DAGs.
Define the pipeline
Use the agent to generate the orchestration pipeline configuration:
- In the Agent Chat , provide the following prompt (remembering to replace
${PROJECT_ID}):
Initialize and define an orchestration pipeline (fraud_analysis_pipeline) triggering
the ingestion notebook, dbt project, and inference notebook in sequential order.
For Dataproc Serverless engine configs in us-central1, use resourceProfile.inline
(defining properties with spark.jars: "gs://spark-lib/spanner/spark-3.5-spanner-1.4.0.jar"
for inference) rather than resourceProfile.path or overrides.

Set the schedule interval to run daily at midnight, and use
gs://${PROJECT_ID}-airflow-artifacts for artifact storage.
Review the DAG configuration
The Data Agent Kit Orchestrator uses declarative YAML configurations to define and deploy pipelines to Apache Airflow, allowing definitions to be version controlled and deployed via CI/CD.
In the IDE Explorer pane, review the two pipeline files the agent generated at the root of your workspace:
-
deployment.yaml: Open this file. This serves as your environment registry. It maps your logicaldevpipeline to thecymbal-airflowenvironment, sets the execution region (us-central1), and defines theartifact_storagebucket where compiled DAGs and dependencies are staged. -
fraud_analysis_pipeline.yaml: Open this file. This defines the execution graph. It specifies the trigger schedule (interval: '0 0 * * *') and sequences the three steps under theactionsblock:- An ingestion
notebookaction for01_ingestion.ipynbrunning on Dataproc Serverless. - A transformation
pipelineaction targeting thedbt_projectdirectory, with adependsOndependency pointing to the ingestion step. - An inference
notebookaction for03_inference.ipynbwith adependsOndependency pointing to the dbt step, bundling the Spanner JAR property.
- An ingestion
- The agent will also summarize these generated artifacts into a Walkthrough tab in your editor pane, outlining the configurations and validations performed.
Interactive DAG configuration
The Data Agent Kit renders your pipeline configuration as an interactive visual graph for inspecting and editing Airflow DAG properties.
- In the IDE activity bar, open the Google Cloud Data Agent Kit panel.
- Under
DATA ENGINEERING, expandOrchestration Pipelines. - Click
fraud_analysis_pipeline.yamlto open the visual DAG canvas in the main editor.
- Click the
Schedule triggernode at the top. A configuration flyout opens on the right, displaying the parsed Cron string (0 0 * * *) and allowing you to adjust parameters like backfill and catchup. - Click either notebook task node (such as the ingestion or inference step). The flyout updates to display the specific Dataproc Serverless execution mappings and connector properties.
- Notice the notebook filename hyperlink (such as
01_ingestion.ipynb) inside the node block. Clicking it opens the notebook directly in your editor. - In the left sidebar underneath Orchestration Pipelines, click
Deployment configuration. This view shows your targetdevenvironment cluster and output GCS bucket artifacts.
Section Recap: You generated an orchestration pipeline configuration with the agent, defining dependencies between ingestion, dbt, and inference tasks in an interactive visual canvas.
8. Deploy, execute, and monitor
With the DAG defined locally, you will connect to the Managed Airflow environment provisioned during setup and deploy the pipeline.
Configure Managed Service for Apache Airflow
Before deploying, configure the Scheduler connection in the Data Agent Kit settings so the extension targets your Managed Airflow environment:
- In the IDE activity bar, open the Google Cloud Data Agent Kit panel.
- Under
SETTINGS, click Settings . - Select Scheduler from the left menu.
- Configure the settings:
- Project ID : Select your active project ID.
- Region : Select
us-central1. - Environment : Select
cymbal-airflow.
- Click Save .
Deploy the DAG
You will now deploy the configured pipeline directly to your Managed Airflow environment from the visual canvas:
- In the Google Cloud Data Agent Kit sidebar, expand
DATA ENGINEERING>Orchestration Pipelinesand clickfraud_analysis_pipeline.yamlto open the visual DAG canvas. - In the top right corner of the canvas toolbar, click the blue Run pipeline button.
- In the environment dropdown picker, select
dev. - Observe the progress notification in the bottom status area (
Running pipeline: Building pipeline locally...). The extension will automatically compile your DAG, package the notebook and dbt assets, and upload them to your Managed Airflow environment's GCS bucket (this takes about 3–4 minutes to complete).
Monitor the run
Once local compilation completes and the popup notification confirms Triggered a new run for pipeline... successfully , monitor the live execution:
- In the Google Cloud Data Agent Kit sidebar, expand
DATA ENGINEERING>Orchestration Pipelines. - Click Pipelines management .
- In the Pipelines Management table, click on
fraud_analysis_pipelineto open its execution history.
- In the Execution History view, select the active run from the calendar.
- As the execution progresses across each pipeline task (ingestion, dbt transformation, and inference), status indicators update and task durations populate. Click any task to inspect its live execution output and Airflow DAG logs.
Section Recap: You configured the Airflow Scheduler connection, deployed your end-to-end analytical pipeline to Managed Airflow, and monitored a live execution, verifying the system from raw logs to final Cloud Spanner predictions.
9. Clean up
To avoid incurring ongoing charges to your Google Cloud project for the resources used in this codelab, tear down the environment using the automated script.
- In the Terminal panel (or in Cloud Shell), navigate to the scripts directory and execute:
cd ~/devrel-demos/codelabs/agentic-data-labs/data-science/scripts
chmod +x teardown.sh
./teardown.sh
- The script will list all the resources it plans to delete and prompt for confirmation:
- Managed Airflow Environment (
cymbal-airflow) - Cloud Spanner Instance (
cymbal-fraud) - BigQuery Dataset (
transactions_dataset_evals) - Cloud Storage Buckets (
gs://${PROJECT_ID}-fin-clearing-rawandgs://${PROJECT_ID}-models) - Worker Service Account (
composer-worker-sa)
- Managed Airflow Environment (
- Type
yto confirm. The teardown script will remove all provisioned GCP services and clean up local files.
10. Congratulations!
You have built an end-to-end fraud detection pipeline spanning Cloud Storage, BigQuery, Managed Service for Apache Spark (Spark Serverless), dbt, Cloud Spanner, and Managed Service for Apache Airflow, pair-programming with the Google Cloud Data Agent Kit inside the Antigravity IDE.
What you accomplished
- 📥 Ingested raw transaction logs into a BigQuery table using Managed Service for Apache Spark and the Data Agent Kit.
- 🧹 Deduplicated and normalized data by creating a dbt project with data quality tests.
- 🤖 Trained a distributed Random Forest model using
RandomForestClassifierand exported the trained model to Cloud Storage. - ⚡ Executed batch inference on incoming transactions and routed high-risk records into Cloud Spanner for audit review.
- 🔄 Orchestrated, deployed, and monitored the workflow as a scheduled Airflow DAG using Managed Service for Apache Airflow and the IDE's visual DAG management tools.
Key concepts
مفهوم | What you learned |
Pair-programming inside the IDE using natural language to generate PySpark notebooks, configure dbt models, and define Airflow DAGs | |
Scalable tabular storage for analytical SQL, dbt transformations, and ML training | |
Serverless execution for distributed PySpark data loading and Random Forest ML training | |
Writing batch Spark inference predictions directly into operational database review queues | |
YAML DAG Declarations | Declarative pipeline definitions rendered as interactive Airflow visual graphs in the IDE |
Visual DAG Management | Inspecting pipeline dependencies, deploying to Managed Airflow , and monitoring live task execution history inside the IDE |
مراحل بعدی
- Explore the Google Cloud Data Agent Kit documentation
- Learn more about Managed Service for Apache Spark
- Learn more about Managed Service for Apache Airflow
- Build your own multi-service pipelines using the Antigravity IDE
۱. مقدمه
Imagine you are a Data Scientist at Cymbal Financial , a high-volume payment processor. A wave of settlement delays has occurred, and the compliance team suspects coordinated fraud. You need to build a pipeline to ingest raw clearinghouse transaction logs, clean the data, train a machine learning model, run batch inference, and sink high-risk transactions into a Cloud Spanner review queue for manual auditing.
Normally, this requires days of writing repetitive setup code (Spark notebooks, dbt configurations, training scripts, Airflow DAGs) and constant context-switching between console interfaces and editors.
In this codelab, you will pair-program with an agent using the Google Cloud Data Agent Kit (DAK) inside the Antigravity IDE . Using conversational natural language, the agent will help you generate Spark notebooks, compile a dbt project, construct an inference loop, and orchestrate the workflow using the Managed Service for Apache Airflow .
What you'll do
- Ingest clearinghouse logs from Cloud Storage using Managed Service for Apache Spark (Spark Serverless) into a BigQuery table.
- Deduplicate and normalize transactions using dbt to establish clean data layers (Raw, Staging, Enriched).
- Train a distributed Random Forest classification model (
RandomForestClassifier) on Spark Serverless. - Run batch inference on new transactions and write high-risk alerts directly to Cloud Spanner .
- Orchestrate, visually configure, and deploy the entire pipeline using Managed Service for Apache Airflow and interactive DAG monitoring inside the IDE.
What you'll need
- A web browser such as Chrome
- A Google Cloud project with billing enabled (we recommend using a new, dedicated project for hands-on labs).
- Basic familiarity with SQL, Python, and PySpark.
- Antigravity IDE with a Google AI Pro subscription (recommended)
The resources created in this codelab should cost less than $5. Be sure to follow the Clean Up instructions at the end of the lab to delete provisioned resources.
2. Environment setup
To kick off the lab, you will run a bootstrap script. This script automatically enables required GCP APIs, creates an ingestion Cloud Storage bucket, generates mock transaction and directory datasets, loads reference directories into BigQuery, and kicks off background provisioning of Cloud Spanner and Managed Service for Apache Airflow (formerly known as Cloud Composer).
Select or create a project
Choose an existing project or create a new project in the Google Cloud Console.
Verify billing
Make sure that billing is enabled for your Google Cloud project. You can learn more on how to do this by following this guide .
Run the setup script
You will use Google Cloud Shell (or your local shell configured with the Google Cloud CLI) to launch the environment setup.
- Open the Google Cloud Console .
- Click Activate Cloud Shell in the top-right toolbar.
- In the Cloud Shell terminal, configure your active project:
gcloud config set project <<YOUR_PROJECT_ID>>
export PROJECT_ID=$(gcloud config get-value project)
- Clone the codelab repository and navigate to the scripts folder:
cd ~/
git clone --filter=blob:none --no-checkout https://github.com/GoogleCloudPlatform/devrel-demos.git
cd ~/devrel-demos
git sparse-checkout init --cone
git sparse-checkout set codelabs/agentic-data-labs/data-science
git checkout main
cd codelabs/agentic-data-labs/data-science/scripts
- Run the bootstrap setup script to deploy all resources to
us-central1:
chmod +x setup.sh setup_spanner.sh setup_composer.sh
export REGION=us-central1
./setup.sh
- When the script finishes, you will see a summary output indicating that your BigQuery dataset and Cloud Storage bucket are ready. In the background, Cloud Spanner (takes ~2 minutes) and Managed Airflow (takes ~20 minutes) will continue provisioning. You can monitor their progress at any time by running:
tail -f /tmp/spanner_setup.log
tail -f /tmp/composer_setup.log
Open the Antigravity IDE
- Download and install the Antigravity IDE from the Google Antigravity download page .
- Launch the Antigravity IDE .
- Create a new, empty folder on your local machine (eg named
agentic-data-labs), and open it in the IDE by choosing Open Folder . This will act as your local workspace for the codelab.
Install the Data Agent Kit extension
The Google Cloud Data Agent Kit extension provides deep integration with Google Cloud data services directly within your editor, allowing you to interact with BigQuery, Cloud SQL, Cloud Storage, and more without switching contexts.
- In the Antigravity IDE, click the Extensions icon in the Activity Bar on the far left side of the screen (it looks like four squares).
- In the search bar at the top of the Extensions pane, type
Google Cloud Data Agent Kit. - Locate the extension named Google Cloud Data Agent Kit published by
googlecloudtools - Click the Install button.
- A prompt may appear asking, "Do you trust publisher 'googlecloudtools' and their extensions?". Click Trust Publishers & Install to proceed.
Once installed, you'll see a new Google Cloud Data Agent Kit icon appear in the Activity Bar on the far left of the Antigravity IDE.
- An onboarding page titled "Welcome to Google Cloud Data Agent Kit" should automatically open. If you aren't signed into your Cloud account, follow any prompts to allow access.
- In the Configuration Summary section, locate the project field. Click the dropdown and select your Google Cloud project. Set your region as
us-central1. Then select Configure MCP Servers .
- Select Configure MCP Servers . Under the MCP Configuration pane, ensure you enable the following remote MCP servers:
- BigQuery
- Spanner
- نوت بوک ها
Then click Get Started .
Explore configuration options
Once setup is complete, you'll land on the "Get started with Google Cloud Data Agent Kit" page.
- Under "Setup & Configuration", click Get Started .
- This opens the Data Agent Kit Configuration panel. Explore the tabs:
- Project and Region: Verify your selected Project ID and confirm that the setup script enabled all requisite APIs (Compute Engine, Cloud Storage, BigQuery, Spanner, etc.).
- BigQuery: Configure the default location for your BigQuery queries. Use the region
us-central1. - Configure MCP Servers: View the enabled MCP servers (BigQuery, Notebooks, Spanner, etc.) that allow AI agents to securely interact with your data.
- Skills: Explore pre-built skills that provide agents with specialized capabilities for complex data tasks.
Section Recap: You ran the bootstrap script to create GCS and BigQuery assets while Spanner and Airflow build in the background. You then opened the project in the Antigravity IDE and activated the Google Cloud Data Agent Kit extension. You are now ready to write your first notebook.
3. Ingest raw logs using Spark Serverless
In this section, you will ingest raw JSON transaction logs into the data lake. Managed Service for Apache Spark (Spark Serverless) connects directly with BigQuery 's native storage. You will use the standard BigQuery connector to manage tabular data and enable direct querying and analytics.
Explore the pre-configured Spark Serverless runtime
Before executing Spark code, inspect the Serverless Runtime template that was pre-configured by the setup script. This template defines the target execution environment backend and bundles necessary connector dependencies.
- In the IDE activity bar, open the Google Cloud Data Agent Kit panel.
- Expand the Apache Spark drop-down menu, then expand Serverless .
- Right-click
fraud-pipeline-runtimeand select Profile to open its configuration view in the editor. - In the Profile tab, scroll down and expand Properties to inspect the custom dependencies attached to the environment:
-
spark.jars: Containsgs://spark-lib/spanner/spark-3.5-spanner-1.4.0.jar, which uses the Spark Spanner connector to allow Spark jobs to write inference results directly to Cloud Spanner later in the lab. (Note: Dataproc Serverless includes Google Cloud's Spark BigQuery connector by default, requiring no additional jar configuration to read and write BigQuery tables).
-
- Notice the Interactive Sessions tab on the left. It is currently empty because you have not executed any code yet. As soon as you run the notebook in the next step, a live serverless compute session will dynamically provision and appear here!
Ingest data using the Data Agent Kit
Instead of manually configuring a Spark Session or writing PySpark loading scripts from scratch, you will pair-program with an agent using the Data Agent Kit.
- Open the Agent Chat pane by clicking the Toggle Agent icon in the top-right toolbar.
- Paste the following prompt into the chat (be sure to replace
${PROJECT_ID}with your actual Google Cloud Project ID):
Create a PySpark notebook (01_ingestion.ipynb) to ingest JSON transaction logs
from gs://${PROJECT_ID}-fin-clearing-raw/ into a BigQuery table
`${PROJECT_ID}.transactions_dataset_evals.raw_transactions`
using the Spark BigQuery connector (`format("bigquery")`) with overwrite mode.
- If the agent asks for permission to execute background verification commands (eg "Allow running this command?" ), review the proposed command and select Yes, allow this time (or Yes, and always allow ).
- When the agent finishes generating the file, click the blue Accept all button (or the checkmark icon) at the bottom of the chat pane to save
notebooks/01_ingestion.ipynbto your workspace.
Review and execute the notebook
- Open the newly generated
notebooks/01_ingestion.ipynbin the IDE. - Review the PySpark code for the BigQuery connector write logic.
- Click Run All in the IDE's notebook toolbar.
- If this is your first time running a remote Spark notebook, the IDE may prompt you to install local dependencies. If prompted, click Install dependencies for Remote Spark Kernels and confirm the installation dialogs, then click Run All again.
- In the Select Kernel dropdown menu, choose Remote Spark Kernels -> fraud-pipeline-runtime on Serverless Spark . (Tip: If you do not see your pre-configured runtime template listed, click the refresh icon in the top right of the kernel picker dropdown to reload available remote kernels).
- Look at the status bar in the bottom left of the editor. You will see
Connecting to kernel: fraud-pipeline-runtime on Serverless Spark.... Because this is the initial launch of the Spark Serverless runtime kernel backend, it will take a few minutes to provision and boot up. - Once the kernel finishes connecting, the notebook will automatically begin executing all cells sequentially to process the raw transaction logs into your BigQuery dataset.
تأیید
Once execution completes, check the Data Agent Kit catalog to verify the table creation:
- In the IDE activity bar, open the Google Cloud Data Agent Kit panel.
- Expand the CATALOG section.
- Expand your project ID.
- Expand BigQuery .
- Expand the
transactions_dataset_evalsdataset. - Click the
raw_transactionstable to open its detail view in the main editor. - In the left navigation, explore the Data , Schema , and Details tabs to inspect the ingested records and metadata.
Section Recap: You used natural language in the Agent Chat to generate a complete Spark Serverless workload. You then executed it to process unstructured JSON logs into a BigQuery (raw) table.
4. Deduplicate and normalize with dbt
Before training the ML model, you will enforce data quality by removing duplicate streaming logs, isolating bad records (such as empty transaction IDs), and joining dimensional data (payers and payees). This process requires idempotent, reliable SQL transformations, making dbt (data build tool) a great fit.
Scaffold the dbt pipeline
Use the agent to generate a dbt project over the BigQuery dataset:
- Return to the Agent Chat pane.
- Provide the following instruction to generate the dbt project:
Scaffold a us-central1 dbt project in dbt_project/ that maps raw_transactions
through to an enriched_transactions model in dataset transactions_dataset_evals.

Deduplicate by transaction_id in staging. Quarantine null IDs to an invalid_transactions model.
Join the valid staging records with dim_payers and dim_payees for the enriched_transactions model,
preserving the historical `is_fraud` label column, and finally add a transaction uniqueness test.

Create an implementation plan first.
- The agent will present an Implementation Plan artifact in the main editor pane. Review the proposed file structure and SQL logic.
- Click Proceed (and then Accept all ) to allow the agent to generate the files in your workspace.
- Once generation completes, the agent displays a Walkthrough summarizing the new components. Accept all changes if prompted.
Build and test
Although the agent automatically ran dbt compile to ensure the generated SQL was syntactically valid, you will now materialize these views and tables into BigQuery and run the data quality tests for local verification. (Note: Later in the lab, you will automate this dbt step as part of an end-to-end Airflow DAG).
- In the activity bar on the far left, click the Explorer icon (or press
Cmd/Ctrl+Shift+E). - Expand
dbt_project->modelsto inspect the generated SQL models. Click onenriched_transactions.sqlto open and review the transformation and fraud feature logic in the editor. - In the File Explorer, right-click the
dbt_projectfolder and select Open in Integrated Terminal . This automatically opens a terminal pane set directly to the requireddbt_projectworking directory. - If you do not already have
dbtinstalled, create a virtual environment outsidedbt_project/(at your home or workspace root) and install the BigQuery adapter:
python3 -m venv ~/.venv/dbt
source ~/.venv/dbt/bin/activate
pip install dbt-bigquery
- Run the dbt models and their associated data quality tests:
dbt build
- Watch the terminal output. dbt will compile the SQL, materialize the staging and enriched tables in BigQuery, and execute the data tests.
- Once the build finishes, close the terminal pane to free up screen space for the remaining steps.
Section Recap: You generated a dbt project with the agent, ran data quality tests, and transformed the raw records into staging and enriched BigQuery tables.
5. Train distributed fraud detection model with Random Forest
With the enriched transactions materialized in BigQuery, you will build a machine learning model to classify fraudulent events. Random Forest is an ensemble learning method well-suited for tabular classification data. Running a RandomForestClassifier on Spark Serverless distributes model training across worker nodes without requiring you to manage infrastructure.
In this step, you will use the agent to generate the Spark ML training pipeline.
Generate the ML training notebook
- Open the Agent Chat pane.
- Provide the following prompt to design the model training sequence (remember to replace
${PROJECT_ID}with your active project ID):
Create a PySpark notebook (02_training.ipynb) to train a distributed Random Forest
(RandomForestClassifier) model on the BigQuery table
`transactions_dataset_evals`.`enriched_transactions`, predicting the `is_fraud` label.
Train only on historically labeled records where `is_fraud` is not null.

One-hot encode categorical strings, scale amounts, cache the dataset in memory,
evaluate AUC, and save the evaluated model to gs://${PROJECT_ID}-models/fraud_model.
- Review the agent's plan or generated code and click Proceed / Accept all to save
notebooks/02_training.ipynbto your workspace.
Review and execute the notebook
- Open
notebooks/02_training.ipynbin the editor. - Review the PySpark ML pipeline stages for feature encoding, vector assembly, and Random Forest classification logic.
- Click Run All in the IDE's notebook toolbar.
- When the Select Kernel dropdown picker opens, select fraud-pipeline-runtime on Serverless Spark .
تأیید
Once execution completes, confirm the model was trained and exported correctly:
- Review the evaluation cell outputs near the bottom of the notebook to verify the reported Area Under ROC (AUC) score.
- To ensure the model artifacts were successfully saved to GCS, expand the STORAGE explorer pane in the Data Agent Kit sidebar.
- Locate the bucket ending in
-models(tied to your active Project ID), expand it, and drill down to verify thefraud_modeldirectory and its pipeline stages exist.
Section Recap: You used the agent to create a PySpark ML training pipeline, trained a Random Forest model on your enriched BigQuery table, and exported the model to Cloud Storage.
6. Batch inference and Cloud Spanner write
With a trained predictive model stored in Cloud Storage, you will run batch inference on new transactions flowing through BigQuery. High-risk transactions need to be routed to an operational system so that a compliance team can review them. Cloud Spanner provides a scalable transactional database for this review queue.
Generate the batch inference notebook
Use the agent to create an inference notebook connecting BigQuery, Cloud Storage, and Cloud Spanner:
- Open the Agent Chat pane.
- Provide the following prompt:
Create an inference notebook (03_inference.ipynb) that loads the RandomForestClassifier
model to score unlabeled records (where `is_fraud` is null) from the BigQuery table
`transactions_dataset_evals`.`enriched_transactions`.

Filter for high-risk transactions with a 50%+ fraud probability score (probability >= 0.50)
and write them to the Cloud Spanner table SparkEvalFraudReviewQueue in the cymbal-fraud instance
under fraud-db.
- Accept the generated notebook to save
notebooks/03_inference.ipynbto your workspace.
Review and execute the notebook
- Open the newly generated
notebooks/03_inference.ipynbin the editor. - Review the PySpark inference sequence:
- Dependencies: The Serverless Runtime template provides the required
cloud-spannerJAR dependencies for Spark execution. - Data Formatting: The script drops complex Spark ML vector columns (such as raw features and probabilities) before writing to match the Spanner table schema.
- Spanner Connector: It writes the flagged rows using
.format("cloud-spanner")to append directly to the review queue.
- Dependencies: The Serverless Runtime template provides the required
- Click Run All in the IDE's notebook toolbar.
- When prompted to select a kernel, select fraud-pipeline-runtime on Serverless Spark .
تأیید
Once the inference notebook finishes processing, you can query your operational Spanner database directly inside the IDE:
- In the IDE activity bar, open the Google Cloud Data Agent Kit panel.
- Expand the CATALOG section.
- Expand your project ID, then expand Spanner .
- Navigate to
cymbal-fraud->fraud-db->Tables->SparkEvalFraudReviewQueue. - Right-click the table and select Query Table , then execute the query:
SELECT *
FROM `SparkEvalFraudReviewQueue`
LIMIT 100;
- In the Query Results pane below, you should see newly inserted rows representing high-risk transactions flagged for manual review.
Section Recap: You used the agent to create a batch inference notebook, scored unlabeled BigQuery records with your trained model, and wrote high-risk transactions directly to Cloud Spanner.
7. Scaffold and orchestrate with Managed Airflow
Your pipeline currently consists of discrete steps: an ingestion notebook, a dbt transformation project, and a batch inference notebook. To make this production-ready, you will stitch them together into a scheduled dependency graph.
Managed Service for Apache Airflow (formerly known as Cloud Composer) provides a managed orchestration engine for this workflow. The Data Agent Kit includes an Orchestration Pipelines feature that translates declarative YAML pipeline definitions directly into Airflow DAGs.
Define the pipeline
Use the agent to generate the orchestration pipeline configuration:
- In the Agent Chat , provide the following prompt (remembering to replace
${PROJECT_ID}):
Initialize and define an orchestration pipeline (fraud_analysis_pipeline) triggering
the ingestion notebook, dbt project, and inference notebook in sequential order.
For Dataproc Serverless engine configs in us-central1, use resourceProfile.inline
(defining properties with spark.jars: "gs://spark-lib/spanner/spark-3.5-spanner-1.4.0.jar"
for inference) rather than resourceProfile.path or overrides.

Set the schedule interval to run daily at midnight, and use
gs://${PROJECT_ID}-airflow-artifacts for artifact storage.
Review the DAG configuration
The Data Agent Kit Orchestrator uses declarative YAML configurations to define and deploy pipelines to Apache Airflow, allowing definitions to be version controlled and deployed via CI/CD.
In the IDE Explorer pane, review the two pipeline files the agent generated at the root of your workspace:
-
deployment.yaml: Open this file. This serves as your environment registry. It maps your logicaldevpipeline to thecymbal-airflowenvironment, sets the execution region (us-central1), and defines theartifact_storagebucket where compiled DAGs and dependencies are staged. -
fraud_analysis_pipeline.yaml: Open this file. This defines the execution graph. It specifies the trigger schedule (interval: '0 0 * * *') and sequences the three steps under theactionsblock:- An ingestion
notebookaction for01_ingestion.ipynbrunning on Dataproc Serverless. - A transformation
pipelineaction targeting thedbt_projectdirectory, with adependsOndependency pointing to the ingestion step. - An inference
notebookaction for03_inference.ipynbwith adependsOndependency pointing to the dbt step, bundling the Spanner JAR property.
- An ingestion
- The agent will also summarize these generated artifacts into a Walkthrough tab in your editor pane, outlining the configurations and validations performed.
Interactive DAG configuration
The Data Agent Kit renders your pipeline configuration as an interactive visual graph for inspecting and editing Airflow DAG properties.
- In the IDE activity bar, open the Google Cloud Data Agent Kit panel.
- Under
DATA ENGINEERING, expandOrchestration Pipelines. - Click
fraud_analysis_pipeline.yamlto open the visual DAG canvas in the main editor.
- Click the
Schedule triggernode at the top. A configuration flyout opens on the right, displaying the parsed Cron string (0 0 * * *) and allowing you to adjust parameters like backfill and catchup. - Click either notebook task node (such as the ingestion or inference step). The flyout updates to display the specific Dataproc Serverless execution mappings and connector properties.
- Notice the notebook filename hyperlink (such as
01_ingestion.ipynb) inside the node block. Clicking it opens the notebook directly in your editor. - In the left sidebar underneath Orchestration Pipelines, click
Deployment configuration. This view shows your targetdevenvironment cluster and output GCS bucket artifacts.
Section Recap: You generated an orchestration pipeline configuration with the agent, defining dependencies between ingestion, dbt, and inference tasks in an interactive visual canvas.
8. Deploy, execute, and monitor
With the DAG defined locally, you will connect to the Managed Airflow environment provisioned during setup and deploy the pipeline.
Configure Managed Service for Apache Airflow
Before deploying, configure the Scheduler connection in the Data Agent Kit settings so the extension targets your Managed Airflow environment:
- In the IDE activity bar, open the Google Cloud Data Agent Kit panel.
- Under
SETTINGS, click Settings . - Select Scheduler from the left menu.
- Configure the settings:
- Project ID : Select your active project ID.
- Region : Select
us-central1. - Environment : Select
cymbal-airflow.
- Click Save .
Deploy the DAG
You will now deploy the configured pipeline directly to your Managed Airflow environment from the visual canvas:
- In the Google Cloud Data Agent Kit sidebar, expand
DATA ENGINEERING>Orchestration Pipelinesand clickfraud_analysis_pipeline.yamlto open the visual DAG canvas. - In the top right corner of the canvas toolbar, click the blue Run pipeline button.
- In the environment dropdown picker, select
dev. - Observe the progress notification in the bottom status area (
Running pipeline: Building pipeline locally...). The extension will automatically compile your DAG, package the notebook and dbt assets, and upload them to your Managed Airflow environment's GCS bucket (this takes about 3–4 minutes to complete).
Monitor the run
Once local compilation completes and the popup notification confirms Triggered a new run for pipeline... successfully , monitor the live execution:
- In the Google Cloud Data Agent Kit sidebar, expand
DATA ENGINEERING>Orchestration Pipelines. - Click Pipelines management .
- In the Pipelines Management table, click on
fraud_analysis_pipelineto open its execution history.
- In the Execution History view, select the active run from the calendar.
- As the execution progresses across each pipeline task (ingestion, dbt transformation, and inference), status indicators update and task durations populate. Click any task to inspect its live execution output and Airflow DAG logs.
Section Recap: You configured the Airflow Scheduler connection, deployed your end-to-end analytical pipeline to Managed Airflow, and monitored a live execution, verifying the system from raw logs to final Cloud Spanner predictions.
9. Clean up
To avoid incurring ongoing charges to your Google Cloud project for the resources used in this codelab, tear down the environment using the automated script.
- In the Terminal panel (or in Cloud Shell), navigate to the scripts directory and execute:
cd ~/devrel-demos/codelabs/agentic-data-labs/data-science/scripts
chmod +x teardown.sh
./teardown.sh
- The script will list all the resources it plans to delete and prompt for confirmation:
- Managed Airflow Environment (
cymbal-airflow) - Cloud Spanner Instance (
cymbal-fraud) - BigQuery Dataset (
transactions_dataset_evals) - Cloud Storage Buckets (
gs://${PROJECT_ID}-fin-clearing-rawandgs://${PROJECT_ID}-models) - Worker Service Account (
composer-worker-sa)
- Managed Airflow Environment (
- Type
yto confirm. The teardown script will remove all provisioned GCP services and clean up local files.
10. Congratulations!
You have built an end-to-end fraud detection pipeline spanning Cloud Storage, BigQuery, Managed Service for Apache Spark (Spark Serverless), dbt, Cloud Spanner, and Managed Service for Apache Airflow, pair-programming with the Google Cloud Data Agent Kit inside the Antigravity IDE.
What you accomplished
- 📥 Ingested raw transaction logs into a BigQuery table using Managed Service for Apache Spark and the Data Agent Kit.
- 🧹 Deduplicated and normalized data by creating a dbt project with data quality tests.
- 🤖 Trained a distributed Random Forest model using
RandomForestClassifierand exported the trained model to Cloud Storage. - ⚡ Executed batch inference on incoming transactions and routed high-risk records into Cloud Spanner for audit review.
- 🔄 Orchestrated, deployed, and monitored the workflow as a scheduled Airflow DAG using Managed Service for Apache Airflow and the IDE's visual DAG management tools.
Key concepts
مفهوم | What you learned |
Pair-programming inside the IDE using natural language to generate PySpark notebooks, configure dbt models, and define Airflow DAGs | |
Scalable tabular storage for analytical SQL, dbt transformations, and ML training | |
Serverless execution for distributed PySpark data loading and Random Forest ML training | |
Writing batch Spark inference predictions directly into operational database review queues | |
YAML DAG Declarations | Declarative pipeline definitions rendered as interactive Airflow visual graphs in the IDE |
Visual DAG Management | Inspecting pipeline dependencies, deploying to Managed Airflow , and monitoring live task execution history inside the IDE |
مراحل بعدی
- Explore the Google Cloud Data Agent Kit documentation
- Learn more about Managed Service for Apache Spark
- Learn more about Managed Service for Apache Airflow
- Build your own multi-service pipelines using the Antigravity IDE
۱. مقدمه
Imagine you are a Data Scientist at Cymbal Financial , a high-volume payment processor. A wave of settlement delays has occurred, and the compliance team suspects coordinated fraud. You need to build a pipeline to ingest raw clearinghouse transaction logs, clean the data, train a machine learning model, run batch inference, and sink high-risk transactions into a Cloud Spanner review queue for manual auditing.
Normally, this requires days of writing repetitive setup code (Spark notebooks, dbt configurations, training scripts, Airflow DAGs) and constant context-switching between console interfaces and editors.
In this codelab, you will pair-program with an agent using the Google Cloud Data Agent Kit (DAK) inside the Antigravity IDE . Using conversational natural language, the agent will help you generate Spark notebooks, compile a dbt project, construct an inference loop, and orchestrate the workflow using the Managed Service for Apache Airflow .
What you'll do
- Ingest clearinghouse logs from Cloud Storage using Managed Service for Apache Spark (Spark Serverless) into a BigQuery table.
- Deduplicate and normalize transactions using dbt to establish clean data layers (Raw, Staging, Enriched).
- Train a distributed Random Forest classification model (
RandomForestClassifier) on Spark Serverless. - Run batch inference on new transactions and write high-risk alerts directly to Cloud Spanner .
- Orchestrate, visually configure, and deploy the entire pipeline using Managed Service for Apache Airflow and interactive DAG monitoring inside the IDE.
What you'll need
- A web browser such as Chrome
- A Google Cloud project with billing enabled (we recommend using a new, dedicated project for hands-on labs).
- Basic familiarity with SQL, Python, and PySpark.
- Antigravity IDE with a Google AI Pro subscription (recommended)
The resources created in this codelab should cost less than $5. Be sure to follow the Clean Up instructions at the end of the lab to delete provisioned resources.
2. Environment setup
To kick off the lab, you will run a bootstrap script. This script automatically enables required GCP APIs, creates an ingestion Cloud Storage bucket, generates mock transaction and directory datasets, loads reference directories into BigQuery, and kicks off background provisioning of Cloud Spanner and Managed Service for Apache Airflow (formerly known as Cloud Composer).
Select or create a project
Choose an existing project or create a new project in the Google Cloud Console.
Verify billing
Make sure that billing is enabled for your Google Cloud project. You can learn more on how to do this by following this guide .
Run the setup script
You will use Google Cloud Shell (or your local shell configured with the Google Cloud CLI) to launch the environment setup.
- Open the Google Cloud Console .
- Click Activate Cloud Shell in the top-right toolbar.
- In the Cloud Shell terminal, configure your active project:
gcloud config set project <<YOUR_PROJECT_ID>>
export PROJECT_ID=$(gcloud config get-value project)
- Clone the codelab repository and navigate to the scripts folder:
cd ~/
git clone --filter=blob:none --no-checkout https://github.com/GoogleCloudPlatform/devrel-demos.git
cd ~/devrel-demos
git sparse-checkout init --cone
git sparse-checkout set codelabs/agentic-data-labs/data-science
git checkout main
cd codelabs/agentic-data-labs/data-science/scripts
- Run the bootstrap setup script to deploy all resources to
us-central1:
chmod +x setup.sh setup_spanner.sh setup_composer.sh
export REGION=us-central1
./setup.sh
- When the script finishes, you will see a summary output indicating that your BigQuery dataset and Cloud Storage bucket are ready. In the background, Cloud Spanner (takes ~2 minutes) and Managed Airflow (takes ~20 minutes) will continue provisioning. You can monitor their progress at any time by running:
tail -f /tmp/spanner_setup.log
tail -f /tmp/composer_setup.log
Open the Antigravity IDE
- Download and install the Antigravity IDE from the Google Antigravity download page .
- Launch the Antigravity IDE .
- Create a new, empty folder on your local machine (eg named
agentic-data-labs), and open it in the IDE by choosing Open Folder . This will act as your local workspace for the codelab.
Install the Data Agent Kit extension
The Google Cloud Data Agent Kit extension provides deep integration with Google Cloud data services directly within your editor, allowing you to interact with BigQuery, Cloud SQL, Cloud Storage, and more without switching contexts.
- In the Antigravity IDE, click the Extensions icon in the Activity Bar on the far left side of the screen (it looks like four squares).
- In the search bar at the top of the Extensions pane, type
Google Cloud Data Agent Kit. - Locate the extension named Google Cloud Data Agent Kit published by
googlecloudtools - Click the Install button.
- A prompt may appear asking, "Do you trust publisher 'googlecloudtools' and their extensions?". Click Trust Publishers & Install to proceed.
Once installed, you'll see a new Google Cloud Data Agent Kit icon appear in the Activity Bar on the far left of the Antigravity IDE.
- An onboarding page titled "Welcome to Google Cloud Data Agent Kit" should automatically open. If you aren't signed into your Cloud account, follow any prompts to allow access.
- In the Configuration Summary section, locate the project field. Click the dropdown and select your Google Cloud project. Set your region as
us-central1. Then select Configure MCP Servers .
- Select Configure MCP Servers . Under the MCP Configuration pane, ensure you enable the following remote MCP servers:
- BigQuery
- Spanner
- نوت بوک ها
Then click Get Started .
Explore configuration options
Once setup is complete, you'll land on the "Get started with Google Cloud Data Agent Kit" page.
- Under "Setup & Configuration", click Get Started .
- This opens the Data Agent Kit Configuration panel. Explore the tabs:
- Project and Region: Verify your selected Project ID and confirm that the setup script enabled all requisite APIs (Compute Engine, Cloud Storage, BigQuery, Spanner, etc.).
- BigQuery: Configure the default location for your BigQuery queries. Use the region
us-central1. - Configure MCP Servers: View the enabled MCP servers (BigQuery, Notebooks, Spanner, etc.) that allow AI agents to securely interact with your data.
- Skills: Explore pre-built skills that provide agents with specialized capabilities for complex data tasks.
Section Recap: You ran the bootstrap script to create GCS and BigQuery assets while Spanner and Airflow build in the background. You then opened the project in the Antigravity IDE and activated the Google Cloud Data Agent Kit extension. You are now ready to write your first notebook.
3. Ingest raw logs using Spark Serverless
In this section, you will ingest raw JSON transaction logs into the data lake. Managed Service for Apache Spark (Spark Serverless) connects directly with BigQuery 's native storage. You will use the standard BigQuery connector to manage tabular data and enable direct querying and analytics.
Explore the pre-configured Spark Serverless runtime
Before executing Spark code, inspect the Serverless Runtime template that was pre-configured by the setup script. This template defines the target execution environment backend and bundles necessary connector dependencies.
- In the IDE activity bar, open the Google Cloud Data Agent Kit panel.
- Expand the Apache Spark drop-down menu, then expand Serverless .
- Right-click
fraud-pipeline-runtimeand select Profile to open its configuration view in the editor. - In the Profile tab, scroll down and expand Properties to inspect the custom dependencies attached to the environment:
-
spark.jars: Containsgs://spark-lib/spanner/spark-3.5-spanner-1.4.0.jar, which uses the Spark Spanner connector to allow Spark jobs to write inference results directly to Cloud Spanner later in the lab. (Note: Dataproc Serverless includes Google Cloud's Spark BigQuery connector by default, requiring no additional jar configuration to read and write BigQuery tables).
-
- Notice the Interactive Sessions tab on the left. It is currently empty because you have not executed any code yet. As soon as you run the notebook in the next step, a live serverless compute session will dynamically provision and appear here!
Ingest data using the Data Agent Kit
Instead of manually configuring a Spark Session or writing PySpark loading scripts from scratch, you will pair-program with an agent using the Data Agent Kit.
- Open the Agent Chat pane by clicking the Toggle Agent icon in the top-right toolbar.
- Paste the following prompt into the chat (be sure to replace
${PROJECT_ID}with your actual Google Cloud Project ID):
Create a PySpark notebook (01_ingestion.ipynb) to ingest JSON transaction logs
from gs://${PROJECT_ID}-fin-clearing-raw/ into a BigQuery table
`${PROJECT_ID}.transactions_dataset_evals.raw_transactions`
using the Spark BigQuery connector (`format("bigquery")`) with overwrite mode.
- If the agent asks for permission to execute background verification commands (eg "Allow running this command?" ), review the proposed command and select Yes, allow this time (or Yes, and always allow ).
- When the agent finishes generating the file, click the blue Accept all button (or the checkmark icon) at the bottom of the chat pane to save
notebooks/01_ingestion.ipynbto your workspace.
Review and execute the notebook
- Open the newly generated
notebooks/01_ingestion.ipynbin the IDE. - Review the PySpark code for the BigQuery connector write logic.
- Click Run All in the IDE's notebook toolbar.
- If this is your first time running a remote Spark notebook, the IDE may prompt you to install local dependencies. If prompted, click Install dependencies for Remote Spark Kernels and confirm the installation dialogs, then click Run All again.
- In the Select Kernel dropdown menu, choose Remote Spark Kernels -> fraud-pipeline-runtime on Serverless Spark . (Tip: If you do not see your pre-configured runtime template listed, click the refresh icon in the top right of the kernel picker dropdown to reload available remote kernels).
- Look at the status bar in the bottom left of the editor. You will see
Connecting to kernel: fraud-pipeline-runtime on Serverless Spark.... Because this is the initial launch of the Spark Serverless runtime kernel backend, it will take a few minutes to provision and boot up. - Once the kernel finishes connecting, the notebook will automatically begin executing all cells sequentially to process the raw transaction logs into your BigQuery dataset.
تأیید
Once execution completes, check the Data Agent Kit catalog to verify the table creation:
- In the IDE activity bar, open the Google Cloud Data Agent Kit panel.
- Expand the CATALOG section.
- Expand your project ID.
- Expand BigQuery .
- Expand the
transactions_dataset_evalsdataset. - Click the
raw_transactionstable to open its detail view in the main editor. - In the left navigation, explore the Data , Schema , and Details tabs to inspect the ingested records and metadata.
Section Recap: You used natural language in the Agent Chat to generate a complete Spark Serverless workload. You then executed it to process unstructured JSON logs into a BigQuery (raw) table.
4. Deduplicate and normalize with dbt
Before training the ML model, you will enforce data quality by removing duplicate streaming logs, isolating bad records (such as empty transaction IDs), and joining dimensional data (payers and payees). This process requires idempotent, reliable SQL transformations, making dbt (data build tool) a great fit.
Scaffold the dbt pipeline
Use the agent to generate a dbt project over the BigQuery dataset:
- Return to the Agent Chat pane.
- Provide the following instruction to generate the dbt project:
Scaffold a us-central1 dbt project in dbt_project/ that maps raw_transactions
through to an enriched_transactions model in dataset transactions_dataset_evals.

Deduplicate by transaction_id in staging. Quarantine null IDs to an invalid_transactions model.
Join the valid staging records with dim_payers and dim_payees for the enriched_transactions model,
preserving the historical `is_fraud` label column, and finally add a transaction uniqueness test.

Create an implementation plan first.
- The agent will present an Implementation Plan artifact in the main editor pane. Review the proposed file structure and SQL logic.
- Click Proceed (and then Accept all ) to allow the agent to generate the files in your workspace.
- Once generation completes, the agent displays a Walkthrough summarizing the new components. Accept all changes if prompted.
Build and test
Although the agent automatically ran dbt compile to ensure the generated SQL was syntactically valid, you will now materialize these views and tables into BigQuery and run the data quality tests for local verification. (Note: Later in the lab, you will automate this dbt step as part of an end-to-end Airflow DAG).
- In the activity bar on the far left, click the Explorer icon (or press
Cmd/Ctrl+Shift+E). - Expand
dbt_project->modelsto inspect the generated SQL models. Click onenriched_transactions.sqlto open and review the transformation and fraud feature logic in the editor. - In the File Explorer, right-click the
dbt_projectfolder and select Open in Integrated Terminal . This automatically opens a terminal pane set directly to the requireddbt_projectworking directory. - If you do not already have
dbtinstalled, create a virtual environment outsidedbt_project/(at your home or workspace root) and install the BigQuery adapter:
python3 -m venv ~/.venv/dbt
source ~/.venv/dbt/bin/activate
pip install dbt-bigquery
- Run the dbt models and their associated data quality tests:
dbt build
- Watch the terminal output. dbt will compile the SQL, materialize the staging and enriched tables in BigQuery, and execute the data tests.
- Once the build finishes, close the terminal pane to free up screen space for the remaining steps.
Section Recap: You generated a dbt project with the agent, ran data quality tests, and transformed the raw records into staging and enriched BigQuery tables.
5. Train distributed fraud detection model with Random Forest
With the enriched transactions materialized in BigQuery, you will build a machine learning model to classify fraudulent events. Random Forest is an ensemble learning method well-suited for tabular classification data. Running a RandomForestClassifier on Spark Serverless distributes model training across worker nodes without requiring you to manage infrastructure.
In this step, you will use the agent to generate the Spark ML training pipeline.
Generate the ML training notebook
- Open the Agent Chat pane.
- Provide the following prompt to design the model training sequence (remember to replace
${PROJECT_ID}with your active project ID):
Create a PySpark notebook (02_training.ipynb) to train a distributed Random Forest
(RandomForestClassifier) model on the BigQuery table
`transactions_dataset_evals`.`enriched_transactions`, predicting the `is_fraud` label.
Train only on historically labeled records where `is_fraud` is not null.

One-hot encode categorical strings, scale amounts, cache the dataset in memory,
evaluate AUC, and save the evaluated model to gs://${PROJECT_ID}-models/fraud_model.
- Review the agent's plan or generated code and click Proceed / Accept all to save
notebooks/02_training.ipynbto your workspace.
Review and execute the notebook
- Open
notebooks/02_training.ipynbin the editor. - Review the PySpark ML pipeline stages for feature encoding, vector assembly, and Random Forest classification logic.
- Click Run All in the IDE's notebook toolbar.
- When the Select Kernel dropdown picker opens, select fraud-pipeline-runtime on Serverless Spark .
تأیید
Once execution completes, confirm the model was trained and exported correctly:
- Review the evaluation cell outputs near the bottom of the notebook to verify the reported Area Under ROC (AUC) score.
- To ensure the model artifacts were successfully saved to GCS, expand the STORAGE explorer pane in the Data Agent Kit sidebar.
- Locate the bucket ending in
-models(tied to your active Project ID), expand it, and drill down to verify thefraud_modeldirectory and its pipeline stages exist.
Section Recap: You used the agent to create a PySpark ML training pipeline, trained a Random Forest model on your enriched BigQuery table, and exported the model to Cloud Storage.
6. Batch inference and Cloud Spanner write
With a trained predictive model stored in Cloud Storage, you will run batch inference on new transactions flowing through BigQuery. High-risk transactions need to be routed to an operational system so that a compliance team can review them. Cloud Spanner provides a scalable transactional database for this review queue.
Generate the batch inference notebook
Use the agent to create an inference notebook connecting BigQuery, Cloud Storage, and Cloud Spanner:
- Open the Agent Chat pane.
- Provide the following prompt:
Create an inference notebook (03_inference.ipynb) that loads the RandomForestClassifier
model to score unlabeled records (where `is_fraud` is null) from the BigQuery table
`transactions_dataset_evals`.`enriched_transactions`.

Filter for high-risk transactions with a 50%+ fraud probability score (probability >= 0.50)
and write them to the Cloud Spanner table SparkEvalFraudReviewQueue in the cymbal-fraud instance
under fraud-db.
- Accept the generated notebook to save
notebooks/03_inference.ipynbto your workspace.
Review and execute the notebook
- Open the newly generated
notebooks/03_inference.ipynbin the editor. - Review the PySpark inference sequence:
- Dependencies: The Serverless Runtime template provides the required
cloud-spannerJAR dependencies for Spark execution. - Data Formatting: The script drops complex Spark ML vector columns (such as raw features and probabilities) before writing to match the Spanner table schema.
- Spanner Connector: It writes the flagged rows using
.format("cloud-spanner")to append directly to the review queue.
- Dependencies: The Serverless Runtime template provides the required
- Click Run All in the IDE's notebook toolbar.
- When prompted to select a kernel, select fraud-pipeline-runtime on Serverless Spark .
تأیید
Once the inference notebook finishes processing, you can query your operational Spanner database directly inside the IDE:
- In the IDE activity bar, open the Google Cloud Data Agent Kit panel.
- Expand the CATALOG section.
- Expand your project ID, then expand Spanner .
- Navigate to
cymbal-fraud->fraud-db->Tables->SparkEvalFraudReviewQueue. - Right-click the table and select Query Table , then execute the query:
SELECT *
FROM `SparkEvalFraudReviewQueue`
LIMIT 100;
- In the Query Results pane below, you should see newly inserted rows representing high-risk transactions flagged for manual review.
Section Recap: You used the agent to create a batch inference notebook, scored unlabeled BigQuery records with your trained model, and wrote high-risk transactions directly to Cloud Spanner.
7. Scaffold and orchestrate with Managed Airflow
Your pipeline currently consists of discrete steps: an ingestion notebook, a dbt transformation project, and a batch inference notebook. To make this production-ready, you will stitch them together into a scheduled dependency graph.
Managed Service for Apache Airflow (formerly known as Cloud Composer) provides a managed orchestration engine for this workflow. The Data Agent Kit includes an Orchestration Pipelines feature that translates declarative YAML pipeline definitions directly into Airflow DAGs.
Define the pipeline
Use the agent to generate the orchestration pipeline configuration:
- In the Agent Chat , provide the following prompt (remembering to replace
${PROJECT_ID}):
Initialize and define an orchestration pipeline (fraud_analysis_pipeline) triggering
the ingestion notebook, dbt project, and inference notebook in sequential order.
For Dataproc Serverless engine configs in us-central1, use resourceProfile.inline
(defining properties with spark.jars: "gs://spark-lib/spanner/spark-3.5-spanner-1.4.0.jar"
for inference) rather than resourceProfile.path or overrides.

Set the schedule interval to run daily at midnight, and use
gs://${PROJECT_ID}-airflow-artifacts for artifact storage.
Review the DAG configuration
The Data Agent Kit Orchestrator uses declarative YAML configurations to define and deploy pipelines to Apache Airflow, allowing definitions to be version controlled and deployed via CI/CD.
In the IDE Explorer pane, review the two pipeline files the agent generated at the root of your workspace:
-
deployment.yaml: Open this file. This serves as your environment registry. It maps your logicaldevpipeline to thecymbal-airflowenvironment, sets the execution region (us-central1), and defines theartifact_storagebucket where compiled DAGs and dependencies are staged. -
fraud_analysis_pipeline.yaml: Open this file. This defines the execution graph. It specifies the trigger schedule (interval: '0 0 * * *') and sequences the three steps under theactionsblock:- An ingestion
notebookaction for01_ingestion.ipynbrunning on Dataproc Serverless. - A transformation
pipelineaction targeting thedbt_projectdirectory, with adependsOndependency pointing to the ingestion step. - An inference
notebookaction for03_inference.ipynbwith adependsOndependency pointing to the dbt step, bundling the Spanner JAR property.
- An ingestion
- The agent will also summarize these generated artifacts into a Walkthrough tab in your editor pane, outlining the configurations and validations performed.
Interactive DAG configuration
The Data Agent Kit renders your pipeline configuration as an interactive visual graph for inspecting and editing Airflow DAG properties.
- In the IDE activity bar, open the Google Cloud Data Agent Kit panel.
- Under
DATA ENGINEERING, expandOrchestration Pipelines. - Click
fraud_analysis_pipeline.yamlto open the visual DAG canvas in the main editor.
- Click the
Schedule triggernode at the top. A configuration flyout opens on the right, displaying the parsed Cron string (0 0 * * *) and allowing you to adjust parameters like backfill and catchup. - Click either notebook task node (such as the ingestion or inference step). The flyout updates to display the specific Dataproc Serverless execution mappings and connector properties.
- Notice the notebook filename hyperlink (such as
01_ingestion.ipynb) inside the node block. Clicking it opens the notebook directly in your editor. - In the left sidebar underneath Orchestration Pipelines, click
Deployment configuration. This view shows your targetdevenvironment cluster and output GCS bucket artifacts.
Section Recap: You generated an orchestration pipeline configuration with the agent, defining dependencies between ingestion, dbt, and inference tasks in an interactive visual canvas.
8. Deploy, execute, and monitor
With the DAG defined locally, you will connect to the Managed Airflow environment provisioned during setup and deploy the pipeline.
Configure Managed Service for Apache Airflow
Before deploying, configure the Scheduler connection in the Data Agent Kit settings so the extension targets your Managed Airflow environment:
- In the IDE activity bar, open the Google Cloud Data Agent Kit panel.
- Under
SETTINGS, click Settings . - Select Scheduler from the left menu.
- Configure the settings:
- Project ID : Select your active project ID.
- Region : Select
us-central1. - Environment : Select
cymbal-airflow.
- Click Save .
Deploy the DAG
You will now deploy the configured pipeline directly to your Managed Airflow environment from the visual canvas:
- In the Google Cloud Data Agent Kit sidebar, expand
DATA ENGINEERING>Orchestration Pipelinesand clickfraud_analysis_pipeline.yamlto open the visual DAG canvas. - In the top right corner of the canvas toolbar, click the blue Run pipeline button.
- In the environment dropdown picker, select
dev. - Observe the progress notification in the bottom status area (
Running pipeline: Building pipeline locally...). The extension will automatically compile your DAG, package the notebook and dbt assets, and upload them to your Managed Airflow environment's GCS bucket (this takes about 3–4 minutes to complete).
Monitor the run
Once local compilation completes and the popup notification confirms Triggered a new run for pipeline... successfully , monitor the live execution:
- In the Google Cloud Data Agent Kit sidebar, expand
DATA ENGINEERING>Orchestration Pipelines. - Click Pipelines management .
- In the Pipelines Management table, click on
fraud_analysis_pipelineto open its execution history.
- In the Execution History view, select the active run from the calendar.
- As the execution progresses across each pipeline task (ingestion, dbt transformation, and inference), status indicators update and task durations populate. Click any task to inspect its live execution output and Airflow DAG logs.
Section Recap: You configured the Airflow Scheduler connection, deployed your end-to-end analytical pipeline to Managed Airflow, and monitored a live execution, verifying the system from raw logs to final Cloud Spanner predictions.
9. Clean up
To avoid incurring ongoing charges to your Google Cloud project for the resources used in this codelab, tear down the environment using the automated script.
- In the Terminal panel (or in Cloud Shell), navigate to the scripts directory and execute:
cd ~/devrel-demos/codelabs/agentic-data-labs/data-science/scripts
chmod +x teardown.sh
./teardown.sh
- The script will list all the resources it plans to delete and prompt for confirmation:
- Managed Airflow Environment (
cymbal-airflow) - Cloud Spanner Instance (
cymbal-fraud) - BigQuery Dataset (
transactions_dataset_evals) - Cloud Storage Buckets (
gs://${PROJECT_ID}-fin-clearing-rawandgs://${PROJECT_ID}-models) - Worker Service Account (
composer-worker-sa)
- Managed Airflow Environment (
- Type
yto confirm. The teardown script will remove all provisioned GCP services and clean up local files.
10. Congratulations!
You have built an end-to-end fraud detection pipeline spanning Cloud Storage, BigQuery, Managed Service for Apache Spark (Spark Serverless), dbt, Cloud Spanner, and Managed Service for Apache Airflow, pair-programming with the Google Cloud Data Agent Kit inside the Antigravity IDE.
What you accomplished
- 📥 Ingested raw transaction logs into a BigQuery table using Managed Service for Apache Spark and the Data Agent Kit.
- 🧹 Deduplicated and normalized data by creating a dbt project with data quality tests.
- 🤖 Trained a distributed Random Forest model using
RandomForestClassifierand exported the trained model to Cloud Storage. - ⚡ Executed batch inference on incoming transactions and routed high-risk records into Cloud Spanner for audit review.
- 🔄 Orchestrated, deployed, and monitored the workflow as a scheduled Airflow DAG using Managed Service for Apache Airflow and the IDE's visual DAG management tools.
Key concepts
مفهوم | What you learned |
Pair-programming inside the IDE using natural language to generate PySpark notebooks, configure dbt models, and define Airflow DAGs | |
Scalable tabular storage for analytical SQL, dbt transformations, and ML training | |
Serverless execution for distributed PySpark data loading and Random Forest ML training | |
Writing batch Spark inference predictions directly into operational database review queues | |
YAML DAG Declarations | Declarative pipeline definitions rendered as interactive Airflow visual graphs in the IDE |
Visual DAG Management | Inspecting pipeline dependencies, deploying to Managed Airflow , and monitoring live task execution history inside the IDE |
مراحل بعدی
- Explore the Google Cloud Data Agent Kit documentation
- Learn more about Managed Service for Apache Spark
- Learn more about Managed Service for Apache Airflow
- Build your own multi-service pipelines using the Antigravity IDE