

1. Введение
Представьте, что вы — специалист по анализу данных в компании Cymbal Financial , занимающейся обработкой больших объемов платежей. Произошла волна задержек в расчетах, и команда по соблюдению нормативных требований подозревает скоординированное мошенничество. Вам необходимо создать конвейер для обработки необработанных журналов транзакций клиринговой палаты, очистки данных, обучения модели машинного обучения, выполнения пакетного вывода и отправки транзакций высокого риска в очередь проверки Cloud Spanner для ручного аудита.
Обычно это требует нескольких дней написания повторяющегося кода настройки (блокноты Spark, конфигурации dbt, скрипты обучения, DAG-графы Airflow) и постоянного переключения между консольными интерфейсами и редакторами.
В этом практическом занятии вы будете работать в паре с агентом, используя Google Cloud Data Agent Kit (DAK) внутри среды разработки Antigravity IDE . Используя разговорный естественный язык, агент поможет вам создавать блокноты Spark, компилировать проект dbt, создавать цикл вывода и управлять рабочим процессом с помощью управляемого сервиса Apache Airflow .
Что вы будете делать
- Загрузка журналов из облачного хранилища с использованием управляемого сервиса для Apache Spark (Spark Serverless) в таблицу BigQuery .
- С помощью dbt можно выполнить дедупликацию и нормализацию транзакций для создания чистых слоев данных (исходные, промежуточные, обогащенные).
- Обучите распределенную модель классификации Random Forest (
RandomForestClassifier) на Spark Serverless. - Запускайте пакетный анализ новых транзакций и записывайте оповещения о высоком риске непосредственно в Cloud Spanner .
- Организуйте, визуально настройте и разверните весь конвейер с помощью управляемого сервиса для Apache Airflow и интерактивного мониторинга DAG внутри IDE.
Что вам понадобится
- Веб-браузер, например Chrome.
- Проект Google Cloud с включенной оплатой (для практических занятий рекомендуется использовать новый, выделенный проект).
- Базовые знания SQL, Python и PySpark.
- Antigravity IDE с подпиской Google AI Pro (рекомендуется)
Стоимость ресурсов, созданных в этом практическом задании, должна быть менее 5 долларов. Обязательно следуйте инструкциям по очистке в конце задания, чтобы удалить выделенные ресурсы.
2. Настройка среды
Для начала лабораторной работы вам потребуется запустить скрипт начальной загрузки. Этот скрипт автоматически включает необходимые API GCP, создает сегмент Cloud Storage для приема данных, генерирует фиктивные наборы данных транзакций и каталогов, загружает справочные каталоги в BigQuery и запускает фоновое выделение ресурсов Cloud Spanner и управляемого сервиса для Apache Airflow (ранее известного как Cloud Composer).
Выберите или создайте проект
Выберите существующий проект или создайте новый проект в консоли Google Cloud.
Подтвердите выставление счетов.
Убедитесь, что для вашего проекта Google Cloud включена функция выставления счетов. Подробнее о том, как это сделать, вы можете узнать, следуя этому руководству .
Запустите скрипт установки.
Для запуска настройки среды вам потребуется использовать Google Cloud Shell (или локальную оболочку, настроенную с помощью Google Cloud CLI).
- Откройте консоль Google Cloud .
- Нажмите кнопку «Активировать Cloud Shell» на панели инструментов в правом верхнем углу.

- В терминале Cloud Shell настройте свой активный проект:
gcloud config set project <<YOUR_PROJECT_ID>>
export PROJECT_ID=$(gcloud config get-value project)
- Клонируйте репозиторий codelab и перейдите в папку scripts:
cd ~/
git clone --filter=blob:none --no-checkout https://github.com/GoogleCloudPlatform/devrel-demos.git
cd ~/devrel-demos
git sparse-checkout init --cone
git sparse-checkout set codelabs/agentic-data-labs/data-science
git checkout main
cd codelabs/agentic-data-labs/data-science/scripts
- Запустите скрипт начальной загрузки, чтобы развернуть все ресурсы в
us-central1:
chmod +x setup.sh setup_spanner.sh setup_composer.sh
export REGION=us-central1
./setup.sh
- После завершения выполнения скрипта вы увидите сводную информацию о готовности вашего набора данных BigQuery и хранилища Cloud Storage. В фоновом режиме Cloud Spanner (занимает около 2 минут) и Managed Airflow (занимает около 20 минут) продолжат подготовку ресурсов. Вы можете отслеживать ход выполнения в любое время, выполнив команду:
tail -f /tmp/spanner_setup.log
tail -f /tmp/composer_setup.log
Откройте Antigravity IDE
- Загрузите и установите Antigravity IDE со страницы загрузки Google Antigravity .
- Запустите среду разработки Antigravity IDE .
- Создайте на локальном компьютере новую пустую папку (например, с именем
agentic-data-labs) и откройте её в IDE, выбрав «Открыть папку» . Она будет служить вашей локальной рабочей областью для этого практического задания.
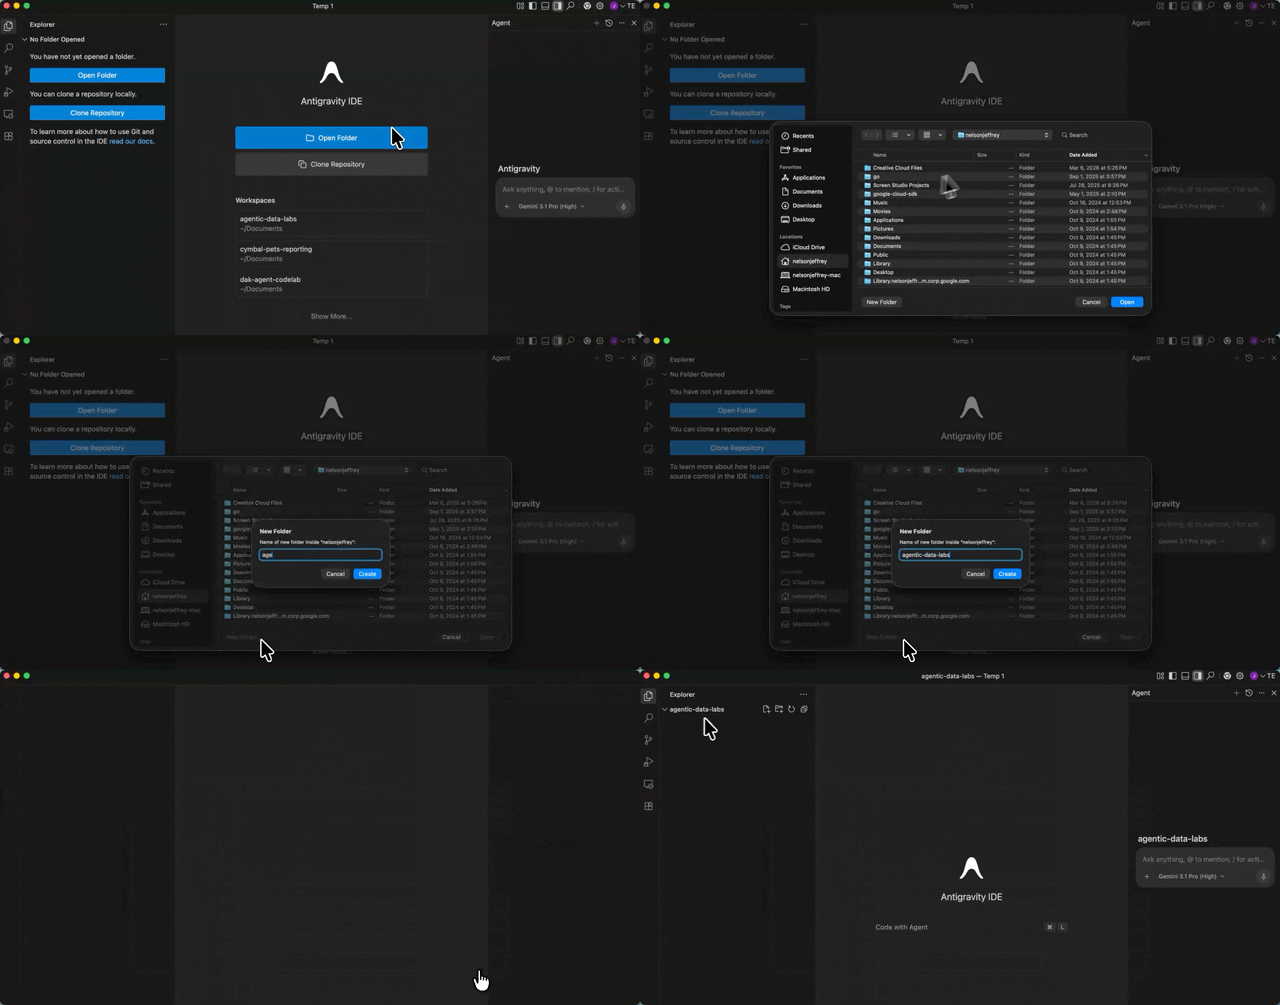
Установите расширение Data Agent Kit.
Расширение Google Cloud Data Agent Kit обеспечивает глубокую интеграцию с сервисами данных Google Cloud непосредственно в вашем редакторе, позволяя взаимодействовать с BigQuery, Cloud SQL, Cloud Storage и другими сервисами без переключения контекста.
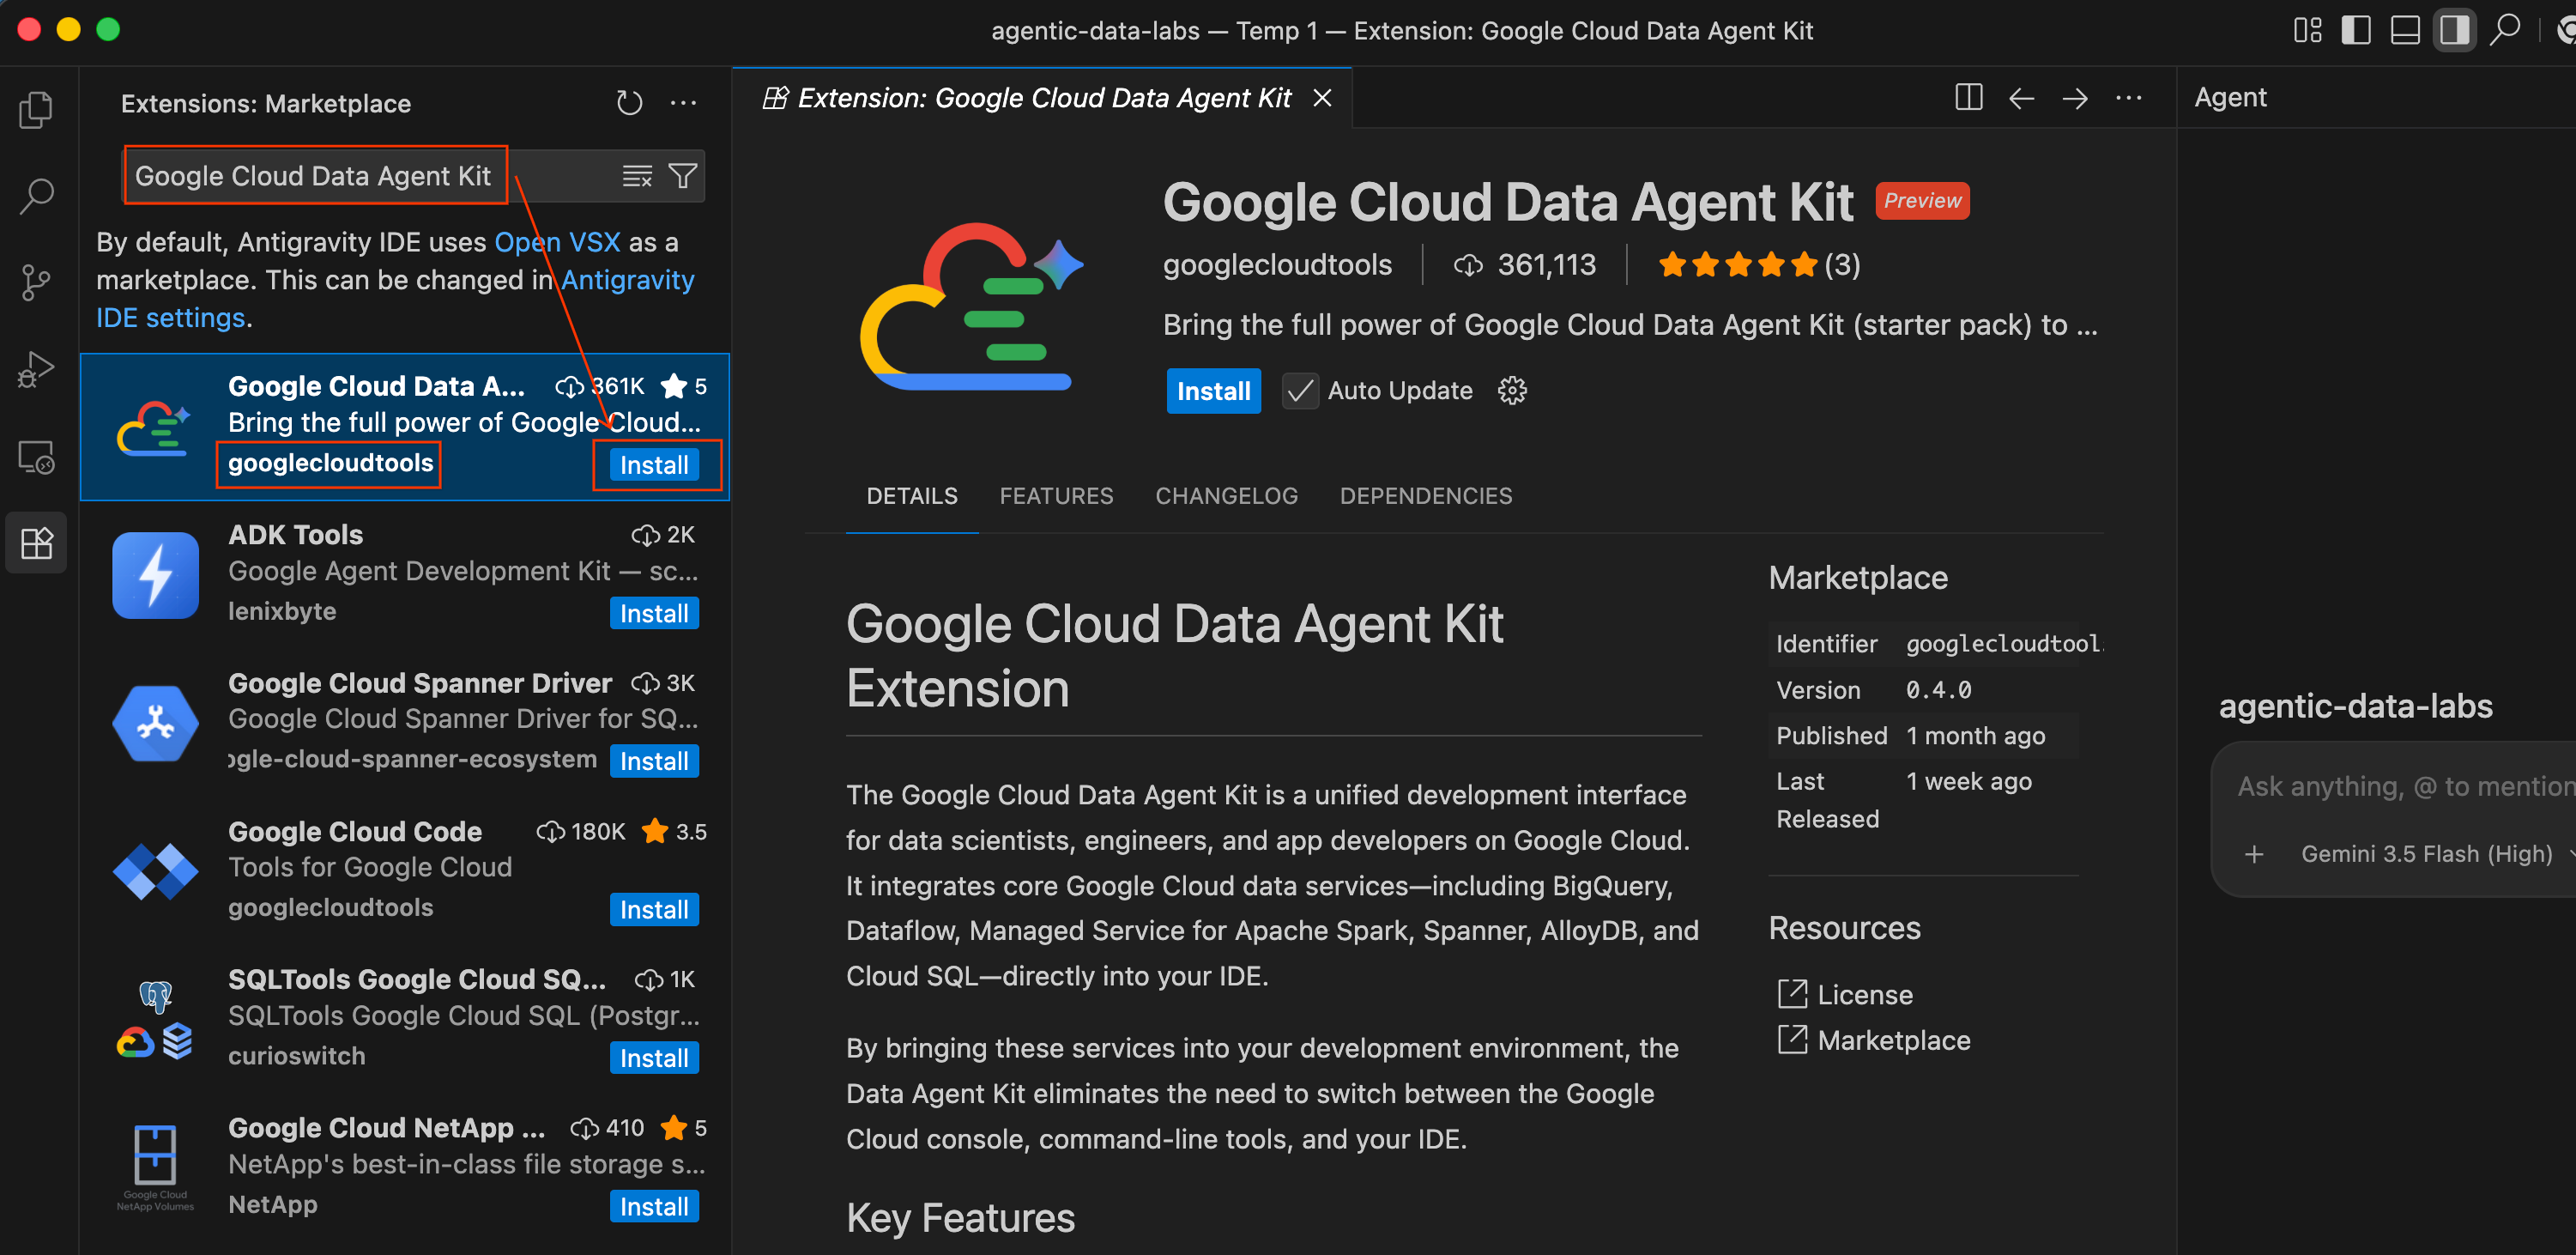
- В среде разработки Antigravity IDE щелкните значок «Расширения» на панели активности в левой части экрана (он выглядит как четыре квадрата).
- В строке поиска в верхней части панели расширений введите
Google Cloud Data Agent Kit. - Найдите расширение под названием Google Cloud Data Agent Kit , опубликованное на сайте
googlecloudtools - Нажмите кнопку «Установить» .
- Возможно, появится запрос: «Доверяете ли вы издателю 'googlecloudtools' и его расширениям?». Нажмите «Доверять издателям и установить» , чтобы продолжить.
После установки в левой части панели активности среды разработки Antigravity IDE появится новый значок Google Cloud Data Agent Kit .
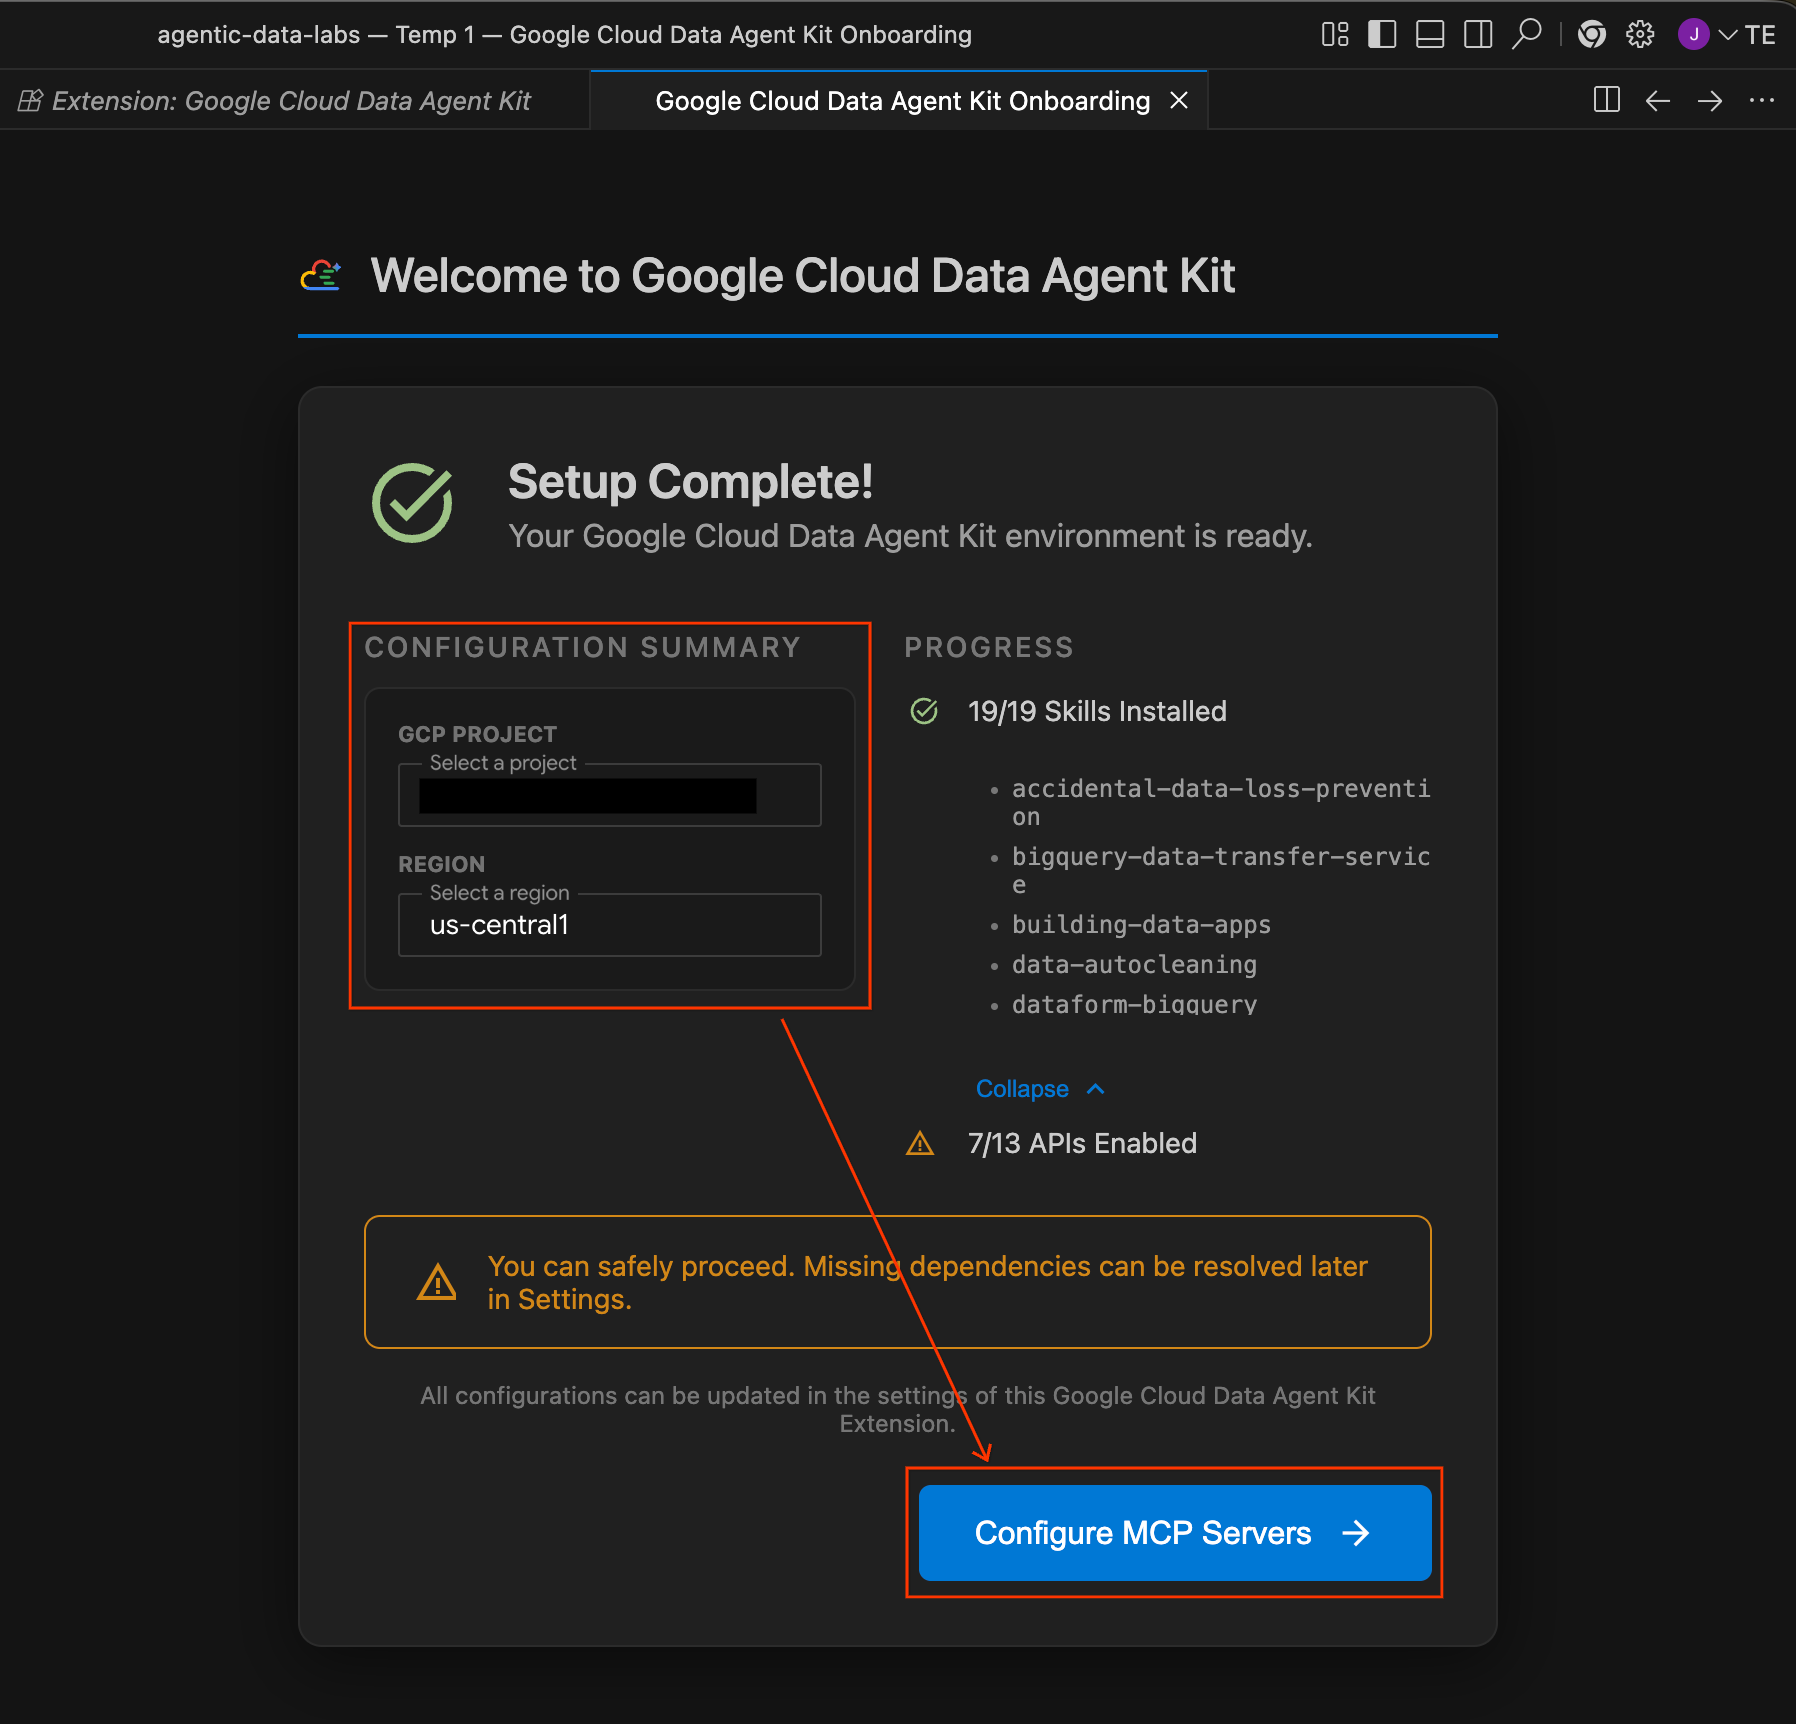
- Автоматически должна открыться страница регистрации под названием «Добро пожаловать в Google Cloud Data Agent Kit». Если вы не вошли в свою учетную запись Cloud, следуйте инструкциям, чтобы разрешить доступ.
- В разделе «Сводка конфигурации» найдите поле «Проект». Щелкните раскрывающийся список и выберите свой проект Google Cloud. Установите регион как
us-central1. Затем выберите «Настроить серверы MCP» .
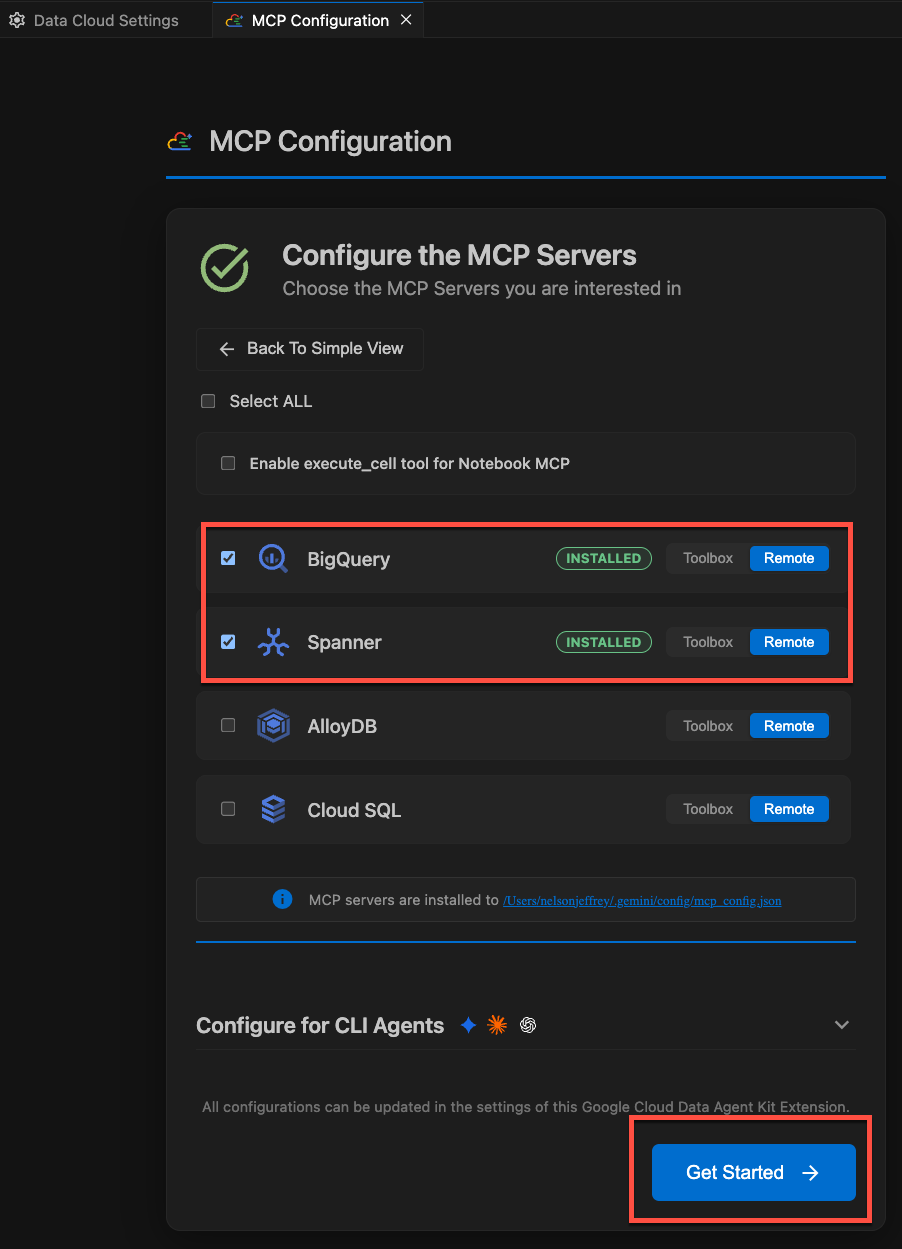
- Выберите «Настроить серверы MCP» . В панели «Конфигурация MCP» убедитесь, что включены следующие удаленные серверы MCP:
- BigQuery
- Гаечный ключ
- Тетради
Затем нажмите «Начать» .
Изучите параметры конфигурации.
После завершения настройки вы попадете на страницу "Начало работы с Google Cloud Data Agent Kit".
- В разделе «Настройка и конфигурация» нажмите «Начать» .
- Это откроет панель настройки Data Agent Kit . Изучите вкладки:
- Проект и регион: Проверьте выбранный идентификатор проекта и убедитесь, что скрипт настройки включил все необходимые API (Compute Engine, Cloud Storage, BigQuery, Spanner и т. д.).
- BigQuery: Настройте местоположение по умолчанию для ваших запросов BigQuery. Используйте регион
us-central1. - Настройка серверов MCP: Просмотрите список включенных серверов MCP (BigQuery, Notebooks, Spanner и т. д.), которые позволяют агентам ИИ безопасно взаимодействовать с вашими данными.
- Навыки: Изучите встроенные навыки , которые предоставляют агентам специализированные возможности для решения сложных задач обработки данных.
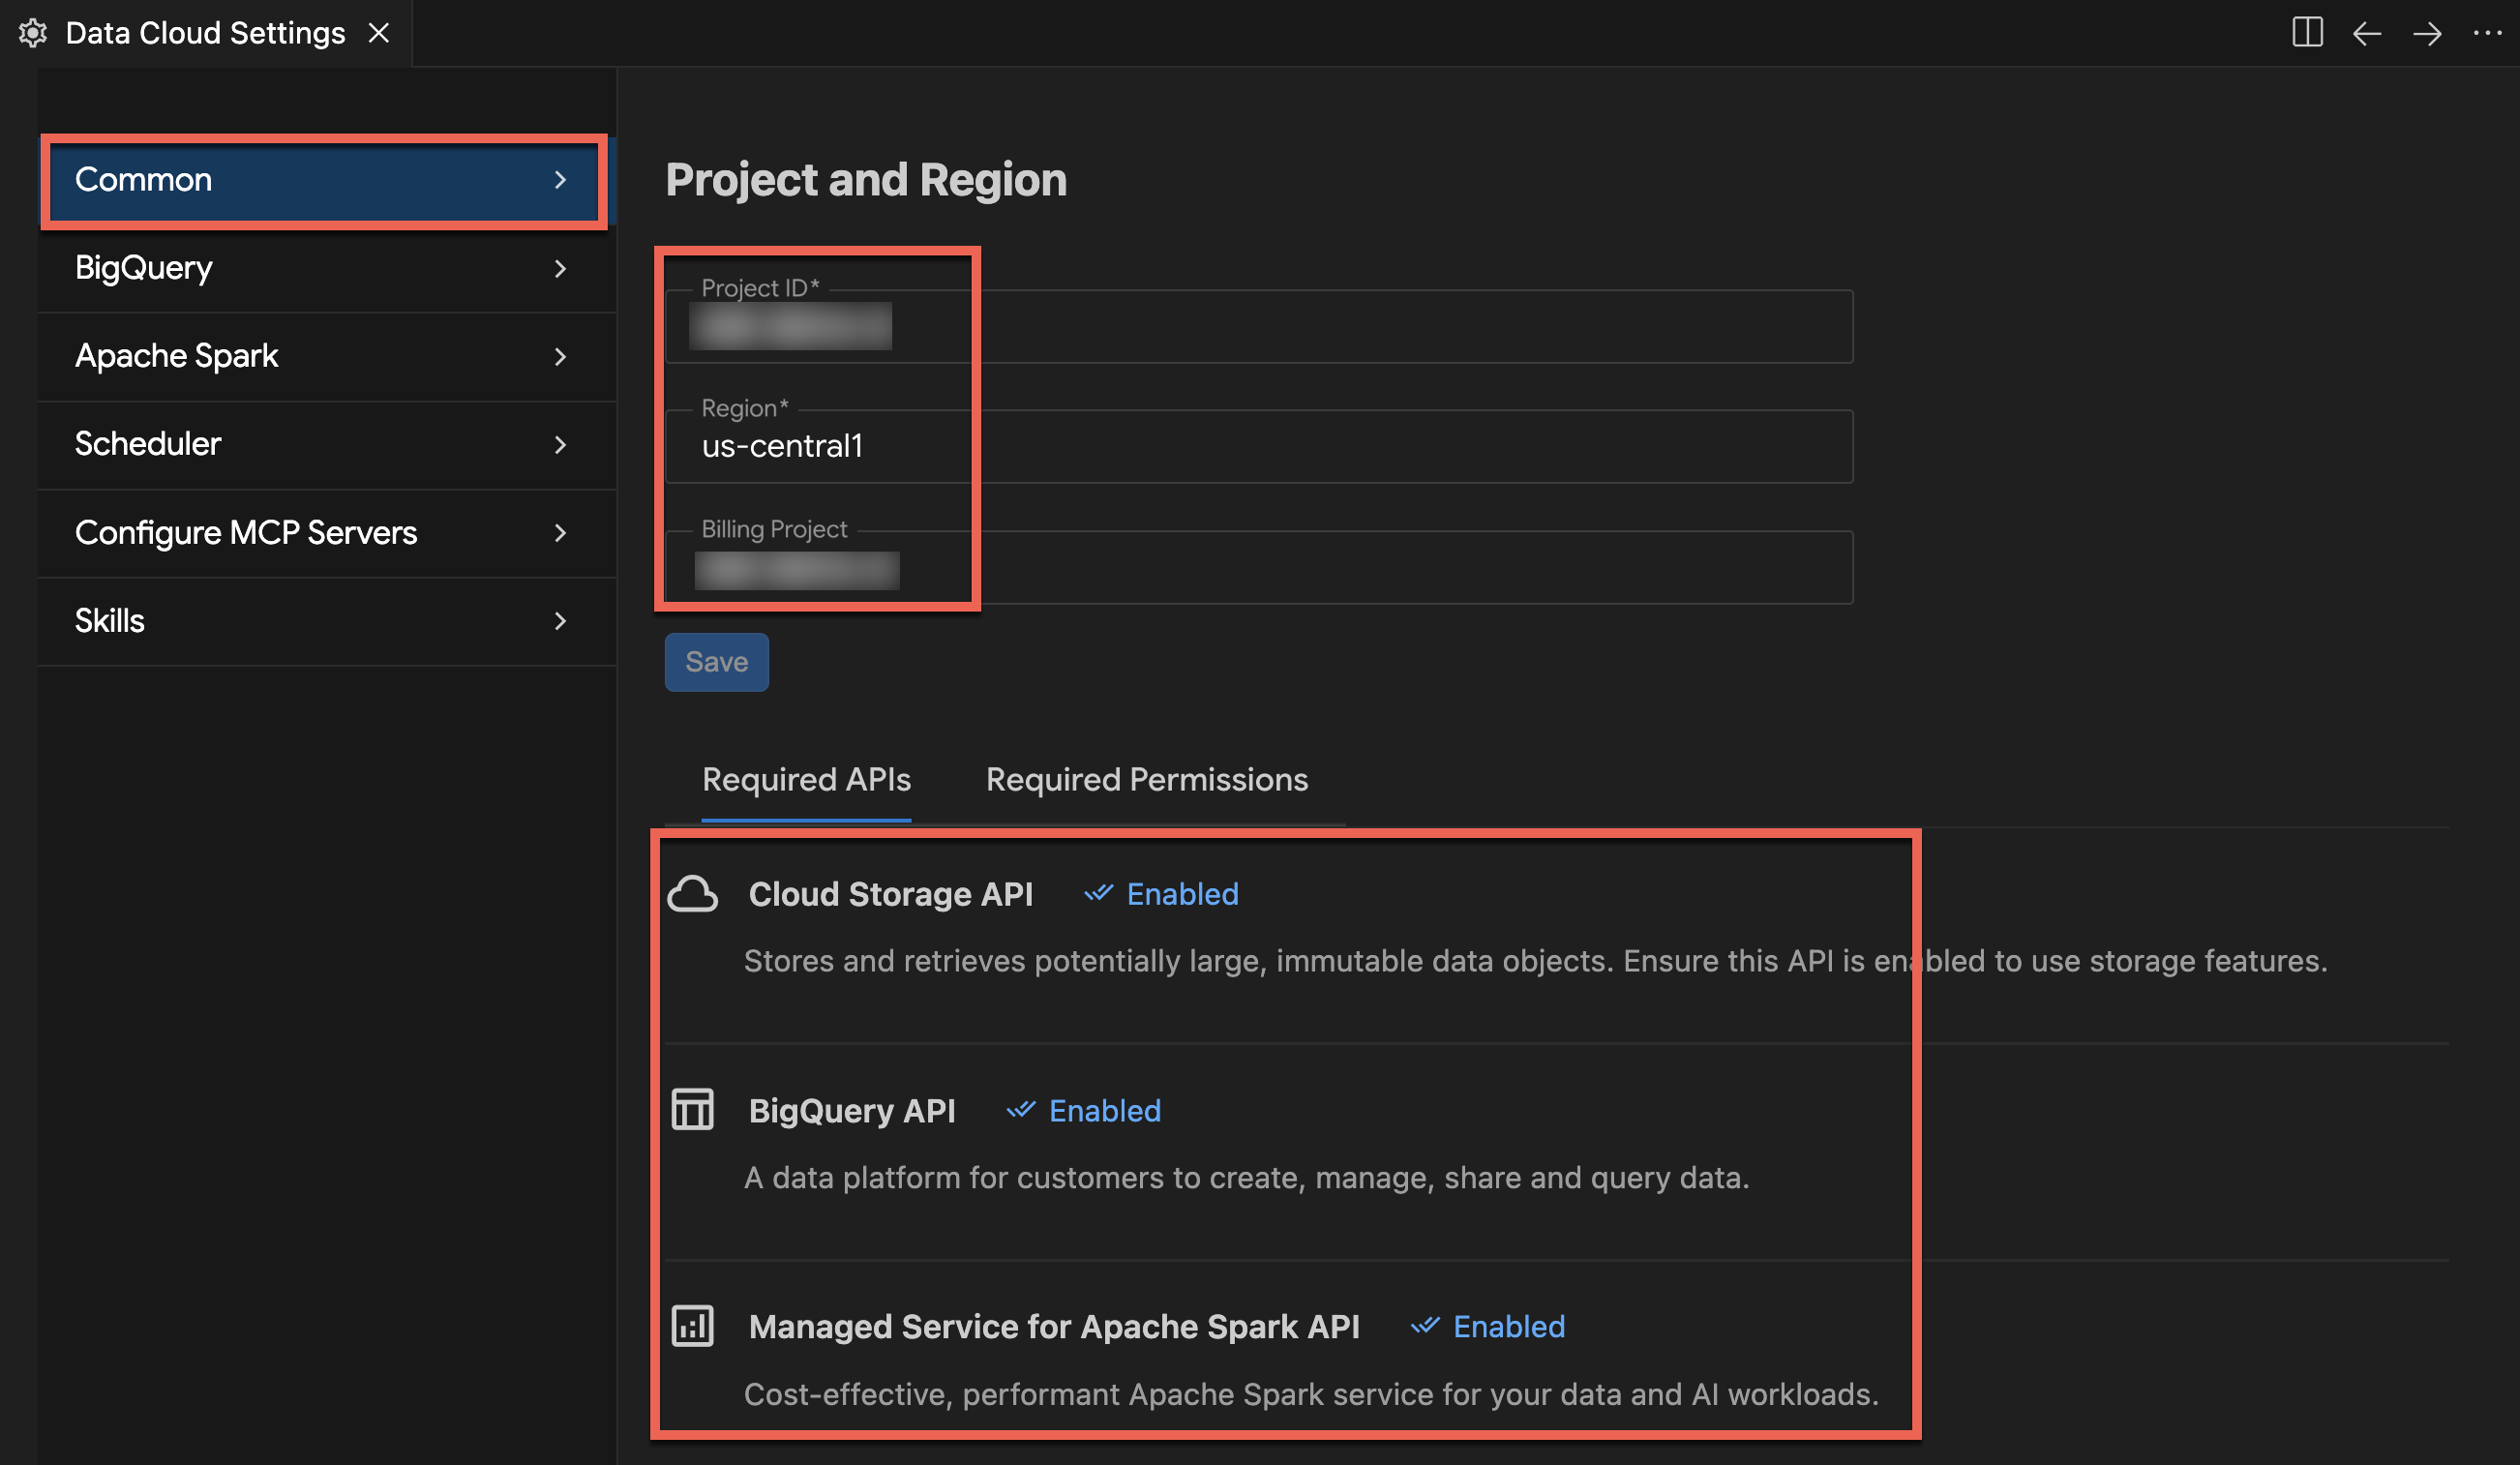
Краткое содержание раздела: Вы запустили скрипт начальной загрузки для создания ресурсов GCS и BigQuery, в то время как Spanner и Airflow выполняли сборку в фоновом режиме. Затем вы открыли проект в IDE Antigravity и активировали расширение Google Cloud Data Agent Kit. Теперь вы готовы написать свой первый блокнот.
3. Загрузка необработанных логов с помощью Spark Serverless.
В этом разделе вы будете загружать необработанные JSON-журналы транзакций в озеро данных. Управляемая служба для Apache Spark (Spark Serverless) напрямую подключается к собственному хранилищу BigQuery . Вы будете использовать стандартный коннектор BigQuery для управления табличными данными и обеспечения прямого выполнения запросов и аналитики.
Изучите предварительно настроенную среду выполнения Spark Serverless.
Перед выполнением кода Spark проверьте шаблон среды выполнения Serverless Runtime, предварительно настроенный скриптом установки. Этот шаблон определяет целевую среду выполнения и включает необходимые зависимости коннектора.
- В панели действий IDE откройте панель Google Cloud Data Agent Kit .
- Разверните выпадающее меню Apache Spark , затем разверните раздел Serverless .
- Щелкните правой кнопкой мыши
fraud-pipeline-runtimeи выберите «Профиль» , чтобы открыть его конфигурационный раздел в редакторе. - На вкладке «Профиль» прокрутите вниз и разверните раздел «Свойства» , чтобы просмотреть пользовательские зависимости, подключенные к среде:
-
spark.jars: Содержитgs://spark-lib/spanner/spark-3.5-spanner-1.4.0.jar, который использует коннектор Spark Spanner , позволяющий заданиям Spark записывать результаты вывода непосредственно в Cloud Spanner позже в ходе лабораторной работы. (Примечание: Dataproc Serverless по умолчанию включает коннектор Spark BigQuery от Google Cloud, поэтому для чтения и записи таблиц BigQuery не требуется дополнительная настройка jar-файлов).
-
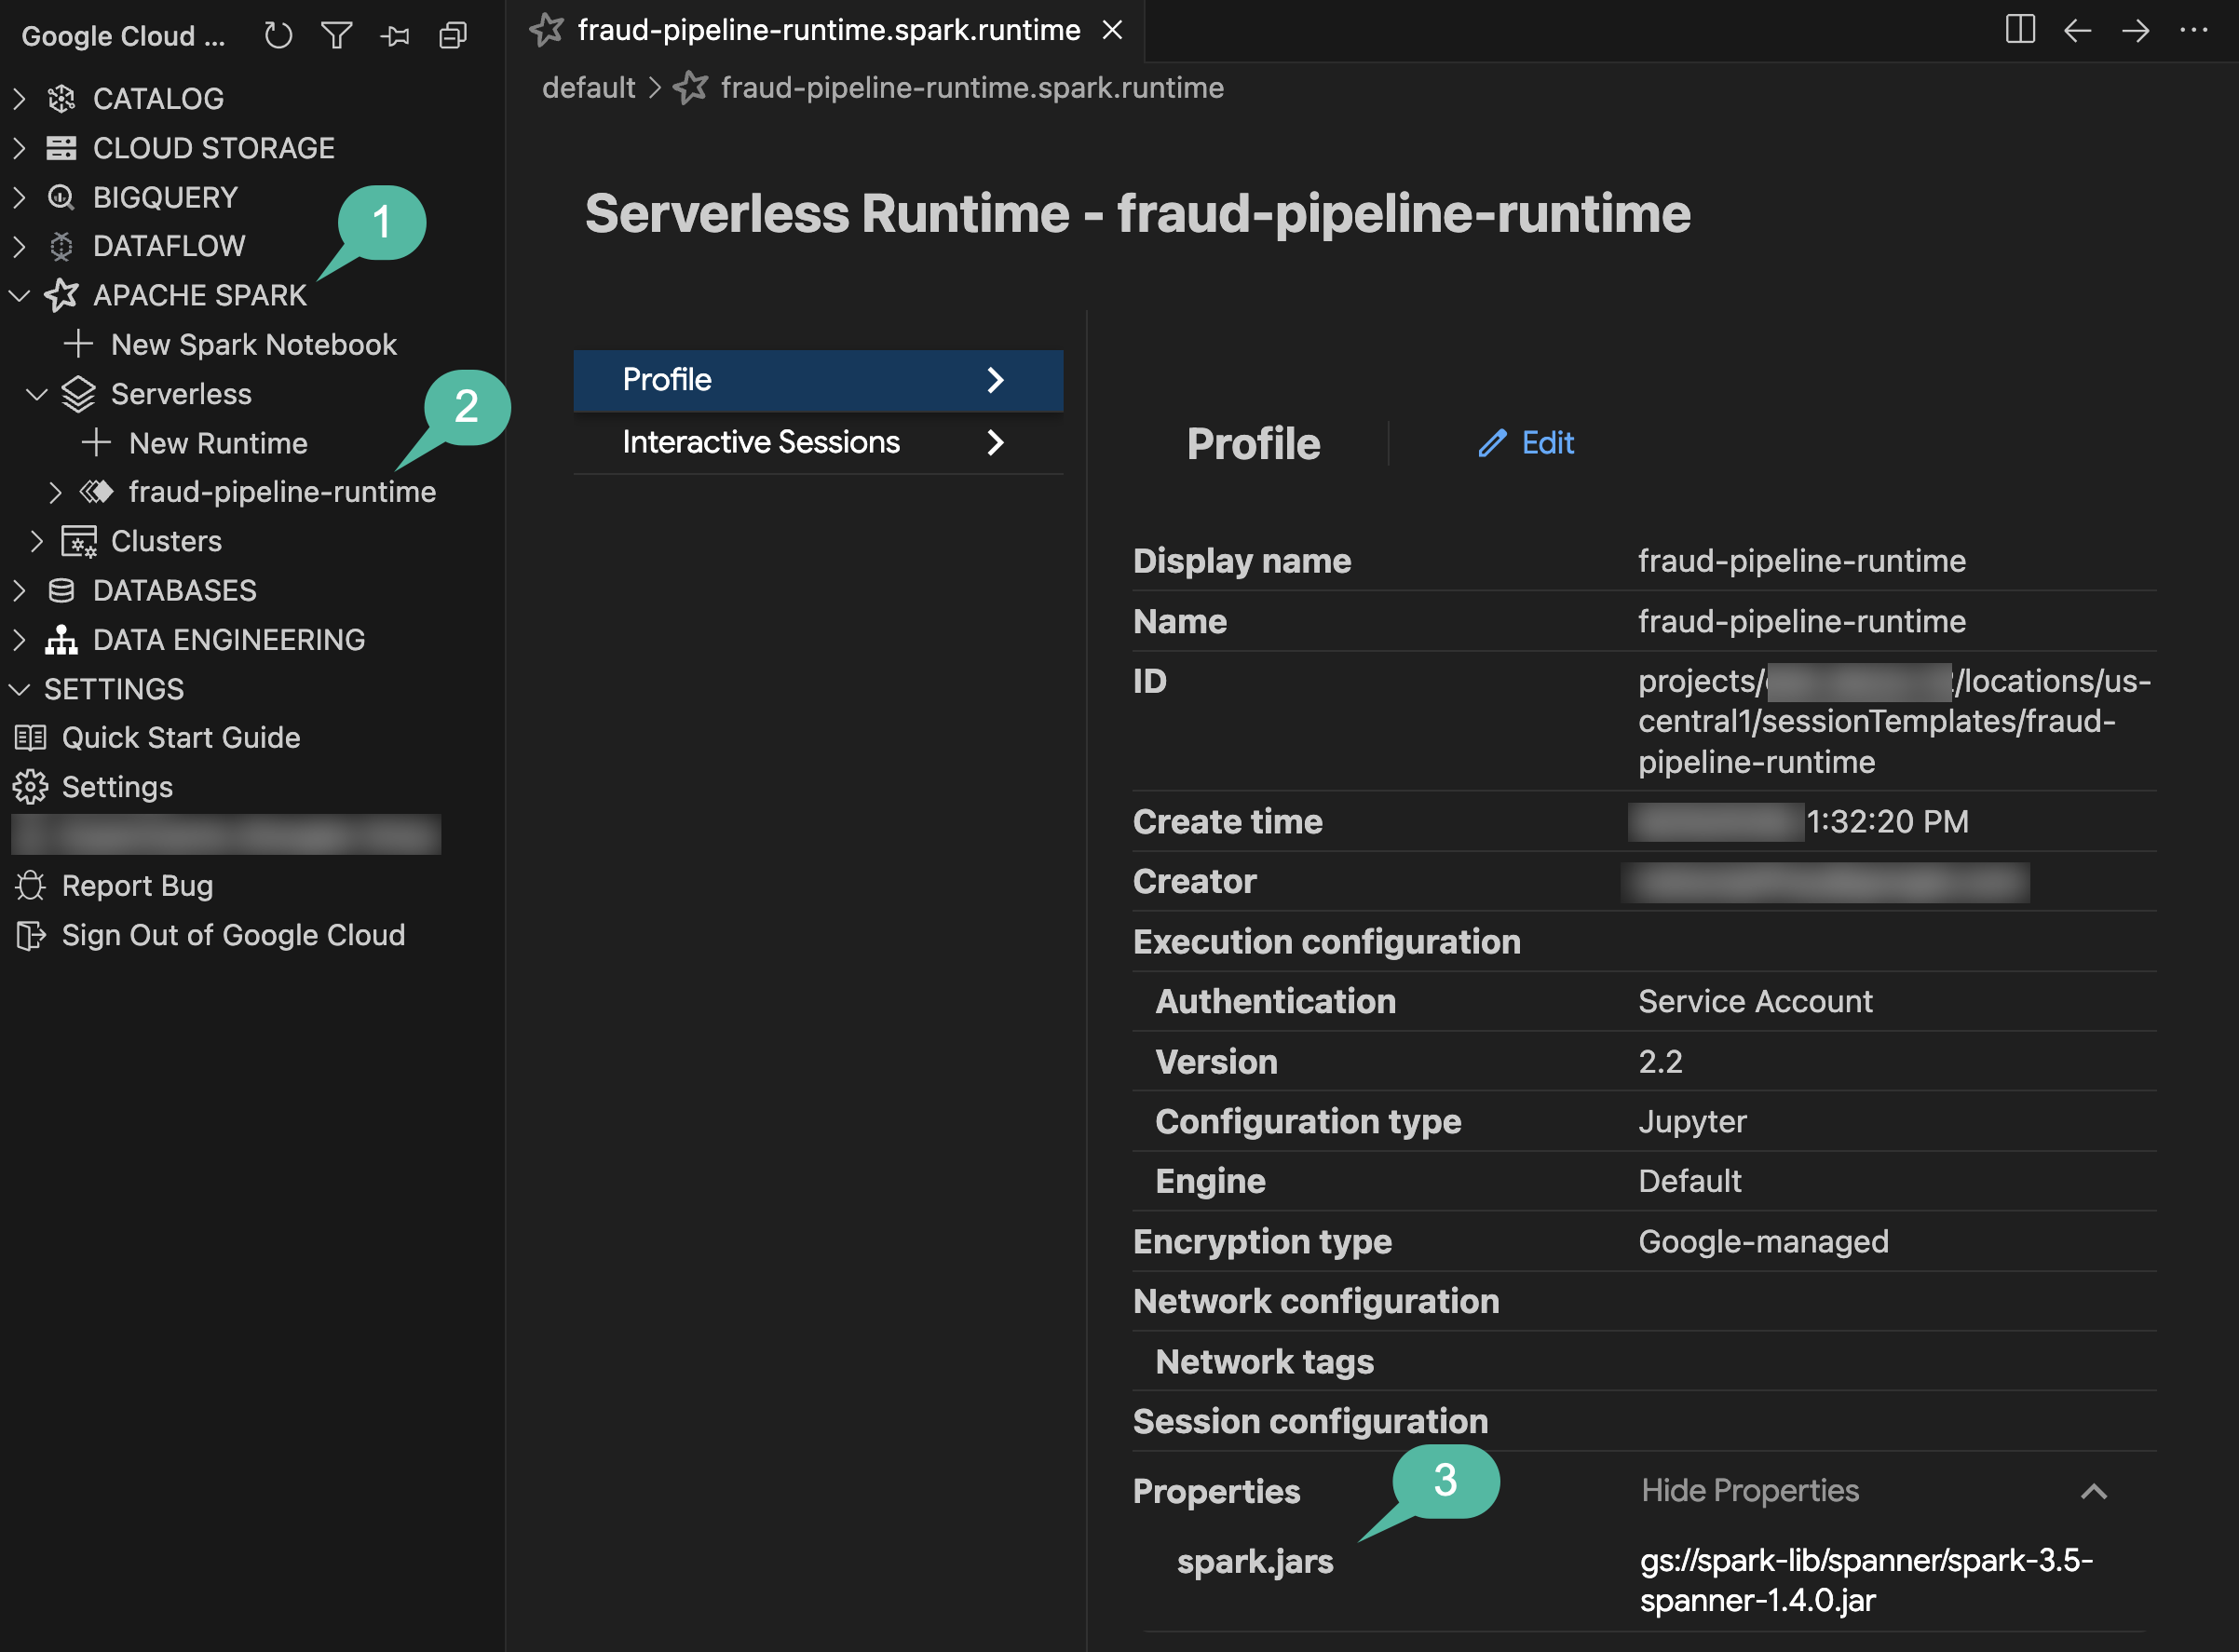
- Обратите внимание на вкладку «Интерактивные сессии» слева. Сейчас она пуста, поскольку вы еще не выполнили никакого кода. Как только вы запустите ноутбук на следующем шаге, динамически будет создана и отобразится активная сессия бессерверных вычислений!
Загрузка данных с помощью Data Agent Kit.
Вместо того чтобы вручную настраивать сессию Spark или писать с нуля скрипты загрузки PySpark, вы будете работать в паре с агентом, используя Data Agent Kit.
- Откройте панель чата с агентом , нажав на значок «Переключить агента» в верхней правой части панели инструментов.
- Вставьте следующую подсказку в чат (обязательно замените
${PROJECT_ID}на фактический идентификатор вашего проекта в Google Cloud):
Create a PySpark notebook (01_ingestion.ipynb) to ingest JSON transaction logs
from gs://${PROJECT_ID}-fin-clearing-raw/ into a BigQuery table
`${PROJECT_ID}.transactions_dataset_evals.raw_transactions`
using the Spark BigQuery connector (`format("bigquery")`) with overwrite mode.
- Если агент запрашивает разрешение на выполнение команд проверки в фоновом режиме (например , "Разрешить выполнение этой команды?" ), просмотрите предложенную команду и выберите "Да, разрешить на этот раз" (или "Да, и всегда разрешать ").
- Когда агент завершит создание файла, нажмите синюю кнопку «Принять все » (или значок галочки) в нижней части панели чата, чтобы сохранить
notebooks/01_ingestion.ipynbв свою рабочую область.
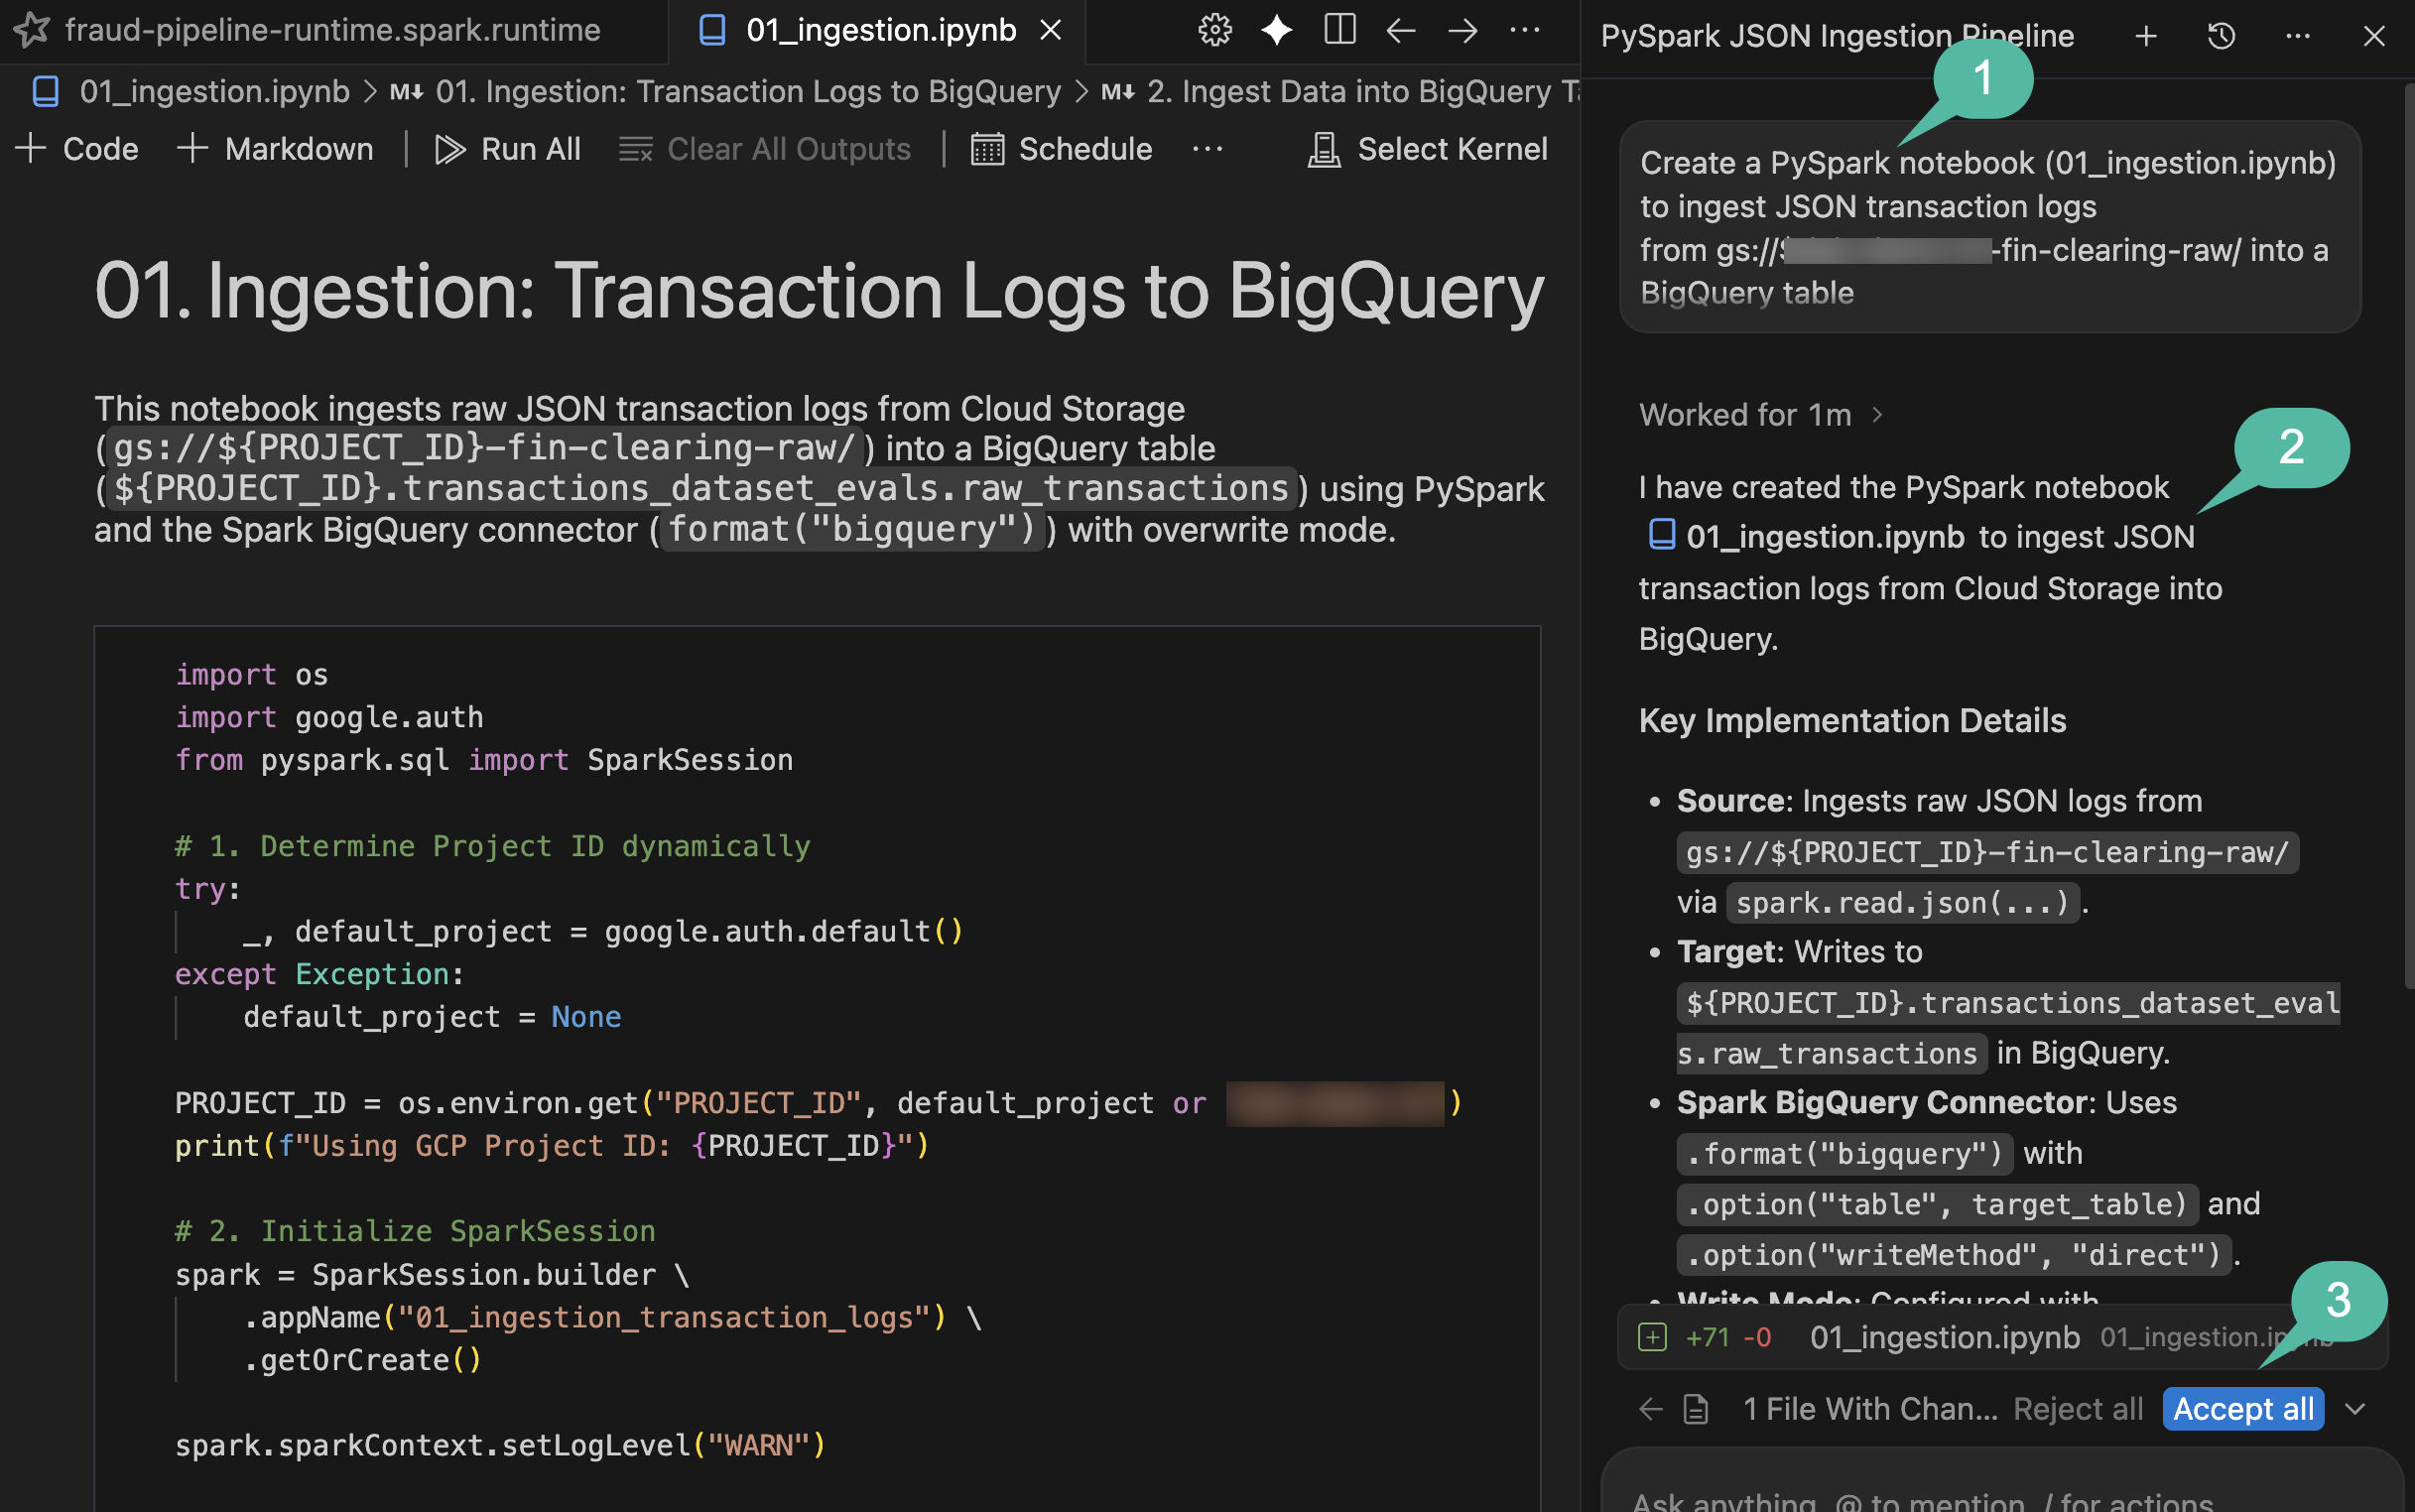
Просмотрите и запустите блокнот.
- Откройте созданный файл
notebooks/01_ingestion.ipynbв IDE. - Изучите код PySpark, чтобы ознакомиться с логикой записи данных в коннектор BigQuery.
- В панели инструментов блокнота IDE нажмите кнопку «Запустить все» .
- Если вы впервые запускаете удаленный блокнот Spark, IDE может предложить вам установить локальные зависимости. В этом случае нажмите «Установить зависимости для удаленных ядер Spark» и подтвердите изменения в диалоговых окнах установки, затем снова нажмите «Запустить все» .
- В раскрывающемся меню «Выбрать ядро» выберите «Удаленные ядра Spark» -> fraud-pipeline-runtime на Serverless Spark . (Совет: если вы не видите свой предварительно настроенный шаблон среды выполнения в списке, нажмите значок обновления в правом верхнем углу раскрывающегося списка выбора ядра, чтобы перезагрузить доступные удаленные ядра).
- Посмотрите на строку состояния в левом нижнем углу редактора. Вы увидите
Connecting to kernel: fraud-pipeline-runtime on Serverless Spark.... Поскольку это первоначальный запуск бэкенда ядра среды выполнения Spark Serverless, потребуется несколько минут для подготовки и загрузки. - После завершения подключения ядра, ноутбук автоматически начнет последовательное выполнение всех ячеек для обработки необработанных журналов транзакций и их переноса в ваш набор данных BigQuery.
Проверка
После завершения выполнения проверьте каталог Data Agent Kit, чтобы убедиться в создании таблицы:
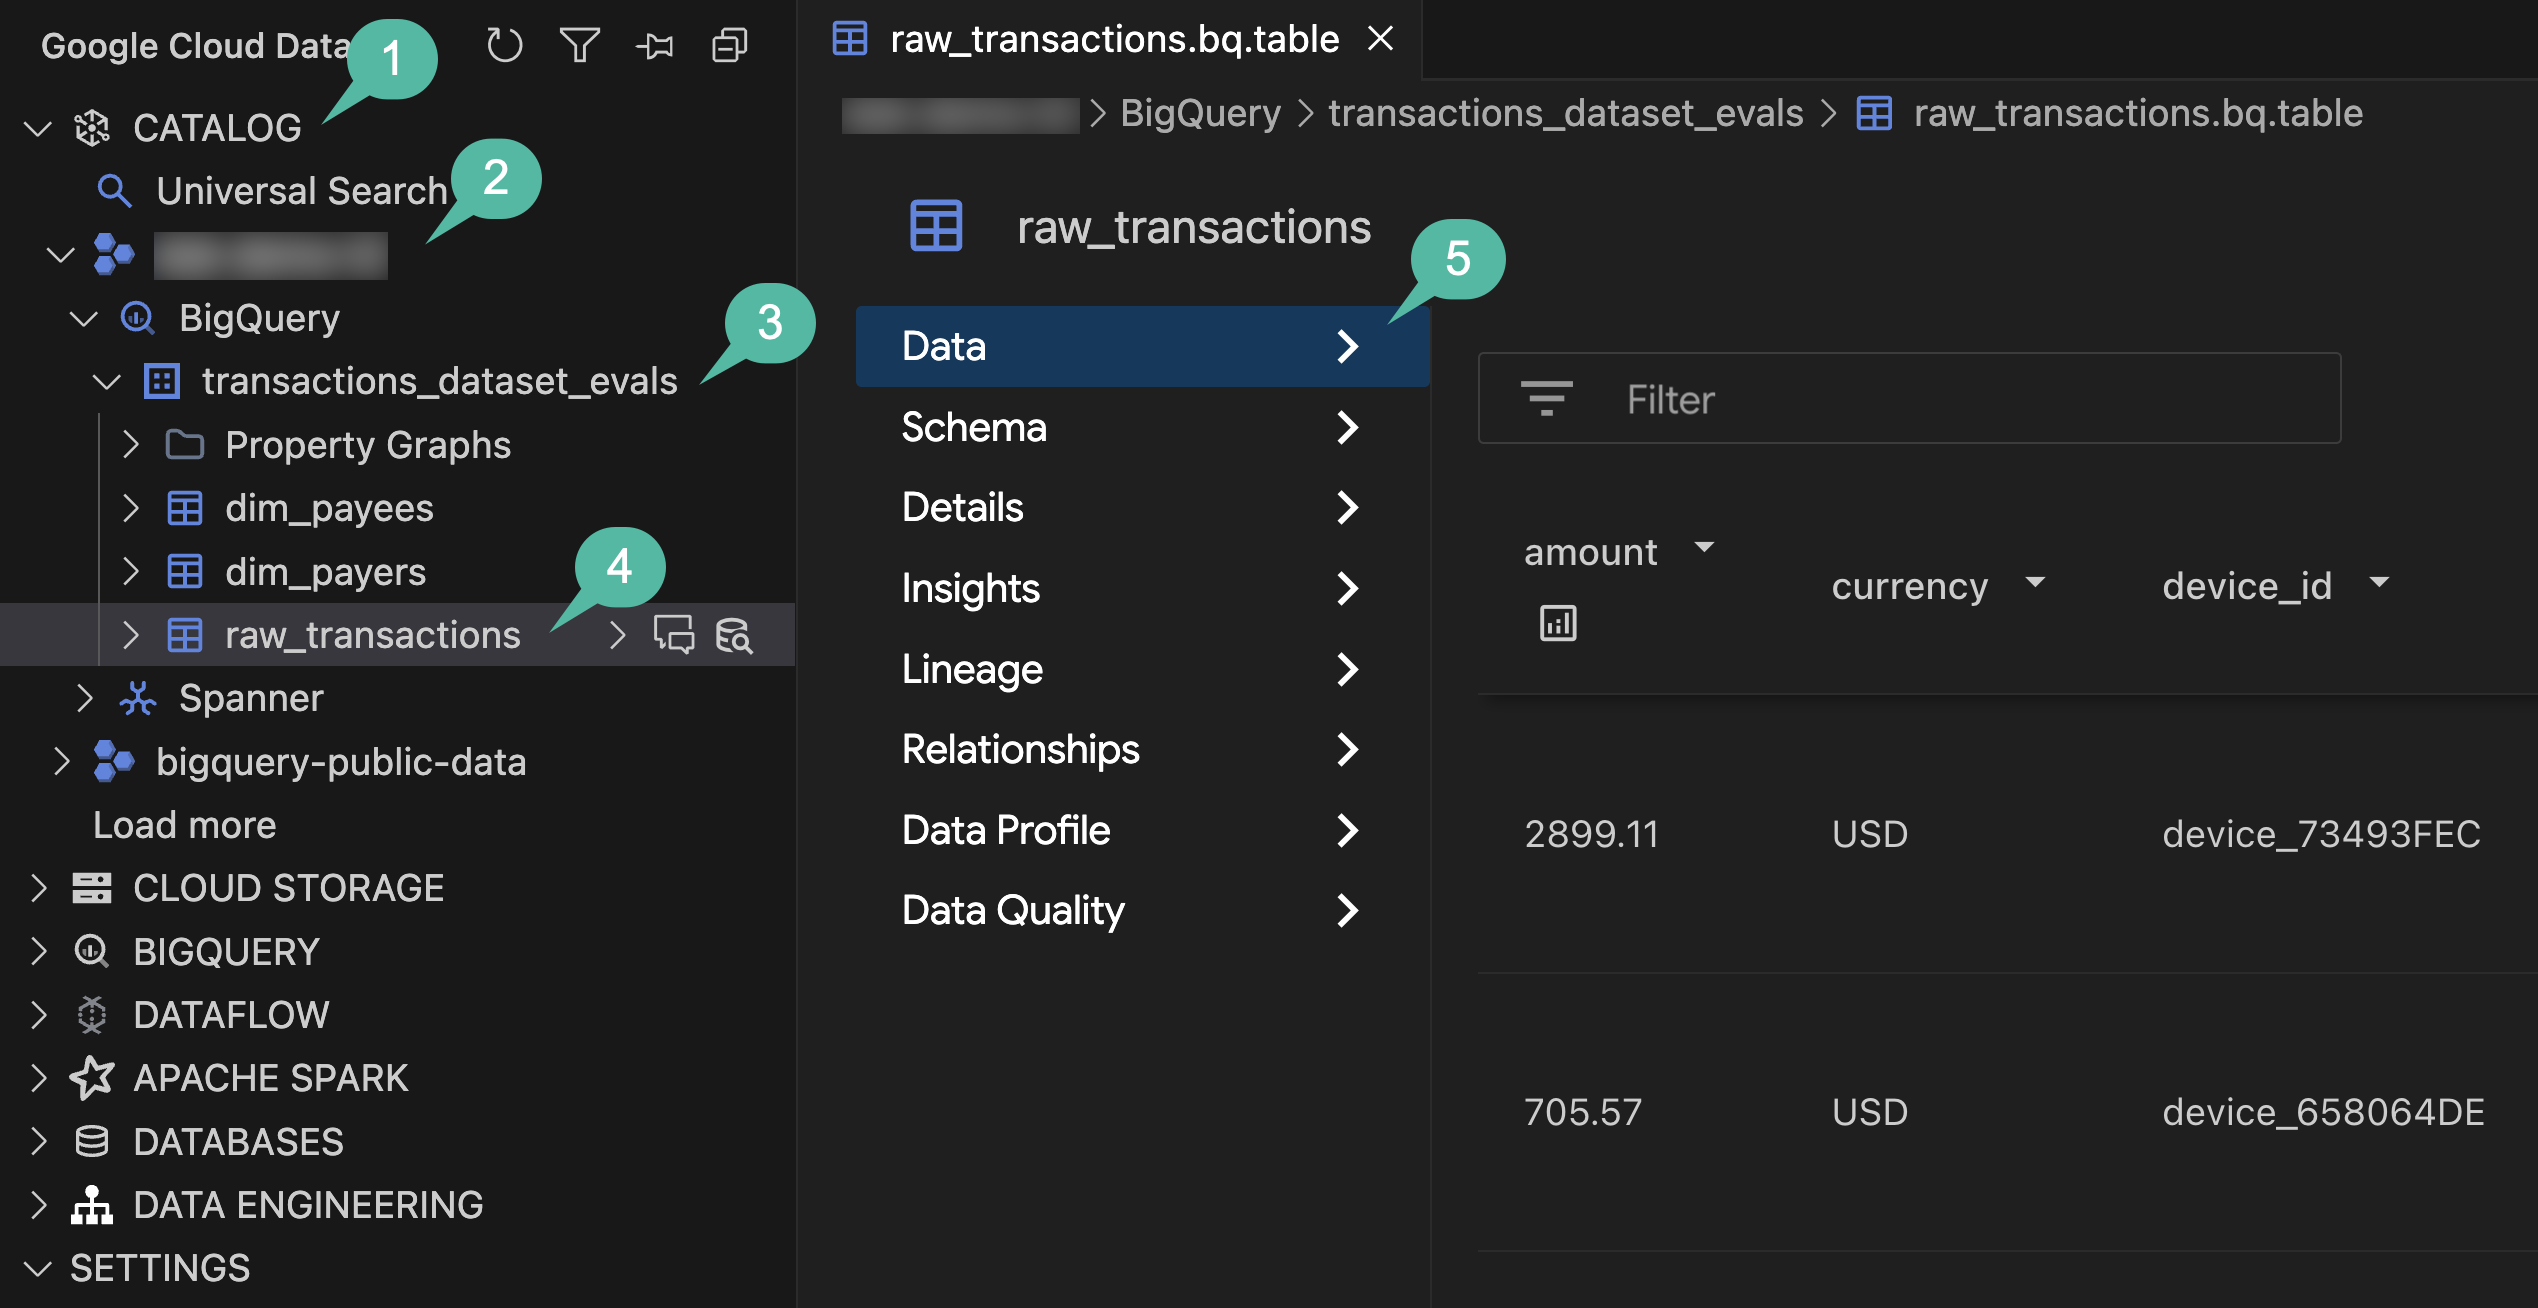
- В панели действий IDE откройте панель Google Cloud Data Agent Kit .
- Разверните раздел КАТАЛОГ .
- Разверните идентификатор вашего проекта.
- Развернуть BigQuery .
- Разверните набор данных
transactions_dataset_evals. - Щелкните по таблице
raw_transactions, чтобы открыть ее подробную информацию в главном редакторе. - В левой панели навигации перейдите на вкладки «Данные» , «Схема» и «Подробности» , чтобы просмотреть загруженные записи и метаданные.
Краткое содержание раздела: Вы использовали естественный язык в чате агента для генерации полной рабочей нагрузки Spark Serverless. Затем вы выполнили ее для обработки неструктурированных JSON-логов и преобразования их в таблицу BigQuery (в необработанном виде).
4. Удалите дубликаты и нормализуйте данные с помощью dbt.
Перед обучением модели машинного обучения необходимо обеспечить качество данных, удалив дубликаты потоковых логов, выделив некорректные записи (например, пустые идентификаторы транзакций) и объединив многомерные данные (плательщиков и получателей). Этот процесс требует идемпотентных и надежных SQL-преобразований, поэтому инструмент dbt (инструмент построения данных) отлично подходит для этой цели.
Создайте структуру конвейера DBT.
Используйте агент для создания проекта dbt на основе набора данных BigQuery:
- Вернитесь в панель чата с агентом .
- Для создания проекта dbt предоставьте следующую инструкцию:
Scaffold a us-central1 dbt project in dbt_project/ that maps raw_transactions
through to an enriched_transactions model in dataset transactions_dataset_evals.

Deduplicate by transaction_id in staging. Quarantine null IDs to an invalid_transactions model.
Join the valid staging records with dim_payers and dim_payees for the enriched_transactions model,
preserving the historical `is_fraud` label column, and finally add a transaction uniqueness test.

Create an implementation plan first.
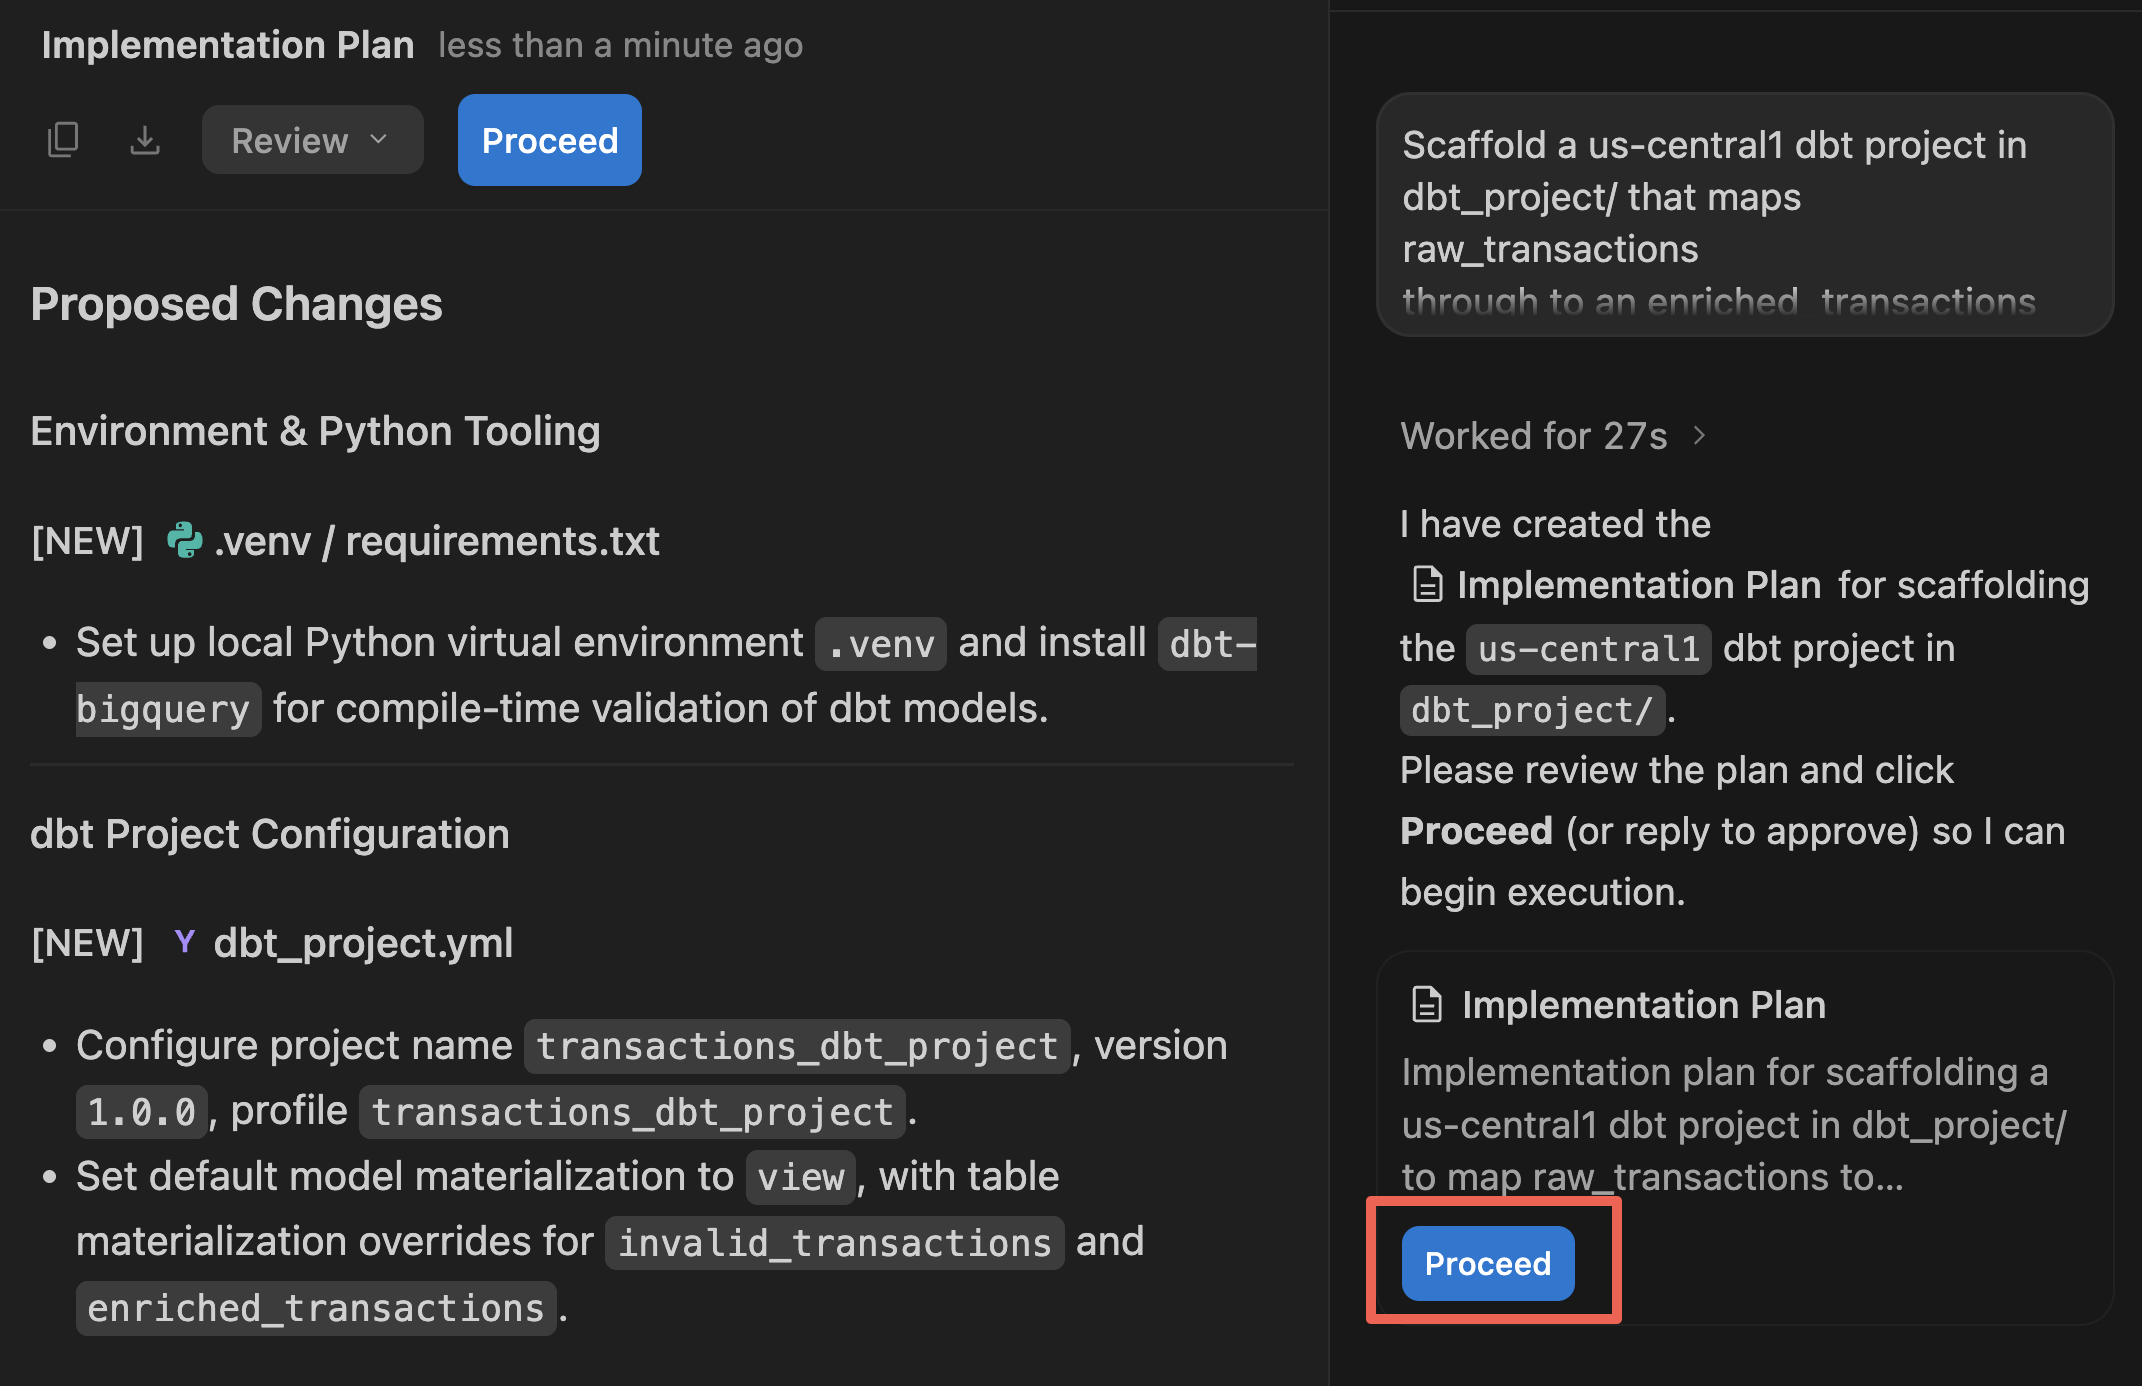
- Агент отобразит документ «План реализации» в главном редакторе. Ознакомьтесь с предлагаемой структурой файлов и логикой SQL-запросов.
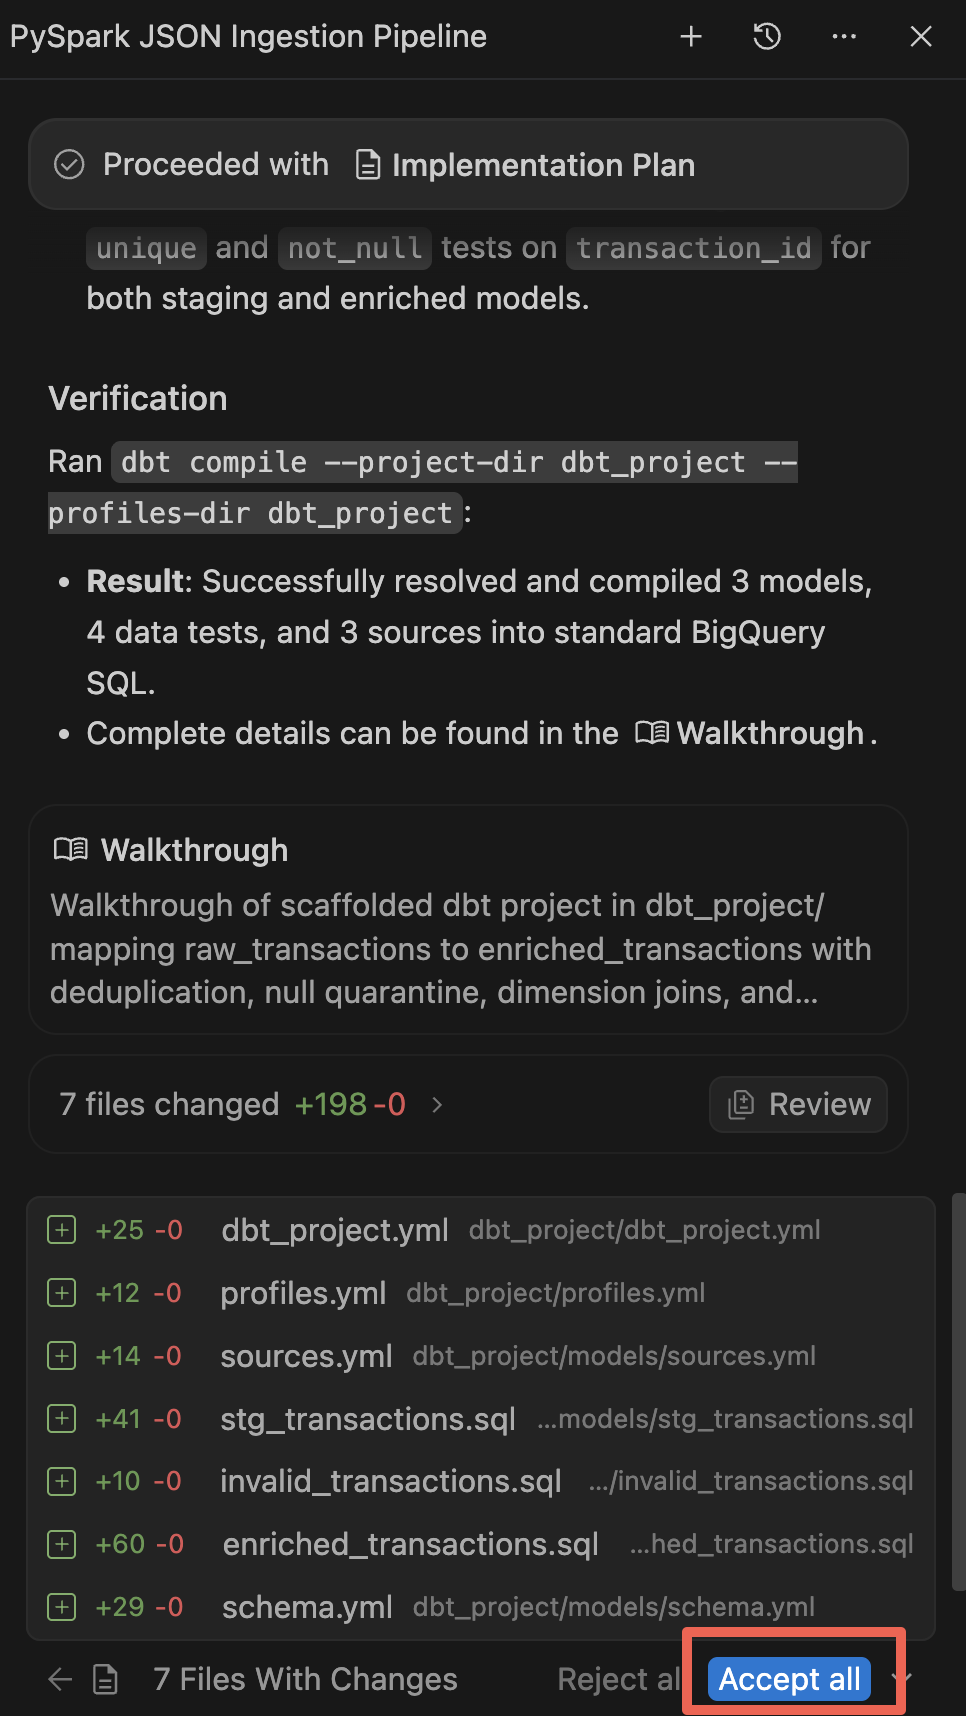
- Нажмите «Продолжить» (а затем «Принять все »), чтобы разрешить агенту сгенерировать файлы в вашем рабочем пространстве.
- После завершения генерации агент отобразит пошаговое руководство, в котором будут кратко описаны новые компоненты. При появлении запроса подтвердите все изменения.
Сборка и тестирование
Хотя агент автоматически запустил dbt compile для проверки синтаксической корректности сгенерированного SQL-запроса, теперь вам предстоит материализовать эти представления и таблицы в BigQuery и запустить тесты качества данных для локальной проверки. (Примечание: позже в лабораторной работе вы автоматизируете этот шаг dbt в рамках сквозного DAG Airflow).
- В левой панели действий щелкните значок Проводника (или нажмите
Cmd/Ctrl+Shift+E). - Разверните
dbt_project->models, чтобы просмотреть сгенерированные SQL-модели. Щелкнитеenriched_transactions.sql, чтобы открыть и просмотреть логику преобразования и обработки мошеннических операций в редакторе. - В проводнике файлов щелкните правой кнопкой мыши папку
dbt_projectи выберите «Открыть во встроенном терминале» . Это автоматически откроет окно терминала, расположенное непосредственно в нужном рабочем каталогеdbt_project. - Если у вас еще не установлен
dbt, создайте виртуальное окружение внеdbt_project/(в корневой директории вашей домашней папки или рабочей области) и установите адаптер BigQuery:
python3 -m venv ~/.venv/dbt
source ~/.venv/dbt/bin/activate
pip install dbt-bigquery
- Запустите модели dbt и соответствующие им тесты качества данных:
dbt build
- Следите за выводом терминала. dbt скомпилирует SQL-запрос, создаст промежуточные и обогащенные таблицы в BigQuery и выполнит проверку данных.
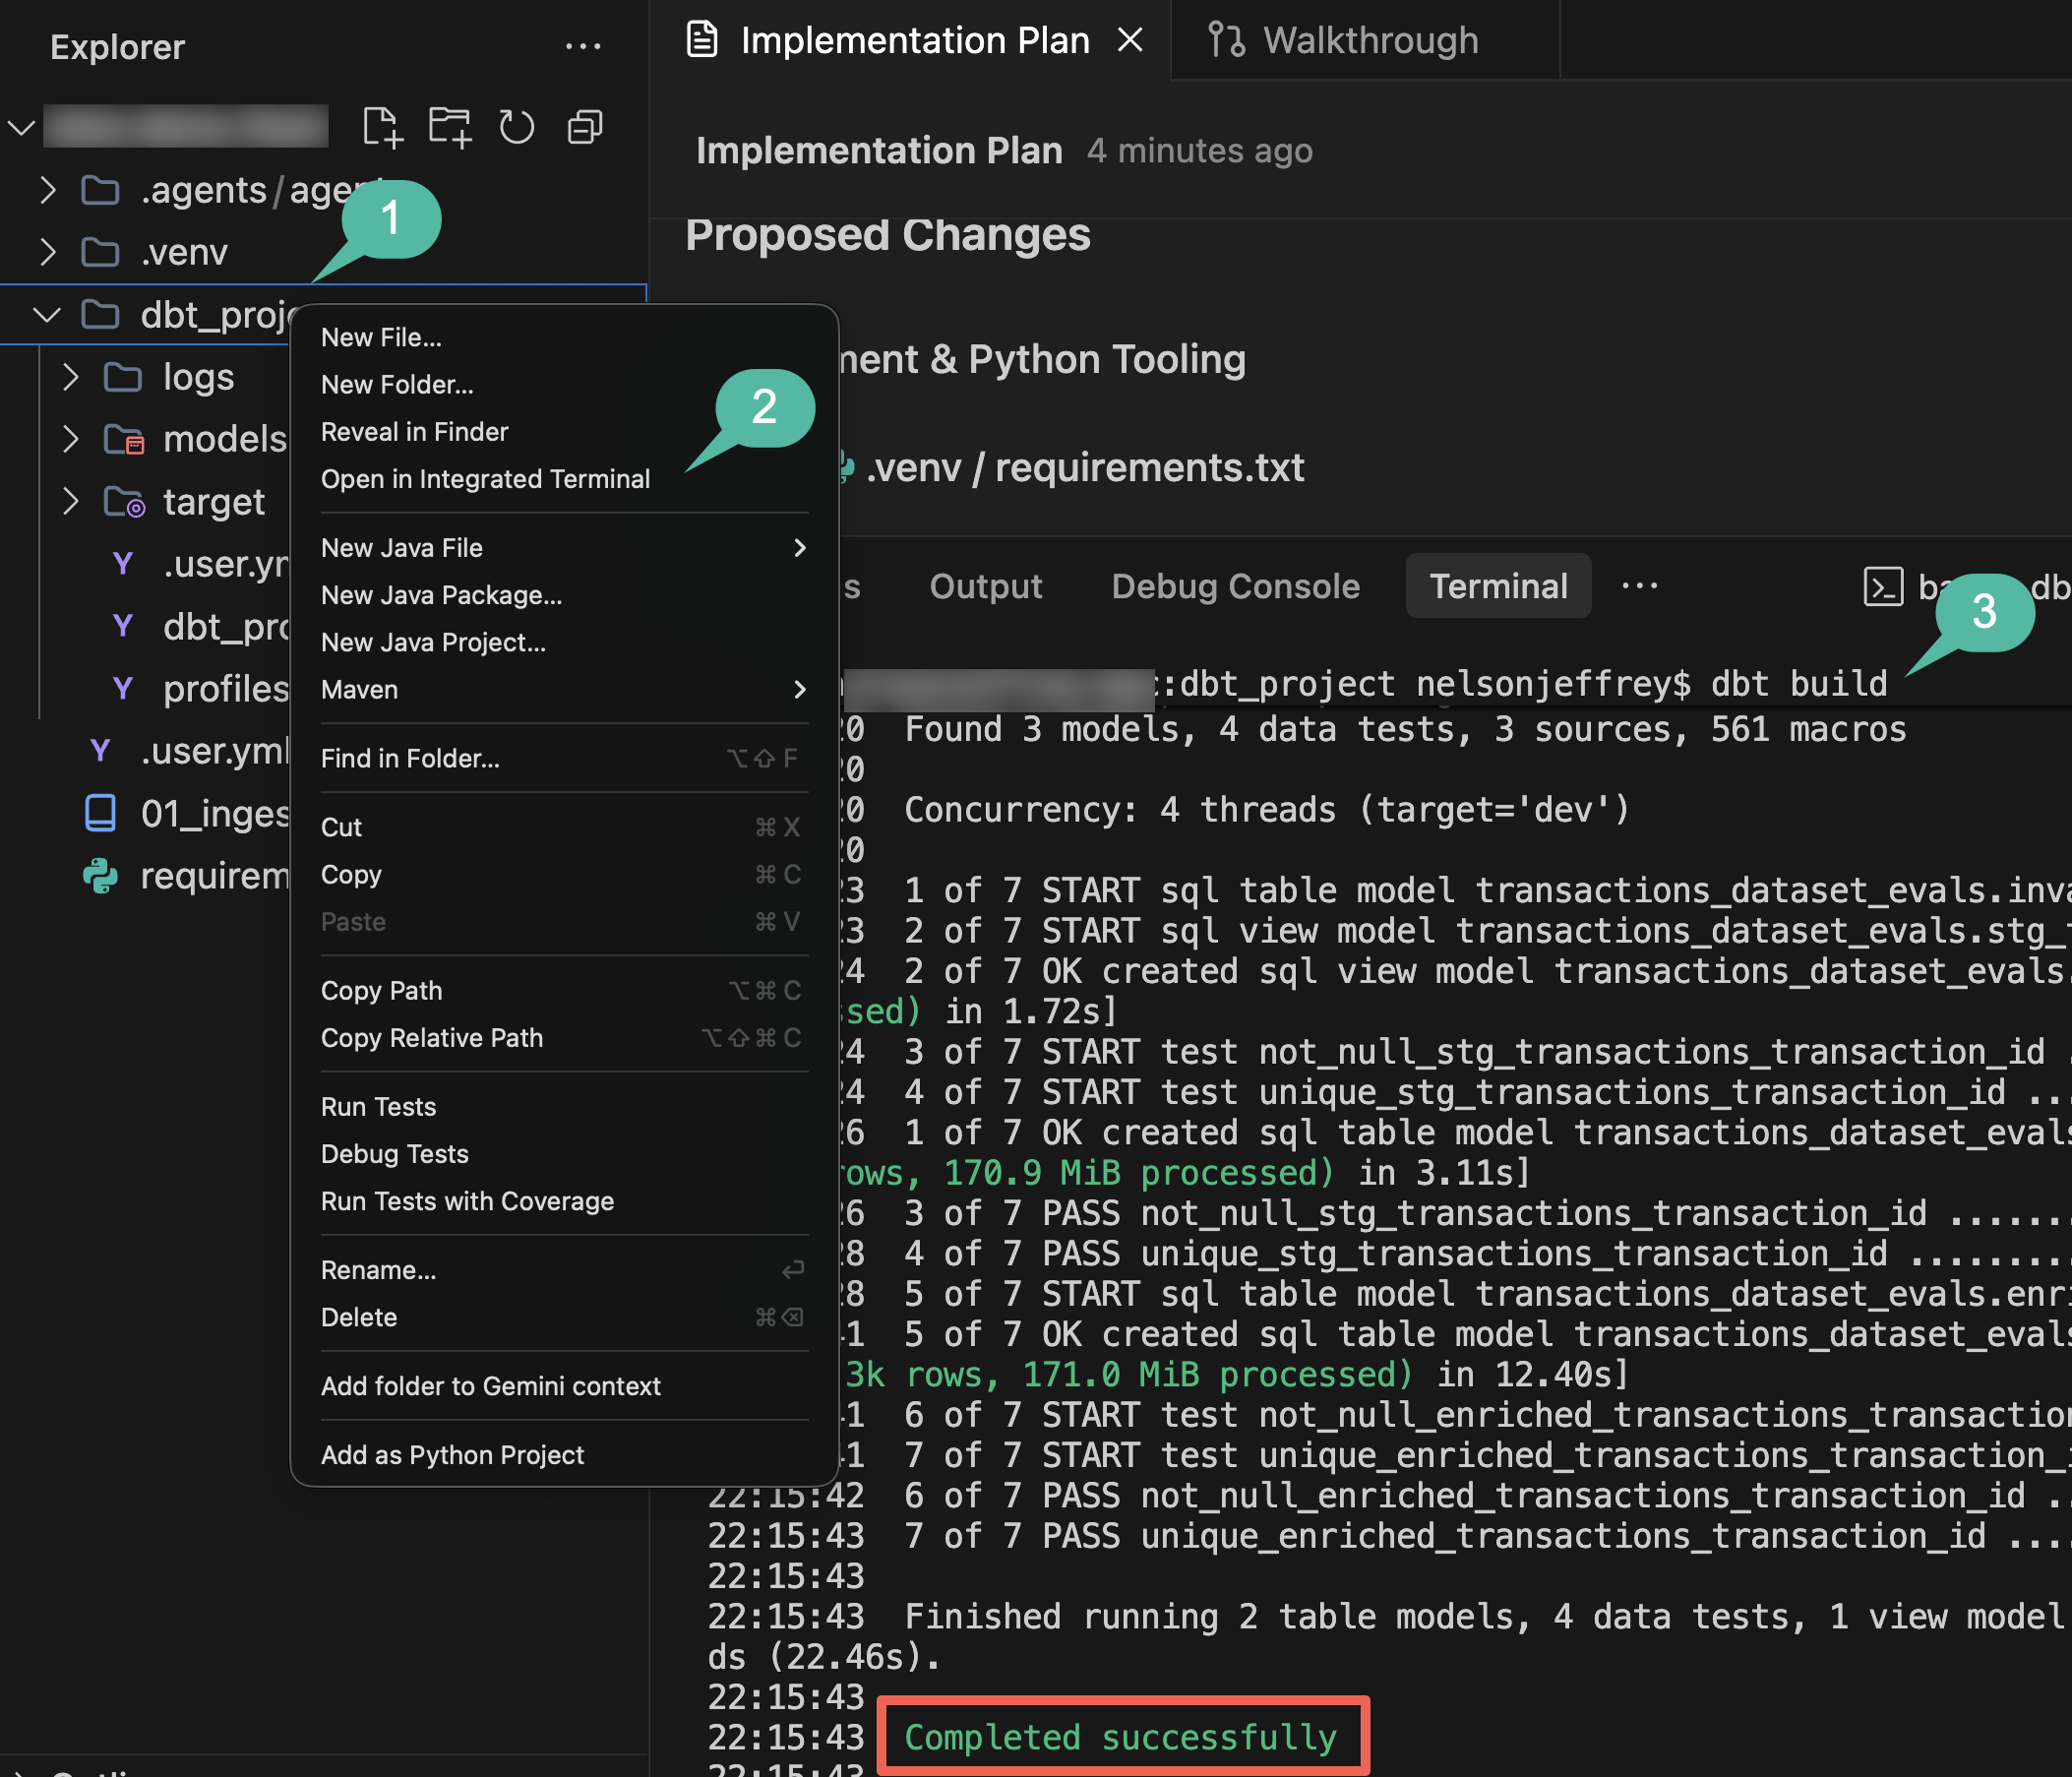
- После завершения сборки закройте окно терминала, чтобы освободить место на экране для оставшихся шагов.
Краткое содержание раздела: Вы создали проект dbt с помощью агента, провели тесты качества данных и преобразовали исходные записи в промежуточные и обогащенные таблицы BigQuery.
5. Обучение распределенной модели обнаружения мошенничества с использованием случайного леса.
Используя обогащенные данные о транзакциях, материализованные в BigQuery, вы создадите модель машинного обучения для классификации мошеннических событий. Случайный лес — это метод ансамблевого обучения, хорошо подходящий для классификации табличных данных. Запуск RandomForestClassifier на Spark Serverless распределяет обучение модели между рабочими узлами без необходимости управления инфраструктурой.
На этом этапе вы будете использовать агент для генерации конвейера обучения Spark ML.
Сгенерируйте блокнот для обучения машинному обучению.
- Откройте панель чата с агентом .
- Для создания последовательности обучения модели введите следующий запрос (не забудьте заменить
${PROJECT_ID}на идентификатор вашего активного проекта):
Create a PySpark notebook (02_training.ipynb) to train a distributed Random Forest
(RandomForestClassifier) model on the BigQuery table
`transactions_dataset_evals`.`enriched_transactions`, predicting the `is_fraud` label.
Train only on historically labeled records where `is_fraud` is not null.

One-hot encode categorical strings, scale amounts, cache the dataset in memory,
evaluate AUC, and save the evaluated model to gs://${PROJECT_ID}-models/fraud_model.
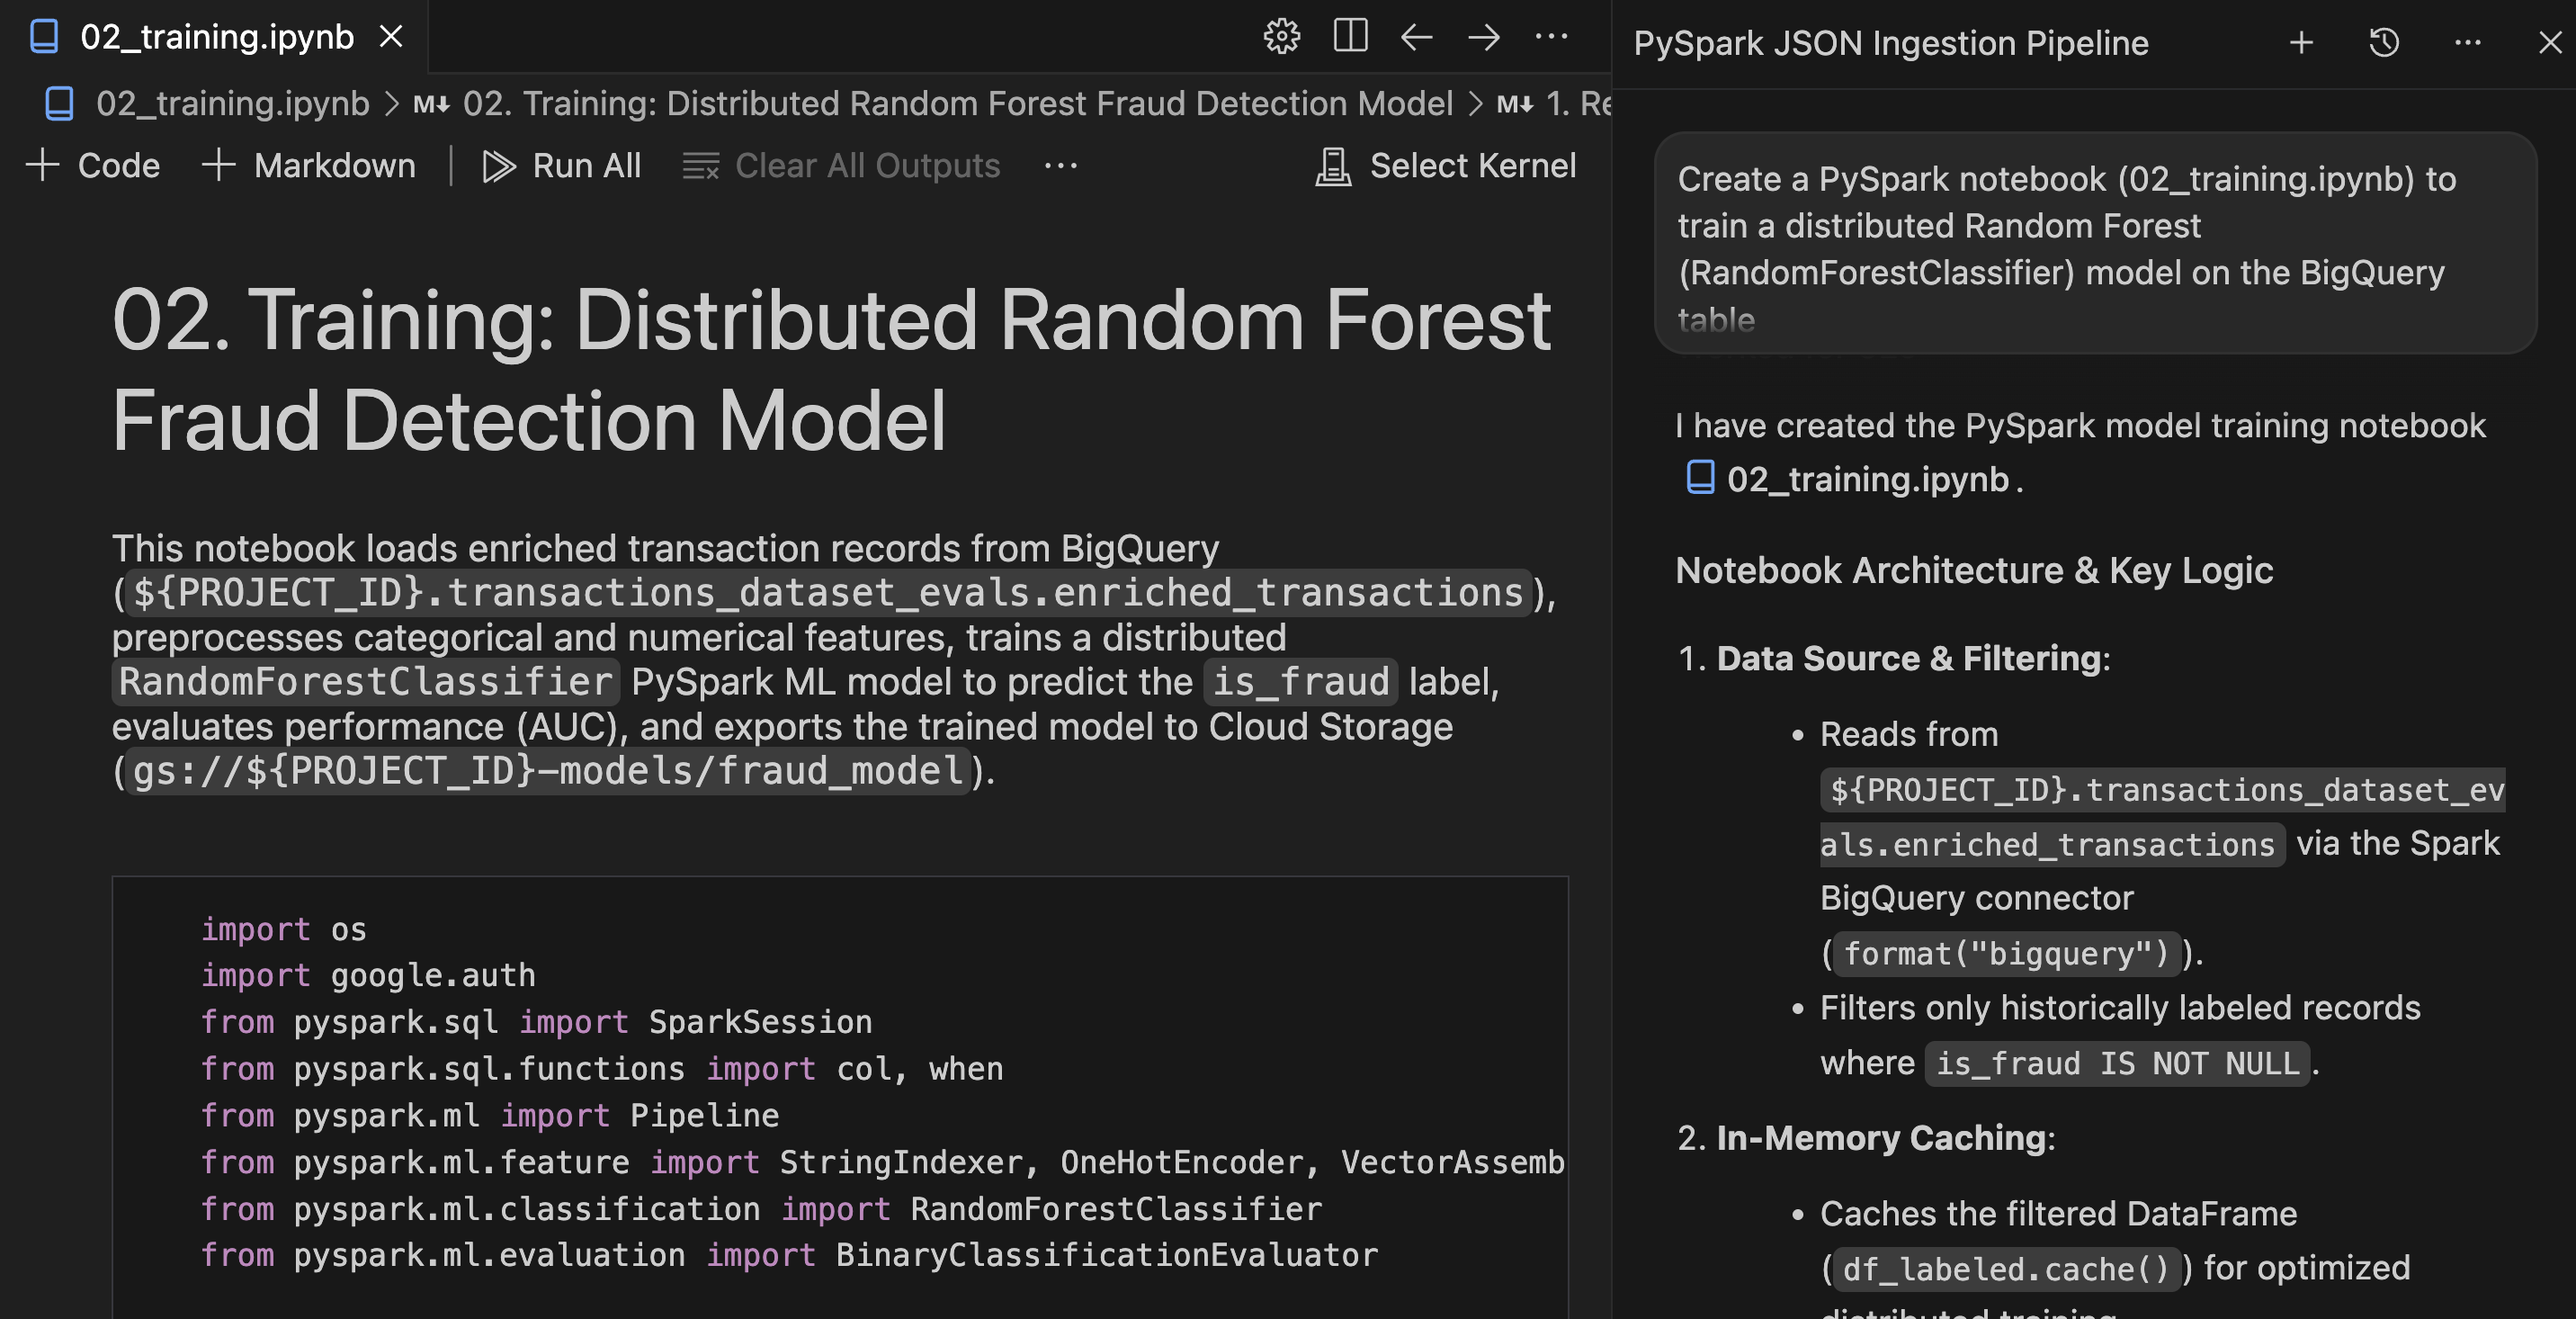
- Просмотрите план агента или сгенерированный код и нажмите «Продолжить» / «Принять все» , чтобы сохранить
notebooks/02_training.ipynbв свою рабочую область.
Просмотрите и запустите блокнот.
- Откройте
notebooks/02_training.ipynbв редакторе. - Ознакомьтесь с этапами конвейера машинного обучения PySpark, посвященными кодированию признаков, сборке векторов и логике классификации с использованием алгоритма случайного леса.
- В панели инструментов блокнота IDE нажмите кнопку «Запустить все» .
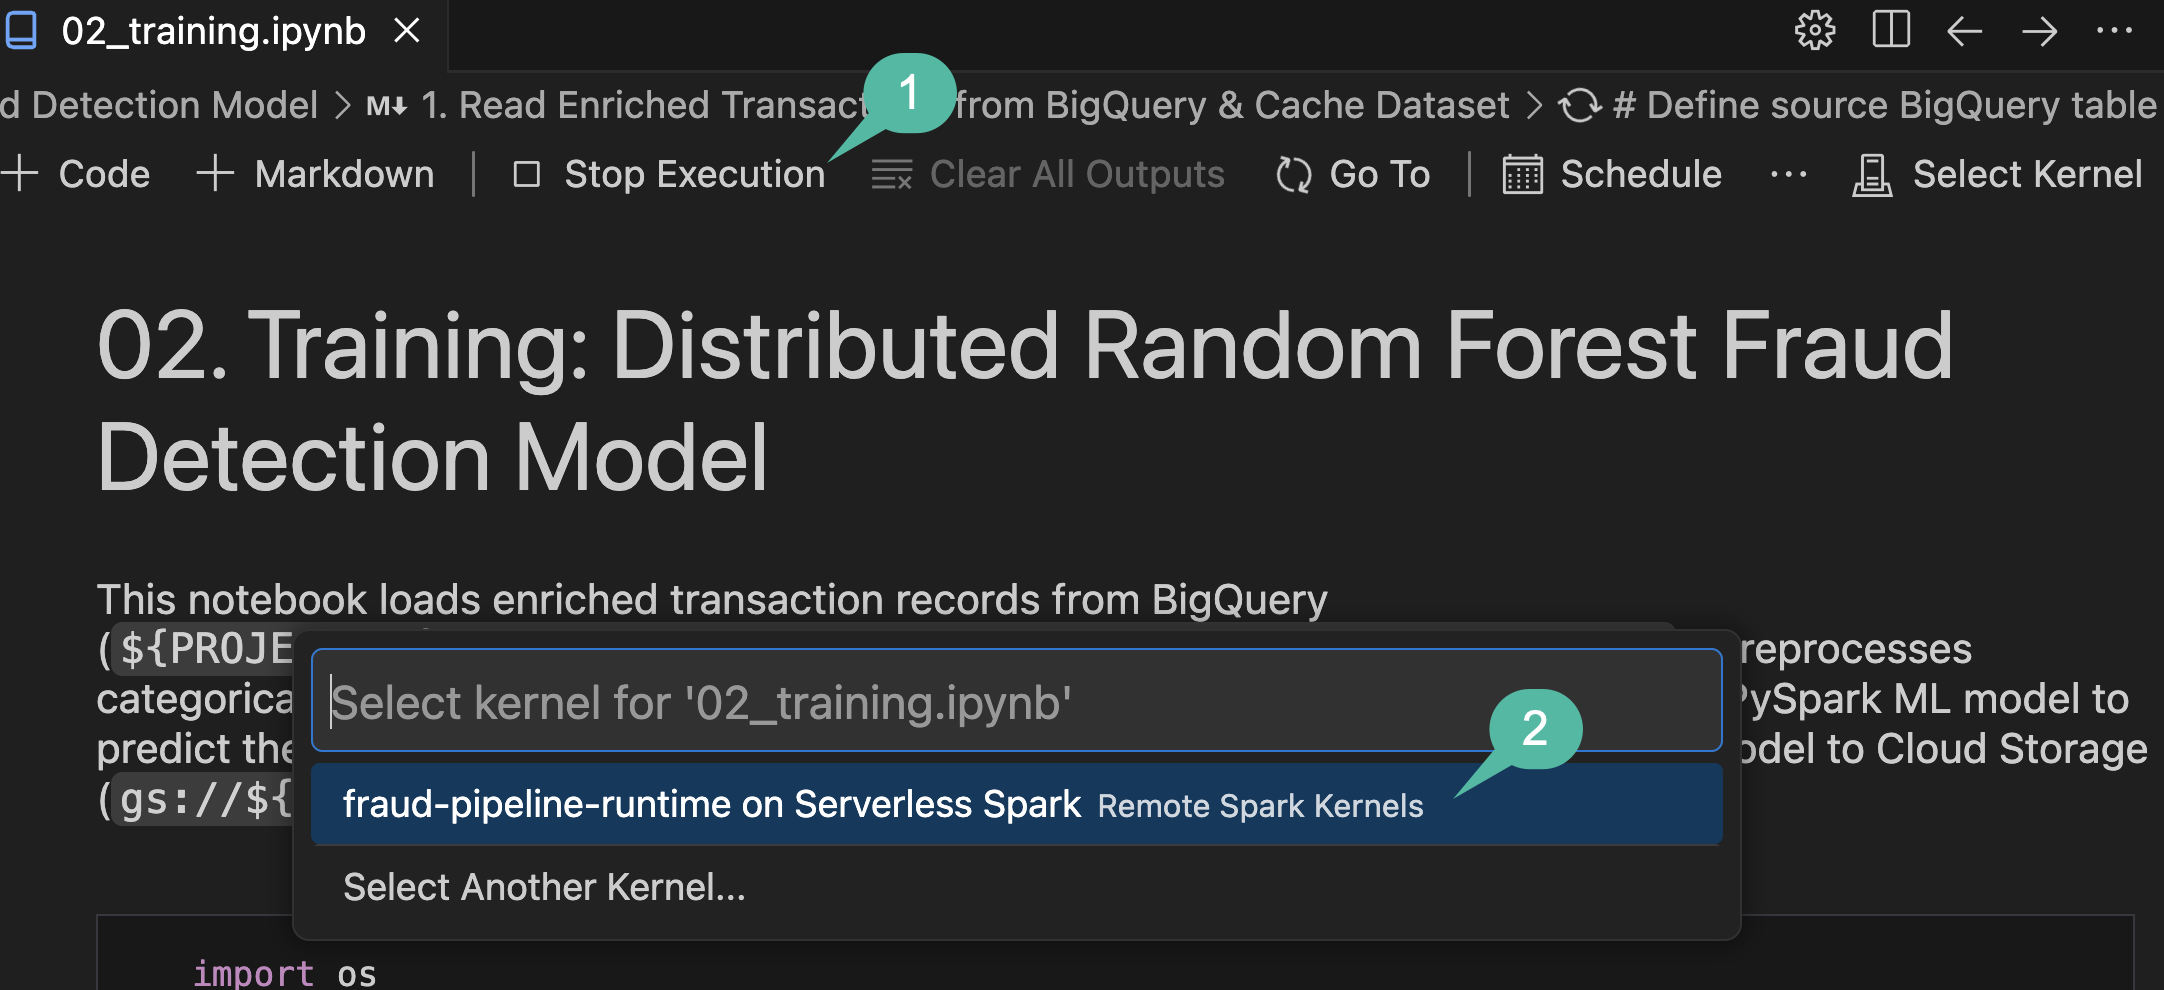
- Когда откроется выпадающее меню выбора ядра , выберите fraud-pipeline-runtime в Serverless Spark .
Проверка
После завершения выполнения убедитесь, что модель была обучена и экспортирована корректно:
- Проверьте результаты анализа ячеек в нижней части блокнота, чтобы убедиться в правильности указанного значения площади под ROC-кривой (AUC).
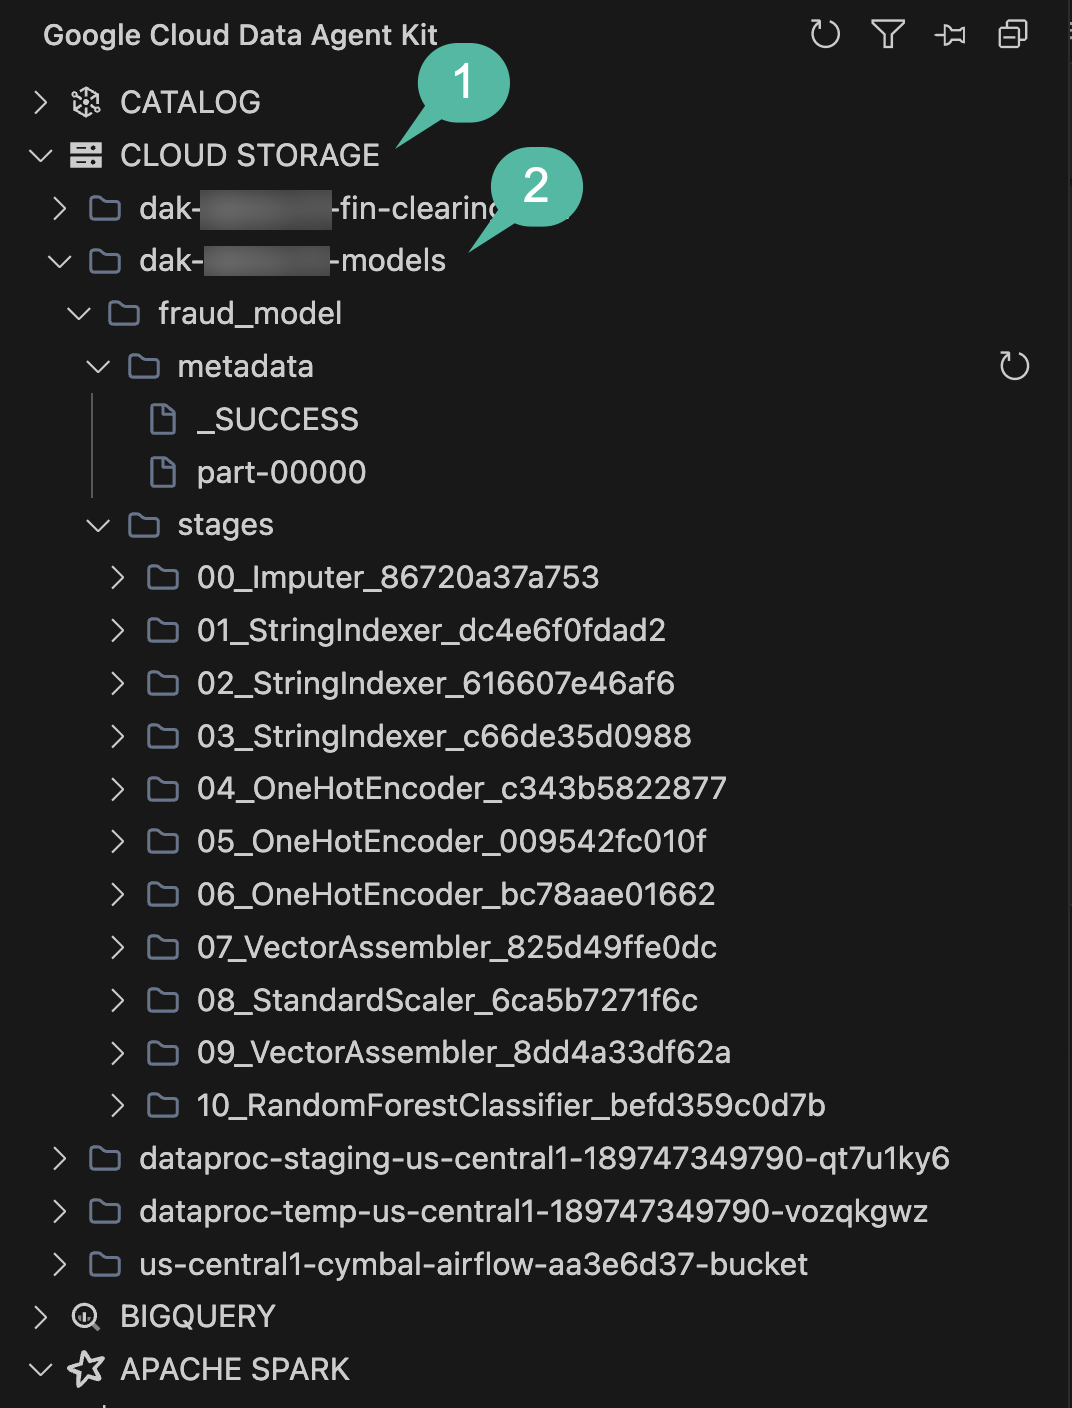
- Чтобы убедиться в успешном сохранении артефактов модели в GCS, разверните панель обозревателя STORAGE на боковой панели Data Agent Kit.
- Найдите раздел, заканчивающийся на
-models(связанный с вашим активным идентификатором проекта), разверните его и проверьте наличие каталогаfraud_modelи его этапов конвейера.
Краткое содержание раздела: Вы использовали агент для создания конвейера обучения PySpark ML, обучили модель случайного леса на обогащенной таблице BigQuery и экспортировали модель в Cloud Storage.
6. Пакетный вывод и запись в Cloud Spanner.
Используя обученную прогностическую модель, хранящуюся в Cloud Storage, вы будете запускать пакетный анализ новых транзакций, поступающих через BigQuery. Транзакции с высоким риском необходимо направлять в операционную систему для их проверки группой по соблюдению нормативных требований. Cloud Spanner предоставляет масштабируемую транзакционную базу данных для этой очереди проверки.
Сгенерируйте блокнот для пакетного вывода результатов.
Используйте агент для создания блокнота для вывода результатов, объединяющего BigQuery, Cloud Storage и Cloud Spanner:
- Откройте панель чата с агентом .
- Введите следующую подсказку:
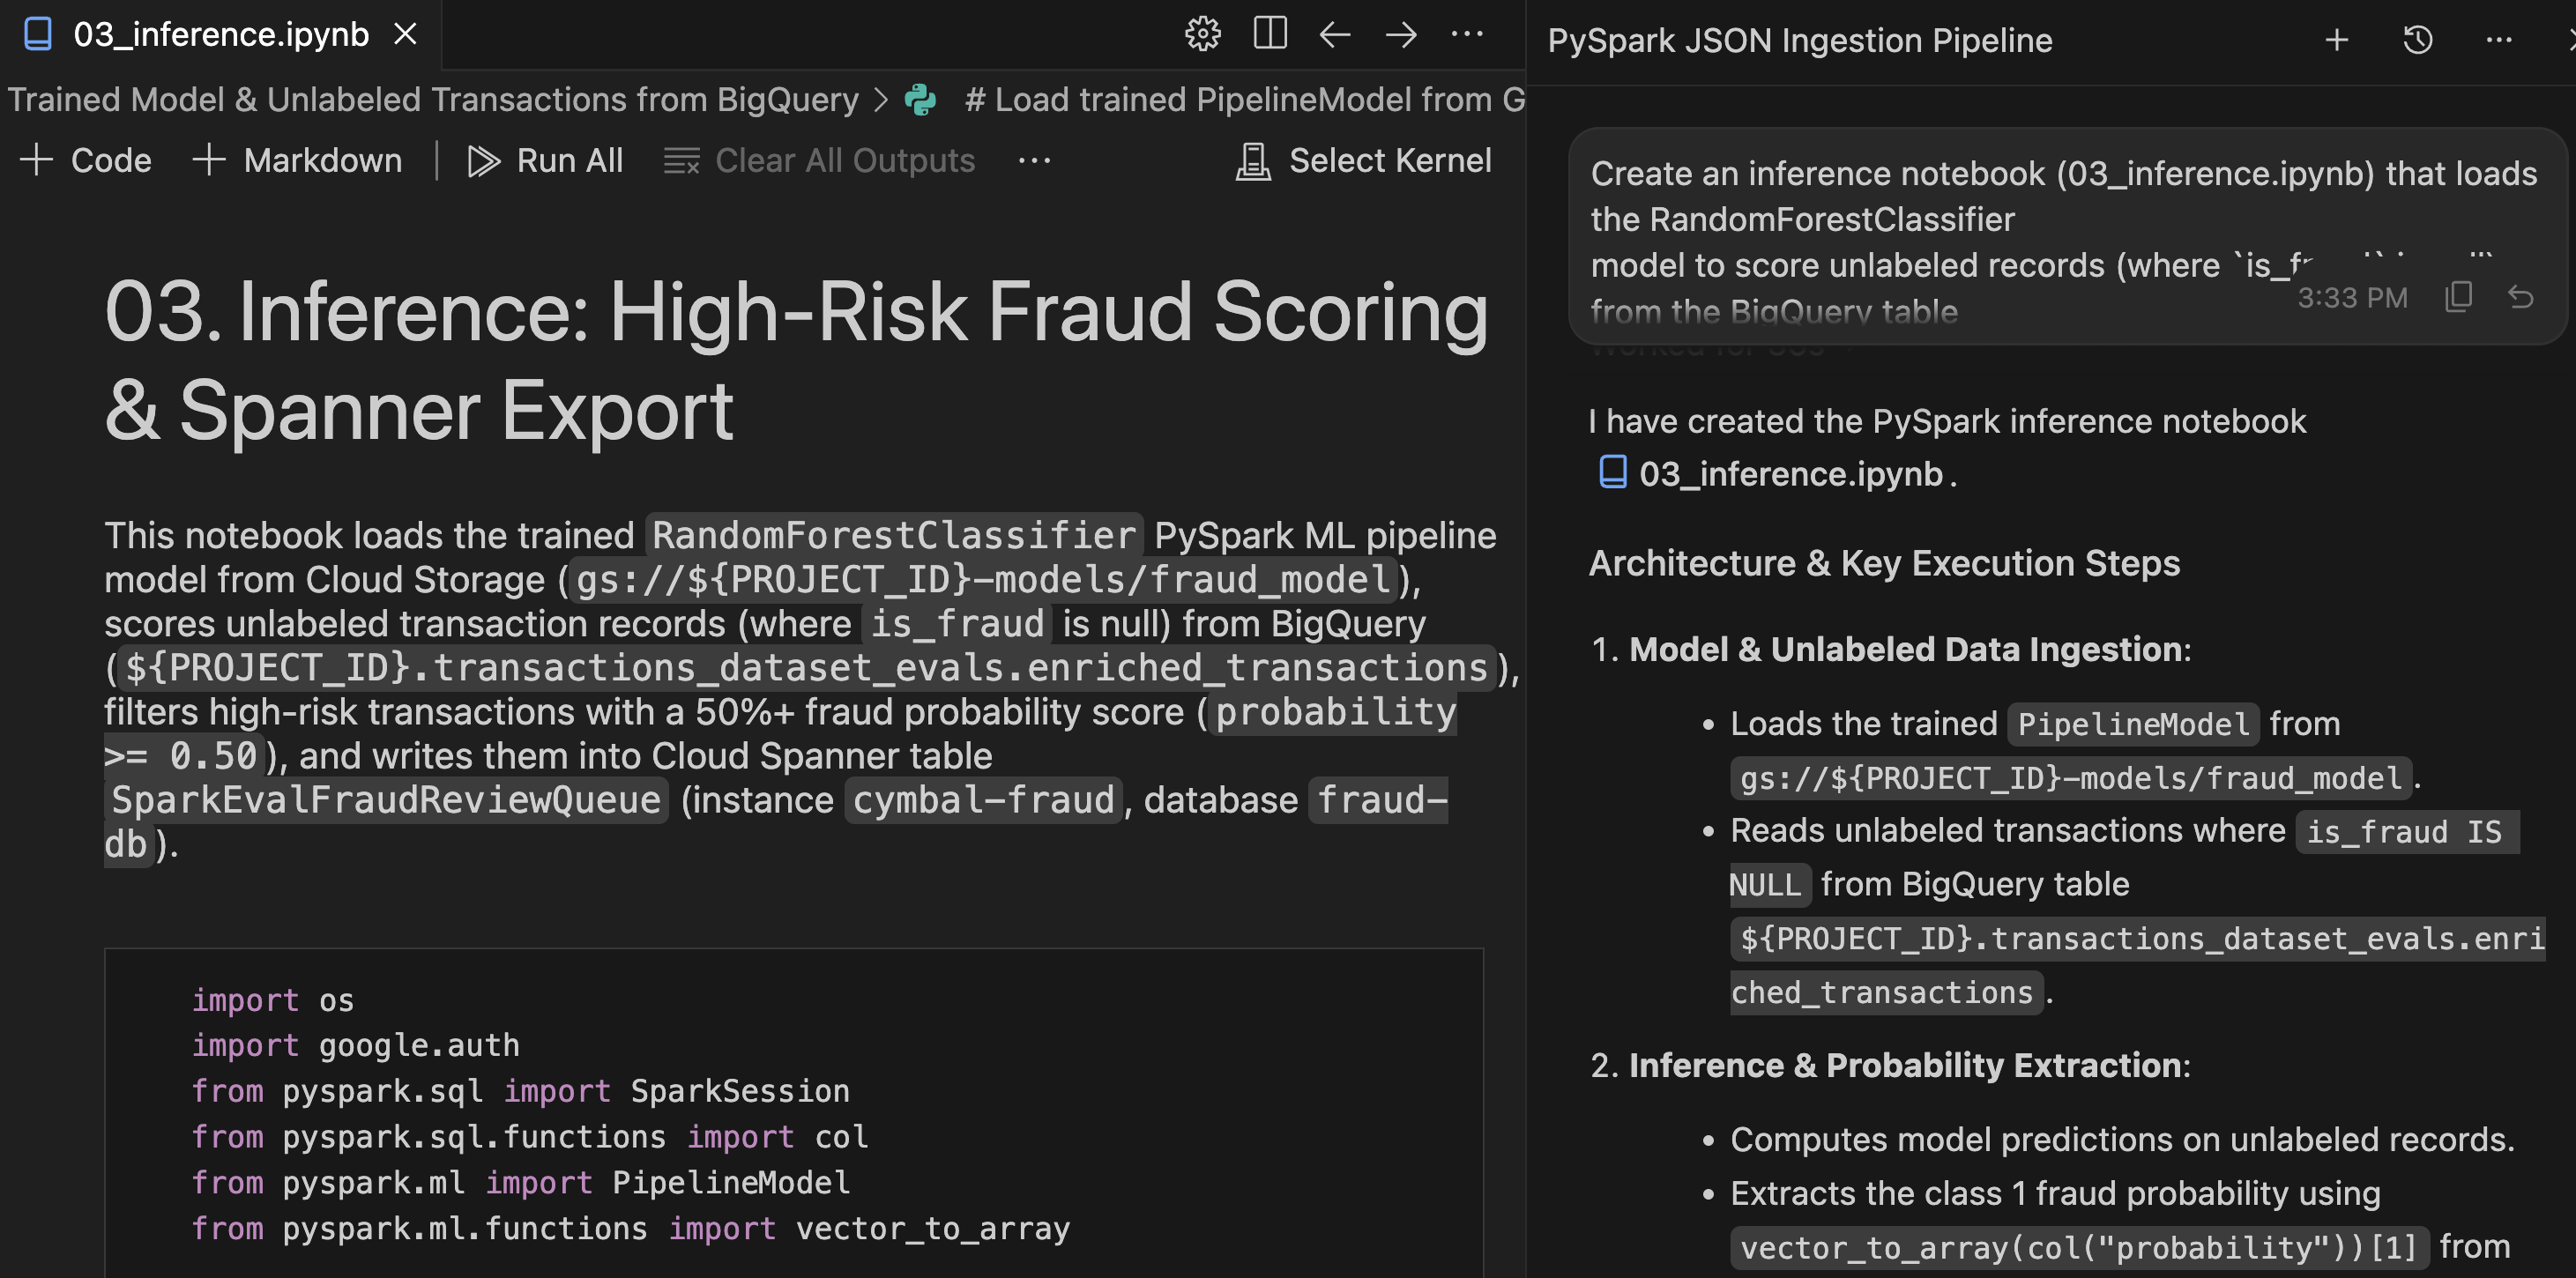
Create an inference notebook (03_inference.ipynb) that loads the RandomForestClassifier
model to score unlabeled records (where `is_fraud` is null) from the BigQuery table
`transactions_dataset_evals`.`enriched_transactions`.

Filter for high-risk transactions with a 50%+ fraud probability score (probability >= 0.50)
and write them to the Cloud Spanner table SparkEvalFraudReviewQueue in the cymbal-fraud instance
under fraud-db.
- Подтвердите создание блокнота, чтобы сохранить файл
notebooks/03_inference.ipynbв свою рабочую область.
Просмотрите и запустите блокнот.
- Откройте созданный файл
notebooks/03_inference.ipynbв редакторе. - Ознакомьтесь с последовательностью выполнения операций вывода PySpark:
- Зависимости: Шаблон Serverless Runtime предоставляет необходимые JAR-зависимости
cloud-spannerдля выполнения Spark. - Форматирование данных: Перед записью скрипт удаляет сложные векторные столбцы Spark ML (такие как исходные признаки и вероятности), чтобы привести данные в соответствие со схемой таблицы Spanner.
- Spanner Connector: Он записывает отмеченные строки, используя
.format("cloud-spanner")для добавления непосредственно в очередь проверки.
- Зависимости: Шаблон Serverless Runtime предоставляет необходимые JAR-зависимости
- В панели инструментов блокнота IDE нажмите кнопку «Запустить все» .
- При запросе на выбор ядра выберите fraud-pipeline-runtime в Serverless Spark .
Проверка
После завершения обработки блокнота вывода вы можете напрямую обращаться к операционной базе данных Spanner внутри IDE:
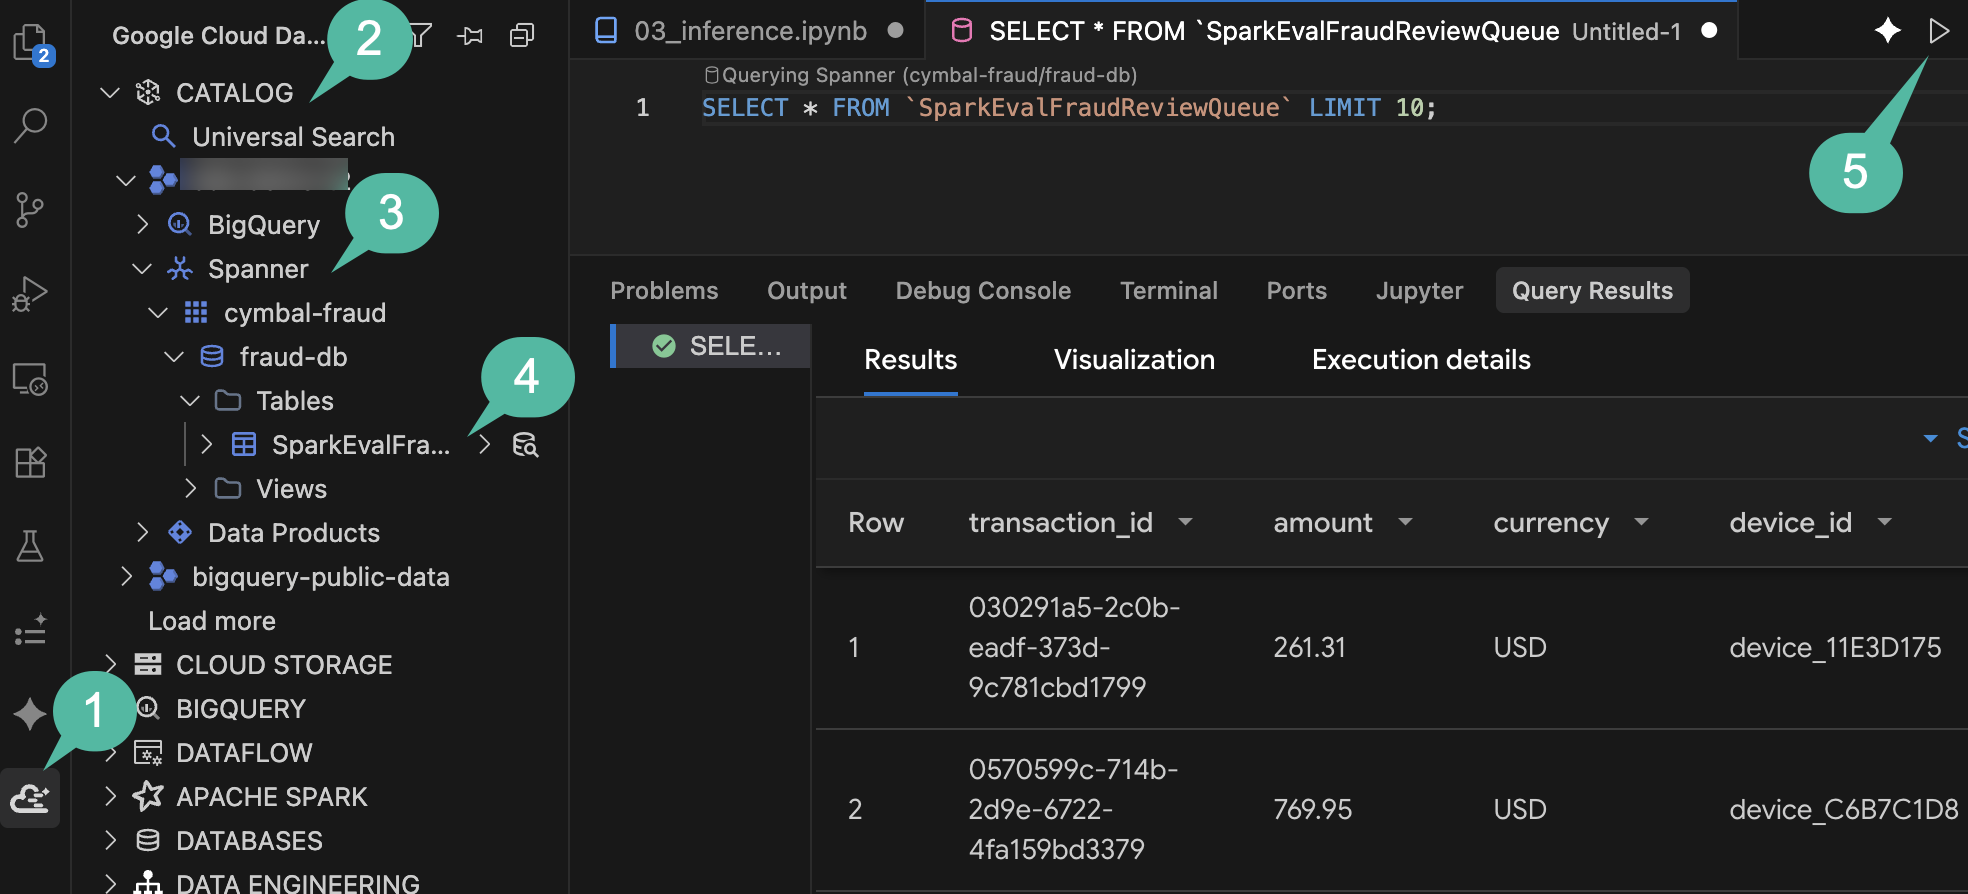
- В панели действий IDE откройте панель Google Cloud Data Agent Kit .
- Разверните раздел КАТАЛОГ .
- Разверните идентификатор вашего проекта, затем разверните Spanner .
- Перейдите в
cymbal-fraud->fraud-db->Tables->SparkEvalFraudReviewQueue. - Щелкните правой кнопкой мыши по таблице и выберите «Запрос к таблице» , затем выполните запрос:
SELECT *
FROM `SparkEvalFraudReviewQueue`
LIMIT 100;
- В панели «Результаты запроса» ниже вы увидите недавно добавленные строки, представляющие транзакции высокого риска, помеченные для ручной проверки.
Краткое содержание раздела: Вы использовали агент для создания блокнота для пакетного вывода результатов, оценивали немаркированные записи BigQuery с помощью обученной модели и записывали транзакции высокого риска непосредственно в Cloud Spanner.
7. Организуйте и управляйте процессом с помощью Managed Airflow.
В настоящее время ваш конвейер обработки данных состоит из отдельных этапов: блокнота для загрузки данных, проекта преобразования dbt и блокнота для пакетного вывода данных. Чтобы подготовить его к работе в производственной среде, вы объедините их в запланированный граф зависимостей.
Управляемая служба для Apache Airflow (ранее известная как Cloud Composer) предоставляет управляемый механизм оркестровки для этого рабочего процесса. Комплект агентов данных включает функцию конвейеров оркестровки , которая преобразует декларативные определения конвейеров YAML непосредственно в DAG-графы Airflow.
Определите конвейер обработки данных
Используйте агент для генерации конфигурации конвейера оркестрации:
- В чате с агентом введите следующую подсказку (не забудьте заменить
${PROJECT_ID}):
Initialize and define an orchestration pipeline (fraud_analysis_pipeline) triggering
the ingestion notebook, dbt project, and inference notebook in sequential order.
For Dataproc Serverless engine configs in us-central1, use resourceProfile.inline
(defining properties with spark.jars: "gs://spark-lib/spanner/spark-3.5-spanner-1.4.0.jar"
for inference) rather than resourceProfile.path or overrides.

Set the schedule interval to run daily at midnight, and use
gs://${PROJECT_ID}-airflow-artifacts for artifact storage.
Проверьте конфигурацию DAG.
Инструмент Data Agent Kit Orchestrator использует декларативные конфигурации YAML для определения и развертывания конвейеров в Apache Airflow, что позволяет контролировать версии определений и развертывать их с помощью CI/CD.
В панели «Проводник IDE» просмотрите два файла конвейера, созданных агентом в корневой папке вашей рабочей области:
-
deployment.yaml: Откройте этот файл. Он служит реестром вашей среды. Он сопоставляет ваш логический конвейерdevсо средойcymbal-airflow, устанавливает регион выполнения (us-central1) и определяет хранилищеartifact_storage, куда помещаются скомпилированные DAG-файлы и зависимости. -
fraud_analysis_pipeline.yaml: Откройте этот файл. Он определяет граф выполнения. В нем задается расписание запуска (interval: '0 0 * * *') и последовательность трех шагов в блокеactions:- Действие
notebookдля загрузки данных из файла01_ingestion.ipynb, выполняемое в среде Dataproc Serverless. - Действие
pipelineпреобразования, нацеленное на каталогdbt_project, с зависимостьюdependsOn, указывающей на этап приема данных. - Действие
notebookвывода для файла03_inference.ipynbс зависимостьюdependsOn, указывающей на шаг dbt, включающее свойство JAR Spanner.
- Действие
- Агент также сведет воедино информацию об этих сгенерированных артефактах на вкладке «Пошаговое руководство» в панели редактора, где будут описаны выполненные настройки и проверки.
Интерактивная конфигурация DAG
Data Agent Kit отображает конфигурацию вашего конвейера в виде интерактивного визуального графа для проверки и редактирования свойств DAG Airflow.
- В панели действий IDE откройте панель Google Cloud Data Agent Kit .
- В разделе
DATA ENGINEERINGразвернитеOrchestration Pipelines. - Щелкните файл
fraud_analysis_pipeline.yaml, чтобы открыть холст визуального DAG в главном редакторе.
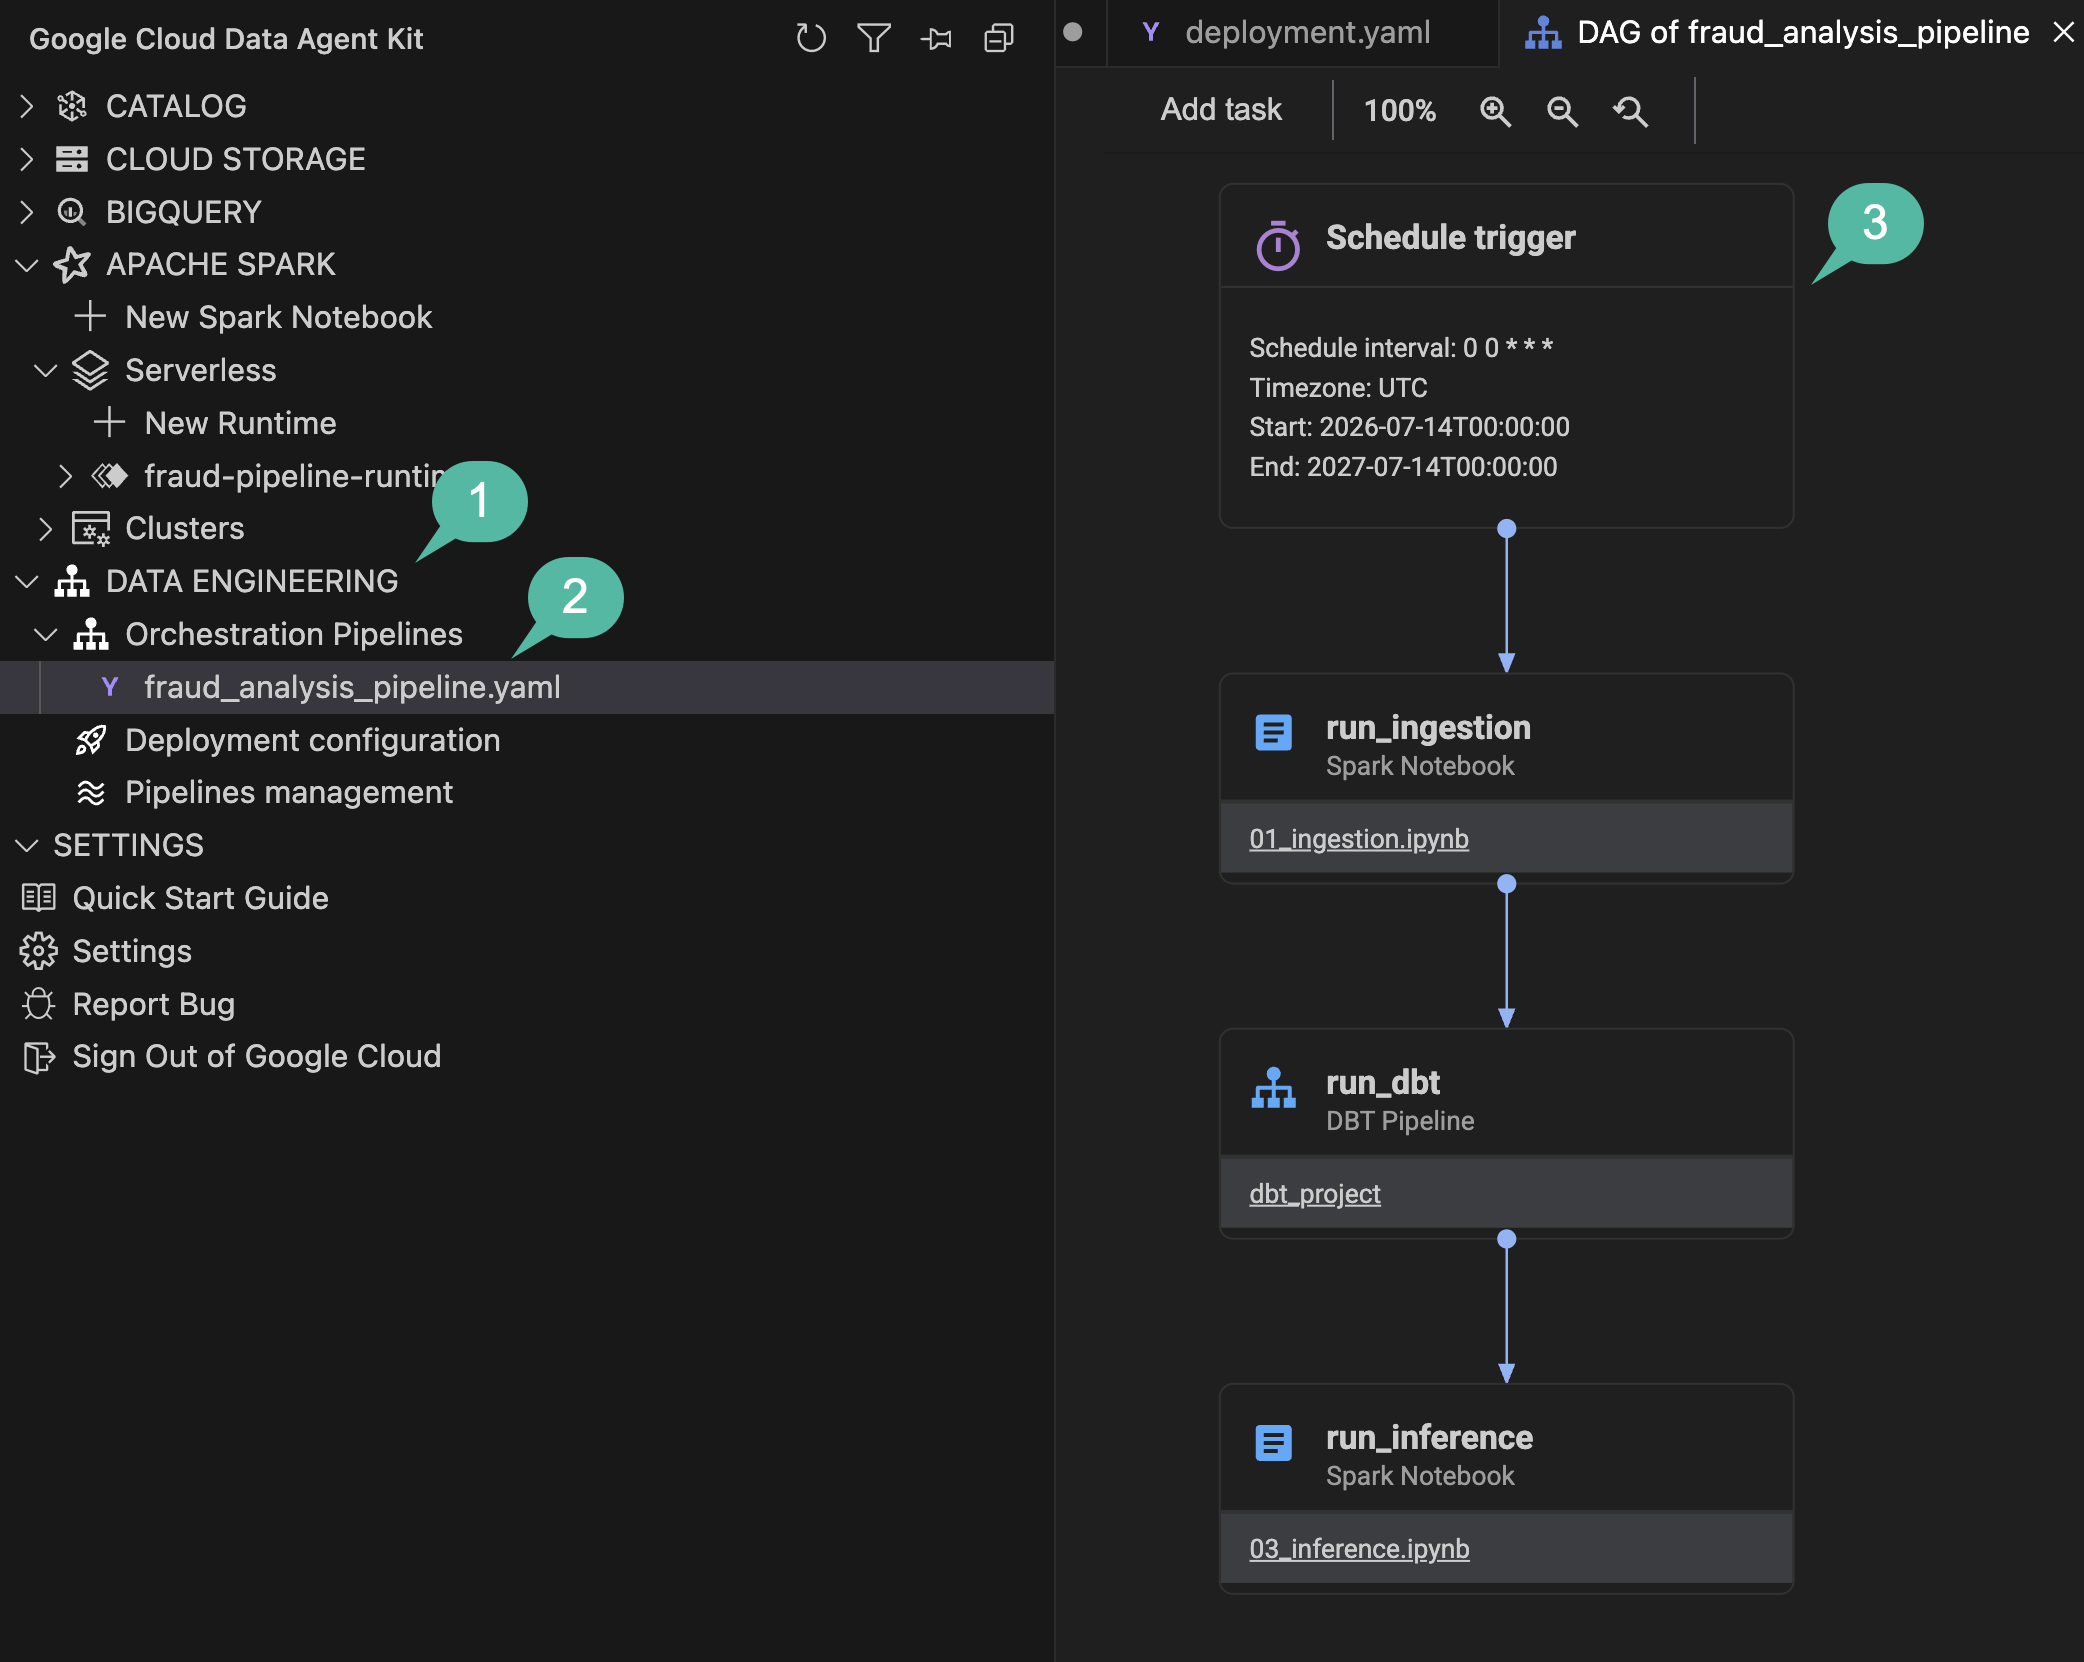
- Щелкните узел
Schedule triggerвверху. Справа откроется всплывающее окно конфигурации, отображающее разобранную строку Cron (0 0 * * *) и позволяющее настроить такие параметры, как заполнение и синхронизация. - Щелкните любой из узлов задач блокнота (например, этап ввода данных или вывода результатов). Всплывающее меню обновится, отображая конкретные сопоставления выполнения Dataproc Serverless и свойства коннектора.
- Обратите внимание на гиперссылку с именем файла блокнота (например,
01_ingestion.ipynb) внутри блока узла. Щелкнув по ней, вы откроете блокнот непосредственно в редакторе. - В левой боковой панели под разделом «Конвейеры оркестровки» нажмите
Deployment configuration. В этом окне отображаются целевой кластер средыdevи выходные артефакты сегмента GCS.
Краткое содержание раздела: Вы создали конфигурацию конвейера оркестрации с помощью агента, определив зависимости между задачами приема данных, dbt и вывода результатов на интерактивном визуальном холсте.
8. Развертывание, выполнение и мониторинг.
После определения локальной группы доступности ресурсов (DAG) вы подключитесь к управляемой среде Airflow, созданной во время настройки, и развернете конвейер.
Настройка управляемой службы для Apache Airflow
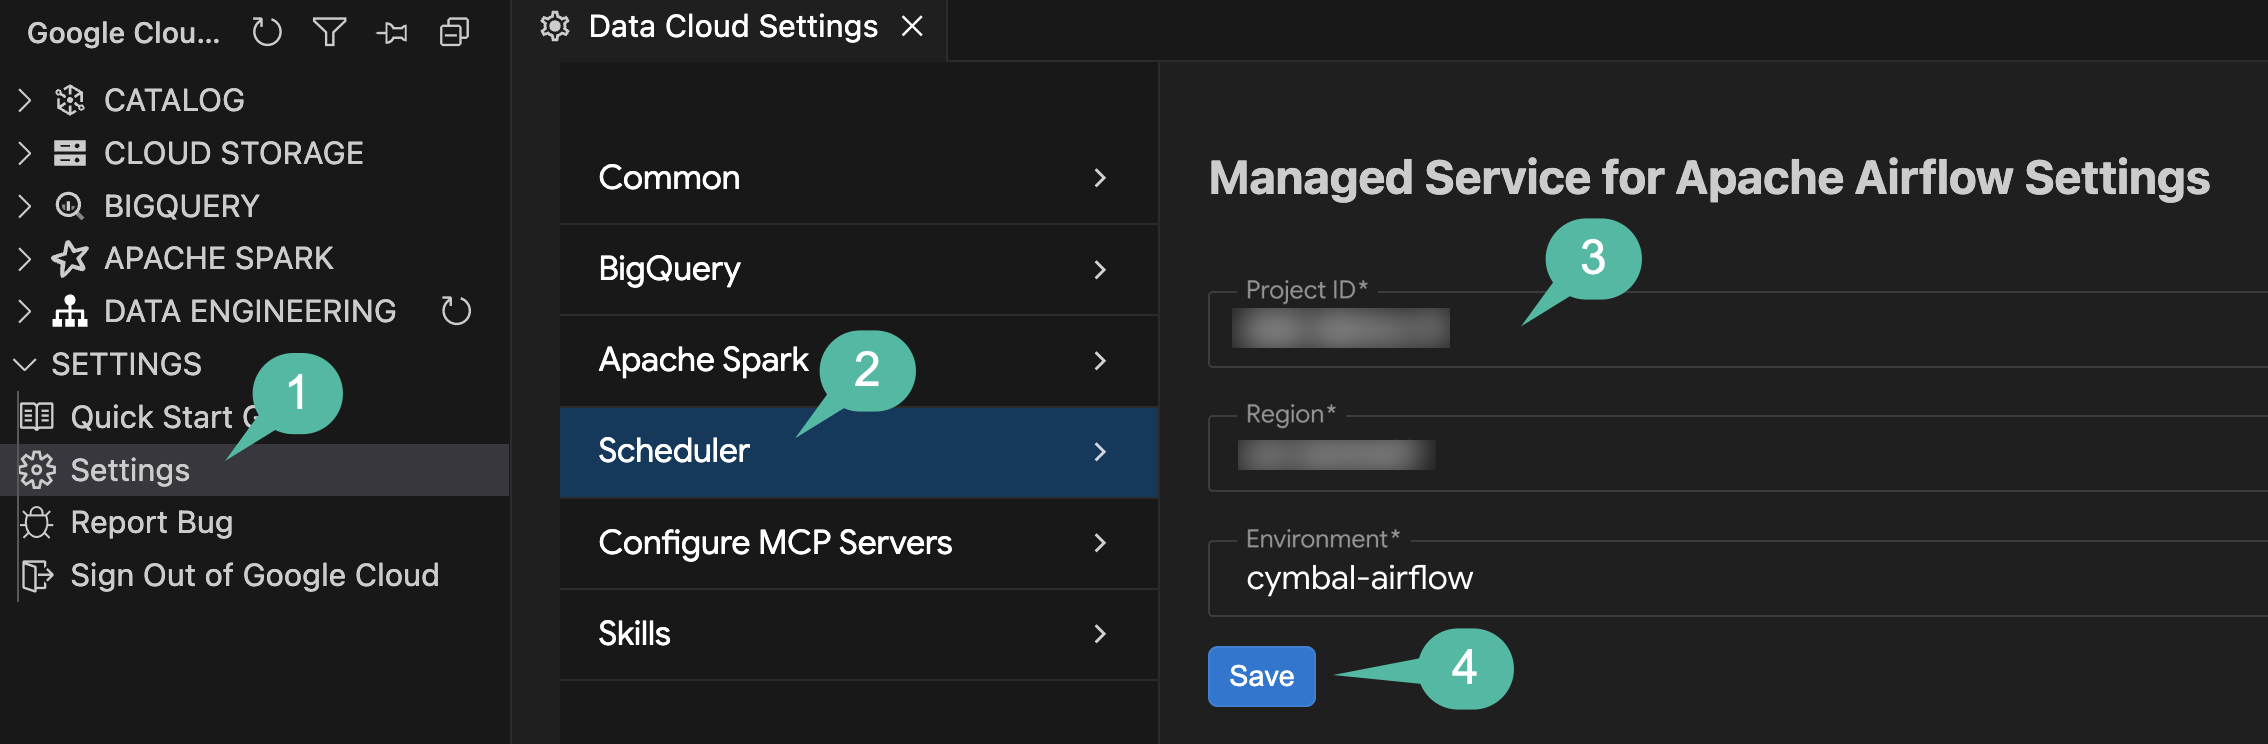
Перед развертыванием настройте подключение к планировщику в параметрах Data Agent Kit таким образом, чтобы расширение было ориентировано на вашу среду Managed Airflow:
- В панели действий IDE откройте панель Google Cloud Data Agent Kit .
- В разделе
SETTINGSнажмите «Настройки» . - Выберите «Планировщик» в левом меню.
- Настройте параметры:
- Идентификатор проекта : Выберите идентификатор вашего активного проекта.
- Регион : Выберите
us-central1. - Окружение : Выберите
cymbal-airflow.
- Нажмите « Сохранить ».
Разверните DAG
Теперь вы сможете развернуть настроенный конвейер непосредственно в вашу среду Managed Airflow с помощью визуального холста:
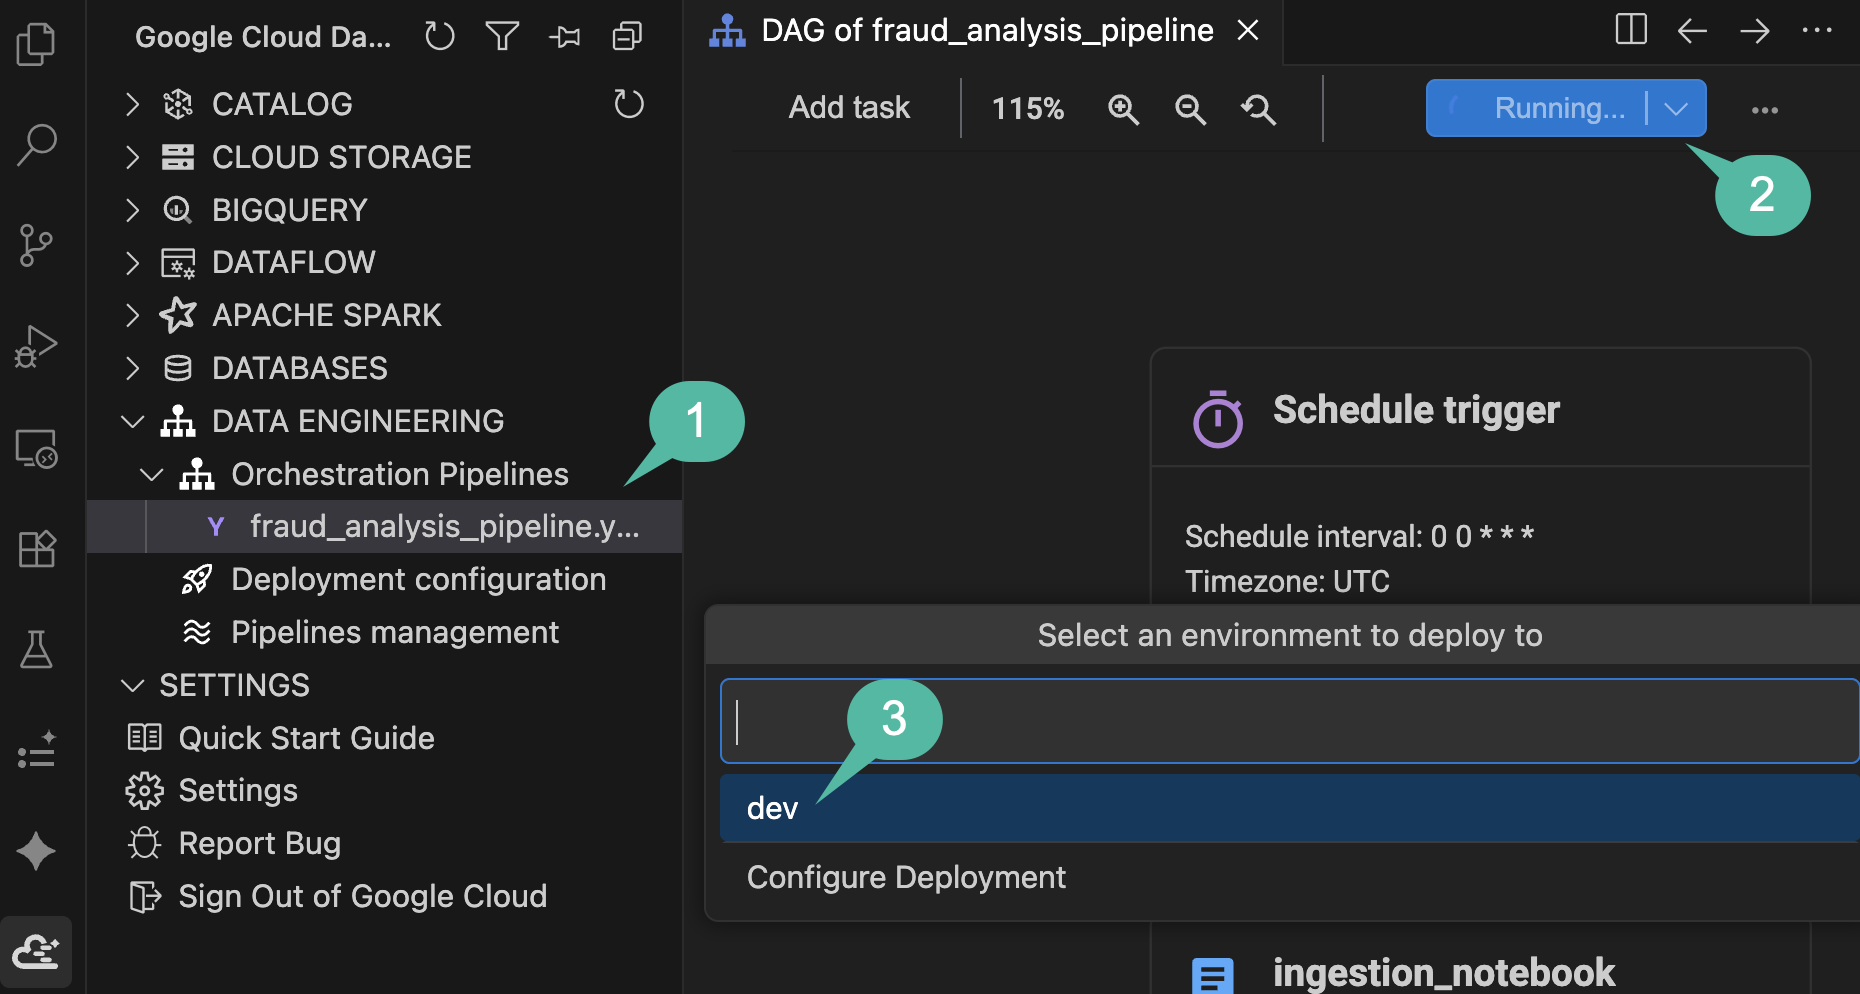
- В боковой панели Google Cloud Data Agent Kit разверните раздел
DATA ENGINEERING>Orchestration Pipelinesи щелкните файлfraud_analysis_pipeline.yaml, чтобы открыть холст визуального DAG. - В правом верхнем углу панели инструментов холста нажмите синюю кнопку «Запустить конвейер» .
- В раскрывающемся списке выбора среды выберите
dev. - Следите за уведомлением о ходе выполнения в нижней области состояния (
Running pipeline: Building pipeline locally...). Расширение автоматически скомпилирует ваш DAG, упакует ресурсы ноутбука и dbt и загрузит их в хранилище GCS вашей среды Managed Airflow (это займет около 3–4 минут).
Следите за ходом
После завершения локальной компиляции и появления всплывающего уведомления с подтверждением Triggered a new run for pipeline... successfully , отслеживайте выполнение в реальном времени:
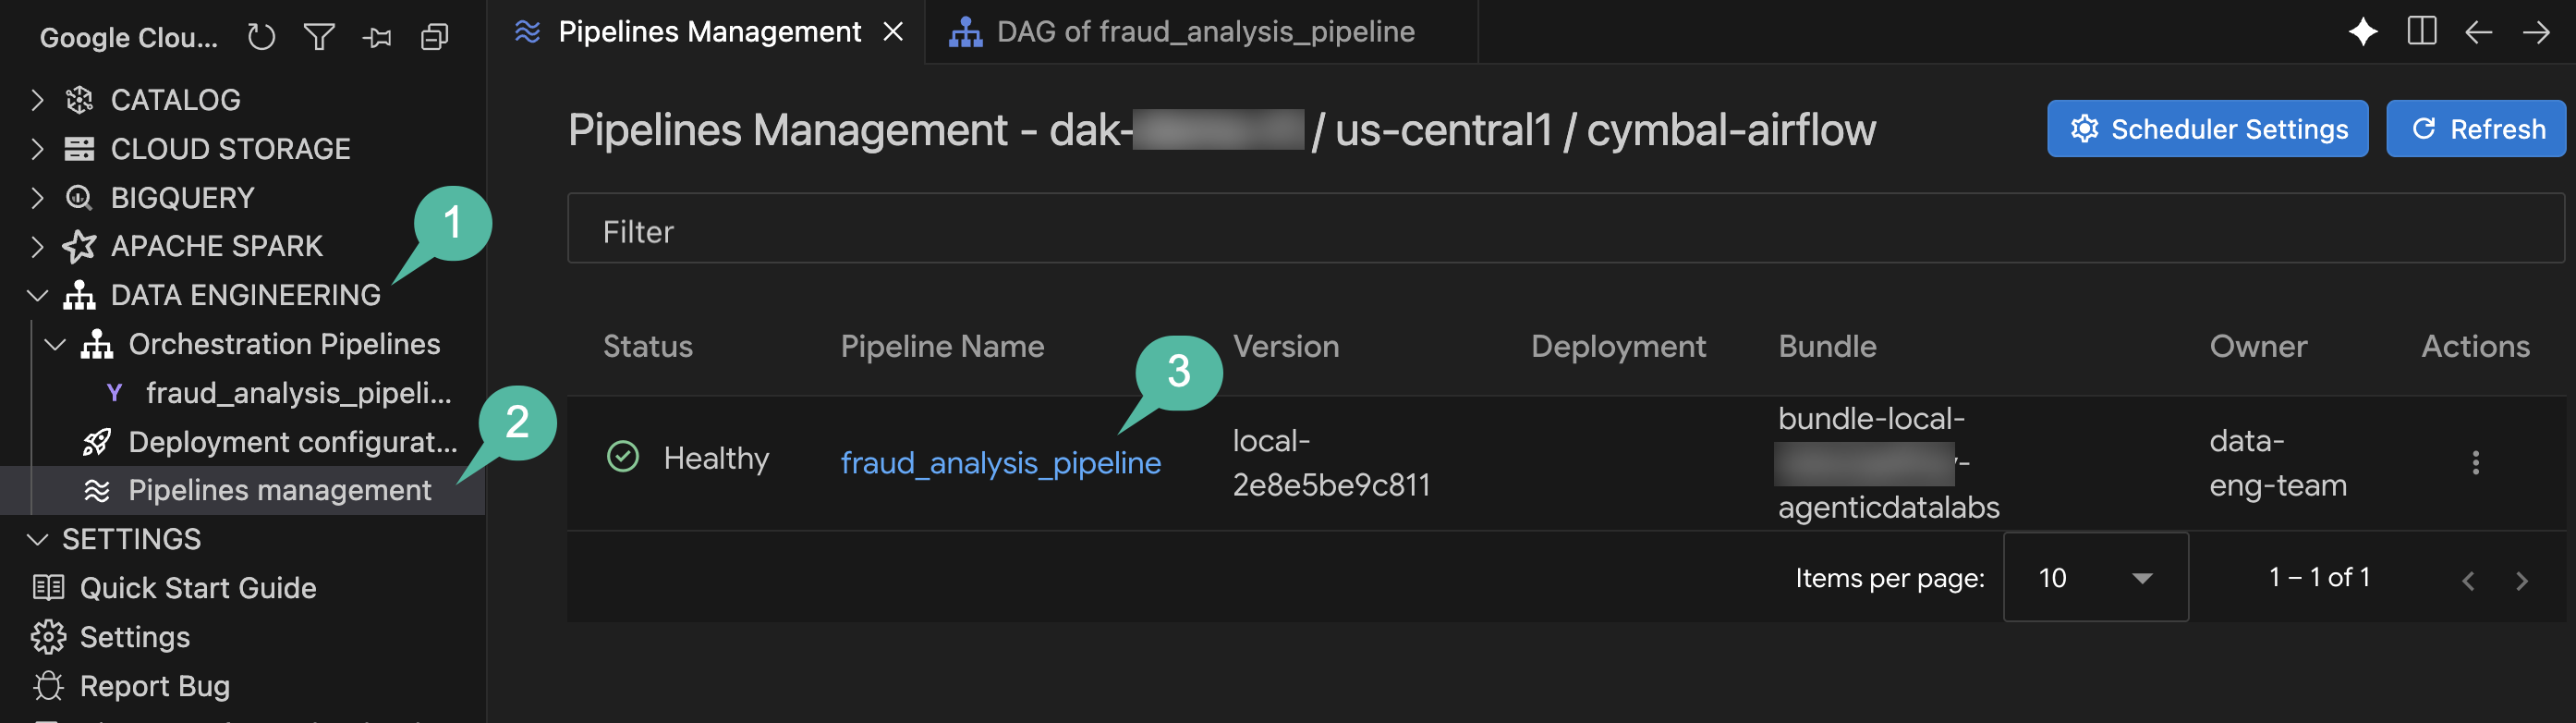
- В боковой панели Google Cloud Data Agent Kit разверните раздел
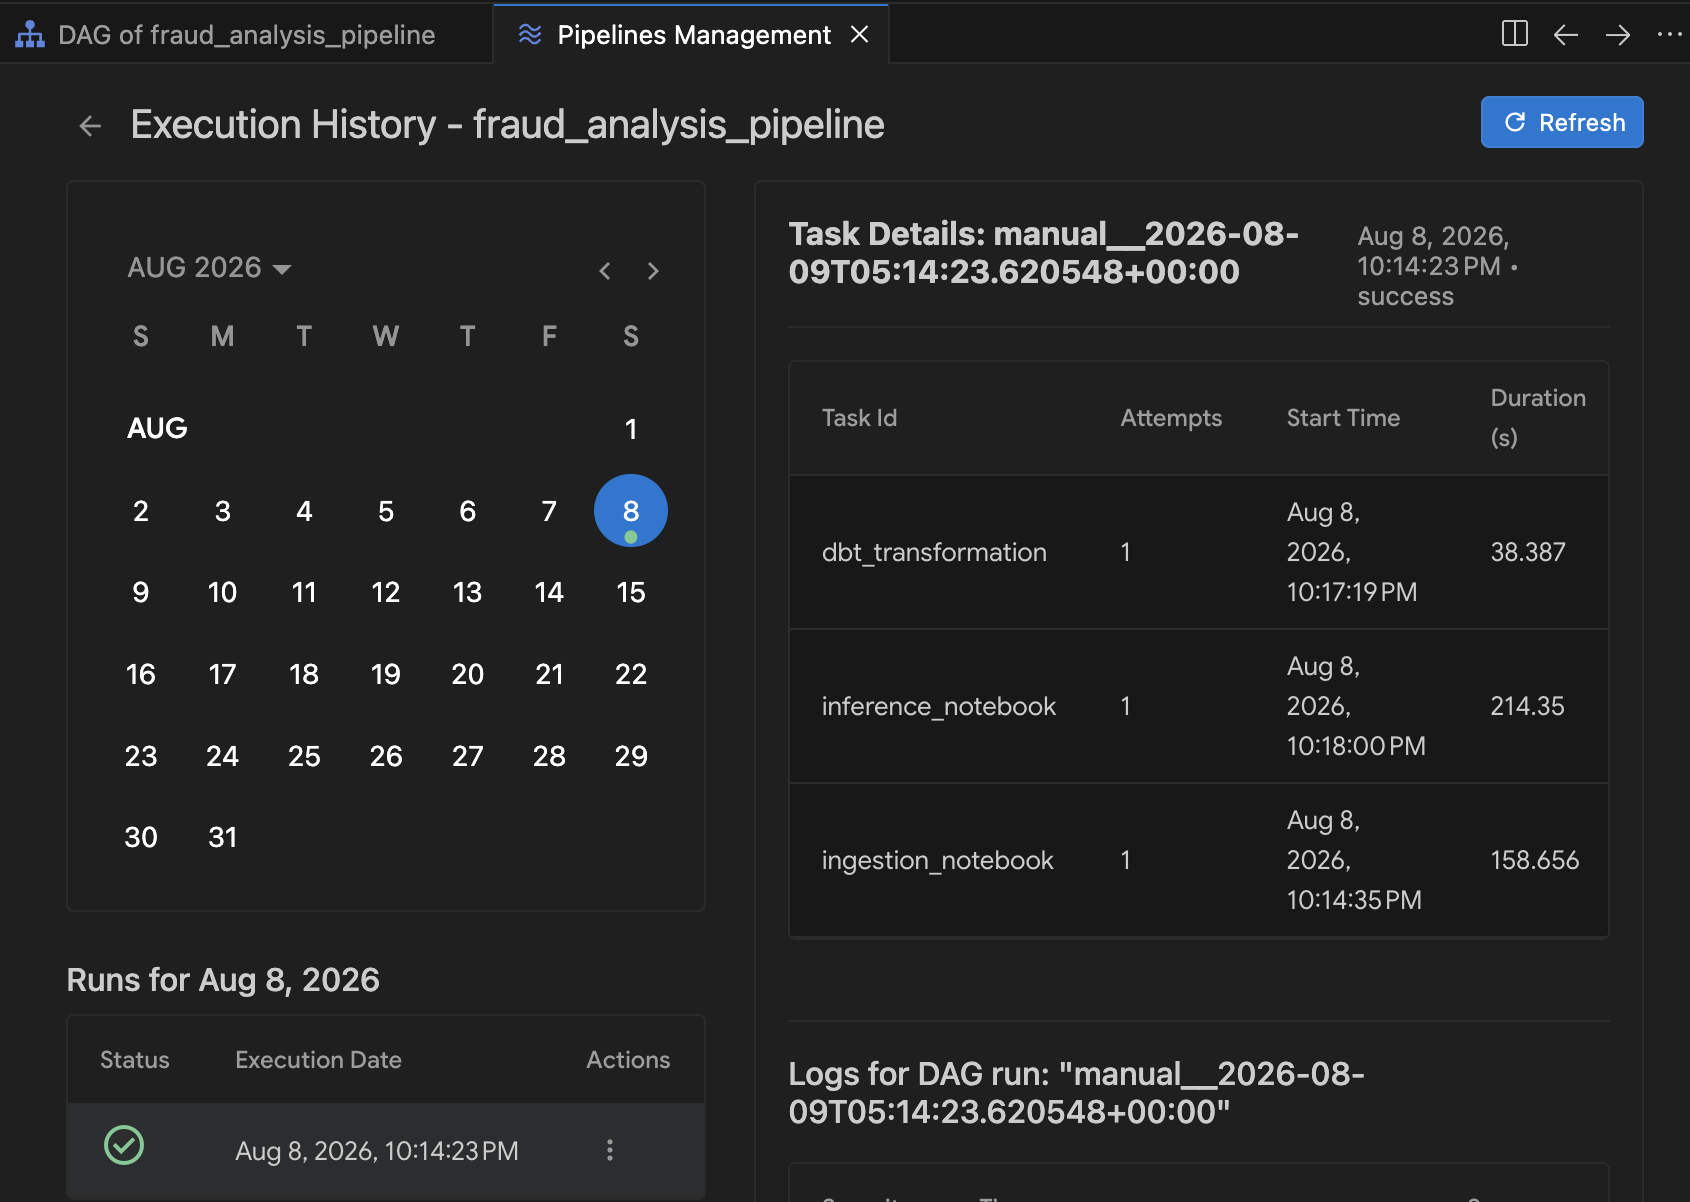
DATA ENGINEERING>Orchestration Pipelines. - Нажмите «Управление конвейерами» .
- В таблице «Управление конвейерами» щелкните по
fraud_analysis_pipeline, чтобы открыть историю его выполнения.
- В окне «История выполнения» выберите активный запуск из календаря.
- По мере выполнения каждой задачи конвейера (загрузка данных, преобразование dbt и вывод результатов) обновляются индикаторы состояния и отображается продолжительность выполнения задач. Щелкните любую задачу, чтобы просмотреть результаты ее выполнения в режиме реального времени и журналы Airflow DAG.
Краткое содержание раздела: Вы настроили подключение к планировщику Airflow, развернули сквозной аналитический конвейер в управляемом Airflow и отслеживали выполнение в реальном времени, проверяя систему от необработанных логов до окончательных прогнозов Cloud Spanner.
9. Уборка
Чтобы избежать постоянных расходов на ресурсы, используемые в этом практическом занятии, для вашего проекта Google Cloud, удалите среду с помощью автоматического скрипта.
- В панели Терминала (или в Cloud Shell) перейдите в каталог scripts и выполните следующую команду:
cd ~/devrel-demos/codelabs/agentic-data-labs/data-science/scripts
chmod +x teardown.sh
./teardown.sh
- Скрипт выведет список всех ресурсов, которые планирует удалить, и запросит подтверждение:
- Управляемая среда воздушного потока (
cymbal-airflow) - Экземпляр Cloud Spanner (
cymbal-fraud) - Набор данных BigQuery (
transactions_dataset_evals) - Сегменты облачного хранилища (
gs://${PROJECT_ID}-fin-clearing-rawиgs://${PROJECT_ID}-models) - Счет для оплаты услуг работника (
composer-worker-sa)
- Управляемая среда воздушного потока (
- Введите
yдля подтверждения. Скрипт завершения удалит все настроенные службы GCP и очистит локальные файлы.
10. Поздравляем!
Вы создали комплексный конвейер обнаружения мошенничества, охватывающий Cloud Storage, BigQuery, управляемый сервис для Apache Spark (Spark Serverless), dbt, Cloud Spanner и управляемый сервис для Apache Airflow, используя парное программирование с Google Cloud Data Agent Kit внутри среды разработки Antigravity IDE.
Чего вы достигли
- 📥 Ввод необработанных журналов транзакций в таблицу BigQuery с использованием Managed Service for Apache Spark и Data Agent Kit.
- 🧹 Данные были дедуплицированы и нормализованы путем создания проекта dbt с тестами качества данных.
- 🤖 Обучил распределенную модель случайного леса с помощью
RandomForestClassifierи экспортировал обученную модель в облачное хранилище. - ⚡ Выполнен пакетный анализ входящих транзакций, и записи с высоким риском перенаправлены в Cloud Spanner для проверки в рамках аудита.
- 🔄 Организовал, развернул и отслеживал рабочий процесс в виде запланированного DAG-графа Airflow, используя управляемую службу для Apache Airflow и инструменты визуального управления DAG в IDE.
Ключевые понятия
Концепция | Что вы узнали |
Парное программирование внутри IDE с использованием естественного языка для генерации блокнотов PySpark, настройки моделей dbt и определения DAG-графов Airflow. | |
Масштабируемое табличное хранилище для аналитического SQL, преобразований dbt и обучения машинного обучения. | |
Бессерверное выполнение для распределенной загрузки данных PySpark и обучения алгоритма машинного обучения Random Forest | |
Запись пакетных прогнозов Spark непосредственно в очереди проверки операционной базы данных. | |
Заявления YAML DAG | Декларативные определения конвейеров, отображаемые в виде интерактивных визуальных графов Airflow в IDE. |
Визуальное управление DAG | Проверка зависимостей конвейера, развертывание в Managed Airflow и мониторинг истории выполнения задач в режиме реального времени внутри IDE. |
Следующие шаги
- Ознакомьтесь с документацией по Google Cloud Data Agent Kit.
- Узнайте больше об управляемых сервисах для Apache Spark.
- Узнайте больше об управляемых сервисах для Apache Airflow.
- Создавайте собственные многосервисные конвейеры с помощью Antigravity IDE.
1. Введение
Представьте, что вы — специалист по анализу данных в компании Cymbal Financial , занимающейся обработкой больших объемов платежей. Произошла волна задержек в расчетах, и команда по соблюдению нормативных требований подозревает скоординированное мошенничество. Вам необходимо создать конвейер для обработки необработанных журналов транзакций клиринговой палаты, очистки данных, обучения модели машинного обучения, выполнения пакетного вывода и отправки транзакций высокого риска в очередь проверки Cloud Spanner для ручного аудита.
Обычно это требует нескольких дней написания повторяющегося кода настройки (блокноты Spark, конфигурации dbt, скрипты обучения, DAG-графы Airflow) и постоянного переключения между консольными интерфейсами и редакторами.
В этом практическом занятии вы будете работать в паре с агентом, используя Google Cloud Data Agent Kit (DAK) внутри среды разработки Antigravity IDE . Используя разговорный естественный язык, агент поможет вам создавать блокноты Spark, компилировать проект dbt, создавать цикл вывода и управлять рабочим процессом с помощью управляемого сервиса Apache Airflow .
Что вы будете делать
- Загрузка журналов из облачного хранилища с использованием управляемого сервиса для Apache Spark (Spark Serverless) в таблицу BigQuery .
- С помощью dbt можно выполнить дедупликацию и нормализацию транзакций для создания чистых слоев данных (исходные, промежуточные, обогащенные).
- Обучите распределенную модель классификации Random Forest (
RandomForestClassifier) на Spark Serverless. - Запускайте пакетный анализ новых транзакций и записывайте оповещения о высоком риске непосредственно в Cloud Spanner .
- Организуйте, визуально настройте и разверните весь конвейер с помощью управляемого сервиса для Apache Airflow и интерактивного мониторинга DAG внутри IDE.
Что вам понадобится
- Веб-браузер, например Chrome.
- Проект Google Cloud с включенной оплатой (для практических занятий рекомендуется использовать новый, выделенный проект).
- Базовые знания SQL, Python и PySpark.
- Antigravity IDE с подпиской Google AI Pro (рекомендуется)
Стоимость ресурсов, созданных в этом практическом задании, должна быть менее 5 долларов. Обязательно следуйте инструкциям по очистке в конце задания, чтобы удалить выделенные ресурсы.
2. Настройка среды
Для начала лабораторной работы вам потребуется запустить скрипт начальной загрузки. Этот скрипт автоматически включает необходимые API GCP, создает сегмент Cloud Storage для приема данных, генерирует фиктивные наборы данных транзакций и каталогов, загружает справочные каталоги в BigQuery и запускает фоновое выделение ресурсов Cloud Spanner и управляемого сервиса для Apache Airflow (ранее известного как Cloud Composer).
Выберите или создайте проект
Выберите существующий проект или создайте новый проект в консоли Google Cloud.
Подтвердите выставление счетов.
Убедитесь, что для вашего проекта Google Cloud включена функция выставления счетов. Подробнее о том, как это сделать, вы можете узнать, следуя этому руководству .
Запустите скрипт установки.
Для запуска настройки среды вам потребуется использовать Google Cloud Shell (или локальную оболочку, настроенную с помощью Google Cloud CLI).
- Откройте консоль Google Cloud .
- Нажмите кнопку «Активировать Cloud Shell» на панели инструментов в правом верхнем углу.
- В терминале Cloud Shell настройте свой активный проект:
gcloud config set project <<YOUR_PROJECT_ID>>
export PROJECT_ID=$(gcloud config get-value project)
- Clone the codelab repository and navigate to the scripts folder:
cd ~/
git clone --filter=blob:none --no-checkout https://github.com/GoogleCloudPlatform/devrel-demos.git
cd ~/devrel-demos
git sparse-checkout init --cone
git sparse-checkout set codelabs/agentic-data-labs/data-science
git checkout main
cd codelabs/agentic-data-labs/data-science/scripts
- Run the bootstrap setup script to deploy all resources to
us-central1:
chmod +x setup.sh setup_spanner.sh setup_composer.sh
export REGION=us-central1
./setup.sh
- When the script finishes, you will see a summary output indicating that your BigQuery dataset and Cloud Storage bucket are ready. In the background, Cloud Spanner (takes ~2 minutes) and Managed Airflow (takes ~20 minutes) will continue provisioning. You can monitor their progress at any time by running:
tail -f /tmp/spanner_setup.log
tail -f /tmp/composer_setup.log
Откройте Antigravity IDE
- Download and install the Antigravity IDE from the Google Antigravity download page .
- Launch the Antigravity IDE .
- Создайте на локальном компьютере новую пустую папку (например, с именем
agentic-data-labs) и откройте её в IDE, выбрав «Открыть папку» . Она будет служить вашей локальной рабочей областью для этого практического задания.
Установите расширение Data Agent Kit.
The Google Cloud Data Agent Kit extension provides deep integration with Google Cloud data services directly within your editor, allowing you to interact with BigQuery, Cloud SQL, Cloud Storage, and more without switching contexts.
- В среде разработки Antigravity IDE щелкните значок «Расширения» на панели активности в левой части экрана (он выглядит как четыре квадрата).
- В строке поиска в верхней части панели расширений введите
Google Cloud Data Agent Kit. - Locate the extension named Google Cloud Data Agent Kit published by
googlecloudtools - Нажмите кнопку «Установить» .
- A prompt may appear asking, "Do you trust publisher 'googlecloudtools' and their extensions?". Click Trust Publishers & Install to proceed.
После установки в левой части панели активности среды разработки Antigravity IDE появится новый значок Google Cloud Data Agent Kit .
- Автоматически должна открыться страница регистрации под названием «Добро пожаловать в Google Cloud Data Agent Kit». Если вы не вошли в свою учетную запись Cloud, следуйте инструкциям, чтобы разрешить доступ.
- В разделе «Сводка конфигурации» найдите поле «Проект». Щелкните раскрывающийся список и выберите свой проект Google Cloud. Установите регион как
us-central1. Затем выберите «Настроить серверы MCP» .
- Select Configure MCP Servers . Under the MCP Configuration pane, ensure you enable the following remote MCP servers:
- BigQuery
- Гаечный ключ
- Тетради
Then click Get Started .
Изучите параметры конфигурации.
После завершения настройки вы попадете на страницу "Начало работы с Google Cloud Data Agent Kit".
- Under "Setup & Configuration", click Get Started .
- Это откроет панель настройки Data Agent Kit . Изучите вкладки:
- Project and Region: Verify your selected Project ID and confirm that the setup script enabled all requisite APIs (Compute Engine, Cloud Storage, BigQuery, Spanner, etc.).
- BigQuery: Настройте местоположение по умолчанию для ваших запросов BigQuery. Используйте регион
us-central1. - Configure MCP Servers: View the enabled MCP servers (BigQuery, Notebooks, Spanner, etc.) that allow AI agents to securely interact with your data.
- Навыки: Изучите встроенные навыки , которые предоставляют агентам специализированные возможности для решения сложных задач обработки данных.
Section Recap: You ran the bootstrap script to create GCS and BigQuery assets while Spanner and Airflow build in the background. You then opened the project in the Antigravity IDE and activated the Google Cloud Data Agent Kit extension. You are now ready to write your first notebook.
3. Ingest raw logs using Spark Serverless
In this section, you will ingest raw JSON transaction logs into the data lake. Managed Service for Apache Spark (Spark Serverless) connects directly with BigQuery 's native storage. You will use the standard BigQuery connector to manage tabular data and enable direct querying and analytics.
Explore the pre-configured Spark Serverless runtime
Before executing Spark code, inspect the Serverless Runtime template that was pre-configured by the setup script. This template defines the target execution environment backend and bundles necessary connector dependencies.
- In the IDE activity bar, open the Google Cloud Data Agent Kit panel.
- Expand the Apache Spark drop-down menu, then expand Serverless .
- Right-click
fraud-pipeline-runtimeand select Profile to open its configuration view in the editor. - In the Profile tab, scroll down and expand Properties to inspect the custom dependencies attached to the environment:
-
spark.jars: Containsgs://spark-lib/spanner/spark-3.5-spanner-1.4.0.jar, which uses the Spark Spanner connector to allow Spark jobs to write inference results directly to Cloud Spanner later in the lab. (Note: Dataproc Serverless includes Google Cloud's Spark BigQuery connector by default, requiring no additional jar configuration to read and write BigQuery tables).
-
- Notice the Interactive Sessions tab on the left. It is currently empty because you have not executed any code yet. As soon as you run the notebook in the next step, a live serverless compute session will dynamically provision and appear here!
Ingest data using the Data Agent Kit
Instead of manually configuring a Spark Session or writing PySpark loading scripts from scratch, you will pair-program with an agent using the Data Agent Kit.
- Open the Agent Chat pane by clicking the Toggle Agent icon in the top-right toolbar.
- Paste the following prompt into the chat (be sure to replace
${PROJECT_ID}with your actual Google Cloud Project ID):
Create a PySpark notebook (01_ingestion.ipynb) to ingest JSON transaction logs
from gs://${PROJECT_ID}-fin-clearing-raw/ into a BigQuery table
`${PROJECT_ID}.transactions_dataset_evals.raw_transactions`
using the Spark BigQuery connector (`format("bigquery")`) with overwrite mode.
- If the agent asks for permission to execute background verification commands (eg "Allow running this command?" ), review the proposed command and select Yes, allow this time (or Yes, and always allow ).
- When the agent finishes generating the file, click the blue Accept all button (or the checkmark icon) at the bottom of the chat pane to save
notebooks/01_ingestion.ipynbto your workspace.
Review and execute the notebook
- Open the newly generated
notebooks/01_ingestion.ipynbin the IDE. - Review the PySpark code for the BigQuery connector write logic.
- Click Run All in the IDE's notebook toolbar.
- If this is your first time running a remote Spark notebook, the IDE may prompt you to install local dependencies. If prompted, click Install dependencies for Remote Spark Kernels and confirm the installation dialogs, then click Run All again.
- In the Select Kernel dropdown menu, choose Remote Spark Kernels -> fraud-pipeline-runtime on Serverless Spark . (Tip: If you do not see your pre-configured runtime template listed, click the refresh icon in the top right of the kernel picker dropdown to reload available remote kernels).
- Look at the status bar in the bottom left of the editor. You will see
Connecting to kernel: fraud-pipeline-runtime on Serverless Spark.... Because this is the initial launch of the Spark Serverless runtime kernel backend, it will take a few minutes to provision and boot up. - Once the kernel finishes connecting, the notebook will automatically begin executing all cells sequentially to process the raw transaction logs into your BigQuery dataset.
Проверка
Once execution completes, check the Data Agent Kit catalog to verify the table creation:
- In the IDE activity bar, open the Google Cloud Data Agent Kit panel.
- Expand the CATALOG section.
- Expand your project ID.
- Expand BigQuery .
- Expand the
transactions_dataset_evalsdataset. - Click the
raw_transactionstable to open its detail view in the main editor. - In the left navigation, explore the Data , Schema , and Details tabs to inspect the ingested records and metadata.
Section Recap: You used natural language in the Agent Chat to generate a complete Spark Serverless workload. You then executed it to process unstructured JSON logs into a BigQuery (raw) table.
4. Deduplicate and normalize with dbt
Before training the ML model, you will enforce data quality by removing duplicate streaming logs, isolating bad records (such as empty transaction IDs), and joining dimensional data (payers and payees). This process requires idempotent, reliable SQL transformations, making dbt (data build tool) a great fit.
Scaffold the dbt pipeline
Use the agent to generate a dbt project over the BigQuery dataset:
- Return to the Agent Chat pane.
- Provide the following instruction to generate the dbt project:
Scaffold a us-central1 dbt project in dbt_project/ that maps raw_transactions
through to an enriched_transactions model in dataset transactions_dataset_evals.

Deduplicate by transaction_id in staging. Quarantine null IDs to an invalid_transactions model.
Join the valid staging records with dim_payers and dim_payees for the enriched_transactions model,
preserving the historical `is_fraud` label column, and finally add a transaction uniqueness test.

Create an implementation plan first.
- The agent will present an Implementation Plan artifact in the main editor pane. Review the proposed file structure and SQL logic.
- Click Proceed (and then Accept all ) to allow the agent to generate the files in your workspace.
- Once generation completes, the agent displays a Walkthrough summarizing the new components. Accept all changes if prompted.
Build and test
Although the agent automatically ran dbt compile to ensure the generated SQL was syntactically valid, you will now materialize these views and tables into BigQuery and run the data quality tests for local verification. (Note: Later in the lab, you will automate this dbt step as part of an end-to-end Airflow DAG).
- In the activity bar on the far left, click the Explorer icon (or press
Cmd/Ctrl+Shift+E). - Expand
dbt_project->modelsto inspect the generated SQL models. Click onenriched_transactions.sqlto open and review the transformation and fraud feature logic in the editor. - In the File Explorer, right-click the
dbt_projectfolder and select Open in Integrated Terminal . This automatically opens a terminal pane set directly to the requireddbt_projectworking directory. - If you do not already have
dbtinstalled, create a virtual environment outsidedbt_project/(at your home or workspace root) and install the BigQuery adapter:
python3 -m venv ~/.venv/dbt
source ~/.venv/dbt/bin/activate
pip install dbt-bigquery
- Run the dbt models and their associated data quality tests:
dbt build
- Watch the terminal output. dbt will compile the SQL, materialize the staging and enriched tables in BigQuery, and execute the data tests.
- Once the build finishes, close the terminal pane to free up screen space for the remaining steps.
Section Recap: You generated a dbt project with the agent, ran data quality tests, and transformed the raw records into staging and enriched BigQuery tables.
5. Train distributed fraud detection model with Random Forest
With the enriched transactions materialized in BigQuery, you will build a machine learning model to classify fraudulent events. Random Forest is an ensemble learning method well-suited for tabular classification data. Running a RandomForestClassifier on Spark Serverless distributes model training across worker nodes without requiring you to manage infrastructure.
In this step, you will use the agent to generate the Spark ML training pipeline.
Generate the ML training notebook
- Open the Agent Chat pane.
- Provide the following prompt to design the model training sequence (remember to replace
${PROJECT_ID}with your active project ID):
Create a PySpark notebook (02_training.ipynb) to train a distributed Random Forest
(RandomForestClassifier) model on the BigQuery table
`transactions_dataset_evals`.`enriched_transactions`, predicting the `is_fraud` label.
Train only on historically labeled records where `is_fraud` is not null.

One-hot encode categorical strings, scale amounts, cache the dataset in memory,
evaluate AUC, and save the evaluated model to gs://${PROJECT_ID}-models/fraud_model.
- Review the agent's plan or generated code and click Proceed / Accept all to save
notebooks/02_training.ipynbto your workspace.
Review and execute the notebook
- Open
notebooks/02_training.ipynbin the editor. - Review the PySpark ML pipeline stages for feature encoding, vector assembly, and Random Forest classification logic.
- Click Run All in the IDE's notebook toolbar.
- When the Select Kernel dropdown picker opens, select fraud-pipeline-runtime on Serverless Spark .
Проверка
Once execution completes, confirm the model was trained and exported correctly:
- Review the evaluation cell outputs near the bottom of the notebook to verify the reported Area Under ROC (AUC) score.
- To ensure the model artifacts were successfully saved to GCS, expand the STORAGE explorer pane in the Data Agent Kit sidebar.
- Locate the bucket ending in
-models(tied to your active Project ID), expand it, and drill down to verify thefraud_modeldirectory and its pipeline stages exist.
Section Recap: You used the agent to create a PySpark ML training pipeline, trained a Random Forest model on your enriched BigQuery table, and exported the model to Cloud Storage.
6. Batch inference and Cloud Spanner write
With a trained predictive model stored in Cloud Storage, you will run batch inference on new transactions flowing through BigQuery. High-risk transactions need to be routed to an operational system so that a compliance team can review them. Cloud Spanner provides a scalable transactional database for this review queue.
Generate the batch inference notebook
Use the agent to create an inference notebook connecting BigQuery, Cloud Storage, and Cloud Spanner:
- Open the Agent Chat pane.
- Provide the following prompt:
Create an inference notebook (03_inference.ipynb) that loads the RandomForestClassifier
model to score unlabeled records (where `is_fraud` is null) from the BigQuery table
`transactions_dataset_evals`.`enriched_transactions`.

Filter for high-risk transactions with a 50%+ fraud probability score (probability >= 0.50)
and write them to the Cloud Spanner table SparkEvalFraudReviewQueue in the cymbal-fraud instance
under fraud-db.
- Accept the generated notebook to save
notebooks/03_inference.ipynbto your workspace.
Review and execute the notebook
- Open the newly generated
notebooks/03_inference.ipynbin the editor. - Review the PySpark inference sequence:
- Dependencies: The Serverless Runtime template provides the required
cloud-spannerJAR dependencies for Spark execution. - Data Formatting: The script drops complex Spark ML vector columns (such as raw features and probabilities) before writing to match the Spanner table schema.
- Spanner Connector: It writes the flagged rows using
.format("cloud-spanner")to append directly to the review queue.
- Dependencies: The Serverless Runtime template provides the required
- Click Run All in the IDE's notebook toolbar.
- When prompted to select a kernel, select fraud-pipeline-runtime on Serverless Spark .
Проверка
Once the inference notebook finishes processing, you can query your operational Spanner database directly inside the IDE:
- In the IDE activity bar, open the Google Cloud Data Agent Kit panel.
- Expand the CATALOG section.
- Expand your project ID, then expand Spanner .
- Navigate to
cymbal-fraud->fraud-db->Tables->SparkEvalFraudReviewQueue. - Right-click the table and select Query Table , then execute the query:
SELECT *
FROM `SparkEvalFraudReviewQueue`
LIMIT 100;
- In the Query Results pane below, you should see newly inserted rows representing high-risk transactions flagged for manual review.
Section Recap: You used the agent to create a batch inference notebook, scored unlabeled BigQuery records with your trained model, and wrote high-risk transactions directly to Cloud Spanner.
7. Scaffold and orchestrate with Managed Airflow
Your pipeline currently consists of discrete steps: an ingestion notebook, a dbt transformation project, and a batch inference notebook. To make this production-ready, you will stitch them together into a scheduled dependency graph.
Managed Service for Apache Airflow (formerly known as Cloud Composer) provides a managed orchestration engine for this workflow. The Data Agent Kit includes an Orchestration Pipelines feature that translates declarative YAML pipeline definitions directly into Airflow DAGs.
Define the pipeline
Use the agent to generate the orchestration pipeline configuration:
- In the Agent Chat , provide the following prompt (remembering to replace
${PROJECT_ID}):
Initialize and define an orchestration pipeline (fraud_analysis_pipeline) triggering
the ingestion notebook, dbt project, and inference notebook in sequential order.
For Dataproc Serverless engine configs in us-central1, use resourceProfile.inline
(defining properties with spark.jars: "gs://spark-lib/spanner/spark-3.5-spanner-1.4.0.jar"
for inference) rather than resourceProfile.path or overrides.

Set the schedule interval to run daily at midnight, and use
gs://${PROJECT_ID}-airflow-artifacts for artifact storage.
Review the DAG configuration
The Data Agent Kit Orchestrator uses declarative YAML configurations to define and deploy pipelines to Apache Airflow, allowing definitions to be version controlled and deployed via CI/CD.
In the IDE Explorer pane, review the two pipeline files the agent generated at the root of your workspace:
-
deployment.yaml: Open this file. This serves as your environment registry. It maps your logicaldevpipeline to thecymbal-airflowenvironment, sets the execution region (us-central1), and defines theartifact_storagebucket where compiled DAGs and dependencies are staged. -
fraud_analysis_pipeline.yaml: Open this file. This defines the execution graph. It specifies the trigger schedule (interval: '0 0 * * *') and sequences the three steps under theactionsblock:- An ingestion
notebookaction for01_ingestion.ipynbrunning on Dataproc Serverless. - A transformation
pipelineaction targeting thedbt_projectdirectory, with adependsOndependency pointing to the ingestion step. - An inference
notebookaction for03_inference.ipynbwith adependsOndependency pointing to the dbt step, bundling the Spanner JAR property.
- An ingestion
- The agent will also summarize these generated artifacts into a Walkthrough tab in your editor pane, outlining the configurations and validations performed.
Interactive DAG configuration
The Data Agent Kit renders your pipeline configuration as an interactive visual graph for inspecting and editing Airflow DAG properties.
- In the IDE activity bar, open the Google Cloud Data Agent Kit panel.
- Under
DATA ENGINEERING, expandOrchestration Pipelines. - Click
fraud_analysis_pipeline.yamlto open the visual DAG canvas in the main editor.
- Click the
Schedule triggernode at the top. A configuration flyout opens on the right, displaying the parsed Cron string (0 0 * * *) and allowing you to adjust parameters like backfill and catchup. - Click either notebook task node (such as the ingestion or inference step). The flyout updates to display the specific Dataproc Serverless execution mappings and connector properties.
- Notice the notebook filename hyperlink (such as
01_ingestion.ipynb) inside the node block. Clicking it opens the notebook directly in your editor. - In the left sidebar underneath Orchestration Pipelines, click
Deployment configuration. This view shows your targetdevenvironment cluster and output GCS bucket artifacts.
Section Recap: You generated an orchestration pipeline configuration with the agent, defining dependencies between ingestion, dbt, and inference tasks in an interactive visual canvas.
8. Deploy, execute, and monitor
With the DAG defined locally, you will connect to the Managed Airflow environment provisioned during setup and deploy the pipeline.
Configure Managed Service for Apache Airflow
Before deploying, configure the Scheduler connection in the Data Agent Kit settings so the extension targets your Managed Airflow environment:
- In the IDE activity bar, open the Google Cloud Data Agent Kit panel.
- Under
SETTINGS, click Settings . - Select Scheduler from the left menu.
- Configure the settings:
- Project ID : Select your active project ID.
- Region : Select
us-central1. - Environment : Select
cymbal-airflow.
- Нажмите « Сохранить ».
Deploy the DAG
You will now deploy the configured pipeline directly to your Managed Airflow environment from the visual canvas:
- In the Google Cloud Data Agent Kit sidebar, expand
DATA ENGINEERING>Orchestration Pipelinesand clickfraud_analysis_pipeline.yamlto open the visual DAG canvas. - In the top right corner of the canvas toolbar, click the blue Run pipeline button.
- In the environment dropdown picker, select
dev. - Observe the progress notification in the bottom status area (
Running pipeline: Building pipeline locally...). The extension will automatically compile your DAG, package the notebook and dbt assets, and upload them to your Managed Airflow environment's GCS bucket (this takes about 3–4 minutes to complete).
Monitor the run
Once local compilation completes and the popup notification confirms Triggered a new run for pipeline... successfully , monitor the live execution:
- In the Google Cloud Data Agent Kit sidebar, expand
DATA ENGINEERING>Orchestration Pipelines. - Click Pipelines management .
- In the Pipelines Management table, click on
fraud_analysis_pipelineto open its execution history.
- In the Execution History view, select the active run from the calendar.
- As the execution progresses across each pipeline task (ingestion, dbt transformation, and inference), status indicators update and task durations populate. Click any task to inspect its live execution output and Airflow DAG logs.
Section Recap: You configured the Airflow Scheduler connection, deployed your end-to-end analytical pipeline to Managed Airflow, and monitored a live execution, verifying the system from raw logs to final Cloud Spanner predictions.
9. Clean up
To avoid incurring ongoing charges to your Google Cloud project for the resources used in this codelab, tear down the environment using the automated script.
- In the Terminal panel (or in Cloud Shell), navigate to the scripts directory and execute:
cd ~/devrel-demos/codelabs/agentic-data-labs/data-science/scripts
chmod +x teardown.sh
./teardown.sh
- The script will list all the resources it plans to delete and prompt for confirmation:
- Managed Airflow Environment (
cymbal-airflow) - Cloud Spanner Instance (
cymbal-fraud) - BigQuery Dataset (
transactions_dataset_evals) - Cloud Storage Buckets (
gs://${PROJECT_ID}-fin-clearing-rawandgs://${PROJECT_ID}-models) - Worker Service Account (
composer-worker-sa)
- Managed Airflow Environment (
- Type
yto confirm. The teardown script will remove all provisioned GCP services and clean up local files.
10. Congratulations!
You have built an end-to-end fraud detection pipeline spanning Cloud Storage, BigQuery, Managed Service for Apache Spark (Spark Serverless), dbt, Cloud Spanner, and Managed Service for Apache Airflow, pair-programming with the Google Cloud Data Agent Kit inside the Antigravity IDE.
What you accomplished
- 📥 Ingested raw transaction logs into a BigQuery table using Managed Service for Apache Spark and the Data Agent Kit.
- 🧹 Deduplicated and normalized data by creating a dbt project with data quality tests.
- 🤖 Trained a distributed Random Forest model using
RandomForestClassifierand exported the trained model to Cloud Storage. - ⚡ Executed batch inference on incoming transactions and routed high-risk records into Cloud Spanner for audit review.
- 🔄 Orchestrated, deployed, and monitored the workflow as a scheduled Airflow DAG using Managed Service for Apache Airflow and the IDE's visual DAG management tools.
Ключевые понятия
Концепция | What you learned |
Pair-programming inside the IDE using natural language to generate PySpark notebooks, configure dbt models, and define Airflow DAGs | |
Scalable tabular storage for analytical SQL, dbt transformations, and ML training | |
Serverless execution for distributed PySpark data loading and Random Forest ML training | |
Writing batch Spark inference predictions directly into operational database review queues | |
YAML DAG Declarations | Declarative pipeline definitions rendered as interactive Airflow visual graphs in the IDE |
Visual DAG Management | Inspecting pipeline dependencies, deploying to Managed Airflow , and monitoring live task execution history inside the IDE |
Следующие шаги
- Explore the Google Cloud Data Agent Kit documentation
- Learn more about Managed Service for Apache Spark
- Learn more about Managed Service for Apache Airflow
- Build your own multi-service pipelines using the Antigravity IDE
1. Введение
Imagine you are a Data Scientist at Cymbal Financial , a high-volume payment processor. A wave of settlement delays has occurred, and the compliance team suspects coordinated fraud. You need to build a pipeline to ingest raw clearinghouse transaction logs, clean the data, train a machine learning model, run batch inference, and sink high-risk transactions into a Cloud Spanner review queue for manual auditing.
Normally, this requires days of writing repetitive setup code (Spark notebooks, dbt configurations, training scripts, Airflow DAGs) and constant context-switching between console interfaces and editors.
In this codelab, you will pair-program with an agent using the Google Cloud Data Agent Kit (DAK) inside the Antigravity IDE . Using conversational natural language, the agent will help you generate Spark notebooks, compile a dbt project, construct an inference loop, and orchestrate the workflow using the Managed Service for Apache Airflow .
Что вы будете делать
- Ingest clearinghouse logs from Cloud Storage using Managed Service for Apache Spark (Spark Serverless) into a BigQuery table.
- Deduplicate and normalize transactions using dbt to establish clean data layers (Raw, Staging, Enriched).
- Train a distributed Random Forest classification model (
RandomForestClassifier) on Spark Serverless. - Run batch inference on new transactions and write high-risk alerts directly to Cloud Spanner .
- Orchestrate, visually configure, and deploy the entire pipeline using Managed Service for Apache Airflow and interactive DAG monitoring inside the IDE.
Что вам понадобится
- Веб-браузер, например Chrome.
- A Google Cloud project with billing enabled (we recommend using a new, dedicated project for hands-on labs).
- Basic familiarity with SQL, Python, and PySpark.
- Antigravity IDE with a Google AI Pro subscription (recommended)
Стоимость ресурсов, созданных в этом практическом задании, должна быть менее 5 долларов. Обязательно следуйте инструкциям по очистке в конце задания, чтобы удалить выделенные ресурсы.
2. Environment setup
To kick off the lab, you will run a bootstrap script. This script automatically enables required GCP APIs, creates an ingestion Cloud Storage bucket, generates mock transaction and directory datasets, loads reference directories into BigQuery, and kicks off background provisioning of Cloud Spanner and Managed Service for Apache Airflow (formerly known as Cloud Composer).
Выберите или создайте проект
Выберите существующий проект или создайте новый проект в консоли Google Cloud.
Подтвердите выставление счетов.
Убедитесь, что для вашего проекта Google Cloud включена функция выставления счетов. Подробнее о том, как это сделать, вы можете узнать, следуя этому руководству .
Запустите скрипт установки.
You will use Google Cloud Shell (or your local shell configured with the Google Cloud CLI) to launch the environment setup.
- Open the Google Cloud Console .
- Click Activate Cloud Shell in the top-right toolbar.
- In the Cloud Shell terminal, configure your active project:
gcloud config set project <<YOUR_PROJECT_ID>>
export PROJECT_ID=$(gcloud config get-value project)
- Clone the codelab repository and navigate to the scripts folder:
cd ~/
git clone --filter=blob:none --no-checkout https://github.com/GoogleCloudPlatform/devrel-demos.git
cd ~/devrel-demos
git sparse-checkout init --cone
git sparse-checkout set codelabs/agentic-data-labs/data-science
git checkout main
cd codelabs/agentic-data-labs/data-science/scripts
- Run the bootstrap setup script to deploy all resources to
us-central1:
chmod +x setup.sh setup_spanner.sh setup_composer.sh
export REGION=us-central1
./setup.sh
- When the script finishes, you will see a summary output indicating that your BigQuery dataset and Cloud Storage bucket are ready. In the background, Cloud Spanner (takes ~2 minutes) and Managed Airflow (takes ~20 minutes) will continue provisioning. You can monitor their progress at any time by running:
tail -f /tmp/spanner_setup.log
tail -f /tmp/composer_setup.log
Откройте Antigravity IDE
- Download and install the Antigravity IDE from the Google Antigravity download page .
- Launch the Antigravity IDE .
- Создайте на локальном компьютере новую пустую папку (например, с именем
agentic-data-labs) и откройте её в IDE, выбрав «Открыть папку» . Она будет служить вашей локальной рабочей областью для этого практического задания.
Установите расширение Data Agent Kit.
The Google Cloud Data Agent Kit extension provides deep integration with Google Cloud data services directly within your editor, allowing you to interact with BigQuery, Cloud SQL, Cloud Storage, and more without switching contexts.
- В среде разработки Antigravity IDE щелкните значок «Расширения» на панели активности в левой части экрана (он выглядит как четыре квадрата).
- В строке поиска в верхней части панели расширений введите
Google Cloud Data Agent Kit. - Locate the extension named Google Cloud Data Agent Kit published by
googlecloudtools - Нажмите кнопку «Установить» .
- A prompt may appear asking, "Do you trust publisher 'googlecloudtools' and their extensions?". Click Trust Publishers & Install to proceed.
После установки в левой части панели активности среды разработки Antigravity IDE появится новый значок Google Cloud Data Agent Kit .
- Автоматически должна открыться страница регистрации под названием «Добро пожаловать в Google Cloud Data Agent Kit». Если вы не вошли в свою учетную запись Cloud, следуйте инструкциям, чтобы разрешить доступ.
- В разделе «Сводка конфигурации» найдите поле «Проект». Щелкните раскрывающийся список и выберите свой проект Google Cloud. Установите регион как
us-central1. Затем выберите «Настроить серверы MCP» .
- Select Configure MCP Servers . Under the MCP Configuration pane, ensure you enable the following remote MCP servers:
- BigQuery
- Гаечный ключ
- Тетради
Then click Get Started .
Изучите параметры конфигурации.
После завершения настройки вы попадете на страницу "Начало работы с Google Cloud Data Agent Kit".
- Under "Setup & Configuration", click Get Started .
- Это откроет панель настройки Data Agent Kit . Изучите вкладки:
- Project and Region: Verify your selected Project ID and confirm that the setup script enabled all requisite APIs (Compute Engine, Cloud Storage, BigQuery, Spanner, etc.).
- BigQuery: Настройте местоположение по умолчанию для ваших запросов BigQuery. Используйте регион
us-central1. - Configure MCP Servers: View the enabled MCP servers (BigQuery, Notebooks, Spanner, etc.) that allow AI agents to securely interact with your data.
- Навыки: Изучите встроенные навыки , которые предоставляют агентам специализированные возможности для решения сложных задач обработки данных.
Section Recap: You ran the bootstrap script to create GCS and BigQuery assets while Spanner and Airflow build in the background. You then opened the project in the Antigravity IDE and activated the Google Cloud Data Agent Kit extension. You are now ready to write your first notebook.
3. Ingest raw logs using Spark Serverless
In this section, you will ingest raw JSON transaction logs into the data lake. Managed Service for Apache Spark (Spark Serverless) connects directly with BigQuery 's native storage. You will use the standard BigQuery connector to manage tabular data and enable direct querying and analytics.
Explore the pre-configured Spark Serverless runtime
Before executing Spark code, inspect the Serverless Runtime template that was pre-configured by the setup script. This template defines the target execution environment backend and bundles necessary connector dependencies.
- In the IDE activity bar, open the Google Cloud Data Agent Kit panel.
- Expand the Apache Spark drop-down menu, then expand Serverless .
- Right-click
fraud-pipeline-runtimeand select Profile to open its configuration view in the editor. - In the Profile tab, scroll down and expand Properties to inspect the custom dependencies attached to the environment:
-
spark.jars: Containsgs://spark-lib/spanner/spark-3.5-spanner-1.4.0.jar, which uses the Spark Spanner connector to allow Spark jobs to write inference results directly to Cloud Spanner later in the lab. (Note: Dataproc Serverless includes Google Cloud's Spark BigQuery connector by default, requiring no additional jar configuration to read and write BigQuery tables).
-
- Notice the Interactive Sessions tab on the left. It is currently empty because you have not executed any code yet. As soon as you run the notebook in the next step, a live serverless compute session will dynamically provision and appear here!
Ingest data using the Data Agent Kit
Instead of manually configuring a Spark Session or writing PySpark loading scripts from scratch, you will pair-program with an agent using the Data Agent Kit.
- Open the Agent Chat pane by clicking the Toggle Agent icon in the top-right toolbar.
- Paste the following prompt into the chat (be sure to replace
${PROJECT_ID}with your actual Google Cloud Project ID):
Create a PySpark notebook (01_ingestion.ipynb) to ingest JSON transaction logs
from gs://${PROJECT_ID}-fin-clearing-raw/ into a BigQuery table
`${PROJECT_ID}.transactions_dataset_evals.raw_transactions`
using the Spark BigQuery connector (`format("bigquery")`) with overwrite mode.
- If the agent asks for permission to execute background verification commands (eg "Allow running this command?" ), review the proposed command and select Yes, allow this time (or Yes, and always allow ).
- When the agent finishes generating the file, click the blue Accept all button (or the checkmark icon) at the bottom of the chat pane to save
notebooks/01_ingestion.ipynbto your workspace.
Review and execute the notebook
- Open the newly generated
notebooks/01_ingestion.ipynbin the IDE. - Review the PySpark code for the BigQuery connector write logic.
- Click Run All in the IDE's notebook toolbar.
- If this is your first time running a remote Spark notebook, the IDE may prompt you to install local dependencies. If prompted, click Install dependencies for Remote Spark Kernels and confirm the installation dialogs, then click Run All again.
- In the Select Kernel dropdown menu, choose Remote Spark Kernels -> fraud-pipeline-runtime on Serverless Spark . (Tip: If you do not see your pre-configured runtime template listed, click the refresh icon in the top right of the kernel picker dropdown to reload available remote kernels).
- Look at the status bar in the bottom left of the editor. You will see
Connecting to kernel: fraud-pipeline-runtime on Serverless Spark.... Because this is the initial launch of the Spark Serverless runtime kernel backend, it will take a few minutes to provision and boot up. - Once the kernel finishes connecting, the notebook will automatically begin executing all cells sequentially to process the raw transaction logs into your BigQuery dataset.
Проверка
Once execution completes, check the Data Agent Kit catalog to verify the table creation:
- In the IDE activity bar, open the Google Cloud Data Agent Kit panel.
- Expand the CATALOG section.
- Expand your project ID.
- Expand BigQuery .
- Expand the
transactions_dataset_evalsdataset. - Click the
raw_transactionstable to open its detail view in the main editor. - In the left navigation, explore the Data , Schema , and Details tabs to inspect the ingested records and metadata.
Section Recap: You used natural language in the Agent Chat to generate a complete Spark Serverless workload. You then executed it to process unstructured JSON logs into a BigQuery (raw) table.
4. Deduplicate and normalize with dbt
Before training the ML model, you will enforce data quality by removing duplicate streaming logs, isolating bad records (such as empty transaction IDs), and joining dimensional data (payers and payees). This process requires idempotent, reliable SQL transformations, making dbt (data build tool) a great fit.
Scaffold the dbt pipeline
Use the agent to generate a dbt project over the BigQuery dataset:
- Return to the Agent Chat pane.
- Provide the following instruction to generate the dbt project:
Scaffold a us-central1 dbt project in dbt_project/ that maps raw_transactions
through to an enriched_transactions model in dataset transactions_dataset_evals.

Deduplicate by transaction_id in staging. Quarantine null IDs to an invalid_transactions model.
Join the valid staging records with dim_payers and dim_payees for the enriched_transactions model,
preserving the historical `is_fraud` label column, and finally add a transaction uniqueness test.

Create an implementation plan first.
- The agent will present an Implementation Plan artifact in the main editor pane. Review the proposed file structure and SQL logic.
- Click Proceed (and then Accept all ) to allow the agent to generate the files in your workspace.
- Once generation completes, the agent displays a Walkthrough summarizing the new components. Accept all changes if prompted.
Build and test
Although the agent automatically ran dbt compile to ensure the generated SQL was syntactically valid, you will now materialize these views and tables into BigQuery and run the data quality tests for local verification. (Note: Later in the lab, you will automate this dbt step as part of an end-to-end Airflow DAG).
- In the activity bar on the far left, click the Explorer icon (or press
Cmd/Ctrl+Shift+E). - Expand
dbt_project->modelsto inspect the generated SQL models. Click onenriched_transactions.sqlto open and review the transformation and fraud feature logic in the editor. - In the File Explorer, right-click the
dbt_projectfolder and select Open in Integrated Terminal . This automatically opens a terminal pane set directly to the requireddbt_projectworking directory. - If you do not already have
dbtinstalled, create a virtual environment outsidedbt_project/(at your home or workspace root) and install the BigQuery adapter:
python3 -m venv ~/.venv/dbt
source ~/.venv/dbt/bin/activate
pip install dbt-bigquery
- Run the dbt models and their associated data quality tests:
dbt build
- Watch the terminal output. dbt will compile the SQL, materialize the staging and enriched tables in BigQuery, and execute the data tests.
- Once the build finishes, close the terminal pane to free up screen space for the remaining steps.
Section Recap: You generated a dbt project with the agent, ran data quality tests, and transformed the raw records into staging and enriched BigQuery tables.
5. Train distributed fraud detection model with Random Forest
With the enriched transactions materialized in BigQuery, you will build a machine learning model to classify fraudulent events. Random Forest is an ensemble learning method well-suited for tabular classification data. Running a RandomForestClassifier on Spark Serverless distributes model training across worker nodes without requiring you to manage infrastructure.
In this step, you will use the agent to generate the Spark ML training pipeline.
Generate the ML training notebook
- Open the Agent Chat pane.
- Provide the following prompt to design the model training sequence (remember to replace
${PROJECT_ID}with your active project ID):
Create a PySpark notebook (02_training.ipynb) to train a distributed Random Forest
(RandomForestClassifier) model on the BigQuery table
`transactions_dataset_evals`.`enriched_transactions`, predicting the `is_fraud` label.
Train only on historically labeled records where `is_fraud` is not null.

One-hot encode categorical strings, scale amounts, cache the dataset in memory,
evaluate AUC, and save the evaluated model to gs://${PROJECT_ID}-models/fraud_model.
- Review the agent's plan or generated code and click Proceed / Accept all to save
notebooks/02_training.ipynbto your workspace.
Review and execute the notebook
- Open
notebooks/02_training.ipynbin the editor. - Review the PySpark ML pipeline stages for feature encoding, vector assembly, and Random Forest classification logic.
- Click Run All in the IDE's notebook toolbar.
- When the Select Kernel dropdown picker opens, select fraud-pipeline-runtime on Serverless Spark .
Проверка
Once execution completes, confirm the model was trained and exported correctly:
- Review the evaluation cell outputs near the bottom of the notebook to verify the reported Area Under ROC (AUC) score.
- To ensure the model artifacts were successfully saved to GCS, expand the STORAGE explorer pane in the Data Agent Kit sidebar.
- Locate the bucket ending in
-models(tied to your active Project ID), expand it, and drill down to verify thefraud_modeldirectory and its pipeline stages exist.
Section Recap: You used the agent to create a PySpark ML training pipeline, trained a Random Forest model on your enriched BigQuery table, and exported the model to Cloud Storage.
6. Batch inference and Cloud Spanner write
With a trained predictive model stored in Cloud Storage, you will run batch inference on new transactions flowing through BigQuery. High-risk transactions need to be routed to an operational system so that a compliance team can review them. Cloud Spanner provides a scalable transactional database for this review queue.
Generate the batch inference notebook
Use the agent to create an inference notebook connecting BigQuery, Cloud Storage, and Cloud Spanner:
- Open the Agent Chat pane.
- Provide the following prompt:
Create an inference notebook (03_inference.ipynb) that loads the RandomForestClassifier
model to score unlabeled records (where `is_fraud` is null) from the BigQuery table
`transactions_dataset_evals`.`enriched_transactions`.

Filter for high-risk transactions with a 50%+ fraud probability score (probability >= 0.50)
and write them to the Cloud Spanner table SparkEvalFraudReviewQueue in the cymbal-fraud instance
under fraud-db.
- Accept the generated notebook to save
notebooks/03_inference.ipynbto your workspace.
Review and execute the notebook
- Open the newly generated
notebooks/03_inference.ipynbin the editor. - Review the PySpark inference sequence:
- Dependencies: The Serverless Runtime template provides the required
cloud-spannerJAR dependencies for Spark execution. - Data Formatting: The script drops complex Spark ML vector columns (such as raw features and probabilities) before writing to match the Spanner table schema.
- Spanner Connector: It writes the flagged rows using
.format("cloud-spanner")to append directly to the review queue.
- Dependencies: The Serverless Runtime template provides the required
- Click Run All in the IDE's notebook toolbar.
- When prompted to select a kernel, select fraud-pipeline-runtime on Serverless Spark .
Проверка
Once the inference notebook finishes processing, you can query your operational Spanner database directly inside the IDE:
- In the IDE activity bar, open the Google Cloud Data Agent Kit panel.
- Expand the CATALOG section.
- Expand your project ID, then expand Spanner .
- Navigate to
cymbal-fraud->fraud-db->Tables->SparkEvalFraudReviewQueue. - Right-click the table and select Query Table , then execute the query:
SELECT *
FROM `SparkEvalFraudReviewQueue`
LIMIT 100;
- In the Query Results pane below, you should see newly inserted rows representing high-risk transactions flagged for manual review.
Section Recap: You used the agent to create a batch inference notebook, scored unlabeled BigQuery records with your trained model, and wrote high-risk transactions directly to Cloud Spanner.
7. Scaffold and orchestrate with Managed Airflow
Your pipeline currently consists of discrete steps: an ingestion notebook, a dbt transformation project, and a batch inference notebook. To make this production-ready, you will stitch them together into a scheduled dependency graph.
Managed Service for Apache Airflow (formerly known as Cloud Composer) provides a managed orchestration engine for this workflow. The Data Agent Kit includes an Orchestration Pipelines feature that translates declarative YAML pipeline definitions directly into Airflow DAGs.
Define the pipeline
Use the agent to generate the orchestration pipeline configuration:
- In the Agent Chat , provide the following prompt (remembering to replace
${PROJECT_ID}):
Initialize and define an orchestration pipeline (fraud_analysis_pipeline) triggering
the ingestion notebook, dbt project, and inference notebook in sequential order.
For Dataproc Serverless engine configs in us-central1, use resourceProfile.inline
(defining properties with spark.jars: "gs://spark-lib/spanner/spark-3.5-spanner-1.4.0.jar"
for inference) rather than resourceProfile.path or overrides.

Set the schedule interval to run daily at midnight, and use
gs://${PROJECT_ID}-airflow-artifacts for artifact storage.
Review the DAG configuration
The Data Agent Kit Orchestrator uses declarative YAML configurations to define and deploy pipelines to Apache Airflow, allowing definitions to be version controlled and deployed via CI/CD.
In the IDE Explorer pane, review the two pipeline files the agent generated at the root of your workspace:
-
deployment.yaml: Open this file. This serves as your environment registry. It maps your logicaldevpipeline to thecymbal-airflowenvironment, sets the execution region (us-central1), and defines theartifact_storagebucket where compiled DAGs and dependencies are staged. -
fraud_analysis_pipeline.yaml: Open this file. This defines the execution graph. It specifies the trigger schedule (interval: '0 0 * * *') and sequences the three steps under theactionsblock:- An ingestion
notebookaction for01_ingestion.ipynbrunning on Dataproc Serverless. - A transformation
pipelineaction targeting thedbt_projectdirectory, with adependsOndependency pointing to the ingestion step. - An inference
notebookaction for03_inference.ipynbwith adependsOndependency pointing to the dbt step, bundling the Spanner JAR property.
- An ingestion
- The agent will also summarize these generated artifacts into a Walkthrough tab in your editor pane, outlining the configurations and validations performed.
Interactive DAG configuration
The Data Agent Kit renders your pipeline configuration as an interactive visual graph for inspecting and editing Airflow DAG properties.
- In the IDE activity bar, open the Google Cloud Data Agent Kit panel.
- Under
DATA ENGINEERING, expandOrchestration Pipelines. - Click
fraud_analysis_pipeline.yamlto open the visual DAG canvas in the main editor.
- Click the
Schedule triggernode at the top. A configuration flyout opens on the right, displaying the parsed Cron string (0 0 * * *) and allowing you to adjust parameters like backfill and catchup. - Click either notebook task node (such as the ingestion or inference step). The flyout updates to display the specific Dataproc Serverless execution mappings and connector properties.
- Notice the notebook filename hyperlink (such as
01_ingestion.ipynb) inside the node block. Clicking it opens the notebook directly in your editor. - In the left sidebar underneath Orchestration Pipelines, click
Deployment configuration. This view shows your targetdevenvironment cluster and output GCS bucket artifacts.
Section Recap: You generated an orchestration pipeline configuration with the agent, defining dependencies between ingestion, dbt, and inference tasks in an interactive visual canvas.
8. Deploy, execute, and monitor
With the DAG defined locally, you will connect to the Managed Airflow environment provisioned during setup and deploy the pipeline.
Configure Managed Service for Apache Airflow
Before deploying, configure the Scheduler connection in the Data Agent Kit settings so the extension targets your Managed Airflow environment:
- In the IDE activity bar, open the Google Cloud Data Agent Kit panel.
- Under
SETTINGS, click Settings . - Select Scheduler from the left menu.
- Configure the settings:
- Project ID : Select your active project ID.
- Region : Select
us-central1. - Environment : Select
cymbal-airflow.
- Нажмите « Сохранить ».
Deploy the DAG
You will now deploy the configured pipeline directly to your Managed Airflow environment from the visual canvas:
- In the Google Cloud Data Agent Kit sidebar, expand
DATA ENGINEERING>Orchestration Pipelinesand clickfraud_analysis_pipeline.yamlto open the visual DAG canvas. - In the top right corner of the canvas toolbar, click the blue Run pipeline button.
- In the environment dropdown picker, select
dev. - Observe the progress notification in the bottom status area (
Running pipeline: Building pipeline locally...). The extension will automatically compile your DAG, package the notebook and dbt assets, and upload them to your Managed Airflow environment's GCS bucket (this takes about 3–4 minutes to complete).
Monitor the run
Once local compilation completes and the popup notification confirms Triggered a new run for pipeline... successfully , monitor the live execution:
- In the Google Cloud Data Agent Kit sidebar, expand
DATA ENGINEERING>Orchestration Pipelines. - Click Pipelines management .
- In the Pipelines Management table, click on
fraud_analysis_pipelineto open its execution history.
- In the Execution History view, select the active run from the calendar.
- As the execution progresses across each pipeline task (ingestion, dbt transformation, and inference), status indicators update and task durations populate. Click any task to inspect its live execution output and Airflow DAG logs.
Section Recap: You configured the Airflow Scheduler connection, deployed your end-to-end analytical pipeline to Managed Airflow, and monitored a live execution, verifying the system from raw logs to final Cloud Spanner predictions.
9. Clean up
To avoid incurring ongoing charges to your Google Cloud project for the resources used in this codelab, tear down the environment using the automated script.
- In the Terminal panel (or in Cloud Shell), navigate to the scripts directory and execute:
cd ~/devrel-demos/codelabs/agentic-data-labs/data-science/scripts
chmod +x teardown.sh
./teardown.sh
- The script will list all the resources it plans to delete and prompt for confirmation:
- Managed Airflow Environment (
cymbal-airflow) - Cloud Spanner Instance (
cymbal-fraud) - BigQuery Dataset (
transactions_dataset_evals) - Cloud Storage Buckets (
gs://${PROJECT_ID}-fin-clearing-rawandgs://${PROJECT_ID}-models) - Worker Service Account (
composer-worker-sa)
- Managed Airflow Environment (
- Type
yto confirm. The teardown script will remove all provisioned GCP services and clean up local files.
10. Congratulations!
You have built an end-to-end fraud detection pipeline spanning Cloud Storage, BigQuery, Managed Service for Apache Spark (Spark Serverless), dbt, Cloud Spanner, and Managed Service for Apache Airflow, pair-programming with the Google Cloud Data Agent Kit inside the Antigravity IDE.
What you accomplished
- 📥 Ingested raw transaction logs into a BigQuery table using Managed Service for Apache Spark and the Data Agent Kit.
- 🧹 Deduplicated and normalized data by creating a dbt project with data quality tests.
- 🤖 Trained a distributed Random Forest model using
RandomForestClassifierand exported the trained model to Cloud Storage. - ⚡ Executed batch inference on incoming transactions and routed high-risk records into Cloud Spanner for audit review.
- 🔄 Orchestrated, deployed, and monitored the workflow as a scheduled Airflow DAG using Managed Service for Apache Airflow and the IDE's visual DAG management tools.
Ключевые понятия
Концепция | What you learned |
Pair-programming inside the IDE using natural language to generate PySpark notebooks, configure dbt models, and define Airflow DAGs | |
Scalable tabular storage for analytical SQL, dbt transformations, and ML training | |
Serverless execution for distributed PySpark data loading and Random Forest ML training | |
Writing batch Spark inference predictions directly into operational database review queues | |
YAML DAG Declarations | Declarative pipeline definitions rendered as interactive Airflow visual graphs in the IDE |
Visual DAG Management | Inspecting pipeline dependencies, deploying to Managed Airflow , and monitoring live task execution history inside the IDE |
Следующие шаги
- Explore the Google Cloud Data Agent Kit documentation
- Learn more about Managed Service for Apache Spark
- Learn more about Managed Service for Apache Airflow
- Build your own multi-service pipelines using the Antigravity IDE
1. Введение
Imagine you are a Data Scientist at Cymbal Financial , a high-volume payment processor. A wave of settlement delays has occurred, and the compliance team suspects coordinated fraud. You need to build a pipeline to ingest raw clearinghouse transaction logs, clean the data, train a machine learning model, run batch inference, and sink high-risk transactions into a Cloud Spanner review queue for manual auditing.
Normally, this requires days of writing repetitive setup code (Spark notebooks, dbt configurations, training scripts, Airflow DAGs) and constant context-switching between console interfaces and editors.
In this codelab, you will pair-program with an agent using the Google Cloud Data Agent Kit (DAK) inside the Antigravity IDE . Using conversational natural language, the agent will help you generate Spark notebooks, compile a dbt project, construct an inference loop, and orchestrate the workflow using the Managed Service for Apache Airflow .
Что вы будете делать
- Ingest clearinghouse logs from Cloud Storage using Managed Service for Apache Spark (Spark Serverless) into a BigQuery table.
- Deduplicate and normalize transactions using dbt to establish clean data layers (Raw, Staging, Enriched).
- Train a distributed Random Forest classification model (
RandomForestClassifier) on Spark Serverless. - Run batch inference on new transactions and write high-risk alerts directly to Cloud Spanner .
- Orchestrate, visually configure, and deploy the entire pipeline using Managed Service for Apache Airflow and interactive DAG monitoring inside the IDE.
Что вам понадобится
- Веб-браузер, например Chrome.
- A Google Cloud project with billing enabled (we recommend using a new, dedicated project for hands-on labs).
- Basic familiarity with SQL, Python, and PySpark.
- Antigravity IDE with a Google AI Pro subscription (recommended)
Стоимость ресурсов, созданных в этом практическом задании, должна быть менее 5 долларов. Обязательно следуйте инструкциям по очистке в конце задания, чтобы удалить выделенные ресурсы.
2. Environment setup
To kick off the lab, you will run a bootstrap script. This script automatically enables required GCP APIs, creates an ingestion Cloud Storage bucket, generates mock transaction and directory datasets, loads reference directories into BigQuery, and kicks off background provisioning of Cloud Spanner and Managed Service for Apache Airflow (formerly known as Cloud Composer).
Выберите или создайте проект
Выберите существующий проект или создайте новый проект в консоли Google Cloud.
Подтвердите выставление счетов.
Убедитесь, что для вашего проекта Google Cloud включена функция выставления счетов. Подробнее о том, как это сделать, вы можете узнать, следуя этому руководству .
Запустите скрипт установки.
You will use Google Cloud Shell (or your local shell configured with the Google Cloud CLI) to launch the environment setup.
- Open the Google Cloud Console .
- Click Activate Cloud Shell in the top-right toolbar.
- In the Cloud Shell terminal, configure your active project:
gcloud config set project <<YOUR_PROJECT_ID>>
export PROJECT_ID=$(gcloud config get-value project)
- Clone the codelab repository and navigate to the scripts folder:
cd ~/
git clone --filter=blob:none --no-checkout https://github.com/GoogleCloudPlatform/devrel-demos.git
cd ~/devrel-demos
git sparse-checkout init --cone
git sparse-checkout set codelabs/agentic-data-labs/data-science
git checkout main
cd codelabs/agentic-data-labs/data-science/scripts
- Run the bootstrap setup script to deploy all resources to
us-central1:
chmod +x setup.sh setup_spanner.sh setup_composer.sh
export REGION=us-central1
./setup.sh
- When the script finishes, you will see a summary output indicating that your BigQuery dataset and Cloud Storage bucket are ready. In the background, Cloud Spanner (takes ~2 minutes) and Managed Airflow (takes ~20 minutes) will continue provisioning. You can monitor their progress at any time by running:
tail -f /tmp/spanner_setup.log
tail -f /tmp/composer_setup.log
Откройте Antigravity IDE
- Download and install the Antigravity IDE from the Google Antigravity download page .
- Launch the Antigravity IDE .
- Создайте на локальном компьютере новую пустую папку (например, с именем
agentic-data-labs) и откройте её в IDE, выбрав «Открыть папку» . Она будет служить вашей локальной рабочей областью для этого практического задания.
Установите расширение Data Agent Kit.
The Google Cloud Data Agent Kit extension provides deep integration with Google Cloud data services directly within your editor, allowing you to interact with BigQuery, Cloud SQL, Cloud Storage, and more without switching contexts.
- В среде разработки Antigravity IDE щелкните значок «Расширения» на панели активности в левой части экрана (он выглядит как четыре квадрата).
- В строке поиска в верхней части панели расширений введите
Google Cloud Data Agent Kit. - Locate the extension named Google Cloud Data Agent Kit published by
googlecloudtools - Нажмите кнопку «Установить» .
- A prompt may appear asking, "Do you trust publisher 'googlecloudtools' and their extensions?". Click Trust Publishers & Install to proceed.
После установки в левой части панели активности среды разработки Antigravity IDE появится новый значок Google Cloud Data Agent Kit .
- Автоматически должна открыться страница регистрации под названием «Добро пожаловать в Google Cloud Data Agent Kit». Если вы не вошли в свою учетную запись Cloud, следуйте инструкциям, чтобы разрешить доступ.
- В разделе «Сводка конфигурации» найдите поле «Проект». Щелкните раскрывающийся список и выберите свой проект Google Cloud. Установите регион как
us-central1. Затем выберите «Настроить серверы MCP» .
- Select Configure MCP Servers . Under the MCP Configuration pane, ensure you enable the following remote MCP servers:
- BigQuery
- Гаечный ключ
- Тетради
Then click Get Started .
Изучите параметры конфигурации.
После завершения настройки вы попадете на страницу "Начало работы с Google Cloud Data Agent Kit".
- Under "Setup & Configuration", click Get Started .
- Это откроет панель настройки Data Agent Kit . Изучите вкладки:
- Project and Region: Verify your selected Project ID and confirm that the setup script enabled all requisite APIs (Compute Engine, Cloud Storage, BigQuery, Spanner, etc.).
- BigQuery: Настройте местоположение по умолчанию для ваших запросов BigQuery. Используйте регион
us-central1. - Configure MCP Servers: View the enabled MCP servers (BigQuery, Notebooks, Spanner, etc.) that allow AI agents to securely interact with your data.
- Навыки: Изучите встроенные навыки , которые предоставляют агентам специализированные возможности для решения сложных задач обработки данных.
Section Recap: You ran the bootstrap script to create GCS and BigQuery assets while Spanner and Airflow build in the background. You then opened the project in the Antigravity IDE and activated the Google Cloud Data Agent Kit extension. You are now ready to write your first notebook.
3. Ingest raw logs using Spark Serverless
In this section, you will ingest raw JSON transaction logs into the data lake. Managed Service for Apache Spark (Spark Serverless) connects directly with BigQuery 's native storage. You will use the standard BigQuery connector to manage tabular data and enable direct querying and analytics.
Explore the pre-configured Spark Serverless runtime
Before executing Spark code, inspect the Serverless Runtime template that was pre-configured by the setup script. This template defines the target execution environment backend and bundles necessary connector dependencies.
- In the IDE activity bar, open the Google Cloud Data Agent Kit panel.
- Expand the Apache Spark drop-down menu, then expand Serverless .
- Right-click
fraud-pipeline-runtimeand select Profile to open its configuration view in the editor. - In the Profile tab, scroll down and expand Properties to inspect the custom dependencies attached to the environment:
-
spark.jars: Containsgs://spark-lib/spanner/spark-3.5-spanner-1.4.0.jar, which uses the Spark Spanner connector to allow Spark jobs to write inference results directly to Cloud Spanner later in the lab. (Note: Dataproc Serverless includes Google Cloud's Spark BigQuery connector by default, requiring no additional jar configuration to read and write BigQuery tables).
-
- Notice the Interactive Sessions tab on the left. It is currently empty because you have not executed any code yet. As soon as you run the notebook in the next step, a live serverless compute session will dynamically provision and appear here!
Ingest data using the Data Agent Kit
Instead of manually configuring a Spark Session or writing PySpark loading scripts from scratch, you will pair-program with an agent using the Data Agent Kit.
- Open the Agent Chat pane by clicking the Toggle Agent icon in the top-right toolbar.
- Paste the following prompt into the chat (be sure to replace
${PROJECT_ID}with your actual Google Cloud Project ID):
Create a PySpark notebook (01_ingestion.ipynb) to ingest JSON transaction logs
from gs://${PROJECT_ID}-fin-clearing-raw/ into a BigQuery table
`${PROJECT_ID}.transactions_dataset_evals.raw_transactions`
using the Spark BigQuery connector (`format("bigquery")`) with overwrite mode.
- If the agent asks for permission to execute background verification commands (eg "Allow running this command?" ), review the proposed command and select Yes, allow this time (or Yes, and always allow ).
- When the agent finishes generating the file, click the blue Accept all button (or the checkmark icon) at the bottom of the chat pane to save
notebooks/01_ingestion.ipynbto your workspace.
Review and execute the notebook
- Open the newly generated
notebooks/01_ingestion.ipynbin the IDE. - Review the PySpark code for the BigQuery connector write logic.
- Click Run All in the IDE's notebook toolbar.
- If this is your first time running a remote Spark notebook, the IDE may prompt you to install local dependencies. If prompted, click Install dependencies for Remote Spark Kernels and confirm the installation dialogs, then click Run All again.
- In the Select Kernel dropdown menu, choose Remote Spark Kernels -> fraud-pipeline-runtime on Serverless Spark . (Tip: If you do not see your pre-configured runtime template listed, click the refresh icon in the top right of the kernel picker dropdown to reload available remote kernels).
- Look at the status bar in the bottom left of the editor. You will see
Connecting to kernel: fraud-pipeline-runtime on Serverless Spark.... Because this is the initial launch of the Spark Serverless runtime kernel backend, it will take a few minutes to provision and boot up. - Once the kernel finishes connecting, the notebook will automatically begin executing all cells sequentially to process the raw transaction logs into your BigQuery dataset.
Проверка
Once execution completes, check the Data Agent Kit catalog to verify the table creation:
- In the IDE activity bar, open the Google Cloud Data Agent Kit panel.
- Expand the CATALOG section.
- Expand your project ID.
- Expand BigQuery .
- Expand the
transactions_dataset_evalsdataset. - Click the
raw_transactionstable to open its detail view in the main editor. - In the left navigation, explore the Data , Schema , and Details tabs to inspect the ingested records and metadata.
Section Recap: You used natural language in the Agent Chat to generate a complete Spark Serverless workload. You then executed it to process unstructured JSON logs into a BigQuery (raw) table.
4. Deduplicate and normalize with dbt
Before training the ML model, you will enforce data quality by removing duplicate streaming logs, isolating bad records (such as empty transaction IDs), and joining dimensional data (payers and payees). This process requires idempotent, reliable SQL transformations, making dbt (data build tool) a great fit.
Scaffold the dbt pipeline
Use the agent to generate a dbt project over the BigQuery dataset:
- Return to the Agent Chat pane.
- Provide the following instruction to generate the dbt project:
Scaffold a us-central1 dbt project in dbt_project/ that maps raw_transactions
through to an enriched_transactions model in dataset transactions_dataset_evals.

Deduplicate by transaction_id in staging. Quarantine null IDs to an invalid_transactions model.
Join the valid staging records with dim_payers and dim_payees for the enriched_transactions model,
preserving the historical `is_fraud` label column, and finally add a transaction uniqueness test.

Create an implementation plan first.
- The agent will present an Implementation Plan artifact in the main editor pane. Review the proposed file structure and SQL logic.
- Click Proceed (and then Accept all ) to allow the agent to generate the files in your workspace.
- Once generation completes, the agent displays a Walkthrough summarizing the new components. Accept all changes if prompted.
Build and test
Although the agent automatically ran dbt compile to ensure the generated SQL was syntactically valid, you will now materialize these views and tables into BigQuery and run the data quality tests for local verification. (Note: Later in the lab, you will automate this dbt step as part of an end-to-end Airflow DAG).
- In the activity bar on the far left, click the Explorer icon (or press
Cmd/Ctrl+Shift+E). - Expand
dbt_project->modelsto inspect the generated SQL models. Click onenriched_transactions.sqlto open and review the transformation and fraud feature logic in the editor. - In the File Explorer, right-click the
dbt_projectfolder and select Open in Integrated Terminal . This automatically opens a terminal pane set directly to the requireddbt_projectworking directory. - If you do not already have
dbtinstalled, create a virtual environment outsidedbt_project/(at your home or workspace root) and install the BigQuery adapter:
python3 -m venv ~/.venv/dbt
source ~/.venv/dbt/bin/activate
pip install dbt-bigquery
- Run the dbt models and their associated data quality tests:
dbt build
- Watch the terminal output. dbt will compile the SQL, materialize the staging and enriched tables in BigQuery, and execute the data tests.
- Once the build finishes, close the terminal pane to free up screen space for the remaining steps.
Section Recap: You generated a dbt project with the agent, ran data quality tests, and transformed the raw records into staging and enriched BigQuery tables.
5. Train distributed fraud detection model with Random Forest
With the enriched transactions materialized in BigQuery, you will build a machine learning model to classify fraudulent events. Random Forest is an ensemble learning method well-suited for tabular classification data. Running a RandomForestClassifier on Spark Serverless distributes model training across worker nodes without requiring you to manage infrastructure.
In this step, you will use the agent to generate the Spark ML training pipeline.
Generate the ML training notebook
- Open the Agent Chat pane.
- Provide the following prompt to design the model training sequence (remember to replace
${PROJECT_ID}with your active project ID):
Create a PySpark notebook (02_training.ipynb) to train a distributed Random Forest
(RandomForestClassifier) model on the BigQuery table
`transactions_dataset_evals`.`enriched_transactions`, predicting the `is_fraud` label.
Train only on historically labeled records where `is_fraud` is not null.

One-hot encode categorical strings, scale amounts, cache the dataset in memory,
evaluate AUC, and save the evaluated model to gs://${PROJECT_ID}-models/fraud_model.
- Review the agent's plan or generated code and click Proceed / Accept all to save
notebooks/02_training.ipynbto your workspace.
Review and execute the notebook
- Open
notebooks/02_training.ipynbin the editor. - Review the PySpark ML pipeline stages for feature encoding, vector assembly, and Random Forest classification logic.
- Click Run All in the IDE's notebook toolbar.
- When the Select Kernel dropdown picker opens, select fraud-pipeline-runtime on Serverless Spark .
Проверка
Once execution completes, confirm the model was trained and exported correctly:
- Review the evaluation cell outputs near the bottom of the notebook to verify the reported Area Under ROC (AUC) score.
- To ensure the model artifacts were successfully saved to GCS, expand the STORAGE explorer pane in the Data Agent Kit sidebar.
- Locate the bucket ending in
-models(tied to your active Project ID), expand it, and drill down to verify thefraud_modeldirectory and its pipeline stages exist.
Section Recap: You used the agent to create a PySpark ML training pipeline, trained a Random Forest model on your enriched BigQuery table, and exported the model to Cloud Storage.
6. Batch inference and Cloud Spanner write
With a trained predictive model stored in Cloud Storage, you will run batch inference on new transactions flowing through BigQuery. High-risk transactions need to be routed to an operational system so that a compliance team can review them. Cloud Spanner provides a scalable transactional database for this review queue.
Generate the batch inference notebook
Use the agent to create an inference notebook connecting BigQuery, Cloud Storage, and Cloud Spanner:
- Open the Agent Chat pane.
- Provide the following prompt:
Create an inference notebook (03_inference.ipynb) that loads the RandomForestClassifier
model to score unlabeled records (where `is_fraud` is null) from the BigQuery table
`transactions_dataset_evals`.`enriched_transactions`.

Filter for high-risk transactions with a 50%+ fraud probability score (probability >= 0.50)
and write them to the Cloud Spanner table SparkEvalFraudReviewQueue in the cymbal-fraud instance
under fraud-db.
- Accept the generated notebook to save
notebooks/03_inference.ipynbto your workspace.
Review and execute the notebook
- Open the newly generated
notebooks/03_inference.ipynbin the editor. - Review the PySpark inference sequence:
- Dependencies: The Serverless Runtime template provides the required
cloud-spannerJAR dependencies for Spark execution. - Data Formatting: The script drops complex Spark ML vector columns (such as raw features and probabilities) before writing to match the Spanner table schema.
- Spanner Connector: It writes the flagged rows using
.format("cloud-spanner")to append directly to the review queue.
- Dependencies: The Serverless Runtime template provides the required
- Click Run All in the IDE's notebook toolbar.
- When prompted to select a kernel, select fraud-pipeline-runtime on Serverless Spark .
Проверка
Once the inference notebook finishes processing, you can query your operational Spanner database directly inside the IDE:
- In the IDE activity bar, open the Google Cloud Data Agent Kit panel.
- Expand the CATALOG section.
- Expand your project ID, then expand Spanner .
- Navigate to
cymbal-fraud->fraud-db->Tables->SparkEvalFraudReviewQueue. - Right-click the table and select Query Table , then execute the query:
SELECT *
FROM `SparkEvalFraudReviewQueue`
LIMIT 100;
- In the Query Results pane below, you should see newly inserted rows representing high-risk transactions flagged for manual review.
Section Recap: You used the agent to create a batch inference notebook, scored unlabeled BigQuery records with your trained model, and wrote high-risk transactions directly to Cloud Spanner.
7. Scaffold and orchestrate with Managed Airflow
Your pipeline currently consists of discrete steps: an ingestion notebook, a dbt transformation project, and a batch inference notebook. To make this production-ready, you will stitch them together into a scheduled dependency graph.
Managed Service for Apache Airflow (formerly known as Cloud Composer) provides a managed orchestration engine for this workflow. The Data Agent Kit includes an Orchestration Pipelines feature that translates declarative YAML pipeline definitions directly into Airflow DAGs.
Define the pipeline
Use the agent to generate the orchestration pipeline configuration:
- In the Agent Chat , provide the following prompt (remembering to replace
${PROJECT_ID}):
Initialize and define an orchestration pipeline (fraud_analysis_pipeline) triggering
the ingestion notebook, dbt project, and inference notebook in sequential order.
For Dataproc Serverless engine configs in us-central1, use resourceProfile.inline
(defining properties with spark.jars: "gs://spark-lib/spanner/spark-3.5-spanner-1.4.0.jar"
for inference) rather than resourceProfile.path or overrides.

Set the schedule interval to run daily at midnight, and use
gs://${PROJECT_ID}-airflow-artifacts for artifact storage.
Review the DAG configuration
The Data Agent Kit Orchestrator uses declarative YAML configurations to define and deploy pipelines to Apache Airflow, allowing definitions to be version controlled and deployed via CI/CD.
In the IDE Explorer pane, review the two pipeline files the agent generated at the root of your workspace:
-
deployment.yaml: Open this file. This serves as your environment registry. It maps your logicaldevpipeline to thecymbal-airflowenvironment, sets the execution region (us-central1), and defines theartifact_storagebucket where compiled DAGs and dependencies are staged. -
fraud_analysis_pipeline.yaml: Open this file. This defines the execution graph. It specifies the trigger schedule (interval: '0 0 * * *') and sequences the three steps under theactionsblock:- An ingestion
notebookaction for01_ingestion.ipynbrunning on Dataproc Serverless. - A transformation
pipelineaction targeting thedbt_projectdirectory, with adependsOndependency pointing to the ingestion step. - An inference
notebookaction for03_inference.ipynbwith adependsOndependency pointing to the dbt step, bundling the Spanner JAR property.
- An ingestion
- The agent will also summarize these generated artifacts into a Walkthrough tab in your editor pane, outlining the configurations and validations performed.
Interactive DAG configuration
The Data Agent Kit renders your pipeline configuration as an interactive visual graph for inspecting and editing Airflow DAG properties.
- In the IDE activity bar, open the Google Cloud Data Agent Kit panel.
- Under
DATA ENGINEERING, expandOrchestration Pipelines. - Click
fraud_analysis_pipeline.yamlto open the visual DAG canvas in the main editor.
- Click the
Schedule triggernode at the top. A configuration flyout opens on the right, displaying the parsed Cron string (0 0 * * *) and allowing you to adjust parameters like backfill and catchup. - Click either notebook task node (such as the ingestion or inference step). The flyout updates to display the specific Dataproc Serverless execution mappings and connector properties.
- Notice the notebook filename hyperlink (such as
01_ingestion.ipynb) inside the node block. Clicking it opens the notebook directly in your editor. - In the left sidebar underneath Orchestration Pipelines, click
Deployment configuration. This view shows your targetdevenvironment cluster and output GCS bucket artifacts.
Section Recap: You generated an orchestration pipeline configuration with the agent, defining dependencies between ingestion, dbt, and inference tasks in an interactive visual canvas.
8. Deploy, execute, and monitor
With the DAG defined locally, you will connect to the Managed Airflow environment provisioned during setup and deploy the pipeline.
Configure Managed Service for Apache Airflow
Before deploying, configure the Scheduler connection in the Data Agent Kit settings so the extension targets your Managed Airflow environment:
- In the IDE activity bar, open the Google Cloud Data Agent Kit panel.
- Under
SETTINGS, click Settings . - Select Scheduler from the left menu.
- Configure the settings:
- Project ID : Select your active project ID.
- Region : Select
us-central1. - Environment : Select
cymbal-airflow.
- Нажмите « Сохранить ».
Deploy the DAG
You will now deploy the configured pipeline directly to your Managed Airflow environment from the visual canvas:
- In the Google Cloud Data Agent Kit sidebar, expand
DATA ENGINEERING>Orchestration Pipelinesand clickfraud_analysis_pipeline.yamlto open the visual DAG canvas. - In the top right corner of the canvas toolbar, click the blue Run pipeline button.
- In the environment dropdown picker, select
dev. - Observe the progress notification in the bottom status area (
Running pipeline: Building pipeline locally...). The extension will automatically compile your DAG, package the notebook and dbt assets, and upload them to your Managed Airflow environment's GCS bucket (this takes about 3–4 minutes to complete).
Monitor the run
Once local compilation completes and the popup notification confirms Triggered a new run for pipeline... successfully , monitor the live execution:
- In the Google Cloud Data Agent Kit sidebar, expand
DATA ENGINEERING>Orchestration Pipelines. - Click Pipelines management .
- In the Pipelines Management table, click on
fraud_analysis_pipelineto open its execution history.
- In the Execution History view, select the active run from the calendar.
- As the execution progresses across each pipeline task (ingestion, dbt transformation, and inference), status indicators update and task durations populate. Click any task to inspect its live execution output and Airflow DAG logs.
Section Recap: You configured the Airflow Scheduler connection, deployed your end-to-end analytical pipeline to Managed Airflow, and monitored a live execution, verifying the system from raw logs to final Cloud Spanner predictions.
9. Clean up
To avoid incurring ongoing charges to your Google Cloud project for the resources used in this codelab, tear down the environment using the automated script.
- In the Terminal panel (or in Cloud Shell), navigate to the scripts directory and execute:
cd ~/devrel-demos/codelabs/agentic-data-labs/data-science/scripts
chmod +x teardown.sh
./teardown.sh
- The script will list all the resources it plans to delete and prompt for confirmation:
- Managed Airflow Environment (
cymbal-airflow) - Cloud Spanner Instance (
cymbal-fraud) - BigQuery Dataset (
transactions_dataset_evals) - Cloud Storage Buckets (
gs://${PROJECT_ID}-fin-clearing-rawandgs://${PROJECT_ID}-models) - Worker Service Account (
composer-worker-sa)
- Managed Airflow Environment (
- Type
yto confirm. The teardown script will remove all provisioned GCP services and clean up local files.
10. Congratulations!
You have built an end-to-end fraud detection pipeline spanning Cloud Storage, BigQuery, Managed Service for Apache Spark (Spark Serverless), dbt, Cloud Spanner, and Managed Service for Apache Airflow, pair-programming with the Google Cloud Data Agent Kit inside the Antigravity IDE.
What you accomplished
- 📥 Ingested raw transaction logs into a BigQuery table using Managed Service for Apache Spark and the Data Agent Kit.
- 🧹 Deduplicated and normalized data by creating a dbt project with data quality tests.
- 🤖 Trained a distributed Random Forest model using
RandomForestClassifierand exported the trained model to Cloud Storage. - ⚡ Executed batch inference on incoming transactions and routed high-risk records into Cloud Spanner for audit review.
- 🔄 Orchestrated, deployed, and monitored the workflow as a scheduled Airflow DAG using Managed Service for Apache Airflow and the IDE's visual DAG management tools.
Ключевые понятия
Концепция | What you learned |
Pair-programming inside the IDE using natural language to generate PySpark notebooks, configure dbt models, and define Airflow DAGs | |
Scalable tabular storage for analytical SQL, dbt transformations, and ML training | |
Serverless execution for distributed PySpark data loading and Random Forest ML training | |
Writing batch Spark inference predictions directly into operational database review queues | |
YAML DAG Declarations | Declarative pipeline definitions rendered as interactive Airflow visual graphs in the IDE |
Visual DAG Management | Inspecting pipeline dependencies, deploying to Managed Airflow , and monitoring live task execution history inside the IDE |
Следующие шаги
- Explore the Google Cloud Data Agent Kit documentation
- Learn more about Managed Service for Apache Spark
- Learn more about Managed Service for Apache Airflow
- Build your own multi-service pipelines using the Antigravity IDE