
1. Build a Reverse ETL Pipeline from Databricks to Spanner using Google Cloud Storage and BigQuery
Introduction
In this codelab, you will build a Reverse ETL pipeline from Databricks to Spanner. Traditionally, standard ETL (Extract, Transform, Load) pipelines move data from operational databases into a data warehouse like Databricks for analytics. A Reverse ETL pipeline does the opposite by moving curated, processed data from the data warehouse back into operational databases, such as Spanner, a globally distributed relational database ideal for high-availability applications, where it can power applications, serve user-facing features, or be used for real-time decision-making.
The goal is to move an aggregated dataset from Databricks Iceberg tables into Spanner tables.
To achieve this, Google Cloud Storage (GCS) and BigQuery are used as intermediate steps. Here's a breakdown of the data flow and the reasoning behind this architecture:

- Databricks to Google Cloud Storage (GCS) in Iceberg Format:
- The first step is to get the data out of Databricks in an open, well-defined format. The table is exported in the Apache Iceberg format. This process writes the underlying data as a set of Parquet files and the table's metadata (schema, partitions, file locations) as JSON and Avro files. Staging this complete table structure in GCS makes the data portable and accessible to any system that understands the Iceberg format.
- Convert GCS Iceberg tables into BigQuery BigLake external table:
- Instead of loading the data directly from GCS into Spanner, BigQuery is used as a powerful intermediary. A BigLake external table is created in BigQuery that points directly to the Iceberg metadata file in GCS. This approach has several advantages:
- No Data Duplication: BigQuery reads the table structure from the metadata and queries the Parquet data files in place without ingesting them, which saves significant time and storage costs.
- Federated Queries: It allows for running complex SQL queries on GCS data as if it were a native BigQuery table.
- ReverseETL BigLake external table into Spanner:
- The final step is to move the data from BigQuery into Spanner. This is achieved using a powerful feature in BigQuery called an
EXPORT DATAquery, which is the "Reverse ETL" step. - Operational Readiness: Spanner is designed for transactional workloads, providing strong consistency and high availability for applications. By moving the data into Spanner, it is made accessible to user-facing applications, APIs, and other operational systems that require low-latency point lookups.
- Scalability: This pattern allows for leveraging BigQuery's analytical power to process large datasets and then serve the results efficiently through Spanner's globally scalable infrastructure.
Services and Terminology
- DataBricks - Cloud based data platform built around Apache Spark.
- Spanner - A globally distributed relational database, that is fully managed by Google.
- Google Cloud Storage - Google cloud's blob storage offering.
- BigQuery - A serverless data warehouse for analytics, that is fully managed by Google.
- Iceberg - An open table format defined by Apache providing abstraction over common open-source data file formats.
- Parquet - An open-source columnar binary data file format by Apache.
What you'll learn
- How to load data into Databricks as Iceberg tables
- How to create a GCS Bucket
- How to export a Databricks table to GCS in the Iceberg format
- How to create a BigLake External Table in BigQuery from the Iceberg table in GCS
- How to setup up a Spanner instance
- How to load BigLake External Tables in BigQuery to Spanner
2. Setup, Requirements & Limitations
Prerequisites
- A Databricks account, preferably on GCP
- A Google Cloud account with a BigQuery Enterprise-tier or higher reservation is required to export from BigQuery to Spanner.
- Access to the Google Cloud Console through a web browser
- A terminal to run Google Cloud CLI commands
If your Google Cloud organization has the iam.allowedPolicyMemberDomains policy enabled, an administrator may need to grant an exception to allow service accounts from external domains. This will be covered in a later step where applicable.
Requirements
- A Google Cloud project with billing enabled.
- A web browser, such as Chrome
- A Databricks account (this lab assumes a workspace hosted in GCP)
- The BigQuery instance must be on the Enterprise edition or higher to use the EXPORT DATA feature.
- If your Google Cloud organization has the
iam.allowedPolicyMemberDomainspolicy enabled, an administrator may need to grant an exception to allow service accounts from external domains. This will be covered in a later step where applicable.
Google Cloud Platform IAM Permissions
The Google account will need the following permissions to execute all the steps in this codelab.
Service Accounts | ||
| Allows the creation of Service Accounts. | |
Spanner | ||
| Allows creating a new Spanner instance. | |
| Allows running DDL statements to create | |
| Allows running DDL statements to create tables in the database. | |
Google Cloud Storage | ||
| Allows creating a new GCS bucket to store the exported Parquet files. | |
| Allows writing the exported Parquet files to the GCS bucket. | |
| Allows BigQuery to read the Parquet files from the GCS bucket. | |
| Allows BigQuery to list the Parquet files in the GCS bucket. | |
Dataflow | ||
| Allows claiming of work items from Dataflow. | |
| Allows the Dataflow worker to send messages back to the Dataflow service. | |
| Allows Dataflow workers to write log entries to Google Cloud Logging. | |
For convenience, predefined roles that contain these permissions can be used.
|
|
|
|
|
|
|
|
Google Cloud Project
A Project is a basic unit of organization in Google Cloud. If an administrator has provided one for use, this step may be skipped.
A project can be created using the CLI like this:
gcloud projects create <your-project-name>
Learn more about creating and managing projects here.
Limitations
It is important to be aware of certain limitations and data type incompatibilities that can arise in this pipeline.
Databricks Iceberg to BigQuery
When using BigQuery to query Iceberg tables managed by Databricks (via UniForm), keep the following in mind:
- Schema Evolution: While UniForm does a good job of translating Delta Lake schema changes to Iceberg, complex changes might not always propagate as expected. For instance, renaming columns in Delta Lake is not translated to Iceberg, which sees it as a
dropand anadd. Always test schema changes thoroughly. - Time Travel: BigQuery cannot use Delta Lake's time travel capabilities. It will only query the latest snapshot of the Iceberg table.
- Unsupported Delta Lake Features: Features like Deletion Vectors and Column Mapping with
idmode in Delta Lake are not compatible with UniForm for Iceberg. The lab usesnamemode for column mapping, which is supported.
BigQuery to Spanner
The EXPORT DATA command from BigQuery to Spanner does not support all BigQuery data types. Exporting a table with the following types will result in an error:
STRUCTGEOGRAPHYDATETIMERANGETIME
Additionally, if the BigQuery project is using the GoogleSQL dialect, the following numeric types are also not supported for export to Spanner:
BIGNUMERIC
For a complete and up-to-date list of limitations, refer to the official documentation: Exporting to Spanner Limitations.
Troubleshooting & Gotchas
- If not on a GCP Databricks instance, defining an External Data Location in GCS may not be possible. In such cases, the files will need to be staged in the Databricks workspace's cloud provider's storage solution, and then migrated to GCS separately.
- When doing so, adjustments will be needed to the metadata as the information will have hard coded paths to the staged files.
3. Setup Google Cloud Storage (GCS)
Google Cloud Storage (GCS) will be used to store the Parquet data files generated by Databricks. To do so, a new bucket will first need to be created to use as the file destination.
Google Cloud Storage
Creating a new bucket
- Navigate to the Google Cloud Storage page in your cloud console.
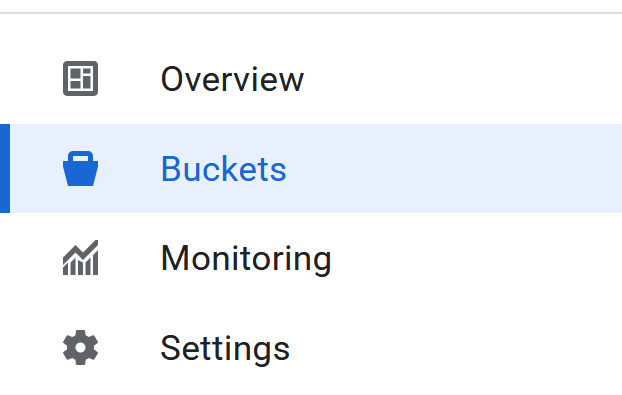
- On the left panel, select Buckets:
- Click the Create button:

- Fill in your bucket details:
- Choose a bucket name to use. For this lab, the name
codelabs_retl_databrickswill be used - Select a region to store the bucket, or use the default values.
- Keep storage class as
standard - Keep default values for control access
- Keep default values for protect object data
- Click the
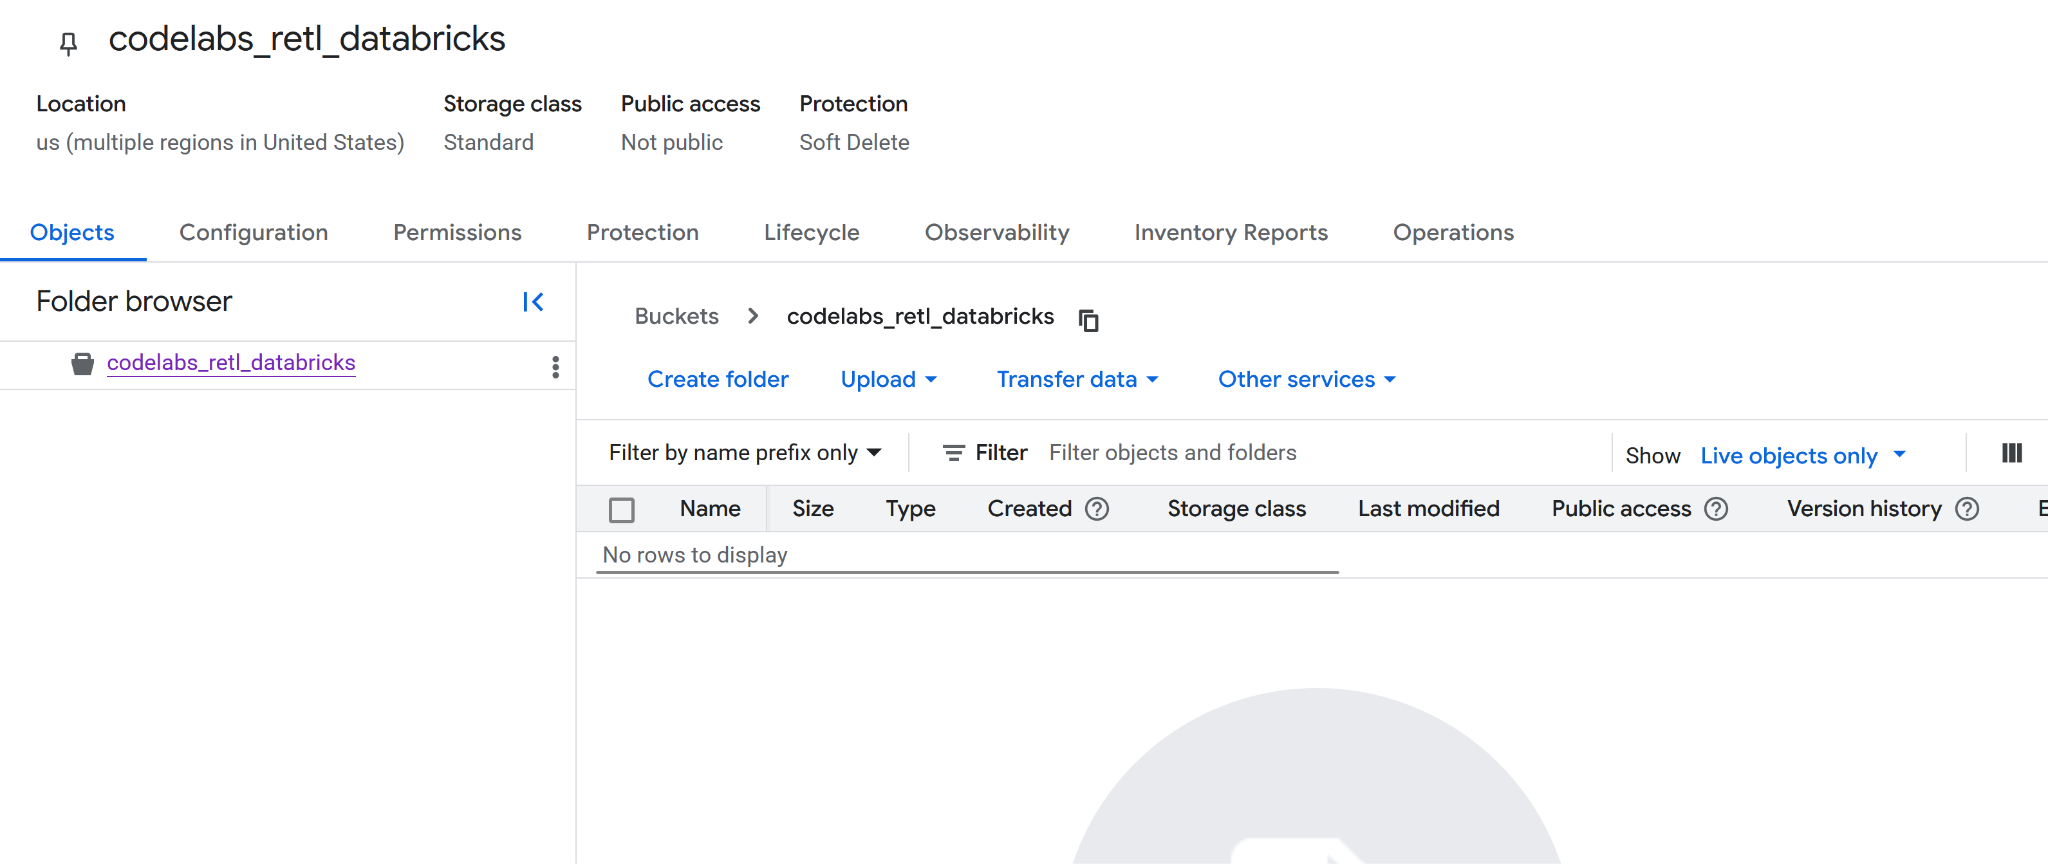
Createbutton when done. A prompt may appear to confirm that public access will be prevented. Go ahead and confirm. - Congratulations, a new bucket has been successfully created! A redirect to the bucket page will occur.
- Copy the new bucket name somewhere as it will be needed later.
Preparing for the next steps
Make sure the following details are noted down as they will be needed in the next steps:
- Google project id
- Google Storage bucket name
4. Setup Databricks
TPC-H Data
For this lab, the TPC-H dataset will be used, which is an industry-standard benchmark for decision support systems. Its schema models a realistic business environment with customers, orders, suppliers, and parts, making it perfect for demonstrating a real-world analytics and data movement scenario.
Instead of using the raw, normalized TPC-H tables, a new, aggregated table will be created. This new table will join data from the orders, customer, and nation tables to produce a denormalized, summarized view of regional sales. This pre-aggregation step is a common practice in analytics, as it prepares the data for a specific use case—in this scenario, for consumption by an operational application.
The final schema for the aggregated table will be:
Col | Type |
nation_name | string |
market_segment | string |
order_year | int |
order_priority | string |
total_order_count | bigint |
total_revenue | decimal(29,2) |
unique_customer_count | bigint |
Iceberg Support with Delta Lake Universal Format (UniForm)
For this lab, the table inside Databricks will be a Delta Lake table. However, to make it readable by external systems like BigQuery, a powerful feature called Universal Format (UniForm) will be enabled.
UniForm automatically generates Iceberg metadata alongside the Delta Lake metadata for a single, shared copy of the table's data. This provides the best of both worlds:
- Inside Databricks: All the performance and governance benefits of Delta Lake are gained.
- Outside Databricks: The table can be read by any Iceberg-compatible query engine, like BigQuery, as if it were a native Iceberg table.
This eliminates the need to maintain separate copies of the data or run manual conversion jobs. UniForm will be enabled by setting specific table properties when the table is created.
Databricks Catalogs
A Databricks catalog is the top-level container for data in Unity Catalog, Databricks' unified governance solution. Unity Catalog provides a centralized way to manage data assets, control access, and track lineage, which is crucial for a well-governed data platform.
It uses a three-level namespace to organize data: catalog.schema.table.
- Catalog: The highest level, used to group data by environment, business unit, or project.
- Schema (or Database): A logical grouping of tables, views, and functions within a catalog.
- Table: The object containing your data.
Before the aggregated TPC-H table can be created, a dedicated catalog and schema must first be set up to house it. This ensures the project is neatly organized and isolated from other data in the workspace.
Create a new Catalog and Schema
In Databricks Unity Catalog, a Catalog serves as the highest level of organization for data assets, acting as a secure container that can span across multiple Databricks workspaces. It enables you to organize and isolate data based on business units, projects, or environments, with clearly defined permissions and access controls.
Within a Catalog, a Schema (also known as a database) further organizes tables, views, and functions. This hierarchical structure allows for granular control and logical grouping of related data objects. For this lab, a dedicated Catalog and Schema will be created to house the TPC-H data, ensuring proper isolation and management.
Creating a Catalog
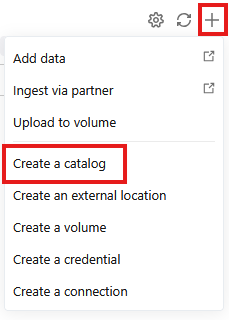
- Go to

- Click the + and then select Create a catalog from the dropdown
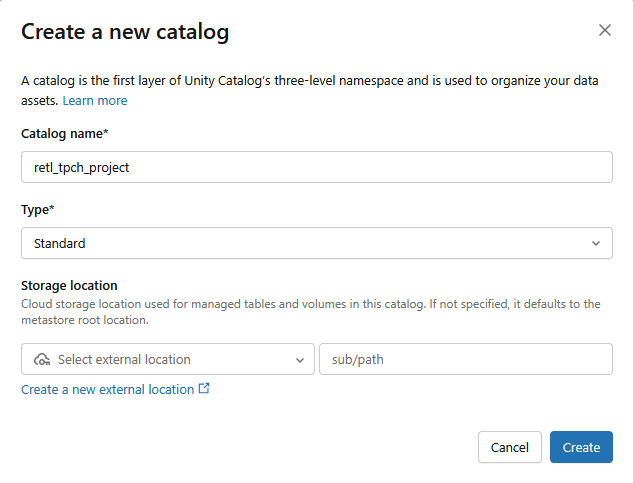
- A new Standard catalog will be created with the following settings:
- Catalog name:
retl_tpch_project - Storage location: Use default if one has been set up in the workspace, or create a new one.
Creating a Schema
- Go to
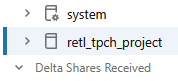
- Select the new catalog that was created from the left panel
- Click on

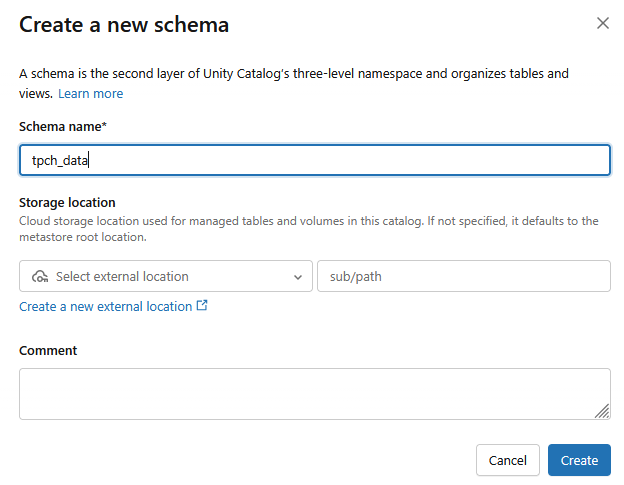
- A new schema will be created with the Schema name as
tpch_data
Setting up External Data
To be able to export data from Databricks to Google Cloud Storage (GCS), external data credentials need to be set up within Databricks. This allows Databricks to securely access and write to the GCS bucket.
- From the Catalog screen, click on
- If you do not see an
External Dataoption, you may findExternal Locationslisted under aConnectdropdown instead.
- Click on

- In the new dialog window, set up the required values for the credentials:
- Credential Type:
GCP Service Account - Credential Name:
retl-gcs-credential
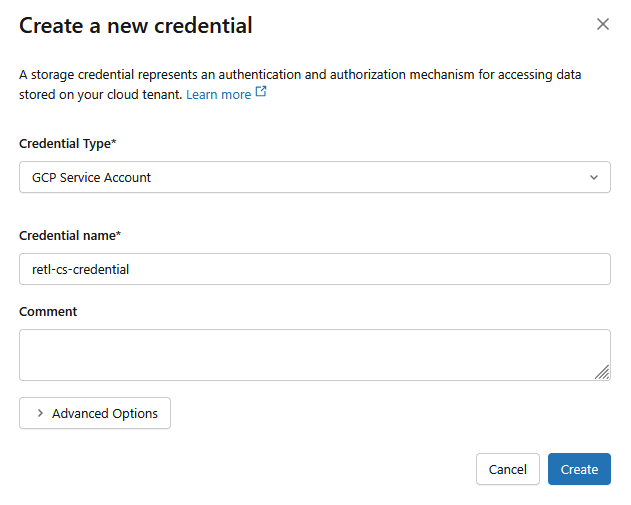
- Click Create
- Next, click on the External Locations tab.
- Click on Create location.
- In the new dialog window, set up the required values for the external location:
- External location name:
retl-gcs-location - Storage type:
GCP - URL: The URL of the GCS bucket, in the format
gs://YOUR_BUCKET_NAME - Storage credential: Select the
retl-gcs-credentialthat was just created.
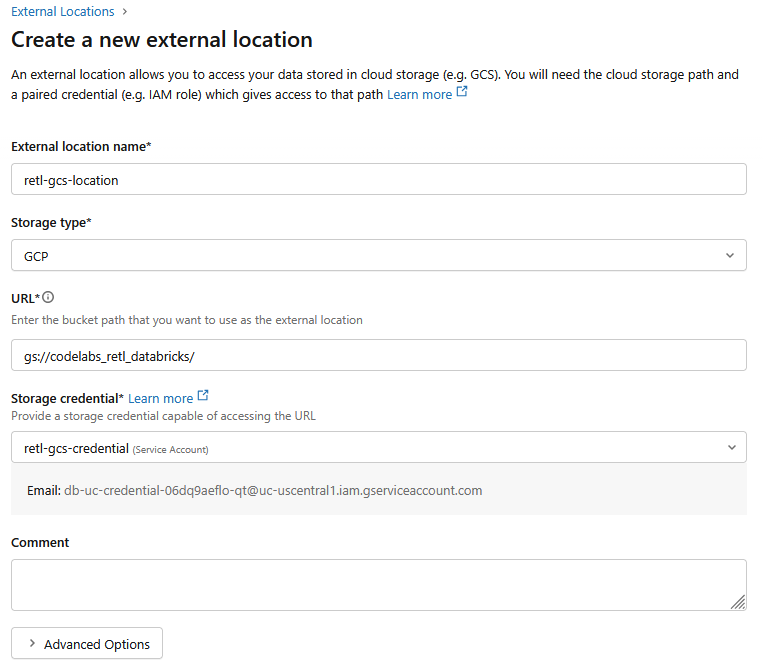
- Note down the Service account email that automatically gets filled out upon selecting the storage credential as it will be needed in the next step.
- Click Create
5. Setting Service Account Permissions
A service account is a special account type used by applications or services to make authorized API calls to Google Cloud resources.
Permissions will now need to be added to the service account created for the new bucket in GCS.
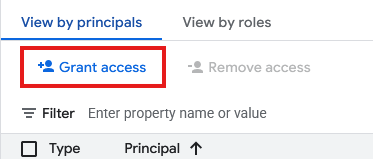
- From the GCS bucket page, Select the Permissions tab.
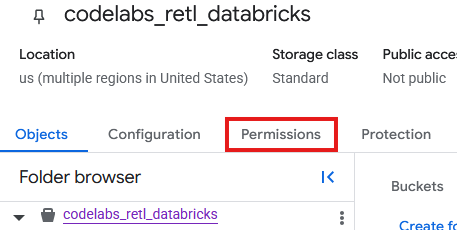
- Click on Grant access in the principals page
- In the Grant Access panel that slides out from the right, input the Service Account ID into the New principals field
- Under Assign Roles, add
Storage Object AdminandStorage Legacy Bucket Reader. These roles allow the Service Account to read, write, and list objects in the storage bucket.
Load TPC-H Data
Now that the Catalog and Schema are created, the TPCH data can be loaded from the existing samples.tpch table that is stored internally in Databricks and manipulated into a new table in the newly defined schema.
Creating Table with Iceberg support
Iceberg Compatibility with UniForm
Behind the scenes, Databricks internally manages this table as a Delta Lake table, giving all the benefits of Delta's performance optimizations and governance features within the Databricks ecosystem. However, by enabling UniForm (short for Universal Format), Databricks is instructed to do something special: every time the table is updated, Databricks automatically generates and maintains the corresponding Iceberg metadata in addition to the Delta Lake metadata.
This means that a single, shared set of data files (the Parquet files) is now described by two different sets of metadata.
- For Databricks: It uses the
_delta_logto read the table. - For External Readers (like BigQuery): They use the Iceberg metadata file (
.metadata.json) to understand the table's schema, partitioning, and file locations.
The result is a table that is fully and transparently compatible with any Iceberg-aware tool. There is no data duplication and no need for manual conversion or synchronization. It's a single source of truth that can be seamlessly accessed by both the analytical world of Databricks and the broader ecosystem of tools that support the open Iceberg standard.
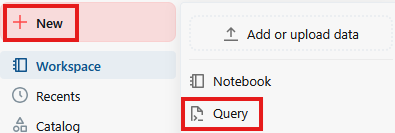
- Click on New then Query
- In the text field of the query page, run the following SQL command:
CREATE TABLE retl_tpch_project.tpch_data.regional_sales_iceberg
USING DELTA
LOCATION 'gs://<Your bucket name>/regional_sales_iceberg'
TBLPROPERTIES (
'delta.columnMapping.mode' = 'name',
'delta.enableIcebergCompatV2' = 'true',
'delta.universalFormat.enabledFormats' = 'iceberg'
)
AS
SELECT
n.n_name AS nation_name,
c.c_mktsegment AS market_segment,
YEAR(o.o_orderdate) AS order_year,
o.o_orderpriority AS order_priority,
COUNT(o.o_orderkey) AS total_order_count,
ROUND(SUM(o.o_totalprice), 2) AS total_revenue,
COUNT(DISTINCT c.c_custkey) AS unique_customer_count
FROM samples.tpch.orders AS o
INNER JOIN samples.tpch.customer AS c
ON o.o_custkey = c.c_custkey
INNER JOIN samples.tpch.nation AS n
ON c.c_nationkey = n.n_nationkey
GROUP BY
n.n_name,
c.c_mktsegment,
YEAR(o.o_orderdate),
o.o_orderpriority;
OPTIMIZE retl_tpch_project.tpch_data.regional_sales_iceberg;
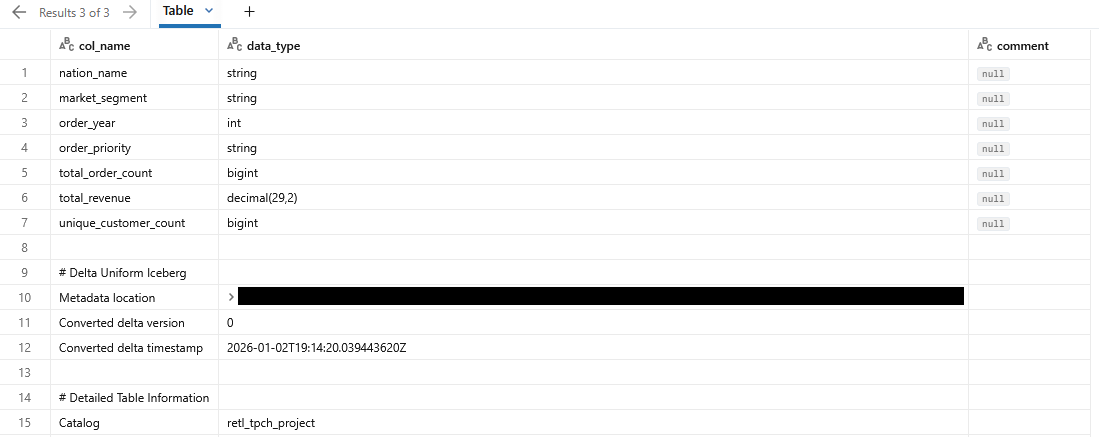
DESCRIBE EXTENDED retl_tpch_project.tpch_data.regional_sales_iceberg;
Notes:
- Using Delta - Specifies that we are using a Delta Lake Table. Only Delta Lake tables in Databricks can be stored as an external table.
- Location - Specifies where the table is to be stored, if external.
- TablePropertoes - The
delta.universalFormat.enabledFormats = ‘iceberg'creates the compatible iceberg metadata alongside the Delta Lake files. - Optimize - Forcefully triggers the UniForm metadata generation, as that usuallye happens async.
- The output of the query should show details on the newly created table
Verify GCS table data
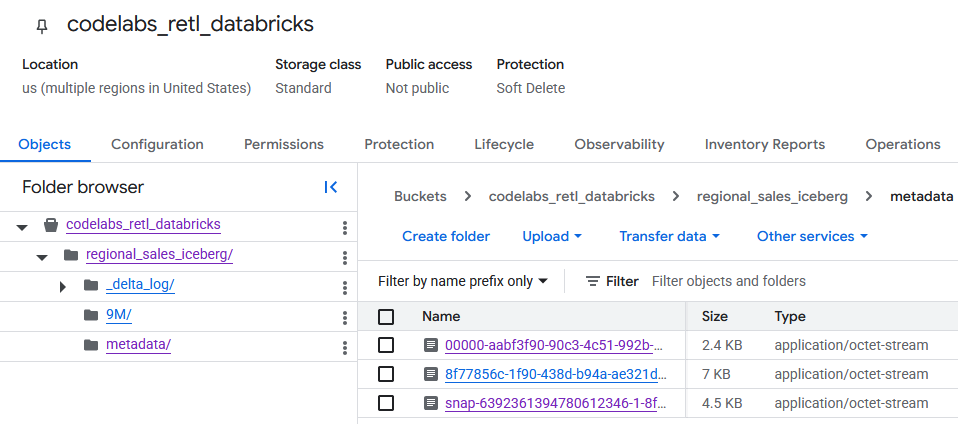
Upon navigating to the GCS bucket, the newly created table data can now be found.
You'll find the Iceberg metadata within the metadata folder, which is used by external readers (like BigQuery). The Delta Lake metadata, which Databricks internally uses, is tracked in the _delta_log folder.
The actual table data is stored as Parquet files within another folder, typically named with a randomly generated string by Databricks. For example, in the screenshot below, the data files are located in the 9M folder.
6. Setup BigQuery and BigLake
Now that the Iceberg table is in Google Cloud Storage, the next step is to make it accessible to BigQuery. This will be done by creating a BigLake external table.
BigLake is a storage engine that allows creating tables in BigQuery that read data directly from external sources like Google Cloud Storage. For this lab, it's the key technology that enables BigQuery to understand the Iceberg table that was just exported without needing to ingest the data.
To make this work, two components are needed:
- A Cloud Resource Connection: This is a secure link between BigQuery and GCS. It uses a special service account to handle authentication, ensuring that BigQuery has the necessary permissions to read the files from the GCS bucket.
- An External Table Definition: This tells BigQuery where to find the Iceberg table's metadata file in GCS and how it should be interpreted.
Create a Cloud Resource Connection
First, the connection that allows BigQuery to access GCS will be created.
More info on creating Cloud Resource Connections can be found here
- Go to BigQuery
- Click On Connections under Explorer
- If the Explorer plane is not visible, click on

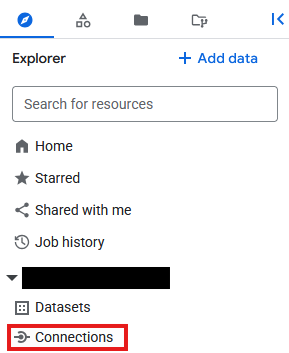
- On the Connections page, click

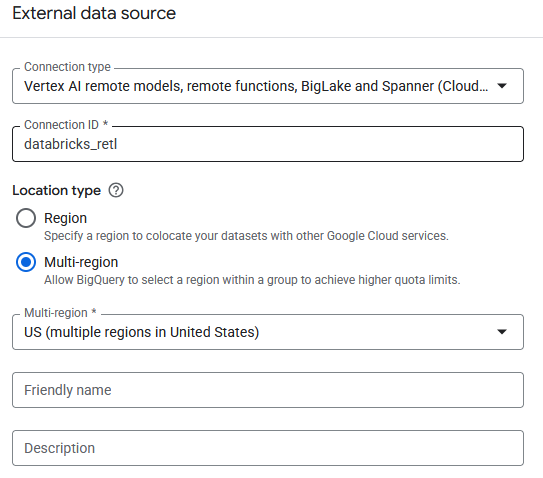
- For Connection type choose
Vertex AI remote models, remote functions, BigLake and Spanner (Cloud Resource) - Set the connection ID to
databricks_retland create the connection

- An entry should now be seen in the Connections table of the newly created connection. Click on that entry to see the connection details.

- In the connection details page, note down the Service account id as it will be needed later.
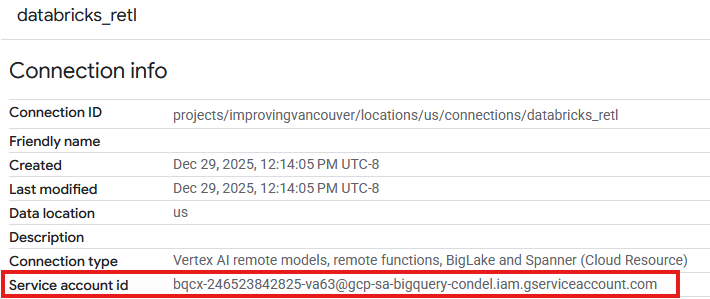
Grant Access to the Connection Service Account
- Go to IAM & Admin
- Click on Grant access
- For the New principals field, enter the Connection Resource's Service account id created above.
- For Role, select
Storage Object Userand then click
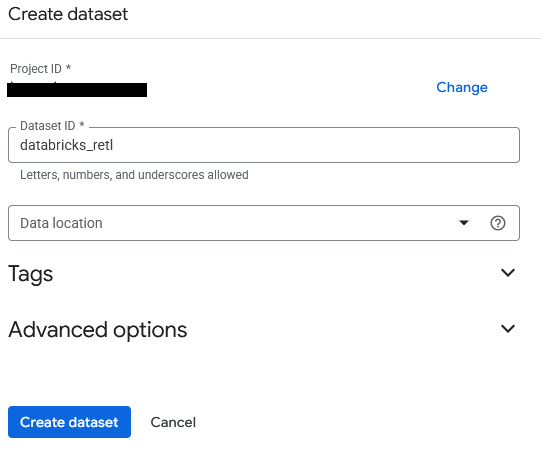
With the connection established and its service account granted the necessary permissions, the BigLake external table can now be created. First, a Dataset is needed in BigQuery to act as a container for the new table. Then, the table itself will be created, pointing it to the Iceberg metadata file in the GCS bucket.
- Go to BigQuery
- In the Explorer panel, click on the project ID, then click on the three dots and select Create dataset.

- The dataset will be named
databricks_retl. Leave the other options as default and click the Create dataset button.
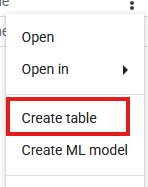
- Now, find the new
databricks_retldataset in the Explorer panel. Click the three dots next to it and select Create table.
- Fill in the following settings for the table creation:
- Create table from:
Google Cloud Storage - Select file from GCS bucket or use a URI pattern: Browse to the GCS Bucket and locate the metadata JSON file that was generated during the Databricks export. The path should look something like:
regional_sales/metadata/v1.metadata.json. - File format:
Iceberg - Table:
regional_sales - Table type:
External table - Connection ID: Select the
databricks_retlconnection created earlier. - Leave the rest of the values as default, then click Create table.
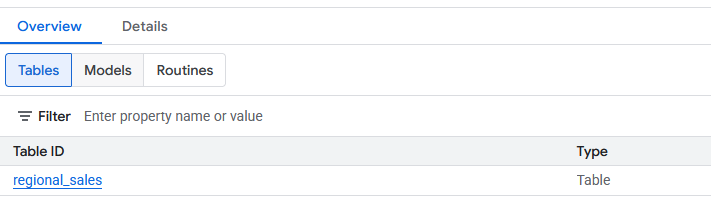
- Once created, the new
regional_salestable should be visible under thedatabricks_retldataset. This table can now be queried using standard SQL, just as with any other BigQuery table.
7. Load to Spanner
The final and most important part of the pipeline has been reached: moving the data from BigLake External tables into Spanner. This is the "Reverse ETL" step, where the data, having been processed and curated in the data warehouse, is loaded into an operational system for use by applications.
Spanner is a fully managed, globally distributed relational database. It offers the transactional consistency of a traditional relational database but with the horizontal scalability of a NoSQL database. This makes it an ideal choice for building scalable, highly available applications.
The process will be:
- Create a Spanner instance, which is the physical allocation of resources.
- Create a database within that instance.
- Define a table schema in the database that matches the structure of the
regional_salesdata. - Run a BigQuery
EXPORT DATAquery to load the data from the BigLake table directly into the Spanner table.
Create Spanner Instance, Database, and Table
- Go to Spanner
- Click on
 . Feel free to use an existing instance if one is available. Setup the instance requirements as needed. For this lab, the following were used:
Edition | Enterprise |
Instance Name | databricks-retl |
Region Configuration | Your region of choice |
Compute Unit | Processing Units (PUs) |
Manual Allocation | 100 |
- Once created, go to the Spanner instance page, and select
 . Feel free to use an existing database if one is available.
- For this lab, a database will be created with
- Name:
databricks-retl - Database Dialect:
Google Standard SQL
- Once the database is created, select it from the Spanner Instance page enter the Spanner Database page.
- From the Spanner Database page, click on

- In the new query page, the table definition for the table to import into Spanner will be created. To do so, run the following SQL query.
CREATE TABLE regional_sales (
    nation_name STRING(MAX),
    market_segment STRING(MAX),
    order_year INT64,
    order_priority STRING(MAX),
    total_order_count INT64,
    total_revenue NUMERIC,
    unique_customer_count INT64
) PRIMARY KEY (nation_name, market_segment, order_year, order_priority);
- Once the SQL command executes, the Spanner table will now be ready for BigQuery to Reverse ETL the data. The creation of the table can be verified by seeing it listed in the left panel in the Spanner database.

Reverse ETL to Spanner using EXPORT DATA
This is the final step. With the source data ready in a BigQuery BigLake table and the destination table created in Spanner, the actual data movement is surprisingly simple. A single BigQuery SQL query will be used: EXPORT DATA.
This query is designed specifically for scenarios like this. It efficiently exports data from a BigQuery table (including external ones like the BigLake table) to an external destination. In this case, the destination is the Spanner table. More information on the export feature can be found here
More information on setting up BigQuery to Spanner Reverse ETL can be found here
- Go to BigQuery
- Open a new query editor tab.
- On the Query page, enter the following SQL. Remember to replace the project ID in the **
uri** and the table path with the correct project ID.
EXPORT DATA OPTIONS(

uri='https://spanner.googleapis.com/projects/YOUR_PROJECT_ID/instances/databricks-retl/databases/databricks-retl',
  format='CLOUD_SPANNER',
   spanner_options="""{
      "table": "regional_sales",
      "priority": "MEDIUM"
  }"""
) AS

SELECT * FROM `YOUR_PROJECT_ID.databricks_retl.regional_sales`;
- Once the command completes, the data has been successfully exported to Spanner!
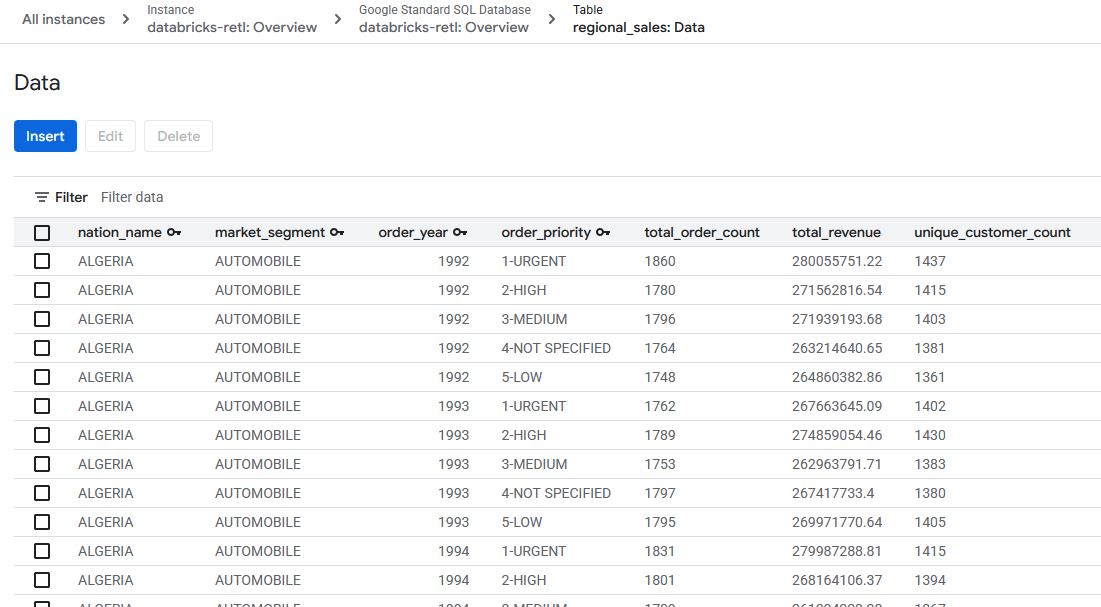
8. Verify Data in Spanner
Congratulations! A complete Reverse ETL pipeline has been successfully built and executed, moving data from a Databricks data warehouse to an operational Spanner database.
The final step is to verify that the data has arrived in Spanner as expected.
- Go to Spanner.
- Navigate to your
databricks-retlinstance and then to thedatabricks-retldatabase. - In the list of tables, click on the
regional_salestable. - On the left-hand navigation menu for the table, click on the Data tab.
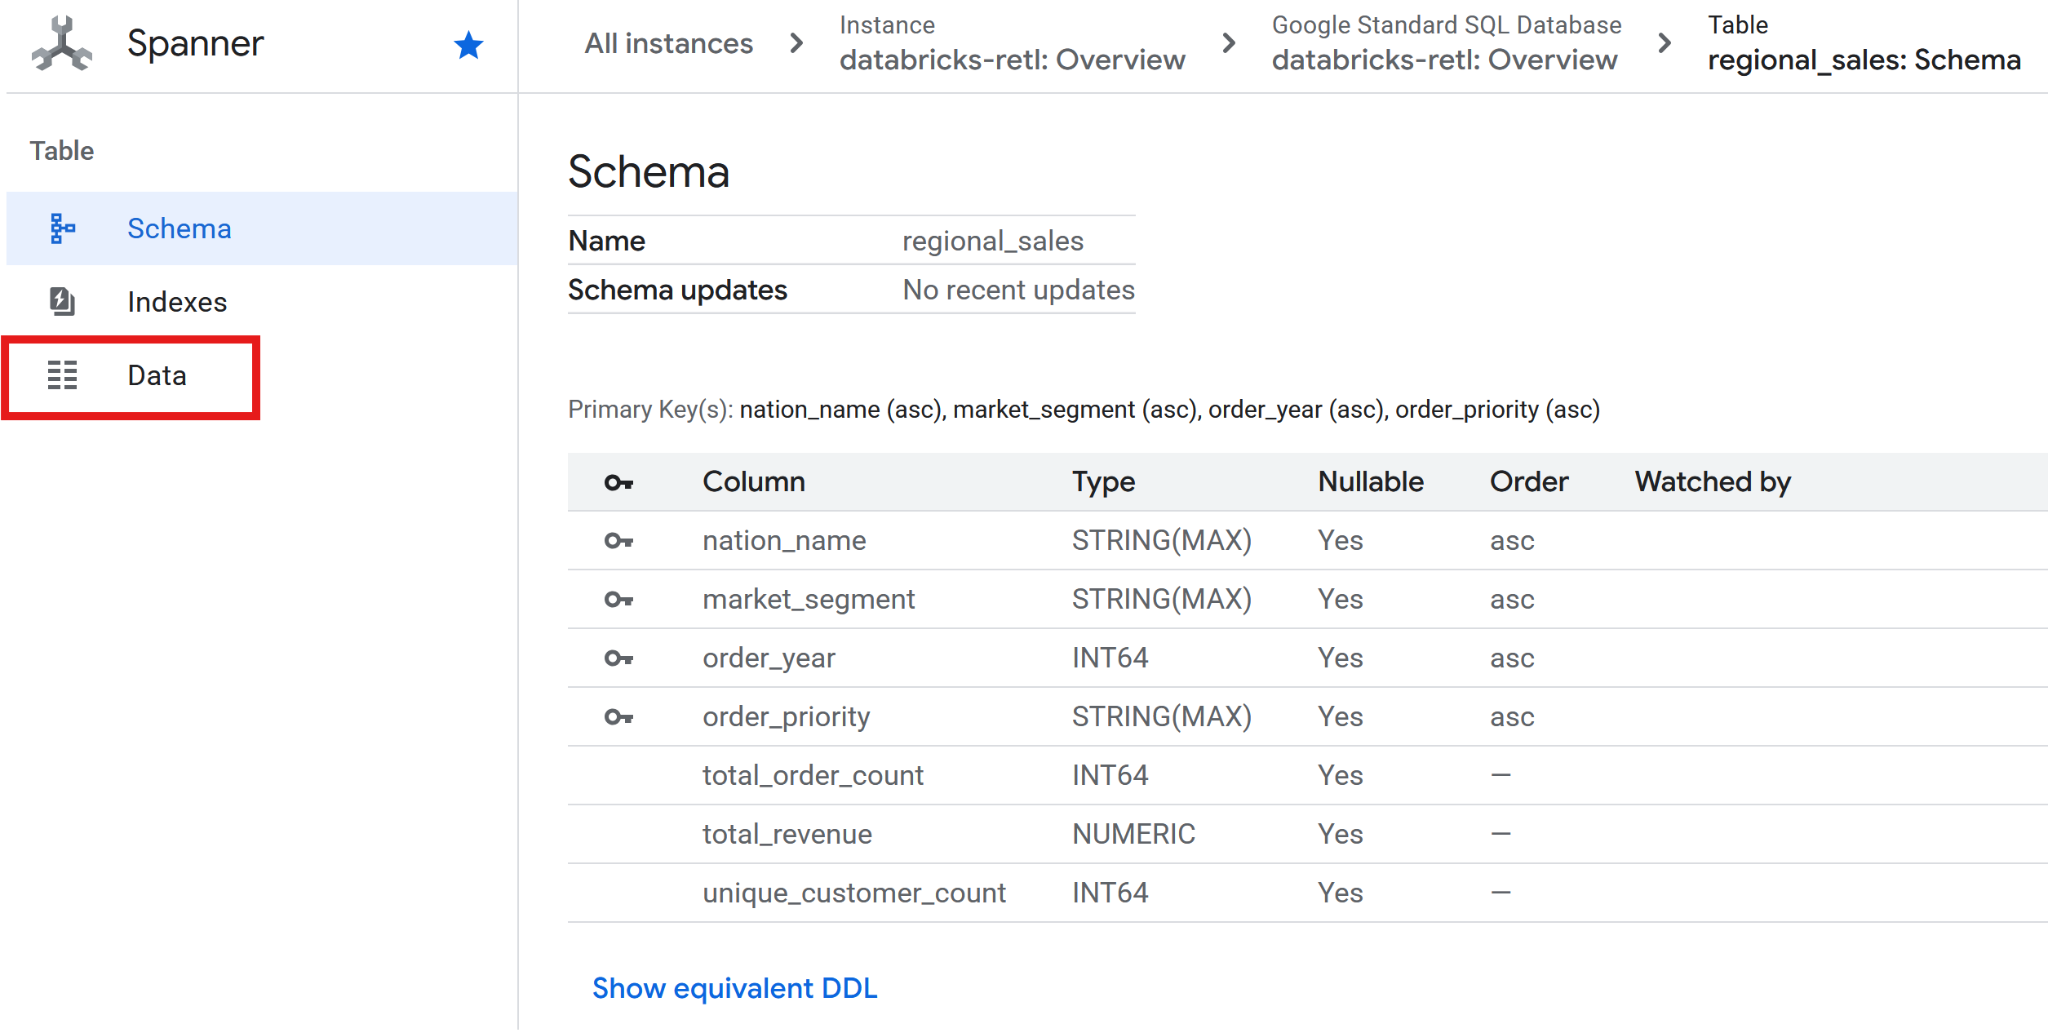
- The aggregated sales data, originally from Databricks, should now be loaded and ready for use in the Spanner table. This data is now in an operational system, ready to power a live application, serve a dashboard, or be queried by an API.
The gap between the analytical and operational data worlds has been successfully bridged.
9. Clean-up
Remove all added tables and stored data when you are done with this lab.
Clean up Spanner Tables
- Goto Spanner
- Click on the instance that was used for this lab from the list named
databricks-retl

- In the instance page, click on

- Enter
databricks-retlin the confirmation dialog that pops up, and click
Clean up GCS
- Goto GCS
- Select
 from the left side menu
 - Select the ``codelabs_retl_databricks bucket
- Once selected, click on the
 button that appears at the top banner

- Enter
DELETEin the confirmation dialog that pops up, and click
Clean up Databricks
Delete Catalog/Schema/Table
- Sign into your Databricks instance
- Click on
 from the left side menu
 - Select the previously created
 from the catalog list
 - In the Schema list, select
 that was created
 - Select the previously created
 from the table list
 - Expand the table options by clicking on
 and select
 Delete - Click
 on the confirmation dialog to delete the table
 - Once the table is deleted, you will be brought back up to the schema page
- Expand the schema options by clicking on and select
Delete - Click on the confirmation dialog to delete the Schema
- Once the schema is deleted, you will be brought back up to the catalog page
- Follow steps 4 - 11 again to delete the
defaultschema if one exists. - From the catalog page, expand the catalog options by clicking on and select
Delete - Click on the confirmation dialog to delete the catalog
Delete External Data Location / Credentials
- From the Catalog screen, click on
- If you do not see an
External Dataoption, you may findExternal Locationlisted under aConnectdropdown instead. - Click on the
retl-gcs-locationexternal data location previously created - From the external location page, expand the location options by clicking on and select
Delete - Click on the confirmation dialog to delete the external location
- Click on
- Click on the
retl-gcs-credentialthat was previously created - From the credential page, expand the credential options by clicking on and select
Delete - Click on the confirmation dialog to delete the credentials.
10. Congratulations
Congratulations for completing the codelab.
What we've covered
- How to load data into Databricks as Iceberg tables
- How to create a GCS Bucket
- How to export a Databricks table to GCS in the Iceberg format
- How to create a BigLake External Table in BigQuery from the Iceberg table in GCS
- How to setup up a Spanner instance
- How to load BigLake External Tables in BigQuery to Spanner