
1. Introduction
This tutorial will guide you through deploying, managing, and monitoring a powerful agent built with the Agent Development Kit (ADK) on Google Cloud Run. The ADK empowers you to create agents capable of complex, multi-agent workflows. By leveraging Cloud Run, a fully managed serverless platform, you can deploy your agent as a scalable, containerized application without worrying about the underlying infrastructure. This powerful combination allows you to focus on your agent's core logic while benefiting from Google Cloud's robust and scalable environment.
Throughout this tutorial, we will explore the seamless integration of the ADK with Cloud Run. You'll learn how to deploy your agent and then dive into the practical aspects of managing your application in a production-like setting. We will cover how to safely roll out new versions of your agent by managing traffic, enabling you to test new features with a subset of users before a full release.
Furthermore, you will gain hands-on experience with monitoring the performance of your agent. We will simulate a real-world scenario by conducting a load test to observe Cloud Run's automatic scaling capabilities in action. To gain deeper insights into your agent's behavior and performance, we will enable tracing with Cloud Trace. This will provide a detailed, end-to-end view of requests as they travel through your agent, allowing you to identify and address any performance bottlenecks. By the end of this tutorial, you will have a comprehensive understanding of how to effectively deploy, manage, and monitor your ADK-powered agents on Cloud Run.
Through the codelab, you will employ a step by step approach as follows:
- Create a PostgreSQL database on CloudSQL to be used for ADK Agent database session service
- Set up a basic ADK agent
- Setup database session service to be used by ADK runner
- Initial deploy the agent to cloud run
- Load testing and inspect cloud run auto scaling
- Deploy new agent revision and gradually increase traffic to new revisions
- Setup cloud tracing and inspect agent run tracing
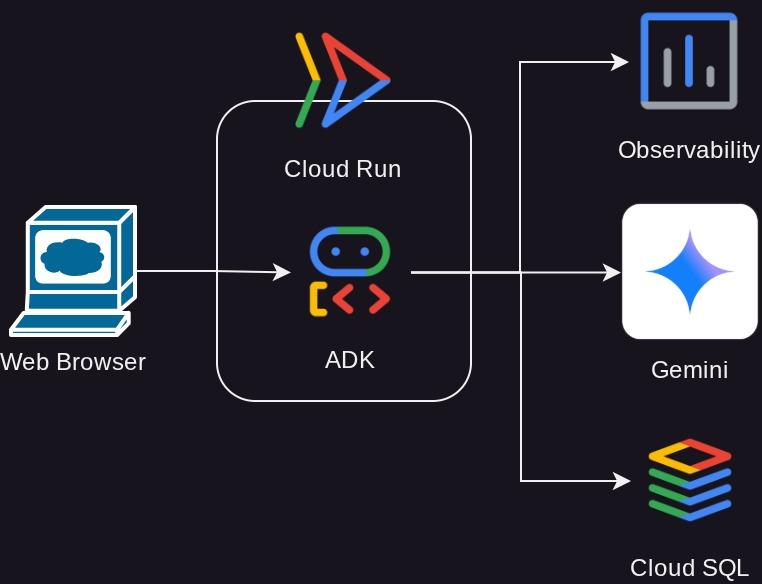
Architecture Overview
Prerequisites
- Comfortable working with Python
- An understanding of basic full-stack architecture using HTTP service
What you'll learn
- ADK structure and local utilities
- Setup ADK agent with Database session service
- Setup PostgreSQL in CloudSQL to be used by Database session service
- Deploy application to Cloud Run using Dockerfile and setup initial environment variables
- Configure and Test Cloud Run auto scaling with load testing
- Strategy to gradual release with Cloud Run
- Setup ADK Agent tracing to Cloud Trace
What you'll need
- Chrome web browser
- A Gmail account
- A Cloud Project with billing enabled
This codelab, designed for developers of all levels (including beginners), uses Python in its sample application. However, Python knowledge isn't required for understanding the concepts presented.
2. 🚀 Preparing Workshop Setup
Now, we will utilize Cloud Shell IDE for this tutorial, click the following button to navigate there
Once in the Cloud Shell, clone the template working directory for this codelab from Github, run the following command. It will create the working directory in the deploy_and_manage_adk directory
git clone https://github.com/alphinside/deploy-and-manage-adk-service.git deploy_and_manage_adk
Then, run the following command in the terminal to open the cloned repository as your working directory
cloudshell workspace ~/deploy_and_manage_adk && cd ~/deploy_and_manage_adk
After that, your interface should look similar to this
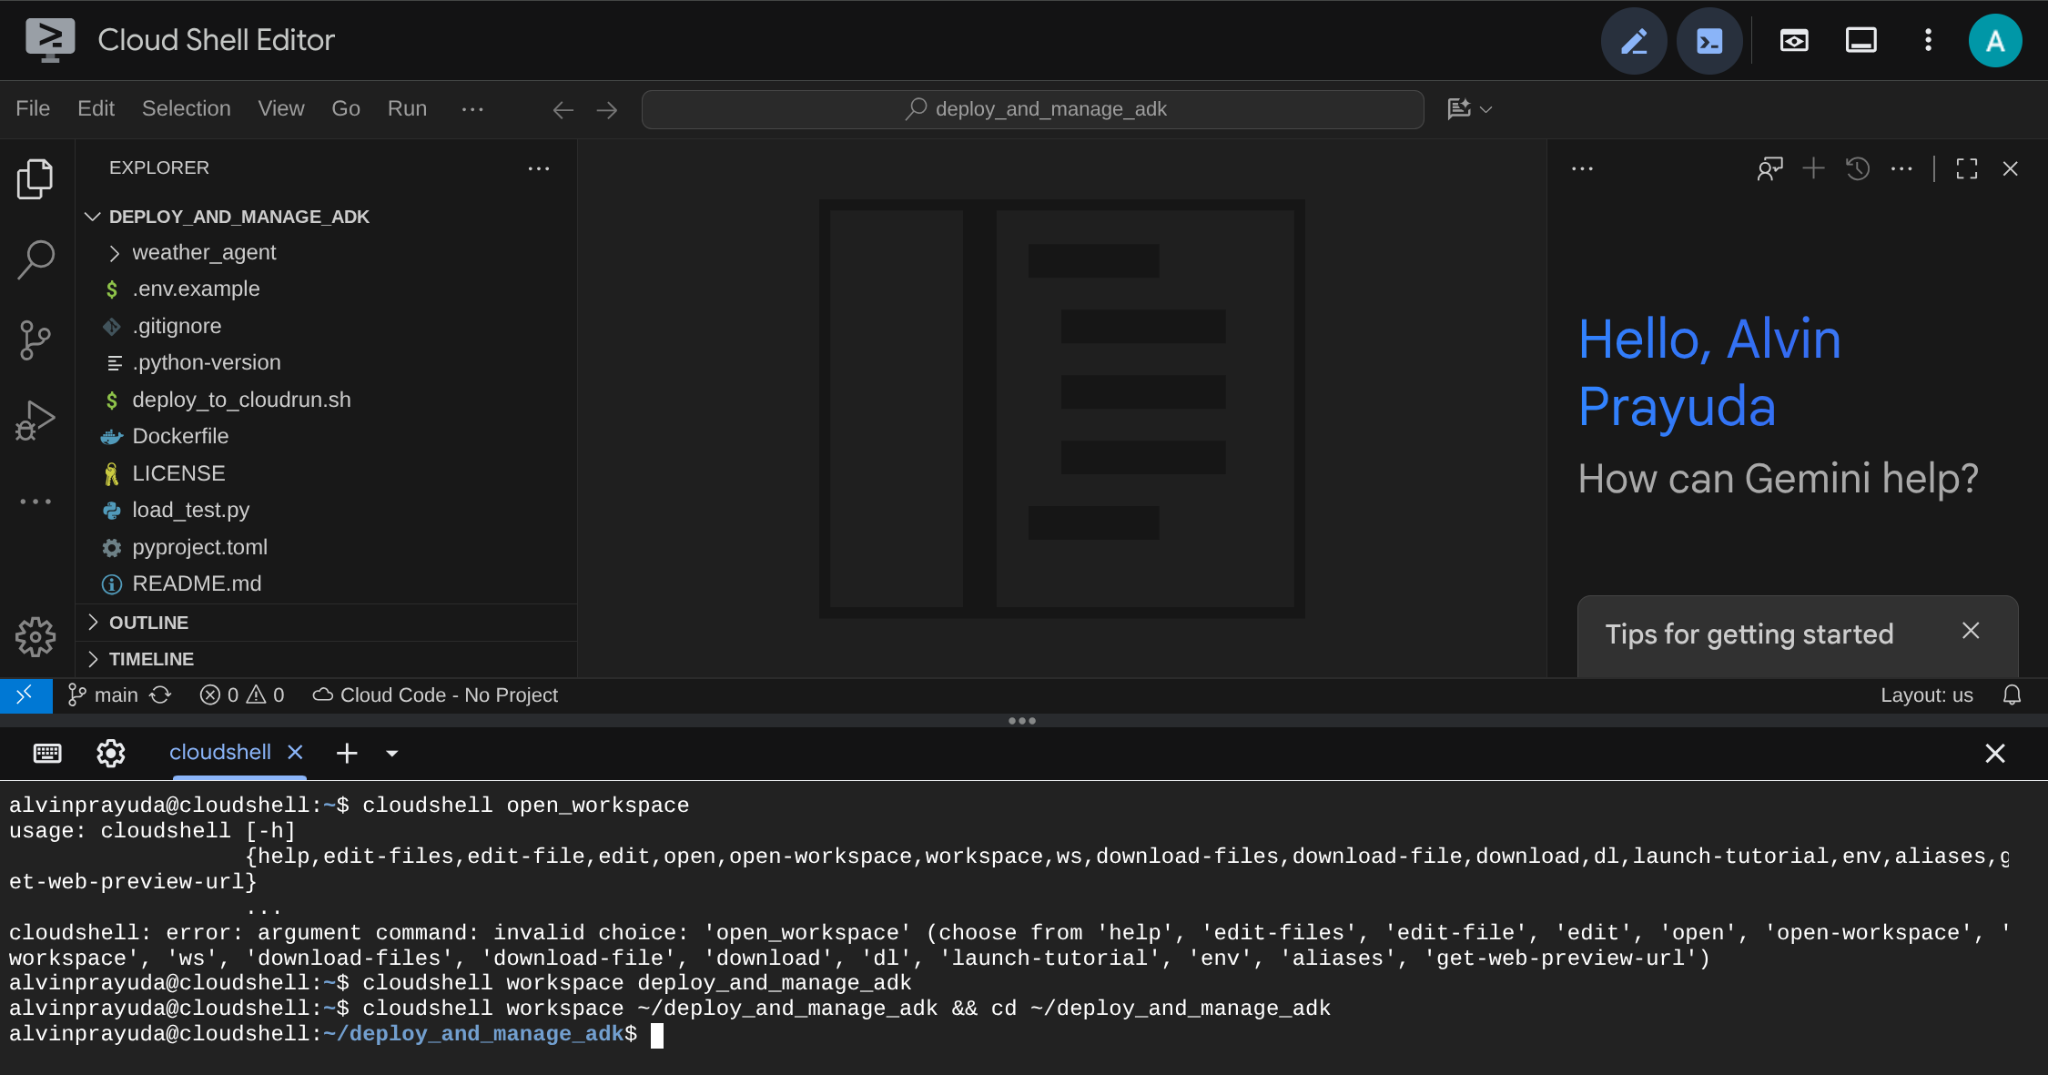
This will be our main interface, IDE on top, terminal on the bottom. Now we need to prepare our terminal to create and activate our Google Cloud Project which will be linked to previously claimed trial billing account. We've prepared a script for you to always ensure your terminal session is ready. Run the following command ( ensure you are already inside the deploy_and_manage_adk workspace
bash setup_trial_project.sh && source .env
When running this, you will be prompted with suggested project ID name, you can press Enter to continue

After waiting for a while, if you see this output in your console, then you are ready to go to next step 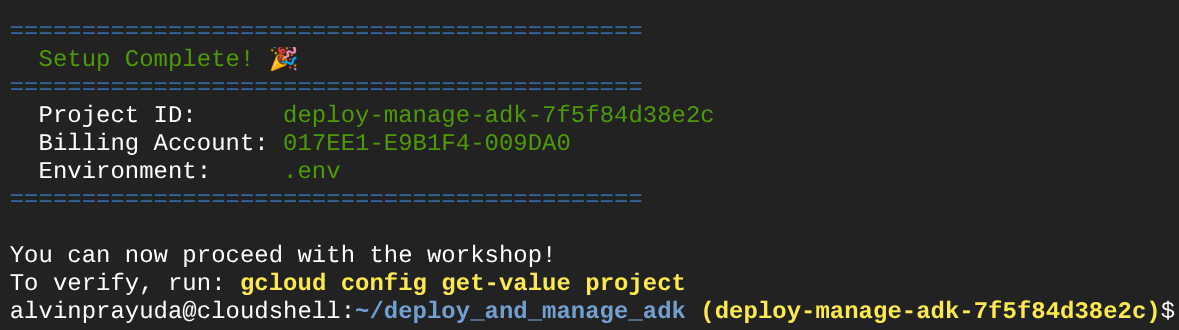
This shows that your terminal is already authenticated and set to the correct project ID ( the yellow colour beside the current directory path ). What this command does is help you create a new project, find and link the project to a trial billing account, prepare the .env file for the environment variable config and also activate the correct project ID in the terminal for you.
Now, we are ready for the next step
3. 🚀 Enabling APIs
In this tutorial, we will interact with the CloudSQL database, Gemini model, and Cloud Run and these product will required the following API to be activated, run these command to enable them
This could take a while.
gcloud services enable aiplatform.googleapis.com \
                       run.googleapis.com \
                       cloudbuild.googleapis.com \
                       cloudresourcemanager.googleapis.com \
                       sqladmin.googleapis.com \
                       compute.googleapis.com
On successful execution of the command, you should see a message similar to the one shown below:
Operation "operations/..." finished successfully.
4. 🚀 Python Environment Setup and Environment Variables
We will utilize Python 3.12 in this codelab and we will use uv python project manager to simplify the need of creating and managing python version and virtual environment. This uv package is already preinstalled on Cloud Shell.
Run this command to install the required dependencies to the virtual environment on the .venv directory
uv sync --frozen
Next, we will inspect required environment variable files for this project. Previously this file was being set up by the setup_trial_project.sh script. Run the following command to open the .env file in editor
cloudshell open .env
You will see the following configurations already applied on the .env file.
# .env

# Google Cloud and Vertex AI configuration
GOOGLE_CLOUD_PROJECT=your-project-id
GOOGLE_CLOUD_LOCATION=global
GOOGLE_GENAI_USE_VERTEXAI=True

# Database connection for session service
# DB_CONNECTION_NAME=your-db-connection-name
For this codelab, we are going with the pre-configured values for GOOGLE_CLOUD_LOCATION and GOOGLE_GENAI_USE_VERTEXAI.
Now we can move to the next step, creating the database to be utilized by our agent for state and session persistence.
5. 🚀 Preparing CloudSQL Database
We will need a database to be utilized by the ADK agent later on. Let's create a PostgreSQL database on Cloud SQL. Run the following command to create the database instance first. We will use the default postgres database name, so we'll skip database creation here. We also need to configure our default database username too (also postgres) , for the sake of tutorial, let's use ADK-deployment123 as our password
gcloud sql instances create adk-deployment \
  --database-version=POSTGRES_17 \
  --edition=ENTERPRISE \
  --tier=db-g1-small \
  --region=us-west1 \
  --availability-type=ZONAL \
  --project=${GOOGLE_CLOUD_PROJECT} && \
gcloud sql users set-password postgres \
  --instance=adk-deployment \
  --password=ADK-deployment123
In the above command, the first common gcloud sql instances create adk-deployment is a command we use to create the database instance. We are using a sandbox minimal specification for the sake of this tutorial. The second command gcloud sql users set-password postgres used to change the default postgres username password
Note that we use adk-deployment as our database instance name. Once finished, you should see output in the terminal like shown below which shows the instance is ready and the default user password is updated
Created [https://sqladmin.googleapis.com/sql/v1beta4/projects/your-project-id/instances/adk-deployment].
NAME: adk-deployment
DATABASE_VERSION: POSTGRES_17
LOCATION: us-west1-a
TIER: db-g1-small
PRIMARY_ADDRESS: xx.xx.xx.xx
PRIVATE_ADDRESS: -
STATUS: RUNNABLE
Updating Cloud SQL user...done.
As deploying this database will take some time, let's continue to the next section while waiting for the CloudSQL database deployment to be ready.
6. 🚀 Build the Weather Agent with ADK and Gemini 2.5
Introduction to ADK Directory Structure
Let's start by exploring what ADK has to offer and how to build the agent. ADK complete documentation can be accessed in this URL . ADK offers us many utilities within its CLI command execution. Some of them are the following :
- Setup the agent directory structure
- Quickly try interaction via CLI input output
- Quickly setup local development UI web interface
Now, let's check the agent structure on the weather_agent directory
weather_agent/
├── __init__.py
├── agent.py
└── tool.py
And if you inspect the init.py and agent.py you will see this code
# __init__.py

from weather_agent.agent import root_agent

__all__ = ["root_agent"]
# agent.py


import os
from pathlib import Path

import google.auth
from dotenv import load_dotenv
from google.adk.agents import Agent
from weather_agent.tool import get_weather

# Load environment variables from .env file in root directory
root_dir = Path(__file__).parent.parent
dotenv_path = root_dir / ".env"
load_dotenv(dotenv_path=dotenv_path)


# Use default project from credentials if not in .env
_, project_id = google.auth.default()
os.environ.setdefault("GOOGLE_CLOUD_PROJECT", project_id)
os.environ.setdefault("GOOGLE_CLOUD_LOCATION", "global")
os.environ.setdefault("GOOGLE_GENAI_USE_VERTEXAI", "True")

root_agent = Agent(
    name="weather_agent",
    model="gemini-2.5-flash",
    instruction="""
You are a helpful AI assistant designed to provide accurate and useful information.
""",
    tools=[get_weather],
)
ADK Code Explanation
This script contains our agent initiation where we initialize the following things:
- Set the model to be used to
gemini-2.5-flash - Provide tool
get_weatherto support the agent functionality as weather agent
Run the Web UI Locally
Now, we can interact with the agent and inspect its behavior locally. ADK allows us to have a development web UI to interact and inspect what's going on during the interaction. Run the following command to start the local development UI server
uv run adk web --port 8080
It will spawn output like the following example, means that we can already access the web interface
INFO:     Started server process [xxxx]
INFO:     Waiting for application startup.

+-----------------------------------------------------------------------------+
| ADK Web Server started                                                      |
|                                                                             |
| For local testing, access at http://localhost:8080.                         |
+-----------------------------------------------------------------------------+

INFO:     Application startup complete.
INFO:     Uvicorn running on http://0.0.0.0:8080 (Press CTRL+C to quit)
Now, to check it, click the Web Preview button on the top area of your Cloud Shell Editor and select Preview on port 8080
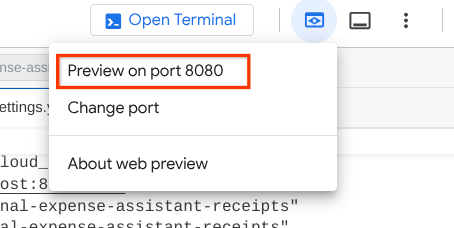
You will see the following web page where you can select available agents on the top left drop down button ( in our case it should be weather_agent ) and interact with the bot. You will see many informations about the log details during agent runtime in the left window
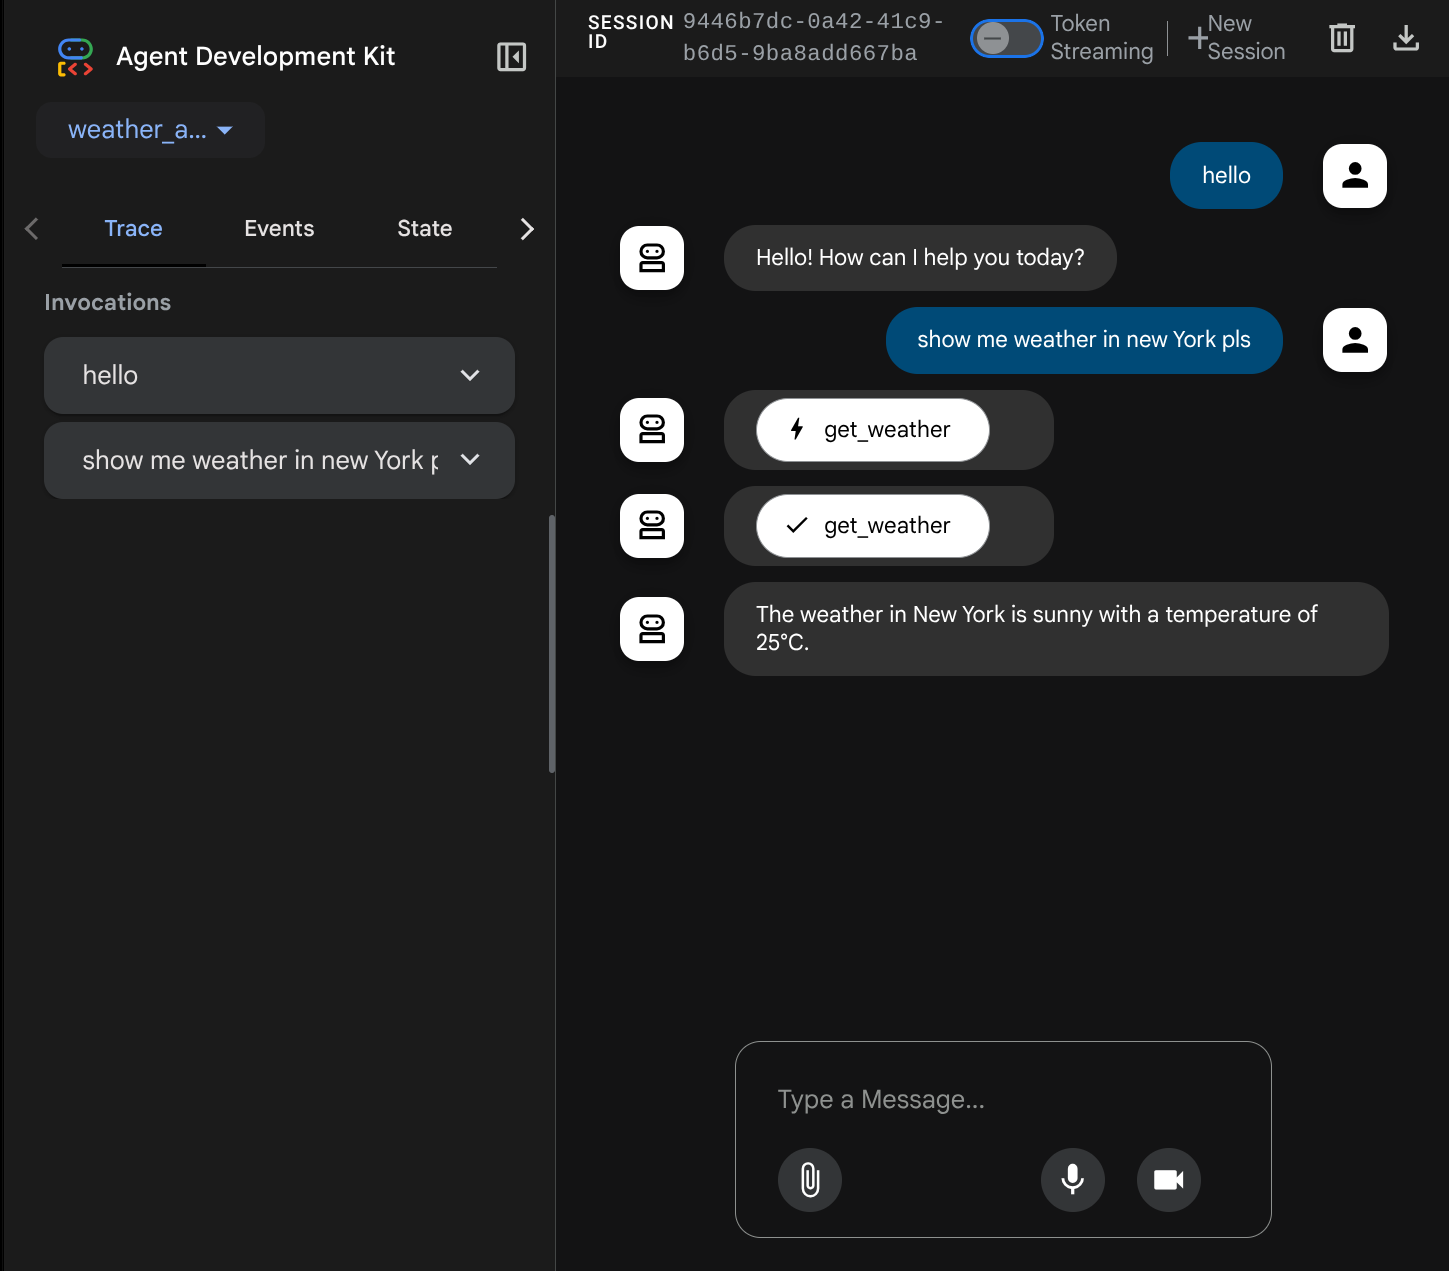
Now, try to interact with it. On the left bar, we can inspect the trace for each input, so we can understand how long the time it takes for each action taken by the agent before forming the final answer.
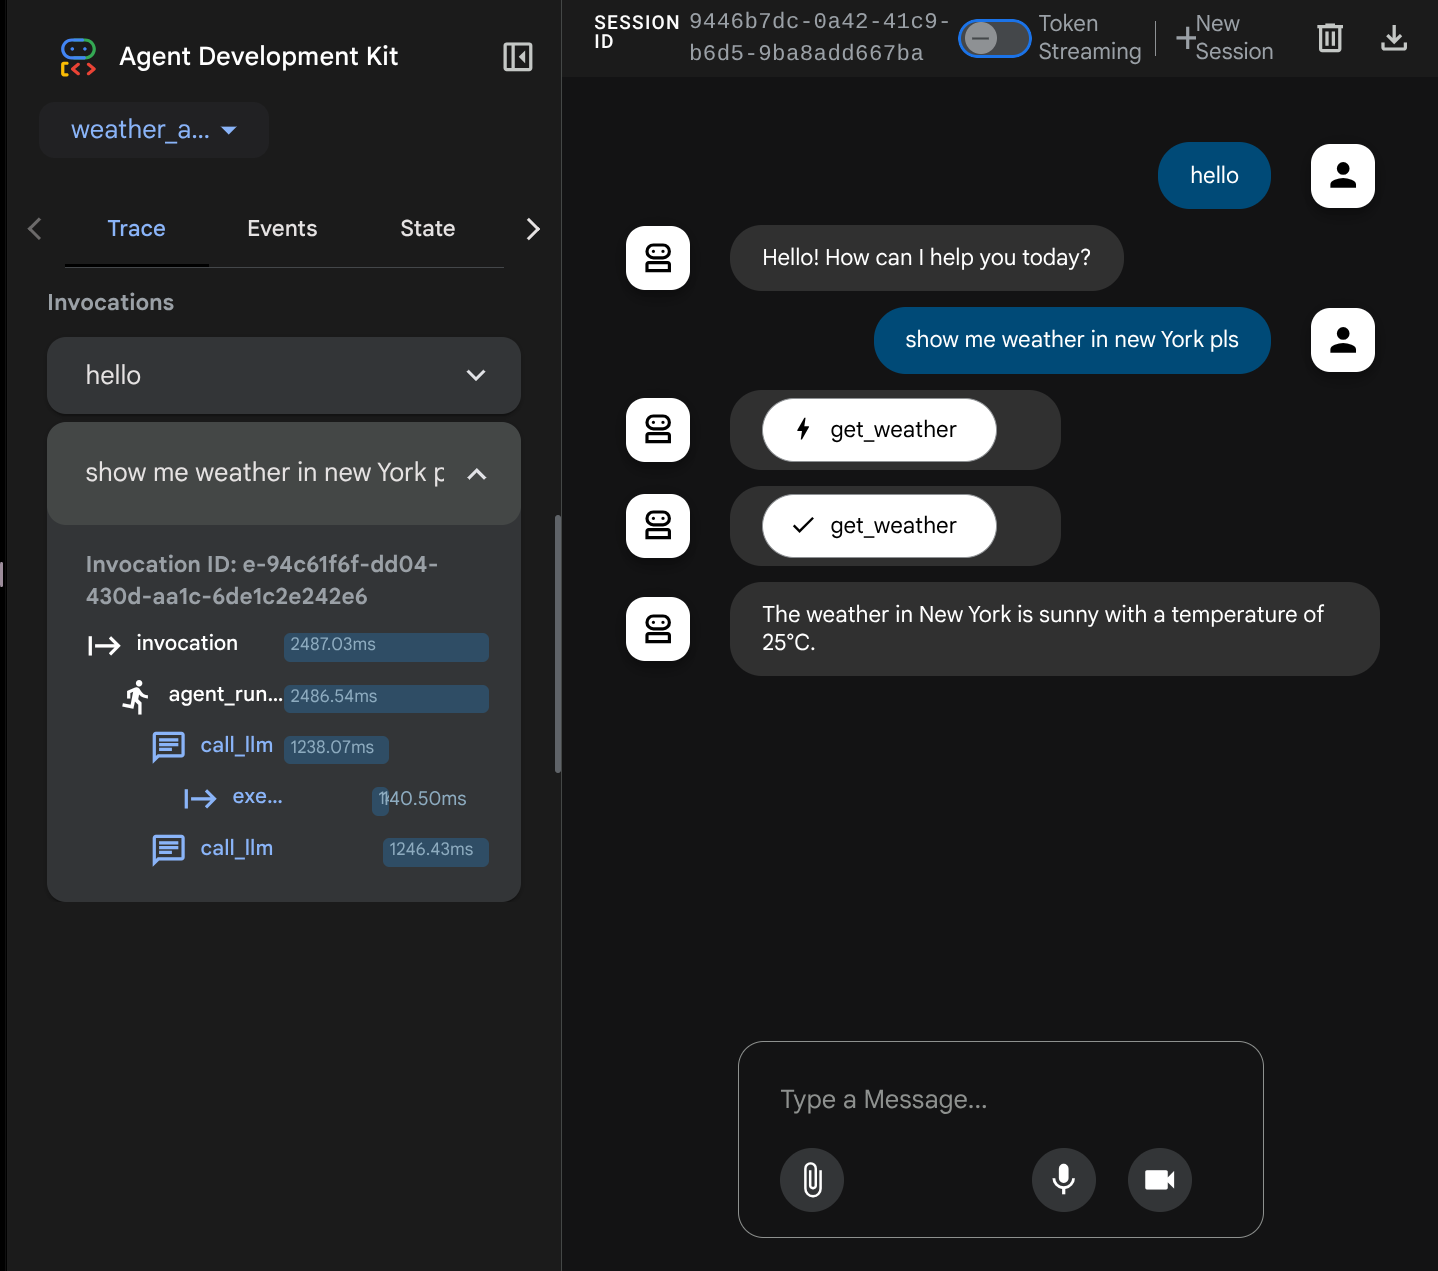
This one of the observability features that has been built into ADK, currently we inspect it locally. Later on we will see how this integrated into Cloud Tracing so we have centralized trace of all requests
7. 🚀 Deploying to Cloud Run
Now, let's deploy this agent service to Cloud Run. For the sake of this demo, this service will be exposed as a public service that can be accessed by others. However, keep in mind that this is not the best practices as it is not secure
This deployment scenario enables you to customize your agent backend service, we will use Dockerfile to deploy our agent to Cloud Run. At this point, we already have all the files needed ( the Dockerfile and the server.py ) to deploy our applications to Cloud Run. By having these 2 items, you can flexibly customize your agent deployment ( E.g. adding custom backend routes and/or adding additional sidecar service for monitoring purposes ). We will discuss this in detail later on.
Now, let's deploy the service first, navigate to the Cloud Shell Terminal and make sure the current project is configured to your active project, let's run the setup script again, optionally you also can use command gcloud config set project [PROJECT_ID] to configure your active project
bash setup_trial_project.sh && source .env
Now, we need to revisit the .env file again, open it and you will see that we need to uncomment the DB_CONNECTION_NAME variable and fill it with the correct value
# Google Cloud and Vertex AI configuration
GOOGLE_CLOUD_PROJECT=your-project-id
GOOGLE_CLOUD_LOCATION=global
GOOGLE_GENAI_USE_VERTEXAI=True

# Database connection for session service
DB_CONNECTION_NAME=your-db-connection-name
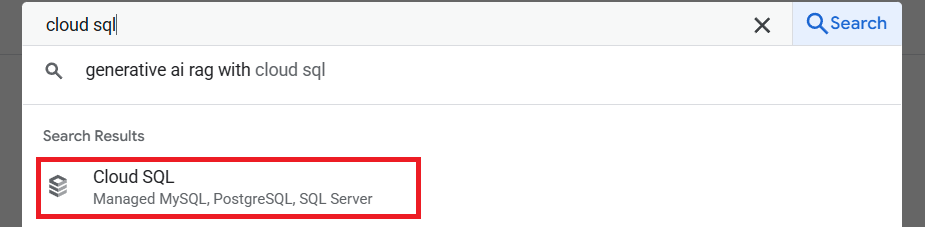
To get the DB_CONNECTION_NAME value, let's visit Cloud SQL dashboard
then click the instance that you've created. Navigate to the search bar on the top section of the cloud console, and type "cloud sql". Then click the Cloud SQL product
After that you will see the previously created instance, click on it
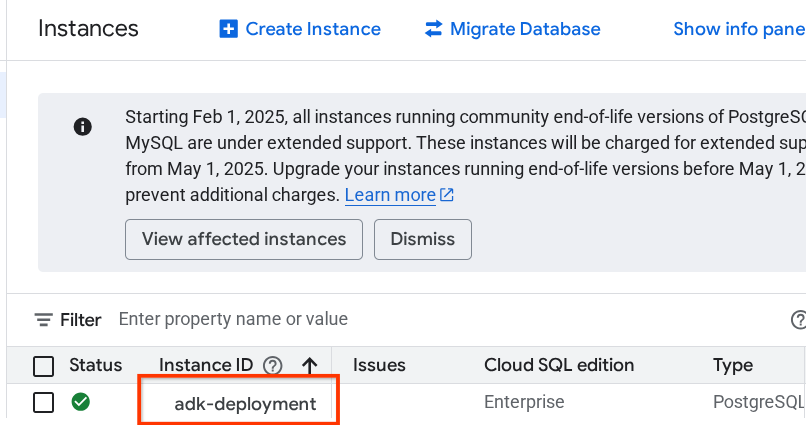
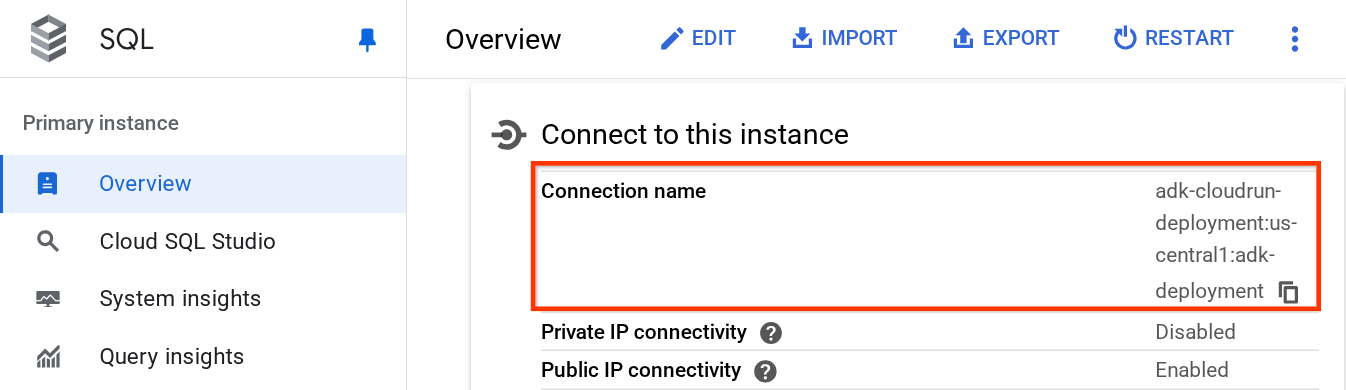
Inside the instance page, scroll down to the "Connect to this instance" section and you can copy the Connection Name to substitute the DB_CONNECTION_NAME value.
After that open the .env file with the following command
cloudshell edit .env
and modify the DB_CONNECTION_NAME variable in the .env file. Your env file should look like below example
# Google Cloud and Vertex AI configuration
GOOGLE_CLOUD_PROJECT=your-project-id
GOOGLE_CLOUD_LOCATION=global
GOOGLE_GENAI_USE_VERTEXAI=True

# Database connection for session service
DB_CONNECTION_NAME=your-project-id:your-location:your-instance-name
After that run the deployment script
bash deploy_to_cloudrun.sh
If you're prompted to acknowledge creation of an artifact registry for docker repository, just answer Y.
While we waiting for the deployment process, let's take a look on the deploy_to_cloudrun.sh
#!/bin/bash

# Load environment variables from .env file
if [ -f .env ]; then
    export $(cat .env | grep -v '^#' | xargs)
else
    echo "Error: .env file not found"
    exit 1
fi

# Validate required variables
required_vars=("GOOGLE_CLOUD_PROJECT" "DB_CONNECTION_NAME")
for var in "${required_vars[@]}"; do
    if [ -z "${!var}" ]; then
        echo "Error: $var is not set in .env file"
        exit 1
    fi
done

gcloud run deploy weather-agent \
    --source . \
    --port 8080 \
    --project ${GOOGLE_CLOUD_PROJECT} \
    --allow-unauthenticated \
    --add-cloudsql-instances ${DB_CONNECTION_NAME} \
    --update-env-vars SESSION_SERVICE_URI="postgresql+pg8000://postgres:ADK-deployment123@postgres/?unix_sock=/cloudsql/${DB_CONNECTION_NAME}/.s.PGSQL.5432",GOOGLE_CLOUD_PROJECT=${GOOGLE_CLOUD_PROJECT} \
    --region us-west1 \
    --min 1 \
    --memory 1G \
    --concurrency 10
This script will load your .env variable, then run the deployment command.
If you take a closer look, we only need one gcloud run deploy command to do all the necessary things that need to be taken care of if you want to deploy a service: building the image, push to registry, deploy the service, setting IAM policy, creating revision, and even routing traffic. In this example, we already provide the Dockerfile, hence this command will utilize it to build the app
Once the deployment is complete, you should get a link similar to the below:
https://weather-agent-*******.us-west1.run.app
After you get this URL, you can use your application from the Incognito window or your mobile device and access the agent Dev UI. While waiting for deployment, let's inspect the detailed service that we just deploy in the next section
8. 💡 The Dockerfile and Backend Server Script
In order to make the agent accessible as a service, we will wrap the agent inside a FastAPI app which will be run on the Dockerfile command. Below is the content of the Dockerfile
FROM python:3.12-slim

RUN pip install --no-cache-dir uv==0.7.13

WORKDIR /app

COPY . .

RUN uv sync --frozen

EXPOSE 8080

CMD ["uv", "run", "uvicorn", "server:app", "--host", "0.0.0.0", "--port", "8080"]
We can configure necessary services to support the agent here like preparing Session, Memory, or Artifact service for production purposes here. Here is the code of the server.py that will be used
import os

from dotenv import load_dotenv
from fastapi import FastAPI
from google.adk.cli.fast_api import get_fast_api_app
from pydantic import BaseModel
from typing import Literal
from google.cloud import logging as google_cloud_logging


# Load environment variables from .env file
load_dotenv()

logging_client = google_cloud_logging.Client()
logger = logging_client.logger(__name__)

AGENT_DIR = os.path.dirname(os.path.abspath(__file__))

# Get session service URI from environment variables
session_uri = os.getenv("SESSION_SERVICE_URI", None)

# Prepare arguments for get_fast_api_app
app_args = {"agents_dir": AGENT_DIR, "web": True, "trace_to_cloud": True}

# Only include session_service_uri if it's provided
if session_uri:
    app_args["session_service_uri"] = session_uri
else:
    logger.log_text(
        "SESSION_SERVICE_URI not provided. Using in-memory session service instead. "
        "All sessions will be lost when the server restarts.",
        severity="WARNING",
    )

# Create FastAPI app with appropriate arguments
app: FastAPI = get_fast_api_app(**app_args)

app.title = "weather-agent"
app.description = "API for interacting with the Agent weather-agent"


class Feedback(BaseModel):
    """Represents feedback for a conversation."""

    score: int | float
    text: str | None = ""
    invocation_id: str
    log_type: Literal["feedback"] = "feedback"
    service_name: Literal["weather-agent"] = "weather-agent"
    user_id: str = ""


# Example if you want to add your custom endpoint
@app.post("/feedback")
def collect_feedback(feedback: Feedback) -> dict[str, str]:
    """Collect and log feedback.

    Args:
        feedback: The feedback data to log

    Returns:
        Success message
    """
    logger.log_struct(feedback.model_dump(), severity="INFO")
    return {"status": "success"}


# Main execution
if __name__ == "__main__":
    import uvicorn

    uvicorn.run(app, host="0.0.0.0", port=8080)
Server Code Explanation
These are the things that is defined in the server.py script:
- Convert our agent into a FastAPI app using the
get_fast_api_appmethod. This way we will inherit the same route definition that is utilized for the web development UI. - Configure necessary Session, Memory, or Artifact service by adding the keyword arguments to the
get_fast_api_appmethod. In this tutorial, if we configureSESSION_SERVICE_URIenv var, then the session service will use that otherwise it will use in-memory session - We can add custom route to support other backend business logic, in the script we add feedback functionality route example
- Enable cloud tracing in the
get_fast_api_apparg parameters, to send trace to Google Cloud Trace - Run the FastAPI service using uvicorn
Now, if your deployment is already finished, please try interacting with the agent from the web Dev UI by accessing the Cloud Run URL
9. 🚀 Inspecting Cloud Run Auto Scaling with Load Testing
Now, we will inspect the auto-scaling capabilities of cloud run. For this scenario, let's deploy new revision while enabling maximum concurrencies per instance. In the previous section, we set the maximum concurrency to 10 ( flag --concurrency 10 ). Hence we can expect the Cloud Run will try to scale its instance when we do load test that exceed this number.
Let's inspect the load_test.py file. This will be the script we use to do the load testing using locust framework. This script will do the following things :
- Randomized user_id and session_id
- Create session_id for the user_id
- Hit endpoint "/run_sse" with the created user_id and session_id
We will need to know our deployed service URL, if you missed it. We can go to the Cloud Run console
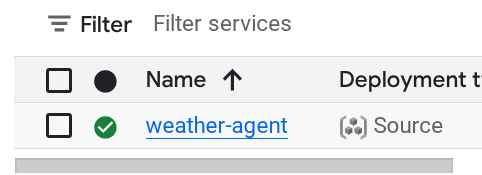
Then, find your weather-agent service and click it
The service URL will be displayed right beside the Region information. E.g.

To simplified things for you let's run the following script to get your recently deployed service URL and store it in SERVICE_URL environment variable
export SERVICE_URL=$(gcloud run services describe weather-agent \
    --platform managed \
    --region us-west1 \
    --format 'value(status.url)')
Then run the following command to load test our agent app
uv run locust -f load_test.py \
              -H $SERVICE_URL \
              -u 60 \
              -r 5 \
              -t 120 \
              --headless
Running this you will see metrics like this displayed. ( In this example all reqs success )
Type     Name                                  # reqs      # fails |    Avg     Min     Max    Med |   req/s  failures/s
--------|------------------------------------|-------|-------------|-------|-------|-------|-------|--------|-----------
POST     /run_sse end                             813     0(0.00%) |   5817    2217   26421   5000 |    6.79        0.00
POST     /run_sse message                         813     0(0.00%) |   2678    1107   17195   2200 |    6.79        0.00
--------|------------------------------------|-------|-------------|-------|-------|-------|-------|--------|-----------
         Aggregated                              1626     0(0.00%) |   4247    1107   26421   3500 |   13.59        0.00
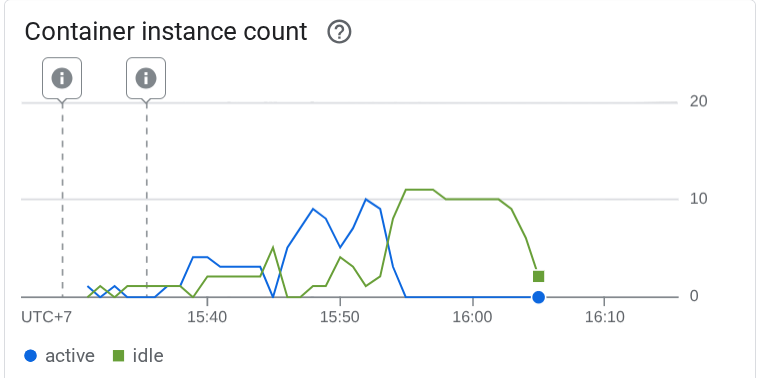
Then let's see what happened in the Cloud Run, go to your deployed service again, and see the dashboard. This will show how cloud runs automatically scale the instance to handle incoming requests. Because we are limiting the max concurrency to 10 per instance, the cloud run instance will try to adjust the number of containers to satisfy this condition automatically.
10. 🚀 Gradual Release New Revisions
Now, let's have the following scenario. We want to update the prompt of the agent. Open the weather_agent/agent.py with the following command
cloudshell edit weather_agent/agent.py
and overwrite it with the following code:
# weather_agent/agent.py

import os
from pathlib import Path

import google.auth
from dotenv import load_dotenv
from google.adk.agents import Agent
from weather_agent.tool import get_weather

# Load environment variables from .env file in root directory
root_dir = Path(__file__).parent.parent
dotenv_path = root_dir / ".env"
load_dotenv(dotenv_path=dotenv_path)


# Use default project from credentials if not in .env
_, project_id = google.auth.default()
os.environ.setdefault("GOOGLE_CLOUD_PROJECT", project_id)
os.environ.setdefault("GOOGLE_CLOUD_LOCATION", "global")
os.environ.setdefault("GOOGLE_GENAI_USE_VERTEXAI", "True")

root_agent = Agent(
    name="weather_agent",
    model="gemini-2.5-flash",
    instruction="""
You are a helpful AI assistant designed to provide accurate and useful information.
You only answer inquiries about the weather. Refuse all other user query
""",
    tools=[get_weather],
)
Then, you want to release new revisions but don't want all request traffic to go directly to the new version. We can do gradual release with cloud run. First, we need to deploy a new revision, but with –no-traffic flag. Save the previous agent script and run the following command
gcloud run deploy weather-agent \
                  --source . \
                  --port 8080 \
                  --project $GOOGLE_CLOUD_PROJECT \
                  --allow-unauthenticated \
                  --region us-west1 \
                  --no-traffic
After finishing, you will receive a similar log like the previous deployment process with the difference of the number of traffic served. It will show 0 percent traffic served.
Service [weather-agent] revision [weather-agent-xxxx-xxx] has been deployed and is serving 0 percent of traffic.
Next, let's go to the Cloud Run dashboard
Then, find your weather-agent service and click it
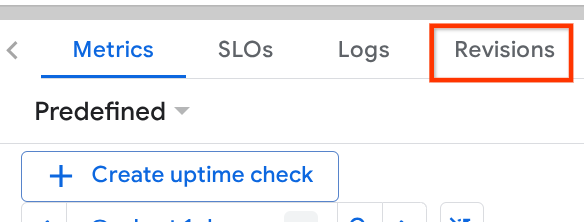
Go to Revisions tab and you will see the list of deployed revision there
You will see that the new deployed revisions is serving 0%, from here you can click the kebab button (⋮) and choose Manage Traffic
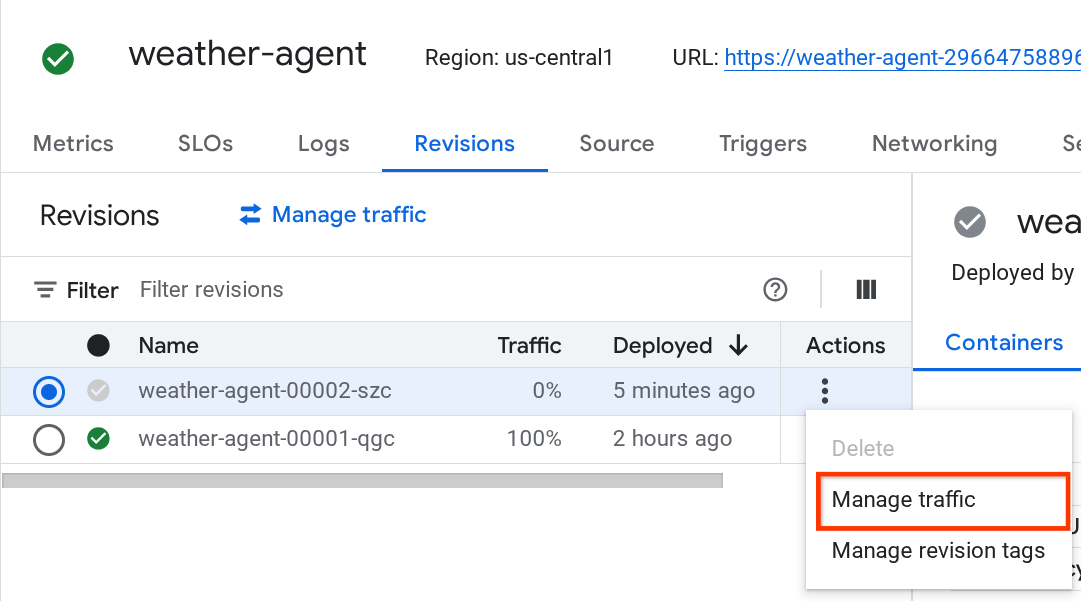
In the newly pop up window, you can edit the percentage of the traffic going to which revisions.
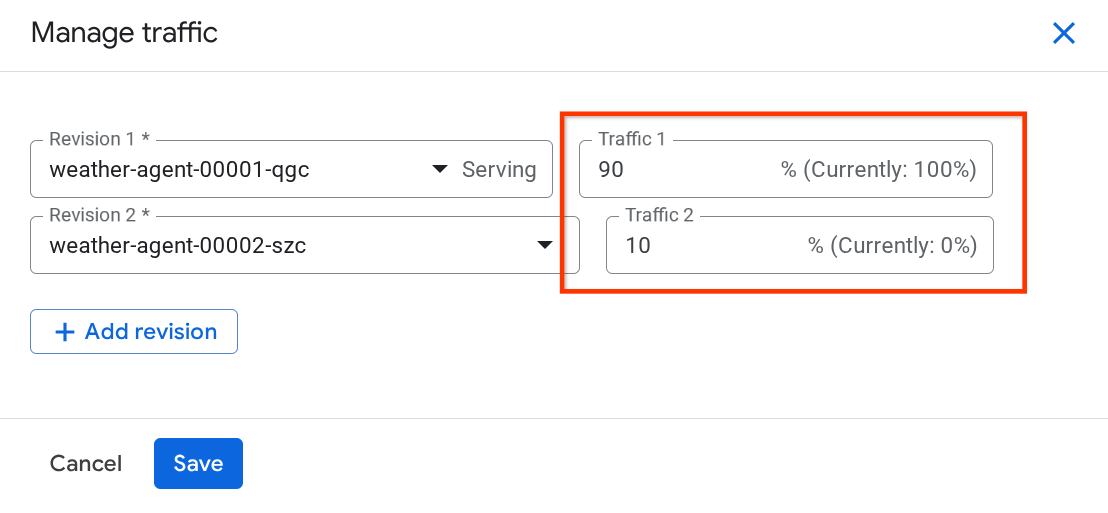
After waiting for a while, the traffic will be directed proportionally based on the percentage configurations. This way, we can easily roll back to the previous revisions if something happened with the new release
11. 🚀 ADK Tracing
Agents built with ADK already support tracing using open telemetry embedding in it. We have Cloud Trace to capture those tracing and visualize it. Let's inspect the server.py on how we enable it in our previously deployed service
# server.py

...

app_args = {"agents_dir": AGENT_DIR, "web": True, "trace_to_cloud": True}

...

app: FastAPI = get_fast_api_app(**app_args)

...
Here, we pass the trace_to_cloud argument to True. If you are deploying with other options, you can check this documentation for more details on how to enable tracing to Cloud Trace from various deployment options
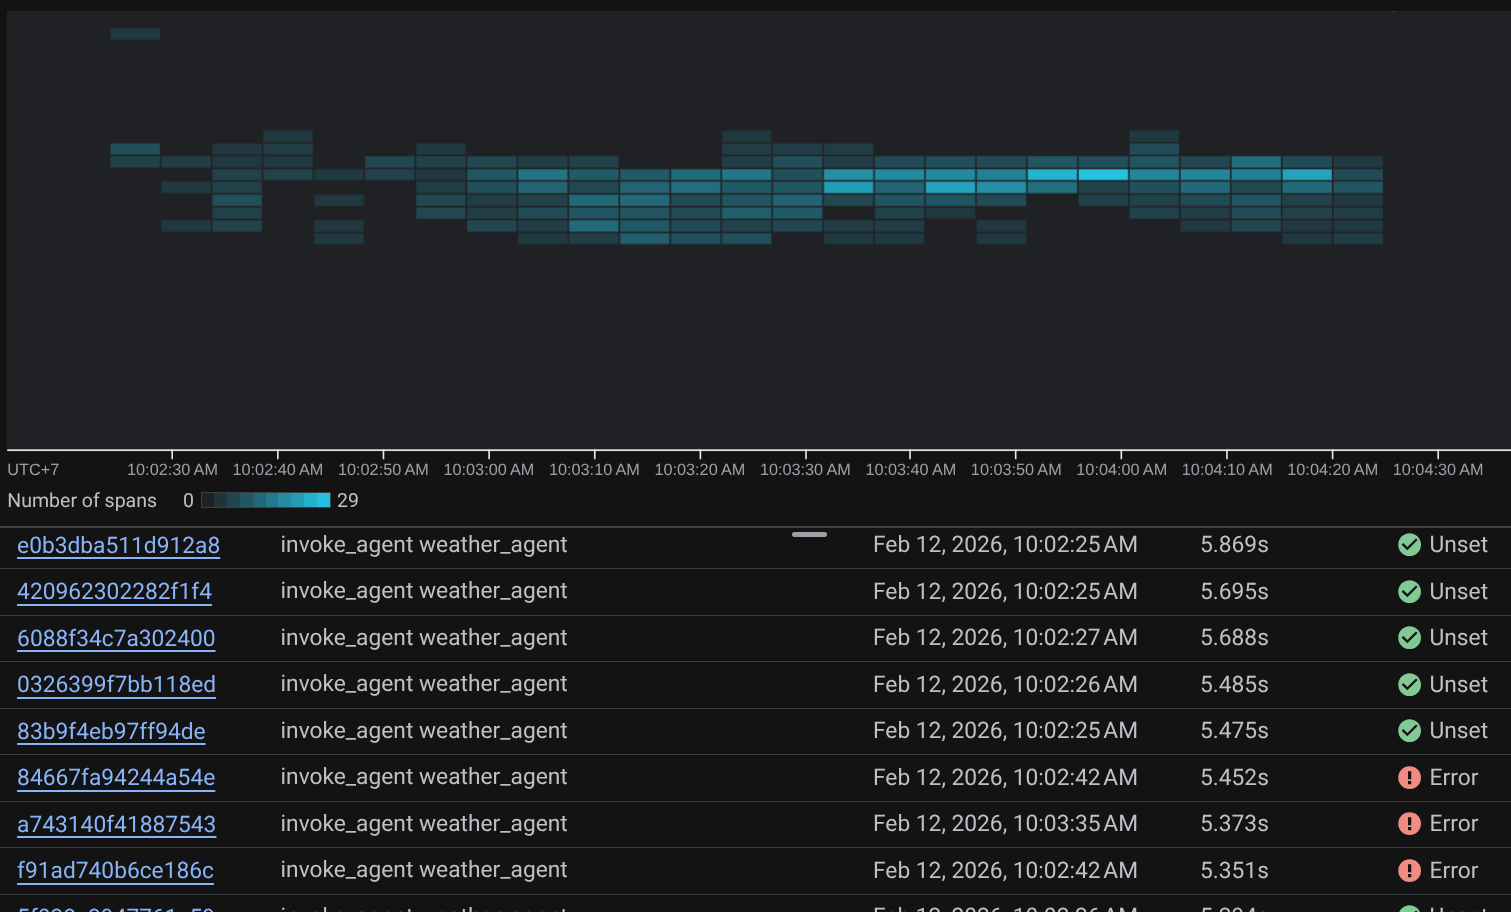
Try to access your service web dev UI and have a chat with the agent. After that let's go to the Trace Explorer page
On the trace explorer page, you will see our conversation with the agent trace is submitted. You can see from the Span name section and filter out the span specific to our agent ( it's named agent_run [weather_agent] ) there

When the spans are already filtered, you also can inspect each trace directly. It will show detailed duration on each action taken by the agent. For example, look images below
On each section, you can inspect the details in the attributes like shown below
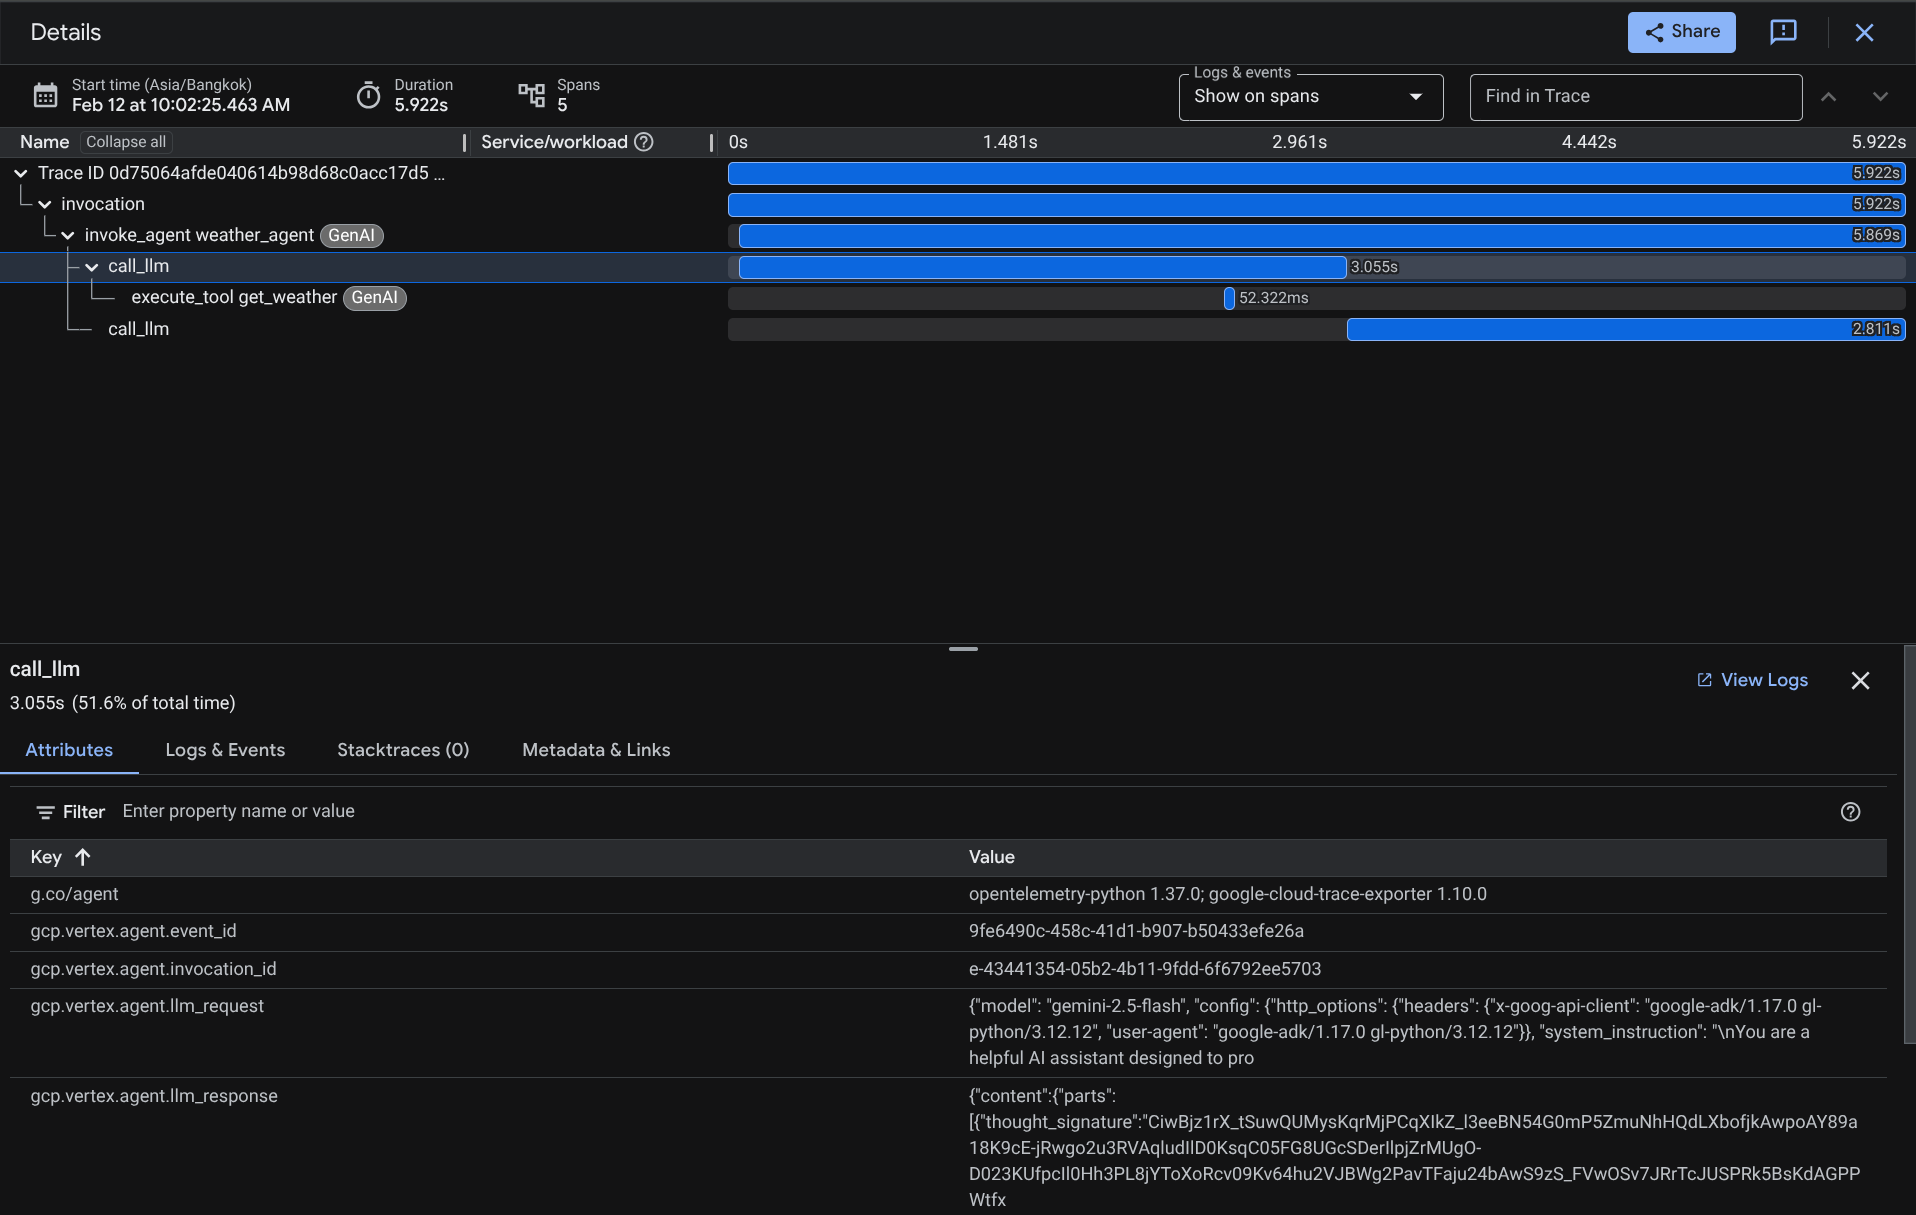
There you go, now we have good observability and information on each interaction of our agent with the user to help debug issues. Feel free to try various tooling or workflows!
12. 🎯 Challenge
Try multi-agent or agentic workflows to see how they perform under loads and what the trace looks like
13. 🧹 Clean up
To avoid incurring charges to your Google Cloud account for the resources used in this codelab, follow these steps:
- In the Google Cloud console, go to the Manage resources page.
- In the project list, select the project that you want to delete, and then click Delete.
- In the dialog, type the project ID, and then click Shut down to delete the project.
- Alternatively you can go to Cloud Run on the console, select the service you just deployed and delete.