
۱. مقدمه
This tutorial will guide you through deploying, managing, and monitoring a powerful agent built with the Agent Development Kit (ADK) on Google Cloud Run. The ADK empowers you to create agents capable of complex, multi-agent workflows. By leveraging Cloud Run, a fully managed serverless platform, you can deploy your agent as a scalable, containerized application without worrying about the underlying infrastructure. This powerful combination allows you to focus on your agent's core logic while benefiting from Google Cloud's robust and scalable environment.
Throughout this tutorial, we will explore the seamless integration of the ADK with Cloud Run. You'll learn how to deploy your agent and then dive into the practical aspects of managing your application in a production-like setting. We will cover how to safely roll out new versions of your agent by managing traffic, enabling you to test new features with a subset of users before a full release.
Furthermore, you will gain hands-on experience with monitoring the performance of your agent. We will simulate a real-world scenario by conducting a load test to observe Cloud Run's automatic scaling capabilities in action. To gain deeper insights into your agent's behavior and performance, we will enable tracing with Cloud Trace. This will provide a detailed, end-to-end view of requests as they travel through your agent, allowing you to identify and address any performance bottlenecks. By the end of this tutorial, you will have a comprehensive understanding of how to effectively deploy, manage, and monitor your ADK-powered agents on Cloud Run.
Through the codelab, you will employ a step by step approach as follows:
- یک پایگاه داده PostgreSQL روی CloudSQL ایجاد کنید تا برای سرویس جلسه پایگاه داده ADK Agent استفاده شود.
- یک عامل ADK پایه راهاندازی کنید
- Setup database session service to be used by ADK runner
- Initial deploy the agent to cloud run
- Load testing and inspect cloud run auto scaling
- Deploy new agent revision and gradually increase traffic to new revisions
- راهاندازی ردیابی ابری و اجرای ردیابی توسط عامل بازرسی
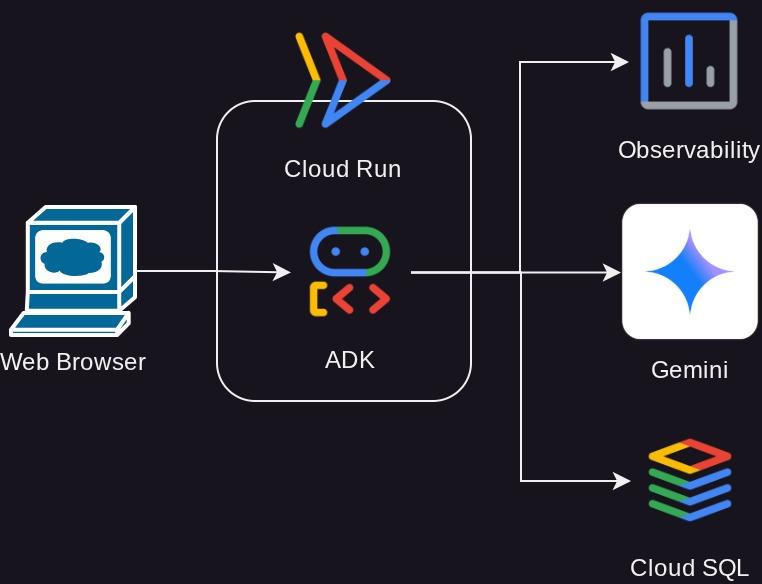
Architecture Overview
پیشنیازها
- Comfortable working with Python
- درک معماری پایه فول استک با استفاده از سرویس HTTP
آنچه یاد خواهید گرفت
- ساختار ADK و خدمات محلی
- راهاندازی ADK agent با سرویس جلسه پایگاه داده
- راهاندازی PostgreSQL در CloudSQL برای استفاده توسط سرویس جلسه پایگاه داده
- استقرار برنامه در Cloud Run با استفاده از Dockerfile و تنظیم متغیرهای اولیه محیط
- پیکربندی و آزمایش Cloud اجرای مقیاسبندی خودکار با آزمایش بار
- استراتژی انتشار تدریجی با Cloud Run
- Setup ADK Agent tracing to Cloud Trace
آنچه نیاز دارید
- Chrome web browser
- یک حساب جیمیل
- A Cloud Project with billing enabled
این آزمایشگاه کد که برای توسعهدهندگان در تمام سطوح (از جمله مبتدیان) طراحی شده است، در برنامه نمونه خود از پایتون استفاده میکند. با این حال، برای درک مفاهیم ارائه شده، دانش پایتون لازم نیست.
2. 🚀 Preparing Workshop Setup
Now, we will utilize Cloud Shell IDE for this tutorial, click the following button to navigate there
پس از ورود به Cloud Shell، پوشه کاری قالب را برای این codelab از Github کپی کنید و دستور زیر را اجرا کنید. این دستور پوشه کاری را در پوشه deploy_and_manage_adk ایجاد میکند.
git clone https://github.com/alphinside/deploy-and-manage-adk-service.git deploy_and_manage_adk
Then, run the following command in the terminal to open the cloned repository as your working directory
cloudshell workspace ~/deploy_and_manage_adk && cd ~/deploy_and_manage_adk
پس از آن، رابط کاربری شما باید شبیه به این باشد
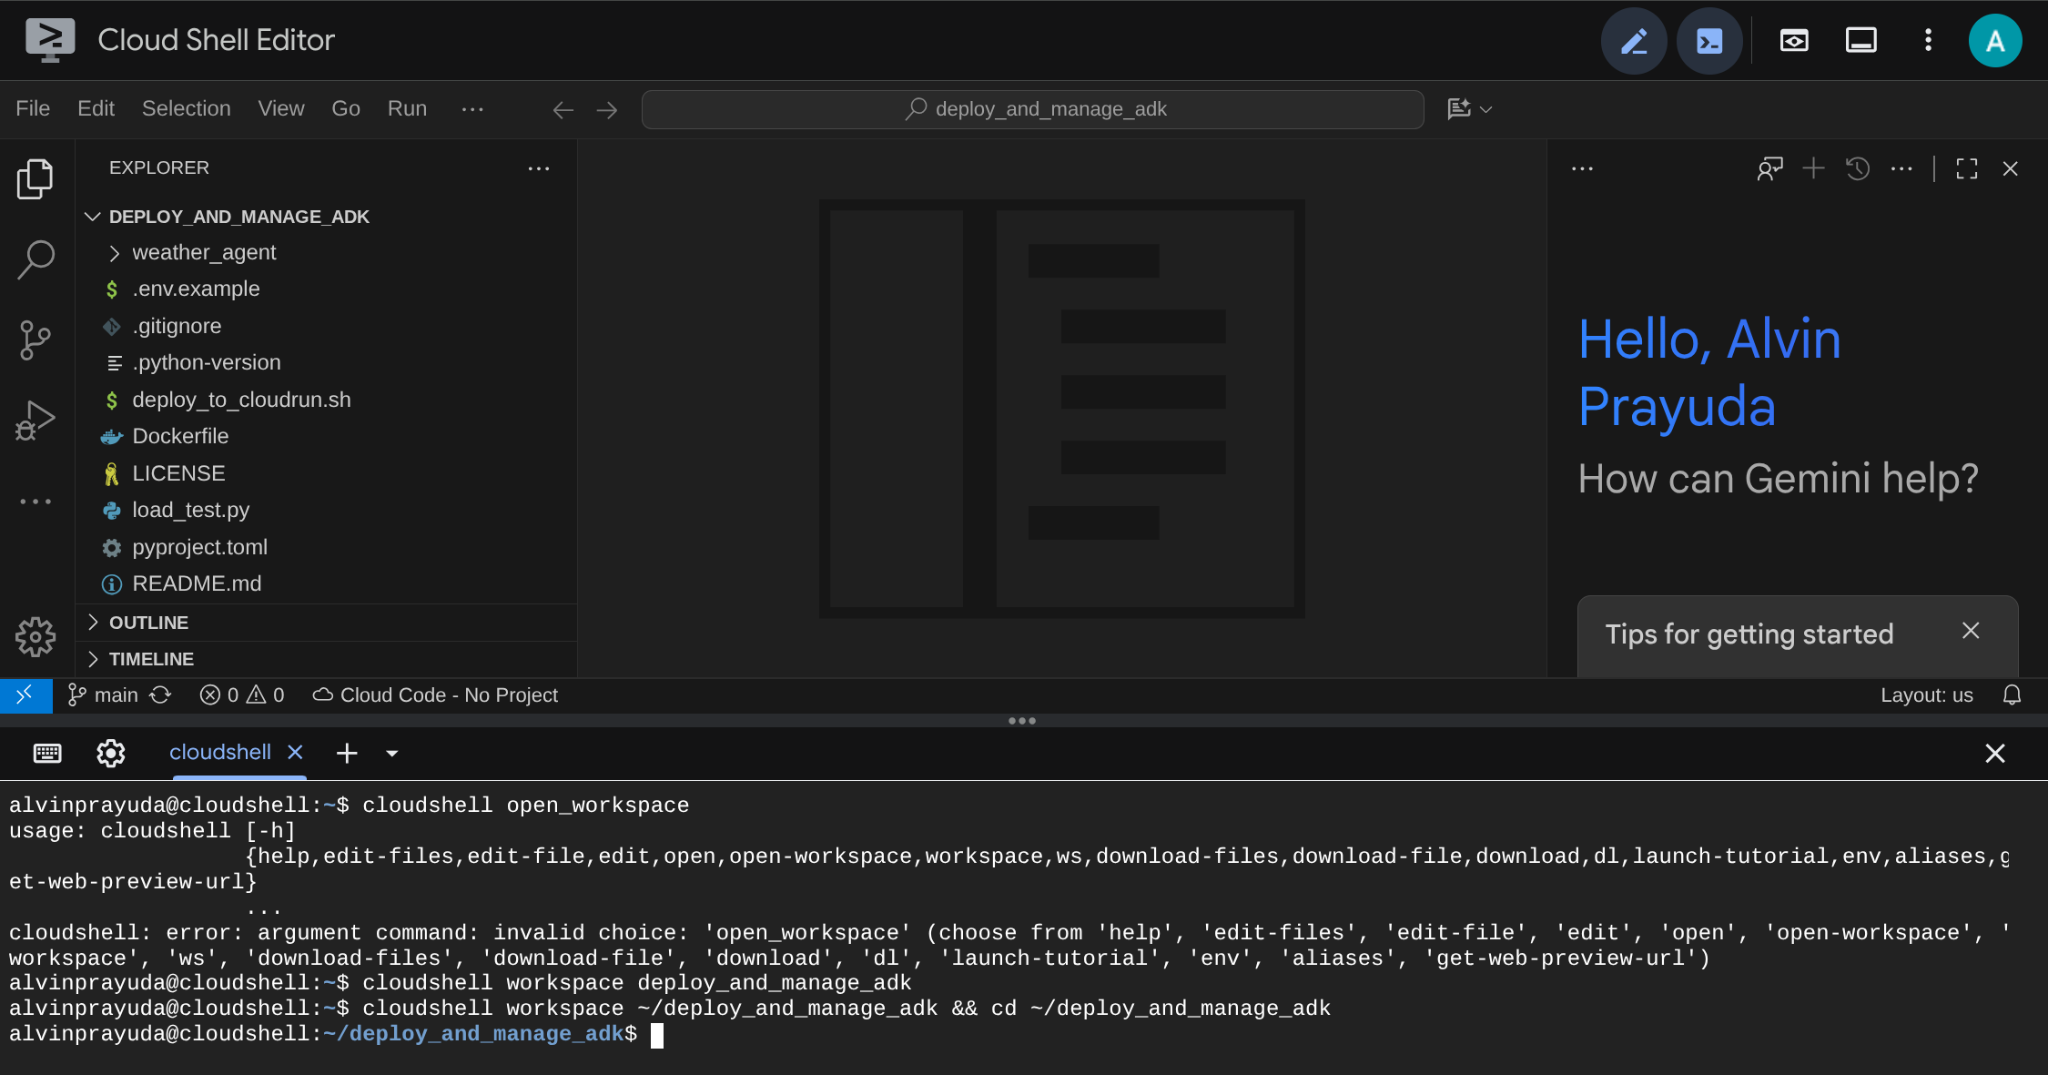
This will be our main interface, IDE on top, terminal on the bottom. Now we need to prepare our terminal to create and activate our Google Cloud Project which will be linked to previously claimed trial billing account. We've prepared a script for you to always ensure your terminal session is ready. Run the following command ( ensure you are already inside the deploy_and_manage_adk workspace
bash setup_trial_project.sh && source .env
هنگام اجرای این دستور، نام پیشنهادی برای شناسه پروژه از شما پرسیده میشود، میتوانید برای ادامه، Enter فشار دهید.

پس از مدتی انتظار، اگر این خروجی را در کنسول خود مشاهده کردید، آماده رفتن به مرحله بعدی هستید. 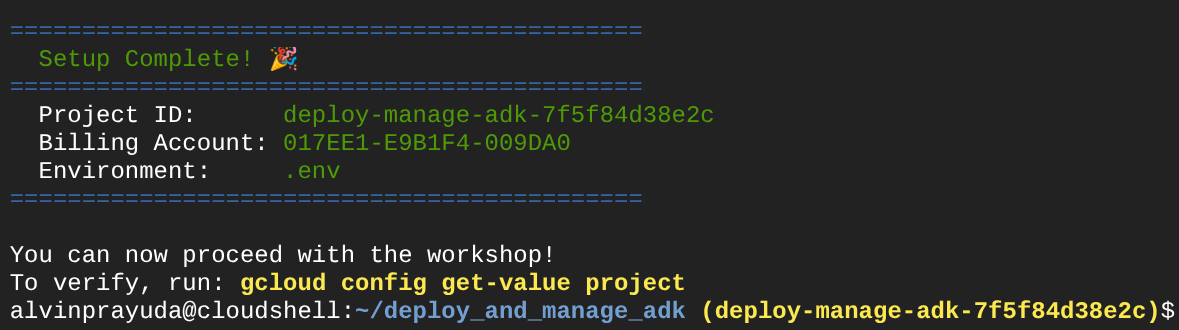
این نشان میدهد که ترمینال شما از قبل احراز هویت شده و روی شناسه پروژه صحیح (رنگ زرد کنار مسیر دایرکتوری فعلی) تنظیم شده است. کاری که این دستور انجام میدهد این است که به شما در ایجاد یک پروژه جدید، پیدا کردن و پیوند دادن پروژه به یک حساب پرداخت آزمایشی، آمادهسازی فایل .env برای پیکربندی متغیر محیطی و همچنین فعال کردن شناسه پروژه صحیح در ترمینال برای شما کمک میکند.
Now, we are ready for the next step
3. 🚀 Enabling APIs
In this tutorial, we will interact with the CloudSQL database, Gemini model, and Cloud Run and these product will required the following API to be activated, run these command to enable them
این ممکن است مدتی طول بکشد.
gcloud services enable aiplatform.googleapis.com \
                       run.googleapis.com \
                       cloudbuild.googleapis.com \
                       cloudresourcemanager.googleapis.com \
                       sqladmin.googleapis.com \
                       compute.googleapis.com
در صورت اجرای موفقیتآمیز دستور، باید پیامی مشابه آنچه در زیر نشان داده شده است را مشاهده کنید:
Operation "operations/..." finished successfully.
۴. 🚀 تنظیمات محیط پایتون و متغیرهای محیطی
ما در این آزمایشگاه کد از پایتون ۳.۱۲ استفاده خواهیم کرد و از ابزار مدیریت پروژه uv python برای سادهسازی نیاز به ایجاد و مدیریت نسخه پایتون و محیط مجازی استفاده خواهیم کرد. این بسته uv از قبل روی Cloud Shell نصب شده است.
این دستور را اجرا کنید تا وابستگیهای مورد نیاز برای محیط مجازی در دایرکتوری .venv نصب شود.
uv sync --frozen
در مرحله بعد، فایلهای متغیر محیطی مورد نیاز برای این پروژه را بررسی خواهیم کرد. قبلاً این فایل توسط اسکریپت setup_trial_project.sh تنظیم میشد. دستور زیر را برای باز کردن فایل .env در ویرایشگر اجرا کنید.
cloudshell open .env
You will see the following configurations already applied on the .env file.
# .env

# Google Cloud and Vertex AI configuration
GOOGLE_CLOUD_PROJECT=your-project-id
GOOGLE_CLOUD_LOCATION=global
GOOGLE_GENAI_USE_VERTEXAI=True

# Database connection for session service
# DB_CONNECTION_NAME=your-db-connection-name
برای این آزمایشگاه کد، ما از مقادیر از پیش تنظیمشده برای GOOGLE_CLOUD_LOCATION و GOOGLE_GENAI_USE_VERTEXAI.
اکنون میتوانیم به مرحله بعدی برویم، یعنی ایجاد پایگاه دادهای که توسط عامل ما برای پایداری وضعیت و نشست مورد استفاده قرار گیرد.
5. 🚀 Preparing CloudSQL Database
We will need a database to be utilized by the ADK agent later on. Let's create a PostgreSQL database on Cloud SQL. Run the following command to create the database instance first. We will use the default postgres database name, so we'll skip database creation here. We also need to configure our default database username too (also postgres) , for the sake of tutorial, let's use ADK-deployment123 as our password
gcloud sql instances create adk-deployment \
  --database-version=POSTGRES_17 \
  --edition=ENTERPRISE \
  --tier=db-g1-small \
  --region=us-west1 \
  --availability-type=ZONAL \
  --project=${GOOGLE_CLOUD_PROJECT} && \
gcloud sql users set-password postgres \
  --instance=adk-deployment \
  --password=ADK-deployment123
در دستور بالا، اولین gcloud sql instances create adk-deployment دستوری است که ما برای ایجاد نمونه پایگاه داده استفاده میکنیم. ما برای این آموزش از مشخصات حداقلی sandbox استفاده میکنیم. دستور دوم gcloud sql users set-password postgres برای تغییر رمز عبور پیشفرض نام کاربری postgres استفاده میشود.
توجه داشته باشید که ما از adk-deployment به عنوان نام نمونه پایگاه داده خود استفاده میکنیم. پس از اتمام، باید خروجی مانند زیر را در ترمینال مشاهده کنید که نشان میدهد نمونه آماده است و رمز عبور پیشفرض کاربر بهروزرسانی شده است.
Created [https://sqladmin.googleapis.com/sql/v1beta4/projects/your-project-id/instances/adk-deployment].
NAME: adk-deployment
DATABASE_VERSION: POSTGRES_17
LOCATION: us-west1-a
TIER: db-g1-small
PRIMARY_ADDRESS: xx.xx.xx.xx
PRIVATE_ADDRESS: -
STATUS: RUNNABLE
Updating Cloud SQL user...done.
از آنجایی که استقرار این پایگاه داده مدتی طول میکشد، بیایید در حالی که منتظر آماده شدن استقرار پایگاه داده CloudSQL هستیم، به بخش بعدی برویم.
۶. 🚀 ساخت عامل آب و هوا با ADK و Gemini 2.5
Introduction to ADK Directory Structure
بیایید با بررسی آنچه ADK ارائه میدهد و نحوه ساخت عامل شروع کنیم. مستندات کامل ADK را میتوان در این URL مشاهده کرد. ADK ابزارهای زیادی را در اجرای دستورات CLI خود به ما ارائه میدهد. برخی از آنها عبارتند از:
- Setup the agent directory structure
- Quickly try interaction via CLI input output
- رابط کاربری وب توسعه محلی را به سرعت راهاندازی کنید
حالا، بیایید ساختار عامل را در دایرکتوری weather_agent بررسی کنیم.
weather_agent/
├── __init__.py
├── agent.py
└── tool.py
و اگر init.py و agent.py را بررسی کنید، این کد را خواهید دید.
# __init__.py

from weather_agent.agent import root_agent

__all__ = ["root_agent"]
# agent.py


import os
from pathlib import Path

import google.auth
from dotenv import load_dotenv
from google.adk.agents import Agent
from weather_agent.tool import get_weather

# Load environment variables from .env file in root directory
root_dir = Path(__file__).parent.parent
dotenv_path = root_dir / ".env"
load_dotenv(dotenv_path=dotenv_path)


# Use default project from credentials if not in .env
_, project_id = google.auth.default()
os.environ.setdefault("GOOGLE_CLOUD_PROJECT", project_id)
os.environ.setdefault("GOOGLE_CLOUD_LOCATION", "global")
os.environ.setdefault("GOOGLE_GENAI_USE_VERTEXAI", "True")

root_agent = Agent(
    name="weather_agent",
    model="gemini-2.5-flash",
    instruction="""
You are a helpful AI assistant designed to provide accurate and useful information.
""",
    tools=[get_weather],
)
توضیح کد ADK
This script contains our agent initiation where we initialize the following things:
- مدل مورد استفاده را روی
gemini-2.5-flashتنظیم کنید. - Provide tool
get_weatherto support the agent functionality as weather agent
Run the Web UI Locally
اکنون میتوانیم با عامل تعامل داشته باشیم و رفتار آن را به صورت محلی بررسی کنیم. ADK به ما امکان میدهد یک رابط کاربری وب توسعهیافته برای تعامل و بررسی اتفاقات در طول تعامل داشته باشیم. دستور زیر را برای شروع سرور رابط کاربری توسعهیافته محلی اجرا کنید.
uv run adk web --port 8080
خروجی مانند مثال زیر تولید میشود، به این معنی که ما از قبل میتوانیم به رابط وب دسترسی داشته باشیم.
INFO:     Started server process [xxxx]
INFO:     Waiting for application startup.

+-----------------------------------------------------------------------------+
| ADK Web Server started                                                      |
|                                                                             |
| For local testing, access at http://localhost:8080.                         |
+-----------------------------------------------------------------------------+

INFO:     Application startup complete.
INFO:     Uvicorn running on http://0.0.0.0:8080 (Press CTRL+C to quit)
اکنون، برای بررسی آن، روی دکمه پیشنمایش وب در قسمت بالای ویرایشگر Cloud Shell خود کلیک کنید و پیشنمایش را روی پورت ۸۰۸۰ انتخاب کنید.
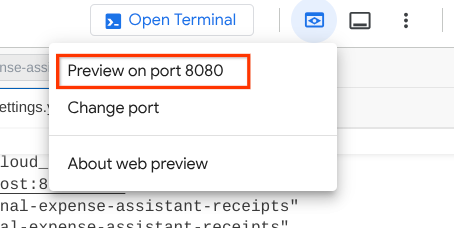
صفحه وب زیر را مشاهده خواهید کرد که در آن میتوانید عاملهای موجود را از طریق دکمه کشویی بالا سمت چپ انتخاب کنید (در مورد ما باید weather_agent باشد) و با ربات تعامل داشته باشید. در پنجره سمت چپ، اطلاعات زیادی در مورد جزئیات گزارش در طول زمان اجرای عامل مشاهده خواهید کرد.
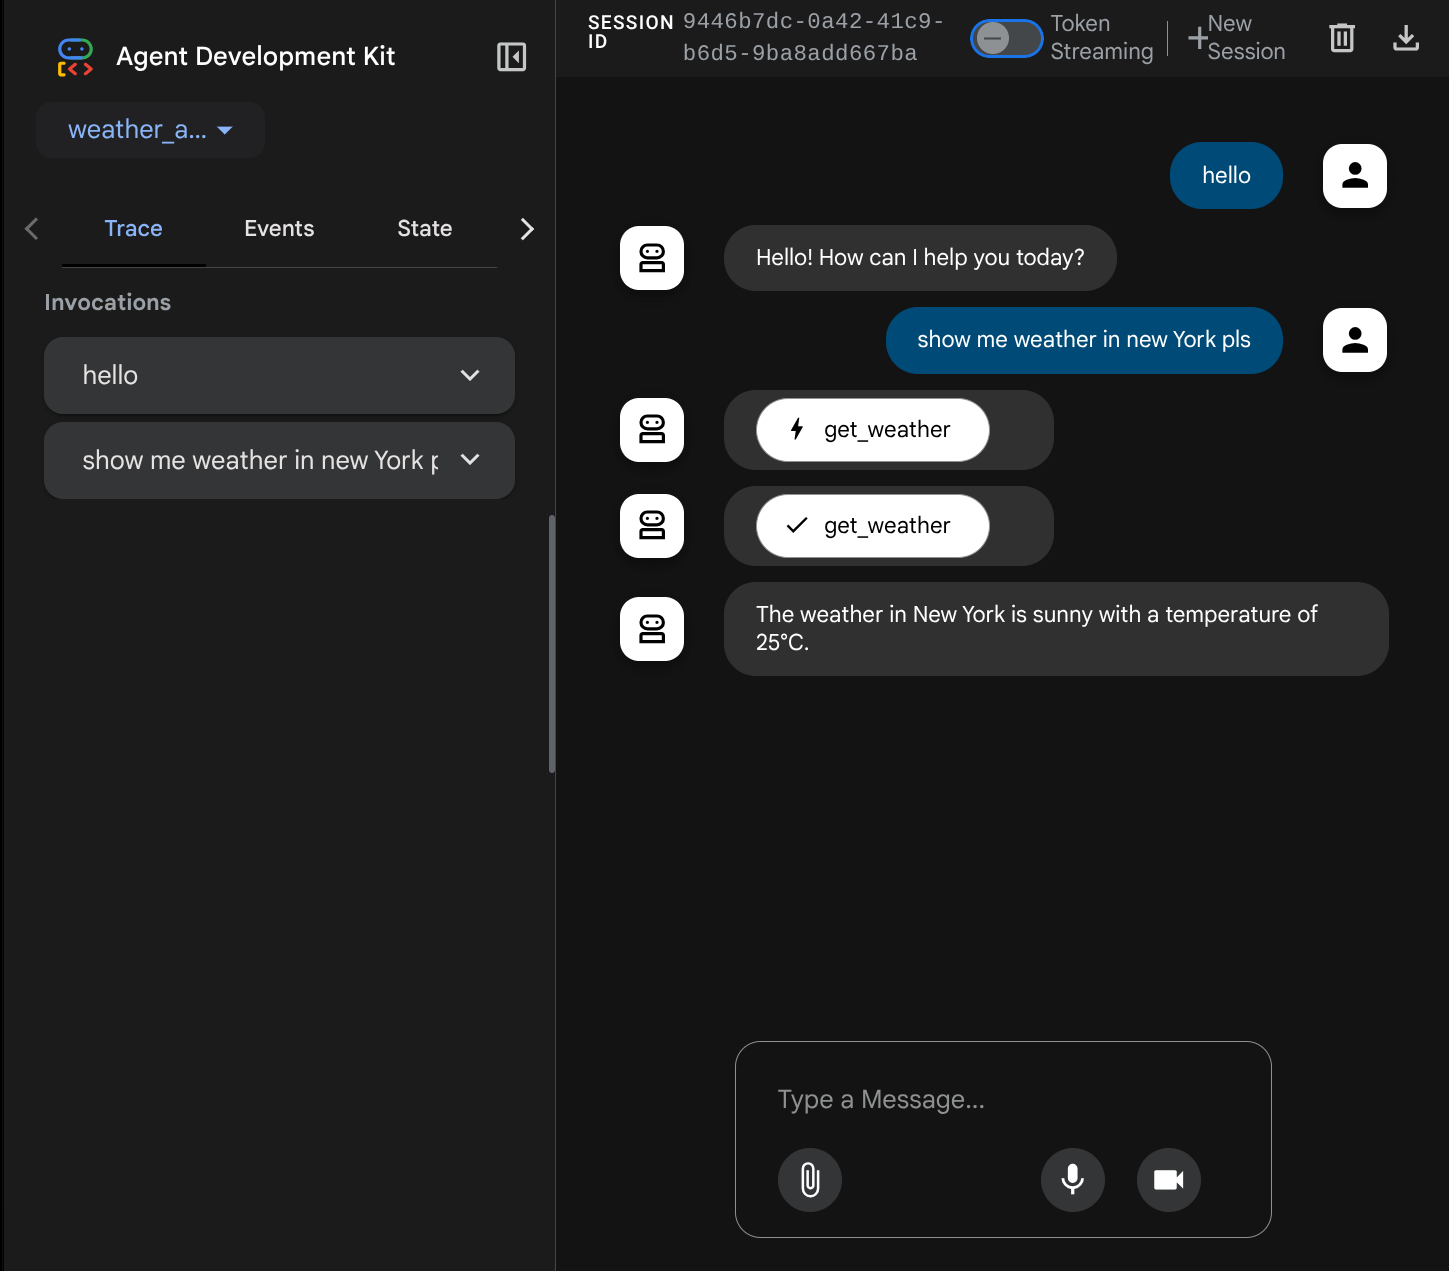
حالا، سعی کنید با آن تعامل کنید. در نوار سمت چپ، میتوانیم رد هر ورودی را بررسی کنیم، بنابراین میتوانیم بفهمیم که برای هر عملی که توسط عامل انجام میشود، قبل از تشکیل پاسخ نهایی، چقدر زمان لازم است.
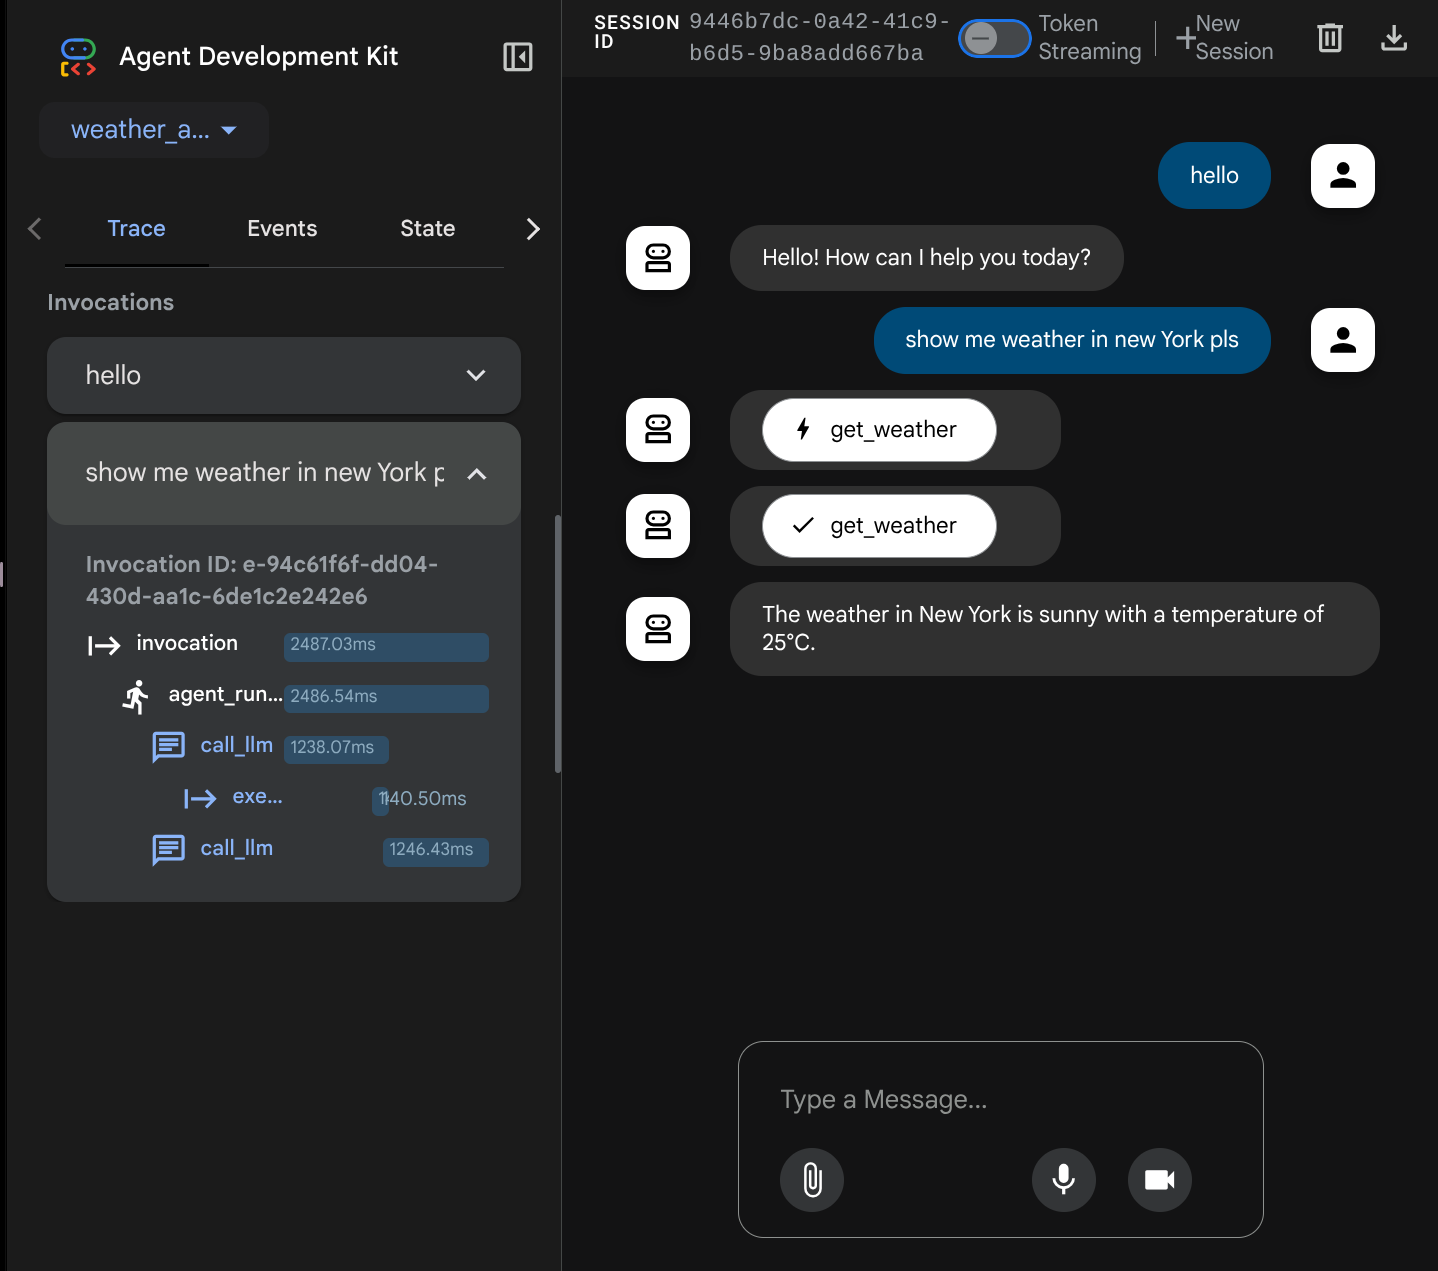
This one of the observability features that has been built into ADK, currently we inspect it locally. Later on we will see how this integrated into Cloud Tracing so we have centralized trace of all requests
7. 🚀 Deploying to Cloud Run
Now, let's deploy this agent service to Cloud Run. For the sake of this demo, this service will be exposed as a public service that can be accessed by others. However, keep in mind that this is not the best practices as it is not secure
This deployment scenario enables you to customize your agent backend service, we will use Dockerfile to deploy our agent to Cloud Run. At this point, we already have all the files needed ( the Dockerfile and the server.py ) to deploy our applications to Cloud Run. By having these 2 items, you can flexibly customize your agent deployment ( Eg adding custom backend routes and/or adding additional sidecar service for monitoring purposes ). We will discuss this in detail later on.
حالا، بیایید ابتدا سرویس را مستقر کنیم، به ترمینال Cloud Shell برویم و مطمئن شویم که پروژه فعلی با پروژه فعال شما پیکربندی شده است، بیایید اسکریپت راهاندازی را دوباره اجرا کنیم، به صورت اختیاری میتوانید از دستور gcloud config set project [PROJECT_ID] برای پیکربندی پروژه فعال خود استفاده کنید.
bash setup_trial_project.sh && source .env
حالا باید دوباره فایل .env را بررسی کنیم، آن را باز کنیم. خواهید دید که باید متغیر DB_CONNECTION_NAME را از حالت کامنت خارج کرده و با مقدار صحیح پر کنیم.
# Google Cloud and Vertex AI configuration
GOOGLE_CLOUD_PROJECT=your-project-id
GOOGLE_CLOUD_LOCATION=global
GOOGLE_GENAI_USE_VERTEXAI=True

# Database connection for session service
DB_CONNECTION_NAME=your-db-connection-name
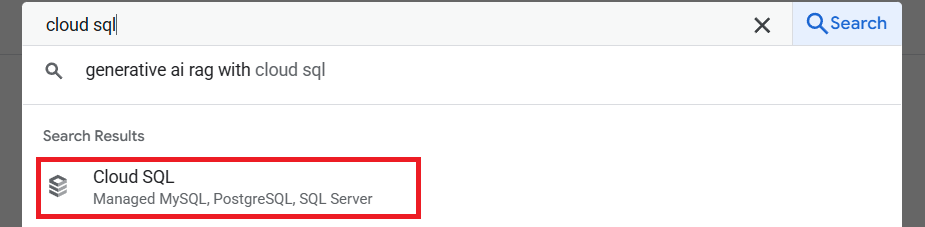
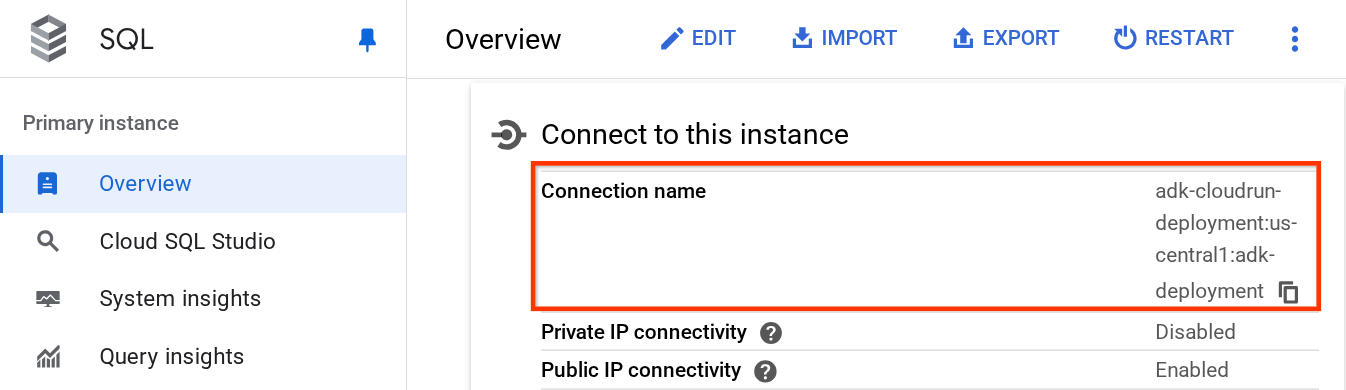
برای دریافت مقدار DB_CONNECTION_NAME ، به داشبورد Cloud SQL مراجعه کنید.
سپس روی نمونهای که ایجاد کردهاید کلیک کنید. به نوار جستجو در قسمت بالای کنسول ابری بروید و "cloud sql" را تایپ کنید. سپس روی محصول Cloud SQL کلیک کنید.
After that you will see the previously created instance, click on it
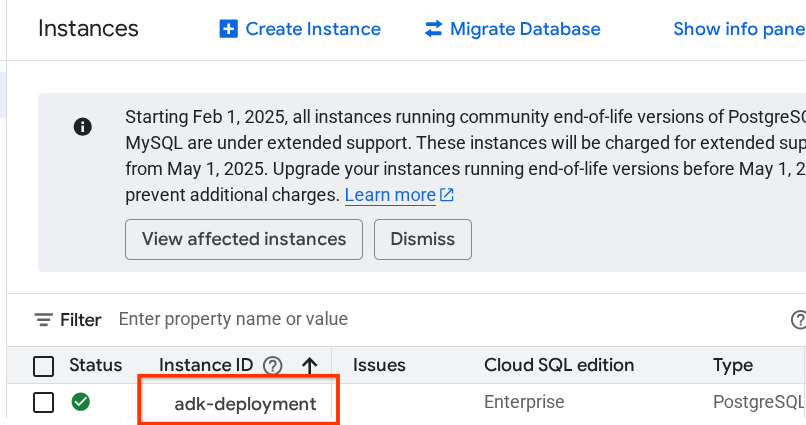
در داخل صفحه نمونه، به پایین اسکرول کنید تا به بخش « اتصال به این نمونه » برسید. در آنجا میتوانید نام اتصال را کپی کنید تا جایگزین مقدار DB_CONNECTION_NAME شود.
پس از آن فایل .env را با دستور زیر باز کنید
cloudshell edit .env
و متغیر DB_CONNECTION_NAME را در فایل .env تغییر دهید. فایل env شما باید مانند مثال زیر باشد.
# Google Cloud and Vertex AI configuration
GOOGLE_CLOUD_PROJECT=your-project-id
GOOGLE_CLOUD_LOCATION=global
GOOGLE_GENAI_USE_VERTEXAI=True

# Database connection for session service
DB_CONNECTION_NAME=your-project-id:your-location:your-instance-name
پس از آن اسکریپت استقرار را اجرا کنید
bash deploy_to_cloudrun.sh
اگر از شما خواسته شد که ایجاد یک رجیستری مصنوعات برای مخزن داکر را تأیید کنید، فقط با Y پاسخ دهید.
در حالی که منتظر فرآیند استقرار هستیم، بیایید نگاهی به فایل deploy_to_cloudrun.sh بیندازیم.
#!/bin/bash

# Load environment variables from .env file
if [ -f .env ]; then
    export $(cat .env | grep -v '^#' | xargs)
else
    echo "Error: .env file not found"
    exit 1
fi

# Validate required variables
required_vars=("GOOGLE_CLOUD_PROJECT" "DB_CONNECTION_NAME")
for var in "${required_vars[@]}"; do
    if [ -z "${!var}" ]; then
        echo "Error: $var is not set in .env file"
        exit 1
    fi
done

gcloud run deploy weather-agent \
    --source . \
    --port 8080 \
    --project ${GOOGLE_CLOUD_PROJECT} \
    --allow-unauthenticated \
    --add-cloudsql-instances ${DB_CONNECTION_NAME} \
    --update-env-vars SESSION_SERVICE_URI="postgresql+pg8000://postgres:ADK-deployment123@postgres/?unix_sock=/cloudsql/${DB_CONNECTION_NAME}/.s.PGSQL.5432",GOOGLE_CLOUD_PROJECT=${GOOGLE_CLOUD_PROJECT} \
    --region us-west1 \
    --min 1 \
    --memory 1G \
    --concurrency 10
This script will load your .env variable, then run the deployment command.
If you take a closer look, we only need one gcloud run deploy command to do all the necessary things that need to be taken care of if you want to deploy a service: building the image, push to registry, deploy the service, setting IAM policy, creating revision, and even routing traffic. In this example, we already provide the Dockerfile, hence this command will utilize it to build the app
پس از اتمام نصب، باید لینکی مشابه لینک زیر دریافت کنید:
https://weather-agent-*******.us-west1.run.app
بعد از اینکه این URL را دریافت کردید، میتوانید از برنامه خود در پنجره ناشناس یا دستگاه تلفن همراه خود استفاده کنید و به رابط کاربری توسعهدهنده عامل دسترسی پیدا کنید. در حالی که منتظر استقرار هستید، بیایید سرویس دقیقی را که در بخش بعدی مستقر میکنیم، بررسی کنیم.
۸. 💡 داکرفایل و اسکریپت سرور بکاند
برای اینکه عامل به عنوان یک سرویس قابل دسترسی باشد، عامل را درون یک برنامه FastAPI قرار میدهیم که با دستور Dockerfile اجرا خواهد شد. در زیر محتوای Dockerfile آمده است.
FROM python:3.12-slim

RUN pip install --no-cache-dir uv==0.7.13

WORKDIR /app

COPY . .

RUN uv sync --frozen

EXPOSE 8080

CMD ["uv", "run", "uvicorn", "server:app", "--host", "0.0.0.0", "--port", "8080"]
ما میتوانیم سرویسهای لازم برای پشتیبانی از عامل را در اینجا پیکربندی کنیم، مانند آمادهسازی سرویس Session ، Memory یا Artifact برای اهداف عملیاتی. در اینجا کد server.py که استفاده خواهد شد، آمده است.
import os

from dotenv import load_dotenv
from fastapi import FastAPI
from google.adk.cli.fast_api import get_fast_api_app
from pydantic import BaseModel
from typing import Literal
from google.cloud import logging as google_cloud_logging


# Load environment variables from .env file
load_dotenv()

logging_client = google_cloud_logging.Client()
logger = logging_client.logger(__name__)

AGENT_DIR = os.path.dirname(os.path.abspath(__file__))

# Get session service URI from environment variables
session_uri = os.getenv("SESSION_SERVICE_URI", None)

# Prepare arguments for get_fast_api_app
app_args = {"agents_dir": AGENT_DIR, "web": True, "trace_to_cloud": True}

# Only include session_service_uri if it's provided
if session_uri:
    app_args["session_service_uri"] = session_uri
else:
    logger.log_text(
        "SESSION_SERVICE_URI not provided. Using in-memory session service instead. "
        "All sessions will be lost when the server restarts.",
        severity="WARNING",
    )

# Create FastAPI app with appropriate arguments
app: FastAPI = get_fast_api_app(**app_args)

app.title = "weather-agent"
app.description = "API for interacting with the Agent weather-agent"


class Feedback(BaseModel):
    """Represents feedback for a conversation."""

    score: int | float
    text: str | None = ""
    invocation_id: str
    log_type: Literal["feedback"] = "feedback"
    service_name: Literal["weather-agent"] = "weather-agent"
    user_id: str = ""


# Example if you want to add your custom endpoint
@app.post("/feedback")
def collect_feedback(feedback: Feedback) -> dict[str, str]:
    """Collect and log feedback.

    Args:
        feedback: The feedback data to log

    Returns:
        Success message
    """
    logger.log_struct(feedback.model_dump(), severity="INFO")
    return {"status": "success"}


# Main execution
if __name__ == "__main__":
    import uvicorn

    uvicorn.run(app, host="0.0.0.0", port=8080)
توضیح کد سرور
اینها مواردی هستند که در اسکریپت server.py تعریف شدهاند:
- با استفاده از متد
get_fast_api_app، عامل خود را به یک برنامه FastAPI تبدیل کنید. به این ترتیب، همان تعریف مسیری را که برای رابط کاربری توسعه وب استفاده میشود، به ارث خواهیم برد. - با اضافه کردن آرگومانهای کلمه کلیدی به متد
get_fast_api_appسرویسهای Session، Memory یا Artifact لازم را پیکربندی کنید. در این آموزش، اگر ما متغیر env مربوط بهSESSION_SERVICE_URIرا پیکربندی کنیم، سرویس session از آن استفاده خواهد کرد، در غیر این صورت از session درون حافظهای استفاده خواهد کرد. - ما میتوانیم مسیر سفارشی را برای پشتیبانی از منطق کسبوکار backend دیگر اضافه کنیم، در اسکریپت، مثال مسیر با قابلیت بازخورد را اضافه میکنیم.
- ردیابی ابری را در پارامترهای آرگومان
get_fast_api_appفعال کنید تا ردیابی به Google Cloud Trace ارسال شود. - Run the FastAPI service using uvicorn
اکنون، اگر استقرار شما از قبل به پایان رسیده است، لطفاً با دسترسی به آدرس اینترنتی Cloud Run، از طریق رابط کاربری توسعه وب با عامل تعامل برقرار کنید.
9. 🚀 Inspecting Cloud Run Auto Scaling with Load Testing
اکنون، قابلیتهای مقیاسپذیری خودکار cloud run را بررسی خواهیم کرد. برای این سناریو، بیایید نسخه جدید را با فعال کردن حداکثر همزمانی به ازای هر نمونه، پیادهسازی کنیم. در بخش قبلی، حداکثر همزمانی را روی 10 تنظیم کردیم (flag --concurrency 10 ). از این رو میتوانیم انتظار داشته باشیم که Cloud Run وقتی تست بارگذاری را انجام میدهیم که از این عدد فراتر میرود، سعی کند نمونه خود را مقیاسبندی کند.
بیایید فایل load_test.py را بررسی کنیم. این اسکریپتی خواهد بود که ما برای انجام تست بار با استفاده از چارچوب locust استفاده خواهیم کرد. این اسکریپت کارهای زیر را انجام خواهد داد:
- شناسه کاربری و شناسه جلسه تصادفی
- برای user_id، session_id ایجاد کنید.
- با user_id و session_id ایجاد شده، به نقطه پایانی "/run_sse" بروید
اگر آدرس اینترنتی سرویس مستقر شده خود را فراموش کردهاید، باید آن را بدانیم. میتوانیم به کنسول Cloud Run برویم.
Then, find your weather-agent service and click it
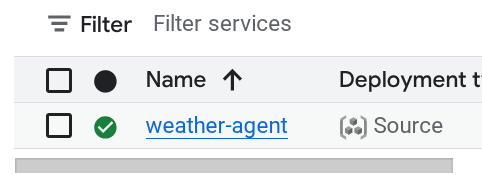
The service URL will be displayed right beside the Region information. Eg

برای سادهسازی کارها، اسکریپت زیر را اجرا کنید تا URL سرویس اخیراً پیادهسازی شده خود را دریافت کرده و آن را در متغیر محیطی SERVICE_URL ذخیره کنید.
export SERVICE_URL=$(gcloud run services describe weather-agent \
    --platform managed \
    --region us-west1 \
    --format 'value(status.url)')
سپس دستور زیر را برای بارگذاری تست برنامه عامل خود اجرا کنید
uv run locust -f load_test.py \
              -H $SERVICE_URL \
              -u 60 \
              -r 5 \
              -t 120 \
              --headless
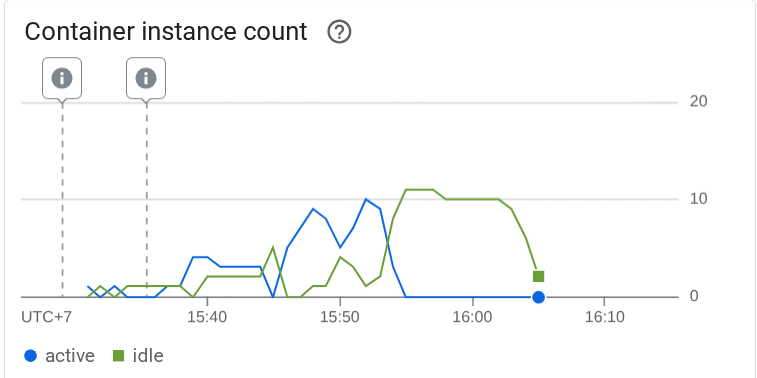
Running this you will see metrics like this displayed. ( In this example all reqs success )
Type     Name                                  # reqs      # fails |    Avg     Min     Max    Med |   req/s  failures/s
--------|------------------------------------|-------|-------------|-------|-------|-------|-------|--------|-----------
POST     /run_sse end                             813     0(0.00%) |   5817    2217   26421   5000 |    6.79        0.00
POST     /run_sse message                         813     0(0.00%) |   2678    1107   17195   2200 |    6.79        0.00
--------|------------------------------------|-------|-------------|-------|-------|-------|-------|--------|-----------
         Aggregated                              1626     0(0.00%) |   4247    1107   26421   3500 |   13.59        0.00
Then let's see what happened in the Cloud Run, go to your deployed service again, and see the dashboard. This will show how cloud runs automatically scale the instance to handle incoming requests. Because we are limiting the max concurrency to 10 per instance, the cloud run instance will try to adjust the number of containers to satisfy this condition automatically.
۱۰. 🚀 انتشار تدریجی نسخههای جدید
Now, let's have the following scenario. We want to update the prompt of the agent. Open the weather_agent/agent.py with the following command
cloudshell edit weather_agent/agent.py
و آن را با کد زیر بازنویسی کنید:
# weather_agent/agent.py

import os
from pathlib import Path

import google.auth
from dotenv import load_dotenv
from google.adk.agents import Agent
from weather_agent.tool import get_weather

# Load environment variables from .env file in root directory
root_dir = Path(__file__).parent.parent
dotenv_path = root_dir / ".env"
load_dotenv(dotenv_path=dotenv_path)


# Use default project from credentials if not in .env
_, project_id = google.auth.default()
os.environ.setdefault("GOOGLE_CLOUD_PROJECT", project_id)
os.environ.setdefault("GOOGLE_CLOUD_LOCATION", "global")
os.environ.setdefault("GOOGLE_GENAI_USE_VERTEXAI", "True")

root_agent = Agent(
    name="weather_agent",
    model="gemini-2.5-flash",
    instruction="""
You are a helpful AI assistant designed to provide accurate and useful information.
You only answer inquiries about the weather. Refuse all other user query
""",
    tools=[get_weather],
)
سپس، میخواهید نسخههای جدید را منتشر کنید، اما نمیخواهید همه درخواستهای ترافیک مستقیماً به نسخه جدید منتقل شوند. میتوانیم انتشار تدریجی را با اجرای ابری انجام دهیم. ابتدا، باید یک نسخه جدید را مستقر کنیم، اما با پرچم –no-traffic . اسکریپت عامل قبلی را ذخیره کنید و دستور زیر را اجرا کنید
gcloud run deploy weather-agent \
                  --source . \
                  --port 8080 \
                  --project $GOOGLE_CLOUD_PROJECT \
                  --allow-unauthenticated \
                  --region us-west1 \
                  --no-traffic
پس از اتمام، یک گزارش مشابه مانند فرآیند استقرار قبلی با تفاوت تعداد ترافیک ارائه شده دریافت خواهید کرد. این گزارش 0 درصد ترافیک ارائه شده را نشان میدهد.
Service [weather-agent] revision [weather-agent-xxxx-xxx] has been deployed and is serving 0 percent of traffic.
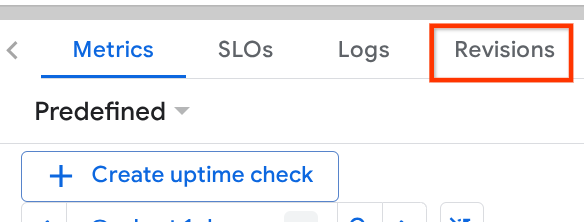
بعد، بیایید به داشبورد Cloud Run برویم
سپس، سرویس هواشناسی خود را پیدا کنید و روی آن کلیک کنید
به برگه «ویرایشها» بروید و فهرست ویرایشهای پیادهسازیشده را در آنجا مشاهده خواهید کرد.
خواهید دید که نسخههای جدید مستقر شده 0٪ را ارائه میدهند، از اینجا میتوانید روی دکمه کباب (⋮) کلیک کنید و مدیریت ترافیک را انتخاب کنید
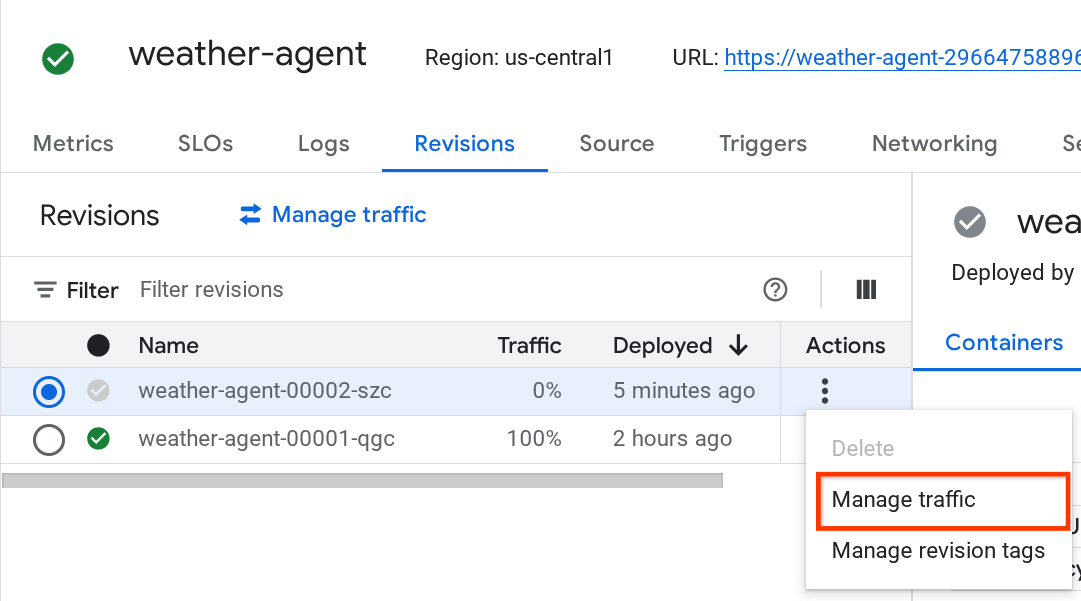
در پنجرهای که به تازگی باز شده است، میتوانید درصد ترافیکی که به کدام نسخهها میرود را ویرایش کنید.

پس از مدتی انتظار، ترافیک به صورت متناسب و بر اساس درصد پیکربندیها هدایت میشود. به این ترتیب، اگر مشکلی در نسخه جدید پیش بیاید، میتوانیم به راحتی به نسخههای قبلی برگردیم.
۱۱. 🚀 ردیابی ADK
Agents built with ADK already support tracing using open telemetry embedding in it. We have Cloud Trace to capture those tracing and visualize it. Let's inspect the server.py on how we enable it in our previously deployed service
# server.py

...

app_args = {"agents_dir": AGENT_DIR, "web": True, "trace_to_cloud": True}

...

app: FastAPI = get_fast_api_app(**app_args)

...
در اینجا، آرگومان trace_to_cloud را به True ارسال میکنیم. اگر با گزینههای دیگری در حال استقرار هستید، میتوانید برای جزئیات بیشتر در مورد نحوه فعال کردن ردیابی به Cloud Trace از گزینههای مختلف استقرار ، این مستندات را بررسی کنید.
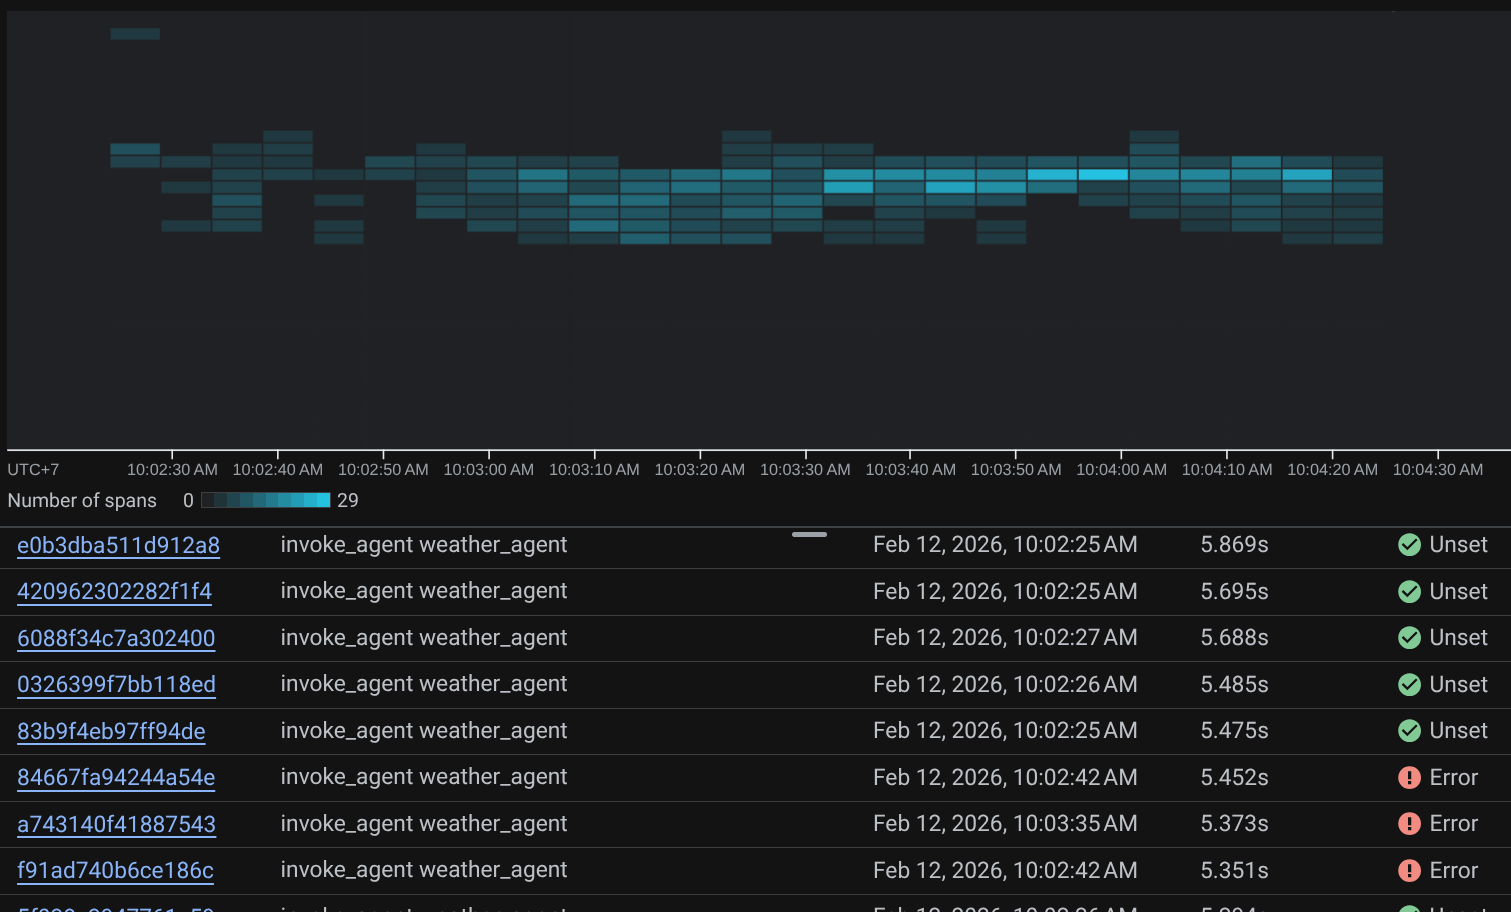
Try to access your service web dev UI and have a chat with the agent. After that let's go to the Trace Explorer page
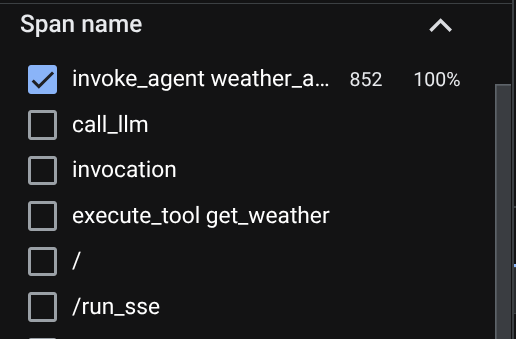
On the trace explorer page, you will see our conversation with the agent trace is submitted. You can see from the Span name section and filter out the span specific to our agent ( it's named agent_run [weather_agent] ) there
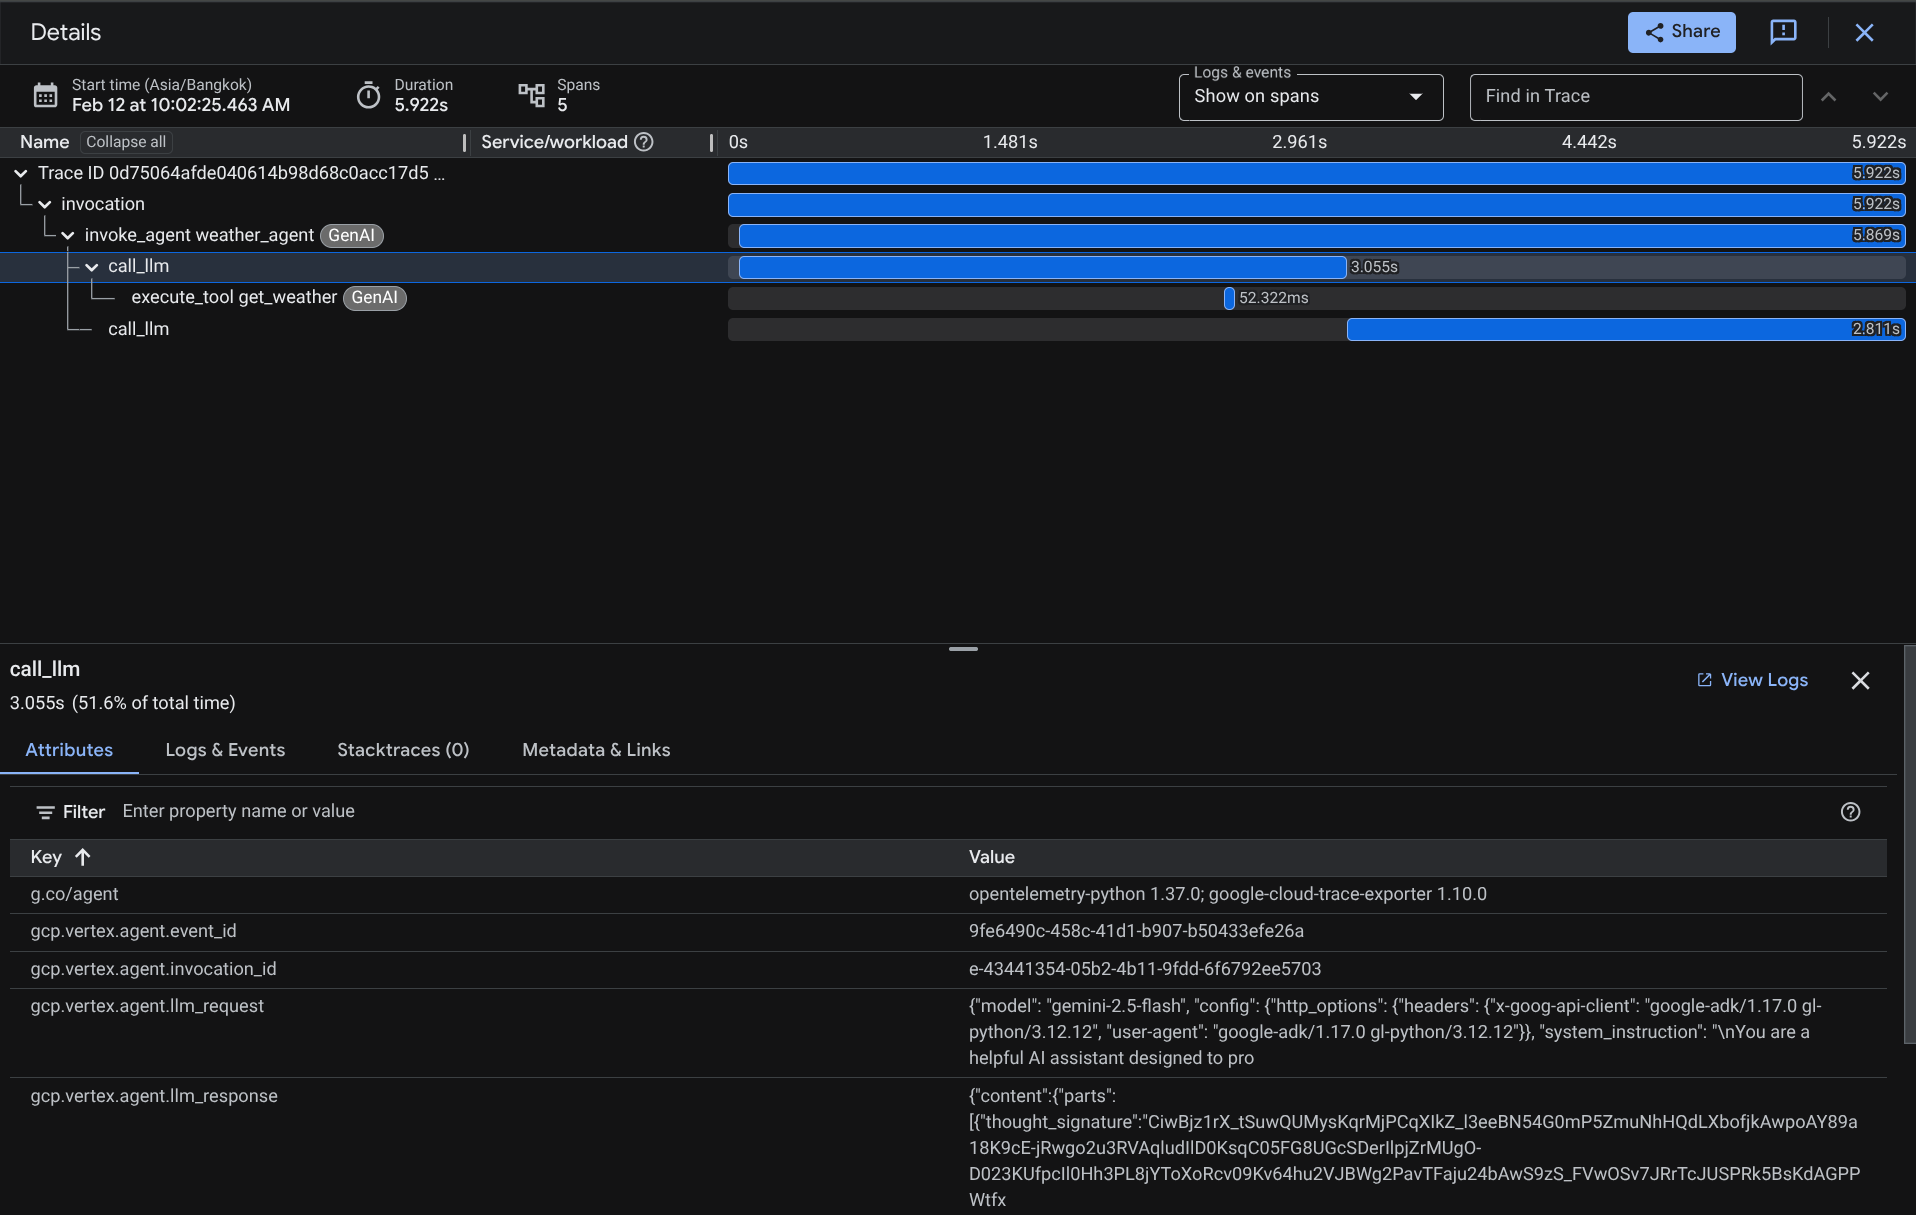
When the spans are already filtered, you also can inspect each trace directly. It will show detailed duration on each action taken by the agent. For example, look images below
در هر بخش، میتوانید جزئیات مربوط به ویژگیها را مانند آنچه در زیر نشان داده شده است، بررسی کنید.
There you go, now we have good observability and information on each interaction of our agent with the user to help debug issues. Feel free to try various tooling or workflows!
۱۲. چالش🎯
گردشهای کاری چندعاملی یا عاملدار را امتحان کنید تا ببینید تحت بار کاری چگونه عمل میکنند و ردپا چگونه به نظر میرسد.
۱۳. 🧹 تمیز کردن
To avoid incurring charges to your Google Cloud account for the resources used in this codelab, follow these steps:
- در کنسول گوگل کلود، به صفحه مدیریت منابع بروید.
- در لیست پروژهها، پروژهای را که میخواهید حذف کنید انتخاب کنید و سپس روی «حذف» کلیک کنید.
- در کادر محاورهای، شناسه پروژه را تایپ کنید و سپس برای حذف پروژه، روی خاموش کردن کلیک کنید.
- Alternatively you can go to Cloud Run on the console, select the service you just deployed and delete.